How to Sell Supplements Online | Step by Step (Free Method)

How to Sell Supplements Online

Ideal For: All the supplement sellers, supplement makers, retail supplement selling business owners, and other supplement merchants can use this method to take their supplements selling business online.
How to Sell Supplements Online

Why Choose this Method for Selling Over any Other Solution?

Unlike any other solution, this method allows you to:

  • List and sell your supplements for FREE. Absolutely no payment required.
  • No commission on sales.
  • Collect payment through multiple payment modes from a single checkout page.
  • Sell one time or recurring subscriptions of your supplements.
  • Sell and collect payment in any currency as per your requirement.
  • Give discounts on your products by offering special coupon codes.
  • Add sales commission agents to help you in selling supplements online.

Get Pabbly Subscription Billing for Free

Fitness freaks and a lot of lovers use to search for supplements online. And if are planning to kick start supplements business online then these steps can give you a hit and start selling supplements in no time.

Why would you like to sell supplements online?

There could be many possible answers to this question as this could give you a new platform to sell supplements online. Also, you can get more customers by a small effort.

The management though could be very messy if you try to do it manually. But, the service i.e, Pabbly Subscription Billing that I’m introducing here could help you a lot. As it almost everything from product management to transactions and refunds for free.

You can create shareable checkout pages for single/multiple products. And also embed these checkout pages on WordPress.

There a lot that this service could help you with for selling supplements online.

  • Keep up the record for all your items in stock
  • Showcase these items beautifully along with images and description on checkout pages
  • Accept online as well as offline payments
  • Appy taxes, coupons and discounts
  • Automatic invoicing
    And much more…

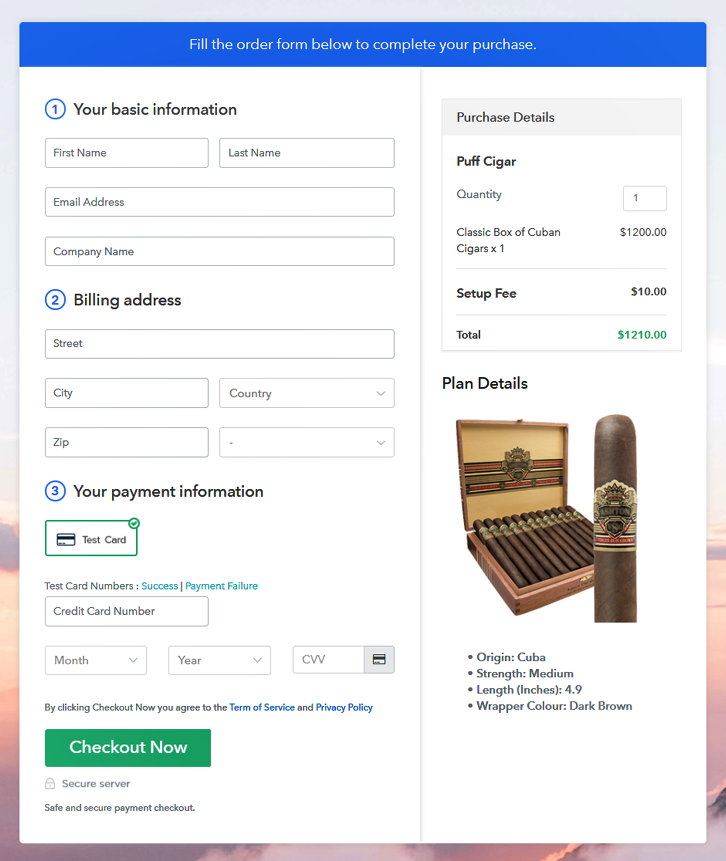
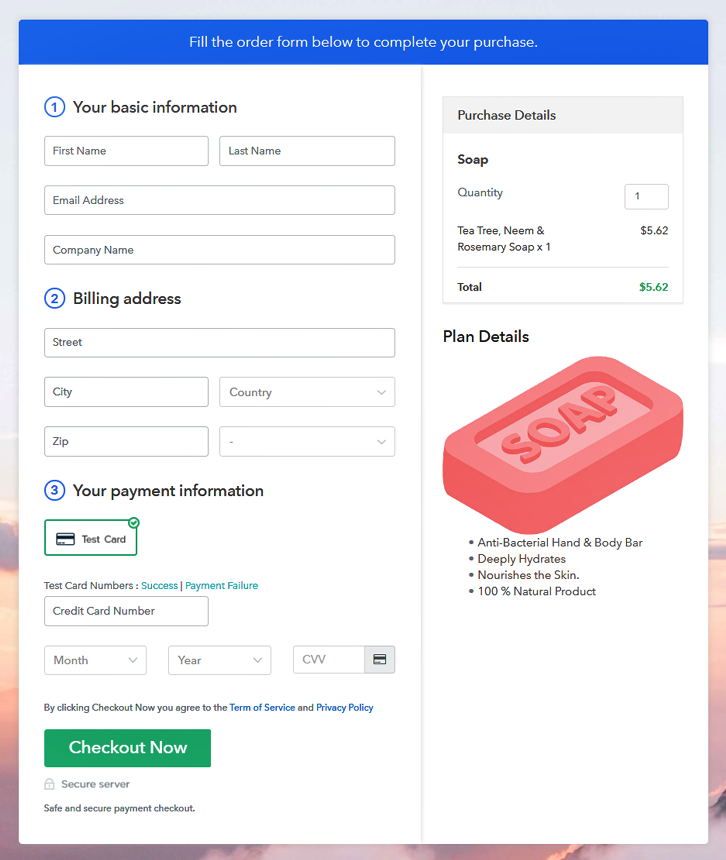
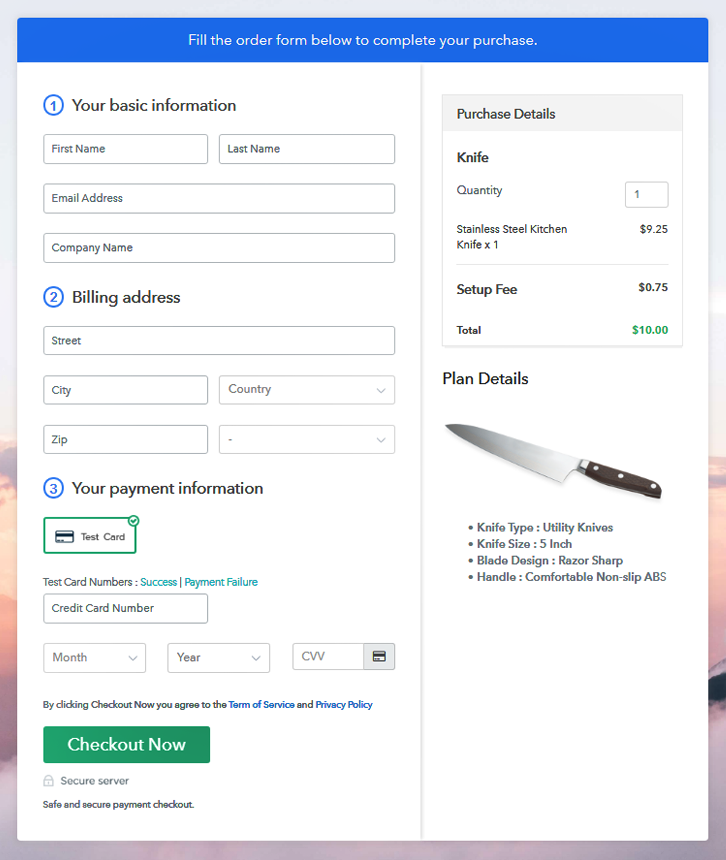
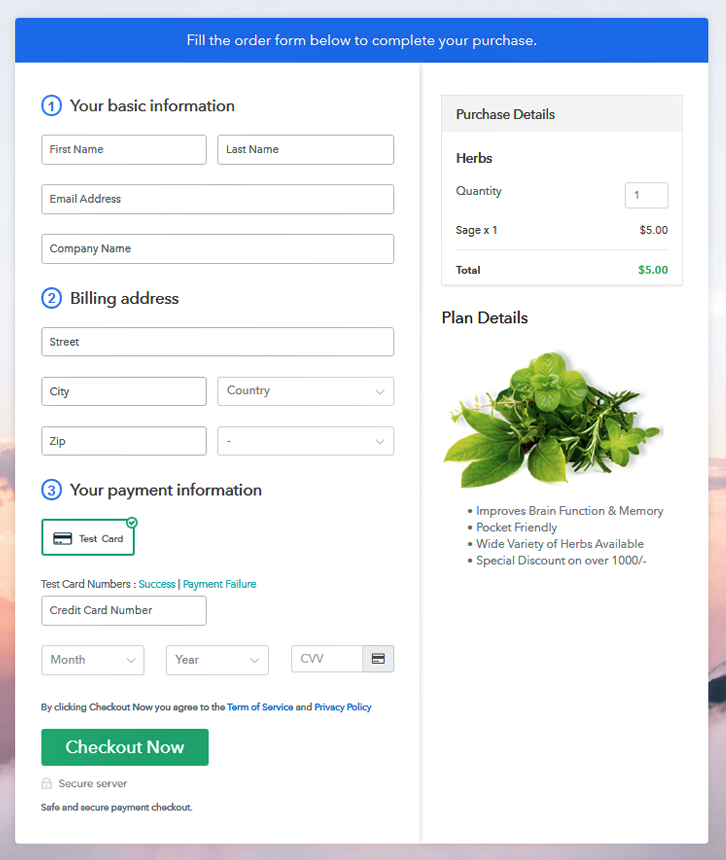
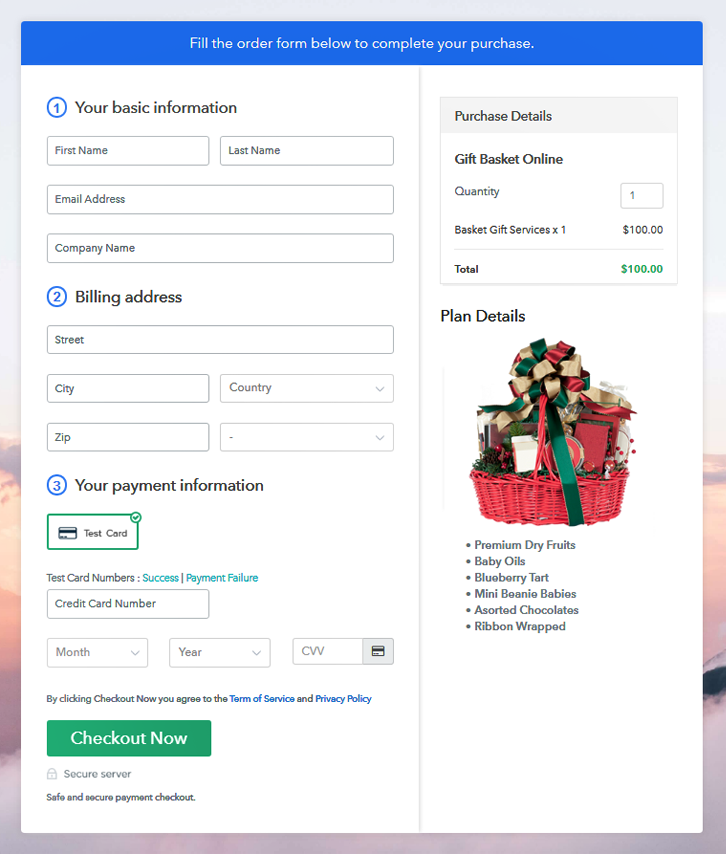
This is How your Checkout Page will Look Like After Creation
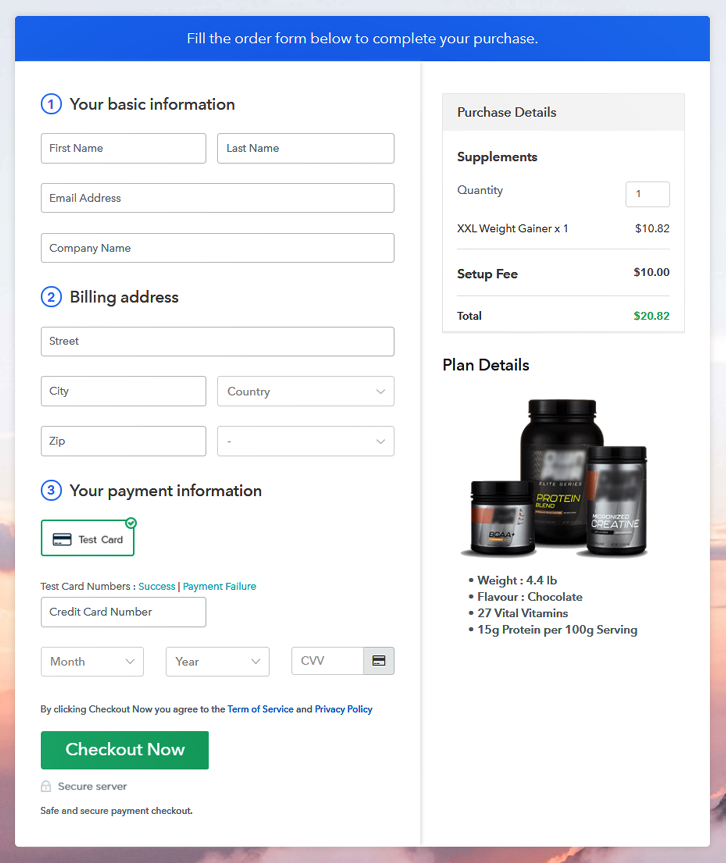
Checkout Page Preview to Sell Supplements Online

Preview Checkout Page

Step 1: Login to Pabbly Subscription Billing

Signup
Very first, visit the Pabbly Subscription Billing website. Find a button on the upper right corner named “Sign Up Free”  and click it. And sign-up or sign-in into the system.

Sign Up For Free!

Step 2: Select Subscription Billing

Access Subscription Billing

Step 3: Account Setup

Setup Account

After a successful sign-in, a dialogue box will pop-up, fill out the details asked. The company name, currency & a phone number.

Step 4: Connect Payment Gateway to Sell Supplements Online

Connect Payment Gateway

Next, is connecting a payment gateway. There are multiple payment gateway options available along with their integration guides mention below. I’m explaining the process by using a text gateway option that this service provides. And you can also use it for testing but for accepting payments you must connect a payment gateway.

Step 5: Add Your Product

Add Product

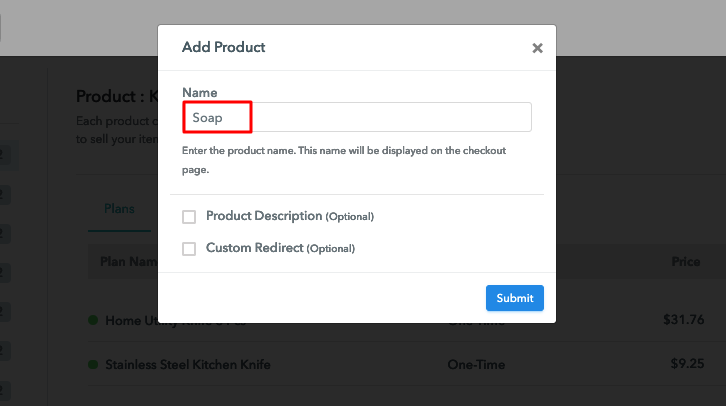
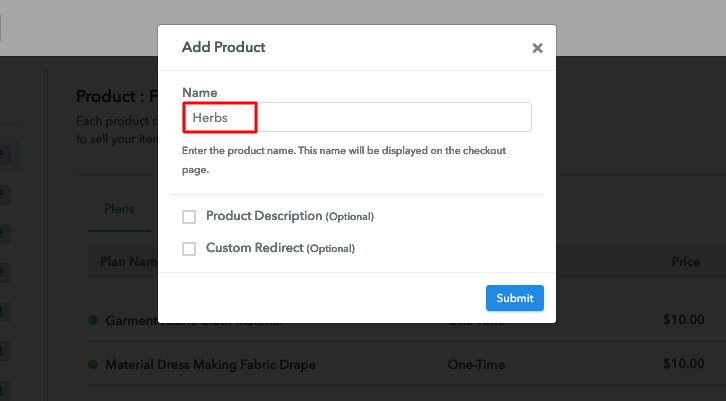
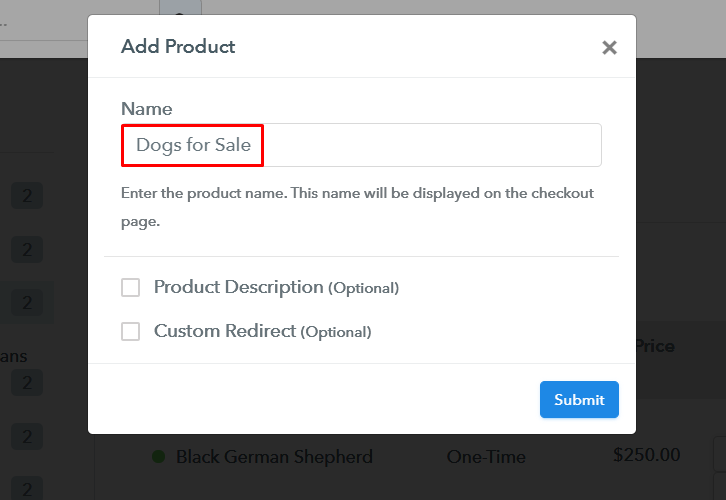
After integrating a payment gateway you can click on the “Add New Product” to add a category of your products. As after this, we’ll be adding the items based on these categories.
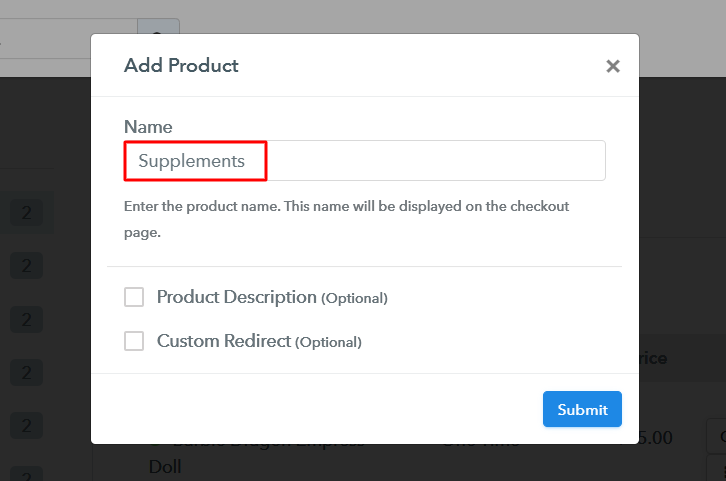
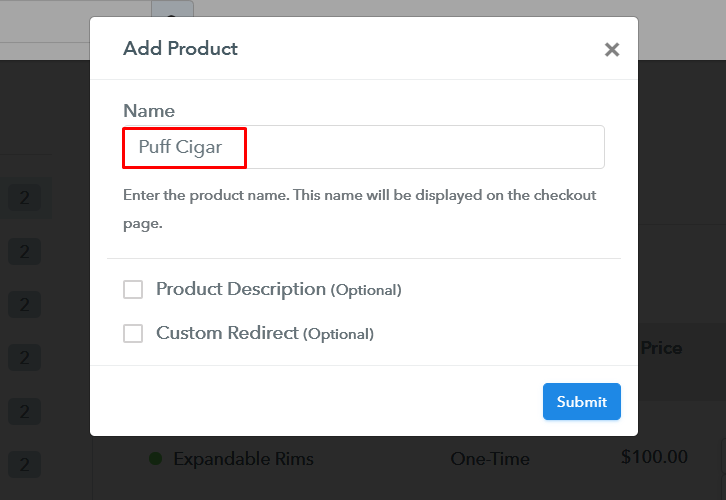
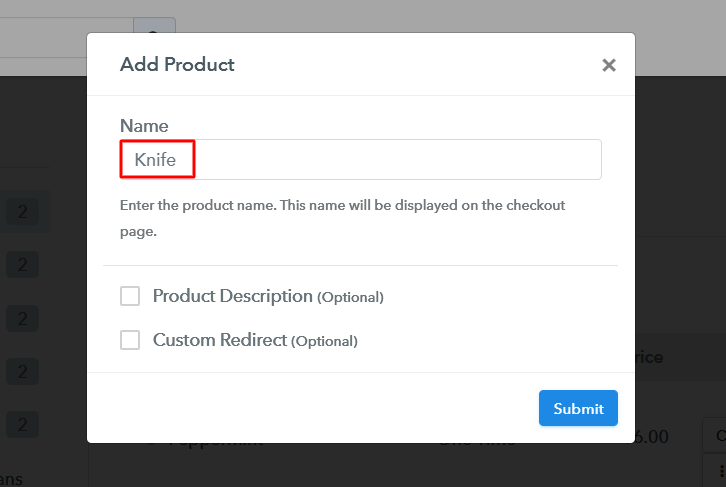
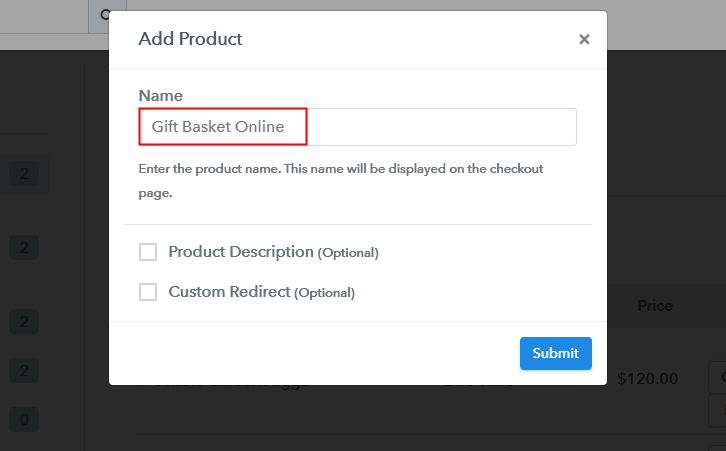
Add Product to Sell Supplements Online

Once you are done creating a product, strike the “Submit” button. A product will get appended on your product list. Also, you can create as many product as you like to add.

Note: Here you can add all the products related to the similar category by creating plans for each of them.

Step 6: Add Plans

Now, next is adding supplements to sell as plans. Click on the “Add New Plan” button and fill out the details about the supplement that you want to show on the checkout page.

(a) Select Add New Plan

Add Plan

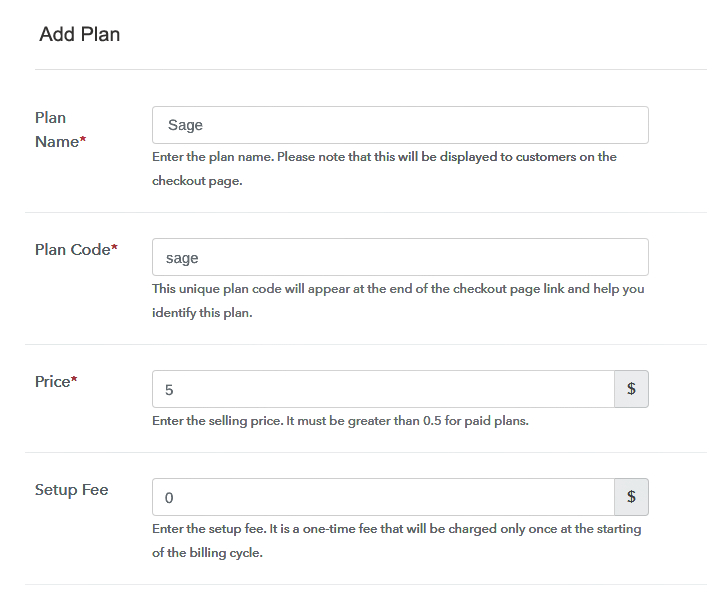
(b) Specify the Plan & Pricing Details
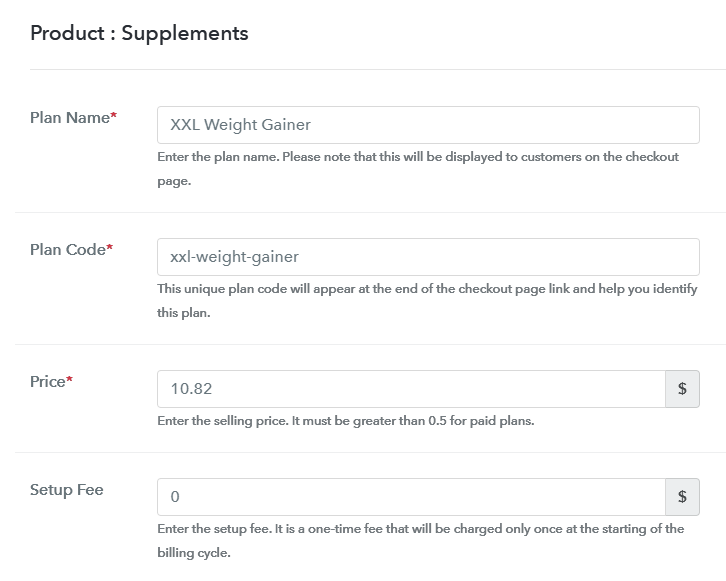
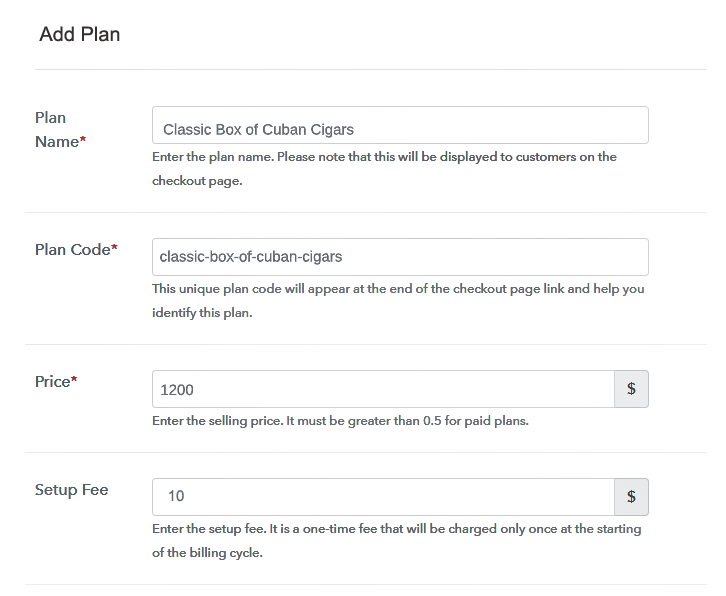
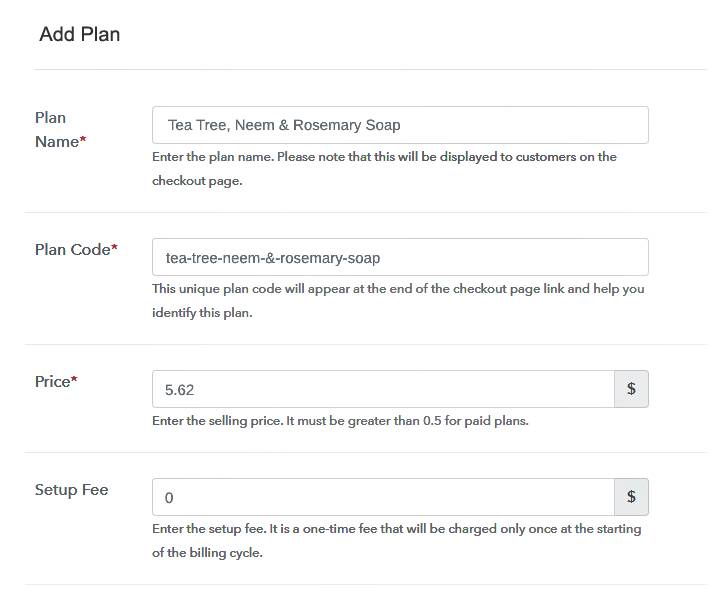
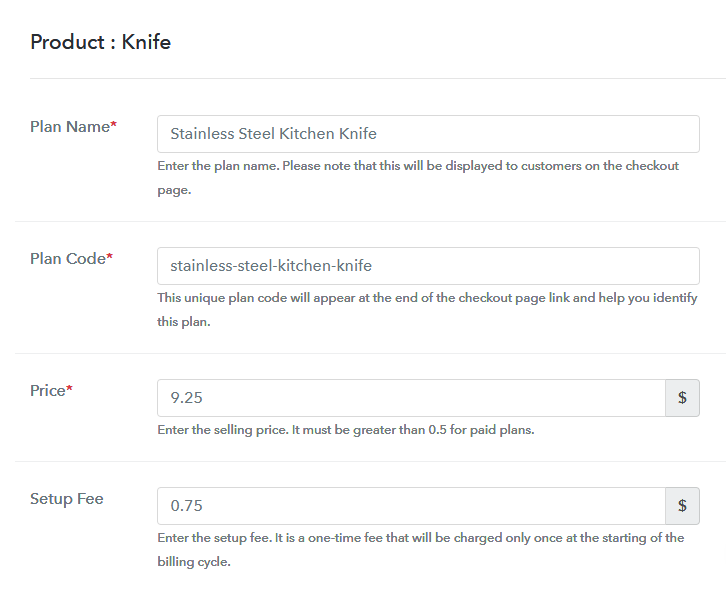
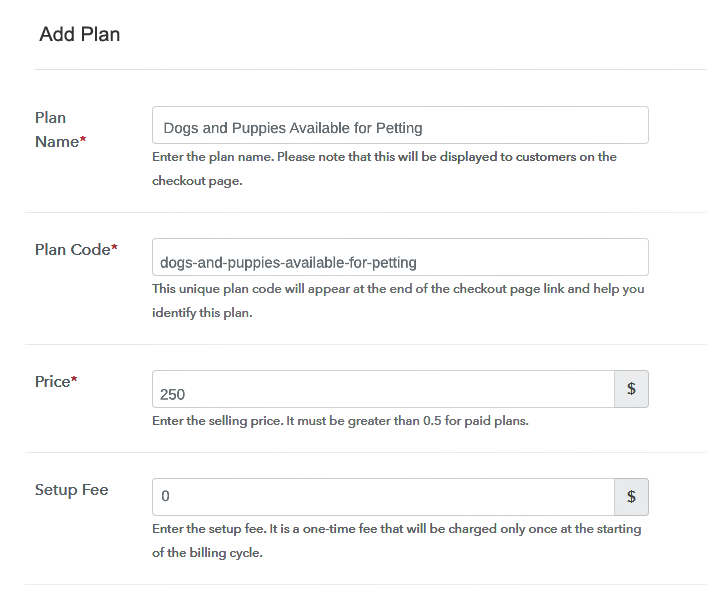
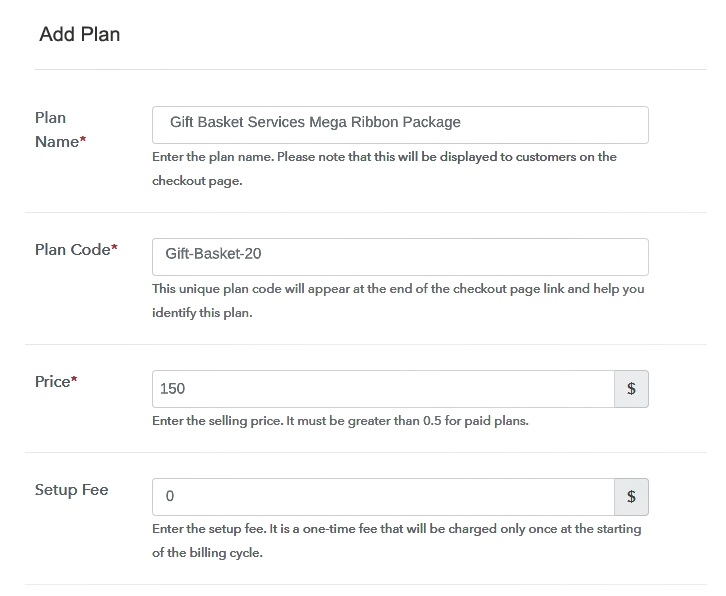
Add Plan to Sell Supplements Online

After you click on “Add a Plan” button. You’ll be asked to fill out the details as plan name, code, price etc to sell supplements online.

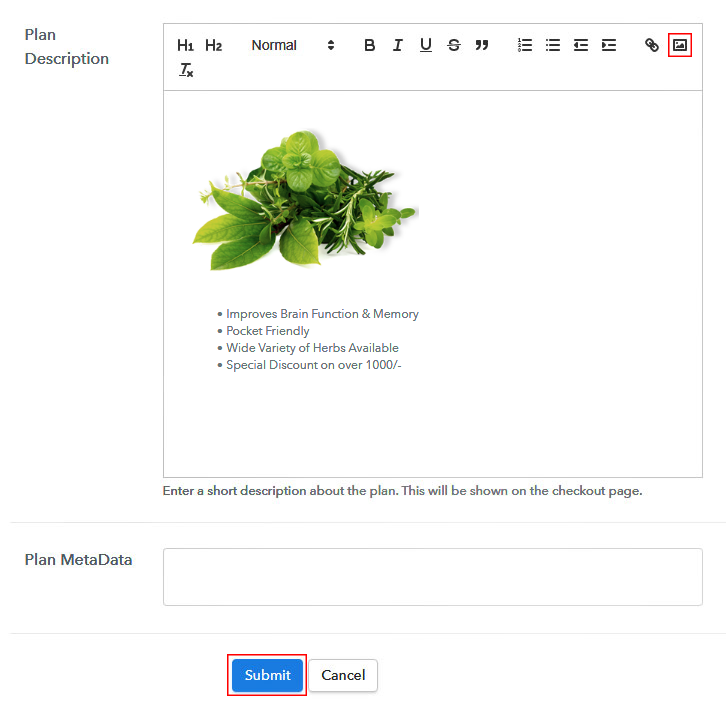
(c) Add Image & Description
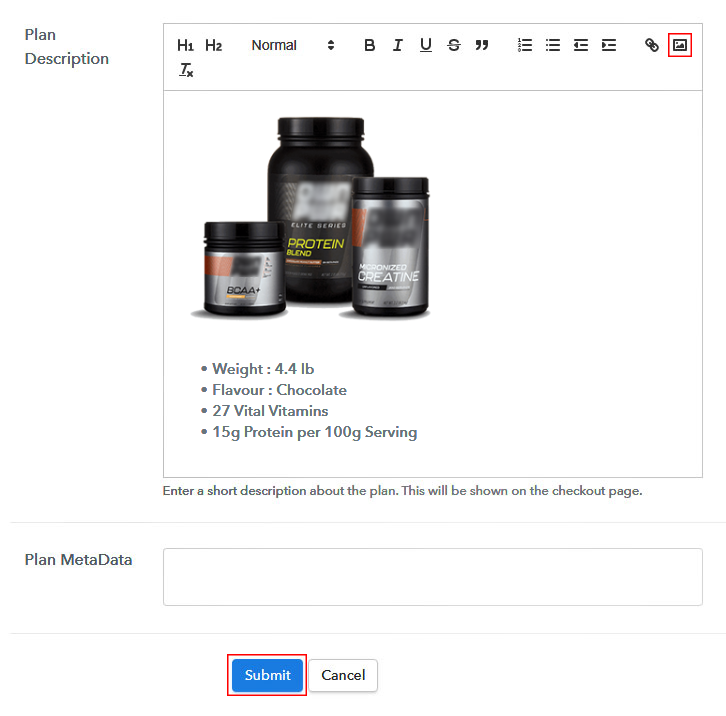
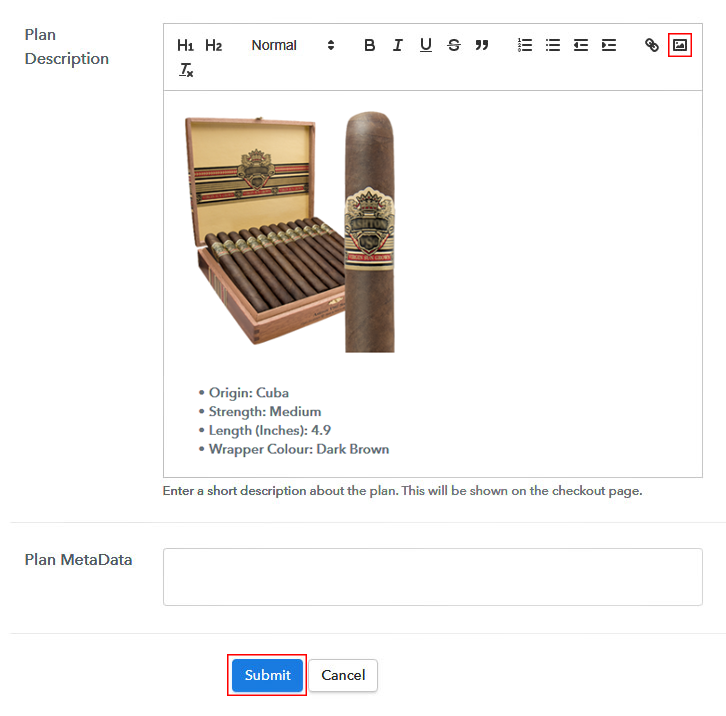
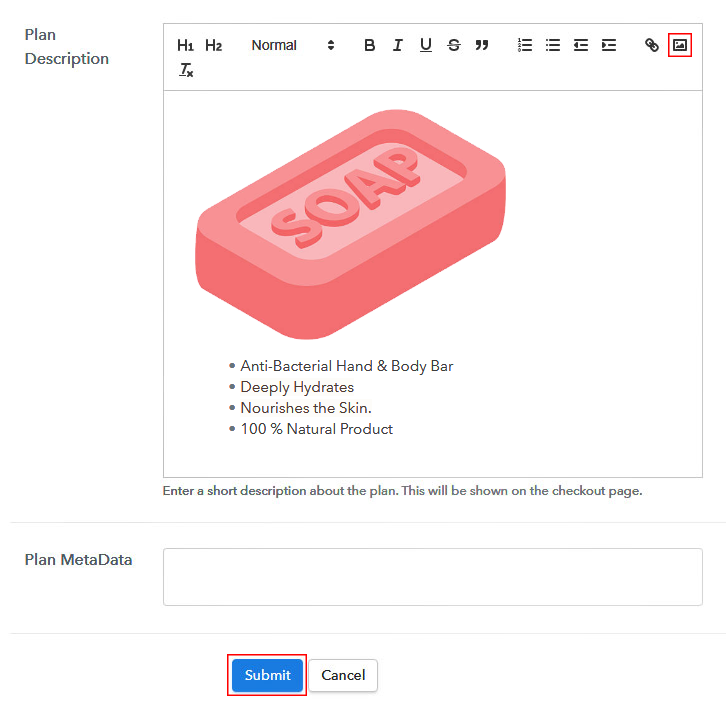
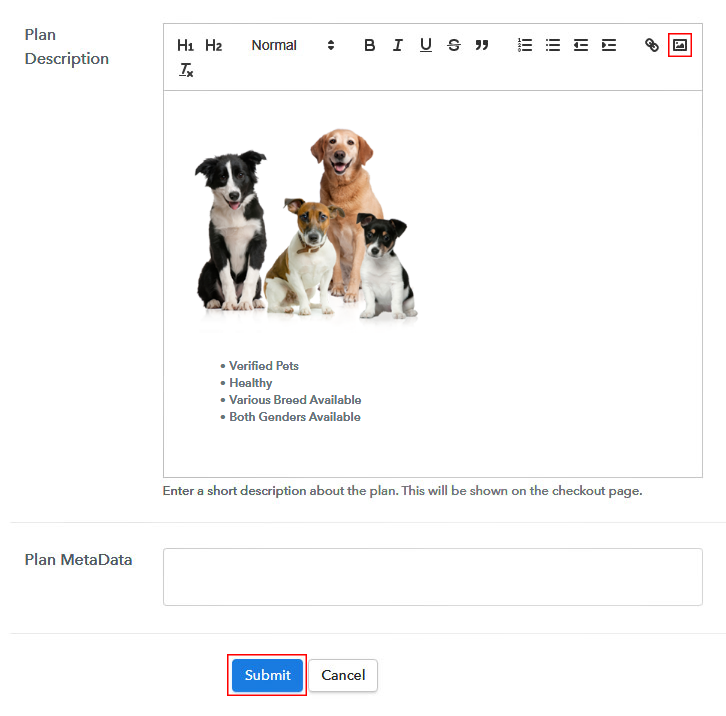
Add Image & Description to Sell Supplements Online

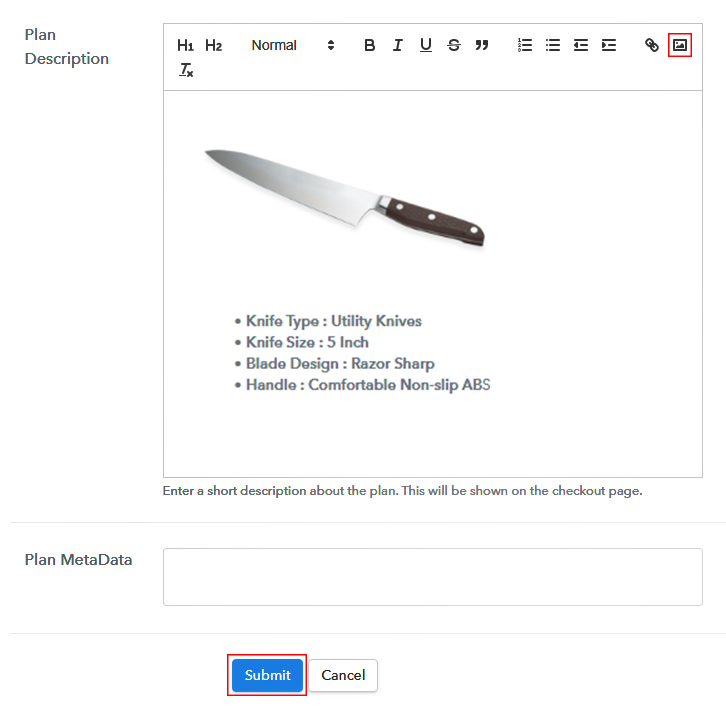
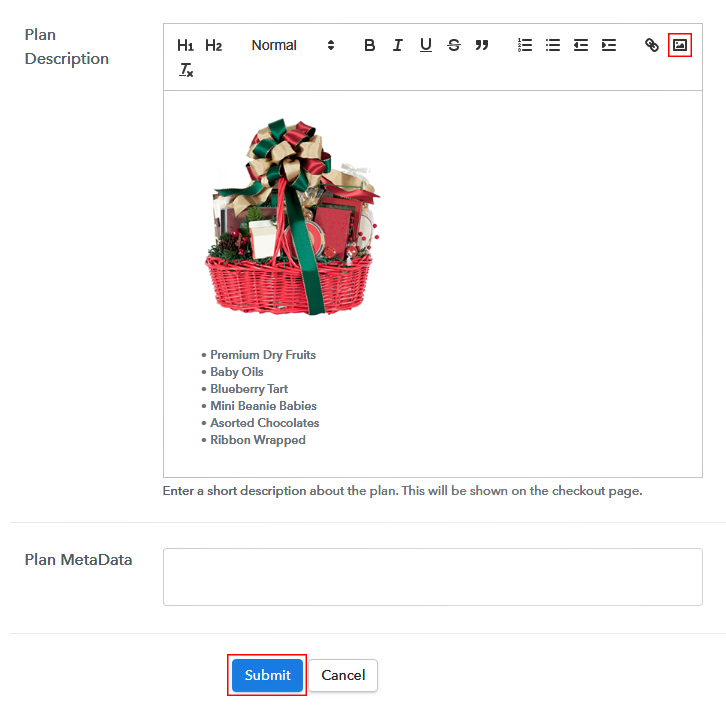
In the same process of creating a plan for adding an item you will encounter a field named “Add Description” here you can choose to display image and text regarding the supplement that you want to add as shown above.

Moreover, there are many text formatting options also available to format the text as you’d like to display on the checkout page. Such as lists, quotes, links, headings etc.

Hit the “Submit” button once you are done and an item will get appended to sell supplements online.

Remember, You’ll need to follow step 6 every time you want to append a plan.

Step 7: Share your Checkout Page

Share Checkout Page on Social Media

After every successful plan creation, you will encounter a window as shown above. This window contains a link & a code to share the created checkout page.

  • First, you can copy the checkout page URL given under “Plan Link” window & share it on social media platforms, SMS, emails etc. to sell supplements online.
  • Second, you can use this same checkout page URL in your website’s button links & anchor text source.
  • Also, two direct Facebook & Twitter sharing options are there to share the created checkout page directly onto these platforms.

Step 8: Preview Checkout Page

Follow these steps to preview a checkout page:

(a) Click on the View Button

View Checkout Plan

(b) Take a Look at the Checkout Page

Checkout Page Preview to Sell Supplements Online

Step 9: Embed Checkout Page in Site & Sell Supplements Online

Embed Checkout Page on Website

For embedding the created checkout page on WordPress, copy the code given under “Embed Plan Link” window.

(a) Edit the Page & Paste the Copied Link

Paste_Link_in_Text_Editor

And paste the copied code on the text area of your post or page.

(b) Save & Publish the Checkout Page

Save_and_Publish

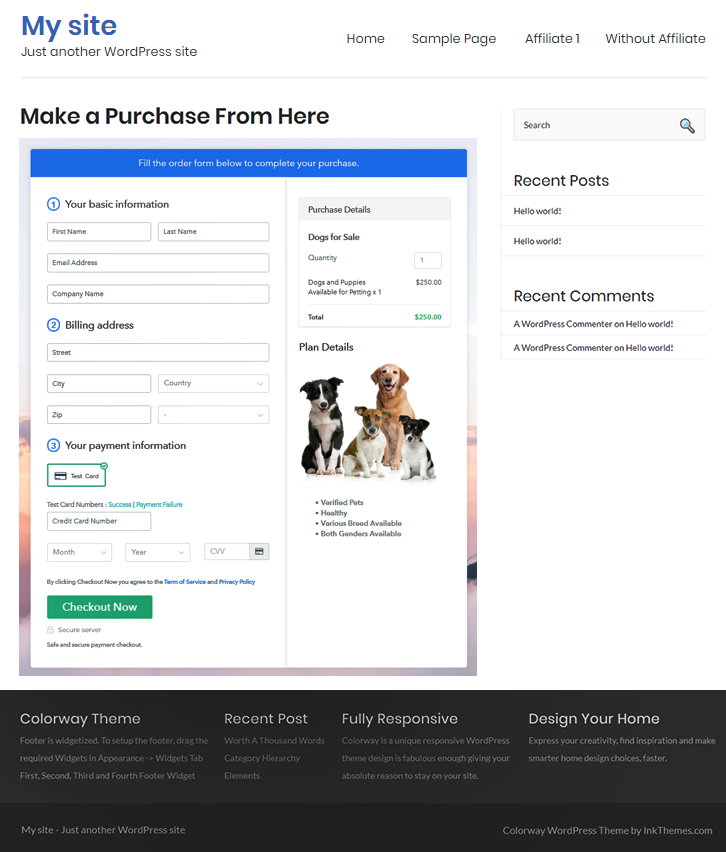
Publish the page or post & a checkout page will get embedded on your website. You can visit this page by going onto its URL.

(c) Check out the Final Look of your Checkout Page on WordPress Site
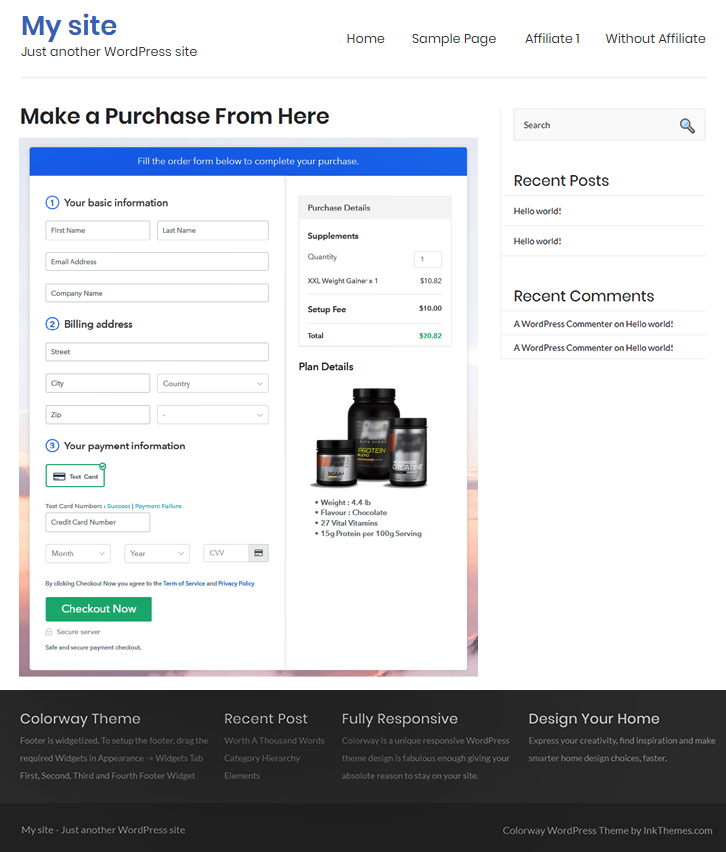
Checkout Page On Site to Sell Supplements Online

Step 10: Multiplan Checkout Page

Note: In case you want to sell multiple products via a single checkout page, you create a multi-plan checkout page otherwise skip this step.

(a) Click on Add Mutiplan Checkout

Multiplan_Checkout

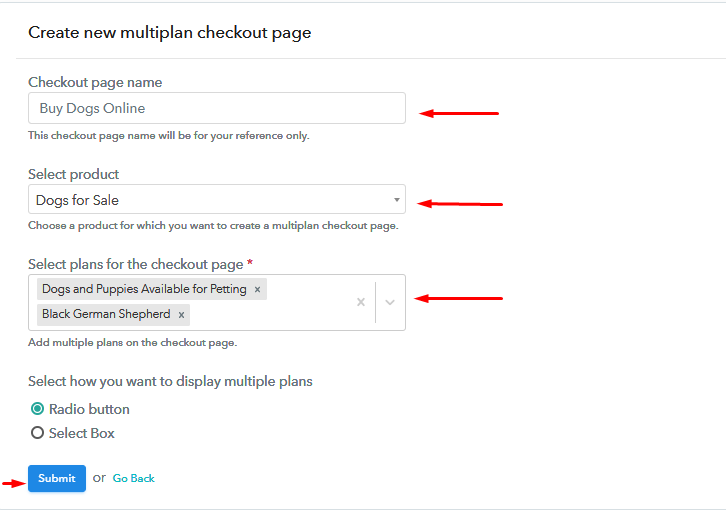
(b) Add Plans to Sell Multiple Supplements Products from Single Checkout Page
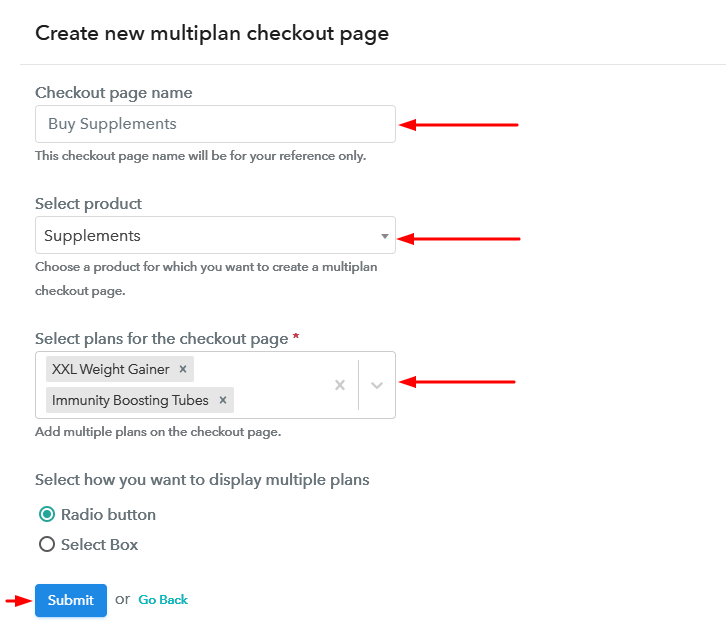
Create Multiplan Checkout Page to Sell Supplements Online

(c) Take a Look at the Checkout Page:
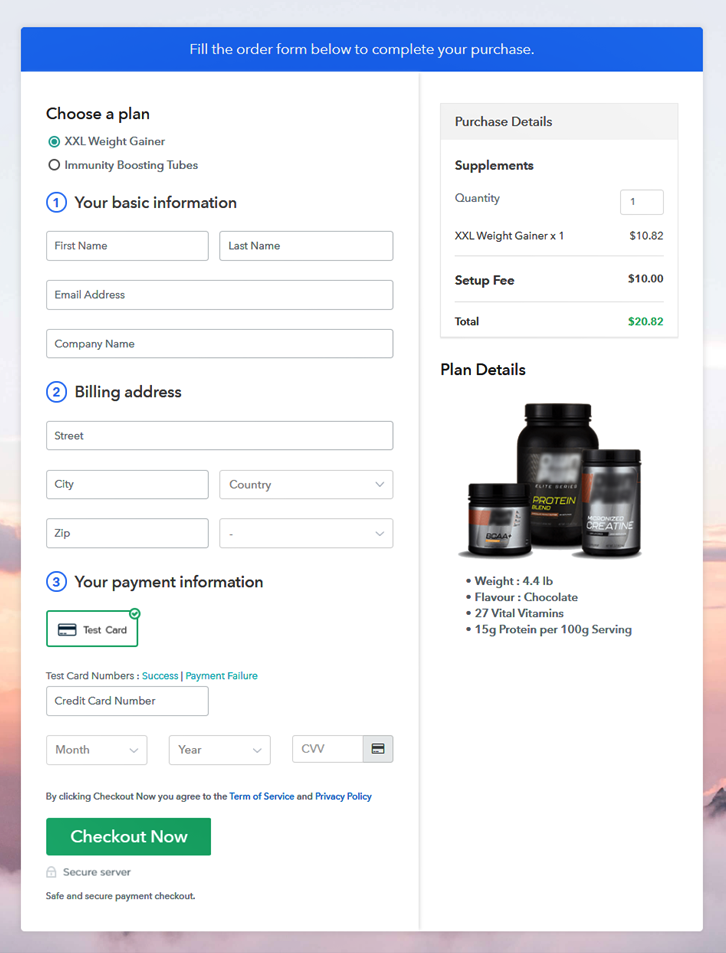
Multiplan Checkout Page to Sell Supplements Online

Preview Checkout Page

Wrapping Up

This was my catch on the easiest way to start selling supplements online. All these steps are very easy to follow and even a non-techy person can easily use this system.

Another advantage of using this service is safe and secure online as well as office transactions.

Hope this could be of help!

Good Luck! for your business and do comment on your suggestions in the section below.

You May Also Like To Read

How to Sell Cigars Online | Step by Step (Free Method)

How to Sell Cigars Online

Ideal For: All the cigar manufacturers, cigar sellers, retail cigar shop owners, and other merchants can use this method to take their cigar selling business online.

How to Sell Cigars Online

Why Choose this Method for Selling Over any Other Solution?

Unlike any other solution, this method allows you to:

  • List and sell your cigars for FREE. Absolutely no payment required.
  • No commission on sales.
  • Collect payment through multiple payment modes from a single checkout page.
  • Sell one time or recurring subscriptions of your cigars.
  • Sell and collect payment in any currency as per your requirement.
  • Give discounts on your products by offering special coupon codes.
  • Add sales commission agents to help you in selling your cigars.

Get Pabbly Subscription Billing for Free

If you own the offline cigar selling shop and poked by many of the people around you to upgrade it then you should definitely give it a thought to feed. Taking steps in the online world is not that tough and it surely opens up the plethora of opportunity.
Yet, the question…

Why would you like to sell cigars online?

One of the obvious reasons to start a cigar selling business is, it provides you a global audience, and selling cigars online with proper license is a walk in a park.  And we are living in the age of couch potatoes. So, a click on the internet is always better than a visit to the shop.

As we already said that selling cigars is easy and using the software named Pabbly Subscription Billing one can readily develop an online presence. It lets you build amazing checkout pages to sell cigars online. Not just this, it allows you to keep track of all the products via software. Some of the crystal clear features of the software involve:

  • Collect payment in any currency via the checkout page
  • List multiple cigars in the single checkout page
  • Offer special discount and coupon codes to tempt buyers

Above are some of the reasons you should go with software and now we are showing how to create a checkout page to sell cigars online using the software.

Note: Remember, there is no such thing as a “safe” tobacco product. In no possible way, we are encouraging selling cigars to minors. It is illegal to even attempt to buy cigars below the minimum age.

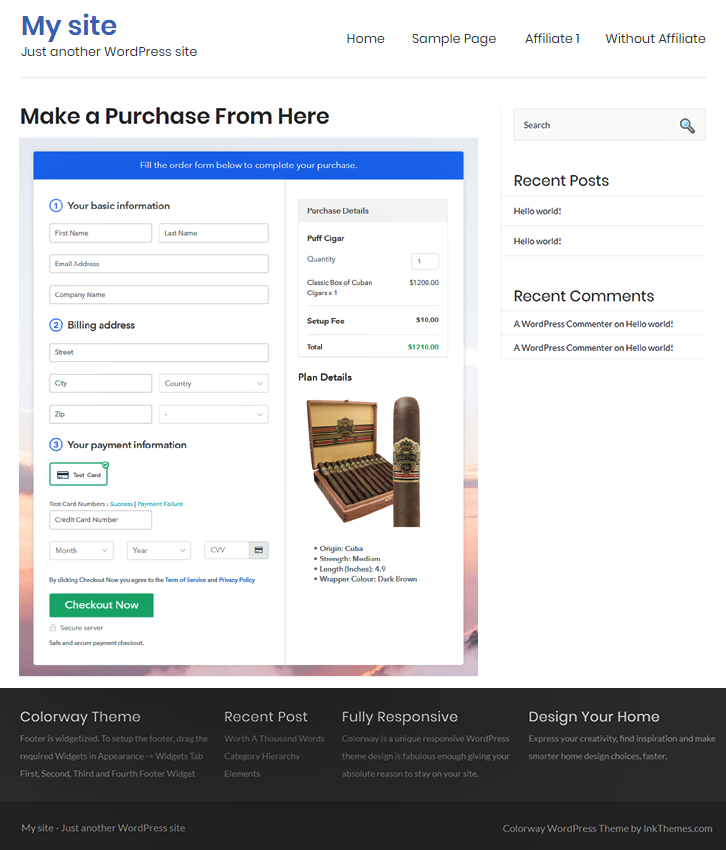
This is How your Checkout Page will Look Like After Creation

Checkout Page to Sell Cigars Online

Preview Checkout Page

Step 1: Login to Pabbly Subscription Billing

Signup

The very step is to visit the Pabbly Subscription Billing site and click on the “Sign Up Free” button. Further, sign up either using your Gmail credentials or create a new account according to your convenience.

Sign Up For Free!

Step 2: Select Subscription Billing

Access Subscription Billing

Step 3: Account Setup

Setup Account

Next, fill out all the details like company name, select currency and phone number after clicking on the “Access Now” button of the software.

Step 4: Connect Payment Gateways To Sell Cigars Online

Connect Payment Gateway

It is wise to enable the “Test Payment” mode for gaining a better understanding of the software. Here, we are also heading with a test payment gateway. Additionally, it is packed with different payment gateways like PayPal, Razorpay, and much more. Below we are providing the payment integration guides to help you out.

Step 5: Add Your Product

Add Product

Afterward, name the product which is puff cigar, you can also specify the particular type like Cuban, etc. It also comes with an option of product description where you can write little about its specification.

Add Product to Start Selling Cigars Online

Once done with all the details, click on the “Submit” button.

Note: Here you can add all the products related to the similar category by creating plans for each of them.

Step 6: Add Plans  

Now, let’s disclose plans for different kinds of cigars available in your store.

(a) Select Add New Plan

Add Plan

(b) Specify the Plan & Pricing Details

Specify the Plan and Pricing to Sell Cigars Online

Next, just fill all the related details like plan name, code, price, set-up fee and much more to continue.

(c) Add Image & Description

Add Image & Description to Sell Cigars Online

Moreover, to fascinate the possible customers on the checkout page, it is important to write a brief description of cigars with bullets, images, etc.

Subsequent, click on the “Submit” button to add the product on the checkout page.

Also, you can add multiple plans and types of cigars in your product list which you want to sell online.

Step 7: Share your Checkout Page

Share Checkout Page on Social Media

  • You can share the link of the checkout page directly on social media accounts like Facebook & Twitter.
  • Besides, the next strategy is to share the direct link to plan with your clients via SMS or email marketing.
  • Also, to redirect customers on the checkout page, you can embed the given plan link in the buttons or any anchor text on your website.

Step 8: Preview Checkout Page

Below are the steps to preview the checkout page:

(a) Click on the View Button

View Checkout Plan

(b) Take a Look at the Checkout Page

Checkout Page to Sell Cigars Online

Step 9: Embed Checkout Page in Site & Sell Cigars Online

Embed Checkout Page on Website

Additionally, copy the embed plan link to insert the checkout page on your WordPress site.

(a) Edit the Page & Paste the Copied Link

Paste Link in Text Editor

Instantly, paste the copied plan link on a text editor of the WordPress dashboard.

(b) Save & Publish the Checkout Page

Save and Publish

Make sure of all the changes and finally hit the “Publish” button.

(c) Check out the Final Look of your Checkout Page on WordPress Site

Final Look of your Checkout Page to Sell Cigars Online

Step 10: Multiplan Checkout Page

Note: In case you want to sell multiple products via a single checkout page, you can create a multi-plan checkout page otherwise skip this step.

(a) Click on Add Mutiplan Checkout

Multiplan Checkout

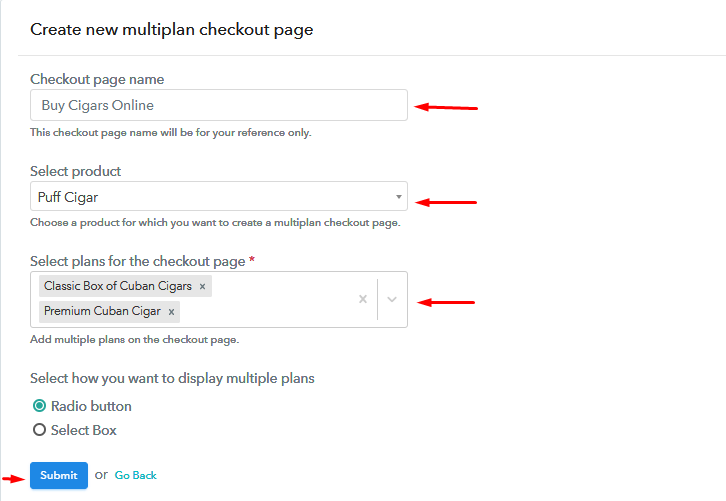
(b) Add Plans to Sell Multiple Cigars from Single Checkout Page

Add Multiple Products to Start Selling Cigars Online

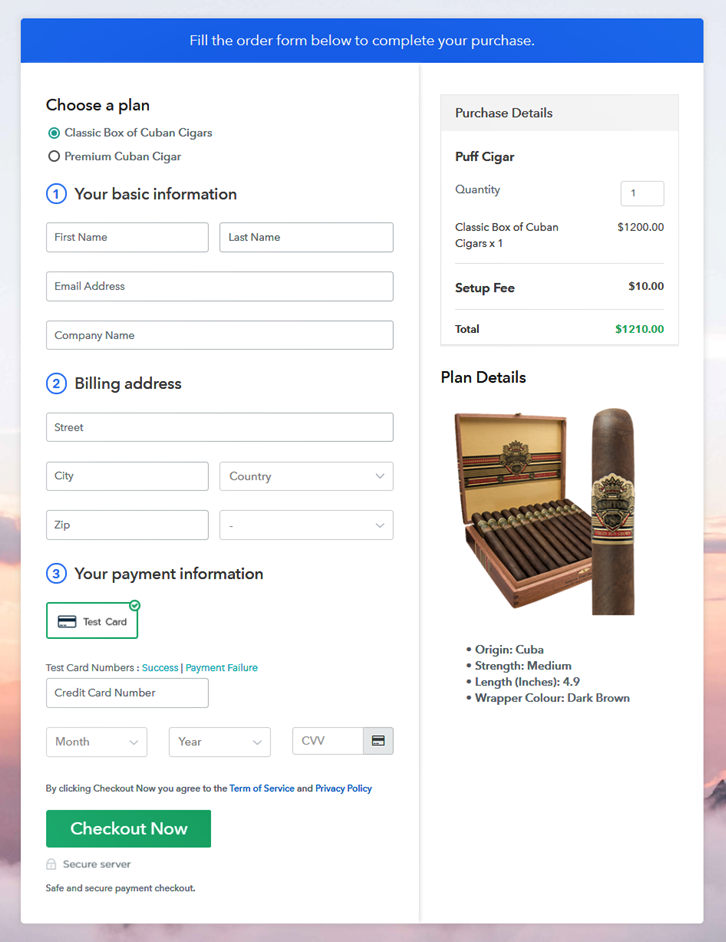
(c) Take a Look at the Checkout Page

Multiplan Checkout Page to Sell Cigars Online

Preview Checkout Page

Wrapping Up

Ah finally! At the end of this blog, we are with the conclusion that selling cigars online can boost and gives stability to your business. Follow all the mentioned 10 steps and start your cigars selling business in a couple of minutes.

So, try this amazing software and let us know your reaction in the comment section.

You May Also Like To Read –

How to Sell Soaps Online | Step by Step (Free Method)

How to Sell Soap Online

Ideal For: All the soap manufacturers, homemade soap stores, and other independent entrepreneurs who sell handmade soaps from their homes can use this method to take their soap selling business online.

How to Sell Soap Online

Why Choose this Method for Selling Over any Other Solution?

Unlike any other solution, this method allows you to:

  • List and sell soaps for FREE. Absolutely no payment required.
  • No commission on sales.
  • Collect payment through multiple payment modes from a single checkout page.
  • Sell one time or recurring subscriptions of soaps.
  • Sell and collect payment in any currency as per your requirement.
  • Give discounts on your products by offering special coupon codes.
  • Add sales commission agents to help you in selling soaps.

Get Pabbly Subscription Billing for Free

In current times, everything is online, from clothes to real estate and everything else and one of them is soap. Handmade soaps are in very much demand right now and are considered one of the luxury items. Hence, if you make handmade soaps from your home or your little workstation then you should certainly take your business online. Why restrict yourself to the local market when you can easily broaden your customer reach.

Why would you like to sell soaps online?

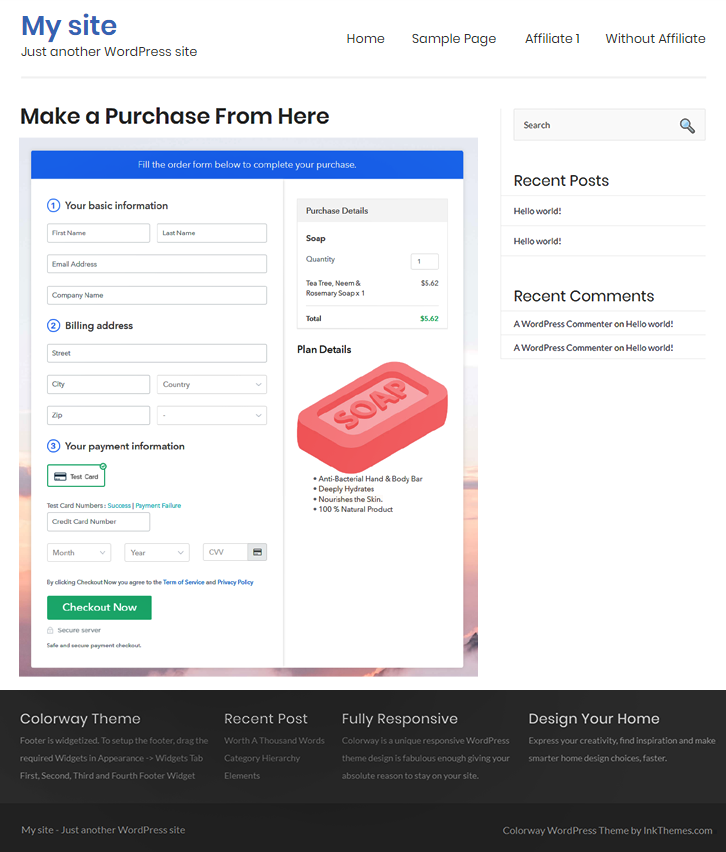
Well, the obvious reason is it doesn’t cost you much to sell soaps online as compared to opening your own store. The second reason is that you can easily widen your customer reach by starting your soap selling business online. Pabbly Subscription Billing is the only service that allows you to start soap selling business online for free. The most important and useful asset is its checkout page. You just have to create checkout pages for your soaps and share their links on social media or your website, so that your customers can make direct buys.

Also, it offers amazing features that you can access such as, integration with your website, easily share invoices with your customers, collect one-time or recurring payments, and much more.

This is How your Checkout Page will Look Like After Creation

Preview Checkout Page

Preview Checkout Page

Step 1: Log in to Pabbly Subscription Billing

Signup

At first, open Pabbly Subscription Billing website and click on the “Sign Up Free” button. Once the button is clicked, you are reached on the signup page, where you can create your account with Gmail or manually enter your details.

Sign Up For Free!

Step 2: Select Subscription Billing

Access Subscription Billing

Step 3: Account Setup

Setup Account

After completing the signup process, now fill up your company details i.e. company name, select currency, and contact number in the appeared dialogue box.

Step 4: Connect Payment Gateway to Sell Soaps Online

Connect Payment Gateway

Once you move forward after the account setup, here, the payment collection process is shown via enabling the ‘Test Payment’ mode. Later, you can connect other payment gateways of your preference. The complete integration guide for payment gateways is provided below.

Step 5: Add Your Product

Add Product

Once the payment mode is enabled, then you can add your first product. You can add soaps of different categories, for example, eucalyptus soap, orange & ginger soap, etc, and add all other types of soaps in the same product by creating different plans.

Add Product Name to Sell Soaps Online

Simply fill up these details and your product is added.

Note: Here you can add all the products related to the similar category by creating plans for each of them.

Step 6: Add Plans

Let’s get started and create plans for different categories of soaps that you want to sell

(a) Select Add New Plan

Add Plan

(b) Specify the Plan and Pricing Details

Add Details to Sell Soap Online

On clicking add new plan, you will reach to the plan page, here you will have to fill the plan details such as plan name, code, billing cycle, price, etc.

(c) Add Image & Description

Add Image to Sell Soap Online

Also, describe the soaps that you want to sell along with the product links, images, etc, and click on the submit button to add your plan.
You can create more plans for all the soaps in a similar manner.

Step 7: Share Your Checkout Page

Share Checkout Page on Social Media

  • Share your checkout page on social media like Facebook and Twitter.
  • Copy the mentioned link and send it to your customers through SMS or emails directly.
  • Embed your plan link to your website so that your customers can be landed on the checkout page directly.

Step 8: Preview Checkout Page

Follow the below steps to view checkout page

(a) Click on the View Button

View Checkout Plan

(b) Take a Look at the Checkout Page

Preview Checkout Page

Step 9: Embed Checkout Page in Site & Sell Soaps Online

Embed Checkout Page on Website

Just copy the provided plan embedding link and embed the checkout page to your WordPress site.

(a) Edit the Page & Paste the Copied Link

Paste Link in Text Editor

Copy and paste the link in the text area of the editor

(b) Save & Publish the Checkout Page

Save and Publish

After the code is pasted, click on the publish button to embed your checkout page.

(c) Check Out the Final Look of your Checkout Page on WordPress Site

Embed Checkout Page to Sell Soap Online

Step 10: Multiplan Checkout Page

Note: In case you want to sell multiple products through a single checkout page, create a multi-plan checkout plan, otherwise skip this step.

(a) Click on Add Multiplan Checkout

Multiplan Checkout

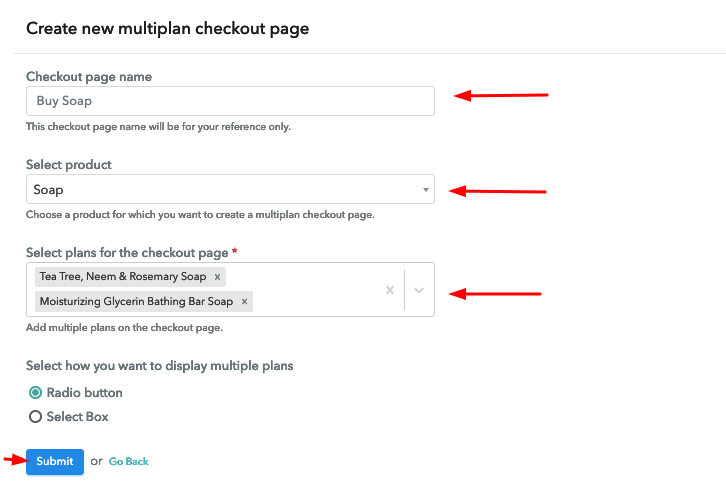
(b) Add Plans to Sell Multiple Soaps from Single Checkout Page

Multiplan Details to Sell Soap Online

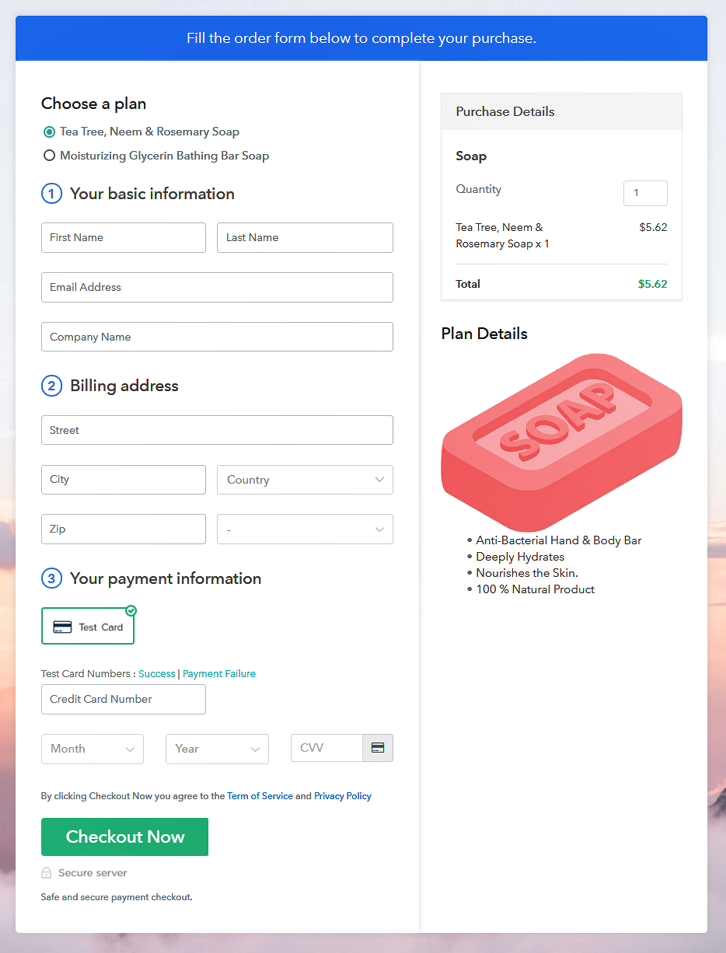
(c) Take a Look at the Checkout Page

Multiplan Ccheckout to Sell Soap Online

Preview Checkout Page

Wrapping Up

To conclude, if you are really interested in being your own boss and passionate about starting your soap selling online business then, Pabbly Subscription Billing is your key to success. You get to start your business for free, sell as many products as you wish, generate unlimited revenue and so many more other advantages. So don’t just sit there, go and sign up now.
For further queries or suggestions, please contact us.

You May Also Like To Read –

How to Sell Knife Online | Step by Step (Free Method)

How to Sell Knife Online

Ideal For: All the knife sellers, knife makers, retail knife selling business owners, and other knife merchants can use this method to take their knife selling business online.

How to Sell Knife Online

Why Choose this Method for Selling Over any Other Solution?

Unlike any other solution, this method allows you to:

  • List and sell your knives for FREE. Absolutely no payment required.
  • No commission on sales.
  • Collect payment through multiple payment modes from a single checkout page.
  • Sell one time or recurring subscriptions of your knife.
  • Sell and collect payment in any currency as per your requirement.
  • Give discounts on your products by offering special coupon codes.
  • Add sales commission agents to help you in selling your knife online.

Get Pabbly Subscription Billing for Free

I’ve seen a lot of people having a hard time searching for various knives. And if you are searching a way to sell knife online than this could be the end of your search.

Why would you like to sell knife online?

Well, there could be many possible answers to this question. If you already have the product then you can kick start knife business online in no time and bring a platform to showcase the product with the online audience.

Yes! manually managing all items and payments always gives headaches and let’s not go into the security as only a professional can make sure of it.

So, here I can tell you 10 simplest steps, completely safe & secure with excellent management parameters that you’ll need.

The service is called Pabbly Subscription Billing and it will help you create beautiful checkout pages in no time for free. Moreover, it allows you to share these checkout pages using social media platforms, SMS, emails etc. Also, it allows you to embed the created checkout pages on WordPress.

Following are the advantages of using this service.

  • Maintain a record for all the knives in stock
  • Showcase your products in beautiful checkout pages
  • Collect safe & secure online/offline payments
  • Automated invoicing
  • Include taxes, coupons & discounts

This is How your Checkout Page will Look Like After Creation

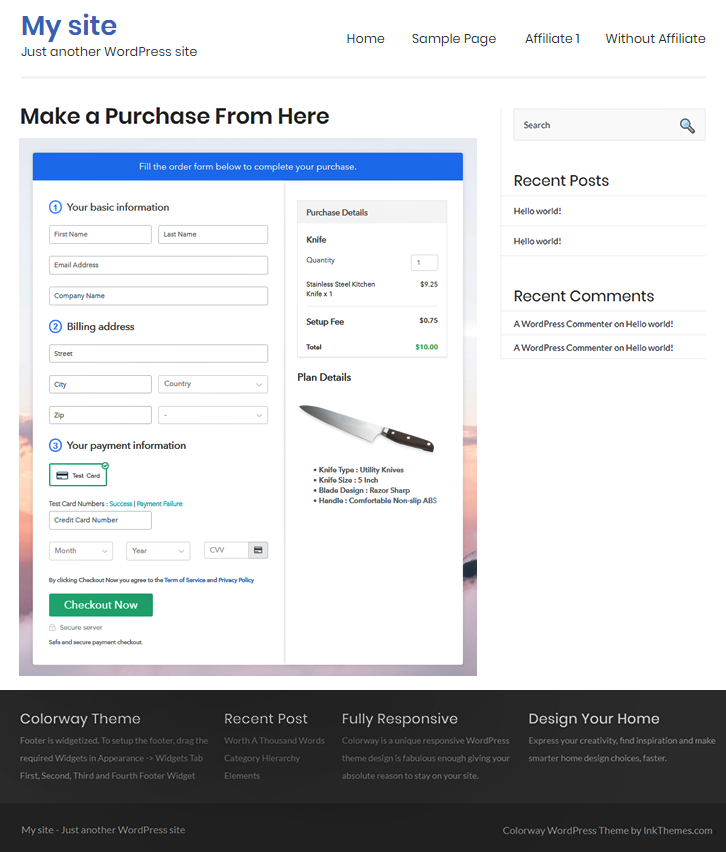
Checkout Page to Sell Knife Online

Preview Checkout Page

Step 1: Login to Pabbly Subscription Billing

Signup
To get started first, you’ll need to visit the Pabbly Subscription Billing website. Then click on the “Sign Up Free” button. Now, either fill out the sign-up form and get registered on the platform or hit “Sign up with Google” and get into the system using your Gmail account.

Sign Up For Free!

Step 2: Select Subscription Billing

Access Subscription Billing

Step 3: Account Setup

Setup Account

Next is filling out the details on the pop-up that appears after a successful sign-in. It will ask you for three information i.e, the company name, currency & a phone number. Quickly fill out the details and click on “Continue” to proceed forward.

Step 4: Connect Payment Gateway to Sell Knife Online

Connect Payment Gateway

After filling out the basic details, now is the time to connect a payment gateway. You can pick any options from the multiple payment methods that it provides. Also, check out the below-mentioned links for the integration guides. I am enabling the test payment option here that Pabbly Subscription Billing provides for testing.

Step 5: Add Your Product

Add Product

Once you integrate a payment gateway, you can create products. Just click on the “Add New Product” button & name a category of knife as a product name.

Add Product to Sell Knife Online

Hit the “Submit” button after filling out the details about the product & a product will get created. Remember that product doesn’t mean an item it is much like a category of items.

Note: Here you can add all the products related to the similar category by creating plans for each of them.

Step 6: Add Plans

Now, is the stage which will let you add your knife to sell and for this you’ll need to add the knife to be sold as a plan. Click on the “Add New Plan” button and fill out the details to show on the checkout page.

(a) Select Add New Plan

Add Plan

(b) Specify the Plan & Pricing Details

Add Plan to Sell Knife Online

Plan name goes as by the name of the knife that you want to sell and all the other details similarly as price by the cost of the knife that you want to sell and code as the code that you want to give to the knife that you want to sell etc.

(c) Add Image & Description

Add Image & Description to Sell Knife Online

Next, you’ll find a field named “Add Description” & you can add an image and description regarding the knife that you want to sell.

Further, you can make use of the multiple text formatting tools available as lists, quotes, links, headings etc to excellently showcase a description.

Strike the “Submit” button and an item will get appended to sell knife online.

Remember, follow step 6 to add as many knives as you want to sell.

Step 7: Share your Checkout Page

Share Checkout Page on Social Media

After creating a plan, you will encounter a window as shown above. This window contains links and code to share what you just created (i.e, a plan).

  • Copy the checkout page URL given under “Plan Link” window and share it anywhere on social media, SMS, emails etc. to sell knife online.
  • Also, you can use this same checkout page URL in your website’s buttons & anchor texts.
  • You’ll see two direct sharing options to share the created checkout page over Facebook & Twitter.

Step 8: Preview Checkout Page

Follow these steps to preview a checkout page:

(a) Click on the View Button

View Checkout Plan

(b) Take a Look at the Checkout Page

Checkout Page Preview to Sell Knife Online

Step 9: Embed Checkout Page in Site & Sell Tea Online

Embed Checkout Page on Website

To embed the created checkout page on WordPress copy the code given under “Embed Plan Link” pane.

(a) Edit the Page & Paste the Copied Link

Paste_Link_in_Text_Editor

Paste the copied code on the text area of the post or page.

(b) Save & Publish the Checkout Page

Save_and_Publish

Click on the ‘Publish’ button of the page/post. The checkout page will get embedded on your website’s page/post. You can visit this page by going onto its assigned URL.

(c) Check out the Final Look of your Checkout Page on WordPress Site

Checkout Page On Site to Sell Knife Online

Step 10: Multiplan Checkout Page

Note: In case you want to sell multiple products via a single checkout page, you create a multi-plan checkout page otherwise skip this step.

(a) Click on Add Mutiplan Checkout

Multiplan_Checkout

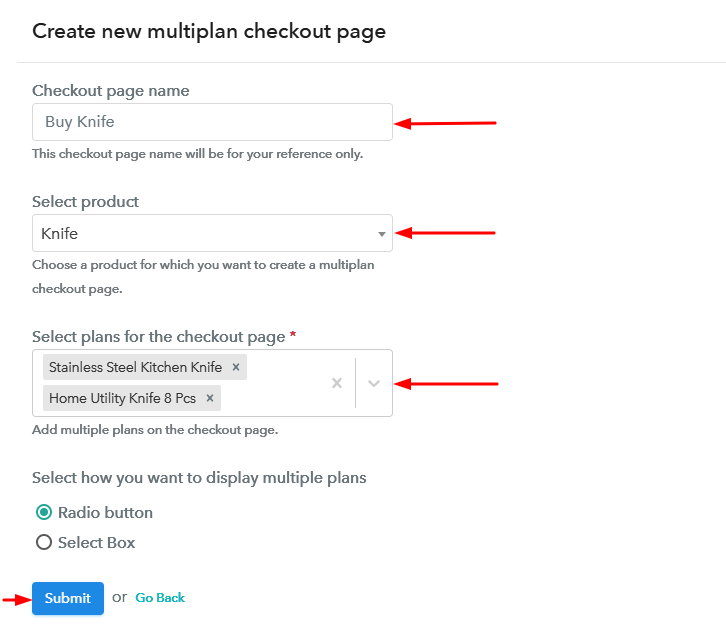
(b) Add Plans to Sell Multiple Knife Products from Single Checkout Page

Create Multiplan Checkout to Sell Knife Online

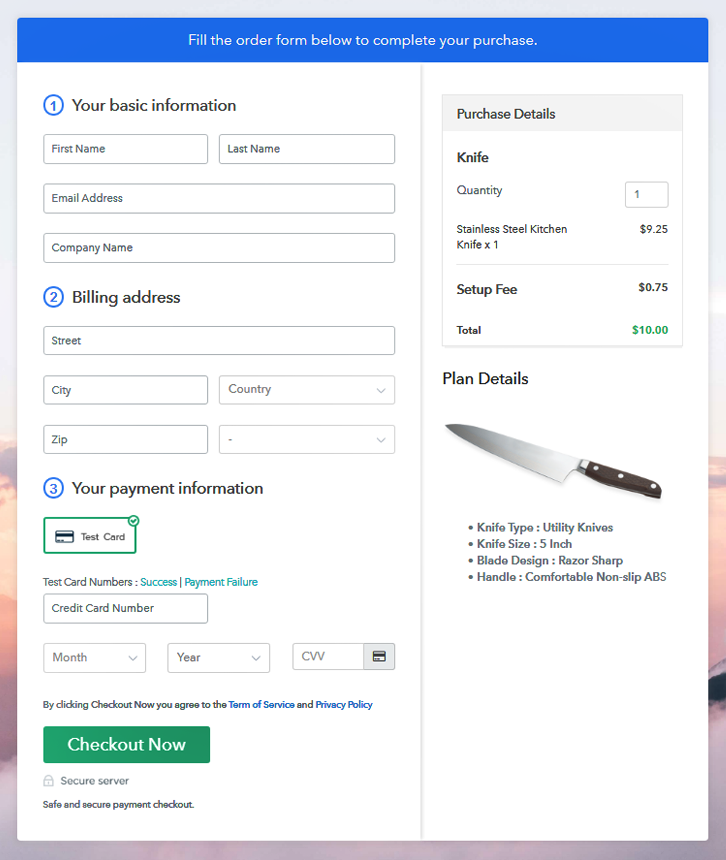
(c) Take a Look at the Checkout Page:

Multiplan Checkout Page to Sell Knife Online

Preview Checkout Page

Wrapping Up

Starting a knife business online is an affordable way to sell a knife online. This service can help you reach the buyers in no time. It not only takes care of the product management but also allows you to accept payments securely with multiple gateways methods like PayPal, Stripe, Razorpay, Authorize.net etc.

Hope this was helpful. Good Luck! with your business and drop a comment below as your feedback.

You May Also Like To Read

How to Sell Logos Online | Step by Step (Free Method)

Ideal For: All digital art studios, logo makers, digital artists and other merchants can use this method to sell logos online.

How To Sell Logos Online

Why Choose this Method for Selling Over any Other Solution?

Unlike any other solution, this method allows you to:

  • List and sell your logos for FREE. Absolutely no payment required.
  • No commission deducted on sales.
  • Collect payment through multiple payment modes from a single checkout page.
  • Sell one time or recurring subscriptions of your logos.
  • Sell and collect payment in any currency as per your requirement.
  • Give discounts on your products by offering special coupon codes.
  • Add sales commission agents to help you in selling your logos.

Get Pabbly Subscription Billing for Free

On a product package, the very first thing that captures visitors’ attention is the company’s logo. As a matter of fact, the ever-increasing number of companies are demanding premium custom logos for their service. That is why, as a digital artist, you are tinkering with the idea of start selling logos online.

Why would you like to sell logos online?

Ever heard of a popular phrase ‘What is seen is sold’. Your logos may be stunning, looks highly professional yet no one is buying it. That is because no one is seeing your product. Now the best approach is you start selling your logos online. Obviously duh!! That is why you are here.  But the question is, what is the best possible way?

Well, you can always approach professional channels that display and sells logos. However,  the problem with these third party online websites are they charge a minimum of 40% of your revenue. That is outrageous, obviously, you are not going pay this exorbitant amount as commission. So, let us go for the better yet cheaper approach.

There is an online tool called Pabbly Subscription Billing that can list unlimited products without charging any excess commission. Other important feature includes:

  • List unlimited, products, and plans
  • Get unlimited revenues from different billing models like single, recurring, etc
  • Track payments and revenue
  • Receive automatic email alerts in case of payment failure/completion
  • The system automatically reattempts credit card in 3,5,7 days after the decline.

Since you all are fired up, let us help you to set up the online store to start selling logos online.

This is How your Checkout Page will Look Like After Creation

Checkout To Sell Logos Online

Preview Checkout Page

Step 1: Log in to Pabbly Subscription Billing

Signup

Search in Google for Pabbly Subscription Billing and on their website click on the button “Sign up Free“. Here simply sign in through your, Gmail account or you can fill in the blanks like name, email address and then press the “Sign Up” button.

Sign Up For Free!

Step 2: Select Subscription Billing

Access Subscription Billing

Now that you have entered into the dashboard, click on the “Access Now” button on the Subscription Billing option.

Step 3: Account Setup

Setup Account

Here a dialog box will open up that mandates you to fill the company details like name, currency, and phone number. After filing in the details press the “Continue” button to complete the process.

Step 4: Connect Payment Gateways To Sell Logos Online

Connect Payment Gateway

Now, since customers have limited patience and won’t tolerate any inconveniences during payments, therefore you need to ensure that they enjoy a seamless payment process. This can be done using a dummy payment gateway in Pabbly Subscription Billing, where you can pilot test the whole payment experience before giving it to your customers.

Here, with Pabbly Subscription Billing, you can integrate with a ton of payment gateways like Razorpay, PayPal, Authorize.net, etc. With the help of the articles mentioned below, you can easily integrate with your preferred ones. But I am going ahead, by enabling the test payment option to continue the process.

Step 5: Add Your Product

Add Product

Excellent, now that you have integrated your payment gateway, let’s move on to add products. Here at the section below the “Enable Payments” click on “Add your product”. This will redirect you a dialog box with a blue button “Add New Product”. Click it.

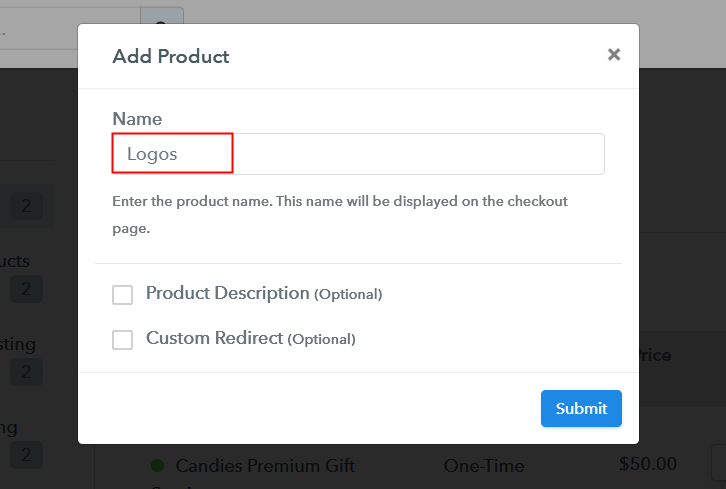
Another pop-up box emerges and here fill the required product information like logos then provide a small description, and redirect to a particular website by ticking on the checkboxes.

Add Product to Sell Logos Online

Fill up the details and your product is created.

Note: Here you can add all the products related to the similar category by creating plans for each of them.

Step 6: Add Plans

Now, we are going to create plans for selling logos online, directly from your desktop.

(a) Select Add New Plan

Add Plan

(b) Specify the Plan & Pricing Details

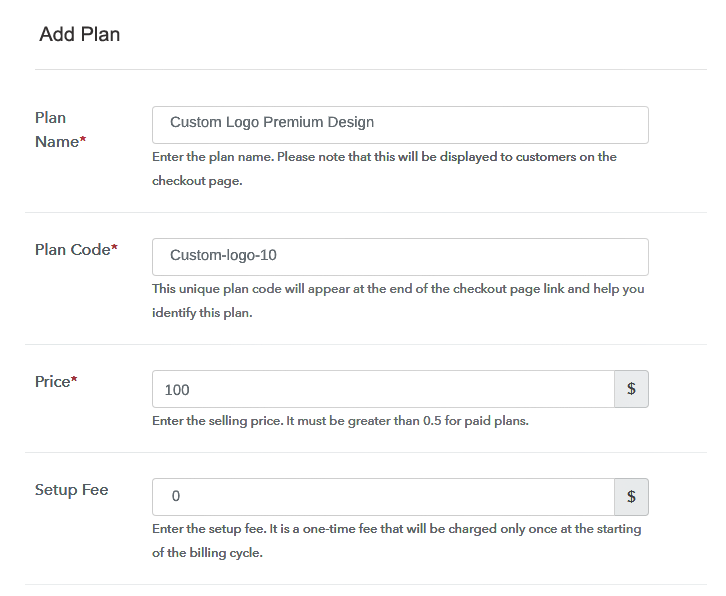
sell product online

Later, you will reach the plan page, here you have to fill in details like plan name, code, price, setup fees. Scrolling down to the section below, here you can see the choice to change the billing models like one-time payment, recurring, etc. Here click on the preferred revenue model and yes, you can change it any time.

(c) Add Image & Description

product description to sell logos online

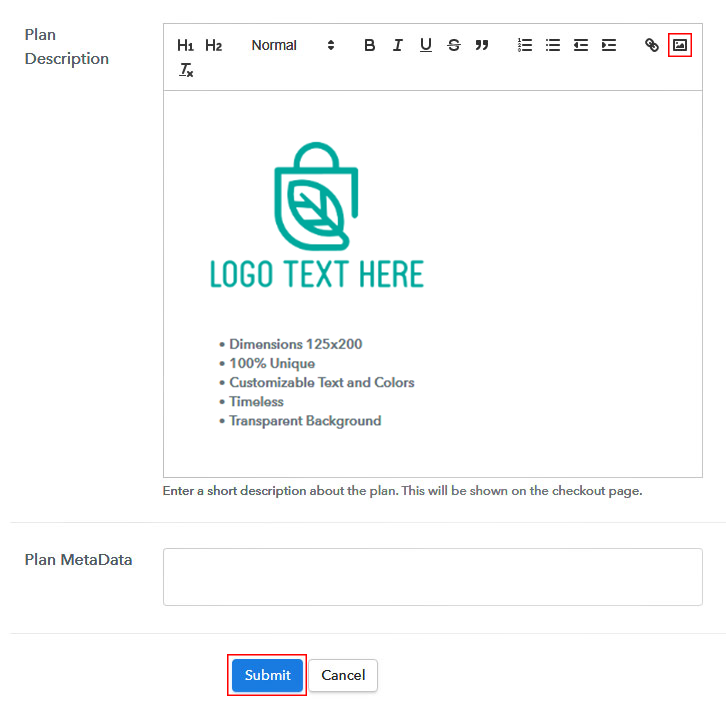
Upload the logo, using the image option (red box).

Now after inserting the image, provide comprehensive details of the logo preferably in bullets points, background, customizable texts, colors, etc. After describing the product details press the “Submit” button. Likewise, following the same method,  you can add multiple products, one at a time.

Step 7: Share your Checkout Page

Share Checkout Page on Social Media

  • To create more awareness about your products you can share your checkout page on Twitter & Facebook by just pressing the respective buttons.
  • You can also use emails and SMS to send check out links more dissemination of your products.
  • Furthermore, you can build buttons on your webpage and paste the checkout links on it. Or you can place it on any anchor text on your website, so the users will be redirected to the checkout page.

Step 8: Preview Checkout Page

Follow up these steps to preview checkout page:

(a) Click on the View Button

View Checkout Plan

(b) Take a Look at the Checkout Page

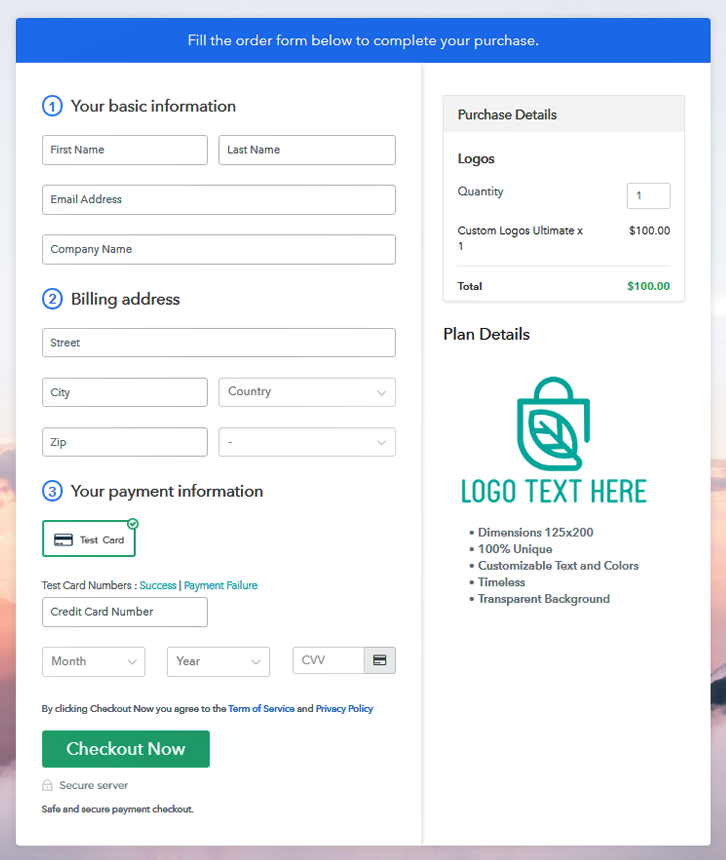
Final Checkout page To Sell Logos Online

Step 9: Embed Checkout Page in Site & Sell Logos Online

Embed Checkout Page on Website

Now,  copy the embed plan link to insert the checkout page on your WordPress website.

(a) Edit the Page & Paste the Copied Link

Paste_Link_in_Text_Editor

Now, when the link is copied, then paste it to the text area of the editor.

(b) Save & Publish the Checkout Page

Save_and_Publish

After pasting the code, now hit the ‘Publish’ button. Your checkout page is embedded.

(c) Check out the Final Look of your Checkout Page on WordPress Site

Embed checkout to website to Sell Logos Online

Step 10: Multiplan Checkout Page

Note: In case you want to sell multiple products via a single checkout page, you can create a multi-plan checkout page otherwise skip this step.

(a) Click on Add Mutiplan Checkout

Multiplan_Checkout

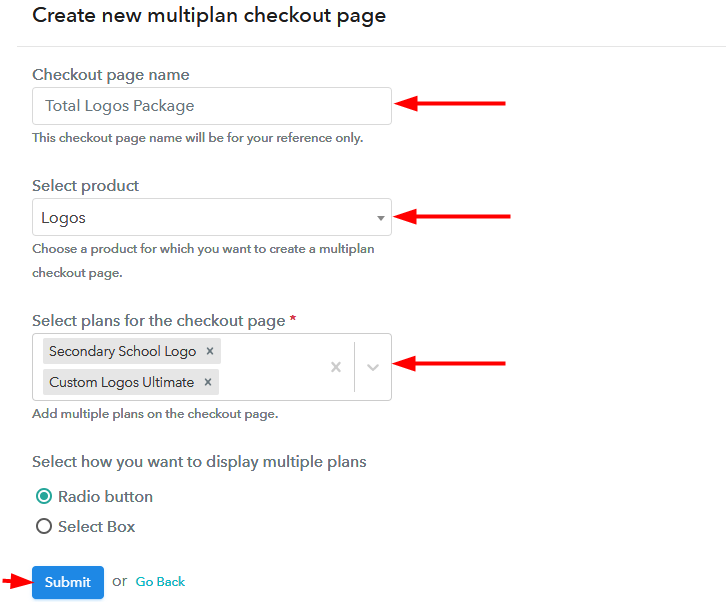
(b) Add Plans to Sell Logos Online from Single Checkout Page

multilan checkout to start selling logos online

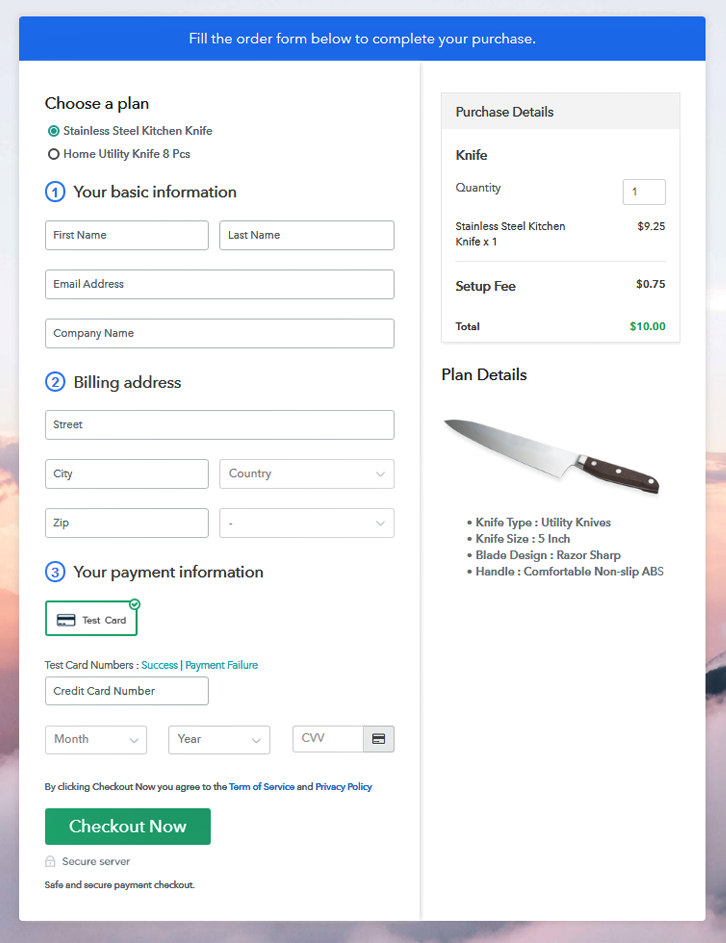
(c) Take a Look at the Checkout Page

Final multiplan checkout page

Preview Checkout Page

Wrapping Up

This is a very easy and cheap method to start selling logos online. Now the advantage of using Pabbly Subscriptions Billing over other platforms includes higher currency standards, brand awareness through Whatsapp, no commissions etc.

Now, since you are a beginner, these steps might be a bit overwhelming for you. But relax, you got us. If you have any queries, just give us a comment in the section below. We will answer at the earliest.
You May Also Like To Read –

How to Sell Fabric Online | Step by Step (Free Method)

How to Sell Fabric Online

Ideal For: All the fabric manufacturers, fabric sellers, retail fabric stores, wholesale fabric suppliers and other vendors can use this method to take their fabric selling business online.

How to Sell Fabric Online

Why Choose this Method for Selling Over any Other Solution?

Unlike any other solution, this method allows you to:

  • List and sell your fabric for FREE. Absolutely no payment required.
  • No commission on sales.
  • Collect payment through multiple payment modes from a single checkout page.
  • Sell one time or recurring subscriptions of your fabric.
  • Sell and collect payment in any currency as per your requirement.
  • Give discounts on your products by offering special coupon codes.
  • Add sales commission agents to help you in selling your fabric.

Get Pabbly Subscription Billing for Free

The synonym of fashion is fabric whether it is cashmere, chiffon, cotton, crepe, etc it always remains in demand. Fabric selling is one of the promising businesses and people making so much dime out of it. Considering this, there is no harm starting fabric selling business online.

Why would you like to sell fabric online?

One of the prominent reasons, the world is abundant with fibre which includes cotton, silk, etc. Recently, one article of “The Hindu” states that the textile industry has the potential to cross a turnover of $ 350 billion by 2025. No doubt, the digital market is a myriad of possibilities to earn handsome money by selling fabric online.

Moreover, buying and selling are more convenient on the internet as it saves a lot of trouble visiting showroom to showroom. That’s the reason most of the fabric manufacturer making a presence in the digital market. Keeping all this in mind, we would like to recommend you an all-in-one software named Pabbly Subscription Billing. The tool lets you create exceptionally beautiful checkout pages to sell fabric online. Some of its enunciated features involve:

  • List the various type of fabric through the single checkout page
  • Offer special discount and coupon codes to attract customers
  • Collect payment via both online and offline mode

Above are some of the benefits and now let’s see how to sell fabric online using the Pabbly Subscription Billing software.

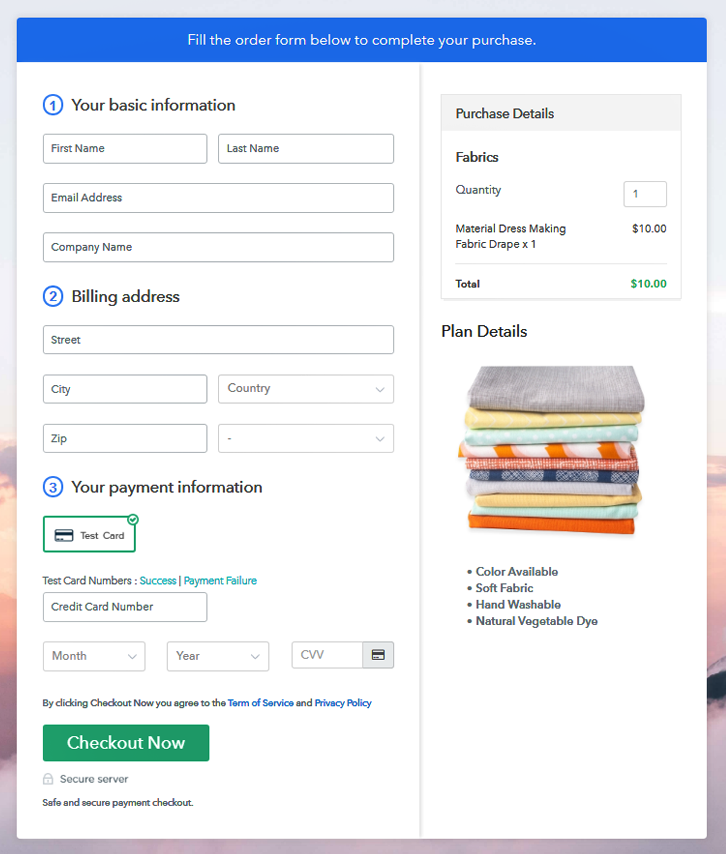
This is How your Checkout Page will Look Like After Creation

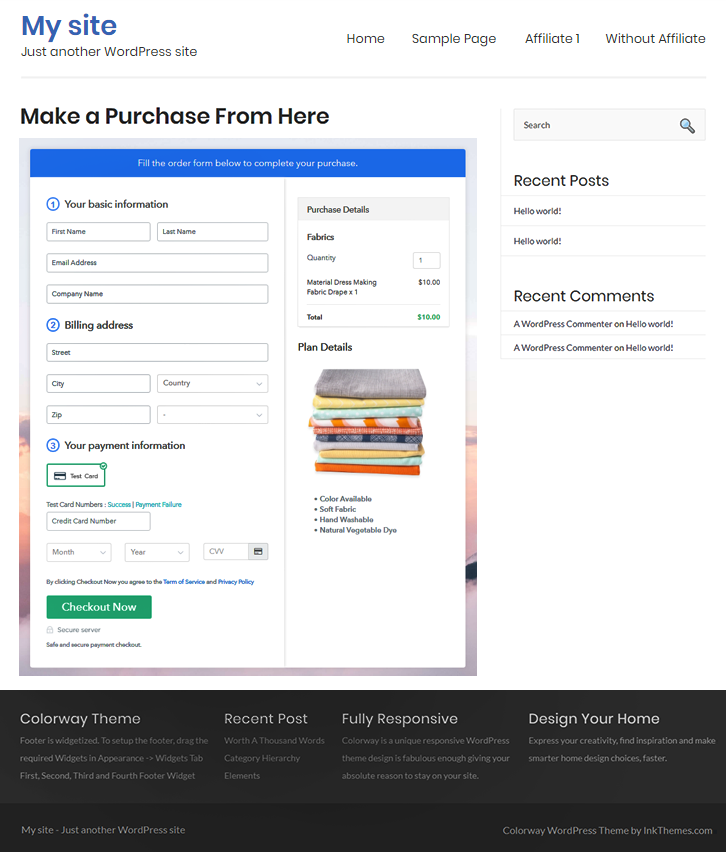
Checkout Page to Sell Fabric Online

Preview Checkout Page

Step 1: Login to Pabbly Subscription Billing

Signup

To initiate the process, go to Pabbly Subscription Billing site and then click on the “Sign Up Free” button. Further, sign-up into the software either using your Gmail credentials or you can always create a new account.

Sign Up For Free!

Step 2: Select Subscription Billing

Access Subscription Billing

Step 3: Account Setup

Setup Account

The next thing to do after clicking on the “Access Now” button of the software, it will instantly open the page with details like company name, select currency, and phone number. After filling out those details click the “Continue” button.

Step 4: Connect Payment Gateways To Sell Fabrics Online

Connect Payment Gateway

Next, click on the “Enable Test Payment” to know all about the software payment procedure. Additionally, it is packed with multiple payment gateways like PayPal, Stripe, etc which you can use after knowing all about the software. For your convenience, we are mentioning below the payment integration guides below. Here, we are also heading ahead with the test payment gateway.

Step 5: Add Your Product

Add Product

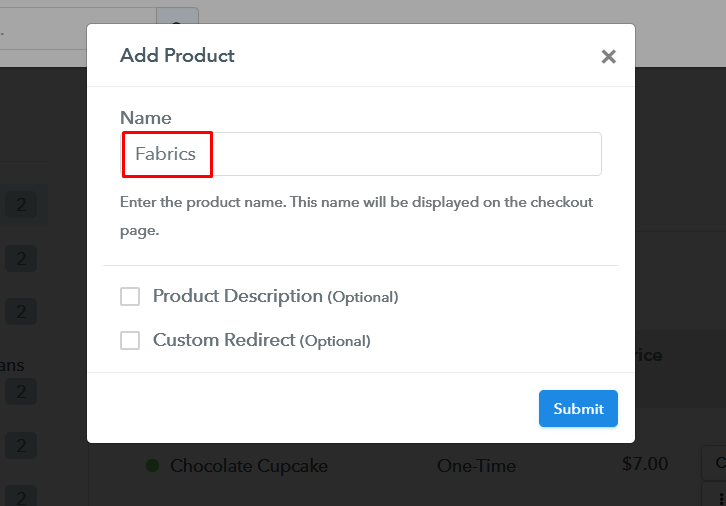
Subsequently, name the product which is fabrics, you can also specify the particular type like cotton, silk, etc. It also comes with an option of product description where you can write little about its specification.

Add Product to Start Selling fabrics Online

After filling out all the details, click on the “Submit” button.

Note: Here you can add all the products related to the similar category by creating plans for each of them.

Step 6: Add Plans 

Now, let’s cast some light on plans for different kinds of fabric available in your store.

(a) Select Add New Plan

Add Plan

(b) Specify the Plan & Pricing Details

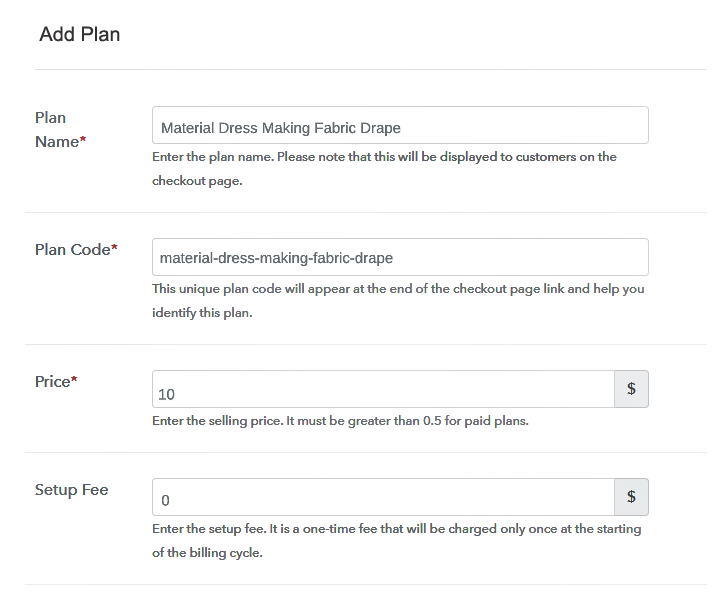
Specify the Plan and Pricing to Sell Fabric Online

Next, without any disturbance fill all the details like plan name, code, price, set-up fee and much more to continue.

(c) Add Image & Description

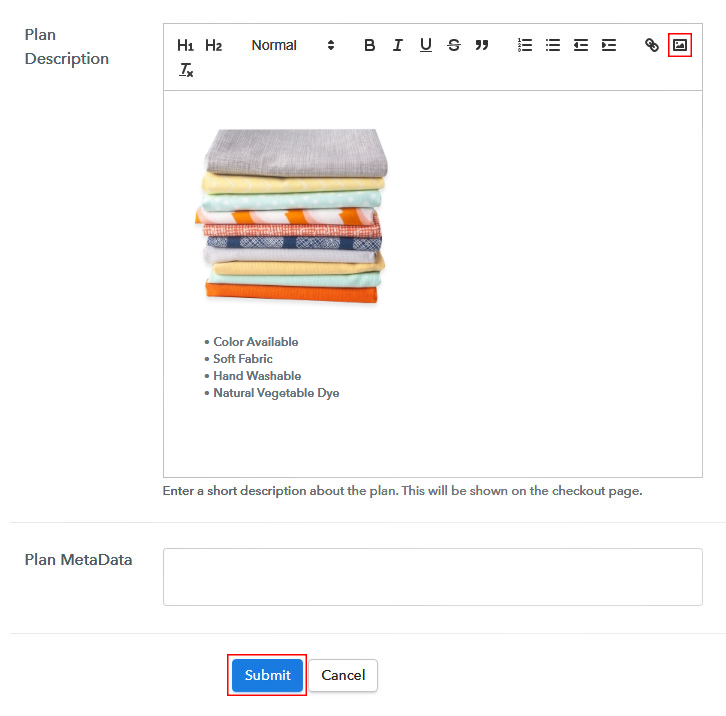
Add Image & Description to Sell Fabric Online

Furthermore, to draw the attention of potential buyers on the checkout page, it is important to write a brief description of fabric with bullets, images, etc.

Next, click on the “Submit” button to add the product on the checkout page.

Also, you can add multiple plans and types of fabrics in your product list which you want to market online.

Step 7: Share your Checkout Page

Share Checkout Page on Social Media

  • You can share the link of the checkout page directly on social media accounts like Facebook & Twitter.
  • Further, the next thing to do is share the direct link to plan with your customers via SMS or email marketing.
  • Besides, to redirect users on the checkout page, you can embed the provided plan link in the buttons or any anchor text on your website.

Step 8: Preview Checkout Page

Follow up below mentioned steps to preview the checkout page:

(a) Click on the View Button

View Checkout Plan

(b) Take a Look at the Checkout Page

Checkout Page to Sell Fabric Online

Step 9: Embed Checkout Page in Site & Sell Fabric Online

Embed Checkout Page on Website

Further, copy the embed plan link to insert the checkout page on your WordPress site.

(a) Edit the Page & Paste the Copied Link

Paste Link in Text Editor

Now, paste the copied plan link on a text editor of the WordPress dashboard.

(b) Save & Publish the Checkout Page

Save and Publish

After making all the changes, finally hit the “Publish” button.

(c) Check out the Final Look of your Checkout Page on WordPress Site

Final Look of your Checkout Page to Start Selling Fabric Online

Step 10: Multiplan Checkout Page

Note: In case you want to sell multiple products via a single checkout page, you can create a multi-plan checkout page otherwise skip this step.

(a) Click on Add Mutiplan Checkout

Multiplan Checkout

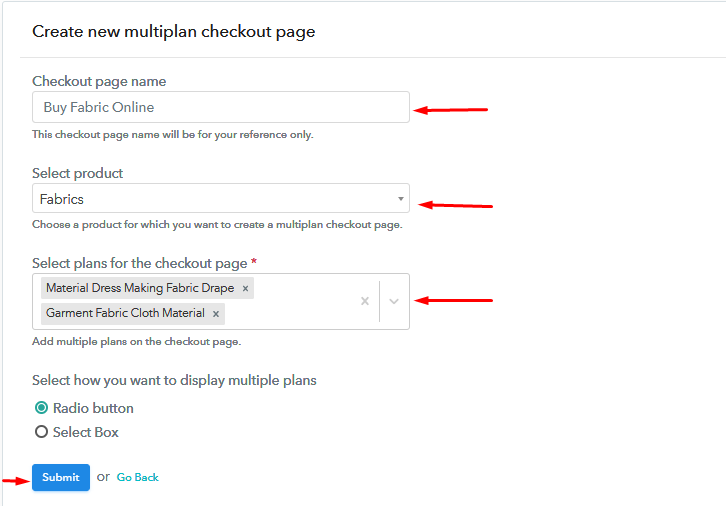
(b) Add Plans to Sell Multiple Fabric from Single Checkout Page

Add Multiple Products to Start Selling Fabric Online

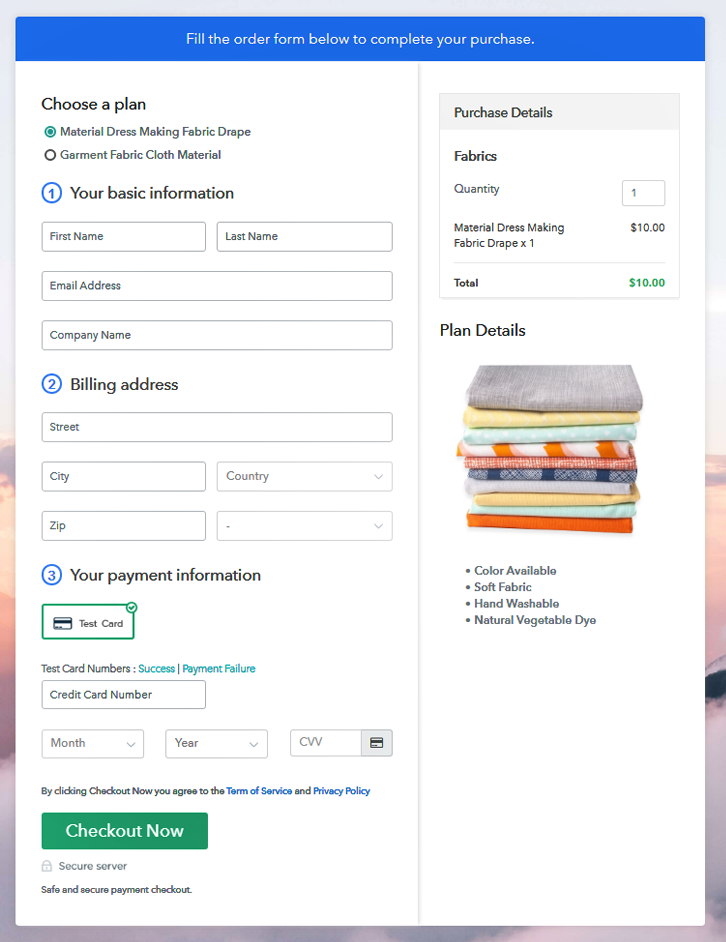
(c) Take a Look at the Checkout Page

Multiplan Checkout Page to Sell Fabric Online

Preview Checkout Page

Wrapping Up

Hopefully, now you know how to sell fabric online. All the mentioned steps will help you boost your fabric business online. The advantage of starting a fabric selling business online is it has a lower set up cost which can be afforded by anyone. So, don’t stop your business from achieving great heights.

Try this tool and knock us out with your queries. We are here to help you.

You May Also Like To Read –

How to Sell Herbs Online | Step by Step (Free Method)

How to Sell Herbs Online

Ideal For: All the herb farms, herbal stores, and other independent entrepreneurs who grow herbs and sell from their homes can use this method to take their herbs selling business online.

How to Sell Herbs Online

Why Choose this Method for Selling Over any Other Solution?

Unlike any other solution, this method allows you to:

  • List and sell herbs for FREE. Absolutely no payment required.
  • No commission on sales.
  • Collect payment through multiple payment modes from a single checkout page.
  • Sell one time or recurring subscriptions of herbs.
  • Sell and collect payment in any currency as per your requirement.
  • Give discounts on your products by offering special coupon codes.
  • Add sales commission agents to help you in selling herbs.

Get Pabbly Subscription Billing for Free

Are you an herbal entrepreneur with a passion for plants and likes to make your own herbal products, then you should definitely take this passion to online business platforms. You should start your own herb selling online business and expand your customer reach and make a good amount of money.

Why would you like to sell herbs online?

Because it will cost you nothing as compared to opening a store. There are several platforms available to start online herbs selling business but they may charge you a lot of money. Hence, here we are telling you about a service that allows you to start your business for free. Pabbly Subscription Billing allows you to effortlessly start your online herbs selling business free of cost with so many amazing features. You can add unlimited products and plans, unlimited customers, create unlimited discount coupons, integrate with your website and so much more without any transaction fees.

Other than this, its checkout page is very important and helpful. Simply create checkout pages for your herbs and share their links on social media or on your website so that your customers can buy your products directly through them.

This is How your Checkout Page will Look Like After Creation

Checkout Page Preview

Preview Checkout Page

Step 1: Log in to Pabbly Subscription Billing

Signup

At the very first step, visit Pabbly Subscription Billing website and click on the “Sign Up Free” button. Once the button is clicked, you are reached on the signup page, where you can create your account with Gmail or manually enter your details.

Sign Up For Free!

Step 2: Select Subscription Billing

Access Subscription Billing

Step 3: Account Setup

Setup Account

Once the signup process is completed, now fill up your company details i.e. company name, select currency, and contact number in the appeared dialogue box.

Step 4: Connect Payment Gateway to Sell Herbs Online

Connect Payment Gateway

We have shown you the payment collection process via the ‘Test Payment’ mode. Later, you can connect other payment gateways as per your choice. The complete integration guide for payment gateways is provided below.

Step 5: Add Your Product

Add Product

Once the payment mode is enabled, then you can add your first product. You can add herbs of different categories, for example, thyme, sage, etc, and add all other types of herbs in the same product by creating different plans.

Add Product Name to Sell Herbs Online

Simply fill up these details and your product is added.

Note: Here you can add all the products related to the similar category by creating plans for each of them.

Step 6: Add Plans

Let’s get started and create plans for different categories of herbs that you want to sell

(a) Select Add New Plan

Add Plan

(b) Specify the Plan and Pricing Details

Add Details to Sell Herbs Online

On clicking add new plan, the plan page opens, here you will have to fill the plan details such as plan name, code, billing cycle, price, etc.

(c) Add Image & Description

Add Image to Sell Herbs Online

Also, describe the herbs that you want to sell along with the product links, images, etc, and click on the submit button to add your plan.
You can create more plans for all the herbs in a similar manner.

Step 7: Share Your Checkout Page

Share Checkout Page on Social Media

  • Share your checkout page on social media like Facebook and Twitter.
  • Copy the mentioned link and send it to your customers through SMS or emails directly.
  • Embed your plan link to your website so that your customers can be landed on the checkout page directly.

Step 8: Preview Checkout Page

Follow the given steps to view checkout page

(a) Click on the View Button

View Checkout Plan

(b) Take a Look at the Checkout Page

Checkout Page Preview

Step 9: Embed Checkout Page in Site & Sell Herbs Online

Embed Checkout Page on Website

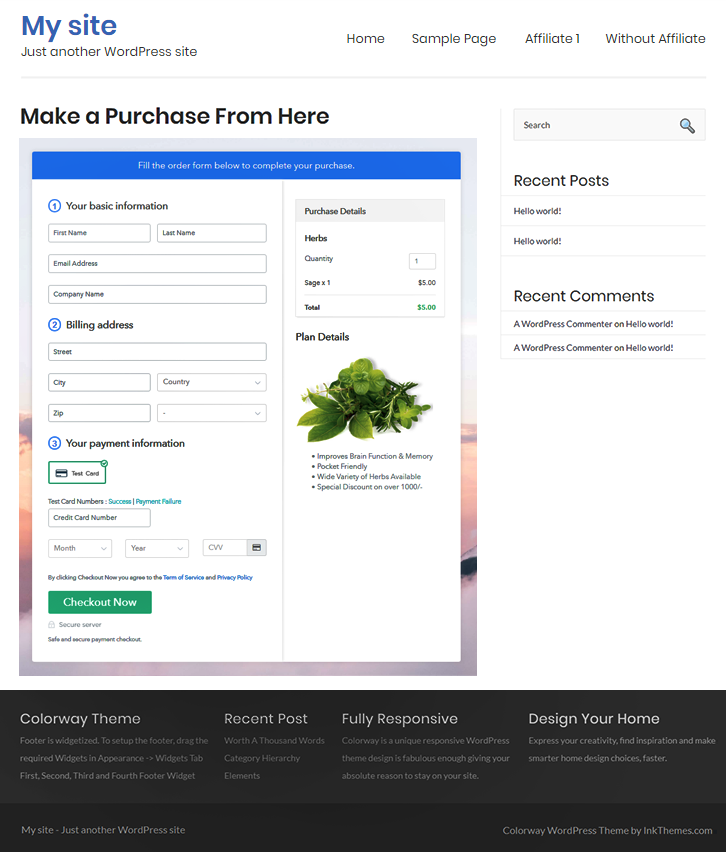
Just copy the provided plan embedding link and embed the checkout page to your WordPress site.

(a) Edit the Page & Paste the Copied Link

Paste Link in Text Editor

Copy and paste the link in the text area of the editor

(b) Save & Publish the Checkout Page

Save and Publish

After the code is pasted, click on the publish button to embed your checkout page.

(c) Check Out the Final Look of your Checkout Page on WordPress Site

Embed Checkout Page to Website to Sell Herbs Online

Step 10: Multiplan Checkout Page

Note: In case you want to sell multiple products through a single checkout page, create a multi-plan checkout plan, otherwise skip this step.

(a) Click on Add Multiplan Checkout

Multiplan Checkout

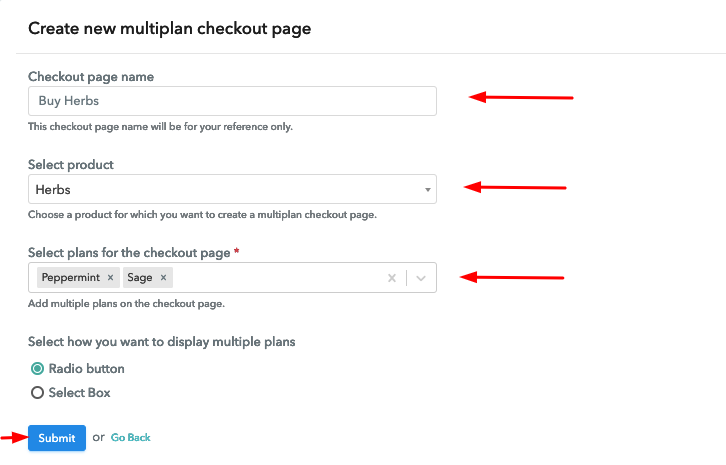
(b) Add Plans to Sell Multiple Herbs from Single Checkout Page

Add Multiplan Details to Sell Herbs Online

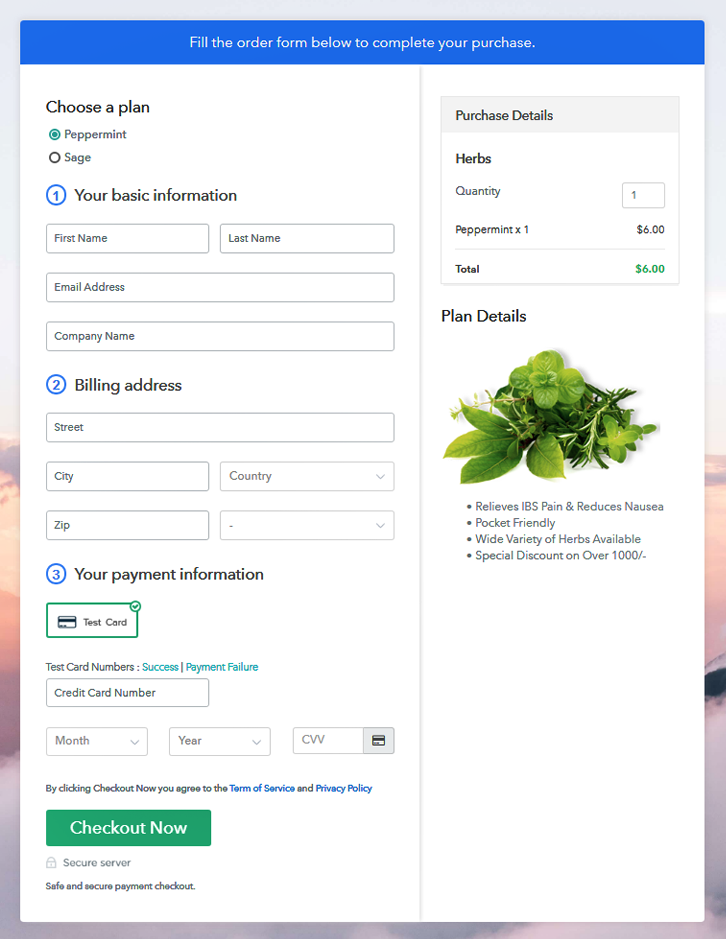
(c) Take a Look at the Checkout Page

Multiplan Checkout Page to Sell Herbs Online

Preview Checkout Page

Wrapping Up

In the end, we hope this blog helped you to start your online herbs selling business with ease. With Pabbly Subscription Billing it’s a lot easier to start your online business as it is user-friendly, free of charge, and comes with so many advantageous features. So, if you’re still thinking what to do, then Pabbly Subscription Billing is your answer. Go and signup now and start your business.

For further queries or suggestions please write to us.

You May Also Like To Read –

How to Sell Dogs Online | Step by Step (Free Method)

How to Sell Dogs Online

Ideal For: All the dog lovers, dog sellers, pet shop owners, foster dog services, stray dog services and other pet providers can use this method to take their dog selling business online.

How to Sell Dogs Online

Why Choose this Method for Selling Over any Other Solution?

Unlike any other solution, this method allows you to:

  • List and sell your dogs for FREE. Absolutely no payment required.
  • No commission on sales.
  • Collect payment through multiple payment modes from a single checkout page.
  • Sell one time or recurring subscriptions of your dogs.
  • Sell and collect payment in any currency as per your requirement.
  • Give discounts on your products by offering special coupon codes.
  • Add sales commission agents to help you in selling your dogs.

Get Pabbly Subscription Billing for Free

“Paws are always better than fake palms” ever heard of it, you must have if you’re a dog lover. Most of the people across the globe love to pet dogs. This is why it is an icing on the cake to start dog selling business online.

Why would you like to sell dogs online?

Most of the research mentioned, that dogs are emotional support to human beings. Having a pet around you decrease blood pressure, anxiety, and perhaps even boost immunity. Now, let’s put some light on the statistics released by Forbes Magazine where it has been said that the pet industry is experiencing tremendous growth. The article quoted that “almost 85 million households have a pet and over the last 30 years pet ownership has gone from 56% to 68% of all households”.

So, owing to that there is no doubt in saying that pets are trendy and that’s why you should start selling dogs online. And, starting things from scratch is a hustling process, that’s why we would like to suggest Pabbly Subscription Billing software. It allows you to create startling checkout pages to sell dogs online. Not just this, it is swamped with features, some of the benefits are mention below.

  • Lower set-up cost
  • Wider audience
  • Collect payment in any currency via the checkout page
  • List various kinds of dogs in a single checkout page

The aforementioned are some of the points that might give your business a head start. Now, let’s see how to create an attractive checkout page to sell dogs online using the software.

This is How your Checkout Page will Look Like After Creation

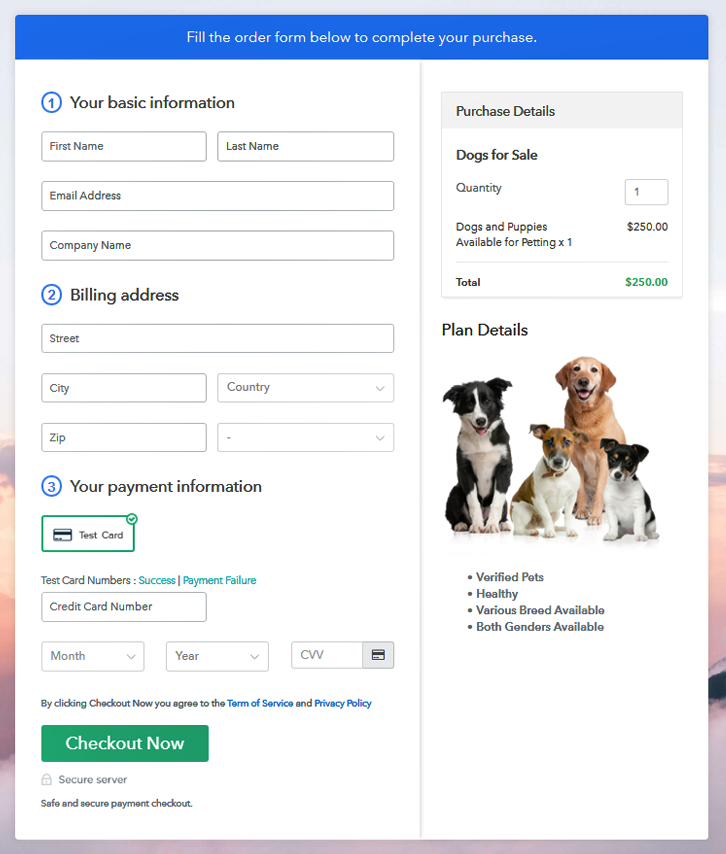
Checkout Page to Sell Dogs Online

Preview Checkout Page

Step 1: Login to Pabbly Subscription Billing

Signup

Go to the Pabbly Subscription Billing site and then there click on the “Sign Up Free” icon appearing on the top. After that, sign-up into the software either using your Gmail credentials or you can create a new account according to your convenience.

Sign Up For Free!

Step 2: Select Subscription Billing

Access Subscription Billing

Step 3: Account Setup

Setup Account

After clicking on the “Access Now” button of the software, you will redirect to a page that has details like company name, select currency, and phone number. Just fill those details to continue.

Step 4: Connect Payment Gateways To Sell Dogs Online

Connect Payment Gateway

For starters, always use test payment mode to know all about the payment procedure of the software. Here, we are also using test payment mode. Additionally, the software has various payment gateways like PayPal, Stripe, etc. Below we are mentioning payment integration guides to help you out.

Step 5: Add Your Product

Add Product

Further, the next thing to do is add your product which is dogs, you can specify the type which can be a labrador, german shepherd, etc and mention little about in the description category.

Add Product to Start Selling Dogs Online

Fill out all these details and then click on “Submit”.

Note: Here you can add all the products related to the similar category by creating plans for each of them.

Step 6: Add Plans

Now, let’s unfold out all the plans for different kinds of dogs available in your pet store.

(a) Select Add New Plan

Add Plan

(b) Specify the Plan & Pricing Details

Specify the Plan and Pricing to Start Dog Selling Business Online

Further, don’t avoid to fill details of products like plan name, code, price, setup fees, billing cycle, and more.

(c) Add Image & Description

Add Image & Description to Sell Dogs Online

Furthermore, it is crucial to grab the dog lover’s attention on the checkout page. So, write a brief description of a pet with bullets, images, etc.

Next, to add the dog on your checkout page, you have to click on the “Submit” button.

Thus, you can add multiple plans and types of dogs in your product list which you want to sell online.

Step 7: Share your Checkout Page

Share Checkout Page on Social Media

  • You can share the link of the checkout page on social media accounts like Facebook & Twitter.
  • The next thing to do is share the direct link to plan with your customers via SMS or email marketing.
  • Moreover, to redirect users on the checkout page, you can add the provided plan link in the buttons or any anchor text on your website.

Step 8: Preview Checkout Page

Below are the steps to preview the checkout page.

(a) Click on the View Button

View Checkout Plan

(b) Take a Look at the Checkout Page

Checkout Page to Sell Dogs Online

Step 9: Embed Checkout Page in Site & Sell Dogs Online

Embed Checkout Page on Website

Consequently, to embed the checkout page on the WordPress site, just copy the plan link.

(a) Edit the Page & Paste the Copied Link

Paste Link in Text Editor

The next step is to paste the copied plan link on the text editor of the WordPress dashboard.

(b) Save & Publish the Checkout Page

Save and Publish

Further, the final step to embed the checkout plan is to hit the “Publish” button.

(c) Check out the Final Look of your Checkout Page on WordPress Site

Final Look of your Checkout Page to Sell Dogs Online

Step 10: Multiplan Checkout Page

Note: In case you want to sell multiple products via a single checkout page, you can create a multi-plan checkout page otherwise skip this step.

(a) Click on Add Mutiplan Checkout

Multiplan Checkout

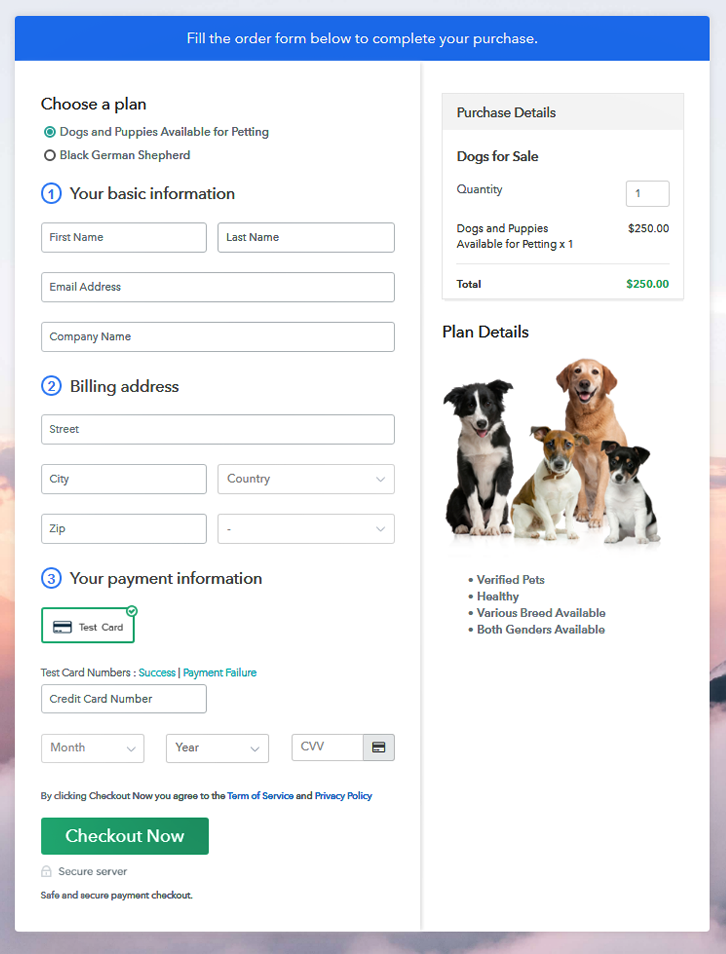
(b) Add Plans to Sell Multiple Dogs from Single Checkout Page

Add Multiple Dogs to Sell Online

(c) Take a Look at the Checkout Page

Multiplan Checkout Page to Sell Dogs Online

Preview Checkout Page

Wrapping Up

So, here we are at the end of the blog with the conclusion that all the mentioned steps are easy and will definitely boost your dog selling business. It’s never too late to start a new thing with proper guidance. So give this software a try and make pet lovers out there happy by selling puppies and dogs online.

Also, if you have any queries about the tool, feel free to reach out to us.

You May Also Like To Read –

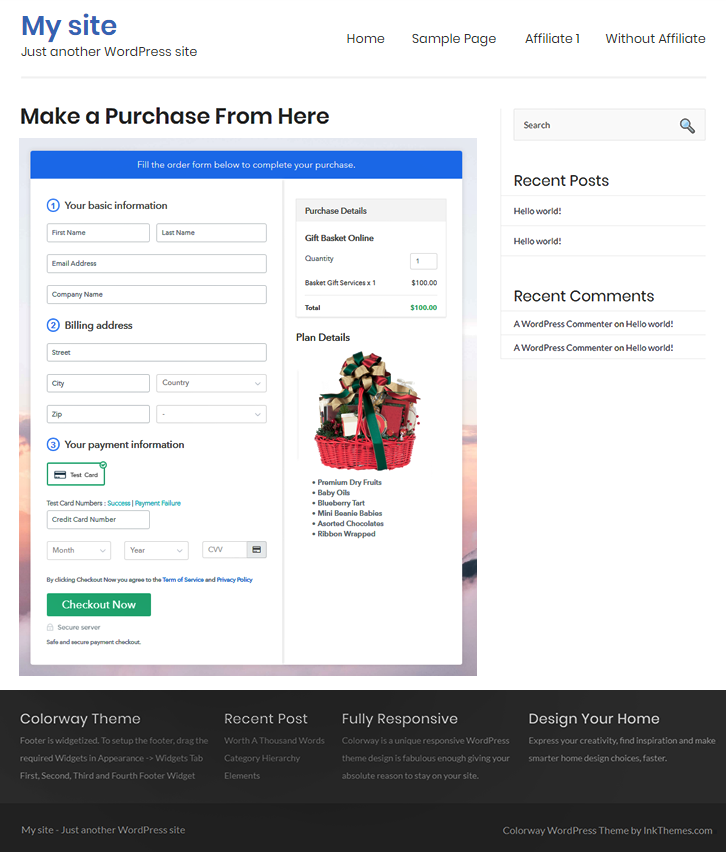
How to Sell Gift Basket Services Online | Step by Step (Free Method)

Ideal For: All gift shops, gift basket manufacturers, art galleries and other merchants can use this method to sell gift basket services online.

How to Sell Gift Basket Services Online

Why Choose this Method for Selling Over any Other Solution?

Unlike any other solution, this method allows you to:

  • List and sell your gift basket products for FREE. Absolutely no payment required.
  • No commission deducted on sales.
  • Collect payment through multiple payment modes from a single checkout page.
  • Sell one time or recurring subscriptions of your gift basket products
  • Sell and collect payment in any currency as per your requirement.
  • Give discounts on your products by offering special coupon codes.
  • Add sales commission agents to help you in selling your gift basket products.

Get Pabbly Subscription Billing for Free

The best way to congratulate or express happiness is through gift baskets. Now, this is a billion-dollar industry, and every year it is growing leaps & bounds. But, if you are a newbie in this business then you should definitely start thinking about selling gift basket services online.

Why would you like to sell gift basket services online?

The prime reason is when you start selling gift basket services online, it means opening your business to the whole world. This in turns means that you can leverage best practices and prices for your products. Furthermore, you are also free from clutches of middleman, who charge exorbitant fees for setup, rent, and storage. So simply put, all that profits will land only in your pocket without any leakage. Well, since I have gotten you excited, let me ask you, how will you set up an online store?

Well, it is actually easy, to set up an online store, with an online tool called Pabbly Subscription Billing. As it can build an online store in a couple of minutes with unlimited product listing. Not just that, it has many incredible features that can give an advantage over your peers like:

  • You can build unlimited products and plans
  • Also, create unlimited coups and discounts
  • Furthermore, you can easily track revenues and payments
  • In case of payment completion/failure, it sends automatic emails as alerts
  • Moreover, you access different billing models like one time, recurring, etc
  • Also, you can add coupons to bring in more offers
  • You can customize checkouts and even place your own logo

Now that you have become accustomed to its incredible features,  let’s us help you in setting up the infrastructure to start selling gift basket services online.

This is How your Checkout Page will Look Like After Creation

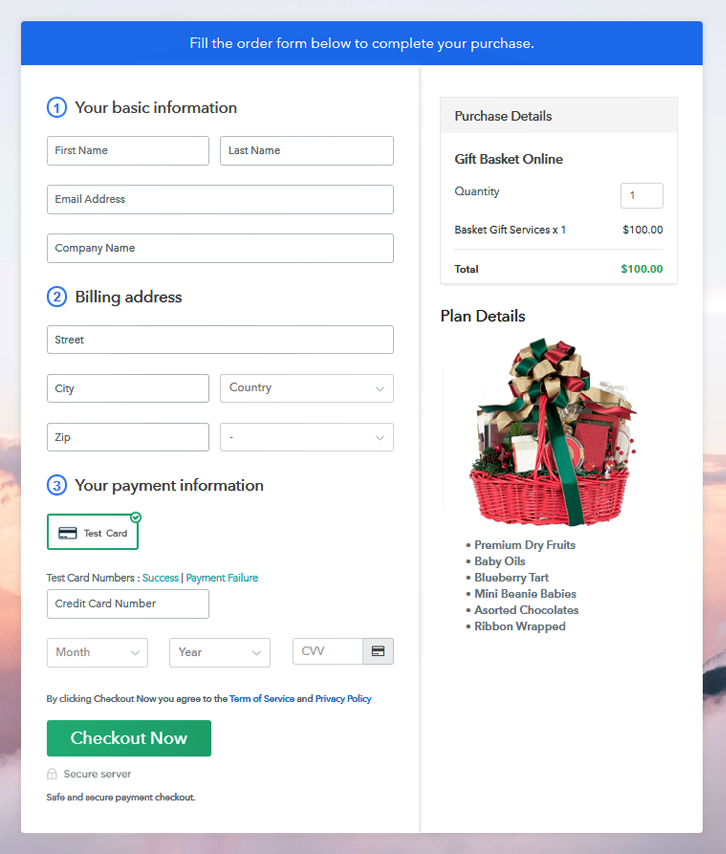
Checkout to Sell Gift Basket Services Online

Preview Checkout Page

Step 1: Log in to Pabbly Subscription Billing

Signup

Search in Google for Pabbly Subscription Billing and on their website click on the button “Sign up Free“. Now, using your Gmail account simply sign in or you can fill in the required details like name, email address, and then press the “Sign Up” button.

Sign Up For Free!

Step 2: Select Subscription Billing

Access Subscription Billing

Now that you have entered into the dashboard, click on the “Access Now” button on the Subscription Billing option.

Step 3: Account Setup

Setup Account

Here you will meet a dialog box that requires you to fill the company details like name, currency standards, and phone number. Press on the continue button to complete the process after filling the details.

Step 4: Connect Payment Gateways To Sell Gift Basket Service Online

Connect Payment Gateway

During payments, an annoyed customer can leave the transactions midway even at the slightest disruption. To avoid this, with Pabbly Subscription Billing, you can work on dummy payment gateways that stimulate the entire payment experience of a customer. This ensures a customer has a seamless transaction experience. All you have to do is click the “Enable Test Payment” option.

Now with Pabbly Subscription Billing, you can opt for any payment gateway like PayPal, Stripe, Razorpay, etc for selling gift basket service online. The integration is easy with the help of the articles given below. But I am going ahead, by enabling the test payment option to continue the process.

Step 5: Add Your Product

Add Product

Excellent, now that you have integrated your payment gateway, let’s move on to add products. Here at the section below the “Enable Payments” click on “Add your product”. This will redirect you a dialog box with a blue button “Add New Product”. Click it.

Another pop-up box emerges and here fill the required product information like gift basket service, then provide a small description, and redirect to a particular website by ticking on the checkboxes.

 Sell Gift Basket Services Online

Fill up the details and your product is created.

Note: Here you can add all the products related to the similar category by creating plans for each of them.

Step 6: Add Plans

Now, we are going to create plans for gift basket service online from your farm.

(a) Select Add New Plan

Add Plan

(b) Specify the Plan & Pricing Details

product pricing

Now, you will reach the plan page, here you have to fill in details like plan name, code, price, setup fees. Now scroll down, and in the section below you can see the choice to change the billing models like one-time payment, recurring, etc. Decide the revenue model, and of course, you can change it any time.

(c) Add Image & Description

product description

Here, take an awesome picture of your gift basket, upload it here by pressing the image button.

After fixing the image, give a concise description of the gift basket preferably in bullets points, like basket type, products included, accessories, etc. After mentioning the product description press the “Submit” button. Likewise, following the same process, you can add many other types of products.

Step 7: Share your Checkout Page

Share Checkout Page on Social Media

  • To create more awareness about your products you can share your checkout page on Twitter & Facebook by just pressing the respective buttons.
  • You can also use emails and SMS to send check out links more dissemination of your products.
  • Furthermore, you can build buttons on your webpage and paste the checkout links on it. Or you can place it on any anchor text on your website, so the users will be redirected to the checkout page.

Step 8: Preview Checkout Page

Follow up these steps to preview checkout page:

(a) Click on the View Button

View Checkout Plan

(b) Take a Look at the Checkout Page

Final Checkout Page Gift Basket Services Online

Step 9: Embed Checkout Page in Site & Sell Gift Basket Service Online

Embed Checkout Page on Website

Now,  copy the embed plan link to insert the checkout page on your WordPress website.

(a) Edit the Page & Paste the Copied Link

Paste_Link_in_Text_Editor

Now, when the link is copied, then paste it to the text area of the editor.

(b) Save & Publish the Checkout Page

Save_and_Publish

After pasting the code, now hit the ‘Publish’ button. Your checkout page is embedded.

(c) Check out the Final Look of your Checkout Page on WordPress Site

Embedding Checkout Page to Sell Gift Basket Services Online


Step 10: Multiplan Checkout Page

Note: In case you want to sell multiple products via a single checkout page, you can create a multi-plan checkout page otherwise skip this step.

(a) Click on Add Mutiplan Checkout

Multiplan_Checkout

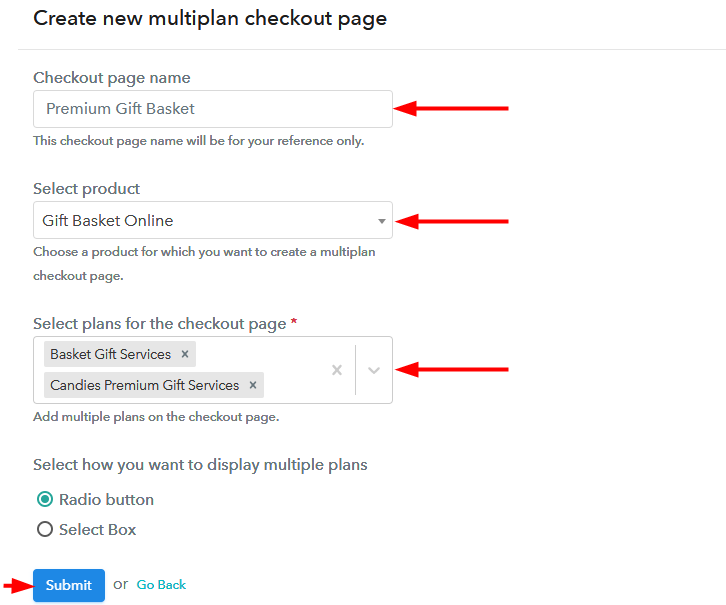
(b) Add Plans to Sell Multiple Gift Basket Services online from Single Checkout Page

creating multiplan checkout

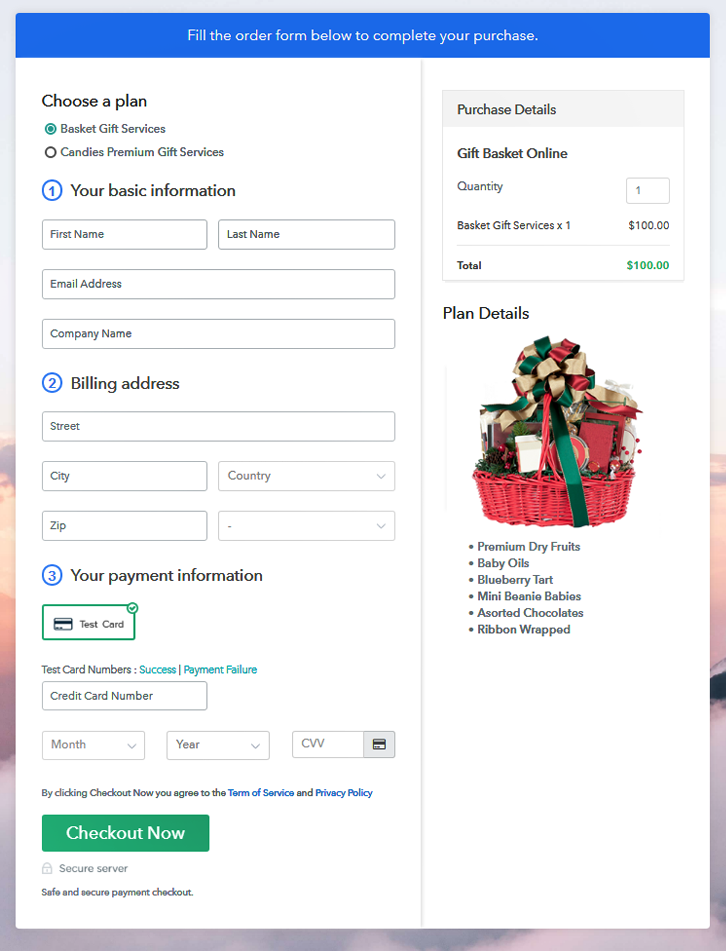
(c) Take a Look at the Checkout Page

multiplan checkout

Preview Checkout Page

Wrapping Up

Incredible, isn’t it? With just a few steps you completely overhauled your traditional brick & mortar shop to a modern store that sells gift basket services online. With Pabbly Subscription Billing, you can receive payments in any currency or denominations. Furthermore, you will have a general idea about the regions where your products are selling well.

Well, of course, since you are a beginner, you might have a ton of doubts regarding the steps or online payments in general. Feel free to ping us in the comment section below. Thank you.
You May Also Like To Read –

How to Sell Books Online | Step by Step (Free Method)

How to Sell Books Online

Ideal For: All the book sellers, book publishers, book writers, book makers, retail book selling business owners, and other book merchants can use this method to take their books selling business online.

How to Sell Books Online

Why Choose this Method for Selling Over any Other Solution?

Unlike any other solution, this method allows you to:

  • List and sell your books for FREE. Absolutely no payment required.
  • No commission on sales.
  • Collect payment through multiple payment modes from a single checkout page.
  • Sell one time or recurring subscriptions of your books.
  • Sell and collect payment in any currency as per your requirement.
  • Give discounts on your products by offering special coupon codes.
  • Add sales commission agents to help you in selling your books online.

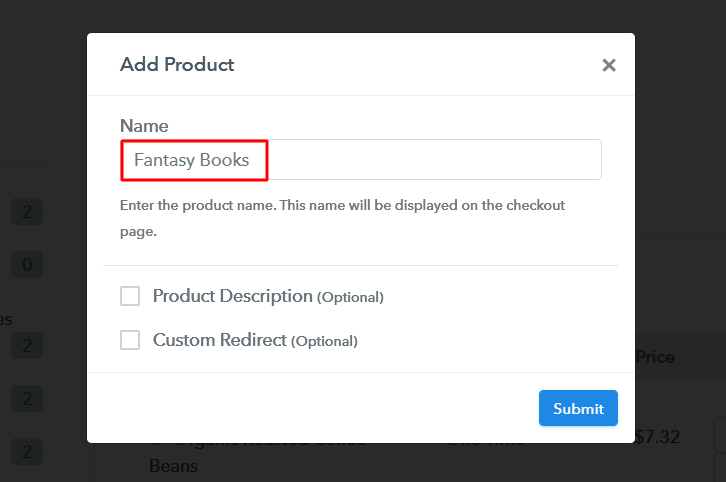
Get Pabbly Subscription Billing for Free

In today’s internet-prone world, almost nobody wants to go out and buy books from a locale. And if you are having books then we can help you with the latter part i.e, selling books online.

Why would you like to sell books online?

Well, if you are planning to start books business online, it could take almost nothing and will let you find more genuine readers for your books.

Although there is a service that can help you with the management of all your books as well as the payments for free. Yes! it that easy nowadays.

In this article, I am telling you the 10 simple steps that will let you sell books online with no coding knowledge. Moreover, there are other benefits attached such as the record-keeping dashboard, beautiful checkout pages, online/offline payments, multiple payment gateway options, taxes, coupons, discounts and many many more…

More importantly, you can share these checkout pages (as shown below) over social media platforms like Facebook, Twitter, WhatsApp and emails as well as SMS. Yes! no need to design a big website for selling books online that the biggest advantage of it.

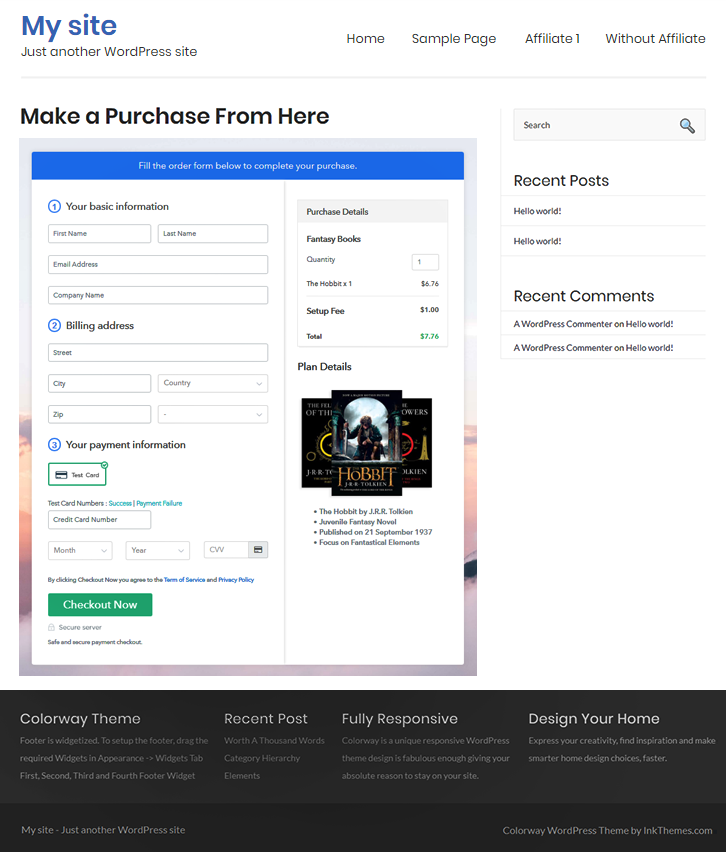
This is How your Checkout Page will Look Like After Creation

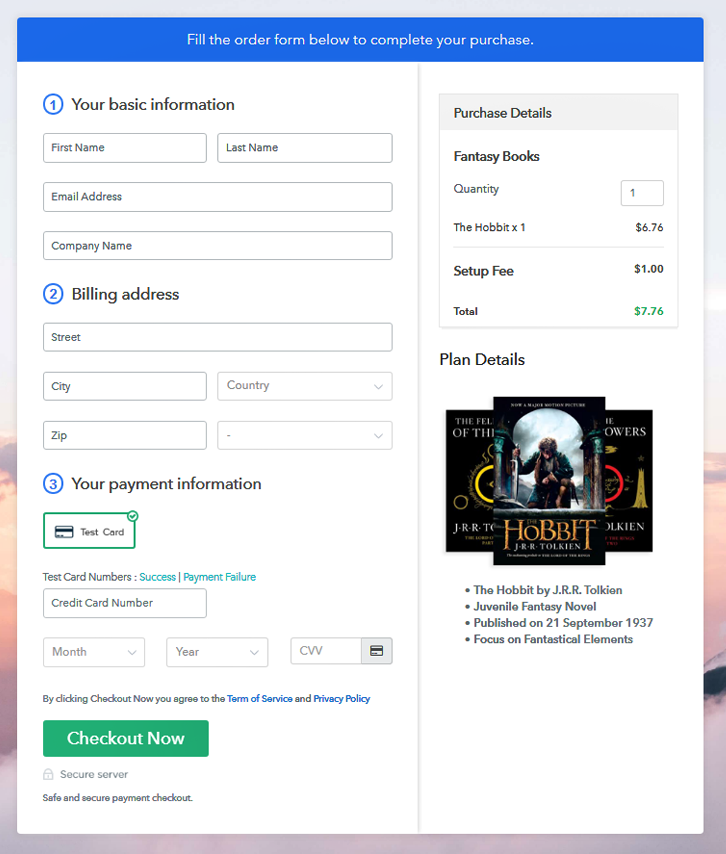
Checkout Page Preview to Sell Books Online

Preview Checkout Page

Step 1: Login to Pabbly Subscription Billing

Signup
To get started first, you’ll need to visit the Pabbly Subscription Billing website. Then click on the “Sign Up Free” button. Now, either fill out the sign-up form and get registered on the platform or hit “Sign up with Google” and get into the system using your Gmail account.

Sign Up For Free!

Step 2: Select Subscription Billing

Access Subscription Billing

Step 3: Account Setup

Setup Account

Next is filling out the details on the pop-up that appears after a successful sign-in. It will ask you for three information i.e, the company name, currency & a phone number. Quickly fill out the details and click on “Contnue” to proceed forward.

Step 4: Connect Payment Gateway to Sell Books Online

Connect Payment Gateway

After filling out the basic details, now is the time to connect a payment gateway. You can pick any options from the multiple payment methods that it provides. Also, check out the below-mentioned links for the integration guides. I am enabling the test payment option here that Pabbly Subscription Billing provides for testing.

Step 5: Add Your Product

Add Product

Once you integrate a payment gateway, you can create products. Just click on the “Add New Product” button & name a category of books as a product name.

Add Product to Sell Books Online

Hit the “Submit” button after filling out the details about the product & a product will get created. Remember that product doesn’t mean an item it is much like a border category of items.

Note: Here you can add all the products related to the similar category by creating plans for each of them.

Step 6: Add Plans

Now, is the stage which will let you add your books to sell and for this you’ll need to add the book to be sold as a plan. Click on the “Add New Plan” button and fill out the details to show on the checkout page.

(a) Select Add New Plan

Add Plan

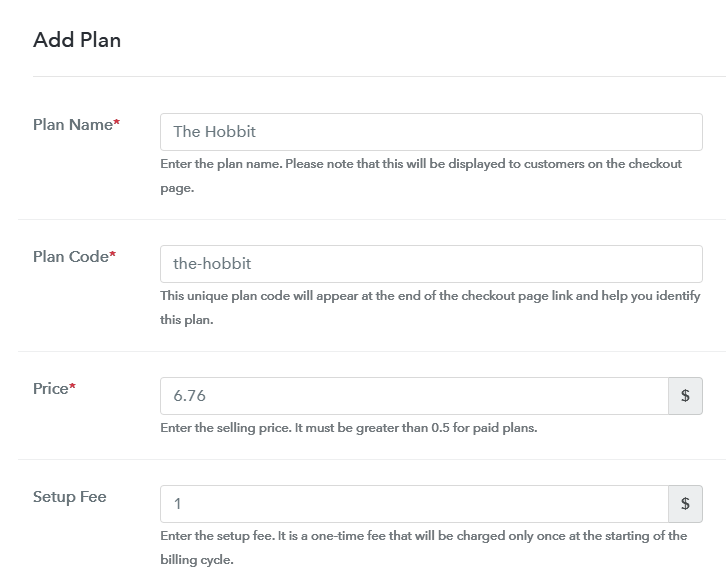
(b) Specify the Plan & Pricing Details

Add Plan to Sell Books Online

Plan name goes as by the name of the book that you want to sell and all the other details similarly as price by the cost of the book that you want to sell and code as the code that you want to give to the book that you want to sell etc.

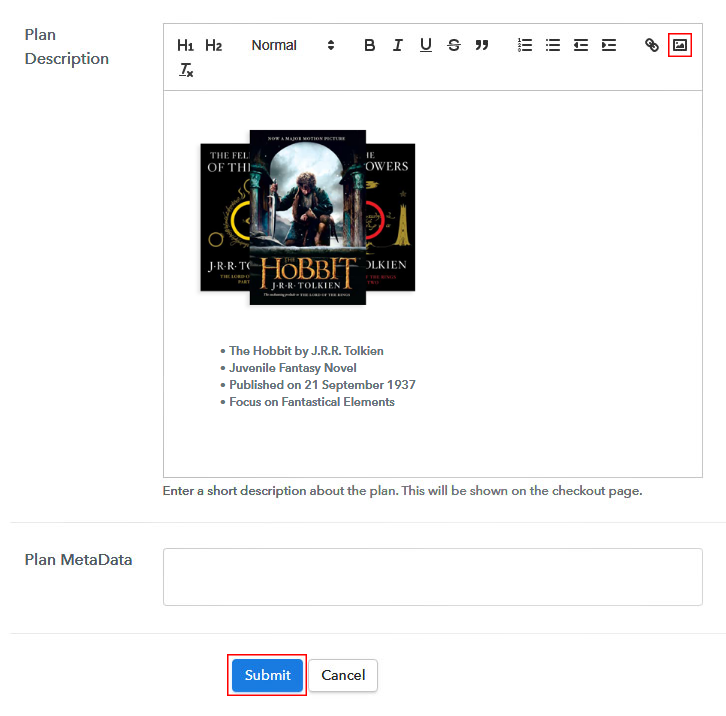
(c) Add Image & Description

Add Image & Description to Sell Books Online

Next, you’ll find a field named “Add Description” in the process of creating a plan. Here to mention, you can use this field to add an image and description regarding the book/books that you want to sell.

Further, you can make use of the multiple text formatting tools available as lists, quotes, links, headings etc to excellently showcase a description.

Strike the “Submit” button and an item will get appended to sell books online.

Remember, follow this step(6) to add as many books as you want to sell.

Step 7: Share your Checkout Page

Share Checkout Page on Social Media

After creating a plan, you will encounter a window as shown above. This window contains links and code to share what you just created (i.e, a plan).

  • Copy the checkout page URL given under “Plan Link” window and share it anywhere on social media, SMS, emails etc. to sell books online.
  • Also, you can use this same checkout page URL in your website’s buttons & anchor texts.
  • You’ll see two direct sharing options to share the created checkout page over Facebook & Twitter.

Step 8: Preview Checkout Page

Follow these steps to preview a checkout page:

(a) Click on the View Button

View Checkout Plan

(b) Take a Look at the Checkout Page

Checkout Page Preview to Sell Books Online

Step 9: Embed Checkout Page in Site & Sell Tea Online

Embed Checkout Page on Website

To embed the created checkout page on WordPress copy the code given under “Embed Plan Link” pane.

(a) Edit the Page & Paste the Copied Link

Paste_Link_in_Text_Editor

Paste the copied code on the text area of the post or page.

(b) Save & Publish the Checkout Page

Save_and_Publish

Click on the ‘Publish’ button of the page/post. The checkout page will get embedded on your website’s page/post. You can visit this page by going onto its assigned URL.

(c) Check out the Final Look of your Checkout Page on WordPress Site

Checkout Page On Site to Sell Books Online

Step 10: Multiplan Checkout Page

Note: In case you want to sell multiple products via a single checkout page, you create a multi-plan checkout page otherwise skip this step.

(a) Click on Add Mutiplan Checkout

Multiplan_Checkout

(b) Add Plans to Sell Multiple Book Products from Single Checkout Page

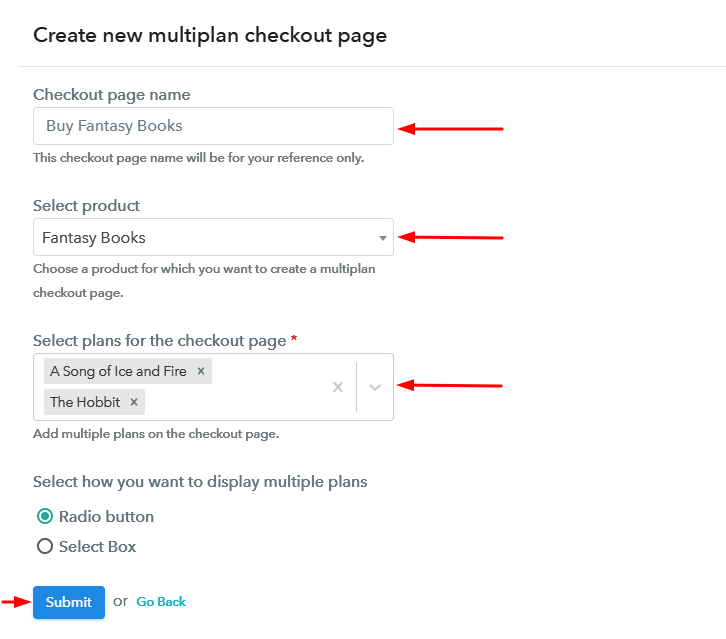
Create Multiplan Checkout to Sell Books Online

(c) Take a Look at the Checkout Page:

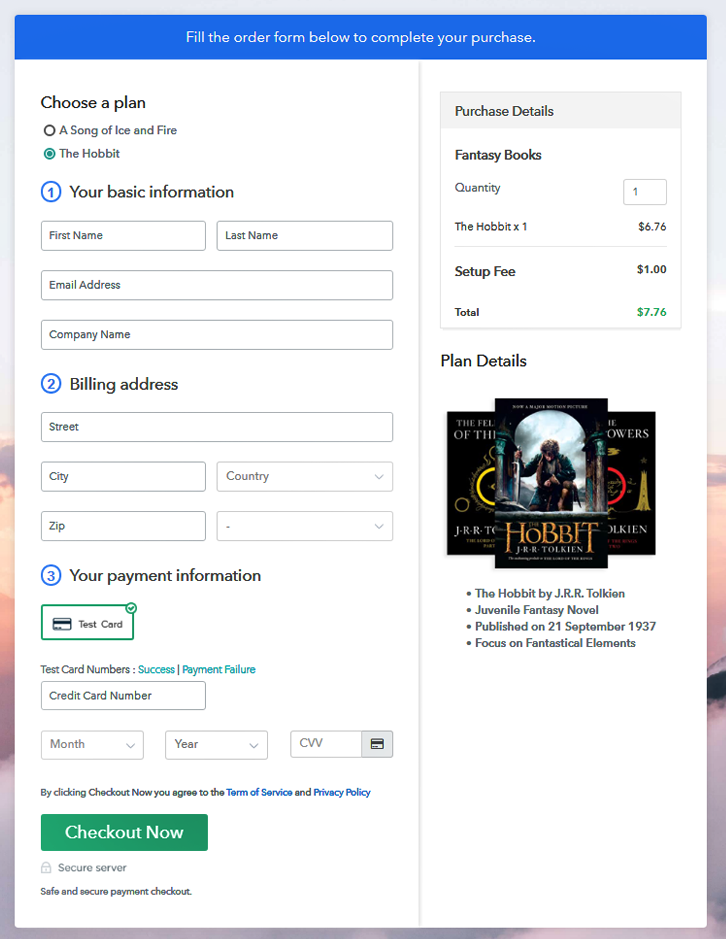
Multiplan Checkout Page to Sell Books Online

Preview Checkout Page

Wrapping Up

Starting a books business online is an affordable way to break into the books industry. This service can help you join the ranks of books business owners in mere weeks. It not only takes care of the management but also let you accept payments securely with multiple gateways such as PayPal, Stripe, Razorpay, Authorize.net etc.

Hope this was helpful. Good Luck! with your business and drop a comment below as your feedback over this.

You May Also Like To Read