How to Sell Car Covers Online | Step by Step (Free Method)

How to Sell Car Covers Online

Ideal For: All the car cover manufacturers, car cover sellers, retail car cover shop owners, and other merchants can use this method to take their car covers selling business online.

How to Sell Car Covers Online

Why Choose this Method To Sell Car Covers Online?

Unlike any other solution, this method allows you to:

  • List and sell your car covers for FREE. Absolutely no payment required.
  • No need to pay commission on any of your sale.
  • Multiple payment options like PayPal, Credit Card, etc to collect payment from a single place.
  • Sell one time or recurring subscriptions of your car covers.
  • Collect payments & sell products in any currency as per your requirement.
  • Give discounts on your products by offering special coupon codes.
  • Add sales commission agents to help you in selling car covers online.

Get Pabbly Subscription Billing for Free

People search for car covers online as there is a great availability with minimum efforts. And you must be searching for some way to sell car covers online.

Well, there is this service named Pabbly Subscription Billing which can help you start car covers business online in just a few minutes. The process of creating checkout pages is discussed in this article, these checkout pages allow you to showcase your product and accept payments through it.

There are other peculiarities of using this service. They are:

  • You can manage each and every product at one place
  • Sell unlimited car covers by creating unlimited products & plans
  • Accept online as well as offline payments
  • Keep a record of all transactions
  • Offer coupons and discounts to the customers
  • Share checkout pages anywhere to sell car covers globally
  • Embed payment checkout pages on websites
    And much more…

Final View of Checkout Page For Your Car Covers Selling Business

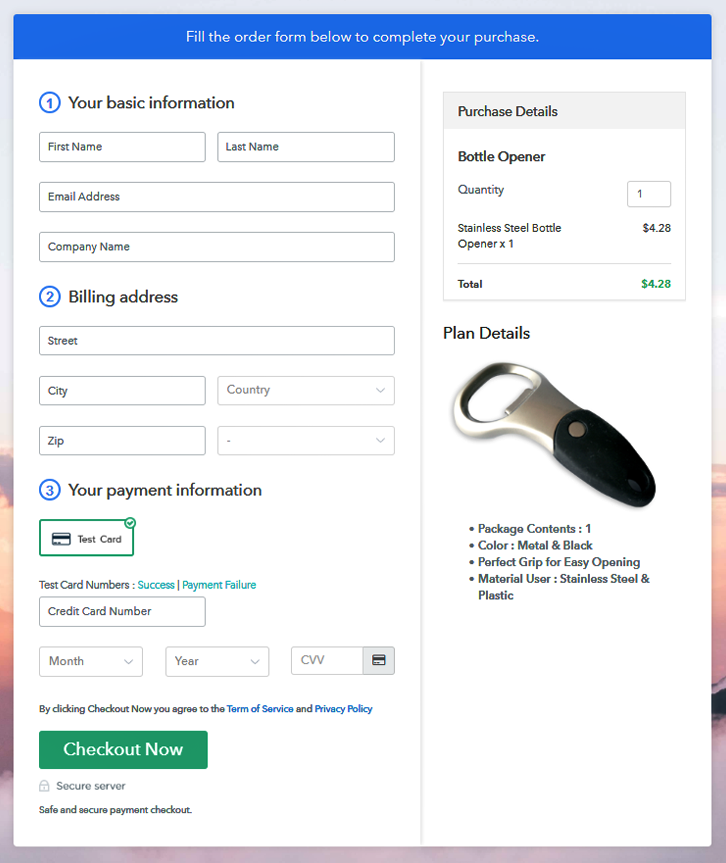
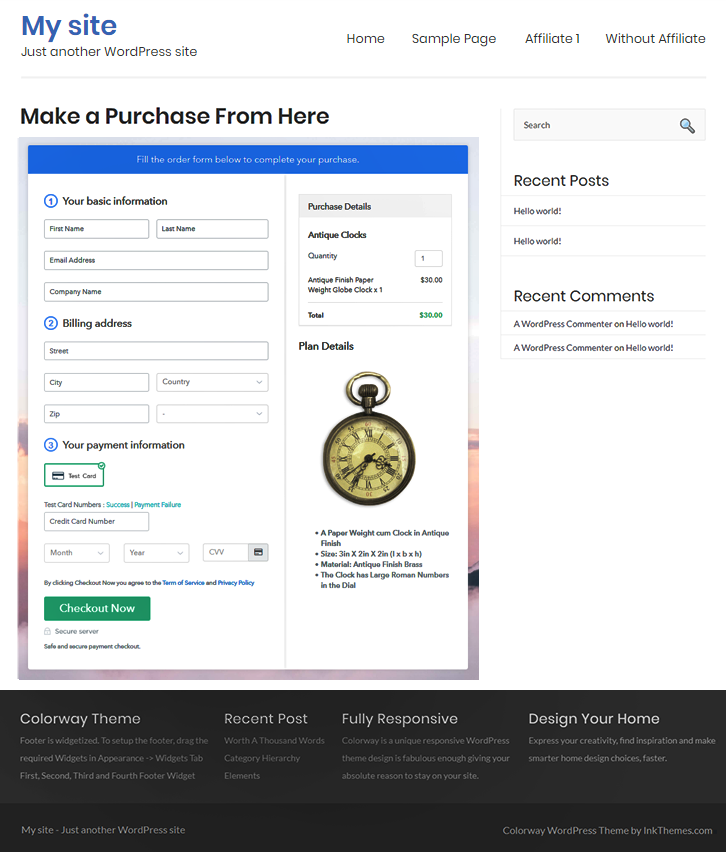
Checkout Page Preview to Sell Car Covers Online

Preview Checkout Page

Step 1: Log in to Pabbly Subscription Billing

Signup

You can initiate the process to sell car covers online by visiting Pabbly Subscription Billing. On the website locate the button to ‘Sign Up Free‘ and click it. You’ll be redirected to a sign-up page, here either use your Google ID to directly Sign Up or Sign up manually by filling out the details asked.

Sign Up For Free!

Step 2: Select Subscription Billing

Access Subscription Billing

Step 3: Account Setup

Setup Account

In the above-shown window fill out the company name, preferred currency, and a contact number.

Step 4: Connect Payment Gateways & Start Car Covers Selling Busines Online

Connect Payment Gateway

Next step is making the system able for accepting payments to sell car covers online. For this, we’ll integrate a reliable payment gateway amongst the following options. You can also follow the step by step integration guide linked. Here in this blog, I’m enabling the test payment gateway for now.

Step 5: Add Product For Your Car Covers

Add Product

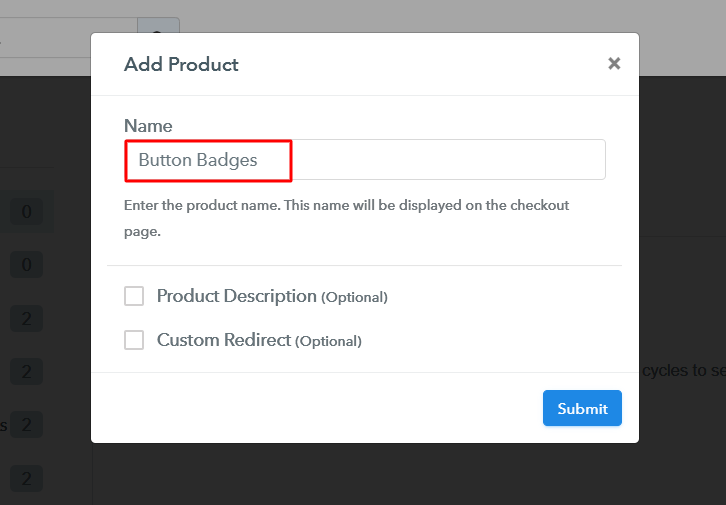
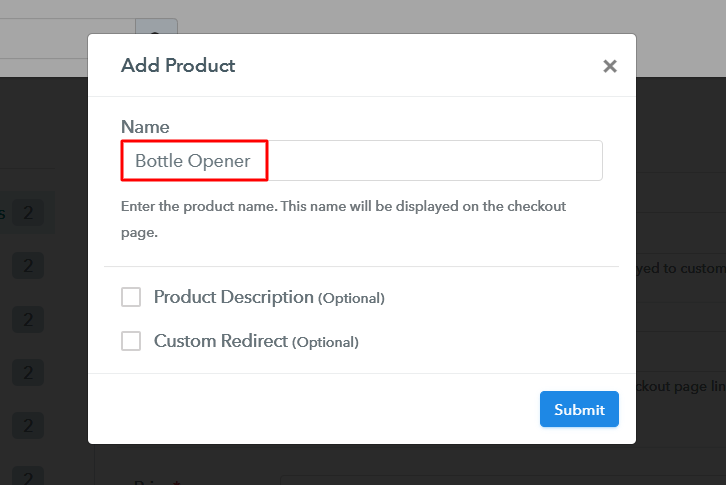
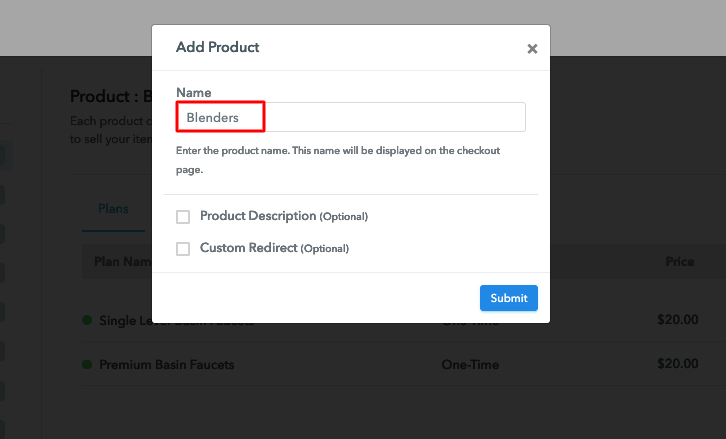
In this step, we’ll add product categories for selling car covers online. You can mention any car cover category as a product name such as plastic car covers, waterproof car covers etc.

Add Product to Sell Car Covers Online

Note: Here you can add all the products related to the similar category by creating plans for each of them.

Step 6: Add Plans 

Let’s rollout plans for different kinds of Car Covers available in your store.

(a) Select Add New Plan

Add Plan

(b) Specify the Plan & Pricing Details
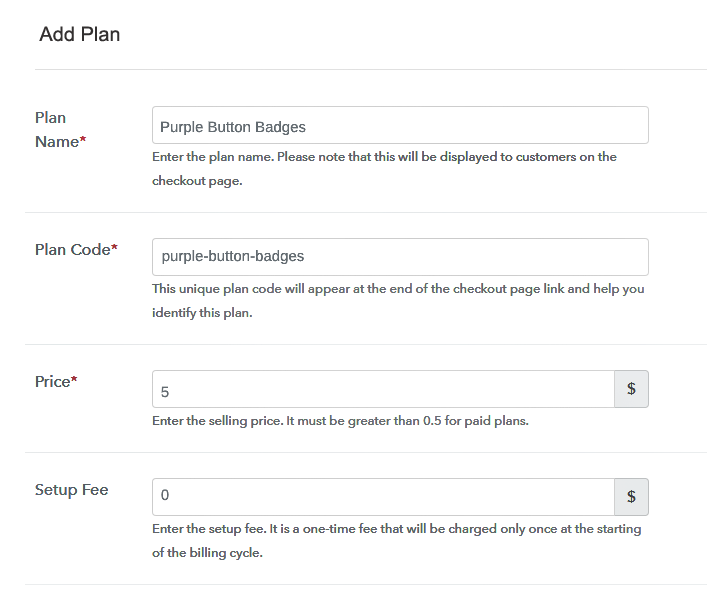
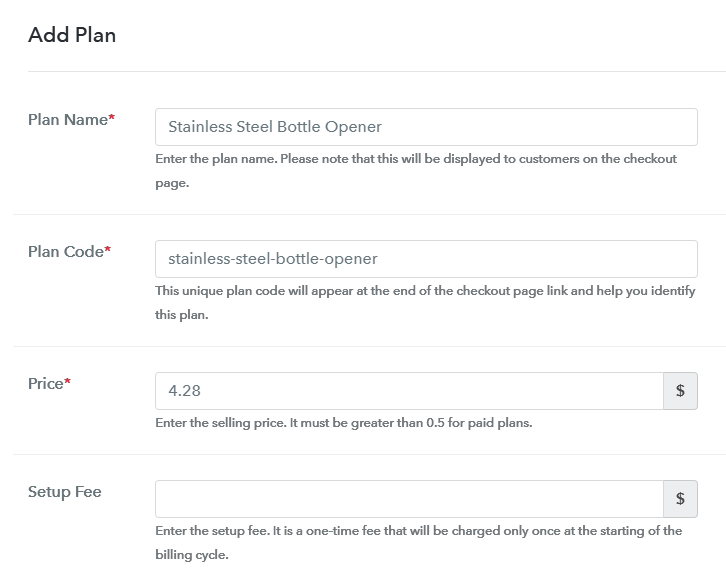
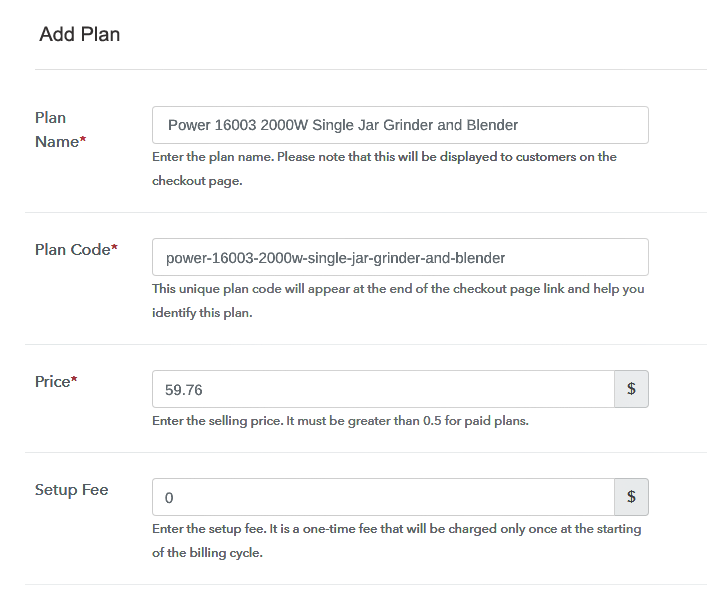
Add Plan to Sell Car Covers Online

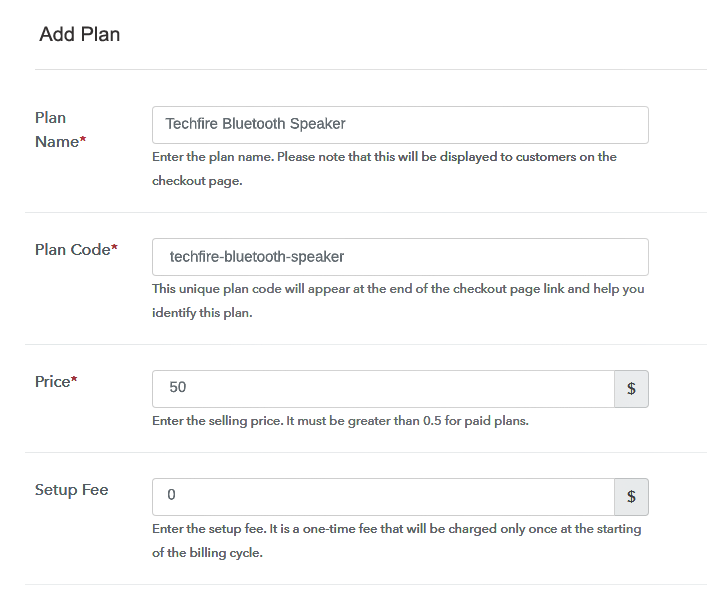
In the plan details page, fill out a car cover’s name, code, price, billing cycle and other related information.

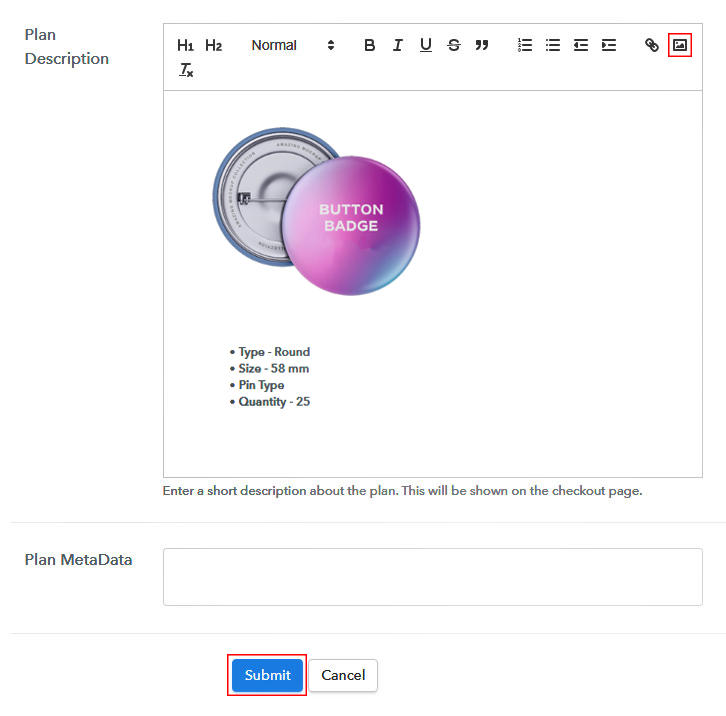
(c) Add Image & Description of Car Cover

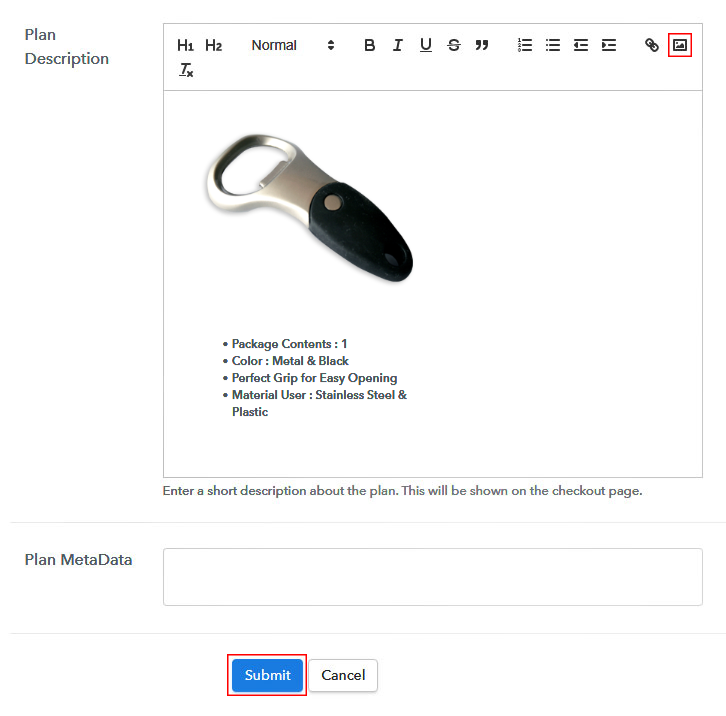
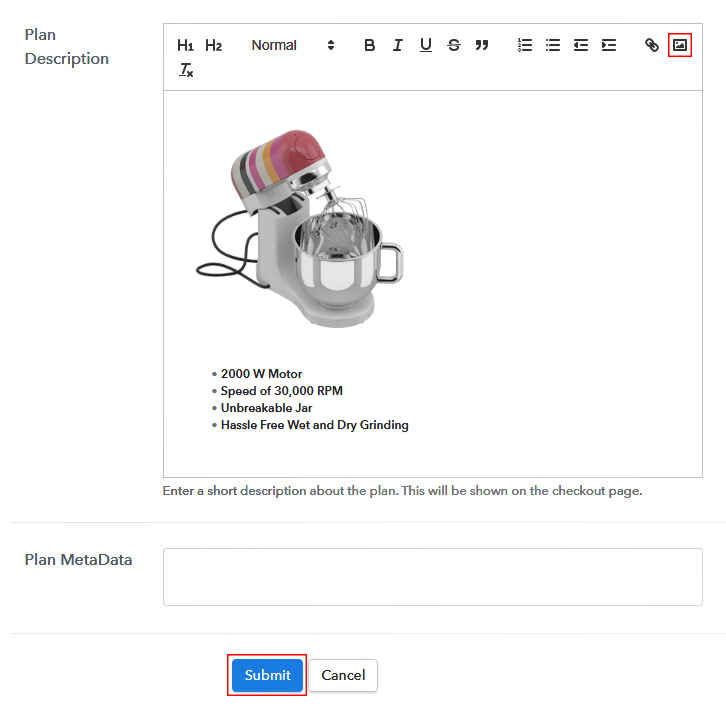
Add Image & Description to Sell Car Covers Online

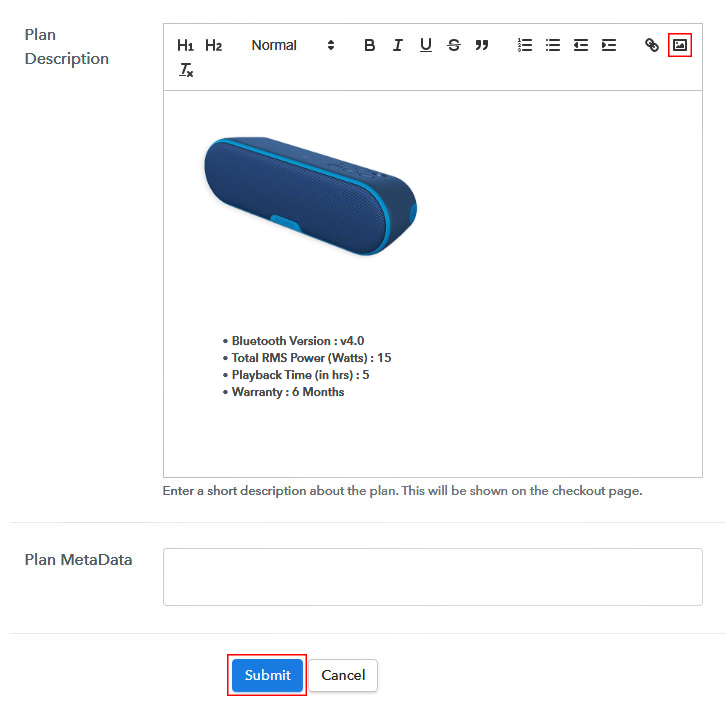
Put an image and description in the above-shown section.

Submit this page and a plan will be added to sell car covers online.

You can add other car covers in the same way.

Step 7: Share your Checkout Page

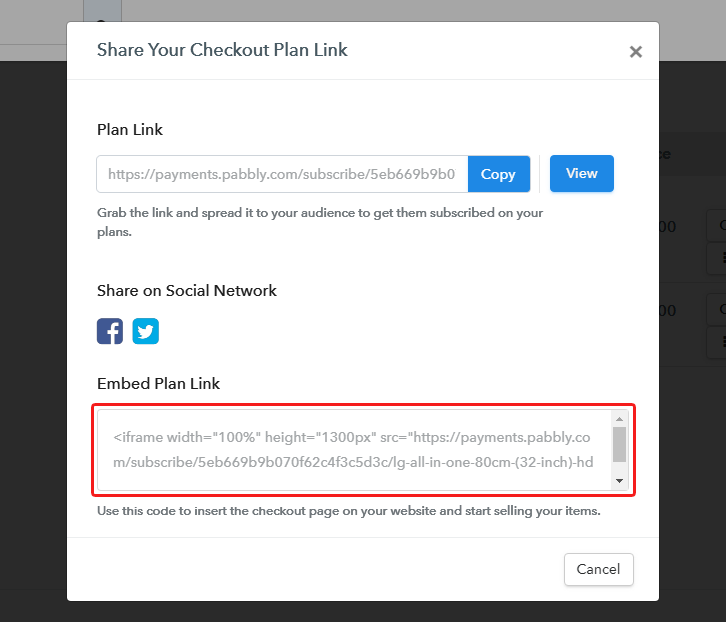
Share Checkout Page on Social Media

  • Directly click the Facebook and Twitter buttons to share the plan onto these platforms
  • Share the plan link with your customers on emails and SMS
  • Link the plan link in the site buttons and texts to redirect customers on the checkout page

Step 8: Preview Checkout Page

Follow up the recommended steps to preview the checkout page:

(a) Click on the View Button

View Checkout Plan

(b) Take a Look at the Checkout Page
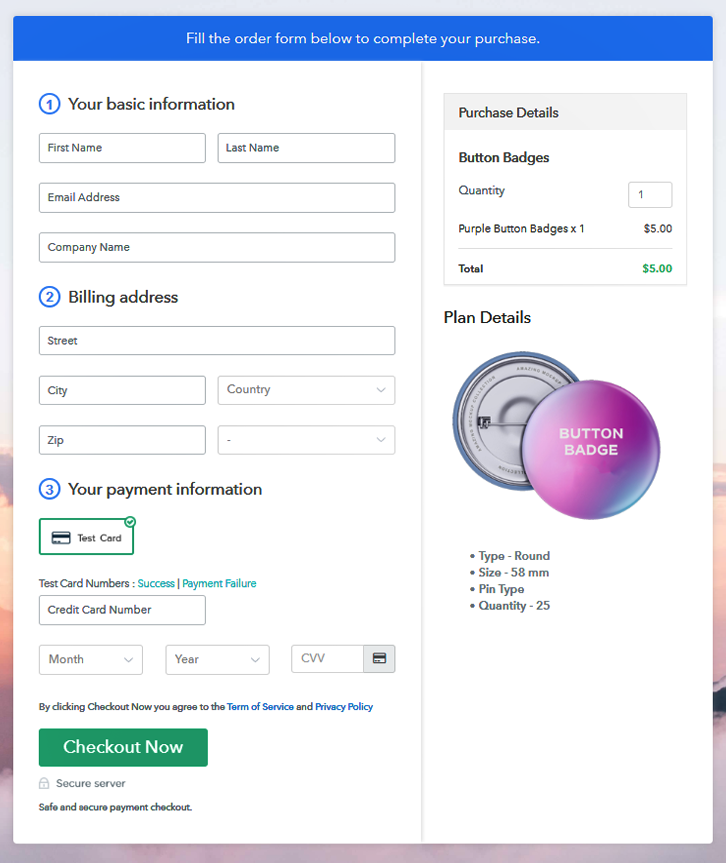
Checkout Page Preview to Sell Car Covers Online

Step 9: Embed Checkout Page in Site & Sell Car Cover Online

Embed Checkout Page on Website

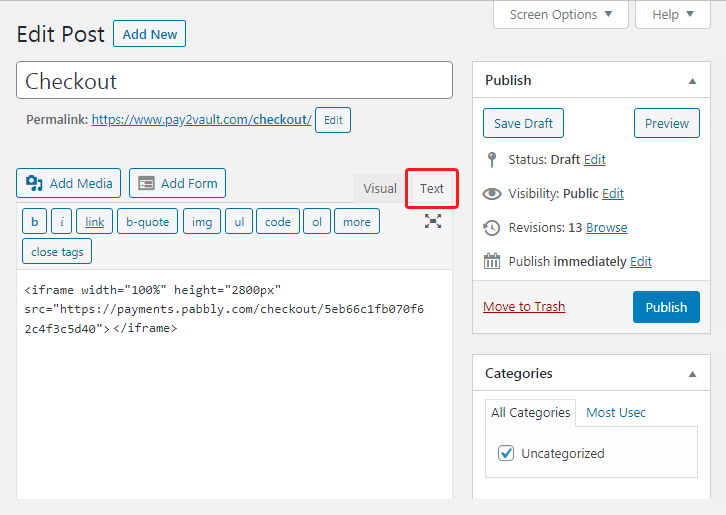
Just copy the link and add the checkout page to sell car covers online at any preferable place on your WordPress site.

(a) Edit the Page & Paste the Copied Link

Paste Link in Text Editor

Further, paste the plan link on a text editor of the WordPress dashboard.

(b) Save & Publish the Checkout Page

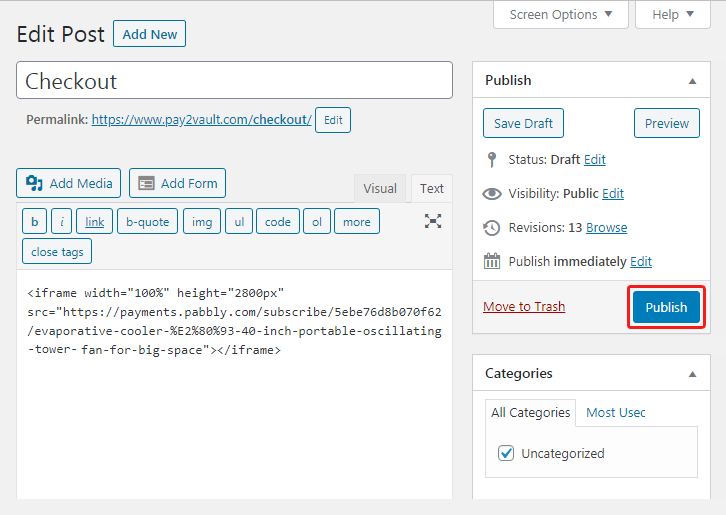
Save and Publish

Next, click the “Publish” button, after making changes.

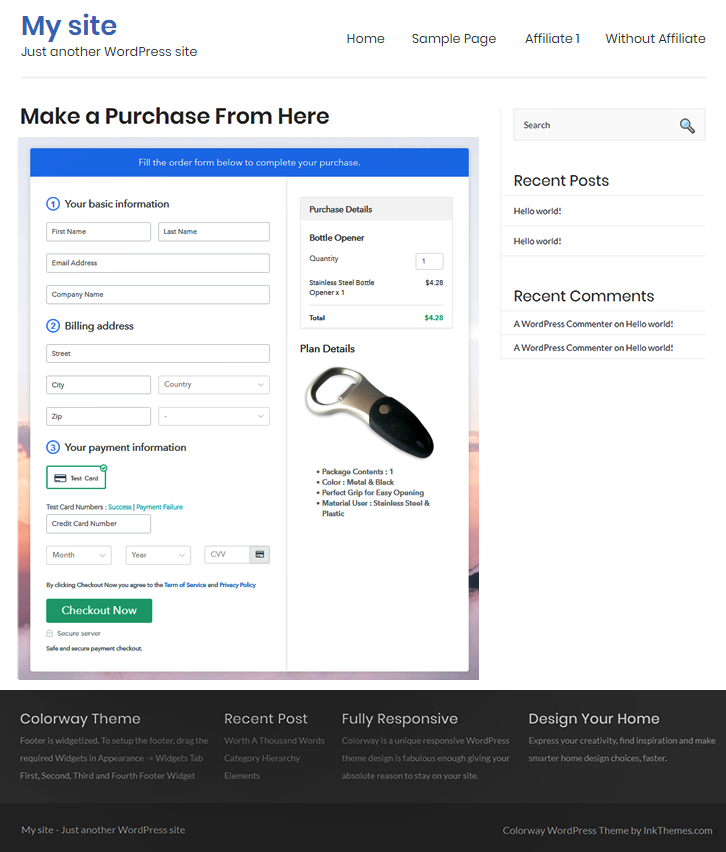
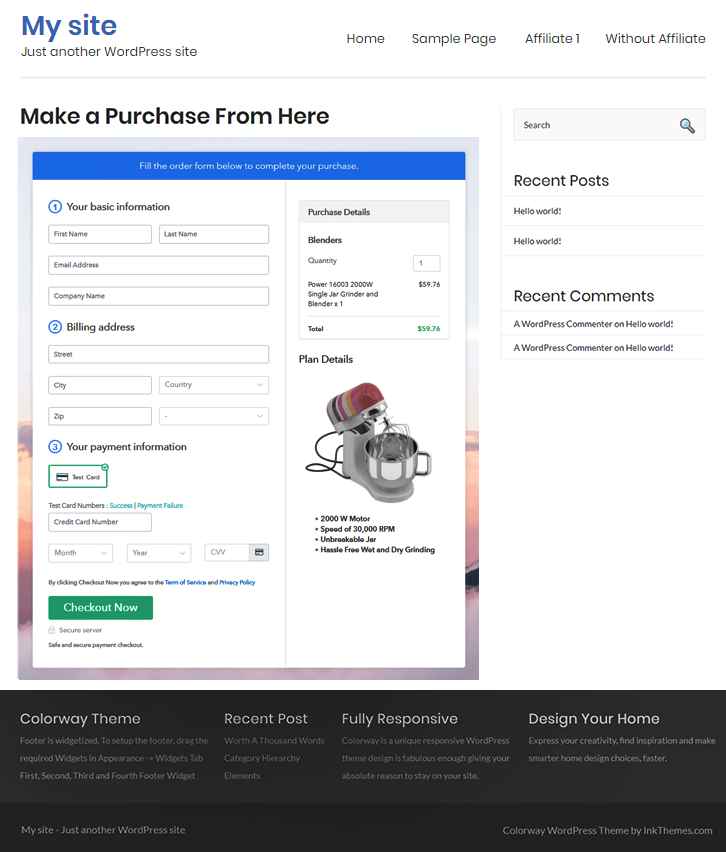
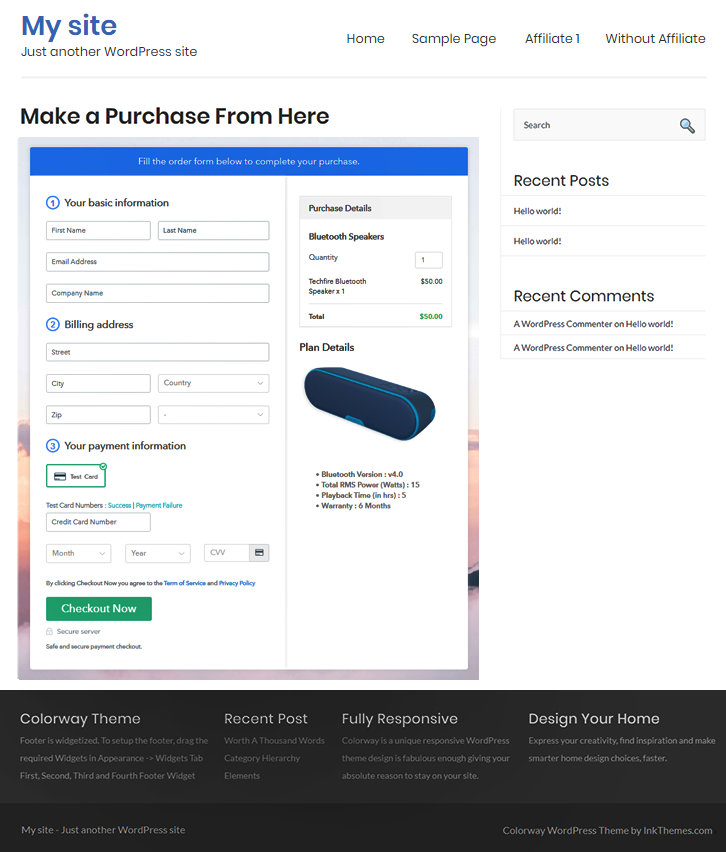
(c) Check out the Final Look of your Checkout Page on WordPress Site
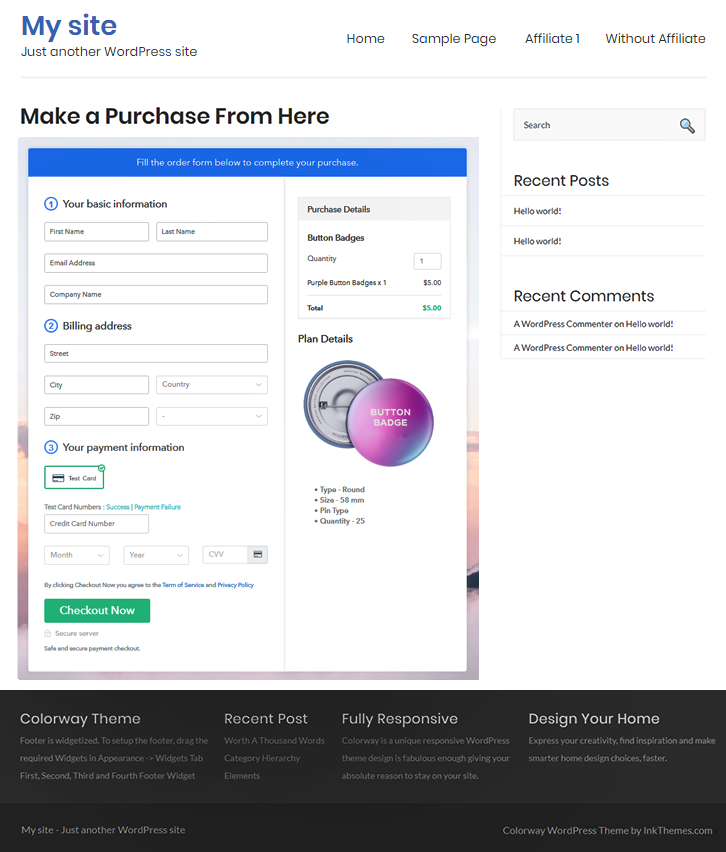
Checkout Page On Site to Sell Car Covers Online

Step 10: Multiplan Checkout Page

Note: In case you want to sell multiple products via a single checkout page, you can create a multi-plan checkout page otherwise skip this step.

(a) Click on Add Mutiplan Checkout

Multiplan Checkout

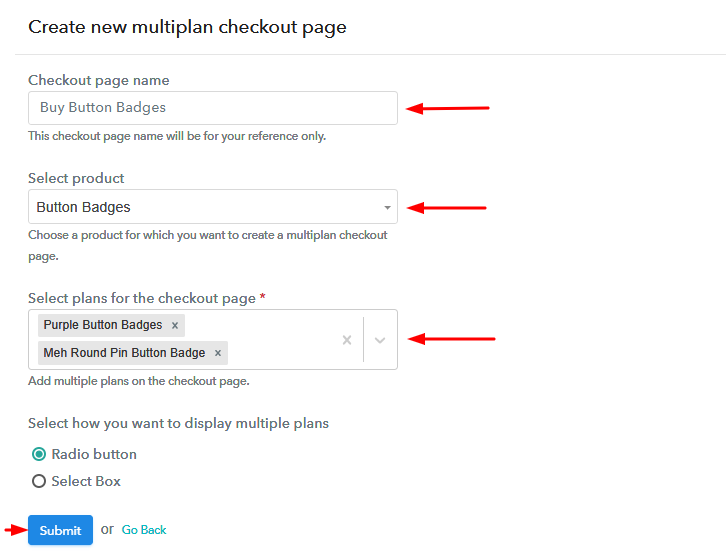
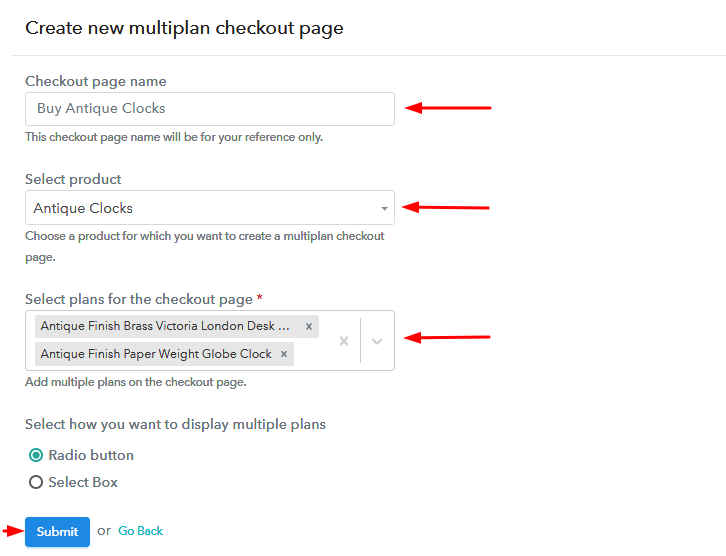
(b) Add Plans to Sell Multiple Car Covers from Single Checkout Page

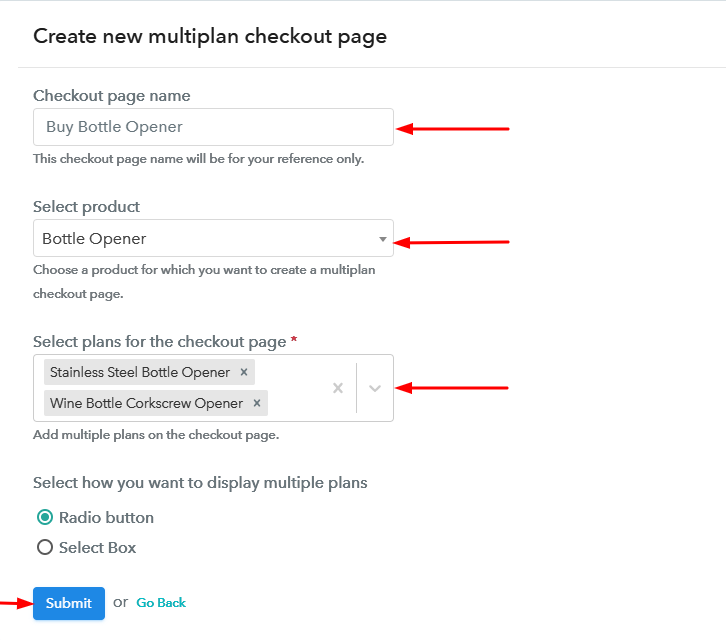
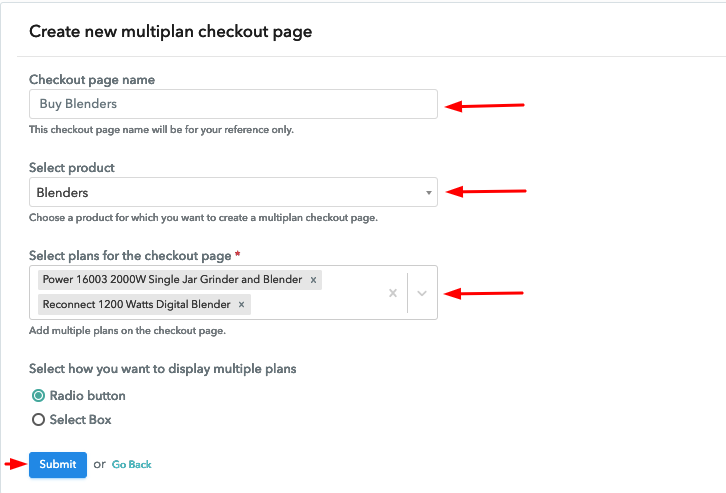
Create Multiplan Checkout to Sell Car Covers Online

(c) Take a Look at the Checkout Page
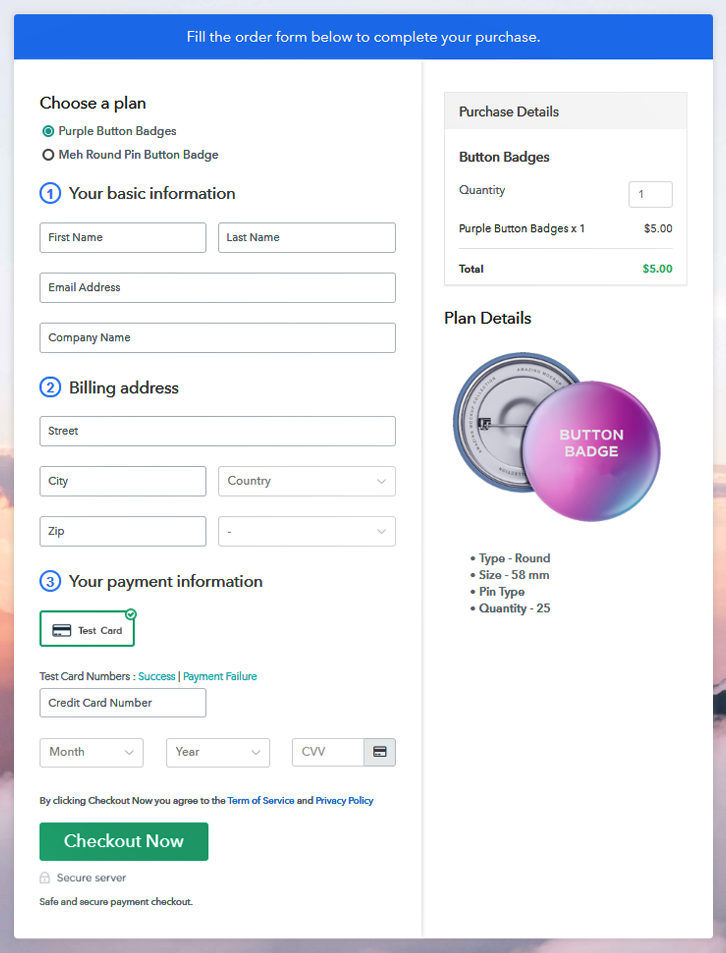
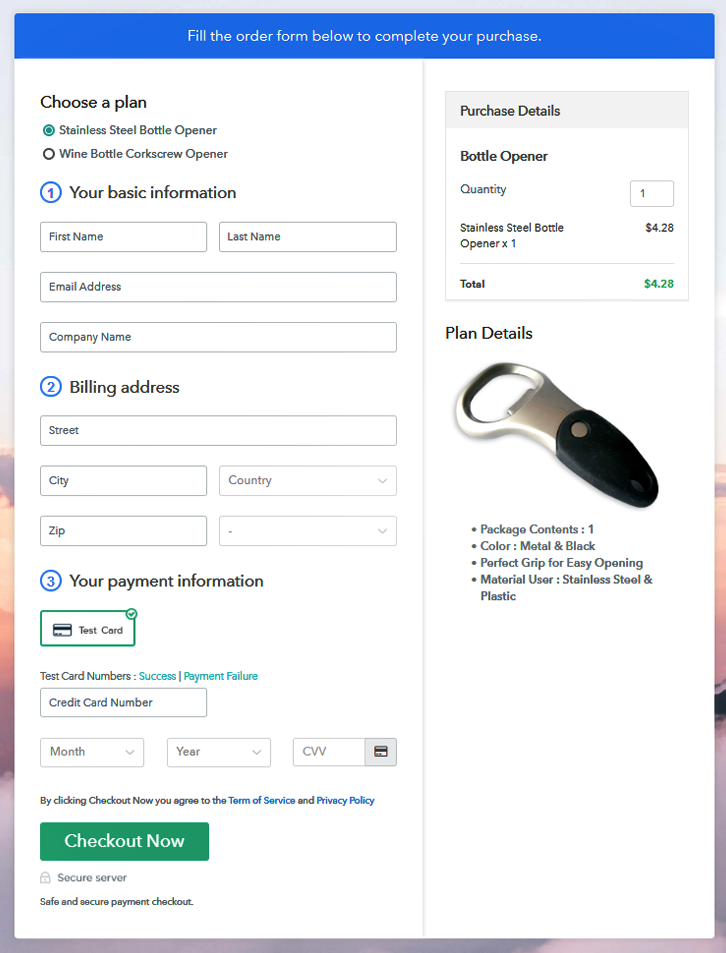
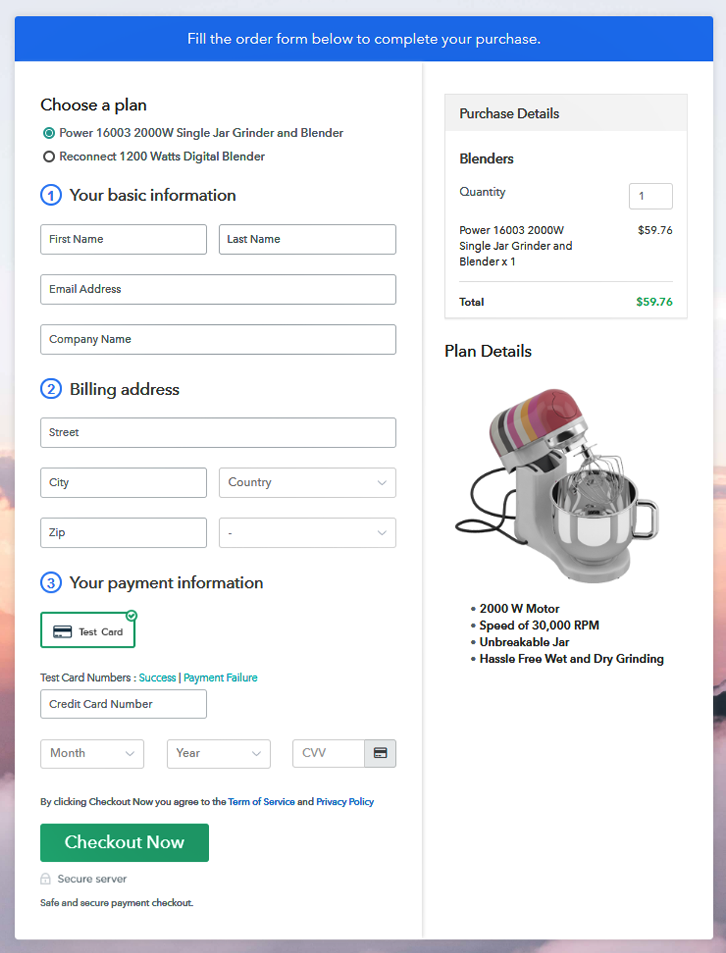
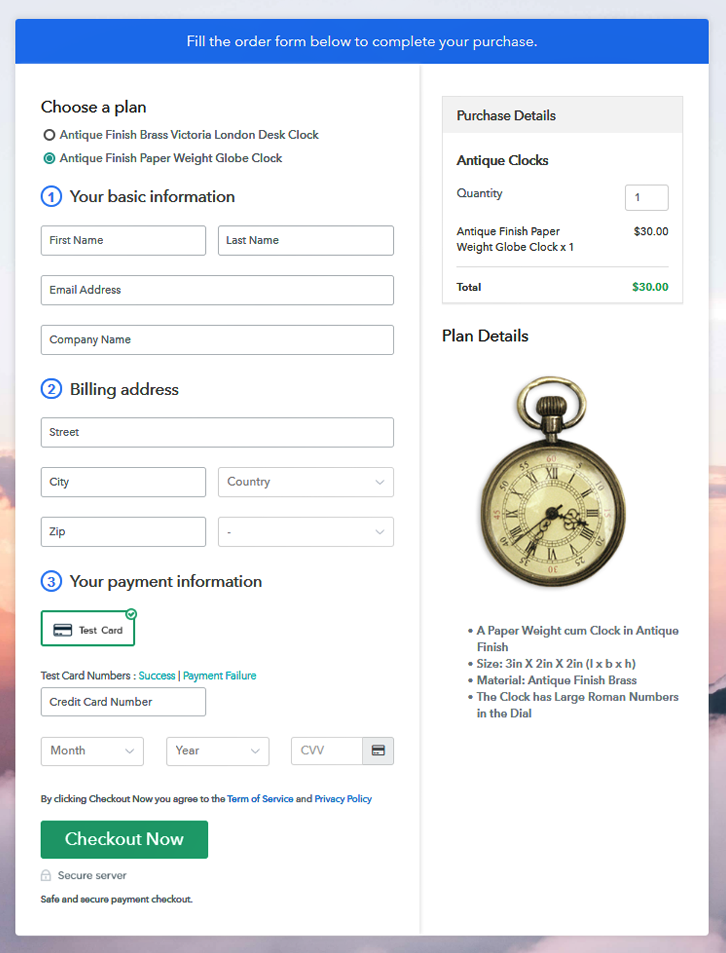
Multiplan Checkout Page to Sell Car Covers Online

Preview Checkout Page

Wrapping Up

This was my catch on How to sell car covers online? Checkout page creation process has many benefits regarding the management and selling of car covers online. Also, the billing and invoicing are automatic and it will help in gaining the customer’s trust as the receipt is sent instantly after purchase.

Most importantly you can choose amongst your preferred gateway and accept payments in multiple currencies.

Hope this article was helpful and drop your feedback in the comment section.

You May Also Like To Read –
How to Sell Carrots Online | Step by Step (Free Method)

How to Sell Carrots Online

Ideal For: All the carrot sellers, carrot makers, retail carrot selling business owners, and other carrot selling merchants can use this method to take their carrots selling business online.

How to Sell Carrots Online

Why Choose this Method To Sell Carrots Online?

Unlike any other solution, this method allows you to:

  • List and sell your carrots for FREE. Absolutely no payment required.
  • No need to pay commission on any of your sale.
  • Multiple payment options like PayPal, Credit Card, etc to collect payment from a single place.
  • Sell one time or recurring subscriptions of your carrots.
  • Collect payments & sell products in any currency as per your requirement.
  • Give discounts on your products by offering special coupon codes.
  • Add sales commission agents to help you in selling carrots online.

Get Pabbly Subscription Billing for Free

People love to buy fresh fruits and veggies online as there is a variety. So, if you are finding some way to sell carrots online then here is the easiest way.

Pabbly Subscription Billing can help you start carrot business online. Using this service you can create plan checkout pages and can share them with the customers to accept payments. Moreover, in a single process of creating checkout page, you will be doing the following in parallel for selling carrots online.

  • Creating a record for all the available items
  • Beautifully displaying carrots on a page
  • Preparing a system to accept offline/online payments
  • Using safe & secure payment method
  • Applying automatic taxes (if needed)
  • Offering discounts & coupons (optional)
  • Automatic billing & invoicing
  • Sharing carrots to sell almost everywhere on the globe
    And much more…

Final View of Checkout Page For Your Carrots Selling Business

Checkout Page Preview to Sell Carrots Online

Preview Checkout Page

Step 1: Log in to Pabbly Subscription Billing

Signup

To start carrots business online, initiate by going to Pabbly Subscription Billing website. On the website click on the button ‘Sign Up Free‘. And in the sign-up page, either sign-up directly using Google sign-up button or manually register yourself and sign-up.

Sign Up For Free!

Step 2: Select Subscription Billing

Access Subscription Billing

Step 3: Account Setup

Setup Account

Fill in the company name, currency, and contact details in the pop-up window shown.

Step 4: Connect Payment Gateways & Start Carrots Selling Busines Online

Connect Payment Gateway

Next, enable the system to accept payments by integrating a payment gateway. This gateway will help you accept safe & secure payments for selling carrots online. Besides, there are multiple options available as payment methods and their step by step integration guides are also mentioned below. For now, I’ll be using the test payment gateway option just to proceed further.

Step 5: Add Product For Your Carrots

Add Product

At this point, we can add categories of the product that we wanna set. This will be the product here. You can name it here as orange carrots, black carrots etc.

Add Product to Sell Carrots Online

Fill the details and then submit this.

Note: Here you can add all the products related to the similar category by creating plans for each of them.

Step 6: Add Plans 

Let’s rollout plans for different kinds of carrots available in your store.

(a) Select Add New Plan

Add Plan

(b) Specify the Plan & Pricing Details

Add Plan to Sell Carrots Online

In the plan details page write down the information like name, code, price, billing cycle etc to sell carrots online.

(c) Add Image & Description of Carrots Your Image Here

Add Image & Description to Sell Carrots Online

Write down the description of the carrots that you want to sell using lists, headings and other formatting options. Also, insert an image to show here.

Submit the page once you are done with the plan details and a plan will be added in the list.

Similarly, add other carrots to sell online

Step 7: Share your Checkout Page

Share Checkout Page on Social Media

  • Share the plan link to the customers via email or SMS to accept payments.
  • Directly share the plan link over Facebook & Twitter.
  • Also, you can link the plan link in the buttons and text of a website to redirect the customers on the checkout page.

Step 8: Preview Checkout Page

Follow up the recommended steps to preview the checkout page:

(a) Click on the View Button

View Checkout Plan

(b) Take a Look at the Checkout Page

Checkout Page Preview to Sell Carrots Online

Step 9: Embed Checkout Page in Site & Sell Carrot Online

Embed Checkout Page on Website

Just copy the link and add the checkout page to sell Carrot online at any preferable place on your WordPress site.

(a) Edit the Page & Paste the Copied Link

Paste_Link_in_Text_Editor

Further, paste the plan link on a text editor of the WordPress dashboard.

(b) Save & Publish the Checkout Page

Save_and_Publish

Next, click the “Publish” button, after making changes.

(c) Check out the Final Look of your Checkout Page on WordPress Site

Checkout Page On Site to Sell Carrots Online

Step 10: Multiplan Checkout Page

Note: In case you want to sell multiple products via a single checkout page, you can create a multi-plan checkout page otherwise skip this step.

(a) Click on Add Mutiplan Checkout

Multiplan Checkout

(b) Add Plans to Sell Multiple Carrot from Single Checkout Page

Create Multiplan Checkout to Sell Carrots Online

(c) Take a Look at the Checkout Page

Multiplan Checkout to Sell Carrots Online

Preview Checkout Page

Wrapping Up

This was all about ‘How to sell carrots online?’ fast and easily. Most importantly, you can see the benefits behind making checkout pages and managing all the related procedure for selling carrots online.

These checkout pages serve as a safe and secure way to accept payments for both you and your customers. Moreover, there are multiple currencies and payment gateways to choose from which add up more flexibility.

You May Also Like To Read –
How to Sell Car Wheels Online | Step by Step (Free Method)

How to Sell Car Wheels Online

Ideal For: All the car wheel manufacturers, car wheel sellers, retail autoparts shop owners, car wheel suppliers, car wheel dealers and other merchants can use this method to take their car wheel selling business online.

How to Sell Car Wheels Online

Why Choose this Method To Sell Car Wheels Online?

Unlike any other solution, this method allows you to:

  • List and sell your car wheels for FREE. Absolutely no payment required.
  • No need to pay commission on any of your sales.
  • Multiple payment options like PayPal, Credit Card, etc to collect payment from a single place.
  • Sell one time or recurring subscriptions of your car wheels.
  • Collect payments & sell products in any currency as per your requirement.
  • Give discounts on your products by offering special coupon codes.
  • Add sales commission agents to help you in selling car wheels online.

Get Pabbly Subscription Billing for Free

“We don’t pray for love, we just pray for cars” lyrics of The Weekend matches with everybody’s emotions. For some, cars are just a vehicle and for some, it is the investment of life but in both cases wheels are important. Every now and then people look out for upgrade which involves updating car wheels too. So, if you have a business of car wheels, it is the best time to bring it online.

According to the Allied Market Research, the global automotive wheel market is predicted to attain $47,355.3 million by 2025, recording a CAGR of 5.7% from 2018 to 2025. The reason for the uprise is the demand of light-weighted wheels, technological advancements, and the use of carbon fiber. Considering all these, it would be suitable to start car wheels selling business online. Gladly, we have a software named Pabbly Subscription Billing that can make it happen.

The software allows you to create an astonishing checkout page for selling car wheels online. Some of its remarkable features involve:

  • List different car wheels in a single checkout page
  • Collect currency in both online and offline mode
  • Add taxation charges

Final View of Checkout Page For Your Car Wheels Selling Business

Checkout Page to Sell Car Wheels Online

Preview Checkout Page

Step 1: Log in to Pabbly Subscription Billing

Signup

Start the process for creating a checkout page for selling car wheels online by visiting the Pabbly Subscription Billing in your browser. Moreover, click on the “Sign up Free“ button. Moreover, either manually filled out the details or sign in using your Gmail account.

Sign Up For Free!

Step 2: Select Subscription Billing

Access Subscription Billing

Step 3: Account Setup

Setup Account

Furthermore, after clicking on the “Access Now” button of the software, a page will open with fields like company name, select currency, and phone number. Simply fill out those details to continue creating a checkout page for the car wheels.

Step 4: Connect Payment Gateways & Start Car Wheels Selling Business Online

Connect Payment Gateway

The following step is to gain knowledge about software payment procedures using a “Test Payment Gateway”. Here, we are continuing the checkout page process for the car wheels using a test payment gateway. Additionally, it is packed with various payment gateways like PayPal, Stripe, etc. Moreover, below we are stating the payment integration guides.

Step 5: Add Product For Your Car Wheels

Add Product

Additionally, add the name, which in our case is “Car Wheels”. Here you can specify the type like modern alloy wheels, chrome coated wheels, etc. Also, write a short description of the car wheels to seize the customer’s attention.

Add Product to Start Selling Car Wheels Online

Note: Here you can add all the products related to the similar category by creating plans for each of them.

Step 6: Add Plans 

Let’s unfold out plans for different kinds of car wheels available in your store.

(a) Select Add New Plan

Add Plan

(b) Specify the Plan & Pricing Details

Specify the Plan and Pricing to Sell Car Wheels Online

The next thing to do is fill all the details of the car wheels like plan name, code, price, set-up fee, and much more to continue.

(c) Add Image & Description of Car Wheels

Add Image & Description to Sell Car Wheels Online

Furthermore, it is necessary to write a brief description of the car wheels using bullets, images, etc, to bring inherent customers to the checkout page.

Next, click on the “Submit” button to add the car wheels on the checkout page.

Finally, you can add multiple plans and kinds of car wheels in your product list which you want to market online.

Step 7: Share your Checkout Page

Share Checkout Page on Social Media

  • Besides, share the checkout page of the car wheels on social media accounts like Facebook & Twitter to get the customer’s attention.
  • Plus, you can share the direct link of the car wheel’s checkout page with your customers via SMS or email marketing.
  • Additionally, embed the provided plan link of the car wheels in the buttons or any anchor text on your website.

Step 8: Preview Checkout Page

Follow up the recommended steps to preview the checkout page:

(a) Click on the View Button

View Checkout Plan

(b) Take a Look at the Checkout Page

Checkout Page to Sell Car Wheels Online

Step 9: Embed Checkout Page in Site & Sell Car Wheels Online

Embed Checkout Page on Website

Just copy the link and add the checkout page to sell car wheels online at any preferable place on your WordPress site.

(a) Edit the Page & Paste the Copied Link

Paste Link in Text Editor

Further, paste the plan link on a text editor of the WordPress dashboard.

(b) Save & Publish the Checkout Page

Save and Publish

Next, click the “Publish” button, after making changes.

(c) Check out the Final Look of your Checkout Page on WordPress Site

Final Look of your Checkout Page to Sell Car Wheels Online

Step 10: Multiplan Checkout Page

Note: In case you want to sell multiple products via a single checkout page, you can create a multi-plan checkout page otherwise skip this step.

(a) Click on Add Mutiplan Checkout

Multiplan Checkout

(b) Add Plans to Sell Multiple Car Wheels from Single Checkout Page

Add Multiple Products to Start Selling Car Wheels Online

(c) Take a Look at the Checkout Page

Multiplan Checkout Page to Sell Car Wheels Online

Preview Checkout Page

Wrapping Up

Alright! Every household owns a vehicle and every year there is an increase in vehicle production, so it’s not at all bad to start car wheels selling business online as it is the need of an hour. And, as you know starting any business using Pabbly Subscription Billing is easy. Just follow all the mentioned steps and you’re done.

Try out this software and let us know your reactions in the comments section.

You May Also Like To Read –
How to Sell Car Alarms Online | Step by Step (Free Method)

How to Sell Car Alarms Online

Ideal For: All the car alarm manufacturers, car alarm sellers, car alarm dealers, car alarm suppliers, retail autoparts shop owners, and other merchants can use this method to take their car alarm selling business online.

How to Sell Car Alarms Online

Why Choose this Method To Sell Car Alarms Online?

Unlike any other solution, this method allows you to:

  • List and sell your car alarms for FREE. Absolutely no payment required.
  • No need to pay commission on any of your sales.
  • Multiple payment options like PayPal, Credit Card, etc to collect payment from a single place.
  • Sell one time or recurring subscriptions of your car alarms.
  • Collect payments & sell products in any currency as per your requirement.
  • Give discounts on your products by offering special coupon codes.
  • Add sales commission agents to help you in selling car alarms online.

Get Pabbly Subscription Billing for Free

When comes to spending money on cars, humans generally don’t give a second thought. Owning a luxurious vehicle is the dream of everyone and protecting it from theft is the responsibility. That’s why car alarms were invented to provide the assurance that your vehicle is safe and guarded.

Keeping all these requirements in mind, manufacturers of car alarms started offering a different variety of alarms according to needs. So, if you have car alarm selling business, now is the time to take another step by start selling car alarms online.

Now the question must be popping in your head why so? Actually, according to the Markets And Markets report, the vehicle securing system business will attain 10.75 billion by 2021 and is projected to grow at a CAGR of 7.2% from 2016 to 2021. Considering all this it is the best time to start car alarms selling business online. Luckily, we have a software named Pabbly Subscription Billing that helps you to create an amazing checkout page for selling car alarms online.

Some of its remarkable features involve:

  • List different car alarms in a single checkout page
  • Offer unlimited discounts and coupon codes to customer
  • Create professional invoices using software

Final View of Checkout Page For Your Car Alarms Selling Business

Checkout Page to Sell Car Alarms Online

Preview Checkout Page

Step 1: Log in to Pabbly Subscription Billing

Signup

Start the process for creating a checkout page for selling car alarms online by visiting the Pabbly Subscription Billing in your browser. Further, click on the “Sign up Free“ button. Moreover, either manually filled out the details or sign in using your Gmail account.

Sign Up For Free!

Step 2: Select Subscription Billing

Access Subscription Billing

Step 3: Account Setup

Setup Account

Besides, after clicking on the “Access Now” button of the software, a page will open with fields like company name, select currency, and phone number. Simply fill out those details to continue creating a checkout page for car alarms.

Step 4: Connect Payment Gateways & Start Car Alarms Selling Business Online

Connect Payment Gateway

The subsequent step is to gain knowledge about software payment procedures using a “Test Payment Gateway”. Here, we are continuing the checkout page process for the car alarms using a test payment gateway. Additionally, it is packed with various payment gateways like PayPal, Stripe, etc. Moreover, below we are stating the payment integration guides.

Step 5: Add Product For Your Car Alarms

Add Product

Additionally, add the name, which in our case is “Car Alarms”. Here you can specify the type like silent car alarms, audible car alarms, etc. Also, write a short description of the car alarms to seize the client’s attention.

Add Product to Start Selling Car Alarms Online

Note: Here you can add all the products related to the similar category by creating plans for each of them.

Step 6: Add Plans 

Let’s rollout plans for different kinds of car alarms available in your store.

(a) Select Add New Plan

Add Plan

(b) Specify the Plan & Pricing Details

Specify the Plan and Pricing to Sell Car Alarms Online

The following thing to do is fill all the details of the car alarms like plan name, code, price, set-up fee, and much more to continue.

(c) Add Image & Description of Car Alarms

Add Image & Description to Sell Car Alarms Online

Moreover, it is necessary to write a brief description of car alarms using bullets, images, etc, to bring inherent customers to the checkout page.

Next, click on the “Submit” button to add the car alarms on the checkout page.

Ultimately, you can add multiple plans and kinds of car alarms in your product list which you want to sell online.

Step 7: Share your Checkout Page

Share Checkout Page on Social Media

  • Besides, share the checkout page of the car alarms on social media accounts like Facebook & Twitter to get the customer’s attention.
  • Plus, you can share the direct link of the car alarm’s checkout page with your customers via SMS or email marketing.
  • Additionally, embed the provided plan link of the car alarms in the buttons or any anchor text on your website.

Step 8: Preview Checkout Page

Follow up the recommended steps to preview the checkout page:

(a) Click on the View Button

View Checkout Plan

(b) Take a Look at the Checkout Page

Checkout Page to Sell Car Alarms Online

Step 9: Embed Checkout Page in Site & Sell Car Alarms Online

Embed Checkout Page on Website

Just copy the link and add the checkout page to sell car alarms online at any preferable place on your WordPress site.

(a) Edit the Page & Paste the Copied Link

Paste Link in Text Editor

Further, paste the plan link on a text editor of the WordPress dashboard.

(b) Save & Publish the Checkout Page

Save and Publish

Next, click the “Publish” button, after making changes.

(c) Check out the Final Look of your Checkout Page on WordPress Site

Final Look of your Checkout Page to Sell Car Alarms Online

Step 10: Multiplan Checkout Page

Note: In case you want to sell multiple products via a single checkout page, you can create a multi-plan checkout page otherwise skip this step.

(a) Click on Add Mutiplan Checkout

Multiplan Checkout

(b) Add Plans to Sell Multiple Car Alarms from Single Checkout Page

Add Multiple Products to Start Selling Car Alarms Online

(c) Take a Look at the Checkout Page

Multiplan Checkout Page to Sell Car Alarms Online

Preview Checkout Page

Wrapping Up

Whether you own an expensive vehicle or moderate one, keeping it safe is a necessity and that’s why car alarms selling business never goes down. With the help of Pabbly Subscription Billing, you can easily start car alarms selling business online. Just follow all the mentioned 10 steps and you’re done.

Try this software and knock us out with your queries.

You May Also Like To Read –
How to Sell Canoe Paddles Online | Step by Step (Free Method)

Ideal For: All the canoe paddle manufacturers, water sports shops, kayaking boats builders and other merchants can use this method to sell canoe paddles online.

How to Sell Canoe Paddles Online

Why Choose this Method To Sell Canoe Paddles Online?

Unlike any other solution, this method allows you to:

  • List and sell your canoe paddles for FREE. Absolutely no payment required.
  • No need to pay commission on any of your sale.
  • Multiple payment options like PayPal, Credit Card, etc to collect payment from a single place.
  • Sell one time or recurring subscriptions of your Canoe Paddles.
  • Collect payments & sell products in any currency as per your requirement.
  • Give discounts on your products by offering special coupon codes.
  • Add sales commission agents to help you in selling canoe paddles online.

Get Pabbly Subscription Billing for Free

Canoeing or Kayaking is a high adrenalin water sport and very popular in temperate regions like Canada, North America, Russia, UK, etc. According to Technavio, the global canoeing equipment industry is expected to grow at a healthy CAGR of 3.50% from 2017 to 2021.

But demands for brisk business are coming unconventional areas like Indonesia, Brazil, India as the regions in temperate areas have become highly saturated. And that is why many manufacturers are trying to sell canoe paddles online to meet these demands.

In this article, we will use an awesome software called  Pabbly Subscription Billing that lets you build a checkout page for selling canoe paddles online. Other major benefits of using this software are

  • List Unlimited Number of Canoe Paddles Online
  • Collect Payments in Offline/Online Modes
  • Track Revenues
  • Create Unlimited Coupons, Plans, Discounts, etc
  • Automatic Emails on Payment Failure/ Completion

So why wait, let’s get down to brass tacks to create your first checkout page to start canoe paddles selling business online.

Final View of Checkout Page For Your Canoe Paddles Selling Business

Checkout to Sell Canoe Paddles Online

Preview Checkout Page

Step 1: Log in to Pabbly Subscription Billing

Signup

First of all search is your browser for Pabbly Subscription Billing and here click on  “Sign up Free“. Now, sign in through your, Gmail account or you can fill in fields like name, email address and then press the “Sign Up” button.

Sign Up For Free!

Step 2: Select Subscription Billing

Access Subscription Billing

Step 3: Account Setup

Setup Account

Further, after clicking on the “Access Now” button of the software, a page will redirect with fields like company name, select currency, and phone number. Just fill out those details to continue creating a checkout page for a canoe paddle.

Step 4: Connect Payment Gateways & Start Canoe Paddle Selling Business Online

Connect Payment Gateway

Your customers have smooth payment transactions otherwise they might drop the payments midway. So, to prevent that from happening, Pabbly Subscription Billing provides a dummy payment gateway where try the entire payment experience of the customer in advance.

Payment gateways such as Razorpay, Stripe, and many more can be easily integrated using Pabbly Subscription Billing. There is an integration guide for each of them below this para. But I am going ahead to enable the test payment option to continue the process.

Step 5: Add Product For Your Canoe Paddles

Add Product

I am assuming that the payment gateway integration went well, so then let’s add the product. Below the “Enable Payments” segment there is the “Add your product” section click on it. This will generate a dialog box with a blue button “Add New Product”. Click on it.

You have to add the required product title, in this case, it is ‘canoe paddles’.

Add Product to Sell Canoe Paddles Online

Fill up the details and your product is created.

Note: Here you can add all the products related to the similar category by creating plans for each of them.

Step 6: Add Plans 

Let’s rollout plans for different kinds of canoe paddles available in your store.

(a) Select Add New Plan

Add Plan

(b) Specify the Plan & Pricing Details

Add Description to Sell Canoe Paddles Online

Here, in the plan page, you will fill in details like plan name, code, price, setup fees, etc. Scrolling down you will find different billing models like one-time payment, recurring, based on cycles, etc. Select your preferred billing model that suits your needs and yes you can change it anytime

(c) Add Image & Description of Canoe Paddles

Add Description to Sell Canoe Paddles Online

Take some stunning pictures of your paddles and upload it using the image button.

Now give some comprehensive information on canoe paddles like the material used, weight, fins,  oar diameter, etc in bullet points or numerical points. Then press the “Submit” button.

Also, using the same process, you can list more products.

Step 7: Share your Checkout Page

Share Checkout Page on Social Media

  • Share the checkout page of the canoe paddles on social media accounts like Facebook & Twitter to get the customer’s attention.
  • Moreover, you can share the direct link of the canoe paddles checkout page with your customers via SMS or email marketing.
  • Also, insert the link of the canoe paddles in the buttons or any anchor text on your website.

Step 8: Preview Checkout Page

Follow up the recommended steps to preview the checkout page:

(a) Click on the View Button

View Checkout Plan

(b) Take a Look at the Checkout Page

Checkout to Sell Canoe Paddles Online

Step 9: Embed Checkout Page in Site & Sell Canoe Paddles Online

Embed Checkout Page on Website

Just copy the link and add the checkout page to sell canoe paddles online at any preferable place on your WordPress site.

(a) Edit the Page & Paste the Copied Link

Paste_Link_in_Text_Editor

Further, paste the plan link on a text editor of the WordPress dashboard.

(b) Save & Publish the Checkout Page

Save_and_Publish

Next, click the “Publish” button, after making changes.

(c) Check out the Final Look of your Checkout Page on WordPress Site

Wordpress to Sell Canoe Paddles Online

Step 10: Multiplan Checkout Page

Note: In case you want to sell multiple products via a single checkout page, you can create a multi-plan checkout page otherwise skip this step.

(a) Click on Add Mutiplan Checkout

Multiplan Checkout

(b) Add Plans to Sell Multiple Canoe Paddles from Single Checkout Page

Multiplan to Sell Canoe Paddles Online

(c) Take a Look at the Checkout Page

Multiplan to Sell Canoe Paddles Online

Preview Checkout Page

Wrapping Up

Well, congratulations, because you finally made your first checkout page to sell canoe paddles online through Pabbly Subscription Billing. Now slowly but surely you will ace this software and its features to top the online market and do a brisk business. But initially, if you have any doubts please don’t be hesitant, ask us in the comment section below. We will be happy to indulge you. Thank You!!

You May Also Like To Read –
How to Sell Canned Food Online | Step by Step (Free Method)

How to Sell Canned Food Online

Ideal For: All the canned food stores, grocery stores, grocery shops, wholesale canned food suppliers, and other sellers can use this method to take their canned food selling business online.

How to Sell Canned Food Online

Why Choose this Method To Sell Canned Food Online?

Unlike any other solution, this method allows you to:

  • List and sell your canned food for FREE. Absolutely no payment required.
  • No need to pay commission on any of your sale.
  • Multiple payment options like PayPal, Credit Card, etc to collect payment from a single place.
  • Sell one time or recurring subscriptions of your canned food.
  • Collect payments & sell products in any currency as per your requirement.
  • Give discounts on your products by offering special coupon codes.
  • Add sales commission agents to help you in selling canned food online.

Get Pabbly Subscription Billing for Free

Do you make amazing canned food like salsa, jam, etc and your friends and family are always telling you to make a business out of it? Or do you own a grocery store and sell canned food and want to take it to the next level then why not sell your healthy and tasty canned food online.

By taking your canned food selling business, you can increase your customer base which will consequently increase your revenue. It will become so much easier for your customers to order their favorite canned food online. To start your online business there is an amazing service available and that is Pabbly Subscription Billing which offers you a completely free platform. You just have to create checkout pages for your canned food and share their links on social media so that people can buy canned food directly through those links.

Other than checkout pages, you can also access its other great features for your online business:

  • Add and sell unlimited canned food online
  • Collect one-time or recurring payment for your canned food
  • Integrate it with your website
  • Share invoices of canned food automatically with your customers

Final View of Checkout Page For Your Canned Food Selling Business

Preview Checkout Page

Preview Checkout Page

Step 1: Log in to Pabbly Subscription Billing

Signup

Now in the first step, we have to visit Pabbly Subscription Billing website and then click on the “Signup Free” button. Once you click the button, you will reach to the signup page, where you can create your account automatically via Gmail or enter your details manually.

Sign Up For Free!

Step 2: Select Subscription Billing

Access Subscription Billing

Step 3: Account Setup

Setup Account

After finishing the signup process, now you have to fill up your company details like company name, currency, phone number in the dialogue box.

Step 4: Connect Payment Gateways & Start Canned Food Selling Busines Online

Connect Payment Gateway

In this step as you can see, we have described the payment collection process by enabling the “Test Payment” mode. You can also try and use the test payment mode before proceeding further. Later, you can connect with any of the payment gateways such as PayPal, Stripe, etc that you prefer. The whole payment gateways integration guide is given below.

Step 5: Add Product For Your Canned Food

Add Product

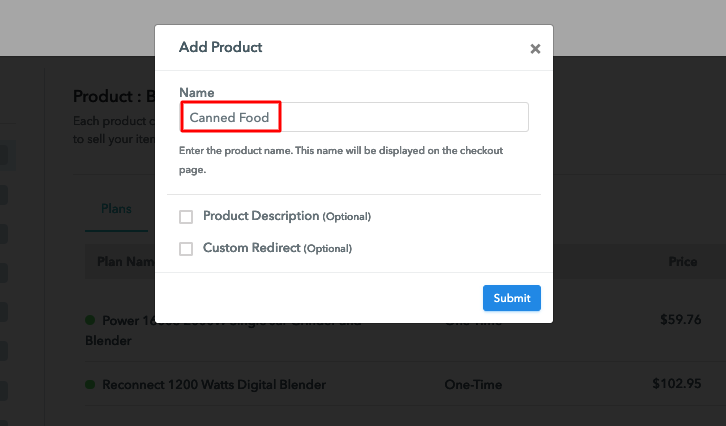
Moving on this step, here you have to add your first product. You can add canned food of different varieties like canned tomatoes, canned clams, etc, and add all the other canned food in the same product section by creating different plans.

Sell Canned Food Online Product Name

Note: Here you can add all the products related to the similar category by creating plans for each of them.

Step 6: Add Plans 

Let’s rollout plans for different kinds of canned food available in your store.

(a) Select Add New Plan

Add Plan

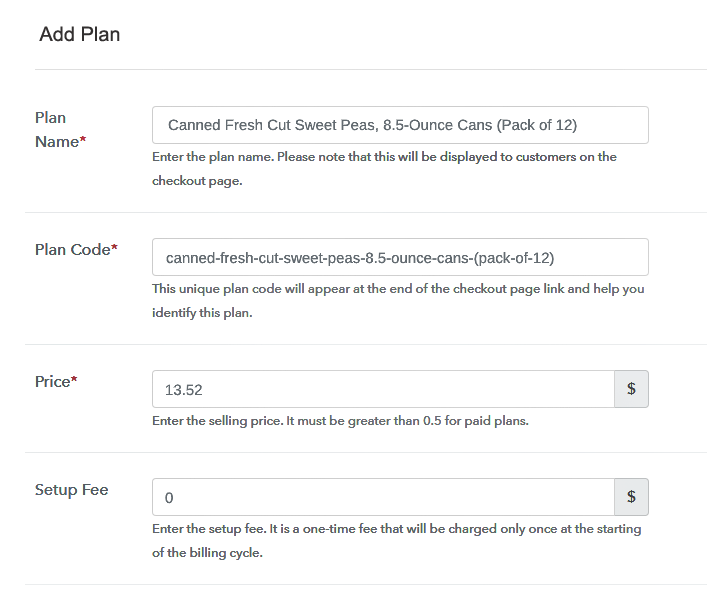
(b) Specify the Plan & Pricing Details

Sell Canned Food Online Details

After clicking the “Add New Plan” button, the plan page will open, where you have to add details like plan name, billing cycle, code, price, etc.

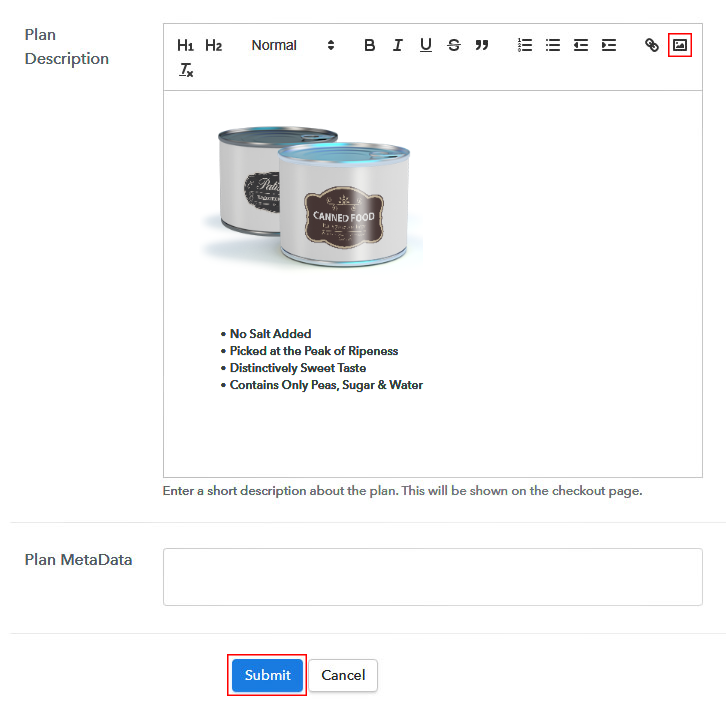
(c) Add Image & Description of Canned Food

Sell Canned Food Online Image

Also, you can describe the canned food that you want to sell along with the product images, links, etc, and click on the submit button to add your plan. You can create more plans for all the canned food similarly.

Step 7: Share your Checkout Page

Share Checkout Page on Social Media

  • Increase your sales by sharing your checkout page on social media like Facebook and Twitter.
  • Also, copy the mentioned link and send it to your customers through SMS or emails directly.
  • Embed your plan link to your website so that your customers can be landed on the checkout page directly.

Step 8: Preview Checkout Page

Follow up the recommended steps to preview the checkout page:

(a) Click on the View Button

View Checkout Plan

(b) Take a Look at the Checkout Page

Preview Checkout Page

Step 9: Embed Checkout Page in Site & Sell Canned Food

Embed Checkout Page on Website

Just copy the link and add the checkout page to sell canned food online at any preferable place on your WordPress site.

(a) Edit the Page & Paste the Copied Link

Paste Link in Text Editor

Further, paste the plan link on a text editor of the WordPress dashboard.

(b) Save & Publish the Checkout Page

Save and Publish

Next, click the “Publish” button, after making changes.

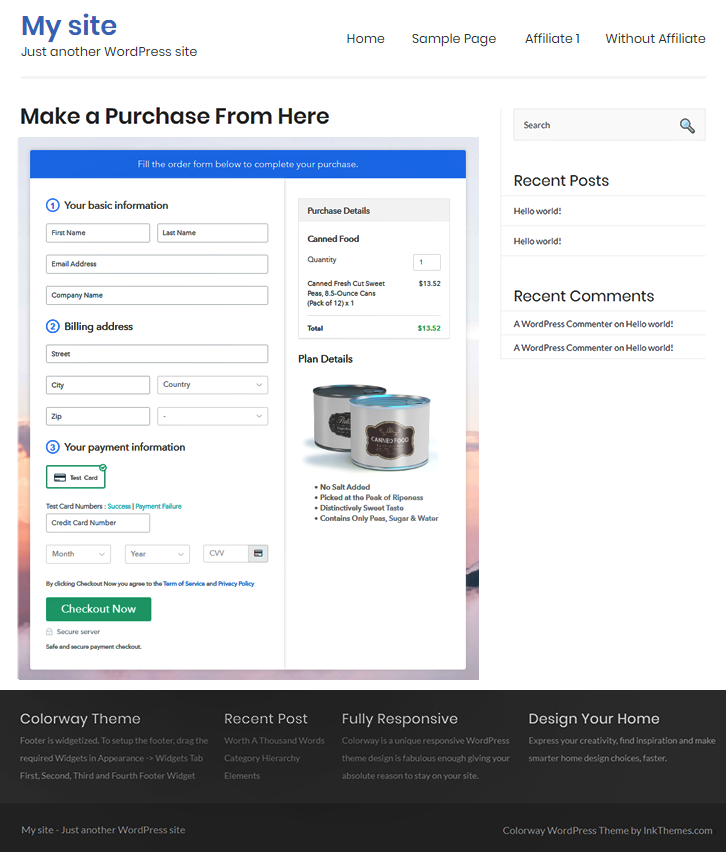
(c) Check out the Final Look of your Checkout Page on WordPress Site

Sell Canned Food Online Website

Step 10: Multiplan Checkout Page

Note: In case you want to sell multiple products via a single checkout page, you can create a multi-plan checkout page otherwise skip this step.

(a) Click on Add Mutiplan Checkout

Multiplan Checkout

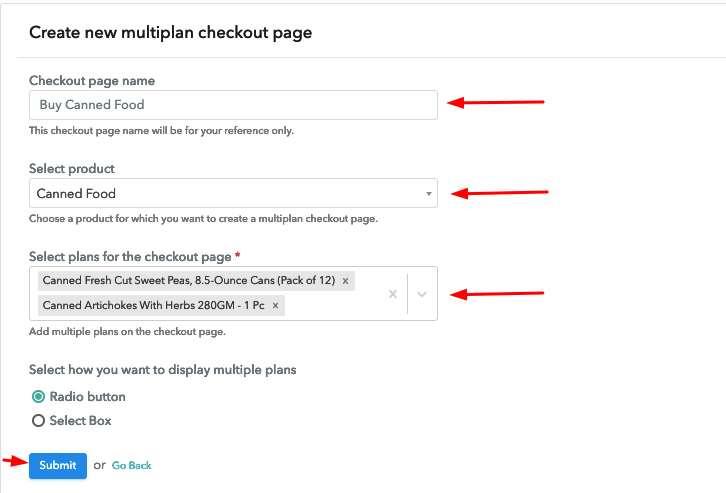
(b) Add Plans to Sell Multiple Canned Food from Single Checkout Page

Sell Canned Food Online Multi Details

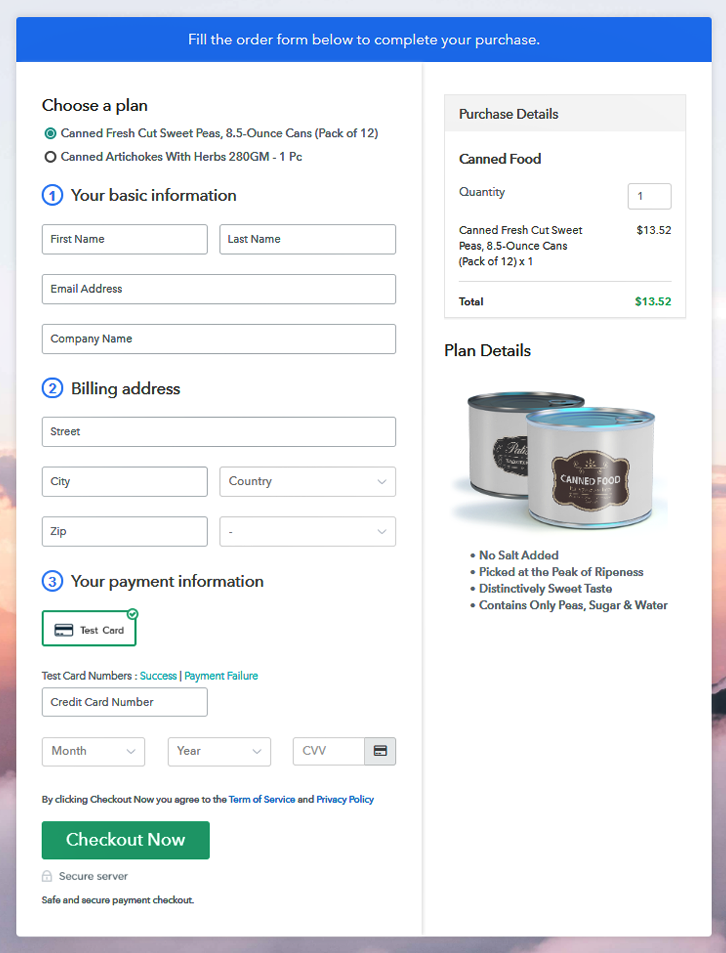
(c) Take a Look at the Checkout Page

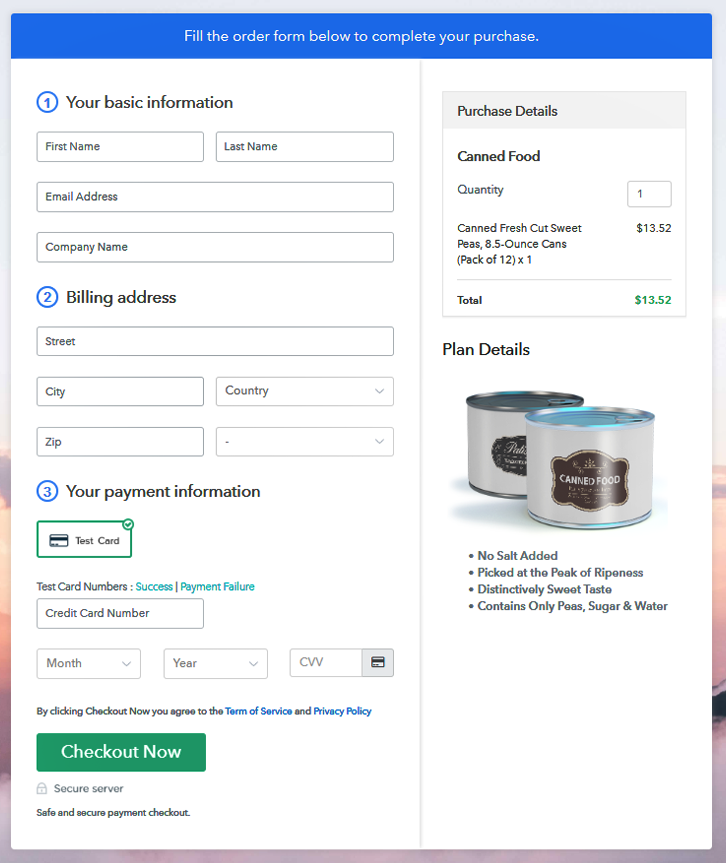
Sell Canned Food Online Multi Checkout

Preview Checkout Page

Wrapping Up

In conclusion, your worries end here with Pabbly Subscription Billing. With this software, you can easily sell canned food online, share invoices, collect payments and so much more. It is easier than ever before to start your own online business for free. So, signup and start selling canned food online today. For further queries or suggestions, please write to us.

You May Also Like To Read –
How to Sell Vitamins and Supplements Online | Step by Step (Free Method)

Ideal For: All the vitamins & supplements centres, dietary supplements websites, protein manufaturers, pharmaceuticals and other merchants can use this method to sell vitamins and supplements online.

How to Sell Vitamins and Supplements Online

Why Choose this Method for Selling Over any Other Solution?

Unlike any other solution, this method allows you to:

  • List and sell vitamins and supplements for FREE. Absolutely no payment required.
  • No commission deducted on sales.
  • Collect payment through multiple payment modes from a single checkout page.
  • Sell one time or recurring subscriptions of your vitamins and supplements.
  • Sell and collect payment in any currency as per your requirement.
  • Give discounts on your products by offering special coupon codes.
  • Add sales commission agents to help you in selling your vitamins and supplements.

Get Pabbly Subscription Billing for Free

The dietary supplements industry brings in massive $140.1 billion as revenues and currently growing at 5.5 % CAGR to reach $230 billion by 2025. According to the National Institute of Health, more than 50% of adult Americans take in some kind of supplements. And to tap into this vast market many big pharmaceuticals are planning to sell vitamins and supplements online to reach more consumers.

Why would you like to sell vitamins and supplements online?

Other than reaching a higher audience and leveraging better prices for products there are many more benefits of selling vitamins and supplements online. These include a 24×7 automated online shop, better revenue management, zero middleman charges, no rent or utility cost, etc. But the real question is how will you sell vitamins and supplements online in the first place?

That is why here I would like to recommend an online tool called Pabbly Subscription Billing that can list an unlimited number of products and create unlimited plans. Also, you can bill your customers in both offline/online mode using awesome checkout pages. Some other benefits are:

  • Create Unlimited Coupons, Discounts
  • Track Revenues
  • Recieve Auto Email Alerts on Payment Completion/ Failure
  • Automatic Card Reattempts on Decline
  • Import/Export Customer Data

Now that you have been mesmerized by its features, let’s create an incredible checkout page to start selling vitamins and supplements business online.

Note: In no way, Pabbly Subscription Billing promotes selling vitamins and supplements online that are unapproved by FDA or equivalent regulatory authorities of different countries.

This is How your Checkout Page will Look Like After Creation

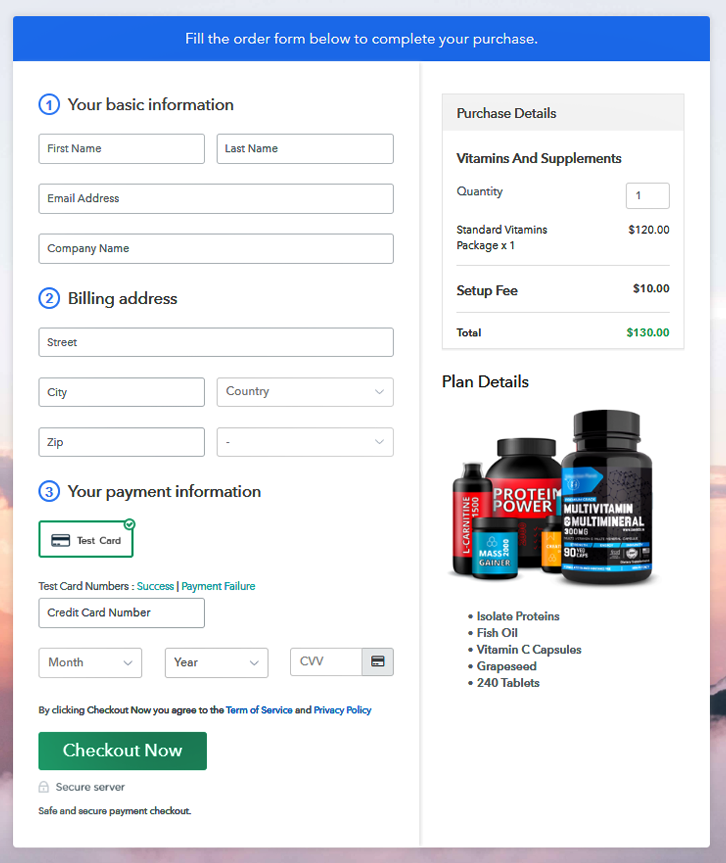
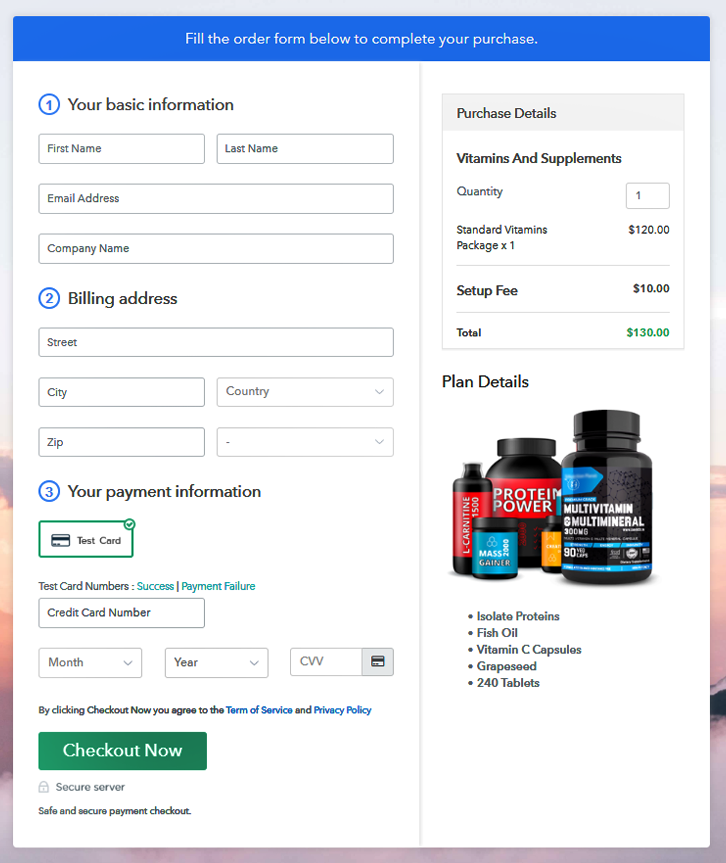
Checkout to Sell Vitamins and Supplements Online

Preview Checkout Page

Step 1: Log in to Pabbly Subscription Billing

Signup

The first thing you need to do is look for  Pabbly Subscription Billing in Google and on the website click on “Sign up Free“. Either sign in using your Gmail account or fill in the required fields like name, email, etc and then click the “Sign Up” button.

Sign Up For Free!

Step 2: Select Subscription Billing

Access Subscription Billing

Now you will enter the dashboard, and here click on the “Access Now” button on the Subscription Billing option.

Step 3: Account Setup

Setup Account

A dialogue box will appear that will require you to fill the company details like name, currency, and phone number. Now, press the “Continue” button after filling in the details.

Step 4: Connect Payment Gateways To Sell Vitamins And Supplements Online

Connect Payment Gateway

You can access the dummy payment gateway, in Pabbly Subscription Billing to beta test the payment experience of a customer. This is to ensure all the glitches are removed beforehand. You can do this by clicking on the “Enable Test Payment” option.

Furthermore,  in Pabbly Subscription Billing, you can integrate with multiple payment gateways like Stripe, Razorpay, PayPal, Authorize.net, etc. For the integration of the payment gateways, there are manuals listed beneath this paragraph. But since we have to set up the payment process, we will click on the “Enable Test Payment” option.

Step 5: Add Your Product

Add Product

So, let’s add products, and to do that below the “Enable Payments,” you will find the section “Add your product” click on it. This creates a dialogue box with a blue button “Add New Product”. Click it.

This will summon a pop-up box and you have to add the required product title, in this case, it is the ‘Vitamins And Supplements’.

Add Product to Sell Vitamins and Supplements Online

Fill up the details and your product is created.

Note: Here you can add all the products related to the similar category by creating plans for each of them.

Step 6: Add Plans

Now, we are going to create plans to start vitamins and supplements business online.

(a) Select Add New Plan

Add Plan

(b) Specify the Plan & Pricing Details

Add plans to Sell Vitamins and Supplements Online

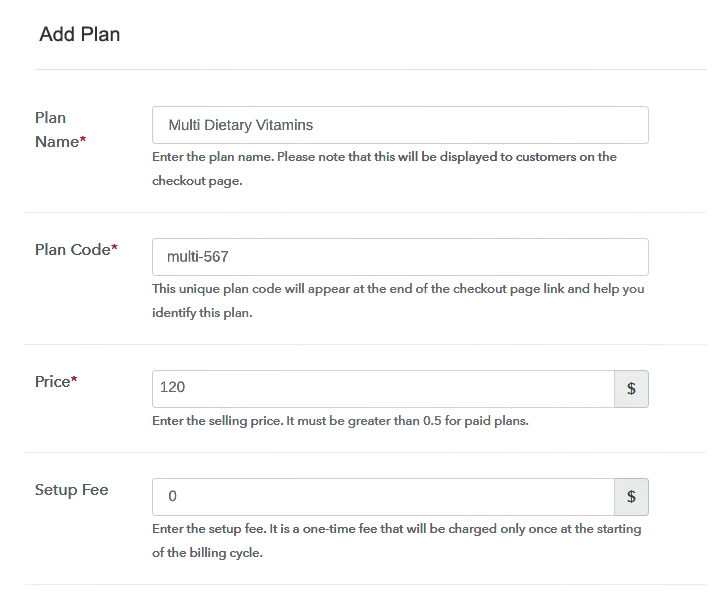
Now you will have to add details like name, code, price, setup fees, etc. If you want you can add different billing models like one-time payment, recurring, based on cycles, etc. Of course, you can change them at any point in their revenue cycle.

(c) Add Image & Description

Add Description to Sell Vitamins and Supplements Online

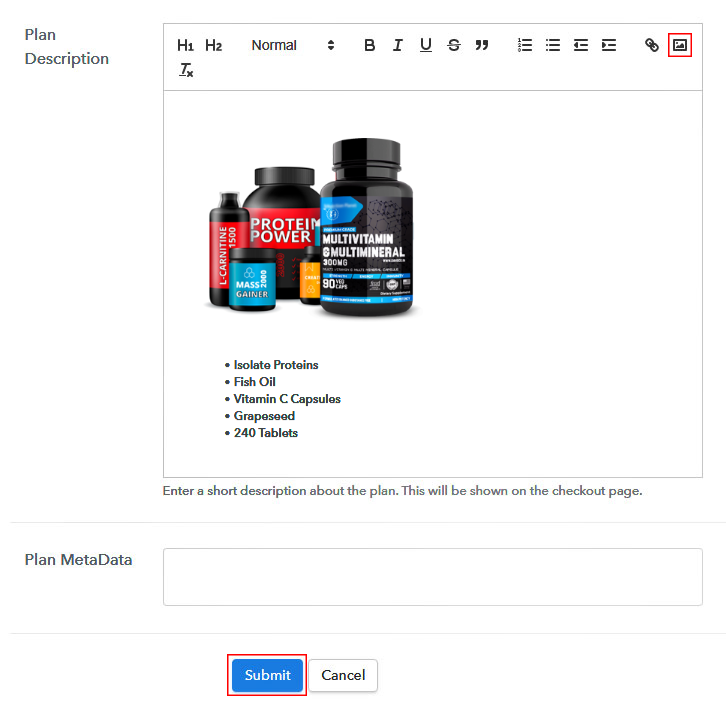
Take some good pictures of your supplements and upload it using the image button.

Moreover, add precise and concise information about the vitamins and supplements like pills, daily consumption quantity, intervals of usage, etc in number points or bullets and then press the “Submit” button.

Furthermore,  using the same methods, you can list more products.

Step 7: Share your Checkout Page

Share Checkout Page on Social Media

  • Now for the marketing of your vitamins and supplements, you can share the checkout pages on Twitter and Facebook by pressing their respective buttons.
  • Furthermore, you can also embed the checkout pages in SMS and emails for more product dissemination.
  • Also, you can create buttons on your website and embed the checkout pages on them. Furthermore, write a text on your website, and anchor the checkout links so the users will be redirected to the checkout page.

Step 8: Preview Checkout Page

Follow up these steps to preview checkout page:

(a) Click on the View Button

View Checkout Plan

(b) Take a Look at the Checkout Page

Checkout to Sell Vitamins and Supplements Online

Step 9: Embed Checkout Page in Site & Sell Vitamins and Supplements Online

Embed Checkout Page on Website

Now,  copy the embed plan link to insert the checkout page on your WordPress website.

(a) Edit the Page & Paste the Copied Link

Paste_Link_in_Text_Editor

Now, when the link is copied, then paste it to the text area of the editor.

(b) Save & Publish the Checkout Page

Save_and_Publish

After pasting the code, now hit the ‘Publish’ button. Your checkout page is embedded.

(c) Check out the Final Look of your Checkout Page on WordPress Site

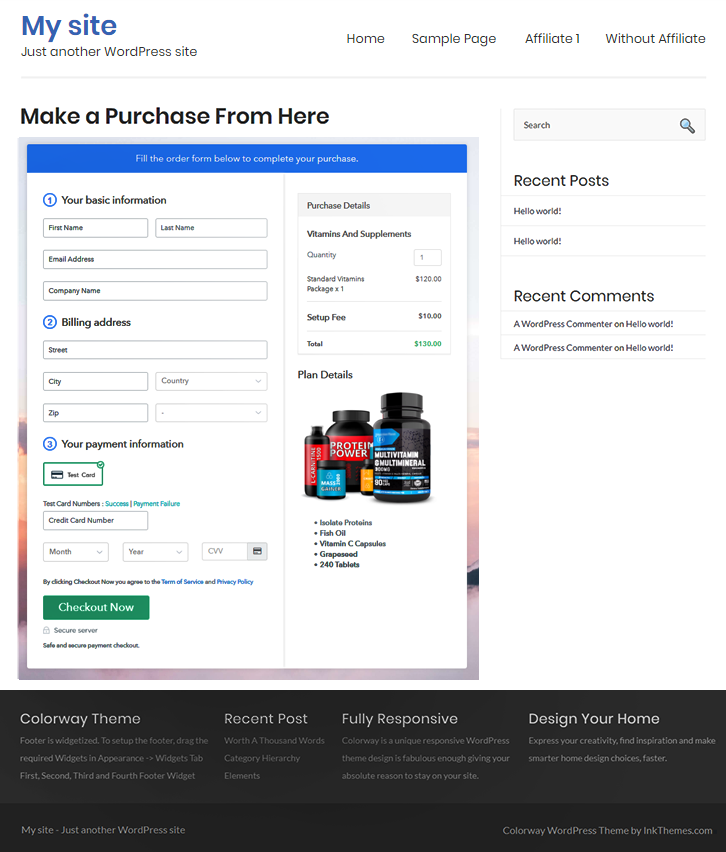
Embed WordPress to Sell Vitamins and Supplements Online

Step 10: Multiplan Checkout Page

Note: In case you want to sell multiple products via a single checkout page, you can create a multi-plan checkout page otherwise skip this step.

(a) Click on Add Mutiplan Checkout

Multiplan Checkout

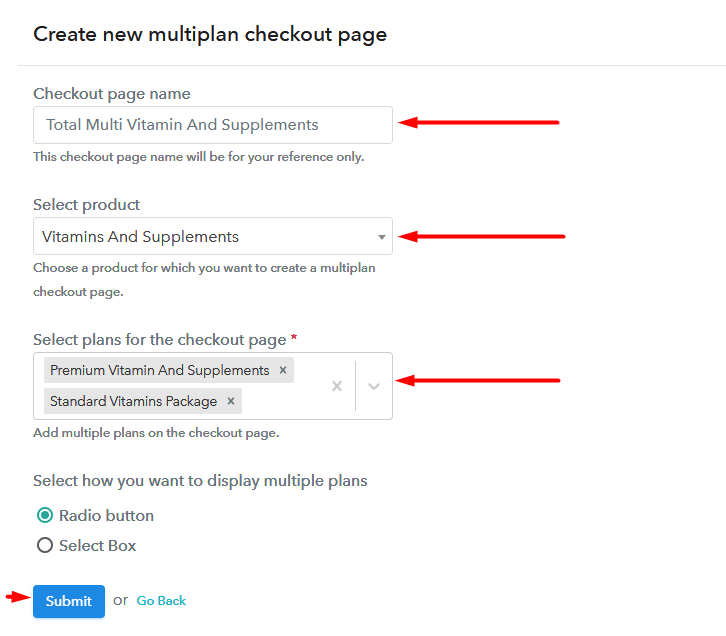
(b) Add Plans to Sell Multiple Vitamins and Supplements Online from Single Checkout Page

Multiplan to Sell Vitamins and Supplements Online

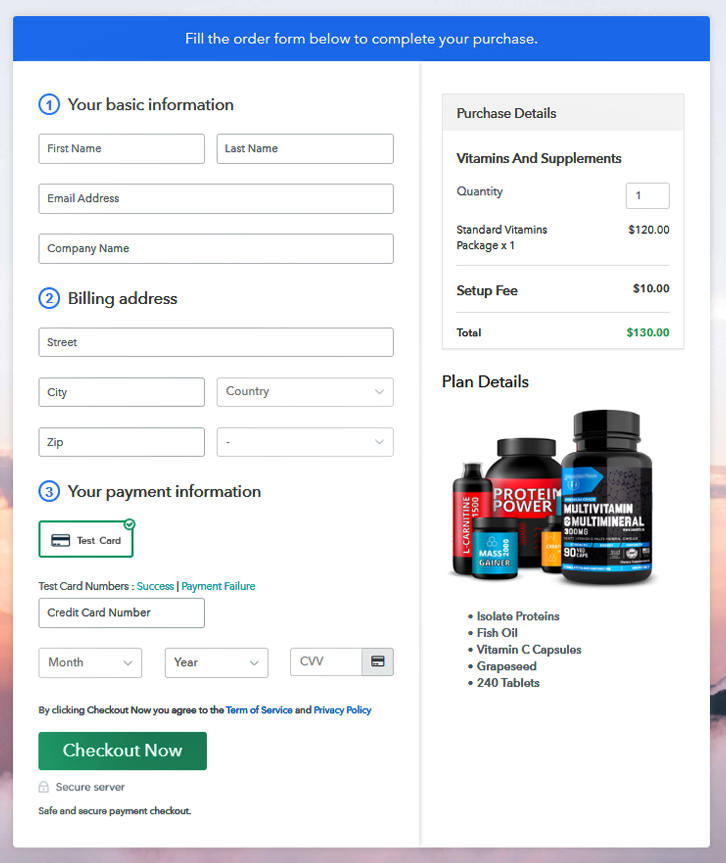
(c) Take a Look at the Checkout Page

Multi plan Checkout to Sell Vitamins and Supplements Online

Preview Checkout Page

Wrapping Up

See, these were the easy step to sell vitamins and supplements online through Pabbly Subscription Billing. Initially, there may be some hiccups but when you learn to fully exploit this tool then you will rule the online market.

Also, if you have any doubts please drop your queries in the comment section below, we will reply at the earliest. Thank You

You May Also Like To Read –
How to Sell Airbags Online | Step by Step (Free Method)

How to Sell Airbags Online

Ideal For: All the airbag sellers, airbag makers, retail airbag selling business owners, and other airbag selling merchants can use this method to take their airbags selling business online.

How to Sell Airbags Online

Why Choose this Method for Selling Over any Other Solution?

Unlike any other solution, this method allows you to:

  • List and sell your airbags for FREE. Absolutely no payment required.
  • No commission on sales.
  • Collect payment through multiple payment modes from a single checkout page.
  • Sell one time or recurring subscriptions of your airbags.
  • Sell and collect payment in any currency as per your requirement.
  • Give discounts on your products by offering special coupon codes.
  • Add sales commission agents to help you in selling airbags online.

Get Pabbly Subscription Billing for Free

There are not many services providing airbags online. And if you are planning to sell airbags online than you can become a major player.

Why would you like to sell airbags online?

Airbags provide a force-over-time & help the passenger in an automobile to reduce their speed in a collision without getting injured. This particularly results in less damage to the passenger. All in all, this provides safety which is a major concern while driving. Well I guess, the passenger’s safety gives enough purpose to sell airbags online.

Let’s discuss the best and quick way to start airbags business online. A service named Pabbly Subscription Billing can help here, as clear from the name itself it will help you in collecting payments and billing for sure. All you need to do is create checkout page for the airbags that you want to sell, showcase information about them and the checkout page will help you collect payments through it.

There’s more to using this service, have a look.

  • You’ll get a place to keep a record of all the airbags in stock
  • Can collect online & offline payments
  • Automatic billing & invoicing
  • Global taxes applicable
  • Accept multiple currencies
  • Unlimited product & plan creation to sell as many airbags as you want to sell
    And much more…

This is How your Checkout Page will Look Like After Creation

Checkout Page Preview to Sell Airbags Online

Preview Checkout Page

Step 1: Login to Pabbly Subscription Billing

Signup
For getting started with selling airbags online, first visit Pabbly Subscription Billing website & click on the “Sign Up Free” button. On the redirected page either directly sign-up using Google or mention some details asked and register into the platform.

Sign Up For Free!

Step 2: Select Subscription Billing

Access Subscription Billing

Now, click the ‘Access Now’ button of the Subscription Billing app here (as shown).

Step 3: Account Setup

Setup Account

Once you click on the Subscription Billing app, above shown pop-up window will display. Mention a company’s name, currency & contact number here.

Step 4: Connect Payment Gateway to Sell Airbags Online

Connect Payment Gateway

Next step towards selling airbags online is integrating a payment gateway. You’ll get several options to choose from and also the integration guides are attached below. This is a mandatory step and enables the system to collect payment. In this blog, just for the understanding of the procedure, I’m using the test payment option to go further.

Step 5: Add Your Product

Add Product

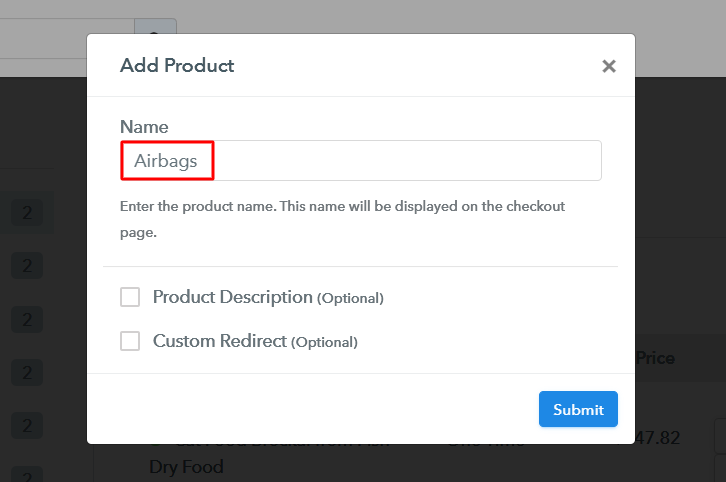
At this step, you can start adding product categories. First, click on the ‘Add New Product’ button and specify a product name in the pop-up window. Also, you can optionally fill out the product description & custom redirect.

Add Product to Sell Airbags Online

Click on the ‘Submit’ button, once all the product details are filled & a product will be launched in your product list instantly.

Note: Here you can add all the products related to the similar category by creating plans for each of them.

Step 6: Add Plans

You can start adding plans following to product creation. Hit ‘Add New Plan’ button under a created product & then top-off the plan details in the plan page. The details that you present in here will be shown on the checkout page for selling airbags online.

(a) Select Add New Plan

Add Plan

(b) Specify the Plan & Pricing Details

Add Plan to Sell Airbags Online

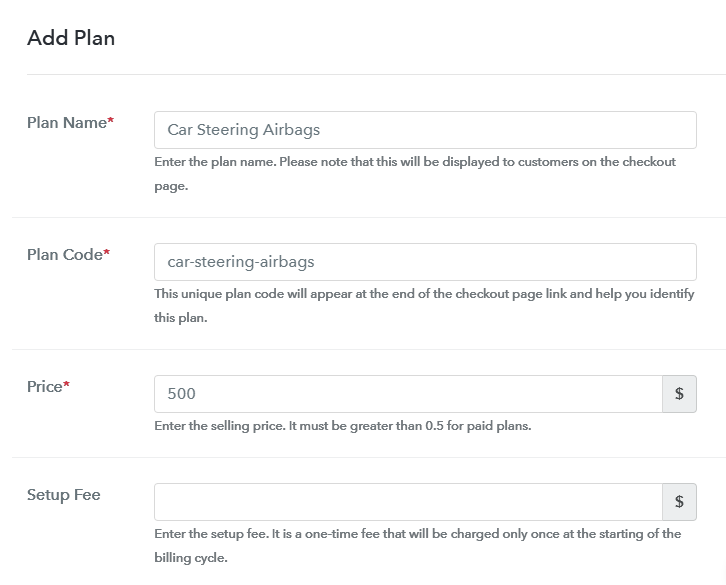
Mention the details to sell an airbag item such as its name, a code, it’s pricing etc.

(c) Add Image & Description

Add Image & Description to Sell Airbags Online

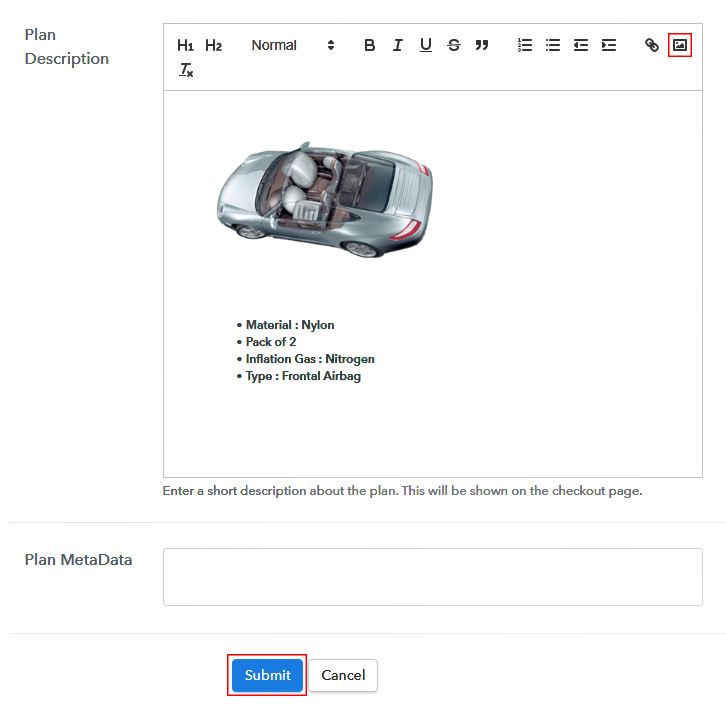
You can also show an airbag’s image & write a description to display on the plan checkout page to sell airbags online. For this, place an image and some descriptive text in the ‘Add Description’ field. You can also use lists, quotes, links, headings etc to write about the airbags.

Click the ‘Submit’ button available here, after writing the airbag’s plan description.  An airbag item will get augmented in the plan list for selling airbags online.

Step 7: Share your Checkout Page

Share Checkout Page on Social Media

Further, you’ll see a window carrying a plan link, two social buttons & a plan code to share and sell airbags online.

  • You can share the URL given in the ‘Plan Link’ window directly on numerous social media platforms, emails, WhatsApp, SMS etc to sell airbags online.
  • Also, you can link this plan link URL to the buttons and texts of any website.
  • There are two Facebook and Twitter sharing buttons also available to share the checkout page directly over these platforms.

Step 8: Preview Checkout Page

Follow these steps to preview a checkout page:

(a) Click on the View Button

View Checkout Plan

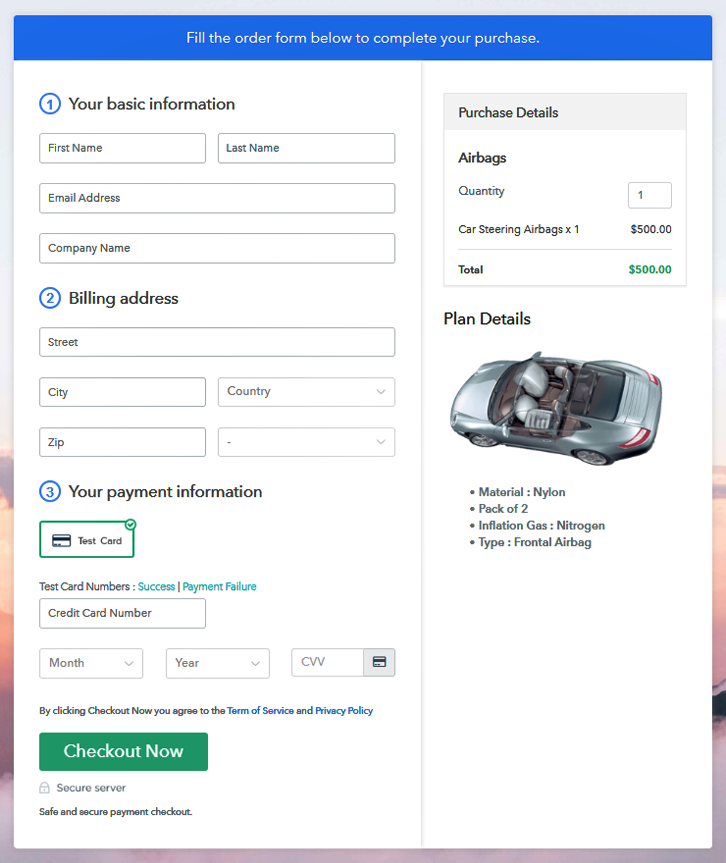
(b) Take a Look at the Checkout Page

Checkout Page Preview to Sell Airbags Online

Step 9: Embed Checkout Page in Site & Sell Airbags Online

Embed Checkout Page on Website

Also, you can copy the code given for embedding checkout pages on WordPress to sell airbags online.

(a) Edit the Page & Paste the Copied Link

Paste_Link_in_Text_Editor

And paste the code in the text area of any post or page.

(b) Save & Publish the Checkout Page

Save_and_Publish

After publishing the post or page the checkout page will get embedded on that particular website.

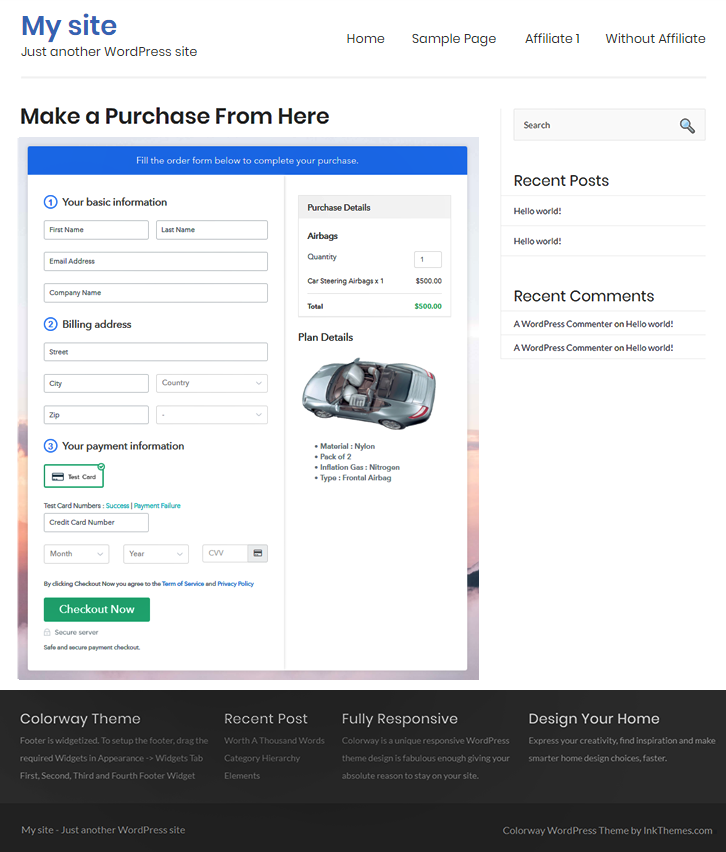
(c) Check out the Final Look of your Checkout Page on WordPress Site

Checkout Page On Site to Sell Airbags Online

Step 10: Multiplan Checkout Page

Note: In case you want to sell multiple products via a single checkout page, you create a multi-plan checkout page otherwise skip this step.

(a) Click on Add Mutiplan Checkout

Multiplan_Checkout

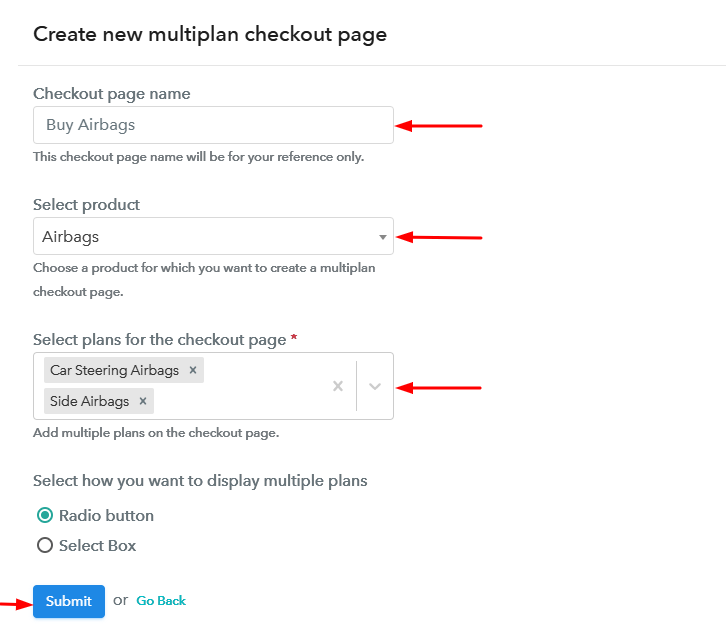
(b) Add Plans to Sell Multiple Airbags from Single Checkout Page

Create Multiplan Checkout to Sell Airbags Online

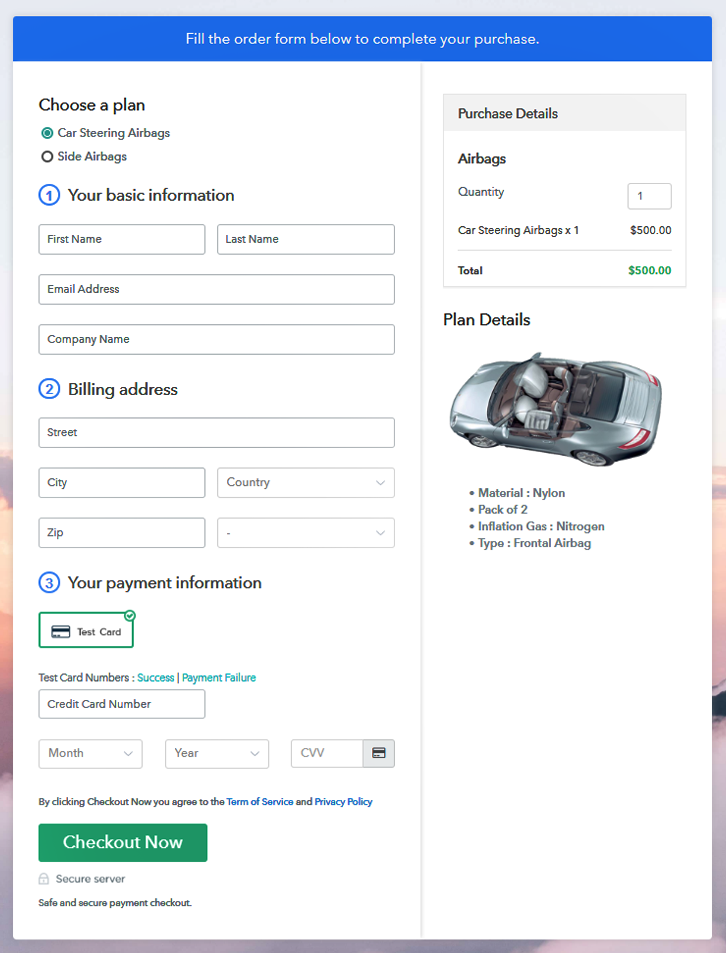
(c) Take a Look at the Checkout Page:

Multiplan Checkout Page to Sell Airbags Online

Preview Checkout Page

Wrapping Up

Up to this point, you can see how simple these steps are and also the fastest way to start airbags business online. Also, the sharing and embedding options add up more flexibility to share the checkout pages to a greater audience.

You May Also Like To Read

How to Sell Processed Groundnut Online | Step by Step (Free Method)

Ideal For: All the groundnut farmers, hawkers, AMPC, cottage industries and other merchants can use this method to sell processed groundnut online.

How to Sell Processed Groundnut Online

Why Choose this Method for Selling Over any Other Solution?

Unlike any other solution, this method allows you to:

  • List and sell processed groundnut for FREE. Absolutely no payment required.
  • No commission deducted on sales.
  • Collect payment through multiple payment modes from a single checkout page.
  • Sell one time or recurring subscriptions of your processed groundnut.
  • Sell and collect payment in any currency as per your requirement.
  • Give discounts on your products by offering special coupon codes.
  • Add sales commission agents to help you in selling your processed groundnut.

Get Pabbly Subscription Billing for Free

Processed groundnut is good for human health as it is cholesterol-free and low in trans-saturated fats but rich in proteins. However, groundnuts cultivation is mostly confined to countries like India and China. And therefore growers from these areas are increasingly selling processed groundnut online to get better demands from around the world.

Why would you like to sell processed groundnut online?

The obvious advantage is higher price discovery for your groundnuts from a global audience. Other benefits include better tracking of your revenues, no commission to middlemen, flexible working hours, etc.  Now that I got you interested to sell processed groundnut online let me show you the tool for it.

Here in this article, we will be using an online tool called Pabbly Subscription Billing that can build incredible checkout pages for you to sell products and collects payment in both offline/online mode. Other benefits of using this software are

  • Unlimited Product Listing
  • Create Unlimited Plans, Coupons & Discounts
  • Generate Unlimited Revenues
  • Import/ Export Customer Data
  • Automatic Reattempts on Card Declines
  • Revenue Analytics
  • Tax Management
  • Auto Email Notification on Payment Failure/ Completion
  • Custom Domains

With these listed features, you will have a better competitive advantage over your peers. So why wait? lets together build an awesome checkout page to sell processed groundnut online.

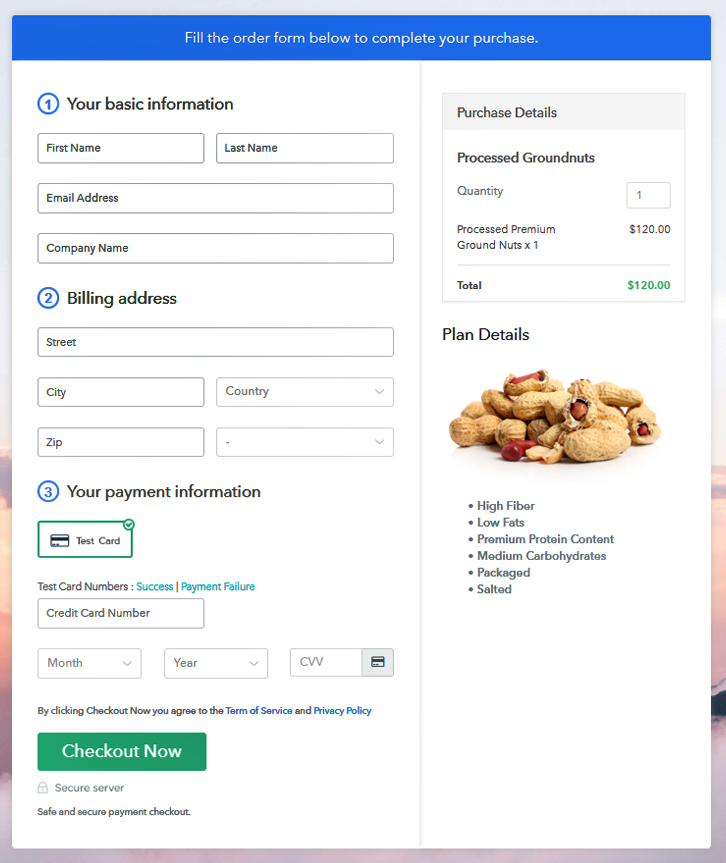
This is How your Checkout Page will Look Like After Creation

checkout  to Sell Processed Groundnut Online

Preview Checkout Page

Step 1: Log in to Pabbly Subscription Billing

Signup

Browse in your search engine for  Pabbly Subscription Billing and here click on “Sign up Free“. So, sign-in using your Gmail account or fill in the mandatory blanks like name, email, etc and then click the “Sign Up” button.

Sign Up For Free!

Step 2: Select Subscription Billing

Access Subscription Billing

Once you sign in you will straight away enter into the dashboard. And here you will have to click on the “Access Now” button on the Subscription Billing option.

Step 3: Account Setup

Setup Account

A dialogue box will appear in front of you that will require you to fill the company details like name, currency, and phone number. Now, press the “Continue” button after filling in the details.

Step 4: Connect Payment Gateways To Sell Processed Groundnut Online

Connect Payment Gateway

Pabbly Subscription ensures a smooth payment experience because it gives a fake payment gateway where you pre-test the payment experience of a customer and diagnose the problems in advance. You can do this by clicking on the “Enable Test Payment” option.

Also, you can integrate multiple payment gateways like Stripe, Razorpay, PayPal, Authorize.net, etc. There are integration guides available beneath this paragraph. But since we have to set up the payment process, we will click on the “Enable Test Payment” option.

Step 5: Add Your Product

Add Product

Now let us add the products. Beneath the “Enable Payments,” you will find the section “Add your product” click on it. This will generate a dialog box with a blue button “Add New Product”. Click it.

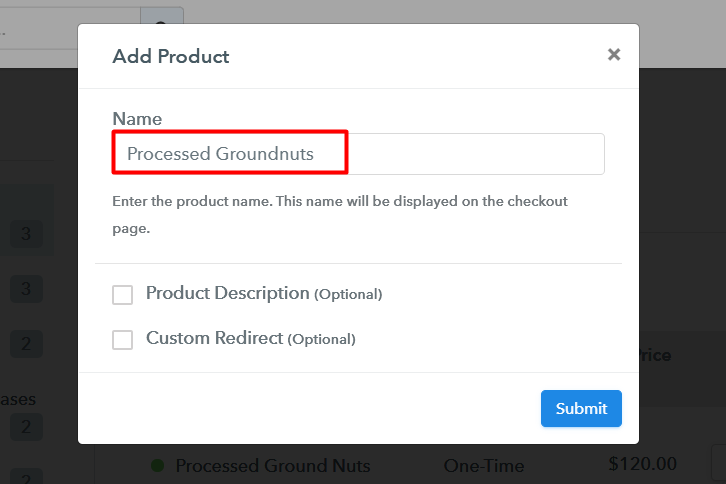
This will generate a pop-up box and you have to add the required product title, in this case, it is the ‘processed groundnut’.

Add Products to Sell Processed Groundnut Online

Fill up the details and your product is created.

Note: Here you can add all the products related to the similar category by creating plans for each of them.

Step 6: Add Plans

Now, we are going to create plans to start processed groundnut business online.

(a) Select Add New Plan

Add Plan

(b) Specify the Plan & Pricing Details

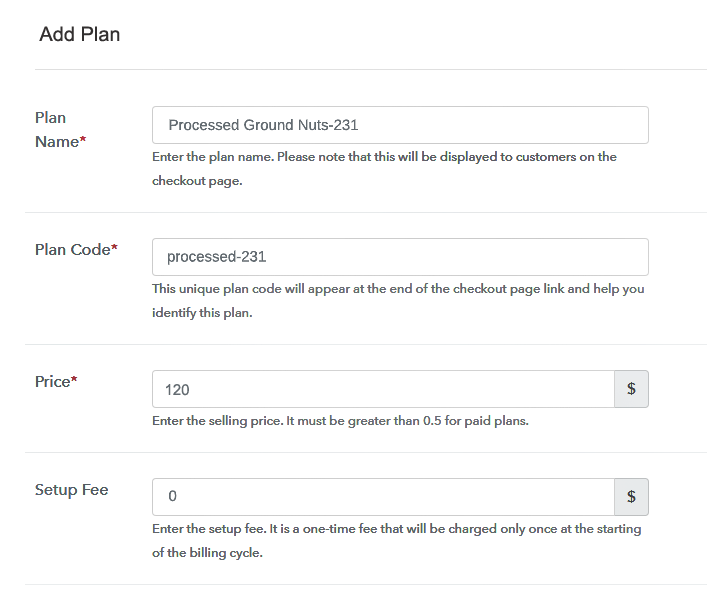
Add Plans to Sell Processed Groundnut Online

Add details of the product related to prices like plan name, code, price, setup fees, etc. Moreover, add billing models according to your wish.

(c) Add Image & Description

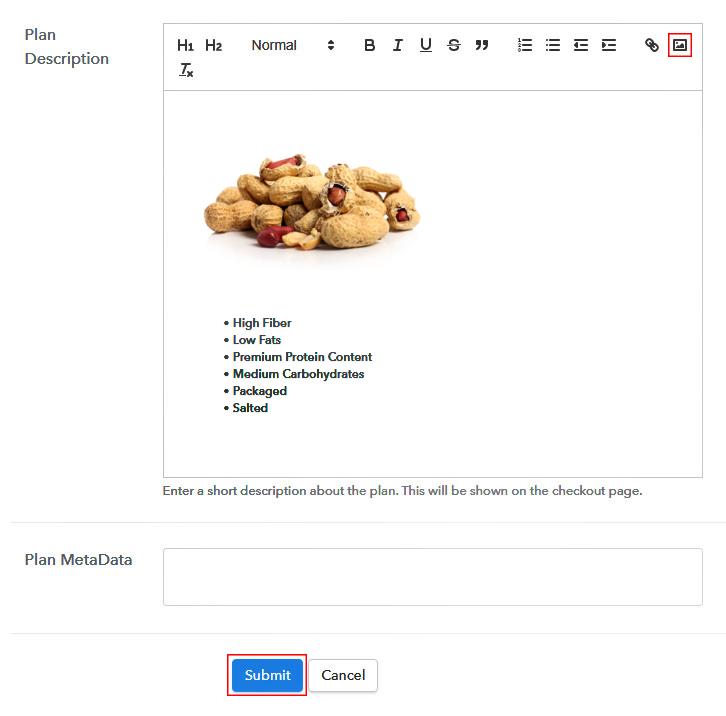
Add Description to Sell Processed Groundnut Online

Take some good snaps of your ground nuts and upload it

Moreover, add a description about the ground nuts like packaging,  etc in preferably bullet points then press the “Submit” button.

Furthermore, using the same methods, you can list more products.

Step 7: Share your Checkout Page

Share Checkout Page on Social Media

  • Now for the product marketing, you can share the checkout pages on Facebook or Twitter with the given buttons.
  • For more brand awareness and marketing embed these checkout pages in SMS and Whatsaap.
  • Furthermore, create buttons on your website to insert these checkout pages on them. Also, you can place it on any anchor text on your website, so the users will be redirected to the checkout page.

Step 8: Preview Checkout Page

Follow up these steps to preview checkout page:

(a) Click on the View Button

View Checkout Plan

(b) Take a Look at the Checkout Page

Preview of checkout to Sell Processed Groundnut Online

Step 9: Embed Checkout Page in Site & Sell Processed Groundnut Online

Embed Checkout Page on Website

Now,  copy the embed plan link to insert the checkout page on your WordPress website.

(a) Edit the Page & Paste the Copied Link

Paste_Link_in_Text_Editor

Now, when the link is copied, then paste it to the text area of the editor.

(b) Save & Publish the Checkout Page

Save_and_Publish

After pasting the code, now hit the ‘Publish’ button. Your checkout page is embedded.

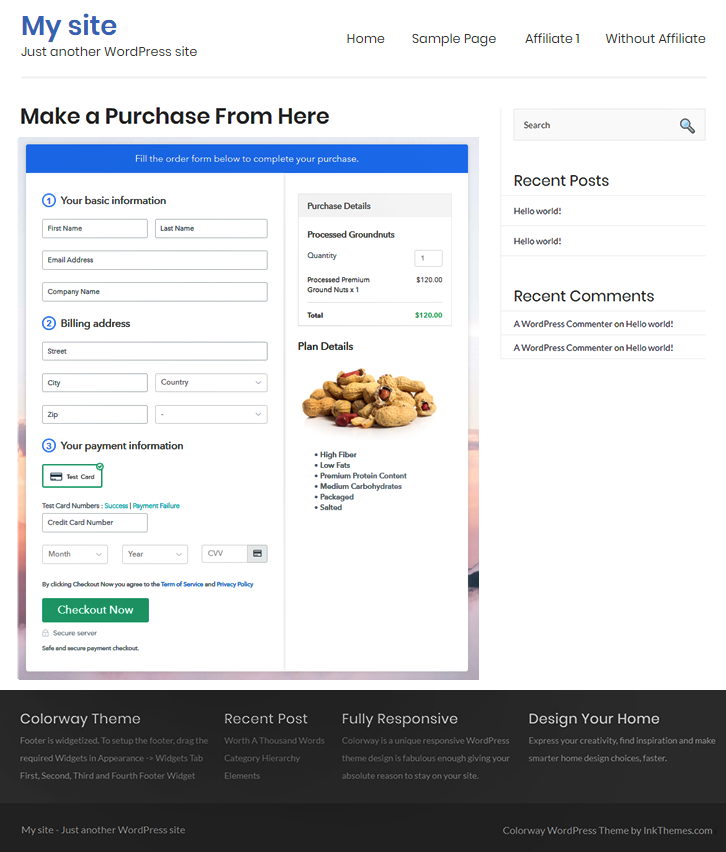
(c) Check out the Final Look of your Checkout Page on WordPress Site

Embed on WordPress to Sell Processed Groundnut Online

Step 10: Multiplan Checkout Page

Note: In case you want to sell multiple products via a single checkout page, you can create a multi-plan checkout page otherwise skip this step.

(a) Click on Add Mutiplan Checkout

Multiplan Checkout

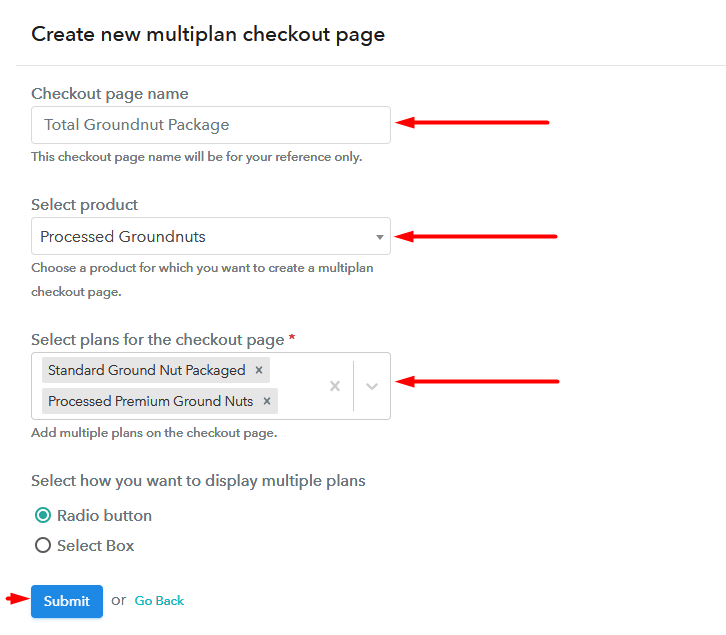
(b) Add Plans to Sell Processed Groundnut Online from Single Checkout Page

Multiplan to Sell Processed Groundnut Online

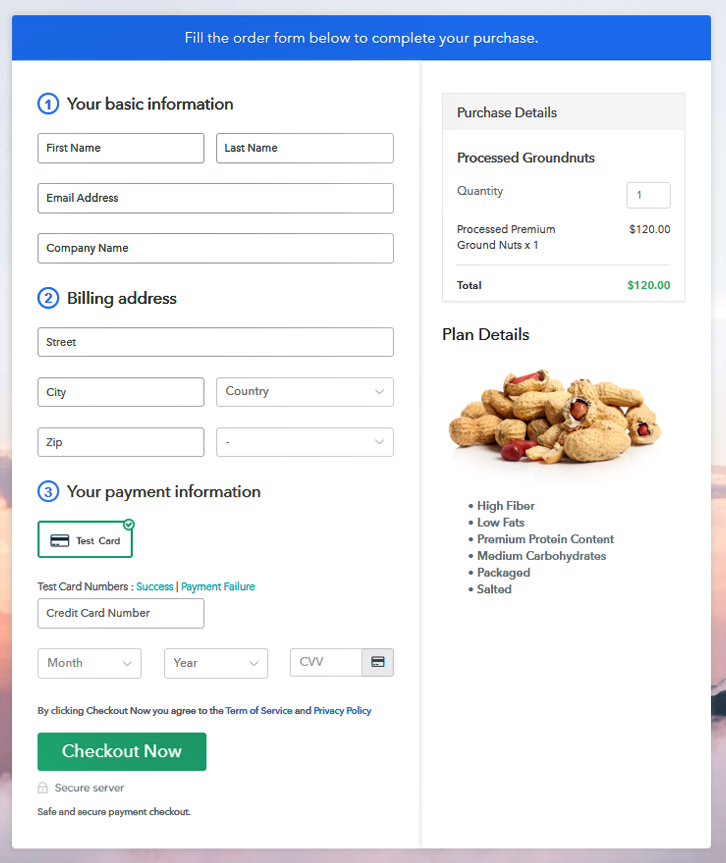
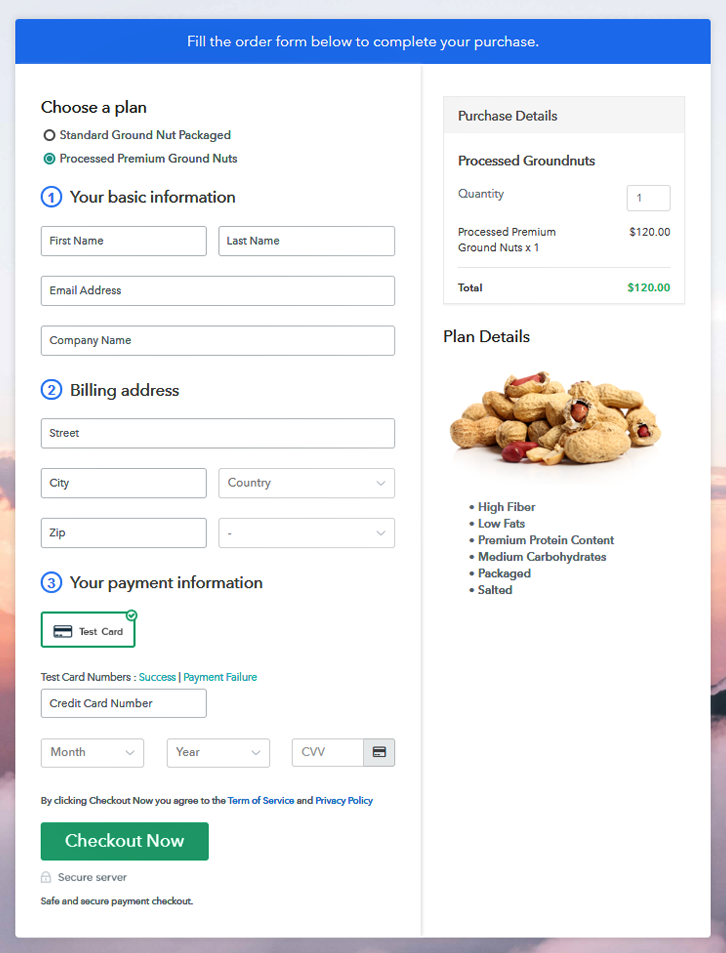
(c) Take a Look at the Checkout Page

Multiplan Checkout  to Sell Processed Groundnut Online

Preview Checkout Page

Wrapping Up

Finally !! You learned how to sell processed groundnut online by building checkout pages in Pabbly Subscription Billing. This software will be your best man to nail all kinds of online business and give you an edge over your competitors.

But despite being easy some of you may have doubts regarding the steps. Hence you can always connect with us to solve your doubts through mail or comment section. Thank You !!

You May Also Like To Read –
How to Sell Antique Clocks Online | Step by Step (Free Method)

How to Sell Antique Clocks Online

Ideal For: All the antique clock shops, clock gift shops, museums, pawn shops, antique clock traders and other merchants can use this method to sell antique clocks online.

How to Sell Antique Clocks Online

Why Choose this Method for Selling Over any Other Solution?

Unlike any other solution, this method allows you to:

  • List and sell antique clocks for FREE. Absolutely no payment required.
  • No commission deducted on sales.
  • Collect payment through multiple payment modes from a single checkout page.
  • Sell one time or recurring subscriptions of your antique clocks.
  • Sell and collect payment in any currency as per your requirement.
  • Give discounts on your products by offering special coupon codes.
  • Add sales commission agents to help you in selling your antique clocks.

Get Pabbly Subscription Billing for Free

Antique clocks are considered to have more value because of their aesthetic or historical significance. That why, most people prefer to buy antique clocks either to have their own collection of valuables clocks or else to decorate their home a classic touch. Thus, you might be looking for ways to start an antique clocks business online to boost your sales.

Why would you like to sell antique clocks online?

Well, there are several advantages of selling antique clocks online but one of the biggest advantage is that you can get immeasurable demand of buyers from a larger global audience. Hence, to do that an online tool is required that can help you create checkout pages online. Thus, we would like to recommend Pabbly Subscription Billing for selling antique clocks online. With the help of this software, you can list an unlimited plans, products online but at the same time with negligible transaction cost. Some of its other benefits include:

  • Collects Payments in Offline & Online Mode
  • Unlimited Revenue Generation
  • Email Alerts on Transaction Completion/Failure
  • Tax Management
  • Customer Data Import/Export

Now, lets create a checkout page to sell antique clocks online using Pabbly Subscription Billing.

This is How your Checkout Page will Look Like After Creation

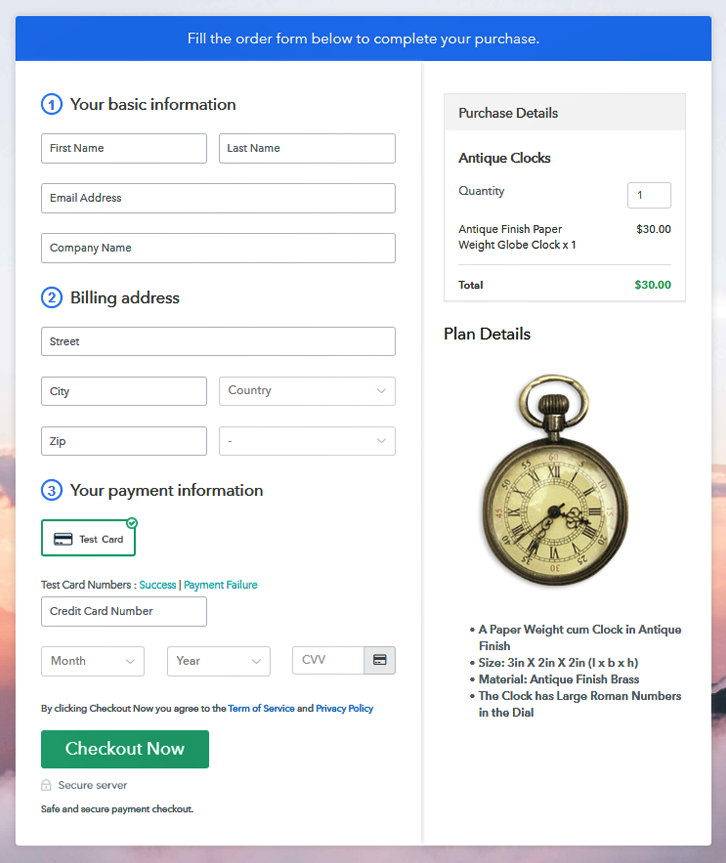
Checkout to Start Antique Clocks Business Online

Preview Checkout Page

Step 1: Log in to Pabbly Subscription Billing

Signup

Go to  Pabbly Subscription Billing and click on “Sign up Free“. You can either sign in via Gmail account or else fill in the required fields manually such as name, email, etc and then press the “Sign Up” button.

Sign Up For Free!

Step 2: Select Subscription Billing

Access Subscription Billing

After entering the dashboard, just press the “Access Now” button on the Subscription Billing option.

Step 3: Account Setup

Setup Account

Once you click on the submit button, a dialogue box will pop up that mandates you to enter the company details such as name, currency, and phone number. Promptly, click on the “Continue” button after filling in the details.

Step 4: Connect Payment Gateways To Sell Antique Clocks Online

Connect Payment Gateway

In order to provide customers the payment experience, Pabbly Subscription Billing offers you a dummy payment gateway. Additionally, there are numerous payment gateways available like Stripe, Razorpay, PayPal, Authorize.net, etc to integrate with Pabbly Subscription Billing. And, their respective integration guides are listed beneath this paragraph. However, as we are setting up the payment process, here I am clicking on the “Enable Test Payment” option.

Step 5: Add Your Product

Add Product

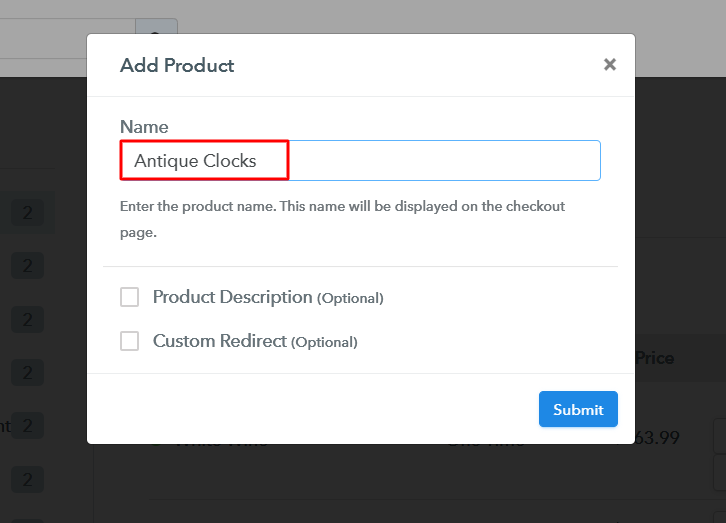
Now, its time to add the product you want to sell online. And for that, you have to click on the blue button stating “Add New Product”. This will generate a pop-up box in which you have to add the product title, in this case, it is the antique clocks.

Add Product to Sell Antique Clocks Online

Fill up the details and your product is created.

Note: Here you can add all the products related to the similar category by creating plans for each of them.

Step 6: Add Plans To Sell Antique Clocks Online

Now, we are going to create plans to start an antique clocks business online.

(a) Select Add New Plan

Add Plan

(b) Specify the Plan & Pricing Details

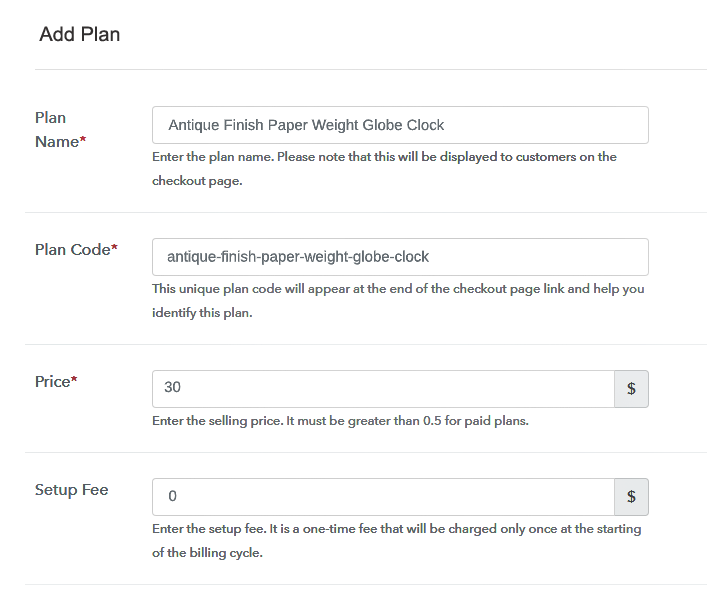
Add Description to Sell Antique Clocks Online

Now the next step is to add the details of the product like name, code, price, setup fees, etc. Moreover, you can also choose different billing models such as one-time payment, recurring, based on cycles, etc.

(c) Add Image & Description

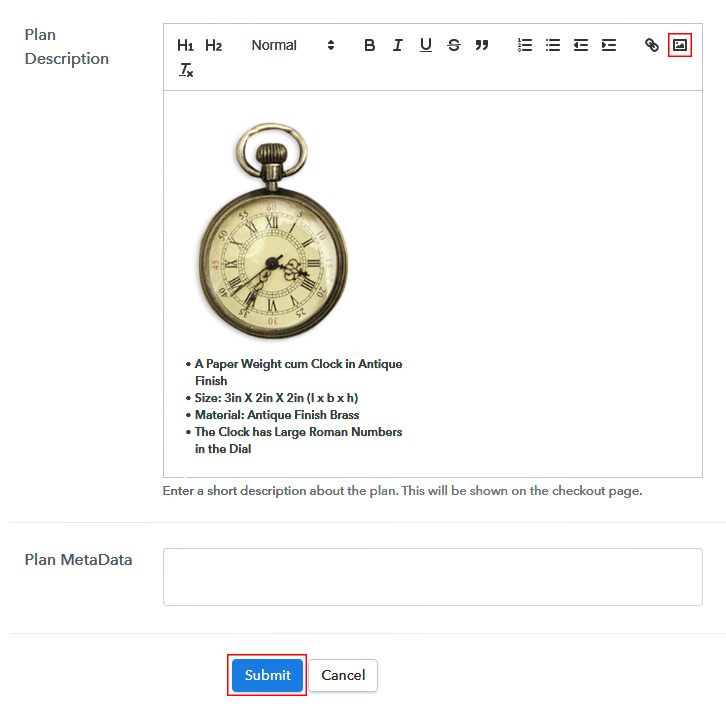
Add Plan to Sell Antique Clocks Online

Afterward, the subsequent step is to upload some stunning images of your antique clocks.

Besides, add information regarding the antique clocks listed in date, previous ownerships, care needed in bullet points then tap on the “Submit” button.

Moreover, using the similar methods, you can also list more products.

Step 7: Share your Checkout Page

Share Checkout Page on Social Media

  • You can always share the checkout pages on Facebook, Twitter with the help of their respective buttons.
  • Additionally, you can insert these checkout pages in SMS and emails for more marketing.
  • Furthermore, you can also build buttons on your website and embed these checkout pages on them. Plus, you can place it on any anchor text on your website, so the users can be redirected to the checkout page.

Step 8: Preview Checkout Page

Follow up these steps to preview checkout page:

(a) Click on the View Button

View Checkout Plan

(b) Take a Look at the Checkout Page

Checkout to Start Antique Clocks Business Online

Step 9: Embed Checkout Page in Site & Sell Antique Clocks Online

Embed Checkout Page on Website

Afterward, copy the embed plan link to insert the checkout page on your WordPress website.

(a) Edit the Page & Paste the Copied Link

Paste_Link_in_Text_Editor

Subsequently, once the link is copied, just paste it to the text area of the editor.

(b) Save & Publish the Checkout Page

Save_and_Publish

After pasting the code, simply press the ‘Publish’ button. Your checkout page is embedded.

(c) Check out the Final Look of your Checkout Page on WordPress Site

Embed on WordPress to Start Antique Clocks Business Online

Step 10: Multiplan Checkout Page

Note: In case you want to sell multiple products via a single checkout page, you can create a multi-plan checkout page otherwise skip this step.

(a) Click on Add Mutiplan Checkout

Multiplan Checkout

(b) Add Plans to Sell Antique Online from Single Checkout Page

Checkout to Sell Antique Clocks Online

(c) Take a Look at the Checkout Page

Multiplan Checkout to Start Antique Clocks BusinessOnline

Preview Checkout Page

Wrapping Up

Finally!! These were the 10 easy steps that you need to follow in order to sell antique clocks online through Pabbly Subscription Billing. So, what are you waiting for? Go ahead and start your antique clocks business online without any hassle.

Moreover, if you have any doubts regarding the process, please drop your queries in the comment section below. We will get back to you ASAP.

You May Also Like To Read –