Stop Manual Booking Calls – Use This Bot

Learn how to automate dental appointment bookings using Pabbly Connect and Pabbly Connect. Follow this detailed tutorial to streamline your booking process. Revolutionize your productivity approach with just a few strategic clicks. Uncover professional methods for connecting applications and creating workflows that reclaim hours of your week.

Watch Step By Step Video Tutorial Below


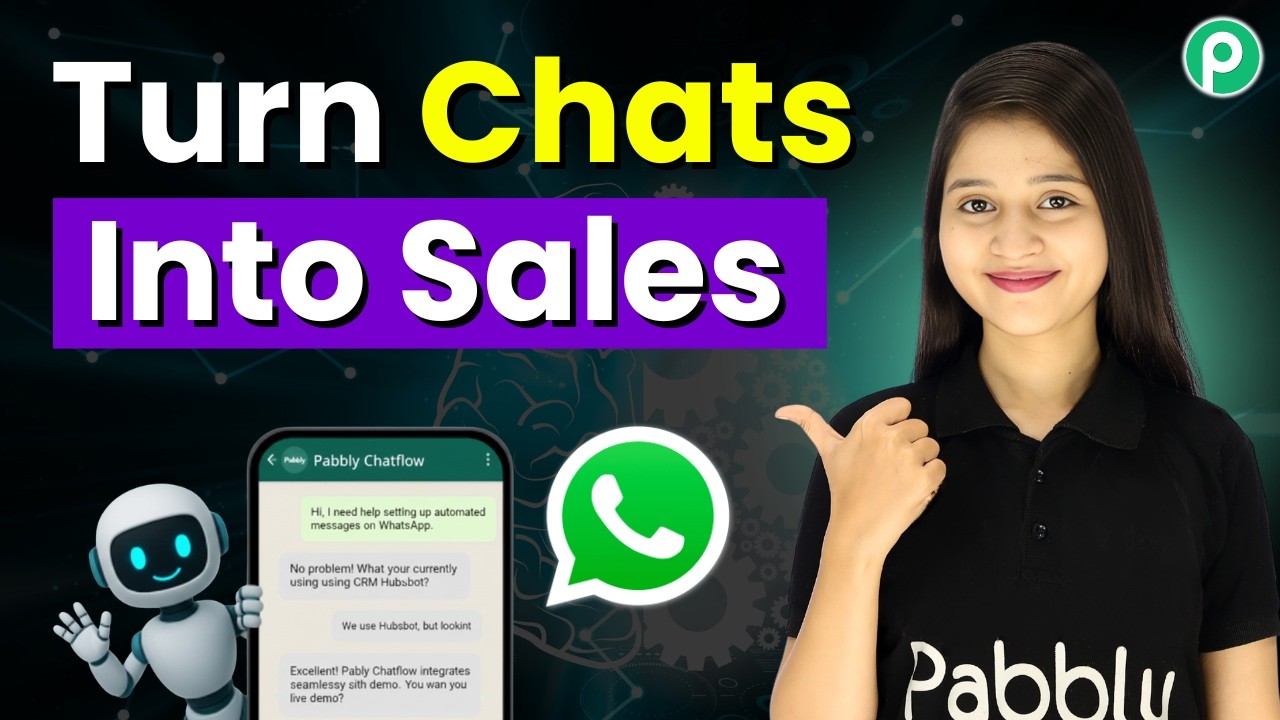
1. Setting Up Pabbly Chatflow for WhatsApp Booking

First of all, to create a WhatsApp chatbot for booking dental appointments, you need to access Pabbly Chatflow. Open a new tab and navigate to pabby.com/chatflow. If you are new, click on the ‘Sign Up Free’ button to create your account. This allows you to utilize 100 free credits every month to build your chatbots.

After signing up, log in to your Pabbly account. Click on the ‘Access Now’ button under the Pabbly Chatflow box to enter the dashboard. Here, you will add your WhatsApp number by clicking on the ‘Add WhatsApp Number’ button and following the prompts to integrate it with your chatbot.


2. Creating the WhatsApp Chatbot for Appointment Booking

Now we have to work on creating the chatbot flow using Pabbly Chatflow. In the flow builder, click on the ‘Add Flow’ button to create a new chatbot. Name your chatbot something relevant, like ‘Dental Appointment Booking Bot’. For the trigger, select ‘Keyword or Reject Match’ to initiate the chatbot when a specific keyword is sent.

  • Type ‘dentist’ as the first keyword.
  • Type ‘appointment’ as the second keyword.

Once the keywords are set, drag the ‘Text’ action into the flow to send a welcome message. Here, you can add a message like, ‘Hello, welcome to Smilecraft Dental Clinic. You can book your dental appointment in just a few seconds. Please click below to continue.’ Add a quick reply button labeled ‘Book Appointment’ for user interaction.


3. Collecting Appointment Details from Customers

Next, we will collect essential details from the customer using Pabbly Connect. After the customer clicks the ‘Book Appointment’ button, use the ‘Ask Question’ feature to prompt them for their full name. Create a custom field to store this response.

Continue with additional questions for the appointment date, time, and treatment type. After gathering all details, send a confirmation message summarizing the information collected. Include quick reply buttons for ‘Yes’ to confirm or ‘No’ to cancel. This interaction keeps the booking process smooth and user-friendly.

  • Ask for the full name.
  • Ask for the preferred appointment date.
  • Ask for the appointment time.
  • Ask for the treatment type.

By structuring these questions, you ensure that all necessary information is collected efficiently, making the booking process seamless for your customers.


4. Integrating with Google Sheets Using Pabbly Connect

After confirming the appointment details, it’s time to integrate with Google Sheets using Pabbly Connect. First, create a new workflow in Pabbly Connect by clicking on the ‘Create Workflow’ button. Name your workflow appropriately, such as ‘Smilecraft Dental Appointment Booking Bot’.

Select Pabbly Chatflow as your trigger application and choose ‘New Message Received’ as the event. Once you connect your account, you will receive a webhook URL. Copy this URL and paste it into the API request section of your chatbot flow.

Select Google Sheets as the action application. Choose ‘Add New Row’ as the action event. Connect your Google Sheets account.

Map the appointment details you collected from the customer to the respective columns in your Google Sheet. This integration ensures that every appointment request is logged automatically, streamlining your workflow and reducing manual entry errors.


5. Finalizing the Integration and Testing

Finally, save your flow in Pabbly Chatflow and test the entire process to ensure everything works correctly. Send a test message with the keywords you set up, and follow through the booking process as if you were a customer. Ensure that all details are captured accurately and that they are sent to your Google Sheet through Pabbly Connect.

Once you confirm that the workflow operates smoothly, you can start using your WhatsApp chatbot for real bookings. This system will allow customers to book appointments easily, and you will have all the information stored in Google Sheets for easy access and management.

With the integration of Pabbly Connect and Pabbly Chatflow, you can automate your booking process efficiently, saving time and enhancing customer satisfaction.


Conclusion

In this tutorial, we explored how to automate dental appointment bookings using Pabbly Connect and Pabbly Chatflow. By following these steps, you can streamline your booking process, enhance customer experience, and ensure that all appointment details are logged accurately in Google Sheets. Start using this powerful integration today to improve your business efficiency.

Ensure you check out Pabbly Connect to create business automation workflows and reduce manual tasks. Pabbly Connect currently offer integration with 2,000+ applications.

Turn WhatsApp Conversations into Revenue on Autopilot

Learn how to automate WhatsApp conversations and generate revenue using Pabbly Connect. Step-by-step guide to setting up your WhatsApp chatbot. Explore efficient methods for automating routine tasks with clear, concise instructions suited for both newcomers and experienced professionals.

Watch Step By Step Video Tutorial Below


1. Accessing Pabbly Connect for WhatsApp Automation

To turn WhatsApp conversations into revenue on autopilot, the first step is to access Pabbly Connect. Visit the Pabbly website and navigate to the Pabbly Connect section.

If you are new to Pabbly, click on the ‘Sign Up Free’ option to create an account and receive free credits. Existing users can simply sign in. Once logged in, select the Pabbly Connect app to start setting up your WhatsApp automation.


2. Creating Your WhatsApp Chatbot with Pabbly Connect

After accessing Pabbly Connect, navigate to the flows feature. Click on the ‘Add Flow’ button to begin creating your WhatsApp chatbot. Name your flow something descriptive, like ‘Turn WhatsApp Conversations into Revenue on Autopilot’.

In this section, you will utilize the flow builder. The flow builder allows you to create a seamless chatbot experience without any coding. You will start by selecting a trigger event. For this chatbot, choose the keyword trigger option.

  • Select the trigger event as ‘Keywords’.
  • Add expected keywords like ‘hi’ and ‘hello’.
  • Create a welcome message to greet users.

Link this trigger to your welcome message to ensure users receive an immediate response when they initiate a conversation. This setup will help automate the initial interaction with potential customers.


3. Setting Up Interactive Buttons in Pabbly Connect

Next, to enhance user interaction, you will set up buttons within your chatbot. Using Pabbly Connect, you can add quick reply buttons such as ‘Book Treatment’, ‘View Offers’, and ‘Talk to Expert’.

For each button, you will specify the action that occurs when clicked. For example, if a user clicks on ‘Book Treatment’, the bot will respond with a list of available treatments. This creates a dynamic user experience.

  • Add a list button for treatment options.
  • Link treatment types to the corresponding button.
  • Ensure all buttons are connected to their respective actions.

By linking buttons to specific actions, you can guide users through the booking process effectively, ensuring a smooth experience.


4. Capturing User Input with Pabbly Connect

To efficiently collect user information, you will set up a series of questions using Pabbly Connect. This includes asking for their main concern, full name, contact number, and appointment date.

Each question will be configured to capture user responses accurately. For instance, when a user selects a treatment type, the bot will ask, ‘What is your main concern?’ This interaction is crucial for customizing the service offered to the user.

Set up the question nodes for each required input. Define the format for each input (text, number, date). Link each question to the previous node for seamless flow.

This setup enables your bot to gather essential information, allowing for better service delivery and follow-up.


5. Finalizing the Chatbot Flow in Pabbly Connect

Once all components are in place, it’s time to finalize your WhatsApp chatbot flow using Pabbly Connect. Ensure all nodes are properly linked and that the flow is saved.

Test the chatbot by sending the configured keywords to your WhatsApp number. The bot should respond with the welcome message and subsequent prompts as designed. This testing phase is crucial to ensure functionality.

After successful testing, your automated WhatsApp chatbot is ready to engage with users and turn conversations into revenue. Make sure to monitor interactions to optimize performance over time.


Conclusion

In conclusion, utilizing Pabbly Connect to automate WhatsApp conversations can significantly enhance your business’s ability to generate revenue. By following the steps outlined, you can create an effective chatbot that engages users and streamlines communication.

Ensure you check out Pabbly Connect to create business automation workflows and reduce manual tasks. Pabbly Connect currently offer integration with 2,000+ applications.

Stop Managing Meta Leads Manually — Automate This

Learn how to automate your Meta leads management with Pabbly Connect. This detailed tutorial covers WhatsApp, Google Sheets, and Facebook integration. Transform complex automation concepts into accessible, actionable steps that eliminate unnecessary manual work while maximizing existing application capabilities.

Watch Step By Step Video Tutorial Below


1. Accessing Pabbly Connect for Lead Automation

To automate your Meta leads management, start by accessing Pabbly Connect. Open a new tab and navigate to pav.com/connect. If you are a new user, sign up for a free account to explore the features of Pabbly Connect.

Once logged in, you will see the workflow interface. Here, you can create a new workflow that will connect various applications to automate your lead management process. You do not need any coding skills; Pabbly Connect makes it easy to set up integrations.


2. Setting Up Facebook Lead Ads with Pabbly Connect

In this section, we will set up the trigger for Facebook Lead Ads using Pabbly Connect. Select Facebook Lead Ads as your trigger application, and choose the event ‘New Lead Instant’. This ensures that every time a new lead is generated, it will trigger the workflow.

  • Click on the ‘Connect’ button.
  • Select ‘Connect with Facebook Lead Ads’.
  • Log into your Facebook account and select your business page.
  • Choose the lead generation form you are using.

After this setup, click on ‘Save and Send Test Request’ to confirm the connection. You can generate a test lead using the Meta Leads testing tool to ensure everything is working as expected.


3. Sending WhatsApp Messages via Pabbly Connect

Now that your trigger is set up in Pabbly Connect, the next step is to send WhatsApp messages to your leads. For this, select the WhatsApp Cloud API as the action application and choose the event ‘Send Text Message’.

To connect WhatsApp Cloud API with Pabbly Connect, you will need to provide your token, phone number ID, and WhatsApp business account ID. You can find these details in your WhatsApp Cloud API setup. After entering the required information, click on the ‘Save’ button.

  • Map the phone number field to the lead’s phone number.
  • Compose the message you want to send to your leads.
  • Click ‘Save and Send Test Request’ to send a test message.

Make sure to test the message by using your own phone number to see how it appears to the lead. This step ensures that your WhatsApp integration is functioning correctly through Pabbly Connect.


4. Sending SMS via Twilio with Pabbly Connect

Next, we will set up an SMS notification using Twilio, facilitated by Pabbly Connect. Select Twilio as your action application and choose the event ‘Send SMS Message’. Click on the ‘Connect’ button to establish the connection.

You will need to enter your Twilio account SID, authorization token, and sender phone number. After entering these credentials, click on ‘Save’. Once connected, you can customize the SMS body with the lead’s details.

Map the lead’s first name and last name in the SMS body. Ensure the recipient phone number is mapped to the lead’s phone number. Click on ‘Save and Send Test Request’ to send a test SMS.

As with the WhatsApp step, you may receive an error if using a dummy number. Make sure to use a valid number during testing to confirm that your SMS is sent correctly through Pabbly Connect.


5. Tracking Leads in Google Sheets with Pabbly Connect

The final step is to track your leads in Google Sheets using Pabbly Connect. Select Google Sheets as your action application and choose the event ‘Add New Row’. Click on the ‘Connect’ button to set up the connection.

Log into your Google account and allow Pabbly Connect to access your sheets. Select the spreadsheet and the specific sheet where you want to store the lead information. Map the fields such as name, email, phone number, and company from the previous steps.

Select the spreadsheet named ‘Leads Details’. Map the lead’s first name, last name, email, phone number, and company to the corresponding columns. Click ‘Save and Send Test Request’ to verify the setup.

Once confirmed, your leads will automatically be added to your Google Sheets whenever a new lead is generated through Facebook Lead Ads, thanks to the seamless integration provided by Pabbly Connect.


Conclusion

In conclusion, automating your Meta leads management using Pabbly Connect can significantly enhance your efficiency. By integrating Facebook Lead Ads, WhatsApp, Twilio, and Google Sheets, you can streamline your lead nurturing process effectively. With these steps, you can now manage your leads without manual intervention, allowing you to focus on growing your business.

Ensure you check out Pabbly Connect to create business automation workflows and reduce manual tasks. Pabbly Connect currently offer integration with 2,000+ applications.

Automatically Receive Email Alerts for New Leads

Learn how to automatically receive email alerts for new leads using Pabbly Connect. This step-by-step tutorial guides you through the integration process. Explore efficient methods for automating routine tasks with clear, concise instructions suited for both newcomers and experienced professionals.

Watch Step By Step Video Tutorial Below


1. Accessing Pabbly Connect for Email Alerts

To automatically receive email alerts for new leads, first access Pabbly Connect. If you are an existing user, open your workflow builder. New users should go to pabbl.com/connect to sign up for free and explore the features of Pabbly Connect.

Once on the landing page, click on the ‘Sign Up for Free’ button located in the top right corner. This gives you access to 100 free tasks each month, allowing you to send up to 100 emails without any cost.


2. Creating a Workflow in Pabbly Connect

After signing up, navigate to the workflow builder in Pabbly Connect. This is where you will set up triggers and actions for your email alerts. Click on the ‘Add Trigger’ button to begin.

  • Select ‘Google Ads’ as the trigger application.
  • Choose the event ‘New Lead Form Entry’.
  • Click on ‘Connect’ to generate a webhook URL.

Copy the webhook URL generated by Pabbly Connect and go to your Google Ads campaign. Ensure you have a lead form added to your campaign, as this is essential for integration.


3. Configuring Google Ads Lead Form with Pabbly Connect

Scroll to the end of your Google Ads lead form and find the lead delivery options. Here, you need to paste the webhook URL from Pabbly Connect.

  • Paste the copied webhook URL in the designated field.
  • Enter the test key provided by Pabbly Connect.
  • Click on ‘Send Test Data’ to verify the connection.

After sending the test data, return to Pabbly Connect to confirm that the response has been captured successfully.


4. Setting Up Email Alerts Using Pabbly Connect

To send email alerts, click on ‘Add New Action Step’ in Pabbly Connect. Search for and select ‘Gmail’ as the action application.

Choose the event ‘Send Email’ and click on ‘Connect’. If you have an existing connection, select it; otherwise, create a new connection by signing in with your Google account. Provide the necessary permissions to Pabbly Connect.

Fill in the sender’s name, email address, recipient’s email address, and email subject. Map the details of the lead into the email body dynamically using Pabbly Connect’s mapping feature.


5. Testing and Activating the Workflow in Pabbly Connect

After configuring the email details, click on ‘Save and Send Test Request’ in Pabbly Connect. This will send a test email to the specified recipient.

Check your Gmail inbox to confirm that the email has been received successfully. If everything looks good, your workflow is complete and ready to activate.

With this setup, every time a new lead is captured through Google Ads, Pabbly Connect will automatically send an email alert to your sales team, ensuring prompt follow-ups and higher conversion rates.


Conclusion

In this tutorial, we demonstrated how to use Pabbly Connect to automatically receive email alerts for new leads captured through Google Ads. This integration streamlines your lead management process and enhances your team’s responsiveness.

Ensure you check out Pabbly Connect to create business automation workflows and reduce manual tasks. Pabbly Connect currently offer integration with 2,000+ applications.

Stop Hiring Staff — Let This Chatbot Do Everything 😱

Learn how to create an automated WhatsApp chatbot using Pabbly Connect. Integrate various applications seamlessly without coding. Follow our step-by-step tutorial! Discover how to seamlessly connect your essential tools through accessible instructions that make powerful automation available to professionals at every skill level.

Watch Step By Step Video Tutorial Below


1. Setting Up Pabbly Connect for Your WhatsApp Chatbot

To create a WhatsApp chatbot, the first step involves accessing Pabbly Connect. Start by opening a new tab and navigating to Pabbly.com/chatflow. If you are new to Pabbly, click on the ‘Sign Up Free’ option to create an account and receive 100 free credits monthly. Existing users can simply click on the ‘Sign In’ option to access their dashboard.

Once logged in, you will find all Pabbly applications. Click on the ‘Access Now’ button under Pabbly Connect to enter the dashboard. This is where you can manage your WhatsApp number and start creating your chatbot seamlessly.


2. Creating Your Chatbot Flow with Pabbly Connect

After accessing the Pabbly Connect dashboard, you will be directed to the flow builder page. Click on the ‘Plus Add Flow’ button to start a new flow. Name your flow appropriately, for example, ‘Stop Hiring Staff – Let This Chatbot Do Everything’. This name will help you identify your chatbot easily later on.

  • Click the ‘Add Flow’ button.
  • Enter a descriptive name for your flow.
  • Ensure the flow is active by toggling the active/inactive switch.

Next, select a trigger event by clicking on it. Enter keywords such as ‘hi’ and ‘hello’ to trigger the chatbot when users send these messages. This setup enables your bot to respond automatically whenever these keywords are detected.


3. Designing Responses for Your Chatbot in Pabbly Connect

Now, it’s time to design the responses your chatbot will send. Using the Pabbly Connect flow builder, add a text button to create a welcome message. For instance, you can enter, ‘Welcome to Talent Bridge HR Solutions! How can I help you today?’ Include options like ‘View Openings’ and ‘Apply for Job’ for users to choose from.

  • Add a welcome message text button.
  • Create quick reply buttons for user options.
  • Link the buttons to the corresponding responses.

When users select an option, the bot should respond accordingly. For example, if they choose ‘View Openings’, the bot will share available job listings. This interactive design keeps users engaged and informed.


4. Collecting User Information with Pabbly Connect

As users interact with your chatbot, it’s essential to collect their information. After a user selects a job type, prompt them to submit their resume. Use the Pabbly Connect flow builder to add an ask media button requesting the user’s resume in document format.

This step is crucial as it allows the chatbot to gather necessary applicant details. After receiving the resume, ask for the user’s full name, contact number, and email address using the ask question buttons. This structured approach ensures you have all the information needed for further processing.


5. Finalizing Your Chatbot Setup in Pabbly Connect

Once you have collected all necessary information, it’s time to finalize your chatbot. Use Pabbly Connect to create a confirmation message that summarizes the user’s application. For instance, you can write, ‘Thank you, [Full Name]. Your application for the [Job Type] has been successfully submitted!’ This message enhances user experience by confirming their submission.

After completing the flow, don’t forget to save your settings. Click the save button to ensure all your changes are updated. Your WhatsApp chatbot is now ready to provide instant replies to applicants, effectively reducing the need for additional staff.


Conclusion

In conclusion, using Pabbly Connect to create a WhatsApp chatbot allows businesses to automate responses and streamline the hiring process. By following these steps, you can set up a fully functional chatbot that engages applicants and collects necessary information efficiently.

Ensure you check out Pabbly Connect to create business automation workflows and reduce manual tasks. Pabbly Connect currently offer integration with 2,000+ applications.

Build a Customer Feedback Bot in Minutes

Learn how to create a customer feedback bot using Pabbly Connect and Pabbly Connect. This step-by-step guide will walk you through the integration process. Follow this definitive guide to creating powerful automated workflows with straightforward, efficiency-focused solutions that save valuable time.

Watch Step By Step Video Tutorial Below


1. Setting Up Pabbly Chatflow for Your Feedback Bot

To build a customer feedback bot, we start by accessing Pabbly Connect and Pabbly Chatflow. Navigate to the Pabbly Chatflow website and sign up for a free account if you haven’t done so already. The sign-up process is straightforward and grants you access to 100 free credits each month, allowing you to create chatbots for free.

Once logged in, click on the ‘Add WhatsApp Number’ button to integrate your WhatsApp account. You can choose from two methods to add your number. After adding your WhatsApp number, you will be directed to the flow builder where you can create your customer feedback bot.


2. Creating the Customer Feedback Bot in Pabbly Chatflow

To create the feedback bot, click on the ‘Add Flow’ button in the flow builder. Name your flow as ‘Customer Feedback Bot’. This step is crucial as it sets the foundation for your bot’s functionality. Next, we will set up the trigger event for the bot. using Pabbly Connect

  • Select ‘Keyword or Regex Match’ as the trigger event.
  • Add the keyword ‘completed’ in the keyword box.
  • Press the enter button to save the keyword.

Now, whenever a customer sends the keyword ‘completed’ after their service, the WhatsApp chatbot will trigger and send a welcome message. This ensures immediate engagement with your customers, enhancing their experience.


3. Configuring Messages and Rating Options

After setting up the trigger, the next step is to configure the welcome message that your customers will receive. Drag the ‘Text’ action into the flow and input your welcome message. This message should include a dynamic field to personalize the greeting, such as the customer’s name. using Pabbly Connect

  • Add three rating options for customers: Poor, Average, and Excellent.
  • Set these options as quick replies.
  • Map the selected rating to a custom field for future reference.

This configuration allows you to collect valuable feedback from customers, which can be used to improve service quality. After configuring the message and options, remember to save your flow to avoid losing any changes.


4. Collecting and Storing Customer Feedback with Pabbly Connect

Once the customer has rated your service, the next step is to ask for additional feedback. Drag the ‘Ask Question’ action into the flow and prompt the customer to provide comments or suggestions. This message should also allow any response format.

After collecting the feedback, it’s essential to store this information in a structured manner. For this, we will use the API request feature in Pabbly Connect. Set up the API request to send the feedback data to your Pabbly Connect account:

Select POST as the request type. Enter the webhook URL from your Pabbly Connect workflow. Map the necessary fields such as name, phone, rating, and feedback.

This integration ensures that all customer feedback is recorded in your Pabbly Connect account, making it easy to manage and analyze customer responses.


5. Integrating Customer Feedback with Google Sheets via Pabbly Connect

The final step is to integrate the feedback data with Google Sheets using Pabbly Connect. In your Pabbly Connect dashboard, create a new workflow and select Pabbly Chatflow as the trigger application. Choose ‘New Message Received’ as the event to start the workflow.

Once the connection is established, map the fields from the feedback data to the corresponding columns in your Google Sheet. This allows you to dynamically update the sheet with new feedback entries:

Select the Google Sheets application as the action. Choose ‘Add New Row’ as the action event. Map customer name, phone, rating, and feedback to the appropriate columns.

After saving this integration, every time a customer provides feedback, it will automatically be recorded in your Google Sheet, streamlining your feedback management process.


Conclusion

In this tutorial, we demonstrated how to build a customer feedback bot using Pabbly Connect and Pabbly Chatflow. By following these steps, you can enhance customer engagement and systematically collect valuable feedback to improve your services. Start using Pabbly Connect today to automate your customer feedback process effectively.

Ensure you check out Pabbly Connect to create business automation workflows and reduce manual tasks. Pabbly Connect currently offer integration with 2,000+ applications.

Build an AI Bot That Improves In-Store Visits

Learn how to create an AI bot that enhances in-store visits using Pabbly Chatflow. Follow this detailed tutorial to set up your WhatsApp assistant effectively.

Watch Step By Step Video Tutorial Below


1. Accessing Pabbly Chatflow for Your WhatsApp Assistant

To create an AI bot that improves in-store visits, you first need to access Pabbly Chatflow. Open a new tab and navigate to pav.com/chatflow. Here, you will find options to either sign in or sign up.

If you are new to Pabbly Chatflow, click on the ‘Sign Up Free’ button. This allows you to create a free account where you can receive 100 free credits every month. If you need more credits, consider upgrading to a premium plan. Once logged in, click on the ‘Access Now’ button under the Pabbly Chatflow box to enter the dashboard.


2. Creating Your WhatsApp Assistant with Pabbly Chatflow

After accessing Pabbly Chatflow, the next step is to create your WhatsApp assistant. Click on the ‘Add WhatsApp Number’ button and follow the prompts to add your WhatsApp number. This will enable you to create a WhatsApp assistant within the platform.

  • Select a method to add your WhatsApp number.
  • Click on the ‘AI Assistant’ to start creating your assistant.

Once your number is added, click on ‘Add a Assistant’ and name your assistant. For example, you can name it ‘AI Bot That Improves In-Store Visits’. This sets the foundation for your WhatsApp assistant.


3. Configuring AI Instructions in Pabbly Chatflow

Now that your assistant is created, it’s time to configure the AI instructions using Pabbly Chatflow. This involves selecting an AI agent and setting the necessary parameters. Choose an AI type and fill in the instruction box with the role and constraints of your assistant.

Make sure to set the temperature to 0.5 to balance creativity and focus. You will also need to select the AI model, such as GPT 5.2, and input your OpenAI API key. This key is essential for the AI to function properly. To obtain this key, create a new secret key on the OpenAI platform and paste it into Pabbly Chatflow.


4. Uploading Knowledge Source for Your Assistant

With the AI instructions set, the next step is to upload a knowledge source to assist the AI in providing accurate information. In Pabbly Chatflow, drag and drop your knowledge base file, which can be in PDF or .txt format, into the designated area. Ensure the file size is under 90 MB.

  • Prepare your knowledge base in Google Docs.
  • Download the file in an acceptable format.

After uploading, you will receive a notification confirming that the file has been processed successfully. This information will help your AI assistant respond accurately to customer inquiries.


5. Finalizing Your Assistant and Testing

Now that your knowledge source is uploaded, you can finalize your assistant’s interface in Pabbly Chatflow. Customize the assistant’s heading, subheading, and initial messages. You can also style the assistant by selecting a theme and adjusting the shape.

Once you are satisfied with the configuration, click the ‘Save’ button to activate your assistant. You can test your assistant by sending a keyword like ‘purchase’ via WhatsApp. This will trigger the assistant, and you should receive a welcome message confirming it is operational.

With your WhatsApp assistant successfully created using Pabbly Chatflow, you can now enhance the customer experience and increase footfall in your store. This AI bot is an effective tool for engaging with customers and providing them with vital information.


Conclusion

In this tutorial, we explored how to build an AI bot that improves in-store visits using Pabbly Chatflow. By following these steps, you can create an effective WhatsApp assistant that enhances customer interaction and boosts store traffic.

Ensure you check out Pabbly Connect to create business automation workflows and reduce manual tasks. Pabbly Connect currently offer integration with 2,000+ applications.

Hospitals Reduced Front Desk Work by 70% Using AI 😱

Discover how to automate hospital front desk tasks by 70% using Pabbly Connect and WhatsApp AI integration. Step-by-step tutorial included! Discover hidden automation capabilities within your existing tools. This guide shows you how to connect your essential applications and permanently eliminate redundant manual processes.

Watch Step By Step Video Tutorial Below


1. Accessing Pabbly Connect for Hospital Automation

To begin automating hospital front desk tasks, first access Pabbly Connect. This platform serves as the foundation for integrating various applications, including WhatsApp for seamless communication.

Navigate to the Pabbly Connect website and sign up for a free account. Once logged in, you will find options to create new integrations. Ensure you have your WhatsApp API details ready to set up the connection effectively.


2. Creating a WhatsApp AI Assistant with Pabbly Connect

The next step is to create an AI assistant specifically for hospitals using Pabbly Connect. This assistant will handle inquiries and appointment bookings automatically, significantly reducing front desk workload.

  • Open Pabbly Chatflow and select the AI assistant feature.
  • Click on the ‘Add Assistant’ button and name your assistant.
  • Set the instructions for the AI, defining its behavior.

After configuring the AI assistant, you can customize its responses and set parameters like welcome messages and fallback messages. This feature ensures that the assistant can engage users effectively.


3. Integrating Knowledge Base into Pabbly Connect

To enhance the AI assistant’s capabilities, integrate a knowledge base using Pabbly Connect. This knowledge base will provide the AI with specific information about hospital services, appointment bookings, and more.

Prepare a knowledge base file in PDF or TXT format, ensuring it is under 90 MB. Once ready, upload this file into the Pabbly Connect interface, allowing the AI to access detailed hospital information.

This integration is crucial as it allows the AI assistant to provide accurate and relevant responses to user inquiries. The knowledge base should include:

  • Appointment booking procedures
  • Doctor availability
  • Common FAQs

4. Finalizing the AI Assistant Setup in Pabbly Connect

Once the knowledge base is integrated, finalize your AI assistant setup with Pabbly Connect. Customize the assistant’s interface, including initial messages and user prompts for a personalized experience.

Activate the assistant by enabling the toggle in settings, and save your configurations. This step is essential for ensuring that the assistant is live and ready to interact with users.

Additionally, you can embed the assistant into your hospital’s website, making it easily accessible to patients. Simply copy the provided embed code and paste it into your website’s HTML.


5. Enabling Auto Replies with Pabbly Connect

To ensure that your AI assistant is responsive, enable auto-reply settings within Pabbly Connect. This feature allows the assistant to automatically reply to incoming messages, providing instant assistance to users.

Configure the auto-reply settings by selecting the contact list for which the assistant will respond. After saving these settings, your assistant will be ready to handle inquiries without manual intervention.

With these configurations, your hospital’s front desk workload can be significantly reduced, allowing staff to focus on more critical tasks. The integration of Pabbly Connect with WhatsApp ensures a seamless communication experience for patients.


Conclusion

By utilizing Pabbly Connect, hospitals can automate their front desk operations and reduce workload by 70%. This integration not only streamlines communication via WhatsApp but also enhances patient experience through immediate responses.

Ensure you check out Pabbly Connect to create business automation workflows and reduce manual tasks. Pabbly Connect currently offer integration with 2,000+ applications.

How to Automatically Save Instagram Leads to Google Contacts (Step-by-Step)

Learn how to automatically save Instagram leads to Google Contacts using Pabbly Connect. This detailed tutorial outlines every step of the integration process. Master proven automation processes with practical implementation examples and strategic recommendations you can apply immediately in your workflow.

Watch Step By Step Video Tutorial Below


1. Accessing Pabbly Connect for Instagram Leads

To start automatically saving Instagram leads to Google Contacts, you first need to access Pabbly Connect. Visit the Pabbly website by typing Pabbly.com in your browser. Once there, sign in to your existing account, or sign up for free if you are a new user.

After signing in, navigate to the Pabbly Connect application. This is where you will create a new workflow to connect your Instagram lead ads with Google Contacts. Click on the ‘Access Now’ button to enter the Pabbly Connect dashboard.


2. Creating a Workflow in Pabbly Connect

In the Pabbly Connect dashboard, you can create a new workflow by clicking on the ‘Create Workflow’ button. This will prompt you to select a workflow builder. Choose the new beta version for a modern experience. Name your workflow as ‘Automatically Save Instagram Leads to Google Contacts’ and select a folder for organization.

  • Click on the ‘Create’ button to finalize your workflow setup.
  • You will see a pop-up for entering a trigger application.

Set Instagram lead ads as your trigger application. This means that every time a new lead is generated from Instagram, it will trigger the workflow, allowing Pabbly Connect to automate the process of adding that lead to Google Contacts.


3. Setting Up the Trigger with Instagram Lead Ads

To set up the trigger, select Instagram lead ads and choose the event as ‘New Lead Instant’. Click on ‘Connect’ to establish a connection between Pabbly Connect and Instagram. If you don’t have an existing connection, you will need to add a new one.

Follow the prompts to connect with your Facebook account associated with Instagram. Once connected, select the Facebook page linked to your Instagram account and choose the lead form you want to use. This setup ensures that every new lead from Instagram is captured by Pabbly Connect.


4. Adding Google Contacts as an Action Step

After setting up the trigger, it’s time to add Google Contacts as the action step. In your workflow, click on ‘Add New Action Step’ and search for Google Contacts. Choose the action event as ‘Create Contact’ and click ‘Connect’. If you don’t have an existing connection, you will need to authenticate your Google account. using Pabbly Connect

  • Select your Google account and grant necessary permissions.
  • Map the fields from your Instagram lead ads to the corresponding fields in Google Contacts.

Mapping is crucial as it ensures that the data from Instagram leads is accurately transferred to Google Contacts. Use the dynamic mapping feature to pull in details like first name, last name, email address, and phone number.


5. Testing the Workflow and Finalizing

Once you have set up the mapping, click on ‘Save and Send Test Request’ to test the workflow. This will send a test lead from Instagram to Google Contacts via Pabbly Connect. After the test is successful, refresh your Google Contacts to check if the new contact appears.

If the test is successful, your integration is complete. Now, every time you receive a new lead from Instagram, Pabbly Connect will automatically add that lead to your Google Contacts, streamlining your lead management process.


Conclusion

This tutorial demonstrated how to automatically save Instagram leads to Google Contacts using Pabbly Connect. By following these steps, you can enhance your lead management and ensure that no potential customer is missed.

Ensure you check out Pabbly Connect to create business automation workflows and reduce manual tasks. Pabbly Connect currently offer integration with 2,000+ applications.

Capture Leads Automatically Using WhatsApp Bot

Learn how to capture leads automatically using a WhatsApp bot with Pabbly Connect and Pabbly Connect. Step-by-step tutorial included. Eliminate manual repetitive tasks from your workflow. Discover proven automation methods with intuitive steps designed for efficiency-minded professionals.

Watch Step By Step Video Tutorial Below


1. Accessing Pabbly Connect for WhatsApp Bot Integration

To capture leads automatically using a WhatsApp bot, you first need to access Pabbly Connect. Start by visiting the Pabbly website and navigating to the Pabbly Connect dashboard. If you are a new user, you can sign up for a free account, which provides you with 100 free credits every month to create your workflows.

Once logged in, you will find the option to create a new workflow. This is essential for integrating your WhatsApp bot with other applications. Here’s how to get started:

  • Visit Pabbly Connect and sign in to your account.
  • Click on ‘Create Workflow’ to begin.
  • Name your workflow appropriately for easy identification.

Now, you are ready to set up your WhatsApp bot integration using Pabbly Connect.


2. Setting Up Your WhatsApp Chatbot in Pabbly Chatflow

After accessing Pabbly Connect, the next step is to set up your WhatsApp chatbot using Pabbly Chatflow. Navigate to the Pabbly Chatflow dashboard and click on the ‘Add WhatsApp Number’ button. This allows you to link your WhatsApp number to the chatbot.

Once your number is added, click on ‘Flows’ to access the flow builder. Here, you can create a new flow for your WhatsApp chatbot. Follow these steps to set it up:

  • Click on ‘Add Flow’ to create a new chatbot flow.
  • Select a trigger event, such as keyword match, to initiate the chatbot.
  • Add keywords that will trigger your bot, like ‘event’ or ‘hello’.

Once these steps are completed, your WhatsApp chatbot will be ready to interact with users when they send the specified keywords.


3. Creating the Chatbot Flow with Pabbly Chatflow

With your WhatsApp chatbot initiated, you can now create the flow that captures leads. In Pabbly Chatflow, drag and drop the necessary action buttons to design your bot’s conversation. Start with a welcome message that introduces your services.

For instance, when a user triggers the bot, it should send a message like ‘Welcome to Grand Aura events!’ and then ask a series of questions about their event. Here are the steps to create this flow:

Add a text action for the welcome message. Use the ‘Ask Question’ action to gather details such as event type, guest count, budget, and date. Map the responses to custom fields for later retrieval.

After setting up these interactions, your chatbot will effectively gather necessary information from leads and prepare to send it to your sales team via Pabbly Connect for follow-up management.


4. Integrating Chatbot Responses with Google Sheets via Pabbly Connect

To ensure all captured lead details are organized, you can integrate your WhatsApp chatbot with Google Sheets using Pabbly Connect. This integration allows you to store customer responses automatically, facilitating better follow-up.

In Pabbly Connect, create a new workflow that connects Pabbly Chatflow to Google Sheets. Follow these steps:

Select Pabbly Chatflow as the trigger application and set the event to ‘New Message Received’. Copy the webhook URL provided and paste it into your Pabbly Chatflow settings. Add Google Sheets as the action application and configure it to save the lead details in a new row.

This integration will ensure that every lead captured by your WhatsApp bot is recorded in your Google Sheets for easy access and management by your sales team.


5. Sending Email Notifications to Your Sales Team with Pabbly Connect

In addition to storing lead information, you can set up email notifications for your sales team using Pabbly Connect. This ensures that your team is promptly informed about new leads captured through the WhatsApp bot.

To configure email notifications, follow these steps in Pabbly Connect:

Add Gmail as the action application and select ‘Send Email’ as the event. Connect your Gmail account and specify the recipient email address for your sales team. Map the lead details captured from the WhatsApp bot into the email content.

With this setup, your sales team will receive an email notification every time a new lead is captured, allowing them to follow up efficiently and effectively.


Conclusion

Using Pabbly Connect and Pabbly Chatflow, you can automatically capture leads through a WhatsApp bot, integrate with Google Sheets, and notify your sales team via email. This streamlined process enhances lead management and improves follow-up efficiency.

Ensure you check out Pabbly Connect to create business automation workflows and reduce manual tasks. Pabbly Connect currently offer integration with 2,000+ applications.