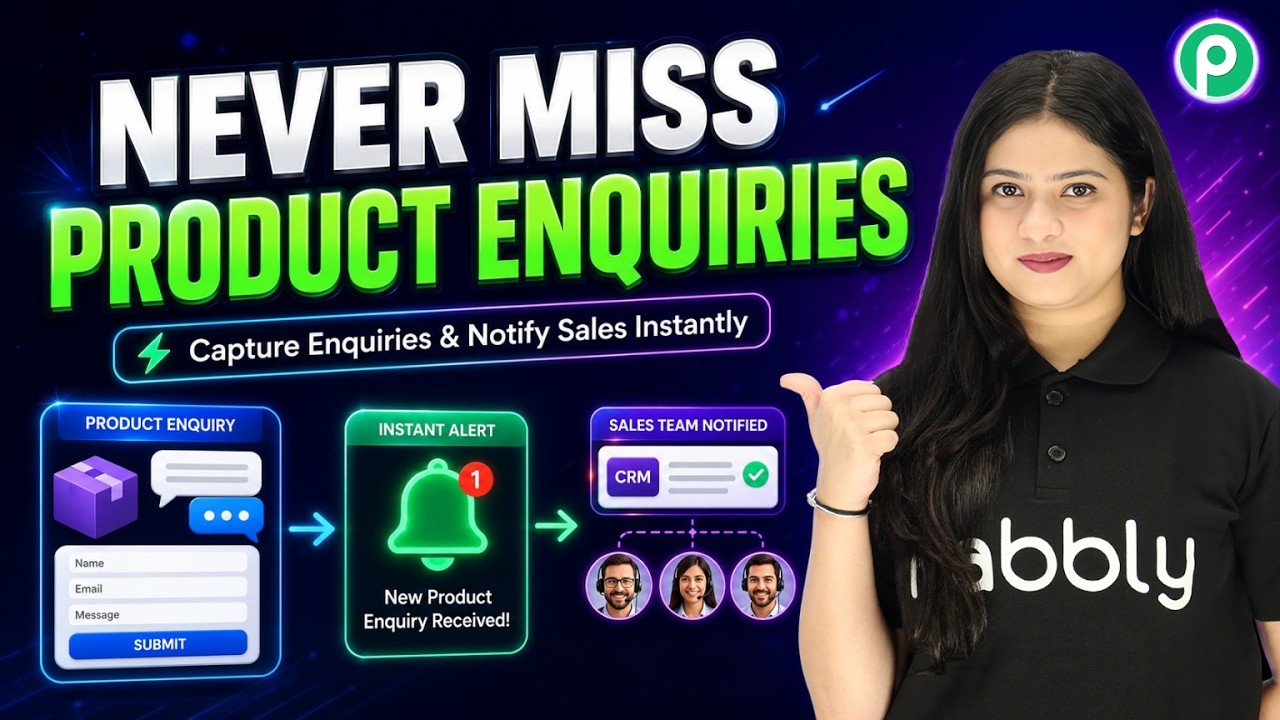
Capture Product Enquiries & Notify Your Sales Team Instantly
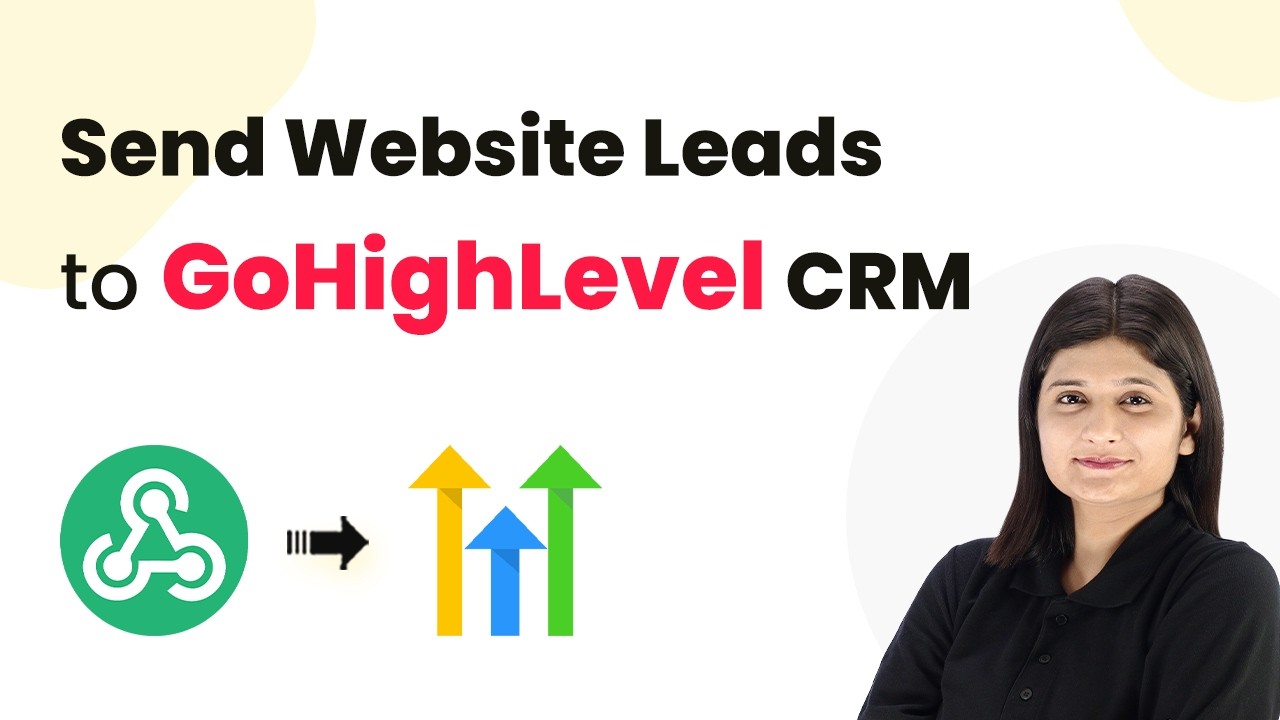
To begin integrating your website form with Go High Level using Pabbly Connect, first, access the Pabbly website by typing pabbly.com in your browser. From the homepage, you can sign in or sign up for a free account, which provides you with some monthly tasks to explore the platform.
Once logged in, navigate to the Pabbly Connect application from the dashboard. Here, you can create workflows to automate your processes efficiently. If you are a new user, consider utilizing the free tasks to familiarize yourself with the features before upgrading.
After accessing Pabbly Connect, click on the “Create Workflow” button to start building your automation. Name your workflow something descriptive, such as “Automatically Send Website Leads to Go High Level.” Select a folder for organization, like “Forms Automation,” and click on create.
Upon creation, a box will appear where you need to define your trigger application. This trigger is essential as it starts the automation process whenever a new form submission occurs.
In the trigger application, select “Webhook by Pabbly” and choose the event “Catch Webhook.” Click on connect to generate a unique webhook URL. This URL acts as a bridge between your website form and Pabbly Connect.
Next, access the code for your website form in a text editor. Replace the existing webhook URL with the one generated by Pabbly Connect. Save the changes to ensure that the form can send submissions to the webhook.
After saving the changes, go back to Pabbly Connect and test the webhook by submitting your form. This step is crucial for capturing the response and ensuring everything is set up correctly.
Once the webhook response is captured, it’s time to add an action step. Click on “Add New Action Step” and search for “Lead Connector V2”. Select the action event “Create Contact” to add new leads to your Go High Level account.
When prompted, connect your Go High Level account to Pabbly Connect. You can choose to add a new connection or select an existing one. After connecting, you’ll need to map the fields from the webhook response to the corresponding fields in Go High Level.
This mapping ensures that every time a new form submission occurs, the lead data is accurately transferred to Go High Level without manual entry.
After setting up the action step, it’s essential to test the integration. Click on “Save and Send Test Request” to verify that a new contact is created in Go High Level. Refresh your contacts page in Go High Level to see if the new lead appears correctly.
If the test is successful, you’ll see a confirmation response from Pabbly Connect. This indicates that the integration is functioning as expected. If you encounter any issues, review the steps to ensure everything is correctly set up.
This testing phase is critical to ensure that your workflow is operational and that leads are being captured correctly through Pabbly Connect.
In this tutorial, we explored how to use Pabbly Connect to integrate your website form with Go High Level for automated lead management. By following the steps outlined, you can ensure that every new form submission is captured and processed efficiently.
Utilizing Pabbly Connect not only streamlines your workflow but also enhances your lead management process, allowing you to focus on growing your business.

To start integrating WooCommerce with WhatsApp, first access Pabbly Connect by visiting www.pabbly.com/connect. This platform allows you to automate processes without coding.
If you are a new user, you can sign up for free and receive 100 tasks monthly to begin your integration journey. Once logged in, you’ll be greeted by the dashboard where you can create your automation workflows.
In this step, you will set up a trigger in Pabbly Connect that captures new orders from your WooCommerce store. Begin by creating a new workflow and selecting “WooCommerce” as your trigger app.
In the WooCommerce settings, go to the “Webhooks” section and click on “Add Webhook.” Here, you can name your webhook (e.g., “New Order Created”), set the status to active, and paste the copied webhook URL. Once saved, this will establish the connection between WooCommerce and Pabbly Connect.
Now that the trigger is set up in Pabbly Connect, you need to place a test order to verify the integration. Go to your WooCommerce store and add a product to the cart.
Proceed to checkout and fill in the required fields. Use a dummy name like “Best User” and an email such as “[email protected]”. Ensure the address is valid, including the city, state (Madhya Pradesh), and a dummy phone number. After placing the order, wait for a few seconds for Pabbly Connect to capture the order details.
With the order data captured, the next step is to send a WhatsApp message using Pabbly Chatbot. In your Pabbly Connect workflow, add a new action and select “Pabbly Chatbot” as the application.
After setting up the message parameters, click on “Save and Send Test Request”. This will trigger the WhatsApp message to be sent to the customer who placed the order, confirming their purchase and providing a coupon code.
After completing the setup, it’s crucial to verify that the integration works as intended. Check your WhatsApp for the message sent to the test customer. You should see a personalized message thanking them for their order.
This integration allows you to automate communication with customers, enhancing their experience and increasing the likelihood of repeat orders. By using Pabbly Connect, you can streamline this process without needing technical skills.
Integrating WooCommerce with WhatsApp using Pabbly Connect automates customer communication, ensuring timely notifications. This setup not only saves time but also enhances customer engagement, encouraging repeat business.
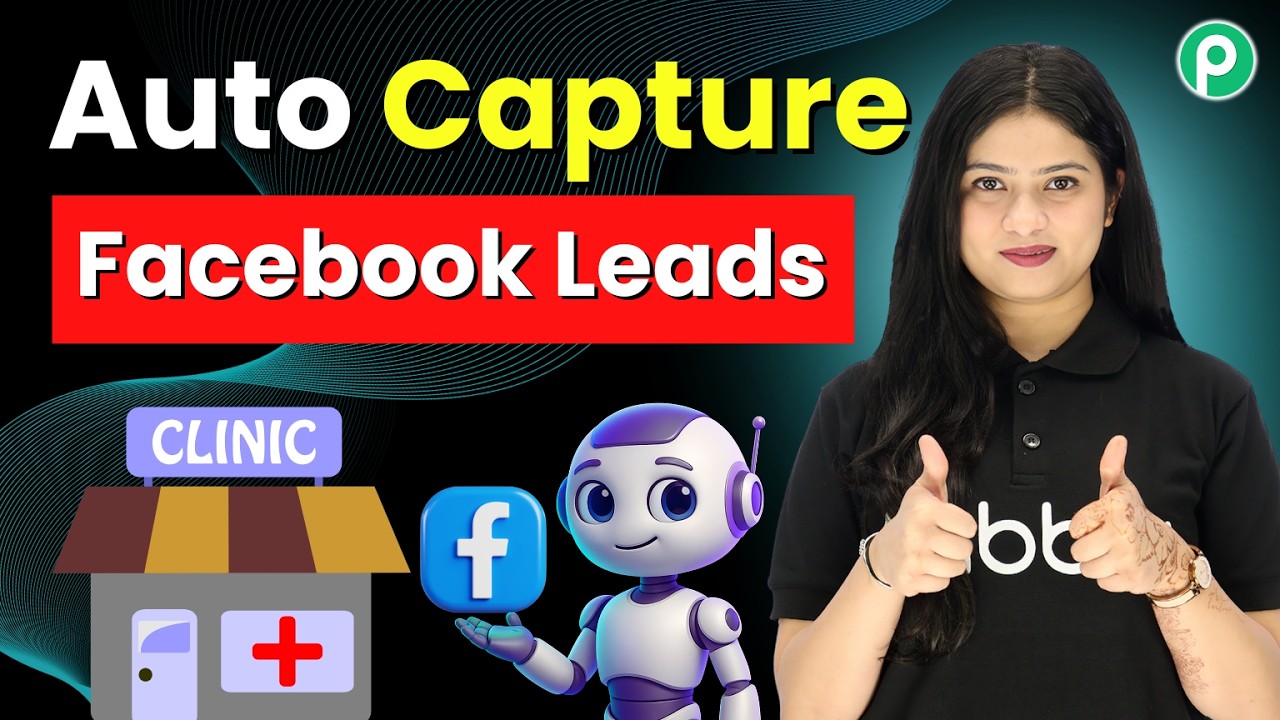
To start integrating Facebook Lead Ads with Google Sheets, first, access Pabbly Connect by navigating to pabbly.com/connect in your browser. This platform is essential for creating automated workflows that link various applications seamlessly.
Once on the landing page, you will see options to sign in or sign up for free. If you are an existing user, click on the “Sign In” button. Otherwise, click “Sign Up for Free” to create a new account. This process takes only a few minutes and gives you 100 free tasks each month to explore the platform’s capabilities.
After logging into your Pabbly Connect account, you will be directed to the dashboard. Here, click on “Create Workflow” to initiate a new integration setup. You can choose to create the workflow from scratch or use the Quick Builder for a simplified process.
This setup allows you to automate the process of capturing leads and storing them in Google Sheets without any manual effort. After configuring the trigger, proceed to define the action to add a new row in Google Sheets for each new lead captured.
Next, you will connect your Facebook Lead Ads to Pabbly Connect. Ensure you are logged into your Facebook account where the ad campaign is running. Click on “Connect with Facebook Lead Ads” and select your Facebook account from the dropdown menu.
Once connected, choose the Facebook page associated with your ad campaign. In this case, it is titled “Summer Smiles.” You will then need to select the specific lead ad form you created for dental appointment requests. After saving and sending a test request, you will receive a confirmation that the connection is successful.
Now, it’s time to connect Google Sheets with Pabbly Connect. Select the option to add a new connection and choose your Google account. Grant the necessary permissions to allow Pabbly Connect to access your Google Sheets.
Once connected, select the spreadsheet where you want to store the lead information. Ensure that the spreadsheet is prepared with the necessary columns, such as name, email, phone number, city, and concern. You will map these fields to the corresponding data received from Facebook Lead Ads.
This mapping ensures that every time a new lead is captured, their details are automatically updated in Google Sheets, allowing for efficient lead management.
In this tutorial, we demonstrated how to integrate Facebook Lead Ads with Google Sheets using Pabbly Connect. This integration streamlines the lead management process, allowing you to capture and organize leads efficiently without manual input. By following these steps, you can ensure that your leads are recorded in real-time, enhancing your business operations.
Utilizing Pabbly Connect for this integration not only saves time but also improves your ability to follow up with potential clients effectively. Start automating your workflows today!

To begin integrating WordPress and Pinterest, you first need to access Pabbly Connect. Go to the Pabbly Connect website by typing pabbly.com/connect in your browser’s address bar.
Once there, you will see options for signing in or signing up. If you are a new user, sign up for a free account to explore Pabbly Connect’s features. Existing users can sign in directly. This platform allows you to automate tasks between various applications efficiently.
Now that you have accessed Pabbly Connect, the next step is to create a new post in your WordPress account. This post will be the trigger for your automation.
Go to your WordPress dashboard and click on “Add New” under Posts. Fill in the title and description, and upload an image for your post. Once everything is set, click the “Publish” button to make your post live. This action will initiate the connection with Pabbly Connect.
After publishing, you can view the post to ensure it appears correctly. This post now sets the stage for the automation to take place through Pabbly Connect.
With your WordPress post published, navigate back to Pabbly Connect to set up the integration. Click on the “Create Workflow” button to start.
Select “WordPress” as your trigger application and choose “New Post Published” as the event. Click the “Connect” button to create a connection. You will need to copy the webhook URL provided by Pabbly Connect and add it to your WordPress settings.
After configuring the webhook, save the settings. The integration is now set up to trigger whenever a new post is published in WordPress, which will be sent to Pabbly Connect.
Now that your WordPress post is connected, the next step is to create a pin in Pinterest using Pabbly Connect. In your Pabbly Connect workflow, search for Pinterest as your action application.
Select “Create Pin” as the event. Click on the “Connect” button, and allow access to your Pinterest account. You will then be prompted to fill in the required fields for your pin.
After mapping the necessary fields, click “Save and Send Test Request” to create the pin. You will receive a confirmation response, indicating that your pin has been successfully created in Pinterest.
To finalize your automation, check your Pinterest account to verify that the pin has been created. Refresh your Pinterest page, and you should see the new pin reflecting the content from your WordPress post.
This successful integration demonstrates how Pabbly Connect automates the process of sharing new WordPress posts as pins on Pinterest, saving you time and effort in manual posting.
By following these steps, you can easily set up similar automations between various applications using Pabbly Connect. This tool not only streamlines your workflow but also enhances your productivity.
In this tutorial, we explored how to automate the integration between WordPress and Pinterest using Pabbly Connect. With these steps, you can efficiently share your blog posts as pins, enhancing your online presence.
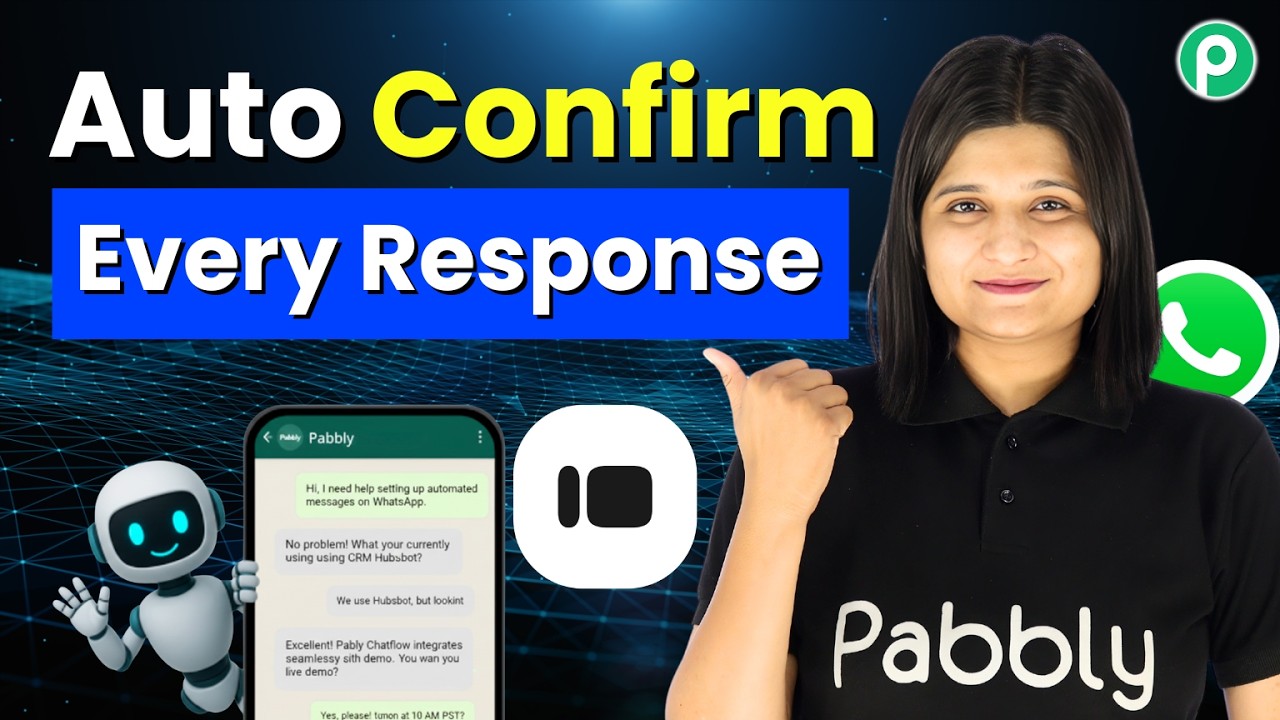
To begin integrating Typeform with WhatsApp, first access Pabbly Connect by visiting the Pabbly website. Simply type pabby.com in your browser and sign in to your account.
Once logged in, navigate to the Pabbly Connect dashboard. This is where you can create and manage your automation workflows. If you are a new user, consider signing up for a free account to explore the features.
To create a new workflow, click on the “Create Workflow” button on the dashboard. Name your workflow something descriptive, such as “Send Instant WhatsApp Confirmation for Typeform Responses”. Select the appropriate folder for organization.
After setting the trigger, you will need to connect your Typeform account to Pabbly Connect. Follow the prompts to log in and grant necessary permissions.
With the Typeform connection established, it’s time to test the integration. Fill out a sample Typeform submission to capture the webhook response in Pabbly Connect. Ensure you enter all required fields like name, email, and phone number.
After submitting the form, return to your Pabbly dashboard. You should see the response captured successfully, indicating that the integration is working as intended.
Next, configure the action step to send a WhatsApp message using Pabbly Connect. Select Pabbly Chatflow as your action application and choose “Send Text Message” as the action event.
After configuring the message, hit “Save and Send Test Request” to verify that the WhatsApp message is sent successfully. Check your WhatsApp for the confirmation message.
In conclusion, integrating Typeform with WhatsApp using Pabbly Connect automates your communication process effectively. By following these steps, you can ensure that every new Typeform submission triggers a personalized WhatsApp message, enhancing your engagement with leads.
Utilizing Pabbly Connect not only saves time but also improves customer interaction, making it a valuable tool for your business.
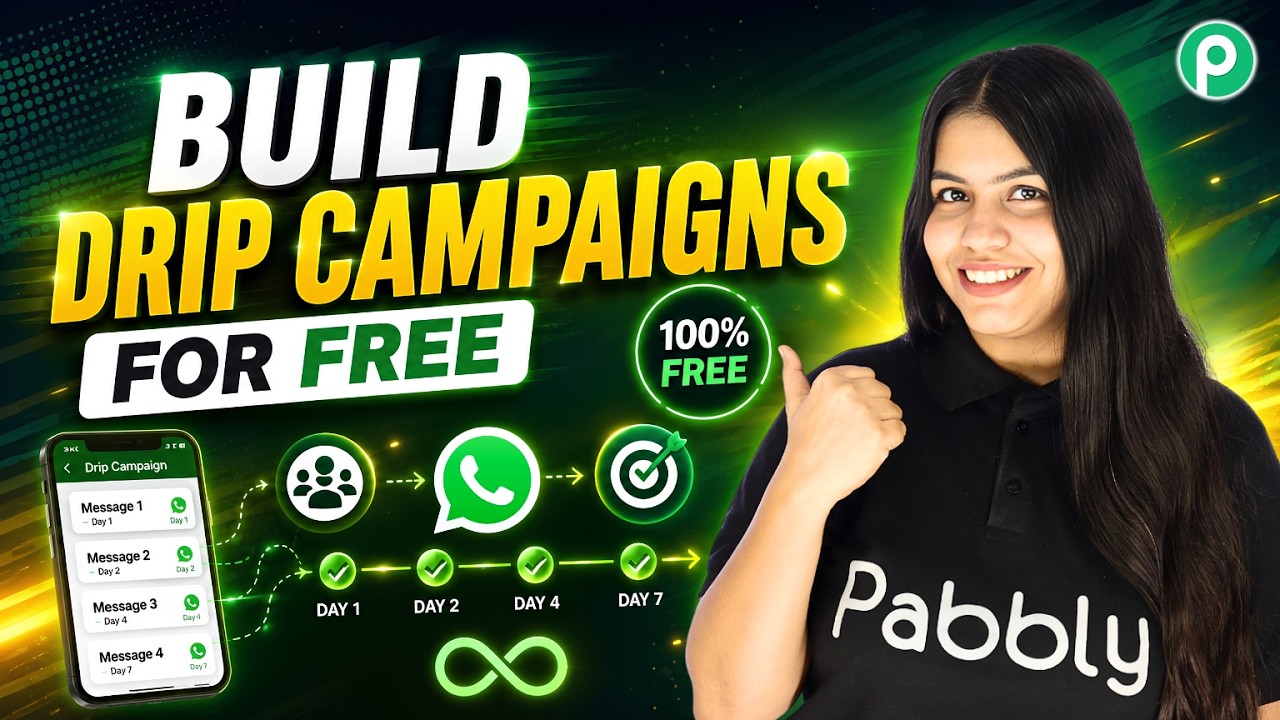
To start creating a WhatsApp drip campaign, first, access Pabbly Connect. You can do this by visiting the Pabbly website and logging into your account. If you are a new user, sign up for a free trial which allows you to send up to 100 WhatsApp messages.
Once logged in, navigate to the dashboard of Pabbly Connect. Here, you will find various options to set up your integrations. Ensure your WhatsApp number is added in Pabbly Chatflow to facilitate sending messages seamlessly.
Next, you will create a drip campaign using Pabbly Connect. Go to the “Flow” section and click on the “Add Flow” button. Name your flow appropriately, such as “WhatsApp Drip Campaign” to keep track of your automation.
This trigger will start your drip campaign once the first WhatsApp message is delivered to the lead. Use the broadcast section of Pabbly Connect to send the initial message to your leads.
After setting the trigger, it’s time to configure the messages in your drip campaign. The first message will be sent immediately after the trigger. For subsequent messages, you will need to introduce delays. Use the “Delay” action node to set the time intervals between messages.
For example, if you want the second message to be sent one day after the first, select the delay type as “Delay for” and set the value to 1 day. Repeat this process for additional messages, adjusting the delays as needed.
Each message can be personalized using dynamic fields, such as the lead’s name, by using the “dollar name” variable in your messages. This ensures that each lead receives a personalized experience.
Once all messages and delays are set up, review the flow in Pabbly Connect. Ensure that each message is connected correctly with the appropriate delays. This step is crucial to maintain the sequence of messages being sent to your leads.
After verifying the setup, click the “Save Flow” button. This action will finalize your drip campaign, and it will be activated once the first WhatsApp template is delivered. You can customize the number of messages and their timing based on your business needs.
Remember, the maximum delay you can set is 30 days, but if you need longer intervals, you can use the “Delay until” option. This flexibility allows you to tailor your communication strategy effectively.
Using Pabbly Connect for your WhatsApp drip campaigns offers numerous advantages. It automates the communication process, ensuring that leads are consistently engaged without manual effort. This approach not only saves time but also enhances the customer experience.
Additionally, with the ability to personalize messages and set specific delays, businesses can maintain a professional image while nurturing leads. The integration capabilities of Pabbly Connect make it a powerful tool for any business looking to streamline their communication efforts.
Overall, utilizing Pabbly Connect can significantly improve your lead management process and drive better results for your business.
In conclusion, setting up a WhatsApp drip campaign using Pabbly Connect streamlines your communication with leads. This automation not only saves time but also enhances customer engagement through personalized messaging. Start utilizing Pabbly Connect today to improve your communication strategy.

In this section, we will explore how to utilize Pabbly Connect to automate the advertisement booking process for a newspaper agency. By integrating WhatsApp with Pabbly Connect, businesses can streamline their customer interactions, allowing clients to book advertisements directly through chat.
The process begins with setting up a flow in Pabbly Connect. This involves creating a chatbot that can handle inquiries and collect necessary information from customers, thus eliminating repetitive tasks for your team.
To create your advertisement booking chatbot, first, access the Pabbly Chat Flow dashboard. Click on the “+ Add Flow” button to start. Name your flow appropriately to reflect its purpose, such as “Advertisement Booking”.
Link these elements in Pabbly Connect to ensure smooth navigation through the chatbot. This setup allows customers to initiate the booking process seamlessly.
Once the chatbot is set up, it’s crucial to collect relevant customer information. When a user clicks on “Book an Ad”, the bot should prompt them for details such as advertisement type and format.
Using Pabbly Connect to manage these interactions ensures that all necessary information is gathered efficiently, allowing for a streamlined booking process.
After collecting the necessary information, the chatbot should provide a summary of the booking request. This includes details like the advertisement type, size, and customer contact information.
To finalize the booking, the chatbot can send a confirmation message to the customer, utilizing the data collected earlier. This automated response not only enhances customer experience but also saves time for your team.
By leveraging Pabbly Connect, you can ensure that every interaction is personalized and efficient, leading to higher customer satisfaction and retention.
In conclusion, using Pabbly Connect to automate your newspaper advertisement booking process can significantly improve operational efficiency. By creating a WhatsApp chatbot, you can provide instant responses to customer inquiries and streamline the booking process.
With the steps outlined in this tutorial, you can easily set up your own automated system, ensuring that your newspaper agency remains competitive and responsive to customer needs.

To initiate your WhatsApp broadcast, first, you need to access Pabbly Connect. Open your browser and navigate to pabbly.com/chatflow. This platform is essential for managing your WhatsApp communications effectively.
If you are a new user, click on “Sign Up for Free” to create an account. Existing users can simply log in. Once logged in, you will see all Pabbly applications. Click on “Access Now” under Pabbly Chatflow to proceed.
Once you are in Pabbly Chatflow, navigate to the broadcast section. Here, you will create a message template that will be used for your WhatsApp broadcast. Templates are crucial for sending bulk messages efficiently.
After creating your template, click on the “Add Broadcast” button. This will allow you to set up a new broadcast campaign. Select the type as “Broadcast Campaign” and name it appropriately, such as “Real Estate Broadcast”.
To send messages, you need to import contacts into Pabbly Connect. First, ensure your contacts are in a Google Sheets format. Download this file as a CSV to upload it into Pabbly Chatflow.
In the contact section, click on the “Add Contact” button. You can either add contacts individually or in bulk by uploading the CSV file. Select the option to upload a CSV and import your contacts into Pabbly Connect.
With your contacts now in Pabbly Chatflow, you can proceed to send your WhatsApp broadcast. Select the contact list you want to send the message to and refine your audience if necessary.
Choose the message type as either “Pre-approved” or “Regular message”. For this tutorial, select the pre-approved template. You can also add media to your message to make it more engaging.
After scheduling, you will see the stats for your broadcast, including sent, delivered, and read messages. This is how Pabbly Connect simplifies the process of sending WhatsApp broadcasts.
In this tutorial, we explored how to use Pabbly Connect to send bulk WhatsApp messages effectively. By integrating Google Sheets and Pabbly Chatflow, you can engage with your leads efficiently. This method is invaluable for real estate agents and businesses alike.

To start integrating Facebook Messenger with Google Gemini, the first step is accessing Pabbly Connect. Open a new tab and navigate to www.pabbly.com/connect. This platform allows you to automate various tasks seamlessly.
If it’s your first time using Pabbly Connect, you can sign up for free, which provides you with 100 free tasks each month. This allows you to explore the features and create your workflows without any initial investment.
Once logged into Pabbly Connect, you can begin setting up your integration. Start by creating a new workflow and selecting Facebook Messenger as your trigger application. This will initiate the process of connecting your Facebook page to Pabbly Connect.
After connecting, select your business page from the dropdown menu. This setup allows Pabbly Connect to monitor messages sent to your page and respond automatically.
Next, you will set up Google Gemini to generate automated responses to inquiries received via Facebook Messenger. In this step, Pabbly Connect acts as the intermediary that facilitates communication between Facebook Messenger and Google Gemini.
To integrate Gemini, click on the “Add New Connection” option again and select Google Gemini. You will need to enter your API key, which can be obtained from the Gemini API keys page.
This mapping allows Gemini to understand the context of the inquiry and generate an appropriate response.
After generating a response with Google Gemini, the next step is to send that response back to the user on Facebook Messenger. This is where Pabbly Connect streamlines the process, ensuring that the generated replies reach the right audience.
To do this, select the action to send a message back to Facebook Messenger. You will need to map the recipient ID, page ID, and the message generated by Gemini.
Once everything is mapped, click the “Save and Send Test Request” button to complete the integration. This action will send the generated response back to the user who inquired.
By following the steps outlined above, you can effectively automate responses to inquiries on Facebook Messenger using Pabbly Connect and Google Gemini. This integration enhances your customer service capabilities and ensures that no lead goes unanswered.
With Pabbly Connect, you can manage multiple automations seamlessly, allowing you to focus on growing your business while maintaining excellent communication with your clients.


