How to Sell Cupcakes Online | Step by Step (Free Method)

How to Sell Cupcakes Online

Ideal For: All the cakeries, cafes & restaurants, and other independent bakers with homemade cupcakes can use this method to take their cupcakes selling business online.
How to Sell Cupcakes Online

Why Choose this Method for Selling Over any Other Solution?

Unlike any other solution, this method allows you to:

  • List and sell cupcakes for FREE. Absolutely no payment required.
  • No commission on sales.
  • Collect payment through multiple payment modes from a single checkout page.
  • Sell one time or recurring subscriptions of cupcakes.
  • Sell and collect payment in any currency as per your requirement.
  • Give discounts on your products by offering special coupon codes.
  • Add sales commission agents to help you in selling cupcakes.

Get Pabbly Subscription Billing for Free

Selling cupcakes is a new trendy business in the market but to bake great cupcakes needs a great sense of style, taste, and passion. Furthermore, if you are passionate enough to bake cupcakes then you should definitely take your cupcake selling business online. Starting your cupcake selling business online is more easier than opening a new shop and promoting it. Even if you don’t have any money to start your business that’s when online platforms come into play.

Why would you like to sell cupcakes online?

Answer to this question is you can easily give your cupcakes selling business a headstart by taking it online without investing anything. Pabbly Subscription Billing is a platform through which you can sell unlimited cupcakes and generate unlimited profit without any restrictions. You can integrate it with your website, add unlimited products and plans, create coupons and discounts and so much more.
Also, its checkout page is very beneficial for your business. You just have to create it and share its link on your website or on social media and your customers can make purchases directly through it.

This is How your Checkout Page will Look Like After Creation
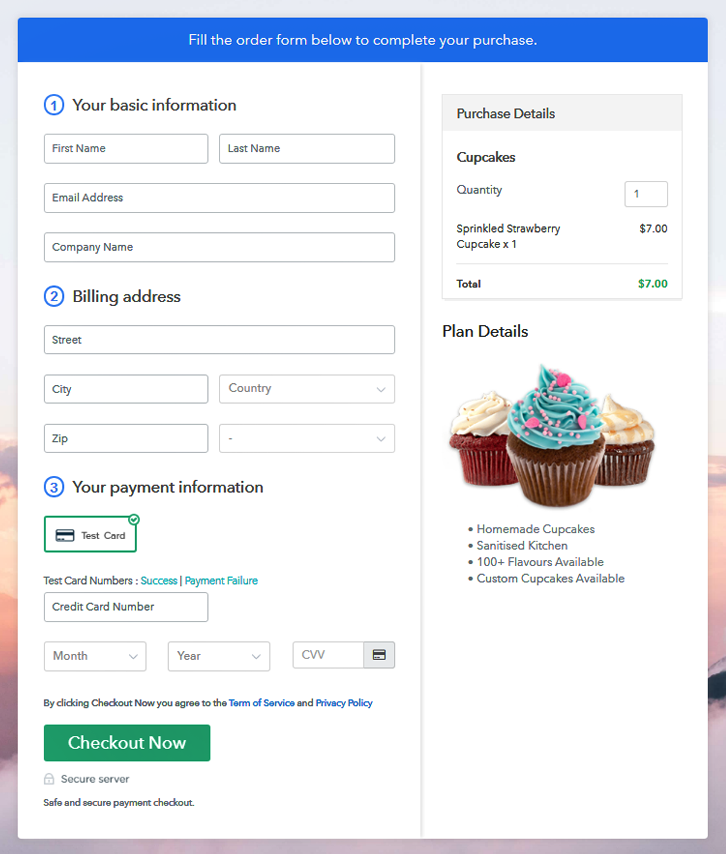
Checkout Page Preview

Preview Checkout Page

Step 1: Log in to Pabbly Subscription Billing

Signup

The first step includes, you to visit the Pabbly Subscription Billing website and click on the “Sign Up Free” button. Once the button is clicked, you are landed on the signup page, where you can create your account through Gmail or manually enter your details.

Sign Up For Free!

Step 2: Select Subscription Billing

Access Subscription Billing

Step 3: Account Setup

Setup Account

Once the signup process is finished, now you have to fill up your company details i.e. company name, select currency, and contact number in the appeared dialogue box.

Step 4: Connect Payment Gateway to Sell Cupcakes Online

Connect Payment Gateway

Here, we are showing you the payment collection process by enabling the ‘Test Payment’ mode. Further, you can connect with the payment gateways of your own choice like PayPal. The complete integration guide for payment gateways is provided below.

Step 5: Add Your Product

Add Product

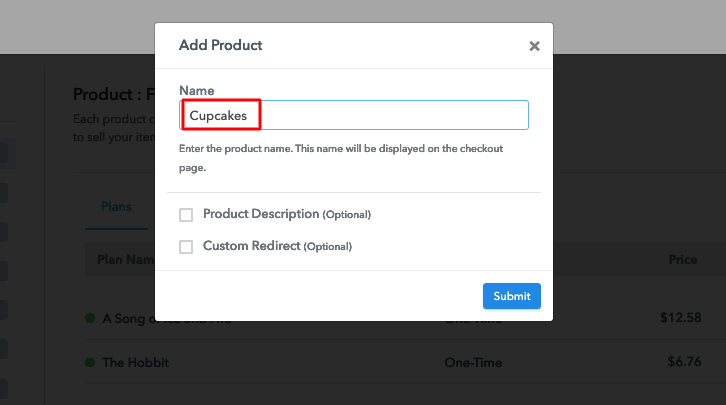
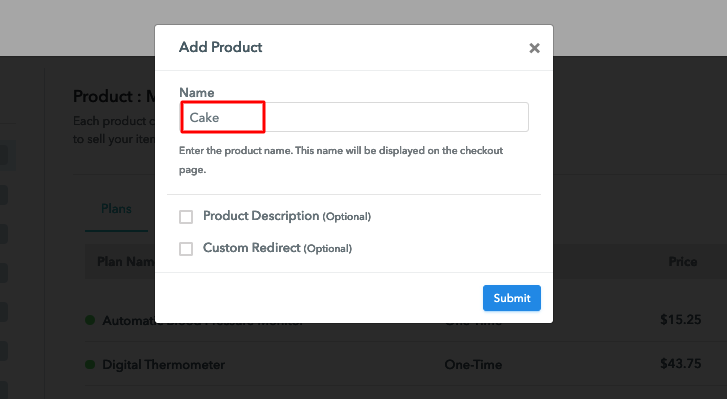
When the payment mode is enabled, then you can add your first product. You can add cupcakes of different categories, for example, lemon cupcakes, apple pie cupcakes, etc, and add all other types of cupcakes in the same product by creating different plans.

Add Product Name to Sell Cupcakes Online

You just have to fill up these details and your product is added.

Note: Here you can add all the products related to the similar category by creating plans for each of them.

Step 6: Add Plans

Let’s get started and create plans for different categories of cupcakes that you want to sell

(a) Select Add New Plan

Add Plan

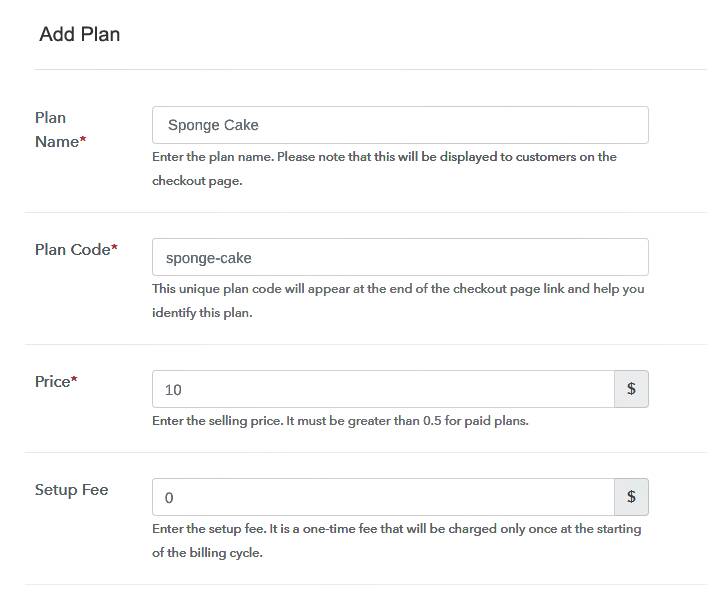
(b) Specify the Plan and Pricing Details
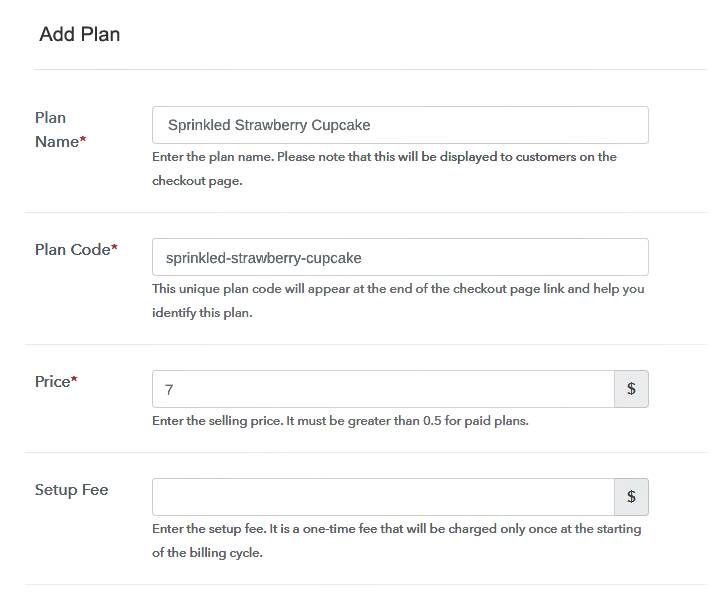
Add Details to Sell Cupcakes Online

On clicking add new plan, you are landed to the plan page, here you will have to fill the plan details such as plan name, code, billing cycle, price, etc.

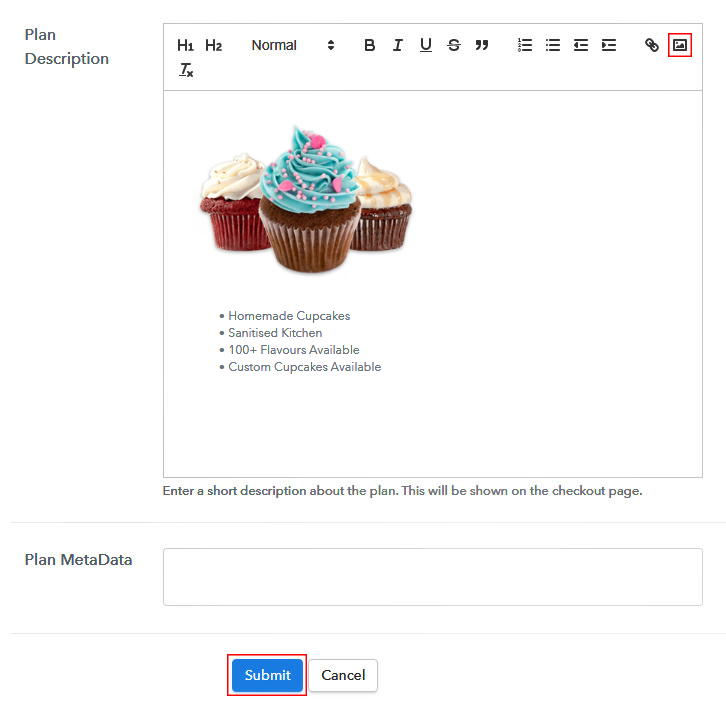
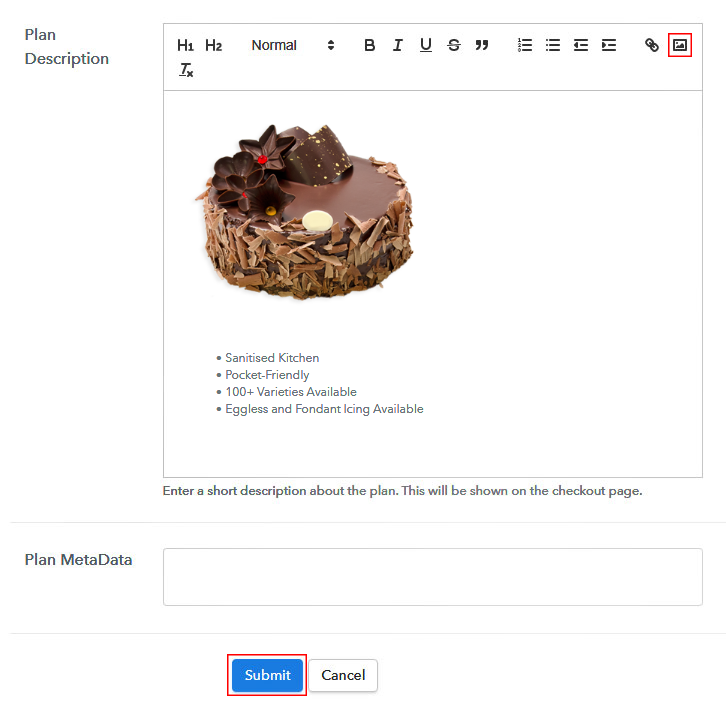
(c) Add Image & Description

Add Image to Sell Cupcakes Online

Also, add a description of cupcakes along with the product links, images, etc, and click on the submit button to add your plan.
You can create more plans for all the cupcakes in a similar manner.

Step 7: Share Your Checkout Page

Share Checkout Page on Social Media

  • Share your checkout page on social networking sites like Facebook and Twitter.
  • Copy the mentioned link and send it to your customers through SMS or emails directly.
  • Embed your plan link to your website so that your customers can be landed on the checkout page directly.

Step 8: Preview Checkout Page

Follow the given steps to view checkout page

(a) Click on the View Button

View Checkout Plan

(b) Take a Look at the Checkout Page

Checkout Page Preview

Step 9: Embed Checkout Page in Site & Sell Cupcakes Online

Embed Checkout Page on Website

Just copy the provided plan embedding link and embed the checkout page to your WordPress site.

(a) Edit the Page & Paste the Copied Link

Paste Link in Text Editor

Copy and paste the link in the text area of the editor

(b) Save & Publish the Checkout Page

Save and Publish

After the code is pasted, click on the publish button to embed your checkout page.

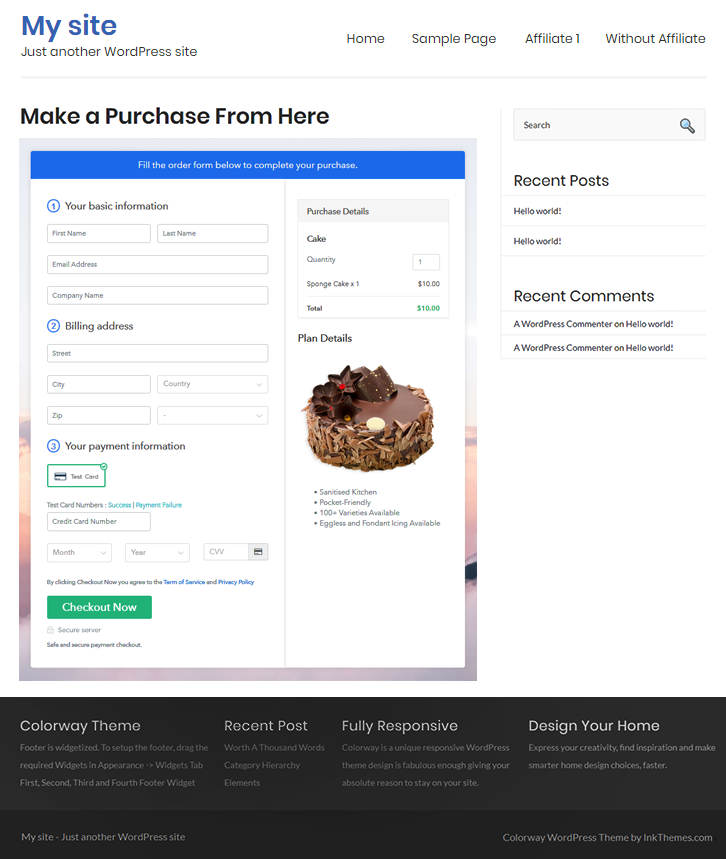
(c) Check Out the Final Look of your Checkout Page on WordPress Site
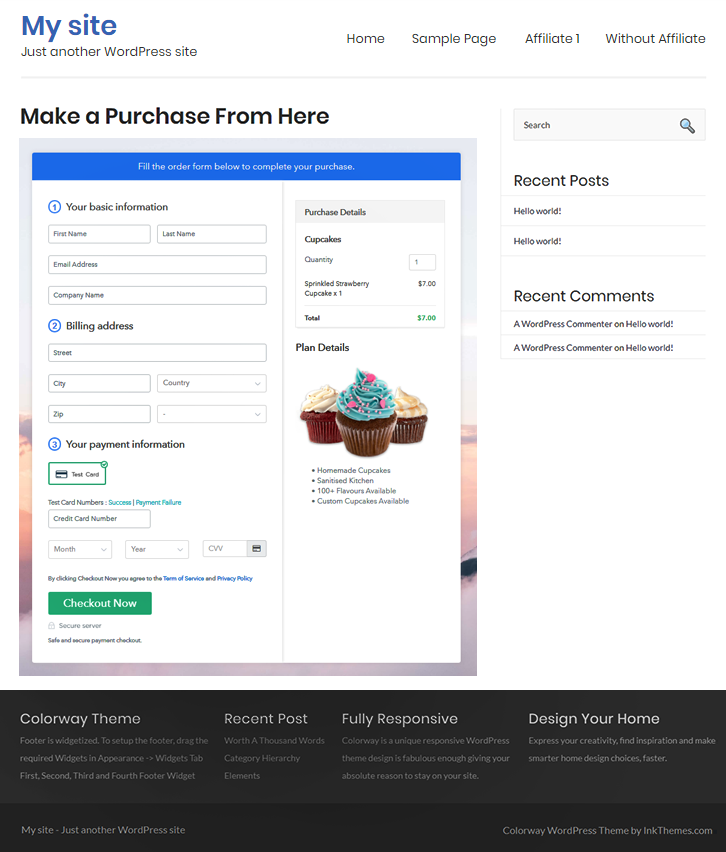
Embed Checkout to Website to Sell Cupcakes Online

Step 10: Multiplan Checkout Page

Note: In case you want to sell multiple products through a single checkout page, create a multi-plan checkout plan, otherwise skip this step.

(a) Click on Add Multiplan Checkout

Multiplan Checkout

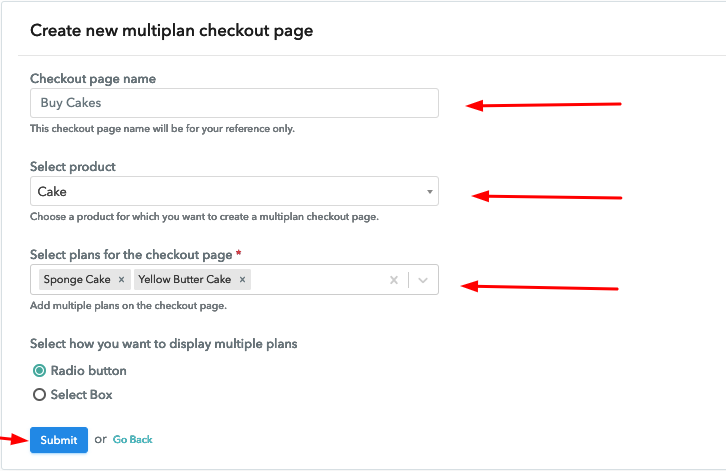
(b) Add Plans to Sell Multiple Cupcakes from Single Checkout Page
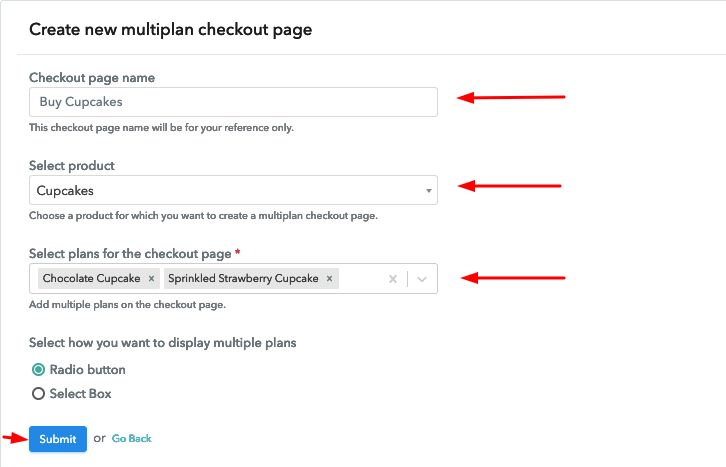
Add Multiplan Details to Sell Cupcakes Online

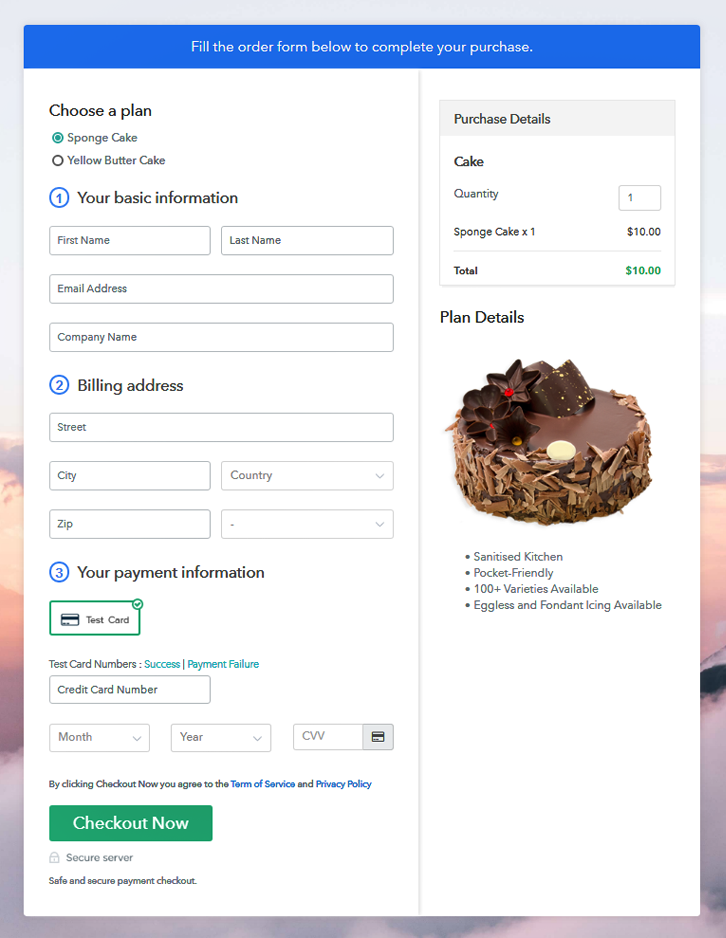
(c) Take a Look at the Checkout Page
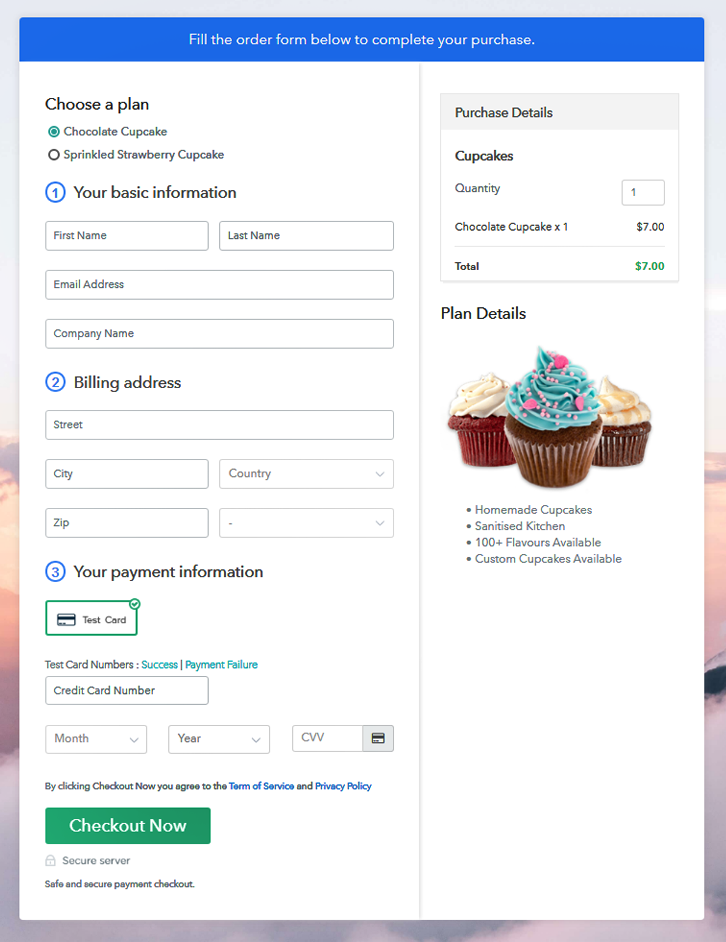
Multiplan Checkout Page to Sell Cupcakes Online

Preview Checkout Page

Wrapping Up

In conclusion, Pabbly Subscription Billing is the only service through which you can readily start your cupcakes selling online business for free while other services will cost you a lot. So this is a golden opportunity for those bakers who always wanted their own cupcakes business but couldn’t afford it. Therefore, don’t think twice as it is free, easy to use and you won’t regret it.
For further queries or suggestions, please write to us.

You May Also Like To Read –
How to Sell Coffee Bean Roasting Machines Online | (Free Method)

Ideal For: All coffee bean roasting machine manufacturers, MSMEs, merchants and other traders can use this method to sell coffee bean roasting machines online.

How to Sell Coffee Bean Roasting Machine Online

Why Choose this Method for Selling Over any Other Solution?

Unlike any other solution, this method allows you to:

  • List and sell your coffee bean roasting machines for FREE. Absolutely no payment required.
  • No commission deducted on sales.
  • Collect payment through multiple payment modes from a single checkout page.
  • Sell one time or recurring subscriptions of your coffee bean roasting machines.
  • Sell and collect payment in any currency as per your requirement.
  • Give discounts on your products by offering special coupon codes.
  • Add sales commission agents to help you in selling your coffee bean roasting machines.

Get Pabbly Subscription Billing for Free

According to BBC, over a billion cups of coffee are consumed every day, and demands for caffeine from natural coffee beans are ever-increasing. So, as to capture this big market you are tempted to sell coffee beans roasting machines online. But you have hit a snag and want a solution.

Why would you like to sell coffee bean roasting machines online?

Well, if you start selling coffee bean roasting machines online, in a matter of time you will be inundated with business offers from around the world. Also, since you will find the most genuine buyers online your product will get more generous offers, at least better than your brick and mortar store. Now that I have got you excited, let me tell you about an awesome online tool, to help you in selling coffee bean roasting machines online. Well, that is Pabbly Subscription Billing which not only brings your product online but also gives you a necessary advantage over your peers with some of its unique features like

  • Adding product details without any hassle
  • Collecting payments both in online and offline mode
  • Adding multiple billing models
  • Tracking details related to product sales and revenues

Obviously, since you are mesmerized by these features we now will go through 10 really easy steps to help you start selling coffee bean roasting machines online.

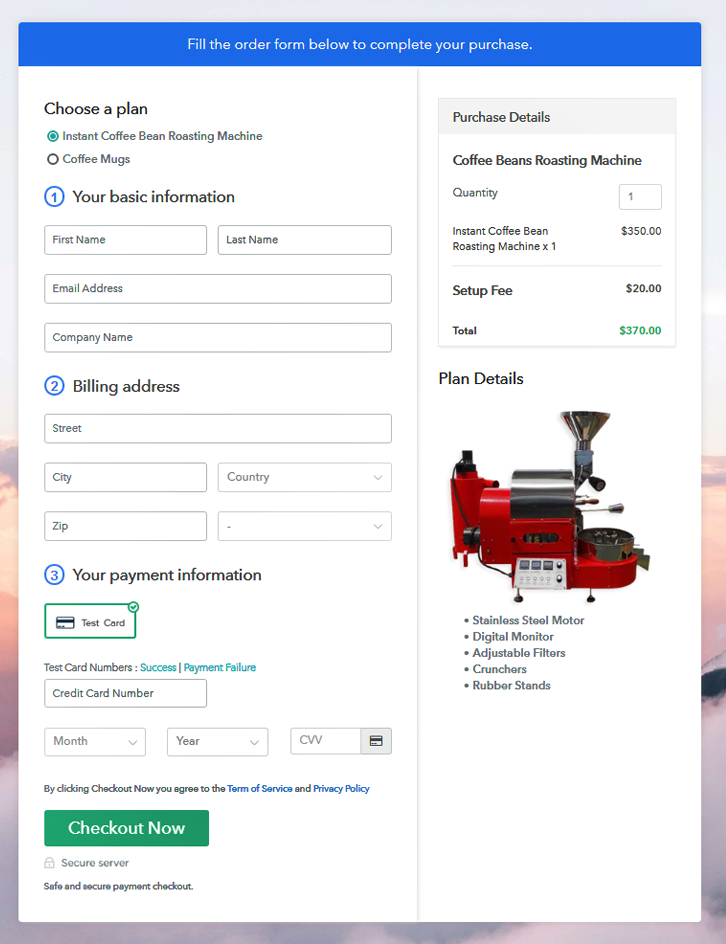
This is How your Checkout Page will Look Like After Creation

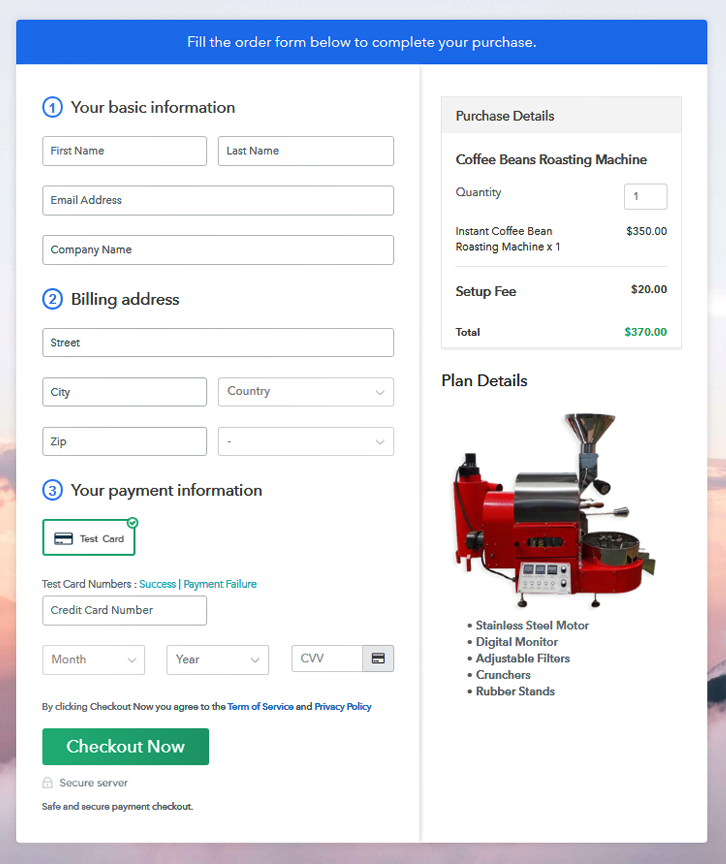
Checkout to Sell Coffee Beans Roasting Machine Online

Preview Checkout Page

Step 1: Log in to Pabbly Subscription Billing

Signup

Search in Google for Pabbly Subscription Billing and on their website click on the button “Sign up Free“. When you click on the button, a sign-up page opens and fill in the required fields or simply sign in using Gmail account.

Sign Up For Free!

Step 2: Select Subscription Billing

Access Subscription Billing

Now that you have entered into the dashboard, click on the “Access Now” button on the Subscription Billing option.

Step 3: Account Setup

Setup Account

This will generate a dialog box that requires you to fill the company details like name, currency standards, and phone number. Easily fill these parts and click on continue to complete the process.

Step 4: Connect Payment Gateways To Sell Coffee Bean Roasting Machines Online

Connect Payment Gateway

Now, you should always ensure that your customers must have a seamless experience during payments. So, to stimulate that process you can always “Enable Test Payment” option. Furthermore, with Pabbly Subscription Billing, you can connect with multiple payment gateways for selling coffee bean roasting machines online, with the help of the articles given below.  Now, just to simply continue the process, I am going to enabling the test payment option.

Step 5: Add Your Product

Add Product

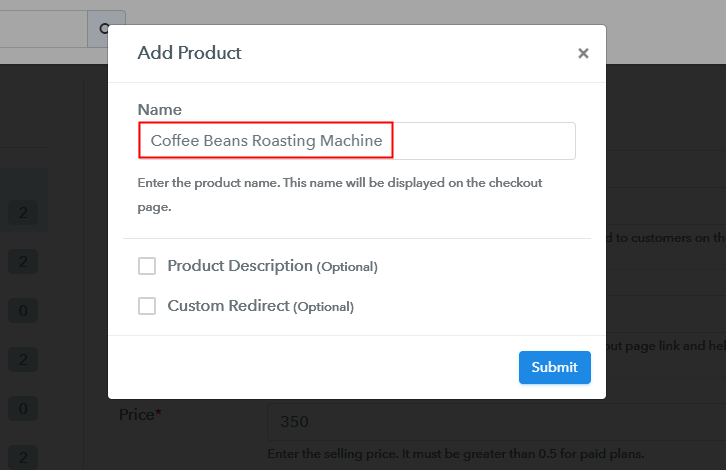
Good, now after embedding the payment gateway, it is time to add to your products.  Clicking on the “Add New Product” button will generate a dialog box. Now, in this dialog box, you have to fill in the name of the coffee bean roasting machine type, provide a small description, and even redirect to a particular website.

product Coffee Beans Roasting Machine Online

Fill up the details and your product is created.

Note: Here you can add all the products related to the similar category by creating plans for each of them.

Step 6: Add Plans

Now, we are going to create plans for coffee bean roasting machines available in your store.

(a) Select Add New Plan

Add Plan

(b) Specify the Plan & Pricing Details

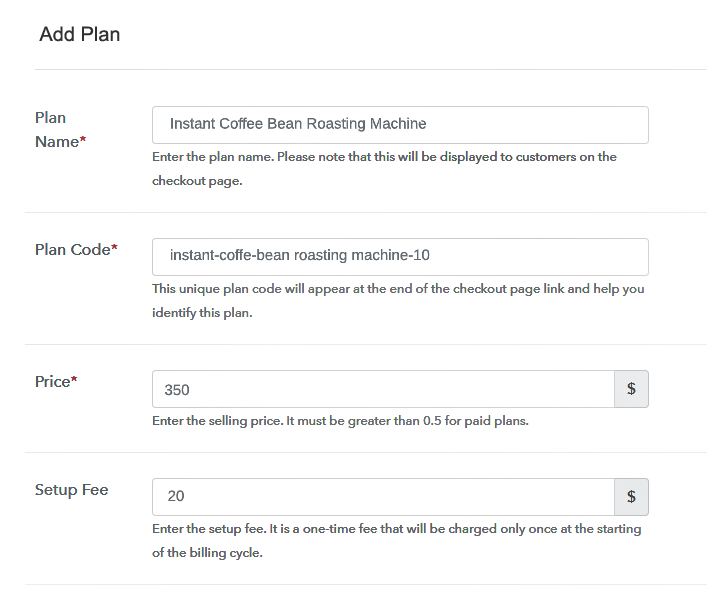
description of Coffee Beans Roasting Machine

For adding a plan you will be redirected to plan page where you have to fill details like plan name, code, price, setup fees, billing cycle, etc. This is one of the most important steps to start selling coffee bean roasting machines online.

(c) Add Image & Description

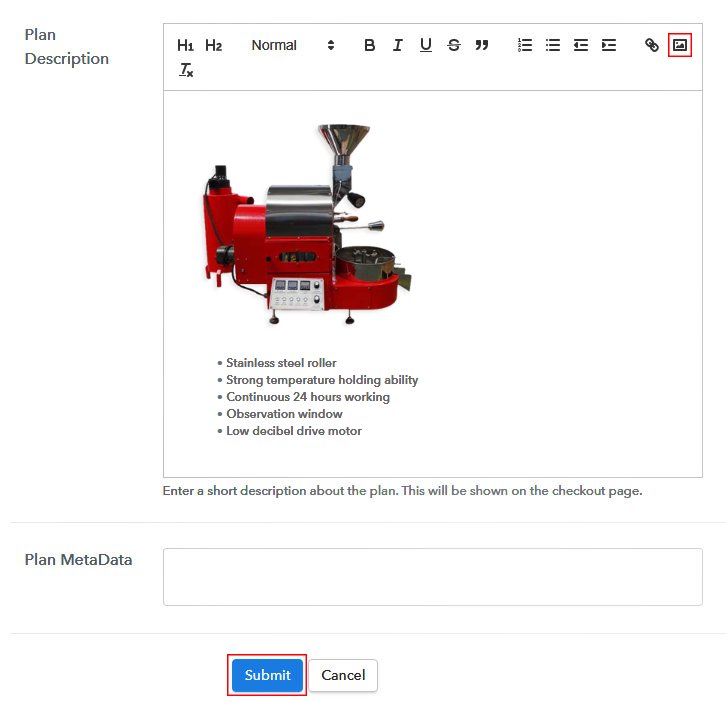
details of Coffee Beans Roasting Machine

First, take some good pictures of coffee bean roasting machines you want to sell and paste it here.

It will be very helpful for your customers if you provide some product descriptions of the coffee bean roasting machines in bullet points. Like material used in the motor, quantity of coffee beans per roast, rpm of the motor, and more.

Now having filled out the description, press the “Submit” button. Following the same method, you can add multiple coffee bean roasting machines.

Step 7: Share your Checkout Page

Share Checkout Page on Social Media

  • Now you share the link of the checkout page on Twitter & Facebook by just pressing the respective buttons.
  • Or you can send the checkout page link to customers through emails and  SMS.
  • Also, you can create some buttons on your webpage and paste the checkout links. Or you can place it on any anchor text on your website, so the users will be redirected to the checkout page.

Step 8: Preview Checkout Page

Follow up these steps to preview checkout page:

(a) Click on the View Button

View Checkout Plan

(b) Take a Look at the Checkout Page

checkout for Coffee Beans Roasting Machine

Step 9: Embed Checkout Page in Site & Sell Coffee Bean Roasting Machines Online

Embed Checkout Page on Website

Now,  copy the embed plan link to insert the check out the page on your WordPress website.

(a) Edit the Page & Paste the Copied Link

Paste_Link_in_Text_Editor

Now, when the link is copied, then paste it to the text area of the editor.

(b) Save & Publish the Checkout Page

Save_and_Publish

After pasting the code, now hit the ‘Publish’ button. Your checkout page is embedded.

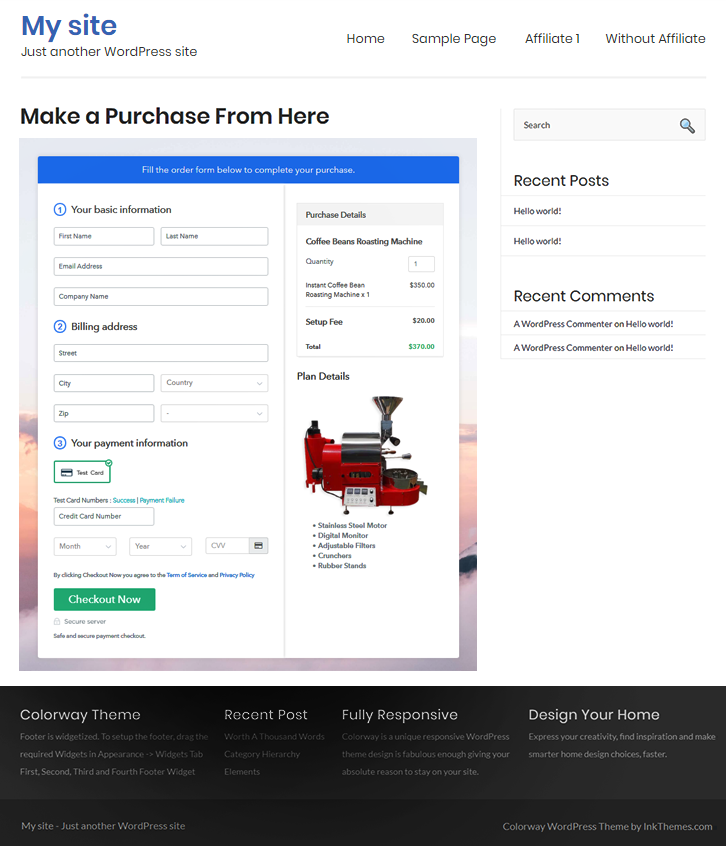
(c) Check out the Final Look of your Checkout Page on WordPress Site

coffee Beans Roasting Machine Online checkout

Step 10: Multiplan Checkout Page

Note: In case you want to sell multiple products via a single checkout page, you can create a multi-plan checkout page otherwise skip this step.

(a) Click on Add Mutiplan CheckoutMultiplan_Checkout

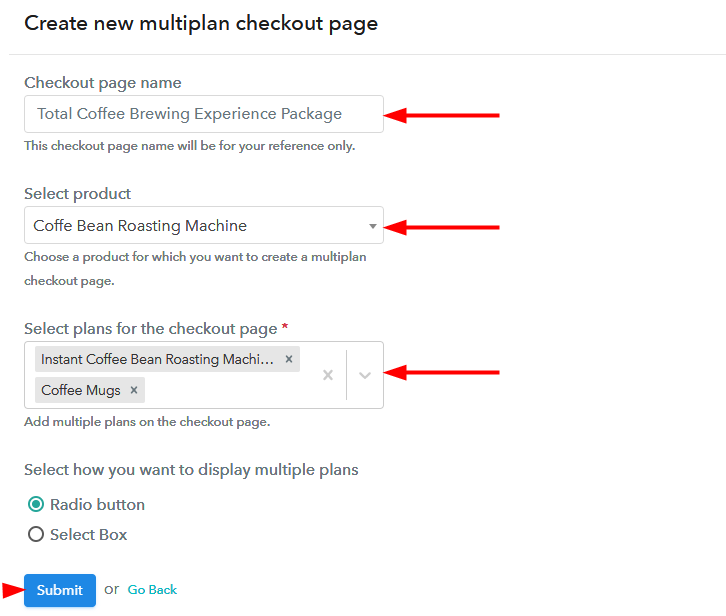
(b) Add Plans to Sell Multiple Coffee Bean Roasting Machines from Single Checkout Page

creating multiplan checout page

(c) Take a Look at the Checkout Page

multiplan Checkout of Coffee Beans Roasting Machine Online

Preview Checkout Page

Wrapping Up

Viola, by following these 10 easy steps you can start selling coffee bean roasting machines online. Also, not just coffee machines but you can sell any digital or physical products online in a few clicks. Furthermore, with some efforts, you can work on many different billing models to bring more business and clients to your workstation.

Moreover, if you have any doubts regarding these steps or payment gateway integration please feel free to ping me in the comment section below. Thank you.

You May Also Like To Read –
How to Sell Poultry Farm Products Online | Step by Step (Free Method)

Ideal For: All poultry farmers, cooperative societies, cottage industries and poultry breeders can use this method to sell poultry farm products  online.

How To Sell Poultry Farm Products Online

Why Choose this Method for Selling Over any Other Solution?

Unlike any other solution, this method allows you to:

  • List and sell your poultry farm products for FREE. Absolutely no payment required.
  • No commission deducted on sales.
  • Collect payment through multiple payment modes from a single checkout page.
  • Sell one time or recurring subscriptions of your poultry farm products
  • Sell and collect payment in any currency as per your requirement.
  • Give discounts on your products by offering special coupon codes.
  • Add sales commission agents to help you in selling your poultry farm products.

Get Pabbly Subscription Billing for Free

Everyone needs proteins and the best yet cheapest source of proteins are always poultry products. And since nowadays every business are increasingly hooking up their products online, then as a poultry farmer you should also consider selling poultry farm products online.

Why would you like to sell poultry farm products online?

Now, there can be many reasons like maybe your traditional business model is not doing well. Or your chickens have laid a lot more eggs than anticipated and would probably go rotting if there are no other means of selling them. Many of your big competitors like Walmart and Big Basket already have a digital presence. So why wait let’s start selling poultry farm products online.

But halt!! I forgot to ask, do you know how to set up an online shop? If not, well then I present to you Pabbly Subscription Billing which can not only list an unlimited number of products online. But also comes preloaded with a ton of features that will give you a headstart over big competitors. They are:

  • Create unlimited products and plans
  • Sends automatic email alerts in case of payment failure
  • No additional transaction Fees
  • Track sales and revenues
  • Multiple payment gateway integrations
  • Multiple billing models
  • Easy Invoicing

Now that you are dazzled by its features, let’s begin the set up to start selling poultry farm products online.

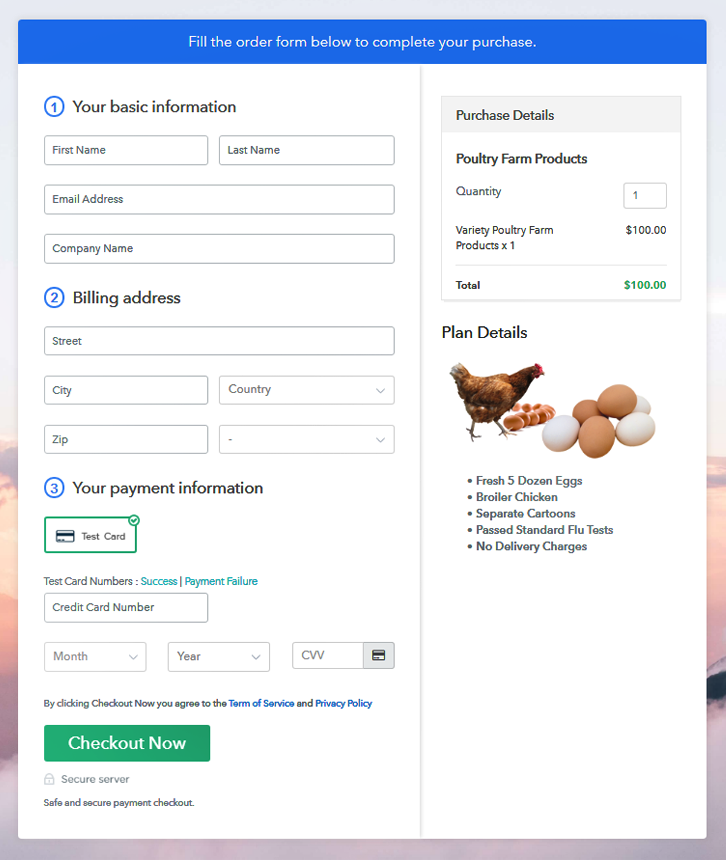
This is How your Checkout Page will Look Like After Creation

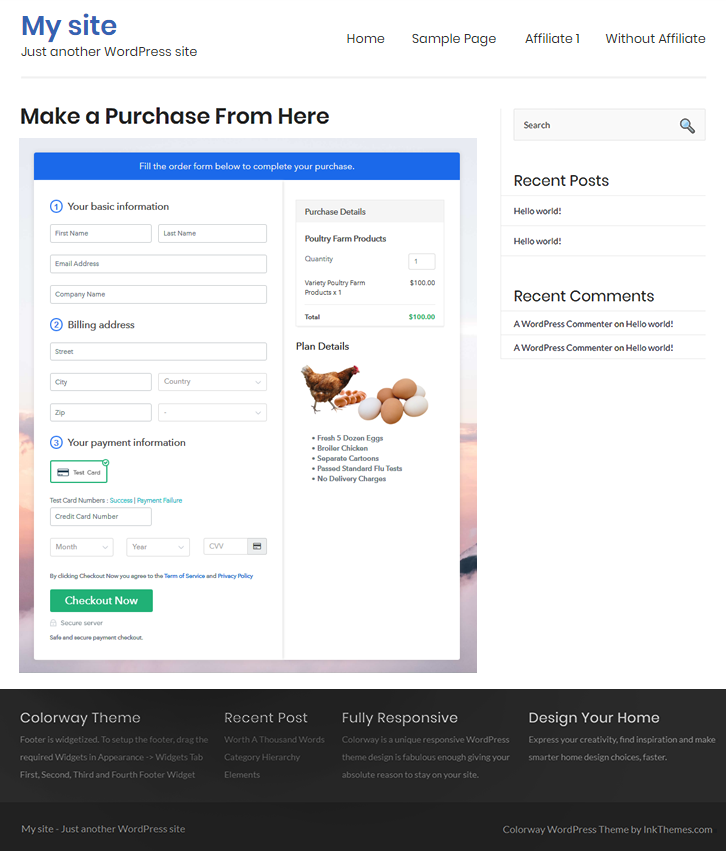
checkout to sell poultry farm products online

Preview Checkout Page

Step 1: Log in to Pabbly Subscription Billing

Signup

Search in Google for Pabbly Subscription Billing and on their website click on the button “Sign up Free“. When you click on the button, a sign-up page opens  and sign in using your Gmail account.

Sign Up For Free!

Step 2: Select Subscription Billing

Access Subscription Billing

Now that you have entered into the dashboard, click on the “Access Now” button on the Subscription Billing option.

Step 3: Account Setup

Setup Account

Here you will meet a dialog box that requires you to fill the company details like name, currency standards, and phone number.  Press on the continue button to complete the process after filling the details.

Step 4: Connect Payment Gateways To Sell Poultry Farm Products Online

Connect Payment Gateway

Since customers can leave transactions even at the slightest inconveniences you must always ensure that your customers must enjoy a serene payment experience. Now, with Pabbly Subscription Billing, you can stimulate an experience where you perform payments processing exactly like a customer. This can be done with the “Enable Test Payment” option.

Furthermore, with Pabbly Subscription Billing, you can connect with multiple payment gateways for selling poultry farm products online, with the help of the articles given below. Now, just to simply continue the process, I am going to enabling the test payment option.

Step 5: Add Your Product

Add Product

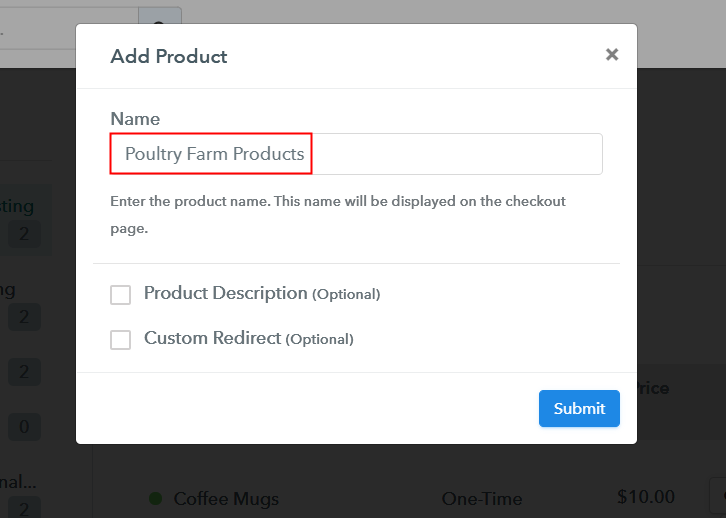
Great, now that you have added the payment gateway, it is time to add your products. Here at the section below the “Enable Payments” click on “Add your product”. This will generate a pop-up page with a blue button “Add New Product”. Click it.

Now, you will be redirected to a dialog box, here you have to fill in name of the poultry product, then provide a small description, and even add links for redirecting to a particular website.

add poultry farm products

Fill up the details and your product is created.

Note: Here you can add all the products related to the similar category by creating plans for each of them.

Step 6: Add Plans

Now, we are going to create plans for poultry products from your farm.

(a) Select Add New Plan

Add Plan

(b) Specify the Plan & Pricing Details

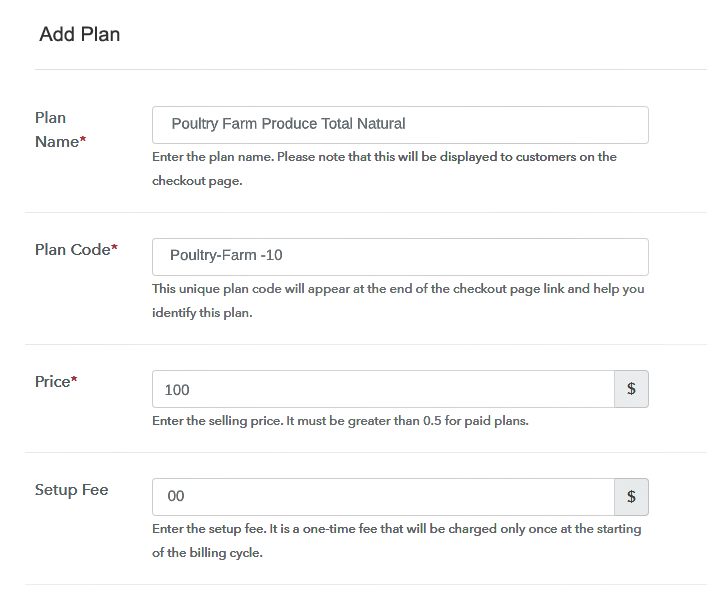
How

For adding a plan you will be redirected to plan page where you have to fill details like plan name, code, price, setup fees. Furthermore, in a segment below, you will always have the option to change the billing models like one-time payment, recurring, etc. This is one of the most important steps to start selling poultry farm products online.

(c) Add Image & Description

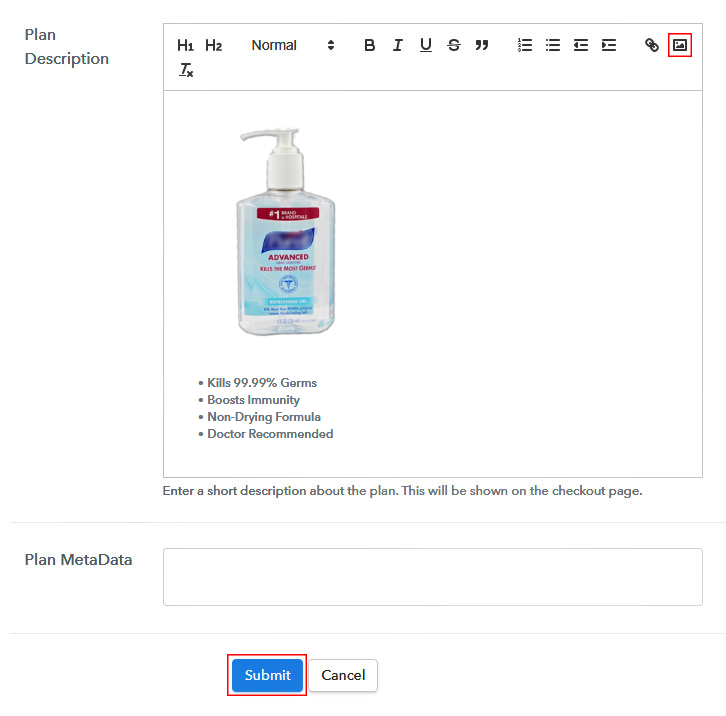
description to sell poultry farm products online

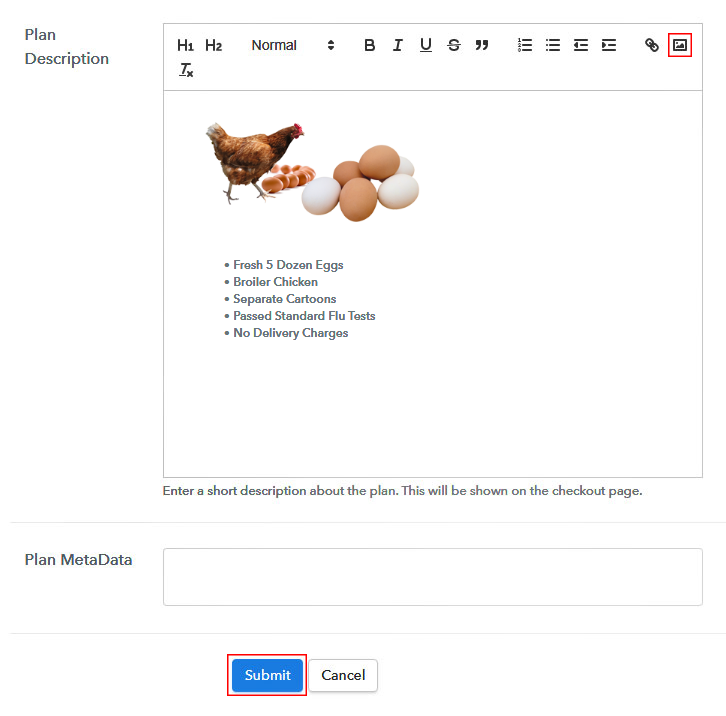
Whatever you want to sell, eggs, meat, or any other poultry products, take a good picture and insert it here.

Now provide an excellent description of your poultry products preferably in bullet points. Like the number of eggs per cartoon, eggs or meat, etc. After writing the product description press the “Submit” button. Furthermore, following the same procedure, you can add many other types of products.

Step 7: Share your Checkout Page

Share Checkout Page on Social Media

  • To create more awareness about your products you can share your checkout page on Twitter & Facebook by just pressing the respective buttons.
  • If you want more action, you can even send the checkout link to customers through emails and SMS.
  • Also, you can create some buttons on your webpage and paste the checkout links. Or you can place it on any anchor text on your website, so the users will be redirected to the checkout page.

Step 8: Preview Checkout Page

Follow up these steps to preview checkout page:

(a) Click on the View Button

View Checkout Plan

(b) Take a Look at the Checkout Page

Final checkout to sell poultry farm products online

Step 9: Embed Checkout Page in Site & Sell Poultry Farm Products Online

Embed Checkout Page on Website

Now,  copy the embed plan link to insert the checkout page on your WordPress website.

(a) Edit the Page & Paste the Copied Link

Paste_Link_in_Text_Editor

Now, when the link is copied, then paste it to the text area of the editor.

(b) Save & Publish the Checkout Page

Save_and_Publish

After pasting the code, now hit the ‘Publish’ button. Your checkout page is embedded.

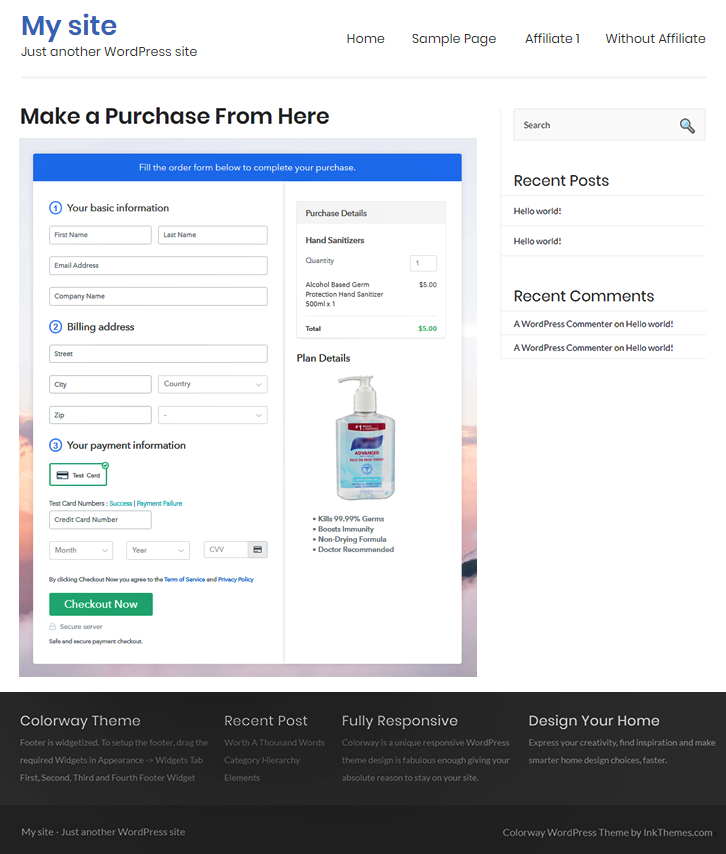
(c) Check out the Final Look of your Checkout Page on WordPress Site

embedding checkout to sell poultry farm products online


Step 10: Multiplan Checkout Page

Note: In case you want to sell multiple products via a single checkout page, you can create a multi-plan checkout page otherwise skip this step.

(a) Click on Add Mutiplan Checkout

Multiplan_Checkout

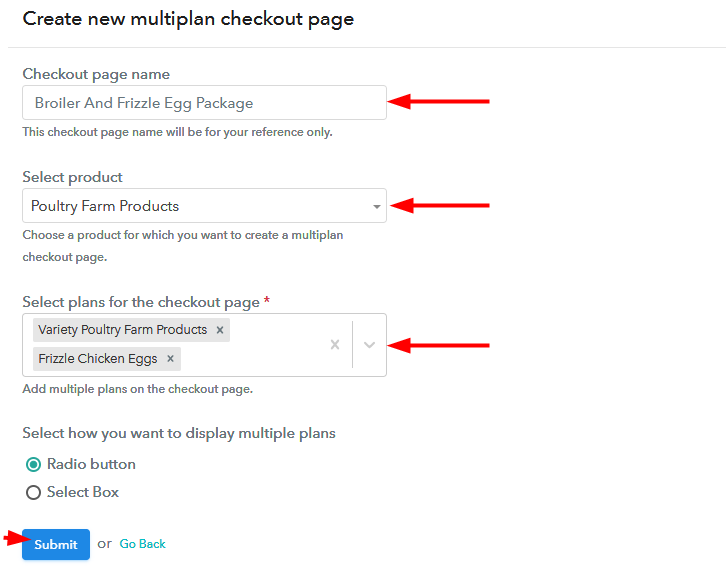
(b) Add Plans to Sell Multiple Poultry Farm Products Online from Single Checkout Page

How

(c) Take a Look at the Checkout Page

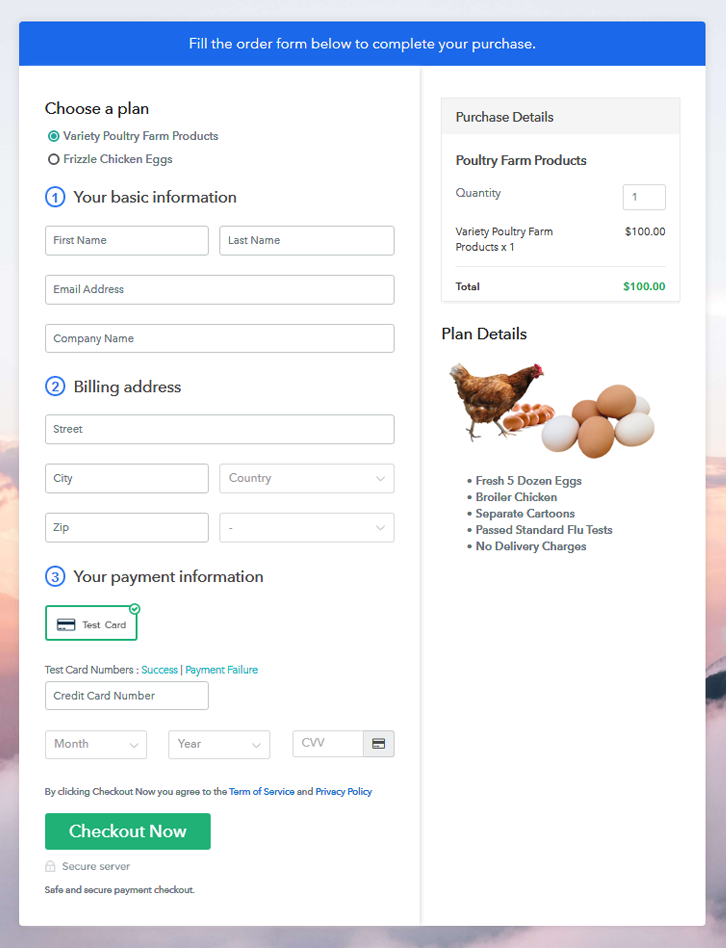
multiplan checkout to sell poultry farm products online

Preview Checkout Page

Wrapping Up

Well, reaching the last phase of this article, I would insist that you start selling poultry farm products online. Because the benefits are obviously manifold and you have nothing to lose anyway. Besides using Pabbly Subscription billing you can list unlimited products and will have means to share the checkout pages on Whataspp to bring in more consumers.

Now, these steps are easy to understand but if you have any doubts regarding the same, please leave a comment below. Thank you

You May Also Like To Read –
How to Sell Hand Sanitizers Online | Step by Step (Free Method)

How To Sell Hand Sanitizers Online

Ideal For: All the sanitizer manufacturers, hand sanitizer sellers, retail sanitizer shop owners, hand sanitizer wholesale suppliers and other vendors can use this method to skyrocket their hand sanitizer selling business online.

How To Sell Hand Sanitizers Online

Why Choose this Method for Selling Over any Other Solution?

Unlike any other solution, this method allows you to:

  • List and sell your hand sanitizers for FREE. Absolutely no payment required.
  • No commission on sales.
  • Collect payment through multiple payment modes from a single checkout page.
  • Sell one time or recurring subscriptions of your hand sanitizers.
  • Sell and collect payment in any currency as per your requirement.
  • Give discounts on your products by offering special coupon codes.
  • Add sales commission agents to help you in selling your hand sanitizers.

Get Pabbly Subscription Billing for Free

Hand sanitizers are recommended by health practitioners for protection against germs and viruses. It has been claimed that it kills 99% of bacteria and that’s why there is a huge uptick in demand of hand sanitizers. Owing to the demand for sanitizers, it’s a suitable time to start your hand sanitizer business online.

Why would you like to sell hand sanitizers online?

Prevention is always better than cure, that’s the reason why most of the people started using hand sanitizers at their workplace, home, etc. Hand sanitizers work as health shield and not to forget, we all witnessed the global pandemic. So, safety always comes first. In one of the reports released by Grand View Research, it has been published the hand sanitizer market will mark the worth of $13.7 billion by 2027 which is an outstanding number.

To be very honest it is the only business which is growing rapidly at the CAGR of over 17%. Considering all these, it is the suitable timing to make some dime out of your hand sanitizer business by displaying it on the web.

That’s why we are suggesting a bundle box of joy named Pabbly Subscription Billing that will help your hand sanitizer business to reach the height. The software lets you create an astonishing checkout page to sell hand sanitizers online. Some of its distinct features involve:

  • Add multiple hand sanitizers in a single checkout page
  • Receive instant payment via PayPal, Razorpay and much more
  • Build attractive invoices in a blink of an eye
  • Charge taxation money according to country or region

Above are some of the perks of using software and now let’s jump on the process of building an effective checkout page for selling hand sanitizers online.

This is How your Checkout Page will Look Like After Creation

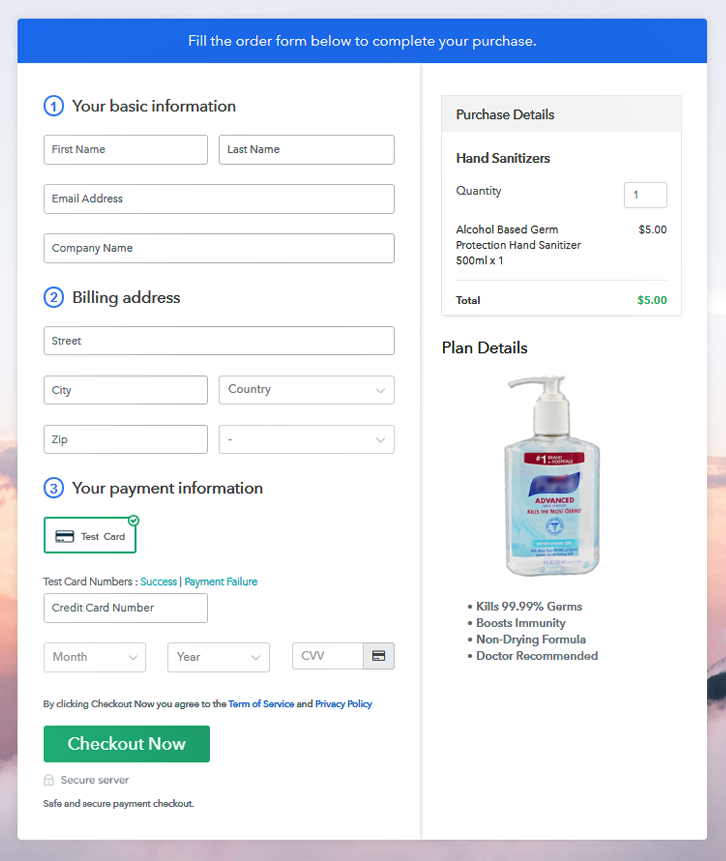
Checkout Page to Sell Hand Sanitizers Online

Preview Checkout Page

Step 1: Login to Pabbly Subscription Billing

Signup

Start the process by visiting the Pabbly Subscription Billing site and click on the “Sign Up Free” button appearing at the top right corner. Further, sign-up in the software using Gmail credentials or you can create a new account for the same.

Sign Up For Free!

Step 2: Select Subscription Billing

Access Subscription Billing

Step 3: Account Setup

Setup Account

As soon as you click on the “Access Now” button of the software, a page will open with details like company name, select currency, and phone number. Quickly fill out those details to continue.

Step 4: Connect Payment Gateways To Sell Hand Sanitizers Online

Connect Payment Gateway

As a newbie, it is better to go for a test payment gateway to gain knowledge about the software payment procedure. Here, we are also enabling the test payment. Additionally, the software is flourished with multiple payment gateways such as PayPal, Stripe, etc. For your convenience, we are mentioning all the payment integration guides below.

Step 5: Add Your Product

Add Product

The next step is to define the product which is hand sanitizer. Specify the category and write a little about it in the description. Further, you can add different types of hand sanitizer in a product category.

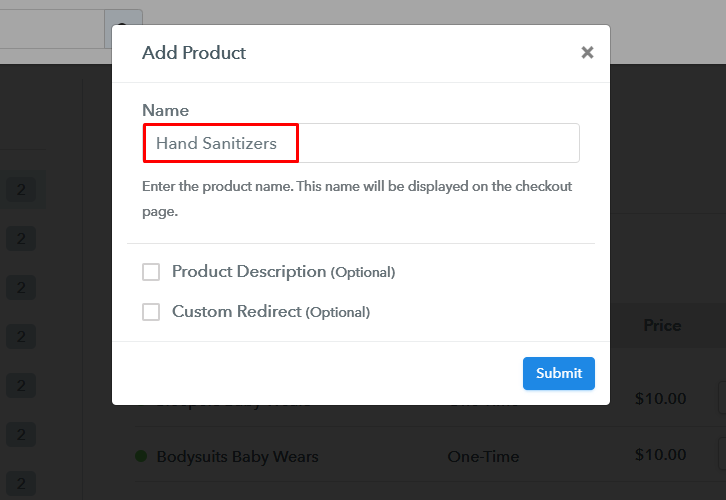
Add Product To Start Selling Hand Sanitizer Online

Fill out all those details and voila your product is created

Note: Here you can add all the products related to the similar category by creating plans for each of them.

Step 6: Add Plans 

Let’s unfold all the different kinds of hand sanitizers available in your store.

(a) Select Add New Plan

Add Plan

(b) Specify the Plan & Pricing Details

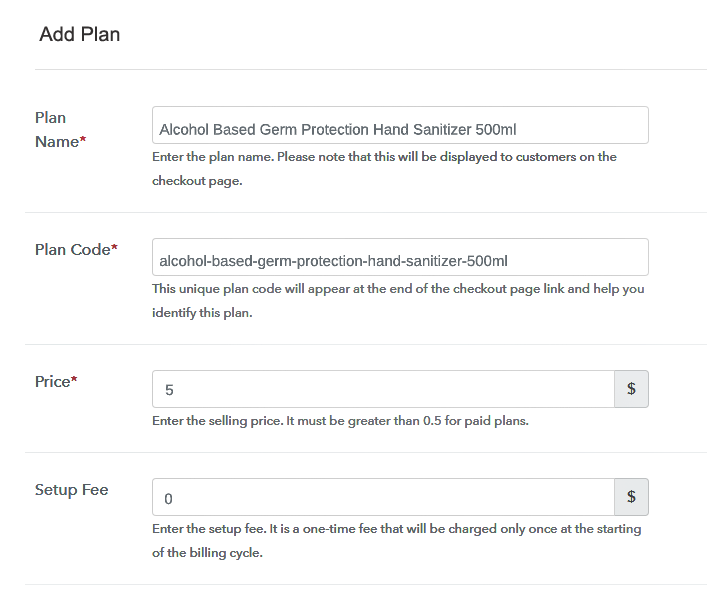
Specify the Plan and Pricing to Sell Hand Sanitizer Online

Next, fill out all the details like plan name, code, price, set-up fees and much more to continue.

(c) Add Image & Description

Add Image and Description to Sell Hand Sanitizer Online

Furthermore, to draw the audience’s attention towards the checkout page, write a brief description of hand sanitizer with bullets, images, links, etc.

Next, click on the “Submit” button, once you’re done with the procedure.

Similarly, according to your stocks, you can add different types of hand sanitizers that you want to sell online.

Step 7: Share your Checkout Page

Share Checkout Page on Social Media

  • Just share the link of the checkout page on social media sites like Facebook & Twitter.
  • The next choice is to share a direct link with your customers via SMS or email marketing.
  • Moreover, to redirect the user on the checkout page, you can add the provided plan link in the buttons or any anchor text on your website.

Step 8: Preview Checkout Page

Further, follow all the mentioned steps to view the checkout page.

(a) Click on the View Button

View Checkout Plan

(b) Take a Look at the Checkout Page

Checkout Page to Sell Hand Sanitizers Online

Step 9: Embed Checkout Page in Site & Sell Hand Sanitizers Online

Embed Checkout Page on Website

To embed the checkout page link on the WordPress site, just copy the embed plan link.

(a) Edit the Page & Paste the Copied Link

Paste Link in Text Editor

Next, simply paste a link on the text editor of the WordPress dashboard.

(b) Save & Publish the Checkout Page

Save and Publish

Hit the “Publish” button to successfully embed the checkout page.

(c) Check out the Final Look of your Checkout Page on WordPress Site

Final Look of your Checkout Page to Sell Hand Sanitizers Online

Step 10: Multiplan Checkout Page

Note: In case you want to sell multiple products via a single checkout page, you can create a multi-plan checkout page otherwise skip this step.

(a) Click on Add Mutiplan Checkout

Multiplan Checkout

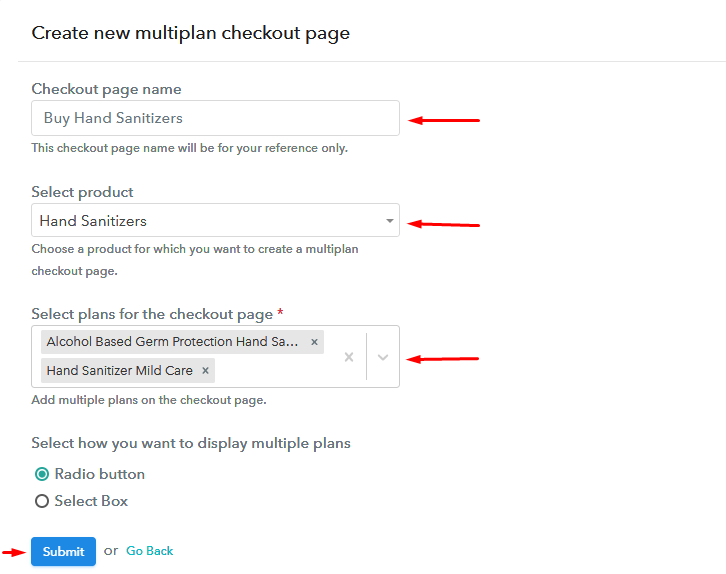
(b) Add Plans to Sell Multiple Hand Sanitizers from Single Checkout Page

Add Multiple Product to Start Selling Hand Sanitizer Online

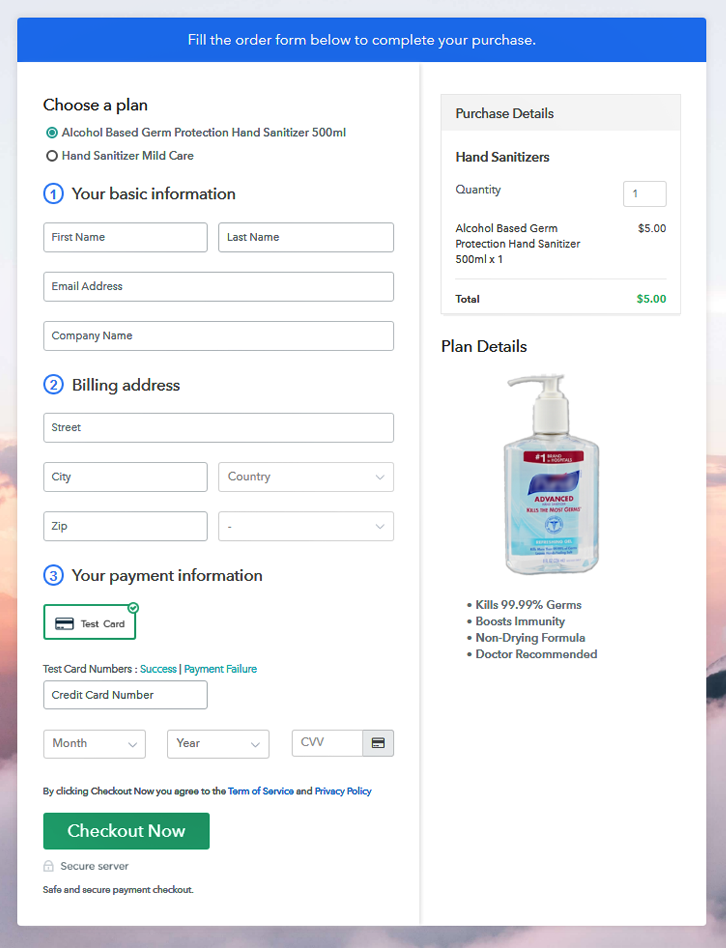
(c) Take a Look at the Checkout Page

Multiplan Checkout Page to Sell Hand Sanitizers Online

Preview Checkout Page

Wrapping Up

That’s all! here we have discussed all the easy 10 steps to boost your bulk hand sanitizer business online. Hand sanitizers are not going out of business any time soon and there are chances that, in the coming times it will become one of the basic necessities of human beings. Keeping all this in mind, it is going to be the best decision of your life to start selling hand sanitizers online.

Remember “Drop of Sanitizer A Day keeps Germs Away”, so start using software to start selling hand sanitizer online and knock us out with your queries.

You May Also Like To Read –
How to Sell Quilts Online | Step by Step (Free Method)

How to Sell Quilts Online

Ideal For: All the home furnishing shops, wholesale bedding & linen sellers, and other independent entrepreneurs with homemade quilts can use this method to take their quilts selling business online.

How to Sell Quilts Online

Why Choose this Method for Selling Over any Other Solution?

Unlike any other solution, this method allows you to:

  • List and sell quilts for FREE. Absolutely no payment required.
  • No commission on sales.
  • Collect payment through multiple payment modes from a single checkout page.
  • Sell one time or recurring subscriptions of quilts.
  • Sell and collect payment in any currency as per your requirement.
  • Give discounts on your products by offering special coupon codes.
  • Add sales commission agents to help you in selling quilts.

Get Pabbly Subscription Billing for Free

Now that slowly winter season is arriving, its time to get started with the quilt selling business again, and in today’s times, everything is being sold online. Hence, you should also take your quilt selling business online and widen your customer reach.

Why would you like to sell quilts online?

Because it takes almost nothing to start your quilt selling business online. Yes, here we are telling you about Pabbly Subscription Billing which provides you the platform to start quilt selling business online for free. With it, you can add unlimited products and plans, add unlimited customers, and generate unlimited revenue free of charge. Also, it offers you to collect one time or recurring billing, easily share the invoices with your customers, integrate with your business website, and much more.

Other than that, you won’t even have to pay any transactional fees on your revenue. Simply create a checkout page and share its link with your users to collect one time or recurring payments effortlessly. Also, your customers will be able to make purchases directly through the checkout page from your website.

This is How your Checkout Page will Look Like After Creation

Checkout Page Preview to Sell Quilts Online

Preview Checkout Page

Step 1: Log in to Pabbly Subscription Billing

Signup

In the first step, you have to visit the Pabbly Subscription Billing website and click on the “Sign Up Free” button. On clicking the button, you are landed on the signup page, where you can create your account via Gmail or manually enter your email address and other details.

Sign Up For Free!

Step 2: Select Subscription Billing

Access Subscription Billing

Step 3: Account Setup

Setup Account

When you are done with the signup process, fill up your company details such as company name, select currency, and contact number in the appeared dialogue box.

Step 4: Connect Payment Gateway to Sell Quilts Online

Connect Payment Gateway

Here, in this blog, we are showing you how the payment collection process works by enabling the test payment mode. Later, you have to connect other payment gateways. The complete integration guide for payment gateways is provided below.

Step 5: Add Your Product

Add Product

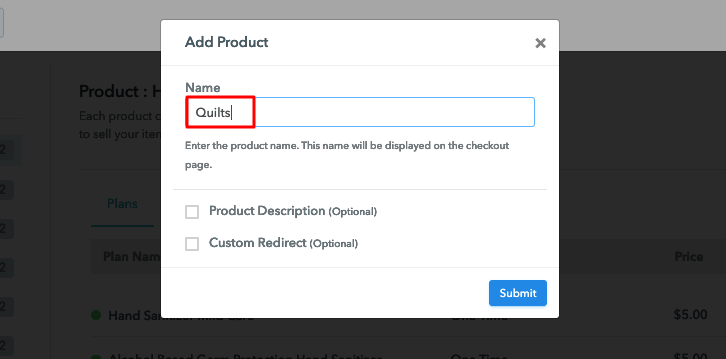
Once payment mode is enabled, now you can add your first product. You can add quilts of different categories, for example, patchwork quilts, embroidered quilts, etc, and add all other types of quilts in the same product by creating different plans.

Add Product Name to Sell Quilts Online

Just fill up these details and your product is added.

Note: Here you can add all the products related to the similar category by creating plans for each of them.

Step 6: Add Plans

Let’s get started and create plans for different categories of quilts that you want to sell

(a) Select Add New Plan

Add Plan

(b)Specify the Plan and Pricing Details

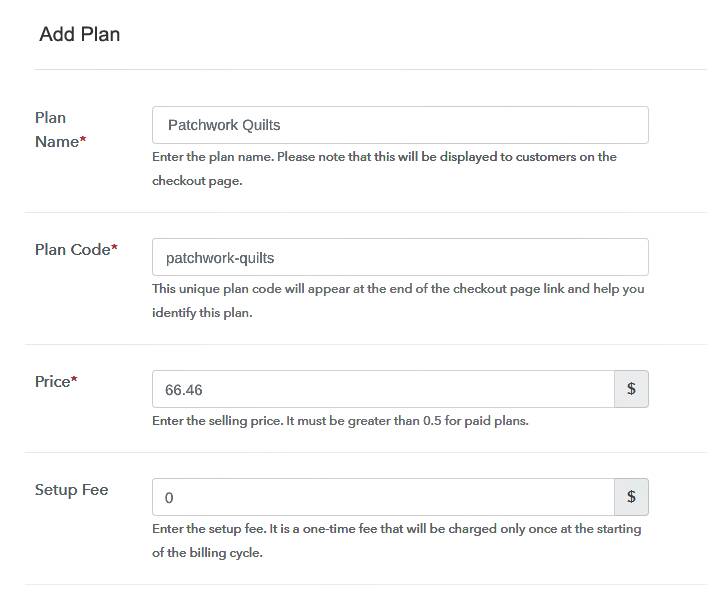
Add Plan Details to Sell Quilts Online

On clicking add new plan, you are redirected to the plan page, here you will have to fill the plan details such as plan name, code, billing cycle, price, etc.

(c) Add Image & Description

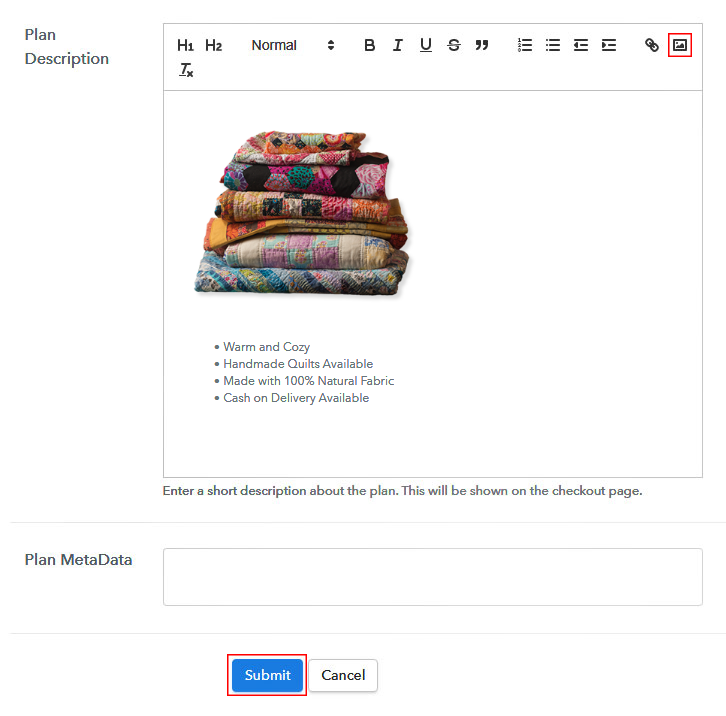
Add Image to Sell Quilts Online

Also, add a description of the quilts along with the product links, images, etc, and click on the submit button to add your plan.
You can create more plans for all the quilts in a similar manner.

Step 7: Share Your Checkout Page

Share Checkout Page on Social Media

  • Share your checkout page on social networking sites such as Facebook and Twitter.
  • Copy the mentioned link and send it to your customers through SMS or emails directly.
  • Embed your plan link to your website so that your customers can be landed on the checkout page directly.

Step 8: Preview Checkout Page

Follow the given steps to view checkout page

(a) Click on the View Button

View Checkout Plan

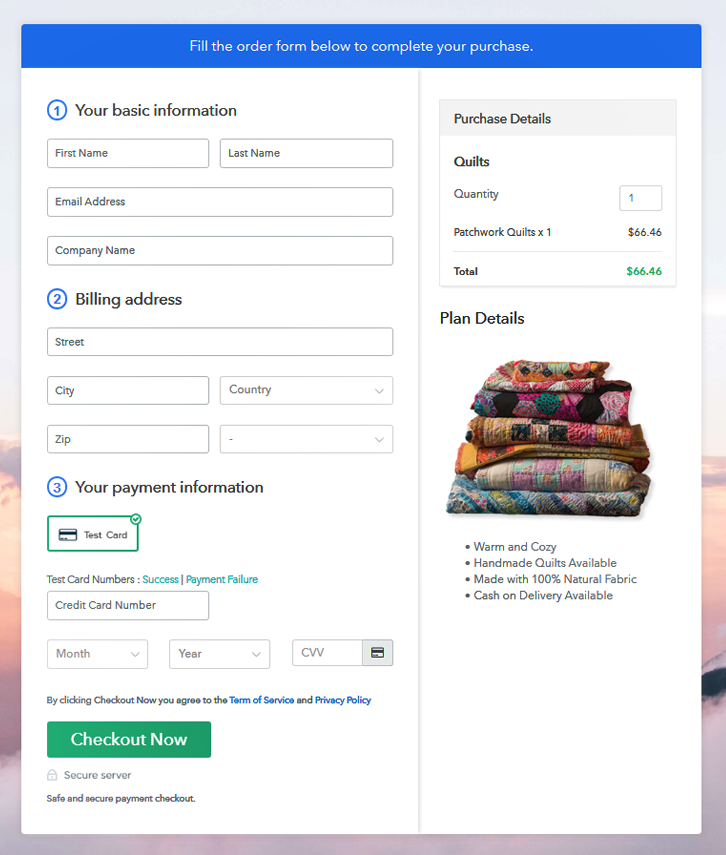
(b) Take a Look at the Checkout Page

Checkout Page Preview to Sell Quilts Online

Step 9: Embed Checkout Page in Site & Sell Quilts Online

Embed Checkout Page on Website

Just copy the provided plan embedding link and embed the checkout page to your WordPress site.

(a) Edit the Page & Paste the Copied Link

Paste Link in Text Editor

Copy and paste the link in the text area of the editor

(b) Save & Publish the Checkout Page

Save and Publish

Once the code is pasted, click on the publish button to embed your checkout page.

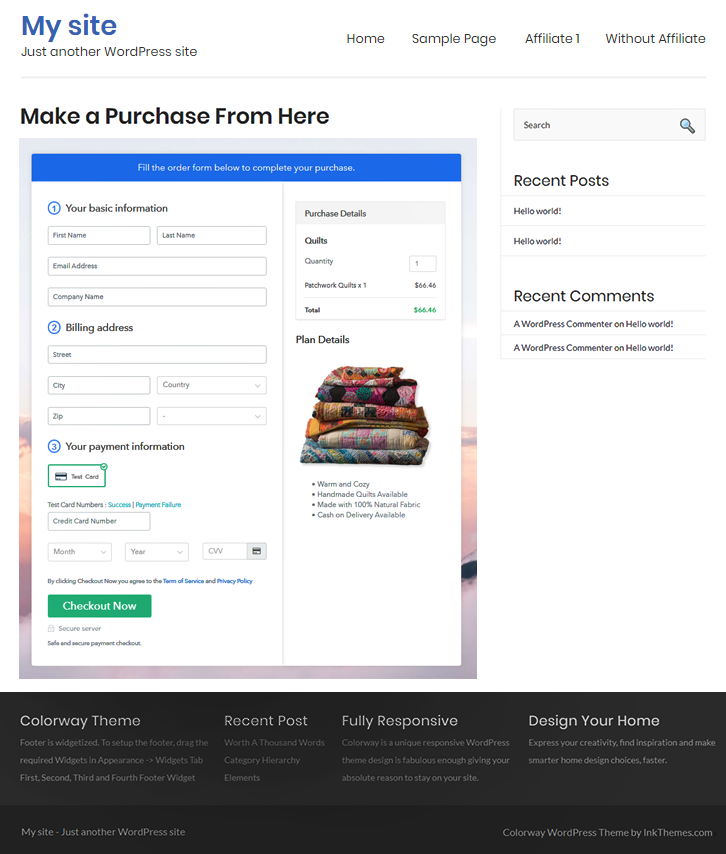
(c) Check Out the Final Look of your Checkout Page on WordPress Site

Embed Checkout Page to Website to Sell Quilts Online

Step 10: Multiplan Checkout Page

Note: In case you want to sell multiple products through a single checkout page, create a multi-plan checkout plan, otherwise skip this step.

(a) Click on Add Multiplan Checkout

Multiplan Checkout

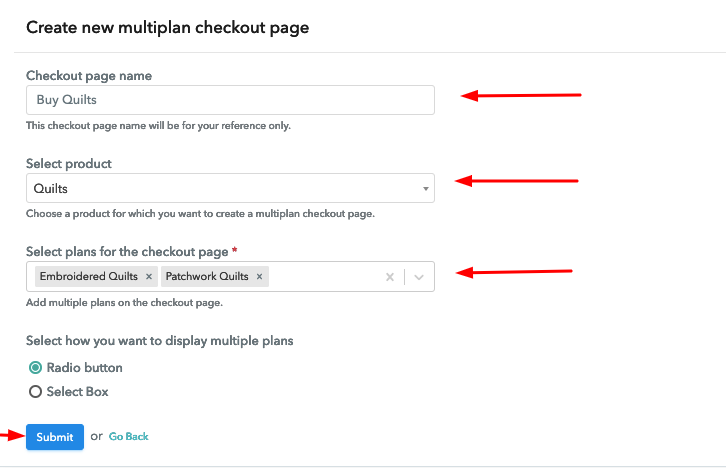
(b) Add Plans to Sell Multiple Quilts from Single Checkout Page

Add Multiplan Details to Sell Quilts Online

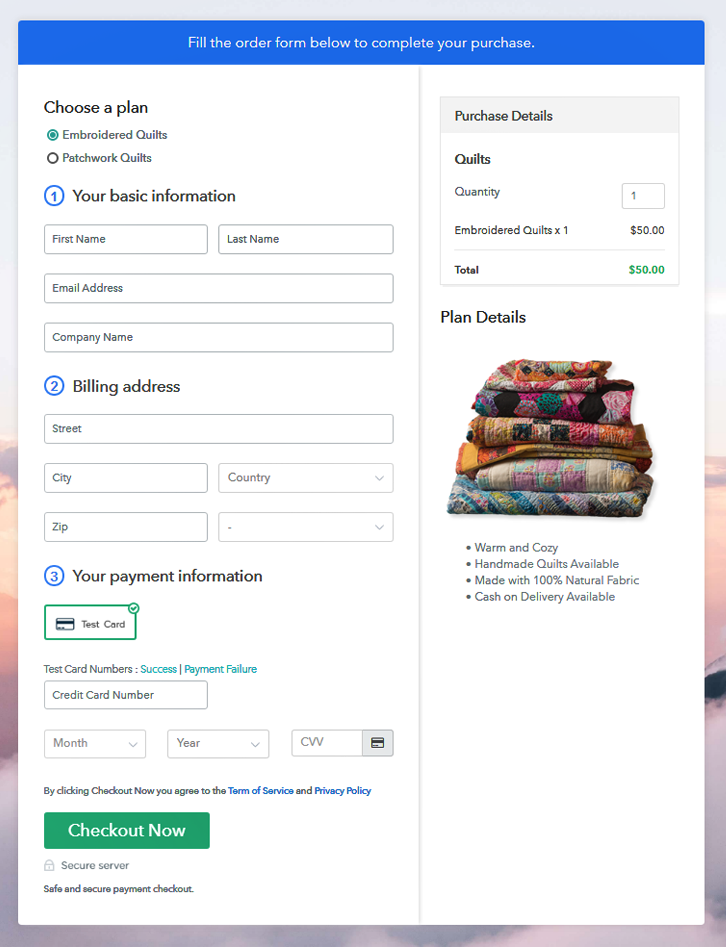
(c) Take a Look at the Checkout Page

Multiplan Checkout Page to Sell Quilts Online

Preview Checkout Page

Wrapping Up

At the end of the blog, we hope this article was helpful for you and for those who were trying to get into the online quilt selling business but couldn’t because of the investment. Now it’s a child’s play with Pabbly Subscription Billing to start quilt selling business online and make money from the comfort of your home. Hence, without wasting any more time visit the Pabbly Subscription Billing website and get started with your business.
For further queries or suggestions, please contact us.

You May Also Like To Read –
How to Sell Roasted Coffee Beans Online | Step by Step (Free Method)

How to Sell Roasted Coffee Beans Online

Ideal For: All the roasted coffee bean sellers, roasted coffee bean makers, retail roasted coffee bean selling business owners, and other roasted coffee bean merchants can use this method to take their roasted coffee beans selling business online.

How to Sell Roasted Coffee Beans Online

Why Choose this Method for Selling Over any Other Solution?

Unlike any other solution, this method allows you to:

  • List and sell your roasted coffee beans for FREE. Absolutely no payment required.
  • No commission on sales.
  • Collect payment through multiple payment modes from a single checkout page.
  • Sell one time or recurring subscriptions of your roasted coffee beans.
  • Sell and collect payment in any currency as per your requirement.
  • Give discounts on your products by offering special coupon codes.
  • Add sales commission agents to help you in selling your roasted coffee beans online.

Get Pabbly Subscription Billing for Free

With approximately 63% of the world population drinking coffee every day, now is a great time to hop into the coffee industry and start roasted coffee beans business online.

Why would you like to sell roasted coffee beans online?

There could be many possible reasons, but just the passion for selling coffee online could be more than enough. As investing in a local coffee shop is a fairly large risk.

Creating a complete website or investing money for developing a system for selling roasted coffee beans online could waste a lot of your time and money. And why going for such a clumsy option when you have easier ways available.

Just follow the simplest steps explained within this blog and kick start roasted coffee beans business online.

Moreover, this will take care of everything with super excellent management.

  • You can list out all the available product in stock
  • Display items in beautiful checkout pages along with the image & description
  • Collect payments from online as well as offline sources
  • Automatically generate invoices and send them to the buyers
  • Easily apply proper taxes, coupons & discounts
    And much more…

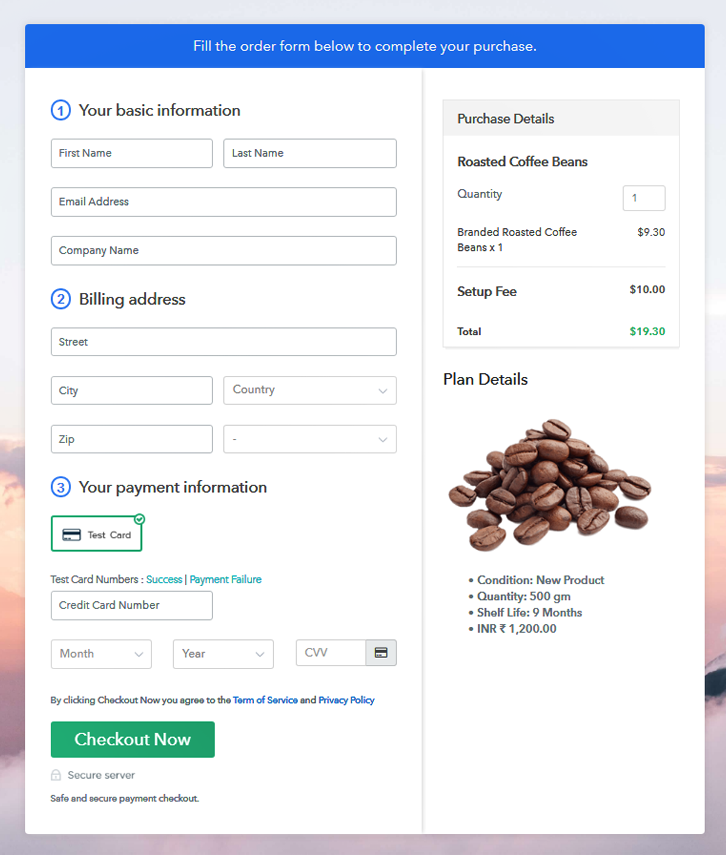
This is How your Checkout Page will Look Like After Creation

Checkout Page Preview to Sell Roasted Coffee Beans Online

Preview Checkout Page

Step 1: Login to Pabbly Subscription Billing

Signup
Very first you’ll need to visit the Pabbly Subscription Billing website. On the right upper corner click on the “Sign Up Free” button. You will get landed over a login/registration page. Here, either sign-in directly with Google or sign-up on the platforms by filling the form with all essential details.

Sign Up For Free!

Step 2: Select Subscription Billing

Access Subscription Billing

Step 3: Account Setup

Setup Account

After signing in you can encounter a pop up asking for the company name, currency and phone number. Quickly fill out the details to proceed forward.

Step 4: Connect Payment Gateway to Sell Roasted Coffee Beans Online

Connect Payment Gateway

The next step is to add a payment gateway. For this, you can choose from multiple options that it provides. Also, links to the integration guides are mentioned below. Here particularly I am enabling the test payment option.

Step 5: Add Your Product

Add Product

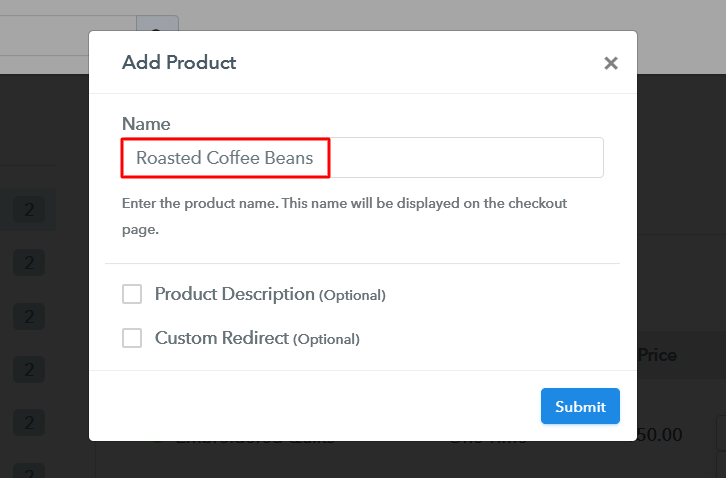
After a payment gateway is enabled. Click on the “Add New Product” button and name a category of roasted coffee beans as a product.

Add Product to Sell Roasted Coffee Beans Online

Once you are done filling out the details click on the “Submit” button and a product will get created.

Note: Here you can add all the products related to the similar category by creating plans for each of them.

Step 6: Add Plans

Next, click on the “Add New Plan” button to add the different roasted coffee beans that you have. A page asking for the plan name and essential details will open up. Be a little specific here as these details would be visible on the checkout pages.

(a) Select Add New Plan

Add Plan

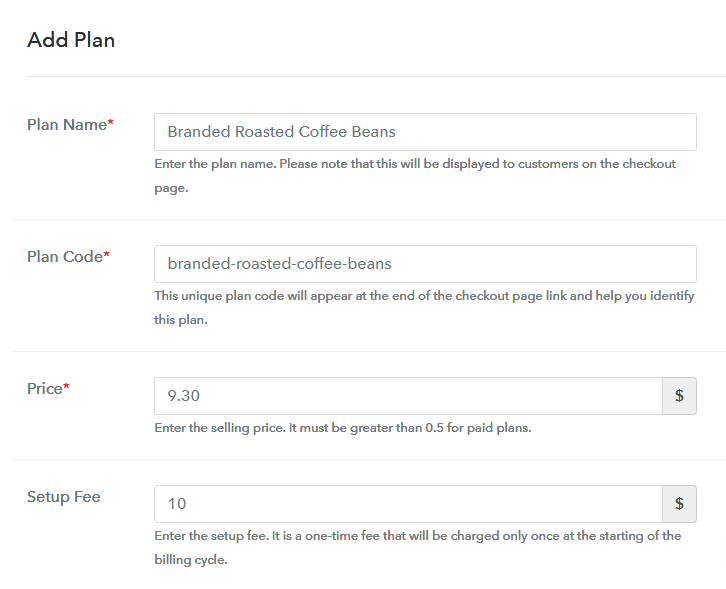
(b) Specify the Plan & Pricing Details

Add Plan to Sell Roasted Coffee Beans Online

Name the plan as whichever roasted coffee beans item you want to sell. Specify the code, price, a setup fee etc.

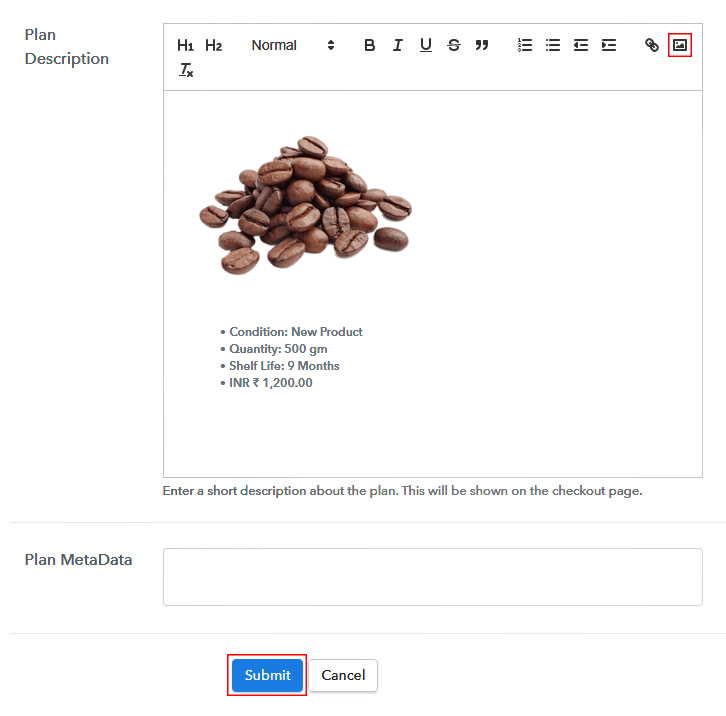
(c) Add Image & Description

Add Image & Description to Sell Roasted Coffee Beans Online

In this same procedure of adding items to sell roasted coffee beans online, you’ll encounter an “Add Description” section. If you want to add an image and text describing the item then this will go here only.

Also, you can use multiple text formatting tools such as lists, quotes, links, headings etc to write a description.

Strike the “Submit” button here once you are done with description. An item will get appended to sell roasted coffee beans online.

Remember, each time you need to add an item follow this step.

Step 7: Share your Checkout Page

Share Checkout Page on Social Media

You can share the designed checkout page from this next window that pop-out once you create a plan.

  • You can use copy the checkout page URL given under “Plan Link” window to sell roasted coffee beans online.
  • Also, you can use the checkout page URL in buttons & anchor text of your website.
  • Two direct sharing options are also available to share the checkout plan over Facebook & Twitter.

Step 8: Preview Checkout Page

Follow these steps to preview a checkout page:

(a) Click on the View Button

View Checkout Plan

(b) Take a Look at the Checkout Page

Checkout Page Preview to Sell Roasted Coffee Beans Online

Step 9: Embed Checkout Page in Site & Sell Tea Online

Embed Checkout Page on Website

If you want to embed the checkout page on WordPress then copy the code given under “Embed Plan Link” window.

(a) Edit the Page & Paste the Copied Link

Paste_Link_in_Text_Editor

And paste the copied code on your post or page’s text area section.

(b) Save & Publish the Checkout Page

Save_and_Publish

Hit the ‘Publish’ button of the page or post where you have pasted the code. A checkout page will be embedded on your website’s page/post. You can visit this page by going onto its URL.

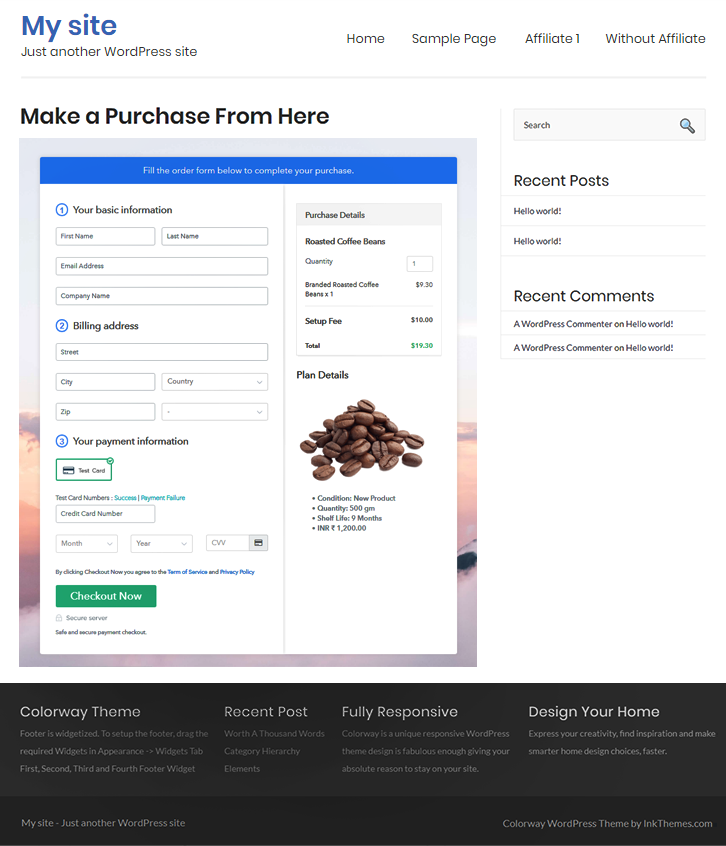
(c) Check out the Final Look of your Checkout Page on WordPress Site

Checkout Page On Site to Sell Roasted Coffee Beans Online

Step 10: Multiplan Checkout Page

Note: In case you want to sell multiple products via a single checkout page, you create a multi-plan checkout page otherwise skip this step.

(a) Click on Add Mutiplan Checkout

Multiplan_Checkout

(b) Add Plans to Sell Multiple Roasted Coffee Beans Products from Single Checkout Page

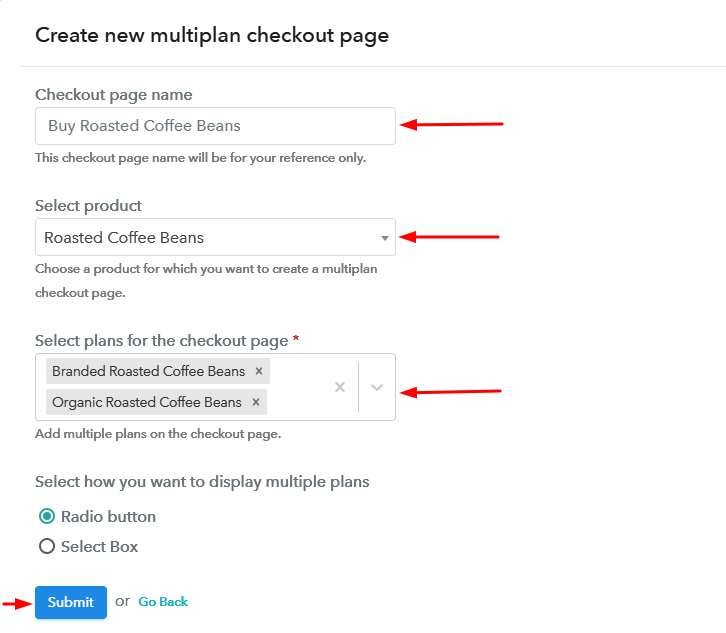
Create Multiplan Checkout to Sell Roasted Coffee Beans Online

(c) Take a Look at the Checkout Page:

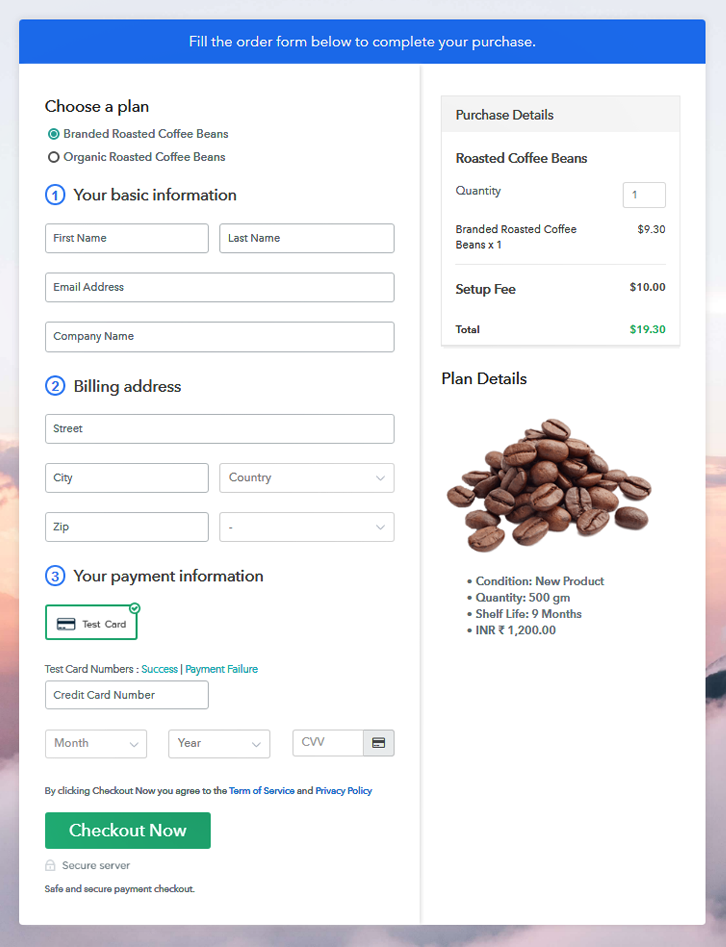
Multiplan Checkout to Sell Roasted Coffee Beans Online

Preview Checkout Page

Wrapping Up

Starting a coffee business online is an affordable way to break into the coffee industry. This service can help you join the ranks of coffee business owners in mere weeks. It not only takes care of the management but also let you accept payments securely with multiple gateways to choose from. You get to choose from the most reliable ones such as PayPal, Stripe, Razorpay, Authorize.net etc.

I wish this was helpful. Good Luck! with your business and drop a comment below as your feedback over this.

You May Also Like To Read

How to Sell Children’s Books Online | Step by Step (Free Method)

How To Sell Children's Books Online

Ideal For: All the children’s book publishers, children’s book authors, children’s book sellers, retail book shop owners, wholesale children’s book distributors and other merchants can use this method to take their children’s book selling business online.

How To Sell Children's Books Online

Why Choose this Method for Selling Over any Other Solution?

Unlike any other solution, this method allows you to:

  • List and sell your children’s books for FREE. Absolutely no payment required.
  • No commission on sales.
  • Collect payment through multiple payment modes from a single checkout page.
  • Sell one time or recurring subscriptions of your children’s books.
  • Sell and collect payment in any currency as per your requirement.
  • Give discounts on your products by offering special coupon codes.
  • Add sales commission agents to help you in selling your children’s books.

Get Pabbly Subscription Billing for Free

Books are always considered as a source of inspiration and perfect learning material to parents for their kids. And keeping kids occupied is a tough task and that’s where good books came as a savior. The digital market is offering all of us beyond our needs and this is exactly why you should start selling children’s books online.

Why would you like to sell children’s books online?

One of the prior reasons, to start children’s bookselling business is it has been revealed that in the 100 best selling books, around 31% contribute to children’s books which is an amazing figure. And if that’s not enough, you might believe the parenting surveys fact where it has been said that books are the best way to improve the creative skills of children. This is why you should give online market a chance.

Meantime, “The cat is out of the bag” a while ago and now every author knows how crucial and important marketing is and what’s a better platform than the internet.

But, we already have done all the heavy lifting for you and here we are suggesting Pabbly Subscription Billing that will skyrocket your children’s bookselling business. It lets you create amazing checkout pages to sell children’s books online. Some of its rarest features involve:

  • Include taxation charge according to country or region
  • Create professional invoices in a couple of minutes
  • List multiple children books in the single checkout page
  • Collect payments in both online and offline mode

The aforementioned are the reason why you should try your hands on this amazing software. Now, let’s see how to create a checkout page for selling children’s books online.

This is How your Checkout Page will Look Like After Creation

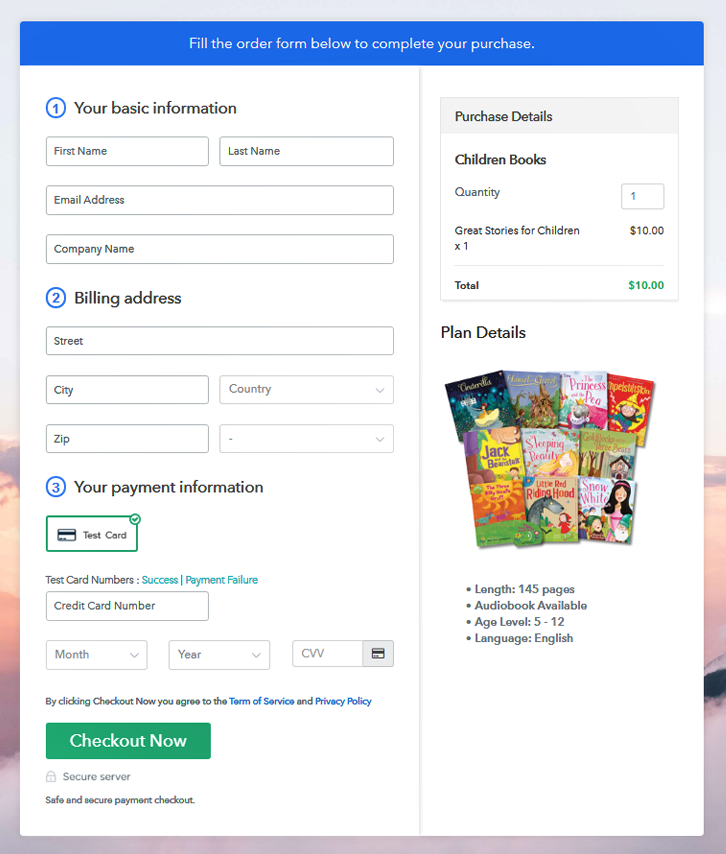
Checkout Page to Sell Children Books Online

Preview Checkout Page

Step 1: Login to Pabbly Subscription Billing

Signup

Start the process by visiting the Pabbly Subscription Billing site and then clicking on the “Sign Up Free” option. Further, enter into software either use your Gmail credentials or create a new account.

Sign Up For Free!

Step 2: Select Subscription Billing

Access Subscription Billing

Step 3: Account Setup

Setup Account

Once you’re done clicking on the “Access Now” button of the Pabbly Subscription Billing, a page will open with basic details such as company name, select currency, and phone number. Just fill out those details to continue the process.

Step 4: Connect Payment Gateways To Sell Children’s Books Online

Connect Payment Gateway

Our advice here to always try the test payment mode to gain in-depth knowledge about the software payment procedures. Here, we are also using the test payment mode. Additionally, the software has multiple payment gateways like PayPal, Stripe, etc. That’s why we are mentioning payment integration guides below.

Step 5: Add Your Product

Add Product

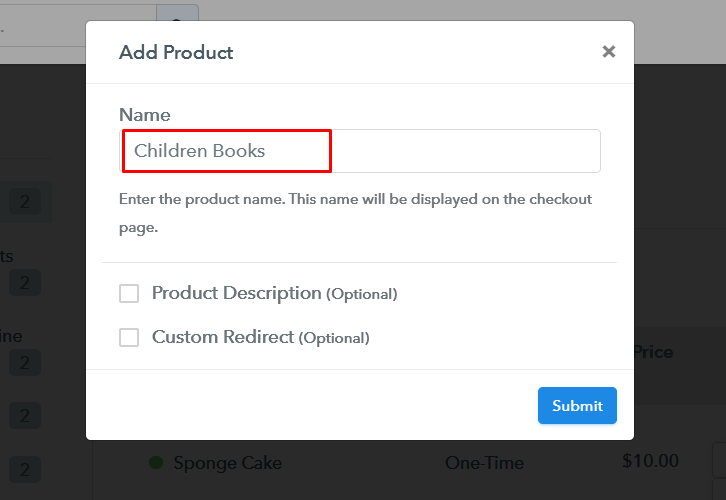
Further, here specify your product which is children’s books. You can write a little about the product and fill all the necessary details related to it in a product description section.

Add Product to Sell Children Books Online

Note: Here you can add all the products related to the similar category by creating plans for each of them.

Step 6: Add Plans

Let’s roll out all the plans for different kinds of kid’s books available in your store.

(a) Select Add New Plan

Add Plan

(b) Specify the Plan & Pricing Details

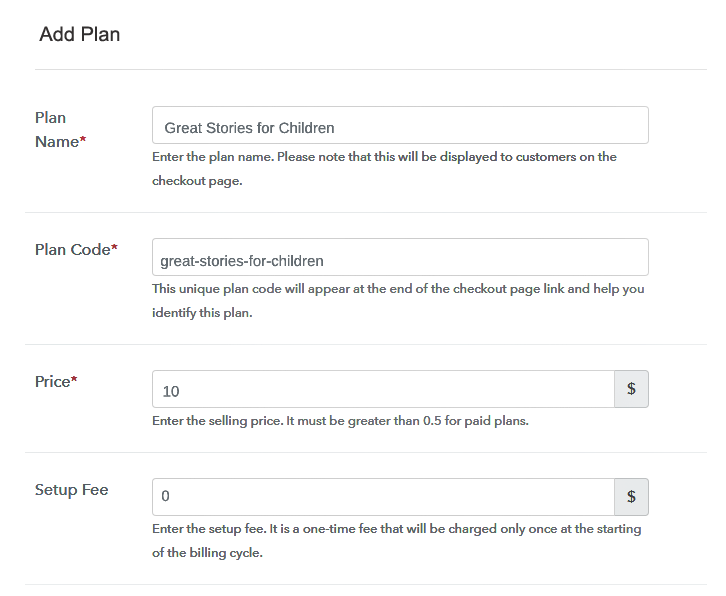
Specify the Plan & Pricing to Sell Children Books Online

Subsequently, fill out the details of the product like plan name, code, price, setup fees, billing cycle, and more.

(c) Add Image & Description

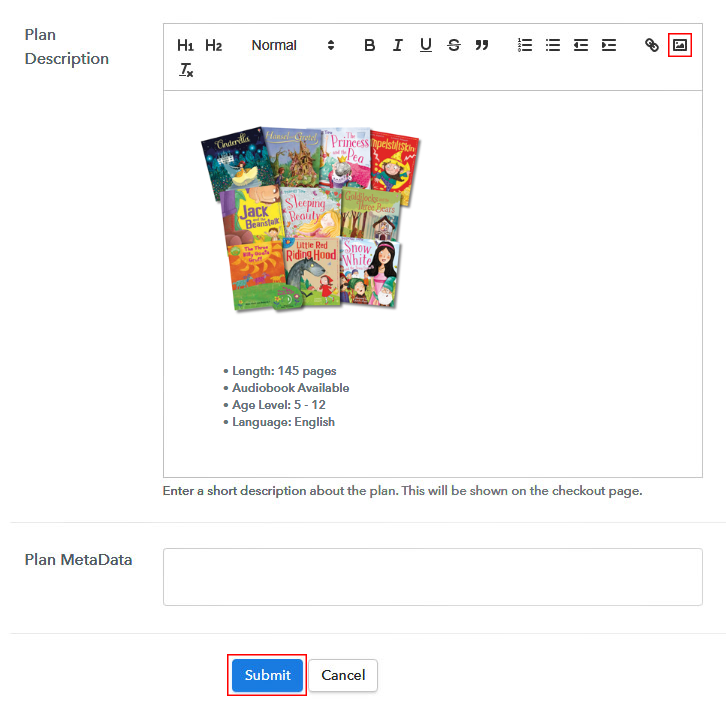
Add Image and Description to Sell Children Books Online

Next, to grab the audience’s attention on the checkout page, write a brief description of kid’s books with bullets, images, links, etc.

Further, click on the “Submit” button after you are done with the procedure.

Likewise, you can add multiple plans and types of children’s books in your product list which you want to sell online.

Step 7: Share your Checkout Page

Share Checkout Page on Social Media

  • Simply share the link of the checkout page on social media accounts like Facebook & Twitter.
  • The second option is to share a link directly with your customers via SMS or email marketing.
  • Furthermore, you can add the provided plan link in the buttons or any anchor text on your website, so the users will be redirected to the checkout page.

Step 8: Preview Checkout Page

Next, to view the checkout page, follow the below-mentioned steps.

(a) Click on the View Button

View Checkout Plan

(b) Take a Look at the Checkout Page

Checkout Page to Sell Children Books Online

Step 9: Embed Checkout Page in Site & Sell Children’s Books Online

Embed Checkout Page on Website

Next, copy the embed plan link of the checkout page which you want to embed on your WordPress site.

(a) Edit the Page & Paste the Copied Link

Paste Link in Text Editor

Now, paste the link on the text editor of a WordPress site.

(b) Save & Publish the Checkout Page

Save and Publish

After that, just press the “Publish” button to embed the checkout page on site.

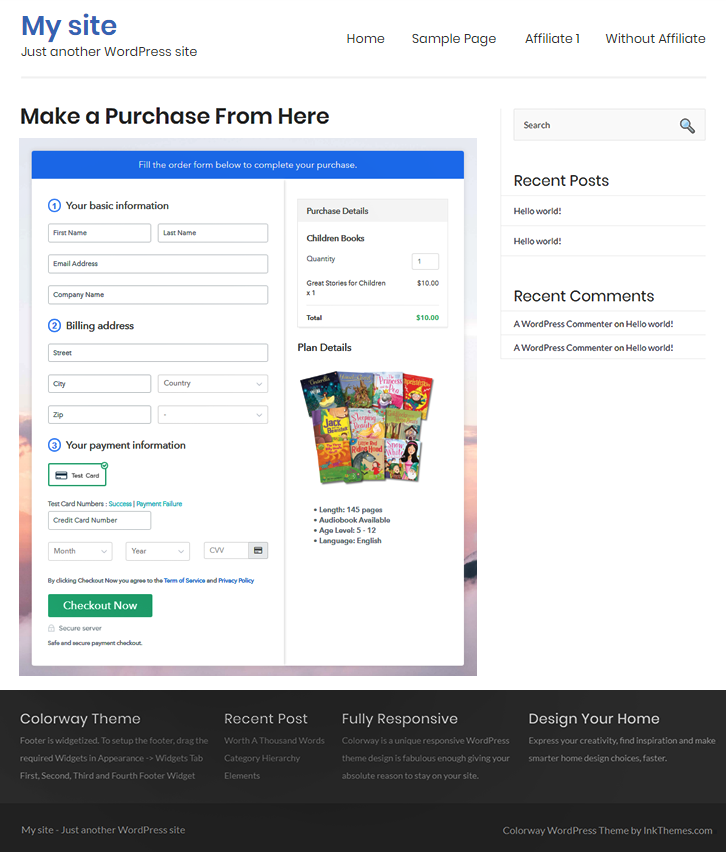
(c) Check out the Final Look of your Checkout Page on WordPress Site

Final Look of your Checkout Page to Sell Children Books Online

Step 10: Multiplan Checkout Page

Note: In case you want to sell multiple products via a single checkout page, you can create a multi-plan checkout page otherwise skip this step.

(a) Click on Add Mutiplan Checkout

Multiplan Checkout

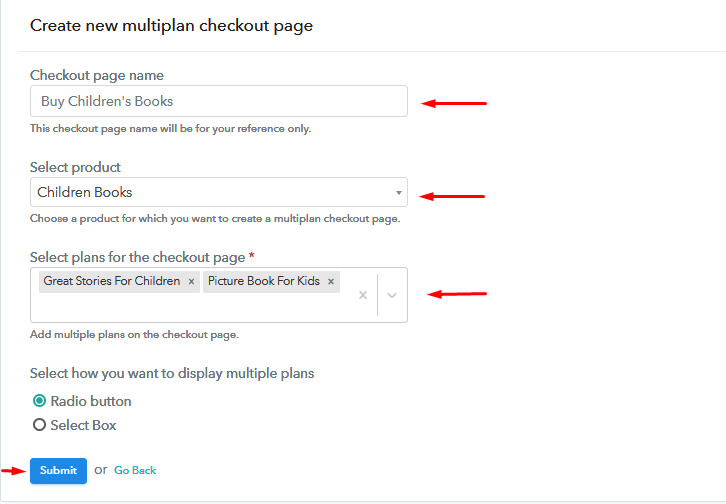
(b) Add Plans to Sell Multiple Children’s Books from Single Checkout Page

Add Multiple Products To Sell Children Books Online

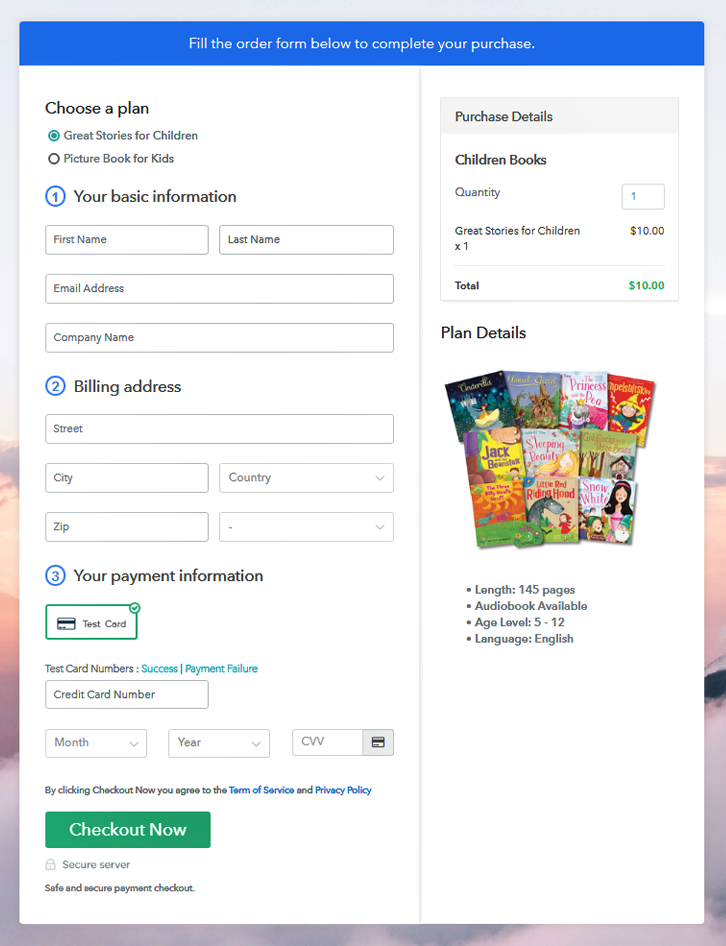
(c) Take a Look at the Checkout Page

Multiplan Checkout Pages to Sell Children Books Online

Preview Checkout Page

Wrapping Up

Tada! here we are at the end of this blog with the conclusion that there is no harm in trying new things especially when it comes to enhancing your business growth. Selling children’s books online is convenient and within the reach of folks. That’s why we prepared a guide on how to sell children’s books online by following these easy steps.

So, don’t dwell in confusion and try this amazing software for a change.

You May Also Like To Read –
How to Sell Baby Wears Online | Step by Step (Free Method)

How to Sell Baby Wears Online

Ideal For: All the garment shops, wholesale clothing sellers, and other independent entrepreneurs can use this method to take their baby wears selling business online.

How to Sell Baby Wears Online

Why Choose this Method for Selling Over any Other Solution?

Unlike any other solution, this method allows you to:

  • List and sell baby wears for FREE. Absolutely no payment required.
  • No commission on sales.
  • Collect payment through multiple payment modes from a single checkout page.
  • Sell one time or recurring subscriptions of baby wears.
  • Sell and collect payment in any currency as per your requirement.
  • Give discounts on your products by offering special coupon codes.
  • Add sales commission agents to help you in selling baby clothing.

Get Pabbly Subscription Billing for Free

Are you in baby wears selling business? Do you have your own shop for the same? Then you must be aware of the everyday struggles to get orders or to make sales. To get rid of those daily problems and save your time you should start baby wears business online.

Why would you like to sell baby wears online?

Well, because selling baby wears online is much cheaper than to sell from a shop in the market, and in this blog, we are telling even a free way to start your business online. Pabbly Subscription Billing is the one and only service through which you can start selling baby wears online without investing a single penny. With this platform, you not only get to start your business for free but also you can add unlimited plans and products, unlimited customers, and generate unlimited revenue.

Also, you won’t have to pay any transactional charges on your revenue as well. , just create a checkout page and share its link with your users to easily collect one time or recurring payments. Your customers will be able to make direct purchases through the checkout page from your website.

This is How your Checkout Page will Look Like After Creation

Checkout Page Preview

Preview Checkout Page

Step 1: Log in to Pabbly Subscription Billing

Signup

Log in to the Pabbly Subscription Billing website and click on the “Sign Up Free” button. After clicking the button, you are redirected to the signup page where you can sign up via your Gmail account or enter your email address and password manually for free.

Sign Up For Free!

Step 2: Select Subscription Billing

Access Subscription Billing

Step 3: Account Setup

Setup Account

After completing the signup process, fill up your company details i.e. company name, select currency, and contact number in the appeared dialogue box. Fill all these details to move forward to the next step.

Step 4: Connect Payment Gateway to Sell Baby Wears Online

Connect Payment Gateway

In this blog, we are describing to you how the payment collection process works by enabling the test payment mode. Later, you have to connect other payment gateways. The complete integration guide for payment gateways is provided below.

Step 5: Add Your Product

Add Product

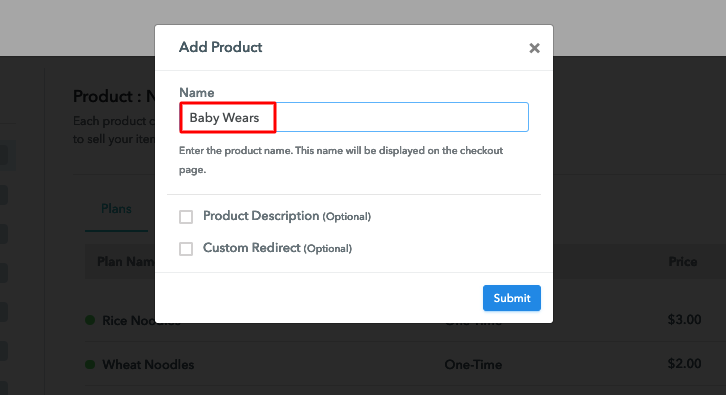
After enabling payment mode, you can add your first product. You can add baby wears of different categories, for example, bodysuits, sleepers, etc, and add all other types of baby wears in the same product by creating different plans.

Add Product Name to Sell Baby Wears Online

By filling up these details your product is created.

Note: Here you can add all the products related to the similar category by creating plans for each of them.

Step 6: Add Plans

Let’s get started and create plans for different categories of baby wears that you want to sell

(a) Select Add New Plan

Add Plan

(b) Specify the Plan and Pricing Details

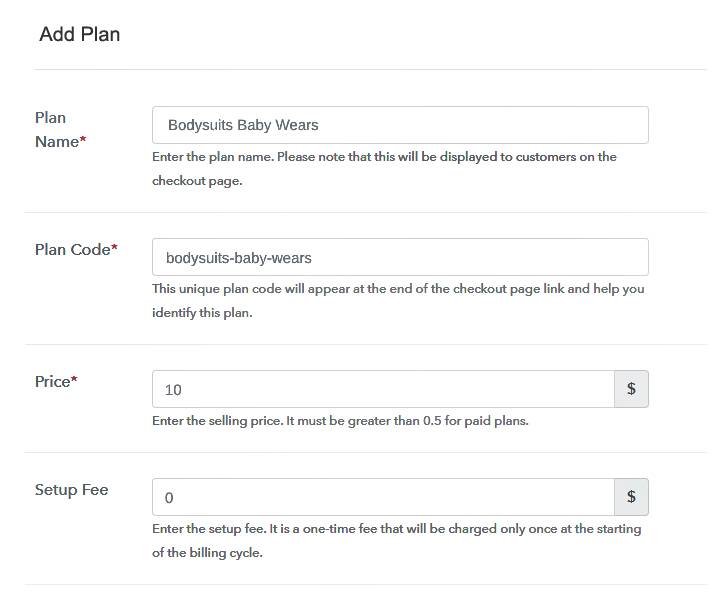
Add Plan Details to Sell Baby Wears Online

After adding a plan, you are landed on the plan page, where you will have to fill the plan details such as plan name, code, billing cycle, price, etc.

(c) Add Image & Description

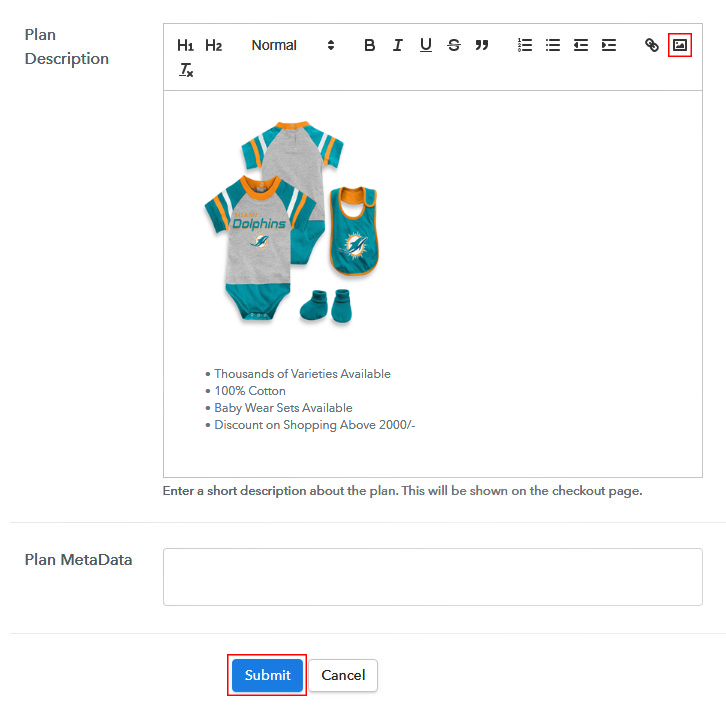
Add Image to Details to Sell Baby Wears Online

Also, write down a description of the baby wears along with the product links, images, etc, and click on the submit button to add your plan.
You can create more plans for all the baby wears in a similar manner.

Step 7: Share Your Checkout Page

Share Checkout Page on Social Media

  • Share your checkout page on social networking sites such as Facebook and Twitter.
  • Copy the specified link and send it to your customers via SMS or emails directly.
  • Embed your plan link to your website so that your customers can be landed on the checkout page.

Step 8: Preview Checkout Page

Follow the given steps to view checkout page

(a) Click on the View Button

View Checkout Plan

(b)Take a Look at the Checkout Page

Checkout Page Preview

Step 9: Embed Checkout Page in Site & Sell Baby Wears Online

Embed Checkout Page on Website

Simply copy the provided plan embedding link and embed the checkout page to your WordPress site.

(a) Edit the Page & Paste the Copied Link

Paste_Link_in_Text_Editor

Copy and paste the link in the text area of the editor

(b) Save & Publish the Checkout Page

Save_and_Publish

After the code is pasted, click on the publish button to embed your checkout page.

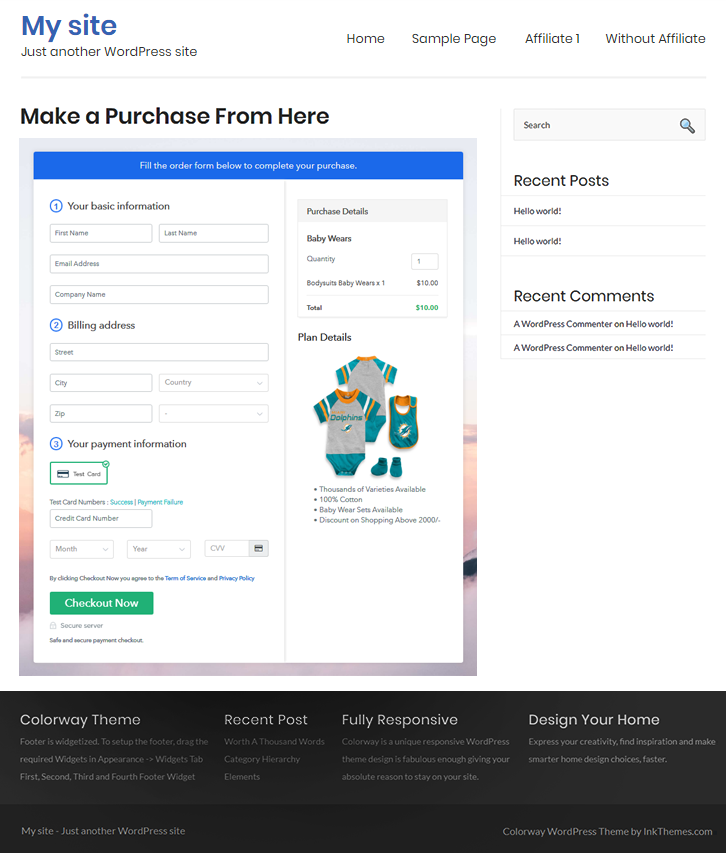
(c) Check Out the Final Look of your Checkout Page on WordPress Site

Embed Checkout Page to Website to Sell Baby Wears Online

Step 10: Multiplan Checkout Page

Note: In case you want to sell multiple products through a single checkout page, create a multi-plan checkout plan, otherwise skip this step.

(a) Click on Add Multiplan Checkout

Multiplan_Checkout

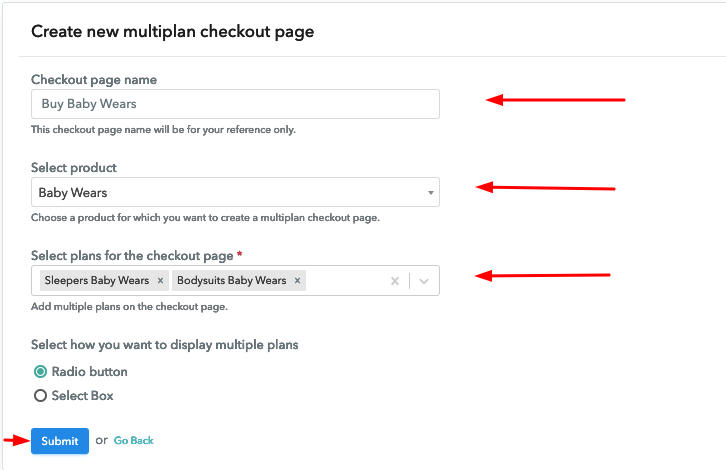
(b) Add Plans to Sell Multiple Baby Wears from Single Checkout Page

Multiplan Details to Sell Baby Wears Online

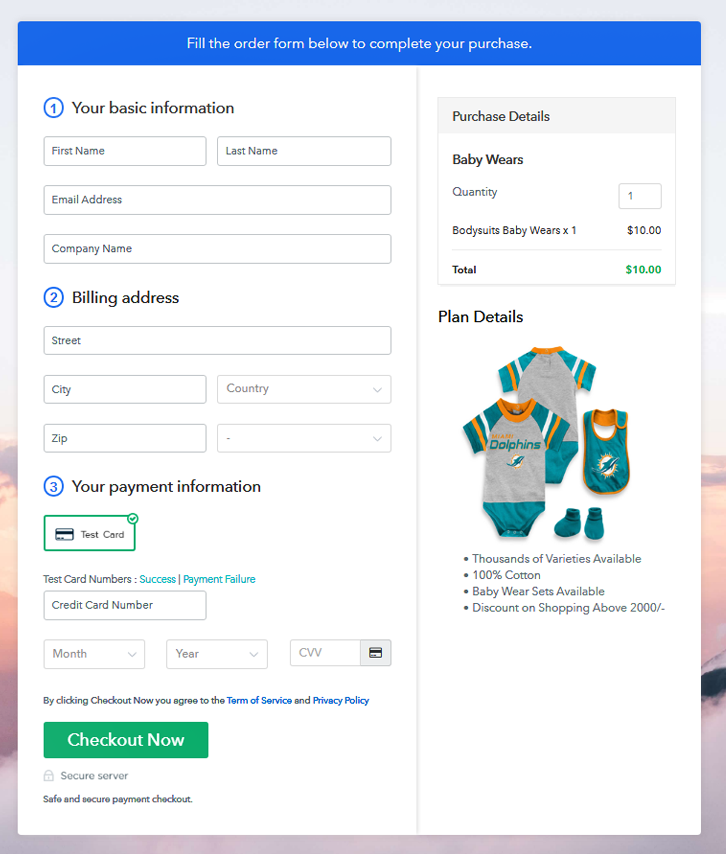
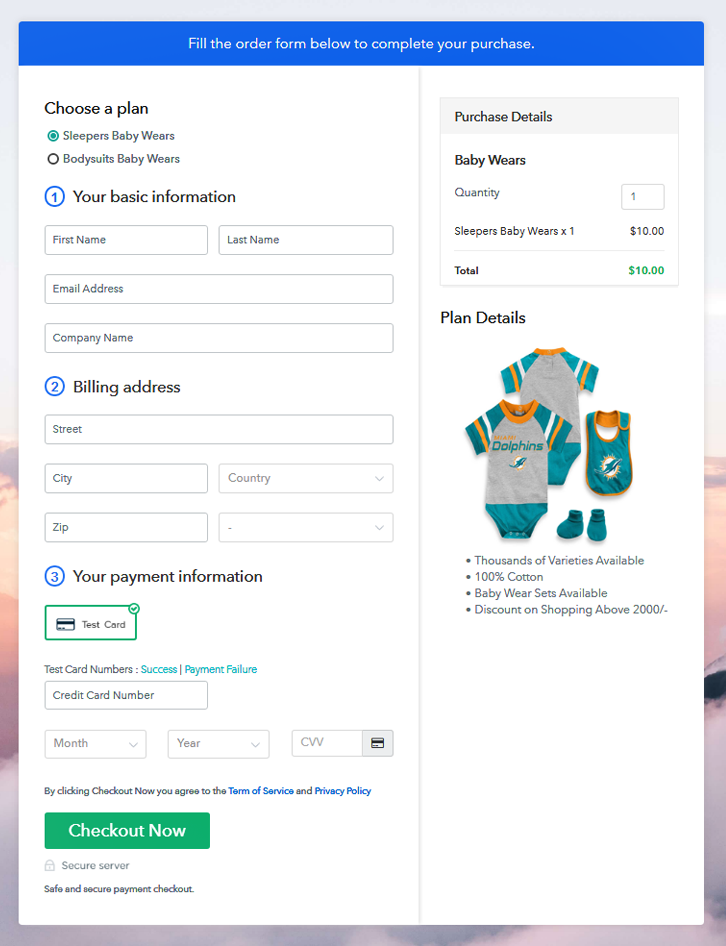
(c) Take a Look at the Checkout Page

Multiplan Checkout Page to Sell Baby Wears Online

Preview Checkout Page

Wrapping Up

At last, it’s a lot easier now to start your baby wears business online as with Pabbly Subscription Billing, you don’t have to spend anything, it’s easy to use and even beginners can handle the service. So without thinking twice take your baby wears selling business online and start generating unlimited revenue without any fuss.
For further queries or suggestions, please write to us.

You May Also Like To Read –
How to Sell Cakes Online | Step by Step (Free Method)

How to Sell Cakes Online

Ideal For: All the bakeries, hotels & restaurants, and other independent entrepreneurs can use this method to take their cake selling business online.

How to Sell Cakes Online

Why Choose this Method for Selling Over any Other Solution?

Unlike any other solution, this method allows you to:

  • List and sell cakes for FREE. Absolutely no payment required.
  • No commission on sales.
  • Collect payment through multiple payment modes from a single checkout page.
  • Sell one time or recurring subscriptions of cakes and pastries.
  • Sell and collect payment in any currency as per your requirement.
  • Give discounts on your products by offering special coupon codes.
  • Add sales commission agents to help you in selling cakes.

Get Pabbly Subscription Billing for Free

If you love to bake and are thinking of starting your own cake selling business but are struggling to do so because of the investment then you should definitely start cake selling business online instead of opening a shop.

Why would you like to sell cakes online?

Well because it’s much cheaper than opening your own bakery shop. You can bake and deliver cakes from your home via online platforms and one of those platforms is Pabbly Subscription Billing. With this service, you get to start your cake selling business online for absolutely free, and you can add unlimited plans and products, unlimited customers to your list, and whatnot.

In addition to this, there won’t be any transactional charges on your generated revenue as well. Furthermore, you just have to create a checkout page and share its link with your users to readily collect one time or the recurring payments. Your customers will be able to make direct buys through the checkout page from your website.

This is How your Checkout Page will Look Like After Creation

Checkout Page Preview to Sell Cakes Online

Preview Checkout Page

Step 1: Log in to Pabbly Subscription Billing

Signup

Log in to the Pabbly Subscription Billing website and click on the “Sign Up Free” button, after clicking the button, you are landed to the signup page where you can sign up via your Gmail account or enter your email address and password manually for free.

Sign Up For Free!

Step 2: Select Subscription Billing

Access Subscription Billing

Step 3: Account Setup

Setup Account

After the signup process is completed, you have to fill your company details i.e. company name, select currency, and contact number in the appeared dialogue box. Fill all these details to move forward to the next step.

Step 4: Connect Payment Gateway to Sell Cakes Online

Connect Payment Gateway

In this step, through the above picture, we are showing you how the payment collection process works through enabling test payment mode. Afterward, you have to connect other payment gateways to collect payment. The complete integration guide for payment gateways is provided below.

Step 5: Add Your Product

Add Product

After enabling payment mode, you can add your first product. You can add cakes of different categories, for example, chocolate cakes, truffle cakes, etc, and add all other types of cakes in the same product by creating different plans.

Add Product Name to Sell Cakes Online

Just fill up these details and your product is created.

Note: Here you can add all the products related to the similar category by creating plans for each of them.

Step 6: Add Plans

Let’s get started and create plans for different categories of cakes that you want to sell

(a) Select Add New Plan

Add Plan

(b) Specify the Plan and Pricing Details

Add Plan Details to Sell Cakes online

After clicking on add new plan button, you are landed on the plan page, where you will have to fill the plan details such as plan name, code, billing cycle, price, etc.

(c) Add Image & Description

Add Image to Plan Details to Sell Cakes Online

Also, write down a description of the cakes along with the product links, images, etc, and click on the submit button to add your plan.
You can create more plans for all the cakes in a similar manner.

Step 7: Share Your Checkout Page

Share Checkout Page on Social Media

  • Share your checkout page on social networking sites such as Facebook and Twitter.
  • Copy the specified link and send it to your customers via SMS or emails directly.
  • Embed your plan link to your website so that your customers can be landed on the checkout page.

Step 8: Preview Checkout Page

Follow the given steps to view checkout page

(a) Click on the View Button

View Checkout Plan

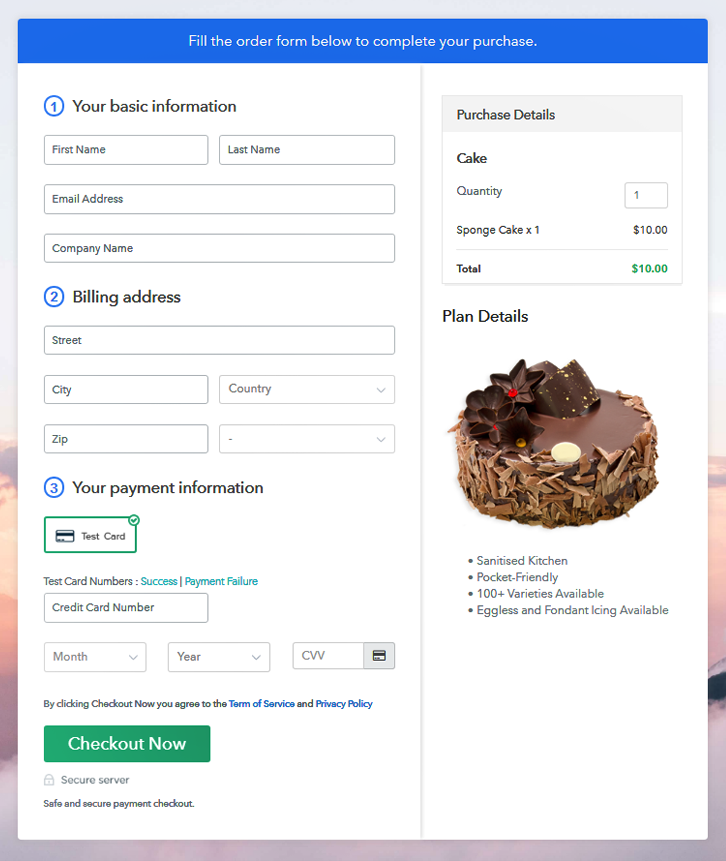
(b) Take a Look at the Checkout Page

Checkout Page Preview to Sell Cakes Online

Step 9: Embed Checkout Page in Site & Sell Cakes Online

Embed Checkout Page on Website

Easily copy the provided plan embedding link and embed the checkout page to your WordPress site.

(a) Edit the Page & Paste the Copied Link

Paste_Link_in_Text_Editor

Copy and paste the link in the text area of the editor

(b) Save & Publish the Checkout Page

Save_and_Publish

After the code is pasted, click on the publish button to embed your checkout page.

(c) Check Out the Final Look of your Checkout Page on WordPress Site

Embed Checkout Page to Website to Sell Cake Online

Step 10: Multiplan Checkout Page

Note: In case you want to sell multiple products through a single checkout page, create a multi-plan checkout plan, otherwise skip this step.

(a) Click on Add Multiplan Checkout

Multiplan_Checkout

(b) Add Plans to Sell Multiple Cakes from Single Checkout Page

Multiplan Details to Sell Cakes Online

(c) Take a Look at the Checkout Page

Multiplan Checkout Page to Sell Cakes Online

Preview Checkout Page

Wrapping Up

To conclude, this was the easiest and free way to sell cakes online without anyone’s help. This way you can start your cake selling business independently without investing any money, which is a win-win offer for those who have been struggling to take their business online. We hope, this blog was beneficial for you, and for further queries or suggestions, kindly contact us.

You May Also Like To Read –
How to Sell Grocery Items Online? | Step by Step (Free Method)

How to Sell Grocery Items Online

Ideal For: All the grocery dealers, household enterprises, retail grocery item traders and other merchants can use this method to sell grocery items online.

How to Sell Grocery Items Online

Why Choose this Method for Selling Over any Other Solution?

Unlike any other solution, this method allows you to:

  • List and sell your grocery items for FREE. Absolutely no payment required.
  • No commission deducted on sales.
  • Collect payment through multiple payment modes from a single checkout page.
  • Sell one time or recurring subscriptions of your grocery items.
  • Sell and collect payment in any currency as per your requirement.
  • Give discounts on your products by offering special coupon codes.
  • Add sales commission agents to help you in selling your groceries.

Get Pabbly Subscription Billing for Free

Grocery items come in the basic needs of every human being. Therefore, grocery sellers are never out of business. So, you must be looking for ways to start your grocery business online.

Why would you like to sell grocery items online?

We understand how important it is to stay updated with day to day business. And taking your grocery business online is one of the important step to take. Therefore, an online tool is required that helps you to manage your business online without any hassle. Thus, we would like to recommend Pabbly Subscription Billing as the best tool to start your grocery business online. Here, let me take you through its prominent features.

  • It helps you to maintain an inventory of all the groceries in stock
  • Moreover, you can set up delivery or extra charges as per your needs
  • Further, you can collect payments both in offline and online mode
  • Besides, it enables you to create invoices that can be used as tax receipts.
  • You can also provide a comprehensive description of each and every product

So, why wait to sell grocery items online? Just create checkout pages by following the step below and you are ready to share it on social media or on website in few snaps.

This is How your Checkout Page will Look Like After Creation

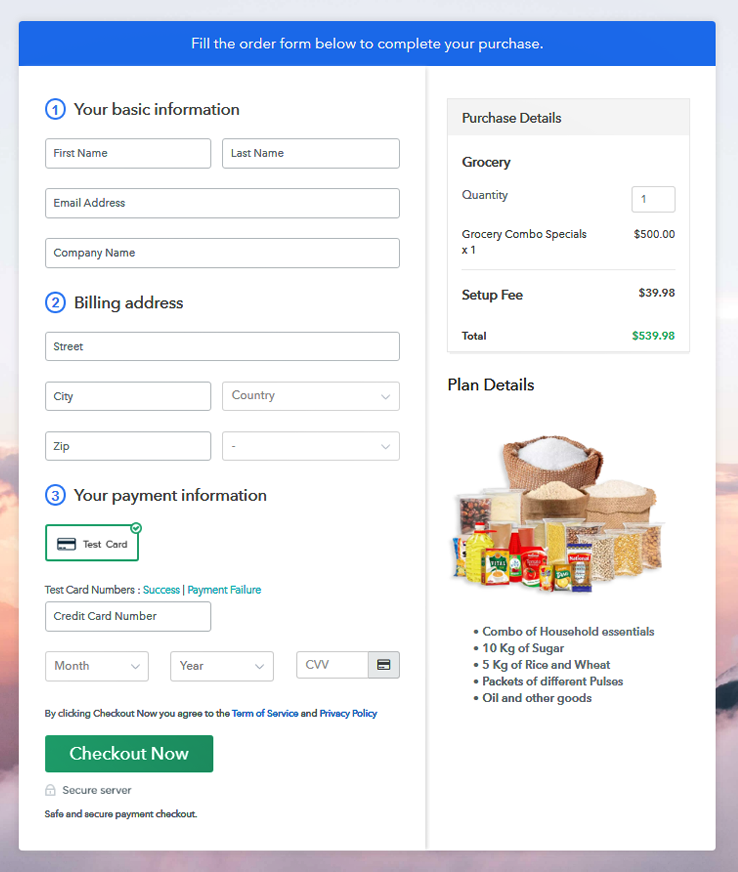
Checkout Page to Start Grocery Business Online

Preview Checkout Page

Step 1: Log in to Pabbly Subscription Billing

Signup

First of all, search out for Pabbly Subscription Billing and click on their website. Then, tap on the button “Sign up Free” that will redirect you to a sign-up page.  Just fill out all the fields manually or sign in via Gmail account.

Sign Up For Free!

Step 2: Select Subscription Billing

Access Subscription Billing

Step 3: Account Setup

Setup Account

Subsequently, fill out the company details such as name, currency standards, and phone number. Then, click on continue in order to complete the process.

Step 4: Connect Payment Gateways To Sell Grocery Items Online

Connect Payment Gateway

The next step is to check the payment gateways as it helps you to stimulate the whole payment experience of a customer. Moreover, Pabbly Subscription Billing comes with multiple payment gateways such as PayPal, Stripe, Razorpay, etc. In the meantime, here I am enabling the test payment gateway in order to elaborate the whole process using test payment gateway.

Step 5: Add Your Product

Add Product

When successfully embedded your payment gateway, the next step is to add your product. Simply tap on the “Add New Product” button that will open a dialog box. Then, enter the details of the groceries with the product specifications.

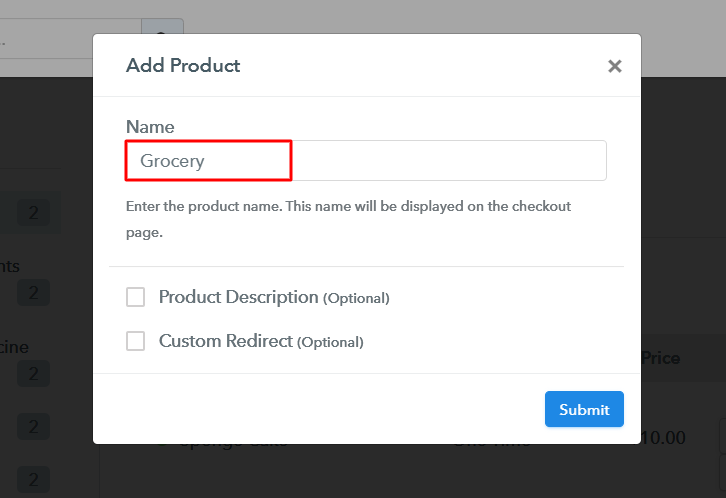
Add Product to Sell Grocery Online

Fill up the details and your product is created.

Note: Here you can add all the products related to the similar category by creating plans for each of them.

Step 6: Add Plans

Now, create plans for grocery items that are available in your store.

(a) Select Add New Plan

Add Plan

(b) Specify the Plan & Pricing Details

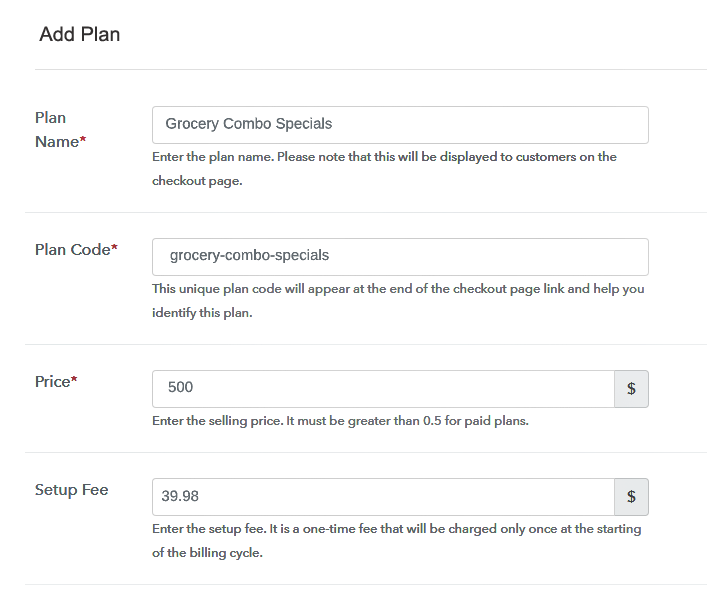
Add Plan Details to Sell Grocery Items Online

In order to add a plan, you will be redirected to the plan page to fill details such as name, code, price, setup fees, billing cycle, etc.

(c) Add Image & Description

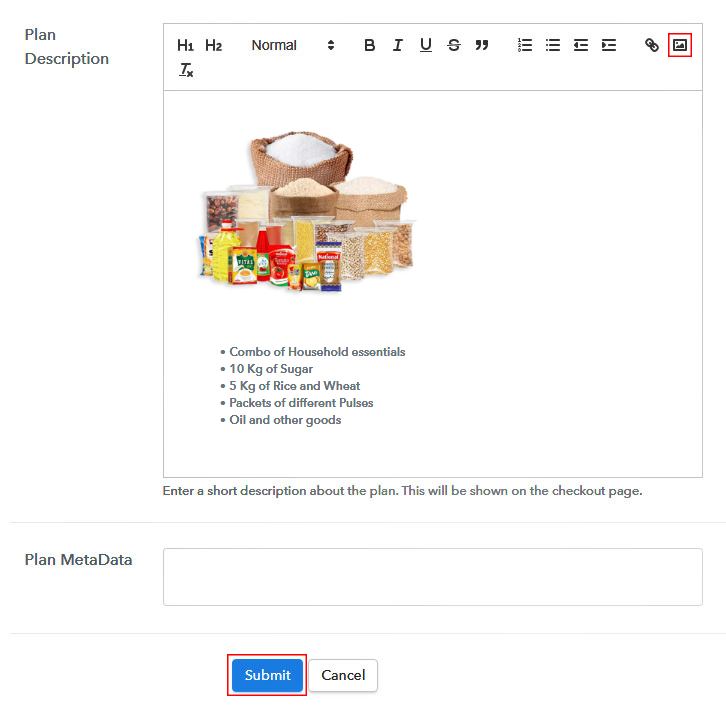
Add Image & Description to Sell Grocery Items Onlne

Now, paste the image of the grocery items you want to sell online.

Moreover, also provide some product description of the groceries in bullet points such as quantity, quality, etc.

After filling out the description, just click on the “Submit” button.

Step 7: Share your Checkout Page

Share Checkout Page on Social Media

  • Next, just share the checkout page on Twitter & Facebook by direct buttons.
  • Moreover, you can also share the checkout page link to customers with the help of emails and SMS.
  • Similarly, it allows you to add the provided plan link in the buttons or any anchor text of your website in order to redirect users to checkout page.

Step 8: Preview Checkout Page

Follow up these steps to preview checkout page:

(a) Click on the View Button

View Checkout Plan

(b) Take a Look at the Checkout Page

Checkout Page to Start Grocery Business Online

Step 9: Embed Checkout Page in Site & Sell Grocery Items Online

Embed Checkout Page on Website

Just copy the embedding link to insert the checkout page on your WordPress website.

(a) Edit the Page & Paste the Copied Link

Paste Link in Text Editor

Consequently, after copying the link, paste it to the text area of the editor.

(b) Save & Publish the Checkout Page

Save and Publish

Next, hit the ‘Publish’ button after pasting the code and your checkout page is embedded.

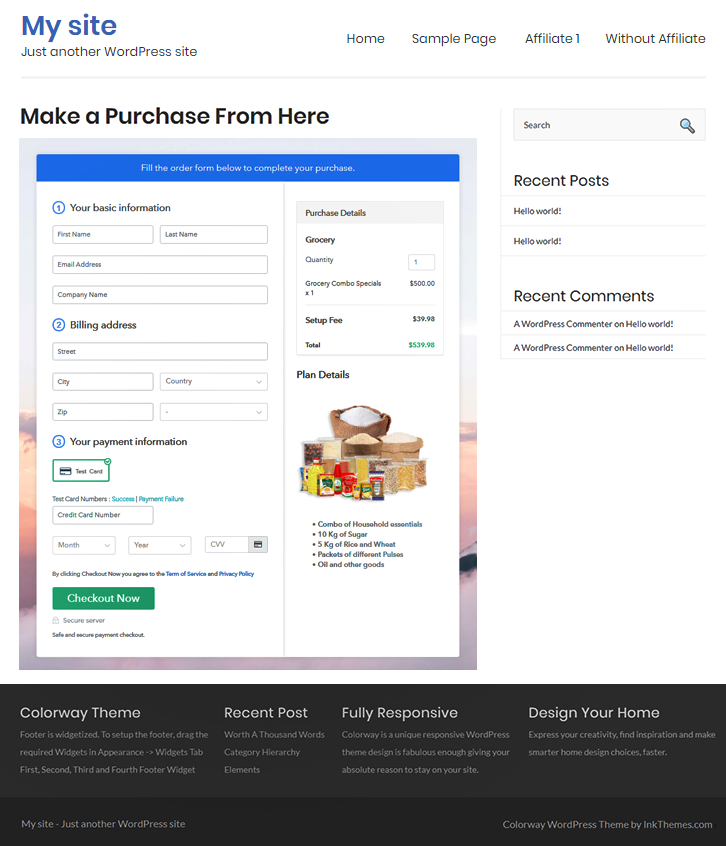
(c) Check out the Final Look of your Checkout Page on WordPress Site

Embed Checkout to Start Grocery Business Online

Step 10: Multiplan Checkout Page

Note: In case you want to sell multiple products via a single checkout page, you can create a multi-plan checkout page otherwise skip this step.

(a) Click on Add Mutiplan Checkout

Multiplan Checkout

(b) Add Plans to Sell Grocery Items from Single Checkout Page

Add Plan to Sell Grocery Online

(c) Take a Look at the Checkout Page

Multiplan Checkout Page

Preview Checkout Page

Wrapping Up

There you go! Now you know how to sell your grocery items online. Just follow the above-mentioned steps and you are good to go. So, what are you waiting for? Start your Grocery business online and earn more than ever by selling grocery items without any hassle.

You May Also Like To Read –