How to Sell Tupperware Online | Step by Step (Free Method)

Ideal For: All the Tupperware manufacturer, Tupperware sellers, wholesale Tupperware suppliers, retail Tupperware traders and other merchants can use this method to sell Tupperware online.
How to Sell Tupperware Online

Why Choose this Method for Selling Over any Other Solution?

Unlike any other solution, this method allows you to:

  • List and sell your Tupperware for FREE. Absolutely no payment required.
  • No commission deducted on sales.
  • Collect payment through multiple payment modes from a single checkout page.
  • Sell one time or recurring subscriptions of your Tupperware.
  • Sell and collect payment in any currency as per your requirement.
  • Give discounts on your products by offering special coupon codes.
  • Add sales commission agents to help you in selling your Tupperware.

Get Pabbly Subscription Billing for Free

In our daily life, Tupperware is one of the basic product that we use. From storing food in kitchen to packing lunch for your loved ones, Tupperware always comes in handy. Thus, you might be looking out for ways to start selling Tupperware online.

Why would you like to sell Tupperware online?

Household products are something that never goes out of business. And providing such products on their doorstep is like taking your business to the next level. Therefore, a tool is required so that you can sell Tupperware online without any hassle. Hence, we would like to recommend Pabbly Subscription Billing as the most versatile online tool which helps you to create checkout pages easily. Want to know why we are suggesting it? Then, let me tell you some of the outstanding features that it offers.

  • Online and offline payment collection
  • Create unlimited plans and products
  • Offer limitless coupons and discounts
  • Add tax as well as delivery charges
  • Share checkout page on social media platforms or website

Now, let me take you through the 10 easy steps to create a checkout page.

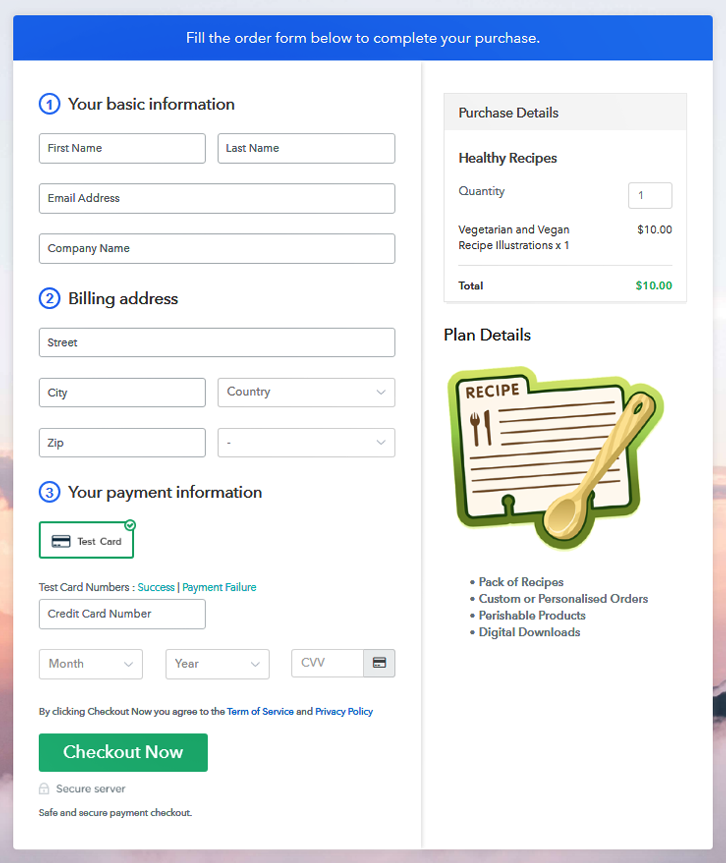
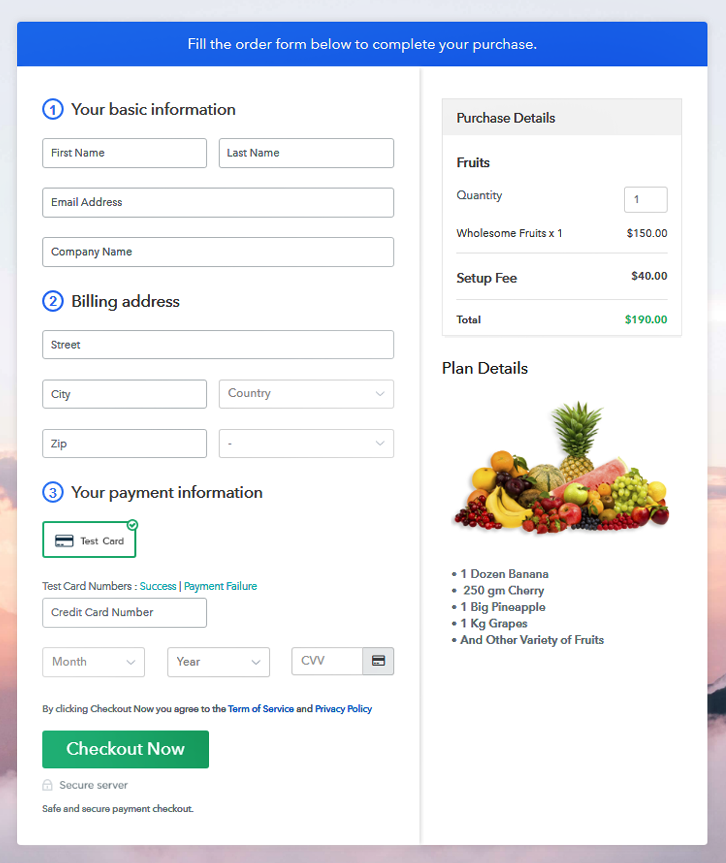
This is How your Checkout Page will Look Like After Creation
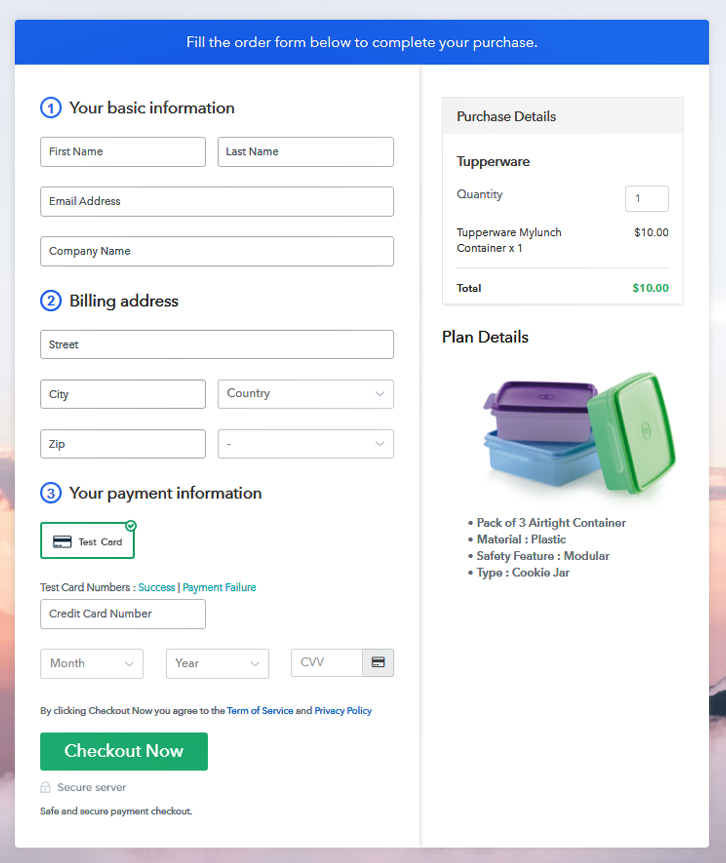
Checkout Page to Sell Tupperware Online

Preview Checkout Page

Step 1: Log in to Pabbly Subscription Billing

Signup

Your former step is to go to Pabbly Subscription Billing and click on the button “Sign up Free“. Then, on their sign-up page, you need to fill up the fields either by entering details manually or sign in via Gmail account.

Sign Up For Free!

Step 2: Select Subscription Billing

Access Subscription Billing

Step 3: Account Setup

Setup Account

Thereafter, fill out the company details like name, currency, and phone number. Next, just tap on the button named “Continue” so that you can complete the entire process.

Step 4: Connect Payment Gateways To Sell Tupperware Online

Connect Payment Gateway

Another subsequent step is to check the process of payment with the help of test payment gateway. Apart from that, Pabbly Subscription Billing also provide you various payment gateways such as PayPal, Stripe, Razorpay, and many more. For instance, I am elaborating the payment process using test payment gateway.

Step 5: Add Your Product

Add Product

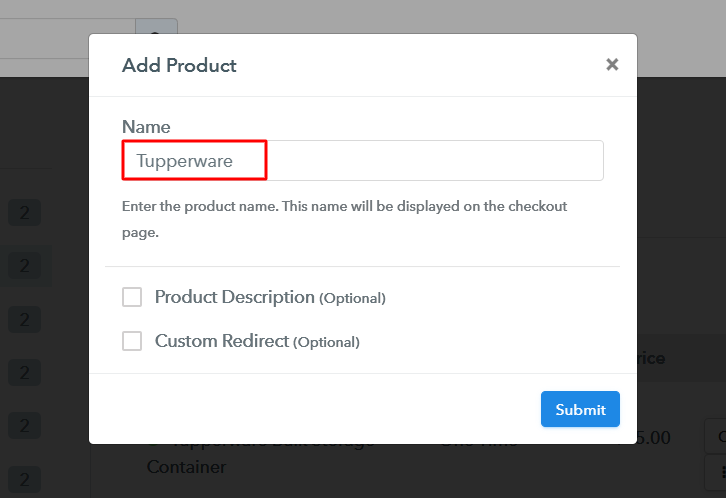
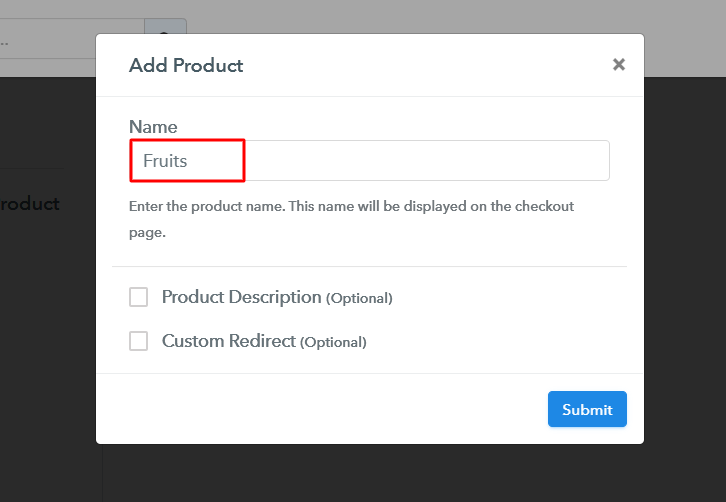
Once you embed the payment gateway, your next step is to add products. Just tap on the button named “Add New Product” through which a dialog box will open up. Following that enter the details of the Tupperware.

Add Product To Sell Tupperware Online

Fill out the entire details and your product is created.

Note: Here you can add all the products related to the similar category by creating plans for each of them.

Step 6: Add Plans

Now, create plans for Tupperware that you want to sell online.

(a) Select Add New Plan

Add Plan

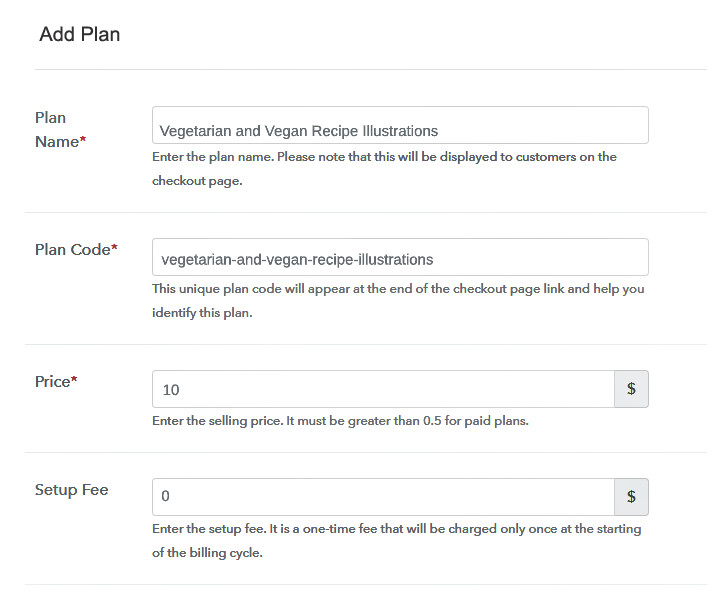
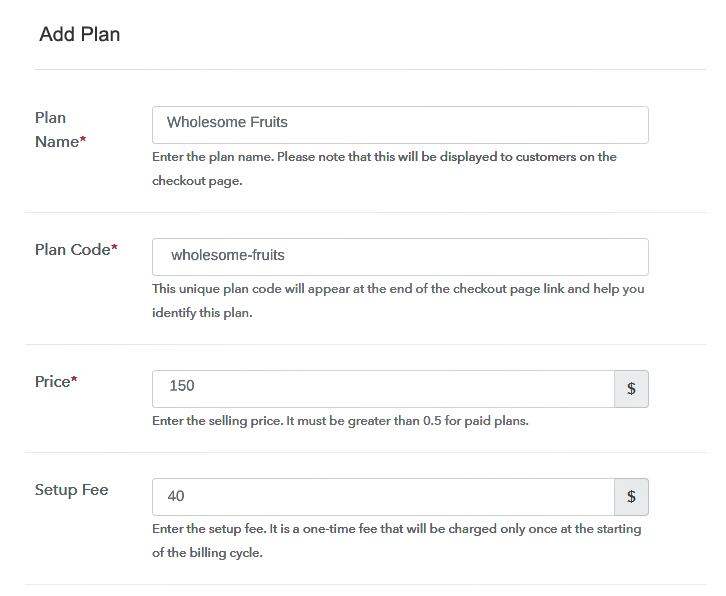
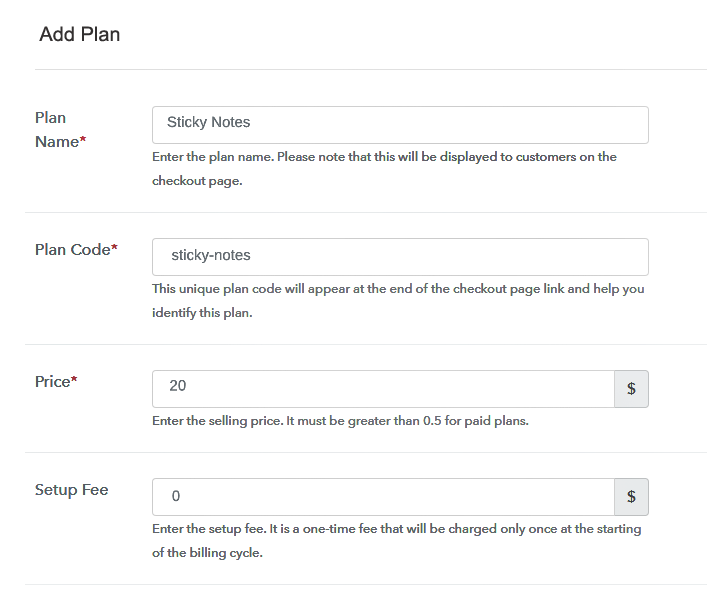
(b) Specify the Plan & Pricing Details
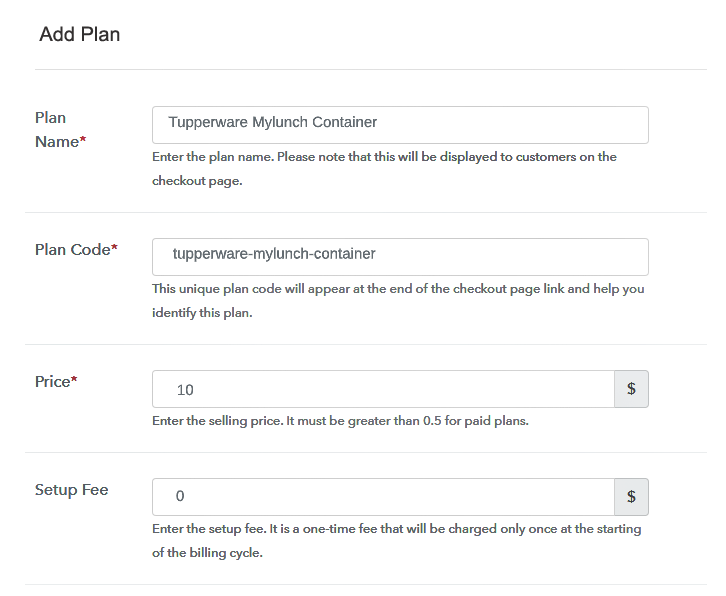
Specify the Plan & Pricing Details to Sell Tupperware Online

Now, you need to specify the plan by entering details such as name, code, price, setup fees, billing cycle, etc.

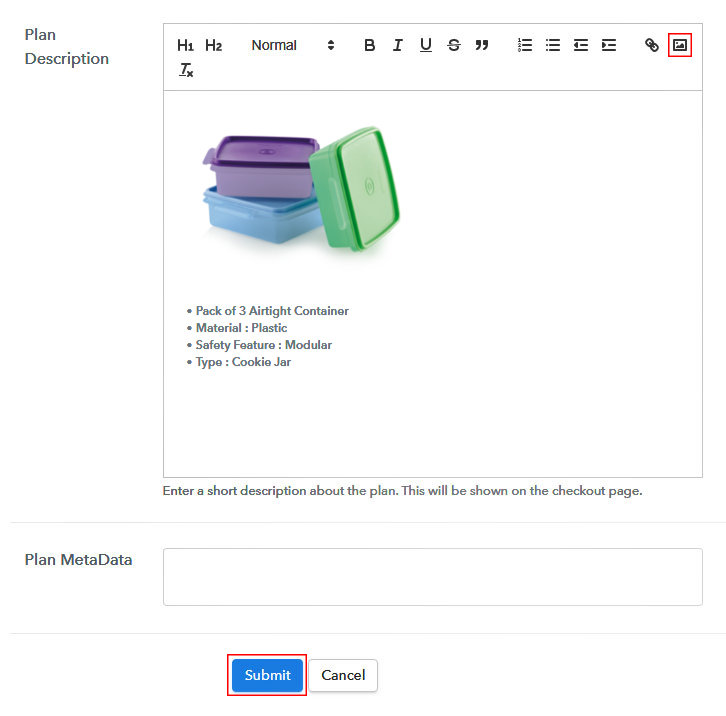
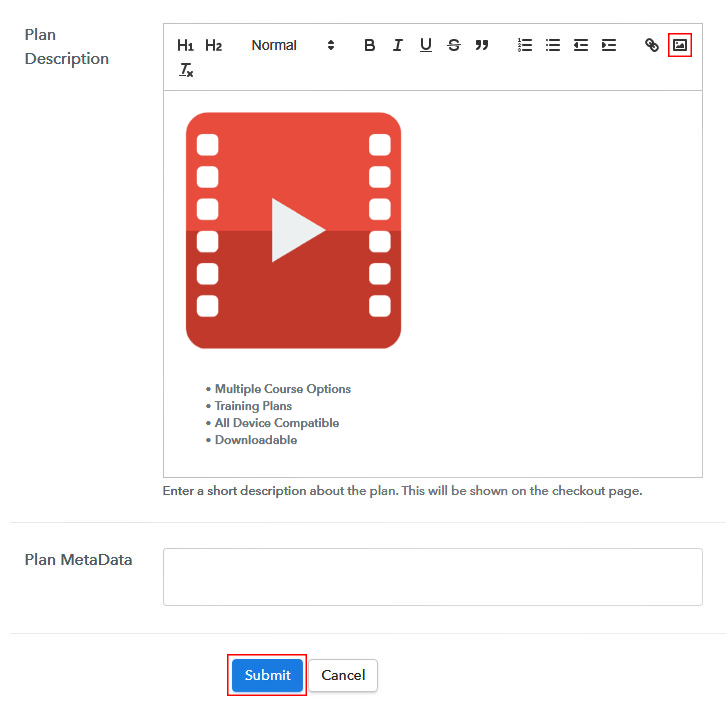
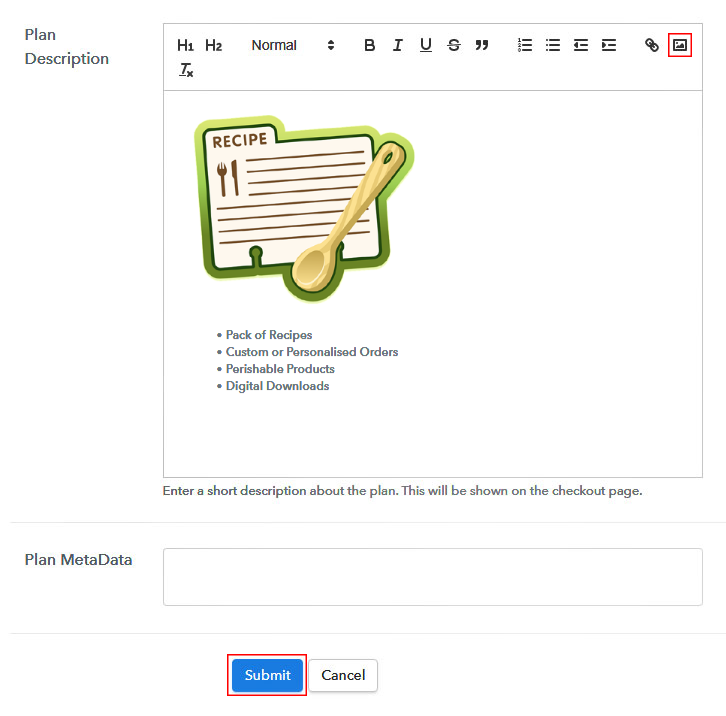
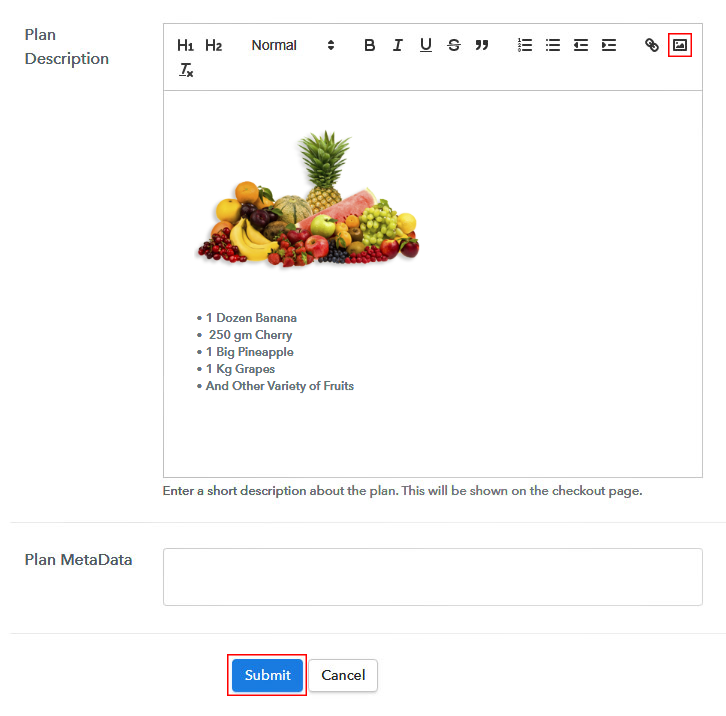
(c) Add Image & Description

Add Image & Description to Sell Tupperware Online

Then, simply paste the image of the Tupperware that you want to sell online.

Moreover, give your product information in bullet points like quantity, quality, etc.

After filling the entire details all you need to do is click on the “Submit” button.

Step 7: Share your Checkout Page

Share Checkout Page on Social Media

  • Now, just share the checkout page on Twitter & Facebook with the help of respective buttons.
  • Moreover, you can also emails and SMS the checkout page link to your customers.
  • Furthermore, you can also use anchor text anywhere on your website or embed a button in order to redirect users to the checkout page.

Step 8: Preview Checkout Page

Follow up these steps to preview checkout page:

(a) Click on the View Button

View Checkout Plan

(b) Take a Look at the Checkout Page

Checkout Page to Sell Tupperware Online

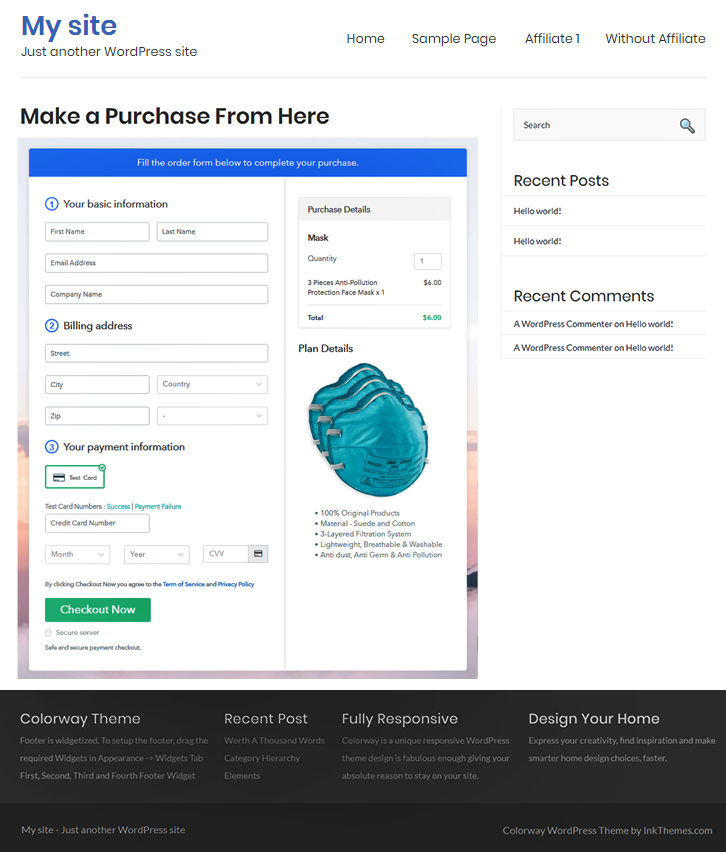
Step 9: Embed Checkout Page in Site & Sell Tupperware Online

Embed Checkout Page on Website

Just copy the embed link to insert the checkout page on your WordPress website.

(a) Edit the Page & Paste the Copied Link

Paste Link in Text Editor

Then, copy the link and paste it to the text area of the editor.

(b) Save & Publish the Checkout Page

Save and Publish

Next, just click on the button entitled ‘Publish’ after pasting the code and your checkout page is embedded.

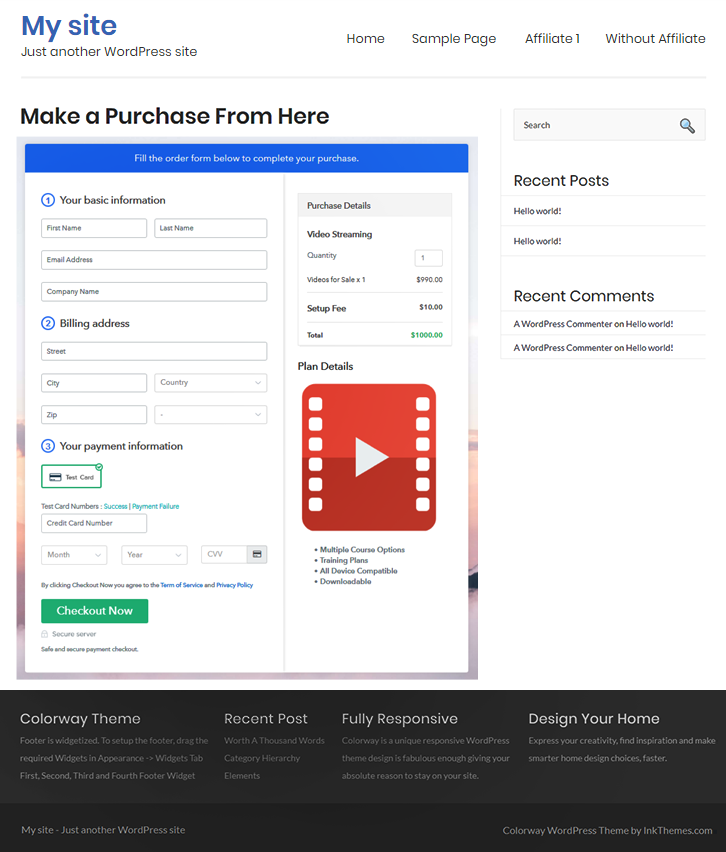
(c) Check out the Final Look of your Checkout Page on WordPress Site
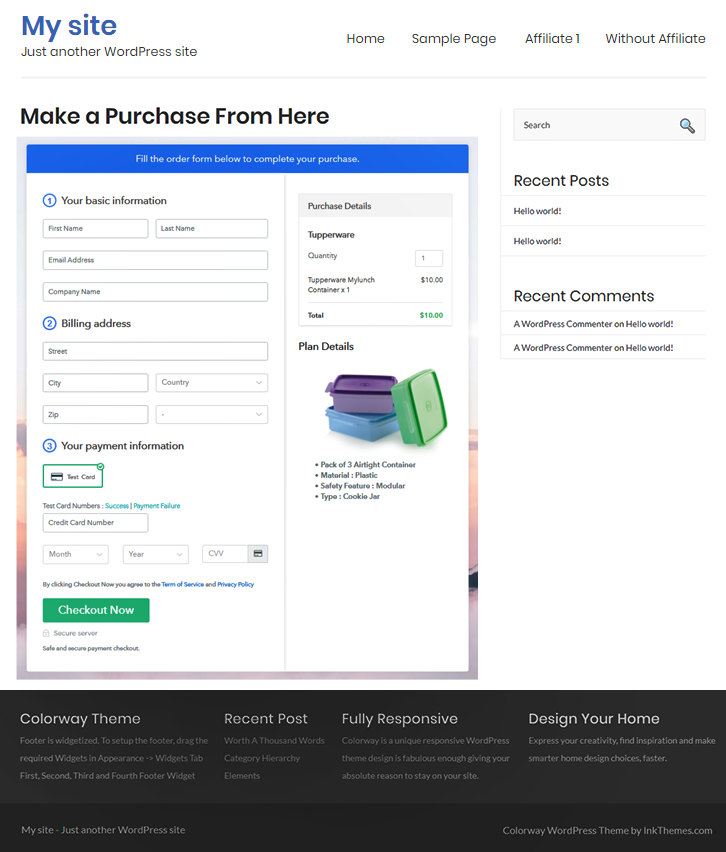
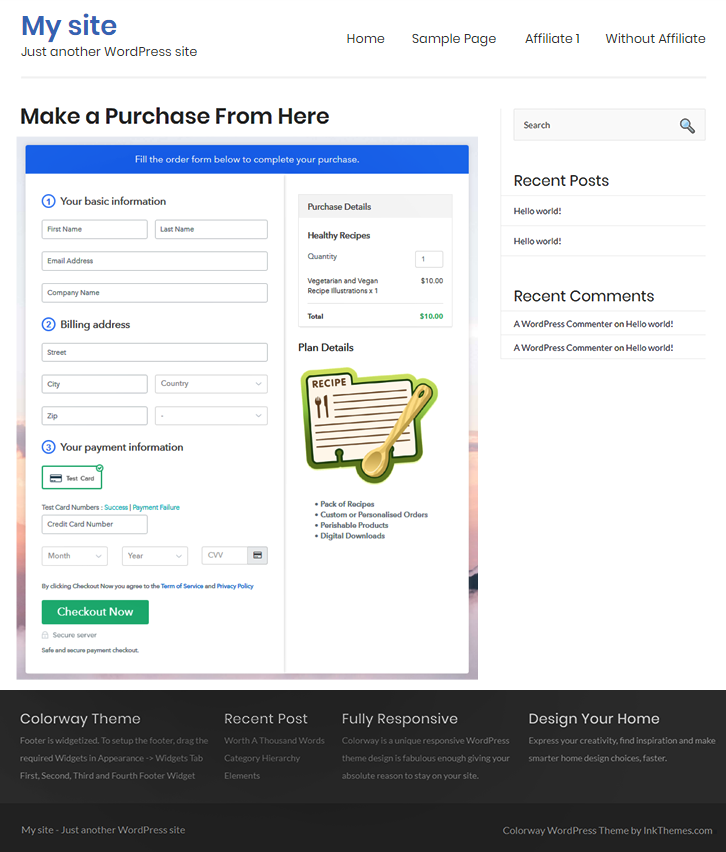
Checkout Page on WordPress Site to Start Tupperware Business Online

Step 10: Multiplan Checkout Page

Note: In case you want to sell multiple products via a single checkout page, you can create a multi-plan checkout page otherwise skip this step.

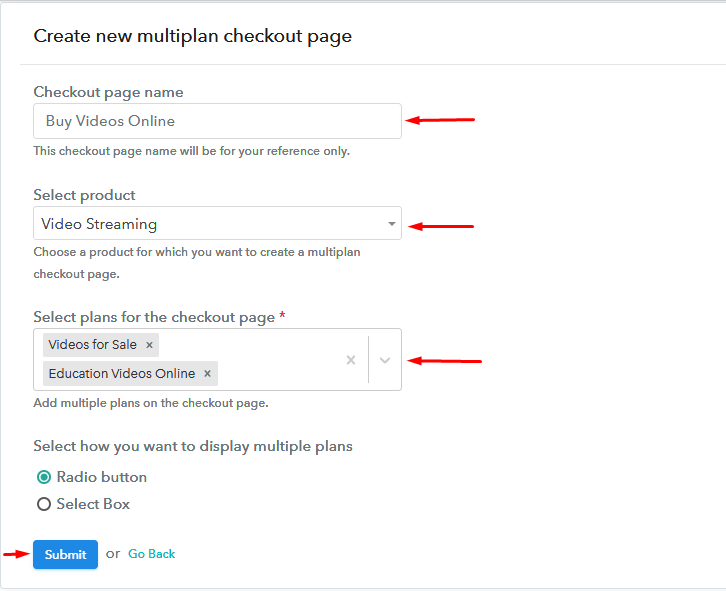
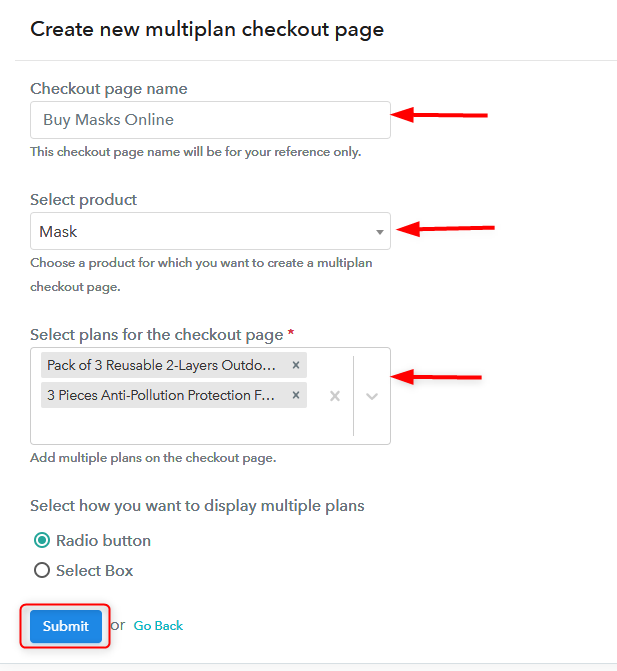
(a) Click on Add Mutiplan CheckoutMultiplan Checkout

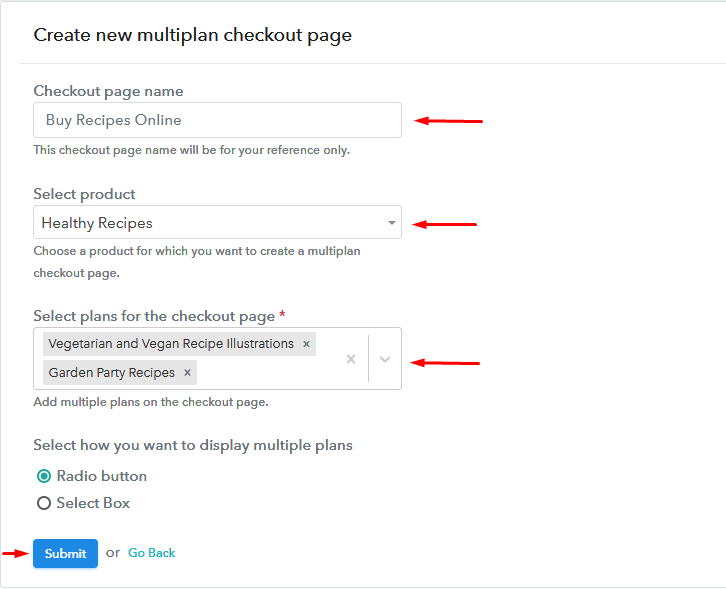
(b) Add Plans to Sell Tupperware from Single Checkout Page
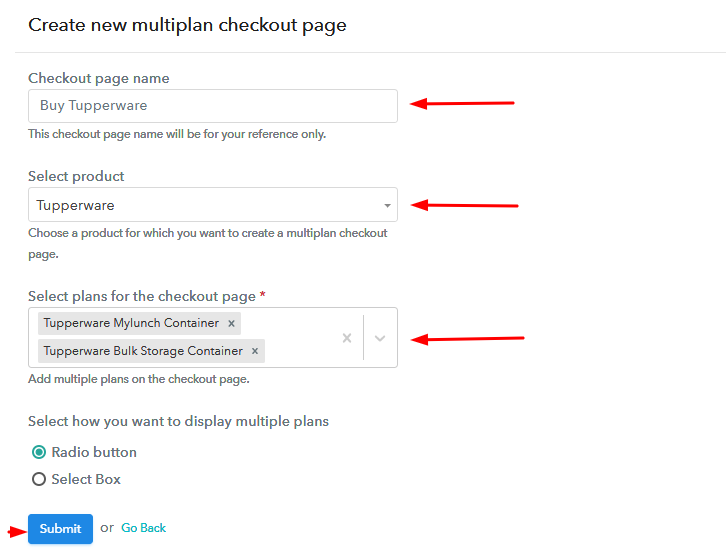
Add Plans to Sell Tupperware from Single Checkout Page

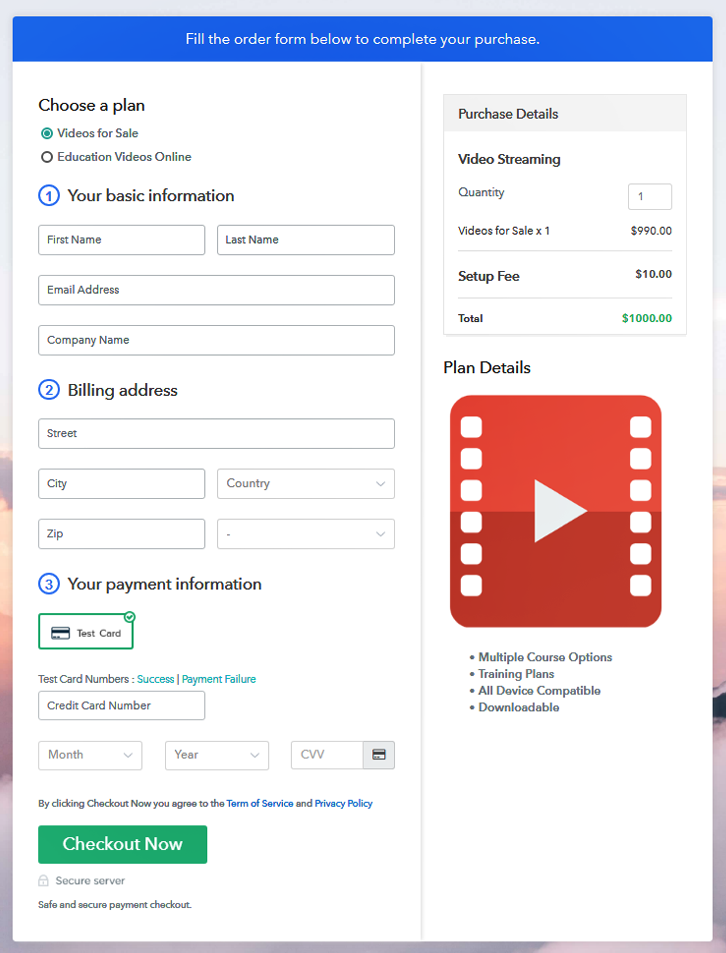
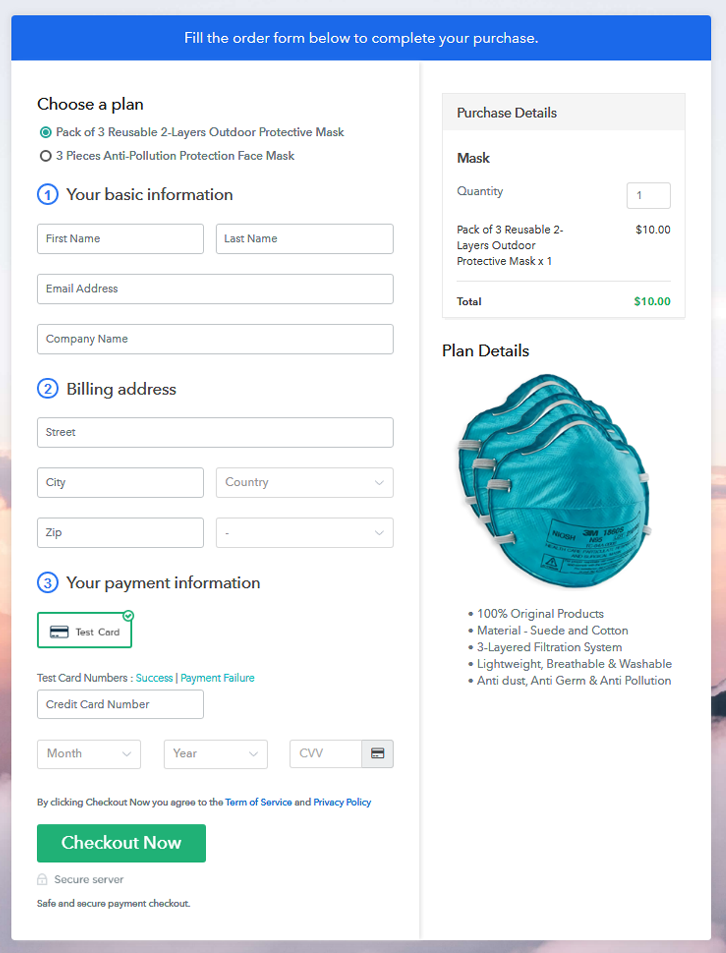
(c) Take a Look at the Checkout Page
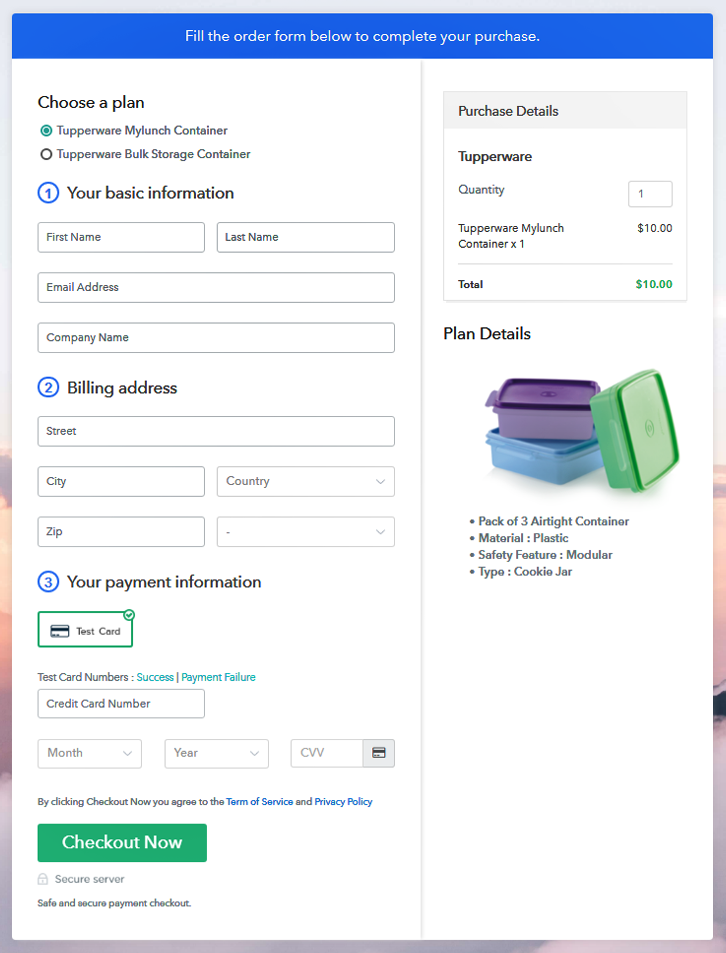
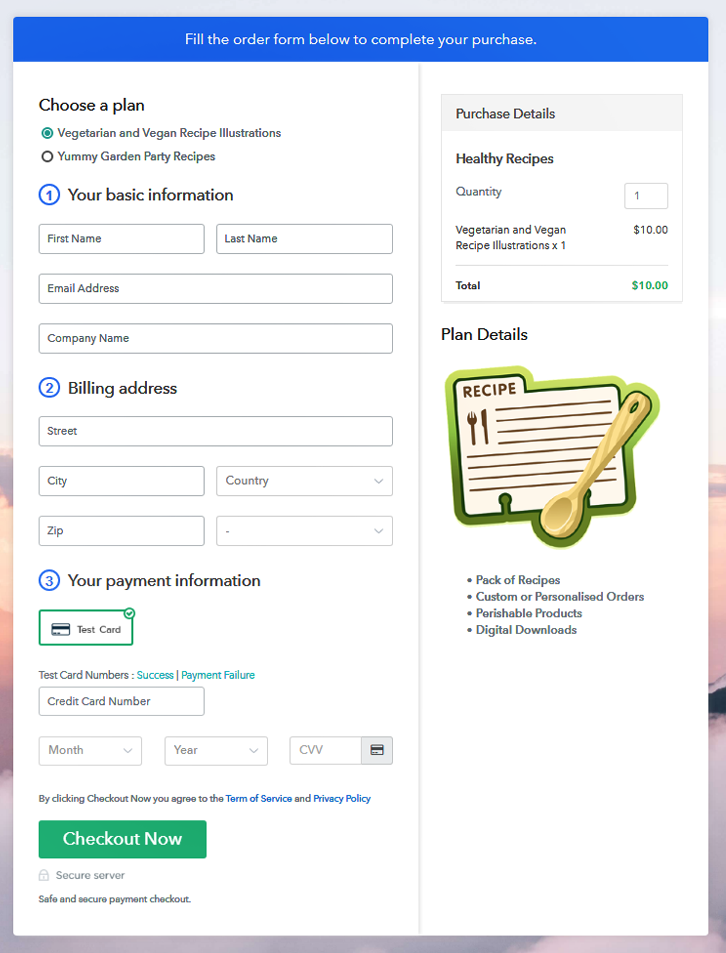
Multiplan Checkout Page to Start Tupperware Business Online

Preview Checkout Page

Wrapping Up

Voila! Your checkout page is ready to share online on multiple social media platforms or websites. We hope this article has helped you to solve your query on “How to Sell Tupperware Online?”. All you need to do is follow each and every step as mentioned above and you are good to go. So, what are you waiting for? Start your Tupperware business online and increase your sales in no time.

You May Also Like To Read –
How to Sell Videos Online | Step by Step (Free Method)

How to Sell Videos Online

Ideal For: All the content creators, young enterpreneurs, educators, gym owners, product reviewers and other merchants can use this method to take their video selling business online.

How to Sell Videos Online

Why Choose this Method for Selling Over any Other Solution?

Unlike any other solution, this method allows you to:

  • List and sell your videos for FREE. Absolutely no payment required.
  • No commission on sales.
  • Collect payment through multiple payment modes from a single checkout page.
  • Sell one time or recurring subscriptions of your videos.
  • Sell and collect payment in any currency as per your requirement.
  • Give discounts on your products by offering special coupon codes.
  • Add sales commission agents to help you in selling your videos.

Get Pabbly Subscription Billing for Free

Do you know that people spend an average span of 16 hours a week watching videos? Yes, you do know that. Half of the population prefers to indulge in a digital world watching stuff online. So if you have quality video content that you want to sell online then it’s high time.

Why would you like to sell videos online?

In one of the research, it has been claimed that every second individual looks over on the internet for solutions, as it is handy and requires less effort. Come to our discussion,  it has been pointed out that the internet is a go-to resource for learning a skill and people love to watch videos.

Not to forget, we are living in the age of 4G where videos bring 80% traffic on the internet. Considering all these figures, it won’t be bad if you start your own video selling business. And for that, you will need assistance and we have one such software named Pabbly subscription Billing that will assist you in your journey. The tool lets you create beautiful checkout pages to sell videos online. Some of its features involve:

  • Collect currency in offline and online mode
  • Add coupon codes and discount on the checkout page
  • Keep track of the prospects
  • Sell multiple videos through a single checkout page

Aforesaid are some of the reasons to give the software a chance and now let’s dive into the process of creating a checkout page using the tool.

This is How your Checkout Page will Look Like After Creation

Checkout Page to Sell Videos Online

Preview Checkout Page

Step 1: Login to Pabbly Subscription Billing

Signup

Start the process by visiting the Pabbly Subscription Billing site and click on the “Sign Up Free” button. Then, login into the software either using your Gmail credentials or simply create a new account.

Sign Up For Free!

Step 2: Select Subscription Billing

Access Subscription Billing

Step 3: Account Setup

Setup Account

Once after clicking on the “Access Now” button of the software, it will open the page with details like company name, select currency, and phone number. After finishing all the details, then press continue to go on.

Step 4: Connect Payment Gateways To Sell Videos Online

Connect Payment Gateway

As a newbie always prefer the test payment gateway to gain the knowledge about payment procedure of the software. Below we are also using the “Test Payment” gateway for our checkout page. Additionally, it is filled with multiple payment gateways like PayPal, Stripe, etc. Below we are also offering the payment integration guides to help you out.

Step 5: Add Your Product

Add Product

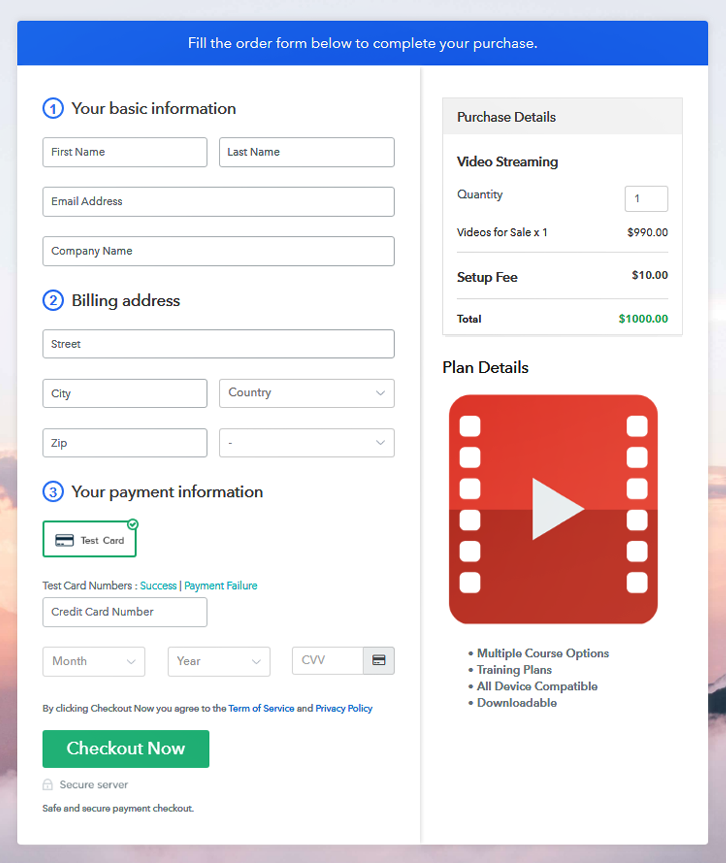
Further, add the name, which in our case is video streaming. Here you can specify the type like education videos, fitness videos, etc. Also, write a short description of the product to grab the customer’s attention.

Add Product to Start Selling Videos Online

After filling details, click on the “Submit” button.

Note: Here you can add all the products related to the similar category by creating plans for each of them.

Step 6: Add Plans 

Now, let’s loose out plans for different kinds of videos available in your store.

(a) Select Add New Plan

Add Plan

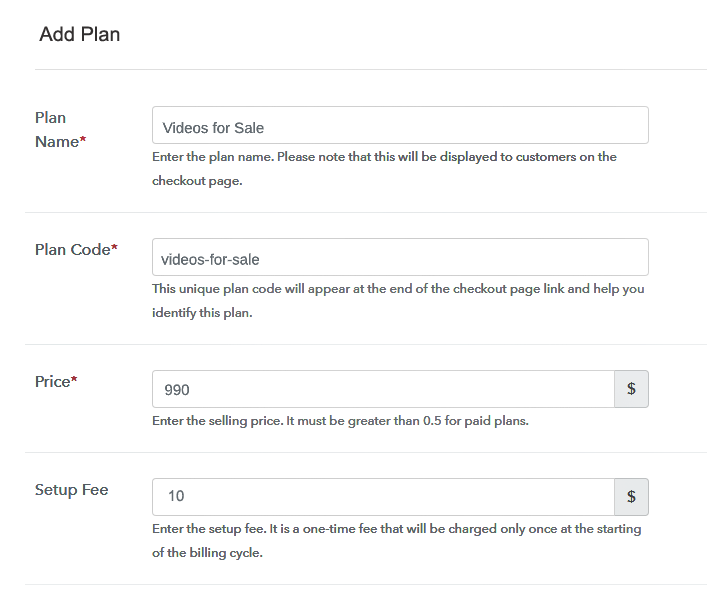
(b) Specify the Plan & Pricing Details

Specify the Plan and Pricing to Start Videos Selling Business Online

Next, to proceed fill all the details like plan name, code, price, set-up fee, and much more to go on.

(c) Add Image & Description

Add Image & Description to Sell Videos Online

Besides, it is essential to write a brief description of videos using bullets, images, etc, to bring natural customers to the checkout page,

Next, click the “Submit” button to add a product on the checkout page.

Additionally, you can add multiple plans and types of videos in your product list which you want to sell online.

Step 7: Share your Checkout Page

Share Checkout Page on Social Media

  • Further, share the checkout page on social media accounts like Facebook & Twitter to grab customer’s attention.
  • Moreover, the next thing to do is share the direct link to plan with your customers via SMS or email marketing.
  • Additionally, embed the provided plan link in the buttons or any anchor text on your website.

Step 8: Preview Checkout Page

Follow up the recommended steps to preview the checkout page:

(a) Click on the View Button

View Checkout Plan

(b) Take a Look at the Checkout Page

Checkout Page to Sell Videos Online

Step 9: Embed Checkout Page in Site & Sell Videos Online

Embed Checkout Page on Website

Simply copy the link and add the checkout page to sell videos online at any proper place on your WordPress site.

(a) Edit the Page & Paste the Copied Link

Paste Link in Text Editor

Immediately, paste the plan link on a text editor of the WordPress dashboard.

(b) Save & Publish the Checkout Page

Save and Publish

After making all the changes, just hit the “Publish” button.

(c) Check out the Final Look of your Checkout Page on WordPress Site

Final Look of your Checkout Page to Sell Videos Online

Step 10: Multiplan Checkout Page

Note: In case you want to sell multiple products via a single checkout page, you can create a multi-plan checkout page otherwise skip this step.

(a) Click on Add Mutiplan Checkout

Multiplan Checkout

(b) Add Plans to Sell Multiple Videos from Single Checkout Page

Add Multiple Products to Start Selling Videos Online

(c) Take a Look at the Checkout Page

Multiplan Checkout Page to Sell Videos Online

Preview Checkout Page

Wrapping Up 

While wrapping this up, one of the quotes of Seneca makes sense which is “Men trust their eyes rather than their ears” which is a perfect example of how blindfolded people follow the culture of viewing videos. Why not follow, if it is a good medium of entertainment, learning skills, and much more. Believe us, it’s not too late to start your video selling business online. Follow the above-mentioned steps and you’re good to go.

Let us know if you have any queries regarding it in the comments section.

You May Also Like To Read –
How to Sell Notes Online | Step by Step (Free Method)

How to Sell Notes Online

Ideal For: All the note sellers, wholesale note suppliers, retail note traders and other stationary merchants can use this method to sell notes online.

How to Sell Notes Online

Why Choose this Method for Selling Over any Other Solution?

Unlike any other solution, this method allows you to:

  • List and sell your notes for FREE. Absolutely no payment required.
  • No commission deducted on sales.
  • Collect payment through multiple payment modes from a single checkout page.
  • Sell one time or recurring subscriptions of your notes.
  • Sell and collect payment in any currency as per your requirement.
  • Give discounts on your products by offering special coupon codes.
  • Add sales commission agents to help you in selling your notes.

Get Pabbly Subscription Billing for Free

Using notes always comes in handy either you are a student or a working person. No wonder, how profitable it will be to sell notes online. So, you might be looking for a tool to start selling notes online.

Why would you like to sell notes online?

It’s true that how the digital age has made everything so easy that you can buy anything you want in just a few clicks. Therefore, nowadays it is really important to start business online so that you earn extra bucks without investing much time and effort. Thus, to help you out with that we would like to suggest Pabbly Subscription Billing as the most versatile tool to start your notes business online. Let me take you through some of the prominent features that it provides.

  • Collect payment online as well as offline
  • Sell different notes through single checkout page
  • Create unlimited discount and coupons to increase your sale
  • Share checkout page link on various social media platforms or websites
  • Add delivery charges or tax charges as well

Now without wasting any of your time, let me take you through the 10 easy steps to sell notes online.

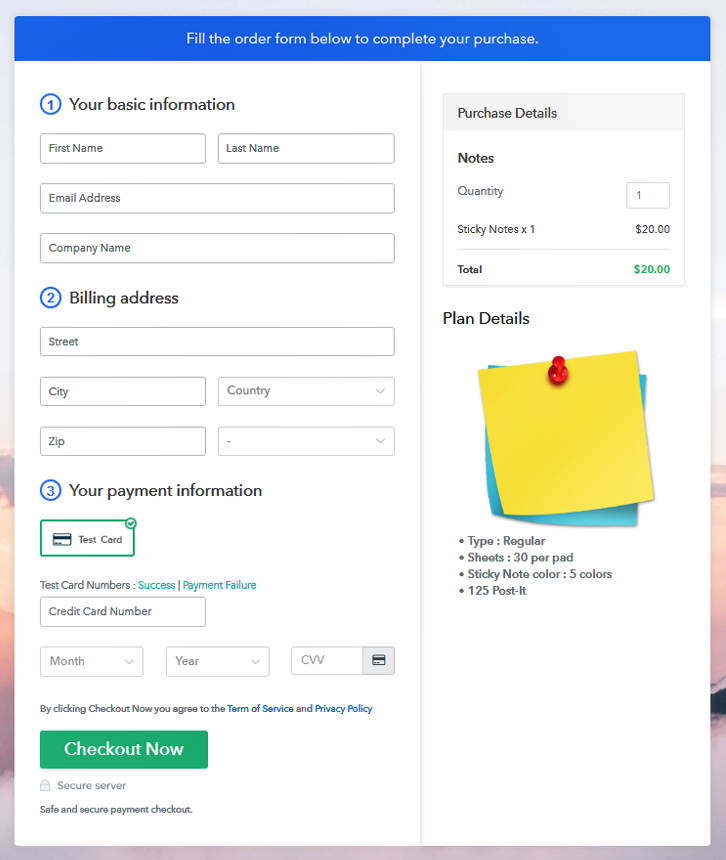
This is How your Checkout Page will Look Like After Creation

Checkout Page to Start Selling Notes Online

Preview Checkout Page

Step 1: Log in to Pabbly Subscription Billing

Signup

Firstly, go to Pabbly Subscription Billing and later click on the button “Sign up Free” on its website. Afterward, you will be directed to their sign-up page where you need to fill out the fields manually, or else you can sign in via Gmail account.

Sign Up For Free!

Step 2: Select Subscription Billing

Access Subscription Billing

Step 3: Account Setup

Setup Account

Afterward, enter the company details such as name, currency, and phone number. Then, just tap on “Continue” so that you can complete the whole process.

Step 4: Connect Payment Gateways To Sell Notes Online

Connect Payment Gateway

Another subsequent step is to check the process of payment with the help of test payment gateway. Apart from that Pabbly Subscription Billing also provide you various payment gateways such as PayPal, Stripe, Razorpay, and many more. For instance, I am elaborating the payment process with the help of test payment gateway.

Step 5: Add Your Product

Add Product

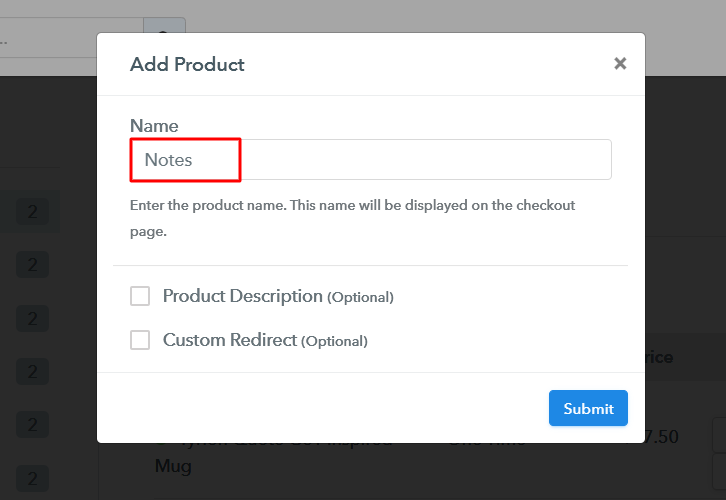
Once you embed the payment gateway, your next step is to add products. Just tap on the button named “Add New Product” through which a dialog box will open up. Following that enter the details of the notes.

Add Product To Sell Notes Online

Fill out the entire details and your product is created.

Note: Here you can add all the products related to the similar category by creating plans for each of them.

Step 6: Add Plans

Subsequently, create plans for notes that you want to sell online.

(a) Select Add New Plan

Add Plan

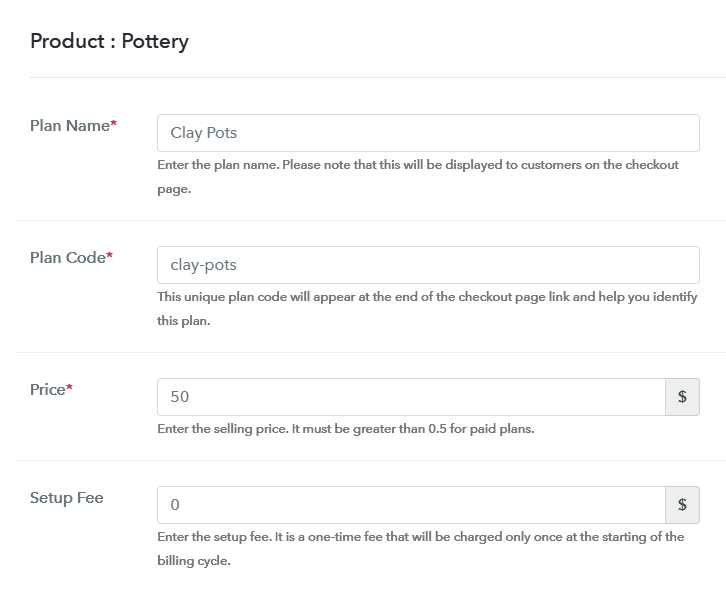
(b) Specify the Plan & Pricing Details

Add Plan Details to Sell Notes Online

Now, you need to specify the plan by entering details such as name, code, price, setup fees, billing cycle, etc.

(c) Add Image & Description

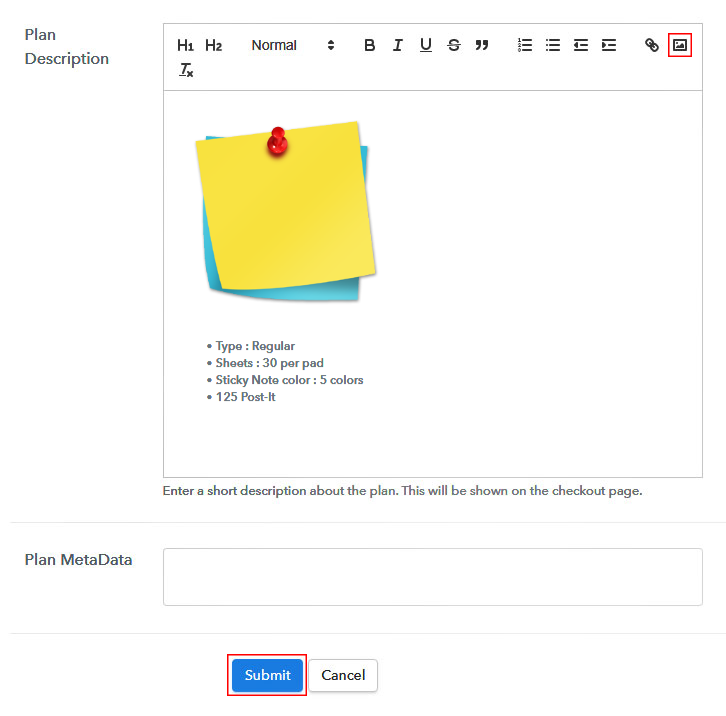
Add Plan Description to Sell Notes Online

Then, simply paste the image of the notes that you want to sell online.

Moreover, give your product information in bullet points like quantity, quality, etc.

After filling all the details all you need to do is click on the “Submit” button.  Moreover, you can also add numerous plans along with types of notes in your product list in order to advertise online.

Step 7: Share your Checkout Page

Share Checkout Page on Social Media

  • Now, just share the checkout page on Twitter & Facebook with the help of direct buttons.
  • Moreover, you can also emails and SMS the checkout page link to your customers.
  • Furthermore, you can also use anchor text anywhere on your website or embed a button in order to redirect users to the checkout page.

Step 8: Preview Checkout Page

Follow up these steps to preview checkout page:

(a) Click on the View Button

View Checkout Plan

(b) Take a Look at the Checkout Page

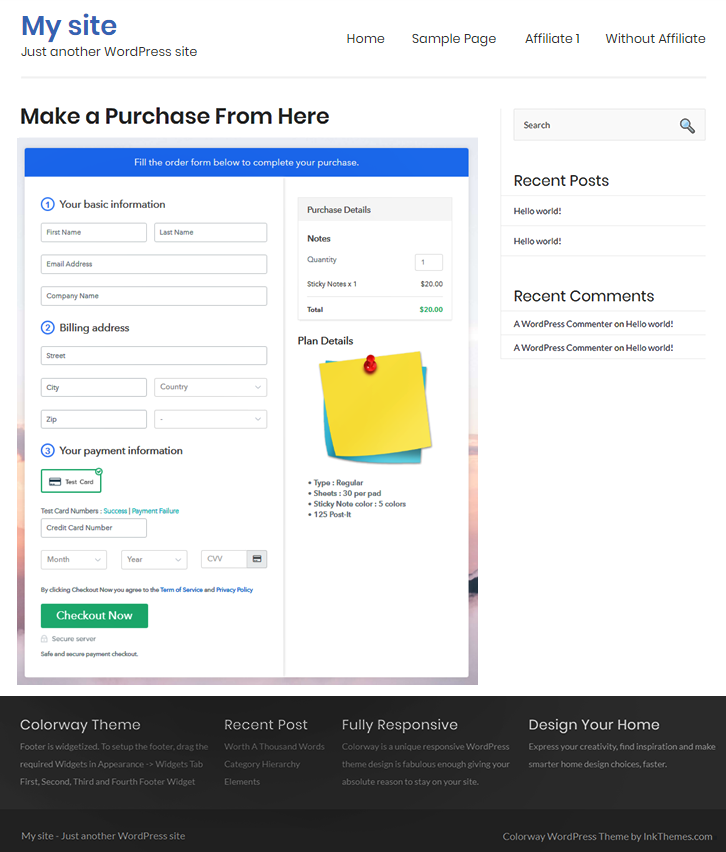
Checkout Page to Start Selling Notes Online

Step 9: Embed Checkout Page in Site & Sell Notes Online

Embed Checkout Page on Website

Just copy the embed link to insert the checkout page on your WordPress website.

(a) Edit the Page & Paste the Copied Link

Paste Link in Text Editor

Then, copy the link and paste it to the text area of the editor.

(b) Save & Publish the Checkout Page

Save and Publish

Next, just click on the buttons named ‘Publish’ after pasting the code and your checkout page is embedded.

(c) Check out the Final Look of your Checkout Page on WordPress Site

Checkout Page on WordPress Site

Step 10: Multiplan Checkout Page

Note: In case you want to sell multiple products via a single checkout page, you can create a multi-plan checkout page otherwise skip this step.

(a) Click on Add Mutiplan CheckoutMultiplan Checkout

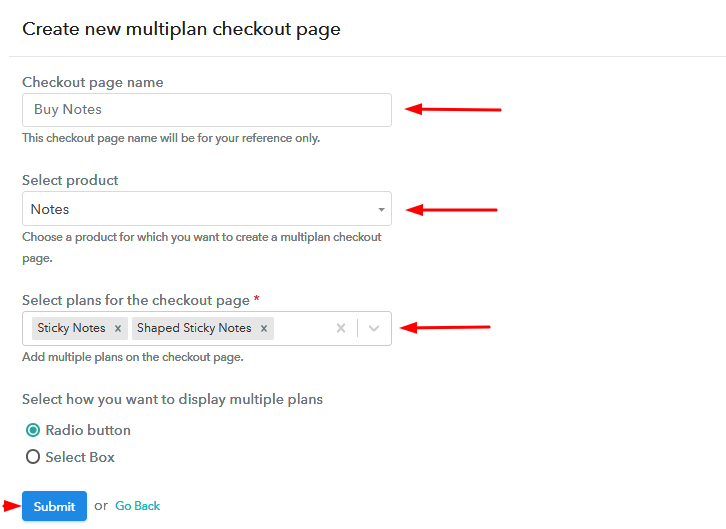
(b) Add Plans to Sell Notes from Single Checkout Page

Add Plans to Sell Notes from Single Checkout Page

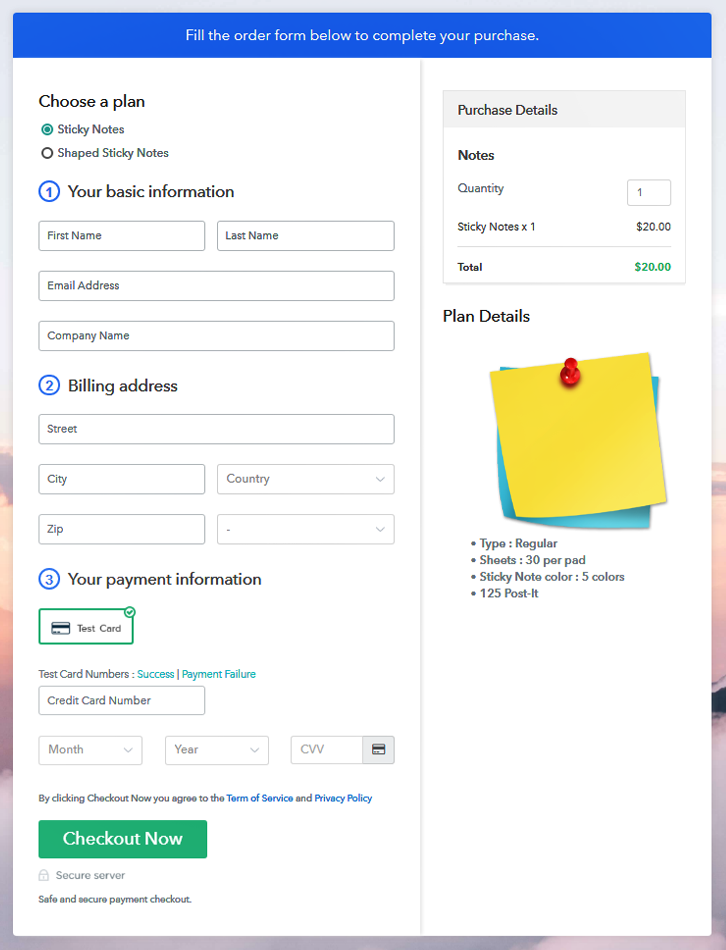
(c) Take a Look at the Checkout Page

Multiplan Checkout Page to Start Notes Business Online

Preview Checkout Page

Wrapping Up

So, this is all we had for your query on how to sell notes online? You can easily follow the steps and start your notes business online. Pabbly Subscription Billing gives you the flexibility to share the checkout pages wherever you want. You can either embed it on your website or share on social media accounts to grasp customer in bulk. And, if you have any queries don’t forget to mention it in the comment section below. We will get back to you as soon as possible.

You May Also Like To Read –
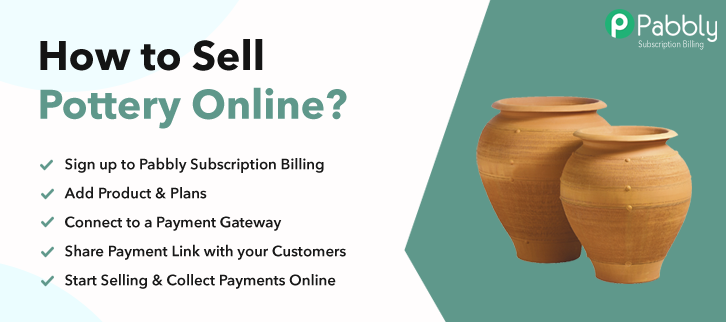
How to Sell Pottery Online | Step by Step (Free Method)

How to Sell Pottery Online

Ideal For: All the pottery sellers, pottery makers, retail pottery selling business owners, and other pottery merchants can use this method to take their pottery selling business online.

How to Sell Pottery Online

Why Choose this Method for Selling Over any Other Solution?

Unlike any other solution, this method allows you to:

  • List and sell your pottery for FREE. Absolutely no payment required.
  • No commission on sales.
  • Collect payment through multiple payment modes from a single checkout page.
  • Sell one time or recurring subscriptions of your pottery.
  • Sell and collect payment in any currency as per your requirement.
  • Give discounts on your products by offering special coupon codes.
  • Add sales commission agents to help you in selling pottery online.

Get Pabbly Subscription Billing for Free

There are many earthenware, stoneware and porcelain pottery/ceramics available online but if you think there is still something missing and want to sell pottery online then you must be finding a smarter way to start. So, here it is in this article.

Why would you like to sell pottery online?

Well, there could be many possibilities or just wanting another platform to sell pottery online would be enough. There is this services that can help you in selling pottery online. It’s called Pabbly Subscription Billing & it can help you for free.

  • It will take care of the management of items & the payments
  • You can showcase your pottery to the world, through beautiful checkout pages
  • Help you in collecting online as well as offline payments & record them
  • Automatic email invoicing
  • Let you apply taxes, create coupons and discounts easily
    And many more…

All you need to do is a simple sign-in and create a checkout page to kick start pottery business online. After that, either you can embed the checkout page on WordPress or share it on social media & other sharing platforms. For instance Facebook, Twitter, WhatsApp, SMS and Emails etc.

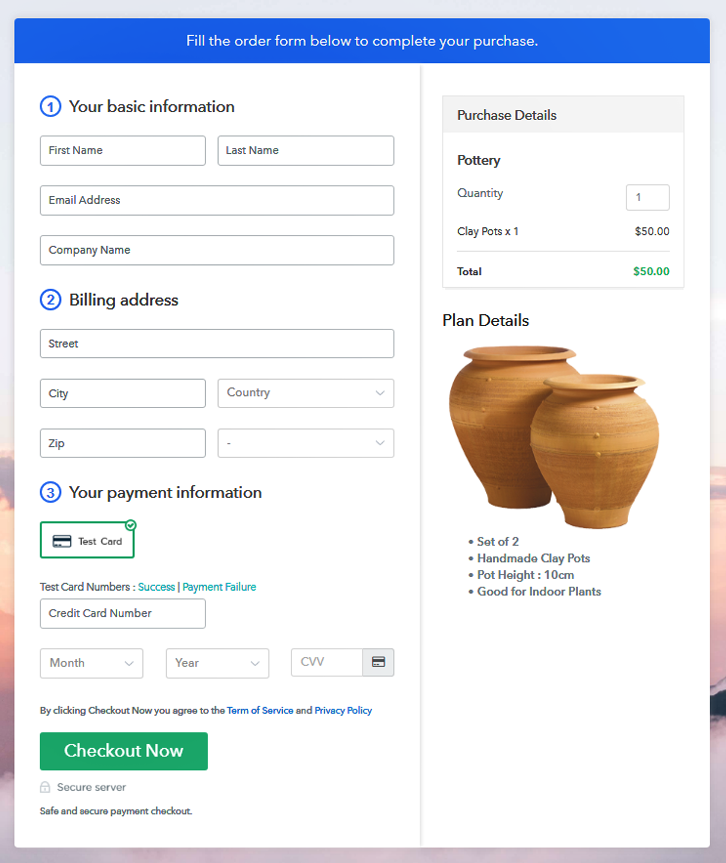
This is How your Checkout Page will Look Like After Creation

Checkout Page Preview to Sell Pottery Online

Preview Checkout Page

Step 1: Login to Pabbly Subscription Billing

Signup
Go to the Pabbly Subscription Billing website & click on the “Sign Up Free” button. This will land you on the login/registration page. Either directly sign-in with Google or Sign-up manually by filling out the details asked.

Sign Up For Free!

Step 2: Select Subscription Billing

Access Subscription Billing

Step 3: Account Setup

Setup Account

After completing the sign-in process, a dialogue box will pop out. Fill the details such as the company name, currency & a phone number. Then click the “Continue” button to proceed forward in the procedure.

Step 4: Connect Payment Gateway to Sell Pottery Online

Connect Payment Gateway

In this step, you’ll need to add a payment gateway, this will be further used for payments and transactions. This service has multiple options for connecting a payment method and the integration guides are also linked just below. Here, I’m using the text payment method for testing purpose.

Step 5: Add Your Product

Add Product

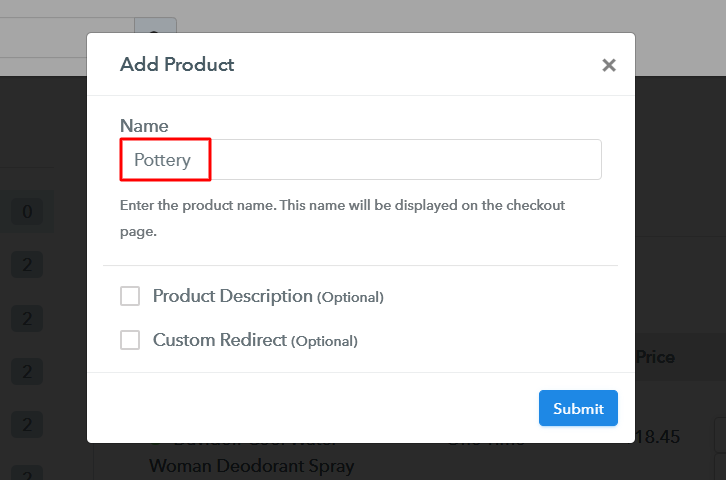
Now, the system is ready and you can create products. Don’t get confused by the product to be an item to sell. A product is much like a category of item. Click on the “Add New Product” button to add a category of the pottery.

Add Product to Sell Pottery Online

Hit the “Submit” button once you are done creating the product to sell pottery online. Here to mention, you can create as many products as you like to.

Note: Here you can add all the products related to the similar category by creating plans for each of them.

Step 6: Add Plans

Next step is creating a plan for the product category. Click on the “Add New Plan” button for this & fill out the details about the pottery item that you want to show on the checkout page.

(a) Select Add New Plan

Add Plan

(b) Specify the Plan & Pricing Details

Add Plan to Sell Pottery Online

Fill out the details as plan name, code, price etc to sell pottery online.

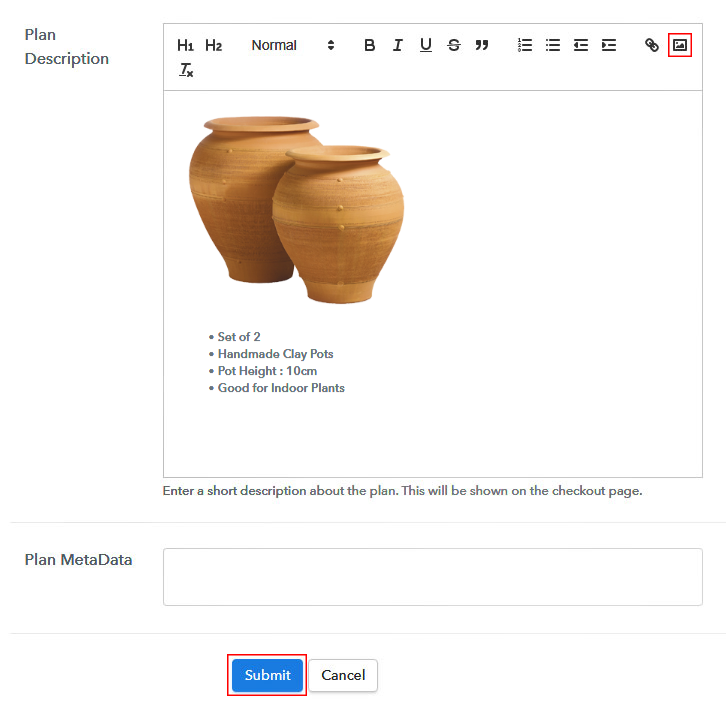
(c) Add Image & Description

Add Image & Description to Sell Pottery Online

In the field named “Add Description”, you can put an image & some descriptive text to display on the checkout page to sell pottery online.

Also, there are many text formatting options available to format the text as per your will such as lists, quotes, links, headings etc.

Click on the “Submit” button after writing the details & an item will be added for selling pottery online.

Follow the same (i.e, step 6) every time you want to append a plan in the list.

Step 7: Share your Checkout Page

Share Checkout Page on Social Media

After a successful plan creation, a window will open up as shown above. It contains a plan link & a code to share the created checkout page.

  • You can copy the URL given under “Plan Link” window & can share it on social media platforms, SMS, emails etc. to sell pottery online.
  • Also, you can use this URL in your website’s button links & anchor text source.
  • Two direct Facebook & Twitter sharing options are also available to share the created checkout page directly on these platforms.

Step 8: Preview Checkout Page

Follow these steps to preview a checkout page:

(a) Click on the View Button

View Checkout Plan

(b) Take a Look at the Checkout Page

Checkout Page Preview to Sell Pottery Online

Step 9: Embed Checkout Page in Site & Sell Pottery Online

Embed Checkout Page on Website

To embed a checkout page on WordPress, copy the code given under “Embed Plan Link” window.

(a) Edit the Page & Paste the Copied Link

Paste_Link_in_Text_Editor

And paste it in the text area of the post or page on your website.

(b) Save & Publish the Checkout Page

Save_and_Publish

Publish the page or post & a checkout page will be embedded on your website. You can visit this page by going onto its assigned URL.

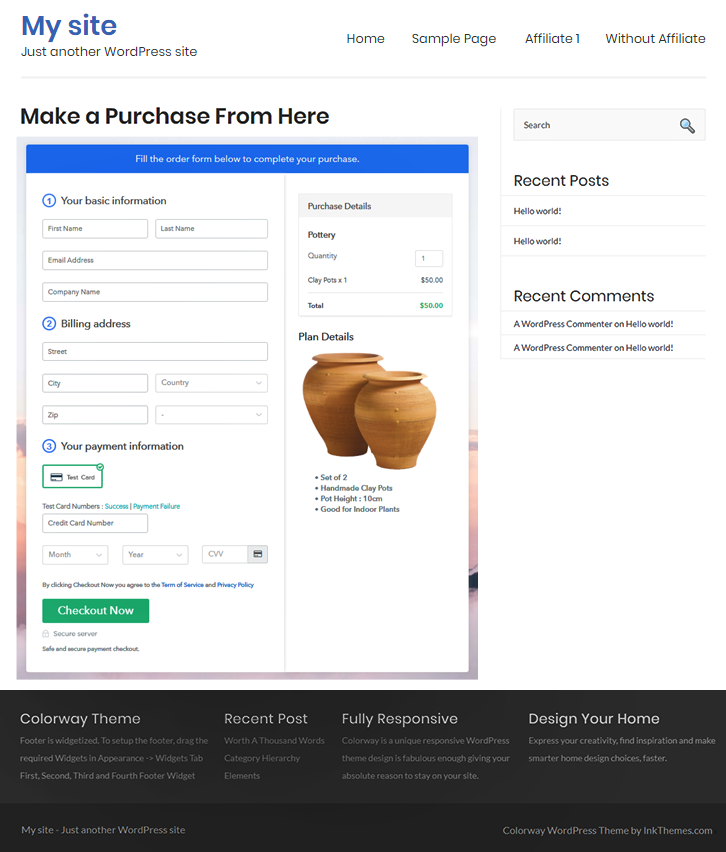
(c) Check out the Final Look of your Checkout Page on WordPress Site

Checkout Page On Site to Sell Pottery Online

Step 10: Multiplan Checkout Page

Note: In case you want to sell multiple products via a single checkout page, you create a multi-plan checkout page otherwise skip this step.

(a) Click on Add Mutiplan Checkout

Multiplan_Checkout

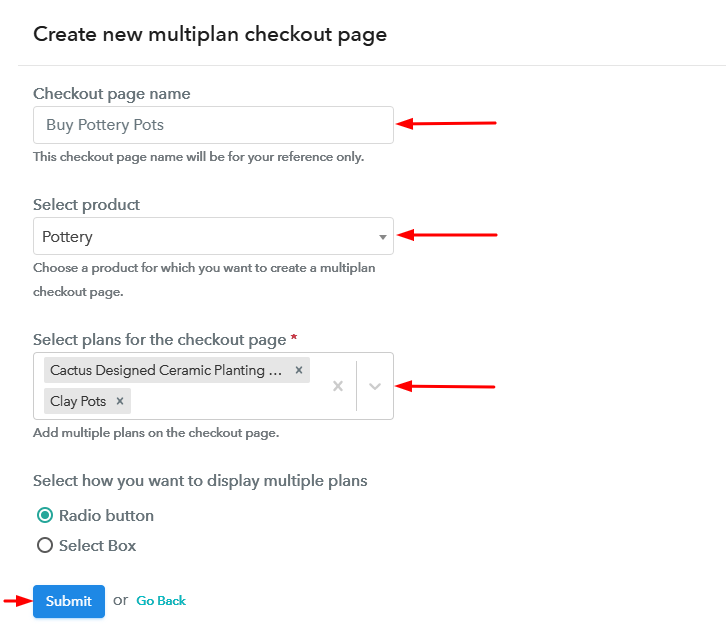
(b) Add Plans to Sell Multiple Pottery from Single Checkout Page

Create Multiplan Checkout to Sell Pottery Online

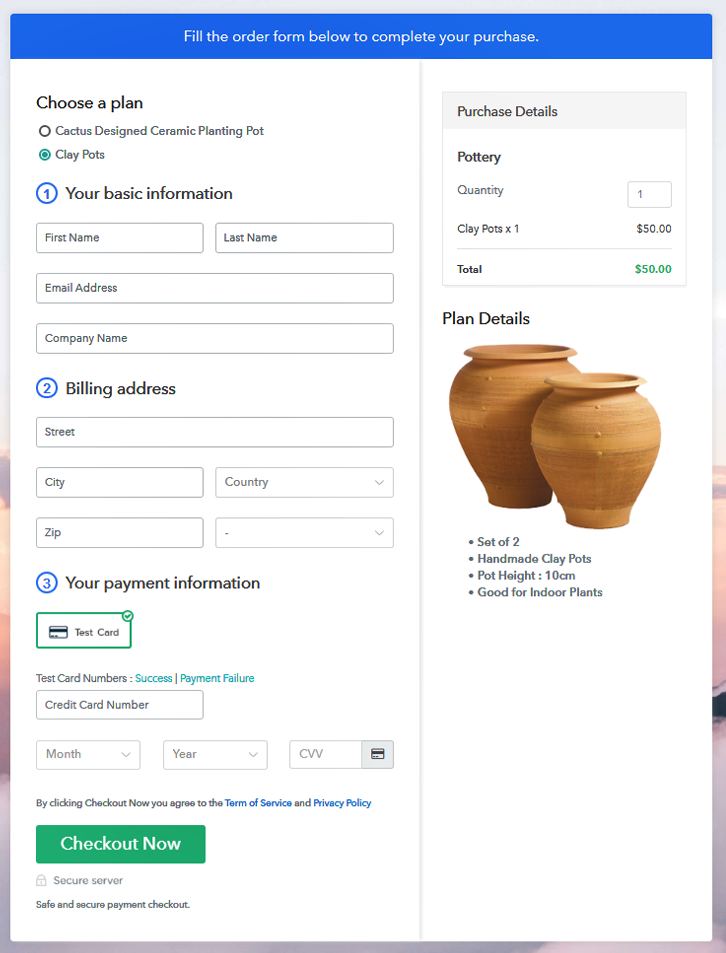
(c) Take a Look at the Checkout Page:

Multiplan Checkout to Sell Pottery Online

Preview Checkout Page

Wrapping Up

This was my catch on the best way to sell pottery online. You can kick start pottery business online by following these 10 steps. Moreover, there are multiple options to choose from as payment methods such as PayPal, Stripe, Authorize.Net, Razorpay etc.

Also, you can share the created checkout pages over multiple social media platforms for selling pottery online.

Good Luck with your pottery business!

You May Also Like To Read

How to Sell Recipes Online | Step by Step (Free Method)

How to Sell Recipes Online

Ideal For: All the cooks, restuarant owners, chefs, gourmet chefs, culinary experts, food bloggers and other merchants can use this method to take their recipes selling business online.

How to Sell Recipes Online

Why Choose this Method for Selling Over any Other Solution?

Unlike any other solution, this method allows you to:

  • List and sell your recipes for FREE. Absolutely no payment required.
  • No commission on sales.
  • Collect payment through multiple payment modes from a single checkout page.
  • Sell one time or recurring subscriptions of your cooking recipes.
  • Sell and collect payment in any currency as per your requirement.
  • Give discounts on your products by offering special coupon codes.
  • Add sales commission agents to help you in selling your recipes.

Get Pabbly Subscription Billing for Free

The only thing for which people all across the globe agree in a heartbeat is the love for food. And believe us, in the world full of dine-in or take-out foodies love to cook at home. So, if you’re a chef and thinking of selling recipes online then it is food for thought.

Why would you like to sell recipes online?

First of all, gone were the days when you have to wait for your talent to get recognized, we are living in the age of the internet where everything is at a fingertip. So selling recipes of your favorite food is not at all tough. The second reason is, in one of the article released by The Economic Times, it has been claimed that getting paid for recipes are the next big thing. Many of the food enthusiasts are earning well from selling their recipes online.

Now, the question is how to bring home the bacon by selling recipes online? And the answer is using software named Pabbly Subscription Billing. The tool lets you create astonishing checkout pages for your recipes selling business. Not just this, it has other features too which are as follows:

  • Add multiple recipes in a single checkout page
  • Collect currency in both offline and online mode
  • Give discount and coupon codes to clients
  • Apply tax charges based on country, regions, etc

These are some of the points of this software and now let’s cast light on how to create a checkout page for selling recipes online using the tool.

This is How your Checkout Page will Look Like After Creation

Checkout Page to Sell Recipes Online

Preview Checkout Page

Step 1: Login to Pabbly Subscription Billing

Signup

Initiate the process by visiting Pabbly Subscription Billing site and click on the “Sign Up Free” button. Then, login into the software either using your Gmail credentials or simply create a new account.

Sign Up For Free!

Step 2: Select Subscription Billing

Access Subscription Billing

Step 3: Account Setup

Setup Account

Further, click the “Access Now” button of the software, it will open the page with details like company name, select currency, and phone number. Simply click “continue” button.

Step 4: Connect Payment Gateways To Sell Recipes Online

Connect Payment Gateway

The very important thing for any business is payment gateways. Here we are discussing the same. The software offers the test payment gateway for a good understanding of the payment procedure. Besides, it has multiple payment gateways like PayPal, Stripe, etc. Hereby, introducing the payment integration guides to help you out.

Step 5: Add Your Product

Add Product

Furthermore, add your cooking recipes and name it which in our case is Healthy recipes. Here you can specify the type like vegetarian, non-vegetarian, etc. Also, write a short description of the recipes to grasp the client’s attention.

Add Product to Start Selling Recipes Online

Simply fill up those details and click on the “Submit” button.

Note: Here you can add all the products related to the similar category by creating plans for each of them.

Step 6: Add Plans  

Let’s release out plans for different kinds of recipes available in your store.

(a) Select Add New Plan

Add Plan

(b) Specify the Plan & Pricing Details

Specify the Plan and Pricing to Start Selling Recipes Online

Then, don’t neglect to fill aspects like plan name, code, price, set-up fee, and much more to continue.

(c) Add Image & Description

Add Image & Description to Sell Recipes Online

Moreover, to sell a recipe through the checkout page, it is essential to write a brief description of recipes using bullets, images, etc.

Further, to add a product on the checkout page, click on the “Submit” button.

Additionally, you can add various plans and types of recipes in your product list which you want to publicize in the digital market.

Step 7: Share your Checkout Page

Share Checkout Page on Social Media

  • To draw people’s attention, share the checkout page directly on social media accounts like Facebook & Twitter.
  • Also, you can distribute the direct link to plan with your customers via SMS or email marketing.
  • Additionally, to redirect the customer on the website, embed the provided plan link in the buttons or any anchor text on your website.

Step 8: Preview Checkout Page

Below suggested steps are a gateway to preview the checkout page:

(a) Click on the View Button

View Checkout Plan

(b) Take a Look at the Checkout Page

Checkout Page to Sell Recipes Online

Step 9: Embed Checkout Page in Site & Sell Recipes Online

Embed Checkout Page on Website

Simply copy the link and add the checkout page on your site.

(a) Edit the Page & Paste the Copied Link

Paste Link in Text Editor

Immediately, paste the recipes plan link on a text editor of the WordPress dashboard.

(b) Save & Publish the Checkout Page

Save and Publish

Hit the “Publish” button, to embed the checkout page.

(c) Check out the Final Look of your Checkout Page on WordPress Site

Final Look of your Checkout Page to Sell Recipes Online

Step 10: Multiplan Checkout Page

Note: In case you want to sell multiple products via a single checkout page, you can create a multi-plan checkout page otherwise skip this step.

(a) Click on Add Mutiplan Checkout

Multiplan Checkout

(b) Add Plans to Sell Multiple Recipes from Single Checkout Page

Add Multiple Products to Start Selling Recipes Online

(c) Take a Look at the Checkout Page

Multiplan Checkout Page to Sell Recipes Online

Preview Checkout Page

Wrapping Up

Tada! Whether you have any secret grandma’s recipes or your own special recipes, you can surely make some dime out of it by selling recipes online. Using the software you can earn handsome income and can give wings to your cooking passion. All the steps mentioned above are easy and executable.

So, don’t box yourself now and try this amazing tool and knock us out with your queries.

You May Also Like To Read –
How to Sell Perfumes Online | Step by Step (Free Method)

How to Sell Perfumes Online

Ideal For: All the wholesale perfume sellers, perfume distributers, perfume showroom, gift shops, and other local perfumeries can use this method to take their perfume selling business online.

How to Sell Perfumes Online

Why Choose this Method for Selling Over any Other Solution?

Unlike any other solution, this method allows you to:

  • List and sell perfumes for FREE. Absolutely no payment required.
  • No commission on sales.
  • Collect payment through multiple payment modes from a single checkout page.
  • Sell one time or recurring subscriptions of perfumes.
  • Sell and collect payment in any currency as per your requirement.
  • Give discounts on your products by offering special coupon codes.
  • Add sales commission agents to help you in selling perfumes.

Get Pabbly Subscription Billing for Free

Perfumes are considered one of the luxuries and people happen to love them from ancient times. Some of you must be in perfume selling business but aren’t able to reach out to more number of people? Then this blog is for you. If you own a perfumery or a fragrance store then think about taking your perfume selling business online.

Why would you like to sell perfumes online?

Why wouldn’t you? It’s cheap, it expands your customer reach, you can sell unlimited perfumes, generate a lot of profit, run your business on your terms and what not. Now you must be thinking about which service to choose for your perfume selling business. We are talking about Pabbly Subscription Billing, which offers you a free platform to start perfume selling business online without any charges. The best part about this service is its checkout page. You just have to create the checkout for your perfumes and share their links on your website or social media, and your customers can make direct purchases through them.

Also, Pabbly Subscription Billing offers you so many features which are beneficial for you:

  • Zero transaction fees
  • Generate unlimited revenue
  • Add and sell unlimited products and plans
  • Integration with your website and other services
  • Generate and share invoices with customers automatically.

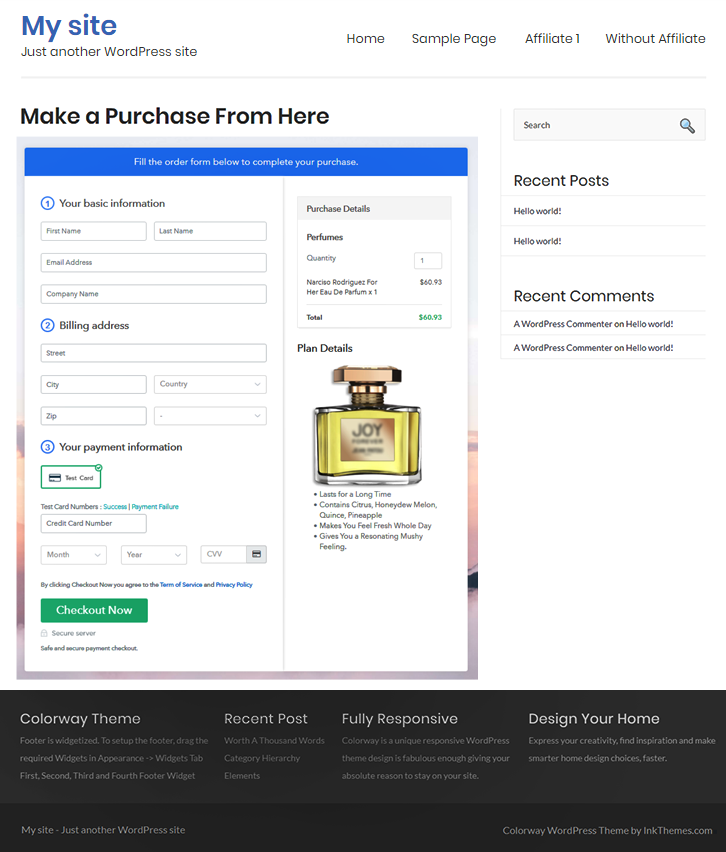
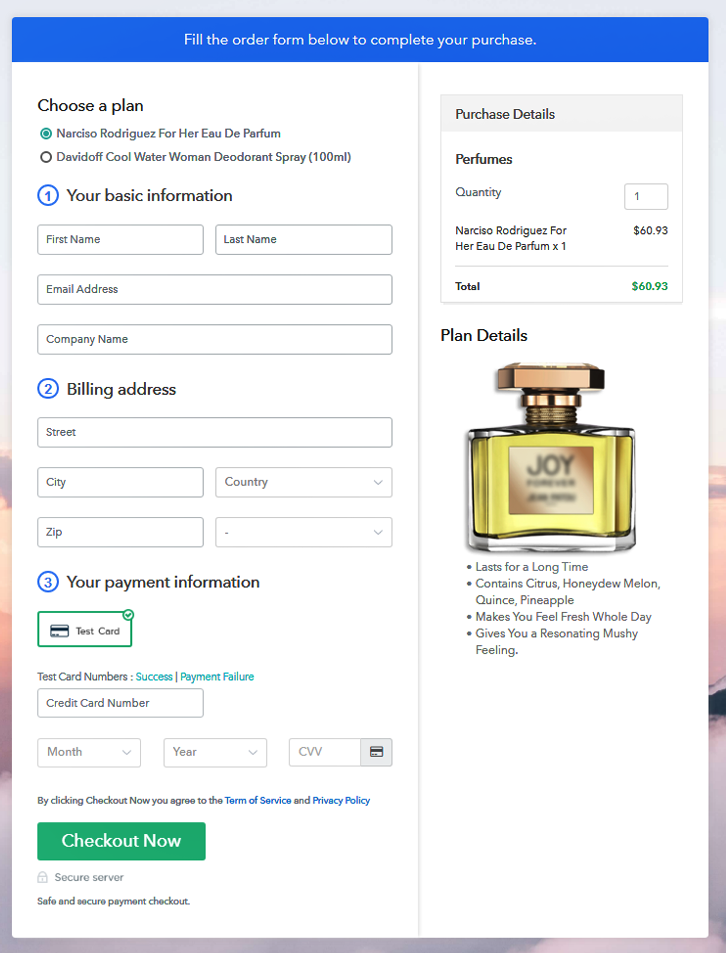
This is How your Checkout Page will Look Like After Creation

Preview Checkout Page

Preview Checkout Page

Step 1: Log in to Pabbly Subscription Billing

Signup

At first, visit Pabbly Subscription Billing website and then click on the “Sign Up Free” button. Once you click the button, you will reach to the signup page, where you can create your account with your Gmail or manually enter your details.

Sign Up For Free!

Step 2: Select Subscription Billing

Access Subscription Billing

Step 3: Account Setup

Setup Account

Once you complete the signup process, then fill up your company details i.e. company name, select currency, and contact number in the appeared dialogue box.

Step 4: Connect Payment Gateway to Sell Perfumes Online

Connect Payment Gateway

Later, the account setup, here,  the payment collection process is shown by enabling the ‘Test Payment’ mode. Later, you can connect other payment gateways of your preference. The complete integration guide for payment gateways is provided below.

Step 5: Add Your Product

Add Product

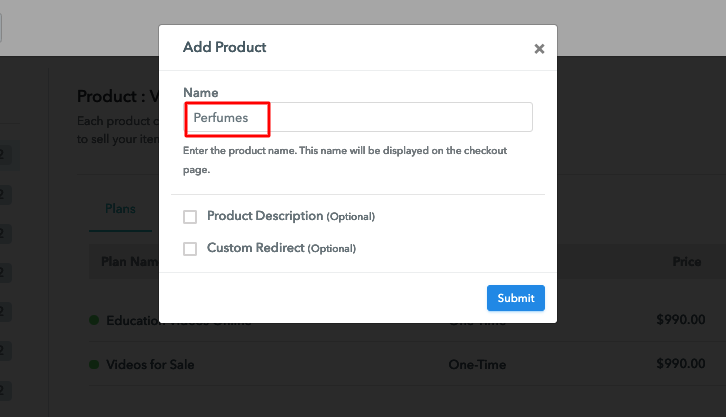
After the payment mode is enabled, in the next step you have to add your first product. You can insert perfumes of different categories, for example, Eau de perfume, Eau de cologne, etc, and add all other types of perfumes in the same product by creating different plans.

Add Product Name to Sell Perfumes Online

Simply fill up these details and your product is added.

Note: Here you can add all the products related to the similar category by creating plans for each of them.

Step 6: Add Plans

Let’s get started and create plans for different categories of perfumes that you want to sell

(a) Select Add New Plan

Add Plan

(b) Specify the Plan and Pricing Details

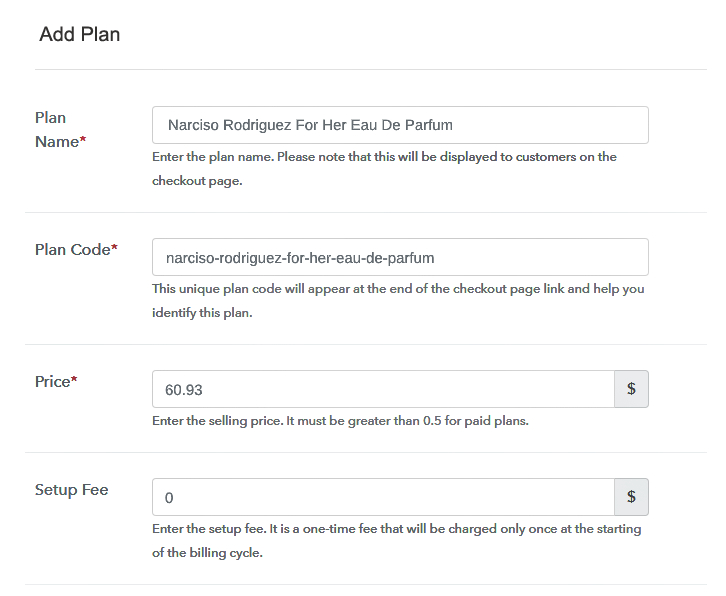
Add Details to Sell Perfumes Online

Subsequently, clicking add new plan, you will be redirected to the plan page, here you will have to fill the plan details such as plan name, code, billing cycle, price, etc.

(c) Add Image & Description

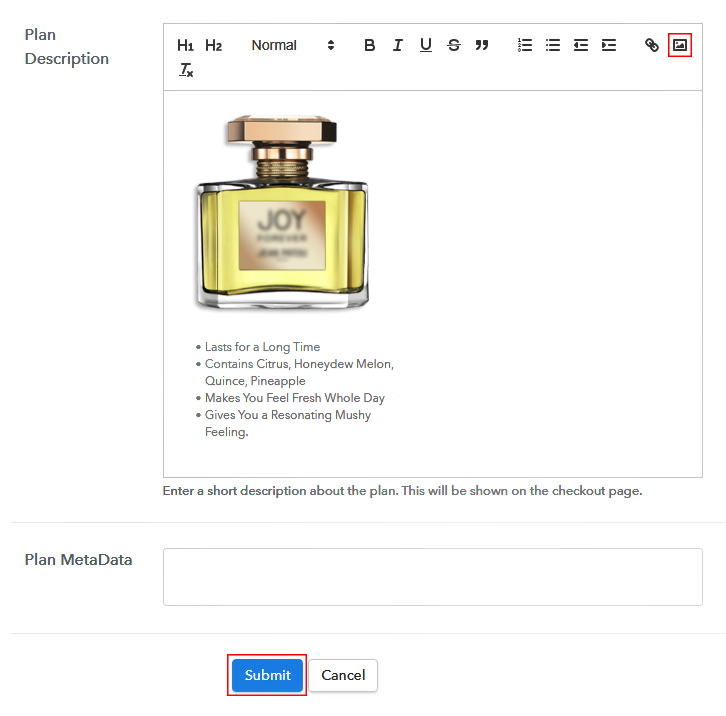
Add Image to Sell Perfumes Online

Also, write a description of the perfumes that you want to sell along with the product links, images, etc, and click on the submit button to add your plan.
You can create more plans for all the perfumes in a similar manner.

Step 7: Share Your Checkout Page

Share Checkout Page on Social Media

  • Share your checkout page on social media like Facebook and Twitter.
  • Copy the mentioned link and send it to your customers through SMS or emails directly.
  • Embed your plan link to your website so that your customers can be landed on the checkout page directly.

Step 8: Preview Checkout Page

Follow these steps to view checkout page

(a) Click on the View Button

View Checkout Plan

(b) Take a Look at the Checkout Page

Preview Checkout Page

Step 9: Embed Checkout Page in Site & Sell Perfumes Online

Embed Checkout Page on Website

Just copy the provided plan embedding link and embed the checkout page to your WordPress site.

(a) Edit the Page & Paste the Copied Link

Paste Link in Text Editor

Copy and paste the link in the text area of the editor

(b) Save & Publish the Checkout Page

Save and Publish

After the code is pasted, click on the publish button to embed your checkout page.

(c) Check Out the Final Look of your Checkout Page on WordPress Site

Embed Checkout Page to Sell Perfumes Online

Step 10: Multiplan Checkout Page

Note: In case you want to sell multiple products through a single checkout page, create a multi-plan checkout plan, otherwise skip this step.

(a) Click on Add Multiplan Checkout

Multiplan Checkout

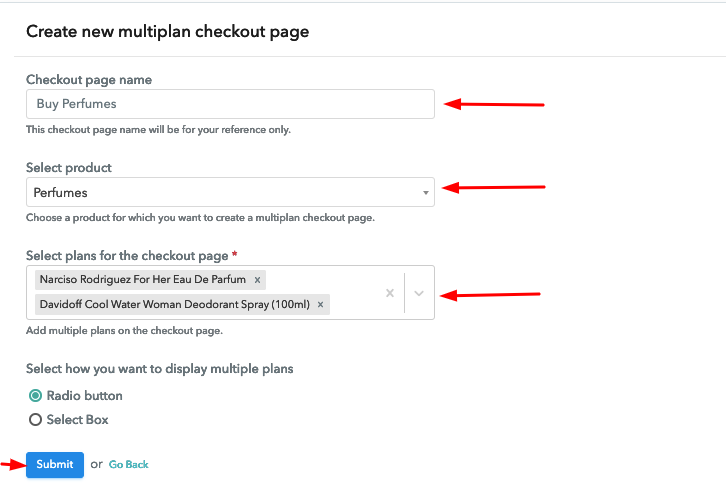
(b) Add Plans to Sell Multiple Perfumes from Single Checkout Page

Multiplan Details to Sell Perfumes Online

(c) Take a Look at the Checkout Page

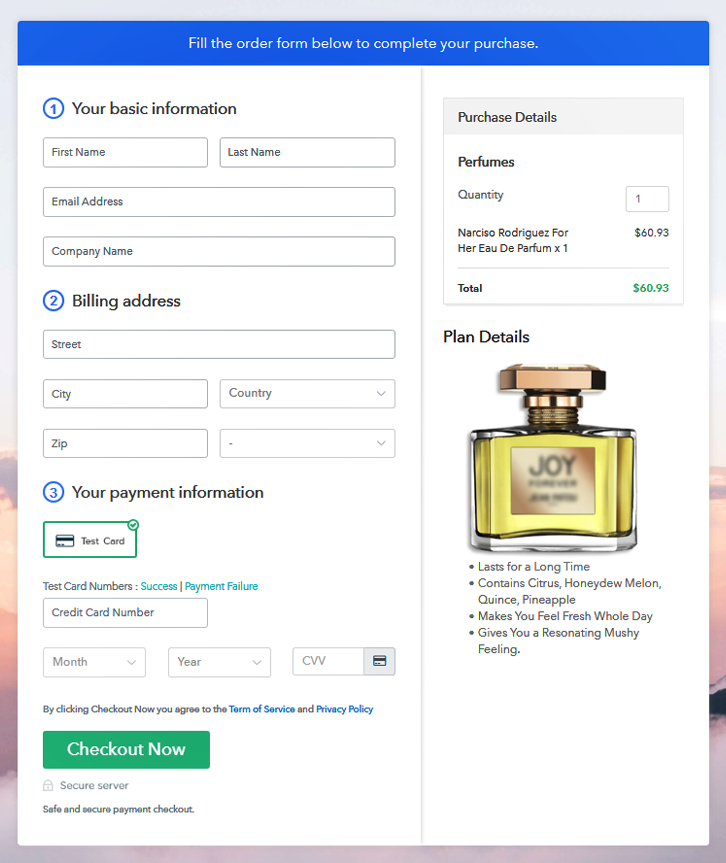
Multiplan Checkout to Sell Perfumes Online

Preview Checkout Page

Wrapping Up

We are at the end of the blog now and we hope that this article was helpful for starting your perfumes selling online business. With Pabbly Subscription Billing, there are endless possibilities for profit. You can start your online business for free, sell perfumes online as much as you wish without any commission fees, generate unlimited revenue and the list goes on. Hence, signup now and start your perfume selling business online.

For further queries or suggestions, please contact us.

You May Also Like To Read –
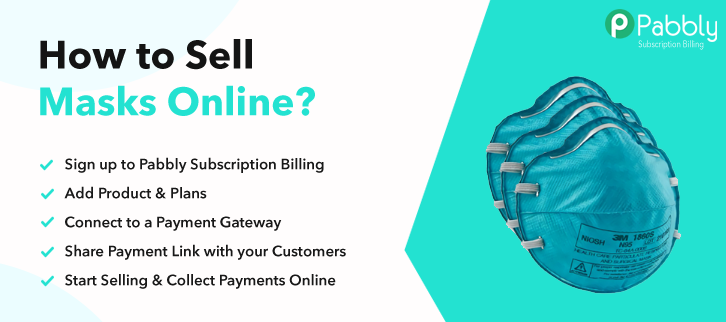
How to Sell Masks Online | Step by Step (Free Method)

How to Sell Masks Online

Ideal For: All masks manufacturers, homemade masks sellers, retail masks owners, masks wholesale vendors, and other merchants can use this method to start selling masks online.

How to Sell Masks Online

Why Choose this Method for Selling Over any Other Solution?

Unlike any other solution, this method allows you to:

  • List and sell your masks for FREE. Absolutely no payment required.
  • No commission on sales.
  • Collect payment through multiple payment modes from a single checkout page.
  • Sell one time or recurring subscriptions of your masks.
  • Sell and collect payment in any currency as per your requirement.
  • Give discounts on your products by offering special coupon codes.
  • Add sales commission agents to help you in selling your masks.

Get Pabbly Subscription Billing for Free

Since the onset of the coronavirus epidemic, it has been difficult to find reusable and protective face masks on a global scale.

In response, many have decided to make face masks and sell from home to help healthcare workers, people who are sick, and caregivers.

Why would you like to sell masks online?

Recently, the Centers for Disease Control and Prevention (CDC) guidelines promote the use of masks when in public. Because masks minimize the spread of germs and can protect us from air pollution. This recommendation comes as a precautionary measure to reduce the risk of respiratory and heart disease, while also protecting people from infection by blocking droplets and bacteria.

To help meet the demand for masks, you can start selling different types of masks online. It is the most searched item on the Internet in the last few months. In addition, selling handmade masks is a unique opportunity for you to set up an online shop.

There is an online tool named Pabbly Subscription Billing that helps you in selling the masks online without any hassle. You can sell unlimited masks without charging any excess commission. With its simple and easy checkout page, you can respond to buyer demand faster than larger companies with more complex production processes.

There are some advanced features of this software that help you sell online masks by generating unlimited profits without any restrictions:

  • Create unlimited products, and plans for different types of masks like N95, surgical, and cloth.
  • Keep records for all your items in stock
  • Sell masks and get unlimited revenues from different billing models like one-time, recurring, etc
  • Apply coupons, discounts & taxes

And so on…

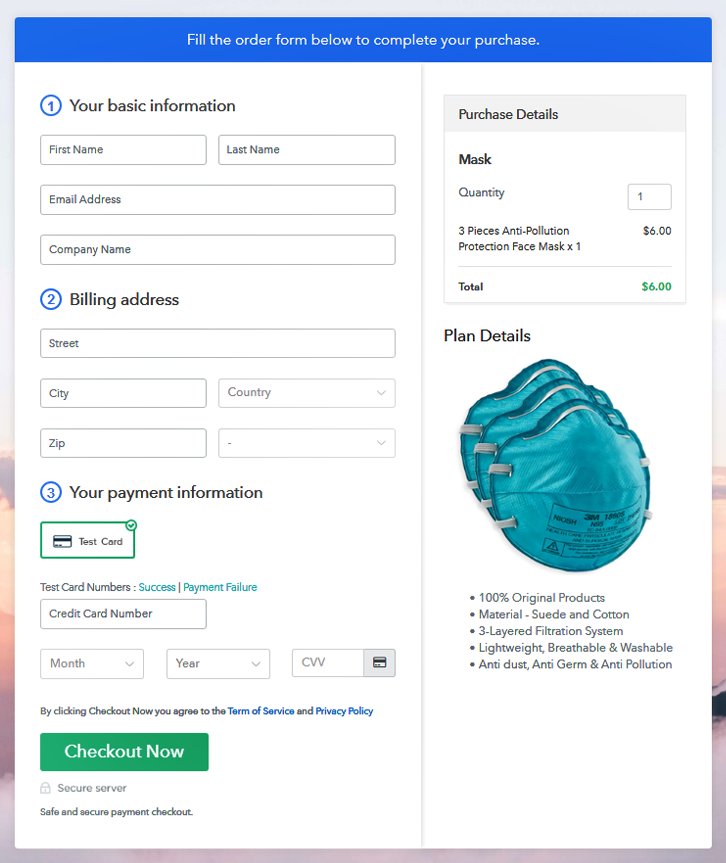
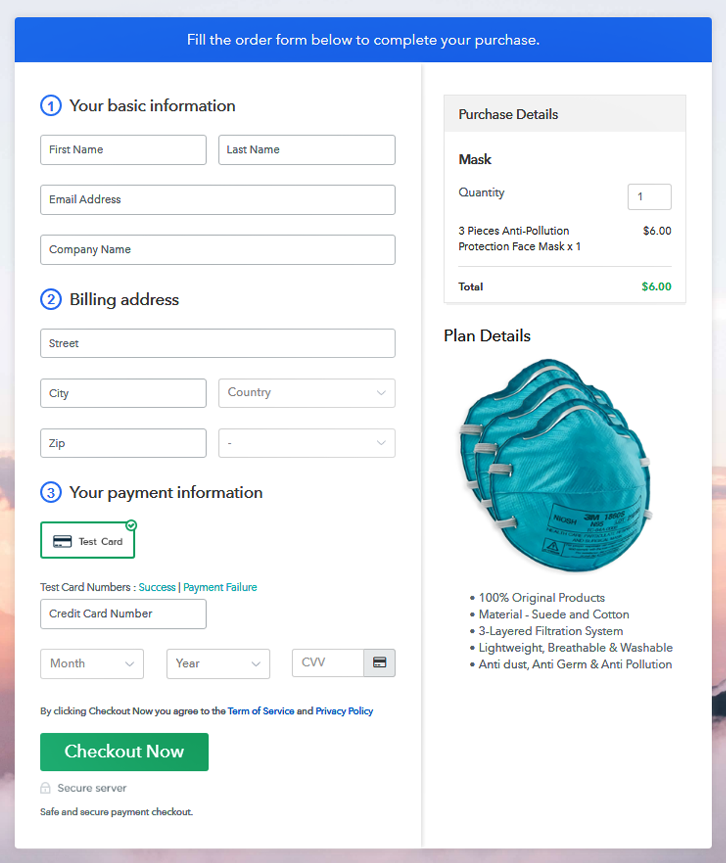
This is How your Checkout Page will Look Like After Creation

Checkout Page Preview - Sell Masks Online

Preview Checkout Page

Step 1: Login to Pabbly Subscription Billing

Firstly, visit the Pabbly Subscription Billing website to create the checkout page and Sign Up to the software with your Gmail or manually filled out the sign-up form.

Signup

Sign Up For Free!

Step 2: Select Subscription Billing

Access Subscription Billing

Step 3: Account Setup

As soon as you enter the login details a Pabbly Subscription Dashboard will open on the screen. Now select the Subscription Billing and click on the “Access Now” button.

The popup will open on the screen which asks you for basic information like company name, currency, and phone number. Just fill out asked details for continuing the setup.

Setup Account

Step 4: Connect Payment Gateway to Sell Masks Online

Connect Payment Gateway

After setting up the account, you will need to connect the payment gateway. Pabbly Subscription Billing provides the trial payment mode for beginners to learn the payment procedures. You can enable the test payment mode by clicking the button “Enable test payment” for checking the application working. Besides, there are multiple payment gateway options available along with their integration guides mention below like PayPal, Stripe, Razorpay, Authorize.net, and many more.

Step 5: Add Your Product

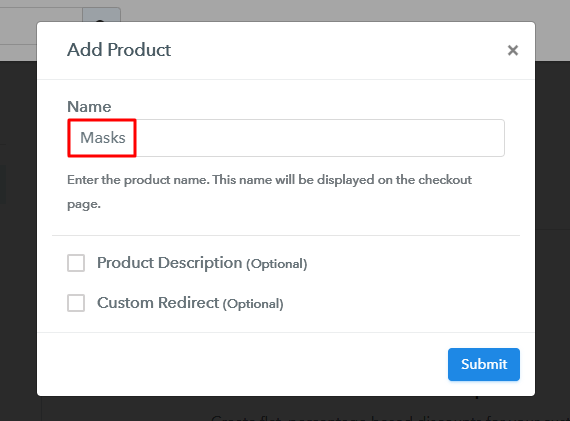
Now specify the product name with details by clicking on the “Add New Product” option. Apart from this, you can also add various types of items to the same product category by creating different plans.

Add Product - Start Selling Masks Online

After filling all the details, click on the submit button, and your product is created.

Note: Here you can add all the products related to the similar category by creating plans for each of them.

Step 6: Add Plans

Now, let’s create various plans for all types of masks that you want to sell in your online store.

(a) Select Add New Plan

Add Plan

(b) Specify the Plan & Pricing Details

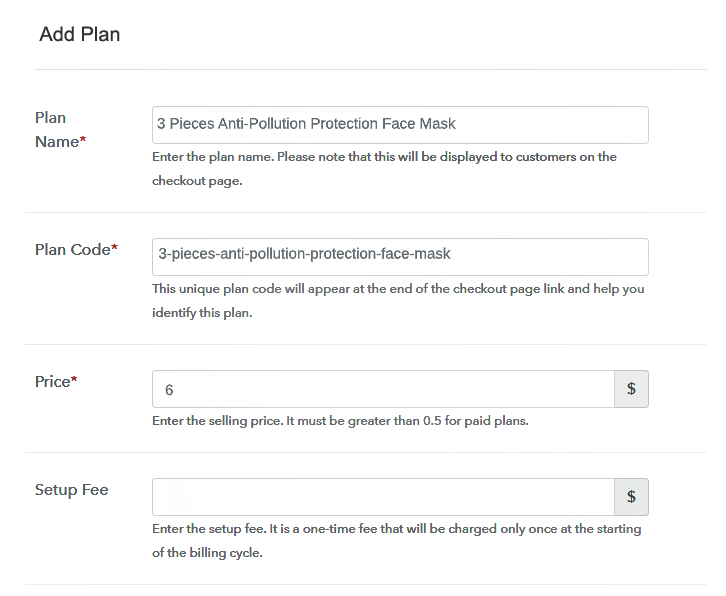
Add Plan

Therein, you can specify the plan details like plan name, plan code, price, setup fee, and many more for selling masks online.

(c) Add Image & Description

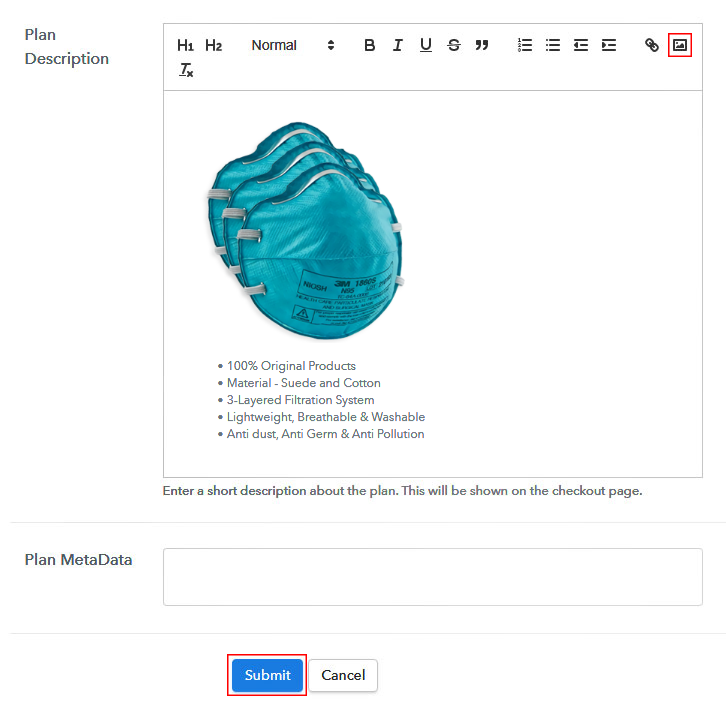
Add Product Image

Following the previous step, you can also write a brief description of your product with an image in the “Plan Description” field. Furthermore, you can also customize the text in different formats, add links, etc., as you’d like to display on the checkout page.

Hit on the “Submit” button once you are done with the changes and your checkout page is ready to sell masks online.

Step 7: Share your Checkout Page

Share Checkout Page on Social Media

When you click on the submit button a pop-up window will encounter on your screen with sharing options like:

  • Firstly, you can copy the checkout page URL and share it with your audience via social media platforms, SMS, emails etc. to sell masks online.
  • Second, you can share the checkout page directly on Facebook and Twitter to increase user engagement.
  • Apart from this, using this link, you can add the checkout page on your website’s button links & anchor text source.

Step 8: Preview Checkout Page

Instantly, you can preview your checkout page by clicking on the “View” button.

(a) Click on the View Button

View Checkout Plan

(b) Take a Look at the Checkout Page

Checkout Page Preview to Sell Masks Online

Step 9: Embed Checkout Page in Site & Sell Masks Online

Embed Checkout Page on Website

Using the embed plan link, you can add the checkout page on your WordPress by copying the checkout page link.

(a) Edit the Page & Paste the Copied Link

Paste Link in Text Editor

Momentarily, paste the copied link on your WordPress post or page text editor.

(b) Save & Publish the Checkout Page

Save and Publish

After pasting the code click on the ‘Publish’ button and your checkout page will get embedded on the website.

(c) Check out the Final Look of your Checkout Page on WordPress Site

Embed Checkout Page to Sell Masks Online

Step 10: Multiplan Checkout Page

Note: In case you want to sell multiple products via a single checkout page, you can create a multi-plan checkout page otherwise skip this step.

(a) Click on Add Mutiplan Checkout

Multiplan Checkout

(b) Add Plans to Sell Multiple Masks

from Single Checkout Page

Create Multiplan Checkout

(c) Take a Look at the Checkout Page

Multiplan Checkout Page Preview to Sell Masks Online

Preview Checkout Page

Wrapping Up

Now more than ever, the world needs productive small business owners like you. But if you are not sure from where or how to start the business then this article might help you. Masks are the best protection against the spread of germs, so sell masks and engage your customers for your business. Here, we recommend the easiest way to start your business via the checkout page. Just follow these simplest 10 steps to create your own checkout page for starting your masks business online.

You May Also Like To Read –
How to Sell Hair Products Online | Step by Step (Free Method)

How to Sell Hair Products Online

Ideal For: All the hair salons, hair care & styling stores, wholesale hair products sellers, and people who make homemade hair products like hair masks, hair oil, etc can use this method to take their hair products selling business online.

How to Sell Hair Products Online

Why Choose this Method for Selling Over any Other Solution?

Unlike any other solution, this method allows you to:

  • List and sell hair products for FREE. Absolutely no payment required.
  • No commission on sales.
  • Collect payment through multiple payment modes from a single checkout page.
  • Sell one time or recurring subscriptions of hair products.
  • Sell and collect payment in any currency as per your requirement.
  • Give discounts on your products by offering special coupon codes.
  • Add sales commission agents to help you in selling hair products.

Get Pabbly Subscription Billing for Free

Are you looking to increase your sales of hair products? If you own a hair care store or make homemade hair products then try taking your business to online platforms. Online platforms give you the freedom to run your business on your terms and generate as much revenue as you wish.

Why would you like to sell hair products online?

The answer is obvious, everyone loves pampered hair and people love to experiment with new hair products on them. If you can deliver great hair products at reasonable rates then what else can people ask for? Today we are telling you about Pabbly Subscription Billing which is a free platform, where you can start your hair products selling business online absolutely free. Moreover, the most useful asset is its checkout page. Just create checkout pages for your hair products and share their links on your business website and social media, so that your customers can make purchases directly through them.

Apart from this, Pabbly Subscription Billing comes with so many attractive features:

  • Zero transaction fees on your sales.
  • Share invoices with your customers easily.
  • Add & sell unlimited products and plans.
  • Generate unlimited revenue.
  • Integrate with your business website.
  • Collect one-time or recurring payments easily.

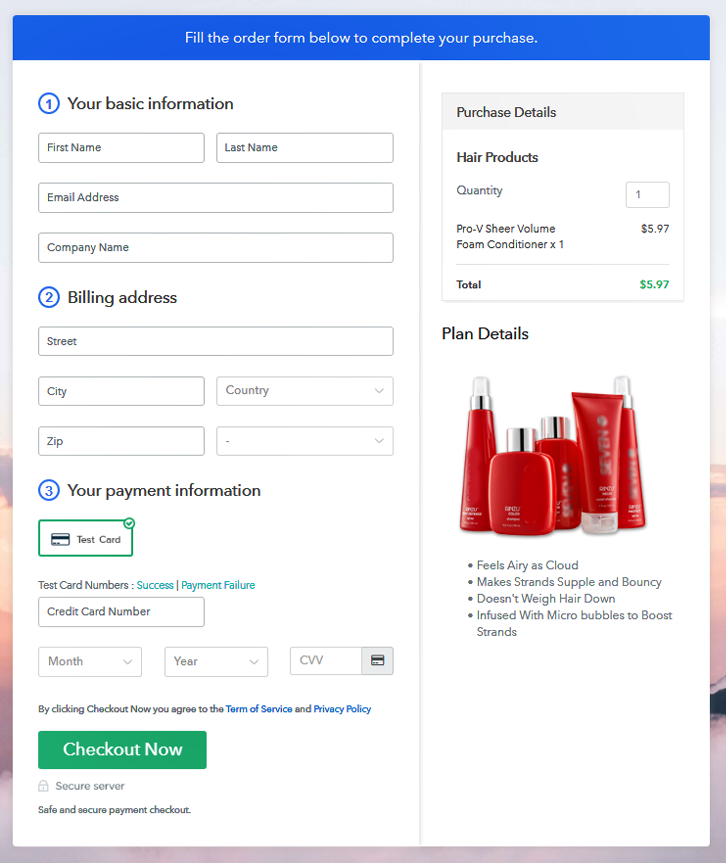
This is How your Checkout Page will Look Like After Creation

Preview Checkout Page

Preview Checkout Page

Step 1: Log in to Pabbly Subscription Billing

Signup

Let’s start with visiting Pabbly Subscription Billing website and then click on the “Sign Up Free” button. On clicking the button, you will reach on the signup page, where you can create your account with your Gmail or manually enter your details.

Sign Up For Free!

Step 2: Select Subscription Billing

Access Subscription Billing

Step 3: Account Setup

Setup Account

Once the signup process is completed, then fill up your company details i.e. company name, select currency, and contact number in the appeared dialogue box.

Step 4: Connect Payment Gateway to Sell Hair Products Online

Connect Payment Gateway

After you complete the account setup process, here, we are showing you the payment collection process by enabling the ‘Test Payment’ mode. Later, you can connect other payment gateways of your preference. The complete integration guide for payment gateways is provided below.

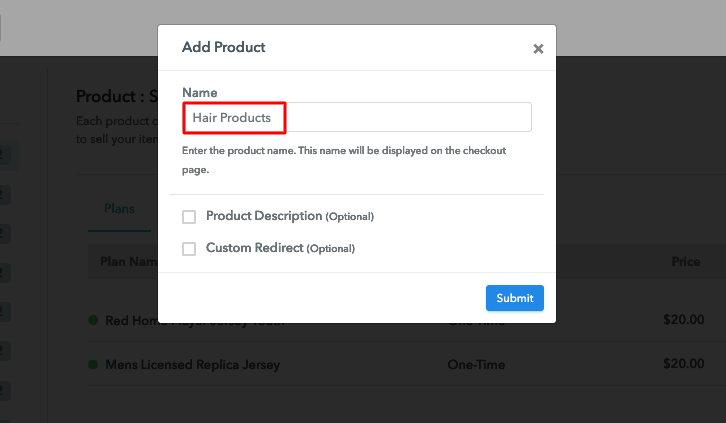
Step 5: Add Your Product

Add Product

Once the payment mode is enabled, then you can add your first product. You can include hair products of different categories, for example, shampoo, hair masks, etc, and all other types of hair products in the same product by creating different plans.

Add Product Name to Sell Hair Products Online

You just have to fill up these details and your product is added.

Note: Here you can add all the products related to the similar category by creating plans for each of them.

Step 6: Add Plans

Let’s get started and create plans for different categories of hair products that you want to sell

(a) Select Add New Plan

Add Plan

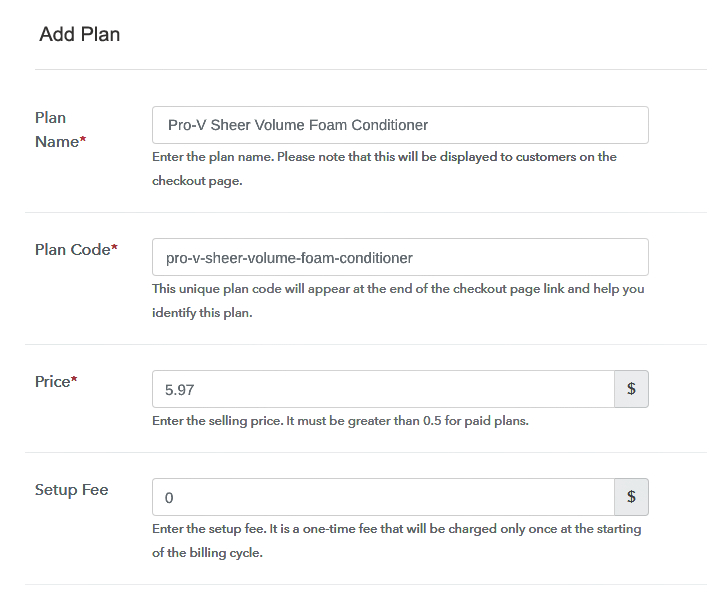
(b) Specify the Plan and Pricing Details

Add Details to Sell Hair Products Online

When you click add new plan, you will land on the plan page, here you will have to fill the plan details such as plan name, code, billing cycle, price, etc.

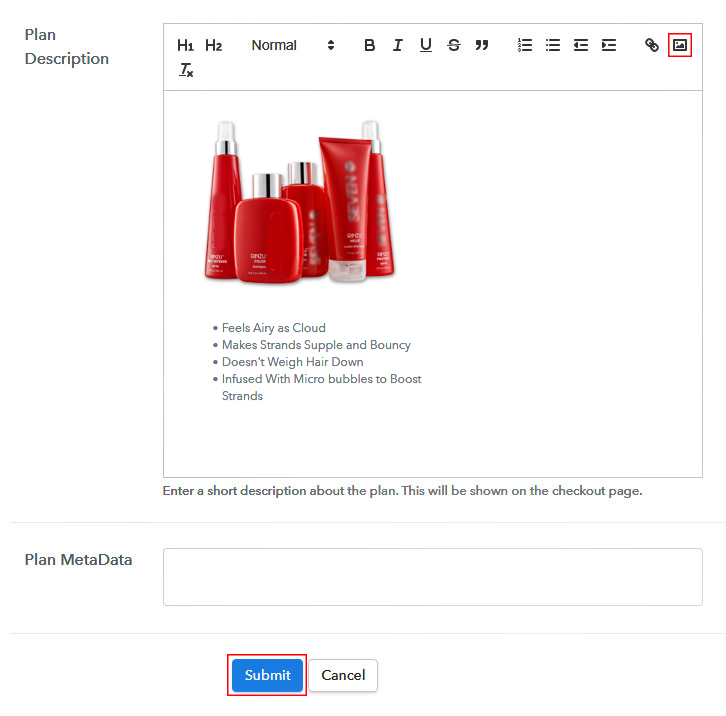
(c) Add Image & Description

Add Image to Sell Hair Products Online

Also, describe the hair products that you want to sell along with the product links, images, etc, and click on the submit button to add your plan.
You can create more plans for all the hair products in a similar manner.

Step 7: Share Your Checkout Page

Share Checkout Page on Social Media

  • Share your checkout page on social media such as Facebook and Twitter.
  • Copy the provided link and send it to your customers via SMS or emails directly.
  • Embed your plan link to your website so that your customers can be redirected to the checkout page directly.

Step 8: Preview Checkout Page

Follow the mentioned steps to view checkout page

(a) Click on the View Button

View Checkout Plan

(b) Take a Look at the Checkout Page

Preview Checkout Page

Step 9: Embed Checkout Page in Site & Sell Hair Products Online

Embed Checkout Page on Website

Just copy the provided plan embedding link and embed the checkout page to your WordPress site.

(a) Edit the Page & Paste the Copied Link

Paste Link in Text Editor

Copy and paste the link in the text area of the editor

(b) Save & Publish the Checkout Page

Save and Publish

After the code is pasted, click on the publish button to embed your checkout page.

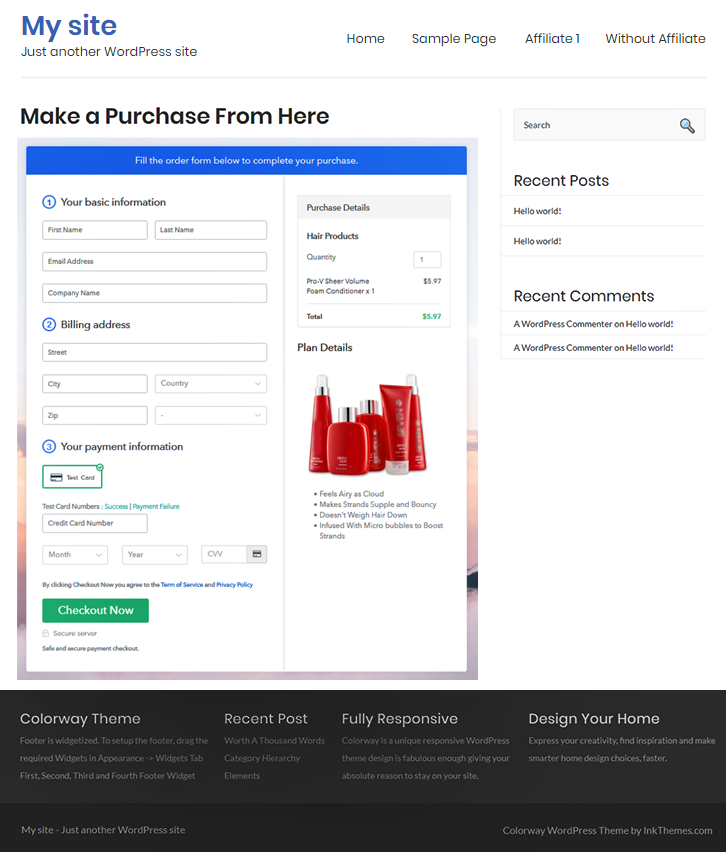
(c) Check Out the Final Look of your Checkout Page on WordPress Site

Embed Checkout Page to Sell Hair Products Online

Step 10: Multiplan Checkout Page

Note: In case you want to sell multiple products through a single checkout page, create a multi-plan checkout plan, otherwise skip this step.

(a) Click on Add Multiplan Checkout

Multiplan Checkout

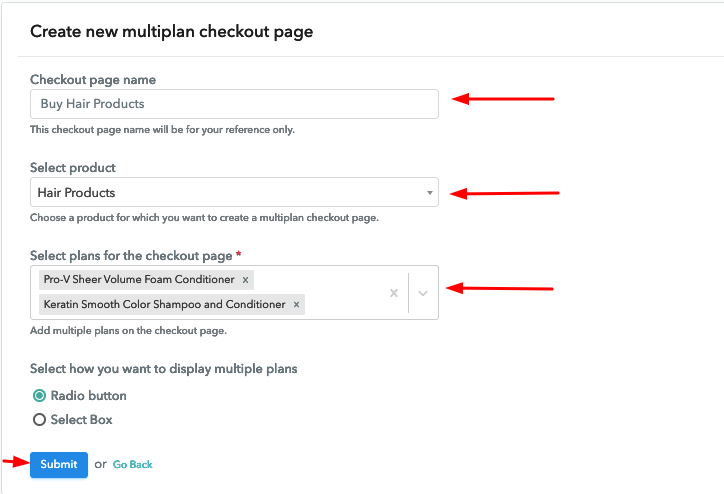
(b) Add Plans to Sell Multiple Hair Products from Single Checkout Page

Multiplan Details to Sell Hair Products Online

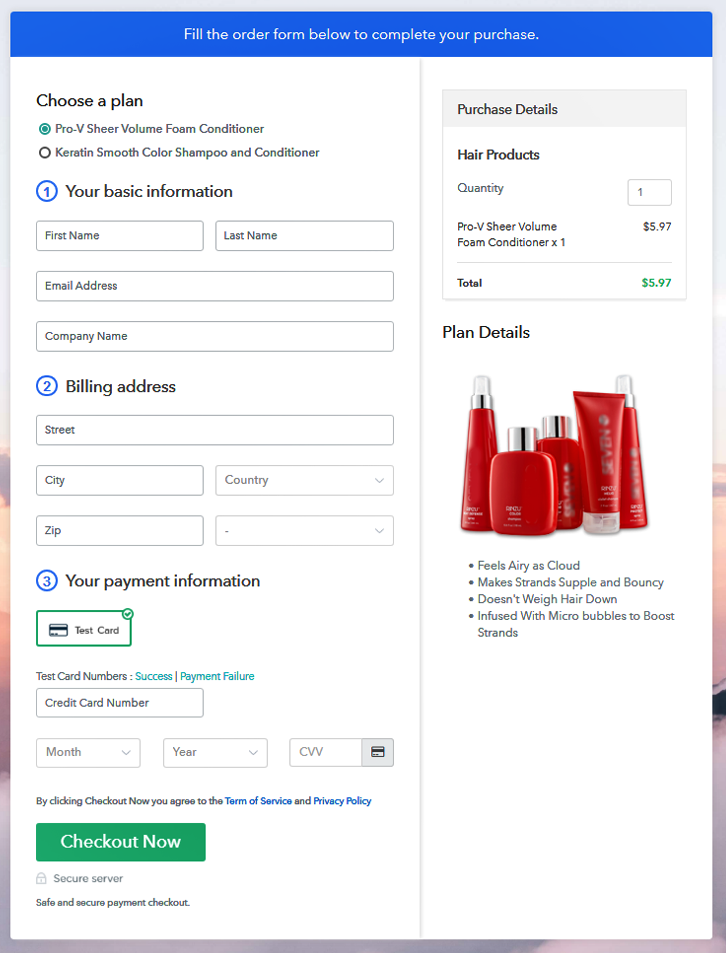
(c) Take a Look at the Checkout Page

Multiplan Checkout to Sell Hair Products Online

Preview Checkout Page

Wrapping Up

To conclude, Pabbly Subscription Billing is the only platform that can boost up your hair products selling business online without asking for a single penny. With it, you can sell unlimited hair products online, earn unlimited profit, widen your customer reach, and so much more. Where else can you find this amazing deal? Hence, if you are serious about selling hair products online then, go and signup now and boost up your business. For further queries or suggestions, please contact us.

You May Also Like To Read –
How to Sell Fruits Online | Step by Step (Free Method)

How to Sell Fruits Online

Ideal For: All the fruit farms, fruit sellers, wholesale fruit vendors, fruit suppliers, retail fruit traders and other merchants can use this method to sell fruits online.

How to Sell Fruits Online

Why Choose this Method for Selling Over any Other Solution?

Unlike any other solution, this method allows you to:

  • List and sell your fruits for FREE. Absolutely no payment required.
  • No commission deducted on sales.
  • Collect payment through multiple payment modes from a single checkout page.
  • Sell one time or recurring subscriptions of your fruits.
  • Sell and collect payment in any currency as per your requirement.
  • Give discounts on your products by offering special coupon codes.
  • Add sales commission agents to help you in selling your fruits.

Get Pabbly Subscription Billing for Free

Fruits are considered as the most healthiest food for human beings. That is the reason why people offer fruits to someone who is sick and wish them to get well soon. Hence, you might be looking for ways to start your fruit selling business online.

Why would you like to sell fruits online?

We understand how digital world has turn out to be the most important part of our day to day life. And, to cope up with that selling things online is a new trend which everyone is following. Therefore, we would like recommend you Pabbly Subscription Billing tool so that you can sell fruits online without any hassle. Here, let me take you through the most prominent feature this software provides.

  • Collect payment either offline or online
  • Create unlimited products and plan
  • Provide coupons and discounts
  • Add tax and delivery charges

Not only that, but you can also create checkout pages that can be shared on social media like Facebook, Twitter, etc or else embed on the website. Want to know how? Let me take you through those easy 10 steps.

This is How your Checkout Page will Look Like After Creation

Checkout Page to Start Selling Fruits Online

Preview Checkout Page

Step 1: Log in to Pabbly Subscription Billing

Signup

First of all, go to the site of Pabbly Subscription Billing then click on the button “Sign up Free” which will redirect you to their sign-up page. Fill out all the fields manually or else sign in via Gmail account.

Sign Up For Free!

Step 2: Select Subscription Billing

Access Subscription Billing

Step 3: Account Setup

Setup Account

Then, fillup the entire details of the company like name, currency standards, and phone number. Next, click on “Continue” to complete the whole process.

Step 4: Connect Payment Gateways To Sell Fruits Online

Connect Payment Gateway

In order to stimulate the whole payment experience of a customer, the next step is to check the payment gateways. Besides, Pabbly Subscription Billing offers you multiple payment gateways like PayPal, Stripe, Razorpay, etc. In the meantime, I am enabling the test payment gateway so that you can understand the entire process with the help of test payment gateway.

Step 5: Add Your Product

Add Product

After successfully embedding the payment gateway, the following step is to add products. Just click on the “Add New Product” button which will open a dialog box. Next, fill out the details of the fruits with its specifications.

Add Products to Sell Fruits Online

Enter the details and your product is created.

Note: Here you can add all the products related to the similar category by creating plans for each of them.

Step 6: Add Plans

Now, create plans for fruits that are available in your stocks.

(a) Select Add New Plan

Add Plan

(b) Specify the Plan & Pricing Details

Add Plan to Sell Fruits Online

To add a plan, you will be redirected to the plan page in order to enter the details like name, code, price, setup fees, billing cycle, etc.

(c) Add Image & Description

Add Image & Description to Sell Fruits Online

Subsequently, paste the image of the fruits you wish to sell online.

Further, provide some product information of the fruits in bullet points like quantity, quality, etc.

Once you fillup the information, just tap on the “Submit” button.

Step 7: Share your Checkout Page

Share Checkout Page on Social Media

  • Succeeding, you can now share the checkout page on Twitter & Facebook by using the direct buttons.
  • Furthermore, using emails and SMS you can directly share the checkout page link to customers.
  • Likewise, it enables you to add the provided plan link in the buttons. Along with that, you can also use the anchor text anywhere on your website so that you can redirect users to the checkout page.

Step 8: Preview Checkout Page

Follow up these steps to preview checkout page:

(a) Click on the View Button

View Checkout Plan

(b) Take a Look at the Checkout Page

Checkout Page to Start Selling Fruits Online

Step 9: Embed Checkout Page in Site & Sell Fruits Online

Embed Checkout Page on Website

Simply, copy the embed link in order to insert the checkout page on your WordPress website.

(a) Edit the Page & Paste the Copied Link

Paste Link in Text Editor

Afterward, just copy the link and paste it to the text area of the editor.

(b) Save & Publish the Checkout Page

Save and Publish

Then, tap on the buttons named ‘Publish’ once you paste the code. Voila! your checkout page is embedded.

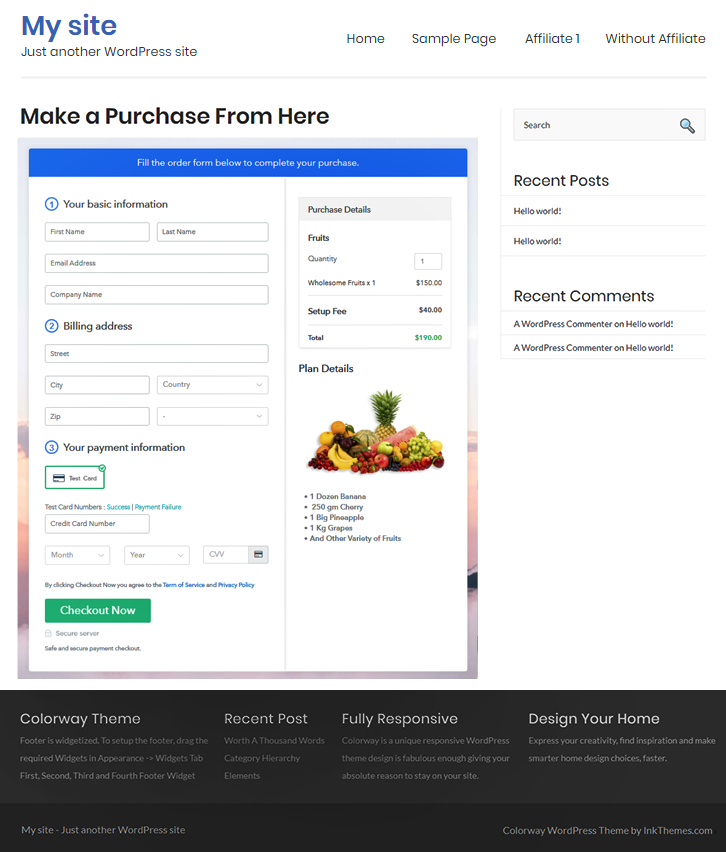
(c) Check out the Final Look of your Checkout Page on WordPress Site

Checkout Page on WordPress Site to Sell Fruits Online

Step 10: Multiplan Checkout Page

Note: In case you want to sell multiple products via a single checkout page, you can create a multi-plan checkout page otherwise skip this step.

(a) Click on Add Mutiplan Checkout

Multiplan Checkout

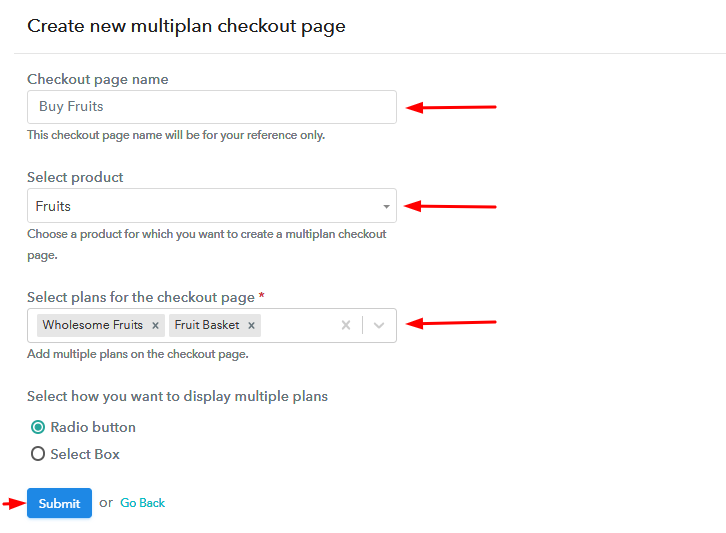
(b) Add Plans to Sell Fruits from Single Checkout Page

Add Plans to Sell Fruits from Single Checkout Page

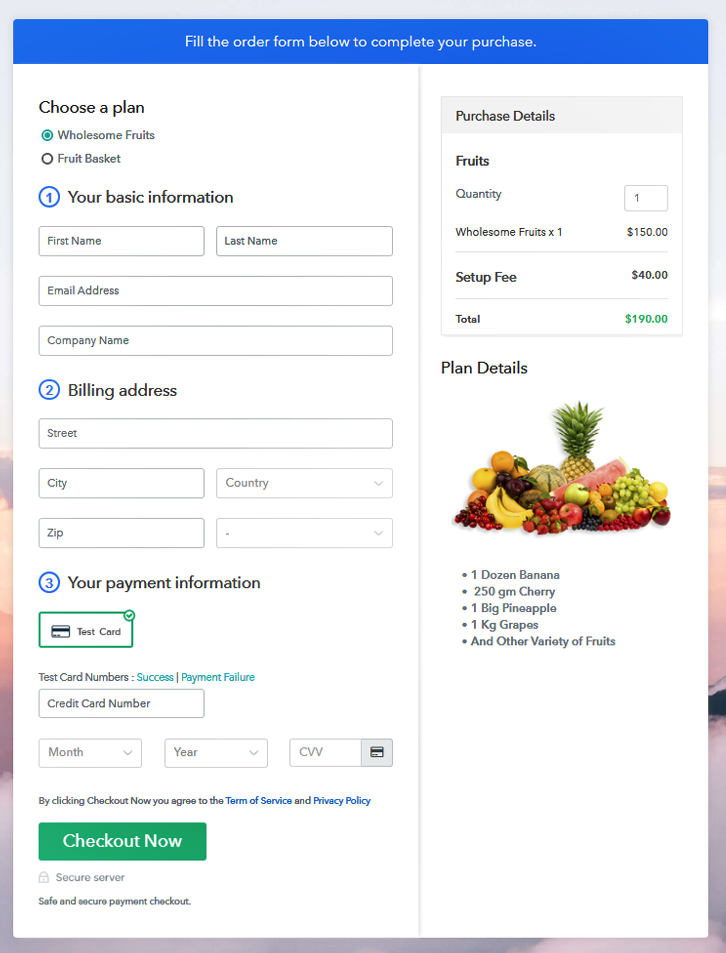
(c) Take a Look at the Checkout Page

Multiplan Checkout Page to Start Fruit Business Online

Preview Checkout Page

Wrapping Up

We hope this article has helped you to solve your query on “How to sell fruits online?”. You just need to follow the above-mentioned steps in order to start your online fruit selling business without any hassle. So, what are you waiting for? Go ahead and start selling fruits online.

You May Also Like To Read –
How to Sell Baby Clothes Online | Step by Step (Free Method)

Ideal For: All baby clothes manufacturers, weavers, baby clothes traders and other merchants can use this method to sell baby clothes online.

How to Sell Baby Clothes Online

Why Choose this Method for Selling Over any Other Solution?

Unlike any other solution, this method allows you to:

  • List and sell your baby clothes for FREE. Absolutely no payment required.
  • No commission deducted on sales.
  • Collect payment through multiple payment modes from a single checkout page.
  • Sell one time or recurring subscriptions of your baby clothes.
  • Sell and collect payment in any currency as per your requirement.
  • Give discounts on your products by offering special coupon codes.
  • Add sales commission agents to help you in selling your baby clothes.

Get Pabbly Subscription Billing for Free

According to the United Nations, the average number of babies born per day is 3,60,000 and 140 million in a year. The numbers are overwhelming, isn’t it? Imagine the amount of money a person can make if he starts selling baby clothes online.

Why would you like to sell baby clothes online?

The 19th century was lead by steam engines, the 20th century by oil and 21st century will be known as the age of the internet.  My point is, if you start selling baby clothes online, you have access to the best prices available. This is because scores of customers from different parts of the world will bid for your products. Other benefits include a 24×7 open online store, no sales representatives, lesser taxes, lower storage rents, etc.

But the question is, How will you open an online store? Well actually it is pretty simple, you use an online software called Pabbly Subscription Billing. This software can build your online store with unlimited products in just minutes. Not just products, you can create unlimited plans for your customers. Other features includes:

  • List multiple products according to categories
  • Generate unlimited revenues
  • Custom domains
  • High-quality security apparatus
  • Unlimited Storage
  • Affiliate Modules

Exciting isn’t it? Now let us create an internet store to start selling baby clothes online.

This is How The Checkout Page will Look Like After Creation

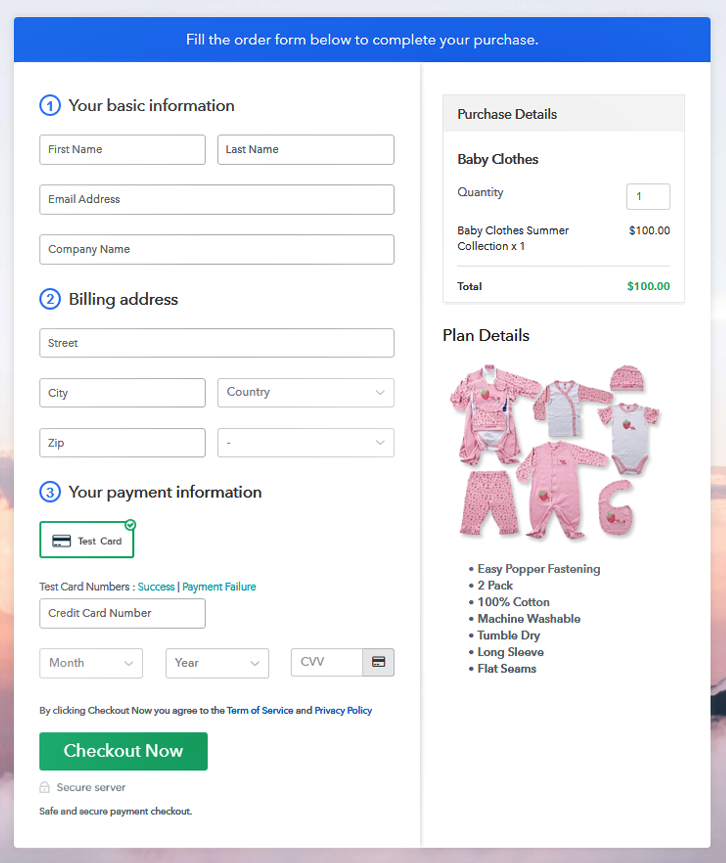
Checkout to Sell Baby Clothes Online

Preview Checkout Page

Step 1: Log in to Pabbly Subscription Billing

Signup

Search in Google for Pabbly Subscription Billing and on their website click on the button “Sign up Free“. Here simply sign in through your, Gmail account or you can fill in the blanks like name, email address and then press the “Sign Up” button.

Sign Up For Free!

Step 2: Select Subscription Billing

Access Subscription Billing

Now that you have entered into the dashboard, click on the “Access Now” button on the Subscription Billing option.

Step 3: Account Setup

Setup Account

Here in this dialog box, you will have to fill the company details like name, currency, and phone number. After filing in the details press the “Continue” button to complete the process.

Step 4: Connect Payment Gateways To Sell Baby Clothes Online

Connect Payment Gateway

The customers can the payment transactions midday if they are annoyed by the slightest of glitches. So, you need to bring a serene payment environment for them. But, in Pabbly Subscription Billing, you can pre-test the payment experience of a customer using dummy payment gateways. You can do this by clicking on “Enable Test Payment” option

Here, with Pabbly Subscription Billing, you can integrate with a ton of payment gateways like Razorpay, PayPal, Authorize.net, etc. With the help of the articles mentioned below, you can easily integrate with your preferred ones. But I am going ahead, by enabling the test payment option to continue the process.

Step 5: Add Your Product

Add Product

If everything in payment integration went well then, let’s move on to add products. Below “Enable Payments” you will find the section “Add your product” click on it. This will generate a dialog box with a blue button “Add New Product”. Click on it.

This will summon a  pop-up box and you can fill the required product title like baby clothes, then tick on the checkboxes if you want to add product description and custom redirect.

add product as baby clothes

Fill up the details and your product is created.

Note: Here you can add all the products related to the similar category by creating plans for each of them.

Step 6: Add Plans

Now, we are going to create plans for selling baby clothes online, directly from your desktop.

(a) Select Add New Plan

Add Plan

(b) Specify the Plan & Pricing Details

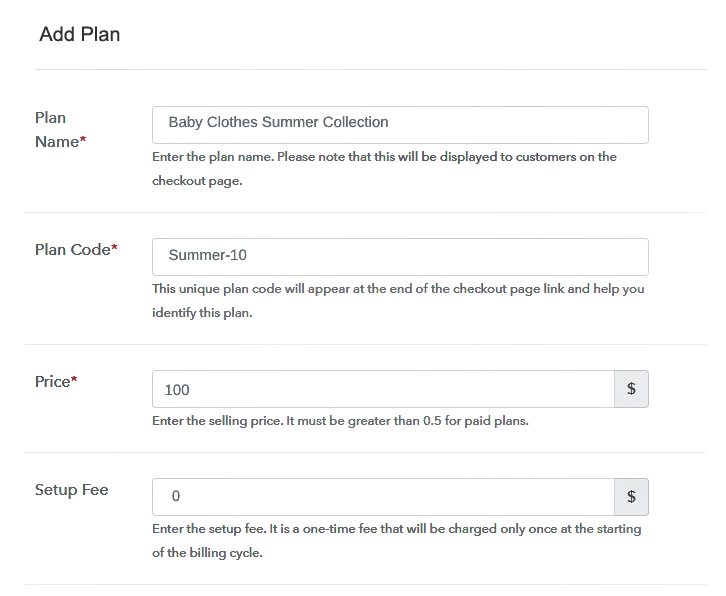
Description for Selling Baby Clothes Online

Later, you will reach the plan page, here you have to fill in details like plan name, code, price, setup fees. Scrolling down to the section below, here you can see the choice to change the billing models like one-time payment, recurring, etc. Here click on the preferred revenue model and yes, you can change it any time.

(c) Add Image & Description

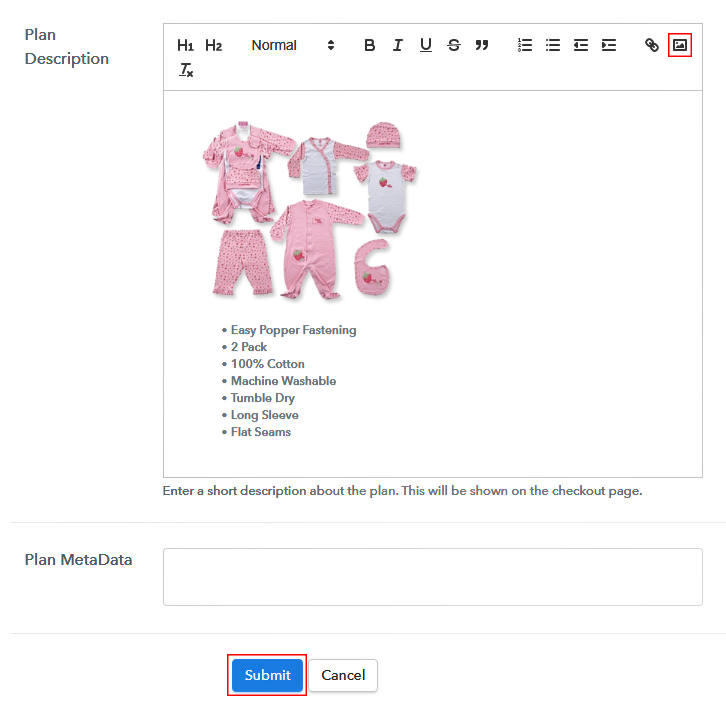
details of baby clothes

Upload the best image possible of the baby clothes

Now after inserting the image, provide comprehensive details of the baby clothes, like seasonal wear, popper zipper or button, the material used etc. After describing the product details press the “Submit” button. Likewise, following the same method,  you can add multiple products, one at a time.

Step 7: Share your Checkout Page

Share Checkout Page on Social Media

  • Now, if you want you can even share the checkout pages on Twitter and Facebook by pressing the respective buttons.
  • Furthermore, add checkout pages in emails and SMS for more brand awareness.
  • Moreover, you can build buttons on your webpage and paste the checkout links on it. Or you can place it on any anchor text on your website, so the users will be redirected to the checkout page.

Step 8: Preview Checkout Page

Follow up these steps to preview checkout page:

(a) Click on the View Button

View Checkout Plan

(b) Take a Look at the Checkout Page

Final Checkout Page to Sell Clothes Online

Step 9: Embed Checkout Page in Site & Sell Baby Clothes Online

Embed Checkout Page on Website

Now,  copy the embed plan link to insert the checkout page on your WordPress website.

(a) Edit the Page & Paste the Copied Link

Paste_Link_in_Text_Editor

Now, when the link is copied, then paste it to the text area of the editor.

(b) Save & Publish the Checkout Page

Save_and_Publish

After pasting the code, now hit the ‘Publish’ button. Your checkout page is embedded.

(c) Check out the Final Look of your Checkout Page on WordPress Site

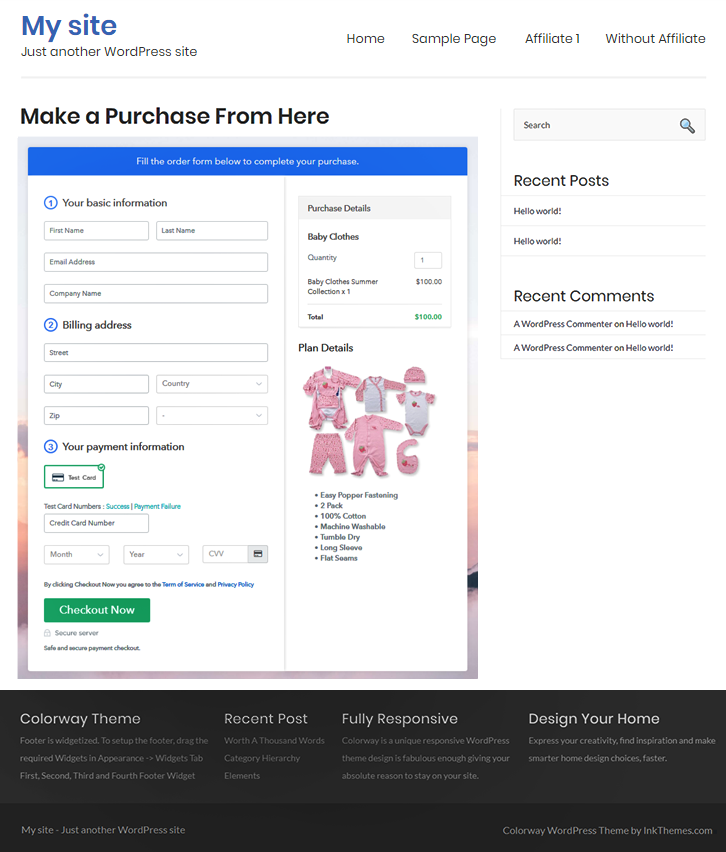
Wordpress site embedding

Step 10: Multiplan Checkout Page

Note: In case you want to sell multiple products via a single checkout page, you can create a multi-plan checkout page otherwise skip this step.

(a) Click on Add Mutiplan Checkout

Multiplan_Checkout

(b) Add Plans to Sell Baby Clothes Online from Single Checkout Page

Multiplan for selling baby clothes online

(c) Take a Look at the Checkout Page

checkout to start selling baby clothes online

Preview Checkout Page

Wrapping Up

Since this century will be dominated by the internet, you better start selling baby clothes online. Now the cheapest and the easiest way is of course through Pabbly Subscription Billing.

Obviously, you are new to e-commerce and may get little fussy over these steps, so if you have any doubts feel free to connect with us through the comment section. Thanks have a nice day.

You May Also Like To Read –