Ideal For: All masks manufacturers, homemade masks sellers, retail masks owners, masks wholesale vendors, and other merchants can use this method to start selling masks online.

Why Choose this Method for Selling Over any Other Solution?
Unlike any other solution, this method allows you to:
- List and sell your masks for FREE. Absolutely no payment required.
- No commission on sales.
- Collect payment through multiple payment modes from a single checkout page.
- Sell one time or recurring subscriptions of your masks.
- Sell and collect payment in any currency as per your requirement.
- Give discounts on your products by offering special coupon codes.
- Add sales commission agents to help you in selling your masks.
Since the onset of the coronavirus epidemic, it has been difficult to find reusable and protective face masks on a global scale.
In response, many have decided to make face masks and sell from home to help healthcare workers, people who are sick, and caregivers.
Why would you like to sell masks online?
Recently, the Centers for Disease Control and Prevention (CDC) guidelines promote the use of masks when in public. Because masks minimize the spread of germs and can protect us from air pollution. This recommendation comes as a precautionary measure to reduce the risk of respiratory and heart disease, while also protecting people from infection by blocking droplets and bacteria.
To help meet the demand for masks, you can start selling different types of masks online. It is the most searched item on the Internet in the last few months. In addition, selling handmade masks is a unique opportunity for you to set up an online shop.
There is an online tool named Pabbly Subscription Billing that helps you in selling the masks online without any hassle. You can sell unlimited masks without charging any excess commission. With its simple and easy checkout page, you can respond to buyer demand faster than larger companies with more complex production processes.
There are some advanced features of this software that help you sell online masks by generating unlimited profits without any restrictions:
- Create unlimited products, and plans for different types of masks like N95, surgical, and cloth.
- Keep records for all your items in stock
- Sell masks and get unlimited revenues from different billing models like one-time, recurring, etc
- Apply coupons, discounts & taxes
And so on…
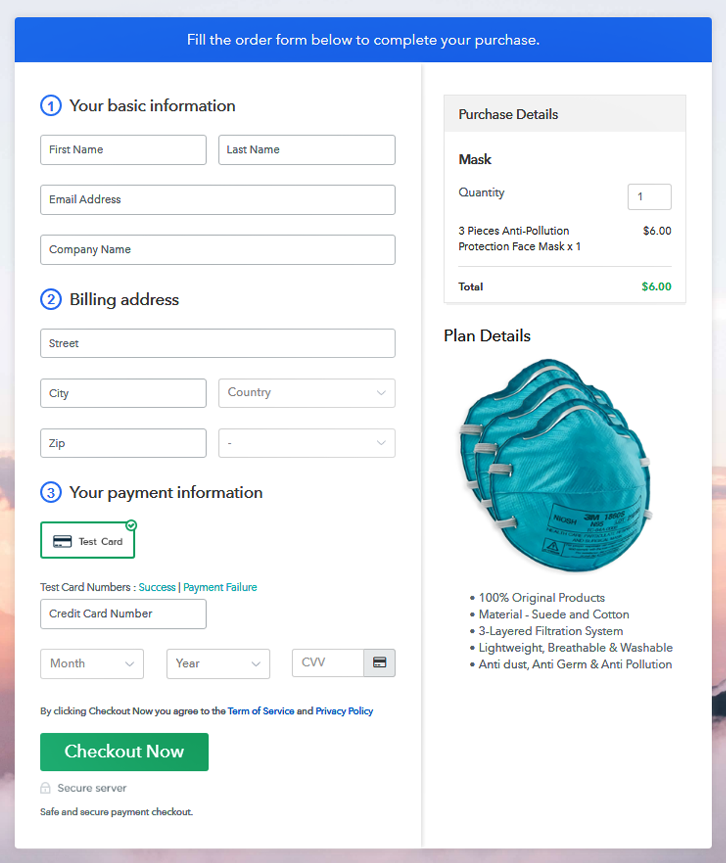
This is How your Checkout Page will Look Like After Creation

Step 1: Login to Pabbly Subscription Billing
Firstly, visit the Pabbly Subscription Billing website to create the checkout page and Sign Up to the software with your Gmail or manually filled out the sign-up form.

Step 2: Select Subscription Billing

Step 3: Account Setup
As soon as you enter the login details a Pabbly Subscription Dashboard will open on the screen. Now select the Subscription Billing and click on the “Access Now” button.
The popup will open on the screen which asks you for basic information like company name, currency, and phone number. Just fill out asked details for continuing the setup.

Step 4: Connect Payment Gateway to Sell Masks Online

After setting up the account, you will need to connect the payment gateway. Pabbly Subscription Billing provides the trial payment mode for beginners to learn the payment procedures. You can enable the test payment mode by clicking the button “Enable test payment” for checking the application working. Besides, there are multiple payment gateway options available along with their integration guides mention below like PayPal, Stripe, Razorpay, Authorize.net, and many more.
- PayPal integration guide
- Stripe integration guide
- Razorpay integration guide
- Authorize.net integration guide
Step 5: Add Your Product
Now specify the product name with details by clicking on the “Add New Product” option. Apart from this, you can also add various types of items to the same product category by creating different plans.
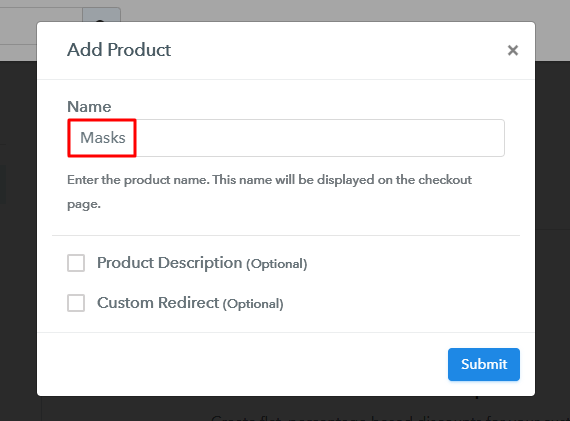
After filling all the details, click on the submit button, and your product is created.
Note: Here you can add all the products related to the similar category by creating plans for each of them.
Step 6: Add Plans
Now, let’s create various plans for all types of masks that you want to sell in your online store.
(a) Select Add New Plan

(b) Specify the Plan & Pricing Details
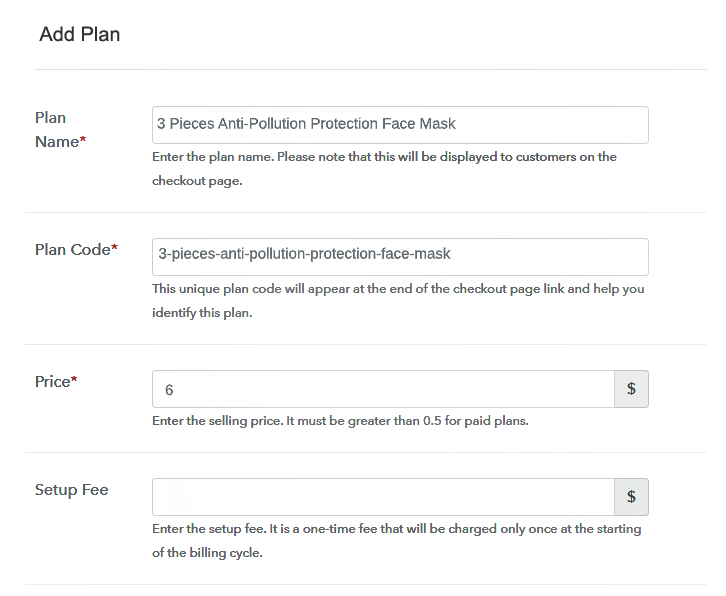
Therein, you can specify the plan details like plan name, plan code, price, setup fee, and many more for selling masks online.
(c) Add Image & Description
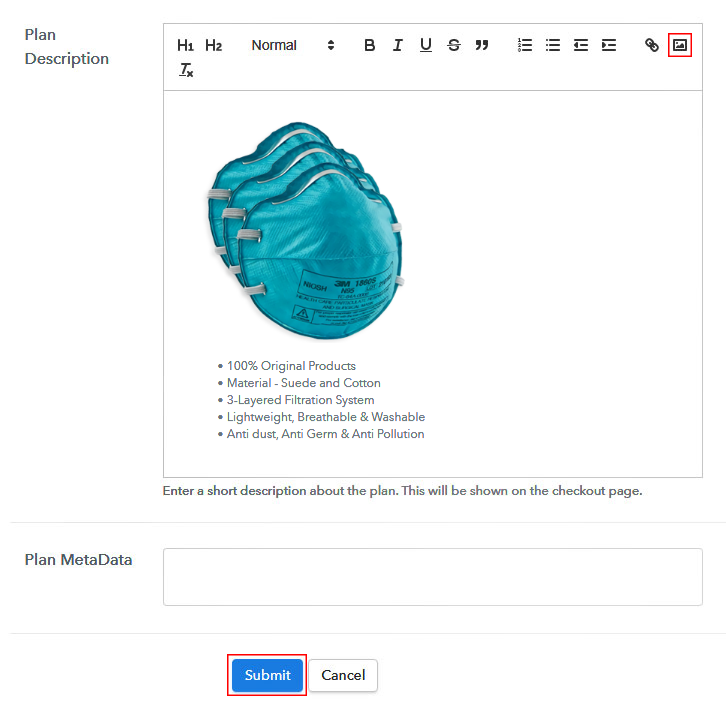
Following the previous step, you can also write a brief description of your product with an image in the “Plan Description” field. Furthermore, you can also customize the text in different formats, add links, etc., as you’d like to display on the checkout page.
Hit on the “Submit” button once you are done with the changes and your checkout page is ready to sell masks online.
Step 7: Share your Checkout Page

When you click on the submit button a pop-up window will encounter on your screen with sharing options like:
- Firstly, you can copy the checkout page URL and share it with your audience via social media platforms, SMS, emails etc. to sell masks online.
- Second, you can share the checkout page directly on Facebook and Twitter to increase user engagement.
- Apart from this, using this link, you can add the checkout page on your website’s button links & anchor text source.
Step 8: Preview Checkout Page
Instantly, you can preview your checkout page by clicking on the “View” button.
(a) Click on the View Button

(b) Take a Look at the Checkout Page
Step 9: Embed Checkout Page in Site & Sell Masks Online

Using the embed plan link, you can add the checkout page on your WordPress by copying the checkout page link.
(a) Edit the Page & Paste the Copied Link

Momentarily, paste the copied link on your WordPress post or page text editor.
(b) Save & Publish the Checkout Page

After pasting the code click on the ‘Publish’ button and your checkout page will get embedded on the website.
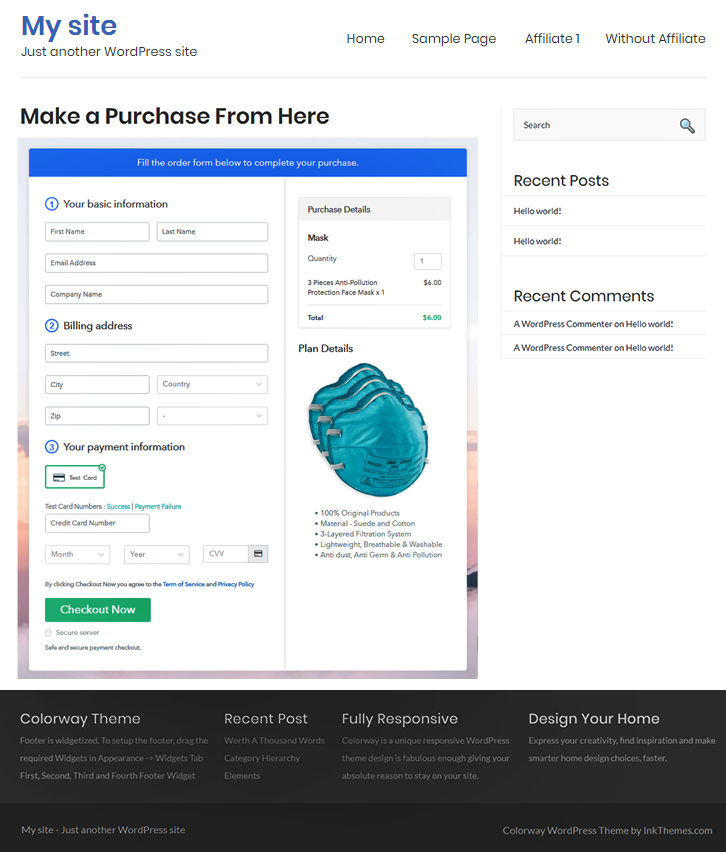
(c) Check out the Final Look of your Checkout Page on WordPress Site
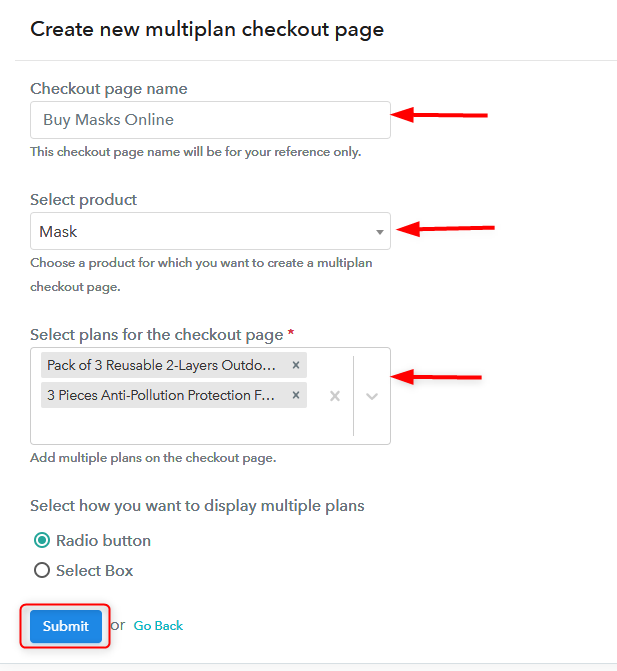
Step 10: Multiplan Checkout Page
Note: In case you want to sell multiple products via a single checkout page, you can create a multi-plan checkout page otherwise skip this step.
(a) Click on Add Mutiplan Checkout

(b) Add Plans to Sell Multiple Masks
from Single Checkout Page
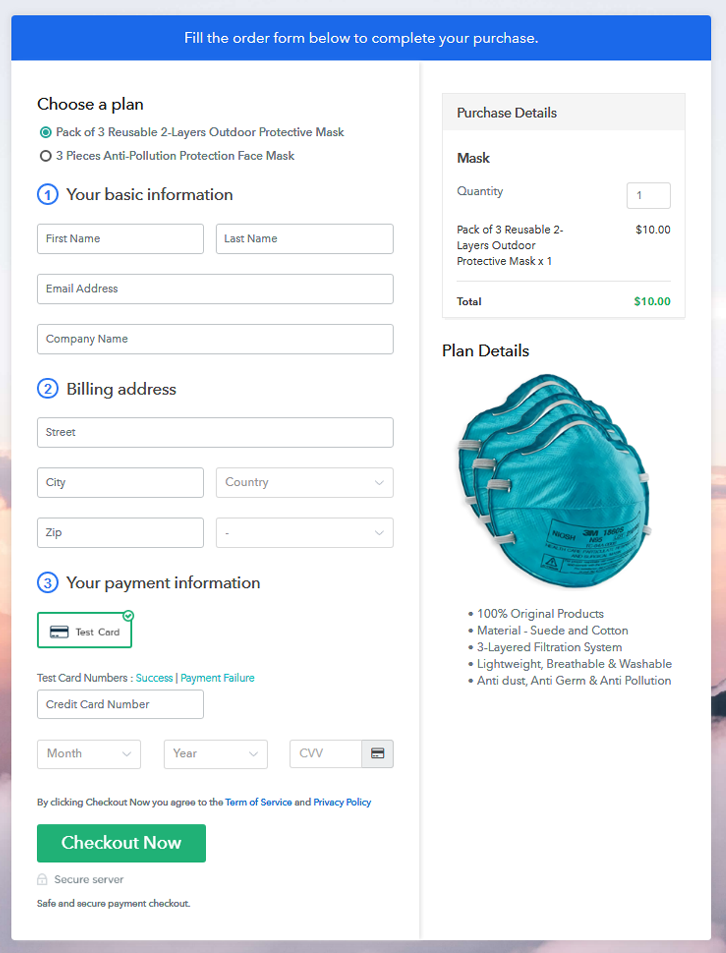
(c) Take a Look at the Checkout Page
Wrapping Up
Now more than ever, the world needs productive small business owners like you. But if you are not sure from where or how to start the business then this article might help you. Masks are the best protection against the spread of germs, so sell masks and engage your customers for your business. Here, we recommend the easiest way to start your business via the checkout page. Just follow these simplest 10 steps to create your own checkout page for starting your masks business online.


