Ideal For: All the plant sellers, plant gardeners, retail plant selling business owners, and other plant merchants can use this method to take their plants selling business online.
Why Choose this Method for Selling Over any Other Solution?
Unlike any other solution, this method allows you to:
- List and sell your plants for FREE. Absolutely no payment required.
- No commission on sales.
- Collect payment through multiple payment modes from a single checkout page.
- Sell one time or recurring subscriptions of your plants.
- Sell and collect payment in any currency as per your requirement.
- Give discounts on your products by offering special coupon codes.
- Add sales commission agents to help you in selling plants online.
Plants bring us closer to nature. Nature lovers use to search for indoor and outdoor plants online. And you must be here finding a smart way to sell plants online.
Why would you like to sell plants online?
There could be many reasons possible for selling plants online or maybe you are finding just another platform to kick start plants business online.
Speaking of selling plants on an online platform, what scares most is the management from keeping details of all items to collecting payments.
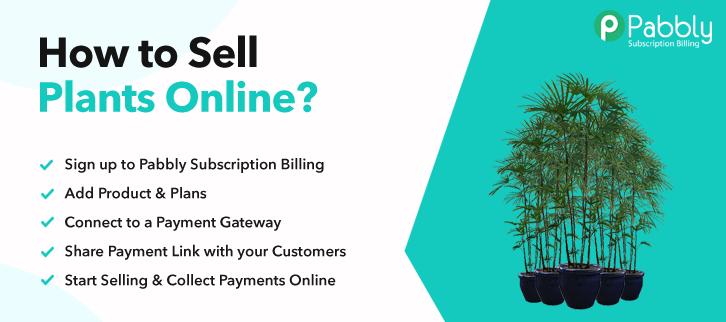
Well, you can follow these 10 simplest steps and Pabbly Subscription Billing will take care of the rest.
- It will keep a record of all the plants to sell
- Display plants beautifully in checkout pages
- Accept online as well as offline payments
- Apply taxes, discounts and coupons
- Automatic invoicing over emails
And much more…
All you need to do is create single/multi-plan checkout pages with no coding just a few clicks.
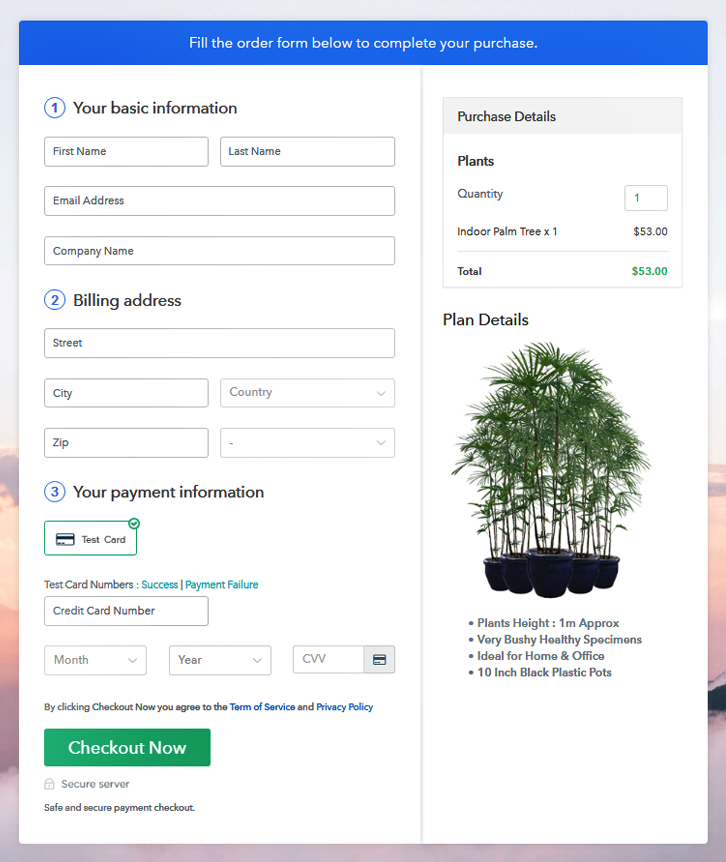
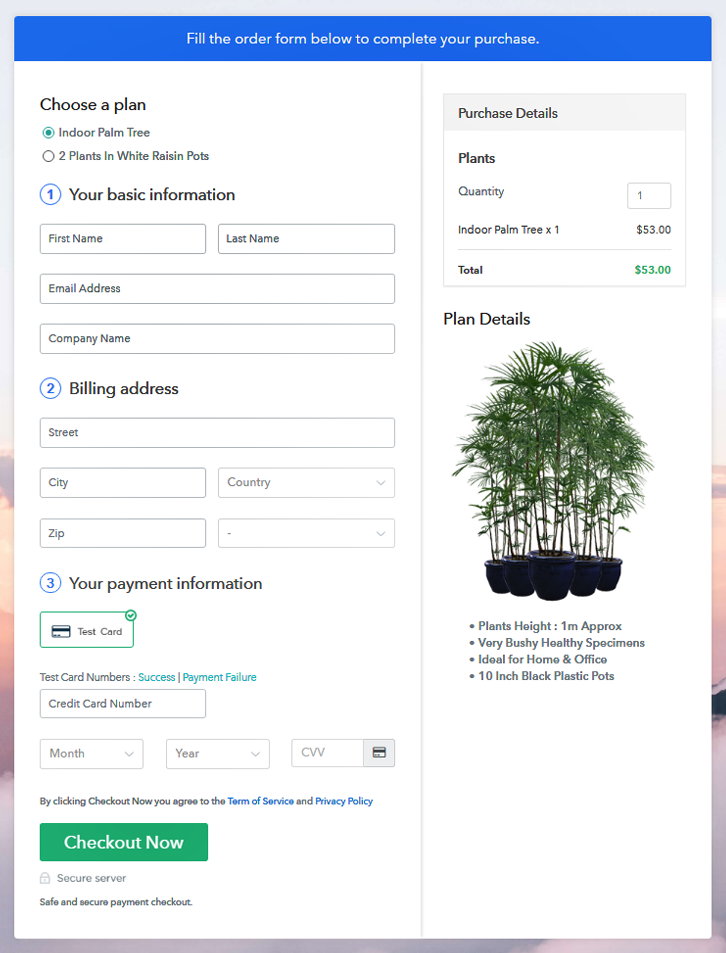
This is How your Checkout Page will Look Like After Creation
Step 1: Login to Pabbly Subscription Billing

Visit the Pabbly Subscription Billing website & look for the button named “Sign Up Free”. Click on the button and this will land you on the sign-in & sign-up page. Either directly sign-in with Google or Sign-up manually after filling the details asked in the sign-up form.
Step 2: Select Subscription Billing

Step 3: Account Setup

After successfully logging into the system, a dialogue box will pop open. Quickly fill out the details asked such as the company name, currency & a phone number. And click on the “Continue” button to proceed forward.
Step 4: Connect Payment Gateway to Sell Plants Online

The very next important step is to add the payment gateway. There are multiple options for it. I’m using the text payment method here, but for payments and transaction to carry out you can choose from the options available. Also, links to the integration guides are as follows.
Step 5: Add Your Product

Adding the product the right step to successfully integrating the payment gateway. Now, click on the “Add New Product” button to add a category of the plants. As after this, we’ll be adding the plants under there product as plans.
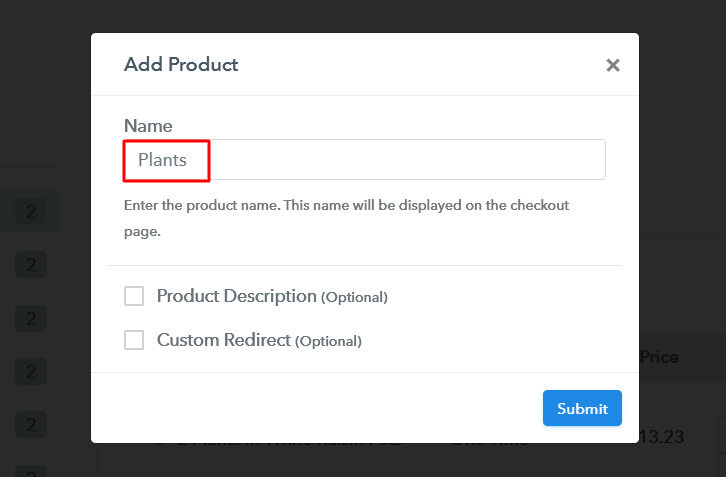
After creating a product based on a category, hit the “Submit” button on the bottom right corner. Here to mention, you can create as many products as you like to.
Note: Here you can add all the products related to the similar category by creating plans for each of them.
Step 6: Add Plans
Now, next is adding plants to sell as plans. Click on the “Add New Plan” button & fill out the details about the plants that you want to show on the checkout page.
(a) Select Add New Plan

(b) Specify the Plan & Pricing Details
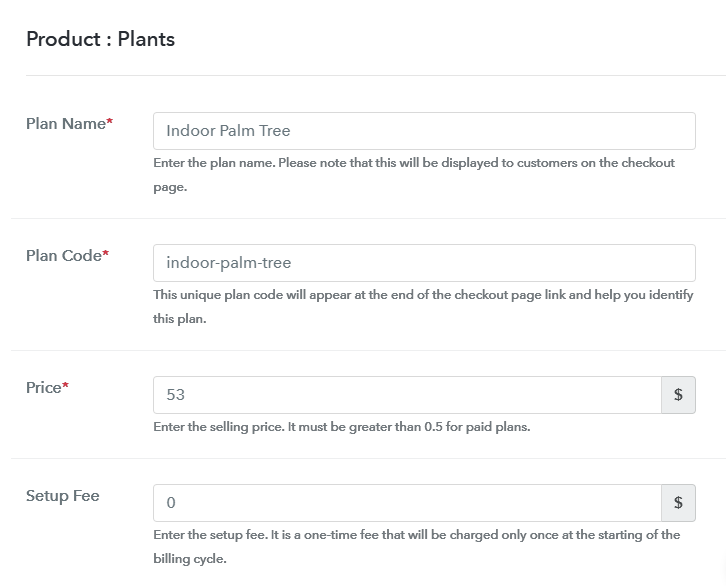
After clicking on the “Add a Plan” button. You’ll be asked to fill out the details as plan name, code, price etc to sell plants online.
(c) Add Image & Description
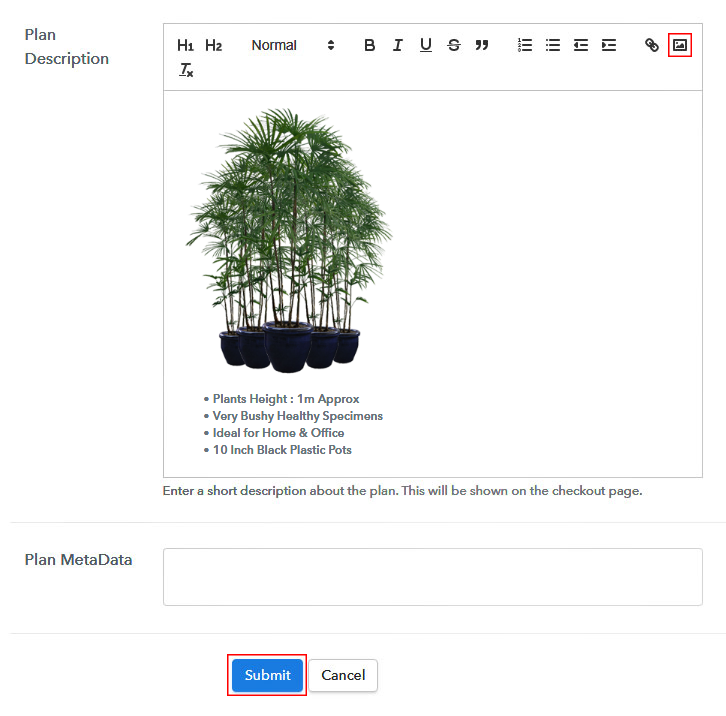
In the same process, you will encounter a field named “Add Description”. Here you can use image & text to display on the checkout page to sell plants online.
Further, there are multiple text formatting options available to format the text. Such as lists, quotes, links, headings etc.
Strike the “Submit” button once you are done and an item will be added for selling plants online.
You’ll need to follow this step every time you want to append a plan in the list.
Step 7: Share your Checkout Page

After every successful plan creation, a window will pop up as shown above. This window contains a plan link & a code to share the created checkout page over different platforms.
- First, you can copy the checkout page URL given under “Plan Link” window & share it on social media platforms, SMS, emails etc. to sell plants online.
- Second, you can use this same checkout page URL in your website’s button links & text anchors.
- Also, two direct Facebook & Twitter sharing buttons are there to share the created checkout page directly onto these platforms.
Step 8: Preview Checkout Page
Follow these steps to preview a checkout page:
(a) Click on the View Button

(b) Take a Look at the Checkout Page
Step 9: Embed Checkout Page in Site & Sell Plants Online

For embedding the created checkout page on WordPress, copy the code given in the “Embed Plan Link” window.
(a) Edit the Page & Paste the Copied Link

And then paste the copied code in the text area of your post/page.
(b) Save & Publish the Checkout Page

Publish the page/post and the checkout page will get embedded on your website. You can visit this page by going onto its parmalink.
(c) Check out the Final Look of your Checkout Page on WordPress Site

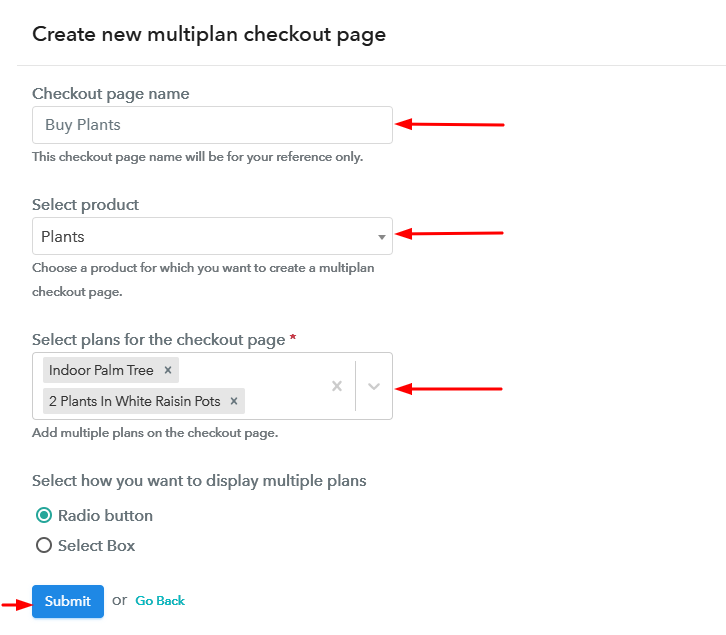
Step 10: Multiplan Checkout Page
Note: In case you want to sell multiple products via a single checkout page, you create a multi-plan checkout page otherwise skip this step.
(a) Click on Add Mutiplan Checkout

(b) Add Plans to Sell Multiple Plants Products from Single Checkout Page
(c) Take a Look at the Checkout Page:
Wrapping Up
These were the 10 simplest steps to start plants business online. And even a non-techy person could use them to sell plants online. Also, if you are not having a website then also you can use this method for selling plants online.
There are multiple options available for integration such as PayPal, Stripe, Authorize.Net, Razorpay etc.
Good Luck with your plant business!


