How to Sell Sofa Online | Step by Step (Free Method)

How to Sell Sofa Online

Ideal For: All the furniture stores, home decor stores, wholesale furniture suppliers, furniture manufacturers, and other merchants can use this method to take their sofa selling business online.
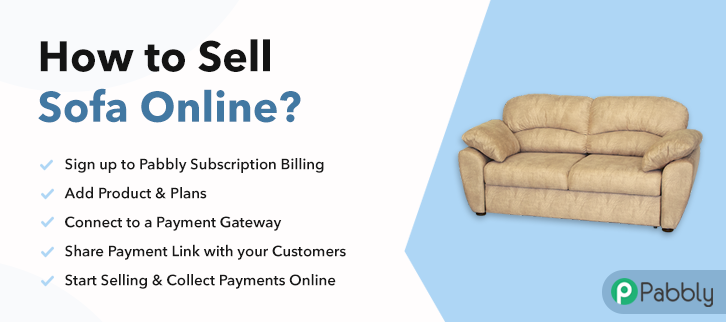
How to Sell Sofa Online

Why Choose this Method for Selling Over any Other Solution?

Unlike any other solution, this method allows you to:

  • List and sell sofa for FREE. Absolutely no payment required.
  • No commission on sales.
  • Collect payment through multiple payment modes from a single checkout page.
  • Sell one time or recurring subscriptions of the sofa.
  • Sell and collect payment in any currency as per your requirement.
  • Give discounts on your products by offering special coupon codes.
  • Add sales commission agents to help you in selling the sofa.

Get Pabbly Subscription Billing for Free

Let’s face it, everybody is crazy about the new and in-trend furniture for their homes and offices and if you sell new and modern sofa then how about taking your business to the next level to earn more profit. Every business is already online and if you are not then obviously you are way behind than your competitors. Therefore, now its high time to take your sofa selling business online.

Why would you like to sell sofa online?

Because who doesn’t like to earn extra money! Everybody does. You can easily increase your revenue by taking your sofa selling business online and expanding your customer reach, as from the comfort of their homes the users can finalize & buy the sofas they want to. Making the process smoother and reaching out to customers globally. You just have to create checkout pages for your sofas and share their links on social media, so that people can easily buy your product through them. To start your sofa selling business online, we have brought a fantastic and free service for you which is Pabbly Subscription Billing. You can start your online sofa selling business with zero investment on Pabbly Subscription Billing.

Not only you can create checkout pages but you can also access other amazing features for your business:

  • Add and sell unlimited sofas
  • Zero transaction fees
  • Collect one-time or recurring payments of your sofas
  • Integrate with your website

This is How your Checkout Page will Look Like After Creation
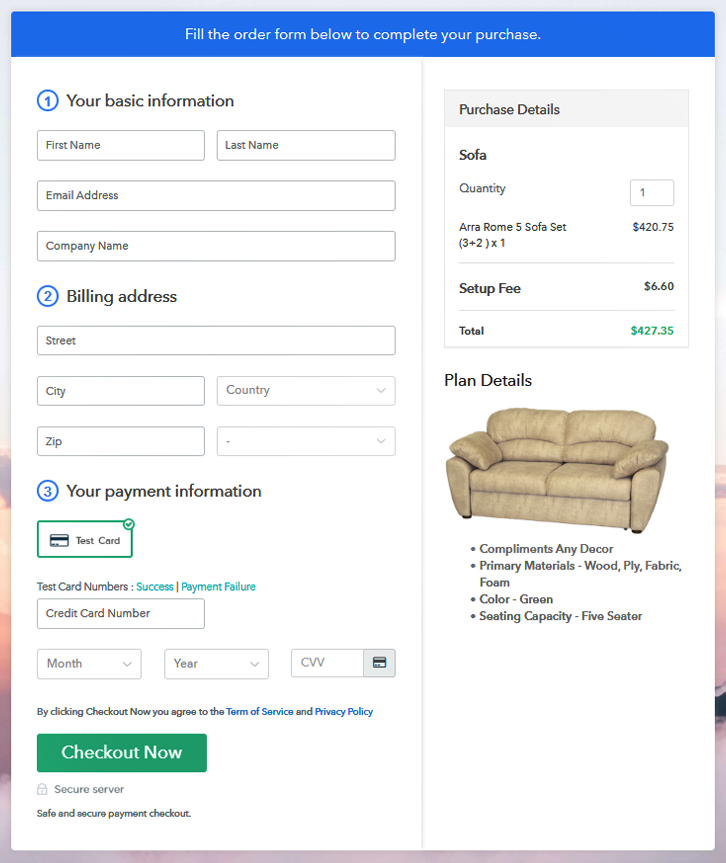
Preview Checkout Page

Preview Checkout Page

Step 1: Log in to Pabbly Subscription Billing

Signup

Let’s start with visiting Pabbly Subscription Billing website and then click on the “Sign Up Free” button. After clicking the button, you will reach to the signup page, where you can create your account within a few seconds with your Gmail or manually enter your details.

Sign Up For Free!

Step 2: Select Subscription Billing

Access Subscription Billing

Step 3: Account Setup

Setup Account

After you have completed the signup process, now fill up your company details i.e. company name, select currency, and contact number in the shown dialogue box.

Step 4: Connect Payment Gateway to Sell Sofa Online

Connect Payment Gateway

In step number four, the payment collection process is described by enabling the ‘Test Payment’ mode. Further, you can connect with other payment gateways that you prefer. The complete integration guide for payment gateways is provided below.

Step 5: Add Your Product

Add Product

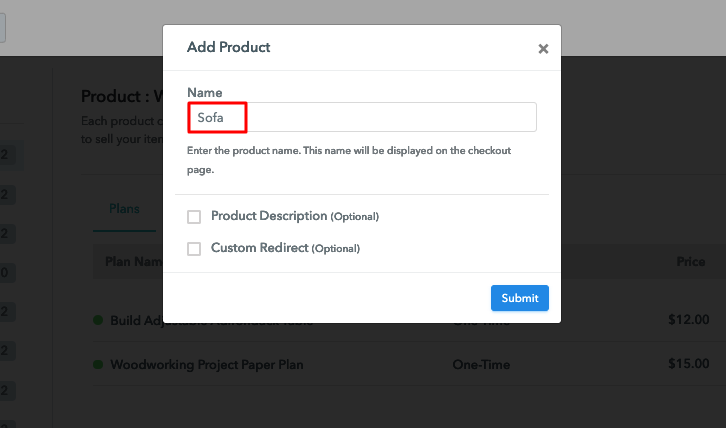
Moving on to this step, now you have to add your first product. You can add sofa of different categories for example armchairs, modular sofa, etc, and add all other types of sofas in the same product by creating different plans.

Add Product Name to Sell Sofa Online

Fill all this information to add your product.

Note: Here you can add all the products related to the similar category by creating plans for each of them.

Step 6: Add Plans

Let’s get started and create plans for different categories of sofa that you want to sell

(a) Select Add New Plan

Add Plan

(b) Specify the Plan and Pricing Details
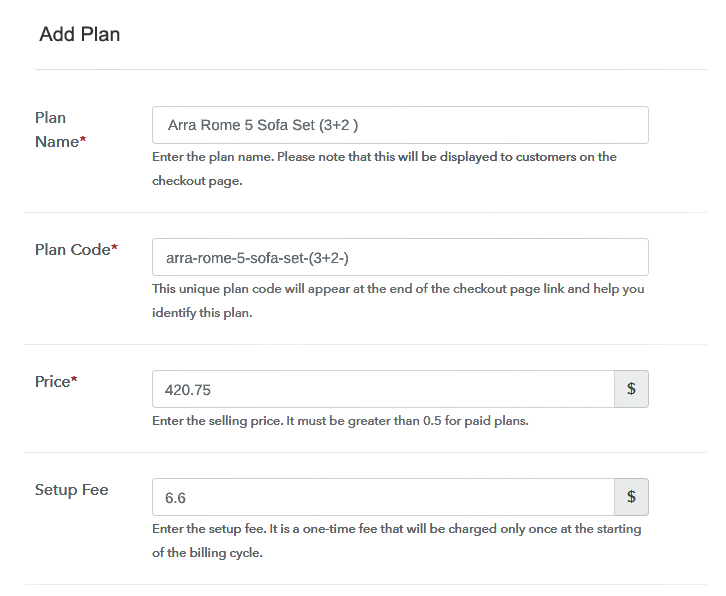
Add Details to Sell Sofa Online

Once you click “Add New Plan” button, you will land on the plan page, here you will have to fill the plan details such as plan name, code, billing cycle, price, etc.

(c) Add Image & Description

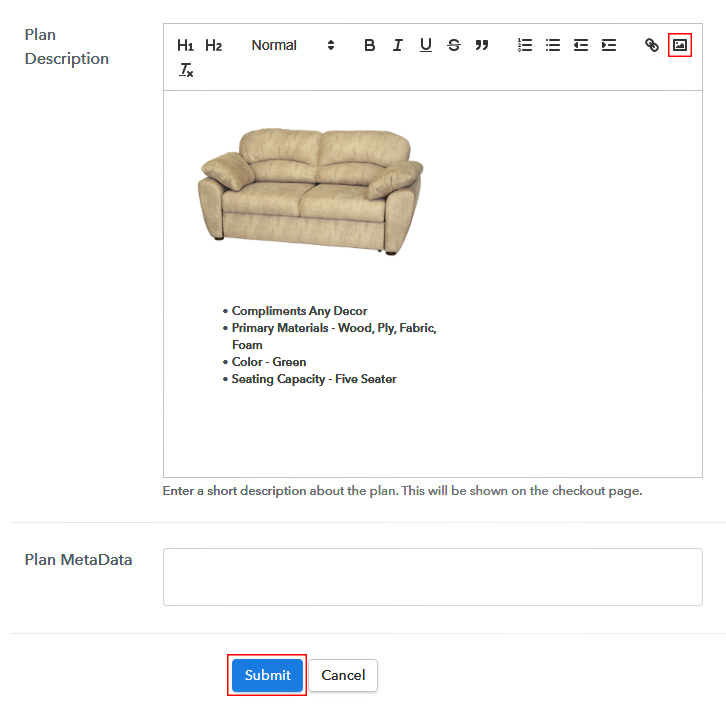
Add Image to Sell Sofa Online

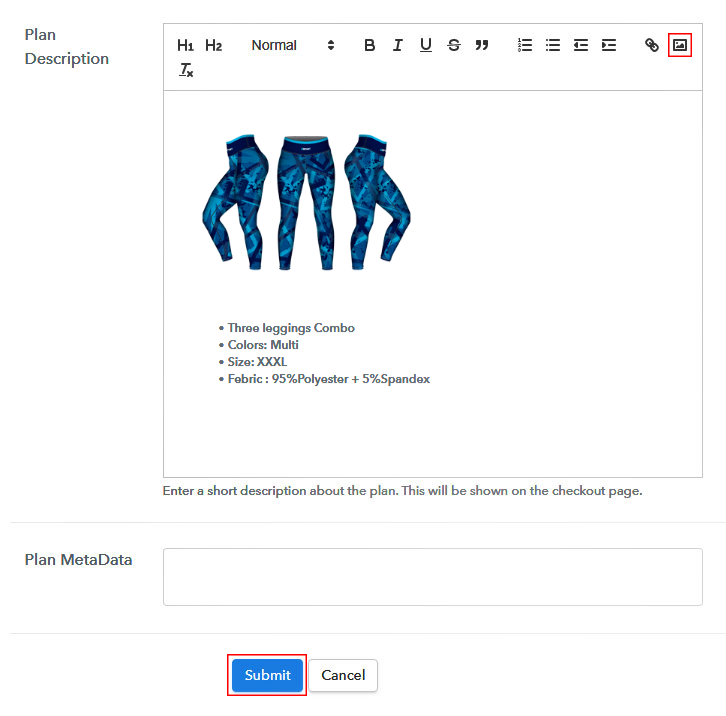
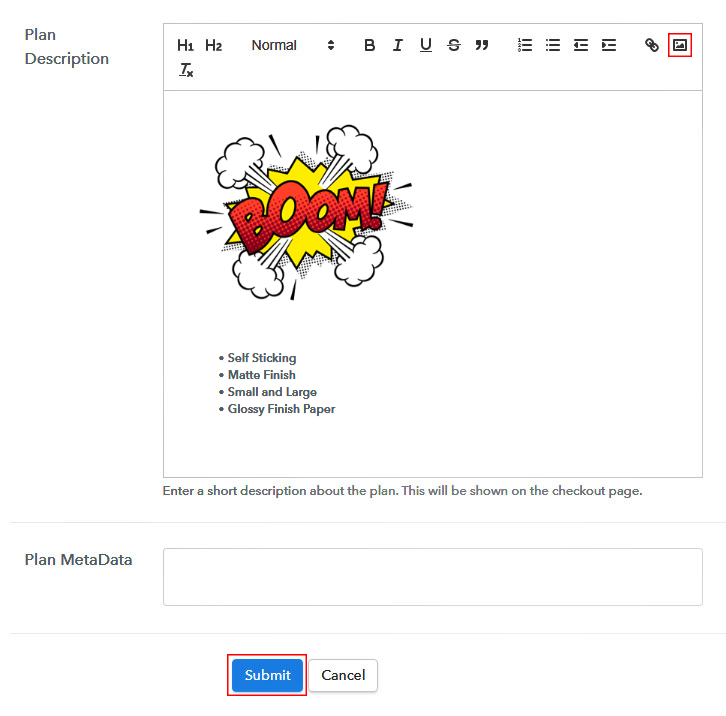
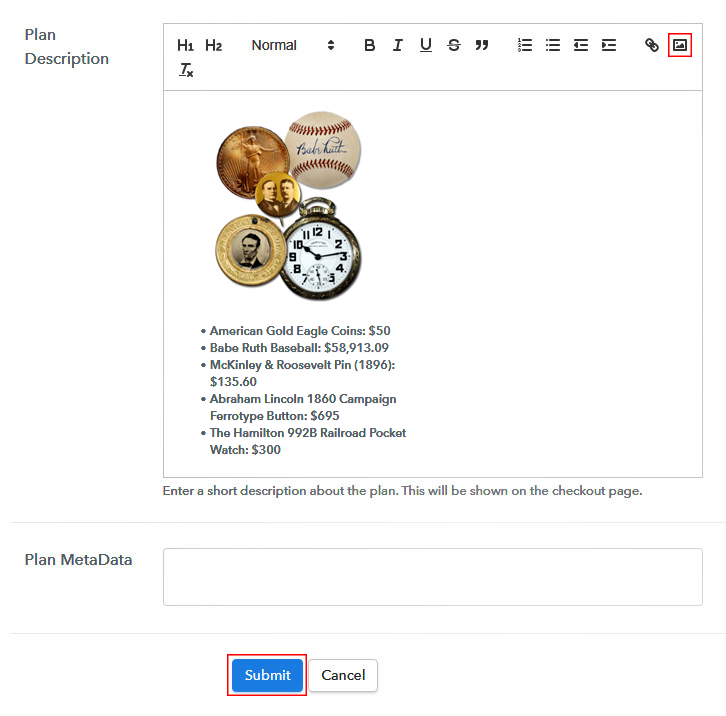
Furthermore, write a description of the sofa that you want to sell along with the product links, images, etc, and click on the submit button to add your plan.
You can create more plans for all the sofas similarly.

Step 7: Share Your Checkout Page

Share Checkout Page on Social Media

  • To increase your sales share your checkout page on social media like Facebook and Twitter.
  • Also, copy the mentioned link and send it to your customers through SMS or emails directly.
  • Embed your plan link to your website so that your customers can be landed on the checkout page directly.

Step 8: Preview Checkout Page

To view checkout page, you have to follow these steps

(a) Click on the View Button

View Checkout Plan

(b) Take a Look at the Checkout Page

Preview Checkout Page

Step 9: Embed Checkout Page in Site & Sell Sofa Online

Embed Checkout Page on Website

Just copy the provided plan embedding link and embed the checkout page to your WordPress site.

(a) Edit the Page & Paste the Copied Link

Paste Link in Text Editor

Copy and paste the link in the text area of the editor

(b) Save & Publish the Checkout Page

Save and Publish

After the code is pasted, click on the publish button to embed your checkout page.

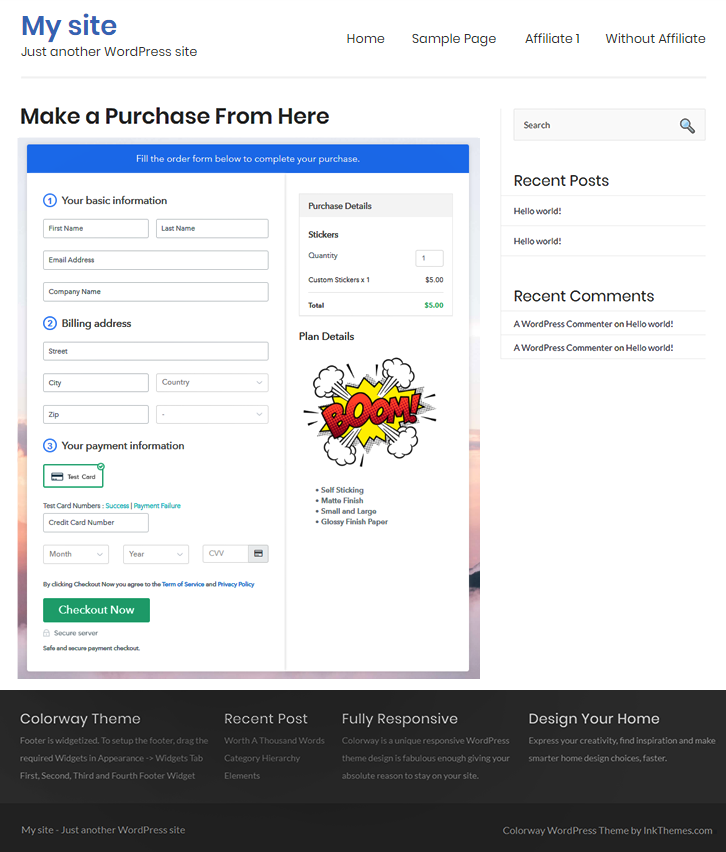
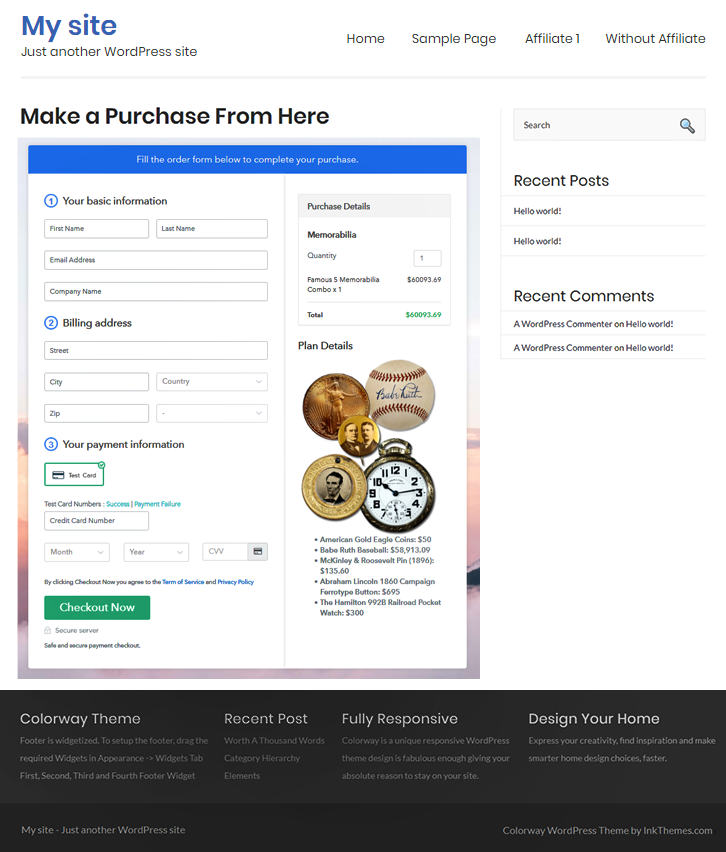
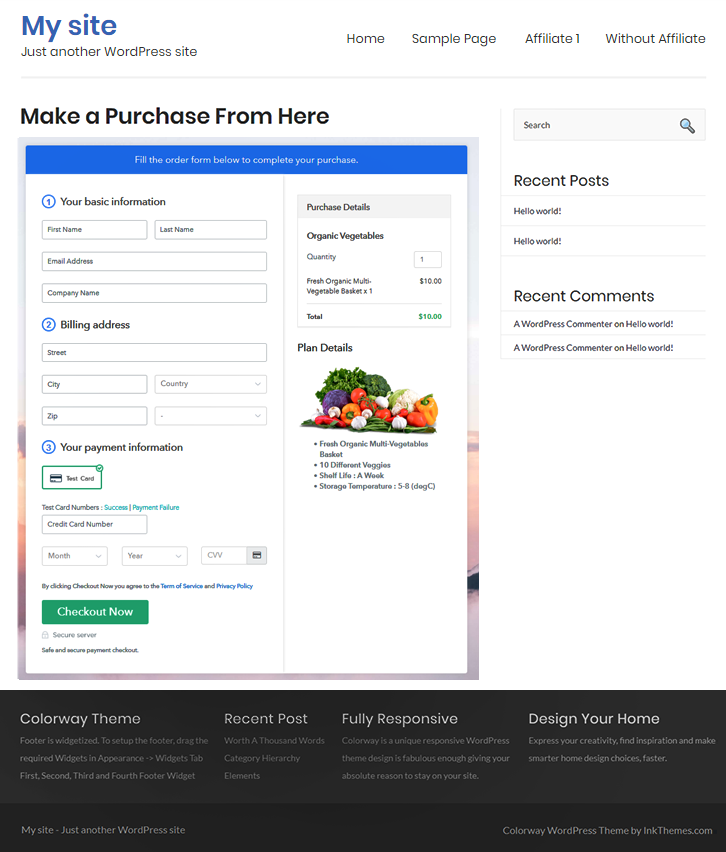
(c) Check Out the Final Look of your Checkout Page on WordPress Site
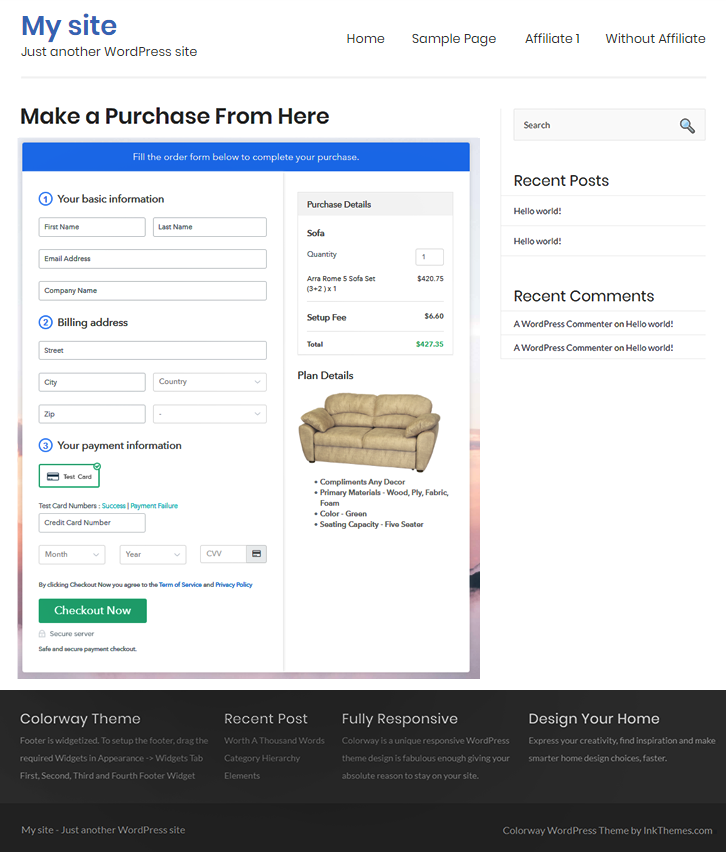
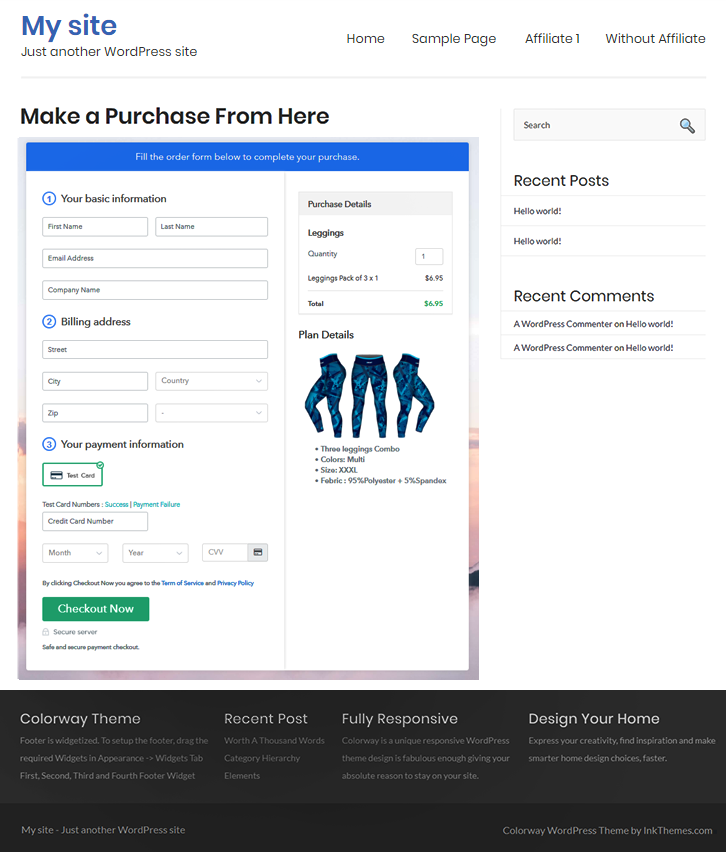
Add Checkout to Sell Sofa Online

Step 10: Multiplan Checkout Page

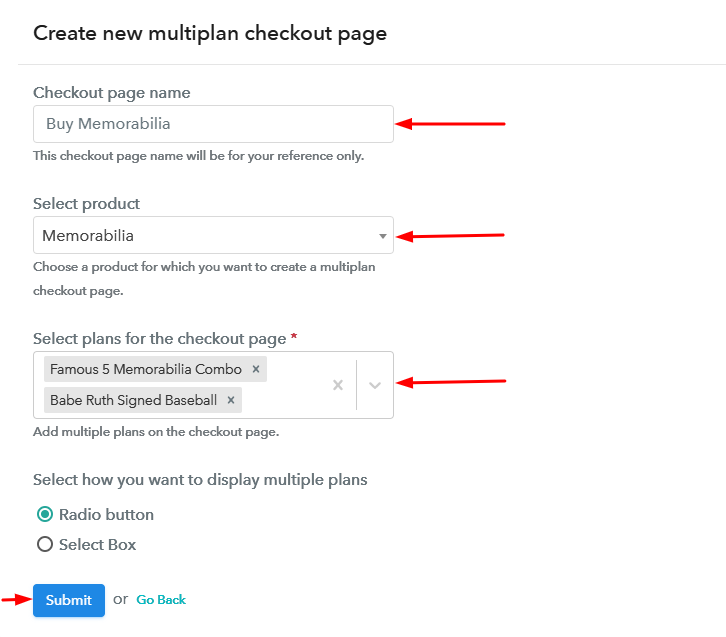
Note: In case you want to sell multiple products through a single checkout page, create a multi-plan checkout plan, otherwise skip this step.

(a) Click on Add Multiplan Checkout

Multiplan Checkout

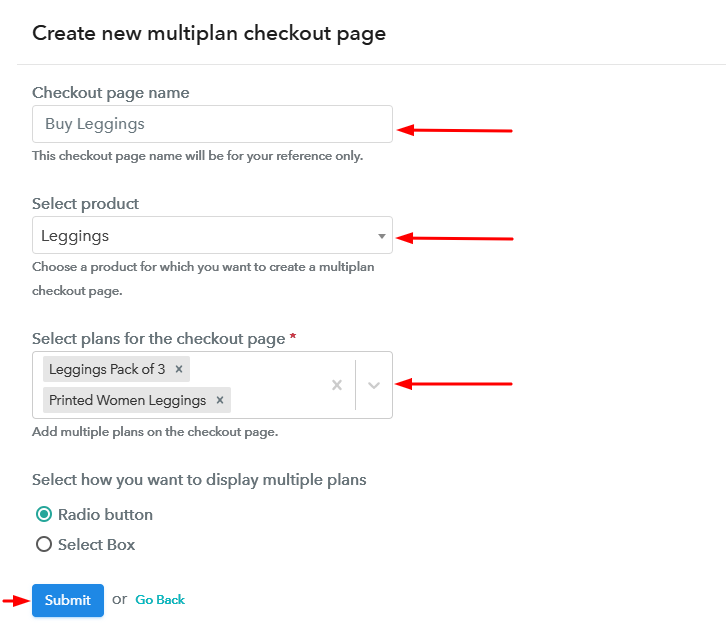
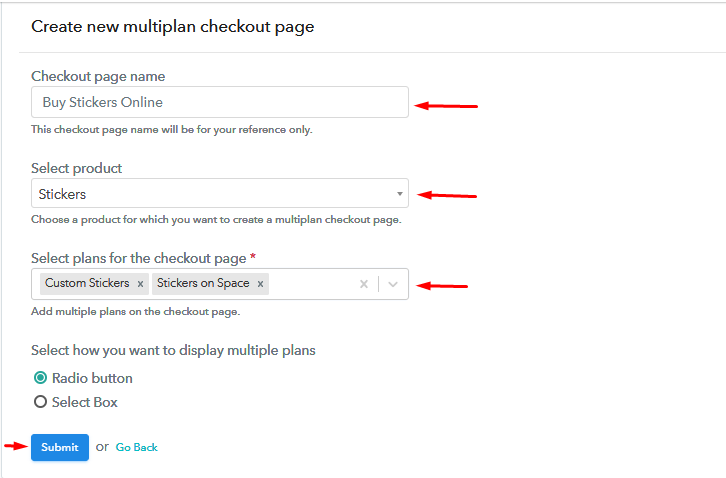
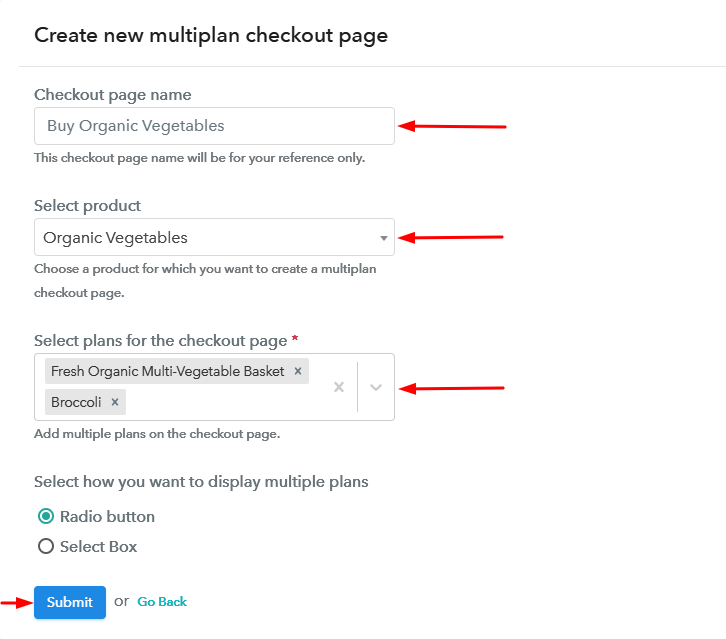
(b) Add Plans to Sell Multiple Sofa from Single Checkout Page
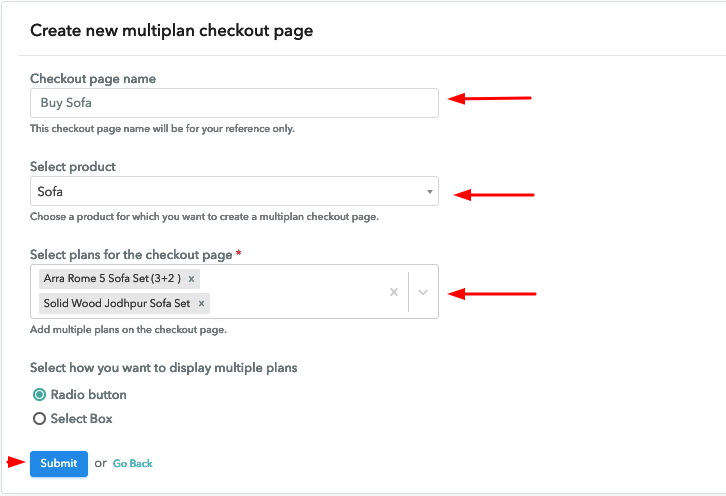
Multiplan Details to Sell Sofa Online

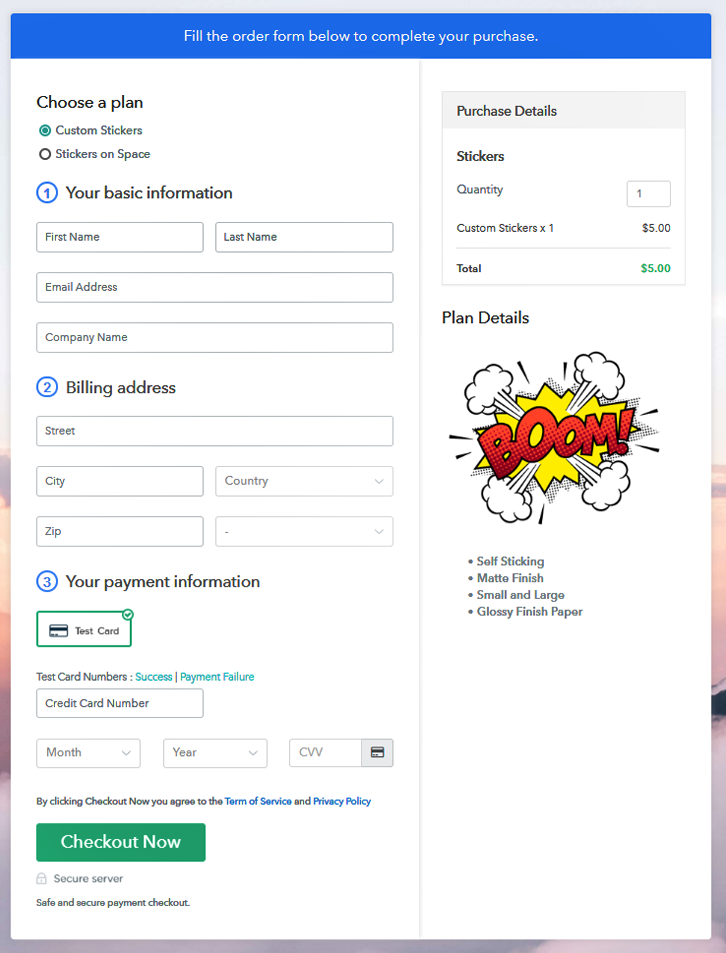
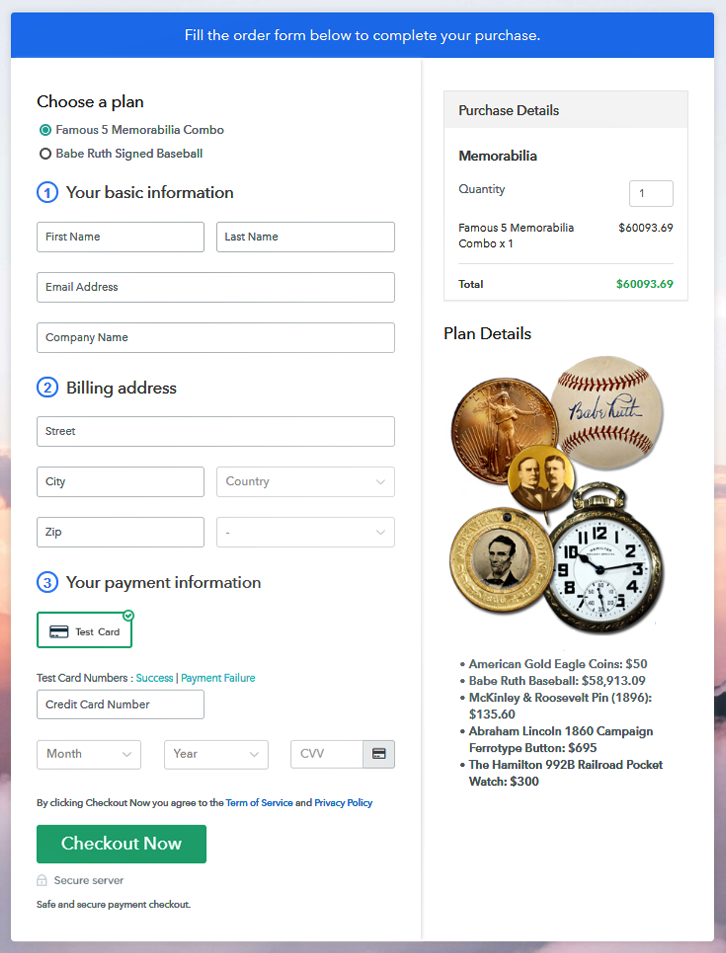
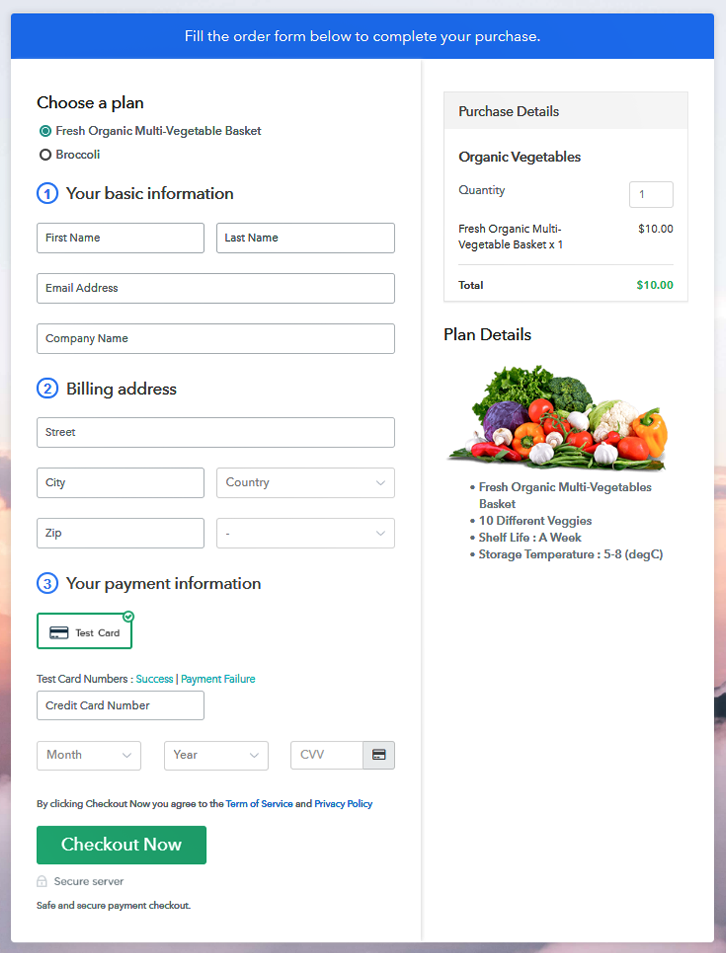
(c) Take a Look at the Checkout Page
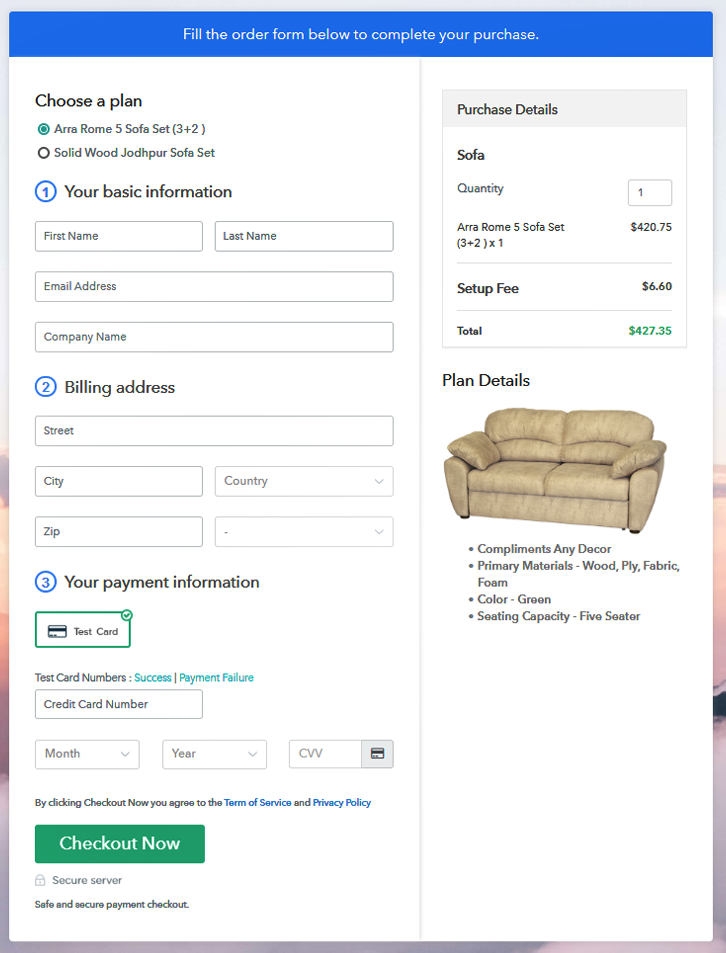
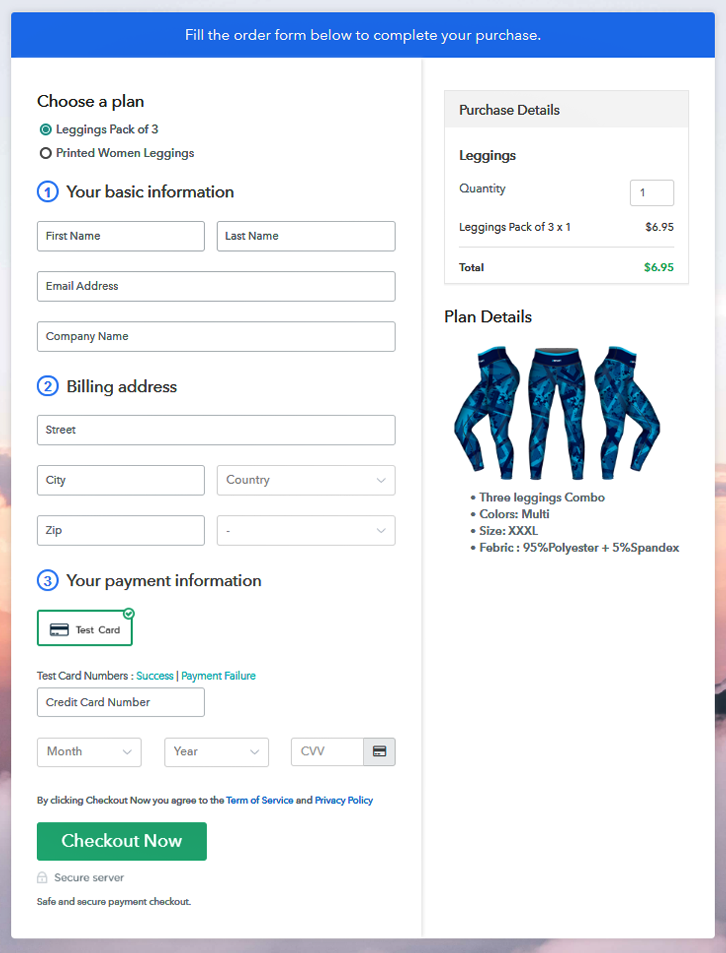
Multiplan Checkout Plan to Sell Sofa Online

Preview Checkout Page

Wrapping Up

At the completion, we hope that this blog was helpful for you making your decisions for your online business. With Pabbly Subscription Billing you can do so much and that too for free, like collect payments, share invoices, sell unlimited sofa and the list goes on. Therefore, get up, register now, and start selling. For further queries or suggestions, please contact us.

You May Also Like To Read –
How to Sell Spices Online | Step by Step (Free Method)

How to Sell Spices Online

Ideal For: All the spice stores, grocery stores, general stores, spice companies, wholesale spice suppliers, and other sellers with homemade spices can use this method to take their spices selling business online.

How to Sell Spices Online

Why Choose this Method for Selling Over any Other Solution?

Unlike any other solution, this method allows you to:

  • List and sell spices for FREE. Absolutely no payment required.
  • No commission on sales.
  • Collect payment through multiple payment modes from a single checkout page.
  • Sell one time or recurring subscriptions of spices.
  • Sell and collect payment in any currency as per your requirement.
  • Give discounts on your products by offering special coupon codes.
  • Add sales commission agents to help you in selling spices.

Get Pabbly Subscription Billing for Free

Spices are highly in-demand, as they add flavors and aroma to your recipes. People from all over the globe are very much interested to try different types of spices from different countries to enhance their recipes and if you sell authentic spices then without thinking twice you should take your business online.

Why would you like to sell spices online?

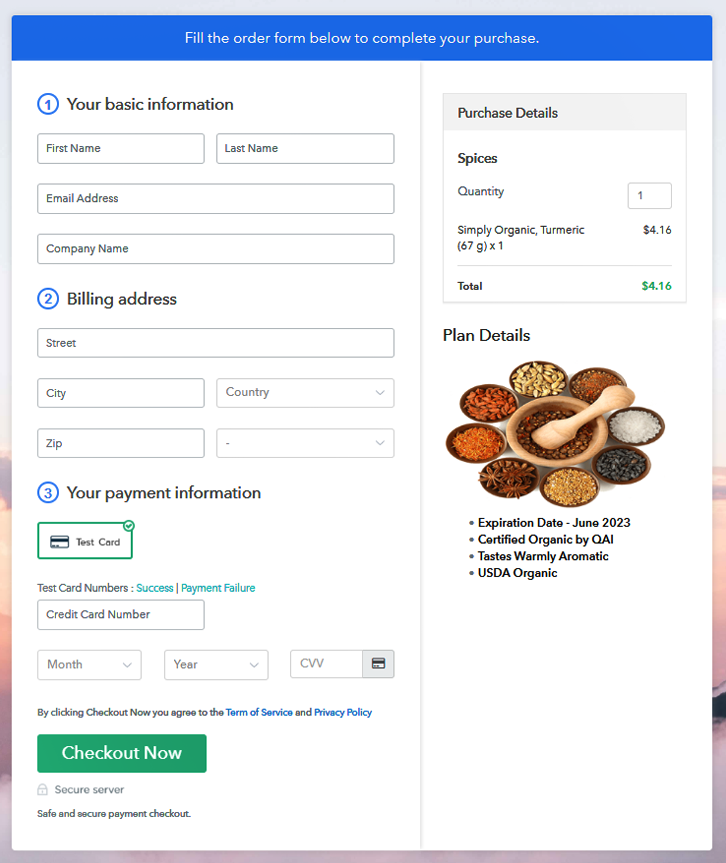
The first reason is people want versatility in their food and the spices, and they can easily buy spices from anywhere and any time through your online spice selling business. The second reason is you can earn more profit without investing a large amount of money. Simply you have to create checkout pages for your spices and share their links on social media and people can buy spices directly through these checkout pages. To create checkout pages we have brought a free and fantastic service through which you can start your online spices selling business – Pabbly Subscription Billing.

Other than checkout pages Pabbly Subscription Billing also offers various helping features to build up your spices selling online business:

  • Integrate it with your website to boost up sales of spices
  • Collect one-time or recurring payments easily of your spices
  • Pay zero transaction fees
  • Share invoices of spices automatically with the buyers

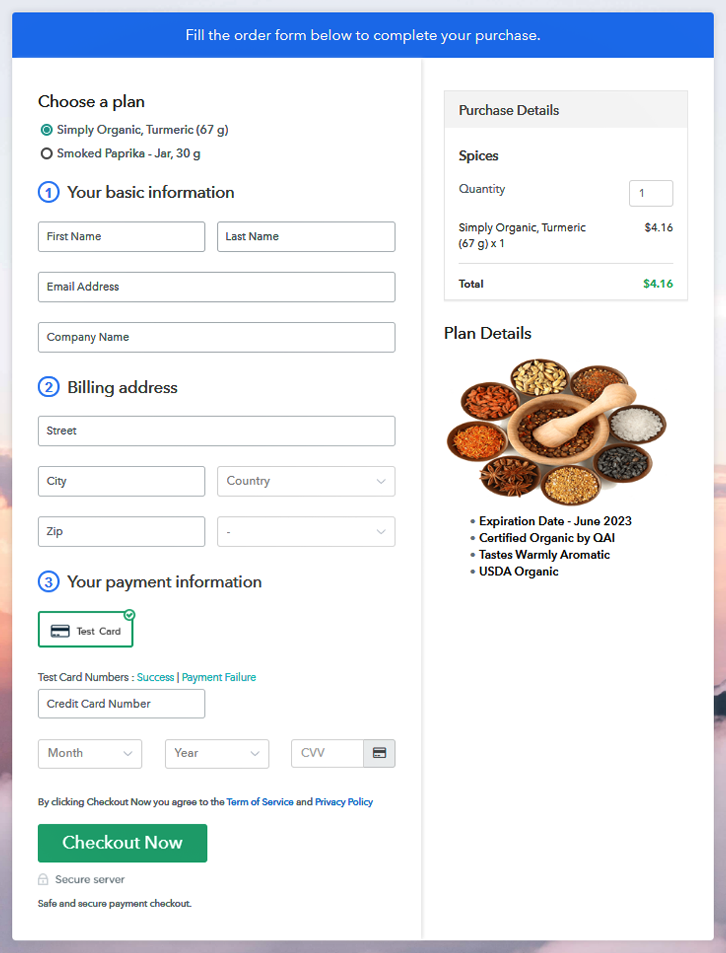
This is How your Checkout Page will Look Like After Creation

Preview Checkout Page

Preview Checkout Page

Step 1: Log in to Pabbly Subscription Billing

Signup

In the first step, you have to visit Pabbly Subscription Billing website and then click on the “Sign Up Free” button. Once the button is clicked, you are reached on the signup page, where you can create your account quickly with your Gmail or manually enter your details.

Sign Up For Free!

Step 2: Select Subscription Billing

Access Subscription Billing

Step 3: Account Setup

Setup Account

Once the signup process is done, now you have to fill up your company details i.e. company name, select currency, and contact number in the appeared dialogue box.

Step 4: Connect Payment Gateway to Sell Spices Online

Connect Payment Gateway

After the account setup is done, here, we are showing you the payment collection process by enabling the ‘Test Payment’ mode. Further, you can connect other payment gateways of your choice. The complete integration guide for payment gateways is provided below.

Step 5: Add Your Product

Add Product

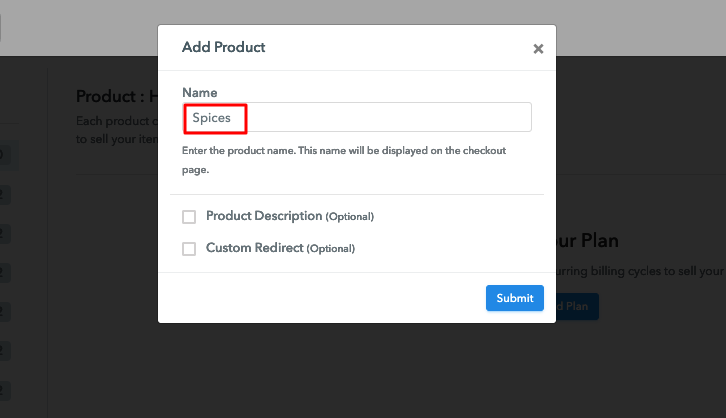
In this step, you have to add your first product. You can add spices of different categories like cloves, black pepper, etc, and add all other types of spices in the same product by creating different plans.

Add Product Name to Sell Spices Online

You just have to fill up these details and your product is added.

Note: Here you can add all the products related to the similar category by creating plans for each of them.

Step 6: Add Plans

Let’s get started and create plans for different categories of spices that you want to sell

(a) Select Add New Plan

Add Plan

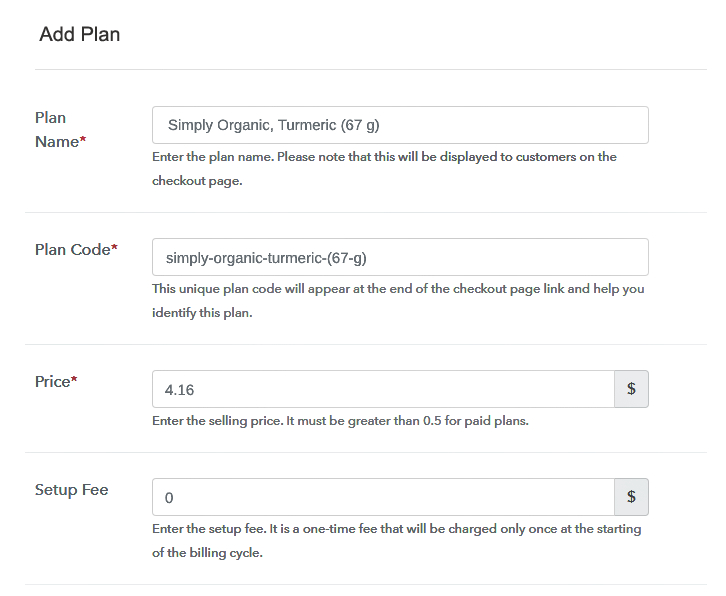
(b) Specify the Plan and Pricing Details

Add Details to Sell Spices Online

On clicking add new plan, you will be redirected to the plan page, here you will have to fill the plan details such as plan name, code, billing cycle, price, etc.

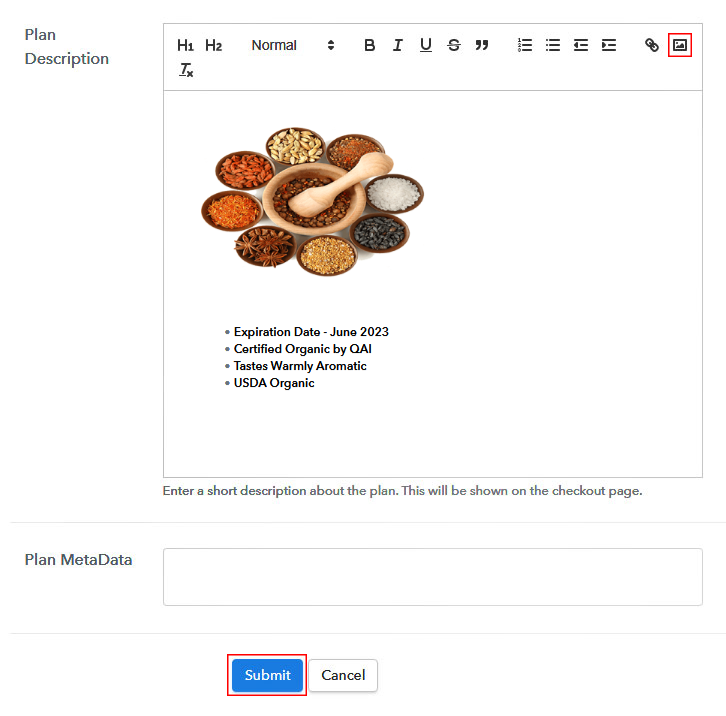
(c) Add Image & Description

Add Image to Sell Spices Online

Also, describe the spices that you want to sell along with the product links, images, etc, and click on the submit button to add your plan.
You can create more plans for all other spices in a similar manner.

Step 7: Share Your Checkout Page

Share Checkout Page on Social Media

  • Share your checkout page on social media like Facebook and Twitter.
  • Copy the mentioned link and send it to your customers through SMS or emails directly.
  • Embed your plan link to your website so that your customers can be landed on the checkout page directly.

Step 8: Preview Checkout Page

Follow these steps to view checkout page

(a) Click on the View Button

View Checkout Plan

(b) Take a Look at the Checkout Page

Preview Checkout Page

Step 9: Embed Checkout Page in Site & Sell Spices Online

Embed Checkout Page on Website

Just copy the provided plan embedding link and embed the checkout page to your WordPress site.

(a) Edit the Page & Paste the Copied Link

Paste Link in Text Editor

Copy and paste the link in the text area of the editor

(b) Save & Publish the Checkout Page

Save and Publish

After the code is pasted, click on the publish button to embed your checkout page.

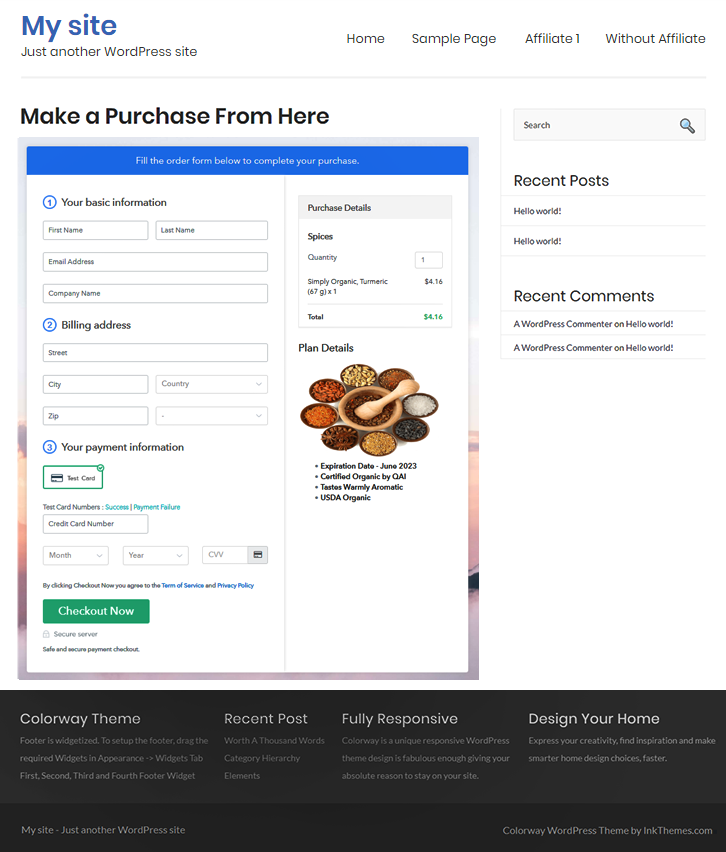
(c) Check Out the Final Look of your Checkout Page on WordPress Site

Add Checkout to Sell Spices Online

Step 10: Multiplan Checkout Page

Note: In case you want to sell multiple products through a single checkout page, create a multi-plan checkout plan, otherwise skip this step.

(a) Click on Add Multiplan Checkout

Multiplan Checkout

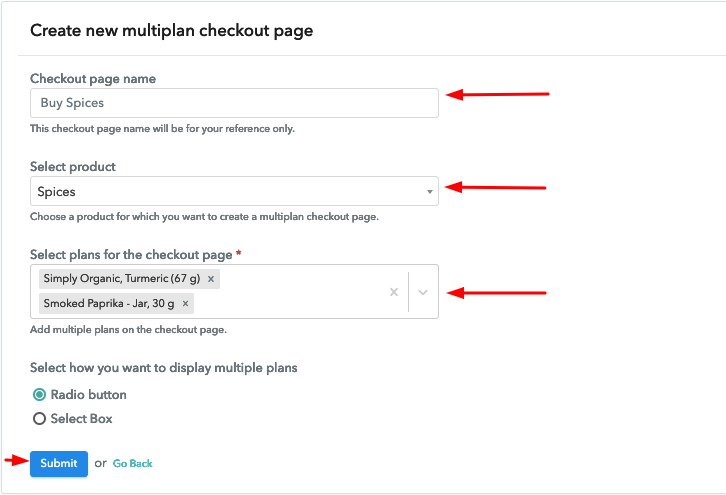
(b) Add Plans to Sell Multiple Spices from Single Checkout Page

Multiplan Details to Sell Spices Online

(c) Take a Look at the Checkout Page

Multiplan Checkout to Sell Spices Online

Preview Checkout Page

Wrapping Up

In conclusion, if you were looking for a way to start spices selling online business then Pabbly Subscription Billing is your answer. With its amazing features, you can easily start collect payments, share invoices with customers, and all of this without paying anything. Hence, stop waiting and start selling. For further queries or suggestions, please contact us.

You May Also Like To Read –
How to Sell Drinks Online | Step by Step (Free Method)

How To Sell Drinks Online

Ideal For: All the fruit drink manufacturers, juice shops, soda water stores, distelleries, breweries and other merchants can use this method to sell drinks online.

How To Sell Drinks Online

Why Choose this Method for Selling Over any Other Solution?

Unlike any other solution, this method allows you to:

  • List and sell drinks for FREE. Absolutely no payment required.
  • No commission deducted on sales.
  • Collect payment through multiple payment modes from a single checkout page.
  • Sell one time or recurring subscriptions of your drinks.
  • Sell and collect payment in any currency as per your requirement.
  • Give discounts on your products by offering special coupon codes.
  • Add sales commission agents to help you in selling your drinks.

Get Pabbly Subscription Billing for Free

Now, the word ‘drinks’ encompasses a wide range of stuff from simple fruit drinks, non-perishables, nonprepared, beverages to beers, and alcohol. But don’t worry about the category, as here you will learn an awesome method to sell any kind of drinks online.

Why would you like to sell drinks online?

The benefits are obviously manifold like, lower logistic costs, immediate customer feedback, no haggling from customers, 24×7 open online shop, automated store, security, better revenue management, etc. Now that you learned about the benefits lets build an online store to sell drinks online. But before, you should know that there are a ton of software available for building an online store.

Here I am going recommend Pabbly Subscription Billing as it can list an unlimited number of drinks and bill customers through its checkout pages in offline/online modes. Other features provided by Pabbly Subscription Billing are:

  • Create Unlimited Plans, Coupons, Discounts, etc
  • Automatic Card Reattempts on Decline
  • Email Alerts on Payment Completion/Failure
  • Better Tax Management
  • Import/Export Customer Data with Ease

Impressed by the features? Lets us build an incredible checkout page to start selling drinks online.

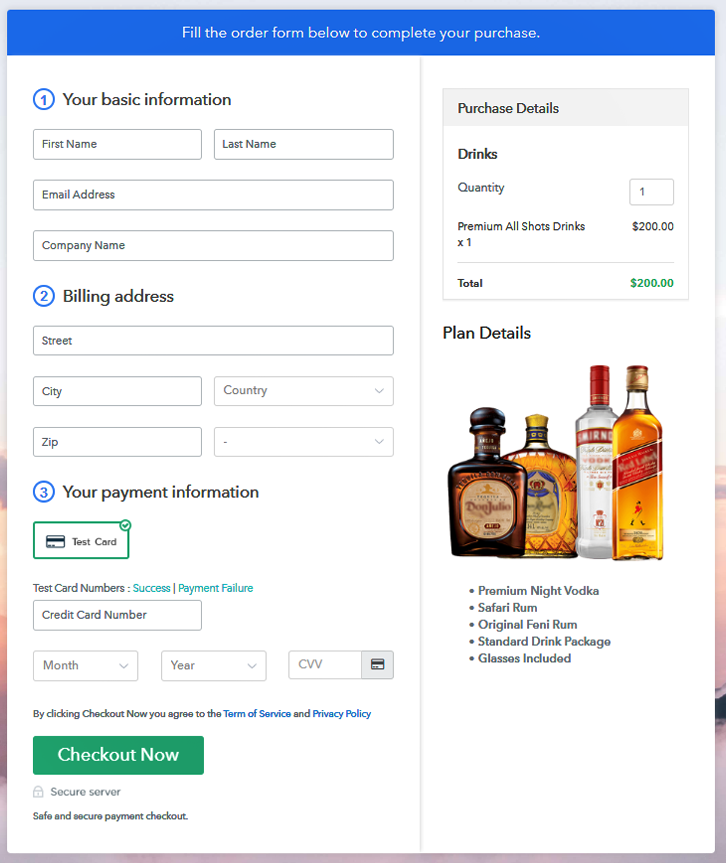
This is How your Checkout Page will Look Like After Creation

Checkout to Sell Drinks Online

Preview Checkout Page

Step 1: Log in to Pabbly Subscription Billing

Signup

First, you have to search for  Pabbly Subscription Billing and on reaching their website click on “Sign up Free“. So, you can either sign-in using your Gmail account or fill in the required fields like name, email, etc and then click the “Sign Up” button.

Sign Up For Free!

Step 2: Select Subscription Billing

Access Subscription Billing

Once you sign in you will straight away enter into the dashboard. And here you will have to click on the “Access Now” button on the Subscription Billing option.

Step 3: Account Setup

Setup Account

A dialogue box will appear in front of you that will require you to fill the company details like name, currency, and phone number. Now, press the “Continue” button after filling in the details.

Step 4: Connect Payment Gateways To Sell Drinks Online

Connect Payment Gateway

As a merchant, your priority should always be to give a smooth payment experience for the customers. That is why Pabbly Subscription Billing provides a dummy payment gateway, where you pre-test the payment experience of a customer and diagnose the problems beforehand. You can do this by clicking on the “Enable Test Payment” option.

Now with Pabbly Subscription Billing, you can integrate multiple payment gateways like Stripe, Razorpay, PayPal, Authorize.net, etc. There are integration guides available beneath this paragraph. But since we have to set up the payment process, we will click on the “Enable Test Payment” option.

Step 5: Add Your Product

Add Product

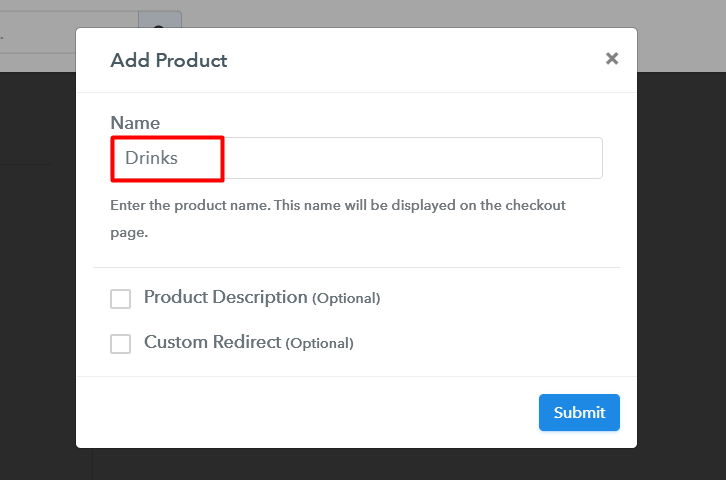
Now let us add the products. Beneath the “Enable Payments,” you will find the section “Add your product” click on it. This will generate a dialog box with a blue button “Add New Product”. Click it.

This will generate a pop-up box and you have to add the required product title, in this case, it is the ‘drinks’.

Add Products to Sell Drinks Online

Fill up the details and your product is created.

Note: Here you can add all the products related to the similar category by creating plans for each of them.

Step 6: Add Plans

Now, we are going to create plans to start a liquor business online

(a) Select Add New Plan

Add Plan

(b) Specify the Plan & Pricing Details

Add Plan to Sell Drinks Online

Now you have to add details of the product related to prices like plan name, code, price, setup fees, etc. Furthermore, there are different billing models like one-time payment, recurring, based on cycles, etc. Yes, if you are not satisfied with the present billing models then you can change it at any time.

(c) Add Image & Description

Add Description to Sell Drinks Online

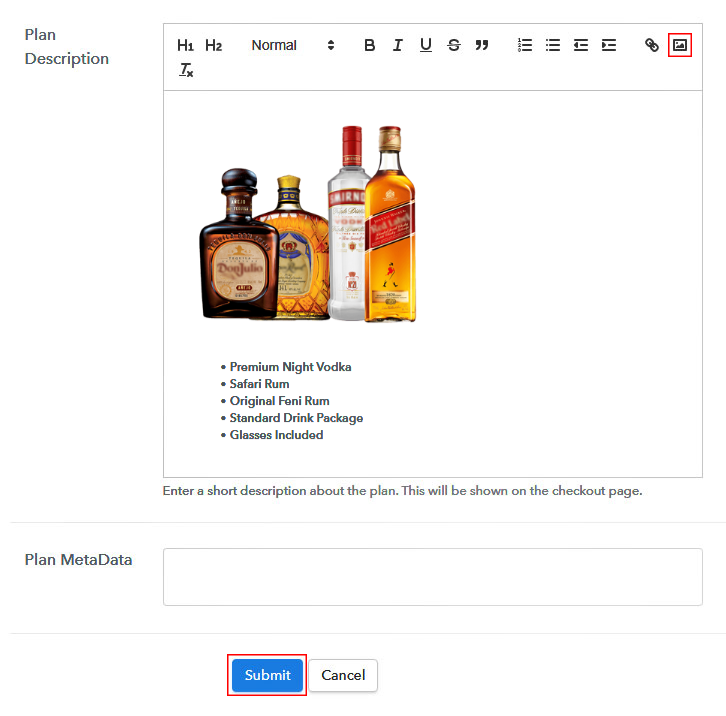
Now, upload some amazing images of your liquor.

Moreover, add a description about the liquor like height, weight, character, licensing number, etc in preferably bullet points then press the “Submit” button.

Furthermore, using the same methods, you can list more products.

Step 7: Share your Checkout Page

Share Checkout Page on Social Media

  • Now for more marketing of your products, you can share the checkout pages on Facebook or Twitter with the given buttons.
  • Also, if you want in SMS and emails for more information and brand awareness.
  • Moreover, you can build buttons on your website and embed these checkout pages on them. Also, you can place it on any anchor text on your website, so the users will be redirected to the checkout page.

Step 8: Preview Checkout Page

Follow up these steps to preview checkout page:

(a) Click on the View Button

View Checkout Plan

(b) Take a Look at the Checkout Page

Checkout to Sell Drinks Online

Step 9: Embed Checkout Page in Site & Sell Drinks Online

Embed Checkout Page on Website

Now,  copy the embed plan link to insert the checkout page on your WordPress website.

(a) Edit the Page & Paste the Copied Link

Paste_Link_in_Text_Editor

Now, when the link is copied, then paste it to the text area of the editor.

(b) Save & Publish the Checkout Page

Save_and_Publish

After pasting the code, now hit the ‘Publish’ button. Your checkout page is embedded.

(c) Check out the Final Look of your Checkout Page on WordPress Site

Embed to Sell Drinks Online

Step 10: Multiplan Checkout Page

Note: In case you want to sell multiple products via a single checkout page, you can create a multi-plan checkout page otherwise skip this step.

(a) Click on Add Mutiplan Checkout

Multiplan Checkout

(b) Add Plans to Sell Drinks Online from Single Checkout Page

Multiplan to Sell Drinks Online

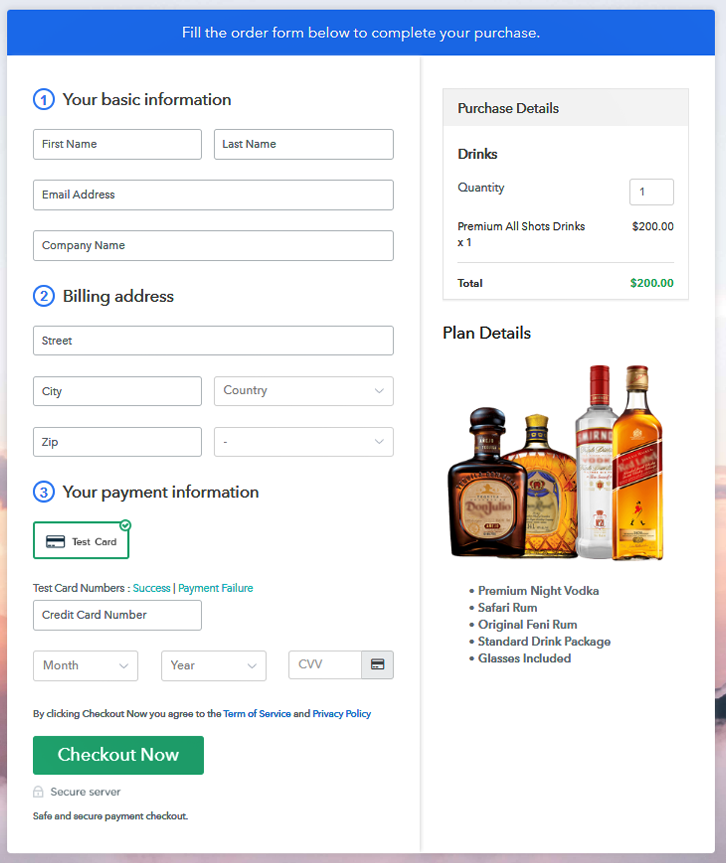
(c) Take a Look at the Checkout Page

Checkout to Sell Drinks Online

Preview Checkout Page

Wrapping Up

The internet has brought rapid changes to our world, the traditional way of business is fast coming to an end. So, that is why hook up your website to Pabbly Subscription Billing to start selling drinks online.

Look, since you are new, you might have some queries related to the process mentioned above. Fear not !!, you can always drop your queries in the comment section below. We will be at your service as soon as possible.

You May Also Like To Read –
How to Sell Industrial Equipment Online | Step by Step (Free Method)

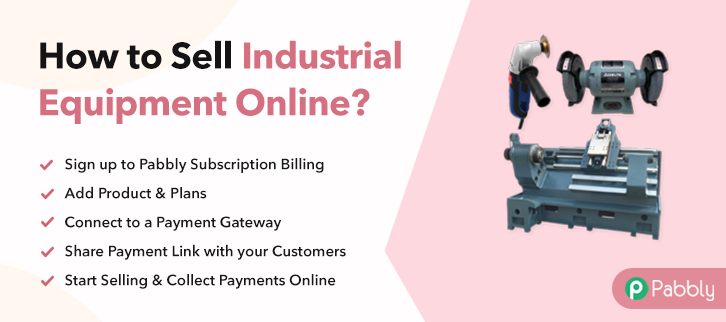
How to Sell Industrial Equipment Online

Ideal For: All the industrial equipment manufacturers, heavy machinery sellers, MSME and other merchants can use this method to sell industrial equipment online.

How to Sell Industrial Equipment Online

Why Choose this Method for Selling Over any Other Solution?

Unlike any other solution, this method allows you to:

  • List and sell industrial equipment for FREE. Absolutely no payment required.
  • No commission deducted on sales.
  • Collect payment through multiple payment modes from a single checkout page.
  • Sell one time or recurring subscriptions of your industrial equipment.
  • Sell and collect payment in any currency as per your requirement.
  • Give discounts on your products by offering special coupon codes.
  • Add sales commission agents to help you in selling your industrial equipment.

Get Pabbly Subscription Billing for Free

‘Industrial equipment’ is a generic term used for capital goods from simple lathe machines to rocket boosters. Now, with the rise of the internet, many manufacturers are opting to sell industrial equipment online to get better demands from a global audience and I think you should also give it a try.

Why would you like to sell industrial equipment online?

The prime reason you should be considering to start selling industrial equipment online is that the world is hurtling towards an internet-based economy. Let me give you a perspective, in 2019 around 12,000 retail stores were shut down in the United States alone due to lack of business. In the same year, there was a staggering 23%  rise in online sales. Getting a picture? Well, now you have understood the importance of the online economy, lets us help you to create an e-store to start industrial equipment business online.

Therefore, you should know that there are many online tools that can help you to create an e-store. So, here, I am going to recommend an incredible software ie. Pabbly Subscription Billing that lets you sell any kinds of products online via its checkout pages. More benefits include:

  • Payment Collection in Both Online/Offline Mode
  • Unlimited Product Listing
  • Unlimited Coupons, Plans, and Discounts
  • Email Alerts on Payment Completion/Failure
  • Import/Export Customers Data

So, now that I have got your interest, let me show you how to build an awesome checkout page to sell industrial equipment online.

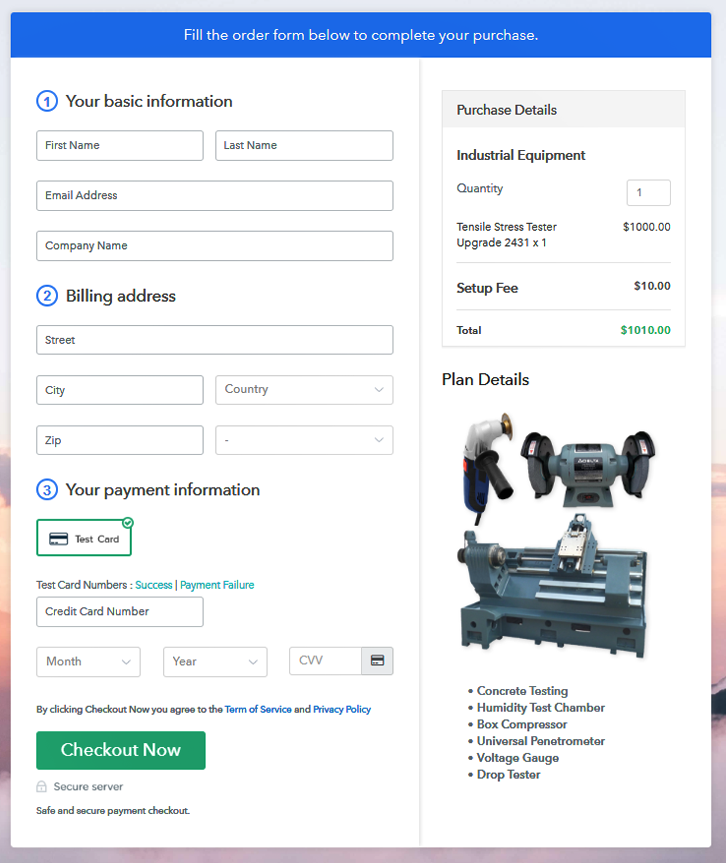
This is How your Checkout Page will Look Like After Creation

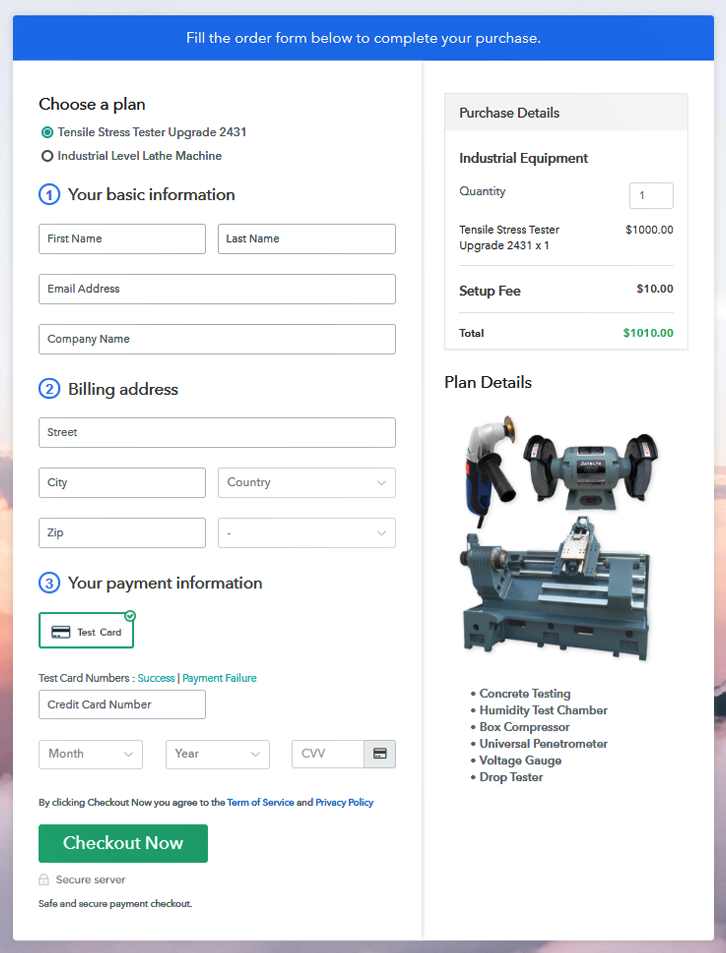
Checkout to Sell Industrial Equipment Online

Preview Checkout Page

Step 1: Log in to Pabbly Subscription Billing

Signup

First, you have to search   Pabbly Subscription Billing  and on opening their website click on “Sign up Free“. You can either sign in using your Gmail account or fill in the required fields like name, email, etc and then click the “Sign Up” button.

Sign Up For Free!

Step 2: Select Subscription Billing

Access Subscription Billing

Then you will enter the dashboard, and here click on the “Access Now” button on the Subscription Billing option.

Step 3: Account Setup

Setup Account

A dialogue box will appear on your screen requiring you to fill the company details like name, currency, and phone number. Now, press the “Continue” button after filling in the details.

Step 4: Connect Payment Gateways To Sell Industrial Equipment Online

Connect Payment Gateway

It is always advisable to check if your payment transactions are going well. That is why, Pabbly Subscription Billing provides a dummy payment gateway, where you pilot tests the experience of a customer during the payment process. This is to ensure that you remove all the glitches beforehand. You can do this by clicking on the “Enable Test Payment” option.

Also, using Pabbly Subscription Billing, you can integrate payment gateways like Stripe, Razorpay, PayPal and many more. For the integration of the payment gateways, you can avail the help of listed guides beneath this paragraph. But since we have to set up the payment process, we will click on the “Enable Test Payment” option.

Step 5: Add Your Product

Add Product

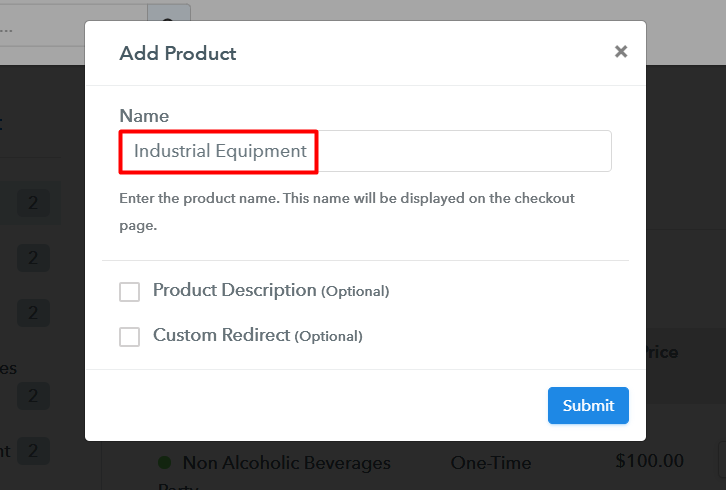
So, if the payment process went well lets’ add products. You will find below the “Enable Payments,” there is a section “Add your product” click on it. This will create a dialog box with a blue button “Add New Product”. Click it.

This will generate a pop-up box and you have to add the required product title, in this case, it is the ‘industrial equipment’.

Add Product to Sell Industrial Equipment Online

Fill up the details and your product is created.

Note: Here you can add all the products related to the similar category by creating plans for each of them.

Step 6: Add Plans

Now, we are going to create plans to start an industrial equipment business online

(a) Select Add New Plan

Add Plan

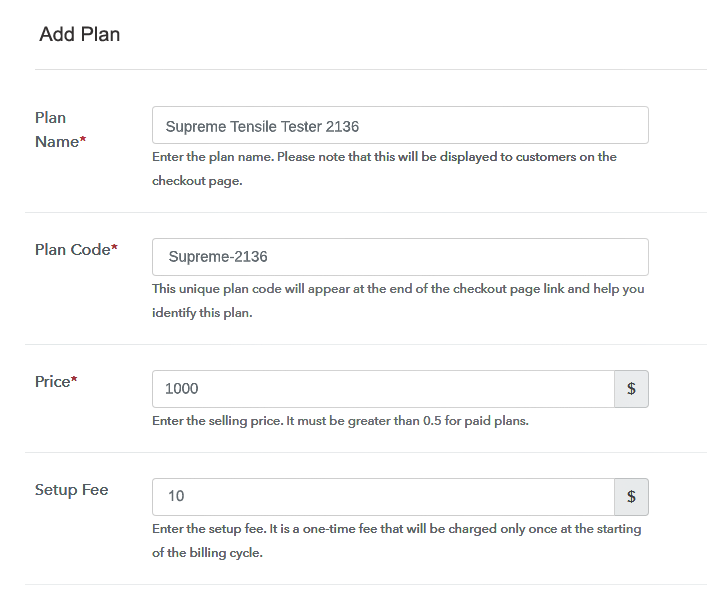
(b) Specify the Plan & Pricing Details

Add Plans to Sell Industrial Equipment Online

Now you will add details of the product related to prices like plan name, code, price, setup fees, etc. Furthermore, you can choose for different billing models like one-time payment, recurring, based on cycles, etc. Of course, you can change it any time you want.

(c) Add Image & Description

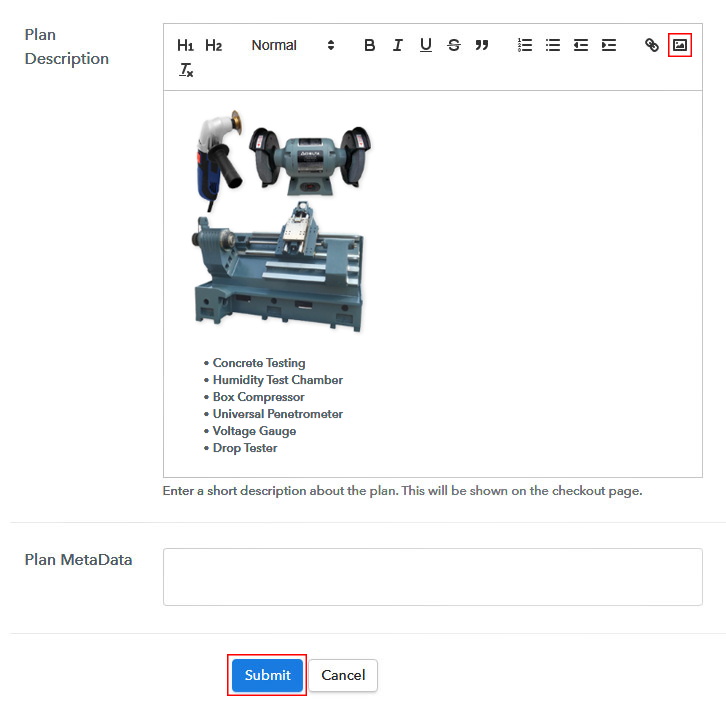
Add Description to Sell Industrial Equipment Online

Now, upload some stunning images of your industrial equipment.

Before you press the ‘submit button’ add some description about your product like tolerance, humidity conditions, heat intake, etc all in bullet points.

Furthermore, using the same methods, you can list more products.

Step 7: Share your Checkout Page

Share Checkout Page on Social Media

  • Share the checkout pages on Facebook, Twitter for brand awareness.
  • Also, to get more consumer traffic, you can embed the checkout pages on SMS and emails.
  • Furthermore, you can build buttons on your website and embed these checkout pages on them. Also, you can place it on any anchor text on your website, so the users will be redirected to the checkout page.

Step 8: Preview Checkout Page

Follow up these steps to preview checkout page:

(a) Click on the View Button

View Checkout Plan

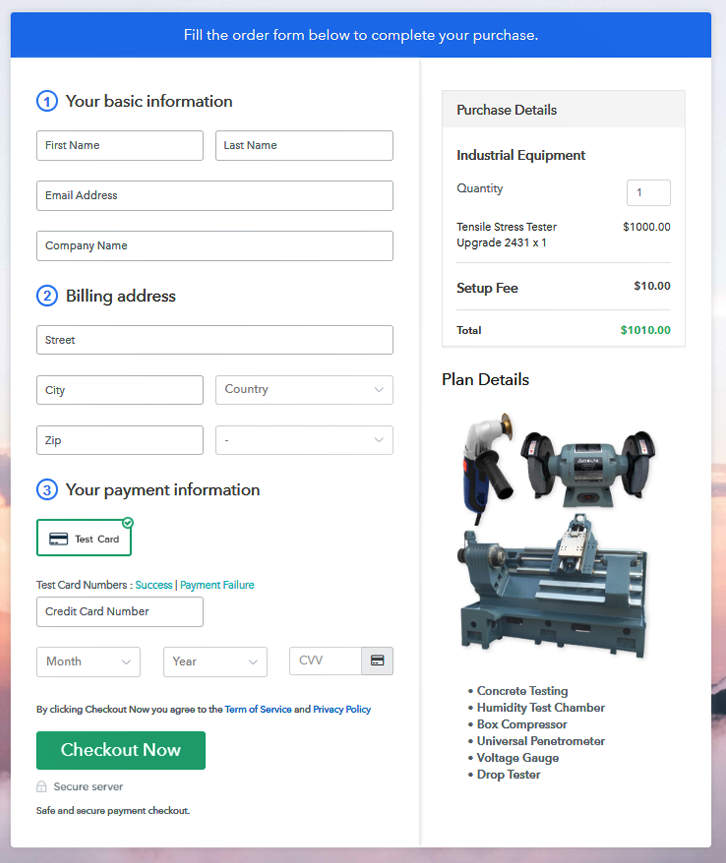
(b) Take a Look at the Checkout Page

Checkout to Sell Industrial Equipment Online

Step 9: Embed Checkout Page in Site & Sell Industrial Equipment Online

Embed Checkout Page on Website

Now,  copy the embed plan link to insert the checkout page on your WordPress website.

(a) Edit the Page & Paste the Copied Link

Paste_Link_in_Text_Editor

Now, when the link is copied, then paste it to the text area of the editor.

(b) Save & Publish the Checkout Page

Save_and_Publish

After pasting the code, now hit the ‘Publish’ button. Your checkout page is embedded.

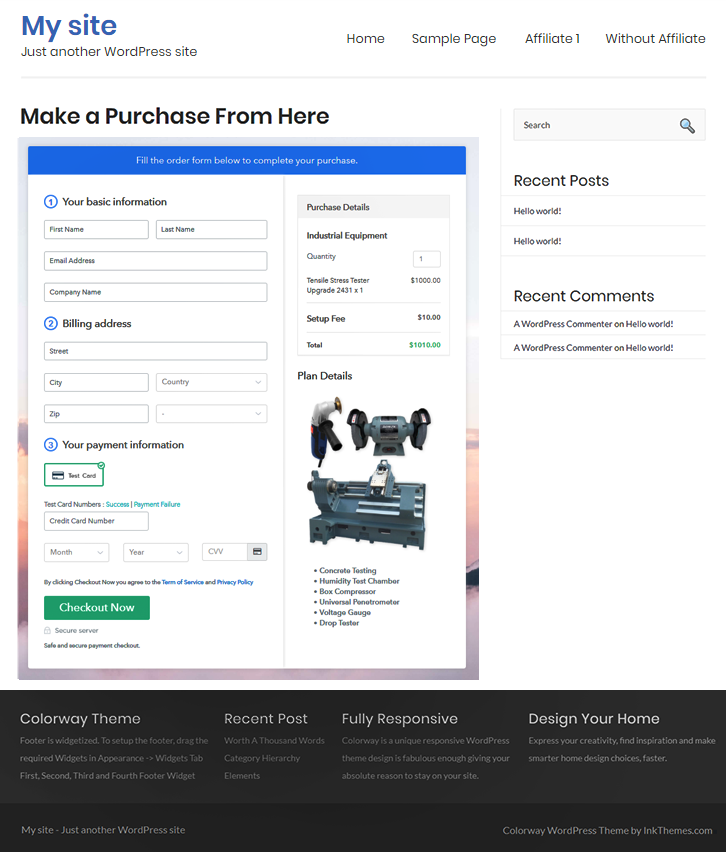
(c) Check out the Final Look of your Checkout Page on WordPress Site

Embedd WordPress to Sell Industrial Equipment Online

Step 10: Multiplan Checkout Page

Note: In case you want to sell multiple products via a single checkout page, you can create a multi-plan checkout page otherwise skip this step.

(a) Click on Add Mutiplan Checkout

Multiplan Checkout

(b) Add Plans to Sell Multiple Industrial Equipment Online from Single Checkout Page

Multiplan to Sell Industrial Equipment Online

(c) Take a Look at the Checkout Page

Multiplan Checkout to Sell Industrial Equipment Online

Preview Checkout Page

Wrapping Up

Viola, you have finally build a checkout page, to sell industrial equipment online using Pabbly Subscription Billing. Now, initially, you may have some hiccups here and there but eventually, you will learn to fully exploit this tool to conquer the online market.

Yes, I understand you have doubts regarding the steps, so please drop your queries in the comment section below we will reply to you at the earliest.

You May Also Like To Read –
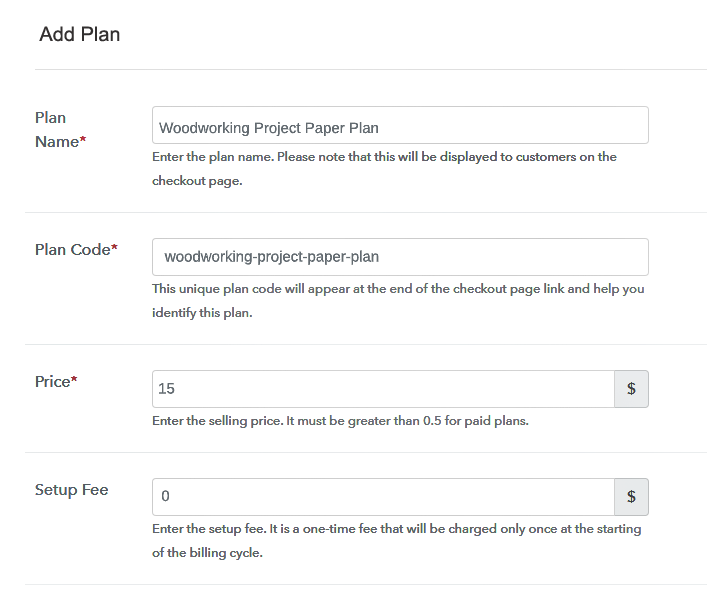
How to Sell Woodworking Projects Online | Step by Step (Free Method)

How to Sell Woodworking Projects Online

Ideal For: All the woodworking project designers, wood craft store, furniture shop owners, and furniture designers can use this method to take their woodworking projects selling business online.

How to Sell Woodworking Projects Online

Why Choose this Method for Selling Over any Other Solution?

Unlike any other solution, this method allows you to:

  • List and sell woodworking projects for FREE. Absolutely no payment required.
  • No commission on sales.
  • Collect payment through multiple payment modes from a single checkout page.
  • Sell one time or recurring subscriptions of woodworking projects.
  • Sell and collect payment in any currency as per your requirement.
  • Give discounts on your products by offering special coupon codes.
  • Add sales commission agents to help you in selling woodworking projects.

Get Pabbly Subscription Billing for Free

Are you a craft lover and wish to sell your woodworking projects to big architects or builders? If yes, then you should think about selling your woodworking projects online as it might help you to reach out to people from all over the world.

Why would you like to sell woodworking projects online?

The reason is quite simple because it will help you to endorse your work and talent. Not only that, but you will also eventually start making money out of it too. Hence, we would like to suggest a unique service that will allow you to start your woodworking projects business for free, i.e, Pabbly Subscription Billing. With the help of this tool, you can create checkout pages easily to sell your plans online. Moreover, you can also share their links on your social media accounts and websites, so that people can buy your woodworking projects directly through them.

Not only that, but this tool also provides you unlimited access to its excellent features like:

  • Add unlimited plans and product for free to increase your sales
  • Moreover, you can also generate and share invoices automatically
  • Besides, it enables you to integrate with your website as well
  • Apart from that, you can use this service without any transaction fees

Isn’t it amazing to get all of this in one place? Well, now its time to roll toward the steps to create checkout pages for your online business.

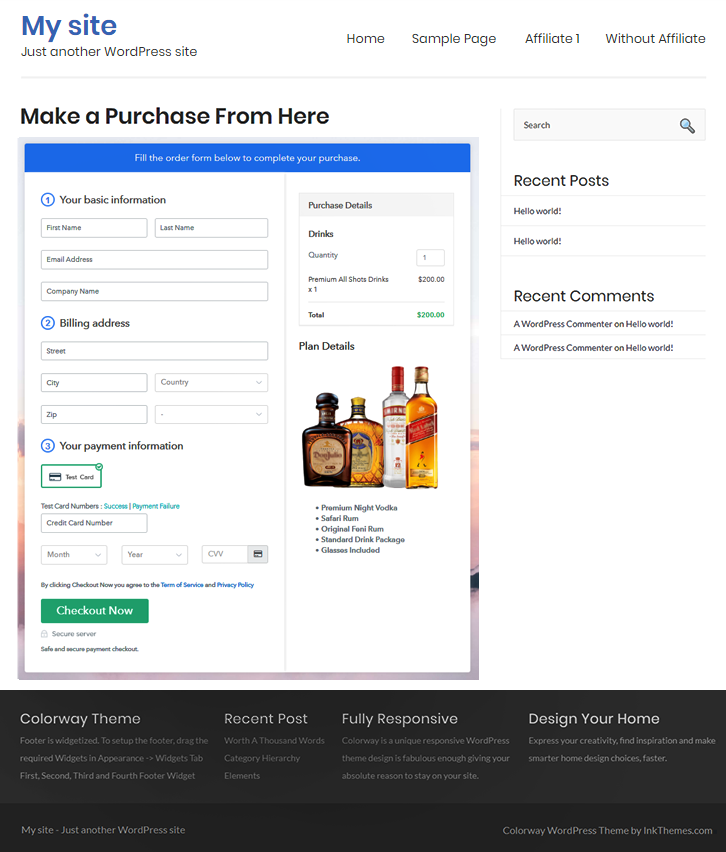
This is How your Checkout Page will Look Like After Creation

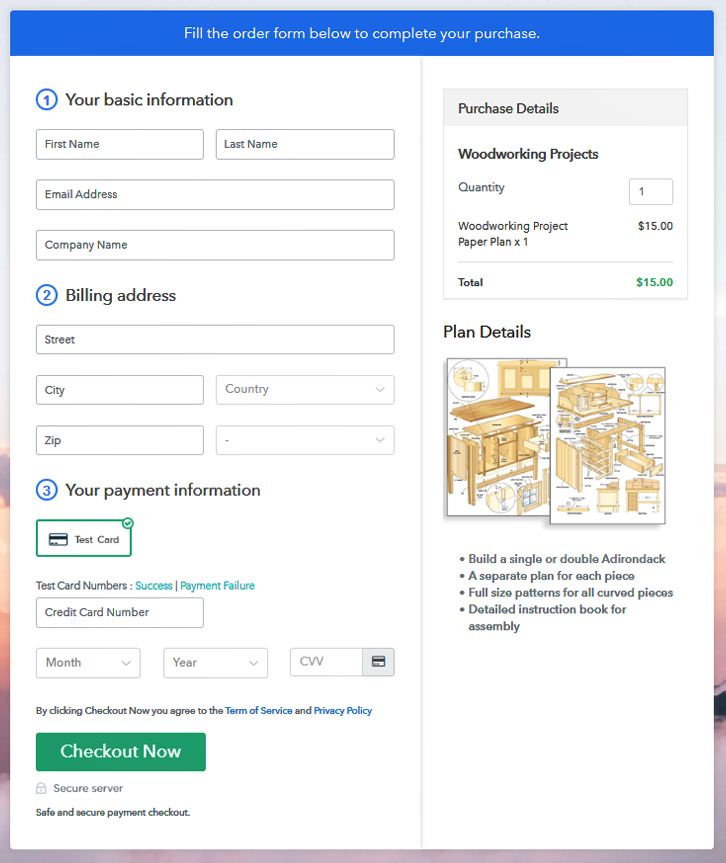
Preview Checkout Page to Sell Woodworking Projects Online

Preview Checkout Page

Step 1: Log in to Pabbly Subscription Billing

Signup

First of all, visit the Pabbly Subscription Billing website and then press the “Sign Up Free” button. Once you click the button, you will land on the signup page, where you can create your account either by using your Gmail or else by entering your details manually.

Sign Up For Free!

Step 2: Select Subscription Billing

Access Subscription Billing

Step 3: Account Setup

Setup Account

Once you complete the entire signup process, then you need to fill up the company details i.e. name, currency, and contact number in the appeared dialogue box.

Step 4: Connect Payment Gateway to Sell Woodworking Projects Online

Connect Payment Gateway

In this step, I am going to enable the “Test Payment” mode in order to demonstrate the process of payment collection. Not only that, you can also connect with any other payment gateways of your choice by using the integration guide for payment gateways which are provided below. For instance, here I am enabling test payment gateway.

Step 5: Add Your Product

Add Product

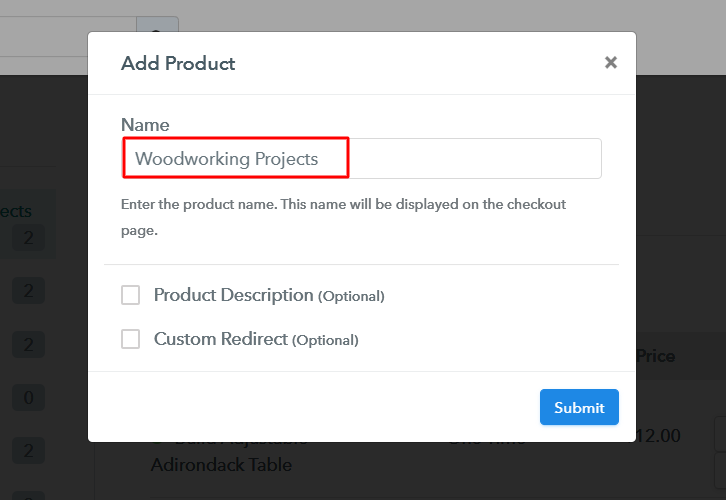
Afterward, now your subsequent step is to add your first product. Moreover, you can also provide a description of your product.

Add Product Name to Sell Woodworking Projects Online

Fill these details to add your product.

Note: Here you can add all the products related to the similar category by creating plans for each of them.

Step 6: Add Plans

Now, let’s get started and create plans for different categories of woodworking projects that you wish to sell online.

(a) Select Add New Plan

Add Plan

(b) Specify the Plan and Pricing Details

Add Details to Sell Woodworking Projects Online

After clicking on the “Add New Plan” button, you will be directed to the plan page, where you have to enter the plan details like name, code, billing cycle, price, etc.

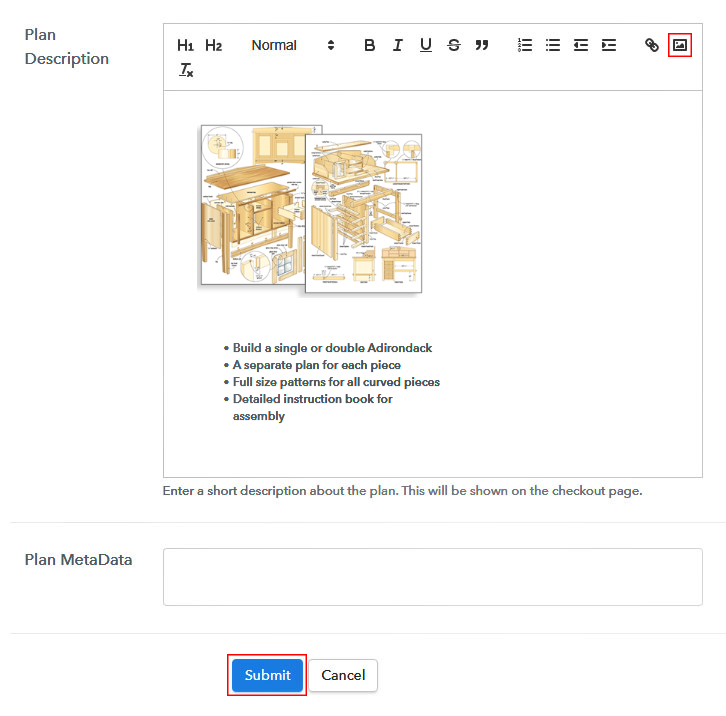
(c) Add Image & Description

Add Image to Sell Woodworking Projects Online

Additionally,  you can also provide a description of the projects that you want to sell including the product links, images, etc, and hit the submit button in order to add your plan.
Likewise, you can also create more plans for all the woodworking projects in a similar manner.

Step 7: Share Your Checkout Page

Share Checkout Page on Social Media

  • In order to boost your product, now you can share your checkout page on social media platforms such as Facebook, Twitter.
  • Not only that, but you can also copy the mentioned link and send it to your customers directly via SMS or emails.
  • Furthermore, it also allows you to embed your plan link in the button of your website in order to redirect your customers to the checkout page.

Step 8: Preview Checkout Page

Just follow the below steps to view checkout page

(a) Click on the View Button

View Checkout Plan

(b) Take a Look at the Checkout Page

Preview Checkout Page to Sell Woodworking Projects Online

Step 9: Embed Checkout Page in Site & Sell Woodworking Projects Online

Embed Checkout Page on Website

Moving forward to the next step, now you have to copy the provided plan embed link in order to embed the checkout page to your WordPress site.

(a) Edit the Page & Paste the Copied Link

Paste Link in Text Editor

Simply, copy and paste the link in the text area of the editor

(b) Save & Publish the Checkout Page

Save and Publish

Once the code is pasted, just hit the “Publish” button in order to embed your checkout page.

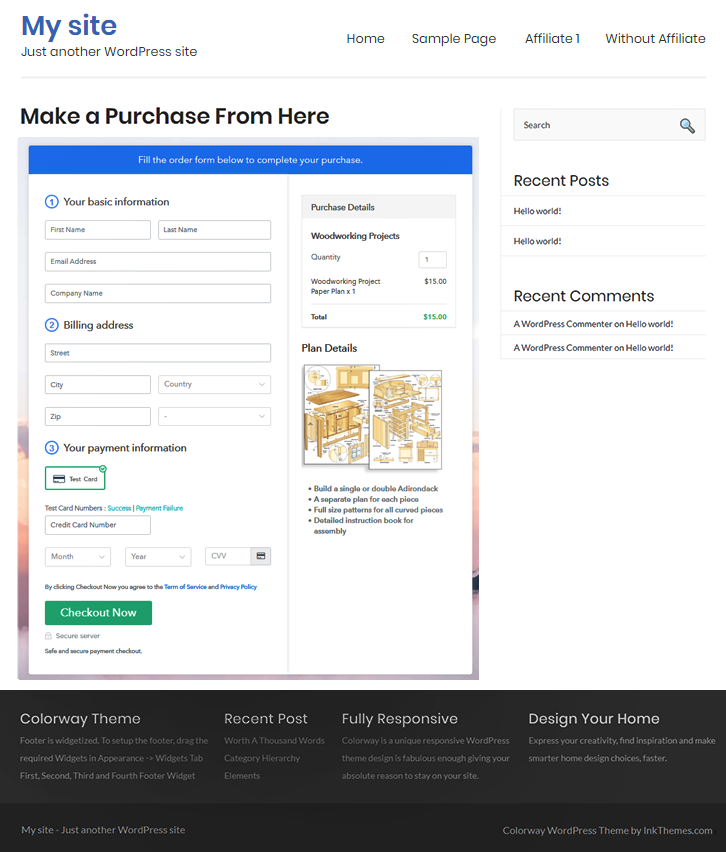
(c) Check Out the Final Look of your Checkout Page on WordPress Site

Embed Checkout on Website to Start Woodworking Projects Business Online

Step 10: Multiplan Checkout Page

Note: In case you want to sell multiple products through a single checkout page, create a multi-plan checkout plan, otherwise skip this step.

(a) Click on Add Multiplan Checkout

Multiplan Checkout

(b) Add Plans to Sell Multiple Woodworking Projects from Single Checkout Page

Multiplan Details to Sell Woodworking Projects Online

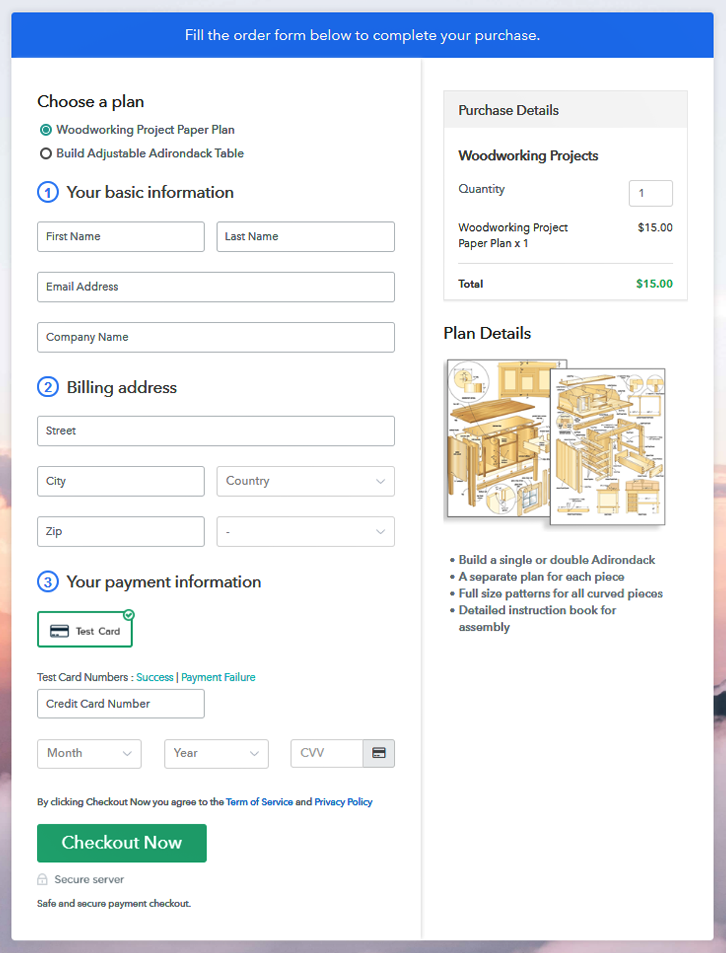
(c) Take a Look at the Checkout Page

Multiplan Checkout to Sell Woodworking Projects Online

Preview Checkout Page

Wrapping Up

Finally! Now, you can start your woodworking project business online for free through Pabbly Subscription Billing. As, this service provides you the access to generate unlimited plans, products along with creating checkout pages online. Therefore, you don’t need to worry about anything as now you can start your own online business just by following the above-mentioned steps. Furthermore, don’t forget to write to us in the comment section below for further queries or suggestions, we will be happy to help.

You May Also Like To Read –

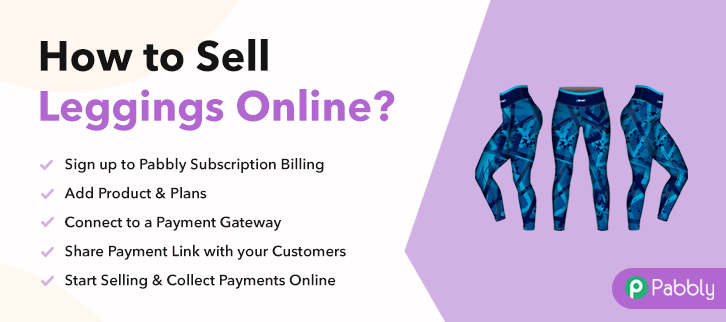
How to Sell Leggings Online | Step by Step (Free Method)

How to Sell Leggings Online

Ideal For: All the leggings sellers, leggings makers, retail leggings selling business owners, and other leggings selling merchants can use this method to take their leggings selling business online.

How to Sell Leggings Online

Why Choose this Method for Selling Over any Other Solution?

Unlike any other solution, this method allows you to:

  • List and sell your leggings for FREE. Absolutely no payment required.
  • No commission on sales.
  • Collect payment through multiple payment modes from a single checkout page.
  • Sell one time or recurring subscriptions of your leggings.
  • Sell and collect payment in any currency as per your requirement.
  • Give discounts on your products by offering special coupon codes.
  • Add sales commission agents to help you in selling leggings online.

Get Pabbly Subscription Billing for Free

Online shopping is growing so fast and has taken over 69% of the American audience (according to a survey) amongst which 59% of these shoppers bought clothes. So, if you are planning to sell leggings online this could be a good investment. And for selling leggings online you’ll be needing a way to get started so, apply the following steps and get started.

Why would you like to sell leggings online?

Well, what’s much better for a business than more buyers and an online presence could actually help you get them. So, bring your business online and start leggings business online.

We are going to create product checkout pages in these steps and you can share any created checkout page containing your product to sell over many numerous platforms to sell leggings online. These platforms include Facebook, Twitter, WhatsApp, Emails, SMS and more. Also, you’ll get to embed the checkout pages in buttons, texts, posts, pages of a website.

Here, is what more you’ll get by using this service.

  • A place to keep all the leggings in stock
  • Beautifully product pages to display an item
  • Showcase single & multiple items
  • Collect safe & secure payments both online & offline
  • Automated billing & invoicing through emails
  • Unlimited product & plan creation to sell as many leggings as you want to
    And much more…

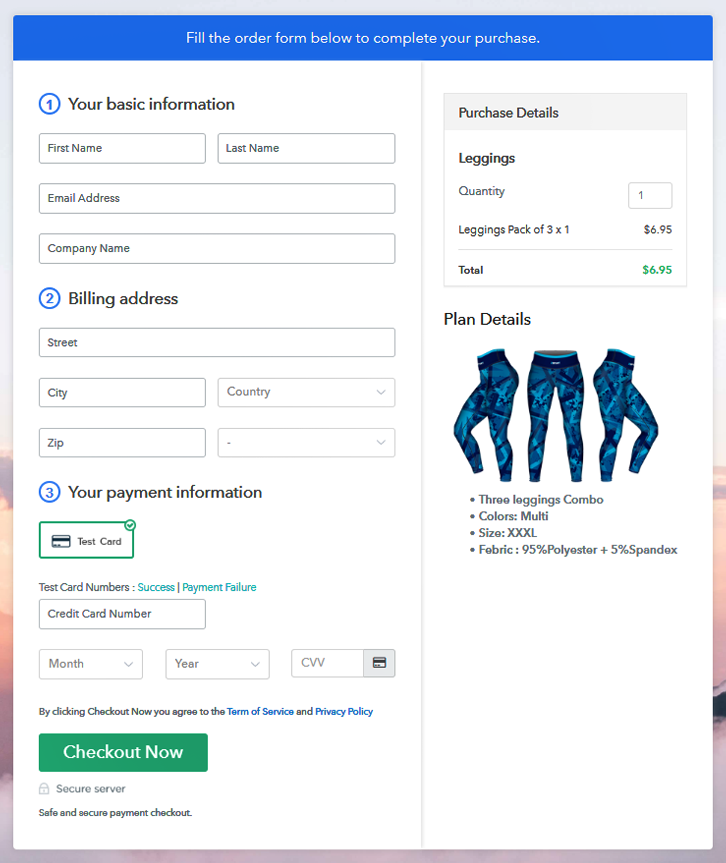
This is How your Checkout Page will Look Like After Creation

Checkout Page Preview to Sell Leggings Online

Preview Checkout Page

Step 1: Login to Pabbly Subscription Billing

Signup
You can initiate the procedure by visiting the Pabbly Subscription Billing website. On the website click on the “Sign Up Free” button present. This will bring you over a sign-in/sign-up page. Here either fill-up the details in the sign-up form and then sign-in or directly sign-in using a Google account.

Sign Up For Free!

Step 2: Select Subscription Billing

Access Subscription Billing

Step 3: Account Setup

Setup Account

In the window asking for the company name, currency and phone number, mention the details and click on the “Continue” button.

Step 4: Connect Payment Gateway to Sell Leggings Online

Connect Payment Gateway

Next and a very important step in the procedure is integrating a payment method. Here particularly I’m using the test payment method but you’ll need to choose from the various options available. Also, a link to the integration guide is mentioned below.

Step 5: Add Your Product

Add Product

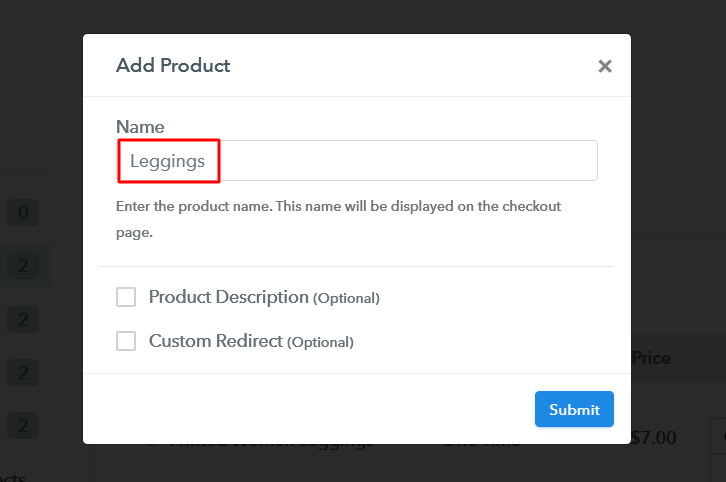
Now, the system settings are all ready and we can start creating products. Click on the “Add New Product” button and determine the product name. This product name is much like a category assigned to a variety of items for instance cotton leggings, ankle length etc.

Add Product to Sell Leggings Online

Click on the “Submit” button & a product will be appended in your product list instantly.

Note: Here you can add all the products related to the similar category by creating plans for each of them.

Step 6: Add Plans

After adding a product, you can add multiple plans to it. Click on the “Add New Plan” button and fill up the details asked on the plan page will open up. Remember, these details will be visible on the checkout page for selling leggings online.

(a) Select Add New Plan

Add Plan

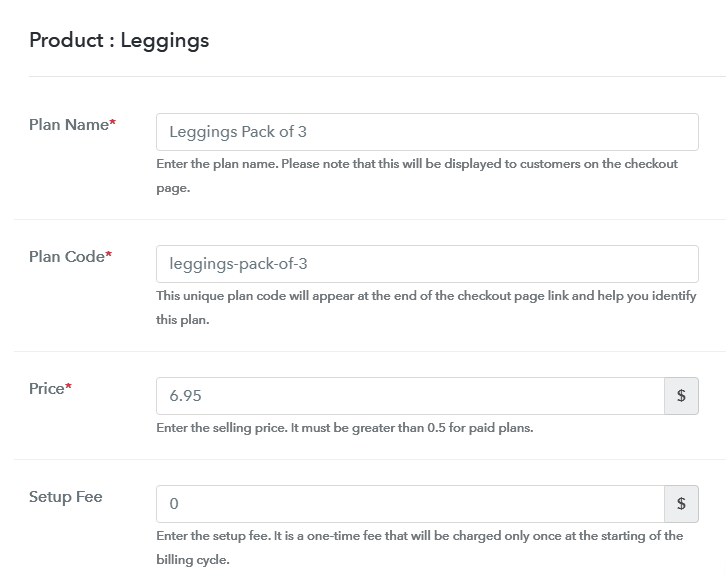
(b) Specify the Plan & Pricing Details

Add Plan to Sell Leggings Online

Mention the plan details like name, code, pricing etc as per the leggings that you want to sell online.

(c) Add Image & Description

Add Image & Description to Sell Leggings Online

You can also put an image and description in the display to sell leggings online. For this put an image and description in the “Add Description” field.

Additionally, you can also make use of lists, quotes, links, headings etc.

Hit the “Submit” button once you are done with this leggings plan description and an item will get appended in the system for selling leggings online.

Step 7: Share your Checkout Page

Share Checkout Page on Social Media

Next, you’ll see a window displaying a plan link & a plan code to sell leggings online using different platforms.

  • You can copy the URL given under “Plan Link” & share it on social media platforms like SMS, emails, WhatsApp etc to sell leggings online.
  • Also, you can link this same URL in any website’s buttons & anchor texts to link a created checkout page there.
  • Two direct Facebook and Twitter icons are also available in this box, click them to share the checkout page directly over these platforms.

Step 8: Preview Checkout Page

Follow these steps to preview a checkout page:

(a) Click on the View Button

View Checkout Plan

(b) Take a Look at the Checkout Page

Checkout Page Preview to Sell Leggings Online

Step 9: Embed Checkout Page in Site & Sell Leggings Online

Embed Checkout Page on Website

You can use the code given under “Embed Plan Link” window to embed a checkout page on WordPress. For this, copy the complete code.

(a) Edit the Page & Paste the Copied Link

Paste_Link_in_Text_Editor

And paste it in the text area of any post or page.

(b) Save & Publish the Checkout Page

Save_and_Publish

Then publish the post/page afterwards & a checkout page will get embedded on your website. Also, you can visit this post or page by visiting its URL.

(c) Check out the Final Look of your Checkout Page on WordPress Site

Checkout Page On Site to Sell Leggings Online

Step 10: Multiplan Checkout Page

Note: In case you want to sell multiple products via a single checkout page, you create a multi-plan checkout page otherwise skip this step.

(a) Click on Add Mutiplan Checkout

Multiplan_Checkout

(b) Add Plans to Sell Multiple Leggings from Single Checkout Page

Create Multiplan Checkout to Sell Leggings Online

(c) Take a Look at the Checkout Page:

Multiplan Checkout Page to Sell Leggings Online

Preview Checkout Page

Wrapping Up

If you have searched for ways to start leggings business online then you may have yet seen that this right here is the simplest as well as fastest way possible. Also, payments are a real concern in online businesses and for that, this service is providing very safe and reliable options to choose from.

Also, small as well as large business can use this method to sell selling online very easily.

You May Also Like To Read

How to Sell Stickers Online | Step by Step (Free Method)

How to Sell Stickers Online

Ideal For: All the sticker manufacturers, sticker sellers, retail stationary shop owners, customized sticker sellers and other merchants can use this method to take their stickers selling business online.

How to Sell Stickers Online

Why Choose this Method for Selling Over any Other Solution?

Unlike any other solution, this method allows you to:

  • List and sell your stickers for FREE. Absolutely no payment required.
  • No commission on sales.
  • Collect payment through multiple payment modes from a single checkout page.
  • Sell one time or recurring subscriptions of your stickers.
  • Sell and collect payment in any currency as per your requirement.
  • Give discounts on your products by offering special coupon codes.
  • Add sales commission agents to help you in selling your stickers.

Get Pabbly Subscription Billing for Free

Stickers are important to children, youngsters, protestors, and activists apart from their age as it sometimes considered as a source of motivation or other time for fun. Honestly, we have witnessed many protests and not a single one without stickers because they somehow allure global audiences.

Why would you like to sell stickers online?

Stickers are a new form of spreading awareness and performative activism. Almost everyone uses stickers at their workplace, home, schools, and other areas. This is the reason why the sticker’s business has a huge uptick in past years. Not just this, the Business Wire confirmed in its report that stickers market projected to be worth USD 11.96 billion by 2021.

To be very honest, every age group loves stickers and especially kids. So, if you have the slightest thought of starting stickers selling business online then go for it because it is profitable and it will keep your creative side awake. And, we have one such software named Pabbly Subscription Billing in mind that will make your dream come true. The amazing software allowed you to build astonishing checkout pages for selling stickers online. Some of its remarkable features involve:

  • List various stickers in a single checkout page
  • Collect currency in both online and offline mode
  • Create professional invoices
  • Add taxation charges according to country or region

The aforementioned are some of the bonuses of software and now let’s concentrate on creating a checkout page for selling stickers online using a tool.

This is How your Checkout Page will Look Like After Creation

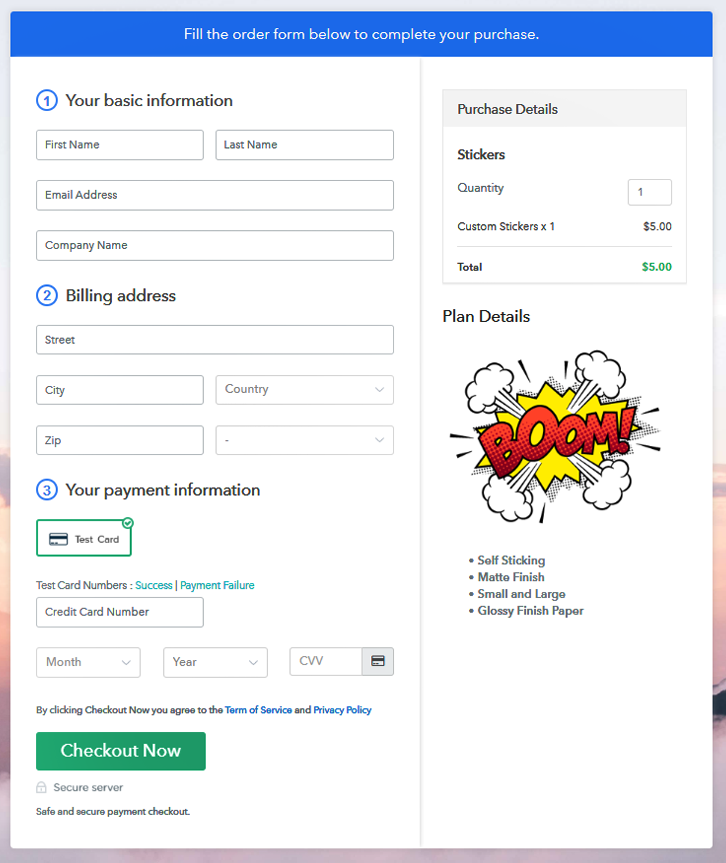
Checkout Page to Sell Stickers Online

Preview Checkout Page

Step 1: Log in to Pabbly Subscription Billing

Signup

Ignite the process of creating a checkout page for selling stickers online by visiting the Pabbly Subscription Billing in your browser and then click on “Sign up Free“. Additionally, either manually filled out the details or sign in using your Gmail account.

Sign Up For Free!

Step 2: Select Subscription Billing

Access Subscription Billing

Step 3: Account Setup

Setup Account

Next, after clicking on the “Access Now” button of the software, a page will begin with fields like company name, select currency, and phone number. Just fill out those details to continue creating a checkout page for stickers.

Step 4: Connect Payment Gateways To Sell Stickers Online

Connect Payment Gateway

The following step is to make attain knowledge about software payment procedures using a dummy payment gateway which is a “test payment gateway”. Here, we are proceeding the checkout page process for stickers using a test payment gateway. Additionally, it is swamped with various payment gateways like PayPal, Stripe, etc. Also, beneath we are addressing the payment integration guides to help you out.

Step 5: Add Your Product

Add Product

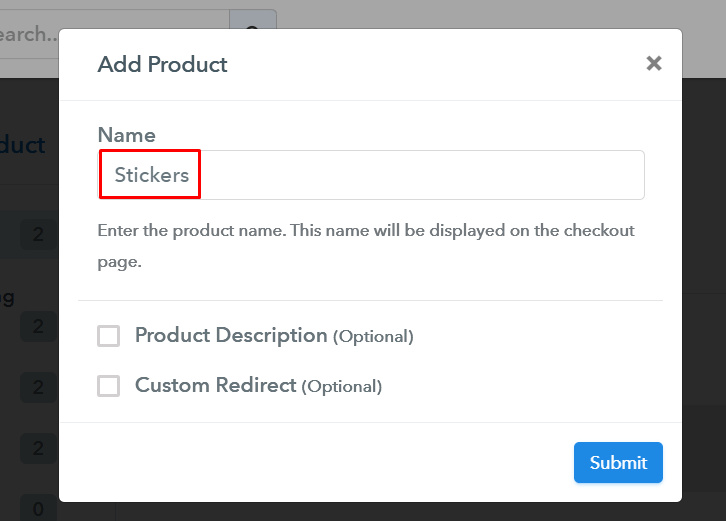
Moreover, add the name, which in our case stickers. Here you can specify the type like funky stickers, wall stickers, etc. Also, write a short description of the stickers to grab the buyer’s attention.

Add Product to Start Selling Stickers Online

Following, click on the “Submit” button after filling the details about the stickers.

Note: Here you can add all the products related to the similar category by creating plans for each of them.

Step 6: Add Plans 

Let’s uncover out plans for different kinds of stickers available in your store.

(a) Select Add New Plan

Add Plan

(b) Specify the Plan & Pricing Details

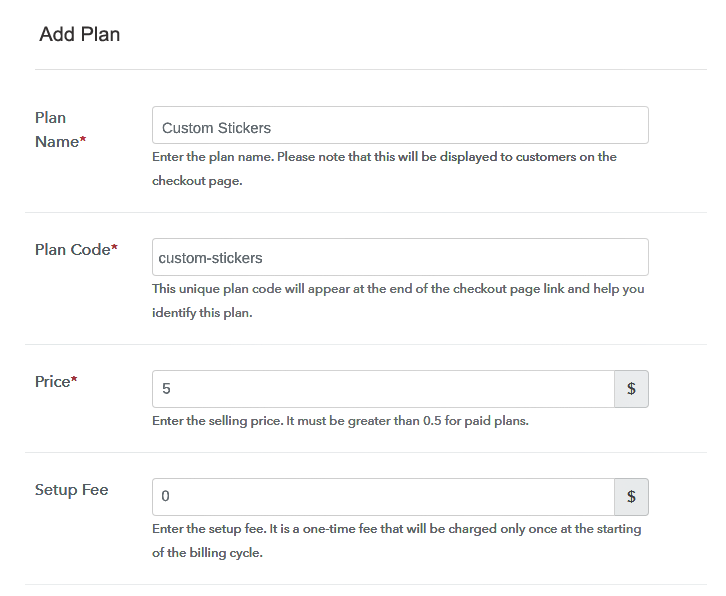
Specify the Plan and Pricing to Start Selling Stickers Online

The subsequent thing to do is fill all the details of stickers like plan name, code, price, set-up fee, and much more to continue.

(c) Add Image & Description

Add Image & Description to Sell Stickers Online

Furthermore, it is necessary to write a brief description of stickers using bullets, images, etc, to bring real consumers to the checkout page.

Following, click the “Submit” button to add the stickers on the checkout page.

Additionally, you can add multiple plans and kinds of stickers in your product list which you want to trade online.

Step 7: Share your Checkout Page

Share Checkout Page on Social Media

  • Furthermore, share the checkout page of stickers on social media accounts like Facebook & Twitter to get the prospect’s attention.
  • Also, you can share the direct link of the sticker’s checkout page with your customers via SMS or email marketing.
  • Additionally, embed the provided plan link of stickers in the buttons or any anchor text on your website.

Step 8: Preview Checkout Page

Follow up the recommended steps to preview the checkout page for stickers:

(a) Click on the View Button

View Checkout Plan

(b) Take a Look at the Checkout Page

Checkout Page to Sell Stickers Online

Step 9: Embed Checkout Page in Site & Sell Stickers Online

Embed Checkout Page on Website

Simply copy the link and add the checkout page to sell stickers online at any decent place on your WordPress site.

(a) Edit the Page & Paste the Copied Link

Paste Link in Text Editor

Also, paste the plan link of stickers on a text editor of the WordPress dashboard.

(b) Save & Publish the Checkout Page

Save and Publish

Hit the “Publish” button, after making changes.

(c) Check out the Final Look of your Checkout Page on WordPress Site

Final Look of your Checkout Page to Sell Stickers Online

Step 10: Multiplan Checkout Page

Note: In case you want to sell multiple products via a single checkout page, you can create a multi-plan checkout page otherwise skip this step.

(a) Click on Add Mutiplan Checkout

Multiplan Checkout

(b) Add Plans to Sell Multiple Stickers from Single Checkout Page

Multiple Products to Start Selling Stickers Online

(c) Take a Look at the Checkout Page

Multiplan Checkout Page to Sell Stickers Online

Preview Checkout Page

Wrapping Up

With every season there comes a new variety of stickers, you must have remembered GOT stickers. So, there is no chance that stickers business will go downhill anytime soon. And, now you are aware of how easy it is to start stickers selling business online using software Pabbly Subscription Billing. Just follow all the suggested steps and you’re good to go.

Try out this software and let us know your reactions in the comments section.

You May Also Like To Read –
How to Sell Memorabilia Online | Step by Step (Free Method)

How to Sell Memorabilia Online

Ideal For: All the memorabilia sellers, memorabilia shop owners, retail memorabilia selling business owners, and other memorabilia selling merchants can use this method to take their memorabilia selling business online.

How to Sell Memorabilia Online

Why Choose this Method for Selling Over any Other Solution?

Unlike any other solution, this method allows you to:

  • List and sell your memorabilia for FREE. Absolutely no payment required.
  • No commission on sales.
  • Collect payment through multiple payment modes from a single checkout page.
  • Sell one time or recurring subscriptions of your memorabilia.
  • Sell and collect payment in any currency as per your requirement.
  • Give discounts on your products by offering special coupon codes.
  • Add sales commission agents to help you in selling memorabilia online.

Get Pabbly Subscription Billing for Free

People need to spend too much on starting a memorabilia business online. Also, finding customers in a locality would be pretty hard. So, the web could be the best option for memorabilia shop owners and even those who want to sell even single memorabilia. The procedure that I’m going to discuss further can help both types of sellers to sell memorabilia online easily.

Why would you like to sell memorabilia online?

Well, buyers could pay a satisfactory amount for memorabilia and if there is somehow a global reach possible then the amount could be even much better. There is this service named Pabbly Subscription Billing which allows you to create product checkout pages to sell memorabilia online and share them globally. Here, is what more you’ll get with this service.

  • Proper management dashboard for all memorabilia in stock
  • A display page for all the items in beautiful checkout pages
  • Collect payment both offline & online
  • Multiple reliable gateway options
  • Automatic invoicing over emails
  • Multiple sharing and embedding options for the checkout pages
    And much more to sell memorabilia online

You can share the created checkout pages over social media platforms like Facebook, Twitter, WhatsApp, SMS, Email etc. Also, you can embed these checkout pages in a website’s post, pages, buttons, text etc.

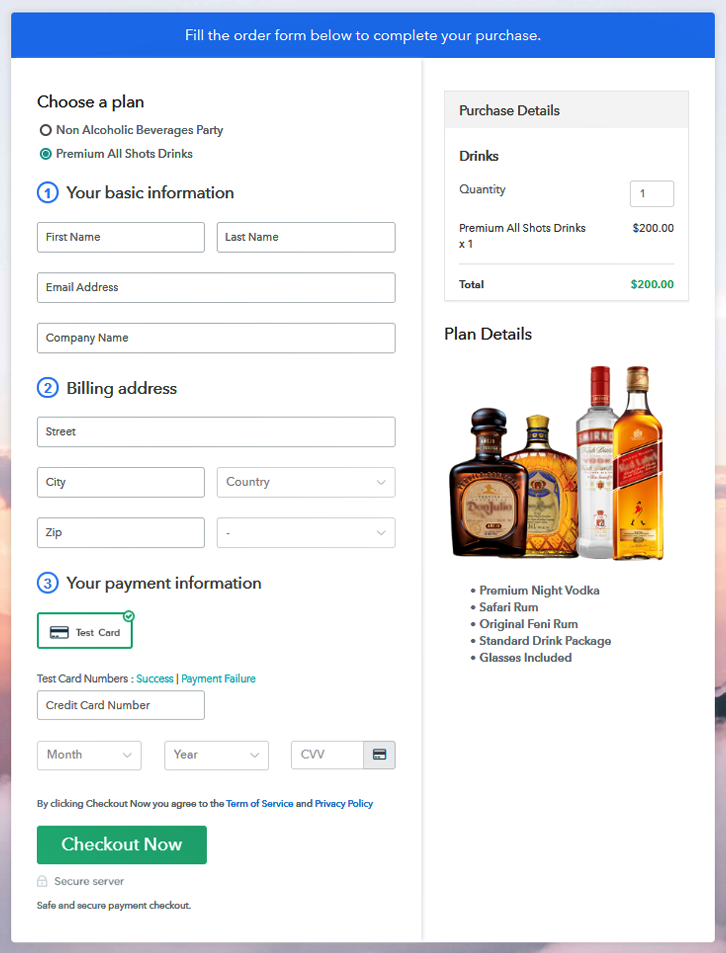
This is How your Checkout Page will Look Like After Creation

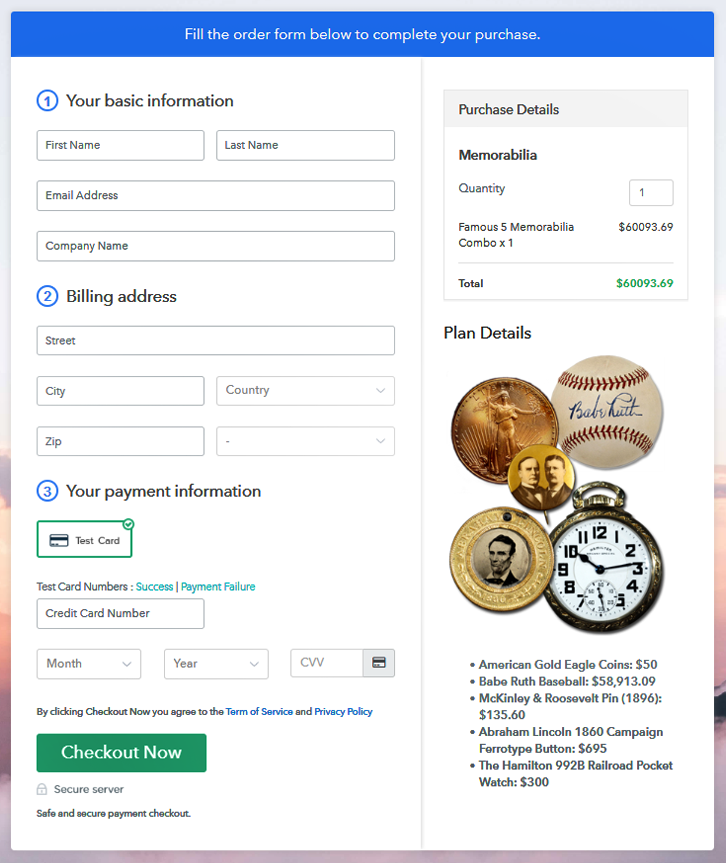
Checkout Page Preview to Sell Memorabilia Online

Preview Checkout Page

Step 1: Login to Pabbly Subscription Billing

Signup
The first step is visiting the Pabbly Subscription Billing website. Here click on the “Sign Up Free” button. This will open up a login/registration page. Sign-in into the system via already existing Google account or by manual sign-up.

Sign Up For Free!

Step 2: Select Subscription Billing

Access Subscription Billing

After signing in to the system choose the Pabbly Subscription Billing app amongst the choices and click on the “Access Now” button next to it (as shown above).

Step 3: Account Setup

Setup Account

A pop-up will appear requesting to fill out the company name, currency and a phone number. Quickly mention the required information and click on the “Continue” button.

Step 4: Connect Payment Gateway to Sell Memorabilia Online

Connect Payment Gateway

Next, step is integrating a payment gateway. For this there are multiple options to opt also, the integration guides are linked below. For the testing purpose here I’m selecting the test payment gateway.

Step 5: Add Your Product

Add Product

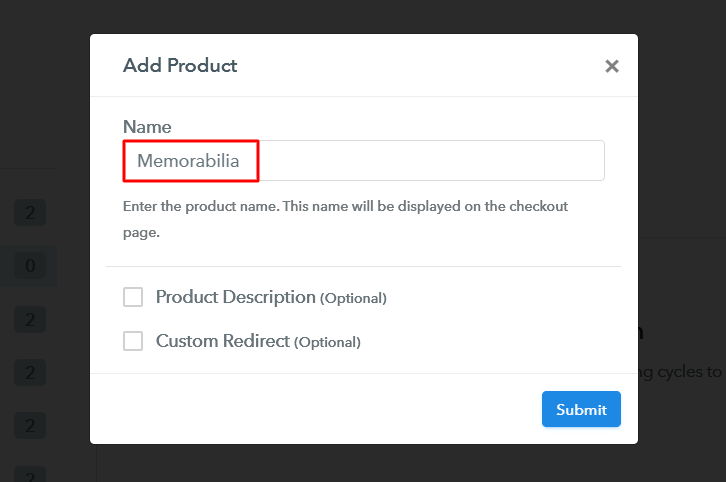
Now, you are ready for adding products. For adding a product click on the “Add New Product” button as shown above. A box will open up as shown below you’ll need to mention a product category to sell memorabilia online in it.

Add Product to Sell Memorabilia Online

Hit the “Submit” button after you are done filling out the product details to sell memorabilia online.

Note: Here you can add all the products related to the similar category by creating plans for each of them.

Step 6: Add Plans

Next is adding plans to a created product. For this, under the created product click the ” “Add New Plan” button. You’ll be directed to a plan page.

(a) Select Add New Plan

Add Plan

(b) Specify the Plan & Pricing Details

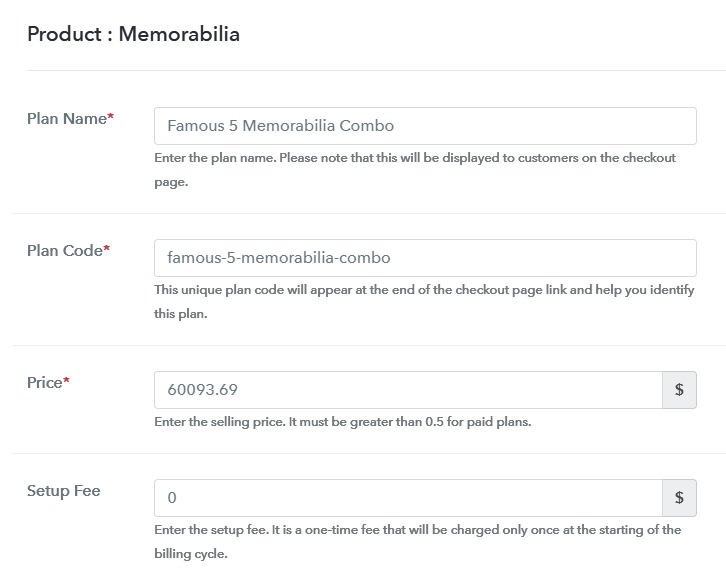
Add Plan to Sell Memorabilia Online

Fill out the plan details such as a plan name of the memorabilia, code, price to display on the checkout page for selling memorabilia online.

(c) Add Image & Description

Add Image & Description to Sell Memorabilia Online

Also, mentioned an image as well as a description for the memorabilia while creating a plan. You can place it in the “Add Description” field. This information will all be visible on the product checkout page to sell field online.

There are some text formatting options also available in the bar such as lists, quotes, links, headings etc to format the memorabilia descriptive text.

After filling out all the plan details, strike the “Submit” button and an item will be added for selling memorabilia online.

Step 7: Share your Checkout Page

Share Checkout Page on Social Media

After every new successful plan creation, a window will become visible holding a plan link and a page code redirecting to the created checkout page to sell memorabilia online.

  • You can share this “Plan Link” on multiple social media platforms like SMS, WhatsApp, emails etc.
  • Also, you can link this plan link in the buttons and text anchors of any website.
  • Two direct Facebook & Twitter icon buttons are also visible here, click them to share any created checkout page directly onto these platforms.

Step 8: Preview Checkout Page

Follow these steps to preview a checkout page:

(a) Click on the View Button

View Checkout Plan

(b) Take a Look at the Checkout Page

Checkout Page Preview to Sell Memorabilia Online

Step 9: Embed Checkout Page in Site & Sell Memorabilia Online

Embed Checkout Page on Website

You can use the code under “Embed Plan Link” to embed the checkout page on WordPress. For embedding a page, copy the complete code given there.

(a) Edit the Page & Paste the Copied Link

Paste_Link_in_Text_Editor

And then paste it in the text area section of any post or page.

(b) Save & Publish the Checkout Page

Save_and_Publish

Hit the “Publish” button of the post or page and a checkout page will get embedded on your website.

(c) Check out the Final Look of your Checkout Page on WordPress Site

Checkout Page On Site to Sell Memorabilia Online

Step 10: Multiplan Checkout Page

Note: In case you want to sell multiple products via a single checkout page, you create a multi-plan checkout page otherwise skip this step.

(a) Click on Add Mutiplan Checkout

Multiplan_Checkout

(b) Add Plans to Sell Multiple Memorabilia from Single Checkout Page

Create Multiplan Checkout to Sell Memorabilia Online

(c) Take a Look at the Checkout Page:

Multiplan Checkout to Sell Memorabilia Online

Preview Checkout Page

Wrapping Up

These were the ten steps to kick start memorabilia business online right on and take your products to a global market. The service provides secure payments along with multiple payment methods to opt from. I highly recommend this method over any other as it does not require any complex set-up and has a very well-managed system.

Also, there is no transaction fee or any other charges so this service worth a try as there is a small investment of time only.

Good Luck with your memorabilia business!

You May Also Like To Read

How to Sell DVDs Online | Step by Step (Free Method)

How to Sell DVDs Online

Ideal For: All the DVD sellers, DVD makers, retail DVD selling business owners, and other DVD selling merchants can use this method to take their DVDs selling business online.

How to Sell DVDs Online

Why Choose this Method for Selling Over any Other Solution?

Unlike any other solution, this method allows you to:

  • List and sell your DVDs for FREE. Absolutely no payment required.
  • No commission on sales.
  • Collect payment through multiple payment modes from a single checkout page.
  • Sell one time or recurring subscriptions of your DVDs.
  • Sell and collect payment in any currency as per your requirement.
  • Give discounts on your products by offering special coupon codes.
  • Add sales commission agents to help you in selling DVDs online.

Get Pabbly Subscription Billing for Free

DVDs are famous for watching movies & playing video games. PS3, PS4, Xbox all play DVDs and Blu-rays. And if you are searching for some platform to kick start DVDs business online then give this a try.

Why would you like to sell DVDs online?

Maybe because there is a good audience watching movies and playing games on various consoles that support DVDs. The online presence is much like reaching out to more audience, but many business owners don’t actually know where to start.

So, here is the simplest idea to sell DVDs online in clicks. Create showy checkout pages containing information about the DVDs that you want to sell and then share them anywhere you want. Also, you can link the checkout pages in website buttons, texts and embed them in post/pages.

Also, you can manage the DVDs to sell, their online and offline payments, billing and invoicing etc very easily.

This is How your Checkout Page will Look Like After Creation

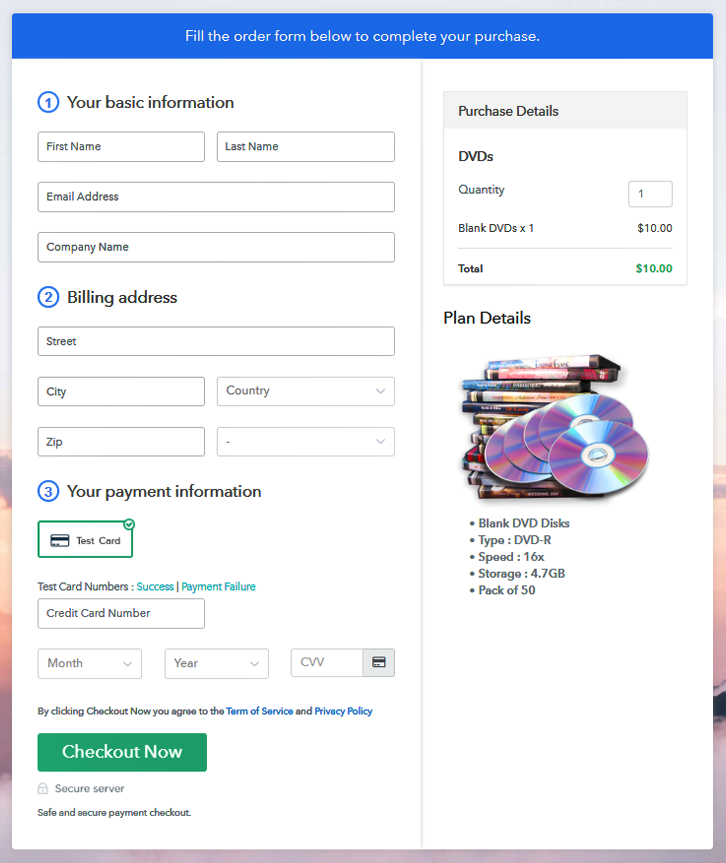
Checkout Page Preview to Sell DVDs Online

Preview Checkout Page

Step 1: Login to Pabbly Subscription Billing

Signup
At first, you’ll need to visit Pabbly Subscription Billing website. On the home page click on the “Sign Up Free” button. You’ll be then redirected to the sign-in/sign-up page here either sign-in using an existing Google account or sign-up manually by filling out the registration form.

Sign Up For Free!

Step 2: Select Subscription Billing

Access Subscription Billing

After a successful sign-up, a page will open-up containing multiple apps click on the Subscription Billing app as shown above.

Step 3: Account Setup

Setup Account

A window will pop-up asking for information like company name, currency & phone number. Fill out the details asked here & then hit the “Continue” button.

Step 4: Connect Payment Gateway to Sell DVDs  Online

Connect Payment Gateway

In this step, you’ll be integrating payment method. Moreover, multiple payment gateway options are available here to choose from. Also, the integration guidelines are mentioned below. Here I’m using the test payment gateway for now.

Step 5: Add Your Product

Add Product

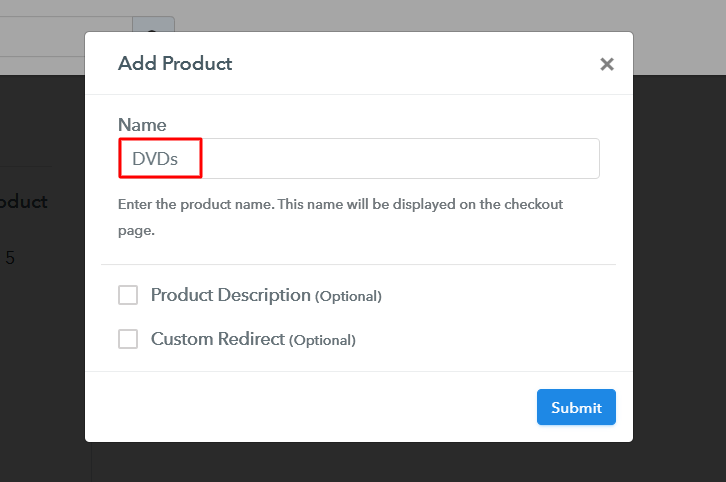
Next is creating a product for this click on the “Add New Product” button. Here, you can specify a product name much like a category. Further, we’ll be adding plans to this product category.

Add Product to Sell DVDs Online

After filling out the product details click on the “Submit” button. Besides, you can add as many DVDs products as you want to add.

Note: Here you can add all the products related to the similar category by creating plans for each of them.

Step 6: Add Plans

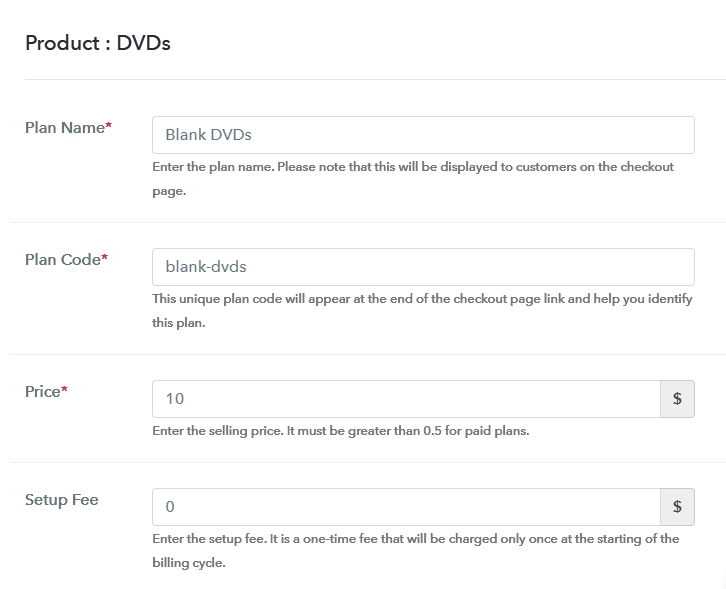
After adding a product, you can further add plans to it. Just click on the “Add New Plan” button & you’ll be redirected to a plan page where you’ll need to fill out the details about your item to sell DVDs online.

(a) Select Add New Plan

Add Plan

(b) Specify the Plan & Pricing Details

Add Plan to Sell DVDs Online

Here, mention a plan name, a code, the price to sell DVDs online.

(c) Add Image & Description

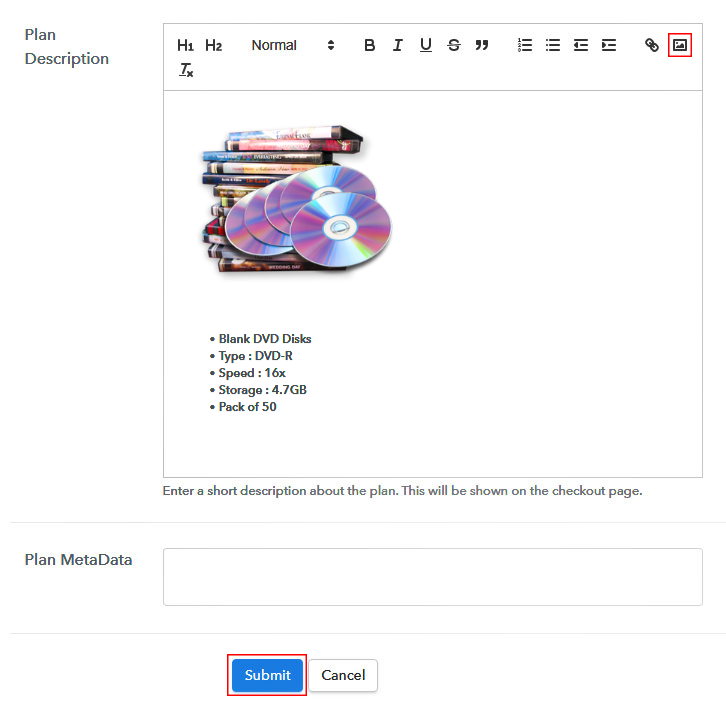
Add Image & Description to Sell DVDs Online

Add an image and description of the item to sell in the “Add Description” field to sell DVDs online. Also, you can use various text formatting options available to format the descriptive text for selling DVDs online. For this, you can use lists, quotes, links, headings etc.

Strike the “Submit” after filling out the plan details to sell DVDs online and a plan will be added in that particular product category.

Step 7: Share your Checkout Page

Share Checkout Page on Social Media

After creating a new plan, a box will be visible (as shown above), containing a plan link & a code.

  • You can make use of the “Plan Link” to share a checkout page over various social media platforms, SMS, emails etc for selling DVDs online.
  • Similarly, you can also link this same “Plan Link” in buttons & text of your website.
  • Also, two Facebook & Twitter buttons are available to share the created plan checkout page directly onto these platforms.

Step 8: Preview Checkout Page

Follow these steps to preview a checkout page:

(a) Click on the View Button

View Checkout Plan

(b) Take a Look at the Checkout Page

Checkout Page Preview to Sell DVDs Online

Step 9: Embed Checkout Page in Site & Sell DVDs Online

Embed Checkout Page on Website

The code given under “Embed Plan Link” box can be used to embed a page on WordPress. For this, copy the code given.

(a) Edit the Page & Paste the Copied Link

Paste_Link_in_Text_Editor

And then paste it in the text area of a post or page of a website.

(b) Save & Publish the Checkout Page

Save_and_Publish

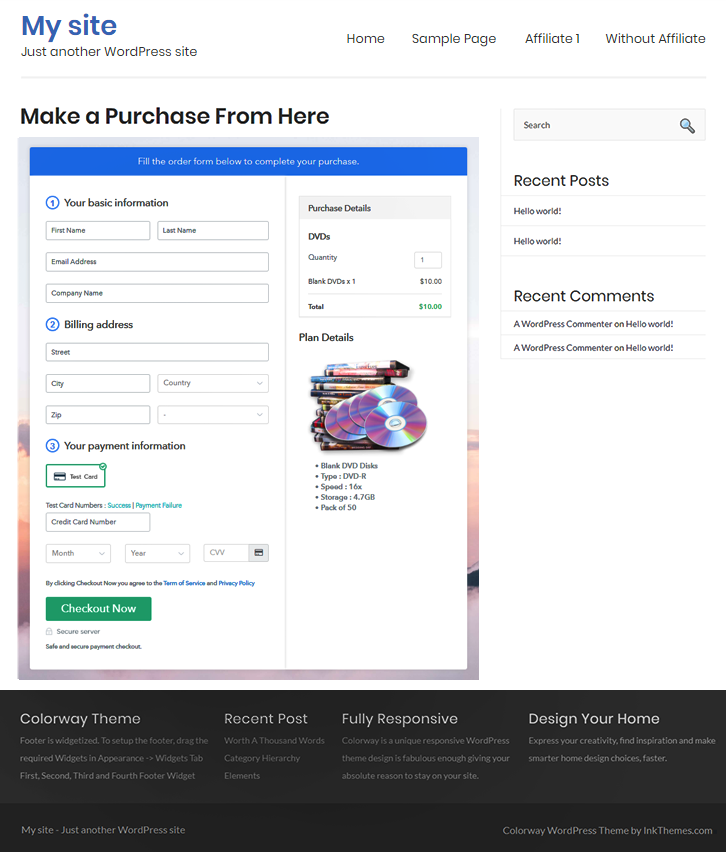
Then click on the “Publish” button of the post or page. The checkout page will be embedded on that website right away.

(c) Check out the Final Look of your Checkout Page on WordPress Site

Checkout Page On Site to Sell DVDs Online

Step 10: Multiplan Checkout Page

Note: In case you want to sell multiple products via a single checkout page, you create a multi-plan checkout page otherwise skip this step.

(a) Click on Add Mutiplan Checkout

Multiplan_Checkout

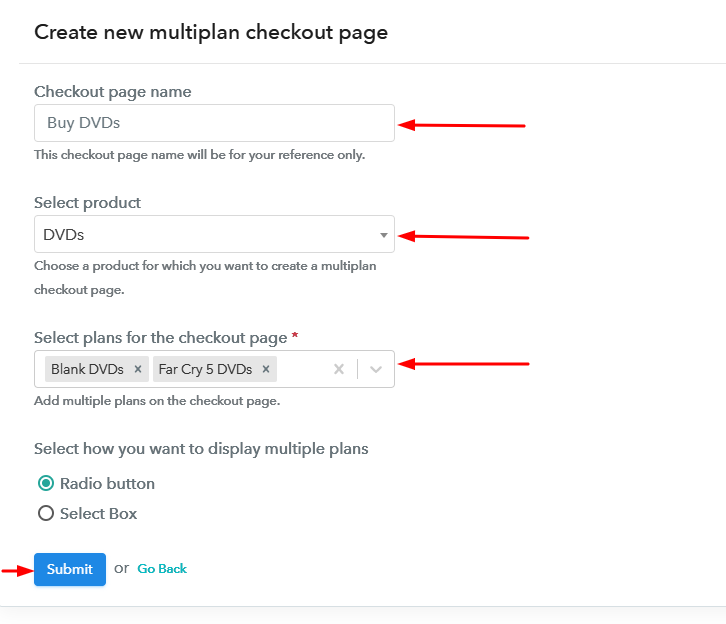
(b) Add Plans to Sell Multiple DVDs from Single Checkout Page

Create Multiplan Checkout to Sell DVDs Online

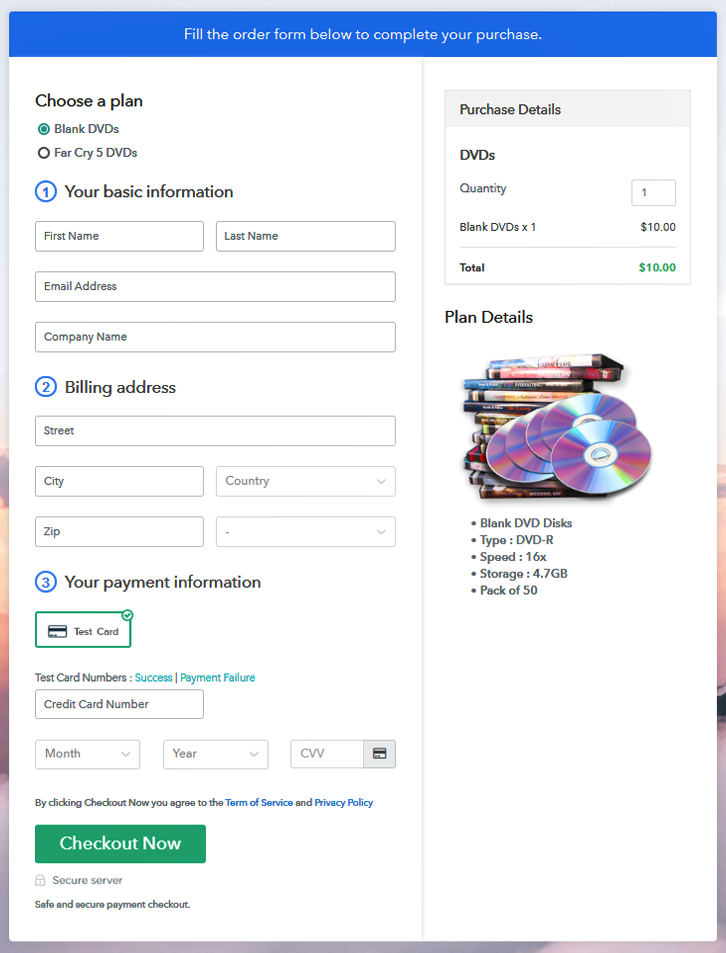
(c) Take a Look at the Checkout Page:

Multiplan Checkout Page to Sell DVDs Online

Preview Checkout Page

Wrapping Up

These were the 10 simplest steps to start DVDs business online. And even a non-techy person could use them to sell DVDs online. Also, if you are not having a website then also you can use this method for selling DVDs online.

There are multiple options available for integration such as PayPal, Stripe, Authorize.Net, Razorpay etc.

Good Luck with your DVDs business!

You May Also Like To Read

How to Sell Organic Vegetables Online | Step by Step (Free Method)

How to Sell Organic Vegetables Online

Ideal For: All the organic vegetable sellers, organic vegetable cultivators, retail vegetable selling business owners, and other vegetable selling merchants can use this method to take their vegetable selling business online.

How to Sell Organic Vegetables Online

Why Choose this Method for Selling Over any Other Solution?

Unlike any other solution, this method allows you to:

  • List and sell your organic vegetables for FREE. Absolutely no payment required.
  • No commission on sales.
  • Collect payment through multiple payment modes from a single checkout page.
  • Sell one time or recurring subscriptions of your organic vegetables.
  • Sell and collect payment in any currency as per your requirement.
  • Give discounts on your products by offering special coupon codes.
  • Add sales commission agents to help you in selling organic vegetables online.

Get Pabbly Subscription Billing for Free

To help everyone live a healthy life organic vegetables are now available online and anyone can buy them in a few clicks. And if you are planning to sell organic vegetables online then I can tell you a smarter way.

Why would you like to sell organic vegetables online?

Well, you must be heaving your own reasons for bringing fresh organic vegetables to people’s lives. But there are many concerns to start an organic vegetable business online.

Also, here is a one-stop solution, which can help you with all the catches that come in selling veggies online within just mere clicks. All you need to do is follow the 10 simple steps discussed in this article and you’ll be up in selling organic vegetables online. Further, it also enables you to do the following.

  • It provides a place to manage all items to sell organic vegetables online
  • A system to accept safe & secure payments
  • Online place to display items beautifully
  • Apply taxes and discounts
  • Billing & invoicing
  • Sharing the products easily
    etc.

This service will make use of checkout pages where you can display a product to sell organic vegetables online and share it on different social media platforms like Facebook, WhatsApp, Twitter, SMS, Emails etc.

Moreover, you can also embed the created checkout page on a website’s post/page, buttons or text anchors.

This is How your Checkout Page will Look Like After Creation

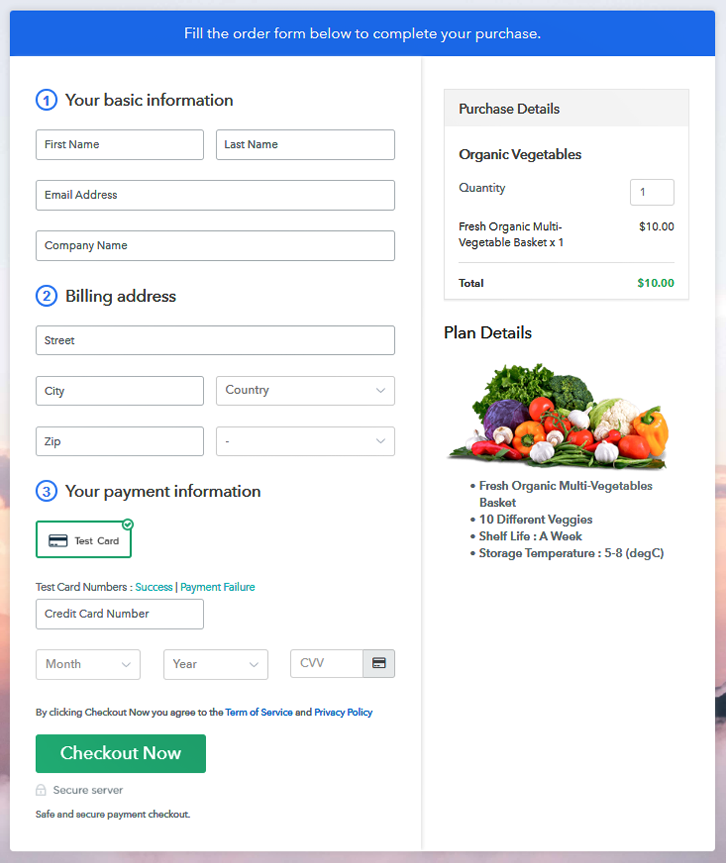
Checkout Page Preview to Sell Organic Vegetables Online

Preview Checkout Page

Step 1: Login to Pabbly Subscription Billing

Signup
You can start the procedure by visiting the Pabbly Subscription Billing website. Here & click on the “Sign Up Free” button and sign-in/sign-up into the system. You can directly sign-in using a Google account or you can sign-up by filling out the registration form.

Sign Up For Free!

Step 2: Select Subscription Billing

Access Subscription Billing

After filling successfully signing in, click on the “Access Now” button of the Subscription Billing service as shown above.

Step 3: Account Setup

Setup Account

A window will pop-open asking for a company name, currency & phone number. Mention the details asked and then click the “Continue” button to proceed forward.

Step 4: Connect Payment Gateway to Sell Organic Vegetables Online

Connect Payment Gateway

This is a mandatory integration step in the whole procedure. As you’ll need to integrate a payment gateway. The service provides multiple options to choose a payment method. I’m using the test payment method here for testing the personality. Although, for accepting payments you’ll need to use a payment method amongst the following.

Step 5: Add Your Product

Add Product

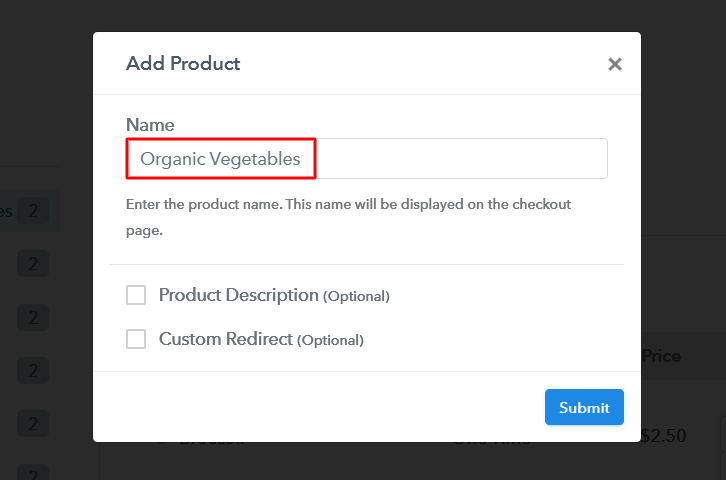
Now, is the time to create a product. Click on the “Add New Product” button to add a category of the organic vegetables. Fill out the details asked.

Add Product to Sell Organic Vegetables Online

Click on the “Submit” button after filling out the details to sell organic vegetables online. Repeat this step for adding more products.

Note: Here you can add all the products related to the similar category by creating plans for each of them.

Step 6: Add Plans

Next step is adding a plan for the created product. First, click on the “Add New Plan” button of a product and stuff out the details about the veggies that you want to sell. These plan details will be visible on the checkout page.

(a) Select Add New Plan

Add Plan

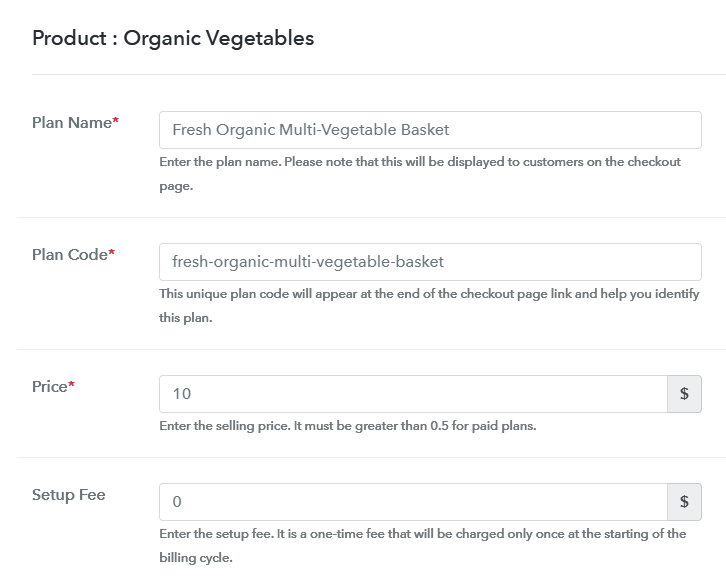
(b) Specify the Plan & Pricing Details

Add Plan to Sell Organic Vegetables Online

Fill out the details as plan name, code, price etc to sell organic vegetables online.

(c) Add Image & Description

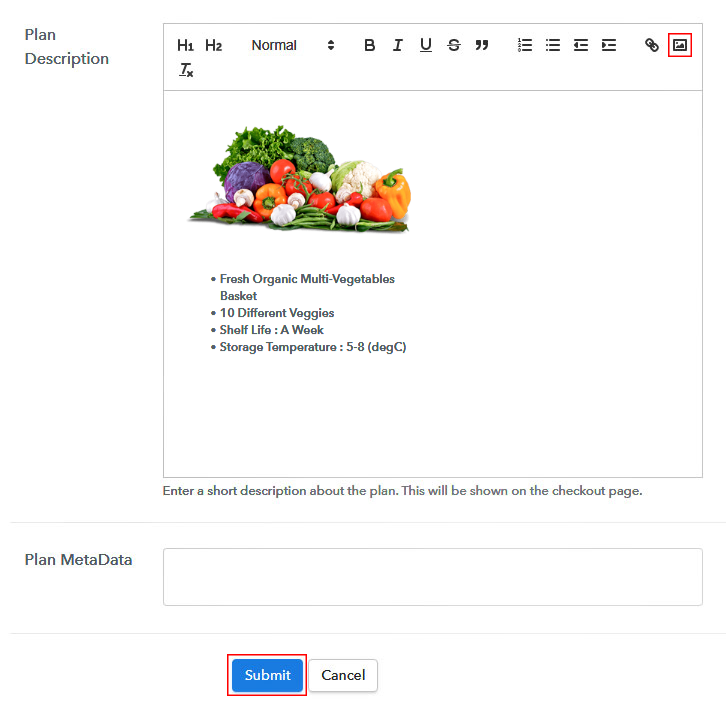
Add Image & Description to Sell Organic Vegetables Online

You can put an image and description of an organic vegetable to sell in the “Add Description” section.

Furthermore, there are many text formatting tools to add lists, quotes, links, headings etc in the description for selling organic vegetable online.

Click the “Submit” button once you are done filling out the plan details and description to sell organic vegetables online.

Repeat this step every time you want to add a plan for a particular product.

Step 7: Share your Checkout Page

Share Checkout Page on Social Media

After a plan creation, you can see plan link and code in a pop-up window to share as well as embed the created single checkout page.

  • You can share the “Plan Link” on social media platforms, SMS, and emails to sell organic vegetables online.
  • Moreover, you can also link this “Plan Link” in buttons & text anchors.
  • Two direct sharing buttons are also available here to share the plan over Facebook & Twitter.

Step 8: Preview Checkout Page

Follow these steps to preview a checkout page:

(a) Click on the View Button

View Checkout Plan

(b) Take a Look at the Checkout Page

Checkout Page Preview to Sell Organic Vegetables Online

Step 9: Embed Checkout Page in Site & Sell Organic Vegetables Online

Embed Checkout Page on Website

To embed a created checkout page on WordPress, you can copy the code given under “Embed Plan Link” window.

(a) Edit the Page & Paste the Copied Link

Paste_Link_in_Text_Editor

And paste it in the text area of a post/page on your website.

(b) Save & Publish the Checkout Page

Save_and_Publish

After placing the code Publish this post/page & the checkout page will be embedded on your website.

(c) Check out the Final Look of your Checkout Page on WordPress Site

Checkout Page On Site to Sell Organic Vegetables Online

Step 10: Multiplan Checkout Page

Note: In case you want to sell multiple products via a single checkout page, you create a multi-plan checkout page otherwise skip this step.

(a) Click on Add Mutiplan Checkout

Multiplan_Checkout

(b) Add Plans to Sell Multiple Organic Vegetables from Single Checkout Page

Create Multiplan Checkout Page to Sell Organic Vegetables Online

(c) Take a Look at the Checkout Page:

Multiplan Checkout Page to Sell Organic Vegetables Online

Preview Checkout Page

Wrapping Up

As you can clearly see that these were the simplest steps to start an organic vegetable business online. Also, there is a guarantee of safe and secure payments as it is offering multiple safe & secure payment gateways like PayPal, Stripe, Razorpay & Authorize.Net.

You may also find multiple sharing options and embedding option very useful in selling organic vegetables online.

You May Also Like To Read