Ideal For: All the memorabilia sellers, memorabilia shop owners, retail memorabilia selling business owners, and other memorabilia selling merchants can use this method to take their memorabilia selling business online.

Why Choose this Method for Selling Over any Other Solution?
Unlike any other solution, this method allows you to:
- List and sell your memorabilia for FREE. Absolutely no payment required.
- No commission on sales.
- Collect payment through multiple payment modes from a single checkout page.
- Sell one time or recurring subscriptions of your memorabilia.
- Sell and collect payment in any currency as per your requirement.
- Give discounts on your products by offering special coupon codes.
- Add sales commission agents to help you in selling memorabilia online.
People need to spend too much on starting a memorabilia business online. Also, finding customers in a locality would be pretty hard. So, the web could be the best option for memorabilia shop owners and even those who want to sell even single memorabilia. The procedure that I’m going to discuss further can help both types of sellers to sell memorabilia online easily.
Why would you like to sell memorabilia online?
Well, buyers could pay a satisfactory amount for memorabilia and if there is somehow a global reach possible then the amount could be even much better. There is this service named Pabbly Subscription Billing which allows you to create product checkout pages to sell memorabilia online and share them globally. Here, is what more you’ll get with this service.
- Proper management dashboard for all memorabilia in stock
- A display page for all the items in beautiful checkout pages
- Collect payment both offline & online
- Multiple reliable gateway options
- Automatic invoicing over emails
- Multiple sharing and embedding options for the checkout pages
And much more to sell memorabilia online
You can share the created checkout pages over social media platforms like Facebook, Twitter, WhatsApp, SMS, Email etc. Also, you can embed these checkout pages in a website’s post, pages, buttons, text etc.
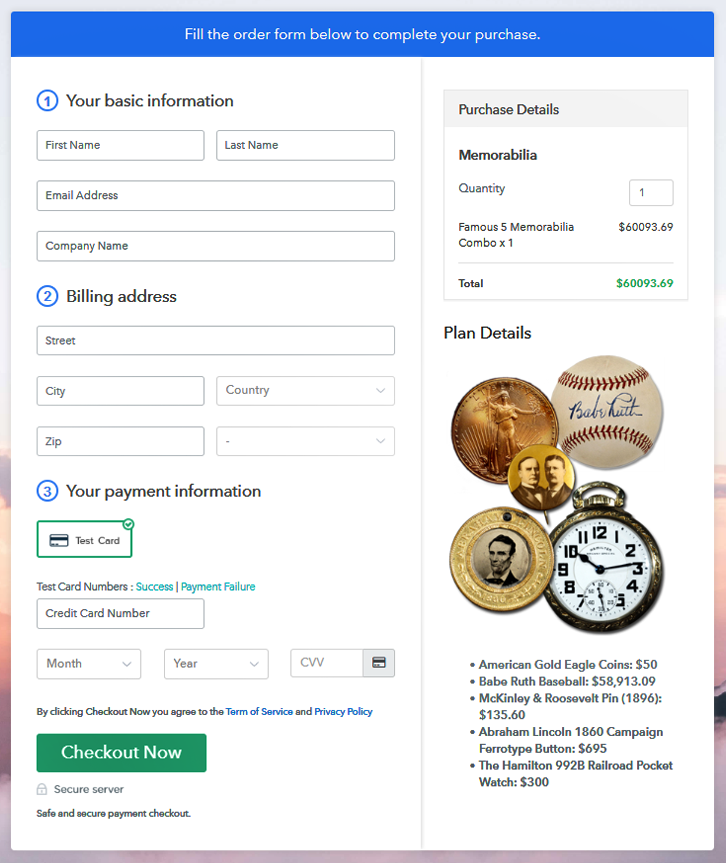
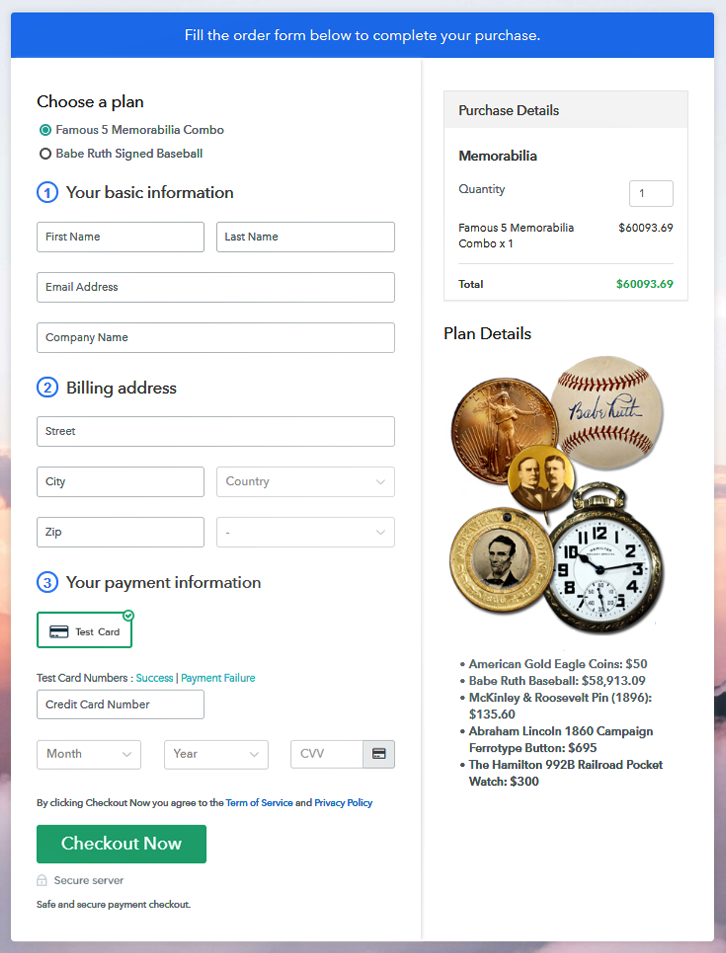
This is How your Checkout Page will Look Like After Creation
Step 1: Login to Pabbly Subscription Billing

The first step is visiting the Pabbly Subscription Billing website. Here click on the “Sign Up Free” button. This will open up a login/registration page. Sign-in into the system via already existing Google account or by manual sign-up.
Step 2: Select Subscription Billing

After signing in to the system choose the Pabbly Subscription Billing app amongst the choices and click on the “Access Now” button next to it (as shown above).
Step 3: Account Setup

A pop-up will appear requesting to fill out the company name, currency and a phone number. Quickly mention the required information and click on the “Continue” button.
Step 4: Connect Payment Gateway to Sell Memorabilia Online

Next, step is integrating a payment gateway. For this there are multiple options to opt also, the integration guides are linked below. For the testing purpose here I’m selecting the test payment gateway.
Step 5: Add Your Product

Now, you are ready for adding products. For adding a product click on the “Add New Product” button as shown above. A box will open up as shown below you’ll need to mention a product category to sell memorabilia online in it.
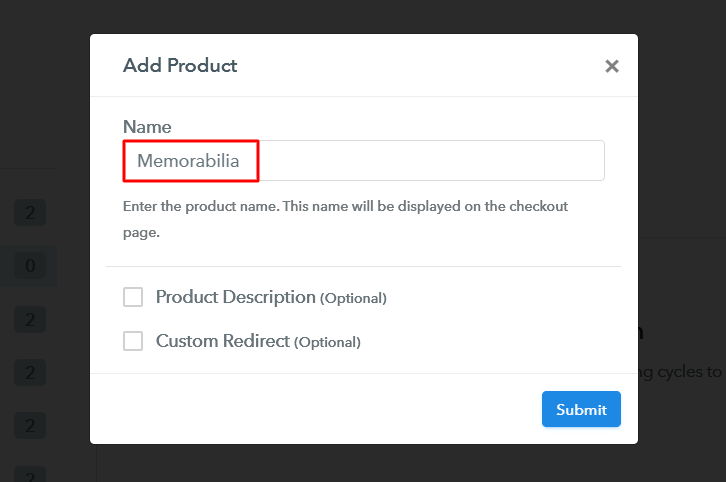
Hit the “Submit” button after you are done filling out the product details to sell memorabilia online.
Note: Here you can add all the products related to the similar category by creating plans for each of them.
Step 6: Add Plans
Next is adding plans to a created product. For this, under the created product click the ” “Add New Plan” button. You’ll be directed to a plan page.
(a) Select Add New Plan

(b) Specify the Plan & Pricing Details
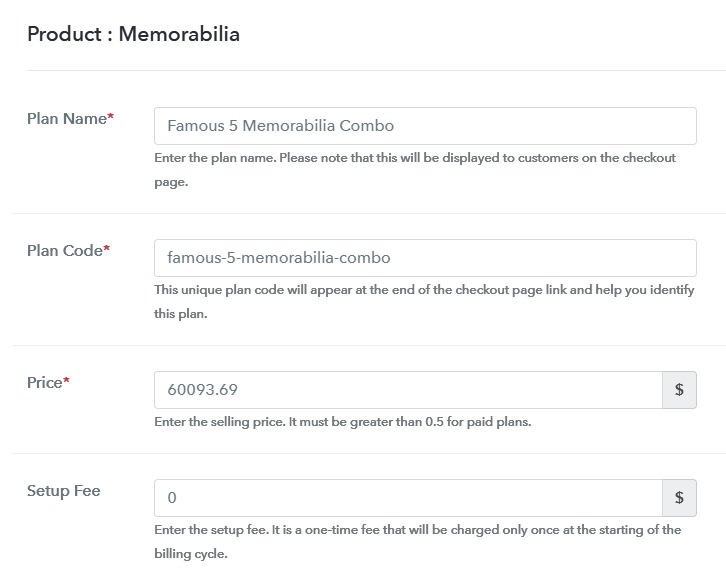
Fill out the plan details such as a plan name of the memorabilia, code, price to display on the checkout page for selling memorabilia online.
(c) Add Image & Description
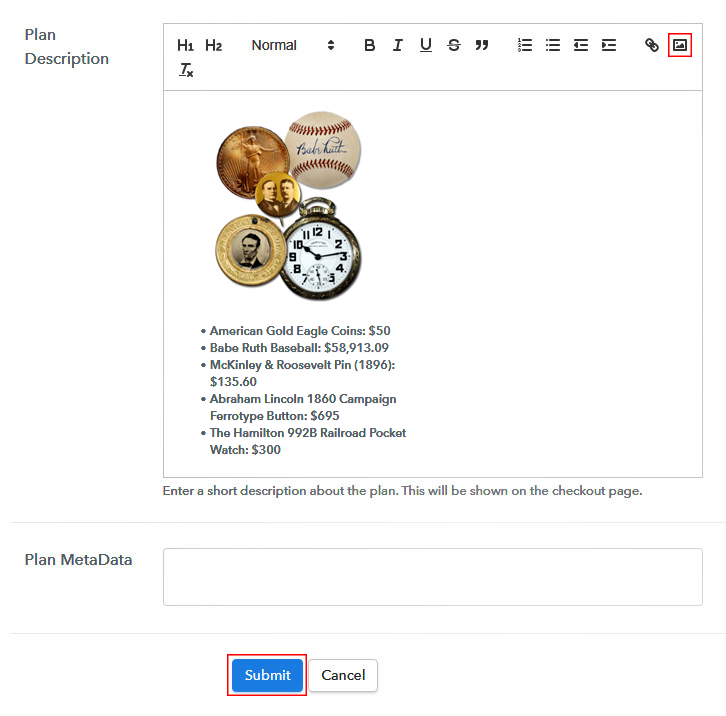
Also, mentioned an image as well as a description for the memorabilia while creating a plan. You can place it in the “Add Description” field. This information will all be visible on the product checkout page to sell field online.
There are some text formatting options also available in the bar such as lists, quotes, links, headings etc to format the memorabilia descriptive text.
After filling out all the plan details, strike the “Submit” button and an item will be added for selling memorabilia online.
Step 7: Share your Checkout Page

After every new successful plan creation, a window will become visible holding a plan link and a page code redirecting to the created checkout page to sell memorabilia online.
- You can share this “Plan Link” on multiple social media platforms like SMS, WhatsApp, emails etc.
- Also, you can link this plan link in the buttons and text anchors of any website.
- Two direct Facebook & Twitter icon buttons are also visible here, click them to share any created checkout page directly onto these platforms.
Step 8: Preview Checkout Page
Follow these steps to preview a checkout page:
(a) Click on the View Button

(b) Take a Look at the Checkout Page
Step 9: Embed Checkout Page in Site & Sell Memorabilia Online

You can use the code under “Embed Plan Link” to embed the checkout page on WordPress. For embedding a page, copy the complete code given there.
(a) Edit the Page & Paste the Copied Link

And then paste it in the text area section of any post or page.
(b) Save & Publish the Checkout Page

Hit the “Publish” button of the post or page and a checkout page will get embedded on your website.
(c) Check out the Final Look of your Checkout Page on WordPress Site
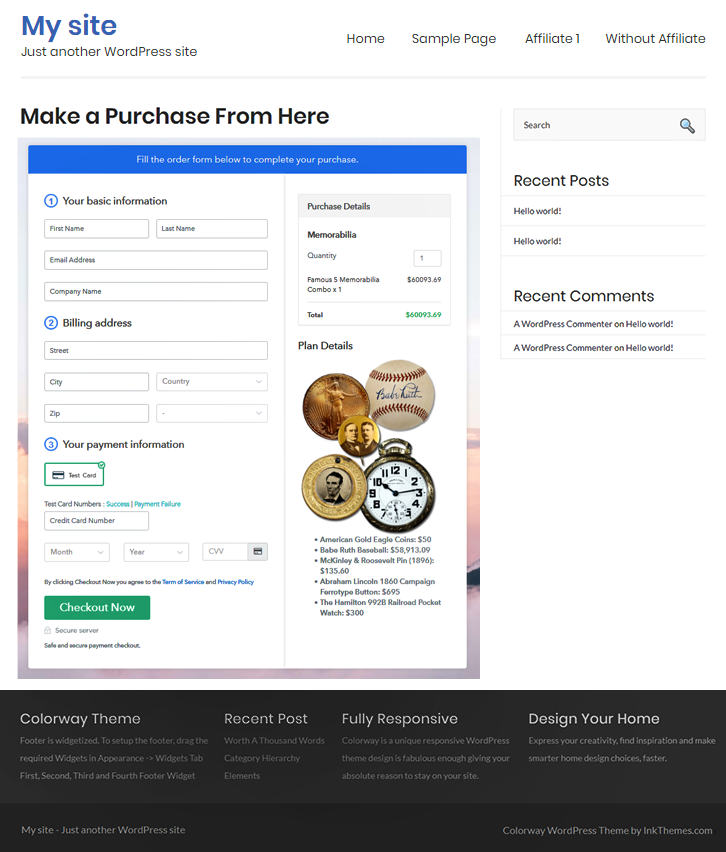
Step 10: Multiplan Checkout Page
Note: In case you want to sell multiple products via a single checkout page, you create a multi-plan checkout page otherwise skip this step.
(a) Click on Add Mutiplan Checkout

(b) Add Plans to Sell Multiple Memorabilia from Single Checkout Page

(c) Take a Look at the Checkout Page:
Wrapping Up
These were the ten steps to kick start memorabilia business online right on and take your products to a global market. The service provides secure payments along with multiple payment methods to opt from. I highly recommend this method over any other as it does not require any complex set-up and has a very well-managed system.
Also, there is no transaction fee or any other charges so this service worth a try as there is a small investment of time only.
Good Luck with your memorabilia business!


