Ideal For: All the domain dealers, domain owners, domain auctioneers and other merchants can use this method to sell domain names online.

Why Choose this Method to Sell Domain Names Online?
Unlike any other solution, this method allows you to:
- List and sell your domain names for FREE. Absolutely no payment required.
- No need to pay commission on any of your sale.
- Multiple payment options like PayPal, Credit Card, etc to collect payment from a single place.
- Sell one time or recurring subscriptions of your domain names.
- Collect payments & sell products in any currency as per your requirement.
- Give discounts on your products by offering special coupon codes.
- Add sales commission agents to help you in selling domain names online.
$30 freaking million!! I repeat $30 million was the amount for which the domain name ‘voice.com’ was sold in 2019. And before that ‘insure.com’ was sold for $16 million. Now, as a domain holder, you probably know this and that is why you are looking for a decent method to sell domain names online.
You can always, list domains and hope to find buyers on domain auctioneering websites like GoDaddy, HostGator, etc. But the problem is, these websites take a massive percentage cut as commission. Another method currently popular with domain sellers is to insert a checkout page on their websites to sell domain names online.
Here, in this article, we will be recommending an awesome tool called Pabbly Subscription Billing, which creates mesmerizing checkout pages to sell domain names online. The main advantage of using this system is, there are no commission or transaction charges, for listing and selling domain names online. Other benefits are:
- Custom Domain
- Custom Logo
- Auto Email Notification on Payment Processing
- Dunning Management
- Storage
- Tracking Revenues
So, well let’s get started to build our first checkout page with Pabbly Subscription Billing to sell domain names online.
Note: Selling domain names online is well and good, but cybersquatting is illegal.
Final View of Checkout Page for your Domain Names Selling Business

Step 1: Log in to Pabbly Subscription Billing

Locate the website Pabbly Subscription Billing in your search engine. Now on reaching their website click on the “Sign up Free“ button. Either manually fill all the information or simply sign in using your Gmail account.
Sign Up For Free!
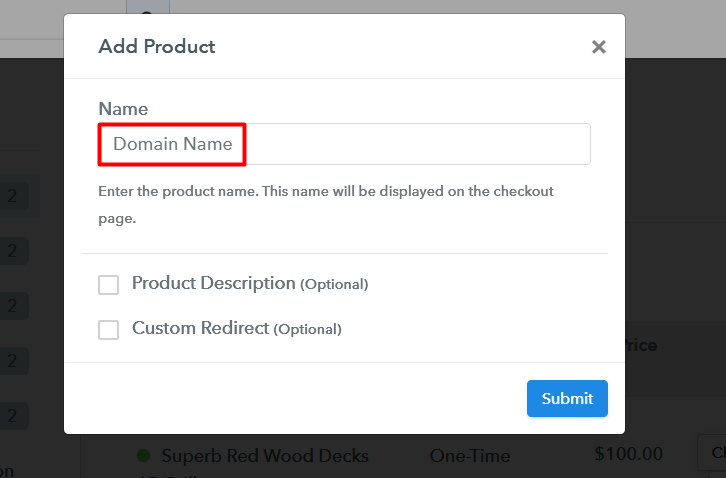
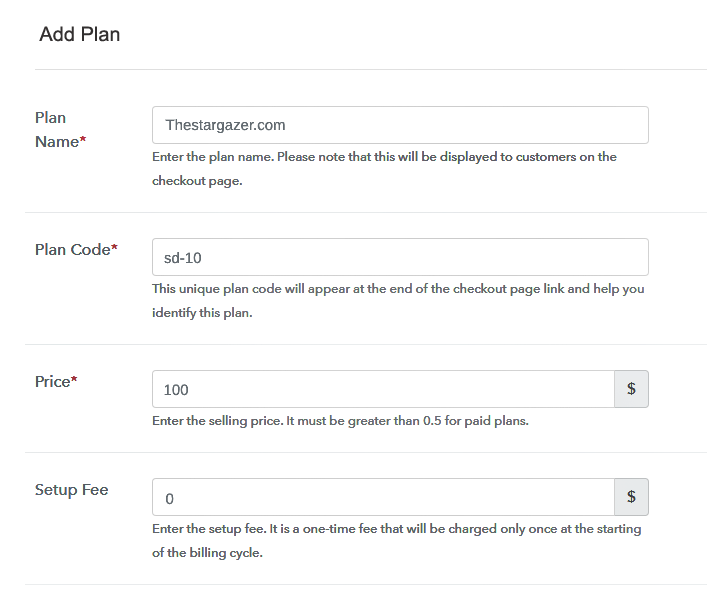
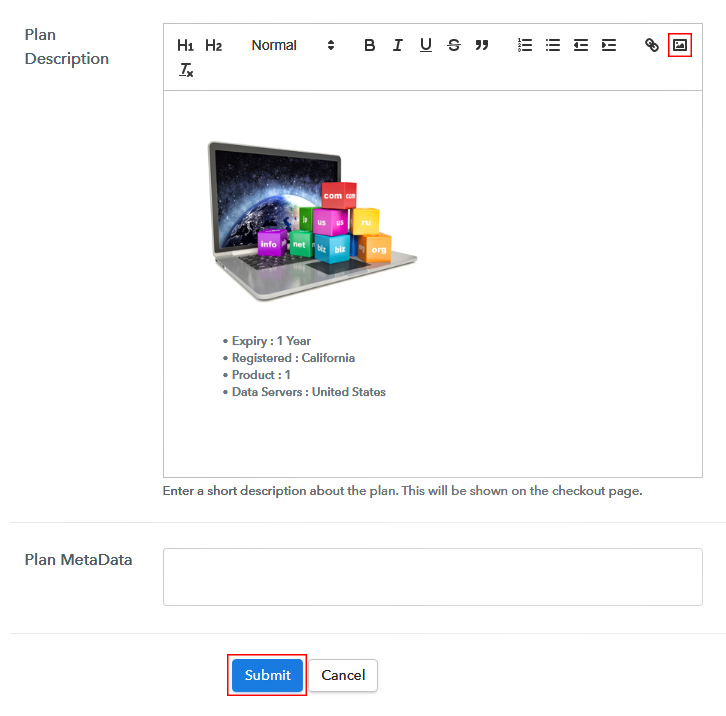
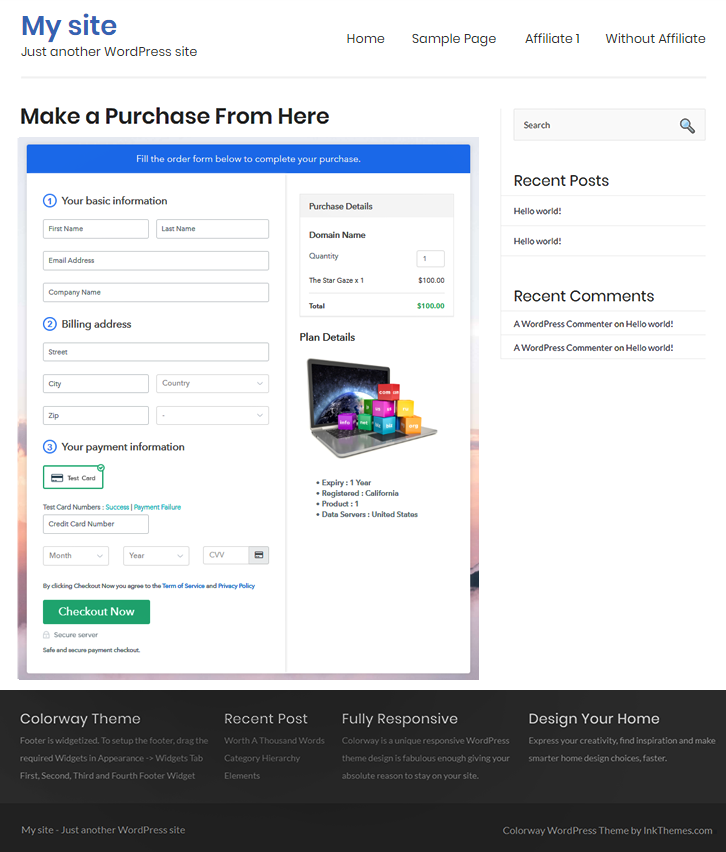
A dialog box will open you, that will require you to fill the company details like name, currency, and phone number. After filing in the details press the “Continue” button to complete the process. A customer has a low tolerance for any inconveniences especially during payments and can leave the transactions half completed. As a merchant, you should avoid any kind of glitches and make the whole payment experience streamlined. That is why with Pabbly Subscription Billing, you can beta test the whole payment experience of a customer using dummy payment gateways. You can do this by clicking on “Enable Test Payment” option Now, with Pabbly Subscription Billing, you can integrate with a ton of payment gateways like Stripe, Razorpay, PayPal, Authorize.net, etc. These payment gateways can be easily integrated using the help of the articles given below. But since we have to set up the payment process, we will click on the “Enable Test Payment” option So I hope payment integration went well, now let’s move on to add products. Below “Enable Payments” you will find the section “Add your product” click on it. This will generate a dialog box with a blue button “Add New Product”. Click it. This will summon a pop-up box and you can fill the required product title like socks then tick on the checkboxes if you want to add product description and custom redirect. Fill out all the details like the name of the product and voila your product is created. Note: Here you can add all the products related to the similar category by creating plans for each of them. Let’s rollout plans for different kinds of domains available in your store. In the plan page, fill in information like plan name, code, price, setup fees, etc. Moreover, while coming down you will find different billing models like one-time payment, recurring, based on cycles, etc. Now, choose the one that interests you the most. Furthermore, you can change it any time you want. Let’s introduce some incredible screenshots of your domains, and upload it by clicking the image button. Now under the image place some concise information of your domains like expiry, servers, country of origin etc, and then press the “Submit” button. Now, by using the same process, you can list more products. Follow up the recommended steps to preview the checkout page: Moreover, just copy the link and add the checkout page to sell domain names online at any suitable place on your WordPress site. Further, paste the plan link of the domain names on a text editor of the WordPress dashboard. Next, click the “Publish” button, after making changes. Note: In case you want to sell multiple products via a single checkout page, you can create a multi-plan checkout page otherwise skip this step. Excellent !! You have created your first checkout page with Pabbly Subscription Billing to sell domains online. It barely takes 10 minutes to create one checkout page and soon with practice, you will able to do so. But, for now, if you have any doubts please write it down in the comment section below. We will reply to you at the earliest.Step 2: Select Subscription Billing

Step 3: Account Setup

Step 4: Connect Payment Gateways & Start Domain Names Selling Business Online

Step 5: Add Product for your Domain Names

Step 6: Add Plans
(a) Select Add New Plan

(b) Specify the Plan & Pricing Details
(c) Add Image & Description of Domains
Step 7: Share your Checkout Page

Step 8: Preview Checkout Page
(a) Click on the View Button

(b) Take a Look at the Checkout Page

Step 9: Embed Checkout Page in Site & Sell Domain Names Online

(a) Edit the Page & Paste the Copied Link

(b) Save & Publish the Checkout Page

(c) Check out the Final Look of your Checkout Page on WordPress Site
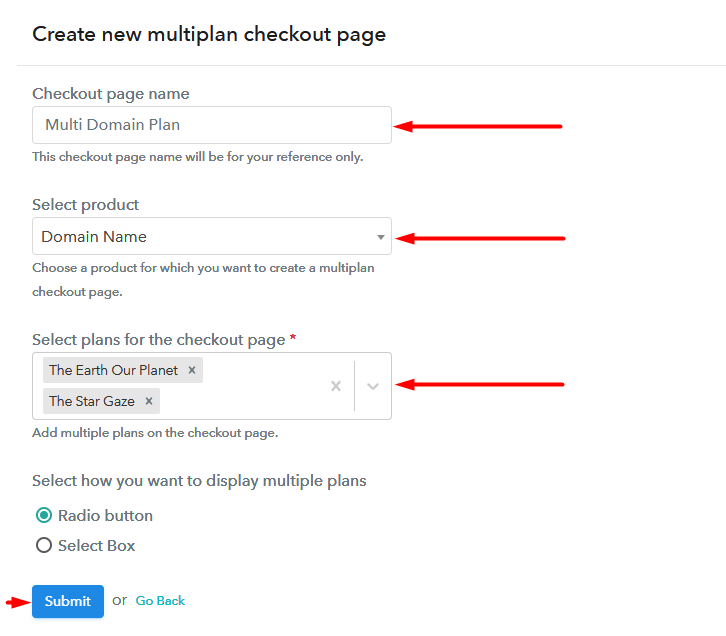
Step 10: Multiplan Checkout Page
(a) Click on Add Mutiplan Checkout

(b) Add Plans to Sell Multiple Domain Names from Single Checkout Page
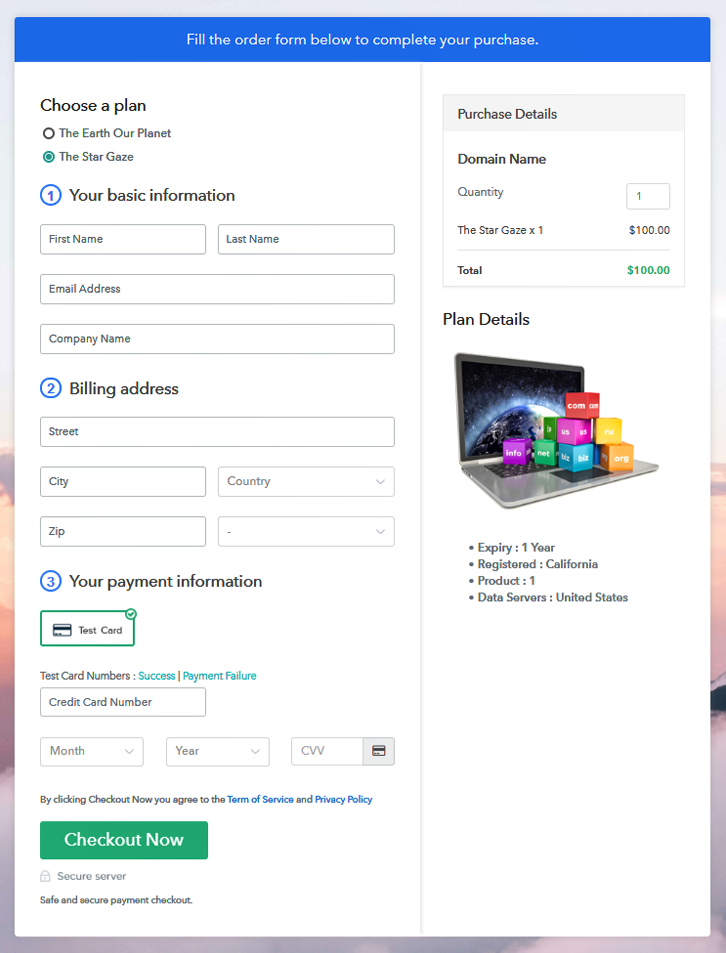
(c) Take a Look at the Checkout Page
Wrapping Up
You May Also Like To Read –


