How to Sell Honey Online | Step by Step (Free Method)

How to Sell Honey Online

Ideal For: All the honey sellers, beekeepers, honey farmers, apiculturists, retail honey selling business owners, and other honey selling merchants can use this method to take their honey selling business online.

How to Sell Honey Online

Why Choose this Method for Selling Over any Other Solution?

Unlike any other solution, this method allows you to:

  • List and sell your honey for FREE. Absolutely no payment required.
  • No commission on sales.
  • Collect payment through multiple payment modes from a single checkout page.
  • Sell one time or recurring subscriptions of your honey.
  • Sell and collect payment in any currency as per your requirement.
  • Give discounts on your products by offering special coupon codes.
  • Add sales commission agents to help you in selling honey online.

Get Pabbly Subscription Billing for Free

Honey comes with many advantages. It has many medicinal and other uses like weight loss, used as an ointment, curing cough etc. But, sometimes it’s very hard to find locally. As there are many varieties available people are buying honey online more frequently. So, if you are planning to sell honey online then these this method could help you without any technical knowledge.

Why would you like to sell honey online?

Maybe you want to extend the circle of your audience and gain more customers via another means i.e, the web. Well for this making an eCommerce website could be a better idea but its quite time consuming and can take help from more than one person.

You can start a honey business online on your own by using Pabbly Subscription Billing. Everything that’s needed is already here in this article that is 10 simplest steps and you are up in the market of selling honey online.

Now, you may be wondering how and what’s all is this service gonna offer. And, the answer is through checkout pages which can be shared almost anywhere. Also, have a look at the following things that it is offering.

  • Proper management of all the items in stock
  • A beautiful display of the items in checkout pages
  • Safe & secure online as well as offline payments
  • Automatic invoicing over email with relevant taxes
  • You can offer coupons and discounts
    And much more to sell honey online.

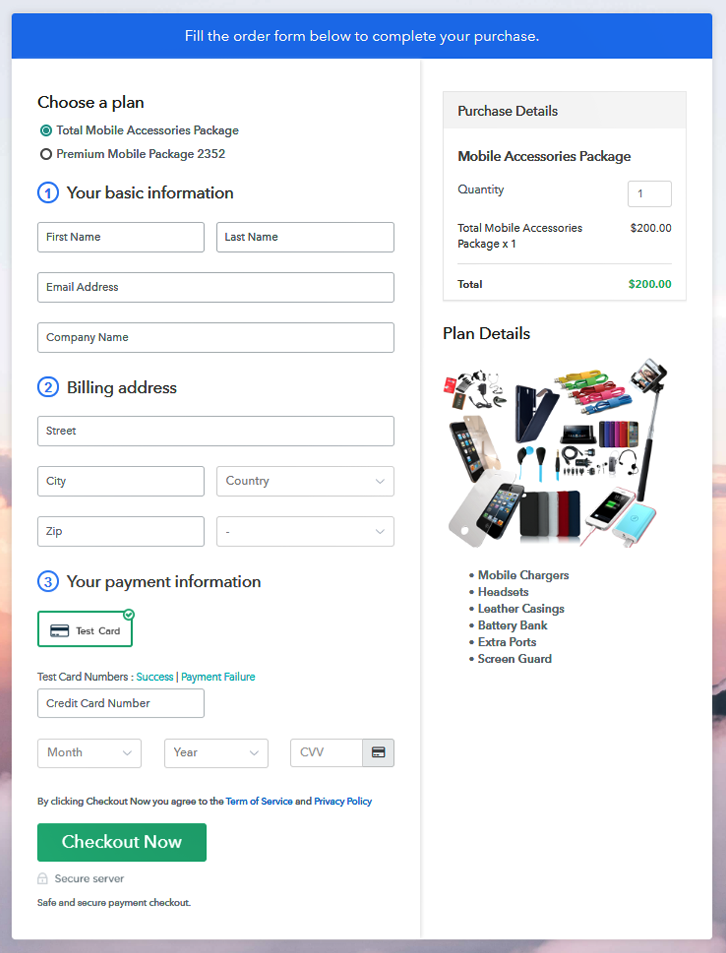
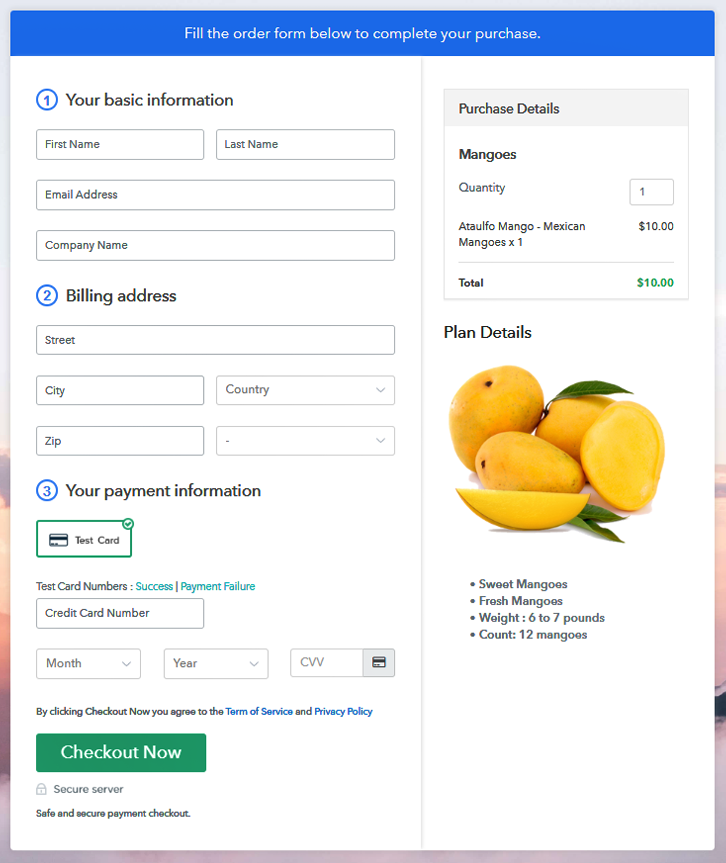
This is How your Checkout Page will Look Like After Creation
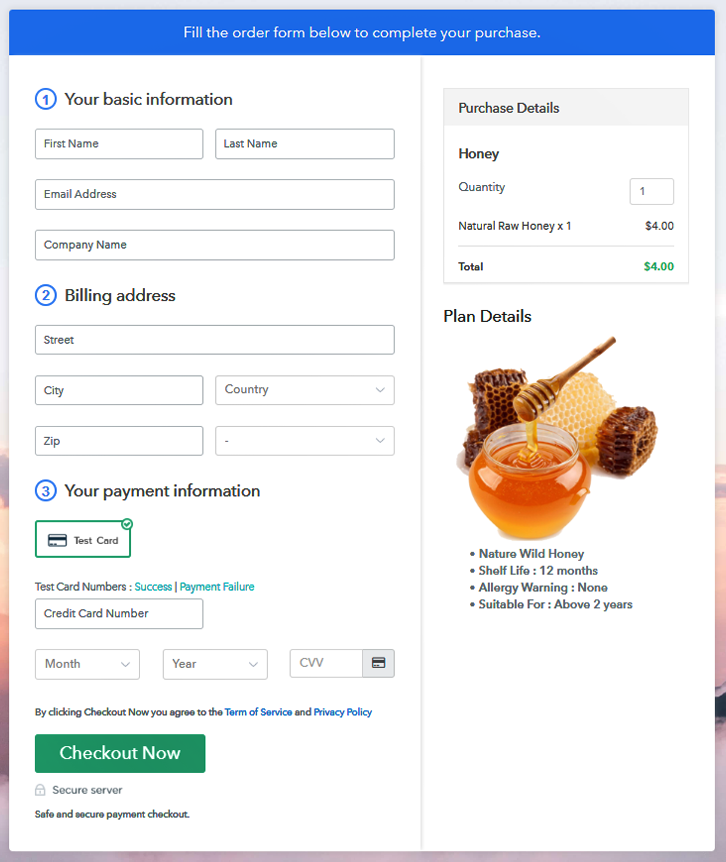
Checkout Page Preview to Sell Honey Online

Preview Checkout Page

Step 1: Login to Pabbly Subscription Billing

Signup
Firstly, initiate the process by visiting Pabbly Subscription Billing website and click on the “Sign Up Free”. You’ll be then land over a sign-in/sign-up page here either sign-in using a Google account or sign-up manually by filling out the registration details.

Sign Up For Free!

Step 2: Select Subscription Billing

Access Subscription Billing

Step 3: Account Setup

Setup Account

Once you click on the “Access Now” button of Pabbly Subscription Billing a window will reveal asking for information regarding company name, currency & phone number. Fill out the details asked & click on the “Continue” button given.

Step 4: Connect Payment Gateway to Sell Honey Online

Connect Payment Gateway

In this step, we’ll be adding a payment method and this is an important step in the procedure. Moreover, there are multiple gateway integration options available to choose from and links to their integration guide is also mentioned below. For testing, here I’m using the test payment gateway.

Step 5: Add Your Product

Add Product

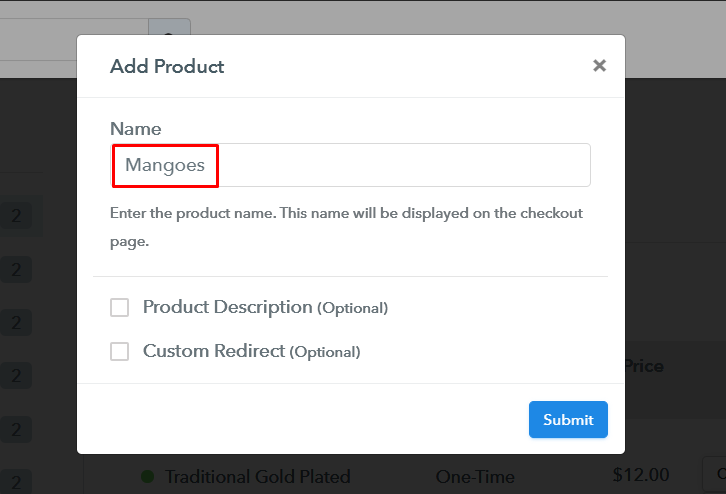
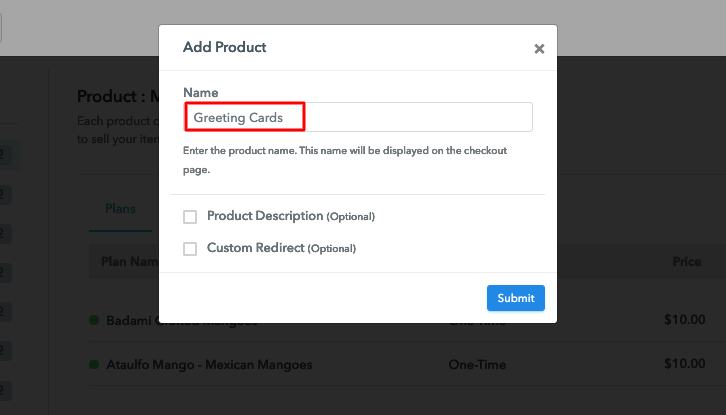
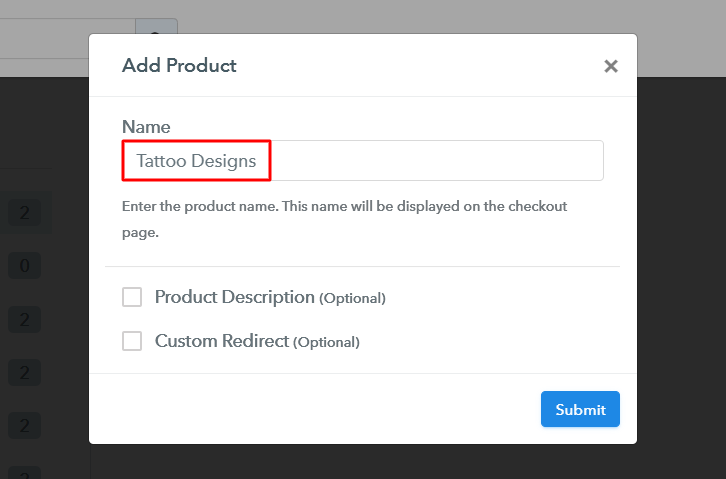
Now, you’ll need to create a product for this click on “Add New Product”. Then specify a name much like a category that you want to add. More further we’ll be going to add plans to this product category.
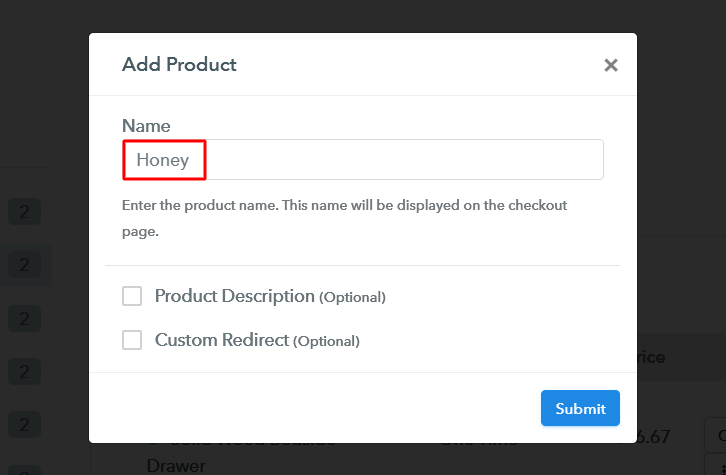
Add Product to Sell Honey Online

Once you are done creating a product click on the “Submit” button. Besides, you can add as many honey products as you want to add.

Note: Here you can add all the products related to the similar category by creating plans for each of them.

Step 6: Add Plans

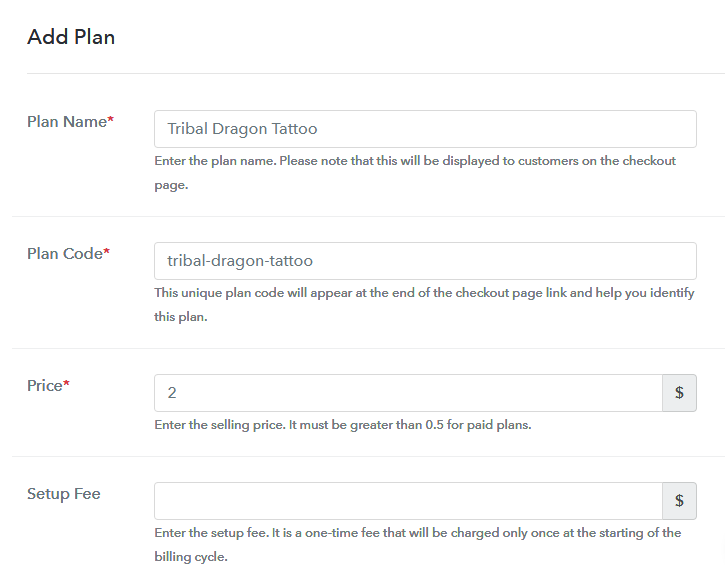
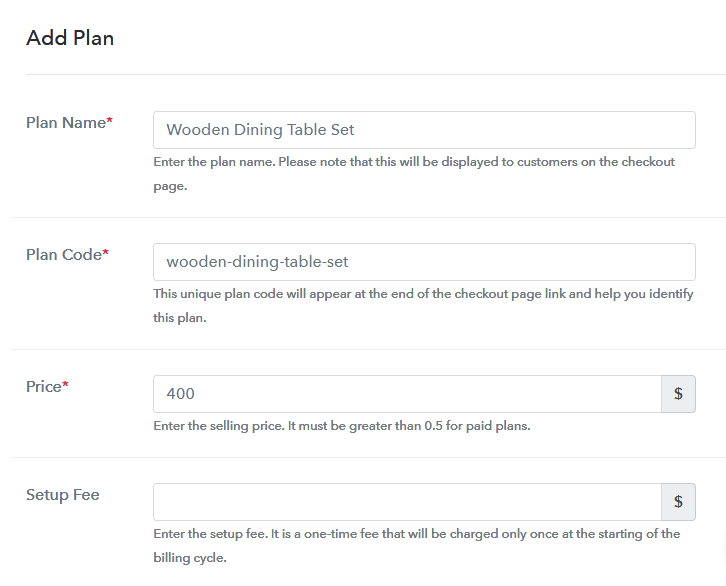
After adding a product, you can further add plans to it. Just click on the “Add New Plan” button & you’ll be redirected to a plan page where you’ll need to fill out the details about your item to sell honey online.

(a) Select Add New Plan

Add Plan

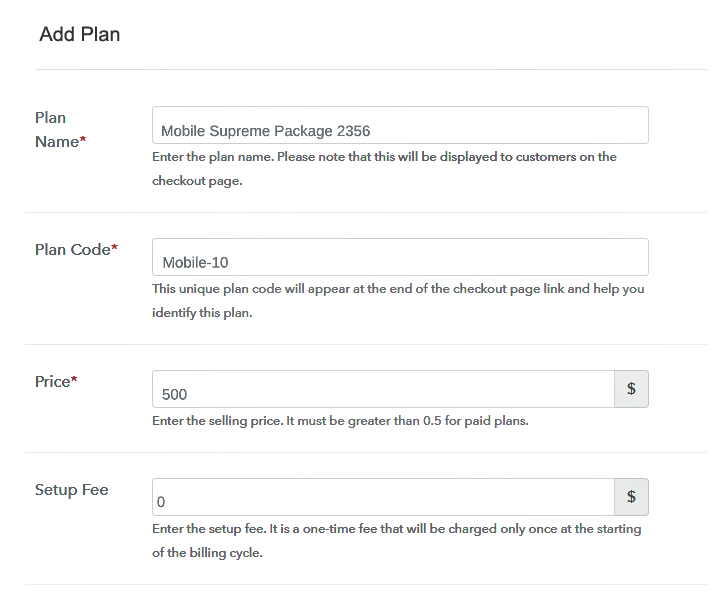
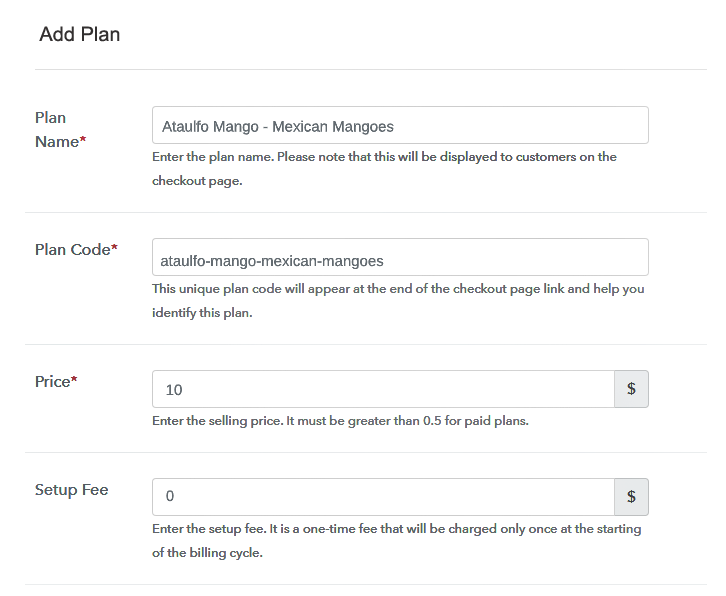
(b) Specify the Plan & Pricing Details
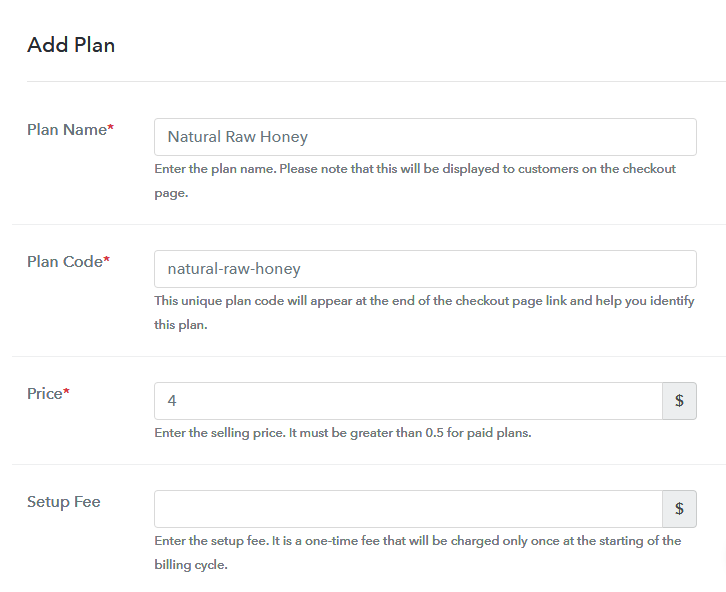
Add Plan to Sell Honey Online

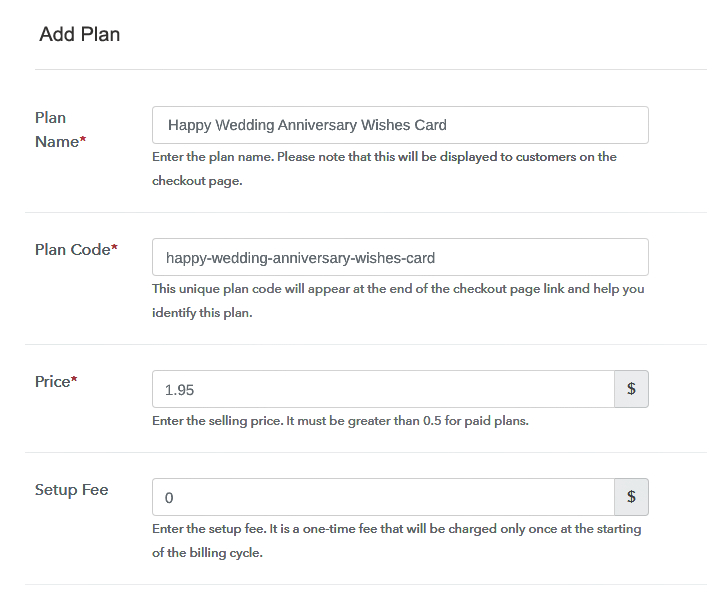
Assign a plan name, a code, the pricing etc to sell honey online.

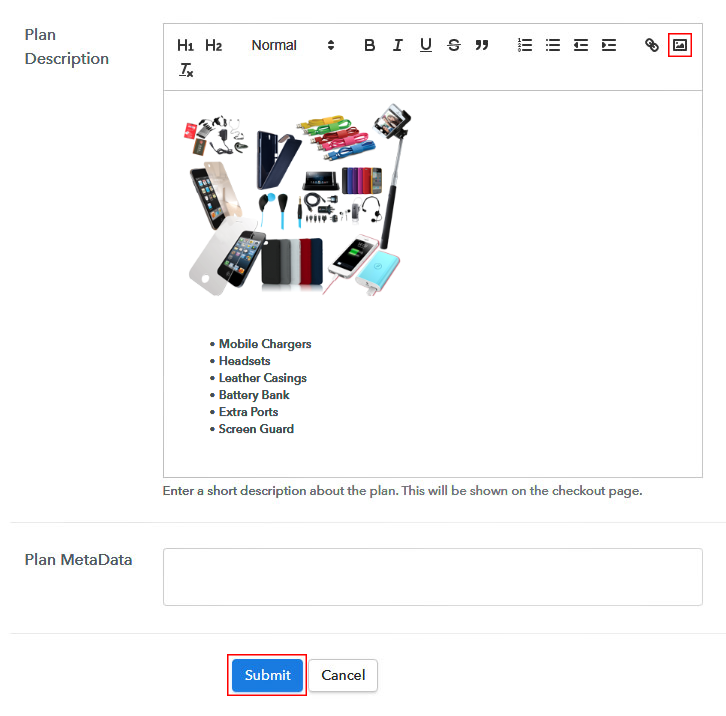
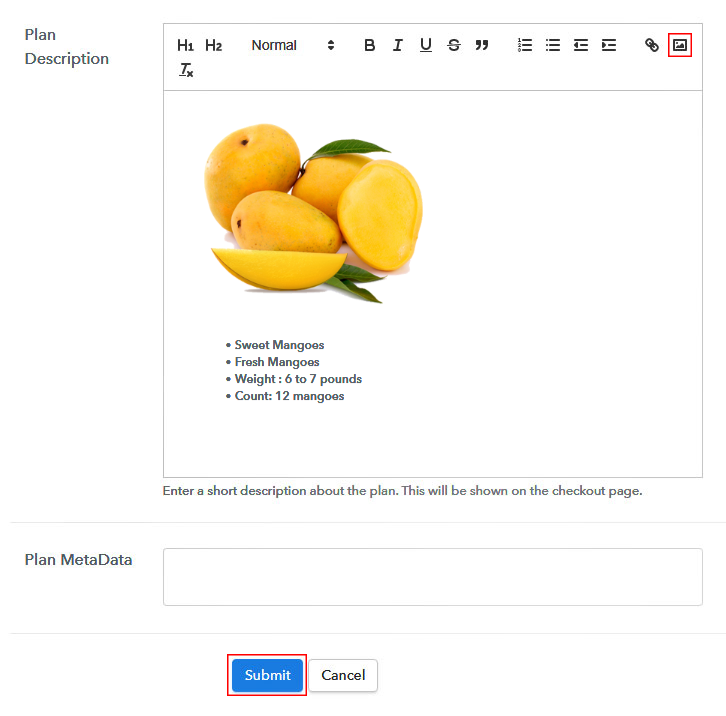
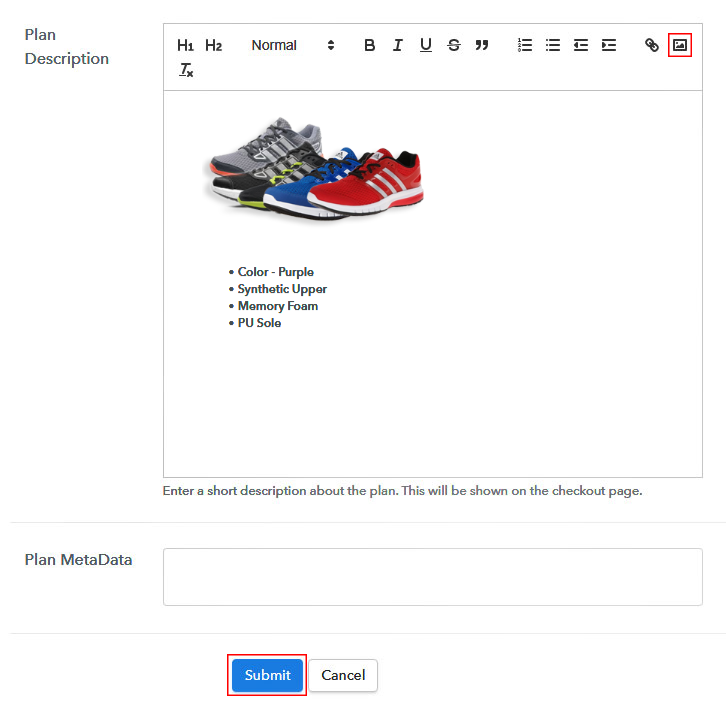
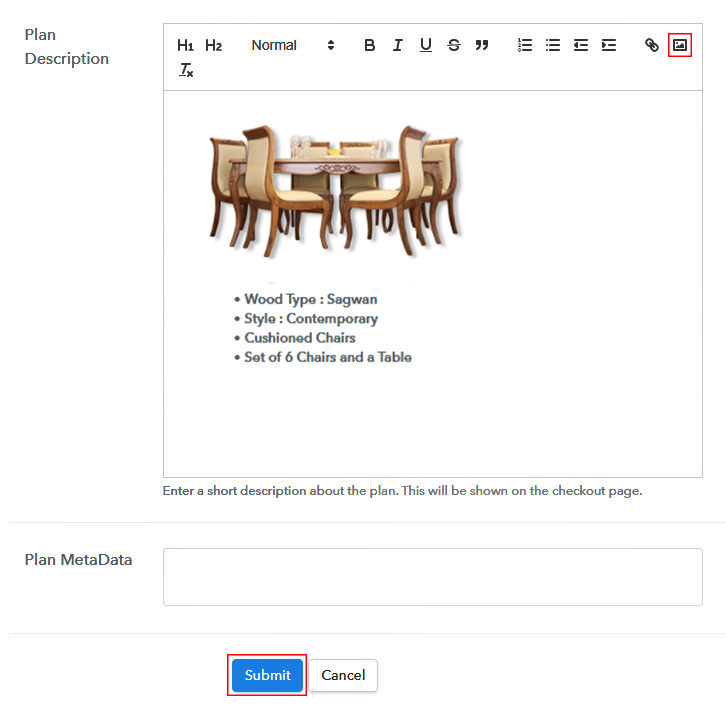
(c) Add Image & Description
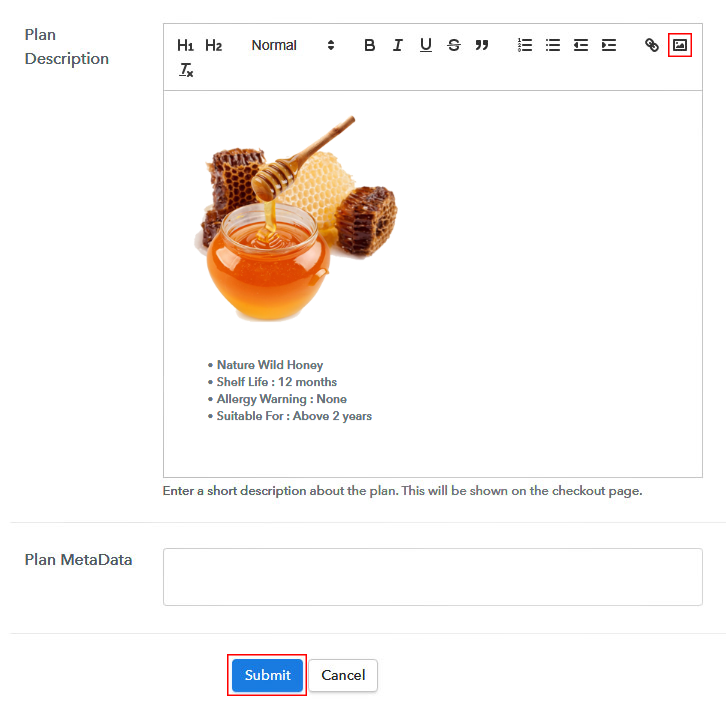
Add Image & Description to Sell Honey Online

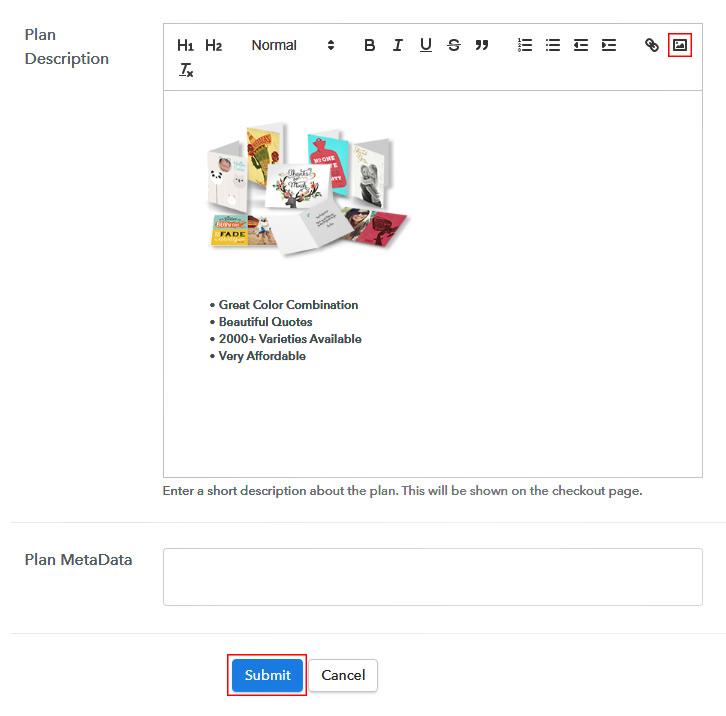
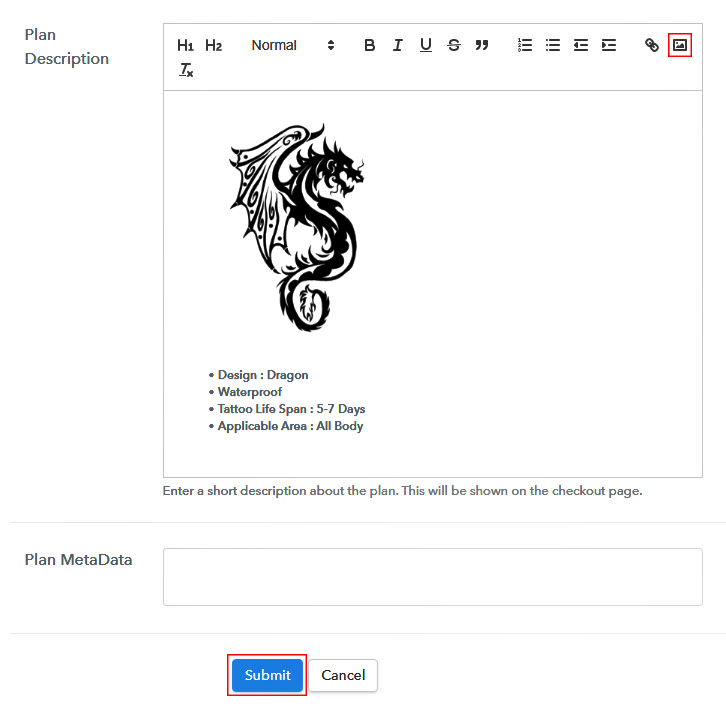
Here, you’ll see a field named “Add Description” where you can put an image and description to show on the checkout page to sell furniture online.

Also, you can see multiple text formatting tools available to format the descriptive text. You can use lists, quotes, links, headings etc.

Click on the “Submit” button once you are done with the plan description to sell honey online and an item will be added in that product category.

Just remember, you’ll need to repeat this step every time you want to add a plan to a product for selling honey online.

Step 7: Share your Checkout Page

Share Checkout Page on Social Media

A window will be open up after that, as shown above. It contains a plan link & a code to use the created checkout page further.

  • You can copy the “Plan Link” URL & paste it on various social media platforms, SMS, emails etc. to share the product for selling honey online.
  • Similarly, you can also use this same URL in the buttons & links of your website.
  • Two direct Facebook & Twitter sharing buttons are also visible here to share the created checkout page directly onto these platforms.

Step 8: Preview Checkout Page

Follow these steps to preview a checkout page:

(a) Click on the View Button

View Checkout Plan

(b) Take a Look at the Checkout Page

Checkout Page Preview to Sell Honey Online

Step 9: Embed Checkout Page in Site & Sell Honey Online

Embed Checkout Page on Website

To embed the created checkout page over WordPress, copy the code given under “Embed Plan Link” box.

(a) Edit the Page & Paste the Copied Link

Paste_Link_in_Text_Editor

And paste it in the text area section of any post/page of a website.

(b) Save & Publish the Checkout Page

Save_and_Publish

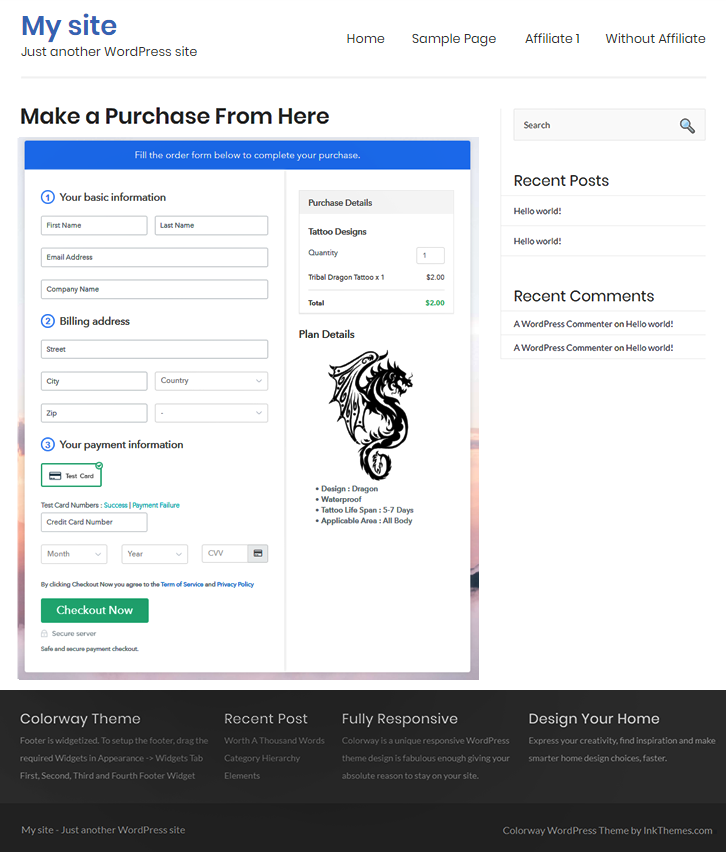
Publish this post/page & the checkout page will be embedded on that website.

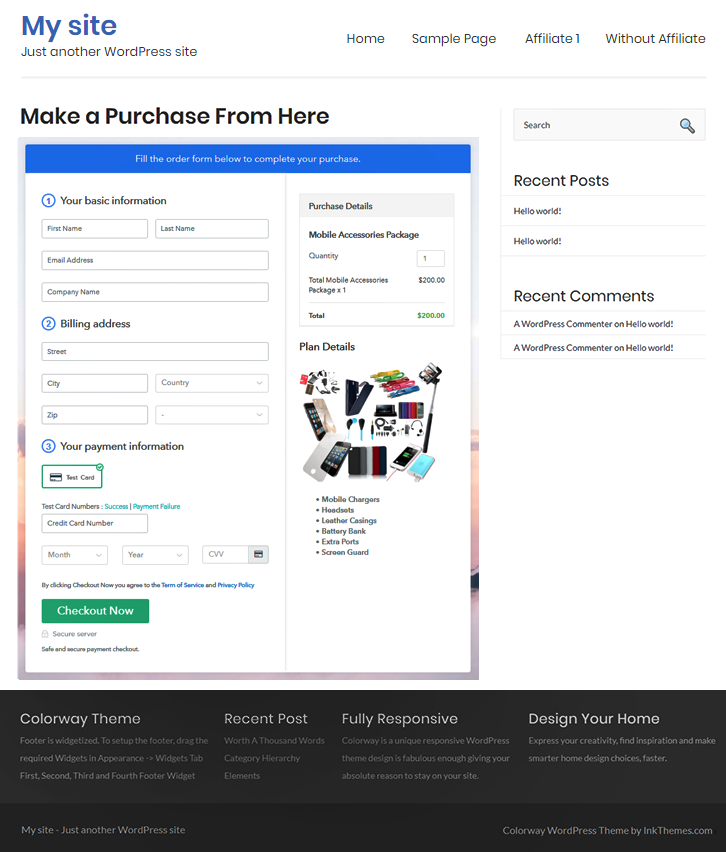
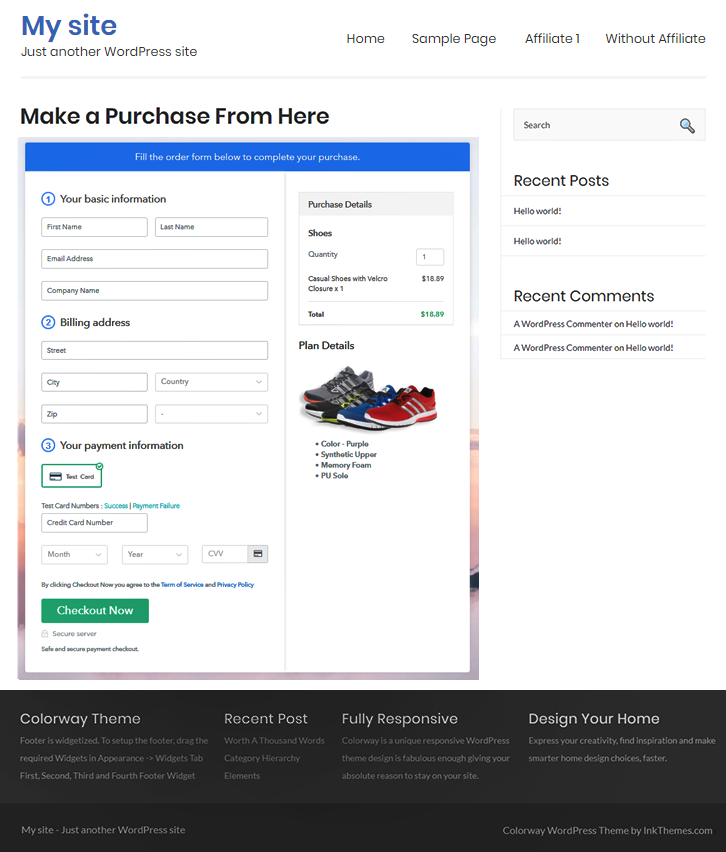
(c) Check out the Final Look of your Checkout Page on WordPress Site
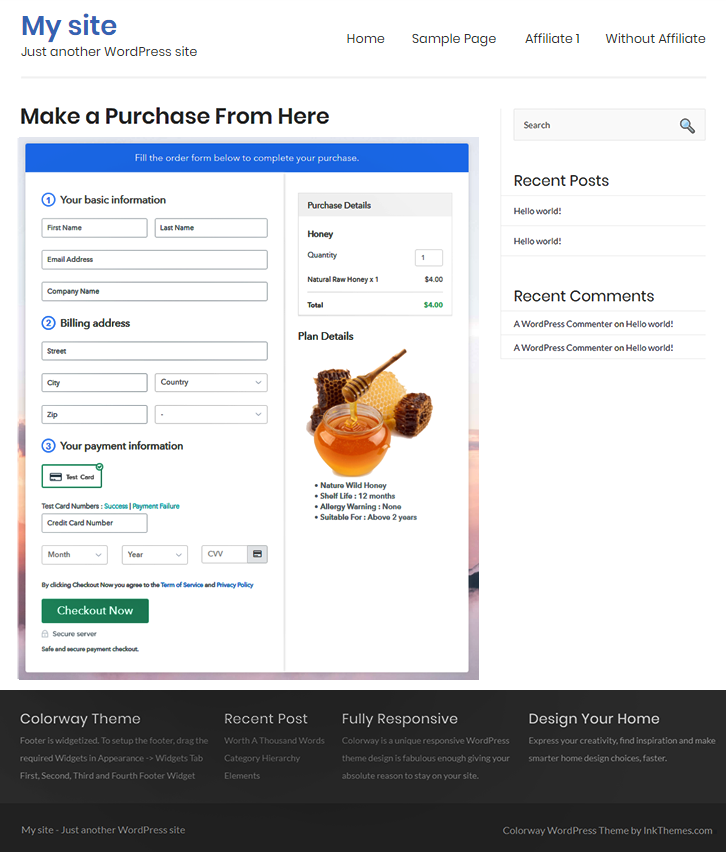
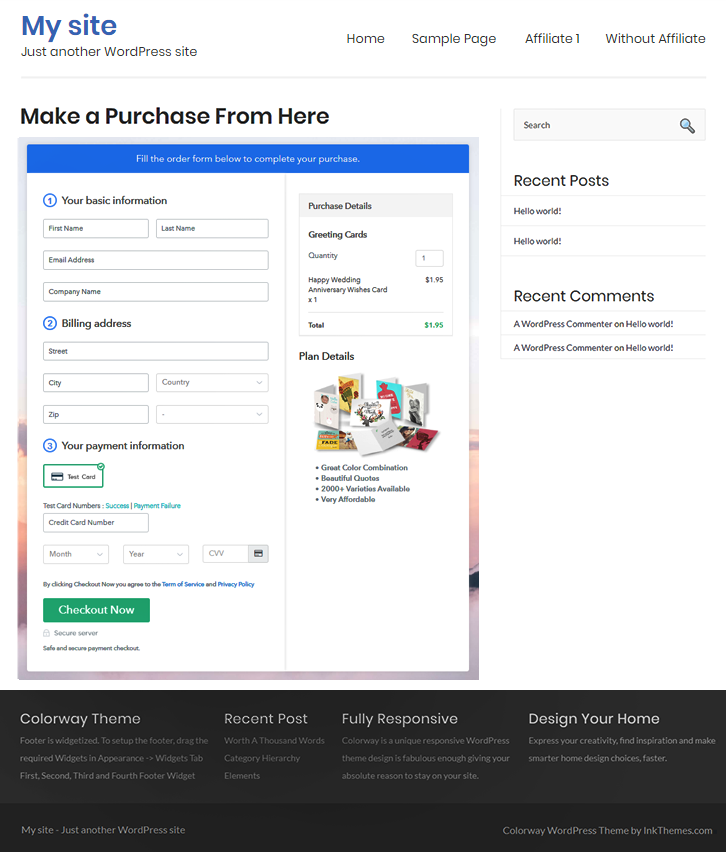
Checkout Page On Site to Sell Honey Online

Step 10: Multiplan Checkout Page

Note: In case you want to sell multiple products via a single checkout page, you create a multi-plan checkout page otherwise skip this step.

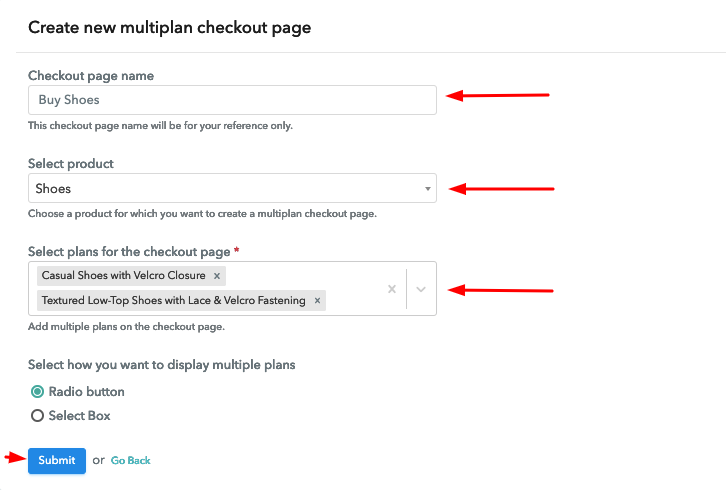
(a) Click on Add Mutiplan Checkout

Multiplan_Checkout

(b) Add Plans to Sell Multiple Honey from Single Checkout Page
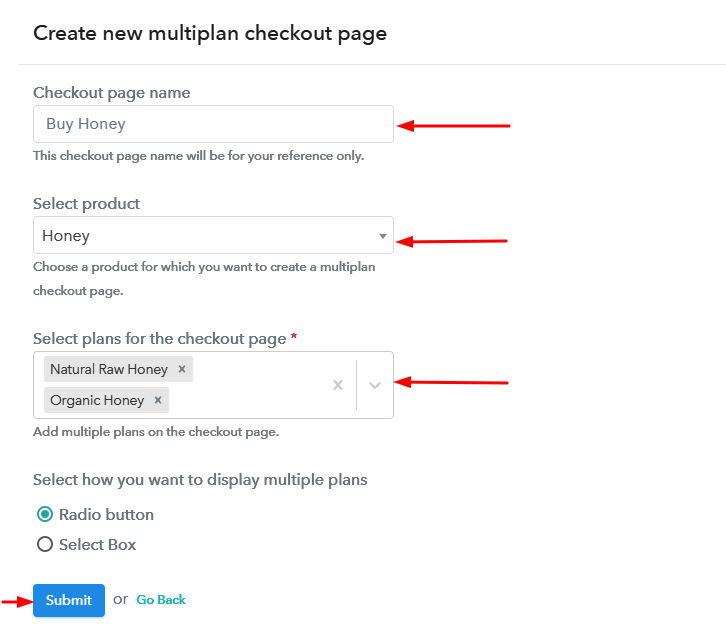
Create Multiplan Checkout to Sell Honey Online

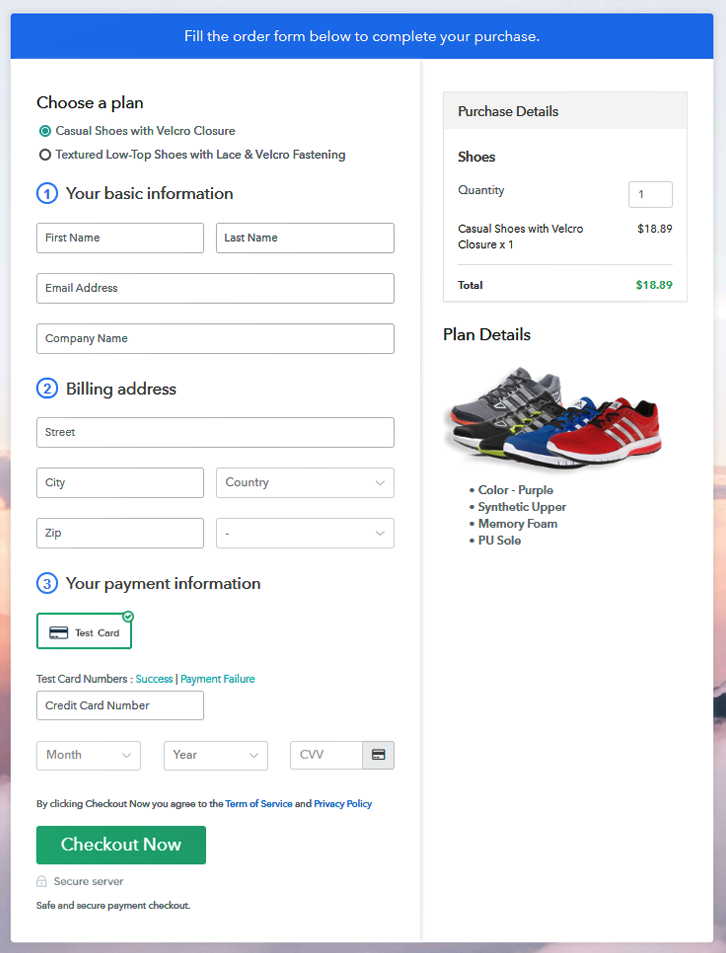
(c) Take a Look at the Checkout Page:
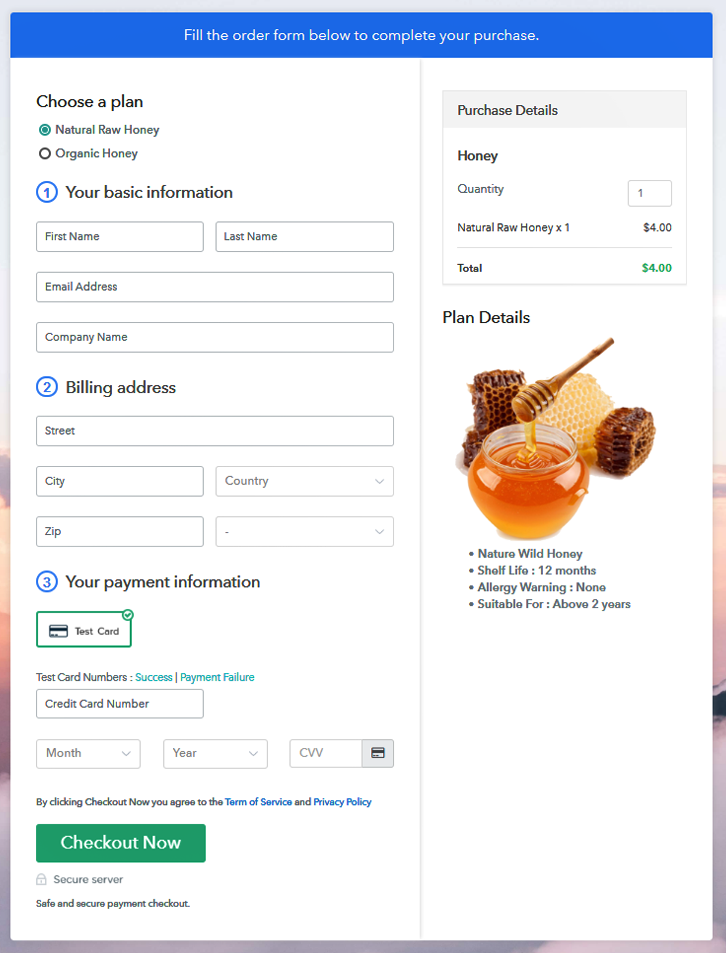
Multiplan Checkout to Sell Honey Online

Preview Checkout Page

Wrapping Up

These were the 10 simplest steps to start a honey business online. And even a non-techy person could use them to sell honey online. Also, if you are not having a website then also you can use this method for selling honey online.

There are multiple options available for integration such as PayPal, Stripe, Authorize.Net, Razorpay etc.

Good Luck with your honey business!

You May Also Like To Read
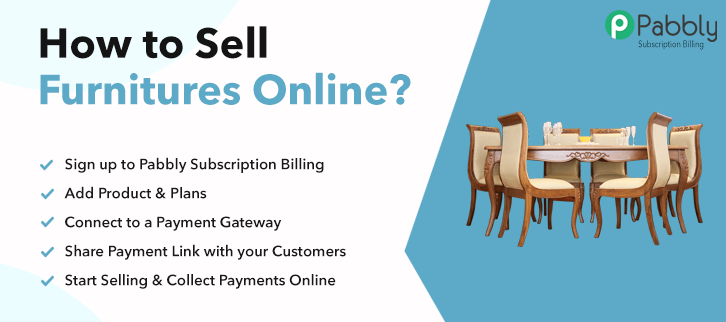
 

How to Sell Furniture Online | Step by Step (Free Method)

How to Sell Furniture Online

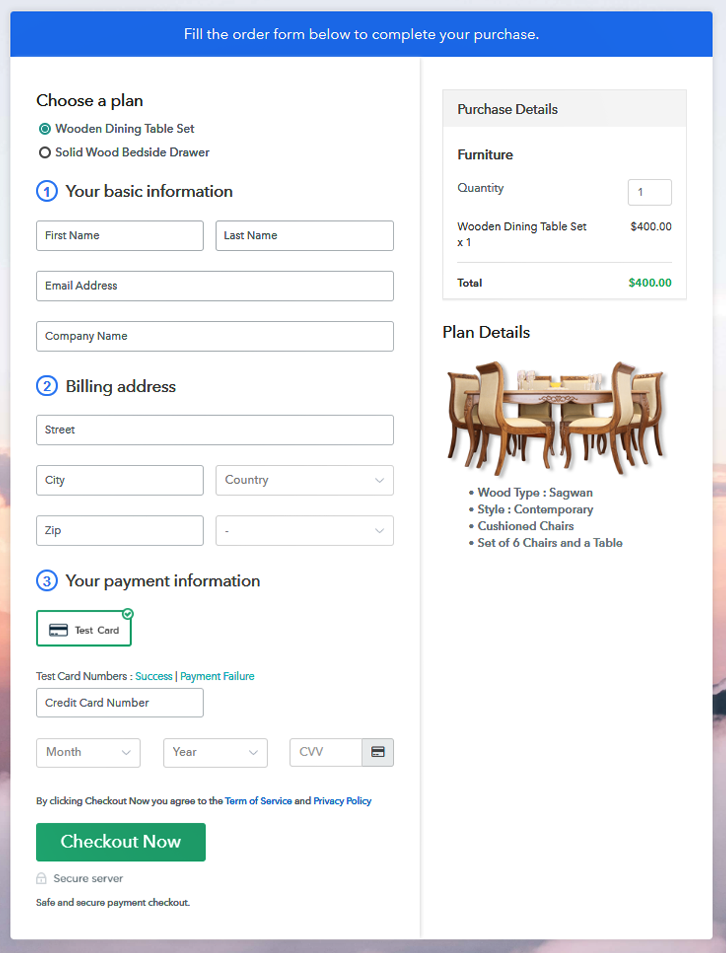
Ideal For: All the furniture sellers, furniture makers, retail furniture selling business owners, and other furniture selling merchants can use this method to take their furniture selling business online.

How to Sell Furniture Online

Why Choose this Method for Selling Over any Other Solution?

Unlike any other solution, this method allows you to:

  • List and sell your furniture for FREE. Absolutely no payment required.
  • No commission on sales.
  • Collect payment through multiple payment modes from a single checkout page.
  • Sell one time or recurring subscriptions of your furniture.
  • Sell and collect payment in any currency as per your requirement.
  • Give discounts on your products by offering special coupon codes.
  • Add sales commission agents to help you in selling furniture online.

Get Pabbly Subscription Billing for Free

Nowadays people are most likely to buy furniture online as they don’t need to visit shops plus a lot of varieties are available in clicks. So, if you are planning to step in online furniture selling then this article could help.

Why would you like to sell furniture online?

There could be many possible answers to this question but only the thought of taking your furniture business online is more than enough as it will automatically increase the buyers. And to shape this beautiful idea to work Pabbly Subscription Billing service could help you for free.

This service will let you manage everything in its system and create beautiful checkout pages to sell furniture online. Furthermore, the service also enables the embedding of the product checkout page over WordPress.

Some benefits of using this service are:

  • Keep a record for all the furniture stock at one place
  • Display items beautifully in checkout pages
  • Accept safe & secure payments both offline & online
  • Offer discounts & coupons
  • Automatic invoicing and tax management
    And much more to sell furniture online

You can share the checkout page link to various social media platforms like Twitter, Facebook, Emails, SMS, WhatsApp etc for selling furniture online.

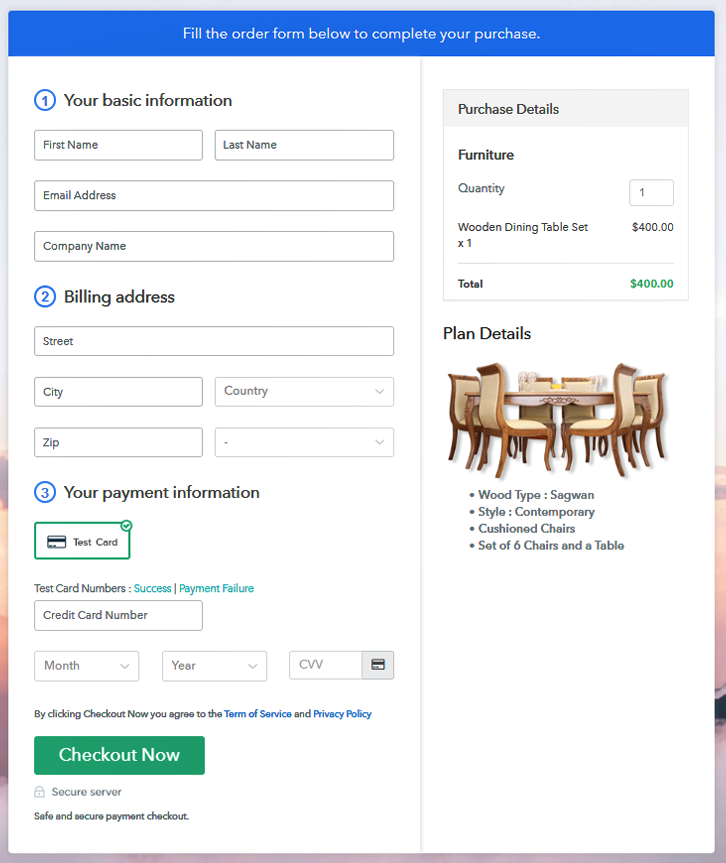
This is How your Checkout Page will Look Like After Creation

Checkout Page Preview to Sell Furniture Online

Preview Checkout Page

Step 1: Login to Pabbly Subscription Billing

Signup
At first, visit the Pabbly Subscription Billing website & click on the “Sign Up Free” button there. Now, directly sign-in with Google or sign-up manually by filling out the registration form.

Sign Up For Free!

Step 2: Select Subscription Billing

Access Subscription Billing

Step 3: Account Setup

Setup Account

Once you click on the “Access Now” button a window will pop-up asking the company name, currency & phone number. You’ll need to fill out these details and after that click on the “Continue” button to proceed.

Step 4: Connect Payment Gateway to Sell Furniture Online

Connect Payment Gateway

This is an important step and you’ll need to connect a payment gateway here. A payment gateway is used to accept payments and there are multiple options available in this service. Use the integration guide links mentioned below. Here, particularly I’m using the test payment gateway.

Step 5: Add Your Product

Add Product

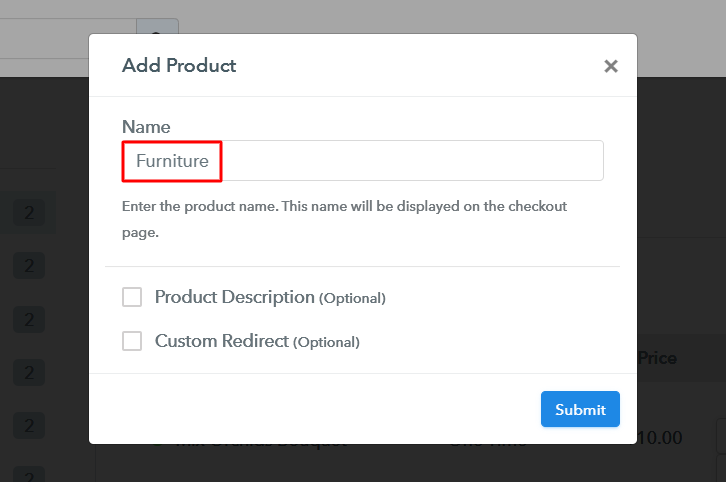
Next, is creating a product. For this click on the Add New Product” button and add a name much like a category of furniture. We’ll be going to add plans (item) to this particular product category afterwards.

Add Product to Sell Furniture Online

Click on the “Submit” button once you are done with the description of the product category to sell furniture online. Remember every time you want to add a product category you’ll need to repeat this step.

Note: Here you can add all the products related to the similar category by creating plans for each of them.

Step 6: Add Plans

Once a product is created, you can add plans to it. For this click on the “Add New Plan” button & fill the details describing the plan or item that you are adding.

(a) Select Add New Plan

Add Plan

(b) Specify the Plan & Pricing Details

Add Plan to Sell Furniture Online

You can name the plan, assign a code to it, write a price to display on the checkout page for the furniture that you want to sell.

(c) Add Image & Description

Add Image & Description to Sell Furniture Online

While creating a plan, you will see a field named “Add Description”, you can use this field to add an image & some descriptive text to display on the plan checkout page to sell furniture online.

Besides this, there are several text formatting tools also available to format the item’s description per your will. For instance, if you want to use lists, quotes, links, headings etc than you could use them.

Hit the “Submit” button after filling out all the details & an item will be added for selling furniture online.

You’ll need to follow this step to add more plans in future to sell furniture online.

Step 7: Share your Checkout Page

Share Checkout Page on Social Media

After a plan creation, a window will open holding a plan link & a code for the created checkout page.

  • You can copy the “Plan Link” & paste it to share it on social media platforms, SMS & emails to sell furniture online.
  • Moreover, you can also link this plan link in buttons & text anchors of a website.
  • Two direct Facebook & Twitter sharing buttons are also visible there to share any created checkout page directly onto these platforms.

Step 8: Preview Checkout Page

Follow these steps to preview a checkout page:

(a) Click on the View Button

View Checkout Plan

(b) Take a Look at the Checkout Page

Checkout Page Preview to Sell Furniture Online

Step 9: Embed Checkout Page in Site & Sell Furniture Online

Embed Checkout Page on Website

To embed any created checkout page on WordPress, you’ll need to copy the code given under “Embed Plan Link” window.

(a) Edit the Page & Paste the Copied Link

Paste_Link_in_Text_Editor

And then paste it in the text area of any post/page of your website.

(b) Save & Publish the Checkout Page

Save_and_Publish

After pasting the code publish the post/page. A checkout page will get embedded on your website.

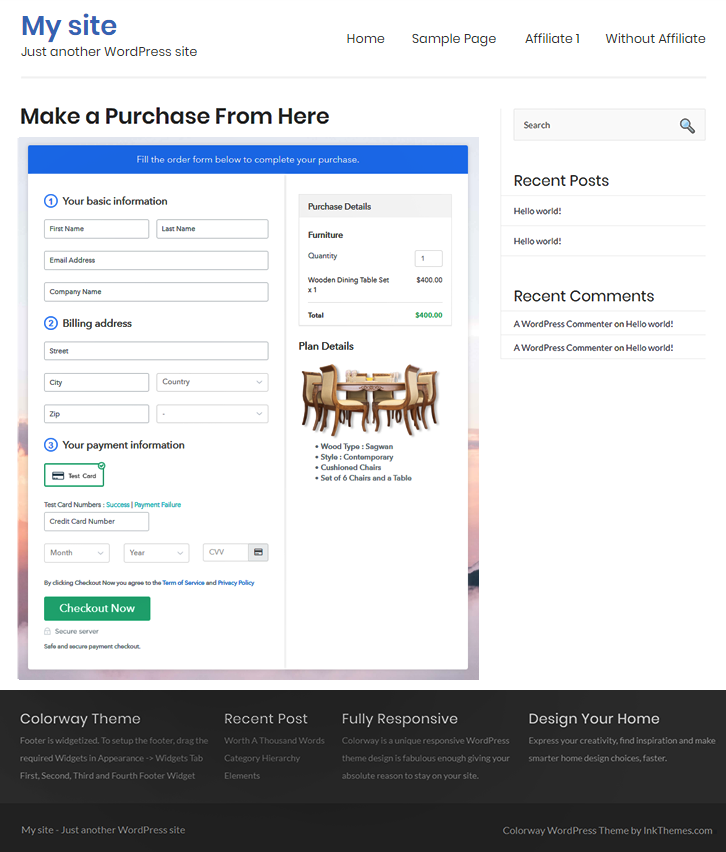
(c) Check out the Final Look of your Checkout Page on WordPress Site

Checkout Page On Site to Sell Furniture Online

Step 10: Multiplan Checkout Page

Note: In case you want to sell multiple products via a single checkout page, you create a multi-plan checkout page otherwise skip this step.

(a) Click on Add Mutiplan Checkout

Multiplan_Checkout

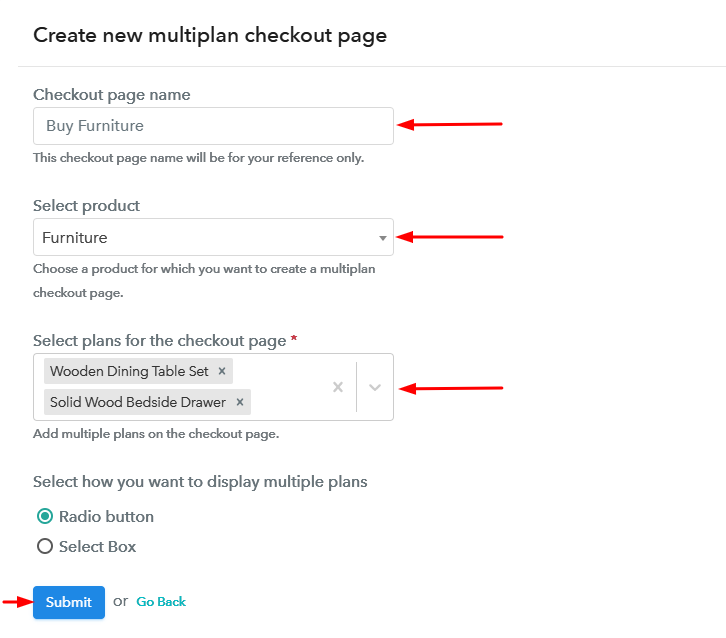
(b) Add Plans to Sell Multiple Furniture from Single Checkout Page

Create Multiplan Checkout Page to Sell Furniture Online

(c) Take a Look at the Checkout Page:

Multiplan Checkout to Sell Furniture Online

Preview Checkout Page

Wrapping Up

This is the fastest way to kick start furniture business online and be a player in the online furniture industry. Also, this service ensures the payment via the best payment gateway options like PayPal, Stripe, Razorpay & Authorize.Net to sell furniture online securely.

Moreover, there are various benefits of using checkout pages for selling furniture online. You can share them anywhere you want as well as embed them on your site.

Good Luck with your furniture business!

You May Also Like To Read
How to Sell Mobile Accessories Online | Step by Step (Free Method)

Ideal For: All the mobile accessories manufacturers, mobile store owners, gift shops, electronic goods stores, cottage industries, MSME and other merchants can use this method to sell mobile accessories online.

How to Sell Mobile Accessories Online

Why Choose this Method for Selling Over any Other Solution?

Unlike any other solution, this method allows you to:

  • List and sell mobile accessories for FREE. Absolutely no payment required.
  • No commission deducted on sales.
  • Collect payment through multiple payment modes from a single checkout page.
  • Sell one time or recurring subscriptions of your mobile accessories.
  • Sell and collect payment in any currency as per your requirement.
  • Give discounts on your products by offering special coupon codes.
  • Add sales commission agents to help you in selling your mobile accessories.

Get Pabbly Subscription Billing for Free

Can you imagine a day without mobile phones or its accessories like earbuds, power bank, memory card, etc? It has become as essential as food and water. According to Allied Market Research, this market is currently valued at $224.69 billion, and with the current growth rate of 3.1%, it is poised to reach a staggering $284.06 billion by 2026. However, the market has become too cluttered and competitive for a new player. Hence many manufacturers are looking for new methods to beat the competition like opting to sell mobile accessories online.

Why would you like to sell mobile accessories online?

The benefits of selling mobile accessories online are manifold like you don’t need to rent a kiosk in the mall for higher traffic. Your products will be purchased by customers from around the world. Furthermore, you can save time, since most of the process is automated in online shopping. So the next question is how will you establish an online store in the first place?

Well, there are actually many online software that can build an e-store. But here I would like to recommend Pabbly Subscription Billing which can sell mobile accessories through its awesome checkout pages. Using this software, you can list an unlimited number of mobile accessories and bill customers in different revenue models like one time, recurring, based on cycles. Furthermore, you can share the checkout pages on social media sites for more brand awareness. More benefits include:

  • Generating Unlimited Revenues
  • Collecting Payments in Online/Offline modes
  • Customizable Checkout
  • Monitoring Sales and Data
  • Transparent Billing Without Any Extra Commission
  • Creating Unlimited Plans, Coupons, and Discounts
  • Tax Management According to Regions

So, now that I have got you interested in Pabbly Subscription Billing, let us create an incredible checkout page to start your mobile accessories business online.

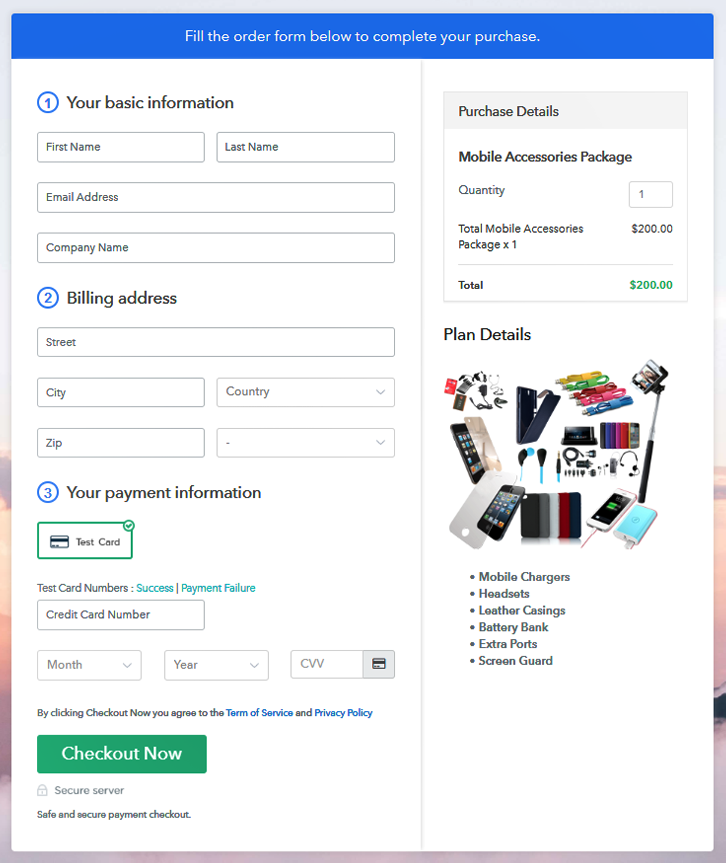
This is How your Checkout Page will Look Like After Creation

Checkout to Sell Mobile Accessories Online

Preview Checkout Page

Step 1: Log in to Pabbly Subscription Billing

Signup

Visit  Pabbly Subscription Billing  and landing on their website click on “Sign up Free“. Either sign in using your Gmail account or fill in the required fields like name, email, etc and then click the “Sign Up” button.

Sign Up For Free!

Step 2: Select Subscription Billing

Access Subscription Billing

Now you will enter the dashboard, and here click on the “Access Now” button on the Subscription Billing option.

Step 3: Account Setup

Setup Account

A dialogue box will appear that will require you to fill the company details like name, currency, and phone number. Now, press the “Continue” button after filling in the details.

Step 4: Connect Payment Gateways To Sell Mobile Accessories Online

Connect Payment Gateway

Pabbly Subscription Billing provides you with a dummy payment gateway, where you can beta test the experience of a customer during the payment process. This will help you to remove all the glitches beforehand. You can do this by clicking on the “Enable Test Payment” option.

Furthermore, with Pabbly Subscription Billing, you can integrate with multiple payment gateways like Stripe, Razorpay, PayPal, Authorize.net, etc. For the integration of the payment gateways, you can avail the help of listed guides beneath this paragraph. But since we have to set up the payment process, we will click on the “Enable Test Payment” option.

Step 5: Add Your Product

Add Product

So, now we are going to add the products. Below the “Enable Payments,” you will find the section “Add your product” click on it. This will create a dialog box with a blue button “Add New Product”. Click it.

This will generate a pop-up box and you have to add the required product title, in this case, it is the mobile accessories

Add Product to Sell Mobile Accessories Online

Fill up the details and your product is created.

Note: Here you can add all the products related to the similar category by creating plans for each of them.

Step 6: Add Plans

Now, we are going to create plans to start a mobile accessories business online

(a) Select Add New Plan

Add Plan

(b) Specify the Plan & Pricing Details

Add Plan to Sell Mobile Accessories Online

Now you will add details of the product related to prices like plan name, code, price, setup fees, etc. Furthermore, you can choose for different billing models like one-time payment, recurring, based on cycles, etc. Yes, if you are not content with the revenue system then you can change it at any time.

(c) Add Image & Description

Add Description to Sell Mobile Accessories Online

Now, upload some stunning images of your mobile accessories.

Moreover, add some information about the mobile accessories listed in the package like battery storage, screen guards, earbuds, etc in bullet points then press the “Submit” button.

Furthermore, using the same methods, you can list more products.

Step 7: Share your Checkout Page

Share Checkout Page on Social Media

  • Share the checkout pages on Facebook, Twitter using their respective buttons for marketing the products.
  • Furthermore, you can embed checkout pages in SMS and emails for more information and brand awareness.
  • Moreover, you can build buttons on your website and embed these checkout pages on them. Also, you can place it on any anchor text on your website, so the users will be redirected to the checkout page.

Step 8: Preview Checkout Page

Follow up these steps to preview checkout page:

(a) Click on the View Button

View Checkout Plan

(b) Take a Look at the Checkout Page

Checkout to Sell Mobile Accessories Online

Step 9: Embed Checkout Page in Site & Sell Mobile Accessories Online

Embed Checkout Page on Website

Now,  copy the embed plan link to insert the checkout page on your WordPress website.

(a) Edit the Page & Paste the Copied Link

Paste_Link_in_Text_Editor

Now, when the link is copied, then paste it to the text area of the editor.

(b) Save & Publish the Checkout Page

Save_and_Publish

After pasting the code, now hit the ‘Publish’ button. Your checkout page is embedded.

(c) Check out the Final Look of your Checkout Page on WordPress Site

Embedd to Sell Mobile Accessories Online

Step 10: Multiplan Checkout Page

Note: In case you want to sell multiple products via a single checkout page, you can create a multi-plan checkout page otherwise skip this step.

(a) Click on Add Mutiplan Checkout

Multiplan Checkout

(b) Add Plans to Sell Mobile Accessories Online from Single Checkout Page

Multiplan to Sell Mobile Accessories Online

(c) Take a Look at the Checkout Page

Multiplan Checkout to Sell Mobile Accessories Online

Preview Checkout Page

Wrapping Up

Following, these steps you can easily start your mobile accessories business online through Pabbly Subscription Billing. Initially, these steps might be a bit overwhelming for you but don’t fear, just go along and finish it. But in case if you have any doubts, feel free to drop them in the comment section below. Thank You.

You May Also Like To Read –

How to Sell Swords Online | Step by Step (Free Method)

How to Sell Swords Online

Ideal For: All sword manufacturers, hunting lodges, weaponary shops, sword dealers, and other merchants can use this method to sell swords online.

How to Sell Swords Online

Why Choose this Method for Selling Over any Other Solution?

Unlike any other solution, this method allows you to:

  • List and sell your swords for FREE. Absolutely no payment required.
  • No commission deducted on sales.
  • Collect payment through multiple payment modes from a single checkout page.
  • Sell one time or recurring subscriptions of your swords.
  • Sell and collect payment in any currency as per your requirement.
  • Give discounts on your products by offering special coupon codes.
  • Add sales commission agents to help you in selling your swords.

Get Pabbly Subscription Billing for Free

Ever heard of the famous Arthurian legend “Those who shall pull the Excalibur sword from the stone shall rule Briton”. Well, now customers won’t have to pull any sword from any stone as you will be selling swords online.

Why would you like to sell swords online?

Nowadays, people use swords mostly in sports activities and are considered as an antique showpiece inspired from movies and TV shows. For instance, who doesn’t remember the sword of Ned Stark in Game of Thrones made of Valyrian steel. That is the reason why people search for it on many e-commerce websites like Amazon, Alibaba, and Oracle. However, swords are regarded as weapons and many e-commerce companies forbid sellers to sell swords online.

But, there is always an option of creating your own store online so that you can sell swords without any hassle. And for that here we would like to suggest you Pabbly Subscription Billing one of the best tool to build an e-store. As, it lets you create checkout pages easily that you can share on social media platforms and also embed it on your website. Here, let me tell you some other feature that it provides:

  • Create Unlimited Plan and Products
  • Affiliate Management Modules
  • Several Payment Gateways
  • Tax Management

So, without wasting any of your time, let me take you through the 10 easy steps to create your checkout page.

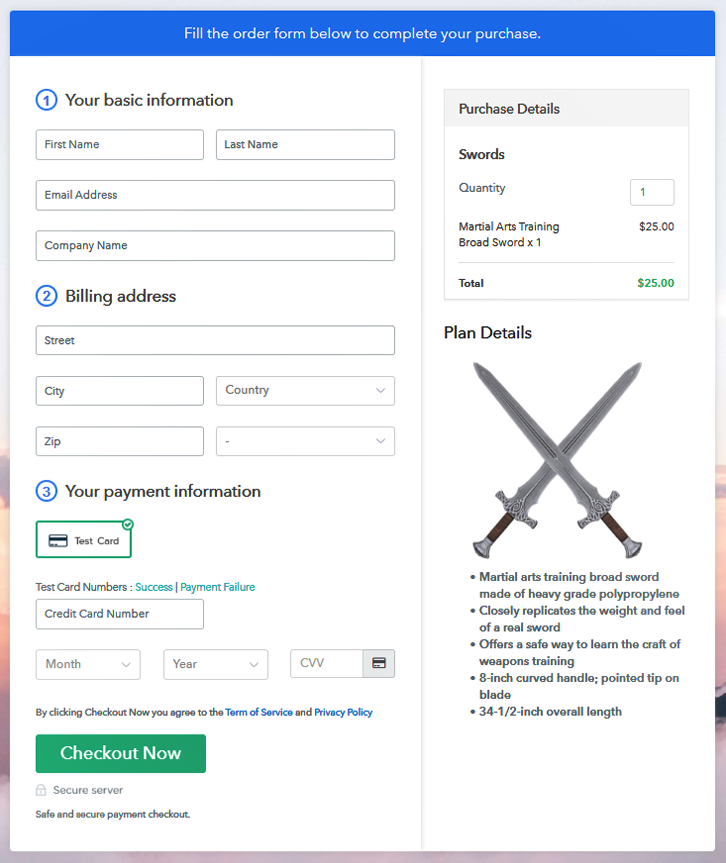
This is How your Checkout Page will Look Like After Creation

Checkout to Sell Swords Online

Preview Checkout Page

Step 1: Log in to Pabbly Subscription Billing

Signup

Go to  Pabbly Subscription Billing and tap on “Sign up Free“. Here, you can either sign in via Gmail account or else you can fill out the details like name, email, etc manually. After that just click on the button named “Sign Up”.

Sign Up For Free!

Step 2: Select Subscription Billing

Access Subscription Billing

After you complete your signup, you will be redirected to the dashboard where you need to tap on the button stating “Access Now”.

Step 3: Account Setup

Setup Account

A dialog box will pop up asking you to fill out the company details like name, currency, phone number, etc,  Once you complete filling up the details just press the blue “Continue” button in order to complete the entire process.

Step 4: Connect Payment Gateways To Sell Swords Online

Connect Payment Gateway

Pabbly Subscription Billing comes with a test payment gateway in order to test the entire payment experience of the customer. For that, you just need to click on the “Enable Test Payment”option to test out this functionality.

Moreover, Pabbly Subscription Billing allows you to integrate with many payment gateways like PayPal, Authorize.net, Stripe, etc. Here, you can also integrate a particular payment gateway with the help of integration guide below. For instance, here i am going to enable the test payment option to continue the process.

Step 5: Add Your Product

Add Product

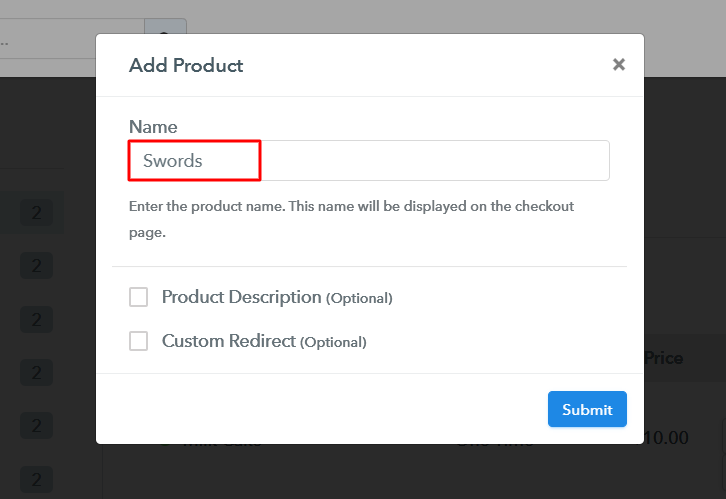
Now, the subsequent step is to add products by clicking on the “Add your product” section. Then, just add the title of the product, like in this case I wrote Swords.

Add Product to Sell Swords Online

Fill up the details and your product is created.

Note: Here you can add all the products related to the similar category by creating plans for each of them.

Step 6: Add Plans

Now, our next step is to create plans in order to start swords business online.

(a) Select Add New Plan

Add Plan

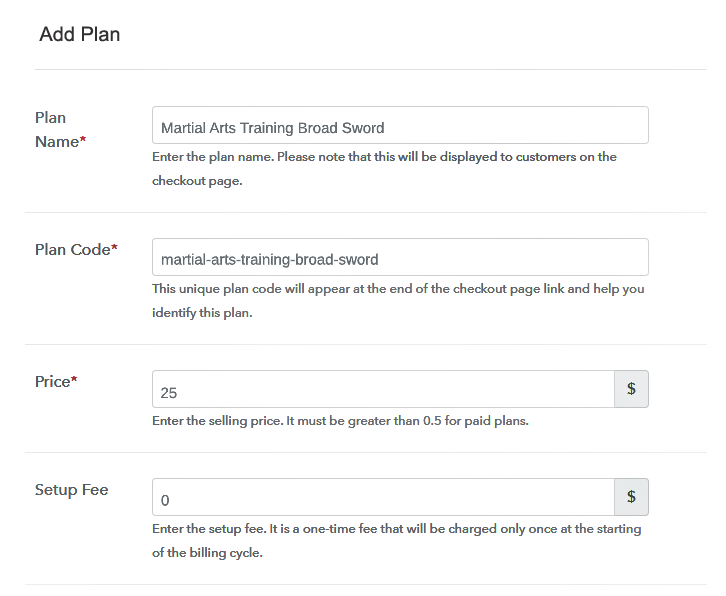
(b) Specify the Plan & Pricing Details

Specify the Plan & Pricing Details to Sell Swords Online

Once you are directed to the plan page, you need to enter the details such as plan name, code, price, setup fees, etc.

(c) Add Image & Description

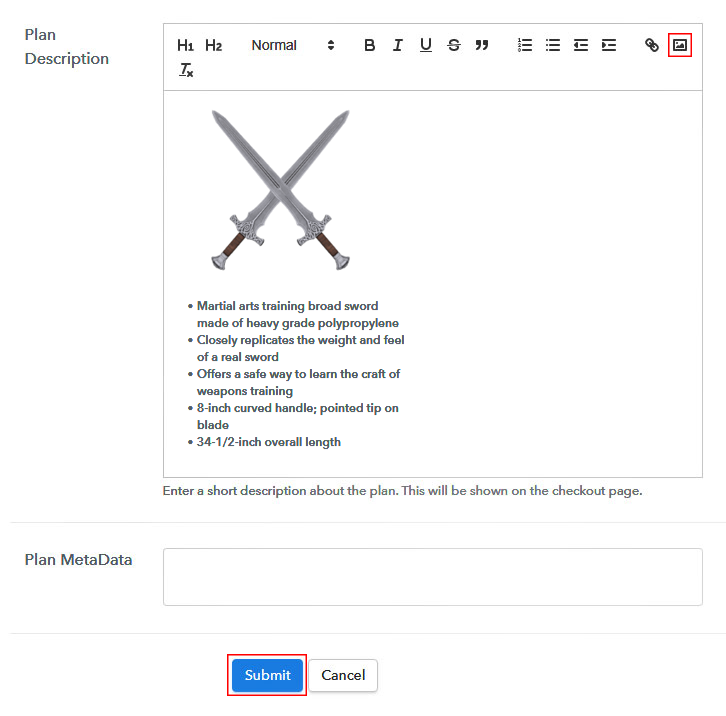
Add Product Description to Sell Swords Online

Now, add images of your swords and insert them with the help of the upload image button.

Consequently, provide some useful information regarding your swords such as materials used, in bullet points. After that just click on the “Submit” button.

Furthermore, using the same process, you can also create several products.

Step 7: Share your Checkout Page

Share Checkout Page on Social Media

  • Now, you can share the checkout page easily on social media sites like Twitter and Facebook with the help of their respective buttons.
  • Moreover, you can also share the checkout page directly with your customers using emails and SMS.
  • Furthermore, you can add the buttons on your websites. And can also use anchor text anywhere on your website to redirect users on the checkout page.

Step 8: Preview Checkout Page

Follow up these steps to preview checkout page:

(a) Click on the View Button

View Checkout Plan

(b) Take a Look at the Checkout Page

Checkout to Sell Swords Online

Step 9: Embed Checkout Page in Site & Sell Swords Online

Embed Checkout Page on Website

Afterward, just copy the embed plan link in order to insert the checkout page on your WordPress website.

(a) Edit the Page & Paste the Copied Link

Paste Linkin Text Editor

Once you copy the link, just paste it to the text area of the editor.

(b) Save & Publish the Checkout Page

Save and Publish

After pasting the code, press the ‘Publish’ button and your checkout page is embedded.

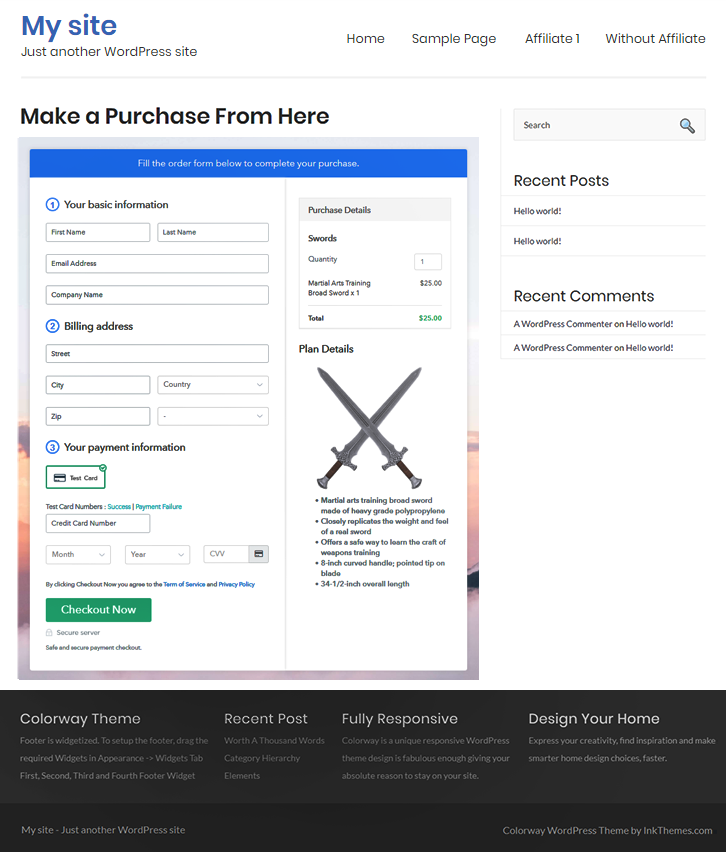
(c) Check out the Final Look of your Checkout Page on WordPress Site

Wordpress Embedding Of Checkout Pages to Start Swords Business Online

Step 10: Multiplan Checkout Page

Note: In case you want to sell multiple products via a single checkout page, you can create a multi-plan checkout page otherwise skip this step.

(a) Click on Add Multiplan Checkout

Multiplan Checkout

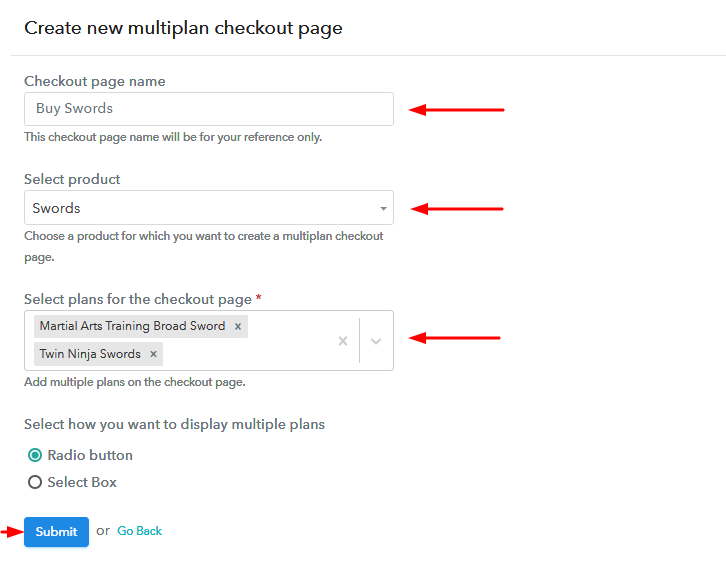
(b) Add Plans to Sell Swords Online from Single Checkout Page

Add Plans to Sell Swords Online from Single Checkout Page

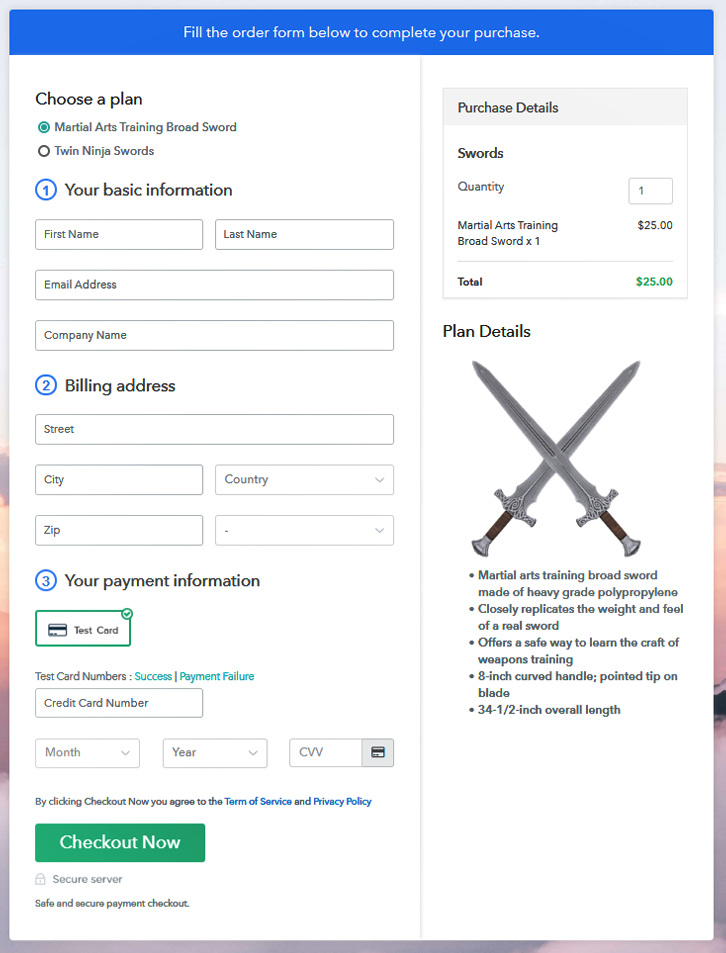
(c) Take a Look at the Checkout Page

Multiplan Checkout Page to Start Swords Business Online

Preview Checkout Page

Wrapping Up

That’s it! We hope this article was helpful for you so that you can start your swords business online easily. Just follow all the steps that we have mentioned above and your business is set to sell swords online. And, if you have any query don’t forget to write us in the comment section below. We will try to answer it as soon as possible. Thank You!

You May Also Like To Read –

How to Sell Mangoes Online | Step by Step (Free Method)

How to Sell Mangoes Online

Ideal For: All the mango manufacturers, mango sellers, retail mango shop owners, mango suppliers, mango dealers and other vendors can use this method to escalate their mango selling business online.

How to Sell Mangoes Online

Why Choose this Method for Selling Over any Other Solution?

Unlike any other solution, this method allows you to:

  • List and sell your mangoes for FREE. Absolutely no payment required.
  • No commission on sales.
  • Collect payment through multiple payment modes from a single checkout page.
  • Sell one time or recurring subscriptions of your mangoes.
  • Sell and collect payment in any currency as per your requirement.
  • Give discounts on your products by offering special coupon codes.
  • Add sales commission agents to help you in selling your mangoes.

Get Pabbly Subscription Billing for Free

Everybody loves Raymond can be denied but everybody loves mango is a fact for sure. That’s the reason why mango called out to be a king of fruit. And, if you pay attention to our traditional values it has been said that mango is a food of the gods. However, it is a seasonal fruit but you will find pickles, pulp, and packaged food of mangoes available all along the year.

Why would you like to sell mangoes online?

One of the prominent reason to start selling mangoes online apart from its sweet taste, delicious flavor, and mouth-watering quality, it is known for controlling heart rate and blood pressure. Not just this, mangoes contain an antioxidant compound which provides protection against breast cancer and colon cancers.

If not this, then the second reason to start mango selling business online is to give a thought to Research and Market team predictions where it has been said that the mango product market to grow with a CAGR of 6.2% over the forecast period from 2019-2025.

To be very honest, tap on the phone is way easier than paying a visit to a fruit shop. Owing to all this, you can start mango selling business online using a software “Pabbly Subscription Billing” which lets you create startling checkout pages to sell mangoes online. Some of its rarest features involve:

  • List variety of mangoes through the single checkout page
  • Offer discount and coupon codes to customers
  • Send email notification to potential buyers

Aforesaid are some of the points of software and now let’s cast light on creating a checkout page for selling mangoes online using a tool.

This is How your Checkout Page will Look Like After Creation

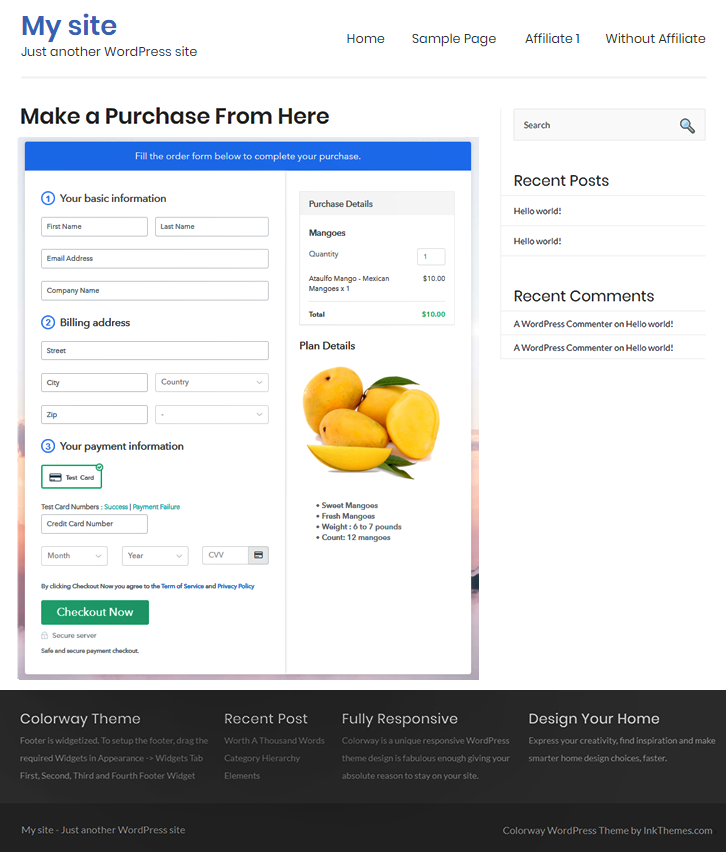
Checkout Page to Sell Mangoes Online

Preview Checkout Page

Step 1: Log in to Pabbly Subscription Billing

Signup

The former step to do is visit the Pabbly Subscription Billing in your browser and then click on “Sign up Free“. Further, you can always sign in using your Gmail account or manually filled out the details.

Sign Up For Free!

Step 2: Select Subscription Billing

Access Subscription Billing

Step 3: Account Setup

Setup Account

Next, after clicking on the “Access Now” button of the software, a page will open with fields like company name, select currency, and phone number. Just fill out those details to continue creating a checkout page for mangoes.

Step 4: Connect Payment Gateways To Sell Mangoes Online

Connect Payment Gateway

The following step is to make the user informed of the payment procedure. This’s why the software offers a test payment gateway, so you can gain knowledge about the software payment procedure. Here, we are proceeding the checkout page process for mangoes using a test payment gateway. Additionally, it is stuffed with payment gateways like PayPal, Stripe, etc. Further, beneath we are addressing the payment integration guides to help you out.

Step 5: Add Your Product

Add Product

Furthermore, add the name, which in our case is mangoes. Here you can specify the type like Alphonso, Badami, etc. Also, write a short description of the mangoes to grab the customer’s attention.

Add Product to Start Selling Mangoes Online

Next, click on the “Submit” button after filling the details about mangoes.

Note: Here you can add all the products related to the similar category by creating plans for each of them.

Step 6: Add Plans

Let’s uncover plans for different kinds of mangoes available in your store.

(a) Select Add New Plan

Add Plan

(b) Specify the Plan & Pricing Details

Specify the Plan and Pricing to Start Selling Mangoes Online

The succeeding thing to do is fill all the details of mangoes like plan name, code, price, set-up fee, and much more to move on.

(c) Add Image & Description

Add Image & Description to Sell Mangoes Online

Furthermore, it is necessary to write a brief description of mangoes using bullets, images, etc, to bring natural shoppers to the checkout page.

Next, click the “Submit” button to add mangoes on the checkout page.

Additionally, you can add multiple plans and kinds of mangoes in your product list which you want to sell online.

Step 7: Share your Checkout Page

Share Checkout Page on Social Media

  • Moreover, share the checkout page of mangoes on social media accounts like Facebook & Twitter to catch the buyer’s attention.
  • Plus, you can share a direct link of the mango’s checkout page with your customers via SMS or email marketing.
  • Additionally, embed the provided plan link of mangoes in the buttons or any anchor text on your website.

Step 8: Preview Checkout Page

Follow up the recommended steps to preview the checkout page for mangoes:

(a) Click on the View Button

View Checkout Plan

(b) Take a Look at the Checkout Page

Checkout Page to Sell Mangoes Online

Step 9: Embed Checkout Page in Site & Sell Mangoes Online

Embed Checkout Page on Website

Just copy the link and add the checkout page to sell mangoes online at any proper place on your WordPress site.

(a) Edit the Page & Paste the Copied Link

Paste Link in Text Editor

Furthermore, paste the plan link of mangoes on a text editor of the WordPress dashboard.

(b) Save & Publish the Checkout Page

Save and Publish

Push the “Publish” button, after doing changes.

(c) Check out the Final Look of your Checkout Page on WordPress Site

Final Look of your Checkout Page to Start Selling Mangoes Online

Step 10: Multiplan Checkout Page

Note: In case you want to sell multiple products via a single checkout page, you can create a multi-plan checkout page otherwise skip this step.

(a) Click on Add Mutiplan Checkout

Multiplan Checkout

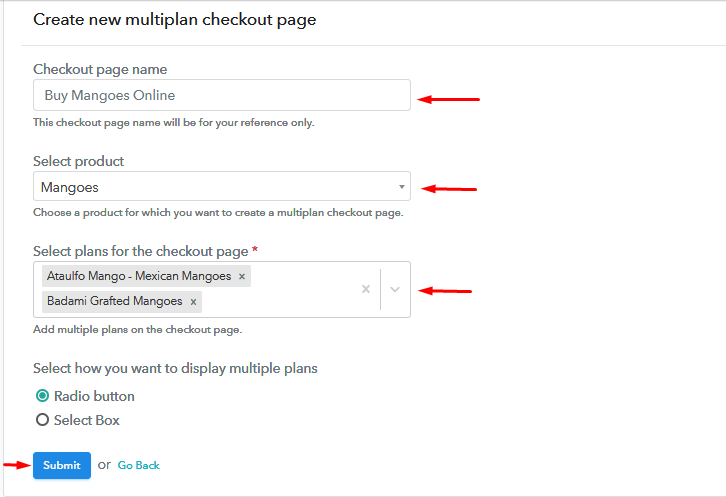
(b) Add Plans to Sell Multiple Mangoes from Single Checkout Page

Multiplan Checkout Page to Sell Mangoes Online

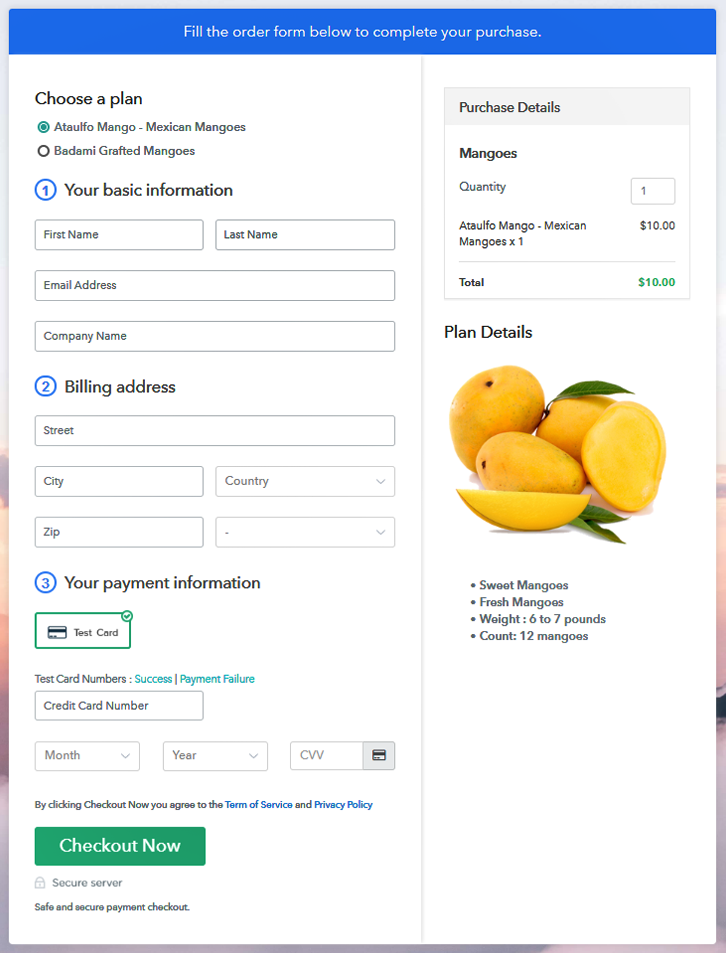
(c) Take a Look at the Checkout Page

Multiplan Checkout Page to Sell Mangoes Online

Preview Checkout Page

Wrapping Up

There is a reason for saying “Mango among fruits” as mango is loved by almost everyone. And, starting your mango selling business online is definitely a holy idea using the software Pabbly Subscription Billing. Just follow all the mentioned steps and you’re good to go.

So, try the tool and knock us out with any queries regarding the same.

You May Also Like To Read –

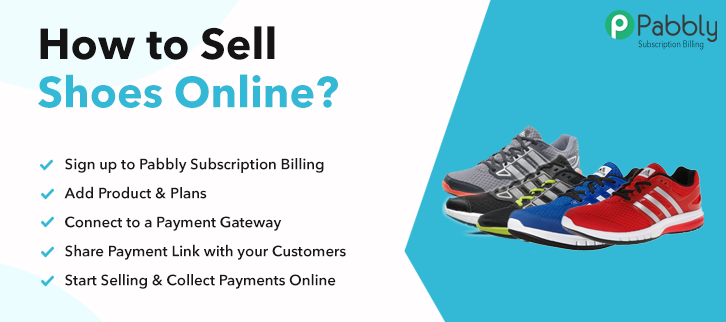
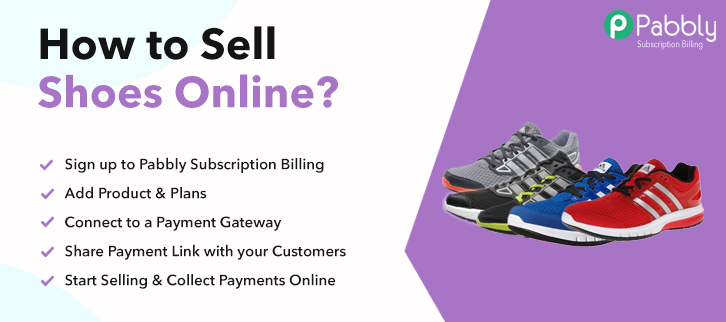
How to Sell Shoes Online | Step by Step (Free Method)

How to Sell Shoes Online

Ideal For: All the footwear shops, wholesale footwear suppliers, shoe manufacturers, and other merchants can use this method to take their shoes selling business online.

How to Sell Shoes Online

Why Choose this Method for Selling Over any Other Solution?

Unlike any other solution, this method allows you to:

  • List and sell shoes for FREE. Absolutely no payment required.
  • No commission on sales.
  • Collect payment through multiple payment modes from a single checkout page.
  • Sell one time or recurring subscriptions of shoes.
  • Sell and collect payment in any currency as per your requirement.
  • Give discounts on your products by offering special coupon codes.
  • Add sales commission agents to help you in selling shoes.

Get Pabbly Subscription Billing for Free

Are you thinking to expand your shoes selling business and broaden your customer reach? Ever wondered about selling shoes online? Well, the footwear market is remunerative and it can give huge returns on your investments.

Why would you like to sell shoes online?

The obvious answer is you can earn more easy money from online shoes selling business than from an offline one. You just have to create checkout pages for your shoes and share their links on social media or your website and people can buy your products directly through these links. To create checkout pages and start your shoes selling online business there is an amazing and free tool, Pabbly Subscription Billing. With this service, you can kick start your business in a few minutes.

Also, Pabbly Subscription Billing offers you many great features:

  • Share invoices automatically with users
  • Collect one-time or recurring payments through offline or online modes
  • Integrate it with your website to increase your sales
  • You don’t have to pay any transaction fees

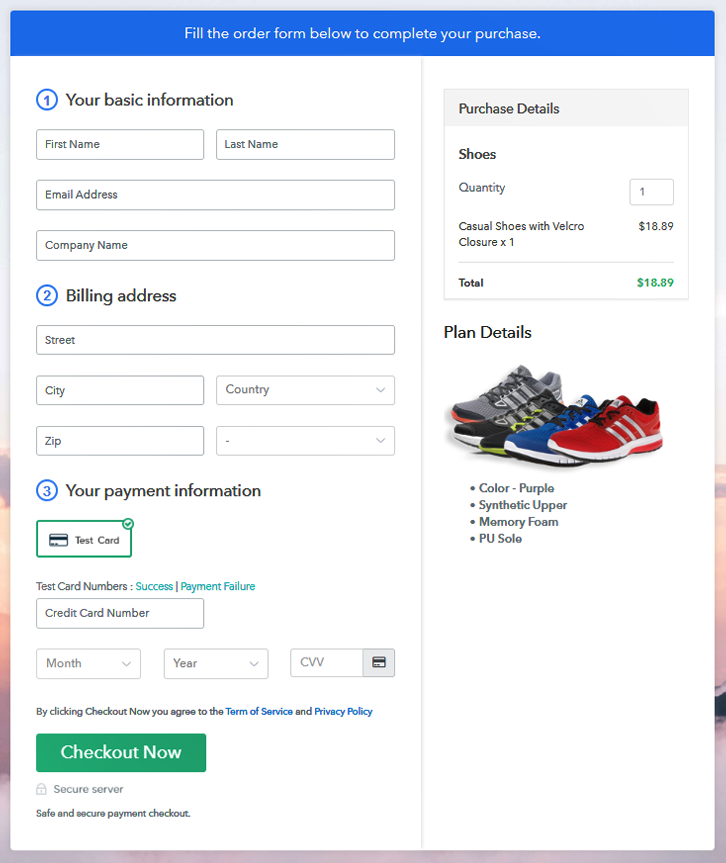
This is How your Checkout Page will Look Like After Creation

Preview Checkout Page

Preview Checkout Page

Step 1: Log in to Pabbly Subscription Billing

Signup

The first step is to visit Pabbly Subscription Billing website and then click on the “Sign Up Free” button. After clicking the button, you will land on the signup page, where you can create your account in few seconds with Gmail or manually enter your details.

Sign Up For Free!

Step 2: Select Subscription Billing

Access Subscription Billing

Step 3: Account Setup

Setup Account

When you are done with the signup process, now you have to fill up your company details i.e. company name, select currency, and contact number in the appeared dialogue box.

Step 4: Connect Payment Gateway to Sell Shoes Online

Connect Payment Gateway

After setting up your account, here, we are showing you the payment collection process by enabling the ‘Test Payment’ mode. Thereafter, you can connect with other payment gateways whichever you prefer. The complete integration guide for payment gateways is provided below.

Step 5: Add Your Product

Add Product

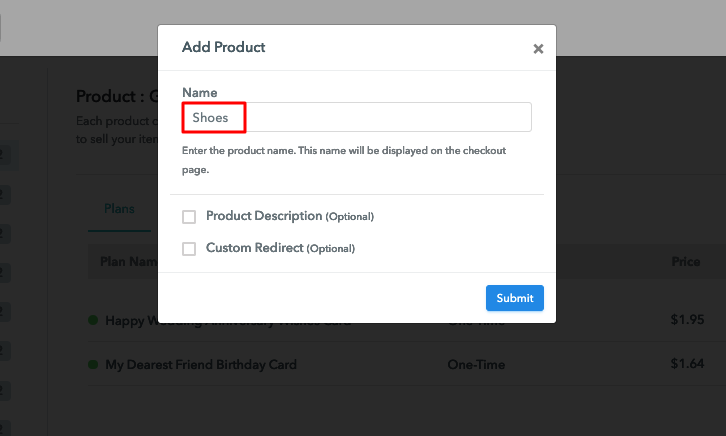
In this step, you have to add your first product. You can add shoes from different categories such as running shoes, casual sneakers, etc, and add all other types of shoes in the same product by creating different plans.

Add Product Name to Sell Shoes Online

Fill all this information to add your product.

Note: Here you can add all the products related to the similar category by creating plans for each of them.

Step 6: Add Plans

Let’s get started and create plans for different categories of shoes that you want to sell

(a) Select Add New Plan

Add Plan

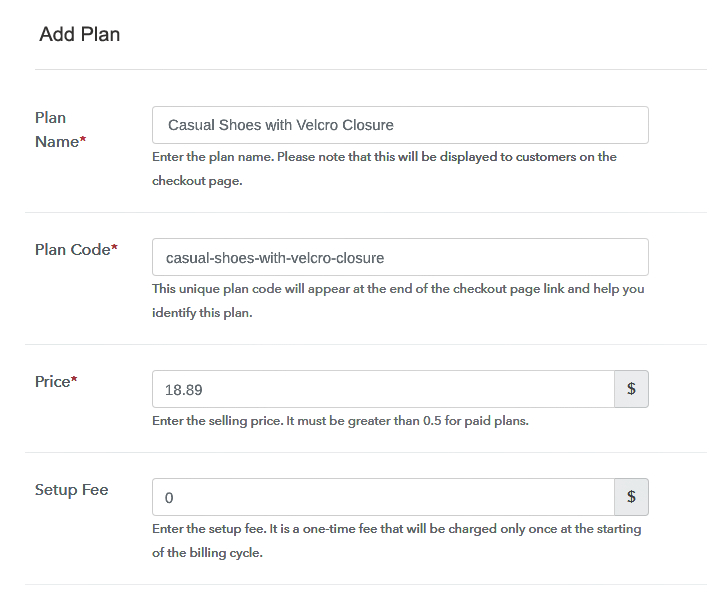
(b) Specify the Plan and Pricing Details

Add Details to Sell Shoes Online

When you will “Add New Plan” button, you will be redirected to the plan page, here you will have to fill the plan details such as plan name, code, billing cycle, price, etc.

(c) Add Image & Description

Add Image to Sell Shoes Online

Also, describe your shoes that you want to sell along with the product links, images, etc, and click on the submit button to add your plan.
You can create more plans for all the shoes similarly.

Step 7: Share Your Checkout Page

Share Checkout Page on Social Media

  • You can share your checkout page on social media like Facebook and Twitter.
  • Furthermore, copy the mentioned link and send it to your customers through SMS or emails directly.
  • Also, embed your plan link to your website so that your customers can be landed on the checkout page directly.

Step 8: Preview Checkout Page

By following these steps you can view checkout page

(a) Click on the View Button

View Checkout Plan

(b) Take a Look at the Checkout Page

Preview Checkout Page

Step 9: Embed Checkout Page in Site & Sell Shoes Online

Embed Checkout Page on Website

Just copy the provided plan embedding link and embed the checkout page to your WordPress site.

(a) Edit the Page & Paste the Copied Link

Paste Link in Text Editor

Copy and paste the link in the text area of the editor

(b) Save & Publish the Checkout Page

Save and Publish

After the code is pasted, click on the publish button to embed your checkout page.

(c) Check Out the Final Look of your Checkout Page on WordPress Site

Add Checkout Page to Sell Shoes Online

Step 10: Multiplan Checkout Page

Note: In case you want to sell multiple products through a single checkout page, create a multi-plan checkout plan, otherwise skip this step.

(a) Click on Add Multiplan Checkout

Multiplan Checkout

(b) Add Plans to Sell Multiple Shoes from Single Checkout Page

Multiplan Details to Sell Shoes Online

(c) Take a Look at the Checkout Page

Multiplan Checkout to Sell Shoes Online

Preview Checkout Page

Wrapping Up

One last note, Pabbly Subscription Billing is going to help you in setting up your online shoes selling business so much. With its amazing features, you can boost up your business and take it to heights of success. Now, you can easily collect payments, share invoices, create discount coupons, and whatnot. Therefore, stop thinking and start selling.
For further queries or suggestions, please contact us.

You May Also Like To Read –

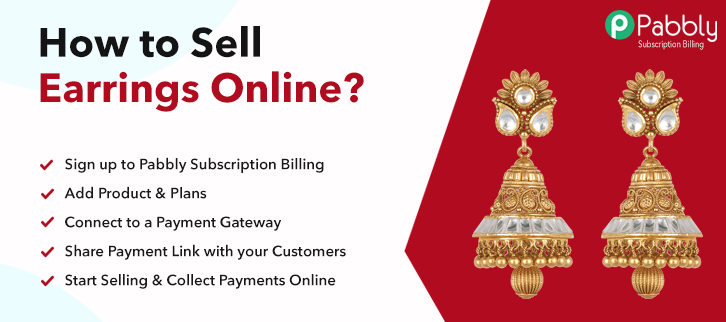
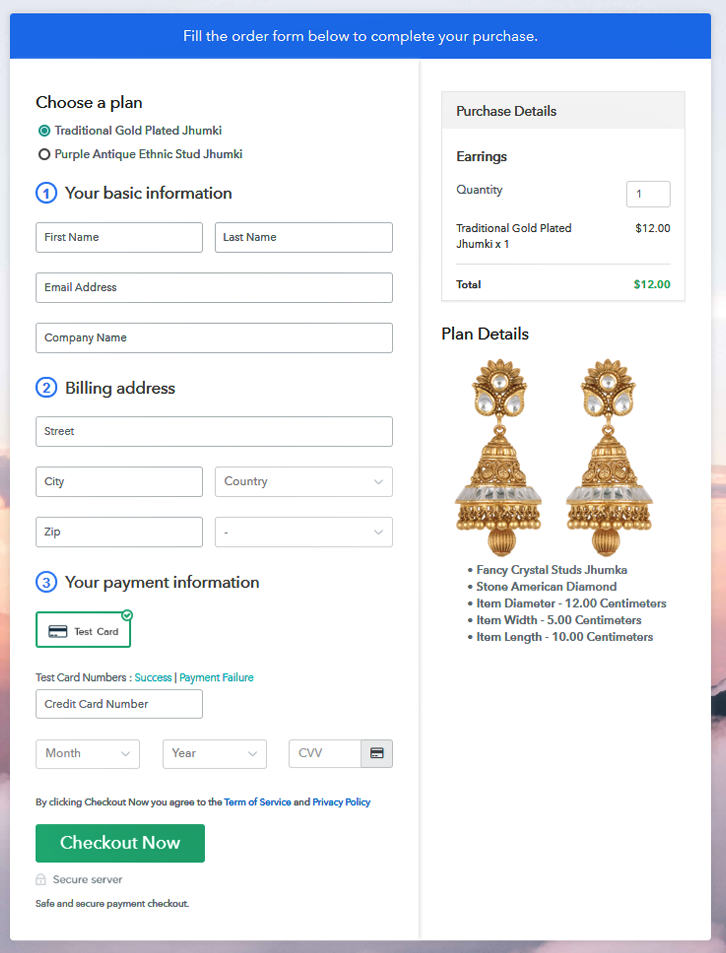
How to Sell Earrings Online | Step by Step (Free Method)

How to Sell Earrings Online

Ideal For: All wholesale earrings suppliers, earring manufacturers, jewelry shop owners and other merchants can use this method to start selling earrings online.

How to Sell Earrings Online

Why Choose this Method for Selling Over any Other Solution?

Unlike any other solution, this method allows you to:

  • List and sell your earrings for FREE. Absolutely no payment required.
  • No commission on sales.
  • Collect payment through multiple payment modes from a single checkout page.
  • Sell one time or recurring subscriptions of your earrings.
  • Sell and collect payment in any currency as per your requirement.
  • Give discounts on your products by offering special coupon codes.
  • Add sales commission agents to help you in selling earrings online.

Get Pabbly Subscription Billing for Free

The jewelry industry can be very profitable, especially when it comes to selling online. So, if you are interested in selling earrings and jewelry online, then you’ve come to the right place. To successfully sell earrings online through the checkout page check out this guide and turn your passion or business into a profit by learning how to sell earrings online.

Why would you like to sell earrings online?

Earrings is a great fit for eCommerce as products are lightweight, easy to ship, and come in many variations. Starting your earring business online lets your customers shop from anywhere at any time and gives your business a competitive edge by spanning online and offline experiences. However, there are numerous billing tools are available online for selling the products, so to help you out here I would like to recommend the best software named Pabbly Subscription Billing. With this, you can start your business of selling earrings online via checkout pages for free.

Pabbly Subscription billing allows you to sell unlimited products online without charging any extra fee. As well as you can accept online or offline payments. Following are the advantages of using this service of creating checkout pages without any restrictions:

  • Create single/multi-plan checkout pages
  • Keep records for all your sales & products
  • Maintain a record for all the stock
  • Showcase product details in beautiful checkout pages
  • Collect online and offline payments
  • Apply taxes, coupons, and discounts

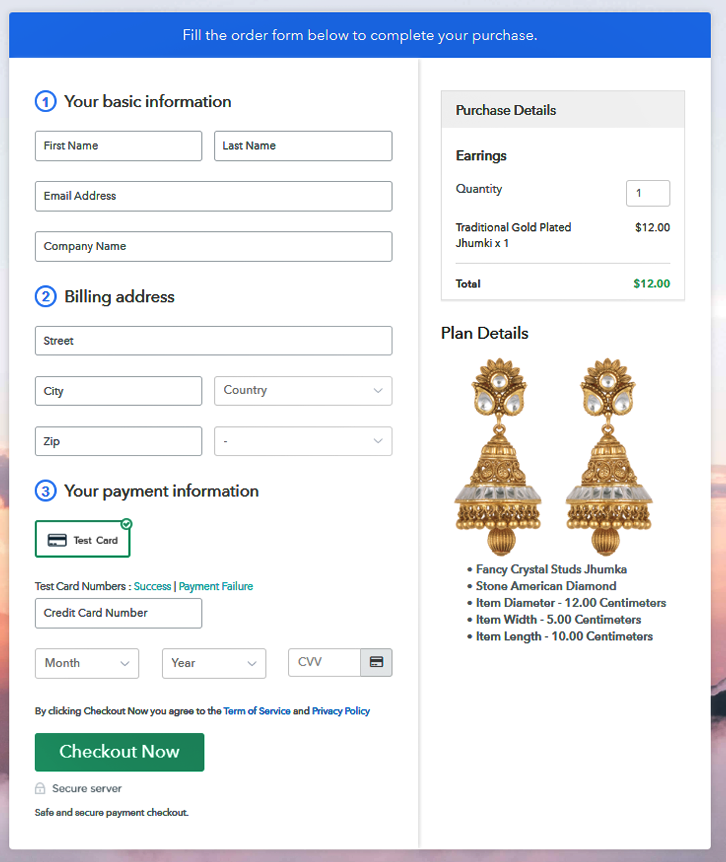
This is How your Checkout Page will Look Like After Creation

Preview Checkout Page - Sell Earrings Online

Preview Checkout Page

Step 1: Login to Pabbly Subscription Billing

Signup

Firstly, visit the Pabbly Subscription Billing website and click on the “Sign-Up Free” button. You’ll land on the signup-up page where you can register on the software with Gmail account or manually filling the details.

Sign Up For Free!

Step 2: Select Subscription Billing

Access Subscription Billing

Step 3: Account Setup

Setup Account

Once you are successfully logged into the system, fill up the basic information like company name, currency, and phone number that will appear in the diagonal box.

Step 4: Connect Payment Gateway to Sell Earrings Online

Connect Payment Gateway

Now, you can connect the payment gateway for accepting payments. You can connect multiple payment gateways like PayPal, Stripe, Razorpay, Authorize.net, etc. Moreover, Pabbly Subscription Billing provides the “Enable Test Payment” button for testing the payment mode. Below, check out the integration guides of multiple gateways

Step 5: Add Your Product

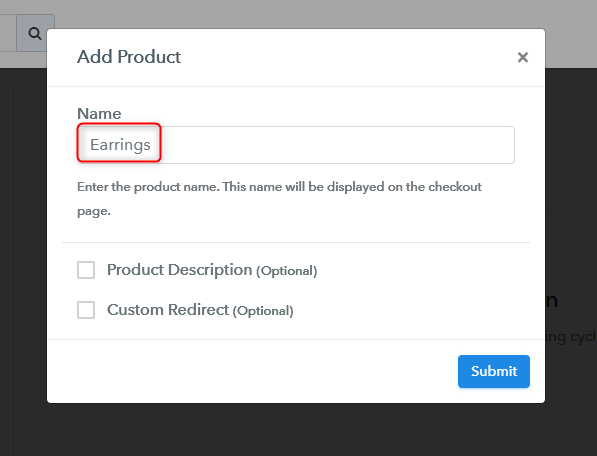
Next, categorize earrings into different categories by clicking on the  “Add New Product” option. You can add the multiple plans in the same product category.

Add Product

Click on the “Submit” button, and your product is created.

Note: Here you can add all the products related to the similar category by creating plans for each of them.

Step 6: Add Plans

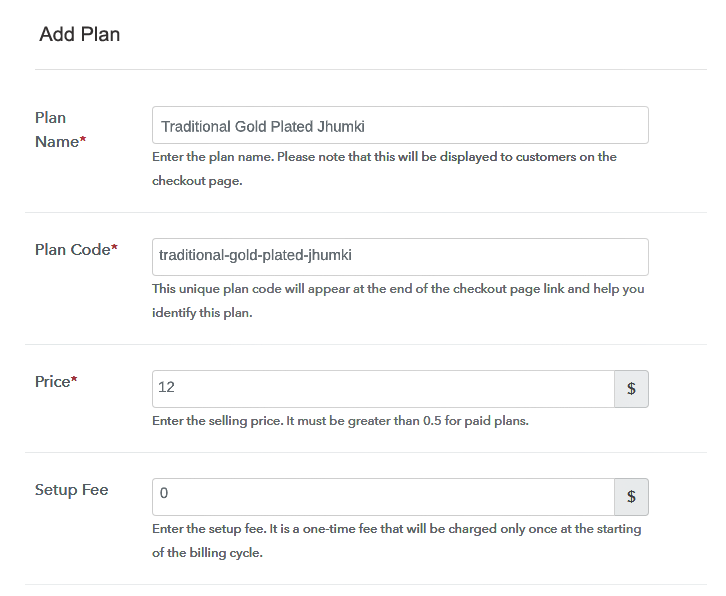
Now, create various plans for all types of earrings like gold, diamond, jhumkas etc., that you want to sell.

(a) Select Add New Plan
Add Plan

(b) Specify the Plan & Pricing Details

Add Plan

After creating the plan, you can specify the plan details like plan name, plan code, price, setup fee, etc., for selling earrings online.

(c) Add Image & Description

Add Product Image

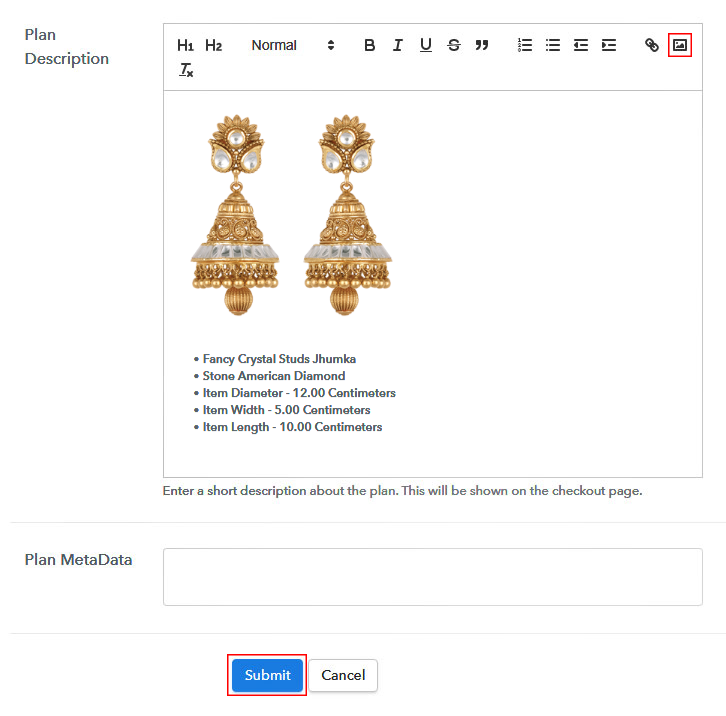
For adding the image to the “Plan Description” section click on the image icon that will appear on the right corner. Moreover, you can write a brief description of your product and customize the text and add product links. Once you are done with the changes hit on the “Submit” button and your checkout page is ready to sell earrings online.

Step 7: Share your Checkout Page

Share Checkout Page on Social Media

You can share your checkout page with your buyers in 3 different ways:

  • First share the link on social media platforms, SMS, emails, etc.
  • Secondly, send the checkout page directly on Facebook and Twitter.
  • Lastly, you can use the checkout page link on your website as a button & text anchors.

Step 8: Preview Checkout Page

Now it’s time to preview your checkout page by following these steps

(a) Click on the View Button

View Checkout Plan

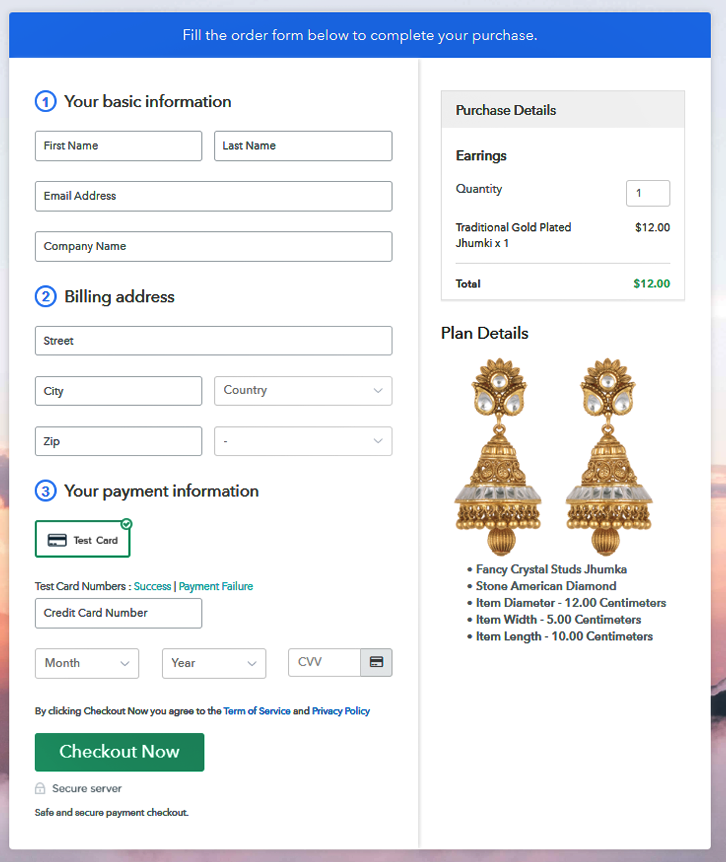
(b) Take a Look at the Checkout Page

Preview Checkout Page - Sell Earrings Online

Step 9: Embed Checkout Page in Site & Sell Earrings Online

Embed Checkout Page on Website

For embedding the checkout page on your WordPress copy the checkout page link given under the “Embed Plan Link” window.

(a) Edit the Page & Paste the Copied Link

Paste Link in Text Editor

Instantly, paste the copied link on your WordPress post/page text editor.

(b) Save & Publish the Checkout Page

Save and Publish

Click on the ‘Publish’ button to embed your checkout page.

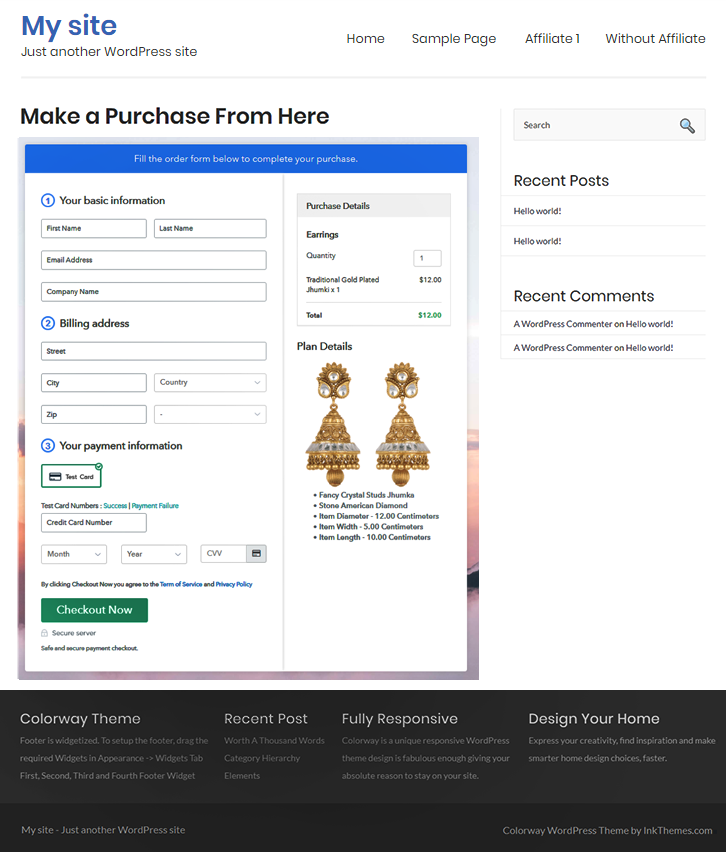
(c) Check out the Final Look of your Checkout Page on WordPress Site

Preview On WordPress Site - Start Selling Earrings Online

Step 10: Multiplan Checkout Page

Note: In case you want to sell multiple products via a single checkout page, you can create a multi-plan checkout page otherwise skip this step.

(a) Click on Add Mutiplan Checkout

Multiplan Checkout

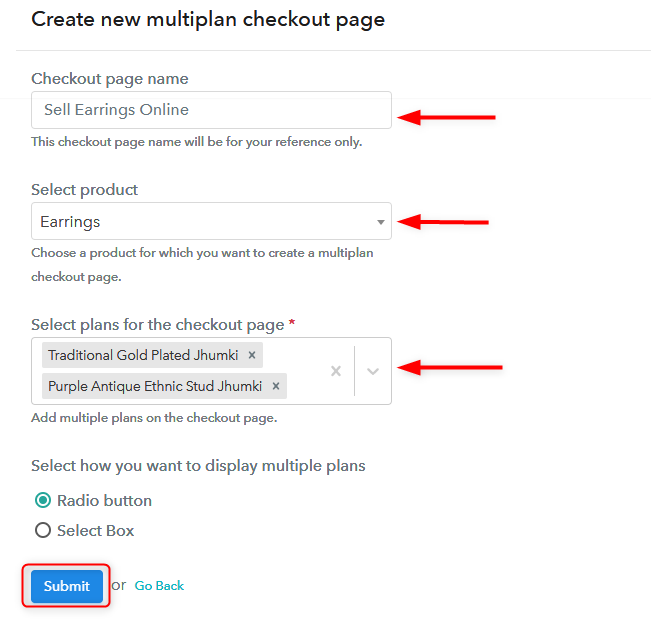
(b) Add Plans to Sell Multiple Earrings from Single Checkout Page

Create Multiplan Checkout Page

(c) Take a Look at the Checkout Page

Preview Multiplan Checkout Page - Sell Earrings Online

Preview Checkout Page

Wrapping Up

Here, we’ve talked about how to sell earrings online, now it’s time for you to spread your wings.

Follow these steps and start selling earrings online with the Pabbly Subscription Billing checkout page without worrying about any extra commissions. This service not only manages your all data but also enable’s you to accept safe and secure online payments using multiple payment gateways.

You May Also Like To Read –

How to Sell Greeting Cards Online | Step by Step (Free Method)

How to Sell Greeting Cards Online

Ideal For: All the gift shops, greeting cards shop, wholesale greeting card suppliers, and other merchants who sell handmade greeting cards can use this method to take their greeting cards selling business online.

How to Sell Greeting Cards Online

Why Choose this Method for Selling Over any Other Solution?

Unlike any other solution, this method allows you to:

  • List and sell greeting cards for FREE. Absolutely no payment required.
  • No commission on sales.
  • Collect payment through multiple payment modes from a single checkout page.
  • Sell one time or recurring subscriptions of greeting cards.
  • Sell and collect payment in any currency as per your requirement.
  • Give discounts on your products by offering special coupon codes.
  • Add sales commission agents to help you in selling greeting cards.

Get Pabbly Subscription Billing for Free

Greeting cards are all-rounder gift items that work with every situation, whether its someone’s birthday or anniversary and if you sell greeting cards or make greeting cards then consider taking your greeting cards selling business online.

Why would you like to sell greeting cards online?

Greeting cards are sold on every occasion and if people can access your unique greeting cards online from all over the world then you can earn great profit as you don’t have to invest a lot in online business. Therefore today we have brought you a fantastic service that allows you to sell greeting cards online for free which is Pabbly Subscription Billing. You can easily create checkout pages on this platform for your cards and share their links on social media or your website and start collecting payments through them.

Also, you get unlimited access to its amazing features:

  • Collect one-time or recurring payments of your greeting cards
  • Share invoices automatically with buyers
  • You can integrate with your website and other applications
  • Pay zero transaction fees

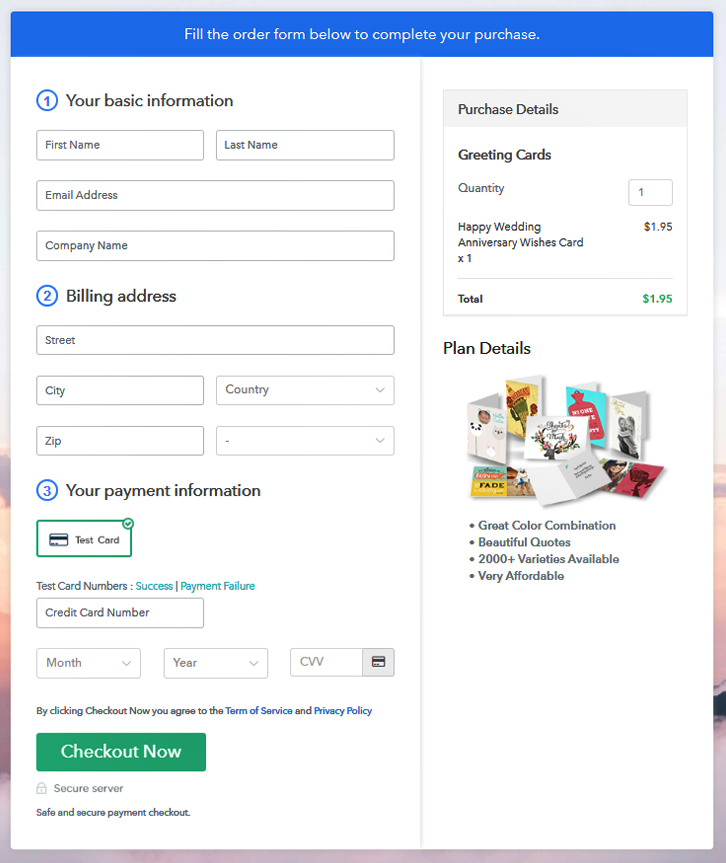
This is How your Checkout Page will Look Like After Creation

Preview Checkout Page

Preview Checkout Page

Step 1: Log in to Pabbly Subscription Billing

Signup

Let’s start with visiting Pabbly Subscription Billing website and then click on the “Sign Up Free” button. On clicking the button, the signup page will open, where you can create your account with your Gmail or manually enter your details.

Sign Up For Free!

Step 2: Select Subscription Billing

Access Subscription Billing

Step 3: Account Setup

Setup Account

After finishing the signup process, now you have to fill up your company details i.e. company name, select currency, and contact number in the appeared dialogue box.

Step 4: Connect Payment Gateway to Sell Greeting Cards Online

Connect Payment Gateway

Once the account setup is done, now, the payment collection process is explained by enabling the ‘Test Payment’ mode. Subsequently, you can connect other payment gateways of your choice. The complete integration guide for payment gateways is provided below.

Step 5: Add Your Product

Add Product

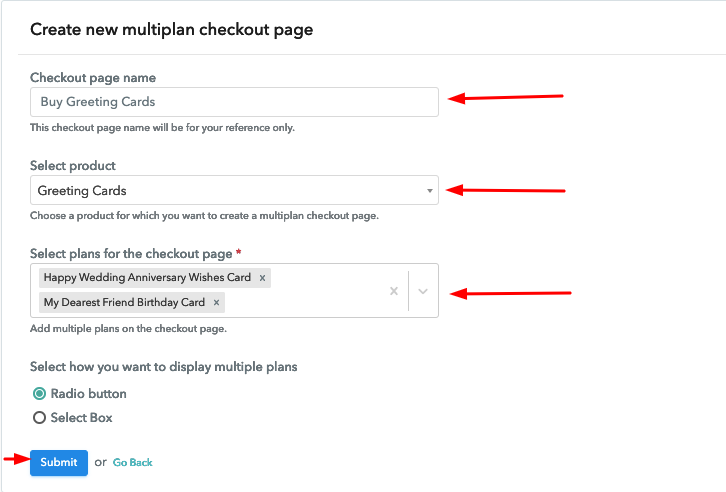
Moving to this step, you have to add your first product. You can add greeting cards of different categories for instance birthday cards, sorry cards, etc, and add all other types of greeting cards in the same product by creating different plans.

Add Product Name to Sell Greeting Cards Online

You just have to fill up these details and your product is added.

Note: Here you can add all the products related to the similar category by creating plans for each of them.

Step 6: Add Plans

Let’s get started and create plans for different categories of greeting cards that you want to sell

(a) Select Add New Plan

Add Plan

(b) Specify the Plan and Pricing Details

Add Details to Sell Greeting Cards Online

On clicking add new plan, you will reach to the plan page, here you will have to fill the plan details such as plan name, code, billing cycle, price, etc.

(c) Add Image & Description

Add Image to Sell Greeting Cards Online

Also, write a description of the greeting cards that you want to sell along with the product links, images, etc, and click on the submit button to add your plan.
You can create more plans for all the greeting cards in a similar manner.

Step 7: Share Your Checkout Page

Share Checkout Page on Social Media

  • Share your checkout page on social media like Facebook and Twitter to boost up your sales.
  • Also, copy the mentioned link and send it to your customers through SMS or emails directly.
  • Embed your plan link to your website so that your customers can be landed on the checkout page directly.

Step 8: Preview Checkout Page

Follow these steps to view checkout page

(a) Click on the View Button

View Checkout Plan

(b) Take a Look at the Checkout Page

Preview Checkout Page

Step 9: Embed Checkout Page in Site & Sell Greeting Cards Online

Embed Checkout Page on Website

Just copy the provided plan embedding link and embed the checkout page to your WordPress site.

(a) Edit the Page & Paste the Copied Link

Paste Link in Text Editor

Copy and paste the link in the text area of the editor

(b) Save & Publish the Checkout Page

Save and Publish

After the code is pasted, click on the publish button to embed your checkout page.

(c) Check Out the Final Look of your Checkout Page on WordPress Site

Add Checkout Page to Sell Greeting Cards Online

Step 10: Multiplan Checkout Page

Note: In case you want to sell multiple products through a single checkout page, create a multi-plan checkout plan, otherwise skip this step.

(a) Click on Add Multiplan Checkout

Multiplan Checkout

(b) Add Plans to Sell Multiple Greeting Cards from Single Checkout Page

Multiplan Details to Sell Greeting Cards Online

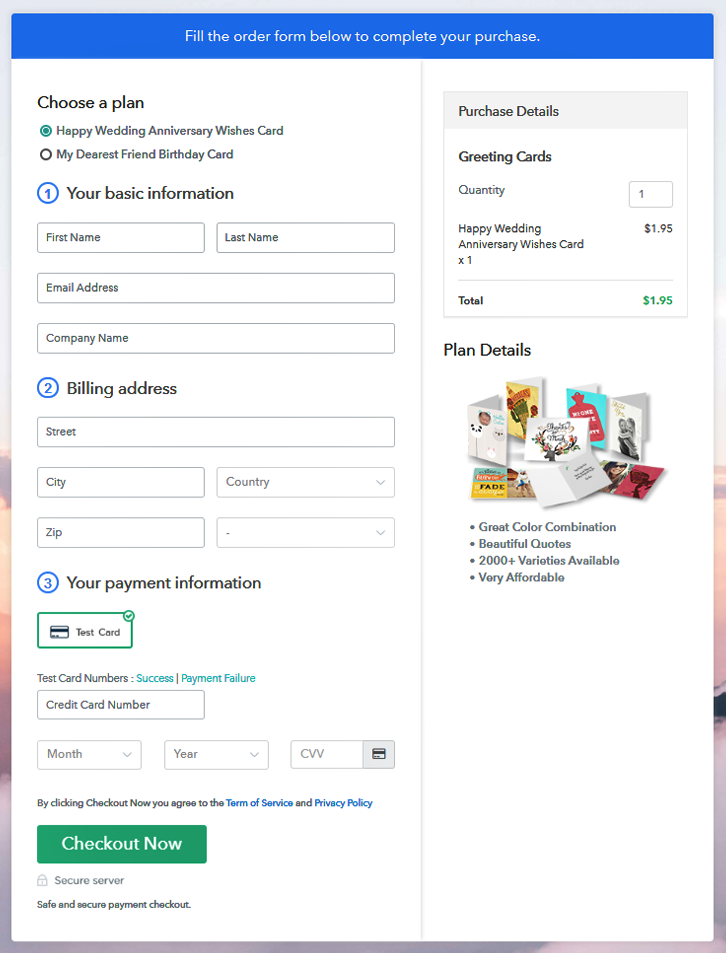
(c) Take a Look at the Checkout Page

Multiplan Checkout to Sell Greeting Cards Online

Preview Checkout Page

Wrapping Up

So now you can start selling greeting cards online easily with zero investment, all thanks to Pabbly Subscription Billing. This amazing service offers you so many beneficial features for free like easy invoicing, integration, unlimited products, and plans, and the list is long. Hence, without any more wait signup and start selling now.
For further queries or suggestions, please contact us.

You May Also Like To Read –

How to Sell Tattoo Designs Online | Step by Step (Free Method)

How to Sell Tattoo Designs Online

Ideal For: All the tattoo design sellers, tattoo design makers, retail tattoo design selling business owners, and other tattoo design selling merchants can use this method to take their tattoo designs selling business online.

How to Sell Tattoo Designs Online

Why Choose this Method for Selling Over any Other Solution?

Unlike any other solution, this method allows you to:

  • List and sell your tattoo designs for FREE. Absolutely no payment required.
  • No commission on sales.
  • Collect payment through multiple payment modes from a single checkout page.
  • Sell one time or recurring subscriptions of your tattoo designs.
  • Sell and collect payment in any currency as per your requirement.
  • Give discounts on your products by offering special coupon codes.
  • Add sales commission agents to help you in selling tattoo designs online.

Get Pabbly Subscription Billing for Free

According to a research survey in 2012, one out of every 5 adults has at least one tattoo. That is there are 21% of tattoo loving audience out these and possibly more, as it is not possible for almost everyone to get get a tattoo. But, there are people searching for tattoo designs online and if are planning to sell tattoos online we can tell you a smarter way.

Why would you like to sell tattoo designs online?

As we all know that there are permanent and temporary tattoos, so people must be searching for better designs to get one. Using a service called Pabbly Subscription billing you can start tattoo design business in few clicks.

This service will enable you to get started in no time and make use of beautiful checkout page to showcase your design. Moreover, it has a lot to offer such as product management, payments, invoicing and much more…

Also, it allows sharing the created checkout pages over social media platforms, SMS, emails etc for selling tattoo designs online.

This is How your Checkout Page will Look Like After Creation

Checkout Page Preview to Sell Tattoo Designs Online

Preview Checkout Page

Step 1: Login to Pabbly Subscription Billing

Signup
Visit the mentioned site named Pabbly Subscription Billing & click on the “Sign Up Free” button here as shown above. You’ll land over a sign-up & registration page. Here either directly sign-in using a Google account or sign-up by filling out the details asked.

Sign Up For Free!

Step 2: Select Subscription Billing

Access Subscription Billing

Step 3: Account Setup

Setup Account

By clicking on the ” Access Now” button you will be asked to fill out three details i.e, the company name, currency & a phone number. Fill out the details quickly and click on the “Continue” button to proceed forward.

Step 4: Connect Payment Gateway to Sell Tattoo Designs Online

Connect Payment Gateway

Step 4 is the most important step as payment gateway integration is going to happen. Pabbly Subscription Billing provides multiple choices to choose from for a payment method. Also, the links to the integration guides are mentioned below. Follow the links and integrate a reliable gateway of your choice by following the step by step procedure given there. Here, I’m using the text payment method for testing purpose.

Step 5: Add Your Product

Add Product

Now, the essentials are all set you can proceed forward toward creating a product. For this click on the “Add New Product” button to add a category of the tattoo designs.

Add Product to Sell Tattoo Designs Online

Strike the “Submit” button once you are done creating a product to sell tattoo designs online. Just remember, you can create as many products as you like to based on the (tattoo) category that you want to enlist.

Note: Here you can add all the products related to the similar category by creating plans for each of them.

Step 6: Add Plans

Once you created a product, you can add items as plans to it. Click on the “Add New Plan” button & fill out the details about the tattoo design that you want to show on the checkout page.

(a) Select Add New Plan

Add Plan

(b) Specify the Plan & Pricing Details

Add Plan to Sell Tattoo Designs Online

You can add details to show like plan name, code, price etc to sell tattoo designs online.

(c) Add Image & Description

Add Image & Description to Sell Tattoo Designs Online

In the same step of creating a plan, you will see a field named “Add Description”, you can use this field so showcase an image as well as its description to sell tattoo designs online.

Additionally, several text formatting options also available here to format the text and use lists, quotes, links, headings etc in your tattoos description.

Hit the “Submit” button after filling out all the details for selling the tattoo design & an item will be added.

You can create multiple plans by repeating this step.

Step 7: Share your Checkout Page

Share Checkout Page on Social Media

Just after each successful plan creation, a window will pop-up carrying a plan link (to share) & a code (to embed) the created checkout page.

  • Copy the URL given under “Plan Link” window to share the checkout page on social media platforms, SMS, and emails to sell tattoo designs online.
  • Also, you can use this same link in buttons & text anchors on your website.
  • You can also see two direct sharing buttons for Facebook & Twitter.

Step 8: Preview Checkout Page

Follow these steps to preview a checkout page:

(a) Click on the View Button

View Checkout Plan

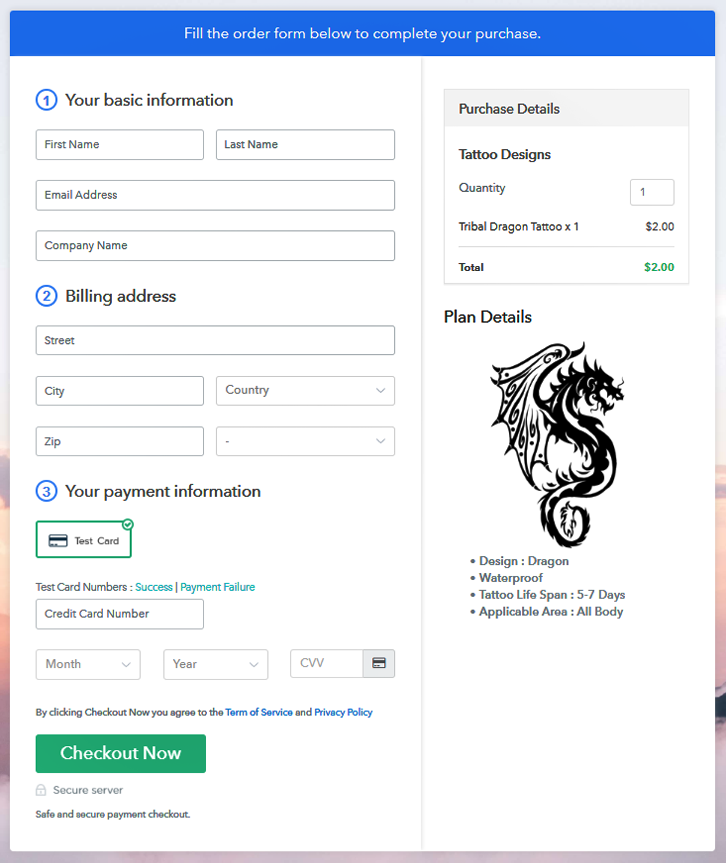
(b) Take a Look at the Checkout Page

Checkout Page Preview to Sell Tattoo Designs Online

Step 9: Embed Checkout Page in Site & Sell Tattoo Designs Online

Embed Checkout Page on Website

To embed any created checkout page on WordPress, copy the code given under the “Embed Plan Link” window.

(a) Edit the Page & Paste the Copied Link

Paste_Link_in_Text_Editor

And paste it in the text area of post/page on your website.

(b) Save & Publish the Checkout Page

Save_and_Publish

Publish the post/page & the created checkout page will get embedded on your website. Use the link (URL) assigned to that post/page to visit the checkout page.

(c) Check out the Final Look of your Checkout Page on WordPress Site

Checkout Page On Site to Sell Tattoo Designs Online

Step 10: Multiplan Checkout Page

Note: In case you want to sell multiple products via a single checkout page, you create a multi-plan checkout page otherwise skip this step.

(a) Click on Add Mutiplan Checkout

Multiplan_Checkout

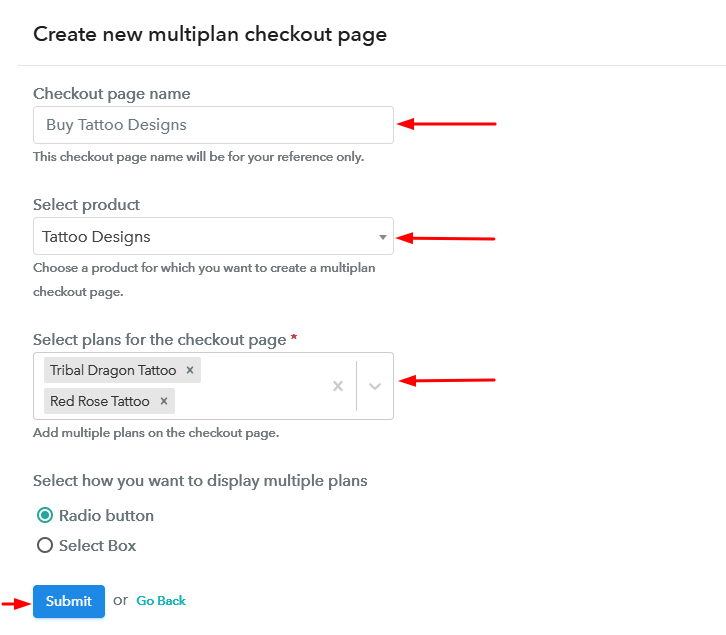
(b) Add Plans to Sell Multiple Tattoo Designs from Single Checkout Page

Create Multiplan Checkout Page to Sell Tattoo Designs Online

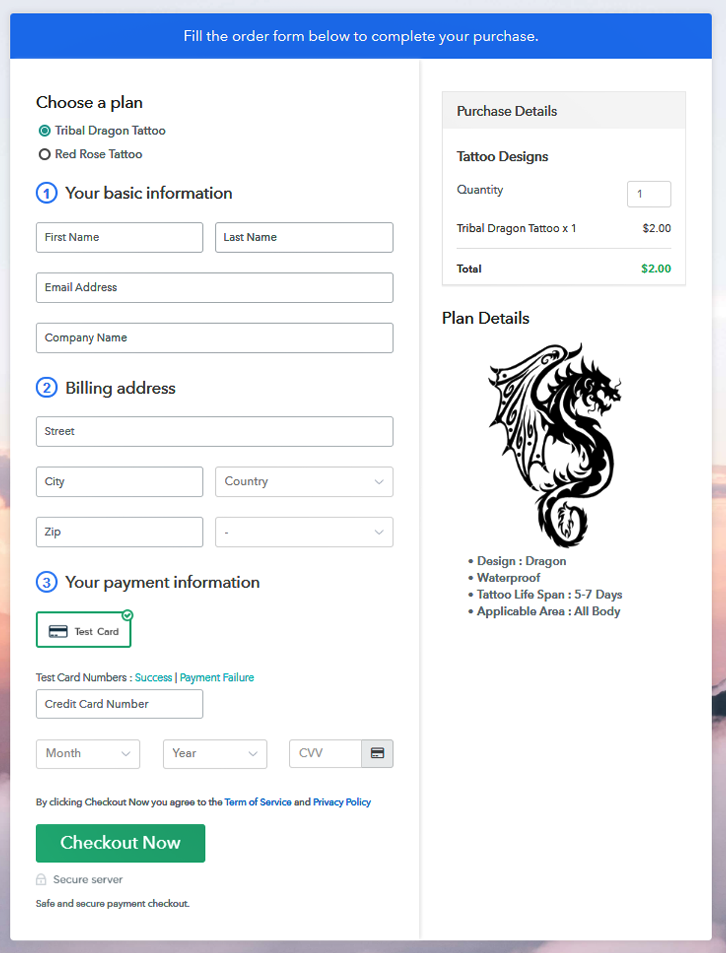
(c) Take a Look at the Checkout Page:

Multiplan Checkout to Sell Tattoo Designs Online

Preview Checkout Page

Wrapping Up

This was my catch on the easiest way to start tattoo design business online. You’ll only need to follow these 10 steps explained above to start selling tattoo designs online.

It not only helps you for free to sell tattoo design online but also takes care of the management and payments using multiple reliable payments gateway options.

Good Luck with your tattoo design business!

You May Also Like To Read
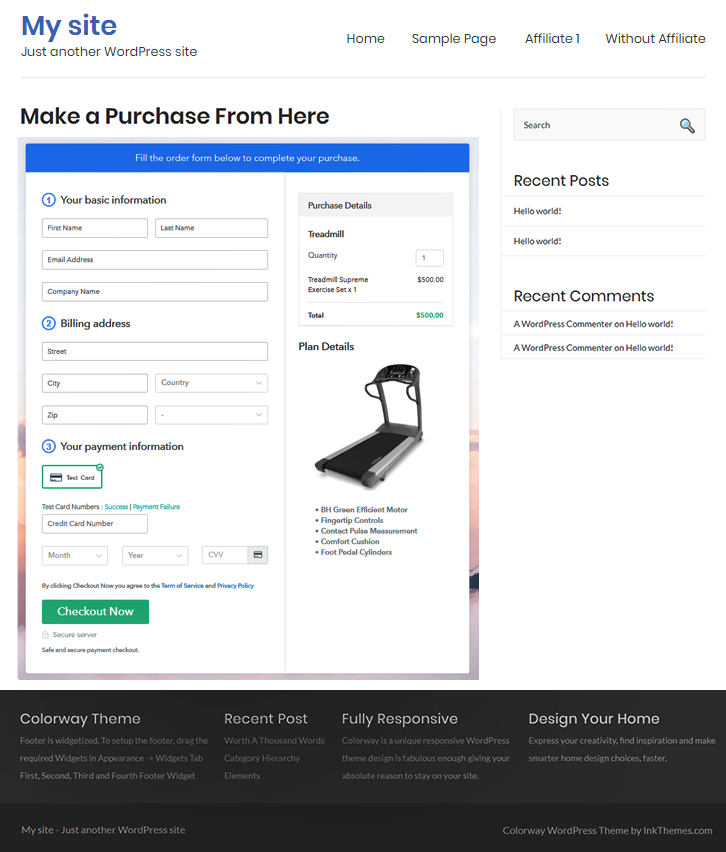
How to Sell Treadmills Online | Step by Step (Free Method)

Ideal For: All the gym equipment manufacturers, treadmill stores, fitness equipment shops and other merchants can use this method to sell treadmills online.

How to Sell Treadmills Online

Why Choose this Method for Selling Over any Other Solution?

Unlike any other solution, this method allows you to:

  • List and sell your treadmills for FREE. Absolutely no payment required.
  • No commission deducted on sales.
  • Collect payment through multiple payment modes from a single checkout page.
  • Sell one time or recurring subscriptions of your treadmills.
  • Sell and collect payment in any currency as per your requirement.
  • Give discounts on your products by offering special coupon codes.
  • Add sales commission agents to help you in selling your treadmills.

Get Pabbly Subscription Billing for Free

The invention of the first treadmill dates back to the 1st century AD in Ancient Rome. Now in the present era, it is the largest selling exercise instrument and therefore the competition is very stiff between the treadmill manufacturers. That is why many manufacturers are increasingly looking to start selling treadmills online to beat the competition at least in their home turf.

Why would you like to sell treadmills online?

Well, the advantages of selling treadmills online are numerous like 24×7 online shop, better price discovery by a global audience, better revenue, and tax management, lower logistics, lesser personnel cost, etc. Exciting isn’t it? But, may I interject your euphoria to ask do you know how can you sell treadmills online in the first place?

Well, actually there are many e-store creators which can build your online market in couple of minutes. One of the best in this game is Pabbly Subscription Billing that can create checkout pages to list an unlimited number of products. Other helpful features includes:

  • Create Customizable Checkouts
  • Multiple Billing Models Like Recurring, One-Time, Based On Cycles
  • Brand Awareness Through Different Social Media Platforms
  • Email Notifications on Transactions
  • Creating Unlimited Coupons and Plans
  • Automatic Reattempts and Notifications on Credit Card Declines

See, these listed features will give you a competitive edge over other manufacturers and make your business bloom. So buckle up as I am going to teach you how to start treadmill selling business online.

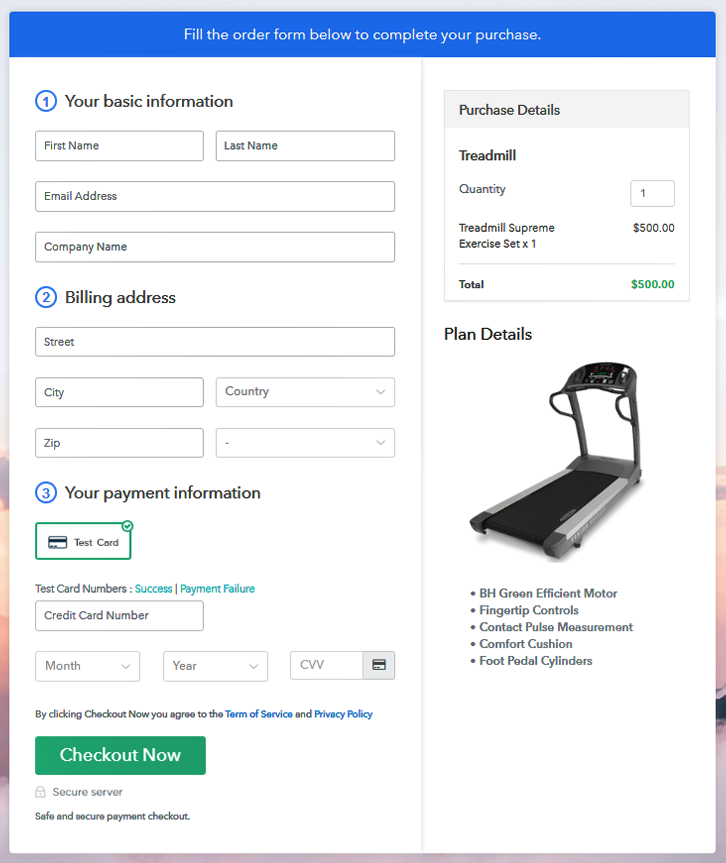
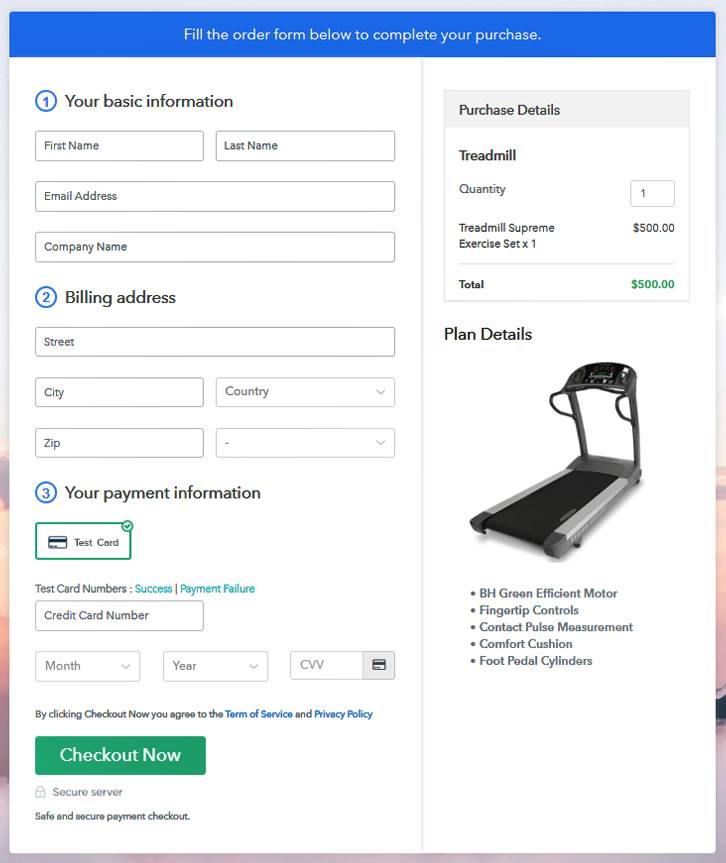
This is How your Checkout Page will Look Like After Creation

checkout to Sell Treadmills Online

Preview Checkout Page

Step 1: Log in to Pabbly Subscription Billing

Signup

Open Pabbly Subscription Billing  and reaching their website, click on “Sign up Free“. You have two options either sign in using your Gmail account or as usual fill in the required fields like name, email, etc and then click the “Sign Up” button.

Sign Up For Free!

Step 2: Select Subscription Billing

Access Subscription Billing

Now, you brought to the dashboard, and here click on the “Access Now” button on the Subscription Billing option.

Step 3: Account Setup

Setup Account

You will be redirected to a dialogue box that will require you to fill the company details like name, currency, and phone number. Now, press the “Continue” button after filling in the details.

Step 4: Connect Payment Gateways To Sell Treadmills Online

Connect Payment Gateway

To avoid any glitches while the customer is performing the payment transaction. Pabbly Subscription Billing provides you with a dummy payment gateway, where you can try the whole payment experience of a customer beforehand. You can do this by clicking on the “Enable Test Payment” option.

Also, Pabbly Subscription Billing, allows you to integrate with multiple payment gateways like Stripe, Razorpay, PayPal, Authorize.net, etc. For the integration of the payment gateways, you can use the listed guides beneath this paragraph. But since we have to set up the payment process, we will click on the “Enable Test Payment” option.

Step 5: Add Your Product

Add Product

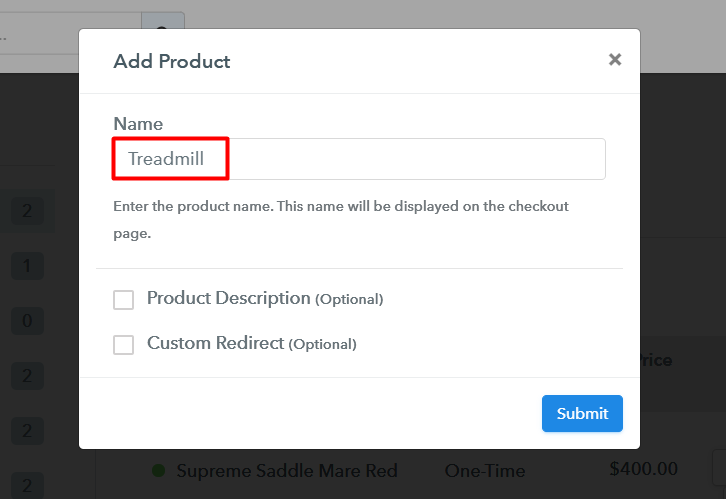
Alright, now let’s move on to add products. Below “Enable Payments” you will find the segment “Add your product” click on it. This will generate a dialog box with a blue button “Add New Product”. Click it.

This will generate a pop-up box and you have to add the required product title, in this case, it is the treadmills.

Add Products to Sell Treadmills Online

Fill up the details and your product is created.

Note: Here you can add all the products related to the similar category by creating plans for each of them.

Step 6: Add Plans

Now, we are going to create plans to start a treadmills business online

(a) Select Add New Plan

Add Plan

(b) Specify the Plan & Pricing Details

Add Plan to Sell Treadmills Online

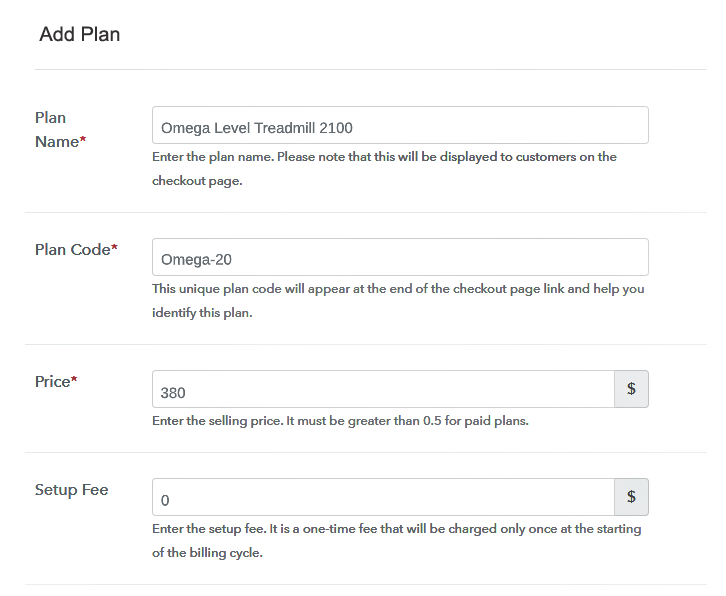
It is time to add product pricing details like plan name, code, price, setup fees, etc. Also, you can opt for different billing models like one-time payment, recurring, based on cycles, etc.

(c) Add Image & Description

Add description to Sell Treadmills Online

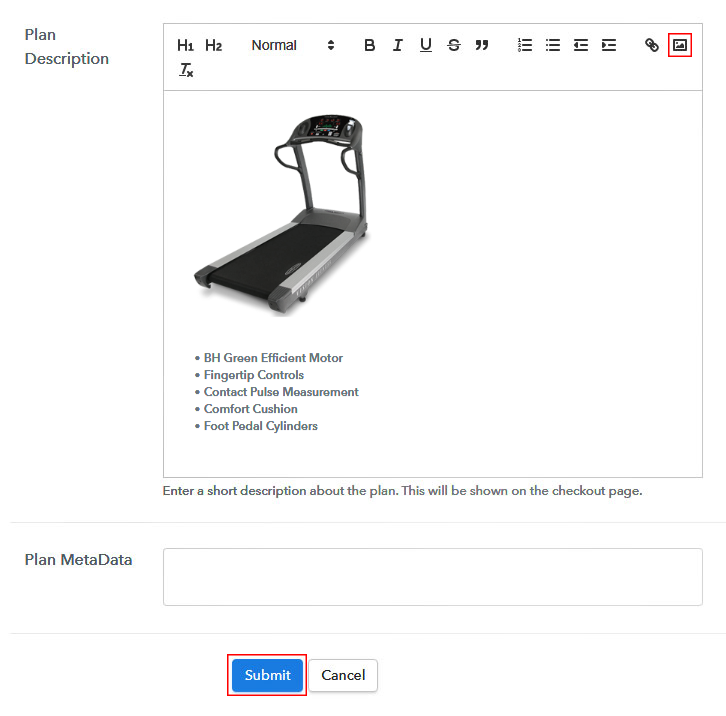
Now, upload some stunning images of your treadmills.

Furthermore, add some information about treadmills like color, cushions, motor rpm etc in bullet points then press the “Submit” button.

Moreover, using the same process, you can list more products.

Step 7: Share your Checkout Page

Share Checkout Page on Social Media

  • Now, you can share the checkout pages on Facebook, Twitter using their respective buttons for more product awareness.
  • Also, for more marketing, you can embed checkout pages in SMS and emails.
  • Moreover, you can build buttons on your website and embed these checkout pages on them. Also, you can place it on any anchor text on your website, so the users will be redirected to the checkout page.

Step 8: Preview Checkout Page

Follow up these steps to preview checkout page:

(a) Click on the View Button

View Checkout Plan

(b) Take a Look at the Checkout Page

Add Checkout to Sell Treadmills Online

Step 9: Embed Checkout Page in Site & Sell Treadmills Online

Embed Checkout Page on Website

Now,  copy the embed plan link to insert the checkout page on your WordPress website.

(a) Edit the Page & Paste the Copied Link

Paste_Link_in_Text_Editor

Now, when the link is copied, then paste it to the text area of the editor.

(b) Save & Publish the Checkout Page

Save_and_Publish

After pasting the code, now hit the ‘Publish’ button. Your checkout page is embedded.

(c) Check out the Final Look of your Checkout Page on WordPress Site

Embed on WordPress to Sell Treadmills Online

Step 10: Multiplan Checkout Page

Note: In case you want to sell multiple products via a single checkout page, you can create a multi-plan checkout page otherwise skip this step.

(a) Click on Add Mutiplan Checkout

Multiplan Checkout

(b) Add Plans to Sell Treadmills Online from Single Checkout Page

Multiplan to Sell Treadmills Online

(c) Take a Look at the Checkout Page

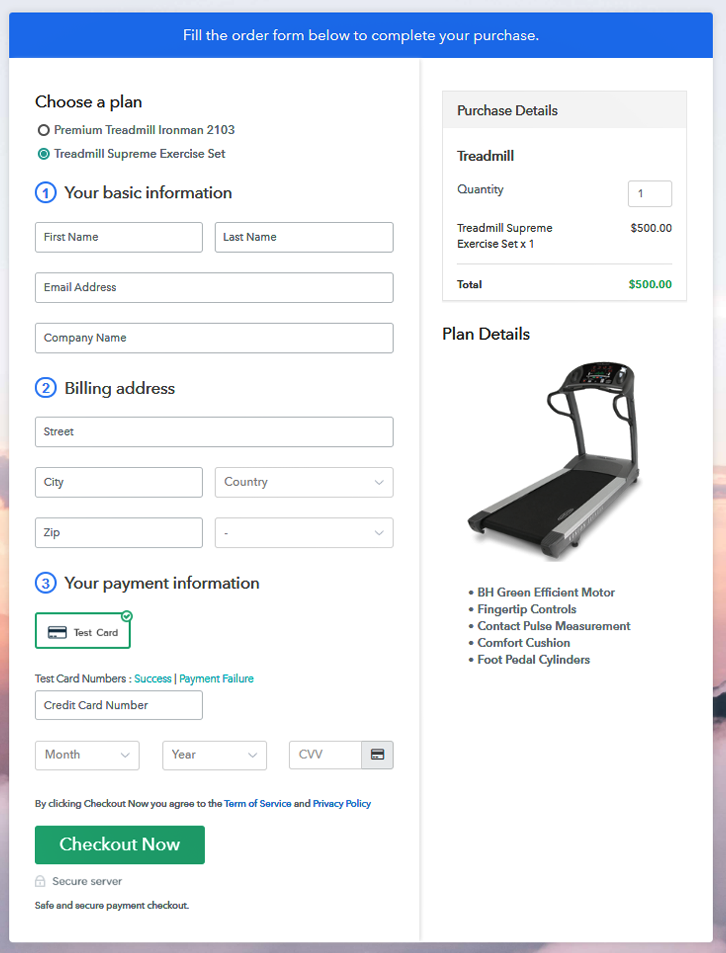
Multiplan Checkout to Sell Treadmills Online

Preview Checkout Page

Wrapping Up

Excellent, you have learned to create checkouts to sell treadmills online through Pabbly Subscription Billing. Other than the listed advantages Pabbly Subscription Billing offers cheaper pricing and transparency than most of the e-stores builders out there.

Also, you may have some doubts regarding the steps or payment integration. So feel free to drop your queries in the comment section below.

You May Also Like To Read –