How to Sell Scooters Online | Step by Step (Free Method)

How to Sell Scooters Online

Ideal For: All the scooters manufacturers, vehicle sellers, retail scooter shop owners, vehicle showroom owners, and other merchants can use this method to take their scooters selling business online.
How to Sell Scooters Online

Why Choose this Method for Selling Over any Other Solution?

Unlike any other solution, this method allows you to:

  • List and sell your scooters for FREE. Absolutely no payment required.
  • No commission on sales.
  • Collect payment through multiple payment modes from a single checkout page.
  • Sell one time or recurring subscriptions of your scooters.
  • Sell and collect payment in any currency as per your requirement.
  • Give discounts on your products by offering special coupon codes.
  • Add sales commission agents to help you in selling your scooters.

Get Pabbly Subscription Billing for Free

One of the best memory of childhood was sat in front of the scooter and holding the steering as if we are the one driving it, almost everybody did it at some point in their life.  Scooters become one of the essentials of household and because of this, scooters selling business is promising.

Why would you like to sell scooters online?

Well! One of the most prominent reasons to start scooter selling business online is the ease of driving in a dense area, plus the scooters are less bulky compared to other vehicles. According to the Business Wire report, the global scooter market expected to grow with a CAGR of 6.5% in 2020-2025.

Not just this, now electric scooters are also in trend because of last-mile transportation as compared to on-demand transportation. Considering all this, it won’t be cliche to start scooter selling business online. Luckily, we recently came across software named Pabbly Subscription Billing that can help you to build your online business.

The software allows you to build amazing checkout pages for selling scooters online. Further, it is packed with amazing features, some of them are mention below:

  • List different scooters in a single checkout page
  • Offer unlimited coupon codes and discounts to customers
  • Add taxation charges

The aforesaid are some of the bonuses of software and now let’s focus on creating a checkout page for selling scooters online using this tool.

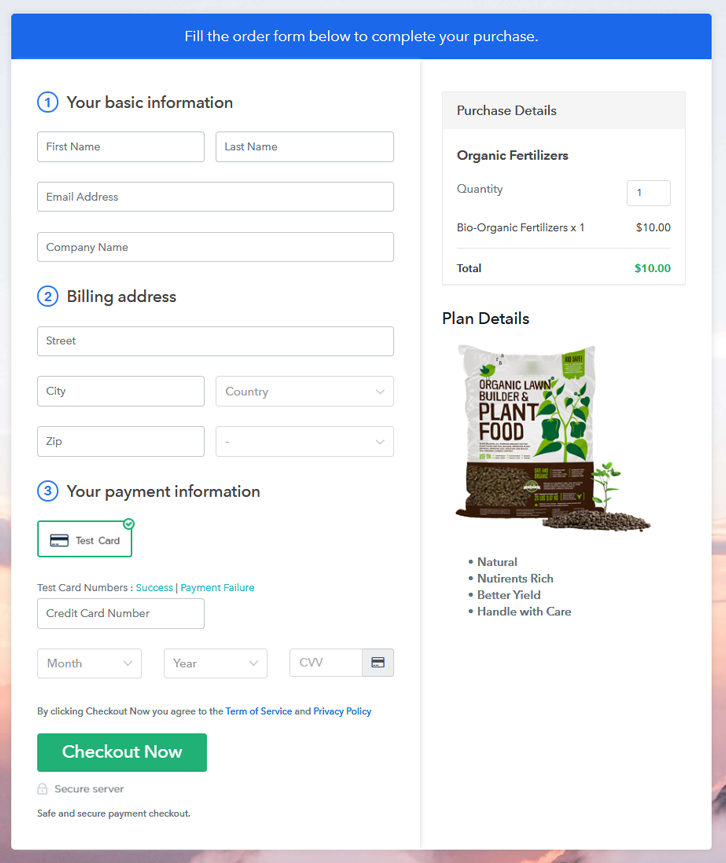
This is How your Checkout Page will Look Like After Creation
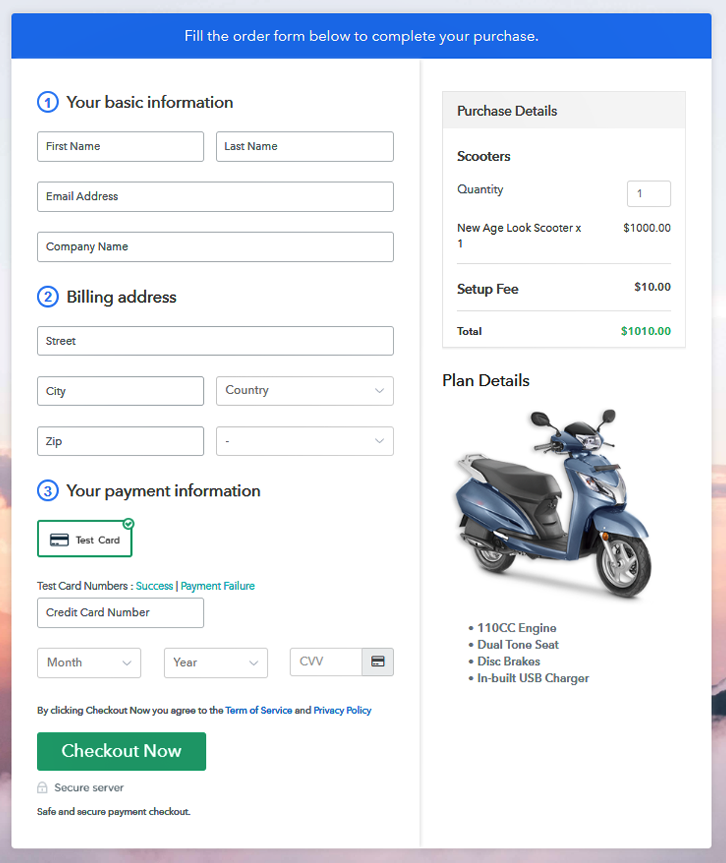
Checkout Page to Sell Scooters Online

Preview Checkout Page

Step 1: Log in to Pabbly Subscription Billing

Signup

Start the process of creating a checkout page for selling scooters online by visiting the Pabbly Subscription Billing in your browser and then click on “Sign up Free“. Further, either manually filled out the details or sign in using your Gmail account.

Sign Up For Free!

Step 2: Select Subscription Billing

Access Subscription Billing

Step 3: Account Setup

Setup Account

Moreover, after tapping on the “Access Now” button of the software, a page will redirect with fields like company name, select currency, and phone number. Just fill out those details to continue creating a checkout page for scooters.

Step 4: Connect Payment Gateways To Sell Scooters Online

Connect Payment Gateway

The next step is to gain knowledge of software payment procedure using “Test payment Gateway”. Here, we are proceeding the checkout page process for scooters using a test payment gateway.

Moreover, it is packed with various payment gateways like PayPal, Stripe, etc. Besides, here we are mentioning the payment integration guides to help you out.

Step 5: Add Your Product

Add Product

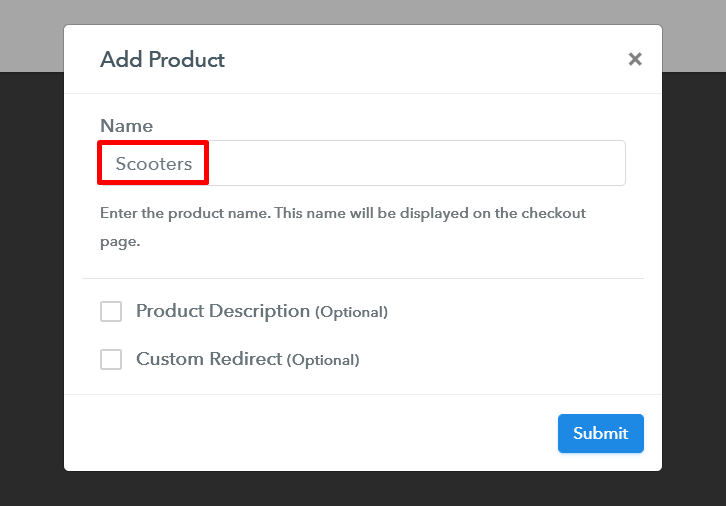
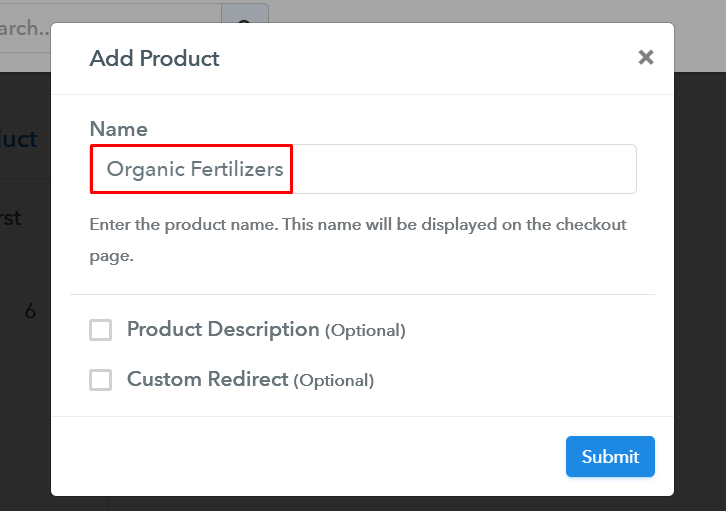
Moreover, add the name, which in our case is “Scooters”. Here you can specify the type like an electric scooter, kick scooter, moped, etc. Also, write a short description of the scooters to catch the customer’s attention.

Add Product to Start Selling Scooters Online

Consequently, click on the “Submit” button after filling the details about the scooters.

Note: Here you can add all the products related to the similar category by creating plans for each of them.

Step 6: Add Plans 

Let’s rollout plans for different kinds of scooters available in your store.

(a) Select Add New Plan

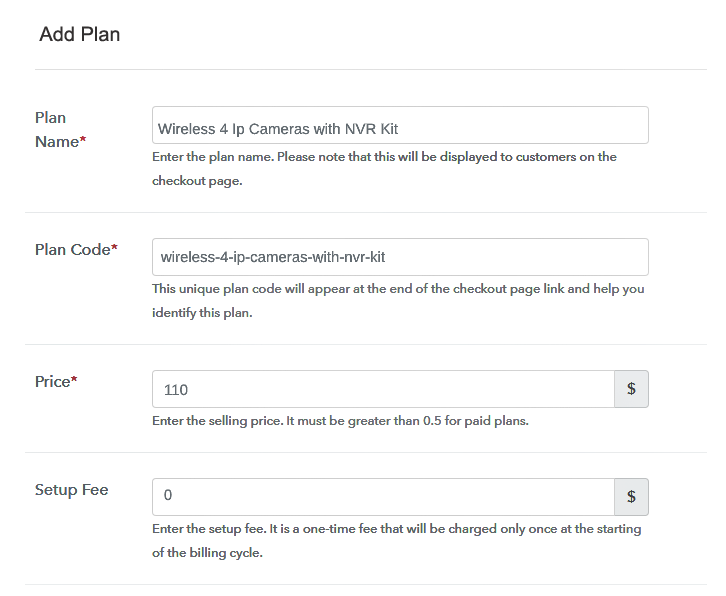
Add Plan

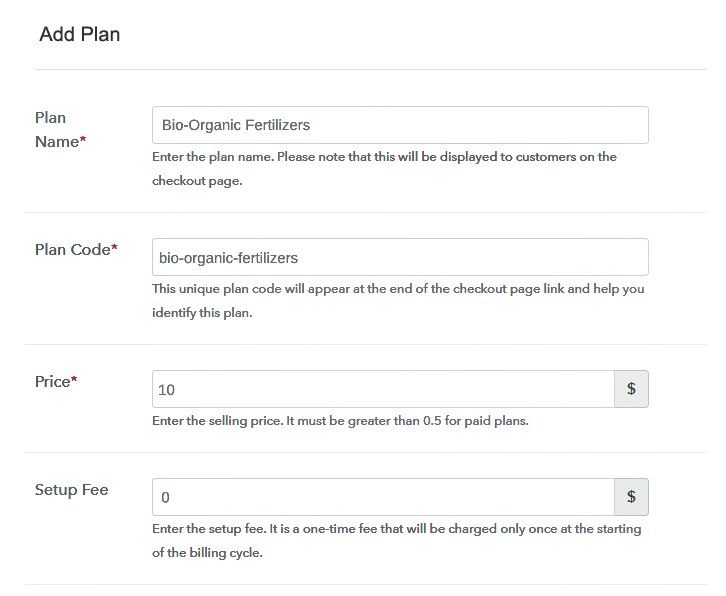
(b) Specify the Plan & Pricing Details
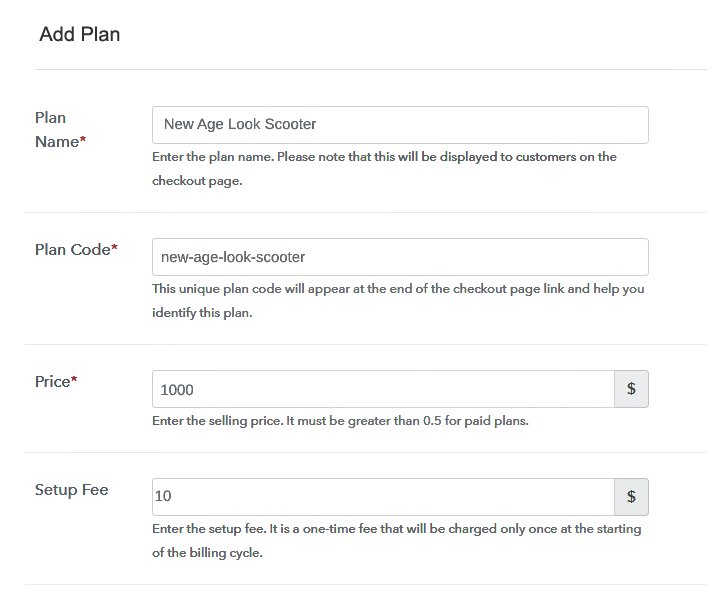
Specify the Plan and Description to Start Scooters Selling Business Online

Subsequently, fill all the details of the scooters like plan name, code, price, set-up fee, and much more to proceed.

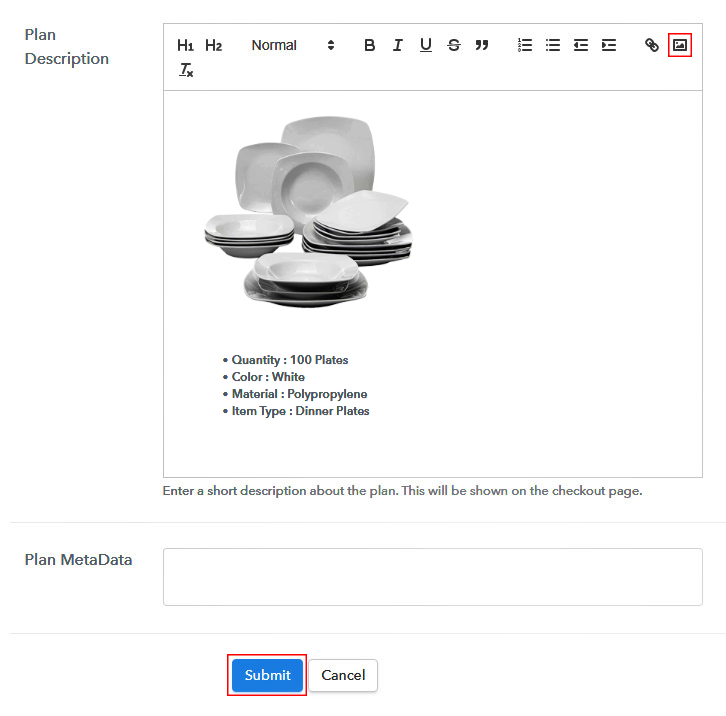
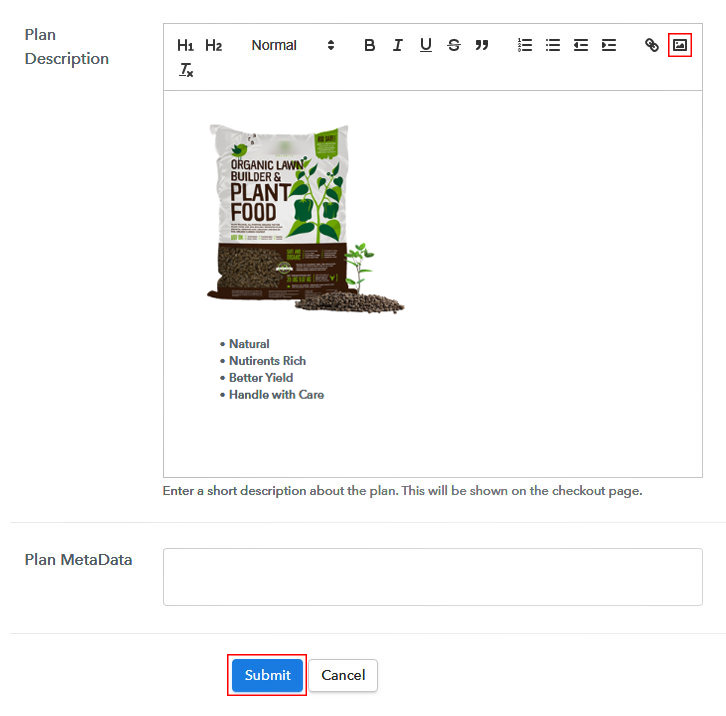
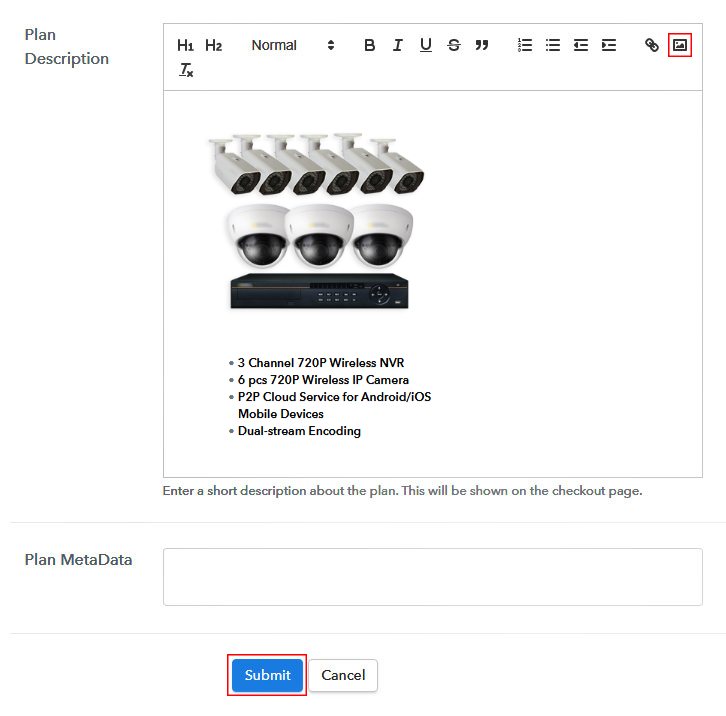
(c) Add Image & Description

Add Image & Description to Sell Scooters Online

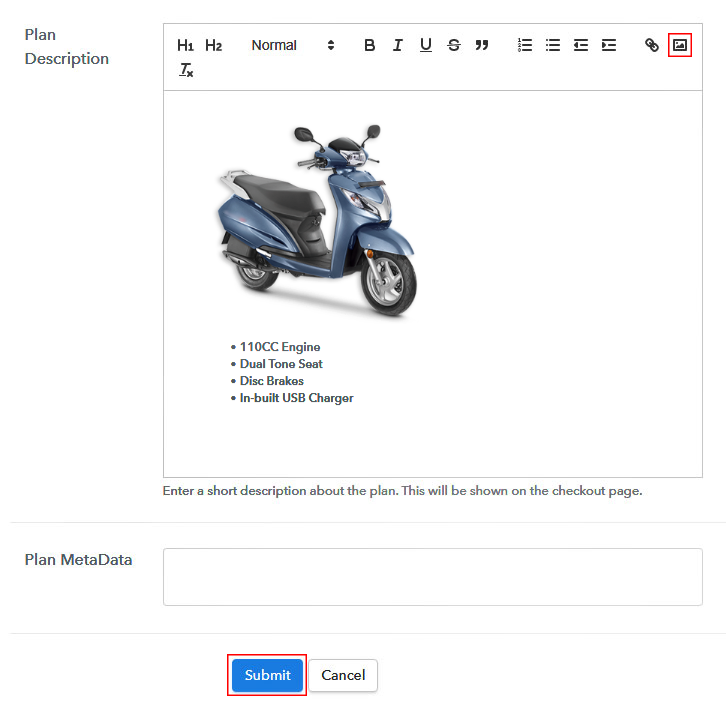
Furthermore, it is necessary to write a brief description of scooters using bullets, images, etc, to bring genuine buyers to the checkout page.

Also, click the “Submit” button to add the scooters on the checkout page.

Subsequently, you can add multiple plans and kinds of scooters in your product list which you want to market online.

Step 7: Share your Checkout Page

Share Checkout Page on Social Media

  • Furthermore, share the checkout page of scooters on social media accounts like Facebook & Twitter to get the buyer’s attention.
  • Plus, you can share the direct link of the scooter’s checkout page with your customers via SMS or email marketing.
  • Also, embed the provided plan link of scooters in the buttons or any anchor text on your website.

Step 8: Preview Checkout Page

Follow up the recommended steps to preview the checkout page for scooters:

(a) Click on the View Button

View Checkout Plan

(b) Take a Look at the Checkout Page

Checkout Page to Sell Scooters Online

Step 9: Embed Checkout Page in Site & Sell Scooters Online

Embed Checkout Page on Website

Moreover, copy the link and add the checkout page to sell scooters online at any proper place on your WordPress site.

(a) Edit the Page & Paste the Copied Link

Paste Link in Text Editor

Additionally, paste the plan link of the scooters checkout page on a text editor of the WordPress dashboard.

(b) Save & Publish the Checkout Page

Save and Publish

Subsequently, after doing all the changes, make sure to hit the “Publish” button.

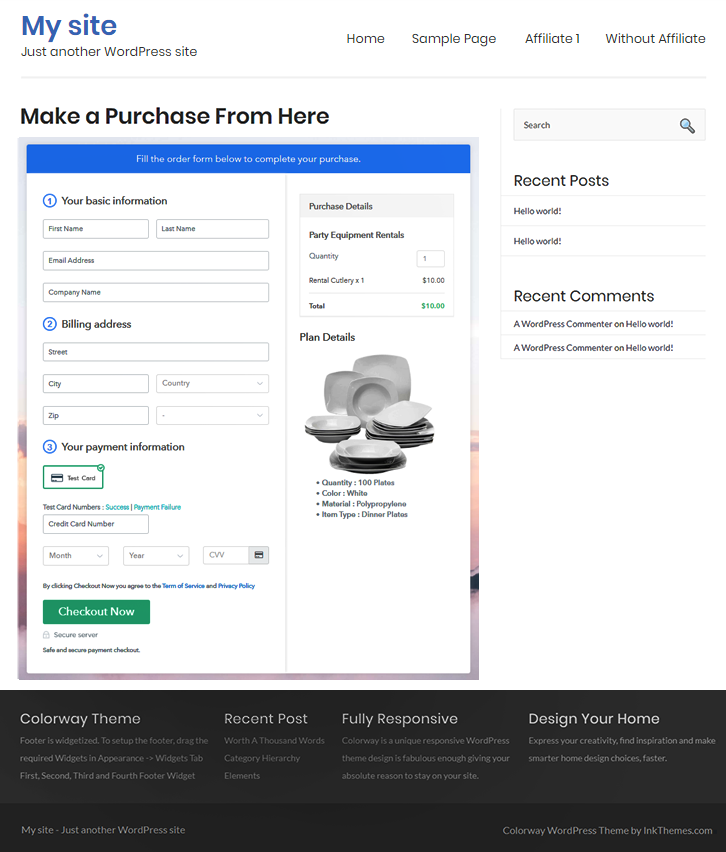
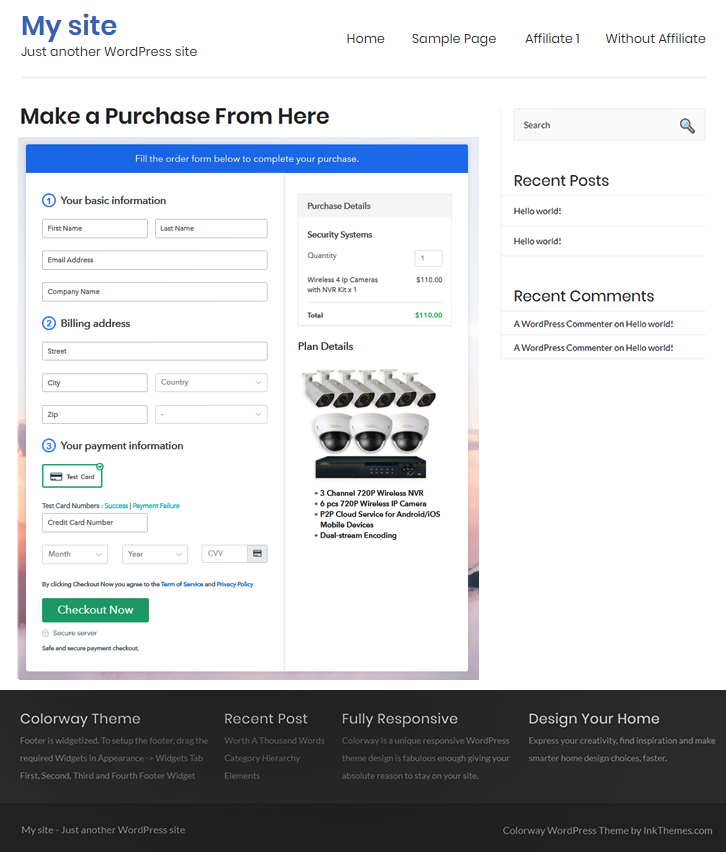
(c) Check out the Final Look of your Checkout Page on WordPress Site
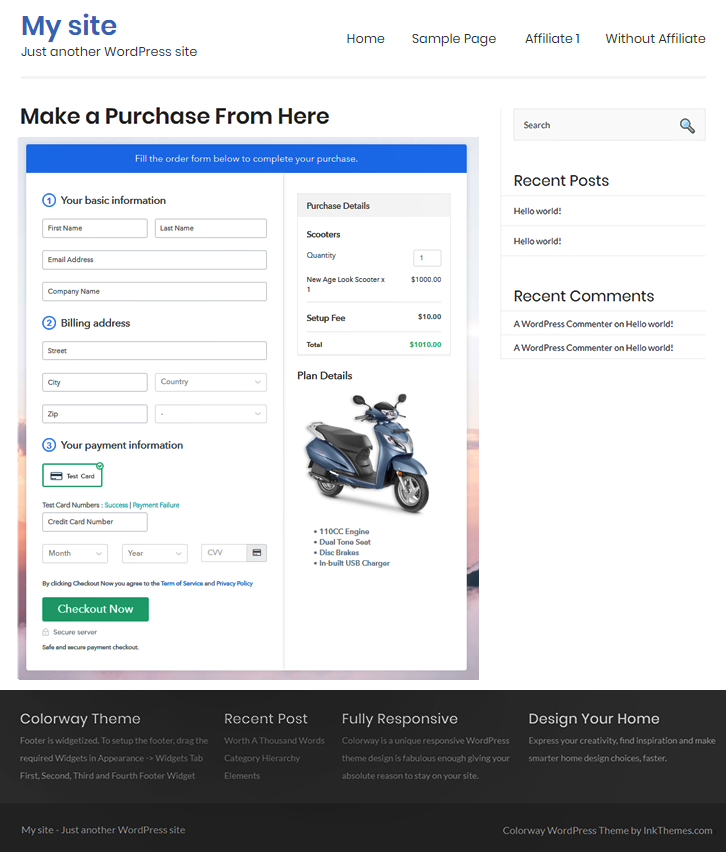
Final Look of your Checkout Page to Sell Scooters Online

Step 10: Multiplan Checkout Page

Note: In case you want to sell multiple products via a single checkout page, you can create a multi-plan checkout page otherwise skip this step.

(a) Click on Add Mutiplan Checkout

Multiplan Checkout

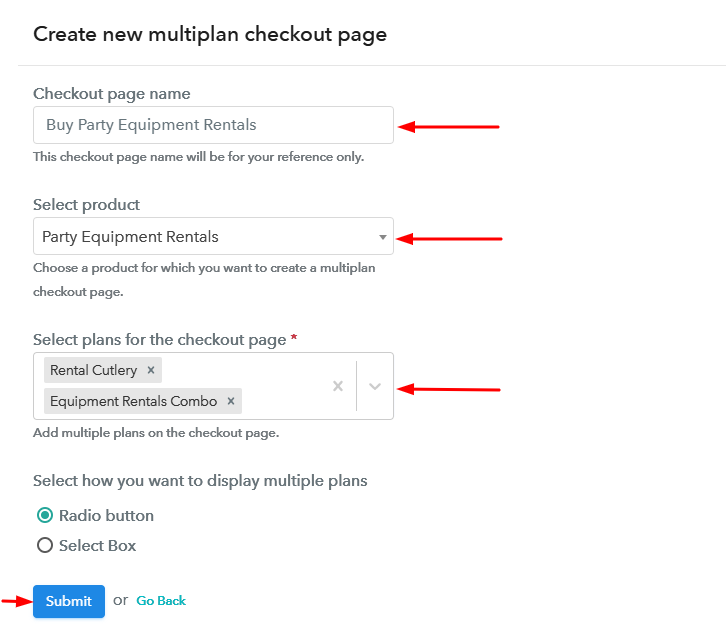
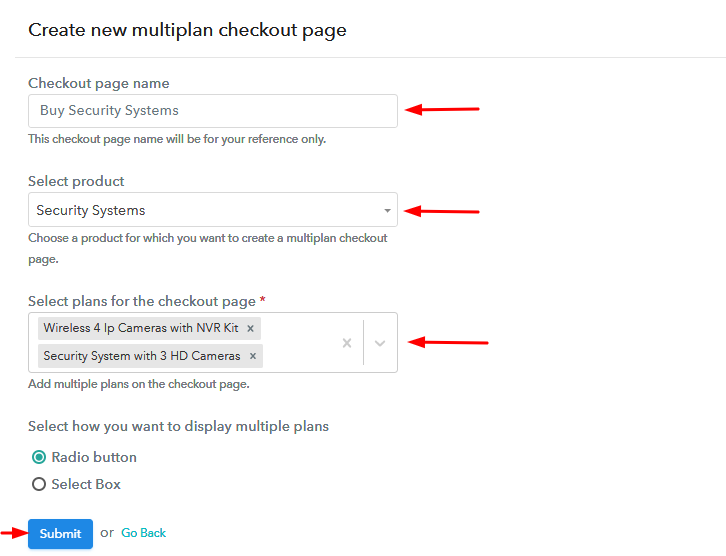
(b) Add Plans to Sell Multiple Scooters from Single Checkout Page
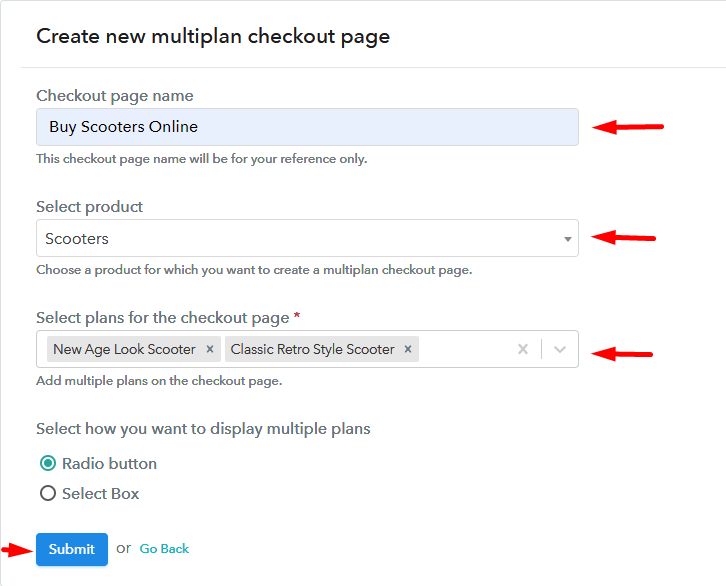
Add Multiple Products to Start Selling Scooters Online

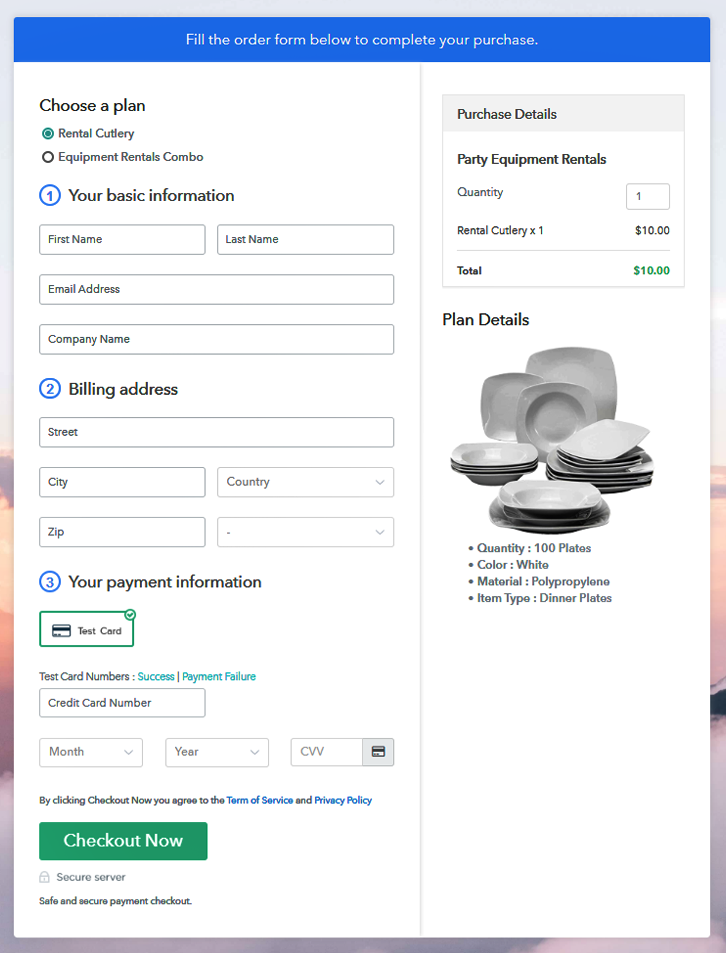
(c) Take a Look at the Checkout Page
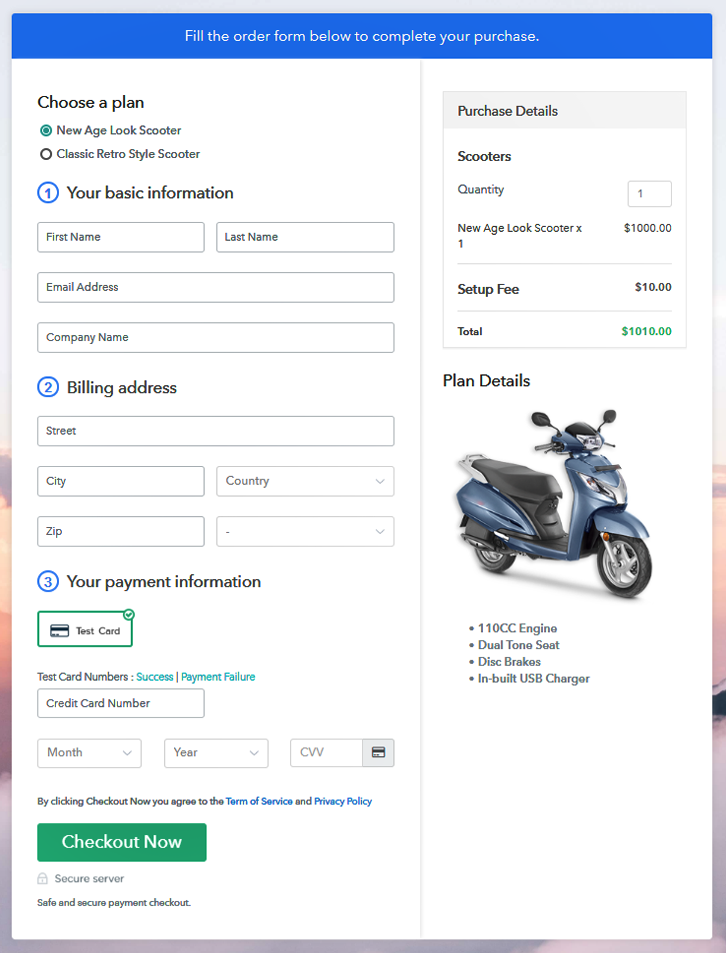
Multiplan Checkout Page to Sell Scooters Online

Preview Checkout Page

Wrapping Up

Irrespective of gender, scooters are the things loved by everyone. Every household owns at least one scooter which is a reason why scooter selling business never slows down. And, using Pabbly Subscription Billing, one can start its own scooter selling business online without any trouble. Just follow all the mentioned steps and nothing else.

So, go and try out this software. Let us know about your views in the comments section.

You May Also Like To Read –
How to Sell Safety Items Online | Step by Step (Free Method)

How to Sell Safety Items Online

Ideal For: All the safety item manufacturers, safety item sellers, retail safety item shop owners, and other merchants can use this method to take their safety items selling business online.

How to Sell Safety Items Online

Why Choose this Method for Selling Over any Other Solution?

Unlike any other solution, this method allows you to:

  • List and sell your safety items for FREE. Absolutely no payment required.
  • No commission on sales.
  • Collect payment through multiple payment modes from a single checkout page.
  • Sell one time or recurring subscriptions of your safety items.
  • Sell and collect payment in any currency as per your requirement.
  • Give discounts on your products by offering special coupon codes.
  • Add sales commission agents to help you in selling your safety items.

Get Pabbly Subscription Billing for Free

Once somebody quoted “Prepare and prevent, don’t repair and repent” which means safety always comes first. There is no compromise on human safety, that’s why selling safety items online are in demand.

Why would you like to sell safety items online?

One of the promising reasons to start safety items selling business online is that it is mandatory by the government to use safety equipment at the workplace. Not just this, there is a rising demand for safety systems in the oil & gas industry which is another good reason.

According to Markets And Markets reports, the industrial safety equipment merchandise is expected to grow from USD 3.3 billion in 2019 to USD 5.4 billion by 2024, at a CAGR of 8.6% which is actually a figure to consider. Keeping all this in mind, it won’t be bad to start your own safety items selling business online. Gladly, we have one such software named Pabbly Subscription Billing that can help you. The tool lets you create a startling checkout page for selling safety items online. Some of its unique features involve:

  • List various safety items in a single checkout page
  • Collect currency in both online and offline mode
  • Offer unlimited discounts and coupon codes

These are some of the perks of software and now let’s concentrate on creating a checkout page for selling safety items online using a tool.

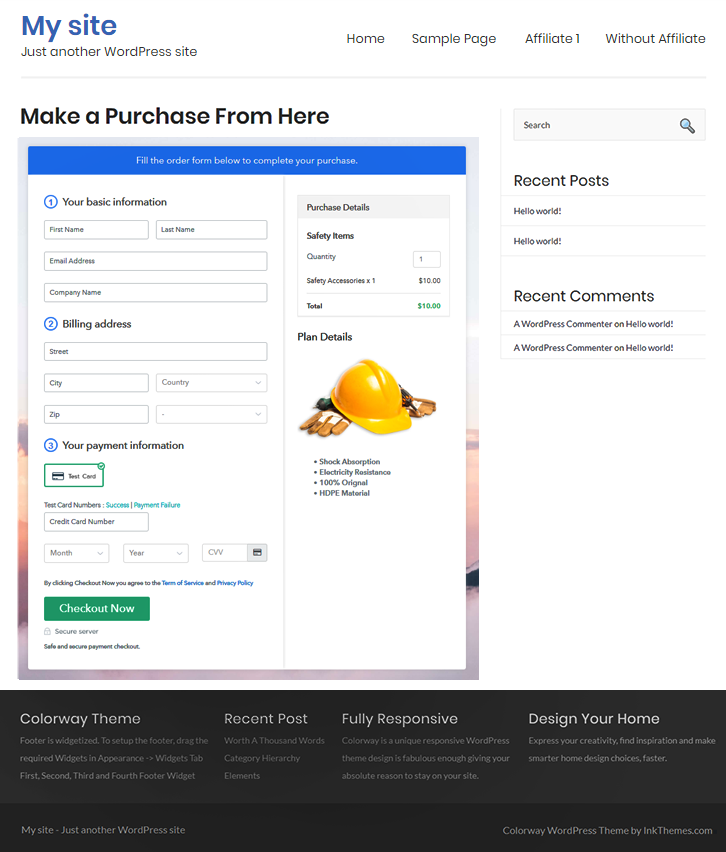
This is How your Checkout Page will Look Like After Creation

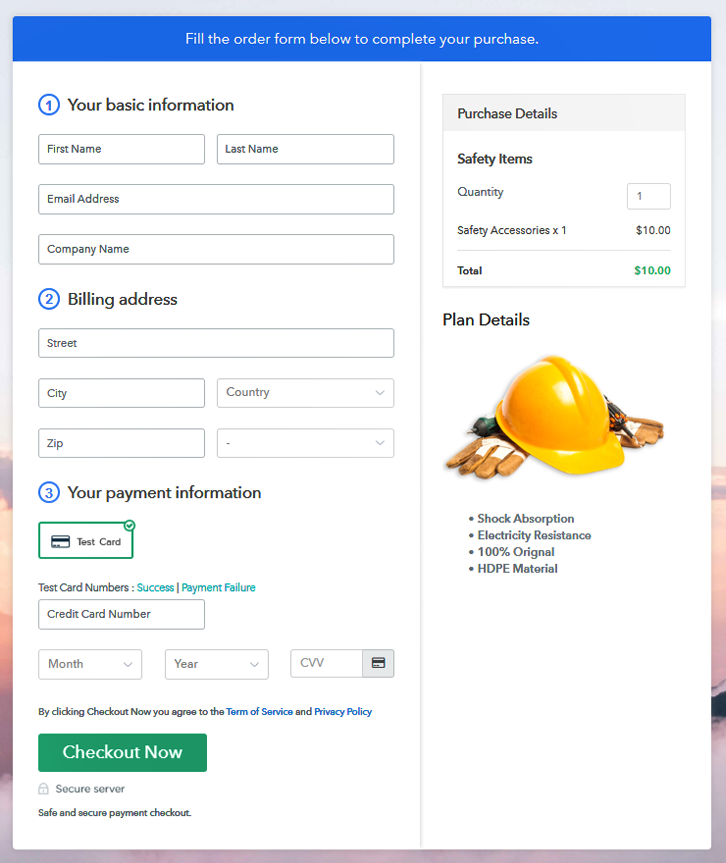
Checkout Page to Sell Safety Items Online

Preview Checkout Page

Step 1: Log in to Pabbly Subscription Billing

Signup

Fire up the process of creating a checkout page for selling safety items online by visiting the Pabbly Subscription Billing in your browser and then click on “Sign up Free“. Further, either manually filled out the details or sign in using your Gmail account.

Sign Up For Free!

Step 2: Select Subscription Billing

Access Subscription Billing

Step 3: Account Setup

Setup Account

Further, after clicking on the “Access Now” button of the software, a page will open with fields like company name, select currency, and phone number. Simply fill out those details to continue creating a checkout page for safety items.

Step 4: Connect Payment Gateways To Sell Safety Items Online

Connect Payment Gateway

Now, the next part of the process is to know about software payment procedures using a “Test Payment Gateway”. Here, we are continuing the checkout page process for safety items using a test payment gateway. Additionally, it is stuffed with various payment gateways like PayPal, Stripe, etc. Moreover, below we are mentioning the payment integration guides.

Step 5: Add Your Product

Add Product

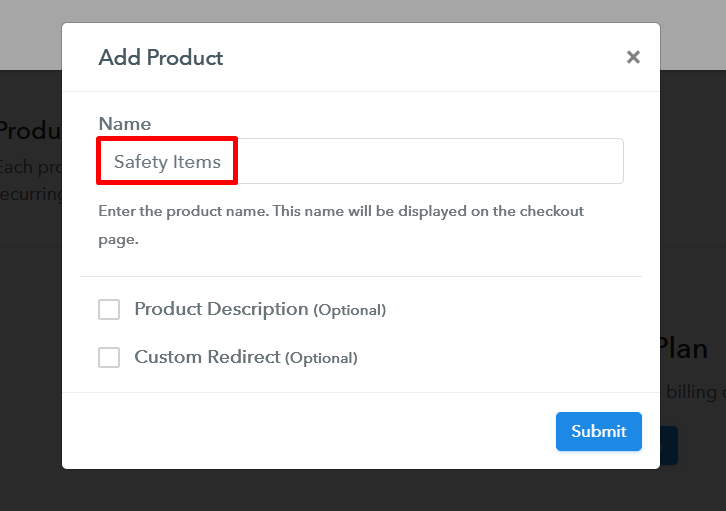
Furthermore, add the name, which in our case is “Safety Items”. Here you can specify the type like safety glasses, safety harness, etc. Also, write a short description of the safety items to grasp the customer’s attention.

Add Product to Start Selling Safety Items Online

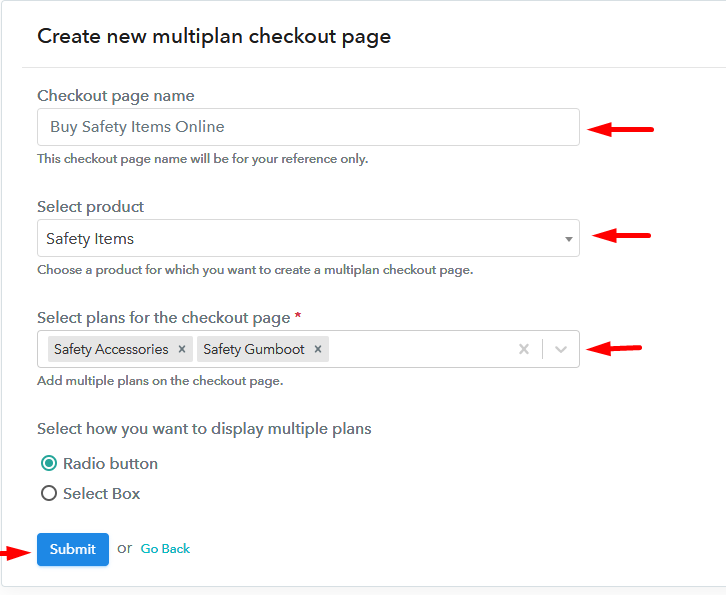
Next, click on the “Submit” button after filling the details about the safety items.

Note: Here you can add all the products related to the similar category by creating plans for each of them.

Step 6: Add Plans 

Let’s share plans for different kinds of safety items available in your store.

(a) Select Add New Plan

Add Plan

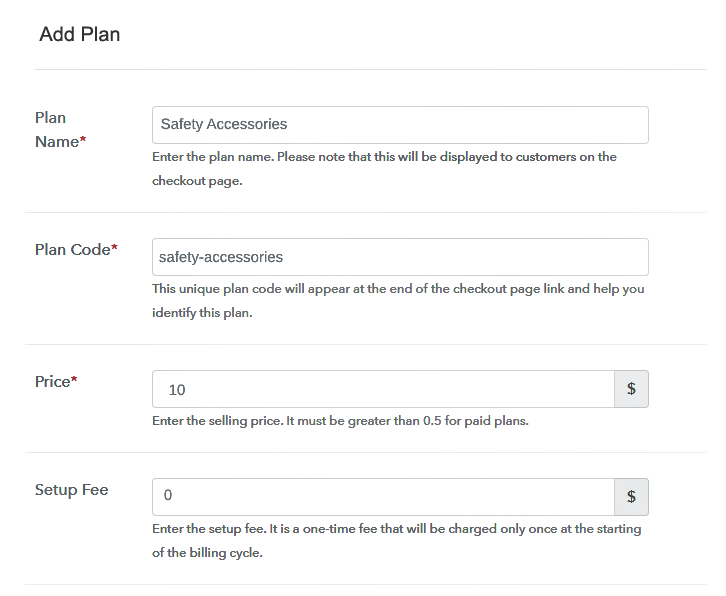
(b) Specify the Plan & Pricing Details

Specify the Plan and Pricing to Sell Safety Items Online

The following thing to do is fill all the details of safety items like plan name, code, price, set-up fee, and much more to continue.

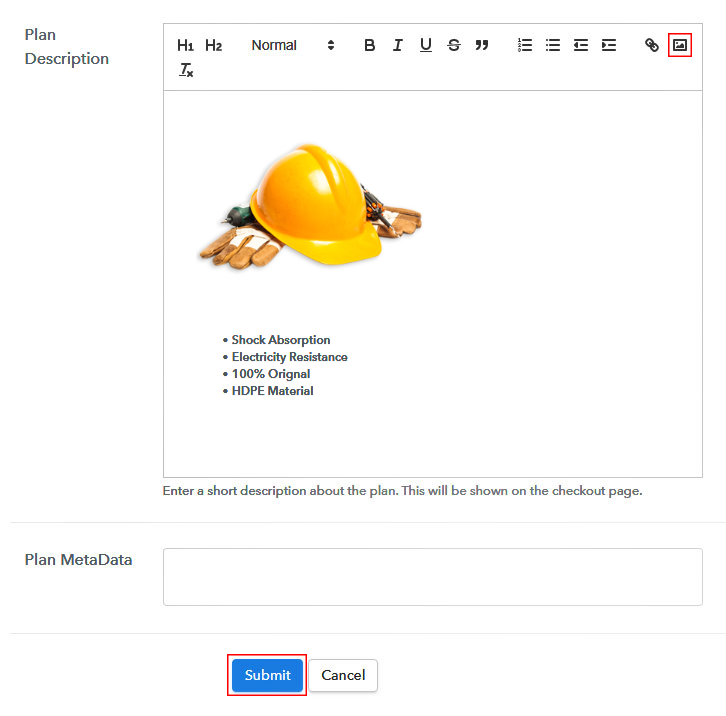
(c) Add Image & Description

Add Image & Description to Sell Safety Items Online

Moreover, it is necessary to write a brief description of safety items using bullets, images, etc, to bring real buyers to the checkout page.

Following, click the “Submit” button to add the safety items on the checkout page.

Subsequently, you can add multiple plans and kinds of safety items in your product list which you want to sell online.

Step 7: Share your Checkout Page

Share Checkout Page on Social Media

  • Besides, share the checkout page of the safety items on social media accounts like Facebook & Twitter to get the buyer’s attention.
  • Also, you can share the direct link of the safety item’s checkout page with your customers via SMS or email marketing.
  • Additionally, embed the provided plan link of the safety items in the buttons or any anchor text on your website.

Step 8: Preview Checkout Page

Follow up the recommended steps to preview the checkout page for safety items:

(a) Click on the View Button

View Checkout Plan

(b) Take a Look at the Checkout Page

Checkout Page to Sell Safety Items Online

Step 9: Embed Checkout Page in Site & Sell Safety Items  Online

Embed Checkout Page on Website

Furthermore, copy the link, and add the checkout page to sell safety items online at any decent place on your WordPress site.

(a) Edit the Page & Paste the Copied Link

Paste Link in Text Editor

Also, paste the plan link of the safety items on a text editor of the WordPress dashboard.

(b) Save & Publish the Checkout Page

Save and Publish

Hit the “Publish” button after doing changes.

(c) Check out the Final Look of your Checkout Page on WordPress Site

Final Look of your Checkout Page to Sell Safety Items Online

Step 10: Multiplan Checkout Page

Note: In case you want to sell multiple products via a single checkout page, you can create a multi-plan checkout page otherwise skip this step.

(a) Click on Add Mutiplan Checkout

Multiplan Checkout

(b) Add Plans to Sell Multiple Safety Items from Single Checkout Page

Add Multiple Products to Start Selling Safety Items Online

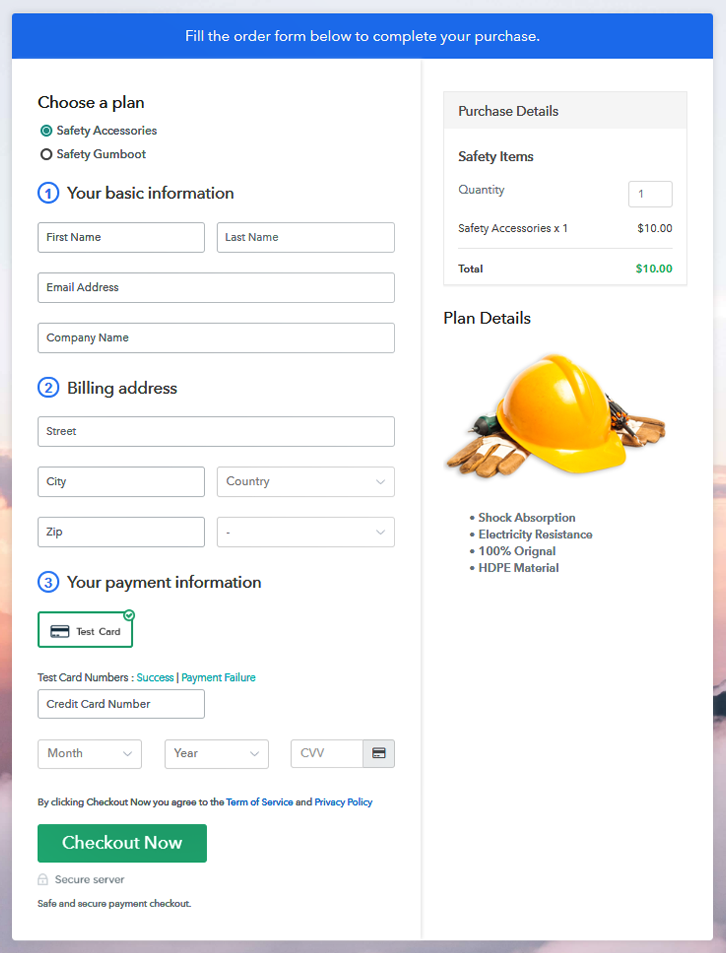
(c) Take a Look at the Checkout Page

Multiplan Checkout Page to Sell Safety Items Online

Preview Checkout Page

Wrapping Up

Hopefully, safety is always the first concern and that’s why safety items are always on demand. This article had clear some air about safety items, and starting safety items business online is very easy using Pabbly Subscription Billing software. All you have to do is follow all the above-mentioned steps and you’re done.

So, don’t wait anymore to check out this software and tell us about your experience.

You May Also Like To Read –
How to Sell Security Systems Online | Step by Step (Free Method)

How to Sell Security Systems Online

Ideal For: All the security system accessories manufacturers, security system store owners, electronic shop owners, electronic goods stores, gadget industries, MSME and other merchants can use this method to sell security systems online.

How to Sell Security Systems Online

Why Choose this Method for Selling Over any Other Solution?

Unlike any other solution, this method allows you to:

  • List and sell security systems for FREE. Absolutely no payment required.
  • No commission deducted on sales.
  • Collect payment through multiple payment modes from a single checkout page.
  • Sell one time or recurring subscriptions of your security systems.
  • Sell and collect payment in any currency as per your requirement.
  • Give discounts on your products by offering special coupon codes.
  • Add sales commission agents to help you in selling your security systems.

Get Pabbly Subscription Billing for Free

Several businessmen, shop owners and house owners look for security systems to keep their valuable stuff safe. And, as everything is so digital nowadays that buying all the stuff online has become a new trend. Thus, you must also be looking for ways to start your security systems business online.

Why would you like to sell security systems online?

The benefit of selling security systems online is that you don’t have to go to the mall, different shops and have to compare everything by yourself with the limited choices available. Just type what you want online and all the products are available with their pricing and specifications. Therefore, by using an online selling tool, you can sell your products to customers from all around the world. Moreover, you can also save your time as most of the processes are automated in online shopping. But, here comes a question, that how can you establish an online store in the first place?

Fortunately, there are several online tools available in the market that can help you build an e-store. But here I would like to suggest you Pabbly Subscription Billing as one of the versatile tool that allows you to sell security systems through its awesome checkout pages. Here, let me tell you some of the perks that it offers:

  • Generate Unlimited Plans, Coupons, and Discounts
  • Customizable Checkout
  • Tax Management
  • Collect Payments in Online & Offline modes
  • Create Unlimited Revenues
  • Perceive Sales and Data

Apart from that, you can also share your checkout pages on different social media platforms, websites, etc. Now, without any further due, let me take you through the steps of creating checkout pages using Pabbly Subscription Billing.

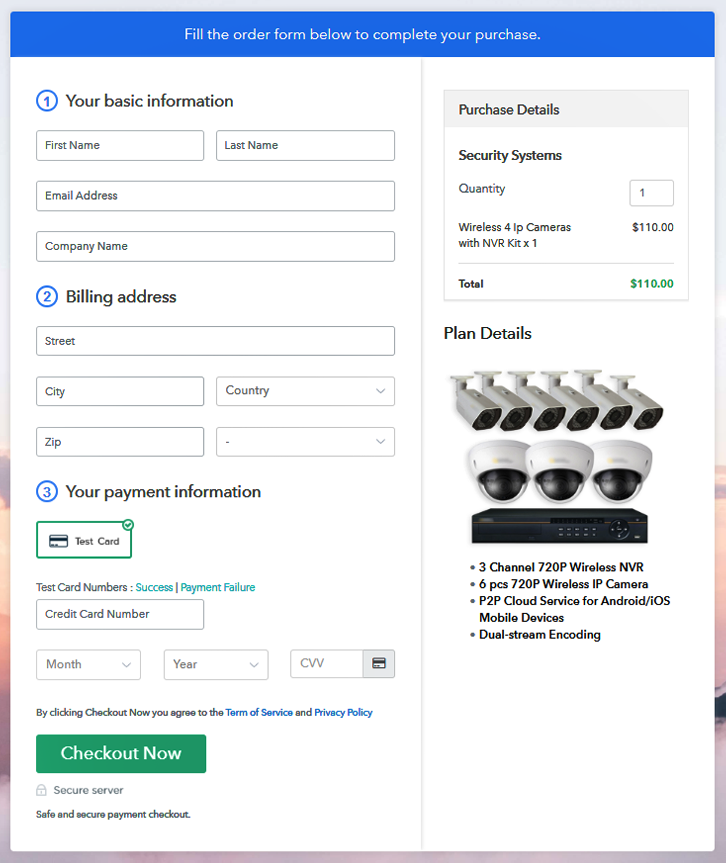
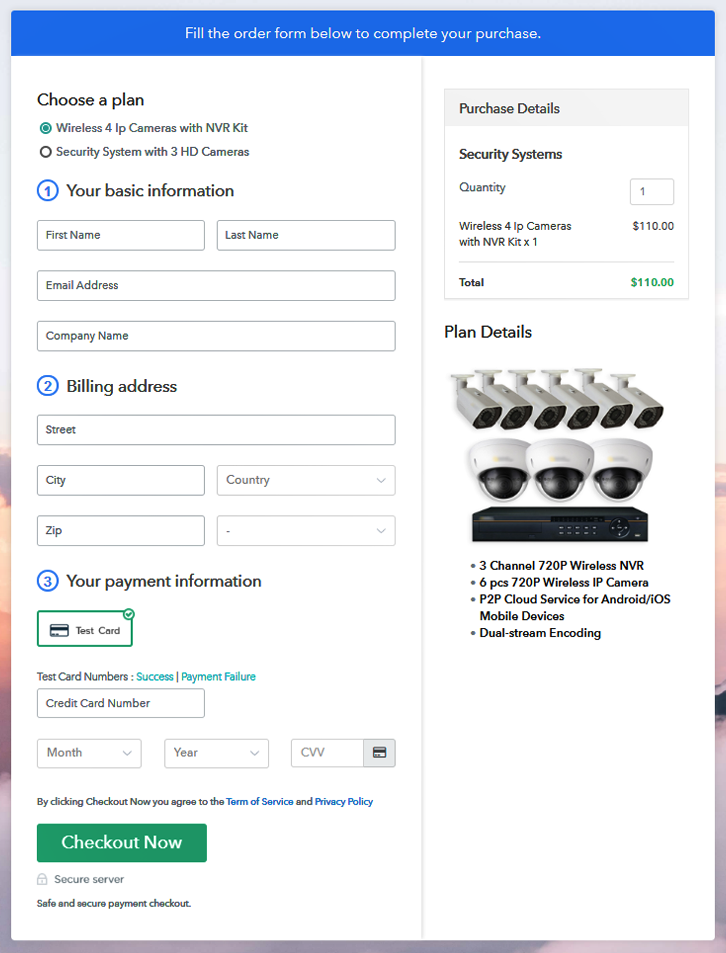
This is How your Checkout Page will Look Like After Creation

Checkout to Sell Security Systems Online

Preview Checkout Page

Step 1: Log in to Pabbly Subscription Billing

Signup

Initially, visit  Pabbly Subscription Billing website and then click on “Sign up Free” button. Either fill in the required fields like name, email, etc manually or else you can sign in via Gmail account. After that, all you have to do is just tap on the “Sign Up” button.

Sign Up For Free!

Step 2: Select Subscription Billing

Access Subscription Billing

Step 3: Account Setup

Setup Account

A dialogue box will open up, asking you to enter the company details such as name, currency, and phone number. After that, simply tap on the “Continue” button once you complete filling in the details.

Step 4: Connect Payment Gateways To Sell Security Systems Online

Connect Payment Gateway

Pabbly Subscription Billing comes with a dummy payment gateway that allows customers to experience the payment process. You can do this by clicking on the “Enable Test Payment” option.

Besides, Pabbly Subscription Billing also allows you to integrate with multiple payment gateways like Stripe, Razorpay, PayPal, Authorize.net, etc. You can use the guides mentioned below to integrate with other payment gateways. However, in order to set up the payment process, here I am clicking on the “Enable Test Payment” option.

Step 5: Add Your Product

Add Product

So, now we are going to add the products and for that, you need to click on a blue button named “Add New Product”.

That will generate a pop-up box where you have to add the product name, as here it is “Security Systems”.

Add Product to Sell Security Systems Online

Fill up the details and your product is created.

Note: Here you can add all the products related to the similar category by creating plans for each of them.

Step 6: Add Plans

Now, we are going to create plans to start a security systems business online.

(a) Select Add New Plan

Add Plan

(b) Specify the Plan & Pricing Details

Add Plan to Sell Security Systems Online

Furthermore, now you have to add the entire details of the product such as plan name, code, price, setup fees, etc.

(c) Add Image & Description

Add Description to Sell Security Systems Online

Now, upload some striking images of your security systems to get viewers’ attention.

Besides, you can also add some descriptions regarding the security system such as its streaming quality, integration, megapixels, etc in bullet points, link, numbering, etc then tap on the “Submit” button.

Moreover, you can also list more products by using the same method.

Step 7: Share your Checkout Page

Share Checkout Page on Social Media

  • Now, you can share the checkout pages on Facebook & Twitter with the help of their respective buttons.
  • Besides, you can also send checkout pages to your customers using SMS and emails.
  • Further, you can either build buttons on your website and embed these checkout pages on them, or else you can place any anchor text so the users will be redirected to the checkout page.

Step 8: Preview Checkout Page

Follow up these steps to preview checkout page:

(a) Click on the View Button

View Checkout Plan

(b) Take a Look at the Checkout Page

Checkout to Sell Security Systems Online

Step 9: Embed Checkout Page in Site & Sell Security Systems Online

Embed Checkout Page on Website

Afterward, simply copy the embed plan link to insert the checkout page on your WordPress website.

(a) Edit the Page & Paste the Copied Link

Paste Link in Text Editor

When the link is copied, just paste it to the text area of the editor.

(b) Save & Publish the Checkout Page

Save and Publish

Once you are done pasting the code, simply hit the ‘Publish’ button. Your checkout page is embedded.

(c) Check out the Final Look of your Checkout Page on WordPress Site

Embedd to Sell Security Systems Online

Step 10: Multiplan Checkout Page

Note: In case you want to sell multiple products via a single checkout page, you can create a multi-plan checkout page otherwise skip this step.

(a) Click on Add Mutiplan Checkout

Multiplan Checkout

(b) Add Plans to Sell Multiple Security Systems Online from Single Checkout Page

Multiplan to Sell Security Systems Online

(c) Take a Look at the Checkout Page

Multiplan Checkout to Sell Security Systems Online

Preview Checkout Page

Wrapping Up

Just by following the above-mentioned steps, you can easily start your security system business online with the help of Pabbly Subscription Billing. Moreover, this tool offers you several payment gateways like PayPal, Razorpay, etc to choose from.

However, if you have any queries, feel free to drop them in the comment section below. We will get back to you ASAP.

You May Also Like To Read –
How to Sell Safety Clothes Online | Step by Step (Free Method)

How to Sell Safety Clothes Online

Ideal For: All the safety clothes sellers, safety clothes makers, retail safety clothes selling business owners, and other safety clothes selling merchants can use this method to take their safety clothes selling business online.

How to Sell Safety Clothes Online

Why Choose this Method for Selling Over any Other Solution?

Unlike any other solution, this method allows you to:

  • List and sell your safety clothes for FREE. Absolutely no payment required.
  • No commission on sales.
  • Collect payment through multiple payment modes from a single checkout page.
  • Sell one time or recurring subscriptions of your safety clothes.
  • Sell and collect payment in any currency as per your requirement.
  • Give discounts on your products by offering special coupon codes.
  • Add sales commission agents to help you in selling safety clothes online.

Get Pabbly Subscription Billing for Free

Protective workwear or simply safety clothes are very important to protect a worker from airborne matter, biohazards, chemicals, electrical, and heat. Also, it has a great demand over the internet so, you must be finding a process to sell safety clothes online.

Why would you like to sell safety clothes online?

Safety clothes should be accessible to all and what’s better than an online presence. This way it is easier for both buyer and seller to buy and sell safety clothes online.

Well, there are many ways to start selling safety clothes on the web such as eCommerce sites, mobile application etc. But this could take a lot of your time compared to the process of creating checkout pages using Pabbly Subscription Billing, that we are going to explain in this blog.

This process can help you showcase your safety clothes on a page and accept payments through it. Also, you can share these checkout pages globally and on various social media platforms like Facebook, Twitter, WhatsApp, Emails, SMS etc. Also, you can embed these pages on a website’s posts, pages, buttons, texts etc.

Here, is what more you’ll get by using this service.

  • A place to keep a record of all the safety clothes in stock
  • Unlimited products and plan creation to sell unlimited safety clothes
  • Showcase single & multiple items in pages
  • Collect both online & offline payments
  • Automated billing & invoicing through emails
    And much more…

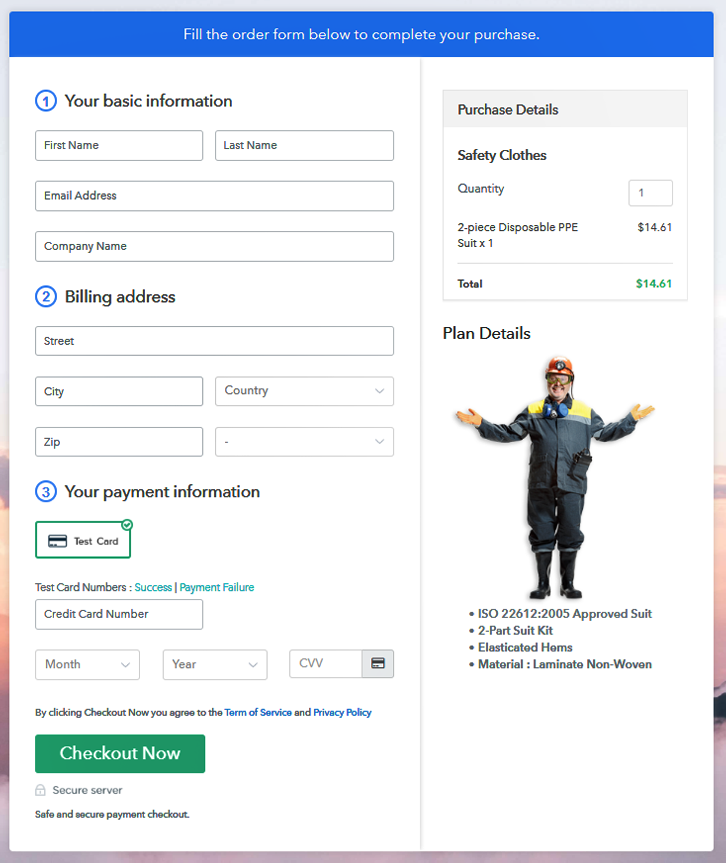
This is How your Checkout Page will Look Like After Creation

Checkout Page Preview to Sell Safety Clothes Online

Preview Checkout Page

Step 1: Login to Pabbly Subscription Billing

Signup
You can initiate the procedure by visiting the Pabbly Subscription Billing website. On the website click on the “Sign Up Free” button present. This will bring you over a sign-in/sign-up page. Here either fill-up the details in the sign-up form and then sign-in or directly sign-in using a Google account.

Sign Up For Free!

Step 2: Select Subscription Billing

Access Subscription Billing

Step 3: Account Setup

Setup Account

In the window asking for the company name, currency and phone number, mention the details and click on the “Continue” button.

Step 4: Connect Payment Gateway to Sell Safety Clothes Online

Connect Payment Gateway

Next and a very important step in the procedure is integrating a payment method. Here particularly I’m using the test payment method but you’ll need to choose from the various options available. Also, a link to the integration guide is mentioned below.

Step 5: Add Your Product

Add Product

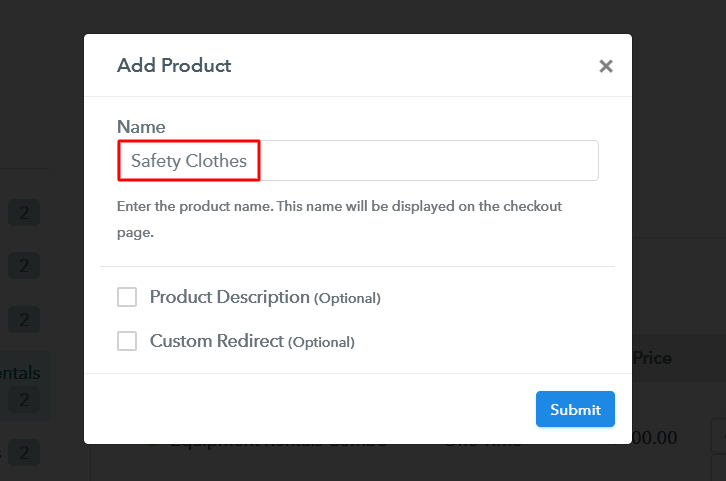
Now, the system settings are all ready and we can start creating products. Click on the “Add New Product” button and determine the product name. This product name is much like a category assigned to a variety of items, for instance, one-piece safety clothes, two-piece safety clothes, reusable etc.

Add Product to Sell Safety Clothes Online

Click on the “Submit” button & a product will be appended in your product list instantly.

Note: Here you can add all the products related to the similar category by creating plans for each of them.

Step 6: Add Plans

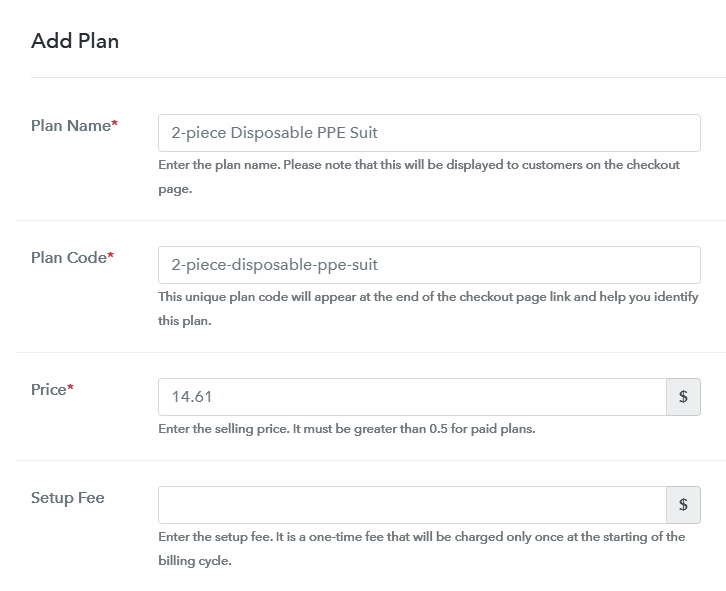
After adding a product, you can add multiple plans to it. Click on the “Add New Plan” button and fill up the details asked on the plan page will open up. Remember, these details will be visible on the checkout page for selling safety clothes online.

(a) Select Add New Plan

Add Plan

(b) Specify the Plan & Pricing Details

Add Plan to Sell Safety Clothes Online

Mention the plan details like name, code, pricing etc as per the safety clothes that you want to sell online.

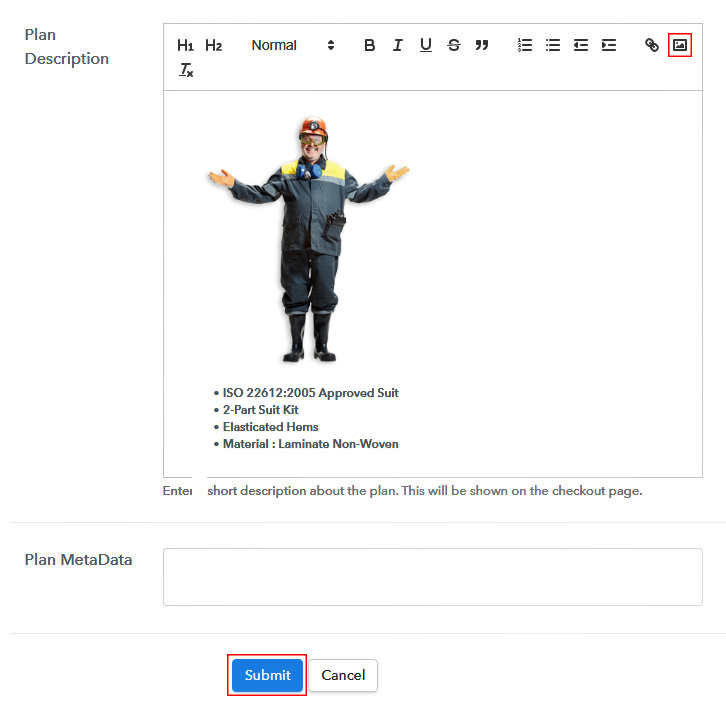
(c) Add Image & Description

Add Image & Description to Sell Safety Clothes Online

You can also put an image and description in the display to sell safety clothes online. For this put an image and description in the “Add Description” field.

Additionally, you can also make use of lists, quotes, links, headings etc.

Hit the “Submit” button once you are done with this safety clothes plan description and an item will get appended in the system for selling safety clothes online.

Step 7: Share your Checkout Page

Share Checkout Page on Social Media

Next, you’ll see a window displaying a plan link & a plan code to sell safety clothes online using different platforms.

  • You can copy the URL given under “Plan Link” & share it on social media platforms like SMS, emails, WhatsApp etc to sell safety clothes online.
  • Also, you can link this same URL in any website’s buttons & anchor texts to link a created checkout page there.
  • Two direct Facebook and Twitter icons are also available in this box, click them to share the checkout page directly over these platforms.

Step 8: Preview Checkout Page

Follow these steps to preview a checkout page:

(a) Click on the View Button

View Checkout Plan

(b) Take a Look at the Checkout Page

Checkout Page Preview to Sell Safety Clothes Online

Step 9: Embed Checkout Page in Site & Sell Safety Clothes Online

Embed Checkout Page on Website

You can use the code given under “Embed Plan Link” window to embed a checkout page on WordPress. For this, copy the complete code.

(a) Edit the Page & Paste the Copied Link

Paste_Link_in_Text_Editor

And paste it in the text area of any post or page.

(b) Save & Publish the Checkout Page

Save_and_Publish

Then publish the post/page afterwards & a checkout page will get embedded on your website. Also, you can visit this post or page by visiting its URL.

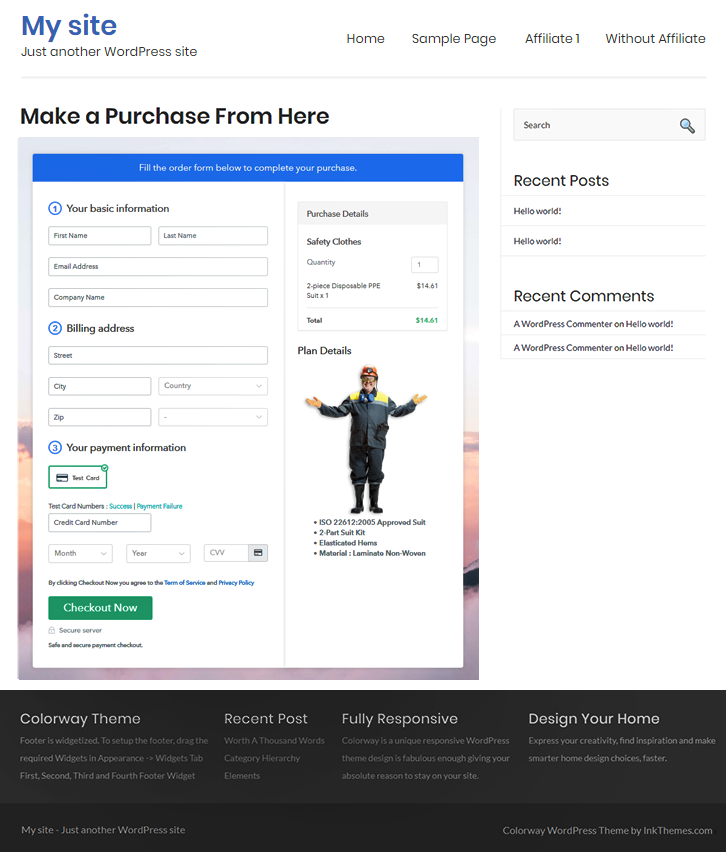
(c) Check out the Final Look of your Checkout Page on WordPress Site

Checkout Page On Site to Sell Safety Clothes Online

Step 10: Multiplan Checkout Page

Note: In case you want to sell multiple products via a single checkout page, you create a multi-plan checkout page otherwise skip this step.

(a) Click on Add Mutiplan Checkout

Multiplan_Checkout

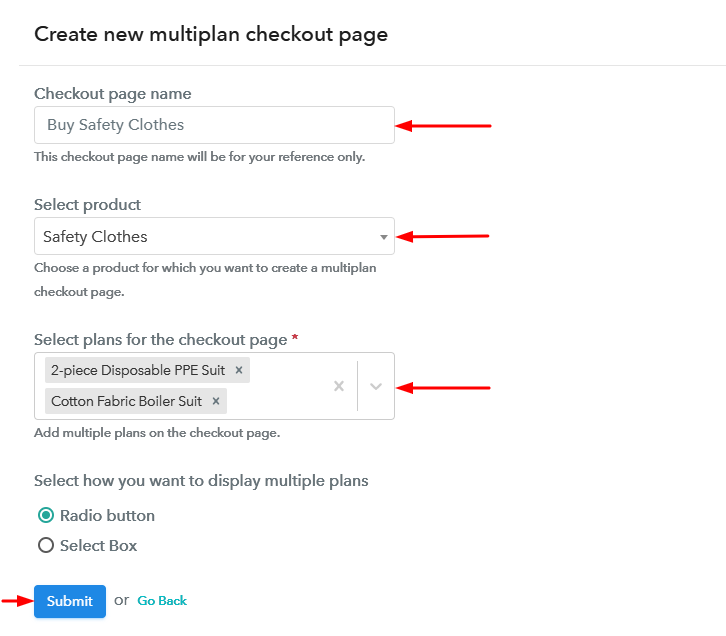
(b) Add Plans to Sell Multiple Safety Clothes from Single Checkout Page

Create Multiplan Checkout to Sell Safety Clothes Online

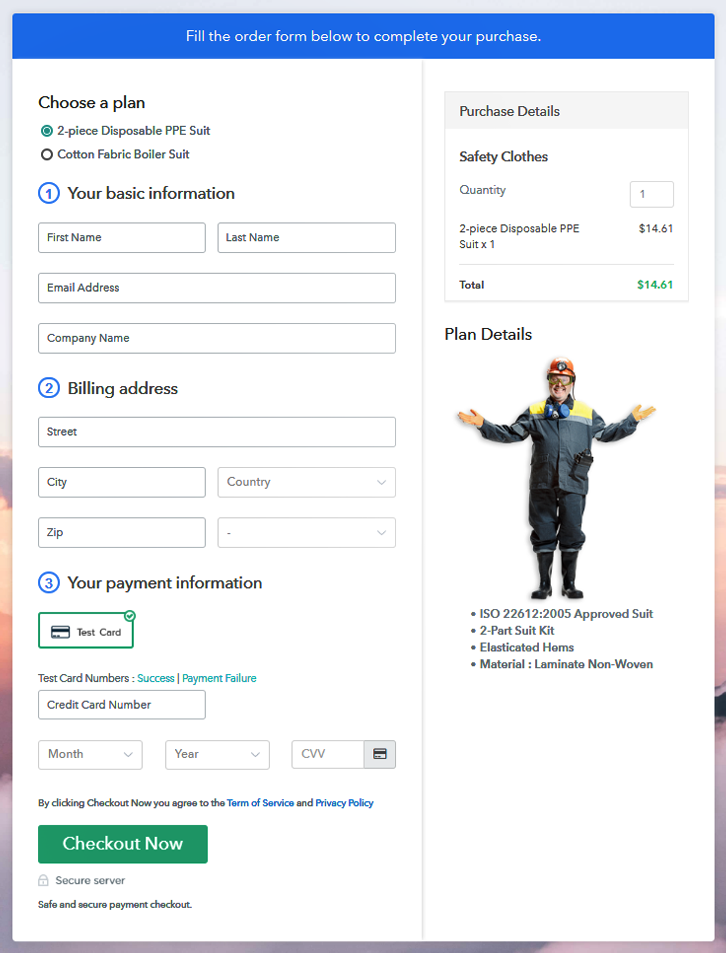
(c) Take a Look at the Checkout Page:

Multiplan Checkout Page to Sell Safety Clothes Online

Preview Checkout Page

Wrapping Up

If you have searched for ways to start safety clothes business online then you may have yet seen that this right here is the simplest as well as the fastest way possible. Also, payments are a real concern in online businesses and for that, this service is providing very safe and reliable options to choose from.

Also, small as well as large business can use this method to sell safety clothes online very easily.

You May Also Like To Read

How to Sell Party Equipment Online | Step by Step (Free Method)

How to Sell Party Equipment Online

Ideal For: All the party equipment sellers, party equipment makers, retail party equipment selling business owners, and other party equipment selling merchants can use this method to take their party equipment selling business online.

How to Sell Party Equipment Online

Why Choose this Method for Selling Over any Other Solution?

Unlike any other solution, this method allows you to:

  • List and sell your party equipment for FREE. Absolutely no payment required.
  • No commission on sales.
  • Collect payment through multiple payment modes from a single checkout page.
  • Sell one time or recurring subscriptions of your party equipment.
  • Sell and collect payment in any currency as per your requirement.
  • Give discounts on your products by offering special coupon codes.
  • Add sales commission agents to help you in selling party equipment online.

Get Pabbly Subscription Billing for Free

Nowadays, people prefer to buy almost everything online. And there is a good demand for event supplies so you must be finding a way to sell party equipment online.

Why would you like to sell party equipment online?

Well, this way you can extend your selling platform to another level i.e, online for sure. Also, you can increase the sales of your party equipment by reaching out to a bigger audience.

Well, manually managing the sales in high sales season could be very tricky sometimes. So here in this blog, we have discussed an all-in-one solution for your payments, management, invoking etc.

We are going to create plan checkout pages using a service named Pabbly Subscription Billing more further in this blog. The checkout page will help you in displaying your product as well as accept payments through it.

Besides, other advantages also came along with this service.

  • You’ll get a dashboard to keep a record of your items and payments
  • Sell single as well as multiple party equipment through checkout pages
  • You can apply taxes internationally, offer coupons and discounts
  • Accept offline and online payments
  • Use multiple payment gateway options to sell party equipment safely
  • Share your product pages over multiple social media platforms
    And much more…

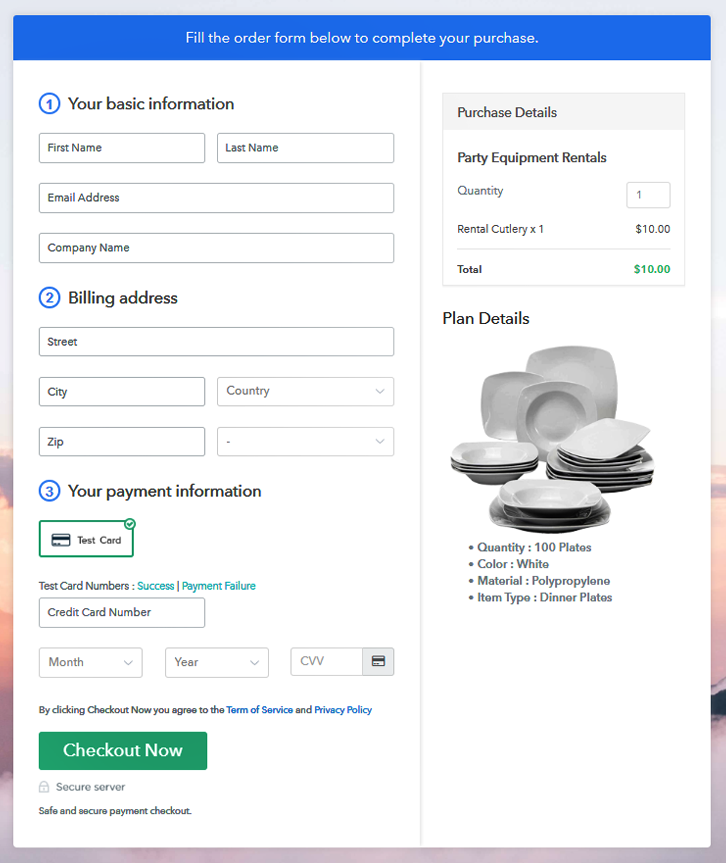
This is How your Checkout Page will Look Like After Creation

Checkout Page Preview to Sell Party Equipment Online

Preview Checkout Page

Step 1: Login to Pabbly Subscription Billing

Signup
Firstly, you’ll need to visit the Pabbly Subscription Billing website and then click on the “Sign Up Free” button there. You’ll then be redirected to a sign-in/sign-up page. There either sign-in using a Google account or sign-up manually.

Sign Up For Free!

Step 2: Select Subscription Billing

Access Subscription Billing

After that the above-shown page will be visible, here click on the Subscription Billing app.

Step 3: Account Setup

Setup Account

Then, you’ll see a pop-up asking for company name, currency & phone number. Specify the asked details & then hit the “Continue” button.

Step 4: Connect Payment Gateway to Sell Party Equipment Online

Connect Payment Gateway

This is the step where you’ll need to integrate a payment gateway to accept payments. For this, you can choose amongst the multiple options available. Also, step-by-step integration guides are linked below for integrations. Here, I’m using the test payment method for now.

Step 5: Add Your Product

Add Product

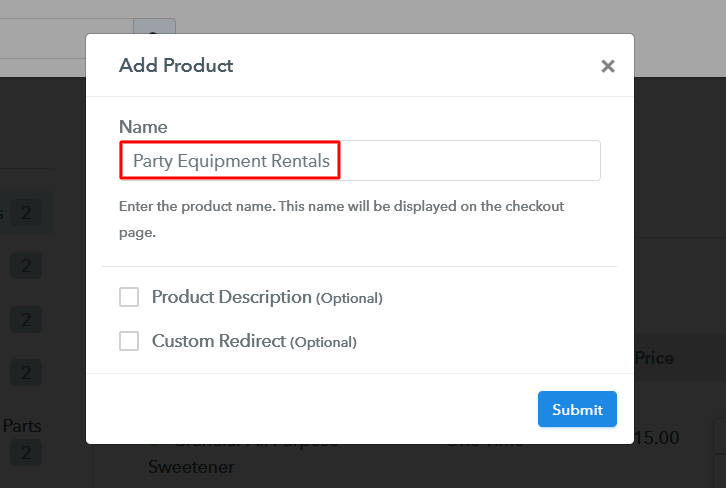
Up to this mark, all the one-time settings are done and you can start creating products for selling party equipment online. Strike the “Add New Product” button (as shown above) and write a product name & its related details.

Add Product to Sell Party Equipment Online

Strike the “Submit” button once you’re done filling out the product details. The product is much like a category of party equipment here & we’ll be adding plans to every product further.

Note: Here you can add all the products related to the similar category by creating plans for each of them.

Step 6: Add Plans

Now, you can add party equipment as plans under the created product. For this, just click on the “Add New Plan” button & you’ll be redirected to a plan description page.

(a) Select Add New Plan

Add Plan

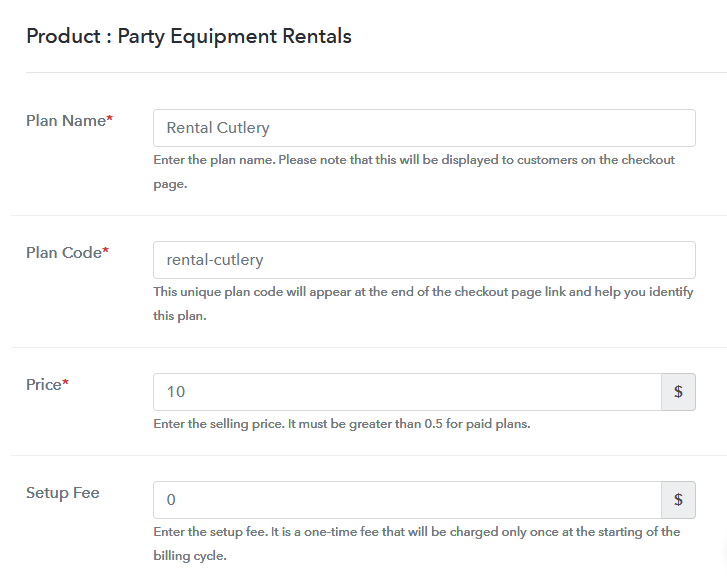
(b) Specify the Plan & Pricing Details

Add Plan to Sell Party Equipment Online

Fill the plan details for the party equipment such as plan name, code, price etc.

(c) Add Image & Description

Add Image & Description to Sell Party Equipment Online

Now, remember to show an image and description fill out the field named  “Add Description” on this page. Moreover, you can also make use of the text formatting options accessible to format the text for selling party equipment online. You can use lists, quotes, links, headings etc.

Strike the “Submit” button after filling out the plan details for selling party equipment online and a plan will be added in that particular party equipment product category.

Step 7: Share your Checkout Page

Share Checkout Page on Social Media

After every new plan creation, a pane will open up (as shown above), containing a plan link & a code to share globally and start party equipment business online.

  • You can share the Plan Link URL of a checkout page over various social media platforms like WhatsApp, SMS, emails and other platforms available.
  • Similarly, you can also link this “Plan Link” to the buttons & texts of a website.
  • Two Facebook & Twitter sharing buttons are also available to share the created plan checkout page directly over these platfroms.

Step 8: Preview Checkout Page

Follow these steps to preview a checkout page:

(a) Click on the View Button

View Checkout Plan

(b) Take a Look at the Checkout Page

Checkout Page Preview to Sell Party Equipment Online

Step 9: Embed Checkout Page in Site & Sell Party Equipment Online

Embed Checkout Page on Website

To embed a created checkout page on WordPress, use the code given under “Embed Plan Link” box. To embed a page, copy the complete code given in here.

(a) Edit the Page & Paste the Copied Link

Paste_Link_in_Text_Editor

And then paste it in the text area of a WordPress post or page.

(b) Save & Publish the Checkout Page

Save_and_Publish

Then click on the “Publish” button of that post or page. And that particular checkout page will get embedded on that website to sell party equipment online. Also, you can visit the published page’s URL to have a look at the page.

(c) Check out the Final Look of your Checkout Page on WordPress Site

Checkout Page On Site to Sell Party Equipment Online

Step 10: Multiplan Checkout Page

Note: In case you want to sell multiple products via a single checkout page, you create a multi-plan checkout page otherwise skip this step.

(a) Click on Add Mutiplan Checkout

Multiplan_Checkout

(b) Add Plans to Sell Multiple Party Equipment from Single Checkout Page

Create Multiplan Checkout to Sell Party Equipment Online

(c) Take a Look at the Checkout Page:

Multiplan Checkout Page to Sell Party Equipment Online

Preview Checkout Page

Wrapping Up

These were the 10 simplest steps to start party equipment business online. And even a non-techy person could use these steps to sell party equipment online. Also, there are multiple payment gateway methods available to choose from such as PayPal, Stripe, Authorize.Net, Razorpay etc for accepting safe and secure payments.

Good Luck with your party equipment business!

You May Also Like To Read

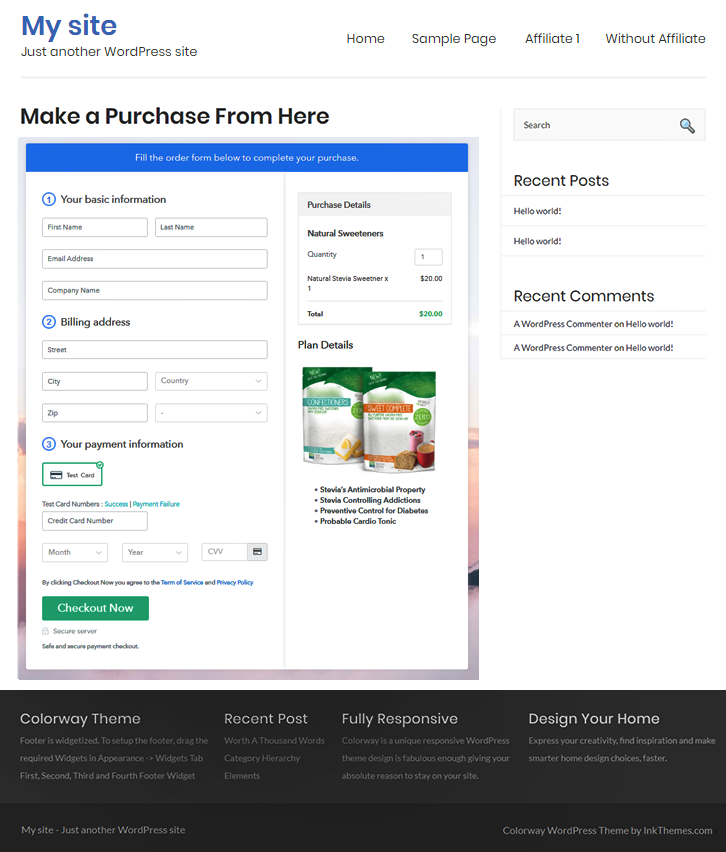
How to Sell Natural Sweeteners Online | Step by Step (Free Method)

How to Sell Natural Sweeteners Online

Ideal For: All the natural sweetener sellers, retail natural sweetener business owners, and other natural sweetener selling merchants can use this method to take their natural sweeteners selling business online.

How to Sell Natural Sweeteners Online

Why Choose this Method for Selling Over any Other Solution?

Unlike any other solution, this method allows you to:

  • List and sell your natural sweeteners for FREE. Absolutely no payment required.
  • No commission on sales.
  • Collect payment through multiple payment modes from a single checkout page.
  • Sell one time or recurring subscriptions of your natural sweeteners.
  • Sell and collect payment in any currency as per your requirement.
  • Give discounts on your products by offering special coupon codes.
  • Add sales commission agents to help you in selling natural sweeteners online.

Get Pabbly Subscription Billing for Free

Everyone wants to live a healthy life and for that several healthy products are now available online that anyone can buy in a few clicks. And if you are willing to start your own natural sweetener business online then here let me tell you a smarter way to do that.

Why would you like to sell natural sweeteners online?

Well, our day to day life has now become very hectic and unhealthy. That is the reason why people try to find healthy alternatives online so they can switch into a healthy lifestyle. Hence, this might be the perfect time for your natural sweeteners business to take online. Because bringing natural sweetener to people’s lives will be directly proportional to the hike in your business sales.

Thus, to help out in setting up your business online we would like to suggest the most versatile tool i.e, Pabbly Subscription Billing. It is a one-stop solution that can help you with all the business need for selling up natural sweeteners online. Moreover, it also facilitates you with several features mentioned in the following:

  • It helps you to manage all items you want to sell online
  • Moreover, you can accept safe & secure payments online & offline
  • Besides, it enables you to add taxes and delivery charges
  • Further, you can manage billing & invoicing automatically

Not only this, using this tool you can create checkout pages in order to display a product to sell natural sweeteners online. Furthermore, you can also share them on various social media platforms such as Facebook, WhatsApp, Twitter, SMS, Emails and many more.

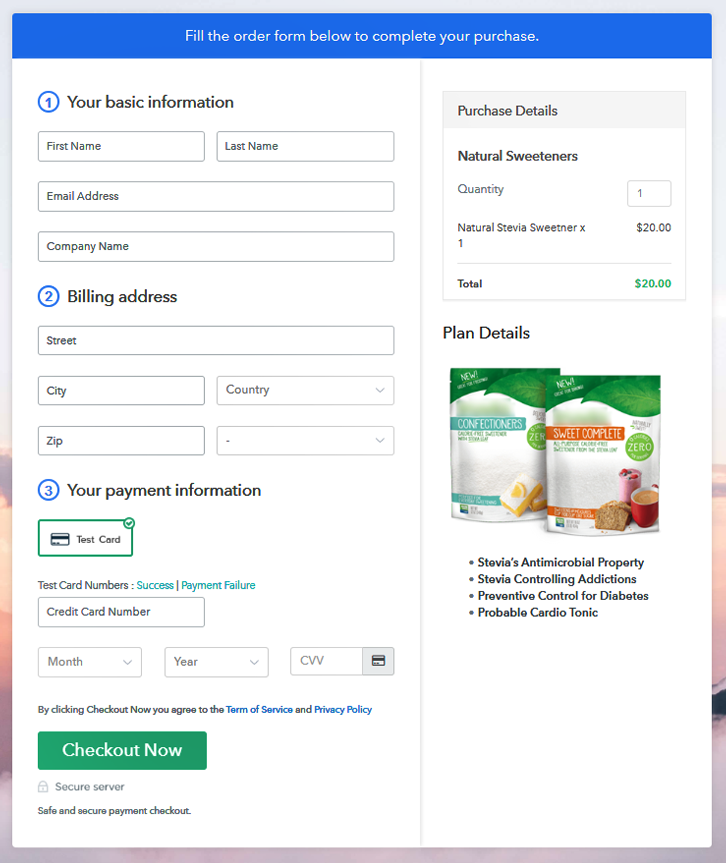
This is How your Checkout Page will Look Like After Creation

Checkout Page Sell Natural Sweeteners Online

Preview Checkout Page

Step 1: Login to Pabbly Subscription Billing

Signup
First of all, visit the Pabbly Subscription Billing website and tap on the “Sign Up Free” button to complete your signup. You can either sign-in directly using a Google account or else by filling out the registration form manually.

Sign Up For Free!

Step 2: Select Subscription Billing

Access Subscription Billing

Step 3: Account Setup

Setup Account

A dialog box will open up asking you to fill out company name, currency & phone number. Mention the details and then press the button named “Continue” to proceed forward.

Step 4: Connect Payment Gateway to Sell Natural Sweeteners Online

Connect Payment Gateway

Pabbly Subscription Billing comes with test payment gateway so that one can learn how to integrate a payment gateway easily. Moreover, this service offers multiple payment gateways to choose from such as Razorpay, PayPal, etc. For instance, here I’m using the test payment method for elaborating on the testing procedure. Although, you can also go through other payment integration guides amongst the following to integrate with other payment gateways.

Step 5: Add Your Product

Add Product

Now, is the time for you to create a product by clicking on the “Add New Product” button. For example, here I am adding natural sweeteners as a product.

Add Product To Sell Natural Sweeteners Online

Later, just tap on the “Submit” button after you complete filling the entire details to sell natural sweeteners online. Similarly, you can also repeat this whole procedure in order to add more products.

Note: Here you can add all the products related to the similar category by creating plans for each of them.

Step 6: Add Plans

The next step is to add plans in order to sell natural sweeteners online.

(a) Select Add New Plan

Add Plan

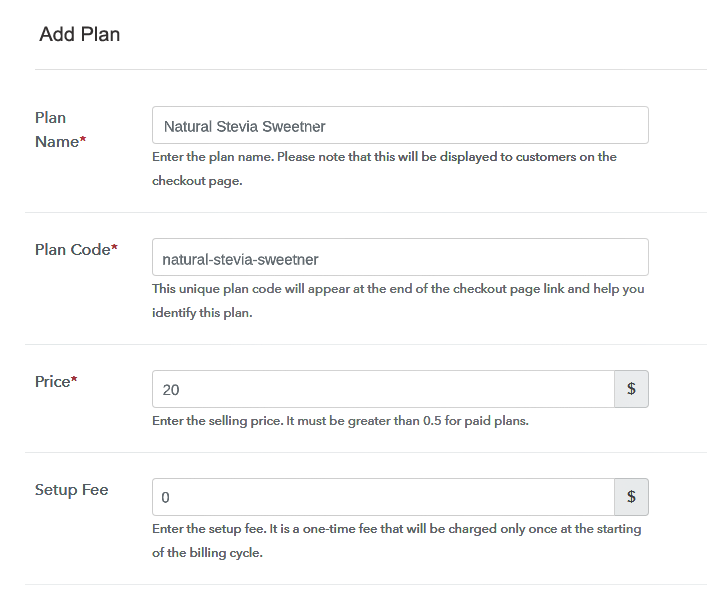
(b) Specify the Plan & Pricing Details

Specify the Plan & Pricing Details to Sell Natural Sweeteners Online

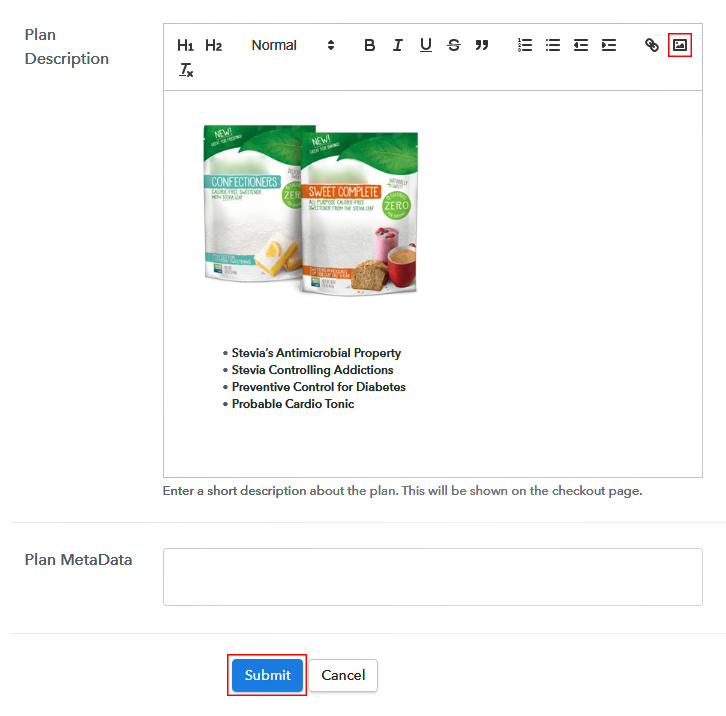
(c) Add Image & Description

Add Image & Description to Sell Natural Sweeteners Online

Now, you need to add an image and description of natural sweeteners to sell online.

Besides, you can also provide the description and properties of the product in points & bullets.

After that, just press the “Submit” button once you complete filling up the plan details.

Step 7: Share your Checkout Page

Share Checkout Page on Social Media

  • Now, your plan link is ready to be shared on social media platforms like Facebook & Twitter.
  • Furthermore, you can also send this link directly to your customers via SMS and email.
  • Besides, you can also embed this checkout page link on the buttons of your website or else place it on any anchor text on your website.

Step 8: Preview Checkout Page

Follow these steps to preview a checkout page:

(a) Click on the View Button

View Checkout Plan

(b) Take a Look at the Checkout Page

Checkout Page Sell Natural Sweeteners Online

Step 9: Embed Checkout Page in Site & Sell Natural Sweeteners Online

Embed Checkout Page on Website

To embed a created checkout page on WordPress, all you have to do is copy the code given under the “Embed Plan Link” window.

(a) Edit the Page & Paste the Copied Link

Paste_Link_in_Text_Editor

Now, just paste it in the text area of a post/page on your website.

(b) Save & Publish the Checkout Page

Save_and_Publish

After placing the code, just press the button named “Publish” & the checkout page will be embedded on your website.

(c) Check out the Final Look of your Checkout Page on WordPress Site

Checkout Page on WordPress Site to Start Natural Sweeteners Business Online

Step 10: Multiplan Checkout Page

Note: In case you want to sell multiple products via a single checkout page, you can create a multi-plan checkout page otherwise skip this step.

(a) Click on Add Mutiplan Checkout

Multiplan_Checkout

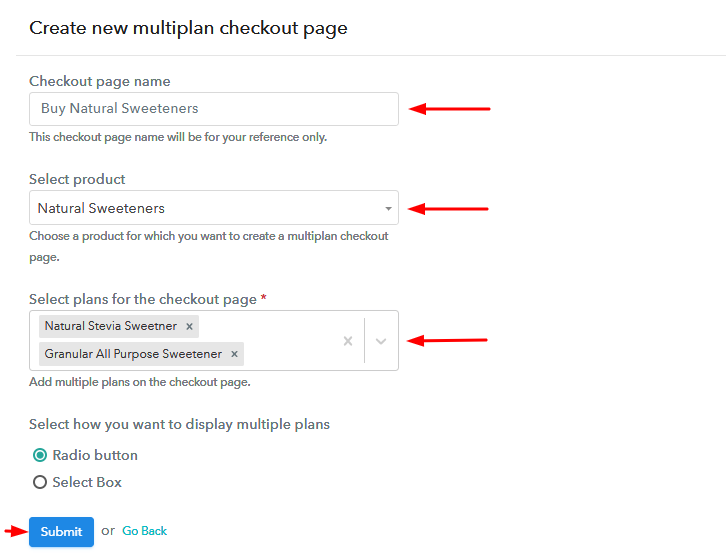
(b) Add Plans to Sell Multiple Natural Sweeteners from Single Checkout Page

Add Plans to Sell Multiple Natural Sweeteners

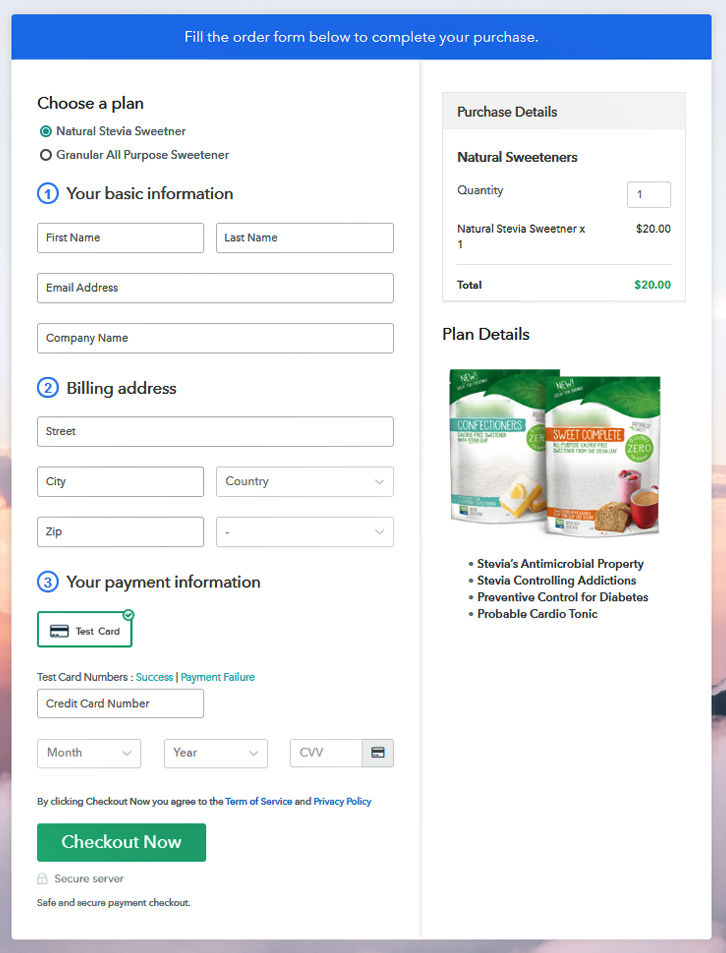
(c) Take a Look at the Checkout Page:

Multiplan Checkout Page to Start Natural Sweeteners Business Online

Preview Checkout Page

Wrapping Up

Finally! As you can see how easy are these steps to start your natural sweeteners business online. Just follow them and your natural sweetener selling online business is ready to take off. So why wait anymore? Log into Pabbly Subscription Billing and start making checkout pages in no time. If you like this blog or have any queries regarding it. Do tell us in the comment section below. We will get back to you as soon as possible.

You May Also Like To Read

How to Sell Organic Fertilizers Online | Step by Step (Free Method)

How to Sell Organic Fertilizers Online

Ideal For: All the organic fertilizer manufacturers, organic fertilizer sellers, retail fertilizer shop owners, and other merchants can use this method to take their organic fertilizers selling business online.

How to Sell Organic Fertilizers Online

Why Choose this Method for Selling Over any Other Solution?

Unlike any other solution, this method allows you to:

  • List and sell your organic fertilizers for FREE. Absolutely no payment required.
  • No commission on sales.
  • Collect payment through multiple payment modes from a single checkout page.
  • Sell one time or recurring subscriptions of your organic fertilizers.
  • Sell and collect payment in any currency as per your requirement.
  • Give discounts on your products by offering special coupon codes.
  • Add sales commission agents to help you in selling your organic fertilizers.

Get Pabbly Subscription Billing for Free

“Fertilizer does no good in a heap, but a little spread around works miracles all over” is actually so on point. Organic fertilizers are widely used by farmers because of their natural qualities. Unlike chemical fertilizers, organic makes soil rich and healthier.

This is why people are preferring organic fertilizers over chemicals.

Why would you like to sell organic fertilizers online?

The prominent reason to start organic fertilizer business online, everybody is shifting towards organic whether it is food or fertilizers. According to the Technavio report, organic fertilizer market size is poised to grow by USD 1.36 billion during the period 2019-2023.

Not to forget, the demand for grains, vegetables, pulses, and other agricultural yields will not be going to stop ever. And, people are demanding environmentally sustainable products which somehow lead to organic fertilizers.

Further, giving all this a thought, you won’t be sorry if you start your organic fertilizers selling business online. Fortunately, we came across software named Pabbly Subscription Billing that can fulfill your desire without much work. The software lets you create a beautiful checkout page for selling organic fertilizers online. Additionally, some of its amazing features involve:

  • List various kind of organic fertilizers in a single checkout page
  • Offer unlimited coupon codes and discount to a customer
  • Generate profession invoices
  • Add taxation charges

These are some of the perks of software. Further, let’s focus on creating a checkout page for selling organic fertilizers online using a tool.

This is How your Checkout Page will Look Like After Creation

Checkout Page to Sell Organic Fertilizers Online

Preview Checkout Page

Step 1: Log in to Pabbly Subscription Billing

Signup

Fire up the process of creating a checkout page for selling organic fertilizers online by visiting the Pabbly Subscription Billing in your browser and then click on “Sign up Free“. Further, either manually filled out the details or sign in using your Gmail account.

Sign Up For Free!

Step 2: Select Subscription Billing

Access Subscription Billing

Step 3: Account Setup

Setup Account

Moreover, after tapping on the “Access Now” button of the software, a page will open with fields like company name, select currency, and phone number. Simply fill out those details to continue creating a checkout page for organic fertilizers.

Step 4: Connect Payment Gateways To Sell Organic Fertilizers Online

Connect Payment Gateway

The next step is to gain knowledge of software payment procedure using “Test payment Gateway”. Here, we are proceeding the checkout page process for organic fertilizers using a test payment gateway.

Further, it is packed with various payment gateways like PayPal, Stripe, etc. Besides, here we are mentioning the payment integration guides to help you out.

Step 5: Add Your Product

Add Product

Furthermore, add the name, which in our case is “organic fertilizers”. Here you can specify the type like dry organic fertilizers, compost, etc. Also, write a short description of the organic fertilizers to grasp the customer’s attention.

Add Product to Start Selling Organic Fertilizers Online

Subsequent, click on the “Submit” button after filling the details about the organic fertilizers.

Note: Here you can add all the products related to the similar category by creating plans for each of them.

Step 6: Add Plans

Let’s unfold out plans for different kinds of organic fertilizers available in your store.

(a) Select Add New Plan

Add Plan

(b) Specify the Plan & Pricing Details

Specify the Plan to Sell Organic Fertilizers Online

The following thing to do is fill all the details of organic fertilizers like plan name, code, price, set-up fee, and much more to proceed.

(c) Add Image & Description

Add Image & Description to Sell Organic Fertilizers Online

Moreover, it is necessary to write a brief description of organic fertilizers using bullets, images, etc, to bring real buyers to the checkout page.

Following, click the “Submit” button to add the organic fertilizers on the checkout page.

Subsequently, you can add multiple plans and kinds of organic fertilizers in your product list which you want to market online.

Step 7: Share your Checkout Page

Share Checkout Page on Social Media

  • Furthermore, share the checkout page of organic fertilizers on social media accounts like Facebook & Twitter to get the buyer’s attention.
  • Plus, you can share the direct link of the organic fertilizer’s checkout page with your customers via SMS or email marketing.
  • Also, embed the provided plan link of organic fertilizers in the buttons or any anchor text on your website.

Step 8: Preview Checkout Page

Follow up the recommended steps to preview the checkout page for organic fertilizers:

(a) Click on the View Button

View Checkout Plan

(b) Take a Look at the Checkout Page

Checkout Page to Sell Organic Fertilizers Online

Step 9: Embed Checkout Page in Site & Sell Organic Fertilizers Online

Embed Checkout Page on Website

Moreover, copy the link and add the checkout page to sell organic fertilizers online at any proper place on your WordPress site.

(a) Edit the Page & Paste the Copied Link

Paste Link in Text Editor

Additionally, paste the plan link of the organic fertilizer checkout page on a text editor of the WordPress dashboard.

(b) Save & Publish the Checkout Page

Save and Publish

Subsequently, after doing all the changes, make sure to hit the “Publish” button.

(c) Check out the Final Look of your Checkout Page on WordPress Site

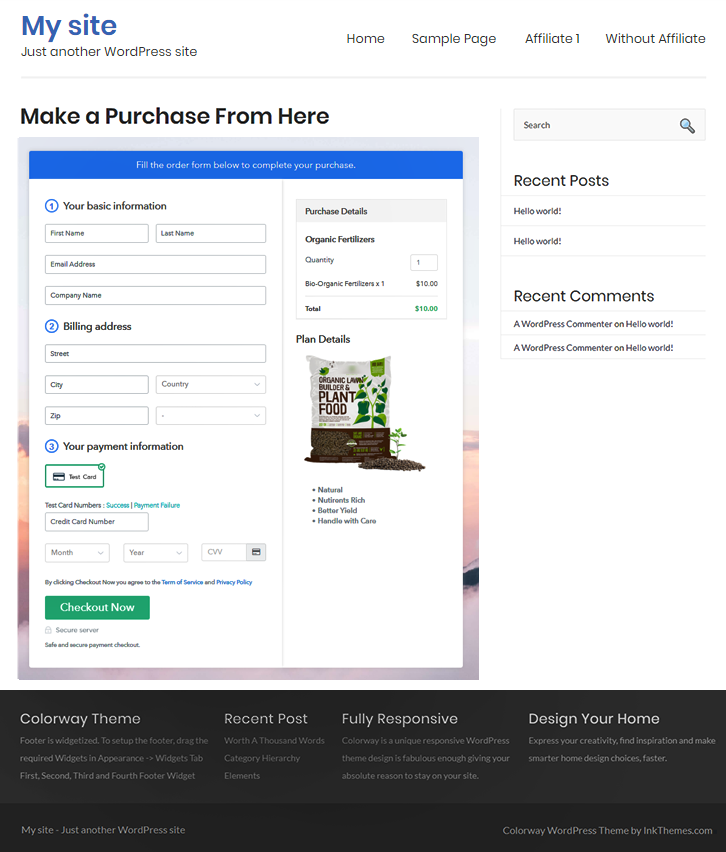
Final Look of your Checkout Page to Sell Organic Fertilizers Online

Step 10: Multiplan Checkout Page

Note: In case you want to sell multiple products via a single checkout page, you can create a multi-plan checkout page otherwise skip this step.

(a) Click on Add Mutiplan Checkout

Multiplan Checkout

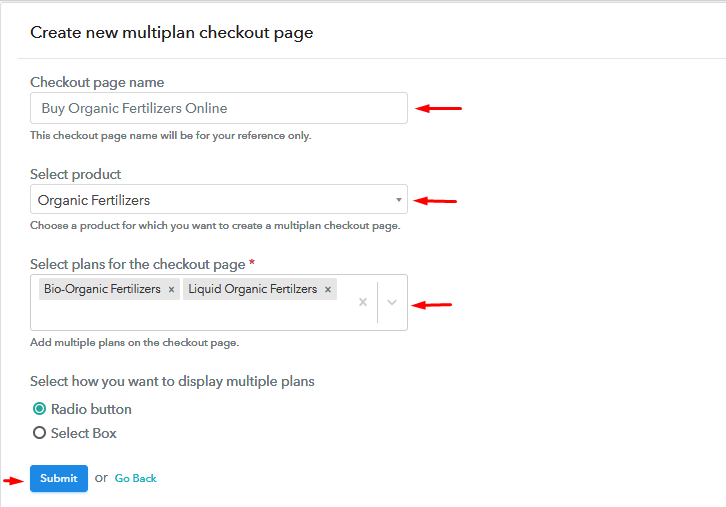
(b) Add Plans to Sell Multiple Organic Fertilizers from Single Checkout Page

Add Multiple Products to Start Selling Organic Fertilizers Online

(c) Take a Look at the Checkout Page

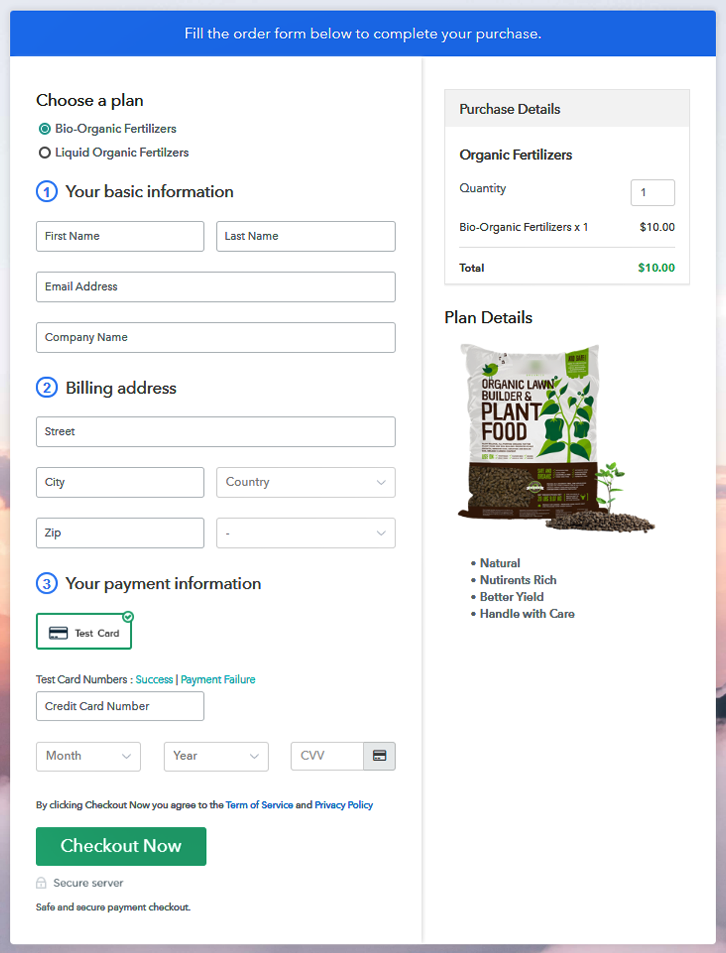
Multiplan Checkout Page to Sell Organic Fertilizers Online

Preview Checkout Page

Wrapping Up

Okay! Organic fertilizers are something serving the farming industry for a very long time. Now you know how easy it is to start organic fertilizers selling business online. All you have to do is use the software Pabbly Subscription Billing and you’re good to go.

So, don’t stay in confusion, try this software out and let us know your reaction in the comments section.

You May Also Like To Read –
How to Sell Pet Toys Online | Step by Step (Free Method)

How to Sell Pet Toys Online

Ideal For: All the pet stores, pet accessories shops, pet toy manufacturers, and other sellers with homemade pet toys can use this method to take their pet toys selling business online.

How to Sell Pet Toys Online

Why Choose this Method for Selling Over any Other Solution?

Unlike any other solution, this method allows you to:

  • List and sell pet toys for FREE. Absolutely no payment required.
  • No commission on sales.
  • Collect payment through multiple payment modes from a single checkout page.
  • Sell one time or recurring subscriptions of the pet toys.
  • Sell and collect payment in any currency as per your requirement.
  • Give discounts on your products by offering special coupon codes.
  • Add sales commission agents to help you in selling the pet toys.

Get Pabbly Subscription Billing for Free

There is nothing more important to pet owners than their fur babies, their health, and happiness. While it is debatable that pet toy business always offers profit or not but one thing is clear that people won’t stop spoiling their pets. So, if you sell pet toys then why not take your pet toys selling business online?

Why would you like to sell pet toys online?

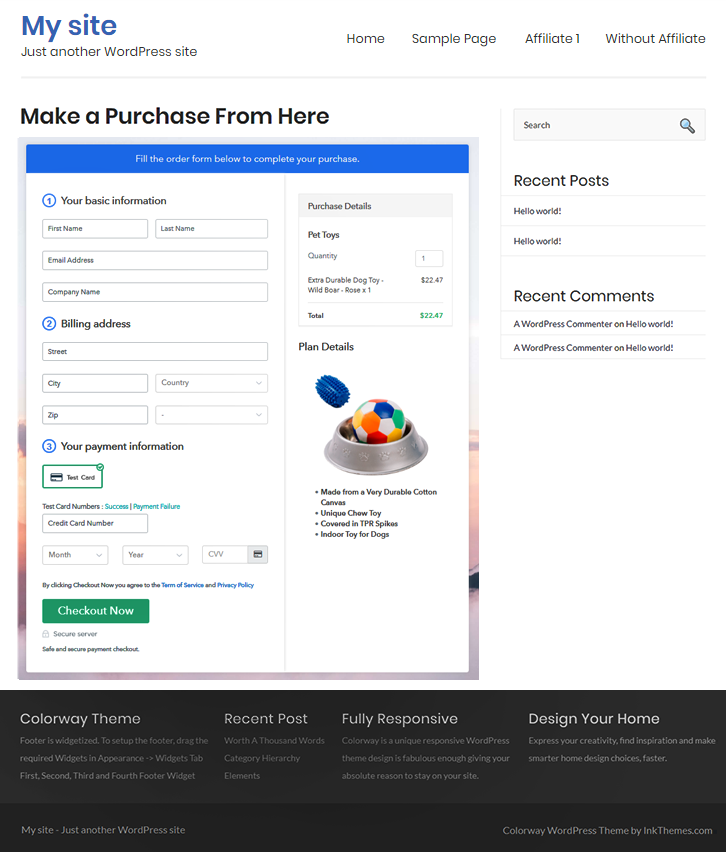
It is obvious that everyone wants to make more money in whatever they do and online business is one of the opportunities to do it. By taking your pet toys selling business online you can get a higher conversion rate and more number of customers. To help you start your pet toys selling business Pabbly Subscription Billing is here, which is completely free. With this service, you can create checkout pages and share their links on social media, so that people can buy toys directly through them.

Other than checkout pages, you can also access its many other awesome features for your business:

  • Collect one-time or recurring payments for your pet toys
  • Share invoices automatically with buyers
  • Pay zero transaction fees on your sales
  • Integrate with your pet toys website

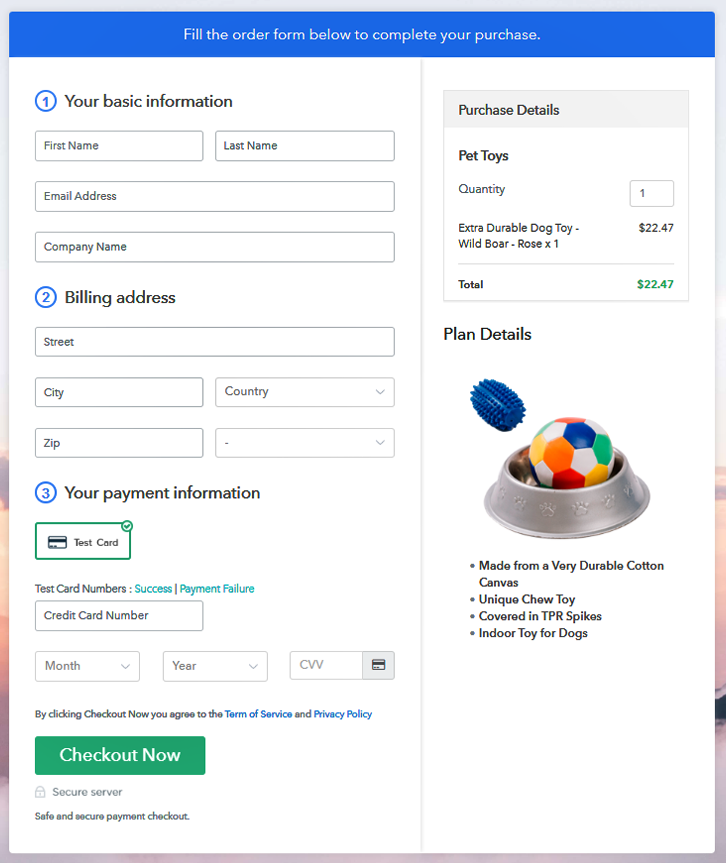
This is How your Checkout Page will Look Like After Creation

Preview Checkout Page

Preview Checkout Page

Step 1: Log in to Pabbly Subscription Billing

Signup

You have to begin with visiting Pabbly Subscription Billing website and then click on the “Sign Up Free” button. Once you click the button, you will land on the signup page, where you can create your account in a blink with your Gmail or manually enter your details.

Sign Up For Free!

Step 2: Select Subscription Billing

Access Subscription Billing

Step 3: Account Setup

Setup Account

Once you finish the signup process, now you have to fill up your company details i.e. company name, select currency, and contact number in the dialogue box.

Step 4: Connect Payment Gateway to Sell Pet Toys Online

Connect Payment Gateway

Further in this step, the payment collection process is described by enabling the ‘Test Payment’ mode. However, you can connect other payment gateways of your preference. The complete integration guide for payment gateways is provided below.

Step 5: Add Your Product

Add Product

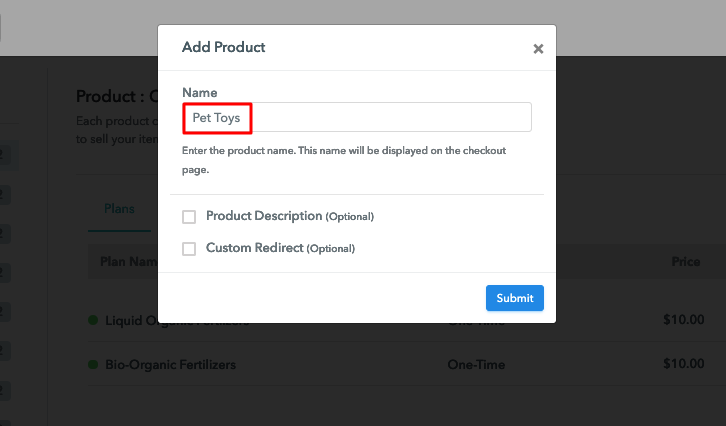
After the payment mode is enabled, now you have to add your first product. You can add pet toys of different types for example chew toys, stuffed toys, etc, and add all other types of pet toys in the same product by creating different plans.

Sell Pet Toys Online

Just fill up this information and your product is added.

Note: Here you can add all the products related to the similar category by creating plans for each of them.

Step 6: Add Plans

Let’s get started and create plans for different categories of pet toys that you want to sell

(a) Select Add New Plan

Add Plan

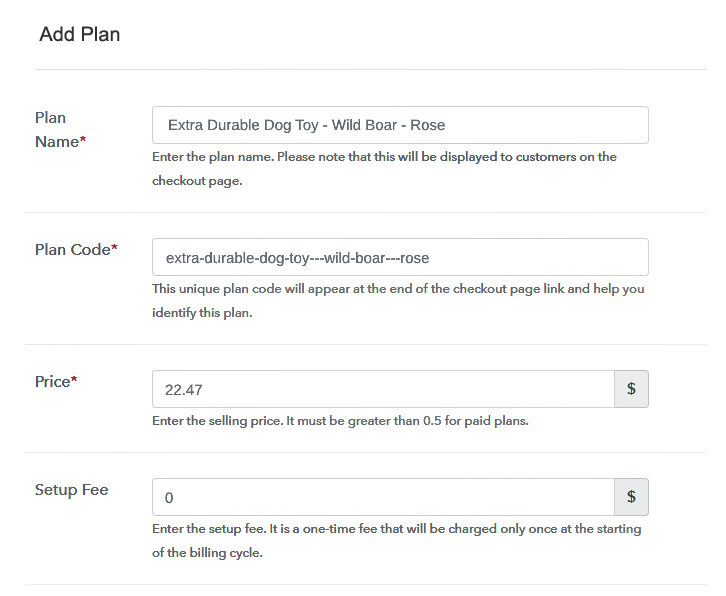
(b) Specify the Plan and Pricing Details

Sell Pet Toys Online Details

On clicking add new plan button, you will reach to the plan page, here you will have to fill the plan details such as plan name, code, billing cycle, price, etc.

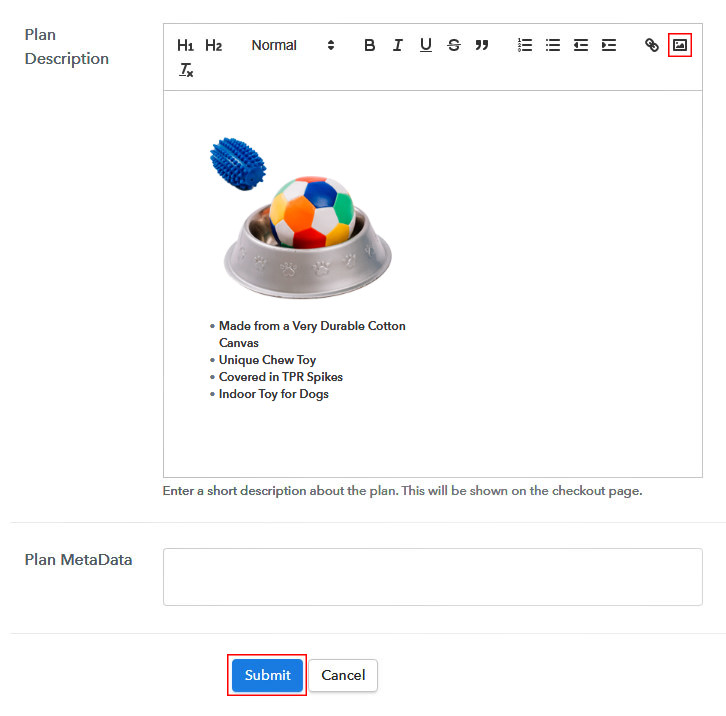
(c) Add Image & Description

Sell Pet Toys Online Image

Also, write a description of the pet toys that you want to sell along with the product links, images, etc, and click on the submit button to add your plan.
You can create more plans for all the pet toys likewise.

Step 7: Share Your Checkout Page

Share Checkout Page on Social Media

  • Share your checkout page on social media like Facebook and Twitter to boost up your business of pet toys.
  • Also, copy the mentioned link and send it to your customers through SMS or emails directly.
  • Further, embed your plan link to your website so that your customers can be landed on the checkout page directly.

Step 8: Preview Checkout Page

Follow these steps to view checkout page

(a) Click on the View Button

View Checkout Plan

(b) Take a Look at the Checkout Page

Preview Checkout Page

Step 9: Embed Checkout Page in Site & Sell Pet Toys Online

Embed Checkout Page on Website

Just copy the provided plan embedding link and embed the checkout page to your WordPress site.

(a) Edit the Page & Paste the Copied Link

Paste Link in Text Editor

Copy and paste the link in the text area of the editor

(b) Save & Publish the Checkout Page

Save and Publish

After the code is pasted, click on the publish button to embed your checkout page.

(c) Check Out the Final Look of your Checkout Page on WordPress Site

Sell Pet Toys Online Website

Step 10: Multiplan Checkout Page

Note: In case you want to sell multiple products through a single checkout page, create a multi-plan checkout plan, otherwise skip this step.

(a) Click on Add Multiplan Checkout

Multiplan Checkout

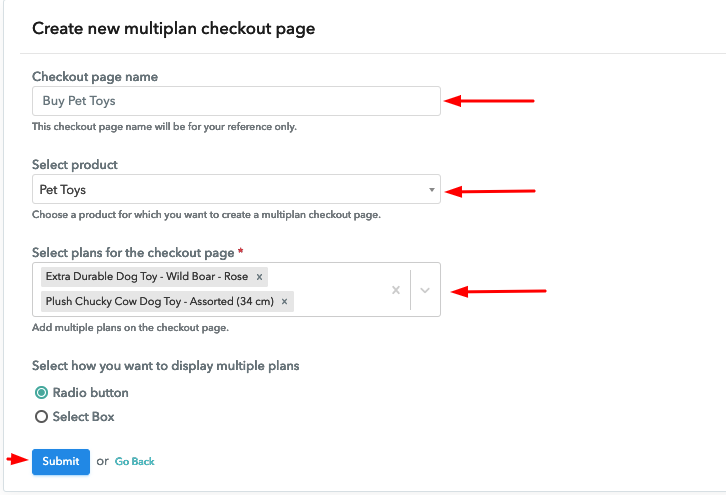
(b) Add Plans to Sell Multiple Pet Toys from Single Checkout Page

Sell Pet Toys Online Multi Details

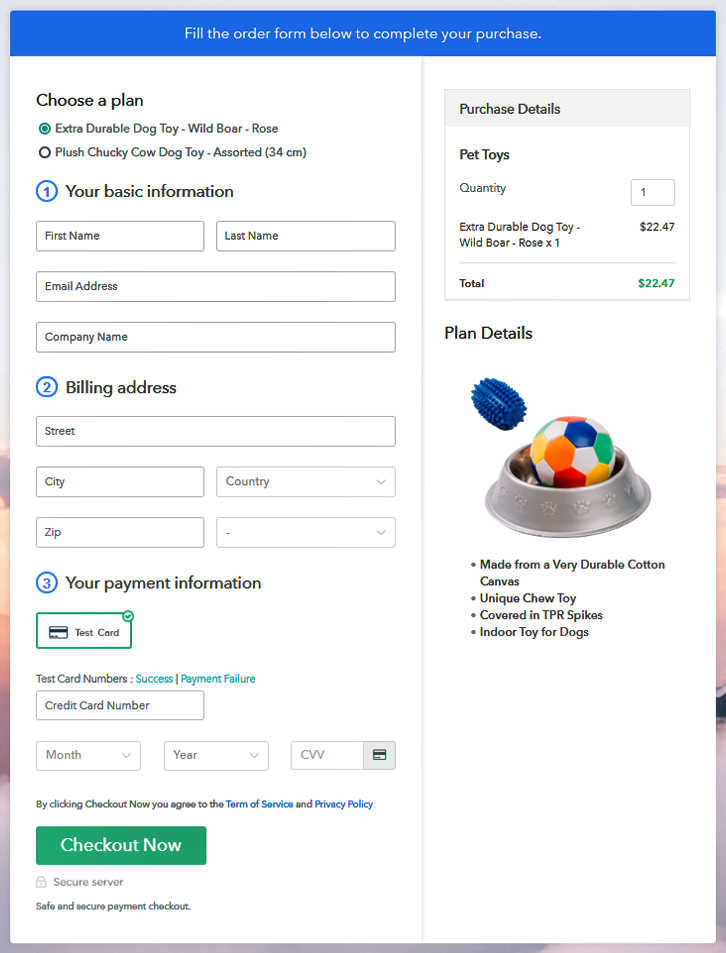
(c) Take a Look at the Checkout Page

Sell Pet Toys Online Multi Checkout

Preview Checkout Page

Wrapping Up

So, this was the easiest and free method to start selling pet toys online. With Pabbly Subscription Billing you can sell unlimited pet toys, share invoices, collect payments via online or offline modes, and all this without even paying a single penny. Where else can you find this amazing deal! Therefore, start selling online and spread the joy to pets.
For further queries or suggestions, please contact us.

You May Also Like To Read –
Pabbly Connect & Zoom Integration Guide

Overview

Pabbly Connect is an integration tool that provides you the ability to integrate multiple applications by managing the data flow smoothly. You can create automated workflows and transfer the data between your favorite apps and services without any manual efforts.

The best part of Pabbly Connect is it doesn’t put any limitation on workflows. One can create unlimited workflows and get the repetitive task done through automation without depending on developers and any coding work.

Prerequisite

Release note/updates for existing app users

You need to reauthorize the Pabbly Connect app since we’ve added new scopes that will allow you to use Zoom application more broadly. We have added two new scopes namely “View your webinars /webinar:read” and “View and manage your webinars /webinar:write”.

With the helps these scopes, you can now easily view list of webinars and can add new registrant to a webinar also.

Installing Pabbly Connect from the Zoom Marketplace

  1. Login to your Zoom account and navigate to the Zoom Marketplace.
  2. Search for Pabbly Connect and click the app.
  3. If the app is not pre-approved, contact your Zoom admin to approve this app for your account.
  4. Click “Visit site to install”. You will be redirected to Pabbly Connect.
  5. Login or signup up for a new account of Pabbly Connect.

Using the Pabbly Connect Integration

Actions with Zoom

Actions mean that when something occurs in another app, Pabbly Connect causes an action in Zoom.

Available Actions with Zoom are:

  • Create a meeting
  • Delete a meeting
  • Update a meeting
  • Retrieve a meeting
  • Add meeting registrant
  • Add a webinar registrant
  • List Webinar Absentees
  • List Meeting Registrant
  • Get Past Meeting Registrant
  • Update Meeting Registrant’s Status
  • Update Webinar Registrant’s Status
  • Retrieve a Webinar

Creating a Workflow in Pabbly Connect

In Pabbly Connect, a Workflow is a bundle of triggers, actions, and scheduler, which will perform a complete action to connect your applications.

A workflow can be simply created by adding any text (application name, the purpose for the integration, etc) according to your needs

Steps to create a workflow in Pabbly Connect:

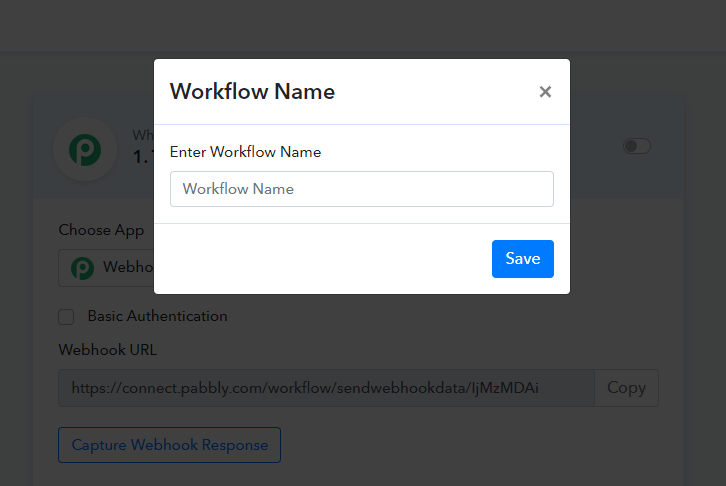
Step 1: Sign in to your Pabbly Connect account, click on “Create a Workflow” & enter your workflow name.

enter_workflow_name

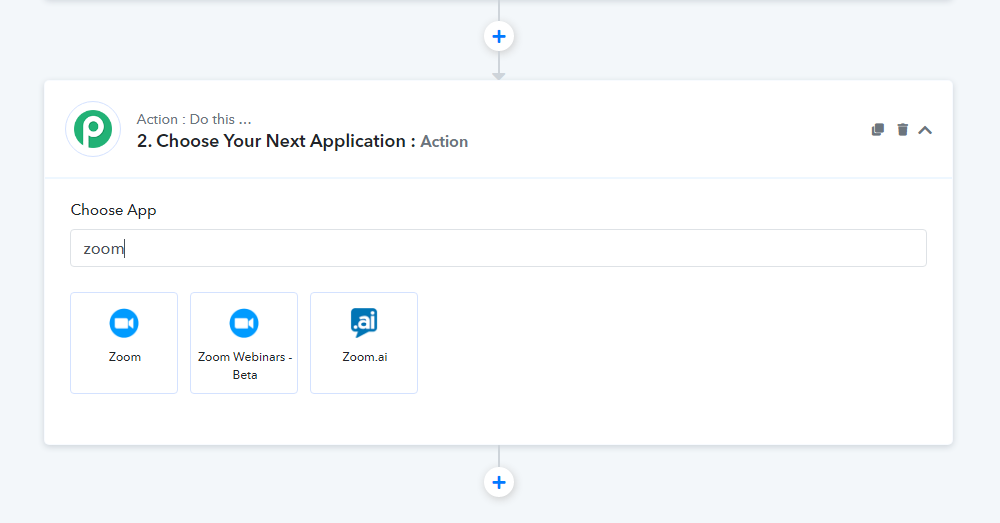
Step 2:  Go to choose Your Application: Action Module & choose Zoom App.

Pabbly

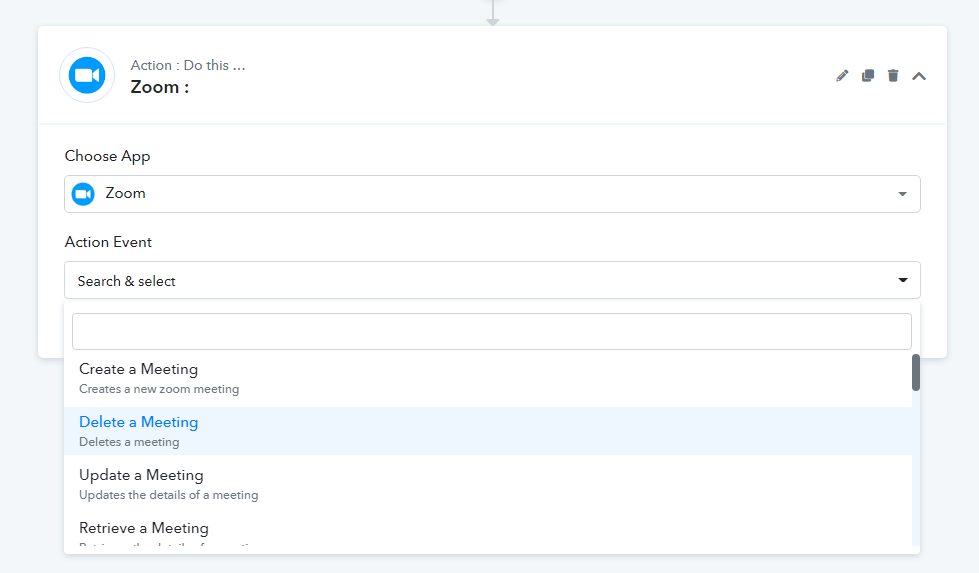
Step 3: Select an action event that you want to create from the dropdown menu.

Pabbly

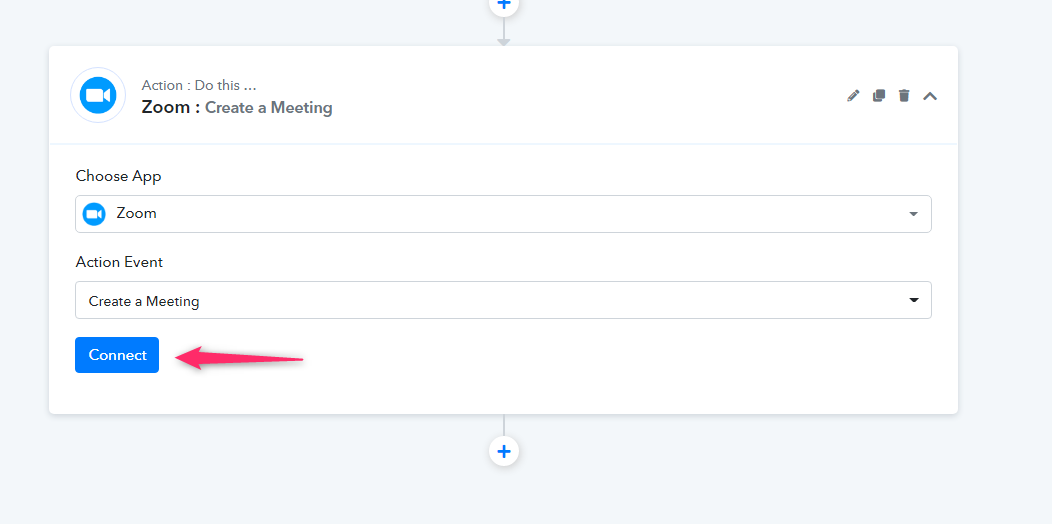
Step 4: Click on Connect button

Pabbly

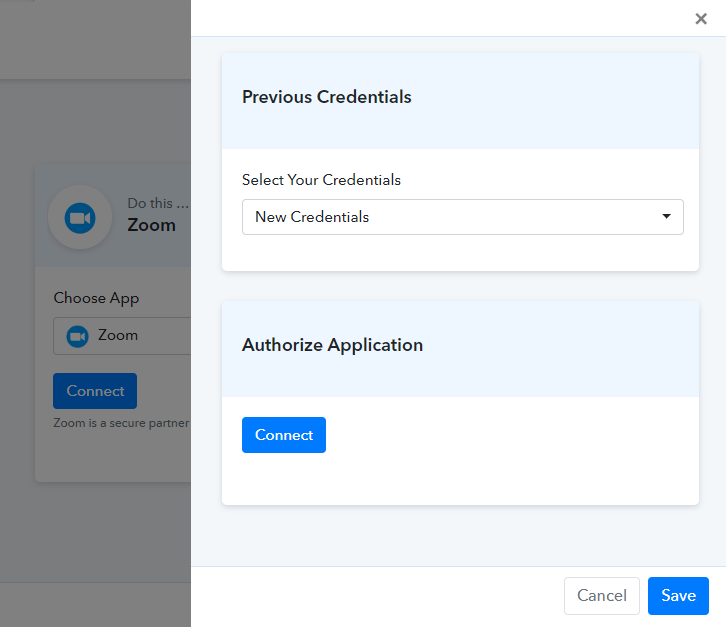
Step 4: Connect your Zoom account by clicking on the Connect Button.

new_credentails

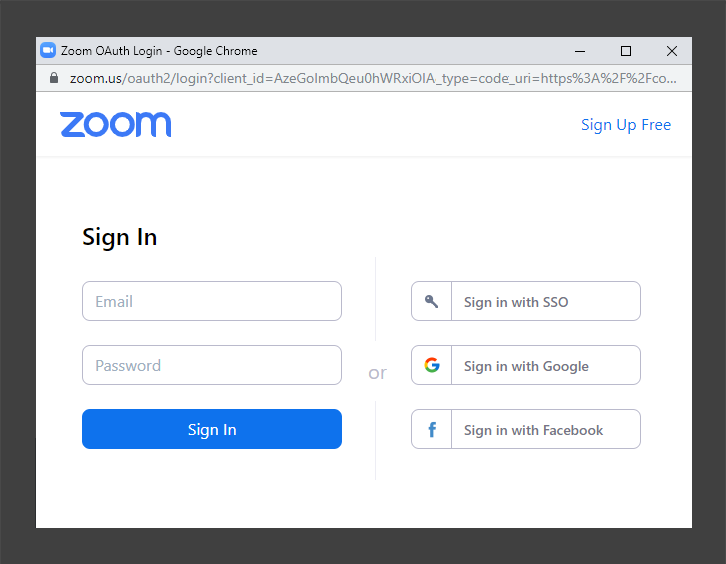
Step 5: After selecting the app, you will be redirected to the Zoom App Login page where you’ve to login using your credentials.

login_to_zoom_app

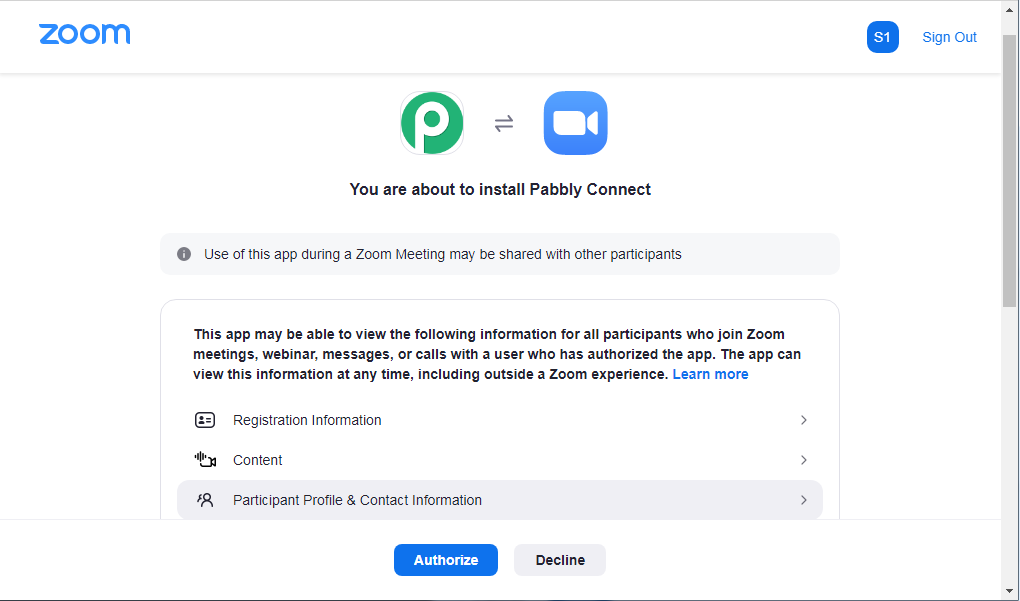
Step 6: Click on the authorize button to provide access of your Zoom Account to Pabbly Connect.

Pabbly

Once the integration has been created, you can perform the actions as per your requirement.

Uninstall

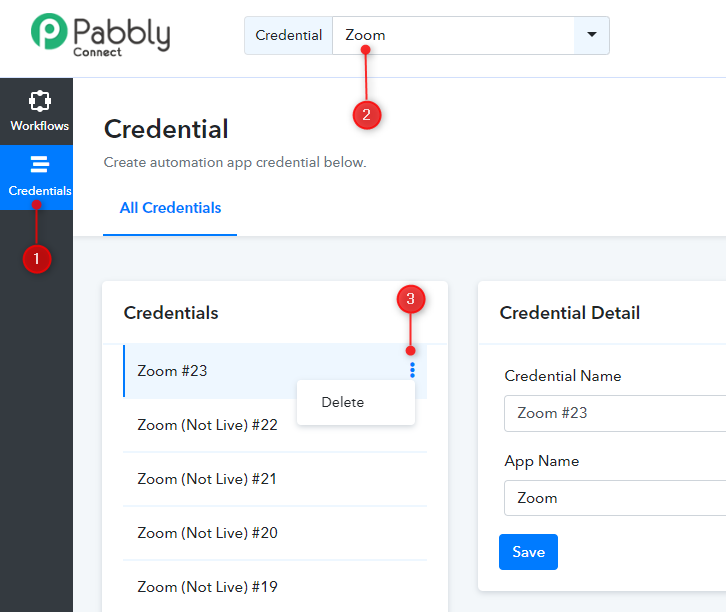
1. Login to your Pabbly Connect account.

2. Click on the Credential -> Search the Zoom App from the search bar -> Click on the delete option.

uninstall_connection

3. Now, login to your Zoom account and navigate to the Zoom App Marketplace.

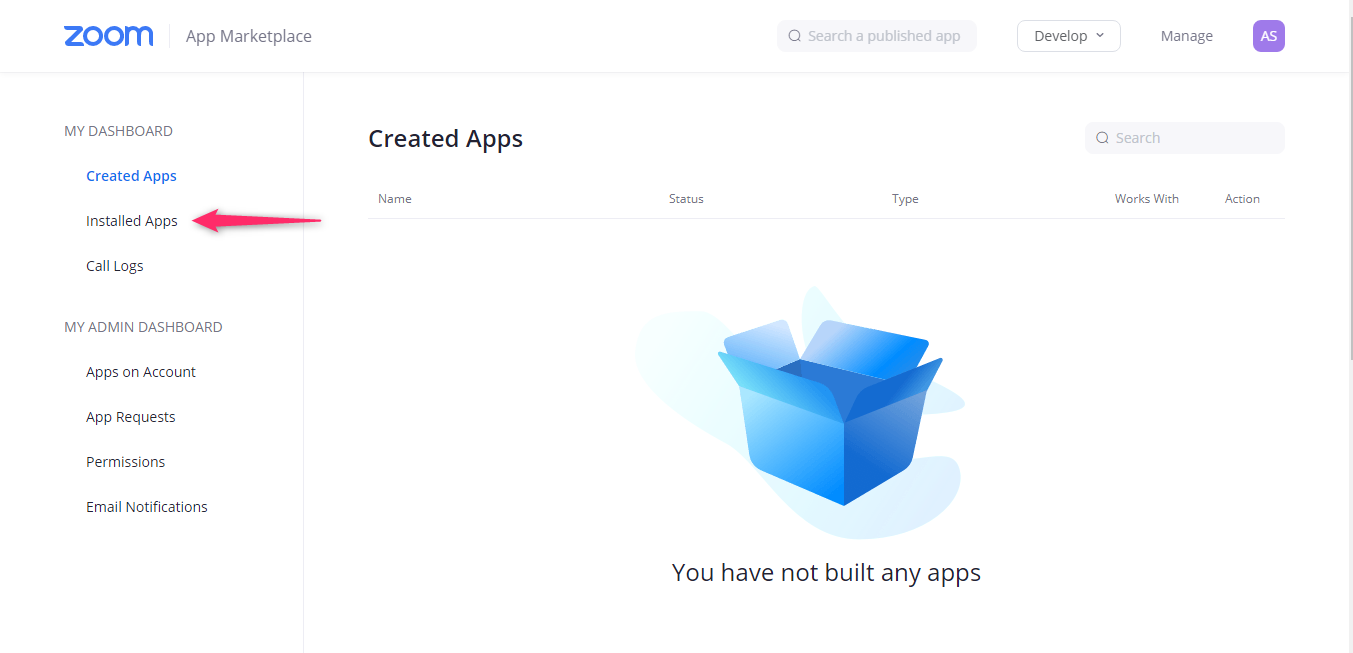
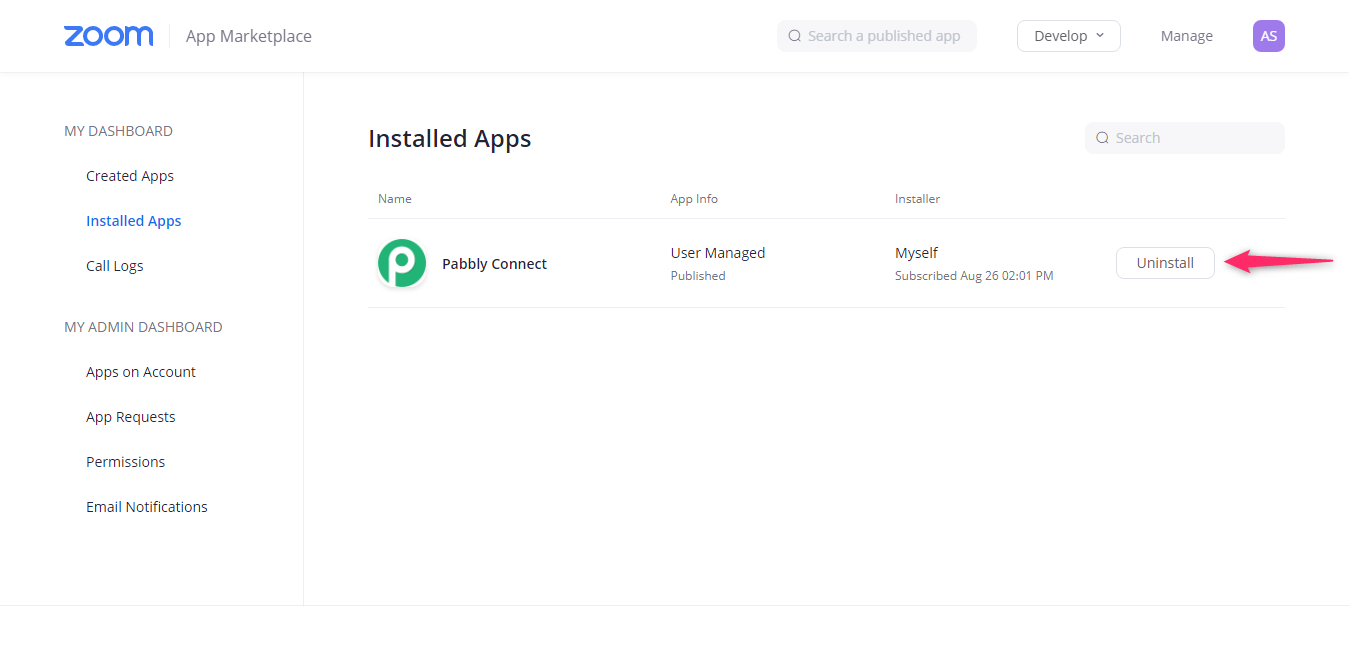
4. Click Manage > Installed Apps or search for the Pabbly Connect app.

Pabbly

5. Click the Pabbly Connect app.

6. Click uninstall.

Pabbly

Install

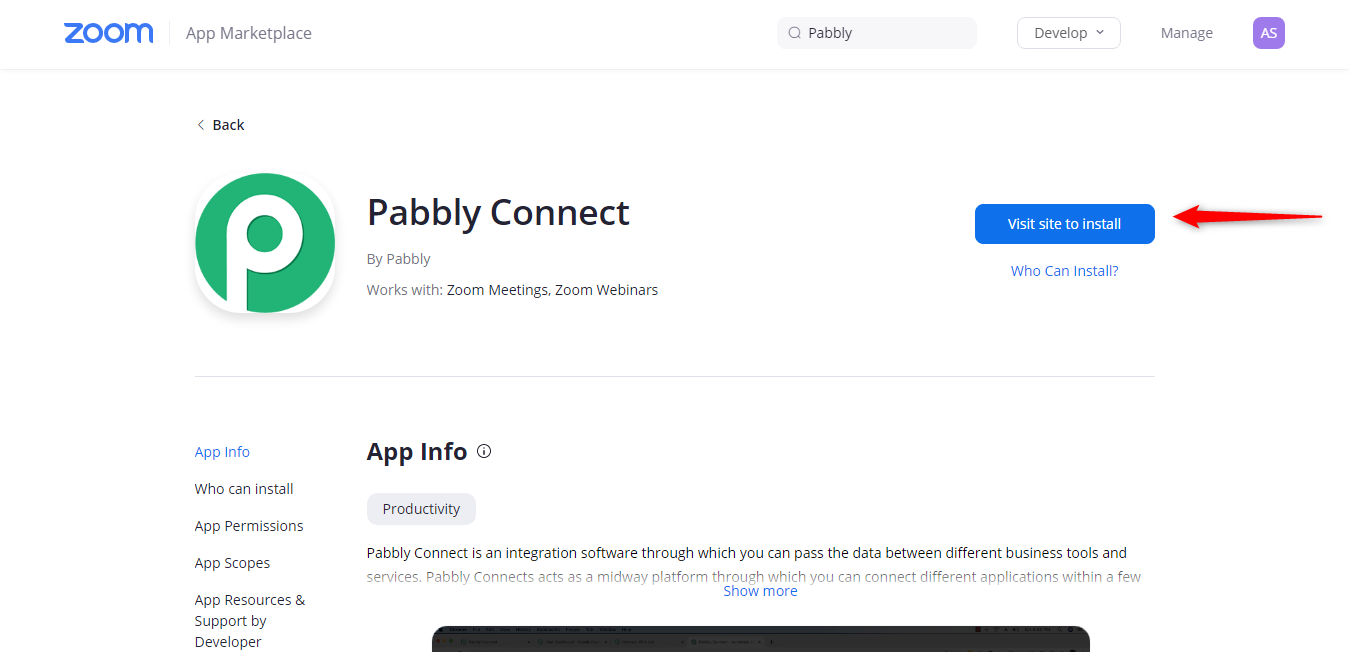
1. Login to your Zoom account and navigate to the Zoom App Marketplace.

2. Click Manage > Installed Apps or search for the Pabbly Connect app.

3. Click Visit site to Install button and follow the instructions.

Pabbly

How to Sell Lottery Tickets Online | Step by Step (Free Method)

How to Sell Lottery Tickets Online

Ideal For: All the lottery ticket sellers, lottery ticket makers, retail lottery tickets selling business owners, and other lottery ticket selling merchants can use this method to take their lottery tickets selling business online.

How to Sell Lottery Tickets Online

Why Choose this Method for Selling Over any Other Solution?

Unlike any other solution, this method allows you to:

  • List and sell your lottery tickets for FREE. Absolutely no payment required.
  • No commission on sales.
  • Collect payment through multiple payment modes from a single checkout page.
  • Sell one time or recurring subscriptions of your lottery tickets.
  • Sell and collect payment in any currency as per your requirement.
  • Give discounts on your products by offering special coupon codes.
  • Add sales commission agents to help you in selling lottery tickets online.

Get Pabbly Subscription Billing for Free

There are many people out there who love to try their luck by buying lotteries. Hereafter you may be planning to sell lottery tickets online.

Why would you like to sell lottery tickets online?

Well, maybe you want to extend your business globally or you just want to increase your lottery tickets sales.

Most importantly, it’s very important for an online business to manage payments and related stuff like invoicing, billing, keeping records etc. Well, no need to worry now as in this article we are going to discuss something that’s gonna solve all these problems excellently.

We are going to create checkout pages further to share your items online and collect payments through it. There is actually more to it as we are going to get more advantages for selling lottery tickets online. Such as:

  • A dashboard to record all the payments and tickets in stock
  • Collect online as well as offline payments
  • Automate billing and invoicing for the tickets
  • Create unlimited products and plan to sell unlimited lottery tickets
  • Share and sell lottery tickets on social media platforms
  • Embed checkout pages on websites
    And more…

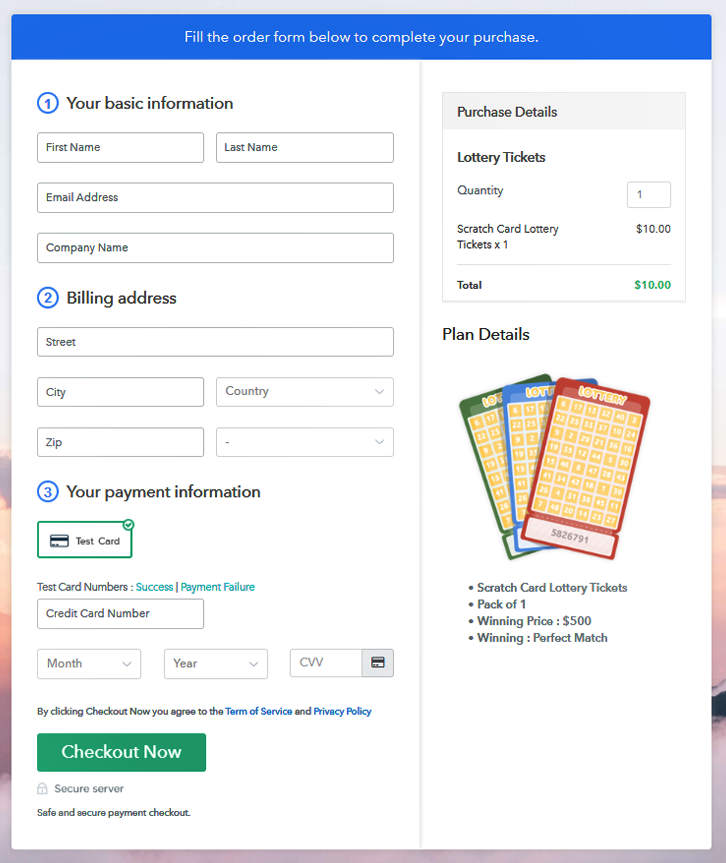
This is How your Checkout Page will Look Like After Creation

Checkout Page Preview to Sell Lottery Tickets Online

Preview Checkout Page

Step 1: Login to Pabbly Subscription Billing

Signup
The very first step is visiting Pabbly Subscription Billing & click on the “Sign Up Free” button there. This will redirect you over a sign-up & registration page. Here either directly sign-in using an existing Google account or sign-up manually by filling out the details asked in the form.

Sign Up For Free!

Step 2: Select Subscription Billing

Access Subscription Billing

The second step will be, click on the “Access Now” button right next to the Subscription Billing app of the service.

Step 3: Account Setup

Setup Account

After that, a window will pop-up asking to fill out three details i.e, the company name, currency and a contact number. Quickly stuff the details and hit the “Continue” button.

Step 4: Connect Payment Gateway to Sell Lottery Tickets Online

Connect Payment Gateway

In this step, you’ll need to integrate a payment gateway to accept payment. This is an important step in this procedure and also there are multiple options available to choose from. You can follow the integration guides linked below to integrate a payment method. Although, I’ve been using the test payment method in this blog, just for getting through the procedure while testing.

Step 5: Add Your Product

Add Product

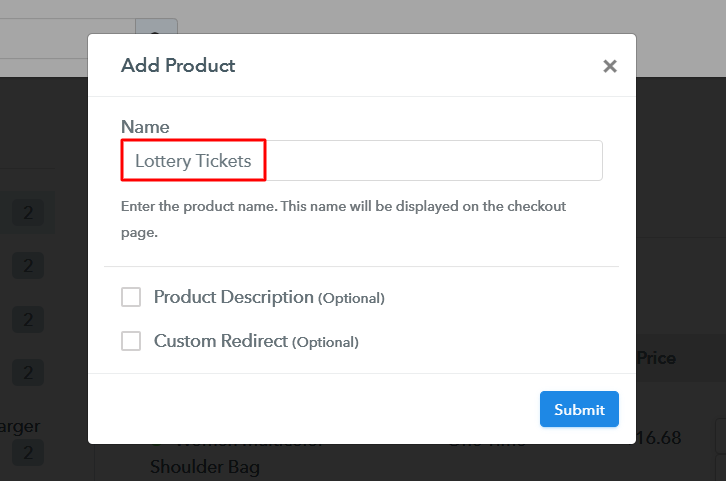
Now, you can start adding products and for this just click on the “Add New Product” button. Mention a product name and other related details. Well, a product will be much like a category of lottery tickets.

Add Product to Sell Lottery Tickets Online

Hit the “Submit” button, after mentioning the details of a product to sell lottery tickets online. Remember one thing though that you can add as many products as you like to based on the (lottery) category that you want to enlist.

Note: Here you can add all the products related to the similar category by creating plans for each of them.

Step 6: Add Plans

Now, you can add plans to any created product. Click on the “Add New Plan” button & a plan page will open up asking details about the lottery tickets that you want to show on the checkout page.

(a) Select Add New Plan

Add Plan

(b) Specify the Plan & Pricing Details

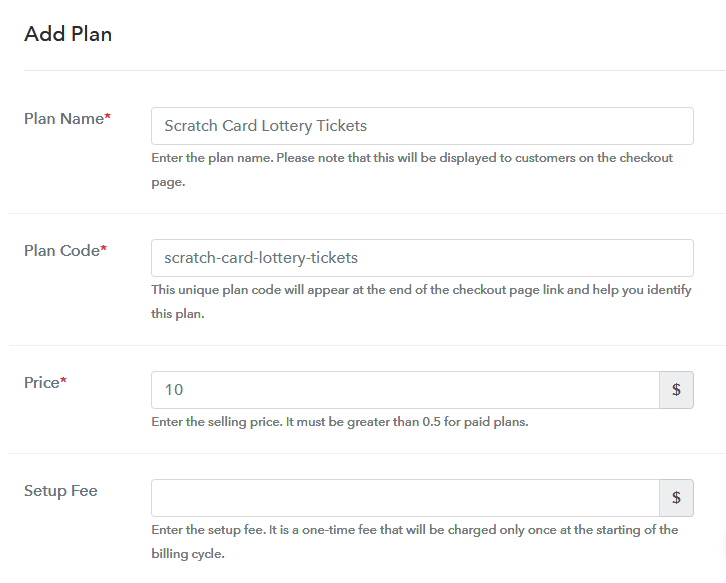
Add Plan to Sell Lottery Tickets Online

Here, add details like plan name, code, price etc to sell lottery tickets online.

(c) Add Image & Description

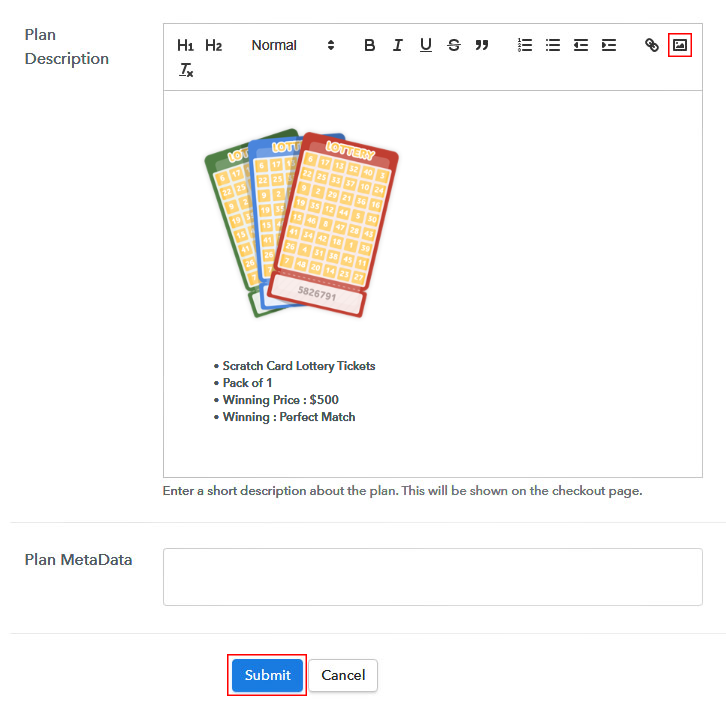
Add Image & Description to Sell Lottery Tickets Online

Also, I recommend you to place an image and description of every product. And for this, you’ll need to fill out the “Add Description” area. Additionally, you can also make use of the text formatting options such as links, quotes, headings, alignments etc to sell lottery tickets online.

Once you are done with the lottery details that you want to sell, “Submit” this page for selling the lottery ticket & a lottery ticket will be added instantly on your plan list.

Similarly, add as many plans as you want to add, under every product.

Step 7: Share your Checkout Page

Share Checkout Page on Social Media

  • You can copy the given under “Plan Link” URL to share any checkout page on social media platforms, SMS, emails and WhatsApp to sell lottery tickets online.
  • Also, you can use this same URL to link the checkout page in any website’s buttons & text anchors.
  • You can also see two direct sharing icons representing Facebook & Twitter. Just click them and share a checkout page directly onto that platform.

Step 8: Preview Checkout Page

Follow these steps to preview a checkout page:

(a) Click on the View Button

View Checkout Plan

(b) Take a Look at the Checkout Page

Checkout Page Preview to Sell Lottery Tickets Online

Step 9: Embed Checkout Page in Site & Sell Lottery Tickets Online

Embed Checkout Page on Website

To embed any created checkout page on WordPress, copy the complete code given under the “Embed Plan Link” window.

(a) Edit the Page & Paste the Copied Link

Paste_Link_in_Text_Editor

And paste it in the text area section of any post/page on your website.

(b) Save & Publish the Checkout Page

Save_and_Publish

Then publish the post/page & the checkout page will get embedded on your website’s post or page.

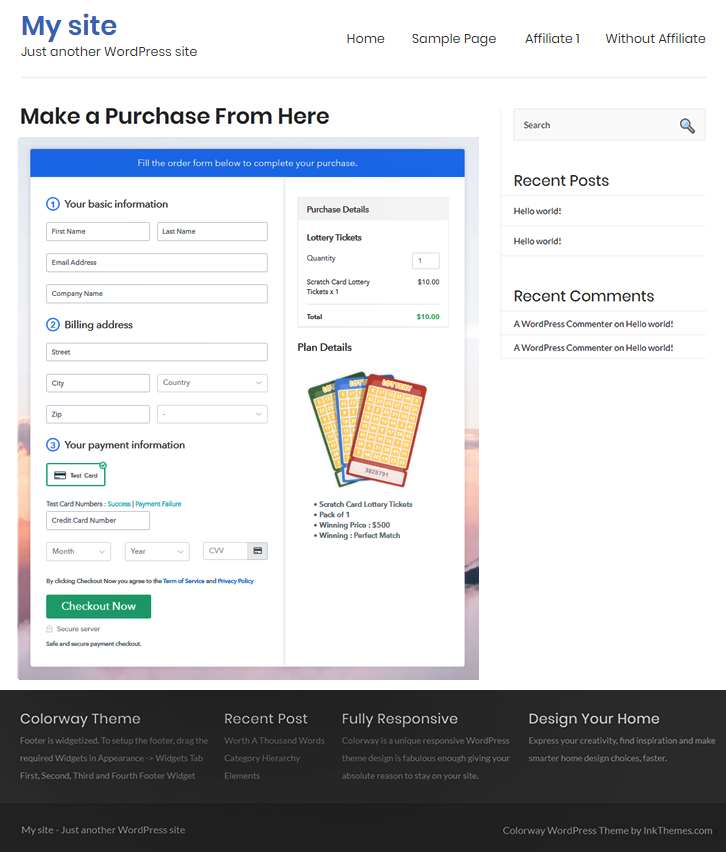
(c) Check out the Final Look of your Checkout Page on WordPress Site

Checkout Page On Site to Sell Lottery Tickets Online

Step 10: Multiplan Checkout Page

Note: In case you want to sell multiple products via a single checkout page, you create a multi-plan checkout page otherwise skip this step.

(a) Click on Add Mutiplan Checkout

Multiplan_Checkout

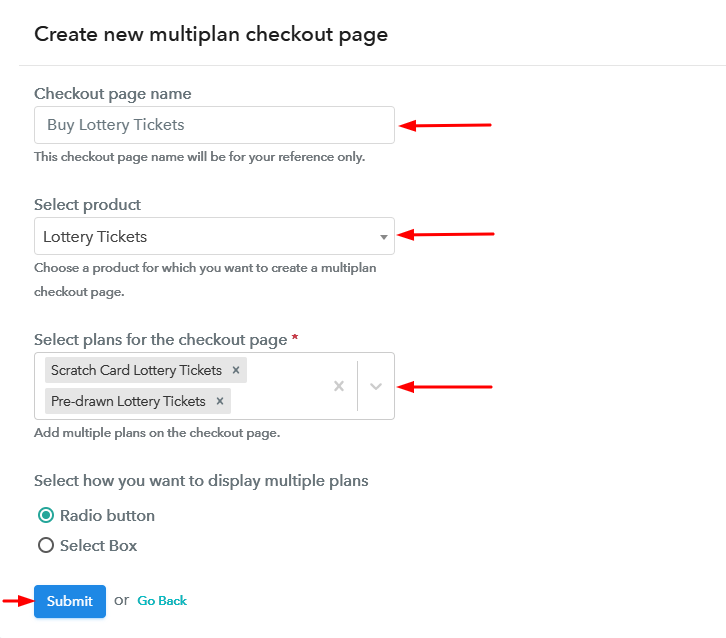
(b) Add Plans to Sell Multiple Lottery Tickets from Single Checkout Page

Create Multiplan Checkout to Sell Lottery Tickets Online

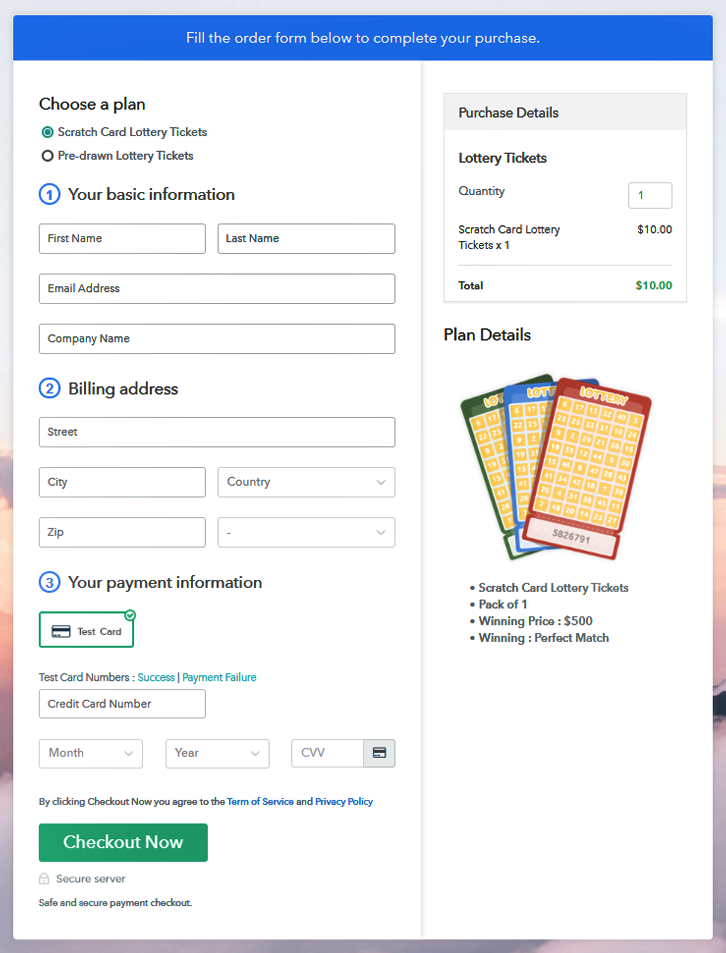
(c) Take a Look at the Checkout Page:

Multiplan Checkout to Sell Lottery Tickets Online

Preview Checkout Page

Wrapping Up

Well, if you have followed the procedure then you can directly see that you are now ready to sell lottery tickets online. Also, you must have seen that the overall method was pretty easy and you can implement them on your own for selling lottery tickets online.

Moreover, there are many benefits discussed and implemented throughout. And it also has very reliable options to choose a payment gateway method for safe and secure payments.

Good Luck with your lottery ticket business!

You May Also Like To Read