How to Sell Cosmetics Online | Step by Step (Free Method)

How to Sell Cosmetics Online

Ideal For: All the cosmetic stores, cosmetic shops, independent beauty brands, makeup shops, and other makeup artists with their own makeup line can use this method to take their cosmetics selling business online.
How to Sell Cosmetics Online

Why Choose this Method To Sell Cosmetics Online?

Unlike any other solution, this method allows you to:

  • List and sell your cosmetics for FREE. Absolutely no payment required.
  • No need to pay commission on any of your sale.
  • Multiple payment options like PayPal, Credit Card, etc to collect payment from a single place.
  • Sell one time or recurring subscriptions of your cosmetics.
  • Collect payments & sell products in any currency as per your requirement.
  • Give discounts on your products by offering special coupon codes.
  • Add sales commission agents to help you in selling cosmetics online.

Get Pabbly Subscription Billing for Free

There are over 200+ cosmetic brands available in the market but if you have some different and unique cosmetics to offer and if you are wondering how to build a cosmetic business, then you have landed at the right place. You can turn your passion for beauty into a professional online business.

If you start selling cosmetics online there will be better chances for the profit as people can access your cosmetics from all over the world and your customer reach will increase. To start your cosmetics selling online business you only need Pabbly Subscription Billing, which is a completely free platform. With this service, you can create checkout pages for your cosmetics and share them on social media or your website and people can start purchasing your cosmetics through them.

Other than the checkout pages, it also offers many other helpful features for your online business:

  • Add and sell unlimited cosmetics
  • Share invoices of cosmetics automatically with users
  • Integrate it with your website
  • Collect one-time or recurring payments for your cosmetics

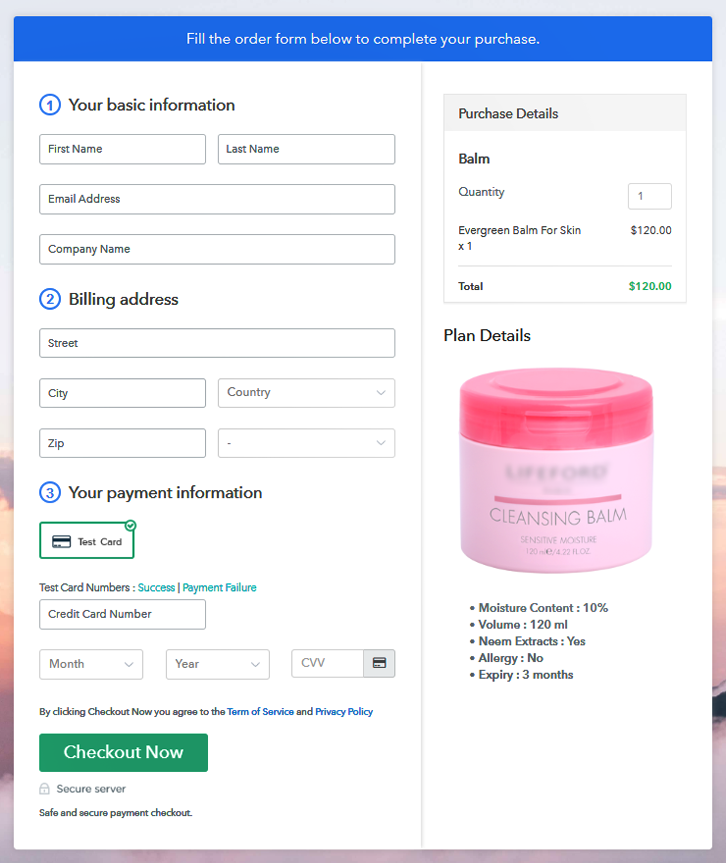
Final View of Checkout Page For Your Cosmetics Selling Business
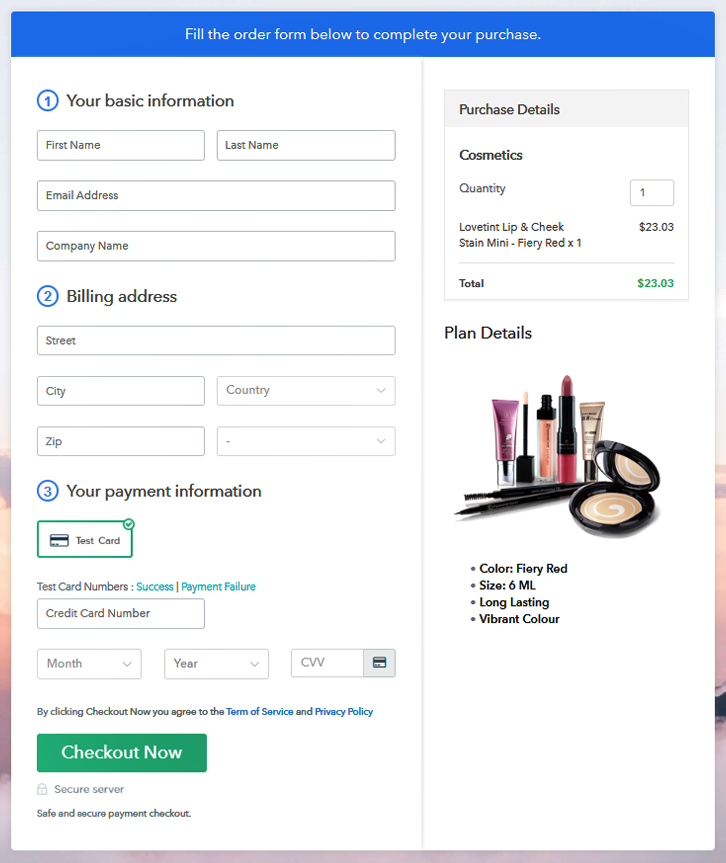
Preview Checkout Page

Preview Checkout Page

Step 1: Log in to Pabbly Subscription Billing

Signup

In the first step, you have to visit Pabbly Subscription Billing website and then click on the “Signup Free” button. Once you click the button, the signup page will appear, where you can sign up for free in a few seconds via your Gmail or you can also enter your details manually.

Sign Up For Free!

Step 2: Select Subscription Billing

Access Subscription Billing

Step 3: Account Setup

Setup Account

Once you have completed the signup process, here you have to fill up your company details like company name, currency, & phone number in the given dialogue box.

Step 4: Connect Payment Gateways & Start Cosmetics Selling Busines Online

Connect Payment Gateway

Here, the payment collection process is described by enabling the “Test Payment” mode. You can also check the test payment mode before moving forward. However, you can connect with other payment gateways such as PayPal, Stripe, etc of your choice. The whole payment gateways integration guide is given below.

Step 5: Add Product For Your Cosmetics

Add Product

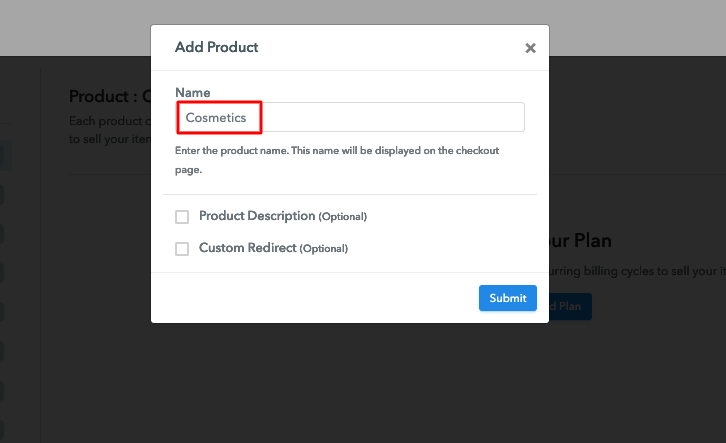
Moving forward to this step, here you have to add your first product. You can add cosmetics of different types such as bronzers, highlighters, etc. Add all the other cosmetics in the same product section by creating different plans for them.

Sell Cosmetics Online Product Name

Note: Here you can add all the products related to the similar category by creating plans for each of them.

Step 6: Add Plans

Let’s rollout plans for different kinds of cosmetics available in your store.

(a) Select Add New Plan

Add Plan

(b) Specify the Plan & Pricing Details
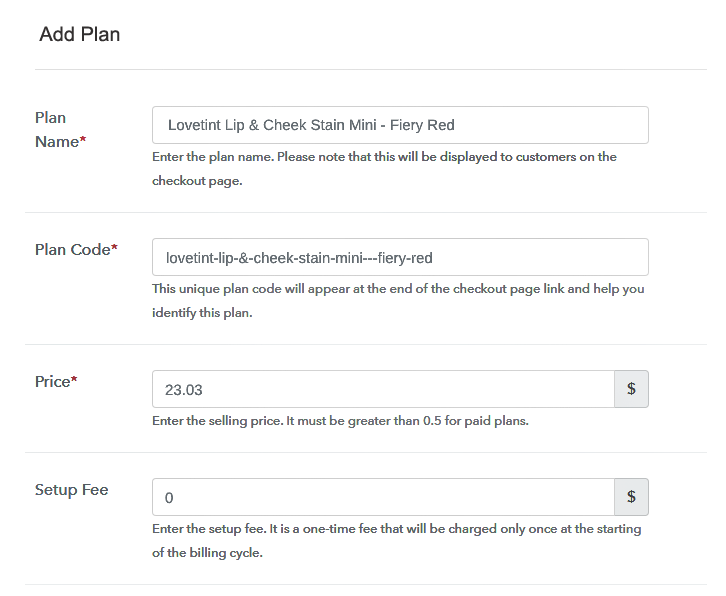
Sell Cosmetics Online Details

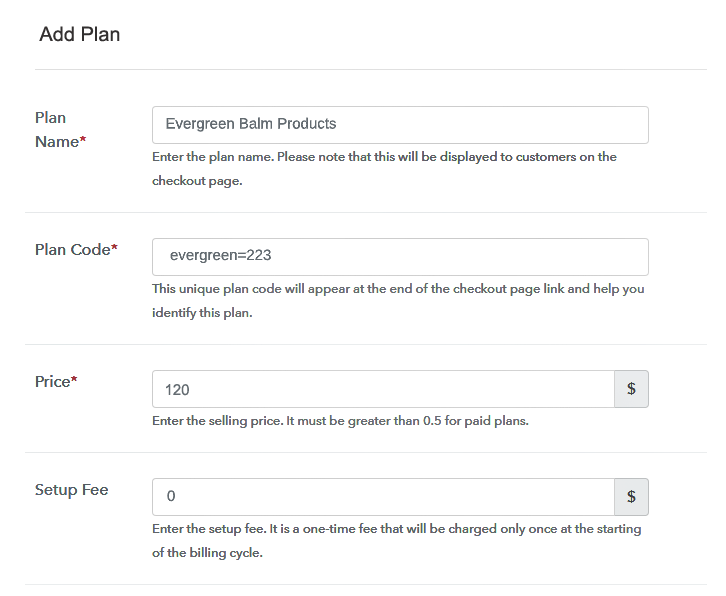
On clicking the “Add New Plan” button, the plan page will open, here you have to add details like plan name, billing cycle, code, price, etc.

(c) Add Image & Description of Cosmetics
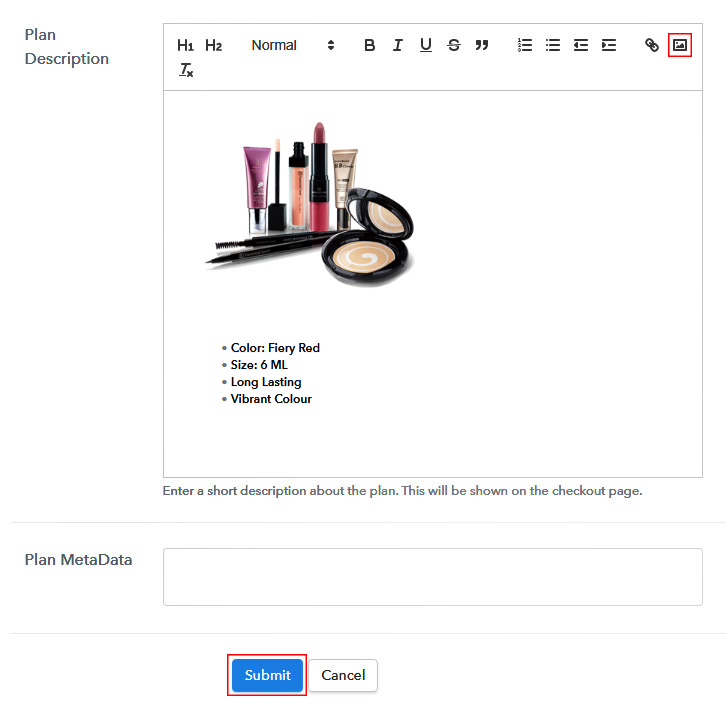
Sell Cosmetics Online

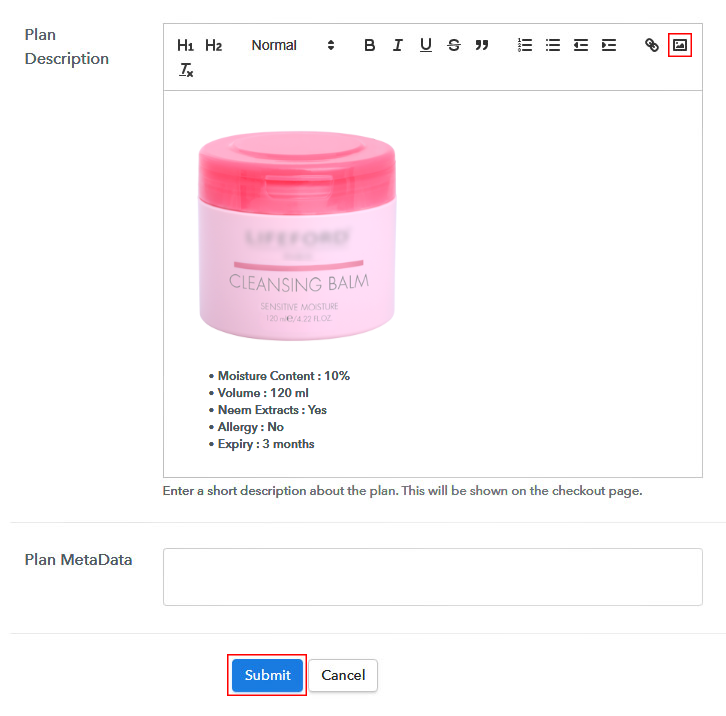
Also, describe the cosmetics that you want to sell along with the product images, links, etc, and click on the submit button to add your plan. You can create more plans for all the other cosmetics likewise.

Step 7: Share your Checkout Page

Share Checkout Page on Social Media

  • To raise your sales of cosmetics, share your checkout page on social media like Facebook and Twitter.
  • Also, copy the mentioned link and send it to your customers over SMS or emails directly.
  • Embed your plan link to your website so that your customers can be landed on the checkout page directly.

Step 8: Preview Checkout Page

Follow up the recommended steps to preview the checkout page:

(a) Click on the View Button

View Checkout Plan

(b) Take a Look at the Checkout Page

Preview Checkout Page

Step 9: Embed Checkout Page in Site & Sell Cosmetics Online

Embed Checkout Page on Website

Just copy the link and add the checkout page to sell cosmetics online at any preferable place on your WordPress site.

(a) Edit the Page & Paste the Copied Link

Paste Link in Text Editor

Further, paste the plan link on a text editor of the WordPress dashboard.

(b) Save & Publish the Checkout Page

Save and Publish

Next, click the “Publish” button, after making changes.

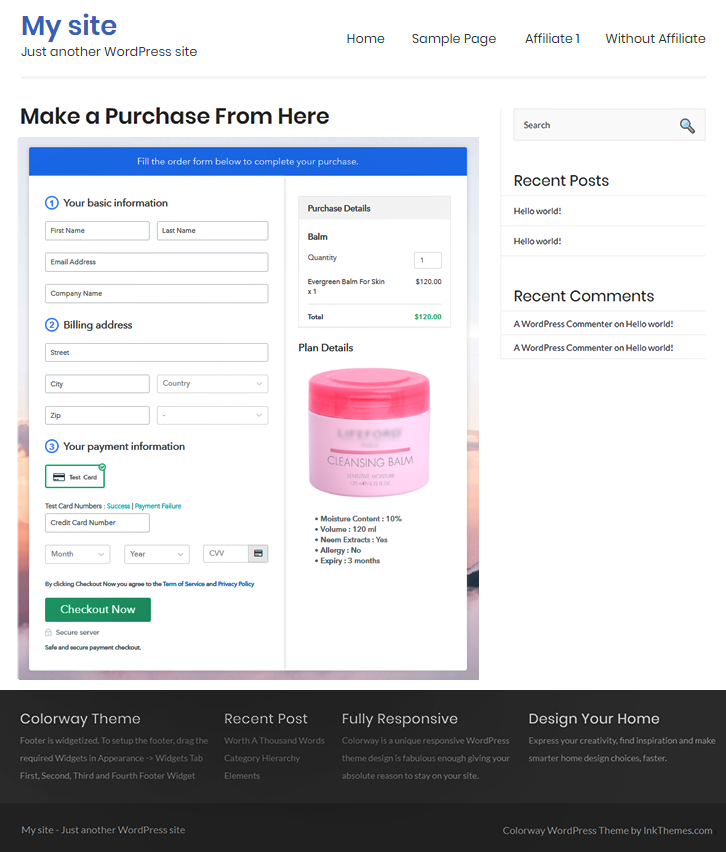
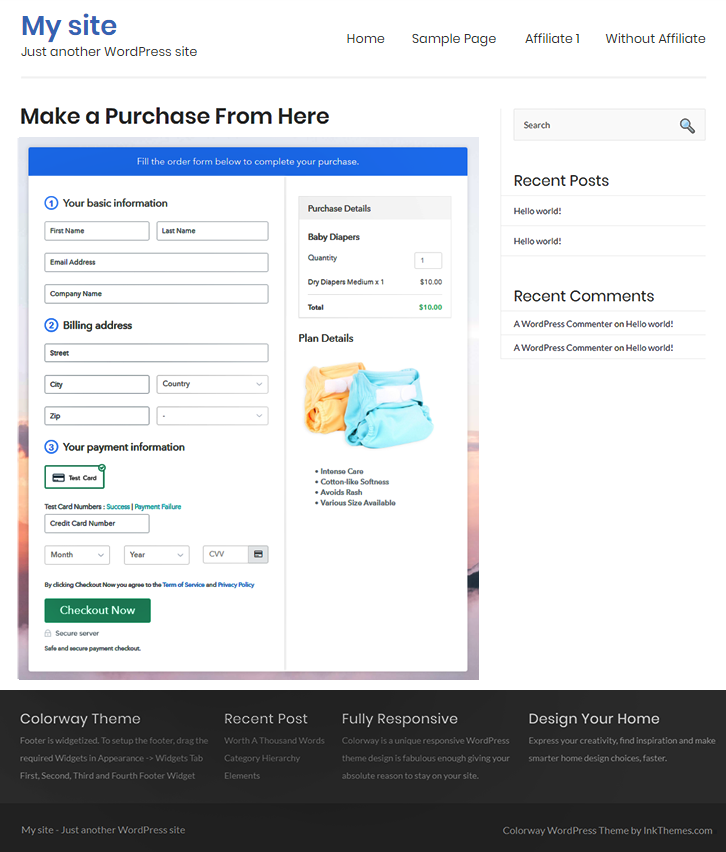
(c) Check out the Final Look of your Checkout Page on WordPress Site
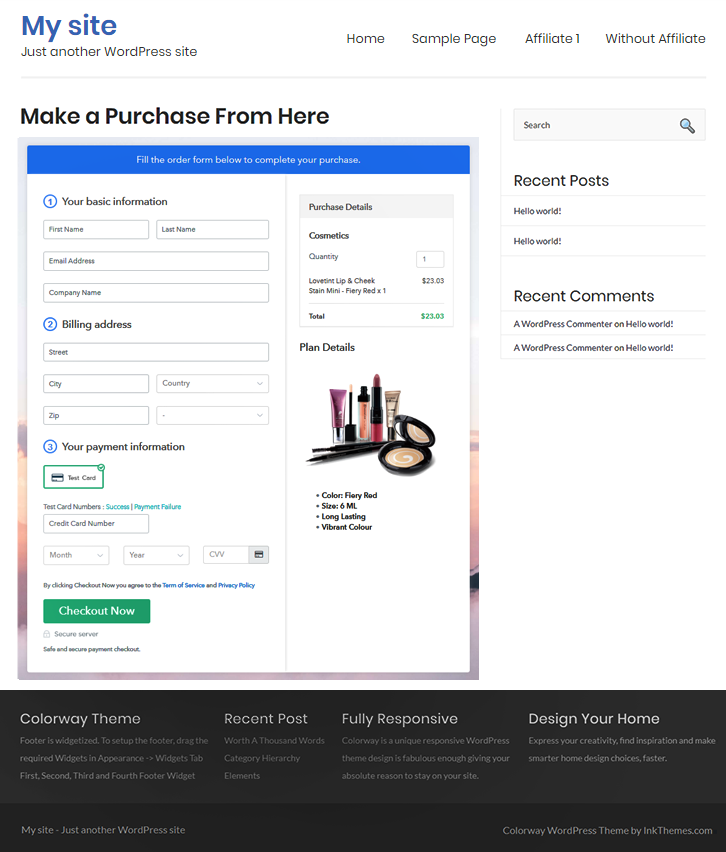
Sell Cosmetics Online Website

Step 10: Multiplan Checkout Page

Note: In case you want to sell multiple products via a single checkout page, you can create a multi-plan checkout page otherwise skip this step.

(a) Click on Add Mutiplan Checkout

Multiplan Checkout

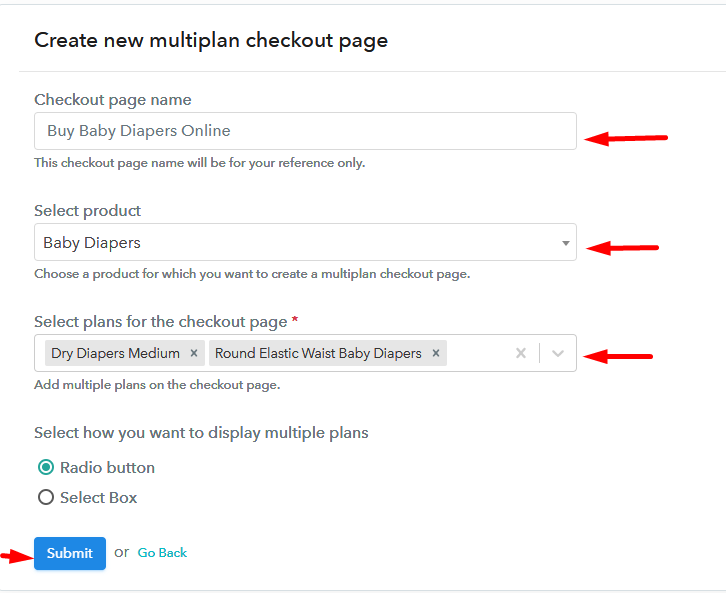
(b) Add Plans to Sell Multiple Cosmetics from Single Checkout Page
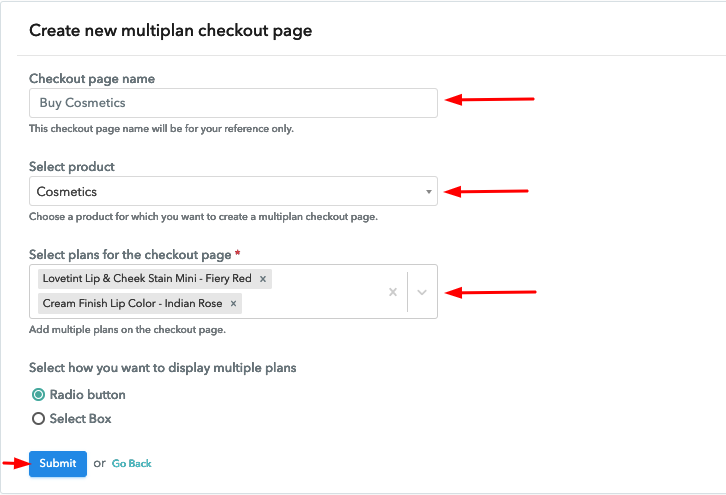
Sell Cosmetics Online Multi Details

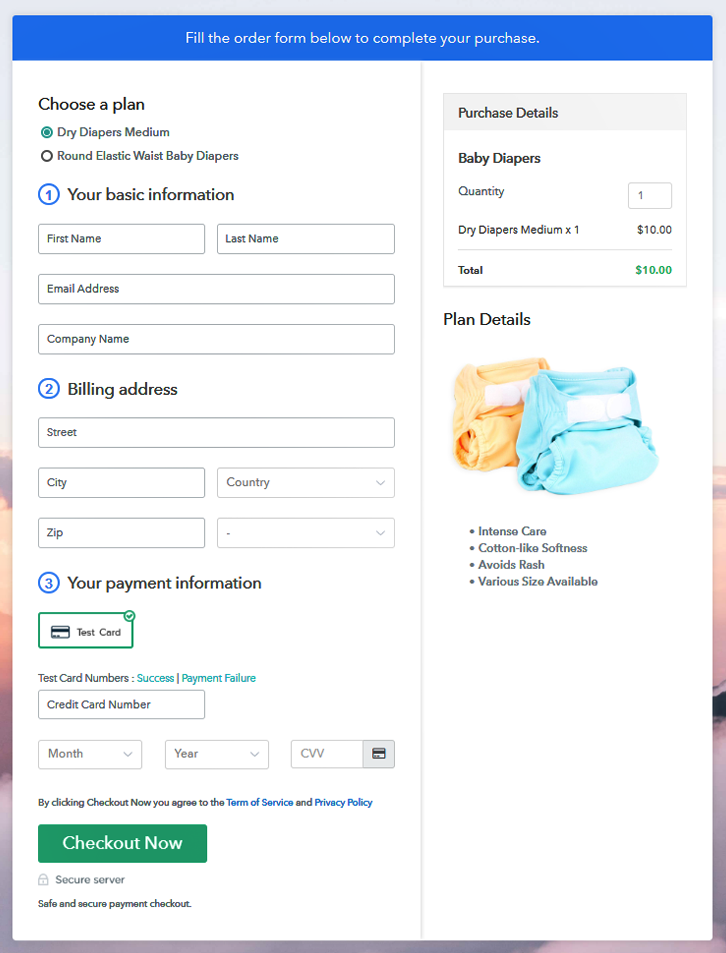
(c) Take a Look at the Checkout Page

Sell Cosmetics Online Multi Checkout

Preview Checkout Page

Wrapping Up

Lastly, now you can easily start selling cosmetics online for free all thanks to Pabbly Subscription Billing. This software makes it a lot easier to sell cosmetics online through its amazing features. Now you can sell unlimited cosmetics, create discount coupons, share invoices, and whatnot. We are sure you won’t find any other service like it. Therefore, signup and start selling your cosmetics now. For further queries or suggestions, please write to us.

You May Also Like To Read –

How to Sell Paint Brushes Online | Step by Step (Free Method)

How to Sell Paint Brushes Online

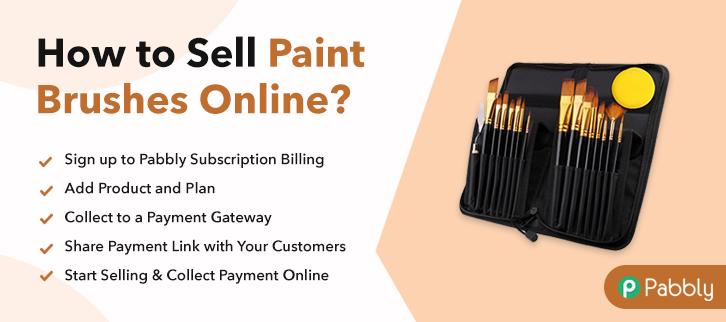
Ideal For: All the paint brush manufacturers, paint brush sellers, paint brush dealers, paint brush suppliers, paint brush shop owners, and other merchants can use this method to sell paint brushes online.

How to Sell Paint Brushes Online

Why Choose this Method to Sell Paint Brushes Online?

Unlike any other solution, this method allows you to:

  • List and sell your paint brushes for FREE. Absolutely no payment required.
  • No need to pay commission on any of your sales.
  • Multiple payment options like PayPal, Credit Card, etc to collect payment from a single place.
  • Sell one time or recurring subscriptions of your paint brushes.
  • Collect payments & sell products in any currency as per your requirement.
  • Give discounts on your products by offering special coupon codes.
  • Add sales commission agents to help you in selling paint brushes online.

Get Pabbly Subscription Billing for Free

Art lovers are all around the world and one of the most classic art is painting. From painting a canvas or portraits, paint brushes are the most important tool. This is a reason why the paint brushes market never goes down. So, starting paint brushes selling business online is a great idea of the time.

Not just this, selling paint brushes online is way much convenient for buyers to purchase as it saves the trouble of visiting shops offline. Besides, it comes with peaks like a global audience, easy management, online payment collection, etc.

Giving all this a thought, it would be best to start paint brushes selling business online. Fortunately, we came across software named Pabbly Subscription Billing that lets us create an amazing checkout page for selling paint brushes online. Some of its remarkable features involve:

  • List various kind of paint brushes in a single checkout page
  • Create professional invoices using software
  • Offer unlimited discounts and coupon codes to customers.

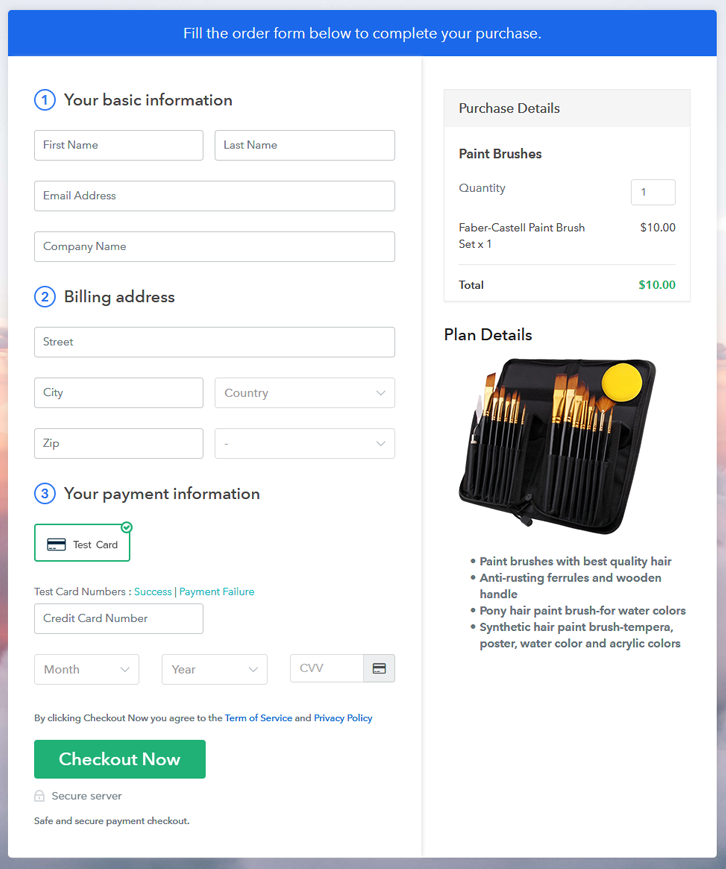
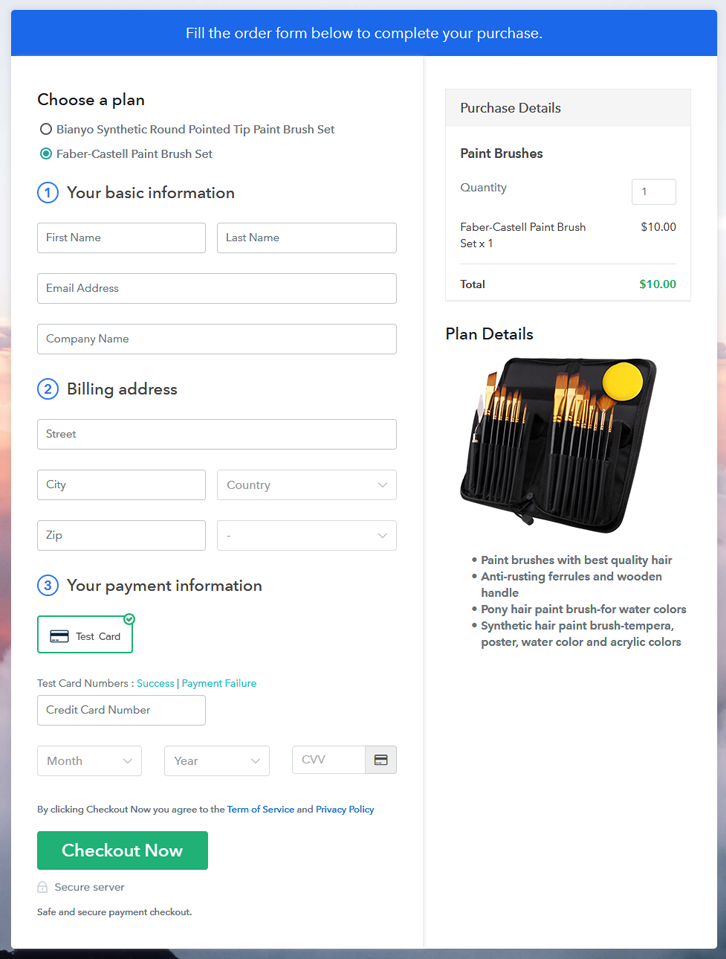
Final View of Checkout Page for your Paint Brushes Selling Business

Final View of Checkout Page for Your Paint Brushes Selling Business

Preview Checkout Page

Step 1: Log in to Pabbly Subscription Billing

Signup

The very first step for creating a checkout page for paint brushes is, by visiting the Pabbly Subscription Billing in your browser. After that, click on the “Sign up Free“ button. Further, either manually filled out the details or sign in using your Gmail account.

Sign Up For Free!

Step 2: Select Subscription Billing

Access Subscription Billing

Step 3: Account Setup

Setup Account

Moreover, after clicking on the “Access Now” button of the software, a page will start with fields like company name, select currency, and phone number. Just fill out those details to continue creating a checkout page for paint brushes.

Step 4: Connect Payment Gateways & Start Paint Brushes Selling Business Online

Connect Payment Gateway

The subsequent step is about gathering information regarding payment procedures using a “Test Payment Gateway”. Here, we will explain the checkout page process for the paint brushes with the help of a test payment gateway. Further, this tool offers various payment gateways such as PayPal, Stripe, etc. Also, below are the payment integration guides to help you out.

Step 5: Add Product for your Paint Brushes

Add Product

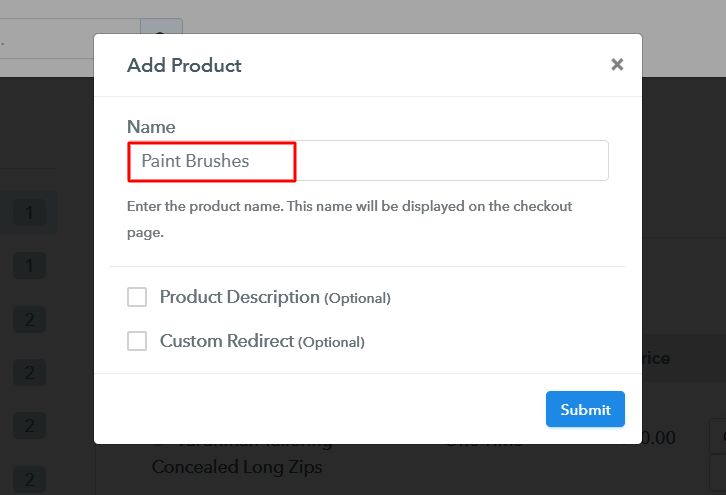
Moreover, add the name, which in our case is “Paint Brushes”. Here you can specify the type like pointed paint brushes, flat paint brushes, etc. Additionally, write a short description of the paint brushes to bind the client’s attention.

Add Product to Start Selling Paint Brushes Online

Furthermore, just fill out all those details and your product is created.

Note: Here you can add all the products related to the similar category by creating plans for each of them.

Step 6: Add Plans 

Let’s discover plans for different kinds of paint brushes available in your store.

(a) Select Add New Plan

Add Plan

(b) Specify the Plan & Pricing Details

Specify the Plan and Pricing to Sell Paint Brushes Online

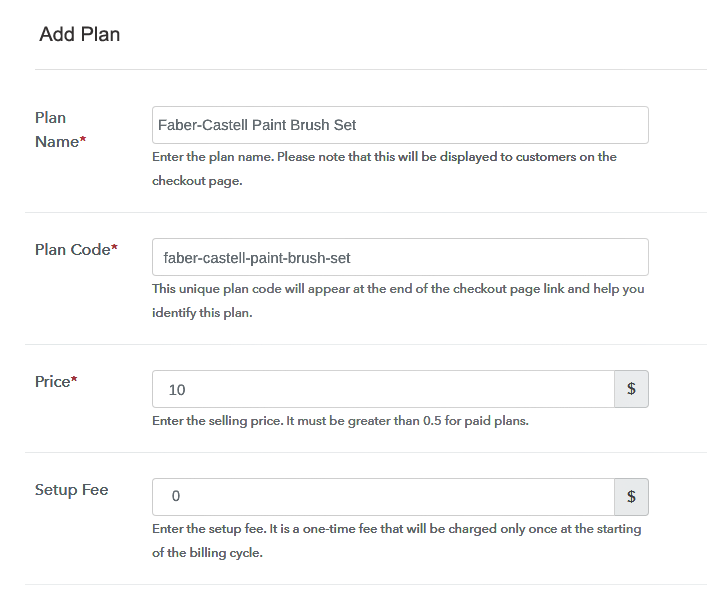
The next thing to do is fill all the details of the paint brushes like plan name, code, price, set-up fee, and much more to continue.

(c) Add Image & Description of Paint Brushes

Add Image & Description of Paint Brushes

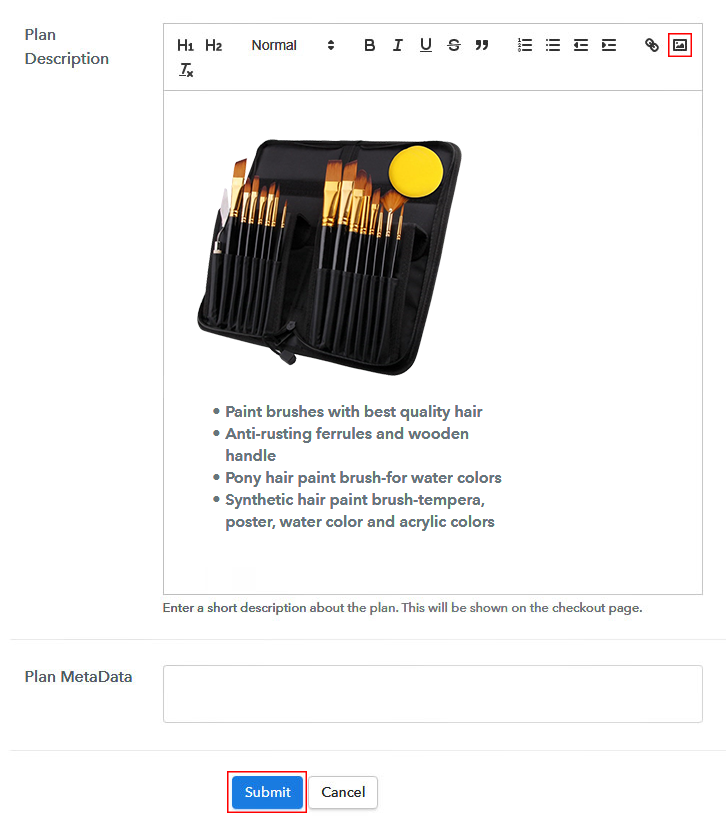
Furthermore, it is necessary to write a brief description of paint brushes using bullets, images, etc, to bring original buyers to the checkout page.

Next, click on the “Submit” button to add the paint brushes on the checkout page.

Finally, you can add multiple plans and kinds of paint brushes in your product list which you want to market online.

Step 7: Share your Checkout Page

Share Checkout Page on Social Media

  • Moreover, share the checkout page of the paint brushes on social media accounts like Facebook & Twitter to grab the customer’s attention.
  • Also, you can share the direct link of the paint brush’s checkout page with your customers via SMS or email marketing.
  • Additionally, embed the provided plan link of the paint brushes in the buttons or any anchor text on your website.

Step 8: Preview Checkout Page

Follow up the recommended steps to preview the checkout page:

(a) Click on the View Button

View Checkout Plan

(b) Take a Look at the Checkout Page

Final View of Checkout Page for Your Paint Brushes Selling Business

Step 9: Embed Checkout Page in Site & Sell Paint Brushes Online

Embed Checkout Page on Website

Just copy the link and add the checkout page to sell paint brushes online at any proper place on your WordPress site.

(a) Edit the Page & Paste the Copied Link

Embed Checkout Page on Website

Further, paste the plan link of paint brushes on a text editor of the WordPress dashboard.

(b) Save & Publish the Checkout Page

Save_and_Publish

Next, click the “Publish” button, after making changes.

(c) Check out the Final Look of your Checkout Page on WordPress Site

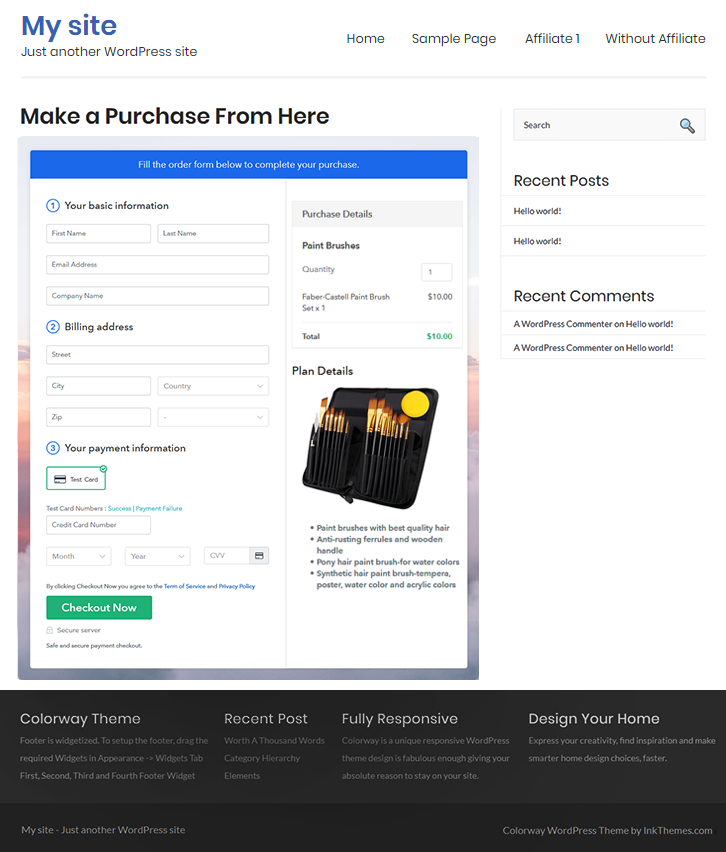
Final Look of your Checkout Page to Sell Paint Brushes Online on WordPress Site

Step 10: Multiplan Checkout Page

Note: In case you want to sell multiple products via a single checkout page, you can create a multi-plan checkout page otherwise skip this step.

(a) Click on Add Mutiplan Checkout

Multiplan Checkout

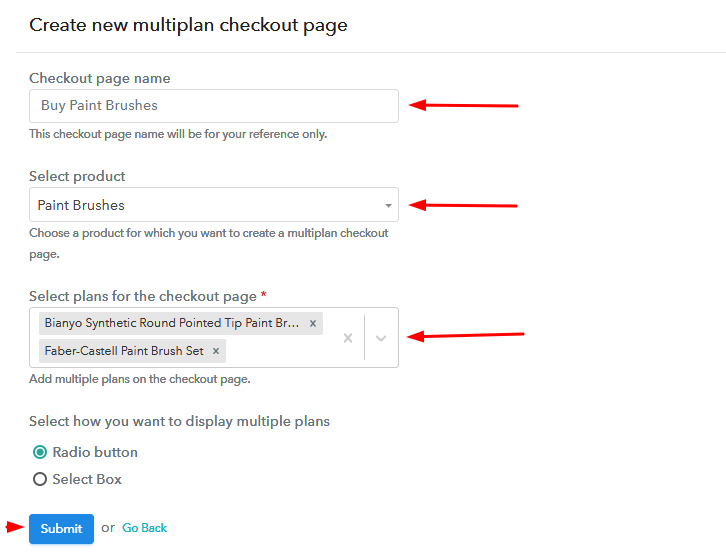
(b) Add Plans to Sell Multiple Paint Brushes from Single Checkout Page

Add Plans to Sell Multiple Paint Brushes from Single Checkout Page

(c) Take a Look at the Checkout Page
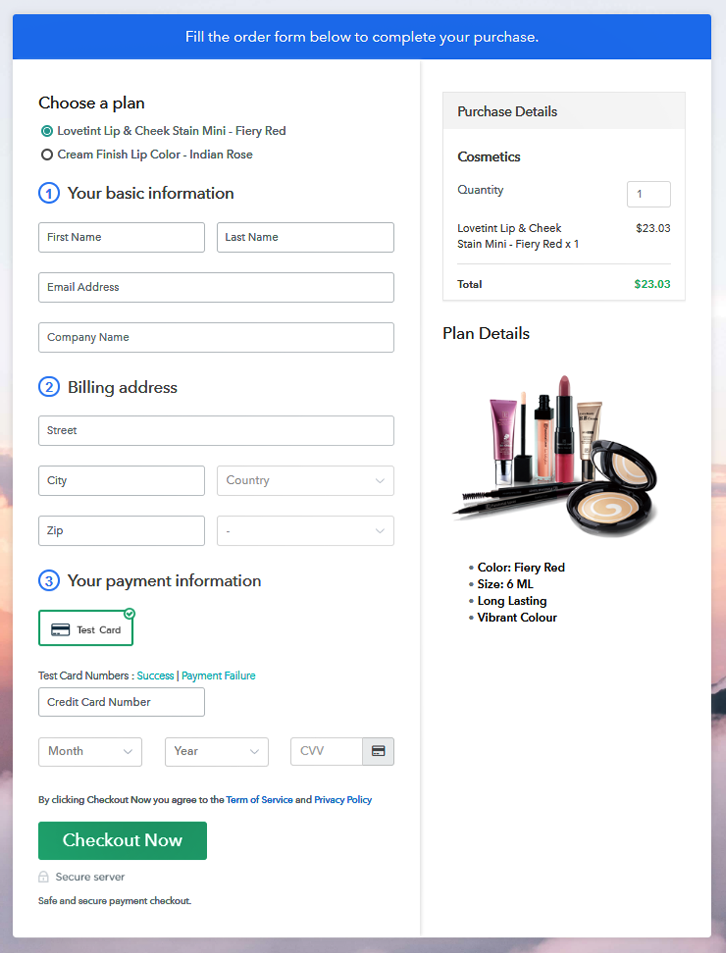
Multiplan Checkout Page to Sell Paint Brushes Online

Preview Checkout Page

Wrapping Up

This was the process of ‘how to sell paint brushes online using checkout pages’. Paint brushes are being used from centuries and it is not going out of trend any time soon. So, start your own paint brushes selling business online using Pabbly Subscription Billing software. Moreover, if have any suggestion or query, ping us in the comment section below. We will get back to you ASAP. Thank you!!

You May Also Like To Read –
How to Sell Barrels Online | Step by Step (Free Method)

Ideal For: All barrel manufacturers, MSME, home enterprises, wood workers, wineyards and other merchants can use this method to sell barrels online

How to Sell Barrels Online

Why Choose this Method To Sell Barrels Online?

Unlike any other solution, this method allows you to:

  • List and sell your barrels for FREE. Absolutely no payment required.
  • No need to pay commission on any of your sale.
  • Multiple payment options like PayPal, Credit Card, etc to collect payment from a single place.
  • Sell one time or recurring subscriptions of your barrels.
  • Collect payments & sell products in any currency as per your requirement.
  • Give discounts on your products by offering special coupon codes.
  • Add sales commission agents to help you in selling barrels online.

Get Pabbly Subscription Billing for Free

The ancient Egyptians in 2600 BCE were the first to use barrels for fermenting grapes. And nowadays the barrels are in very high demand as they can be used to distill spirits like premium whiskey, rum, tabasco sauce, etc. Also, many states in America have jurisdiction that only barrel-fermented wines will be allowed to sell for retail. That is why many barrel manufacturers are keen to sell barrels online to serve these demands.

In this article, I am introducing an awesome software called Pabbly Subscription Billing that lets you create awesome checkout pages to sell barrels online. The advantages of using this method are

  • Unlimited Product Listing
  • Generate Unlimited Revenues
  • Insert Customized Logos
  • Transparent Billing
  • Multiple Billing Models
  • Revenue Tracking

So why wait, let us build an awesome checkout page to sell barrels online.

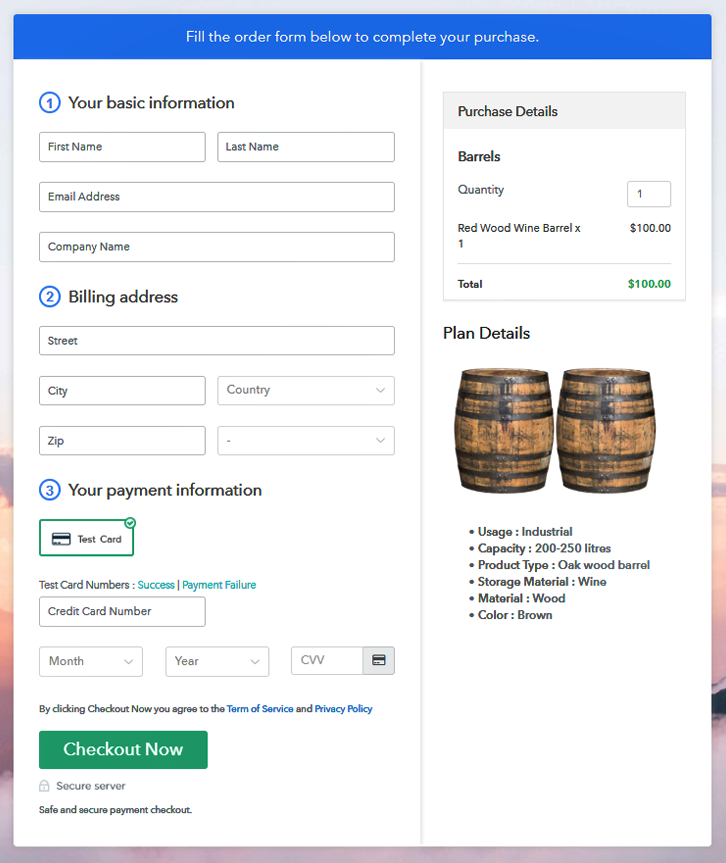
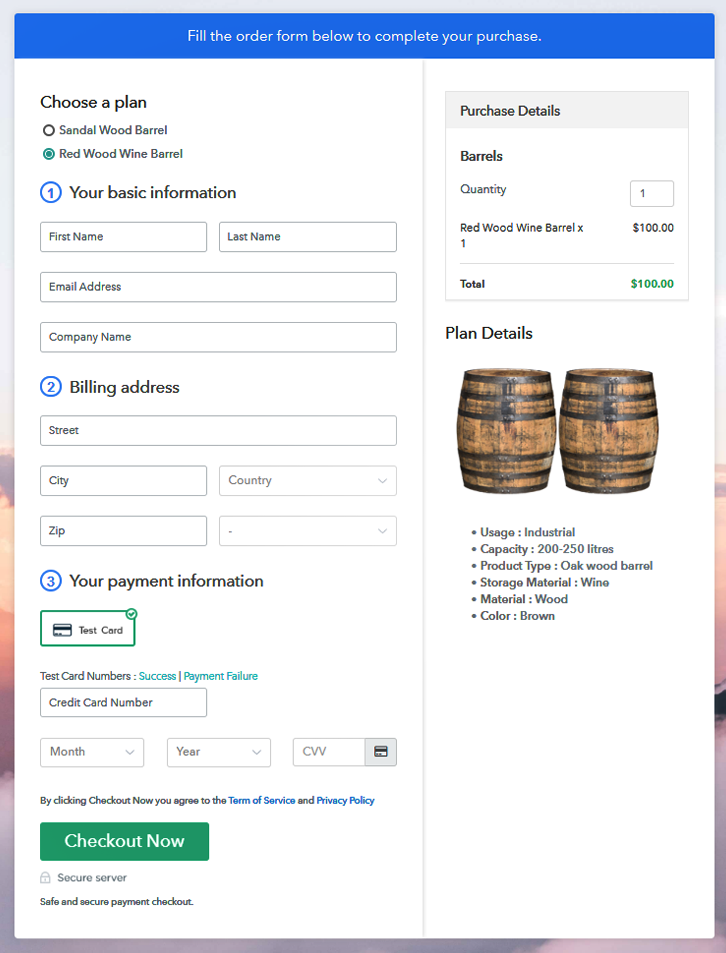
Final View of Checkout Page For Your Barrel Selling Business

Checkout to Sell Barrels Online

Preview Checkout Page

Step 1: Log in to Pabbly Subscription Billing

Signup

Locate in  Google for Pabbly Subscription Billing and when landing on website click on the button “Sign up Free“. Here simply sign in through your, Gmail account or you can fill in the blanks like name, email address and then press the “Sign Up” button.

Sign Up For Free!

Step 2: Select Subscription Billing

Access Subscription Billing

Step 3: Account Setup

Setup Account

A dialog box will be generated and you will fill in the details like company name, currency, phone number, etc. Now after filing in the information press the blue “Continue” button to complete the process.

Step 4: Connect Payment Gateways & Start Barrels Selling Bussiness Online

Connect Payment Gateway

Obviously, customers must enjoy an awesome payment experience. So to remove the glitches beforehand Pabbly Subscription Billing provides a dummy payment gateway. Here, you can beta test the entire payment experience of the customer. Just click on the “Enable Test Payment” option to start testing out this functionality

Now with Pabbly Subscription Billing, you can integrate many payment gateways PayPal, Authorize.net, Stripe, etc. Beneath this paragraph, there are integration guides to embed the payment gateway of your choice. So, I am going to enable the test payment option to continue the process.

Step 5: Add Product For Your Barrel

Add Product

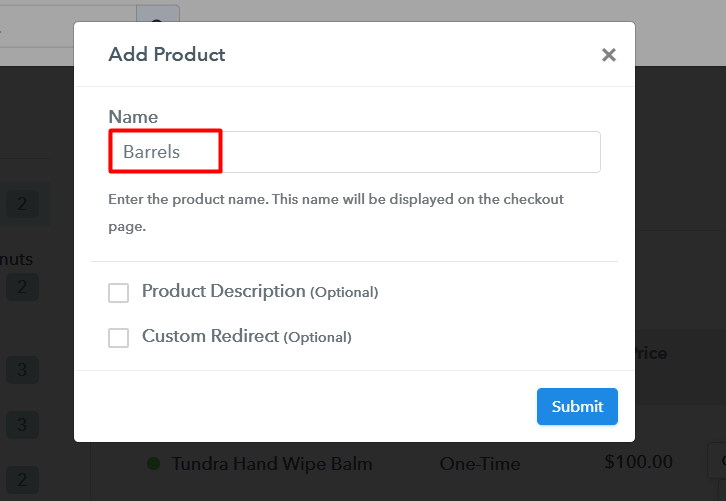
Since payment gateway integration went well, then let’s add the product. Below the “Enable Payments” section there is the “Add your product” section click it. This will summon a dialog box with a blue button “Add New Product”. Click on it.

You have to add the required product title, in this case, it is ‘barrels’

Add Products to Sell Barrels Online

Fill up the details and your product is created.

Note: Here you can add all the products related to the similar category by creating plans for each of them.

Step 6: Add Plans 

Let’s rollout plans for different kinds of barrels available in your store.

(a) Select Add New Plan

Add Plan

(b) Specify the Plan & Pricing Details

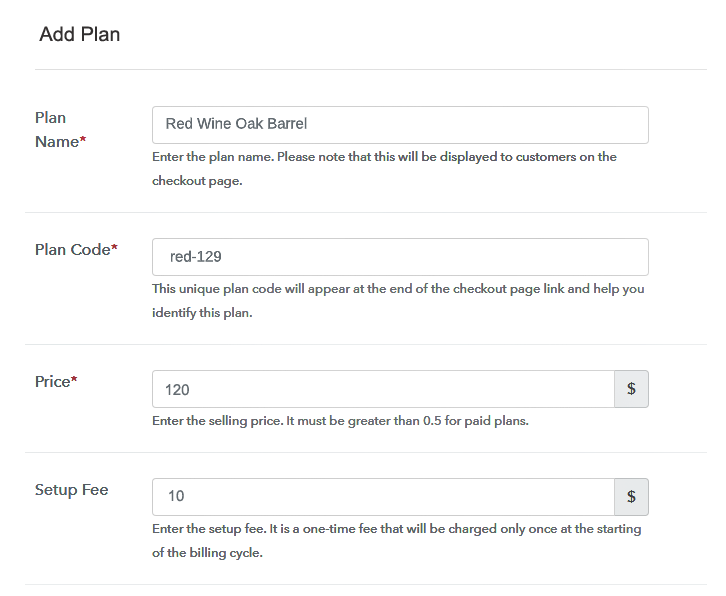
Add Plan to Sell Barrels Online

Here, in the plan page, you will fill in details like plan name, code, price, setup fees, etc. Scrolling down you will find different billing models like one-time payment, recurring, based on cycles, etc. Select your preferred billing model that suits your needs and yes you can change it anytime

(c) Add Image & Description of Barrel

Add Description to Sell Barrels Online

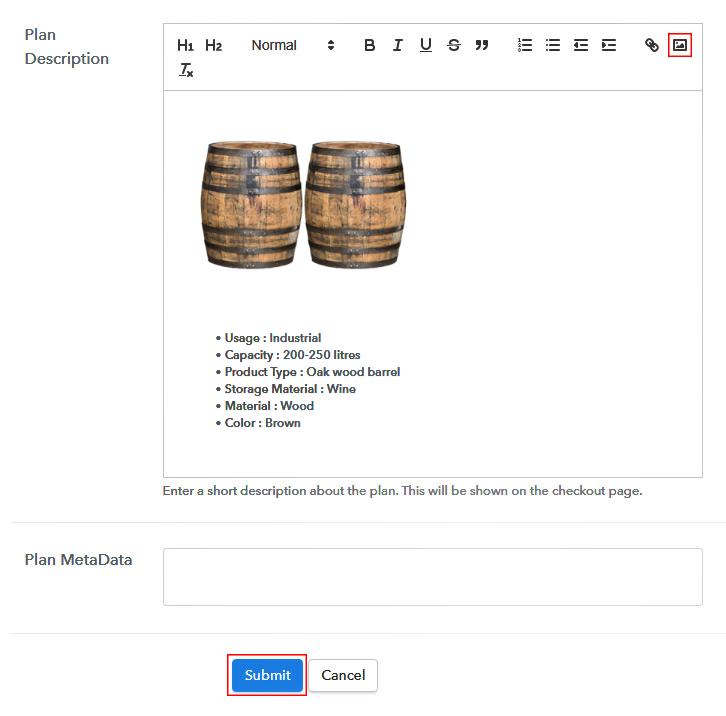
Now, take some snapshots of your barrels and insert it using the upload image button.

So, after uploading the image provide some useful information of your barrels like materials used, volume, pints, expiry, etc in bullet points or numerical points. Then press the “Submit” button.

Moreover, using the same process, you can list more products

Step 7: Share your Checkout Page

Share Checkout Page on Social Media

  • Furthermore, you can share the checkout page of the barrel on social media accounts like Facebook & Twitter to get the customer’s attention.
  • Moreover, you can share the direct link of the barrel checkout page with your customers via SMS or email marketing.
  • Also, embed the provided plan link of the barrel in the buttons or any anchor text on your website.

Step 8: Preview Checkout Page

Follow up the recommended steps to preview the checkout page:

(a) Click on the View Button

View Checkout Plan

(b) Take a Look at the Checkout Page

Checkout Preview to Sell Barrels Online

Step 9: Embed Checkout Page in Site & Sell Barrel Online

Embed Checkout Page on Website

Just copy the link and add the checkout page to sell barrels online at any preferable place on your WordPress site.

(a) Edit the Page & Paste the Copied Link

Paste_Link_in_Text_Editor

Further, paste the plan link on a text editor of the WordPress dashboard.

(b) Save & Publish the Checkout Page

Save_and_Publish

Next, click the “Publish” button, after making changes.

(c) Check out the Final Look of your Checkout Page on WordPress Site

Wordpress to Sell Barrels Online

Step 10: Multiplan Checkout Page

Note: In case you want to sell multiple products via a single checkout page, you can create a multi-plan checkout page otherwise skip this step.

(a) Click on Add Mutiplan Checkout

Multiplan Checkout

(b) Add Plans to Sell Multiple Barrels from Single Checkout Page

Multiplan to Sell Barrels Online

(c) Take a Look at the Checkout Page

Checkout to Sell Barrels Online

Preview Checkout Page

Wrapping Up

Excellent, you have learned the method to sell barrel online through Pabbly Subscription Billing. This is perhaps the best, simplest and cheapest method to start barrel business online. Obviously, since you are new, you may encounter some problems. But slowly but surely you will really learn to tame this software incredible features for your own merit.

Moreover, if you have any doubts then write your queries in the comment section below. You guys are awesome!! Thank You

You May Also Like To Read –
How to Sell Ascorbic Acid Online | Step by Step (Free Method)

How to Sell Ascorbic Acid Online

Ideal For: All the ascorbic acid sellers, ascorbic acid makers, retail ascorbic acid selling business owners, and other ascorbic acid selling merchants can use this method to take their ascorbic acid selling business online.

How to Sell Ascorbic Acid Online

Why Choose this Method for Selling Over any Other Solution?

Unlike any other solution, this method allows you to:

  • List and sell your ascorbic acid for FREE. Absolutely no payment required.
  • No commission on sales.
  • Collect payment through multiple payment modes from a single checkout page.
  • Sell one time or recurring subscriptions of your ascorbic acid.
  • Sell and collect payment in any currency as per your requirement.
  • Give discounts on your products by offering special coupon codes.
  • Add sales commission agents to help you in selling ascorbic acid online.

Get Pabbly Subscription Billing for Free

Ascorbic acid (Vitamin C) is used to treat the low level of vitamin C in people who can not costume its proper amount from their regular diet. It has a great market as the culture of a healthy diet is diminishing. And you must be finding a way to sell ascorbic acid online.

Why would you like to sell ascorbic acid online?

There has been 5.1% CAGR (Compound Annual Groth Rate) of the ascorbic acid business in the year report of 2020-2025. Well, I guess this is enough reason to pursue in ascorbic acid business online.

In this blog, we’ve discussed the best possible way to start ascorbic acid business online in minutes. During the procedure explained further here, We’ll be creating checkout pages to showcase as well as collect payments through them. You can use these checkout pages on almost every global platform available. Also, you can share these plan pages on social media platforms, in SMS, Emails and can even embed them on websites.

There are many other benefits of using this service for selling ascorbic acid online.

  • You’ll get a dashboard to manage all the ascorbic acid items in stock
  • Accept online/offline payments
  • Apply global taxes
  • Automatic billing & invoicing
  • You can offer coupons and discounts
  • And much more…

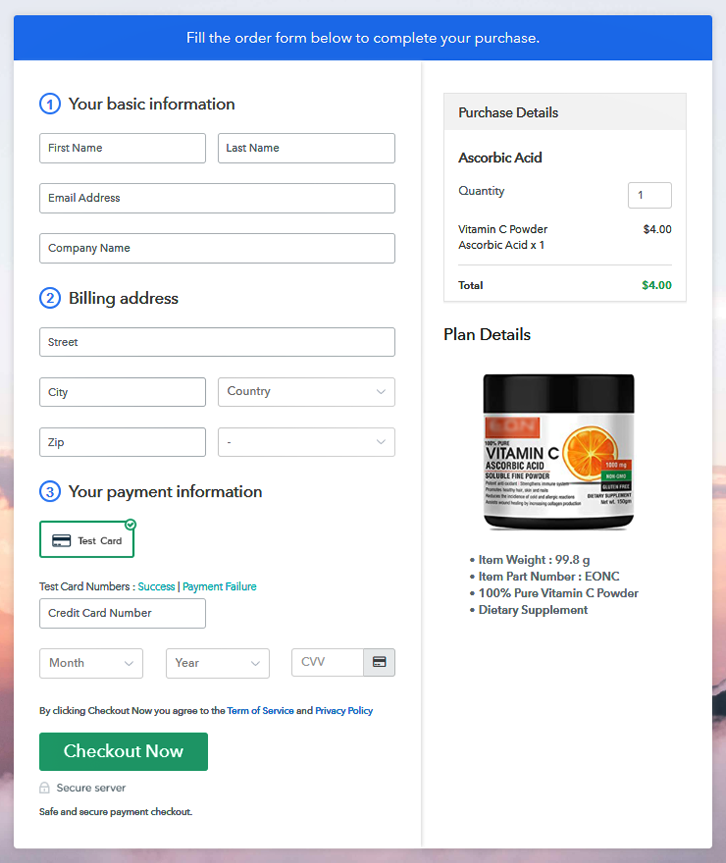
This is How your Checkout Page will Look Like After Creation

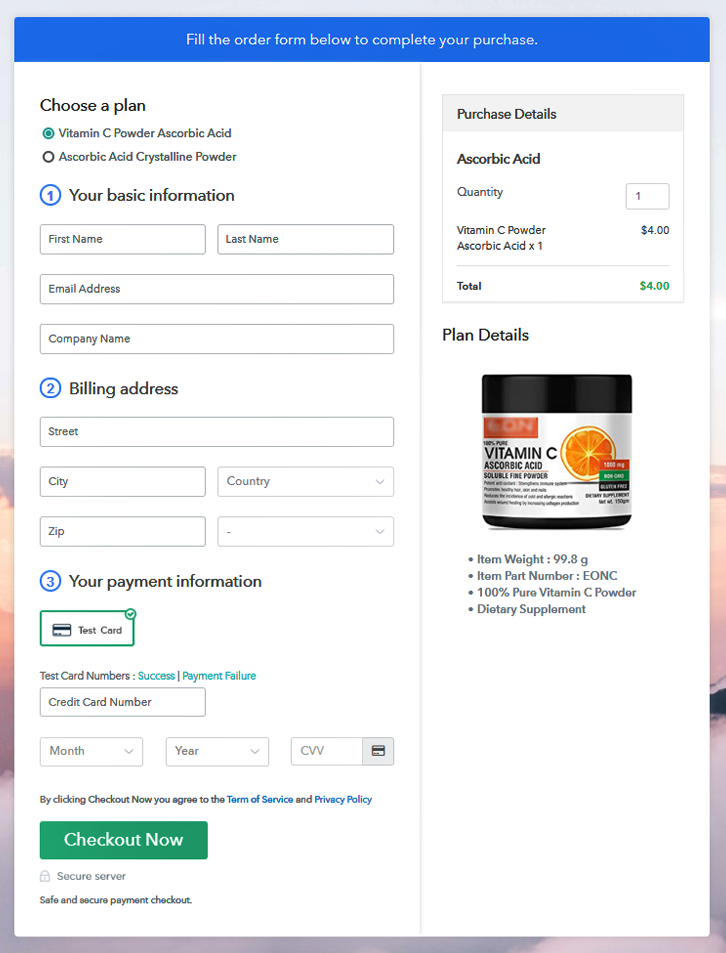
Checkout Page Preview to Sell Ascorbic Acid Online

Preview Checkout Page

Step 1: Login to Pabbly Subscription Billing

Signup
To start selling ascorbic acid online first go to Pabbly Subscription Billing official website. And then find and click on the button named “Sign Up Free”. On the sign-up page either manually fill the form or sign-up with Google.

Sign Up For Free!

Step 2: Select Subscription Billing

Access Subscription Billing

Step 3: Account Setup

Setup Account

A pop-up window will show up asking for three information i.e, company’s name, currency & phone number followed by service choices. Instantly, fill out the information asked.

Step 4: Connect Payment Gateway to Sell Ascorbic Acid Online

Connect Payment Gateway

In this step, we’ll integrate a payment gateway to accept payments to sell ascorbic acid online. To implement this, multiple options are available along with the integration guides. I’m enabling the test payment gateway to go forward in the procedure for now.

Step 5: Add Your Product

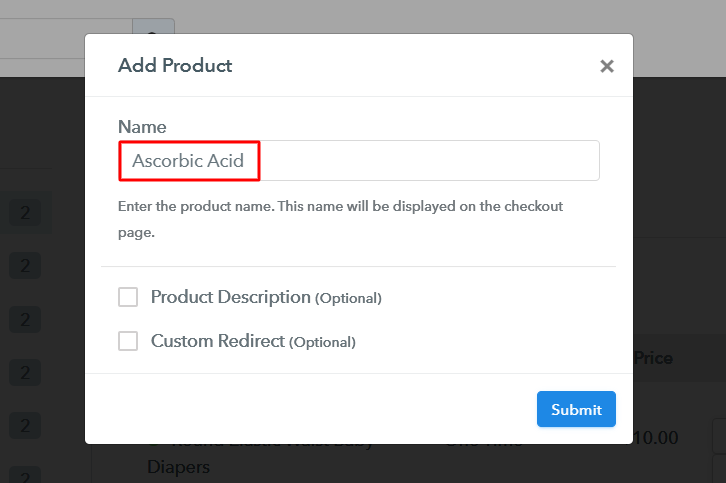
Add Product

Further, you can create a product and you can name it as a category of ascorbic acid. For instance sodium ascorbate; calcium ascorbate etc.

Add Product to Sell Ascorbic Acid Online

Strike the ‘Submit’ bottom once you are done & your product got created.

Note: Here you can add all the products related to the similar category by creating plans for each of them.

Step 6: Add Plans

Let’s create the plans for all the different types of ascorbic acid items available in your store.

(a) Select Add New Plan

Add Plan

(b) Specify the Plan & Pricing Details

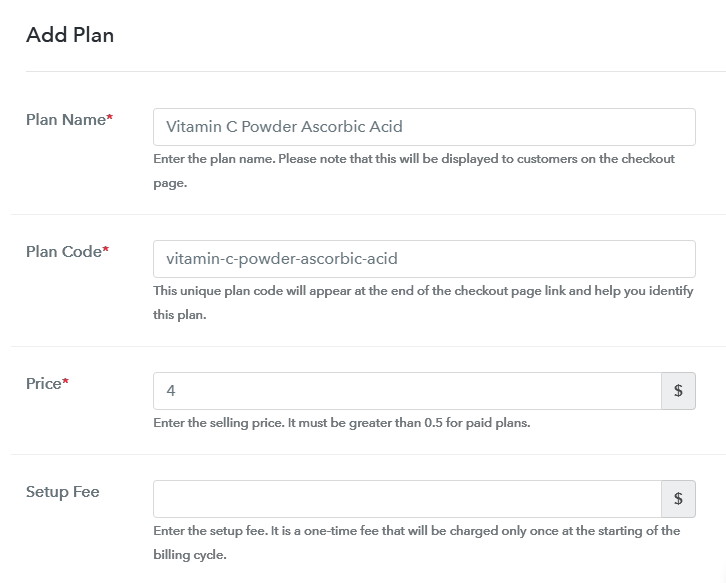
Add Plan to Sell Ascorbic Acid Online

In the plan details page, you can mention plan name, code, pricing, billing cycle etc to show in the checkout page to sell ascorbic acid online.

(c) Add Image & Description

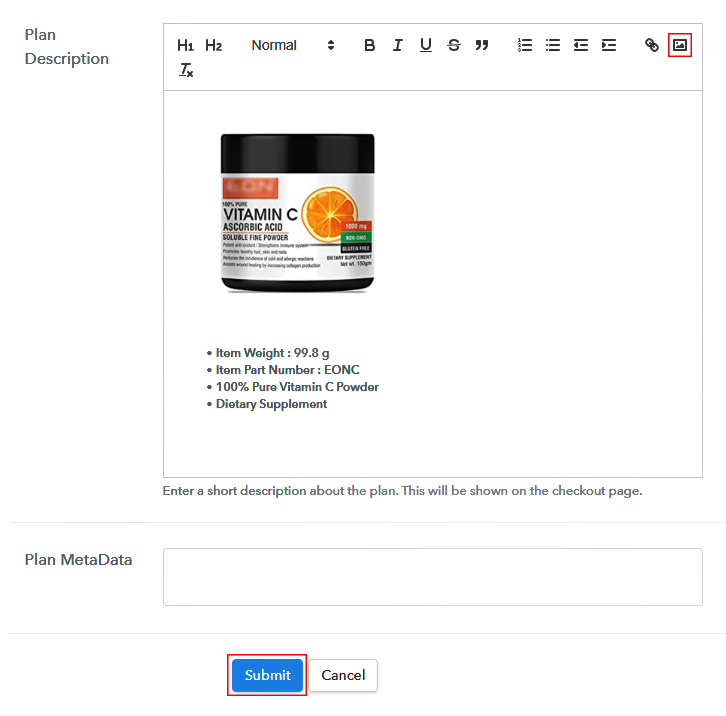
Add Image & Description to Sell Ascorbic Acid Online

Also, you can put an image and write a description with formatting.

On clicking the submit button your plan will be ready to sell online.

Similarly, you can add other items of your stock for selling ascorbic acid online.

Step 7: Share your Checkout Page

Share Checkout Page on Social Media

  • Directly share the plan link on Facebook & Twitter.
  • And you can also share the plan link with your customers on emails & SMS.
  • Moreover, you can redirect any button or text on the checkout page by linking it to the plan link.

Step 8: Preview Checkout Page

Follow these steps to preview a checkout page:

(a) Click on the View Button

View Checkout Plan

(b) Take a Look at the Checkout Page

Checkout Page Preview to Sell Ascorbic Acid Online

Step 9: Embed Checkout Page in Site & Sell Ascorbic Acid Online

Embed Checkout Page on Website

Simply copy the provided plan embedding link to add the checkout page at any preferrable place on your WordPress site.

(a) Edit the Page & Paste the Copied Link

Paste_Link_in_Text_Editor

Once the link is copied paste it in the text area of the editor.

(b) Save & Publish the Checkout Page

Save_and_Publish

After pasting the code simply hit the ‘Publish’ button. Your Checkout page is embedded.

(c) Check out the Final Look of your Checkout Page on WordPress Site

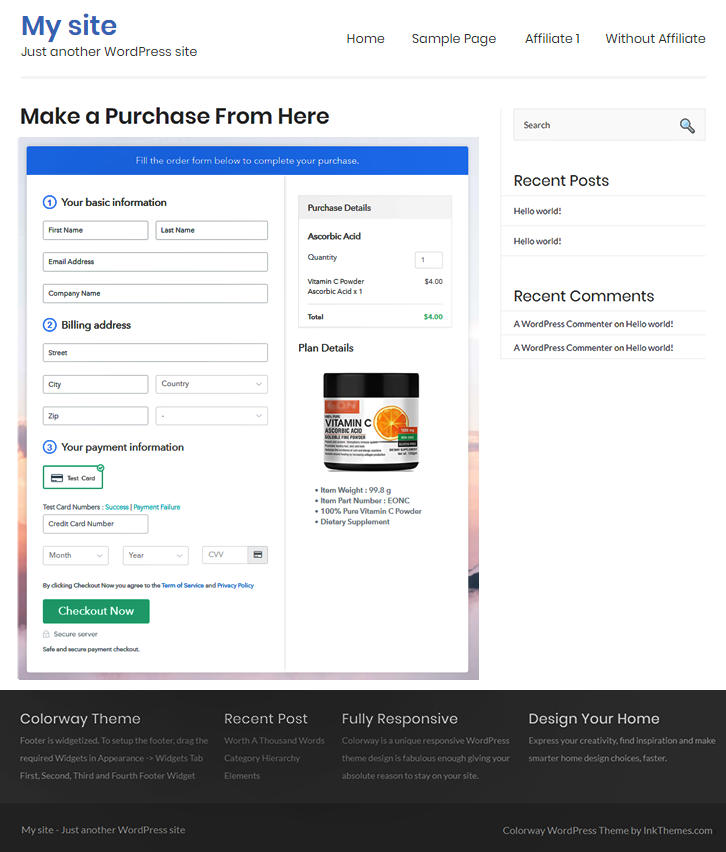
Checkout Page On Site to Sell Ascorbic Acid Online

Step 10: Multiplan Checkout Page

Note: In case you want to sell multiple products via a single checkout page, you create a multi-plan checkout page otherwise skip this step.

(a) Click on Add Mutiplan Checkout

Multiplan_Checkout

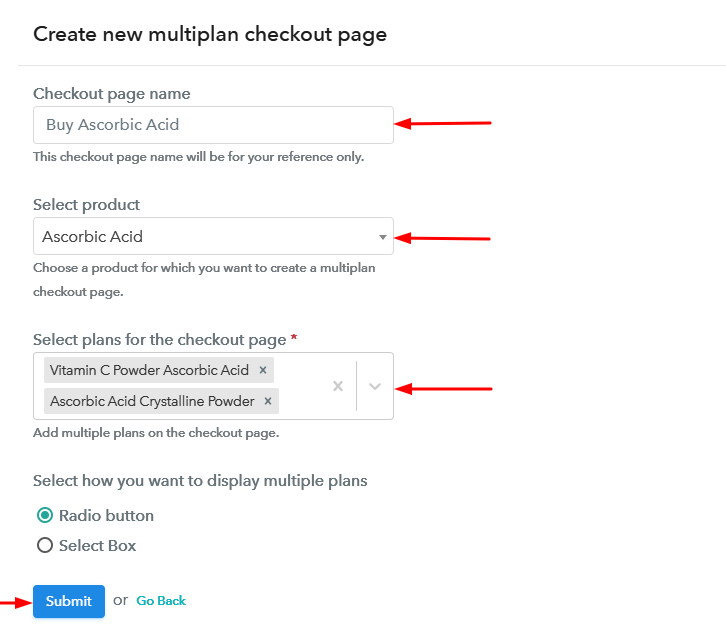
(b) Add Plans to Sell Multiple Ascorbic Acid from Single Checkout Page

Create Multiplan Checkout to Sell Ascorbic Acid Online

(c) Take a Look at the Checkout Page:

Multiplan Checkout Page to Sell Ascorbic Acid Online

Preview Checkout Page

Wrapping Up

This was my catch on how to sell ascorbic acid online? Most importantly, this procedure of creating checkout pages gives ease to management for selling ascorbic acid online.

These checkout pages are much like online receipts from where the customers can buy goods. Besides, you can accept any currency and can use multiple reliable payment gateways.

Hope this serves your need & Good Luck!

You May Also Like To Read

How to Sell Artificial Plants Online | Step by Step (Free Method)

How to Sell Artificial Plants Online

Ideal For: All the artificial plant sellers, artificial plant traders, retail artificial plant selling business owners, and other artificial plant merchants can use this method to sell artificial plants online.

How to Sell Artificial Plants Online

Why Choose this Method for Selling Over any Other Solution?

Unlike any other solution, this method allows you to:

  • List and sell your artificial plants for FREE. Absolutely no payment required.
  • No commission on sales.
  • Collect payment through multiple payment modes from a single checkout page.
  • Sell one time or recurring subscriptions of your artificial plants.
  • Sell and collect payment in any currency as per your requirement.
  • Give discounts on your products by offering special coupon codes.
  • Add sales commission agents to help you in selling artificial plants online.

Get Pabbly Subscription Billing for Free

Artificial plants are mostly used for decoration purposes as they provide a natural touch. They are a perfect fit for indoor and outdoor plants as they don’t require water to survive. Thus, you might be looking for some smarter ways to start your artificial plants business online.

Why would you like to sell artificial plants online?

Well, there could be a lot of reasons possible for selling artificial plants online. As, one of the reason could be to increase your sales by taking your business on a digital platform. Besides, there are plenty of software available online to kick start artificial plants business online.

But, here we would like to recommend you one of the most amazing tool i.e, Pabbly Subscription Billing. As, it helps you to create amazing checkout pages that you can share anywhere as per your business requirements. Not only that, but you can also manage all the details of the items in one place with the help of this software.

Now, let me tell you the 10 simple steps that you need to follow to create single/multi-plan checkout pages with just a few clicks.

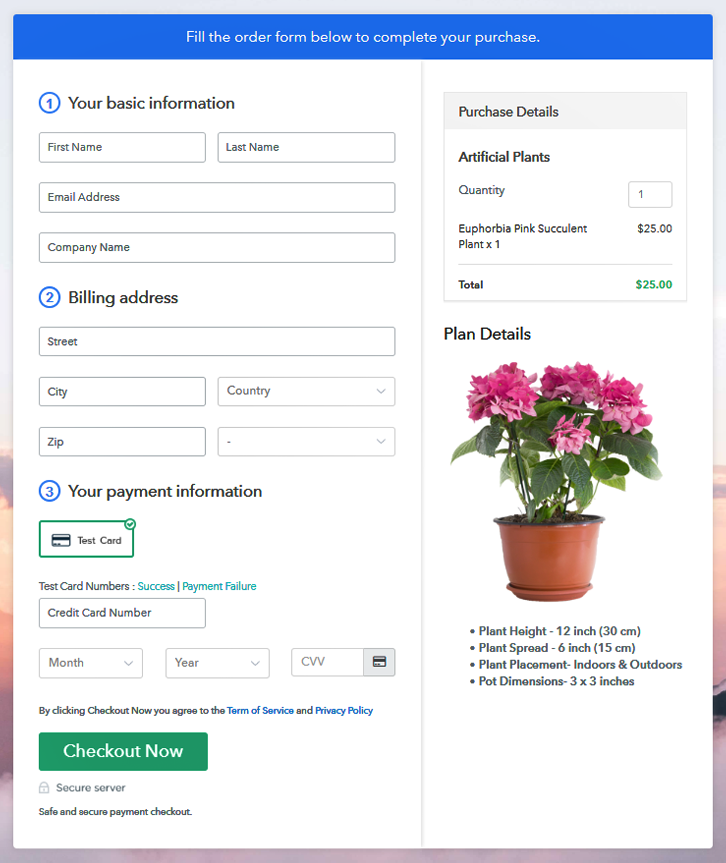
This is How your Checkout Page will Look Like After Creation

Checkout Page to Start Artificial Plants Business Online

Preview Checkout Page

Step 1: Login to Pabbly Subscription Billing

Signup
Go to the website of Pabbly Subscription Billing & look for the button named “Sign Up Free”. Just click on the button that will land you on the sign-in & sign-up page. Either you can directly sign-in via Google or else by entering all the details manually.

Sign Up For Free!

Step 2: Select Subscription Billing

Access Subscription Billing

Step 3: Account Setup

Setup Account

After completing your sign up, now its time to add the company details like name, currency & a phone number. Then, just click on the “Continue” button to proceed forward.

Step 4: Connect Payment Gateway to Sell Artificial Plants Online

Connect Payment Gateway

Another subsequent step is to add the payment gateway. There are multiple options available such as PayPal, Stripe, etc. For instance, here I’m using the text payment method to demonstrate the payment procedure. Moreover, you can also go for any other payment procedure you want to try by using their integration guide given beneath this paragraph.

Step 5: Add Your Product

Add Product

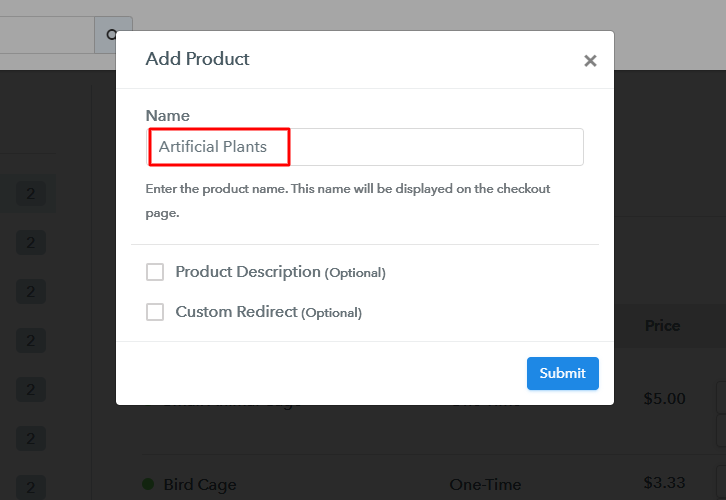
Now, its time to add the product by clicking on the “Add New Product” button to add a category of the artificial plants. As, here I am adding the artificial plants under there product name.

Add Product to Sell Artificial Plants Online

After creating a product based on a category, simply press the “Submit” button on the bottom right corner. Moreover, you can create as many products as you like to.

Note: Here you can add all the products related to the similar category by creating plans for each of them.

Step 6: Add Plans

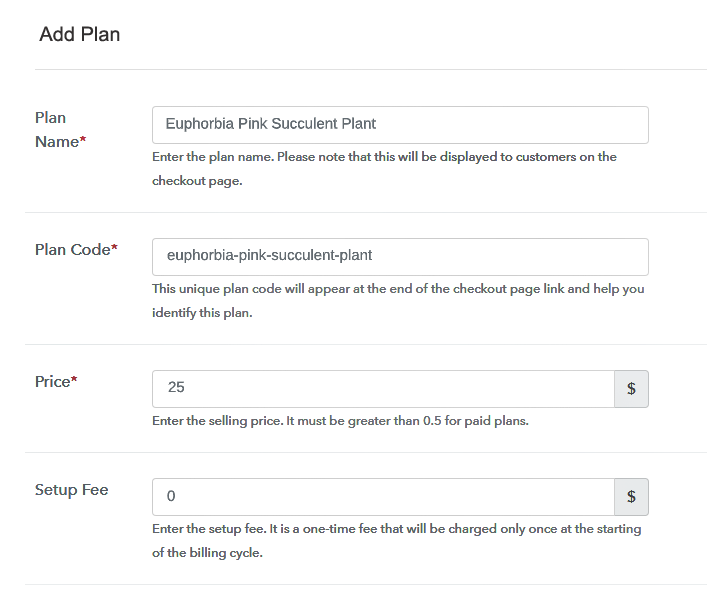
Now, the next step is to add artificial plants in plans. For this, you need to click on the “Add New Plan” button & fill out the details about the artificial plants that you want to sell online.

(a) Select Add New Plan

Add Plan

(b) Specify the Plan & Pricing Details

Add Plan to Sell Artificial Plants Online

After clicking on the “Add a Plan” button. The subsequent step is to fill out the details like plan name, code, price, etc to sell artificial plants online.

(c) Add Image & Description

Add Image & Description to Sell Artificial Plants Online

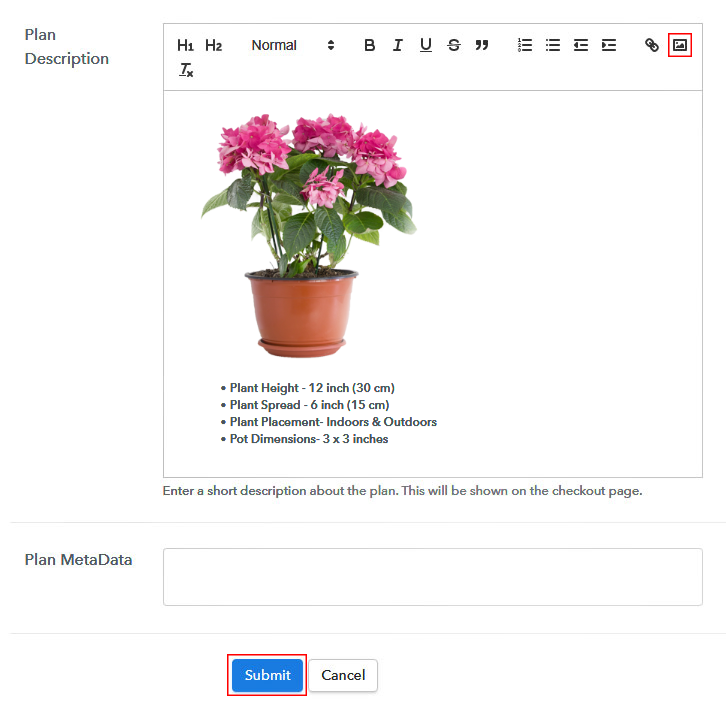
In the same process, now you can add some beautiful images to display on the checkout page.

Besides, there are various text formatting options available to format the text. For example, lists, quotes, links, headings, etc.

Once you are done just strike the “Submit” button and an item will be added for selling artificial plants online.

Moreover, by following these steps, you can add as many plans as you want.

Step 7: Share your Checkout Page

Share Checkout Page on Social Media

Now, you can copy the checkout page URL and share it on social media platforms, SMS, emails, etc. to sell artificial plants online.

Other than that, you can also use this same checkout page URL in your website’s button links & anchor text.

Additionally, with the help of Facebook & Twitter buttons, you can share the created checkout page directly onto these platforms.

Step 8: Preview Checkout Page

Follow these steps to preview a checkout page:

(a) Click on the View Button

View Checkout Plan

(b) Take a Look at the Checkout Page

Checkout Page to Start Artificial Plants Business Online

Step 9: Embed Checkout Page in Site & Sell Artificial Plants Online

Embed Checkout Page on Website

For embedding the created checkout page on WordPress, copy the code given in the “Embed Plan Link” window.

(a) Edit the Page & Paste the Copied Link

Paste_Link_in_Text_Editor

Furthermore, just paste the copied code in the text area of your post/page.

(b) Save & Publish the Checkout Page

Save_and_Publish

Just click on the “Publish” button and your checkout page is embedded.

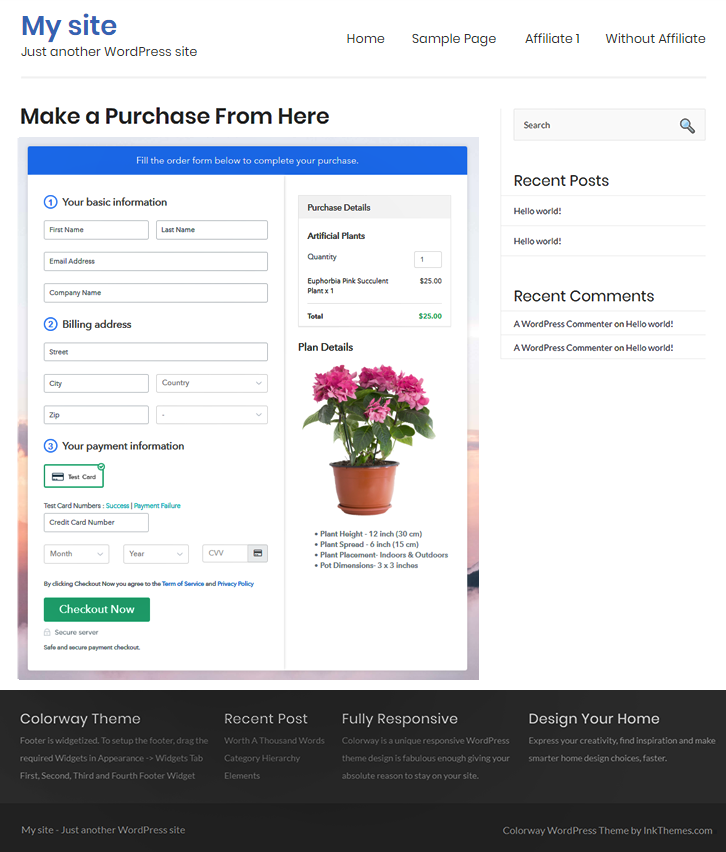
(c) Check out the Final Look of your Checkout Page on WordPress Site

Checkout Page on WordPress Site to Start Artificial Plants Business Online

Step 10: Multiplan Checkout Page

Note: In case you want to sell multiple products via a single checkout page, you can create a multi-plan checkout page otherwise skip this step.

(a) Click on Add Mutiplan Checkout

Multiplan_Checkout

(b) Add Plans to Sell Multiple Artificial Plants Products from Single Checkout Page

Create Multiplan Checkout to Sell Artificial Plants Online

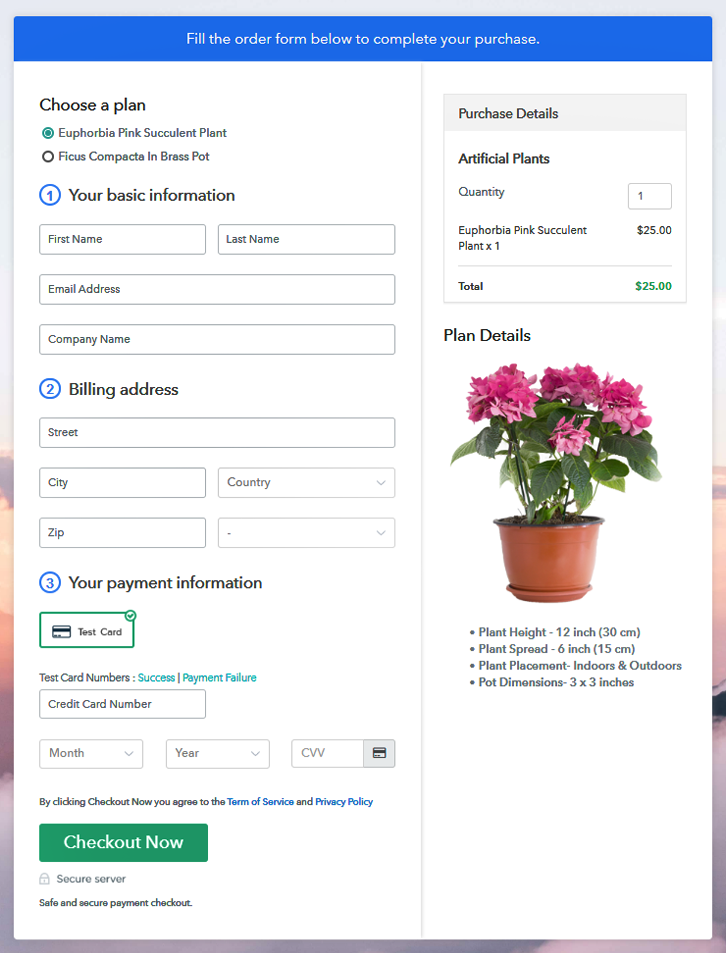
(c) Take a Look at the Checkout Page:

Multiplan Checkout Page to Start Artificial Plants Business Online

Preview Checkout Page

Wrapping Up

So, these were the 10 simplest steps that you need to follow in order to start artificial plants business online. Anyone can use this simple method to take their business only. Furthermore, if you don’t have any website then you can simply sell artificial plants using social media platforms, SMS and emails.

You May Also Like To Read

How to Sell Backpacks Online | Step by Step (Free Method)

How to Sell Backpacks Online

Ideal For: All the backpack selling stores, backpack sellers, backpack manufacturer, backpack traders and other merchants can use this method to take their backpacks selling business online.

How to Sell Backpacks Online

Why Choose this Method for Selling Over any Other Solution?

Unlike any other solution, this method allows you to:

  • List and sell backpacks for FREE. Absolutely no payment required.
  • No commission on sales.
  • Collect payment through multiple payment modes from a single checkout page.
  • Sell one time or recurring subscriptions of backpacks.
  • Sell and collect payment in any currency as per your requirement.
  • Give discounts on your products by offering special coupon codes.
  • Add sales commission agents to help you in selling backpacks.

Get Pabbly Subscription Billing for Free

Backbacks are used widely by students and by the people who travel. That is the reason why they never get out of business. Hence, you might be looking for ways to start your backpacks selling business online to expand your customer reach and earn great profit.

Why would you like to sell backpacks online?

Because as we told you above, that the backpacks business is always in trend and growing day by day. Therefore, it might be very profitable to sell it online to get orders from people globally. Now, here comes a question that which service to choose for the online business. Thus, here we would like to suggest Pabbly Subscription Billing that helps you create checkout pages easily to sell things online. After creating a checkout page, you just need to share their links on social media and your website so that your customers can make purchases directly through them.

Apart from this, Pabbly Subscription Billing also provides numerous great features like:

  • Collect one-time or recurring payments via online or offline modes
  • No transaction fees
  • Generate invoices automatically
  • Create and sell unlimited products, plans
  • Add tax and delivery charges
  • Generate unlimited revenue

This is How your Checkout Page will Look Like After Creation

Preview Checkout Page to Start Backpacks Business Online

Preview Checkout Page

Step 1: Log in to Pabbly Subscription Billing

Signup

In the first step, you have to visit the Pabbly Subscription Billing website and press the “Sign Up Free” button. After clicking the button, you will reach to the signup page, where you can either sign in automatically via Gmail or enter the details manually.

Sign Up For Free!

Step 2: Select Subscription Billing

Access Subscription Billing

Step 3: Account Setup

Setup Account

Once the signup process is completed, now its time to fill out the company details i.e. name, select currency, and contact number in the appeared dialogue box.

Step 4: Connect Payment Gateway to Sell Backpacks Online

Connect Payment Gateway

In this step, the payment collection process is described by enabling the ‘Test Payment’ mode. Moreover, Pabbly Subscription Billing allows you to connect with other payment gateways too such as Stripe, PayPal, etc. Following the previous step, you can connect other payment gateways of your choice by using their integration guide provided below.

Step 5: Add Your Product

Add Product

After the payment mode is enabled, then you have to add your first product. You can add backpacks of different categories in the same product by creating different plans.

Add Product Name to Sell Backpacks Online

You just have to fill up these details and your product is added.

Note: Here you can add all the products related to the similar category by creating plans for each of them.

Step 6: Add Plans

Let’s get started and create plans for different categories of backpacks that you want to sell online.

(a) Select Add New Plan

Add Plan

(b) Specify the Plan and Pricing Details

Add Details to Sell Bags Online

On clicking “Add New Plan”, you will be redirected to the plan page.  Where you need to fill out the plan details like name, code, billing cycle, price, etc.

(c) Add Image & Description

Add Image to Sell Backpacks Online

Also, add a description of the backpacks that you want to sell along with the product links, images, etc.

After that, just click on the “Submit” button in order to add the backpacks on the checkout page.

Finally, add the multiple plans and types of backpacks in your product list that you wish to sell online. Likewise, you can create more plans for all the backpacks in a similar manner.

Step 7: Share Your Checkout Page

Share Checkout Page on Social Media

  • Share your checkout page on social media like Facebook and Twitter using their respective buttons.
  • You can also copy the mentioned link and send it to your customers through SMS or emails directly.
  • Besides that, you can also embed your plan link to your website so that your customers can be directed on the checkout page in one click.

Step 8: Preview Checkout Page

Follow these mentioned steps to view checkout page

(a) Click on the View Button

View Checkout Plan

(b) Take a Look at the Checkout Page

Preview Checkout Page to Start Backpacks Business Online

Step 9: Embed Checkout Page in Site & Sell Backpacks Online

Embed Checkout Page on Website

Just copy the provided plan link and embed the checkout page to your WordPress site.

(a) Edit the Page & Paste the Copied Link

Paste Link in Text Editor

Copy and paste the link in the text area of the editor.

(b) Save & Publish the Checkout Page

Save and Publish

After the code is pasted, click on the “Publish” button to embed your checkout page.

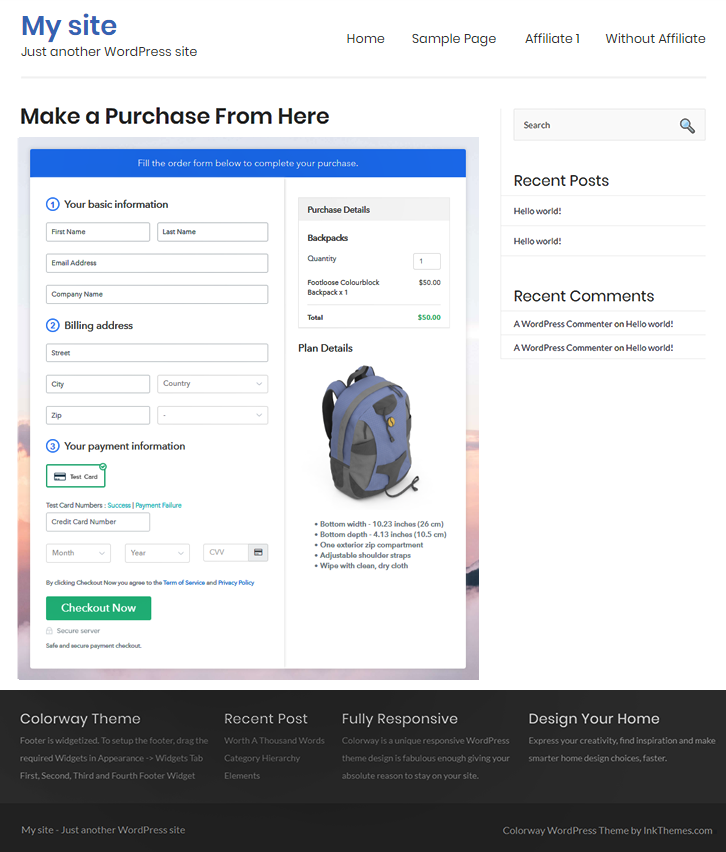
(c) Check Out the Final Look of your Checkout Page on WordPress Site

Embed Checkout to Start Backpacks Business Online

Step 10: Multiplan Checkout Page

Note: In case you want to sell multiple products through a single checkout page, you can create a multi-plan checkout plan, otherwise skip this step.

(a) Click on Add Multiplan Checkout

Multiplan Checkout

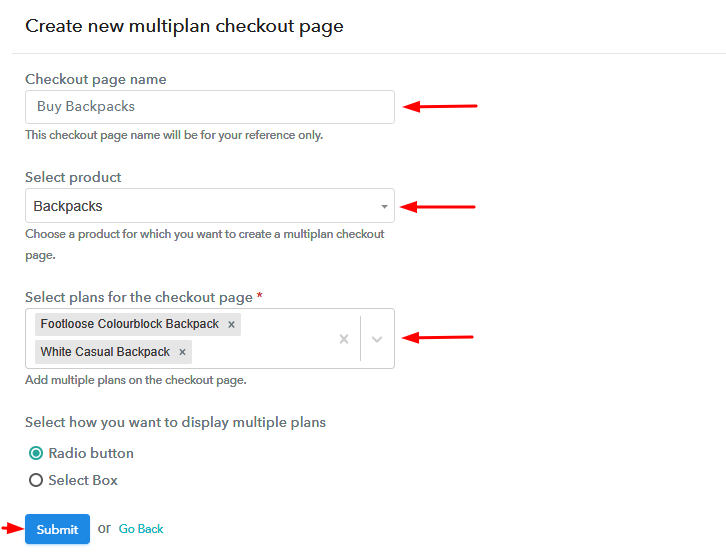
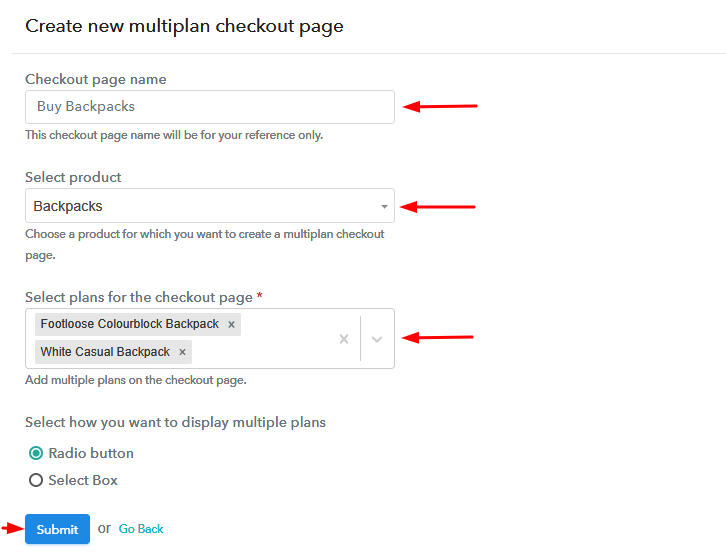
(b) Add Plans to Sell Multiple Backpacks from Single Checkout Page

Multiplan Details to Sell Backpacks Online

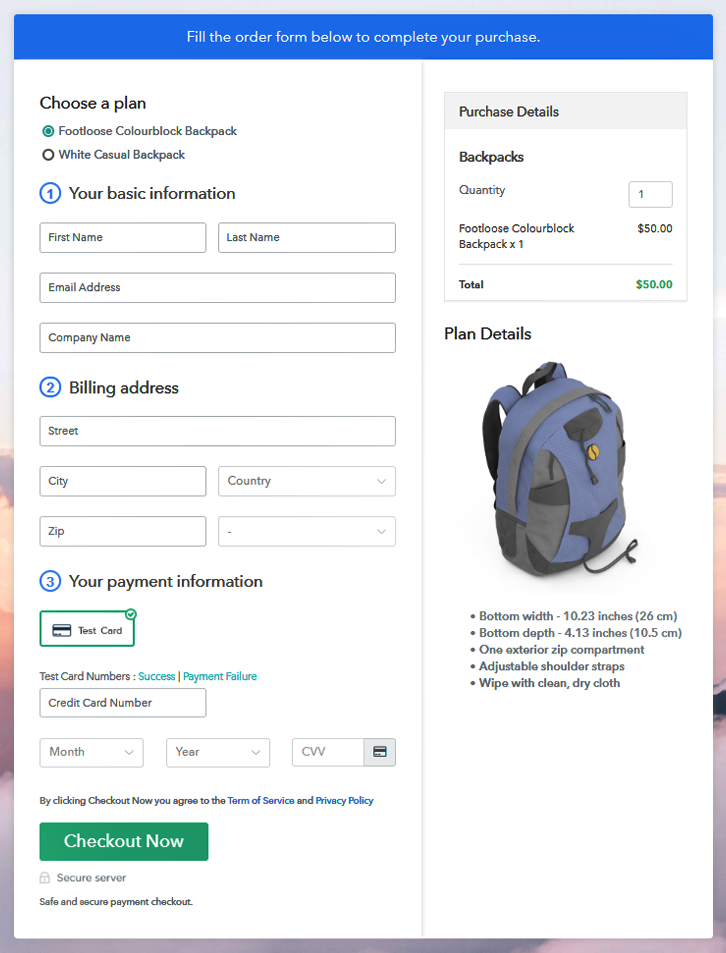
(c) Take a Look at the Checkout Page

Multiplan Checkout to Start Backpacks Business Online

Preview Checkout Page

Wrapping Up

We hope this blog was helpful for you in starting your backpacks selling business online. Pabbly Subscription Billing is one of the service to start an online business as it is cost-free and easy to use. Moreover, it offers several amazing features like invoicing, payment collection, checkout pages, and so much more. So, what are you waiting for? Go ahead and start building up your online business for free with Pabbly Subscription Billing. And if you have any queries or suggestions, do write to us in the comment section below. We will revert back soon.

You May Also Like To Read –
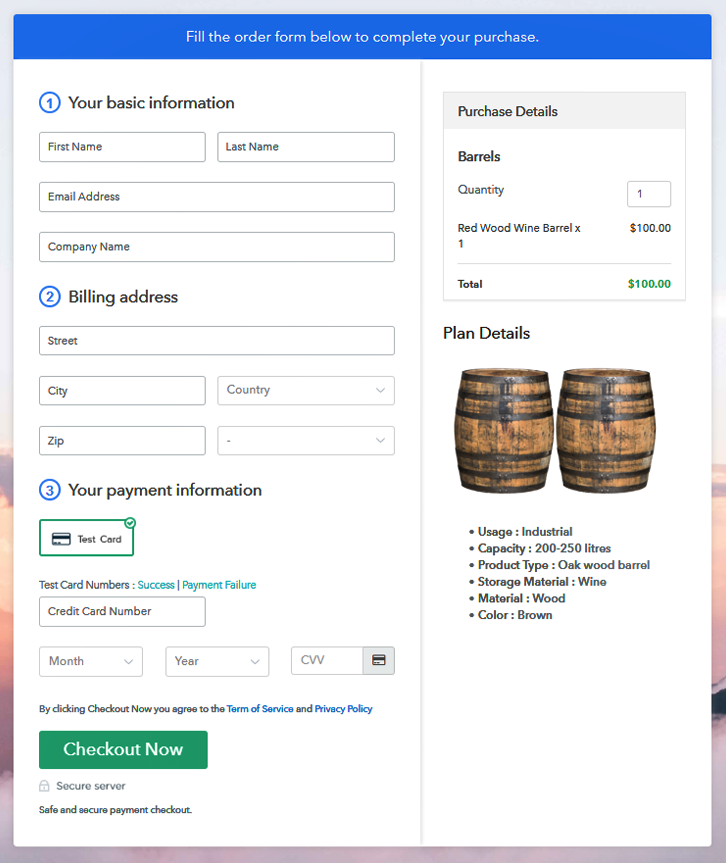
How to Sell Balms Online | Step by Step (Free Method)

Ideal For: All the ayurveda stores, cosmetic shops, medical stores, cottage industries, MSMEs, balm manufaturers, pharmaceuticals and other merchants can use this method to sell balms online.

How to Sell Balms Online

Why Choose this Method for Selling Over any Other Solution?

Unlike any other solution, this method allows you to:

  • List and sell the balms for FREE. Absolutely no payment required.
  • No commission deducted on sales.
  • Collect payment through multiple payment modes from a single checkout page.
  • Sell one time or recurring subscriptions of your balms.
  • Sell and collect payment in any currency as per your requirement.
  • Give discounts on your products by offering special coupon codes.
  • Add sales commission agents to help you in selling your balms.

Get Pabbly Subscription Billing for Free

‘Balm’ is a generic term used for topical medications for lips, skin, forehead to get relief from pain, rashes, dryness, acne, spores, etc. These ointments were used as early as 3500 BCE in Indian, Chinese, and Mediterranean civilizations. Now in the 21st century with the advent of the internet, many manufacturers are increasingly selling balms online to get better demands.

Why would you like to sell balms online?

When you start selling balms online, your products will be discovered by customers from around the world. This, in turn, ensures competitive pricing between customers thus building up higher profits for you. Besides you can save plenty, in rent & utilities, licensing fees, middleman commission, and more.

Now there are many tools available to sell balms online, but here I am going to recommend awesome software i.e. Pabbly Subscription Billing. This software allows you to build inventories of unlimited products and sell them in both offline/online modes using its awesome checkout pages. More benefits are listed below:

  • Unlimited Revenues
  • Custom Domains
  • Create Unlimited Plans, Coupons & Discounts
  • Auto Email Alerts on Transaction Failure/ Completion
  • Import/ Export Customer Data
  • Automatic Reattempts on Card Declines
  • Revenue Analytics
  • Tax Management

With the features mentioned above, you will have an upper hand over your competitors. So why wait, let us create an awesome checkout page to start your balm business online.

Note: Pabbly Subscription Billing doesn’t encourage selling unlicensed balms or any other medicinal products, unapproved by FDA or equivalent regulatory agencies.

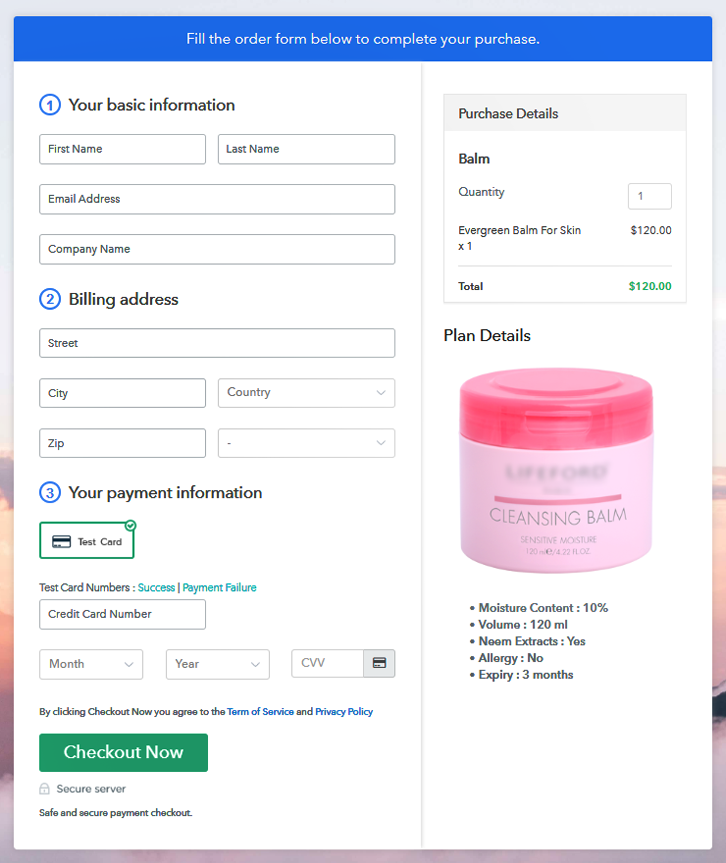
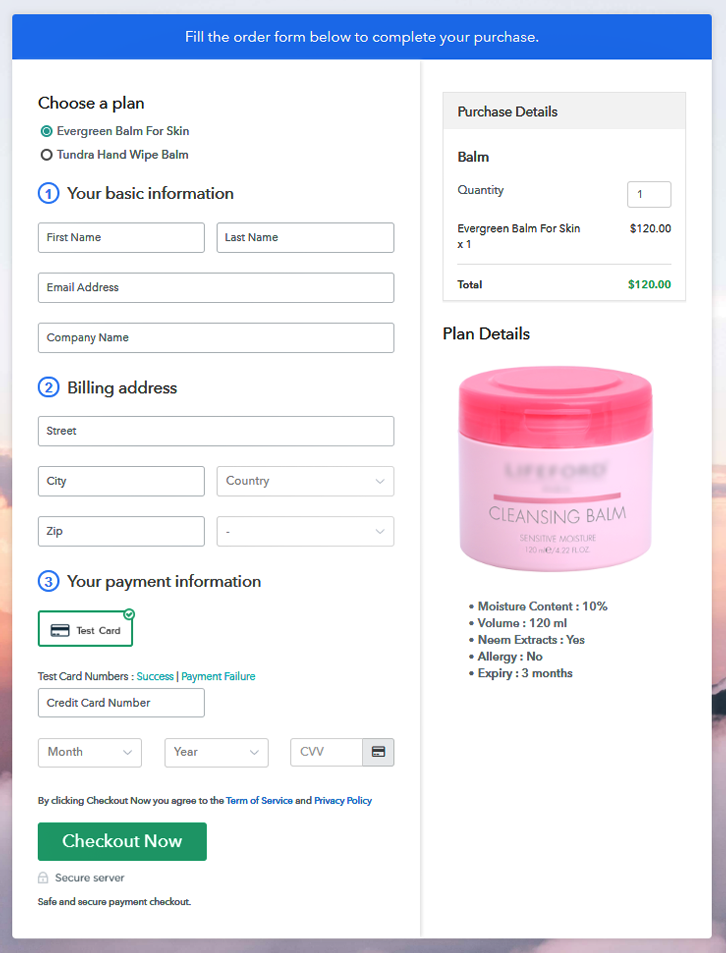
This is How your Checkout Page will Look Like After Creation

Checkout to Sell Balms Online

Preview Checkout Page

Step 1: Log in to Pabbly Subscription Billing

Signup

Browse for  Pabbly Subscription Billing  in your search engines and on reaching their website click on “Sign up Free“. Either sign in using your Gmail account or fill in the required fields like name, email, etc and then click the “Sign Up” button.

Sign Up For Free!

Step 2: Select Subscription Billing

Access Subscription Billing

So you will enter the dashboard and now click on the “Access Now” button on the Subscription Billing option.

Step 3: Account Setup

Setup Account

This will generate a dialogue box that will require you to fill the company details like name, currency, and phone number. Now, you have to press the “Continue” button after filling in the details.

Step 4: Connect Payment Gateways To Sell Balms Online

Connect Payment Gateway

Using Pabbly Subscription Billing’s dummy payment gateway, you can stimulate the payment experience of a customer. This makes you confident that all glitches are sorted out and the customer will enjoy a serene payment experience. You can do this by clicking on the “Enable Test Payment” option.

Moreover, with Pabbly Subscription Billing, you can integrate with multiple payment gateways like Stripe, Razorpay, PayPal, Authorize.net, etc. There are manuals available for the integration of payment gateways beneath this paragraph. But since we have to set up the payment process, we will click on the “Enable Test Payment” option.

Step 5: Add Your Product

Add Product

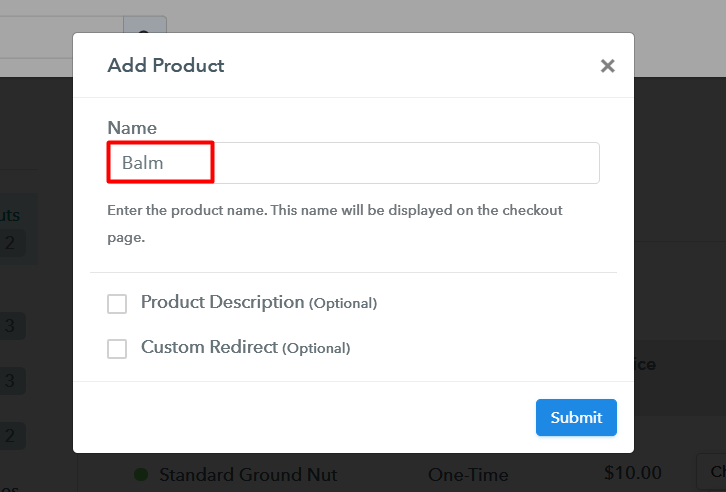
After integrating the payment gateway, we are going to add the products. Below the “Enable Payments,” you will find the section “Add your product” click on it. This will create a dialog box with a blue button “Add New Product”. Click it.

This will generate a pop-up box and you have to add the required product title, in this case, it is the ‘balms’.

Add Product to Sell Balms Online

Fill up the details and your product is created.

Note: Here you can add all the products related to the similar category by creating plans for each of them.

Step 6: Add Plans

Now, we are going to create plans to start a balm business online.

(a) Select Add New Plan

Add Plan

(b) Specify the Plan & Pricing Details

Add Plan to Sell Balms Online

Add details of the product related to prices like plan name, code, price, setup fees, etc. Also, you can choose for different billing models like one-time payment, recurring, based on cycles, etc. Yes, if you are not satisfied with the present billing models then you can change it at any time.

(c) Add Image & Description

Add description to Sell Balms Online

Now, upload some amazing images of your balm.

Moreover, add a description of the balm-like volume, extracts, allergy, etc in preferably bullet points or numerical order for easy understanding then press the “Submit” button.

Furthermore, using the same methods, you can list more products.

Step 7: Share your Checkout Page

Share Checkout Page on Social Media

  • For spreading information about the products you can share the checkout pages on Facebook, Twitter using their respective buttons.
  • Furthermore, you can embed checkout pages in SMS and emails for more product awareness.
  • Moreover, you can build buttons on your website and embed these checkout pages on them. Also, you can place it on any anchor text on your website, so the users will be redirected to the checkout page.

Step 8: Preview Checkout Page

Follow up these steps to preview checkout page:

(a) Click on the View Button

View Checkout Plan

(b) Take a Look at the Checkout Page

Checkout to Sell Balms Online

Step 9: Embed Checkout Page in Site & Sell Balms Online

Embed Checkout Page on Website

Now,  copy the embed plan link to insert the checkout page on your WordPress website.

(a) Edit the Page & Paste the Copied Link

Paste_Link_in_Text_Editor

Now, when the link is copied, then paste it to the text area of the editor.

(b) Save & Publish the Checkout Page

Save_and_Publish

After pasting the code, now hit the ‘Publish’ button. Your checkout page is embedded.

(c) Check out the Final Look of your Checkout Page on WordPress Site

Embed in WordPress to Sell Balms Online

Step 10: Multiplan Checkout Page

Note: In case you want to sell multiple products via a single checkout page, you can create a multi-plan checkout page otherwise skip this step.

(a) Click on Add Mutiplan Checkout

Multiplan Checkout

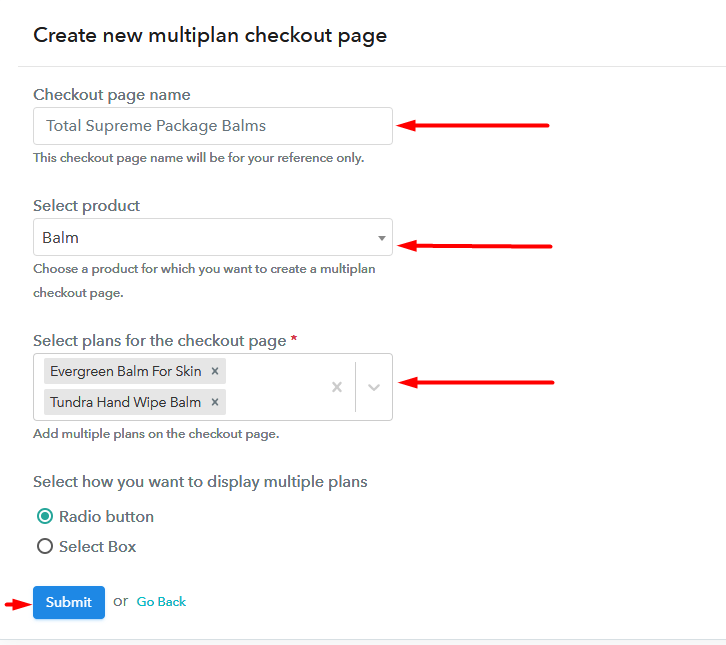
(b) Add Plans to Sell Multiple Balms Online from Single Checkout Page

Multiple Ways to Sell Balms Online

(c) Take a Look at the Checkout Page

Multiplan Checkout to Sell Balms Online

Preview Checkout Page

Wrapping Up

Well, these are the simple steps to build a checkout page in Pabbly Subscription Billing to sell balms online.  Although, it may look a bit overwhelming for you initially but slowly you will fully exploit its awesome features to dominate the online landscape. Also, if you have any questions related to these steps please write them in the comment section below. We will reply at the earliest. Thank You !!

You May Also Like To Read –
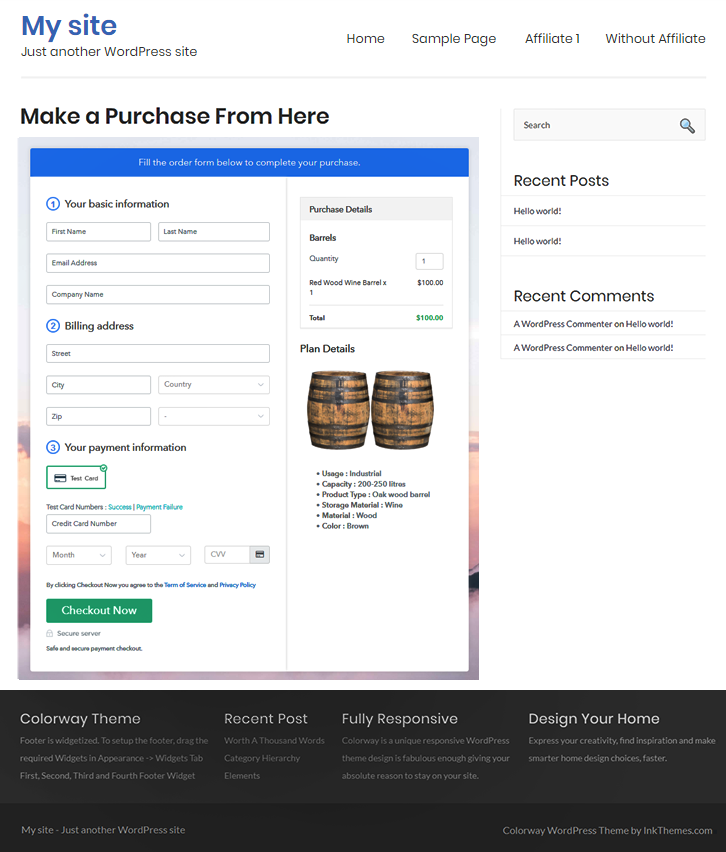
How to Sell Swimming Suits Online | Step by Step (Free Method)

How to Sell Swimming Suits Online

Ideal For: All the swimming suit manufacturers, swim wear sellers, swimming suit sellers, retail swimming suit shop owners, and other merchants can use this method to take their swimming suit selling business online.

How to Sell Swimming Suits Online

Why Choose this Method for Selling Over any Other Solution?

Unlike any other solution, this method allows you to:

  • List and sell your swimming suits for FREE. Absolutely no payment required.
  • No commission on sales.
  • Collect payment through multiple payment modes from a single checkout page.
  • Sell one time or recurring subscriptions of your swimming suits.
  • Sell and collect payment in any currency as per your requirement.
  • Give discounts on your products by offering special coupon codes.
  • Add sales commission agents to help you in selling your swimming suits

Get Pabbly Subscription Billing for Free

Gigi Hadid once quoted in her interview “I appreciate a swimsuit even in warm weather”. Swimming is considered as one of the strongest exercises, and it has been said that swimming suits improve the swimmer’s performance. There are many reasons why people wear swimming suits as it maintains body shape, it improves your swimming speed and above all, it avoids unnecessary water drag.

Why would you like to sell swimming suits online?

In one of the studies, it has been stated swimming helps in improving mental health, that’s why there is more participation in swimming classes at the arrival of summer. According to Allied Market Research, the swimwear market is projected to reach $28,148 million by 2024, enrolling a CAGR of 6.2% from 2018 to 2024.

Not just this, customers are demanding designer swimsuits, particularly multifunctional one-piece and cover-ups, which are also distinguished as a fashion statement, thus impelling the growth of the swimwear market. Giving all this figure a thought, it is best to start swimming suits selling business online. And, to help you out, we already had done all the heavy lifting. Thus, we are suggesting one software named Pabbly Subscription Billing which lets you create an amazing checkout page for selling swimming suits online.

Some of its top-notch features involve:

  • List different swimming suits in a single checkout page
  • Generate professional invoices
  • Offer unlimited coupon codes and discounts to prospects

The aforementioned are some of the features of the software and now let’s create a checkout page for selling swimming suits online using this tool.

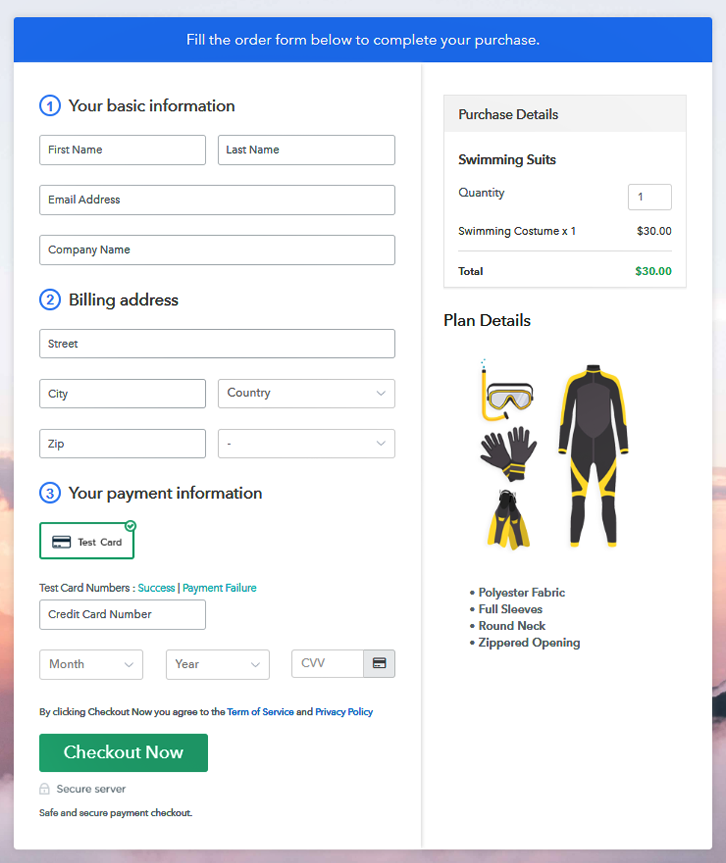
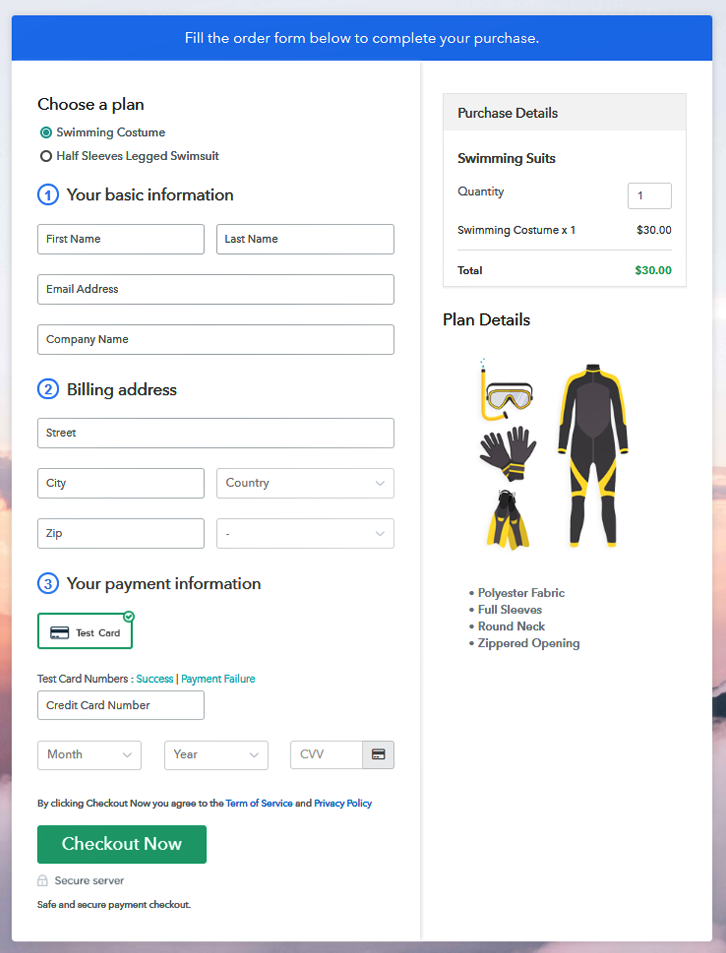
This is How your Checkout Page will Look Like After Creation

Checkout Page to Sell Swimming Suits Online

Preview Checkout Page

Step 1: Log in to Pabbly Subscription Billing

Signup

The very first step for creating a checkout page for selling swimming suits online by visiting the Pabbly Subscription Billing in your browser. Then click on the “Sign up Free“ button. Further, either manually filled out the details or sign in using your Gmail account.

Sign Up For Free!

Step 2: Select Subscription Billing

Access Subscription Billing

Step 3: Account Setup

Setup Account

Further, after clicking on the “Access Now” button of the software, a page will redirect with fields like company name, select currency, and phone number. Just fill out those details to continue creating a checkout page for swimming suits.

Step 4: Connect Payment Gateways To Sell Swimming Suits Online

Connect Payment Gateway

Further, the next part of the process is to know about software payment procedures using a “Test Payment Gateway”. Here, we are continuing the checkout page process for swimming suits using a test payment gateway. Additionally, it is stuffed with various payment gateways like PayPal, Stripe, etc. Moreover, below we are mentioning the payment integration guides to help you out.

Step 5: Add Your Product

Add Product

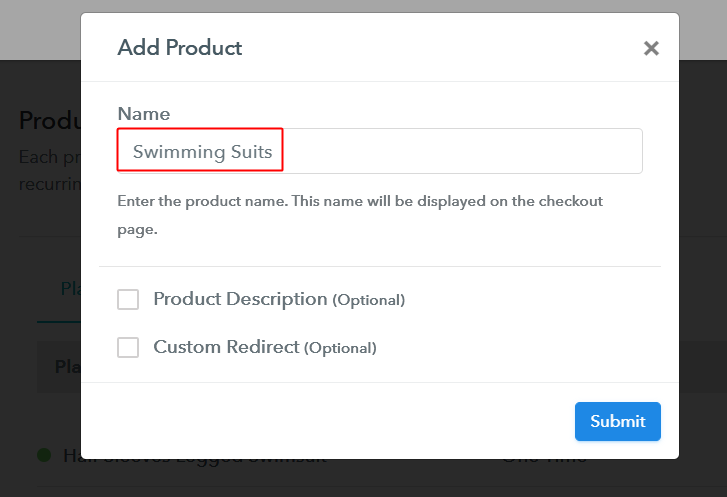
Subsequently, add the name, which in our case is “Swimming Suits”. Here you can specify the type like sling swimsuit, leg suit, etc. Also, write a short description of the swimsuit to catch the buyer’s attention.

Add Product to Start Selling Swimming Suits Online

Next, click on the “Submit” button after filling the details about the swimming suit.

Note: Here you can add all the products related to the similar category by creating plans for each of them.

Step 6: Add Plans 

Let’s unfold out plans for different kinds of swimming suits available in your store.

(a) Select Add New Plan

Add Plan

(b) Specify the Plan & Pricing Details

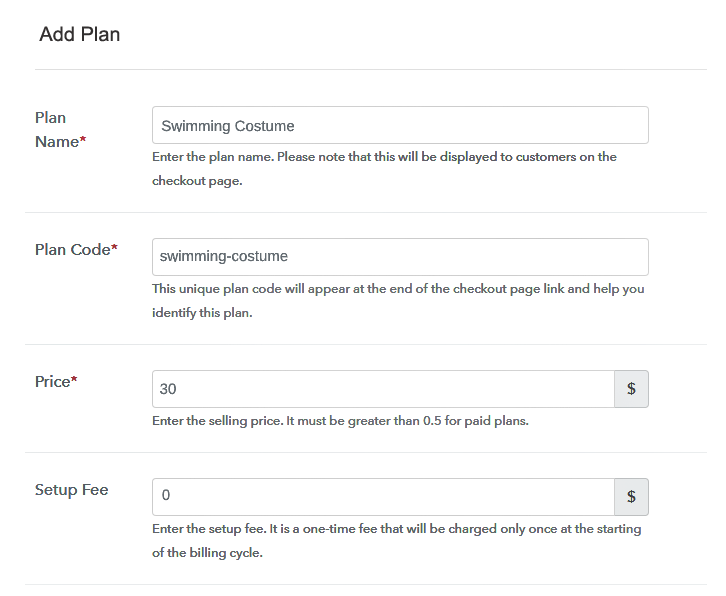
Specify the Plan and Pricing to Sell Swimming Suits Online

The following thing to do is fill all the details of swimming suits like plan name, code, price, set-up fee, and much more to continue.

(c) Add Image & Description

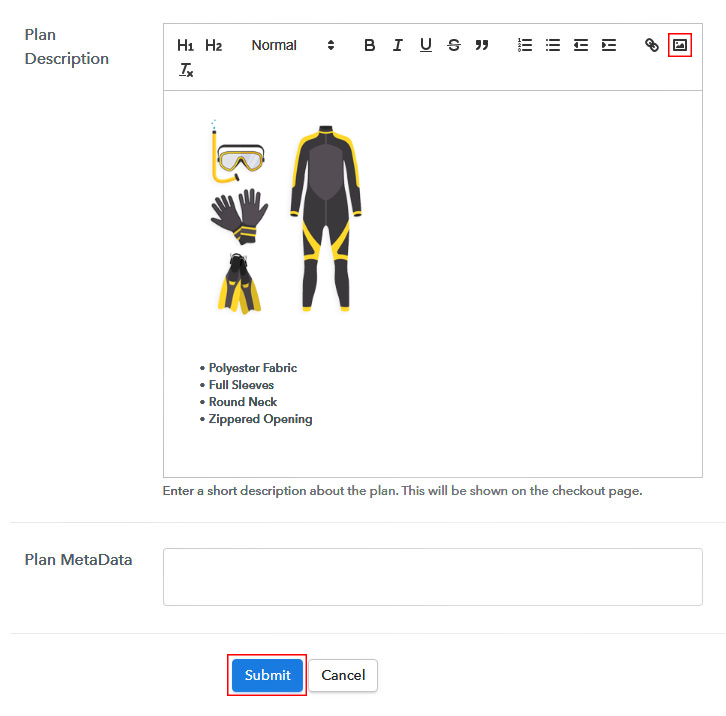
Add Image & Description to Sell Swimming Suits Online

Moreover, it is necessary to write a brief description of swimming suits using bullets, images, etc, to bring potential buyers to the checkout page.

Following, click the “Submit” button to add the swimming suits on the checkout page.

Subsequently, you can add multiple plans and kinds of swimming suits in your product list which you want to market online.

Step 7: Share your Checkout Page

Share Checkout Page on Social Media

  • Moreover, share the checkout page of the swimming suits on social media accounts like Facebook & Twitter to get the buyer’s attention.
  • Also, you can share the direct link of the swimming suit’s checkout page with your customers via SMS or email marketing.
  • Additionally, embed the provided plan link of the swimming suits in the buttons or any anchor text on your website.

Step 8: Preview Checkout Page

Follow up the recommended steps to preview the checkout page of swimming suits:

(a) Click on the View Button

View Checkout Plan

(b) Take a Look at the Checkout Page

Checkout Page to Sell Swimming Suits Online

Step 9: Embed Checkout Page in Site & Sell Swimming Suits Online

Embed Checkout Page on Website

Furthermore, copy the link, and add the checkout page to sell swimming suits online at any decent place on your WordPress site.

(a) Edit the Page & Paste the Copied Link

Paste Link in Text Editor

Also, paste the plan link of the swimming suits on a text editor of the WordPress dashboard.

(b) Save & Publish the Checkout Page

Save and Publish

Moreover, hit the “Publish” button after doing changes in the checkout page of the swimming suits.

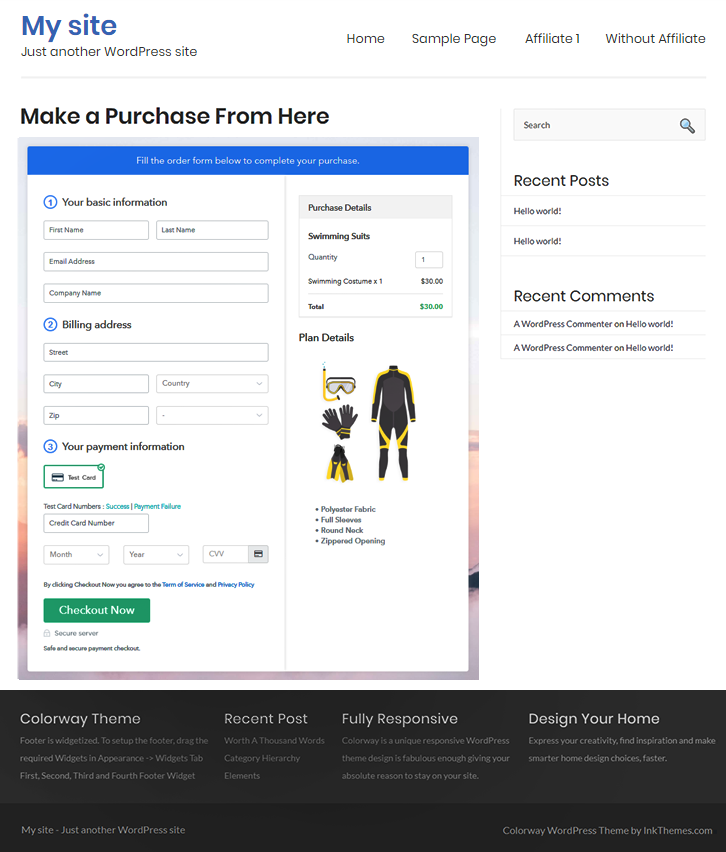
(c) Check out the Final Look of your Checkout Page on WordPress Site

Final Look of your Checkout page to Sell Swimming Suits Online

Step 10: Multiplan Checkout Page

Note: In case you want to sell multiple products via a single checkout page, you can create a multi-plan checkout page otherwise skip this step.

(a) Click on Add Mutiplan Checkout

Multiplan Checkout

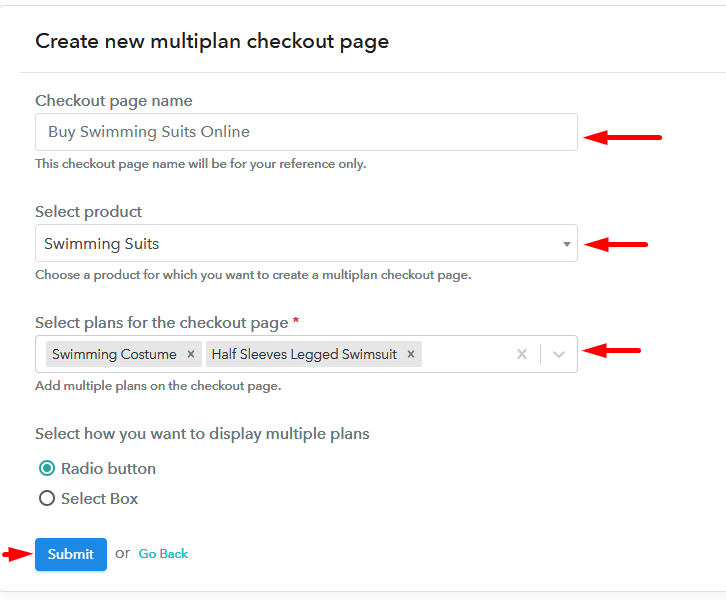
(b) Add Plans to Sell Multiple Swimming Suits from Single Checkout Page

Add Multiple Products to Start Selling Swimming Suits Online

(c) Take a Look at the Checkout Page

Multiplan Checkout Page to Sell Swimming Suits Online

Preview Checkout Page

Wrapping Up

Alright! Swimming costume is important to swimmers and that’s a reason people invest money buying quality swimwear in the market. Keeping this in mind, starting swimming suits business online is a perfect idea. It is very much easy using the software Pabbly Subscription Billing, just follow all the 10 steps and you’re done.

So, don’t wait anymore, let us know your reaction in the comments section.

You May Also Like To Read –
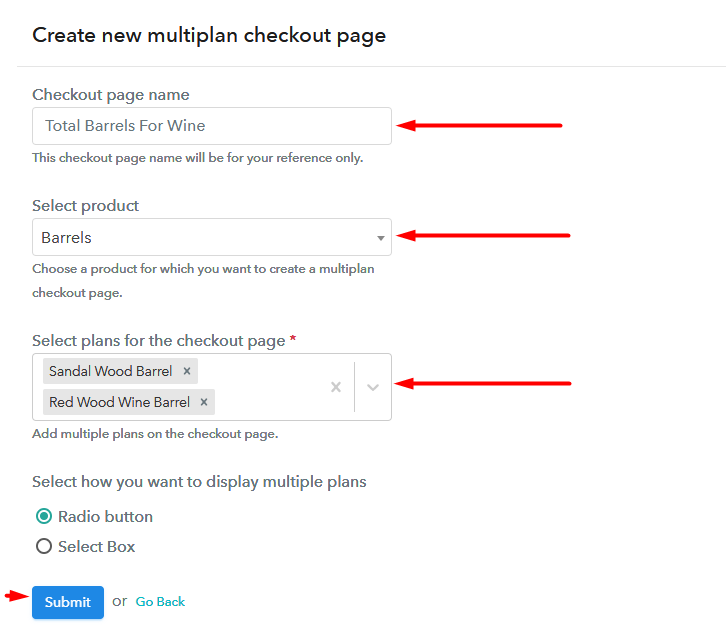
How to Sell Animal Cages Online | Step by Step (Free Method)

How to Sell Animal Cages Online

Ideal For: All the animal cage sellers, animal cage makers, retail animal cage selling business owners, and other animal cage selling merchants can use this method to take their animal cages selling business online.

How to Sell Animal Cages Online

Why Choose this Method for Selling Over any Other Solution?

Unlike any other solution, this method allows you to:

  • List and sell your animal cages for FREE. Absolutely no payment required.
  • No commission on sales.
  • Collect payment through multiple payment modes from a single checkout page.
  • Sell one time or recurring subscriptions of your animal cages.
  • Sell and collect payment in any currency as per your requirement.
  • Give discounts on your products by offering special coupon codes.
  • Add sales commission agents to help you in selling animal cages online.

Get Pabbly Subscription Billing for Free

Cages protect animals and keep them safe and if you want to sell animal cages online then you are really helping animal lovers.

Why would you like to sell animal cages online?

According to World Pet Population, at least 57% of the world population keeps a pet. Having a pet helps people to beat loneliness and depression. Also, studies suggest the bond between people and their pet animals increase fitness, lower stress, and bring happiness to their owners. Spreading this happiness can give enough purpose to sell animal cages online. Or maybe you can have your reasons.

To start animal cages business online we’ll be going to discuss the fastest method possible. You’ll need to create plan checkout pages by feeding information about the animal cages that you want to sell and the checkout page will allow you to show the product as well as accept payments through it.

Well, there are other advantages to using this service.

  • You get a place to keep a record of all the animal cages in stock
  • Showcase single & multiple items on checkout pages
  • Collect safe & secure online & offline payments
  • Appy global tax rules
  • Automated billing & invoicing through emails
  • Unlimited product & plan creation to sell unlimited animal cages
    And much more…

Moreover, using this service you’ll get to share the created checkout pages over social media platforms like Facebook, WhatsApp, SMS, Twitter, Emails etc. Also, you can embed the checkout pages on a website’s posts, pages, buttons and text.

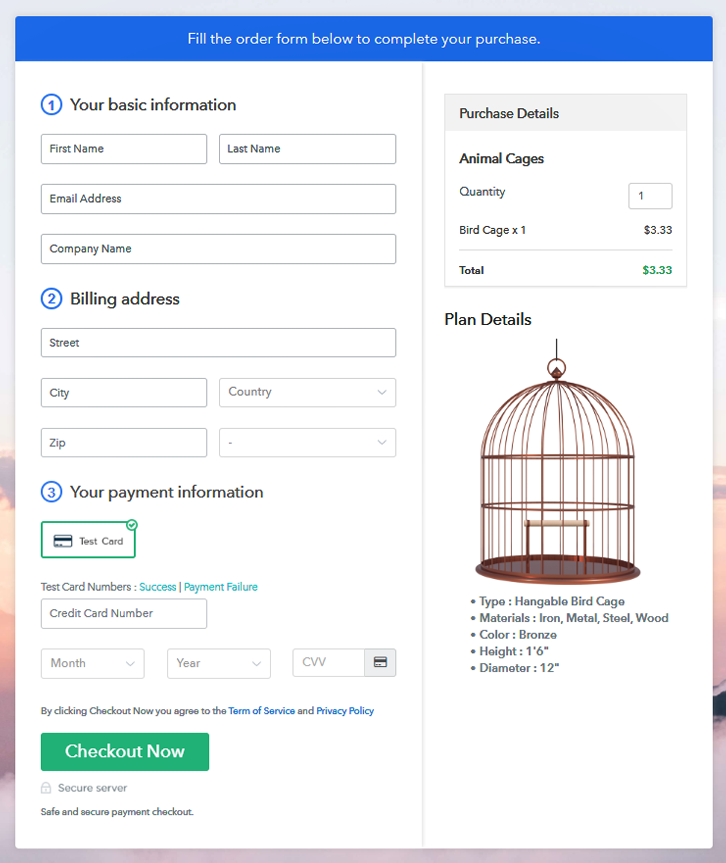
This is How your Checkout Page will Look Like After Creation

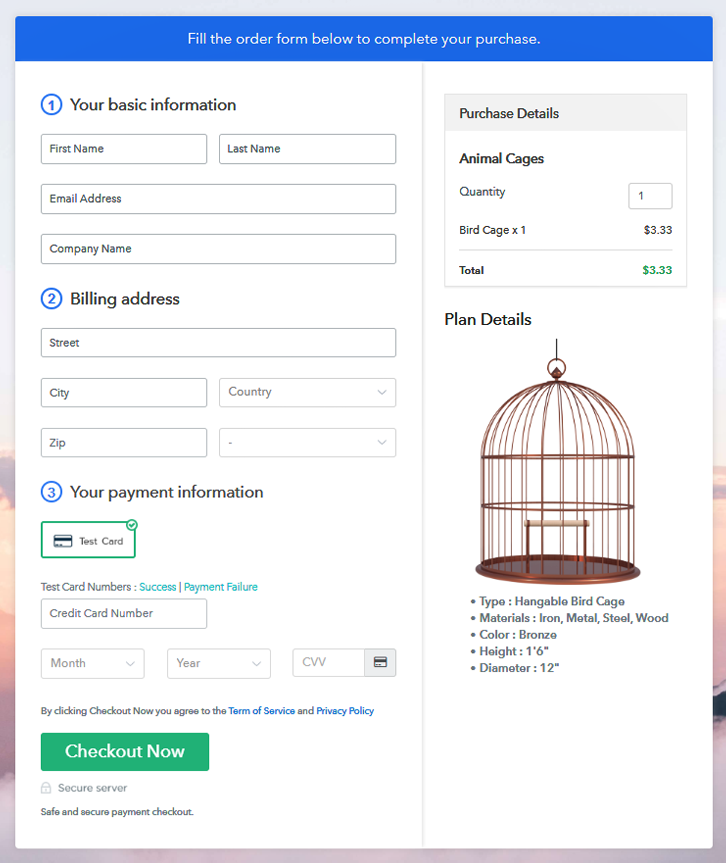
Checkout Page Preview to Sell Animal Cages Online

Preview Checkout Page

Step 1: Login to Pabbly Subscription Billing

Signup
Begin the process by visiting Pabbly Subscription Billing. Then on the website find “Sign Up Free” button and click on it. On the next page, you’ll have two options to sign-in. Either sign-in using Google or you can also create an account on the platform by filling out the basic information in the form provided.

Sign Up For Free!

Step 2: Select Subscription Billing

Access Subscription Billing

After getting into the system, you’ll be redirected to the above-shown page. Click on the ‘Access Now’ button below the Subscription Billing app here.

Step 3: Account Setup

Setup Account

A window will pop-up, reference a company name, currency & phone number here.

Step 4: Connect Payment Gateway to Sell Animal Cages Online

Connect Payment Gateway

At this point in the process, you’ll need to connect a payment gateway to sell animal cages online. For this, the step by step integration guides are linked below for multiple gateways & you can pick any one of them. Here in this blog, I’m enabling the ‘Test Payment’ option to go more further in the procedure.

Step 5: Add Your Product

Add Product

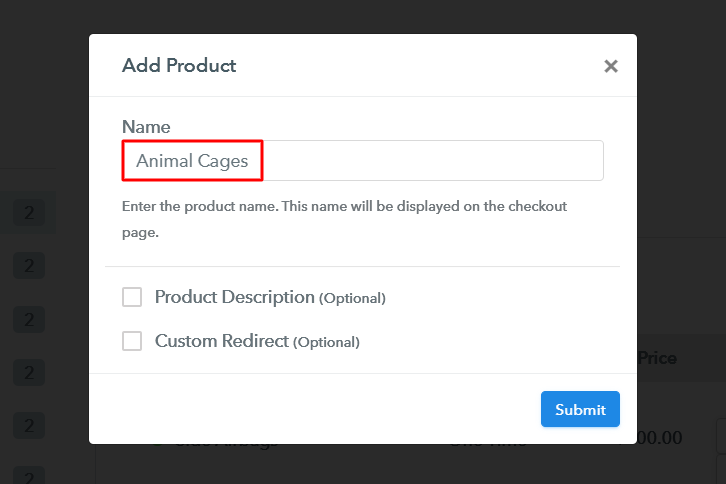
Now in this step, we’ll be adding product categories to sell animal cages online. For this, click the ‘Add New Product’ button & specify a product name category, much like animal cages, bird cages etc.

Add Product to Sell Animal Cages Online

Once you submit the filled details a product will be added in your product list instantly.

Note: Here you can add all the products related to the similar category by creating plans for each of them.

Step 6: Add Plans

After adding a product, you can create varied plans for it. These plans will be the items that you want to sell for that particular product category. Hit the ‘Add New Plan’ button & fill out the plan details. Remember, all these plan details filled will be shown on the plan checkout page for selling animal cages online.

(a) Select Add New Plan

Add Plan

(b) Specify the Plan & Pricing Details

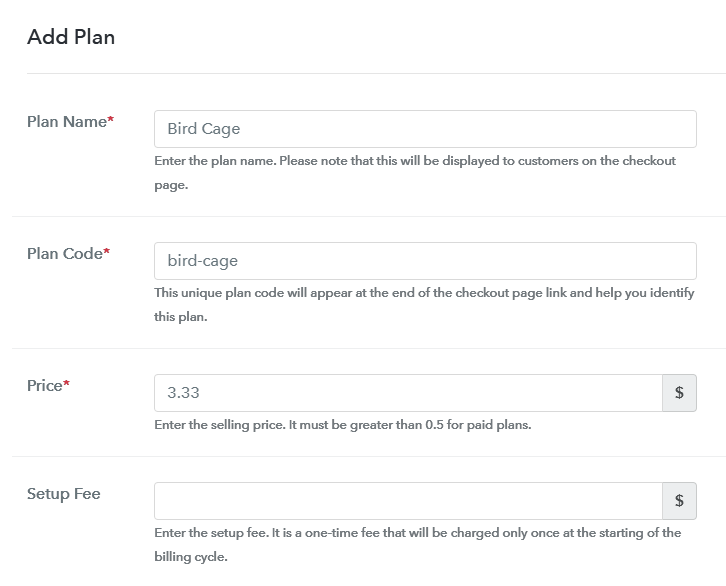
Add Plan to Sell Animal Cages Online

Specify the plan details like animal cage’s name, code, its pricing etc as per the animal cage that you want to sell online.

(c) Add Image & Description

Add Image & Description to Sell Animal Cages Online

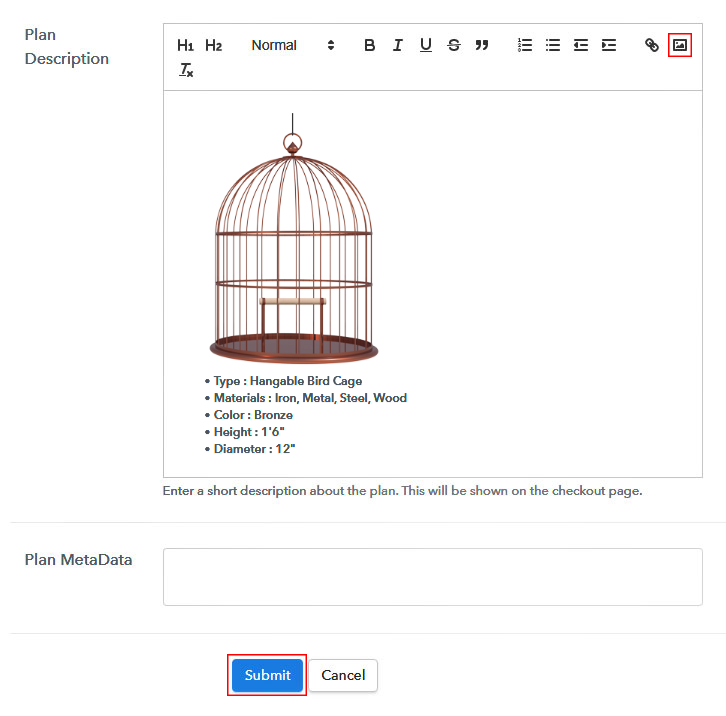
You can also show an image & description for any item on the checkout page to sell animal cages online. For this, insert an image &  description in the ‘Add Description’ field on this page. Additionally, you can also make use of lists, quotes, links, headings etc to format the descriptive text for selling animal cages online.

Submit this page by clicking on the button, once you are done with this animal cage’s details and a plan will get appended in the system for selling animal cages online.

Step 7: Share your Checkout Page

Share Checkout Page on Social Media

Next, a window will open up carrying a plan link URL & a plan code to sell animal cages online over different platforms.

  • You can share the plan link URL given in the ‘Plan Link’ box on multiple social media platforms like WhatsApp, SMS, emails etc to sell animal cages online.
  • Also, you can link this URL in the buttons & text redirects of websites.
  • Moreover, there are two direct Facebook & Twitter sharing buttons to share the checkout page directly onto these platforms.

Step 8: Preview Checkout Page

Follow these steps to preview a checkout page:

(a) Click on the View Button

View Checkout Plan

(b) Take a Look at the Checkout Page

Checkout Page Preview to Sell Animal Cages Online

Step 9: Embed Checkout Page in Site & Sell Animal Cages Online

Embed Checkout Page on Website

The code given under ‘Embed Plan Link’ pane can be used to embed a created checkout page on WordPress. To embed a page, copy the complete code given here.

(a) Edit the Page & Paste the Copied Link

Paste_Link_in_Text_Editor

And then paste it in the text area section of any WordPress post or page.

(b) Save & Publish the Checkout Page

Save_and_Publish

Publish the post or page & the checkout page will get embedded on that website.

(c) Check out the Final Look of your Checkout Page on WordPress Site

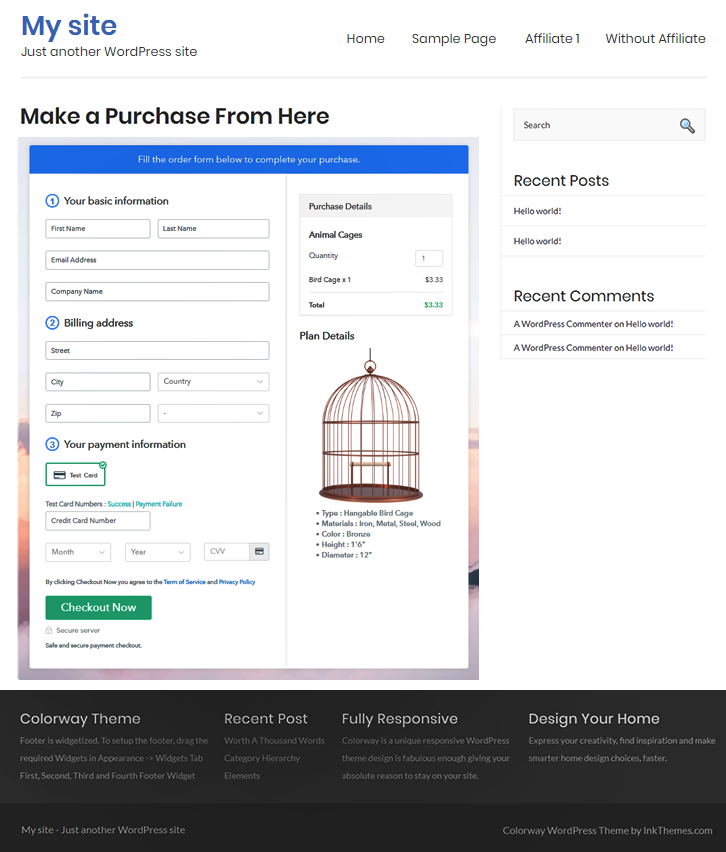
Checkout Page On Site to Sell Animal Cages Online

Step 10: Multiplan Checkout Page

Note: In case you want to sell multiple products via a single checkout page, you create a multi-plan checkout page otherwise skip this step.

(a) Click on Add Mutiplan Checkout

Multiplan_Checkout

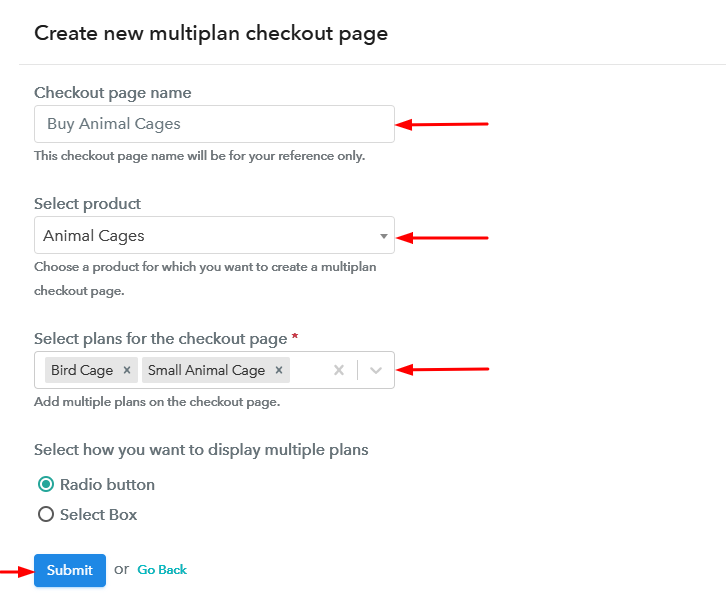
(b) Add Plans to Sell Multiple Animal Cages from Single Checkout Page

Create Multiplan Checkout to Sell Animal Cages Online

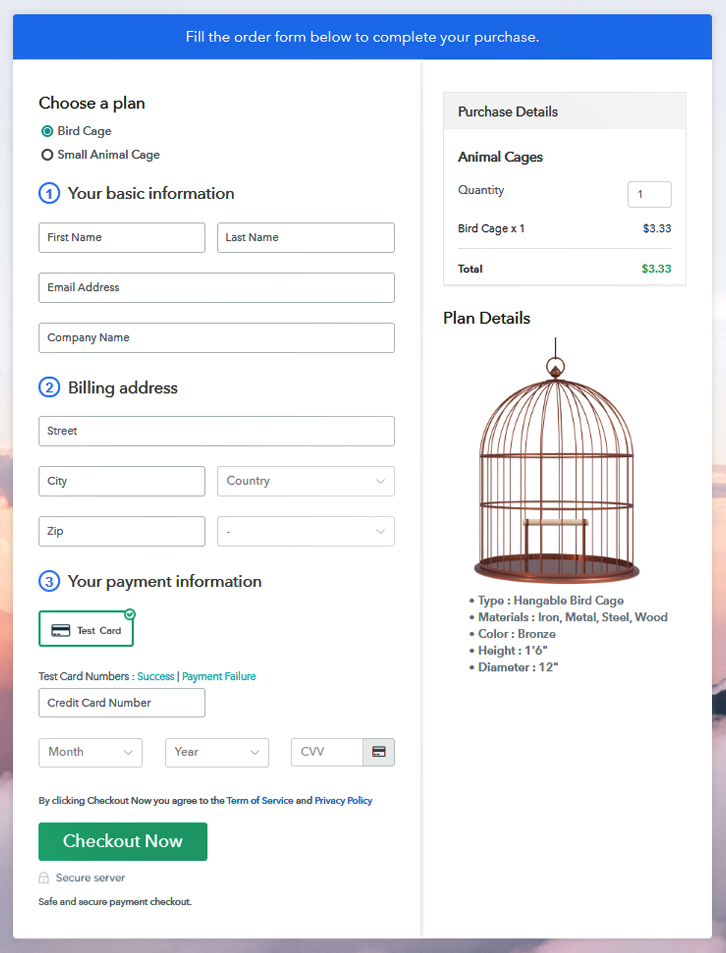
(c) Take a Look at the Checkout Page:

Multiplan Checkout Page to Sell Animal Cages Online

Preview Checkout Page

Wrapping Up

This was the whole procedure and I hope this could be helpful for you to sell animal cages online. You can see by yourself that there is flexibility, scalability plus reliability in this method. You can use multiple reliable gateway options for the payment process of selling animal cages online. Also, there is no selling limit which is almost there in many billing services. Best of luck to start animal cage business online, sell limitless products using this service.

You May Also Like To Read

How to Sell Baby Diapers Online | Step by Step (Free Method)

How to Sell Baby Diapers Online

Ideal For: All the baby diaper manufacturers, baby diaper sellers, retail baby essential shop owners, wholesale baby diaper suppliers, and other merchants can use this method to take their baby diapers selling business online.

How to Sell Baby Diapers Online

Why Choose this Method for Selling Over any Other Solution?

Unlike any other solution, this method allows you to:

  • List and sell your baby diapers for FREE. Absolutely no payment required.
  • No commission on sales.
  • Collect payment through multiple payment modes from a single checkout page.
  • Sell one time or recurring subscriptions of your baby diapers.
  • Sell and collect payment in any currency as per your requirement.
  • Give discounts on your products by offering special coupon codes.
  • Add sales commission agents to help you in selling your baby diapers.

Get Pabbly Subscription Billing for Free

One of the toughest jobs on this planet is raising kids, and to be very honest starting year with newborns is no fun. It involves a lot of work but with diapers, things are a bit different. Diapers play an essential role in parenting job and parents prefer diapers more than anything. So starting diaper business online is like icing on the cake.

Why would you like to sell baby diapers online?

One of the finest reasons to start baby diapers business online is health awareness among parents regarding baby products. Parents lookout for best baby diapers which provide comfort, softness, and avoid rashes. This is the reason why there is a huge uptick in selling baby diapers. Not just this, according to Grand View Research, the global baby diapers market size is expected to reach USD 64.62 billion by 2022.

In the near future, you must notice the biodegradable diapers in the market which will boost sales of diapers definitely. Considering all this, it won’t be odd to start a baby diaper selling business online. Gladly, we have a software named Pabbly Subscription Billing, that lets you create amazing checkout page for selling diapers online. Some of its features are mentioned below:

  • List different types of diapers in a single checkout page
  • Offer unlimited discount and coupon codes to customers
  • Collect currency in both online and offline mode

These are some of the perks of software and now let’s cast light on creating a checkout page for selling baby diapers using this tool.

This is How your Checkout Page will Look Like After Creation

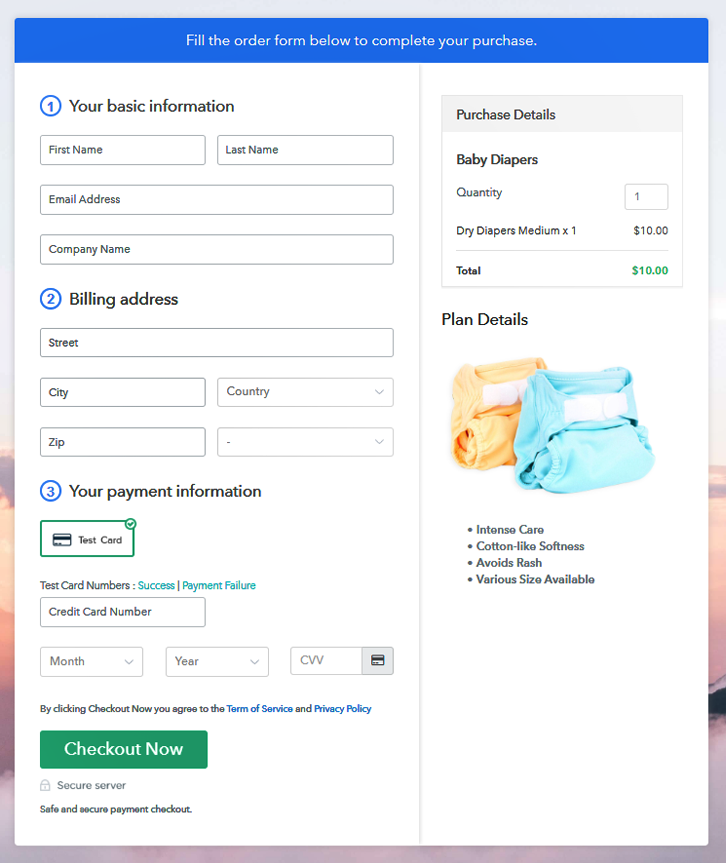
Checkout Page to Sell Baby Diapers Online

Preview Checkout Page

Step 1: Log in to Pabbly Subscription Billing

Signup

Start the process for creating a checkout page for selling baby diapers online by visiting the Pabbly Subscription Billing in your browser. Further, click on the “Sign up Free“ button. Moreover, either manually filled out the details or sign in using your Gmail account.

Sign Up For Free!

Step 2: Select Subscription Billing

Access Subscription Billing

Step 3: Account Setup

Setup Account

Further, after clicking on the “Access Now” button of the software, a page will redirect with fields like company name, select currency, and phone number. Just fill out those details to continue creating a checkout page for baby diapers.

Step 4: Connect Payment Gateways To Sell Baby Diapers Online

Connect Payment Gateway

The next step is to know about software payment procedures using a “Test Payment Gateway”. Here, we are continuing the checkout page process for the baby diapers using a test payment gateway. Additionally, it is packed with various payment gateways like PayPal, Stripe, etc. Moreover, below we are mentioning the payment integration guides.

Step 5: Add Your Product

Add Product

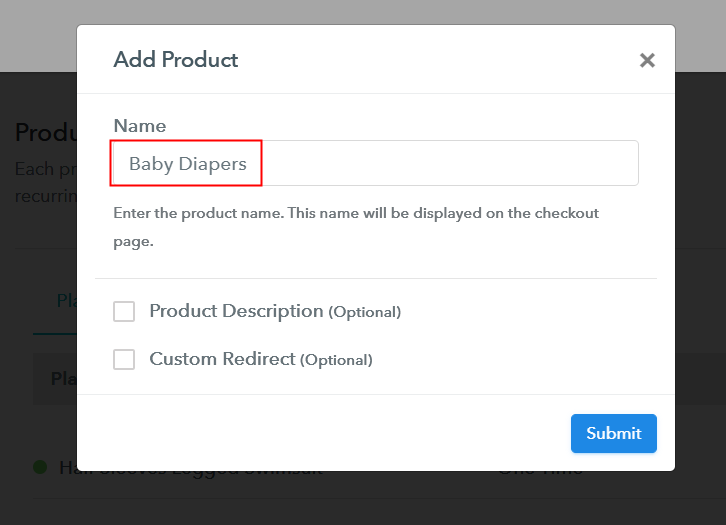
Further, add the name, which in our case is “Baby Diapers”. Here you can specify the type like cloth diapers, disposable diapers, etc. Also, write a short description of the baby diapers to catch the customer’s attention.

Add Product to Start Selling Baby Diapers Online

Next, click on the “Submit” button after filling the details about the baby diapers.

Note: Here you can add all the products related to the similar category by creating plans for each of them.

Step 6: Add Plans

Let’s rollout plans for different kinds of baby diapers available in your store.

(a) Select Add New Plan

Add Plan

(b) Specify the Plan & Pricing Details

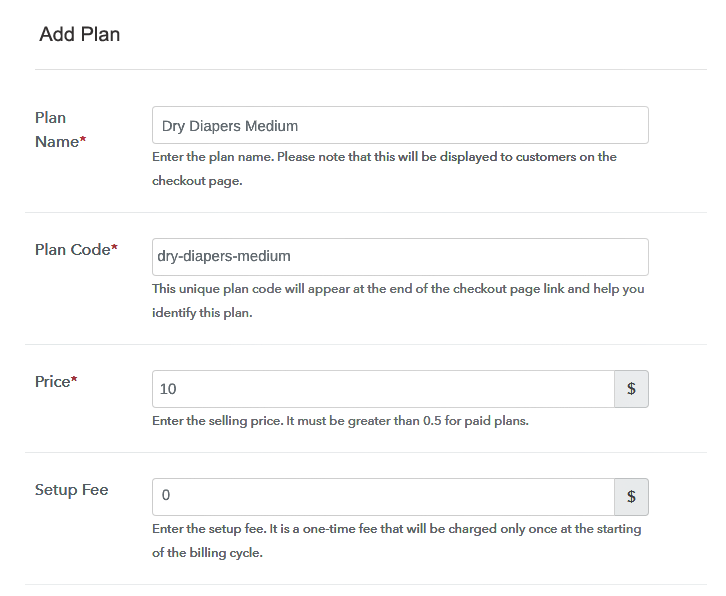
Specify the Plan and Pricing to Sell Baby Diapers Online

The next thing to do is fill all the details of baby diapers like plan name, code, price, set-up fee, and much more to continue.

(c) Add Image & Description

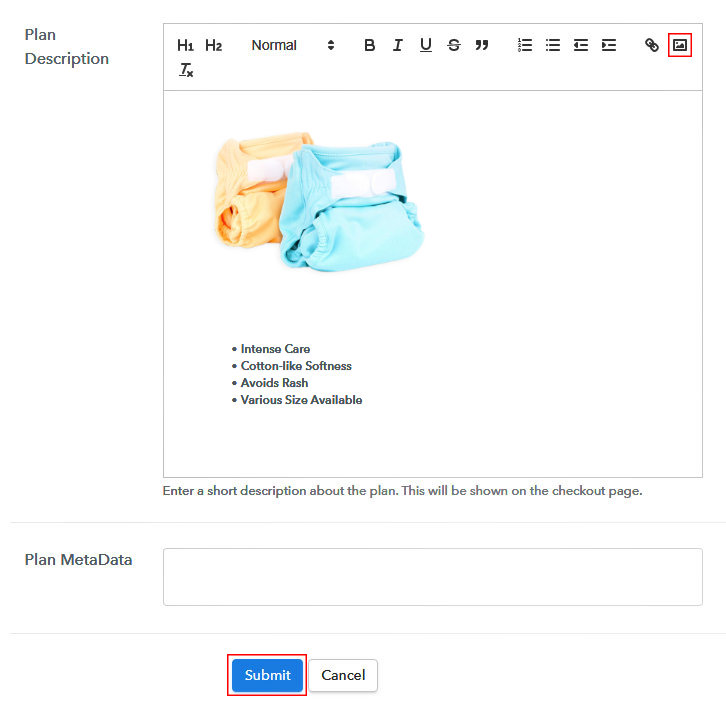
Add Image & Description to Sell Baby DiapersOnline

Besides, it is necessary to write a brief description of baby diapers using bullets, images, etc, to bring potential buyers to the checkout page.

Next, click on the “Submit” button to add the baby diapers on the checkout page.

Finally, you can add multiple plans and kinds of baby diapers in your product list which you want to sell online.

Step 7: Share your Checkout Page

Share Checkout Page on Social Media

  • Besides, share the checkout page of the baby diapers on social media accounts like Facebook & Twitter to get the customer’s attention.
  • Plus, you can share the direct link of the baby diaper’s checkout page with your customers via SMS or email marketing.
  • Additionally, embed the provided plan link of the baby diapers in the buttons or any anchor text on your website.

Step 8: Preview Checkout Page

Follow up the recommended steps to preview the checkout page of baby diapers:

(a) Click on the View Button

View Checkout Plan

(b) Take a Look at the Checkout Page

Checkout Page to Sell Baby Diapers Online

Step 9: Embed Checkout Page in Site & Sell Baby Diapers Online

Embed Checkout Page on Website

Moreover, copy the link, and add the checkout page to sell baby diapers online at any decent place on your WordPress site.

(a) Edit the Page & Paste the Copied Link

Paste Link in Text Editor

Additionally, paste the plan link of the baby diapers on a text editor of the WordPress dashboard.

(b) Save & Publish the Checkout Page

Save and Publish

Further, hit the “Publish” button after doing changes in the checkout page of the baby diapers.

(c) Check out the Final Look of your Checkout Page on WordPress Site

Final Look of your Checkout Page to Sell Baby Diapers Online

Step 10: Multiplan Checkout Page

Note: In case you want to sell multiple products via a single checkout page, you can create a multi-plan checkout page otherwise skip this step.

(a) Click on Add Mutiplan Checkout

Multiplan Checkout

(b) Add Plans to Sell Multiple Baby Diapers from Single Checkout Page

Add Multiple Products to Start Selling Baby Diapers Online

(c) Take a Look at the Checkout Page

Multiplan Checkout Page to Sell Baby Diapers Online

Preview Checkout Page

Wrapping Up

Disposable diapers are ruling the market, parents don’t compromise with their kid’s safety and comfort. Starting baby diapers business online is a good idea as it saves a lot of parent’s time they wasted in visiting stores. All you have to do is follow all the above-mentioned steps and you’re done.

Try out Pabbly Subscription Billing and let us know your reaction in the comments section.

You May Also Like To Read –