How to Sell Clothes Hangers Online | Step by Step (Free Method)

How to Sell Clothes Hangers Online

Ideal For: All the clothes hanger manufacturers, clothes hanger sellers, retail clothes hanger shop owners, and other merchants can use this method to take their clothes hangers selling business online.
How to Sell Clothes Hangers Online

Why Choose this Method To Sell Clothes Hangers Online?

Unlike any other solution, this method allows you to:

  • List and sell your clothes hangers for FREE. Absolutely no payment required.
  • No need to pay commission on any of your sale.
  • Multiple payment options like PayPal, Credit Card, etc to collect payment from a single place.
  • Sell one time or recurring subscriptions of your clothes hangers.
  • Collect payments & sell products in any currency as per your requirement.
  • Give discounts on your products by offering special coupon codes.
  • Add sales commission agents to help you in selling clothes hangers online.

Get Pabbly Subscription Billing for Free

If you are searching for a way to sell clothes hangers online then you have landed over the easiest as well as the fastest solution for it.

In this blog, we’ll be making checkout pages in 10 simple steps for selling clothes hangers online and accept payments through these checkout pages. The procedure is super easy and you will start clothes hangers business online in minutes.

Moreover, in the same process, you’ll be managing the following concurrently.

  • Keeping a record of all the clothes hanger in stock
  • Collect offline or online payments
  • Sell unlimited clothes hangers by making unlimited products & plans
  • Offer coupons & discounts
  • Accept one-time and recurring payments
    And much more…

Well, you can also share the checkout page on Facebook, Twitter, emails, SMS, WhatsApp and other platforms and embed them in the buttons, texts, posts & pages of websites.

Final View of Checkout Page For Your Clothes Hangers Selling Business
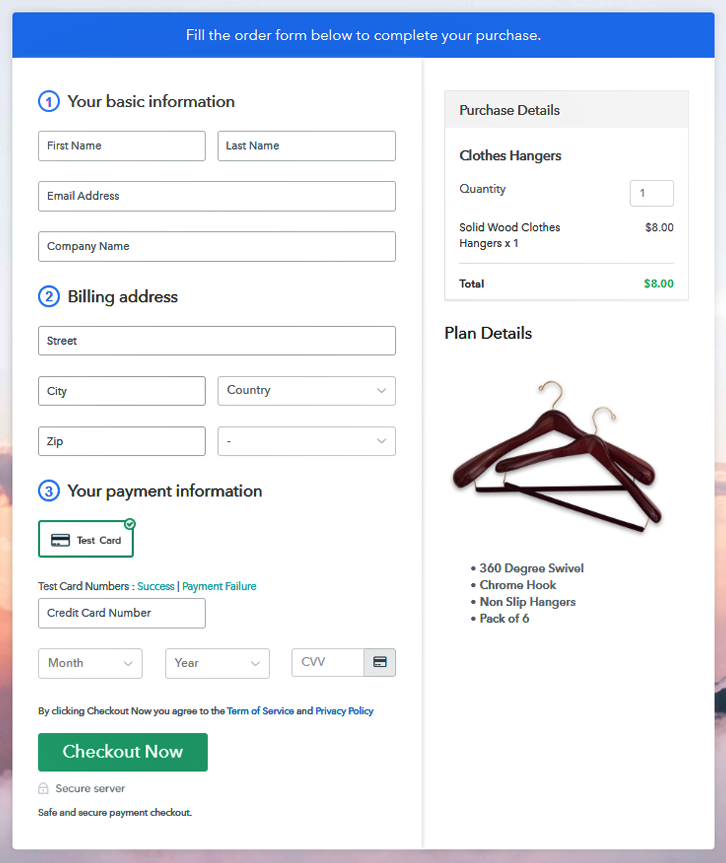
Checkout Page Preview to Sell Clothes Hangers Online

Preview Checkout Page

Step 1: Log in to Pabbly Subscription Billing

Signup

Visiting Pabbly Subscription Billing will be the very first step towards selling clothes hangers online. On the website locate the button named ‘Sign Up Free‘ click it. You can use an existing Google account or you can manually fill out the details to sign-up on the website.

Sign Up For Free!

Step 2: Select Subscription Billing

Access Subscription Billing

Step 3: Account Setup

Setup Account

Introduce a company name, currency and phone number in the pop-up shown.

Step 4: Connect Payment Gateways & Start Clothes Hangers Selling Busines Online

Connect Payment Gateway

To accept payment for selling clothes hangers online, integrate a payment gateway. There are multiple reliable options available to choose from and the integration guides are also linked below. Here I’m using the test payment option to go further in the procedure.

Step 5: Add Product For Your Clothes Hangers

Add Product

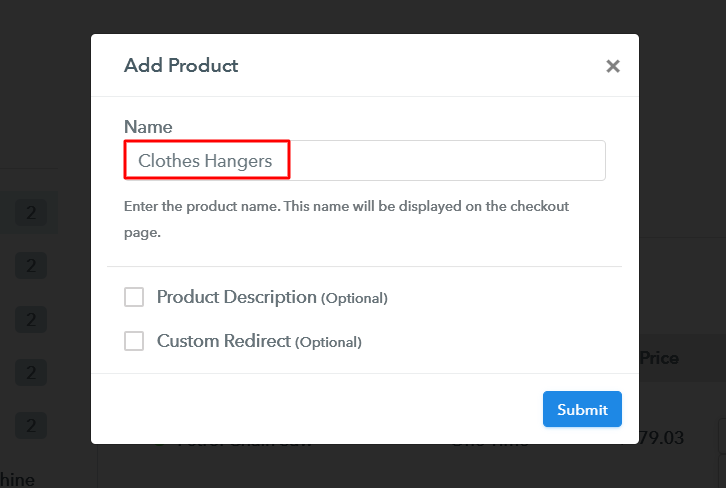
Add a product, its name could be a category of clothes hangers such as wooden, plastic, multi-purpose etc.

Add Product to Sell Clothes Hangers Online

Note: Here you can add all the products related to the similar category by creating plans for each of them.

Step 6: Add Plans 

Let’s rollout plans for different kinds of clothes hangers available in your store.

(a) Select Add New Plan

Add Plan

(b) Specify the Plan & Pricing Details
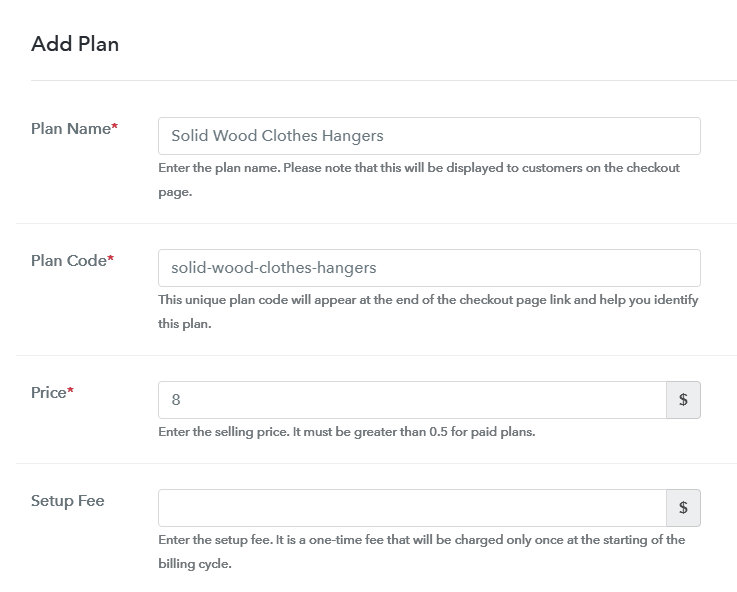
Add Plan to Sell Clothes Hangers Online

Add a clothes hanger’s name, plan code, pricing, billing cycle etc in the plan details page.

(c) Add Image & Description of Clothes Hanger
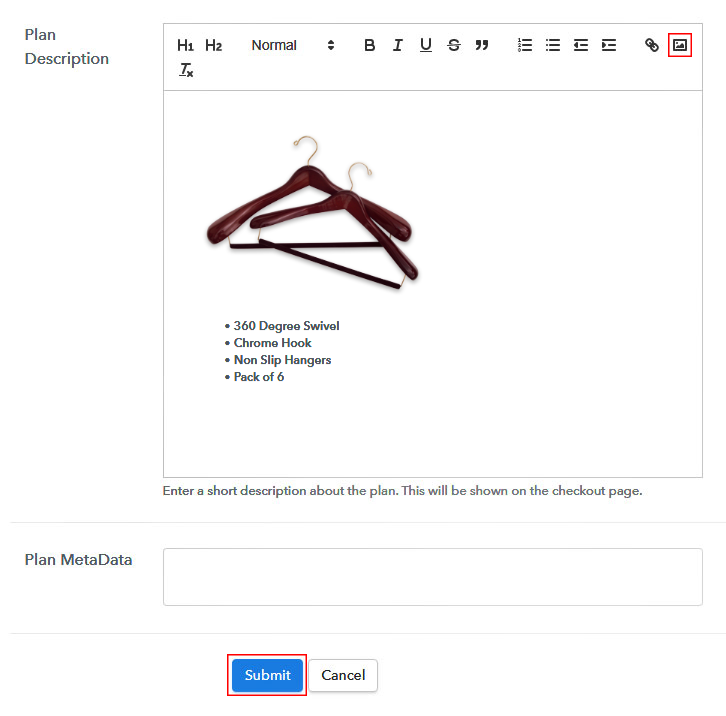
Add Image & Description to Sell Clothes Hangers Online

Also, insert an image and description of the clothes hanger that you want to sell.

Hit ‘Submit’ & a plan will be added instantly.

Repeat this step to add other clothes hangers to sell.

Step 7: Share your Checkout Page

Share Checkout Page on Social Media

  • Share the plan on Facebook & Twitter
  • Share the plan link on emails & SMS with the customers
  • Link the plan link with the site buttons and text and redirect customers on the plan page created

Step 8: Preview Checkout Page

Follow up the recommended steps to preview the checkout page:

(a) Click on the View Button

View Checkout Plan

(b) Take a Look at the Checkout Page

Checkout Page Preview to Sell Clothes Hangers Online

Step 9: Embed Checkout Page in Site & Sell Clothes Hangers Online

Embed Checkout Page on Website

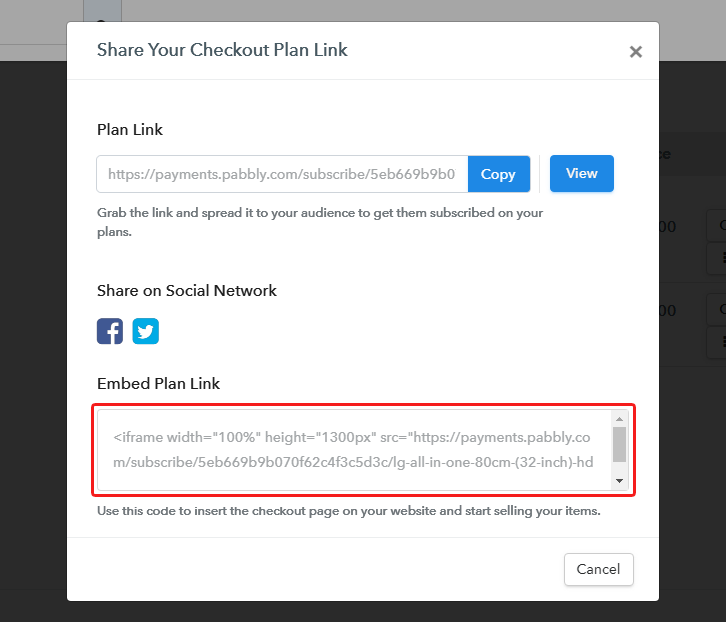
Just copy the link and add the checkout page to sell clothes hangers online at any preferable place on your WordPress site.

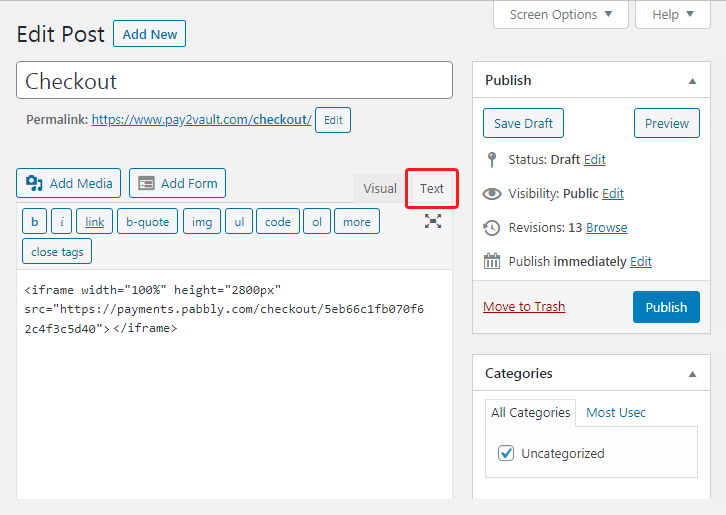
(a) Edit the Page & Paste the Copied Link

Paste Link in Text Editor

Further, paste the plan link on a text editor of the WordPress dashboard.

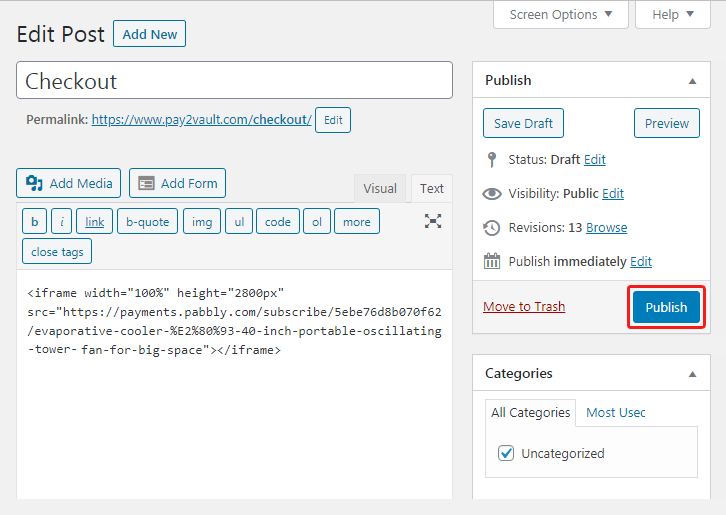
(b) Save & Publish the Checkout Page

Save and Publish

Next, click the “Publish” button, after making changes.

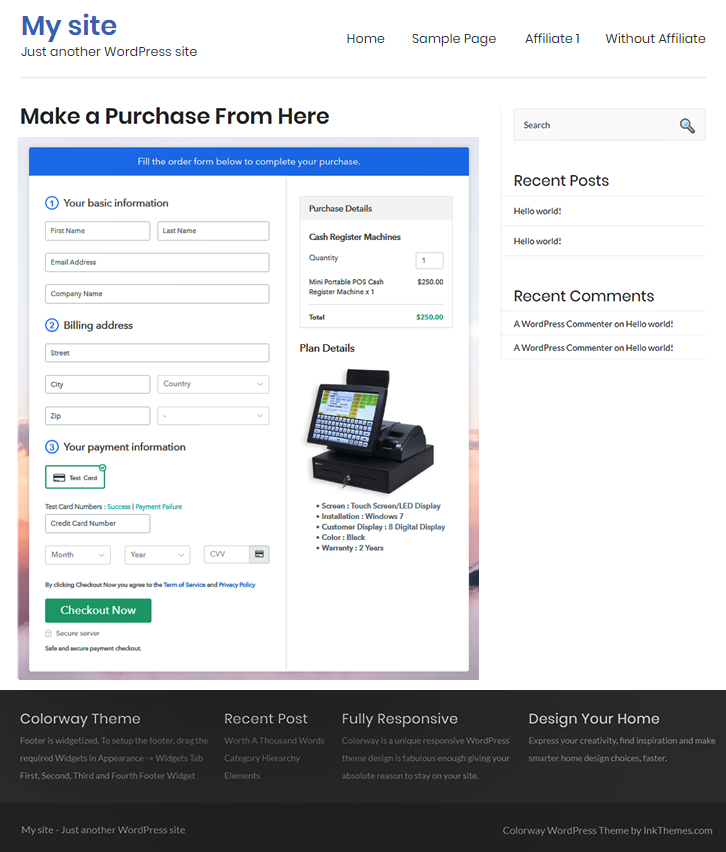
(c) Check out the Final Look of your Checkout Page on WordPress Site
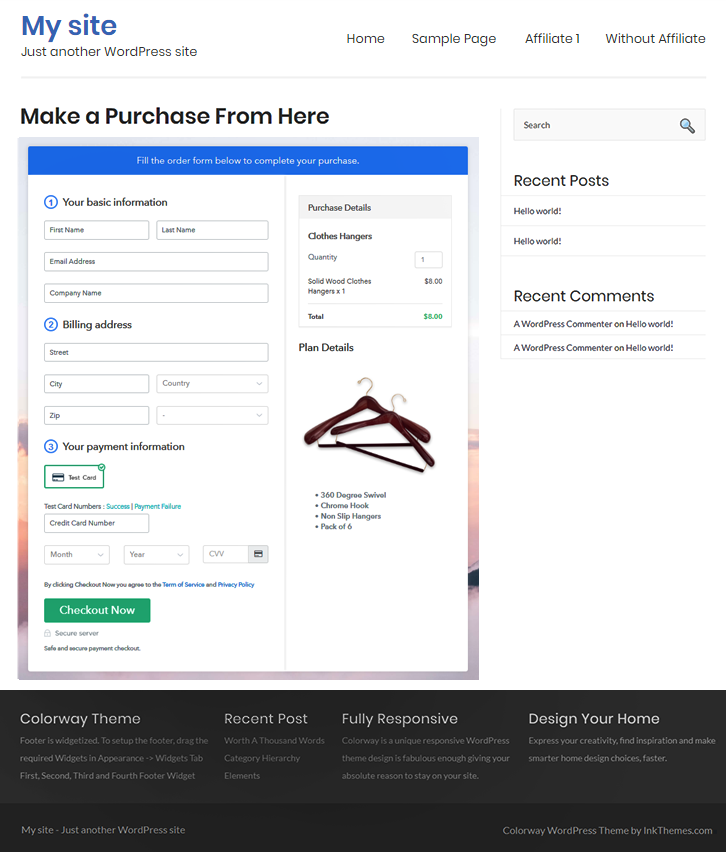
Checkout Page On Site to Sell Clothes Hangers Online

Step 10: Multiplan Checkout Page

Note: In case you want to sell multiple products via a single checkout page, you can create a multi-plan checkout page otherwise skip this step.

(a) Click on Add Mutiplan Checkout

Multiplan Checkout

(b) Add Plans to Sell Multiple Clothes Hangers from Single Checkout Page
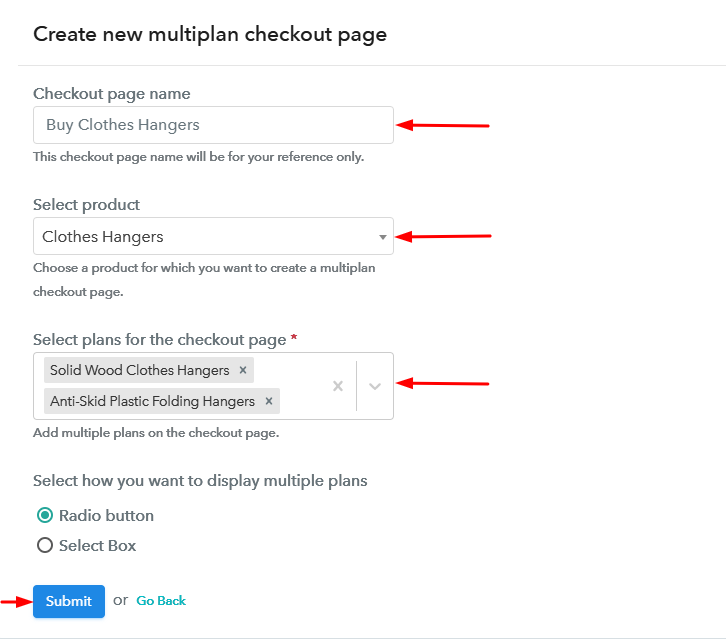
Create Multiplan Checkout to Sell Clothes Hangers Online

(c) Take a Look at the Checkout Page
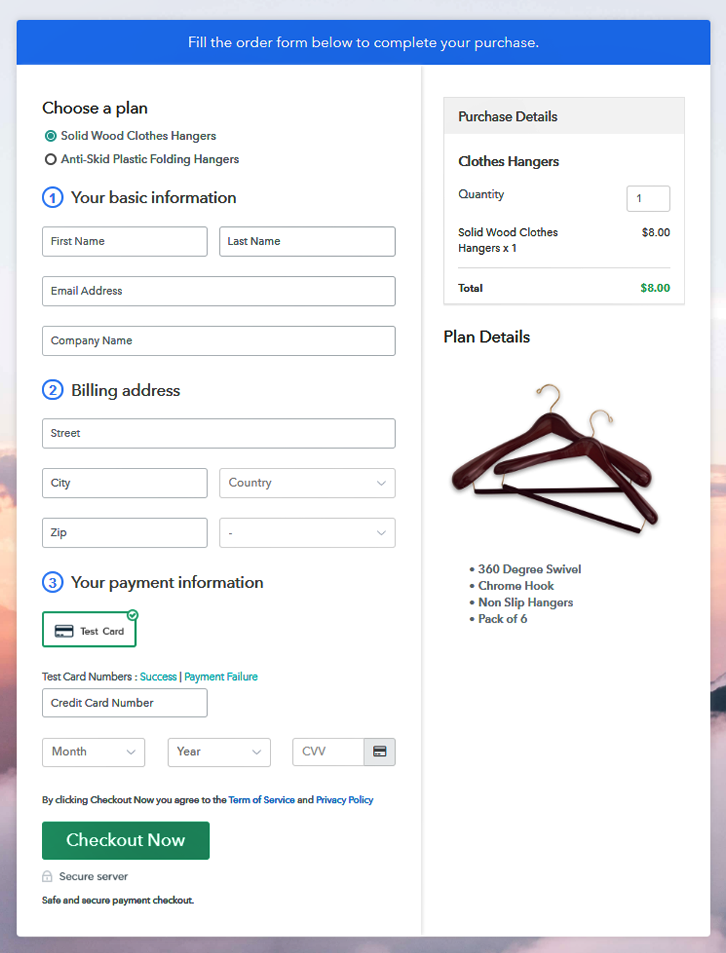
Multiplan Checkout Page to Sell Clothes Hangers Online

Preview Checkout Page

Wrapping Up

This is how to sell clothes hangers online in minutes. Moreover, you can see all the management is also excellently taken care of in the same process. Similarly, the billing and invoicing is also automatic and carried out instantly after every purchase.

Hope this was helpful & Good Luck for your business!

Also, if you have a query comment us below. We’ll respond ASAP.

You May Also Like To Read –
How to Sell Chain Saws Online | Step by Step (Free Method)

How to Sell Chain Saws Online

Ideal For: All the chain saw manufacturers, chain saw sellers, retail chain saw shop owners, and other merchants can use this method to take their chain saws selling business online.

How to Sell Chain Saws Online

Why Choose this Method To Sell Chain Saws Online?

Unlike any other solution, this method allows you to:

  • List and sell your chain saws for FREE. Absolutely no payment required.
  • No need to pay commission on any of your sale.
  • Multiple payment options like PayPal, Credit Card, etc to collect payment from a single place.
  • Sell one time or recurring subscriptions of your chain saws.
  • Collect payments & sell products in any currency as per your requirement.
  • Give discounts on your products by offering special coupon codes.
  • Add sales commission agents to help you in selling chain saws online.

Get Pabbly Subscription Billing for Free

Chain saws are used in cutting firebreaks in wildland fire suppression and harvesting of firewood. There are many types of chainsaws and to find a specific one locally can be too tricky sometimes. So, people search for them online and if you are planning to sell chain saws online then we might help you to get started.

In this blog, we are going to create plan checkout pages to show the chain saws to sell. Using these checkout page we’ll be accepting payments. Not only the payments, but there are also other advantages of using this service.

  • You can make a record for all the chain saws (category-wise) in stock
  • Show a chain saw with its image and features in checkout pages
  • Accept online & offline payments after selling chain saws online
  • Sell unlimited chainsaws by making unlimited products & plans
  • Apply global taxes easily
  • Use multi-currencies
  • Share the plans globally on social media, emails and SMS
  • Embed pages on websites to redirect customers on payment pages
    etc.

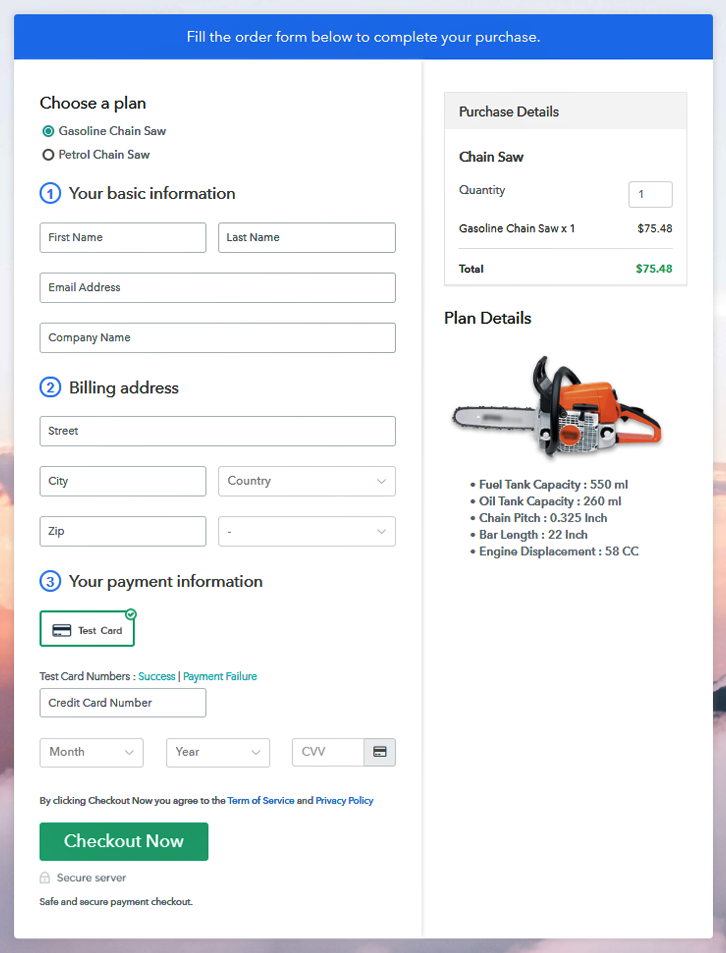
Final View of Checkout Page For Your Chain Saws Selling Business

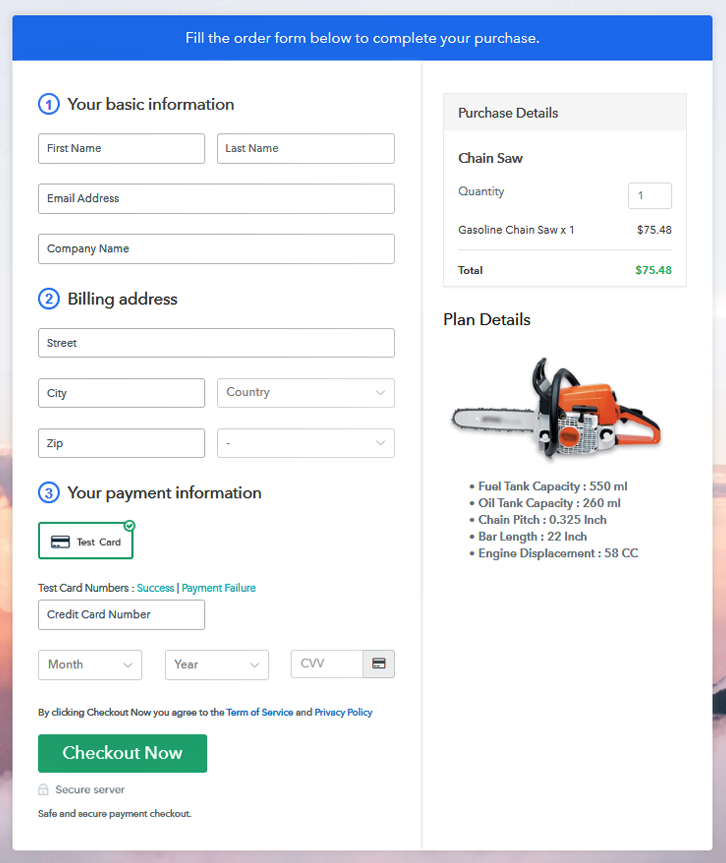
Checkout Page Preview to Sell Chain Saws Online

Preview Checkout Page

Step 1: Log in to Pabbly Subscription Billing

Signup

To start selling chain saws online, first go to Pabbly Subscription Billing & then click on the ‘Sign Up Free‘ button. On the sign-up page choose a way to get into the system. Either directly loving with Google or manually fill-out the form to sign-up.

Sign Up For Free!

Step 2: Select Subscription Billing

Access Subscription Billing

Step 3: Account Setup

Setup Account

Write down the details asked such as your company name, preferred currency & a contact number in the pop-up window shown.

Step 4: Connect Payment Gateways & Start Chain Saws Selling Busines Online

Connect Payment Gateway

Next is integrating a payment gateway to accept payments while selling chain saws online. Here I’m using the test payment method just for testing out the functionality. You can also try the test payment gateway for knowing the service’s functionality. But, you’ll need to integrate a method amongst the following. Also, the links mentioned will bring you to the step by step integration guide.

Step 5: Add Product For Your Chain Saws

Add Product

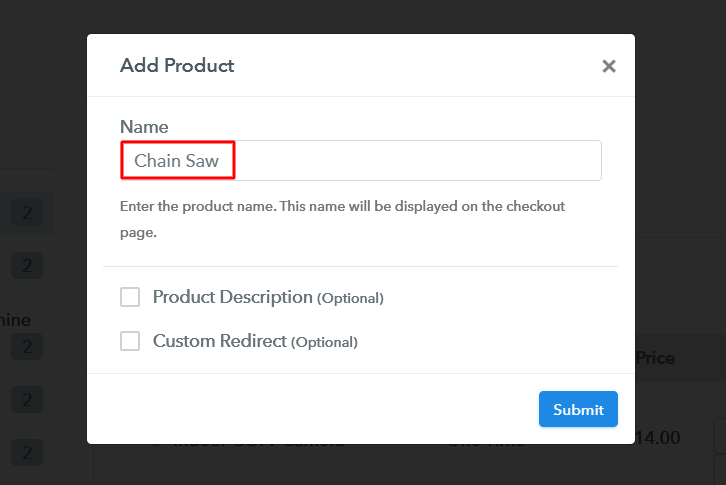
While adding a product you can mention a product category much like cordless electric chainsaw, corded electric chainsaw, gas-powered chainsaw etc.

Add Product to Sell Chain Saws Online

Note: Here you can add all the products related to the similar category by creating plans for each of them.

Step 6: Add Plans 

Let’s rollout plans for different kinds of chain saws available in your store.

(a) Select Add New Plan

Add Plan

(b) Specify the Plan & Pricing Details

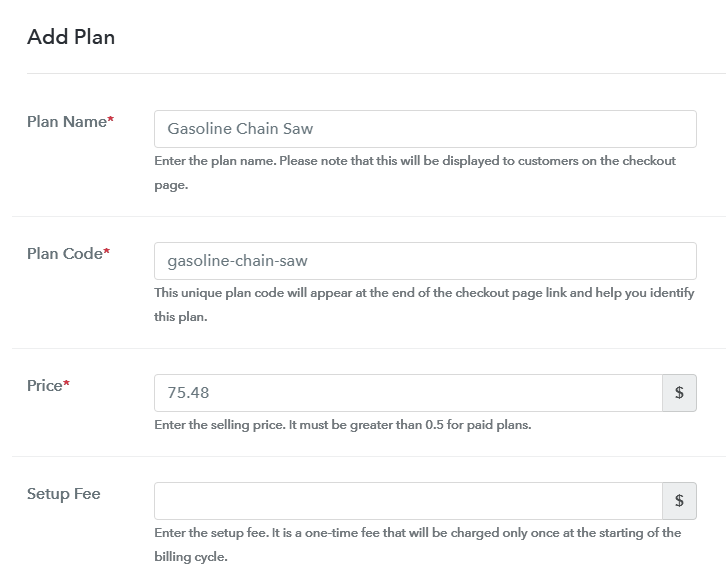
Add Plan to Sell Chain Saws Online

Mention a chain saw’s details like its name, plan page code, price, set-up fee etc.

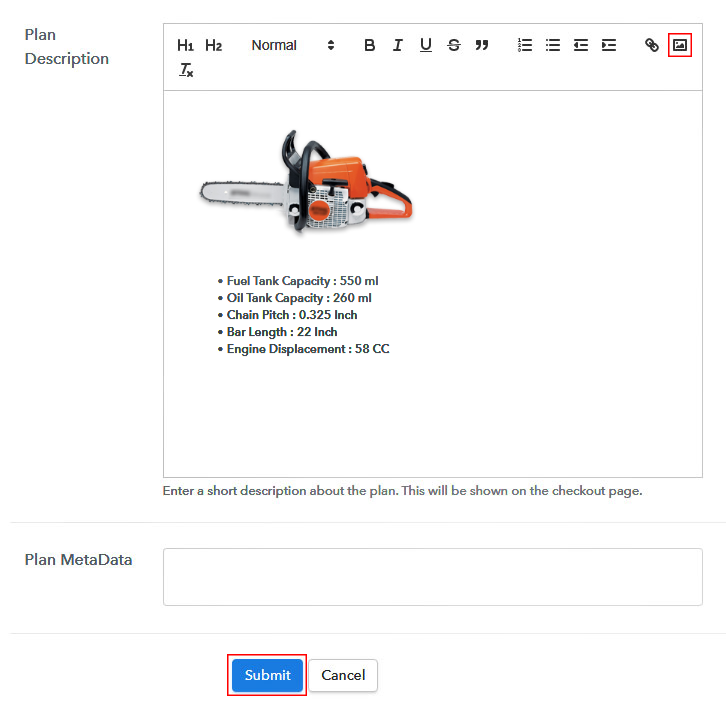
(c) Add Image & Description of Chain Saw

Add Image & Description to Sell Chain Saws Online

Further, you can include a picture of the chainsaw and write down some features.

Submit this plan page and a chain saw will be added to sell.

Likewise, add as many plans as you want to sell online.

Step 7: Share your Checkout Page

Share Checkout Page on Social Media

  • Click on the buttons to share the plan directly over Facebook and Twitter
  • Share the plan link on SMS and emails to your customers
  • Link the plan link to the button and text of any website to redirect customers on the plan page

Step 8: Preview Checkout Page

Follow up the recommended steps to preview the checkout page:

(a) Click on the View Button

View Checkout Plan

(b) Take a Look at the Checkout Page

Checkout Page Preview to Sell Chain Saws Online

Step 9: Embed Checkout Page in Site & Sell Chain Saws Online

Embed Checkout Page on Website

Just copy the link and add the checkout page to sell chain saws online at any preferable place on your WordPress site.

(a) Edit the Page & Paste the Copied Link

Paste Link in Text Editor

Further, paste the plan link on a text editor of the WordPress dashboard.

(b) Save & Publish the Checkout Page

Save and Publish

Next, click the “Publish” button, after making changes.

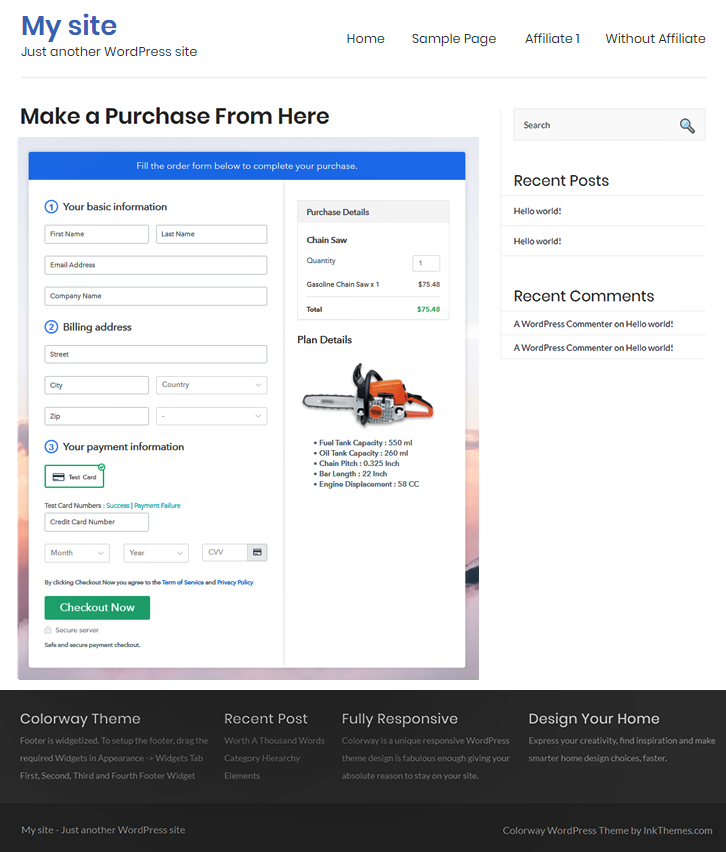
(c) Check out the Final Look of your Checkout Page on WordPress Site

Checkout Page On Site to Sell Chain Saws Online

Step 10: Multiplan Checkout Page

Note: In case you want to sell multiple products via a single checkout page, you can create a multi-plan checkout page otherwise skip this step.

(a) Click on Add Mutiplan Checkout

Multiplan Checkout

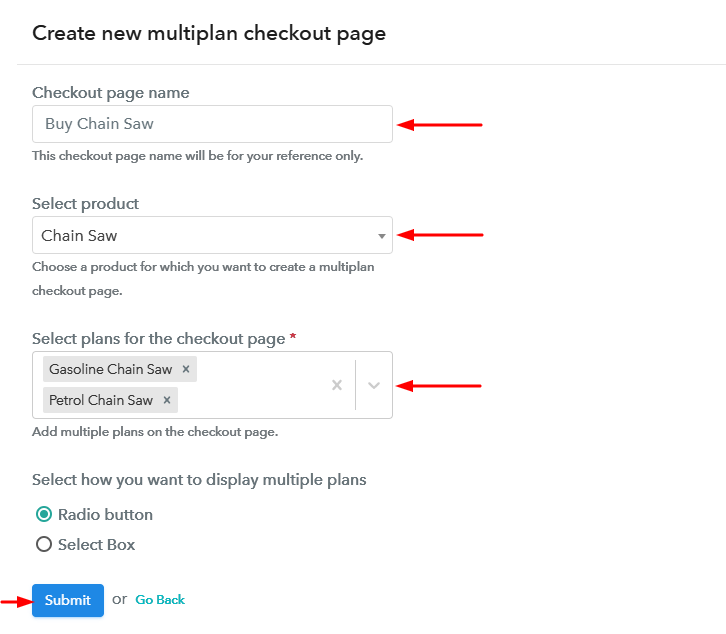
(b) Add Plans to Sell Multiple Chain Saws from Single Checkout Page

Create Multiplan Checkout to Sell Chain Saws Online

(c) Take a Look at the Checkout Page

Multiplan Checkout Page to Sell Chain Saws Online

Preview Checkout Page

Wrapping Up

This was my catch on how to sell chain saws online fast and easily. The overall management required while selling chain saws online is included within this simple process. Also, there is an availability of multiple gateways and currencies.

I hope this was helpful & Good Luck!

You May Also Like To Read –
How to Sell Digital Boards Online | Step by Step (Free Method)

How to Sell Digital Boards Online

Ideal For: All the digital board manufacturers, digital board sellers, digital board dealers, digital board suppliers, digital board shop owners, and other merchants can use this method to sell digital board online.

How to Sell Digital Boards Online

Why Choose this Method To Sell Digital Boards Online?

Unlike any other solution, this method allows you to:

  • List and sell your digital boards for FREE. Absolutely no payment required.
  • No need to pay commission on any of your sales.
  • Multiple payment options like PayPal, Credit Card, etc to collect payment from a single place.
  • Sell one time or recurring subscriptions of your digital boards.
  • Collect payments & sell products in any currency as per your requirement.
  • Give discounts on your products by offering special coupon codes.
  • Add sales commission agents to help you in selling digital boards online.

Get Pabbly Subscription Billing for Free

Gone those days when people prefer chalks and stuff, now digital boards are ruling the market. From corporate to schools everybody is preferring digital boards as it is more interactive. So, if you own an offline shop of the digital board then it is high time to bring it online.

There are numerous perks of starting a digital board selling business online as it saves a buyer from the trouble of visiting shop to shop. Further, the setup cost of online stores is less compared to the offline one. Moreover, no middle man which can be a problem as you have to share the profit margin. Isn’t it amazing? Indeed, yet proper guidance is must for which we are suggesting software named Pabbly Subscription Billing. The software lets you create an astonishing checkout page for selling digital boards online.

Not just this, it is packed with features, some of it are highlighted below:

  • List different digital boards in a single checkout page
  • Collect currency in both offline and online mode
  • Create multiple billing order using a software

So, the aforementioned are some of the points and now let’s concentrate on creating a checkout page for selling digital boards online using this amazing tool.

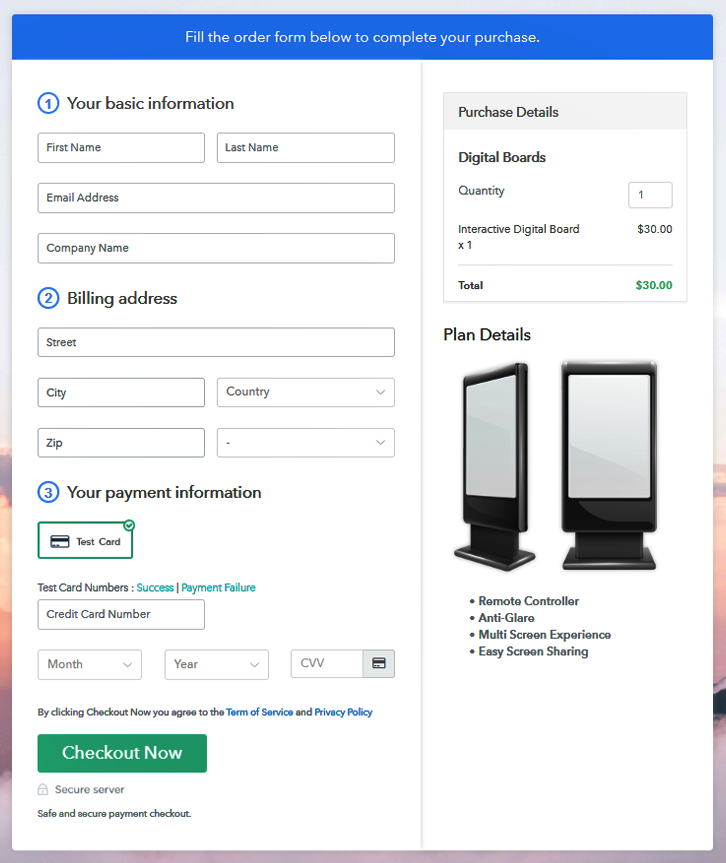
Final View of Checkout Page For Your Digital Boards Selling Business

Checkout Page to Sell Digital Boards Online

Preview Checkout Page

Step 1: Log in to Pabbly Subscription Billing

Signup

Start the process for creating a checkout page for digital boards by visiting the Pabbly Subscription Billing in your browser. After that, click on the “Sign up Free“ button. Further, either manually filled out the details or sign in using your Gmail account.

Sign Up For Free!

Step 2: Select Subscription Billing

Access Subscription Billing

Step 3: Account Setup

Setup Account

Furthermore, after clicking on the “Access Now” button of the software, a page will open with fields like company name, select currency, and phone number. Simply fill out those details to continue creating a checkout page for digital boards.

Step 4: Connect Payment Gateways & Start Digital Boards Selling Business Online

Connect Payment Gateway

The consequent step is about payment procedures using a “Test Payment Gateway”. Here, we will demonstrate the checkout page process for the digital boards with the help of a test payment gateway. Besides that, this tool offers numerous payment gateways such as PayPal, Stripe, etc. Furthermore, below are the payment integration guides to help you out.

Step 5: Add Product For Your Digital Boards

Add Product

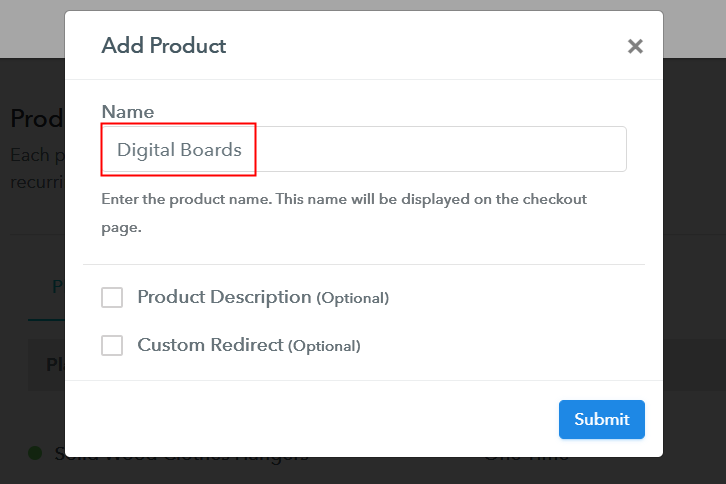
Additionally, add the name, which in our case is “Digital Boards”. Here you can specify the type and also write a short description of the digital boards to seize the client’s attention.

Add Product to Start Selling Digital Boards Online

Note: Here you can add all the products related to the similar category by creating plans for each of them.

Step 6: Add Plans 

Let’s discover plans for different kinds of digital boards available in your store.

(a) Select Add New Plan

Add Plan

(b) Specify the Plan & Pricing Details

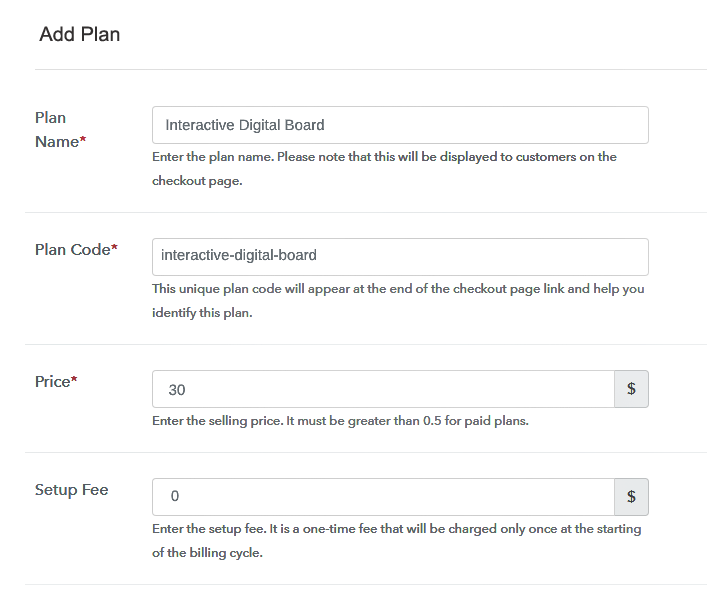
Specify the Plan and Pricing to Sell Digital Boards Online

The following thing to do is fill all the details of the digital boards like plan name, code, price, set-up fee, and much more to continue.

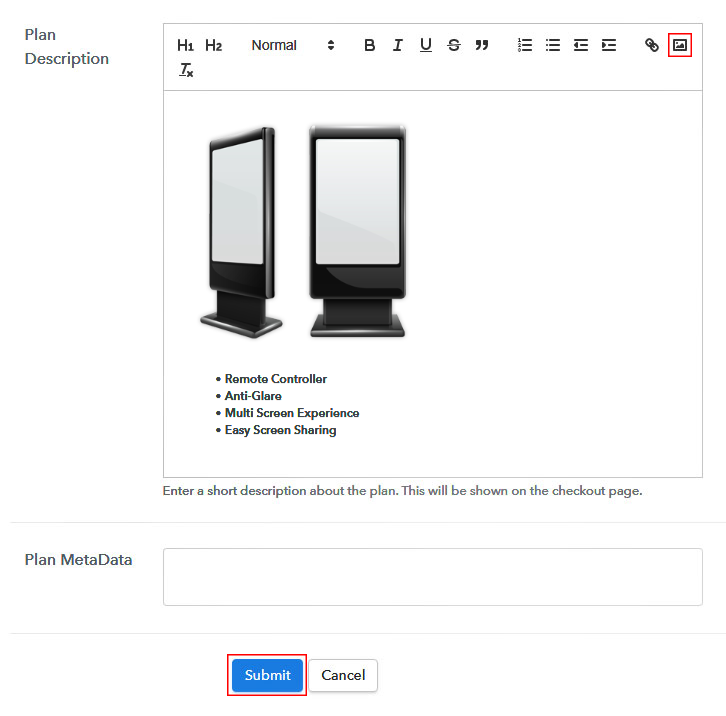
(c) Add Image & Description of Digital Boards

Add Image & Description to Sell Digital Boards Online

Furthermore, it is necessary to write a brief description of digital boards using bullets, images, etc, to bring natural customers to the checkout page.

Subsequently, click on the “Submit” button to add the digital boards on the checkout page.

Conclusively, you can add multiple plans and kinds of digital boards in your product list which you want to market online.

Step 7: Share your Checkout Page

Share Checkout Page on Social Media

  • Furthermore, share the checkout page of the digital boards on social media accounts like Facebook & Twitter to get the customer’s attention.
  • Moreover, you can share the direct link of the digital board’s checkout page with your customers via SMS or email marketing.
  • Besides that, embed the provided plan link of the digital boards in the buttons or any anchor text on your website.

Step 8: Preview Checkout Page

Follow up the recommended steps to preview the checkout page:

(a) Click on the View Button

View Checkout Plan

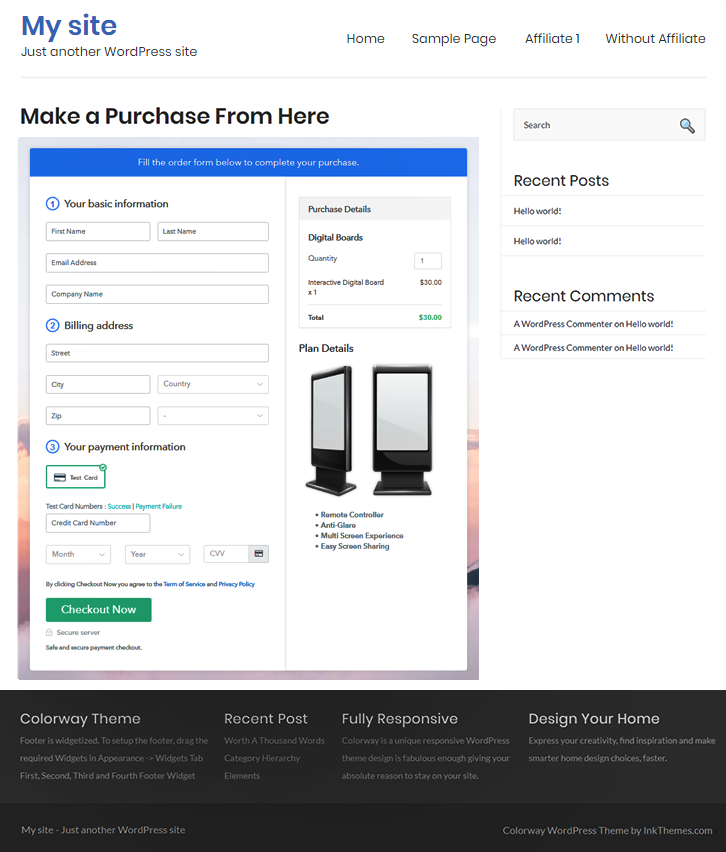
(b) Take a Look at the Checkout Page

Checkout Page to Sell Digital Boards Online

Step 9: Embed Checkout Page in Site & Sell Digital Boards Online

Embed Checkout Page on Website

Just copy the link and add the checkout page to sell digital boards online at any preferable place on your WordPress site.

(a) Edit the Page & Paste the Copied Link

Paste Link in Text Editor

Moreover, paste the plan link on a text editor of the WordPress dashboard.

(b) Save & Publish the Checkout Page

Save and Publish

Next, click the “Publish” button, after making changes.

(c) Check out the Final Look of your Checkout Page on WordPress Site

Final Look of your Checkout Page to Sell Digital Boards Online

Step 10: Multiplan Checkout Page

Note: In case you want to sell multiple products via a single checkout page, you can create a multi-plan checkout page otherwise skip this step.

(a) Click on Add Mutiplan Checkout

Multiplan Checkout

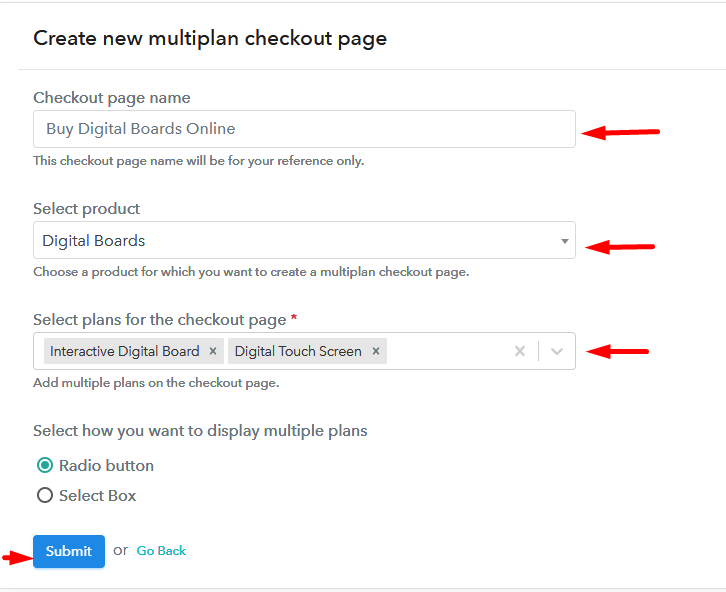
(b) Add Plans to Sell Multiple Digital Boards from Single Checkout Page

Add Multiple Products to Start Selling Digital Boards Online

(c) Take a Look at the Checkout Page

Multiplan Checkout Page to Sell Digital Boards Online

Preview Checkout Page

Wrapping Up

Alright! Starting any business online can be an overwhelming process, but with proper tools, it can be a walk in the park. In our case, it is Pabbly Subscription Billing that helps you to start digital boards selling business online. Just follow all the mentioned 10 steps and it is done just like that. Not just this, it also helps you in building strong customer relationships as it sends a timely alert to customers.

Try your hands on the software and let us know your queries in the comments section.

You May Also Like To Read –
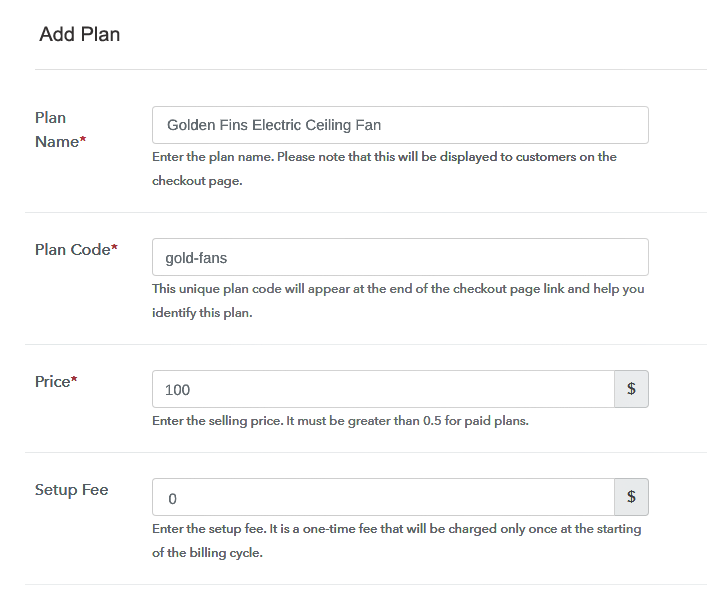
How to Sell Ceiling Fans Online | Step by Step (Free Method)

Ideal For: All the ceiling fans manufacturers, electronic shops, cottage industries, MSME and other merchants can use this method to sell ceiling fans online.

How to Sell Ceiling Fans Online

Why Choose this Method To Sell Ceiling Fans Online?

Unlike any other solution, this method allows you to:

  • List and sell your ceiling fans for FREE. Absolutely no payment required.
  • No need to pay commission on any of your sale.
  • Multiple payment options like PayPal, Credit Card, etc to collect payment from a single place.
  • Sell one time or recurring subscriptions of your ceiling fans.
  • Collect payments & sell products in any currency as per your requirement.
  • Give discounts on your products by offering special coupon codes.
  • Add sales commission agents to help you in selling ceiling fans online.

Get Pabbly Subscription Billing for Free

You have a conventional brick and mortar store selling ceiling fans but after the end of the season, the demand has dried up. To offset the losses you are planning to start ceiling fans selling business online. However, you are hesitant as you are new in this game and don’t know a thing about e-commerce. But don’t worry, we have covered the benefits and steps to sell ceiling fans online.

The advantages of selling ceiling fans online are numerous like higher product discovery by global audiences, competitive pricing, easy and accurate revenue management, no middleman commission, 24×7 automated online shop, better marketing, etc.

Now, to begin your first e-commerce store, we will use an awesome tool called Pabbly Subscription Billing. The benefit of using this software is through its checkout pages you can sell ceiling fans online. Some other benefits are

  • Unlimited Listing Of Products
  • Multiple Billing Models
  • Create Coupons, Plans, Discounts
  • Custom Domain
  • Automatic Email Notification on Payment Completion/Failure
  • Import/Export Customer Data
  • Revenue Tracking
  • Auto Retrial on Card Declines

With these features, you will definitely have a lead over your competitors. So why wait, let us create our first checkout page to start selling ceiling fans online.

Final View of Checkout Page For Your Ceiling Fans Selling Business

Checkout to Sell Ceiling Fans Online

Preview Checkout Page

Step 1: Log in to Pabbly Subscription Billing

Signup

Find Pabbly Subscription Billing in your browser and landing on their website click on  “Sign up Free“. Either you can sign in through your, Gmail account or you can fill in fields like name, email address and then press the “Sign Up” button.

Sign Up For Free!

Step 2: Select Subscription Billing

Access Subscription Billing

Step 3: Account Setup

Setup Account

Click on the “Access Now” button of the software, a page will redirect with fields like company name, select currency, and phone number. Just fill out those details to continue creating a checkout page for a ceiling fan

Step 4: Connect Payment Gateways & Start Ceiling Fans Selling Business Online

Connect Payment Gateway

To prevent glitches during transactions, Pabbly Subscription Billing provides a dummy payment gateway where you can beta test the entire payment experience of the customer in advance.

Payment gateways such as Razorpay, Stripe, and many more can be easily integrated using Pabbly Subscription Billing. There is an integration guide for each of them below this para. But I am going ahead to enable the test payment option to continue the process.

Step 5: Add Product For Your Ceiling Fans

Add ProductAssuming that the payment gateway integration went well, so let’s move on to add the products. Below the “Enable Payments” segment there is the “Add your product” section click on it. This will generate a dialog box with a blue button “Add New Product”. Click on it.

You have to add the required product title, in this case, it is ‘Ceiling Fans’.

Add Product to Sell Ceiling Fans Online

Fill up the details and your product is created.

Note: Here you can add all the products related to the similar category by creating plans for each of them.

Step 6: Add Plans 

Let’s rollout plans for different kinds of ceiling fans available in your store.

(a) Select Add New Plan

Add Plan

(b) Specify the Plan & Pricing Details

Add Plan to Sell Ceiling Fans Online

Here, in the plan page, you will fill in details like plan name, code, price, setup fees, etc. Scrolling down you will find different billing models like one-time payment, recurring, based on cycles, etc. Select your preferred billing model that suits your needs and yes you can change it anytime

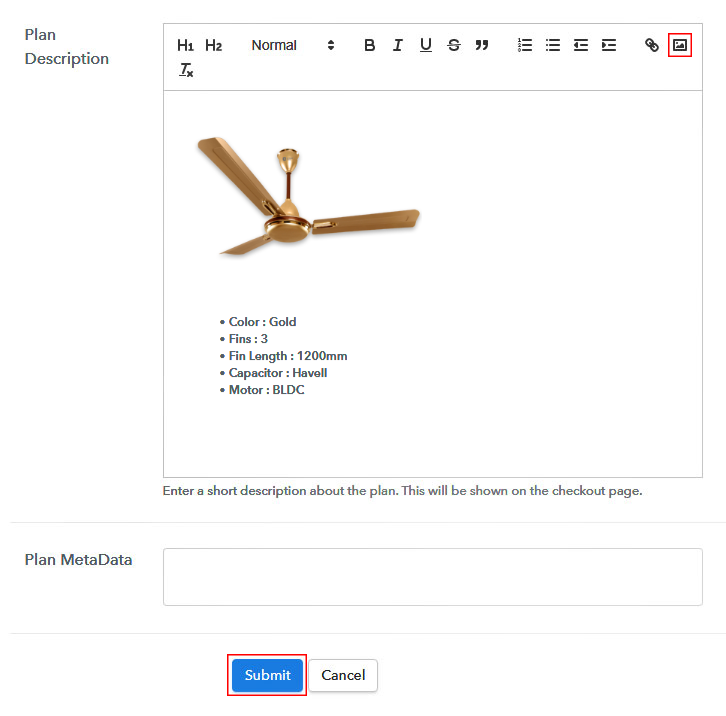
(c) Add Image & Description of Ceiling fans

Add Description to Sell Ceiling Fans Online

Upload high definition images of your ceiling fans by clicking on the image button.

Now give some comprehensive information on ceiling fans like the rotor speed, blades, power intake, etc preferably in bullet points or numerical points. Then press the “Submit” button.

Moreover, using the same process, you can list more products.

Step 7: Share your Checkout Page

Share Checkout Page on Social Media

  • Now share the checkout page of the ceiling fans on social media sites like Facebook & Twitter to get the customer’s attention using their respective buttons.
  • Furthermore, you can share the direct link of the ceiling fans checkout page with your customers via SMS or email marketing.
  • Moreover, you can insert the link of the ceiling fans in the buttons or any anchor text on your website.

Step 8: Preview Checkout Page

Follow up the recommended steps to preview the checkout page:

(a) Click on the View Button

View Checkout Plan

(b) Take a Look at the Checkout Page

Checkout to Sell Ceiling Fans Online

Step 9: Embed Checkout Page in Site & Sell Ceiling Fans  Online

Embed Checkout Page on Website

Just copy the link and add the checkout page to sell ceiling fans online at any preferable place on your WordPress site.

(a) Edit the Page & Paste the Copied Link

Paste_Link_in_Text_Editor

Further, paste the plan link on a text editor of the WordPress dashboard.

(b) Save & Publish the Checkout Page

Save_and_Publish

Next, click the “Publish” button, after making changes.

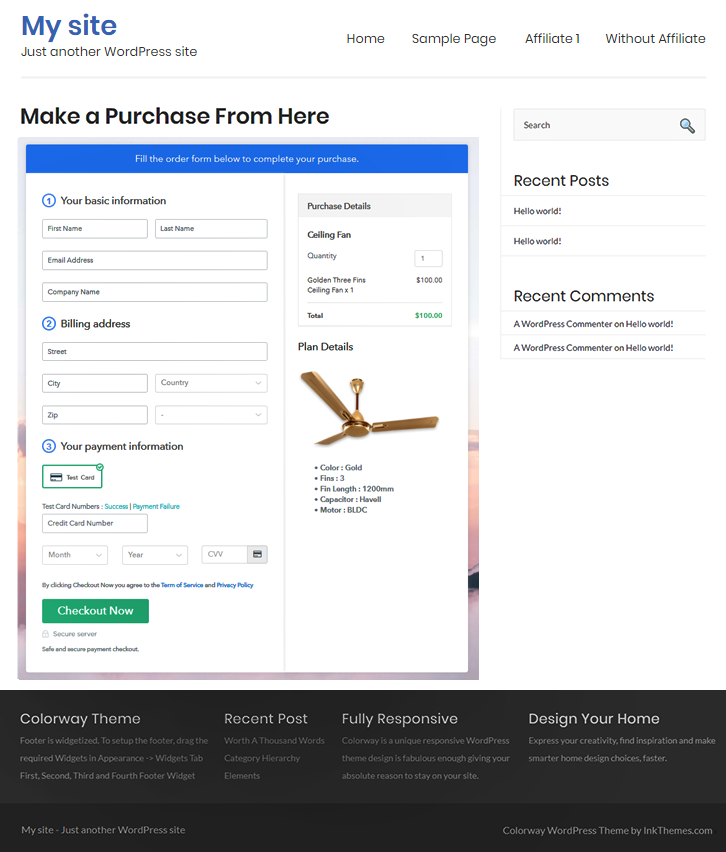
(c) Check out the Final Look of your Checkout Page on WordPress Site

Embed WordPress to Sell Ceiling Fans Online

Step 10: Multiplan Checkout Page

Note: In case you want to sell multiple products via a single checkout page, you can create a multi-plan checkout page otherwise skip this step.

(a) Click on Add Mutiplan Checkout

Multiplan Checkout

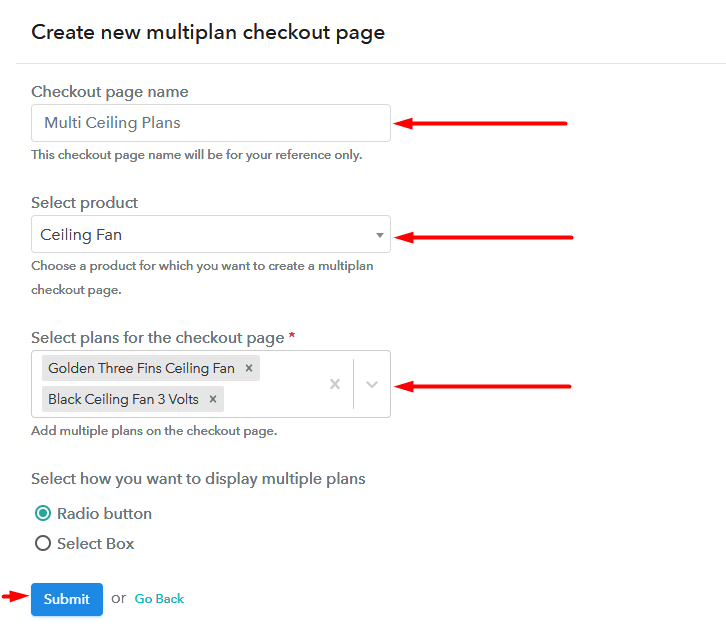
(b) Add Plans to Sell Multiple Ceiling Fans from Single Checkout Page

Add Multi Plans to Sell Ceiling Fans Online

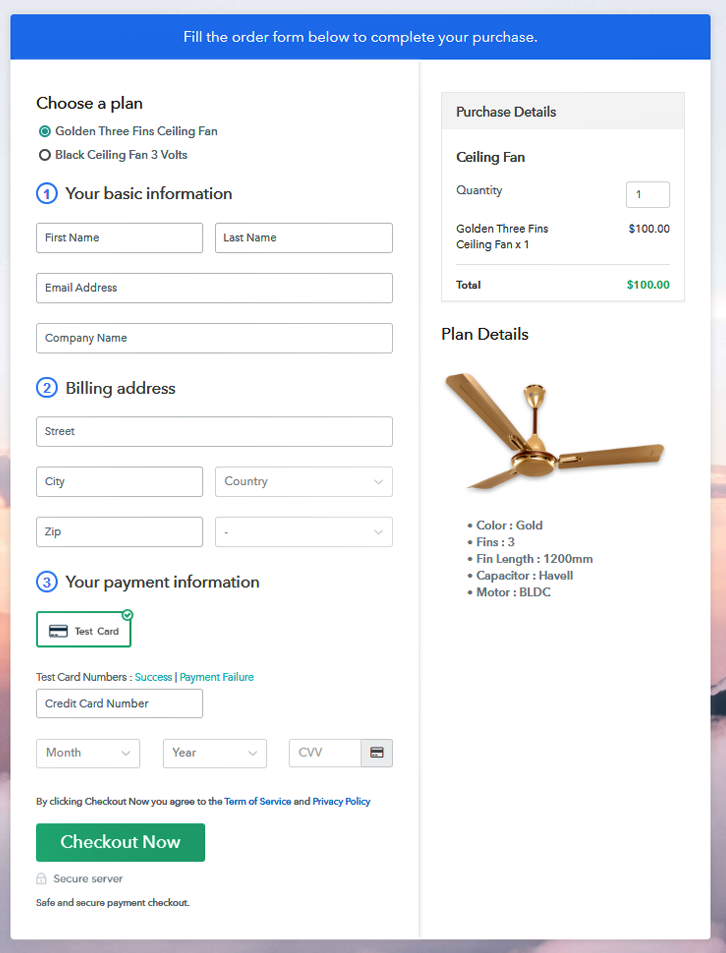
(c) Take a Look at the Checkout Page

Multiplan Checkout to Sell Ceiling Fans Online

Preview Checkout Page

Wrapping Up

Excellent!! You have finally made your first checkout page in Pabbly Subscription Billing to sell ceiling fans online. Since these are your baby steps, you may encounter some hiccups but eventually, you will master all its features to fully dominate the e-commerce world.

Now, you may have some queries regarding these steps, go ahead and drop your questions in the comment section below. We will reply to you at the earliest.

You May Also Like To Read –
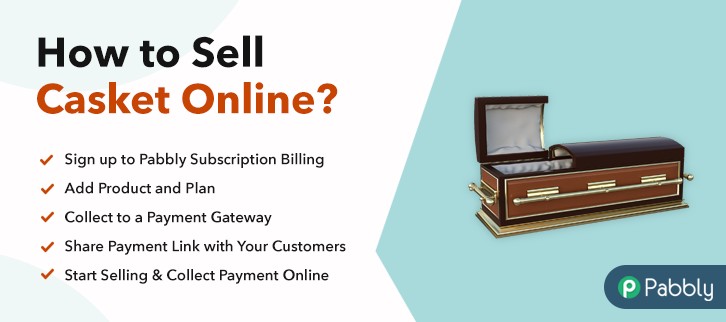
How to Sell Caskets Online | Step by Step (Free Method)

Ideal For: All the caskets manufacturers, burial shops, burial gardens, cemeteries and other merchants can use this method to sell caskets online.

How to Sell Caskets Online

Why Choose this Method To Sell Caskets Online?

Unlike any other solution, this method allows you to:

  • List and sell your caskets for FREE. Absolutely no payment required.
  • No need to pay commission on any of your sale.
  • Multiple payment options like PayPal, Credit Card, etc to collect payment from a single place.
  • Sell one time or recurring subscriptions of your caskets.
  • Collect payments & sell products in any currency as per your requirement.
  • Give discounts on your products by offering special coupon codes.
  • Add sales commission agents to help you in selling caskets online.

Get Pabbly Subscription Billing for Free

In the western world, caskets are used for burials but increasingly many people are opting for crematoriums. It is estimated that by 2035, only 40% of the dead will be buried in the caskets while the rest will be cremated. Since the casket business is shrinking down, many manufacturers are using the internet to sell caskets online for getting higher demands and popularise casket burials. Other benefits of selling caskets online include better marketing, flexible working hours, higher product display, lower middleman commission etc.

Now, in this blog, we will use an online service called Pabbly Subscription Billing to create checkout pages to sell caskets online. The advantages of using this method are many

  • Unlimited Products Listing
  • Generate Unlimited Revenues
  • Revenue Tracking
  • Auto Credit Card Reattempts on Decline
  • Create Unlimited Coupons, Plans & Discounts
  • Automatic Email Notifications
  • Easy Import/ Export  Customer Data
  • Custom Domain

Using, these features, you will be better placed than your competitors in online business. So why wait, let’s build our first checkout page to start casket selling business online.

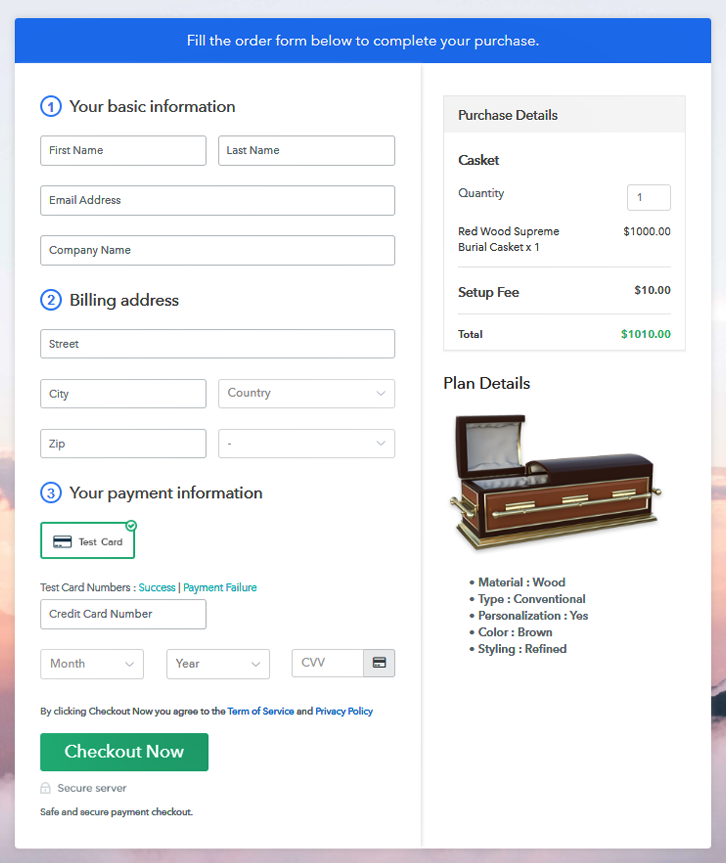
Final View of Checkout Page For Your Caskets Selling Business

Checkout to Sell Caskets Online

Preview Checkout Page

Step 1: Log in to Pabbly Subscription Billing

Signup

Look in your browser for Pabbly Subscription Billing and here click on  “Sign up Free“. Now, sign in through your, Gmail account or you can fill in fields like name, email address and then press the “Sign Up” button.

Sign Up For Free!

Step 2: Select Subscription Billing

Access Subscription Billing

Step 3: Account Setup

Setup Account

Click on the “Access Now” button of the software, a page will redirect with fields like company name, select currency, and phone number. Just fill out those details to continue creating a checkout page for a casket.

Step 4: Connect Payment Gateways & Start Caskets Selling Business Online

Connect Payment Gateway

To prevent glitches during transactions, Pabbly Subscription Billing provides a dummy payment gateway where you can beta test the entire payment experience of the customer in advance.

Payment gateways such as Razorpay, Stripe, and many more can be easily integrated using Pabbly Subscription Billing. There is an integration guide for each of them below this para. But I am going ahead to enable the test payment option to continue the process.

Step 5: Add Product For Your Casket

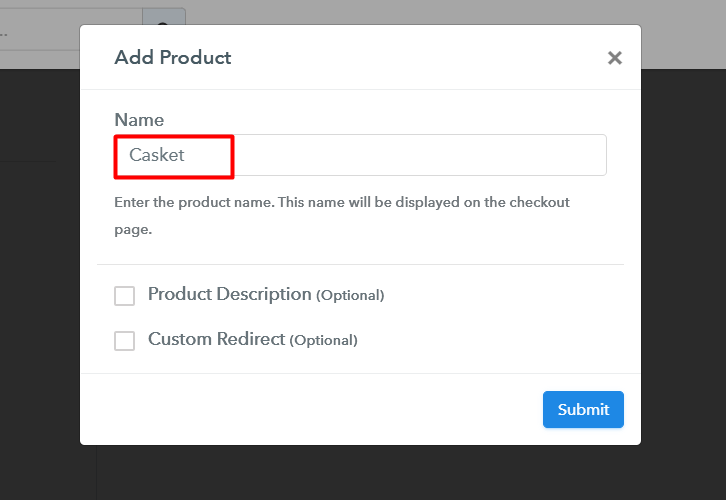
Add ProductI am hoping that the payment gateway integration went well, so let’s start adding the products. Below the “Enable Payments” segment there is the “Add your product” section click on it. This will generate a dialog box with a blue button “Add New Product”. Click on it.

You have to add the required product title, in this case, it is ‘caskets’.

Add Product to Sell Caskets Online

Fill up the details and your product is created.

Note: Here you can add all the products related to the similar category by creating plans for each of them.

Step 6: Add Plans 

Let’s rollout plans for different kinds of caskets available in your store.

(a) Select Add New Plan

Add Plan

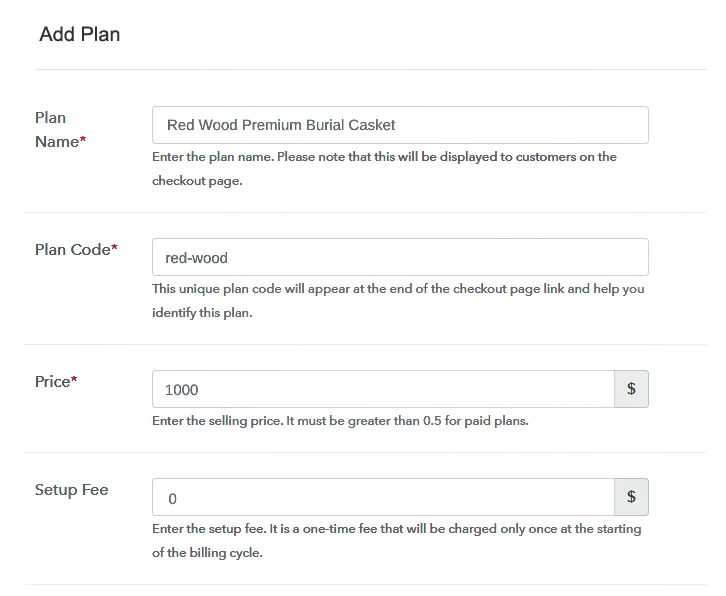
(b) Specify the Plan & Pricing Details

Add Plan to Sell Caskets Online

Here, in the plan page, you will fill in details like plan name, code, price, setup fees, etc. Scrolling down you will find different billing models like one-time payment, recurring, based on cycles, etc. Select your preferred billing model that suits your needs and yes you can change it anytime

(c) Add Image & Description of Caskets

Add Image to Sell Caskets Online

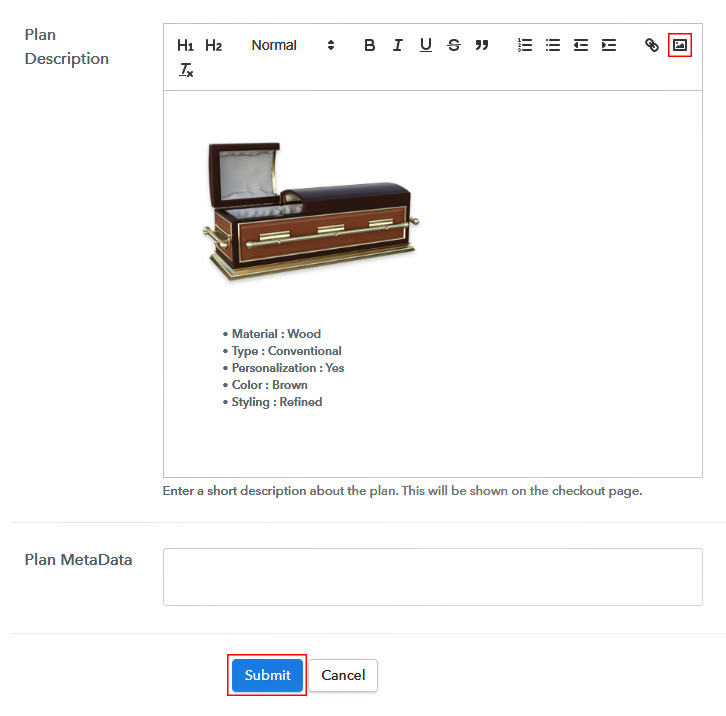
Take some amazing pictures of your caskets and upload it using the image button.

Now give some comprehensive information on caskets like the material used, weight, color, etc in bullet points or numerical points. Then press the “Submit” button.

Also, using the same process, you can list more products.

Step 7: Share your Checkout Page

Share Checkout Page on Social Media

  • Share the checkout page of the caskets on social media accounts like Facebook & Twitter to get the customer’s attention.
  • Moreover, you can share the direct link of the caskets checkout page with your customers via SMS or email marketing.
  • Also, insert the link of the caskets in the buttons or any anchor text on your website.

Step 8: Preview Checkout Page

Follow up the recommended steps to preview the checkout page:

(a) Click on the View Button

View Checkout Plan

(b) Take a Look at the Checkout Page

Preview Checkout to Sell Caskets Online

Step 9: Embed Checkout Page in Site & Sell Ceiling fans  Online

Embed Checkout Page on Website

Just copy the link and add the checkout page to sell caskets online at any preferable place on your WordPress site.

(a) Edit the Page & Paste the Copied Link

Paste_Link_in_Text_Editor

Further, paste the plan link on a text editor of the WordPress dashboard.

(b) Save & Publish the Checkout Page

Save_and_Publish

Next, click the “Publish” button, after making changes.

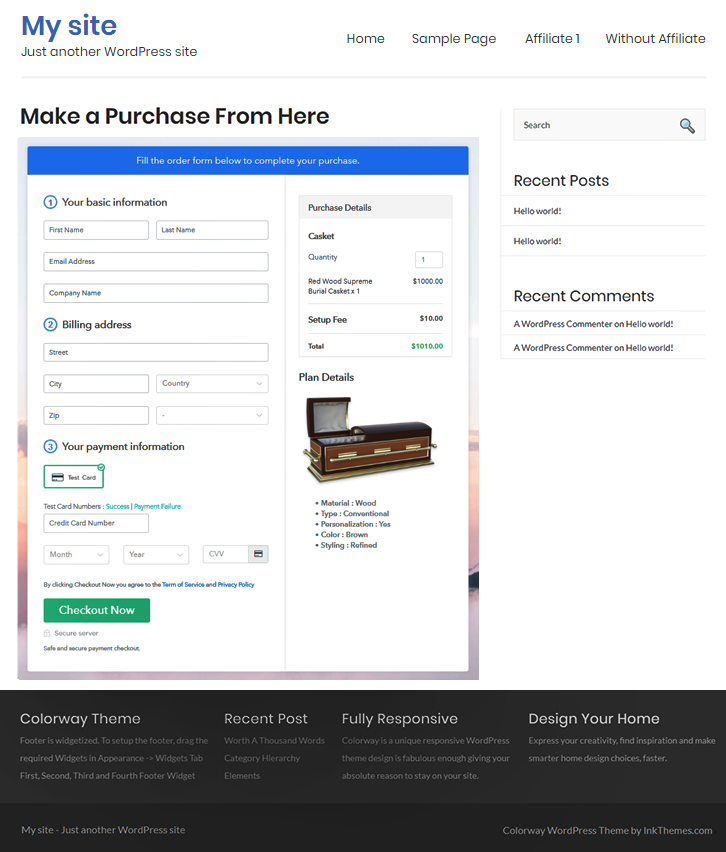
(c) Check out the Final Look of your Checkout Page on WordPress Site

Embed On WordPress to Sell Caskets Online

Step 10: Multiplan Checkout Page

Note: In case you want to sell multiple products via a single checkout page, you can create a multi-plan checkout page otherwise skip this step.

(a) Click on Add Mutiplan Checkout

Multiplan Checkout

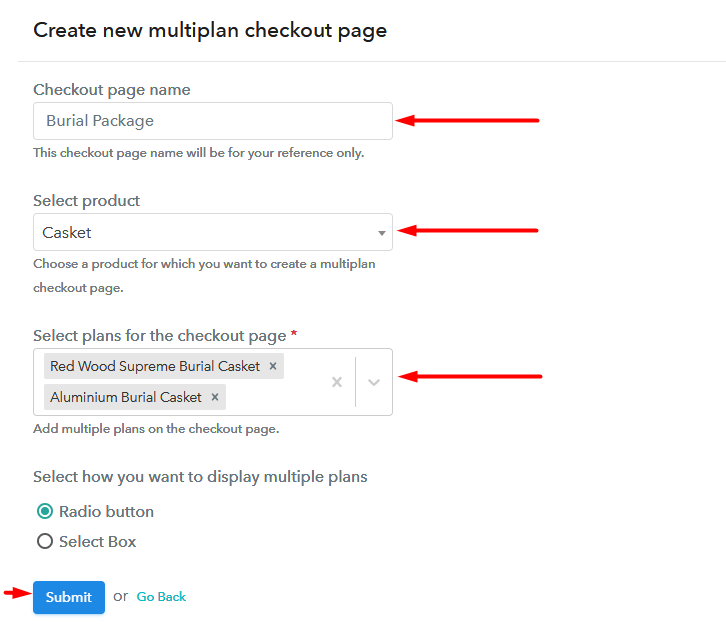
(b) Add Plans to Sell Multiple Caskets from Single Checkout Page

Add Multiplan Plan to Sell Caskets Online

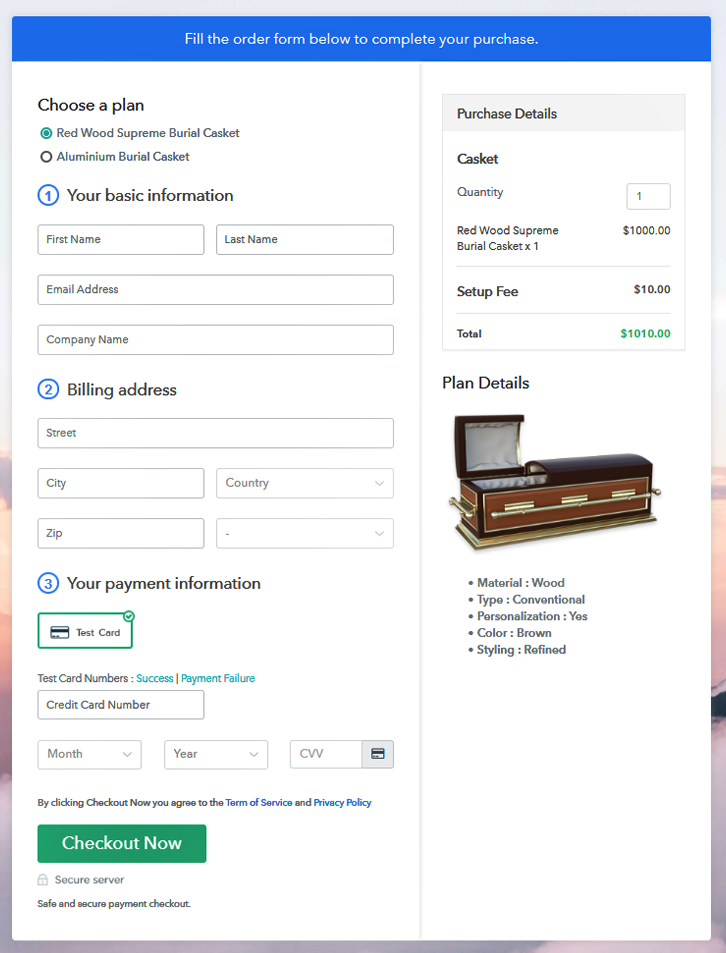
(c) Take a Look at the Checkout Page

Multiplan Checkout to Sell Caskets Online

Preview Checkout Page

Wrapping Up

So, you learned a simple and easy method to sell caskets online through Pabbly Subscription Billing. Using its incredible features, transparent billing and sharing checkout pages, your business will definitely rise manifolds in the long run.

Also, since you are a beginner, you may have some doubts about the listed steps, so feel free to ask any questions in the comment section below. Thank You.

You May Also Like To Read –
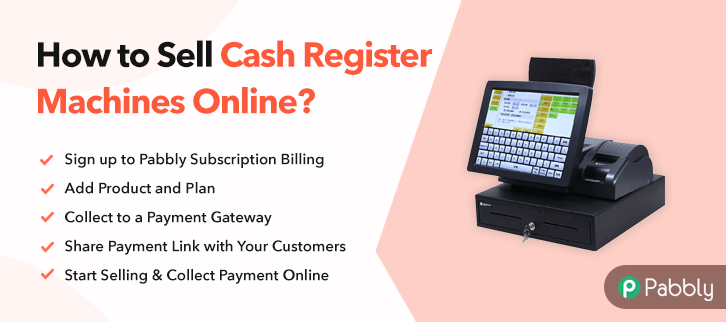
How to Sell Cash Register Machines Online | Step by Step (Free Method)

Ideal For: All the cash register machine manufacturers, cash register machine sellers, cash register machine traders, gadgets shop owners, and other merchants can use this method to sell cash register machines online.

How to Sell Cash Register Machines Online

Why Choose this Method To Sell Cash Register Machines Online?

Unlike any other solution, this method allows you to:

  • List and sell your cash register machines for FREE. Absolutely no payment required.
  • No need to pay commission on any of your sale.
  • Multiple payment options like PayPal, Credit Card, etc to collect payment from a single place.
  • Sell one time or recurring subscriptions of your cash register machines.
  • Collect payments & sell products in any currency as per your requirement.
  • Give discounts on your products by offering special coupon codes.
  • Add sales commission agents to help you in selling cash register machines online.

Get Pabbly Subscription Billing for Free

Gone are the days when cash registers were used to keep the data of sales. They used to require a lot of time and effort to keep records in track. Thus, to save time and efforts of the people cash register machine was invented. And, now they are being widely used by shop owners as it is portable and automatically saves data in it.

Thus, in this digital age, people mostly prefer to buy things online. Therefore, all the shop keepers may find it convenient to buy cash register machine online rather than shopping offline. No wonder, this could be the right time for you to start your cash register machines selling business online.

Therefore, in this blog, we would like to suggest the most versatile tool i.e, Pabbly Subscription Billing. Using this software, you can create checkout pages that can be shared on social media platforms, websites, SMS, emails, etc.

Here are some of its amazing features:

  • Unlimited Product and Plan
  • Endless Coupons & Discounts
  • One Time and Recurring Billing
  • Online & Offline Payment Collection
  • Tax Management

So, without any further due, let me take you through the 10 easy steps that you need to follow for creating checkout pages.

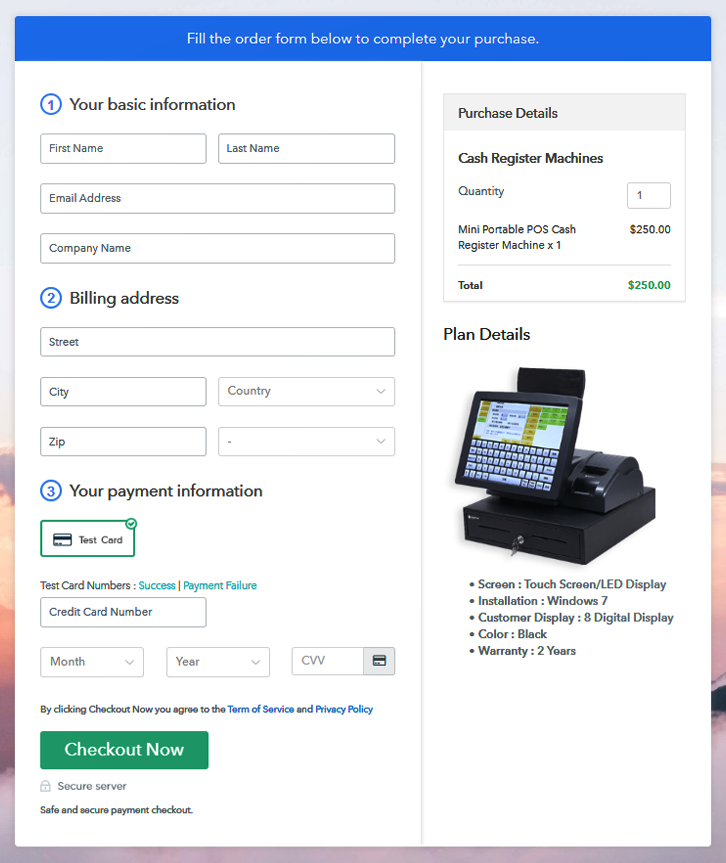
Final View of Checkout Page For Your Cash Register Machines Selling Business

Checkout Page to Start Cash Register Machine Business Online

Preview Checkout Page

Step 1: Log in to Pabbly Subscription Billing

Signup

For creating a checkout page for selling cash register machines online, your first step is to visit the Pabbly Subscription Billing website. Then, you need to press the “Sign up Free“ button. Additionally, you can either fill out the details manually or else sign in via Gmail account.

Sign Up For Free!

Step 2: Select Subscription Billing

Access Subscription Billing

Step 3: Account Setup

Setup Account

After you click on the “Access Now” button, a page will pop up that will ask you to fill the company details such as name, select currency, and phone number. Just fill out those details and click on the “Continue” button to sell cash register machines online.

Step 4: Connect Payment Gateways & Start Cash Register Machines Selling Business Online

Connect Payment Gateway

The following step is to know the payment procedure and for that Pabbly Subscription Billing offers you a “Test Payment Gateway”. Besides, you can also connect with several payment gateways such as PayPal, Stripe, etc using their integration guide given beneath this paragraph. For instance, here I am enabling the test payment gateway.

Step 5: Add Product For Your Cash Register Machines

Add Product

Now, you need to add the product that you want to sell online i.e, cash register machines. And to do so, you need to press the button named “Add New Product” & fill up the name in the appeared pop up box.

Add Product to Sell Cash Register Machines Online

Note: Here you can add all the products related to the similar category by creating plans for each of them.

Step 6: Add Plans 

Let’s rollout plans for different kinds of cash register machines available in your store.

(a) Select Add New Plan

Add Plan

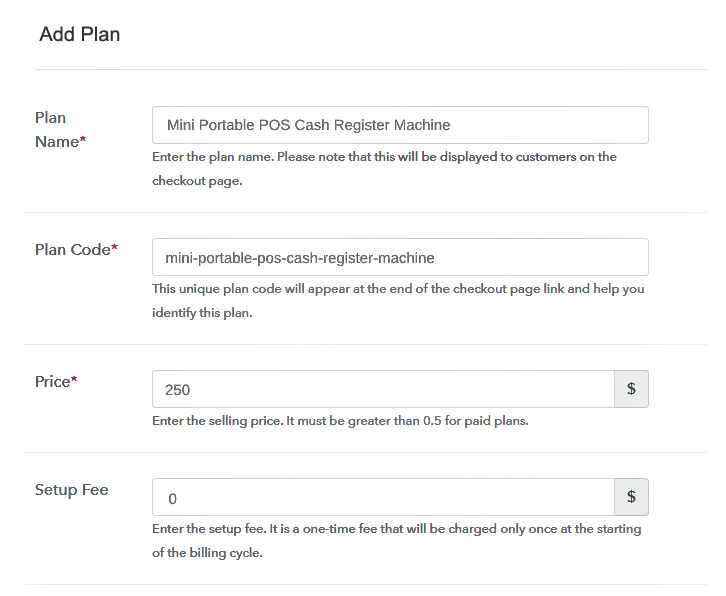
(b) Specify the Plan & Pricing Details

Specify the Plan & Pricing Details to Sell Cash Register Machine Onlline

Afterward, you need to fill all the details of cash register machine such as plan name, code, price, set-up fee, and much more to continue.

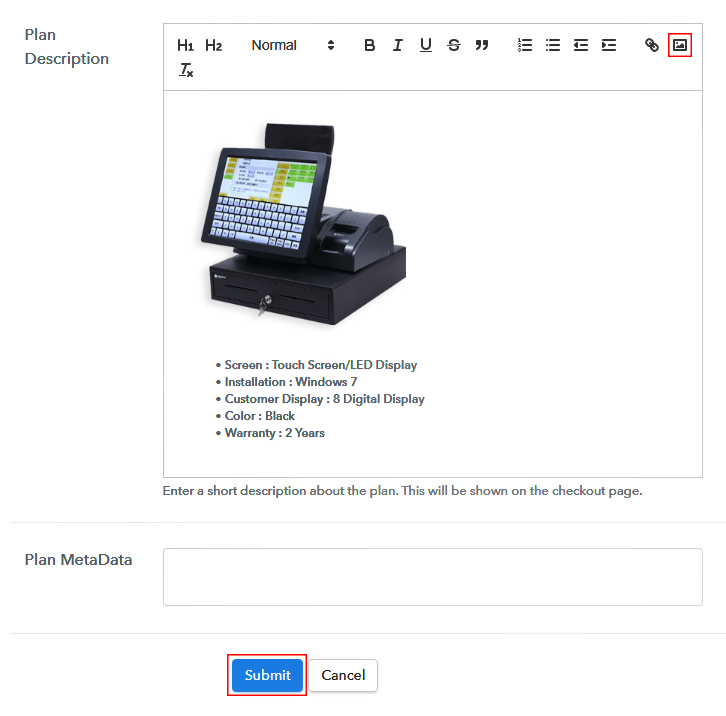
(c) Add Image & Description of Cash Register Machines

Add Image & Description to Sell Cash Register Machine Online

Furthermore, now its time to provide a small description of cash register machines using bullets, images, etc, to the checkout page.

Subsequently, now press the “Submit” button to add the cash register machines on the checkout page.

Next, just add the multiple plans and varieties of cash register machines in your product list that you want to sell online.

Step 7: Share your Checkout Page

Share Checkout Page on Social Media

  • Now, just share the checkout page of the cash register machines on social media platforms such as Facebook & Twitter using their respective buttons.
  • Besides that, you can also share the direct link of the cash register machine’ checkout page with your customers directly through SMS and emails.
  • Not only that, but you can also embed the provided plan link of the cash register machines in the buttons or any anchor text on your website.

Step 8: Preview Checkout Page

Follow up the recommended steps to preview the checkout page:

(a) Click on the View Button

View Checkout Plan

(b) Take a Look at the Checkout Page

Checkout Page to Start Cash Register Machines Business Online

Step 9: Embed Checkout Page in Site & Sell Cash Register Machines Online


Embed Checkout Page on Website

Just copy the link and add the checkout page to sell cash register machines online at any preferable place on your WordPress site.

(a) Edit the Page & Paste the Copied Link

Edit the Page & Paste the Copied Link

Further, paste the plan link on a text editor of the WordPress dashboard.

(b) Save & Publish the Checkout Page

Save & Publish the Checkout Page

Next, click the “Publish” button, after making changes.

(c) Check out the Final Look of your Checkout Page on WordPress Site

Embed Checkout Page in Site & Sell Cash Register Machines Online

Step 10: Multiplan Checkout Page

Note: In case you want to sell multiple products via a single checkout page, you can create a multi-plan checkout page otherwise skip this step.

(a) Click on Add Mutiplan Checkout

Multiplan Checkout

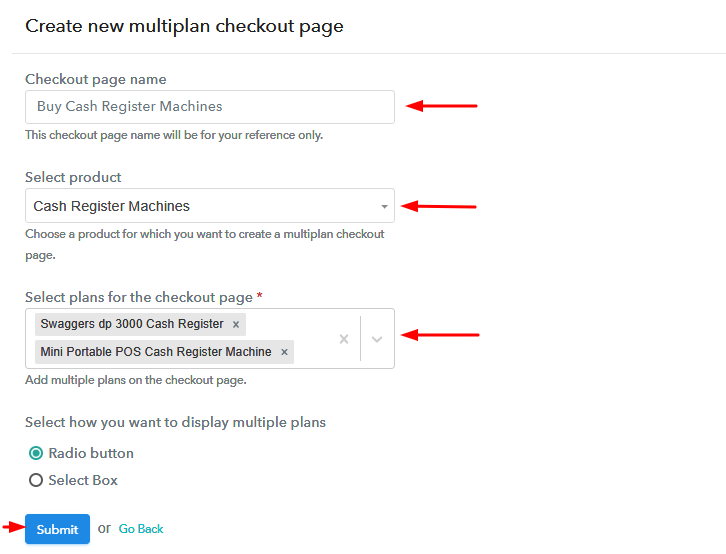
(b) Add Plans to Sell Multiple Cash Register Machines from Single Checkout Page

Add Multiplan to Sell Cash Register Machines Online

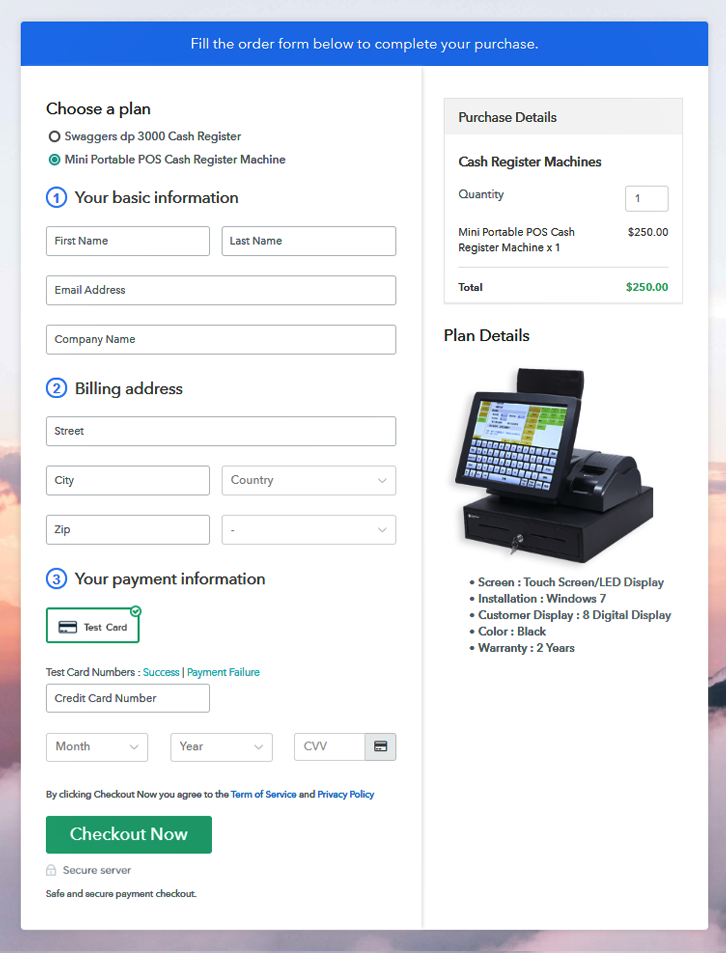
(c) Take a Look at the Checkout Page

Multiplan Checkout Page to Start Cash Register Machine Business Online

Preview Checkout Page

Wrapping Up

We hope this article has helped you resolve your query on “How to sell cash register machines online?”. And to do so, just follow the easy 10 steps that are mentioned above. By doing that, your cash register machines business will be ready to set up in no time.

So, why wait anymore? Start selling cash register machines and if you have any queries regarding these steps. Then, just write it in the comment section below. We will get back to you ASAP. Thank you.

You May Also Like To Read –
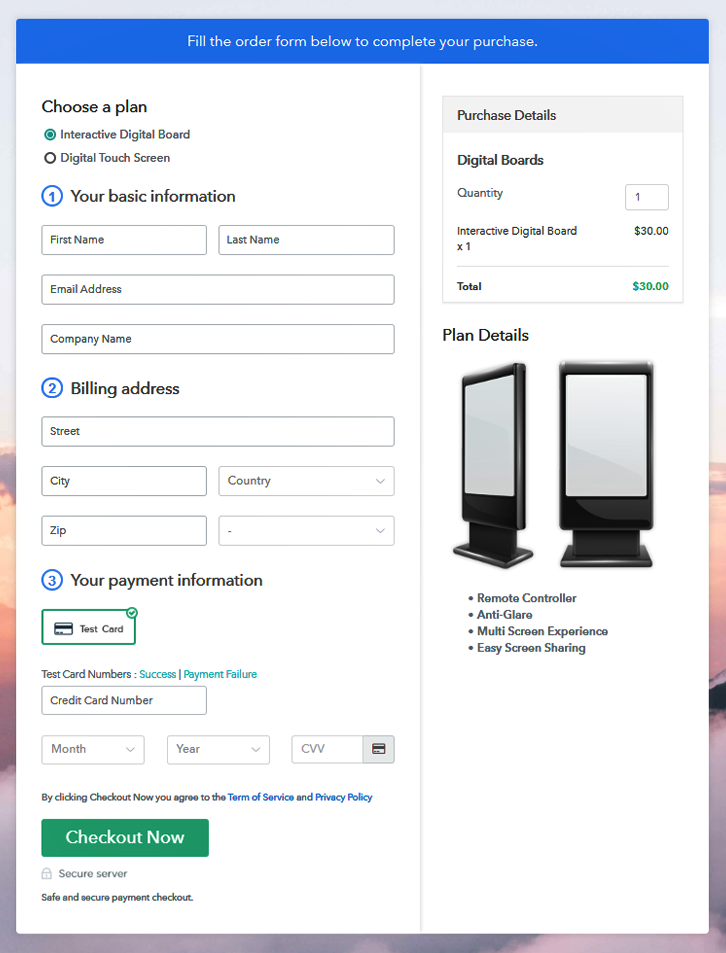
How to Sell Cigarette Boxes Online | Step by Step (Free Method)

How to Sell Cigarette Boxes Online

Ideal For: All the cigarette box manufacturers, cigarette box sellers, retail cigarette box shop owners, and other merchants can use this method to take their cigarette boxes selling business online.

How to Sell Cigarette Boxes Online

Why Choose this Method To Sell Cigarette Boxes Online?

Unlike any other solution, this method allows you to:

  • List and sell your cigarette boxes for FREE. Absolutely no payment required.
  • No need to pay commission on any of your sales.
  • Multiple payment options like PayPal, Credit Card, etc to collect payment from a single place.
  • Sell one time or recurring subscriptions of your cigarette boxes.
  • Collect payments & sell products in any currency as per your requirement.
  • Give discounts on your products by offering special coupon codes.
  • Add sales commission agents to help you in selling cigarette boxes online.

Get Pabbly Subscription Billing for Free

Cigarette consumption is increasing day by day and companies are looking out for a unique strategy to beat the competition. One of the approaches is to distinguish the cigarette boxes from other competitors. By that, they can draw user’s attention towards the product. So if you have a business of cigarette boxes, it is a perfect time to make some dime out of it by bringing the business online.

According to the Globe-News Wire report, the tobacco packaging market would witness a 3.7% CAGR between 2020 and 2030. And starting cigarette selling business online is a positive approach as it will save buyers time. Considering all these we have a software named Pabbly Subscription Billing that lets you create an amazing checkout page for selling cigarette boxes online.

Other than this, it is packed with features, some of it are mentioned below:

  • List different cigarette boxes in a single checkout page
  • Create multiple billing order using a software
  • Offer unlimited coupon codes and discount to customers

So, the aforementioned are some of the points and now let’s focus on creating a checkout page for selling cigarette boxes online using this amazing tool.

Note: In no possible way we are encouraging cigarette consumption. Selling cigarettes to a minor is unethical and illegal.

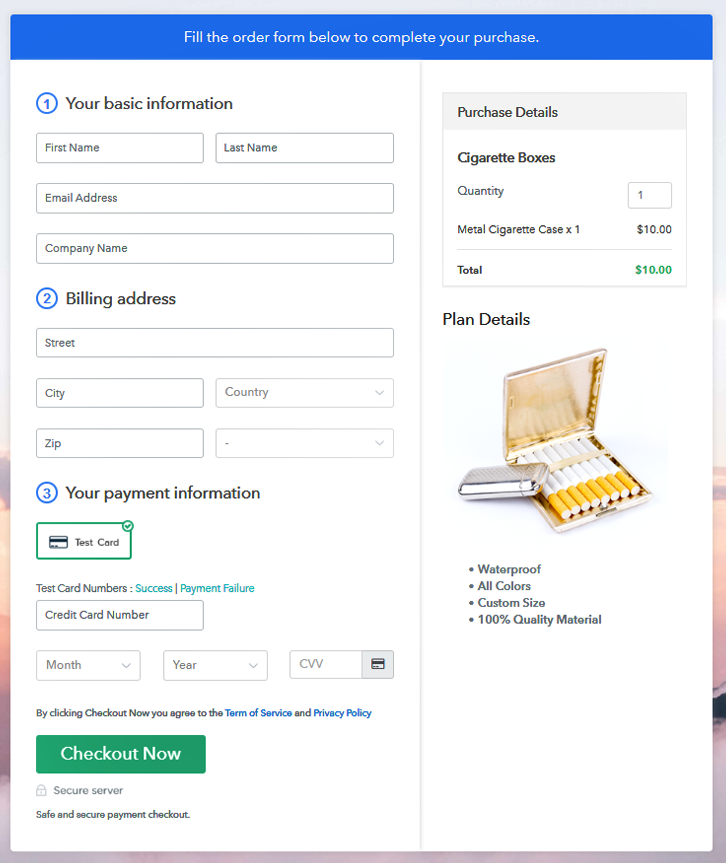
Final View of Checkout Page For Your Cigarette Boxes Selling Business

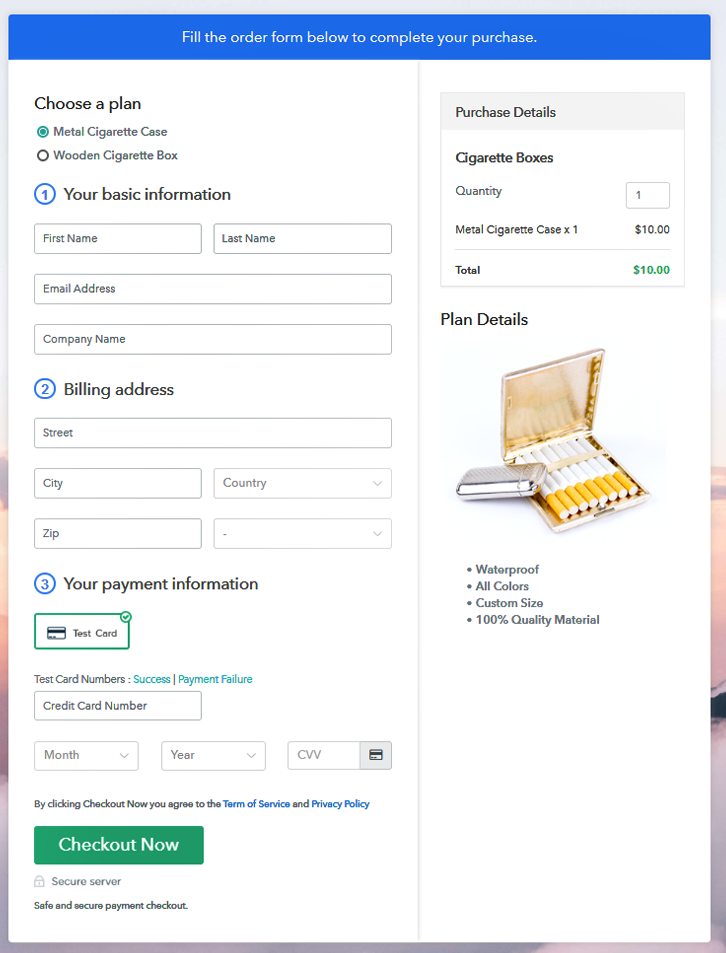
Checkout Page to Sell Cigarette Boxes Online

Preview Checkout Page

Step 1: Log in to Pabbly Subscription Billing

Signup

Begin the process for creating a checkout page for selling cigarette boxes online by visiting the Pabbly Subscription Billing in your browser. Moreover, click on the “Sign up Free“ button. Further, either manually filled out the details or sign in using your Gmail account.

Sign Up For Free!

Step 2: Select Subscription Billing

Access Subscription Billing

Step 3: Account Setup

Setup Account

Moreover, after clicking on the “Access Now” button of the software, a page will redirect with fields like company name, select currency, and phone number. Further, fill out those details to continue creating a checkout page for the cigarette boxes.

Step 4: Connect Payment Gateways & Start Cigarette Boxes Selling Business Online

Connect Payment Gateway

The subsequent step is to gain knowledge about software payment procedures using a “Test Payment Gateway”. Here, we are continuing the checkout page process for the cigarette boxes using a test payment gateway. Additionally, it is packed with various payment gateways like PayPal, Stripe, etc. Besides, below we are stating the payment integration guides.

Step 5: Add Product For Your Cigarette Boxes

Add Product

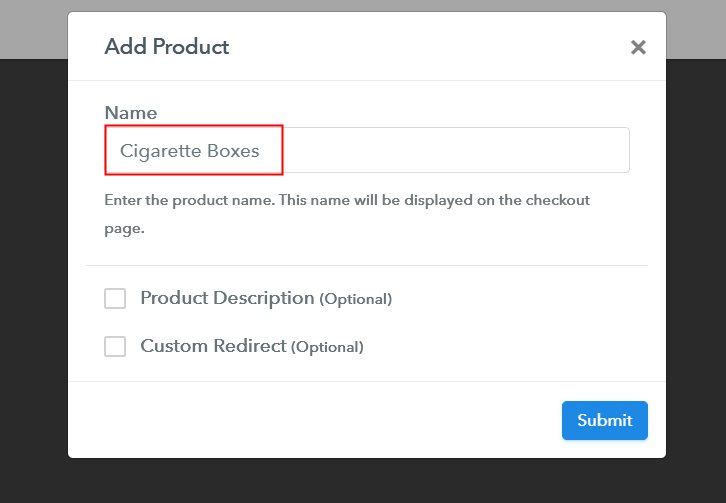
Further, add the name, which in our case is “Cigarette Boxes”. Here you can specify the type like a vintage cigarette box,  wooden cigarette box, etc. Also, write a short description of the cigarette boxes to seize the customer’s attention.

Add Product to Start Selling Cigarette Boxes Online

Note: Here you can add all the products related to the similar category by creating plans for each of them.

Step 6: Add Plans

Let’s rollout plans for different kinds of cigarette boxes available in your store.

(a) Select Add New Plan

Add Plan

(b) Specify the Plan & Pricing Details

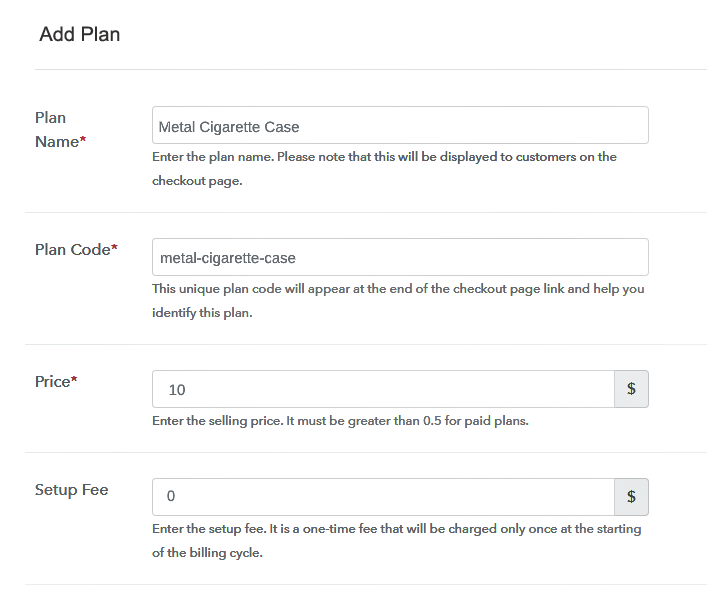
Specify the Plan and Pricing to Sell Cigarette Boxes Online

The following thing to do is fill all the details of the cigarette boxes like plan name, code, price, set-up fee, and much more to continue.

(c) Add Image & Description of Cigarette Boxes

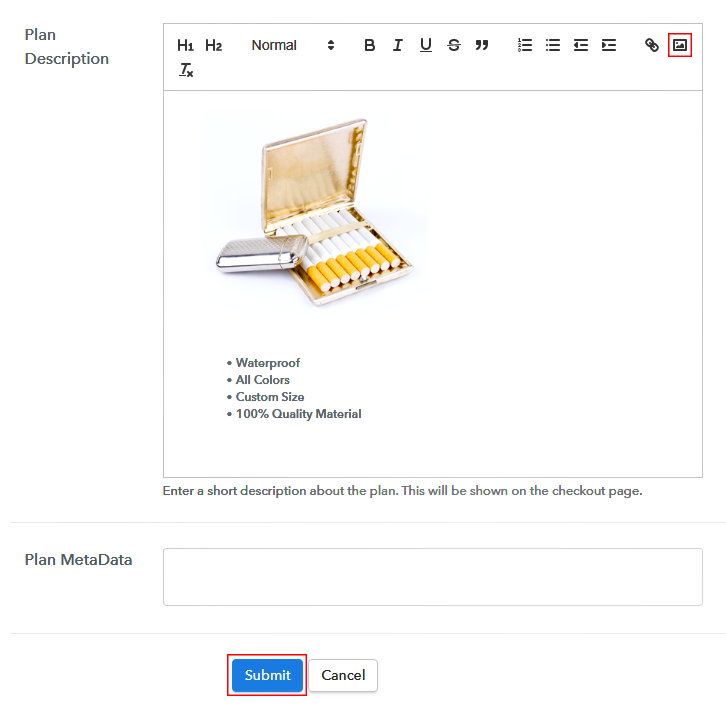
Add Image & Description to Sell Cigarette Boxes Online

Moreover, it is necessary to write a brief description of the cigarette boxes using bullets, images, etc, to bring possible customers to the checkout page.

Furthermore, click on the “Submit” button to add the cigarette boxes on the checkout page.

Certainly, you can add multiple plans and kinds of cigarette boxes in your product list which you want to sell online.

Step 7: Share your Checkout Page

Share Checkout Page on Social Media

  • Besides, share the checkout page of the cigarette boxes on social media accounts like Facebook & Twitter to get the customer’s attention.
  • Plus, you can share the direct link of the cigarette boxes’ checkout page with your customers via SMS or email marketing.
  • Additionally, embed the provided plan link of the cigarette boxes in the buttons or any anchor text on your website.

Step 8: Preview Checkout Page

Follow up the recommended steps to preview the checkout page:

(a) Click on the View Button

View Checkout Plan

(b) Take a Look at the Checkout Page

Checkout Page to Sell Cigarette Boxes Online

Step 9: Embed Checkout Page in Site & Sell Cigarette Boxes Online

Embed Checkout Page on Website

Further, just copy the link and add the checkout page to sell cigarette boxes online at any preferable place on your WordPress site.

(a) Edit the Page & Paste the Copied Link

Paste Link in Text Editor

Moreover, paste the plan link on a text editor of the WordPress dashboard.

(b) Save & Publish the Checkout Page

Save and Publish

Further, click the “Publish” button, after making changes.

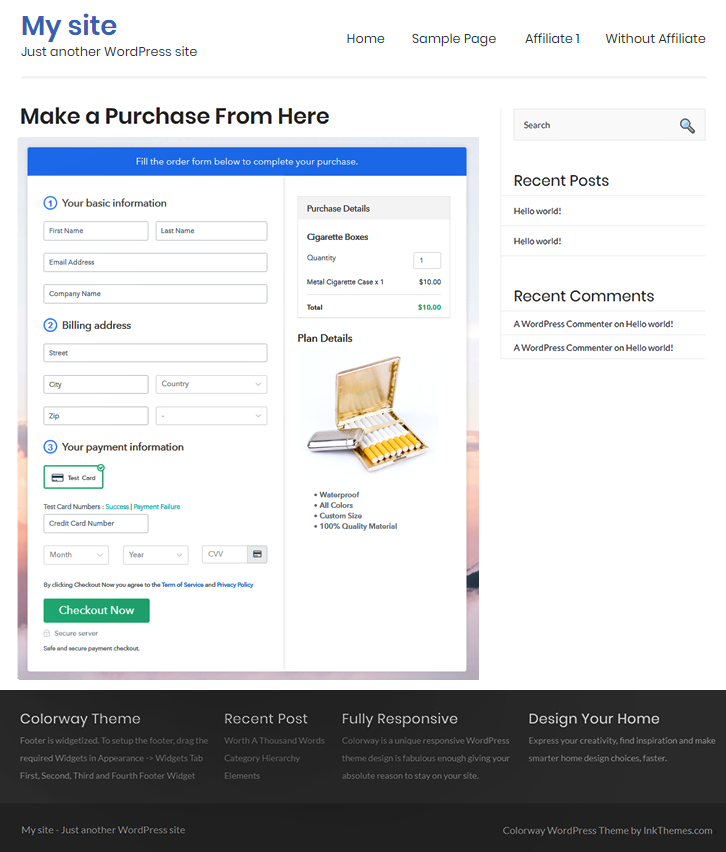
(c) Check out the Final Look of your Checkout Page on WordPress Site

Final Look of your Checkout Page to Sell Cigaretts Boxes Online

Step 10: Multiplan Checkout Page

Note: In case you want to sell multiple products via a single checkout page, you can create a multi-plan checkout page otherwise skip this step.

(a) Click on Add Mutiplan Checkout

Multiplan Checkout

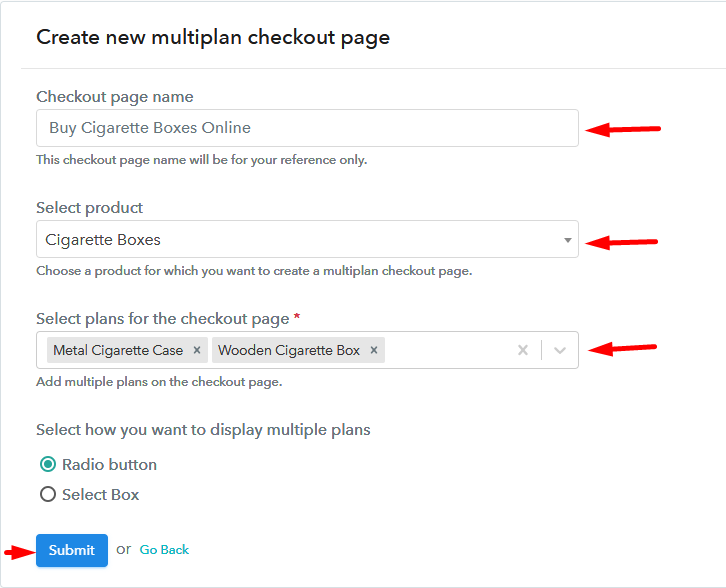
(b) Add Plans to Sell Multiple Cigarette Boxes from Single Checkout Page

Multiplan Checkout Page to Sell Cigarette Boxes Online

(c) Take a Look at the Checkout Page

Multiplan Checkout Page to Sell Cigarette Boxes Online

Preview Checkout Page

Wrapping Up

Hopefully, now you all know how easy it is to start cigarette boxes selling business online using Pabbly Subscription Billing. All you have to do is follow all the above mentioned steps and nothing else. Moreover, the software comes up with many perks like professional invoicing, tracking, and much more.

So, don’t wait anymore, try this software out and knock us out with your queries.

You May Also Like To Read –
How to Sell Cufflinks Online | Step by Step (Free Method)

How to Sell Cufflinks Online

Ideal For: All the cufflink manufacturers, cufflink sellers, cufflink designers, cufflink suppliers, jewellry shop owners, and other merchants can use this method to sell cufflinks online.

How to Sell Cufflinks Online

Why Choose this Method To Sell Cufflinks Online?

Unlike any other solution, this method allows you to:

  • List and sell your cufflinks for FREE. Absolutely no payment required.
  • No need to pay commission on any of your sales.
  • Multiple payment options like PayPal, Credit Card, etc to collect payment from a single place.
  • Sell one time or recurring subscriptions of your cufflinks.
  • Collect payments & sell products in any currency as per your requirement.
  • Give discounts on your products by offering special coupon codes.
  • Add sales commission agents to help you in selling cufflinks online.

Get Pabbly Subscription Billing for Free

Owning a luxurious cufflinks is the dream of every man. As they flaunt their wrist while wearing suits. That’s the reason why cufflinks never go out of fashion. Therefore, it is the right time to take your cufflinks business online, Want to know why? Well, online shopping are very comfortable as buyers can see variety of cufflinks just sitting at home which is more preferred by people nowadays. Moreover, it can also boost your sales as you will be getting orders from all around the world.

In order to start the cufflinks business online, a particular tool is required. And for that, we have a software named Pabbly Subscription Billing that helps you to create beautiful checkout pages for selling cufflinks online. Not only that, but you can also share them on your websites, social media platforms and even through email marketing and SMS. Now, let me take you through the 10 easy steps that you need to follow in order to create checkout pages online.

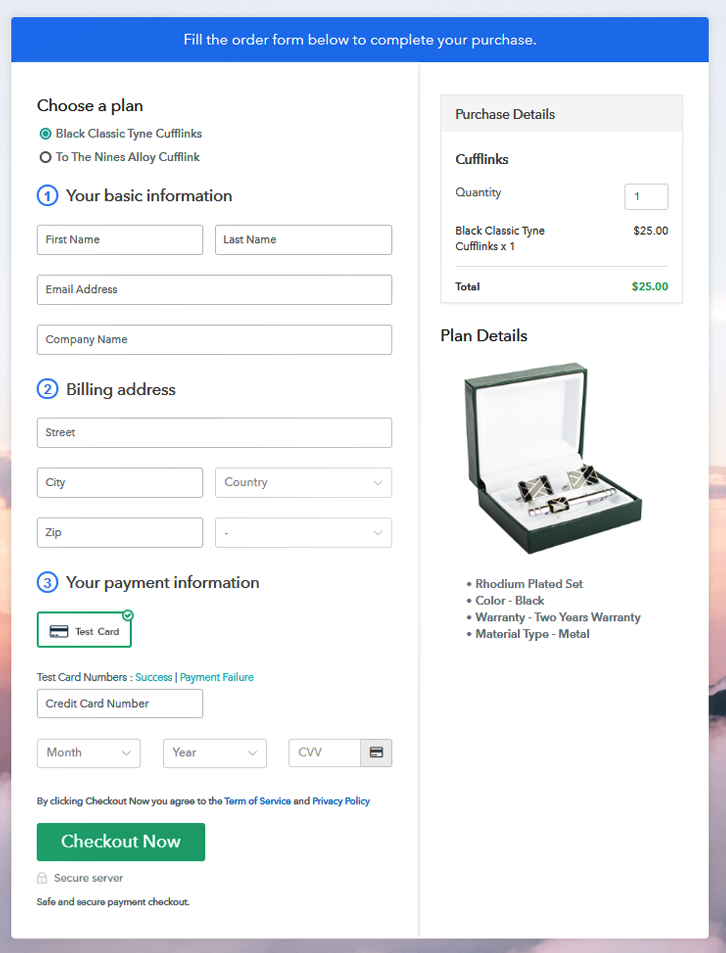
Final View of Checkout Page For Your Cufflinks Selling Business

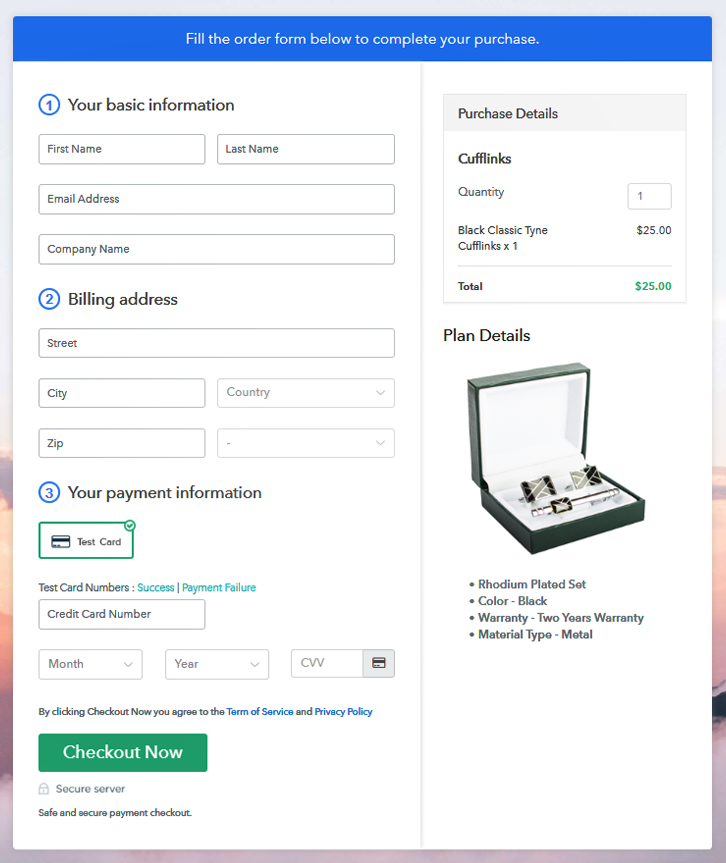
Checkout Page to Sell Cufflinks Online

Preview Checkout Page

Step 1: Log in to Pabbly Subscription Billing

Signup

Start the process by visiting the Pabbly Subscription Billing in your browser. After that, click on the “Sign up Free“ button. Further, either manually filled out the details or sign in using your Gmail account.

Sign Up For Free!

Step 2: Select Subscription Billing

Access Subscription Billing

Step 3: Account Setup

Setup Account

Besides, after clicking on the “Access Now” button of the software, a page will open with fields like company name, select currency, and phone number. Simply fill out those details to continue creating a checkout page for cufflinks.

Step 4: Connect Payment Gateways & Start Cufflinks Selling Business Online

Connect Payment Gateway

The consequent step is about payment procedures using a “Test Payment Gateway”. Here, we will demonstrate the checkout page process for the cufflinks with the help of test payment gateway. Besides that, this tool offers numerous payment gateways such as PayPal, Stripe, etc. Furthermore, below their payment integration guides have been provided.

Step 5: Add Product For Your Cufflinks

Add Product

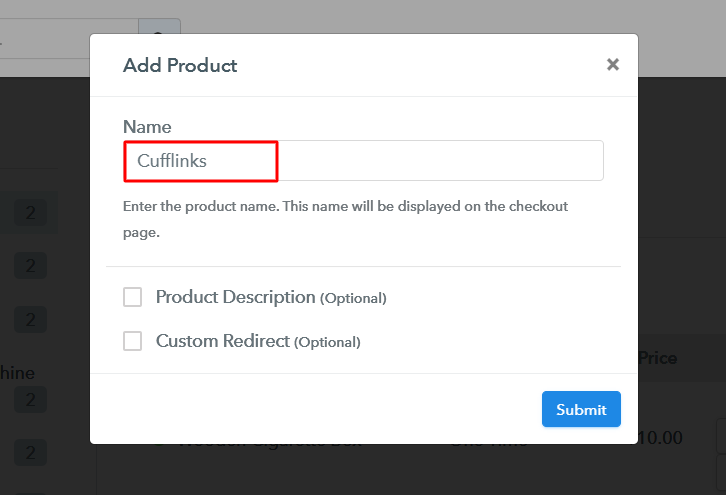
Additionally, add the name, which in our case is “Cufflinks”. Here you can specify the type and also write a short description of the cufflinks to grab the client’s attention.

Add Product to Start Selling Cufflinks Online

Note: Here you can add all the products related to the similar category by creating plans for each of them.

Step 6: Add Plans 

Let’s rollout plans for different kinds of cufflinks available in your store.

(a) Select Add New Plan

Add Plan

(b) Specify the Plan & Pricing Details

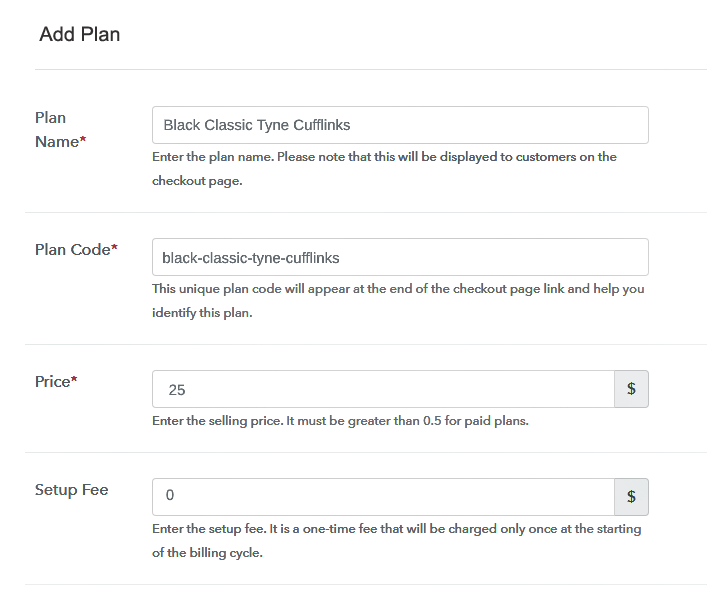
Specify the Plan and Pricing to Sell Cufflinks Online

The following thing to do is fill all the details of the cufflinks like plan name, code, price, set-up fee, and much more to continue.

(c) Add Image & Description of Cufflinks

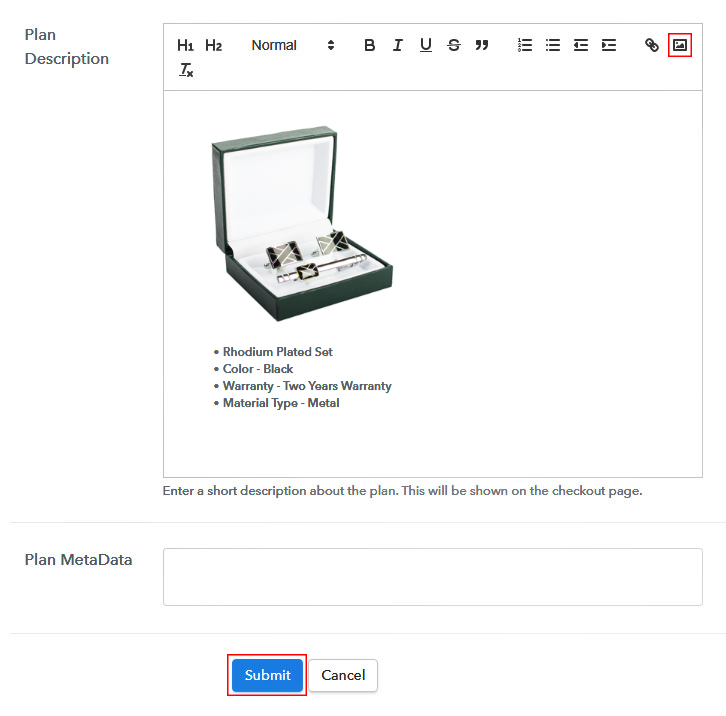
Add Image & Description to Sell Cufflinks Online

Furthermore, it is necessary to write a brief description of cufflinks using bullets, images, etc, to bring inherent customers to the checkout page.

Subsequently, click on the “Submit” button to add the cufflinks on the checkout page.

Conclusively, you can add multiple plans and kinds of cufflinks in your product list which you want to sell online.

Step 7: Share your Checkout Page

Share Checkout Page on Social Media

  • Furthermore, share the checkout page of the cufflinks on social media accounts like Facebook & Twitter to get the customer’s attention.
  • Moreover, you can share the direct link of the cufflink’s checkout page with your customers via SMS or email marketing.
  • Besides that, embed the provided plan link of the cufflinks in the buttons or any anchor text on your website.

Step 8: Preview Checkout Page

Follow up the recommended steps to preview the checkout page:

(a) Click on the View Button

View Checkout Plan

(b) Take a Look at the Checkout Page

Checkout Page to Sell Cufflinks Online

Step 9: Embed Checkout Page in Site & Sell Cufflinks Online

Embed Checkout Page on Website

Just copy the link and add the checkout page to sell cufflinks online at any preferable place on your WordPress site.

(a) Edit the Page & Paste the Copied Link

Paste Link in Text Editor

Further, paste the plan link on a text editor of the WordPress dashboard.

(b) Save & Publish the Checkout Page

Save and Publish

Next, click the “Publish” button, after making changes.

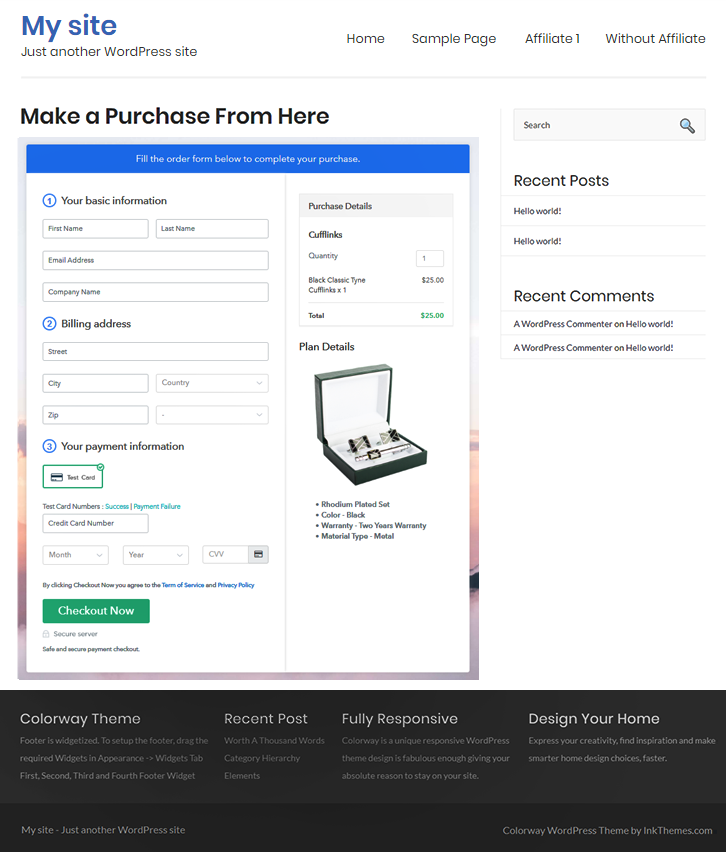
(c) Check out the Final Look of your Checkout Page on WordPress Site

Final Look of your Checkout Page to Sell Cufflinks Online

Step 10: Multiplan Checkout Page

Note: In case you want to sell multiple products via a single checkout page, you can create a multi-plan checkout page otherwise skip this step.

(a) Click on Add Mutiplan Checkout

Multiplan Checkout

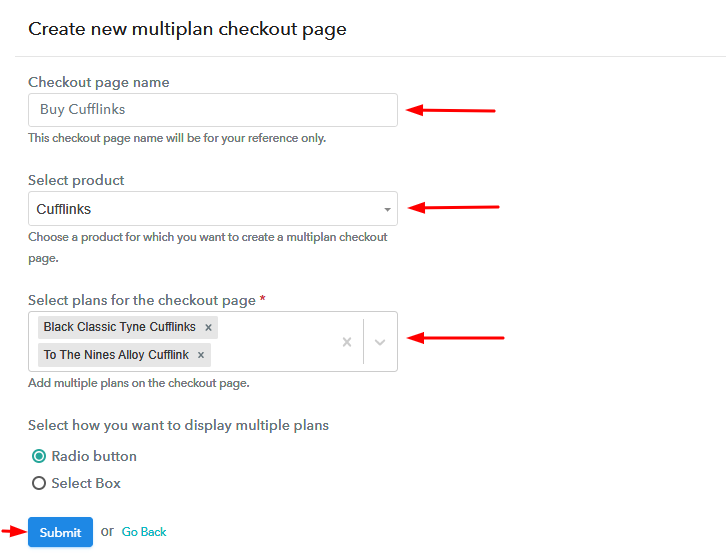
(b) Add Plans to Sell Multiple Cufflinks from Single Checkout Page

Add Multiple Products to Start Selling Cufflinks Online

(c) Take a Look at the Checkout Page

Multiplan Checkout Page to Sell Cufflinks Online

Preview Checkout Page

Wrapping Up

There you go!! With the help of Pabbly Subscription Billing, you can easily start cufflinks selling business online. All you need to do is follow all the above-mentioned 10 steps and you’re ready to go. So, why wait? Sign into Pabbly Subscription Billing and start selling cufflinks in no time.

Try this software and if you have any queries/suggestions. Don’t forget to drop it in the comment section below.

You May Also Like To Read –
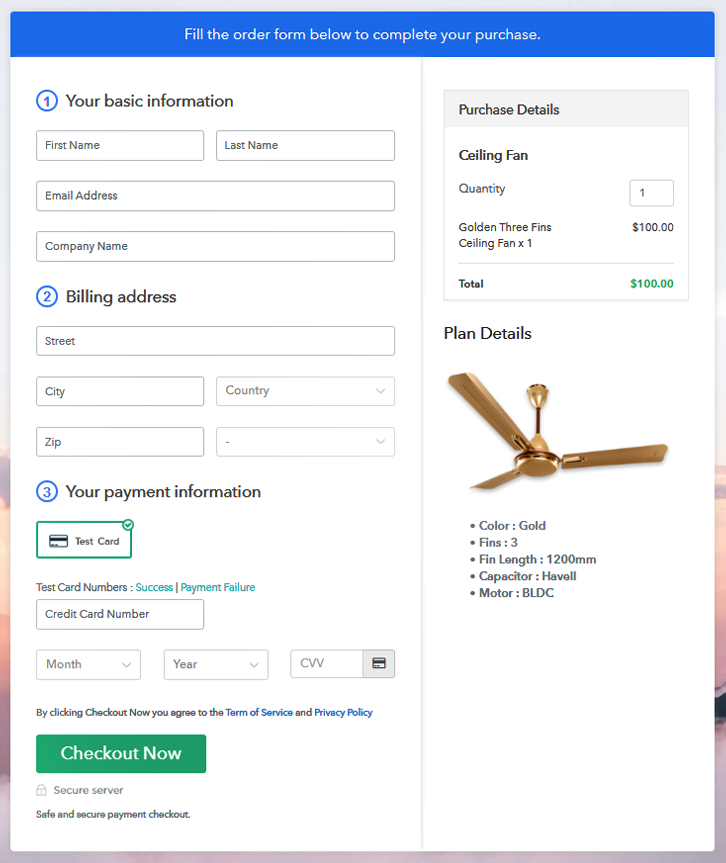
How to Sell CCTV Cameras Online | Step by Step (Free Method)

How to Sell CCTV Cameras Online

Ideal For: All the CCTV camera manufacturers, CCTV camera sellers, retail CCTV camera shop owners, and other merchants can use this method to take their CCTV camera selling business online.

How to Sell CCTV Cameras Online

Why Choose this Method To Sell CCTV Camera Online?

Unlike any other solution, this method allows you to:

  • List and sell your CCTV cameras for FREE. Absolutely no payment required.
  • No need to pay commission on any of your sale.
  • Multiple payment options like PayPal, Credit Card, etc to collect payment from a single place.
  • Sell one time or recurring subscriptions of your CCTV cameras.
  • Collect payments & sell products in any currency as per your requirement.
  • Give discounts on your products by offering special coupon codes.
  • Add sales commission agents to help you in selling CCTV cameras online.

Get Pabbly Subscription Billing for Free

CCTV cameras are now almost everywhere, so this business is also capturing a good audience on the internet. And if you are looking for some way to sell CCTV cameras online then hope that this could be of your help.

In this article, we’ll discuss the process of creating checkout pages to accept secure payments. The checkout pages will display your product and its related details.

Moreover, there are multiple ways by which you can bring customers to these checkout pages. You can share them globally on many social media platforms like Facebook, WhatsApp, Twitter, Emails, SMS etc. Also, you can embed them in the site post, pages, buttons and text.

What more you’ll get to sell CCTV cameras online are:

  • A dashboard to keep a record of all the CCTV cameras in stock
  • Collect payments offline/online
  • Automatic instant invoicing & billing
  • Apply global taxes
  • Offer special coupons and discounts to the customers etc.

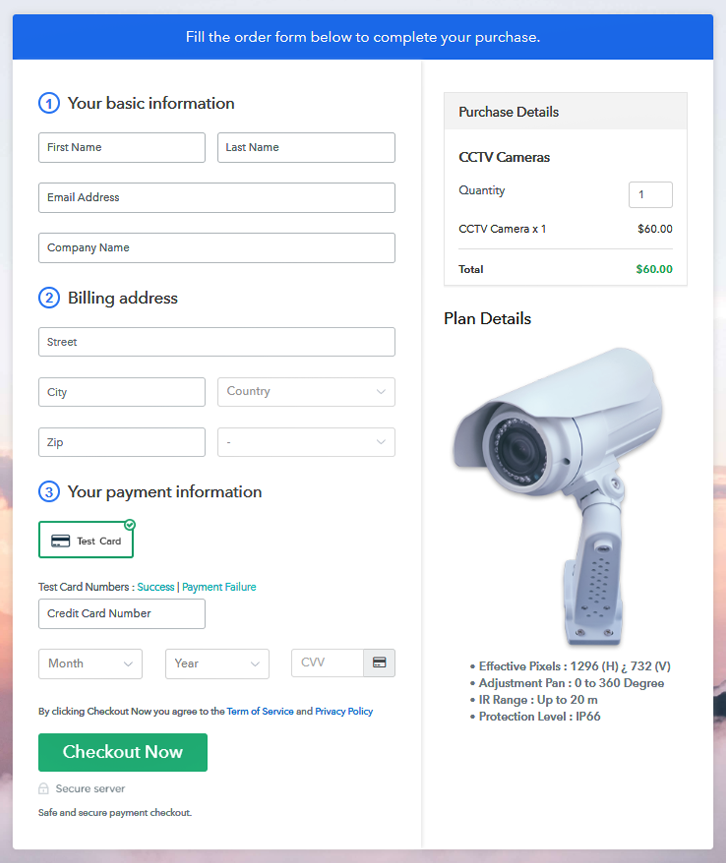
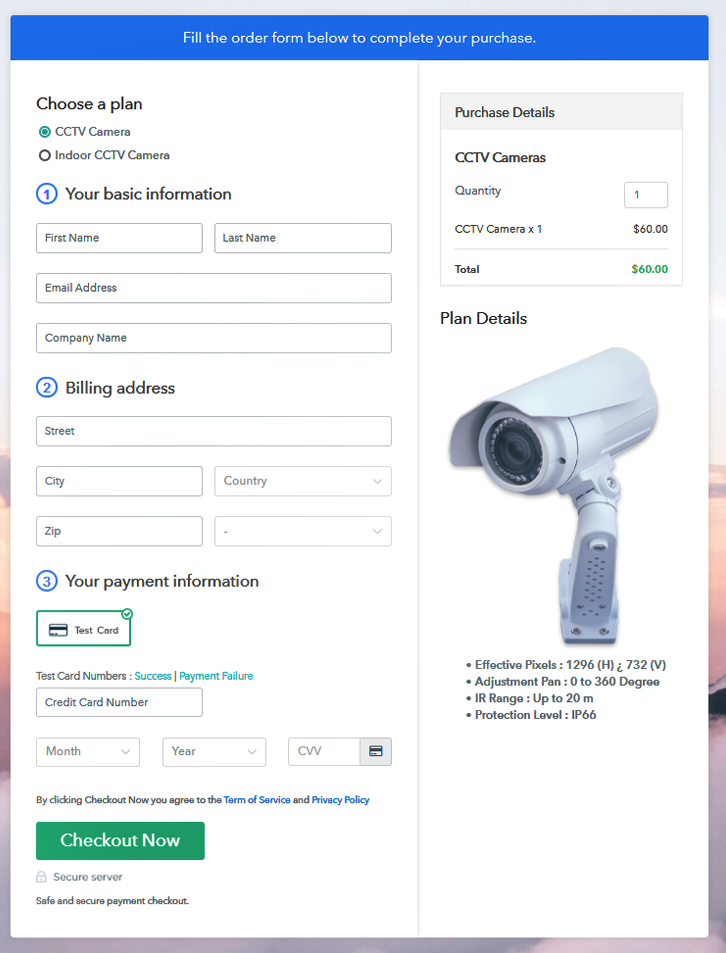
Final View of Checkout Page For Your CCTV cameras Selling Business

Checkout Page Preview to Sell CCTV Cameras Online

Preview Checkout Page

Step 1: Log in to Pabbly Subscription Billing

Signup

To get started with selling CCTV cameras through checkout pages, first visit Pabbly Subscription Billing. And then click on the ‘Sign Up Free‘ button there. On the next sign up page either sign up using Google or manually fill out a few information to register into the platform.

Sign Up For Free!

Step 2: Select Subscription Billing

Access Subscription Billing

Step 3: Account Setup

Setup Account

In this window, provide a company name, phone number and currency to collect.

Step 4: Connect Payment Gateways & Start CCTV Cameras Selling Busines Online

Connect Payment Gateway

Next is adding a reliable payment gateway to accept payments for selling CCTV cameras online. For now, I am using the test payment gateway just to make you aware of the procedure. But, you’ll need to choose as well as integrate a payment gateway from the multiple options available below.

Step 5: Add Product For Your CCTV Camera

Add Product

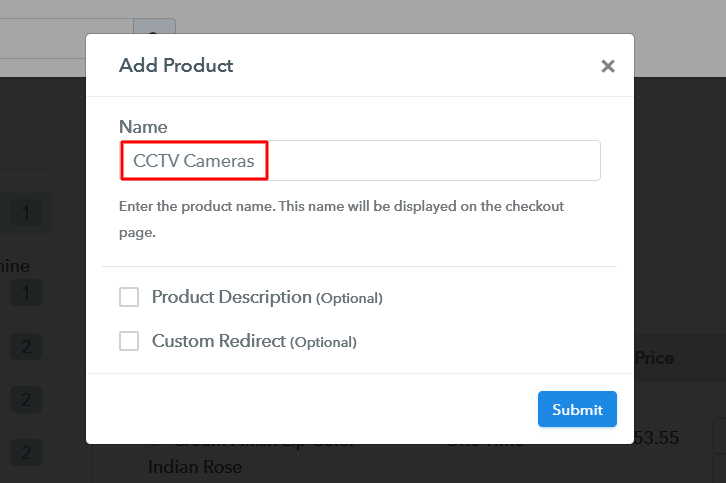
Now, you can add a product and for this click on the ‘Add New Product’ button assign a product name much like a category of CCTV cameras.

Add Product to Sell CCTV Cameras Online

Hit submit and a product is added.

Note: Here you can add all the products related to the similar category by creating plans for each of them.

Step 6: Add Plans 

Let’s rollout plans for different kinds of CCTV cameras available in your store.

(a) Select Add New Plan

Add Plan

(b) Specify the Plan & Pricing Details

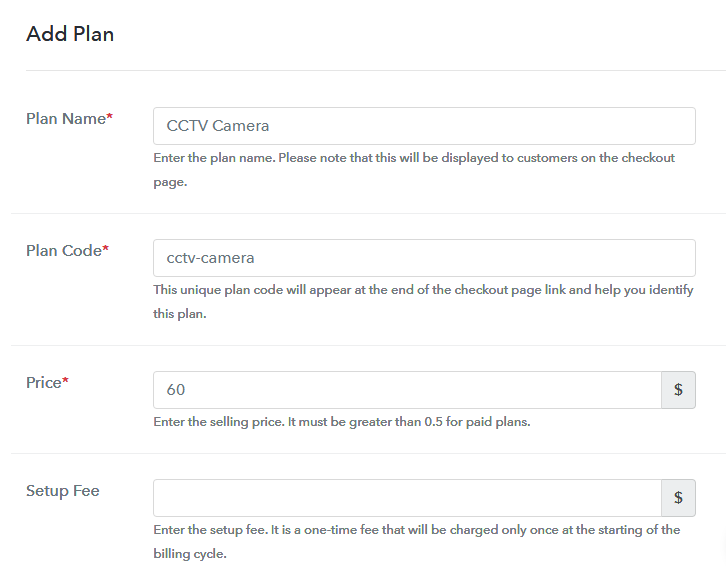
Add Plan to Sell CCTV Cameras Online

On the plan page, details fill out a CCTV camera’s name, code, price, setup fee, billing cycle etc.

(c) Add Image & Description of CCTV Cameras

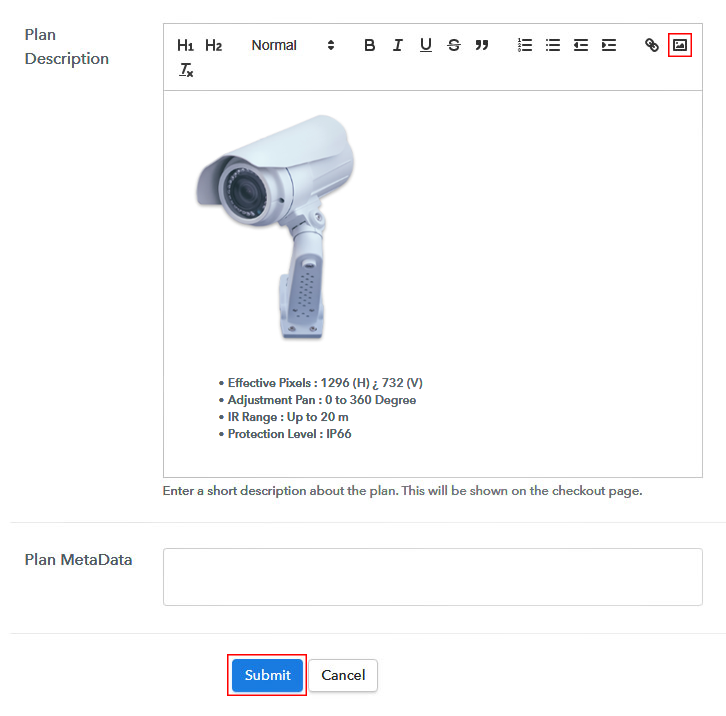
Add Image & Description to Sell CCTV Cameras Online

Also, insert an image of the CCTV camera and some description.

Strike the submit button and a plan to sell CCTV cameras online is added.

Remember, you can add as many plans as you want to.

Step 7: Share your Checkout Page

Share Checkout Page on Social Media

  • Share the checkout page on Facebook & Twitter.
  • Use the plan link to share the plan on emails and SMS with your customers.
  • Link the plan link to any website’s buttons and texts to redirect a customer for payments.

Step 8: Preview Checkout Page

Follow up the recommended steps to preview the checkout page:

(a) Click on the View Button

View Checkout Plan

(b) Take a Look at the Checkout Page

Checkout Page Preview to Sell CCTV Cameras Online

Step 9: Embed Checkout Page in Site & Sell CCTV Cameras Online

Embed Checkout Page on Website

Just copy the link and add the checkout page to sell CCTV cameras online at any preferable place on your WordPress site.

(a) Edit the Page & Paste the Copied Link

Paste Link in Text Editor

Further, paste the plan link on a text editor of the WordPress dashboard.

(b) Save & Publish the Checkout Page

Save and Publish

Next, click the “Publish” button, after making changes.

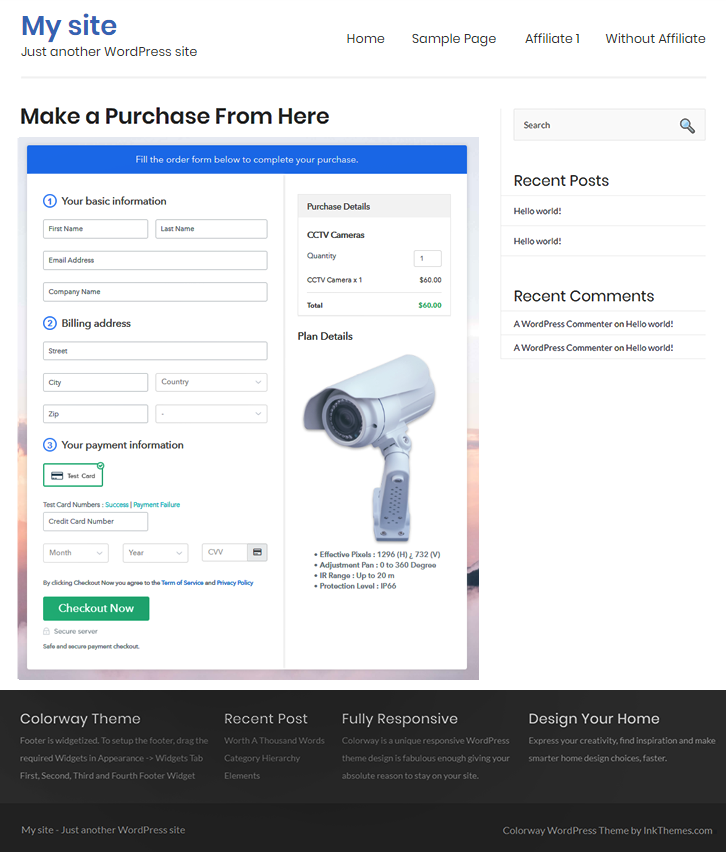
(c) Check out the Final Look of your Checkout Page on WordPress Site

Checkout Page On Site to Sell CCTV Cameras Online

Step 10: Multiplan Checkout Page

Note: In case you want to sell multiple products via a single checkout page, you can create a multi-plan checkout page otherwise skip this step.

(a) Click on Add Mutiplan Checkout

Multiplan Checkout

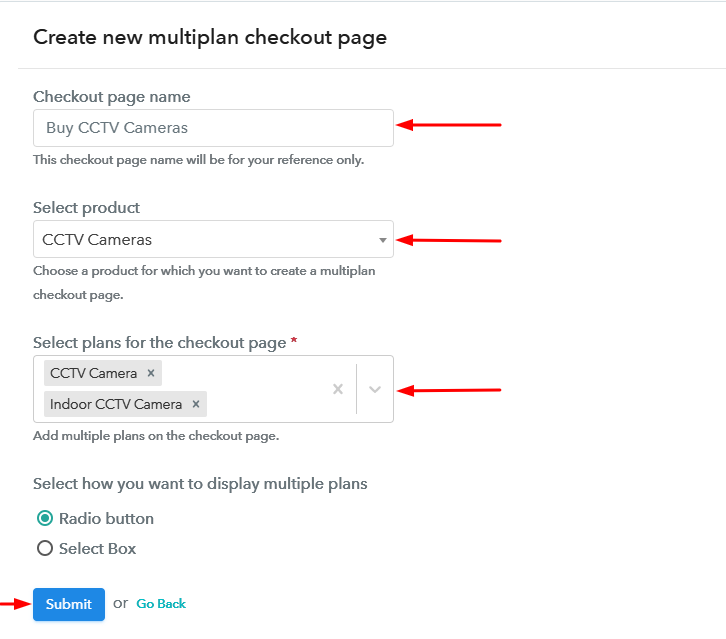
(b) Add Plans to Sell Multiple CCTV Cameras from Single Checkout Page

Create Multiplan Checkout to Sell CCTV Cameras Online

(c) Take a Look at the Checkout Page

Multiplan Checkout Page to Sell CCTV Cameras Online

Preview Checkout Page

Wrapping Up

This was my catch on How to sell CCTV cameras online? This process will also take care of the management along with payments and billing. Also, you’ll get to choose in between multiple payment gateways to collect secure payments.

You May Also Like To Read –
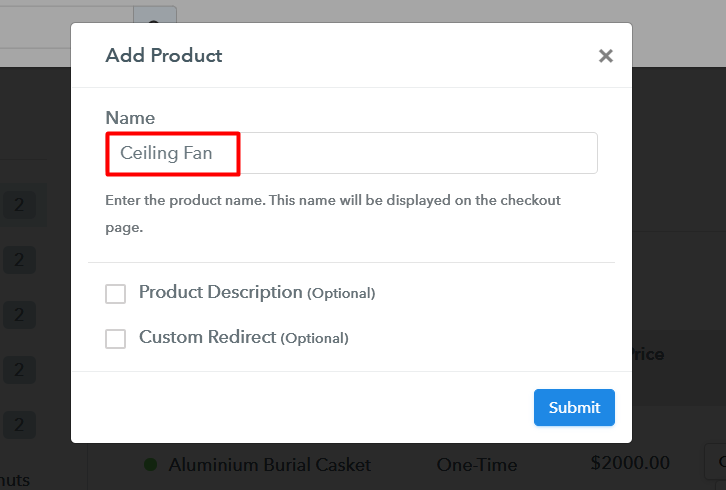
How to Sell Chillies Online | Step by Step (Free Method)

How to Sell Chillies Online

Ideal For: All the chilli shops, chilli suppliers, grocery stores, general stores, supermarkets, and all the other sellers can use this method to take their chillies selling business online.

How to Sell Chillies Online

Why Choose this Method To Sell Chillies Online?

Unlike any other solution, this method allows you to:

  • List and sell your chillies for FREE. Absolutely no payment required.
  • No need to pay commission on any of your sale.
  • Multiple payment options like PayPal, Credit Card, etc to collect payment from a single place.
  • Sell one time or recurring subscriptions of your chillies.
  • Collect payments & sell products in any currency as per your requirement.
  • Give discounts on your products by offering special coupon codes.
  • Add sales commission agents to help you in selling chillies online.

Get Pabbly Subscription Billing for Free

Chillies are an essential part of any recipe for many cuisines. By adding chillies to any dish you can enhance the flavor and aroma of it. Many foodies keep looking for new varieties of chillies to experiment with the recipes. Therefore, if you sell chillies in your store or from your home then why not start selling chillies online for some additional benefit.

By selling chillies online, you can broaden your customer range and get a higher conversion rate as people can order your chillies from anywhere, anytime which will result in extra profit. You just have to create checkout pages for your chillies and share their links on social media and start collecting payments through them. To create checkout pages, there is an awesome and free software available in the market and that is Pabbly Subscription Billing. With this service, you can start selling chillies online for free.

Apart from checkout pages, you also get unlimited access to its other useful features for your online business:

  • Add and sell unlimited chillies online
  • Create discount coupons for your chillies
  • Share invoices of your chillies automatically with users
  • Pay zero transaction fees on your sales

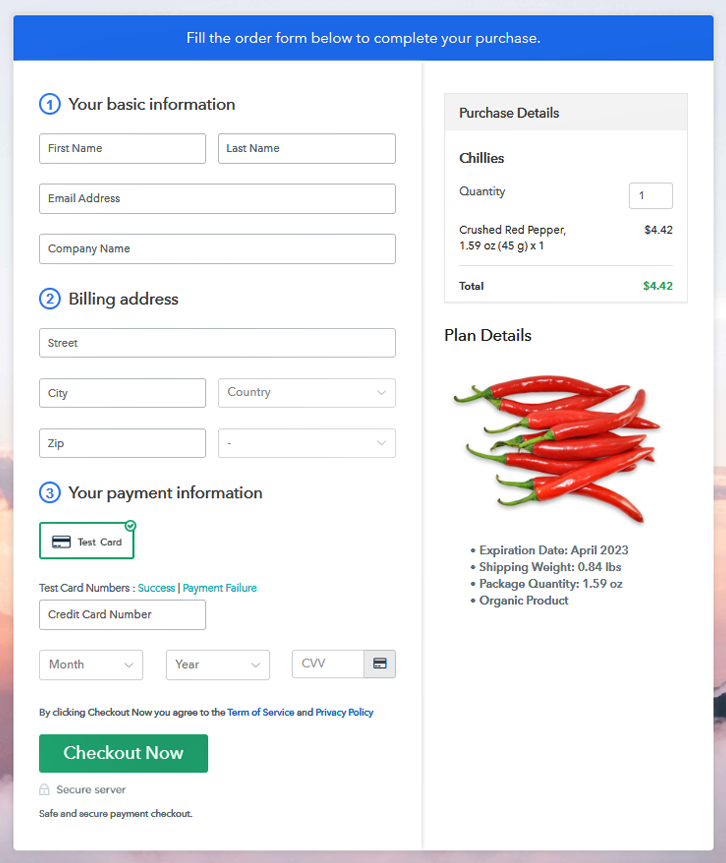
Final View of Checkout Page For Your Chillies Selling Business

Preview Checkout Page

Preview Checkout Page

Step 1: Log in to Pabbly Subscription Billing

Signup

Let’s begin with visiting Pabbly Subscription Billing website and then click on the ” Signup Free” button. On clicking the button, the signup page will open where you can sign up for free via your Gmail or you can also enter your details manually.

Sign Up For Free!

Step 2: Select Subscription Billing

Access Subscription Billing

Step 3: Account Setup

Setup Account

After finishing the signup process, now you have to fill up your company details, i.e. company name, currency, phone number in the shown dialogue box.

Step 4: Connect Payment Gateways & Start Chillies Selling Busines Online

Connect Payment Gateway

In this step, we have explained the payment collection process by enabling the “Test Payment” mode. If you wish, you can also use and check the dummy mode before proceeding further. Later, you can connect with any of the payment gateways like PayPal, Stripe, etc, whichever you prefer. The whole payment gateways integration guide is given below.

Step 5: Add Product For Your Chillies

Add Product

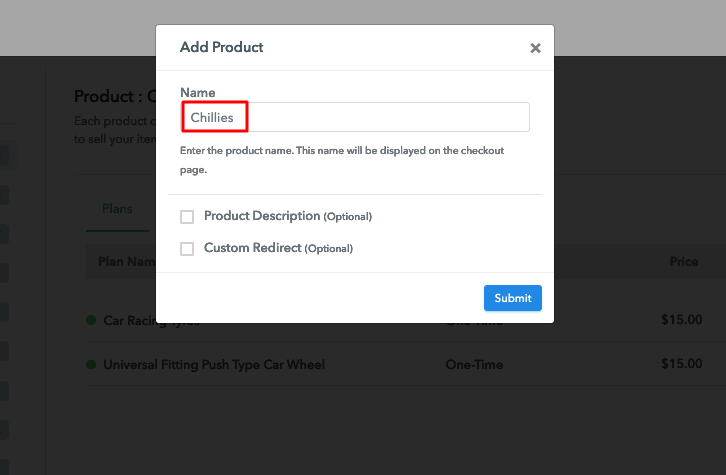
Once you are done with the payment gateways, now you have to add your product. You can add chillies of different types like Thai chillies, Serrano peppers, etc. Add all the other chillies in the same product section by creating different plans for them.

Sell Chillies Online Product Name

Note: Here you can add all the products related to the similar category by creating plans for each of them.

Step 6: Add Plans 

Let’s rollout plans for different kinds of chillies available in your store.

(a) Select Add New Plan

Add Plan

(b) Specify the Plan & Pricing Details

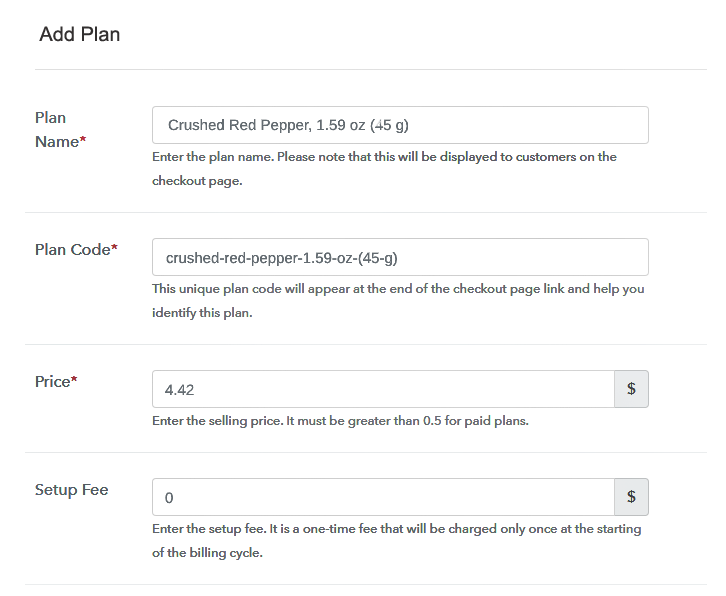
Sell Chillies Online Details

Once you click on ” Add New Plan” button, the plan page will appear, here you have to add details like plan name, billing cycle, code, price, etc.

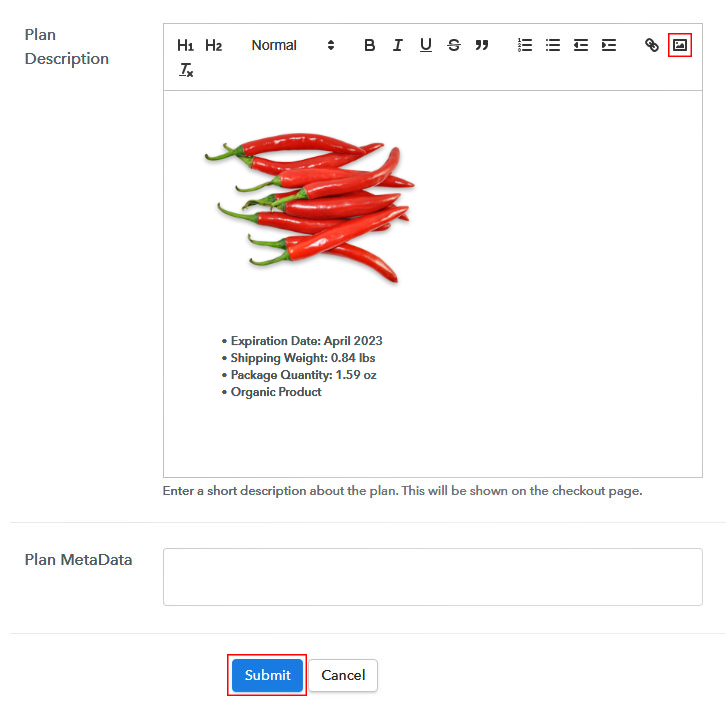
(c) Add Image & Description of Chillies

Sell Chillies Online Image

Also, you can add a description of the chillies that you want to sell along with the product images, links, etc, and click on the submit button to add your plan. You can create more plans for all the other chillies in a similar manner.

Step 7: Share your Checkout Page

Share Checkout Page on Social Media

  • To enhance your sales you can share your checkout page on social media like Facebook and Twitter.
  • Further, copy the mentioned link, and send it to your customers via SMS or emails directly.
  • Also, embed your plan link to your website so that your customers can be landed on the checkout page directly.

Step 8: Preview Checkout Page

Follow up the recommended steps to preview the checkout page:

(a) Click on the View Button

View Checkout Plan

(b) Take a Look at the Checkout Page

Preview Checkout Page

Step 9: Embed Checkout Page in Site & Sell Chillies Online

Embed Checkout Page on Website

Just copy the link and add the checkout page to sell chillies online at any preferable place on your WordPress site.

(a) Edit the Page & Paste the Copied Link

Paste Link in Text Editor

Further, paste the plan link on a text editor of the WordPress dashboard.

(b) Save & Publish the Checkout Page

Save and Publish

Next, click the “Publish” button, after making changes.

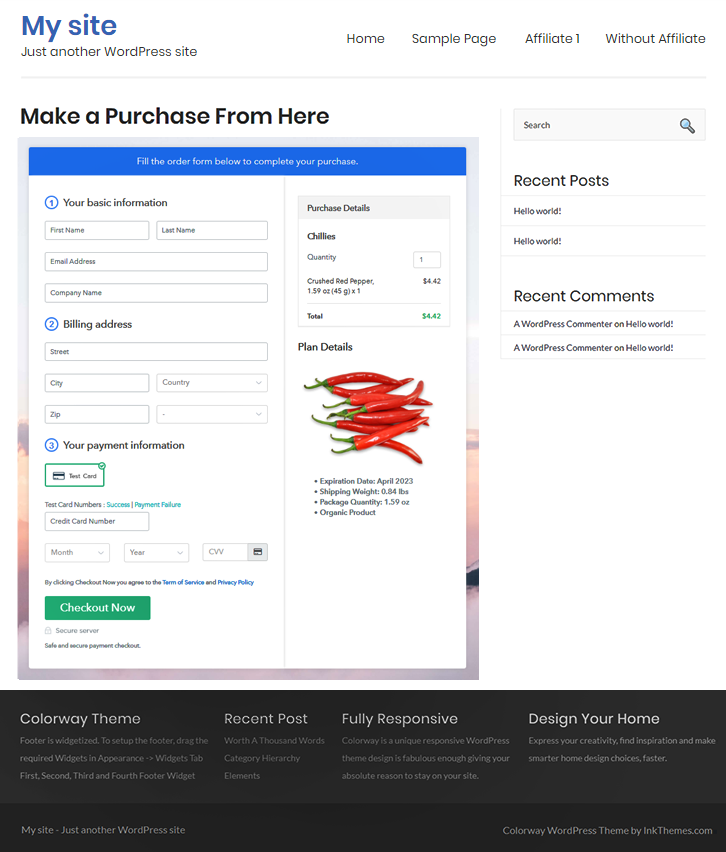
(c) Check out the Final Look of your Checkout Page on WordPress Site

Sell Chillies Online Website

Step 10: Multiplan Checkout Page

Note: In case you want to sell multiple products via a single checkout page, you can create a multi-plan checkout page otherwise skip this step.

(a) Click on Add Mutiplan Checkout

Multiplan Checkout

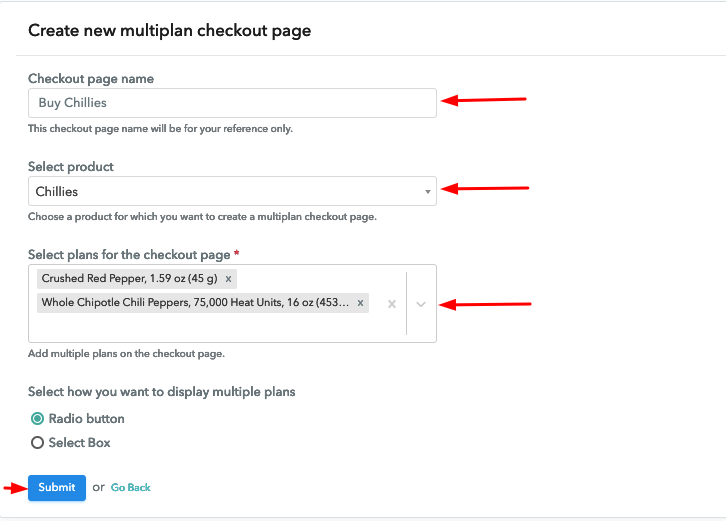
(b) Add Plans to Sell Multiple Chillies from Single Checkout Page

Sell Chillies Online Multi Details

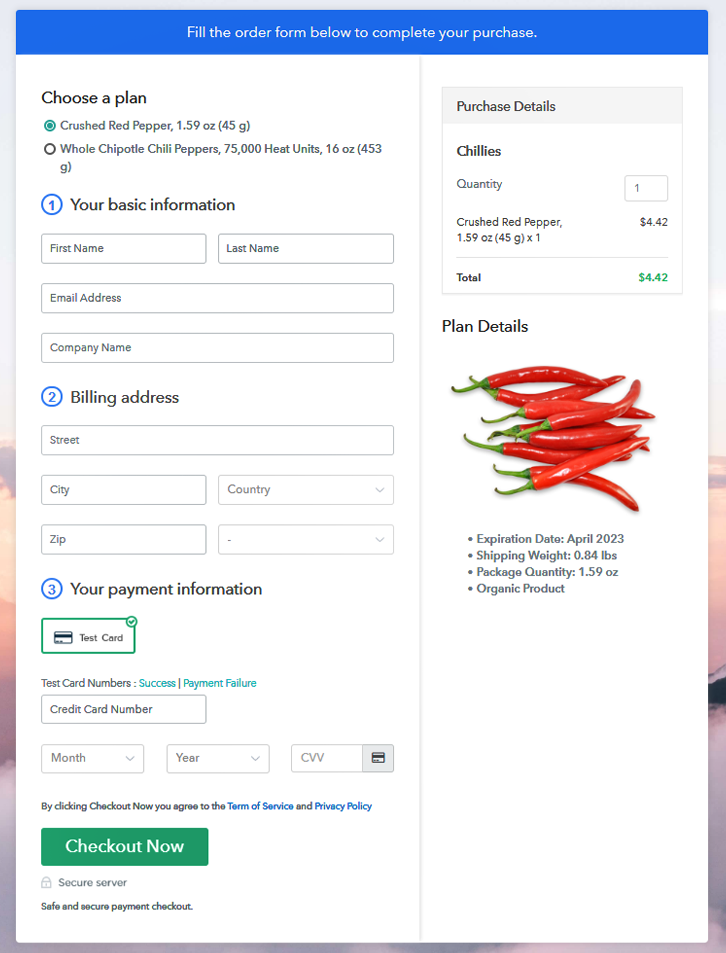
(c) Take a Look at the Checkout Page

Sell Chillies Online Multi Checkout

Preview Checkout Page

Wrapping Up

In conclusion, Pabbly Subscription Billing is the only software you will find which allows you to start your online business for free. With this software, you can sell unlimited chillies online, share invoices, create discount coupons, collect payments, and the list goes on. Now you don’t have to worry about anything related to your online business, this service manages it all. So, signup and start selling your flavorful chillies online. For further queries or suggestions, please contact us.

You May Also Like To Read –