Ideal For: All budding novelists, book reader clubs, fan fiction writers, and other story tellers can use this method to sell stories online.
Why Choose this Method for Selling Over any Other Solution?
Unlike any other solution, this method allows you to:
- List and sell your stories for FREE. Absolutely no payment required.
- No commission deducted on sales.
- Collect payment through multiple payment modes from a single checkout page.
- Sell one time or recurring subscriptions of your stories.
- Sell and collect payment in any currency as per your requirement.
- Give discounts on your products by offering special coupon codes.
- Add sales commission agents to help you in selling your stories.
Ever heard a beautiful quote ” Telling stories makes us human”. We have been churning out stories ever since the age of the caveman. And the invention of the printing press by Gutenberg made us read the stories of other men and women. But with the advent of the internet, a new era of story writing has begun as many storytellers are increasingly selling stories online for higher readership and monetary gains.
Why would you like to sell stories online?
The advantages are numerous, like your creative works will be noticed by millions of readers from around the world. They will provide genuine feedbacks for improvements, have accurate measures of readership, easy revenue management, 24×7 online shop, etc. So obviously you know about these benefits but the question is how will you sell your stories online?
Well, you can always go for sites like Wattpad or Fanfiction.net to submit your stories but the problem with these sites is that they don’t really pay the authors. Moreover, it is extremely difficult for a new writer to shine amongst thousands of other authors on these websites.
Another option that is extremely becoming popular with new-age story writers is building their own e-stores and placing their stories in them. This can be done by using a Saas called Pabbly Subscription Billing. You can build awesome checkout pages to sell stories online and receive payment in both offline/online modes through it. Other benefits are:
- Import/Export Customers Data
- Easy Tax Management
- Unlimited Coupons, Plans, Discounts
- Add Customized Logos
Now, after learning about the features, you may be excited to build your first checkout page to start selling stories online. Well then let me show how it is done.
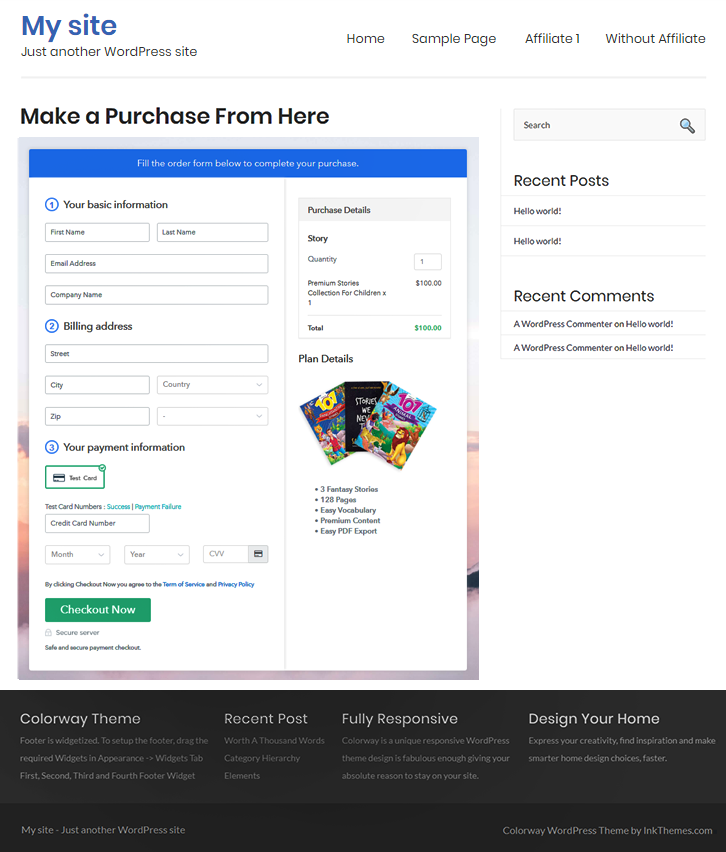
This is How your Checkout Page will Look Like After Creation

Step 1: Log in to Pabbly Subscription Billing

Using your search engines to find Pabbly Subscription Billing and click on “Sign up Free“. Here, you can simply sign in through your, Gmail account or fill in the fields like name, email, etc and then click the “Sign Up” button.
Sign Up For Free!
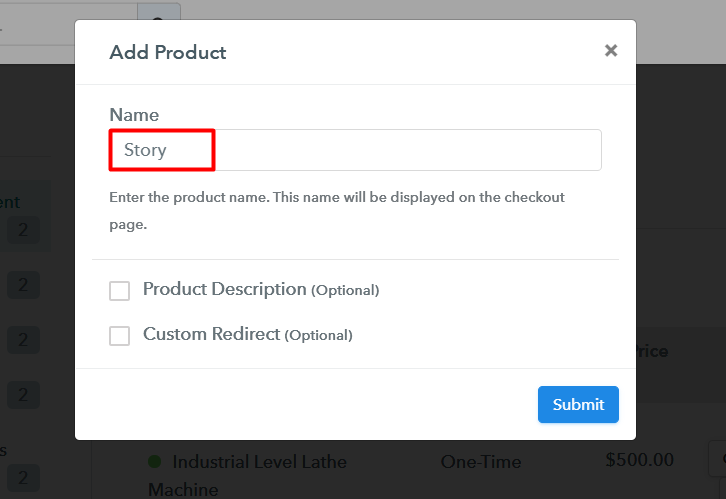
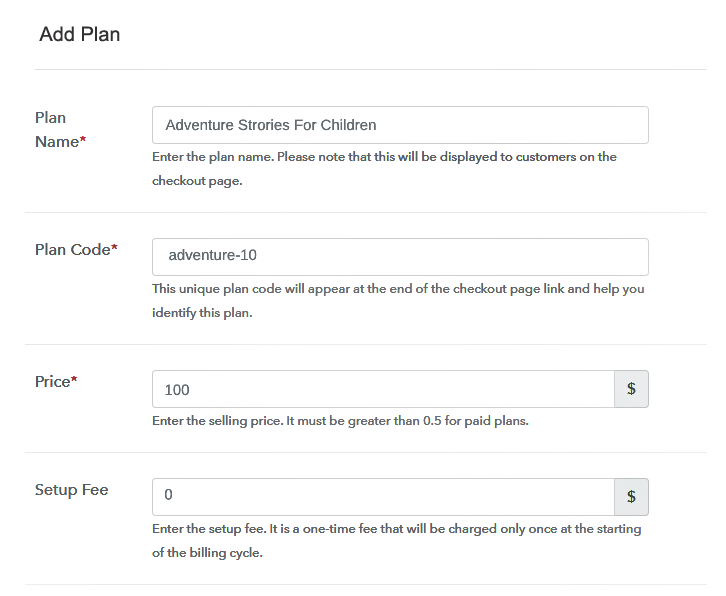
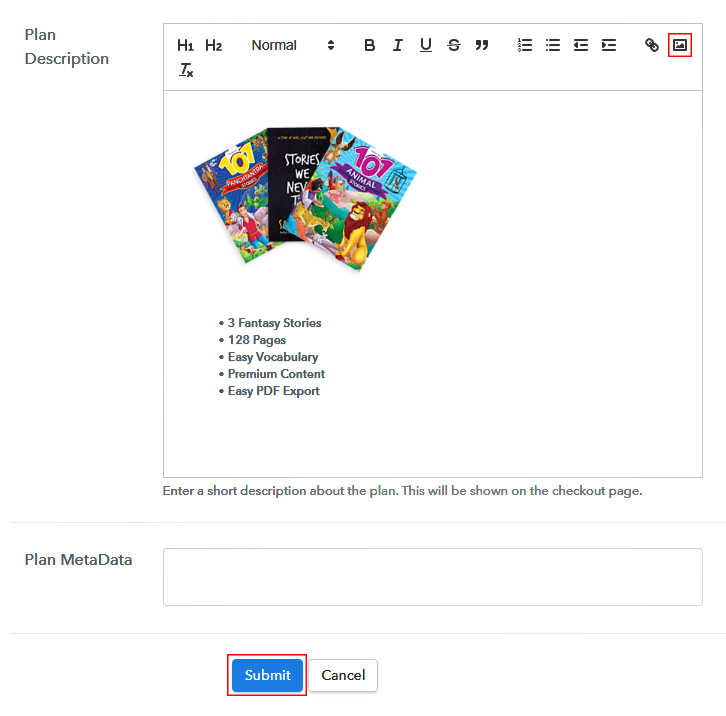
Once you sign in, you will be brought to the dashboard and here click on the “Access Now” button on the Subscription Billing option. Now you will be redirected to a dialog box and you will be asked to fill in the details company name, currency, phone number, etc, After filing in the information press the blue “Continue” button to complete the process. Since you know that your customers must have a serene payment experience. So as to take action against disruptions beforehand Pabbly Subscription Billing provides a dummy payment gateway. Here, you can stimulate the entire payment experience of the customer. Just click on the “Enable Test Payment” option to start testing out this functionality Also, with Pabbly Subscription Billing, you can integrate many payment gateways PayPal, Authorize.net, Stripe, etc. Beneath this paragraph, there are integration guides to embed the payment gateway of your choice. So, I am going to enable the test payment option to continue the process. I hope that the payment gateway integration went well, so let’s add the product. Beneath the “Enable Payments” segment there is the “Add your product” section click it. This will summon a dialog box with a blue button “Add New Product”. Click on it. You have to add the required product title, in this case, it is ‘stories’. Fill up the details and your product is created. Note: Here you can add all the products related to the similar category by creating plans for each of them. Now, we are going to create plans to start story writing business online Next on the plan page, you will fill in details like plan name, code, price, setup fees, etc. Scrolling down you will find different billing models like one-time payment, recurring, based on cycles, etc. Select your preferred billing model that suits your needs and yes you can change it anytime. Now, take some pictures of covers of stories and upload it using the image button. So, after uploading the image provide some useful information about the stories you are selling like the number of pages, genre, rating, readership, etc. in bullet points Furthermore, using the same process, you can list more products Follow up these steps to preview checkout page: Now, copy the embed plan link to insert the checkout page on your WordPress website. Now, when the link is copied, then paste it to the text area of the editor. After pasting the code, now hit the ‘Publish’ button. Your checkout page is embedded. Note: In case you want to sell multiple products via a single checkout page, you can create a multi-plan checkout page otherwise skip this step. The internet has brought a dramatic shift in the business and storytellers can hugely benefit by selling stories online to a higher number of readers. The best method to sell any physical or digital product online is through Pabbly Subscription Billing because they can list limitless products without any charges. May the force be with you.Step 2: Select Subscription Billing

Step 3: Account Setup

Step 4: Connect Payment Gateways To Sell Stories Online

Step 5: Add Your Product

Step 6: Add Plans
(a) Select Add New Plan

(b) Specify the Plan & Pricing Details
(c) Add Image & Description
Step 7: Share your Checkout Page

Step 8: Preview Checkout Page
(a) Click on the View Button

(b) Take a Look at the Checkout Page

Step 9: Embed Checkout Page in Site & Sell Stories Online

(a) Edit the Page & Paste the Copied Link

(b) Save & Publish the Checkout Page

(c) Check out the Final Look of your Checkout Page on WordPress Site
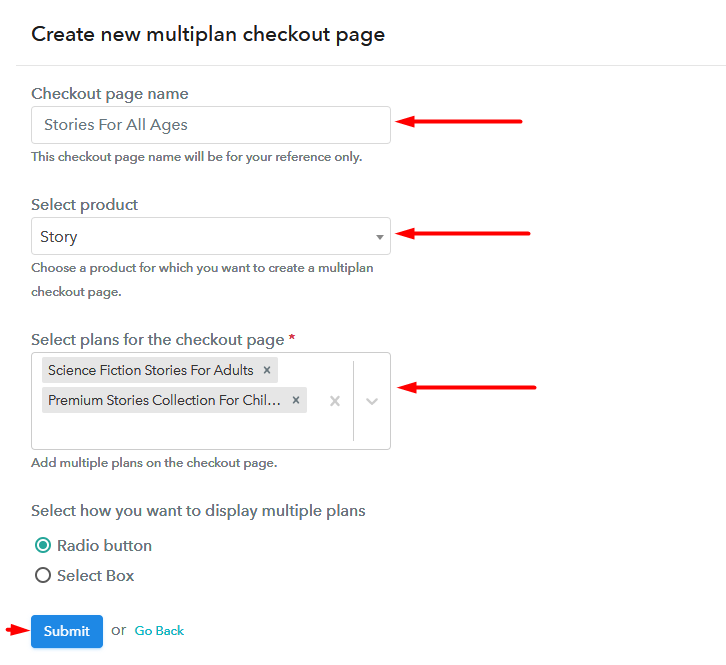
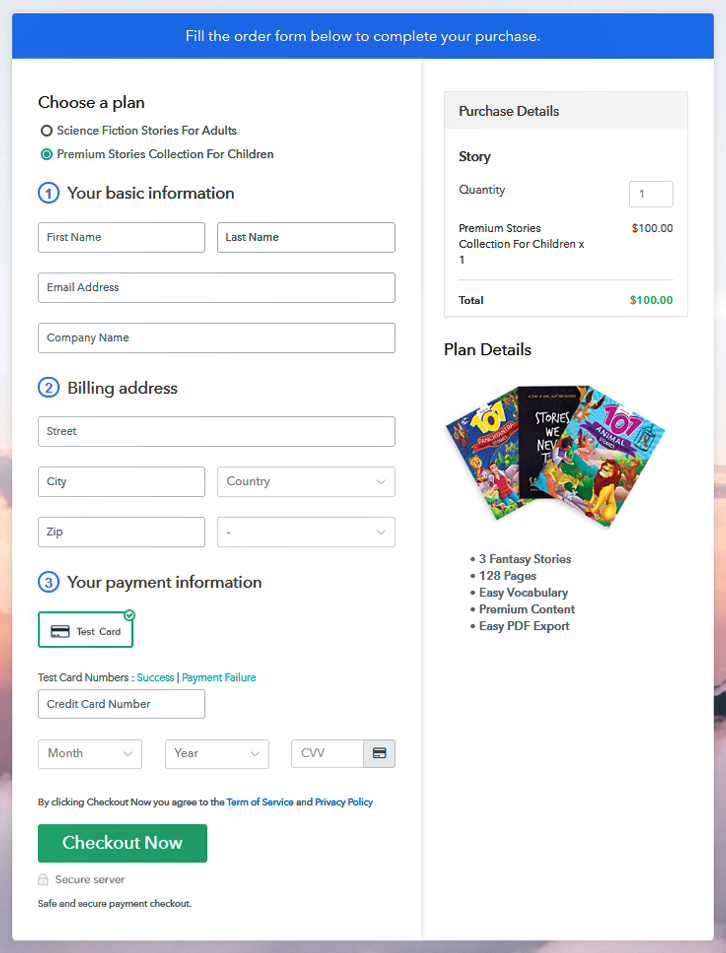
Step 10: Multiplan Checkout Page
(a) Click on Add Multiplan Checkout

(b) Add Plans to Sell Multiple Stories Online from Single Checkout Page
(c) Take a Look at the Checkout Page
Wrapping Up
You May Also Like To Read –


