How to Sell Animal Feeds Online | Step by Step (Free Method)

How to Sell Animal Feeds Online

Ideal For: All the animal feed suppliers, animal feed manufacturers, animal food stores, wholesale animal feed suppliers, and other sellers can use this method to take their animal feeds selling business online.
How to Sell Animal Feeds Online

Why Choose this Method for Selling Over any Other Solution?

Unlike any other solution, this method allows you to:

  • List and sell animal feeds for FREE. Absolutely no payment required.
  • No commission on sales.
  • Collect payment through multiple payment modes from a single checkout page.
  • Sell one time or recurring subscriptions of the animal feeds.
  • Sell and collect payment in any currency as per your requirement.
  • Give discounts on your products by offering special coupon codes.
  • Add sales commission agents to help you in selling the animal feeds.

Get Pabbly Subscription Billing for Free

Some people have animal-related businesses like breeding and selling animals and it is very important for them to keep their animals fit, happy and healthy. The best quality of animal feeds is required to keep animals in their healthiest form and people do not compromise on this. Thus, if you sell animal feeds then think about taking your business online.

Why would you like to sell animal feeds online?

By taking your animal feeds selling business online, you get higher conversion rates, broadened customer range, higher profits and so much more. To start your online animal feeds selling business you need Pabbly Subscription Billing which is absolutely free. Simply, you have to create checkout pages for your animal feeds and share them on social media and start collecting payments through them.

Apart from the checkout pages, you can also access its awesome features for your online business:

  • Create and sell unlimited plans for animal feeds
  • Collect one-time or recurring payments for your animal feeds
  •  Share invoices of animal feed automatically with your customers
  • Pay no transaction fees on your sales

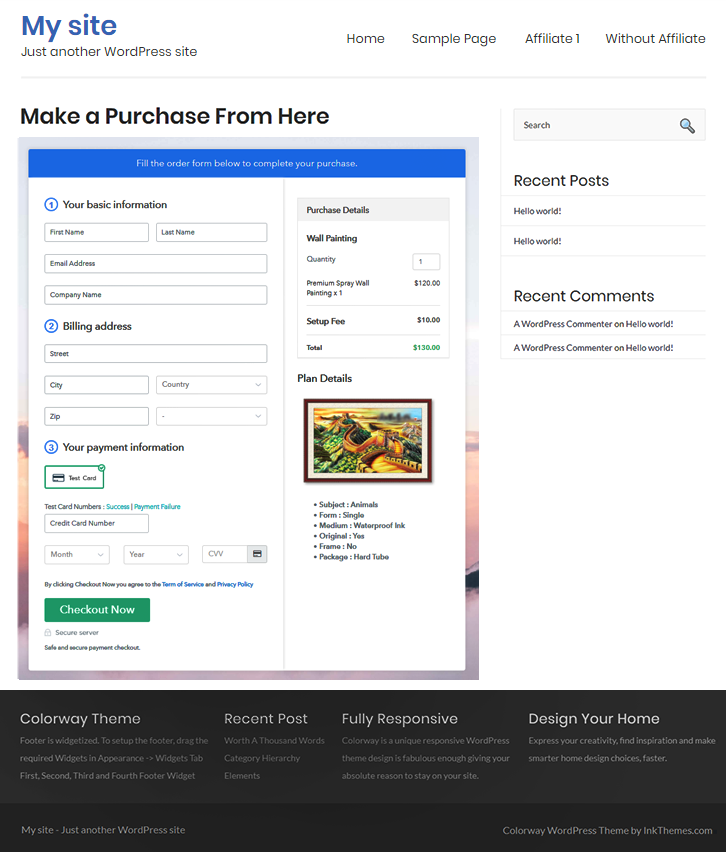
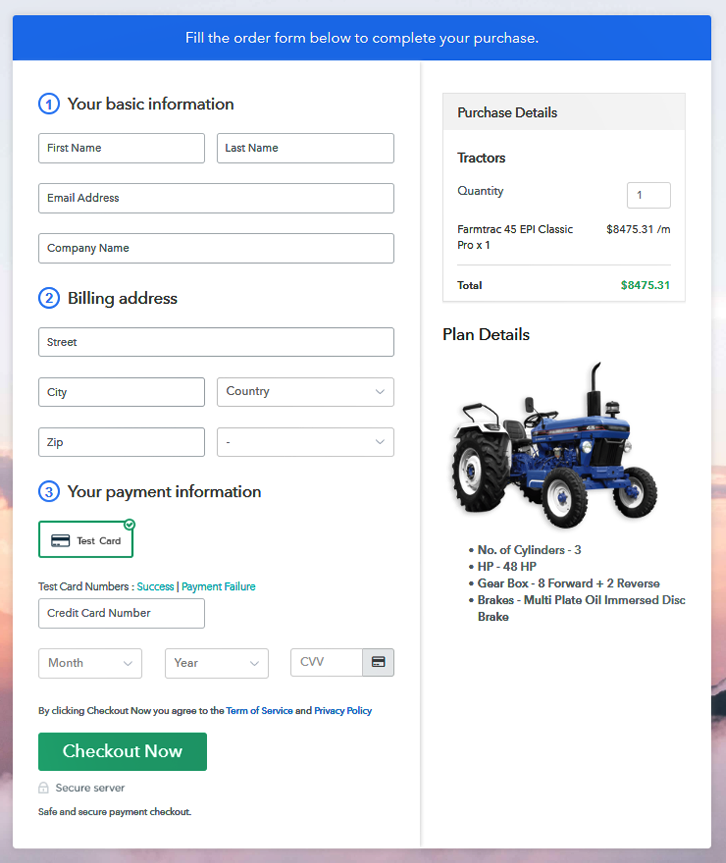
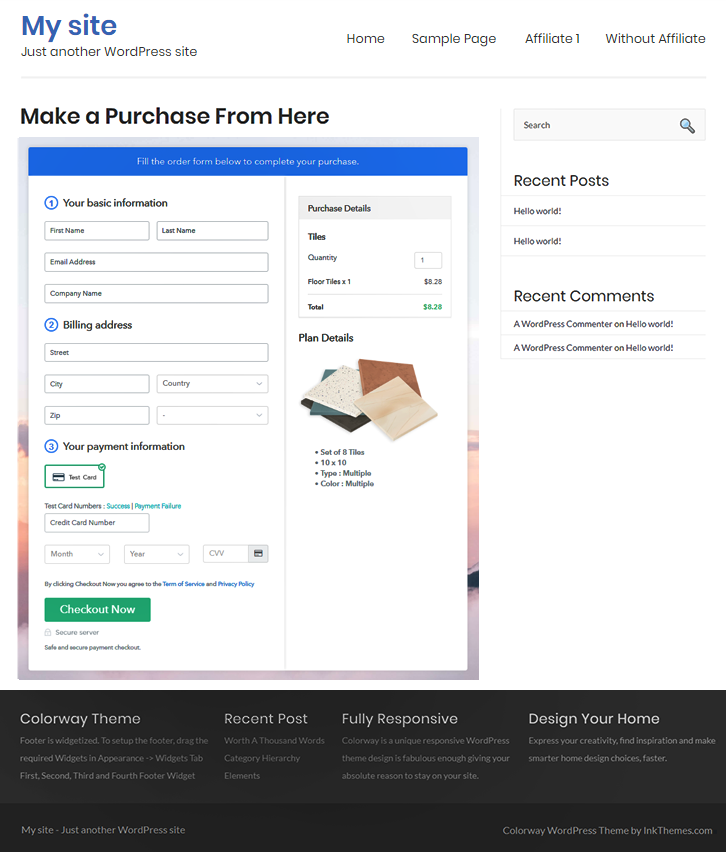
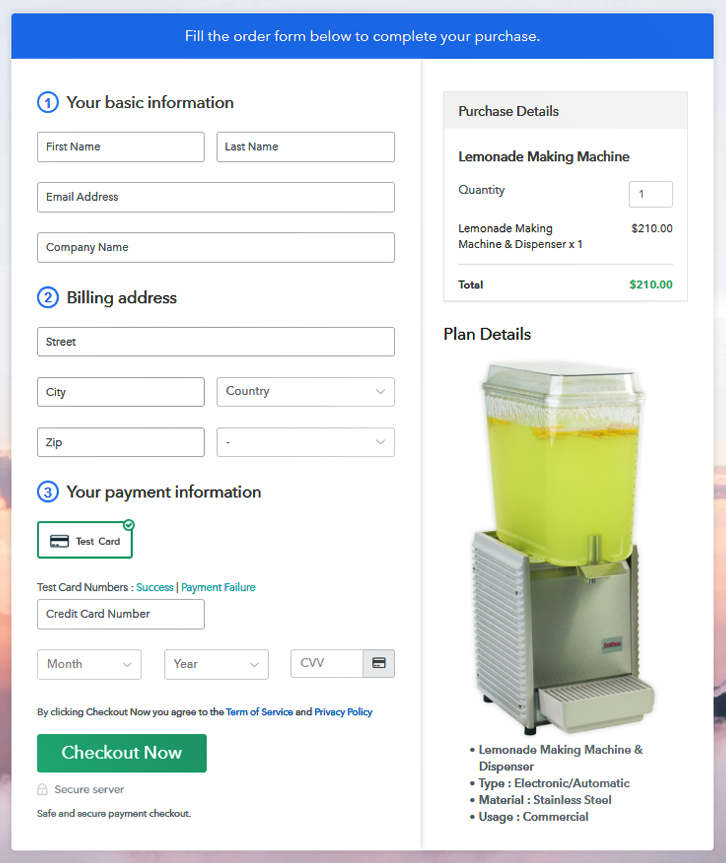
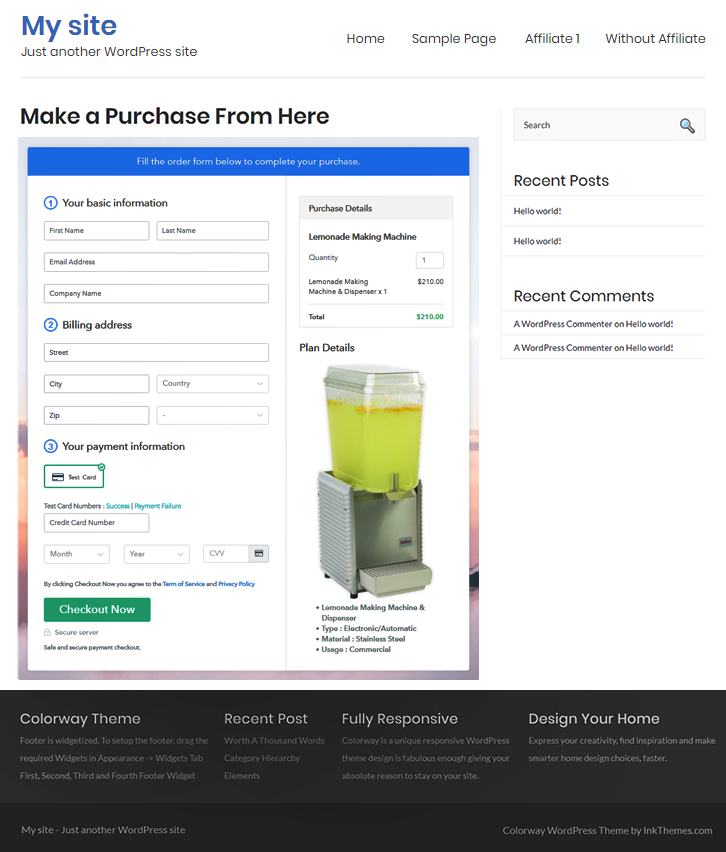
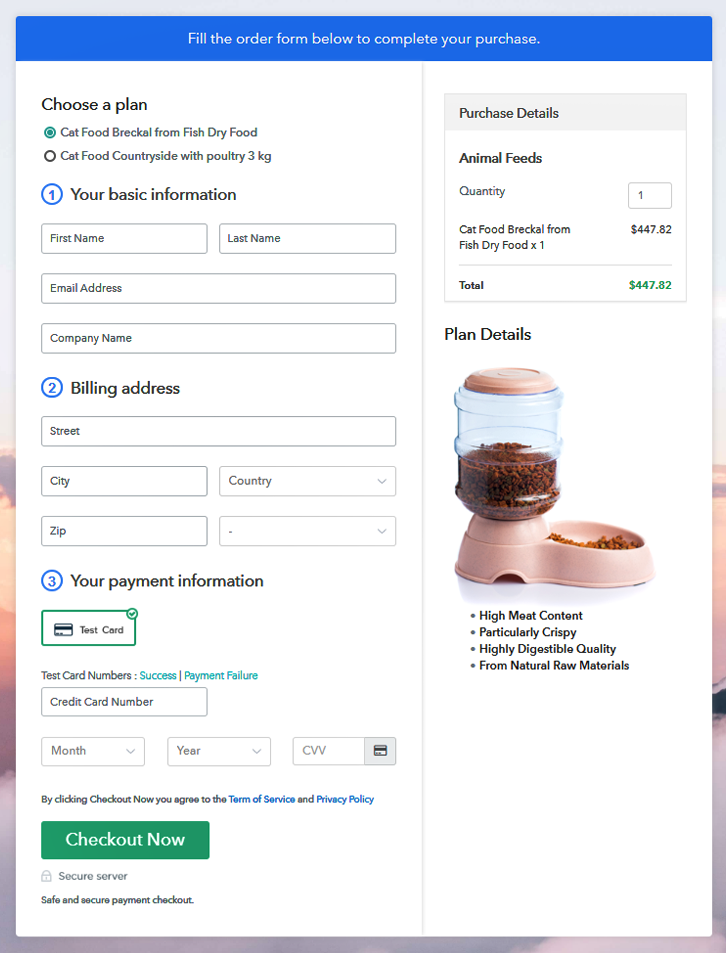
This is How your Checkout Page will Look Like After Creation
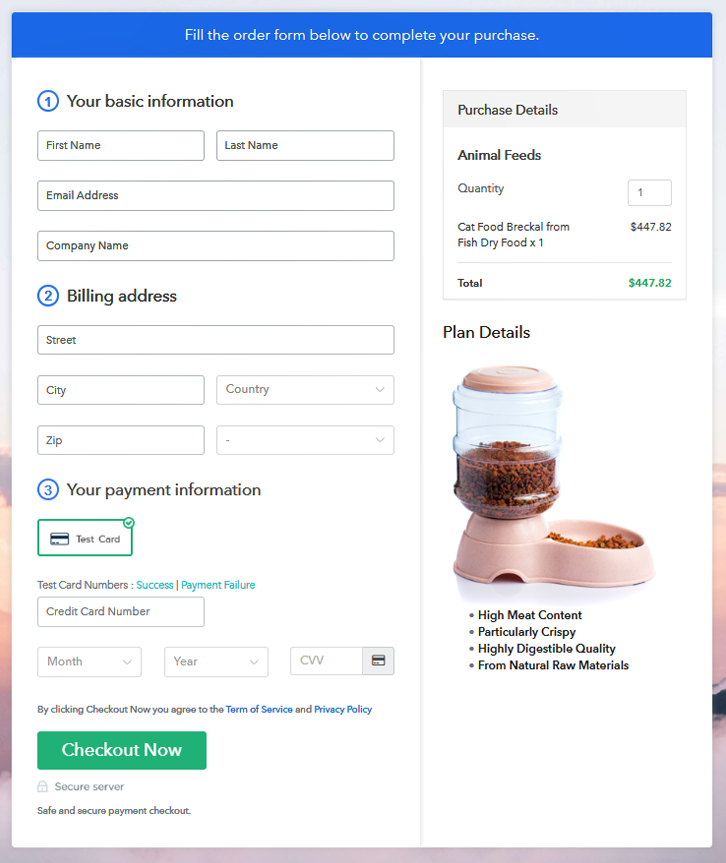
Preview Checkout Page

Preview Checkout Page

Step 1: Log in to Pabbly Subscription Billing

Signup

Let’s begin with visiting Pabbly Subscription Billing website and then click on the “Sign Up Free” button. After you click the button, you will land on the signup page, where you can create your account in mere seconds with your Gmail or manually enter your details.

Sign Up For Free!

Step 2: Select Subscription Billing

Access Subscription Billing

Step 3: Account Setup

Setup Account

In this step, now you have to fill up your company details i.e. company name, currency, and contact number in this dialogue box.

Step 4: Connect Payment Gateway to Sell Animal Feeds Online

Connect Payment Gateway

Further, here, how the payment collection process works has been described by enabling the ‘Test Payment’ mode. Thereafter, you can connect other payment gateways according to your priorities. The complete integration guide for payment gateways is provided below.

Step 5: Add Your Product

Add Product

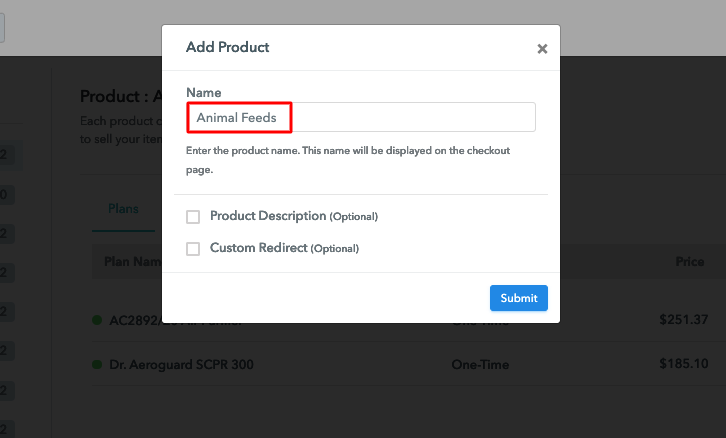
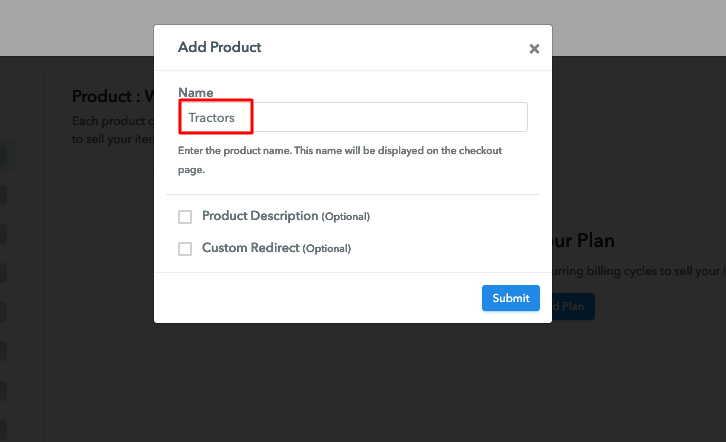
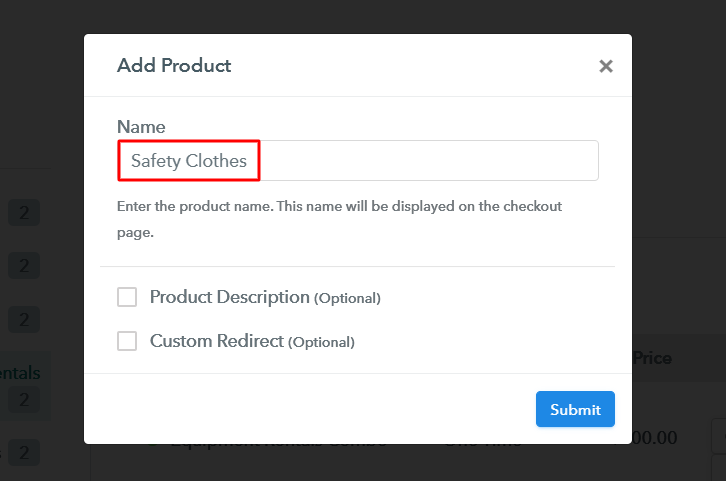
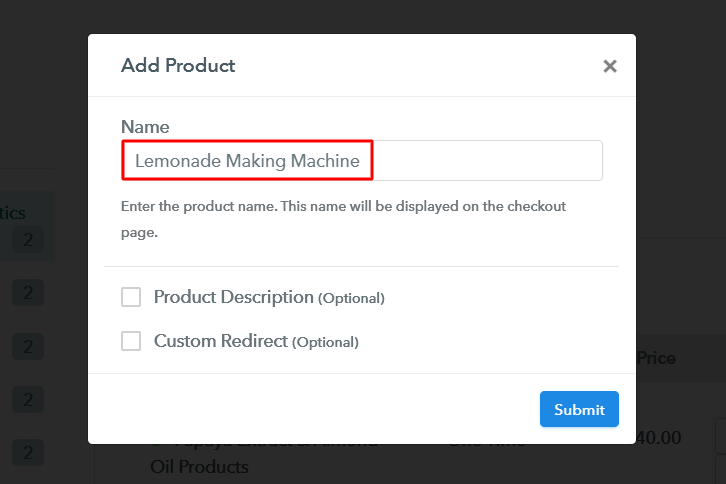
Moving on this step, now you have to add your first product. You can add animal feeds of different types for instance mixed feeds, byproduct feeds, etc. Add all other types of animal feeds in the same product by creating different plans.

Sell Animal Feeds Online Product Name

Simply fill up these details to add your product.

Note: Here you can add all the products related to the similar category by creating plans for each of them.

Step 6: Add Plans

Let’s get started and create plans for different categories of animal feeds that you want to sell

(a) Select Add New Plan

Add Plan

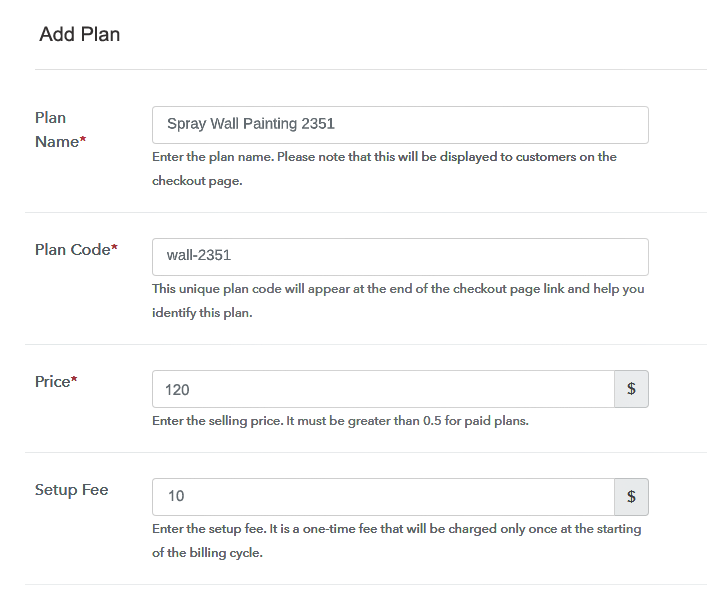
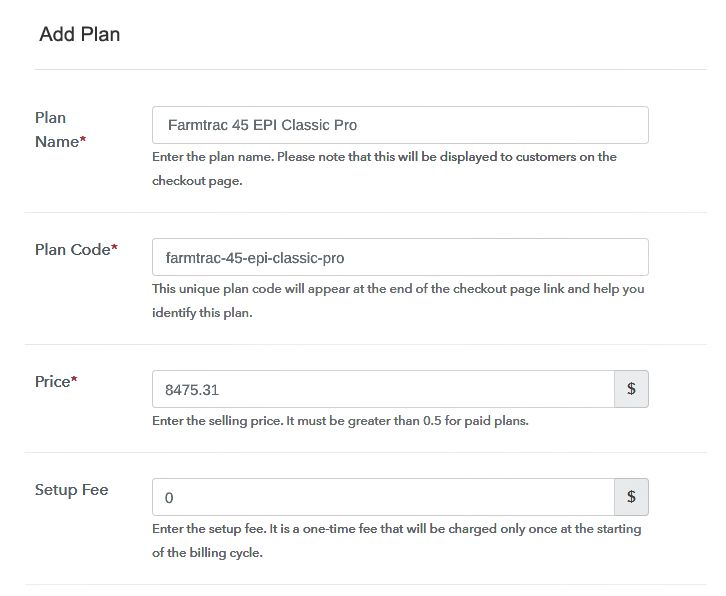
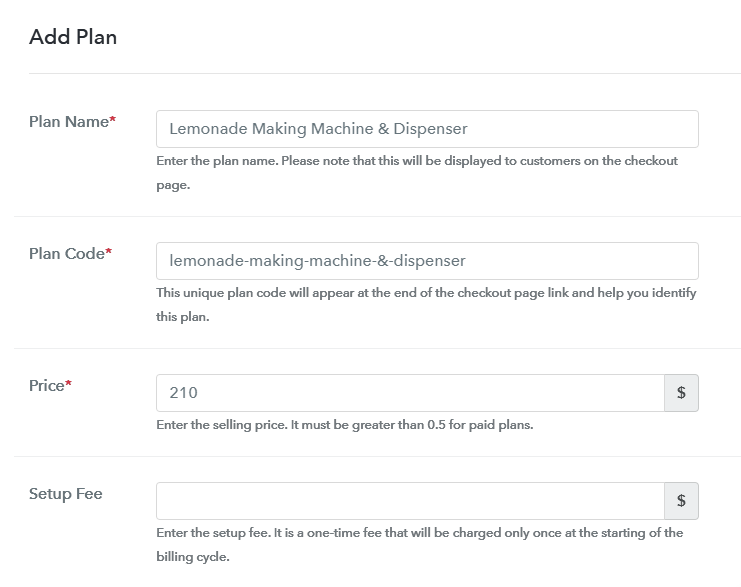
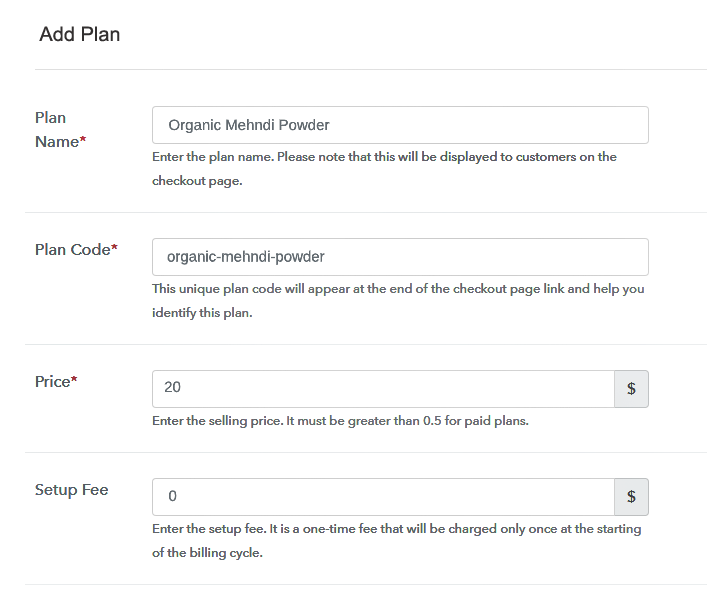
(b) Specify the Plan and Pricing Details
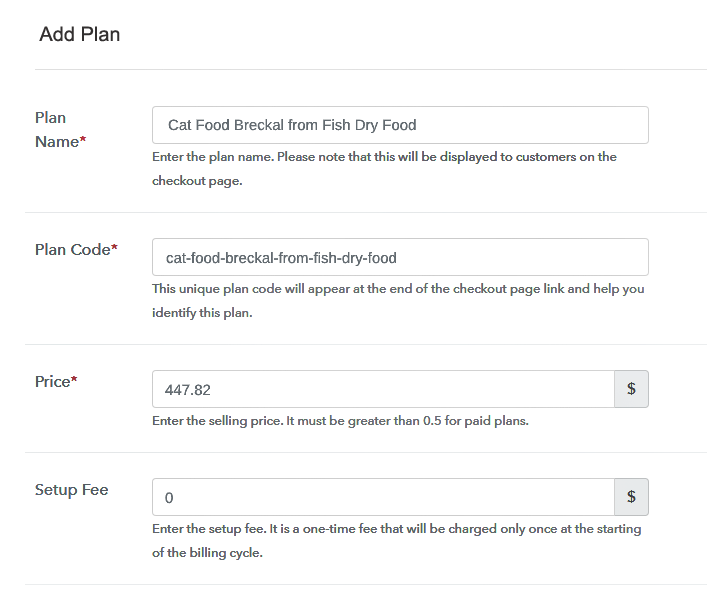
Sell Animal Feeds Online Details

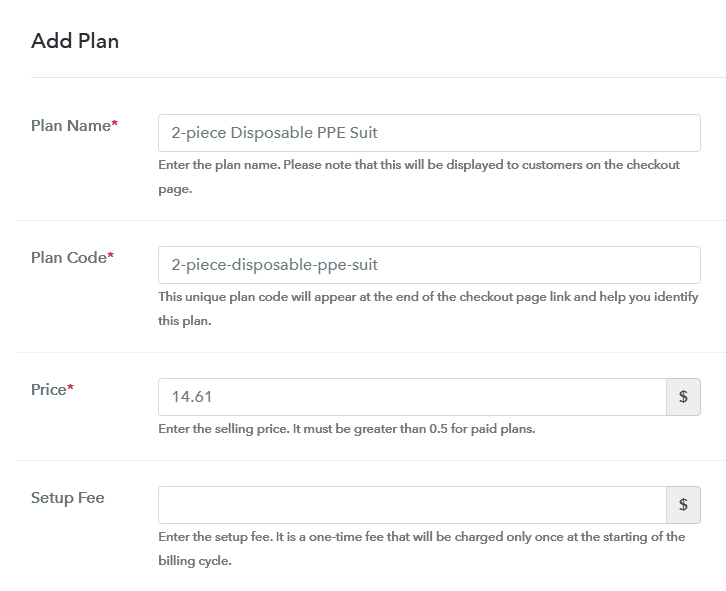
Once clicking the “Add New Plan” button, the plan page will open, here you will have to fill the plan details such as plan name, code, billing cycle, price, etc.

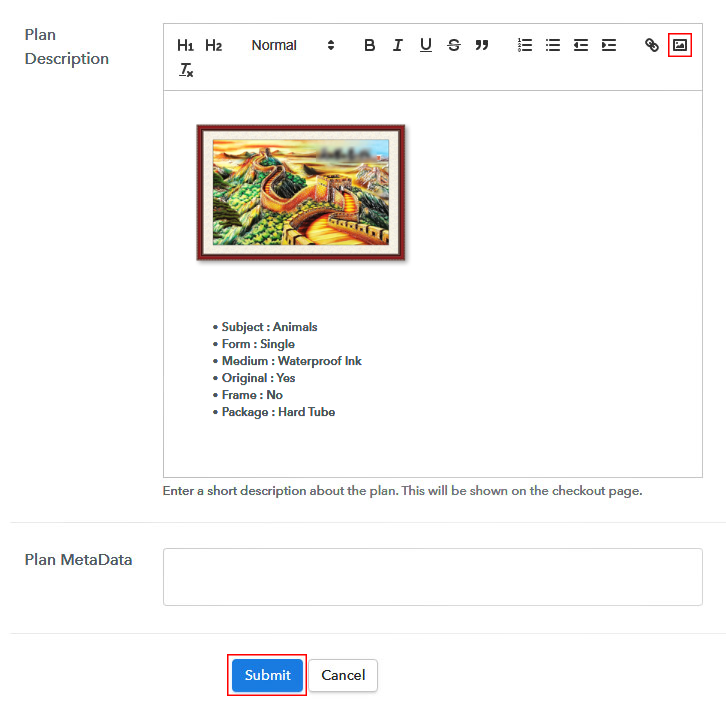
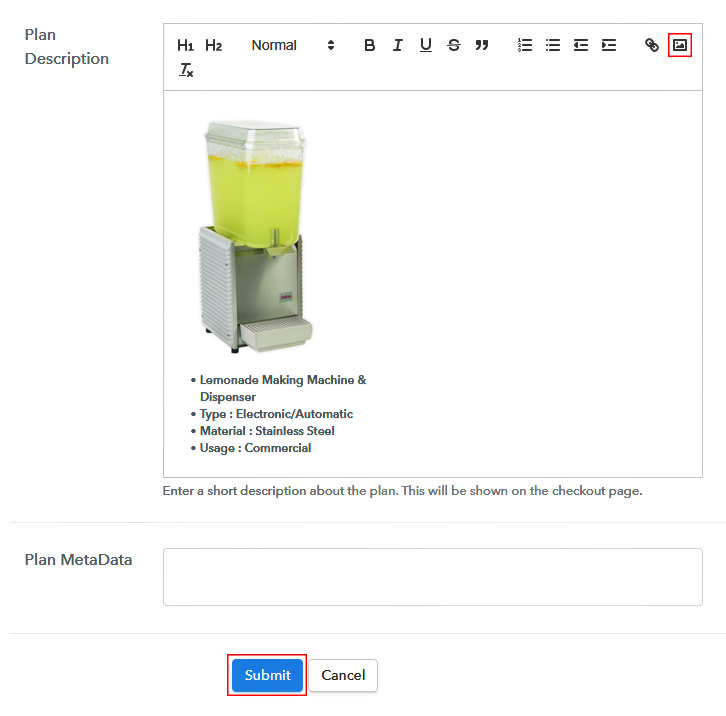
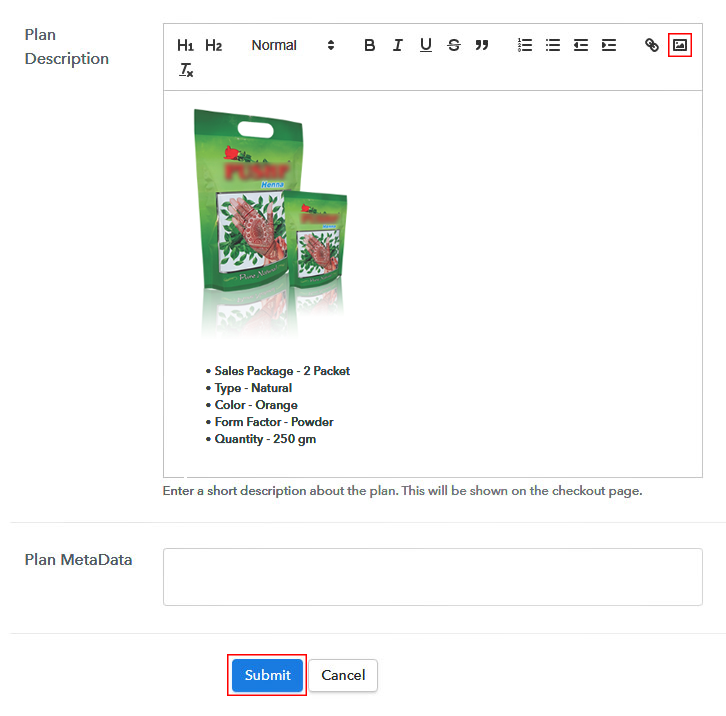
(c) Add Image & Description

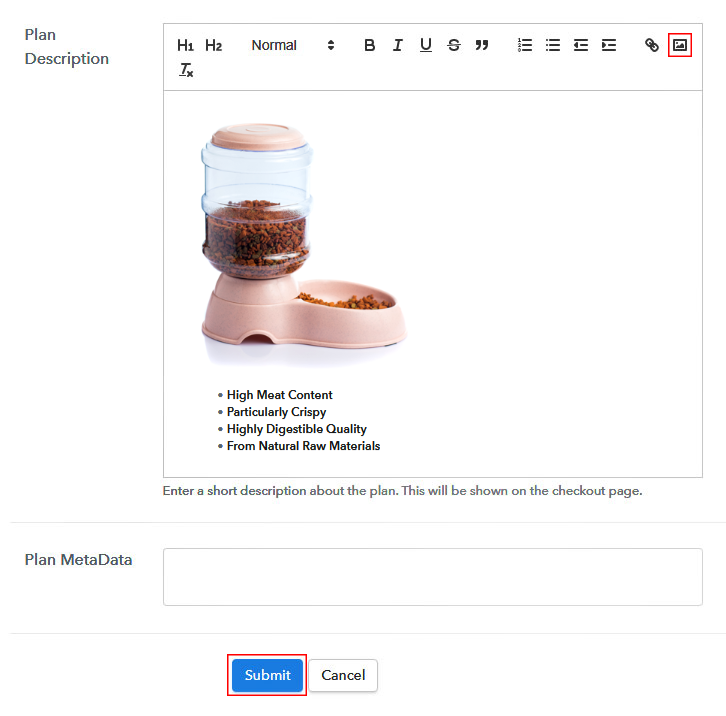
Sell Animal Feeds Online Image

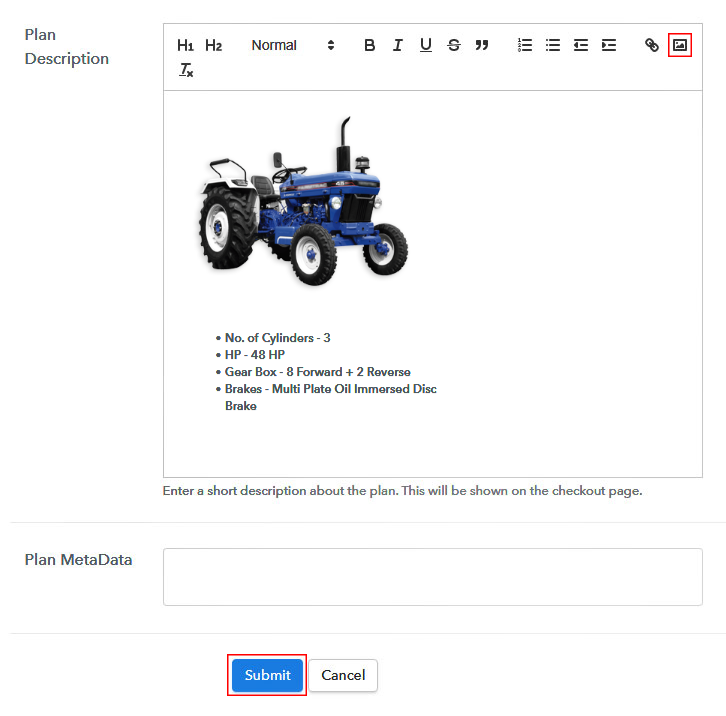
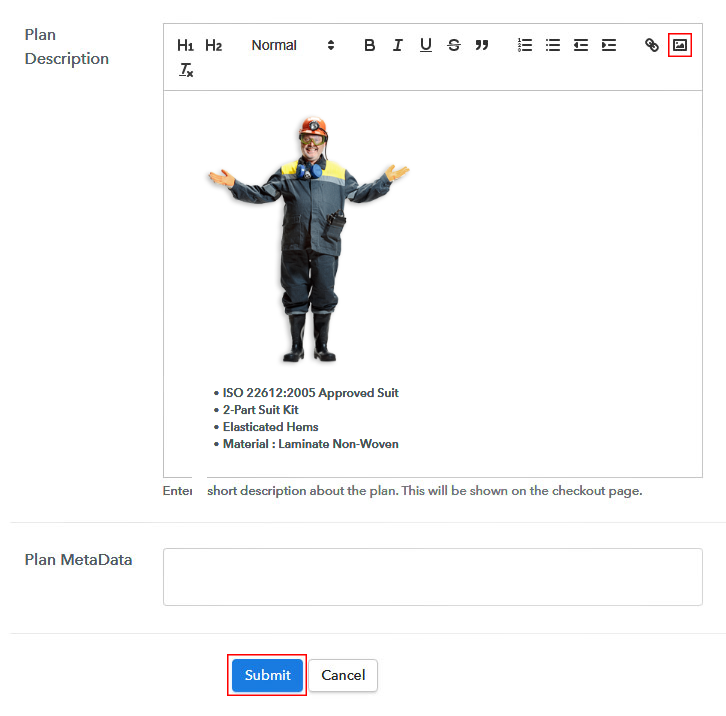
Also, write a description of the animal feeds that you want to sell along with the product links, images, etc, and click on the submit button to add your plan.
You can create more plans for all the other animal feeds likewise.

Step 7: Share Your Checkout Page

Share Checkout Page on Social Media

  • To increase sales of your animal feeds share your checkout page on social media like Facebook and Twitter.
  • Moreover, copy the mentioned link and send it to your customers through SMS or emails directly.
  • Along with all this, you can also embed your plan link to your website so that your customers can be landed on the checkout page directly.

Step 8: Preview Checkout Page

Follow the given steps to view checkout page

(a) Click on the View Button

View Checkout Plan

(b) Take a Look at the Checkout Page

Preview Checkout Page

Step 9: Embed Checkout Page in Site & Sell Animal Feeds Online

Embed Checkout Page on Website

Just copy the provided plan embedding link and embed the checkout page to your WordPress site.

(a) Edit the Page & Paste the Copied Link

Paste Link in Text Editor

Copy and paste the link in the text area of the editor

(b) Save & Publish the Checkout Page

Save and Publish

After the code is pasted, click on the publish button to embed your checkout page.

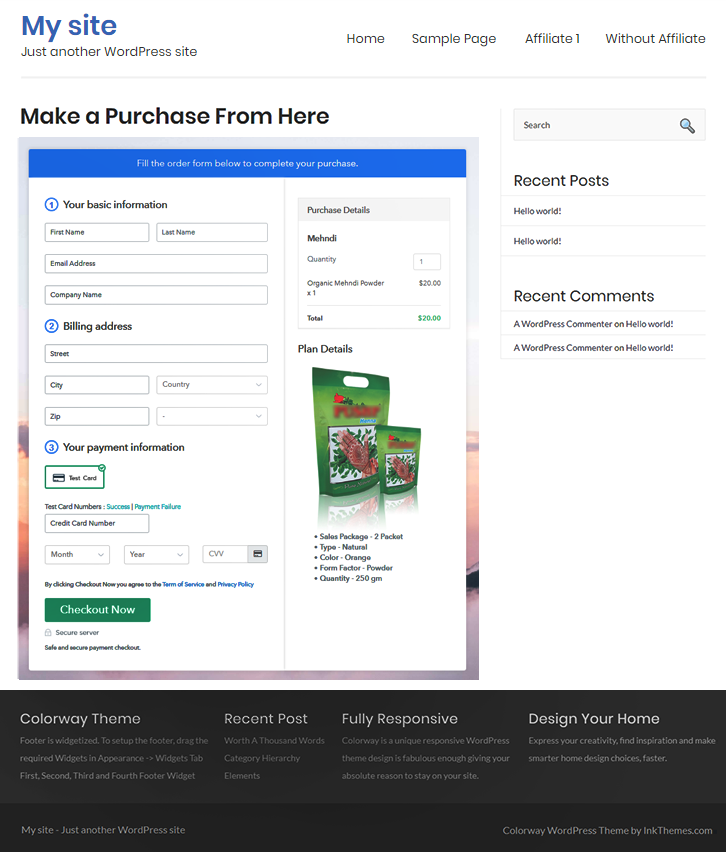
(c) Check Out the Final Look of your Checkout Page on WordPress Site
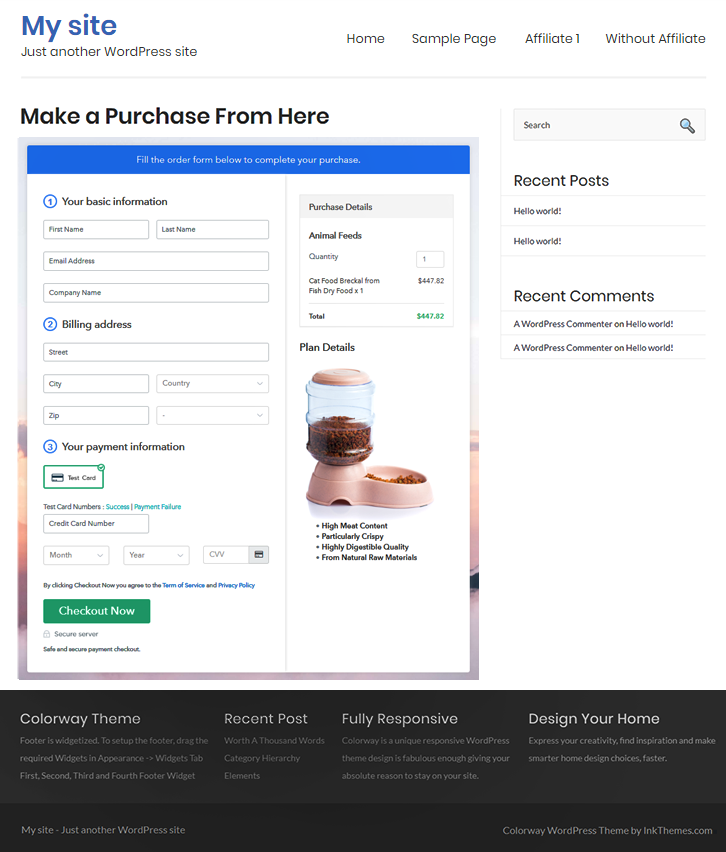
Sell Animal Feeds Online Website

Step 10: Multiplan Checkout Page

Note: In case you want to sell multiple products through a single checkout page, create a multi-plan checkout plan, otherwise skip this step.

(a) Click on Add Multiplan Checkout

Multiplan Checkout

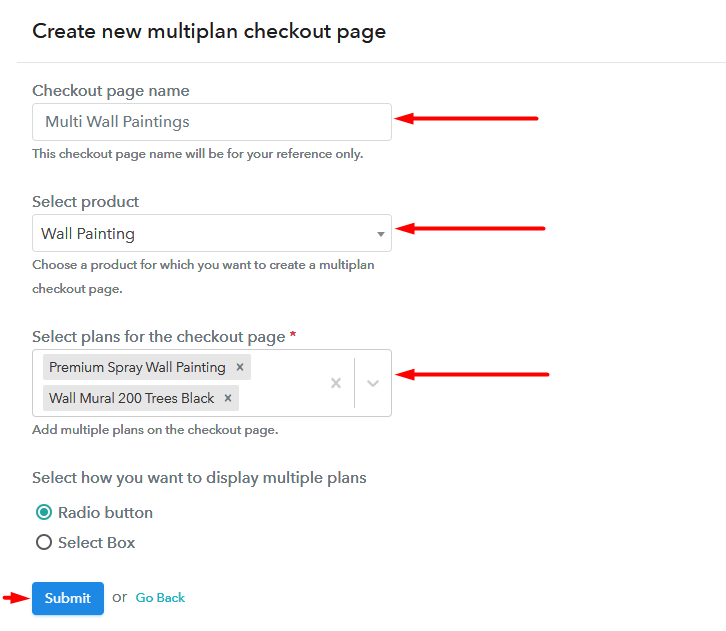
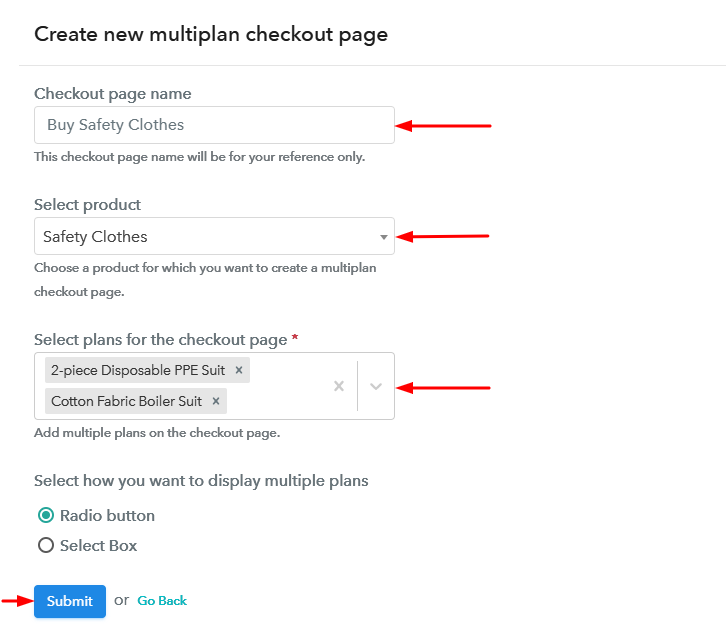
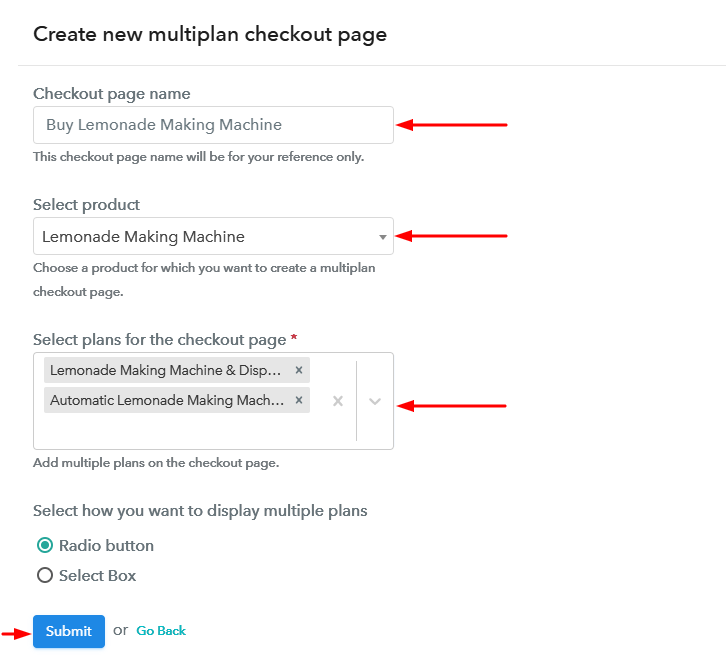
(b) Add Plans to Sell Multiple Animal Feeds from Single Checkout Page
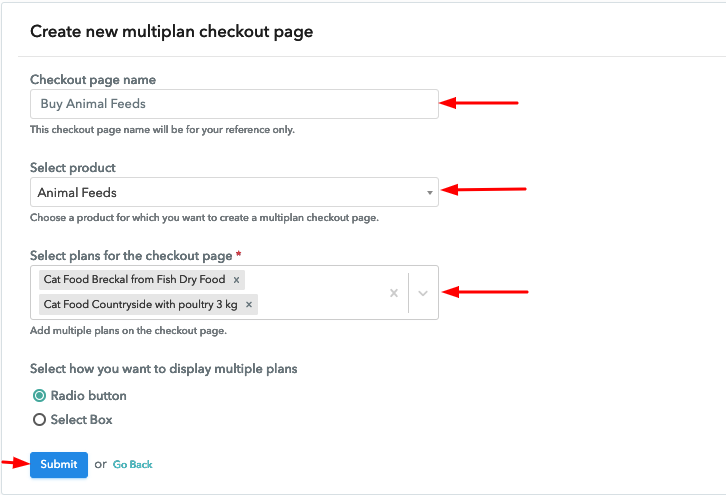
Sell Animal Feeds Online Multi Details

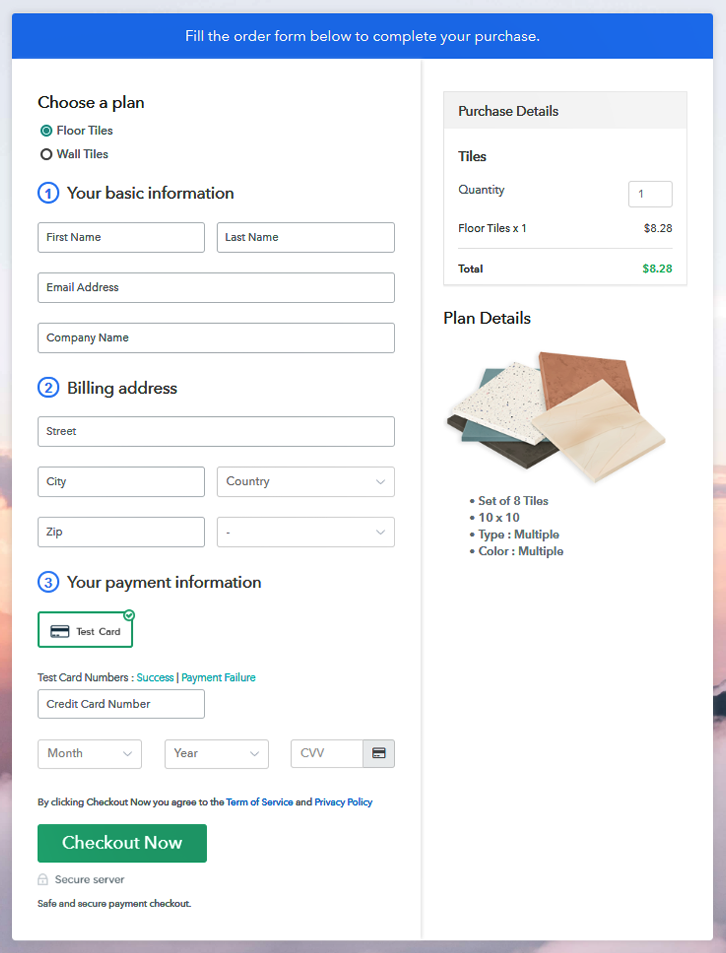
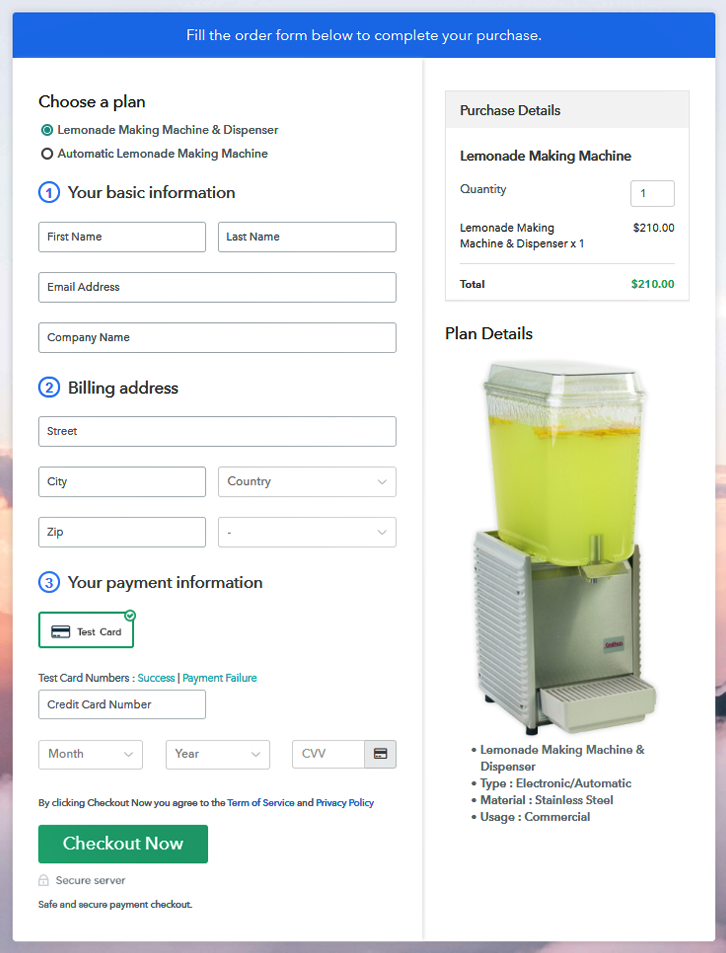
(c) Take a Look at the Checkout Page

Sell Animal Feeds Online Multi Checkout

Preview Checkout Page

Wrapping Up

Conclusively, if you were worried that how you will start your animal feeds selling business online then your worries end with Pabbly Subscription Billing. Now, you can easily sell unlimited animal feeds online, generate unlimited revenue, share invoices, create discount coupons, and whatnot. So, sign up today and start selling animal feeds online with zero investment. For further queries or suggestions, please contact us.

You May Also Like To Read –

How to Sell Air Purifiers Online | Step by Step (Free Method)

How to Sell Air Purifiers Online

Ideal For: All the air purifier shops, electronic stores, electronic showrooms, air purifier manufacturers, and other sellers can use this method to take their air purifiers selling business online.

How to Sell Air Purifiers Online

Why Choose this Method for Selling Over any Other Solution?

Unlike any other solution, this method allows you to:

  • List and sell air purifiers for FREE. Absolutely no payment required.
  • No commission on sales.
  • Collect payment through multiple payment modes from a single checkout page.
  • Sell one time or recurring subscriptions of the air purifiers.
  • Sell and collect payment in any currency as per your requirement.
  • Give discounts on your products by offering special coupon codes.
  • Add sales commission agents to help you in selling the air purifiers.

Get Pabbly Subscription Billing for Free

Indoor AQI is a big concern, according to the Environmental Protection Agency, with contaminants two to five times higher than outdoor air. Hence, air purifiers are in demand right now and if you sell them and wish to add more profit to your business then why not take it online?

Why would you like to sell air purifiers online?

Through online air purifiers selling business, people can order your air purifiers from homes and you get to reach to large number of customers which means higher profit. You just have to create checkout pages for air purifiers and share them on social media, so that people can make purchases directly through them. To create checkout pages you only need Pabbly Subscription Billing, which is an absolutely free service.

Other than the checkout pages you also get unlimited access to its fantastic features for your online business:

  • Add and sell unlimited air purifiers online
  • Collect one-time or recurring payments for your air purifiers
  • Integrate it with your website
  • Pay zero transaction fees on your sales of air purifiers

This is How your Checkout Page will Look Like After Creation

Preview Checkout Page

Preview Checkout Page

Step 1: Log in to Pabbly Subscription Billing

Signup

In the first step, you have to visit Pabbly Subscription Billing website and then click on the “Sign Up Free” button. Once the button is clicked, you will reach to the signup page, where you can create your account with Gmail or manually enter your details.

Sign Up For Free!

Step 2: Select Subscription Billing

Access Subscription Billing

Step 3: Account Setup

Setup Account

Once the signup process is completed, now fill up your company details i.e. company name, currency, and contact number in the given dialogue box.

Step 4: Connect Payment Gateway to Sell Air Purifiers Online

Connect Payment Gateway

Here, we are showing you the payment collection process by enabling the ‘Test Payment’ mode. Subsequently, you can connect other payment gateways of your choice. The complete integration guide for payment gateways is provided below.

Step 5: Add Your Product

Add Product

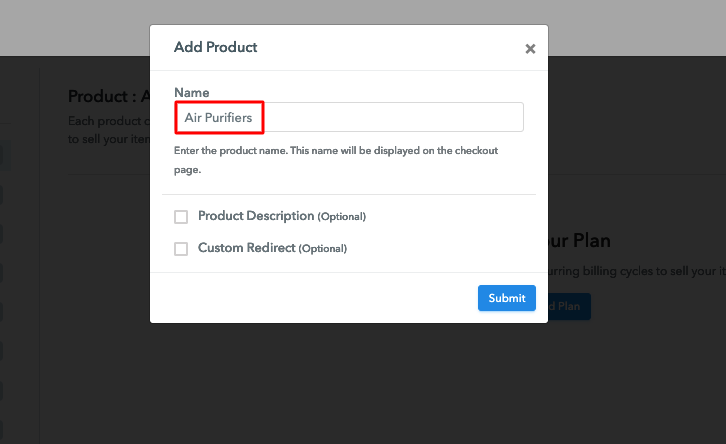
Once the payment mode is enabled, then you have to add your first product. You can add air purifiers of different categories such as electrostatic filters, basic & HEPA filters, etc. Add all other types of air purifiers in the same product by creating different plans.

Sell Air Purifiers Online Product Name

You just have to fill up these details and your product is added.

Note: Here you can add all the products related to the similar category by creating plans for each of them.

Step 6: Add Plans

Let’s get started and create plans for different categories of air purifiers that you want to sell

(a) Select Add New Plan

Add Plan

(b) Specify the Plan and Pricing Details

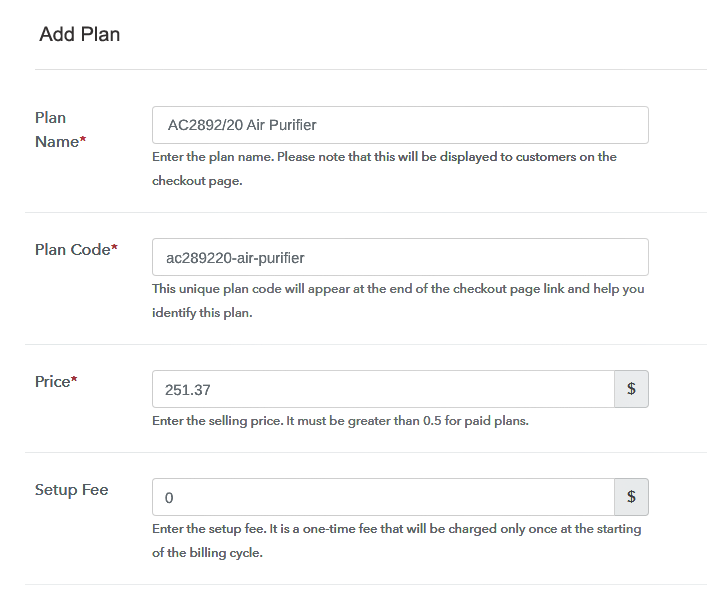
Sell Air Purifiers Online Details

On clicking add new plan, you will be redirected to the plan page, here you will have to fill the plan details such as plan name, code, billing cycle, price, etc.

(c) Add Image & Description

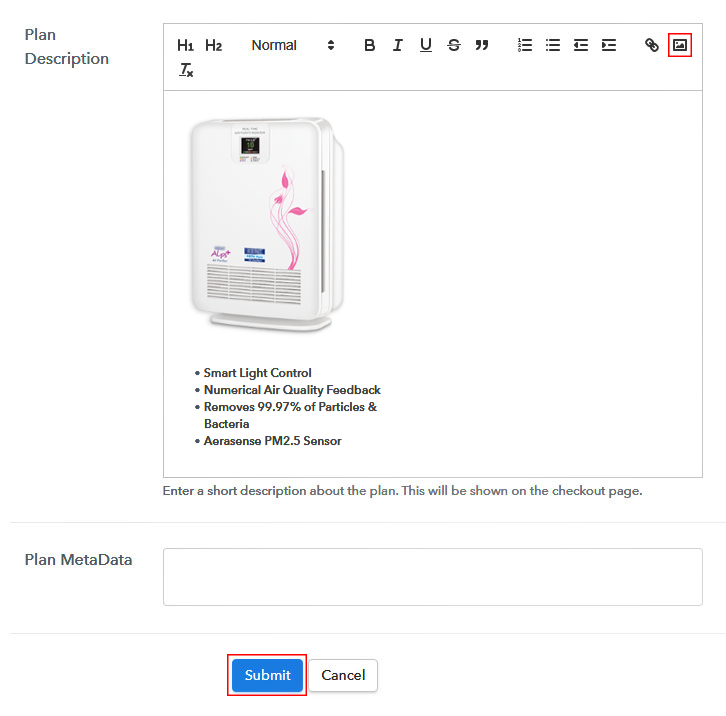
Sell Air Purifiers Online Image

Furthermore, write a description of the air purifiers that you want to sell along with the product links, images, etc, and click on the submit button to add your plan.
You can create more plans for all the other air purifiers in a similar manner.

Step 7: Share Your Checkout Page

Share Checkout Page on Social Media

  • Share your checkout page on social media like Facebook and Twitter.
  • Copy the mentioned link and send it to your customers through SMS or emails directly.
  • Embed your plan link to your website so that your customers can be landed on the checkout page directly.

Step 8: Preview Checkout Page

Follow these specified steps to view checkout page

(a) Click on the View Button

View Checkout Plan

(b) Take a Look at the Checkout Page

Preview Checkout Page

Step 9: Embed Checkout Page in Site & Sell Air Purifiers Online

Embed Checkout Page on Website

Just copy the provided plan embedding link and embed the checkout page to your WordPress site.

(a) Edit the Page & Paste the Copied Link

Paste Link in Text Editor

Copy and paste the link in the text area of the editor

(b) Save & Publish the Checkout Page

Save and Publish

After the code is pasted, click on the publish button to embed your checkout page.

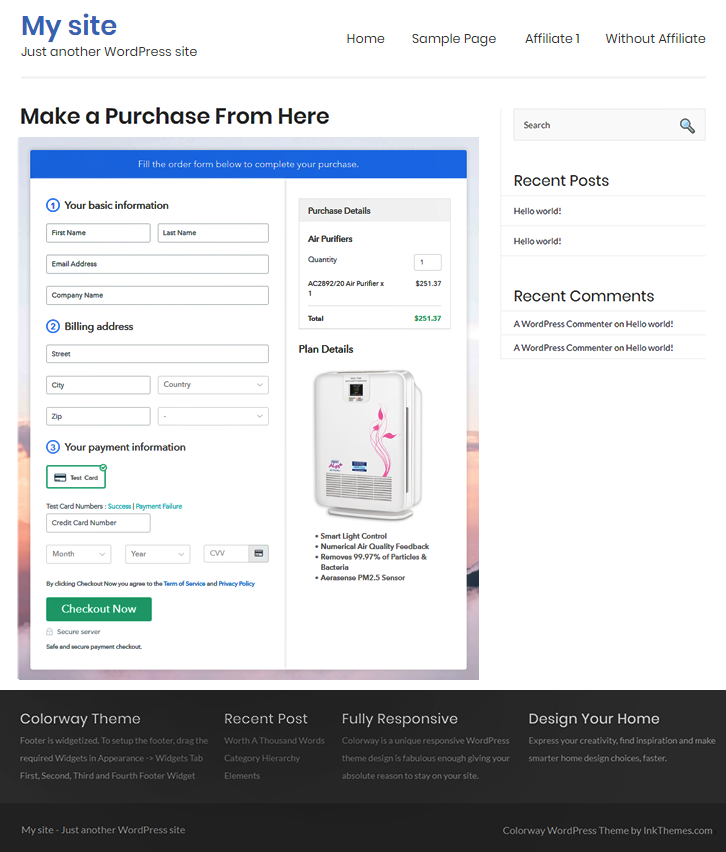
(c) Check Out the Final Look of your Checkout Page on WordPress Site

Sell Air Purifiers Online Website

Step 10: Multiplan Checkout Page

Note: In case you want to sell multiple products through a single checkout page, create a multi-plan checkout plan, otherwise skip this step.

(a) Click on Add Multiplan Checkout

Multiplan Checkout

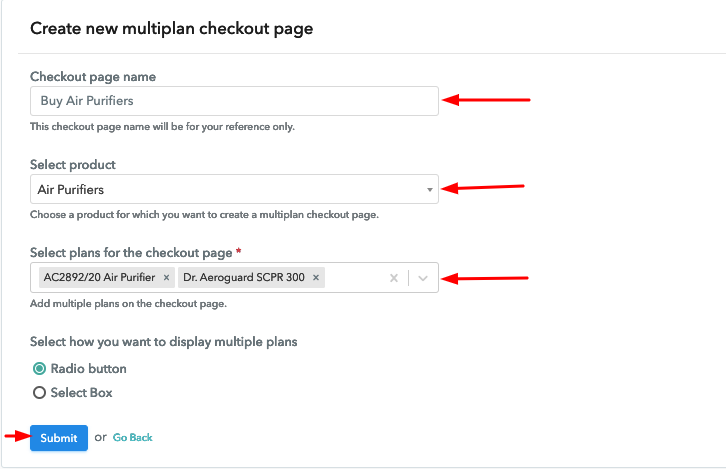
(b) Add Plans to Sell Multiple Air Purifiers from Single Checkout Page

Sell Air Purifiers Online Multi Details

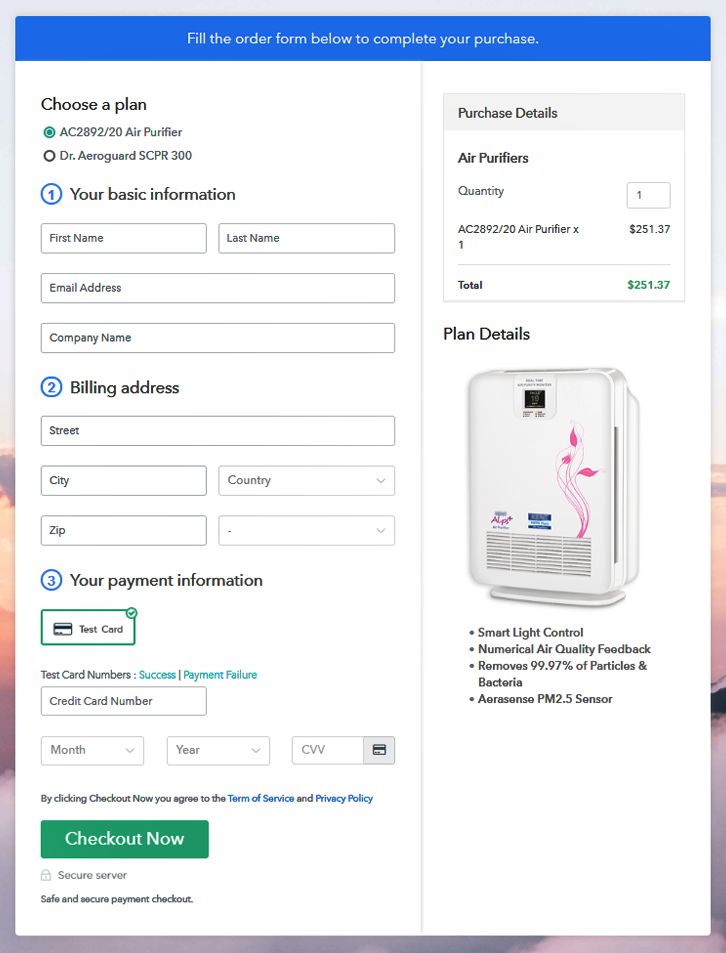
(c) Take a Look at the Checkout Page

Sell Air Purifiers Online Multi Checkout

Preview Checkout Page

Wrapping Up

Lastly, Pabbly Subscription Billing is the easiest and free way to start your air purifiers selling business online. With it, you can sell unlimited products, integrate it with your website, share invoices, and much more for free. Therefore, without thinking twice, start selling air purifiers online and earn unlimited revenue. For further queries or suggestions, please contact us.

You May Also Like To Read –

How to Sell Mehndi Online | Step by Step (Free Method)

How to Sell Mehndi Online

Ideal For: All the mehndi manufacturer, mehndi sellers, shopkeepers, local mehndi dealers and other merchants can use this method to sell mehndi online.

How to Sell Mehndi Online

Why Choose this Method for Selling Over any Other Solution?

Unlike any other solution, this method allows you to:

  • List and sell mehndi for FREE. Absolutely no payment required.
  • No commission on sales.
  • Collect payment through multiple payment modes from a single checkout page.
  • Sell one time or recurring subscriptions of the mehndi.
  • Sell and collect payment in any currency as per your requirement.
  • Give discounts on your products by offering special coupon codes.
  • Add sales commission agents to help you in selling the mehndi.

Get Pabbly Subscription Billing for Free

Mehndi is considered as a natural hair color. Whereas in India, mehndi is mostly used in weddings to apply in the hands of the bride and groom. Well, it is not limited to the wedding season, women love applying it on their hands on any occasion, festivals, etc. Hence, you might be looking for ways to start your mehndi selling business online.

Why would you like to sell mehndi online?

Well, mehndi is not only limited to cosmetic product and nowadays people even use it to cure the dandruff issue. And, as it is natural product and does not have any harmful effect on the body, people prefer to use it as an alternative for chemical products. Thus, to get such thing on the doorstep would be a great step to take your business sales at hike. Therefore, here I would like to suggest Pabbly Subscription Billing that helps you to create checkout pages online without any hassle. Moreover, it’s free and easy to use that also offers you so many amazing features:

  • Add unlimited plans & products to sell mehndi online
  • Collect one-time or recurring payments
  • Add tax and delivery charges
  • Generate invoices automatically

Apart from the above-mentioned features, it also gives you the flexibility to share checkout pages online on websites or different social media platforms like Facebook, Twitter, etc.

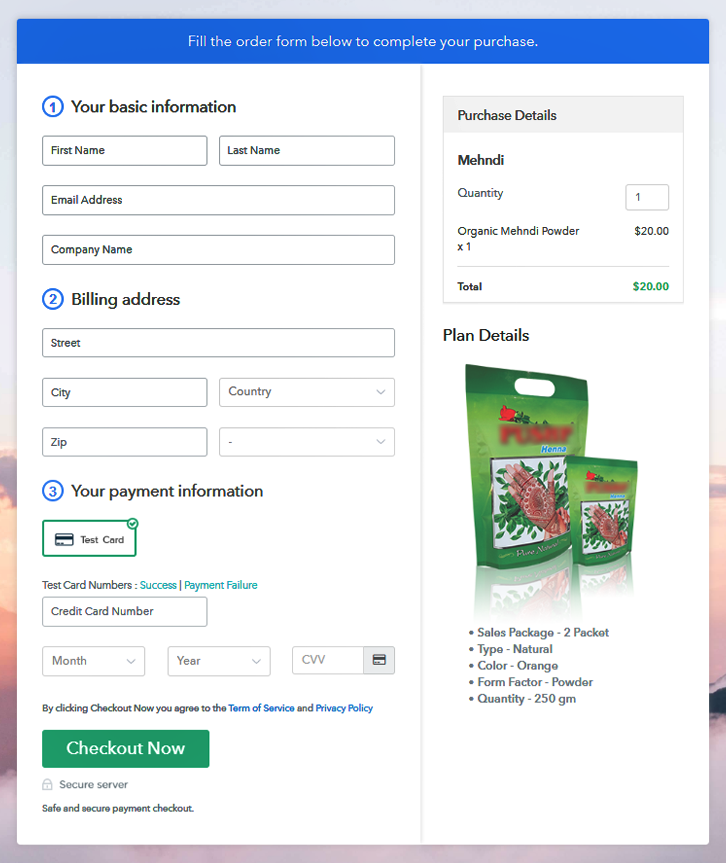
This is How your Checkout Page will Look Like After Creation

Preview Checkout Page to Start Mehndi Business Onlline

Preview Checkout Page

Step 1: Log in to Pabbly Subscription Billing

Signup

Go to Pabbly Subscription Billing website and tap on the button named “Sign Up Free”. After pressing the button, you will reach the signup page, where you need to fill the account details either manually or via Gmail account.

Sign Up For Free!

Step 2: Select Subscription Billing

Access Subscription Billing

Step 3: Account Setup

Setup Account

The next step is to fill up the company details i.e. company name, currency, and contact number in the given dialogue box.

Step 4: Connect Payment Gateway to Sell Mehndi Online

Connect Payment Gateway

Now, its time to describe the payment collection process by enabling the ‘Test Payment’ mode. Moreover, Pabbly Subscription Billing offers you several payment gateways such as Stripe, PayPal, Authorize.net, etc. Yet, you can connect them easily with the help of their integration guides that are mentioned below this paragraph. So, let’s get started by enabling the test payment gateway for instance.

Step 5: Add Your Product

Add Product

Moving on to the next step that is to add the product that you want to sell online. Moreover, you can also add mehndi’s of different types such as organic, herbal, etc.

Add Product to Sell Mehndi Online

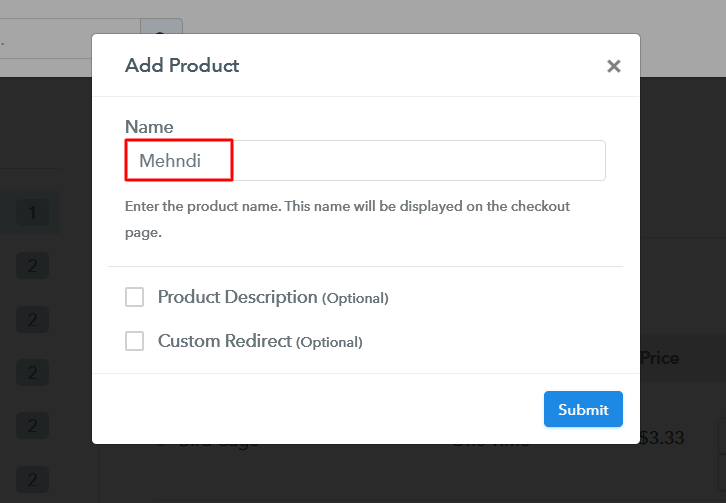
Just fill up these details to add your product.

Note: Here you can add all the products related to the similar category by creating plans for each of them.

Step 6: Add Plans

Let’s get started and create plans for different categories of mehndi that you want to sell.

(a) Select Add New Plan

Add Plan

(b) Specify the Plan and Pricing Details

Add Plan to Sell Mehndi Online

After pressing the “Add New Plan” button, you will be redirected to the plan page, where you will have to enter the plan details like name, code, billing cycle, price, etc.

(c) Add Image & Description

Add Image & Description to Sell Mehndi Online

Additionally, write a description of your mehndi that you want to sell along with the product links, images, etc, and click on the “Submit” button to add your plan.
You can create more plans for all other mehndi in a similar manner.

Step 7: Share Your Checkout Page

Share Checkout Page on Social Media

  • Share your checkout page on social media platforms like Facebook and Twitter.
  • You can also copy the checkout link and send it to your customers through SMS or emails directly.
  • Additionally, you can create some buttons on your website and paste the checkout links on them. Or you can place it on any anchor text on your website, so the users will be redirected to the checkout page.

Step 8: Preview Checkout Page

Follow these steps to view checkout page:

(a) Click on the View Button

View Checkout Plan

(b) Take a Look at the Checkout Page

Preview Checkout Page to Start Mehndi Business Onlline

Step 9: Embed Checkout Page in Site & Sell Mehndi Online

Embed Checkout Page on Website

Just copy the provided plan embed link and embed the checkout page to your WordPress site.

(a) Edit the Page & Paste the Copied Link

Paste Link in Text Editor

Copy and paste the link in the text area of the editor.

(b) Save & Publish the Checkout Page

Save and Publish

After the code is pasted, click on the “Publish” button to embed your checkout page.

(c) Check Out the Final Look of your Checkout Page on WordPress Site

Checkout Page on WordPress Site to Start Mehndi Business Online

Step 10: Multiplan Checkout Page

Note: In case you want to sell multiple products through a single checkout page, create a multi-plan checkout plan, otherwise skip this step.

(a) Click on Add Multiplan Checkout

Multiplan Checkout

(b) Add Plans to Sell Multiple Mehndi from Single Checkout Page

Multiplan Details to Sell Mehndi Online

(c) Take a Look at the Checkout Page
Multi Checkout to Sell Mehndi Online

Preview Checkout Page

Wrapping Up

Whether it is any celebration or festival, mehndi glorifies it another level. And, it is easy to start mehndi selling business online using this software. So, what are you waiting for? Get up & signup now and start selling mehndi online without any hassle. And if you have doubts or concerns, write to us in the comment section below. Thank You!

You May Also Like To Read –
How to Sell Sewing Machine Online | Step by Step (Free Method)

How to Sell Sewing Machine Online

Ideal For: All the sewing machine manufacturers, MSMEs, sewing machine merchants, sewing machine sellers, sewing machine shopowners and other traders can use this method to sell sewing machines online.

How to Sell Sewing Machine Online

Why Choose this Method for Selling Over any Other Solution?

Unlike any other solution, this method allows you to:

  • List and sell your sewing machines for FREE. Absolutely no payment required.
  • No commission deducted on sales.
  • Collect payment through multiple payment modes from a single checkout page.
  • Sell one time or recurring subscriptions of your sewing machines.
  • Sell and collect payment in any currency as per your requirement.
  • Give discounts on your products by offering special coupon codes.
  • Add sales commission agents to help you in selling your sewing machines.

Get Pabbly Subscription Billing for Free

From the fashion industry to the household, sewing machines are used everywhere. Even if you’re stitching a stunning dress or repairing the cloth that got torn, the sewing machine always comes in handy. Thus, you might be looking for ways to start selling sewing machines online.

Why would you like to sell sewing machines online?

Well, if you start selling sewing machines online, you will start getting business offers from all around the world. As, in this digital age, buying things online is a new trend that everyone is following. Moreover, it will not only increase your sales but you will also be able to find the most genuine buyers online who can value your products. Now, here comes a question that which particular tool can help you in selling sewing machines online. Well, that is non-other than Pabbly Subscription Billing which not only brings your product online but also provides you some of the most amazing features like:

  • Create unlimited products, plans, etc
  • Collect payments online as well as offline
  • Share invoices with customers automatically
  • Tracking details associated with product’s sales and revenues
  • Adding multiple billing models

Now, let me take you through 10 easy steps to help you start sewing machines business online.

This is How your Checkout Page will Look Like After Creation

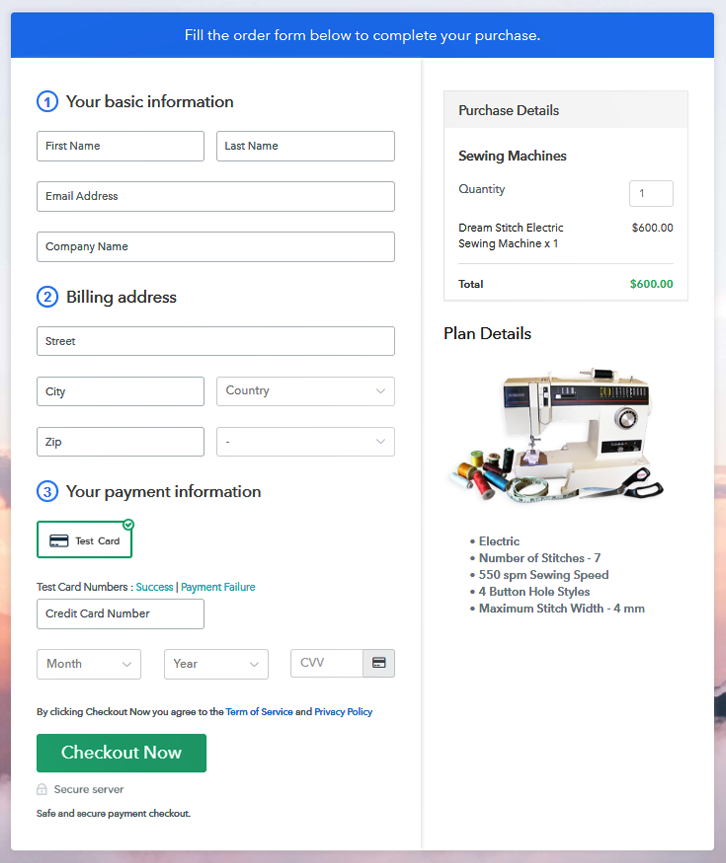
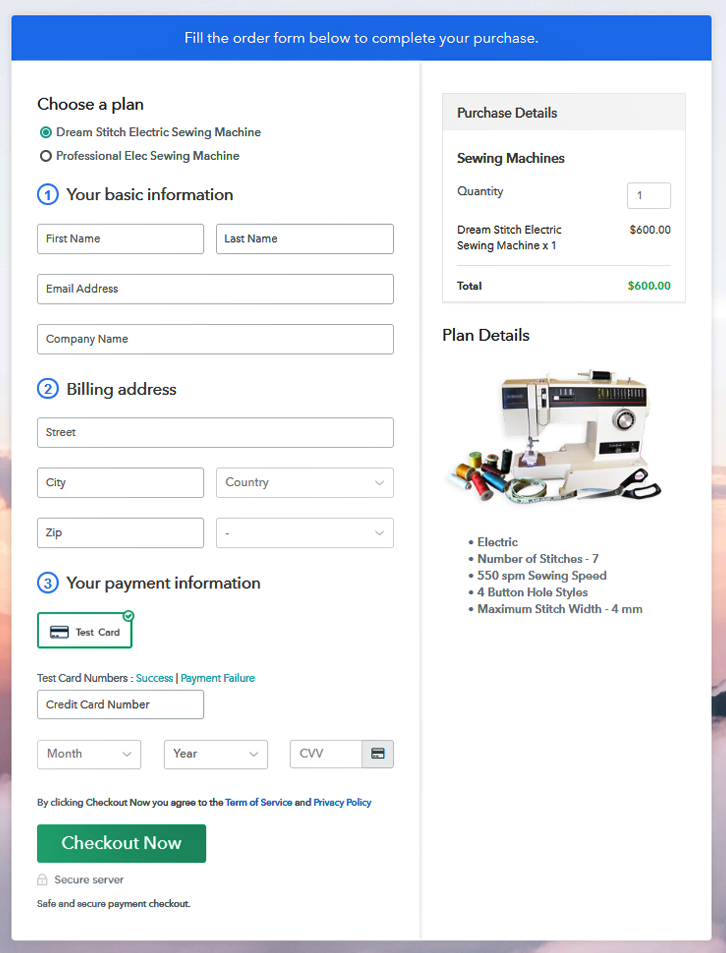
Checkout to Sell Sewing Machine Online

Preview Checkout Page

Step 1: Log in to Pabbly Subscription Billing

Signup

Search for Pabbly Subscription Billing and on their website press the “Sign up Free” button. After clicking on the button, a sign-up page will appear where you have to enter the required fields or just sign in via Gmail account.

Sign Up For Free!

Step 2: Select Subscription Billing

Access Subscription Billing

Step 3: Account Setup

Setup Account

This will generate a dialog box, where you need to enter the details of your company such as name, currency standards, and phone number. After you complete filling the details just tap on the “Continue” button.

Step 4: Connect Payment Gateways To Sell Sewing Machines Online

Connect Payment Gateway

Now, its time to demonstrate the test payment procedure by clicking on the “Enable Test Payment” option. Besides that, Pabbly Subscription Billing offers you to connect with multiple payment gateways like, PayPal, Stripe, etc whose articles are given below.  Now, in order to continue the process, here I am enabling the test payment option.

Step 5: Add Your Product

Add Product

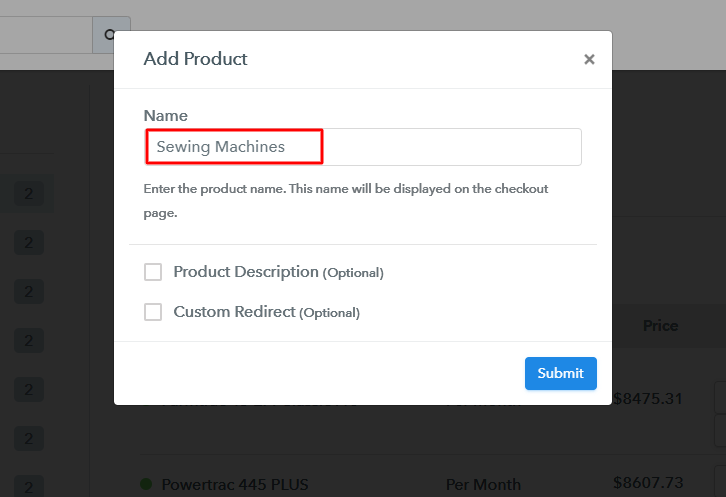
After embedding the payment gateway, now its time to add to your products.  For that, you need to click on the button named  “Add New Product” that will generate a dialog box. Now, fill in the name of sewing machines that you want to sell with a small description of it.

Add Product to Sell Sewing Machine Online

Fill up the details and your product is created.

Note: Here you can add all the products related to the similar category by creating plans for each of them.

Step 6: Add Plans

Now, we are going to create plans for sewing machines available in your store.

(a) Select Add New Plan

Add Plan

(b) Specify the Plan & Pricing Details

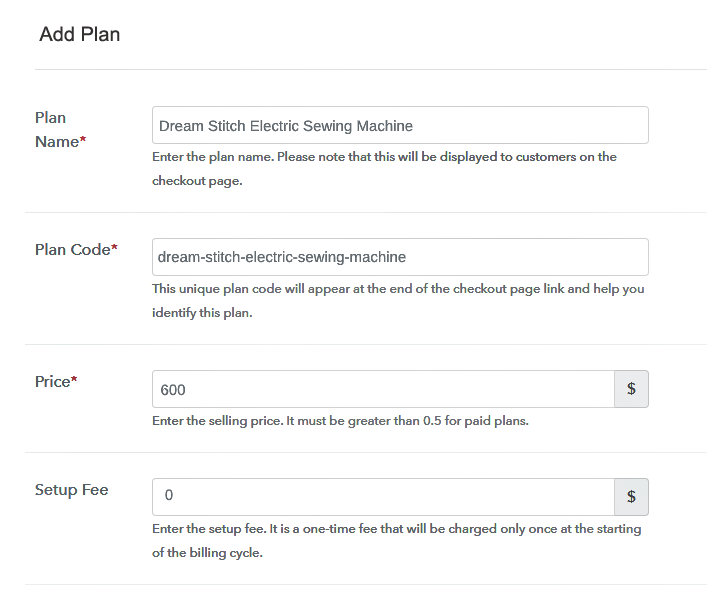
Description of Sewing Machine to Start Business Online

For adding a plan you will be redirected to plan page where you have to fill details like plan name, code, price, setup fees, billing cycle, etc. This is one of the most prominent step to start selling sewing machines online.

(c) Add Image & Description

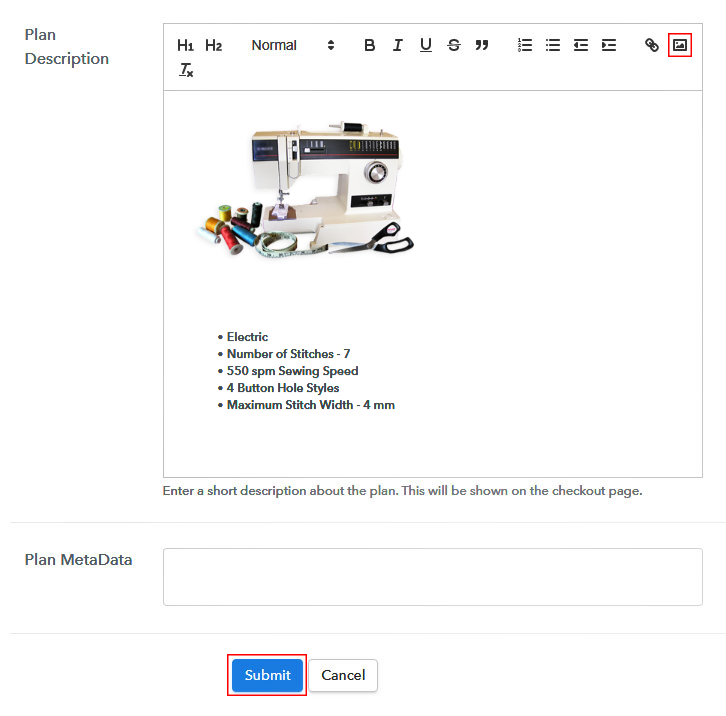
Add Image & Description to Sell Sewing Machine Online

First, take some amazing pictures of sewing machines you want to sell and paste it here.

Then provide some product descriptions of the sewing machines in bullet points like motor, needle, battery, and more.

Now having filled out the description, tap on the “Submit” button. Following the similar method, you can add multiple sewing machines.

Step 7: Share your Checkout Page

Share Checkout Page on Social Media

  • Now you can share the link of the checkout page on Twitter & Facebook by just pressing their respective buttons.
  • Also, you can share the direct link of the sewing machines checkout page with your customers via SMS or email marketing.
  • Additionally, you can create some buttons on your website and paste the checkout links on it. Or you can place it on any anchor text on your website, so the users will be redirected to the checkout page.

Step 8: Preview Checkout Page

Follow up these steps to preview checkout page:

(a) Click on the View Button

View Checkout Plan

(b) Take a Look at the Checkout Page

Checkout to Sell Sewing Machine Online

Step 9: Embed Checkout Page in Site & Sell Sewing Machines Online

Embed Checkout Page on Website

Afterward, just copy the embed plan link to insert the checkout page on your WordPress website.

(a) Edit the Page & Paste the Copied Link

Paste Link in Text Editor

Once the link is copied, then paste it to the text area of the editor.

(b) Save & Publish the Checkout Page

Save and Publish

After pasting the code, now press the ‘Publish’ button and your checkout page is embedded.

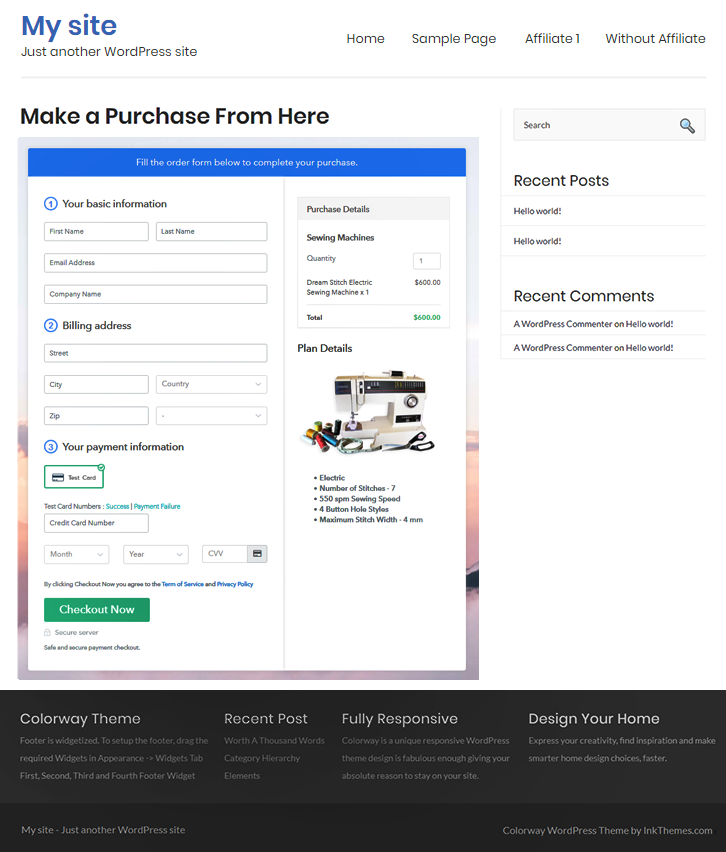
(c) Check out the Final Look of your Checkout Page on WordPress Site

Checkout Page on WordPress Site to Sell Sewing Machine Online

Step 10: Multiplan Checkout Page

Note: In case you want to sell multiple products via a single checkout page, you can create a multi-plan checkout page otherwise skip this step.

(a) Click on Add Mutiplan Checkout

Multiplan_Checkout

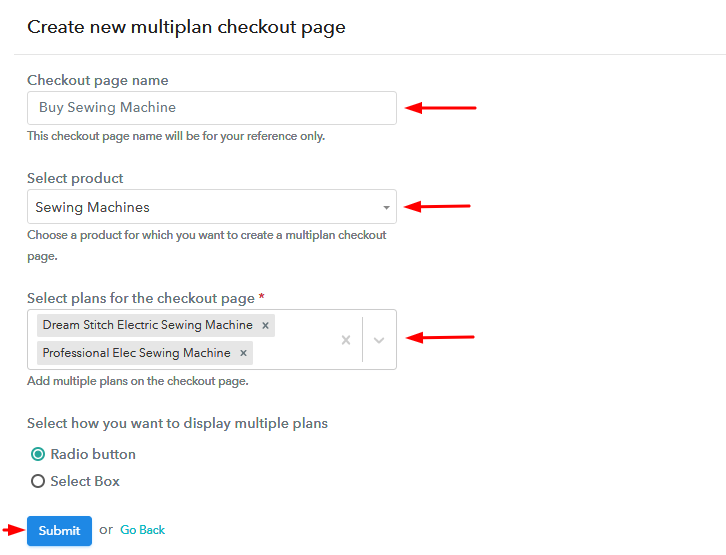
(b) Add Plans to Sell Multiple Sewing Machines from Single Checkout Page

Sell Multiple Sewing Machines from Single Checkout Page

(c) Take a Look at the Checkout Page

Multiplan Checkout of Sewing Machine Online

Preview Checkout Page

Wrapping Up

Finally! These are the 10 easy steps through which you can start selling sewing machines online. Furthermore, you can also use different payment gateways so that there will be no delay in your payments.

Besides, if you have any queries associated with these steps or payment gateway integration. Just drop it in the comment section below, we will get back to you ASAP. Thank you!

You May Also Like To Read –
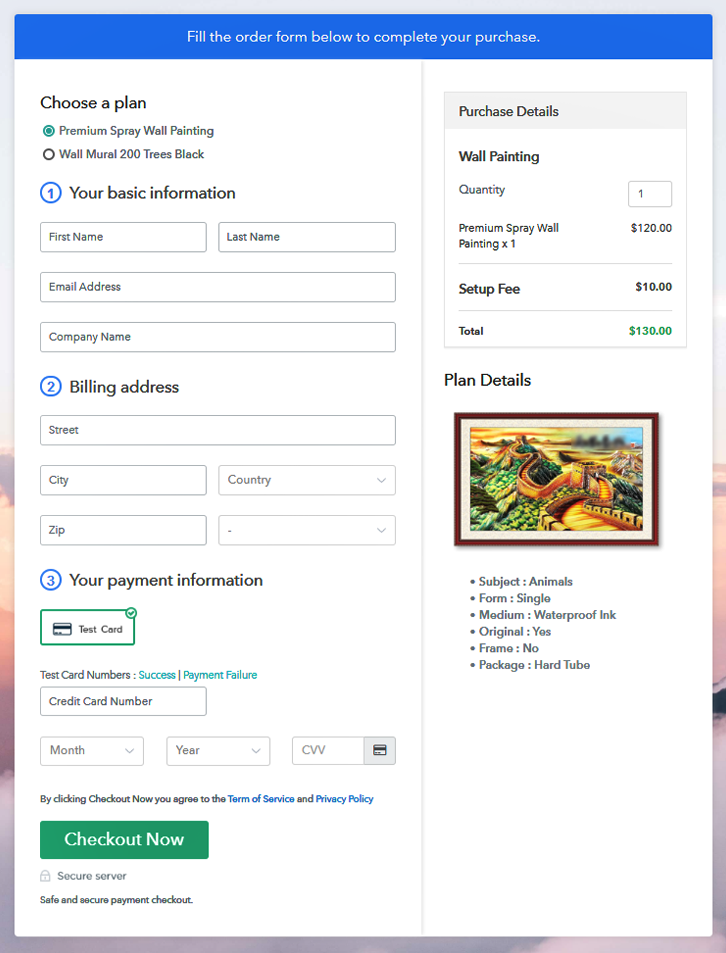
How to Sell Wall Paintings Online | Step by Step (Free Method)

Ideal For: All the artists, mural painters, art studios, freelance artists and other merchants can use this method to sell their wall paintings online.

How to Sell Wall Paintings Online

Why Choose this Method for Selling Over any Other Solution?

Unlike any other solution, this method allows you to:

  • List and sell wall paintings for FREE. Absolutely no payment required.
  • No commission deducted on sales.
  • Collect payment through multiple payment modes from a single checkout page.
  • Sell one time or recurring subscriptions of your wall paintings.
  • Sell and collect payment in any currency as per your requirement.
  • Give discounts on your products by offering special coupon codes.
  • Add sales commission agents to help you in selling your wall paintings.

Get Pabbly Subscription Billing for Free

Our ancestors started painting on walls as early as 40,000 BCE and in ancient Rome, wall painting was a coveted art. It was in the medieval ages especially in the Renaissance period, there was an explosion of wall paintings under Michelangelo, Vinci, Raphael, etc. Now fast-forwarding to 2022 increasingly many artists are selling wall paintings online to get better demands for their works.

Why would you like to sell wall paintings online?

The most traditional art galleries are highly localized, which means their customer traffic is restricted only to a few buyers from around the region. Furthermore, these galleries charge exorbitant rates as rent and security charges.

Now when you start selling wall paintings online, you can say goodbye to all these problems. As you will be inundated with offers from prospective buyers from around the world. Also, the transactions will be only between you and the buyer without any conflict of interest from the middleman. So now after learning the benefits, you may be excited to start wall paintings business online.

But wait! Do you know how to build an e-store to start to sell wall paintings online? Actually it is quite easy, as there are a ton of tools available online. However, here I am going to present an awesome Saas tool called Pabbly Subscription Billing that can list an unlimited number of wall paintings online on negligible commission. Furthermore, you can sell these paintings online in both offline/ online modes. Other advantages include:

  • Transparent Billing
  • Multiple Billing Models like Recurring, One-Time, etc
  • Import/ Export Customer Data
  • Custom Domains
  • Multiple Payment Gateways

These listed features will give you a definite advantage over your competitors and make your business flourish. So why waste time lets, get started to build an awesome checkout page to sell wall paintings online.

This is How your Checkout Page will Look Like After Creation

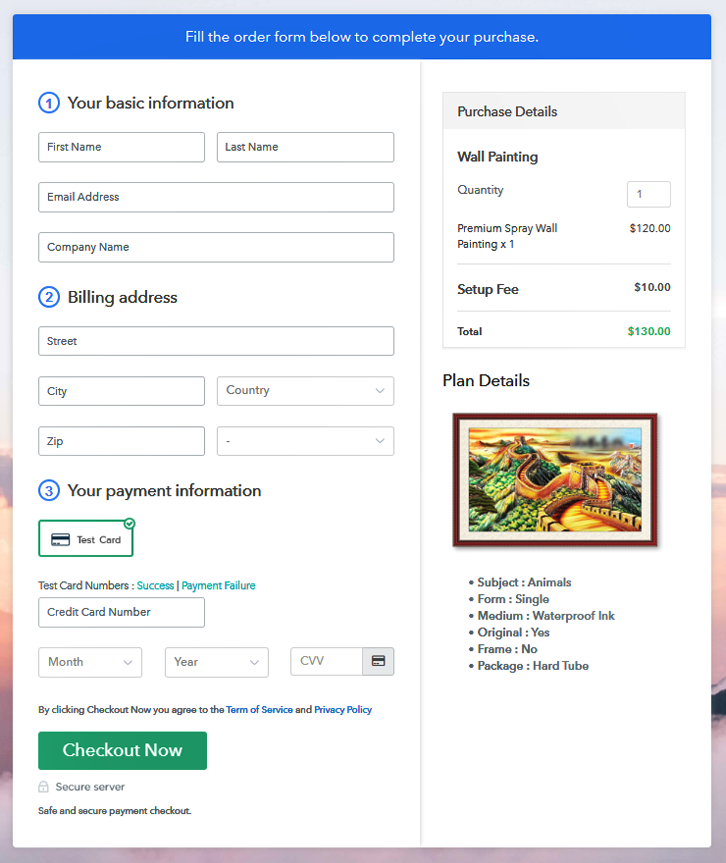
Checkout to Sell Wall Paintings Online

Preview Checkout Page

Step 1: Log in to Pabbly Subscription Billing

Signup

To begin, first search for  Pabbly Subscription Billing in your browser and landing on their website click on “Sign up Free“. Either sign in using your Gmail account or fill in the required fields like name, email, etc and then click the “Sign Up” button.

Sign Up For Free!

Step 2: Select Subscription Billing

Access Subscription Billing

Now you will enter the dashboard, and here click on the “Access Now” button on the Subscription Billing option.

Step 3: Account Setup

Setup Account

A dialogue box will appear that will require you to fill the company details like name, currency, and phone number. Now, press the “Continue” button after filling in the details.

Step 4: Connect Payment Gateways To Sell Wall Paintings Online

Connect Payment Gateway

In Pabbly Subscription Billing, you have access to a dummy payment gateway, where you can pre-test the workings of the payment process. This will help you to remove all the glitches beforehand. You can do this by clicking on the “Enable Test Payment” option.

Moreover, Pabbly Subscription Billing, allows you to integrate with multiple payment gateways like Stripe, Razorpay, PayPal, Authorize.net, etc. For the integration of the payment gateways, there are manuals listed beneath this paragraph. But since we have to set up the payment process, we will click on the “Enable Test Payment” option.

Step 5: Add Your Product

Add Product

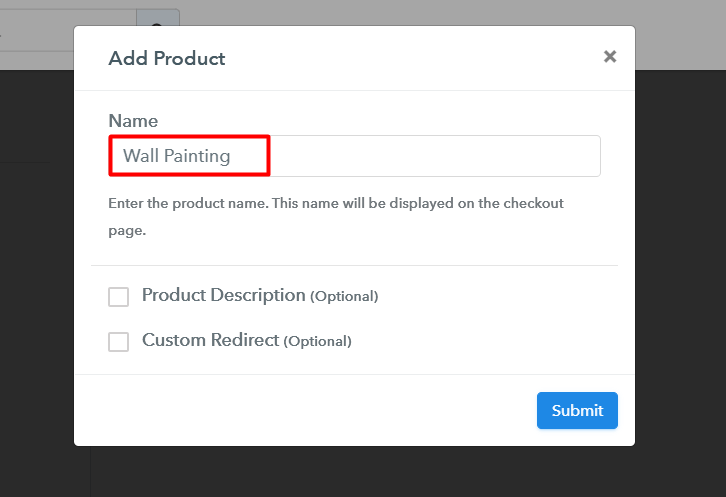
So, now we are going to add the products. Below the “Enable Payments,” you will find the section “Add your product” click on it. This will create a dialog box with a blue button “Add New Product”. Click it.

This will generate a pop-up box and you have to add the required product title, in this case, it is the ‘Wall Paintings’.

Sell Wall Paintings Online

Fill up the details and your product is created.

Note: Here you can add all the products related to the similar category by creating plans for each of them.

Step 6: Add Plans

Now, we are going to create plans to start a wall paintings business online

(a) Select Add New Plan

Add Plan

(b) Specify the Plan & Pricing Details

Add product to Sell Wall Paintings Online

Here you will add the details like name, code, price, setup fees, etc. Also, you can add different billing models like one-time payment, recurring, based on cycles, etc. You can change them whenever you want.

(c) Add Image & Description

Add image to Sell Wall Paintings Online

Now, upload some stunning images of your wall paintings.

Furthermore, add some information about the wall paintings like subject type, colors used, category, etc in bullet points or numbers and then press the “Submit” button.

Also, using the same methods, you can list more products.

Step 7: Share your Checkout Page

Share Checkout Page on Social Media

  • Now for the marketing of your wall paintings, you can share the checkout pages on Twitter and Facebook by pressing their respective buttons.
  • Furthermore, you can also embed the checkout pages in SMS and emails for more product dissemination.
  • Also, you can create buttons on your website and embed the checkout pages on them. Furthermore, you can anchor the checkout links so the users will be redirected to the checkout page.

Step 8: Preview Checkout Page

Follow up these steps to preview checkout page:

(a) Click on the View Button

View Checkout Plan

(b) Take a Look at the Checkout Page

Checkout to Sell Wall Paintings Online

Step 9: Embed Checkout Page in Site & Sell Wall Paintings Online

Embed Checkout Page on Website

Now,  copy the embed plan link to insert the checkout page on your WordPress website.

(a) Edit the Page & Paste the Copied Link

Paste_Link_in_Text_Editor

Now, when the link is copied, then paste it to the text area of the editor.

(b) Save & Publish the Checkout Page

Save_and_Publish

After pasting the code, now hit the ‘Publish’ button. Your checkout page is embedded.

(c) Check out the Final Look of your Checkout Page on WordPress Site

Embed on WordPress to Sell Wall Paintings Online

Step 10: Multiplan Checkout Page

Note: In case you want to sell multiple products via a single checkout page, you can create a multi-plan checkout page otherwise skip this step.

(a) Click on Add Mutiplan Checkout

Multiplan Checkout

(b) Add Plans to Sell Multiple Wall Paintings Online from Single Checkout Page

Add plans to Sell Wall Paintings Online

(c) Take a Look at the Checkout Page

Multiplan to Sell Wall Paintings Online

Preview Checkout Page

Wrapping Up

Congrats!! You finally created your first checkout page to sell wall paintings online through Pabbly Subscription Billing. Slowly you will fully realize the full potential of this software and its incredible feature to dominate the market in the long run. But since you are new to this endeavor, you may have some doubts regarding the steps. So drop your queries in the comment section below. We shall reply to you at the earliest. Thank You

You May Also Like To Read –
How to Sell Wine Online | Step by Step (Free Method)

How to Sell Wine Online

Ideal For: All the wine sellers, wine makers, retail wine selling business owners, and other wine selling merchants can use this method to take their wine selling business online.

How to Sell Wine Online

Why Choose this Method for Selling Over any Other Solution?

Unlike any other solution, this method allows you to:

  • List and sell your wine for FREE. Absolutely no payment required.
  • No commission on sales.
  • Collect payment through multiple payment modes from a single checkout page.
  • Sell one time or recurring subscriptions of your wine.
  • Sell and collect payment in any currency as per your requirement.
  • Give discounts on your products by offering special coupon codes.
  • Add sales commission agents to help you in selling wine online.

Get Pabbly Subscription Billing for Free

Wine has many health and skin benefits and people enjoy its varieties such as red, white, rose etc. And as people are searching for it online you maybe finding a way to sell wine online.

Why would you like to sell wine online?

According to Global Wine Consumption, the total online wine sales are increased by 63% in the year 2019 and these figures give many reasons for selling wine online. Well, let’s not lose track here and start with how can you start selling wine in minutes.

There is this service named Pabbly Subscription Billing, which allows you to create checkout pages to display wines on them as well as collect payments through it. Also, it enables you to share the pages on social media platforms and you can even link them in website’s buttons, texts, posts and pages.

Here, is what more you’ll get by using this service.

  • A place to keep all the wine in stock
  • Beautifully product pages to display an item
  • Showcase single & multiple items
  • Collect safe & secure payments both online & offline
  • Automated billing & invoicing through emails
  • Unlimited product & plan creation to sell as many wines as you want to
    And much more…

This is How your Checkout Page will Look Like After Creation

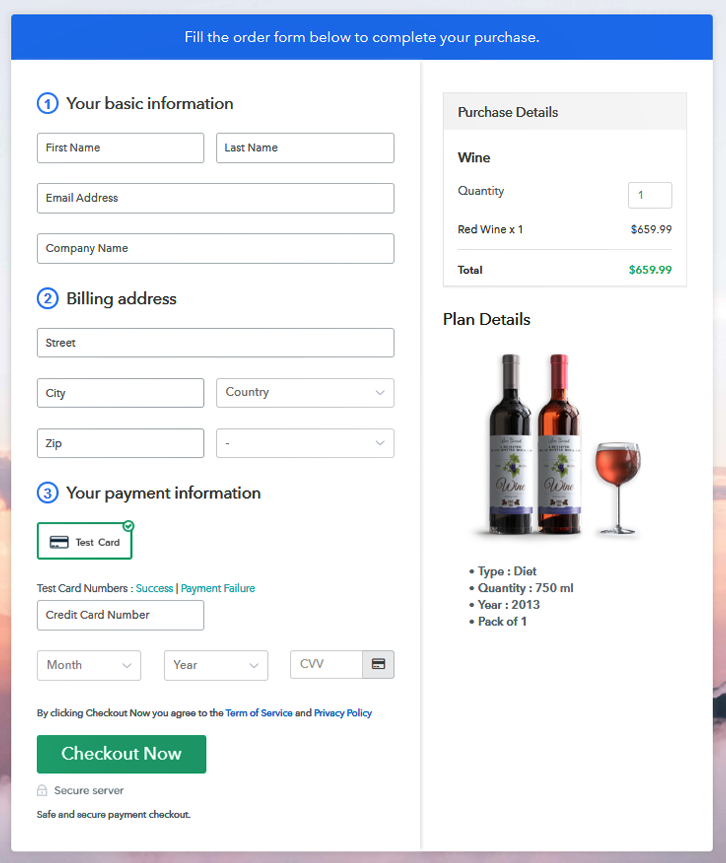
Checkout Page Preview to Sell Wine Online

Preview Checkout Page

Step 1: Login to Pabbly Subscription Billing

Signup
You can begin with visiting Pabbly Subscription Billing website. There click on the “Sign Up Free” button. You’ll then be redirected to a page where you can sign-up by filling out the form provided or you can also sign-up by a Google account.

Sign Up For Free!

Step 2: Select Subscription Billing

Access Subscription Billing

After a successful sign-up, above shown page will open up here click on the ‘Access Now’ button next to Subscription Billing app.

Step 3: Account Setup

Setup Account

In the next pop-up window, mention the company name, currency and phone number and click on ‘Continue’.

Step 4: Connect Payment Gateway to Sell Wine Online

Connect Payment Gateway

In this step, you’ll need to connect a payment gateway to sell wine online. The links to the integration guides are mentioned below and you can follow a step by step procedure for multiple payment gateways. In this article, I’m enabling the test payment method for now.

Step 5: Add Your Product

Add Product

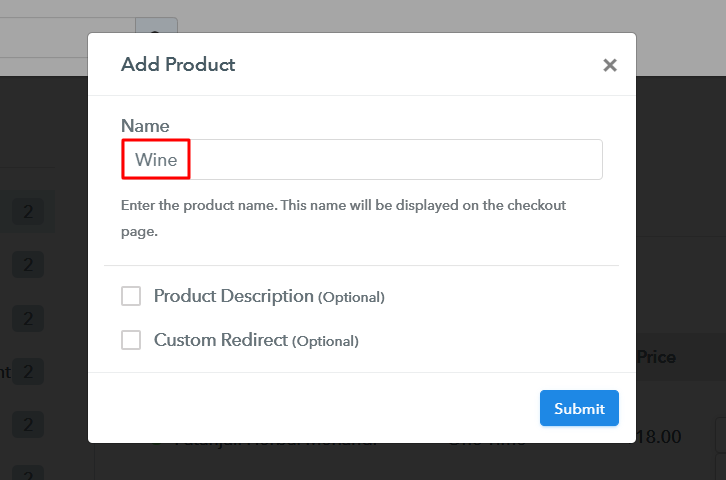
Now, you can specify a category of your products as a product name. Click the ‘Add New Product’ button and mention a product name, for instance, red wine, white wine, rose wine etc.

Add Product to Sell Wine Online

Hit on the ‘Submit’ button once you are done filling out the product details & a product will be added in your product list instantly.

Note: Here you can add all the products related to the similar category by creating plans for each of them.

Step 6: Add Plans

After adding a product, you can add multiple plans to it. These plans will be the items that you want to sell. Click the ‘Add New Plan’ button & stuff the plan details. All these plan details will be shown on the checkout page for selling wine online.

(a) Select Add New Plan

Add Plan

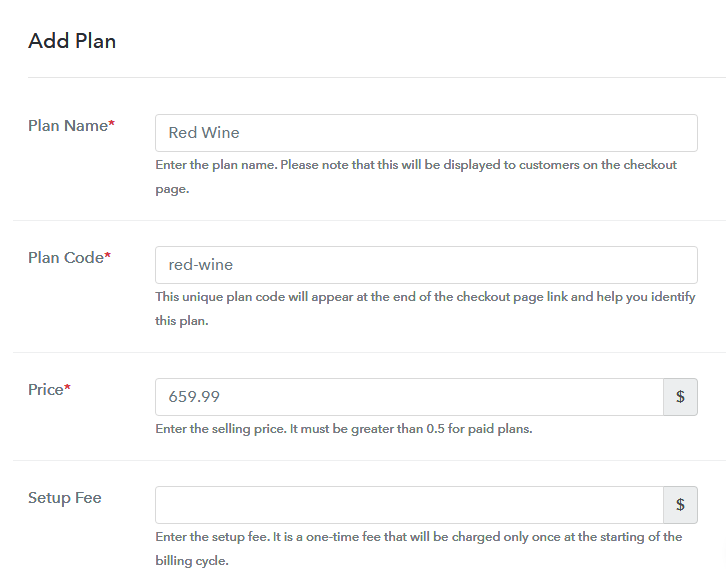
(b) Specify the Plan & Pricing Details

Add Plan to Sell Wine Online

Mention the plan details like wine’s name, code, its pricing etc as per the wine that you want to sell online.

(c) Add Image & Description

Add Image & Description to Sell Wine Online

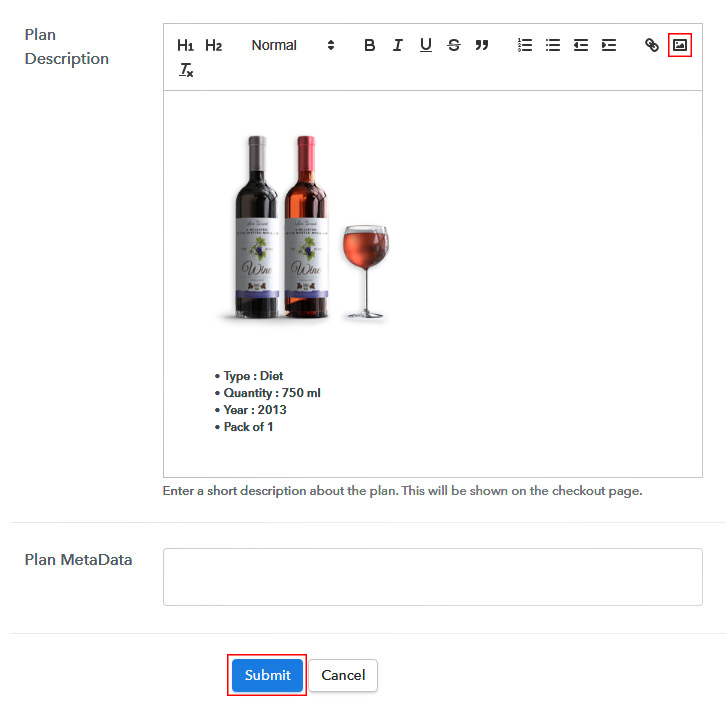
You can also show an image & description in the display area to sell wine online. For this put an image and description in the “Add Description” field. Also, you can make use of lists, quotes, links, headings etc to format the text.

Strike the ‘Submit’ button once you are done with this wine details and a plan will get appended in the system for selling wine online.

Step 7: Share your Checkout Page

Share Checkout Page on Social Media

Next, a window will open up with a plan link & a plan code to sell wine online over different platforms.

  • You can share the URL given under “Plan Link” on multiple social media platforms like WhatsApp, SMS, emails etc to sell wine online.
  • Also, you can link this URL in the buttons and text redirects of a website.
  • There are two Facebook &Twitter sharing buttons to share the checkout page directly over these platforms.

Step 8: Preview Checkout Page

Follow these steps to preview a checkout page:

(a) Click on the View Button

View Checkout Plan

(b) Take a Look at the Checkout Page

Checkout Page Preview to Sell Wine Online

Step 9: Embed Checkout Page in Site & Sell Wine Online

Embed Checkout Page on Website

You can use the code given under ‘Embed Plan Link’ pane to embed a checkout page on WordPress. For this, copy the complete code given.

(a) Edit the Page & Paste the Copied Link

Paste_Link_in_Text_Editor

And then paste it in the text area of any post or page.

(b) Save & Publish the Checkout Page

Save_and_Publish

Publish the post or page afterwards & a checkout page will get embedded on your site.

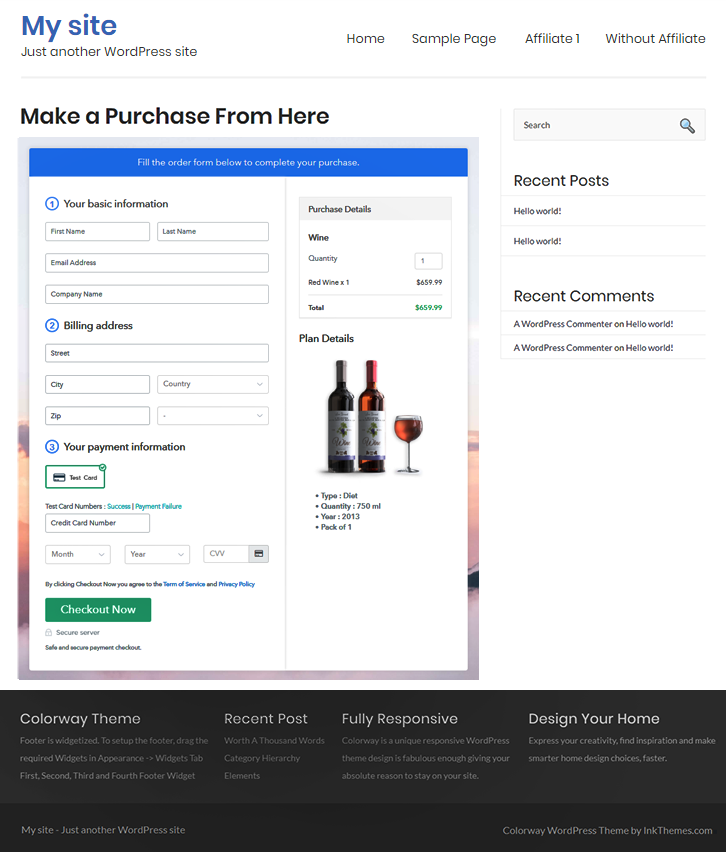
(c) Check out the Final Look of your Checkout Page on WordPress Site

Checkout Page On Site to Sell Wine Online

Step 10: Multiplan Checkout Page

Note: In case you want to sell multiple products via a single checkout page, you create a multi-plan checkout page otherwise skip this step.

(a) Click on Add Mutiplan Checkout

Multiplan_Checkout

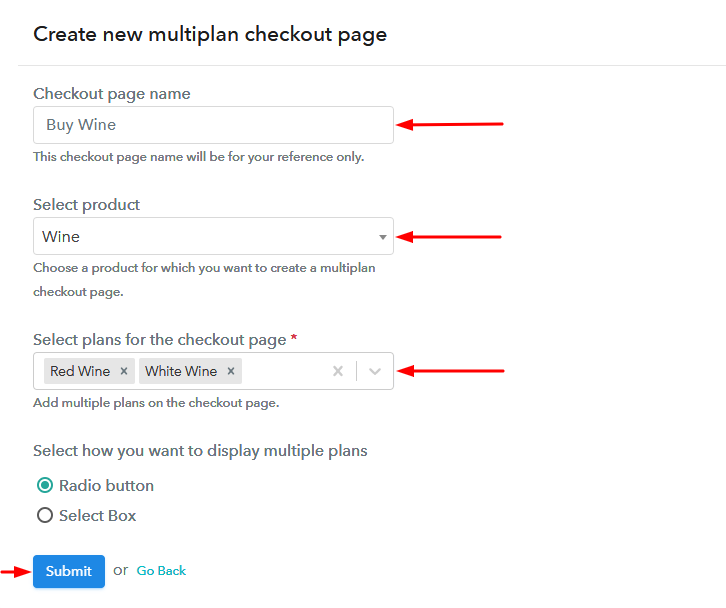
(b) Add Plans to Sell Multiple Wine from Single Checkout Page

Create Multiplan Checkout to Sell Wine Online

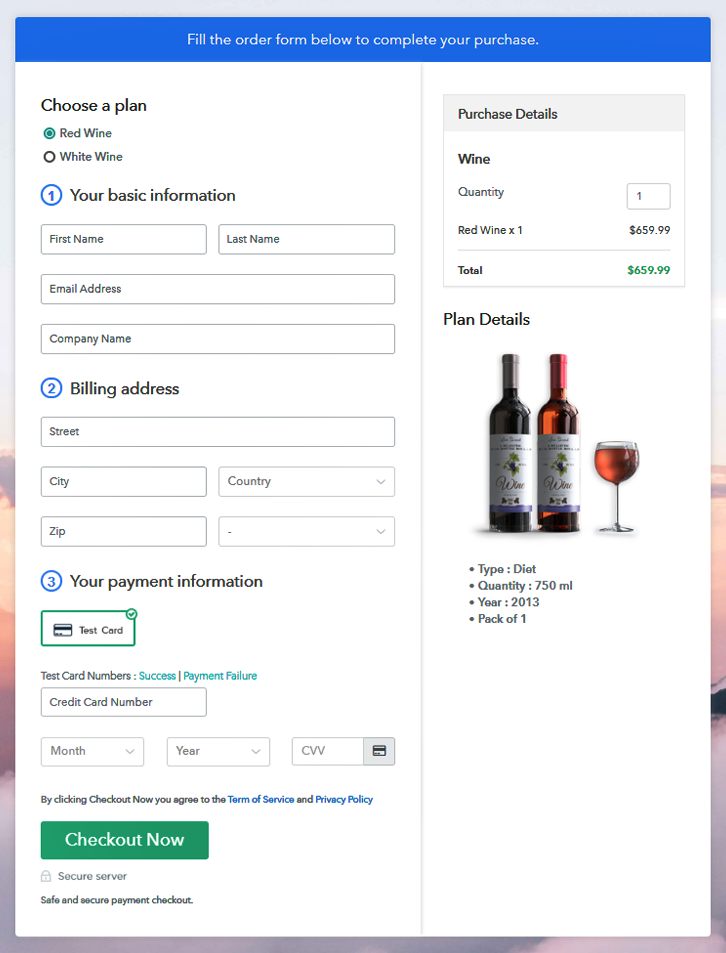
(c) Take a Look at the Checkout Page:

Multiplan Checkout Page to Sell Wine Online

Preview Checkout Page

Wrapping Up

If you have searched for ways to start wine business online then you may have yet seen that this right here is the simplest as well as the fastest way to do so. Also, secure payments are a real concern in online businesses and for that, this service provides multiple reliable options to choose from. Small as well as large business can use this method to sell selling online very easily.

You May Also Like To Read

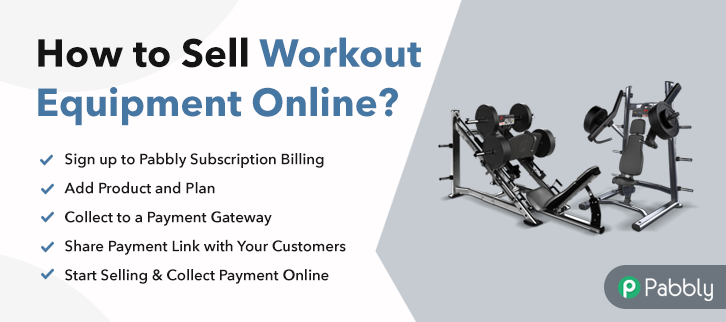
How to Sell Workout Equipment Online | Step by Step (Free Method)

How to Sell Workout Equipment Online

Ideal For: All the workout equipment manufacturers, workout equipment sellers, retail workout equipment shop owners, gym owners and other merchants can use this method to take their workout equipment selling business online.

How to Sell Workout Equipment Online

Why Choose this Method for Selling Over any Other Solution?

Unlike any other solution, this method allows you to:

  • List and sell your workout equipment for FREE. Absolutely no payment required.
  • No commission on sales.
  • Collect payment through multiple payment modes from a single checkout page.
  • Sell one time or recurring subscriptions of your workout equipment.
  • Sell and collect payment in any currency as per your requirement.
  • Give discounts on your products by offering special coupon codes.
  • Add sales commission agents to help you in selling your workout equipment.

Get Pabbly Subscription Billing for Free

Somebody once quoted “Your body is your biggest asset it’s your responsibility to take care of it” which makes people lean towards the fitness industry. Fitness is something which makes you feel good about yourself, and that’s why every year gym membership business rises.

Why would you like to sell workout equipment online?

One of the best inventions of humankind is workout equipment and the rising trend of a home gym is a good reason to start workout equipment business online. After a hectic day of work, exercise and mediation bring relief.

According to Allied Market Research, the fitness equipment market is expected to reach $15.2 billion, registering a CAGR of 3.5% from 2020 to 2027 which is an amazing figure. Considering all this, it is high time to start workout equipment selling business online. Gladly, we have a software named Pabbly Subscription Billing that lets you create a checkout page for selling workout equipment online.

Other than this, it is packed with amazing features, some of it are mentioned below:

  • List various workout equipment in a single checkout page
  • Offer unlimited discount and coupon codes to customers
  • Collect currency in both online and offline mode

These are some of the perks of software and now let’s cast light on creating a checkout page for selling workout equipment using this tool.

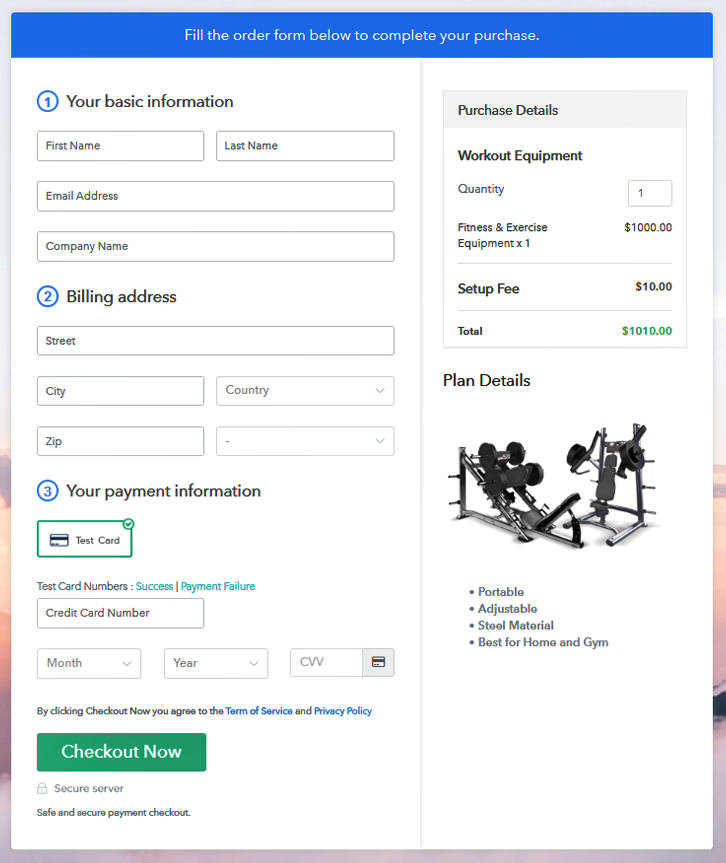
This is How your Checkout Page will Look Like After Creation

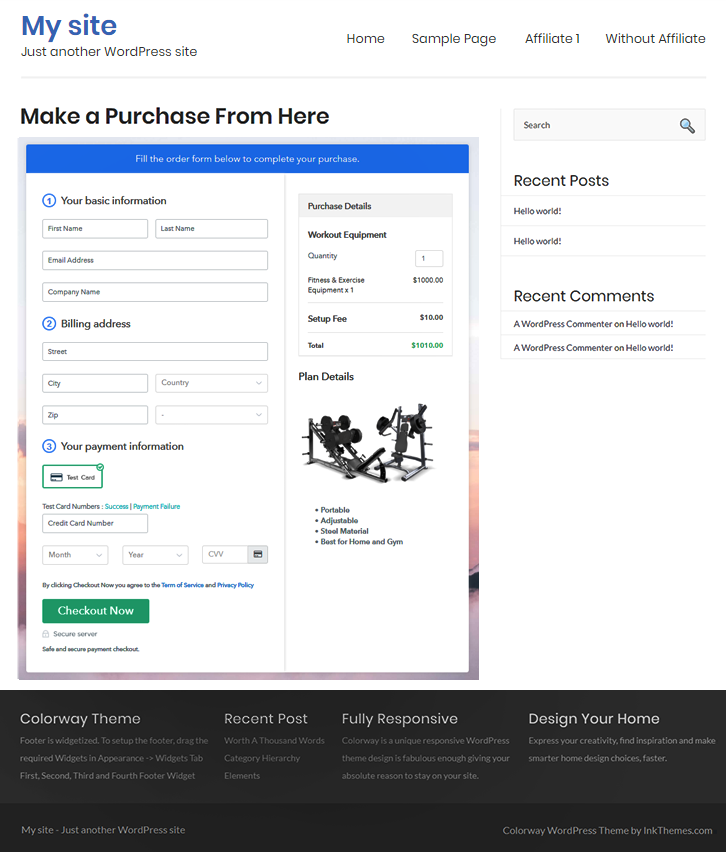
Checkout Page to Sell Workout Equipment Online

Preview Checkout Page

Step 1: Log in to Pabbly Subscription Billing

Signup

The very first step for creating a checkout page for selling workout equipment online by visiting the Pabbly Subscription Billing in your browser. Then click on the “Sign up Free“ button. Further, either manually filled out the details or sign in using your Gmail account.

Sign Up For Free!

Step 2: Select Subscription Billing

Access Subscription Billing

Step 3: Account Setup

Setup Account

Further, after clicking on the “Access Now” button of the software, a page will redirect with fields like company name, select currency, and phone number. Just fill out those details to continue creating a checkout page for workout equipment.

Step 4: Connect Payment Gateways To Sell Workout Equipment Online

Connect Payment Gateway

Now, the next part of the process is to know about software payment procedures using a “Test Payment Gateway”. Here, we are continuing the checkout page process for workout equipment using a test payment gateway. Additionally, it is packed with various payment gateways like PayPal, Stripe, etc. Moreover, below we are mentioning the payment integration guides.

Step 5: Add Your Product

Add Product

Subsequently, add the name, which in our case is “Workout Equipment”. Here you can specify the type like treadmill, stationary bicycle, etc. Also, write a short description of the workout equipment to catch the buyer’s attention.

Add Product to Start Selling Workout Equipment Online

Next, click on the “Submit” button after filling the details about the workout equipment.

Note: Here you can add all the products related to the similar category by creating plans for each of them.

Step 6: Add Plans

Let’s rollout plans for different kinds of workout equipment available in your store.

(a) Select Add New Plan

Add Plan

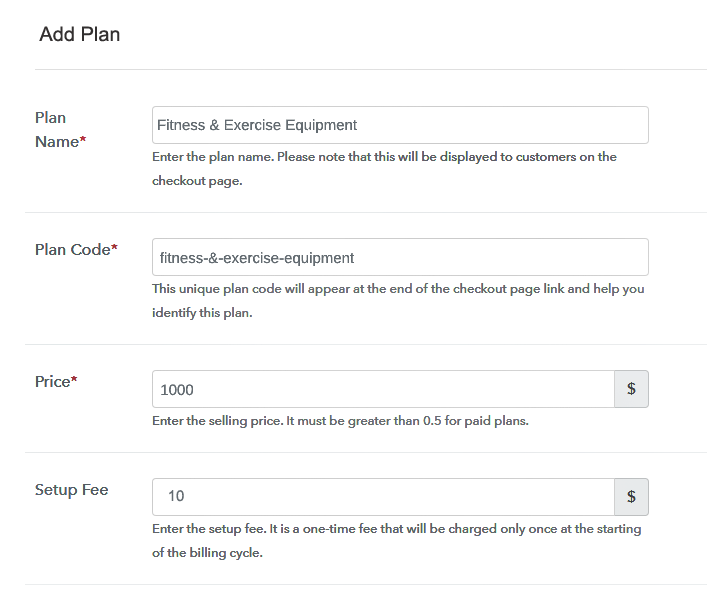
(b) Specify the Plan & Pricing Details

Specify the Plan and Pricing to Start Selling Workout Equipment Online

The following thing to do is fill all the details of workout equipment like plan name, code, price, set-up fee, and much more to continue.

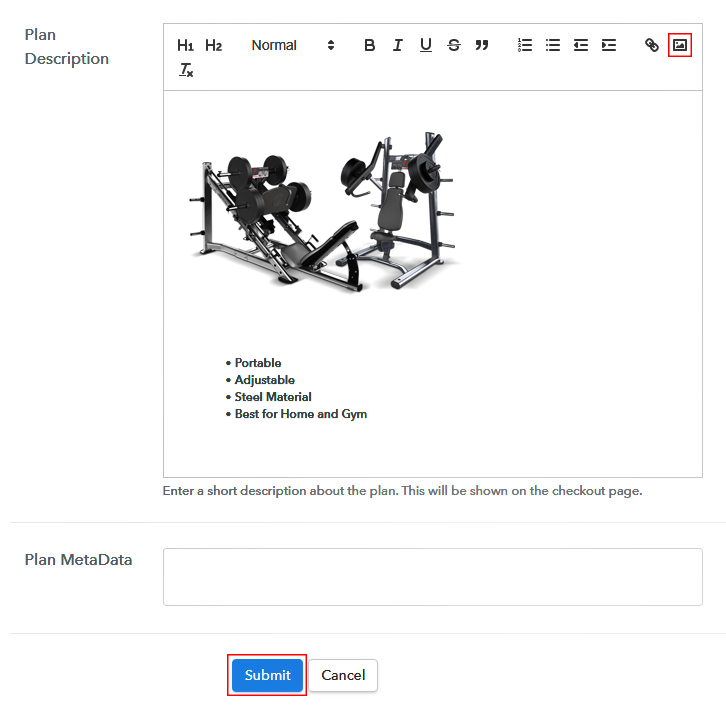
(c) Add Image & Description

Add Image & Description to Sell Workout Equipment Online

Moreover, it is necessary to write a brief description of workout equipment using bullets, images, etc, to bring potential buyers to the checkout page.

Following, click the “Submit” button to add the workout equipment on the checkout page.

Subsequently, you can add multiple plans and kinds of workout equipment in your product list which you want to market online.

Step 7: Share your Checkout Page

Share Checkout Page on Social Media

  • Besides, share the checkout page of the workout equipment on social media accounts like Facebook & Twitter to get the customer’s attention.
  • Also, you can share the direct link of the workout equipment’s checkout page with your customers via SMS or email marketing.
  • Additionally, embed the provided plan link of the workout equipment in the buttons or any anchor text on your website.

Step 8: Preview Checkout Page

Follow up the recommended steps to preview the checkout page of workout equipment:

(a) Click on the View Button

View Checkout Plan

(b) Take a Look at the Checkout Page

Checkout Page to Sell Workout Equipment Online

Step 9: Embed Checkout Page in Site & Sell Workout Equipment Online

Embed Checkout Page on Website

Furthermore, copy the link, and add the checkout page to sell workout equipment online at any decent place on your WordPress site.

(a) Edit the Page & Paste the Copied Link

Paste Link in Text Editor

Also, paste the plan link of the workout equipment on a text editor of the WordPress dashboard.

(b) Save & Publish the Checkout Page

Save and Publish

Further, hit the “Publish” button after doing changes in the checkout page of the workout equipment.

(c) Check out the Final Look of your Checkout Page on WordPress Site

Final Look of your Checkout Page to Start Selling Workout Equipment Online

Step 10: Multiplan Checkout Page

Note: In case you want to sell multiple products via a single checkout page, you can create a multi-plan checkout page otherwise skip this step.

(a) Click on Add Mutiplan Checkout

Multiplan Checkout

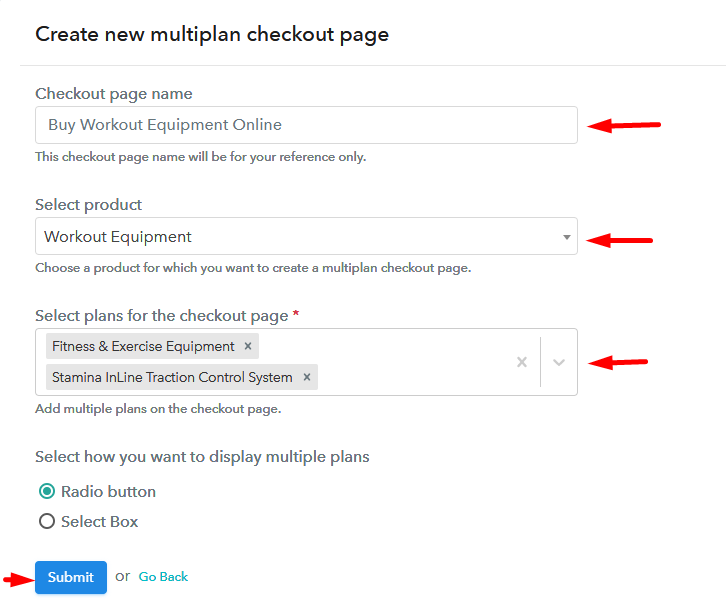
(b) Add Plans to Sell Multiple Workout Equipment from Single Checkout Page

Add Multiple Products to Start Selling Workout Equipment Online

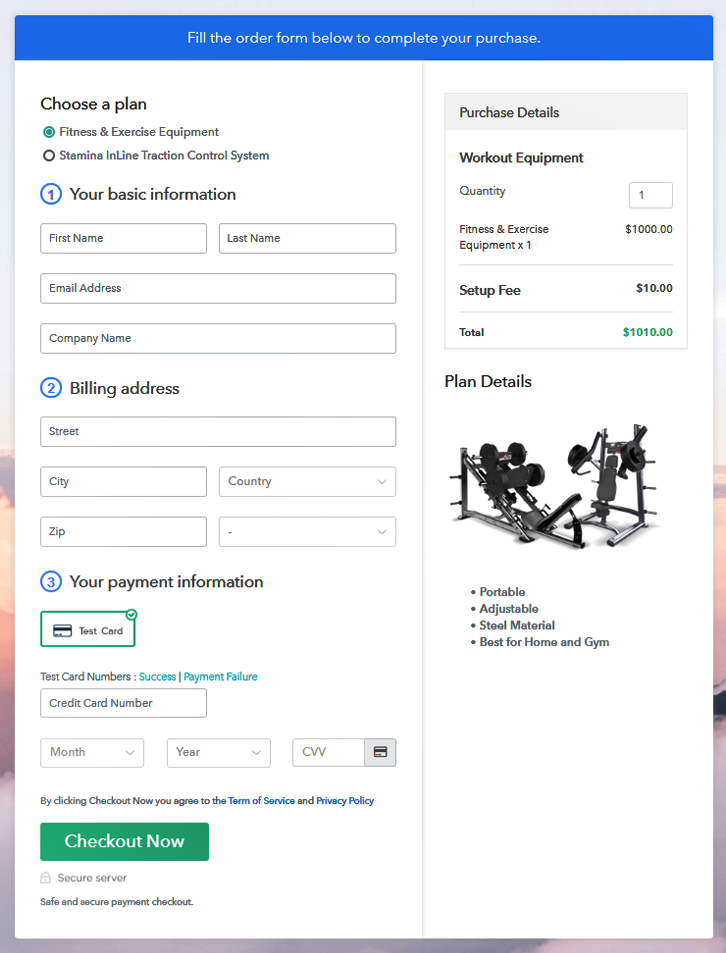
(c) Take a Look at the Checkout Page

Multiplan Checkout Page to Sell Workout Equipment Online

Preview Checkout Page

Wrapping Up

Of course! Everybody wants a healthy lifestyle and that’s a reason why people prefer to buy workout equipment for home. Keeping this in mind it won’t be bad to start workout equipment selling business online. And, it is a cakewalk to start any business using Pabbly Subscription Billing software. Just follow all the above-mentioned steps and you’re done.

So, don’t wait anymore, try out this software and knock us out with your queries.

You May Also Like To Read –
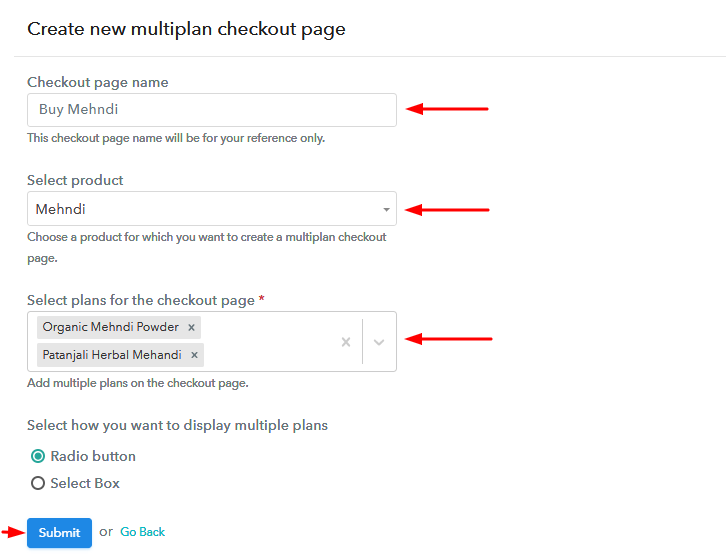
How to Sell Tractors Online | Step by Step (Free Method)

Ideal For: All the tractor showroom, tractor shops, tractor dealers, and other sellers can use this method to take their tractors selling business online.

How to Sell Tractors Online

Why Choose this Method for Selling Over any Other Solution?

Unlike any other solution, this method allows you to:

  • List and sell tractors for FREE. Absolutely no payment required.
  • No commission on sales.
  • Collect payment through multiple payment modes from a single checkout page.
  • Sell one time or recurring subscriptions of the tractors.
  • Sell and collect payment in any currency as per your requirement.
  • Give discounts on your products by offering special coupon codes.
  • Add sales commission agents to help you in selling the tractors.

Get Pabbly Subscription Billing for Free

The life of farmers has changed significantly in comparison to the old times. In former days, when you had to depend on all physical work to acquire your required material. Today, you have the choice to get your work done through modern machines. So, if you sell tractors and want to add profit to your business then you should take your tractors selling business online.

Why would you like to sell tractors online?

Because of online tractors selling business, you can broaden your customer radar, and farmers from all over the world can buy your tractors just by swiping on their phones. It’s easy and hassle-free. You just have to create checkout pages for your tractors and share their links on social media or on your website, and farmers can buy tractors directly through them. To get you started with your online business, we have an incredible and free tool through which you can create checkout pages and that is Pabbly Subscription Billing.

Not only you get to create checkout pages but you can also access its many fabulous features for your online business:

  • Add and sell unlimited tractors
  • Collect one-time or recurring payments for your tractors
  • Share invoice automatically
  • Pay no transaction fees on your sales

This is How your Checkout Page will Look Like After Creation

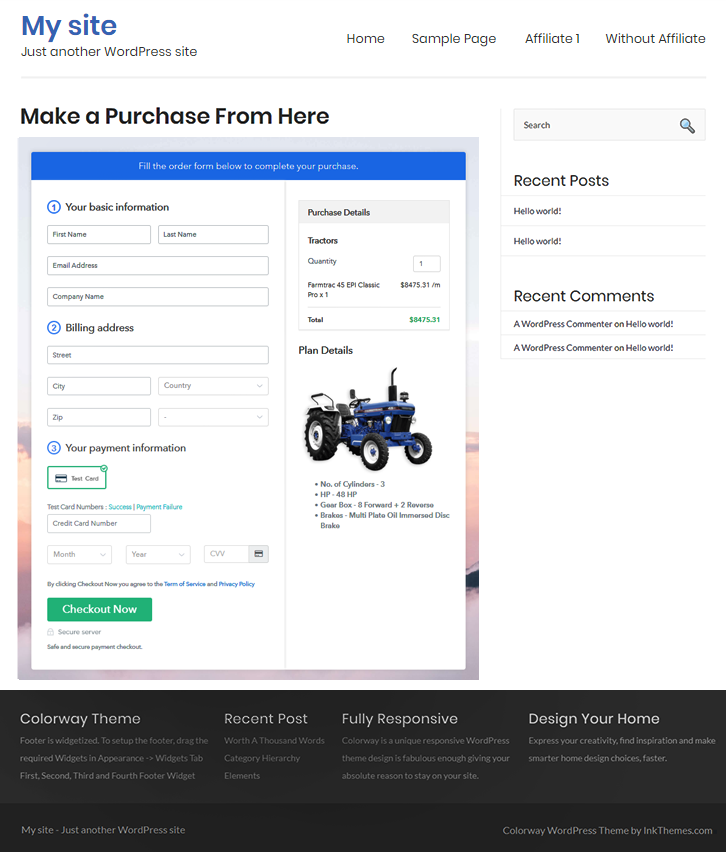
Sell Tractors Online Preview Checkout Page

Preview Checkout Page

Step 1: Log in to Pabbly Subscription Billing

Signup

In the first step, visit Pabbly Subscription Billing website and click on the “Sign Up Free” button. After clicking the button, the signup page will open, where you can create your account quickly with your Gmail or manually enter your details.

Sign Up For Free!

Step 2: Select Subscription Billing

Access Subscription Billing

Step 3: Account Setup

Setup Account

Once the signup process is finished, now fill up your company details i.e. company name, currency, and contact number in the dialogue box.

Step 4: Connect Payment Gateway to Sell Tractors Online

Connect Payment Gateway

Further, here, the payment collection process is shown by enabling the ‘Test Payment’ mode. Thereafter, you can connect with other payment gateways that you prefer. The complete integration guide for payment gateways is provided below.

Step 5: Add Your Product

Add Product

Moving on to this step, you have to add your first product. You can add tractors of different categories like utility tractors, industrial tractors, etc, and add all other types of tractors in the same product by creating different plans.

Sell Tractors Online Product Name

Fill up these details to add your product.

Note: Here you can add all the products related to the similar category by creating plans for each of them.

Step 6: Add Plans

Let’s get started and create plans for different categories of tractors that you want to sell

(a) Select Add New Plan

Add Plan

(b) Specify the Plan and Pricing Details

Sell Tractors Online Details

On clicking add new plan, you will land on the plan page, here you will have to fill the plan details such as plan name, code, billing cycle, price, etc.

(c) Add Image & Description

Sell Tractors Online Image

Also, write down a description of the tractors that you want to sell along with the product links, images, etc, and click on the submit button to add your plan.
You can create more plans for all the tractors similarly.

Step 7: Share Your Checkout Page

Share Checkout Page on Social Media

  • Further, to boost up the sale of your tractors share your checkout page on social media like Facebook and Twitter.
  • Also, copy the mentioned link and send it to your customers through SMS or emails directly.
  • Embed your plan link to your website so that your customers can be landed on the checkout page directly.

Step 8: Preview Checkout Page

Follow the given steps to view checkout page

(a) Click on the View Button

View Checkout Plan

(b) Take a Look at the Checkout Page

Sell Tractors Online Preview Checkout Page

Step 9: Embed Checkout Page in Site & Sell Tractors Online

Embed Checkout Page on Website

Simply copy the provided plan embedding link and embed the checkout page to your WordPress site.

(a) Edit the Page & Paste the Copied Link

Paste Link in Text Editor

Copy and paste the link in the text area of the editor

(b) Save & Publish the Checkout Page

Save and Publish

After pasting the code, click on the publish button to embed your checkout page.

(c) Check Out the Final Look of your Checkout Page on WordPress Site

Sell Tractors Online Website

Step 10: Multiplan Checkout Page

Note: In case you want to sell multiple products through a single checkout page, create a multi-plan checkout plan, otherwise skip this step.

(a) Click on Add Multiplan Checkout

Multiplan Checkout

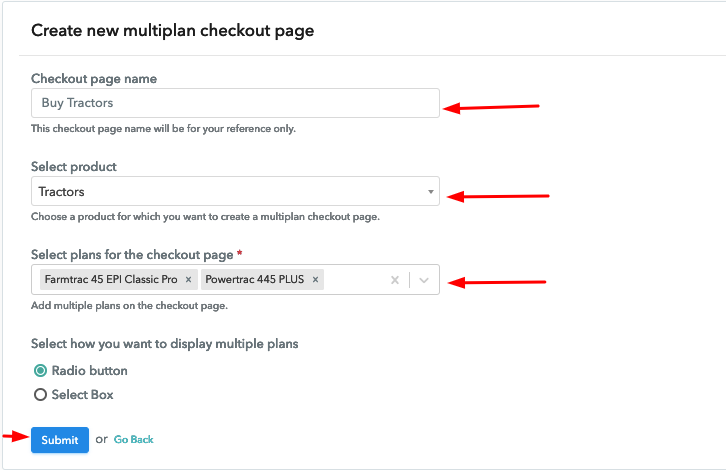
(b) Add Plans to Sell Multiple Tractors from Single Checkout Page

Sell Tractors Online Multi Details

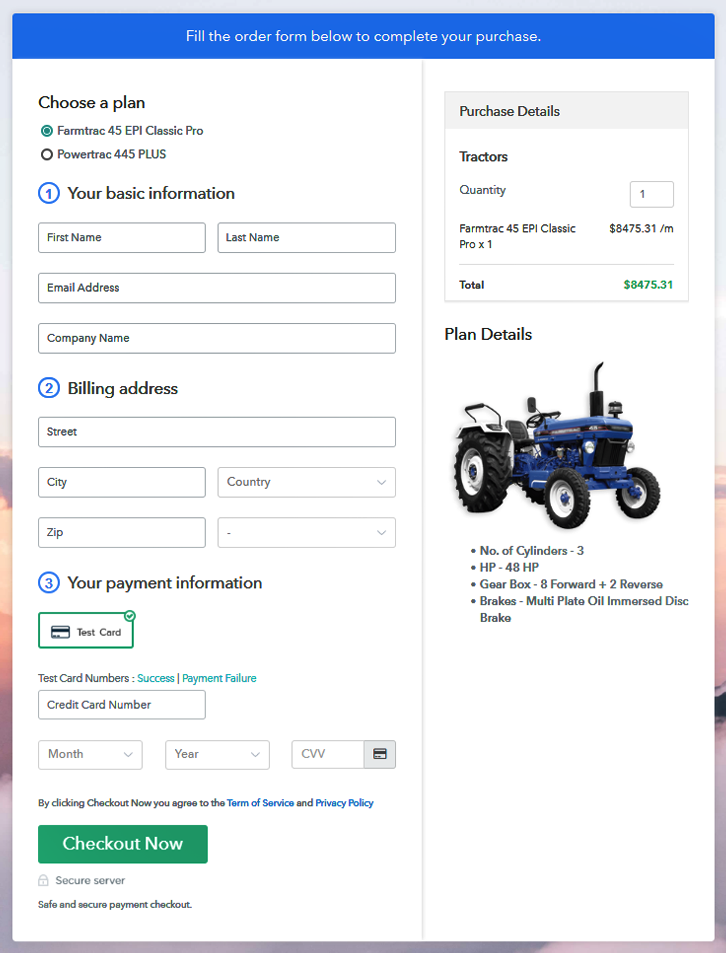
(c) Take a Look at the Checkout Page

Sell Tractors Online Multi Checkout

Preview Checkout Page

Wrapping Up

At last, Pabbly Subscription Billing makes it a lot easier for you to start your online tractors selling business as it’s free and easy to use. With this software, you can collect payment easily, share invoices, sell unlimited tractors, and generate unlimited revenue without paying anything. Hence, signup today and start your online business for free.
For further queries or suggestions, please contact us.

You May Also Like To Read –
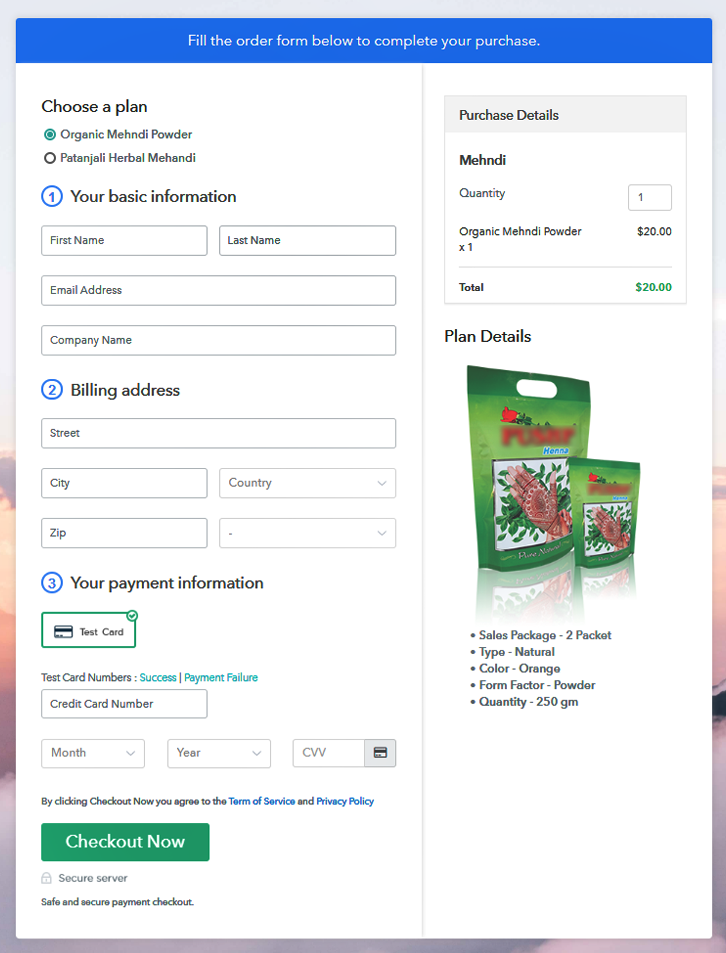
How to Sell Tiles Online | Step by Step (Free Method)

How to Sell Tiles Online

Ideal For: All the tile sellers, tile makers, retail tile selling business owners, and other tile selling merchants can use this method to take their tiles selling business online.

How to Sell Tiles Online

Why Choose this Method for Selling Over any Other Solution?

Unlike any other solution, this method allows you to:

  • List and sell your tiles for FREE. Absolutely no payment required.
  • No commission on sales.
  • Collect payment through multiple payment modes from a single checkout page.
  • Sell one time or recurring subscriptions of your tiles.
  • Sell and collect payment in any currency as per your requirement.
  • Give discounts on your products by offering special coupon codes.
  • Add sales commission agents to help you in selling tiles online.

Get Pabbly Subscription Billing for Free

As there are not always many tile designs available locally so people search online to look for options. And you must be looking for a way to get your designs to the online market to sell tiles online.

Why would you like to sell tiles online?

Well, tiles are sterile to dust, mites, fungus, germs, bacterias and often used to replace carpet for people having allergies or asthma. Also, they need very low maintenance and ceramic tiles clean real easy. So, it’s promising to spend in this business. And, let’s get to the point of how you can start telling tiles online in minutes.

You’ll need to create beautiful checkout pages to showcase your products and accept payments through them. A step by step procedure is explained here in this blog and you only need to follow it to start your business right away.

Not just the payments will be taken care of, using this service but there is more advantages towards using this method. Check them out by yourself:

  • Proper dashboard to manage all the items in stock
  • Collect secure online/offline payments
  • Automatic billing & invoicing
  • Offer coupons and discounts
  • Social sharing and website embed possible
    And much more to sell tiles online.

This is How your Checkout Page will Look Like After Creation

Checkout Page Preview to Sell Tiles Online

Preview Checkout Page

Step 1: Login to Pabbly Subscription Billing

Signup
You can initiate the procedure by visiting Pabbly Subscription Billing website. Go to the “Sign Up Free” button and click it. This will then redirect you to a login/registration page, here you can create your account manually by filling out the sign-up form or you can use your existing Google account to sign-in.

Sign Up For Free!

Step 2: Select Subscription Billing

Access Subscription Billing

As shown above, click on the ‘Access Now’ button next to the Subscription Billing to go further in selling tiles online procedure.

Step 3: Account Setup

Setup Account

Now, you can see a pop-up window requesting to fill a company name, currency & a phone number. Specify the details & click on the “Continue” button there.

Step 4: Connect Payment Gateway to Sell Tiles Online

Connect Payment Gateway

Next step is connecting a payment gateway to collect payments. For this you can select a payment method from the options available, also links to the integration guides are specified below. For now, just to get an overview of the procedure here I’m using the test payment gateway.

Step 5: Add Your Product

Add Product

Now, we can start creating products. Remember a product is much like a tile or tile category here. Push the ‘Add New Product’ button and mention a product name and description (optional).

Add Product to Sell Tiles Online

Then, hit ‘Submit’ and a product will be added in the product list.

Note: Here you can add all the products related to the similar category by creating plans for each of them.

Step 6: Add Plans

Later to adding a product is plan creation under that particular product. Just click on the ‘Add New Plan’ or ‘Add Plan’ button under any product and fill out the details asked in the plan page.

(a) Select Add New Plan

Add Plan

(b) Specify the Plan & Pricing Details

Add Plan to Sell Tiles Online

Here, you can mention a tile name, code, price etc to sell tiles online. Remember that all these filled information are going to be displayed on the plan checkout page to sell tiles online.

(c) Add Image & Description

Add Image & Description to Sell Tiles Online

In the field named ‘Add Description’, you can place an image to display and a text to show on the checkout page. Also, you can make use of the formatting tools and options that are available to set the formatting of the descriptive text to sell tiles online.

Click the ‘Submit’ button once you are done filling all the information to sell tiles online.

Just remember, you’ll need to repeat this step for every tile item that you want to sell online.

Step 7: Share your Checkout Page

Share Checkout Page on Social Media

After every new plan creation, a window will pop up carrying a plan link & a code to use the created checkout page to sell tiles online further.

  • You can share the Plan Link URL on several social media platforms like SMS, emails, WhatsApp etc for selling tiles online.
  • Similarly, you can also link this same URL in the buttons & text redirects on your website.
  • Also, you can see two Facebook & Twitter sharing buttons using which you can directly share the created checkout page.

Step 8: Preview Checkout Page

Follow these steps to preview a checkout page:

(a) Click on the View Button

View Checkout Plan

(b) Take a Look at the Checkout Page

Checkout Page Preview to Sell Tiles Online

Step 9: Embed Checkout Page in Site & Sell Tiles Online

Embed Checkout Page on Website

The code given under ‘Embed Plan Link’ box can be used to embed a created checkout page on WordPress. To embed a checkout page, copy the entire code given here.

(a) Edit the Page & Paste the Copied Link

Paste_Link_in_Text_Editor

And then paste it in the text area section of any post or page of a website.

(b) Save & Publish the Checkout Page

Save_and_Publish

Publish the post or page & the checkout page will be embedded onto that website.

(c) Check out the Final Look of your Checkout Page on WordPress Site

Checkout Page On Site to Sell Tiles Online

Step 10: Multiplan Checkout Page

Note: In case you want to sell multiple products via a single checkout page, you create a multi-plan checkout page otherwise skip this step.

(a) Click on Add Mutiplan Checkout

Multiplan_Checkout

(b) Add Plans to Sell Multiple Tiles from Single Checkout Page

Create Multiplan Checkout to Sell Tiles Online

(c) Take a Look at the Checkout Page:

Multiplan Checkout Page to Sell Tiles Online

Preview Checkout Page

Wrapping Up

I hope if you are through with the procedure that now, you can yourself decide to use this service. As per me, this is the best approach to start tiles business online in minutes. As the checkout page will be available globally and the payment collect is now in safe hands. Also, the embedding and sharing benefits have their own advantages of selling tiles online without a website.

You May Also Like To Read

How to Sell Lemonade Maker Online | Step by Step (Free Method)

How to Sell Lemonade Maker Online

Ideal For: All the lemonade maker sellers, lemonade maker makers, retail lemonade maker selling business owners, and other lemonade maker selling merchants can use this method to take their lemonade maker selling business online.

How to Sell Lemonade Maker Online

Why Choose this Method for Selling Over any Other Solution?

Unlike any other solution, this method allows you to:

  • List and sell your lemonade maker for FREE. Absolutely no payment required.
  • No commission on sales.
  • Collect payment through multiple payment modes from a single checkout page.
  • Sell one time or recurring subscriptions of your lemonade maker.
  • Sell and collect payment in any currency as per your requirement.
  • Give discounts on your products by offering special coupon codes.
  • Add sales commission agents to help you in selling lemonade maker online.

Get Pabbly Subscription Billing for Free

“When life gives you lemons, make lemonade”, this optimistic quote helps us convert sour into sweet. So, why not sell lemonade maker online so that more people can become happier.

Why would you like to sell lemonade maker online?

Well, this particular question can be answered in many ways. Maybe you just want to bring your business on the web or want to get more audience and sales.

Most importantly, bringing a business online is not that simple as many people don’t know from where to start. But here in this article, I’ll explain a procedure via which you’ll kick start lemonade maker business in minutes.

We’are going to create checkout page in more further and using these checkout page we’ll be able to showcase our product as well as accept payments to sell lemonade maker online.

Have a look at what more you’ll get by using this service.

  • A place to keep the record for all the lemonade maker in stock
  • Collect online & offline payments both
  • Automated billing & invoicing through emails
  • Showcase single & multiple lemonade maker on pages
  • Collect safe & secure payments both online & offline
  • Unlimited product & plan creation to sell as many lemonade maker  as you want to sell
    And much more…

This is How your Checkout Page will Look Like After Creation

Checkout Page Preview to Sell Lemonade Maker Online

Preview Checkout Page

Step 1: Login to Pabbly Subscription Billing

Signup
Very first, visit Pabbly Subscription Billing website and click on the “Sign Up Free” button. On the login/registration page, either sign-up manually by mentioning a name, email id and other details or sign-in directly using an existing Google account.

Sign Up For Free!

Step 2: Select Subscription Billing

Access Subscription Billing

Next, hit the “Access Now” below the Subscription Billing app.

Step 3: Account Setup

Setup Account

In the pop-up window shown, quickly fill the details such as the company name, currency and phone number & click on the “Continue” button afterwards.

Step 4: Connect Payment Gateway to Sell Lemonade Maker Online

Connect Payment Gateway

Now, remember this is an important step and we’re going to integrate a payment gateway to accept payments here. For now only, I’m using the test payment gateway available but you’ll get to choose from the multiple options. Moreover, the integration guides to the payment methods are linked below.

Step 5: Add Your Product

Add Product

Now, all the system settings are done and we can start creating products. For this, click the “Add New Product” button & specify a product name. The product name here will be much like a category.

Add Product to Sell Lemonade Maker Online

Fill out the mandatory details and once you are through click on the “Submit” button.

Note: Here you can add all the products related to the similar category by creating plans for each of them.

Step 6: Add Plans

Next, is creating plans for the products. Hit the “Add New Plan” button & then start stuffing details in the plan page. Remember, the details that you mention in here will show up on the checkout page for selling lemonade maker online.

(a) Select Add New Plan

Add Plan

(b) Specify the Plan & Pricing Details

Add Plan to Sell Lemonade Maker Online

Mention the details to sell a lemonade maker item such as name, code, pricing etc.

(c) Add Image & Description

Add Image & Description to Sell Lemonade Maker Online

You can also show a lemonade maker’s image & write a description to display on the plan checkout page to sell lemonade maker online. For this insert an image and descriptive text in the “Add Description” field. You can also make use of lists, quotes, links, headings etc to write about the lemonade maker.

Click on the “Submit” button once you are done writing about the lemonade maker’s plan description.  A lemonade maker plan will get appended in the plan list for selling lemonade maker online.

Step 7: Share your Checkout Page

Share Checkout Page on Social Media

  • You can share the URL given in the “Plan Link” window directly onto various social media platforms, emails, WhatsApp, SMS etc to sell lemonade maker online.
  • Also, you can link the Plan Link URL to the buttons & texts of any website.
  • There are two Facebook & Twitter sharing buttons also available to share the checkout page directly over these platforms.

Step 8: Preview Checkout Page

Follow these steps to preview a checkout page:

(a) Click on the View Button

View Checkout Plan

(b) Take a Look at the Checkout Page

Checkout Page Preview to Sell Lemonade Maker Online

Step 9: Embed Checkout Page in Site & Sell Lemonade Maker Online

Embed Checkout Page on Website

For adding any created page on WordPress, you can copy the code given for embedding checkout pages.

(a) Edit the Page & Paste the Copied Link

Paste_Link_in_Text_Editor

And paste it in the text area of any post or page.

(b) Save & Publish the Checkout Page

Save_and_Publish

After that publish that particular post or page and a checkout page gets embedded on the website.

(c) Check out the Final Look of your Checkout Page on WordPress Site

Checkout Page On Site to Sell Lemonade Maker Online

Step 10: Multiplan Checkout Page

Note: In case you want to sell multiple products via a single checkout page, you create a multi-plan checkout page otherwise skip this step.

(a) Click on Add Mutiplan Checkout

Multiplan_Checkout

(b) Add Plans to Sell Multiple Lemonade Maker from Single Checkout Page

Create Multiplan Checkout to Sell Lemonade Maker Online

(c) Take a Look at the Checkout Page:

Multiplan Checkout Page to Sell Lemonade Maker Online

Preview Checkout Page

Wrapping Up

If you have searched for ways to start lemonade maker business online then you may have yet seen that this fastest procedure so far. Furthermore, payments are always concerns in online businesses and this service is providing very safe and reliable payment gateway options to choose from. Also, small as well as large business can use this method to sell lemonade maker online very easily.

You May Also Like To Read