How To Sell Badminton Rackets Online | Step by Step (Free Method)

How to Sell Badminton Rackets Online

Ideal For: All the badminton racket manufacturers, badminton racket sellers, retail badminton racket shop owners, and other merchants can use this method to take their badminton rackets selling business online.

How to Sell Badminton Rackets Online

Why Choose this Method To Sell Badminton Rackets Online?

Unlike any other solution, this method allows you to:

  • List and sell your badminton rackets for FREE. Absolutely no payment required.
  • No need to pay commission on any of your sale.
  • Multiple payment options like PayPal, Credit Card, etc to collect payment from a single place.
  • Sell one time or recurring subscriptions of your badminton rackets.
  • Collect payments & sell products in any currency as per your requirement.
  • Give discounts on your products by offering special coupon codes.
  • Add sales commission agents to help you in selling badminton rackets online.

Get Pabbly Subscription Billing for Free

People are always looking for branded badminton rackets online. And if you are planning to start badminton rackets business online then this could definitely help buyers to get better choices. However, the checkout pages can help you get started with your plan in no time.

For this, we’ll be creating these checkout pages in 10 simple steps. These checkout pages will further help you do the following.

  • Collect online/ offline payments
  • Display badminton rackets
  • Share your products on social media platforms
  • Sell unlimited badminton rackets
  • Offer coupons & discounts
    And much more…

Also, you’ll get a dashboard to keep track of all items in stock, payments & refunds. You can set single-time or recurring billing. Plus the invoicing will be fully automated.

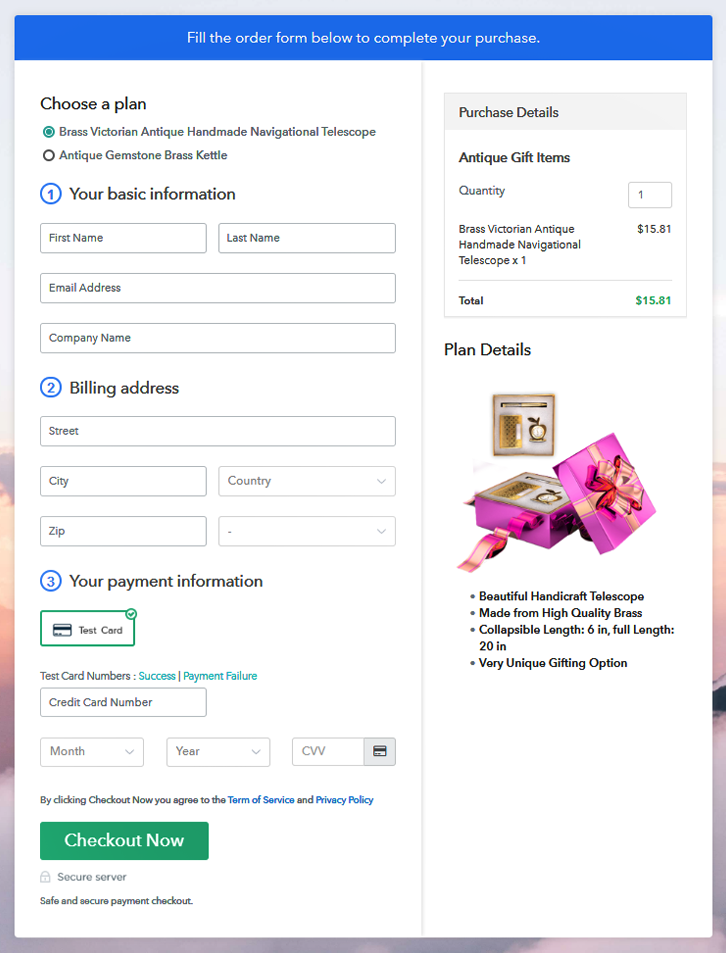
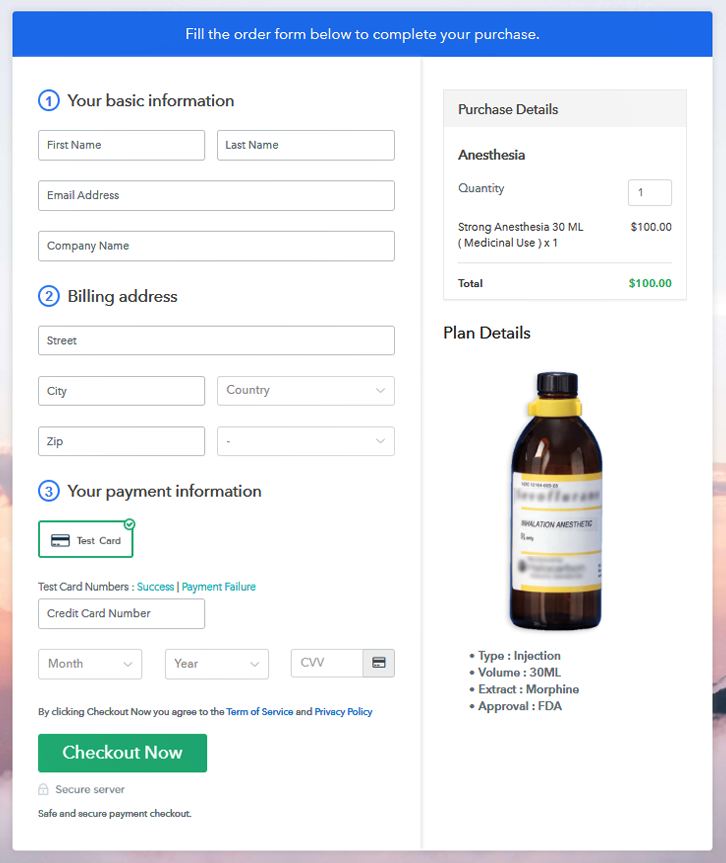
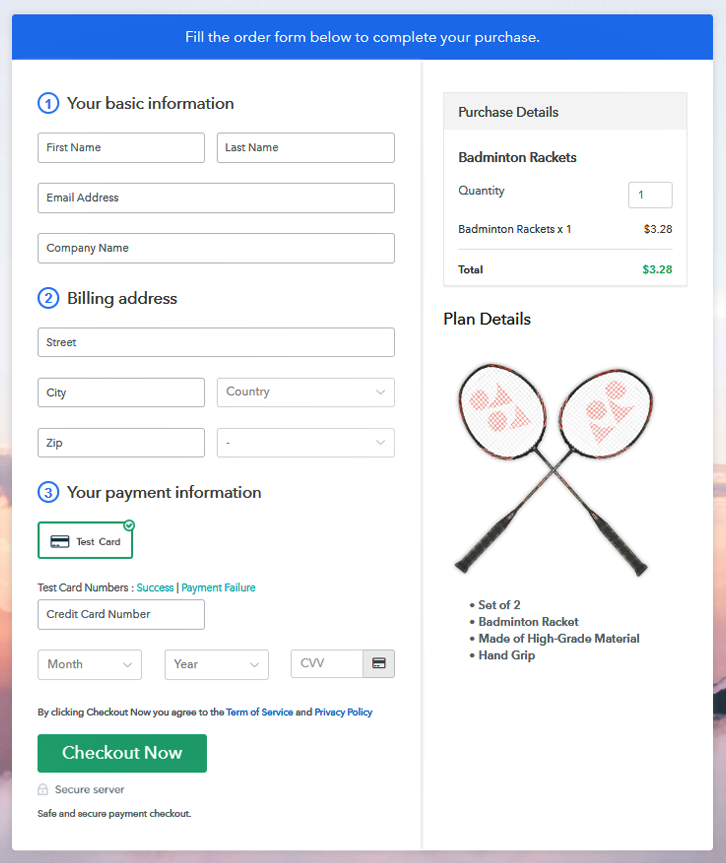
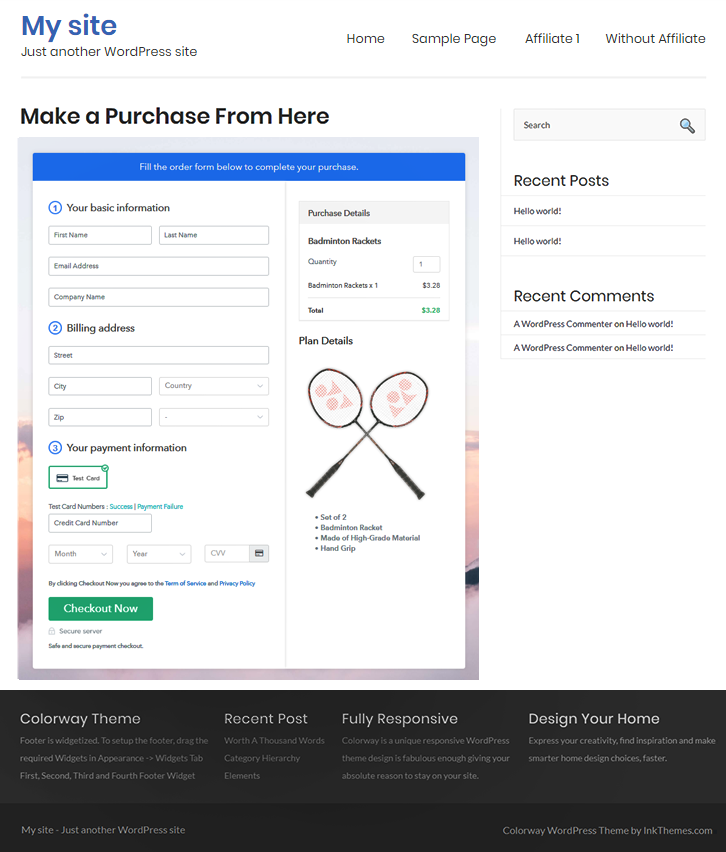
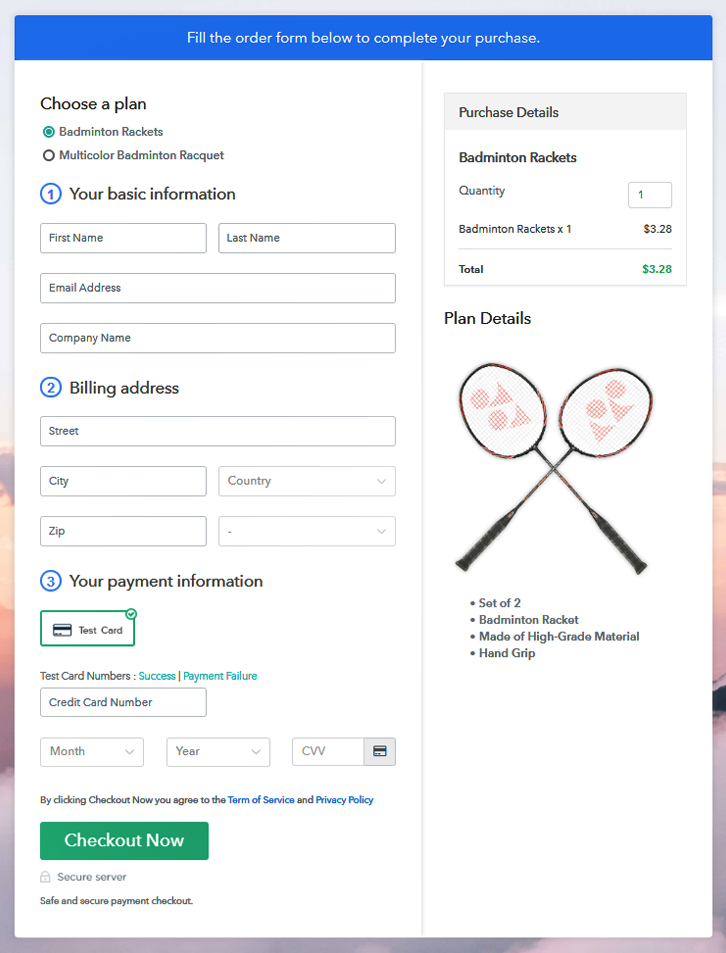
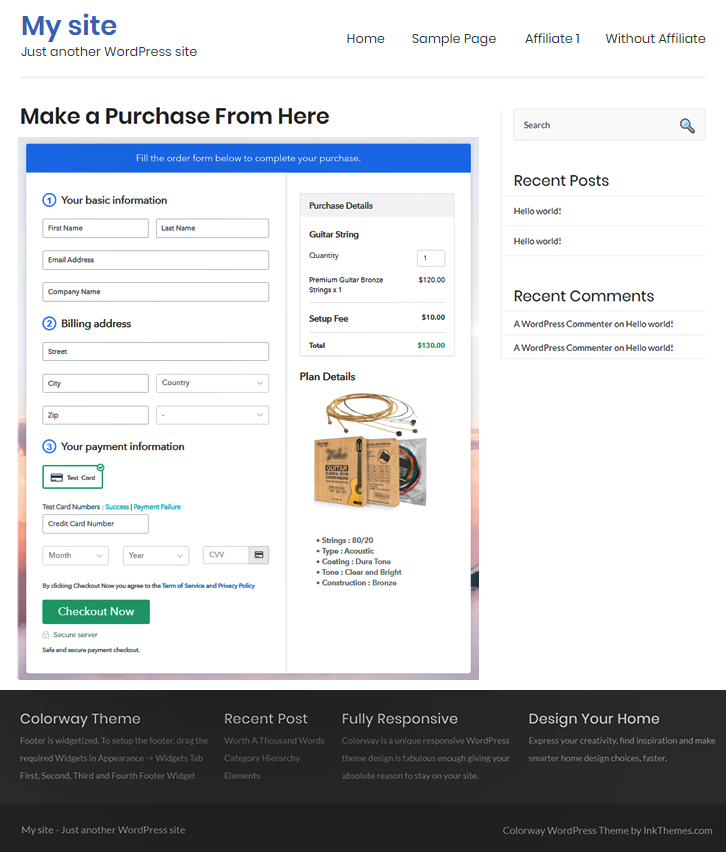
Final View of Checkout Page For Your Badminton Rackets Selling Business

Checkout Page Preview to Sell Badminton Rackets Online

Preview Checkout Page

Step 1: Log in to Pabbly Subscription Billing

Signup

To get started for selling badminton rackets online first, visit Pabbly Subscription Billing & then click on the ‘Sign Up Free‘ button. On the next page redirect, sign-up using a Google account or manually.

Sign Up For Free!

Step 2: Select Subscription Billing

Access Subscription Billing

Step 3: Account Setup

Setup Account

Now, to complete the set-up for selling badminton rackets online, fill out the details asked in the pop-up window shown above.

Step 4: Connect Payment Gateways & Start Badminton Rackets Selling Business Online

Connect Payment Gateway

Next is enabling a payment gateway to accept payments for the sold badminton rackets. To get familiar with the procedure you can use the test payment mode just like me in this blog. But to accept actual payments you’ll need to integrate a payment gateways from the choices available below.

Step 5: Add Product For Your Badminton Rackets

Add Product

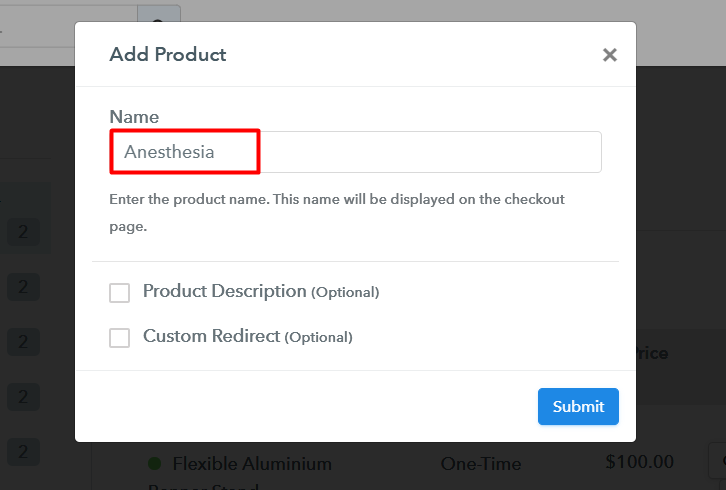
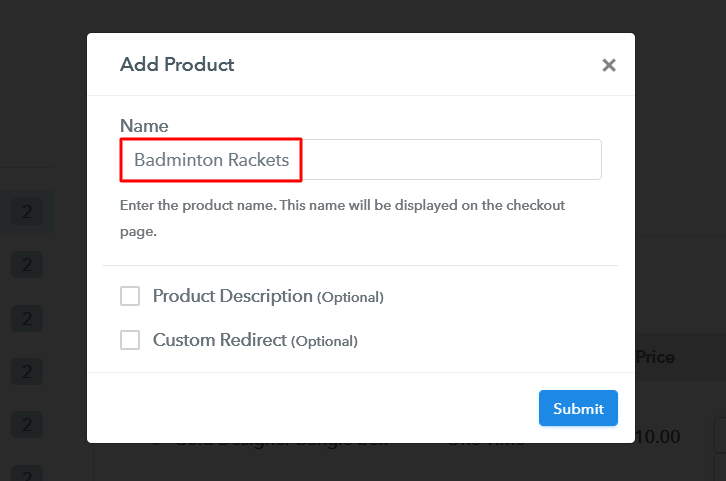
Once you are done with all the system settings, you can create a product. This product will represent a category and we’ll add plans to this category more further.

Add Product to Sell Badminton Rackets Online

Submit the product details and a product will be added instantly.

Note: Here you can add all the products related to the similar category by creating plans for each of them.

Step 6: Add Plans 

Let’s rollout plans for different kinds of badminton rackets available in your store.

(a) Select Add New Plan

Add Plan

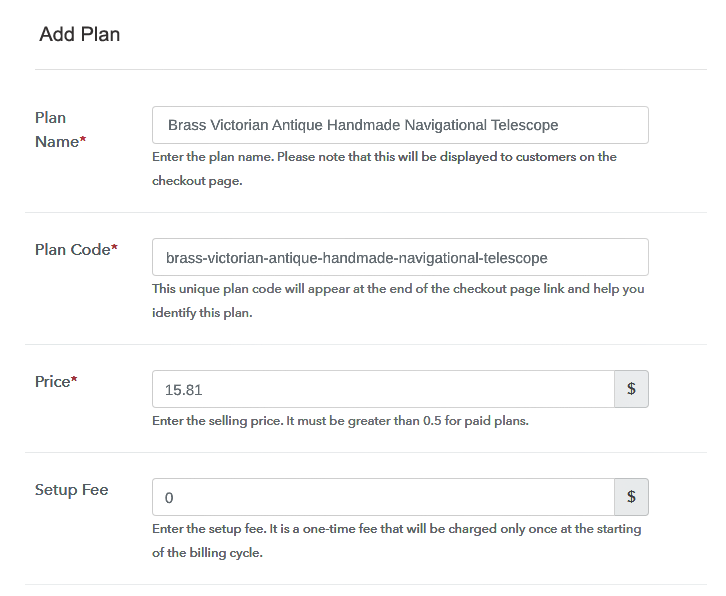
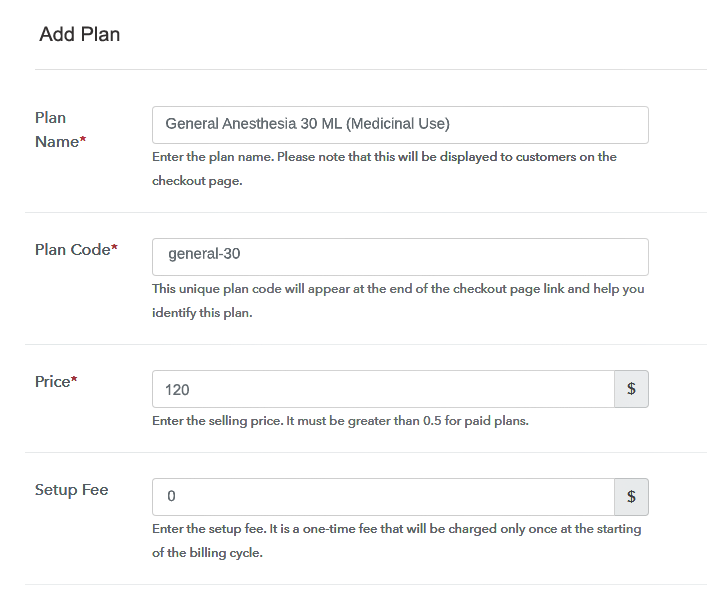
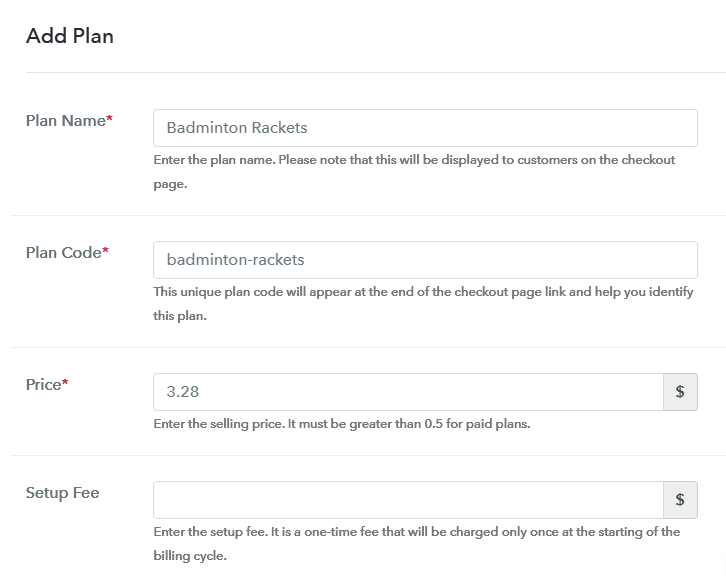
(b) Specify the Plan & Pricing Details

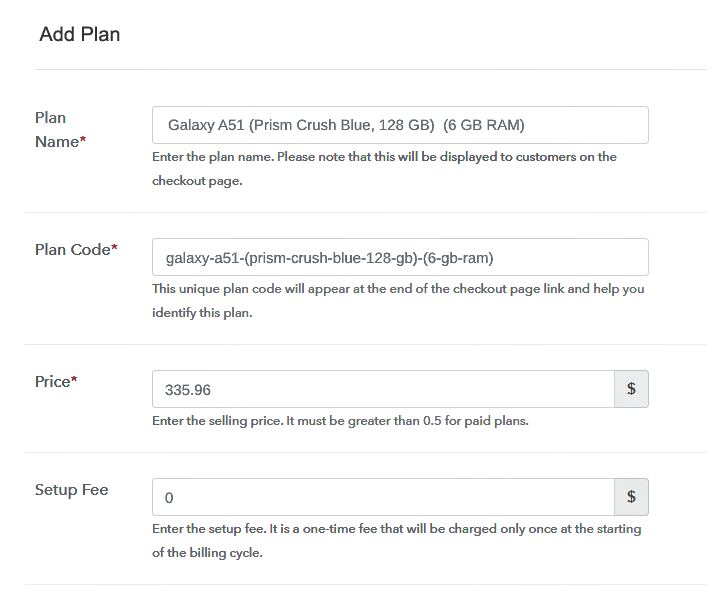
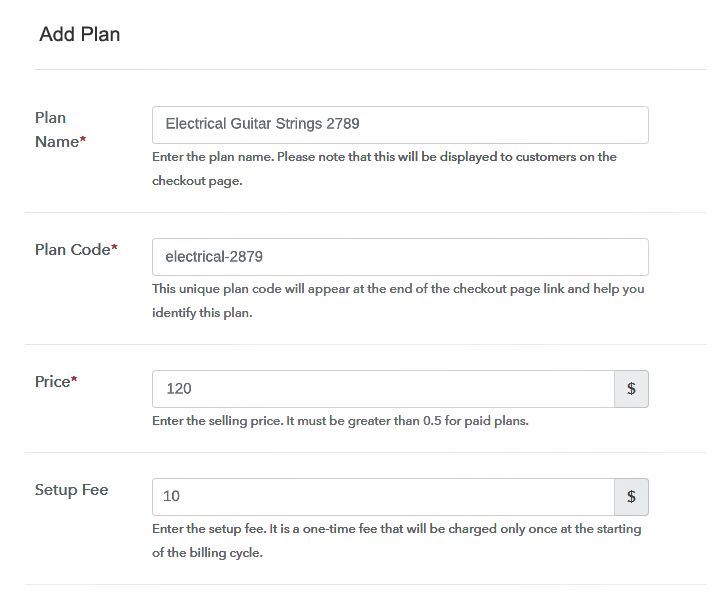
Add Plan to Sell Badminton Rackets Online

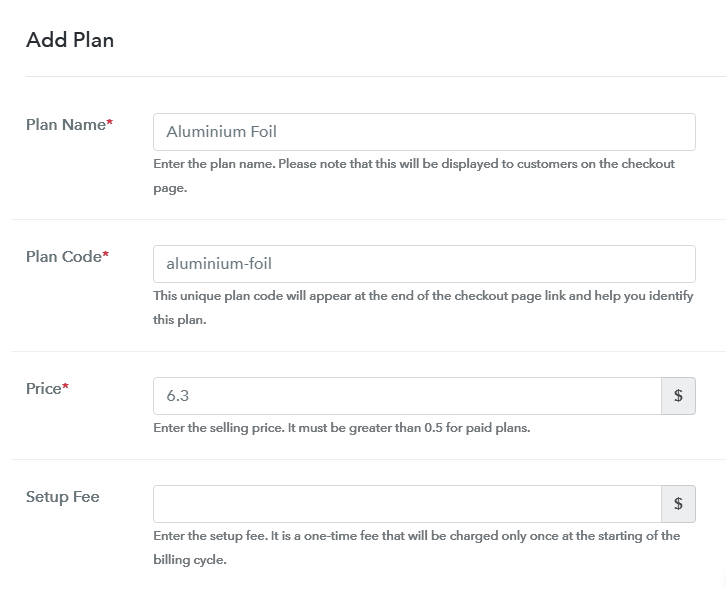
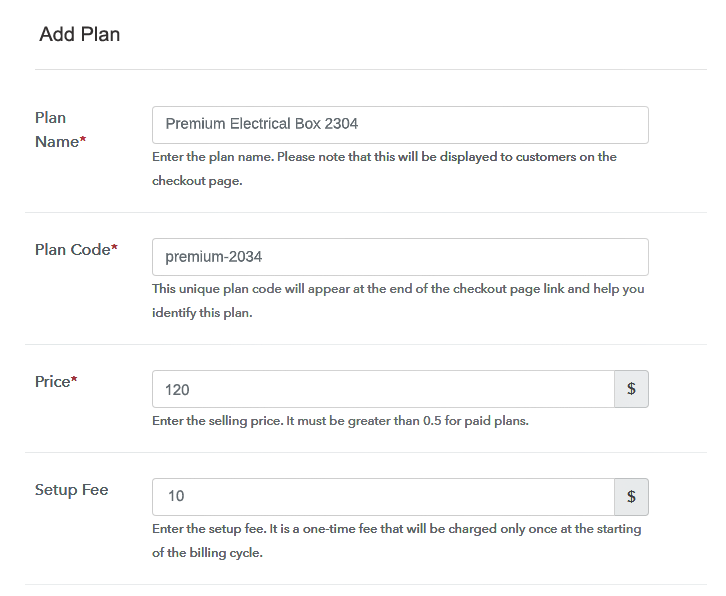
You can fill out the badminton rackets name, code, pricing, billing cycle information in the plan details page.

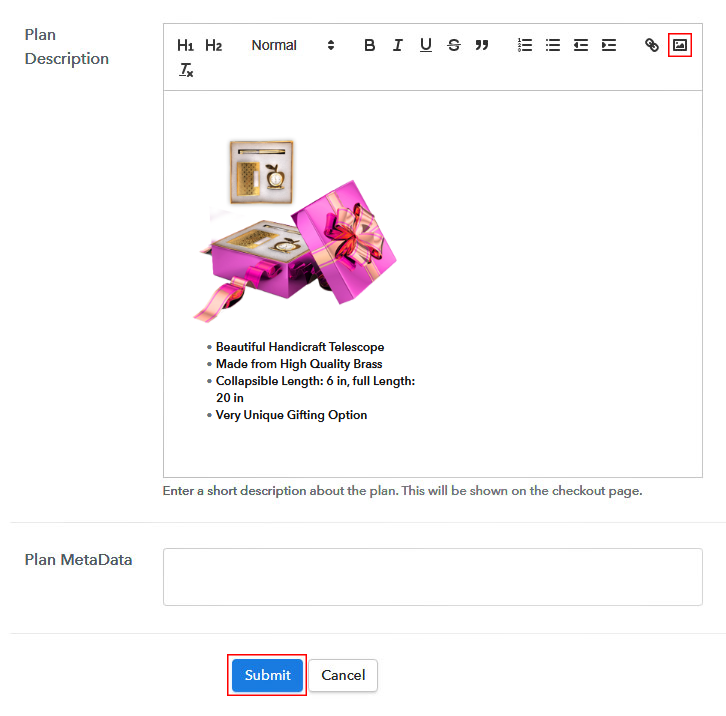
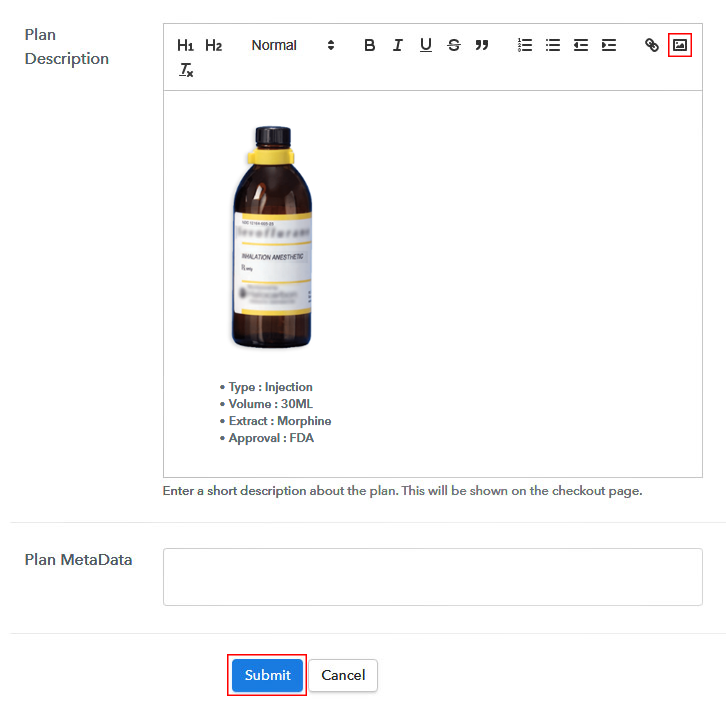
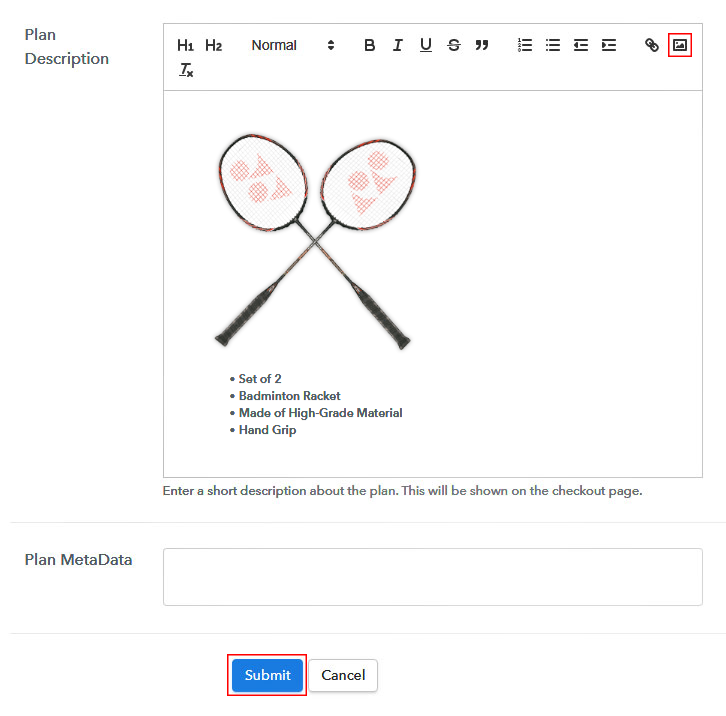
(c) Add Image & Description of Badminton Racket

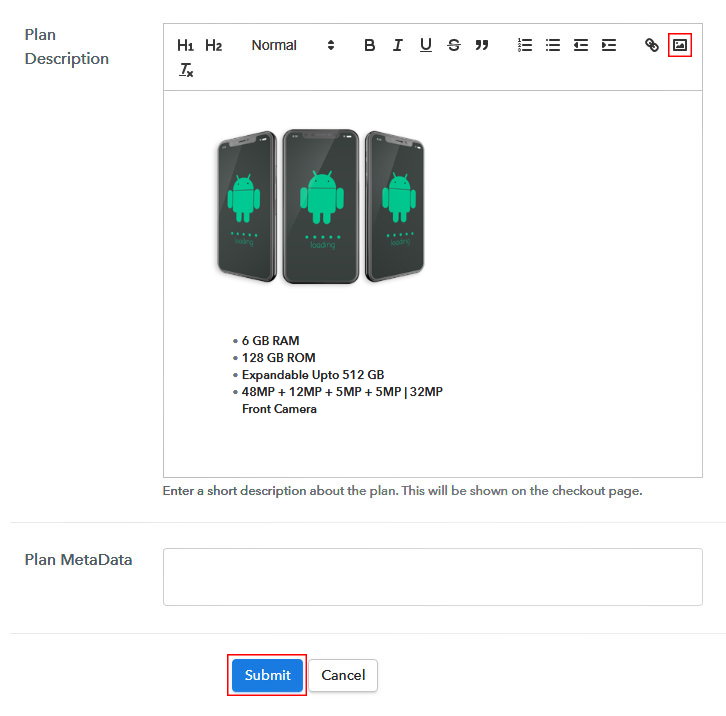
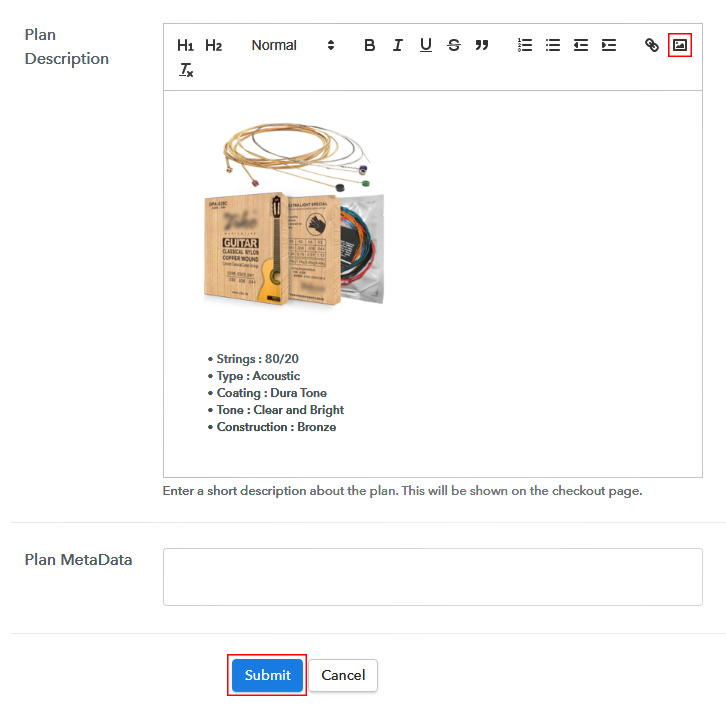
Add Image & Description to Sell Badminton Rackets Online

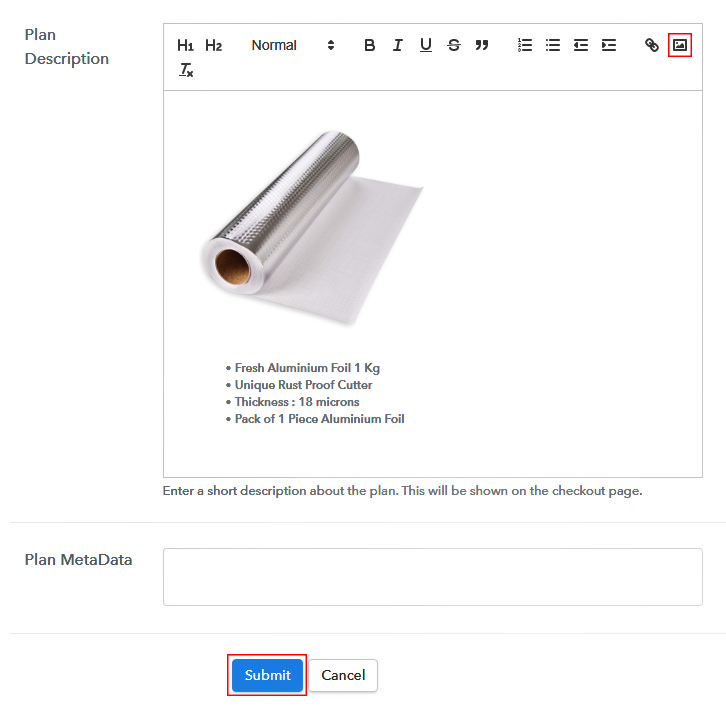
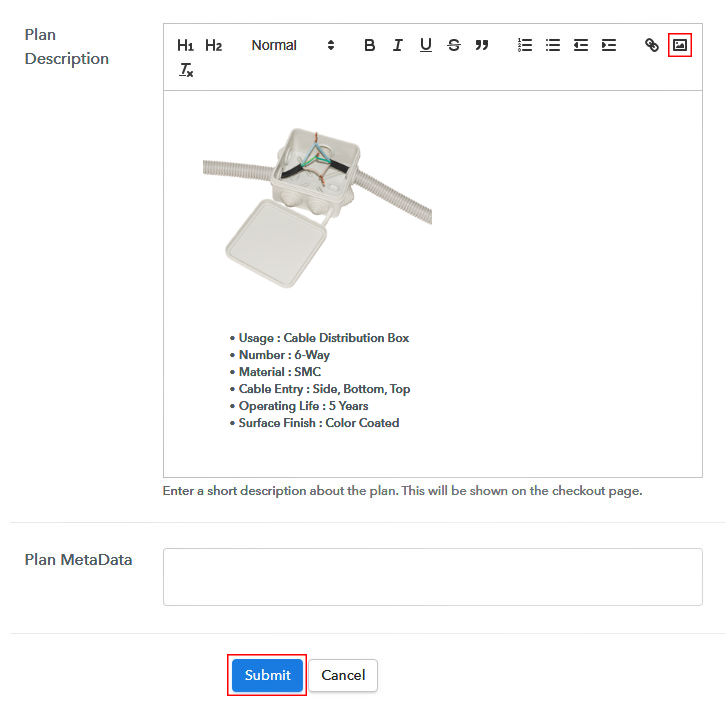
Also, you can add an image & description of the badminton rackets.

Click the submit button here and a plan will be added.

You can add other plans in the same manner.

Step 7: Share your Checkout Page

Share Checkout Page on Social Media

You can share the checkout page with the customers as:

  • Click the button icons to share the checkout page on Facebook & Twitter
  • Share the plan link on any social media platform, emails & SMS
  • You can also link the plan link with the buttons and texts

Step 8: Preview Checkout Page

Follow up the recommended steps to preview the checkout page:

(a) Click on the View Button

View Checkout Plan

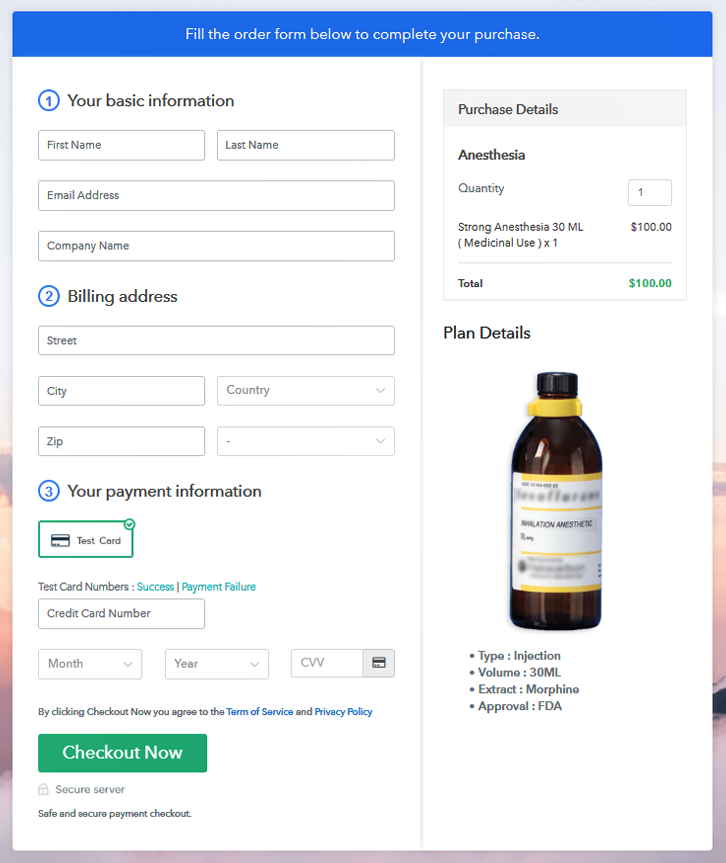
(b) Take a Look at the Checkout Page

Checkout Page Preview to Sell Badminton Rackets Online

Step 9: Embed Checkout Page in Site & Sell Badminton Rackets Online

Embed Checkout Page on Website

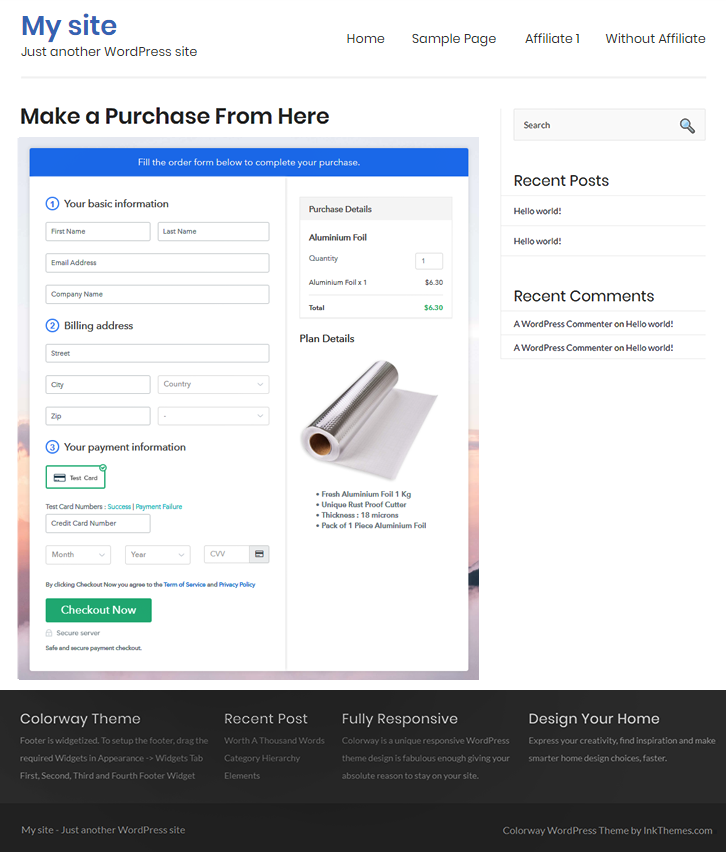
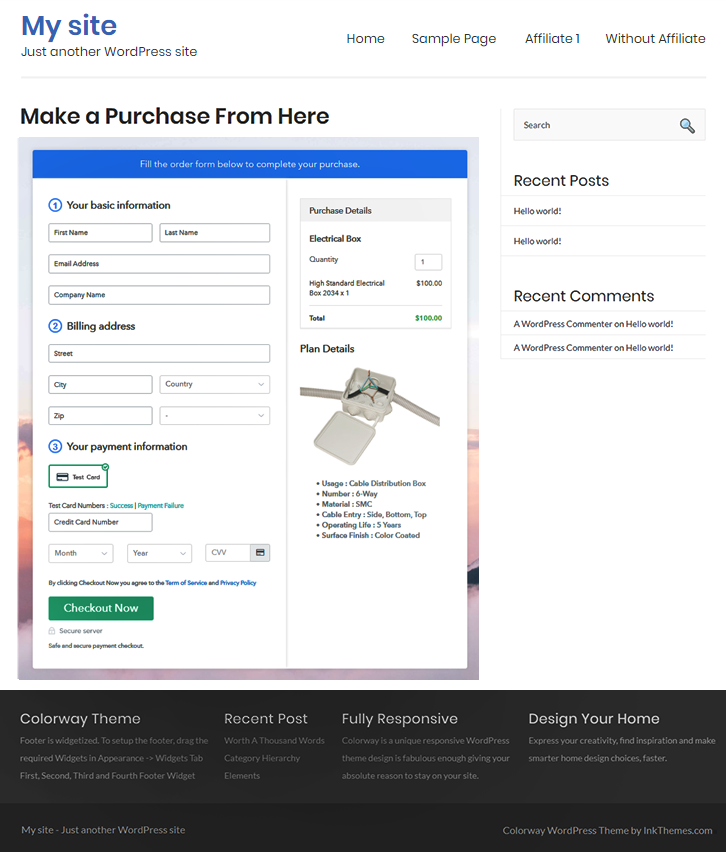
Just copy the link and add the checkout page to sell badminton rackets online at any preferable place on your WordPress site.

(a) Edit the Page & Paste the Copied Link

Embed Checkout Page on Website

Further, paste the plan link on a text editor of the WordPress dashboard.

(b) Save & Publish the Checkout Page

Save_and_Publish

Next, click the “Publish” button, after making changes.

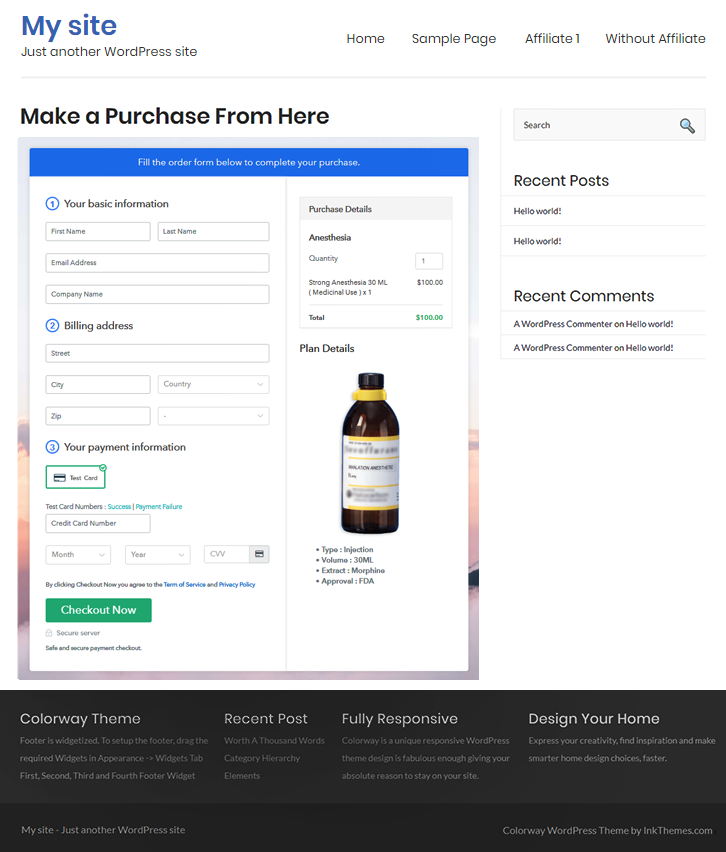
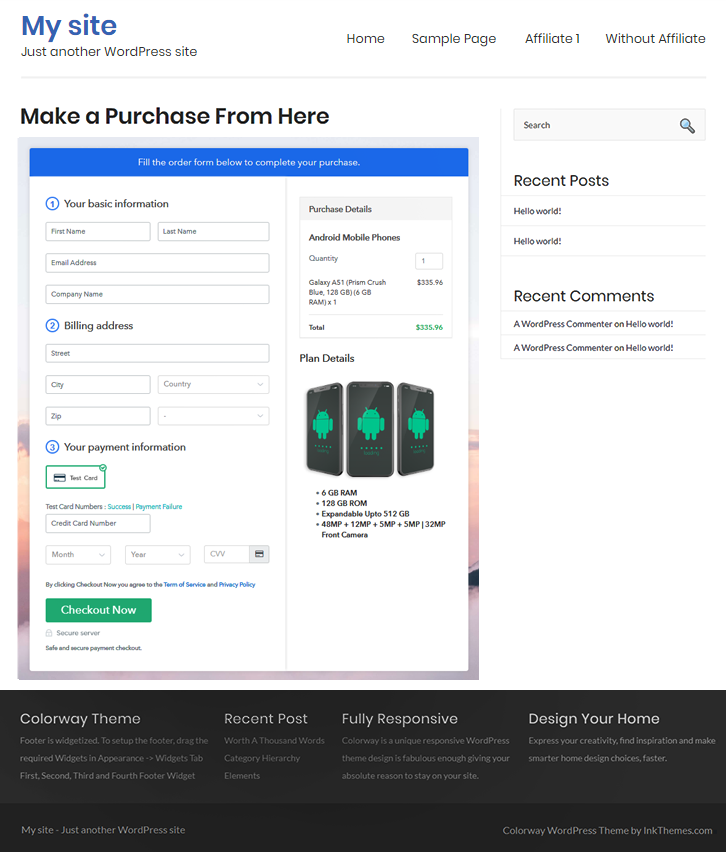
(c) Check out the Final Look of your Checkout Page on WordPress Site

Checkout Page On Site to Sell Badminton Rackets Online

Step 10: Multiplan Checkout Page

Note: In case you want to sell multiple products via a single checkout page, you can create a multi-plan checkout page otherwise skip this step.

(a) Click on Add Mutiplan Checkout

Multiplan Checkout

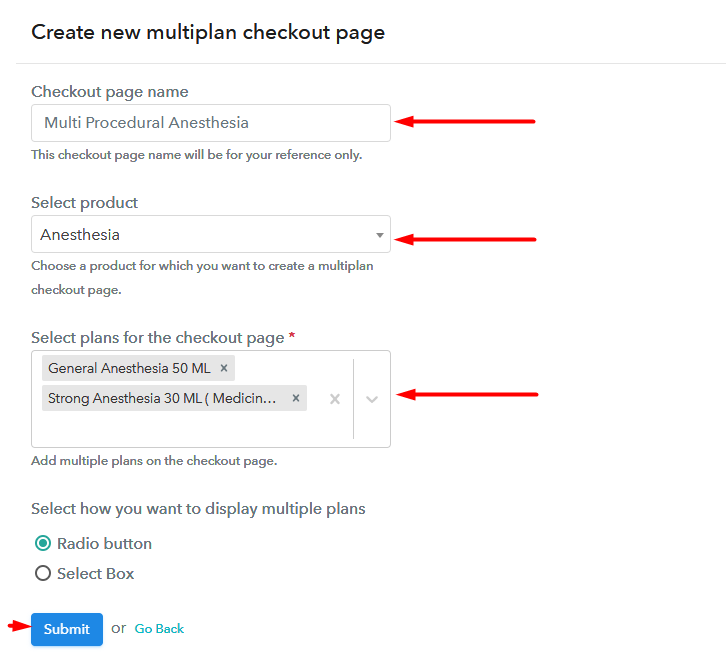
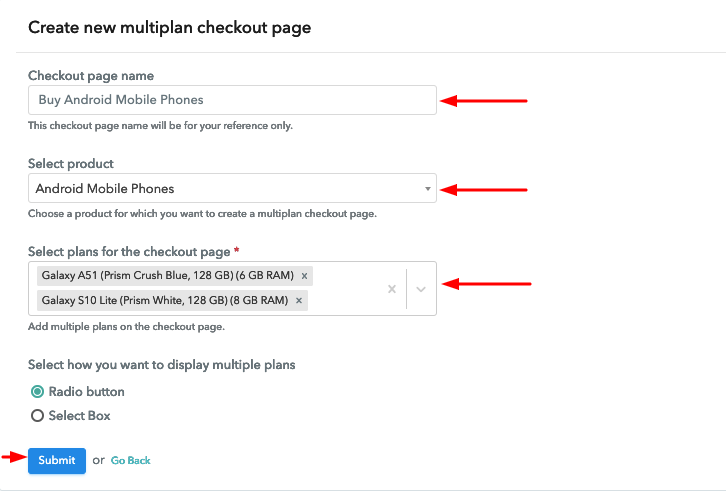
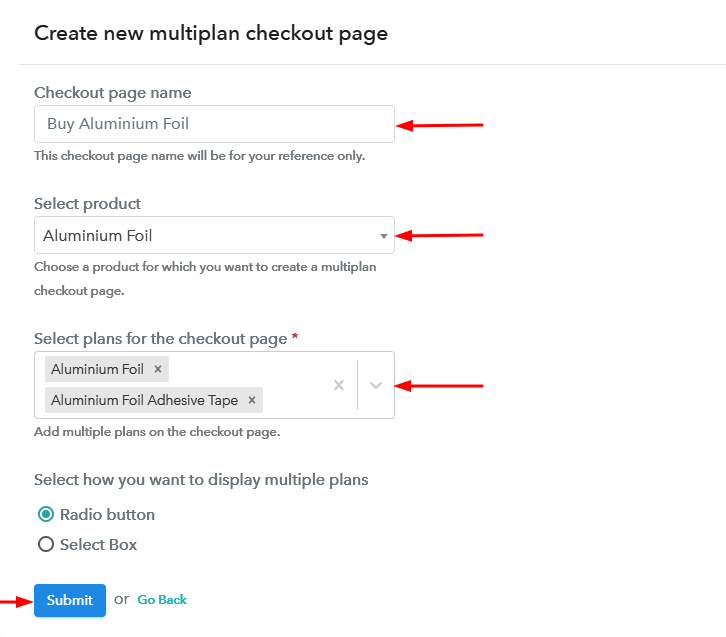
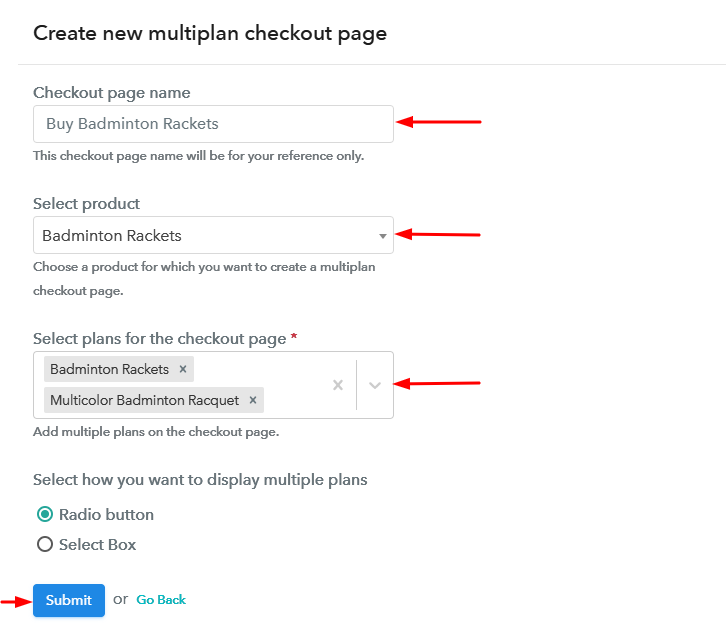
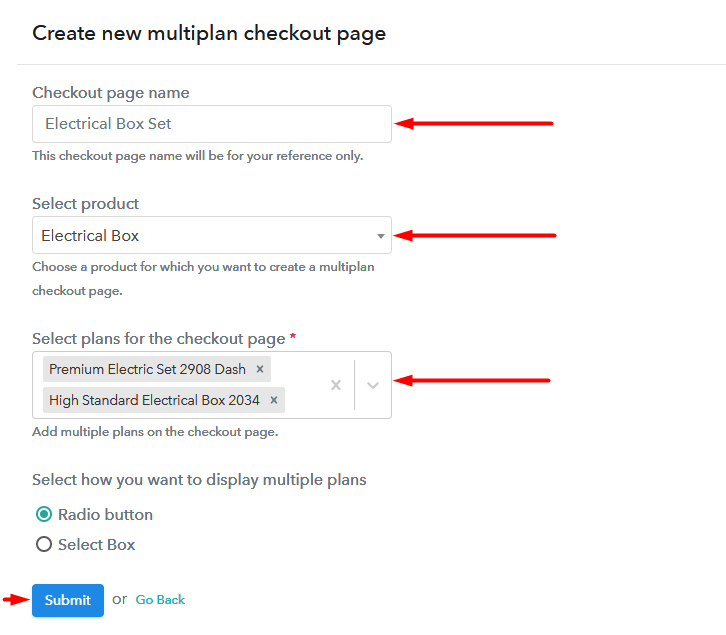
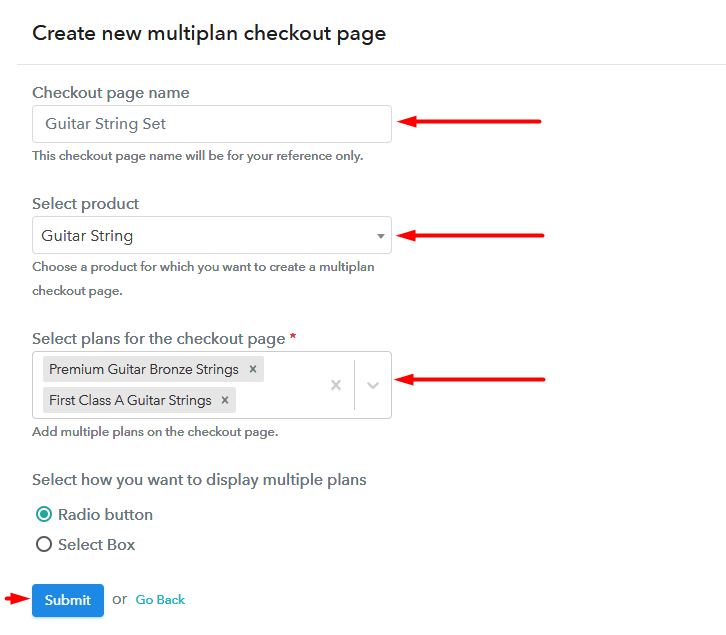
(b) Add Plans to Sell Multiple Badminton Rackets from Single Checkout Page

Create Multiplan Checkout to Sell Badminton Rackets Online

(c) Take a Look at the Checkout Page

Multiplan Checkout Page to Sell Badminton Rackets Online

Preview Checkout Page

Wrapping Up

This is how you can sell badminton rackets online using checkout pages. Checkout pages add flexibility towards sharing your product globally to accept payments. Also, this approach will help you get started in no time and saves you from the clutter of designing an eCommerce site.

Good Luck with your business and do comment your feedback below.

You May Also Like To Read –

How To Sell Auto Tyres Online | Step by Step (Free Method)

How to Sell Auto Tyres Online

Ideal For: All the car tyre shops, tyres showroom, auto parts store, auto parts shop, tyre wholesalers, and other sellers can use this method to take their auto tyres selling business online.

How to Sell Auto Tyres Online

Why Choose this Method To Sell Auto Tyres Online?

Unlike any other solution, this method allows you to:

  • List and sell your auto tyres for FREE. Absolutely no payment required.
  • No need to pay commission on any of your sales.
  • Multiple payment options like PayPal, Credit Card, etc to collect payment from a single place.
  • Sell one time or recurring subscriptions of your auto tyres.
  • Collect payments & sell products in any currency as per your requirement.
  • Give discounts on your products by offering special coupon codes.
  • Add sales commission agents to help you in selling auto tyres online.

Get Pabbly Subscription Billing for Free

Is your auto tyres selling business is going south for the last few years and you want to make up for the losses and earn some extra profit? Then let us take your auto tyres selling business online because everyone already is on online platforms then why should you stay back.

You can easily start selling auto tyres online through checkout pages. Checkout pages are the webpages that help you to improve your sales and broaden the customer range. Simply you have to create checkout pages for your auto tyres and then share them on social media or your website so that people can purchase tyres directly through them. To create checkout pages you need only one service and that is Pabbly Subscription Billing, it is free and easy to use.

Other than checkout pages you can also access its other features like easy invoicing, integration with website and other apps, unlimited listings of products, easy payment collection, etc to build up your online business. So, now let us start creating your first checkout page.

Final View of Checkout Page For Your Auto Tyres Selling Business

Preview Checkout Page

Preview Checkout Page

Step 1: Log in to Pabbly Subscription Billing

Signup

In the beginning, you have to visit Pabbly Subscription Billing website and then click on the “Signup Free” button. On clicking the button, the signup page will appear, here you can create your account in few seconds via Gmail or you can also enter your details manually.

Sign Up For Free!

Step 2: Select Subscription Billing

Access Subscription Billing

Step 3: Account Setup

Setup Account

After you have finished the signup process, now fill up your company details such as company name, currency, and phone number in the appeared dialogue box.

Step 4: Connect Payment Gateways & Start Auto Tyres Selling Business Online

Connect Payment Gateway

Pabbly Subscription Billing makes the payment collection process error-free by providing the “Test Payment” mode. Enable this mode and check for yourself how this process works. Later, you can connect with other payment gateways like Stripe, Razorpay, etc of your choice. The complete payment gateways integration guide is given below-

Step 5: Add Product For Your Auto Tyres

Add Product

In this step, you have to add your first product. You can add auto tyres from different categories like tubed tyres, tubeless tyres, etc.

Sell Auto Tyres Online Product Name

Add all the other tyres in the same product section by creating different plans for them.

Note: Here you can add all the products related to the similar category by creating plans for each of them.

Step 6: Add Plans 

Let’s rollout plans for different kinds of auto tyres available in your store.

(a) Select Add New Plan

Add Plan

(b) Specify the Plan & Pricing Details

Sell Auto Tyres Online Details

On clicking the “Add New Plan” button, you will end up on the plan page, here you have to fill up details like product name, code, price, billing cycle, etc.

(c) Add Image & Description of Auto Tyres

Sell Auto Tyres Online Image

Further, you can describe the auto tyres that you want to sell along with the images, links, etc, and click on the submit button to add your product. You can also create more plans for all the auto tyres in a similar way.

Step 7: Share your Checkout Page

Share Checkout Page on Social Media

If you want to improve your auto tyres sales online then follow these given steps:

  • Share your checkout page on social media such as Facebook and Twitter.
  • Furthermore, copy the mentioned link and send it to your customers through SMS or emails directly.
  • Embed your plan link on your website so that your customers can be landed on the checkout page directly.

Step 8: Preview Checkout Page

Follow up the recommended steps to preview the checkout page:

(a) Click on the View Button

View Checkout Plan

(b) Take a Look at the Checkout Page

Preview Checkout Page

Step 9: Embed Checkout Page in Site & Sell Auto Tyres Online

Embed Checkout Page on Website

Simply copy the link and add the checkout page to sell auto tyres online at any preferable place on your WordPress site.

(a) Edit the Page & Paste the Copied Link

Embed Checkout Page on Website

Further, paste the plan link on a text editor of the WordPress dashboard.

(b) Save & Publish the Checkout Page

Save_and_Publish

Next, click the “Publish” button, after making changes.

(c) Check out the Final Look of your Checkout Page on WordPress Site

Sell Auto Tyres Online Website

Step 10: Multiplan Checkout Page

Note: In case you want to sell multiple products via a single checkout page, you can create a multi-plan checkout page otherwise skip this step.

(a) Click on Add Mutiplan Checkout

Multiplan Checkout

(b) Add Plans to Sell Multiple Auto Tyres from Single Checkout Page

Sell Auto Tyres Online Multi Details

(c) Take a Look at the Checkout Page

Sell Auto Tyres Online Multi Checkout

Preview Checkout Page

Wrapping Up

Coming to the end, this is the easiest and free way to start your online business. With Pabbly Subscription Billing now you can sell unlimited auto tyres online, collect payment easily, share invoices automatically, etc. Now create checkout pages for your auto tyres and start selling them online. For further queries or suggestions please contact us.

You May Also Like To Read –

How To Sell Auto Radiators Online | Step by Step (Free Method)

How to Sell Auto Radiators Online

Ideal For: All the auto parts shop, auto parts store, car parts shop, automobile garages, automobile workshops, and other sellers can use this method to take their auto radiators selling business online.

How to Sell Auto Radiators Online

Why Choose this Method To Sell Auto Radiators Online?

Unlike any other solution, this method allows you to:

  • List and sell your auto radiators for FREE. Absolutely no payment required.
  • No need to pay commission on any of your sales.
  • Multiple payment options like PayPal, Credit Card, etc to collect payment from a single place.
  • Sell one time or recurring subscriptions of your auto radiators.
  • Collect payments & sell products in any currency as per your requirement.
  • Give discounts on your products by offering special coupon codes.
  • Add sales commission agents to help you in selling auto radiators online.

Get Pabbly Subscription Billing for Free

Now is the time to sell auto radiators online as the auto parts sector continues to grow at a rate that shows no signs of slowing down. So, if you own a store of auto parts and sell auto radiators then you should take this business to online platforms for some extra money and increased customer reach.

Checkout pages are the webpages through which, you can easily boost up your sales and get advanced marketing for your business. You just need to create checkout pages for your auto radiators and share them on social media to start selling auto radiators online. To start your online business we present to you an amazing software, Pabbly Subscription Billing which offers you a completely free platform. Other than the checkout pages, it also offers other great features like unlimited selling of products, adding unlimited customers, easy invoicing, unlimited revenue generation, etc.

Let us start creating your first checkout page for your online business.

Final View of Checkout Page For Your Auto Radiators Selling Business

Preview Checkout Page

Preview Checkout Page

Step 1: Log in to Pabbly Subscription Billing

Signup

You have to visit Pabbly Subscription Billing website and then click on the “Signup Free” button. After clicking the button the signup page will appear, here you can signup for free via Gmail or you can also enter your details manually.

Sign Up For Free!

Step 2: Select Subscription Billing

Access Subscription Billing

Step 3: Account Setup

Setup Account

When you have completed the signup process, then you have to fill up your company details like company name, currency, phone number in the shown dialogue box.

Step 4: Connect Payment Gateways & Start Auto Radiators Selling Business Online

Connect Payment Gateway

It gets really easy to understand the payment collection process through Pabbly Subscription Billing’s “Test Payment” mode for the sellers. Before proceeding further we advise you to check and use the dummy mode once to understand it. Afterwards, you can connect with other payment gateways for payment collection like PayPal, Stripe, etc of your choice. The complete payment gateways integration guide is given below-

Step 5: Add Product For Your Auto Radiators

Add Product

Moving on to this step, you have to add your first product, you can add auto radiators of different types such as aluminum radiators, brass radiators, etc. Add all the other radiators in the same product section by creating different plans for them.

Sell Auto Radiators Online Product Name

Fill all the necessary details about your product to add them.

Note: Here you can add all the products related to the similar category by creating plans for each of them.

Step 6: Add Plans 

Let’s rollout plans for different kinds of auto radiators available in your store.

(a) Select Add New Plan

Add Plan

(b) Specify the Plan & Pricing Details

Sell Auto Radiators Online Details

When you click on the “Add New Plan” button, you will land on the plan page, here you have to fill up details like product name, code, price, billing cycle, etc.

(c) Add Image & Description of Auto Radiators

Sell Auto Radiators Online Image

Further, describe the auto radiators that you want to sell along with the images, links, etc, and click on the submit button to add your product. You can create more plans for all the auto radiators in a similar way.

Step 7: Share your Checkout Page

Share Checkout Page on Social Media

If you want to increase your sales then follow these mentioned steps:

  • Share your checkout page on social media such as Facebook and Twitter.
  • Furthermore, copy the mentioned link and send it to your customers through SMS or emails directly.
  • Embed your plan link on your website so that your customers can be landed on the checkout page directly.

Step 8: Preview Checkout Page

Follow up the recommended steps to preview the checkout page:

(a) Click on the View Button

View Checkout Plan

(b) Take a Look at the Checkout Page

Preview Checkout Page

Step 9: Embed Checkout Page in Site & Sell Auto Radiators Online

Embed Checkout Page on Website

Simply copy the link and add the checkout page to sell auto radiators online at any preferable place on your WordPress site.

(a) Edit the Page & Paste the Copied Link

Embed Checkout Page on Website

Further, paste the plan link on a text editor of the WordPress dashboard.

(b) Save & Publish the Checkout Page

Save_and_Publish

Next, click the “Publish” button, after making changes.

(c) Check out the Final Look of your Checkout Page on WordPress Site

Sell Auto Radiators Online Website

Step 10: Multiplan Checkout Page

Note: In case you want to sell multiple products via a single checkout page, you can create a multi-plan checkout page otherwise skip this step.

(a) Click on Add Mutiplan Checkout

Multiplan Checkout

(b) Add Plans to Sell Multiple Auto Radiators from Single Checkout Page

Sell Auto Radiators Online Multi Details

(c) Take a Look at the Checkout Page

Sell Auto Radiators Online Multi Checkout

Preview Checkout Page

Wrapping Up

In conclusion, Pabbly Subscription Billing makes it a lot easier to start an online business with its free and awesome features. Now, you can sell unlimited auto radiators online, share invoices automatically, integrate it with your website, and there is so much more that you can do with this software. Hence, signup and start exploring the benefits of the online world. For further suggestions or queries, please contact us.

You May Also Like To Read –

How to Sell Art Collection Online | Step by Step (Free Method)

How to Sell Art Collection Online

Ideal For: All the art collection makers, art gallery owners, art collection keepers, art collection sellers, retail art collection shop owners, and other merchants can use this method to take their art collection selling business online.

How to Sell Art Collection Online

Why Choose this Method To Sell Art Collection Online?

Unlike any other solution, this method allows you to:

  • List and sell your art collection for FREE. Absolutely no payment required.
  • No need to pay commission on any of your sale.
  • Multiple payment options like PayPal, Credit Card, etc to collect payment from a single place.
  • Sell one time or recurring subscriptions of your art collection.
  • Collect payments & sell products in any currency as per your requirement.
  • Give discounts on your products by offering special coupon codes.
  • Add sales commission agents to help you in selling art collection online.

Get Pabbly Subscription Billing for Free

Art lovers are all around the world and if you are planning to sell art collection online globally then these 10 steps can help you get started in a few minutes.

In this article, we’ll be using the Subscription Billing service of Pabbly for checkout page creation. These checkout pages are capable of collecting safe & secure payments globally as well as in showcasing art pieces excellently.

Moreover, in the meantime of creating checkout pages all the management related to selling art collection online is also taken care of. Also, the invoicing and billing process can be easily automated. You can choose to accept single-time as well as recurring payments to sell art collection online easily.

Uses of checkout pages:

  • To display image & description of the art collection
  • For collecting online or offline payment
  • To sell single or multiple art collections from a single page
  • To share the art collection with your customers on social media
  • For embedding a payment page of WordPress
  • To redirect customers for payments through site buttons & texts
    And much more…

Final View of Checkout Page For Your Art Collection Selling Business

Checkout Page Preview to Sell Art Collection Online

Preview Checkout Page

Step 1: Log in to Pabbly Subscription Billing

Signup

To start art collection business online begin, the process by visiting Pabbly Subscription Billing. On the website click on the ‘Sign Up Free‘ button and choose a method to get into the platform. You can either manually fill out the form given and proceed or you can sign-up with Google.

Sign Up For Free!

Step 2: Select Subscription Billing

Access Subscription Billing

Step 3: Account Setup

Setup Account

To complete the setup for selling art collection online, drop the information regarding your company such as a company name, the currency you wanna deal in and a contact number.

Step 4: Connect Payment Gateways & Start Art Collection Selling Business Online

Connect Payment Gateway

In this step, you’ll need to integrate a payment collection method for collecting payments for selling art collection online. For the first time, you can enable the test payment mode for testing the payment process. I am also explaining the process using the test payment mode in this blog.

While you’ll need to connect with an actual payment gateway. There are multiple options available & the step by step integration guides are linked below.

Step 5: Add Product For Your Art Collection

Add Product

Our next step is adding a product for selling art collection online. Here you can add an art collection from a particular category such as abstract paintings, traditional art collection etc. Further, we can add plans for these product categories.

Add Product to Sell Art Collection Online

Strike the submit button and a product will be added.

Note: Here you can add all the products related to the similar category by creating plans for each of them.

Step 6: Add Plans 

Let’s rollout plans for different kinds of art collection available in your store.

(a) Select Add New Plan

Add Plan

(b) Specify the Plan & Pricing Details

Add Plan to Sell Art Collection Online

In the plan description page write down a name, code, price, billing cycle etc for the art collection to sell.

(c) Add Image & Description of Art Collection

Add Image & Description to Sell Art Collection Online

You can also insert a picture & some descriptive text with formatting.

Hit submit on this page and a plan to sell art collection online will be appended.

Similarly, you can add other art collections as well.

Step 7: Share your Checkout Page

Share Checkout Page on Social Media

You have three different options to share a checkout page with your customers.

  • First, you can directly click on the buttons to share the checkout page on Facebook & Twitter.
  • Second, you can share the plan link on other platforms like emails & SMS
  • Third, you can redirect the customers on the checkout page by linking the plan link with the buttons and texts of any website

Step 8: Preview Checkout Page

Follow up the recommended steps to preview the checkout page:

(a) Click on the View Button

View Checkout Plan

(b) Take a Look at the Checkout Page

Checkout Page Preview to Sell Art Collection Online

Step 9: Embed Checkout Page in Site & Sell Art Collection Online

Embed Checkout Page on Website

Just copy the link and add the checkout page to sell art collection online at any preferable place on your WordPress site.

(a) Edit the Page & Paste the Copied Link

Embed Checkout Page on Website

Further, paste the plan link on a text editor of the WordPress dashboard.

(b) Save & Publish the Checkout Page

Save_and_Publish

Next, click the “Publish” button, after making changes.

(c) Check out the Final Look of your Checkout Page on WordPress Site

Checkout Page On Site to Sell Art Collection Online

Step 10: Multiplan Checkout Page

Note: In case you want to sell multiple products via a single checkout page, you can create a multi-plan checkout page otherwise skip this step.

(a) Click on Add Mutiplan Checkout

Multiplan Checkout

(b) Add Plans to Sell Multiple Art Collection from Single Checkout Page

Create Multiplan Checkout Page to Sell Art Collection Online

(c) Take a Look at the Checkout Page

Multiplan Checkout Page to Sell Art Collection Online

Preview Checkout Page

Wrapping Up

This was the process of ‘how to sell art collection online using checkout pages’. Up till now, you can clearly see why it is the fastest and smartest way out here on the internet. The flexibility of this platform allows you to share the checkout pages almost anywhere, whether it is a social media platform, a WordPress site or any other site’s buttons & texts.

I personally like the multicurrency and multiple gateway options to collect secure payments from reliable sources. Comment below what’s your feedback over it.

You May Also Like To Read –

How To Sell Aquariums Online | Step by Step (Free Method)

How to Sell Aquariums Online

Ideal For: All the aquarium manufacturers, aquarium sellers, aquarium dealers, aquarium suppliers, aquarium shop owners, and other merchants can use this method to sell aquariums online.

How to Sell Aquariums Online

Why Choose this Method To Sell Aquariums Online?

Unlike any other solution, this method allows you to:

  • List and sell your aquariums for FREE. Absolutely no payment required.
  • No need to pay commission on any of your sales.
  • Multiple payment options like PayPal, Credit Card, etc to collect payment from a single place.
  • Sell one time or recurring subscriptions of your aquariums.
  • Collect payments & sell products in any currency as per your requirement.
  • Give discounts on your products by offering special coupon codes.
  • Add sales commission agents to help you in selling aquariums online.

Get Pabbly Subscription Billing for Free

There is something soothing about watching fish in aquariums and with the arrival of seasons, people started buying aquariums for homes, offices, workplaces, etc. This is a reason why surplus demand for aquariums prevailing in the market. And obviously, one of the reasons to give a headstart to aquariums business online.

And, according to the Business Wire report, the global aquarium market will grow at a CAGR of 4.82%  in coming years. Other than this, there are multiple benefits like low set-up cost, no middleman, etc in online stores. Giving all this a thought, you must be thinking of starting aquariums selling business online. Gladly we have a software named Pabbly Subscription Billing that can guide you in the process.

The software lets you create an amazing checkout page for selling aquariums online. Further, below are its highlighted features:

  • Multiple billing models
  • Professional invoices
  • Various payment gateways

Now, let’s focus on creating a checkout page for selling aquariums online using this tool.

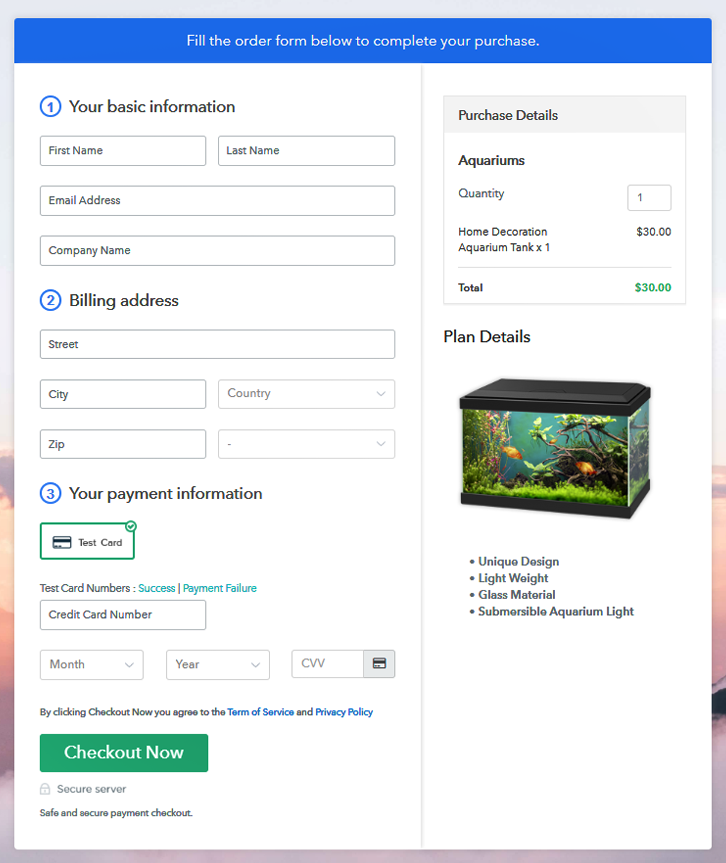
Final View of Checkout Page For Your Aquariums Selling Business

Checkout Page to Sell Aquariums Online

Preview Checkout Page

Step 1: Log in to Pabbly Subscription Billing

Signup

The very first step for creating a checkout page for aquariums is, by visiting the Pabbly Subscription Billing in your browser. After that, click on the “Sign up Free“ button. Moreover, either manually filled out the details or sign in using your Gmail account.

Sign Up For Free!

Step 2: Select Subscription Billing

Access Subscription Billing

Step 3: Account Setup

Setup Account

Also, after clicking on the “Access Now” button of the software, a page will open with fields like company name, select currency, and phone number. Just fill out those details to continue creating a checkout page for aquariums.

Step 4: Connect Payment Gateways & Start Aquariums Selling Business Online

Connect Payment Gateway

The following step is about gathering information about payment procedures using a “Test Payment Gateway”. Here, we will explain the checkout page process for the aquariums with the help of a test payment gateway. Further, this tool offers various payment gateways such as PayPal, Stripe, etc. Besides, below are the payment integration guides to help you out.

Step 5: Add Product For Your Aquariums

Add Product

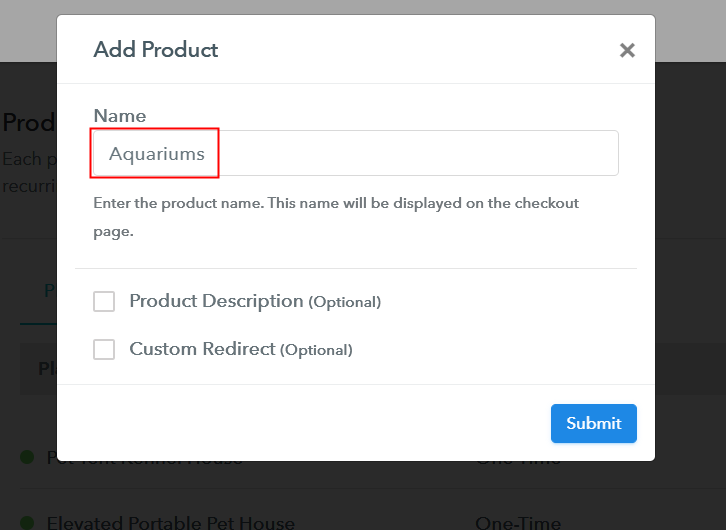
Moreover, add the name, which in our case is “Aquariums”. Here you can specify the type like a large aquarium, small aquarium, etc. Additionally, write a short description of the aquariums to bind the client’s attention.

Add Product to Start Selling Aquariums Online

Note: Here you can add all the products related to the similar category by creating plans for each of them.

Step 6: Add Plans 

Let’s discover plans for different kinds of aquariums available in your store.

(a) Select Add New Plan

Add Plan

(b) Specify the Plan & Pricing Details

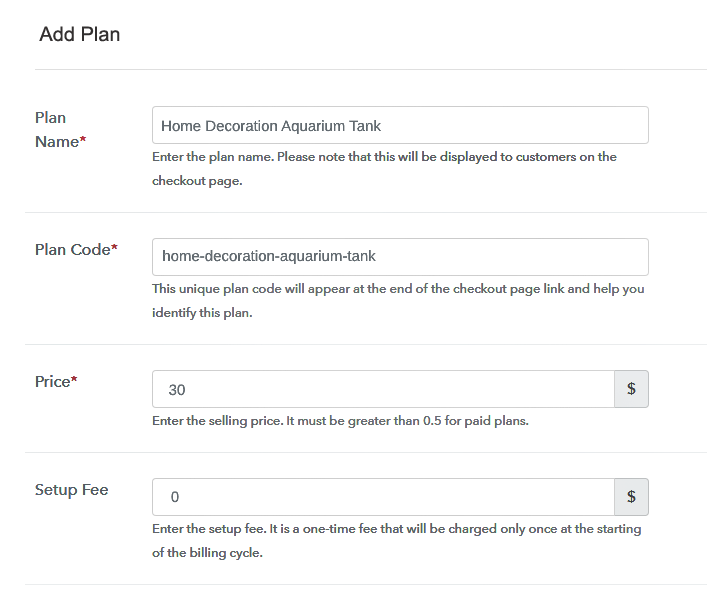
Specify the Plan and Pricing to Sell Aquariums Online

The following thing to do is fill all the details of the aquariums like plan name, code, price, set-up fee, and much more to continue.

(c) Add Image & Description of Aquariums

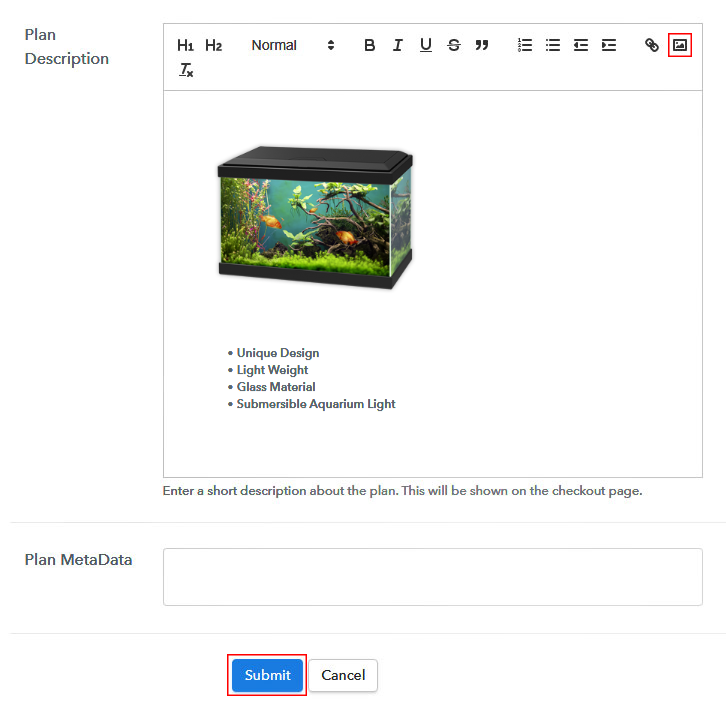
Add Image & Description to Sell Aquariums Online

Furthermore, it is necessary to write a brief description of aquariums using bullets, images, etc, to bring natural buyers to the checkout page.

Next, click on the “Submit” button to add the aquariums on the checkout page.

Finally, you can add multiple plans and kinds of aquariums in your product list which you want to trade online.

Step 7: Share your Checkout Page

Share Checkout Page on Social Media

  • Moreover, share the checkout page of the aquariums on social media accounts like Facebook & Twitter to grab the customer’s attention.
  • Also, you can share the direct link of the aquarium’s checkout page with your customers via SMS or email marketing.
  • Additionally, embed the provided plan link of the aquariums in the buttons or any anchor text on your website.

Step 8: Preview Checkout Page

Follow up the recommended steps to preview the checkout page:

(a) Click on the View Button

View Checkout Plan

(b) Take a Look at the Checkout Page

Checkout Page to Sell Aquariums Online

Step 9: Embed Checkout Page in Site & Sell Aquariums Online

Embed Checkout Page on Website

Simply copy the link and add the checkout page to sell aquariums online at any proper place on your WordPress site.

(a) Edit the Page & Paste the Copied Link

Paste Link in Text Editor

Further, paste the plan link of aquariums on a text editor of the WordPress dashboard.

(b) Save & Publish the Checkout Page

Save and Publish

Next, click the “Publish” button, after making changes.

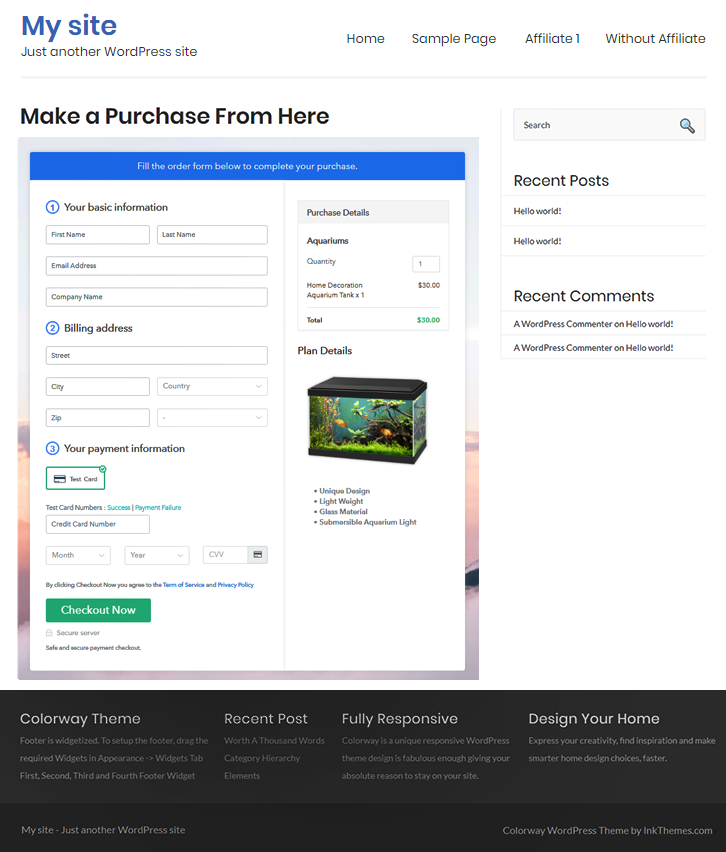
(c) Check out the Final Look of your Checkout Page on WordPress Site

Final Look of your Checkout Page to Sell Aquariums Online

Step 10: Multiplan Checkout Page

Note: In case you want to sell multiple products via a single checkout page, you can create a multi-plan checkout page otherwise skip this step.

(a) Click on Add Mutiplan Checkout

Multiplan Checkout

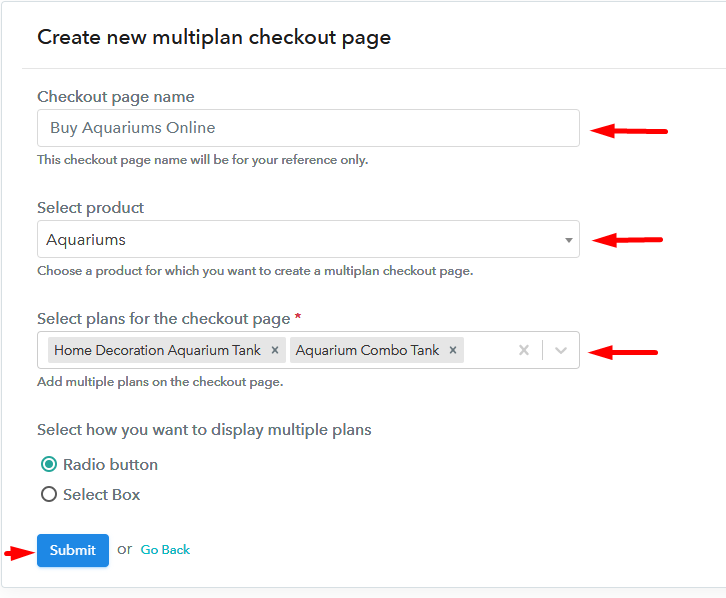
(b) Add Plans to Sell Multiple Aquariums from Single Checkout Page

Add Multiple Products to Start Selling Aquariums Online

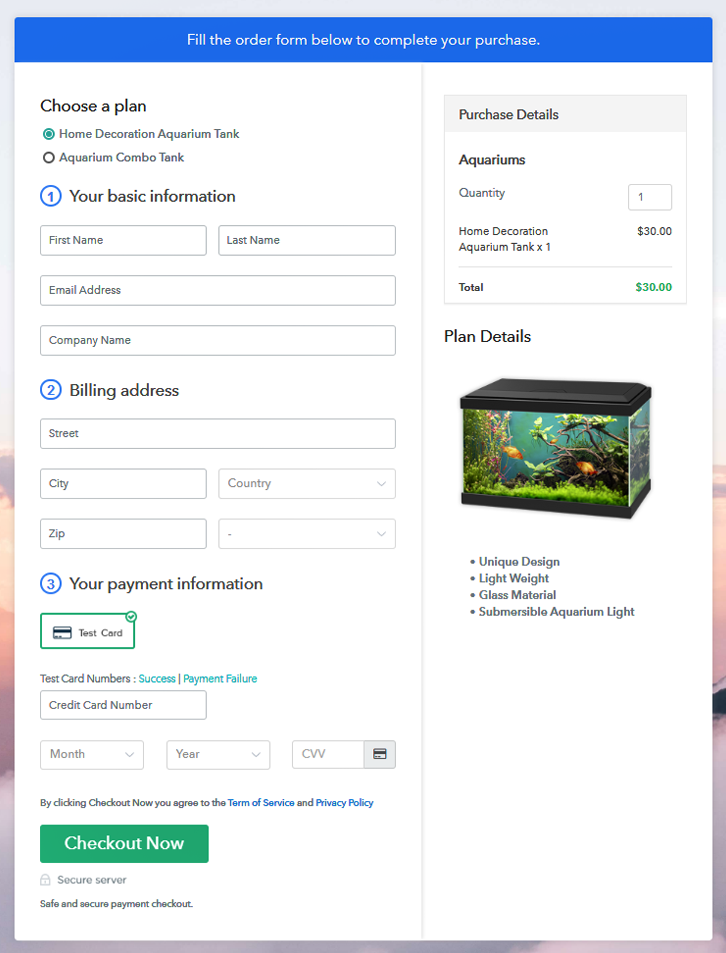
(c) Take a Look at the Checkout Page

Multiplan Checkout Page to Sell Aquariums Online

Preview Checkout Page

Wrapping Up

Okay! So now you know how easily you can start your own aquariums selling business online using software Pabbly Subscription Billing. Just follow all the mentioned 10 steps and nothing else. Further, the software keeps in building strong relationships with prospects by sending timely alerts.

Don’t dwell in confusion now, the amazing tool is here to guide you.

You May Also Like To Read –

How To Sell Antique Gift Items Online | Step by Step (Free Method)

How To Sell Antique Gift Items Online

Ideal For: All the antique shops, antique dealers, antique brokers, antique gift shop, and other sellers can use this method to take their antique gift items selling business online.

How To Sell Antique Gift Items Online

Why Choose this Method To Sell Antique Gift Items Online?

Unlike any other solution, this method allows you to:

  • List and sell your antique gift items for FREE. Absolutely no payment required.
  • No need to pay commission on any of your sales.
  • Multiple payment options like PayPal, Credit Card, etc to collect payment from a single place.
  • Sell one time or recurring subscriptions of your antique gift items.
  • Collect payments & sell products in any currency as per your requirement.
  • Give discounts on your products by offering special coupon codes.
  • Add sales commission agents to help you in selling antique gift items online.

Get Pabbly Subscription Billing for Free

Antiques are one of the hottest selling gift items today. They’re adored by buyers around the world and equally adored by the sellers who make a good living selling them. So, if you sell antique gift items from a store and want to make extra profit and increase customer reach then you must take your business online.

With the help of checkout pages, you can increase your sales and get better marketing for your products. You just have to create checkout pages for your antique gift items and share them online to collect payment directly through them. To create beautiful checkout pages and start your online business you only need Pabbly Subscription Billing. It is a free platform that offers so many helpful features other than checkout for your online antique gift items selling business such as easy invoicing, integration with website, easy payment collection, etc.

Now that you are all excited about the checkout pages, let’s create one quickly.

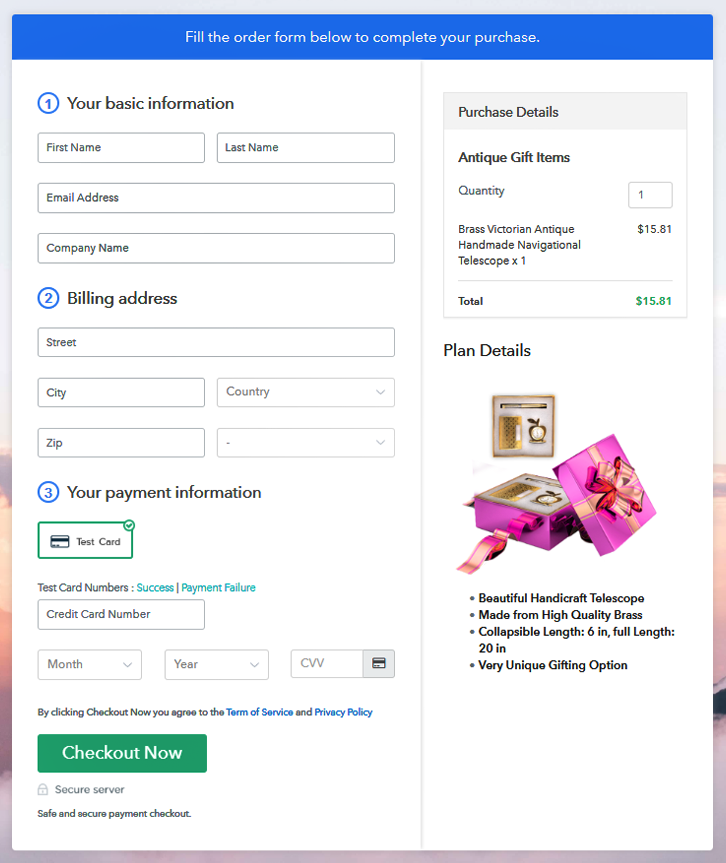
Final View of Checkout Page For Your Antique Gift Items Selling Business

Preview Checkout Page

Preview Checkout Page

Step 1: Log in to Pabbly Subscription Billing

Signup

Start with searching Pabbly Subscription Billing website in your search engine and then click on the “Signup Free” button. On clicking the button, the signup page will appear in front of you. Here, you can create your account for free instantly with Gmail or you can also enter your details manually.

Sign Up For Free!

Step 2: Select Subscription Billing

Access Subscription Billing

Step 3: Account Setup

Setup Account

Once you are done with the signup process, now fill up the details about your company like company name, currency, and phone number in the given dialogue box.

Step 4: Connect Payment Gateways & Start Antique Gift Items Selling Business Online

Connect Payment Gateway

Pabbly Subscription Billing offers a “Test Payment” mode to make the payment collection process more reliable as you can test the entire process without actually filling in the original details. You can also enable and check it before moving forward and can understand how the payment collection process works. Thereafter, you can connect with other payment gateways like PayPal, Stripe, etc whichever you prefer. The complete payment gateways integration guide is mentioned below-

Step 5: Add Product For Your Antique Gift Items

Add Product

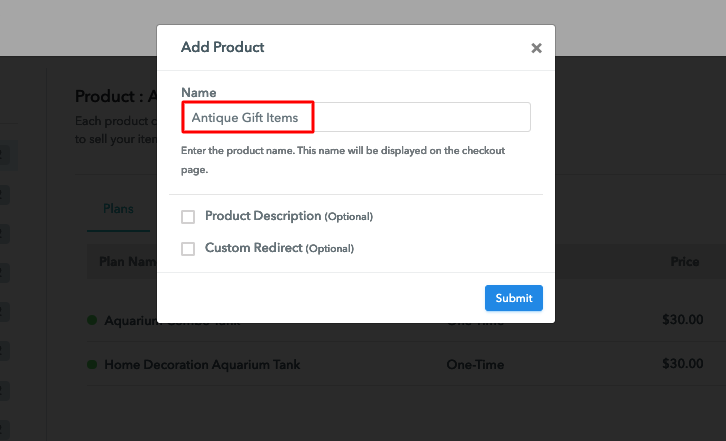
Next, you have to add your first product, you can add antique gift items of different types such as vintage telephones, antique wall clock, etc. Add all the other antique gift items in the same product section by creating different plans for them.

Sell Antique Gift Items Online Product Name

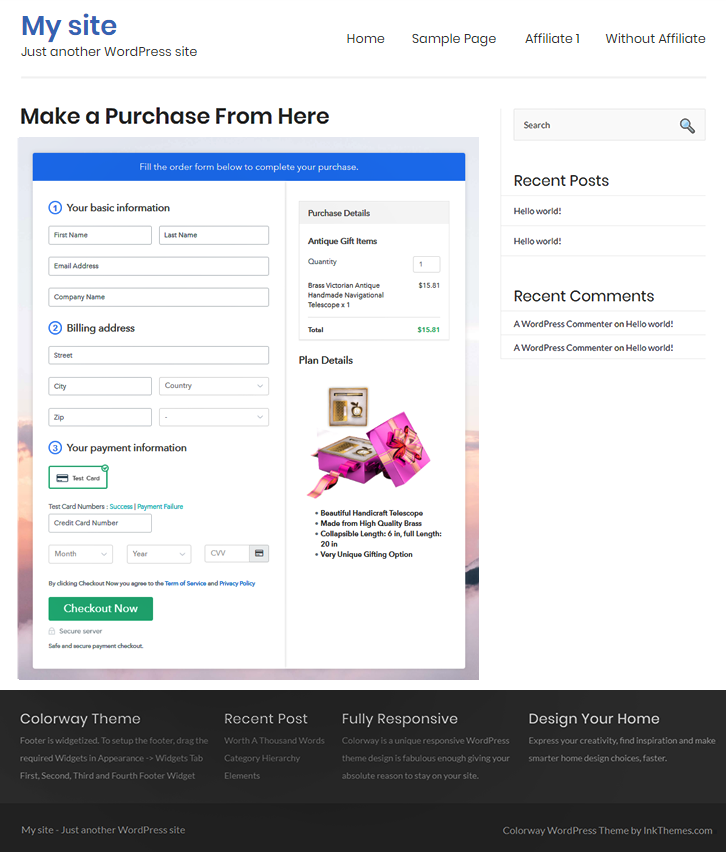
Simply fill the details to add your products.

Note: Here you can add all the products related to the similar category by creating plans for each of them.

Step 6: Add Plans 

Let’s rollout plans for different kinds of antique gift items available in your store.

(a) Select Add New Plan

Add Plan

(b) Specify the Plan & Pricing Details

Sell Antique Gift Items Online Details

In this step, you have to add details of your product like product name, code, price, billing cycle, etc.

(c) Add Image & Description of Antique Gift Items

Sell Antique Gift Items Online Image

Further, you can even add a description of the antique gift items that you want to sell along with the product image, links, etc, and click on the submit button to add your product. You can create more plans for all the other antique gift items similarly.

Step 7: Share your Checkout Page

Share Checkout Page on Social Media

To raise your sales and for improved marketing, follow these given steps:

  • Share your checkout page on social media such as Facebook and Twitter.
  • Furthermore, copy the mentioned link and send it to your customers through SMS or emails directly.
  • Embed your plan link on your website so that your customers can be landed on the checkout page directly.

Step 8: Preview Checkout Page

Follow up the recommended steps to preview the checkout page:

(a) Click on the View Button

View Checkout Plan

(b) Take a Look at the Checkout Page

Preview Checkout Page

Step 9: Embed Checkout Page in Site & Sell Antique Gift Items Online

Embed Checkout Page on Website

Just copy the link and add the checkout page to sell antique gift items online at any preferable place on your WordPress site.

(a) Edit the Page & Paste the Copied Link

Embed Checkout Page on Website

Further, paste the plan link on a text editor of the WordPress dashboard.

(b) Save & Publish the Checkout Page

Save_and_Publish

Next, click the “Publish” button, after making changes.

(c) Check out the Final Look of your Checkout Page on WordPress Site

Sell Antique Gift Items Online Website

Step 10: Multiplan Checkout Page

Note: In case you want to sell multiple products via a single checkout page, you can create a multi-plan checkout page otherwise skip this step.

(a) Click on Add Mutiplan Checkout

Multiplan Checkout

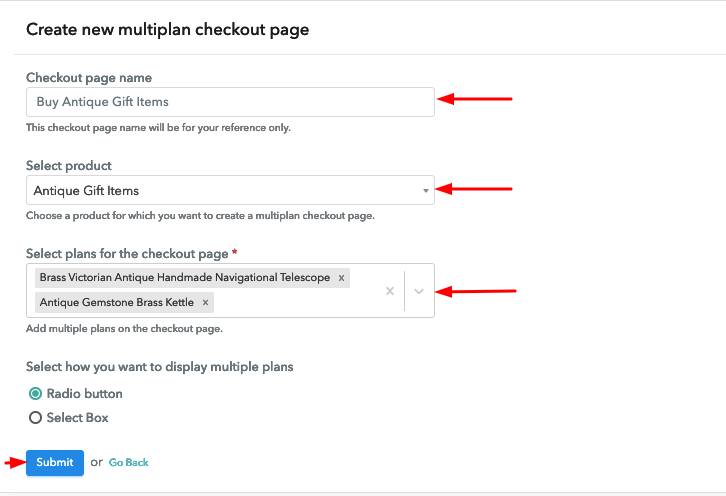
(b) Add Plans to Sell Multiple Antique Gift Items from Single Checkout Page

Sell Antique Gift Items Online Multi Details

(c) Take a Look at the Checkout Page

Sell Antique Gift Items Online Multi Checkout

Preview Checkout Page

Wrapping Up

At the end of the blog, we hope that it was helpful for you and now you can easily set up your online antique gift items store with the help of Pabbly Subscription Billing. Now, sell unlimited products, collect payments easily, generate unlimited revenue without paying anything. So, signup and start selling antique gift items online today. For further queries or suggestions, please write to us.

You May Also Like To Read –

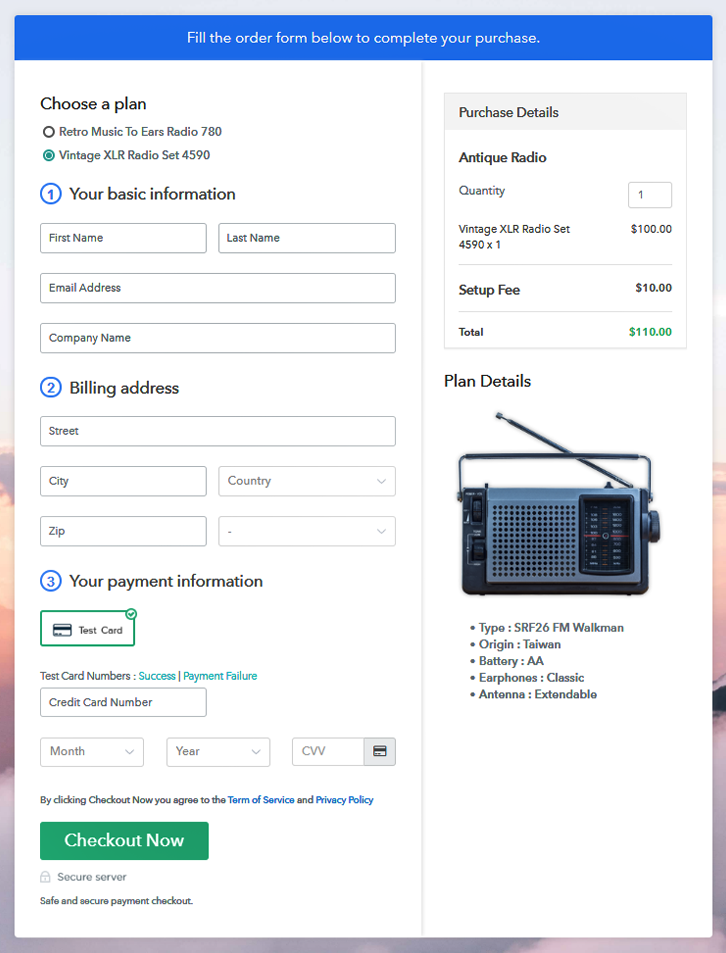
How To Sell Antique Radios Online | Step by Step (Free Method)

How To Sell Antique Radios Online

Ideal For: All the radios manufacturers, vintage gift stores, gift galleries, and other merchants can use this method to sell antique radios online.

How To Sell Antique Radios Online

Why Choose this Method To Sell Antique Radios Online?

Unlike any other solution, this method allows you to:

  • List and sell your antique radios for FREE. Absolutely no payment required.
  • No need to pay commission on any of your sales.
  • Multiple payment options like PayPal, Credit Card, etc to collect payment from a single place.
  • Sell one time or recurring subscriptions of your antique radios online.
  • Collect payments & sell products in any currency as per your requirement.
  • Give discounts on your products by offering special coupon codes.
  • Add sales commission agents to help you in selling antique radios online.

Get Pabbly Subscription Billing for Free

You have a priceless collection of antique radios and you are planning to sell them. But the problem is in this era of digital phones( radio inbuilt) the market for such radios is limited. However, you know there are many who are quite nostalgic about these devices and are willing to buy them. So, you realize the only possible way to reach out to these buyers is if you start selling antique radios online. Also there some other benefits when you sell antique radios online like better price discovery, fully automated 24×7 open shop, tracking revenues, lower middle man commission, etc.

Now, in this article, we will use a Saas tool called Pabbly Subscription Billing to sell antique radios online. The reason is it can list an unlimited number of products and sell them via incredible checkout pages. Some other benefits include

  • Generate Unlimited Revenues
  • Collect Payments in Offline/Online Modes
  • Track Revenues
  • Custom Domain
  • Auto-Email Alerts on Payment Completion/Failure
  • Custom Logo
  • Social Media Marketing

Through these listed benefits, you will have a competitive edge over your peers. So, let us start building our first checkout page to start selling antique radios online.

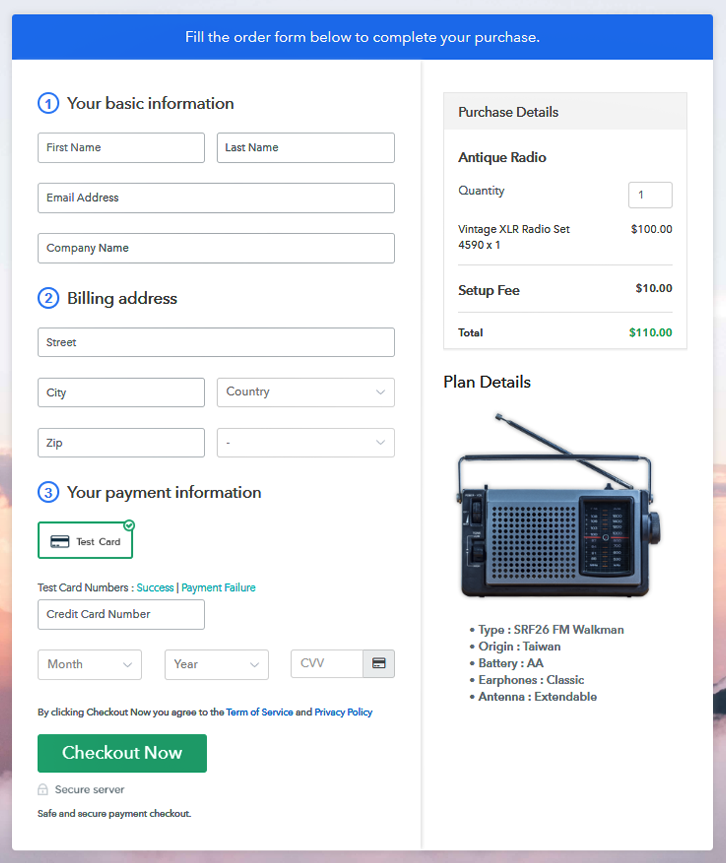
Final View of Checkout Page For Your Antique Radios Selling Business

Checkout To Sell Antique Radios Online

Preview Checkout Page

Step 1: Log in to Pabbly Subscription Billing

Signup

Search for  Pabbly Subscription Billing in your browser. Now, click on the “Sign up Free“ button. Either manually fill out details or simply sign in using your Gmail account.

Sign Up For Free!

Step 2: Select Subscription Billing

Access Subscription Billing

Step 3: Account Setup

Setup Account

This will summon a dialog box requiring you to fill the company details like name, currency standards, and phone number. Quickly fill them up and click on continue to complete the process.

Step 4: Connect Payment Gateways & Start Antique Radios Selling Business Online

Connect Payment Gateway

Of course, you can use the payment gateway to stimulate the whole payment experience of a customer. Furthermore, with Pabbly Subscription Billing, you can integrate with multiple payment gateways like Stripe, Razorpay, PayPal, Authorize.net, etc. There are manuals available for the integration of payment gateways beneath this paragraph. But since we have to set up the payment process, we will click on the “Enable Test Payment” option.

Step 5: Add Product For Your Antique Radios 

Add Product

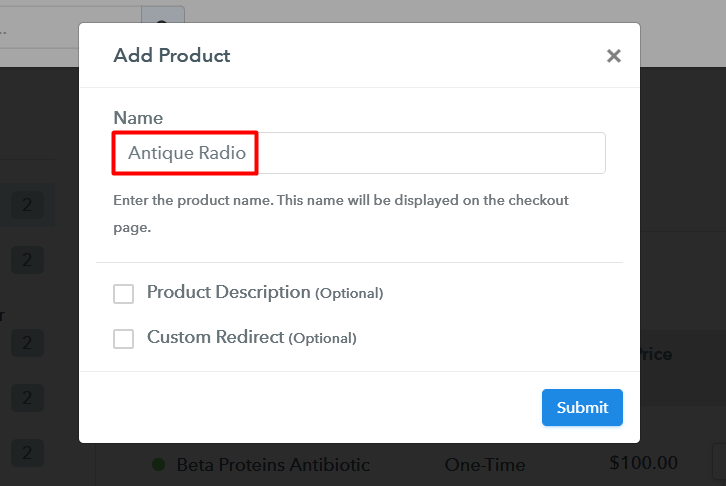
Well, now that you have embedded your payment gateway, its time to add your product. Click on the “Add New Product” button will summon a dialog box. Here you can enter the name of the radio provide a product description, and even redirect to a particular website.

Add Product To Sell Antique Radios Online

Fill out all those details and voila your product is created.

Note: Here you can add all the products related to the similar category by creating plans for each of them.

Step 6: Add Plans 

Let’s rollout plans for different kinds of antique radios available in your store.

(a) Select Add New Plan

Add Plan

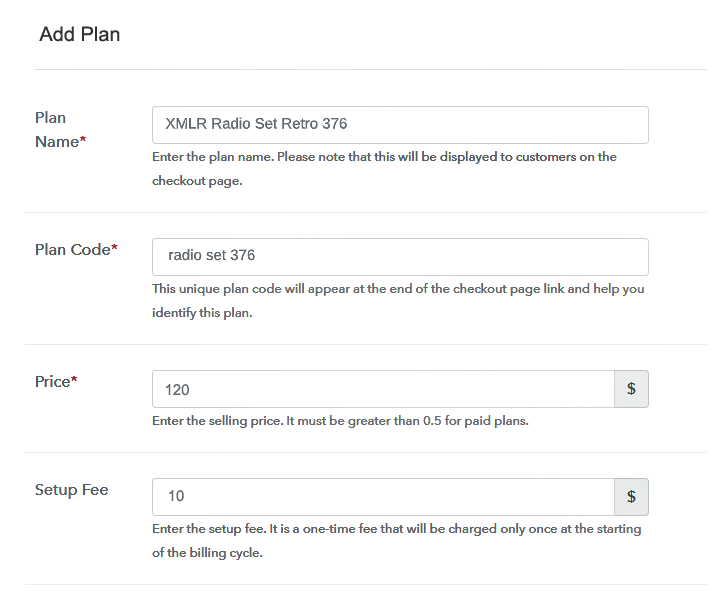
(b) Specify the Plan & Pricing Details

Add Plan To Sell Antique Radios Online

Now you have to fill all the details of the test kits like plan name, code, price, set-up fee, and much more to continue.

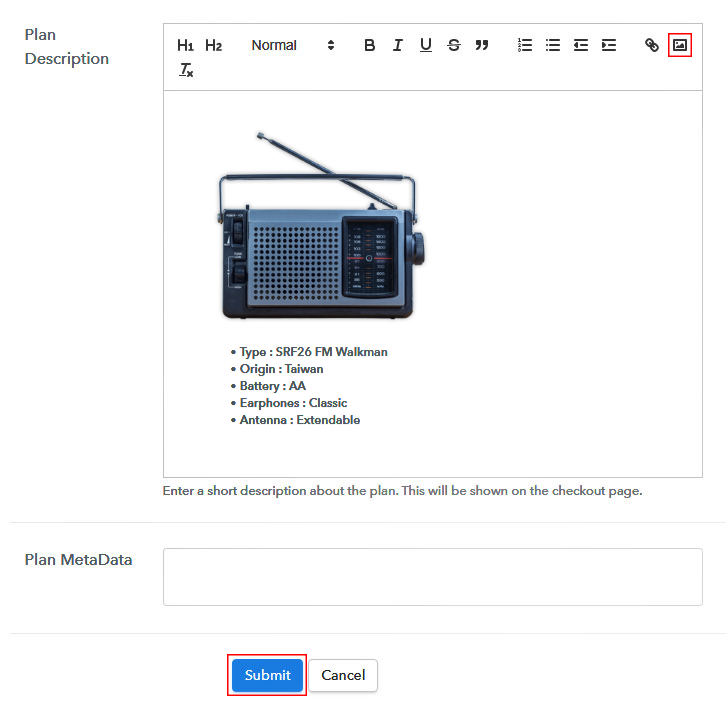
(c) Add Image & Description of Antique radios

Add Description To Sell Antique Radios Online

Get the attention of your customer, by pasting the best image possible of radios using the image button.

Moreover, it will also be helpful if you provide some product descriptions of the radio like age, the capacitor used, plugs and sockets, etc.

After filling out the description, press the submit button.

Step 7: Share your Checkout Page

Share Checkout Page on Social Media

  • Also, you can share the checkout page on Twitter & Facebook by just pressing the respective buttons.
  • Or you can send the checkout page link to customers through emails or SMS.
  • Also, you can add the plan link provided in the buttons or any anchor text on your website, so the users will be redirected to the checkout page.

Step 8: Preview Checkout Page

Follow up the recommended steps to preview the checkout page:

(a) Click on the View Button

View Checkout Plan

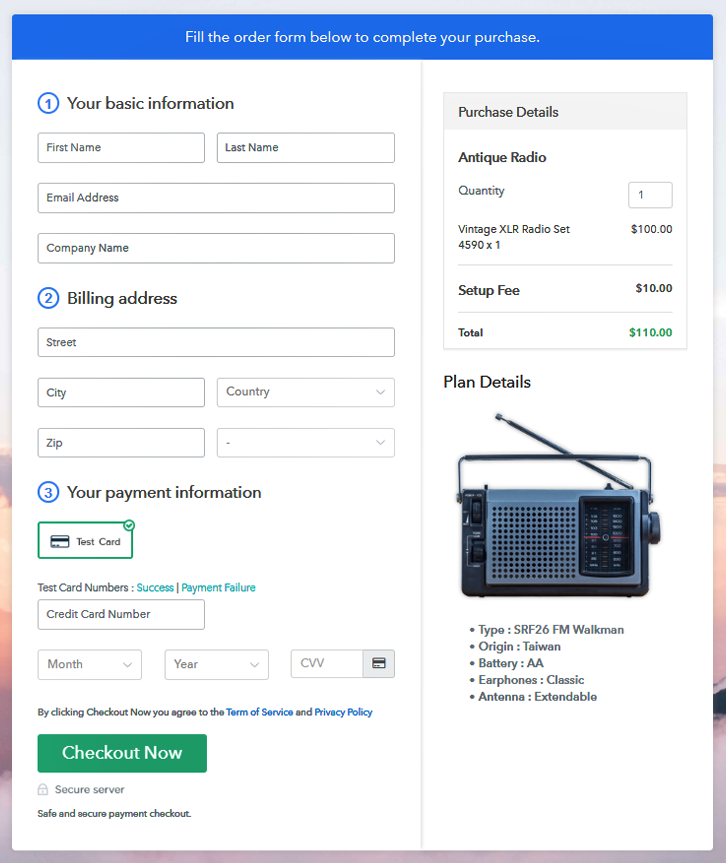
(b) Take a Look at the Checkout Page

Checkout To Sell Antique Radios Online

Step 9: Embed Checkout Page in Site & Sell Antique Radios Online

Embed Checkout Page on Website

Just copy the link and add the checkout page to sell antique radios online at any suitable place on your WordPress site.

(a) Edit the Page & Paste the Copied Link

Embed Checkout Page on Website

Further, paste the plan link of the antique radios on a text editor of the WordPress dashboard.

(b) Save & Publish the Checkout Page

Save_and_Publish

Next, click the “Publish” button, after making changes.

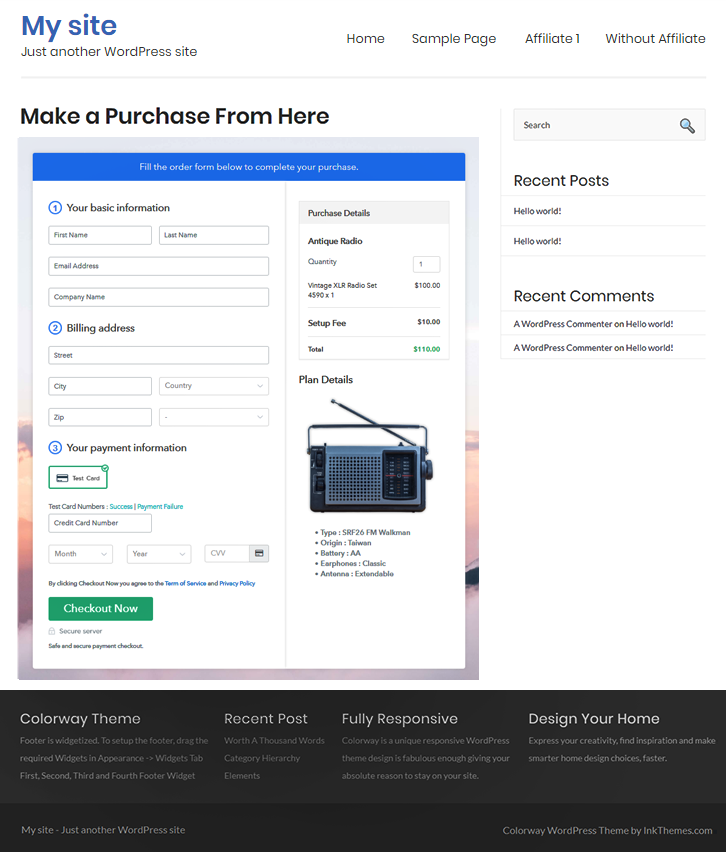
(c) Check out the Final Look of your Checkout Page on WordPress Site

Add WordPress To Sell Antique Radios Online

Step 10: Multiplan Checkout Page

Note: In case you want to sell multiple products via a single checkout page, you can create a multi-plan checkout page otherwise skip this step.

(a) Click on Add Mutiplan Checkout

Multiplan Checkout

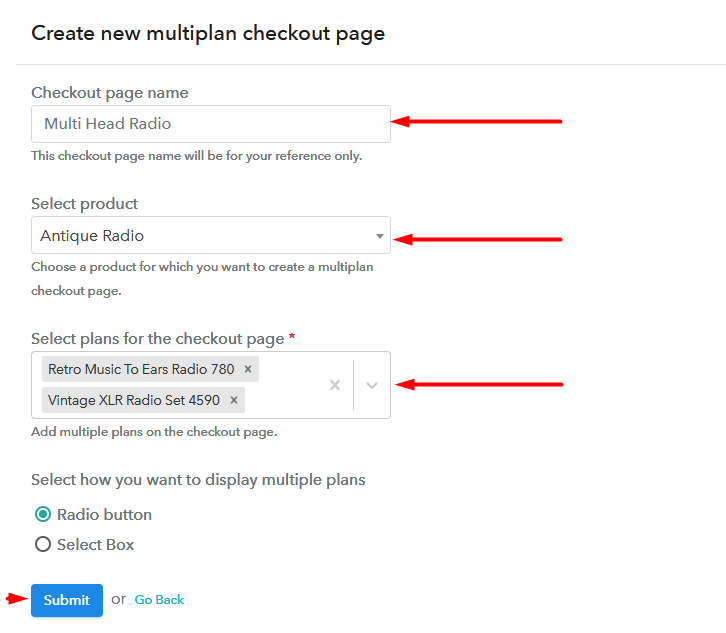
(b) Add Plans to Sell Multiple Antique Radios from Single Checkout Page

Multiplan To Sell Antique Radios Online

(c) Take a Look at the Checkout Page

Multiplan To Sell Antique Radios Online

Preview Checkout Page

Wrapping Up

Yeah !! You learned how to sell antique radios online by building checkout pages in Pabbly Subscription Billing. This tool is your best buddy to dominate all kinds of online business and give you an edge over your competitors.

Also, some of you may have doubts regarding the steps. Hence you can always connect with us to solve your doubts through mail or comment section. Thank You.

You May Also Like To Read –

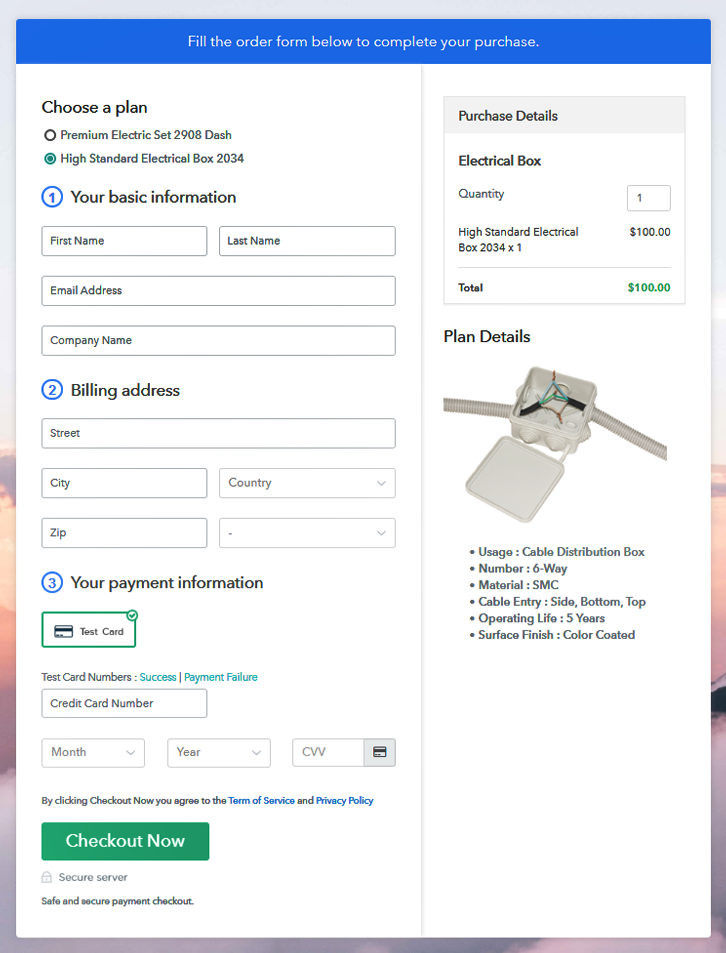
How to Sell Electrical Boxes Online | Step by Step (Free Method)

Ideal For: All the electrical box manufacturers, electrical equipments sellers, electrical box dealers, small electrical cottage industries, and other merchants can use this method to sell electrical boxes online.

How to Sell Electrical Boxes Online

Why Choose this Method To Sell Electrical Boxes Online?

Unlike any other solution, this method allows you to:

  • List and sell your electrical boxes for FREE. Absolutely no payment required.
  • No need to pay commission on any of your sales.
  • Multiple payment options like PayPal, Credit Card, etc to collect payment from a single place.
  • Sell one time or recurring subscriptions of your electrical boxes.
  • Collect payments & sell products in any currency as per your requirement.
  • Give discounts on your products by offering special coupon codes.
  • Add sales commission agents to help you in selling electrical boxes online.

Get Pabbly Subscription Billing for Free

As the owner of a store selling electrical boxes, you are quite proud of your business as your junction boxes are serving each and every home in your locality. Now, you want to expand into other locales but the problem is expansion involves dealing with new tax regulations, laws, middlemen, and logistics. But what if I told you that you can remove all these migraines if you start selling electrical boxes online. Not, only that, you will have have a better revenue management system, automated online shops, flexible working hours, multiple currency billing, and more.

Now, that you are hypnotized to sell electrical boxes online, let me present the tool with which it can be done. This tool is called Pabbly Subscription Billing. The advantage of using this software is, it can create awesome checkout pages to sell electrical boxes online and collect revenue in offline/online modes. Other benefits are:

  • Generate Unlimited Revenues
  • Multiple Billing Models
  • Revenue Tracking
  • Easy Data Import/Export
  • Auto Email Notifications on Transactions Completion/Failure

Using, these features in Pabbly Subscription Billing you will be at the top of the e-commerce game. Now let’s create our first checkout page to start electrical boxes selling business online.

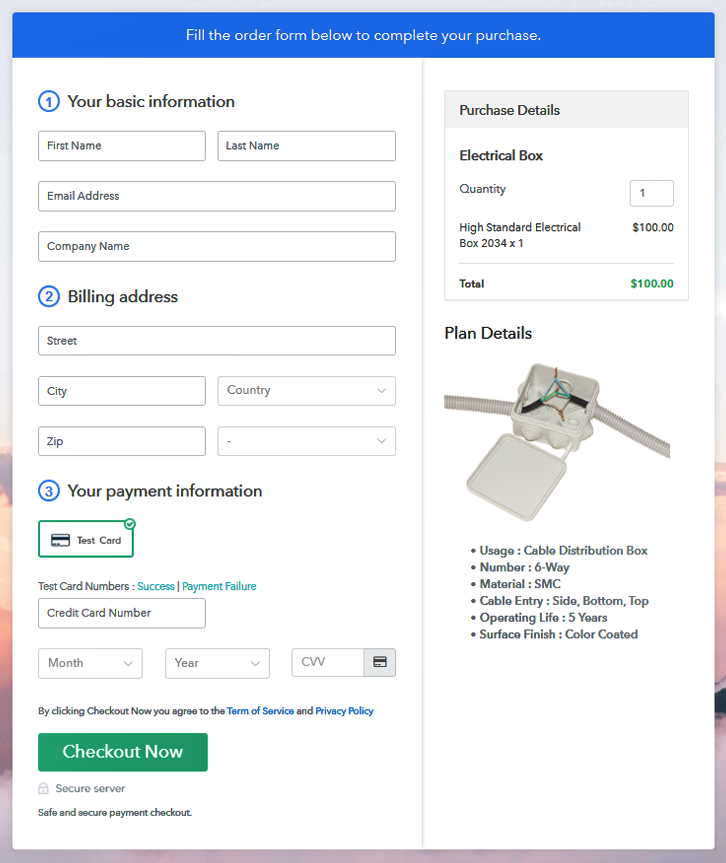
Final View of Checkout Page For Your Electrical Boxes Selling Business

Checkout to Sell Electrical Boxes Online

Preview Checkout Page

Step 1: Log in to Pabbly Subscription Billing

Signup

To begin the process of building a checkout page, first look for  Pabbly Subscription Billing in your search engines. After landing on the website, click on the “Sign up Free“ button. So, either manually fill out all information required in the blank or simply sign in using your Gmail account.

Sign Up For Free!

Step 2: Select Subscription Billing

Access Subscription Billing

Step 3: Account Setup

Setup Account

Moreover, after clicking on the “Access Now” button of the software, a page will open with fields like company name, select currency, and phone number. Now, fill out those details to continue creating a checkout page for electrical boxes.

Step 4: Connect Payment Gateways & Start Electrical Boxes Selling Business Online

Connect Payment Gateway

Now, customers must enjoy an incredible payment experience. So to remove the glitches beforehand Pabbly Subscription Billing provides a dummy payment gateway. Here, you can pilot-test the entire payment experience of the customer. Just click on the “Enable Test Payment” option to start testing out this functionality

Also, with Pabbly Subscription Billing, you can integrate with multiple payment gateways like Stripe, Razorpay, PayPal, Authorize.net, etc. These payment gateways can be easily integrated using the help of the articles given below. But since we have to set up the payment process, we will click on the “Enable Test Payment” option

Step 5: Add Product For Your Electrical Boxes

Add Product

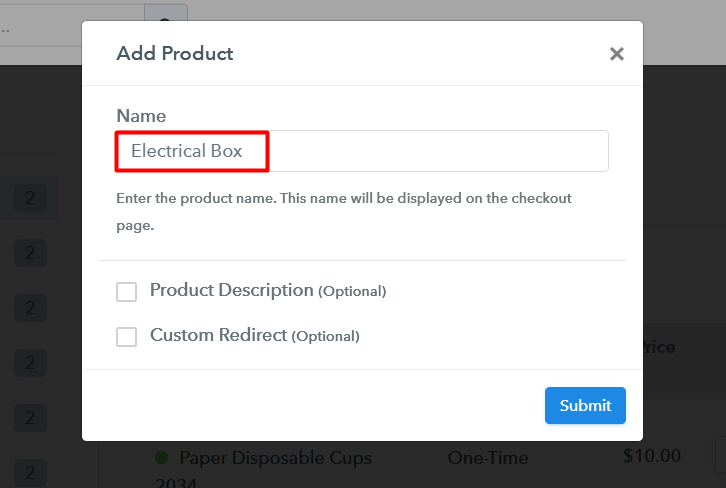
Now add the name of the product, ‘ electrical box’, and if you want you can give a small product description and even redirect it to a website by ticking on the respective tickboxes.

Add Product to Sell Electrical Boxes Online

Note: Here you can add all the products related to the similar category by creating plans for each of them.

Step 6: Add Plans 

Let’s create some plans for electrical boxes available in your store.

(a) Select Add New Plan

Add Plan

(b) Specify the Plan & Pricing Details

Add Plan to Sell Electrical Boxes Online

In the next step, you will be brought to the plan page, here you have to fill in details like plan name, code, price, setup fees. In the section below, you can see the choice to change the billing models like one-time payment, recurring, based on cycles, etc. Also, you can give a free trial of your products. Moreover, you can confirm the status of products like active or inactive.

(c) Add Image & Description of Electrical Boxes

Add Description to Sell Electrical Boxes Online

Here, upload the best image possible of your electrical boxes, if possible add different variants and types.

So, after inserting the image, give a  brief description of the products in bullets points, like the maximum voltage, the material used, outlays, etc. Then, press the “Submit” button. Likewise, following the same method, you can add multiple products, one at a time.

Step 7: Share your Checkout Page

Share Checkout Page on Social Media
  • To create more awareness about your products you can share your checkout page on Twitter & Facebook by just pressing the respective buttons.
  • You can also use emails and SMS to send check out links more dissemination of your products.
  • Furthermore, you can build buttons on your webpage and paste the checkout links on it. Or you can place it on any anchor text on your website, so the users will be redirected to the checkout page.

Step 8: Preview Checkout Page

Follow up the recommended steps to preview the checkout page:

(a) Click on the View Button

View Checkout Plan

(b) Take a Look at the Checkout Page

Final Checkout to Sell Electrical Boxes Online

Step 9: Embed Checkout Page in Site & Sell Electrical Boxes Online

Embed Checkout Page on Website

Just copy the link and add the checkout page to sell electrical boxes online at any preferable place on your WordPress site.

(a) Edit the Page & Paste the Copied Link

Paste Link in Text Editor

Also, paste the plan link on a text editor of the WordPress dashboard.

(b) Save & Publish the Checkout Page

Save and Publish

Next, click the “Publish” button, after making changes.

(c) Check out the Final Look of your Checkout Page on WordPress Site

Embed to Sell Electrical Boxes Online

Step 10: Multiplan Checkout Page

Note: In case you want to sell multiple products via a single checkout page, you can create a multi-plan checkout page otherwise skip this step.

(a) Click on Add Mutiplan Checkout

Multiplan Checkout

(b) Add Plans to Sell Multiple Electrical Boxes from Single Checkout Page

Multi to Sell Electrical Boxes Online

(c) Take a Look at the Checkout Page

Checkout to Sell Electrical Boxes Online

Preview Checkout Page

Wrapping Up

Well Done!! You created your first checkout with Pabbly Subscription Billing to sell electrical boxes online. But, like all new endeavors, initially, there may be some hiccups but soon, you will tame the online market world with Pabbly Subscription Billing.

Go ahead make another checkout page but this time you will create on your own. Godspeed my friend, live long and prosper.

You May Also Like To Read –

How to Sell Guitar Strings Online | Step by Step (Free Method)

How to Sell Guitar Strings Online

Ideal For: All the music instruments manufacturers, guitar sellers, guitar strings makers, small metal workshops and other merchants can use this method to sell guitar strings online.

How to Sell Guitar Strings Online

Why Choose this Method To Sell Guitar Strings Online?

Unlike any other solution, this method allows you to:

  • List and sell your guitar strings for FREE. Absolutely no payment required.
  • No need to pay commission on any of your sales.
  • Multiple payment options like PayPal, Credit Card, etc to collect payment from a single place.
  • Sell one time or recurring subscriptions of your guitar strings.
  • Collect payments & sell products in any currency as per your requirement.
  • Give discounts on your products by offering special coupon codes.
  • Add sales commission agents to help you in selling guitar strings online.

Get Pabbly Subscription Billing for Free

Every guitarists or wannabe have a collection of awesome guitar instruments but every once in a while they lose or break some of their guitar strings. Now as a guitar string maker this a good business opportunity for you. But the problem is you don’t know, how to reach the buyer. Well duh!! The obvious answer is through the internet.

You can offcourse sell guitar strings online on dedicated sites like Musiccritic, Sweetwater, or Amazon. But the problem is you need to pay a hefty commission for listing and on profits. Furthermore, it won’t be possible to build a brand in these websites as your guitar strings will be drowned in countless other products.

That is why we are providing you an awesome software called Pabbly Subscription Billing, that can build incredible checkout pages to start selling guitar strings online.
Other benefits are:

  • List Unlimited Number of Products
  • Multiple Billing Models
  • Place Customized Logo
  • Easy Tax Management
  • Revenue Tracking
  • Auto Email Alerts and Retrials on Card Decline
  • Create Unlimited Plans, Coupon, and Discounts

So, now that I have got you interested with its incredible features lets create our first checkout page to start guitar strings selling business online.

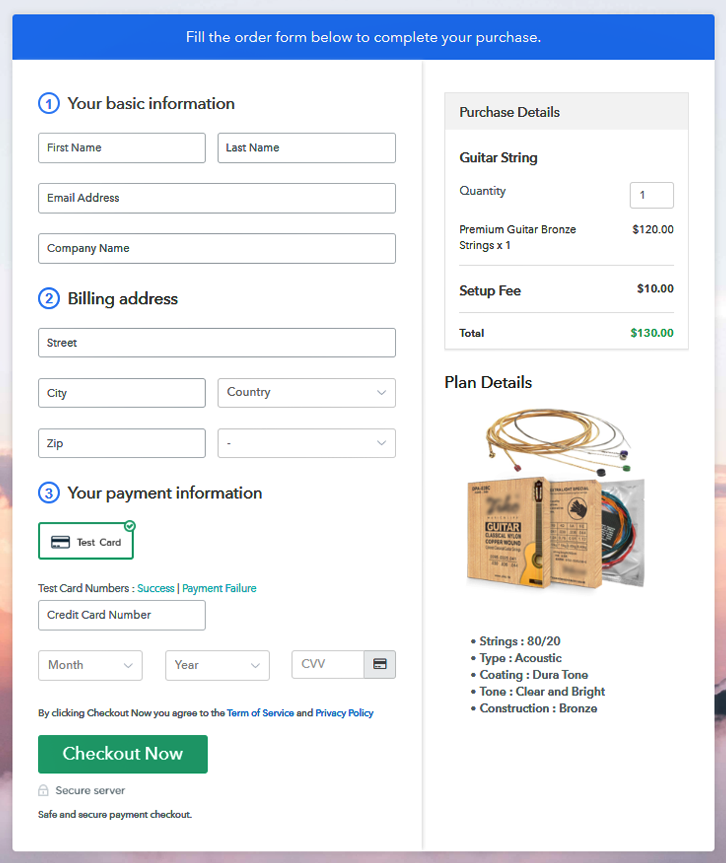
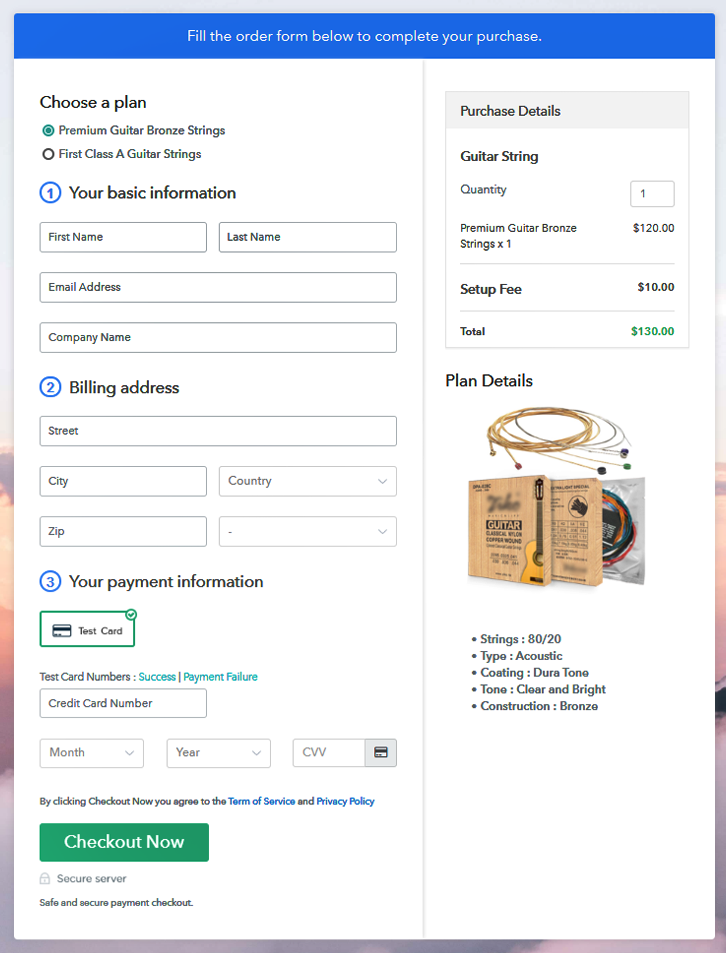
Final View of Checkout Page For Your Guitar Strings Selling Business

Checkout Page to Sell Guitar Strings Online

Preview Checkout Page

Step 1: Log in to Pabbly Subscription Billing

Signup

Browse for  Pabbly Subscription Billing in your search engines. After landing on the website, click on the “Sign up Free“ button. Now, either manually fill out all information required in the blank or simply sign in using your Gmail account.

Sign Up For Free!

Step 2: Select Subscription Billing

Access Subscription Billing

Step 3: Account Setup

Setup Account

Furthermore, after clicking on the “Access Now” button of the software, a page will open with fields like company name, select currency, and phone number. Now, fill out those details to continue creating a checkout page for guitar strings.

Step 4: Connect Payment Gateways & Start Guitar Strings Selling Business Online

Connect Payment Gateway

Pabbly Subscription ensures a smooth payment experience because it provides a dummy payment gateway where you pre-test the payment experience of a customer and diagnoses the problems in advance. You can do this by clicking on the “Enable Test Payment” option.

Also, you can integrate multiple payment gateways like Stripe, Razorpay, PayPal, Authorize.net, etc. There are integration guides available beneath this paragraph. But since we have to set up the payment process, we will click on the “Enable Test Payment” option.

Step 5: Add Product For Your Guitar Strings

Add Product

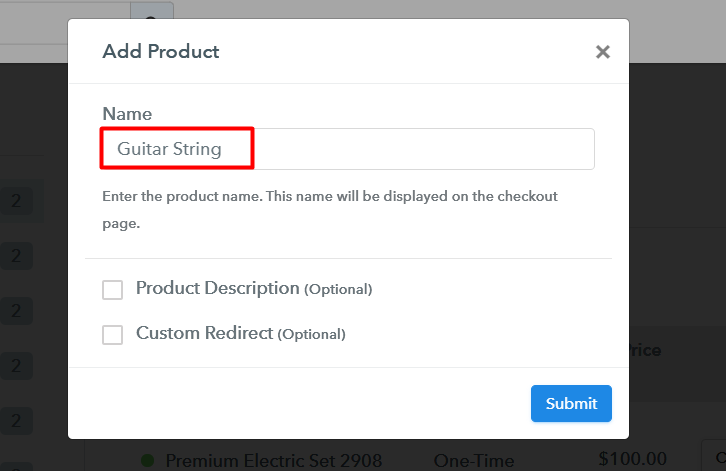
Here you have to add the product, ‘ guitar strings’, and if you want you can give a small product description.

Add Product to Sell Guitar Strings Online

Note: Here you can add all the products related to the similar category by creating plans for each of them.

Step 6: Add Plans 

Let’s create some plans for the guitar strings available in your store.

(a) Select Add New Plan

Add Plan

(b) Specify the Plan & Pricing Details

Add Plan to Sell Guitar Strings Online

Add details of the product related to prices like plan name, code, price, setup fees, etc. Moreover, add billing models according to your wish.

(c) Add Image & Description of Guitar Strings

Add Description to Sell Guitar Strings Online

Take some images of your guitar strings and upload it using the image button

Also, add a description about the guitar strings like a variant, colors, tensile strength, etc in preferably bullet points then press the “Submit” button.

Furthermore, using the same methods, you can list more products.

Step 7: Share your Checkout Page

Share Checkout Page on Social Media
  • For marketing, you can share the checkout pages on Facebook or Twitter with the given buttons.
  • Also, for more brand awareness you can embed these checkout pages in SMS and Whatsaap.
  • Moreover, create buttons on your website to insert these checkout pages on them. Also, you can place it on any anchor text on your website, so the users will be redirected to the checkout page.

Step 8: Preview Checkout Page

Follow up the recommended steps to preview the checkout page:

(a) Click on the View Button

View Checkout Plan

(b) Take a Look at the Checkout Page

Checkout to Sell Guitar Strings Online

Step 9: Embed Checkout Page in Site & Sell Guitar Strings Online

Embed Checkout Page on Website

Just copy the link and add the checkout page to sell guitar strings online at any preferable place on your WordPress site.

(a) Edit the Page & Paste the Copied Link

Paste Link in Text Editor

Also, paste the plan link on a text editor of the WordPress dashboard.

(b) Save & Publish the Checkout Page

Save and Publish

Next, click the “Publish” button, after making changes.

(c) Check out the Final Look of your Checkout Page on WordPress Site

Embedd to Sell Guitar Strings Online

Step 10: Multiplan Checkout Page

Note: In case you want to sell multiple products via a single checkout page, you can create a multi-plan checkout page otherwise skip this step.

(a) Click on Add Mutiplan Checkout

Multiplan Checkout

(b) Add Plans to Sell Multiple Guitar Strings from Single Checkout Page

Multiplan to Sell Guitar Strings Online

(c) Take a Look at the Checkout Page

Multiplan Checkout to Sell Guitar Strings Online

Preview Checkout Page

Wrapping Up

And cut!! You made your first checkout page with Pabbly Subscription Billing to sell guitar strings online. With little effort and more practice, you will be able fully to master the inner workings of this system to dominate the e-commerce billing.

Also, if you have any doubts regarding the steps feel free to ask in the comment section below. Thank You!!

You May Also Like To Read –

5 Best Automate.io Alternatives 2022 (Free & Paid)

Best Automate.io Alternatives

Have you been searching for an automation tool like Automate.io?

Well, this is the best place to get all automate.io alternatives under one roof. Read the article below to find the best alternatives to Automate.io.

Best Automate.io Alternatives

Automate.io is an automation platform for integrating cloud/SaaS applications. With this, you can create simple one-to-one integrations or multi-app workflows in minutes. Moreover, it supports 100+ popular apps such as Salesforce, Google Apps, Trello, Hubspot, Quickbooks, Shopify, and many more.

However, no tool is perfect for all, as each of us has different specifications and agenda. Also, the pricing of Automate.io is not affordable for everybody. So, if you have been looking for automation tools other than Automate.io that provide advanced features at the most affordable prices, then we are here for you. Here are the 10 best Automate.io alternatives you should use in 2022.

A Quick Comparision Between Best Automate.io Alternatives

Services

Pricing (Billed Annually) No. of Tasks (per month) Automation Workflows
Pabbly Connect $96 12,000

Unlimited

Integromat

$228 10,000 Limited
Tray.io $595 Unlimited

Unlimited

Zapier

$299.88 750 Limited
PieSync $108 1000

Limited

1. Pabbly Connect – Best Automate.io Alternatives

“It is an online automation platform that eases your tasks by automating your workflows. Apart from this, it is the only software that gives you access to all the features even in the basic plan at an affordable cost without any limitations.”

The first Automate.io alternative in our list is Pabbly Connect. It is an automation app that helps individuals as well as businesses. Using this single platform, you can integrate all your favorite apps and services such as marketing sales, eCommerce, CRM, payment, and much more. Along with connecting apps, it can also transfer and transform data.

Apart from this, using it you don’t need to oversee what Pabbly Connect is doing. All you need to do is choose the authorized app, set the operation modules according to your specification, and leave the software to do the hard work at any time of day or night. It performs all the simple and complex tasks for you. This can also enable you to connect almost any web service via webhook so you can virtualize a lot more of your technology landscape.

Moreover, you can easily streamline sales processes, social campaigns, and set up cross-functional & multi-step internal workflows with bunch of triggers, actions, and scheduler within a few minutes.

pabbly connect - Automate.io Alternatives

Features

  • Pabbly Connect has a drag-and-drop editor for creating the workflows that take very limited time to learn and ensure a user-friendly experience for newbies.
  • It is integrated with hundreds of popular apps and services. Furthermore, you can easily connect nearly all the web apps without writing a single line of code through JSON, XML, HTML, FormData, Encoded form modules.
  • Besides this, it lets you create your own multi-step workflows across several apps with logics, filters etc.,  to cater for specific projects.
  • Set the specific time intervals like specified date, day, or time for performing a particular action.
  • Pabbly Connect allows more than one trigger per workflow, and triggers can have multiple filters, conditions like If/Else, AND/OR etc.,so, you can create and deploy complex workflows.
  • It provides Excel functions such as number, date, text, currency, percentage, total etc. to save time and effort.
  • Associates Pabbly Connect to unlimited premium apps like Facebook Lead Ads, Google Sheets, Gmail, Linkedin, Stripe, WordPress, Chargebee, Gravity Forms and much more.

Pricing

Pabbly Connect provides 4 plans, starting from free to $359+ that are based on the number of tasks/operations that includes:

  • Starter – Buy this cheapest plan at the cost of $9 and get 12,000 tasks unlimited workflow, instant triggers, multi-step calls, formatters, etc.
  • Rookie – Get 50,000 tasks at $29 per month with all the above-mentioned features.
  • Pro – Pricing of this plan is $37 per month for 60,000 tasks.
  • Advanced – This plan offers custom pricing based on tasks like $57/month for 80,000 and $3000 per month for 9,000,000 tasks.

Click Here For More Details

2. Integromat – Top Automate.io Substitute

Integromat is another Automate.io alternative that lets you connect multiple apps, services, and devices with each other without requiring any programming skills. It will automate processes that you currently handle manually and transfer & transform data. You can connect multiple apps such as Google Drive, Facebook, Twitter, Slack, Dropbox, etc. Integromat works 24*7 so it does not require your intervention. Furthermore, it is used by some popular companies including Uber, Cisco, and Adidas.

pasted image 0

Features

  • It provides 1500 ready-to-use templates that help in setting up the module.
  • Integromat has a live execution feature that empowers you to run scenarios in real-time and view the detailed information about each & every workflow.
  • Using its Excel functions, you can sum up multiple values, or move a date value within a matter of seconds. Functions like text, numbers, dates, aggregate, percentage, and lists are provided.
  • Divide the execution scenarios into multiple routes to process the data within each route differently.
  • Create a complex and multi-step workflow using custom logics and filters. Furthermore, this filter helps in handling errors by implementing special commands or instructions during execution.
  • Process each data separately with the help of built-in iterations and merge individual data into a single bundle through its aggregator feature.

Pricing

  • Free – Integromat offers free plan in which you get 1,000 operations and 100MB to transfer the data.
  • Basic – Purchase this plan at $9 per month and get 10,000 operations,1GB data with a minimum interval of 5 minutes.
  • Standard – You can get this plan at a cost of $29 per month and get 40,000  operations with 20GB data.
  • Business – Besides the above plans, this one will allow you to perform maximum operations i.e. 150,000 operations and 70 GB data at a cost of $99 per month.
  • Platinum – You can purchase this plan at $299/month to get 800,000 operations and 220 GB data.
  • Custom – If you want to perform more than 800,000+ operations then you can go with a high volume plan. But for this plan, you need to contact the service provider.

Click Here For More Details

3. Tray.io – Automation Tool

Tray.io is a full-fledged webhook and automation tool for large businesses and growing startups.  It allows you to connect several apps that aren’t listed in your app library. On every aspect, it stands head & shoulder above Automate.io and brings many of the user-friendly features that Automate.io is popular for. Furthermore, it has a drag-and-drop editor to create a seamless workflow visually.

Tray.io

Features

  • Tray lets you configure the most complex workflows by adding customized logic for strategic competitive advantage.
  • You can trigger the workflows using Webhook URL if you want extra flexibility on your workflows.
  • With this, you can create web forms and trigger your workflow on the basis of form submissions.
  • Further, it offers more than 4500 APIs from popular services like Salesforce, Google, Facebook, Mailchimp, and Dropbox.
  • It has a callable triggers feature that breaks the workflow into several sections so that you can call them from another workflow.

Pricing

  • Standard – Start automating with this plan at the cost of $595 per month when you billed annually. It includes a universal connector, access to quickstarts, standard success plan, and automation templates.
  • Standard Plus – This plan provides you a facility to connect custom connectors, shareable workflows, and access to any success plan at the pricing of $1,450 per month.
  • Professional – Billed annually at the cost of $2,450 per month and get environment promotion, roles-based access, big data processing, and configuration consulting.
  • Enterprise – The pricing of this plan is based on workflow volume, but you will need to contact the Tray sales team for pricing information.

Click Here For More Details

4. Zapier – Versatile Automate.io Compitetor

Zapier is another Automate.io alternative on our list it automates your workflow by connecting different applications at the business or personal level. The platform features new and powerful technological innovations that automatically move data across different web applications. In addition, it provides over 1,500 integrations, so if you don’t find the technology stack listed in your app directory, you can integrate them instantly via Zapier. It offers an easy, powerful, and cost-effective automation solution.

pasted image 0 1

Features

  • You can add many triggers and actions to one zap to create multi-step zaps. That way you can automate complex workflows across many systems at once.
  • It allows users to look up specific data in a system integrated with Zapier thorough search action feature.
  • Zapier has a very powerful feature named formatter that lets you convert any kind of data before putting it into one of the apps such as operating on dates, date formats, currency converters, and many more.
  • Also, it offers online workflow templates that you can customize according to your requirements.
  • Zapier connects more than 2000 apps such as Facebook Lead Ads, Slack, Quickbooks, Google Sheets, Google Docs etc.

Pricing

Zapier offers four pricing plans along with a free trial for large to small scale businesses.

  • Free – Anyone can automate their work with the free trial of Zapier. With this, you will get 100 tasks and 5 zaps per month.
  • Starter – Pay $24.99 per month for 750 tasks and 20 zaps with the integration of 3 premium apps.
  • Professional – Buy this plan at $61.25 per month and get 2000 tasks, unlimited zaps, and premium app integration.
  • Team – You just need to pay $373.75 per month for 50,000 tasks and unlimited zaps.
  • Company – Pay $748.75 for 100,000 tasks and get all the advanced features of Zapier like unlimited zaps, unlimited premium apps, filters, formatters, etc..

Click Here For More Details

5. PieSync – iPaaS Software

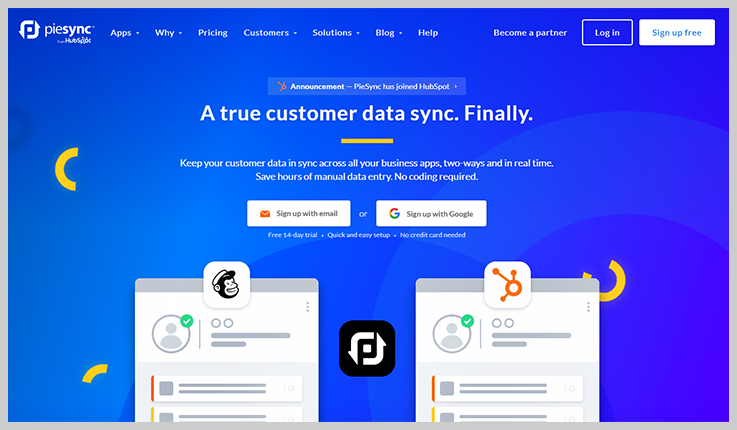
PieSync is the Platform-as-a-Service (iPaaS) tool that connects all professional B2B services and offers seamless two-way sync between them. With this, you can quickly build the sync between SaaS, on-premises, and cloud applications. Besides, it supports 140+ apps and adds a new one every week. PieSync offers syncing solutions for businesses of all sizes so you can make more data-driven decisions by using the most up to date data.
PieSync

Features

  • It provides complete security to your data by encrypting the workflows. Apart from this, it uses advanced authorization methods like Oauth to ensure all customer info is safe and secure.
  • PieSync not only connects multiple apps but also ensures that the data flow between these apps in both directions as well as syncing and updating.
  • With its 2-way sync, apps can sync and talk to each other on a real-time basis.
  • Besides, it automatically detects and manages duplicate data points and removes them.
  • Quickly set up the configuration and create personalized rules, map how you want to sync different information fields across apps, etc., with zero coding required.

Pricing

  • Starter – Create simple syncing with two if/then rules per connection at the cost of $19 per month.
  • Pro – Buy this plan at the cost of $59 per month and create unlimited rules per connection.

Click Here For More Details

Conclusion

As you can see, there are a wide assortment of Automate.io alternatives for you to select from. So, choose the best automation tool for your organization or project to reduce the time spent on manual tasks.

Which one of these Automate.io alternatives has caught your eye? Please share your experience with us in the comments below.

You May Also Like To Read: