How to Sell Cloth Diapers Online | Step by Step (Free Method)

How to Sell Cloth Diapers Online

Ideal For: All the cloth diaper manufacturers, cloth diaper sellers, retail cloth diaper shop owners, and other merchants can use this method to take their cloth diapers selling business online.
How to Sell Cloth Diapers Online

Why Choose this Method To Sell Cloth Diapers Online?

Unlike any other solution, this method allows you to:

  • List and sell your cloth diapers for FREE. Absolutely no payment required.
  • No need to pay commission on any of your sale.
  • Multiple payment options like PayPal, Credit Card, etc to collect payment from a single place.
  • Sell one time or recurring subscriptions of your cloth diapers.
  • Collect payments & sell products in any currency as per your requirement.
  • Give discounts on your products by offering special coupon codes.
  • Add sales commission agents to help you in selling cloth diapers online.

Get Pabbly Subscription Billing for Free

It’s very important for us to use nature friendly products. and if you are planning to sell cloth diapers online then we appreciate your step forward in saving nature. Also, to get started with such business we can help you with the fastest way possible.

The complete process is too easy to implement and you can start selling cloth diapers right away after completion of these 10 steps. We’ll be creating checkout pages in these steps which will help you in displaying the product details as well as collect secure payments through them.

You’ll get a well-functioning centralized dashboard that will perfectly hold all the items and payment records. Moreover, you can share the checkout page over social media and other link sharing platforms like Facebook, Twitter, WhatsApp, emails, SMS and whatnot.

Final View of Checkout Page For Your Cloth Diapers Selling Business
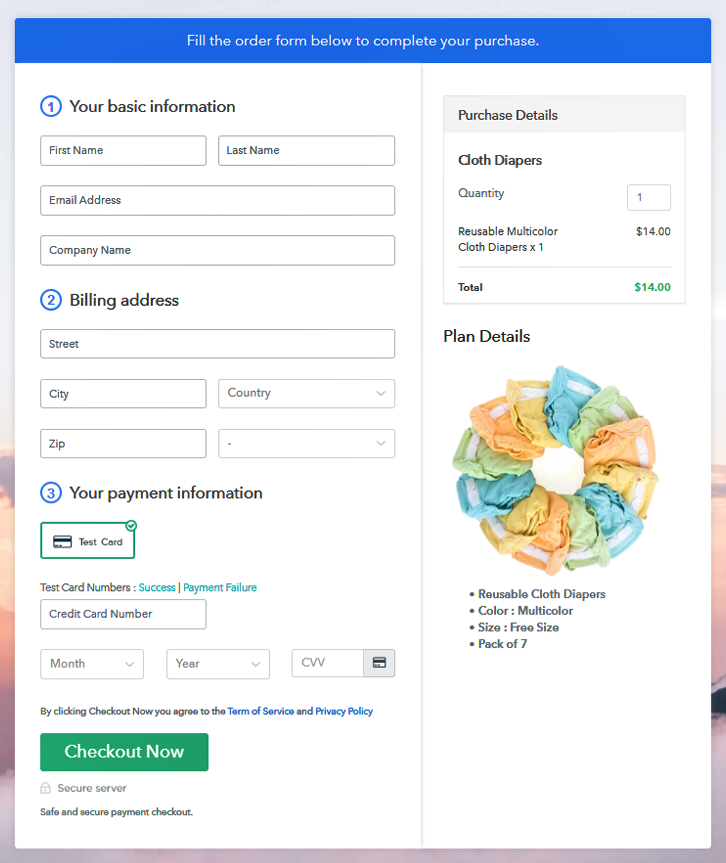
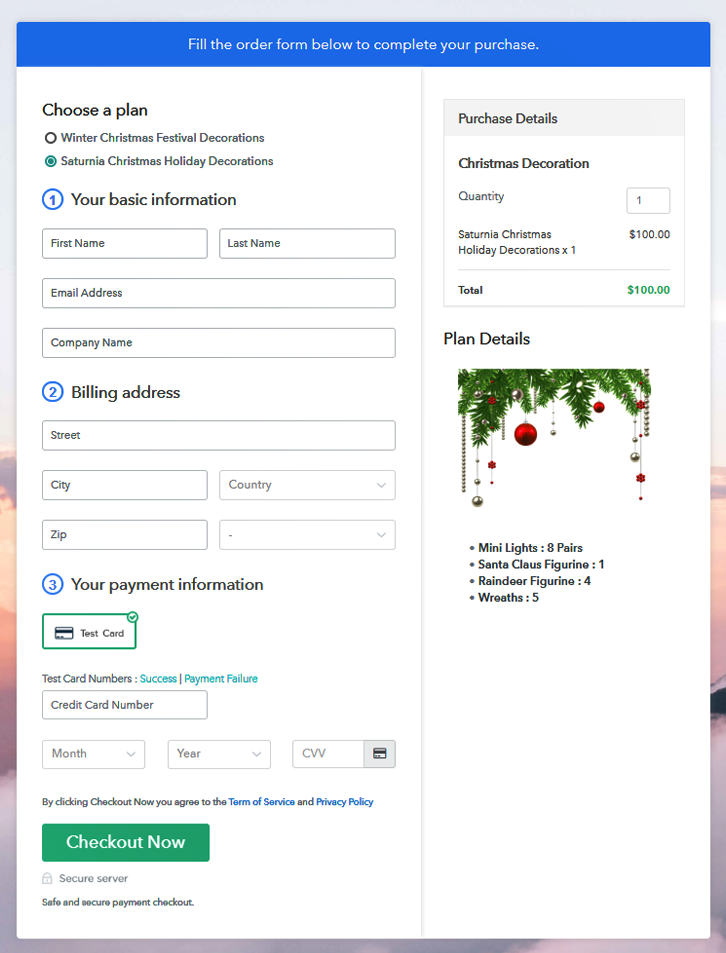
Checkout Page Preview to Sell Cloth Diapers Online

Preview Checkout Page

Step 1: Log in to Pabbly Subscription Billing

Signup

At first, go to the Pabbly Subscription Billing site and click ‘Sign Up Free‘ button. Then on the next page redirect sign-up in the system using a google account or by filling out the few details asked in the registration form.

Sign Up For Free!

Step 2: Select Subscription Billing

Access Subscription Billing

Step 3: Account Setup

Setup Account

Now, the system will ask you to fill the company details to complete the setup for selling cloth diapers online. Quickly stuff all the information asked and proceed further.

Step 4: Connect Payment Gateways & Start Cloth Diapers Selling Business Online

Connect Payment Gateway

Next, you’ll need to integrate a payment gateway method within the system to accept payments for your sold cloth diapers. You can also use the test payment gateway option for now as I’m enabling it. However, you’ll need to integrate a payment method amongst the following.

Step 5: Add Product For Your Cloth Diapers

Add Product

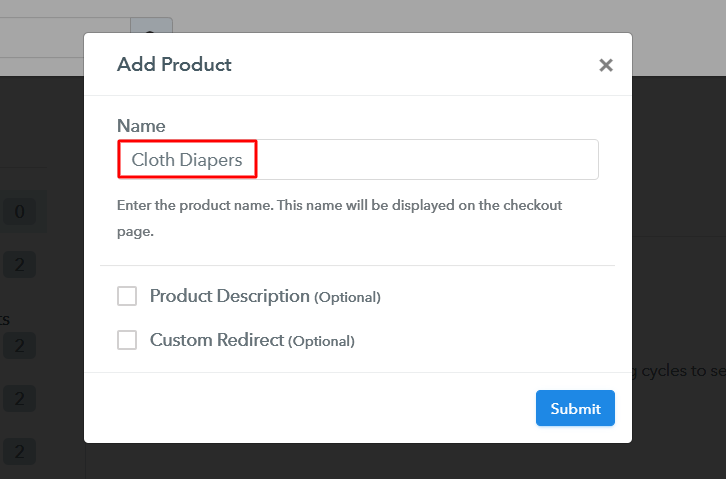
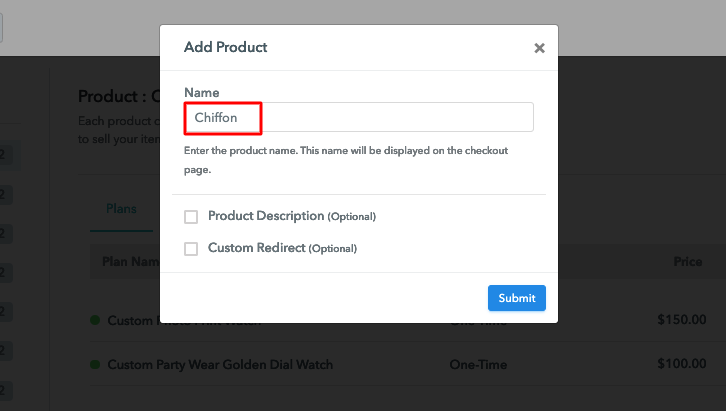
Now in this step, we’ll add a product category for the cloth diapers. More further, we’ll be adding plans (cloth diaper items) to these products.

Add Product to Sell Cloth Diapers Online

Fill in the details and hit submit.

Note: Here you can add all the products related to the similar category by creating plans for each of them.

Step 6: Add Plans 

Now, you’ll need to add plans for the different cloth diaper items available in your store to sell online.

(a) Select Add New Plan

Add Plan

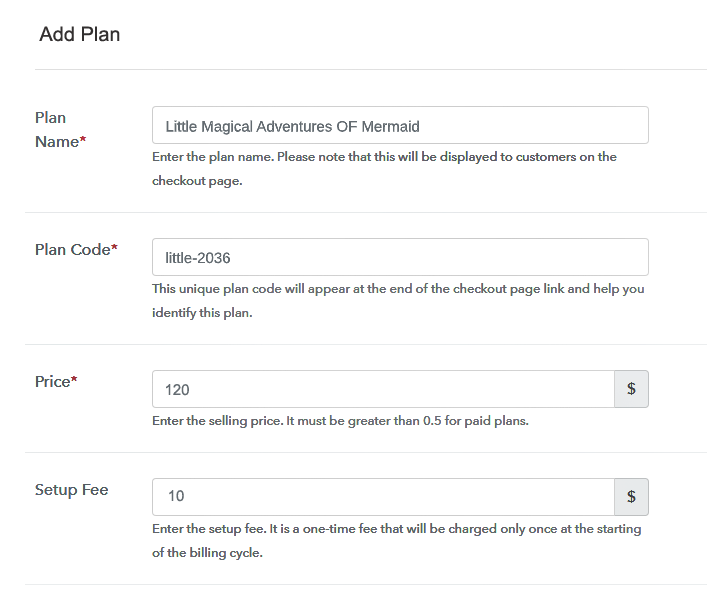
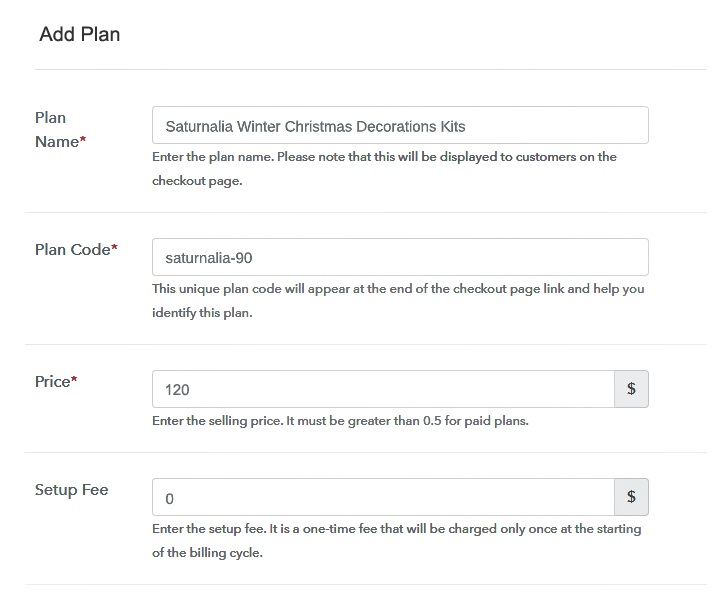
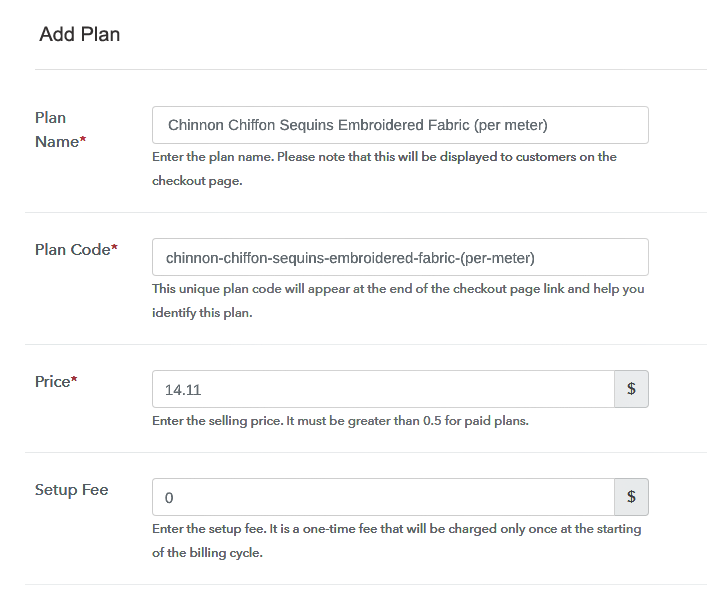
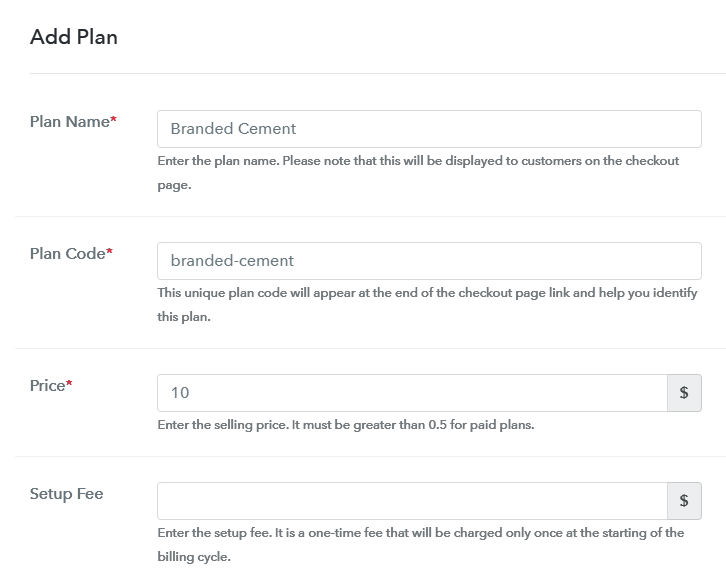
(b) Specify the Plan & Pricing Details
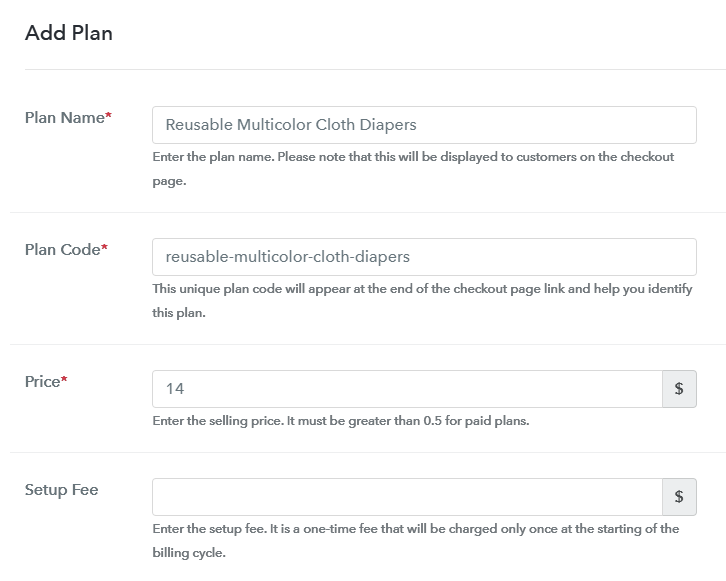
Add Plan to Sell Cloth Diapers Online

You can put the information related to the cloth diaper you wanna sell in the plan details page such as name, price, billing cycle etc.

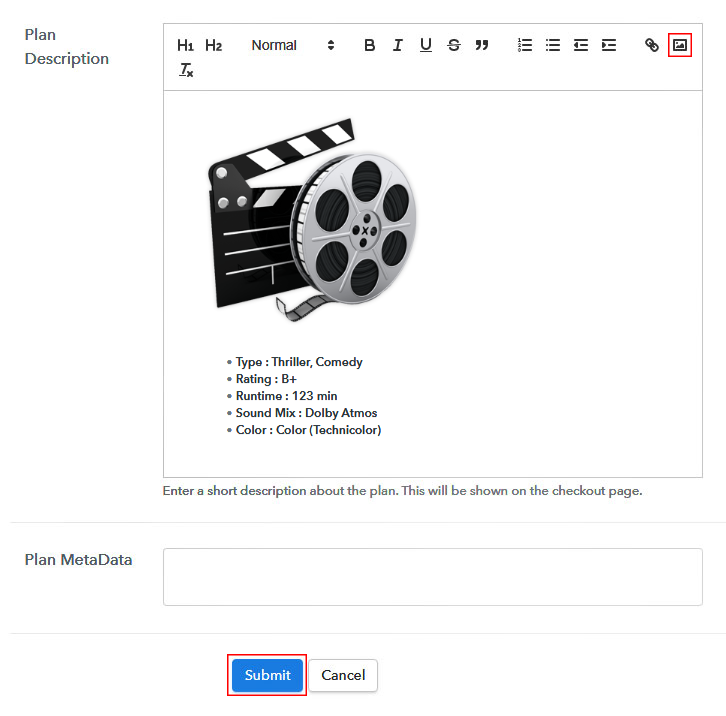
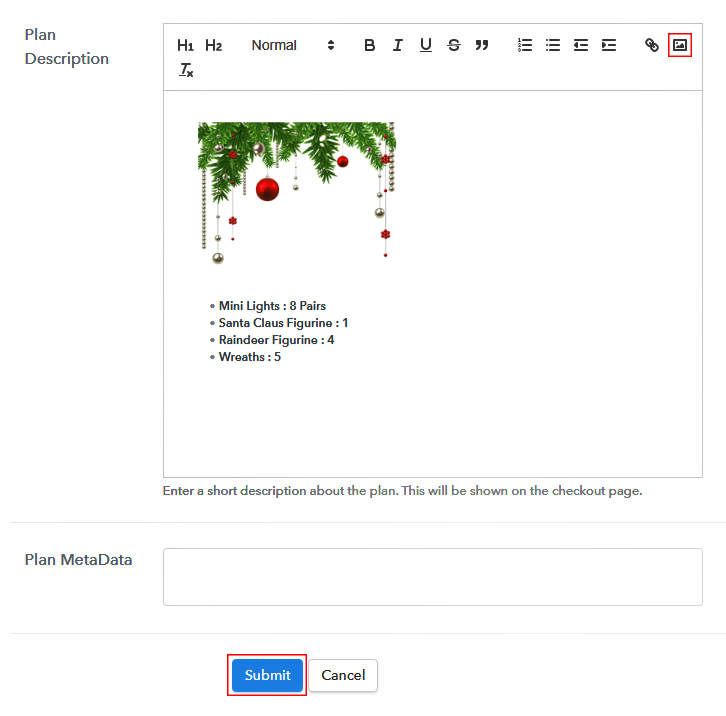
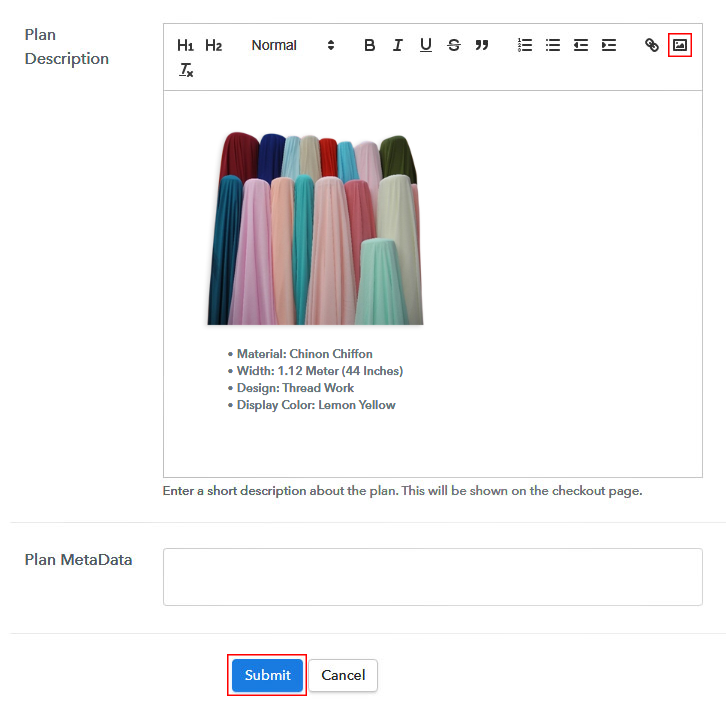
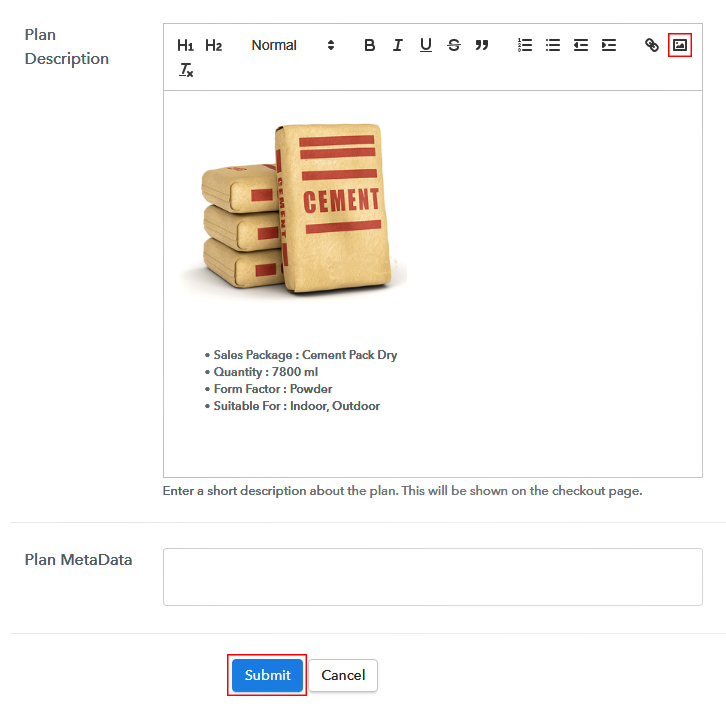
(c) Add Image & Description of Cloth Diaper
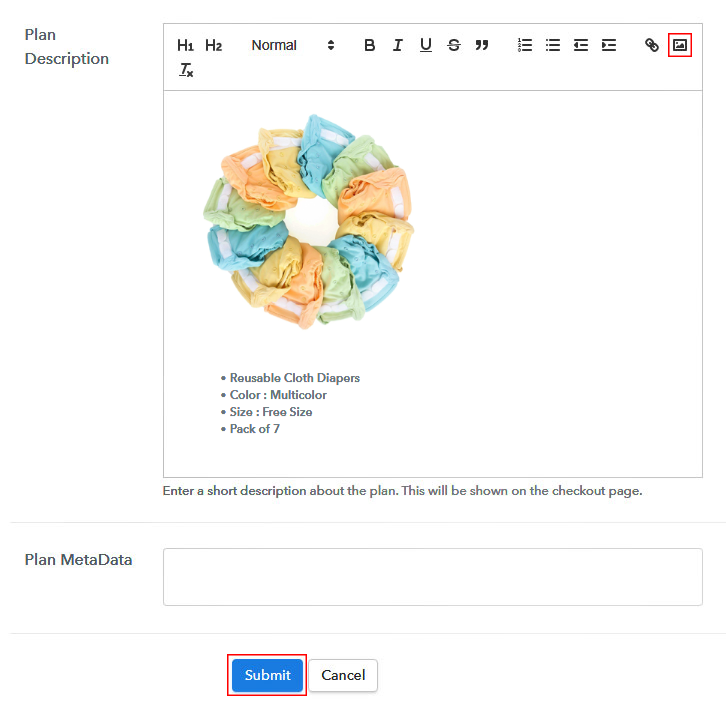
Add Image & Description to Sell Cloth Diapers Online

Also, you can insert an image of the cloth diaper and the product details as a plain text.

Submit this page and a plan to sell cloth diapers online will be appended in the plan list.

Likewise, you can add other cloth diapers to sell.

Step 7: Share your Checkout Page

Share Checkout Page on Social Media

To start selling cloth diapers online, you can share or embed this checkout page.

  • You can directly share the checkout page on Facebook & Twitter by clicking on the buttons available
  • To link a checkout page with buttons and text of a website or app, you’ll need to link it with the plan link given and redirect a customer on the payment page
  • Also, you can share this plan link over any social media or link sharing platform with your customer to accept payments

Step 8: Preview Checkout Page

Follow up the recommended steps to preview the checkout page:

(a) Click on the View Button

View Checkout Plan

(b) Take a Look at the Checkout Page

Checkout Page Preview to Sell Cloth Diapers Online

Step 9: Embed Checkout Page in Site & Sell Cloth Diaper Online

Embed Checkout Page on Website

Just copy the link and add the checkout page to sell cloth diapers online at any preferable place on your WordPress site.

(a) Edit the Page & Paste the Copied Link

Embed Checkout Page on Website

Further, paste the plan link on a text editor of the WordPress dashboard.

(b) Save & Publish the Checkout Page

Save_and_Publish

Next, click the “Publish” button, after making changes.

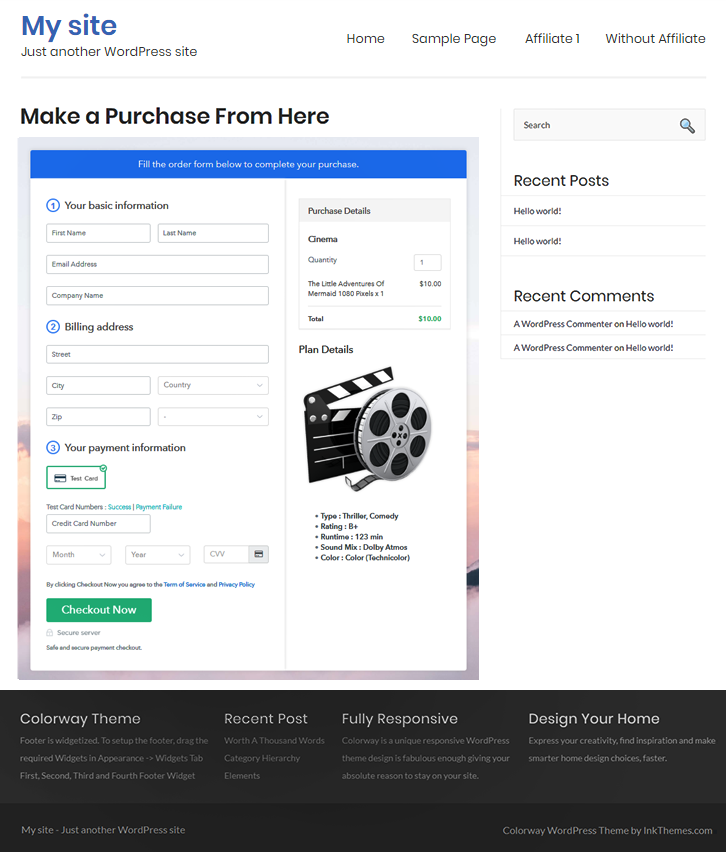
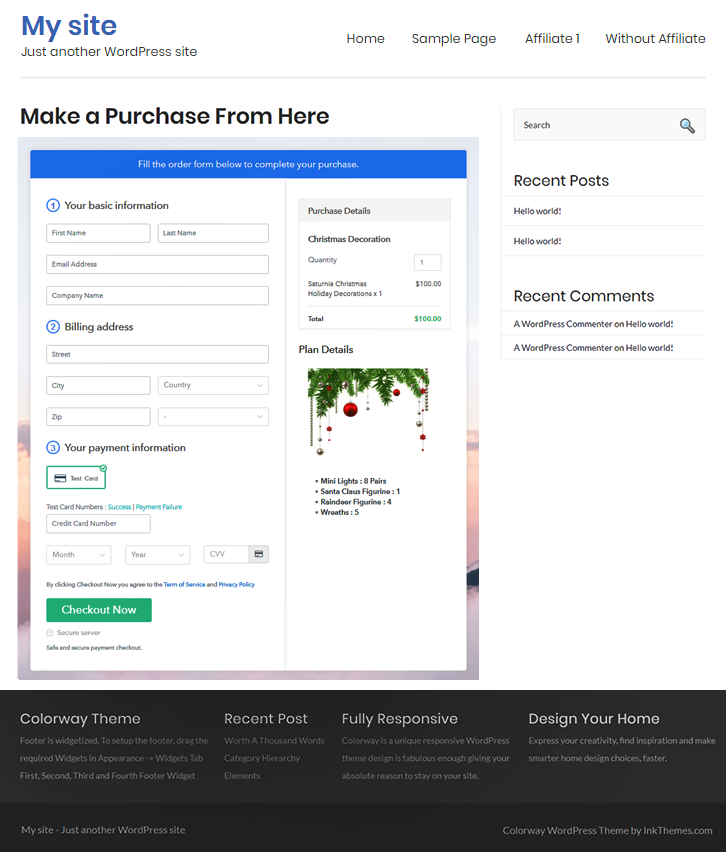
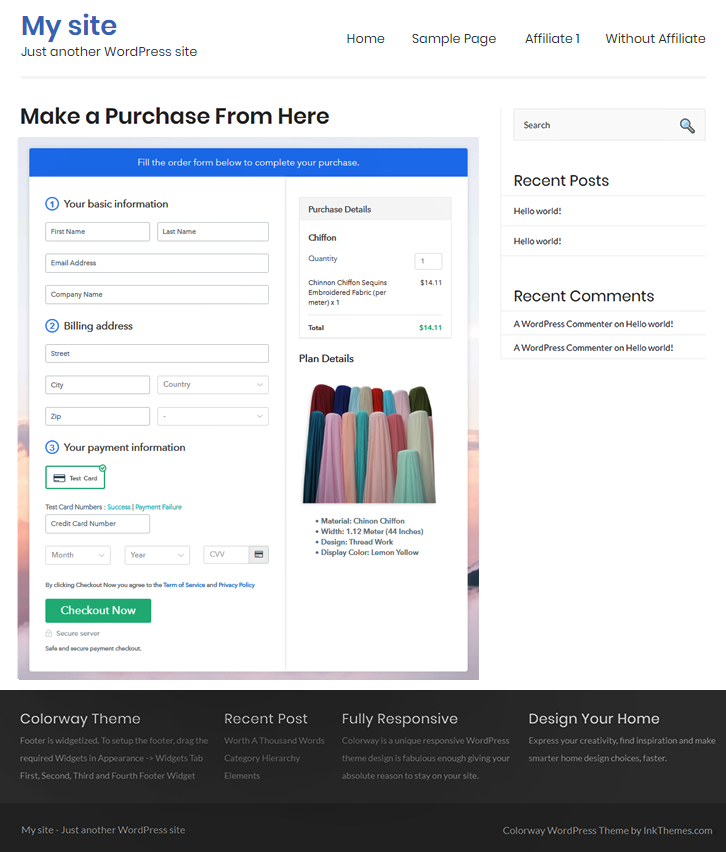
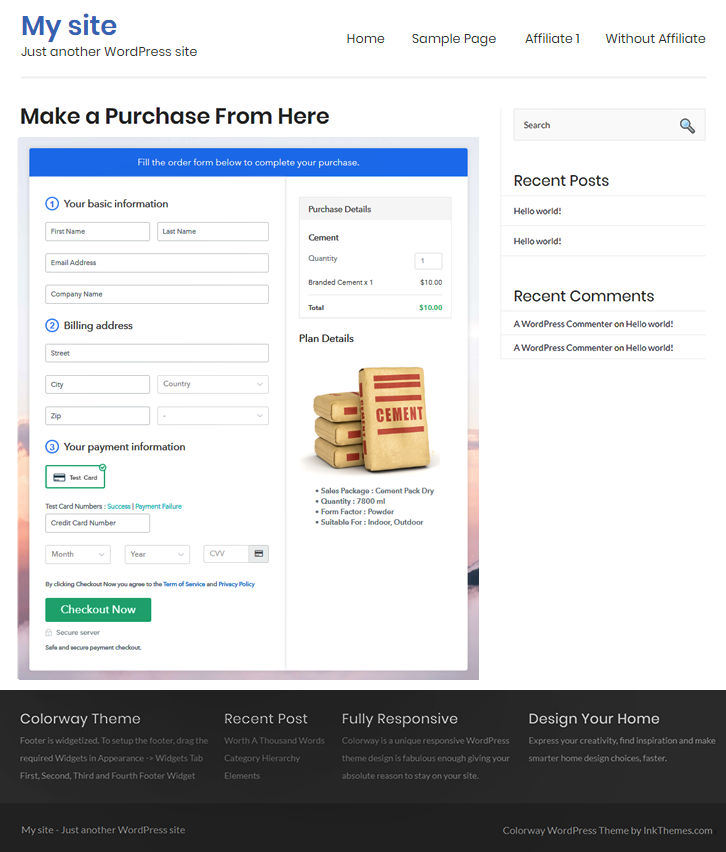
(c) Check out the Final Look of your Checkout Page on WordPress Site
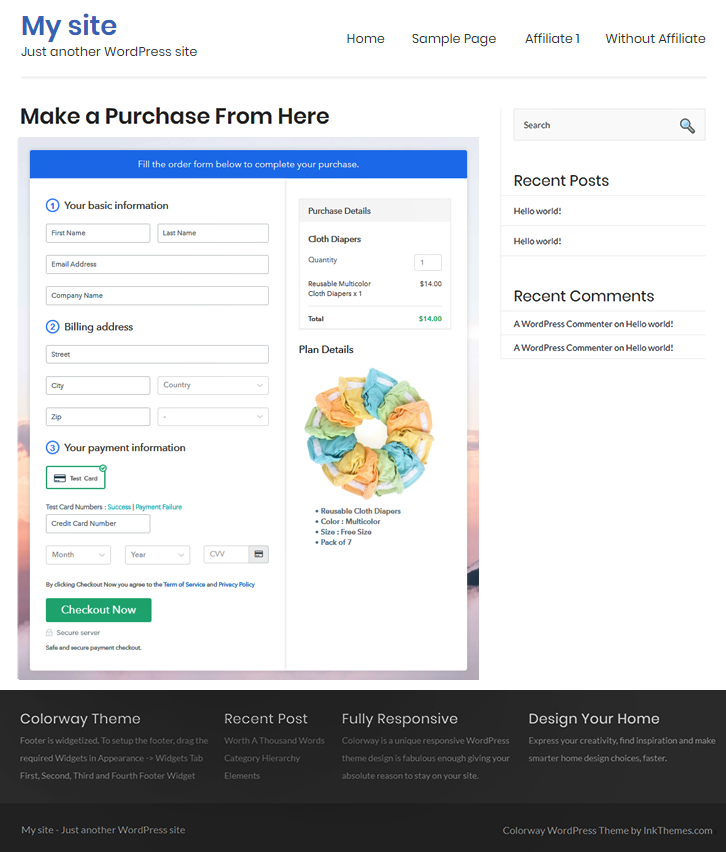
Checkout Page On WordPress Site to Sell Cloth Diapers Online

Step 10: Multiplan Checkout Page

Note: In case you want to sell multiple products via a single checkout page, you can create a multi-plan checkout page otherwise skip this step.

(a) Click on Add Mutiplan Checkout

Multiplan Checkout

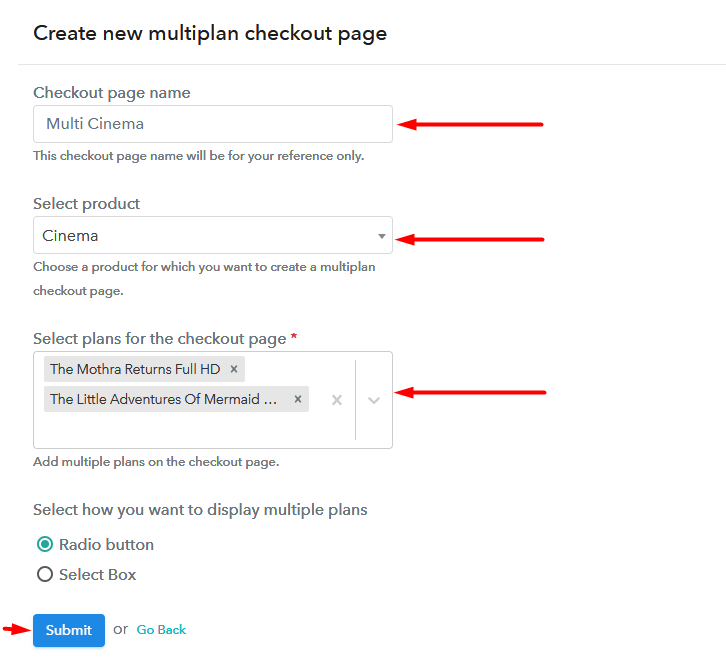
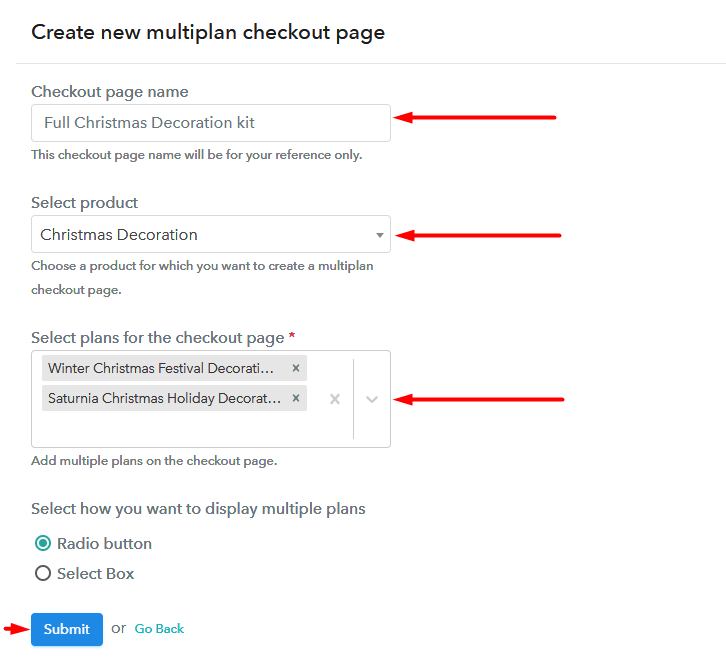
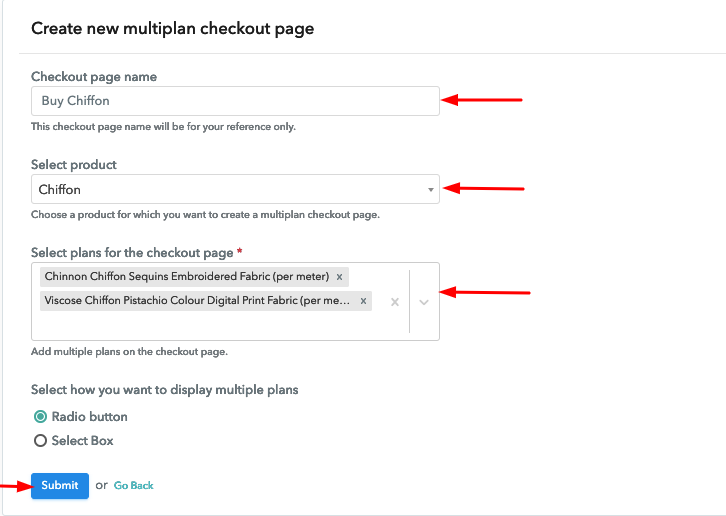
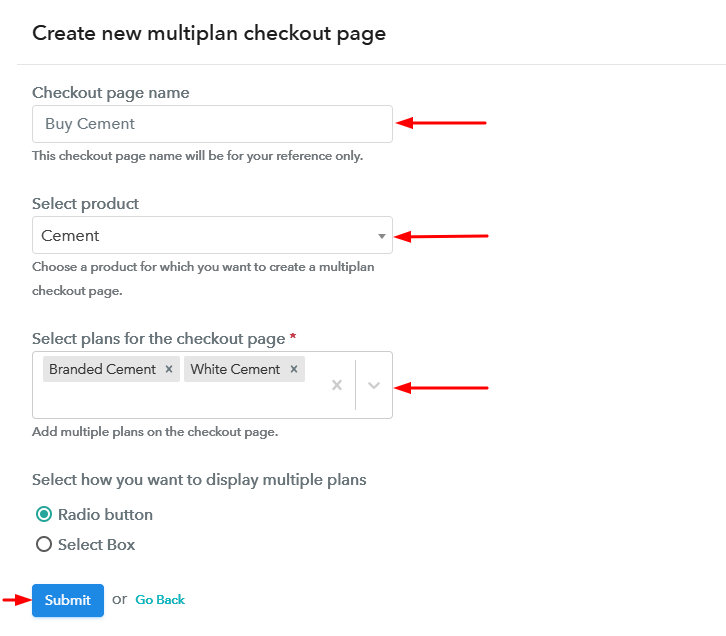
(b) Add Plans to Sell Multiple Cloth Diapers from Single Checkout Page
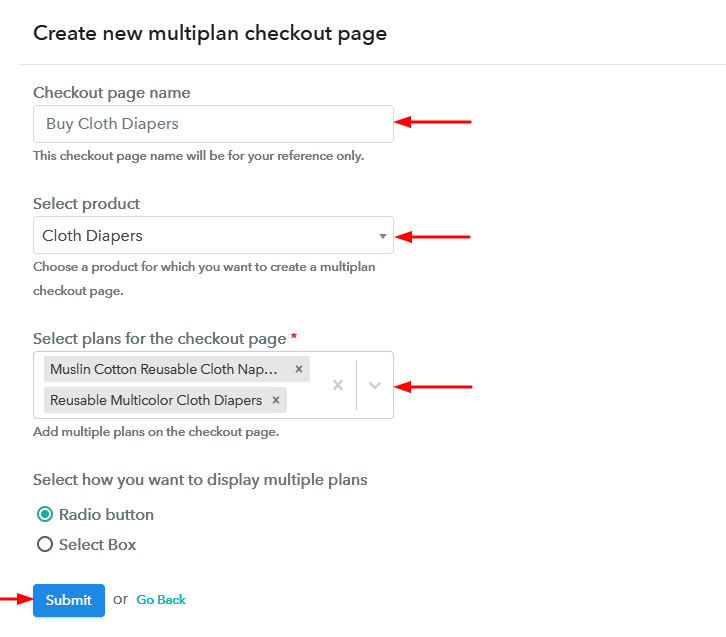
Create Multiplan Checkout to Sell Cloth Diapers Online

(c) Take a Look at the Checkout Page
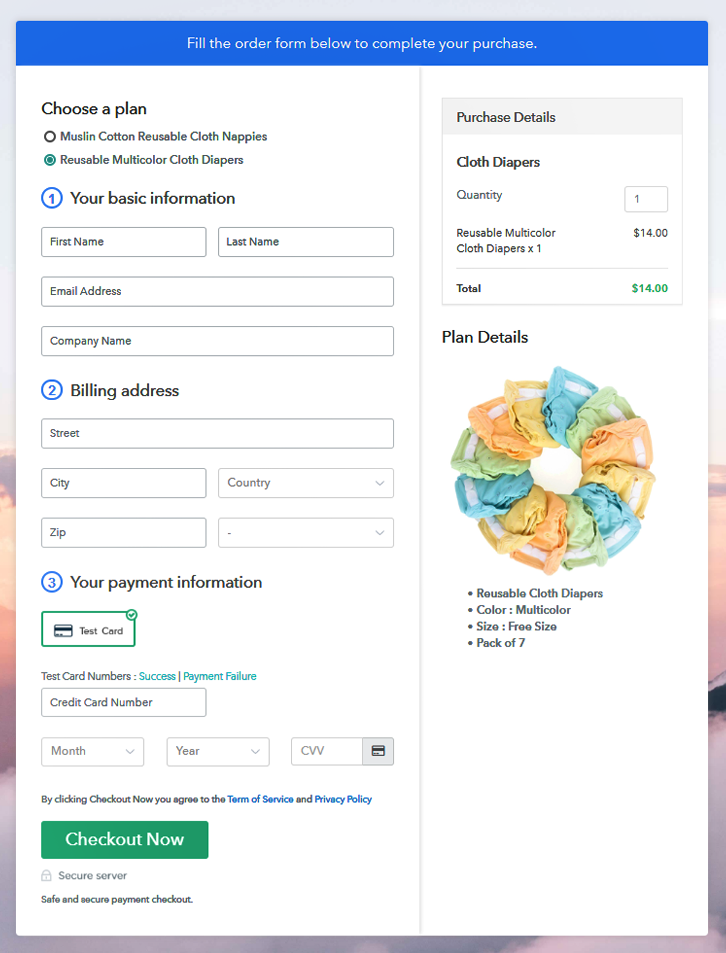
Multiplan Checkout Page to Sell Cloth Diapers Online

Preview Checkout Page

Wrapping Up

Well, this was all about how you can sell cloth diapers online using the checkout page process. You can accept payment in any currency there is and also you’ll get to choose from multiple reliable payment gateways that you prefer.

Moreover, management is another biggest advantage of using this service as everything is centralized and smooth.

You May Also Like To Read –
How To Sell Computers Online | Step by Step (Free Method)

Ideal For: All the electronic stores, computer shops, computer manufacturers, and other merchants can use this method to sell computers online.

How To Sell Computers Online

Why Choose this Method to Sell Computers Online?

Unlike any other solution, this method allows you to:

  • List and sell your computers for FREE. Absolutely no payment required.
  • No need to pay commission on any of your sale.
  • Multiple payment options like PayPal, Credit Card, etc to collect payment from a single place.
  • Sell one time or recurring subscriptions of your computers.
  • Collect payments & sell products in any currency as per your requirement.
  • Give discounts on your products by offering special coupon codes.
  • Add sales commission agents to help you in selling computers online.

Get Pabbly Subscription Billing for Free

According to IBISWorld, online computer sales worldwide brought a massive $23.1 billion in revenues this fiscal year. And also the market is currently growing at an appreciable rate of 6.3% every year. But as a seller, you might have noticed a certain pattern that annual sales from your region are stagnating due to saturation. Whereas the areas of galloping growth are from Asia- Pacific and Africa. So, that is why you are toying with the idea to sell computers online to get business demands from these areas.

Other benefits of selling computers online include competitive pricing, automated online shop, easy revenue tracking, tax management, etc. Of course, you can sell computers online on platforms like Amazon, eBay, or Alibaba. But the real question is are you will willing to pay their exorbitant commission? Nope

That is why in this article we will work with an online tool called Pabbly Subscription Billing which lets you create incredible checkout pages to sell computers online. Further benefits include:

  • List as Many Computers as You Want
  • Generate Unlimited Revenues
  • Easily Import/Export Customers Data
  • Revenue Management
  • Auto Email Notifications

Well, with these features, you will definitely have dominance over other computer sellers. So, why wait, let’s build our first checkout page to sell computers online.

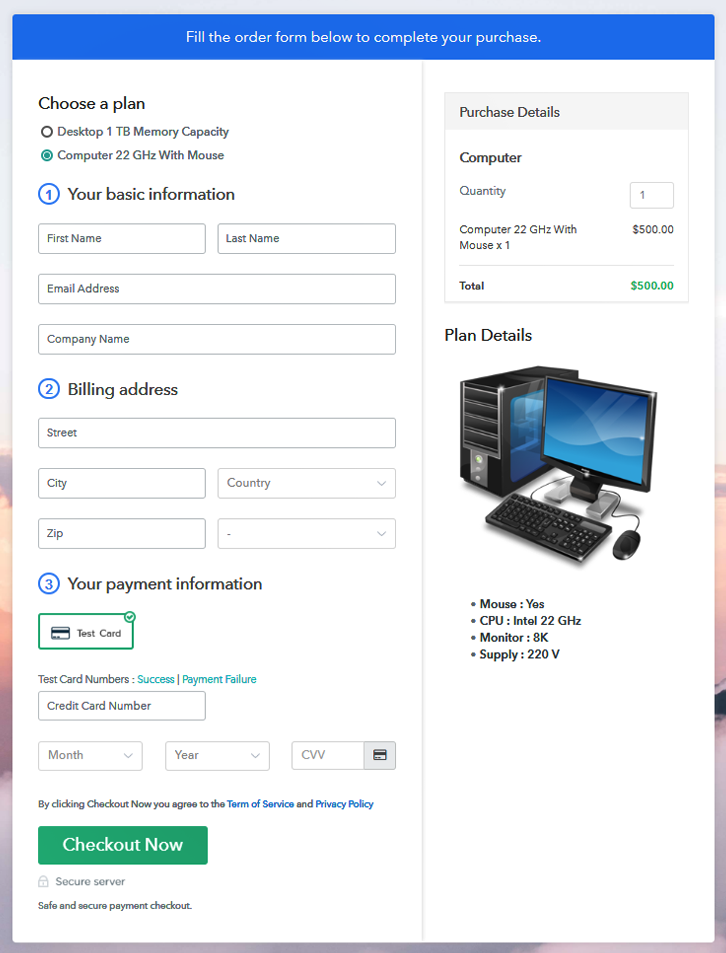
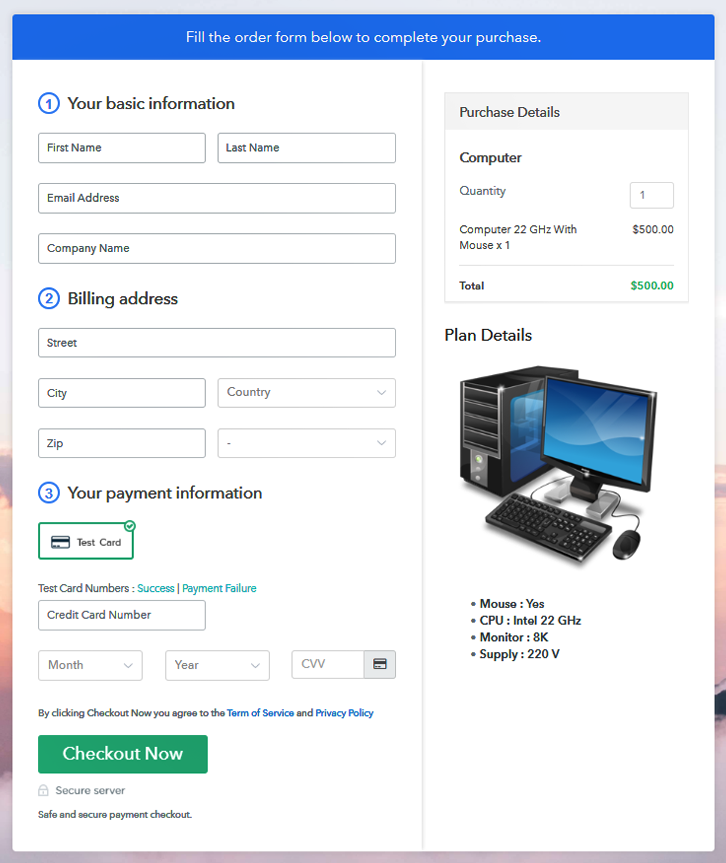
Final View of Checkout Page For Your Computers Selling Business

Checkout To Sell Computers Online

Preview Checkout Page

Step 1: Log in to Pabbly Subscription Billing

Signup

Type in Pabbly Subscription Billing in your search box and press enter. Landing on their website you need to click  “Sign up Free“ button. You can either fill all the information or simply sign in using your Gmail account.

Sign Up For Free!

Step 2: Select Subscription Billing

Access Subscription Billing

Step 3: Account Setup

Setup Account

A dialog box will appear and you will fill in the details like company name, currency, phone number, etc. Now after filing in the information press the blue “Continue” button to complete the process.

Step 4: Connect Payment Gateways & Start Computers Selling Business Online

Connect Payment Gateway

To ensure a high probability of success during customer’s payment transaction Pabbly Subscription Billing provides a dummy payment gateway. Here, you can beta test the entire payment experience of the customer. Just click on the “Enable Test Payment” option to start testing out this functionality

Also, with Pabbly Subscription Billing, you can integrate many payment gateways PayPal, Authorize.net, Stripe, etc. Beneath this paragraph, there are integration guides to embed the payment gateway of your choice. So, I am going to enable the test payment option to continue the process.

Step 5: Add Product For Your Computers 

Add Product

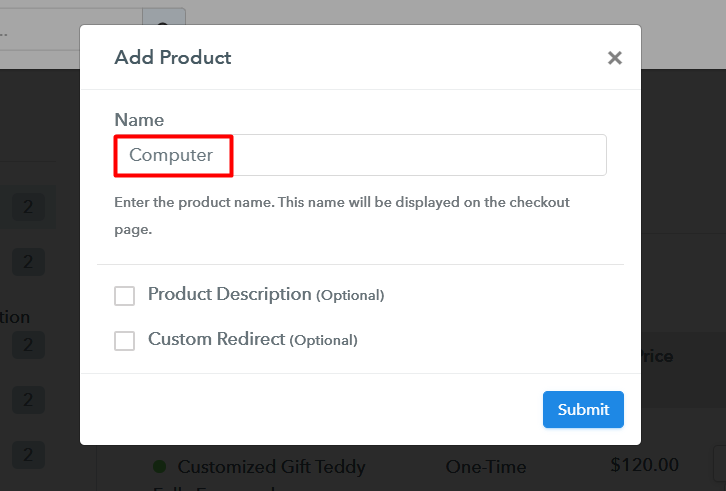
Click on the “Add New Product” button will generate a dialog box. Here you can enter the name of the computers and provide a product description, also even redirect to a particular website.

Add Product To Sell Computers Online

Fill out all the details like the name of the product and voila your product is created.

Note: Here you can add all the products related to the similar category by creating plans for each of them.

Step 6: Add Plans 

Now let us create different plans for computers available in your store.

(a) Select Add New Plan

Add Plan

(b) Specify the Plan & Pricing Details

Add Plan To Sell Computers Online

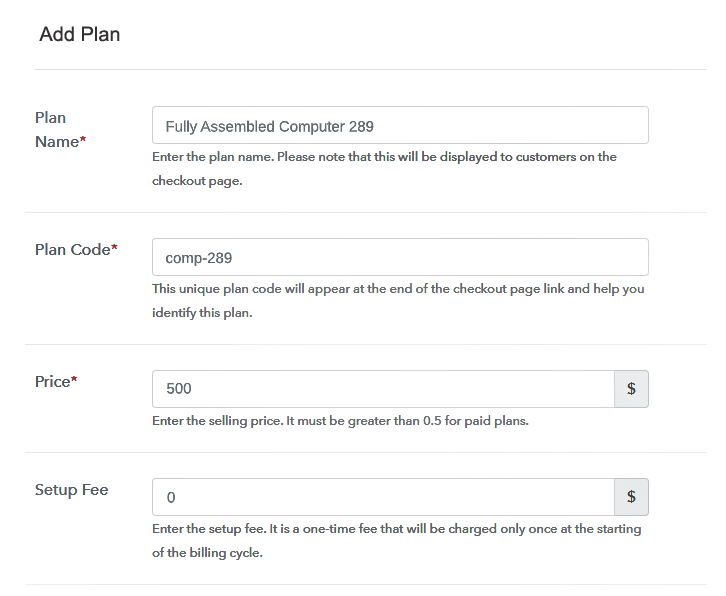
In the plan page, fill in information like plan name, code, price, setup fees, etc. Furthermore, while coming down you will find different billing models like one-time payment, recurring, based on cycles, etc. Also, choose the one that interests you the most. Moreover, you can change it any time you want.

(c) Add Image & Description of Computers

Add Description To Sell Computers Online

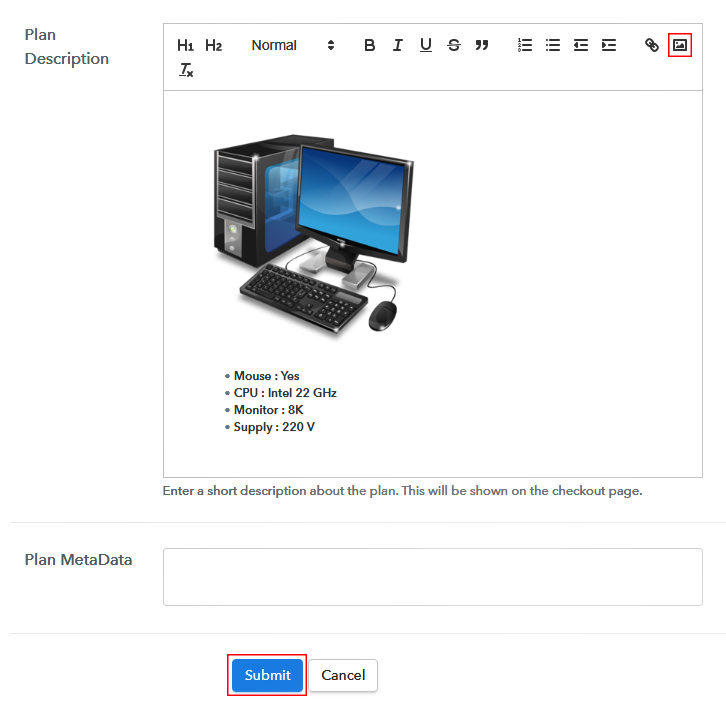
By clicking the image button, you will be able to upload some good images of your computers.

Now, after uploading the image provide some useful information about your computers in bullet points like RAM, ROM, storage, etc. Then press the “Submit” button.

Also, following the same process, you can add more products.

Step 7: Share your Checkout Page

Share Checkout Page on Social Media

You can share the checkout page in three different ways with Pabbly Subscription billing for product marketing.

  • Also, click the respective buttons available to share the checkout page on Facebook & Twitter.
  • Moreover, you can simply share the plan link on emails, SMS, etc.
  • Furthermore, if you want you can embed the plan link within the buttons & add anchor text to redirect customers on checkout pages.

Step 8: Preview Checkout Page

Follow up the recommended steps to preview the checkout page:

(a) Click on the View Button

View Checkout Plan

(b) Take a Look at the Checkout Page

Add Checkout To Sell Computers Online

Step 9: Embed Checkout Page in Site & Sell Computers Online

Embed Checkout Page on Website

Just copy the link and add the checkout page to sell computers online at any suitable place on your WordPress site.

(a) Edit the Page & Paste the Copied Link

Embed Checkout Page on Website

Further, paste the plan link of the computers on a text editor of the WordPress dashboard.

(b) Save & Publish the Checkout Page

Save_and_Publish

Next, click the “Publish” button, after making changes.

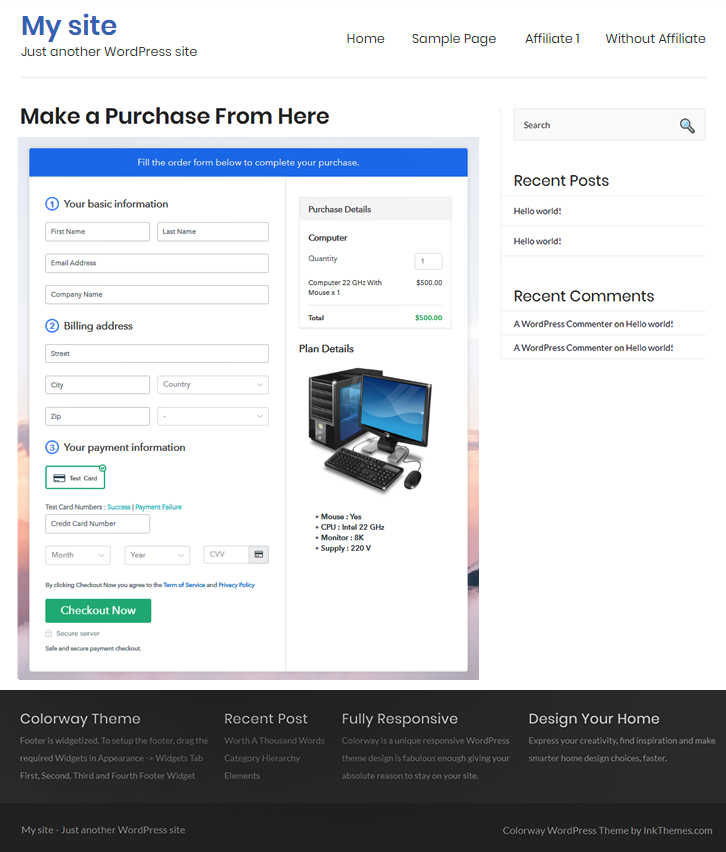
(c) Check out the Final Look of your Checkout Page on WordPress Site

Wordpress Embed To Sell Computers Online

Step 10: Multiplan Checkout Page

Note: In case you want to sell multiple products via a single checkout page, you can create a multi-plan checkout page otherwise skip this step.

(a) Click on Add Mutiplan Checkout

Multiplan Checkout

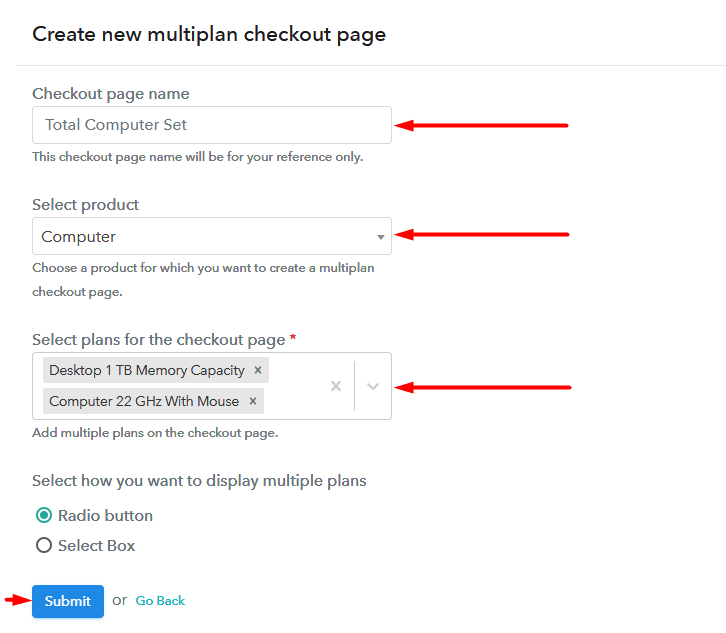
(b) Add Plans to Sell Multiple Computers from Single Checkout Page

Multiplan To Sell Computers Online

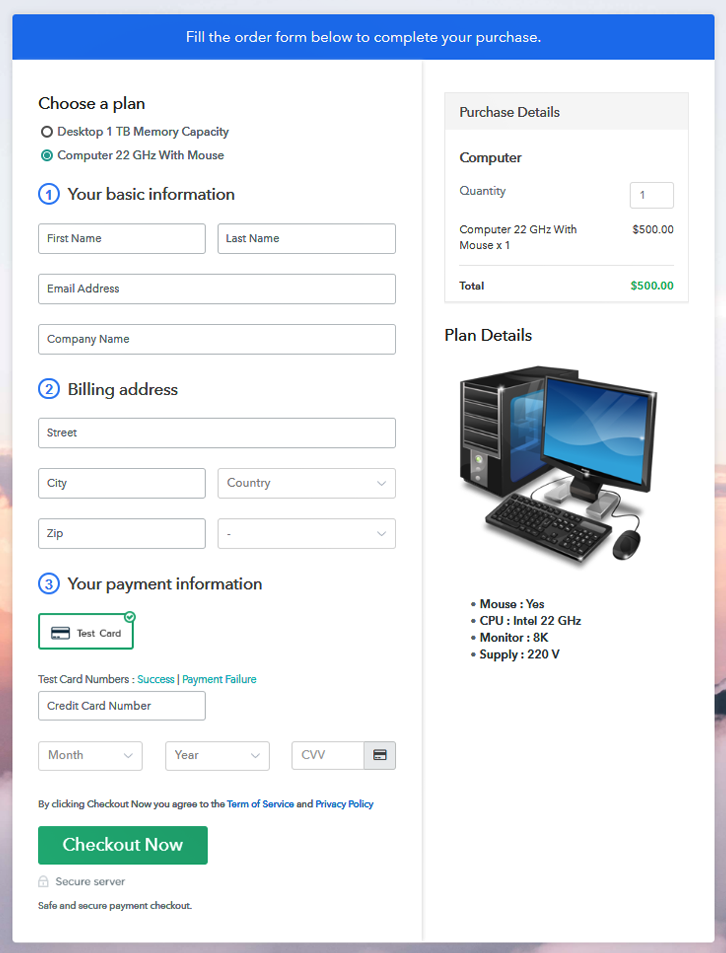
(c) Take a Look at the Checkout Page

Add Mulitplan Checkout To Sell Computers Online

Preview Checkout Page

Wrapping Up

Yipeee!! You build your first checkout page with Pabbly Subscription Billing to sell computers online. Furthermore, with some commitment and effort, you will ace all the features in this software. But for now, if you have any doubts please let us know through the comment section below.  Thank you for your time.

You May Also Like To Read –
How to Sell Computer Courses Online | Step by Step (Free Method)

How to Sell Computer Courses Online

Ideal For: All the computer course experts , computer course sellers, computer course dealers, computer course suppliers, books shop owners and other merchants can use this method to sell computer courses online.

How to Sell Computer Courses Online

Why Choose this Method to Sell Computer Courses Online?

Unlike any other solution, this method allows you to:

  • List and sell your computer courses for FREE. Absolutely no payment required.
  • No need to pay commission on any of your sales.
  • Multiple payment options like PayPal, Credit Card, etc to collect payment from a single place.
  • Sell one time or recurring subscriptions of your computer courses.
  • Collect payments & sell products in any currency as per your requirement.
  • Give discounts on your products by offering special coupon codes.
  • Add sales commission agents to help you in selling computer courses online.

Get Pabbly Subscription Billing for Free

Learning computer skills becomes mandatory and people are looking for computer courses that can benefit them. So, start selling computer courses online is not a bad idea. Why?

Actually, people are way much comfortable in buying computer courses online. Plus, there are perks like you can operate your computer courses business from anywhere. Also, there are no opening time restrictions. Not to forget digital computer courses store provides a global audience and offers benefits like greater revenue.

Gratefully, we have a software named Pabbly Subscription Billing that can help you in starting your own computer courses business online without any prior knowledge. The tool allows you to create an amazing checkout page for selling computer courses online. Some of its exceptional features involve:

  • List various computer courses in a single checkout page
  • Build professional invoices using a software
  • Track revenue

Well, now that I have got you engaged with its incredible features, then let’s focus on creating a checkout page to sell computer courses online.

Final View of Checkout Page for your Computer Courses Selling Business

Checkout Page to Sell Computer Courses Online

Preview Checkout Page

Step 1: Log in to Pabbly Subscription Billing

Signup

Begin the process for creating a checkout page for computer courses by visiting the Pabbly Subscription Billing in your browser. After that, click on the “Sign up Free“ button. Moreover, either manually filled out the details or sign in using your Gmail account.

Sign Up For Free!

Step 2: Select Subscription Billing

Access Subscription Billing

Step 3: Account Setup

Setup Account

Besides, after clicking on the “Access Now” button of the software, a page will open with fields like company name, select currency, and phone number. Simply fill out those details to continue creating a checkout page for computer courses.

Step 4: Connect Payment Gateways & Start Computer Courses Selling Business Online

Connect Payment Gateway

The subsequent step is to gaining knowledge about payment procedures using a “Test Payment Gateway”. Here, we will describe the checkout page process for the computer courses with the help of a test payment gateway. Besides this, the tool offers various payment gateways such as PayPal, Stripe, etc. Further, below are the payment integration guides to help you out.

Step 5: Add Product for your Computer Courses

Add Product

Additionally, add the name, which in our case is “Computer Courses”. Here you can specify the type like basic computer courses, advanced computer courses,  etc. Further, write a short description of the computer courses to grab the client’s attention.

Add Product to Start Selling Computer Courses Online

Moreover, just fill out all those details and your product is created.

Note: Here you can add all the products related to the similar category by creating plans for each of them.

Step 6: Add Plans 

Let’s reveal plans for different kinds of computer courses available in your store.

(a) Select Add New Plan

Add Plan

(b) Specify the Plan & Pricing Details

Specify the Plan and Pricing to Sell Computer Courses Online

The next thing to do is fill all the details of the computer courses like plan name, code, price, set-up fee, and much more to continue.

(c) Add Image & Description of Computer Courses

Add Image & Description to Sell Computer Courses Online

Furthermore, it is necessary to write a brief description of the computer courses using bullets, images, etc, to bring original buyers to the checkout page.

Next, click on the “Submit” button to add the computer courses on the checkout page.

Finally, you can add multiple plans and kinds of computer courses in your product list which you want to market online.

Step 7: Share your Checkout Page

Share Checkout Page on Social Media

  • Moreover, share the checkout page of the computer courses on social media accounts like Facebook & Twitter to grab the customer’s attention.
  • Also, you can share the direct link of the computer courses checkout page with your customers via SMS or email marketing.
  • Additionally, embed the provided plan link of the computer courses in the buttons or any anchor text on your website.

Step 8: Preview Checkout Page

Follow up the recommended steps to preview the checkout page:

(a) Click on the View Button

View Checkout Plan

(b) Take a Look at the Checkout Page

Checkout Page to Sell Computer Courses Online

Step 9: Embed Checkout Page in Site & Sell Computer Courses Online

Embed Checkout Page on Website

Just copy the link and add the checkout page to sell computer courses online at any proper place on your WordPress site.

(a) Edit the Page & Paste the Copied Link

Paste Link in Text Editor

Further, paste the plan link of computer courses on a text editor of the WordPress dashboard.

(b) Save & Publish the Checkout Page

Save_and_Publish

Next, click the “Publish” button, after making changes.

(c) Check out the Final Look of your Checkout Page on WordPress Site

Final Look of your Checkout Page to Sell Computer Courses Online

Step 10: Multiplan Checkout Page

Note: In case you want to sell multiple products via a single checkout page, you can create a multi-plan checkout page otherwise skip this step.

(a) Click on Add Mutiplan Checkout

Multiplan Checkout

(b) Add Plans to Sell Multiple Computer Courses from Single Checkout Page

Add Multiple Products to Start Selling Computer Courses Online

(c) Take a Look at the Checkout Page

Multiplan Checkout Page to Sell Computer Courses Online

Preview Checkout Page

Wrapping Up

Alright! Computer courses are becoming a hot thing in present times. So it is the right time to start computer courses business online. And with the help of Pabbly Subscription Billing, you can easily start selling computer courses online. All you need to do is follow all the above-mentioned steps.

Just, try this software out and let us know if you have any inquiries about the same.

You May Also Like To Read –
How to Sell Colognes Online | Step by Step (Free Method)

How to Sell Colognes Online

Ideal For: All the cologne manufacturers, cologne sellers, retail colongne shop owners, and other merchants can use this method to take their colognes selling business online.

How to Sell Colognes Online

Why Choose this Method To Sell Colognes Online?

Unlike any other solution, this method allows you to:

  • List and sell your colognes for FREE. Absolutely no payment required.
  • No need to pay commission on any of your sale.
  • Multiple payment options like PayPal, Credit Card, etc to collect payment from a single place.
  • Sell one time or recurring subscriptions of your colognes.
  • Collect payments & sell products in any currency as per your requirement.
  • Give discounts on your products by offering special coupon codes.
  • Add sales commission agents to help you in selling colognes online.

Get Pabbly Subscription Billing for Free

‘People who smell good are automatically more attractive’. So, many of them love to buy cologne online and if you are looking to extend your business by selling colognes online then we can help you with a head start.

You can start colognes business online within minutes through checkout pages. As it would take only a few minutes to create them and then share/embed them anywhere to sell colognes online.

It’s super easy to display your cologne with its best features, pricing, offers (optional), discounts (optional) as well as collect online/offline payments for it. Most importantly, you can sell unlimited products as there is no limit over the number of sales. And you can even embed the checkout pages on buttons, text, posts, pages of any website or app to redirect your customers on these checkout pages.

Final View of Checkout Page For Your Colognes Selling Business

Checkout Page Preview to Sell Colognes Online

Preview Checkout Page

Step 1: Log in to Pabbly Subscription Billing

Signup

To start with creating a checkout page to sell colognes online first go to Pabbly Subscription Billing website & then click on ‘Sign Up Free‘. On the registration page select between Google or manual sign-up.

Sign Up For Free!

Step 2: Select Subscription Billing

Access Subscription Billing

Step 3: Account Setup

Setup Account

Next, the system will ask you to fill some company details in a pop-up form. So, quickly fill up a company name, currency and a phone number.

Step 4: Connect Payment Gateways & Start Colognes Selling Business Online

Connect Payment Gateway

Now, you must pay special attention to this step as we’ll be integrating a payment method within the system to collect payments for the sold colognes. You can also skip the actual payment method integration by selecting the test payment mode (just for testing). But remember to accept actual payments you’ll need to choose from the following options of payment methods available and make use of the integration guides linked.

Step 5: Add Product For Your Colognes

Add Product

Up to this point, all the system settings are fixed and you can start adding product categories. Name the product much like a category of colognes as well be adding plans (cologne items) to them more further.

Add Product to Sell Colognes Online

Fill out the details and hit ‘Submit’ here.

Note: Here you can add all the products related to the similar category by creating plans for each of them.

Step 6: Add Plans 

Now, we’ll add all the colognes items available as plans to sell online.

(a) Select Add New Plan

Add Plan

(b) Specify the Plan & Pricing Details

Add Plan to Sell Colognes Online

You can mention/setup details like name, code, billing cycle, plan status for a cologne item on the plan details page.

(c) Add Image & Description of Colognes

Add Image & Description to Sell Colognes Online

Moreover, you can also show an image with some specialities/feature of the cologne.

Once you hit ‘Submit’ in here a checkout page will get ready instantly to sell colognes online.

Similarly, you can add all the other colognes too.

Step 7: Share your Checkout Page

Share Checkout Page on Social Media

For selling colognes online, you can share/embed a checkout page.

  • You can link the plan link URL given with the buttons & texts of a website or app to redirect a customer on the payment checkout page
  • Next, you can directly click the Facebook & Twitter buttons to share a checkout page onto these platforms
  • Also, you can share the checkout page on other social media & link sharing platform to sell colognes online such as emails, WhatsApp, Messenger, SMS etc

Step 8: Preview Checkout Page

Follow up the recommended steps to preview the checkout page:

(a) Click on the View Button

View Checkout Plan

(b) Take a Look at the Checkout Page

Checkout Page Preview to Sell Colognes Online

Step 9: Embed Checkout Page in Site & Sell Colognes Online

Embed Checkout Page on Website

Just copy the link and add the checkout page to sell colognes online at any preferable place on your WordPress site.

(a) Edit the Page & Paste the Copied Link

Embed Checkout Page on Website

Further, paste the plan link on a text editor of the WordPress dashboard.

(b) Save & Publish the Checkout Page

Save_and_Publish

Next, click the “Publish” button, after making changes.

(c) Check out the Final Look of your Checkout Page on WordPress Site

Checkout Page On WordPress Site to Sell Colognes Online

Step 10: Multiplan Checkout Page

Note: In case you want to sell multiple products via a single checkout page, you can create a multi-plan checkout page otherwise skip this step.

(a) Click on Add Mutiplan Checkout

Multiplan Checkout

(b) Add Plans to Sell Multiple Colognes from Single Checkout Page

Create Multiplan Checkout to Sell Colognes Online

(c) Take a Look at the Checkout Page

Multiplan Checkout Page to Sell Colognes Online

Preview Checkout Page

Wrapping Up

These were all the steps for creating checkout pages for selling colognes online. You can see that it’s very simple and easy to perform these steps by your own & at last, you’ll end up getting a well functioning system to start colognes business online.

Also, the centralised dashboard will automatically help you in the management for selling colognes online easily. Furthermore, the billing and invoicing processes are completely automatic and you’ll definitely enjoy it.

You May Also Like To Read –
How To Sell Career Counselling Test Online | Step by Step (Free Method)

How to Sell Career Counseling Test Online

Ideal For: All the coaching classes, career counselors, career consulting agencies, and other sellers can use this method to take their career counseling test selling business online.

How to Sell Career Counseling Test Online

Why Choose this Method To Sell Career Counseling Test Online?

Unlike any other solution, this method allows you to:

  • List and sell your career counseling test for FREE. Absolutely no payment required.
  • No need to pay commission on any of your sales.
  • Multiple payment options like PayPal, Credit Card, etc to collect payment from a single place.
  • Sell one time or recurring subscriptions of your career counseling test.
  • Collect payments & sell products in any currency as per your requirement.
  • Give discounts on your products by offering special coupon codes.
  • Add sales commission agents to help you in selling career counseling test online.

Get Pabbly Subscription Billing for Free

In this competitive world, students are pressurized to choose a career path from an early school stage but many of the students are unaware of their talents and interests. If you are a career counselor who sells career counseling test, you could create a productive business selling them online.

Well, by selling career counseling test online, you can help a lot of students to pursue the right path for their future and also easily boost up your business as people can smoothly swipe and order your tests from the comfort of their homes. You also get to expand your customer range by taking your career counseling test selling business online. Simply create checkout pages for your career counseling test and attach their links on social media and your website, and people can directly make purchases through them.

To start an online career counseling test selling business, there is an amazing service available and that is Pabbly Subscription Billing. This service provides you a completely free platform to start your online business.

Apart from checkout pages, you also get unlimited access to its other helpful features:

  • Collect one-time or recurring payments for your career counseling test
  • Create discount coupons for your customers
  • Share invoices of the career counseling test with customers automatically
  • Add and sell unlimited career counseling test

Final View of Checkout Page For Your Career Counseling Test Selling Business

Preview Checkout Page

Preview Checkout Page

Step 1: Log in to Pabbly Subscription Billing

Signup

The first step includes you to visit Pabbly Subscription Billing website and then click on the “Sign Up Free” button. After you click the button, you will be landed on the signup page, where you can create your account in a jiffy with your Gmail or you can also manually enter your details.

Sign Up For Free!

Step 2: Select Subscription Billing

Access Subscription Billing

Step 3: Account Setup

Setup Account

After finishing the signup process, now you have to fill up your company details i.e. company name, select currency, and contact number in the shown dialogue box.

Step 4: Connect Payment Gateways & Start Career Counseling Test Selling Business Online

Connect Payment Gateway

Here, we are describing the payment collection process by enabling the ‘Test Payment’ mode so that sellers can experience a glitch-free payment collection process. Thereafter, you can connect with other payment gateways such as PayPal, Stripe, etc, whichever you prefer. The complete integration guide for payment gateways is provided below-

Step 5: Add Product For Your Career Counseling Test

Add Product

Further in this step, you have to add your first product. You can add career counseling tests of different types such as personality tests, skills assessments, etc.

Sell Career Counseling Test Online Product Name

In a similar manner add all other types of career counseling tests in the same product by creating different plans.

Note: Here you can add all the products related to the similar category by creating plans for each of them.

Step 6: Add Plans 

Let’s get started and create plans for different categories of career counseling test that you want to sell

(a) Select Add New Plan

Add Plan

(b) Specify the Plan & Pricing Details

Sell Career Counseling Test Online Details

On clicking the button, the plan page will open, here you will have to fill the plan details such as plan name, code, billing cycle, price, etc.

(c) Add Image & Description of Career Counseling Test

Sell Career Counseling Test Online Image

Further, describe the career counseling test that you want to sell along with the product links, images, etc, and then click on the submit button to add your plan.
You can create more plans for all the other career counseling test similarly.

Step 7: Share your Checkout Page

Share Checkout Page on Social Media

Increase your sales by following these given steps:

  • Share your checkout page on social media like Facebook and Twitter.
  • Also, copy the mentioned link and send it to your customers through SMS or emails directly.
  • Embed your plan link to your website so that your customers can be landed on the checkout page directly.

Step 8: Preview Checkout Page

Follow up the recommended steps to preview the checkout page:

(a) Click on the View Button

View Checkout Plan

(b) Take a Look at the Checkout Page

Preview Checkout Page

Step 9: Embed Checkout Page in Site & Sell Career Counselling Test Online

Embed Checkout Page on Website

You just have to copy the provided plan embedding link to sell career counseling test online and embed the checkout page to your WordPress site.

(a) Edit the Page & Paste the Copied Link

Embed Checkout Page on Website

Further, paste the plan link on a text editor of the WordPress dashboard.

(b) Save & Publish the Checkout Page

Save_and_Publish

Next, click the “Publish” button, after making changes.

(c) Check out the Final Look of your Checkout Page on WordPress Site

Sell Career Counseling Test Online Website

Step 10: Multiplan Checkout Page

Note: In case you want to sell multiple products via a single checkout page, you can create a multi-plan checkout page otherwise skip this step.

(a) Click on Add Mutiplan Checkout

Multiplan Checkout

(b) Add Plans to Sell Multiple Career Counseling Test from Single Checkout Page

Sell Career Counseling Test Online Multi Details

(c) Take a Look at the Checkout Page

Sell Career Counseling Test Online Multi Checkout

Preview Checkout Page

Wrapping Up

Lastly, we would say that it gets really hassle-free and easy to start your online business with Pabbly Subscription Billing. With this service, now you can easily sell unlimited products, create discount coupons, share invoices, and all this without even paying any fees. Hence, signup now to add more profit to your career counseling test selling business.
For further queries or suggestions, please leave your comments below.

You May Also Like To Read –
 

How to Sell Coffee Paper Cups Online | Step by Step (Free Method)

How to Sell Coffee Paper Cups Online

Ideal For: All the coffee paper cups manufacturers, coffee paper cup sellers, coffee paper cup dealers, coffee cup suppliers, disposable material shop owners, and other merchants can use this method to sell coffee paper cups online.

How to Sell Coffee Paper Cups Online

Why Choose this Method to Sell Coffee Paper Cups Online?

Unlike any other solution, this method allows you to:

  • List and sell your coffee paper cups for FREE. Absolutely no payment required.
  • No need to pay commission on any of your sales.
  • Multiple payment options like PayPal, Credit Card, etc to collect payment from a single place.
  • Sell one time or recurring subscriptions of your coffee paper cups.
  • Collect payments & sell products in any currency as per your requirement.
  • Give discounts on your products by offering special coupon codes.
  • Add sales commission agents to help you in selling coffee paper cups online.

Get Pabbly Subscription Billing for Free

Every known street has a famous coffee house where people go to buy coffee and all these cafeterias use coffee paper cups. With the rising increase of coffee consumption among people, coffee houses are trending which is a reason why coffee paper cups business is never going down. Wouldn’t it be great to take another step by starting coffee paper cups business online?

Indeed it is! According to the Market Research report, the global paper cup market is projected to register the highest CAGR of over 2.9%, іn tеrmѕ оf rеvеnuе оvеr thе fоrесаѕt реrіоd. Not just this, by selling disposable cups online, you will get the global audience. And, most importantly low set up cost compared to the offline shop. Luckily, we came across a software named Pabbly Subscription Billing that will give your online business a headstart.

The software lets you build amazing checkout pages for selling coffee paper cups online. Some of its remarkable features involve:

  • Multiple billing models
  • Professional invoices
  • Various payment gateways

Well, now that I have got you engaged with its incredible features, then let’s focus on creating a checkout page to sell coffee paper cups online.

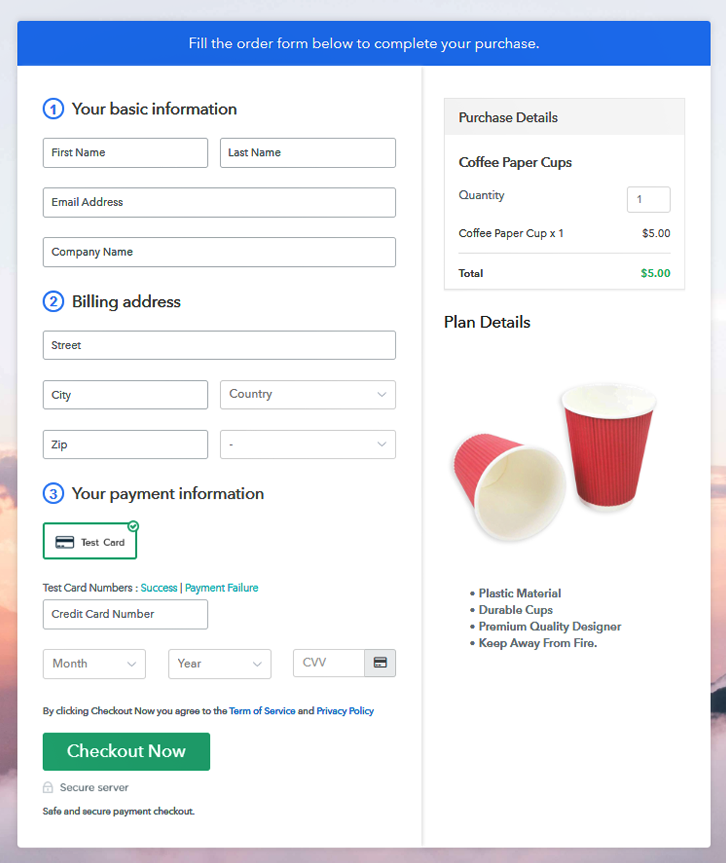
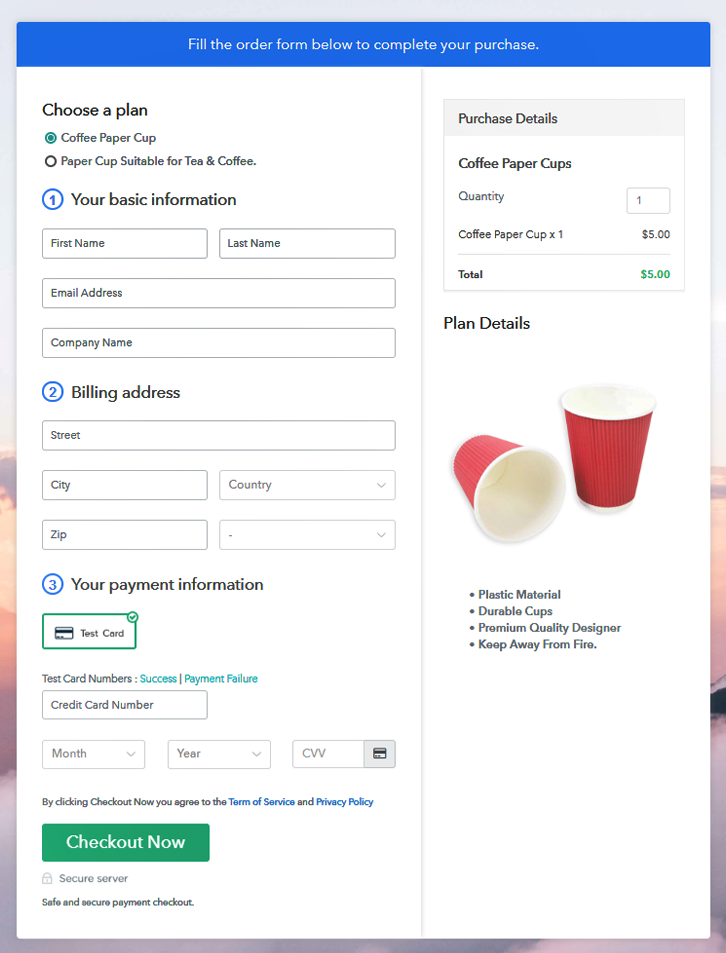
Final View of Checkout Page for Your Coffee Paper Cups Selling Business

Checkout Page to Sell How to Sell Coffee Paper Cups Online Online

Preview Checkout Page

Step 1: Log in to Pabbly Subscription Billing

Signup

Begin the process for creating a checkout page for coffee paper cups by visiting the Pabbly Subscription Billing in your browser. After that, click on the “Sign up Free“ button. Moreover, either manually filled out the details or sign in using your Gmail account.

Sign Up For Free!

Step 2: Select Subscription Billing

Access Subscription Billing

Step 3: Account Setup

Setup Account

Besides, after clicking on the “Access Now” button of the software, a page will open with fields like company name, select currency, and phone number. Simply fill out those details to continue creating a checkout page for coffee paper cups.

Step 4: Connect Payment Gateways & Start Coffee Paper Cups Selling Business Online

Connect Payment Gateway

The subsequent step is to gaining knowledge about payment procedures using a “Test Payment Gateway”. Here, we will describe the checkout page process for the coffee paper cups with the help of a test payment gateway. Besides this, the tool offers various payment gateways such as PayPal, Stripe, etc. Further, below are the payment integration guides to help you out.

Step 5: Add Product For Your Coffee Paper Cups

Add Product

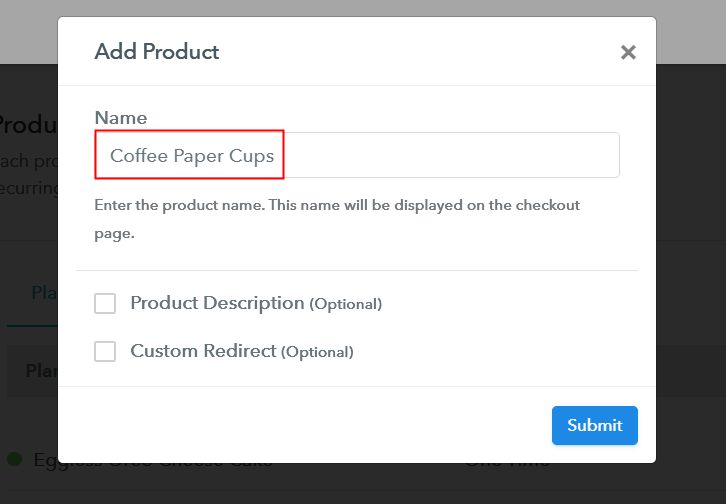
Additionally, add the name, which in our case is “Coffee Paper Cups”. Here you can specify the type like disposable coffee cups, paper plain coffee cups, etc. Further, write a short description of the coffee paper cups to catch the customer’s attention.

Add Product to Start Selling Coffee Paper Cups Online

Moreover, just fill out all those details and your product is created.

Note: Here you can add all the products related to the similar category by creating plans for each of them.

Step 6: Add Plans 

Let’s cast light on plans for different kinds of coffee paper cups available in your store.

(a) Select Add New Plan

Add Plan

(b) Specify the Plan & Pricing Details

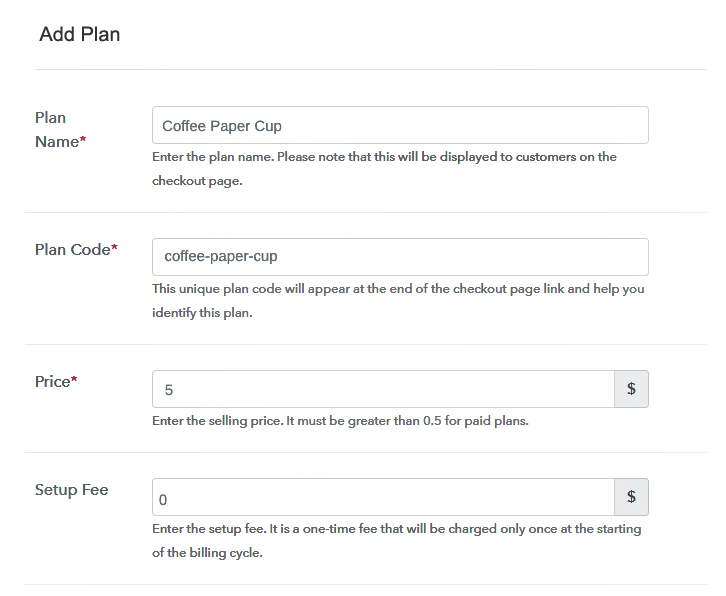
Specify the Plan and Pricing to Sell Coffee Paper Cups Online

The next thing to do is fill all the details of the coffee paper cups like plan name, code, price, set-up fee, and much more to continue.

(c) Add Image & Description of Coffee Paper Cups

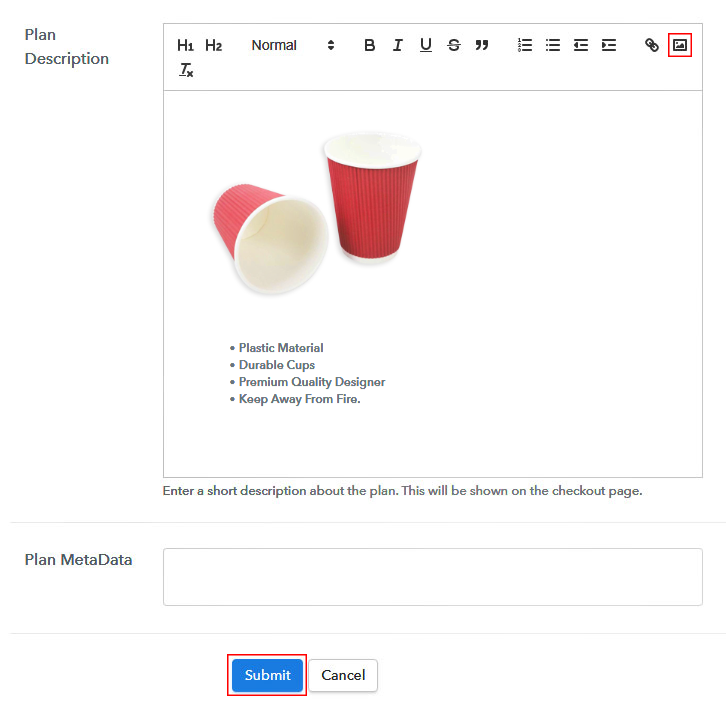
Add Image & Description to Sell How to Sell Coffee Paper Cups Online Online

Next, to engage the visitor on the checkout page, write a brief description of coffee paper cups with bullets, images, links, etc.

Subsequently, click on the “Submit” button to add the coffee paper cups on the checkout page.

Finally, you can add multiple plans and kinds of coffee paper cups in your product list which you want to sell online.

Step 7: Share your Checkout Page

Share Checkout Page on Social Media

  • Moreover, share the checkout page of the coffee paper cups on social media accounts like Facebook & Twitter to grab the customer’s attention.
  • Also, you can share the direct link of the coffee paper cups checkout page with your customers via SMS or email marketing.
  • Additionally, embed the provided plan link of the coffee paper cups in the buttons or any anchor text on your website.

Step 8: Preview Checkout Page

Follow up the recommended steps to preview the checkout page:

(a) Click on the View Button

View Checkout Plan

(b) Take a Look at the Checkout Page

Checkout Page to Sell How to Sell Coffee Paper Cups Online Online

Step 9: Embed Checkout Page in Site & Sell Coffee Paper Cups  Online

Embed Checkout Page on Website

Just copy the link and add the checkout page to sell coffee paper cups online at any proper place on your WordPress site.

(a) Edit the Page & Paste the Copied Link

Embed Checkout Page on Website

Further, paste the plan link on a text editor of the WordPress dashboard.

(b) Save & Publish the Checkout Page

Save_and_Publish

Next, click the “Publish” button, after making changes.

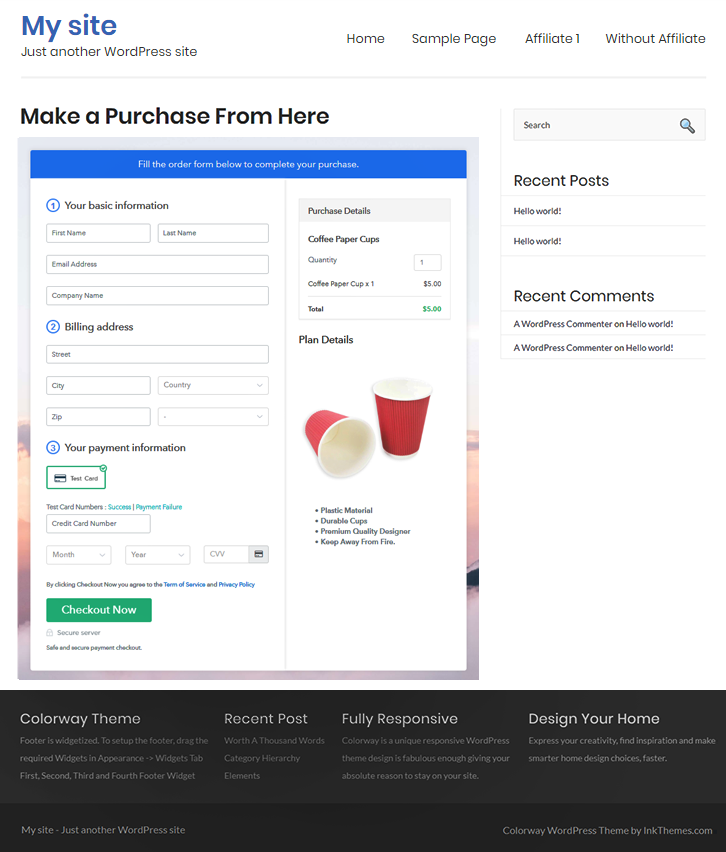
(c) Check out the Final Look of your Checkout Page on WordPress Site

Final Look of your Checkout Page to Sell How to Sell Coffee Paper Cups Online Online

Step 10: Multiplan Checkout Page

Note: In case you want to sell multiple products via a single checkout page, you can create a multi-plan checkout page otherwise skip this step.

(a) Click on Add Mutiplan Checkout

Multiplan Checkout

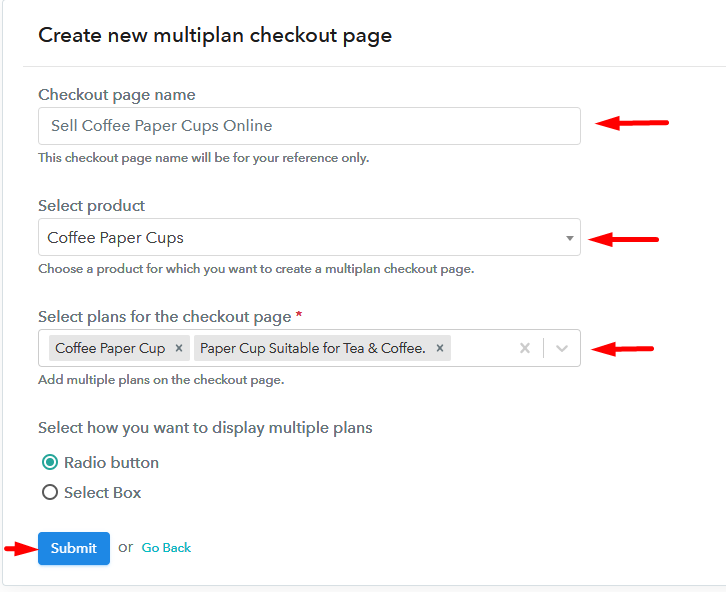
(b) Add Plans to Sell Multiple Coffee Paper Cups from Single Checkout Page

Add Multiple Products to Start Selling Coffee Paper Cups Online

(c) Take a Look at the Checkout Page

Multiplan Checkout Page to Sell How to Sell Coffee Paper Cups Online Online

Preview Checkout Page

Wrapping Up

Alright! Coffee and coffee cups go hand in hand, with increasing consumption, coffee paper cups market is also rising. So starting your own coffee paper cups business is not a bad idea. And, with the help of Pabbly Subscription Billing, you can start an online business easily. Just follow all the mentioned steps and it’s done.

So, try this software out and let us know your reaction in the comment sections.

You May Also Like To Read –
How to Sell Closets Online | Step by Step (Free Method)

How to Sell Closets Online

Ideal For: All the closets manufacturers, closet sellers, closet dealers, closet suppliers, furniture shop owners, and other merchants can use this method to sell closets online.

How to Sell Closets Online

Why Choose this Method to Sell Closets Online?

Unlike any other solution, this method allows you to:

  • List and sell your closets for FREE. Absolutely no payment required.
  • No need to pay commission on any of your sales.
  • Multiple payment options like PayPal, Credit Card, etc to collect payment from a single place.
  • Sell one time or recurring subscriptions of your closets.
  • Collect payments & sell products in any currency as per your requirement.
  • Give discounts on your products by offering special coupon codes.
  • Add sales commission agents to help you in selling closets online.

Get Pabbly Subscription Billing for Free

In every single household, having a closet is a must. As, it is widely used to keep clothes and stuff organized. That is the reason why, closets business never goes down. So, if you have a closet business, then it is the right time for you to take it online. Want to know why?

Well, this is a digital age, where people prefer buying things online, especially that are huge as closets. Because it is very convenient for them and they don’t have to go outside and it will be delivered on their doorstep without any hassle.

Apart from that, this step will help you get a hike in business revenue. As, you will be selling closets online and this will led you to get orders from all around the world. Thus, in order to take your closet business online, you will need a tool that can help you with all the business needs.

Therefore, we would like to suggest you Pabbly Subscription Billing as one of the best online software. Using this you can create amazing checkout pages of your closets and share it on websites, social media platforms, or via emails, SMS. Now, without wasting any of your time, let me take you the 10 easy steps you need to follow for creating a checkout page to sell closets online.

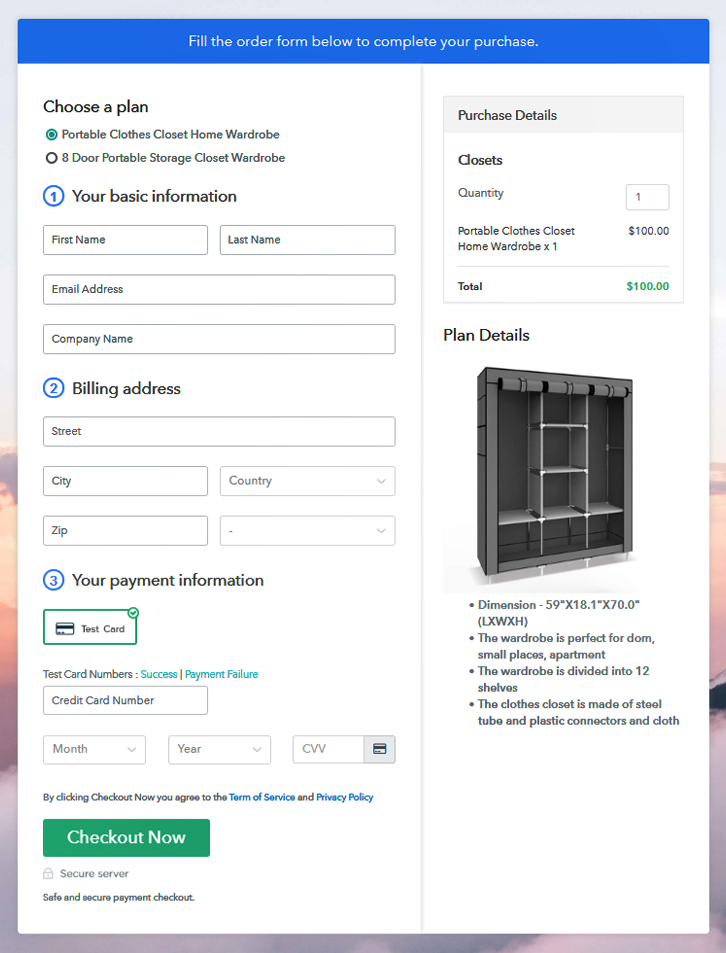
Final View of Checkout Page for Your Closets Selling Business

Checkout Page to Sell How to Sell Closets Online

Preview Checkout Page

Step 1: Log in to Pabbly Subscription Billing

Signup

The process starts by visiting the Pabbly Subscription Billing in your browser. Later, hit the “Sign up Free“ button. Afterwards, either manually filled out the details or sign in using your Gmail account.

Sign Up For Free!

Step 2: Select Subscription Billing

Access Subscription Billing

Step 3: Account Setup

Setup Account

Once you hit on the “Access Now” button of the software, a page will open up. That will ask you to fill the fields like company name, select currency, and phone number. Enter all those details in order to continue creating a checkout page for closets.

Step 4: Connect Payment Gateways & Start Closets Selling Business Online

Connect Payment Gateway

Afterward, we are going to specify the details regarding payment procedures using a “Test Payment Gateway”. Here, I am going to give a brief detail on the checkout page payment process for the closets with the help of a test payment gateway. Apart from that, this tool offers various payment gateways such as PayPal, Stripe, etc. Further, below are the payment integration guides to help you out.

Step 5: Add Product for Your Closets

Add Product

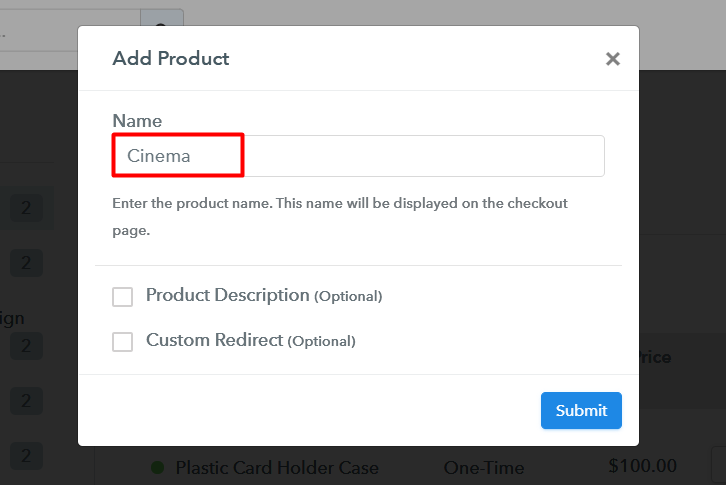
Additionally, add the name, which in our case is “Closets”. Here you can specify the type & write a short description of the closets to catch the customer’s attention.

Add Product to Start Selling Closets Online

Moreover, just fill out all those details and your product is created.

Note: Here you can add all the products related to the similar category by creating plans for each of them.

Step 6: Add Plans 

Let’s cast light on plans for different kinds of closets available in your store.

(a) Select Add New Plan

Add Plan

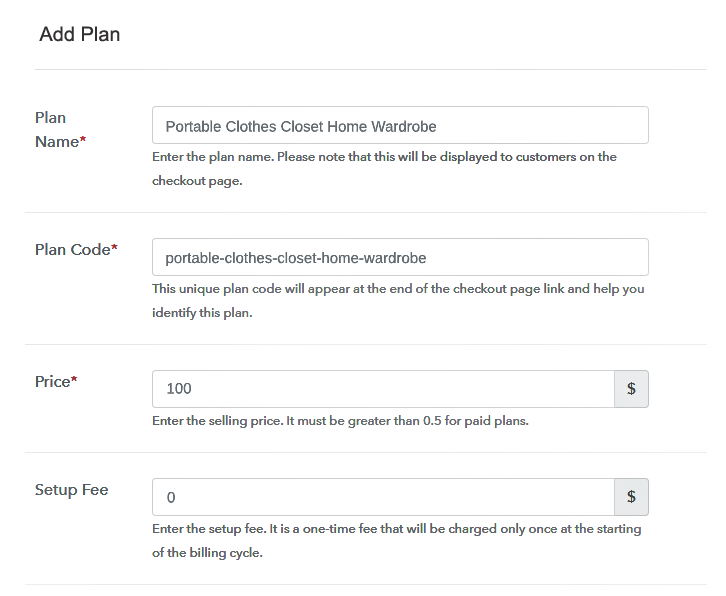
(b) Specify the Plan & Pricing Details

Specify the Plan and Pricing to Sell Closets Online

The next thing to do is fill all the details of the closets like plan name, code, price, set-up fee, and much more to continue.

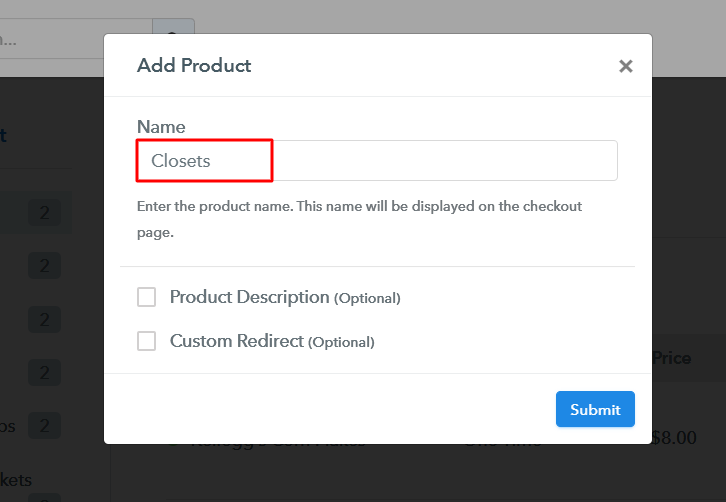
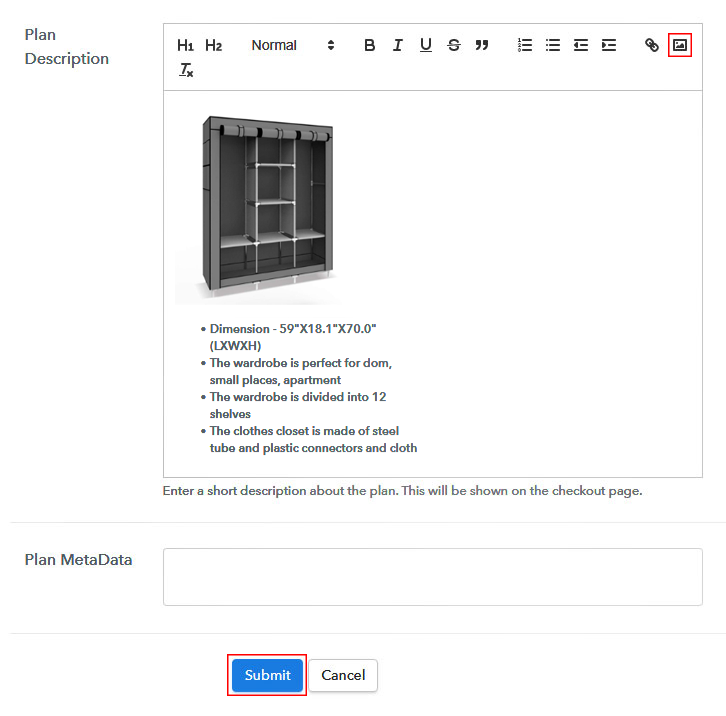
(c) Add Image & Description of Closets

Add Image & Description to Sell How to Sell Closets Online

Next, give a brief description of closets with bullets, images, links, etc.

Afterward, press the “Submit” button to add the closets on the checkout page.

Eventually, add multiple plans along with types of closets in your product list which you want to sell online.

Step 7: Share your Checkout Page

Share Checkout Page on Social Media

  • Moreover, share the checkout page of the closets on social media accounts like Facebook & Twitter.
  • Also, you can share the direct link of the closets checkout page with your customers with the help of SMS or email marketing.
  • Not only that, but you can also embed the provided plan link of the closets in the buttons or any anchor text on your website.

Step 8: Preview Checkout Page

Follow up the recommended steps to preview the checkout page:

(a) Click on the View Button

View Checkout Plan

(b) Take a Look at the Checkout Page

Checkout Page to Sell How to Sell Closets Online

Step 9: Embed Checkout Page in Site & Sell Closets  Online

Embed Checkout Page on Website

Just copy the link and add the checkout page to sell closets online at any proper place on your WordPress site.

(a) Edit the Page & Paste the Copied Link

Embed Checkout Page on Website

Further, paste the plan link on a text editor of the WordPress dashboard.

(b) Save & Publish the Checkout Page

Save_and_Publish

Next, click the “Publish” button, after making changes.

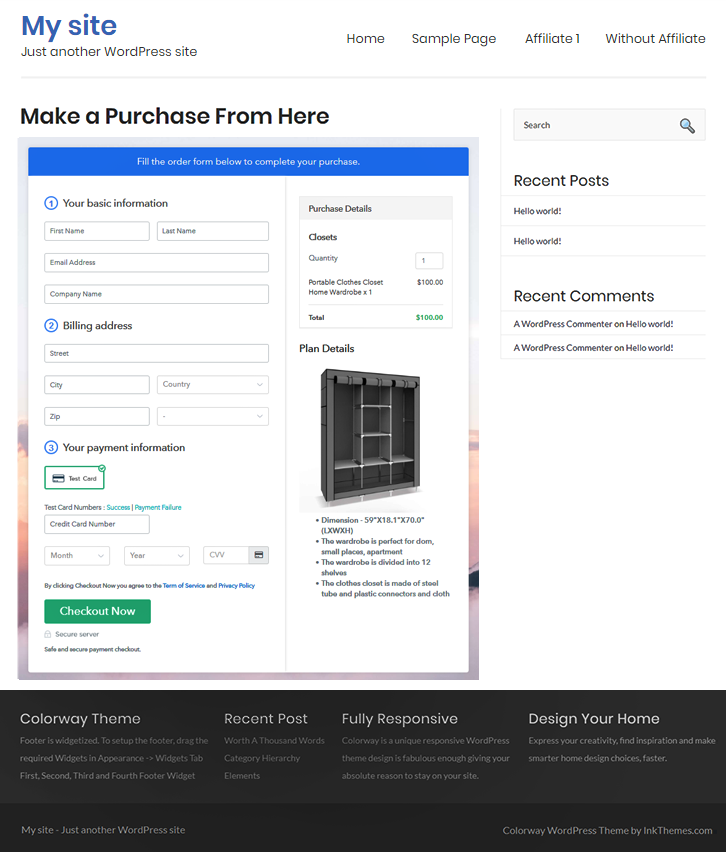
(c) Check out the Final Look of your Checkout Page on WordPress Site

Final Look of your Checkout Page to Sell How to Sell Closets Online

Step 10: Multiplan Checkout Page

Note: In case you want to sell multiple products via a single checkout page, you can create a multi-plan checkout page otherwise skip this step.

(a) Click on Add Mutiplan Checkout

Multiplan Checkout

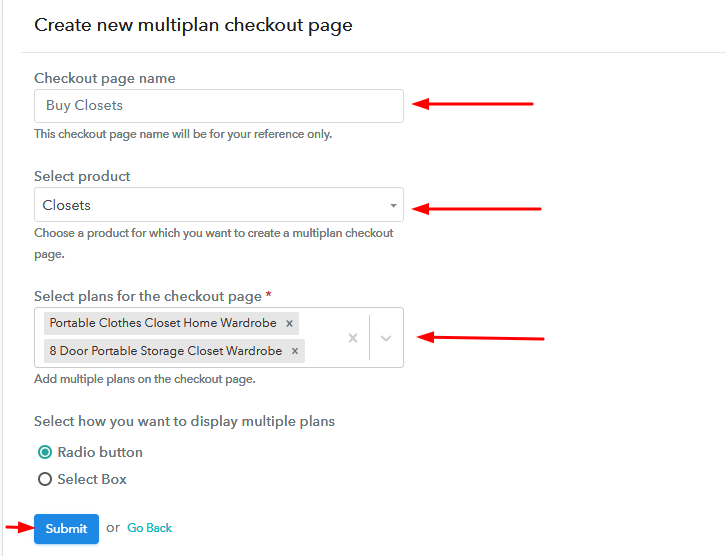
(b) Add Plans to Sell Multiple Closets from Single Checkout Page

Add Multiple Products to Start Selling Closets Online

(c) Take a Look at the Checkout Page

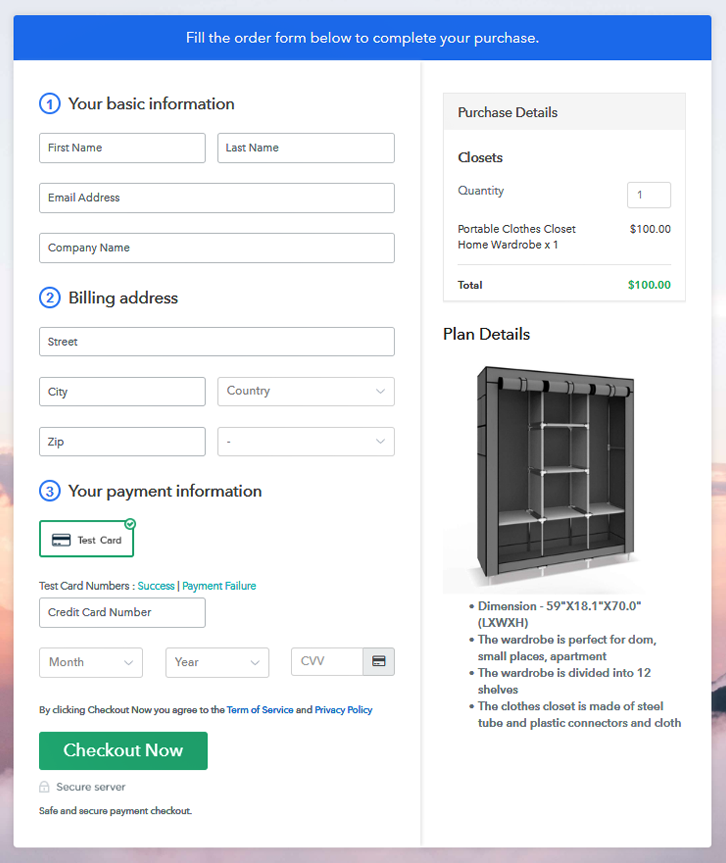
Multiplan Checkout Page to Sell How to Sell Closets Online

Preview Checkout Page

Wrapping Up

Alright! Now you know how easy it is to start your own closets business. Simply log in to Pabbly Subscription Billing and start your own journey of online business in no time. Just follow all the mentioned steps and you’re ready to roll. So, go ahead and try this software. Thank You!!

You May Also Like To Read –

How to Sell Cheesecakes Online | Step by Step (Free Method)

How to Sell Cheesecakes Online

Ideal For: All the cheesecake bakers, cheesecake sellers, cheesecake dealers, cheesecake suppliers, bakery shop owners, and other merchants can use this method to sell cheesecakes online.

How to Sell Cheesecakes Online

Why Choose this Method to Sell Cheesecakes Online?

Unlike any other solution, this method allows you to:

  • List and sell your cheesecakes for FREE. Absolutely no payment required.
  • No need to pay commission on any of your sales.
  • Multiple payment options like PayPal, Credit Card, etc to collect payment from a single place.
  • Sell one time or recurring subscriptions of your cheesecakes.
  • Collect payments & sell products in any currency as per your requirement.
  • Give discounts on your products by offering special coupon codes.
  • Add sales commission agents to help you in selling cheesecakes online.

Get Pabbly Subscription Billing for Free

Everyone has a sweet tooth besides who doesn’t love cheesecakes. And in this digital age, people mostly prefer to buy things online. Because why go through so much mess of making cheesecake when you can order one in just a few clicks. Hence, this must be the right time when you should start thinking about taking your cheesecakes business online. And for that, here we have a perfect tool suggestion for you i.e, Pabbly Subscription Billing that can help you selling cheesecakes online.

With the help of this tool, you can create amazing checkout pages to sell cheesecakes online easily. The link of these checkout pages can be shared on websites, social media platforms, or directly via emails and SMS. Besides this software offers you many perks that are given in the following:

  • Add Unlimited Plans & Products
  • Collect Payment Online and Offline
  • Create Limitless Coupons and Discounts
  • One-time & Recurring Billing
  • Generate Professional Invoices

Now, let’s discuss the 10 easy steps to create a checkout page for selling cheesecakes online.

Final View of Checkout Page for Your Cheesecakes Selling Business

Checkout Page to Sell Cheesecakes Online

Preview Checkout Page

Step 1: Log in to Pabbly Subscription Billing

Signup

Begin the process by creating a checkout page for cheesecakes through visiting the Pabbly Subscription Billing website. After that, you just need to click on the “Sign up Free“ button. However, either manually filled out the details or sign in via Google account.

Sign Up For Free!

Step 2: Select Subscription Billing

Access Subscription Billing

Step 3: Account Setup

Setup Account

Later, after you click on the “Access Now” button, a page will open asking for the details like company name, select currency, and phone number. Simply fill out those details to continue creating a checkout page for cheesecakes.

Step 4: Connect Payment Gateways & Start Cheesecakes Selling Business Online

Connect Payment Gateway

Here, I am going to describe the checkout page process for the cheesecakes with the help of a test payment gateway. And for that, we are going to enable the test payment gateway.  Besides this, the tool offers various payment gateways such as PayPal, Stripe, etc. Further, below are the payment integration guides to help you out with their integration.

Step 5: Add Product for Your Cheesecakes

Add Product

Additionally, add the name, which in our case is “Cheesecake”. Just specify the type and write a short description of the cheesecakes to catch the customer’s attention.

Add Product to Start Selling Cheesecakes Online

Moreover, just fill out all those details and your product is created.

Note: Here you can add all the products related to the similar category by creating plans for each of them.

Step 6: Add Plans 

Let’s rollout plans for different kinds of cheesecakes available in your store.

(a) Select Add New Plan

Add Plan

(b) Specify the Plan & Pricing Details

Specify the Plan and Pricing to Sell Cheesecakes Online

The next thing to do is fill all the details of the cheesecakes like plan name, code, price, set-up fee, and much more to continue.

(c) Add Image & Description of Cheesecakes

Add Image & Description to Sell Cheesecakes Online

Furthermore, now give a brief description of cheesecakes using bullets, images, etc, to the checkout page.

Later, press the “Submit” button to add the cheesecakes on the checkout page.

Conclusively, you can even add multiple plans & types of cheesecakes in your product list which you want to sell online.

Step 7: Share your Checkout Page

Share Checkout Page on Social Media

To sell cheesecakes online, you’ll need to share or link the checkout pages:

  • You can share the checkout page link of cheesecakes directly over Facebook & Twitter using their respective buttons.
  • Additionally, you can share the plan link of cheesecakes directly to your customers via SMS and emails.
  • Eventually, you can even embed the plan link within the buttons & add anchor text anywhere on your website to redirect customers on checkout pages.

Step 8: Preview Checkout Page

Follow up the recommended steps to preview the checkout page:

(a) Click on the View Button

View Checkout Plan

(b) Take a Look at the Checkout Page

Checkout Page Start Selling Cheesecakes Online

Step 9: Embed Checkout Page in Site & Sell Cheesecakes Online

Embed Checkout Page on Website

Just copy the link and add the checkout page to sell cheesecakes online at any proper place on your WordPress site.

(a) Edit the Page & Paste the Copied Link

Embed Checkout Page on Website

Further, paste the plan link of cheesecakes on a text editor of the WordPress dashboard.

(b) Save & Publish the Checkout Page

Save_and_Publish

Next, click the “Publish” button, after making changes.

(c) Check out the Final Look of your Checkout Page on WordPress Site

Final Look of your Checkout Page to Sell Cheesecakes Online

Step 10: Multiplan Checkout Page

Note: In case you want to sell multiple products via a single checkout page, you can create a multi-plan checkout page otherwise skip this step.

(a) Click on Add Mutiplan Checkout

Multiplan Checkout

(b) Add Plans to Sell Multiple Cheesecakes from Single Checkout Page

Add Multiple Products to Start Selling Cheesecakes Online

(c) Take a Look at the Checkout Page

Multiplan Checkout Page to Cheesecakes Online

Preview Checkout Page

Wrapping Up

Alright! Now we have resolved your query on “How to sell cheesecakes online”. So what are you waiting for? Go ahead and start cheesecakes selling business online to boost your sales online. Hence, just follow all the above-mentioned steps and you are ready to start your business online.

So, try this software, and don’t forget to give us your feedback in the comments section below.

You May Also Like To Read –
How to Sell Charity Event Tickets Online | Step by Step (Free Method)

How to Sell Charity Event Tickets Online

Ideal For: All the charity event organizers, event tickets sellers, charity event dealers, PR agencies, event management companies and other merchants can use this method to sell charity event tickets online.

How to Sell Charity Event Tickets Online

Why Choose this Method to Sell Charity Event Tickets Online?

Unlike any other solution, this method allows you to:

  • List and sell your charity event tickets for FREE. Absolutely no payment required.
  • No need to pay commission on any of your sales.
  • Multiple payment options like PayPal, Credit Card, etc to collect payment from a single place.
  • Sell one time or recurring subscriptions of your charity event tickets.
  • Collect payments & sell products in any currency as per your requirement.
  • Give discounts on your products by offering special coupon codes.
  • Add sales commission agents to help you in selling charity event tickets online.

Get Pabbly Subscription Billing for Free

We are living in an empathetic world where charity events used to happen. But most of the charity organizations look for a mediator who can help them selling event tickets online. But, what if we say you can skip the part of middleman instead start your own charity event tickets business online.

Yes! It is possible, and according to the Market and Research report, the global online event ticketing market will exhibit a 4.8% CAGR during the forecast period. Further, by making a digital presence you can make a mark among the global audiences. Gladly, there is a software named Pabbly Subscription Billing that will assist you in selling charity event tickets online.

The software lets you build amazing checkout pages for selling charity event tickets. Moreover, below are its highlighted features:

  • List various charity event tickets in a single checkout page
  • Offer unlimited discounts and coupon codes to customers
  • Receive a confirmation email alert from prospects

Well, now that I have got you interested in its unimaginable features, then let’s focus on creating a checkout page to sell charity event tickets online.

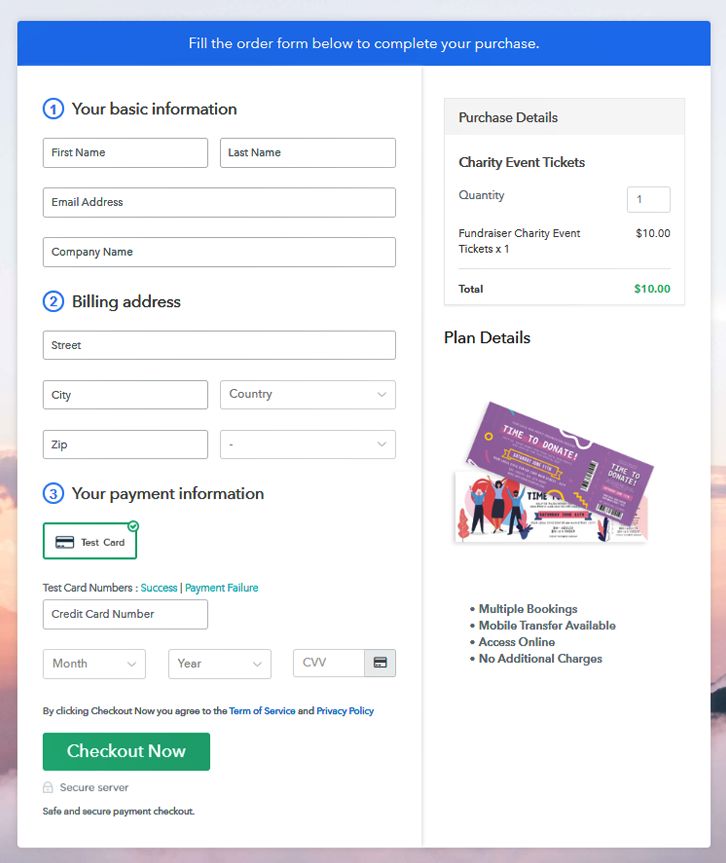
Final View of Checkout Page for Your Charity Event Tickets Selling Business

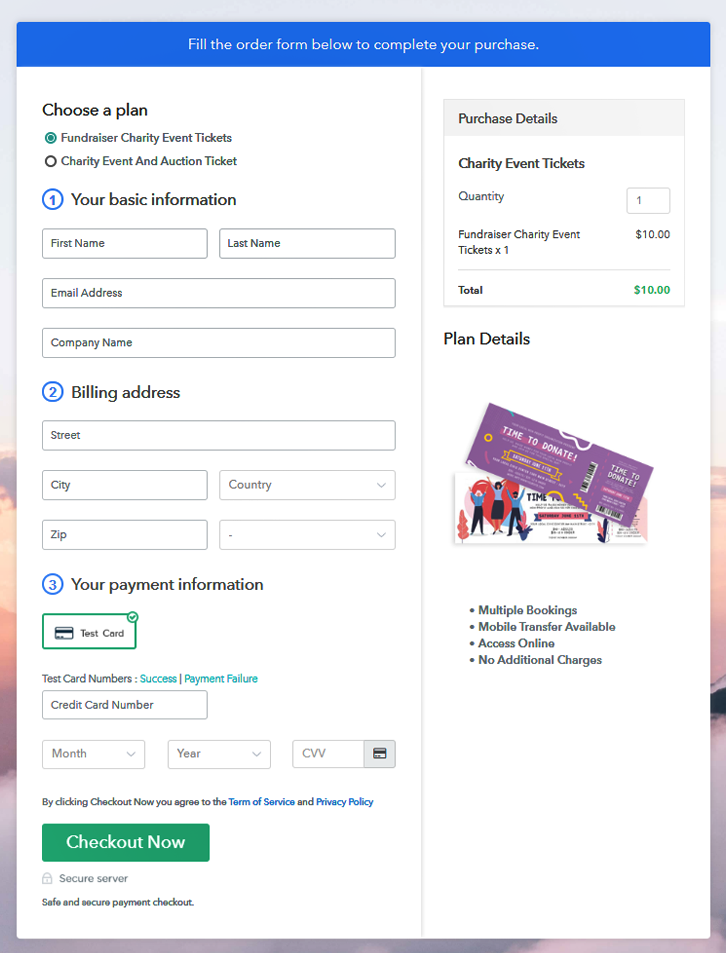
Checkout Page to Sell Charity Event Tickets Online

Preview Checkout Page

Step 1: Log in to Pabbly Subscription Billing

Signup

Begin the process for creating a checkout page for a charity event tickets by visiting the Pabbly Subscription Billing in your browser. After that, click on the “Sign up Free“ button. Moreover, either manually filled out the details or sign in using your Gmail account.

Sign Up For Free!

Step 2: Select Subscription Billing

Access Subscription Billing

Step 3: Account Setup

Setup Account

Besides, after clicking on the “Access Now” button of the software, a page will open with fields like company name, select currency, and phone number. Simply fill out those details to continue creating a checkout page for charity event tickets.

Step 4: Connect Payment Gateways & Start Charity Event Tickets Selling Business Online

Connect Payment Gateway

The subsequent step is to gaining knowledge about payment procedures using a “Test Payment Gateway”. Here, we will describe the checkout page process for the charity event tickets with the help of a test payment gateway. Besides this, the tool offers various payment gateways such as PayPal, Stripe, etc. Further, below are the payment integration guides to help you out.

Step 5: Add Product For Your Charity Event Tickets

Add Product

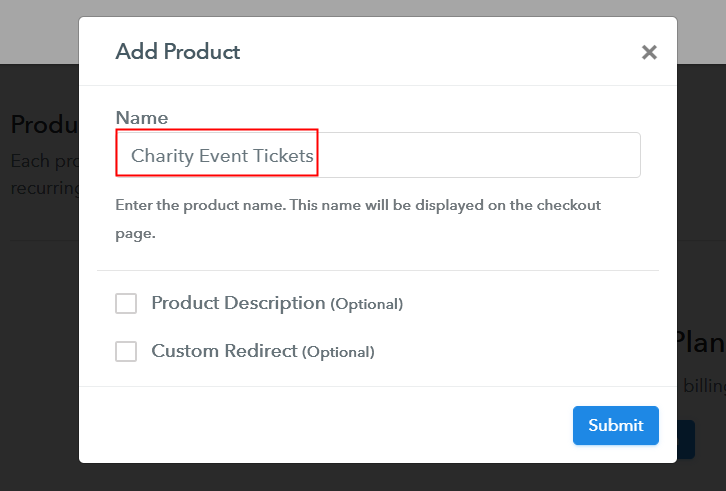
Additionally, add the name, which in our case is “Charity Event Tickets”. Here you can specify the type like fundraiser event tickets, environmental charity event tickets, etc. Further, write a short description of the charity event tickets to grab the customer’s attention.

Add Product to Start Selling Charity Event Tickets Online

Moreover, just fill out all those details and your product is created.

Note: Here you can add all the products related to the similar category by creating plans for each of them.

Step 6: Add Plans 

Let’s discover plans for different kinds of charity event tickets available in your store.

(a) Select Add New Plan

Add Plan

(b) Specify the Plan & Pricing Details

Specify the Plan and Pricing to Sell Charity Event Tickets Online

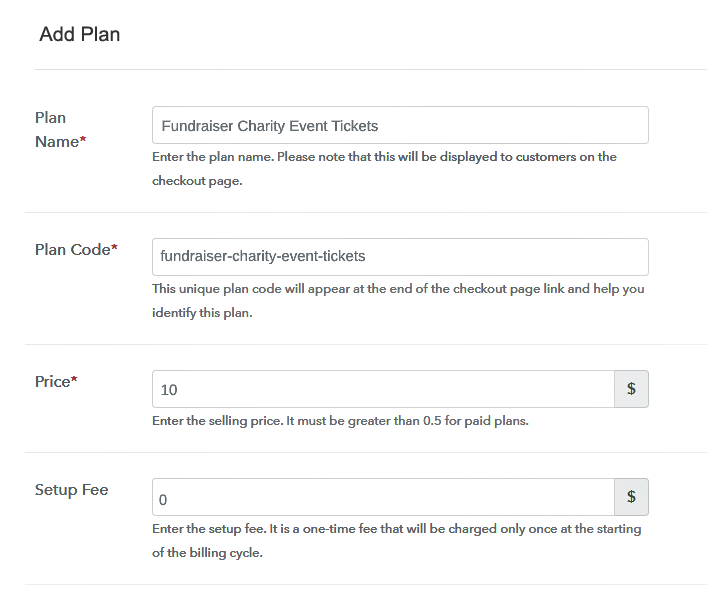
The next thing to do is fill all the details of the charity event tickets like plan name, code, price, set-up fee, and much more to continue.

(c) Add Image & Description of Charity Event Tickets

Add Image & Description to Sell Charity Event Tickets Online

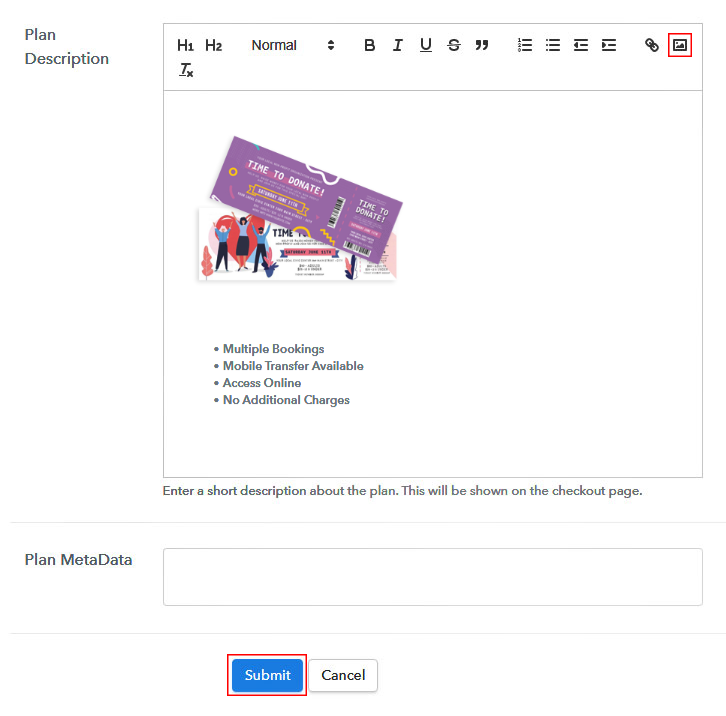
Furthermore, it is necessary to write a brief description of charity event tickets using bullets, images, etc, to bring original buyers to the checkout page.

Next, click on the “Submit” button to add the charity event tickets on the checkout page.

Finally, you can add multiple plans and kinds of charity event tickets in your product list which you want to market online.

Step 7: Share your Checkout Page

Share Checkout Page on Social Media

  • You can easily share the checkout page link of the charity event tickets on Facebook & Twitter.
  • Furthermore, share the direct link to the plan of charity event ticket’s with your customers via SMS or email marketing.
  • Moreover, you can add the plan link provided of a charity event tickets in the buttons or any anchor text on your website, so the users will be redirected to the checkout page.

Step 8: Preview Checkout Page

Follow up the recommended steps to preview the checkout page:

(a) Click on the View Button

View Checkout Plan

(b) Take a Look at the Checkout Page

Checkout Page to Sell Charity Event Tickets Online

Step 9: Embed Checkout Page in Site & Sell Charity Event Tickets Online

Embed Checkout Page on Website

Just copy the link and add the checkout page to sell charity event tickets online at any proper place on your WordPress site.

(a) Edit the Page & Paste the Copied Link

Embed Checkout Page on Website

Further, paste the plan link on a text editor of the WordPress dashboard.

(b) Save & Publish the Checkout Page

Save_and_Publish

Next, click the “Publish” button, after making changes.

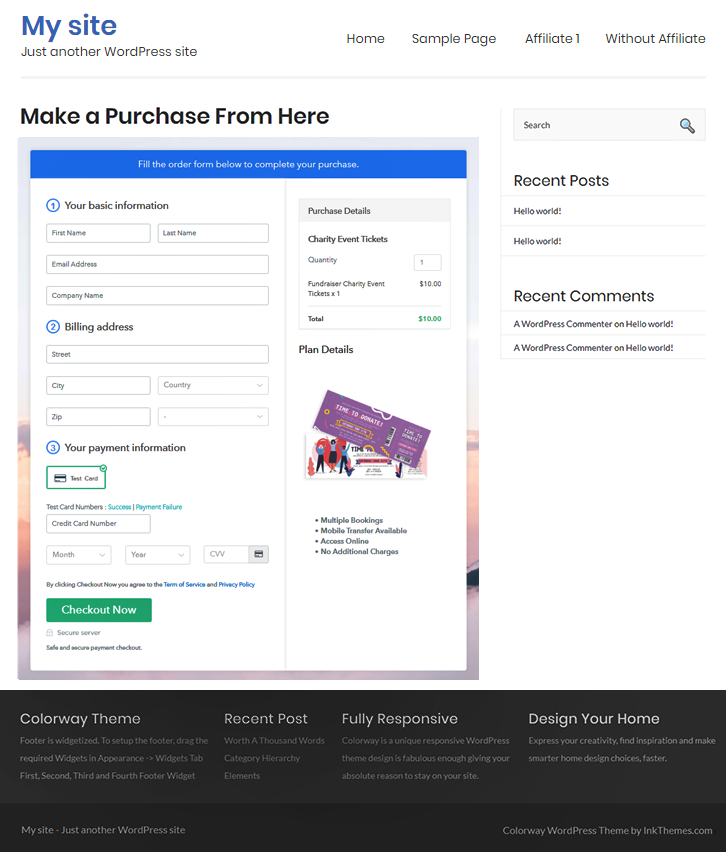
(c) Check out the Final Look of your Checkout Page on WordPress Site

Final Look of your Checkout Page to Sell Charity Event Tickets Online

Step 10: Multiplan Checkout Page

Note: In case you want to sell multiple products via a single checkout page, you can create a multi-plan checkout page otherwise skip this step.

(a) Click on Add Mutiplan Checkout

Multiplan Checkout

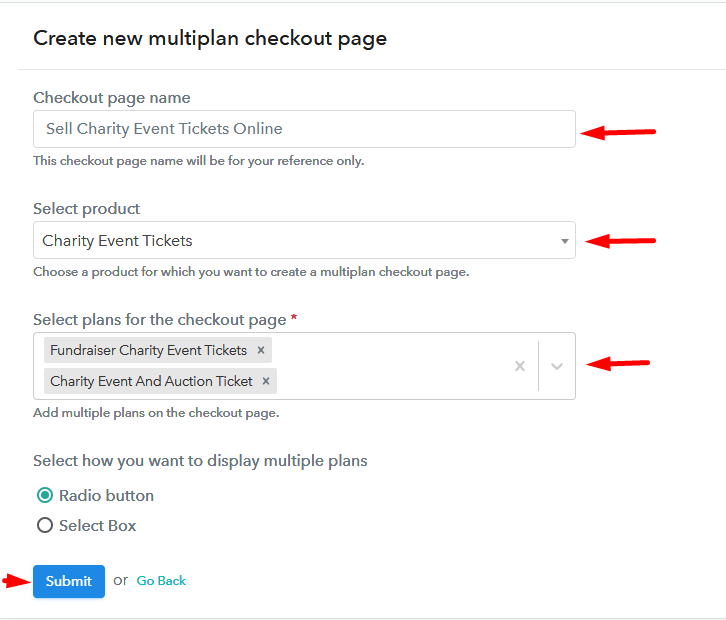
(b) Add Plans to Sell Multiple Charity Event Tickets from Single Checkout Page

Add Multiple Products to Start Selling Charity Event Tickets Online

(c) Take a Look at the Checkout Page

Multiplan Checkout Page to Sell Charity Event Tickets Online

Preview Checkout Page

Wrapping Up

There you have it! If you own the event management company or organize fundraisers or charity events frequently, then you must give a thought to start charity event tickets business online. As you know now, starting any business using Pabbly Subscription Billing is a walk in the park. Moreover, the support team will guide you with the process in case of any difficulty.

So, don’t wait anymore, try this software out and let us know your reaction in the comments section.

You May Also Like To Read –
How to Sell Cereal Bars Online | Step by Step (Free Method)

How to Sell Cereal Bars Online

Ideal For: All the cereal bar makers, cereal bar sellers, retail cereal bar shop owners, and other merchants can use this method to take sell cereal bars online.

How to Sell Cereal Bars Online

Why Choose this Method to Sell Cereal Bars Online?

Unlike any other solution, this method allows you to:

  • List and sell your cereal bars for FREE. Absolutely no payment required.
  • No need to pay commission on any of your sale.
  • Multiple payment options like PayPal, Credit Card, etc to collect payment from a single place.
  • Sell one time or recurring subscriptions of your cereal bars.
  • Collect payments & sell products in any currency as per your requirement.
  • Give discounts on your products by offering special coupon codes.
  • Add sales commission agents to help you in selling cereal bars online.

Get Pabbly Subscription Billing for Free

Nowadays, everyone is getting health conscious and of course who doesn’t love to keep their body fit & fine? That is the reason why, market is always filled with many nutritious products and cereal bar is one of them. Thus, this might be the right time for you to take your cereal bars business online. Want to know why? Because this is a digital age where people want things on their doorstep in just a few clicks. And to do so, you will need a tool that can help you set cereal bar business online.

Fortunately, we have an amazing tool suggestion for you through which you can sell cereal bars online. i.e, Pabbly Subscription Billing. Using this tool, you can create amazing checkout pages and share them on your websites, social media accounts to reach out to the worldwide audience. Here are some of the advantages in the following:

  • You can list unlimited products and plans
  • Besides, you can collect online/offline payments globally
  • Even sell single or multiple products from a single page
  • Send automatic billing and invoicing to your customers
  • Moreover, you can apply global taxes in a few clicks
  • Not only that, but you can also offer discounts and coupons to your customers

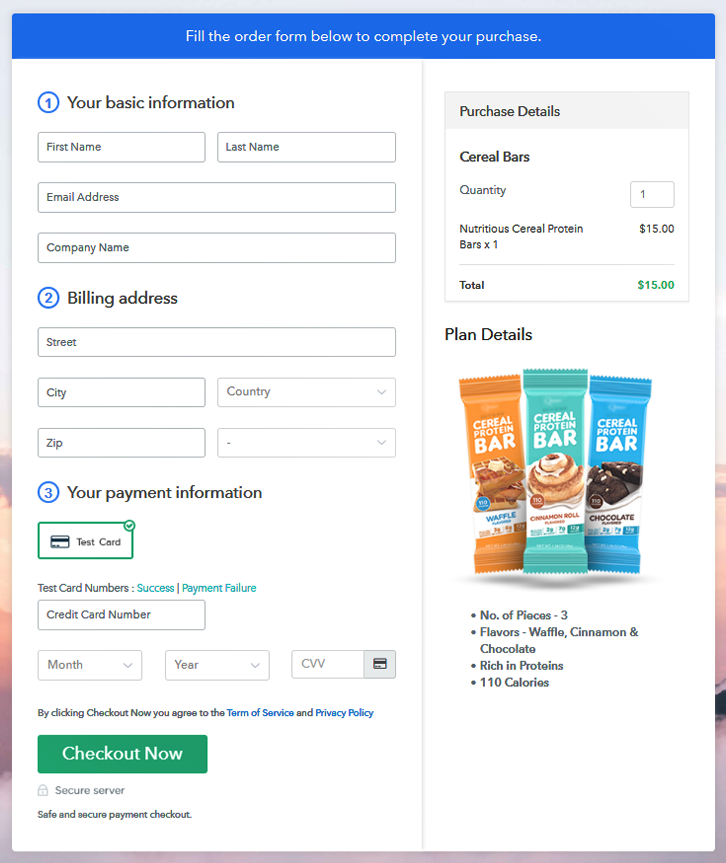
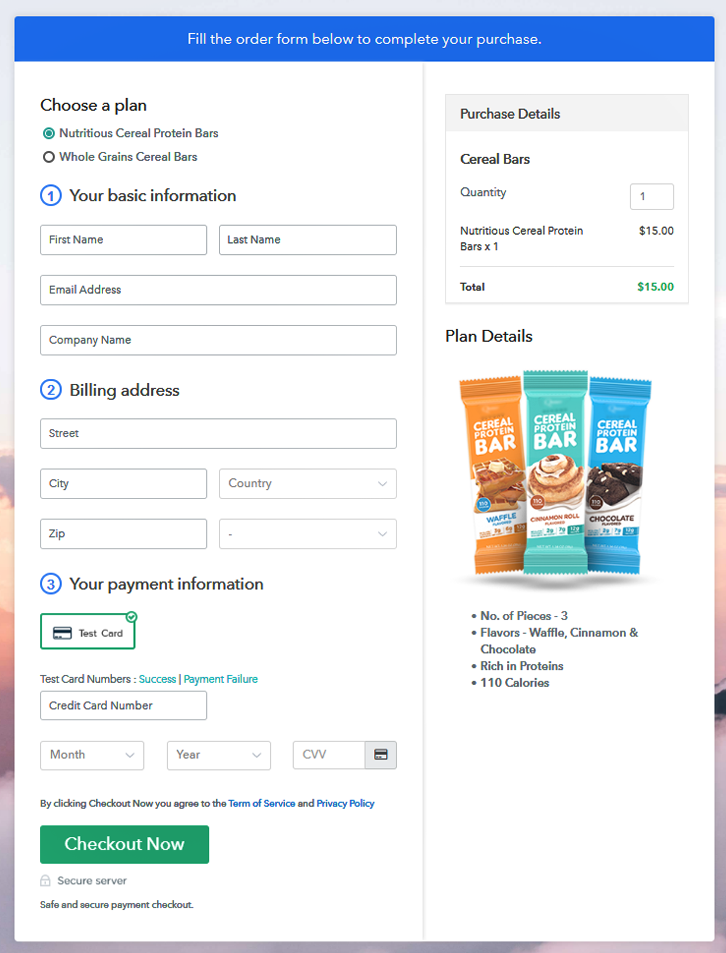
Final View of Checkout Page For Your Cereal Bars Selling Business

Checkout Page Preview to Start Selling Cereal Bars Online

Preview Checkout Page

Step 1: Log in to Pabbly Subscription Billing

Signup

First of all, go to the Pabbly Subscription Billing website to get started with selling cereal bars online. Now, click on ‘Sign Up Free‘ button. Quickly, either manually filled out the details or sign in via Google account.

Sign Up For Free!

Step 2: Select Subscription Billing

Access Subscription Billing

Step 3: Account Setup

Setup Account

Specify a company name, preferred currency, and phone number in the next pop-up window to go further in the set-up procedure.

Step 4: Connect Payment Gateways & Start Cereal Bars Selling Business Online

Connect Payment Gateway

The next step is setting up a payment gateway to collect payment for selling cereal bars online. Here, I am enabling the test payment gateway just to understand the payment collection through this service. Although, you can also choose from the multiple payment gateways like PayPal, Stripe, etc whose integration guides are given below.

Step 5: Add Product for Your Cereal Bars

Add Product

Now up to this point, all the system settings are done and we can start adding product categories. Further, we’ll add plans to sell within these product categories.

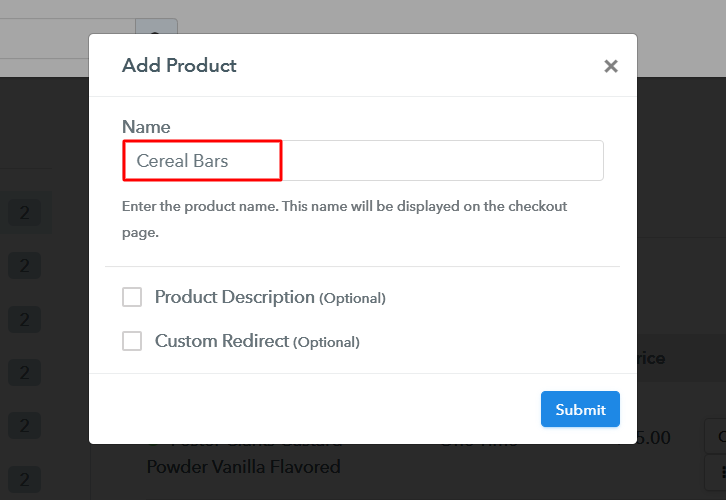
Add Product to Sell Cereal Bars Online

Hit the submit here and a cereal bars product will be added.

Note: Here you can add all the products related to the similar category by creating plans for each of them.

Step 6: Add Plans 

Let’s add plans for the different kinds of cereal bars available in your store.

(a) Select Add New Plan

Add Plan

(b) Specify the Plan & Pricing Details

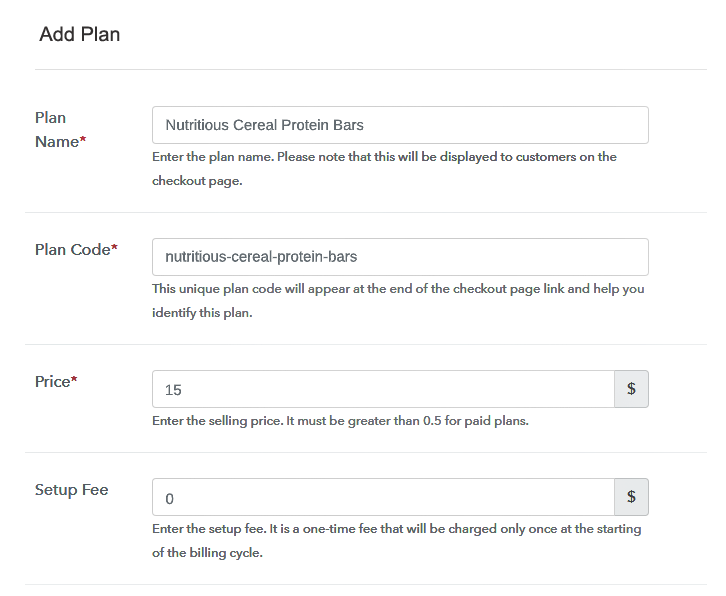
Add Plan to Sell Cereal Bars Online

You can add plan details for any cereal bars from here like its name, code, price, billing cycle, etc.

(c) Add Image & Description of Cereal Bars

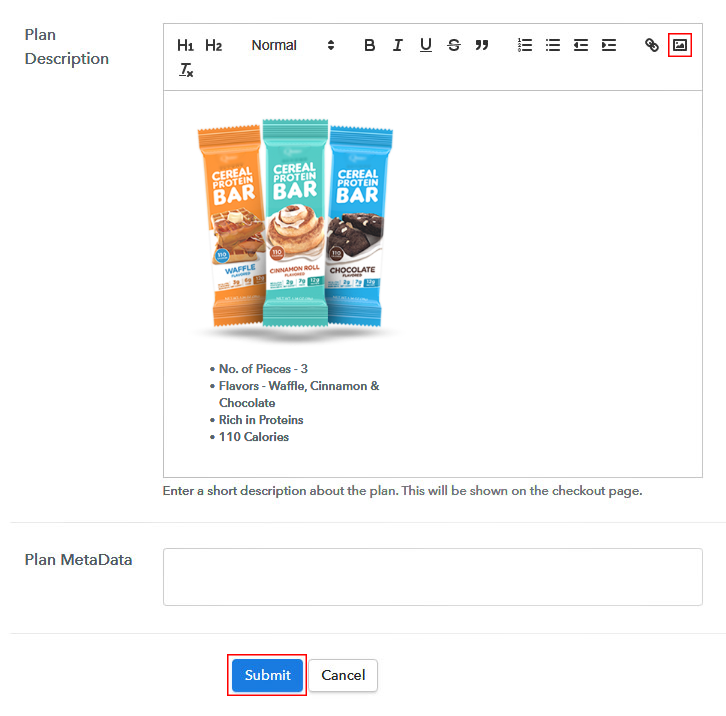
Add Image & Description of Cereal Bars

Also, you can add a picture of the cereal bars with some description about it.

Once you click on the “Submit” button, your cereal bars plan will be ready to sell online.

Furthermore, you can add other cereal bars by going through the same procedure.

Step 7: Share your Checkout Page

Share Checkout Page on Social Media

To sell the cereal bars online, you’ll need to share or link the checkout pages.

  • You can share the checkout page directly over Facebook & Twitter using the sharing buttons highlighted in the above picture.
  • Not only that, but you can share the plan link given here with your customers on any social media or link sharing platform
  • Last but not the least, you can even link this plan link with the buttons & texts of the website and apps.

Step 8: Preview Checkout Page

Follow up the recommended steps to preview the checkout page:

(a) Click on the View Button

View Checkout Plan

(b) Take a Look at the Checkout Page

Checkout Page Preview to Start Selling Cereal Bars Online

Step 9: Embed Checkout Page in Site & Sell Cereal Bars Online

Embed Checkout Page on Website

Just copy the link and add the checkout page to sell cereal bars online at any preferable place on your WordPress site.

(a) Edit the Page & Paste the Copied Link

Embed Checkout Page on Website

Further, paste the plan link on a text editor of the WordPress dashboard.

(b) Save & Publish the Checkout Page

Save_and_Publish

Next, click the “Publish” button, after making changes.

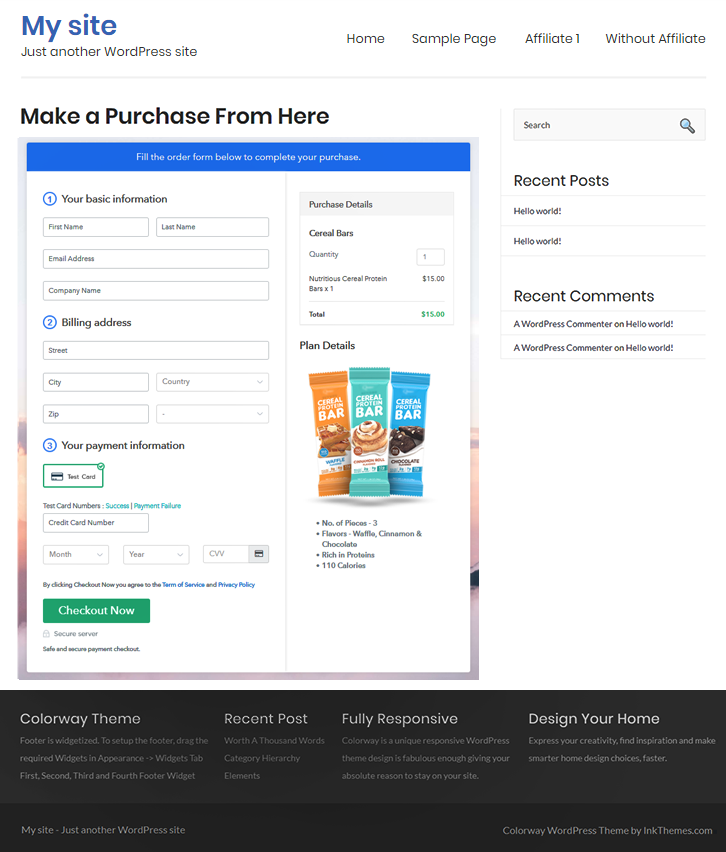
(c) Check out the Final Look of your Checkout Page on WordPress Site

Checkout Page on WordPress Site to Sell Cereal Bars Online

Step 10: Multiplan Checkout Page

Note: In case you want to sell multiple products via a single checkout page, you can create a multi-plan checkout page otherwise skip this step.

(a) Click on Add Mutiplan Checkout

Multiplan Checkout

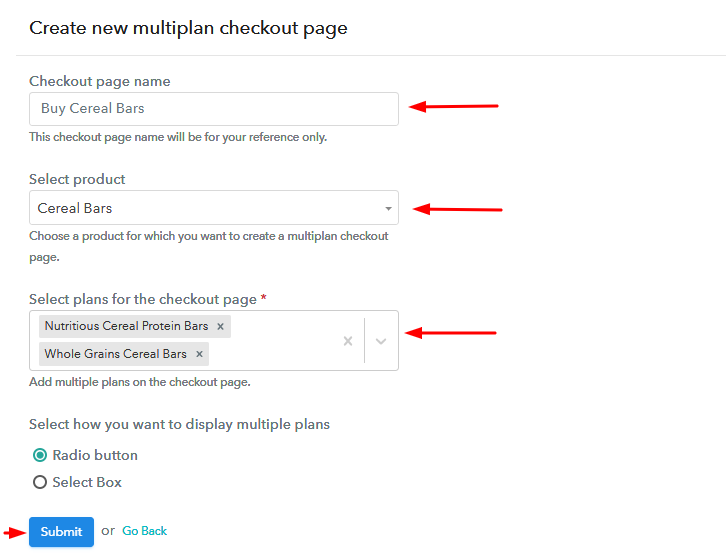
(b) Add Plans to Sell Multiple Cereal Bars from Single Checkout Page

Add Plans to Sell Multiple Cereal Bars from Single Checkout Page

(c) Take a Look at the Checkout Page

Multiplan Checkout Page to Sell Cereal Bars Online

Preview Checkout Page

Wrapping Up

Well, this was all about ‘how to sell cereal bars online’. Now, you can easily create checkout pages using Pabbly Subscription Billing by following the 10 easy steps. So, why wait anymore? Just log in to this software and start selling cereal bars online without any hassle. Besides, for any queries and suggestions, do write to us in the comment section below. Thank you!

You May Also Like To Read –