How to Sell Printers Online | Step by Step (Free Method)

How to Sell Printers Online

Ideal For: All the printer manufacturers, printer dealers, retail gadgets shop owners, wholesale printer dealers and other merchants can use this method to take their printers selling business online.
How to Sell Printers Online

Why Choose this Method for Selling Over any Other Solution?

Unlike any other solution, this method allows you to:

  • List and sell your printers for FREE. Absolutely no payment required.
  • No commission on sales.
  • Collect payment through multiple payment modes from a single checkout page.
  • Sell one time or recurring subscriptions of your printers.
  • Sell and collect payment in any currency as per your requirement.
  • Give discounts on your products by offering special coupon codes.
  • Add sales commission agents to help you in selling your printers.

Get Pabbly Subscription Billing for Free

“Before printing was discovered, a century was equal to thousand years” quoted Henry David Thoreau. One of the greatest discoveries of mankind is Printer. Back in the days, when everything was tough, Remington-Rand discovered the first high-speed printer in 1953 to lessen the burden. Since then, it is claimed to be one of the smartest and powerful inventions.

Why would you like to sell printers online?

The very reason for selling printers online is, it is one of the most common equipments used in schools, colleges, offices, and even at homes. In IDTechEx Research it has been claimed that the printers market will boom in the coming days and will reach $20 billion by 2025. Nowadays, people are more comfortable buying stuff online as it saves a visit to the shop. So, considering all this it won’t be old fashioned to start your printer selling business online.

Now, the real question is how? Don’t worry we already had done all the heavy lifting for you. There is this one amazing software available named Pabbly Subscription Billing in the market that lets you create beautiful checkout pages. Why checkout pages? Because it grabs the audience’s attention and can manage the whole process single-handedly. Other than this, some of the distinct features of the software are:

  • Collect payment both in offline and online mode
  • Offers discount and coupon codes to prospects
  • List multiple printers in the single checkout page

Abovementioned are some of the perks of using software and now let’s move on to the process of creating a checkout page using the Pabbly Subscription Billing.

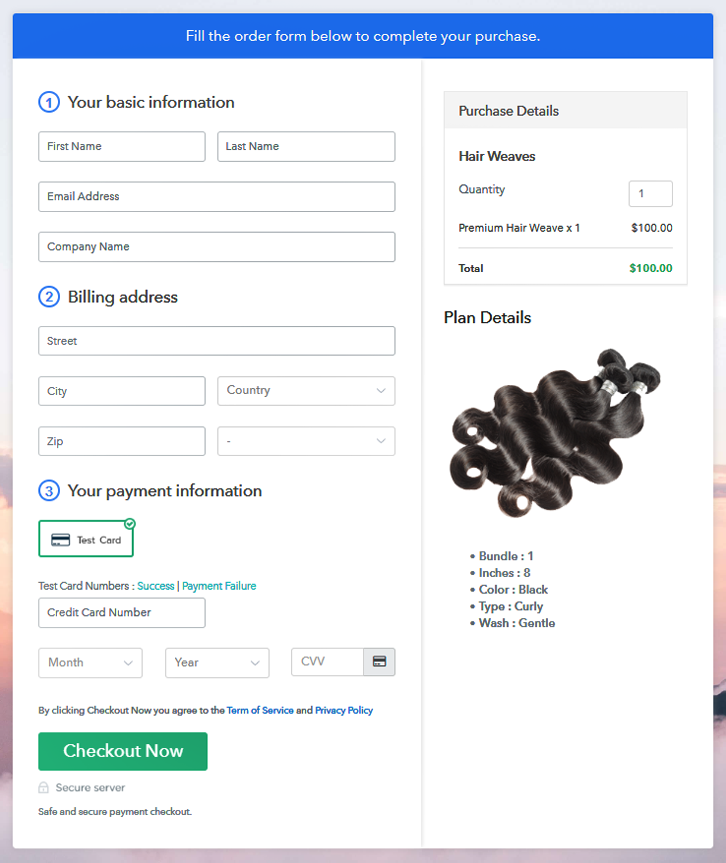
This is How your Checkout Page will Look Like After Creation
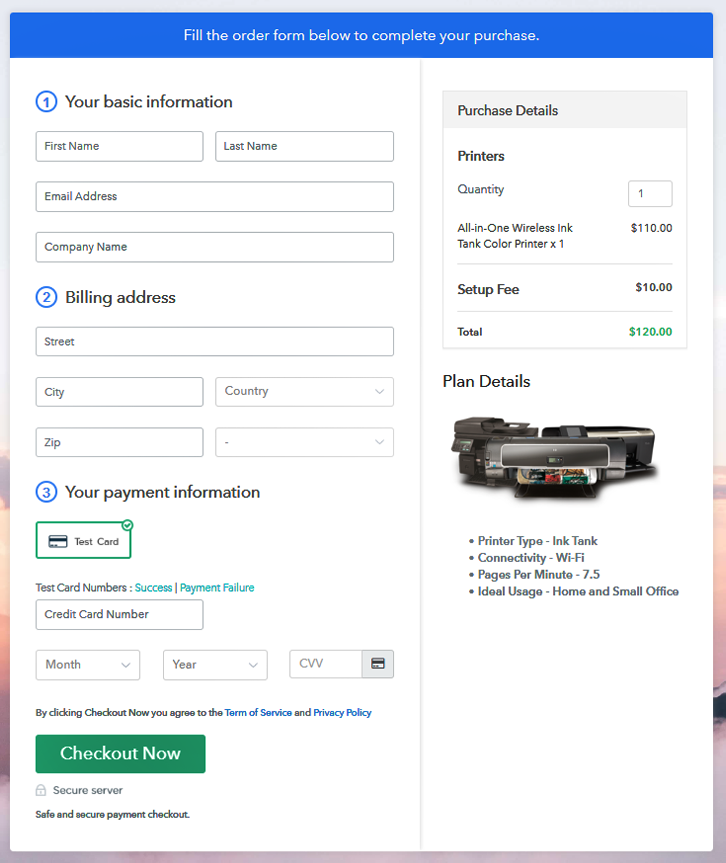
Checkout Page to Sell Printers Online

Preview Checkout Page

Step 1: Log in to Pabbly Subscription Billing

Signup

Initiate the process by visiting the Pabbly Subscription Billing site and click on the “Sign Up Free” button. Then enter into the software by manually filling the details or use your Gmail credentials.

Sign Up For Free!

Step 2: Select Subscription Billing

Access Subscription Billing

Step 3: Account Setup

Setup Account

The next step is to click on the “Access Now” button of the software, it will redirect you to the page with details like company name, select currency, and phone number. After filling out those details, press “Continue”.

Step 4: Connect Payment Gateways To Sell Printers Online

Connect Payment Gateway

Now, the further step is to check the whole payment experience with the help of a dummy payment gateway in software. Also, the software is packed with multiple payment gateways like PayPal, Stripe, etc. Here, we are also using the test payment gateway for explaining the procedure. Additionally, we are mentioning the payment integration guides to help you out.

Step 5: Add Your Product

Add Product

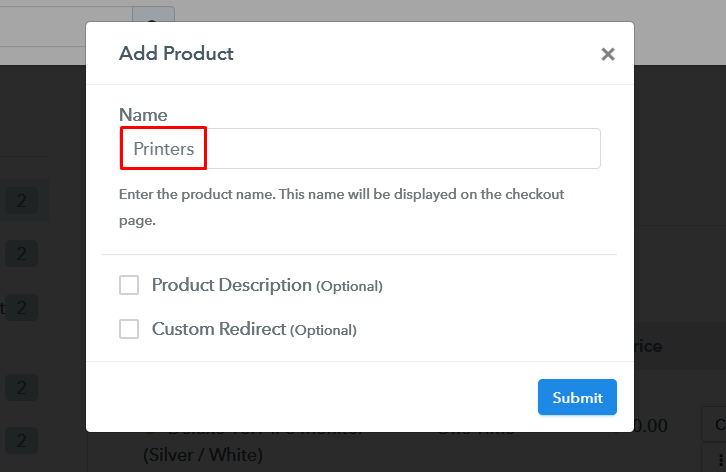
Subsequently, add the name, which in our case is printers. Here you can specify the type like wireless printers, lasers printers, etc. Also, write a short description of the printer to grab the buyer’s attention.

Add Product to Start Selling Printers Online

Then, click on the “Submit” button after filling the details.

Note: Here you can add all the products related to the similar category by creating plans for each of them.

Step 6: Add Plans 

Let’s rollout plans for different kinds of printers available in your store.

(a) Select Add New Plan

Add Plan

(b) Specify the Plan & Pricing Details
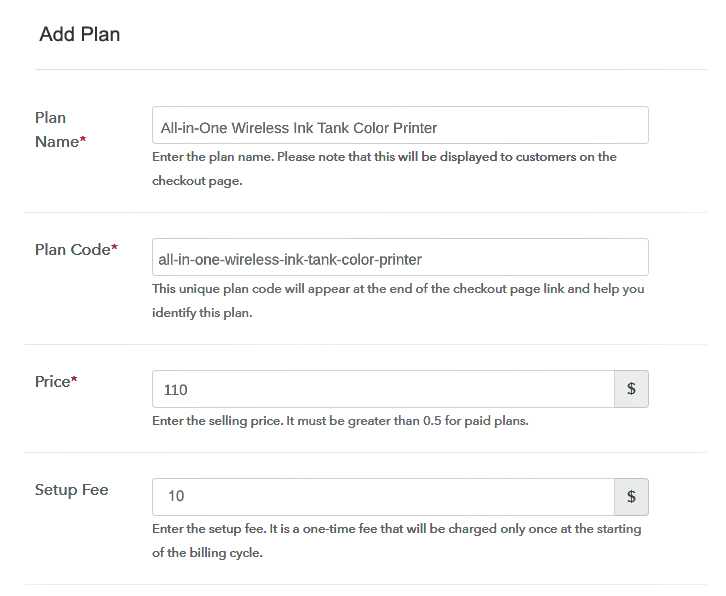
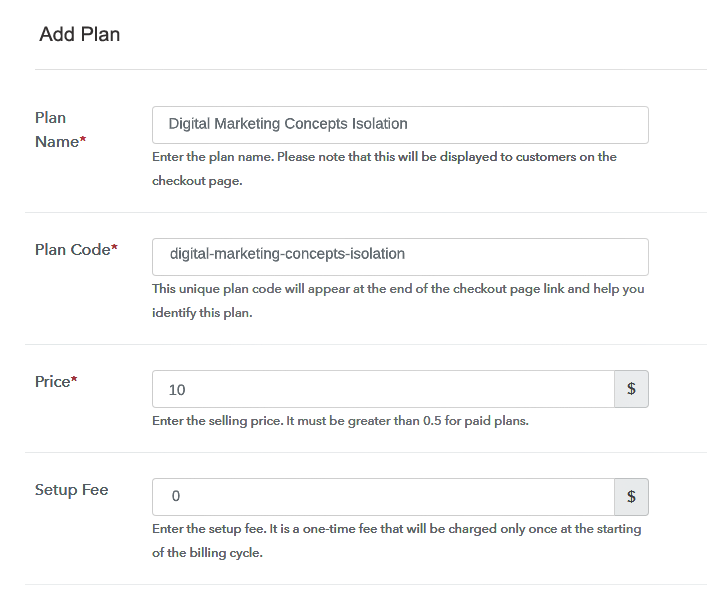
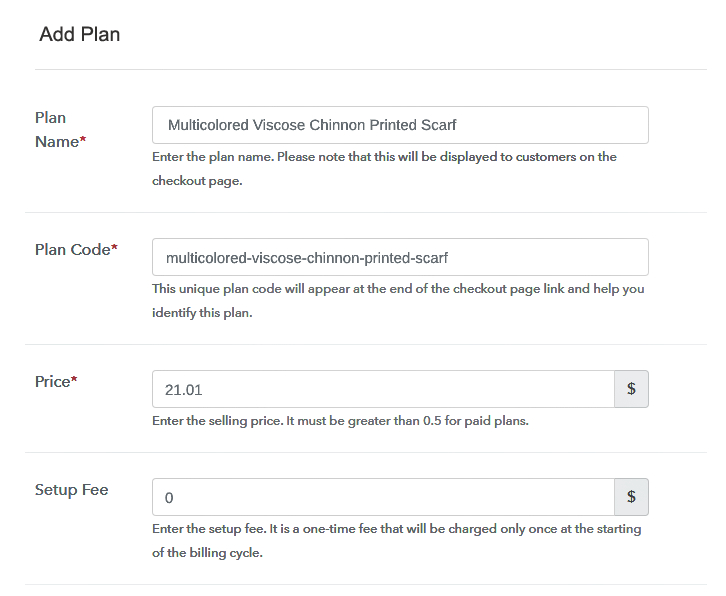
Specify the Plan and Pricing to Sell Printers online

Further, fill out all the details like plan name, code, price, set-up fee, and much more to go on.

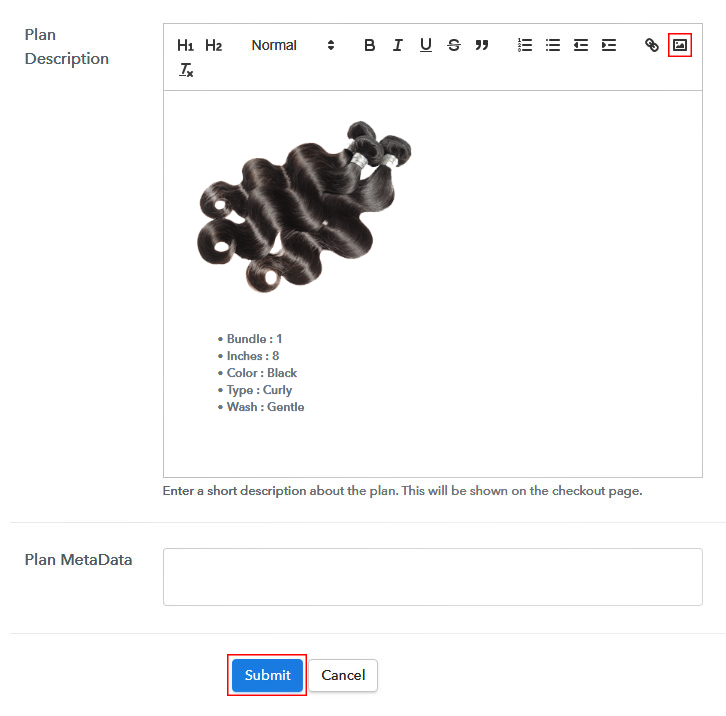
(c) Add Image & Description

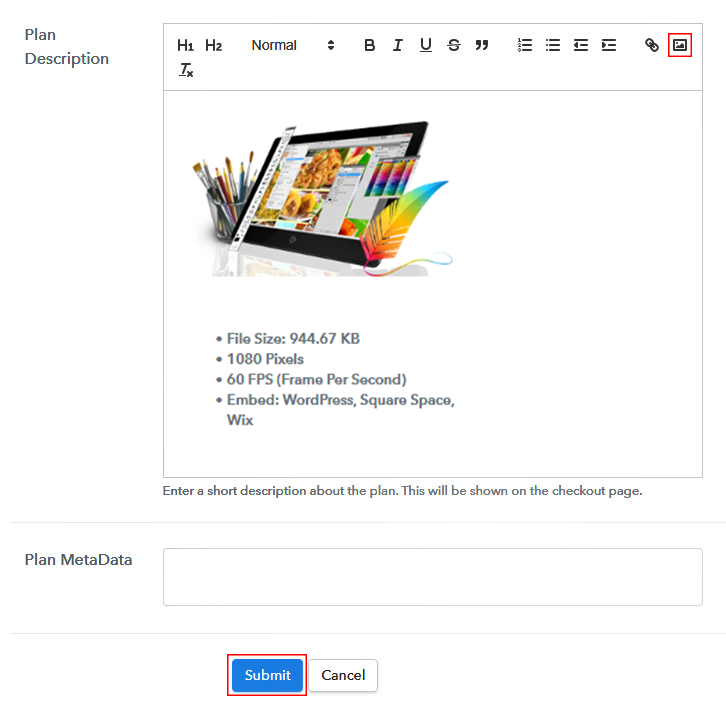
Add Image & Description to Sell Printers Online

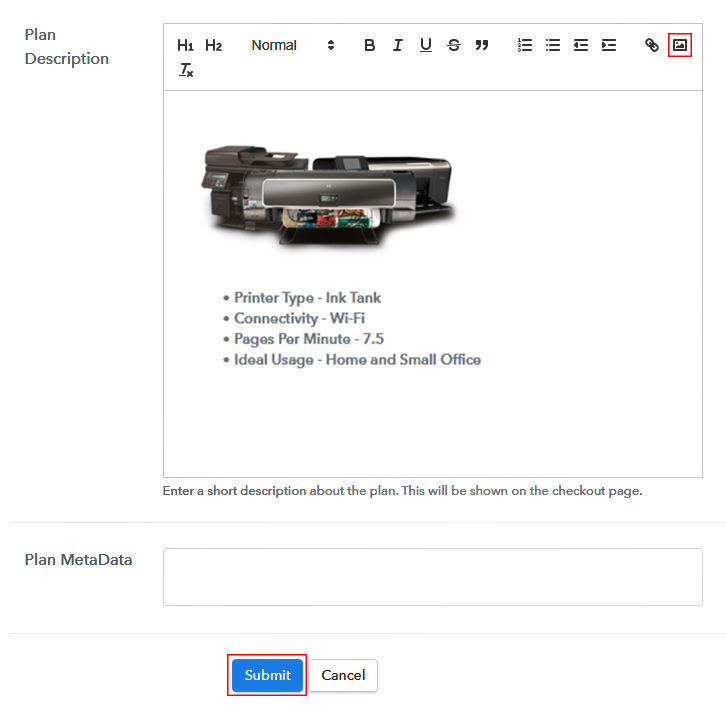
Moreover, it is necessary to write a brief description of printers using bullets, images, etc, to bring natural buyers to the checkout page,

Next, click the “Submit” button to add a product on the checkout page.

Additionally, you can add multiple plans and kinds of printers in your product list which you want to sell online.

Step 7: Share your Checkout Page

Share Checkout Page on Social Media

  • Moreover, share the checkout page of printers on social media accounts like Facebook & Twitter to grab the buyer’s attention.
  • Besides, you can share the direct link to plan with your customers via SMS or email marketing.
  • Additionally, embed the provided plan link of printers in the buttons or any anchor text on your website.

Step 8: Preview Checkout Page

Follow up the recommended steps to preview the checkout page:

(a) Click on the View Button

View Checkout Plan

(b) Take a Look at the Checkout Page

Checkout Page to Sell Printers Online

Step 9: Embed Checkout Page in Site & Sell Printers Online

Embed Checkout Page on Website

Just copy the link and add the checkout page to sell printers online at any preferable place on your WordPress site.

(a) Edit the Page & Paste the Copied Link

Paste Link in Text Editor

Further, paste the plan link on a text editor of the WordPress dashboard.

(b) Save & Publish the Checkout Page

Save and Publish

Next, click the “Publish” button, after making changes.

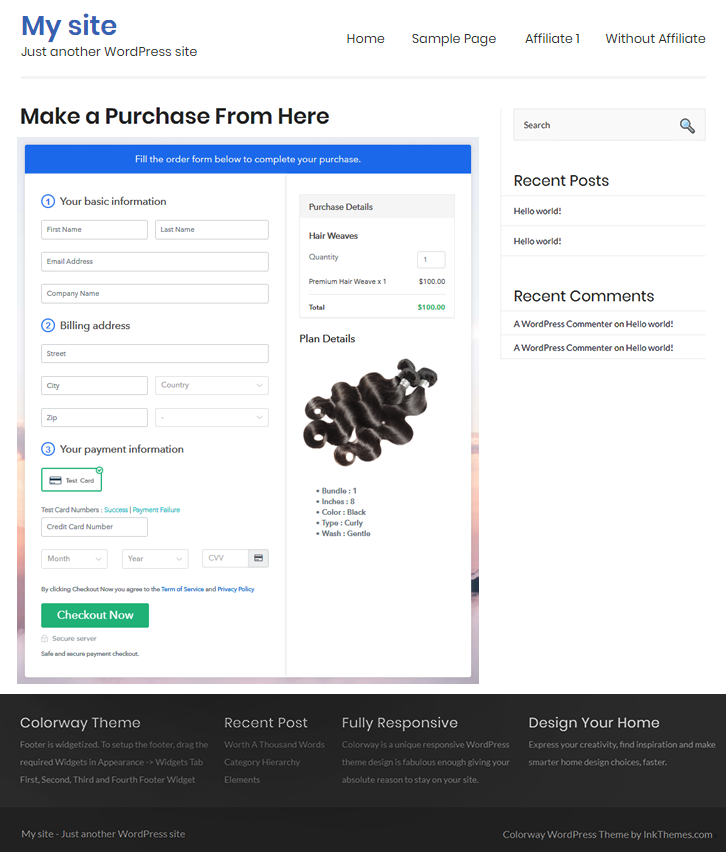
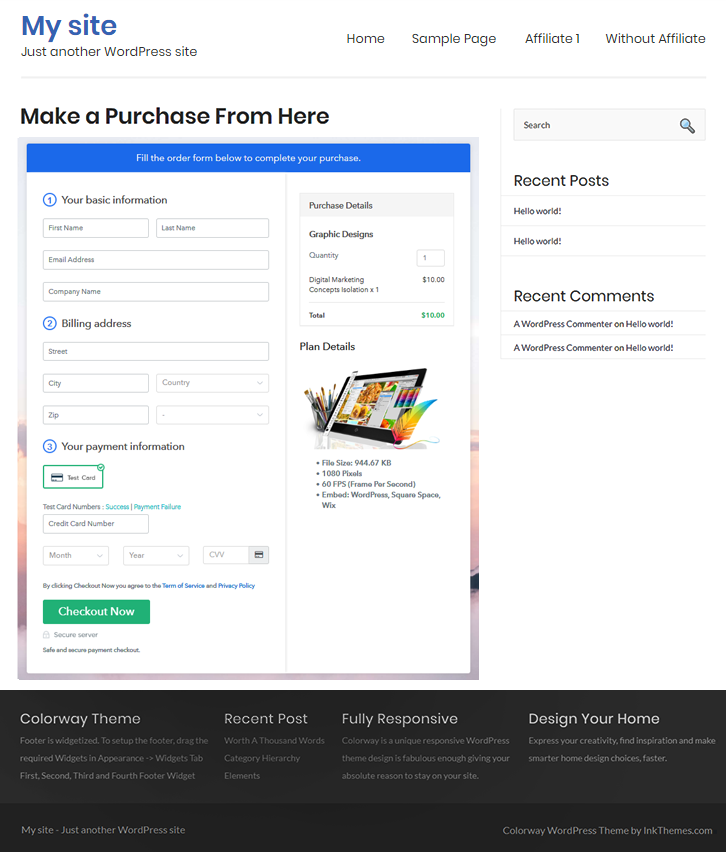
(c) Check out the Final Look of your Checkout Page on WordPress Site
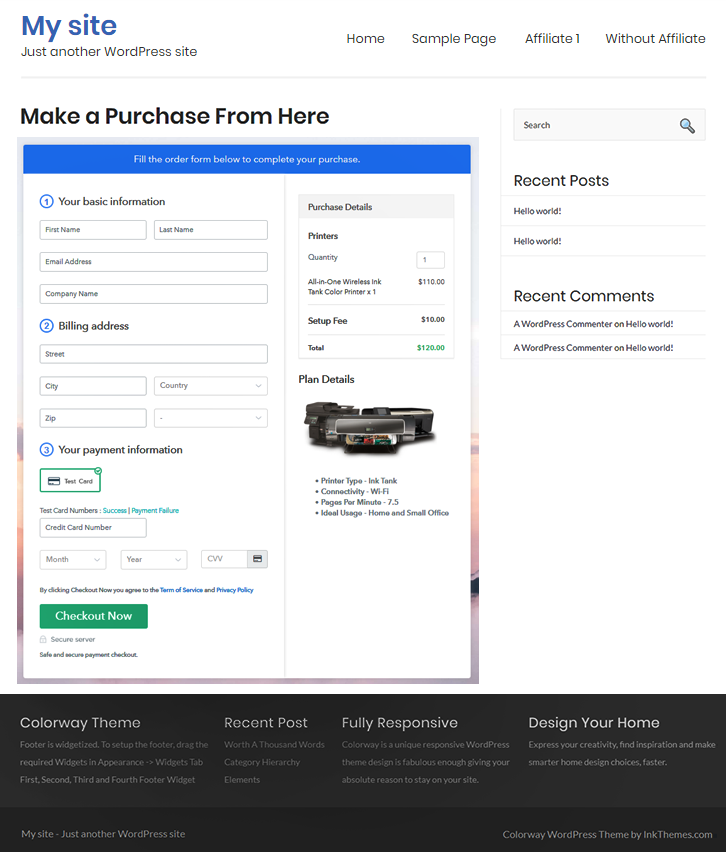
Final Look of your Checkout Page to Sell Printers Online

Step 10: Multiplan Checkout Page

Note: In case you want to sell multiple products via a single checkout page, you can create a multi-plan checkout page otherwise skip this step.

(a) Click on Add Mutiplan Checkout

Multiplan Checkout

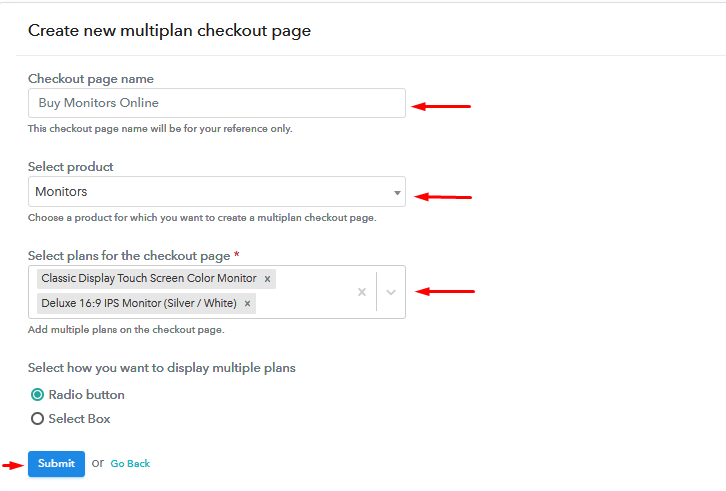
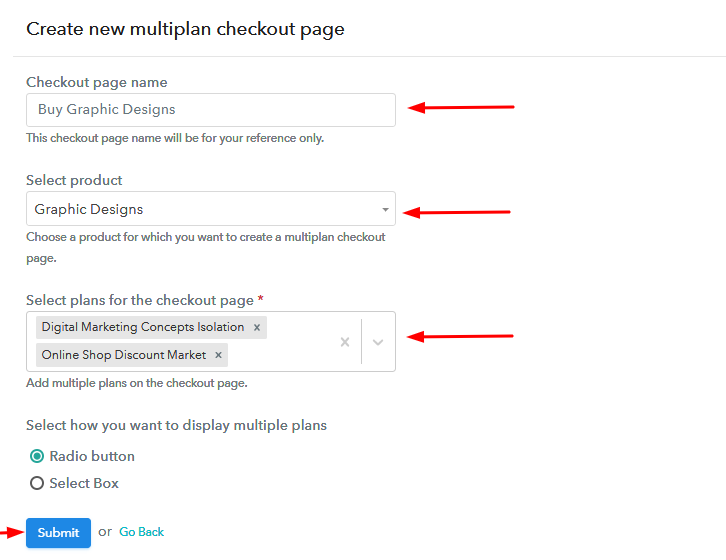
(b) Add Plans to Sell Multiple Printers from Single Checkout Page
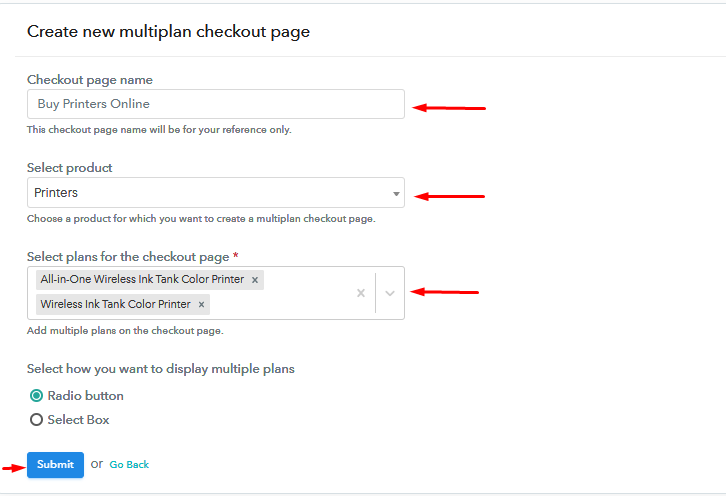
Add Multiple Products to Start Selling Printers Online

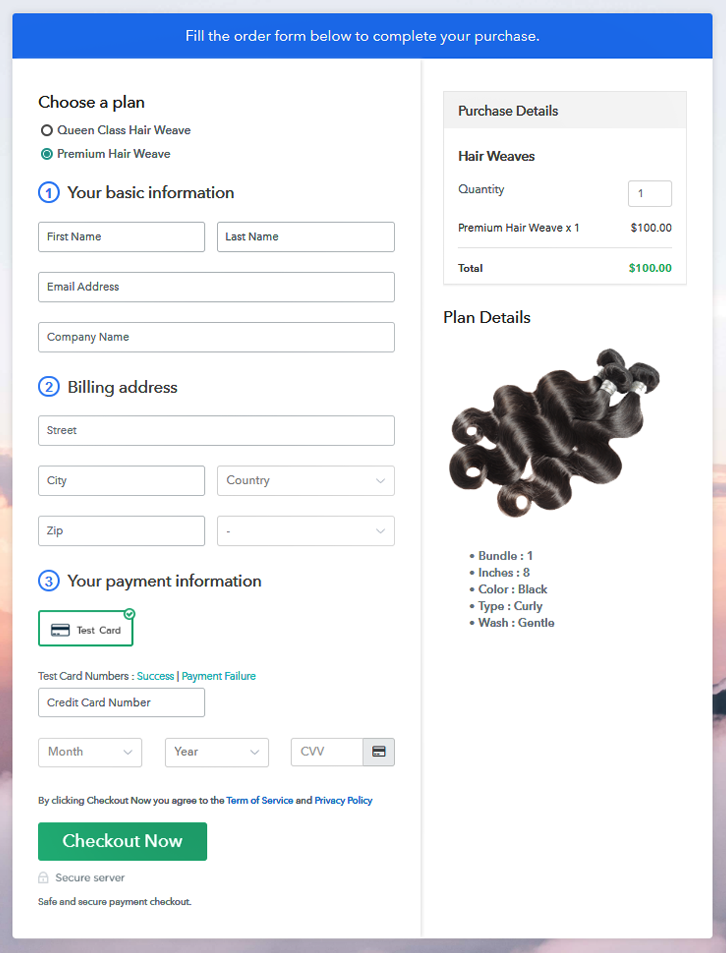
(c) Take a Look at the Checkout Page
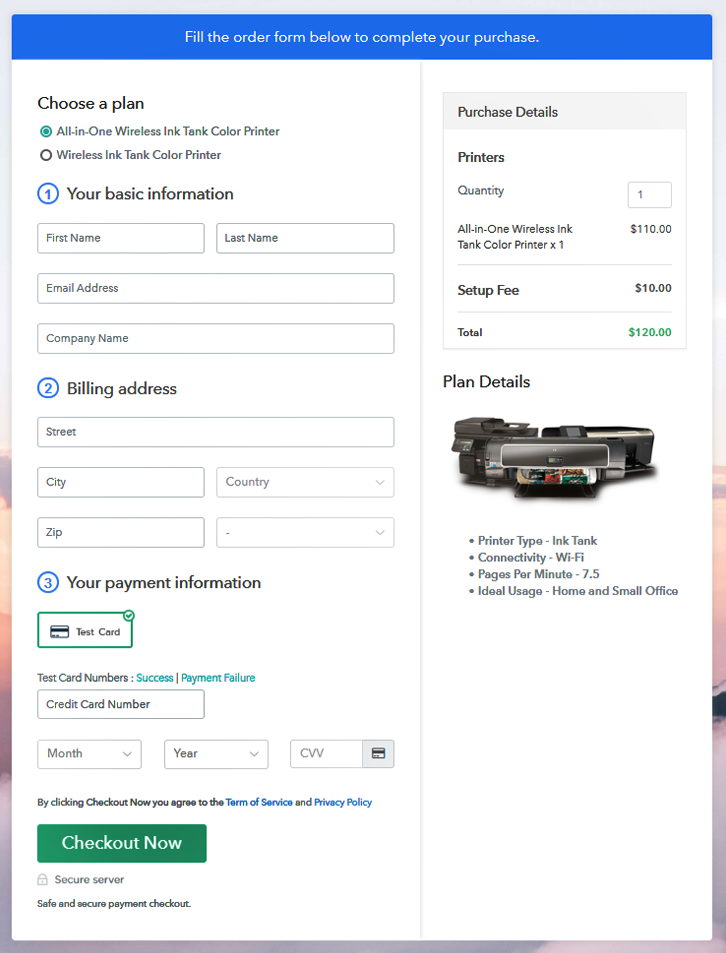
Add Multiple Products to Start Selling Printers Online

Preview Checkout Page

Wrapping Up

Hopefully, now we all know how much overwhelming can be a process of starting a new business. But, selling printers online is a walk in the park with the help of Pabbly Subscription Billing. Not just it lets you create checkout pages but also you can keep track of customers which is good in maintaining a relationship for the long haul.

So, don’t dwell in confusion, try out this software, and let us know your reaction in the comments section.

You May Also Like To Read –
How to Sell Yarn Online | Step by Step (Free Method)

How to Sell Yarn Online

Ideal For: All the knitting stores, retail yarn sellers, wholesale yarn dealers, and merchants who sell yarn from their homes can use this method to take their yarn selling business online.

How to Sell Yarn Online

Why Choose this Method for Selling Over any Other Solution?

Unlike any other solution, this method allows you to:

  • List and sell yarn for FREE. Absolutely no payment required.
  • No commission on sales.
  • Collect payment through multiple payment modes from a single checkout page.
  • Sell one time or recurring subscriptions of yarn.
  • Sell and collect payment in any currency as per your requirement.
  • Give discounts on your products by offering special coupon codes.
  • Add sales commission agents to help you in selling yarn.

Get Pabbly Subscription Billing for Free

Are you are a knitter and also you sell yarn for a living and want to earn more profit? If your answer to these questions is yes, then we are here to solve your problems and the solution is to start yarn selling business online.

Why would you like to sell yarn online?

The simple reasons are to earn more revenue easily by expanding your customer reach without any investment with Pabbly Subscription Billing. With its checkout pages, you can collect one-time and recurring payments easily. You just have to simply create checkout pages for yarn that you want to sell and share their links on social media or your website, so your customers can make direct purchases.

Other than this, With Pabbly Subscription Billing you can access so many amazing features:

  • Sell unlimited products without paying anything
  • Zero transaction fees
  • Integrate with your website
  • Collect one-time or recurring payments easily

This is How your Checkout Page will Look Like After Creation

Preview Checkout Page

Preview Checkout Page

Step 1: Log in to Pabbly Subscription Billing

Signup

In the first step, you have to visit Pabbly Subscription Billing website and then click on the “Sign Up Free” button. On clicking the button, you will reach to the signup page, where you can create an account with Gmail automatically or manually enter your details.

Sign Up For Free!

Step 2: Select Subscription Billing

Access Subscription Billing

Step 3: Account Setup

Setup Account

Once you are done with the signup process, in the next step, you have to fill up your company details i.e. company name, select currency, and contact number in the appeared dialogue box.

Step 4: Connect Payment Gateway to Sell Yarn Online

Connect Payment Gateway

After setting up your account, in this step, the payment collection process is shown by enabling the ‘Test Payment’ mode. Later, you have to connect with other payment gateways of your choice. The complete integration guide for payment gateways is provided below.

Step 5: Add Your Product

Add Product

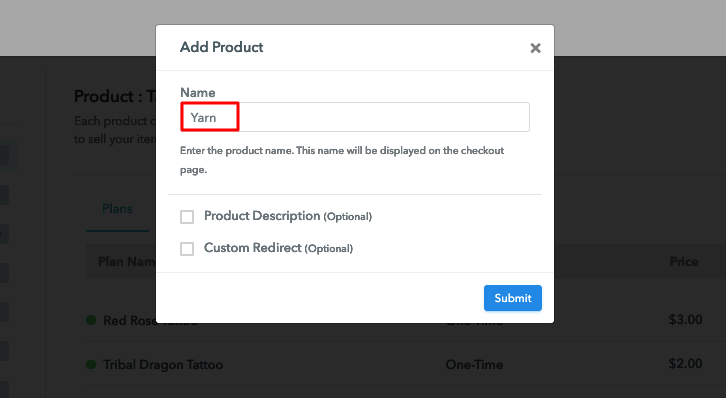
In the next step, you have to add your first product. You can add yarn of different categories for example woolen yarn, cotton yarn, etc, and add all other types of yarn in the same product by creating different plans.

Add Product Name to Sell Yarn Online

Simply fill up these details and your product is added.

Note: Here you can add all the products related to the similar category by creating plans for each of them.

Step 6: Add Plans

Let’s get started and create plans for different categories of yarn that you want to sell

(a) Select Add New Plan

Add Plan

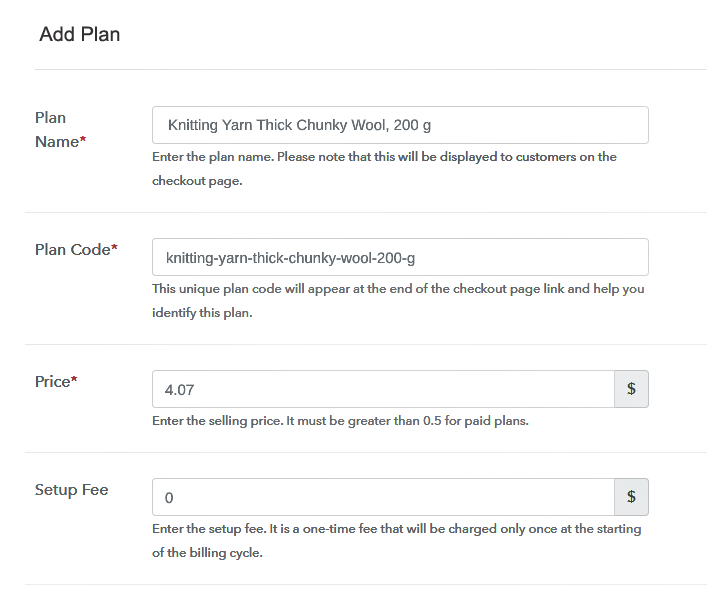
(b) Specify the Plan and Pricing Details

Add Details to Sell Yarn Online

On clicking add new plan, you will be redirected to the plan page, here you will have to fill the plan details such as plan name, code, billing cycle, price, etc.

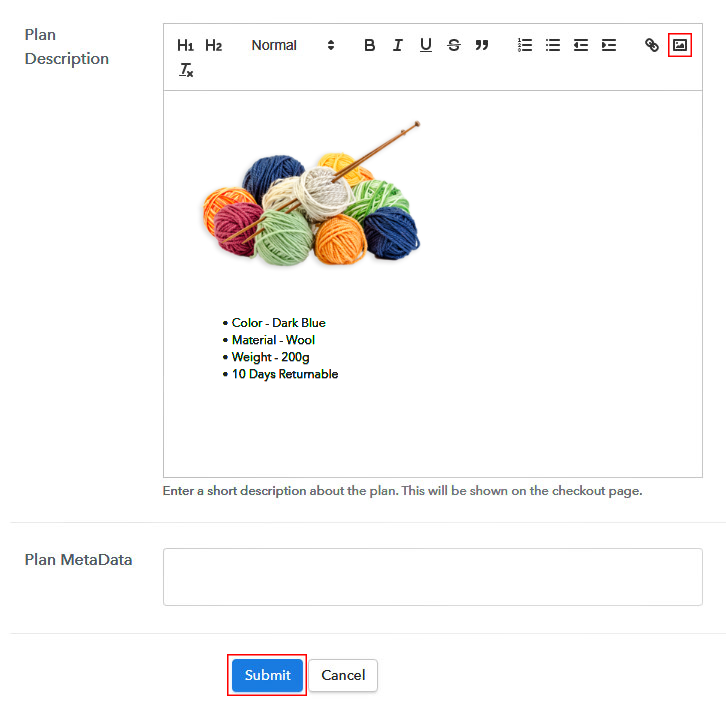
(c) Add Image & Description

Add Image to Sell Yarn Online

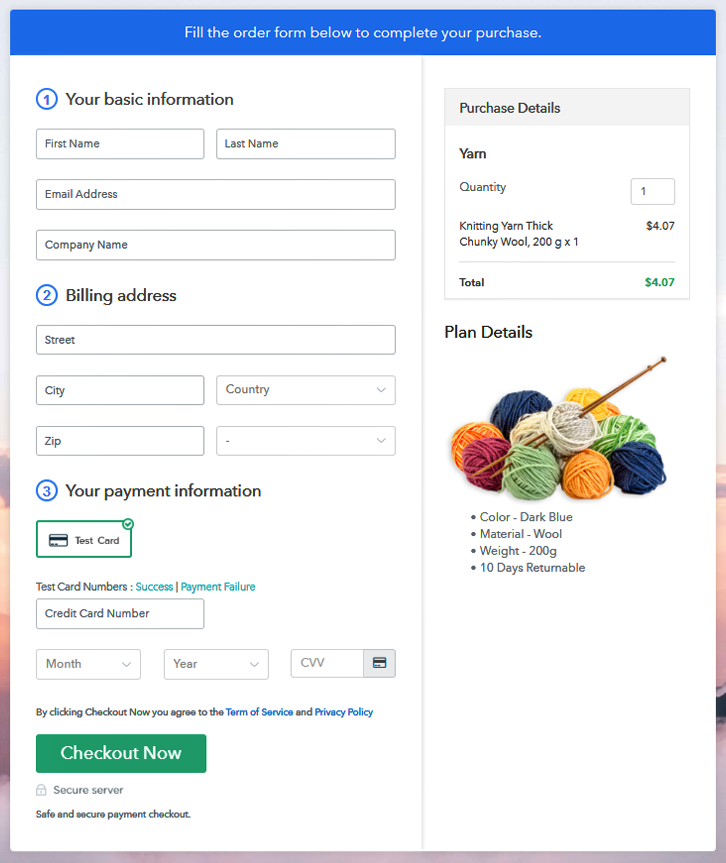
Furthermore, write a description of the yarn that you want to sell along with the product links, images, etc, and click on the submit button to add your plan.
You can create more plans for all the yarn in a similar manner.

Step 7: Share Your Checkout Page

Share Checkout Page on Social Media

  • Share your checkout page on social media like Facebook and Twitter.
  • Copy the mentioned link and send it to your customers through SMS or emails directly.
  • Embed your plan link to your website so that your customers can be landed on the checkout page directly.

Step 8: Preview Checkout Page

Follow the below steps to view checkout page

(a) Click on the View Button

View Checkout Plan

(b) Take a Look at the Checkout Page

Preview Checkout Page

Step 9: Embed Checkout Page in Site & Sell Yarn Online

Embed Checkout Page on Website

Just copy the provided plan embedding link and embed the checkout page to your WordPress site.

(a) Edit the Page & Paste the Copied Link

Paste Link in Text Editor

Copy and paste the link in the text area of the editor

(b) Save & Publish the Checkout Page

Save and Publish

After the code is pasted, click on the publish button to embed your checkout page.

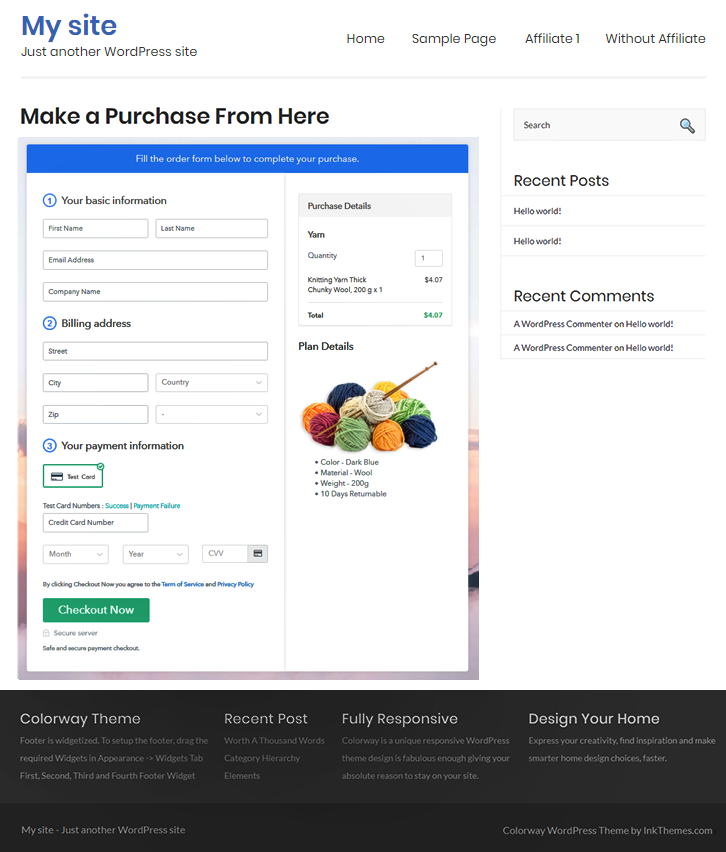
(c) Check Out the Final Look of your Checkout Page on WordPress Site

Add Checkout to Sell Yarn Online

Step 10: Multiplan Checkout Page

Note: In case you want to sell multiple products through a single checkout page, create a multi-plan checkout plan, otherwise skip this step.

(a) Click on Add Multiplan Checkout

Multiplan Checkout

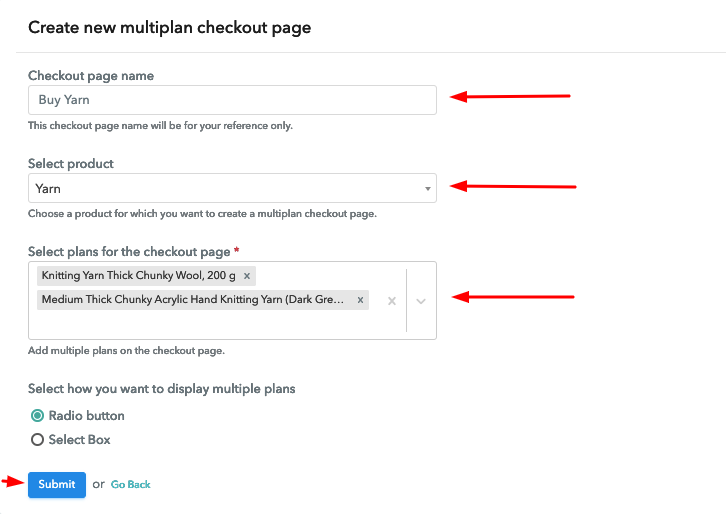
(b) Add Plans to Sell Multiple Yarn from Single Checkout Page

Multiplan Details to Sell Yarn Online

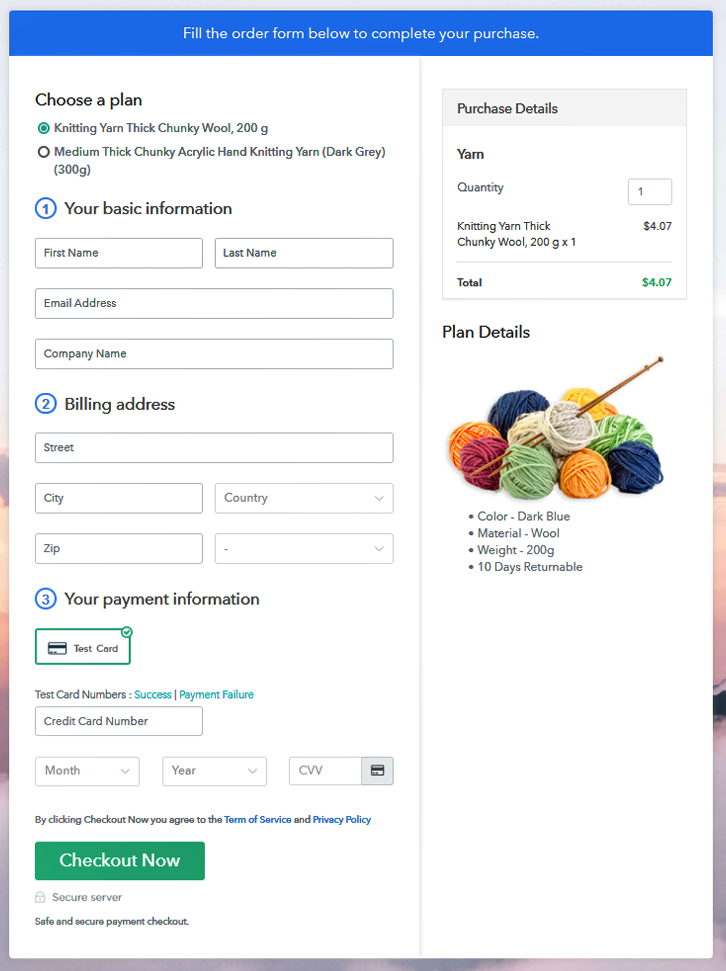
(c) Take a Look at the Checkout Page

Multiplan Checkout to Sell Yarn Online

Preview Checkout Page

Wrapping Up

In the end, we hope that now you can easily make decision about which service to choose to start yarn selling business online. Pabbly Subscription Billing gives you so beneficial features that too for free. Now, collect payments, generate unlimited revenue, share invoices, and boost up your yarn selling business with Pabbly Subscription Billing. For further queries or suggestions, please contact us.

You May Also Like To Read –
How to Sell Scarves Online | Step by Step (Free Method)

How to Sell Scarves Online

Ideal For: All the clothing stores, scarves shop, wholesale scarves suppliers, and merchants who make handmade scarves and sell from homes can use this method to take their scarves selling business online.

How to Sell Scarves Online

Why Choose this Method for Selling Over any Other Solution?

Unlike any other solution, this method allows you to:

  • List and sell scarves for FREE. Absolutely no payment required.
  • No commission on sales.
  • Collect payment through multiple payment modes from a single checkout page.
  • Sell one time or recurring subscriptions of scarves.
  • Sell and collect payment in any currency as per your requirement.
  • Give discounts on your products by offering special coupon codes.
  • Add sales commission agents to help you in selling scarves.

Get Pabbly Subscription Billing for Free

Scarves are considered to fit in almost every outfit whether its casual attire or formal attire, it goes with everything, and not only women but men also love to flaunt scarves on their outfits. Hence, scarves are very much in trend right now, and if you sell scarves from a small store or from your home then its time to take your business online to increase your profit margin.

Why would you like to sell scarves online?

Well, the first reason is, you can easily expand your customer reach and the second reason is online business is considered cheap in comparison to opening a store. You can easily sell scarves online through checkout pages that you can create on online services and Pabbly Subscription Billing is one of them. Just create checkout pages for your scarves and share their links on social media or your website, and start collecting payments easily.

Apart from checkout pages, Pabbly Subscription Billing also comes with many advantageous features:

  • Create countless products and plans for your scarves
  • Automatically create and send invoices to your customers
  • Collect one-time or recurring payments via offline or online modes
  • No transaction fees

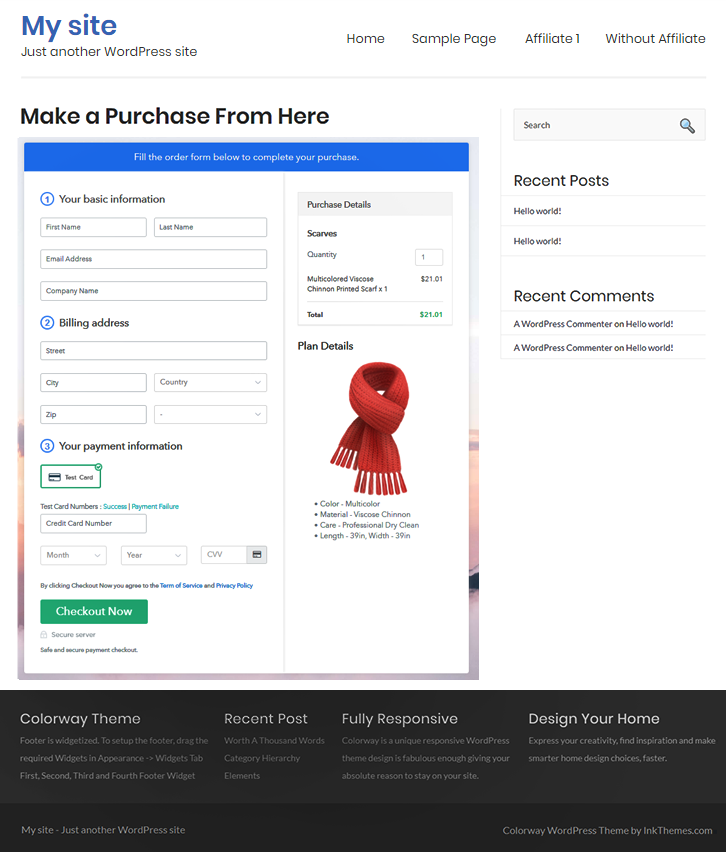
This is How your Checkout Page will Look Like After Creation

Preview Checkout Page

Preview Checkout Page

Step 1: Log in to Pabbly Subscription Billing

Signup

You will start by visiting  Pabbly Subscription Billing website and then click on the “Sign Up Free” button. You will reach the signup page, where you can create your account in a few seconds with your Gmail or manually enter your details.

Sign Up For Free!

Step 2: Select Subscription Billing

Access Subscription Billing

Step 3: Account Setup

Setup Account

Once the signup process is completed, now fill up your company details i.e. company name, select currency, and contact number in the appeared dialogue box.

Step 4: Connect Payment Gateway to Sell Scarves Online

Connect Payment Gateway

After setting up your account, the next step is to add payment gateway for payment collection. We are showing you the payment collection process by enabling the ‘Test Payment’ mode. Later, you can connect other payment gateways of your preference. The complete integration guide for payment gateways is provided below.

Step 5: Add Your Product

Add Product

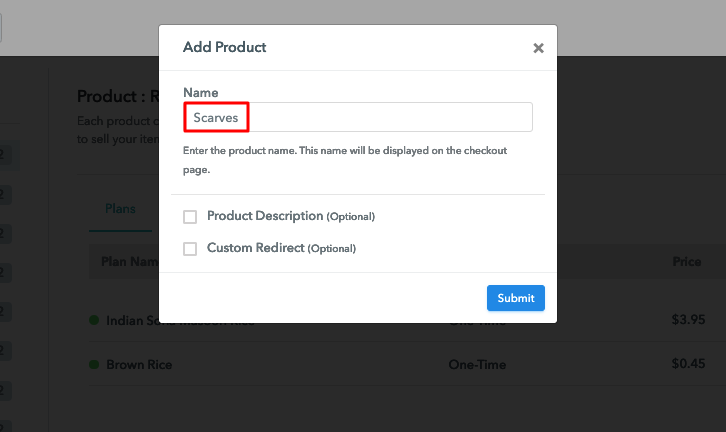
After enabling the payment mode, you have to add your first product. You can add scarves of different categories for example woolen scarves, silk scarves, etc, and add all other types of scarves in the same product by creating different plans.

Add Product Name to Sell Scarves Online

You just have to fill up these details and your product is added.

Note: Here you can add all the products related to the similar category by creating plans for each of them.

Step 6: Add Plans

Let’s get started and create plans for different categories of scarves that you want to sell

(a) Select Add New Plan

Add Plan

(b) Specify the Plan and Pricing Details

Add Details to Sell Scarves Online

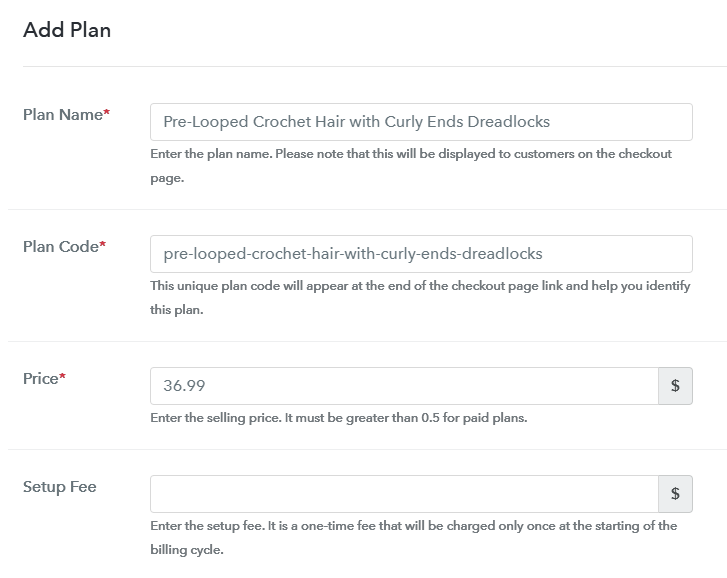
On clicking add new plan, you will be redirected to the plan page, here you will have to fill the plan details such as plan name, code, billing cycle, price, etc.

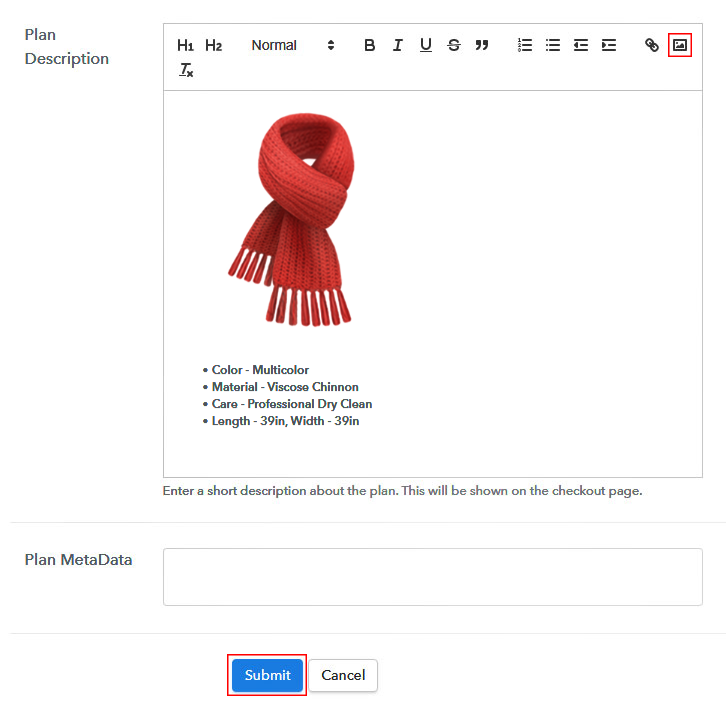
(c) Add Image & Description


Add Image to Sell Scarves Online

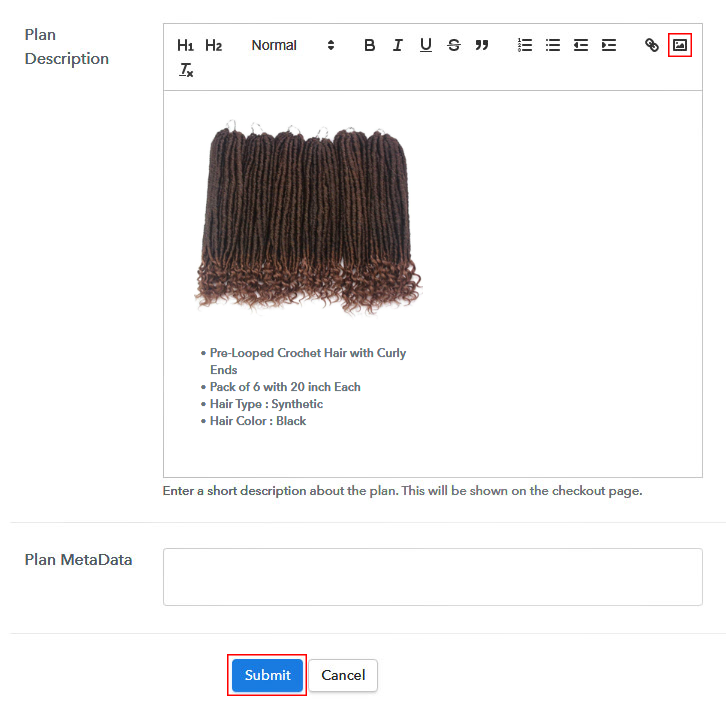
Also, write a description of scarves that you want to sell along with the product links, images, etc, and click on the submit button to add your plan.
You can create more plans for all the scarves in a similar manner.

Step 7: Share Your Checkout Page

Share Checkout Page on Social Media

  • Share your checkout page on social media like Facebook and Twitter.
  • Copy the mentioned link and send it to your customers through SMS or emails directly.
  • Embed your plan link to your website so that your customers can be landed on the checkout page directly.

Step 8: Preview Checkout Page

By following these steps, you can view checkout page

(a) Click on the View Button

View Checkout Plan

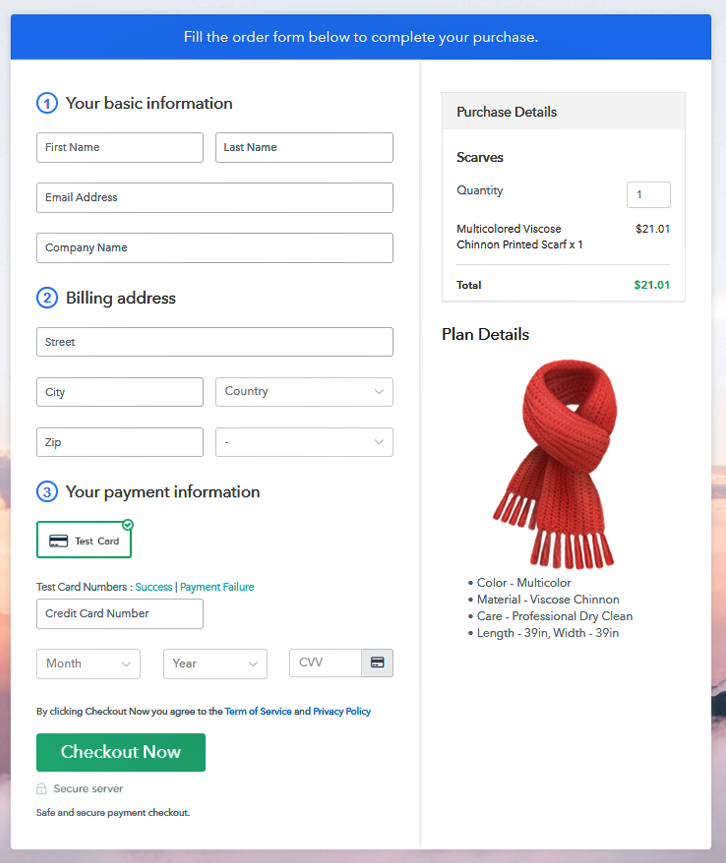
(b) Take a Look at the Checkout Page

Preview Checkout Page

Step 9: Embed Checkout Page in Site & Sell Scarves Online

Embed Checkout Page on Website

Just copy the provided plan embedding link and embed the checkout page to your WordPress site.

(a) Edit the Page & Paste the Copied Link

Paste Link in Text Editor

Copy and paste the link in the text area of the editor

(b) Save & Publish the Checkout Page

Save and Publish

Once you have pasted the code, click on the publish button to embed your checkout page.

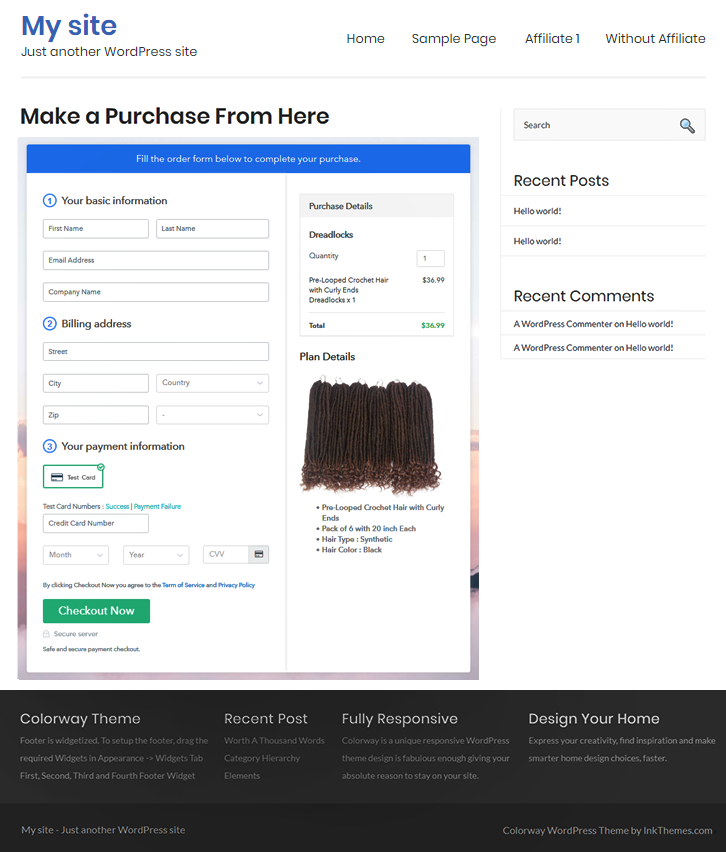
(c) Check Out the Final Look of your Checkout Page on WordPress Site

Add Checkout Page to Sell Scarves Online

Step 10: Multiplan Checkout Page

Note: In case you want to sell multiple products through a single checkout page, create a multi-plan checkout plan, otherwise skip this step.

(a) Click on Add Multiplan Checkout

Multiplan Checkout

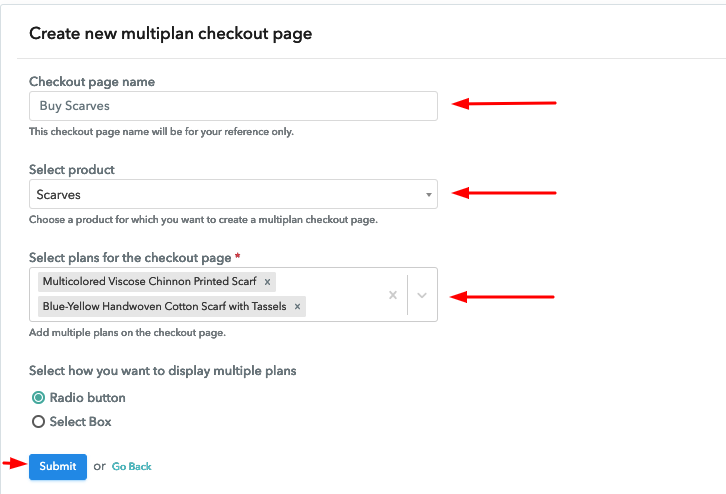
(b) Add Plans to Sell Multiple Scarves from Single Checkout Page

Multiplan Details to Sell Scarves Online

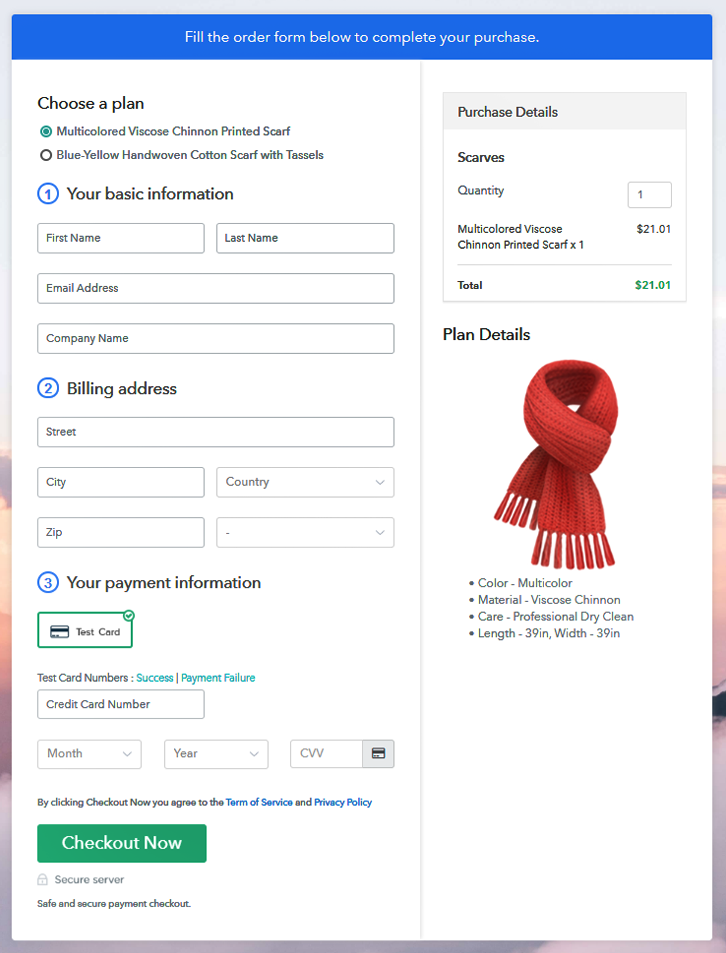
(c) Take a Look at the Checkout Page

Multiplan Checkout to Sell Scarves Online

Preview Checkout Page

Wrapping Up

So, this was the easiest way that you can choose to start your scarves selling business online and the best part is its completely free. You can collect payments easily, share invoices, sell unlimited scarves and so much more with Pablly Subscription Billing. Therefore, start your scarves selling business online today without spending anything.
For further queries or suggestions, please contact us.

You May Also Like To Read –
How to Sell Dreadlocks Online | Step by Step (Free Method)

How to Sell Dreadlocks Online

Ideal For: All the dreadlock sellers, dreadlock makers, retail dreadlock selling business owners, and other dreadlock selling merchants can use this method to take their dreadlocks selling business online.

How to Sell Dreadlocks Online

Why Choose this Method for Selling Over any Other Solution?

Unlike any other solution, this method allows you to:

  • List and sell your dreadlocks for FREE. Absolutely no payment required.
  • No commission on sales.
  • Collect payment through multiple payment modes from a single checkout page.
  • Sell one time or recurring subscriptions of your dreadlocks.
  • Sell and collect payment in any currency as per your requirement.
  • Give discounts on your products by offering special coupon codes.
  • Add sales commission agents to help you in selling dreadlocks online.

Get Pabbly Subscription Billing for Free

It’s really hard to find dreadlocks on local salons and shops. There are many varieties of dreadlocks present over the internet and there is an established audience too. If you are looking for a way to sell dreadlocks online then we can tell you how?

Why would you like to sell dreadlocks online?

To start dreadlocks business online you’ll have to follow these 10 steps mentioned in this article. These steps will let you step forward in selling dreadlocks online through checkout pages.

You can make use of these checkout pages in website buttons, text anchors and also can embed them as post/page. Further, you can also share the checkout page over social media platforms like Facebook, Twitter, WhatsApp and over emails as well as SMS.

You can create as many checkout pages as much items that you want to sell online. Moreover, the system behind i.e, Pabbly Subscription Billing will also take care of the following.

  • Manage and list all the items in stock
  • Showcase items beautifully with image & description in checkout pages
  • Create single/multi-plan checkout pages
  • Collect safe & secure payments (online/offline)
  • Automated invoicing through emails
  • Country-wise taxes
  • Offer coupons and discounts
    And much more…

This is How your Checkout Page will Look Like After Creation

Checkout Page Preview to Sell Dreadlocks Online

Preview Checkout Page

Step 1: Login to Pabbly Subscription Billing

Signup
Initiate the process by visiting Pabbly Subscription Billing website and click on the “Sign Up Free” button. On the login/registration page sign-in using an already existing Google account or sign-up manually by filling out the details asked.

Sign Up For Free!

Step 2: Select Subscription Billing

Access Subscription Billing

Step 3: Account Setup

Setup Account

After clicking on “Access Now” button of Pabbly Subscription Billing a window will show up asking for information like company name, currency & a phone number. Quickly fill out these details and click on the “Continue” button.

Step 4: Connect Payment Gateway to Sell Dreadlocks Online

Connect Payment Gateway

Next is the fourth and the most important step where you’ll need to integrate a payment gateway. There are multiple options available to choose from and a link to the integration guide is also mentioned below. At present, I’m explaining using the test gateway.

Step 5: Add Your Product

Add Product

In this process, you can create products as the setup part is completed. To create a product click on “Add New Product” and specify the product name. The product name would be much like a category assigned to a variety of items.

Add Plan to Sell Dreadlocks Online

Click on the “Submit” button after filling out the details. Furthermore, you can add as many products as you want to.

Note: Here you can add all the products related to the similar category by creating plans for each of them.

Step 6: Add Plans

After adding a product, you can are ready to add plans for the created product. Just click on the “Add New Plan” button under a product and a page will open up asking for plan details to show on the checkout page to sell dreadlocks online.

(a) Select Add New Plan

Add Plan

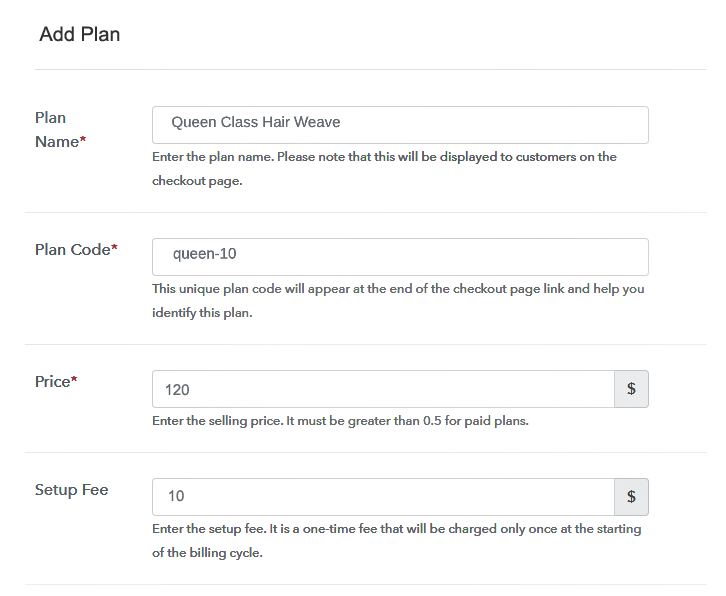
(b) Specify the Plan & Pricing Details

Add Plan to Sell Dreadlocks Online

Fill out the details as plan name, code, price etc as per the dreadlocks that you want to sell online.

(c) Add Image & Description

Add Image & Description to Sell Dreadlocks Online

Here, you’ll also find a filed named “Add Description”, you can put an image & text to display on the checkout page to sell dreadlocks online here.

Additionally, you can see multiple text formatting tools also available to format the text for instance lists, quotes, links, headings etc.

Strike the “Submit” button once you are done with this plan description for selling dreadlocks online and an item will get appended in the system.

Just remember, repeat this step (step 6)  each time you want to add a plan in the list to sell dreadlocks online.

Step 7: Share your Checkout Page

Share Checkout Page on Social Media

After a successful plan creation, a window will be displayed as showing the plan link & code to share the created checkout page over different platforms.

  • You can copy the “Plan Link” URL & share it on social media platforms, SMS, emails etc. to sell dreadlocks online.
  • Also, you can use this same URL in your website’s button links & anchor text source to link the created checkout page.
  • Two direct Facebook & Twitter sharing buttons are also available there to share the page directly over these platforms.

Step 8: Preview Checkout Page

Follow these steps to preview a checkout page:

(a) Click on the View Button

View Checkout Plan

(b) Take a Look at the Checkout Page

Checkout Page Preview to Sell Dreadlocks Online

Step 9: Embed Checkout Page in Site & Sell Dreadlocks Online

Embed Checkout Page on Website

The code given under “Embed Plan Link” window could be used to embed a checkout page on WordPress. For this, you’ll need to copy this code.

(a) Edit the Page & Paste the Copied Link

Paste_Link_in_Text_Editor

And paste it in the text area of any new post or page.

(b) Save & Publish the Checkout Page

Save_and_Publish

After pasting the code, publish the post/page & the checkout page will get embedded on your website. You can visit this post/page by visiting its URL.

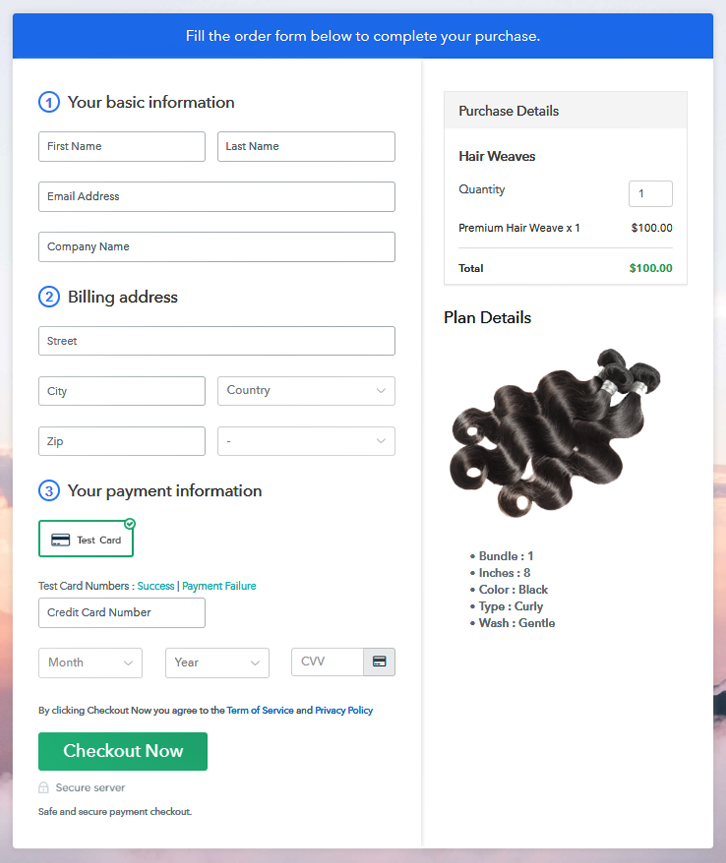
(c) Check out the Final Look of your Checkout Page on WordPress Site

Checkout Page On Site to Sell Dreadlocks Online

Step 10: Multiplan Checkout Page

Note: In case you want to sell multiple products via a single checkout page, you create a multi-plan checkout page otherwise skip this step.

(a) Click on Add Mutiplan Checkout

Multiplan_Checkout

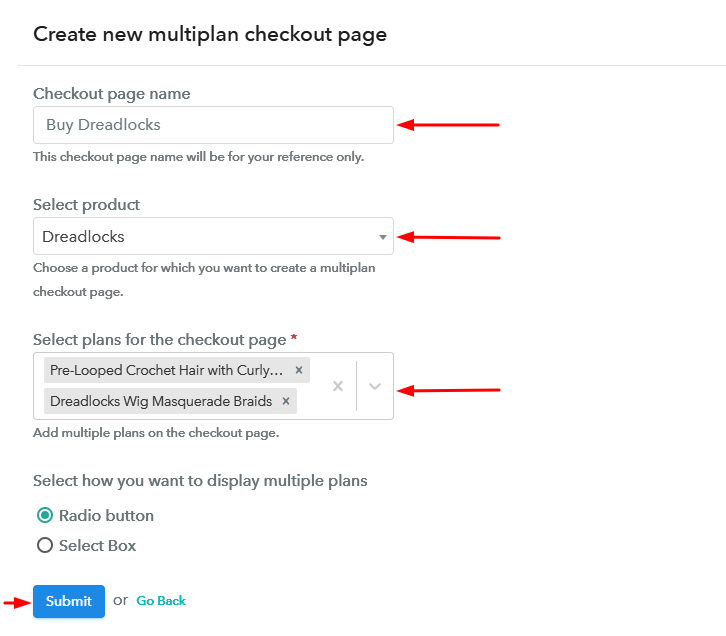
(b) Add Plans to Sell Multiple Dreadlocks from Single Checkout Page

Create Multiplan Checkout to Sell Dreadlocks Online

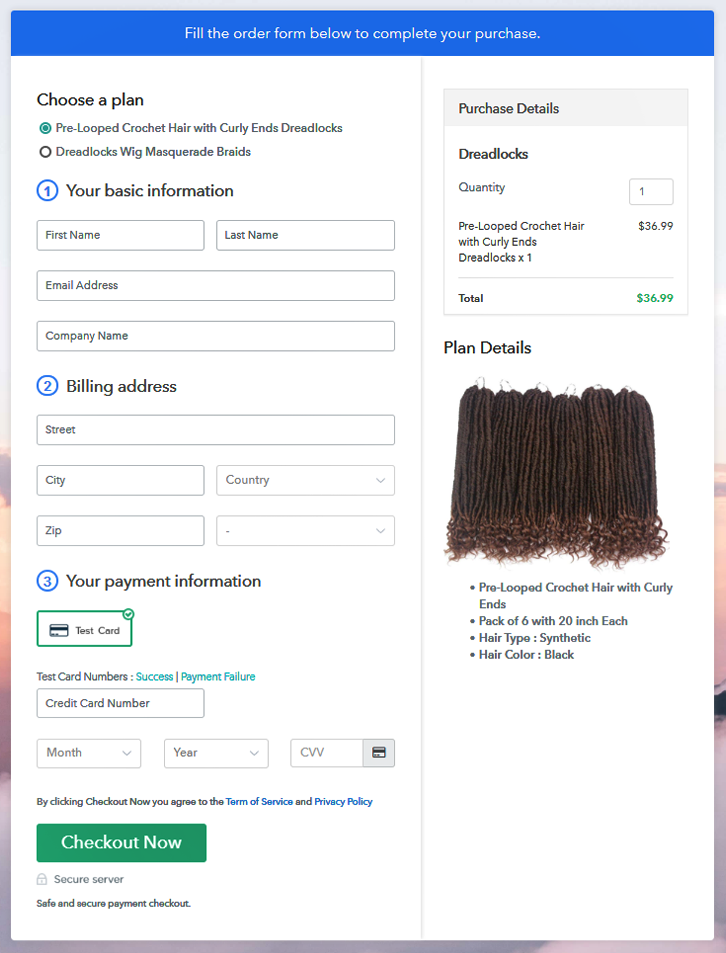
(c) Take a Look at the Checkout Page:

Multiplan Checkout Page to Sell Dreadlocks Online

Preview Checkout Page

Wrapping Up

These were the 10 simplest steps to start a dreadlocks business online. And even a non-techy person could use them to sell dreadlocks online. Also, if you are not having a website then also you can use this method for selling dreadlocks online.

There are multiple options available for integration such as PayPal, Stripe, Authorize.Net, Razorpay etc.

Good Luck with your dreadlocks business!

You May Also Like To Read

How to Sell Hair Weaves Online | Step by Step (Free Method)

Ideal For: All beauty parlors, hair clinics, hair salons, make-up artists, bridal shops and other merchants can use this method to sell hair weaves online.

How to Sell Hair Weaves Online

Why Choose this Method for Selling Over any Other Solution?

Unlike any other solution, this method allows you to:

  • List and sell your hair weaves for FREE. Absolutely no payment required.
  • No commission deducted on sales.
  • Collect payment through multiple payment modes from a single checkout page.
  • Sell one time or recurring subscriptions of your hair weaves.
  • Sell and collect payment in any currency as per your requirement.
  • Give discounts on your products by offering special coupon codes.
  • Add sales commission agents to help you in selling your hair weaves.

Get Pabbly Subscription Billing for Free

The best way to hide bald spots is by wearing hair weaves and this has been practiced by many cultures for over 5000 years. But since the 1990s, the use of toupees is in decline and that is why many manufacturers are looking into selling hair weaves online to get better sales.

Why would you like to sell hair weaves online?

Obviously, hair weaves are slowly losing popularity but with the rise of the internet, you can overturn the decline. Let me tell you the benefits when you start selling hair weaves online. You can reduce your excess inventory, get the best prices for premium products, better tax management, access to a global audience, etc.

So, if you are looking for a method to hook your products online, let me introduce to you an awesome e-store builder called Pabbly Subscription Billing. The reason for mentioning it is because it can list an unlimited number of products and generate unlimited revenues with no transaction costs. The other features that make it incredible are:

  • Unlimited Coupons
  • Customizable Checkout Pages
  • Easy Import/Export Customer Data
  • Email Alerts On Transaction Failure/Completion
  • Automatic Credit Card Re-Attempts

See, these features in the long term will put you in a very profitable position. So let’s work on together to build an awesome checkout page to start selling hair weaves online.

This is How your Checkout Page will Look Like After Creation

Checkout to Sell Hair Weaves Online

Preview Checkout Page

Step 1: Log in to Pabbly Subscription Billing

Signup

Open Pabbly Subscription Billing and here click on  “Sign up Free“. Now you can simply sign in using the Gmail account or fill the mandated fields like name, email, etc and then click the “Sign Up” button.

Sign Up For Free!

Step 2: Select Subscription Billing

Access Subscription Billing

Once you enter, the dashboard and you will have to click on the “Access Now” button on the Subscription Billing option.

Step 3: Account Setup

Setup Account

A dialogue will appear and here you will register your company details like its name, currency in use, phone number, etc. After filing in the information press the blue “Continue” button to complete the process.

Step 4: Connect Payment Gateways To Sell Online

Connect Payment Gateway

Your customers must have a healthy payment experience otherwise they will leave the transactions at the slightest of inconveniences. That is why Pabbly Subscription Billing provides a dummy payment gateway where you can beta test the entire payment experience of a customer beforehand.

Another important feature of Pabbly Subscription Billing is that you have a ton of payment gateways like PayPal, Stripe, Razorpay, and Authorize.net for integration. And below this paragraph, you will find the integration manuals for each of them. But I am going ahead to enable the test payment option to continue the process.

Step 5: Add Your Product

Add Product

After the payment integration, you will have to add your products. This is done by clicking on “Add your product” which is located below the “Enable Payments” section. This will open up a dialog box with a blue button “Add New Product”. Click on it.

You have to add the required product title, in this case, it is hair weaves

Add Product to Sell Hair Weaves Online

Fill up the details and your product is created.

Note: Here you can add all the products related to the similar category by creating plans for each of them.

Step 6: Add Plans

Now, we are going to create plans to start hair weaves business online

(a) Select Add New Plan

Add Plan

(b) Specify the Plan & Pricing Details

Add Description to Sell Hair Weaves Online

So, the plan page, you will fill in details like plan name, code, price, setup fees, etc. In the segment below, you will find different billing models like one-time payment, recurring, based on cycles, etc.

Note: Now, we know that hair weaves start detaching from the main hair base after 6 months. That is why, you should enable a subscription type model, where the user can purchase another set after every 5-6 months.

(c) Add Image & Description

Add Plan to Sell Hair Weaves Online

Now, upload some stunning images of your hair weaves.

Then provide some useful description of your hair weaves like expiry date, type, composition, etc in bullet points and press the “Submit” button.

Also, using the same process, you can list more products

Step 7: Share your Checkout Page

Share Checkout Page on Social Media

  • Using respective buttons, you can share the checkout links on Facebook and Twitter for more marketing of your products.
  • If you want more brand awareness, feel free to insert the checkout pages on emails and SMS
  • Build buttons on your website and hook the checkout pages on them. Also,  you can place it on any anchor text on your website, so the users will be redirected to the checkout page.

Step 8: Preview Checkout Page

Follow up these steps to preview checkout page:

(a) Click on the View Button

View Checkout Plan

(b) Take a Look at the Checkout Page

Checkout to Sell Hair Weaves Online

Step 9: Embed Checkout Page in Site & Sell Hair Weaves Online

Embed Checkout Page on Website

Now,  copy the embed plan link to insert the checkout page on your WordPress website.

(a) Edit the Page & Paste the Copied Link

Paste_Link_in_Text_Editor

Now, when the link is copied, then paste it to the text area of the editor.

(b) Save & Publish the Checkout Page

Save_and_Publish

After pasting the code, now hit the ‘Publish’ button. Your checkout page is embedded.

(c) Check out the Final Look of your Checkout Page on WordPress Site

Embed On WordPress to Sell Hair Weaves Online

Step 10: Multiplan Checkout Page

Note: In case you want to sell multiple products via a single checkout page, you can create a multi-plan checkout page otherwise skip this step.

(a) Click on Add Mutiplan Checkout

Multiplan Checkout

(b) Add Plans to Sell Hair Weaves Online from Single Checkout Page

Multiplan to Sell Hair Weaves Online

(c) Take a Look at the Checkout Page

Final Multiplan Checkout to Sell Hair Weaves Online

Preview Checkout Page

Wrapping Up

The world is rapidly moving towards an online subscription-based economy and if you fail to catch the drift, you will be sunk in the ocean. So act now and start hair weaves business online with Pabbly Subscription Billing.

Also, you are stuck at any steps or have embedding problem with your website please feel free to contact us through the email or drop your queries in the comment section below.

You May Also Like To Read –
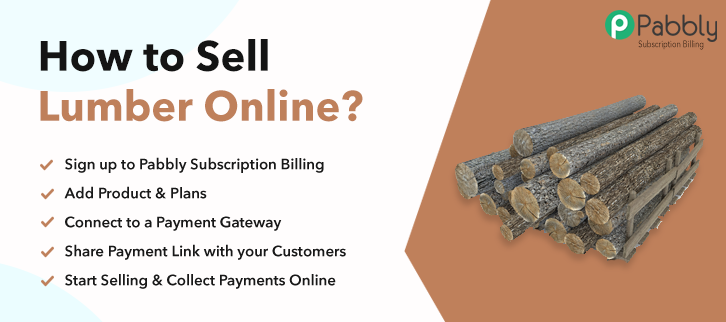
How to Sell Lumber Online | Step by Step (Free Method)

Ideal For: All lumber jacks, wood processors, timber workers and other wood sellers can use this method to sell lumber online.

How to Sell Lumber Online

Why Choose this Method for Selling Over any Other Solution?

Unlike any other solution, this method allows you to:

  • List and sell your lumber for FREE. Absolutely no payment required.
  • No commission deducted on sales.
  • Collect payment through multiple payment modes from a single checkout page.
  • Sell one time or recurring subscriptions of your lumber.
  • Sell and collect payment in any currency as per your requirement.
  • Give discounts on your products by offering special coupon codes.
  • Add sales commission agents to help you in selling your lumber.

Get Pabbly Subscription Billing for Free

The timber logging industry earns over a staggering $15 billion in revenues and employs thousands of people especially in Northern America and Lower Canada. But the scale of operations is dwindling as demands are declining, hence many industry leaders are actively looking to start selling lumber online.

Why would you like to sell lumber online?

Well, increasingly many are looking for non-timber materials for constructing their houses so the demands have dried up and the scale of competition has also increased.  Besides strict environmental laws like the 2010 Boreal Agreement and higher taxes on timber is forcing to get the best prices for their lumber through the internet. Many other advantages of selling lumber online include lower inventory costs, no middleman, zero government interference, and a worldwide audience for best price discovery.

So, now I have got you tingles let me ask how will you set up an online store in the first place. Well, there are a ton of options available but here I would like to recommend a cheap e-store builder called Pabbly Subscription Billing. The advantage of using Pabbly Subscription Billing is it can build checkouts to products and generate unlimited revenues. Other benefits include

  • Unlimited Plans
  • Product Trials
  • Multiple Billing Models like Recurring, One Time and Based On Cycles
  • Custom Domains
  • Unlimited Integrations
  • Easy Invoicing
  • Customizable Checkout Pages

Now, that you are amazed by the features lets us create a checkout page with Pabbly Subscription Billing to start your lumber business online.

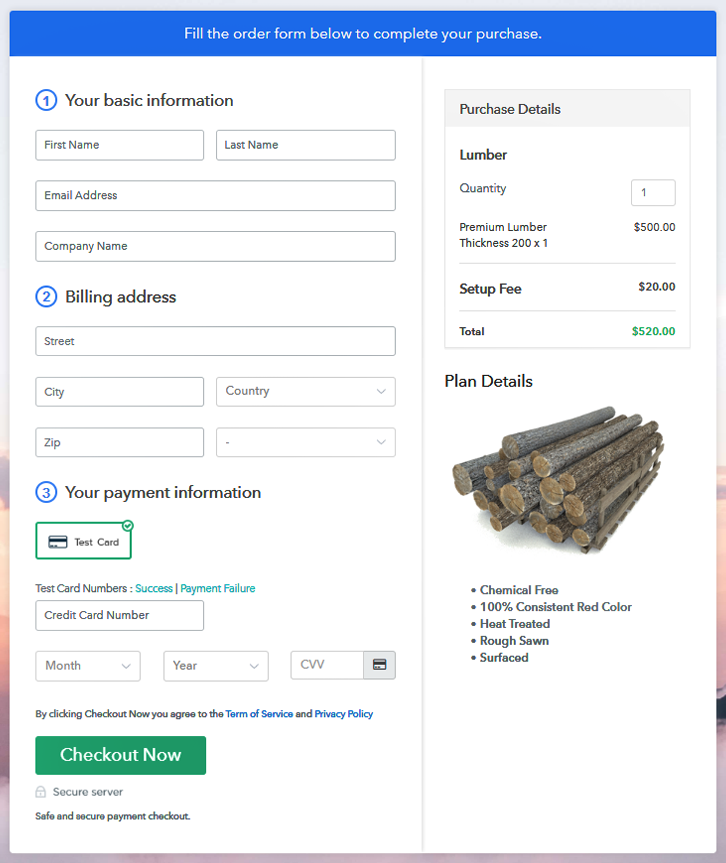
This is How your Checkout Page will Look Like After Creation

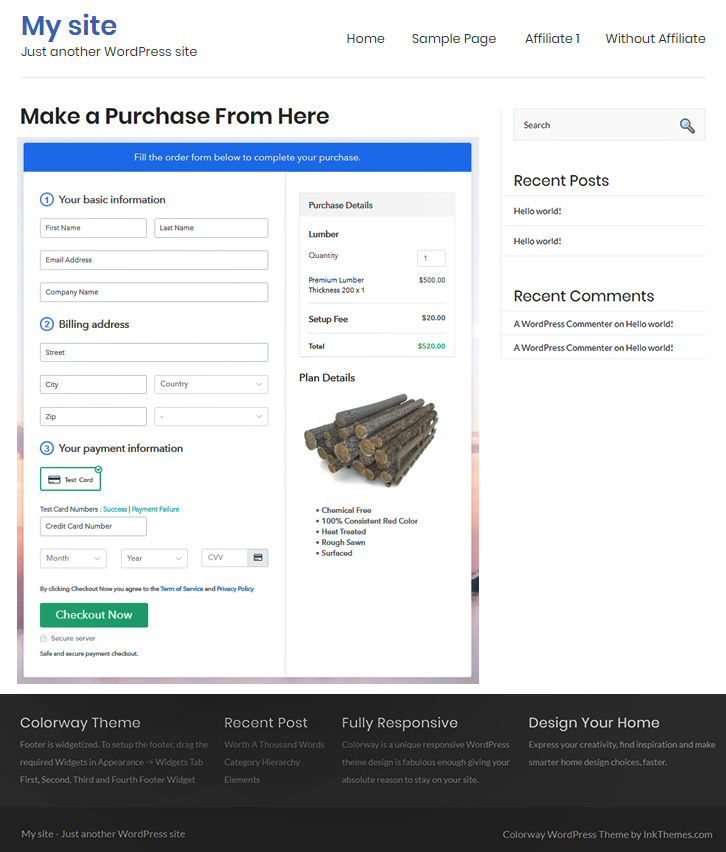
Checkout to Sell Lumber Online

Preview Checkout Page

Step 1: Log in to Pabbly Subscription Billing

Signup

Search for Pabbly Subscription Billing in your browser and on reaching the website, click on “Sign up Free“. You can always sign in using your ubiquitous Gmail account or fill the required blanks like name, email, etc and then click the “Sign Up” button.

Sign Up For Free!

Step 2: Select Subscription Billing

Access Subscription Billing

Now, you will enter the dashboard and here click on the “Access Now” button on the Subscription Billing option.

Step 3: Account Setup

Setup Account

Next, you will be auto-redirect to a dialog box and here you fill details of your company like its name, currency in use, phone number, etc. After the data has been filed press the blue “Continue” button to complete the process.

Step 4: Connect Payment Gateways To Sell Lumber Online

Connect Payment Gateway

You should always make sure that your customers have a serene payment experience otherwise they might leave the transactions midway. To prevent that from happening, Pabbly Subscription Billing provides a dummy payment gateway where you can test the entire payment experience of the customer beforehand.

Paypal, Razorpay, Stripe, and many more payment gateways can be easily integrated using Pabbly Subscription Billing. There is an integration manual for each of them below this para. But I am going ahead to enable the test payment option to continue the process.

Step 5: Add Your Product

Add Product

Now, its time to add your products. This can be done by clicking on “Add your product” which is located below the “Enable Payments” section. This will open up a dialog box with a blue button “Add New Product”. Click on it.

You have to add the required product title, in this case, it is lumber.

Add product to Sell Lumber Online

Fill up the details and your product is created.

Note: Here you can add all the products related to the similar category by creating plans for each of them.

Step 6: Add Plans

Now, we are going to create plans to start lumber business online

(a) Select Add New Plan

Add Plan

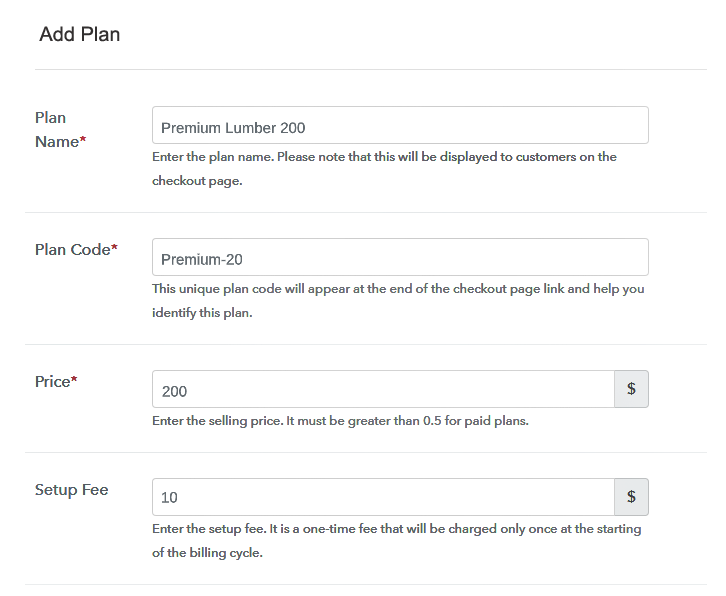
(b) Specify the Plan & Pricing Details

Add Plan to Sell Lumber Online

Now, you will enter the plan page, here you will fill in details like plan name, code, price, setup fees, etc. Also, you will find different billing models like one-time payment, recurring, based on cycles, etc. chose according to your discretion but remember that you can change them any time you want.

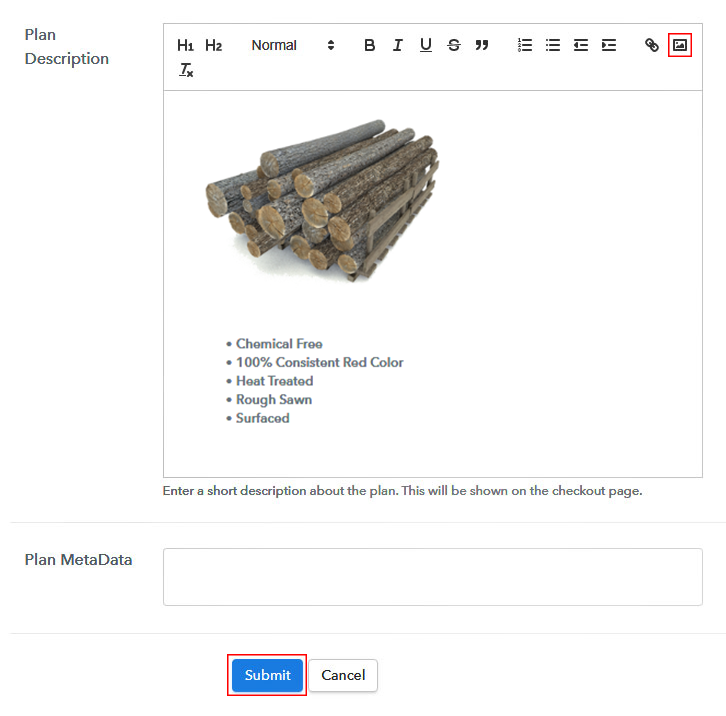
(c) Add Image & Description

Add description to Sell Lumber Online

It’s picture time!! so take some awesome picture of your timber and upload it here using the image button.

Also provide some useful description of your lumber like decomposition, age of sawing, thickness, composition, etc in bullet points and press the “Submit” button.

Also, using the same process, you can list more products

Step 7: Share your Checkout Page

Share Checkout Page on Social Media

  • Obviously, the best method for product awareness is through social media. Hence you can share the checkout pages on Twitter and Facebook through respective buttons.
  • Do insert checkout pages on SMS and emails for more product dissemination.
  • Easily create buttons on your website and embed the checkout pages on them. Also, you can place it on any anchor text on your website, so the users will be redirected to the checkout page.

Step 8: Preview Checkout Page

Follow up these steps to preview checkout page:

(a) Click on the View Button

View Checkout Plan

(b) Take a Look at the Checkout Page

Preview of Checkout to Sell Lumber Online

Step 9: Embed Checkout Page in Site & Sell Lumbers Online

Embed Checkout Page on Website

Now,  copy the embed plan link to insert the checkout page on your WordPress website.

(a) Edit the Page & Paste the Copied Link

Paste_Link_in_Text_Editor

Now, when the link is copied, then paste it to the text area of the editor.

(b) Save & Publish the Checkout Page

Save_and_Publish

After pasting the code, now hit the ‘Publish’ button. Your checkout page is embedded.

(c) Check out the Final Look of your Checkout Page on WordPress Site

Embed Checkout to Sell Lumber Online

Step 10: Multiplan Checkout Page

Note: In case you want to sell multiple products via a single checkout page, you can create a multi-plan checkout page otherwise skip this step.

(a) Click on Add Mutiplan Checkout

Multiplan Checkout

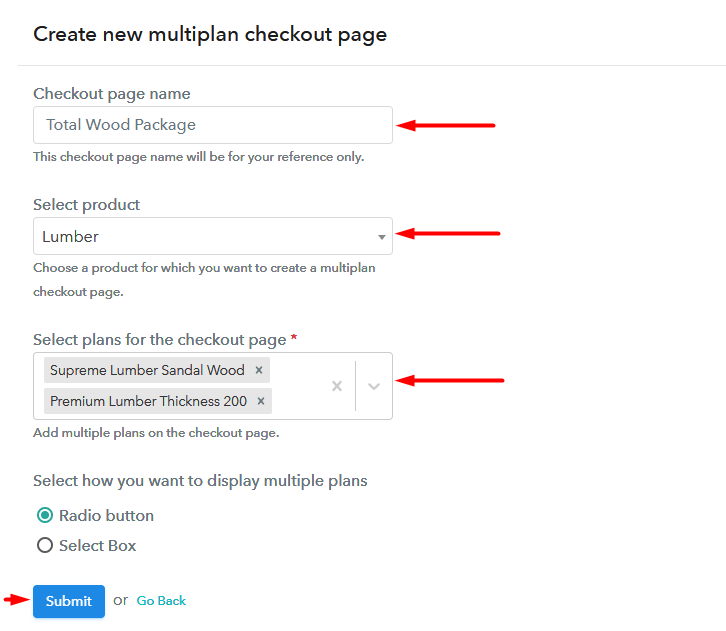
(b) Add Plans to Sell Lumber Online from Single Checkout Page

Multiplan Checkout to Sell Lumber Online

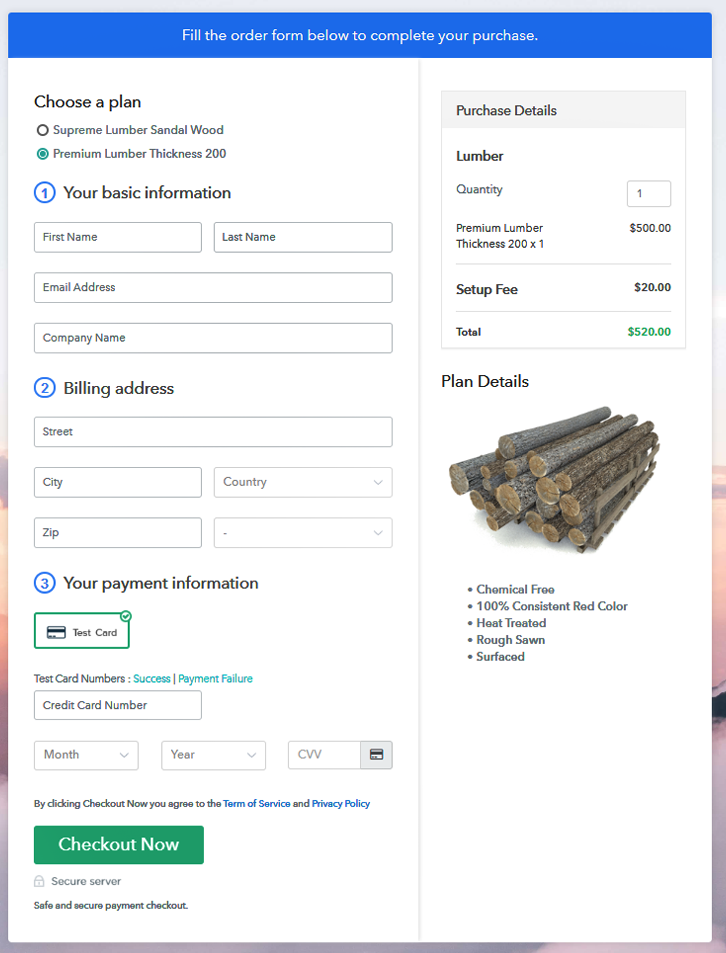
(c) Take a Look at the Checkout Page

Multiplan Checkout to Sell Lumber Online

Preview Checkout Page

Wrapping Up

Since timber logging is increasingly becoming a restricted activity by governments worldwide it is better that you look for various other channels for business. So, buckle up and start lumber selling business online using Pabbly Subscription Billing.

Well, since you are new to this method, you may have some doubts. So feel free to contact us through email or the comment section below. Thank You

You May Also Like To Read –
How to Sell Mushrooms Online | Step by Step (Free Method)

How to Sell Mushrooms Online

Ideal For: All the mushroom farms, mushroom sellers, wholesale mushroom vendors, mushroom suppliers, retail mushroom traders and other merchants can use this method to sell mushrooms online.

How to Sell Mushrooms Online

Why Choose this Method for Selling Over any Other Solution?

Unlike any other solution, this method allows you to:

  • List and sell your mushrooms for FREE. Absolutely no payment required.
  • No commission deducted on sales.
  • Collect payment through multiple payment modes from a single checkout page.
  • Sell one time or recurring subscriptions of your mushrooms.
  • Sell and collect payment in any currency as per your requirement.
  • Give discounts on your products by offering special coupon codes.
  • Add sales commission agents to help you in selling your mushrooms.

Get Pabbly Subscription Billing for Free

Mushrooms are the healthiest food as they are rich in Vitamin B and helps to maintain a good digestive system, nervous system, healthy skin, etc.  That is the reason why people prefer eating mushrooms to keep their bodies healthy. So, wouldn’t it be great to get if people get it on their doorstep in just a few clicks? Thus, you must be searching for ways to start your mushroom selling business online.

Why would you like to sell mushrooms online?

In this digital world, online shopping has turn out to be the most important part of our daily life. Also, selling things online is a new trend that everyone is following nowadays. Hence, we would like to suggest you Pabbly Subscription Billing tool that helps you to create amazing checkout pages to sell mushrooms online without any trouble. Want to know why we are recommending it? So, let me tell you some of its most prominent features:

  • You can collect payment offline as well as online
  • It allows you to create unlimited products and plans
  • Moreover, You can also provide coupons and discounts to your customers
  • Furthermore, it enables you to add tax and delivery charges

Apart from that, you can also share checkout pages using this tool on social media platforms such as Facebook, Twitter, etc. Besides that, you can also embed the checkout page on your website using an anchor text or embedding button. Want to know how? Just follow all the step mentioned below and you are good to go.

This is How your Checkout Page will Look Like After Creation

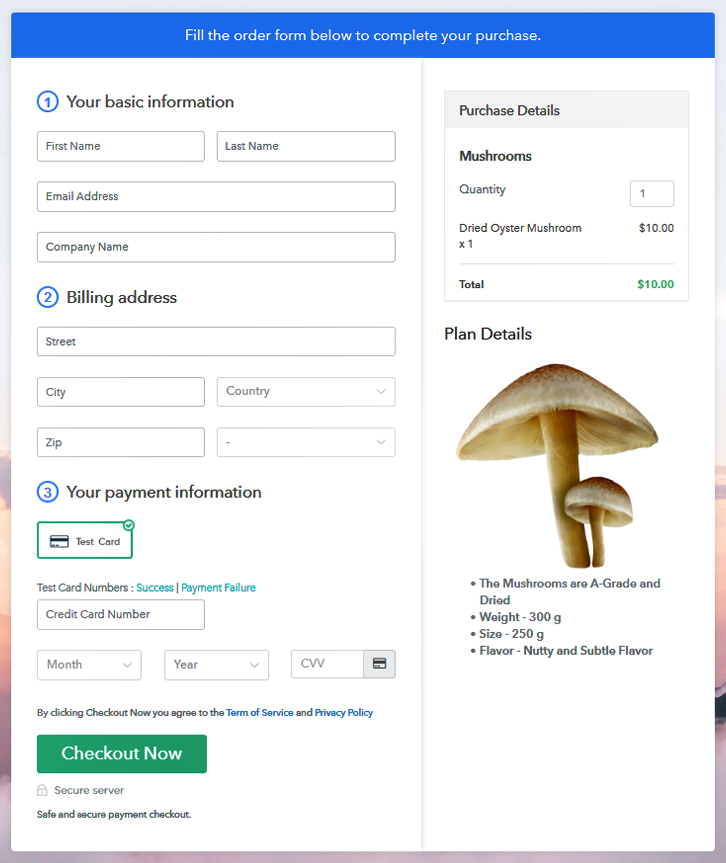
Checkout Page to Start Selling Mushrooms Online

Preview Checkout Page

Step 1: Log in to Pabbly Subscription Billing

Signup

Firstly, go to the site of Pabbly Subscription Billing and after that just press the button “Sign up Free” that will direct you to their sign-up page. Simply enter all the fields either manually or else you can sign in via Gmail account.

Sign Up For Free!

Step 2: Select Subscription Billing

Access Subscription Billing

Step 3: Account Setup

Setup Account

Next, enter all the details of the company like name, currency standards, and phone number. Then, tap on “Continue” to complete the entire process.

Step 4: Connect Payment Gateways To Sell Mushrooms Online

Connect Payment Gateway

Our subsequent step is to check the payment gateways in order to stimulate the entire payment experience of a customer. Additionally, Pabbly Subscription Billing provides you multiple payment gateways such as PayPal, Stripe, Razorpay, etc. For instance, I am enabling the test payment gateway to understand the complete procedure using test payment gateway.

Step 5: Add Your Product

Add Product

Once you successfully embedded the payment gateway, the subsequent step is to add products. Just press on the button stating “Add New Product” that will open a dialog box. Afterward, enter the details of the Mushrooms with their specifications.

Add Products to Sell Mushrooms Online

Enter the details and your product is created.

Note: Here you can add all the products related to the similar category by creating plans for each of them.

Step 6: Add Plans

Now, create plans for mushrooms that are available in your stocks.

(a) Select Add New Plan

Add Plan

(b) Specify the Plan & Pricing Details

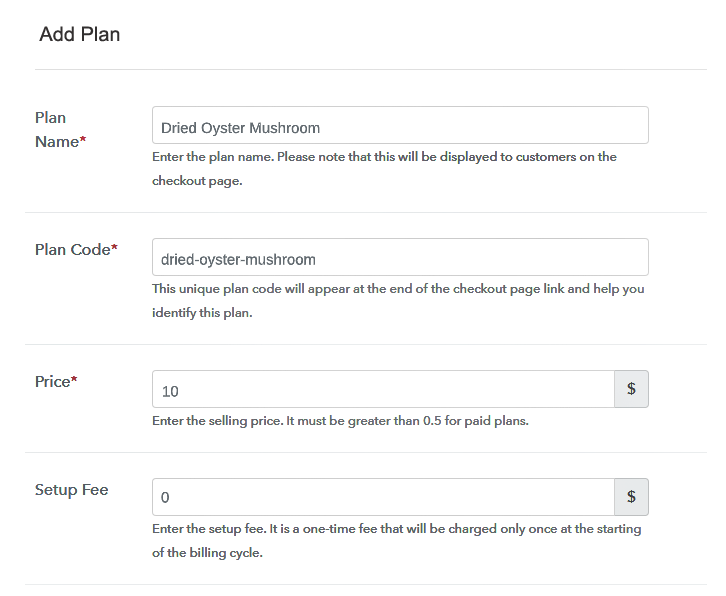
Add Plan to Sell Mushroom Online

In order to add a plan, you will be redirected to the plan page where you need to fill up the details like name, code, price, setup fees, billing cycle, etc.

(c) Add Image & Description

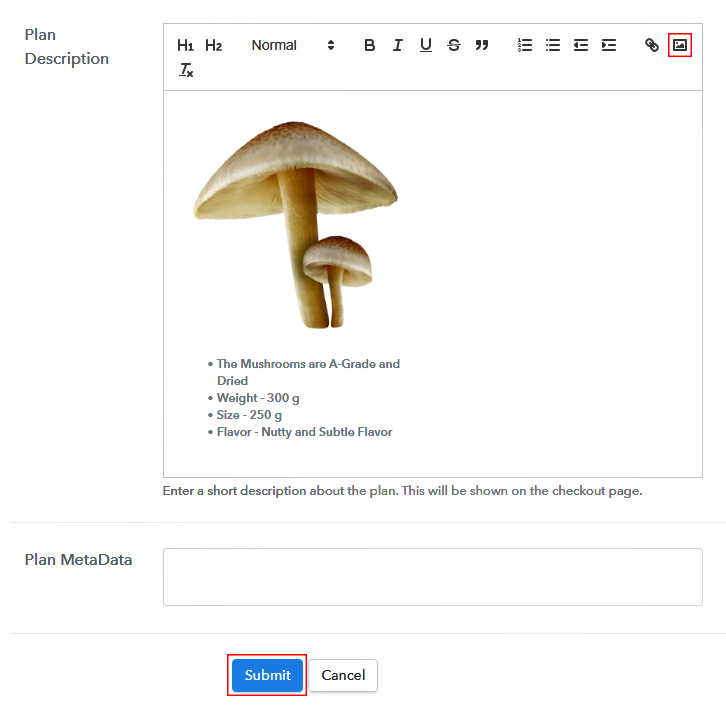
Add Image & Description to Sell Mushroom Online

Consequently, just paste the image of the mushrooms that you wish to sell online.

Additionally, give some product information about the mushrooms in bullet points such as quantity, quality, etc.

After you fillup the information, just press on the button named “Submit”.

Step 7: Share your Checkout Page

Share Checkout Page on Social Media

  • Now share the checkout page on Twitter & Facebook by using their respective buttons.
  • Besides, you can also directly share the checkout page link to customers using emails and SMS.
  • Furthermore, it allows you to add the provided plan link in the buttons. Apart from that, you can even use the anchor text anywhere on your website to redirect users on the checkout page.

Step 8: Preview Checkout Page

Follow up these steps to preview checkout page:

(a) Click on the View Button

View Checkout Plan

(b) Take a Look at the Checkout Page

Checkout Page to Start Selling Mushrooms Online

Step 9: Embed Checkout Page in Site & Sell Mushrooms Online

Embed Checkout Page on Website

Now, just copy the embed link to insert the checkout page on your WordPress website.

(a) Edit the Page & Paste the Copied Link

Paste Link in Text Editor

Later, simply copy the link and then paste it to the text area of the editor.

(b) Save & Publish the Checkout Page

Save and Publish

Afterward, press the buttons labeled ‘Publish’ once you paste the code and your checkout page is embedded.

(c) Check out the Final Look of your Checkout Page on WordPress Site

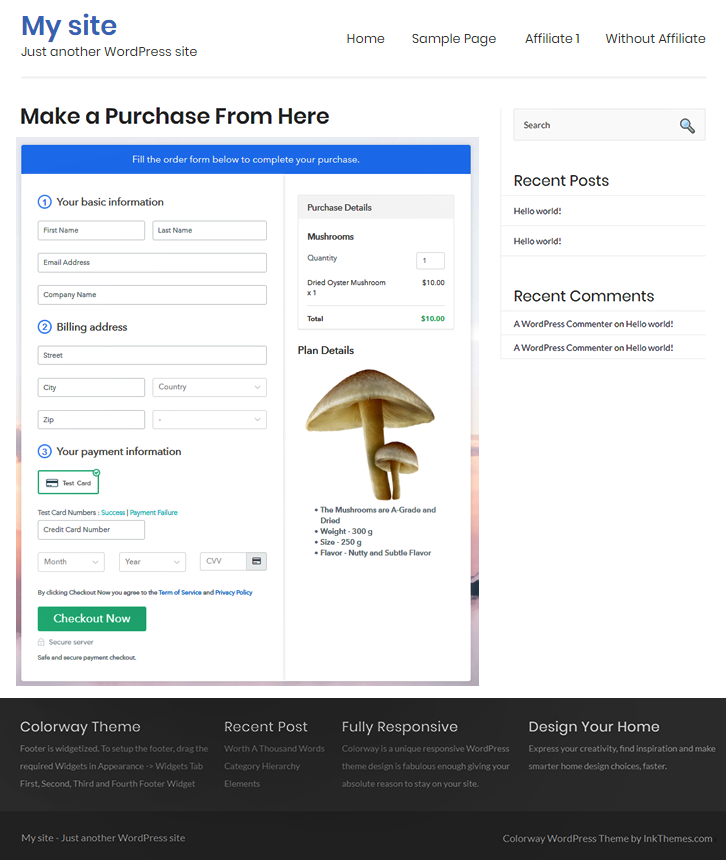
Checkout Page on WordPress Site to Sell Mushrooms Online

Step 10: Multiplan Checkout Page

Note: In case you want to sell multiple products via a single checkout page, you can create a multi-plan checkout page otherwise skip this step.

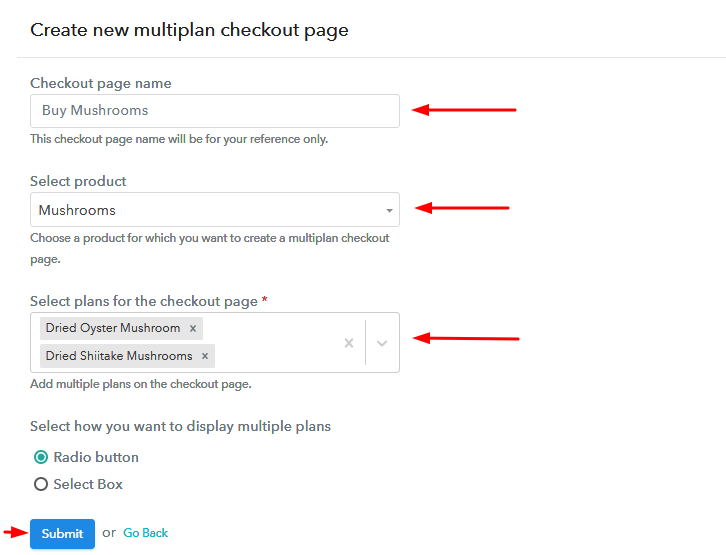
(a) Click on Add Mutiplan CheckoutMultiplan Checkout

(b) Add Plans to Sell Mushrooms from Single Checkout Page

Add Plans to Sell Mushrooms from Single Checkout Page

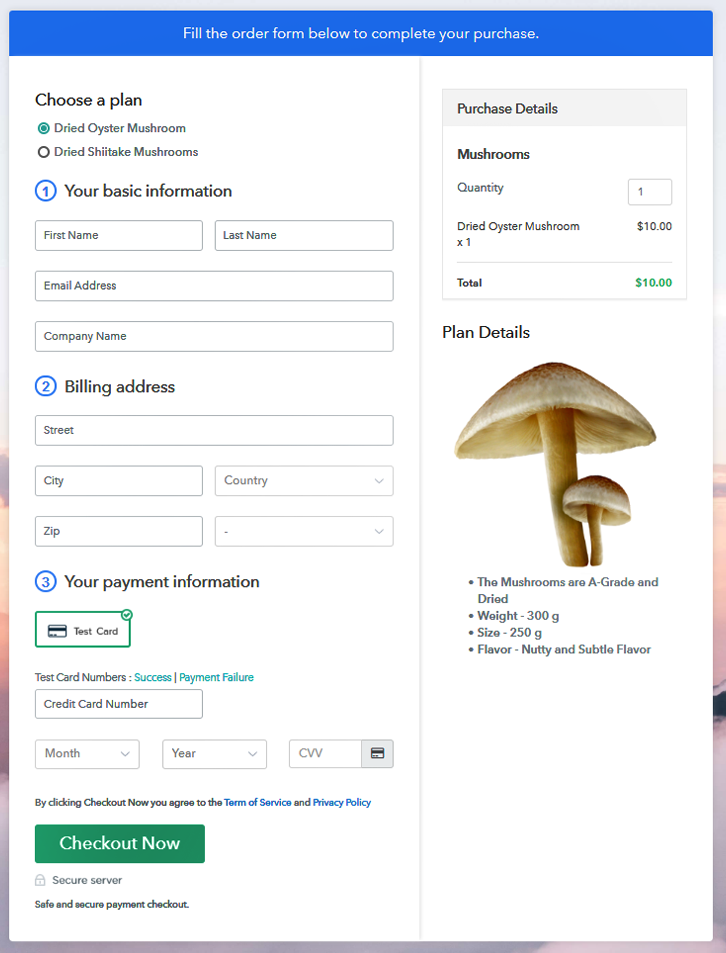
(c) Take a Look at the Checkout Page

Multiplan Checkout Page to Start Mushroom Business Online

Preview Checkout Page

Wrapping Up

We hope this article was helpful to you for solving your query on “How to sell Mushroom online?”. All you need to do is follow the above-mentioned steps and you are good to go. So, what are you waiting for? Go ahead and start your online mushroom selling business without any hassle. And, if you have any query, don’t forget to write it in the comment section below. We will get back to you ASAP.

You May Also Like To Read –
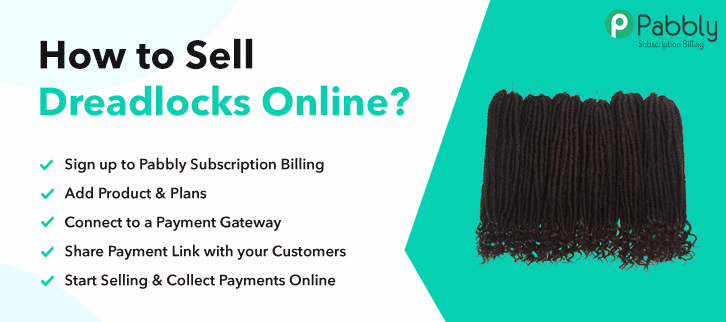
How to Sell Monitors Online | Step by Step (Free Method)

How to Sell Monitors Online

Ideal For: All the monitor manufacturers, computer monitor dealers, monitor sellers, retail  digital gadgets shop owners, gaming monitor sellers and other merchants can use this method to escalate their monitor selling business online.

How to Sell Monitors Online

Why Choose this Method for Selling Over any Other Solution?

Unlike any other solution, this method allows you to:

  • List and sell your monitors for FREE. Absolutely no payment required.
  • No commission on sales.
  • Collect payment through multiple payment modes from a single checkout page.
  • Sell one time or recurring subscriptions of your gaming monitors.
  • Sell and collect payment in any currency as per your requirement.
  • Give discounts on your products by offering special coupon codes.
  • Add sales commission agents to help you in selling your LCD and LED monitors.

Get Pabbly Subscription Billing for Free

There was a time when people use a bulky desktop at their houses, but with the advancement in technology more compatible and flexible monitors came up in the market. Every second household owns a monitor either for working purposes or gaming. That’s why it is high time to start monitor selling business online.

Why would you like to sell monitors online?

One of the coolest reasons to start monitor selling business online is there is a huge demand for monitors in offices and houses. In the IDC report, it has been said that although 21.5-inch is the most popular screen size but soon 23.8-inch wide monitors will fill all the gaps.

The global PC market will be expected to grow annually by 3.9% (CAGR 2020-2023) which is an amazing figure. Considering all these it won’t be dull to start monitor selling business online. And, we have one such software named Pabbly Subscription Billing that will all fulfill your needs. As the checkout page grabs more attention, the tool lets you create amazing checkout pages to sell monitors online. Some of its distinct features involve:

  • Add unlimited products
  • Offer coupon and discount codes
  • Multiple payment gateways
  • Professional invoices

Above mentioned are some of the perks and now let’s cast light on how to create a checkout page using the software.

This is How your Checkout Page will Look Like After Creation

Checkout Page to Sell Monitors Online

Preview Checkout Page

Step 1: Login to Pabbly Subscription Billing

Signup

Ignite the process by visiting Pabbly Subscription Billing and click on “Sign up Free“ button. Here, you can simply sign in using your Gmail account or manually filled out the details.

Sign Up For Free!

Step 2: Select Subscription Billing

Access Subscription Billing

Step 3: Account Setup

Setup Account

Move to the process of clicking on the “Access Now” button of the software, it will redirect to the page with details like company name, select currency, and phone number. Simply click continue to proceed.

Step 4: Connect Payment Gateways To Sell Monitors Online

Connect Payment Gateway

It is wise to go with test payment to gain the knowledge of software payment procedure. Here, we are also using the test payment mode for creating a checkout page. Further, the software has multiple payment gateways which are PayPal, Stripe, etc. So, you can take the help of payment integration guides which we are mentioning below in case of any need.

Step 5: Add Your Product

Add Product

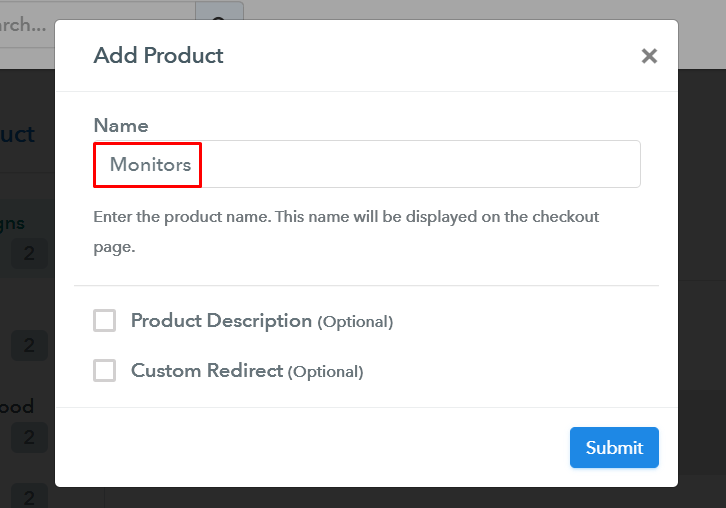
Furthermore, add the name, which in our case is monitors. Here you can specify the type like gaming monitors, LCD monitors, LED monitors, etc. Also, write a short description of the goods to grab the user’s concentration.

Add Product to Start Selling Monitors Online

Afterward, click on the “Submit” button after filling the details.

Note: Here you can add all the products related to the similar category by creating plans for each of them.

Step 6: Add Plans

Let’s uncover out plans for different kinds of monitors available in your store.

(a) Select Add New Plan

Add Plan

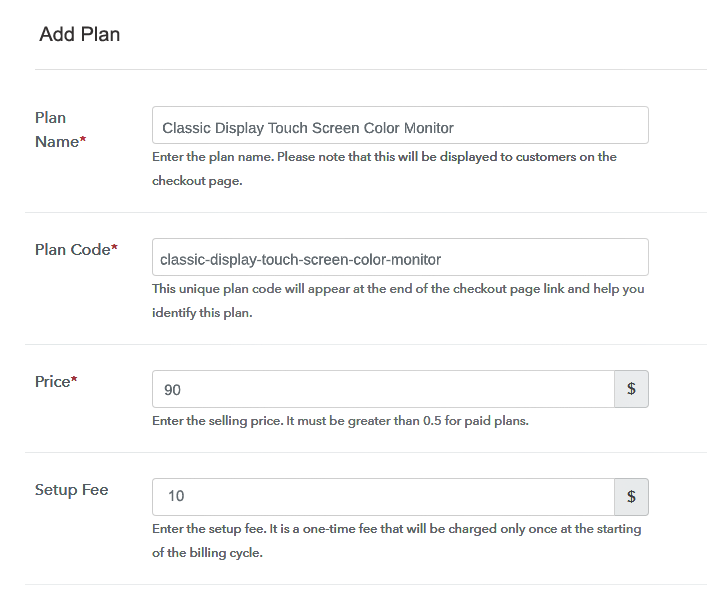
(b) Specify the Plan & Pricing Details

Specify the Plan and Pricing to Start Selling Monitors Online

Next, to proceed fill all the details like plan name, code, price, set-up fee, and much more to go on.

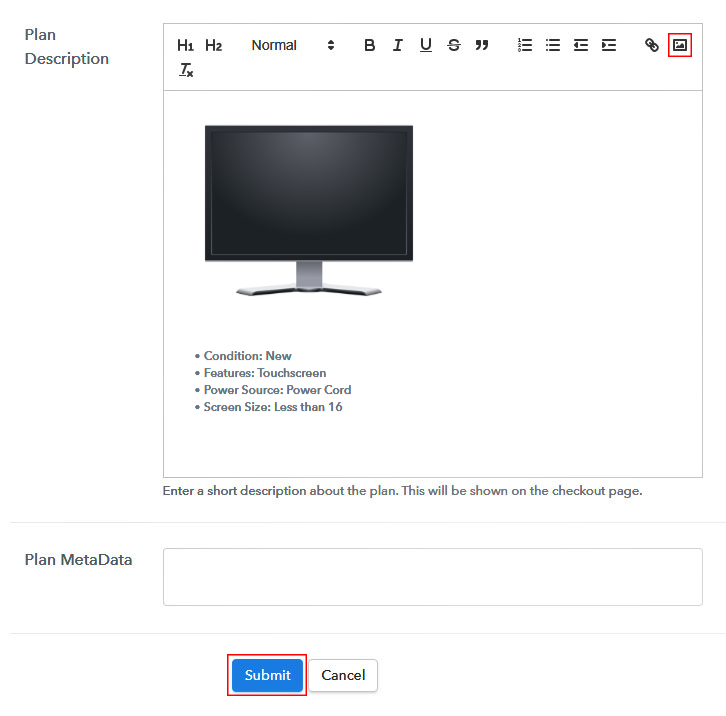
(c) Add Image & Description

Add Image and Description to Start Selling Monitors Online

Moreover, it is necessary to write a brief description of monitors using bullets, images, etc, to bring natural buyers to the checkout page,

Next, click the “Submit” button to add a product on the checkout page.

Additionally, you can add multiple plans and kinds of monitors in your product list which you want to sell online.

Step 7: Share your Checkout Page

Share Checkout Page on Social Media

  • Moreover, share the checkout page of monitors on social media accounts like Facebook & Twitter to grab the buyer’s attention.
  • Besides, you can share the direct link to plan with your customers via SMS or email marketing.
  • Additionally, embed the provided plan link of monitors in the buttons or any anchor text on your website.

Step 8: Preview Checkout Page

Follow up the recommended steps to preview the checkout page:

(a) Click on the View Button

View Checkout Plan

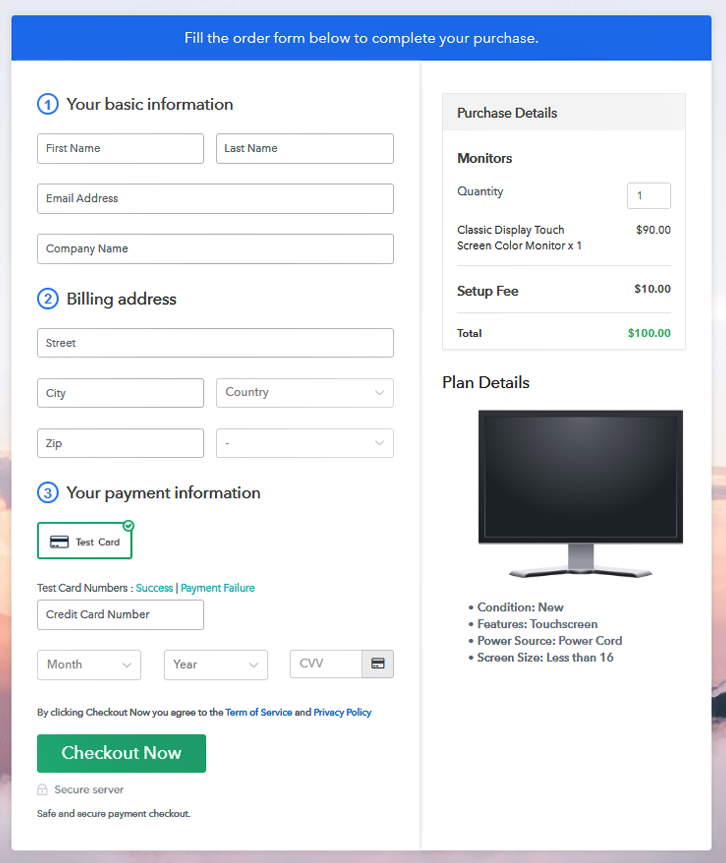
(b) Take a Look at the Checkout Page

Checkout Page to Sell Monitors Online

Step 9: Embed Checkout Page in Site & Sell Monitors Online

Embed Checkout Page on Website

Simply copy the link and add the checkout page to sell monitors online at any suitable place on your WordPress site.

(a) Edit the Page & Paste the Copied Link

Paste Link in Text Editor

Next, paste the plan link on a text editor of the WordPress dashboard.

(b) Save & Publish the Checkout Page

Save and Publish

Hit the “Publish” button, after making changes.

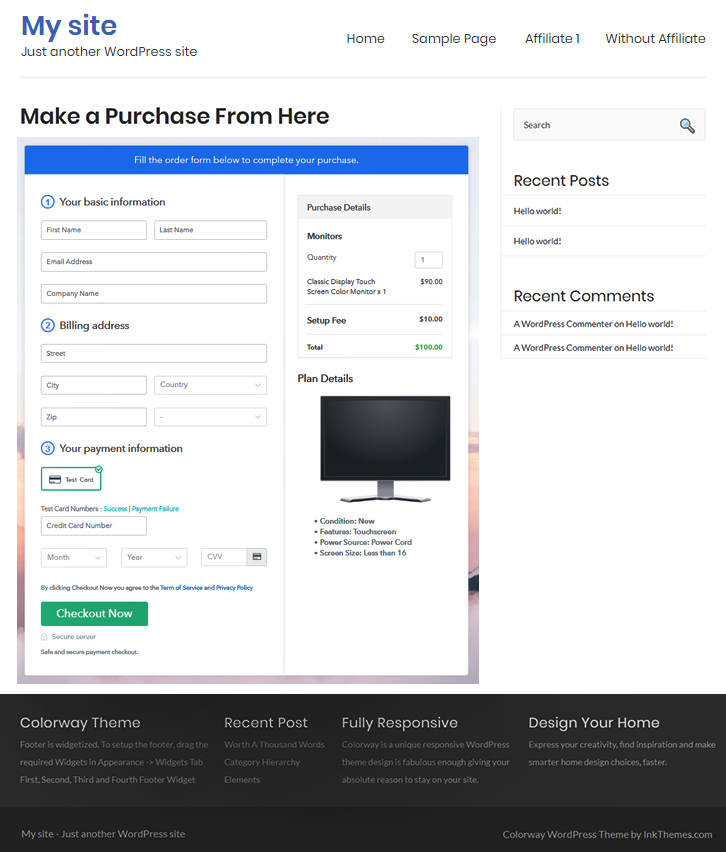
(c) Check out the Final Look of your Checkout Page on WordPress Site

Final Look of your Checkout Page to Sell Monitors Online

Step 10: Multiplan Checkout Page

Note: In case you want to sell multiple products via a single checkout page, you can create a multi-plan checkout page otherwise skip this step.

(a) Click on Add Mutiplan Checkout

Multiplan Checkout

(b) Add Plans to Sell Multiple Monitors from Single Checkout Page

Add Multiple Products to Start Selling Monitors Online

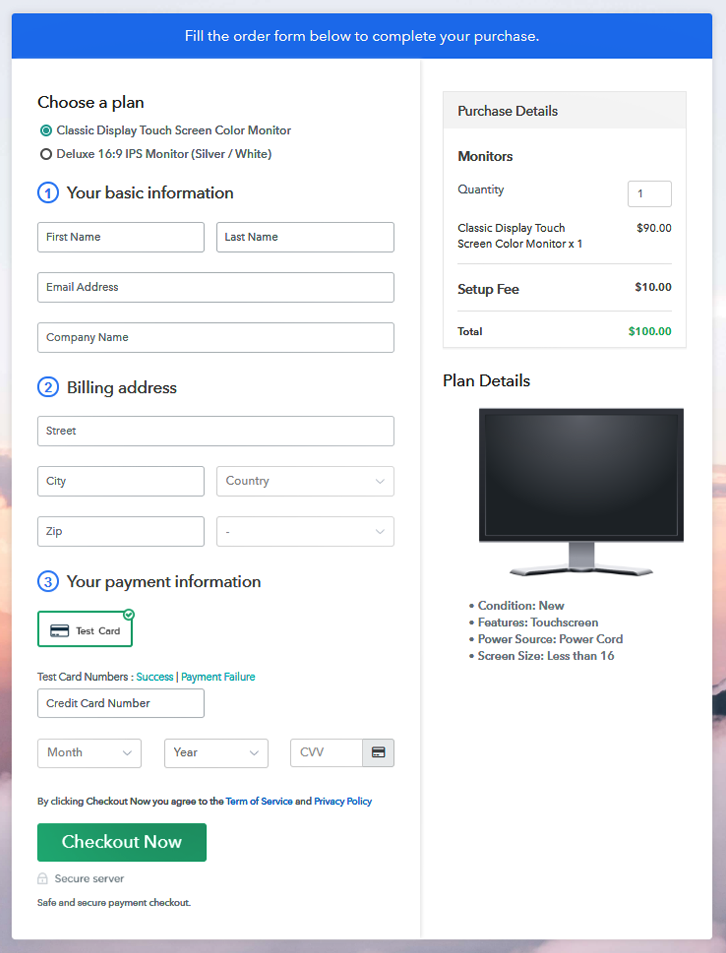
(c) Take a Look at the Checkout Page

Multiplan Checkout Page to Sell Monitors Online

Preview Checkout Page

Wrapping Up

Alright! We have now revealed the easiest steps to start monitor selling business online. Don’t box yourself up, it is important to sell monitors online as it is one of the essential elements. And, honestly using Pabbly Subscription Billing starting any business is a cakewalk.

So. try out this software and let us know your reaction in the comments section.

You May Also Like To Read –
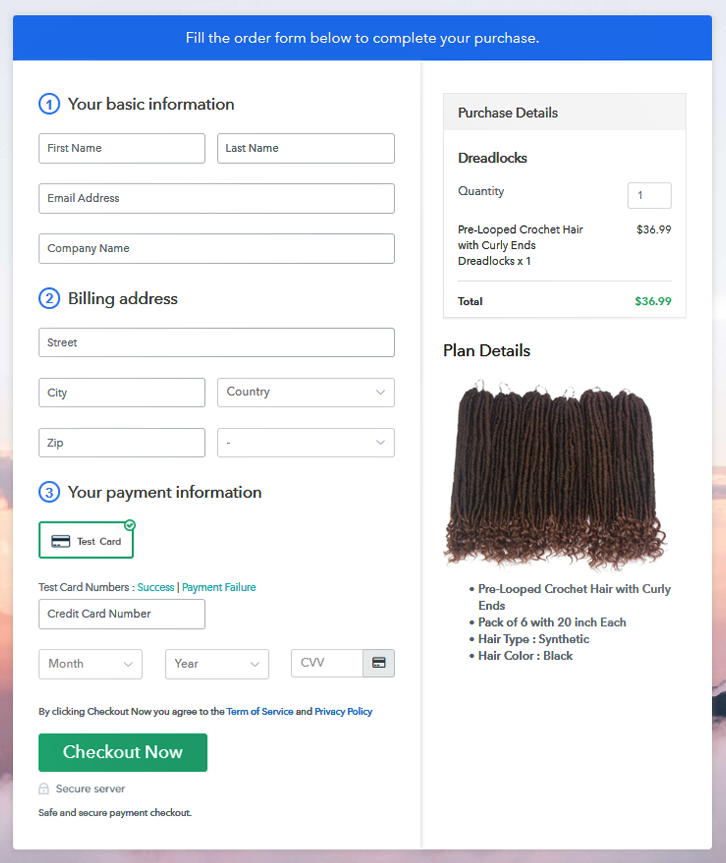
How to Sell Crochet Items Online | Step by Step (Free Method)

How to Sell Crochet Items Online

Ideal For: All the gift shops, art & craft shops, and people who sell handmade crochet items from home can use this method to take their crochet items selling business online.

How to Sell Crochet Items Online

Why Choose this Method for Selling Over any Other Solution?

Unlike any other solution, this method allows you to:

  • List and sell crochet items for FREE. Absolutely no payment required.
  • No commission on sales.
  • Collect payment through multiple payment modes from a single checkout page.
  • Sell one time or recurring subscriptions of crochet items.
  • Sell and collect payment in any currency as per your requirement.
  • Give discounts on your products by offering special coupon codes.
  • Add sales commission agents to help you in selling crochet items.

Get Pabbly Subscription Billing for Free

Do you love to knit and crochet and gift your crafts to your loved once? Then you should absolutely turn your crocheting hobby into an online business because if you are already giving people your crafts for free then why not make some money out of it.

Why would you like to sell crochet items online?

Well, because you can turn your hobby into a business without much investment and since you already love what you do, it becomes much easier to earn money. Now you must be thinking about how can you start your online business? Well, you can easily sell your crochet items through checkout pages which you can create on any online platform, and Pabbly Subscription Billing is one of them. It offers you an absolutely free platform to start your online crochet items selling business. With this service, you just have to create checkout pages for your crochet items and share their links on social media or your website, and people can buy your crochet items directly through those links. It becomes very easy to collect one-time or recurring payments through the checkout pages.

Moreover, Pabbly Subscription Billing also offers so many amazing features other than checkout pages:

  • Collect one-time or recurring payments via offline or online payment modes
  • Zero transaction fees
  • Share invoices with customers automatically
  • Sell unlimited products and plans

This is How your Checkout Page will Look Like After Creation

Preview Checkout Page

Preview Checkout Page

Step 1: Log in to Pabbly Subscription Billing

Signup

In the beginning, you have to visit Pabbly Subscription Billing website and then click on the “Sign Up Free” button. On clicking the button, you will land on the signup page, where you can create your account automatically through your Gmail or manually enter your details.

Sign Up For Free!

Step 2: Select Subscription Billing

Access Subscription Billing

Step 3: Account Setup

Setup Account

Later, the signup process is completed, now fill up your company details i.e. company name, select currency, and contact number in the appeared dialogue box.

Step 4: Connect Payment Gateway to Sell Crochet Items Online

Connect Payment Gateway

After setting up your account, in this step, the payment collection process is described by enabling the ‘Test Payment’ mode. Later, you can connect other payment gateways of your choice. The complete integration guide for payment gateways is provided below.

Step 5: Add Your Product

Add Product

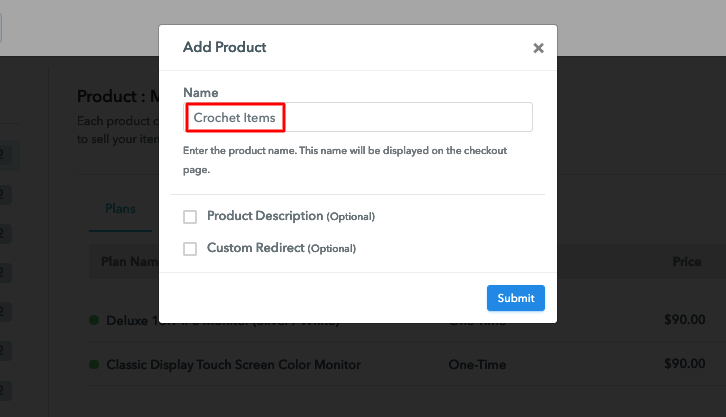
In the next step, you have to add your first product. You can add crochet items of different categories for example crochet bags, crochet jewelry, etc, and add all other types of crochet items in the same product by creating different plans.

Add Product Name to Sell Crochet Items Online

Simply just fill up these details to add your product.

Note: Here you can add all the products related to the similar category by creating plans for each of them.

Step 6: Add Plans

Let’s get started and create plans for different categories of crochet items that you want to sell

(a) Select Add New Plan

Add Plan

(b) Specify the Plan and Pricing Details

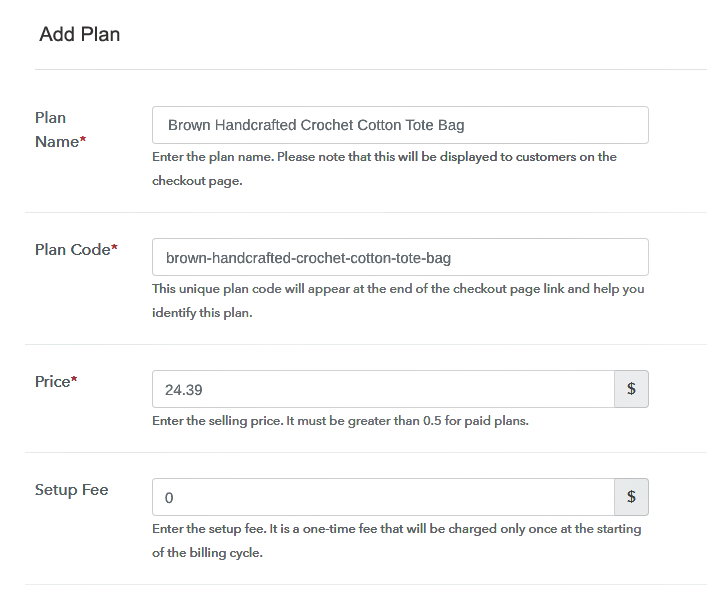
Add Details to Sell Crochet Items Online

On clicking add new plan, you will reach to the plan page, here you will have to fill the plan details such as plan name, code, billing cycle, price, etc.

(c) Add Image & Description

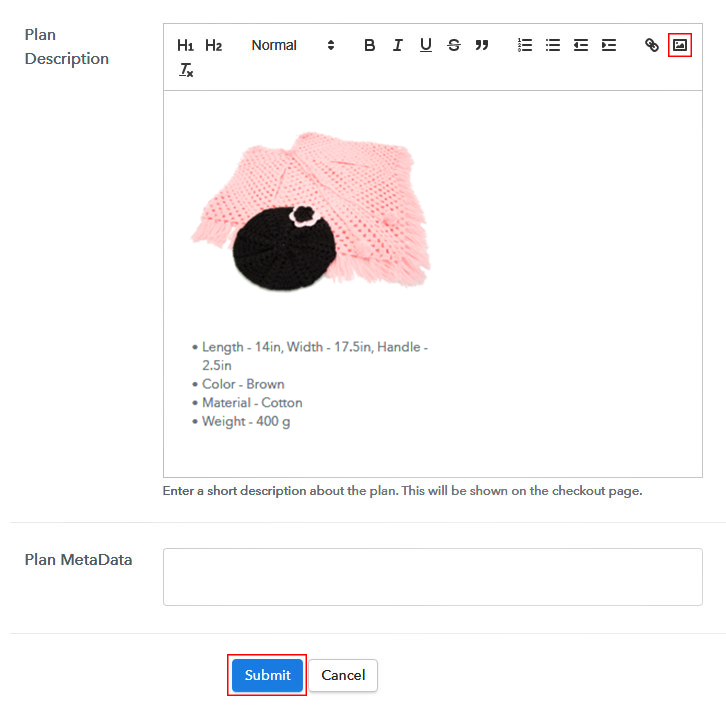
Add Image to Sell Crochet Items Online

Also, write a description of the crochet items that you want to sell along with the product links, images, etc, and click on the submit button to add your plan.
You can create more plans for all the crochet items in a similar manner.

Step 7: Share Your Checkout Page

Share Checkout Page on Social Media

  • You can share your checkout page on social media such as Facebook and Twitter to promote the sales of your product.
  • Furthermore, copy the mentioned link and send it to your customers through SMS or emails directly.
  • Embed your plan link to your website so that your customers can be landed on the checkout page directly.

Step 8: Preview Checkout Page

Follow the mentioned steps to view checkout page

(a) Click on the View Button

View Checkout Plan

(b) Take a Look at the Checkout Page

Preview Checkout Page

Step 9: Embed Checkout Page in Site & Sell Crochet Items Online

Embed Checkout Page on Website

Just copy the provided plan embedding link and embed the checkout page to your WordPress site.

(a) Edit the Page & Paste the Copied Link

Paste Link in Text Editor

Copy and paste the link in the text area of the editor

(b) Save & Publish the Checkout Page

Save and Publish

After pasting the code, click on the publish button to embed your checkout page.

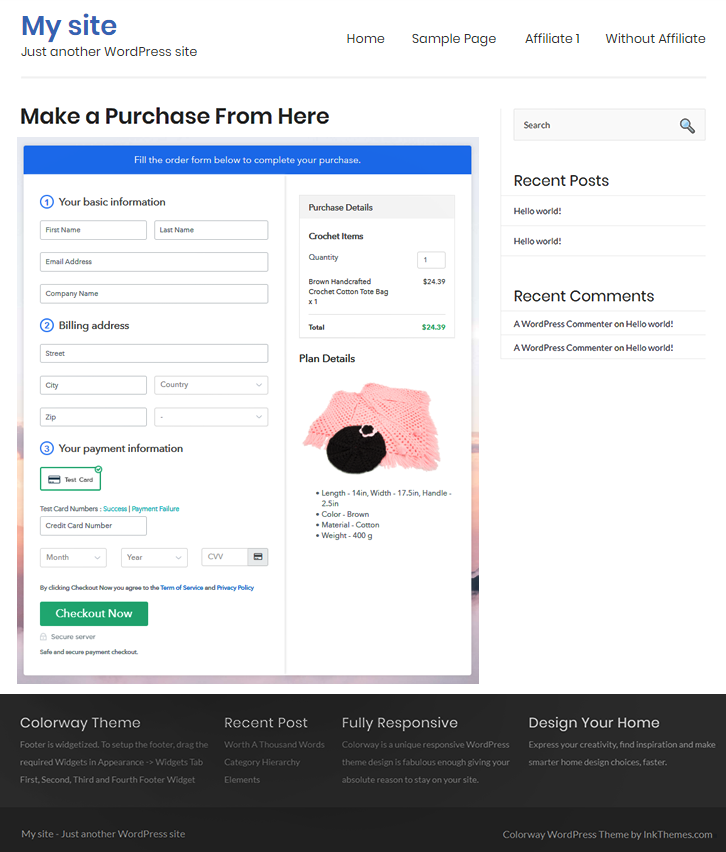
(c) Check Out the Final Look of your Checkout Page on WordPress Site

Add Checkout Page to Sell Crochet Items Online

Step 10: Multiplan Checkout Page

Note: In case you want to sell multiple products through a single checkout page, create a multi-plan checkout plan, otherwise skip this step.

(a) Click on Add Multiplan Checkout

Multiplan Checkout

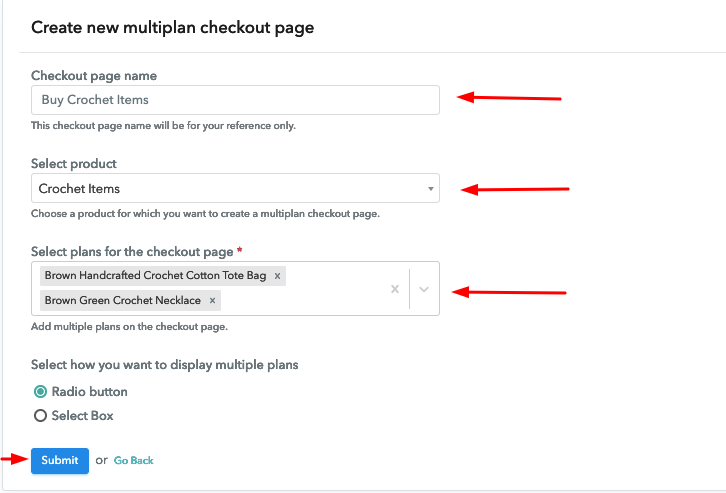
(b) Add Plans to Sell Multiple Crochet Items from Single Checkout Page

Multiplan Details to Sell Crochet Items Online

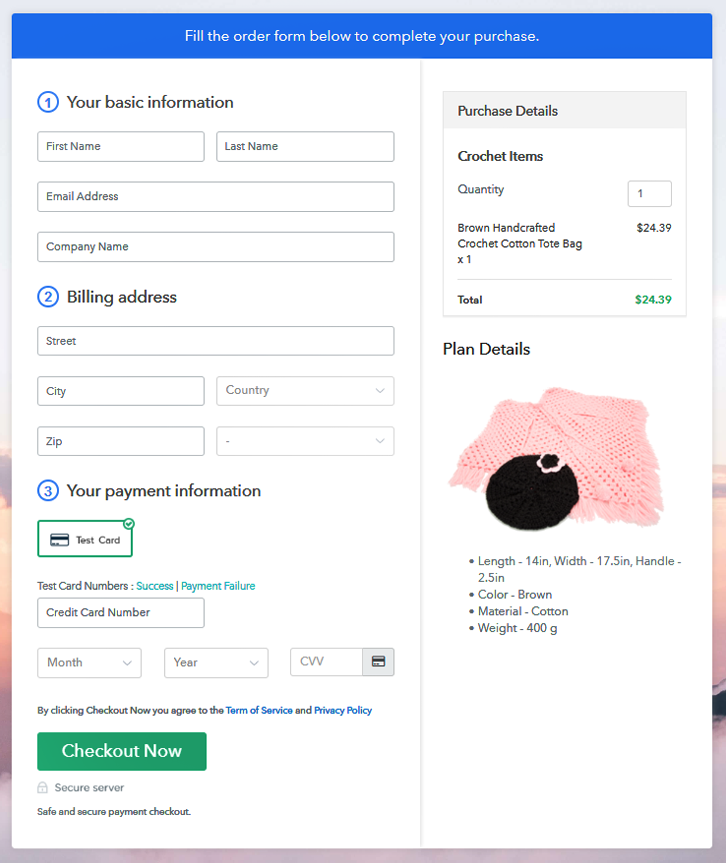
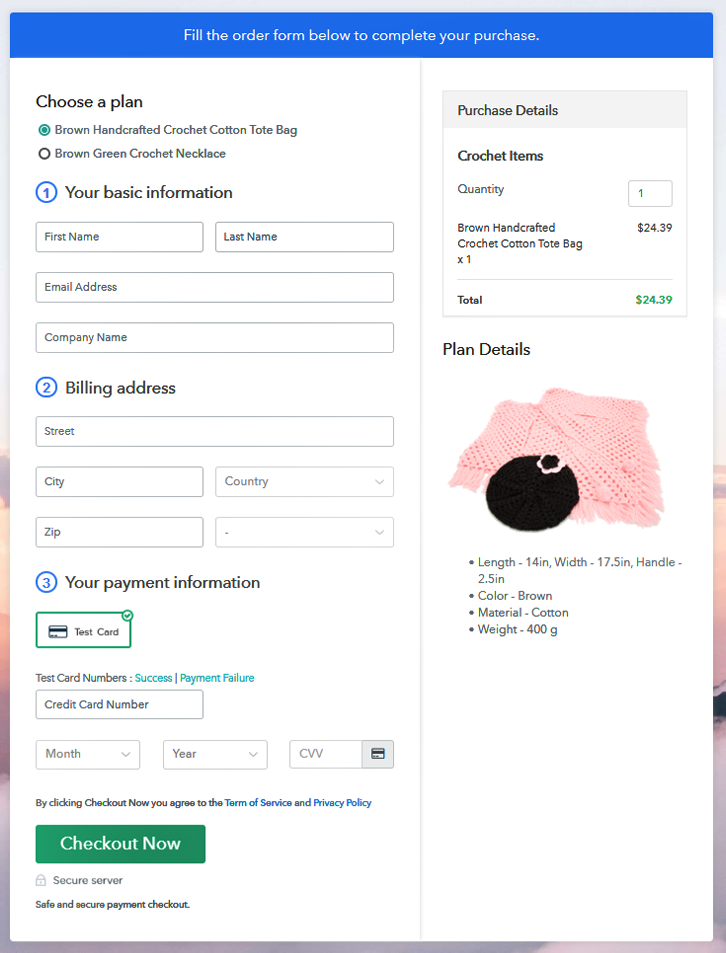
(c) Take a Look at the Checkout Page

Multiplan Checkout to Sell Crochet Items Online

Preview Checkout Page

Wrapping Up

Now, at last, we hope that this blog was helpful for you in starting your online crochet items selling business as you won’t find the same service as Pabbly Subscription Billing. With this service, you can collect payments easily, sell unlimited products, share invoices easily with users, and much more. We can guaranty that you won’t regret it after choosing Pabbly Subscription Billing. For further queries or suggestions, please contact us.

You May Also Like To Read –
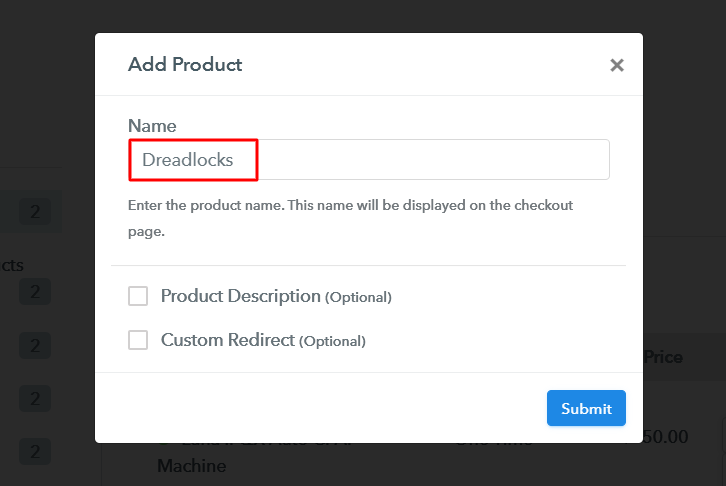
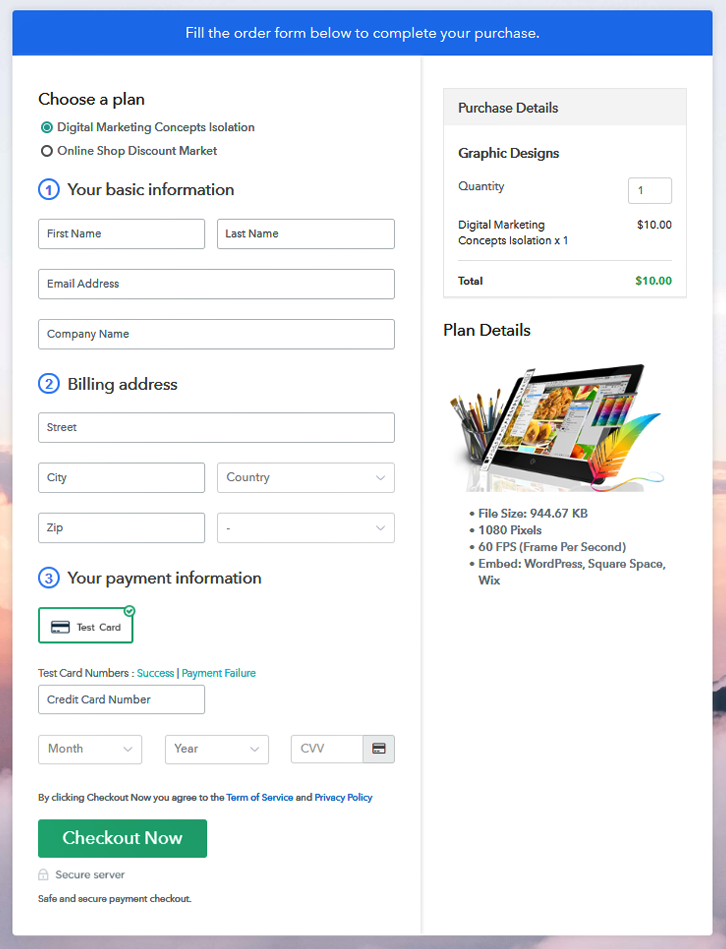
How to Sell Graphic Designs Online | Step by Step (Free Method)

How To Sell Graphic Designs Online

Ideal For: All the graphic design studios, graphic design makers, digital artists and other merchants can use this method to sell graphic designs online.

How to Sell Graphic Designs Online

Why Choose this Method for Selling Over any Other Solution?

Unlike any other solution, this method allows you to:

  • List and sell your graphic designs for FREE. Absolutely no payment required.
  • No commission deducted on sales.
  • Collect payment through multiple payment modes from a single checkout page.
  • Sell one time or recurring subscriptions of your graphic designs.
  • Sell and collect payment in any currency as per your requirement.
  • Give discounts on your products by offering special coupon codes.
  • Add sales commission agents to help you in selling your graphic designs.

Get Pabbly Subscription Billing for Free

Nowadays, most of the companies are demanding graphic designs for assistance in advertisements, brochures, magazines, and reports. That is the main reason why graphic designers are looking forward to start their graphic designing business online.

Why would you like to sell graphic designs online?

In this digital age, everyone is looking out for ways to sell things online. And when it comes to graphic designs, a lot of companies are searching for people who can provide them creative designs. Therefore, it is a great opportunity for people who want to start their graphic design business online. Thus, an online tool is required to help you with all the business needs. So, here we would like to suggest Pabbly Subscription Billing that can list unlimited products without charging any excess commission. Hence, let me take you through some of the important features that it provides:

  • Create unlimited products, and plans
  • Collect payment online as well as offline
  • Moreover, you can also track payments and revenue
  • Furthermore, it allows you to add the delivery rate and tax price
  • Besides, you can also increase your sales by ceating discounts and coupons.

Now, without wasting any of your time, let me help you to set up your graphic design business online step by step.

This is How your Checkout Page will Look Like After Creation

Checkout to Sell Graphic Designs Online

Preview Checkout Page

Step 1: Log in to Pabbly Subscription Billing

Signup

Firstly, go to Pabbly Subscription Billing website and click on the button “Sign up Free“. Then, simply sign in through your Gmail account or fill out all the details manually like name, email address, and press the “Sign Up” button.

Sign Up For Free!

Step 2: Select Subscription Billing

Access Subscription Billing

Step 3: Account Setup

Setup Account

Subsequently, you will see a dialog box that will pop up asking you to fill the company details like name, currency, and phone number. Once you complete filling the details just press the “Continue” button.

Step 4: Connect Payment Gateways To Sell Graphic Designs Online

Connect Payment Gateway

Now, in order to ensure the payment process, you need to test the whole payment experience with the help of a dummy payment gateway in Pabbly Subscription Billing.

Moreover, you can also integrate with a ton of payment gateways such as Razorpay, PayPal, Authorize.net, etc. Just go through the articles that are mentioned below in order to integrate with your preferred payment gateway like PayPal, Stripe, etc. For instance, here I am going to enable the test payment option to continue the process.

Step 5: Add Your Product

Add Product

Now, all you need to do is add the products by clicking on the button stating “Add your product”. Then, specify your product with a small description using the description section below.

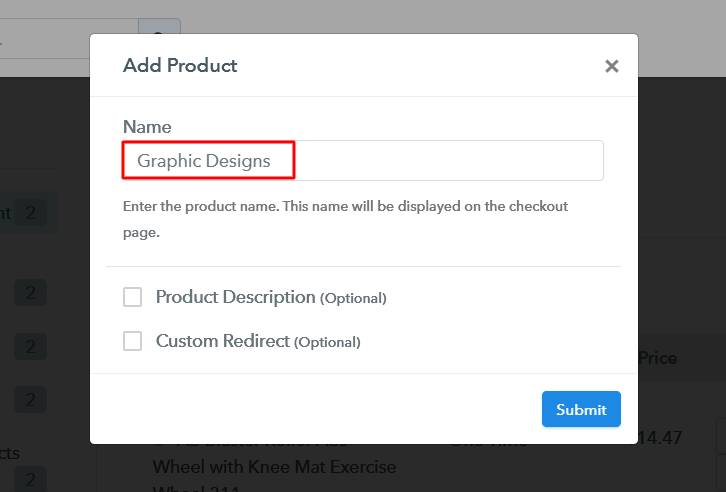
Add Product to Sell Graphic Designs Online

Fill up the details and your product is created.

Note: Here you can add all the products related to the similar category by creating plans for each of them.

Step 6: Add Plans

Next, our step is to create plans for graphic designs that you want to sell online.

(a) Select Add New Plan

Add Plan

(b) Specify the Plan & Pricing Details

Specify the Plan & Pricing Details to Sell Graphic Designs Online

Following the next step, you will redirect to the plan page, where you need to fill in details such as plan name, code, price, setup fees.

(c) Add Image & Description

Product Description to Sell Graphic Designs Online

Now, upload the graphic designs with the help of the image option. After inserting the image, give comprehensive details regarding graphic design in bullets points, file type, size, pixel, etc. Once you are done describing the product details just click on the “Submit” button.

Step 7: Share your Checkout Page

Share Checkout Page on Social Media

  • In order to increase sales of your products, you can share the checkout page on Twitter & Facebook by just pressing the respective buttons.
  • Moreover, using emails and SMS you can also send the checkout page link to your customers directly.
  • Besides, you can also build buttons on your webpage and paste the checkout links on it. Further, you can also use anchor text on your website in order to redirect users to the checkout page.

Step 8: Preview Checkout Page

Follow up these steps to preview checkout page:

(a) Click on the View Button

View Checkout Plan

(b) Take a Look at the Checkout Page

Checkout to Sell Graphic Designs Online

Step 9: Embed Checkout Page in Site & Sell Graphic Designs Online

Embed Checkout Page on Website

Subsequently, just copy the embed plan link to insert the checkout page on your WordPress website.

(a) Edit the Page & Paste the Copied Link

Paste Link in Text Editor

Now, after copying the link just paste it to the text area of the editor.

(b) Save & Publish the Checkout Page

Save & Publish

Once you paste the code, now press the ‘Publish’ button and your checkout page is embedded.

(c) Check out the Final Look of your Checkout Page on WordPress Site

Embed Checkout to Website to Start Graphic Designs Business Online

Step 10: Multiplan Checkout Page

Note: In case you want to sell multiple products via a single checkout page, you can create a multi-plan checkout page otherwise skip this step.

(a) Click on Add Mutiplan CheckoutMultiplan Checkout

(b) Add Plans to Sell Graphic Designs Online from Single Checkout Page

Create Multiplan Checkout to Start Graphic Designs Business Online

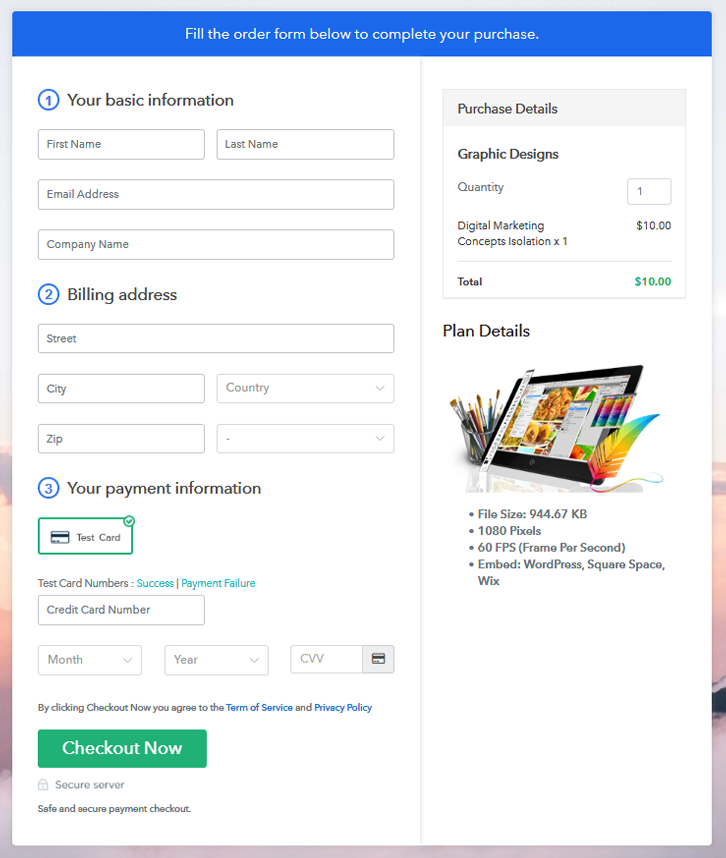
(c) Take a Look at the Checkout Page

Final Multiplan Checkout Page to Sell Graphic Designs Online

Preview Checkout Page

Wrapping Up

There you go! Now you can start graphic design business online just by following the above-mentioned steps. All you need to do is sign up in Pabbly Subscription Billing and you are good to sell graphic designs online without any hassle. Moreover, if you have any queries, just write to us in the comment section below. We will get back to you as soon as possible.

You May Also Like To Read –