How to Sell Beds Online | Step by Step (Free Method)

How to Sell Beds Online

Ideal For: All the bed creators, bed sellers, retail bed shop owners, and other merchants can use this method to take their beds selling business online.

How to Sell Beds Online

Why Choose this Method To Sell Beds Online?

Unlike any other solution, this method allows you to:

  • List and sell your beds for FREE. Absolutely no payment required.
  • No need to pay commission on any of your sale.
  • Multiple payment options like PayPal, Credit Card, etc to collect payment from a single place.
  • Sell one time or recurring subscriptions of your beds.
  • Collect payments & sell products in any currency as per your requirement.
  • Give discounts on your products by offering special coupon codes.
  • Add sales commission agents to help you in selling beds online.

Get Pabbly Subscription Billing for Free

People look for many choices both online & offline while searching for a bed. And if you are planning to sell beds online then you are going to add more choices for them. For this, you must be looking for some way to get started. Well in this blog, we are going to discuss a process which can help you start beds business online in minutes.

More further, we are going to the complete step by step procedure for creating checkout pages. These checkout pages will help you collect secure payments globally, display a product and its specifications.

There are more advantages of using this approach though. You can manage all management excellently with the dashboard that this service provides. Most importantly, you can share the checkout pages on social media platforms, emails, SMS and more…

Final View of Checkout Page For Your Beds Selling Business

Checkout Page Preview to Sell Beds Online

Preview Checkout Page

Step 1: Log in to Pabbly Subscription Billing

Signup

To get started with selling beds online begin, the process by visiting Pabbly Subscription Billing official website. On the website hit the ‘Sign Up Free‘ button. Now, choose a sign-up choice to get into the system, you can either manually fill out the registration form or can also use a Google account.

Sign Up For Free!

Step 2: Select Subscription Billing

Access Subscription Billing

Step 3: Account Setup

Setup Account

Now, a pop-up window will open up asking the company details. Mention the details such as a company name, the currency in which you wanna deal, and a phone number.

Step 4: Connect Payment Gateways & Start Beds Selling Business Online

Connect Payment Gateway

Next step further is integrating a payment gateway to collect payments for the sold products. You can also enable the test payment mode to test the payment collection process. But, you’ll need to choose a method from the following to accept actual payments.

Step 5: Add Product For Your Beds

Add Product

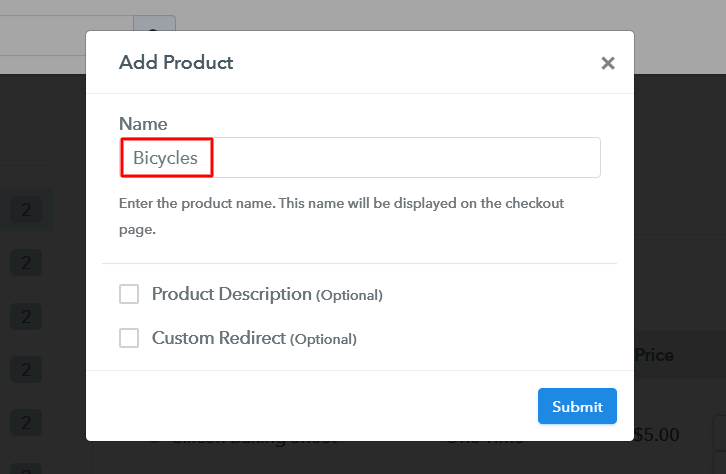
Once, all the system settings are done you can add products to sell beds online. These products are much like categories of the beds you want to sell like wooden beds, beds with storage, bunker beds etc. Further, we’ll add plans to sell in each product category.

Add Product to Sell Beds Online

Hit submit, once you are done and a product will be added.

Note: Here you can add all the products related to the similar category by creating plans for each of them.

Step 6: Add Plans 

Let’s rollout plans for different kinds of beds available in your store.

(a) Select Add New Plan

Add Plan

(b) Specify the Plan & Pricing Details
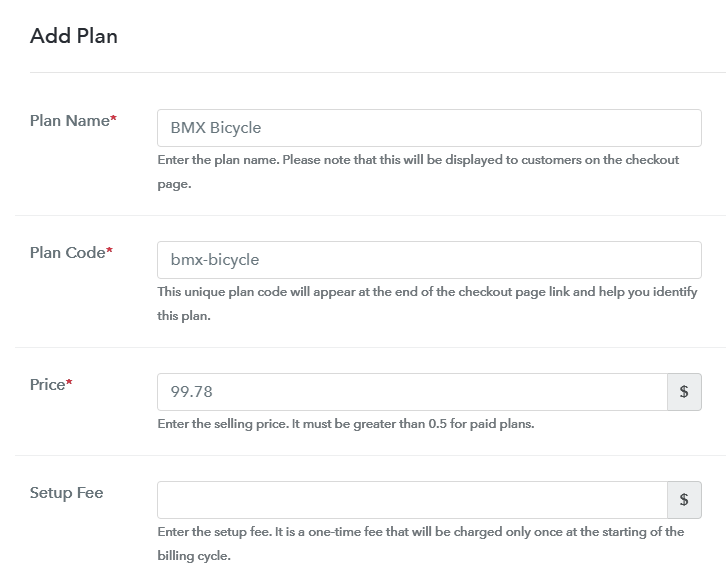
Add Plan to Sell Beds Online

To sell a bed online, you can specify its name, code, price, set-up fee, billing cycle etc details in the plan page.

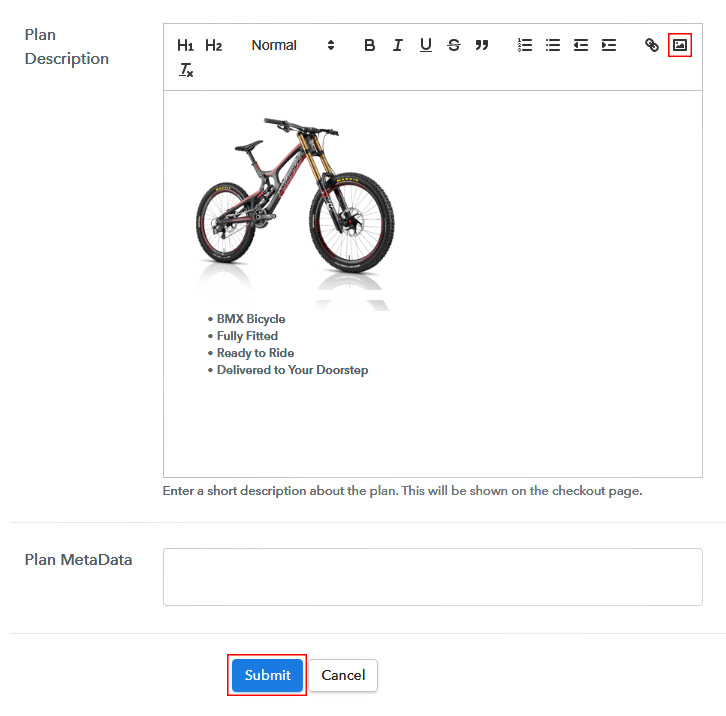
(c) Add Image & Description of Beds

Add Image & Description to Sell Beds Online

Also, you can put an image and some descriptive text about the bed you want to sell.

Once you are done, strike the submit button here & a plan will be added.

Similarly, you can add other beds to sell online.

Step 7: Share your Checkout Page

Share Checkout Page on Social Media

You can share a plan checkout page with the customers in three ways.

  • Directly hit the buttons shown above to share the checkout page on Facebook & Twitter
  • Share the plan link URL on emails and SMS with your customers
  • Link the plan link URL in any website’s buttons & texts to redirect a customer on the checkout page

Step 8: Preview Checkout Page

Follow up the recommended steps to preview the checkout page:

(a) Click on the View Button

View Checkout Plan

(b) Take a Look at the Checkout Page
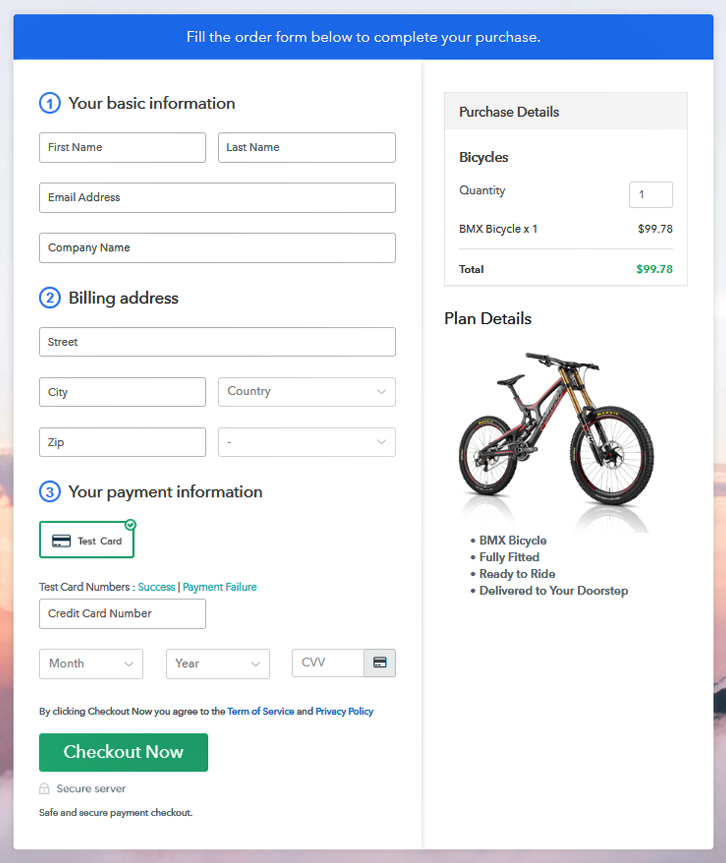
Checkout Page Preview to Sell Beds Online

Step 9: Embed Checkout Page in Site & Sell Beds Online

Embed Checkout Page on Website

Just copy the link and add the checkout page to sell beds online at any preferable place on your WordPress site.

(a) Edit the Page & Paste the Copied Link

Embed Checkout Page on Website

Further, paste the plan link on a text editor of the WordPress dashboard.

(b) Save & Publish the Checkout Page

Save_and_Publish

Next, click the “Publish” button, after making changes.

(c) Check out the Final Look of your Checkout Page on WordPress Site
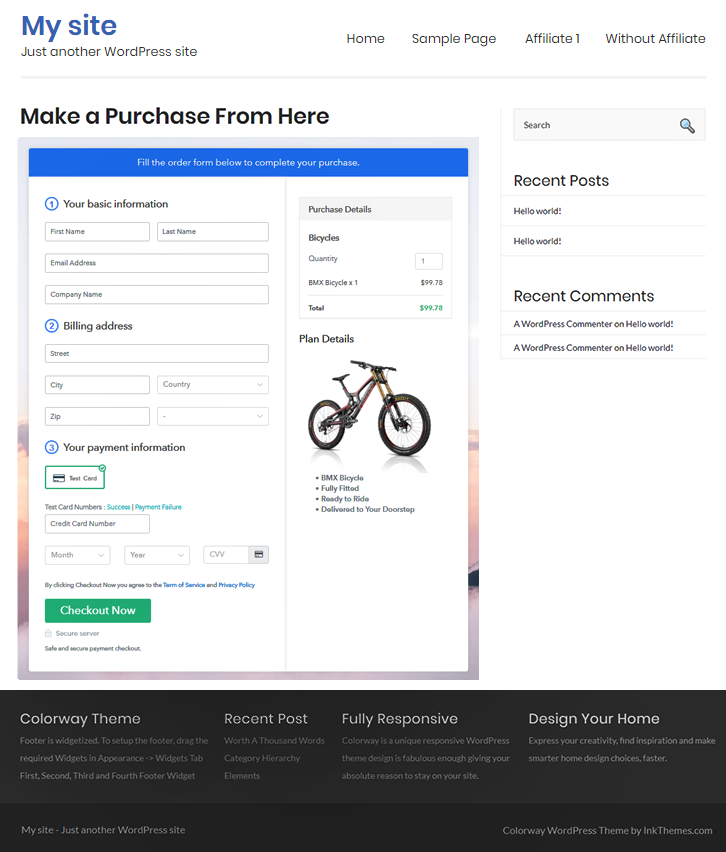
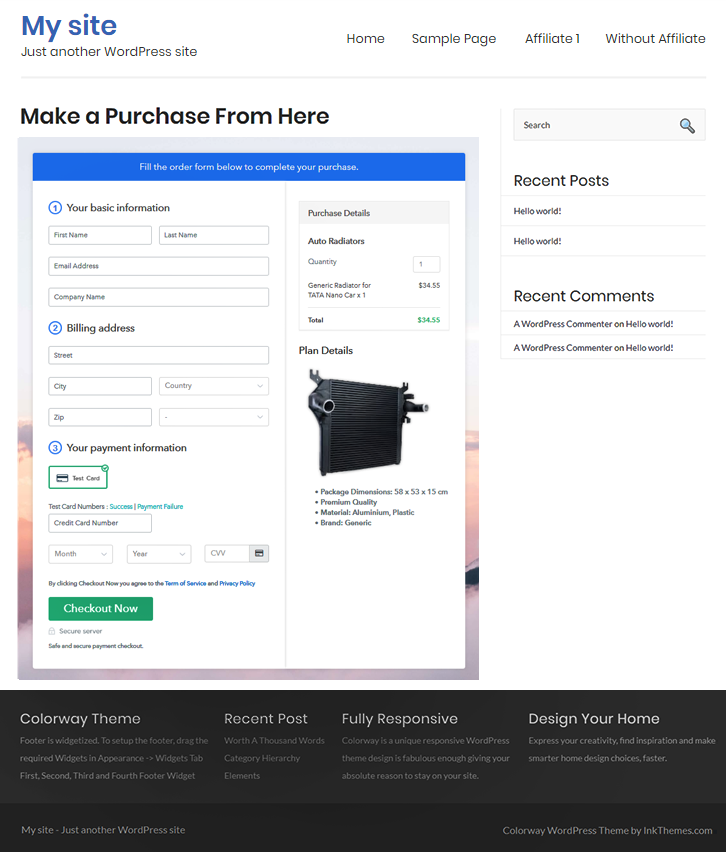
Checkout Page On WordPress Site to Sell Beds Online

Step 10: Multiplan Checkout Page

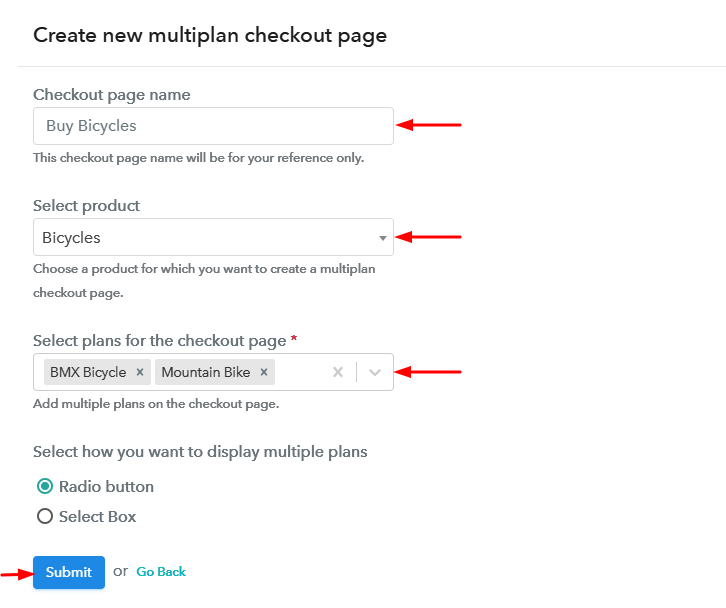
Note: In case you want to sell multiple products via a single checkout page, you can create a multi-plan checkout page otherwise skip this step.

(a) Click on Add Mutiplan Checkout

Multiplan Checkout

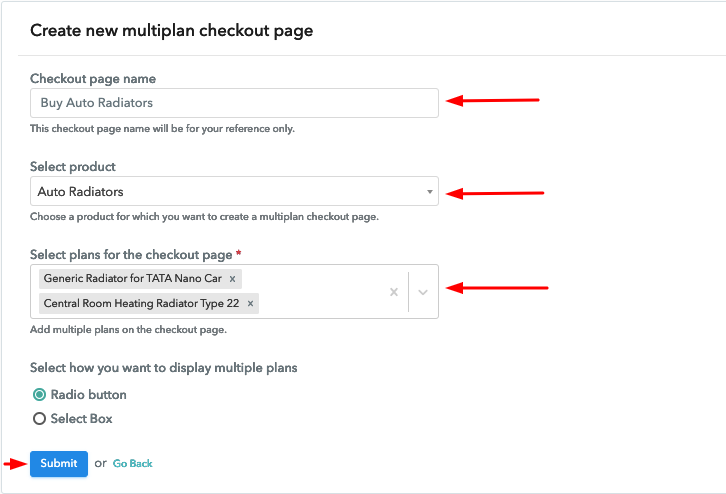
(b) Add Plans to Sell Multiple Beds from Single Checkout Page

Create Multiplan Checkout Page to Sell Beds Online

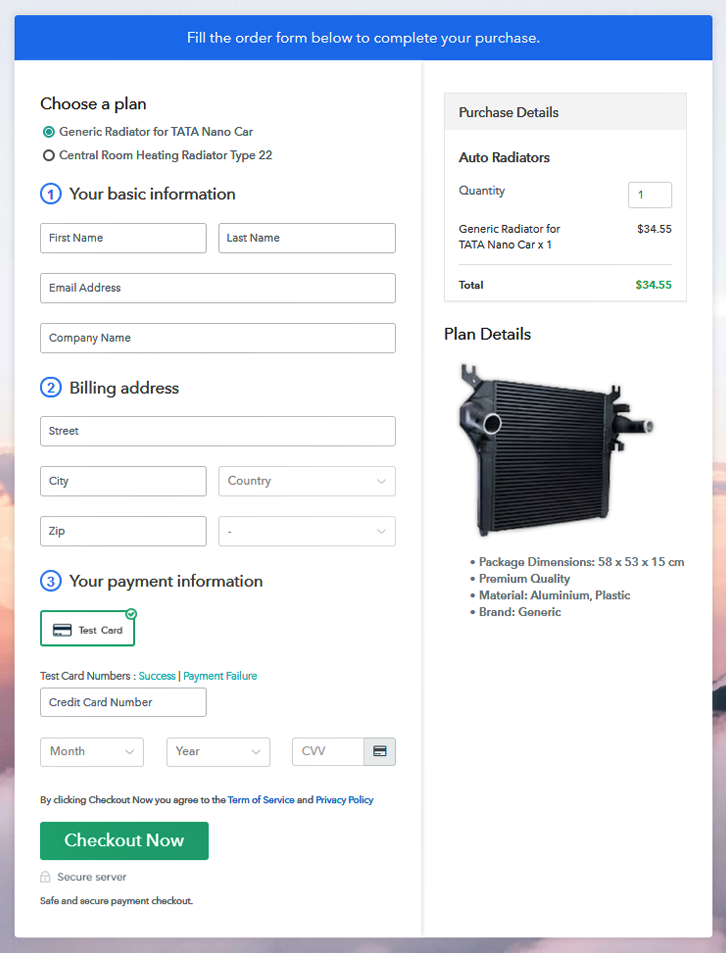
(c) Take a Look at the Checkout Page
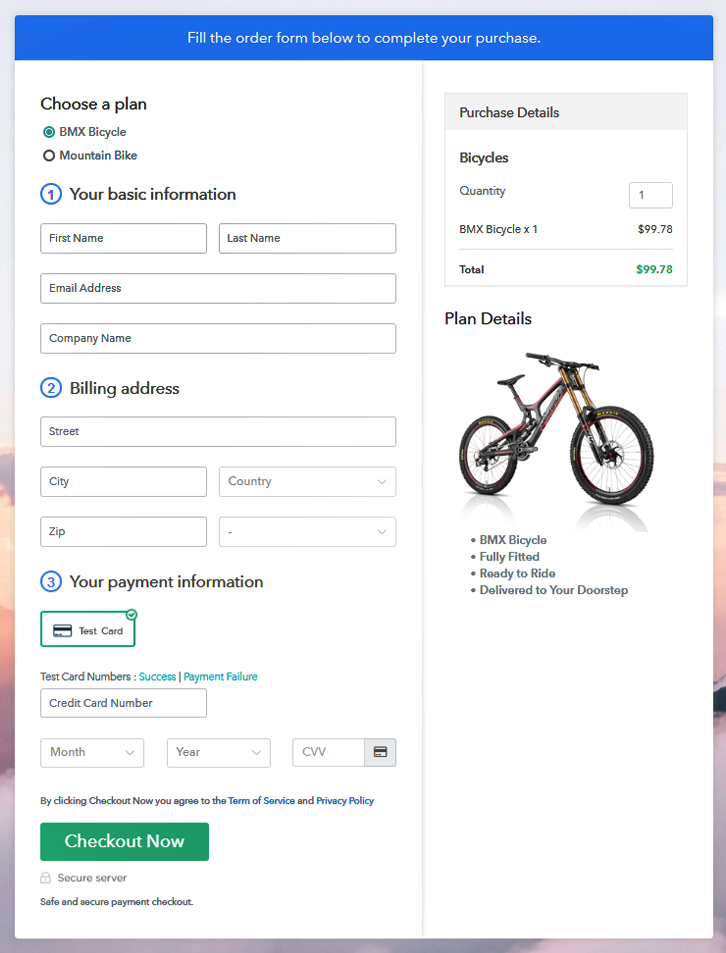
Multiplan Checkout Page to Sell Beds Online

Preview Checkout Page

Wrapping Up

These were the 10 steps to start beds business online in no time. You can sell beds online throughout the globe and can choose to collect any currency. Moreover, all the payment gateway options are pretty reliable.

Apart from the payments, you’ll get a dashboard where you can keep a record of the materials available, payments & refunds which is hard in many cases.

You May Also Like To Read –
How To Sell Anesthesia Online | Step by Step (Free Method)

Ideal For: All the pharmaceuticals, pharma shops, chemists can use this method to sell anesthesia online.

How To Sell Anesthesia Online

Why Choose this Method To Sell Anesthesia Online?

Unlike any other solution, this method allows you to:

  • List and sell your anesthesia for FREE. Absolutely no payment required.
  • No need to pay commission on any of your sales.
  • Multiple payment options like PayPal, Credit Card, etc to collect payment from a single place.
  • Sell one time or recurring subscriptions of your anesthesia.
  • Collect payments & sell products in any currency as per your requirement.
  • Give discounts on your products by offering special coupon codes.
  • Add sales commission agents to help you in selling anesthesia online.

Get Pabbly Subscription Billing for Free

If you are looking for a method to sell anesthesia online, you have come to the right place. But before, let me tell you the benefits of selling anesthesia online. Well for starters, you can easily get rid of the stockpiles before their expiry date as you will get higher demand from around the world. Furthermore, there are other benefits like better revenue management, 24×7 open online shop, better logistics, revenue tracking, etc.

So, to sell anesthesia online, I am going to recommend a Saas tool called Pabbly Subscription Billing. The immediate benefit of using this software is that you can create awesome checkout pages for selling anesthesia online and collect revenues in both offline/online modes. Other benefits are:

  • Unlimited Revenue Collection
  • No Transaction Charges
  • Multiple Billing Models
  • Import/Export Customer Data

Using these features, you will be miles ahead of your competition. So, let us begin to build our first checkout page with Pabbly Subscription Billing to start anesthesia selling business online.

Note: It is illegal to sell anesthesia online without prior permission and approval from FDA or equivalent regulatory authorities.

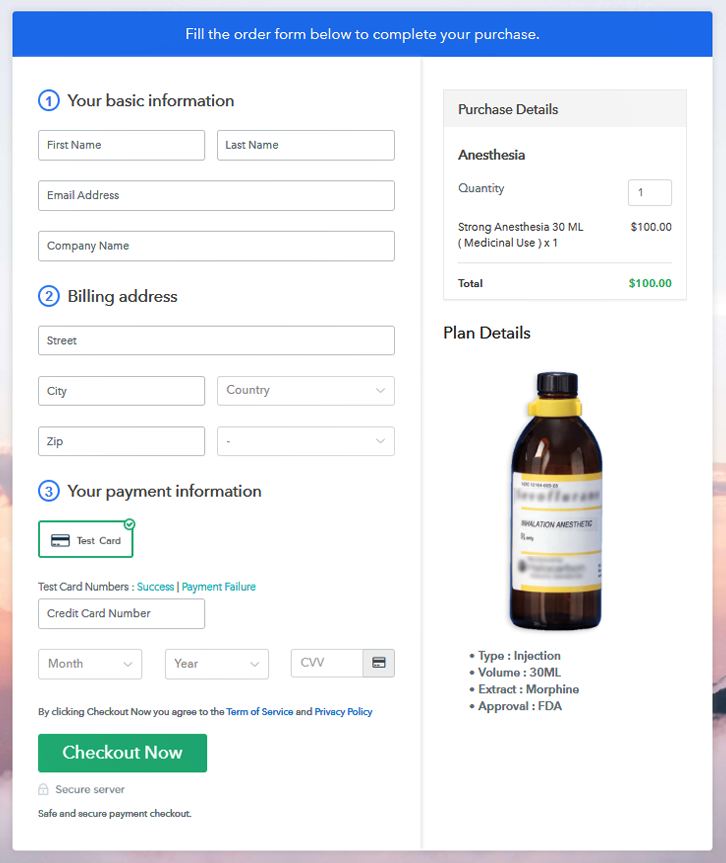
Final View of Checkout Page For Your Anesthesia Selling Business

Checkout To Sell Anesthesia Online

Preview Checkout Page

Step 1: Log in to Pabbly Subscription Billing

Signup

Search for  Pabbly Subscription Billing’s and on reaching their website click on the “Sign up Free“ button. Here, either manually filled out the details or sign in using your Gmail account.

Sign Up For Free!

Step 2: Select Subscription Billing

Access Subscription Billing

Step 3: Account Setup

Setup Account

Furthermore, in this dialog box, you may want to fill in details like name, currency, and phone number. After filing in the information press “Continue” button to complete the process.

Step 4: Connect Payment Gateways & Start Anesthesia Selling Business Online

Connect Payment Gateway

Now, your customers must have a seamless payment experience, otherwise, they will drop the transactions right there. So, with Pabbly Subscription Billing, you can stimulate the payment experience of a customer in advance using a dummy payment gateway. To avail, this functionality, just click on the “Enable Test Payment” option to start testing.

Of course, with Pabbly Subscription Billing, you can use payment gateways like Razorpay, PayPal, Authorize.net, Stripe, etc. Under this para, you will find a complete integration guide for each of them. Now, I am going ahead, by enabling the test payment option to continue the process.

Step 5: Add Product For Your Anesthesia

Add Product

After easily integrating payment gateways lets add products. Below the “Enable Payments” section you will find the section “Add your product” click on it. This will call out a dialog box with a blue button “Add New Product”. Click on it.

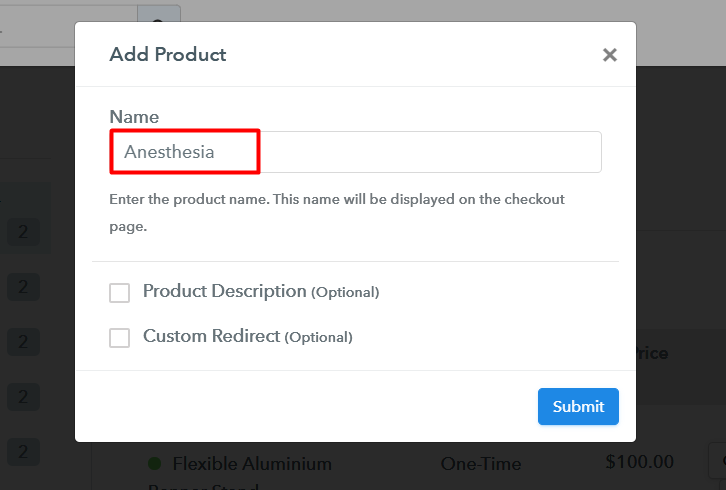
Now a pop up will be generated and here you can fill the required product title like anesthesia. If you want, you may tick in the checkboxes like “Product Description” and “Custom Redirect” to give access to more information about your anesthesia

Add Product To Sell Anesthesia Online

Note: Here you can add all the products related to the similar category by creating plans for each of them.

Step 6: Add Plans 

Let’s explore plans for different kinds of anesthesia available in your store.

(a) Select Add New Plan

Add Plan

(b) Specify the Plan & Pricing Details

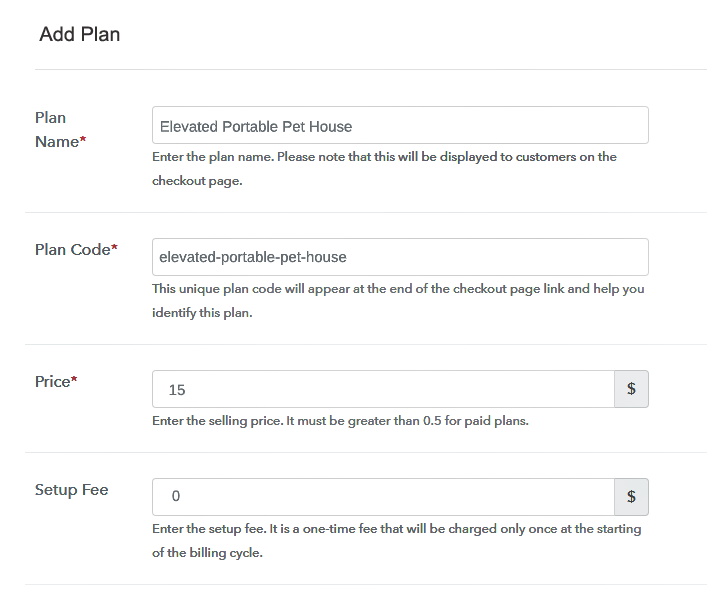
Add Plan To Sell Anesthesia Online

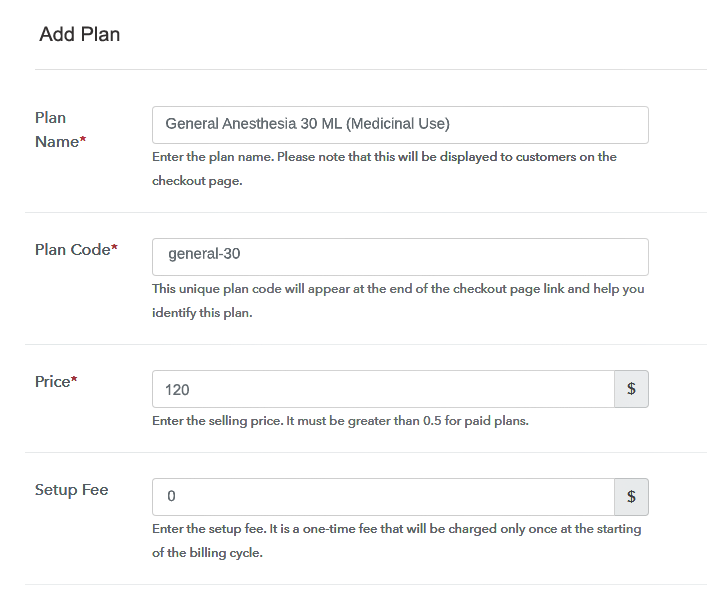
Fill in detail of the anesthesia like plan name, code, price, set-up fee, and much more to continue. Moreover, you have a choice to select multiple billing models and change it anytime you want.

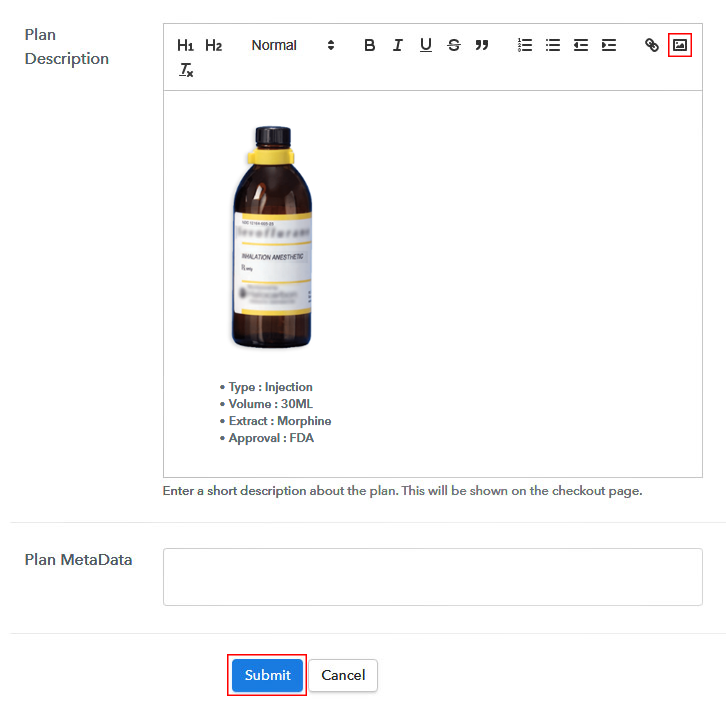
(c) Add Image & Description of Anesthesia

Add Description To Sell Anesthesia Online

Now, take some high-quality images of your anesthesia and upload it using the image button.

After uploading the image, please provide concise information of your anesthesia like volume, expiry date, type, etc. Later press the “Submit” button.

Likewise, following the same method, you can add multiple products, one at a time.

Step 7: Share your Checkout Page

Share Checkout Page on Social Media

  • Moreover, for more product information and marketing, you can share the checkout pages on social media accounts like Facebook & Twitter using respective buttons
  • Also, if you want you can share the anesthesia’s checkout page with your customers via SMS or email marketing.
  • Furthermore, you can embed the checkout pages anesthesia in the buttons or any anchor text on your website.

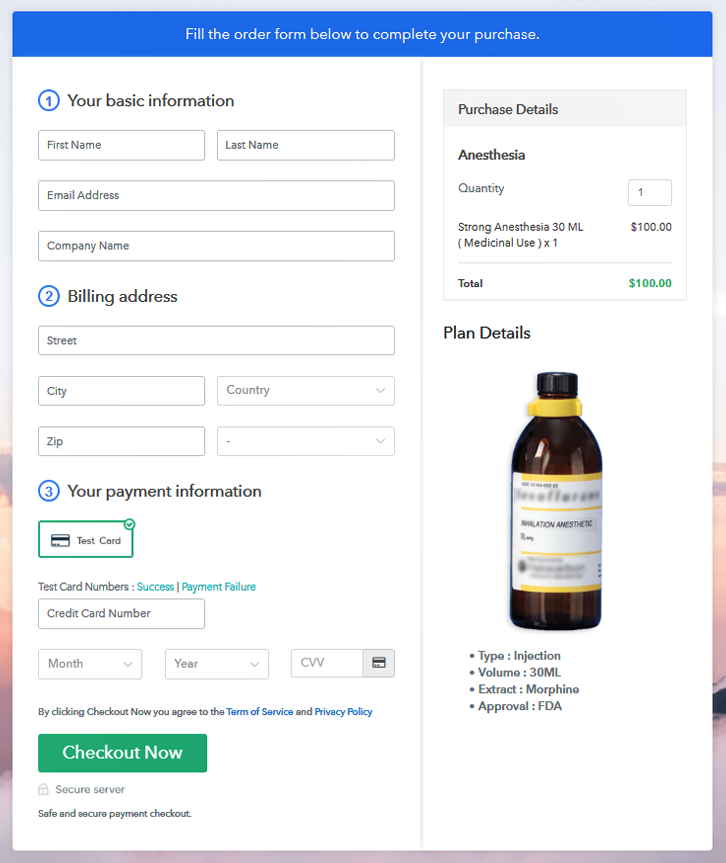
Step 8: Preview Checkout Page

Follow up the recommended steps to preview the checkout page:

(a) Click on the View Button

View Checkout Plan

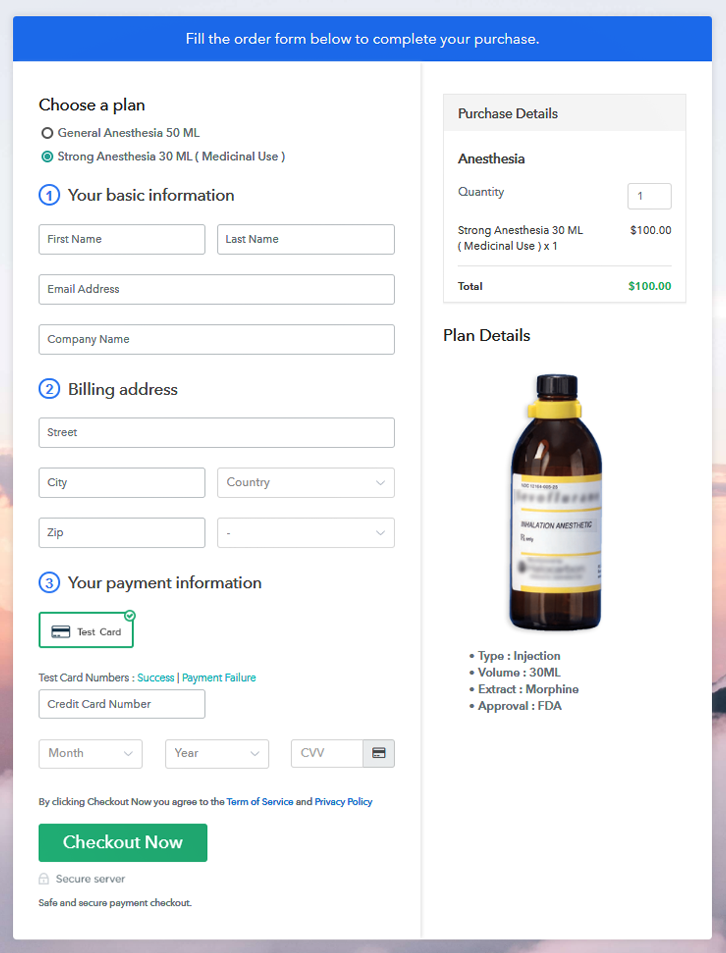
(b) Take a Look at the Checkout Page

Checkout To Sell Anesthesia Online

Step 9: Embed Checkout Page in Site & Sell Anesthesia Online

Embed Checkout Page on Website

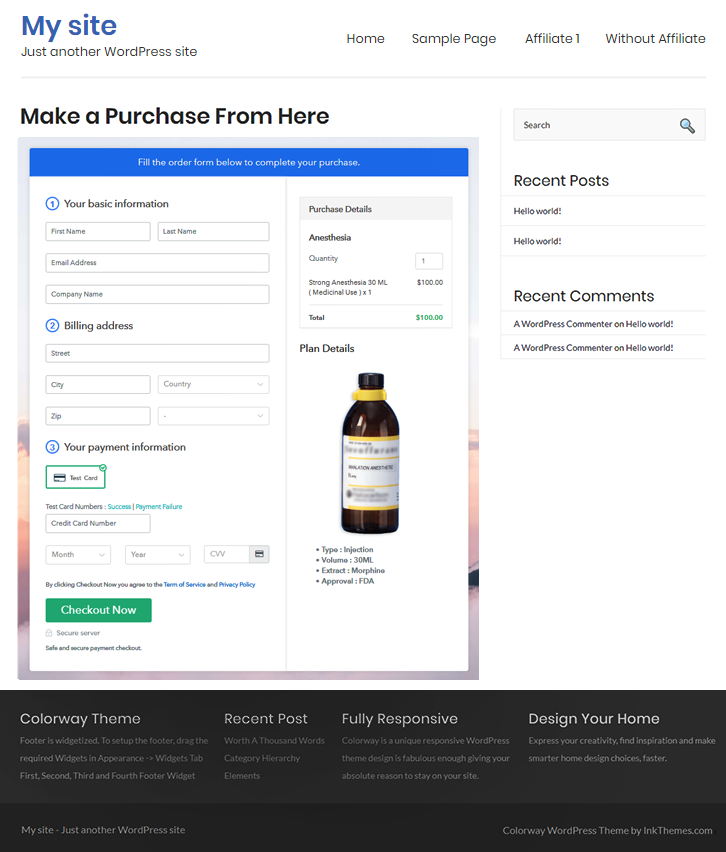
Moreover, lets copy the link and add the checkout page to sell anesthesia online at any place in your WordPress page.

(a) Edit the Page & Paste the Copied Link

Paste Link in Text Editor

Moreover, paste the plan link on a text editor of the WordPress dashboard.

(b) Save & Publish the Checkout Page

Save and Publish

Next, click the “Publish” button, after making changes.

(c) Check out the Final Look of your Checkout Page on WordPress Site

Embed WordPress To Sell Anesthesia Online

Step 10: Multiplan Checkout Page

Note: In case you want to sell multiple products via a single checkout page, you can create a multi-plan checkout page otherwise skip this step.

(a) Click on Add Mutiplan Checkout

Multiplan Checkout

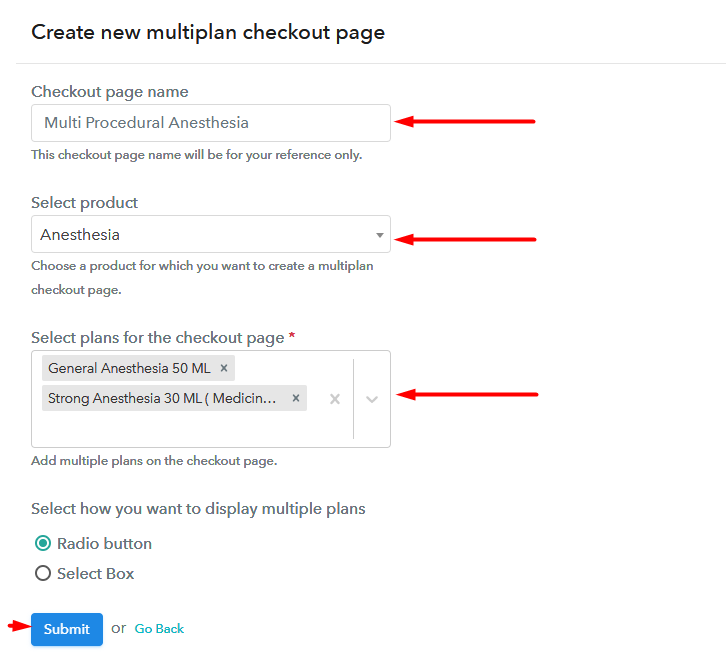
(b) Add Plans to Sell Multiple Anesthesia from Single Checkout Page

Multiplan To Sell Anesthesia Online

(c) Take a Look at the Checkout Page

Multiplan Checkout To Sell Anesthesia Online

Preview Checkout Page

Wrapping Up

Creating your first checkout page was fun, wasn’t it? Now using the same technique you can build unlimited checkout pages with Pabbly Subscription Billing to sell anesthesia online. Furthermore, there are many features which you slowly ace with the help of documentation and webinars listed on the website. Also, since you are a beginner you may have some doubts regarding the methods.
So don’t be hesitant, please drop your queries in the comment section below. Thank you.

You May Also Like To Read –
How To Sell Animal Shelters Online | Step by Step (Free Method)

How to Sell Animal Shelters Online

Ideal For: All the animal shelter manufacturers, animal house sellers, animal shelter dealers, animal shelter suppliers, pet house shop owners, and other merchants can use this method to sell animal shelters online.

How to Sell Animal Shelters Online

Why Choose this Method To Sell Animal Shelters Online?

Unlike any other solution, this method allows you to:

  • List and sell your animal shelters for FREE. Absolutely no payment required.
  • No need to pay commission on any of your sales.
  • Multiple payment options like PayPal, Credit Card, etc to collect payment from a single place.
  • Sell one time or recurring subscriptions of your animal shelters.
  • Collect payments & sell products in any currency as per your requirement.
  • Give discounts on your products by offering special coupon codes.
  • Add sales commission agents to help you in selling animal shelters online.

Get Pabbly Subscription Billing for Free

Having pets at home is so common nowadays and that’s why people look out for animal shelters to make their pets belong. There are wide varieties of animal shelters available in the market like a wooden house, portable house to beat the competition. So, if you own an offline shop of animal shelters then it would be perfect to start animal shelters business online to bring more bacon at home.

One of the prominent reasons to start animal shelter business online is it provides you global audience. Plus, the bargaining doesn’t exist in the digital world which saves sellers and buyers from a lot of trouble. Also, the perks don’t stop here, an online store is easy to open and require minimal setup cost. Considering all this, we are recommending a software named Pabbly Subscription Billing that helps you in building your business from scratch.

The software allows you to create an astonishing checkout page for selling animal shelters online. Some of its remarkable features involve:

  • List different kind of animal shelters in a single checkout page
  • Create professional invoices
  • Offer unlimited discount and coupon codes to customers

Final View of Checkout Page For Your Animal Shelters Selling Business

Checkout Page to Sell Animal Shelters Online

Preview Checkout Page

Step 1: Log in to Pabbly Subscription Billing

Signup

Begin the process for creating a checkout page for animal shelters by visiting the Pabbly Subscription Billing in your browser. After that, click on the “Sign up Free“ button. Moreover, either manually filled out the details or sign in using your Gmail account.

Sign Up For Free!

Step 2: Select Subscription Billing

Access Subscription Billing

Step 3: Account Setup

Setup Account

Besides, after clicking on the “Access Now” button of the software, a page will begin with fields like company name, select currency, and phone number. Simply fill out those details to continue creating a checkout page for animal shelters.

Step 4: Connect Payment Gateways & Start Animal Shelters Selling Business Online

Connect Payment Gateway

The subsequent step is to earning awareness about payment procedures using a “Test Payment Gateway”. Here, we will describe the checkout page process for the animal shelters with the help of a test payment gateway. Besides that, this tool offers various payment gateways such as PayPal, Stripe, etc. Further, below are the payment integration guides to help you out.

Step 5: Add Product For Your Animal Shelters

Add Product

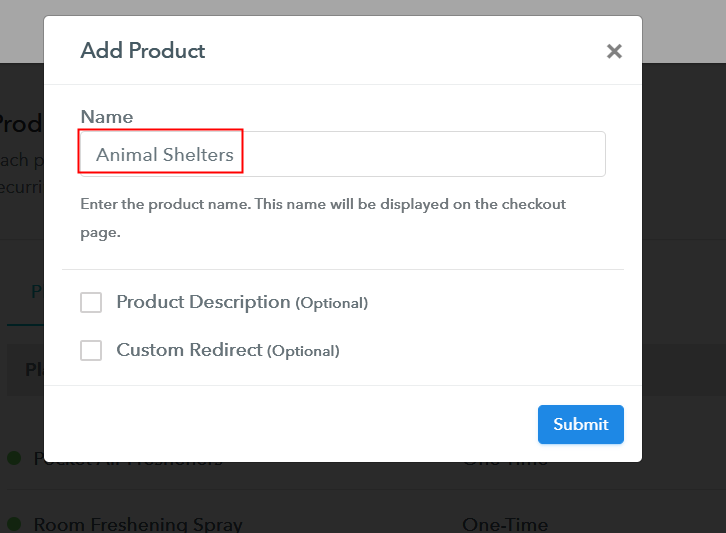
Additionally, add the name, which in our case is “Animal Shelters”. Here you can specify the type like pet houses, etc. Further, write a short description of the animal shelters to catch the customer’s attention.

Add Product to Start Selling Animal Shelters Online

Further, fill out all those details and your product is created.

Note: Here you can add all the products related to the similar category by creating plans for each of them.

Step 6: Add Plans 

Let’s rollout plans for different kinds of animal shelters available in your store.

(a) Select Add New Plan

Add Plan

(b) Specify the Plan & Pricing Details

Specify the Plan and Pricing to Sell Animal Shelters Online

The following thing to do is fill all the details of the animal shelters like plan name, code, price, set-up fee, and much more to continue.

(c) Add Image & Description of Animal Shelters

Add Image & Description to Sell Animal Shelters Online

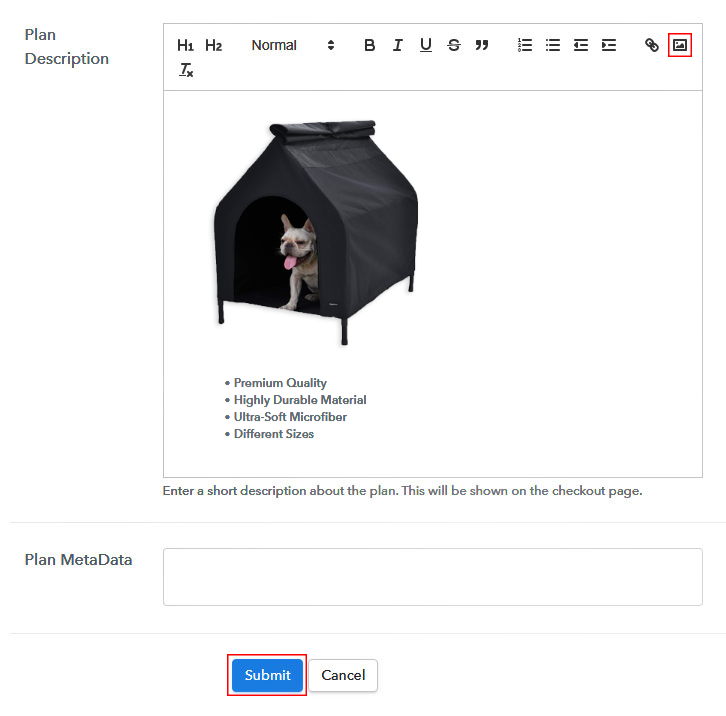
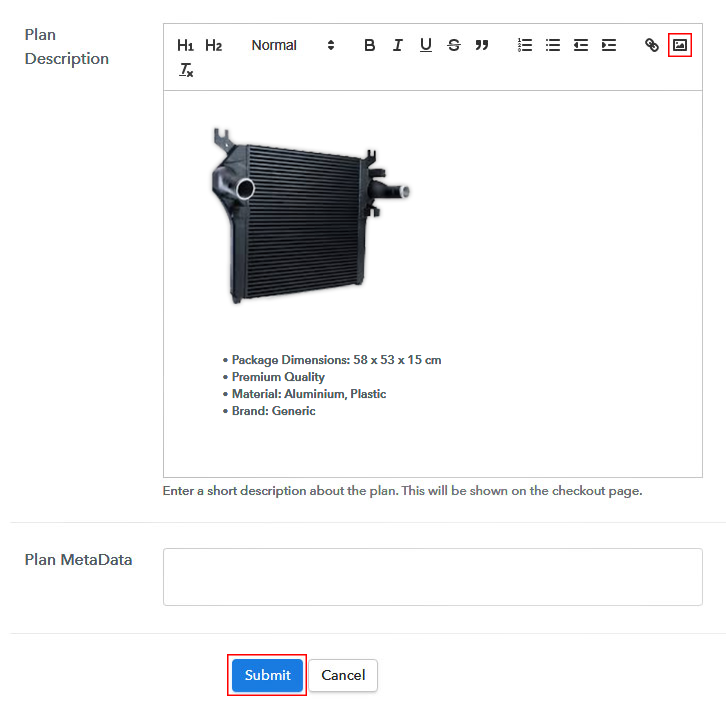
Moreover, it is necessary to write a brief description of animal shelters using bullets, images, etc, to bring natural customers to the checkout page.

Then, click on the “Submit” button to add the animal shelters on the checkout page.

Ultimately, you can add multiple plans and kinds of animal shelters in your product list which you want to sell online.

Step 7: Share your Checkout Page

Share Checkout Page on Social Media

  • Furthermore, share the checkout page of the animal shelters on social media accounts like Facebook & Twitter to get the customer’s attention.
  • Plus, you can share the direct link of the animal shelter’s checkout page with your customers via SMS or email marketing.
  • Besides that, embed the provided plan link of the animal shelters in the buttons or any anchor text on your website.

Step 8: Preview Checkout Page

Follow up the recommended steps to preview the checkout page:

(a) Click on the View Button

View Checkout Plan

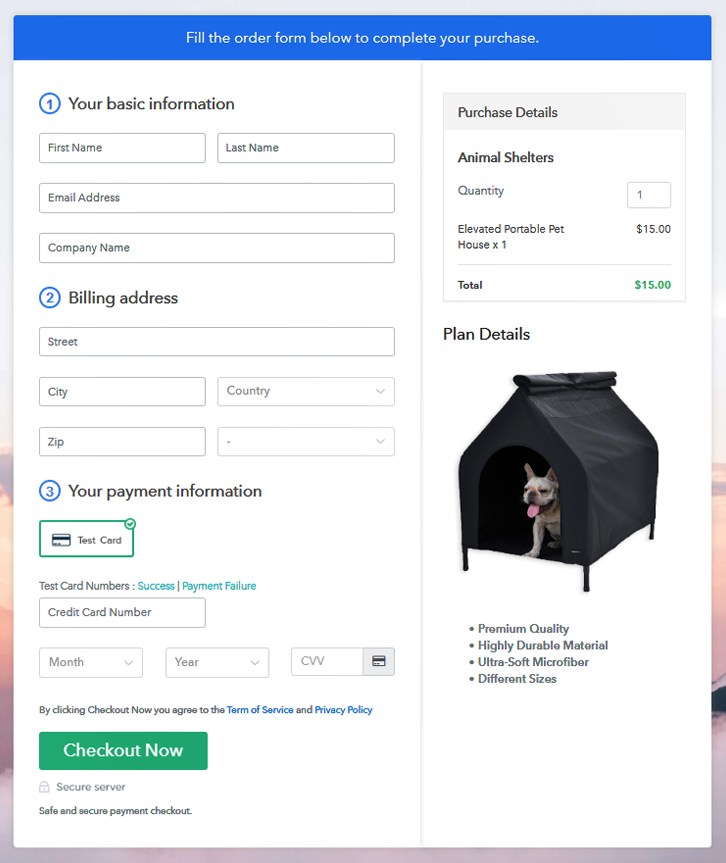
(b) Take a Look at the Checkout Page

Checkout Page to Sell Animal Shelters Online

Step 9: Embed Checkout Page in Site & Sell Animal Shelters Online

Embed Checkout Page on Website

Just copy the link and add the checkout page to sell animal shelters online at any suitable place on your WordPress site.

(a) Edit the Page & Paste the Copied Link

Paste Link in Text Editor

Further, paste the plan link on a text editor of the WordPress dashboard.

(b) Save & Publish the Checkout Page

Save_and_Publish

Next, click the “Publish” button, after making changes.

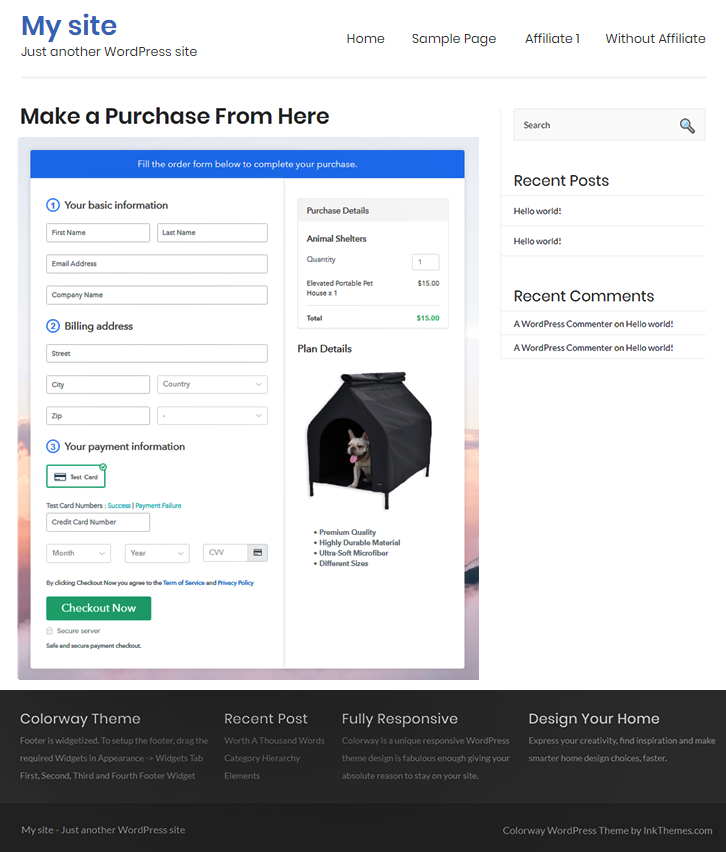
(c) Check out the Final Look of your Checkout Page on WordPress Site

Final Look of your Checkout Page to Sell Animal Shelters Online

Step 10: Multiplan Checkout Page

Note: In case you want to sell multiple products via a single checkout page, you can create a multi-plan checkout page otherwise skip this step.

(a) Click on Add Mutiplan Checkout

Multiplan Checkout

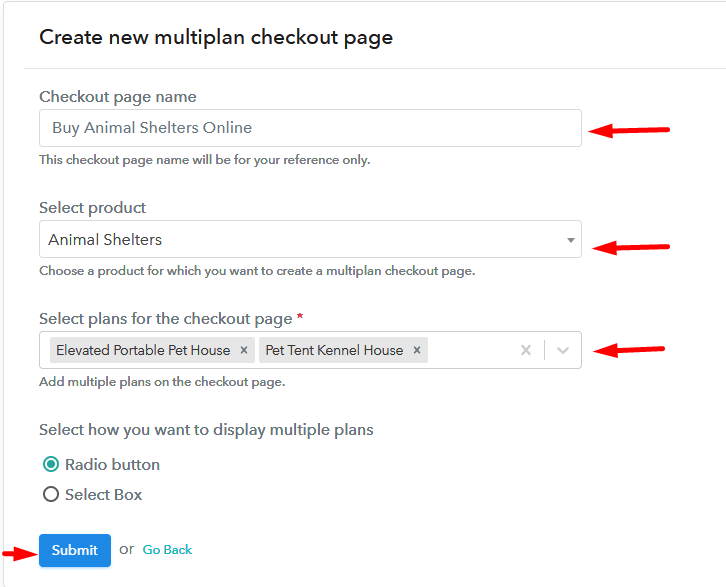
(b) Add Plans to Sell Multiple Animal Shelters from Single Checkout Page

Add Multiple Products to Start Selling Animal Shelters Online

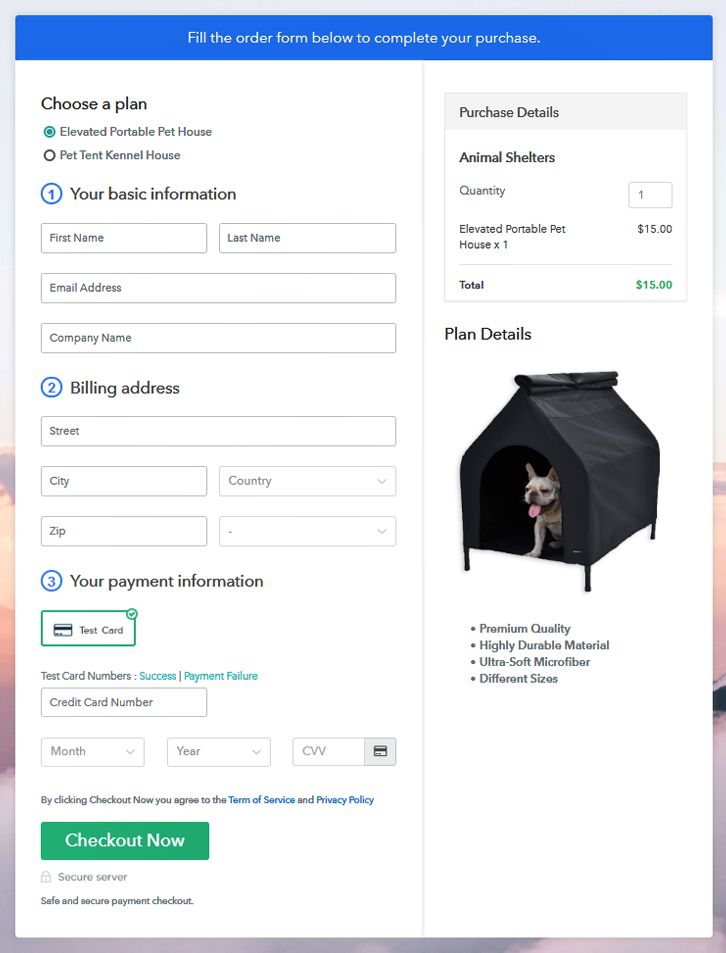
(c) Take a Look at the Checkout Page

Multiplan Checkout Page to Sell Animal Shelters Online

Preview Checkout Page

Wrapping Up

Petting animals is one of the kindest jobs on this planet and that’s why every second household owns a pet. Because of this only, there is a huge uprise in animal shelters business. And, to save you from all the overwhelming process of starting animal shelters business online, Pabbly Subscription Billing is your guy. All you have to do is follow all the mentioned 10 steps and you’re done.

Let us know what you feel about it.

You May Also Like To Read –
How To Sell Antibiotic Test Kits Online | Step by Step (Free Method)

Ideal For: All the antibiotic test kit manufacturers, chemist shops, phramaceuticals, medical stores, bio startups and other merchants can use this method to sell antibiotic test kits online.

How To Sell Antibiotic Test Kits Online

Why Choose this Method To Sell Antibiotic Test Kits Online?

Unlike any other solution, this method allows you to:

  • List and sell your antibiotic test kits for FREE. Absolutely no payment required.
  • No need to pay commission on any of your sales.
  • Multiple payment options like PayPal, Credit Card, etc to collect payment from a single place.
  • Sell one time or recurring subscriptions of your antibiotic test kits.
  • Collect payments & sell products in any currency as per your requirement.
  • Give discounts on your products by offering special coupon codes.
  • Add sales commission agents to help you in selling antibiotic test kits online.

Get Pabbly Subscription Billing for Free

According to market researcher Fact.MR the current market for the antibiotic test kits is growing exceptionally well at CAGR 6.2% and is poised to be a billion-dollar industry by 2026. The key areas of growth are in Japan, Latin America, and Europe. Now as a manufacturer you can’t possibly reach out to all these markets unless you start selling antibiotic test kits online. You obviously know this but have no clue about e-commerce and also lack technical skills.

But don’t you worry, as this article introduces an awesome online tool called Pabbly Subscription Billing, which requires no technical whatsoever to create an online business. The advantage of using this software over others is that you can create mesmerizing checkout pages to list and sell antibiotic test kits online. Furthermore, you can collect revenue through these checkout pages in both offline/online modes. Some other incredible features of this software are:

  • Bill Unlimited Revenues
  • No Hidden Charges
  • Revenue Analytics
  • Multiple Billing Models
  • Auto Email Notifications on Payment Completion/Failure

So, why wait? Let us create our first checkout page with Pabbly Subscription Billing to start antibiotic selling business online

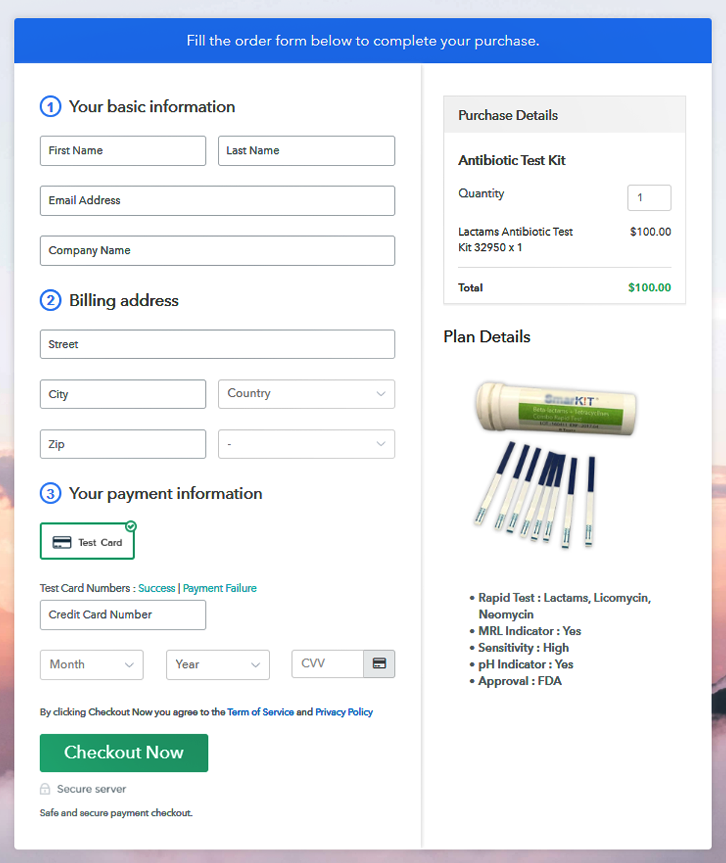
Final View of Checkout Page For Your Antibiotic Test Kits Selling Business

Checkout To Sell Antibiotic Test Kits Online

Preview Checkout Page

Step 1: Log in to Pabbly Subscription Billing

Signup

Lets start the process for creating a checkout page for antibiotic test kits by visiting the Pabbly Subscription Billing in your browser. Now, click on the “Sign up Free“ button. Also, you can either manually fill out details or simply sign in using your Gmail account.

Sign Up For Free!

Step 2: Select Subscription Billing

Access Subscription Billing

Step 3: Account Setup

Setup Account

Moreover, after clicking on the “Access Now” button summons a page with fields like company name, select currency, and phone number. Simply fill out those details to continue creating a checkout page for the antibiotic test kits .

Step 4: Connect Payment Gateways & Start Antibiotic Test Kits Selling Business Online

Connect Payment Gateway

Through Pabbly Subscription Billing’s dummy payment gateway, you can stimulate the payment experience of a customer. This assures you that all glitches are removed beforehand and the customer will enjoy a serene payment experience. You can do this by clicking on the “Enable Test Payment” option.

Furthermore, with Pabbly Subscription Billing, you can integrate with multiple payment gateways like Stripe, Razorpay, PayPal, Authorize.net, etc. There are manuals available for the integration of payment gateways beneath this paragraph. But since we have to set up the payment process, we will click on the “Enable Test Payment” option.

Step 5: Add Product For Your Antibiotic Test Kit

Add Product

Additionally, after integrating the payment gateway, let’s add the products. Below the “Enable Payments,” you will find the section “Add your product” click on it. This will create a dialog box with a blue button “Add New Product”. Click it.

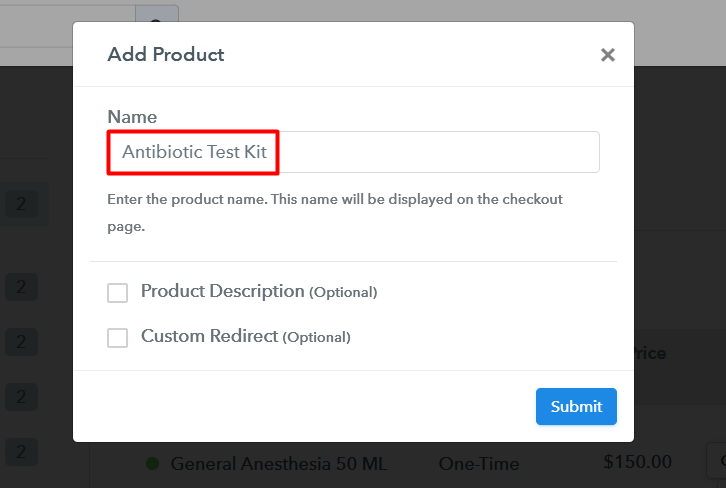
This will generate a pop-up box and you have to add the required product title, in this case, it is the ‘antibiotic test kits’.

Add Product To Sell Antibiotic Test Kits Online

Fill out all those details and voila your product is created.

Note: Here you can add all the products related to the similar category by creating plans for each of them.

Step 6: Add Plans 

Let’s rollout plans for different kinds of antibiotic test kits available in your store.

(a) Select Add New Plan

Add Plan

(b) Specify the Plan & Pricing Details

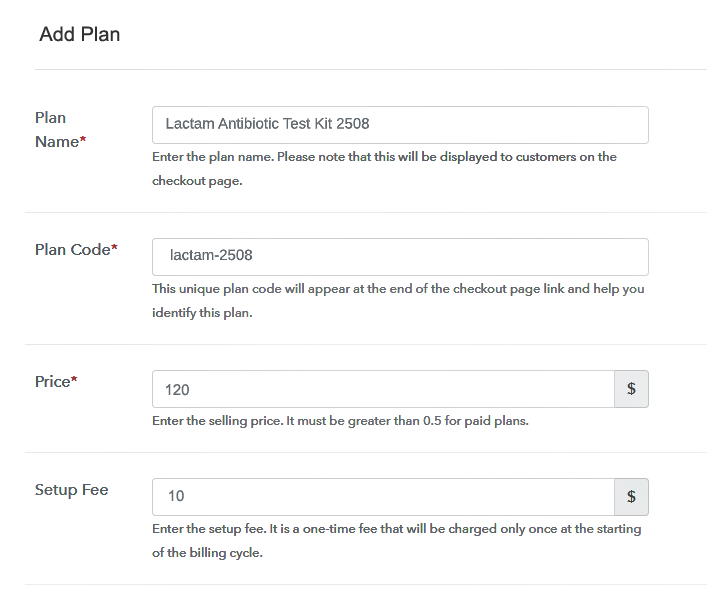
Add Plans To Sell Antibiotic Test Kits Online

The very next thing to do is you have to fill all the details of the test kits like plan name, code, price, set-up fee, and much more to continue.

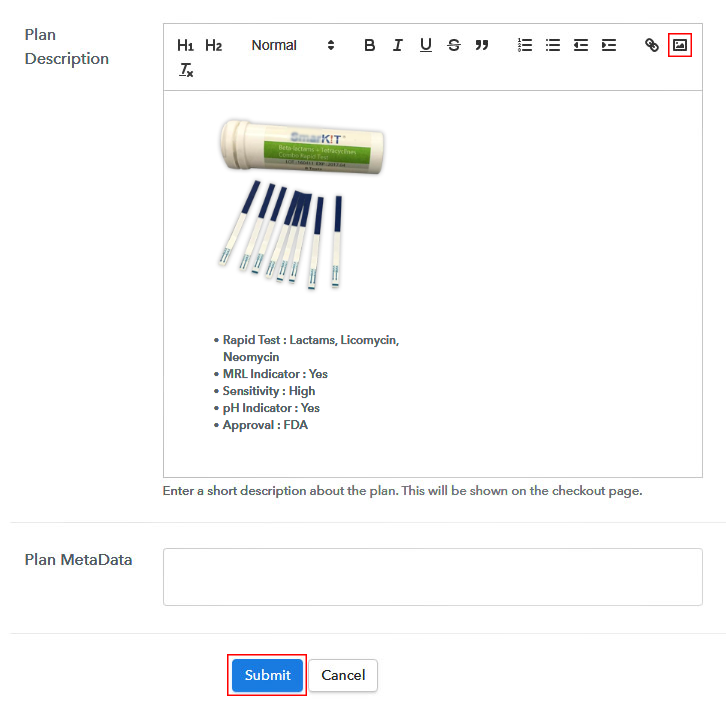
(c) Add Image & Description of Antibiotic Test Kits

Add Description To Sell Antibiotic Test Kits Online

Also, you need to upload some high definition images of your test kits by clicking the image icon.

Furthermore, you have to add a description of the test kits like stable pH, accuracy, expiry, etc in preferably bullet points or numerical order for easy understanding then press the “Submit” button.

Also, using the same methods, you can list more products.

Step 7: Share your Checkout Page

Share Checkout Page on Social Media

  • Also, for spreading information about the products you can share the checkout pages on Facebook, Twitter using their respective buttons.
  • Furthermore, you can embed checkout pages in SMS and emails for more product awareness.
  • Moreover, you can build buttons on your website and embed these checkout pages on them. Also, you can place it on any anchor text on your website, so the users will be redirected to the checkout page.

Step 8: Preview Checkout Page

Follow up the recommended steps to preview the checkout page:

(a) Click on the View Button

View Checkout Plan

(b) Take a Look at the Checkout Page

Checkout To Sell Antibiotic Test Kits Online

Step 9: Embed Checkout Page in Site & Sell Antibiotic Test Kits Online

Embed Checkout Page on Website

Just copy the link and add the checkout page to sell antibiotic test kits online at any suitable place on your WordPress site.

(a) Edit the Page & Paste the Copied Link

Embed Checkout Page on Website

Further, paste the plan link of the antibiotic test kits on a text editor of the WordPress dashboard.

(b) Save & Publish the Checkout Page

Save_and_Publish

Next, click the “Publish” button, after making changes.

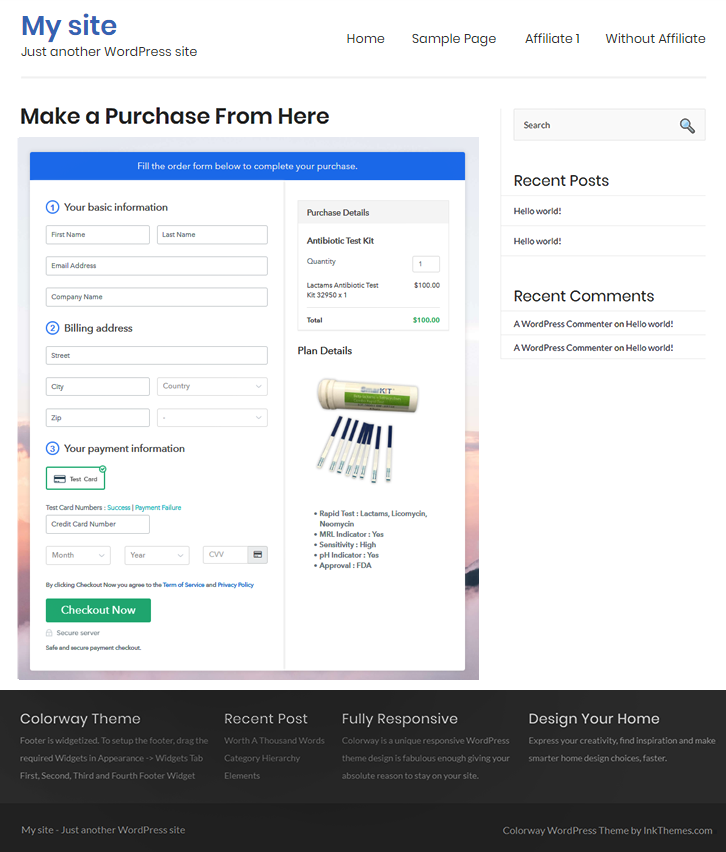
(c) Check out the Final Look of your Checkout Page on WordPress Site

Embedd To Sell Antibiotic Test Kits Online

Step 10: Multiplan Checkout Page

Note: In case you want to sell multiple products via a single checkout page, you can create a multi-plan checkout page otherwise skip this step.

(a) Click on Add Mutiplan Checkout

Multiplan Checkout

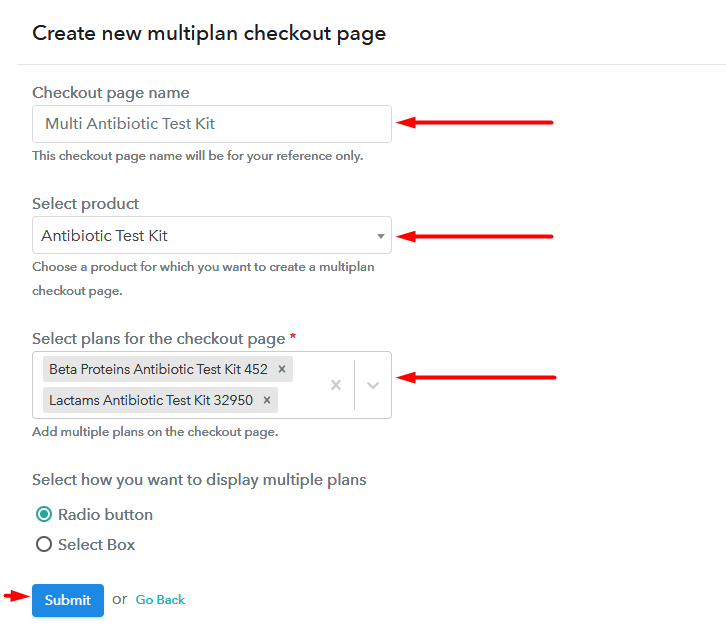
(b) Add Plans to Sell Multiple Antibiotic Test Kits from Single Checkout Page

Add Multiplan To Sell Antibiotic Test Kits Online

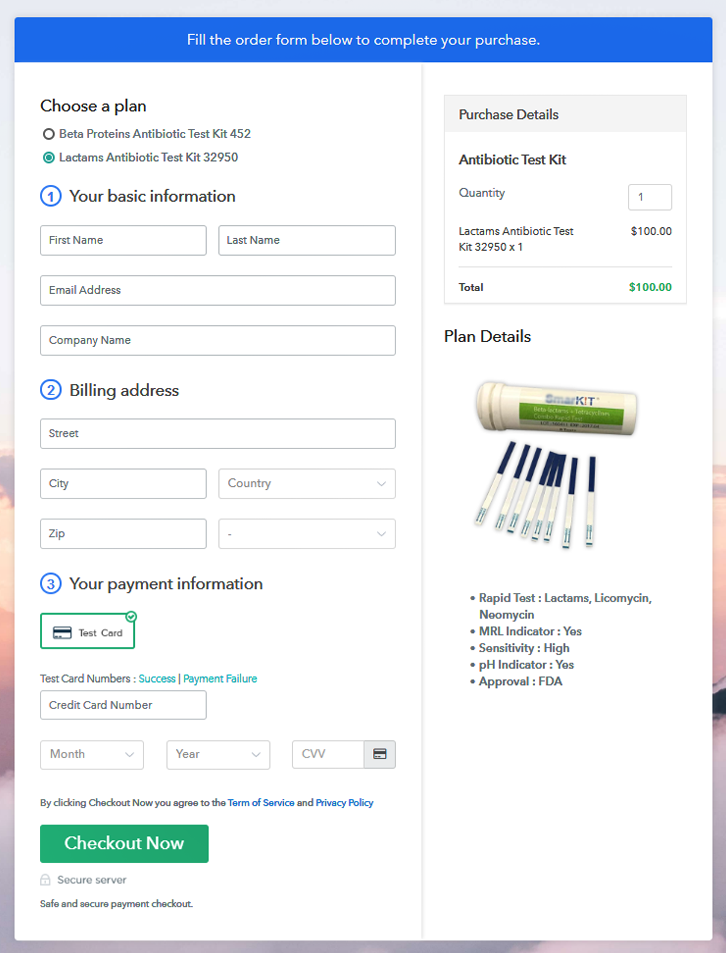
(c) Take a Look at the Checkout Page

Multiplan Checkout To Sell Antibiotic Test Kits Online

Preview Checkout Page

Wrapping Up

All you have to do is follow these 10 easy steps to create an incredible checkout page to sell antibiotic test kits online. However don’t restrict yourself, go ahead and explore the features of Pabbly Subscription Billing. Moreover, it may take some time to master these features but in the long run they will be extremely beneficial for you.  Thank You !!

You May Also Like To Read –
How To Sell Antique Gift Items Online | Step by Step (Free Method)

How To Sell Antique Gift Items Online

Ideal For: All the antique shops, antique dealers, antique brokers, antique gift shop, and other sellers can use this method to take their antique gift items selling business online.

How To Sell Antique Gift Items Online

Why Choose this Method To Sell Antique Gift Items Online?

Unlike any other solution, this method allows you to:

  • List and sell your antique gift items for FREE. Absolutely no payment required.
  • No need to pay commission on any of your sales.
  • Multiple payment options like PayPal, Credit Card, etc to collect payment from a single place.
  • Sell one time or recurring subscriptions of your antique gift items.
  • Collect payments & sell products in any currency as per your requirement.
  • Give discounts on your products by offering special coupon codes.
  • Add sales commission agents to help you in selling antique gift items online.

Get Pabbly Subscription Billing for Free

Antiques are one of the hottest selling gift items today. They’re adored by buyers around the world and equally adored by the sellers who make a good living selling them. So, if you sell antique gift items from a store and want to make extra profit and increase customer reach then you must take your business online.

With the help of checkout pages, you can increase your sales and get better marketing for your products. You just have to create checkout pages for your antique gift items and share them online to collect payment directly through them. To create beautiful checkout pages and start your online business you only need Pabbly Subscription Billing. It is a free platform that offers so many helpful features other than checkout for your online antique gift items selling business such as easy invoicing, integration with website, easy payment collection, etc.

Now that you are all excited about the checkout pages, let’s create one quickly.

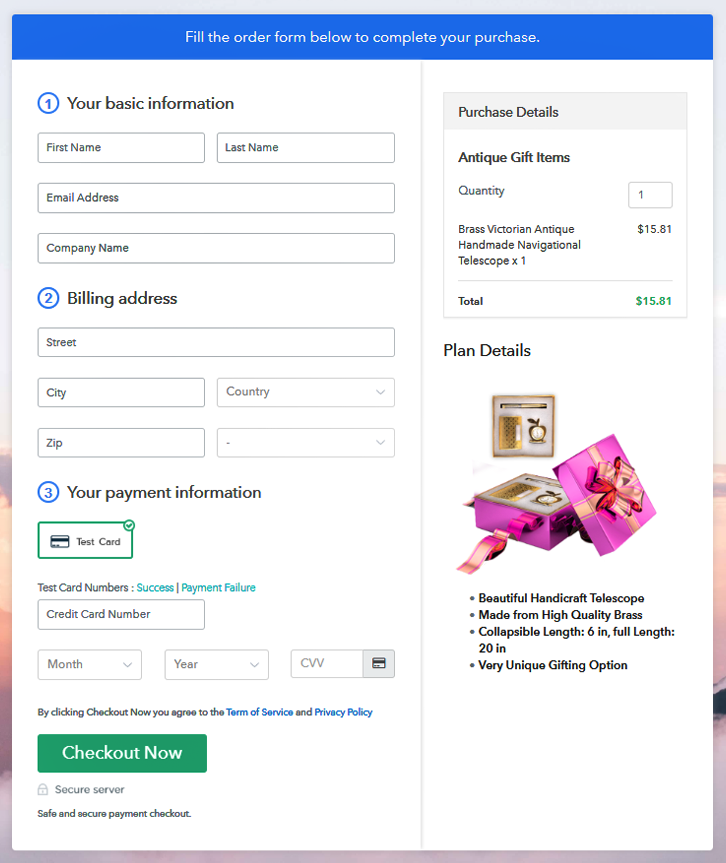
Final View of Checkout Page For Your Antique Gift Items Selling Business

Preview Checkout Page

Preview Checkout Page

Step 1: Log in to Pabbly Subscription Billing

Signup

Start with searching Pabbly Subscription Billing website in your search engine and then click on the “Signup Free” button. On clicking the button, the signup page will appear in front of you. Here, you can create your account for free instantly with Gmail or you can also enter your details manually.

Sign Up For Free!

Step 2: Select Subscription Billing

Access Subscription Billing

Step 3: Account Setup

Setup Account

Once you are done with the signup process, now fill up the details about your company like company name, currency, and phone number in the given dialogue box.

Step 4: Connect Payment Gateways & Start Antique Gift Items Selling Business Online

Connect Payment Gateway

Pabbly Subscription Billing offers a “Test Payment” mode to make the payment collection process more reliable as you can test the entire process without actually filling in the original details. You can also enable and check it before moving forward and can understand how the payment collection process works. Thereafter, you can connect with other payment gateways like PayPal, Stripe, etc whichever you prefer. The complete payment gateways integration guide is mentioned below-

Step 5: Add Product For Your Antique Gift Items

Add Product

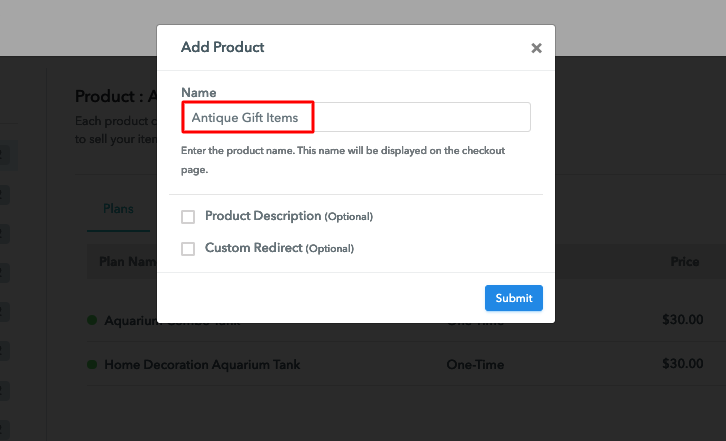
Next, you have to add your first product, you can add antique gift items of different types such as vintage telephones, antique wall clock, etc. Add all the other antique gift items in the same product section by creating different plans for them.

Sell Antique Gift Items Online Product Name

Simply fill the details to add your products.

Note: Here you can add all the products related to the similar category by creating plans for each of them.

Step 6: Add Plans 

Let’s rollout plans for different kinds of antique gift items available in your store.

(a) Select Add New Plan

Add Plan

(b) Specify the Plan & Pricing Details

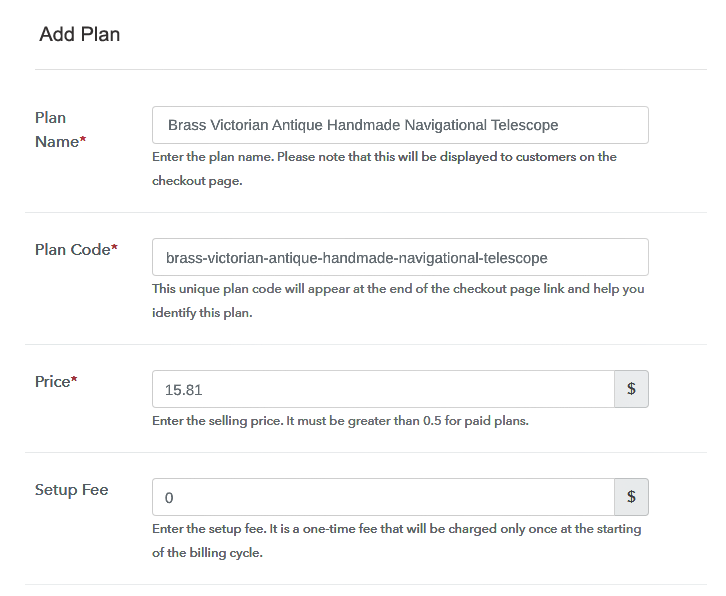
Sell Antique Gift Items Online Details

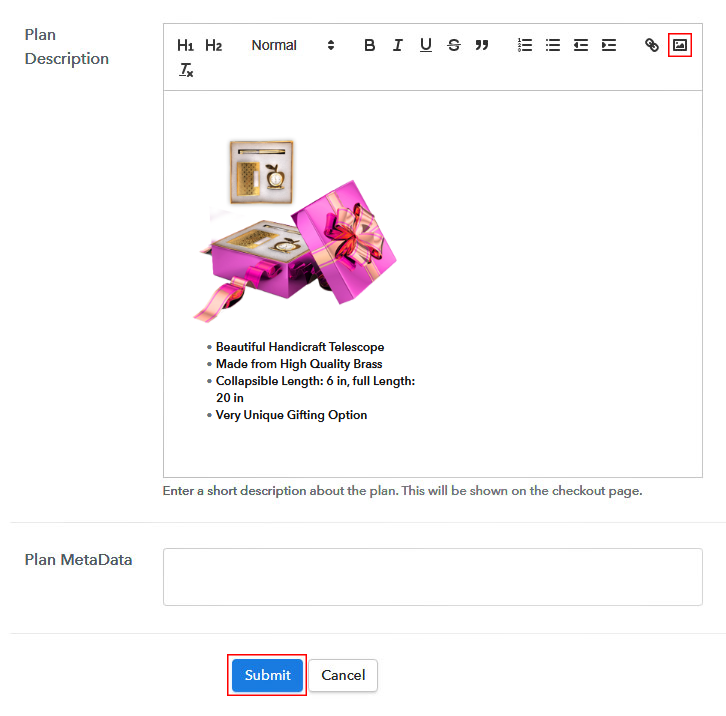
In this step, you have to add details of your product like product name, code, price, billing cycle, etc.

(c) Add Image & Description of Antique Gift Items

Sell Antique Gift Items Online Image

Further, you can even add a description of the antique gift items that you want to sell along with the product image, links, etc, and click on the submit button to add your product. You can create more plans for all the other antique gift items similarly.

Step 7: Share your Checkout Page

Share Checkout Page on Social Media

To raise your sales and for improved marketing, follow these given steps:

  • Share your checkout page on social media such as Facebook and Twitter.
  • Furthermore, copy the mentioned link and send it to your customers through SMS or emails directly.
  • Embed your plan link on your website so that your customers can be landed on the checkout page directly.

Step 8: Preview Checkout Page

Follow up the recommended steps to preview the checkout page:

(a) Click on the View Button

View Checkout Plan

(b) Take a Look at the Checkout Page

Preview Checkout Page

Step 9: Embed Checkout Page in Site & Sell Antique Gift Items Online

Embed Checkout Page on Website

Just copy the link and add the checkout page to sell antique gift items online at any preferable place on your WordPress site.

(a) Edit the Page & Paste the Copied Link

Embed Checkout Page on Website

Further, paste the plan link on a text editor of the WordPress dashboard.

(b) Save & Publish the Checkout Page

Save_and_Publish

Next, click the “Publish” button, after making changes.

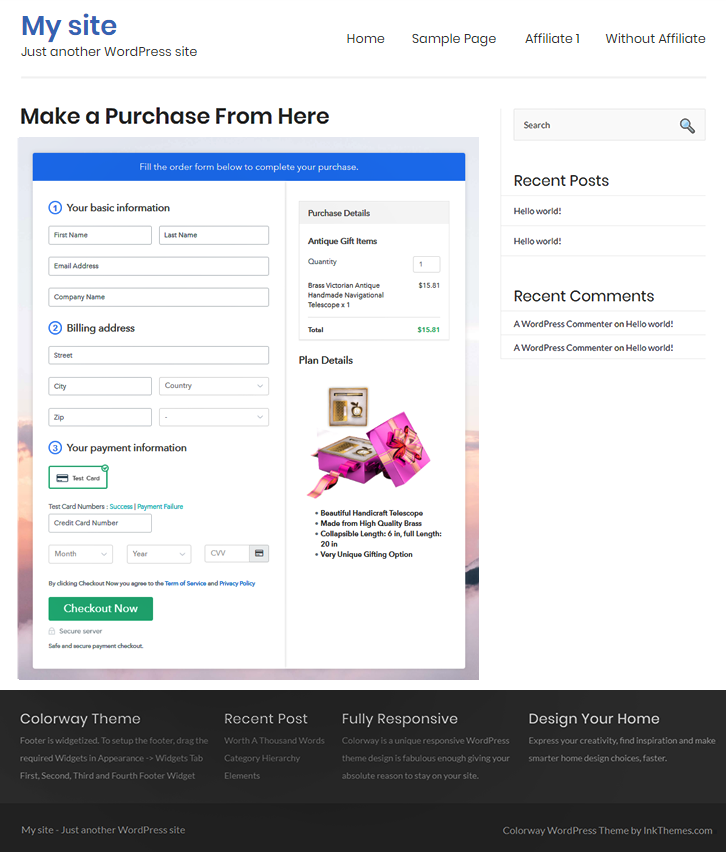
(c) Check out the Final Look of your Checkout Page on WordPress Site

Sell Antique Gift Items Online Website

Step 10: Multiplan Checkout Page

Note: In case you want to sell multiple products via a single checkout page, you can create a multi-plan checkout page otherwise skip this step.

(a) Click on Add Mutiplan Checkout

Multiplan Checkout

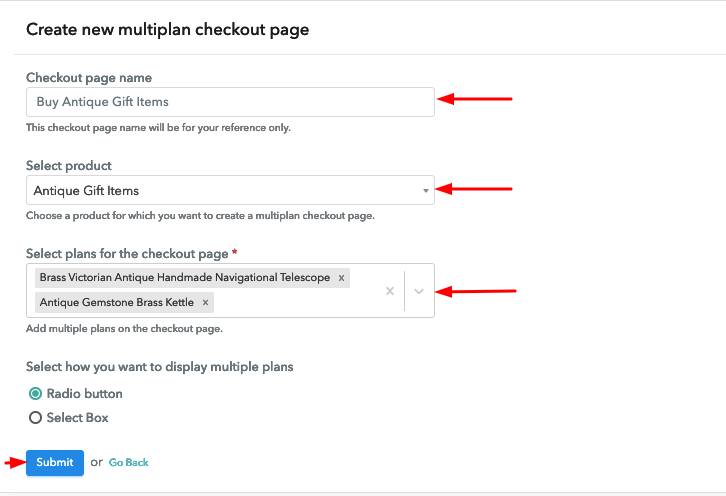
(b) Add Plans to Sell Multiple Antique Gift Items from Single Checkout Page

Sell Antique Gift Items Online Multi Details

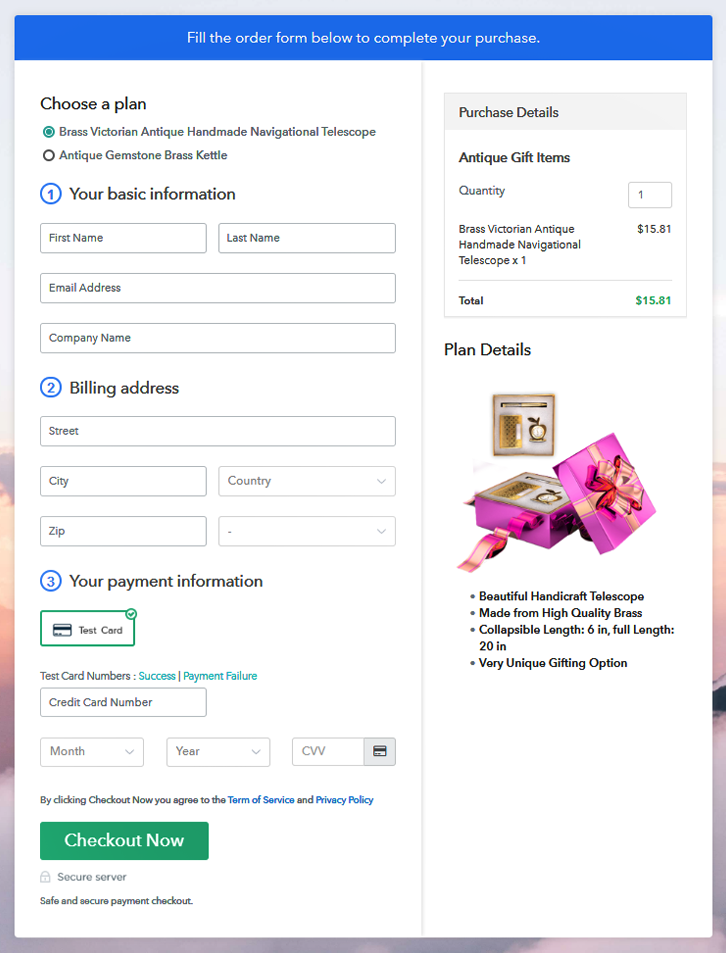
(c) Take a Look at the Checkout Page

Sell Antique Gift Items Online Multi Checkout

Preview Checkout Page

Wrapping Up

At the end of the blog, we hope that it was helpful for you and now you can easily set up your online antique gift items store with the help of Pabbly Subscription Billing. Now, sell unlimited products, collect payments easily, generate unlimited revenue without paying anything. So, signup and start selling antique gift items online today. For further queries or suggestions, please write to us.

You May Also Like To Read –
How To Sell Antique Radios Online | Step by Step (Free Method)

How To Sell Antique Radios Online

Ideal For: All the radios manufacturers, vintage gift stores, gift galleries, and other merchants can use this method to sell antique radios online.

How To Sell Antique Radios Online

Why Choose this Method To Sell Antique Radios Online?

Unlike any other solution, this method allows you to:

  • List and sell your antique radios for FREE. Absolutely no payment required.
  • No need to pay commission on any of your sales.
  • Multiple payment options like PayPal, Credit Card, etc to collect payment from a single place.
  • Sell one time or recurring subscriptions of your antique radios online.
  • Collect payments & sell products in any currency as per your requirement.
  • Give discounts on your products by offering special coupon codes.
  • Add sales commission agents to help you in selling antique radios online.

Get Pabbly Subscription Billing for Free

You have a priceless collection of antique radios and you are planning to sell them. But the problem is in this era of digital phones( radio inbuilt) the market for such radios is limited. However, you know there are many who are quite nostalgic about these devices and are willing to buy them. So, you realize the only possible way to reach out to these buyers is if you start selling antique radios online. Also there some other benefits when you sell antique radios online like better price discovery, fully automated 24×7 open shop, tracking revenues, lower middle man commission, etc.

Now, in this article, we will use a Saas tool called Pabbly Subscription Billing to sell antique radios online. The reason is it can list an unlimited number of products and sell them via incredible checkout pages. Some other benefits include

  • Generate Unlimited Revenues
  • Collect Payments in Offline/Online Modes
  • Track Revenues
  • Custom Domain
  • Auto-Email Alerts on Payment Completion/Failure
  • Custom Logo
  • Social Media Marketing

Through these listed benefits, you will have a competitive edge over your peers. So, let us start building our first checkout page to start selling antique radios online.

Final View of Checkout Page For Your Antique Radios Selling Business

Checkout To Sell Antique Radios Online

Preview Checkout Page

Step 1: Log in to Pabbly Subscription Billing

Signup

Search for  Pabbly Subscription Billing in your browser. Now, click on the “Sign up Free“ button. Either manually fill out details or simply sign in using your Gmail account.

Sign Up For Free!

Step 2: Select Subscription Billing

Access Subscription Billing

Step 3: Account Setup

Setup Account

This will summon a dialog box requiring you to fill the company details like name, currency standards, and phone number. Quickly fill them up and click on continue to complete the process.

Step 4: Connect Payment Gateways & Start Antique Radios Selling Business Online

Connect Payment Gateway

Of course, you can use the payment gateway to stimulate the whole payment experience of a customer. Furthermore, with Pabbly Subscription Billing, you can integrate with multiple payment gateways like Stripe, Razorpay, PayPal, Authorize.net, etc. There are manuals available for the integration of payment gateways beneath this paragraph. But since we have to set up the payment process, we will click on the “Enable Test Payment” option.

Step 5: Add Product For Your Antique Radios 

Add Product

Well, now that you have embedded your payment gateway, its time to add your product. Click on the “Add New Product” button will summon a dialog box. Here you can enter the name of the radio provide a product description, and even redirect to a particular website.

Add Product To Sell Antique Radios Online

Fill out all those details and voila your product is created.

Note: Here you can add all the products related to the similar category by creating plans for each of them.

Step 6: Add Plans 

Let’s rollout plans for different kinds of antique radios available in your store.

(a) Select Add New Plan

Add Plan

(b) Specify the Plan & Pricing Details

Add Plan To Sell Antique Radios Online

Now you have to fill all the details of the test kits like plan name, code, price, set-up fee, and much more to continue.

(c) Add Image & Description of Antique radios

Add Description To Sell Antique Radios Online

Get the attention of your customer, by pasting the best image possible of radios using the image button.

Moreover, it will also be helpful if you provide some product descriptions of the radio like age, the capacitor used, plugs and sockets, etc.

After filling out the description, press the submit button.

Step 7: Share your Checkout Page

Share Checkout Page on Social Media

  • Also, you can share the checkout page on Twitter & Facebook by just pressing the respective buttons.
  • Or you can send the checkout page link to customers through emails or SMS.
  • Also, you can add the plan link provided in the buttons or any anchor text on your website, so the users will be redirected to the checkout page.

Step 8: Preview Checkout Page

Follow up the recommended steps to preview the checkout page:

(a) Click on the View Button

View Checkout Plan

(b) Take a Look at the Checkout Page

Checkout To Sell Antique Radios Online

Step 9: Embed Checkout Page in Site & Sell Antique Radios Online

Embed Checkout Page on Website

Just copy the link and add the checkout page to sell antique radios online at any suitable place on your WordPress site.

(a) Edit the Page & Paste the Copied Link

Embed Checkout Page on Website

Further, paste the plan link of the antique radios on a text editor of the WordPress dashboard.

(b) Save & Publish the Checkout Page

Save_and_Publish

Next, click the “Publish” button, after making changes.

(c) Check out the Final Look of your Checkout Page on WordPress Site

Add WordPress To Sell Antique Radios Online

Step 10: Multiplan Checkout Page

Note: In case you want to sell multiple products via a single checkout page, you can create a multi-plan checkout page otherwise skip this step.

(a) Click on Add Mutiplan Checkout

Multiplan Checkout

(b) Add Plans to Sell Multiple Antique Radios from Single Checkout Page

Multiplan To Sell Antique Radios Online

(c) Take a Look at the Checkout Page

Multiplan To Sell Antique Radios Online

Preview Checkout Page

Wrapping Up

Yeah !! You learned how to sell antique radios online by building checkout pages in Pabbly Subscription Billing. This tool is your best buddy to dominate all kinds of online business and give you an edge over your competitors.

Also, some of you may have doubts regarding the steps. Hence you can always connect with us to solve your doubts through mail or comment section. Thank You.

You May Also Like To Read –
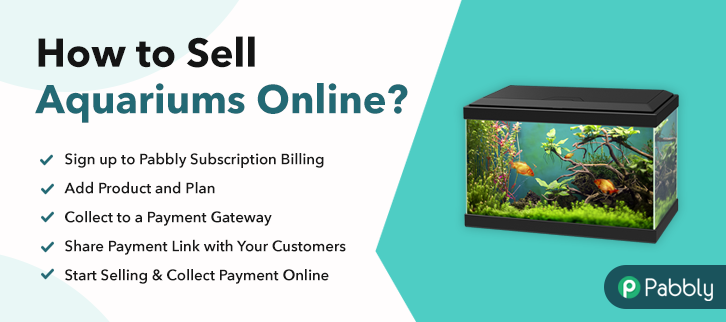
How To Sell Aquariums Online | Step by Step (Free Method)

How to Sell Aquariums Online

Ideal For: All the aquarium manufacturers, aquarium sellers, aquarium dealers, aquarium suppliers, aquarium shop owners, and other merchants can use this method to sell aquariums online.

How to Sell Aquariums Online

Why Choose this Method To Sell Aquariums Online?

Unlike any other solution, this method allows you to:

  • List and sell your aquariums for FREE. Absolutely no payment required.
  • No need to pay commission on any of your sales.
  • Multiple payment options like PayPal, Credit Card, etc to collect payment from a single place.
  • Sell one time or recurring subscriptions of your aquariums.
  • Collect payments & sell products in any currency as per your requirement.
  • Give discounts on your products by offering special coupon codes.
  • Add sales commission agents to help you in selling aquariums online.

Get Pabbly Subscription Billing for Free

There is something soothing about watching fish in aquariums and with the arrival of seasons, people started buying aquariums for homes, offices, workplaces, etc. This is a reason why surplus demand for aquariums prevailing in the market. And obviously, one of the reasons to give a headstart to aquariums business online.

And, according to the Business Wire report, the global aquarium market will grow at a CAGR of 4.82%  in coming years. Other than this, there are multiple benefits like low set-up cost, no middleman, etc in online stores. Giving all this a thought, you must be thinking of starting aquariums selling business online. Gladly we have a software named Pabbly Subscription Billing that can guide you in the process.

The software lets you create an amazing checkout page for selling aquariums online. Further, below are its highlighted features:

  • Multiple billing models
  • Professional invoices
  • Various payment gateways

Now, let’s focus on creating a checkout page for selling aquariums online using this tool.

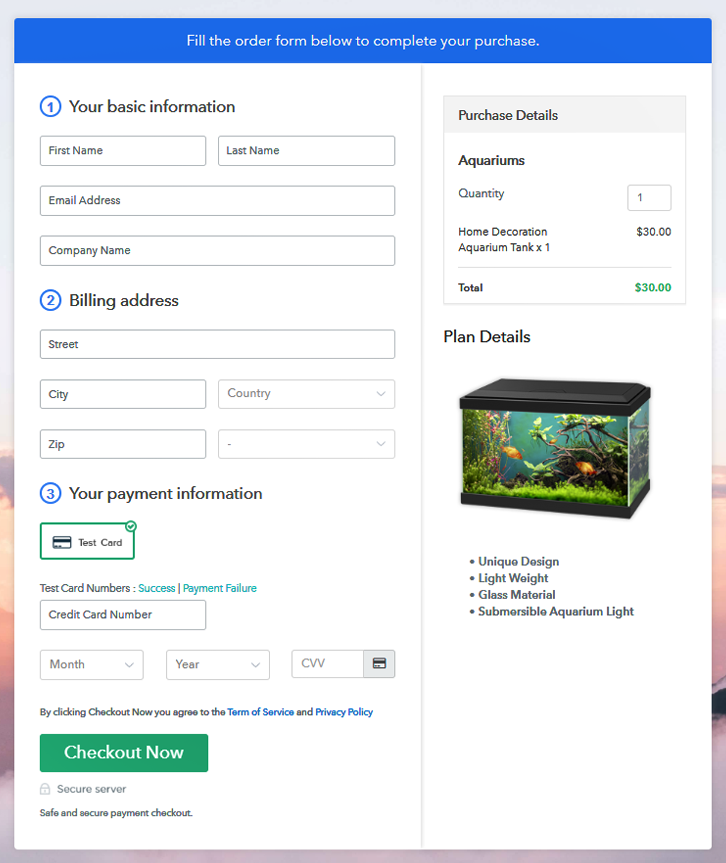
Final View of Checkout Page For Your Aquariums Selling Business

Checkout Page to Sell Aquariums Online

Preview Checkout Page

Step 1: Log in to Pabbly Subscription Billing

Signup

The very first step for creating a checkout page for aquariums is, by visiting the Pabbly Subscription Billing in your browser. After that, click on the “Sign up Free“ button. Moreover, either manually filled out the details or sign in using your Gmail account.

Sign Up For Free!

Step 2: Select Subscription Billing

Access Subscription Billing

Step 3: Account Setup

Setup Account

Also, after clicking on the “Access Now” button of the software, a page will open with fields like company name, select currency, and phone number. Just fill out those details to continue creating a checkout page for aquariums.

Step 4: Connect Payment Gateways & Start Aquariums Selling Business Online

Connect Payment Gateway

The following step is about gathering information about payment procedures using a “Test Payment Gateway”. Here, we will explain the checkout page process for the aquariums with the help of a test payment gateway. Further, this tool offers various payment gateways such as PayPal, Stripe, etc. Besides, below are the payment integration guides to help you out.

Step 5: Add Product For Your Aquariums

Add Product

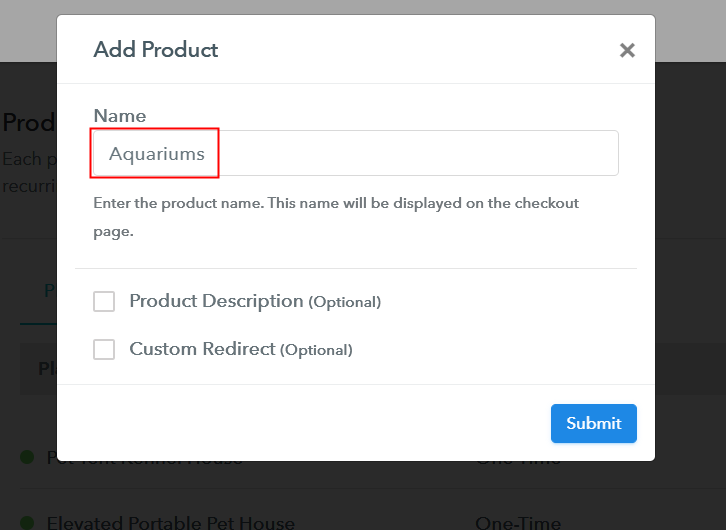
Moreover, add the name, which in our case is “Aquariums”. Here you can specify the type like a large aquarium, small aquarium, etc. Additionally, write a short description of the aquariums to bind the client’s attention.

Add Product to Start Selling Aquariums Online

Note: Here you can add all the products related to the similar category by creating plans for each of them.

Step 6: Add Plans 

Let’s discover plans for different kinds of aquariums available in your store.

(a) Select Add New Plan

Add Plan

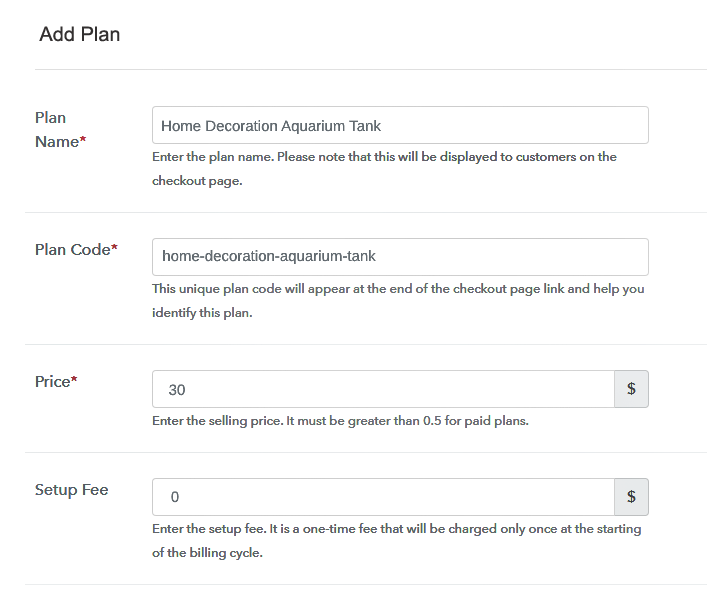
(b) Specify the Plan & Pricing Details

Specify the Plan and Pricing to Sell Aquariums Online

The following thing to do is fill all the details of the aquariums like plan name, code, price, set-up fee, and much more to continue.

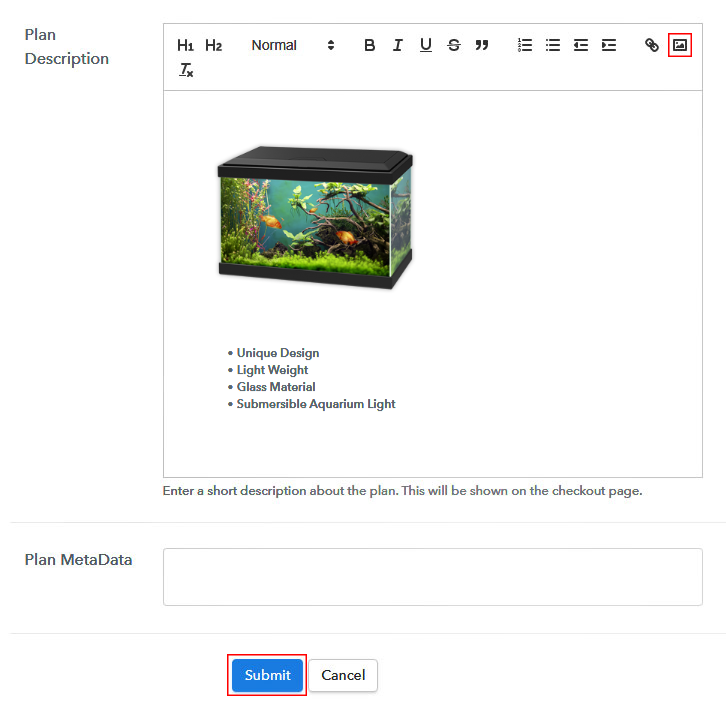
(c) Add Image & Description of Aquariums

Add Image & Description to Sell Aquariums Online

Furthermore, it is necessary to write a brief description of aquariums using bullets, images, etc, to bring natural buyers to the checkout page.

Next, click on the “Submit” button to add the aquariums on the checkout page.

Finally, you can add multiple plans and kinds of aquariums in your product list which you want to trade online.

Step 7: Share your Checkout Page

Share Checkout Page on Social Media

  • Moreover, share the checkout page of the aquariums on social media accounts like Facebook & Twitter to grab the customer’s attention.
  • Also, you can share the direct link of the aquarium’s checkout page with your customers via SMS or email marketing.
  • Additionally, embed the provided plan link of the aquariums in the buttons or any anchor text on your website.

Step 8: Preview Checkout Page

Follow up the recommended steps to preview the checkout page:

(a) Click on the View Button

View Checkout Plan

(b) Take a Look at the Checkout Page

Checkout Page to Sell Aquariums Online

Step 9: Embed Checkout Page in Site & Sell Aquariums Online

Embed Checkout Page on Website

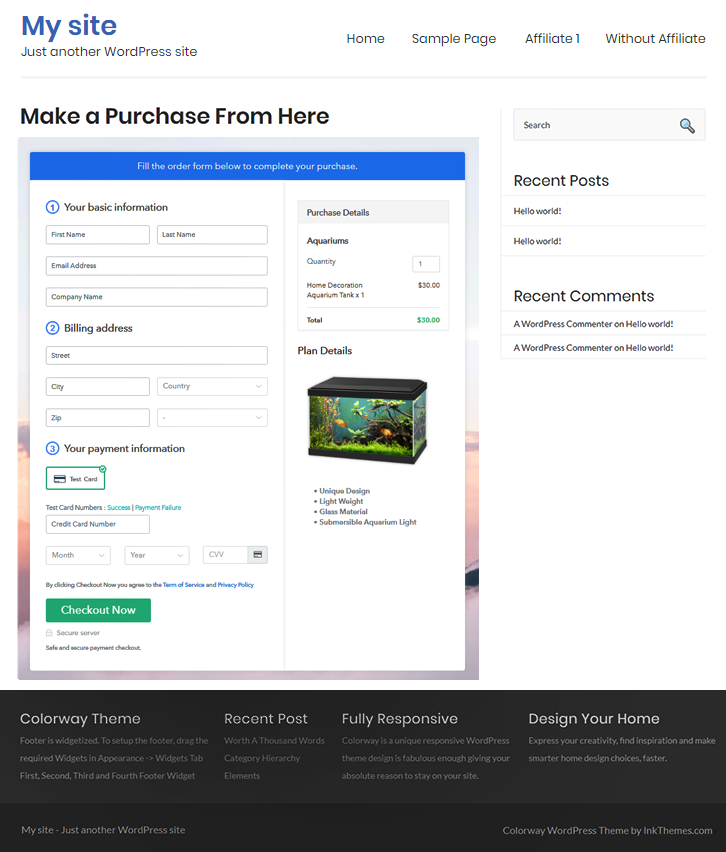
Simply copy the link and add the checkout page to sell aquariums online at any proper place on your WordPress site.

(a) Edit the Page & Paste the Copied Link

Paste Link in Text Editor

Further, paste the plan link of aquariums on a text editor of the WordPress dashboard.

(b) Save & Publish the Checkout Page

Save and Publish

Next, click the “Publish” button, after making changes.

(c) Check out the Final Look of your Checkout Page on WordPress Site

Final Look of your Checkout Page to Sell Aquariums Online

Step 10: Multiplan Checkout Page

Note: In case you want to sell multiple products via a single checkout page, you can create a multi-plan checkout page otherwise skip this step.

(a) Click on Add Mutiplan Checkout

Multiplan Checkout

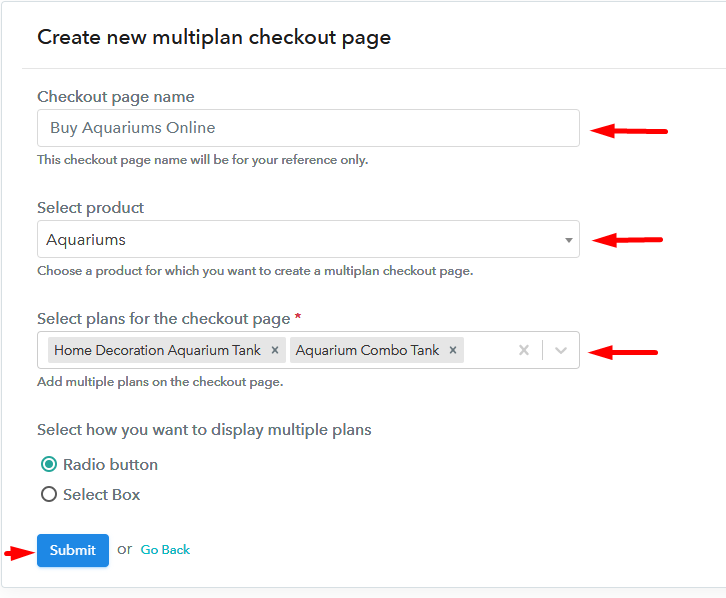
(b) Add Plans to Sell Multiple Aquariums from Single Checkout Page

Add Multiple Products to Start Selling Aquariums Online

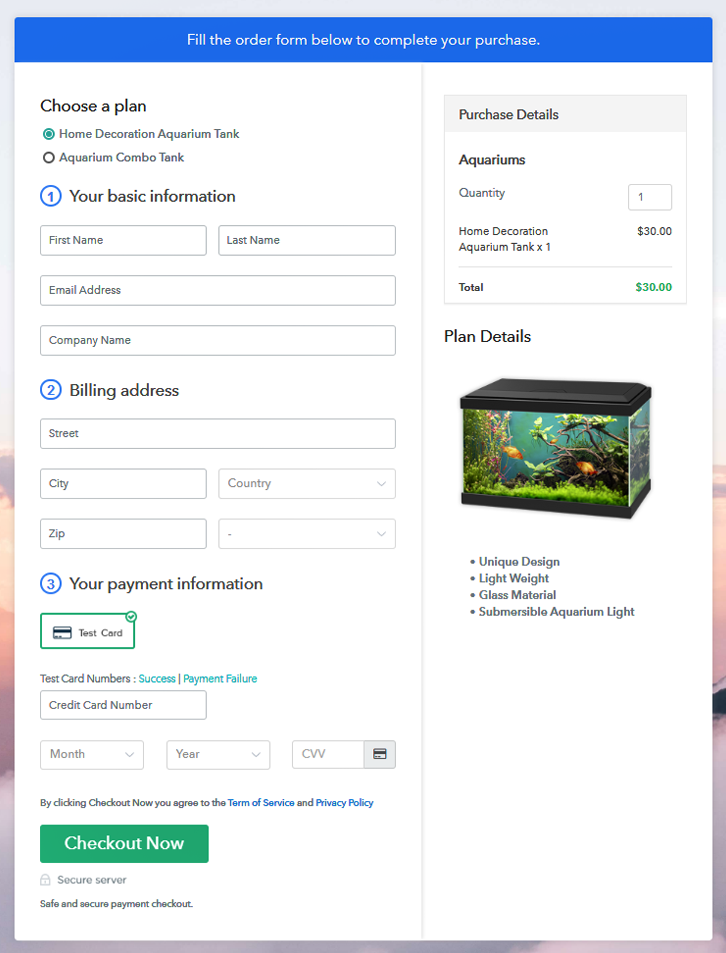
(c) Take a Look at the Checkout Page

Multiplan Checkout Page to Sell Aquariums Online

Preview Checkout Page

Wrapping Up

Okay! So now you know how easily you can start your own aquariums selling business online using software Pabbly Subscription Billing. Just follow all the mentioned 10 steps and nothing else. Further, the software keeps in building strong relationships with prospects by sending timely alerts.

Don’t dwell in confusion now, the amazing tool is here to guide you.

You May Also Like To Read –
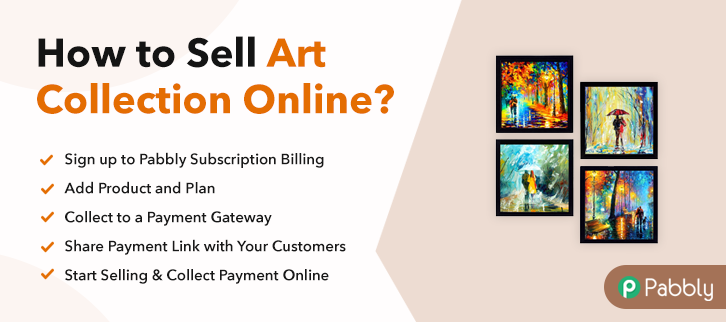
How to Sell Art Collection Online | Step by Step (Free Method)

How to Sell Art Collection Online

Ideal For: All the art collection makers, art gallery owners, art collection keepers, art collection sellers, retail art collection shop owners, and other merchants can use this method to take their art collection selling business online.

How to Sell Art Collection Online

Why Choose this Method To Sell Art Collection Online?

Unlike any other solution, this method allows you to:

  • List and sell your art collection for FREE. Absolutely no payment required.
  • No need to pay commission on any of your sale.
  • Multiple payment options like PayPal, Credit Card, etc to collect payment from a single place.
  • Sell one time or recurring subscriptions of your art collection.
  • Collect payments & sell products in any currency as per your requirement.
  • Give discounts on your products by offering special coupon codes.
  • Add sales commission agents to help you in selling art collection online.

Get Pabbly Subscription Billing for Free

Art lovers are all around the world and if you are planning to sell art collection online globally then these 10 steps can help you get started in a few minutes.

In this article, we’ll be using the Subscription Billing service of Pabbly for checkout page creation. These checkout pages are capable of collecting safe & secure payments globally as well as in showcasing art pieces excellently.

Moreover, in the meantime of creating checkout pages all the management related to selling art collection online is also taken care of. Also, the invoicing and billing process can be easily automated. You can choose to accept single-time as well as recurring payments to sell art collection online easily.

Uses of checkout pages:

  • To display image & description of the art collection
  • For collecting online or offline payment
  • To sell single or multiple art collections from a single page
  • To share the art collection with your customers on social media
  • For embedding a payment page of WordPress
  • To redirect customers for payments through site buttons & texts
    And much more…

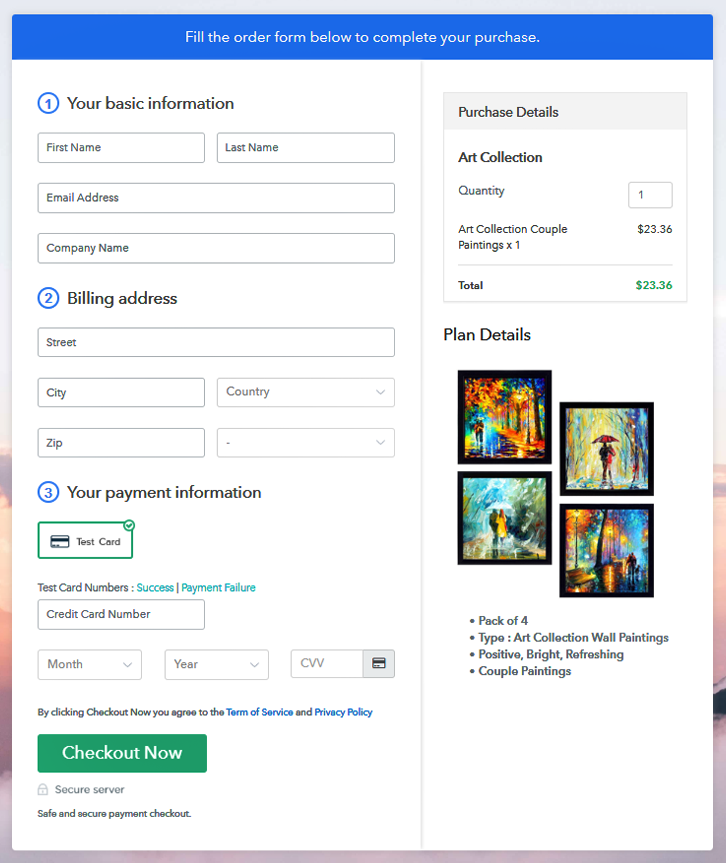
Final View of Checkout Page For Your Art Collection Selling Business

Checkout Page Preview to Sell Art Collection Online

Preview Checkout Page

Step 1: Log in to Pabbly Subscription Billing

Signup

To start art collection business online begin, the process by visiting Pabbly Subscription Billing. On the website click on the ‘Sign Up Free‘ button and choose a method to get into the platform. You can either manually fill out the form given and proceed or you can sign-up with Google.

Sign Up For Free!

Step 2: Select Subscription Billing

Access Subscription Billing

Step 3: Account Setup

Setup Account

To complete the setup for selling art collection online, drop the information regarding your company such as a company name, the currency you wanna deal in and a contact number.

Step 4: Connect Payment Gateways & Start Art Collection Selling Business Online

Connect Payment Gateway

In this step, you’ll need to integrate a payment collection method for collecting payments for selling art collection online. For the first time, you can enable the test payment mode for testing the payment process. I am also explaining the process using the test payment mode in this blog.

While you’ll need to connect with an actual payment gateway. There are multiple options available & the step by step integration guides are linked below.

Step 5: Add Product For Your Art Collection

Add Product

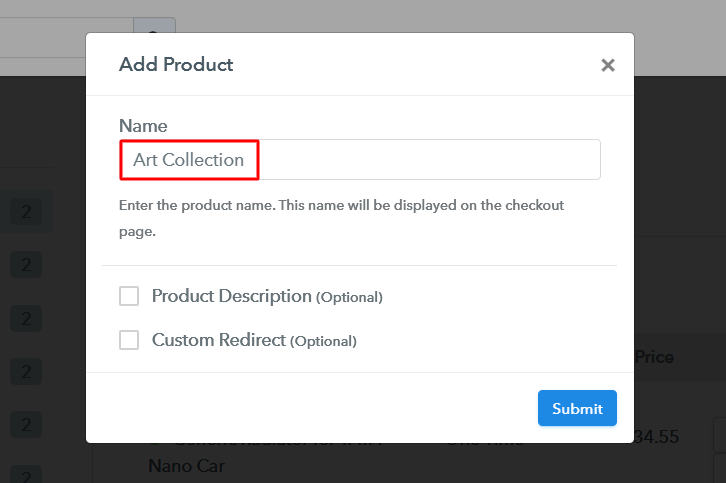
Our next step is adding a product for selling art collection online. Here you can add an art collection from a particular category such as abstract paintings, traditional art collection etc. Further, we can add plans for these product categories.

Add Product to Sell Art Collection Online

Strike the submit button and a product will be added.

Note: Here you can add all the products related to the similar category by creating plans for each of them.

Step 6: Add Plans 

Let’s rollout plans for different kinds of art collection available in your store.

(a) Select Add New Plan

Add Plan

(b) Specify the Plan & Pricing Details

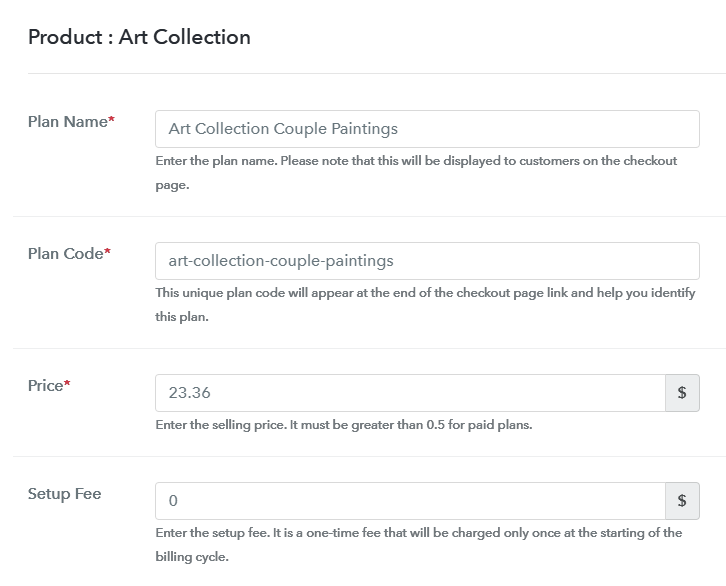
Add Plan to Sell Art Collection Online

In the plan description page write down a name, code, price, billing cycle etc for the art collection to sell.

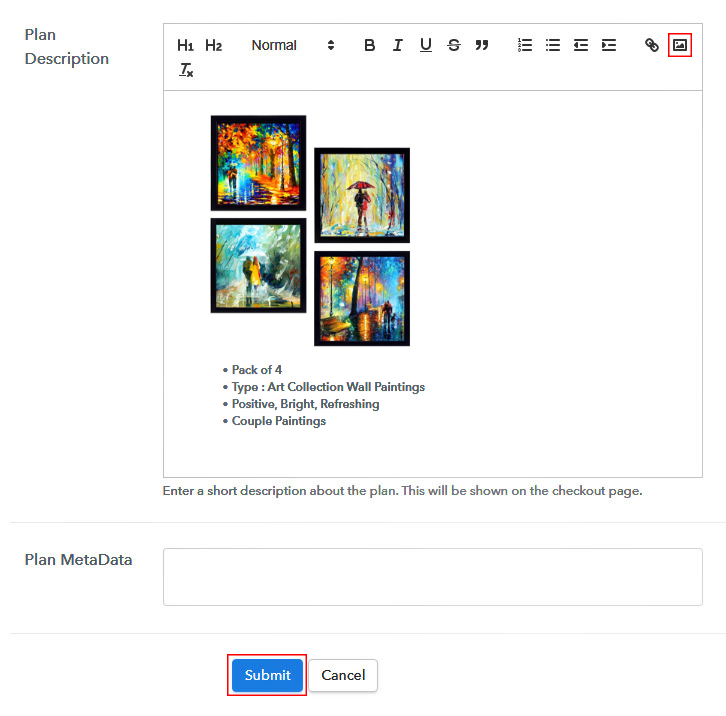
(c) Add Image & Description of Art Collection

Add Image & Description to Sell Art Collection Online

You can also insert a picture & some descriptive text with formatting.

Hit submit on this page and a plan to sell art collection online will be appended.

Similarly, you can add other art collections as well.

Step 7: Share your Checkout Page

Share Checkout Page on Social Media

You have three different options to share a checkout page with your customers.

  • First, you can directly click on the buttons to share the checkout page on Facebook & Twitter.
  • Second, you can share the plan link on other platforms like emails & SMS
  • Third, you can redirect the customers on the checkout page by linking the plan link with the buttons and texts of any website

Step 8: Preview Checkout Page

Follow up the recommended steps to preview the checkout page:

(a) Click on the View Button

View Checkout Plan

(b) Take a Look at the Checkout Page

Checkout Page Preview to Sell Art Collection Online

Step 9: Embed Checkout Page in Site & Sell Art Collection Online

Embed Checkout Page on Website

Just copy the link and add the checkout page to sell art collection online at any preferable place on your WordPress site.

(a) Edit the Page & Paste the Copied Link

Embed Checkout Page on Website

Further, paste the plan link on a text editor of the WordPress dashboard.

(b) Save & Publish the Checkout Page

Save_and_Publish

Next, click the “Publish” button, after making changes.

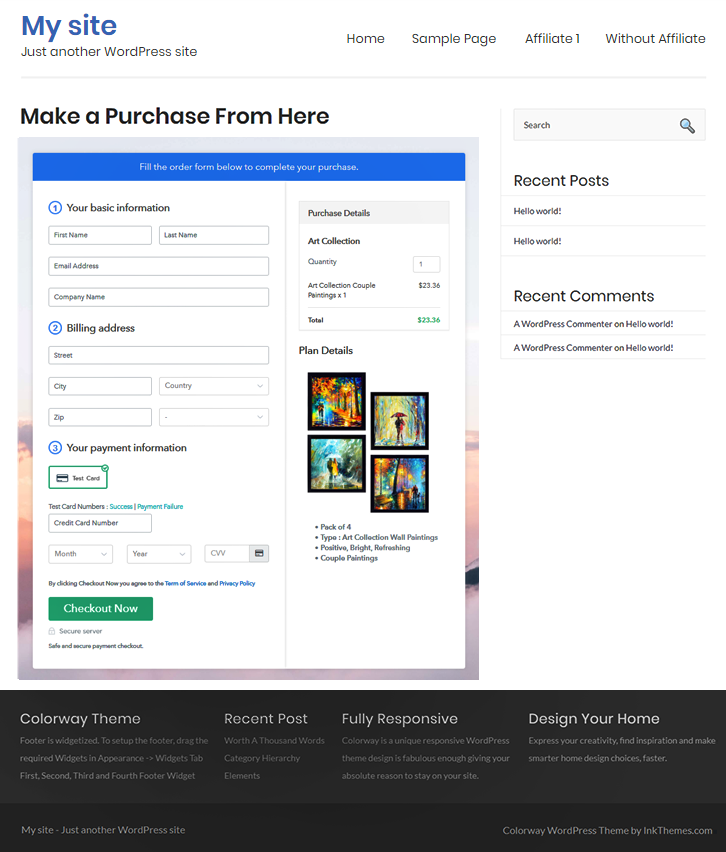
(c) Check out the Final Look of your Checkout Page on WordPress Site

Checkout Page On Site to Sell Art Collection Online

Step 10: Multiplan Checkout Page

Note: In case you want to sell multiple products via a single checkout page, you can create a multi-plan checkout page otherwise skip this step.

(a) Click on Add Mutiplan Checkout

Multiplan Checkout

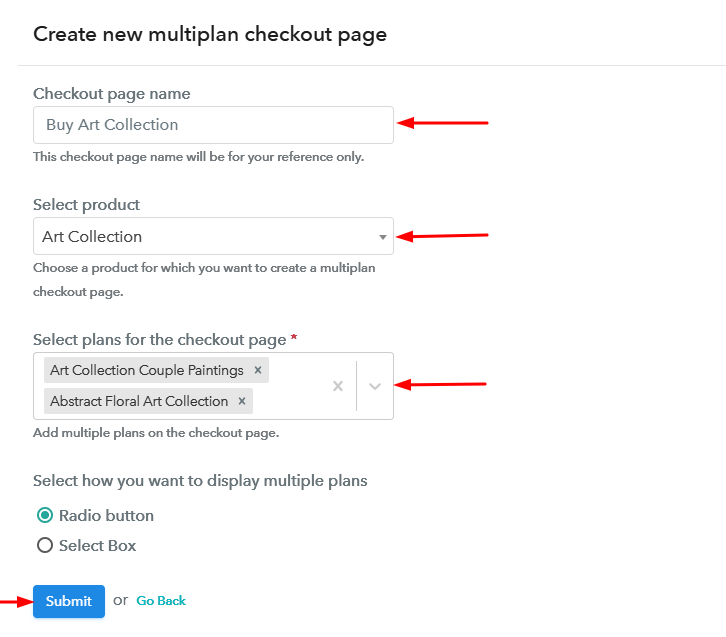
(b) Add Plans to Sell Multiple Art Collection from Single Checkout Page

Create Multiplan Checkout Page to Sell Art Collection Online

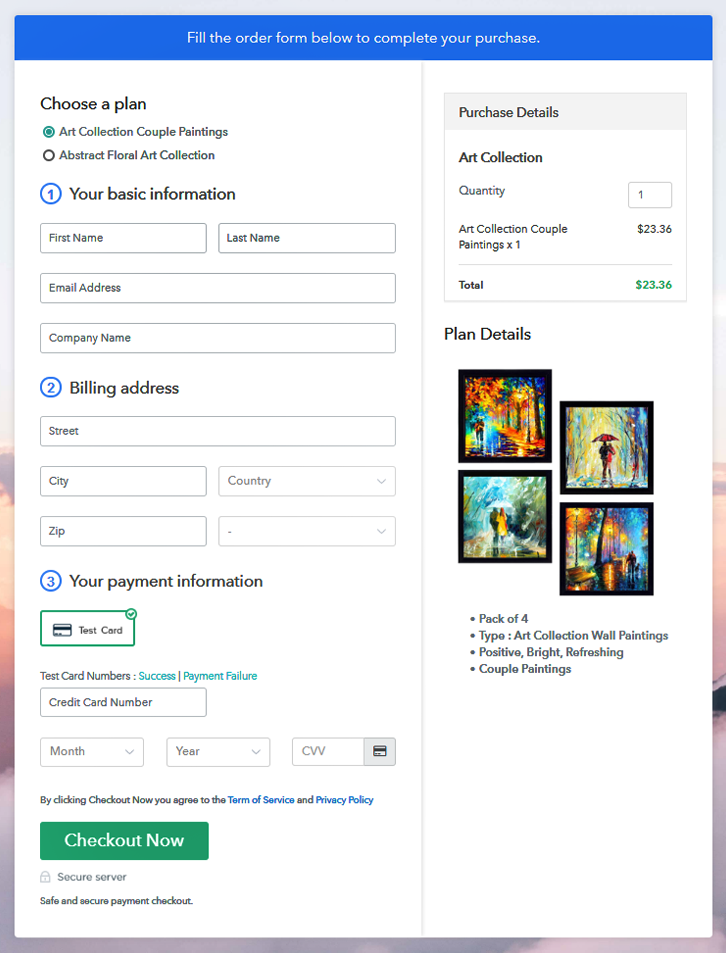
(c) Take a Look at the Checkout Page

Multiplan Checkout Page to Sell Art Collection Online

Preview Checkout Page

Wrapping Up

This was the process of ‘how to sell art collection online using checkout pages’. Up till now, you can clearly see why it is the fastest and smartest way out here on the internet. The flexibility of this platform allows you to share the checkout pages almost anywhere, whether it is a social media platform, a WordPress site or any other site’s buttons & texts.

I personally like the multicurrency and multiple gateway options to collect secure payments from reliable sources. Comment below what’s your feedback over it.

You May Also Like To Read –
How To Sell Auto Tyres Online | Step by Step (Free Method)

How to Sell Auto Tyres Online

Ideal For: All the car tyre shops, tyres showroom, auto parts store, auto parts shop, tyre wholesalers, and other sellers can use this method to take their auto tyres selling business online.

How to Sell Auto Tyres Online

Why Choose this Method To Sell Auto Tyres Online?

Unlike any other solution, this method allows you to:

  • List and sell your auto tyres for FREE. Absolutely no payment required.
  • No need to pay commission on any of your sales.
  • Multiple payment options like PayPal, Credit Card, etc to collect payment from a single place.
  • Sell one time or recurring subscriptions of your auto tyres.
  • Collect payments & sell products in any currency as per your requirement.
  • Give discounts on your products by offering special coupon codes.
  • Add sales commission agents to help you in selling auto tyres online.

Get Pabbly Subscription Billing for Free

Is your auto tyres selling business is going south for the last few years and you want to make up for the losses and earn some extra profit? Then let us take your auto tyres selling business online because everyone already is on online platforms then why should you stay back.

You can easily start selling auto tyres online through checkout pages. Checkout pages are the webpages that help you to improve your sales and broaden the customer range. Simply you have to create checkout pages for your auto tyres and then share them on social media or your website so that people can purchase tyres directly through them. To create checkout pages you need only one service and that is Pabbly Subscription Billing, it is free and easy to use.

Other than checkout pages you can also access its other features like easy invoicing, integration with website and other apps, unlimited listings of products, easy payment collection, etc to build up your online business. So, now let us start creating your first checkout page.

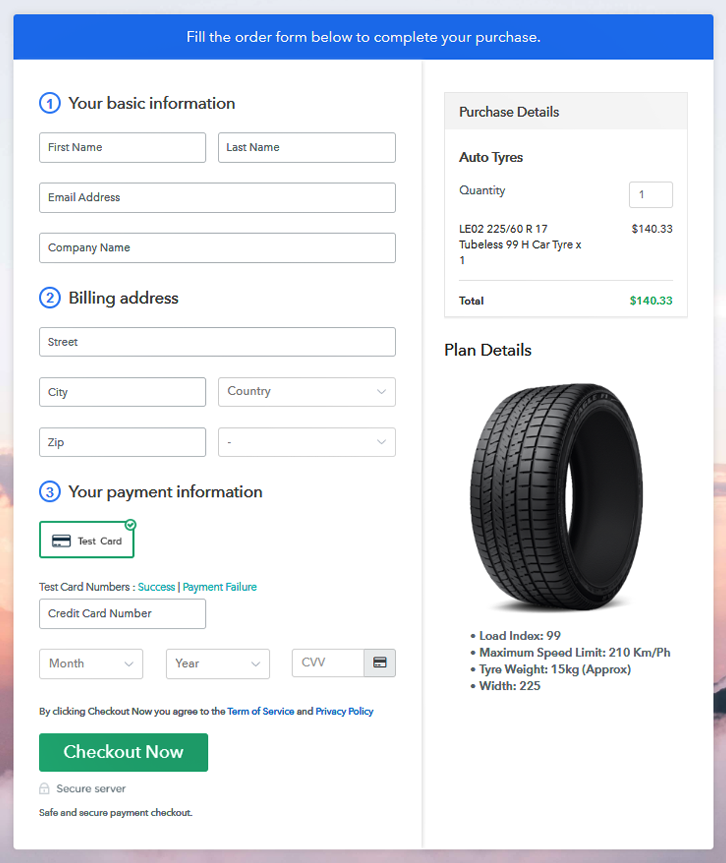
Final View of Checkout Page For Your Auto Tyres Selling Business

Preview Checkout Page

Preview Checkout Page

Step 1: Log in to Pabbly Subscription Billing

Signup

In the beginning, you have to visit Pabbly Subscription Billing website and then click on the “Signup Free” button. On clicking the button, the signup page will appear, here you can create your account in few seconds via Gmail or you can also enter your details manually.

Sign Up For Free!

Step 2: Select Subscription Billing

Access Subscription Billing

Step 3: Account Setup

Setup Account

After you have finished the signup process, now fill up your company details such as company name, currency, and phone number in the appeared dialogue box.

Step 4: Connect Payment Gateways & Start Auto Tyres Selling Business Online

Connect Payment Gateway

Pabbly Subscription Billing makes the payment collection process error-free by providing the “Test Payment” mode. Enable this mode and check for yourself how this process works. Later, you can connect with other payment gateways like Stripe, Razorpay, etc of your choice. The complete payment gateways integration guide is given below-

Step 5: Add Product For Your Auto Tyres

Add Product

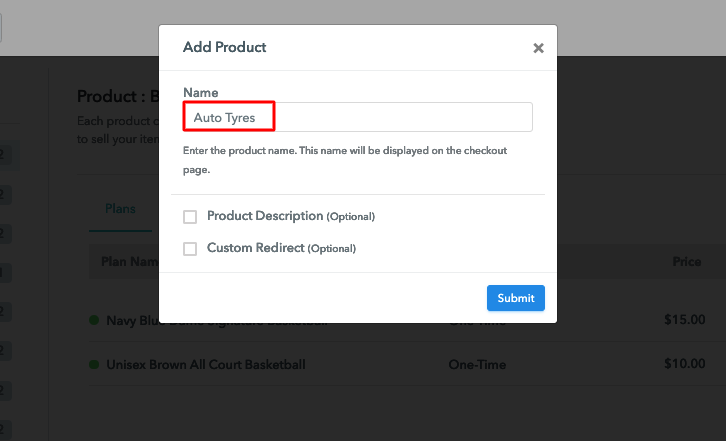
In this step, you have to add your first product. You can add auto tyres from different categories like tubed tyres, tubeless tyres, etc.

Sell Auto Tyres Online Product Name

Add all the other tyres in the same product section by creating different plans for them.

Note: Here you can add all the products related to the similar category by creating plans for each of them.

Step 6: Add Plans 

Let’s rollout plans for different kinds of auto tyres available in your store.

(a) Select Add New Plan

Add Plan

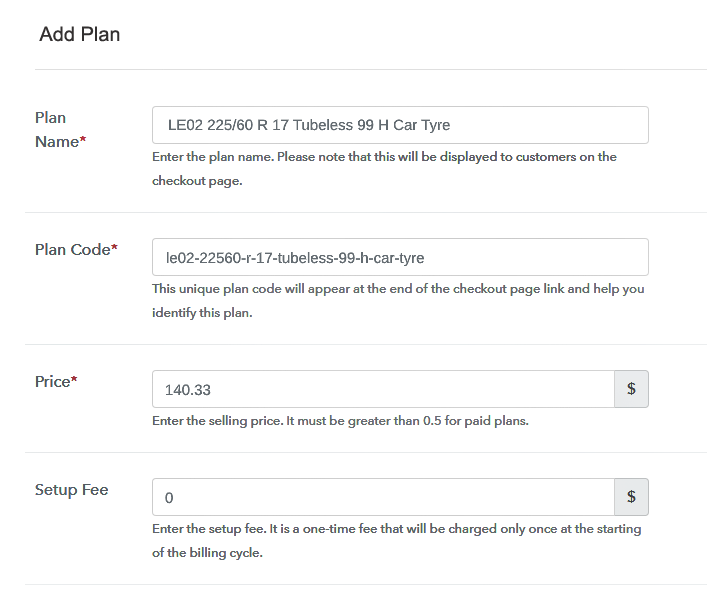
(b) Specify the Plan & Pricing Details

Sell Auto Tyres Online Details

On clicking the “Add New Plan” button, you will end up on the plan page, here you have to fill up details like product name, code, price, billing cycle, etc.

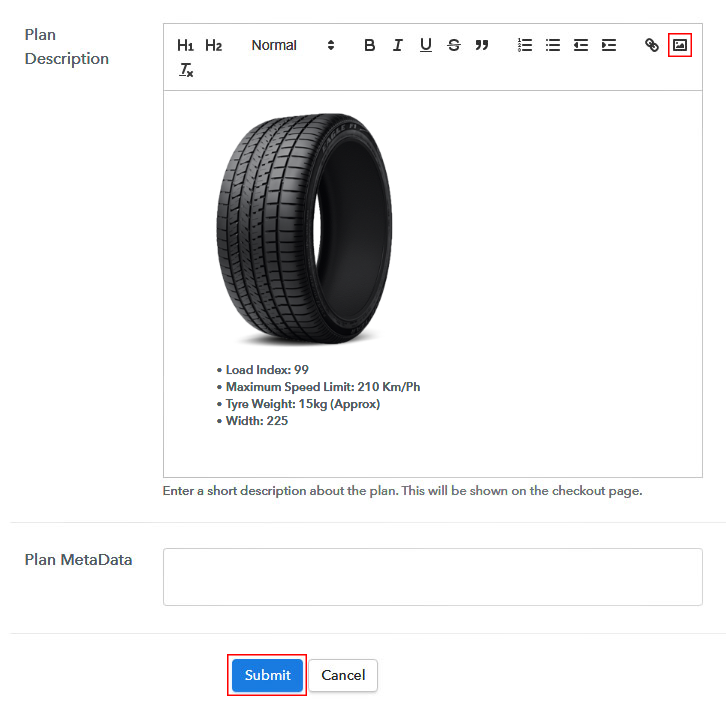
(c) Add Image & Description of Auto Tyres

Sell Auto Tyres Online Image

Further, you can describe the auto tyres that you want to sell along with the images, links, etc, and click on the submit button to add your product. You can also create more plans for all the auto tyres in a similar way.

Step 7: Share your Checkout Page

Share Checkout Page on Social Media

If you want to improve your auto tyres sales online then follow these given steps:

  • Share your checkout page on social media such as Facebook and Twitter.
  • Furthermore, copy the mentioned link and send it to your customers through SMS or emails directly.
  • Embed your plan link on your website so that your customers can be landed on the checkout page directly.

Step 8: Preview Checkout Page

Follow up the recommended steps to preview the checkout page:

(a) Click on the View Button

View Checkout Plan

(b) Take a Look at the Checkout Page

Preview Checkout Page

Step 9: Embed Checkout Page in Site & Sell Auto Tyres Online

Embed Checkout Page on Website

Simply copy the link and add the checkout page to sell auto tyres online at any preferable place on your WordPress site.

(a) Edit the Page & Paste the Copied Link

Embed Checkout Page on Website

Further, paste the plan link on a text editor of the WordPress dashboard.

(b) Save & Publish the Checkout Page

Save_and_Publish

Next, click the “Publish” button, after making changes.

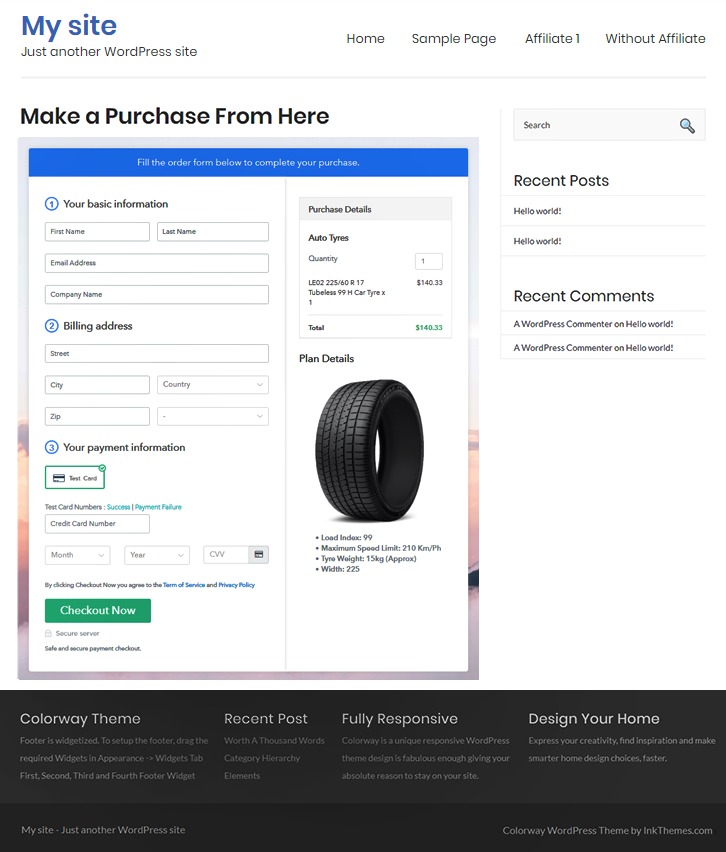
(c) Check out the Final Look of your Checkout Page on WordPress Site

Sell Auto Tyres Online Website

Step 10: Multiplan Checkout Page

Note: In case you want to sell multiple products via a single checkout page, you can create a multi-plan checkout page otherwise skip this step.

(a) Click on Add Mutiplan Checkout

Multiplan Checkout

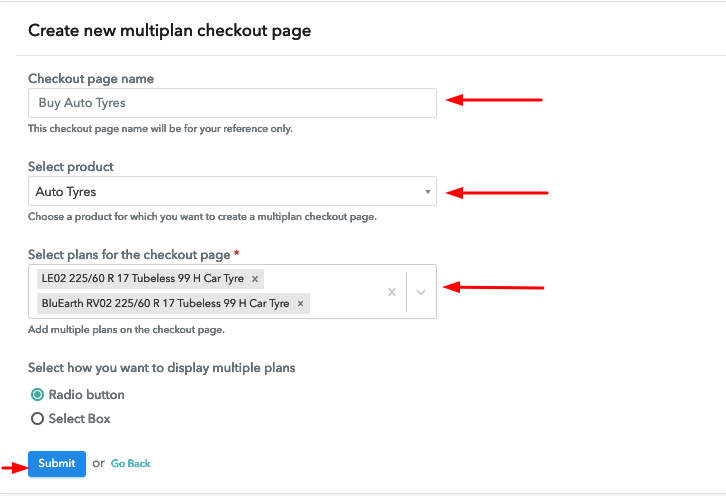
(b) Add Plans to Sell Multiple Auto Tyres from Single Checkout Page

Sell Auto Tyres Online Multi Details

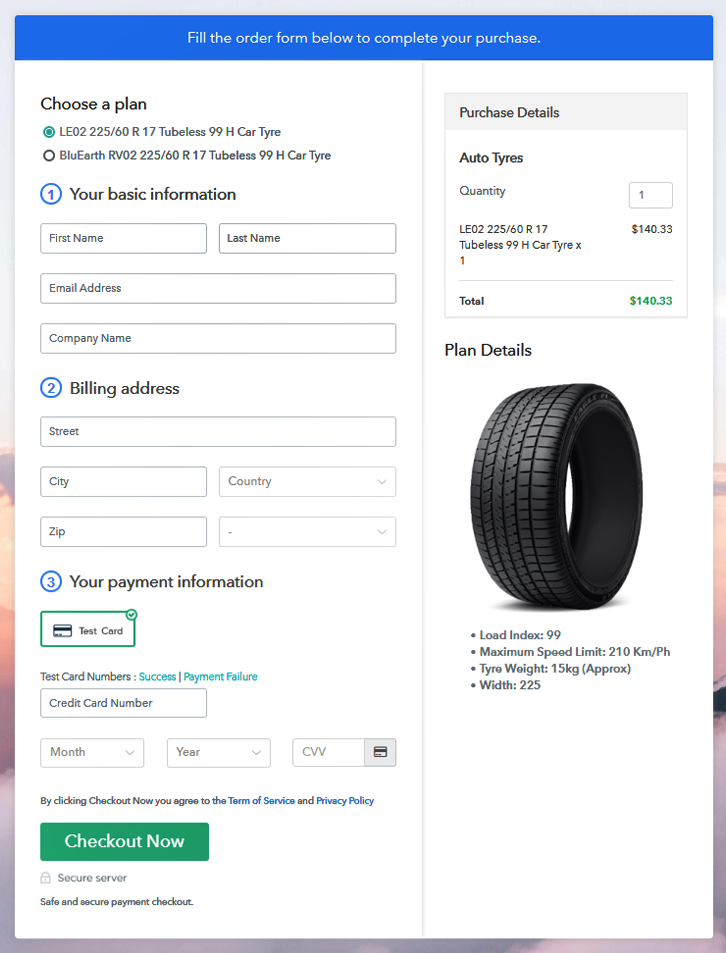
(c) Take a Look at the Checkout Page

Sell Auto Tyres Online Multi Checkout

Preview Checkout Page

Wrapping Up

Coming to the end, this is the easiest and free way to start your online business. With Pabbly Subscription Billing now you can sell unlimited auto tyres online, collect payment easily, share invoices automatically, etc. Now create checkout pages for your auto tyres and start selling them online. For further queries or suggestions please contact us.

You May Also Like To Read –
How To Sell Badminton Rackets Online | Step by Step (Free Method)

How to Sell Badminton Rackets Online

Ideal For: All the badminton racket manufacturers, badminton racket sellers, retail badminton racket shop owners, and other merchants can use this method to take their badminton rackets selling business online.

How to Sell Badminton Rackets Online

Why Choose this Method To Sell Badminton Rackets Online?

Unlike any other solution, this method allows you to:

  • List and sell your badminton rackets for FREE. Absolutely no payment required.
  • No need to pay commission on any of your sale.
  • Multiple payment options like PayPal, Credit Card, etc to collect payment from a single place.
  • Sell one time or recurring subscriptions of your badminton rackets.
  • Collect payments & sell products in any currency as per your requirement.
  • Give discounts on your products by offering special coupon codes.
  • Add sales commission agents to help you in selling badminton rackets online.

Get Pabbly Subscription Billing for Free

People are always looking for branded badminton rackets online. And if you are planning to start badminton rackets business online then this could definitely help buyers to get better choices. However, the checkout pages can help you get started with your plan in no time.

For this, we’ll be creating these checkout pages in 10 simple steps. These checkout pages will further help you do the following.

  • Collect online/ offline payments
  • Display badminton rackets
  • Share your products on social media platforms
  • Sell unlimited badminton rackets
  • Offer coupons & discounts
    And much more…

Also, you’ll get a dashboard to keep track of all items in stock, payments & refunds. You can set single-time or recurring billing. Plus the invoicing will be fully automated.

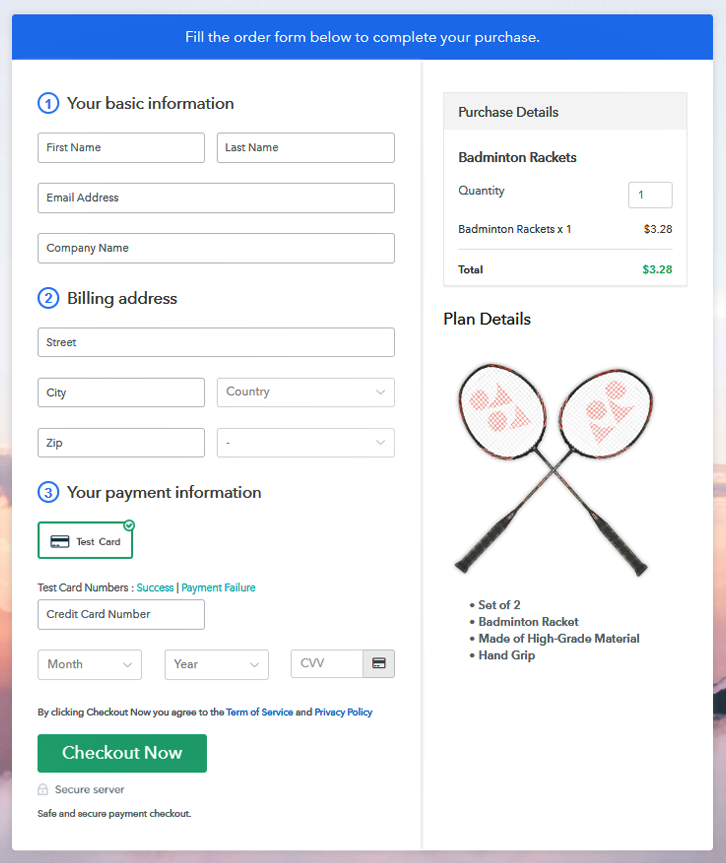
Final View of Checkout Page For Your Badminton Rackets Selling Business

Checkout Page Preview to Sell Badminton Rackets Online

Preview Checkout Page

Step 1: Log in to Pabbly Subscription Billing

Signup

To get started for selling badminton rackets online first, visit Pabbly Subscription Billing & then click on the ‘Sign Up Free‘ button. On the next page redirect, sign-up using a Google account or manually.

Sign Up For Free!

Step 2: Select Subscription Billing

Access Subscription Billing

Step 3: Account Setup

Setup Account

Now, to complete the set-up for selling badminton rackets online, fill out the details asked in the pop-up window shown above.

Step 4: Connect Payment Gateways & Start Badminton Rackets Selling Business Online

Connect Payment Gateway

Next is enabling a payment gateway to accept payments for the sold badminton rackets. To get familiar with the procedure you can use the test payment mode just like me in this blog. But to accept actual payments you’ll need to integrate a payment gateways from the choices available below.

Step 5: Add Product For Your Badminton Rackets

Add Product

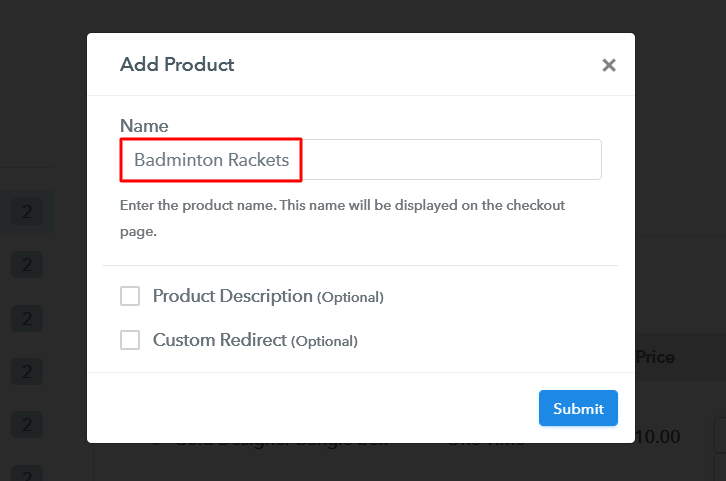
Once you are done with all the system settings, you can create a product. This product will represent a category and we’ll add plans to this category more further.

Add Product to Sell Badminton Rackets Online

Submit the product details and a product will be added instantly.

Note: Here you can add all the products related to the similar category by creating plans for each of them.

Step 6: Add Plans 

Let’s rollout plans for different kinds of badminton rackets available in your store.

(a) Select Add New Plan

Add Plan

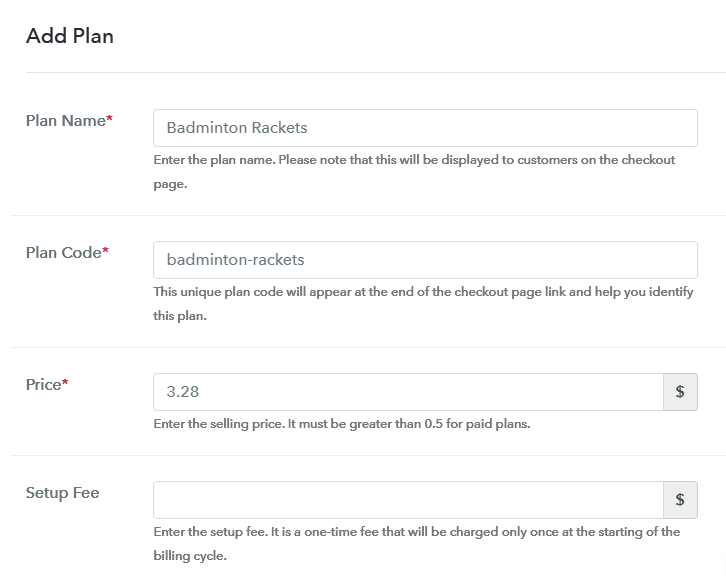
(b) Specify the Plan & Pricing Details

Add Plan to Sell Badminton Rackets Online

You can fill out the badminton rackets name, code, pricing, billing cycle information in the plan details page.

(c) Add Image & Description of Badminton Racket

Add Image & Description to Sell Badminton Rackets Online

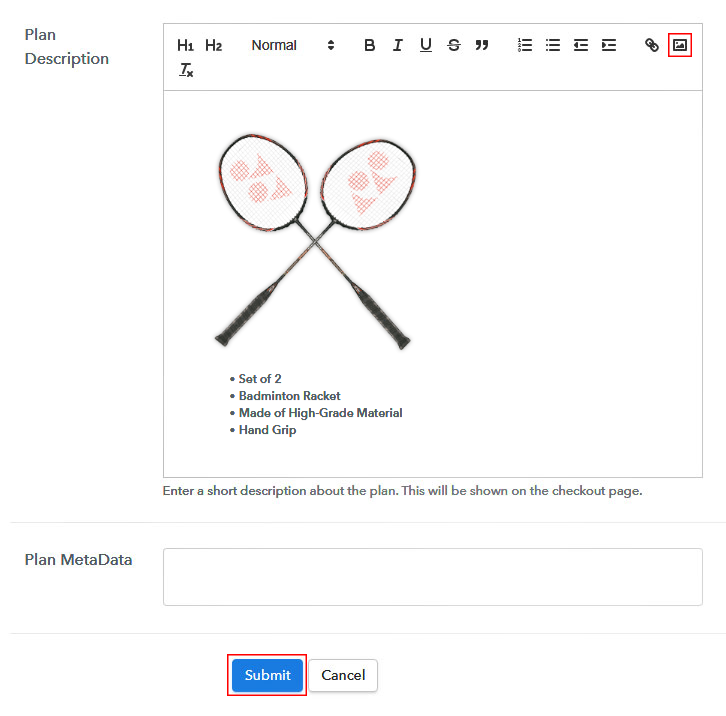
Also, you can add an image & description of the badminton rackets.

Click the submit button here and a plan will be added.

You can add other plans in the same manner.

Step 7: Share your Checkout Page

Share Checkout Page on Social Media

You can share the checkout page with the customers as:

  • Click the button icons to share the checkout page on Facebook & Twitter
  • Share the plan link on any social media platform, emails & SMS
  • You can also link the plan link with the buttons and texts

Step 8: Preview Checkout Page

Follow up the recommended steps to preview the checkout page:

(a) Click on the View Button

View Checkout Plan

(b) Take a Look at the Checkout Page

Checkout Page Preview to Sell Badminton Rackets Online

Step 9: Embed Checkout Page in Site & Sell Badminton Rackets Online

Embed Checkout Page on Website

Just copy the link and add the checkout page to sell badminton rackets online at any preferable place on your WordPress site.

(a) Edit the Page & Paste the Copied Link

Embed Checkout Page on Website

Further, paste the plan link on a text editor of the WordPress dashboard.

(b) Save & Publish the Checkout Page

Save_and_Publish

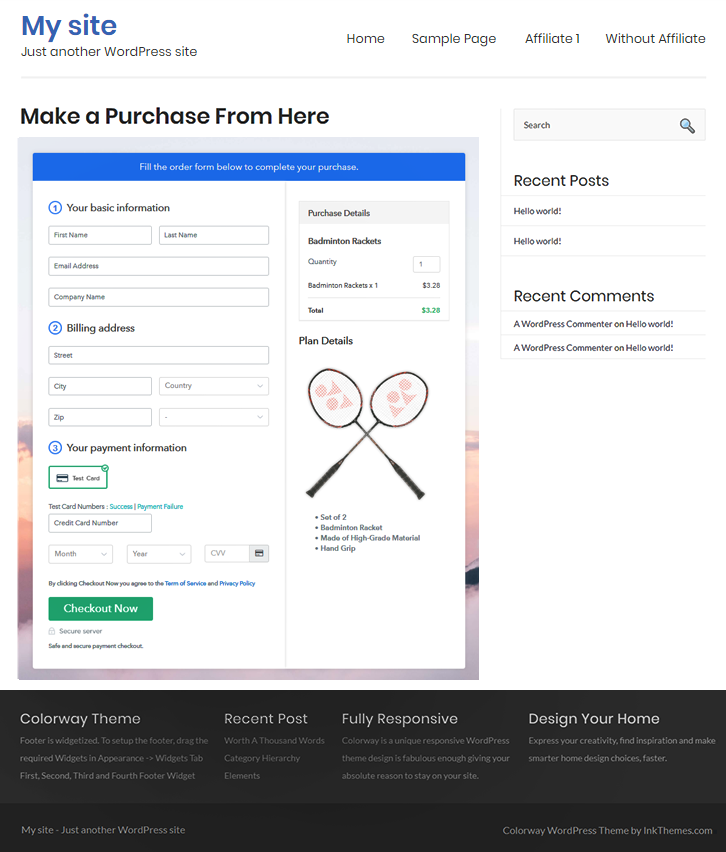
Next, click the “Publish” button, after making changes.

(c) Check out the Final Look of your Checkout Page on WordPress Site

Checkout Page On Site to Sell Badminton Rackets Online

Step 10: Multiplan Checkout Page

Note: In case you want to sell multiple products via a single checkout page, you can create a multi-plan checkout page otherwise skip this step.

(a) Click on Add Mutiplan Checkout

Multiplan Checkout

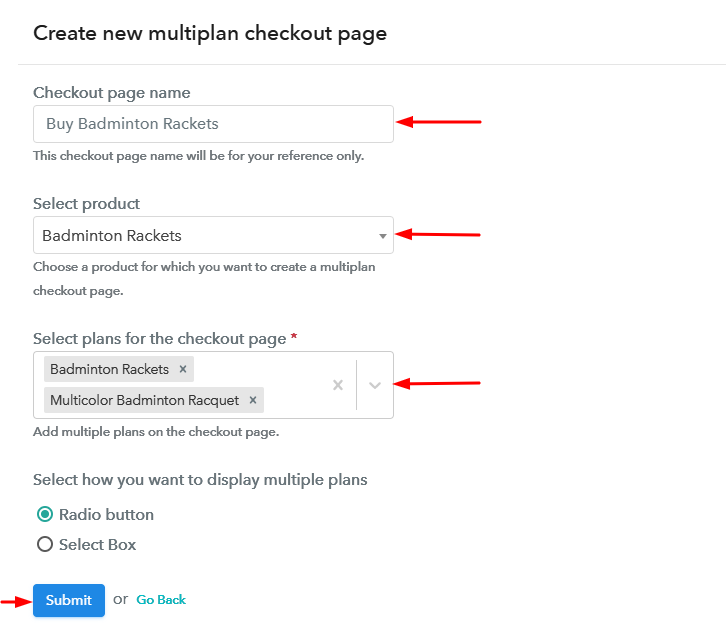
(b) Add Plans to Sell Multiple Badminton Rackets from Single Checkout Page

Create Multiplan Checkout to Sell Badminton Rackets Online

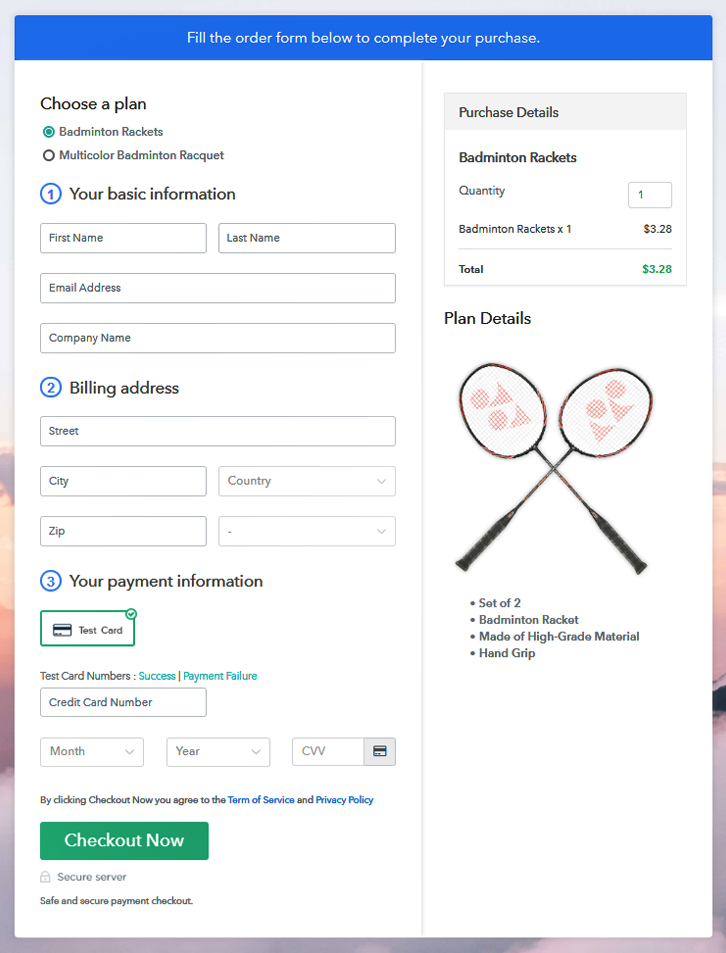
(c) Take a Look at the Checkout Page

Multiplan Checkout Page to Sell Badminton Rackets Online

Preview Checkout Page

Wrapping Up

This is how you can sell badminton rackets online using checkout pages. Checkout pages add flexibility towards sharing your product globally to accept payments. Also, this approach will help you get started in no time and saves you from the clutter of designing an eCommerce site.

Good Luck with your business and do comment your feedback below.

You May Also Like To Read –