Ideal For: All the cabinet door manufacturers, interior designers, furniture galleries, carpenters, and other merchants can use this method to sell cabinet door designs online.
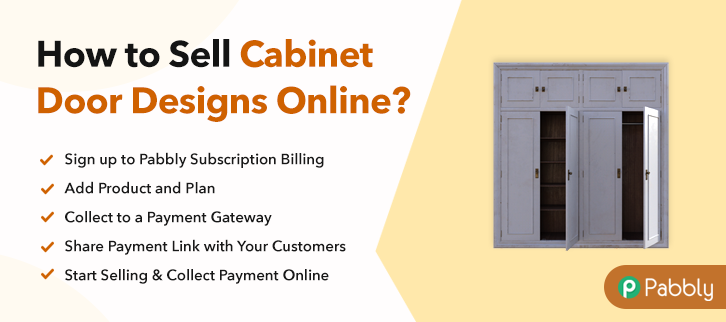
Why Choose this Method to Sell Cabinet Door Designs Online?
Unlike any other solution, this method allows you to:
- List and sell your cabinet door designs for FREE. Absolutely no payment required.
- No need to pay commission on any of your sale.
- Multiple payment options like PayPal, Credit Card, etc to collect payment from a single place.
- Sell one time or recurring subscriptions of your cabinet door designs.
- Collect payments & sell products in any currency as per your requirement.
- Give discounts on your products by offering special coupon codes.
- Add sales commission agents to help you in selling cabinet door designs online.
The primary reason why many carpenters and designers are preferring to sell cabinet door designs online is they don’t have to pay the brokers fee. The broker’s fee in the traditional brick store is usually charged around 20%-40% per piece and that makes quite a dent in a designer’s pocket. The other benefits of selling cabinet door designs online are better product introduction to a global audience, 24×7 open online shop, lower rent, and utilities, etc.
Now to sell cabinet door design online, you can always approach online platforms like Pepperfry, Smartdraw, etc. But they too charge a very heft commission which will burn your entire profit margin. Also, your designs will be drowned in the works of countless other designers. So, that is why in this article we will build a checkout page in Pabbly Subscription Billing to sell cabinet door designs online. Using this software, you will be able to generate unlimited revenue without paying any extra commission.
- List and Sell Unlimited Designs Online
- No Annoying Transaction Fees
- Custom Domain
- Custom Logo
- Revenue Management
- Tracking & Analytics
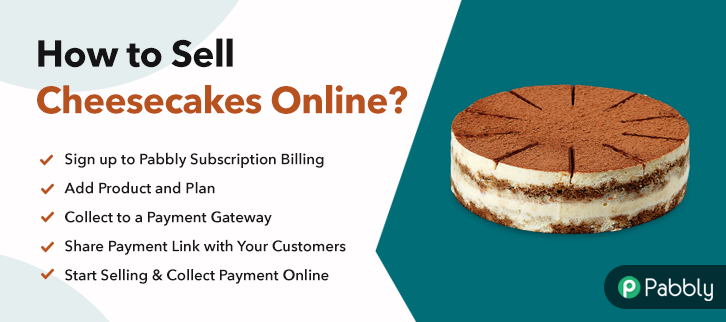
So, let’s create our first checkout page with Pabbly Subscription Billing to start cabinet door design selling business online.
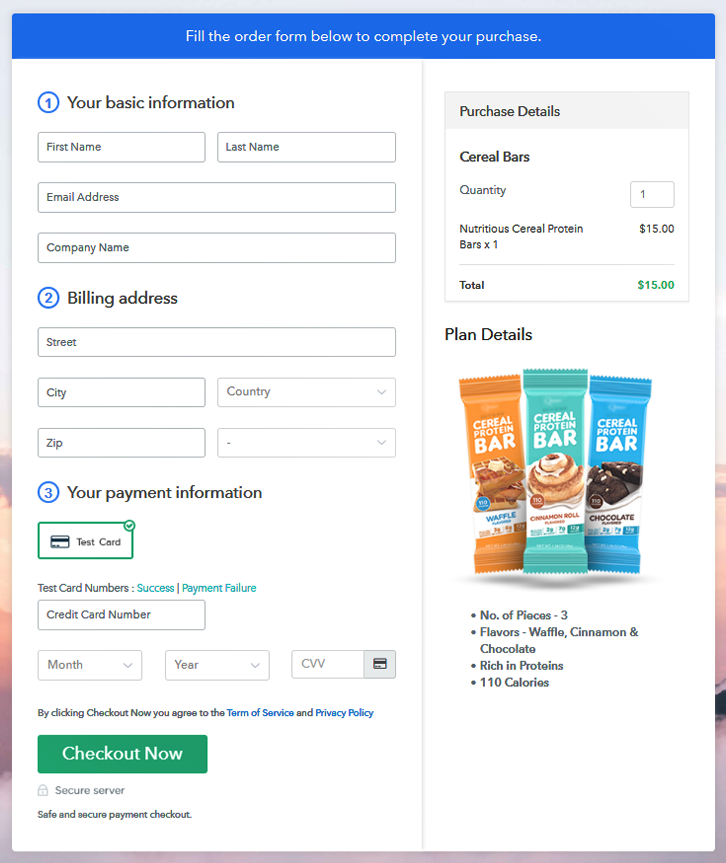
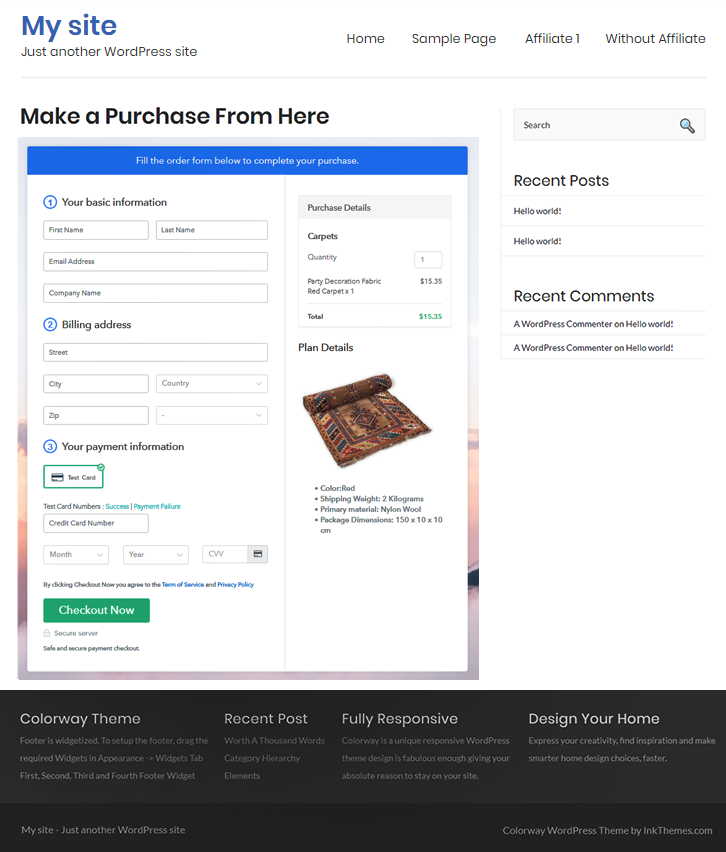
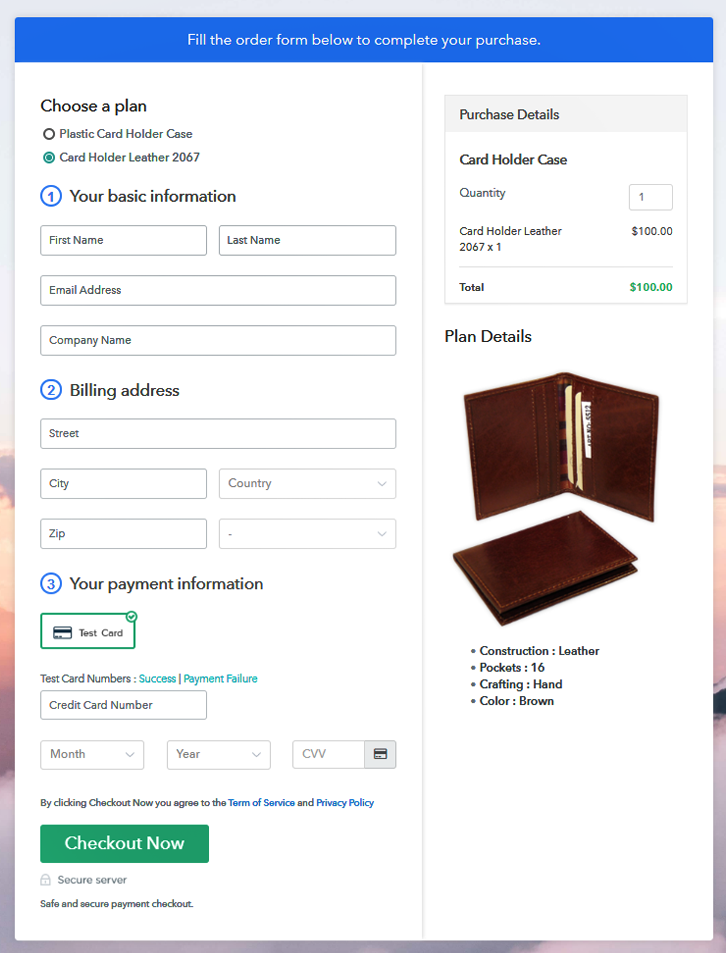
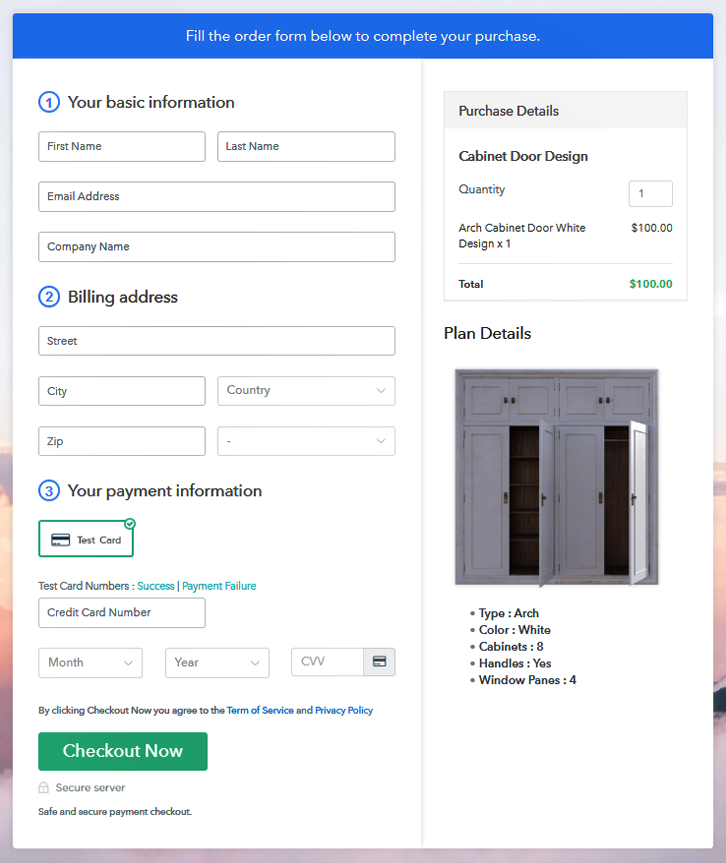
Final View of Checkout Page For Your Cabinet Door Designs Selling Business
Step 1: Log in to Pabbly Subscription Billing

To begin the process look for the website Pabbly Subscription Billing in your search engine. Now on reaching their website click on the “Sign up Free“ button. Either manually fill all the information or simply sign in using your Gmail account.
Sign Up For Free!
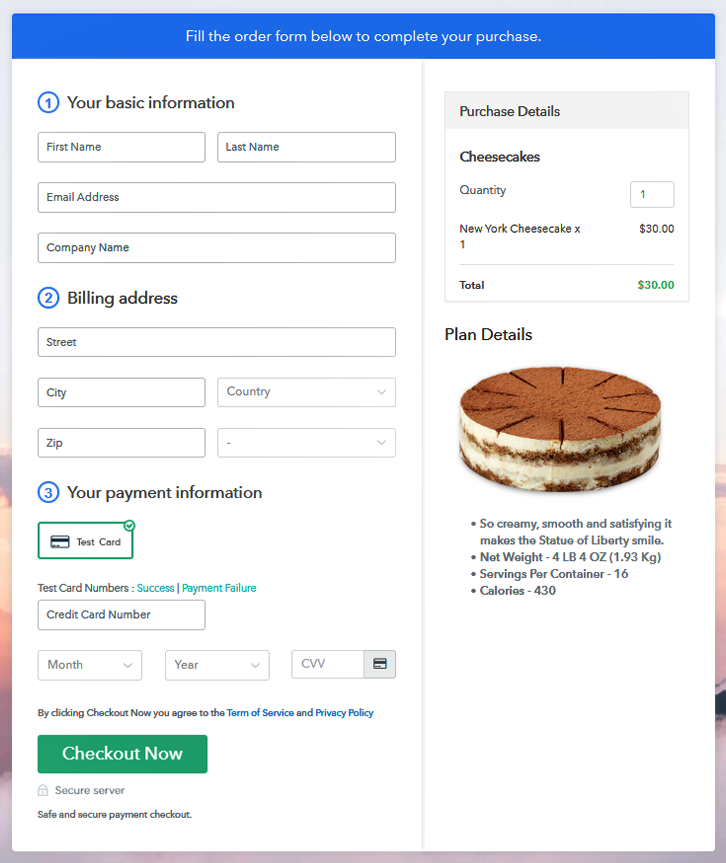
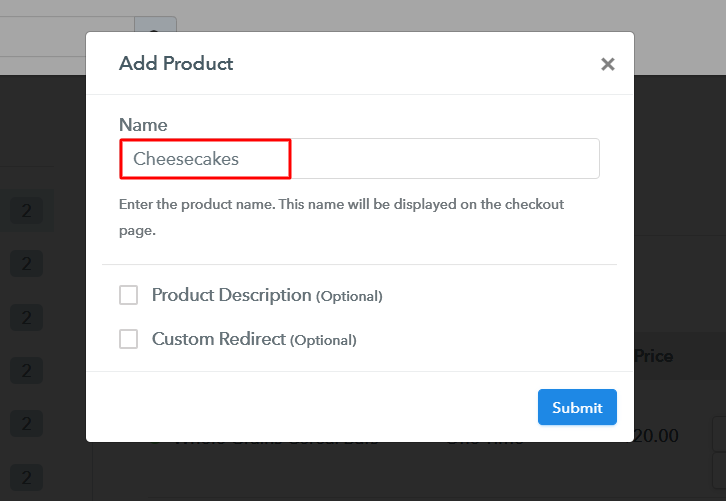
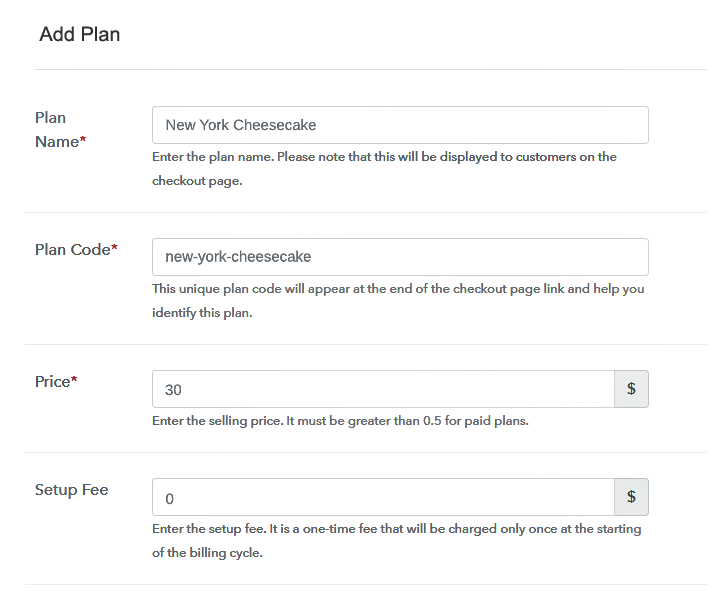
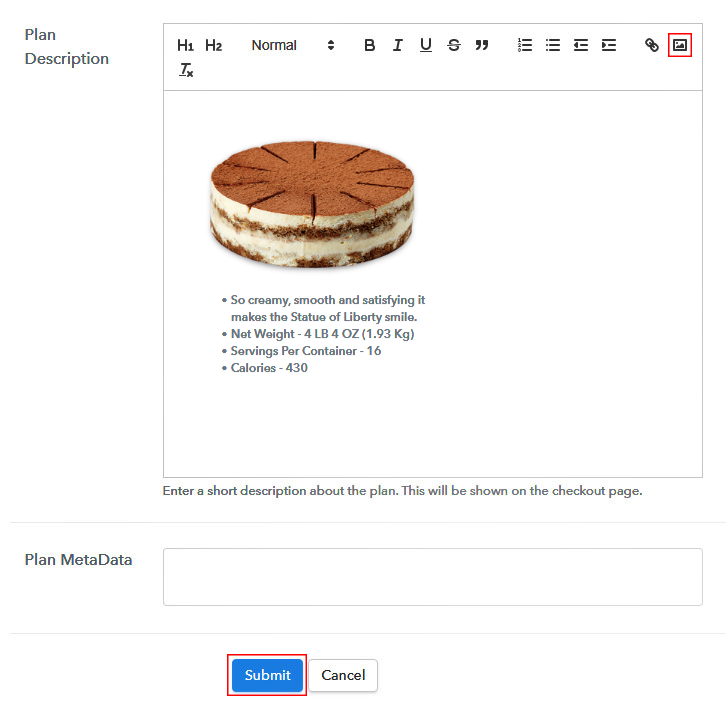
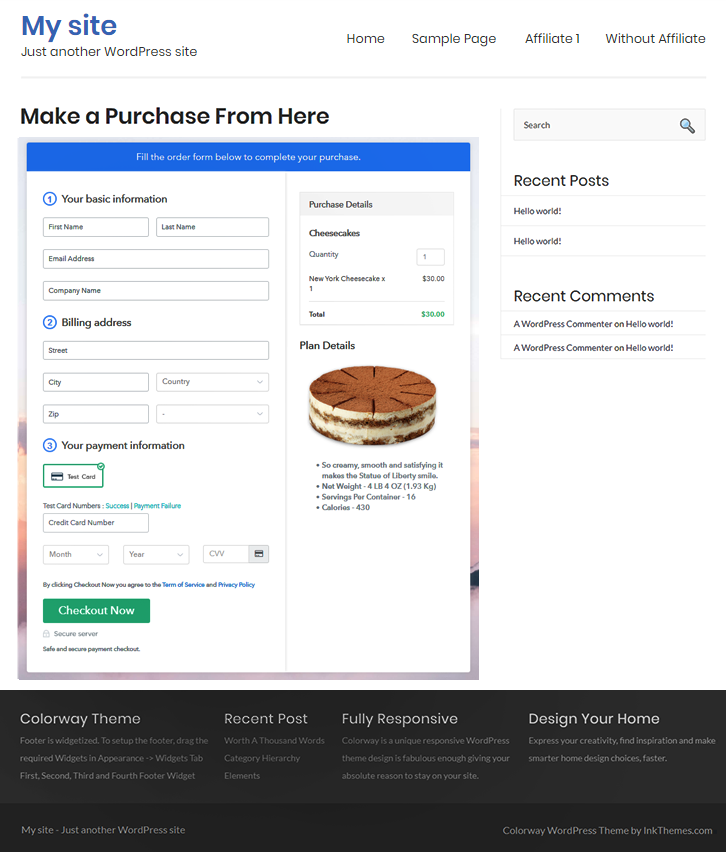
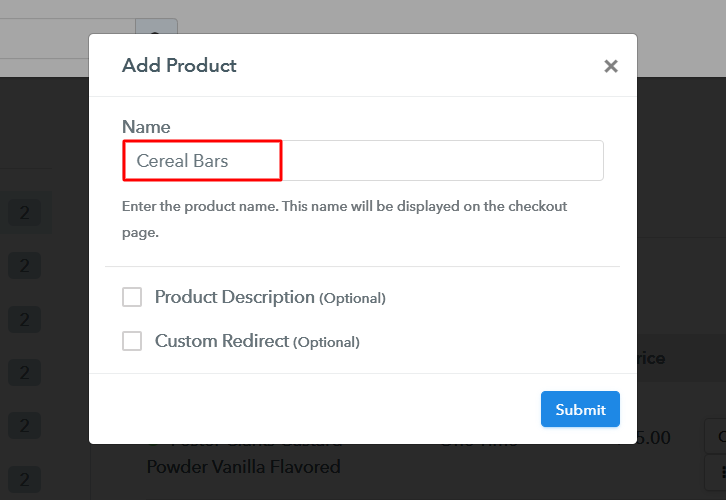
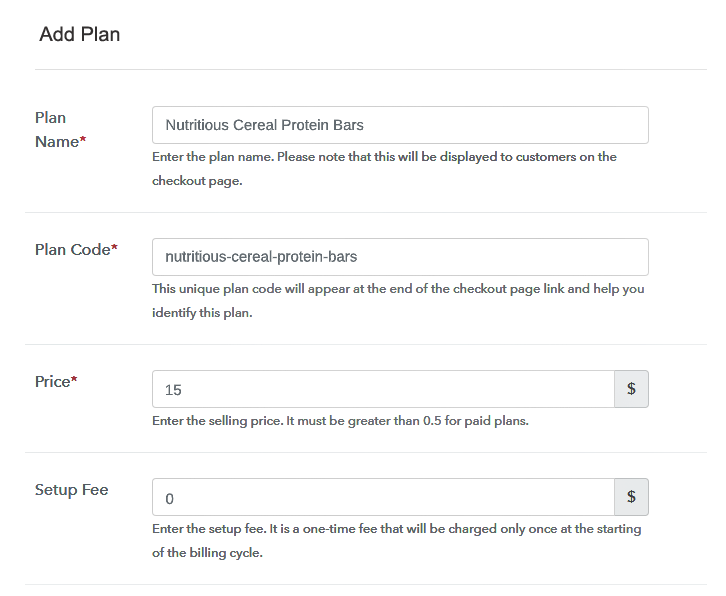
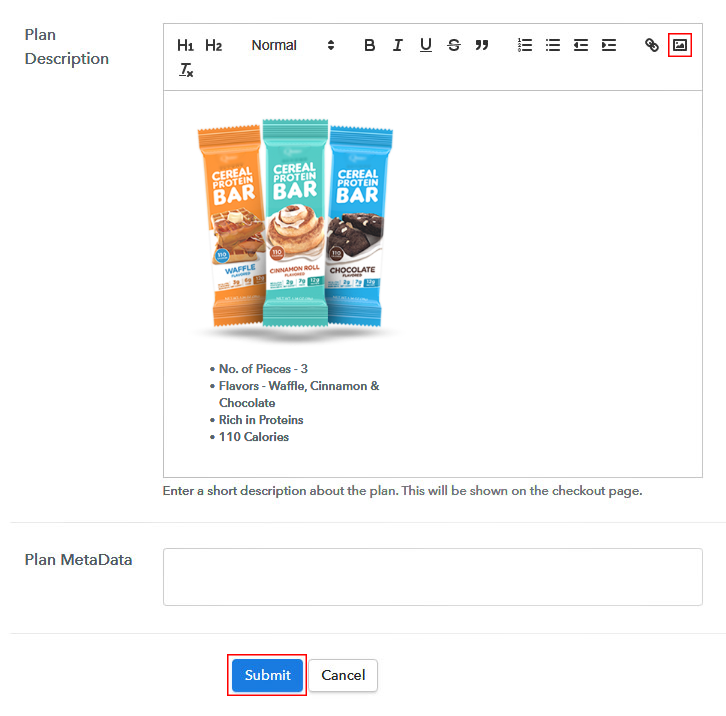
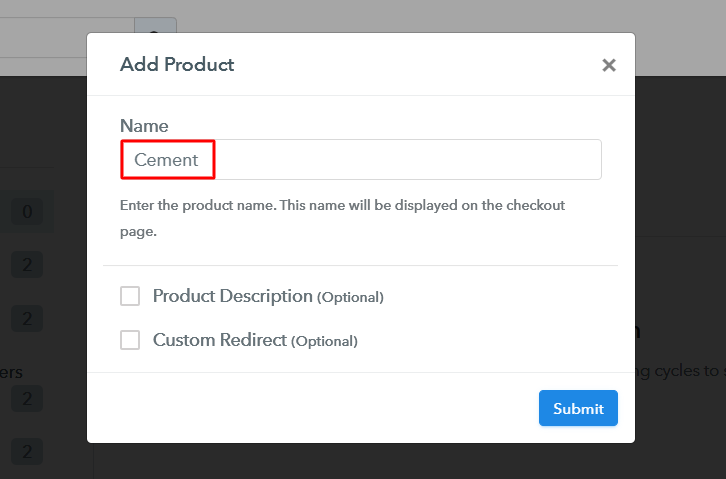
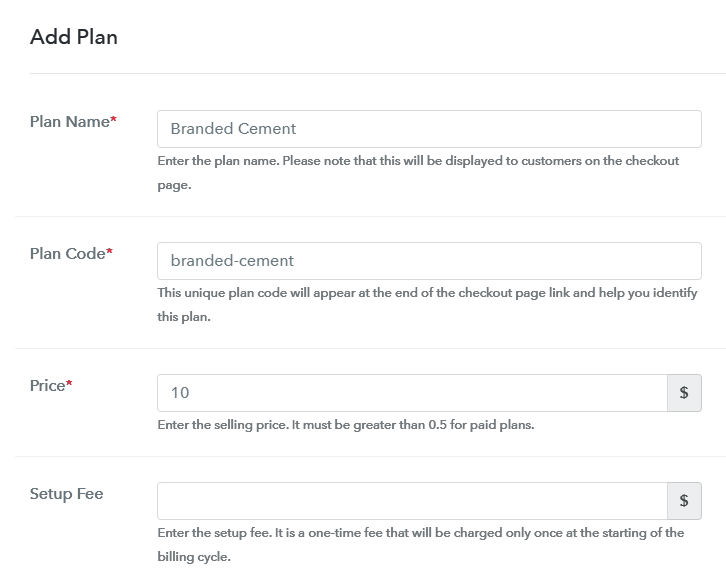
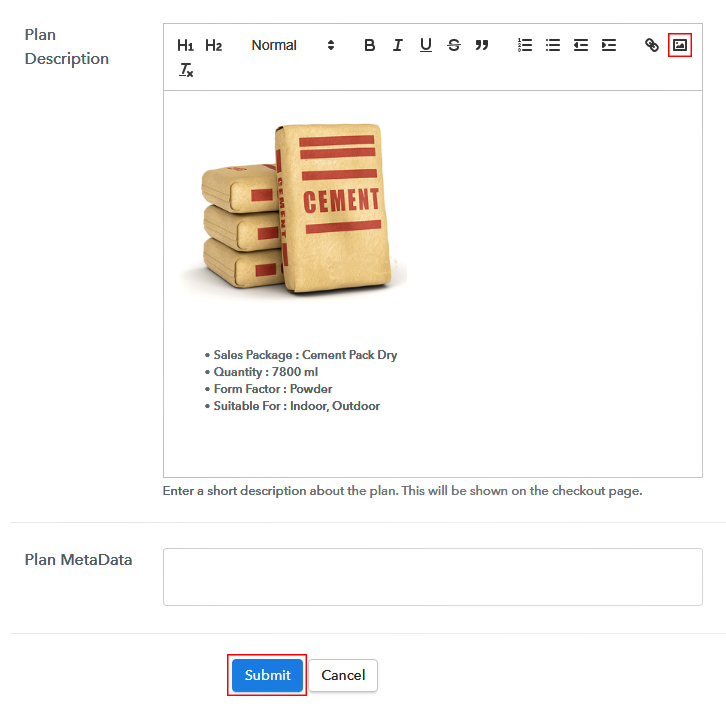
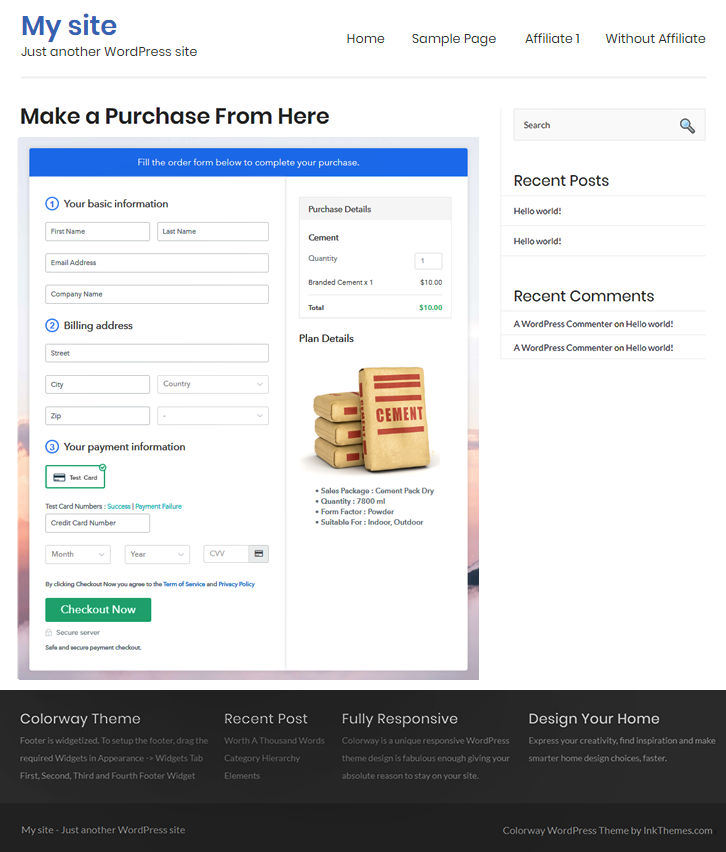
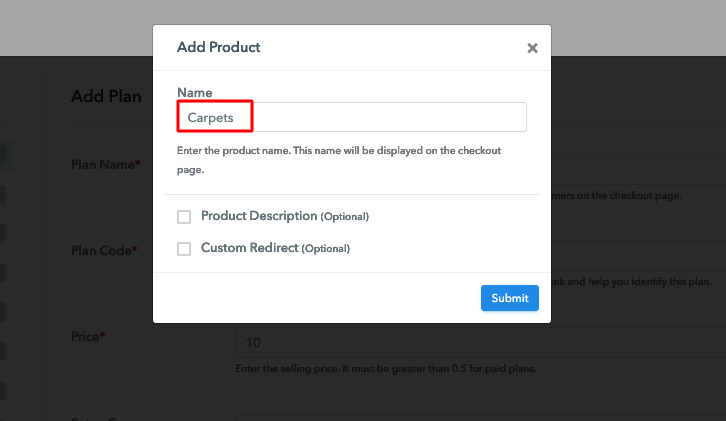
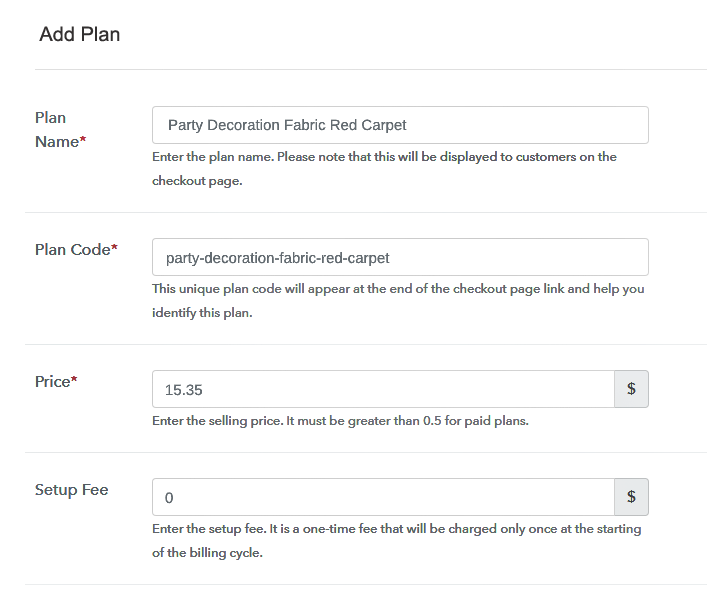
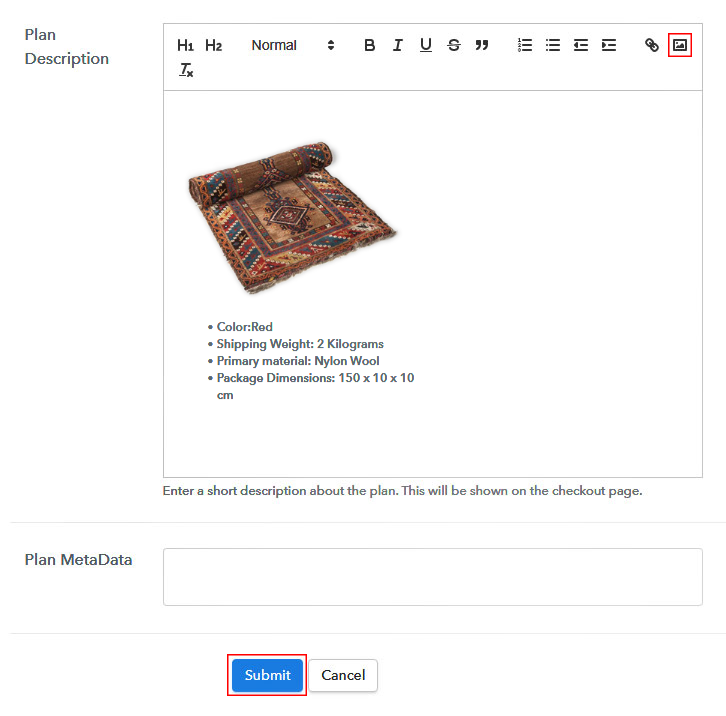
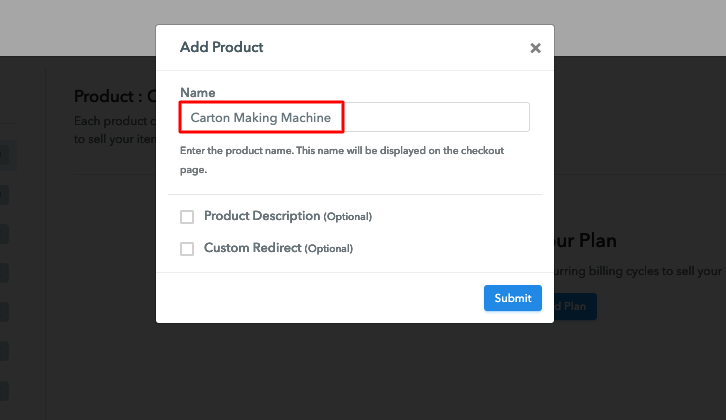
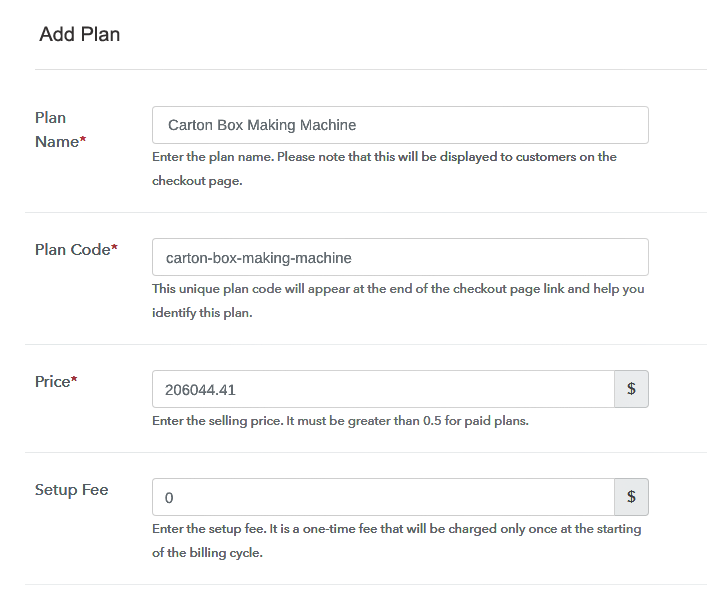
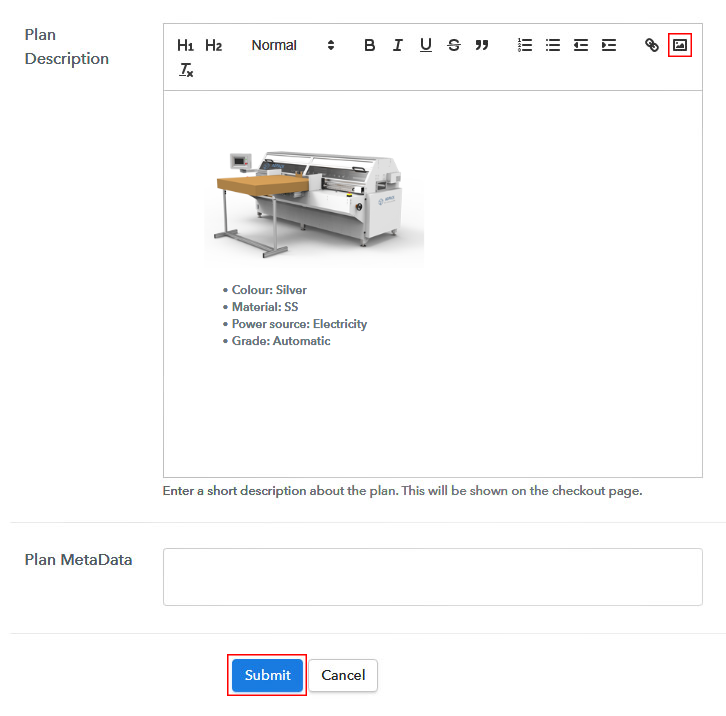
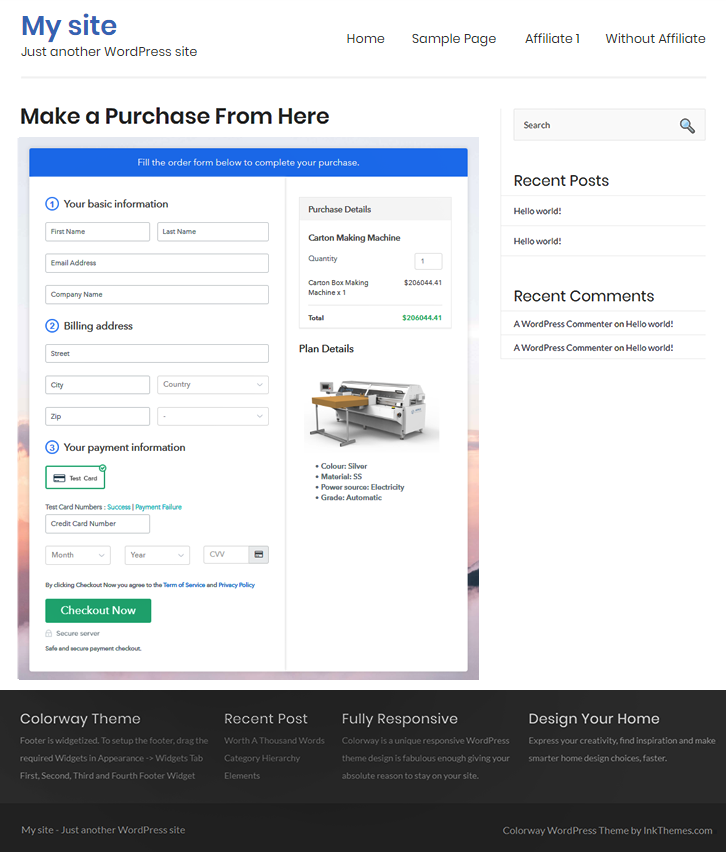
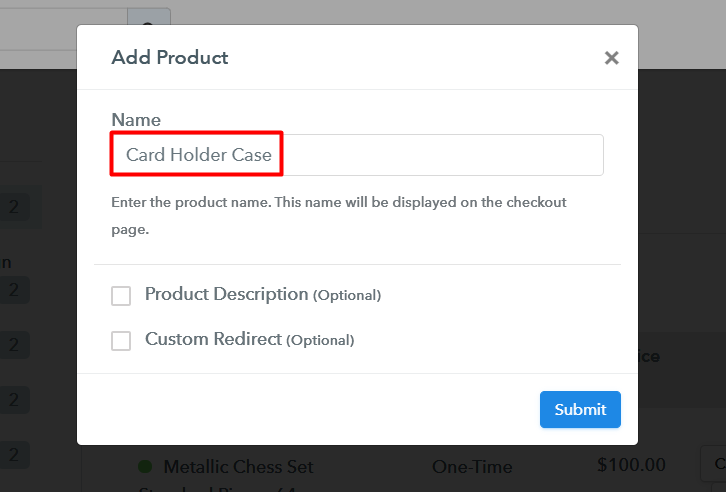
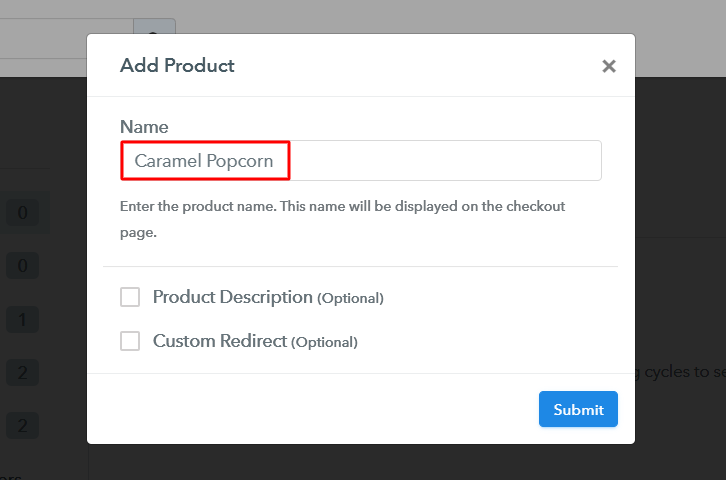
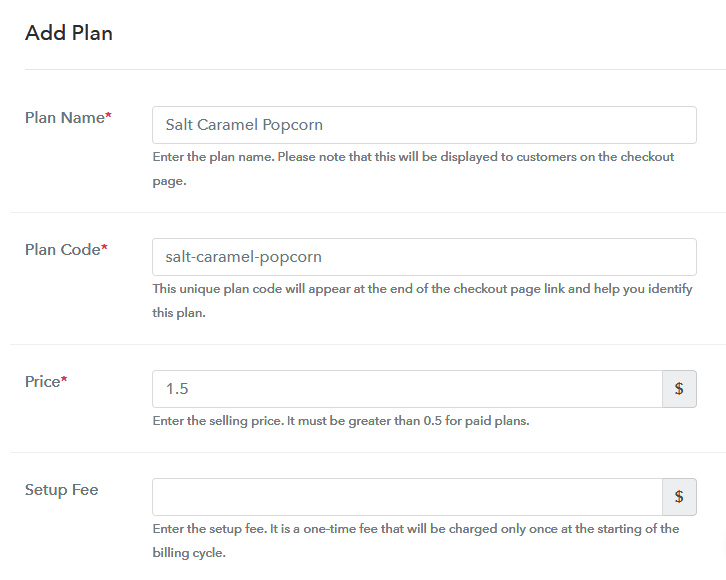
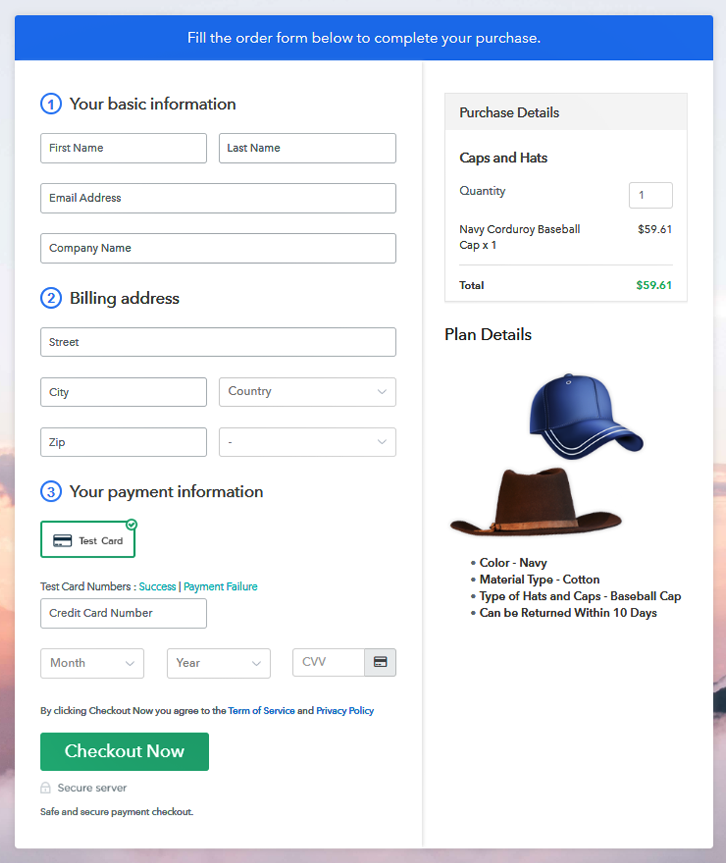
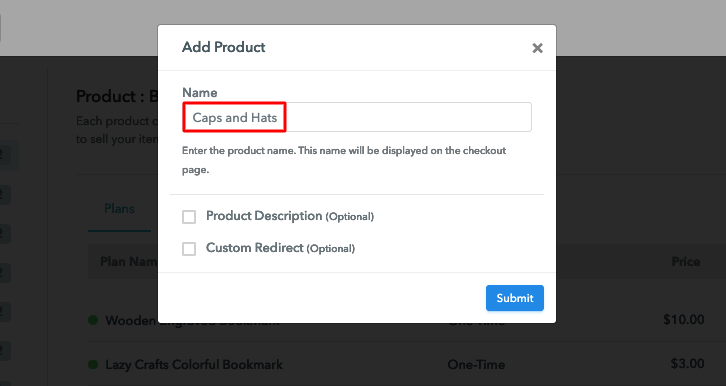
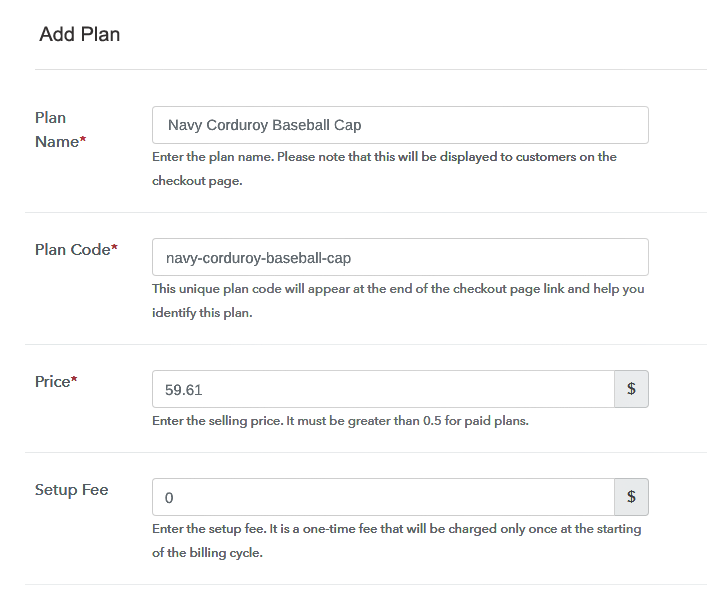
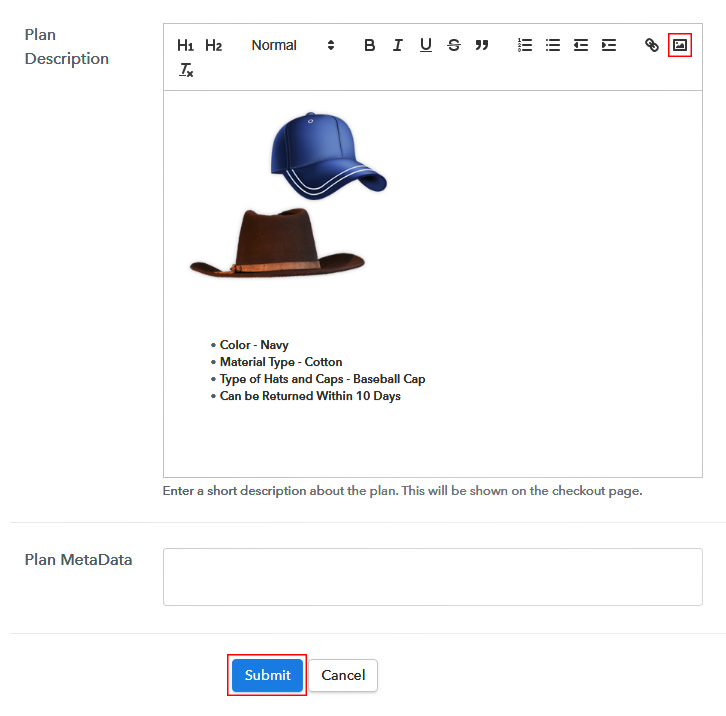
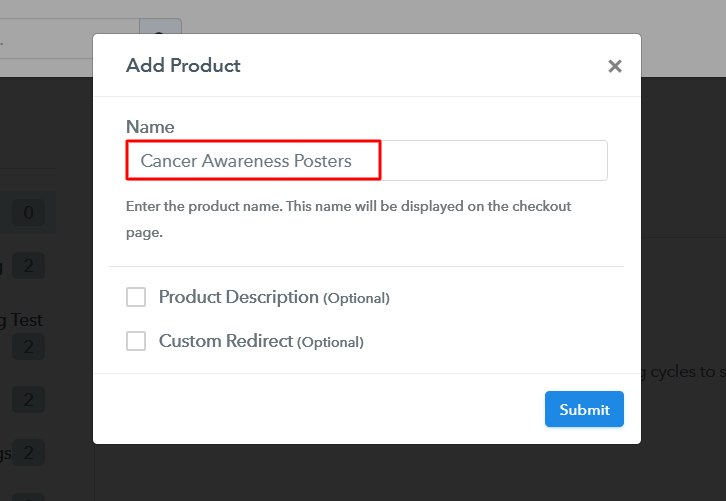
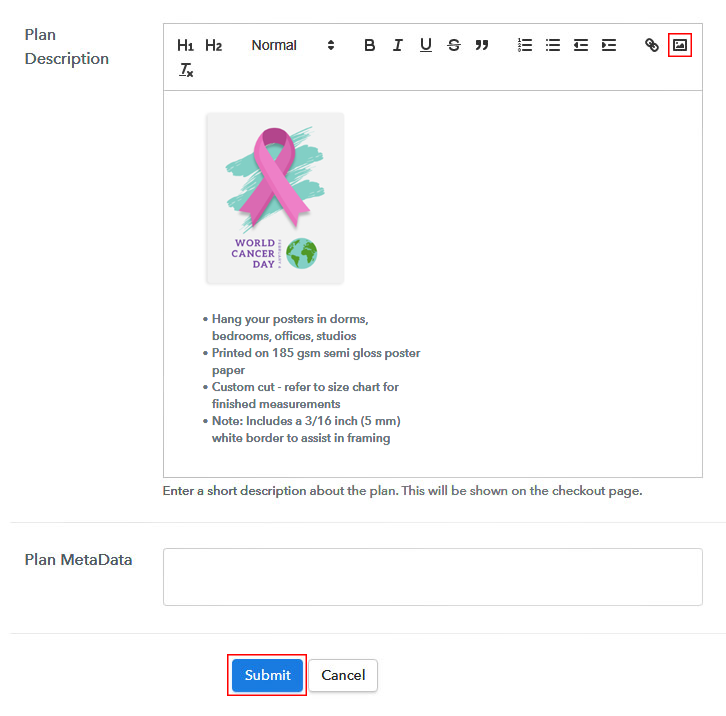
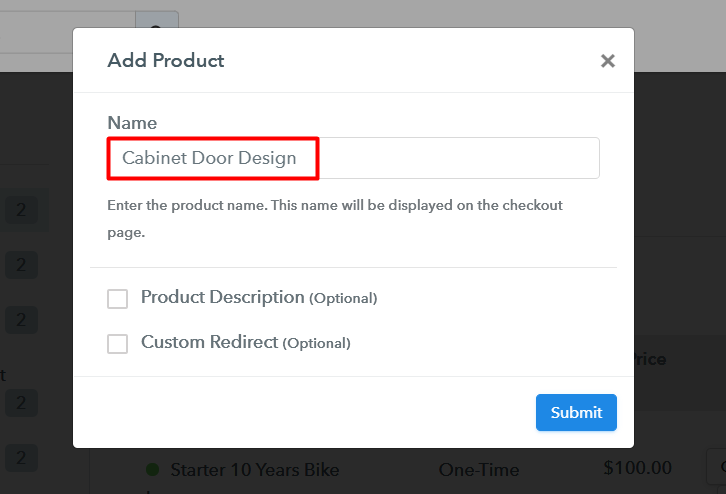
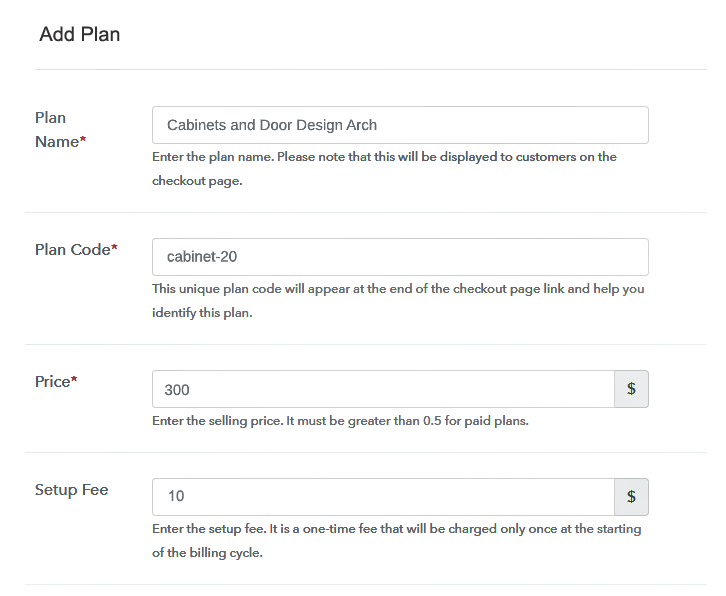
A dialog box will be generated and you will fill in the details like company name, currency, phone number, etc. Now after filing in the information press the blue “Continue” button to complete the process. To make sure that the customers must enjoy a seamless payment experience Pabbly Subscription Billing provides a dummy payment gateway. Here, you can beta test the entire payment experience of the customer. Just click on the “Enable Test Payment” option to start testing out this functionality Also, with Pabbly Subscription Billing, you can integrate many payment gateways PayPal, Authorize.net, Stripe, etc. Beneath this paragraph, there are integration guides to embed the payment gateway of your choice. So, I am going to enable the test payment option to continue the process. After embedding your favorite payment gateway, its time to add your product. Click on the “Add New Product” button will generate a dialog box. Here you can enter the name of the cabinet door designs and provide a product description, also even redirect to a particular website. Fill out all the details like the name of the product and voila your product is created. Note: Here you can add all the products related to the similar category by creating plans for each of them. Let’s rollout plans for different kinds of cabinet door designs available in your store. In the plan page, fill in information like plan name, code, price, setup fees, etc. Moreover, while coming down you will find different billing models like one-time payment, recurring, based on cycles, etc. Now, choose the one that interests you the most. Furthermore, you can change it any time you want. Take some pictures of your cabinets and insert it using the upload image button. So, after uploading the image provide some useful information about your cabinets the arch, shelves, color etc. Then press the “Submit” button. Furthermore, using the same process, you can list more products For more marketing of your products you can share the checkout links in the social media site through three methods Follow up the recommended steps to preview the checkout page: Just copy the link and add the checkout page to sell cabinet door designs online at any suitable place on your WordPress site. Further, paste the plan link of the cabinet door design set on a text editor of the WordPress dashboard. Next, click the “Publish” button, after making changes. Note: In case you want to sell multiple products via a single checkout page, you can create a multi-plan checkout page otherwise skip this step. Following these 10 easy steps, you will create a checkout page in Pabbly Subscription Billing to sell cabinet door designs online. While initially, you may hit some blocks here and there but in due time you will fully master its features to conquer the online market. Since you are new to this, you may have some doubts. So feel free to connect with us in the comment section. We will be in touch as soon as possible. Thank YouStep 2: Select Subscription Billing

Step 3: Account Setup

Step 4: Connect Payment Gateways & Start Cabinet Door Designs Selling Business Online

Step 5: Add Product For Your Cabinet Door Designs

Step 6: Add Plans
(a) Select Add New Plan

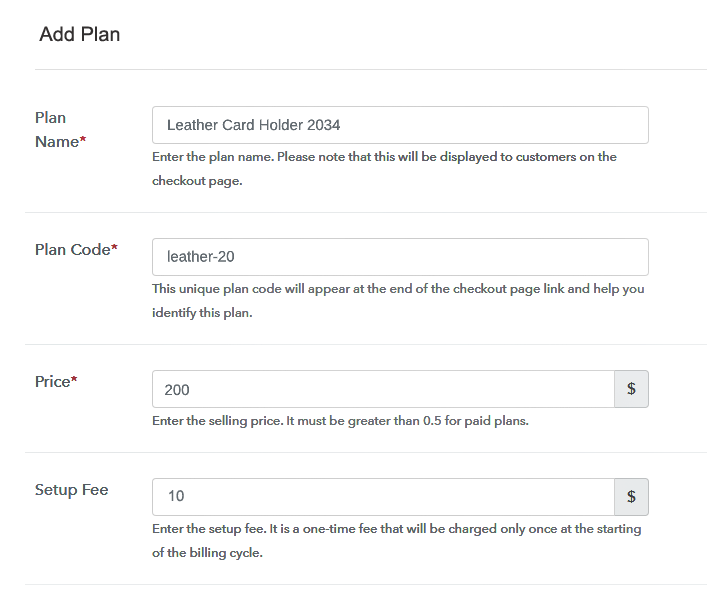
(b) Specify the Plan & Pricing Details
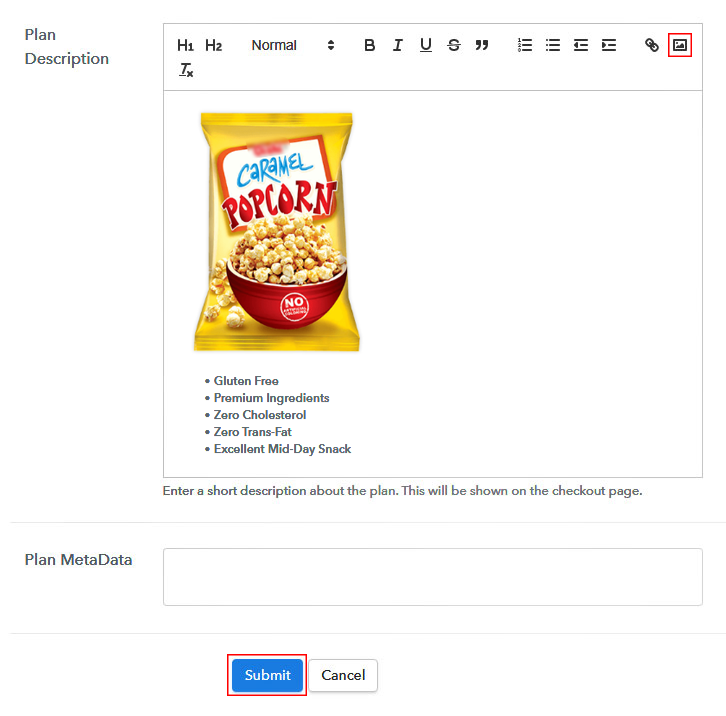
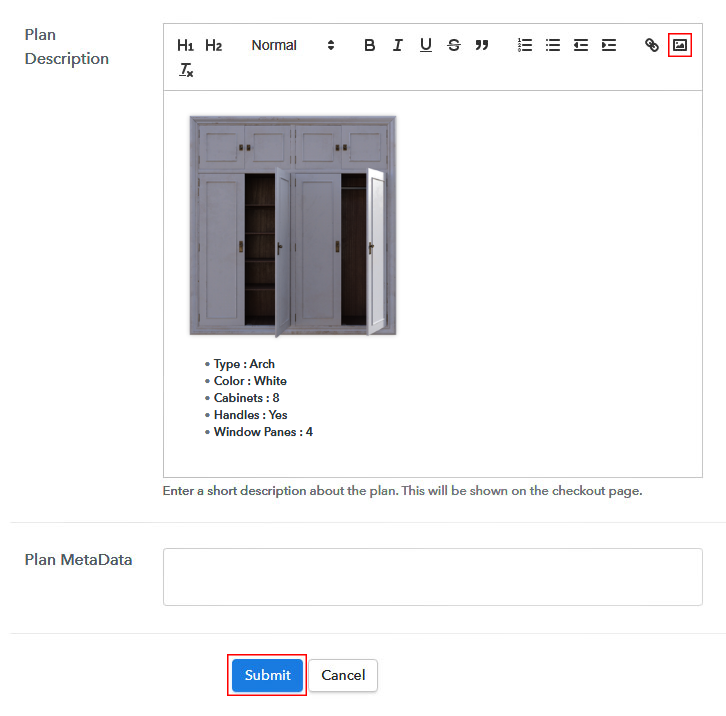
(c) Add Image & Description of Cabinet Door Design
Step 7: Share your Checkout Page

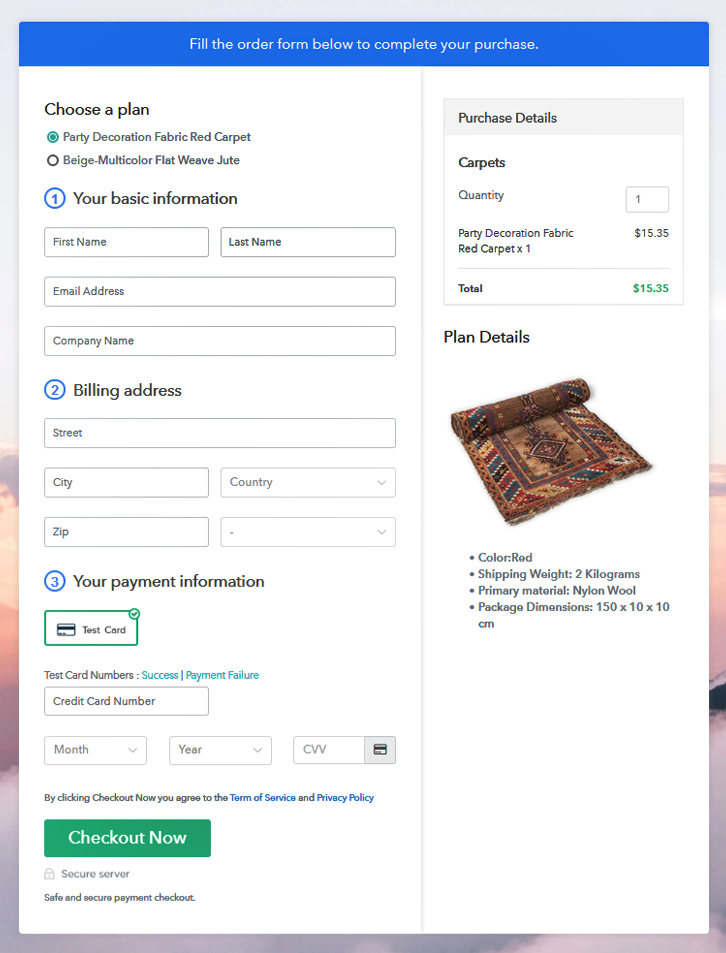
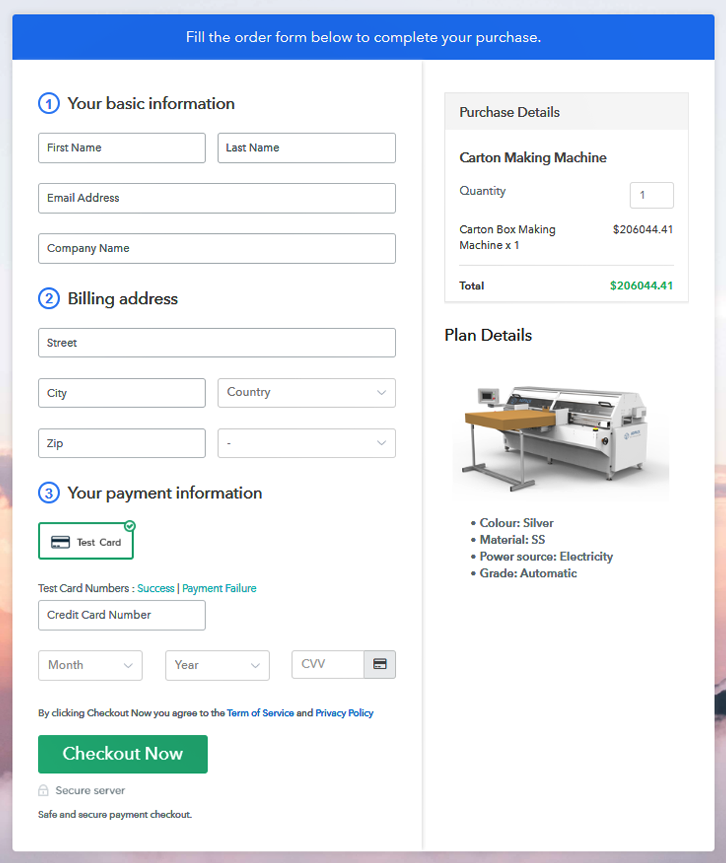
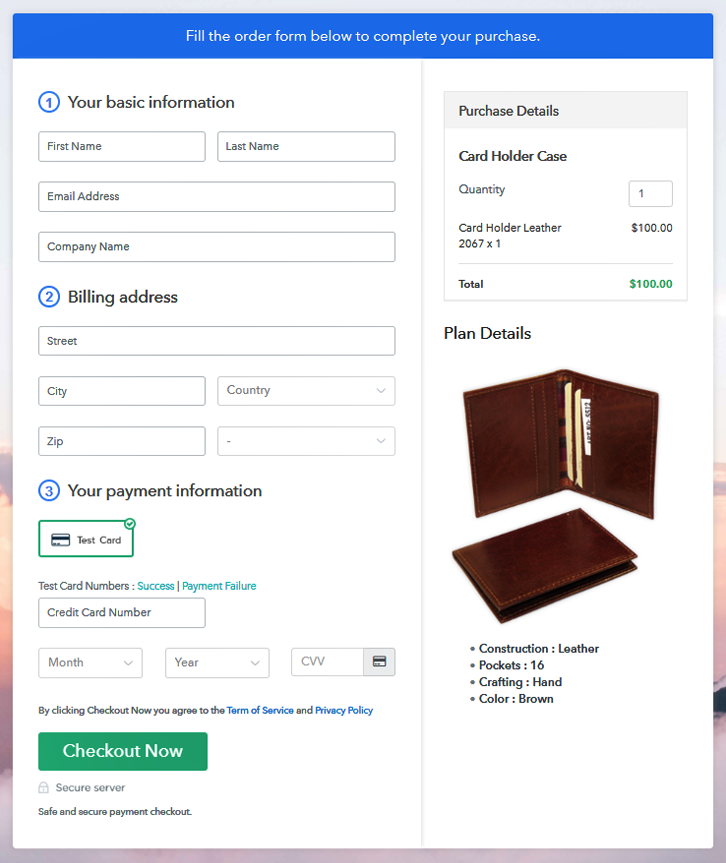
Step 8: Preview Checkout Page
(a) Click on the View Button

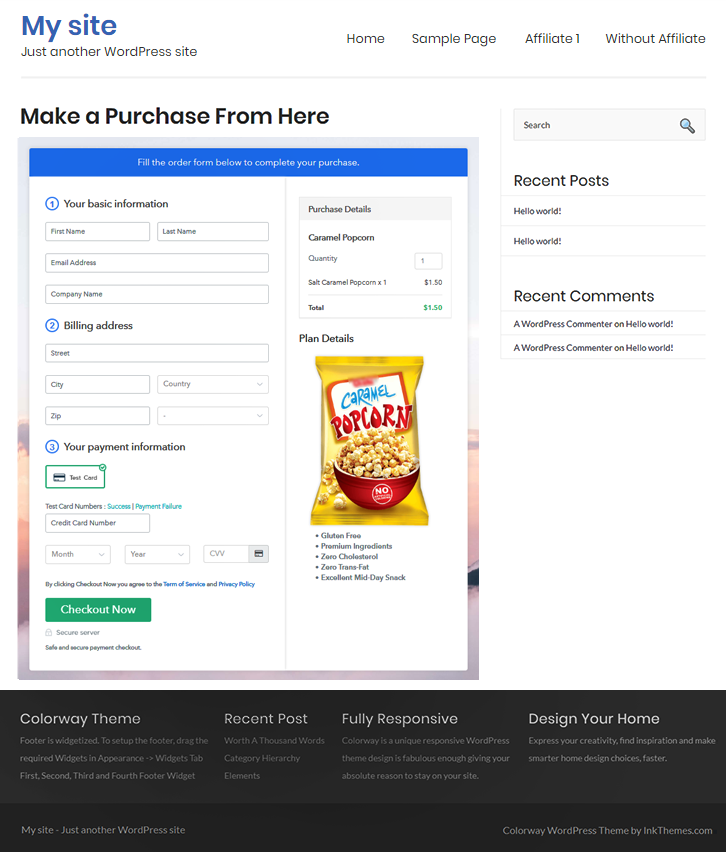
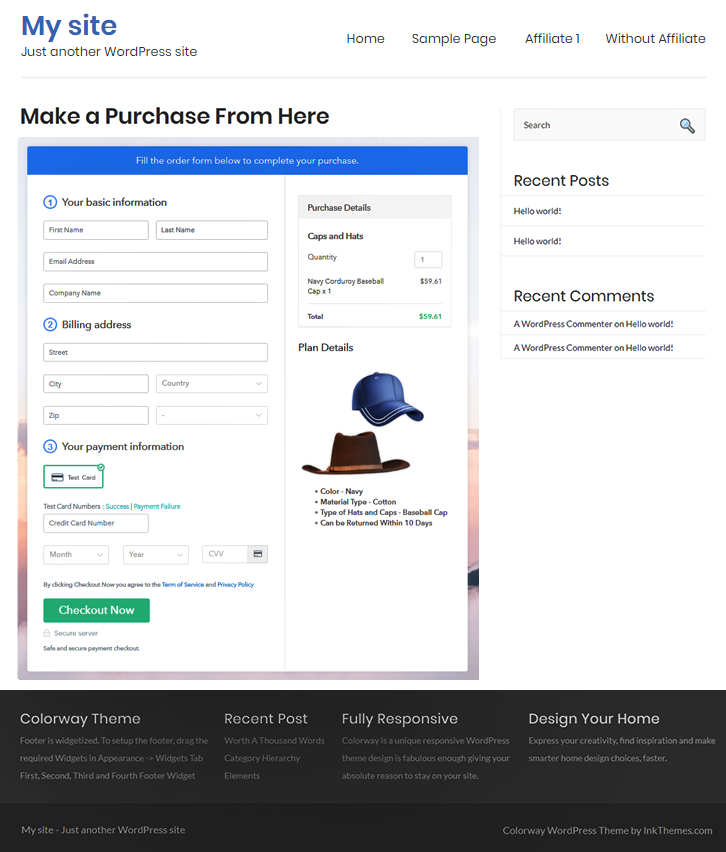
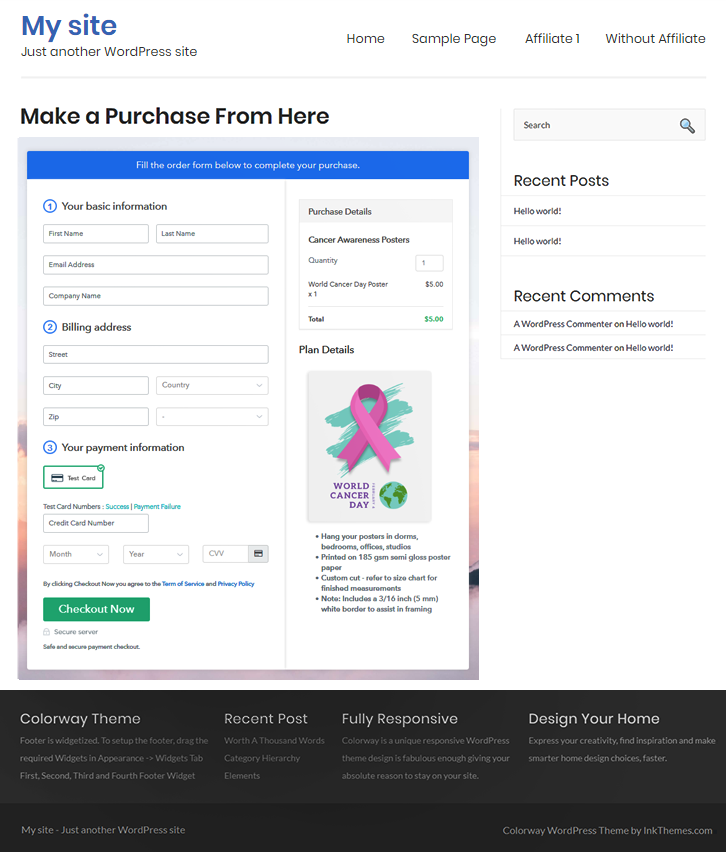
(b) Take a Look at the Checkout Page

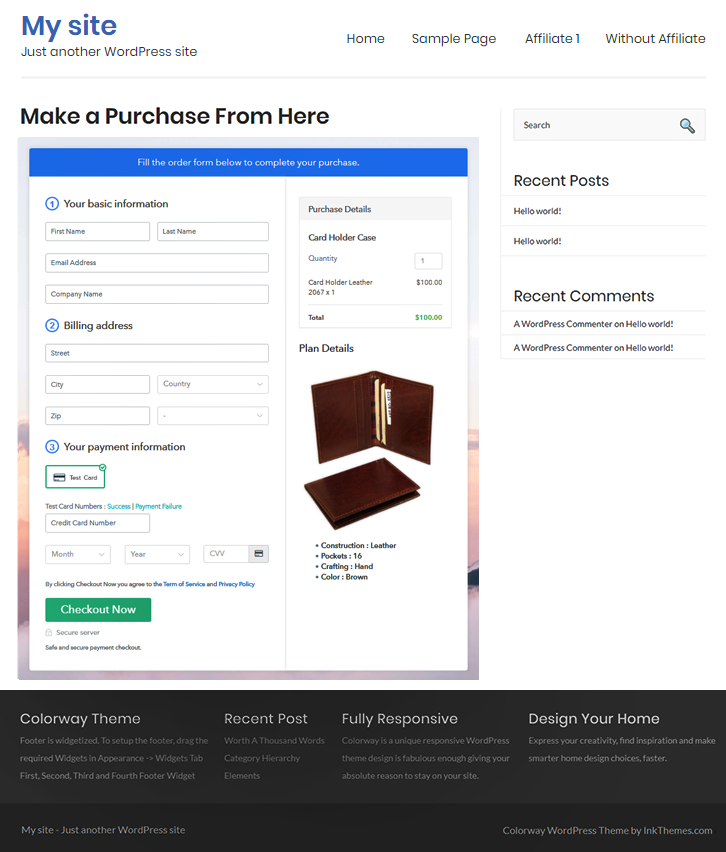
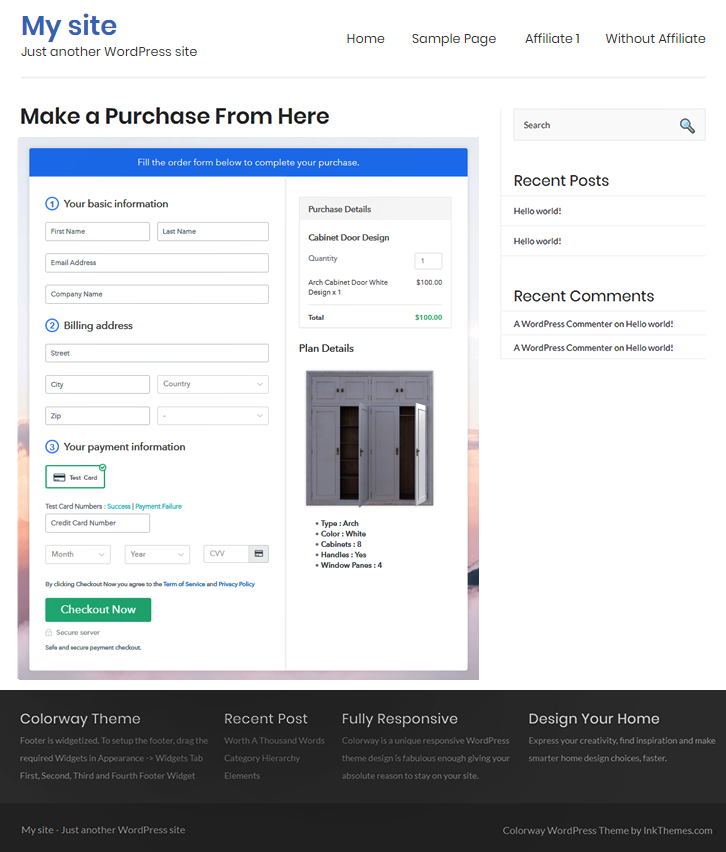
Step 9: Embed Checkout Page in Site & Sell Cabinet Door Designs Online

(a) Edit the Page & Paste the Copied Link

(b) Save & Publish the Checkout Page

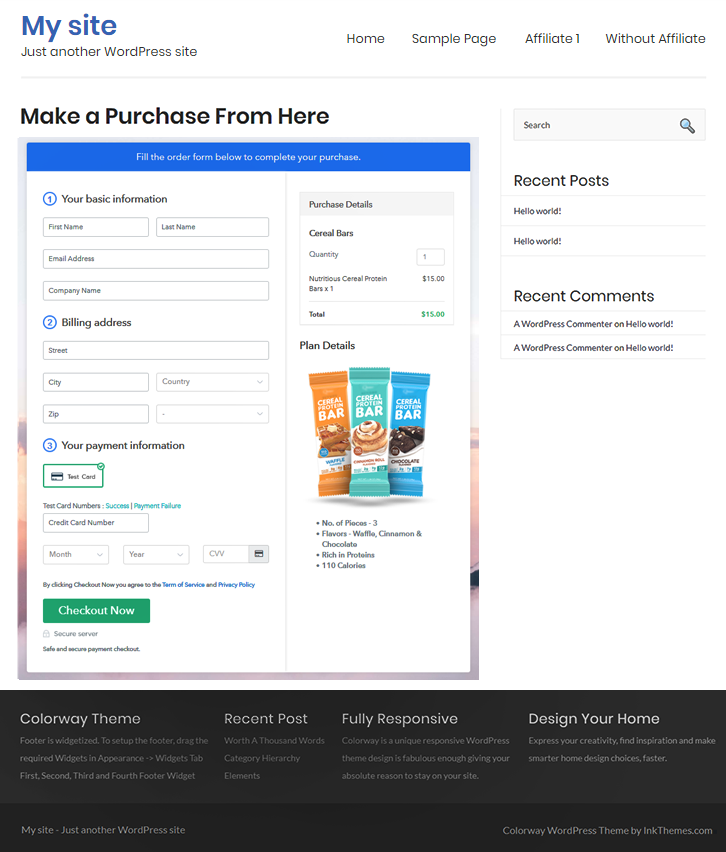
(c) Check out the Final Look of your Checkout Page on WordPress Site
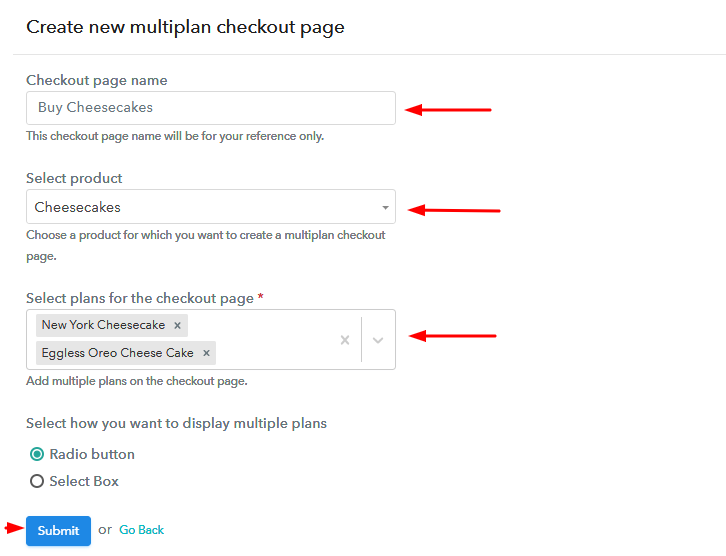
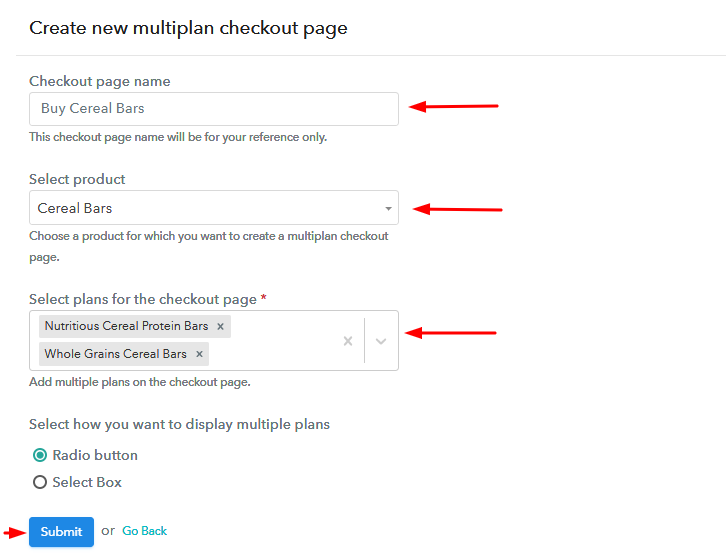
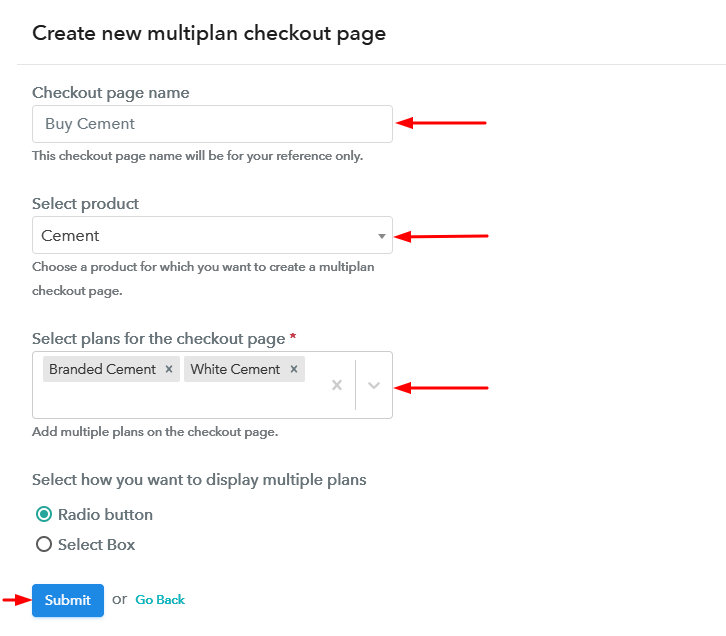
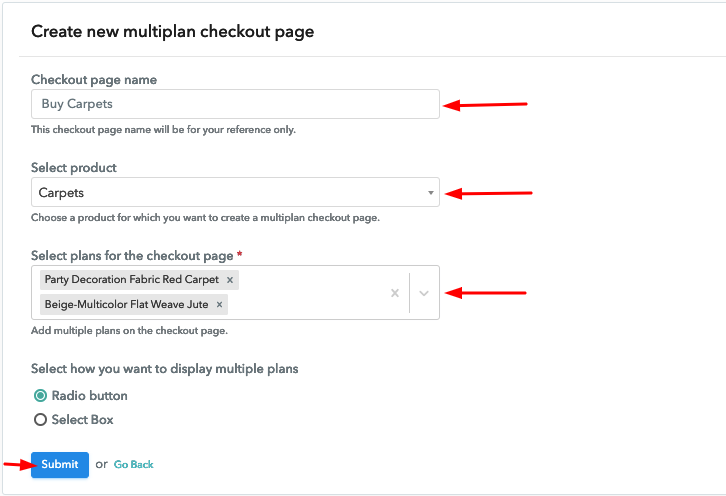
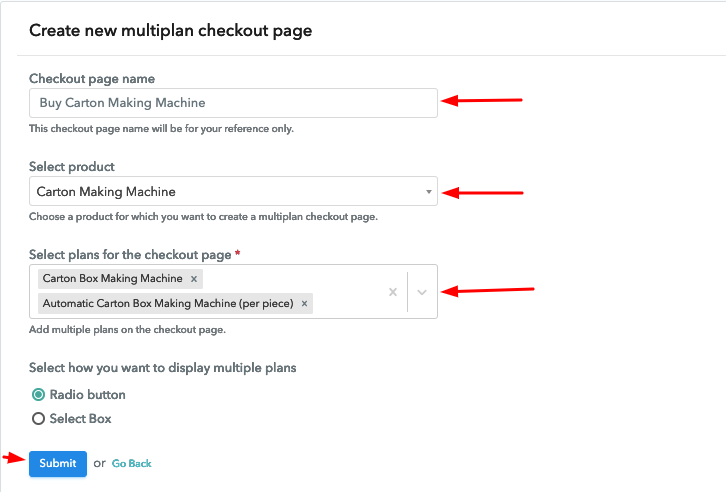
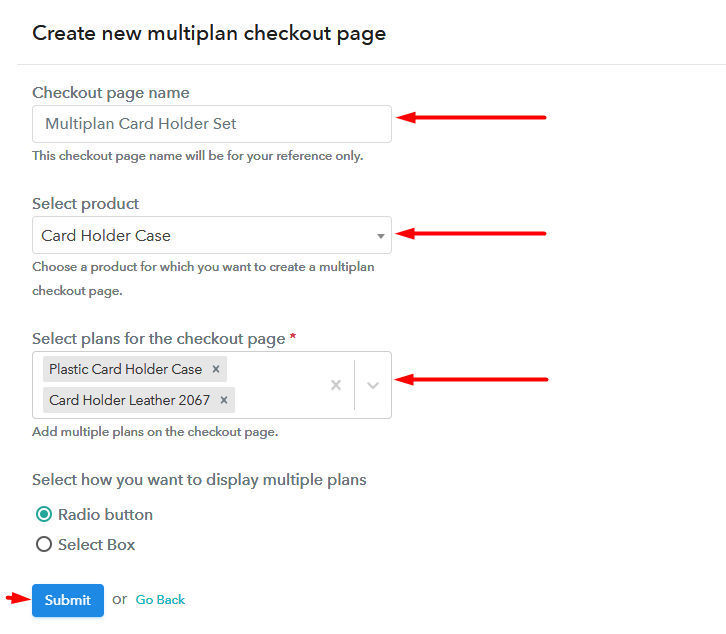
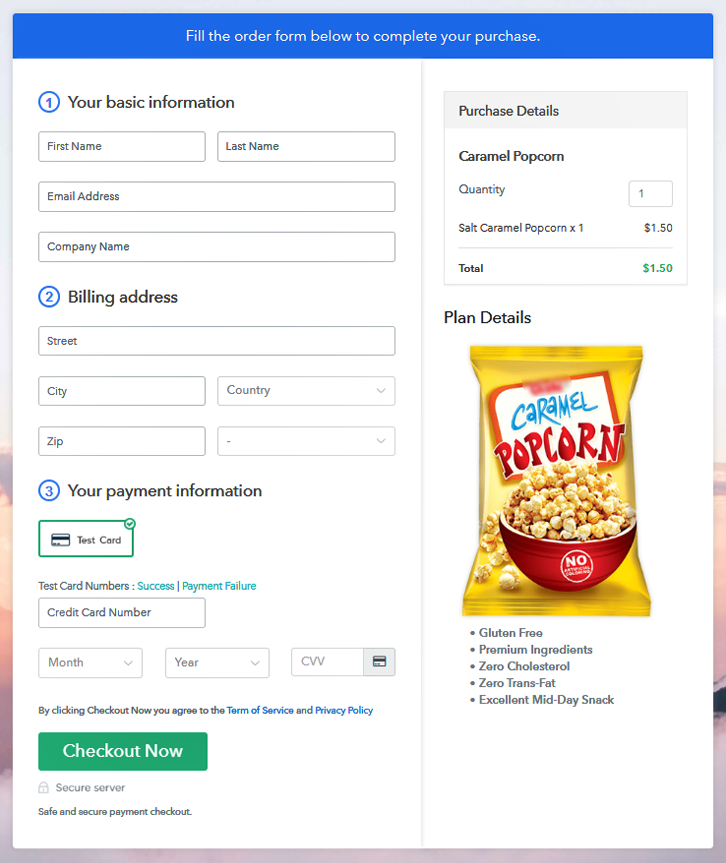
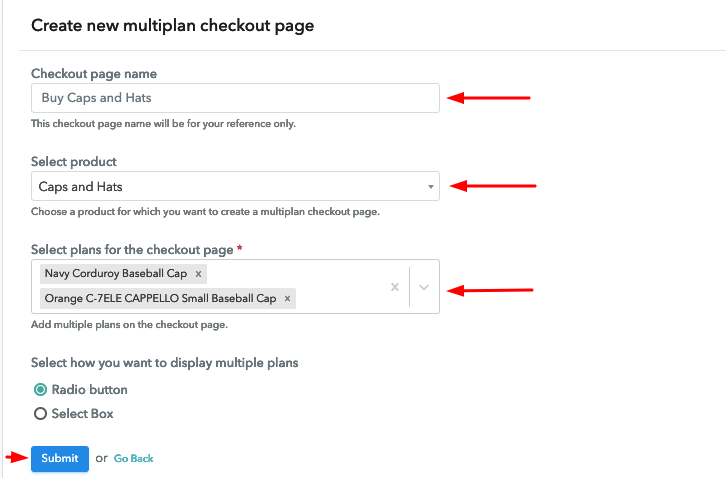
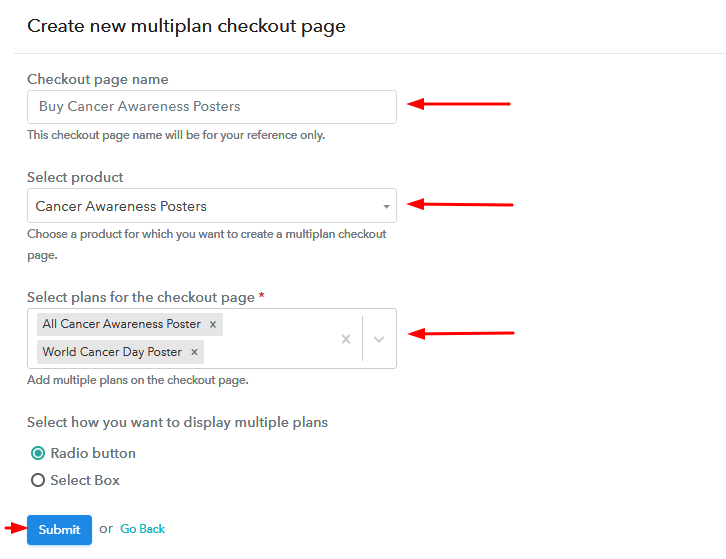
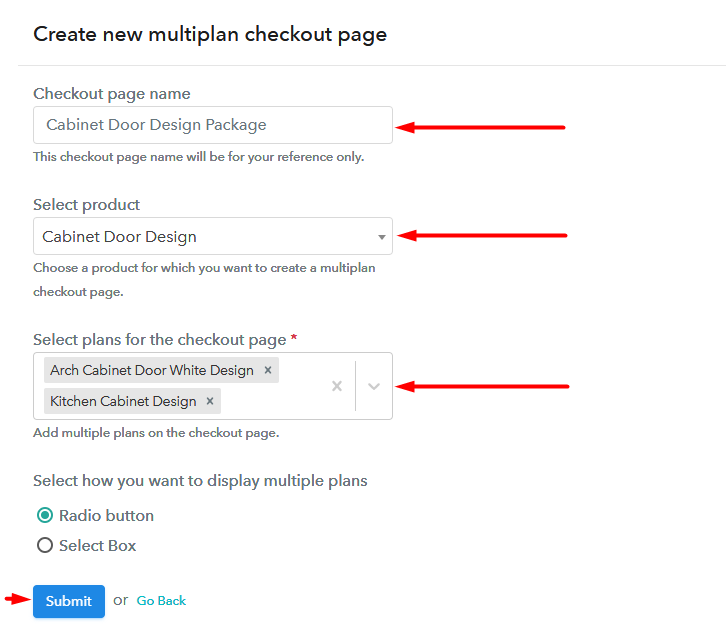
Step 10: Multiplan Checkout Page
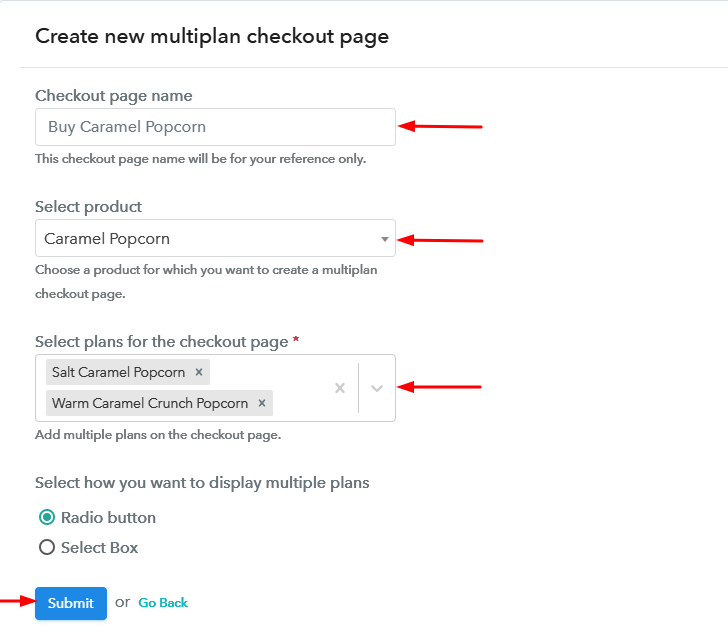
(a) Click on Add Mutiplan Checkout

(b) Add Plans to Sell Multiple Cabinet Door Designs from Single Checkout Page
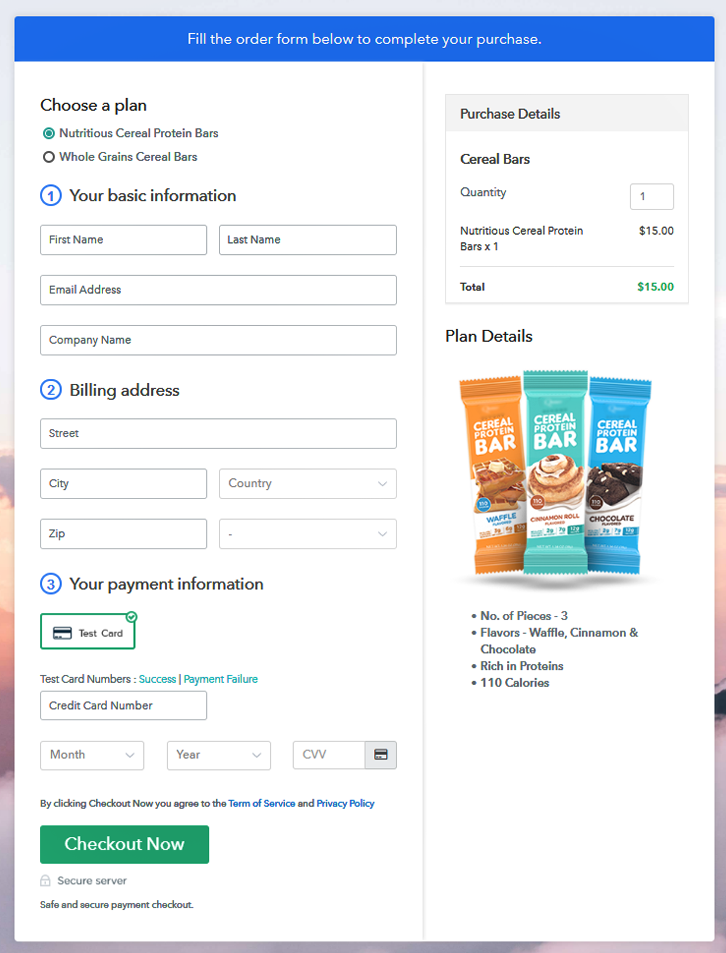
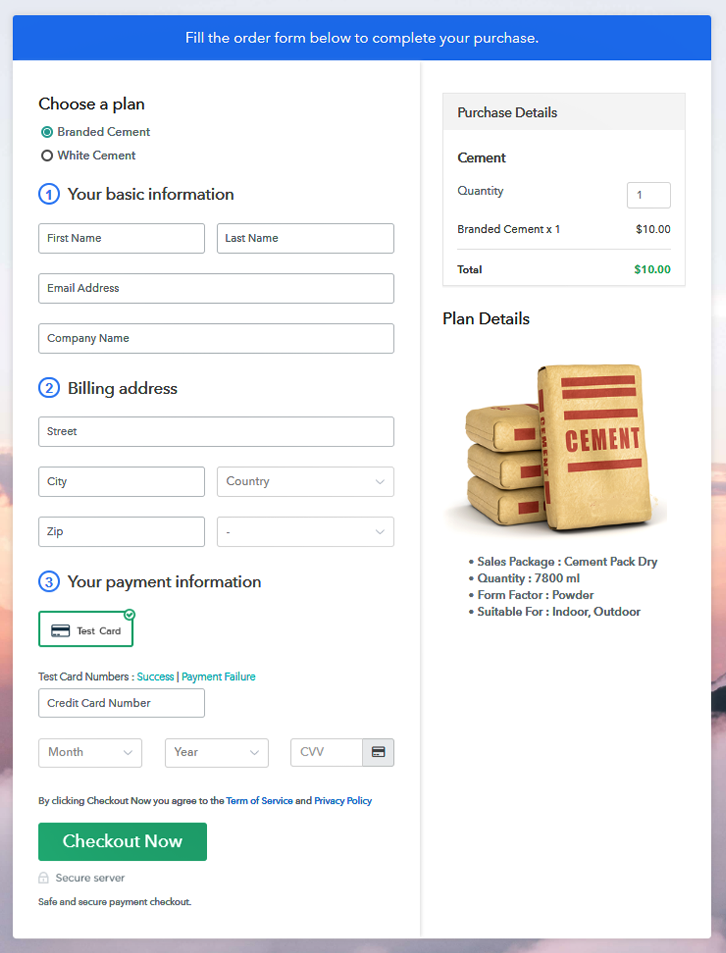
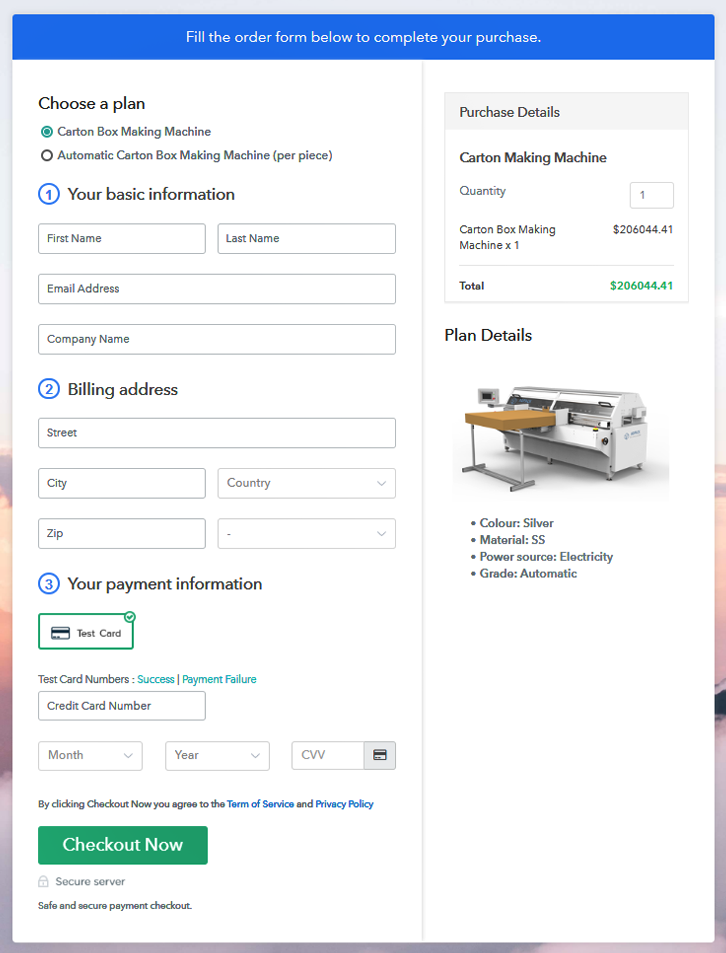
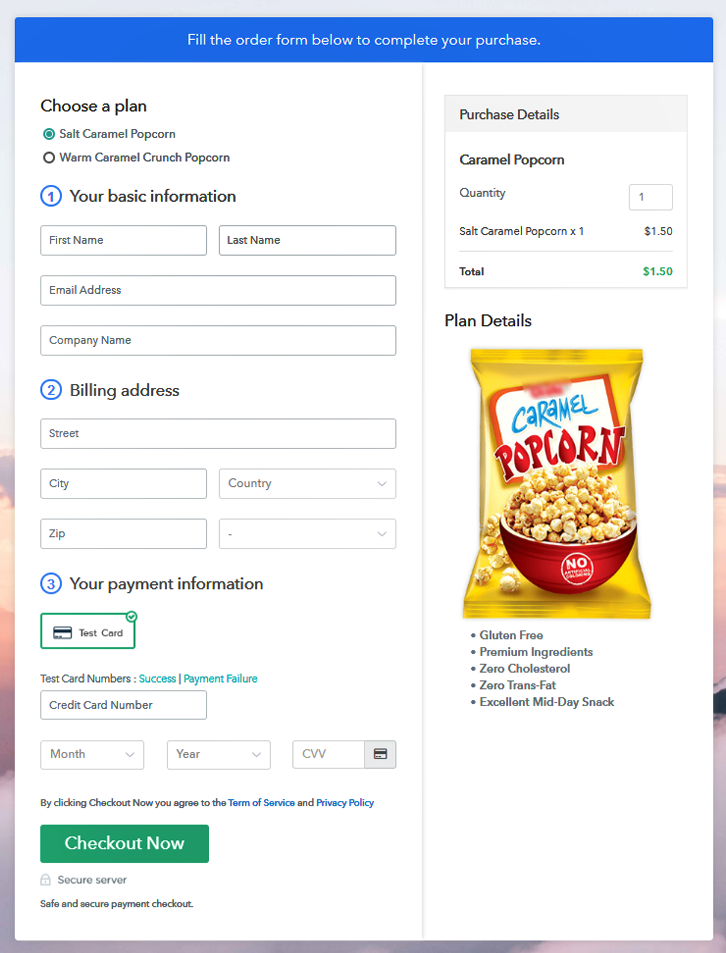
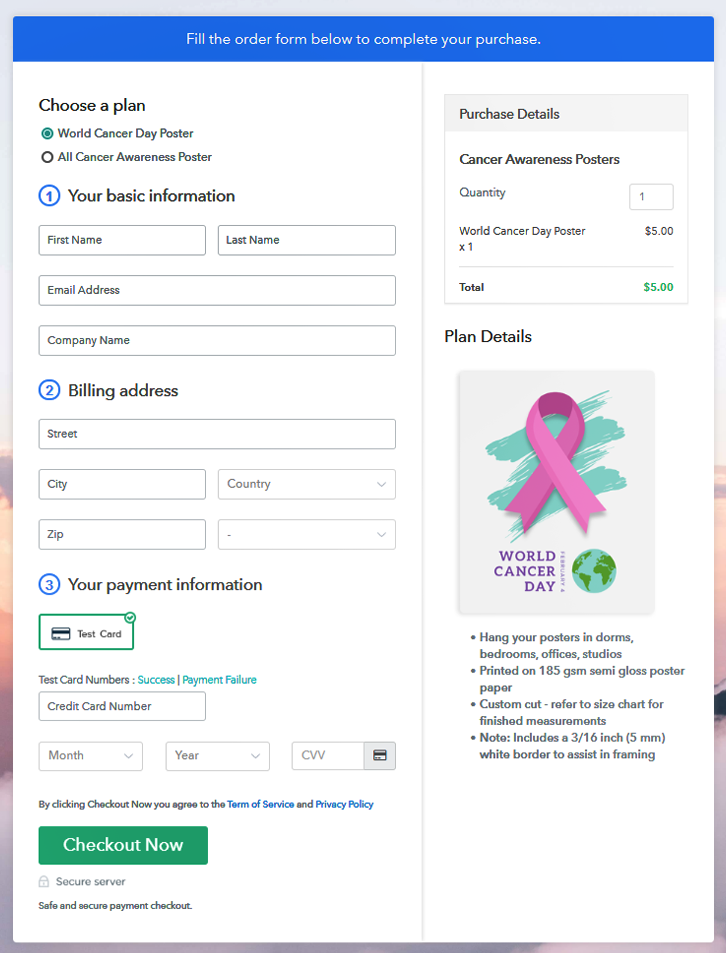
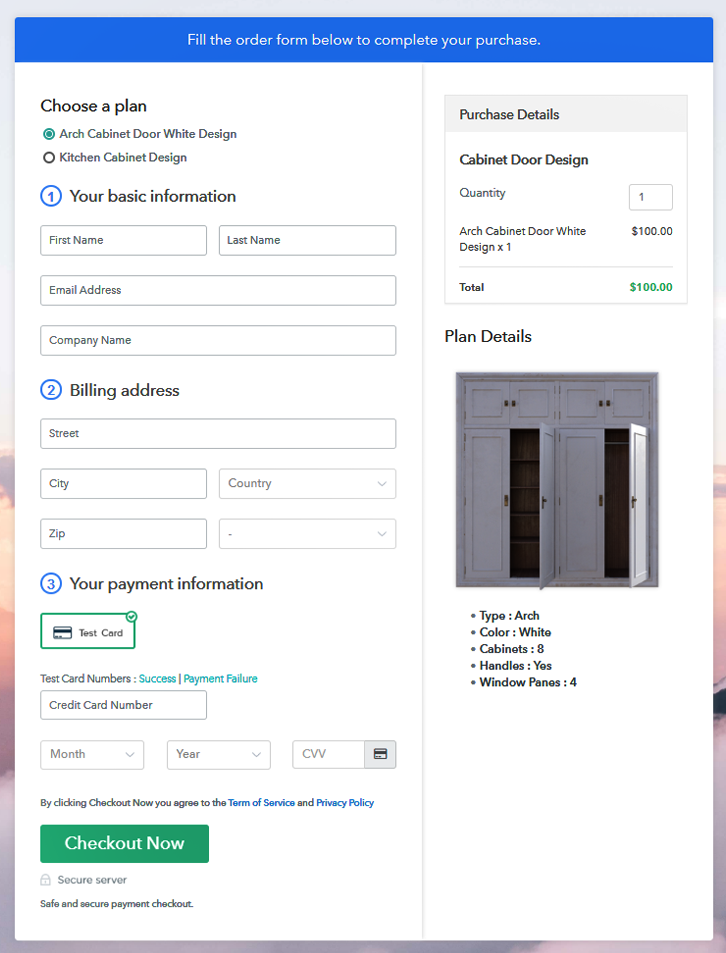
(c) Take a Look at the Checkout Page
Wrapping Up
You May Also Like To Read –