Pabbly Subscriptions is a recurring billing and subscription management software. This user manual helps you to get started with Pabbly Subscriptions. After signing up for the Pabbly Subscriptions, You will notice that there are 7 menu sections viz
- Dashboard
- Products
- Customers
- Sales
- Subscription
- Invoice
- Webhook Events
- Settings
- Multiplan Checkout
- Affiliate
Before going ahead you must check out the quick guide of Pabbly Subscriptions –
How to set up an account in Pabbly Subscriptions?
Let’s get you all these Sections one after the other.
1. Dashboard:
Once you log in to Pabbly Subscriptions account, you can access the dashboard. This is how it will look:

Instant Stats
From the Dashboard, you can get an overview of your product’s Total Sales, Refunds, Subscriptions, and Rebills.
- CUSTOMERS / TOTAL SALES: Total sales stats will tell you about the total revenue generated by the number of customers.
- SALES / TOTAL REFUNDS: This stats refer to the total amount refunded over the number of sales that have happened till date.
- SUBSCRIPTIONS / TOTAL CANCELLED: This is the total amount for the subscriptions that had been cancelled yet against the number of subscriptions.
- CUSTOMERS / TOTAL REBILLS: This stat implies the total rebills amount generated over the total number of customers available on your account.
Advanced Stats
Moreover, the dashboard will also showcase the advanced stats such as Net Revenue, ARPU, MRR, Affiliate and Total Commission.
Net Revenue: This stat defines net sales. It is calculated by subtracting the cost of sold goods from gross revenue. That is anything that comes as a cost to the seller would be deducted from the gross revenue (total revenue generated).
ARPU: The Average Revenue Per Unit is the average cost of monthly revenue received per user. It is calculated by dividing the total revenue by the number of customers that you have.
MRR: It stands for Monthly Recurring Revenue. This is a financial metric that shows the revenue that a company expects to receive on a monthly basis from the recurring billing customers.
Affiliate & Total Commission: It reflects the total commission amount generated by the number of your affiliates.
Detailed Stats
In the section below, you can see the daily, monthly as well as yearly revenue stats. This way, you can easily compare the revenue generation in subsequent days from the dashboard only.
- Revenue Daily Stats: This particular section contains the total amount generated as per Today’s, Yesterdays and Daily Average sales. Here, Daily Average sales propose the last 30 days sales divided by 30.
- Revenue Monthly Stats: This section showcases the months of a year along with the revenue sum generated in that specific month.
- Revenue Yearly Stats: In this section, the revenue numbers will be listed in a yearly fashion.
Also, you can observe your top-selling plans/add-ons along with their name, refund & revenue details. This will directly help you in getting an inside of your products. As in, which product is getting more traction and about the products that need some kind of improvement.
Apart from this, you can check the last 30 days stats of your products as per the affiliate commission, refund and revenue. Further, the Daily average commission, refund and revenue values will also be presented here in details.
More importantly, this dashboard allows you to view stats based on a particular/all product, in between a date range and using various search filters.
P.s:- These stats will be visible to you when you have products & subscriptions on your account.
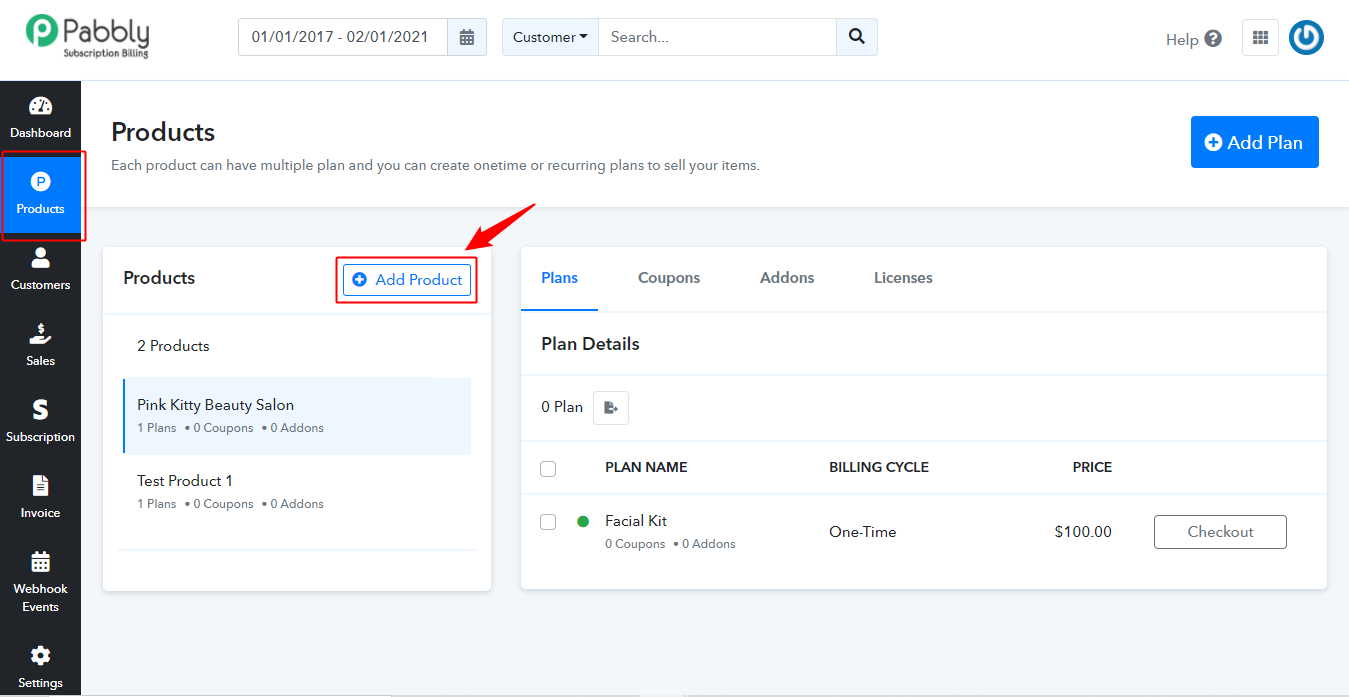
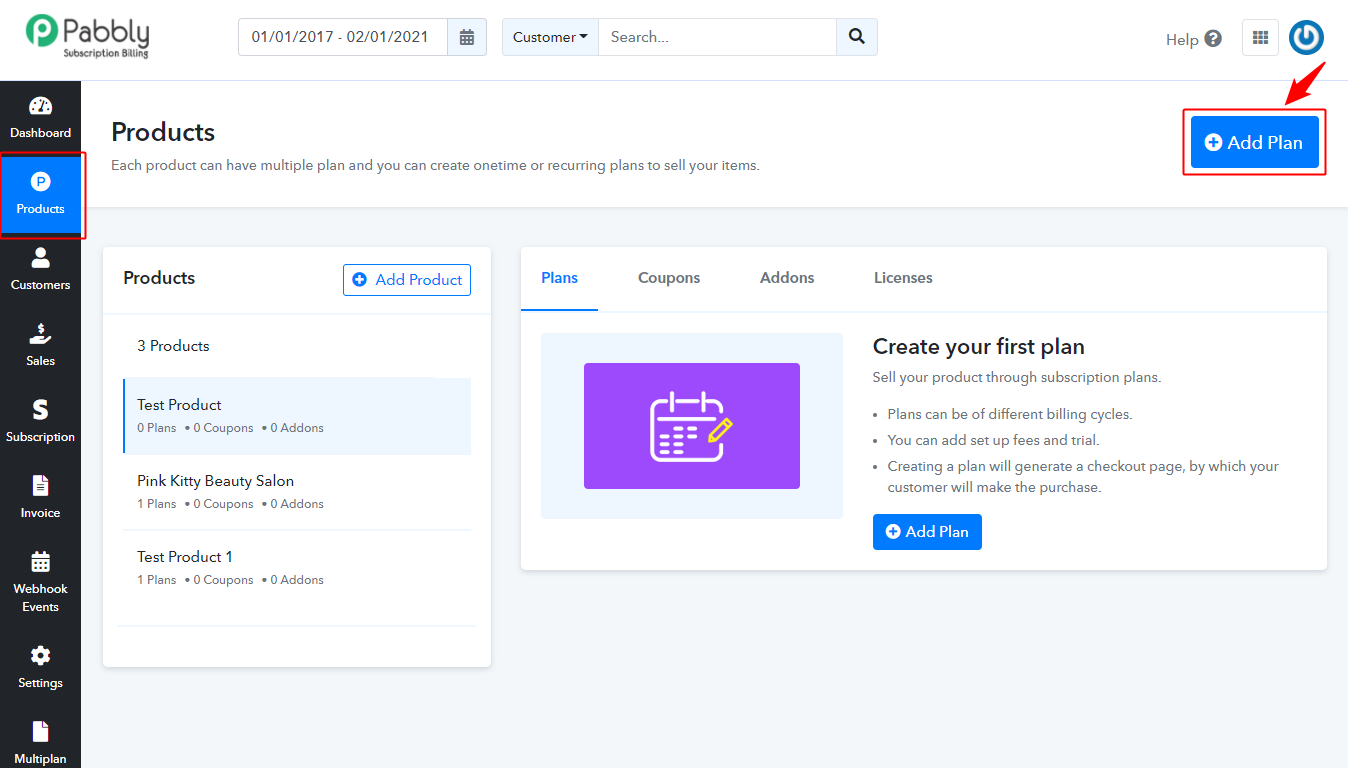
2. Product:
With Pabbly Subscriptions, you can sell SaaS-based products and membership. You must create a product before getting started. There can be multiple plans and coupons associated with a product.
How To Add A Product?
- Go to the “Products” tab.
- Click on “Add New Product ”.
3. Fill the product details.
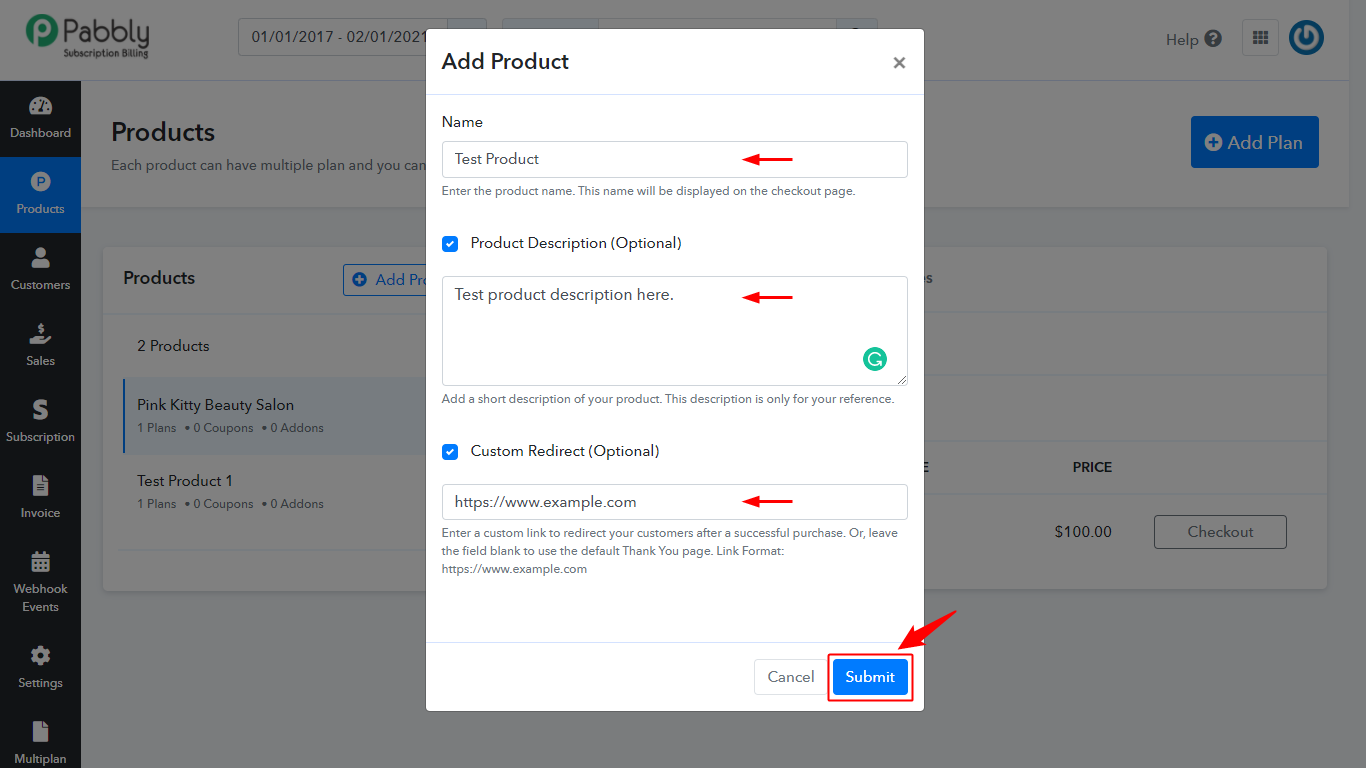
4. Enter the required and optional field values for your product.
Name: You can enter a name of your product. This option is required and you can’t leave it empty.
Product Description (Optional): You can add a product description as text.
Custom Redirect’ (Optional): There is a ‘Custom Redirect’ checkbox. Selecting this will open up a ‘Redirect URL’ field.
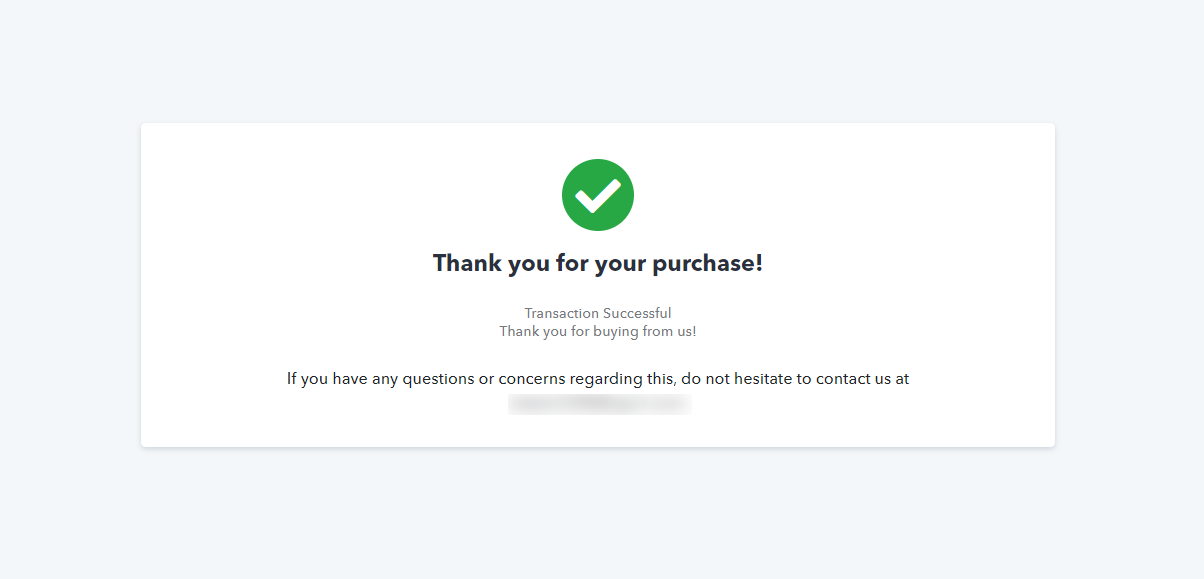
Redirect URL: By choosing this option, you can redirect your customer to any specific page after successful payment completion. You can also leave it blank and by default, it’ll redirect the customers to a pre-designed Thank You Page. Further, you can also change the text of this default Thank You Page.
5. Click on “Save”.
P.s:- Redirect URL is optional, you can leave it blank to display the default “Thank You” page
How To Edit A Product?
- Go to the sidebar and choose “Products”.
- Click on the edit button of the product and make the required changes.
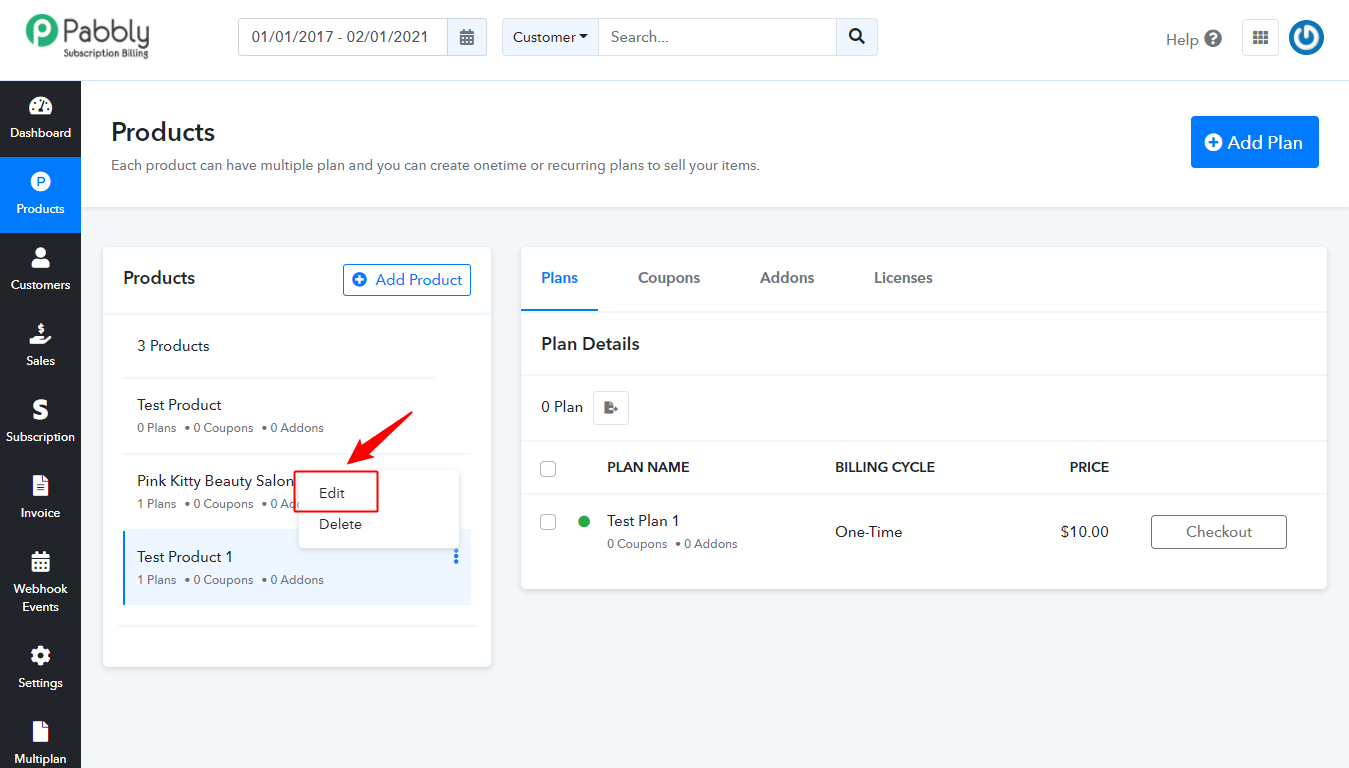
3. Then, click on the “Save” button to save the changes you’ve made.
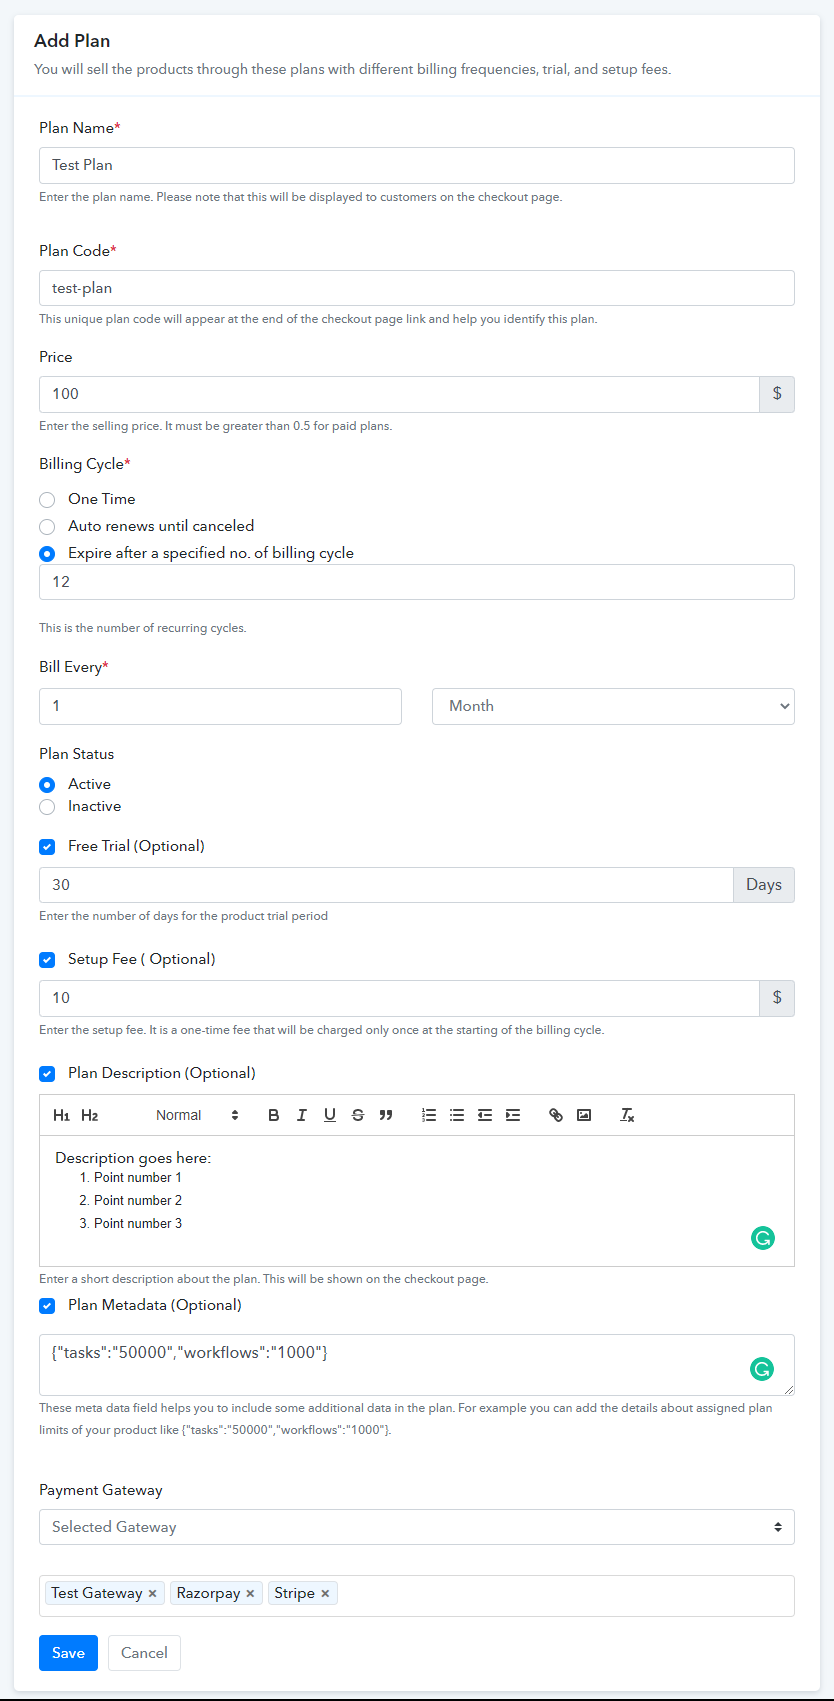
3. How To Set Up Plans For The Product?
Plans are the pricing for your products. You can create unlimited plans corresponding to the product.
1. Go to the “Products” section and select the product to add a plan.
2. Click on “Add Plan”.
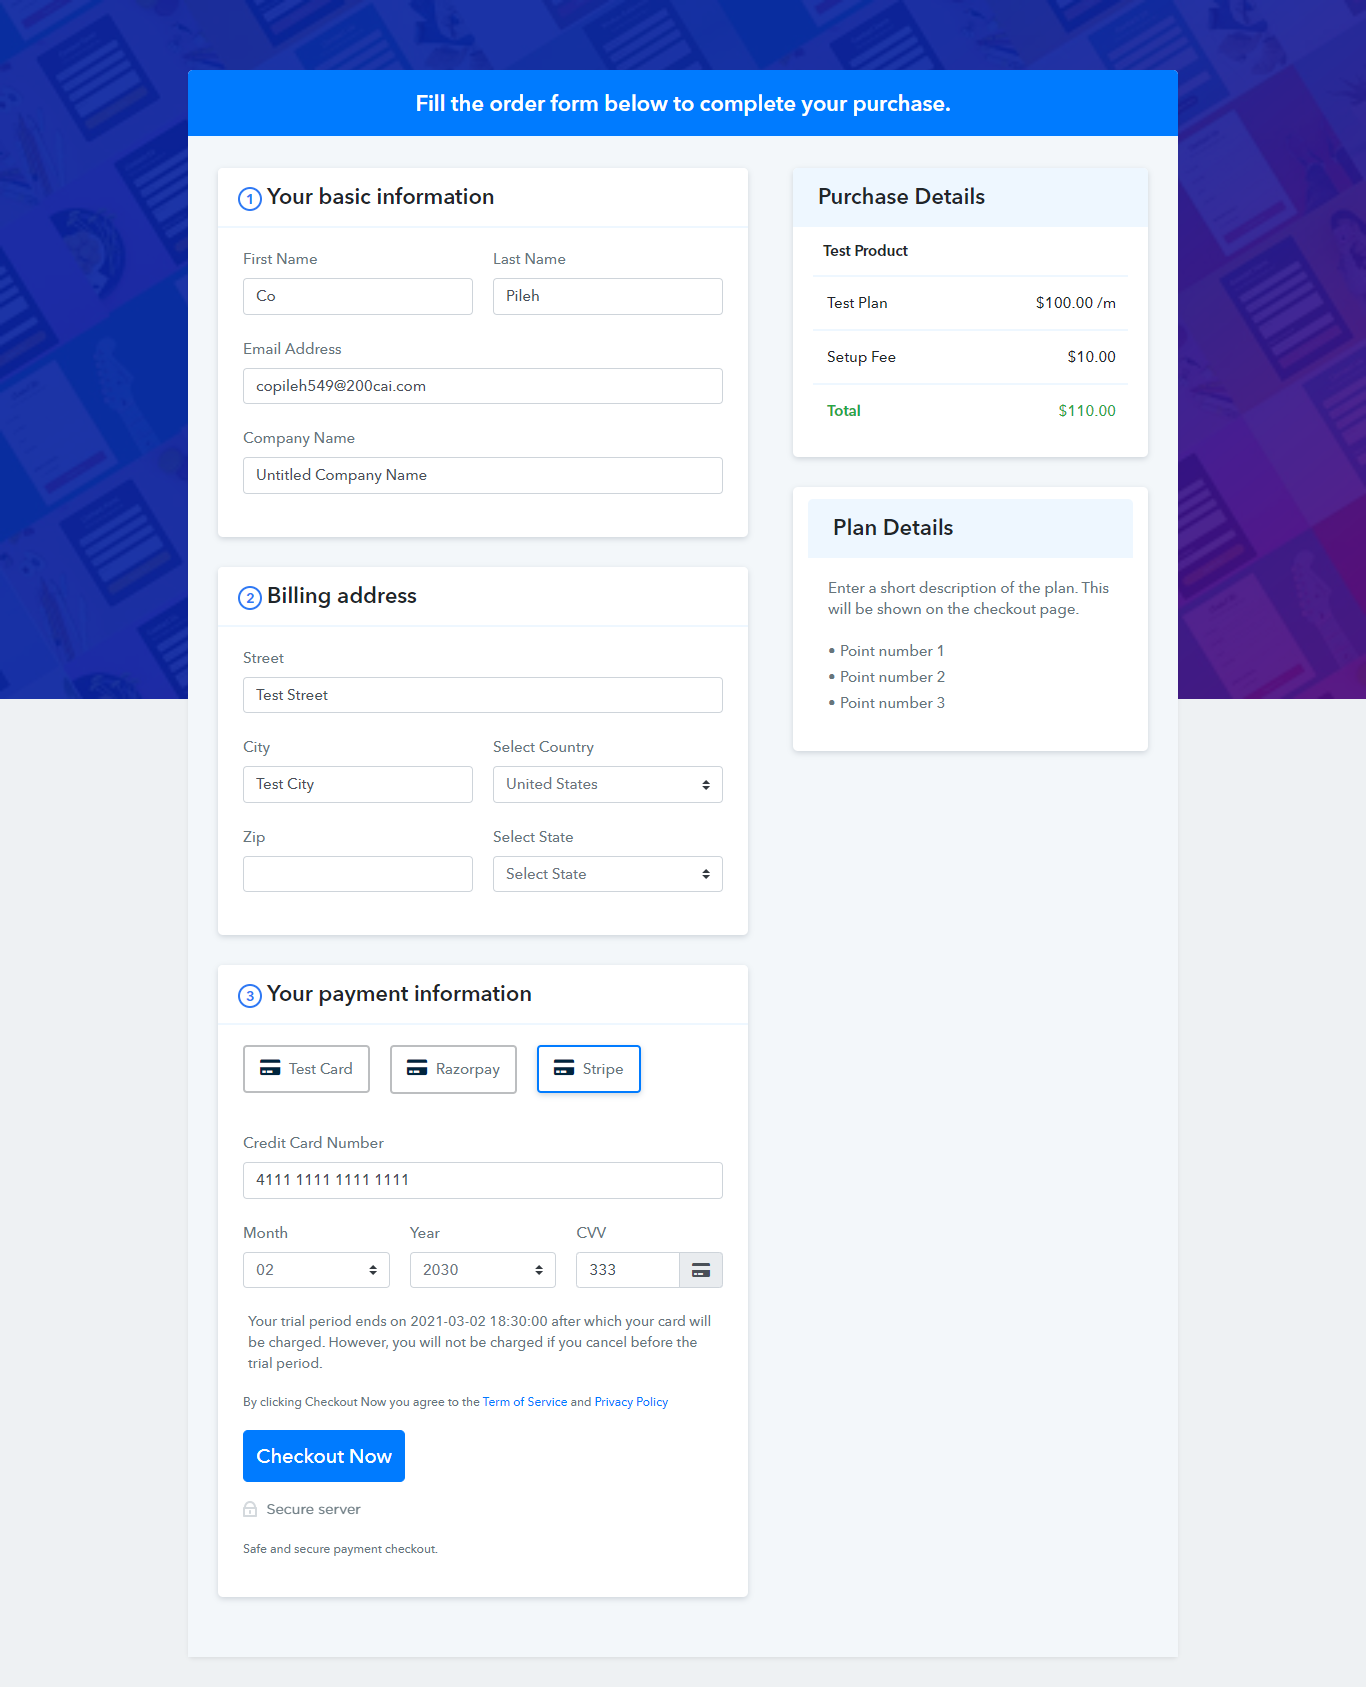
3. Fill up the details of the plan. Here is how the form looks like –
-
Plan Name
For example: If you’re offering basic services or features to your customer then you can name your plan as – “Basic” & when offering the advanced featured you can name it as – “Advanced Plan”. It will be displayed on the invoice that you’ll send to your customer.
-
Plan Code
Here you can add a unique code of the product which acts as a unique identifier.
-
Price
Here you can add the pricing of a plan in a specific currency. Pabbly Subscriptions supports 25+ currencies such as Dollar, Euro, INR etc.
-
Setup Fee (Optional)
You can charge customers a one-time amount setup fee for setting up the account.
-
Billing cycle
1. One Time: The customer will be charged for one time only. 2. Auto renews until cancelled – Customer will be charged as long as customer purposely cancelled the subscription. 3. Expires after a specified no. of billing cycles – Here you can set the no. of billing cycles after which the plan will expire. (For a one-time payment, enter “1”).
-
Bill Every
You can set the number of billing intervals on the weekly, monthly or yearly basis. For example – If you set Bill every 1 month – Your customer would be charged every month on the subscription activation date.
-
Free Trial
Here you can set up a free trial period for a specified number of days. For example, if you set 7-days or 60-days trial period then, your customer will be charged after that trial period.
-
Plan Status
You can ‘Activate’/’Deactivate’ the plan from this section. (When you make a new plan the ‘Plan Status’ is set activated by default)
-
Plan Description
Here you can describe the plan of the product.
-
Plan Metadata (Optional)
Using plan metadata, you can add any additional data or hidden fields to your checkout page. You can add information such as plan limit, some specific numbers, or any other useful parameter that you want to pass along with the payment information. Moreover, these fields won’t be visible on the checkout page. You can use the JSON format for passing values in this field i.e. {“Name”:”Value”,”Name”:”Value”}.
-
Payment Gateway
You can select the payment gateway to display on your plan checkout page. There are options to choose from such as All Gateways (to display all gateways that you’ve connected with your account), any particular gateway, multiple gateways etc.
Also, you can add plan-wise gateways too, to know more check out the Planwise Payment Gateway guide.
4. Finally, Click On The “Submit” Button
Now, your products, their corresponding plans, and their buying links have been created. So, you are now ready to collect payments for your services.
You can see the checkout pages of each plan and also copy the link and embed it on your website.
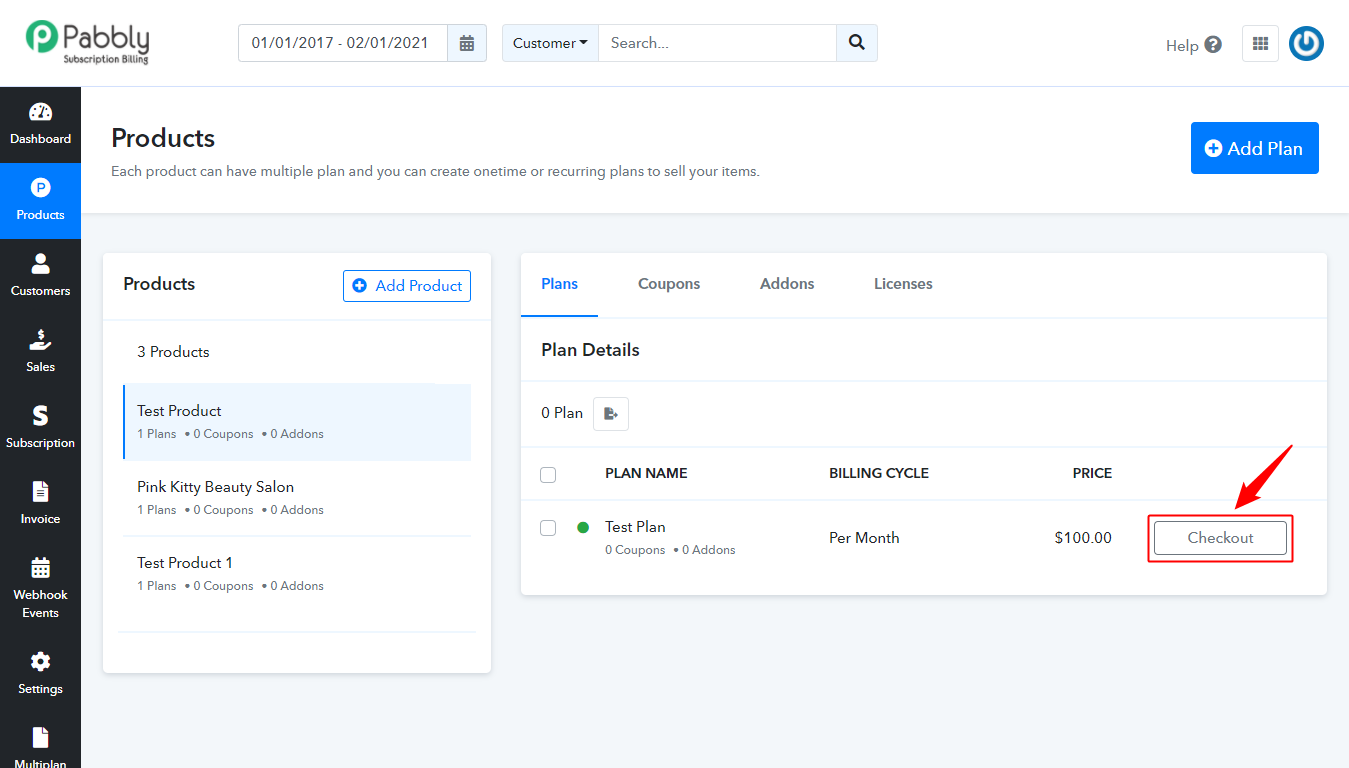
Checkout Page –
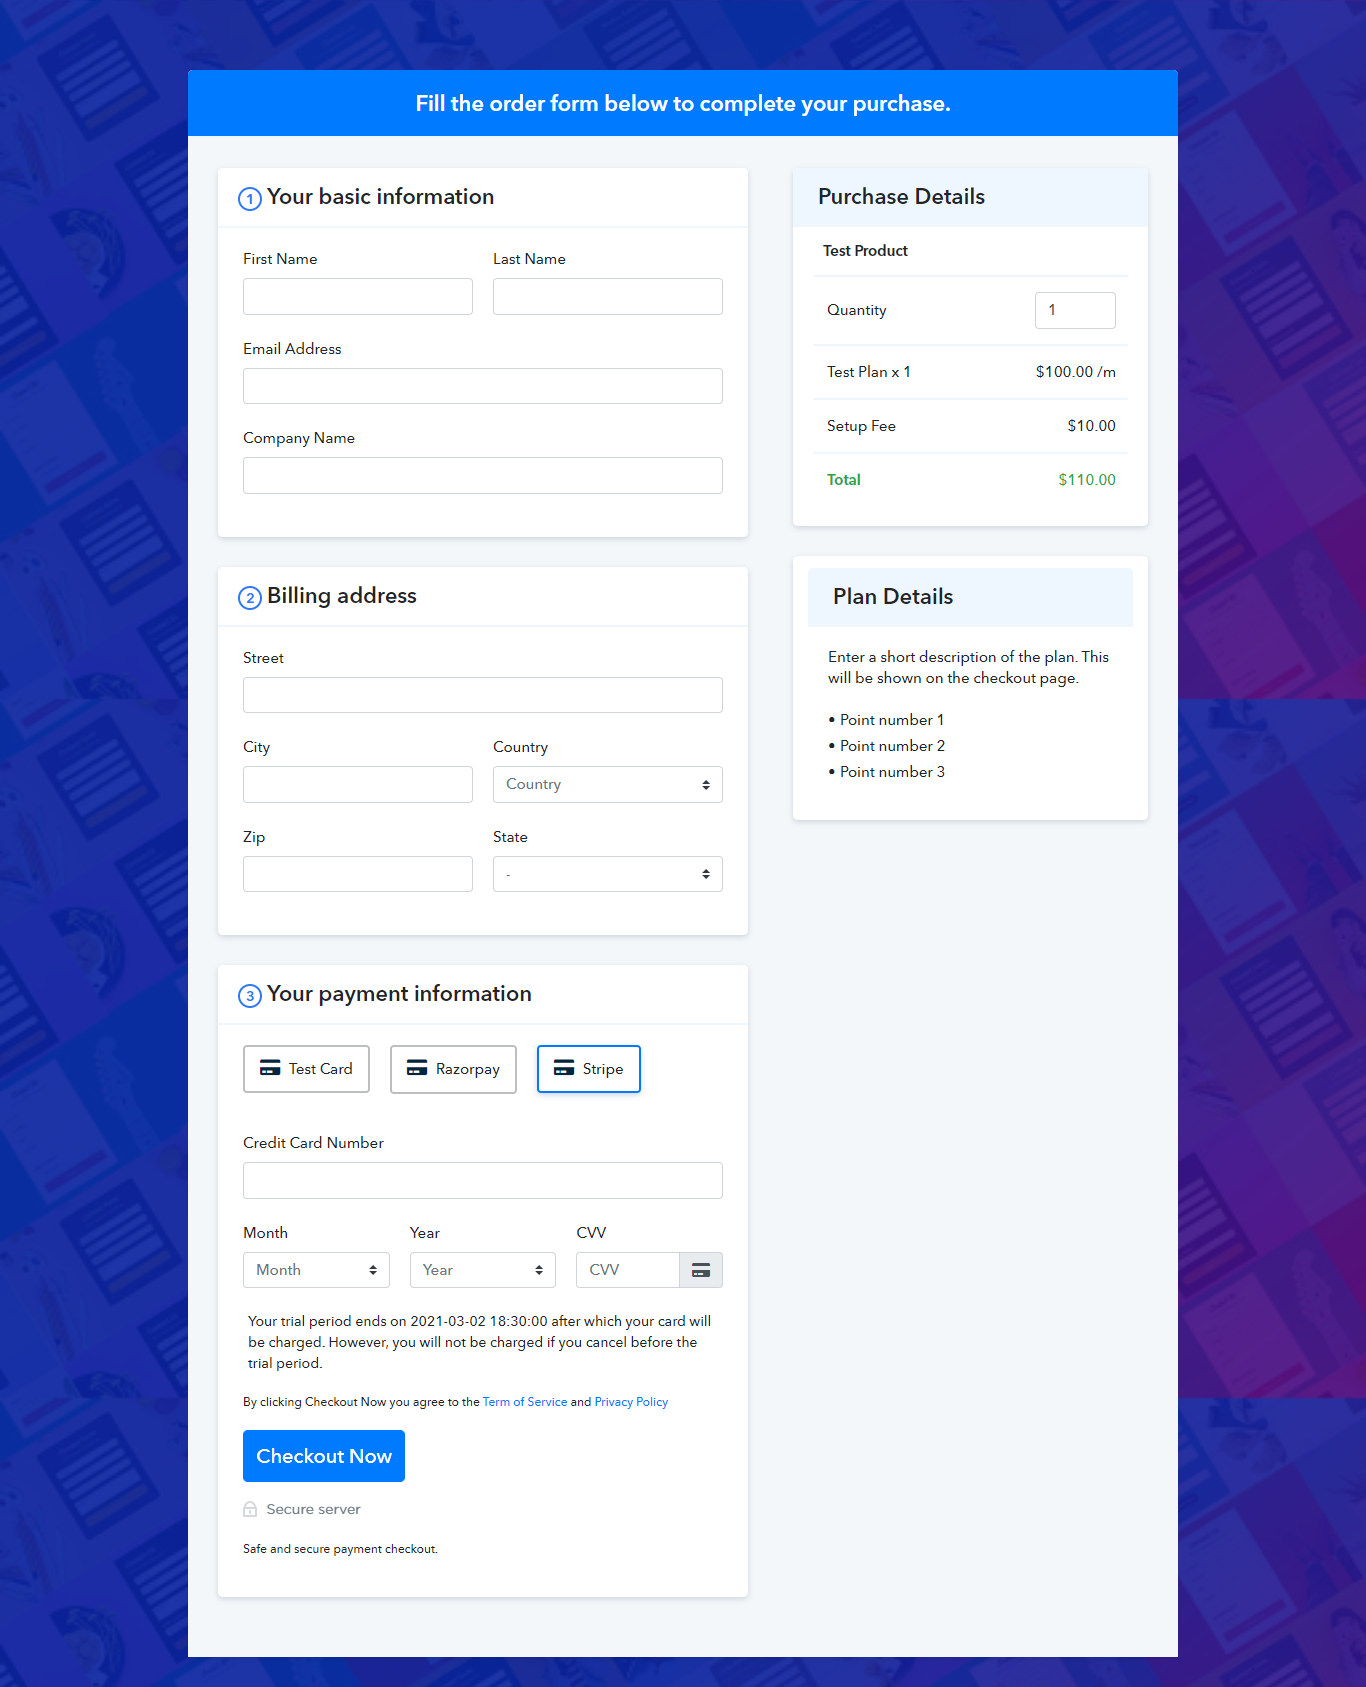
Default Thank You page displays your next billing amount, time, and date.
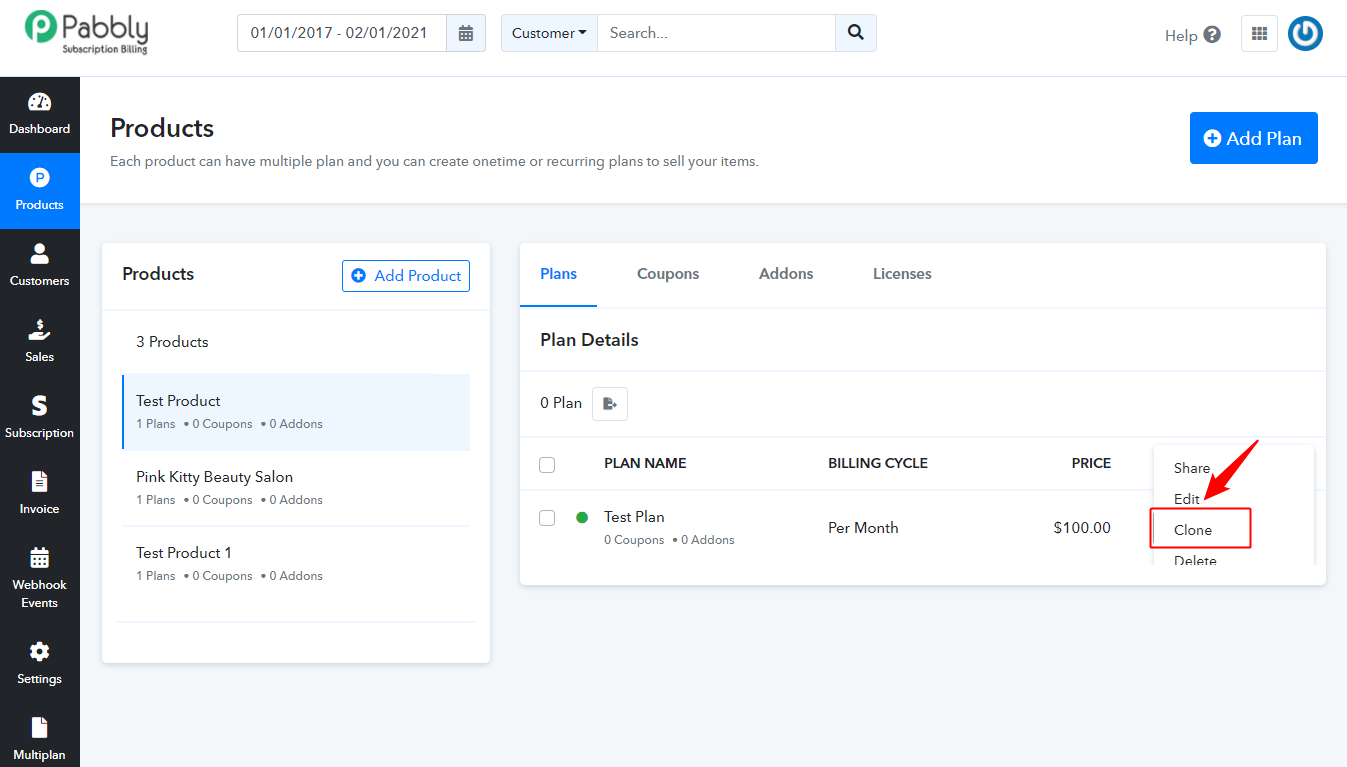
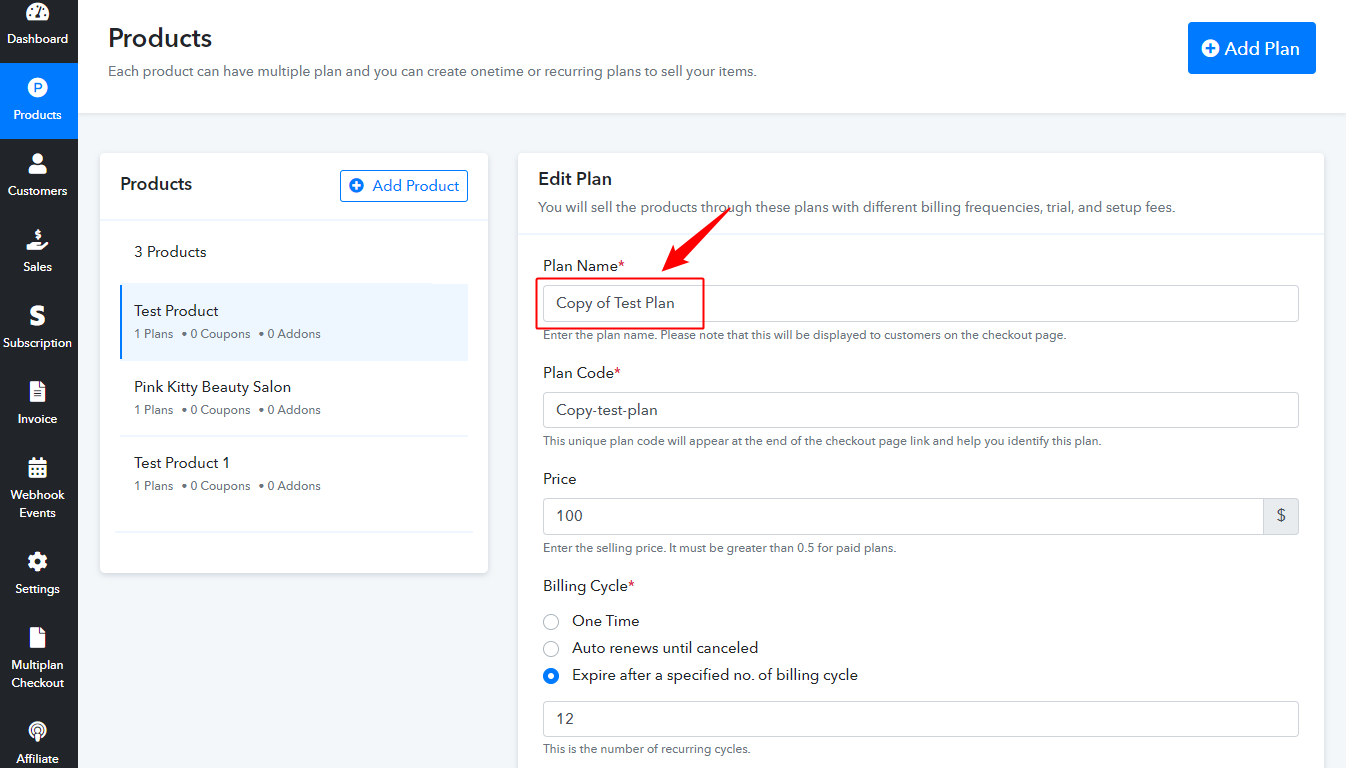
Plan Clone: There is a feature of plan cloning also. In case if you want to make many plans with some minor changes, then you do not need to always add a new plan. Just click on the plan cloning icon and the details will be automatically filled in the plan creation form.
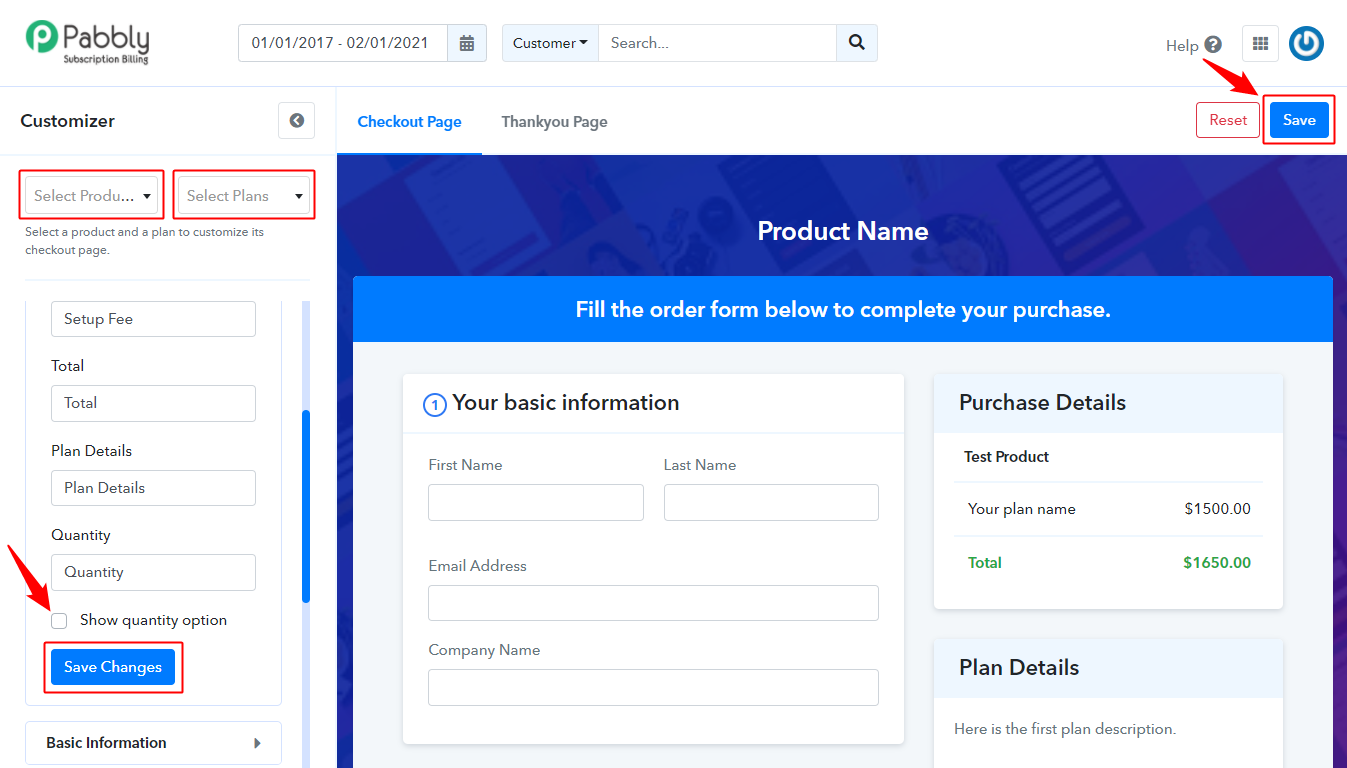
Plan Quantity: A small quantity box is given in the purchase details section of the check out page. By this option, your customer can increase the quantity of the subscription.
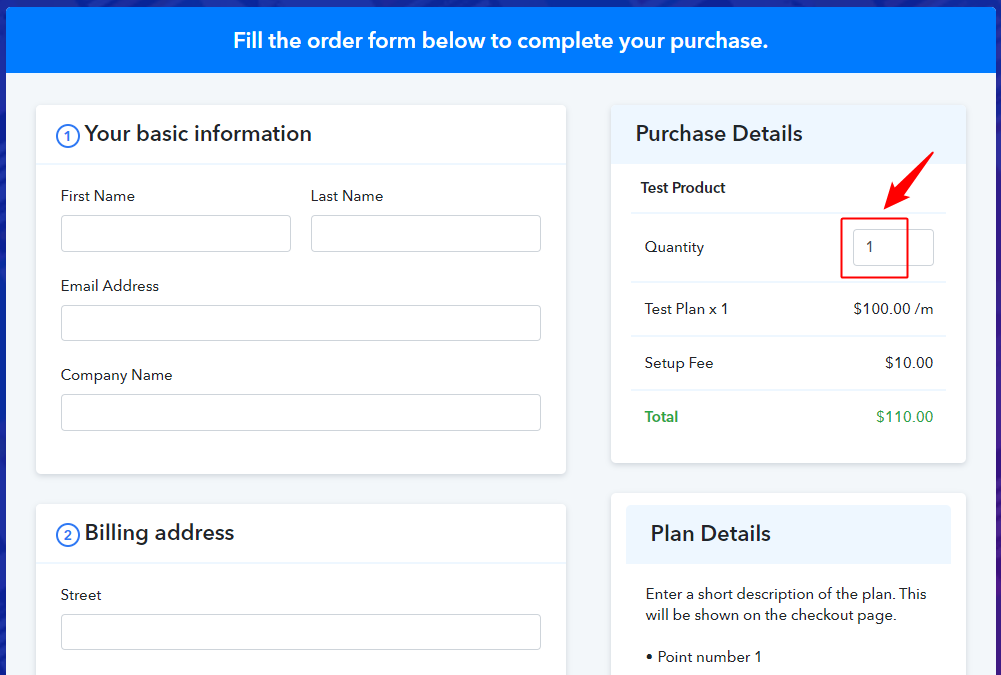
When the customer increase the quantity plan amount will be automatically multiplied with the added number in the box. This quantity is displayed in the invoices and in the subscription overview and in the Invoices sent to the customer.
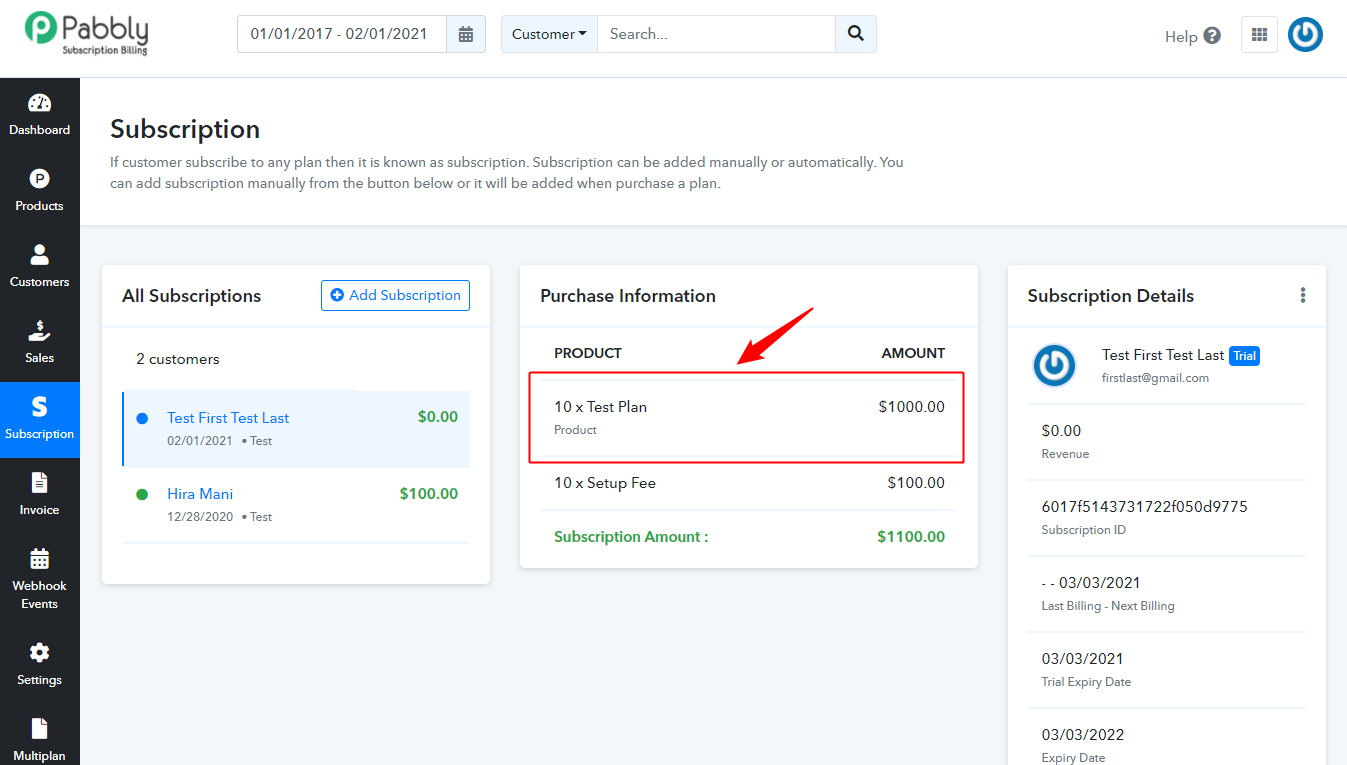
Further, if you are not willing to give this option to your customer then you can simply remove it. Just go the checkout page settings and you will find the option to switch off the quantity field from the ‘Order Information’ section.

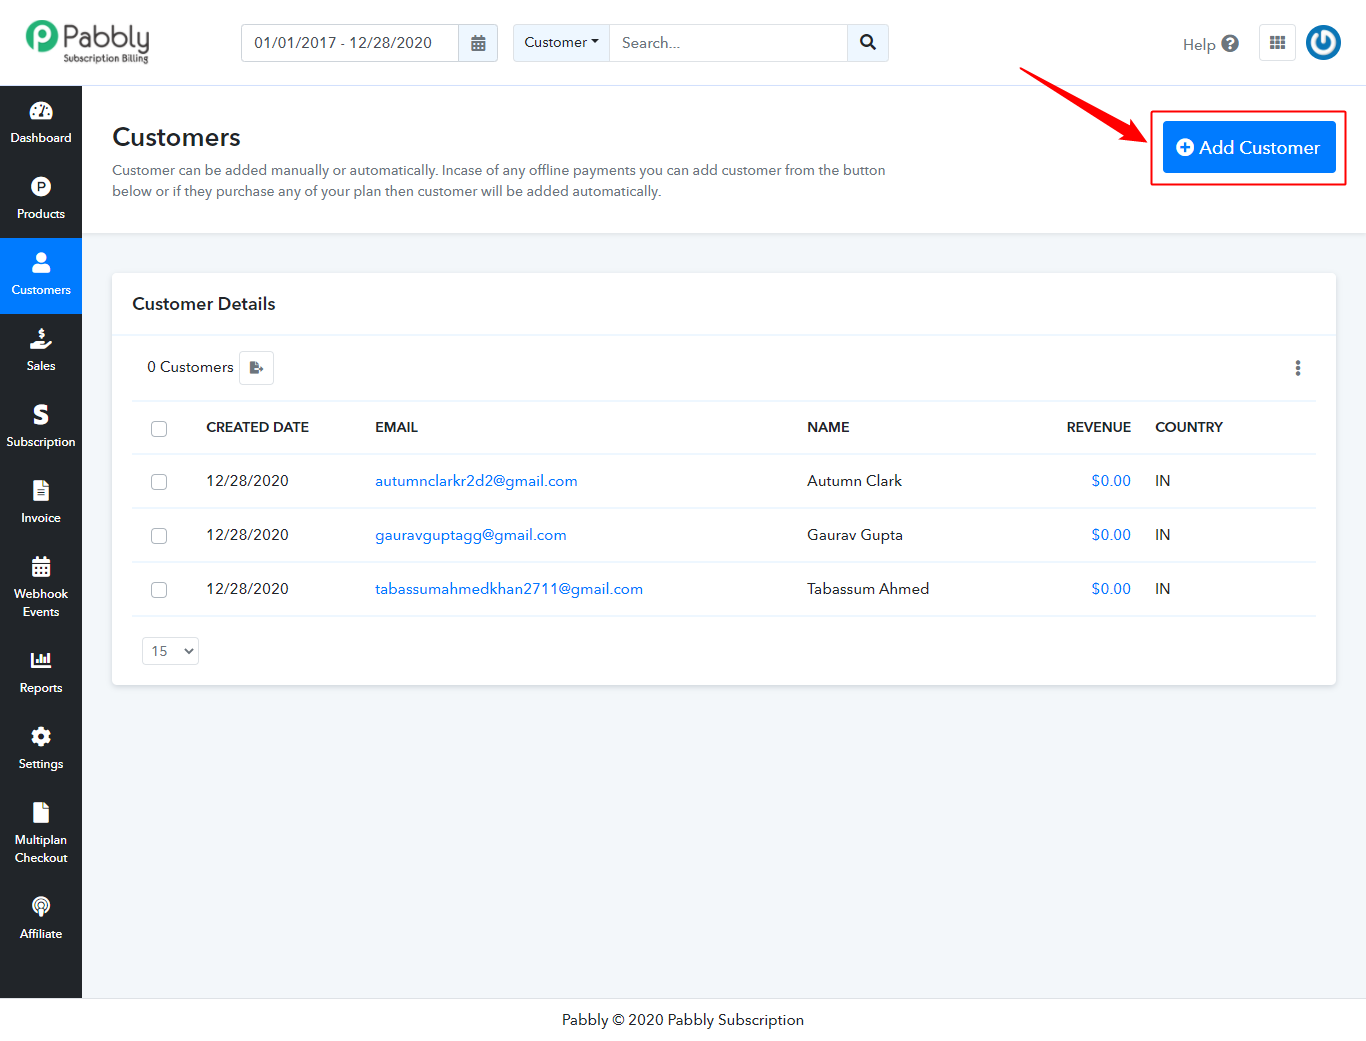
4. Customer:
A customer is a person or businessman who purchases the services or goods from any service provider/company. In this section, the admin can see all the customers on a single page. The customer section will look like this,
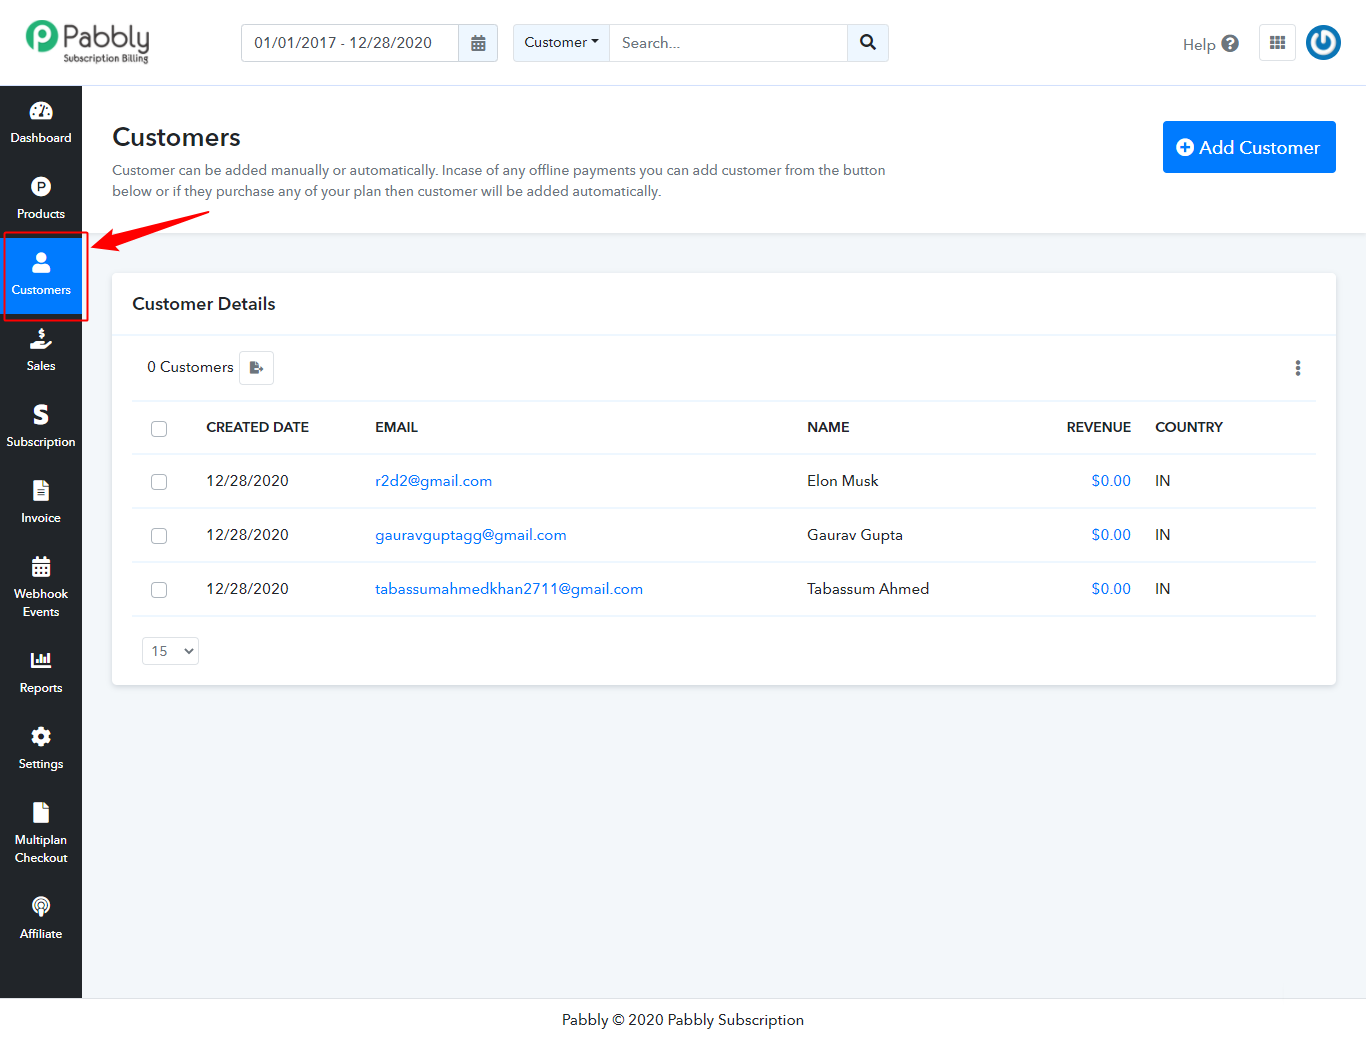
Customers can be added in two ways.
-
Add Customers Automatically
Whenever your customer subscribes to your products, then those customers are automatically added along with their entire details in the customer section.
-
Add Customers Manually
You can manually add customers by following these steps –
- Go to the main menu and click on “Customers”.
- Then click on “Add Customer” button available at the top right.
3. Now fill the customer details.
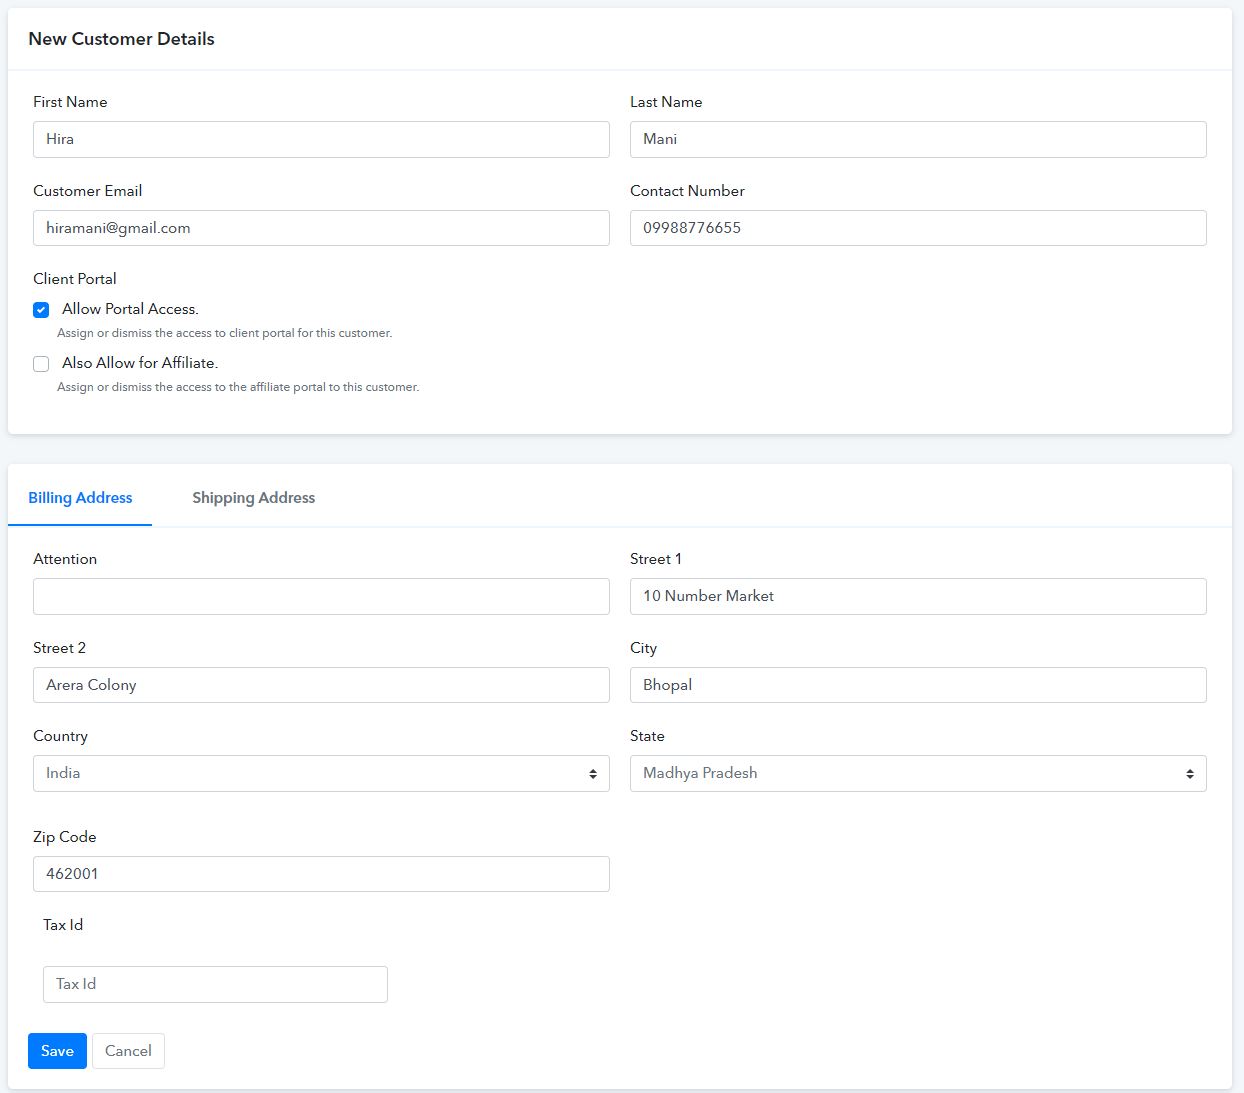
4. You can see the Billing and Shipping address on the customer overview section. The Billing address is shown on the invoice also.
5. Now, click on the “save” button. (New Customer is created)
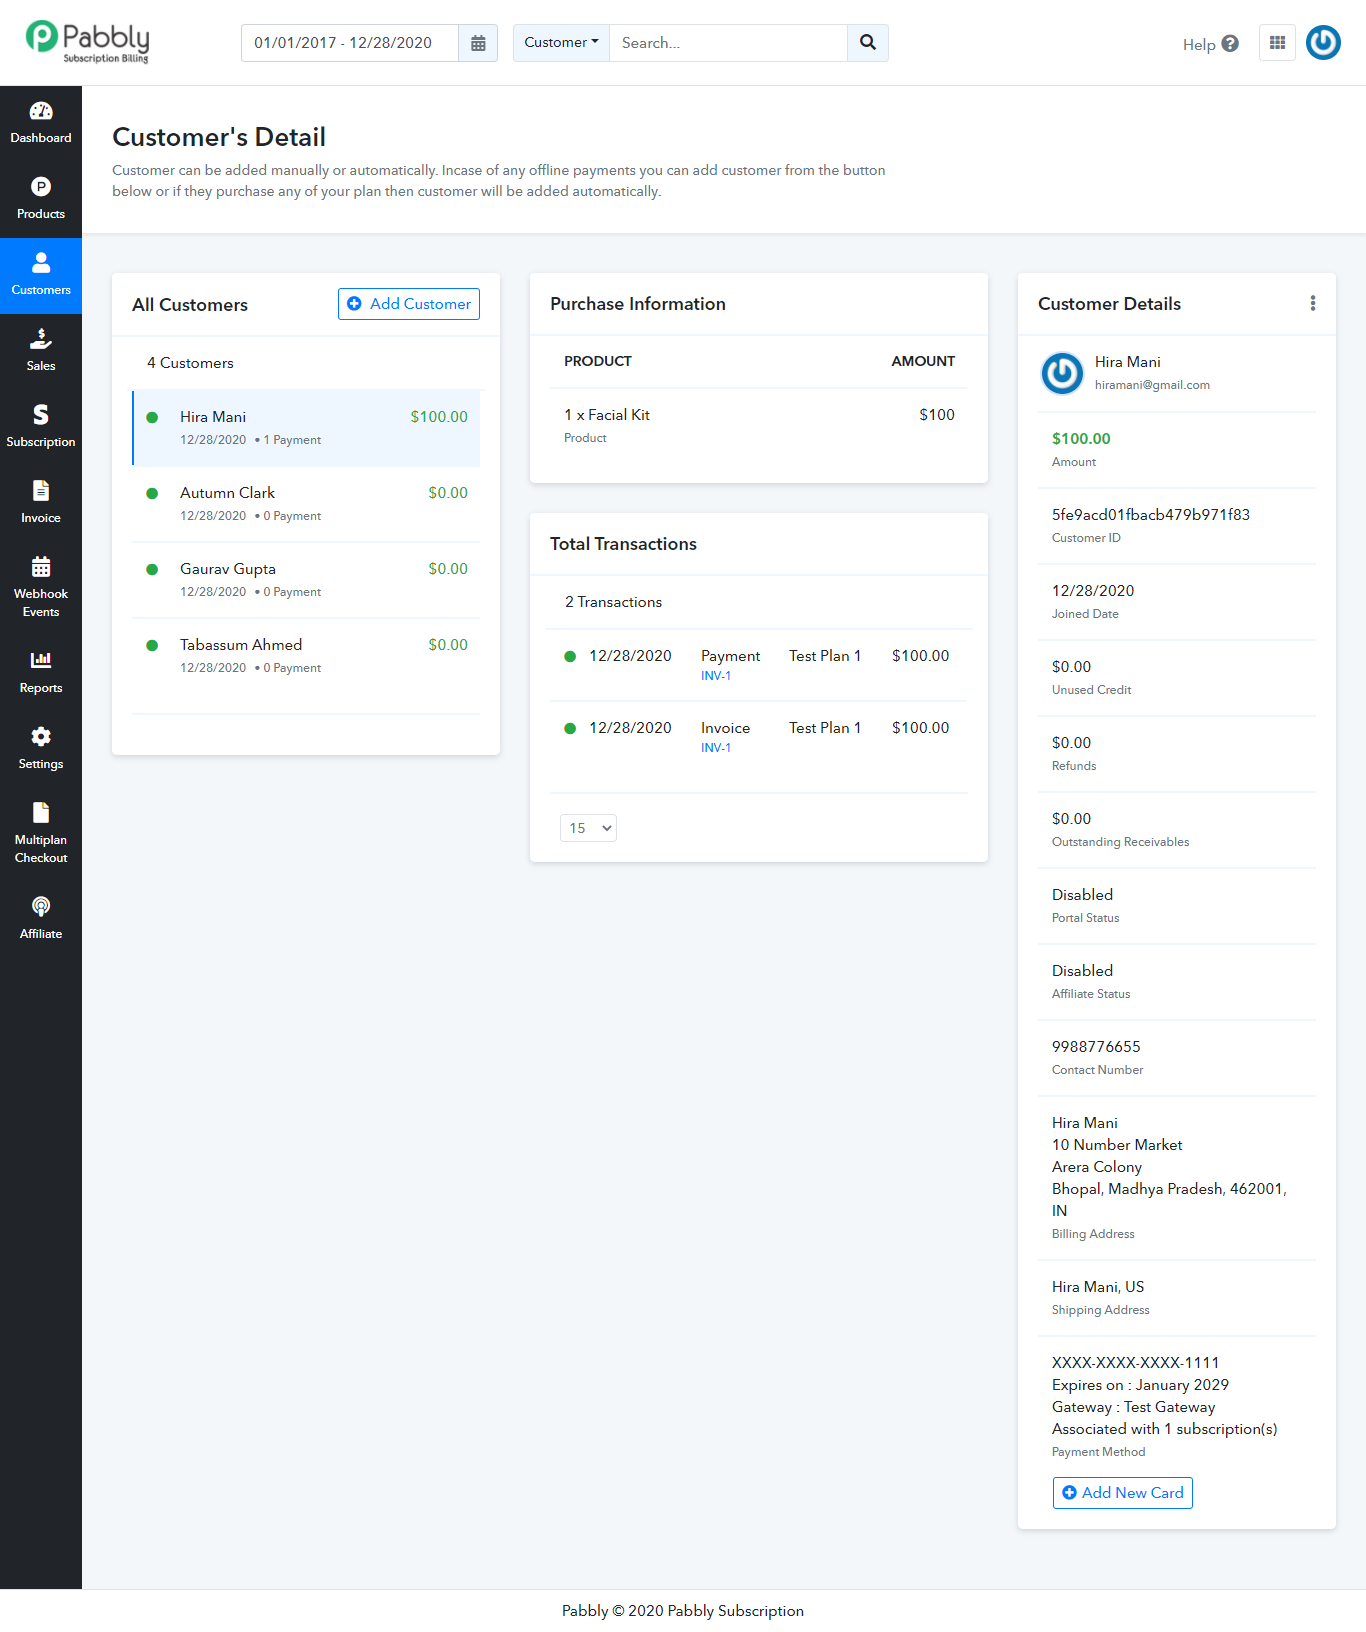
You can see the Customer’s Detail by clicking on the email id of a particular customer. All the information will be visible here such as the details of the customer, purchase information, and transactions.
The ‘Purchase Information’ has all the products and their amount as well as in ‘ Total Transactions you can see the transactions, invoices, payments, credit, refund etc.
How To Edit A Customer?
To edit customer’s details follow the steps below-
- Go to the customer’s section.
- Click on the email id of that customer which you want to edit.
- Select the edit option after clicking on the three verticle dots available in the top-right corner of the ‘Customer Details’ section.
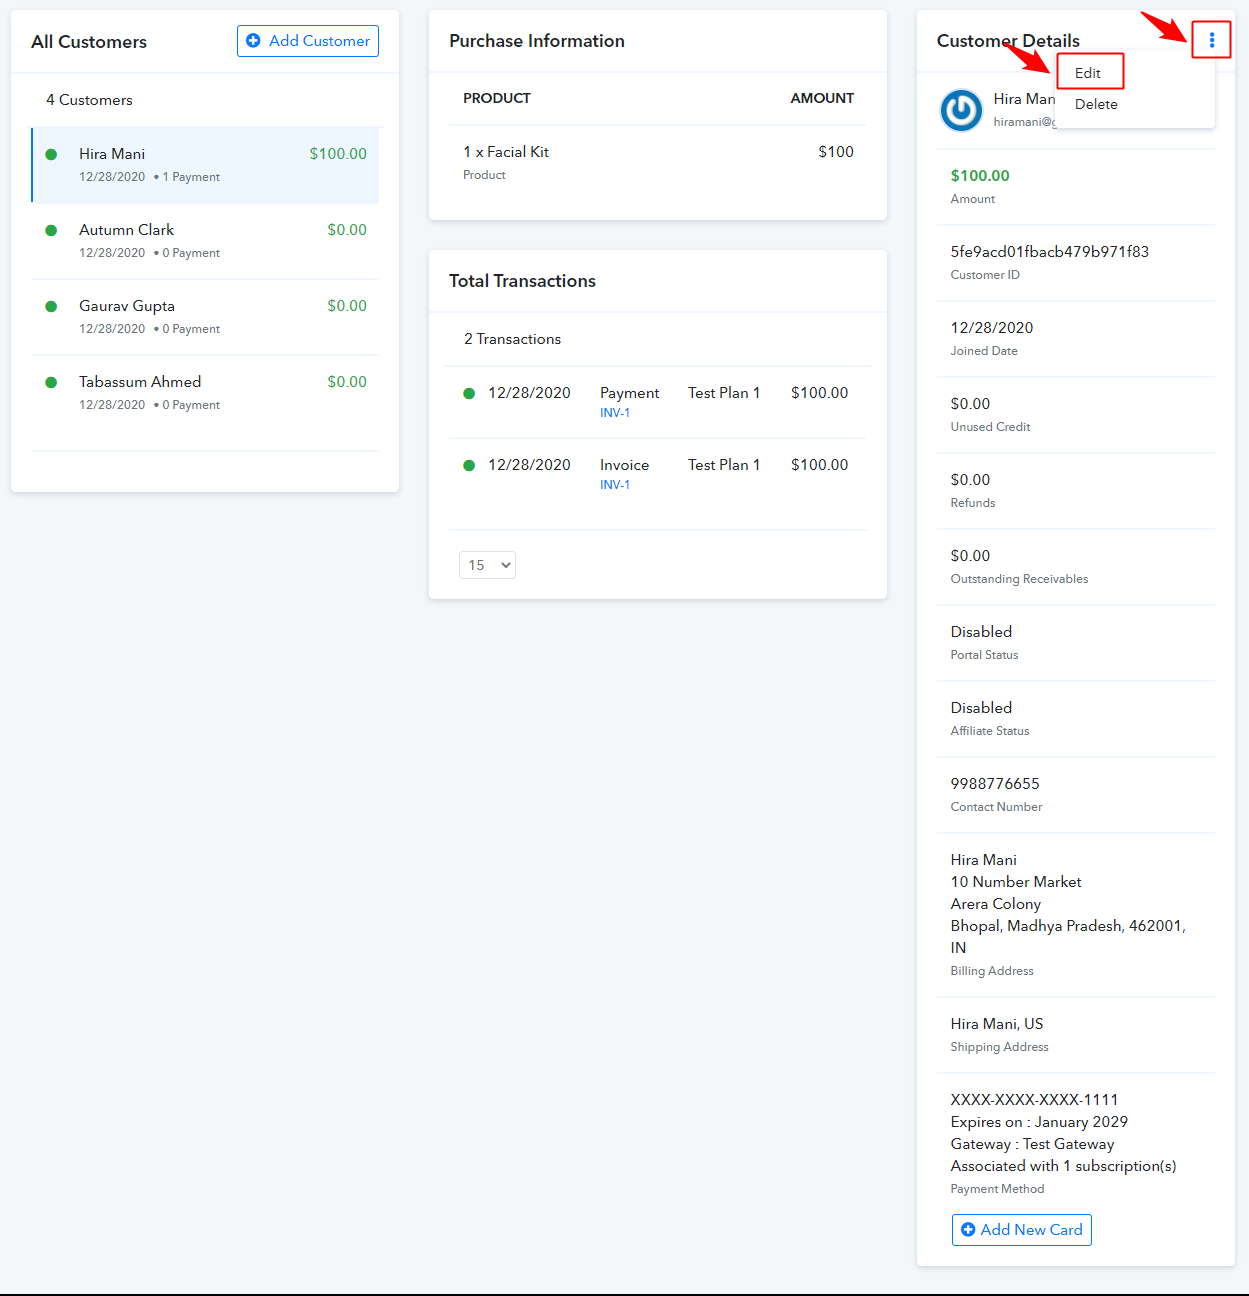
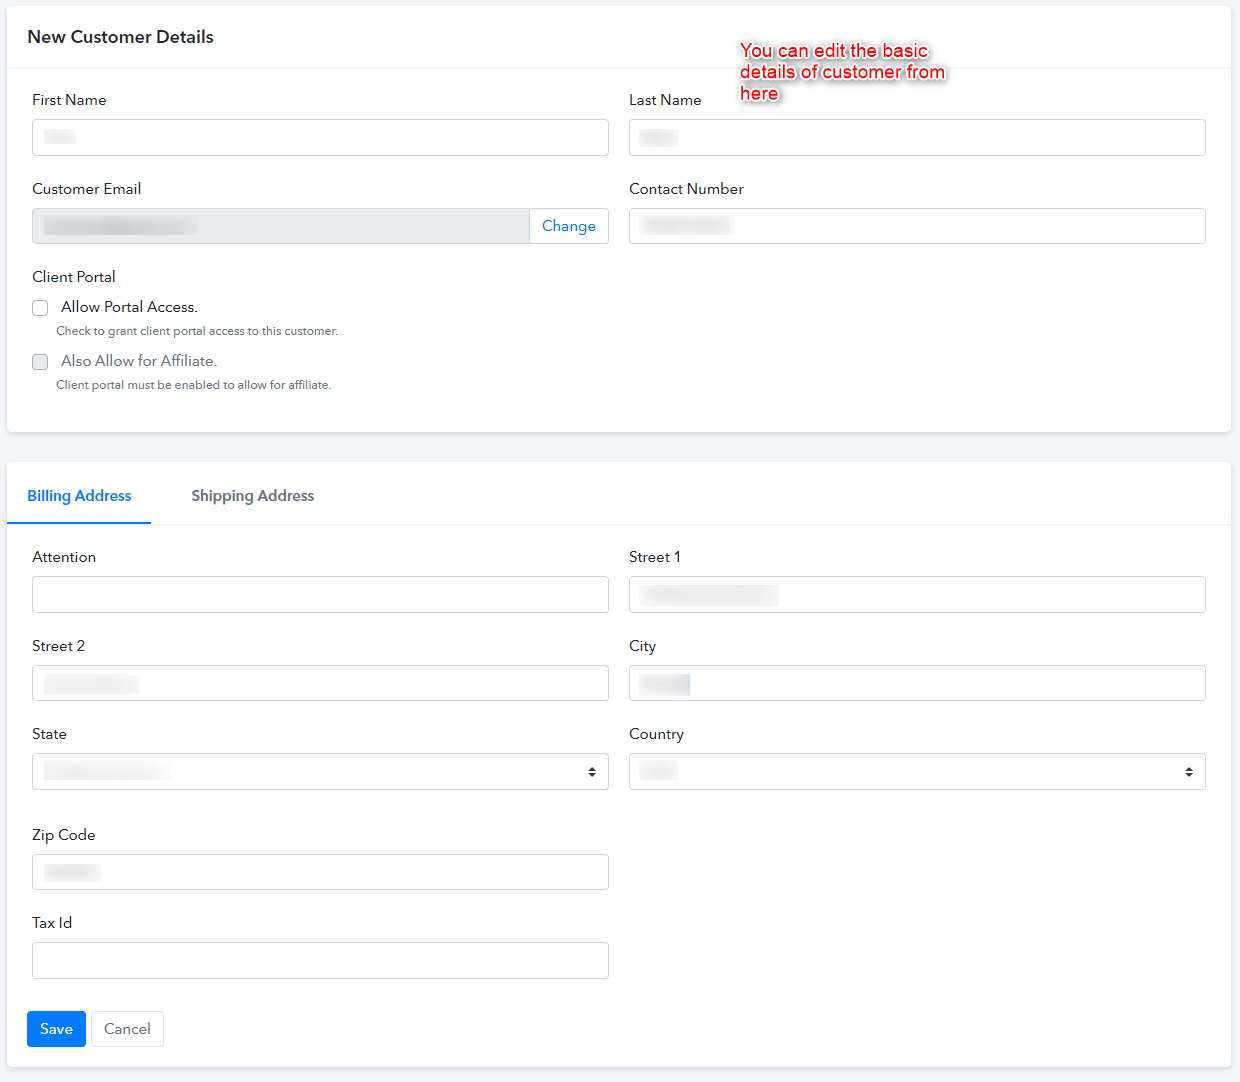
- Edit the customer details in the form.
- Then, click on the “Submit” button.
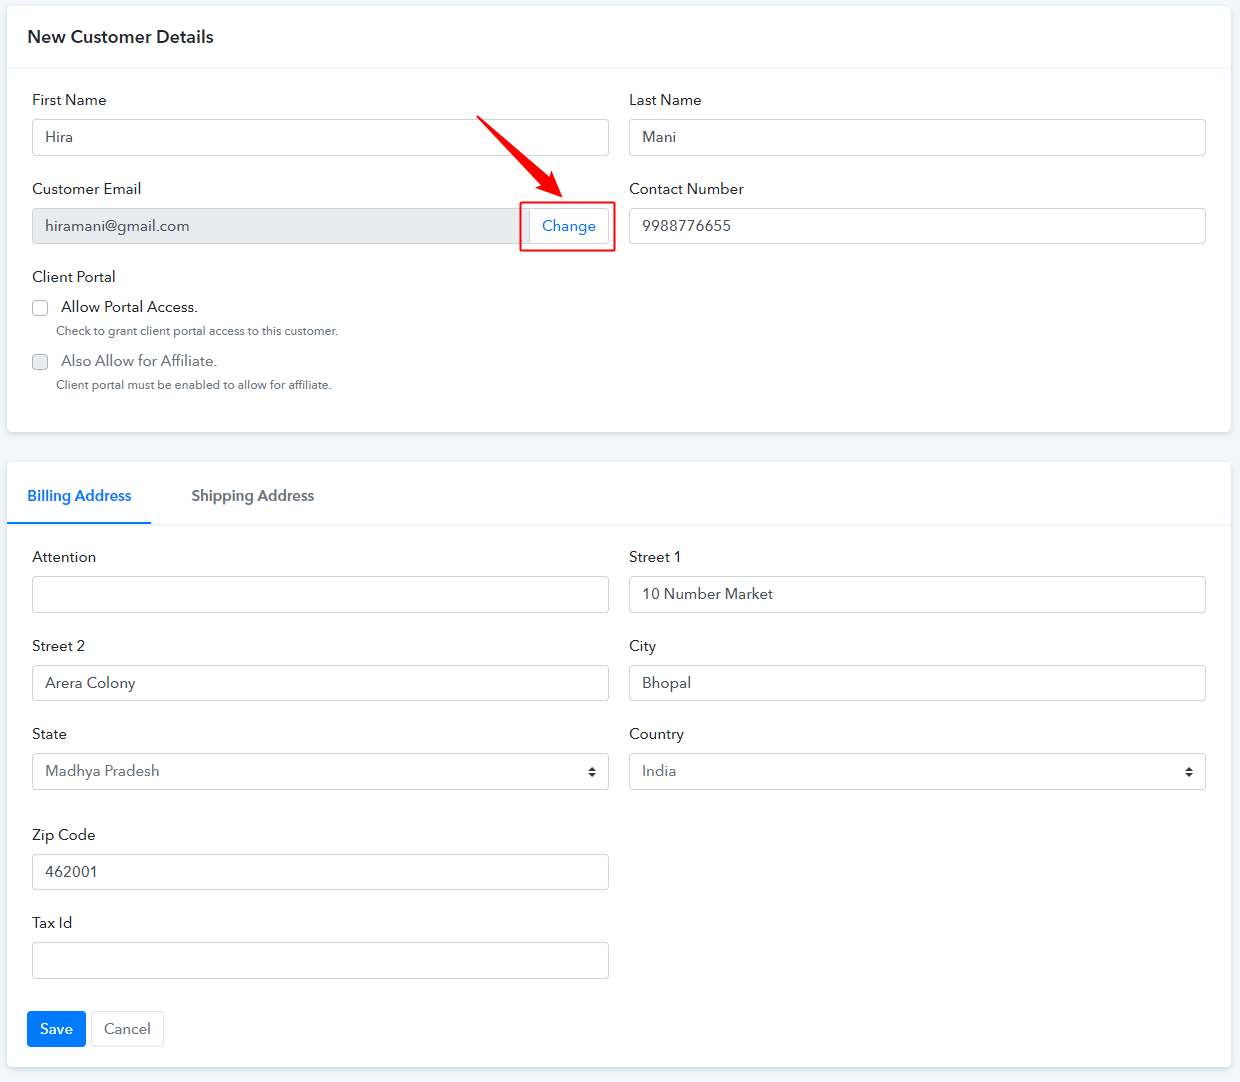
How to Change Customer’s Email?
To edit/change a customer’s email follow the steps given below:
- Go to the customer’s section.
- Click on the email id of that customer which you want to edit.
- Select the edit option after clicking on the three verticle dots available in the top-right corner of the ‘Customer Details’ section.
- Click on the ‘Change’ button that is available next to the ‘Customer Email’ field.
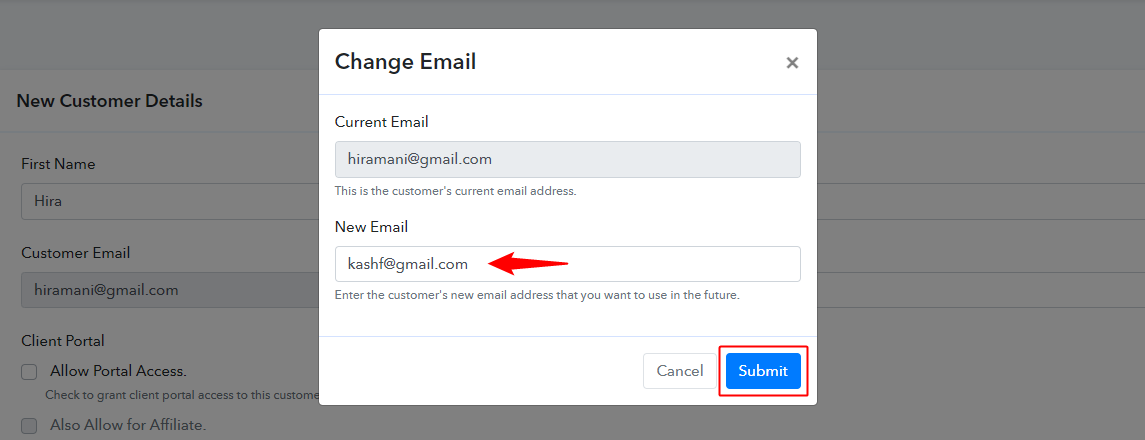
Then, fill in the email address that you want to change in the ‘New Email’ field and hit ‘Submit’ to save the change.
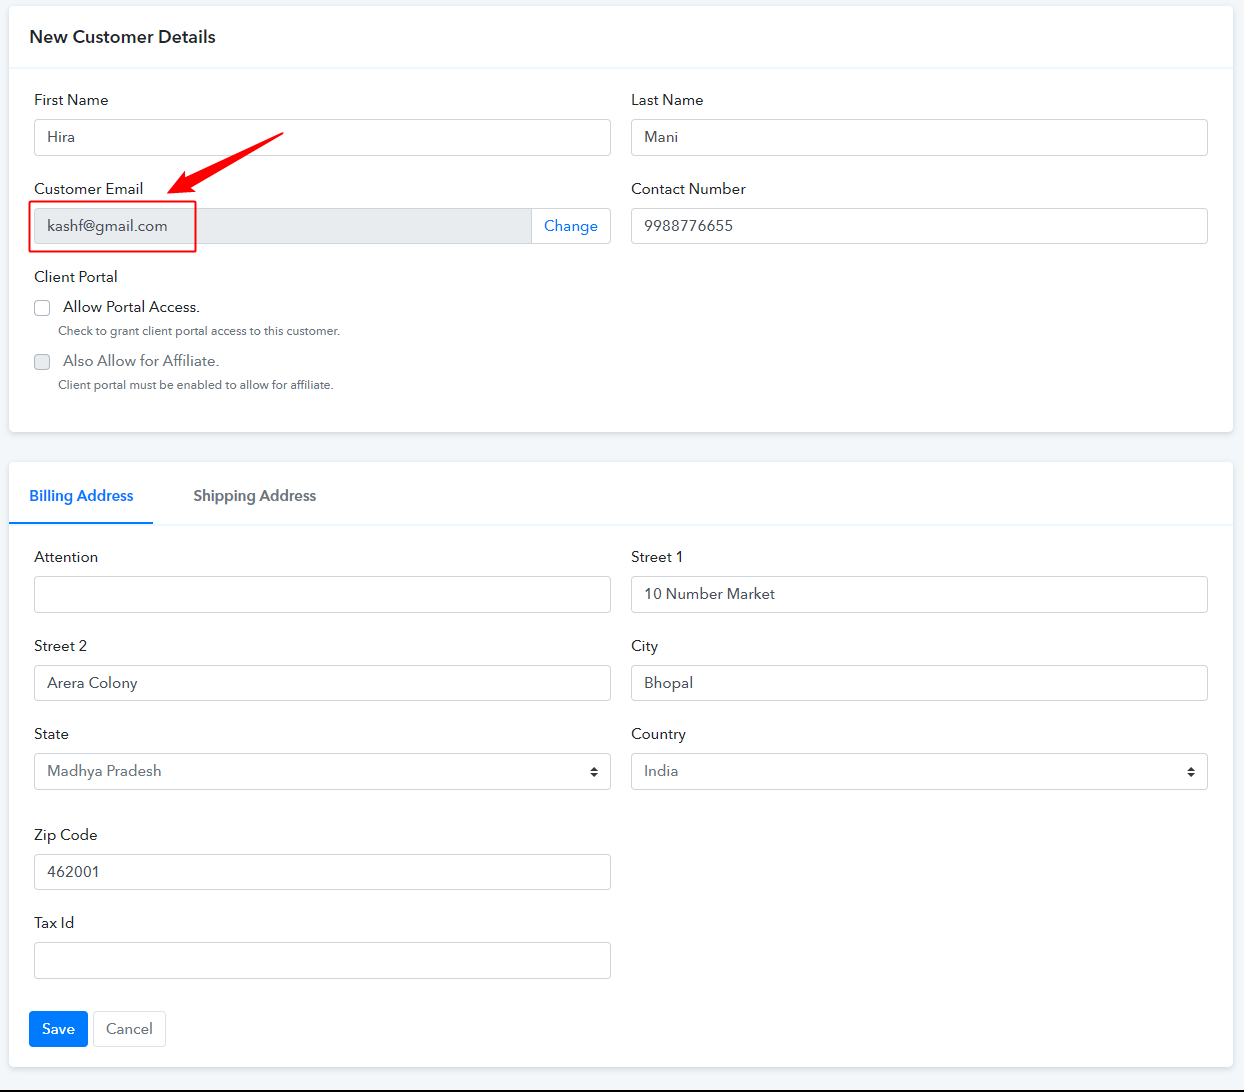
You can check the changed email address in the customer details field after changing the email address. This will then be reflected everywhere on the account.
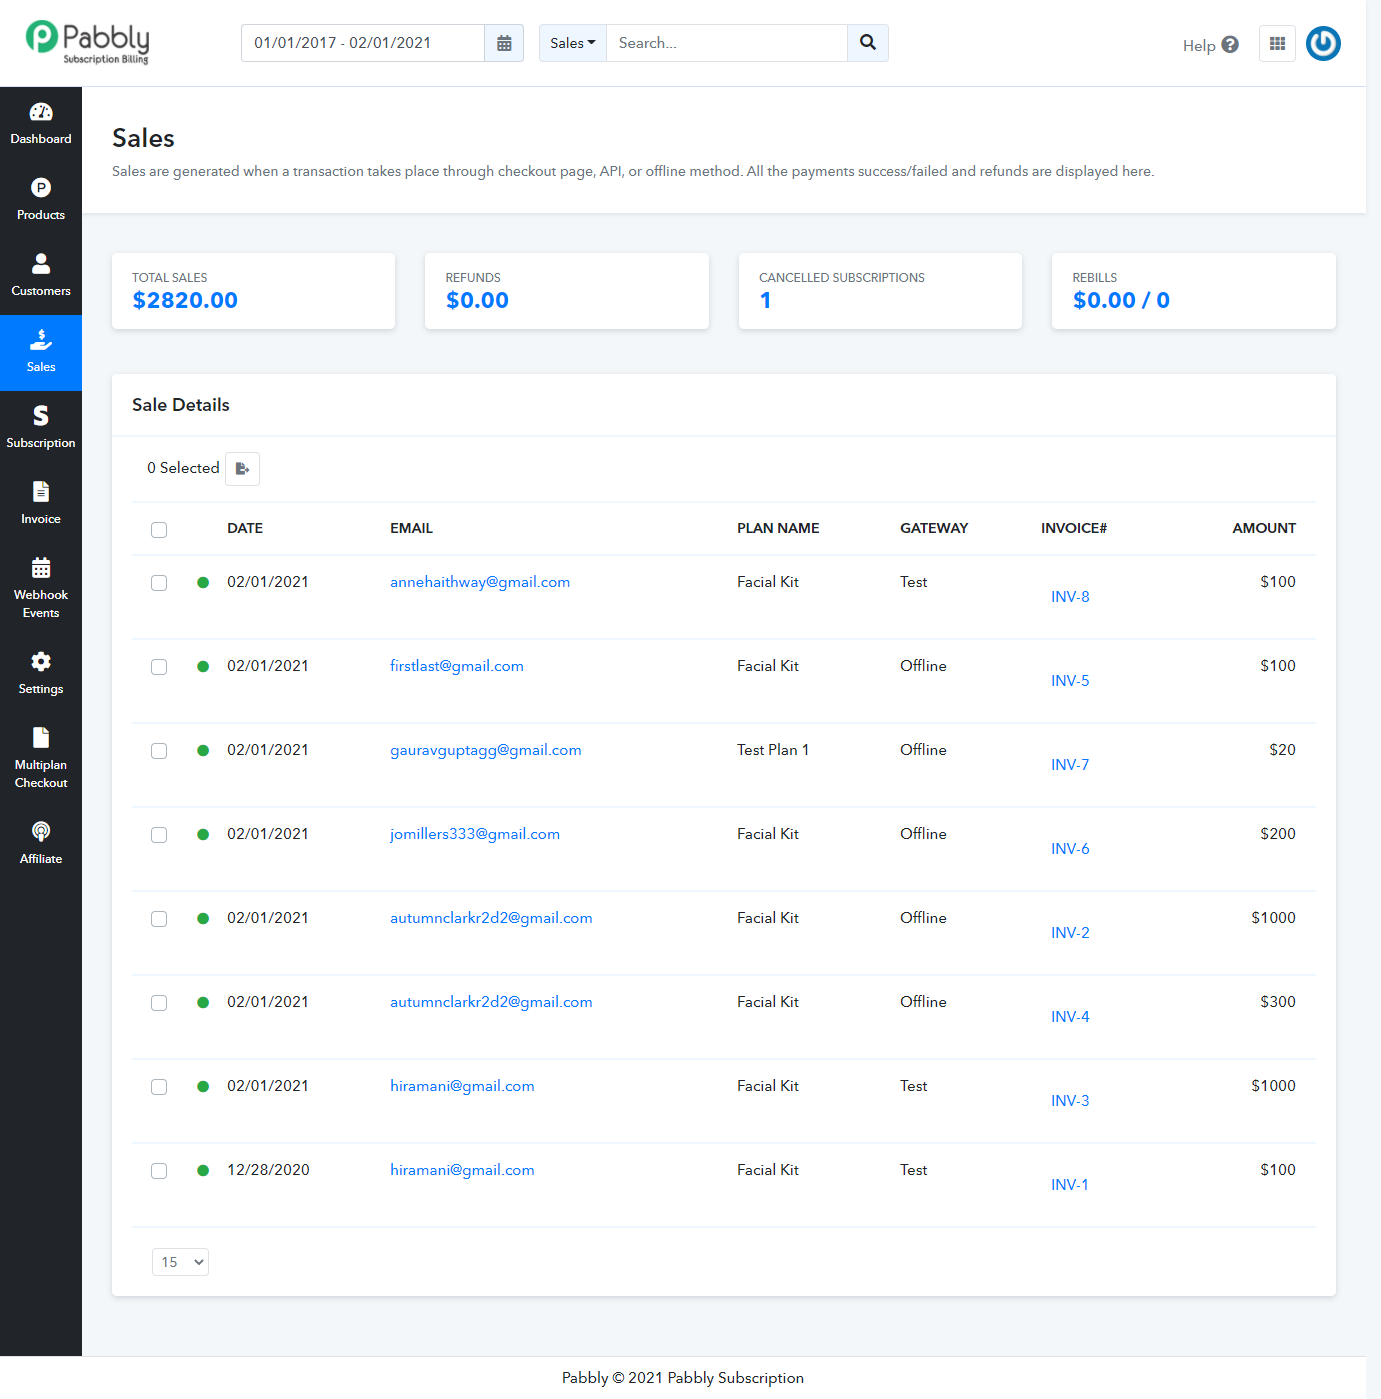
5. Sales
Sales are generated when a transaction takes place through the checkout page, API, or offline method. All the payments success/failed and refunds are displayed here in this section.
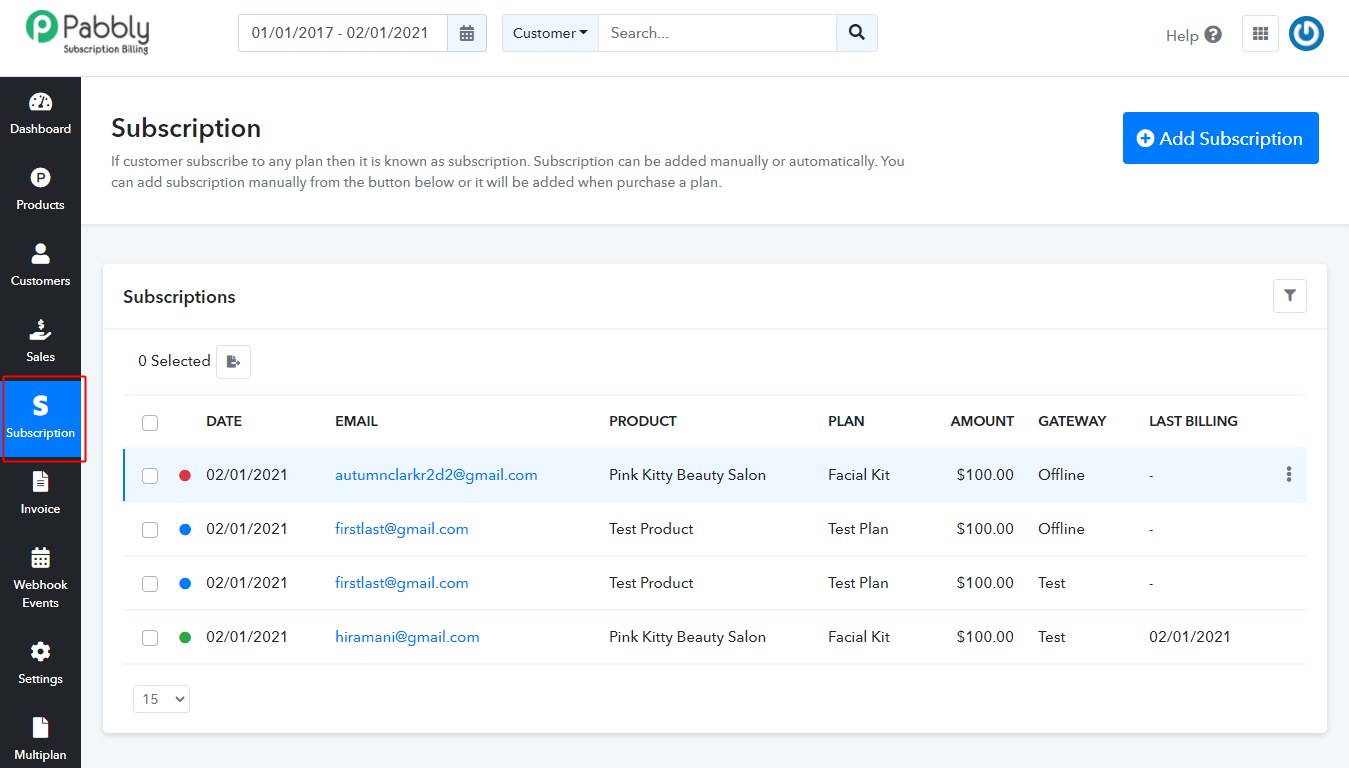
6. Subscriptions:
When a customer complete’s the purchase of any of your plan then the details are added in this section. Subscriptions can be added in two ways –
- Via hosted page/Online.
- Manually/Offline
How To Add A New Subscription Via Checkout Page/Online?
An online subscription is an automatic process, anyone who pays through your Checkout Page, Pabbly subscription automatically adds them as your Subscriptions to make it easier for you to manage and track transactions. You can create an online subscription via your hosted page or you can share the Url of your checkout page via emails or any other way.
Now check your “Subscription” section, a new subscription is created on top of the list by the same email address.
How To Add A New Subscription Manually/Offline?
- Click on the “Subscription” section from the sidebar menu.
- Now, Click on the “Add New Subscription”.
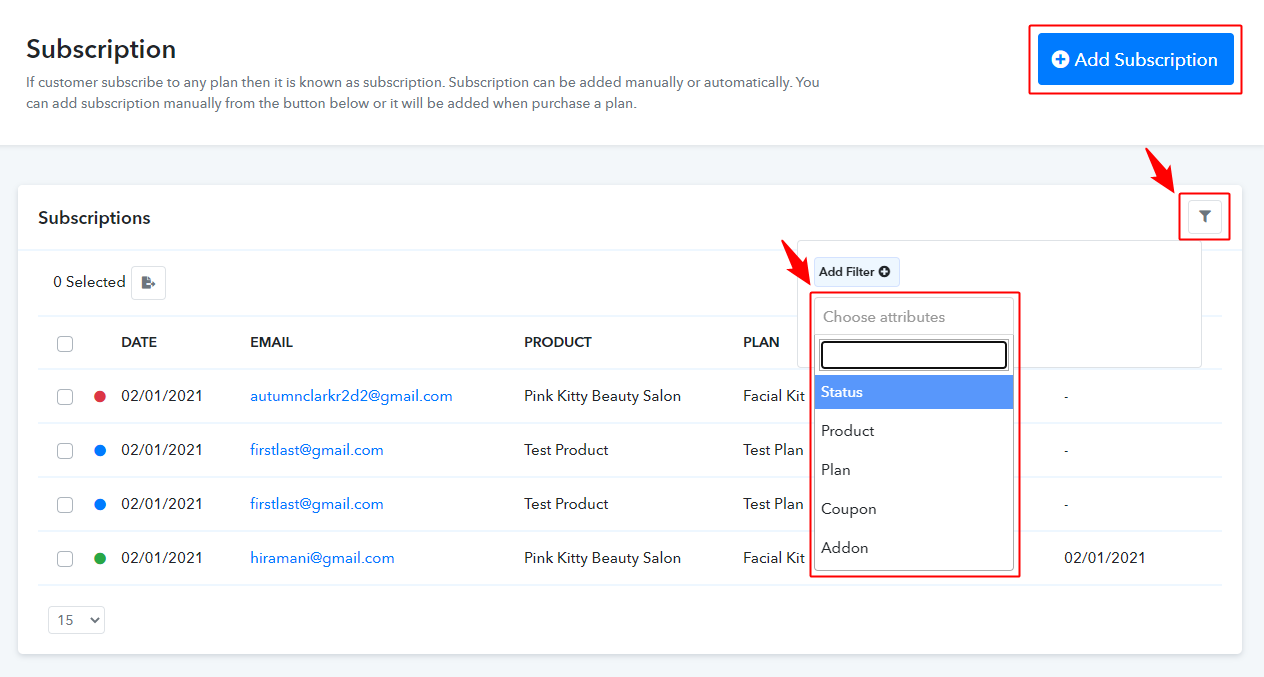
Moreover, if you want to view the list of certain status such as “Live” so, you can also apply the filter on the list and view the subscription which is live. Now fill-up the form which will look like this –
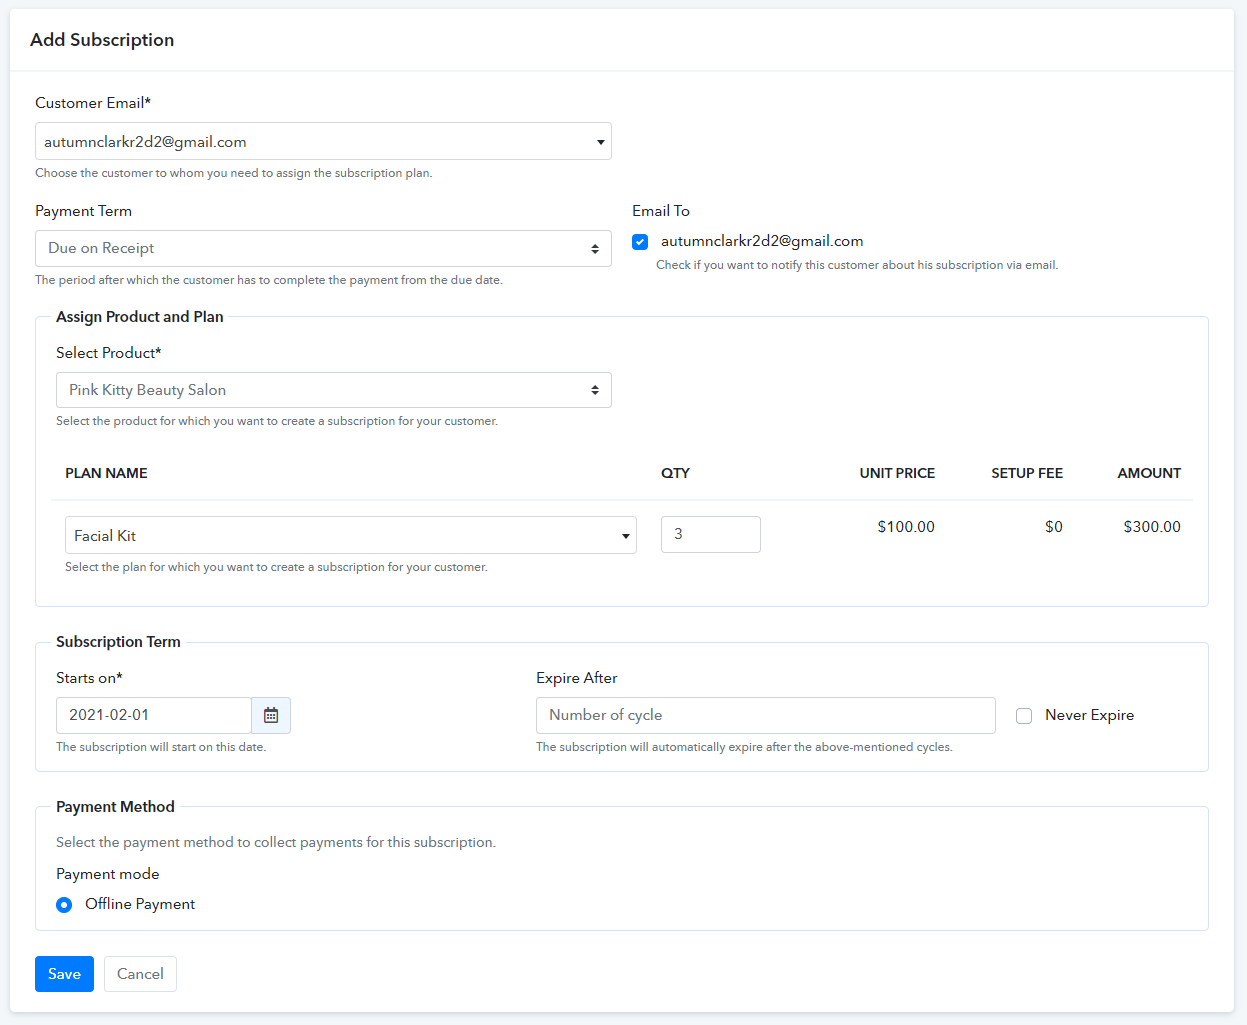
- Customer Name – You can add a new subscription for existing customers.
- Email To – Send email notification to the customer’s id informing about the new subscription.
- Payment Term – Payment term is like how long your customer can pay. For example, if you select net 15 that means your customer has 15 more days to make the payment. This case is just the same as Net 30, Net 45, Net 60.
You can specify the Subscription Term
- Enter the start date when your subscription is activated.
- Specify the number of billing cycles, after which the subscription expires.
(Tick on Never Expire if you want lifetime subscription) You have the 2 payment method –
- Offline – Offline payment means the payment which you receive from other sources i.e., cash, cheque, and other payment gateways. Then the Payment Method will be displayed as
offline in the subscription overview.

- Online payment – Receive payment via Paypal or Stripe.
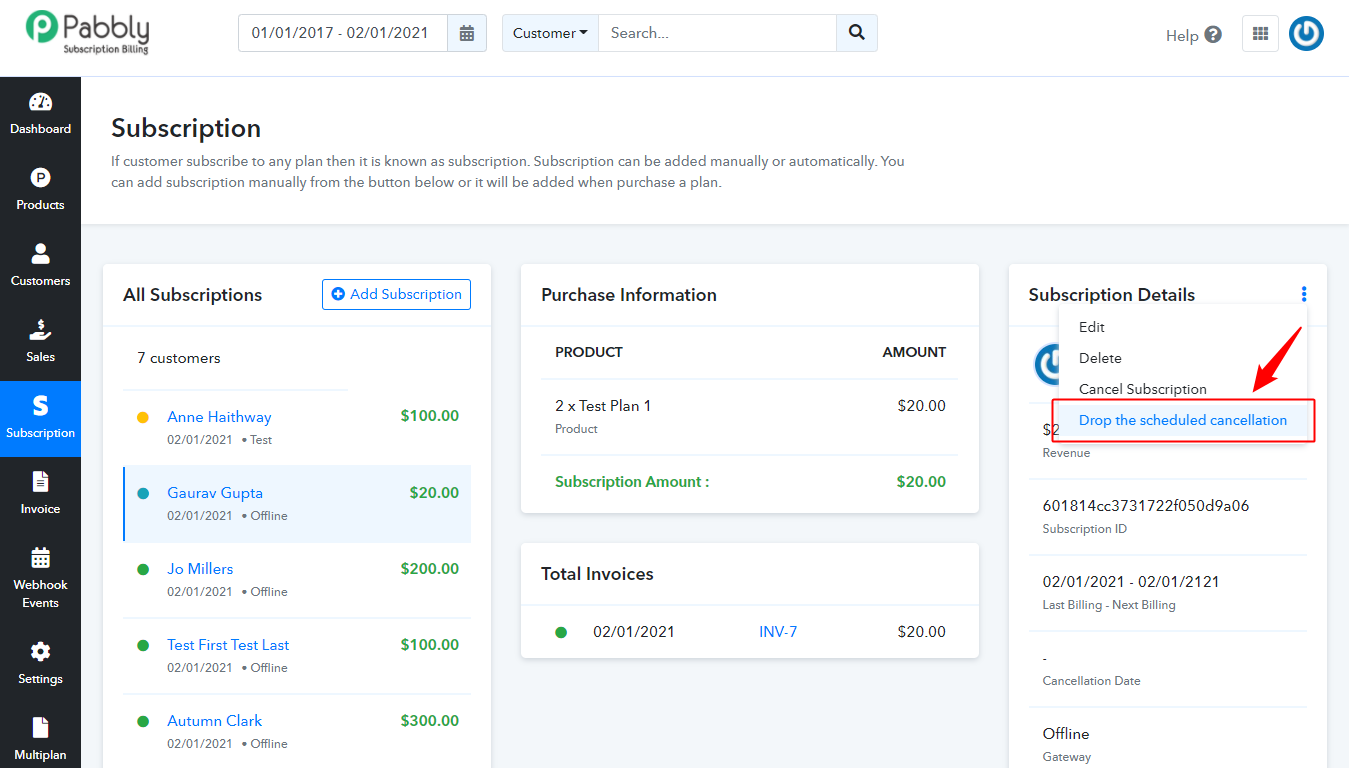
How To Cancel A Subscription?
To cancel the subscription, follow the steps below –
- Go to the “Subscription” section.
- Then, click on the email id of the subscribed customer.
- Now click on “More” button. Then select “Cancel Subscription”.
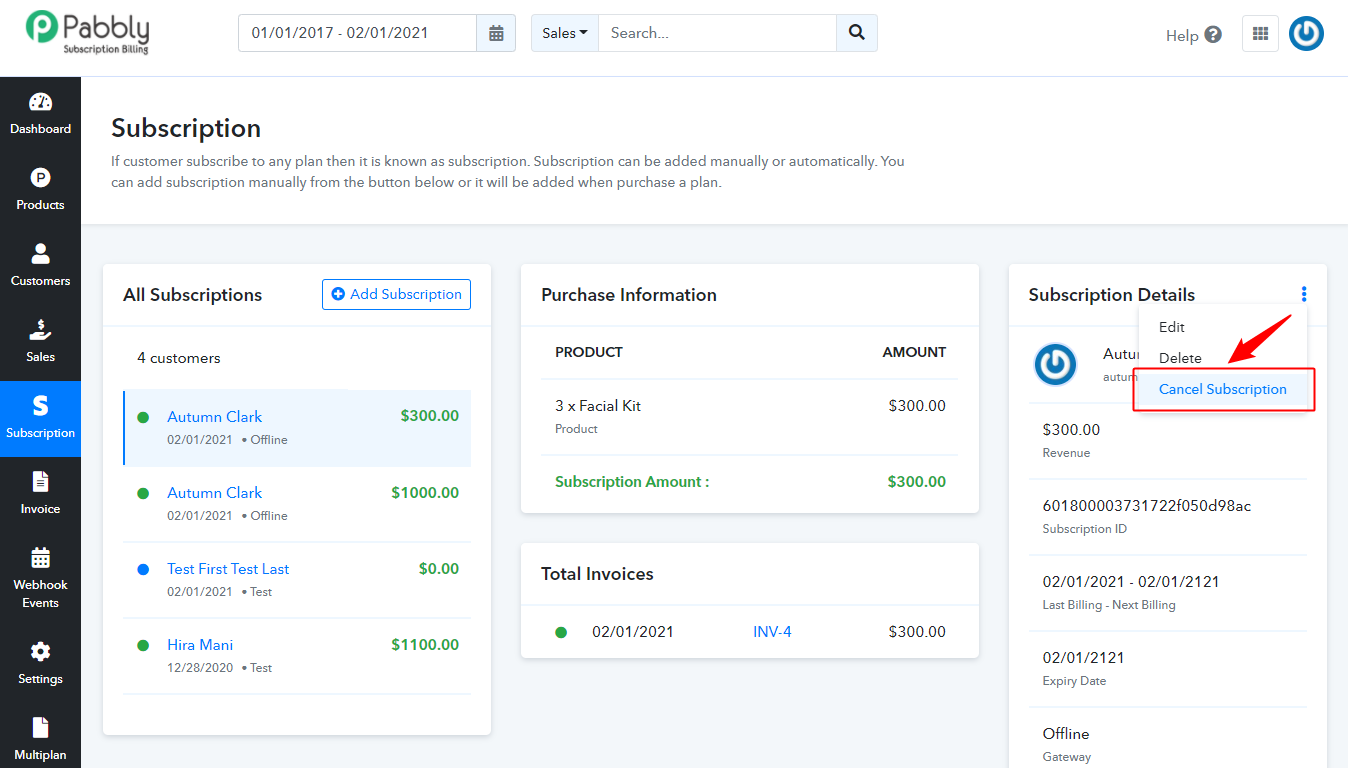
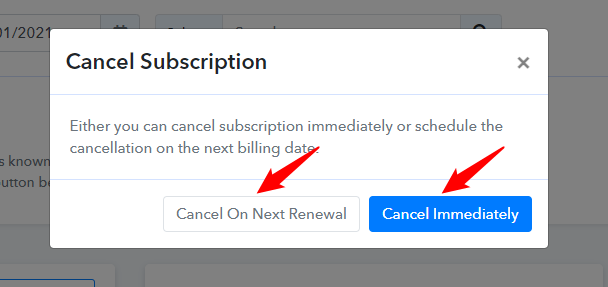
- Then you have to select when you want to cancel the subscription.

Switch To Live (Undo cancellation )
Pabbly Subscription introduces a new feature of “Switch To Live” subscriptions to the customers. This feature allows you to revert any scheduled cancellation into a live one. As you know, Pabbly Subscription allows you to cancel the subscription of any customer in two ways – Cancel Immediately – Subscription will be Cancelled immediately and the customer will not be able to use the service from the moment it is Cancelled. The billing of the customer will also be cancelled from the payment gateway and the payment will not be deducted anymore. Cancel on Next Renewal – Customer can use the service till the end of the current term and the subscription will be cancelled on next billing date.
So the switch To Live action will work for the Cancel On Next Renewal option. When merchant cancel the subscription of with next renewal action then it will be shown in the subscription table like this –
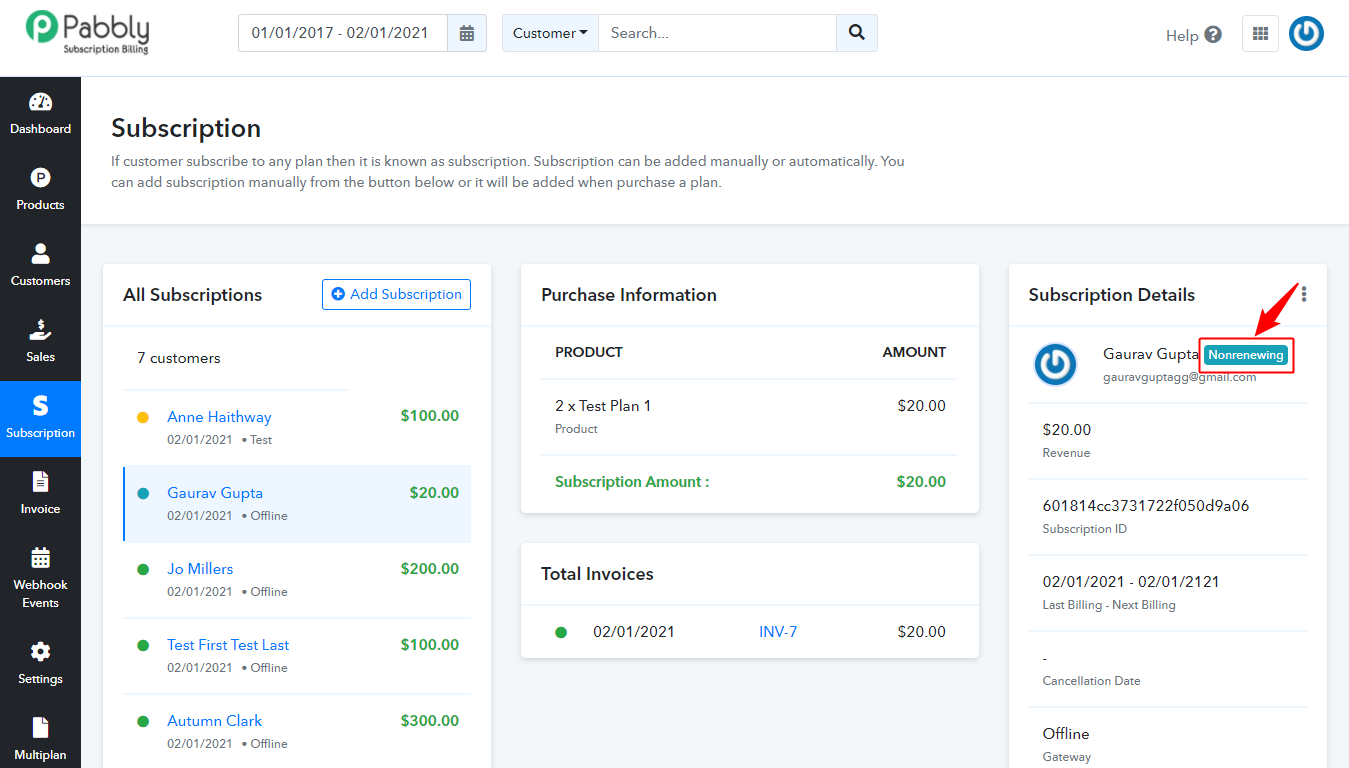
(In this case, the subscription of that customer will be assigned with ‘Non-Renewing’ status.) But if the customer changes their mind wish to continue their account then you can use the ‘Switch To Live’ option and make their subscription Live again.
How To Convert Any Non-Renewal Subscriptions Into Live?
Follow these steps to make a non-renewing subscription into a live one – In the above screenshot, you can see that the subscription of the customer is showing Non-Renewing. So now, click on customer’s email address -> then click on more option -> Select “Switch to live” option from the drop-down.
Once you select this option, the notification for successfully changing the non-renewing subscription into Live will show like this –
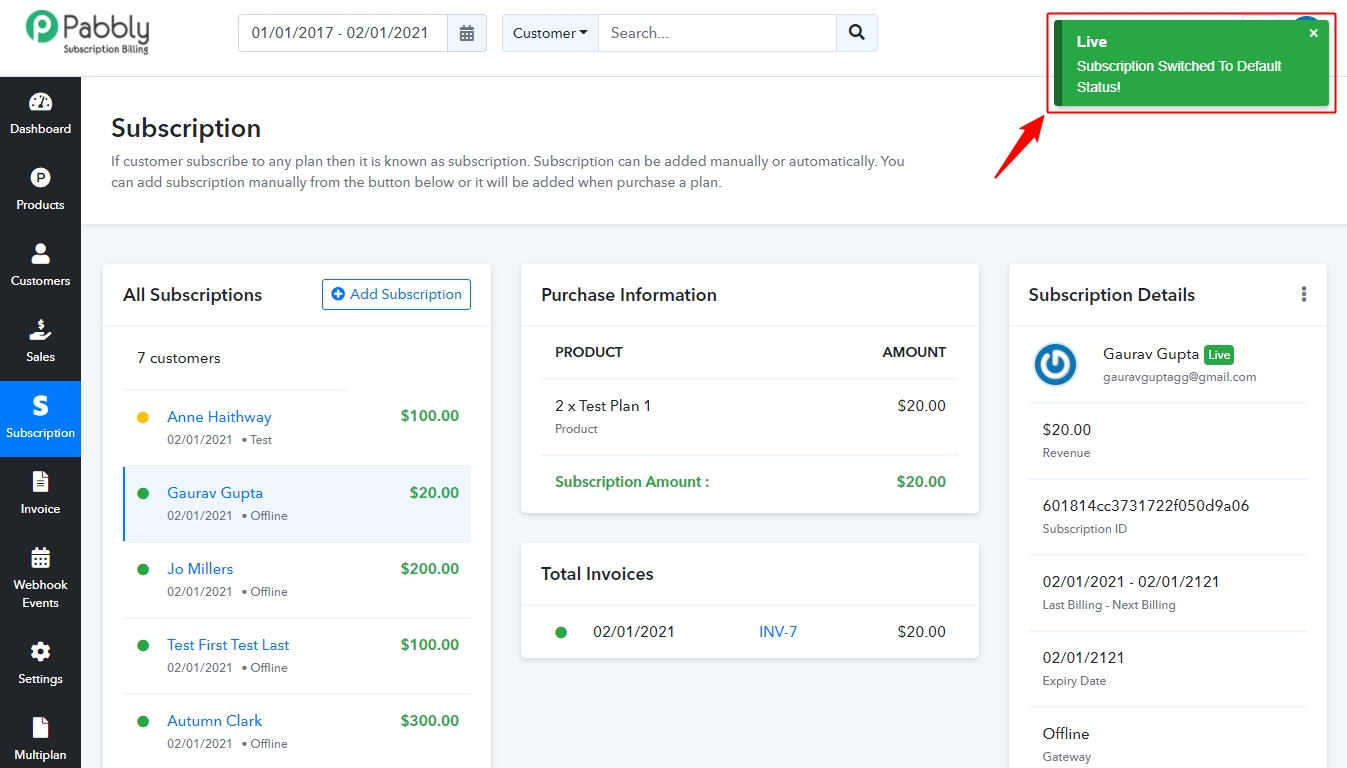
Now, go back to Subscriptions and here you’ll see that the subscription status of that customer goes to live.

7. Invoice:
Invoices are generated by the system and automatically sent to the customer on every transaction. To view the generated invoices of customers. Follow the steps below –
Invoices are generated by the system and automatically sent to the customer on every transaction. To view the generated invoices of customers. Follow the steps below –
- Go to the “Invoice” section.
- Now click on the customer whose invoice you want to see.
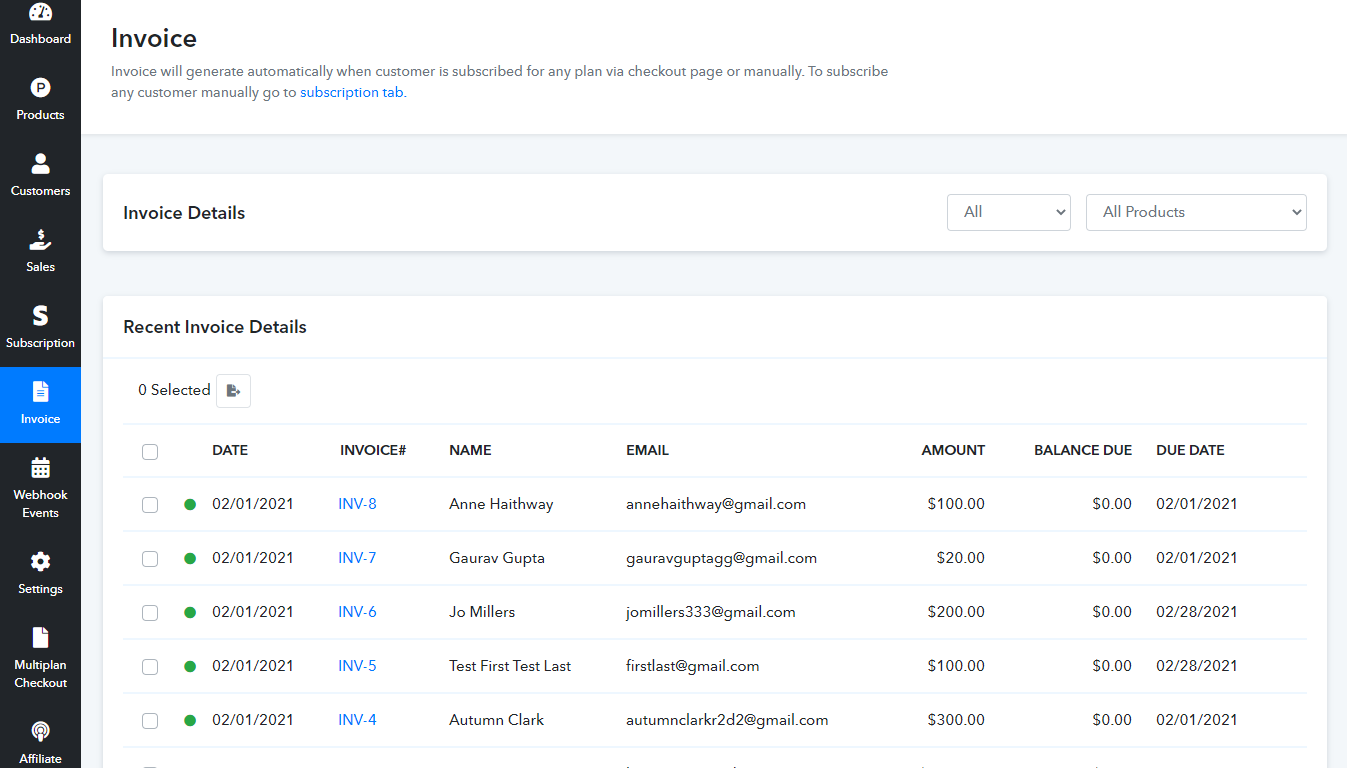
Here is the created invoice looks like –
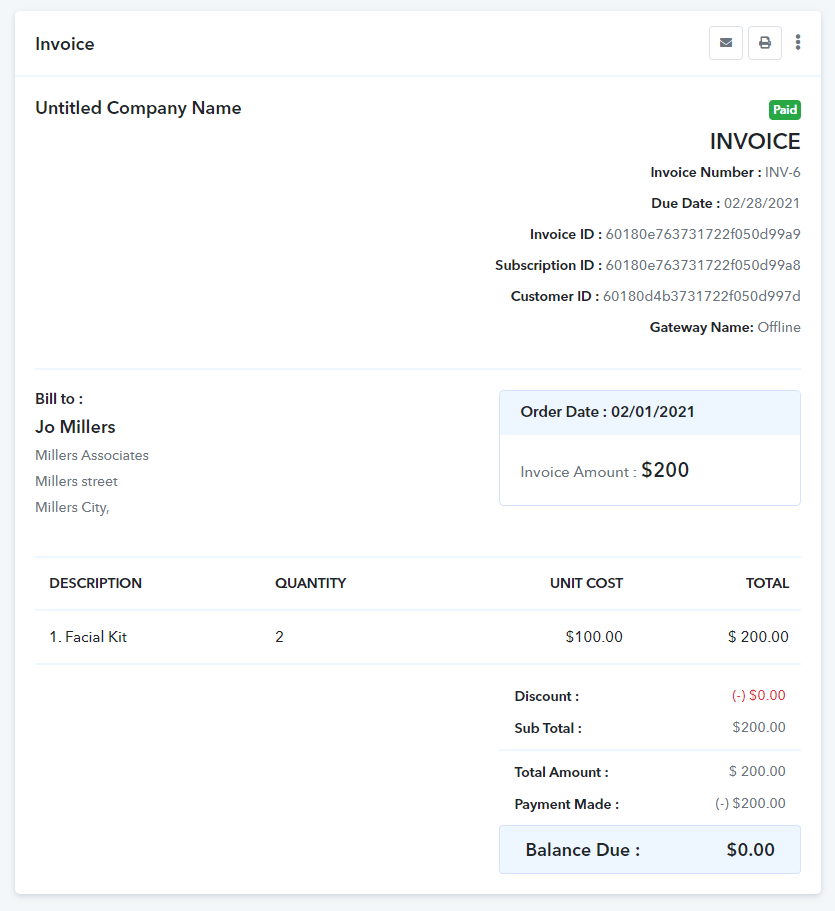
NOTE:- If you offer free trial period then the invoice will be generated after the trial period is over.
There are two ways to make payments one is via checkout page and other is through invoice
In your inbox, you’ll receive an invoice that has the option of “Pay Now” through which the customers are able to make payments.
(The invoice with “Pay Now” option will only available when the payment term is selected)
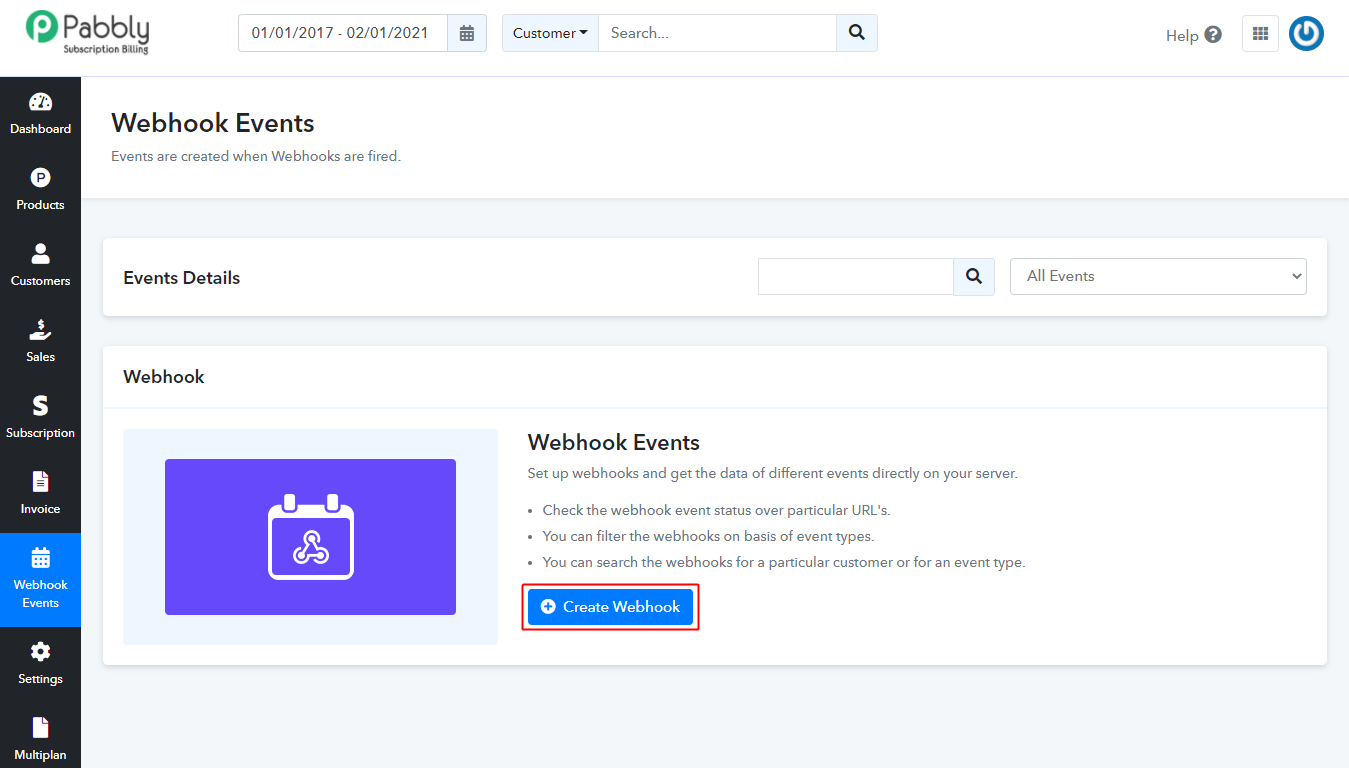
8. Webhook Events
Set up webhooks and get the data of different events directly on your server.
Check the webhook event status over particular URL’s.
You can filter the webhooks on basis of event types.
You can search the webhooks for a particular customer or for an event type.
9. Settings:
You can change the settings of the following sections.
- Profile Settings
- Payment Gateway Integration
- API Settings
- Checkout Page Settings
- Email Notification
- Client Portal
- Webhooks
- Tax
- Invoice Settings
- Dunning Settings
- Addon Accounts
- Multi-Currency
Profile Settings
Set up your profile here by filling up your details such as Name, Email, Phone, Currency, Time Zones etc.
How To Setup Your Profile?
- Go to the “Settings”.
- Then click on “Profile Settings”.
- Fill up the entries.
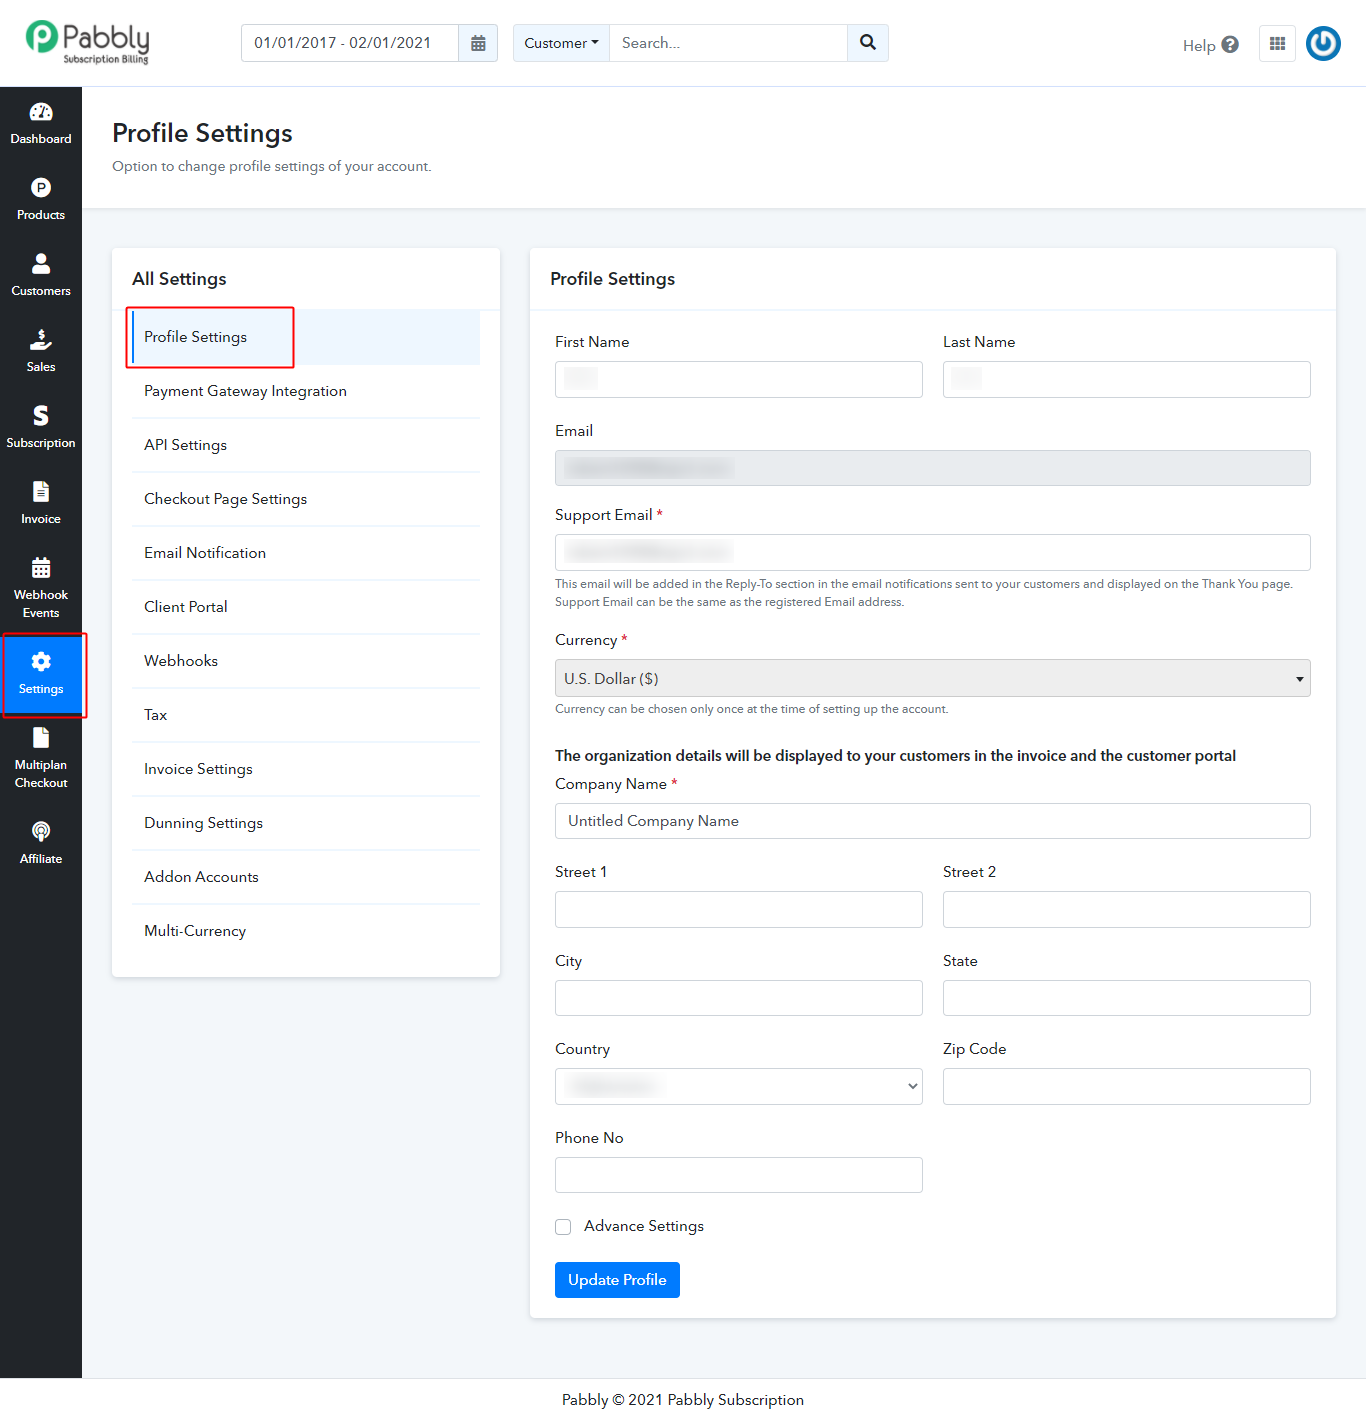
Now, click on “Update Profile” button.
How To Integrate A Payment Gateway?
Pabbly subscriptions support Paypal and Stripe and also a test mode to test your transactions. To integrate with PayPal and Stripe, you need a secret key from your PayPal and Stripe account to do so. If you want to integrate with PayPal, you need to enter the client ID and Client Secret key. It also provides you with the test sandbox mode.
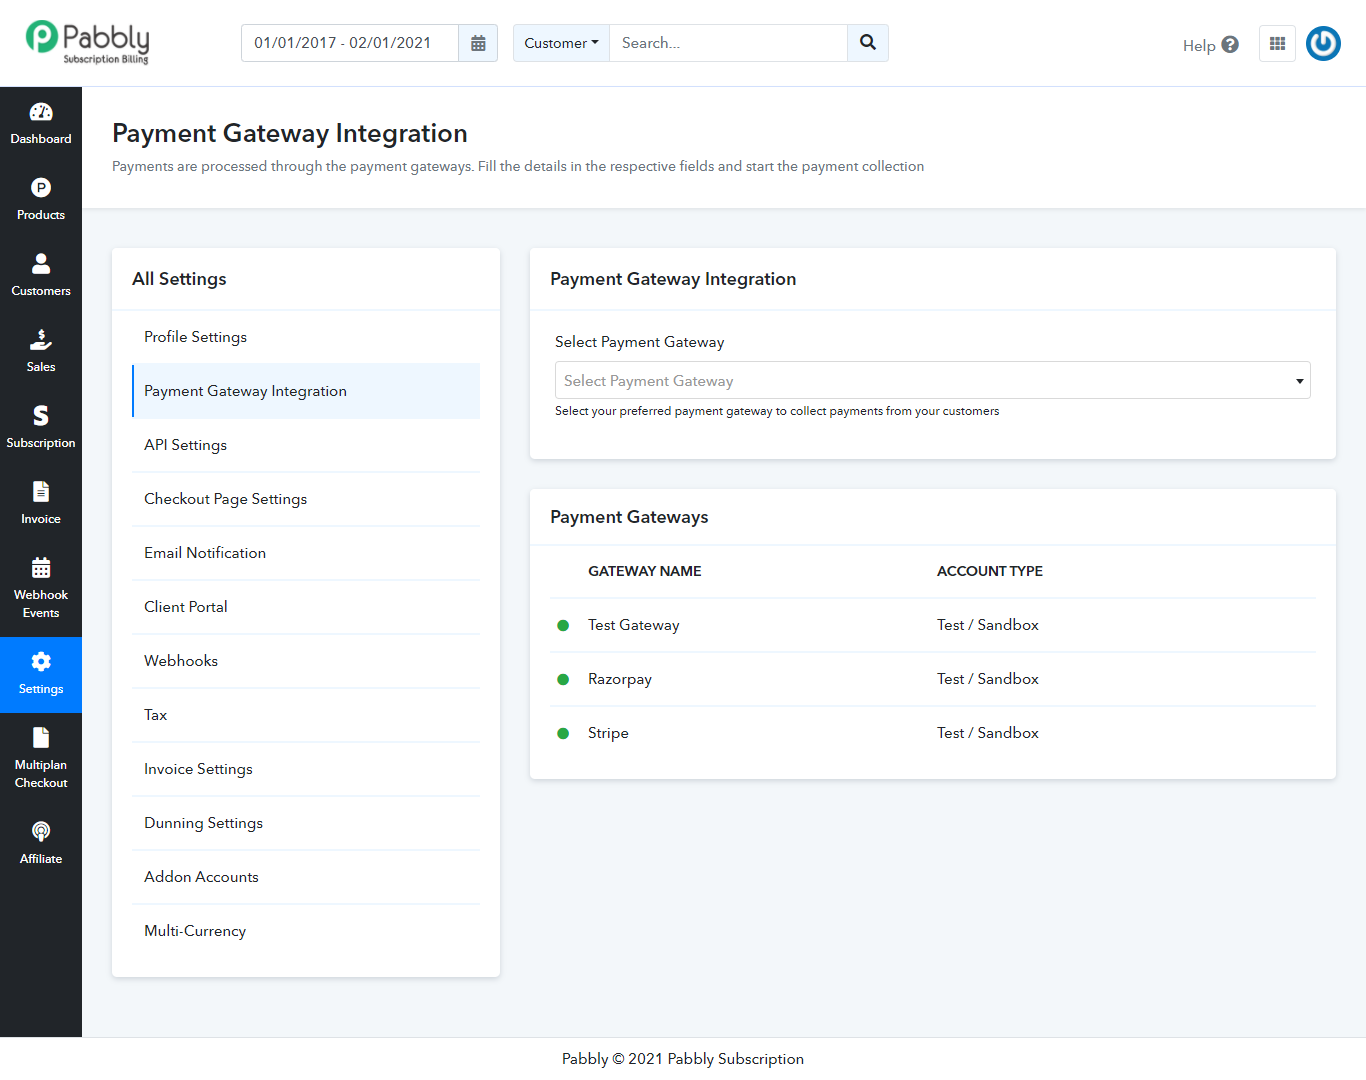
Note: You can add multiple PayPal and Stripe payment gateways with your Pabbly Subscription account. Check out these links
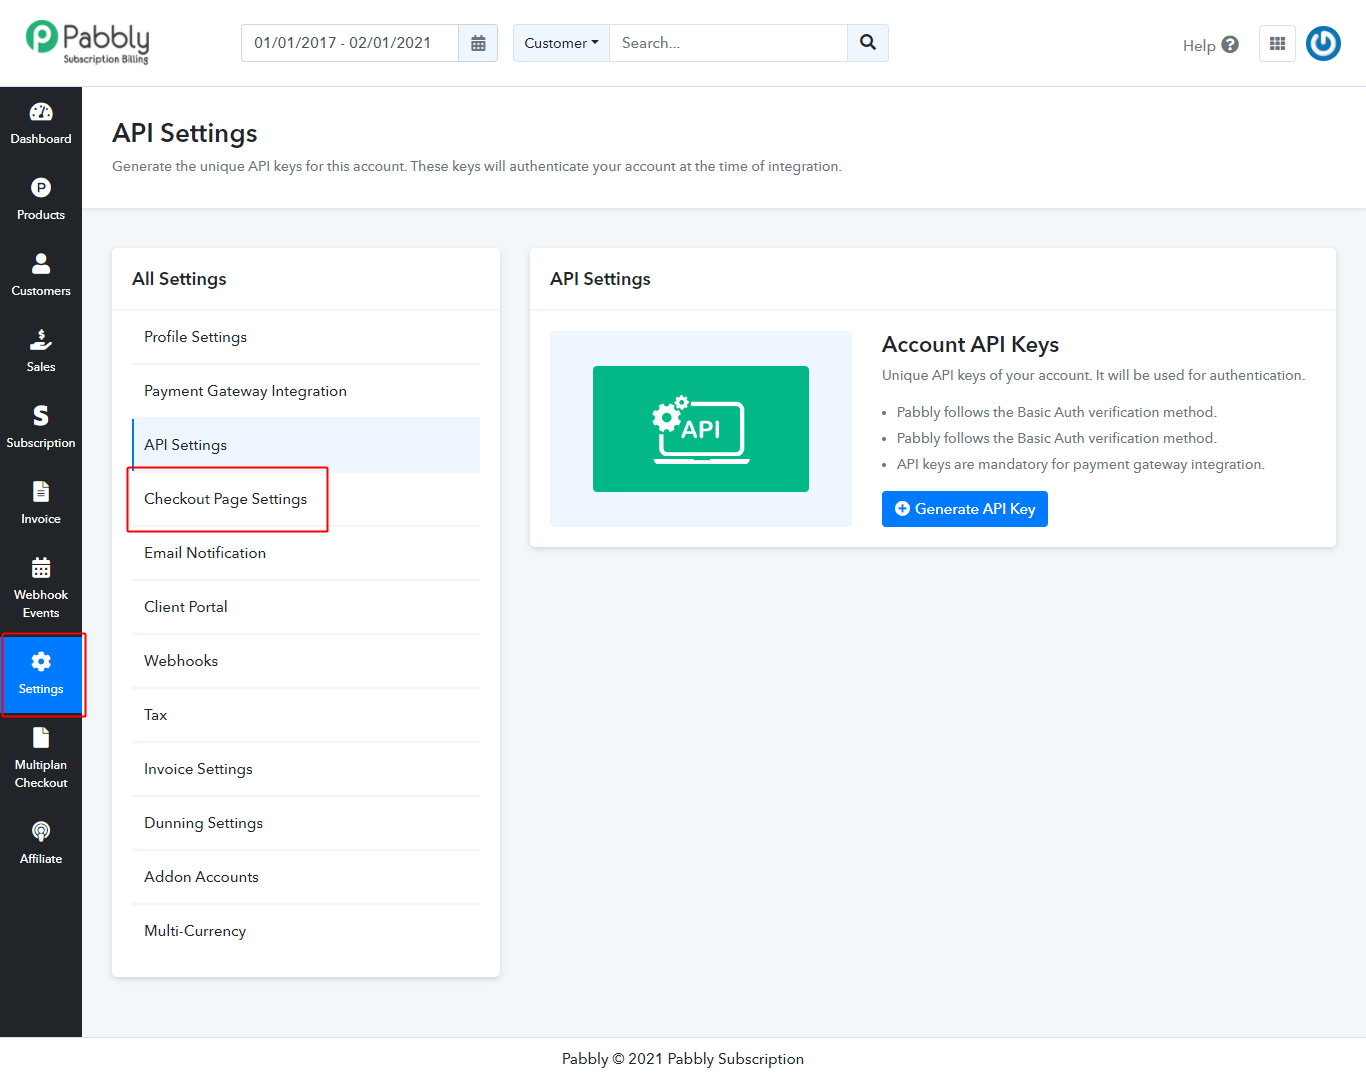
API Settings
Whenever customer signed up in the Pabbly Subscriptions they will get a unique API key and secret key. If you want to integrate the Pabbly subscriptions on your software or your SaaS application then these keys are required. Here you can also regenerate your API and secret key.
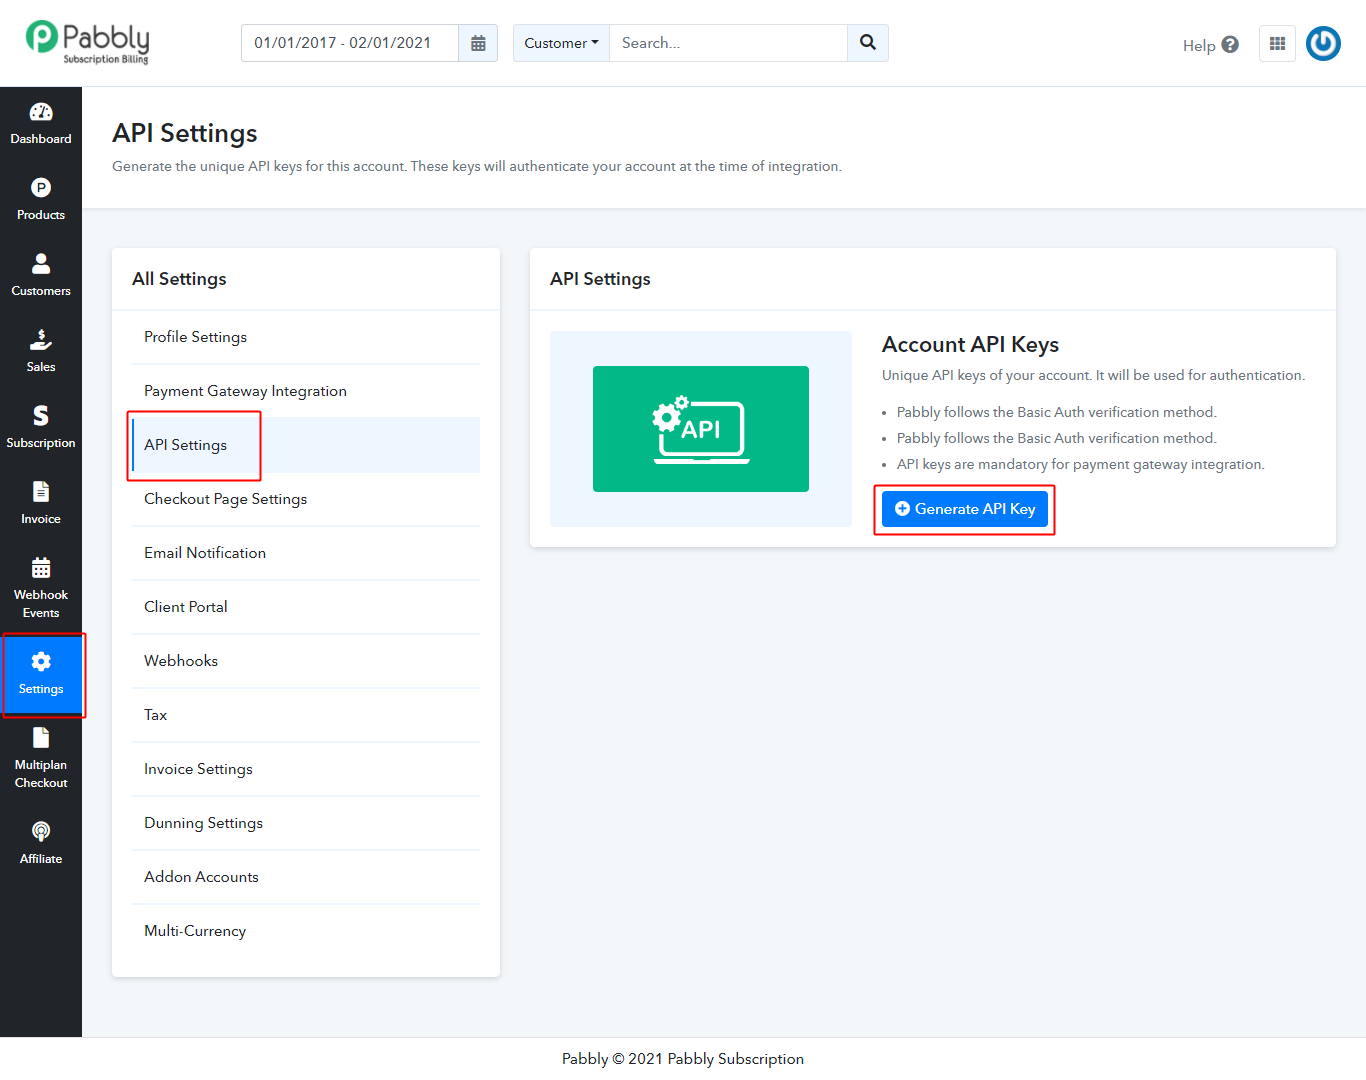
You can use our API’s to get useful data from your account and use it to integrate Pabbly Subscriptions in the varied type of applications.
Pabbly Subscriptions API And Integration Guide
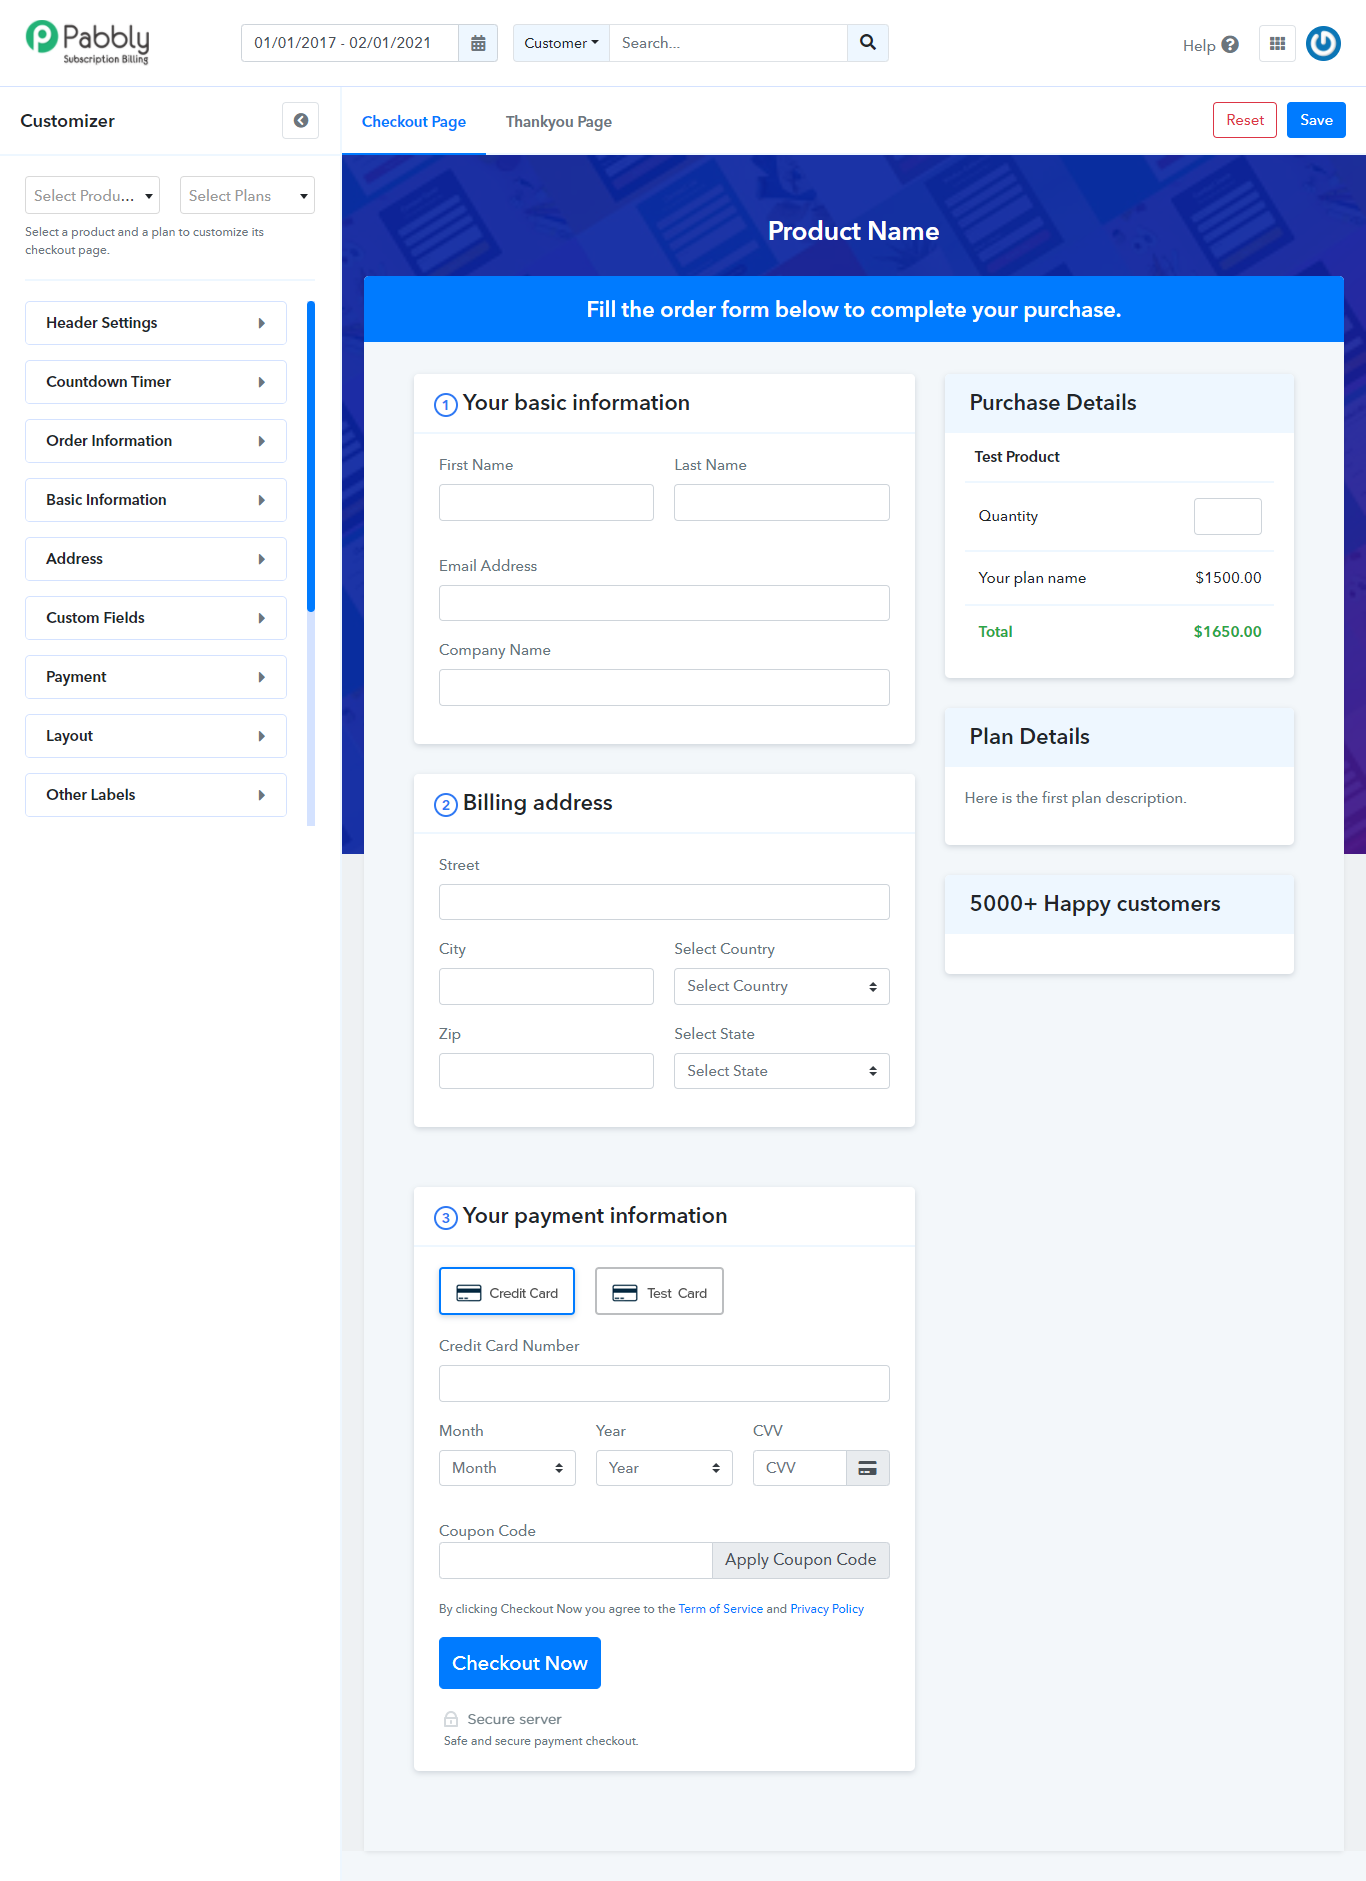
Checkout Page Settings
Checkout pages are specific to each product’s plan and you can view the checkout page for each plan by clicking on “View Checkout Page” under each plan. Once you embed this link in your website, your customer can subscribe to your plan by giving their personal and card information. How to change the settings of checkout pages?
- Go to the “Settings” section.
- Click on “Checkout Page Settings”.
You will be redirected to Checkout Page Customizer.
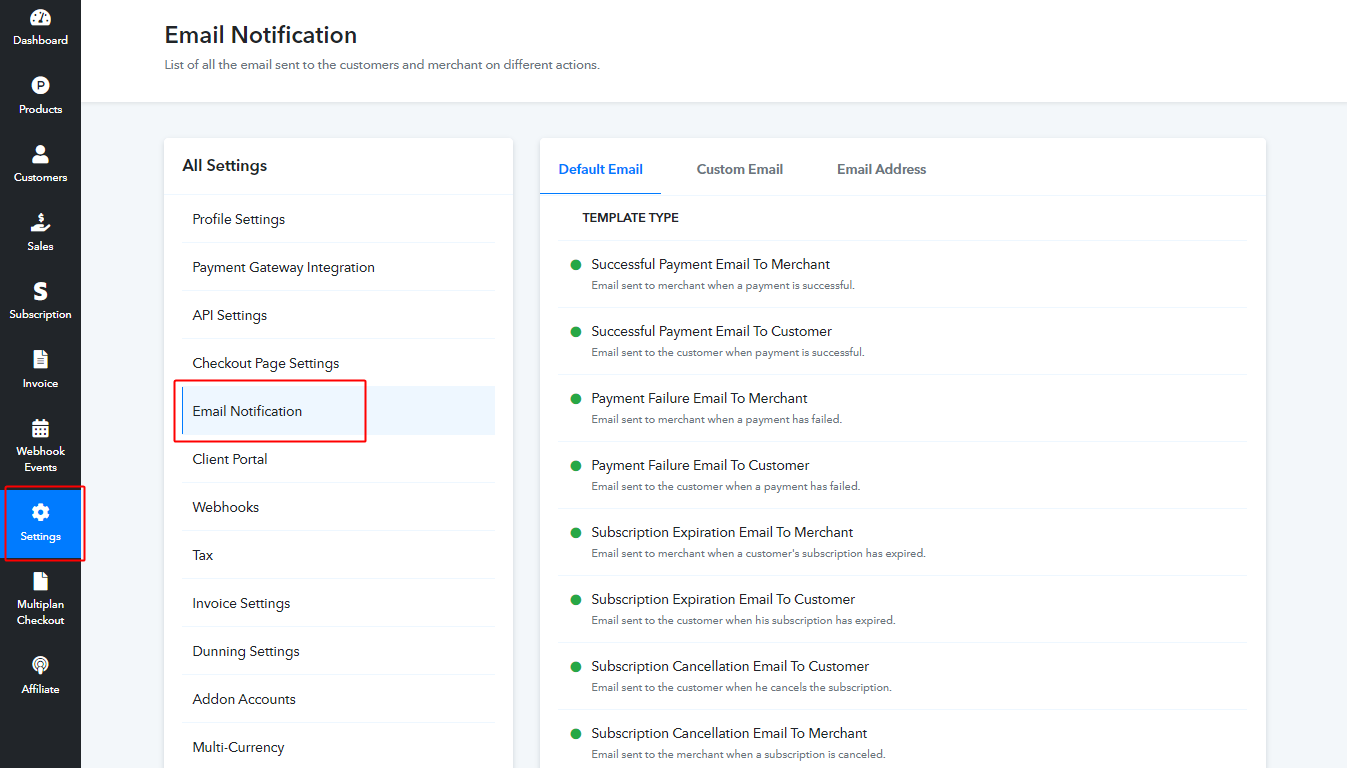
Email Notification
In this section, you can enable or disable email notification for different categories. Moreover, you can customize them by clicking on the edit button.
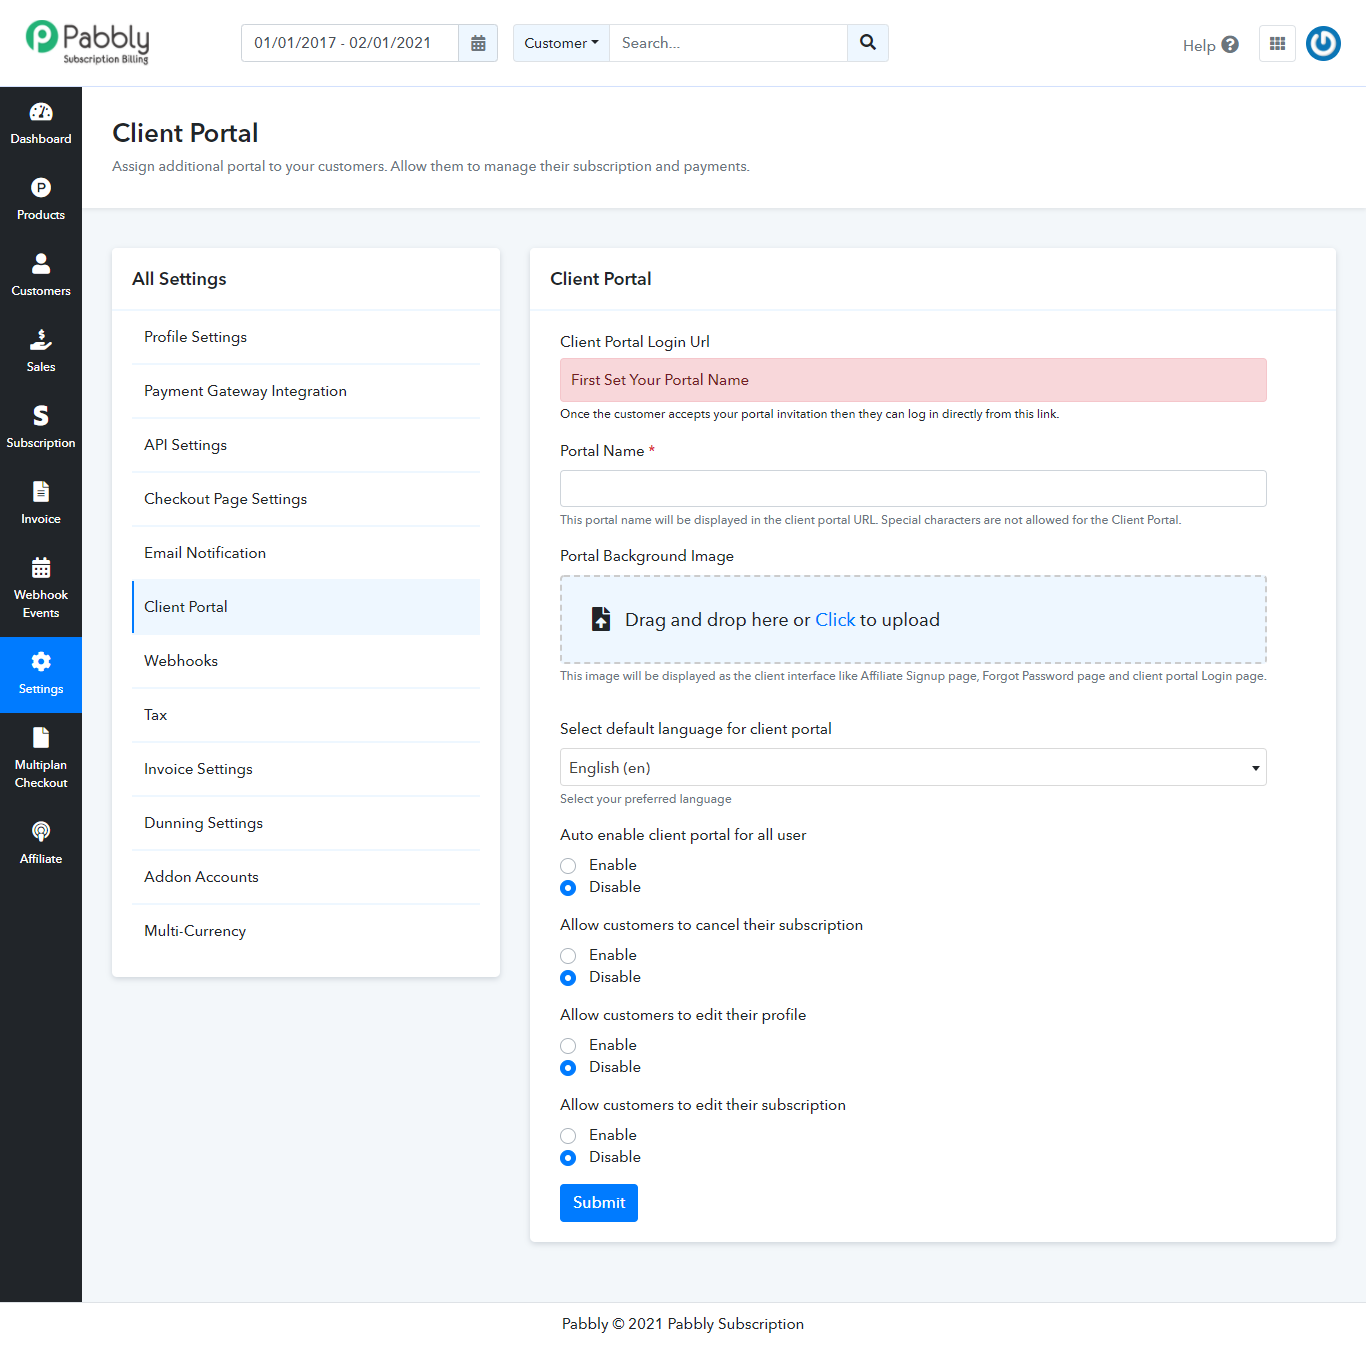
Client Portal
With our Client Portal, you can now offer your customers to monitor their account, edit subscriptions, track transactions, download invoices and many more. You can find more details on Client Portal
here.
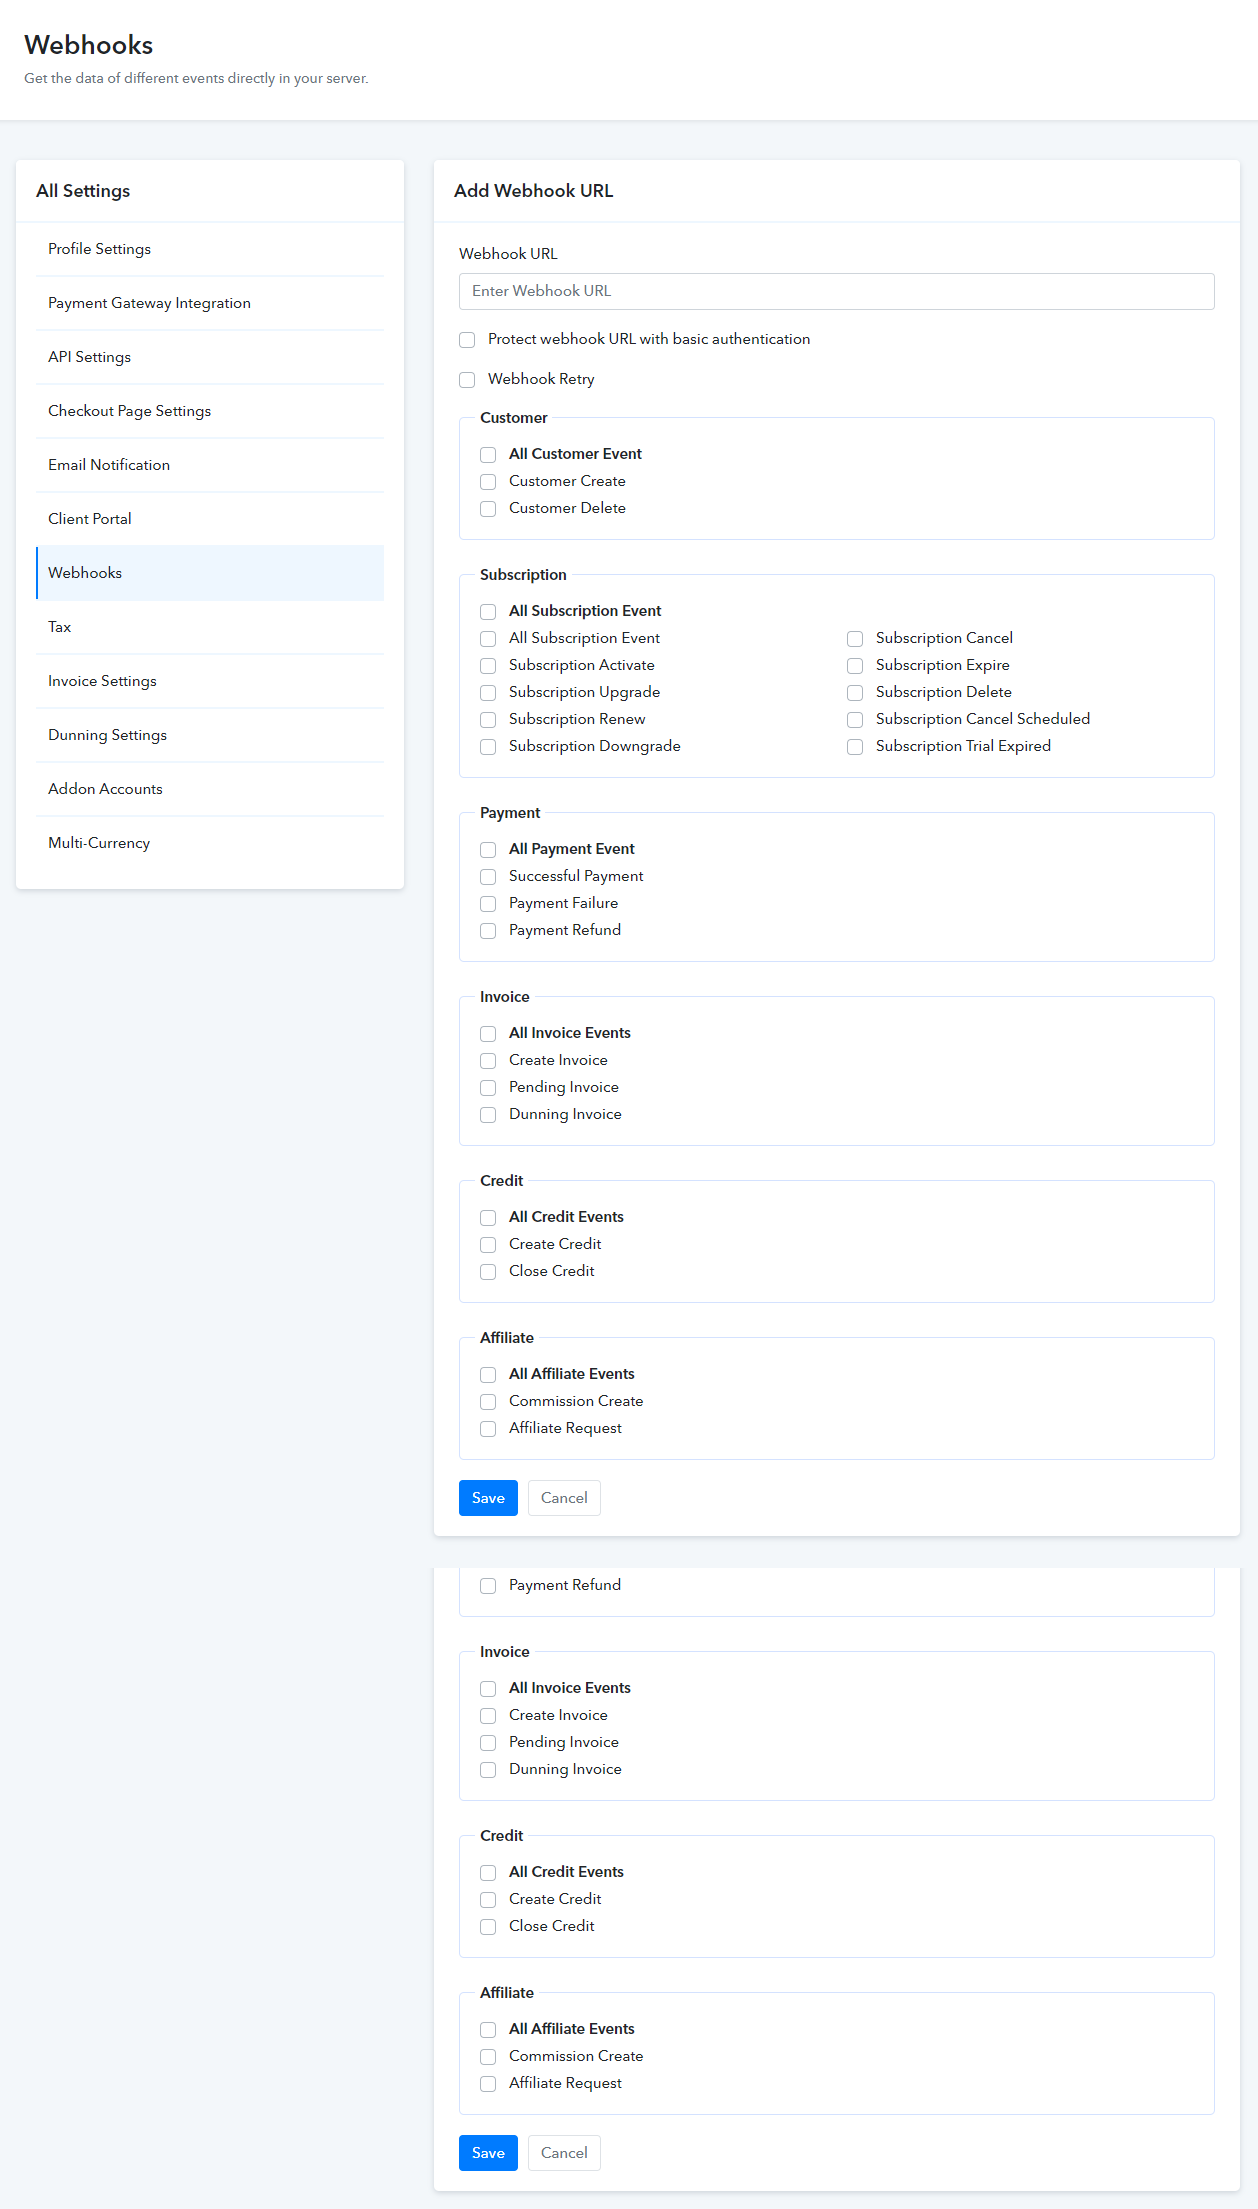
Webhooks
This feature is majorly used for the integration process. You can collect data in the form of HTTP post for differents directly in your third-party application. You just need to create a path in the webhook URL and add it in you Pabbly Subscriptions account and select the events of which you want to collect the data.
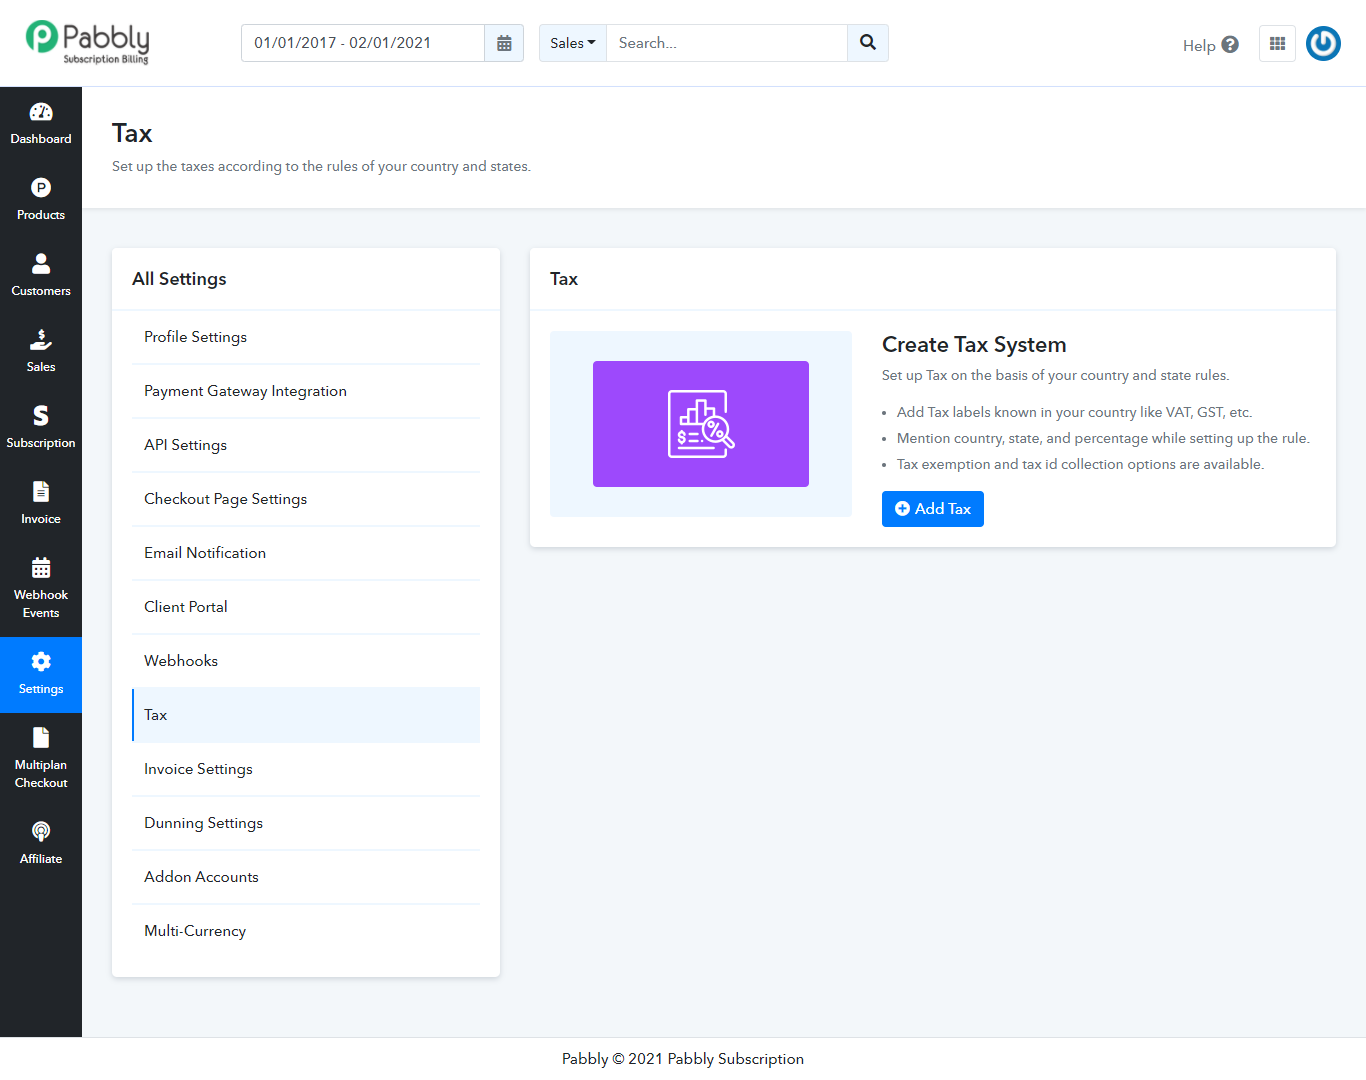
Tax
The automatic working tax module of the Pabbly Subscriptions can be used by the merchant to collect additional taxes from customers. The tax management system of Pabbly Subscriptions works on the basis of country and state rules. You can set up the tax percentage according to your country and state rules. Further, there is an option for a Tax Id collection and reversal charge.
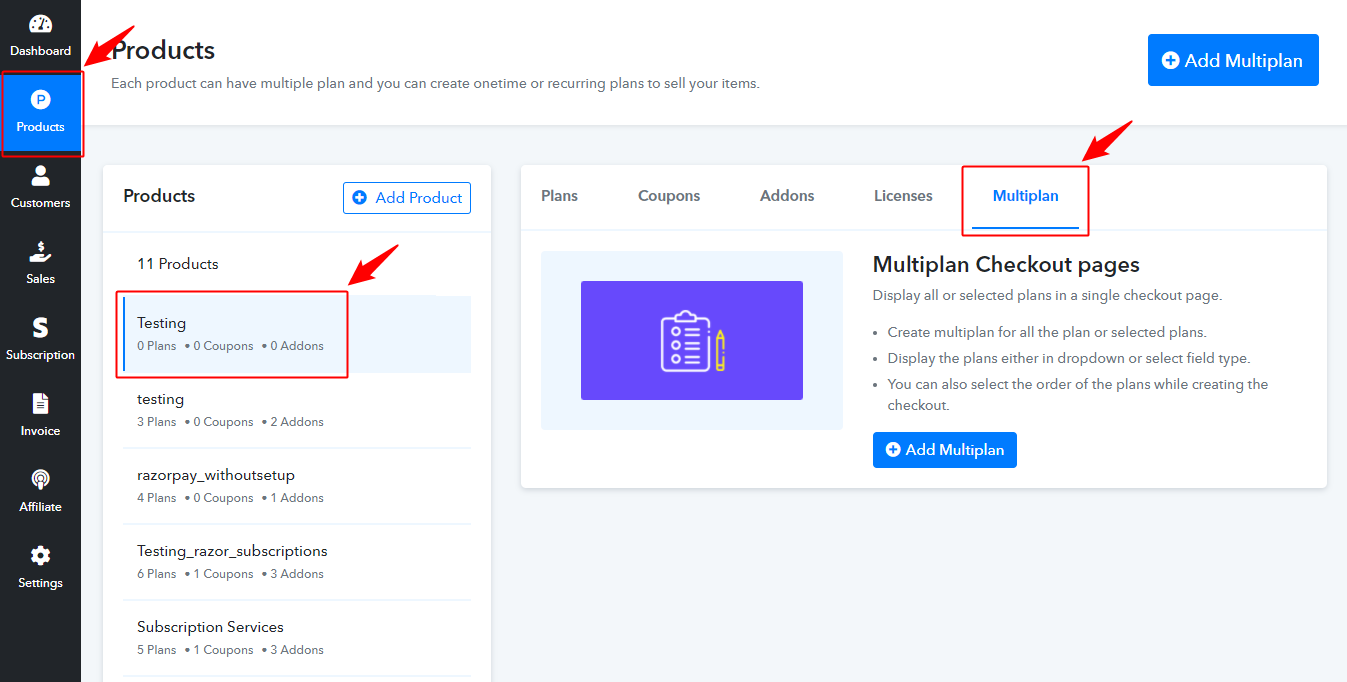
9. Multi Plan Checkout Pages –
By this feature of Pabbly Subscription, you can make a single checkout page which will have multiple plans. Your customer can choose any of the plans and then complete the checkout. This feature of Paably Subscriptions is also known as Multi-plan checkout page feature. To know more about this please check the Documentation.
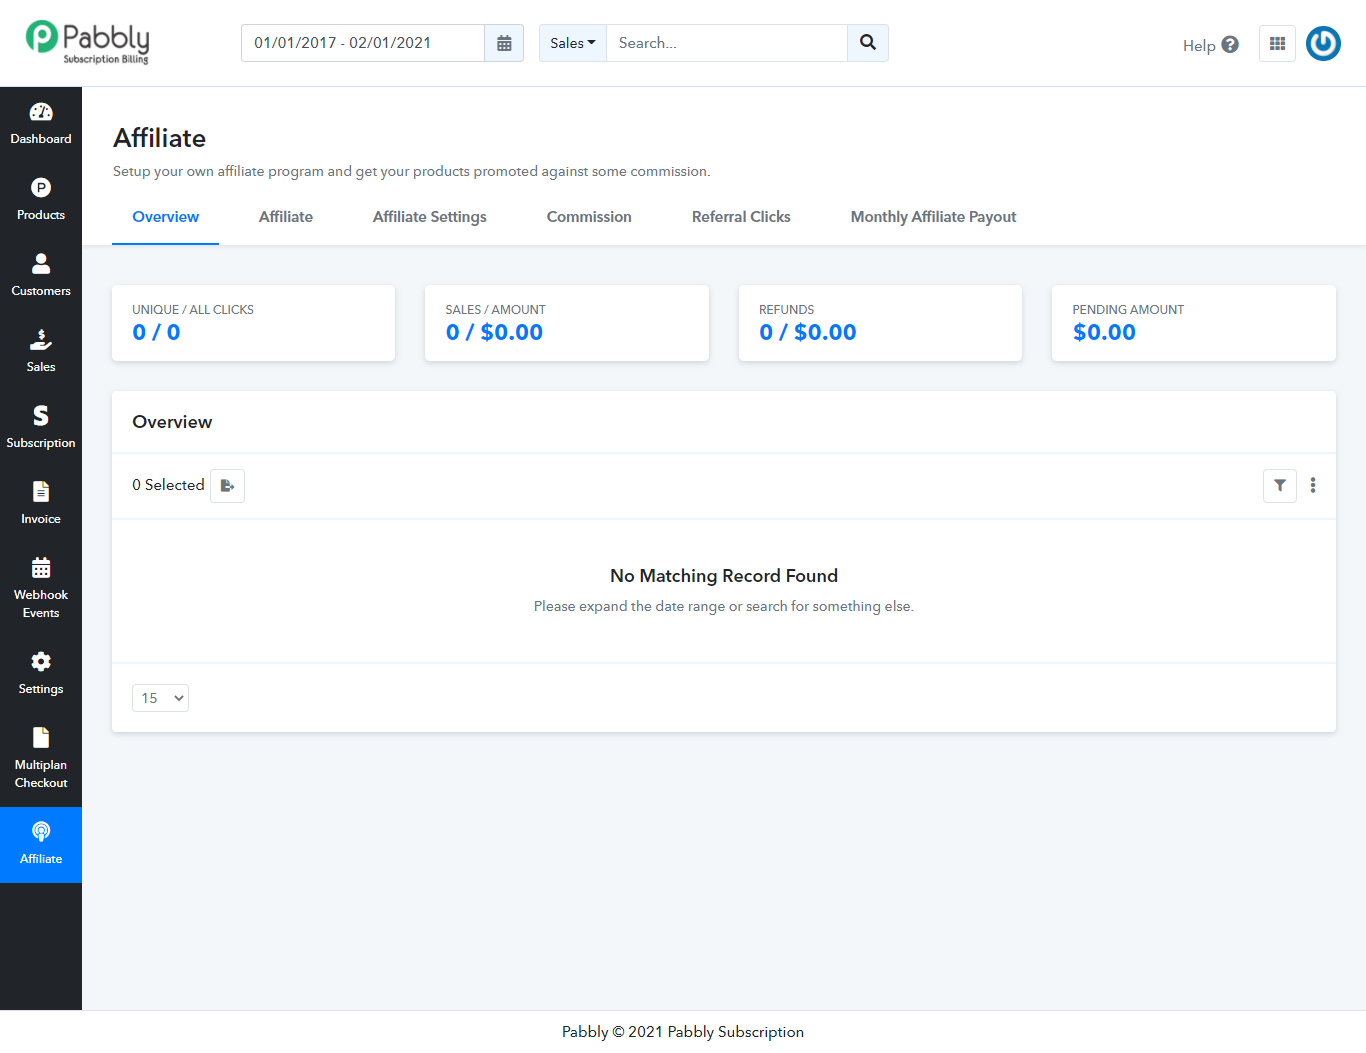
10. Affiliate:
The Pabbly Affiliate Management System is integrated with the Pabbly Subscriptions application. By this system, you can start your own referral program. In this people will sign up to become your affiliate partner and promote your product against some commission. To know more about the affiliate system please check this Documentation.