Are you looking for a way to integrate Calendly with Kirim.Email? If yes, then keep reading, this blog might be beneficial for you.
But before starting the integration process let’s talk a little bit about these software i.e, Calendly and Kirim.Email. Calendly is an app for scheduling appointments, meetings, and events without the use of email chains and phone tags. You can confirm your appointment by sending a Calendly link to the people even if they don’t use Calendly. While Kirim.Email is a web-based, very easy to use email marketing platform to send personalized emails to your subscribers.
Now, you must be thinking that if you can integrate these apps to save your time and a lot of effort. So, that every time someone makes an appointment on Calendly, the lead data or the customer’s info can be automatically updated in your Kirim.Email account. Of course, there is a way to integrate these two apps via an amazing software called Pabbly Connect.
Why Choose This Method Of Integration?
In contrast with other integration services-
- Pabbly Connect does not charge you for its in-built apps like filters, Iterator, Router, Data transformer and more
- Create “Unlimited Workflows” and smoothly define multiple tasks for each action
- As compared to other services which offer 750 tasks at $24.99, Pabbly Connect proffers 50000 tasks in the starter plan of $29 itself
- Unlike Zapier, there’s no restriction on features. Get access to advanced features even in the basic plan
- Try before you buy! Before spending your money, you can actually signup & try out the working of Pabbly Connect for FREE
Through Pabbly Connect, you can create automated workflows and transmit the data between several apps and services without any manual work or coding skills. After integrating any two or more than two applications, your entire workflow works automatically. Other than workflows, you can access its other great features like instant triggers, filters, path routers, etc even with the free plan.
Hence, without any further delay, let’s begin the integration process of Calendly with Kirim.Email.
Step 1: Sign up to Pabbly Connect

Commence the process of integrating Calendly with Kirim.Email by clicking on the “Sign Up Free” icon on the Pabbly Connect dashboard. Further, you can manually fill-up all the details or sign up using your Gmail account.
Try Pabbly Connect for FREE
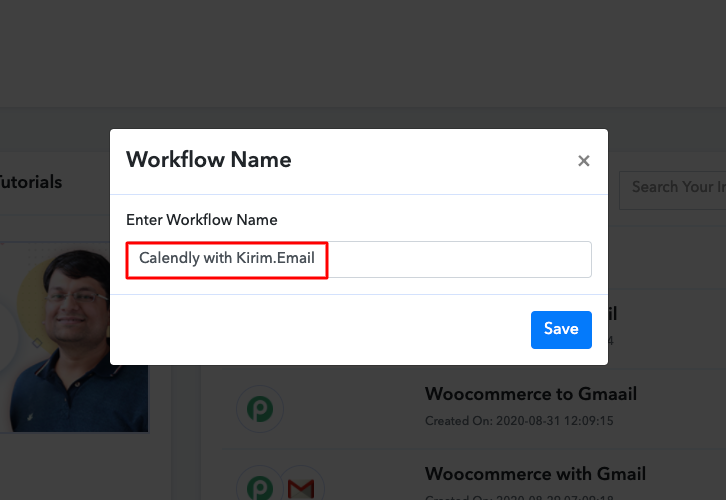
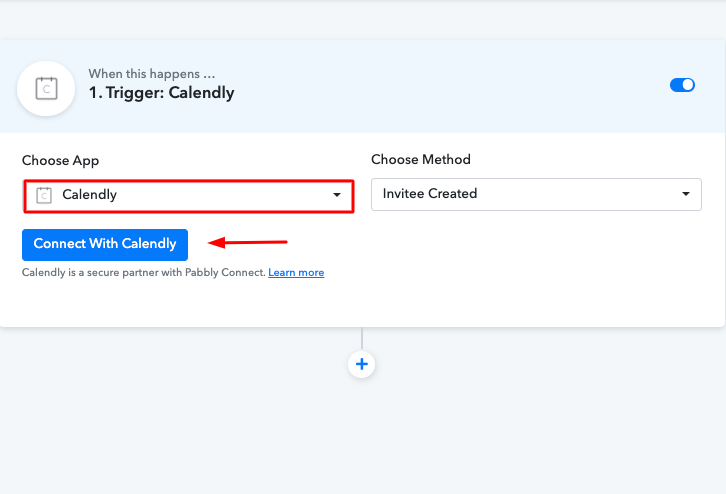
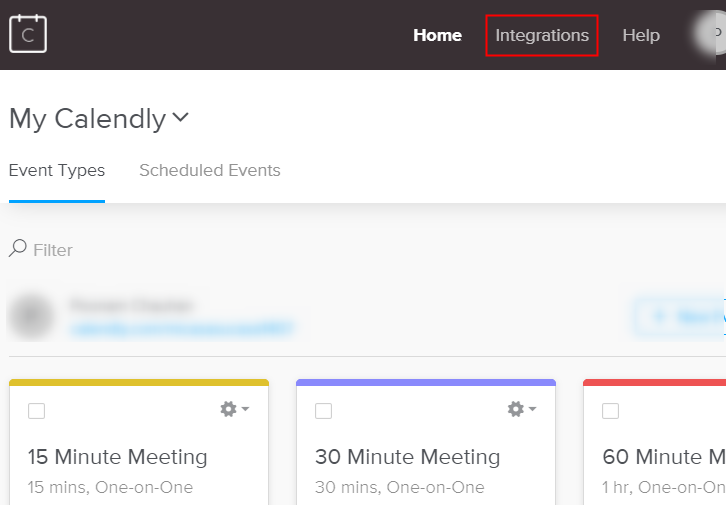
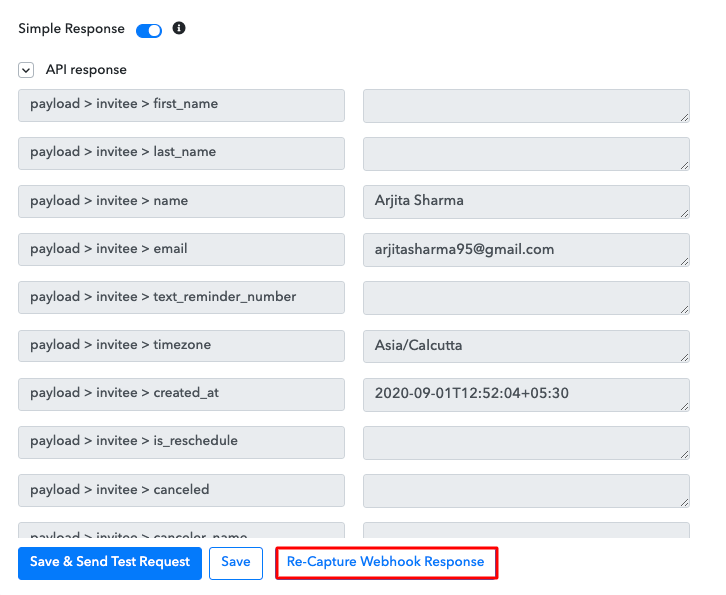
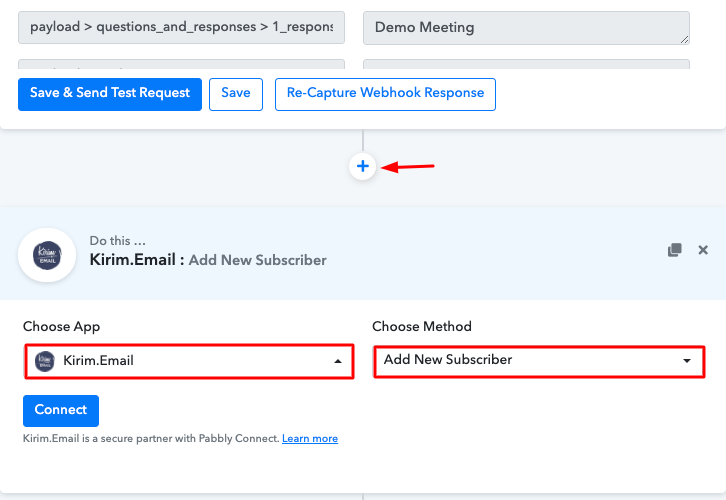
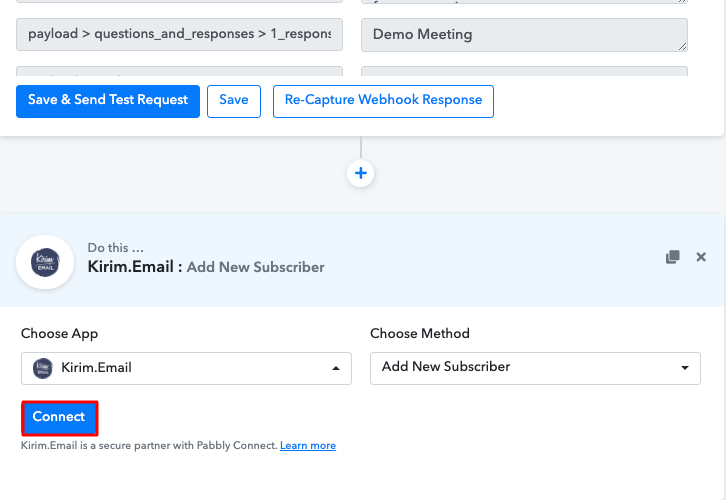
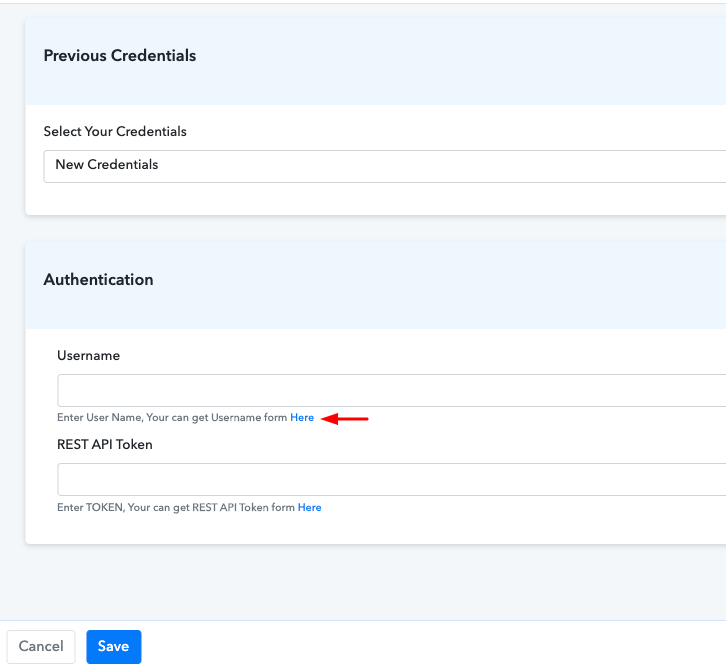
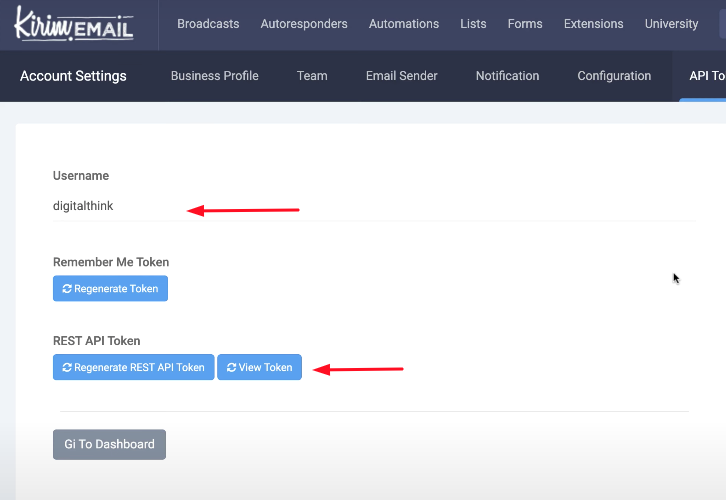
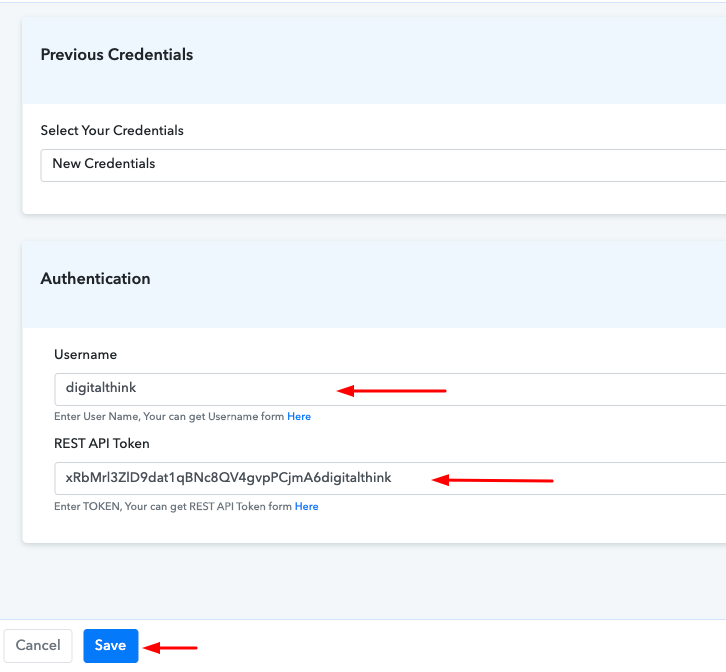
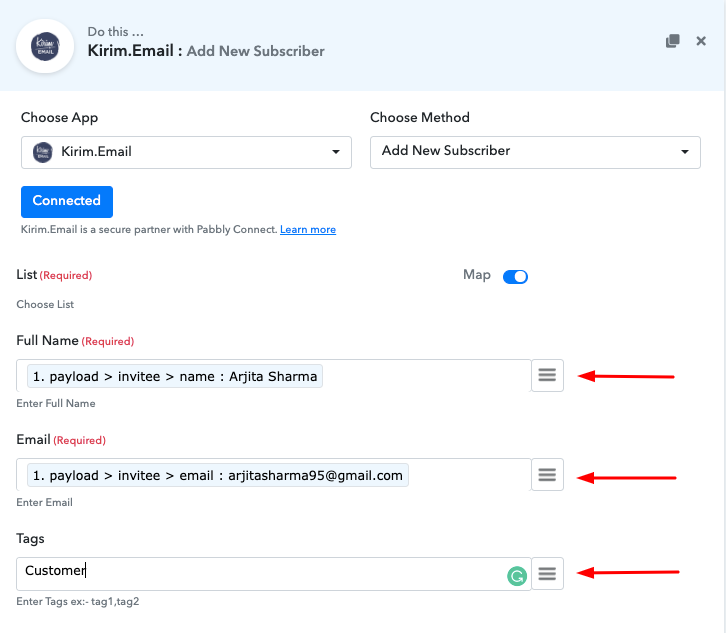
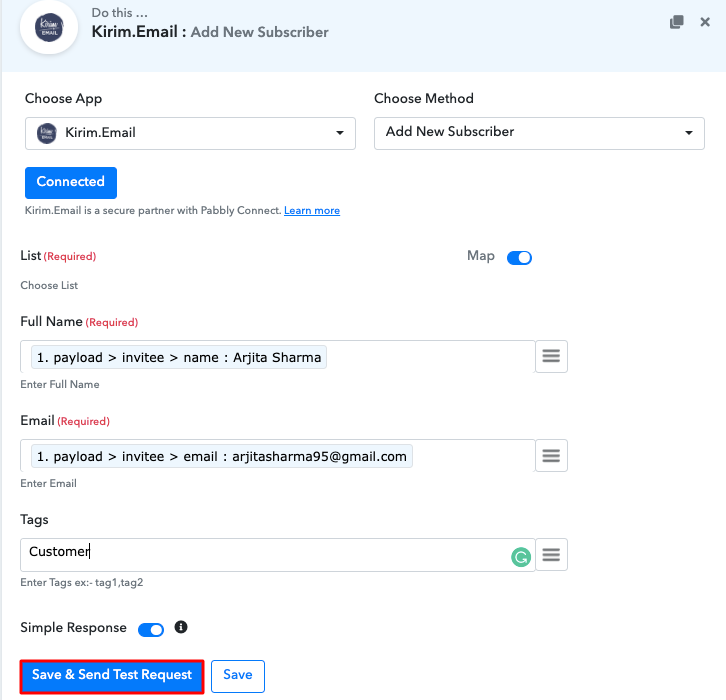
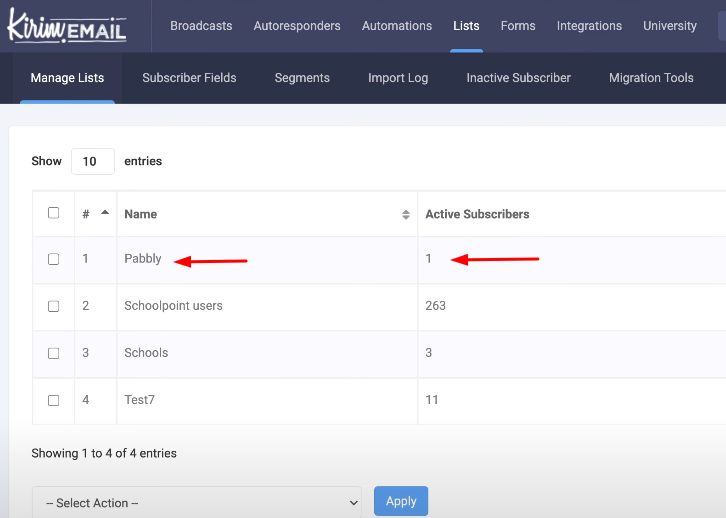
After signing into the account, click on the “Access Now” button of the Connect section to access Pabbly Connect software. Here, you have to press the “Create New Workflow” button to start the integration process. Thereafter, name the workflow according to your needs. Here, we have named the workflow as Calendly with Kirim.Email. Now after creating a workflow, you have to choose the application you want to integrate. Integrate thousands of other applications via Pabbly Connect, click here to signup now. Now, you have to select the application that you want to integrate. In this case, we are choosing Calendly for integration. After selecting the application, click on the “Connect with Calendly” button. Next to move forward, you have to log into your Calendly account to get the API Key After you log in to your Calendly account, click on the “Integration” option appearing on top. Further, you will have two options, either you can copy the API key appearing on the dashboard or you can also regenerate the key as per your need. After getting the key, simply copy it. When you click the “Connect with Calendly” button, a pop-up window will appear on your screen asking for your Calendly API key. Paste the API key you copied from the Calendly account in Pabbly Connect. The webhook provided by the Pabbly Connect is automatically connected with your Calendly account after this step. To test the integration between Pabbly Connect and Calendly, head back to your Calendly account and create a meeting appointment. Now, click on the “Capture Webhook Response” button in Pabbly Connect. As soon as you click on the button, you can see the info about the person who made an appointment on Calendly is captured automatically. Now the next step is to select the action for your trigger. For this, you have to choose the application you want to integrate. Next, click on the “+” icon to add an action for your trigger. Here we are going to select “Kirim.Email” among other applications. Then, select the “Add New Subscriber” option. Now, after making all the required changes, click on the “Connect” button. Later, it will ask for “Username” and “Rest API Token, for which you have to visit the Kirim.Email account. To get the “Username” and “Rest API Token”, you have to log in to your Kirim.Email account. In Pabbly Connect, you can easily find the authentication instructions to get API keys for the integration process. After clicking on the authentication instructions, you will reach to your Kirim.Email account settings page. On this page, you will find all the required data i.e, username, and the rest API token. Copy these credentials. Now to paste the copied username and rest API token, go back to the “Pabbly Connect” dashboard. Paste the credentials into their respective places and just hit the “Save” button. Now, select the list from the dropdown in which you want your subscribers to get added. Then, add the required field from drop-down such as for the email field, select the email option, and for the name field select the name option. You can also add some custom data of the subscribers like tags, city, country, etc. After making all the changes, save the setting and then press the “Send Test Request” button to test the integration. Eventually, when you check the subscribers count in Kirim.Email list, your response will appear there. So, just like that, all the appointments made in Calendly will automatically get added to your subscriber’s list in Kirim.Email after this integration. At last, now you have seen how to integrate Calendly with Kirim.Email via Pabbly Connect. Not only this integration, but you can also bind up thousands of other applications together with the help of Pabbly Connect. You just have to make a few changes in the software, and your entire workflow will be automated, after the integration, you don’t even have to lift a finger. Just follow these simple steps and automate your projects. In case of any queries or suggestions, please leave your comments below.Step 2: Access Pabbly Connect

Step 3: WorkFlow for Calendly with Kirim.Email Integration
(a) Start with a New Workflow

(b) Name the Workflow for Calendly with Kirim.Email
Step 4: Setting Trigger for Calendly Kirim.Email Integration
Select Application you Want to Integrate
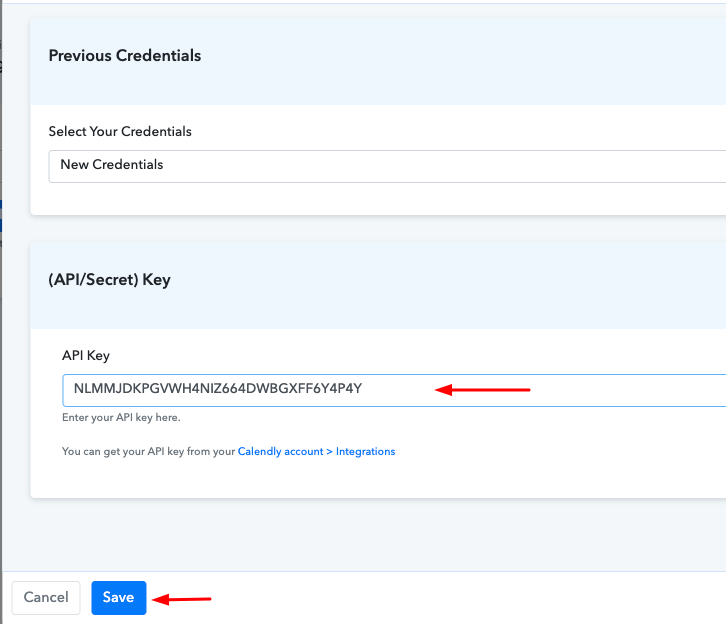
Step 5 : Copy the API Key
(a) Click on Integrations
(b) Copy or Regenerate the API Key

(c) Add API Key
Step 6: Test the Submission in Pabbly Connect Dashboard
Step 7: Setting Action for Calendly Kirim.Email Integration
(a) Select Application you Want to Integrate
(b) Click the Connect Button
Step 8: Connecting Kirim.Email to Pabbly Connect
(a) Click on Instructions
(b) Copy Username and Rest API Token
(c) Paste Username and Rest API Token in Pabbly Connect Dashboard
(d) Add Field Data
(e) Save and Send Test Request
Step 9: Check Responses in Kirim.Email Dashboard
Conclusion –
You May Also Like To Read –


