Having trouble sending data from Google Sheets to Pabbly Email Marketing? Well in this article we will use a simple yet efficient method to solve this problem.
Imagine having a data list in Google Sheets and you want to append this data to any application in the world. Of course, it is possible but the only prerequisite is that you need to have some good technical skills like coding. But let’s face it most of us really don’t have any programming knowledge nor have the patience to manually insert each data into applications. We just wish to click some buttons and the data automatically adds into the application we want.
Well, for people like you, I propose using a SaaS tool called Pabbly Connect. It simply acts like a middleman or a pipe that delivers data from Google Sheets to any application you desire and that too in real-time!!
To explain this process, we will trigger data from Google Sheets into Pabbly Email Marketing using Pabbly Connect. Now the gist of the process is, first we are going to connect Google Sheet to Pabbly Connect then Pabbly Connect to Pabbly Email Marketing.
So, without wasting any more time lets start the process.
Step 1: Connecting Google Sheets To Pabbly Connect
(a) Create a Gooogle Sheet
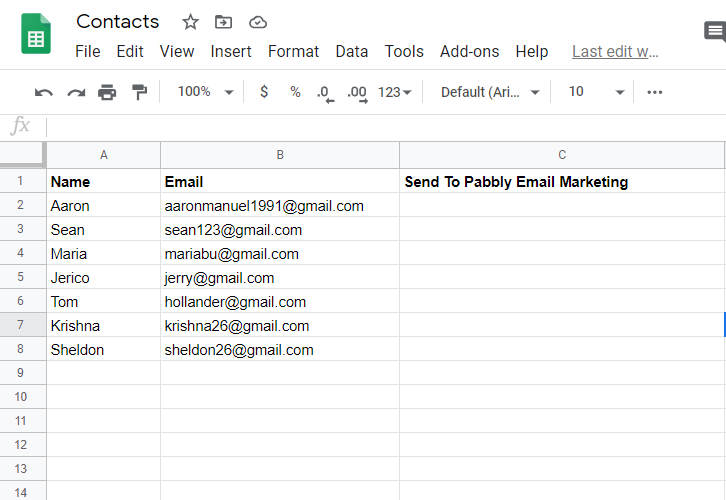
This is my Google Sheet, as you can there are three columns i.e Name, Email, and Send To Pabbly Email Marketing. We will be sending the data in column ‘A’ and ‘B’ to Pabbly Email Marketing. Also, with few tweaks, you can use this awesome method to send data to any other applications.
(b) Click on Add-ons
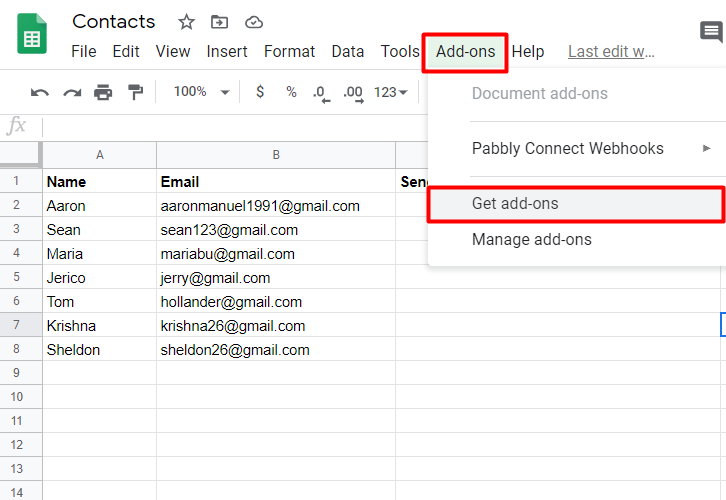
In the upper taskbar of Google Sheet, you will find a button called ‘Add-on’, click it. A drop down emerges, here you can choose the option called ‘Pabbly Connect Webhook’. But since you are hearing Pabbly Connect for the first time, this add-on is obviously not installed in your system. So let’s first install Pabbly Connect into Google Sheet by clicking on the option ‘Get add-on’.
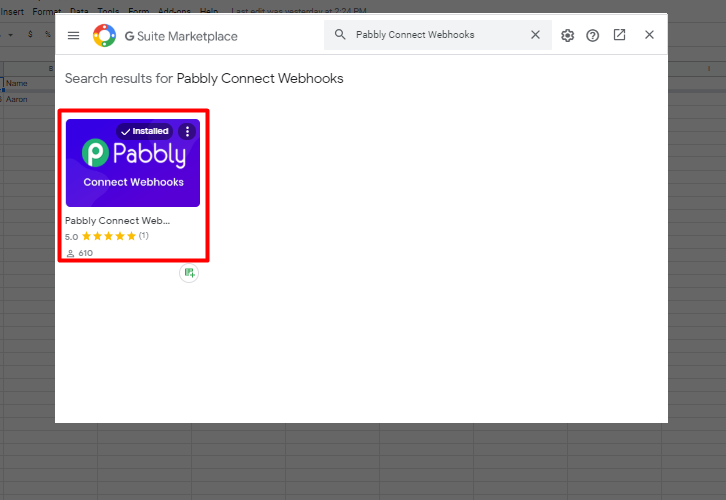
(c) Find Pabbly Connect in G Suite Market Place
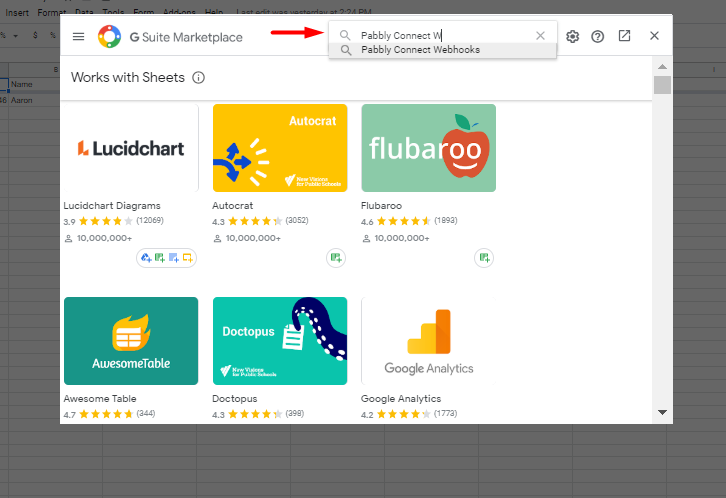
Once you click on ‘Get Add-on’ a new window will pop-up. Here in the search bar look for Pabbly Connect Webhooks. If you have it then click it.
(d) Install Pabbly Connect
Click on install and within seconds this extremely light add-on gets installed into your Google Sheets.
(e) Press Initial Setup In Google Sheets
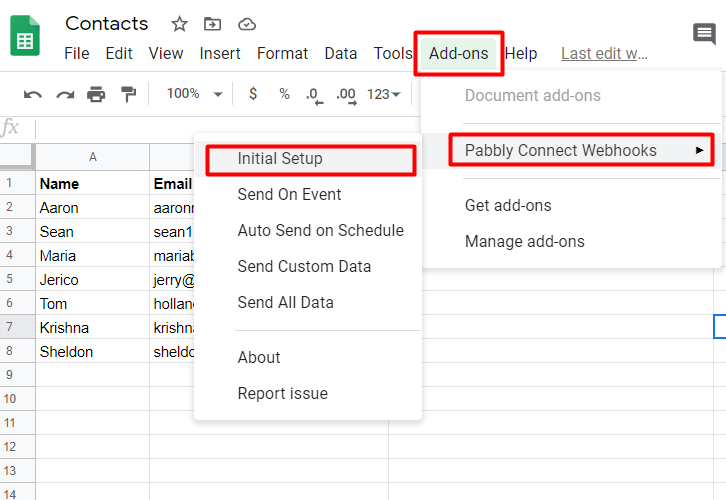
Now, that the Pabbly Connect add-on has been installed in your system, it is time that we exploit it thoroughly. Again from the upper taskbar click on ‘Add-on’ and here click on Pabbly Connect Webhooks. When you click on ‘Pabbly Connect Webhooks’ another drop-down expands with options like Initial Setup, Send on Event, Auto Send On Schedule, etc. Click on ‘Initial Setup’.
Note: In case after clicking Pabbly Connect Webhooks, if it doesn’t show Initial setup, you just need to refresh your Google Sheets. It is a glitch with Google Sheets.
(f) Place The Trigger Column As C
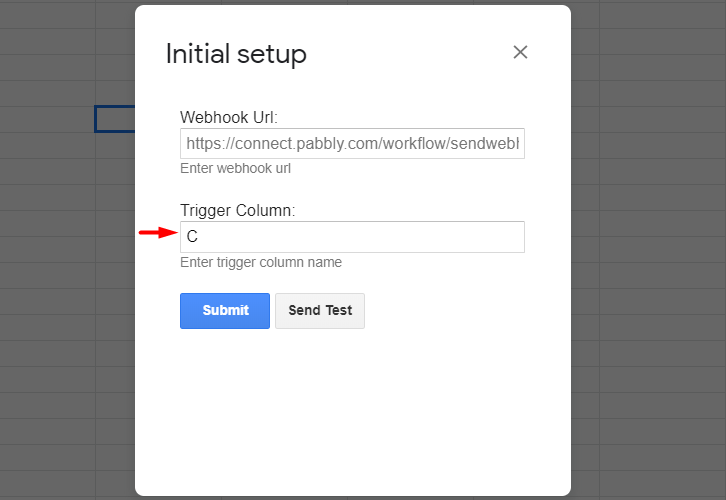
A window emerges, here you have to fill two blanks, the first is Webhook URL and the other is Trigger Column. Since our last data entry column is C, we shall add C in the trigger column. And in the next step, we will learn to place the Webhook URL.
Step 2: Sign into Pabbly Connect

Let’s sign in to Pabbly Connect to begin the process of data filtration. Now either fill in the details manually or sign-up through your Google account.
Step 3: Access Pabbly Connect

After signing up you will enter the dashboard, here access Connect (a service of Pabbly for automated integration & data transmission).
Step 4: Create A New Workflow
(a) Click on Create New Workflow

Now, let us create a new workflow by clicking on the button ‘Create New Workflow’ which is located at the right uppermost corner of the dashboard.
(b) Give a Name to Workflow
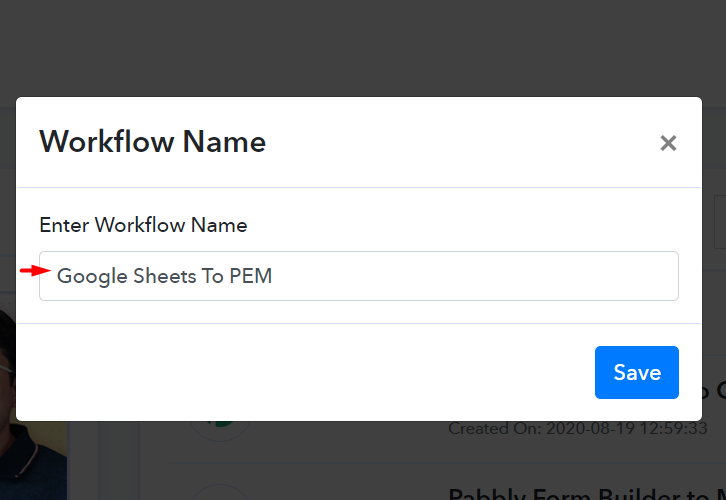
When you click on the blue button ‘Create New Workflow’, a pop-up spring out asking you to name the workflow. You can give any name to workflow according to your discretion, here I am naming it as “Google Sheets To PEM”. After naming the workflow, press the blue save button.
(c) Chose App And Method
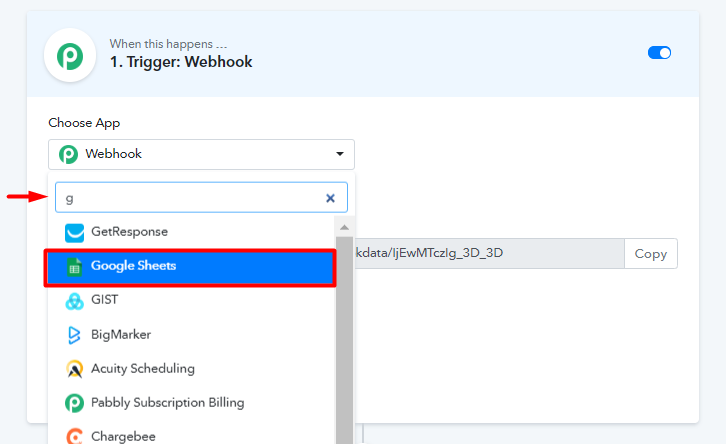
After pressing the save button, a window emerges, here in this window, you will be building the mechanism for triggers to work. The default mode of ‘Choose App’ is Webhook. Now click it and a drop-down emerges, here select Google Sheets.
Once the Google Sheets app is selected, an option automatically appears called Chose Method. Here change the method as a spreadsheet row.
(d) Copy The Webhook URL
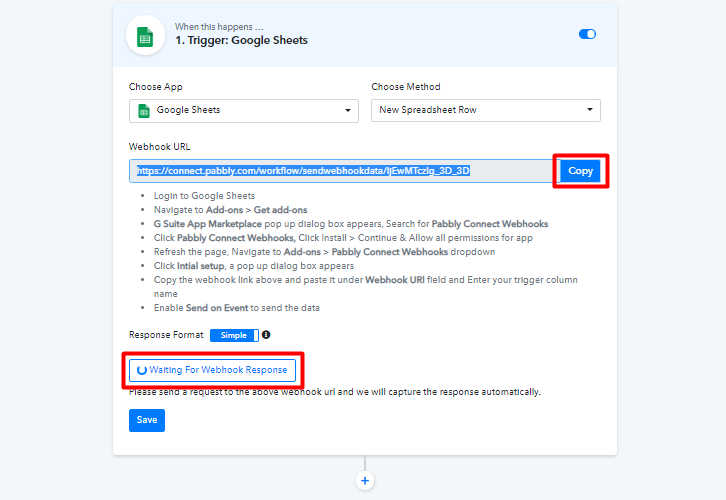
Copy the Webhook URL, just by pressing the ‘Copy’ button. Then press the button ‘Capture Webhook Response’, on clicking it will a response ‘Waiting For Webhook Response’.
(e) Paste The Webhook URL
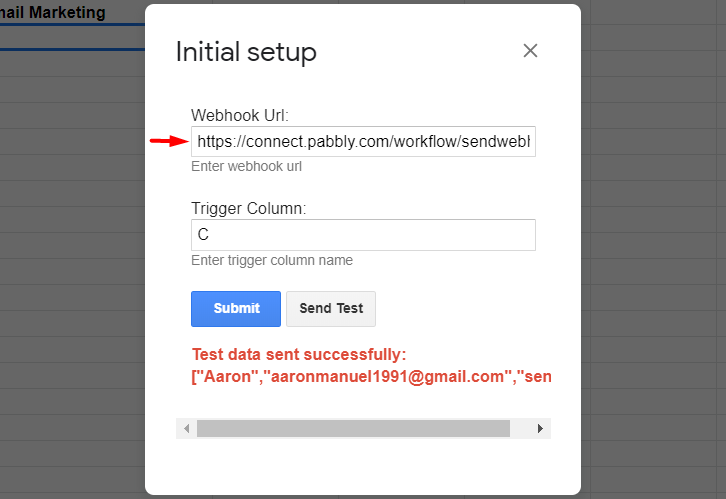
Now, let’s go back to Google Sheet for a minute, and in the initial set up dialogue box let’s paste this URL. After pasting the URL, press the ‘Send Test’ button.
It will show a message in red letters that the data has been successfully sent to Pabbly Connect.
(f) Preview The Data Capture
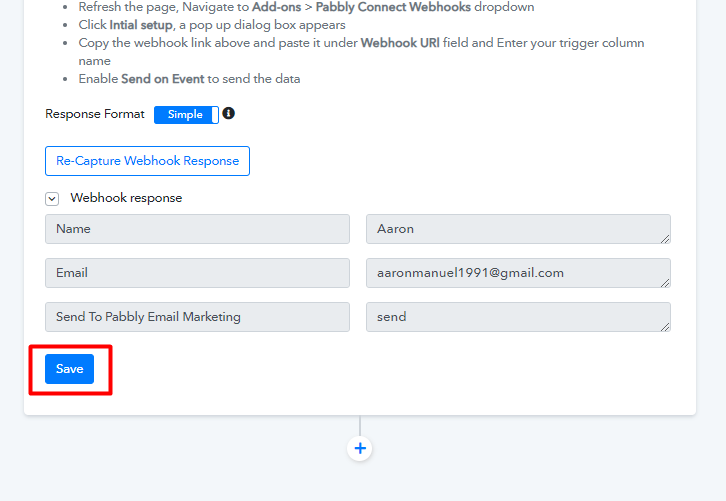
Here, you will see that the data has been automatically been captured by Pabbly Connect and will be reflected in the trigger window box. Now press the save button.
(g) Click Send On Event In Google Sheets

Now click on ‘Send on Event’ by clicking on ‘Add-on’ from the upper-taskbar in Google Sheet. Then click on Pabbly Connect and then ‘Send on Event’. This will ensure, every time a data in column C is added, the data in the whole row will be inserted into Pabbly Connect automatically and that too in real-time!!
So, this whole process ensures that Google Sheet is now connected with Pabbly Connect. Now we will integrate Pabbly Connect with Pabbly Email Marketing.
Step 5: Build API Window
(a) Change Choose API
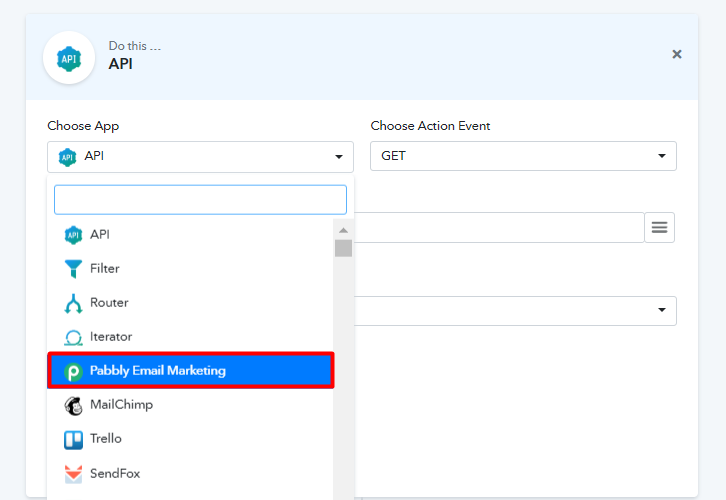
You will find a (+) button beneath the first trigger window, let’s create another trigger window by clicking on this (+) button. Once the trigger window has been created, change the ‘Choose App’ from default API to Pabbly Email Marketing. Now since we are adding new subscribers, we have to change Çhoose Action Event from default GET to Add Subscribers.
(b) Click on Connect With Pabbly Email Marketing
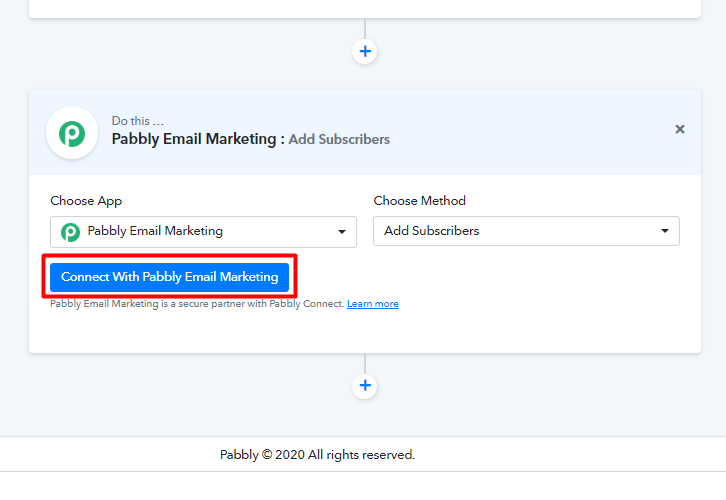
After mentioning your ‘Choose Method’, now click on the blue button located at the end of the trigger box called ‘ Connect With Pabbly Email Marketing’
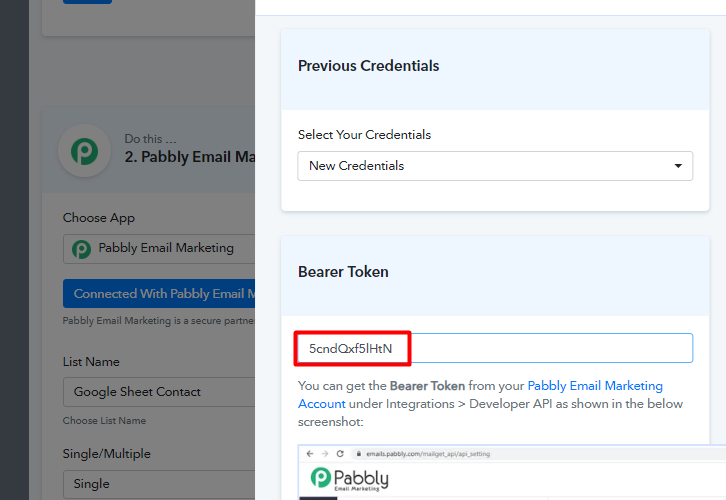
(c) Add Credentials
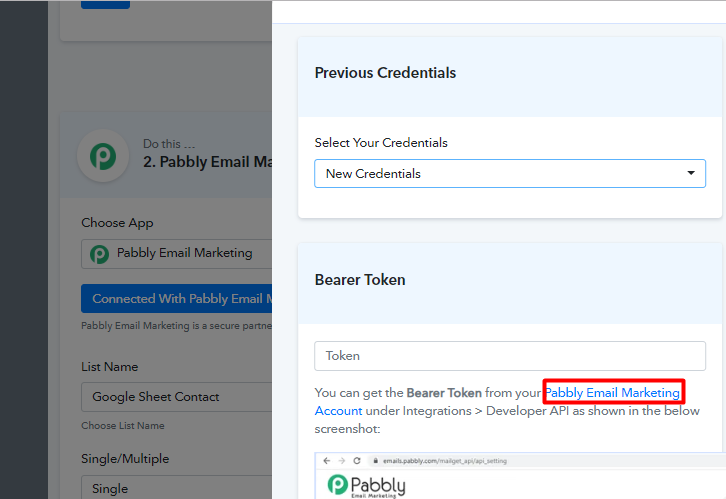
Here, you have to change your credentials to ‘New Credentials’. To get the bearer token click on to Pabbly Email Marketing Account. When you click on the blue link, you will be re-directed to Pabbly Email Marketing’s dashboard.
Step 6: Integrate Pabbly Email Marketing To Pabbly Connect
(a) Click Integrations
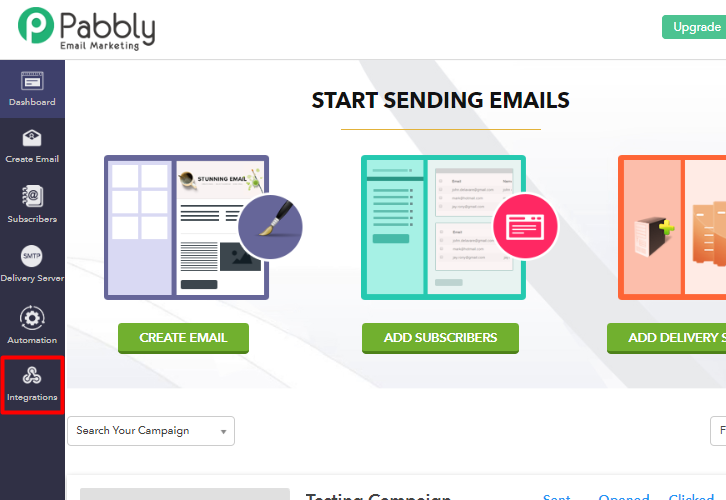
Now, that you have entered the dashboard of Pabbly Email Marketing scroll down and click on integrations.
(b) Press Developer API
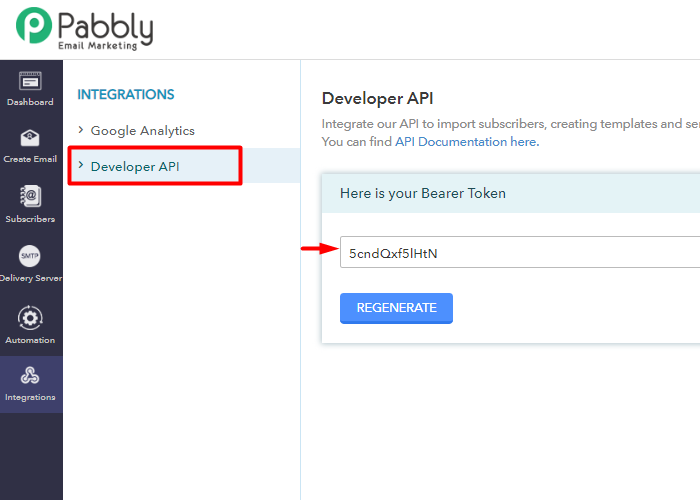
On clicking the integrations option, you will brought to a new window. Here click on Developer API. And in the dialogue box called ‘Here is your Bearer Token’ copy the codes.
(c) Paste The Token
Come back to Pabbly Connect and paste the bearer token in the blank provided and press save.
(d) Create New List
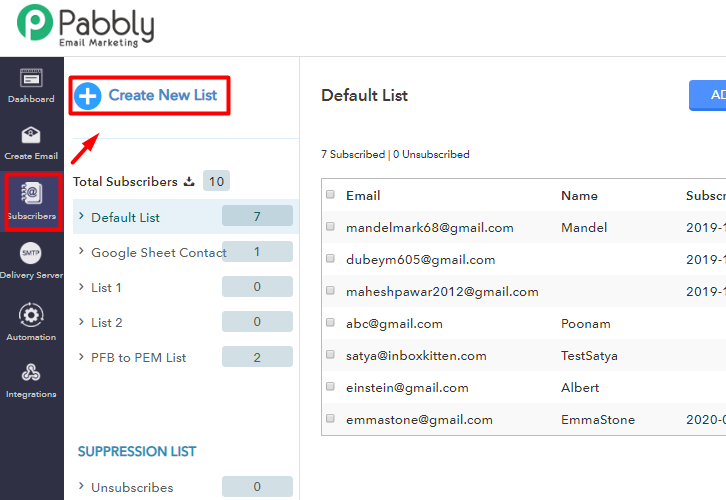
In Pabbly Email Marketing, go to the subscriber’s tab and click it. This will summon a new window, and here add a name to the new contact and press the update button.
(d) Place The Data In Trigger Window
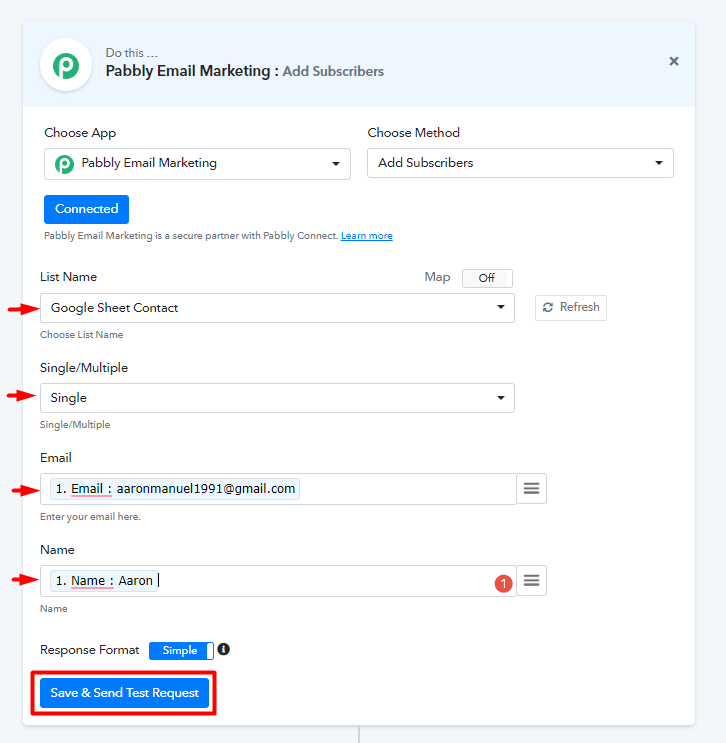
In the second trigger window of Pabbly Connect concerning Pabbly Email Marketing, refresh the list name, and ints drop-down you will see the list name as ‘Google Sheet Connect’. Then change the entries to single this will ensure there is only entry per trigger not multiple. Likewise, from the drop-down change the email and name accordingly.
Then after placing these data, click on ‘Save & Send Test Request’.
Step 7: Preview Result
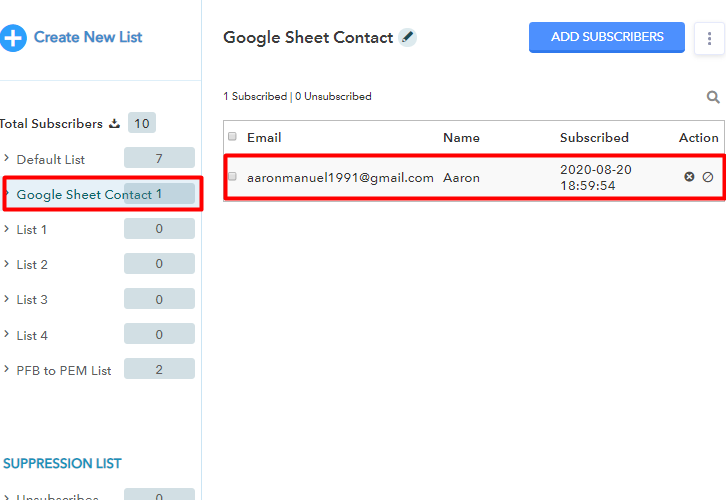
Once you click on ‘Save & Send Test Request’, the data from the Google Sheets will be auto-populated into Pabbly Email Marketing’s subscriber’s list. In my case, as you can see the data has been inserted in the Subscribers’list called as Google Contact List.
Furthermore, every time a responded fills in column C in Google Sheet, his data will be added into the subscriber’s list of Pabbly Email Marketing through Pabbly Connect in real-time. Incredible isn’t it?
Conclusion
Now, you know how easily Pabbly Connect integrates Google Sheets to Pabbly Email Marketing. This is perhaps your first step into the world of automation. Just enter the data and instantaneously, your data will be appended into any application you want through Pabbly Connect. Furthermore, this is just one of its awesome features, there are a ton of wild features you need to try and explore, to fully fathom the applications of this beast. Moreover, to ace Pabbly Connect, you will have access to our incredible video tutorials and documentation to help you with the same.
Also, if you have any queries regarding this article or about Pabbly Connect in general feel free to ask in the comment section below. Our associates will be in touch with you soon.
You May Also Like To Read –
- Integrate Pabbly Form Builder to MailChimp
- Send Google Forms Data to Automizy
- Integrate Pabbly Form Builder to Pabbly Email Marketing
- 5 Best Zapier Alternatives


