How to Auto-Send Slack Direct Message for New Stripe Customers

How to Auto-Send Slack Direct Message for New Stripe Customers

Are you looking for a way to auto-send Slack direct message for new Stripe customers? If yes, here in this article we will provide a step by step guide to integrate Stripe with Slack using Pabbly Connect.

How to Auto-Send Slack Direct Message for New Stripe Customers

But before moving forward, let’s know a little bit about both the software & why there is a need to integrate Stripe with Slack. As we all know, Stripe is a payment infrastructure that allows you to accept payments and manage payouts for all kinds of businesses. On the other hand, Slack is a proprietary business communication platform that offers many IRC-style features, including persistent chat rooms organized by topic, private groups, and direct messaging.

By connecting Stripe with Slack, one can automatically send direct Slack messages on every new customer addition in Stripe. To help you with this we are recommending the best automation and integration software named Pabbly Connect.

Why Choose This Method Of Integration?

In contrast with other integration services-

  • Pabbly Connect does not charge you for its in-built apps like filters, Iterator, Router, Data transformer, and more
  • Create “Unlimited Workflows” and smoothly define multiple tasks for each action
  • As compared to other services which offer 750 tasks at $24.99, Pabbly Connect proffers 50000 tasks in the starter plan of $29 itself
  • Unlike Zapier, there’s no restriction on features. Get access to advanced features even in the basic plan
  • Try before you buy! Before spending your money, you can actually signup & try out the working of Pabbly Connect for FREE

Sign Up To Pabbly Connect 

Pabbly Connect is one of the best automation tools that allow you to integrate unlimited apps without any coding skills. Moreover, you can also access its features such as filters, path routers, etc even in its free plan.

Here in this blog, we will understand how to integrate Stripe and Slack using Pabbly Connect. So, let’s start the integration process.

Step 1: Sign up to Pabbly Connect

Sign Up

Let’s begin the process to auto-send Slack direct message for new Stripe customers by visiting the website of Pabbly Connect and then click on the “Sign-Up Free” button. On the registration page, either signup using an existing Gmail account or manually fill out the form.

Try Pabbly Connect for FREE

Step 2: Access Pabbly Connect

Select Connect

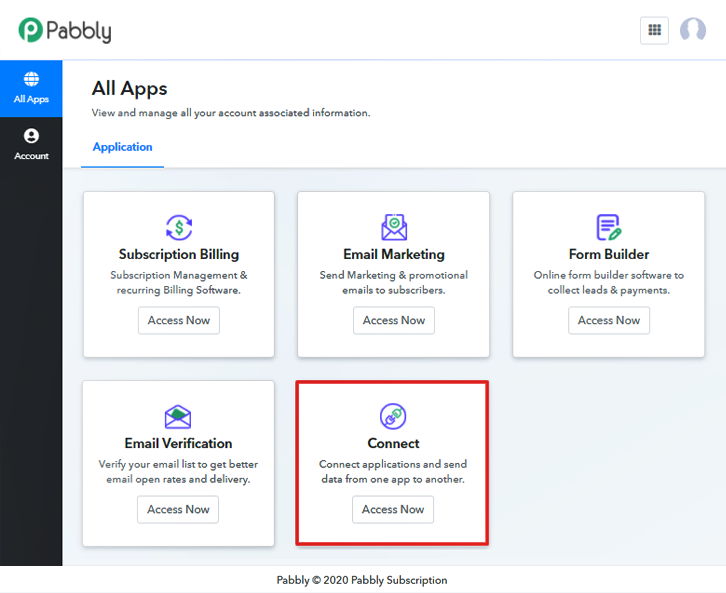
Once you have completed the signup process, click on the Connect section in the dashboard to access Pabbly Connect.

Step 3 : Workflow for Stripe with Slack Integrations

(a) Create New Workflow
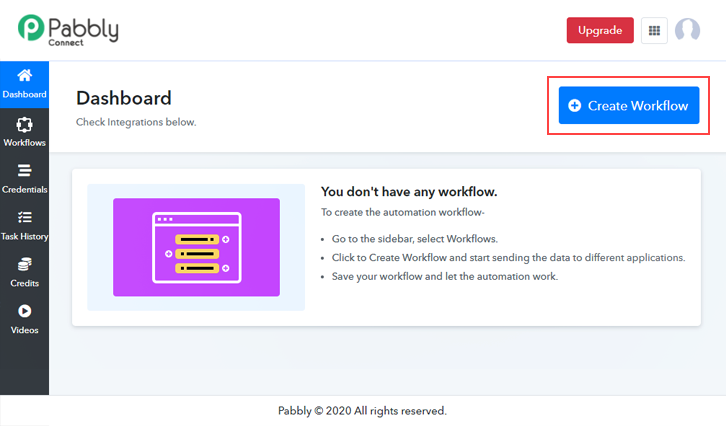
Create New Workflow

Start with creating a workflow for your project by clicking on the “Create Workflow” button.

(b) Name the Workflow

Name the Workflow

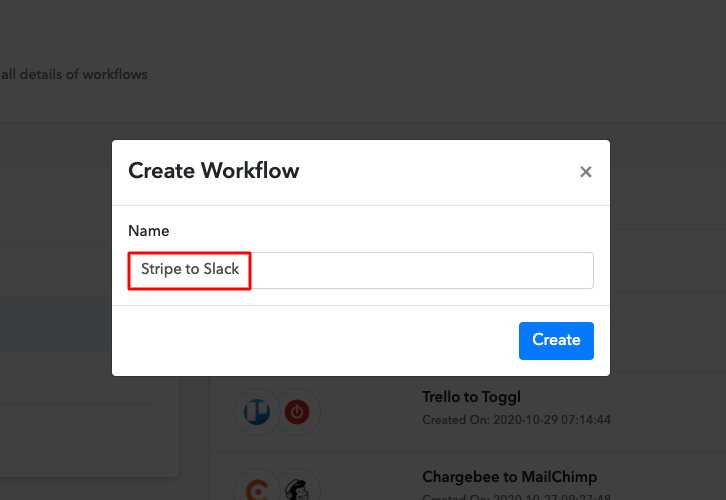
Now, you need to name the workflow just like in the above-shown image. I named the workflow as “Stripe to Slack”, you can obviously name the workflow as per your requirements and needs.

Step 4 : Setting Triggers for Stripe with Slack Integrations

After naming your workflow, you have to select the application you want to integrate. Pabbly Connect allows you to integrate unlimited premium applications, create your free account now.

(a) Select Application you want to Integrate
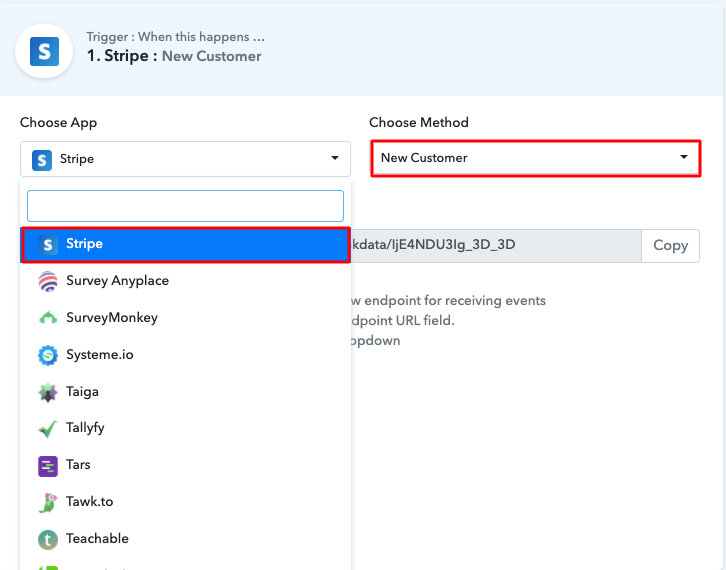
Select-Stripe-Trigger

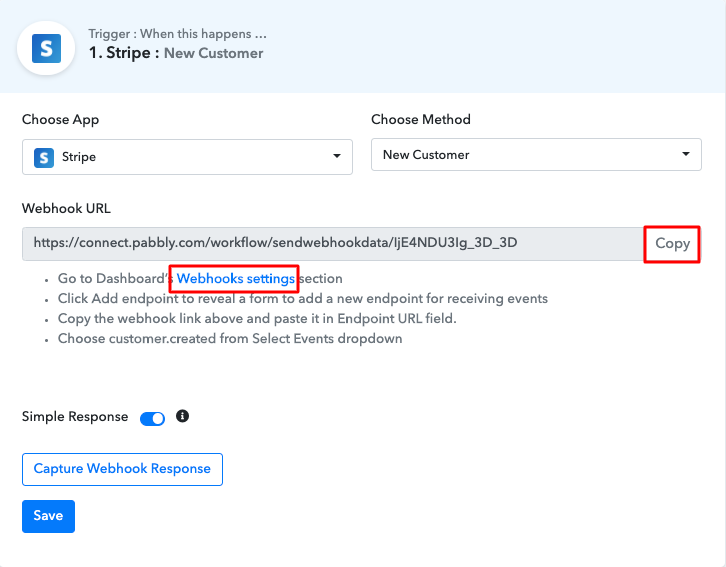
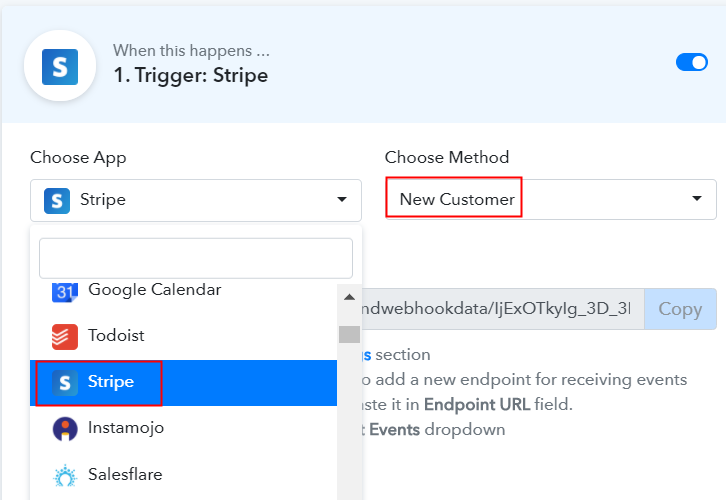
Now, you have to select the application that you want to integrate. In this case, we are choosing “Stripe” for integration. After selecting the application select “New Customer” in the choose method section.

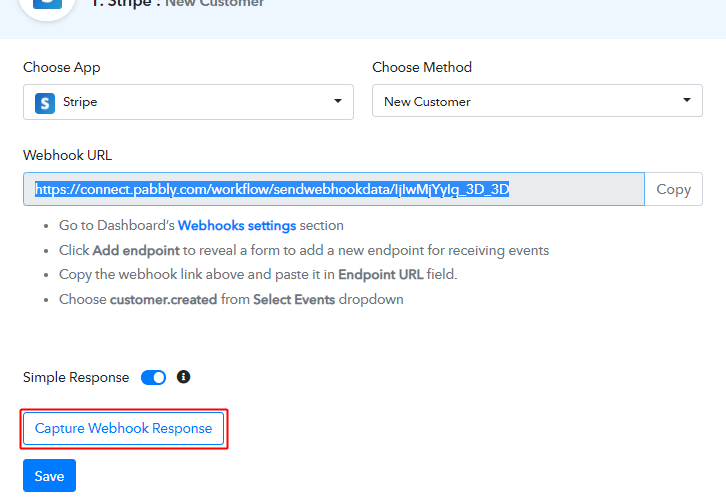
(b) Copy the Webhook URL

Copy-the-Webhook-URL-5

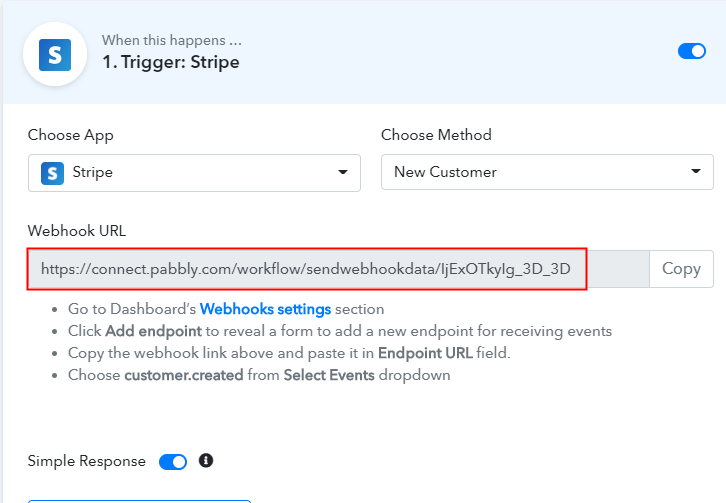
After selecting the application, now you have to copy the webhook URL just like in the above-shown image to take further the integration process. After copying the URL, click on the given webhook settings link to paste the URL.

Step 5 : Connecting Stripe to Pabbly Connect

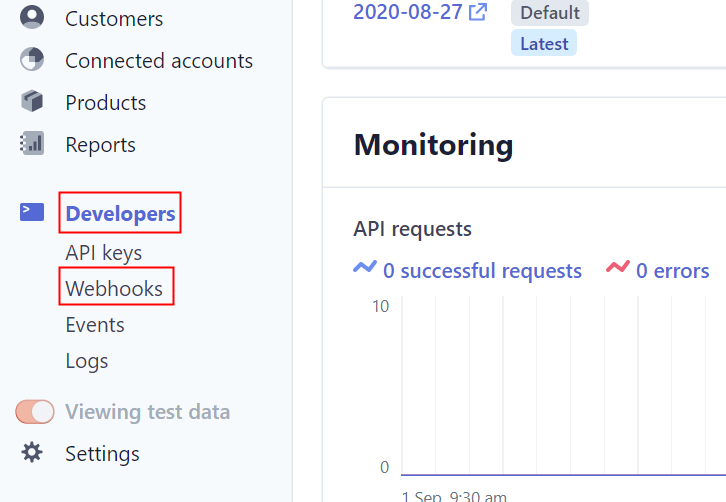
To connect Stripe with Pabbly Connect, you have to paste the copied webhook URL in your Stripe account, for that, you need to log in to your Stripe account.

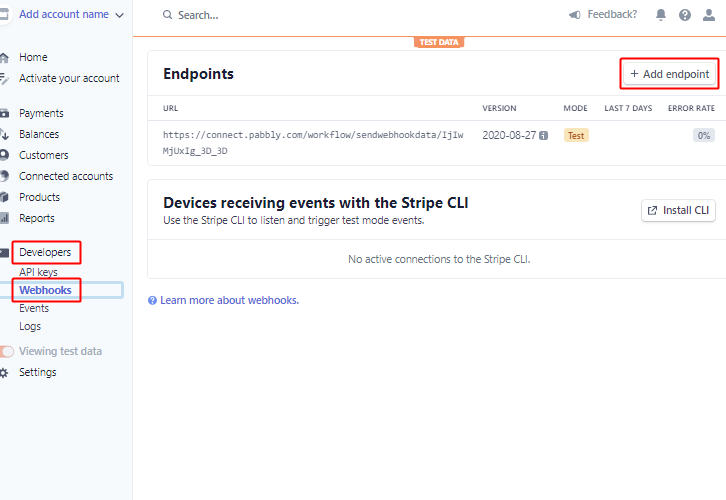
(a) Click on Add Endpoint

Click-on-Add-Endpoint

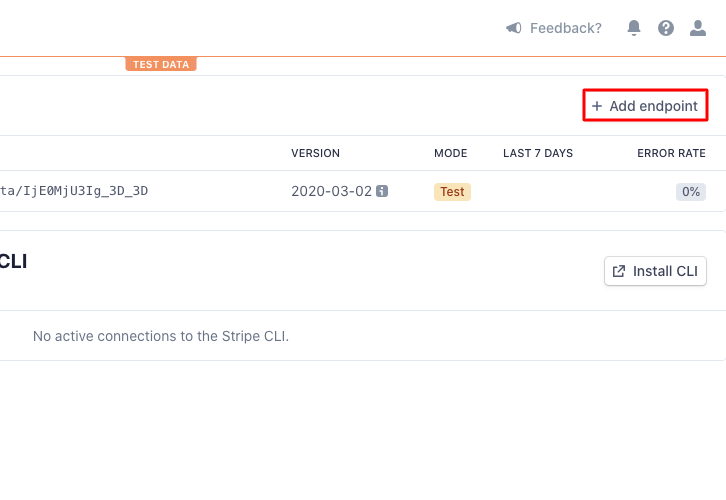
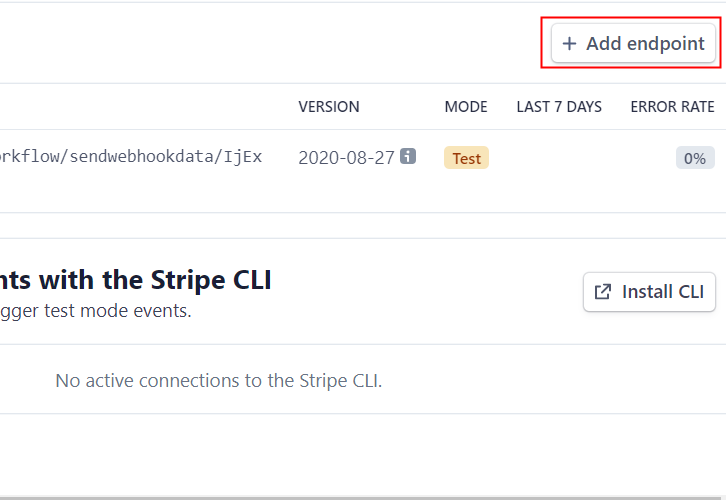
Once you click on the webhook link, your stripe account’s webhook page will appear, here you have to click on the “Add Endpoint” button.

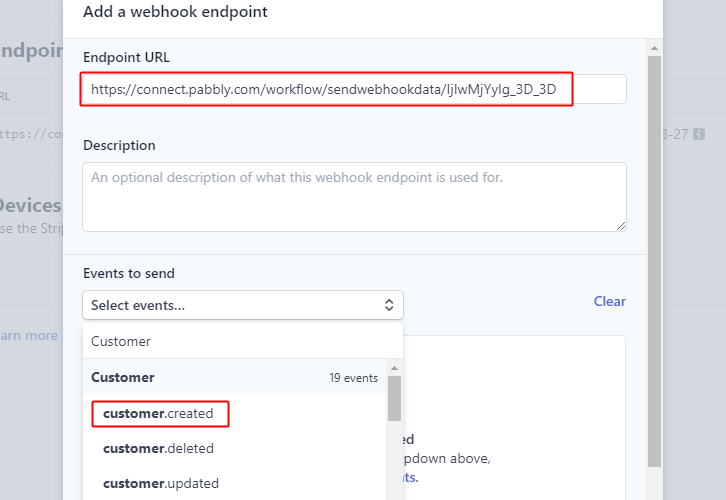
(b) Paste the Webhook URL

Paste Webhook URL

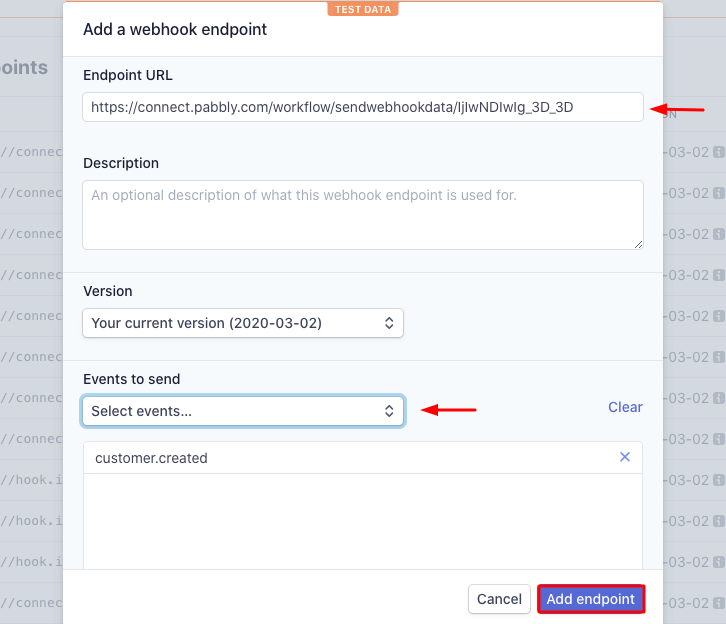
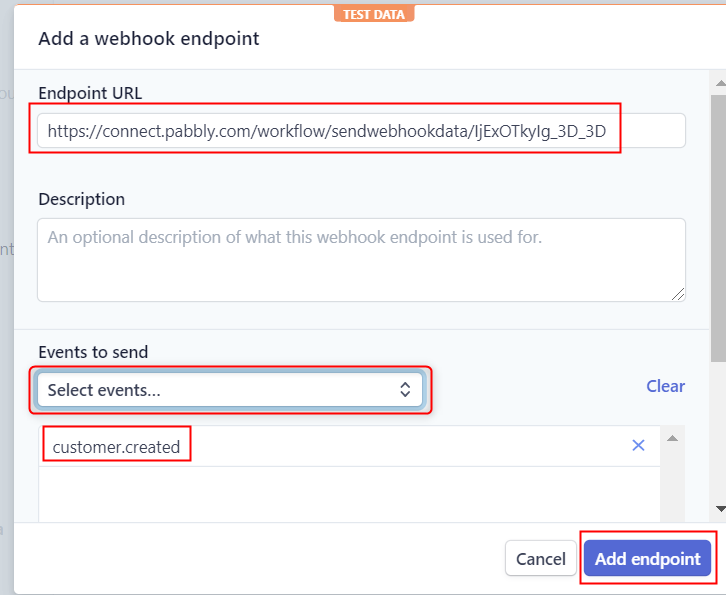
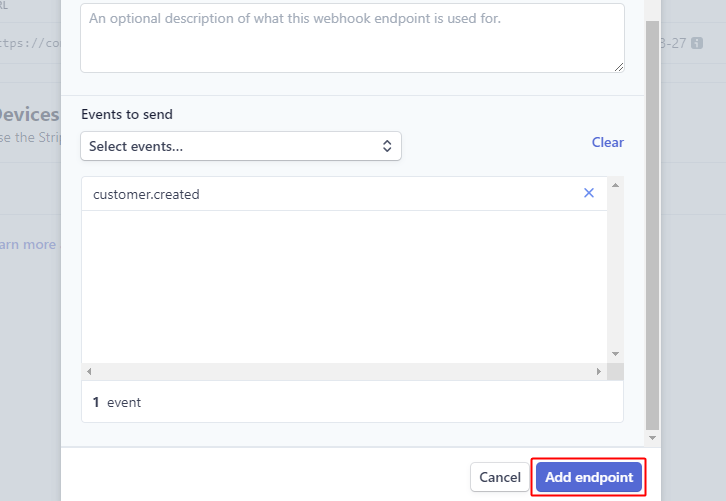
Next, paste the webhook URL and select “Customer Created” from the event to send section, and then hit the “Add Endpoint” button.

Step 6 : Add a Customer

To check if the integration is capturing data or not, we will add a sample customer to the Stripe account.

(a) Click on Customers

Click on Customers

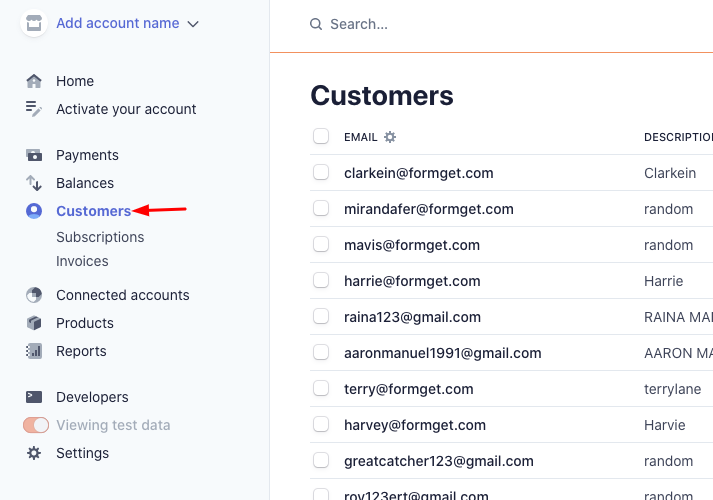
Now to add a customer, click on the “Customers”  option in your Stripe dashboard.

(b) Click on New Button

Click-on-New

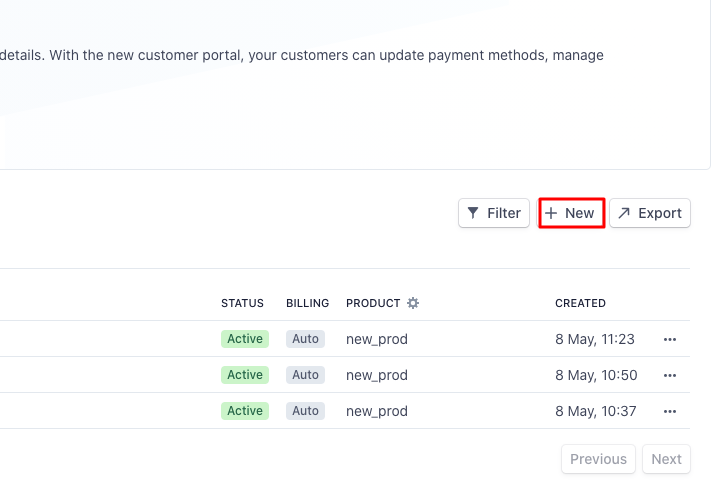
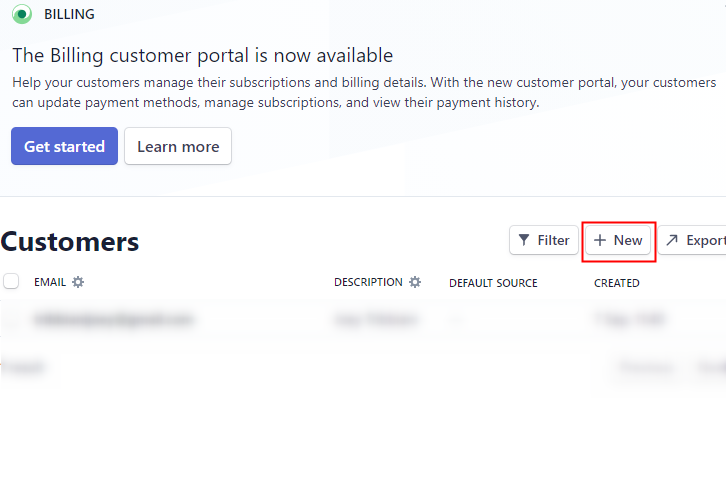
After selecting customers, click on the “New” button.

(c) Add Customer

Add a Customer

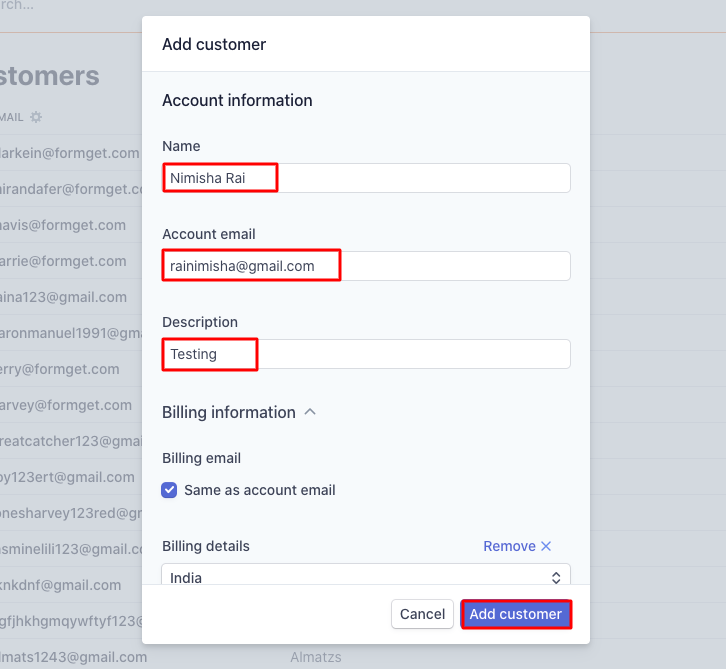
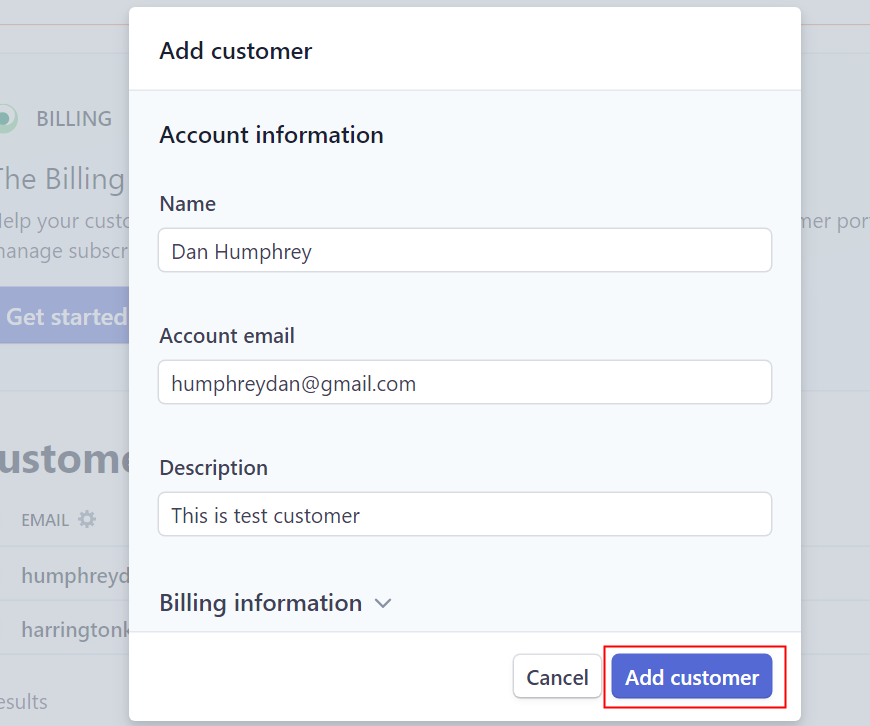
Add all the details of the customer like name, email, address, etc. After filling up all the required details, hit the “Add Customer” button. But before that, click on the “Capture Webhook Response” button in the Pabbly Connect dashboard.

Step 7 : Test the Submission in Pabbly Connect Dashboard
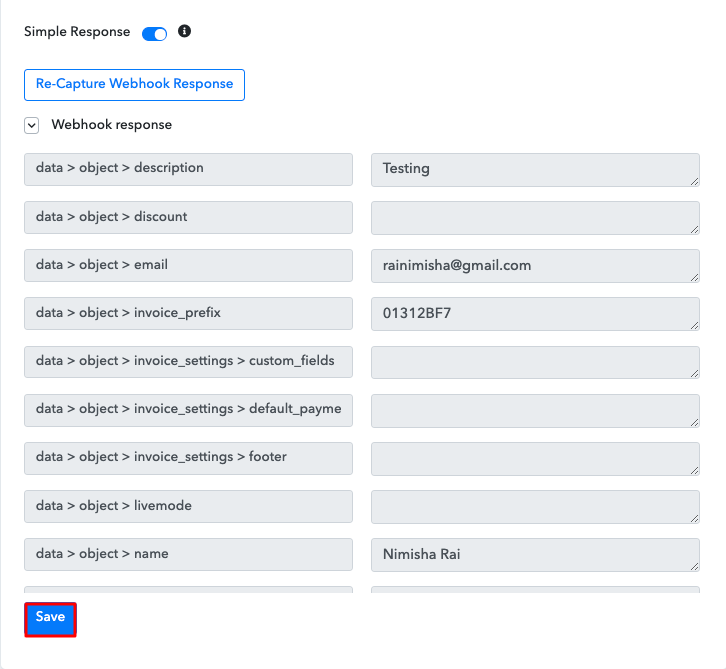
Save the Webhook Response

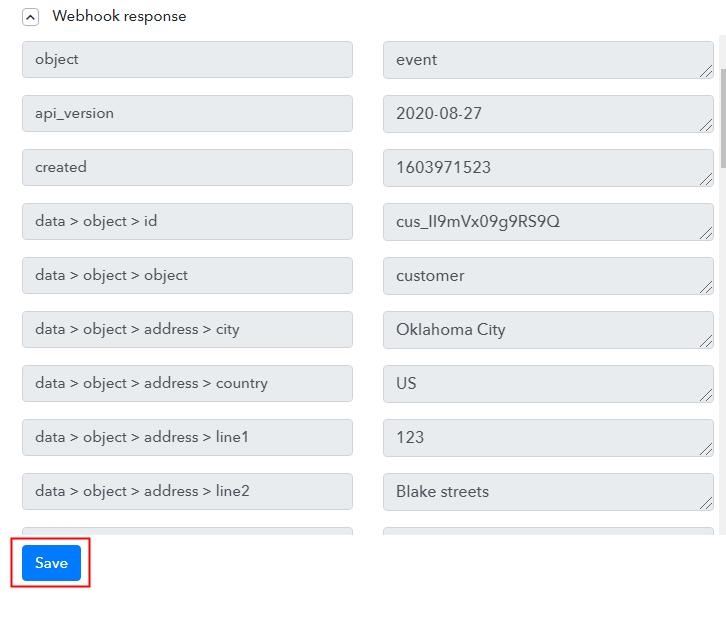
As soon as you click on the “Add Customer” in Stripe and “Capture Webhook Response” in Pabbly Connect the entry will appear on the Pabbly Connect dashboard. Then, click on the “Save” option.

Step 8 : Setting Action for Stripe with Slack Integrations

To make this Stripe-Slack integration work, you have to choose the action for your trigger.

(a) Select Application you Want to Integrate
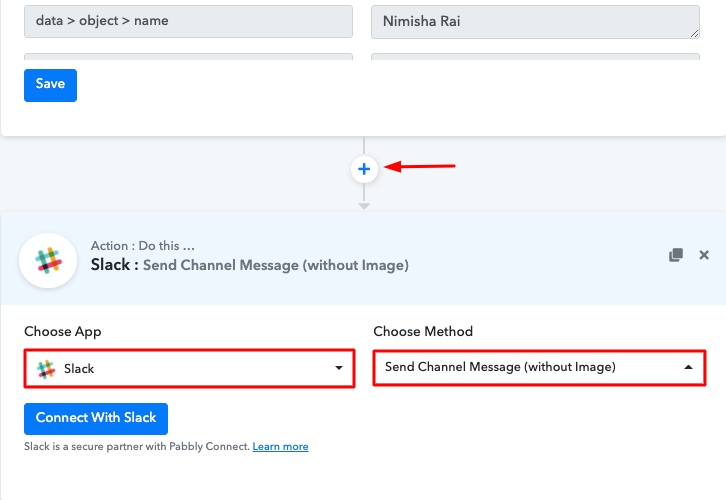
Select Slack

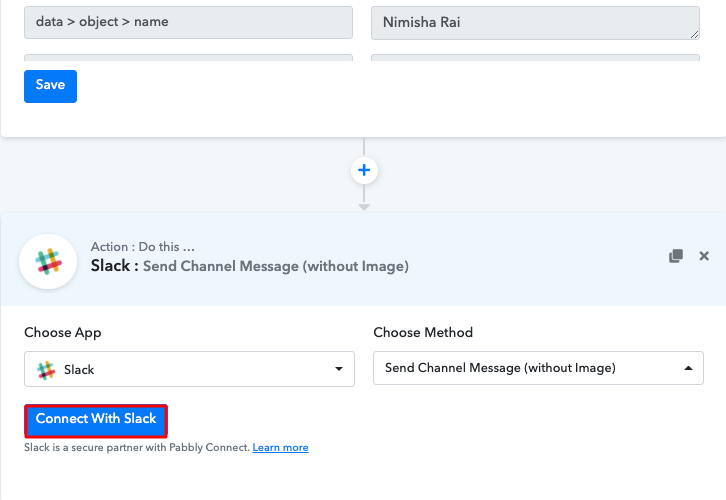
Now in this step, click on the + button below and choose the application that you want to integrate. Here we will choose “Slack” to integrate and in the method section select “Send Channel Message (without Image)”.

(b) Click the Connect Button

Click Connect Slack

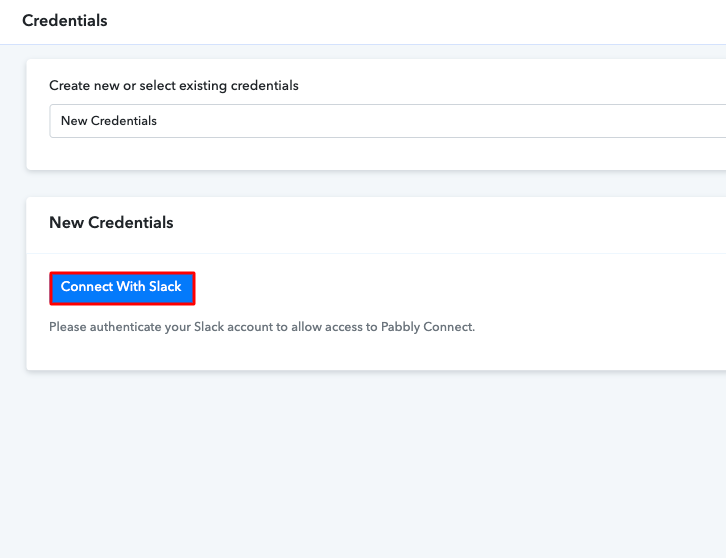
After choosing the application click on the “Connect with Slack” button to move forward.

Step 9: Connecting Slack to Pabbly Connect

To connect Slack to Pabbly Connect, you have to authorize your Slack account. For this, you have to log in to your Slack account.

(a) Authorize Account

Authorize-Application-Slack

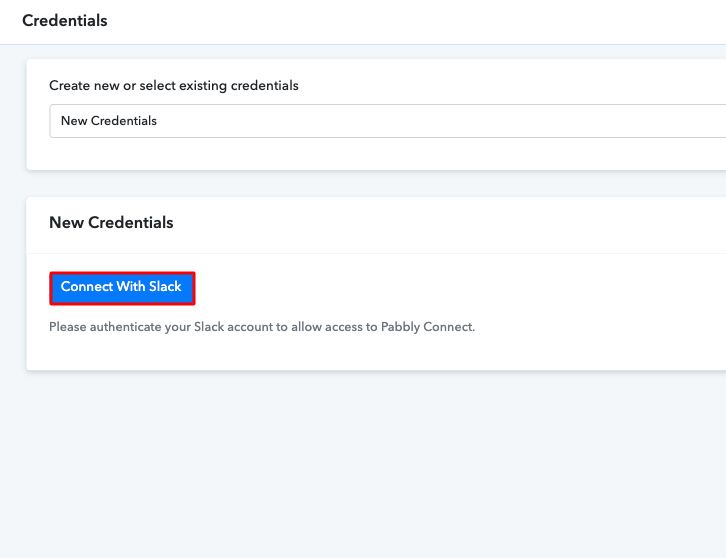
When you click on the “Connect” button, a window will slide in from the right, here you have to again click on the “Connect with Slack” button and then choose the account through which you want to log into your Slack account.

(b) Map the Fields

Map the Fields Slack

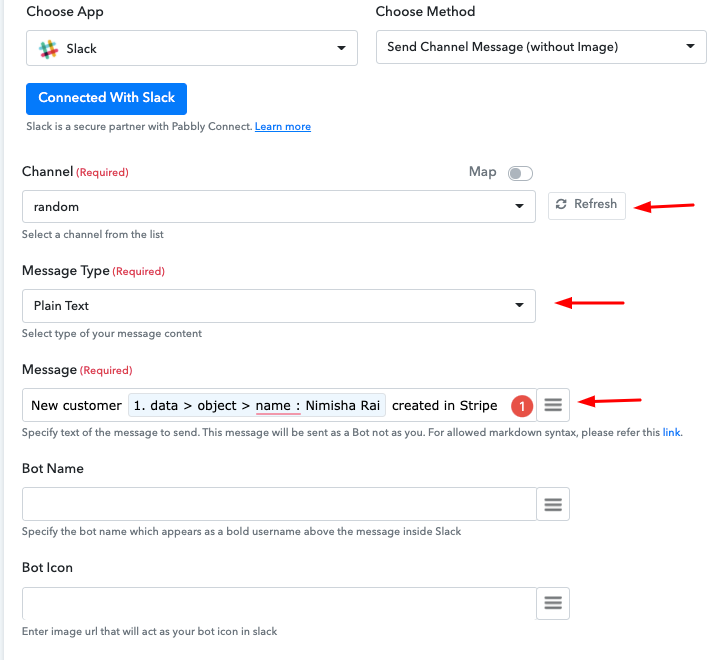
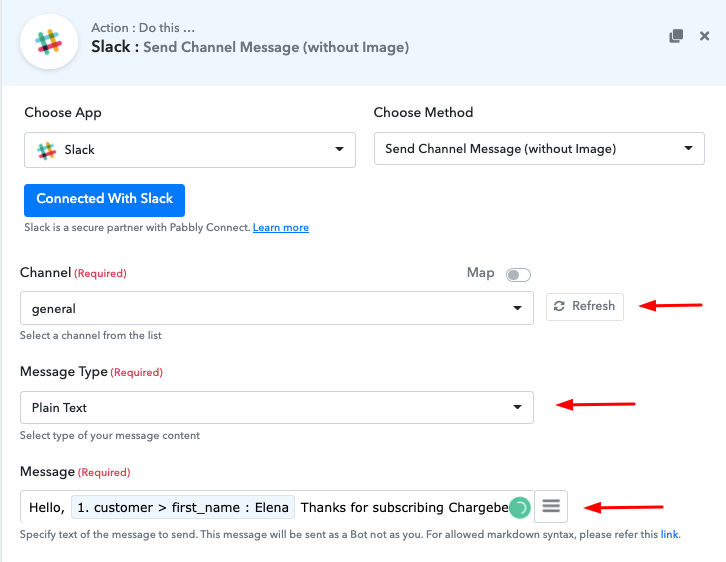
After connecting with your Slack account, map all the fields quickly like channel, message, etc.

(c) Save and Send Test Request

Send Test Request Slack

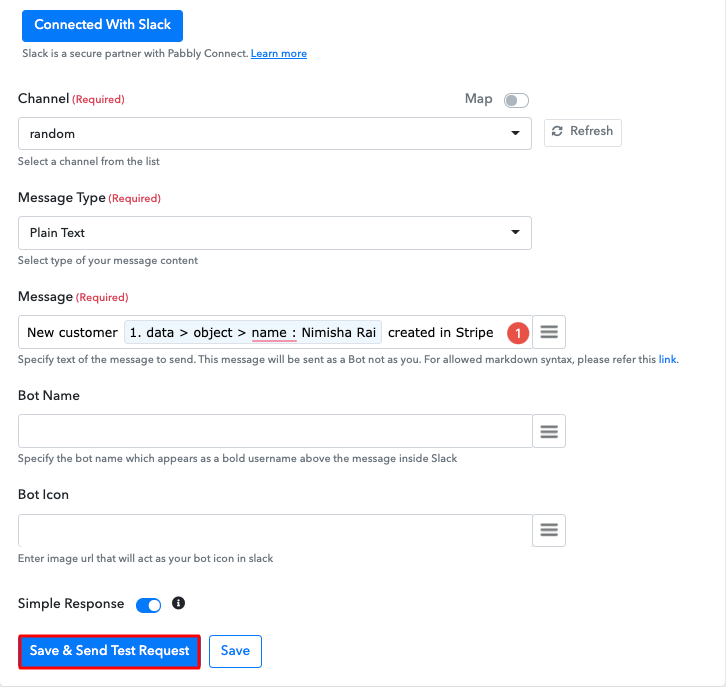
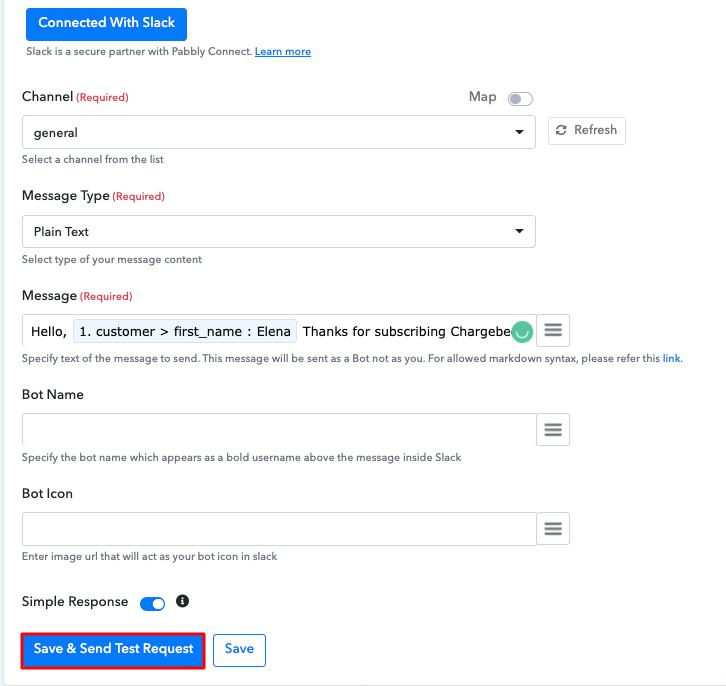
Once you are done adding up all field data click on the “Save & Send Test Request” button.

Step 10: Check Response in Slack Dashboard
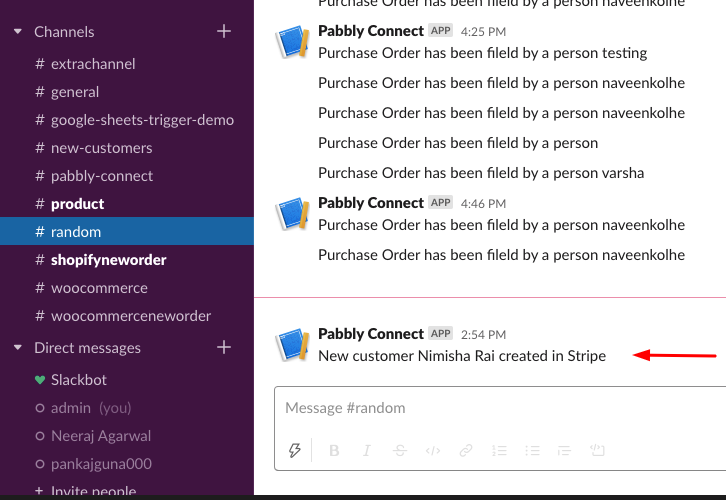
Check Response Slack

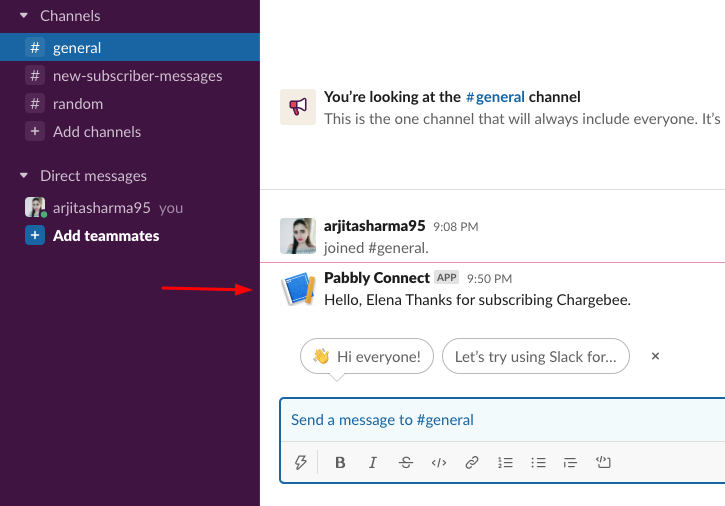
Here, you can see that our integration was successful and the message has been sent from the Slack channel automatically on the creation of a new customer in Stripe. Now, whenever there will be any new customer in your Stripe account, the message will be automatically sent from your Slack account.

Conclusion –

Well, this is all about “How to Auto-Send Slack Direct Message for New Stripe Customers”. Consequently, after completing the step by step procedure, you will end up sending Slack messages automatically on the addition of new customers in Stripe. More importantly, you don’t even need any coding knowledge to follow the steps. You can also, try Pabbly Connect for FREE. Hence, go ahead and signup for your free account.

For further questions, comment below.

You May Also Like to Read –

How to Add Stripe Customers to Quickbooks Online Automatically

How to Add Stripe Customers to Quickbooks Online Automatically

Are you tired of searching for a way to add new Stripe customers to Quickbooks Online automatically? If yes! Then here we are going to reveal the easiest way to integrate Stripe with Quickbooks Online using Pabbly Connect.

How to Add Stripe Customers to Quickbooks Online Automatically

But before moving forward let’s understand the working of both the services. Well, Stripe is a payment processing platform that helps businesses of all sizes. And, on the other hand, Quickbooks Online is accounting software that track miles, create invoices, manage expenses and cash flow of small & large businesses. Hence, by connecting Stripe with Quickbooks Online, you can add new Stripe customers to Quickbooks Online automatically in real-time.

Why Choose This Method Of Integration?

In contrast with other integration services-

  • Pabbly Connect does not charge you for its in-built apps like filters, Iterator, Router, Data transformer, and more
  • Create “Unlimited Workflows” and smoothly define multiple tasks for each action
  • As compared to other services which offer 750 tasks at $24.99, Pabbly Connect proffers 50000 tasks in the starter plan of $29 itself
  • Unlike Zapier, there’s no restriction on features. Get access to advanced features even in the basic plan
  • Try before you buy! Before spending your money, you can actually signup & try out the working of Pabbly Connect for FREE

Sign Up To Pabbly Connect 

To be really honest!! Pabbly Connect is one of the best integration tool that saves you from all the repetitive work to save your time & efforts both. Using this software, you can transfer data between several applications in real-time. Not only that, you don’t need to have any coding skills to use this software, even a newbie can integrate applications with it easily.

Furthermore, this software doesn’t restrict on its any features such as unlimited workflows, premium apps, etc even in its free plan. Here, in this article, we will learn how to integrate Stripe and Quickbooks Online in real-time.

How to Add New Stripe Customers to Quickbooks Online Automatically (step by step)

So, without wasting any of your time, let’s start the integration process.

Step 1: Sign up to Pabbly Connect

Sign up to Pabbly Connect

Begin the process of connecting Stripe to Quickbooks Online by pressing the “Sign Up Free” button on the Pabbly Connect dashboard. Following that, you can either enter the details manually or sign up via Gmail credentials.

Try Pabbly Connect for FREE

Step 2: Access Pabbly Connect

Select Connect

Now, after logging into the account, press the “Access Now” button.

Step 3: Workflow for Stripe to Quickbooks Online Integration

(a) Start with a New Workflow

Create New Workflow for Stripe & Quickbooks Online Integration

Initiate the process of building a workflow for integration by pressing the button named “Create New Workflow”.

(b) Name the Workflow

Name the Workflow for Stripe & Quickbooks Online Integration

Subsequently, now add the name of workflow i.e, “Stripe to Quickbooks Online”. Even though, you can always change the workflow name as per your requirements.

Step 4: Setting Trigger for Stripe to Quickbooks Online Integration

Later on, after building a workflow, choose the integration app to create a workflow for connecting Stripe to Quickbooks Online. Using Pabbly Connect you can avail unlimited actions and triggers, click here to sign up for unlimited workflows for free.

(a) Select Application you Want to Integrate

Select Stripe for Stripe & Quickbooks Online Integration

Now, select the application as “Stripe” from the dropdown, then choose the “New Customer” option to append every customer data from the software into Quickbooks Online.

(b) Copy the Webhook URL

Copy the Webhook URL for Stripe & Quickbooks Online Integration

Then, copy the trigger webhook URL which is appearing on the dashboard.

Step 5: Connecting Stripe to Pabbly Connect

After that, you have to paste the copied Webhook URL into the software to collect customer’s data from Stripe. Hence for that, you have to log in to your Stripe account.

(a) Go to Developer Section

Go to Developer Section for Stripe & Quickbooks Online Integration

Once you log into your Stripe account, go to the “Developer” section on the left of the dashboard. After that, press on the “Webhooks” option.

(b) Click on Add Endpoint

Click on Add Endpoint for Stripe & Quickbooks Online Integration

Afterward, tap on “Webhooks”, it will redirect to an endpoint tab. Then, tap on the “Add Endpoint” option to paste the copied Webhook URL.

(c) Paste the Webhook URL

Paste The Webhook URL

Once you press the “Add Endpoint” button, a window will open up with certain options. Now, paste the URL that was copied into the Endpoint URL tab. In the “Event to Send” tab, make sure to pick customer.created. Ultimately, to save the setting, hit the button named “Add Endpoint”.

(d) Click on Customers

Click on Customers to Add New Stripe Customers to Quickbooks Online

On the left of the dashboard, go back to the “Customer” section, then hit the button named “New” to add customers.

(e) Add Customers

Add Customers

A page will pop-up after hitting the ‘New’ button. Now, enter all the information you need & tap on the bottom of the “Add Customer” button. However, before that, make sure to hit the “Capture Webhook Response” button on the Pabbly Connect dashboard.

Step 6: Test the Response in Pabbly Connect Dashboard

Test the Response for Stripe & Quickbooks Online IntegrationAs soon as you click on the ‘Add Customers’ option, the entry will appear on the ‘Pabbly Connect’ dashboard. Next, hit the ‘Save’ button.

Step 7: Setting Action for Stripe & Quickbooks Online Integration

Next, in order to make this Stripe and Quickbooks Online integration work, you have to choose the action for your trigger.

(a) Select Application you Want to Integrate

Select Application you Want to Integrate

The following step is to click on the “(+)” icon then select “Quickbooks Online” & in the choose method option, select ”Create a Customer”.

(b) Click the Connect Button

Click the Connect Button

Consequently, hit the “Connect With Quickbooks Online” button. Once you do that, you have to log-in to your Quickbooks Online account and it will get connected automatically.

(c) Map Field Data

Map the Feilds
Now, map the required field from drop-down such as for the name, email, etc. Next, after entering all the details, hit the “Send Test Request” button to test the Stripe and Quickbooks Online integration.

(d)Test the Submission and Save

Test the Submission and Save to Add New Stripe customers to ActiveCampaign as Contact

As you can see, all the details are successfully sent to Quickbooks Online. Now, simply click on the “Save” button to save the entire workflow.

Step 8: Check Response in Quickbooks Online Dashboard

Check Response in Quickbooks Online Dashboard

Lastly, when you check the Customer section in Quickbooks Online, your entry will automatically appear there.

Conclusion –

That’s it! Now you know how to add New Stripe customers to Quickbooks Online automatically in real-time. This is a one-time process, now all your manual work will be done by the online business automation tool i.e Pabbly Connect. Just follow the step by step procedure mentioned above and your Stripe to Quickbooks Online integration is set.

So, what’s stopping you now! Go and catch your deal by signing up for a free account.

You May Also Like To Read –

How to Add GetResponse Contact For Newly Added Stripe Customers

How to Create Contact in GetResponse When New Customer is Added in Stripe

Are you looking for a way to create a contact in GetResponse whenever a new customer is added in Stripe?

This could be the end of your search, as we are going to integrate Stripe with GetResponse using Pabbly Connect to automatically create customers on GetResponse using the newly added Stripe customers in real-time.

Pabbly Connect will save the manual work by automating your tasks based on various triggers and actions that you set-up on the connected services.

How to Create Contact in GetResponse When New Customer is Added in Stripe

Here, we’ll add a trigger on Stripe’s new customer event & its respective action for creating a respective customer on GetResponse.

Further, Pabbly Connect allows using multiple advanced features such as multi-step calls, integration with limitless premium apps etc. Also, it helps using routers, filters, formatters and instant triggers to design unlimited workflows.

Why Choose This Method Of Integration?

In contrast with other integration services-

  • Pabbly Connect does not charge you for its in-built apps like filters, Iterator, Router, Data transformer and more
  • Create “Unlimited Workflows” and smoothly define multiple tasks for each action
  • As compared to other services which offer 750 tasks at $24.99, Pabbly Connect proffers 50000 tasks in the starter plan of $29 itself
  • Unlike Zapier, there’s no restriction on features. Get access to advanced features even in the basic plan
  • Try before you buy! Before spending your money, you can actually signup & try out the working of Pabbly Connect for FREE

Sign Up To Pabbly Connect  

This service allows designing task automation within just a minute interval. So, save your time in manual work & automate all your tasks on Pabbly Connect. You can even access all the features without any restriction even in the free plan.

Now, let’s follow the step by step procedure to integrate Stripe and GetResponse to automatically add the newly added customers.

How to Add GetResponse Contact For Newly Added Stripe Customers (step by step)

Step 1: Sign up to Pabbly Connect

Sign Up

Visit Pabbly Connect & then click the ‘Sign-Up Free‘ button. On the registration page signup using an existing Gmail account or manually fill the form details to get into the system.

Try Pabbly Connect for FREE

Step 2: Access Pabbly Connect

Select Connect

After signing up successfully, click the ‘Access Now’ button of the software ‘Connect’ in the Pabbly application.

Step 3: Workflow for Stripe with GetResponse Integration

(a) Start with a New Workflow

Create New Workflow

Start with creating a workflow to auto-create GetResponse customers on every new customer entry on Stripe and to do this strike the ‘Create New Workflow’ button.

(b) Name the Workflow

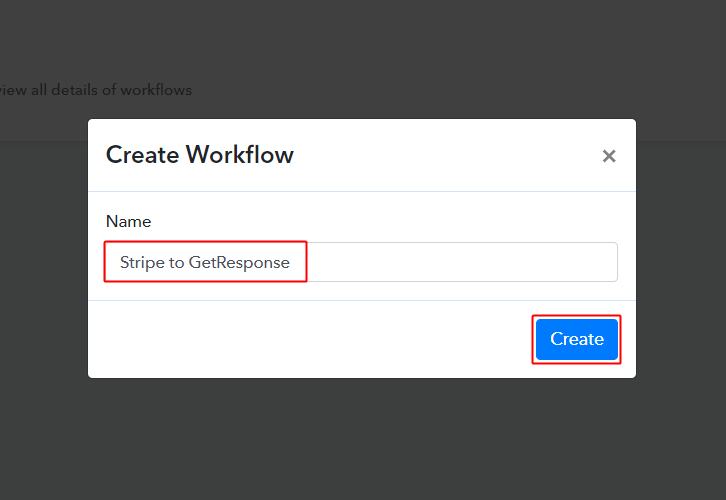
Stripe to GetResponse

Now, name the workflow as per your need (for instance: Stripe to GetResponse etc) and push the ‘Save’ button.

Step 4: Setting Trigger for Stripe – GetResponse Integration

To automatically add newly added Stripe customers on GetResponse, you’ll need to set-up a trigger on the new Stripe customers and its respective action to create a customer on GetResponse using Pabbly Connect.

(a) Select Application you want to integrate

Integrate Stripe

When you push the save button to create the workflow, a trigger window will open next.

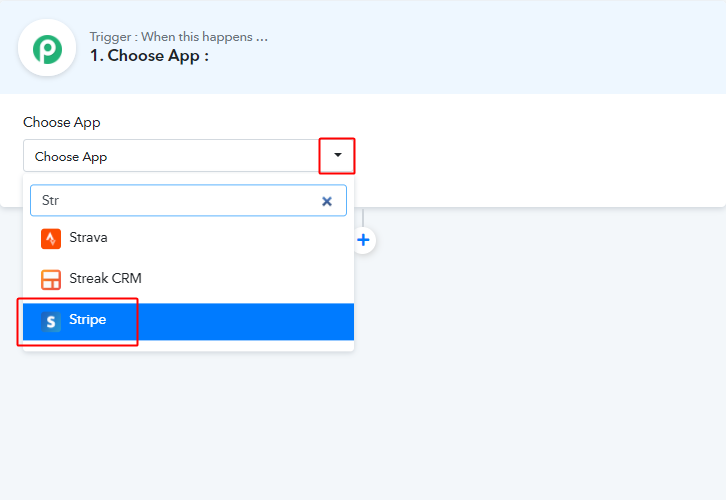
You’ll need to select the ‘Stripe’ option from the ‘Choose App’ field drop-down options.

(b) Select Method & Copy Webhook URL

Select Method & Copy Webhook URL

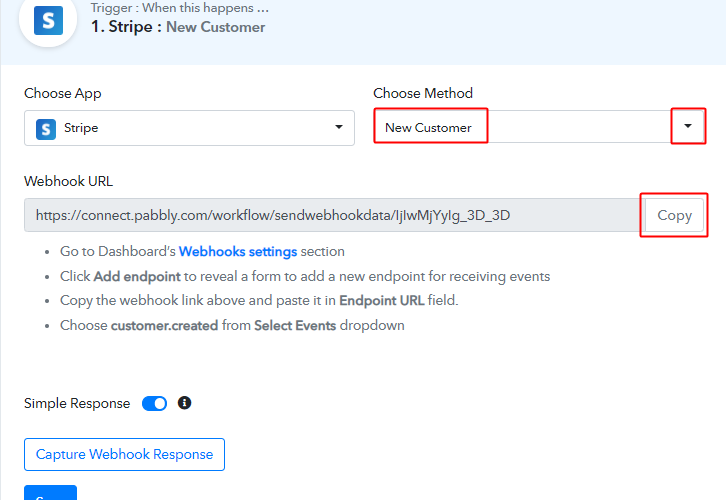
Select the method in here to be ‘New Customer’ & click on the ‘Copy’ button.

Step 5: Connecting Stripe to Pabbly Connect

Sign-in your Stripe account and go to the backend dashboard.

(a) Go to Your Stripe Account & Add an Endpoint

Developer Webhook Add EndPoint

After logging into your Stripe account, click on the ‘Developers’ option in the left verticle menu and then on ‘Webhook’ on the secondary menu.

Lastly, click the ‘Add endpoint’ button.

(b) Paste Webhook URL & Select Event

Paste Webhook URL & Select Event

A window will pop open, paste the copied webhook URL in it and also select the event as ‘customer.created’.

(c) Click on Add Endpoint

Click on Add EndPint

Hit the ‘Add endpoint’ button to create an endpoint.

Step 6: Test the Trigger Response in Pabbly Connect Dashboard

As we can see we are done setting up the trigger to add newly added Stripe customers to GetResponse too. So, let’s just test the trigger by making a test order on Stripe.

(a) Capture Webhook Response

Capture Webhook Response

To test the trigger, first, hit the ‘Capture Webhook Response’ button on the Pabbly Connect trigger window.

(b) Add New Customer

Add New Customer

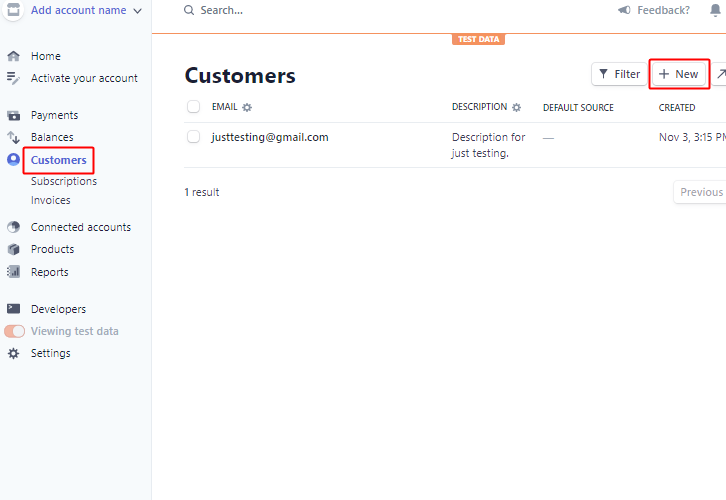
Go to the Stripe account and strike the ‘Customers’ option from the left verticle menu.

Next, click the ‘+ New’  button.

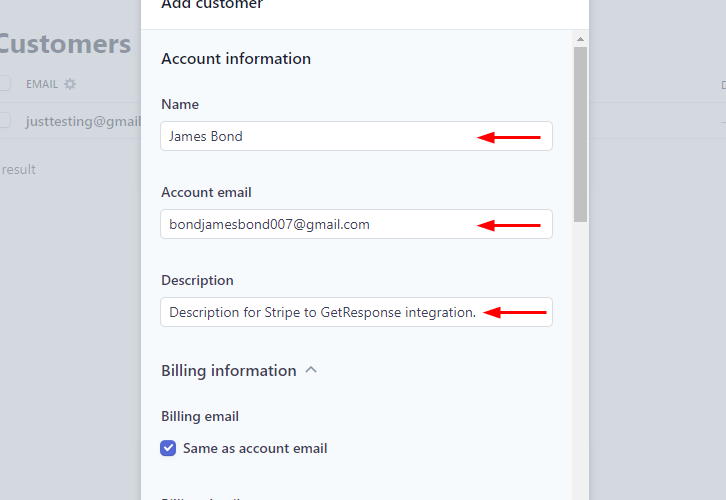
(c) Add Account Information

Add Account Info

Add all the required account information.

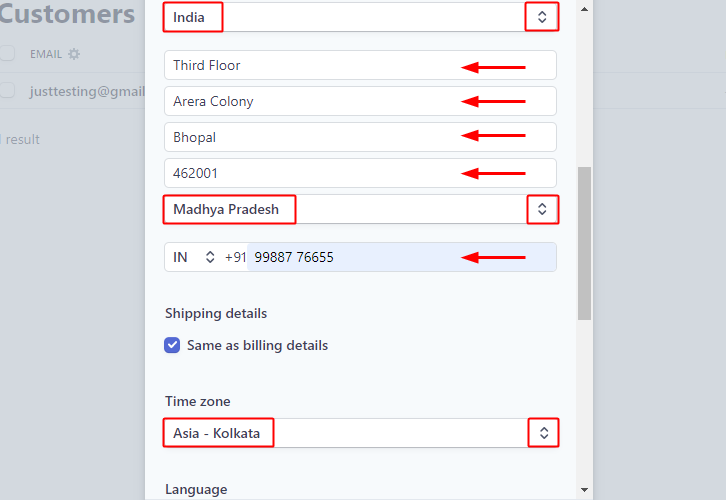
(d) Enter Billing Details

Enter Billing Details

Enter the billing details asked.

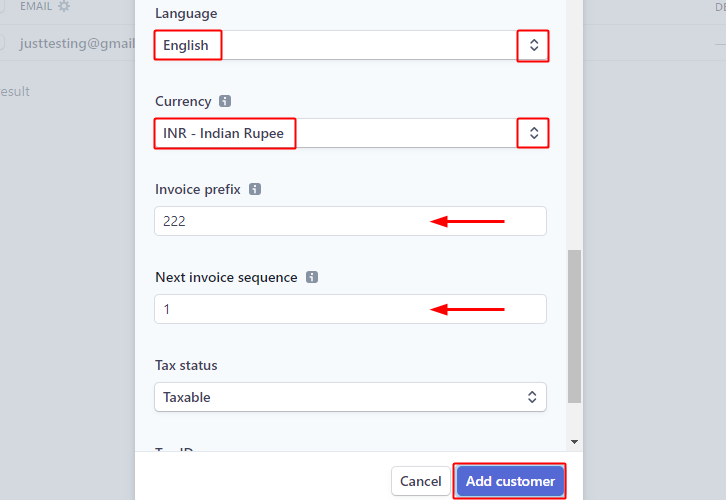
(e) Click on Add Customer

Click on Add Customer

Lastly, select the language & currency. Also, mention the invoice prefix and next invoice sequence.

Press the ‘Add Customer’ button once you are done with the description.

(f) Trigger Response

Trigger Response

Check the trigger response, you can sell all the customer data in it.

Step 7: Setting Action for Stripe – GetResponse Integration

Up to this point, we’ve gathered all the necessary data from Stripe to create a customer on GetResponse. So, let’s proceed to the very last step of creating a customer on GetResponse.

(a) Select Application you want to integrate

Integrate GetResponse

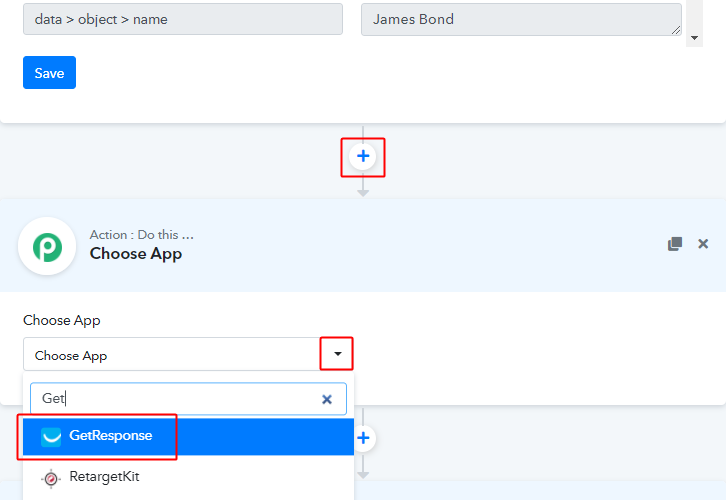
First, click the plus button next to your Stripe trigger window.

And then select the ‘GetResponse’ app to integrate from the ‘Choose App’ field.

(b) Connect with GetResponse

Connect with GetResponse

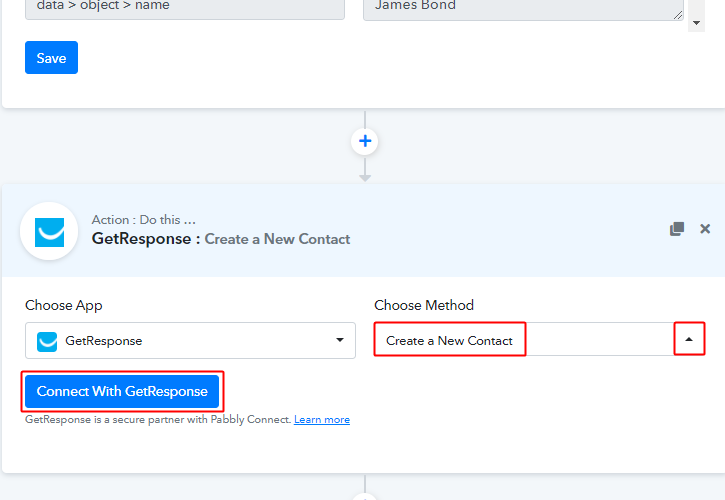
Select the method in here as ‘Create a New Contact’ and then click the ‘Connect with GetResponse’ button.

(c) Enter API Key Prefix & Click on ‘here’

Enter Prefix and Click on here

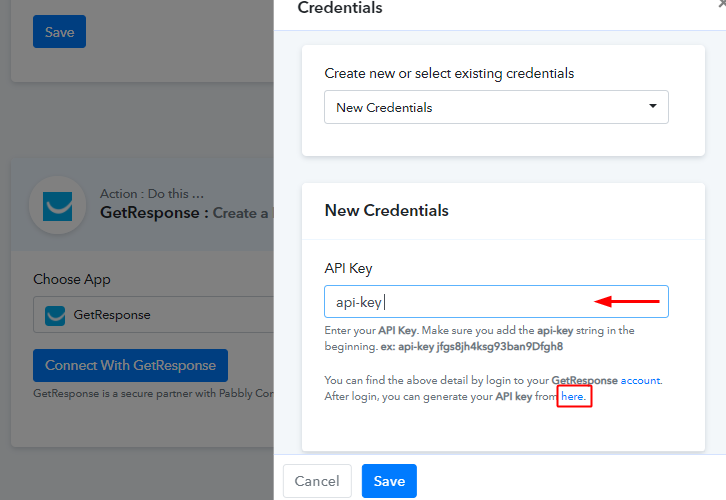
In the next window that slides in from the right, write-down the prefix ‘api-key’ and then hit the ‘here’ anchor text.

(d) Click on Generate API Key

Click on Generate API Key

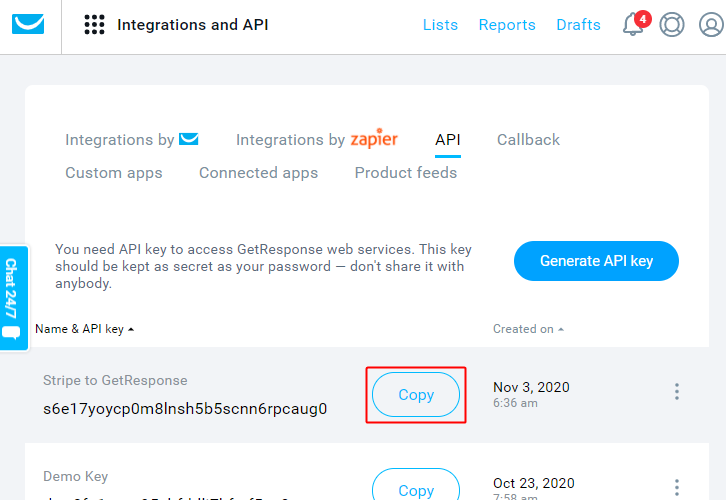
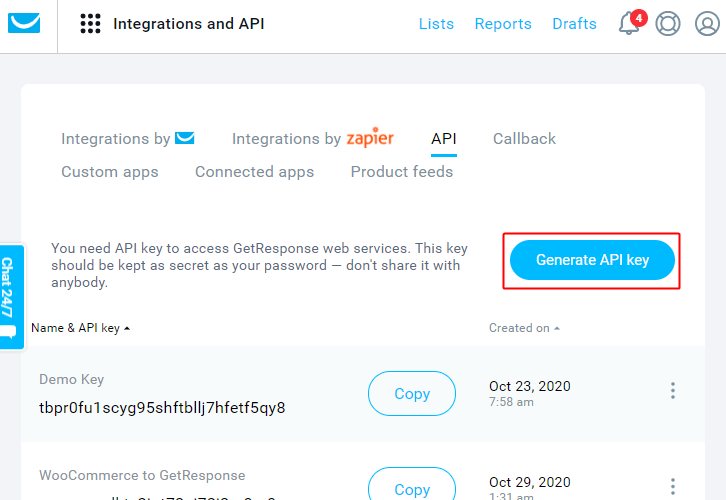
You’ll be directed to the API page.

Click the ‘Generate API Key’ button here.

(e) Name & Generate API Key

Name & Generate API Key

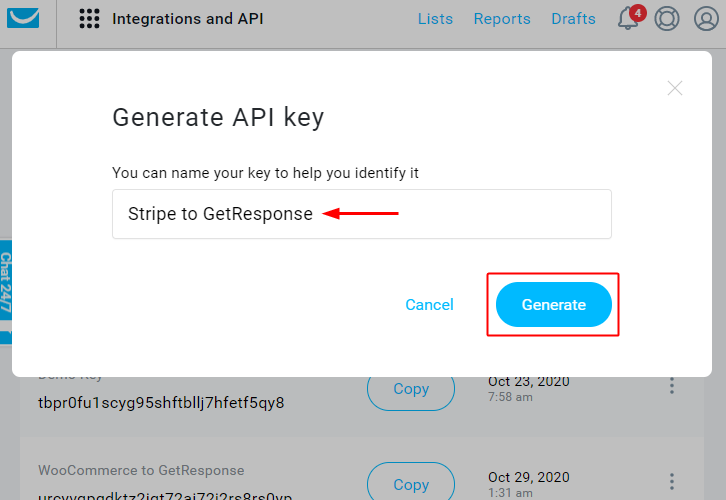
Name the API Key and click on the ‘Generate’ button.

(f) Copy Generated API Key

copy Generated API Key

Copy the generated API key.

(g) Paste API Key & Click ‘Save’

Paste API Key & Click 'Save'

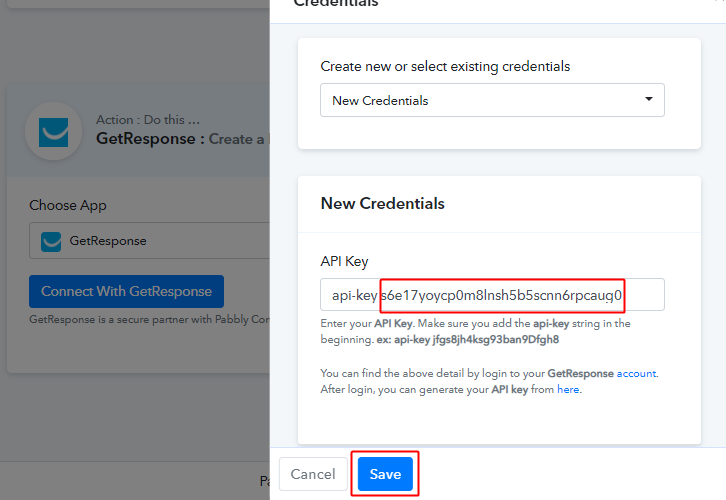
Paste the copied API key on Pabbly Connect as directed.

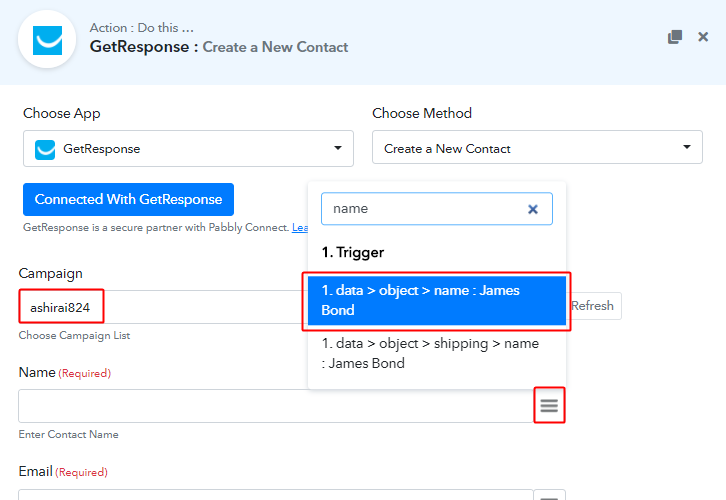
(h) Select Campaign & Map Name

Select Campaign & Map Name

Select a Campaign and map the name field.

To map a value, place your cursor in the field.

Then, click the menu button (or three horizontal lines) next to that particular field.

Lastly, click select the value that you want to map with the respective field.

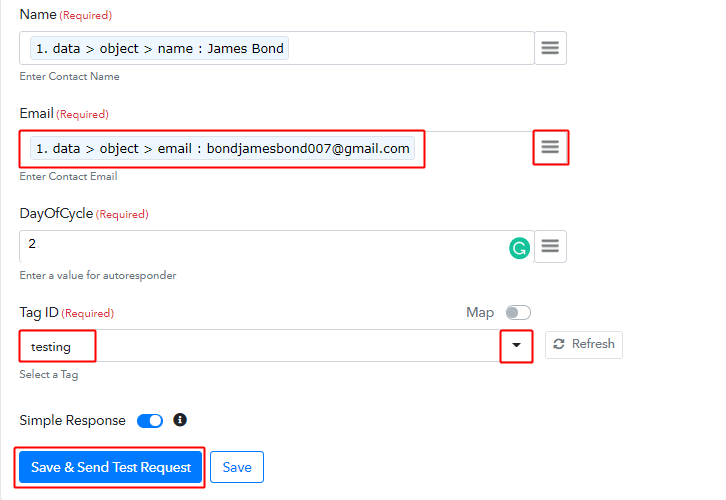
(i) Send Test Request for Action

Send Test Request for Action

Map all the required data and click on the ‘Save & Send Test Request’ button.

Step 8: Check the Action’s Response

This is the last step to check the customer entry on GetResponse for the Stripe customer.

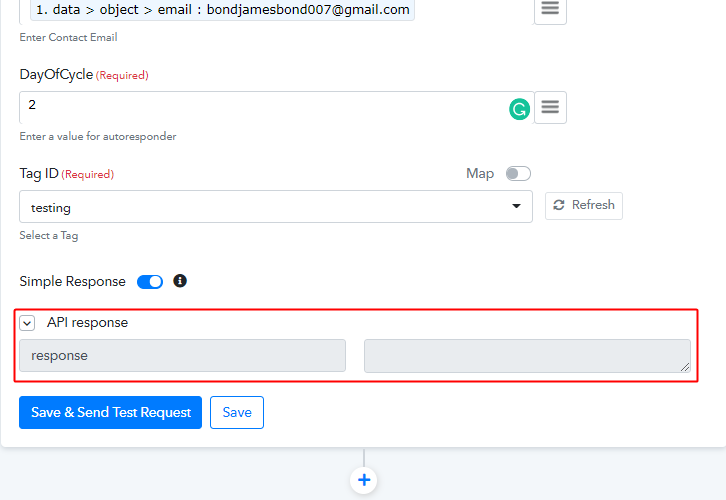
(a) Check the Action API’s Response

Action API Response

You can check the response of your API in the action window.

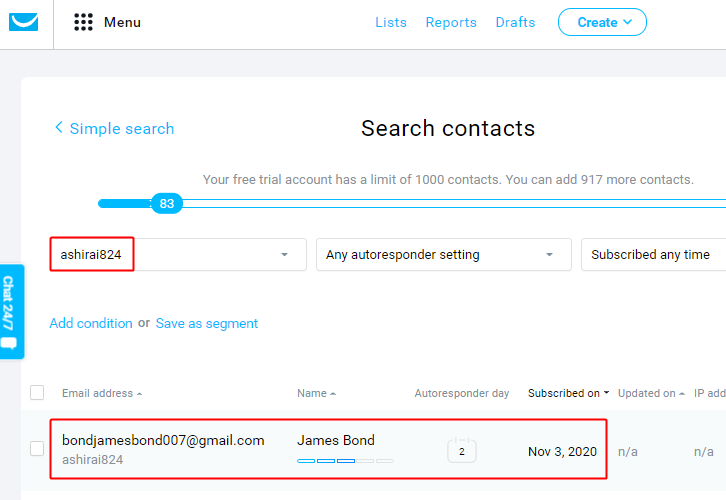
(b) Check the Customer Entry on GetResponse

Customer Entry on GetResponse

Also, you can check the entry of a new customer in your connected GetResponse account.

Step 9: Save the Workflow

Lastly, save the gathered API response and Webhook manually for the smooth working more further.

(a) Save the GetResponse Action API’s Response

Save Action API Response

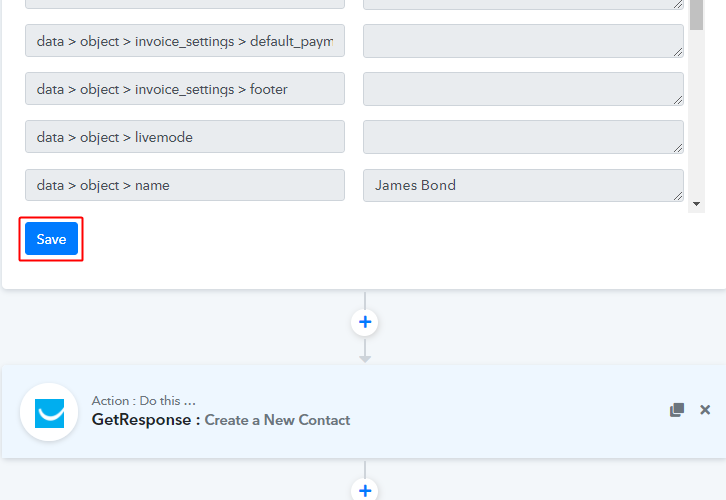
Save the action API’s response by hitting the ‘Save’ button at the bottom of the action API’s response.

(b) Save the Workflow

Save Workflow

As we can see the workflow is working as expected. So, simply save the webhook by clicking the save button in the trigger window.

Wind-Up

Well, this is all about ‘How to add GetResponse contact for newly added Stripe customers’. Consequently, after completing the step by step procedure, you will end up creating GetResponse customers from new Stripe customers automatically. Also, you won’t even need any coding knowledge to follow the steps.

You can even try Pabbly Connect for FREE.

For any more queries/suggestions, do comment below.

You May Also Like to Read:

How to Send Slack Messages for New Chargebee Subscriptions

How to Send Slack Messages for New Chargebee Subscriptions

Wouldn’t it be easier if you can just send Slack messages for new Chargebee subscriptions automatically? Of course, it would be such a timesaver and if you were thinking about it too, then keep reading as this blog is for you.

How to Send Slack Messages for New Chargebee Subscriptions

Pabbly Connect is your answer to all your problems related to automation and integration. Through this software, you can integrate unlimited premium apps, automate all the projects, set unlimited triggers and actions, etc without any coding skills. The amazing part of this software is that you can do all this even with its free plan.

Why Choose This Method Of Integration?

In contrast with other integration services-

  • Pabbly Connect does not charge you for its in-built apps like filters, Iterator, Router, Data transformer, and more
  • Create “Unlimited Workflows” and smoothly define multiple tasks for each action
  • As compared to other services which offer 750 tasks at $24.99, Pabbly Connect offers 50000 tasks in the starter plan of $29 itself
  • Unlike Zapier, there’s no restriction on features. Get access to advanced features even in the basic plan
  • Try before you buy! Before spending your money, you can actually signup & try out the working of Pabbly Connect for FREE

Sign Up To Pabbly Connect

In this blog, we are explaining to you the process to integrate Chargebee with Slack via Pabbly Connect. You just have to follow some simple steps and after this integration, whenever there will be any new subscription in your Chargebee account then the messages will be sent from your Slack channel automatically.

Therefore, without any further delay, let’s get into the blog about how to send Slack messages for new Chargebee subscriptions.

Step 1: Sign up to Pabbly Connect

Sign Up

Let’s kick off the process to send Slack messages for new Chargebee subscriptions by clicking on the ‘Sign Up Free’ icon on the Pabbly Connect home page. Next, either manually fill-up all the details or sign up using your Gmail account.

Try Pabbly Connect for FREE

Step 2: Access Pabbly Connect

Select Connect

Next, after logging into the account, click on the ‘Access Now’ button of the Connect section in the dashboard.

Step 3: Workflow for Chargebee with Slack Integration

(a) Start with a New Workflow

Create New Workflow

Start with creating a workflow for your project by clicking on the ‘Create Workflow’ button.

(b) Name the Workflow

Name the Workflow

Now, you need to name the workflow just like in the above-shown image. I named the workflow as ‘Chargebee to Slack’, you can obviously name the workflow as per your requirements.

Step 4: Setting Trigger for Chargebee with Slack Integration

As soon as you are done with naming your workflow, you will have to select the application you want to integrate. Pabbly Connect allows you to integrate unlimited premium applications, create your free account now.

(a) Select Application you Want to Integrate

Select Chargebee

Now, you have to select the application that you want to integrate. In this case, we are choosing ‘Chargebee’ for integration. In the method section, select ‘New Subscription’.

(b) Click on Connect Button

Click Connect Chargebee

After selecting the application, now you have to click on the ‘Connect with Chargebee’ button just like in the above-shown image to take further the integration process.

Step 5: Connecting Chargebee to Pabbly Connect

To connect Chargebee with Pabbly Connect, you have to add the API key and site name in the software. For that, you have to log in to your Chargebee account.

(a) Click on Chargebee Settings

Click-Settings-Chargebee

After logging into your Chargebee account, click on the ‘Settings’ option, and then click on ‘Configure Chargebee’.

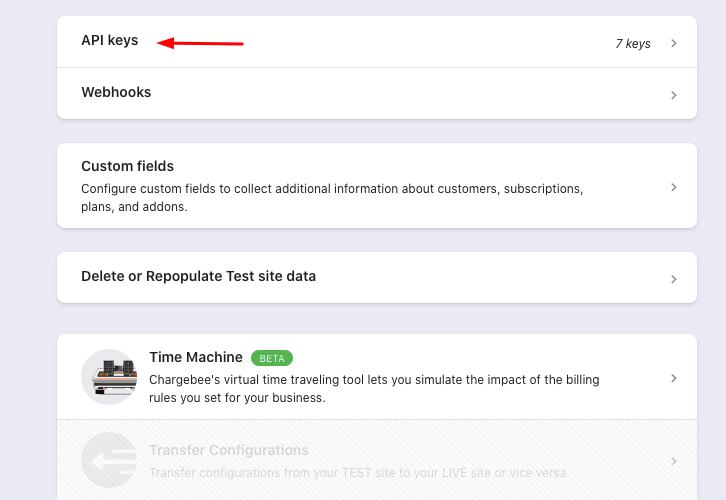
(b) Click on the API Keys

Click-API-Keys-Chargebee

Next, you need to scroll down and click on the ‘API Keys’ option.

(c) Copy the API Key

Copy API Key Chargebee

Now, you have to simply copy the given API key or you can also generate a new API key by clicking on the ‘Add API Key’ button.

(d) Paste the API Key

Paste-the-Credentials-1 Chargebee

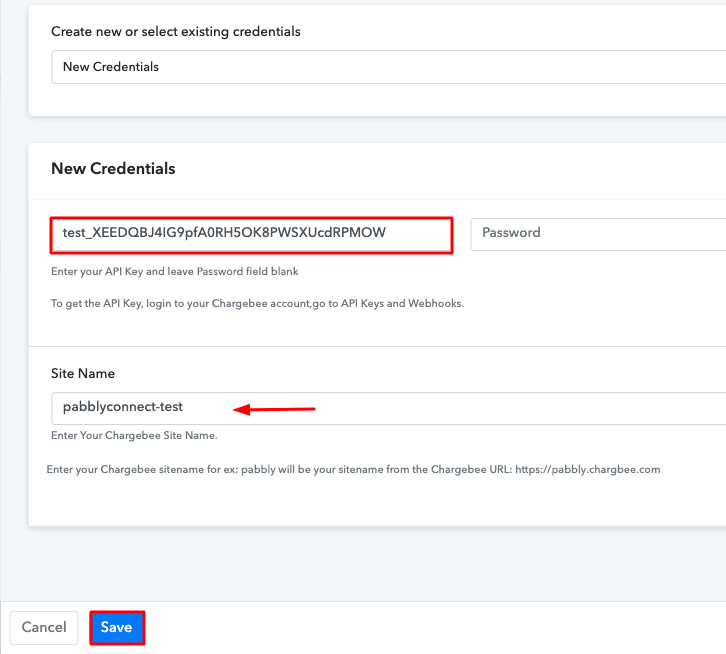
After copying the API key, now you have to paste it into the Pabbly Connect dashboard. You can find the Chargebee site name from the subdomain of your Chargebee account. Once, you have pasted all the required details, then hit the ‘Save’ button.
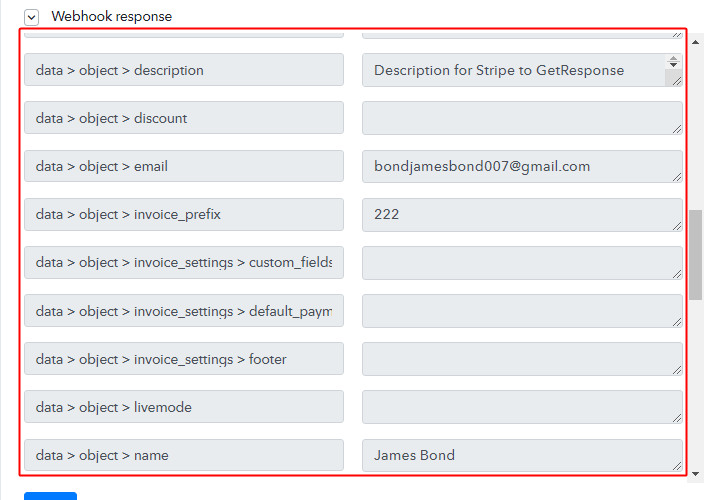
Step 6: Add a Sample Subscriber

To check this integration, we have to send a test request and for that, we will create a dummy subscriber on Chargebee.

(a) Click on Subscriptions

Click-on-Subscriptions-Chargebee

To add a subscriber, first, you have to click on the ‘Subscriptions’ option in your Chargebee dashboard.

(b) Click on Create Subscription

Click-on-Create-Subscription-Chargebee

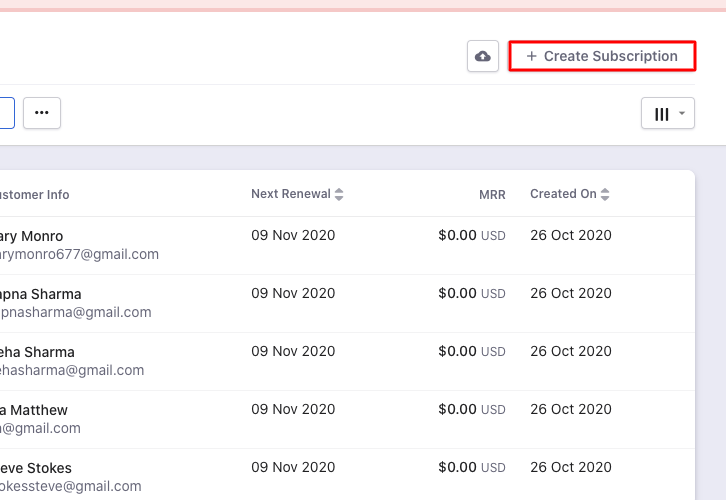
Once you reach the subscription page, now click on the ‘Create Subscription’ button to add a new subscriber.

(c) Add Details

Add New Subscriber Chargebee

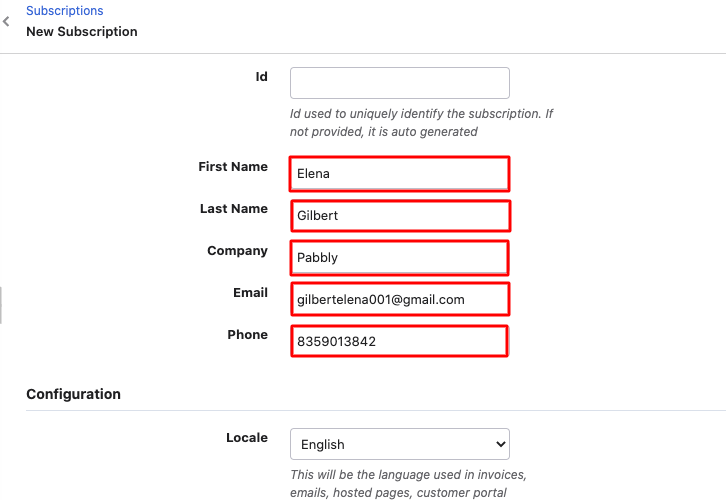
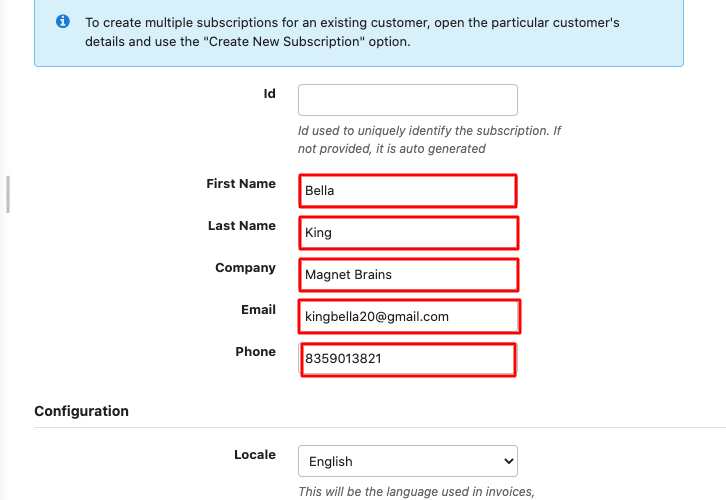
In this step, now you have to add all the required details of the subscriber like name, company, email, etc.

(d) Create Subscription

Click on Create Subscriptions Chargebee

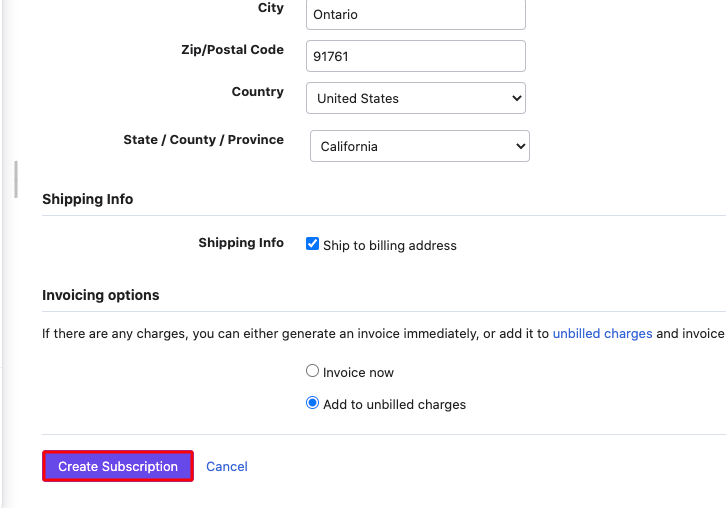
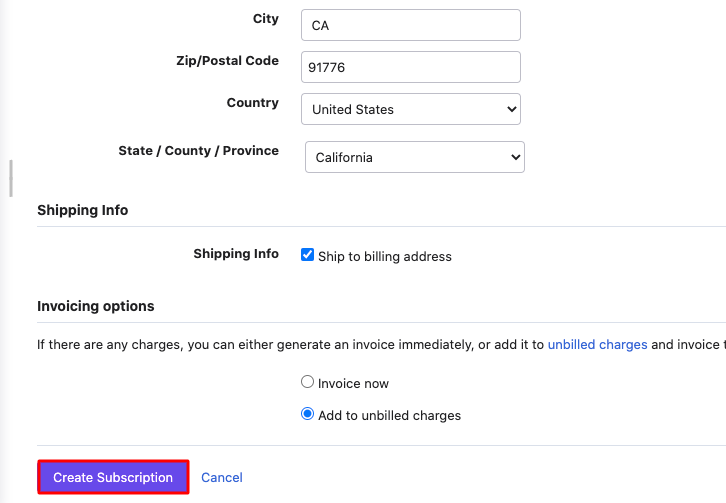
Next, after filling in all the details we will hit the ‘Create Subscription’ button.

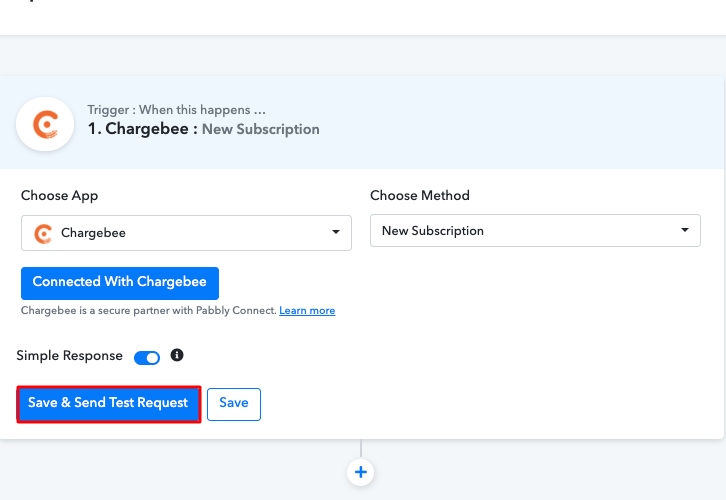
(e) Send a Test Request

Send-Test-Request-Chargebee

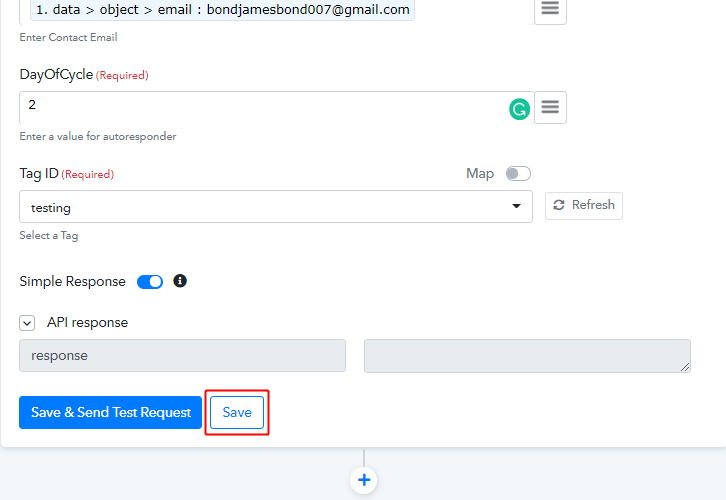
After adding a new subscriber in Chargebee, now we will capture the data by clicking on the ‘Save & Send Test Request’ button in Pabbly Connect.

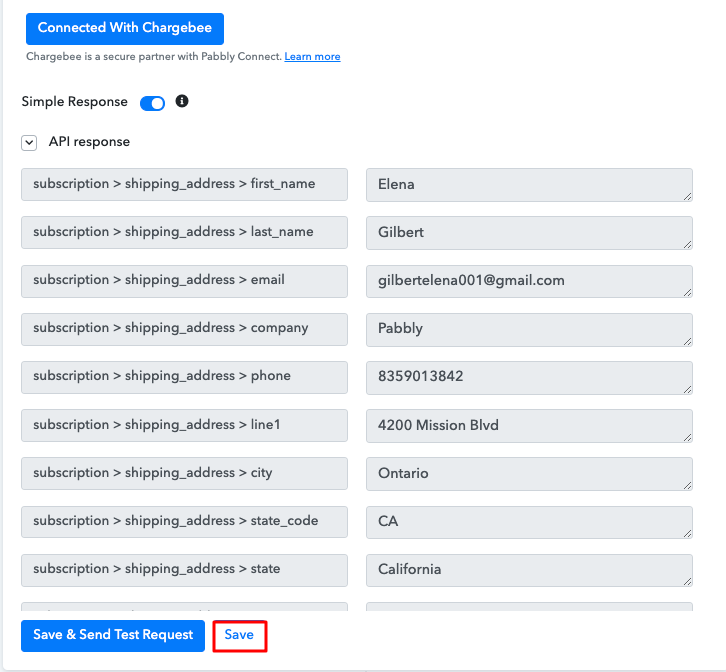
Step 7: Test the Response in Pabbly Connect Dashboard

Save API Response

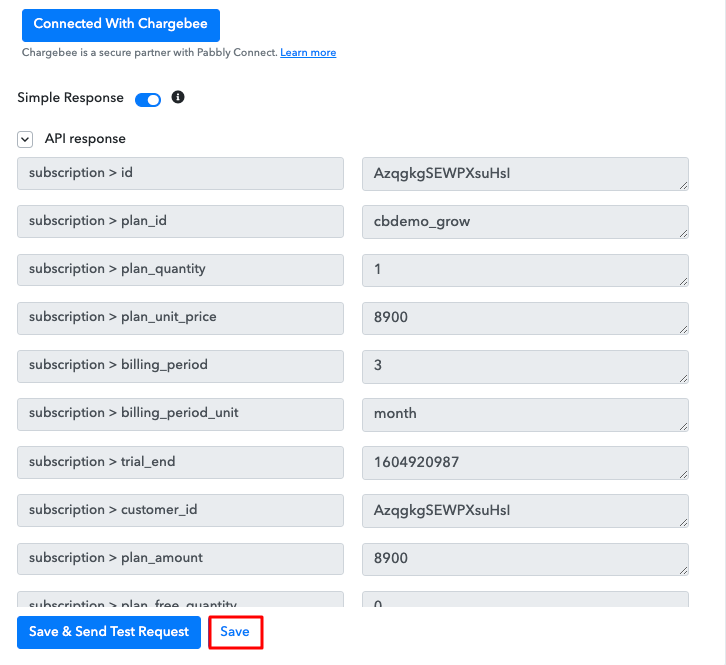
Once you click on the ‘Save & Send Test Request’ in Pabbly Connect, the subscriber info will appear on the Pabbly Connect dashboard. Then, click on the ‘Save’ option.

Step 8: Setting Action for Chargebee with Slack Integration

To make this Chargebee-Slack integration work, you have to choose the action for your trigger.

(a) Select Application you Want to Integrate

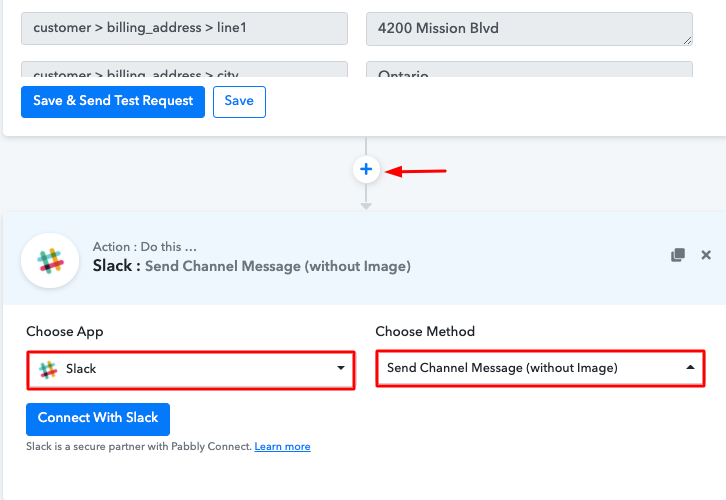
Select Slack

Now in this step, click on the + button below and choose the application that you want to integrate. Here we will choose ‘Slack’ to integrate and in the method section select ‘Send Channel Message (without Image)’.

(b) Click the Connect Button

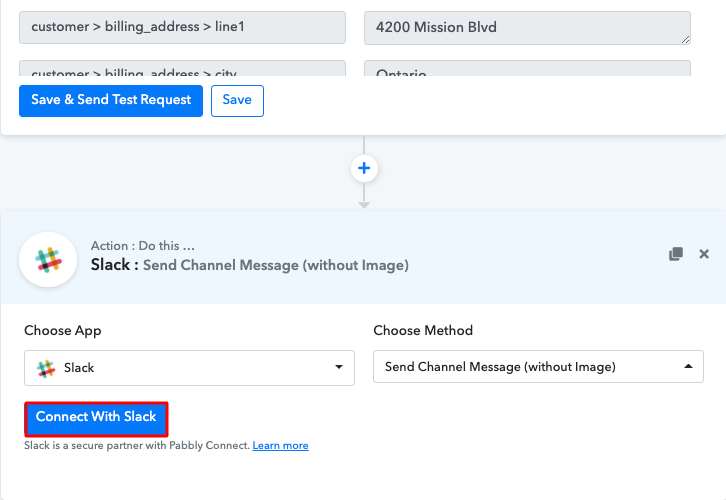
Click Connect Slack

After choosing the application click on the ‘Connect with Slack’ button to move forward.

Step 9: Connecting Slack to Pabbly Connect

To connect Slack to Pabbly Connect, you have to authorize your Slack account. For this, you have to log in to your Slack account.

(a) Authorize Account

Authorize Application Slack

When you click on the ‘Connect’ button, a window will slide in from the right, here you have to again click on the ‘Connect with Slack’ button and then choose the account through which you want to log into your Slack account.

(b) Map the Fields

Map the Fields

After connecting with your Slack account, map all the fields quickly like channel, message, etc.

(c) Save and Send Test Request

Send Test Request

Once you are done adding up all field data click on the ‘Save & Send Test Request’ button.

Step 10: Check Response in Slack Dashboard

Check Response

Here, you can see that our integration was successful and the message has been sent from the Slack channel automatically on the creation of a new subscriber in Chargebee. Now, whenever there will be any new subscription in your Chargebee account, the message will be automatically sent from your Slack account.

Conclusion –

In the end, this was our take on ‘How to Send Slack Messages for New Chargebee Subscriptions’. Now that you have understood how Pabbly Connect works and how it can help you in saving a lot of time and effort, you can integrate any applications easily. You just have to follow these simple steps and once the integration is done, then Pabbly Connect will do the rest for you. Thus, go ahead and signup for free to enjoy this amazing automation and integration service.

For further queries, please drop your comments below. We will get back to you as soon as possible.

You May Also Like to Read –

How to Add New Stripe Customers to ActiveCampaign as Contact

How to Add New Stripe Customers to ActiveCampaign as Contact

Are you tired of searching for a way to add new Stripe customers to ActiveCampaign as Contact? If yes! Then here we are going to reveal the easiest way to integrate Stripe with ActiveCampaign using Pabbly Connect.

How to Add New Stripe Customers to ActiveCampaign as Contact

But before moving forward let’s understand the working of both the services. Well, Stripe is a payment processing platform that helps businesses of all sizes. And, on the other hand, ActiveCampaign is marketing automation and CRM tool. Hence, by connecting Stripe with ActiveCampaign, you can add new Stripe customers to ActiveCampaign as contact in real-time.

Why Choose This Method Of Integration?

In contrast with other integration services-

  • Pabbly Connect does not charge you for its in-built apps like filters, Iterator, Router, Data transformer, and more
  • Create “Unlimited Workflows” and smoothly define multiple tasks for each action
  • As compared to other services which offer 750 tasks at $24.99, Pabbly Connect proffers 50000 tasks in the starter plan of $29 itself
  • Unlike Zapier, there’s no restriction on features. Get access to advanced features even in the basic plan
  • Try before you buy! Before spending your money, you can actually signup & try out the working of Pabbly Connect for FREE

Sign Up To Pabbly Connect 

To be really honest!! Pabbly Connect is one of the best integration tool available in the market. It helps you to remove all repetitive actions also saves a lot of time & effort. With the help of this software, you can transfer data among different applications in real-time. Apart from that, to use this software, you don’t need to have any coding skills, even a newbie or beginner can work with it.

Moreover, this software doesn’t restrict on its any features such as unlimited workflows, premium apps, etc even in its free plan. Here, in this article, we will learn how to integrate Stripe and ActiveCampaign in real-time.

So, without wasting any of your time, let’s start the integration process.

Step 1: Sign up to Pabbly Connect

Sign up to Pabbly Connect

Begin the process of connecting Stripe to ActiveCampaign by pressing the “Sign Up Free” button on the Pabbly Connect dashboard. Next, either fill-up the details manually or sign up using Gmail credentials.

Try Pabbly Connect for FREE

Step 2: Access Pabbly Connect

Select Connect

Subsequently, after logging into the account, press the “Access Now” button as shown in the above image.

Step 3: Workflow for Stripe to ActiveCampaign Integration

(a) Start with a New Workflow

Create New Workflow for Stripe to ActiveCampaign Integration

Start the process of building a workflow for integration by pressing the “Create New Workflow” button.

(b) Name the Workflow

Name the Workflow for Stripe to ActiveCampaign Integration

Moving forward, now add the name of workflow i.e, “Stripe to ActiveCampaign”. Although, you can always name the workflow as per your requirements.

Step 4: Setting Trigger for Stripe to ActiveCampaign Integration

Subsequently, after building a workflow, now choose the integration app to create a workflow for connecting Stripe to ActiveCampaign. Using Pabbly Connect you can avail unlimited actions & triggers, click here to sign up for unlimited workflows for free.

(a) Select Application you Want to Integrate

Select Stripe for connecting Stripe to ActiveCampaign

The next step is to select “Stripe” from the dropdown, then choose the “New Customer” option to append every customer data from the software into ActiveCampaign.

(b) Copy the Webhook URL

Copy the Webhook URL for Connecting Stripe to ActiveCampaign

Afterward, just copy the trigger webhook URL which is appearing on the dashboard.

Step 5: Connecting Stripe to Pabbly Connect

Now, in order to collect customer’s data from Stripe, you need to paste the copied Webhook URL into the software. Hence to do that, you have to log in to your Stripe account.

(a) Go to Developer Section

Go to Developer Section

Once you login to the Stripe account, simply go to the “Developer” section on the left of the dashboard. Then, hit the “Webhooks” option.

(b) Click on Add Endpoint

Click on Add Endpoint

Now, click on “Webhooks”, it will redirect to an endpoint tab. After that, just hit the “Add Endpoint” option so that you can paste the Webhook URL.

(c) Paste the Webhook URL

Paste The Webhook URL

After clicking on the “Add Endpoint” button, a window will open up with certain options. Now, paste the URL that was copied into the Endpoint URL tab. In the “Event to Send” tab, make sure to pick customer.created. Lastly, to save the setting, press ‘Add Endpoint’ button.

(d) Click on Customers

Click on Customers to Add New Stripe Customers to ActiveCampaign as Contact

On the left of the dashboard, go back to the “Customer” section, then click on the “New” button in order to add customers.

(e) Add Customers

Add Customers

A page will pop-up after pressing the ‘New’ button. Simply enter all the information you need & press the bottom of the “Add Customer” button. But, before you do that, make sure to press the “Capture Webhook Response” button on the Pabbly Connect dashboard.

Step 6: Test the Response in Pabbly Connect Dashboard

Test the ResponseAs soon as you click on the ‘Add Customers’ option, the entry will appear on the ‘Pabbly Connect’ dashboard. Then, press the ‘Save’ button.

Step 7: Setting Action for Stripe & ActiveCamapign Integration

Next, in order to make this Stripe and ActiveCampaign integration work, you have to choose the action for your trigger.

(a) Select Application you Want to Integrate

Select ActiveCampaign

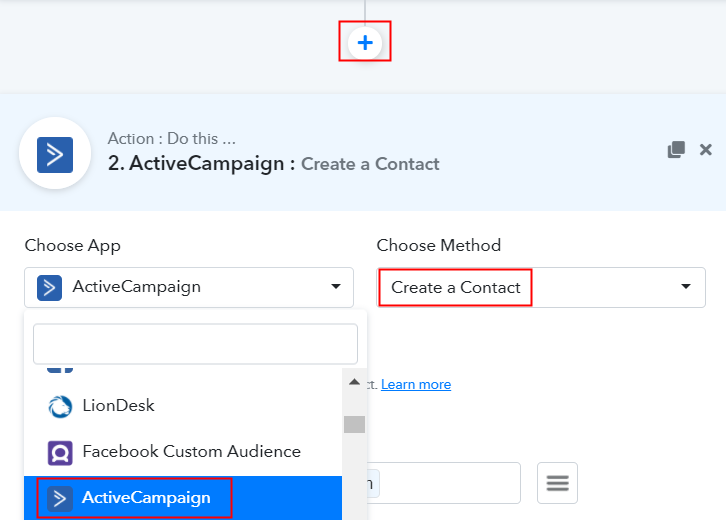
The following step is to click on the “+” icon then select “ActiveCampaign” & in the choose method option, select ”Create a Contact”.

(b) Click the Connect Button

Click the Connect Button

Consequently, hit the “Connect With ActiveCampaign” button after making all the necessary modifications. Once you do that, the authentication window will open that will ask for API Key & URL for which you have to log-in to your ActiveCampaign account.

Step 8: Connecting ActiveCampaign to Pabbly Connect

Later, in order to connect Stripe to ActiveCampaign, you need to paste the “API” for which you have to log in to your ActiveCampaign account.

(a) Click on ActiveCampaign Settings

Click on ActiveCampaign Settings

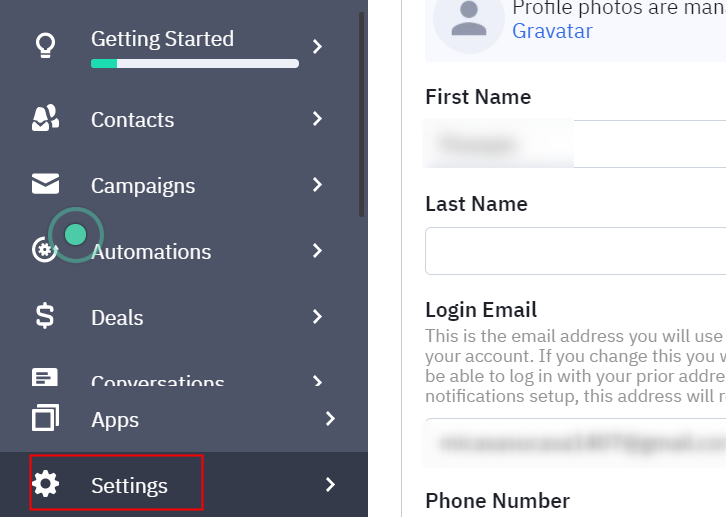
After login, go to the “Settings” option on the left side of the bottom section of the dashboard.

(b) Go to Developer Section

Go to Developer Section to Add New Stripe customers to ActiveCampaign as Contact

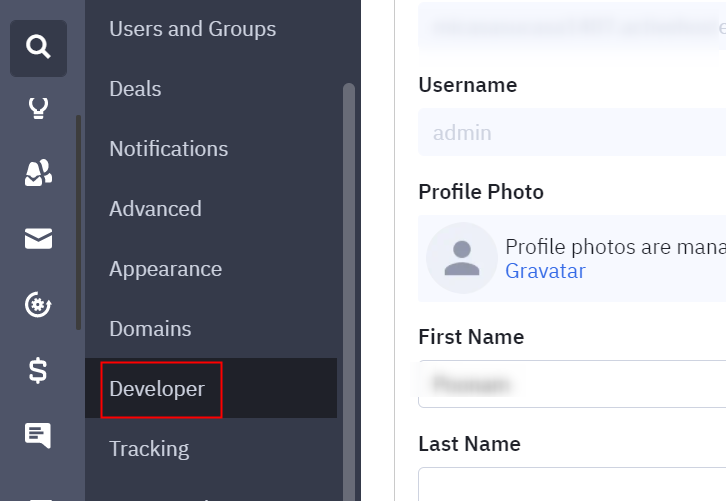
Once you go to “Settings”, a tab will open up, where you can see the “Developer” option, just click on it.

(c) Copy the API Key and URL

Copy the API Key and URL to Add New Stripe customers to ActiveCampaign as Contact

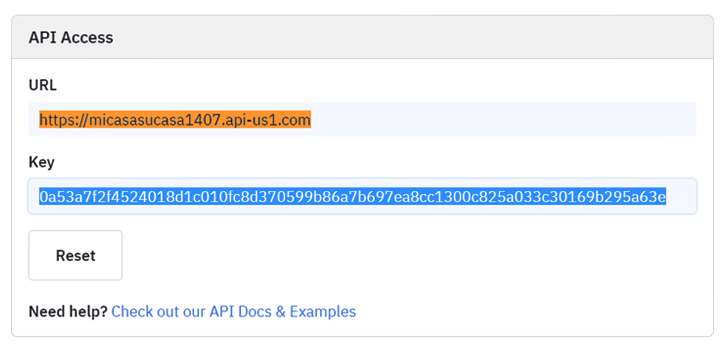
Now, copy the API & URL appearing on the dashboard.

Step 9: Paste API Key in Pabbly Connect Dashboard

Now, head back to the Pabbly Connect dashboard in order to paste the API key and URL.

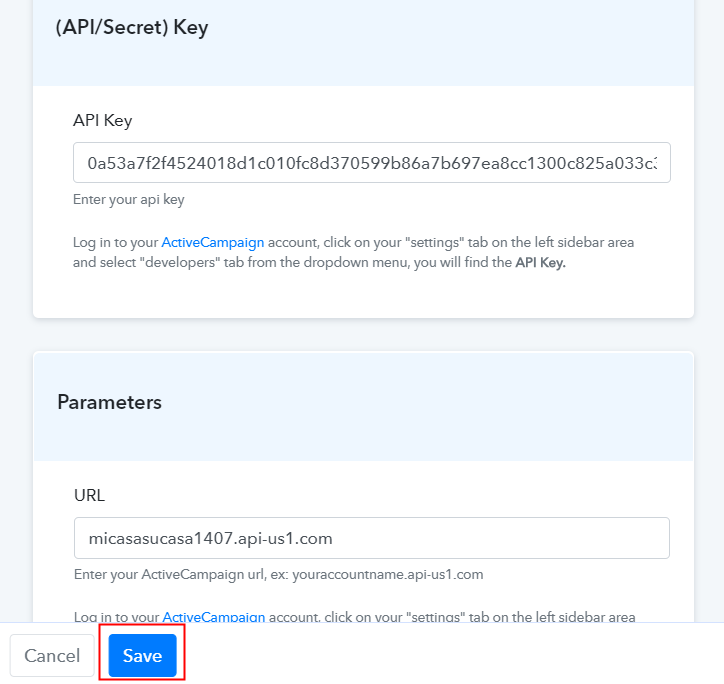
(a) Fill API Key

Fill API Key to Add New Stripe customers to ActiveCampaign as Contact

Now, paste API Key, and in the “URL” column, mention URL. After ensuring all this, hit the “Save” button.

(b) Map Field Data

Map Field Data to Add New Stripe customers to ActiveCampaign as Contact

Now, map the required field from drop-down such as for the email field, select the email option, and for the name field select the name option. Next, after entering all the details, hit the “Send Test Request” button to test the Stripe and ActiveCampaign integration.

(c) Test the Submission and Save

Test the Submission and Save to Add New Stripe customers to ActiveCampaign as Contact

As you can see, the data has been successfully sent to ActiveCampaign. Now simply click on the “Save” button to save the entire workflow.

Step 10: Check Response in ActiveCampaign Dashboard

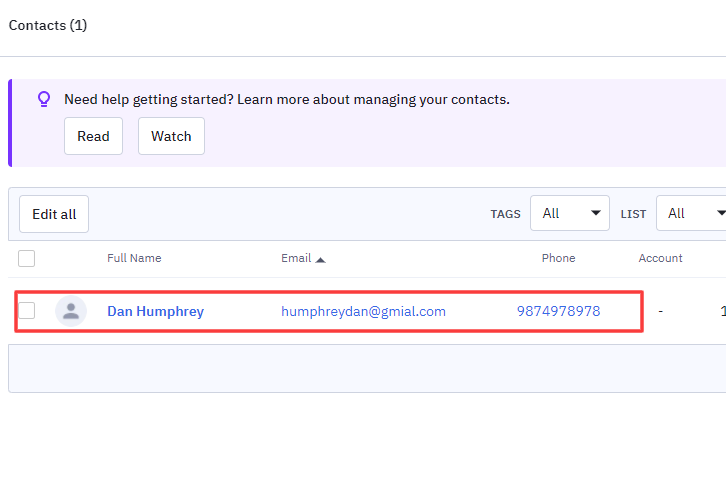
Check Response in ActiveCampaign Dashboard to Add New Stripe customers to ActiveCampaign as Contact

Lastly, when you check the Contact section in ActiveCampaign, your entry will automatically appear there.

Conclusion –

That’s it! Now you know how to add New Stripe customers to ActiveCampaign as contact in real-time. This is a one-time process, now all your manual work will be done by the online business automation tool i.e Pabbly Connect. Just follow the step by step procedure mentioned above and your Stripe to ActiveCampaign integration is set.

So, what’s stopping you now! Go and catch your deal by signing up for a free account.

You May Also Like To Read –

How to Create Asana Tasks for New Telegram Messages

How to Create Asana Tasks for New Telegram Messages

Do you want to know, how you can automatically create Asana tasks for the new Telegram messages?

Well, here’s the easiest answer possible to this question. All you need to do is, set-up a workflow and you’ll end up getting all the Telegram messages as Asana tasks in real-time.

For this, we’ll simply integrate Telegram and Asana using Pabbly Connect software. Pabbly Connect saves the manual work by automating your tasks based on various triggers and actions that you set-up on the connected services.

How to Create Asana Tasks for New Telegram Messages

Here, we’ll add a trigger on Telegram messages & its respective action for creating a respective task on Asana.

Moreover, Pabbly Connect allows using various advanced features such as multi-step calls, integration with unlimited premium apps etc. Also, it supports using routers, filters, formatters & instant triggers to design unlimited workflows.

Why Choose This Method Of Integration?

In contrast with other integration services-

  • Pabbly Connect does not charge you for its in-built apps like filters, Iterator, Router, Data transformer and more
  • Create “Unlimited Workflows” and smoothly define multiple tasks for each action
  • As compared to other services which offer 750 tasks at $24.99, Pabbly Connect proffers 50000 tasks in the starter plan of $29 itself
  • Unlike Zapier, there’s no restriction on features. Get access to advanced features even in the basic plan
  • Try before you buy! Before spending your money, you can actually signup & try out the working of Pabbly Connect for FREE

Sign Up To Pabbly Connect  

This service allows designing task automation within just a minute interval. So, save your time in manual work & automate all your tasks on Pabbly Connect. You can even access all the features without any restriction even in the free plan.

Now, let’s follow the step by step procedure to integrate Telegram and Asana to automatically add the newly added message as task.

Step 1: Sign up to Pabbly Connect

Sign Up

Visit Pabbly Connect & then click the ‘Sign-Up Free‘ button. On the registration page signup using an existing Gmail account or manually fill the form details to get into the system.

Try Pabbly Connect for FREE

Step 2: Access Pabbly Connect

Select Connect

After signing up successfully, click the ‘Access Now’ button of the software ‘Connect’ in the Pabbly application.

Step 3: Workflow for Telegram with Asana Integration

(a) Start with a New Workflow

Create New Workflow

Start with creating a workflow to auto-create Asana tasks on every new message on Telegram and to do this strike the ‘Create New Workflow’ button.

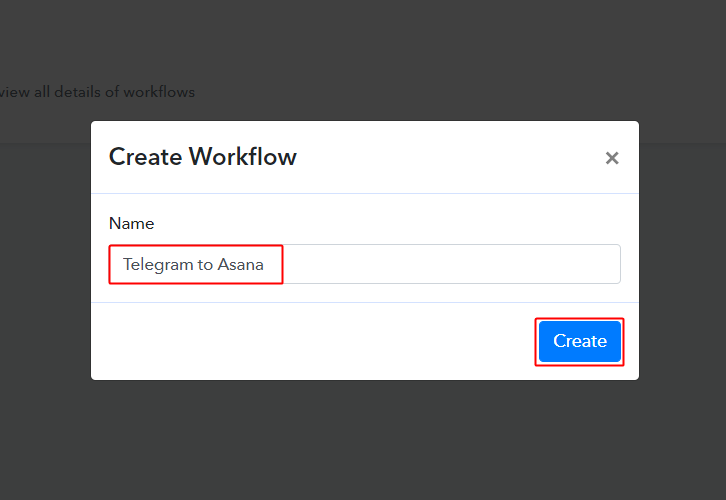
(b) Name the Workflow

Telegram to Asana Workflow

Now, name the workflow as per your need (for instance: Telegram to Asana etc) and push the ‘Save’ button.

Step 4: Setting Trigger for Telegram – Asana Integration

To automatically add newly added Telegram message as Asana tasks, you’ll need to set-up a trigger on the new Telegram messages and its respective action to create a task on Asana using Pabbly Connect.

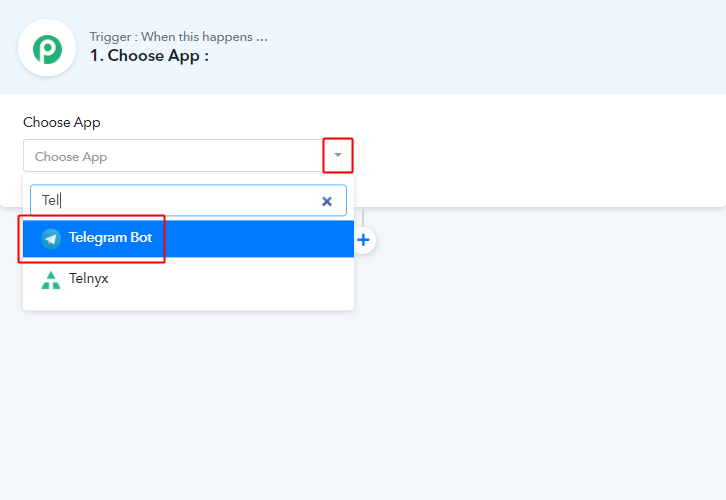
(a) Select Application you want to integrate

Integrate Telegram

When you push the save button to create the workflow, a trigger window will open next.

You’ll need to select the ‘Telegram’ option from the ‘Choose App’ field drop-down options.

(b) Connect with Telegram

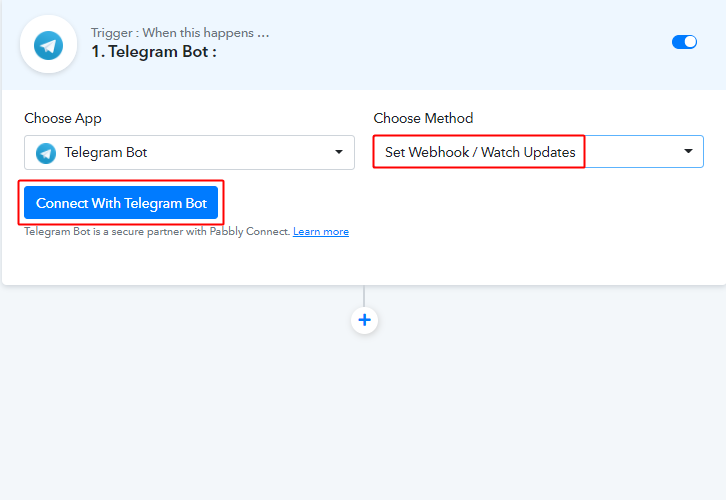
Connect with Telegram Bot

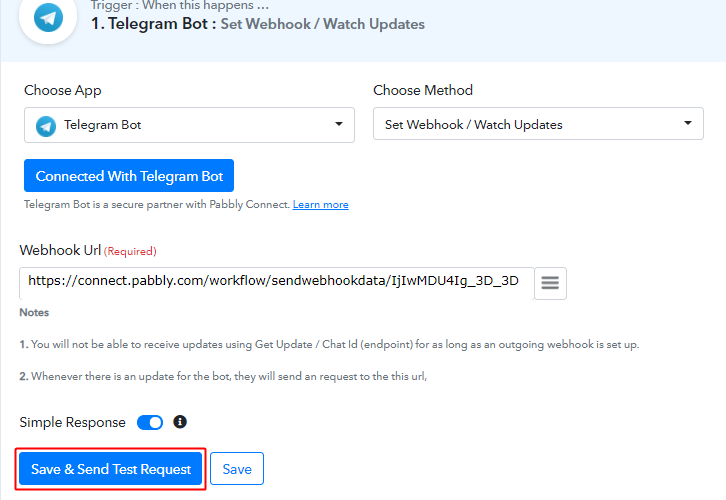
Select the method in here to be ‘Set Webhook/Watch Updates’ & click on ‘Connect with Telegram Bot’ button.

Step 5: Connecting Telegram to Pabbly Connect

Sign-in your Telegram account and go to the backend dashboard.

(a) Click the BotFather Link

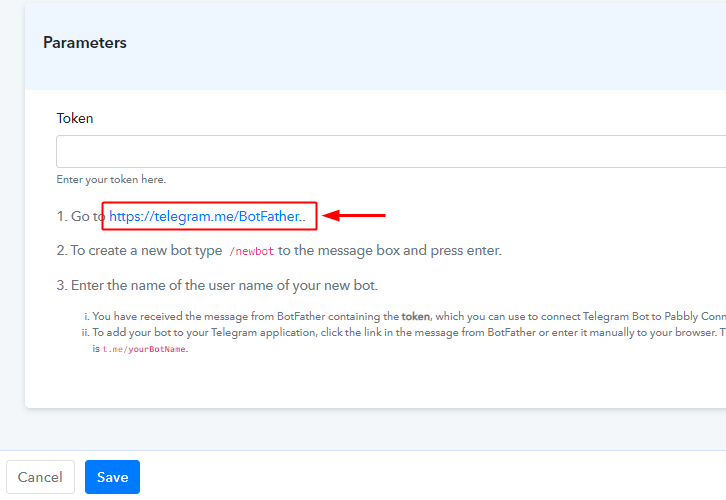
Click the BotFather Link

When you click on the ‘Connect to Telegram Bot’ button, a window will slide in from the right, click on the BotFather link or go to your telegram account and search for BotFather.

(b) Click Start on BotFather Chat

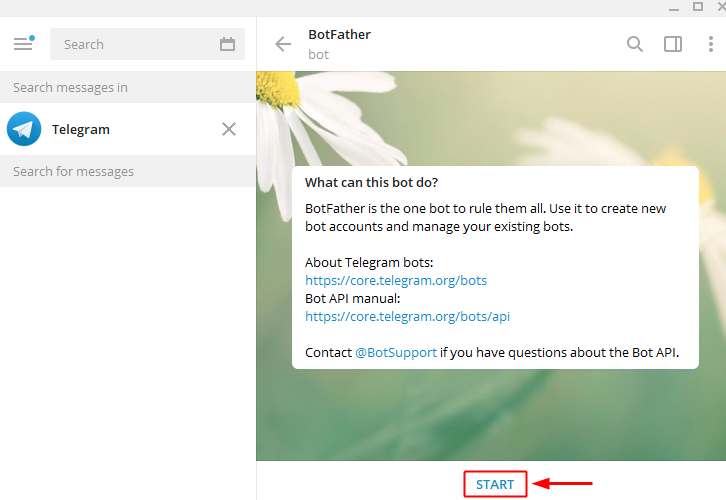
Click Start on BotFather Chat

Once you enter into the BotFather chat, you’ll see a ‘Start’ button. So, simply press it to initiate creating a bot.

(c) Create a New Bot

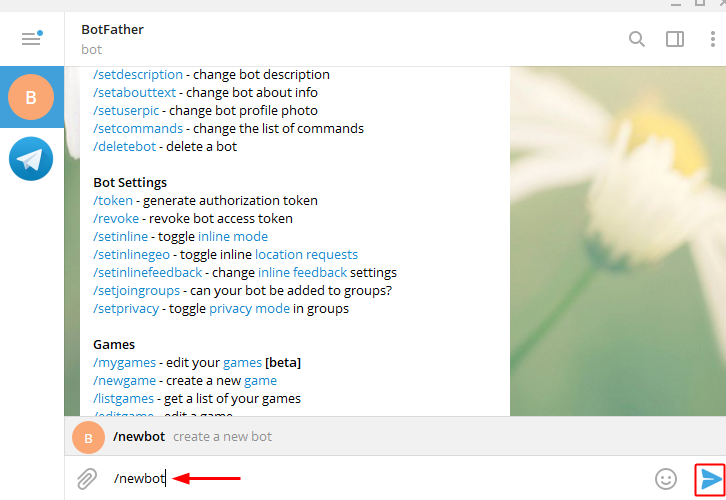
Create New Bot

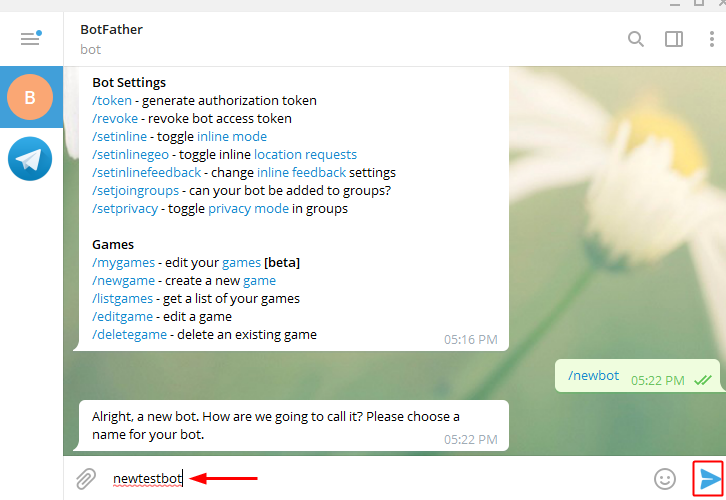
To create a new bot type ‘/newbot’ and then hit send.

(d) Name Your Created Bot

Name Your Bot

Next, it will ask you for a bot name. So, type any bot name that you wanna give to the recently created bot and hit the send icon.

(e) Give Your Bot a Username

Bot Username

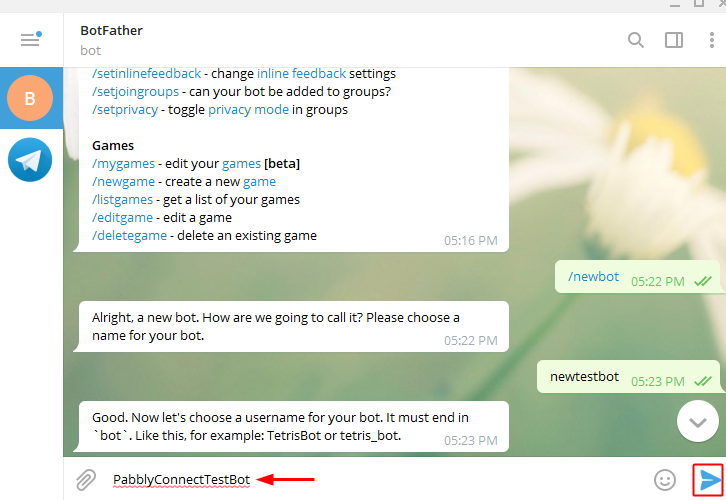
Lastly, give your bot any username that ends with a suffix ‘bot’. Just type the username and hit send.

(f) Copy the Token

Copy Telegram Token

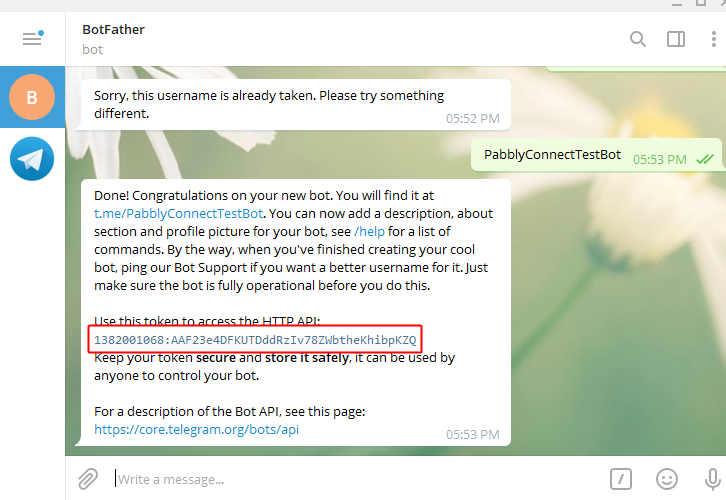
Once you successfully assign a username to your bot, a token will show up along with the new bot greetings.

Select and copy the token from here.

(g) Paste the Copied Token on Pabbly Connect

Paste the Telegram Token

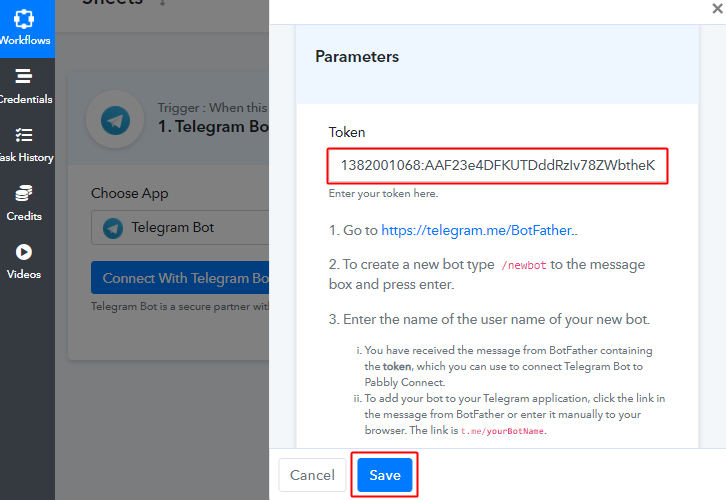
Paste the copied Telegram token in the Pabbly Connect and hit the ‘Save’ button.
Step 6: Test the Trigger Response in Pabbly Connect Dashboard

As we can see we are done setting up the trigger to save the messages send via Telegram in Google Sheets. So, let’s just test the trigger by making a test order on Telegram.

(a) Click on ‘Save & Send Test Request’ Button

Send Test Request

After connecting a Telegram account, a Webhook URL becomes visible along with some extra notes.

Simply click on the ‘Save & Send Test Request’ button in here.

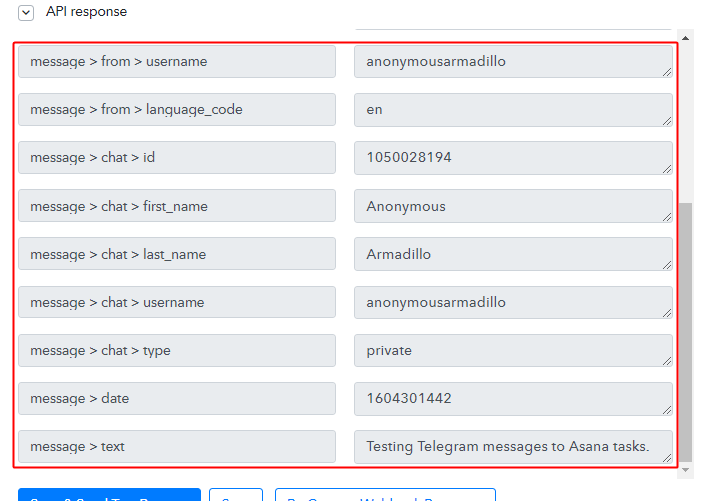
(b) Check the Test Response

Check the Test Response

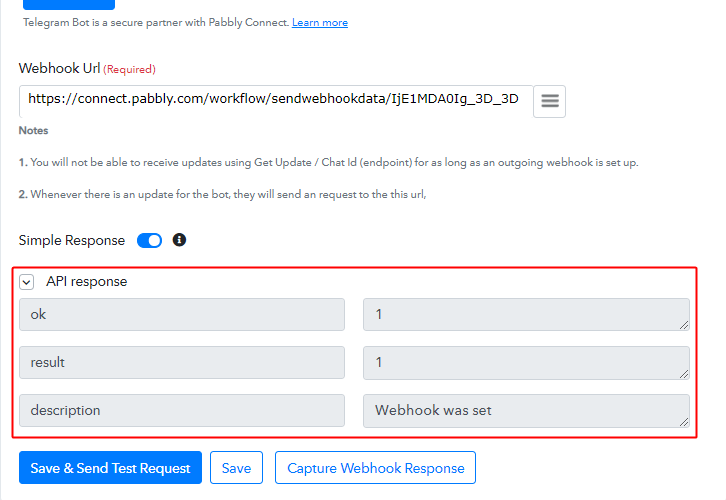
Check the success of your Webhook settings by looking at the API response of the trigger test request. If it looks like thing (as shown in the above image) then your trigger is working fine.

(c) Capture Webhook Response

Capture Webhook Response

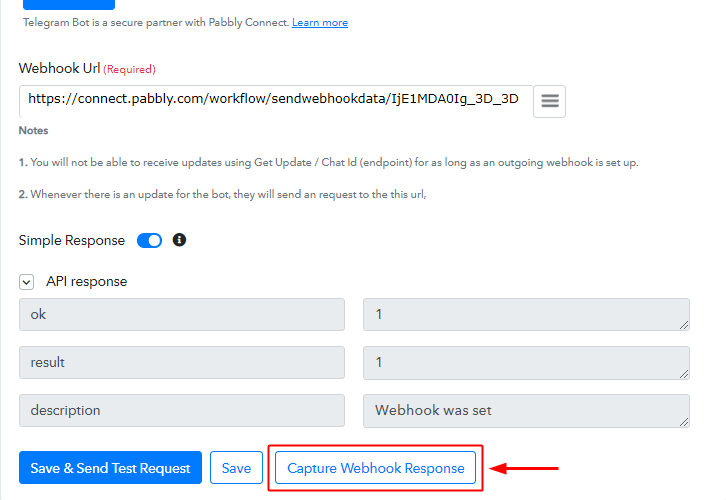
To test the trigger, first, hit the ‘Capture Webhook Response’ button on the Pabbly Connect trigger window.

(d) Send a Message

Send a Message

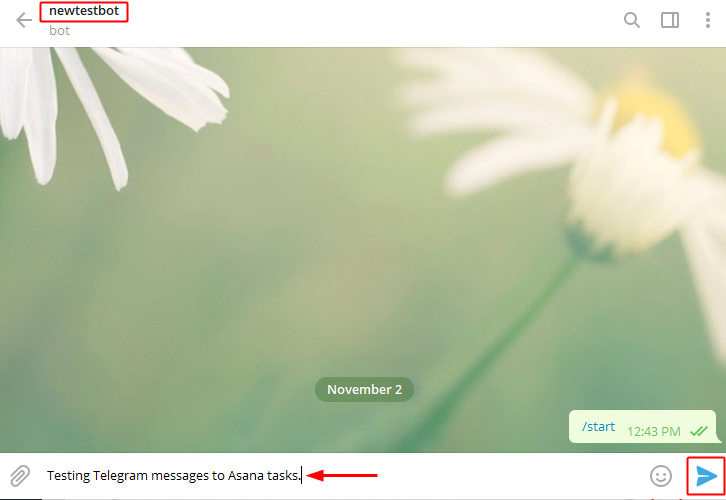
You can simply open the bot’s chat window, type any message and then hit the send button icon.

(e) Check the Trigger Response

Trigger Response

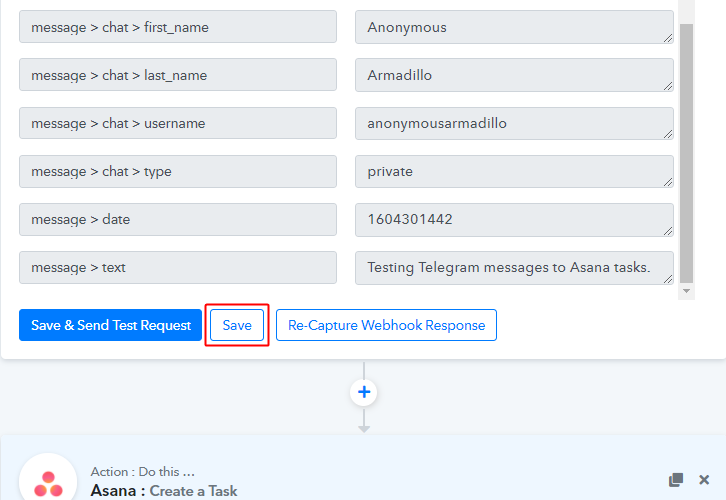
You can see the response of your created trigger below the API Response.

The response will start showing the details of the trigger response.

Step 7: Setting Action for Telegram – Asana Integration

Up to this point, we’ve gathered all the necessary data from Telegram to create a task on Asana. So, let’s proceed to the very last step of creating a task on Asana.

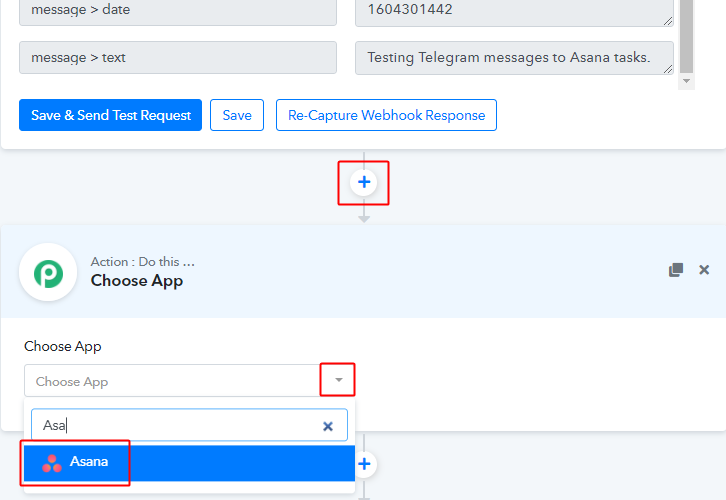
(a) Select Application you want to integrate

Integrate Asana

First, click the plus button next to your Telegram trigger window.

And then select the ‘Asana’ app to integrate from the ‘Choose App’ field.

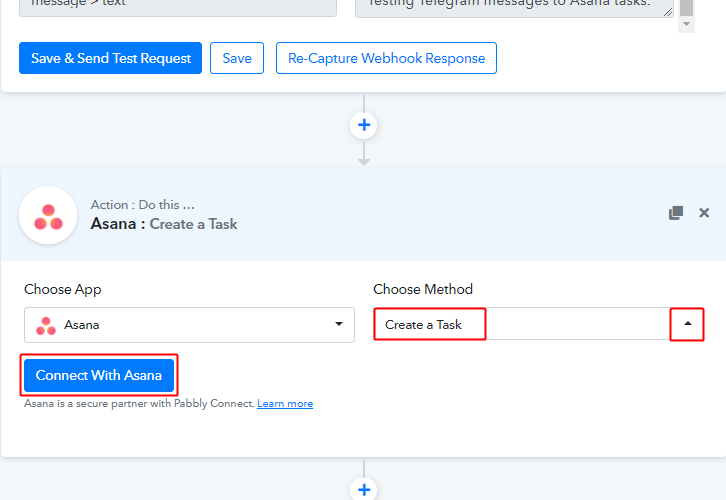
(b) Connect with Asana

Connect with Asana

Select the method in here as ‘Create a Task’ and then click the ‘Connect with Asana’ button.

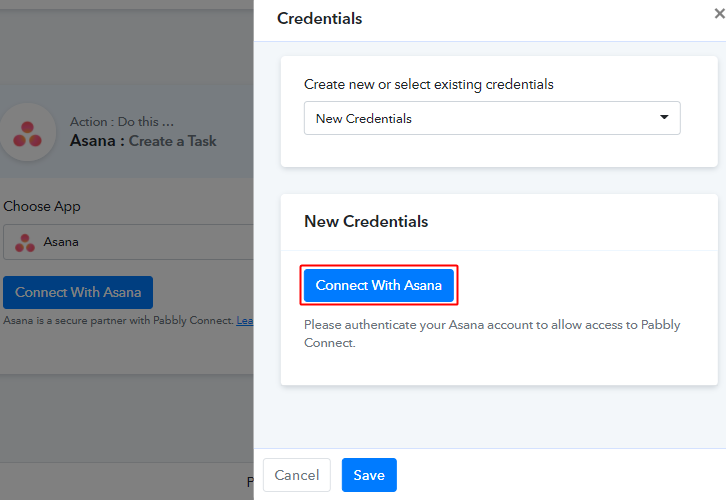
(c) Authorize Asana Account

Authorize Asana Account

In the next window that slides in from the right, click the ‘Connect with Asana’ button & authorize your Asana account.

(d) Map Values

Map Values

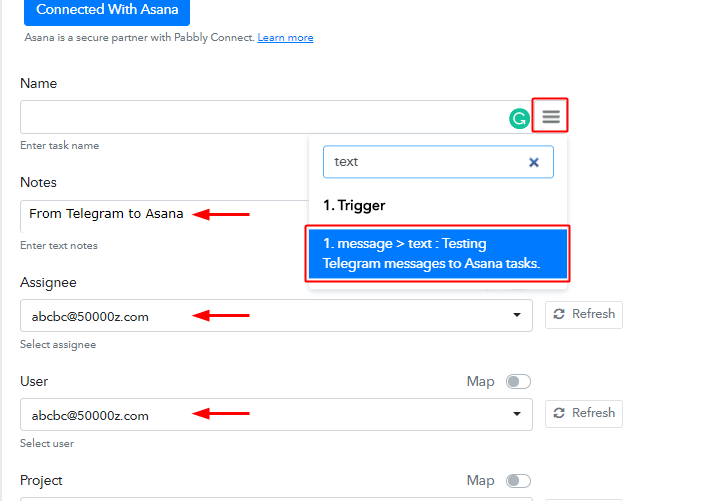
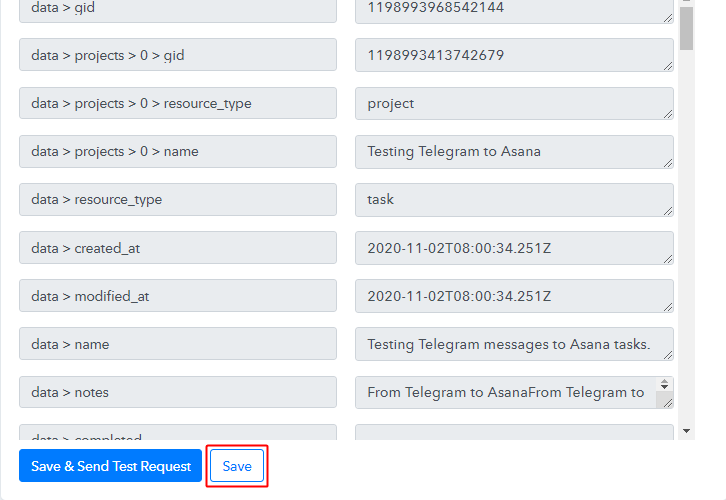
Map the required by mapping the response values.

To map a value, place your cursor in the field.

Then, click the menu button (or three horizontal lines) next to that particular field.

Lastly, click select the value that you want to map with the respective field.

(e) Send Test Request for Action

Send Test Request for Action

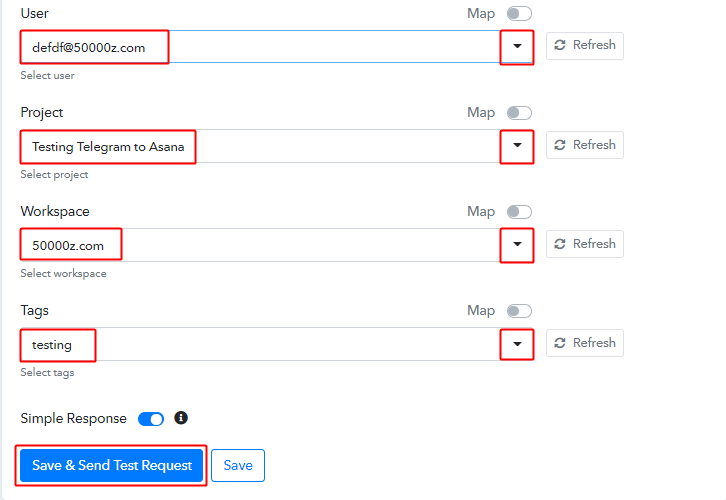
Select the assignee, user, project, workspace and tags.

Hit the ‘Save & Send Test Request’ button once you are done.

Step 8: Check the Action’s Response

This is the last step to check the task entry on Asana for the message on Telegram.

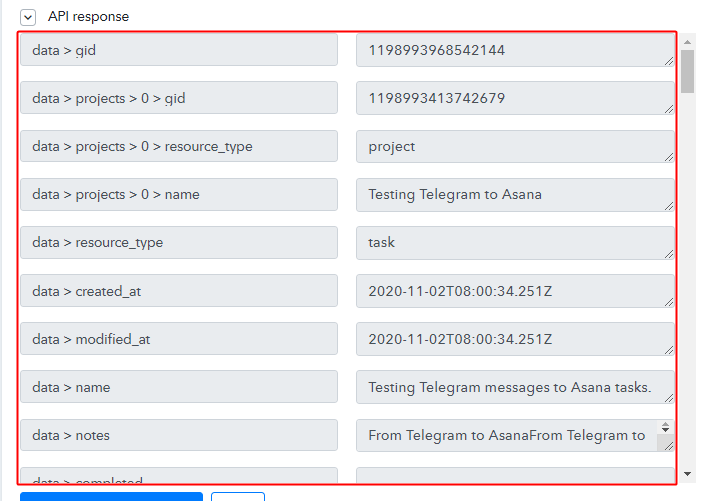
(a) Check the Action API’s Response

Action Response

You can check the response of your API in the action window.

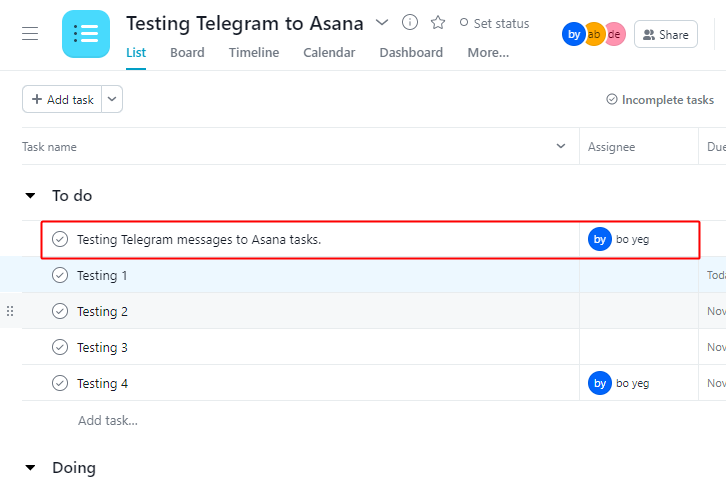
(b) Check the Task Entry on Asana

Task entry on Asana

Also, you can check the entry of a new task in your connected Asana account.

Step 9: Save the Workflow

Lastly, save the gathered API response and Webhook manually for the smooth working more further.

(a) Save the Asana Action API’s Response

Save Action API Response

Save the action API’s response by hitting the ‘Save’ button at the bottom of the action API’s response.

(b) Save the Workflow

Save Workflow

As we can see the workflow is working as expected. So, simply save the webhook by clicking the save button in the trigger window.

Wind-Up

Well, this is all about ‘How to create Asana tasks for new Telegram messages’. Consequently, after completing the step by step procedure, you will end up creating Asana tasks from new Telegram messages automatically. Also, you won’t even need any coding knowledge to follow the steps.

Try Pabbly Connect for FREE.

For further queries & suggestions, comment below.

You May Also Like to Read:

How to Add New Stripe Customers Automatically to MailChimp

How to Add New Stripe Customers Automatically to MailChimp

In case you’re wondering about how to add new Stripe customers automatically to MailChimp? Here we are going to reveal the easiest way to integrate Stripe with MailChimp using Pabbly Connect.

How to Add New Stripe Customers Automatically to MailChimp

But before moving forward let’s understand the need of integrating Stripe and MailChimp. Stripe is a payment processing platform that helps businesses of all sizes. The software helps businesses to send invoices, issue virtual and physical cards, get financing, manage business spend, and much more.

Why Choose This Method Of Integration?

In contrast with other integration services-

  • Pabbly Connect does not charge you for its in-built apps like filters, Iterator, Router, Data transformer, and more
  • Create “Unlimited Workflows” and smoothly define multiple tasks for each action
  • As compared to other services which offer 750 tasks at $24.99, Pabbly Connect proffers 50000 tasks in the starter plan of $29 itself
  • Unlike Zapier, there’s no restriction on features. Get access to advanced features even in the basic plan
  • Try before you buy! Before spending your money, you can actually signup & try out the working of Pabbly Connect for FREE

Sign Up To Pabbly Connect 

On the other hand, MailChimp is a marketing automation platform and email marketing services. By connecting Stripe with MailChimp, you can send Stripe customers to MailChimp in real-time. But the catch here is integrating both the software is quite a work and that’s why we are using software named Pabbly Connect.

Pabbly Connect is one of the simplest integration tool that removes all repetitive actions and saves a lot of time. Using this software, you can transfer data among different applications in real-time. Now, the thing which makes it distinct, it doesn’t require any coding skill to operate even a newbie or amateur can work with it.

Further, the software doesn’t restrict you on features like unlimited workflows, premium apps, and much more even in its free plan.

Here, in this article, we will learn how to connect Stripe and MailChimp in real-time.

So, without any ado, let’s start the integration process.

Step 1: Sign up to Pabbly Connect

Sign Up

Start the process of connecting Stripe to MailChimp by clicking on the “Sign Up Free”icon on the Pabbly Connect dashboard. Further, either fill-up the details manually or sign up using Gmail credentials.

Try Pabbly Connect for FREE

Step 2: Access Pabbly Connect

Select Connect

Next, after logging into the account, click on the “Access Now” button as shown in the above image.

Step 3: Workflow for Stripe to MailChimp Integration

(a) Start with a New Workflow

Create New Workflow

Start the process of building a workflow for integration by clicking on the “Create New Workflow” button.

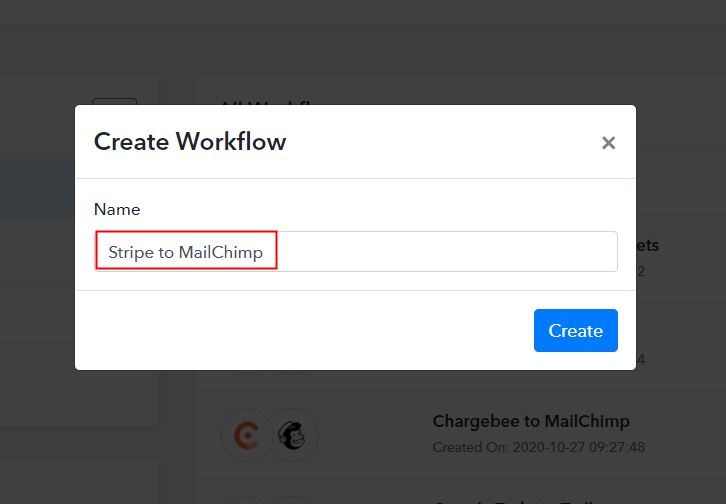
(b) Name the Workflow

Name the Workflow

Moreover, add the name of workflow which in our case is “Stripe to MailChimp”. Nevertheless, you can always name the workflow according to your requirements.

Step 4: Setting Trigger for Stripe to MailChimp Integration

Next, after building a workflow, you have to choose the integration app to create a workflow for connecting Stripe to MailChimp. Using Pabbly Connect you can avail unlimited actions and triggers, click here to sign up for unlimited workflows for free.

(a) Select Application you Want to Integrate

Select Stripe

The following step is to select “Stripe” from the dropdown, then choose the “New Customer” option to append every customer data from the software into MailChimp.

(b) Copy the Webhook URL

Copy the Webhook URL

The next step is to copy the trigger webhook URL which is appearing on the dashboard.

Step 5: Connecting Stripe to Pabbly Connect

To collect customer’s data from Stripe, you gotta paste the copied Webhook URL into the software. For that, you have to log in to your Stripe account.

(a) Go to Developer Section

Go to Developer Section

After login into the Stripe account, go to the “Developer” section on the left of the dashboard. Then click on the “Webhooks” option.

(b) Click on Add Endpoint

Click on Add Endpoint

Further, when you click on “Webhooks”, it will redirect to an endpoint tab, Simply click on the “Add Endpoint” option to paste the Webhook URL.

(c) Paste the Webhook URL

Paste The Webhook URL

As soon as you click on the “Add Endpoint” button, it will unlock the window with certain options. Simply paste the URL that was copied into the Endpoint URL tab. In the “Event to Send” tab, make sure to pick customer.created. Finally, to save the setting, click on ‘Add Endpoint’.

(d) Click on Customers

Click on Customers

On the left of the dashboard, go back to the “Customer” section, then press the “New” button to add customers.

(e) Add Customers

Add Customers

A pop-up will appear after clicking on the ‘New’ button. Just fill in all the information you need and click the bottom of the “Add Customer” button. But make sure to click Capture Webhook Response on the Pabbly Connect dashboard before pressing the button.

Step 6: Test the Response in Pabbly Connect Dashboard

Test the ResponseThe entry will appear on the ‘Pabbly Connect’ dashboard as soon as you click on the ‘Add Customers’ option. Then, click on the ‘Save’ button.
Step 7: Setting Action for Stripe – MailChimp Integration

To make this Stripe MailChimp integration work, you have to choose the action for your trigger.

(a) Select Application you Want to Integrate

Select MailChimp

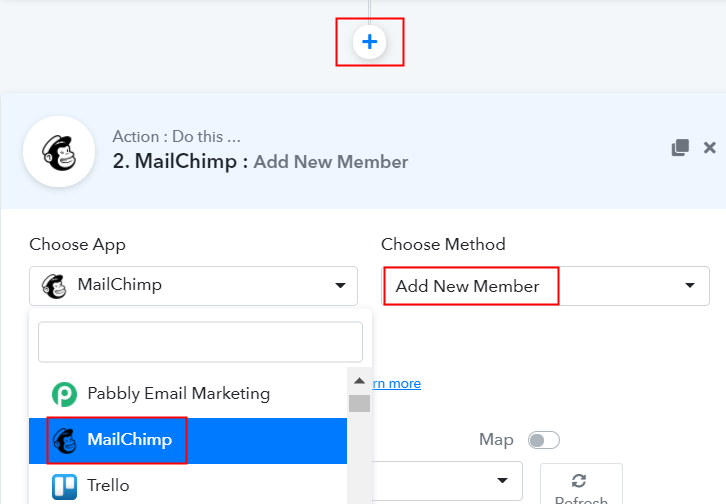
In addition, press the + icon to add an action to the trigger. Here we can pick “MailChimp” from the drop-down. Then choose the method “Add New Member”.

(b) Click the Connect Button

Click the Connect Button

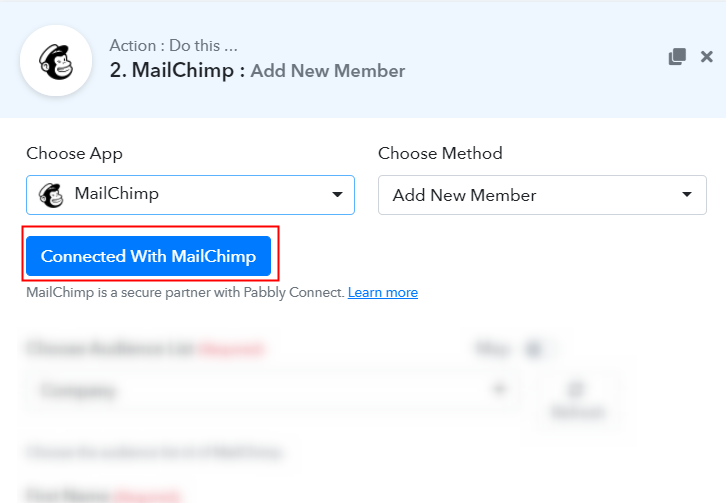
Tap on the “Connected with MailChimp” button after making all the necessary adjustments. In addition, the permission window will open for which you have to log in to your MailChimp account.

Step 8: Connecting MailChimp to Pabbly Connect

To connect Stripe to MailChimp, you need to paste the “Bearer Token” for which you have to log in to your MailChimp account.

(a) Click on MailChimp Account Settings

Click on MailChimp Account Settings

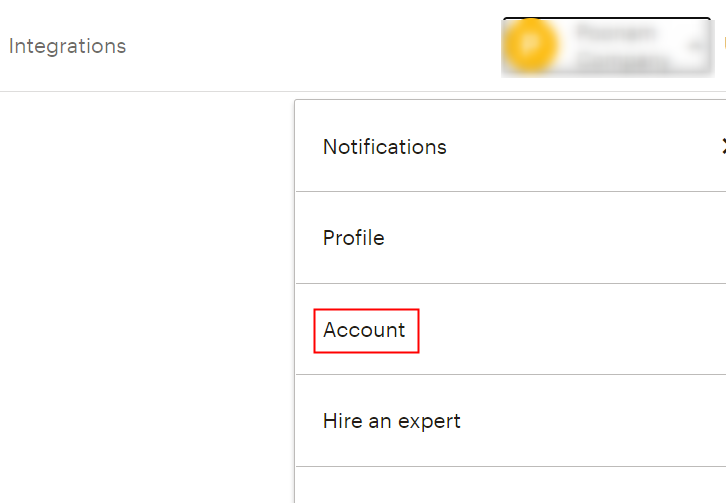
After logging in, press the ‘Account’ button on the bottom of the dashboard.

(b) Move to Extras

Move to Extras

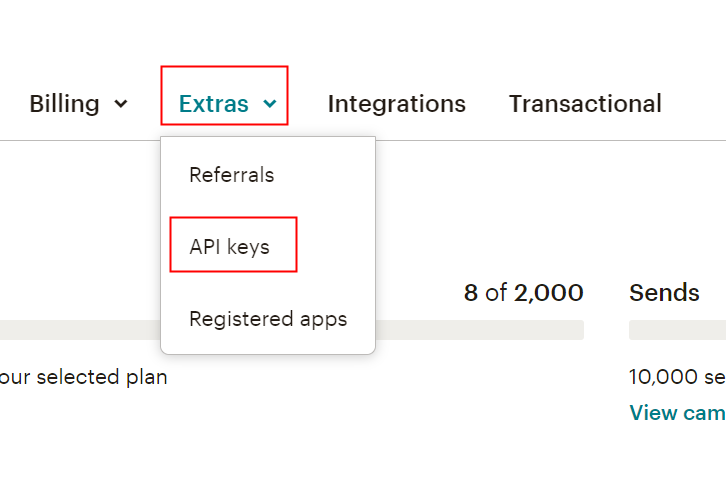
The new window will open when you click on ‘Account’. You’ll see a “Extras” option there, just click on it. Then, click on the option for “API Keys”.

(c) Create a Key

Create a Key

It will generate a key as soon as you press the “Create a Key” button. Just copy it.

Step 9: Paste API Key in Pabbly Connect Dashboard

You need to move back to the Pabbly Connect dashboard and paste the API key in order to add customer details as subscribers to MailChimp.

(a) Fill API Key

Fill API Key

In the bearer token option, just paste the API Key and define the MailChimp Id that appears in the Data Center section at the beginning of your MailChimp URL. After all, this is assured, press the “Save” button.

(b) Map Field Data

Map Field Data

Now the app has already fetched the audience list as you see it. Just map the appropriate field from the drop-down region, such as the email field, select the email option, and select the name option for the name field.

(c) Save and Send Test Request

Save and Send Test Request

Subsequently, after filling all the details, save the setting and then “Send Test Request” to test the Stripe and MailChimp integration.

Step 10: Check Response in MailChimp Dashboard

Check Response in MailChimp Dashboard

Finally, your submission will immediately appear there when you search the Audience segment of MailChimp.

You now know how to connect Stripe to MailChimp. This is a one-time operation. The online business automation platform, i.e. Pabbly Connect will now do all the manual work.

Conclusion –

This is it! Here we have explained the step by step procedure of “How to Add New Stripe Customers Automatically to MailChimp”. We know how daunting a means of integrating two apps can be. This is why people are looking for resources that will help them. And, believe us, Pabbly Connect, which doesn’t put a hole in your wallet, is one of the best Zapier alternatives available on the market. Even in its free trial, you will get access to everything.

All right, what’s stopping you now! Go and catch your deal by signing up for a free account.

You May Also Like To Read –

How to Create Trello Cards from New GitHub Issues

How to Create Trello Cards from new GitHub Issues

This blog has the answer to the question, ‘How to automatically generate cards on Trello with GitHub instant issue creation?’.

Well, if you are also looking for the answer to this question then this could be the easiest way possible on the web. This way you can automate the card creation in your Trello account on every new GitHub issue addition.

We’ll simply integrate GitHub and Trello using Pabbly Connect service. It’ll definitely work as per your expectation to sync your GitHub repositories with your Trello business boards. Pabbly Connect saves the manual work by automating your tasks based on various actions on the connected services.

How to Create Trello Cards from new GitHub Issues

Here, we’ll add a trigger on GitHub ‘New Issue’ & its respective action for creating a card on Trello.

Besides this, Pabbly Connect also supports using routers, filters, formatters & instant triggers to design limitless workflows. Moreover, it also allows using various advanced features such as multi-step calls, integration with unlimited premium apps etc.

Why Choose This Method Of Integration?

In contrast with other integration services-

  • Pabbly Connect does not charge you for its in-built apps like filters, Iterator, Router, Data transformer and more
  • Create “Unlimited Workflows” and smoothly define multiple tasks for each action
  • As compared to other services which offer 750 tasks at $24.99, Pabbly Connect proffers 50000 tasks in the starter plan of $29 itself
  • Unlike Zapier, there’s no restriction on features. Get access to advanced features even in the basic plan
  • Try before you buy! Before spending your money, you can actually signup & try out the working of Pabbly Connect for FREE

Sign Up To Pabbly Connect  

This service facilitates designing workflows as well as task automation within just a minute interval. So, save your time & automate all your tasks & access all Pabbly Connect features without any restriction even in the free plan.

Now, let’s follow the step by step procedure to integrate GitHub and Trello to automatically add the newly added issues as cards.

Step 1: Sign up to Pabbly Connect

Sign Up

Visit the official website of Pabbly Connect & then hit the ‘Sign-Up Free‘ button. Next, on the registration page signup using an existing Google account or manually fill in the form to get into the system.

Try Pabbly Connect for FREE

Step 2: Access Pabbly Connect

Select Connect

After signing up successfully, click the ‘Access Now’ button of the software ‘Connect’ in Pabbly application.

Step 3: Workflow for GitHub with Trello Integration

(a) Start with a New Workflow

Create New Workflow

Start with creating a workflow to auto-create Trello cards on new issue creation on GitHub and to do this strike the ‘Create New Workflow’ button.

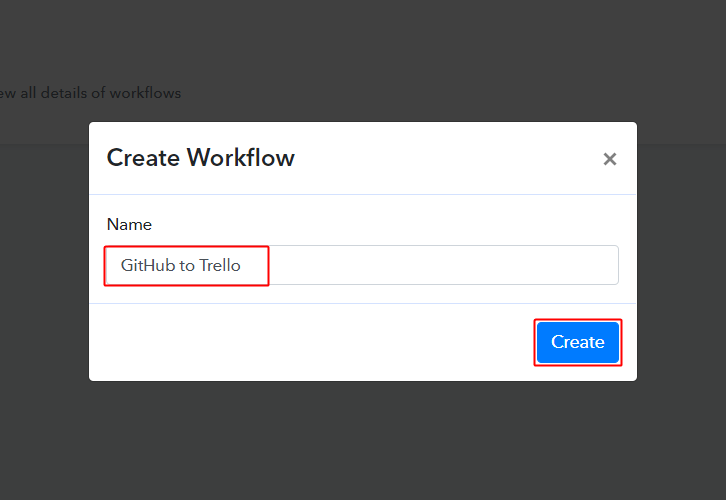
(b) Name the Workflow

GitHub to Trello Workflow

Now, name the workflow as per your need (for instance: GitHub to Trello etc) and push the ‘Save’ button.
Step 4: Setting Trigger for GitHub – Trello Integration

To automatically add newly added GitHub issues as Trello cards, you’ll need to set-up a trigger on the new GitHub issues and its respective action to create a card on Trello using Pabbly Connect.

(a) Select Application you want to integrate

Integrate GitHub

When you hit the save button to create a workflow, a trigger window will open next.

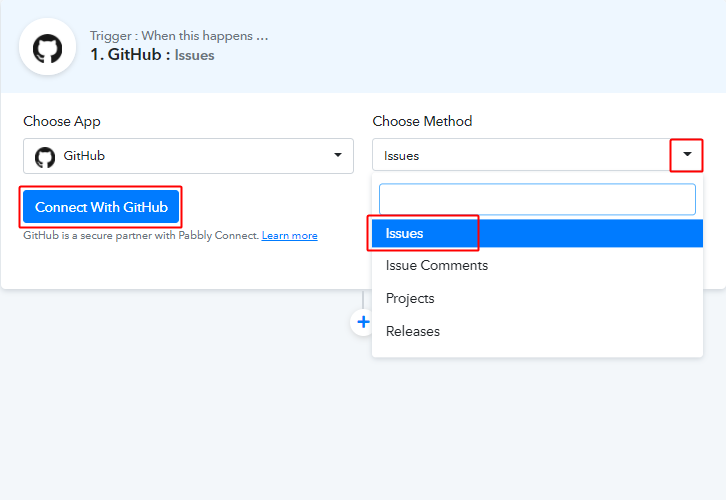
You’ll need to select the ‘GitHub’ option from the ‘Choose App’ field drop-down options.

(b) Connect with GitHub

Connect with GitHub

Select the method in here to be ‘Issues’ & click on ‘Connect with GitHub’ button.

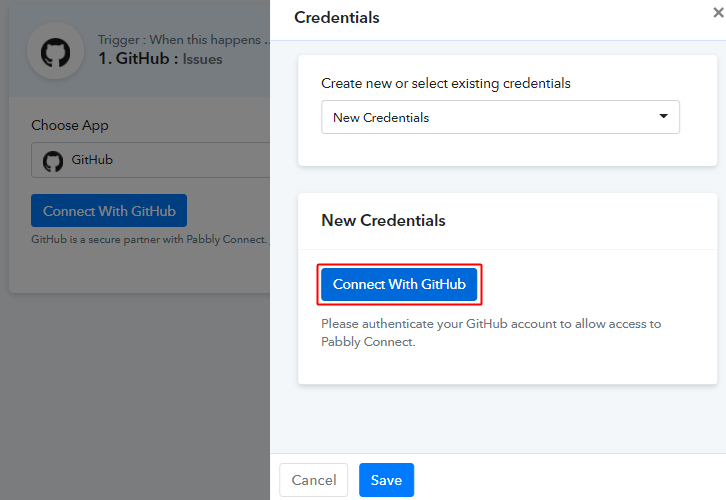
(c) Authorize GitHub Account

Authorize GitHub Account

Next, click the ‘Connect with GitHub’ button and allow your GitHub account to connect with Pabbly Connect trigger.

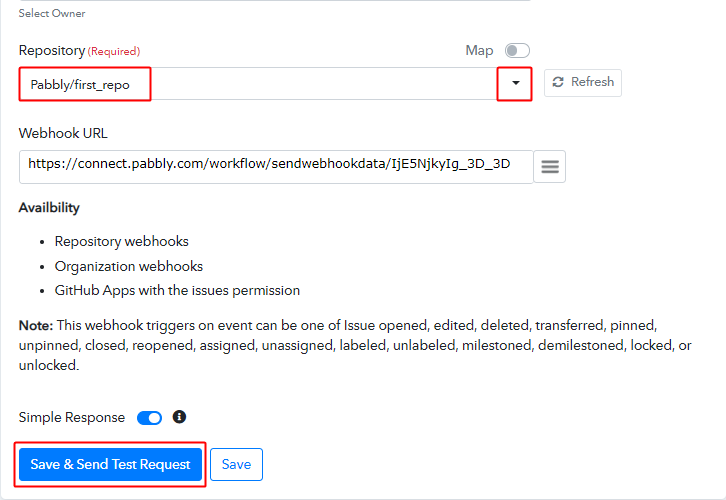
(d) Send Test Request

Send Test Request for Trigger

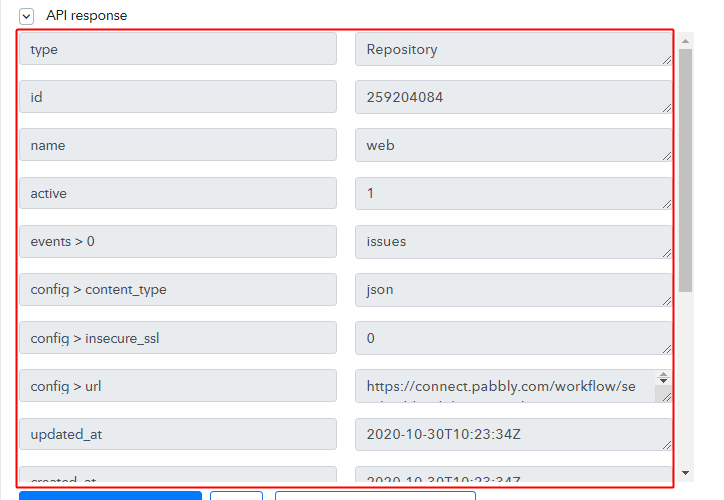
Once you authorize the GitHub account the system with auto-populate the owner and repositories. Select the repository from which you want to create Trello cards.

And then send a test request to check the connection. For this, click on ‘Save & Send Test Request button.

(e) Check the Trigger Response

Triggseer Connection Respon

Assure a successful connection by checking the trigger connection response.

Step 5: Test the Trigger Response in Pabbly Connect Dashboard

As we can see, we are done setting up the trigger to auto-create Trello cards from GitHub issues. So now, let’s just test the trigger by making a test request on the GitHub trigger set-up.

(a) Capture Webhook Response

Capture Webhook Response

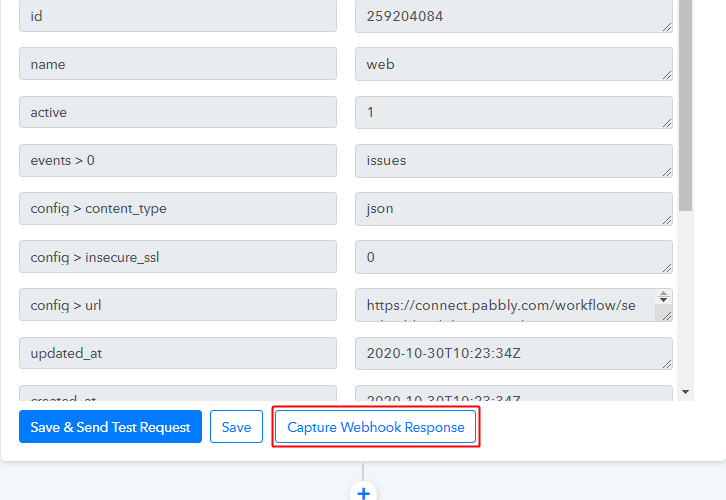
Click the ‘Capture Webhook Response’ button first.

(b) Go to the Selected GitHub Repository

Go to Selected Repository

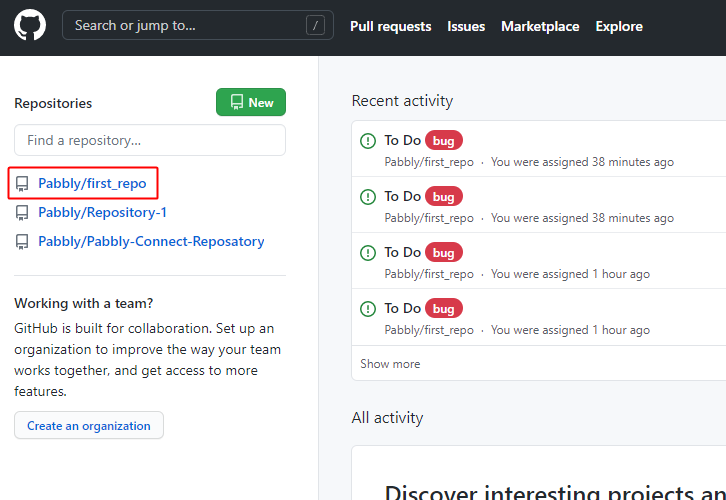
Now, go to the GitHub repository that you selected while connection and click on it.

(c) Got to Issues

Create New Issue

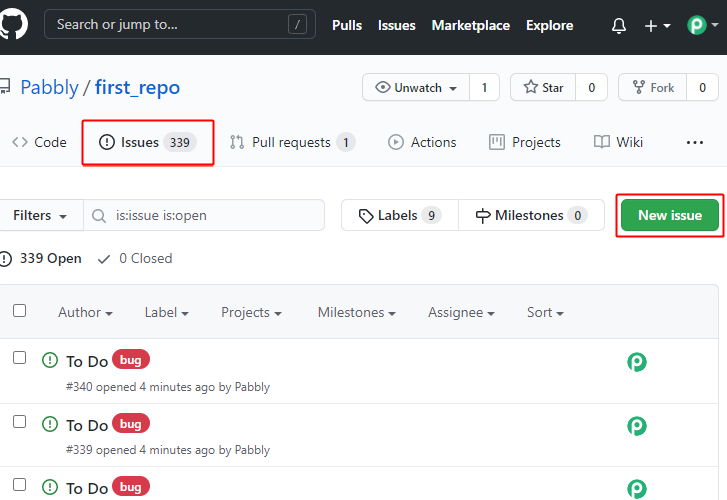
Next, navigate to the ‘Issues’ section by selecting the ‘Issues’ option from the menu. also, click the ‘New issue’ button to create an issue.

(d) Submit a New Issue

Submit an Issue

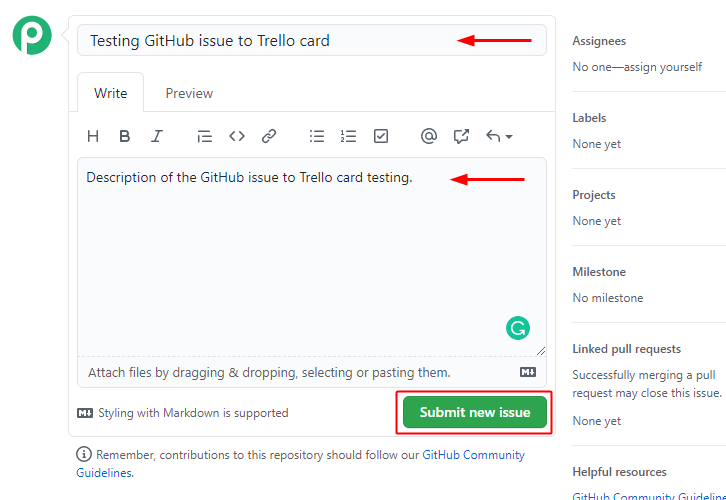
Mention a title as well as a description for the issue and hit ‘Submit new issue’ button.
(e) Check Trigger Response

Trigger Response

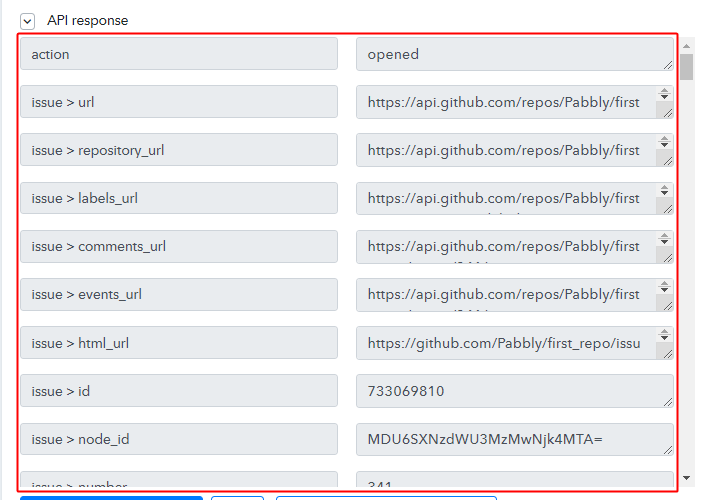
Check the response of the issue creation on the Pabbly Connect trigger.

Step 6: Setting Action for GitHub – Trello Integration

Up to this point, we’ve gathered all the necessary data from GitHub to create a card on Trello. So, let’s proceed to the very last step of creating a card on Trello.

(a) Select Application you want to integrate

Integrate Trello

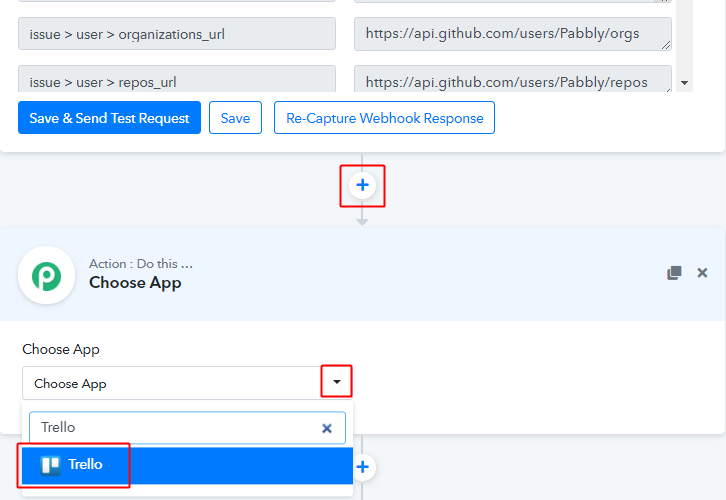
First, click the plus button next to your Github trigger window.

And then select the ‘Trello’ app to integrate from the ‘Choose App’ field.

(b) Connect with Trello

Connect with Trello

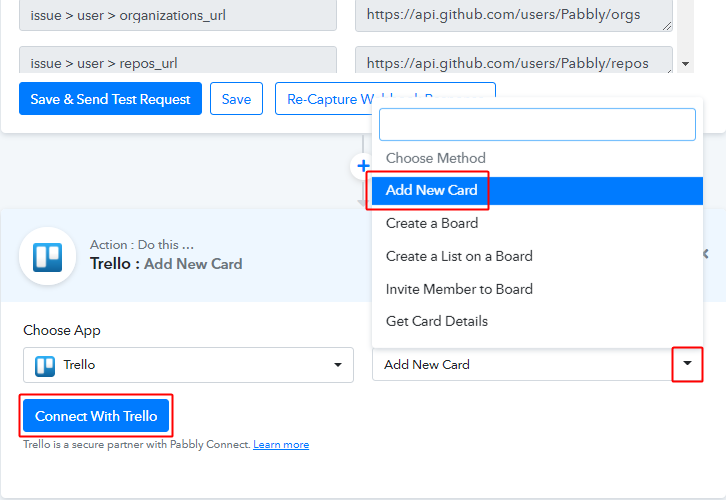
Select the method in here as ‘Add New Card’ and then click the ‘Connect with Trello’ button.

Step 7: Connecting Trello to Pabbly Connect

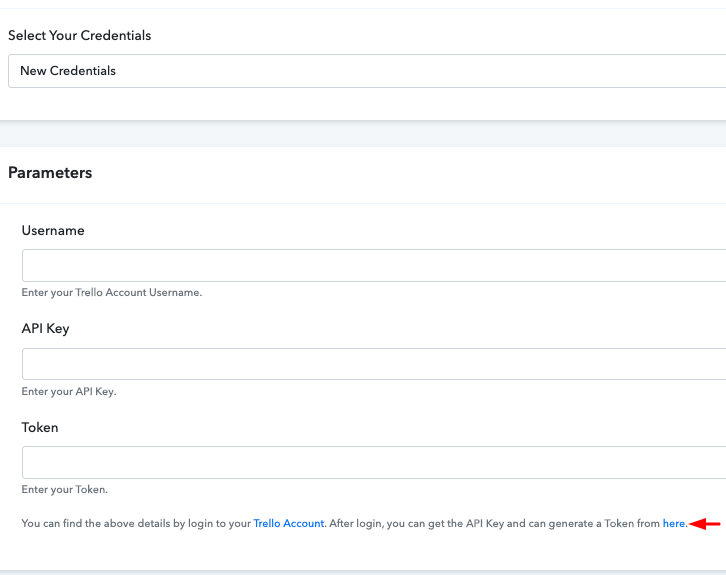
As the system is asking for a Trello account username, API key and token, log in to your Trello account and feed the necessary field details.

(a) Login to Your Trello Account

Copy Username

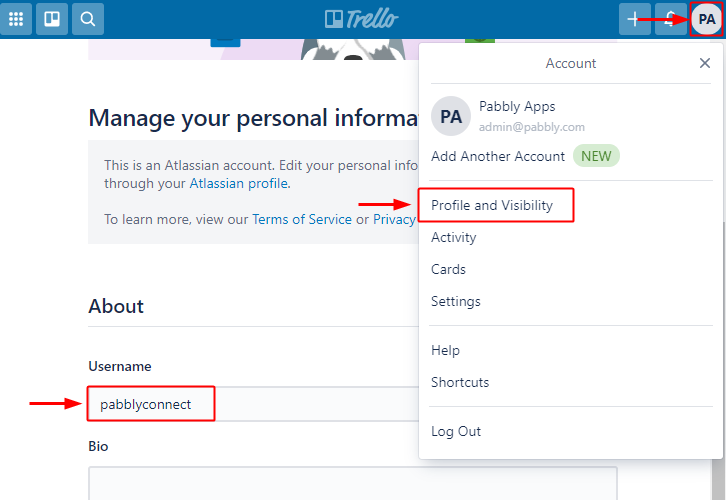
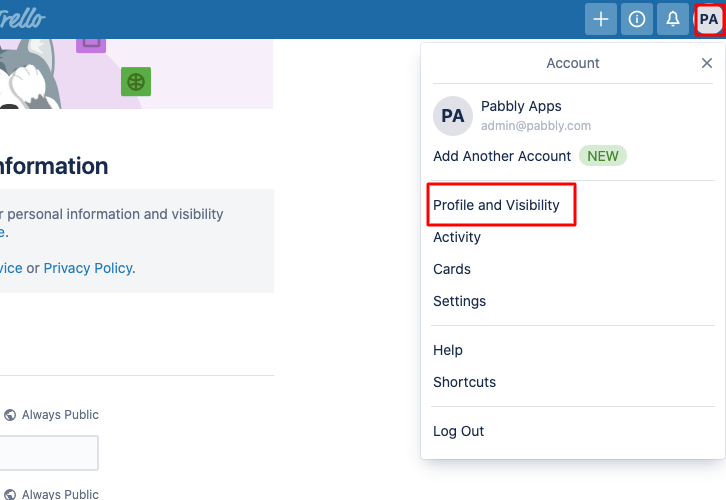
First, log in to your Trello account and then press the profile icon. Then, click on the ‘Profile and Visibility’ option.

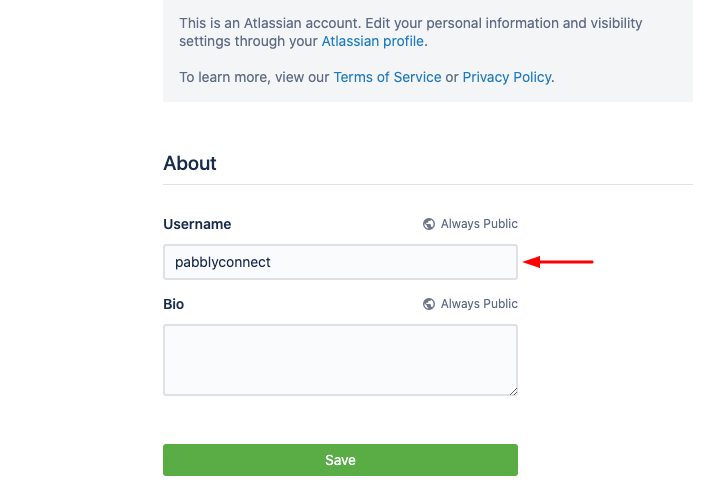
A page will open up containing the Username. Copy your username from here.

(b) Paste the Username

Paste Username

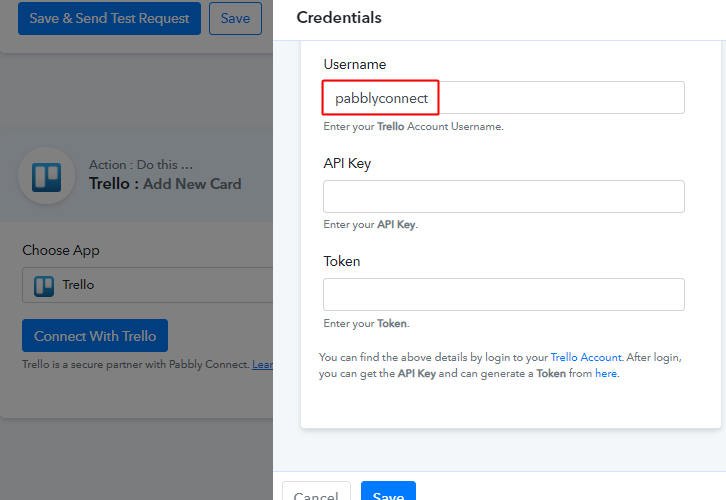
Paste the copied username in the Pabbly Connect trigger connection window.

(c) Click the ‘here’ Text Anchor

Click On Here

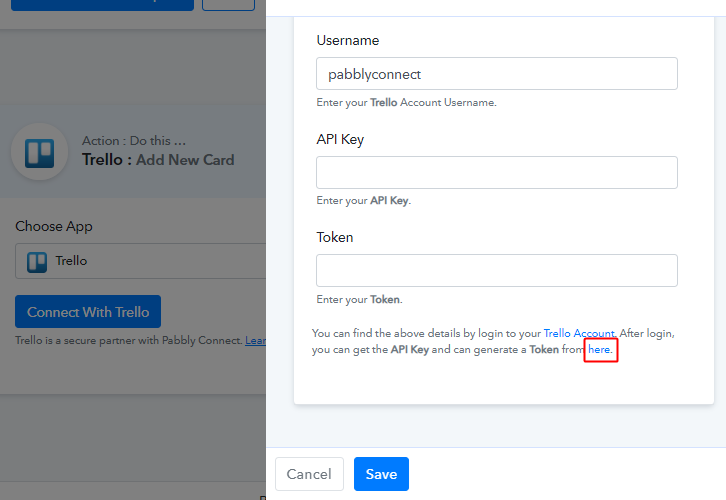
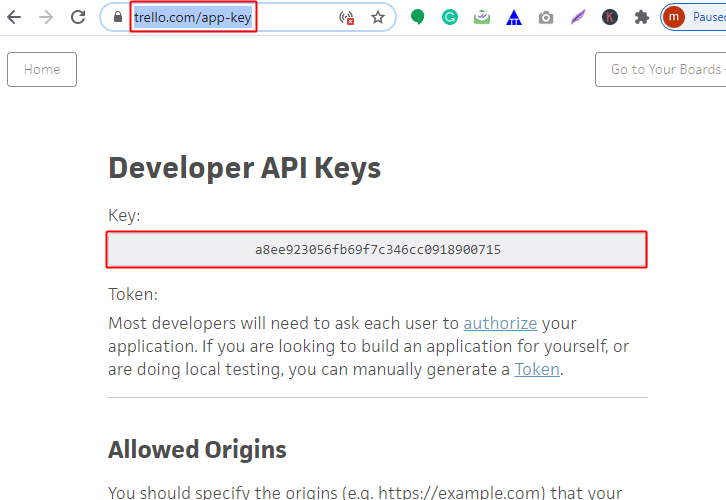
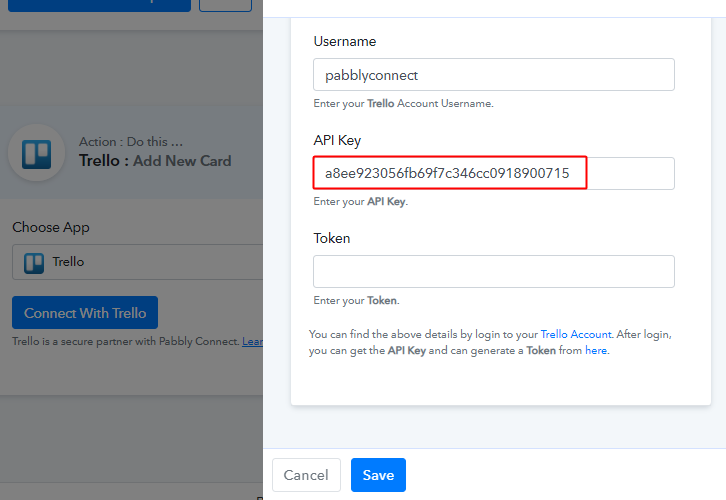
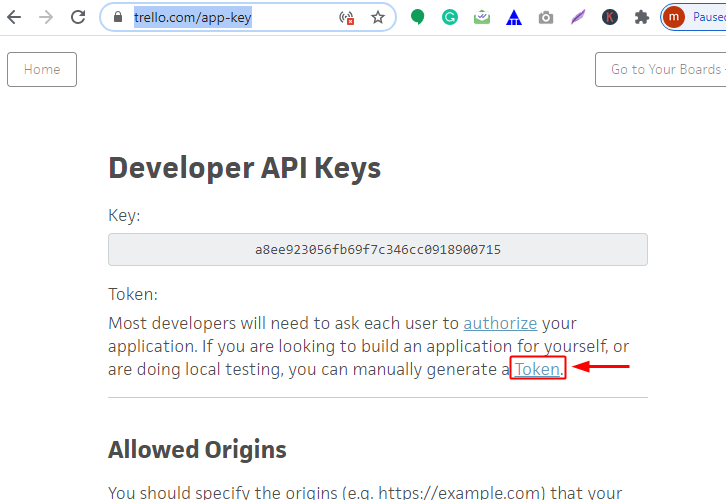
Now, for the API Key, click the ‘here’ text anchor or go to ‘https://trello.com/app-key/’.

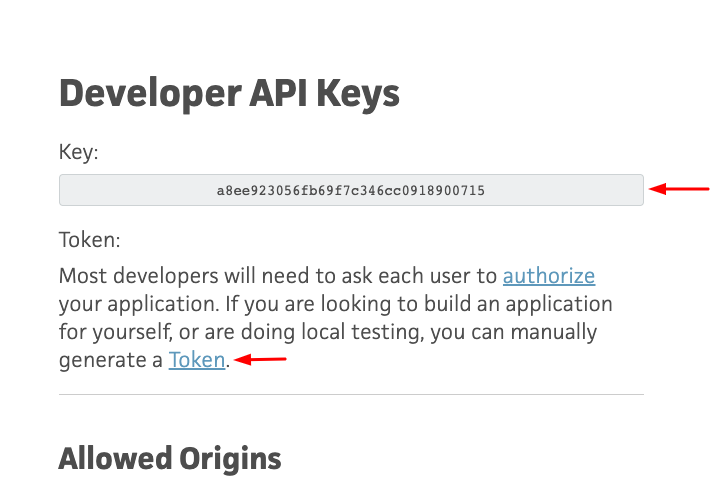
(d) Copy API Token

Copy API Ke

Copy the API key from here.

(e) Paste the Copied API Key

Paste API Key

Paste the API key in the Pabbly Connect trigger’s ‘API Key’ field.

(f) Generate Token

Click on Generate Token

On the Trello API Key window, you will find a link to generate the token. Click on the Token anchor to generate a token.

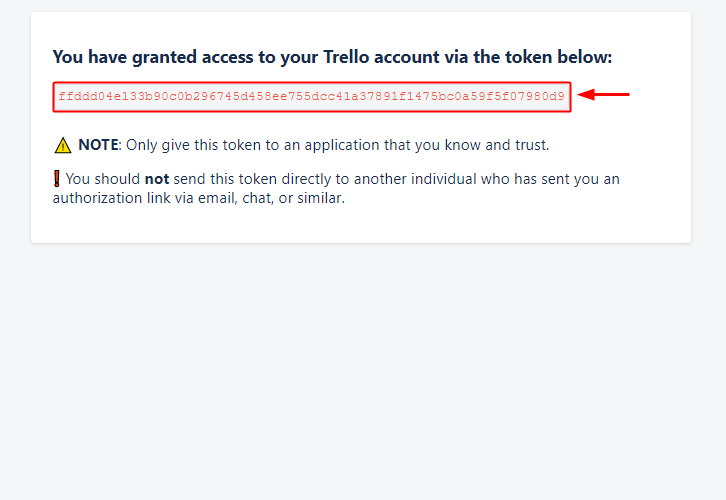
You’ll be direct to authorize your Trello account next. Complete the token generation process.

(g) Copy the Token

Copy Token

Copy the generated token.

(h) Paste the Token

Paste Token & Save

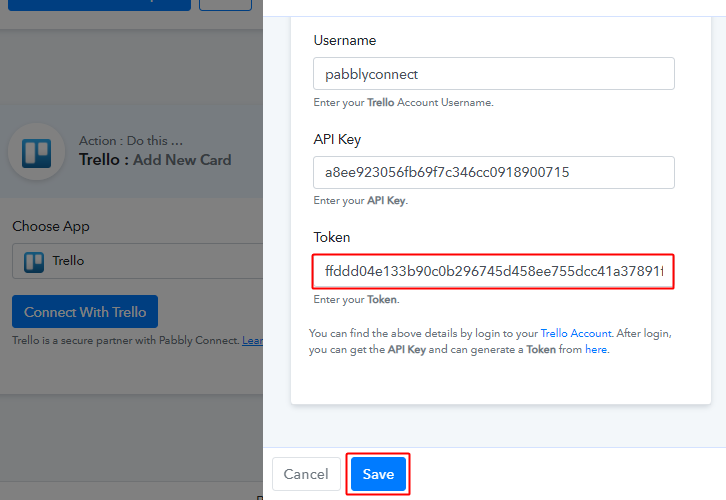
Paste the copied token and then click ‘Save’.

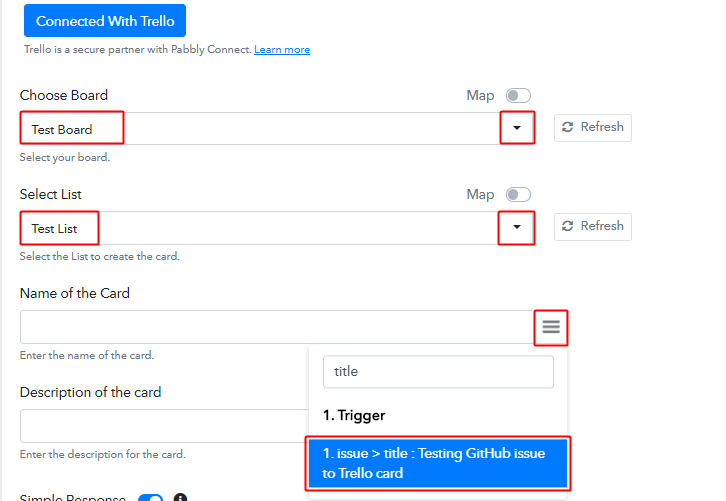
(i) Select the Board, List & Map the Title

Select Board, List & Map the Title

Once you successfully authorize and connect your Trello account, the system will auto-populate all the boards and lists in it.

Select the board and list that you want to use in this workflow.

Also, map the issue title on the card name field.

To map a response value, place your cursor on a field and then click on the three horizontal lines (the menu icon) in front of the field. Lastly, map the values from the response by selecting it from the response drop-down.

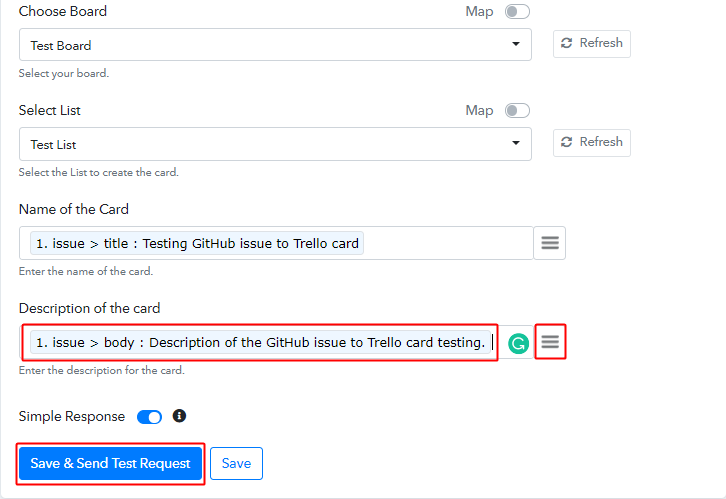
(j) Send Test Request for the Trello Action

Send Test Request for Trello Action

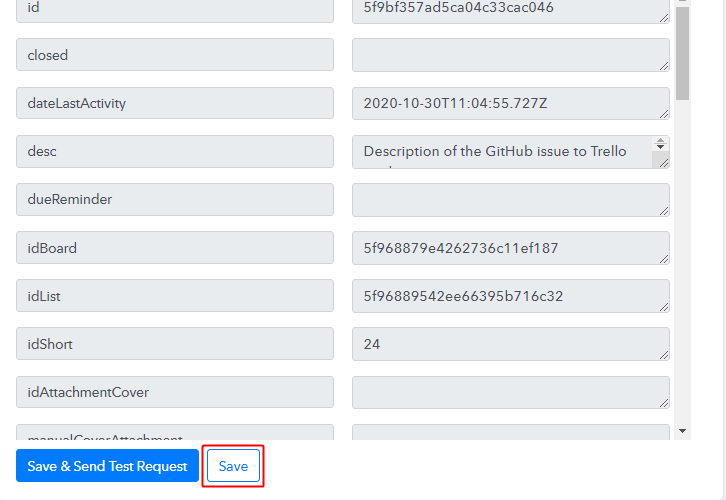
Also, map the GitHub issue body with the card description field.

Hit the ‘Save & Send Test Request’ button once you are done.

Step 8: Check the Action’s Response

This is the last step to check the issue entry on GitHub for the created card on Trello.

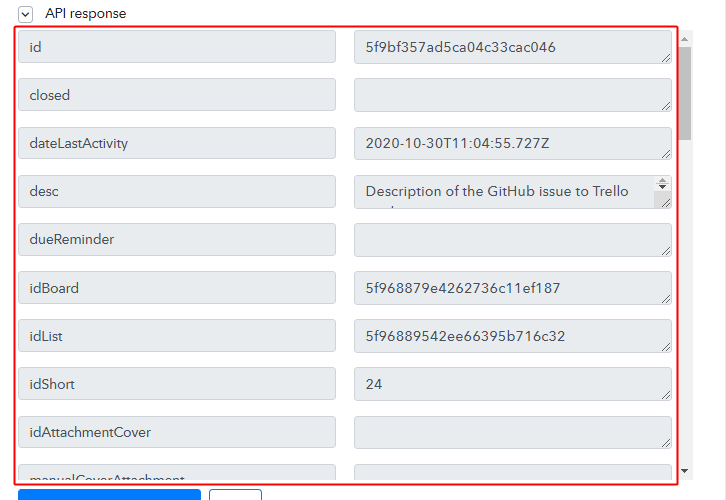
(a) Check the Action API’s Response

Action API Response

You can check the response of your API in the action window.

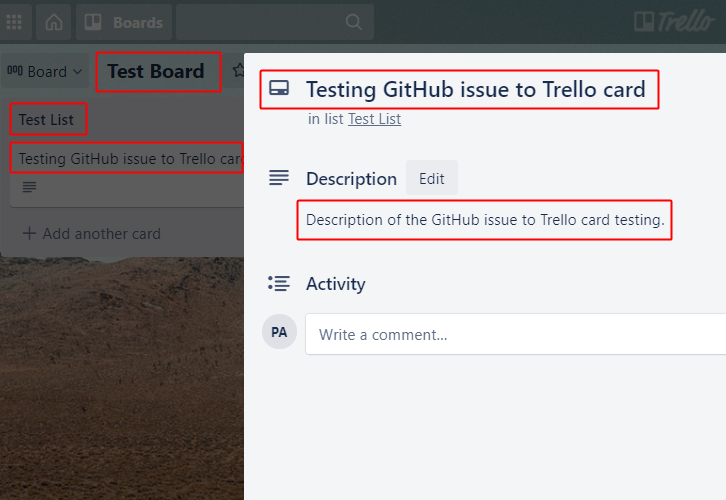
(b) Check the Card Entry in Trello

Card Entry on Trello

Also, you can check the entry of a new card in your connected Trello account.

Step 9: Save the Workflow

Lastly, save the gathered API response and Webhook manually for the smooth working more further.

(a) Save the Trello Action API’s Response

Save Trello Action Response

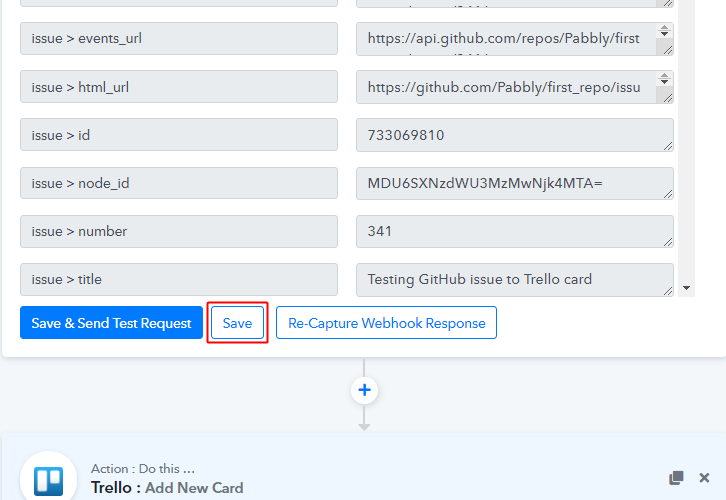
Save the action API’s response by hitting the ‘Save’ button at the bottom of the action API’s response.

(b) Save the Workflow

Save Webhook

As we can see the workflow is working perfectly. So, simply save the webhook by clicking the save button in the trigger window.

Wind-Up

Well, this is all about ‘How to create Trello cards from new GitHub issues?’. Consequently, after completing the step by step procedure, you will end up creating Trello cards from new GitHub issues automatically. Also, you won’t even need any coding knowledge to follow the steps.

Try Pabbly Connect for FREE.

For further queries & suggestions, comment below.

You May Also Like to Read:

How to Add Google Sheets Rows for New Chargebee Subscriptions

How to Add Google Sheets Rows for New Chargebee Subscriptions

Are you tired of looking for ways to add Google Sheets Rows for new Chargebee Subscriptions?

How to Add Google Sheets Rows for New Chargebee Subscriptions

If yes, then you’ve come to the right place. As, here in this blog, you will get a step by step guide to add Google Sheets Rows for new Chargebee Subscriptions automatically. Hence, you don’t have to worry about doing redundant work & can ultimately save a lot of time and effort.

Now, here comes a question that how you can integrate Chargebee with Google Sheets? Well, the answer is quite simple and that is known as Pabbly Connect.

Why Choose This Method Of Integration?

In contrast with other integration services-

  • Pabbly Connect does not charge you for its in-built apps like filters, Iterator, Router, Data transformer, and more
  • Create “Unlimited Workflows” and smoothly define multiple tasks for each action
  • As compared to other services which offer 750 tasks at $24.99, Pabbly Connect proffers 50000 tasks in the starter plan of $29 itself
  • Unlike Zapier, there’s no restriction on features. Get access to advanced features even in the basic plan
  • Try before you buy! Before spending your money, you can actually signup & try out the working of Pabbly Connect for FREE

Sign Up To Pabbly Connect 

Pabbly Connect is one of the best integration & automation software available in the market which helps you to integrate several applications, set unlimited triggers & actions, create infinite workflows, etc. And, to do so, you don’t even require any coding skills. Just integrate it once & relax, it will handle all the workload afterward. Furthermore, you can access all the features even in its free plan.

So, without wasting any more time, let’s get started.

Step 1: Sign up to Pabbly Connect

Sign Up

Start the process to add new Chargebee subscriptions to Google Sheets rows by pressing on the “Sign Up Free” icon on the Pabbly Connect home page. Following that, you can either manually fill-up all the details or sign up using your Gmail account.

Try Pabbly Connect for FREE

Step 2: Access Pabbly Connect

Select Connect

Subsequently, after logging into the account, press the “Access Now” button of the Connect section in the dashboard.

Step 3: Workflow for Chargebee with Google Sheets Integration

(a) Start with a New Workflow

Create New Workflow

Start with creating a workflow for your project by pressing the ‘Create Workflow’ button.
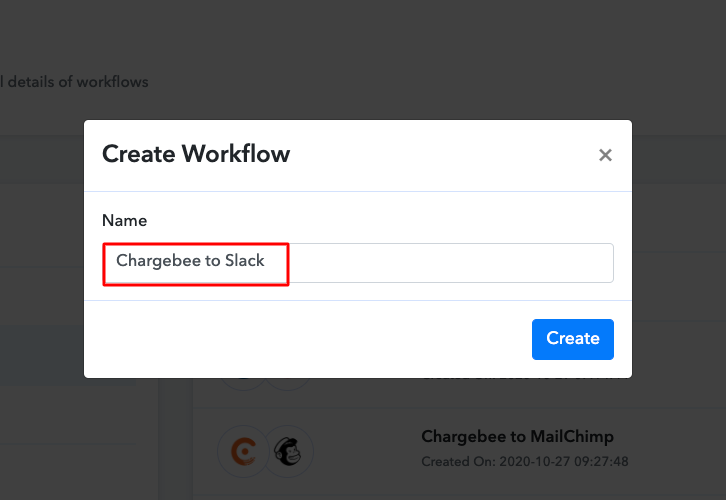
(b) Name the Workflow

Name the Workflow for Chargebee to Google Sheets

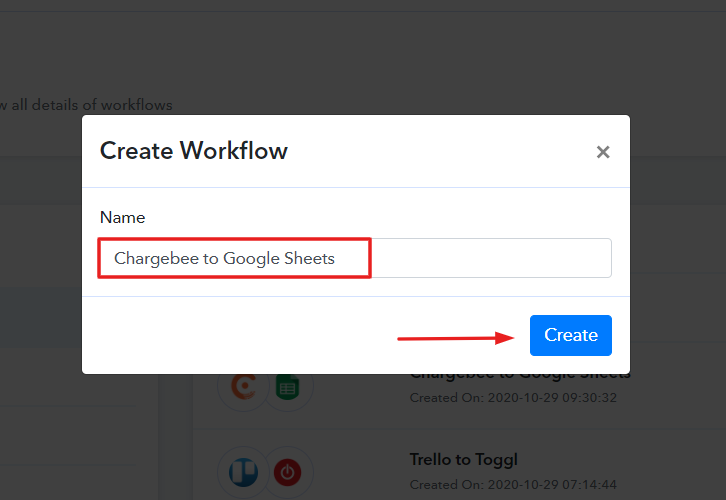
Now, it’s time to name the workflow just like in the above-shown image. I named the workflow as “Chargebee to Google Sheets”, you can obviously name the workflow as per your needs.

Step 4: Setting Trigger for Chargebee with Google Sheets Integration

After naming your workflow, now select the application you want to integrate. Pabbly Connect allows you to integrate unlimited premium applications, create your free account now.

(a) Select Application you Want to Integrate

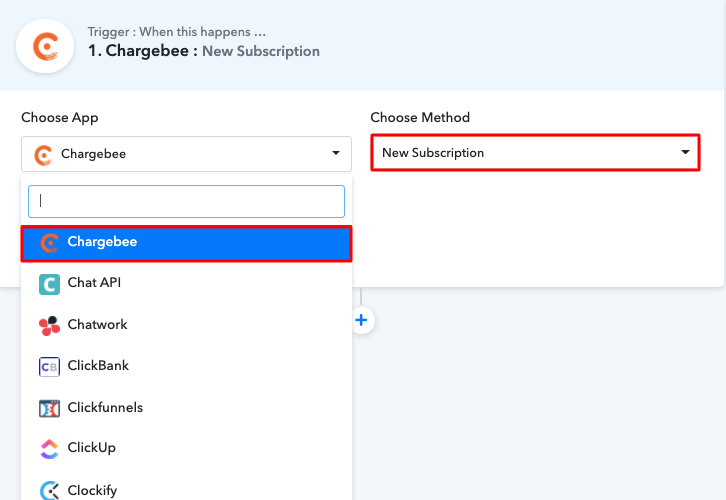
Select Chargebee to Add Google Sheets Rows for New Chargebee Subscriptions

Now, select the application that you want to integrate. In this case, we are choosing “Chargebee” for integration. And, in the method section, select “New Subscription”.

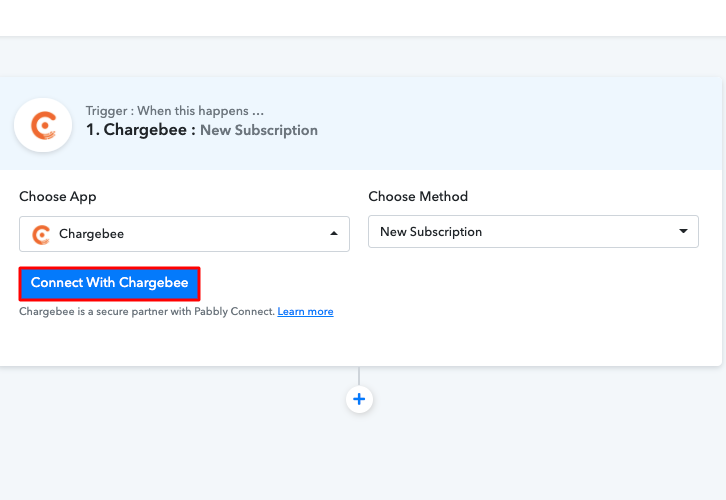
(b) Click on Connect Button

Click Connect Chargebee

After that, now you have to press the “Connect with Chargebee” button just like in the above-shown image to take further the integration process.

Step 5: Connecting Chargebee to Pabbly Connect

Moreover, in order to connect Chargebee with Pabbly Connect, you have to add the API key and site name in the software. Hence to do that, you have to first log in to your Chargebee account.

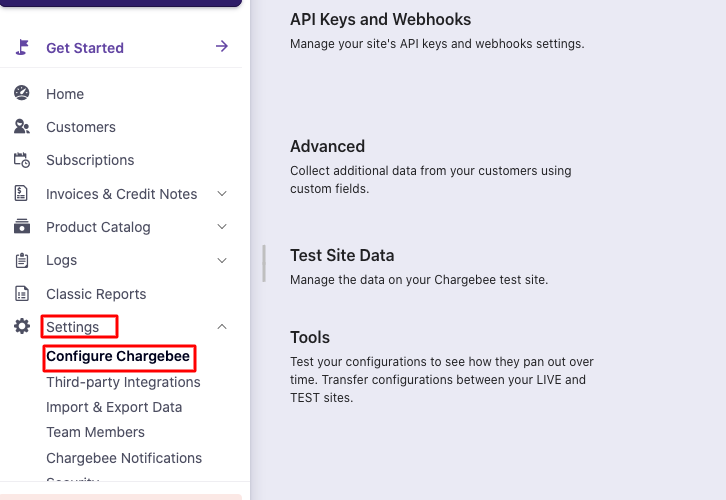
(a) Click on Chargebee Settings

Click Settings Chargebee to Add Google Sheets Rows for New Chargebee Subscriptions

Once you log into your Chargebee account, hit the “Settings” option, & then press the “Configure Chargebee” option.

(b) Click on the API Keys

Click API Keys Chargebee

Consequently, now you need to scroll down the page and press the “API Keys” option to proceed further.

(c) Copy the API Key

Copy the API Key Chargebee

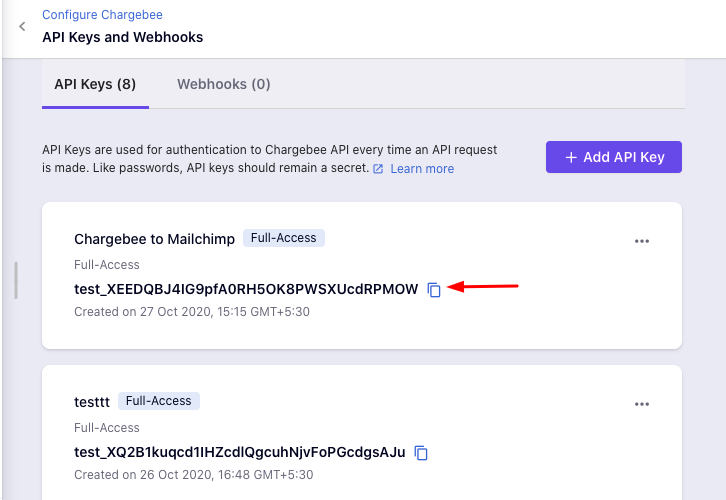
Now, simply copy the given API key, or else you can generate a new API key by pressing the “Add API Key” button.
(d) Paste the API Key

Paste the Credentials

After copying the API key, now you have to paste it into the Pabbly Connect dashboard. You can find the Chargebee site name from the subdomain of your Chargebee account. Once, you are done pasting all the required details, then click on the “Save” button.
Step 6: Add a Sample Subscriber

Subsequently, in order to check this integration, we have to send a test request and for that, we will create a dummy subscriber on Chargebee.

(a) Click on Subscriptions

Click on Subscriptions Chargebee

Hence, to add a subscriber, first of all, you need to press the “Subscriptions” option in your Chargebee dashboard.

(b) Click on Create Subscription

Click on Create Subscription Chargebee

Once you reach the subscription page, just press the “Create Subscription” button in order to add a new subscriber.

(c) Add Details

Add Details

In this step, you have to enter all the required details of the subscriber such as name, company, email, etc.

(d) Create Subscription

Click on Start Subscription

Subsequently, after entering all the details, just hit the “Create Subscription” button.
(e) Send a Test Request

Send Test Request

After adding a new subscriber in Chargebee, capture the data by pressing the “Save & Send Test Request” button in Pabbly Connect dashboard.

Step 7: Test the Response in Pabbly Connect Dashboard

Save the API Response

Furthermore, after pressing the “Save & Send Test Request” in Pabbly Connect, the subscriber info will appear on the Pabbly Connect dashboard. Later on, just hit on the “Save” option.

Step 8: Setting Action for Chargebee with Google Sheets Integration

Consequently, in order to make this Chargebee and Google Sheets integration work, you have to choose the action for your trigger.

(a) Select Application you Want to Integrate

Select Application you Want to Integrate to Add Google Sheets Rows for New Chargebee Subscriptions

Next, hit the “(+)” icon then select “Google Sheets” and in the choose method option, select ” Add New Row”. After that, press the button named “Connect” to authorize it with Google account.

(b) Click the Connect Button

Click the Connect Button to Add Google Sheets Rows for New Chargebee Subscriptions

After pressing the “Connected with Google Sheets” button, an authorization window will open up, so that you log in to your Google account.

(c) Map Field Data

Map Field Data to Add Google Sheets Rows for New Chargebee Subscriptions

All the sheets in your account will appear on the dropdown. Just select the sheet, which in our case is “Sheet1”. Now, all you have to do is add the necessary field from the drop-down like for the name, select the name option, and for the email field select the email. Then, map all the other data in the same way. Succeedingly, just click on “Save & Send Test Request” button.
Step 9: Test the Submission and Save

Test the Submission and Save to Add Google Sheets Rows for New Chargebee Subscriptions

Afterward, once you hit the “Send Test Request”, all the entries will be sent to Google Sheets Rows. Simply tap on the “Save” button to save the entire workflow.

Step 10: Check Response in Google Sheets

Check Response in Google Sheet to Add Google Sheets Rows for New Chargebee Subscriptions

Finally, when you check the Google Sheets, the entered details get auto-populated in a sheet.

Conclusion –

Hopefully, now you know how to add Google Sheets Rows for new Chargebee Subscriptions in real-time. All you have to do is follow all the above-mentioned steps and you can connect Chargebee to Google Sheets quickly. This is a one-time process, after this one can easily avoid repetitive work with the help of automation by using software like Pabbly Connect that allows unlimited premium applications.

So, wait no longer. Go and get your access by signing up for a free account.

You May Also Like to Read –

How to Create Toggl Projects from New Trello Boards

How to Create Toggl Projects from New Trello Boards

Are you searching for a way to create Toggl projects from new Trello boards automatically? If yes, then, you don’t have to look any further as here we are going to tell you about amazing software i.e, Pabbly Connect which can automate your workflow in just a few clicks.

How to Create Toggl Projects from New Trello Boards

Before we get started, let’s know a little bit about the software that we are going to integrate. Well, Toggl is a time tracking app that offers online time tracking and reporting services through their website along with mobile and desktop applications. While, Trello is lists and cards making-application that allows you to organize plans, projects, etc. But there is no way to integrate these apps directly therefore, in order to integrate them, we have a magic tool called Pabbly Connect. This software allows you to integrate two or more than two applications to automate the entire workflow without any coding skills.

Why Choose This Method Of Integration?

In contrast with other integration services-

  • Pabbly Connect does not charge you for its in-built apps like filters, Iterator, Router, Data transformer, and more
  • Create “Unlimited Workflows” and smoothly define multiple tasks for each action
  • As compared to other services which offer 750 tasks at $24.99, Pabbly Connect offers 50000 tasks in the starter plan of $29 itself
  • Unlike Zapier, there’s no restriction on features. Get access to advanced features even in the basic plan
  • Try before you buy! Before spending your money, you can actually signup & try out the working of Pabbly Connect for FREE

Sign Up To Pabbly Connect

Not only integrations, but Pabbly Connect also offers so many other great & helpful features:

  • Create Unlimited Workflows
  • Unlimited Premium Apps
  • Set Unlimited Triggers
  • Unlimited Actions to those Triggers
  • Path Routers

apart from that, you can access all the features even with the free plan.

After this integration, you can easily create Toggl projects from new Trello boards. Henceforth, let’s get started to integrate Toggl with Trello.

Step 1: Sign up to Pabbly Connect

Sign Up

Start the process to create Toggl projects from new Trello boards by clicking on the “Sign Up Free” icon on the Pabbly Connect home page. Next, either manually fill-up all the details or sign up using your Gmail account.

Try Pabbly Connect for FREE

Step 2: Access Pabbly Connect

Select Connect

Next, after logging into the account, click on the “Access Now” button of the Connect section in the dashboard.

Step 3: Workflow for Trello with Toggl Integration

(a) Start with a New Workflow

Create New Workflow

Start with creating a workflow for your project by clicking on the ‘Create Workflow’ button.
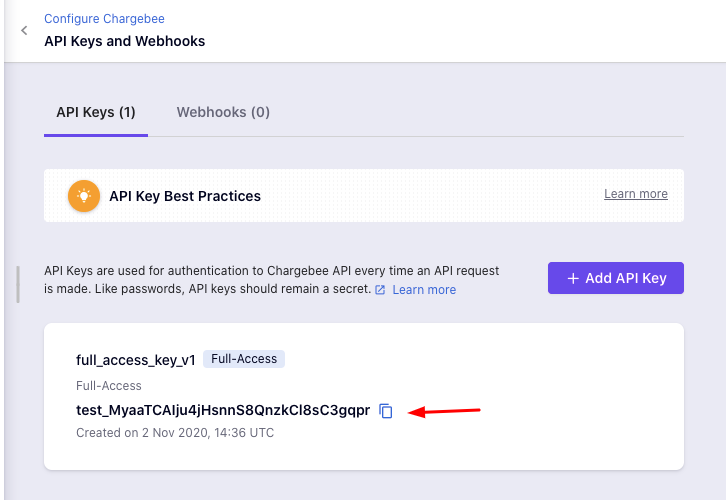
(b) Name the Workflow

Name the Workflow

Now, you need to name the workflow just like in the above-shown image. I named the workflow as “Trello to Toggl”, you can obviously name the workflow as per your requirements.

Step 4: Setting Trigger for Trello with Toggl Integration

As soon as you are done with naming your workflow, you will have to select the application you want to integrate. With the help of Pabbly Connect, you can integrate unlimited premium applications, create your free account now.

(a) Select Application you Want to Integrate

Select Trello

Now, you have to select the application that you want to integrate. In this case, we are choosing “Trello” for integration. In the method section, select “New Board”.
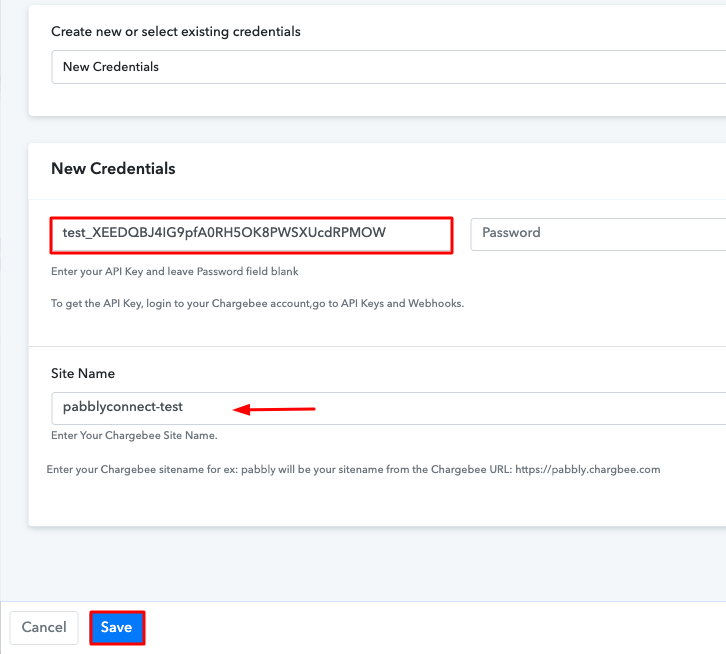
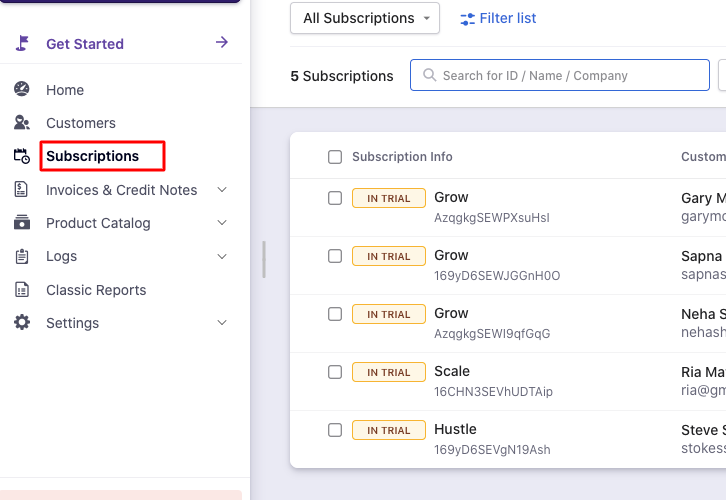
(b) Click on Connect Button

Click Connect Trello

After selecting the application, now you have to click on the “Connect with Trello” button just like in the above-shown image to take further the integration process.

Step 5: Connecting Trello to Pabbly Connect

To connect Trello with Pabbly Connect, you have to add the API key, token, and username in the software. For that, you have to log in to your Trello account.

(a) Click on Profile

Click on Profile

After logging into your Trello account, click on the profile button and then click on the “Profile and Visibility”.

(b) Copy the Username

Copy the Username

On clicking on profile a page will appear with your Trello username, simply copy it.

(c) Click on the API Link

Click on the Link to Get API

Now, we need to get the API key and token, for that we will click on the given link in Pabbly Connect.

(d) Copy the API Key

Copy the API Key

On clicking the link, the API key will appear on your screen, copy the API key, and click on the given token link to copy the token.

(e) Copy the Token

Copy the Token

After clicking on the link a webpage will appear with the token, simply copy the given token to move forward.

(f) Paste the Credentials

Paste the Credentials

Paste all the credentials in the Pabbly Connect dashboard and hit the “Save” button.
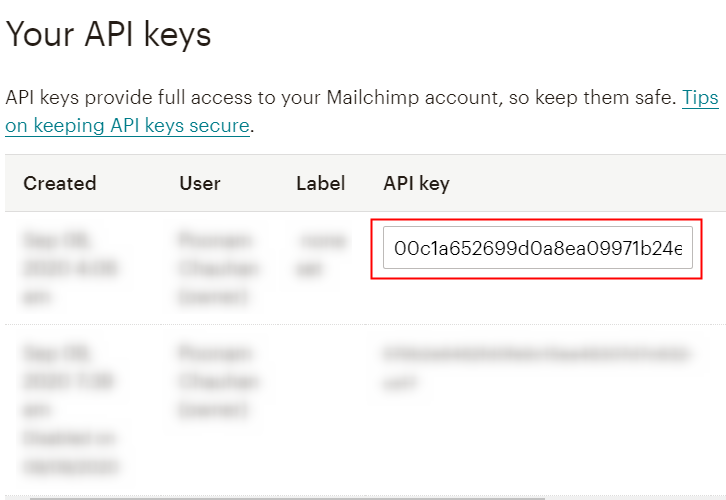
Step 6: Create a Sample Board

To check this integration, we have to send a test request and for that, we will create a dummy board on Trello.

(a) Click on Boards

Click on Boards

Once you log into your Trello account, click on the  “Boards” option given in the top corner and then click on the “Create New Board” option.

(b) Create Board

Create Board

Now name your board and add your team then click on the “Create Board” button.
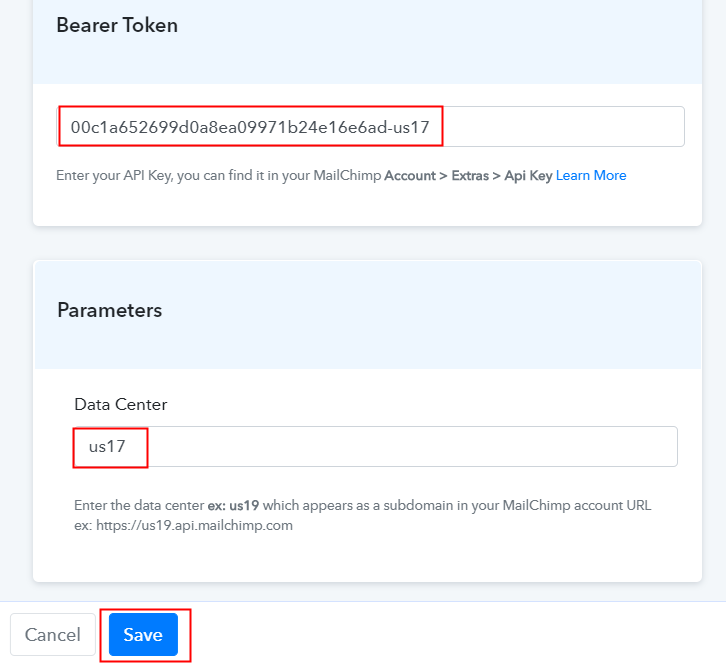
(c) Send a Test Request

Send Test Request Trello

After creating your board, now we will hit the “Save & Send Test Request” button in Pabbly Connect.

Step 7: Test the Response in Pabbly Connect Dashboard

Save the API Response Trello

Once you click on the “Save & Send Test Request” in Pabbly Connect, the board info will appear on the Pabbly Connect dashboard. Then, click on the “Save” option.

Step 8: Setting Action for Trello with Toggl Integration

To make this Trello-Toggl integration work, you have to choose the action for your trigger.

(a) Select Application you Want to Integrate

Select Toggl

Now in this step, click on the + button below and choose the application that you want to integrate. Here we have chosen “Toggl” to integrate and in the method section select “Create Project”.

(b) Click the Connect Button

Click Connect Toggl

After choosing the application click on the “Connect with Toggl” button to move forward.

Step 9: Connecting Toggl to Pabbly Connect

To connect Toggl to Pabbly Connect, you have to enter the API token of your Toggl account in the Pabbly Connect dashboard. For this, you have to log in to your Toggl account.

(a) Click on the API Token Link

Click on the Link to Get API Toggl

To get the API token, click on the given link in Pabbly Connect.

(b) Copy the API Token

Copy the API Token Toggl

On clicking the link, a page will appear with the API token, simply copy the token to move further.

(c) Paste the API Token

Paste the API Token Toggl

Paste the copied API token and then hit the “Save” button.
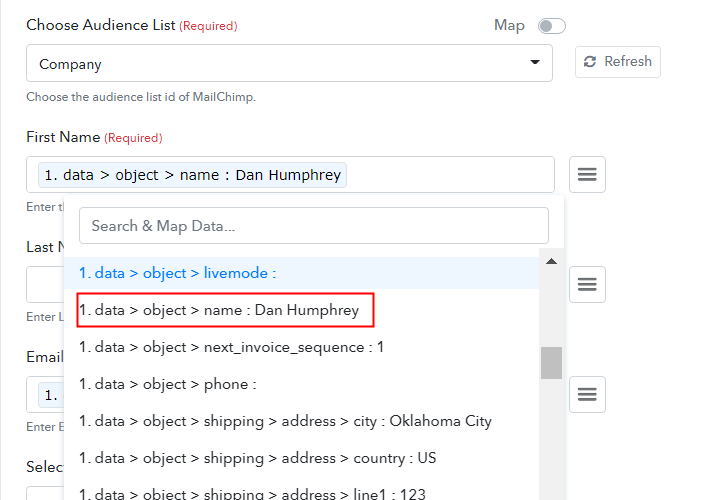
(d) Map the Fields

Map the Fields

After connecting with your Toggl account, map all the fields quickly like name, workplace, etc.

(e) Save and Send Test Request

Send a Test Request

Once you are done adding up all field data click on the “Save & Send Test Request” button.
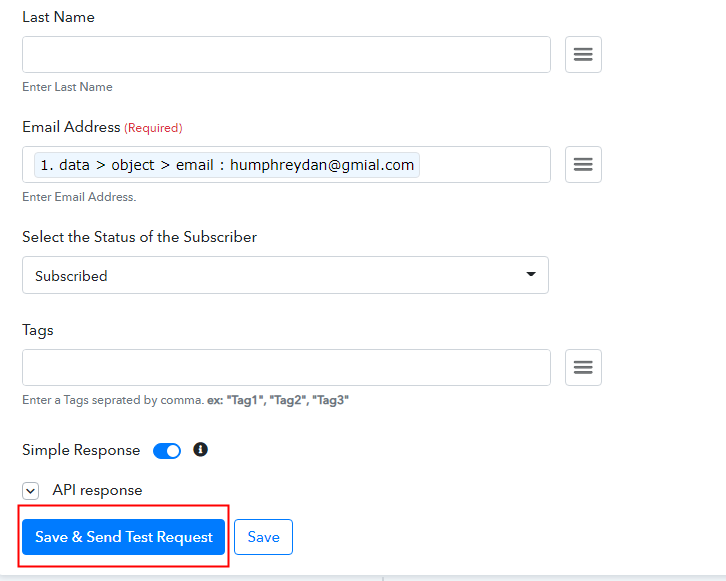
Step 10: Check Response in Toggl Dashboard

Check Response

Here, you can see that our integration was successful and the project has been added to the Toggl account automatically. Now, whenever there will be any new board created in your Trello account, it will be automatically added to your Toggl account as projects.
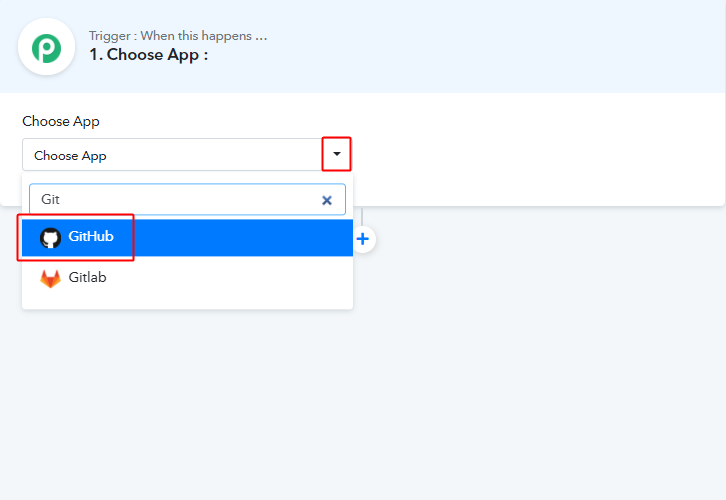
Conclusion –

To conclude, this is our take on “How to Create Toggl Projects from New Trello Boards”. All you have to do is follow all the above-mentioned steps and you’re good to go. Using Pabbly Connect, you can integrate limitless applications & create unlimited workflows. So signup for free and start your automation work with Pabbly Connect. Moreover, in case of any queries, please drop your comments below.

You May Also Like to Read –