How to Add Trello Card from New PayKickstart Sale

How to Add Trello Card from New PayKickstart Sale

Are you still adding Trello cards for every new PayKickstart sale manually?
How to Add Trello Card from New PayKickstart Sale

If yes then don’t worry as I’m going to tell you, how to integrate PayKickstart with Trello and automate tasks within few minutes. You must be aware that there is no native integration between these two services. So, we’ll be using Pabbly Connect to accomplish this automation.

So, basically, Pabbly Connect is integration & automation software that lets you transfer data among multiple applications in real-time.

Most importantly, you don’t have to do any hard coding & even a rookie can use it efficiently. Also, this procedure will be just a one-time setup & after that, the workflow will take care of rest.

Why Choose This Method Of Integration?

In contrast with other integration services-

  • Pabbly Connect does not charge you for its in-built apps like filters, Iterator, Router, Data transformer and more
  • Create “Unlimited Workflows” and smoothly define multiple tasks for each action
  • As compared to other services which offer 750 tasks at $24.99, Pabbly Connect offers 50000 tasks in the starter plan of $29 itself
  • Unlike Zapier, there’s no restriction on features. Get access to advanced features even in the basic plan
  • Try before you buy! Before spending your money, you can actually signup & try out the working of Pabbly Connect for FREE

Sign Up To Pabbly Connect  

But, before jumping directly on the procedure first, let’s learn a wee bit about the services. PayKickstart is a subscription billing service for small and large businesses. Whereas, Trello is a collaboration infrastructure to organize your projects into boards.

Consequently, once you’re done setting up this workflow your customers will get listed onto your project management software i.e, Trello whenever there is a successful sale on PayKickstart.

Additionally, we’ve embedded a video tutorial for this integration. So, have a look at it by yourself –

Besides, we have added the template for this integration to help you get started more quickly. You can strike the ‘Use Workflow’ button given below to get started. Additionally, you can also visit the App Directory & look for more integrations and apps.

How

So, buckle up as we’re going to discover the Trello and PayKickstart integration.

Step 1: Sign up to Pabbly Connect

Sign Up

Start the procedure of connecting PayKickstart with Trello by visiting the Pabbly Connect website. Then, hit the ‘Sign-Up Free‘ button available on the home page. Next, either use your existing Google account or manually fill in the registration form to signup.

Try Pabbly Connect for FREE

Step 2: Access Pabbly Connect

Select Connect

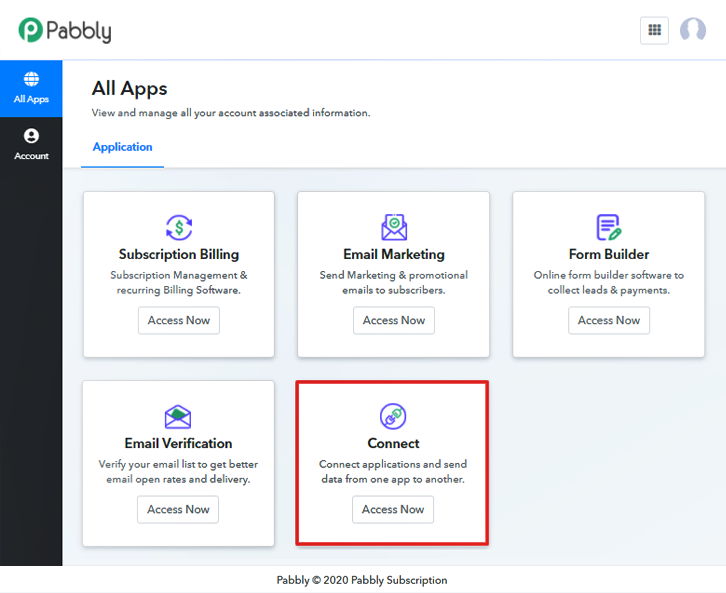
After that, strike the ‘Access Now’ button of the software ‘Connect’ amongst the Pabbly applications.

Step 3: Workflow for PayKickstart with Trello Integration

(a) Start with a New Workflow
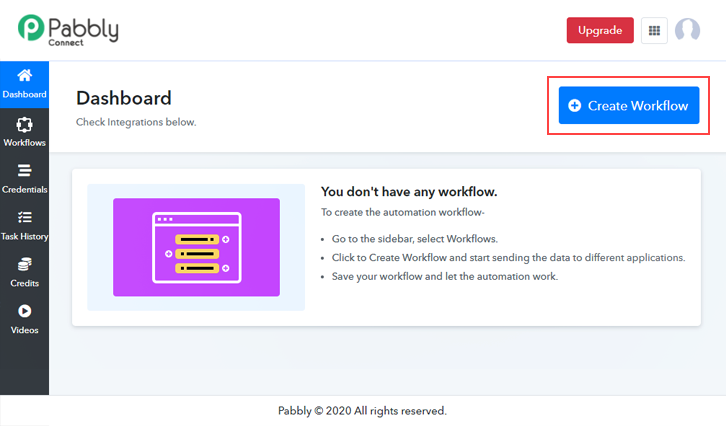
Create New Workflow

Further, start with creating a workflow to add cards on Trello for every new PayKickstart sale & to do this push the ‘Create Workflow’ button first.

(b) Name the Workflow
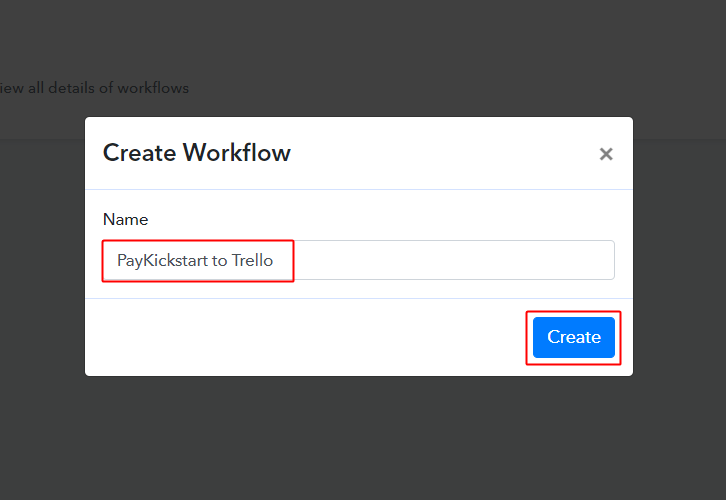
workflow_for_paykickstart_to_trello

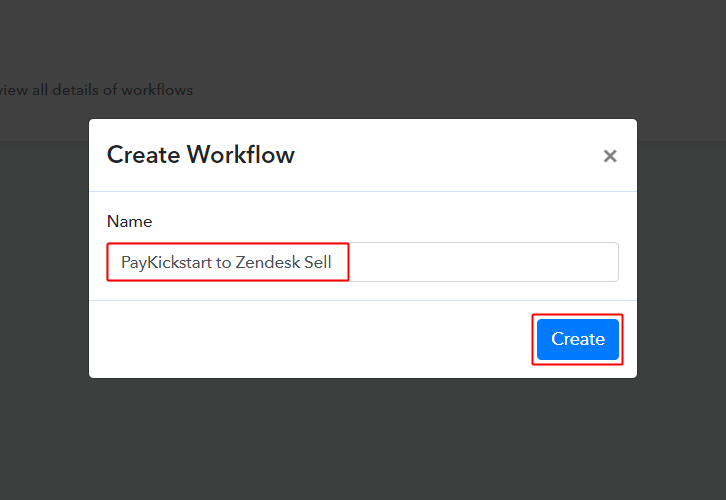
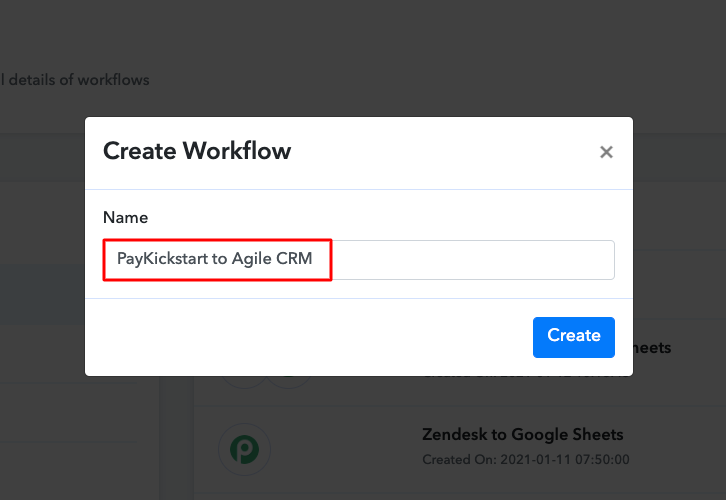
Now, name the workflow as per the integration or use-case (for instance: PayKickstart to Trello etc). Finally, hit the ‘Create’ button available on the right bottom of the pop-up window.

Step 4: Setting Trigger for PayKickstart to Trello Integration

To automatically add Trello cards for every PayKickstart sale, you’ll need to set-up a trigger on PayKickstart sales and its respective action to add a card on Trello using Pabbly Connect.

(a) Select Application you want to integrate
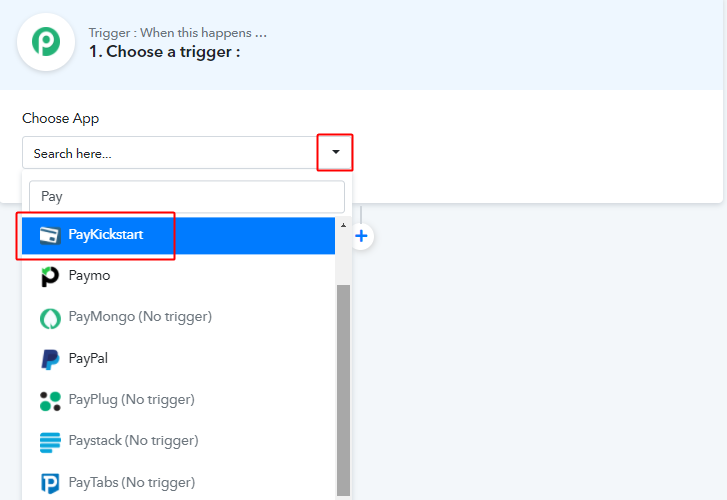
integrate_paykickstart_for_paykickstart_to_trello_workflow

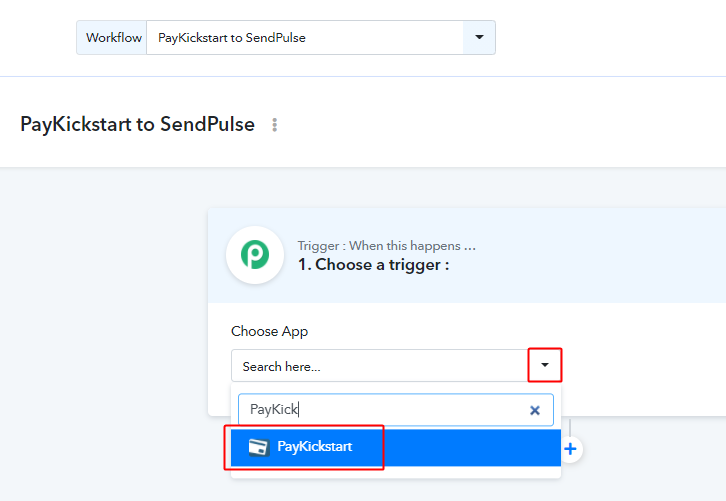
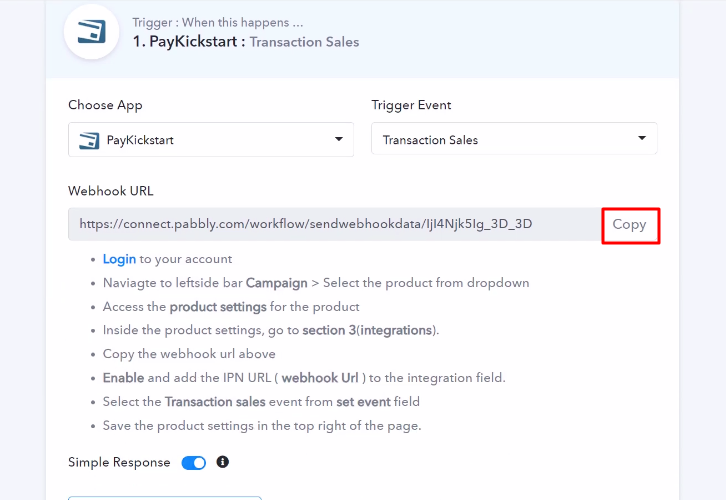
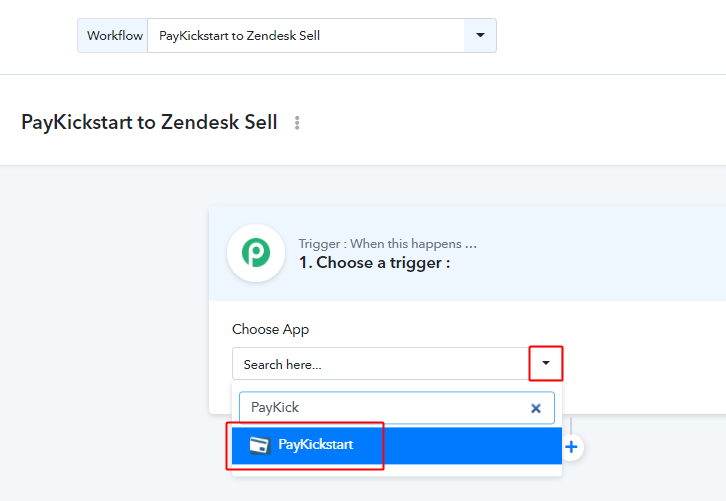
When you click on the ‘Create’ button, a page starts representing the trigger window will open up.

Select ‘PayKickstart’ service from the ‘Choose App’ field’s drop-down.

(b) Select Method & Connect with PayKickstart
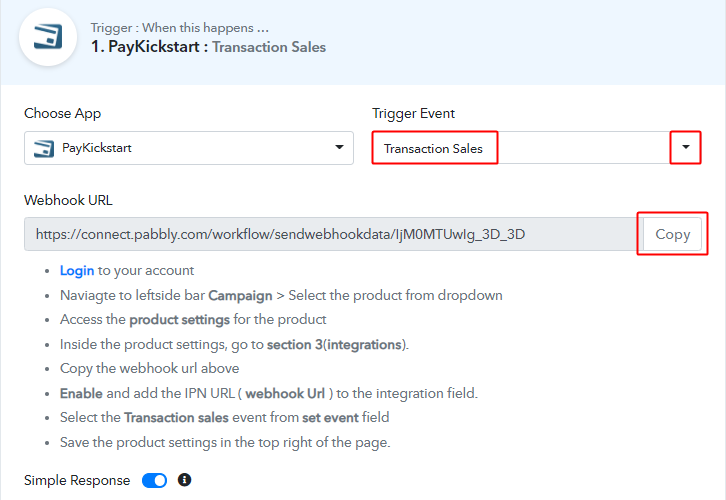
select_method_and_copy_webhook_url_for_paykickstart_to_freshdesk

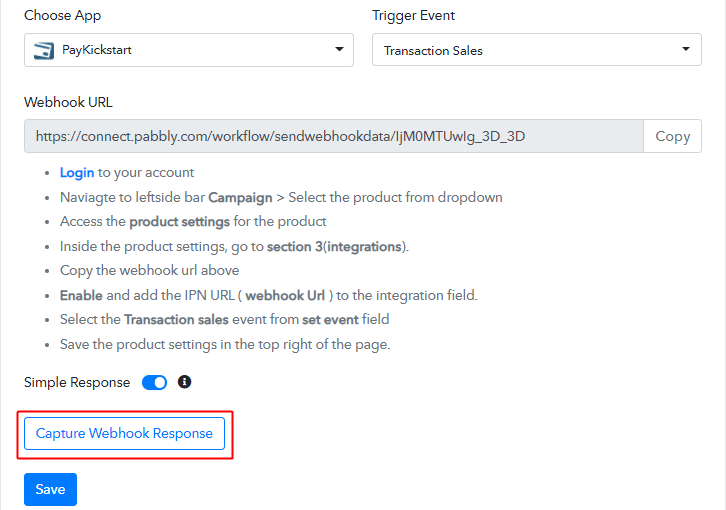
Also, select the method in here as ‘Transaction Sales’ & after that copy the given webhook URL.

Step 5: Connecting PayKickstart to Pabbly Connect

To connect PayKickstart with Pabbly Connect, login to your PayKickstart account & paste the copied trigger URL.

(a) Go to Your PayKickstart Campaigns
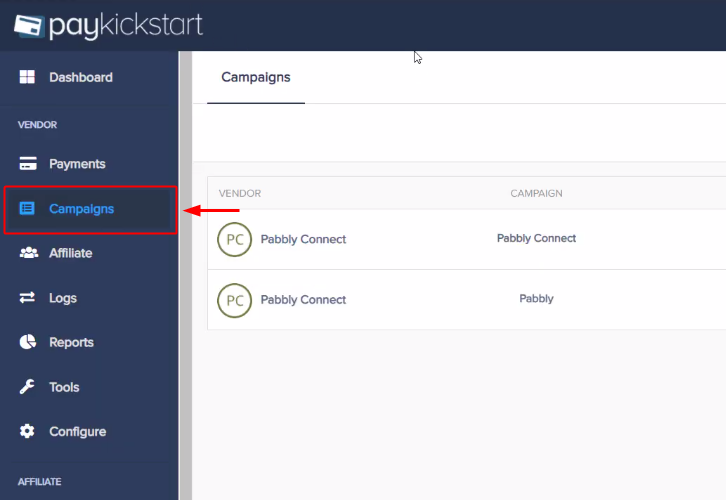
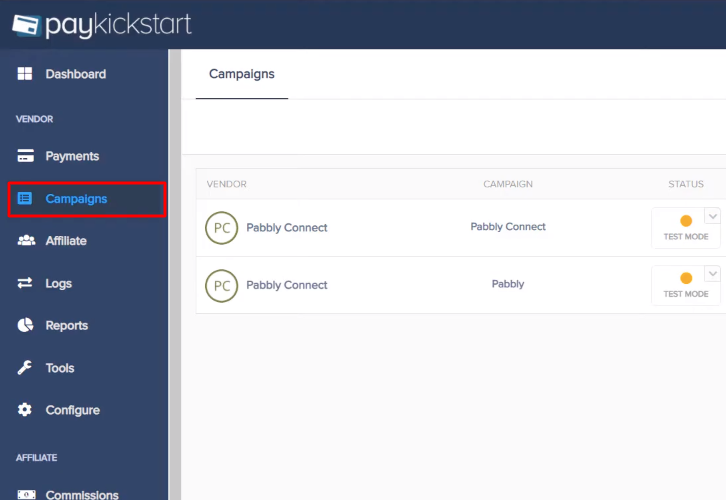
paykickstart_campaigns

After successfully signing in to your PayKickstart account, click on ‘Campaigns’ from the left-vertical menu.

(b) Edit Any Product
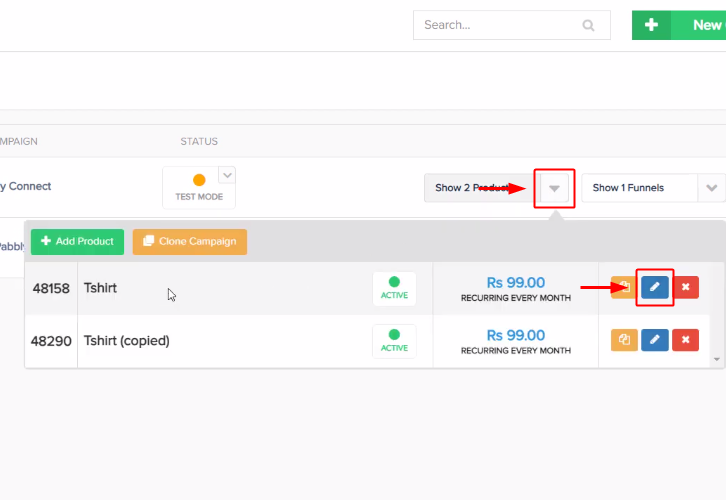
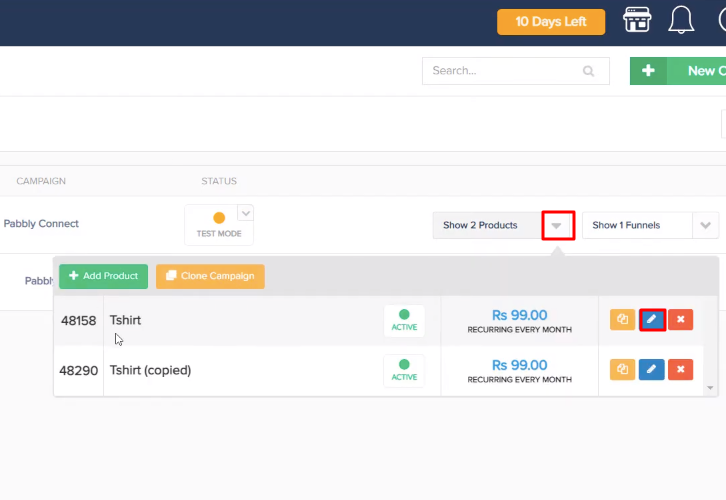
edit_any_product_from_paykickstart_campaigns

A page will open up carrying all your PayKickstart products. Then, click on the pencil icon to edit any of your product.

(c) Click on Integrations
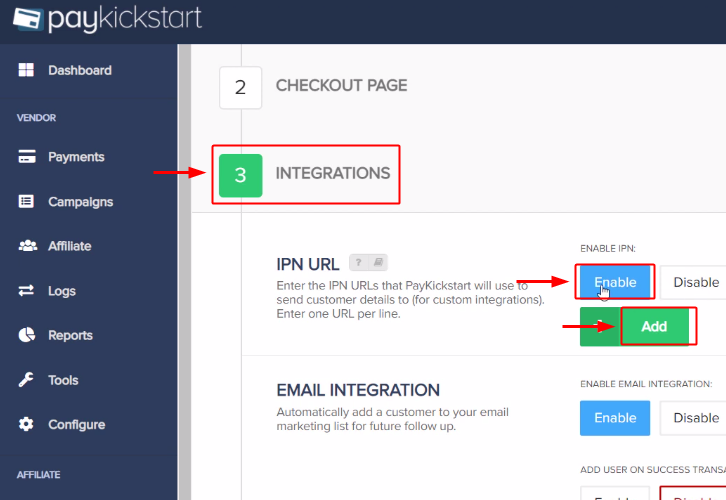
click_on_integrations

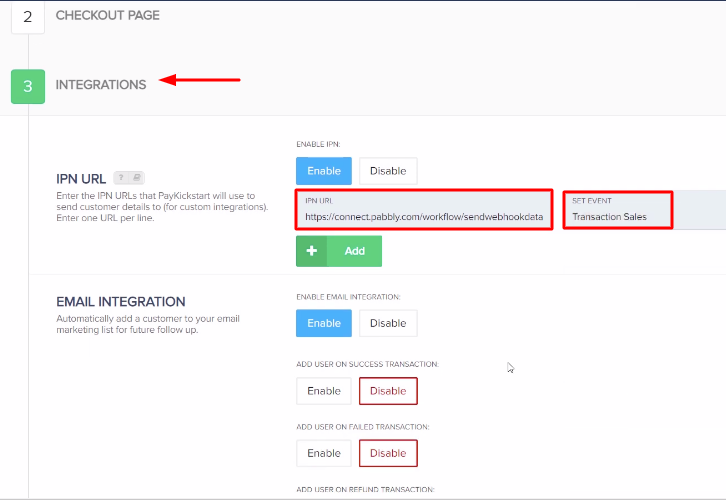
Scroll to the bottom of the page and then click on the ‘Integrations’ section.

Later, click on the ‘Enable’ button in the IPN URL section and after that, click on the ‘Add’ button.

(d) Paste the Webhook URL
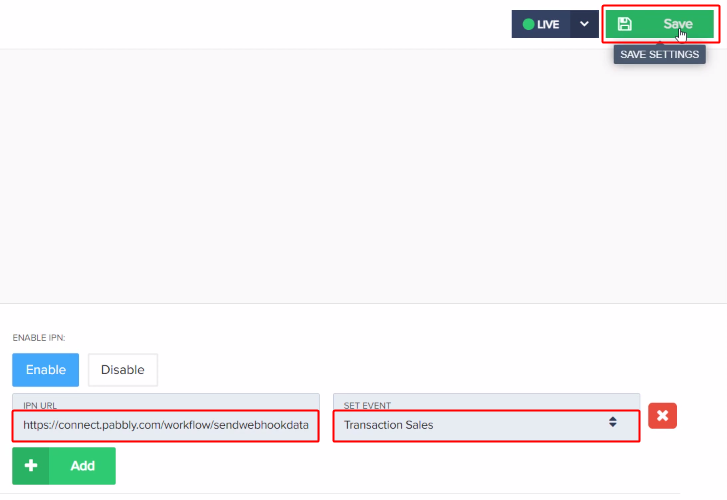
paste_webhook_url_for_paykickstart_to_freshdesk

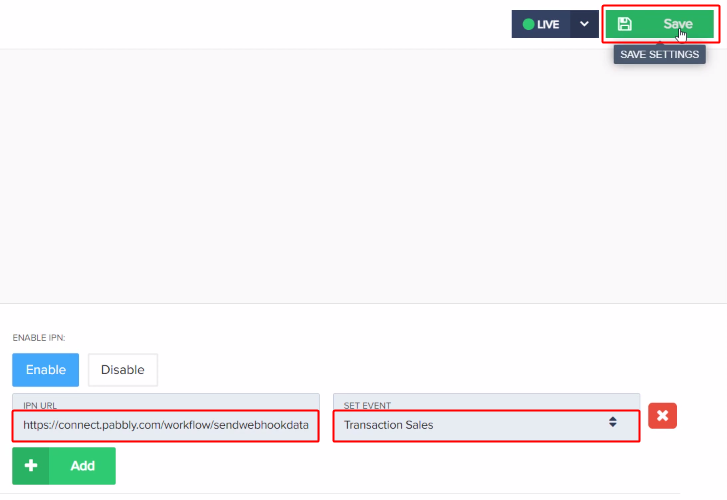
Paste the copied trigger URL in the ‘IPN URL’ field.

Then, select the ‘Transaction Sales’ choice for the ‘SET EVENT’ field’s value.

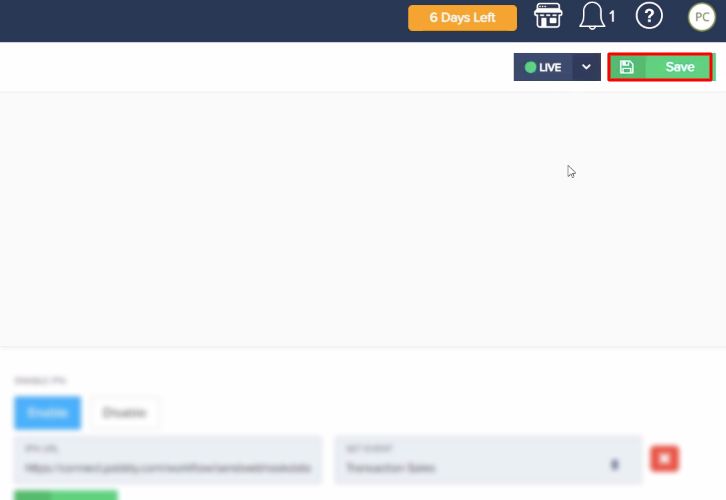
Finally, hit the ‘Save’ button available at the top-right corner of this page.

Step 6: Test the Response in Pabbly Connect Dashboard

As we can see, we are done setting up the trigger for PayKickstart and Trello integration. So, let’s test this trigger by making a test order on PayKickstart.

(a) Capture Webhook Response
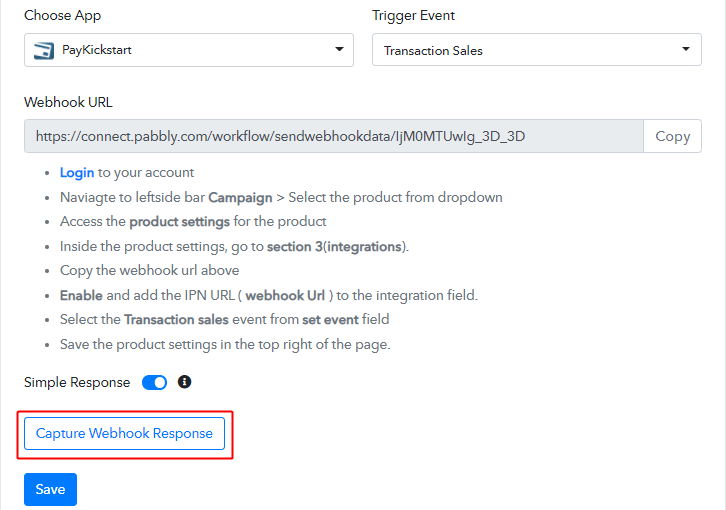
capture_webhook_response_for_paykickstart_to_freshdesk

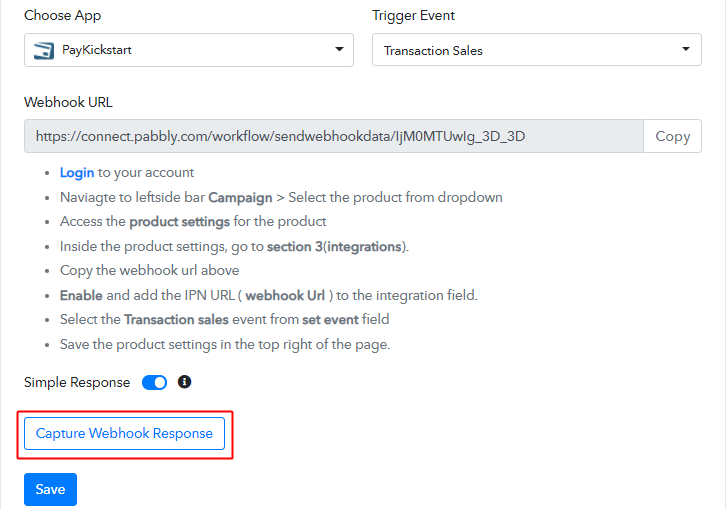
To test the trigger first, hit the ‘Capture Webhook Response’ button on the Pabbly Connect trigger window.

(b) Open Your PayKickstart Campaigns

paykickstart_campaigns

Now, go back to your PayKickstart dashboard & click on ‘Campaigns’ from the verticle menu.

(c) Open Any Product’s Checkout Page
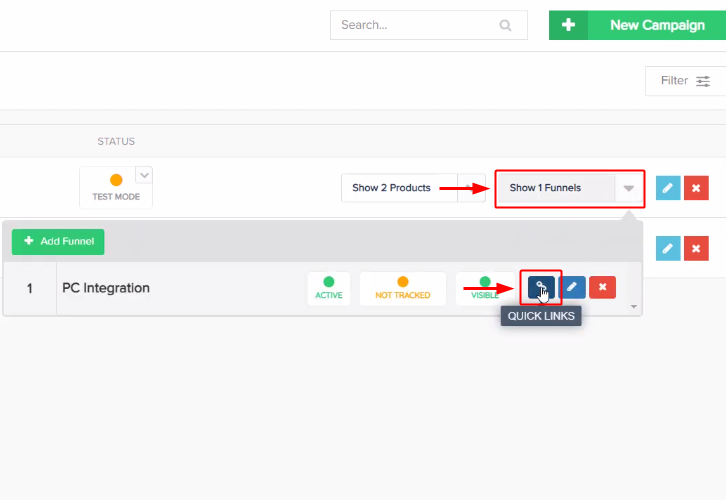
open_checkout_page_for_the_linked_product

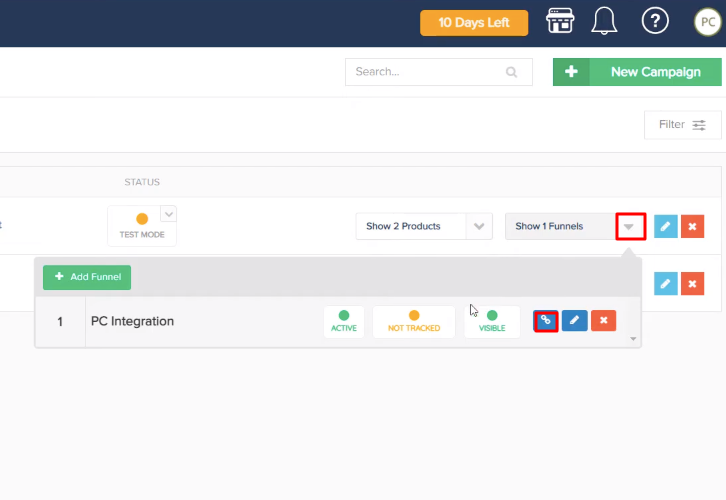
Then, open the checkout page link of the product in which you just did the trigger URL setup.

(d) Copy the Checkout Page URL
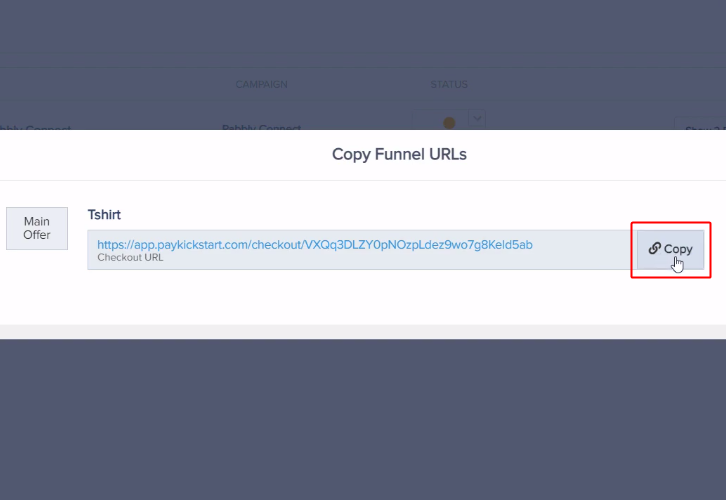
copy_checkout_page_url_for_paykickstart_to_hubspot

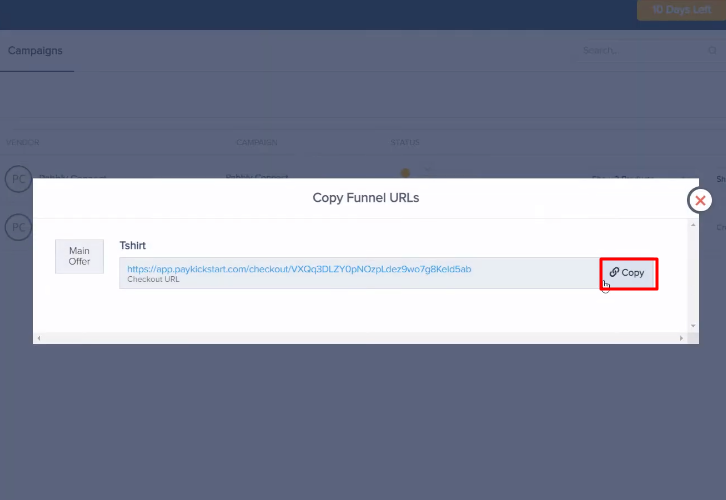
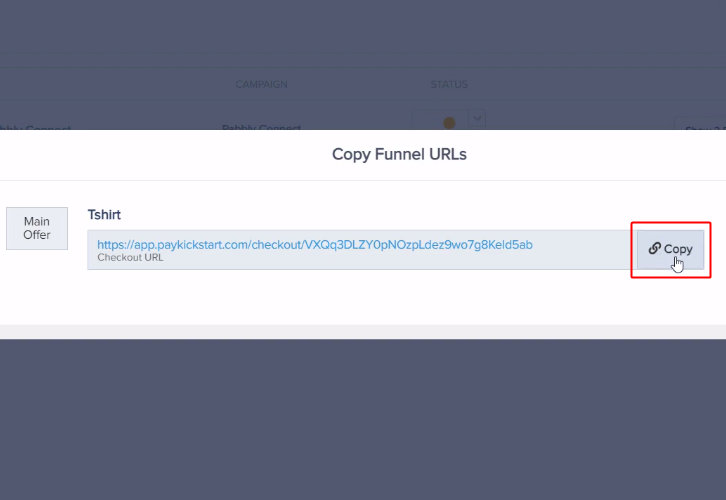
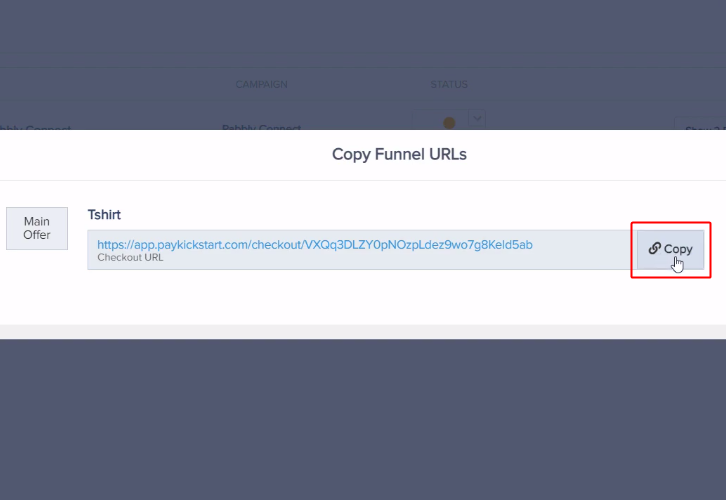
Copy the checkout page URL & then open it in an incognito window.

(e) Make a Test Purchase
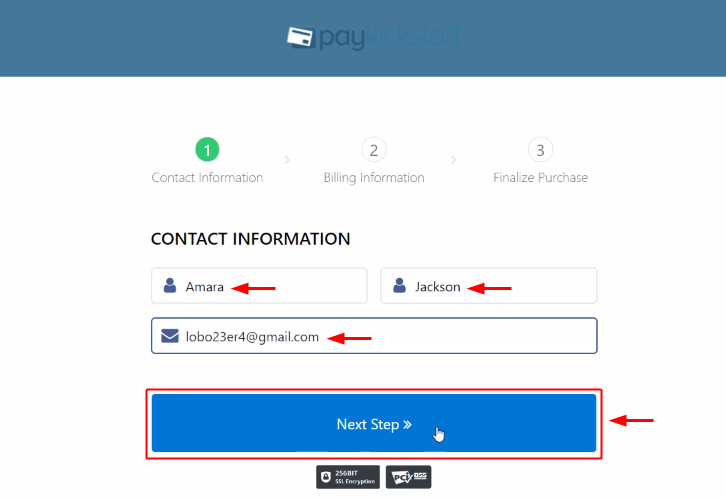
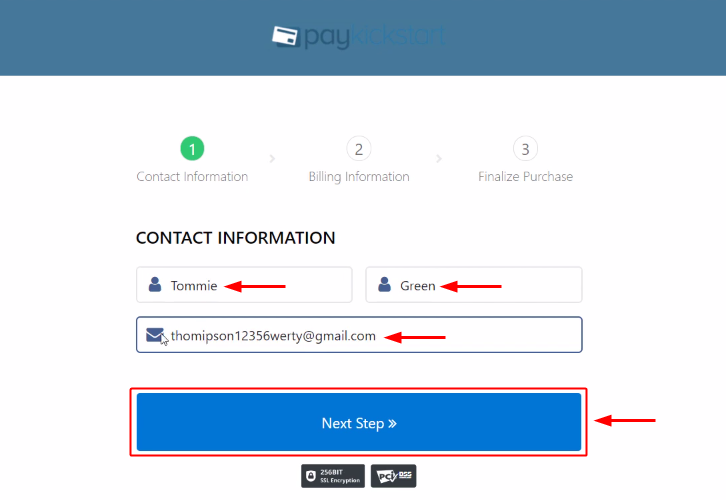
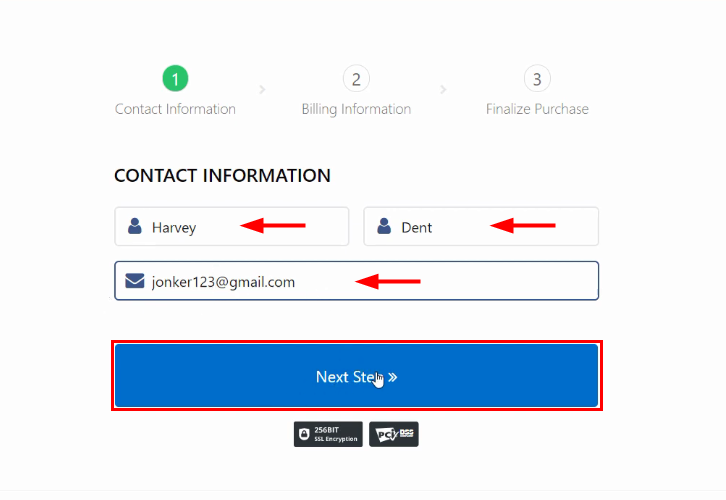
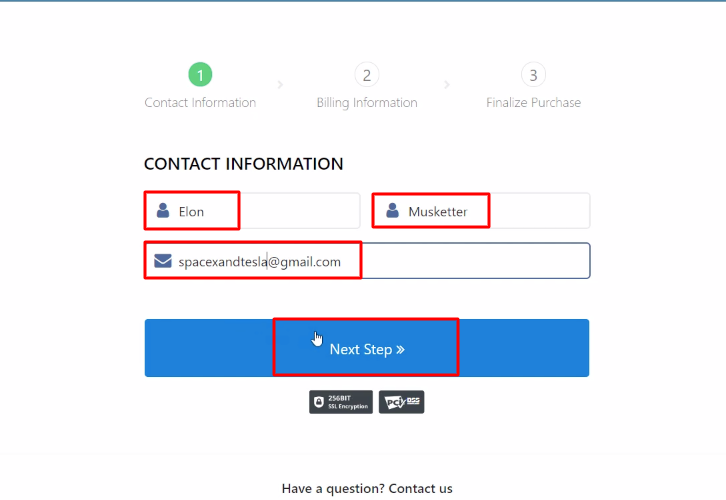
fill_contact_information_for_paykickstart_to_trello

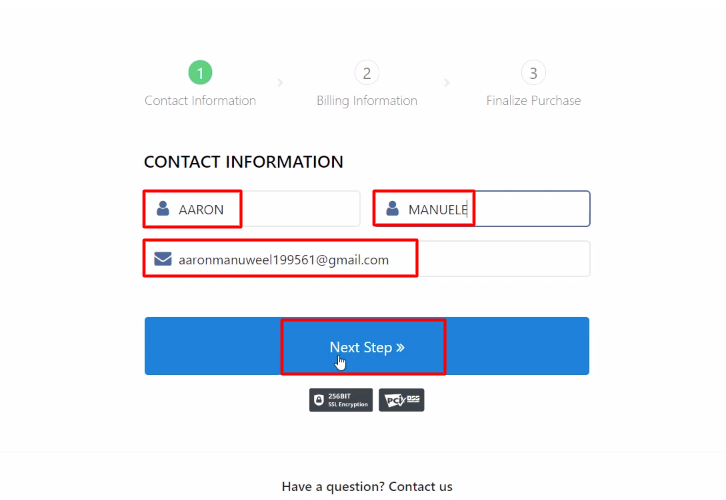
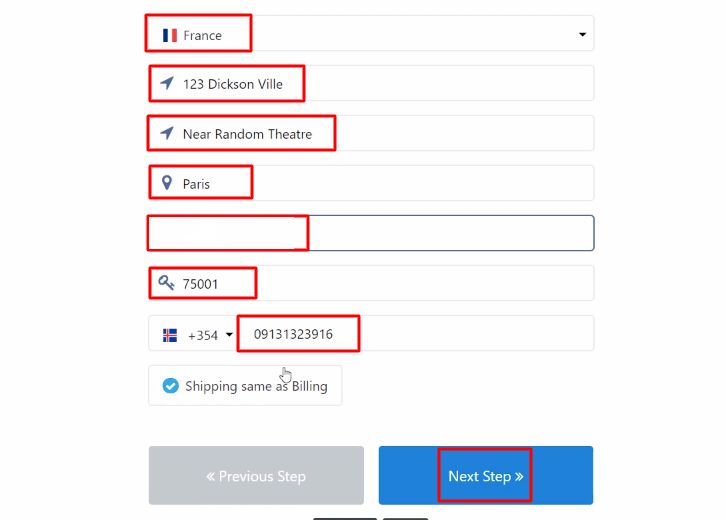
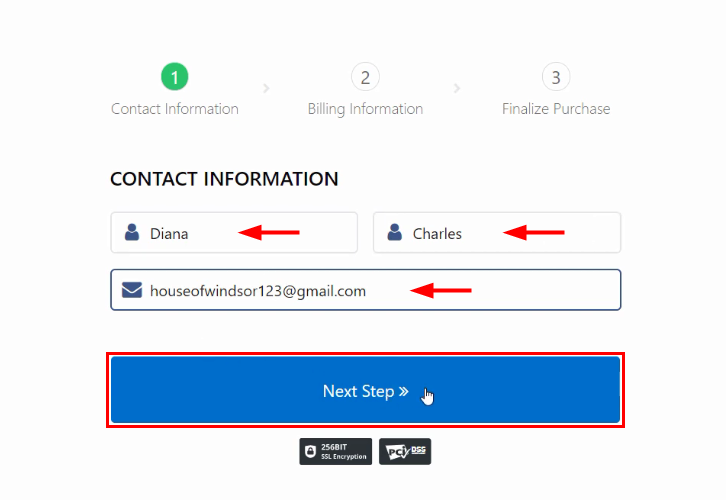
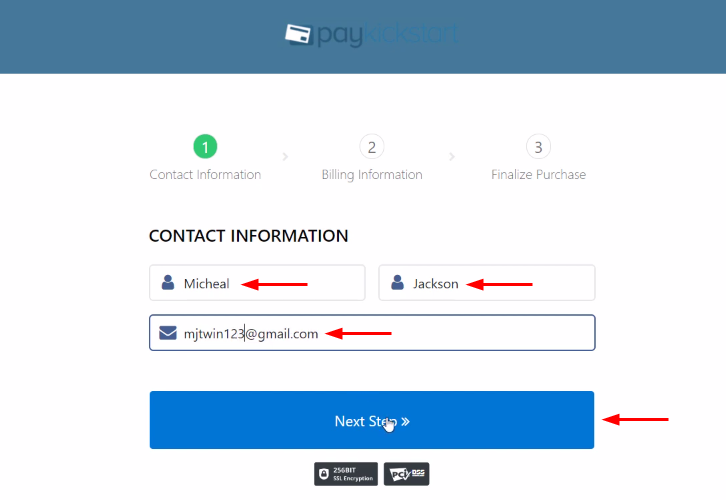
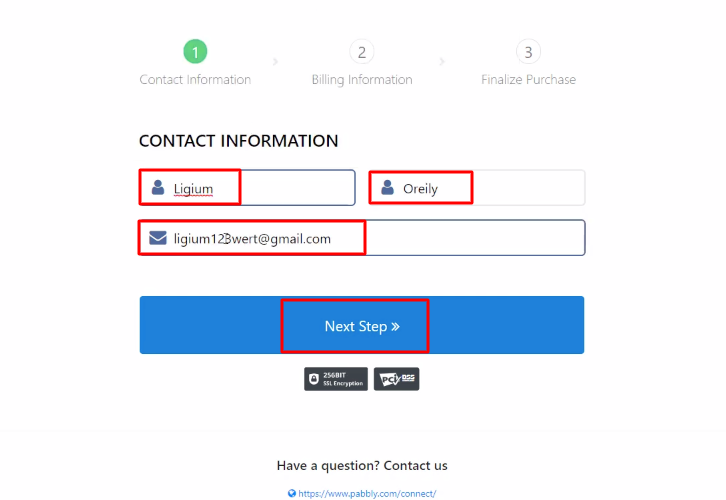
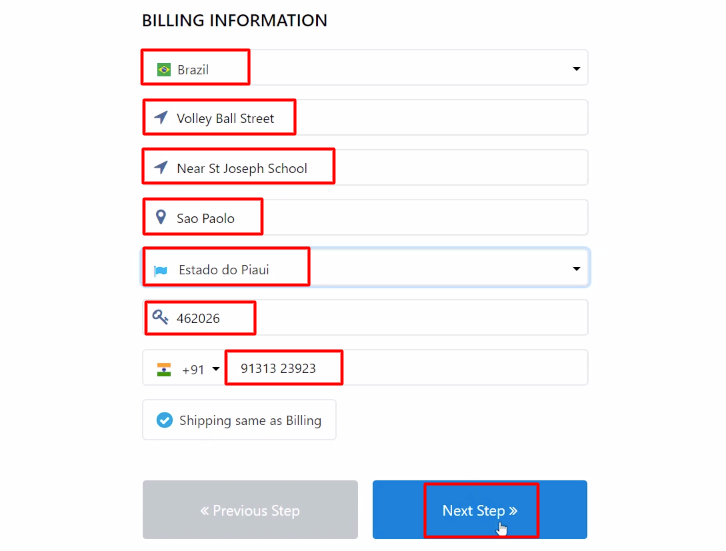
Fill all the required purchase details to make a test purchase. First, it’ll ask you to provide the contact information, second the billing information and lastly to finalize the test purchase.

(f) Complete the Test Purchase
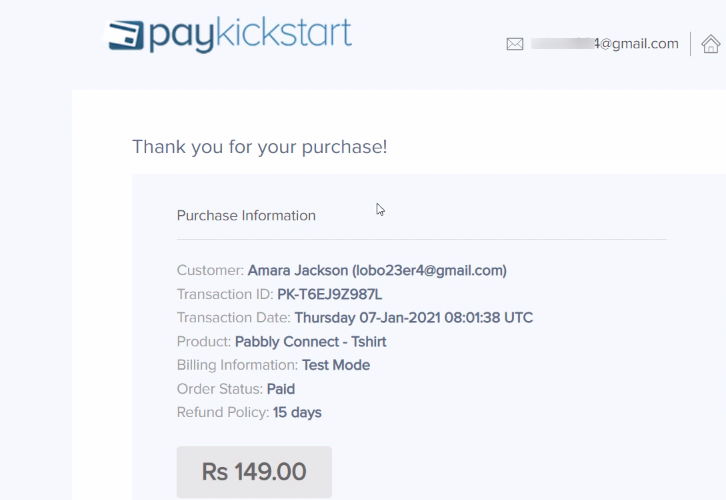
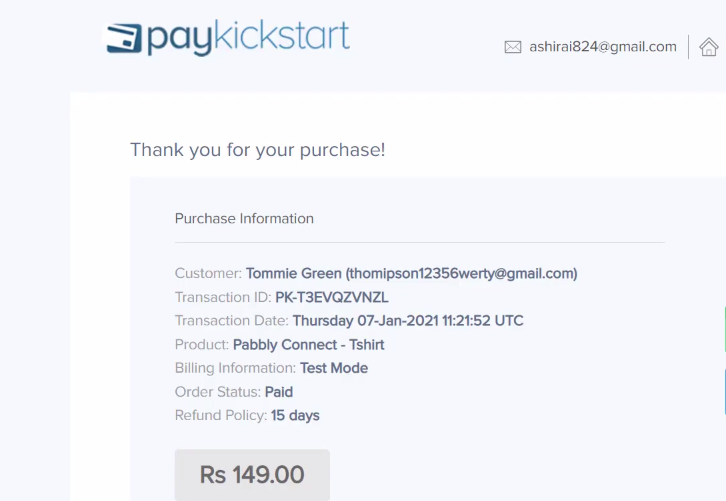
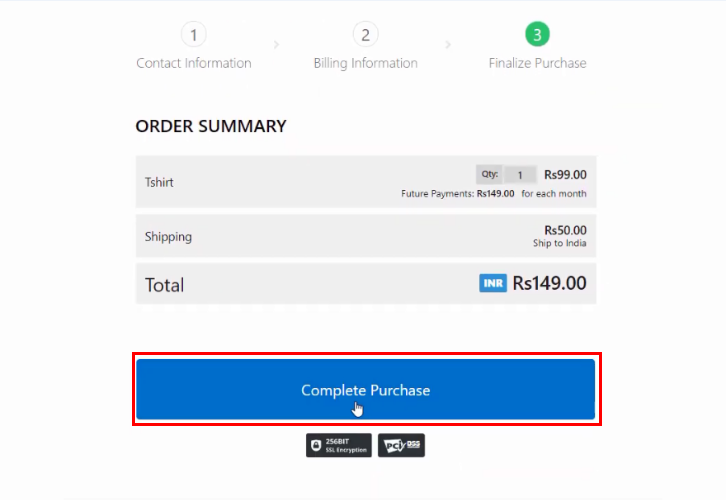
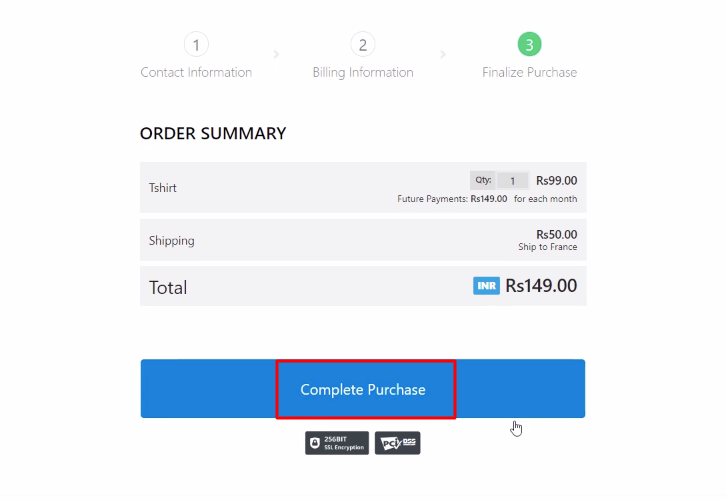
complete_purchase_for_paykickstart_to_trello

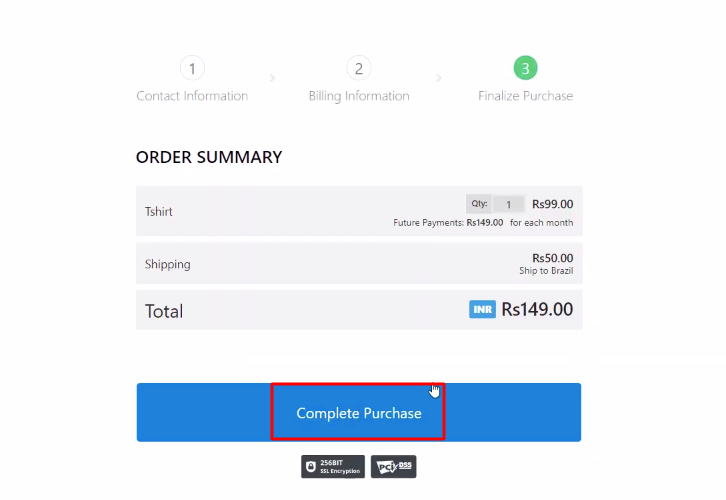
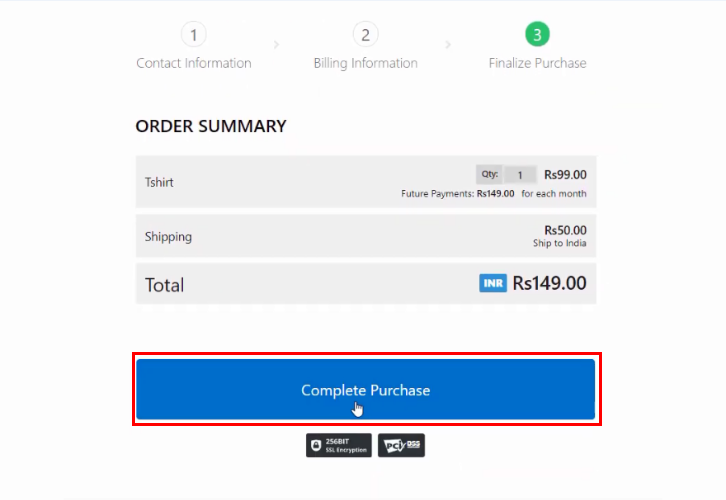
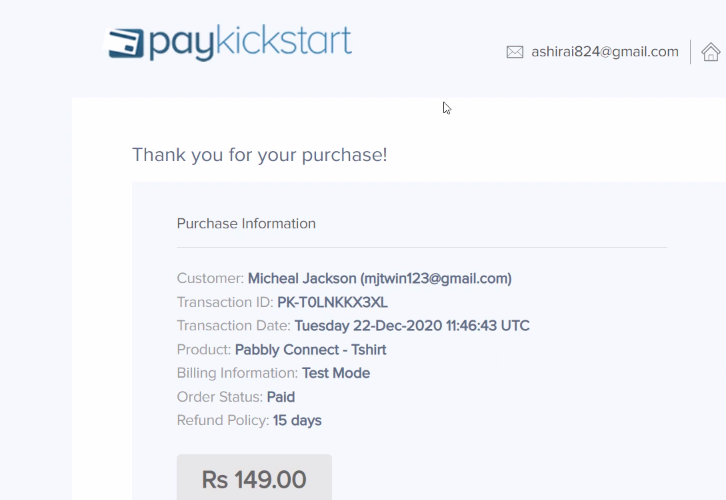
Complete the transaction by following all the steps required.

(g) Check & Save Trigger Response
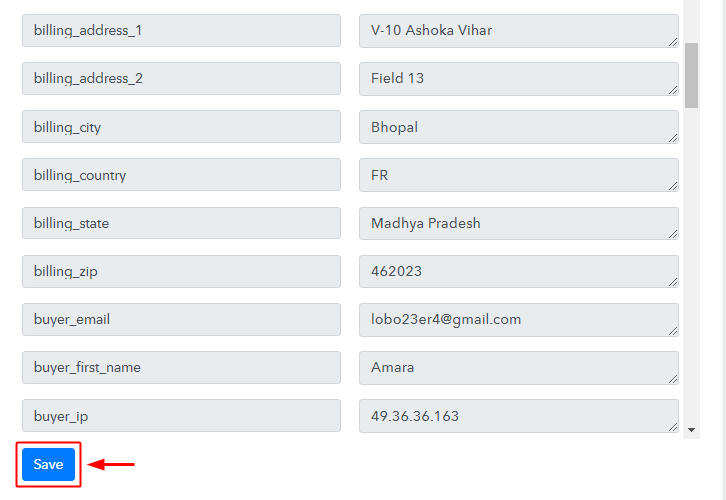
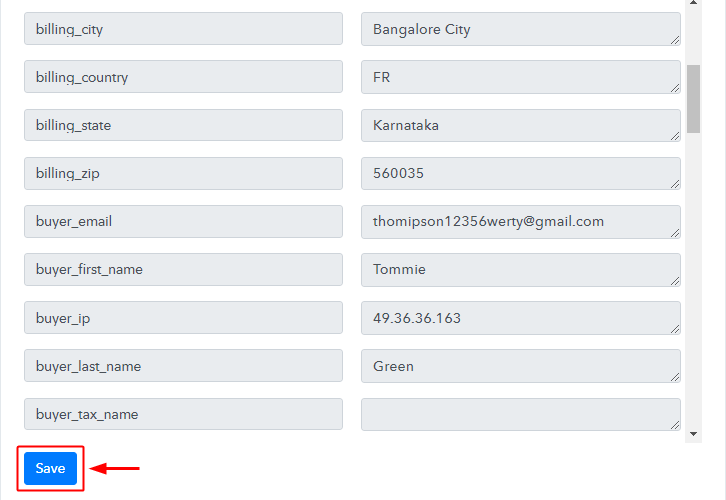
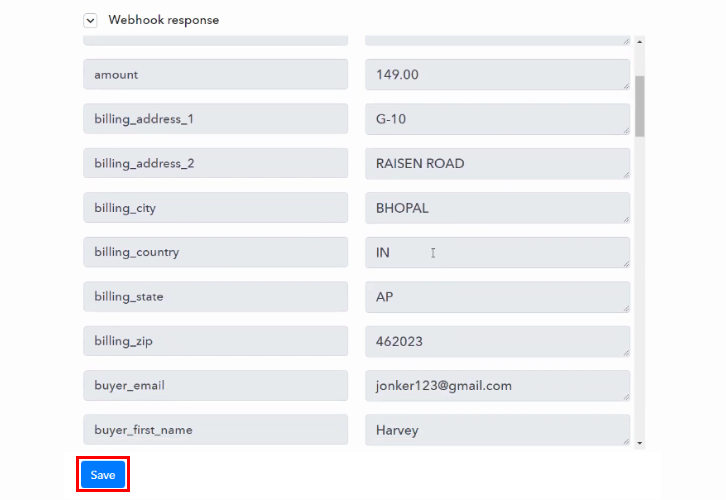
check_and_save_trigger_api_response_for_paykickstart_to_trello

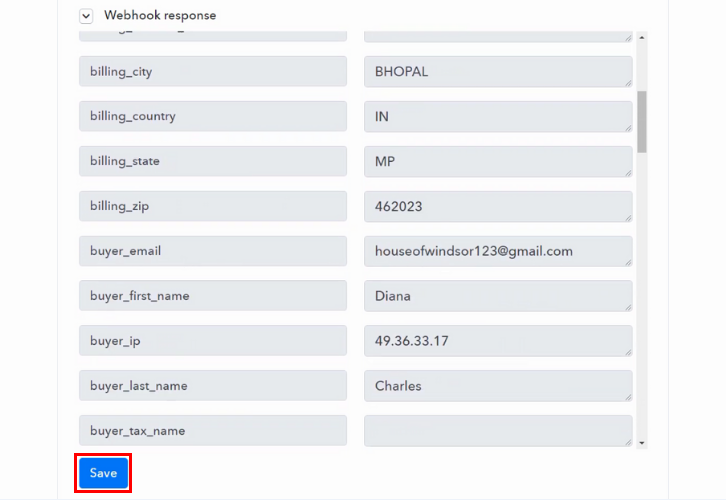
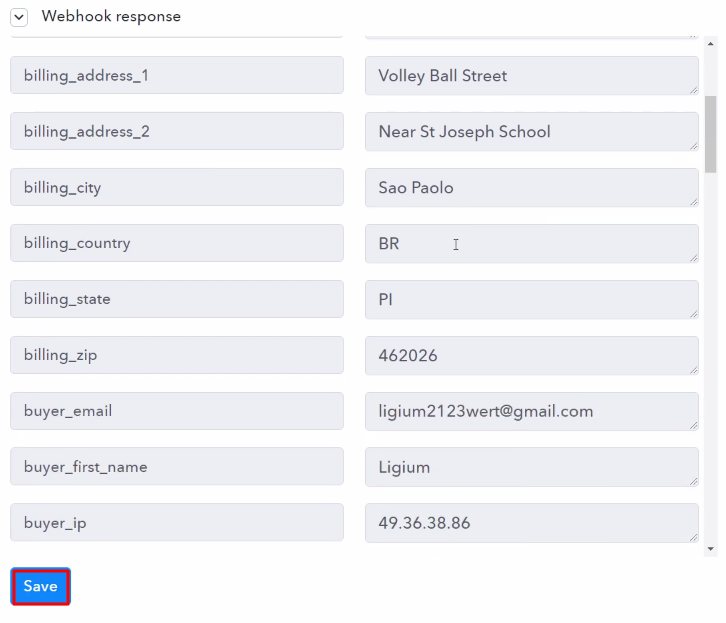
After the successful purchase, the Pabbly Connect trigger response will start illustrating the data for the current PayKickstart transaction.

Don’t forget to save this trigger API response.

Step 7: Setting Action for PayKickstart to Trello Integration

Now, as we have gathered all the necessary information to create a card on Trello from the PayKickstart response. We can now continue to feed this information to perform some action. After that, a new card will be created automatically for every PayKickstart sale.

(a) Select Application you want to Integrate
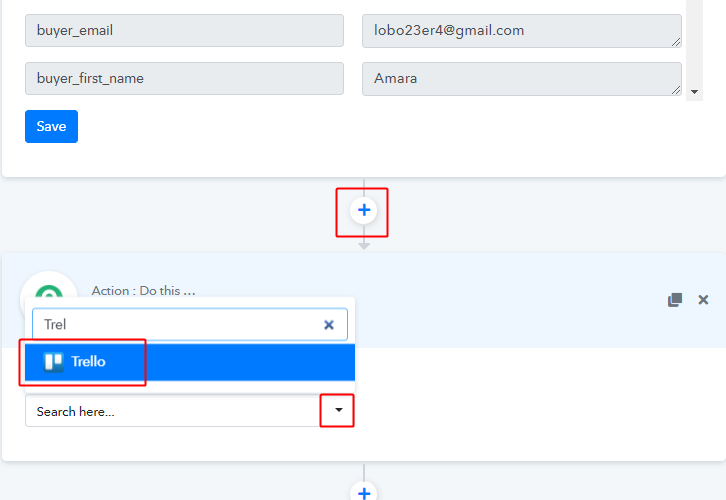
integrate_tello_for_paykickstart_to_trello_workflow

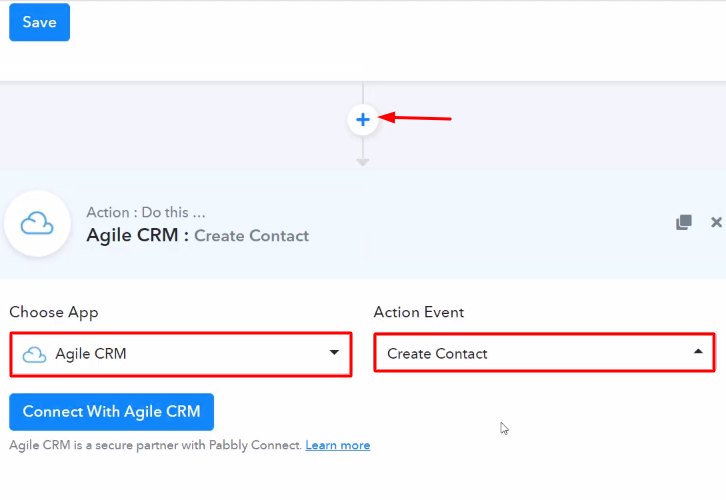
Click on the plus (+) button next to your PayKickstart trigger.

Select the app to integrate as ‘Trello’.

(b) Select Event & Connect with Trello
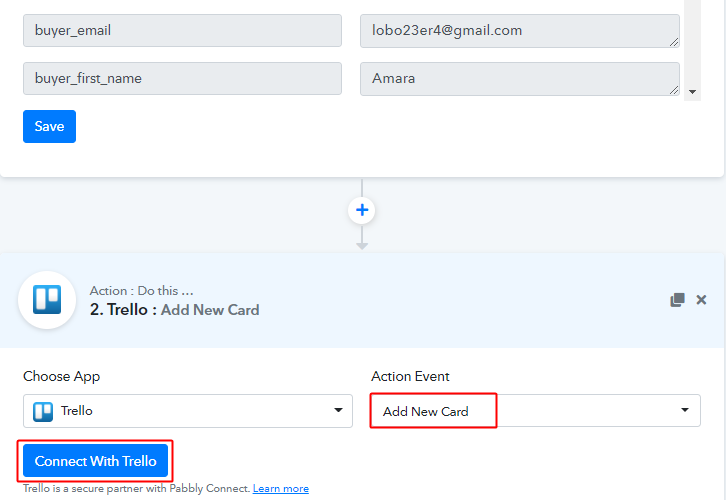
connect_with_trello_for_paykickstart_to_trello

Then, select the action event as ‘Add New Card’.

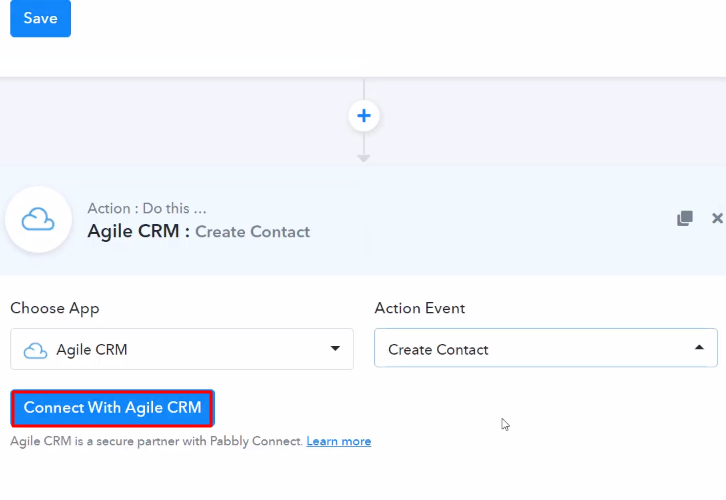
Lastly, push the ‘Connect with Trello’ button.

A window will slide in from the right side asking for a username, API key and a token.

Step 8: Connecting Trello to Pabbly Connect

(a) Login to Your Trello Account
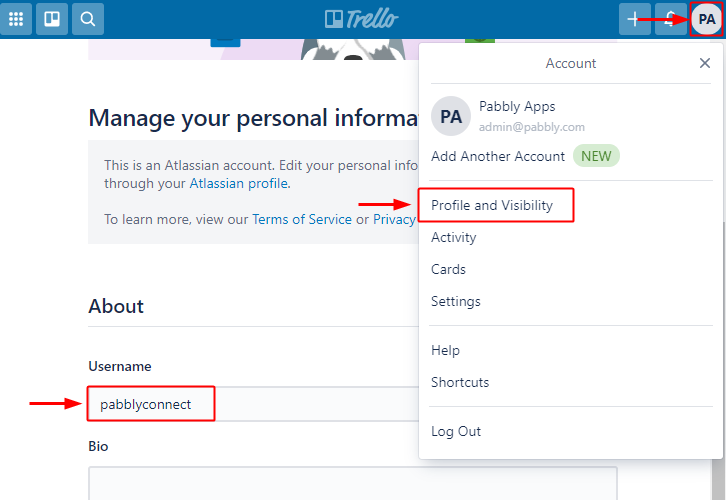
Copy Username

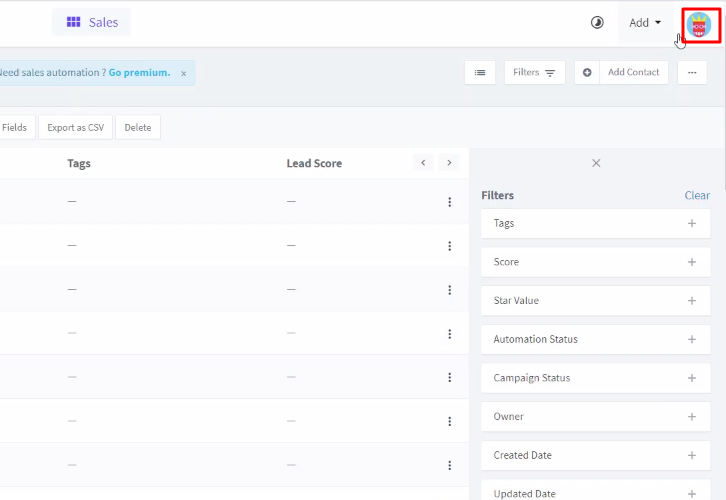
First, log in to your Trello account & then press the profile icon available on the top right corner. Then, click on the ‘Profile and Visibility’ option.

A page will open up containing the Username. Copy your username from here.

(b) Paste the Username
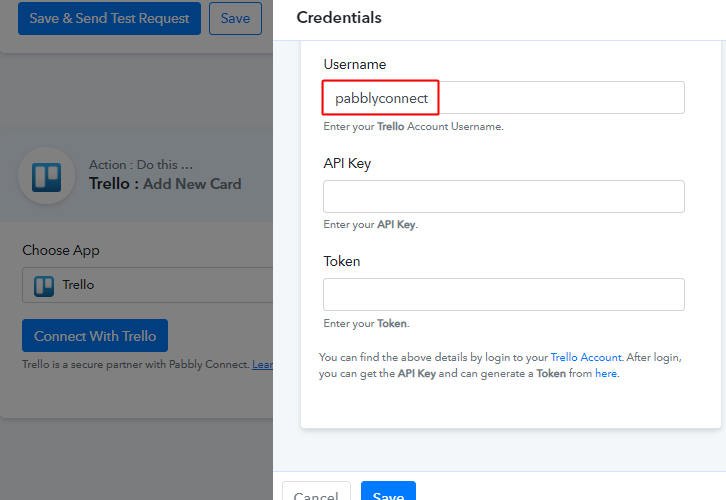
Paste Username

Paste the copied username in the Pabbly Connect window.

(c) Click the ‘here’ Text Anchor
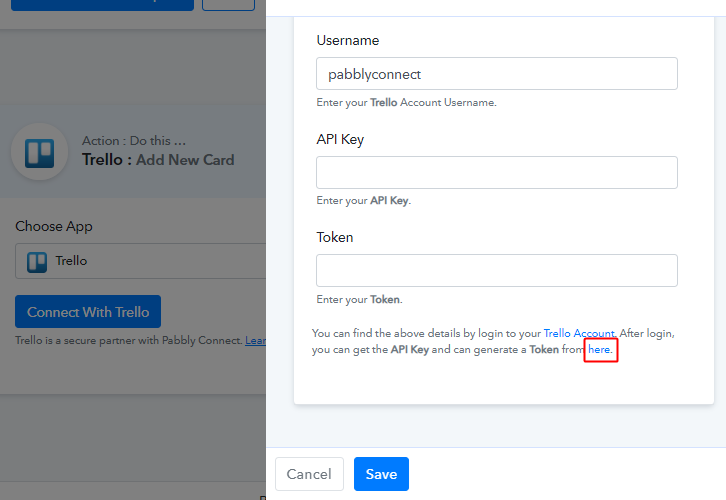
Click On Here

Now, for the API key, click on ‘here’ text anchor or go to ‘https://trello.com/app-key/’.

(d) Copy API Token
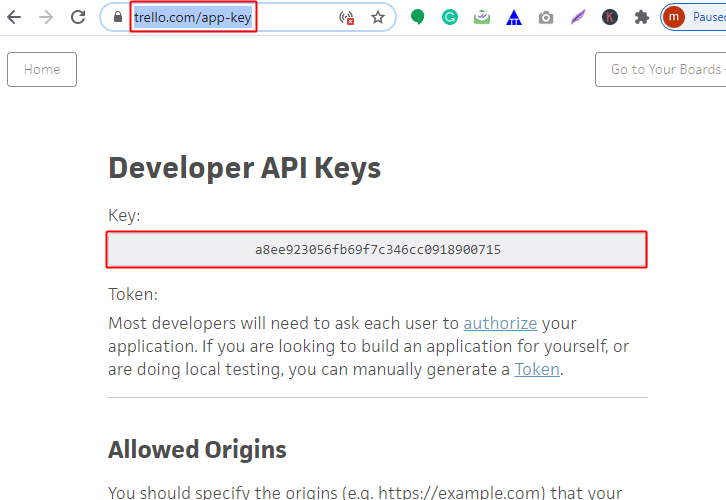
Copy API Ke

Copy the API key value from here.

(e) Paste the Copied API Key
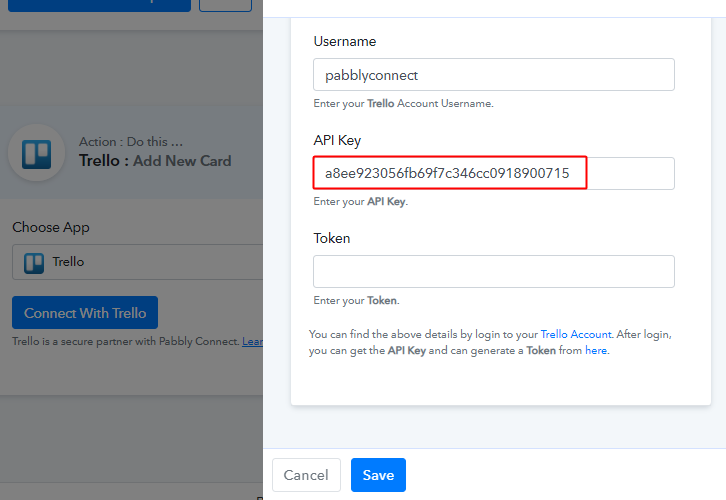
Paste API Key

Paste the copied API key in the Pabbly Connect trigger’s ‘API Key’ field.

(f) Generate Token
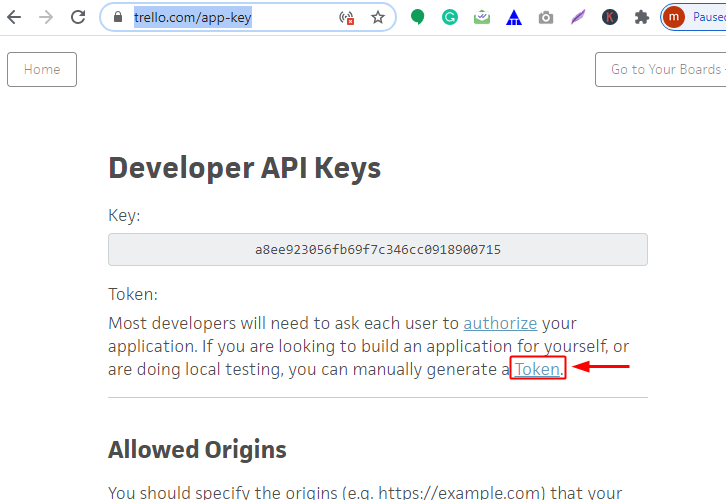
Click on Generate Token

On Trello API key window, you will find a text anchor to generate the token. Click on ‘Token’ to generate a token.

You’ll be direct to authorize your Trello account next. Complete the token generation process.

(g) Copy the Token
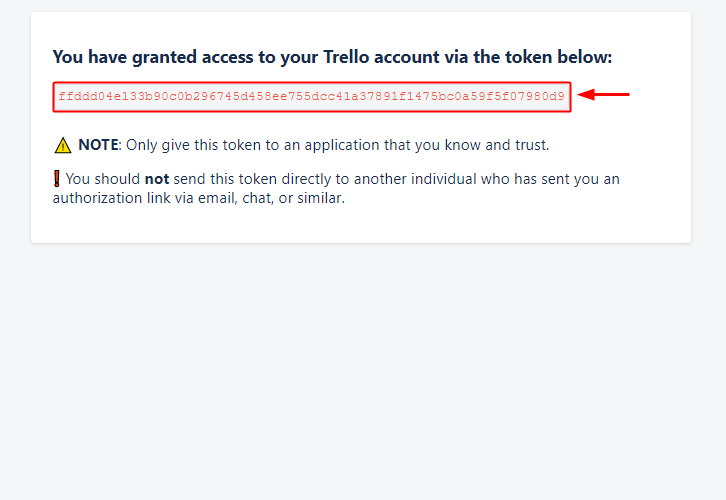
Copy Token

Copy the generated token.

(h) Paste the Token
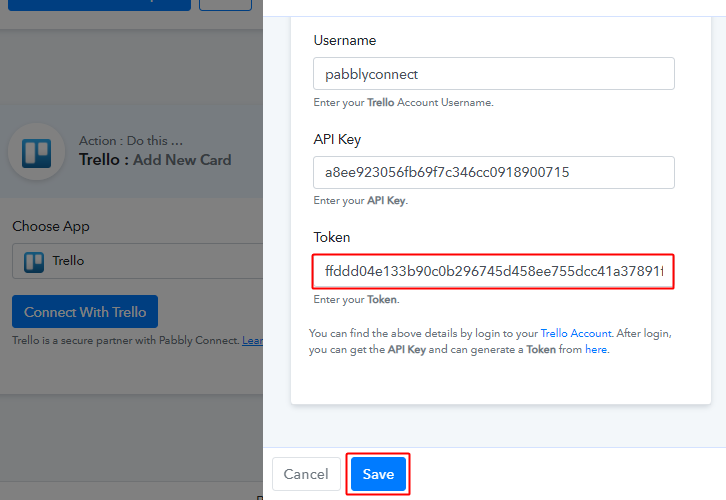
Paste Token & Save

Paste the copied token & then click ‘Save’.

(i) Select the Board & List
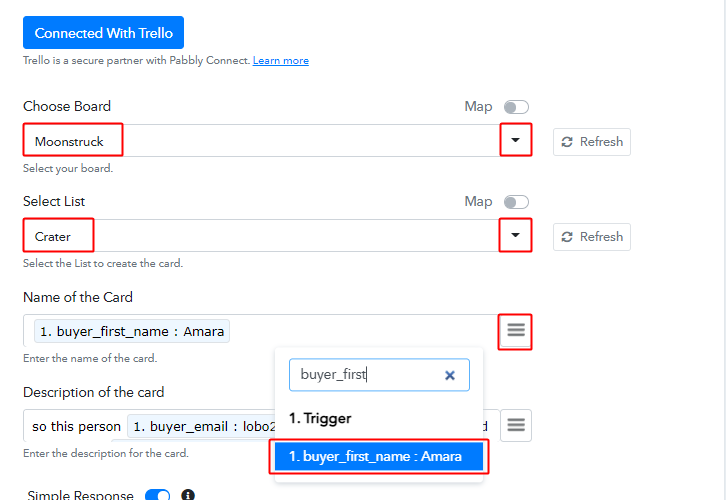
select_board_and_list_and_map_fields_for_paykickstart_to_trello

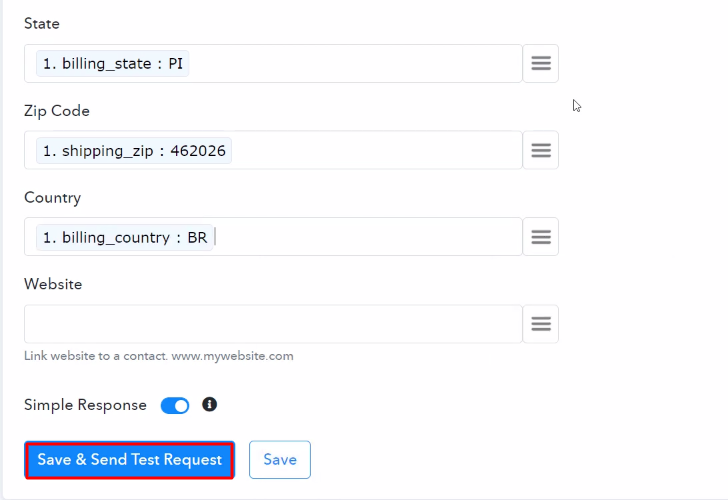
Now, select the board, list and map the name & other required fields. Also, you can add some permanent text along with the mapped fields.

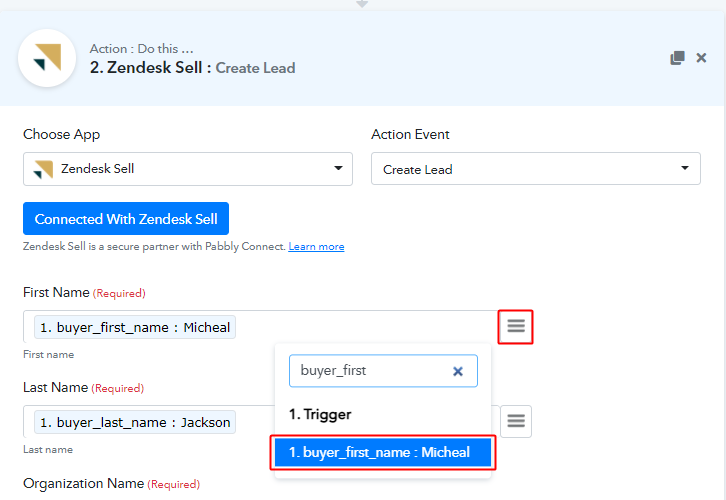
To map a value, hit the three horizontal lines (menu icon) given next to any particular field.

After that, find and select the response that you want to map with that field.

(e) Send Test Request
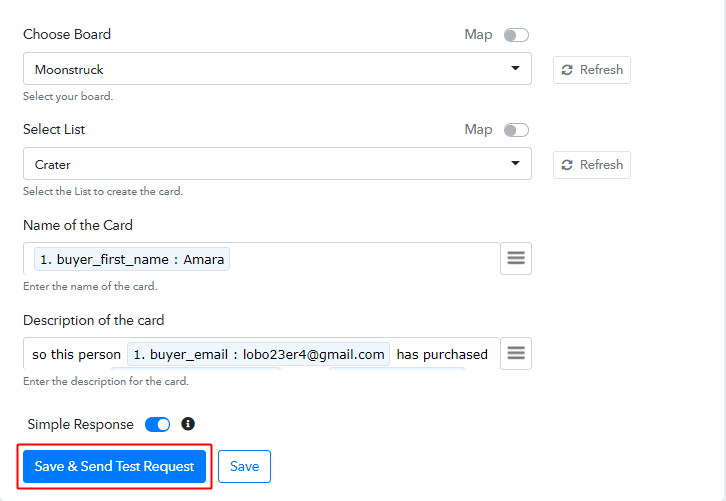
save_and_send_test_request_for_paykickstart_to_trello

Further, click on the ‘Save & Send Test Request’ button to send a test request for creating a card on Trello.

(f) Check & Save Response
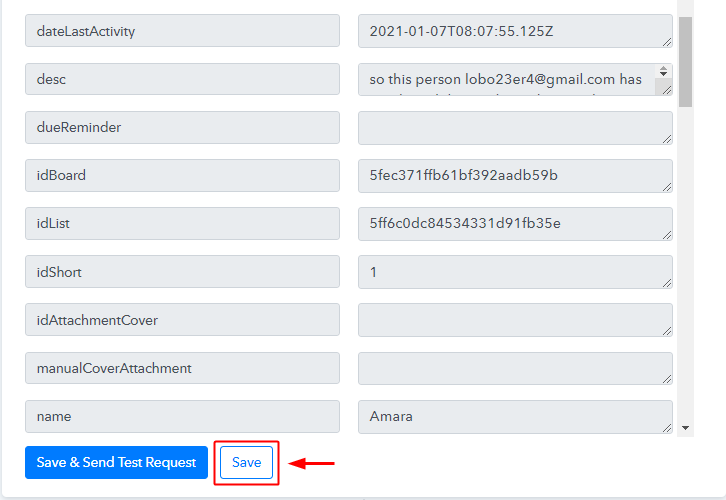
check_and_save_action_api_response_for_paykickstart_to_trello

Certainly, you can check the Trello action’s response in the API action response window. And, if there is some error while sending the data for creating the card then it will start showing you the error.

Finally, click on ‘Save’ to save the action API’s response.

Step 9: Check Response in Trello Dashboard
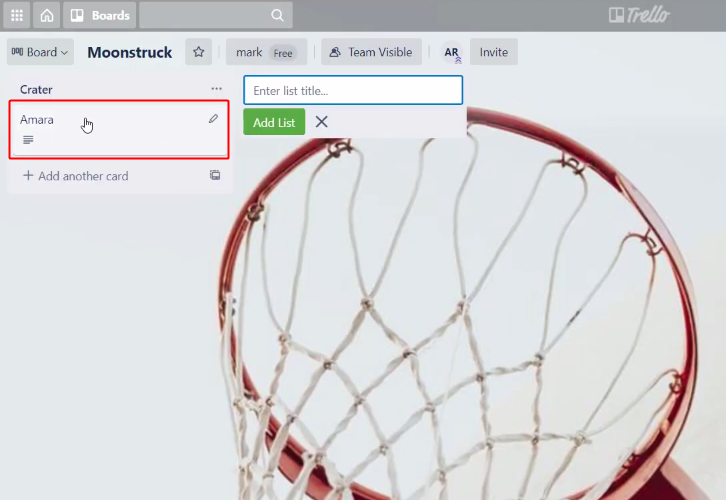
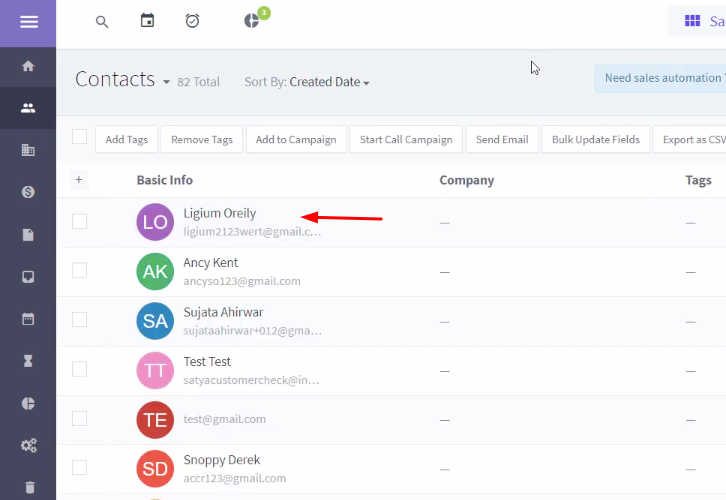
card_entry_on_trello_for_paykickstart_to_trello

Also, you can see the card’s entry on your connected Trello account.

Conclusion –

To sum up, this was all about ‘How to add Trello card from new PayKickstart sale’. Consequently, after completing the step by step procedure, you will end up auto-creating Trello cards for every new sale on PayKickstart.

However, now you can grab Pabbly Connect for FREE with all its premium features.

Also, do comment us your queries in the section given below.

You May Also Like to Read:

How to Add EmailOctopus Subscriber from New Shopify Customers

How to Add EmailOctopus Subscriber from New Shopify Customers

Tired of looking for a way to add EmailOctopus subscriber from new Shopify customers automatically? If yes then this blog can help you in automating the task by using Pabbly Connect. As there is no direct integration possible for these two services.

How to Add EmailOctopus Subscriber from New Shopify Customers

Basically, Pabbly Connect is an integration & automation tool that lets you share data from one application to another in real-time.

And you know what’s the best part? that you don’t have to use any coding skills & even beginners can use it efficiently. Additionally, this will be just a one-time set-up and after that, the Pabbly Connect will take care of the rest.

Why Choose This Method Of Integration?

In contrast with other integration services-

  • Pabbly Connect does not charge you for its in-built apps like filters, Iterator, Router, Data transformer, and more
  • Create “Unlimited Workflows” and smoothly define multiple tasks for each action
  • As compared to other services which offer 750 tasks at $24.99, Pabbly Connect offers 50000 tasks in the starter plan of $29 itself
  • Unlike Zapier, there’s no restriction on features. Get access to advanced features even in the basic plan
  • Try before you buy! Before spending your money, you can actually signup & try out the working of Pabbly Connect for FREE

Sign Up To Pabbly Connect

Before starting the procedure, let’s learn a little about the services. Shopify is an e-commerce platform that allows you to create an online store to sell, ship, and manage your products. Whereas, EmailOctopus is an email marketing app that handles subscriber management, email deliverability, etc.

Moreover, once you set-up this workflow all the subscribers will be automatically added to your EmailOctopus account whenever a customer is enrolled in Shopify.

Also, we are enclosing a video for the same integration as well. Just have a look at it –

Apart from that, we’ve also attached the template for the same to help you get started immediately. You can simply tap on the image below to get started. Moreover, you can go to the App Directory & look for more integrations/apps.So, let’s begin the blog about how to add EmailOctopus subscriber for newly added Shopify customers.

How

Step 1: Sign up to Pabbly Connect

Sign Up

Begin the process to add EmailOctopus subscriber for newly added Shopify customers by pressing the “Sign Up Free” icon on the Pabbly Connect home page. Following that, either manually fill-up all the details or sign up using your Gmail account.

Try Pabbly Connect for FREE

Step 2: Access Pabbly Connect

Select Connect

Next, after logging into the account, press the “Access Now” button of the Connect section in the dashboard.

Step 3: Workflow for Shopify with EmailOctopus Integration

(a) Start with a New Workflow

Create New Workflow

Start with creating a workflow for your project by pressing the ‘Create Workflow’ button.

(b) Name the Workflow

Name the Workflow

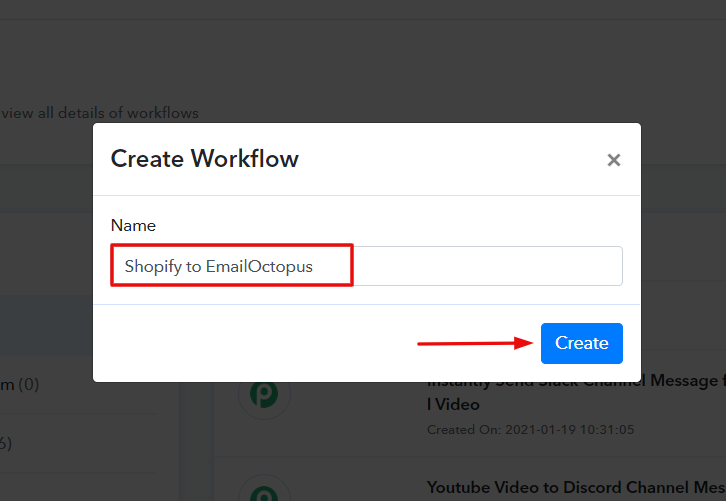
Soon, name the workflow just like in the above-shown image. I named the workflow “Shopify to EmailOctopus”, you can obviously name the workflow as per your requirements.

Step 4: Setting Trigger for Shopify with EmailOctopus Integration

Once you are done naming your workflow, now it’s time to select the application you want to integrate. Pabbly Connect lets you integrate countless premium applications, tap here to create your free account now.

(a) Select Application you Want to Integrate

Select-Shopify-1

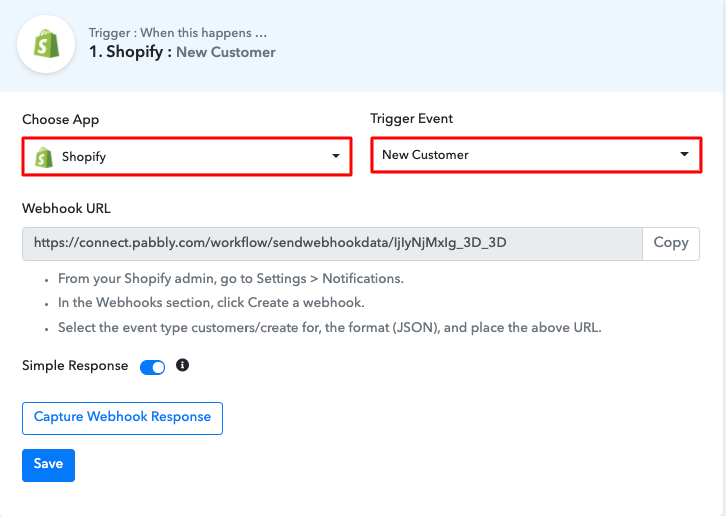
Quickly, select the application that you want to integrate. Here, we are choosing “Shopify” for integration, and in the method section, select “New Customer”.

(b) Copy the Webhook URL

Copy-the-Webhook-URL-6-1

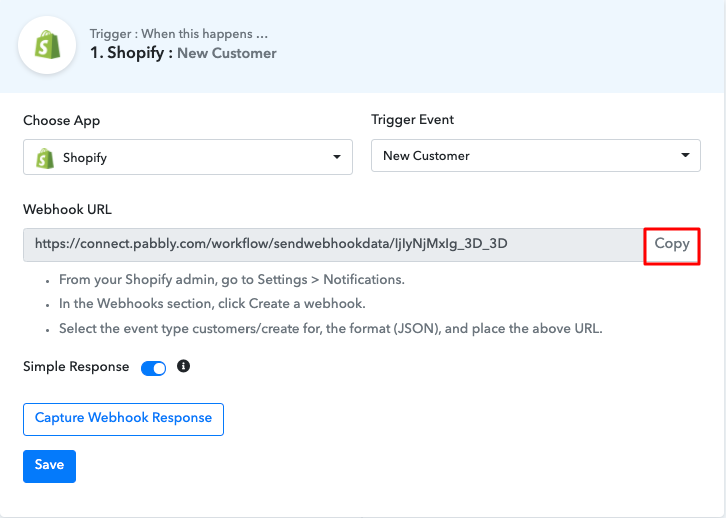
Now it’s time to copy the webhook URL just like in the above-shown image.

Step 5: Connecting Shopify to Pabbly Connect

Next, in order to connect Shopify with Pabbly Connect, you have to paste the copied webhook URL in the software. Hence for that, you have to log in to your Shopify account.

(a) Click on Shopify Settings

Click Settings

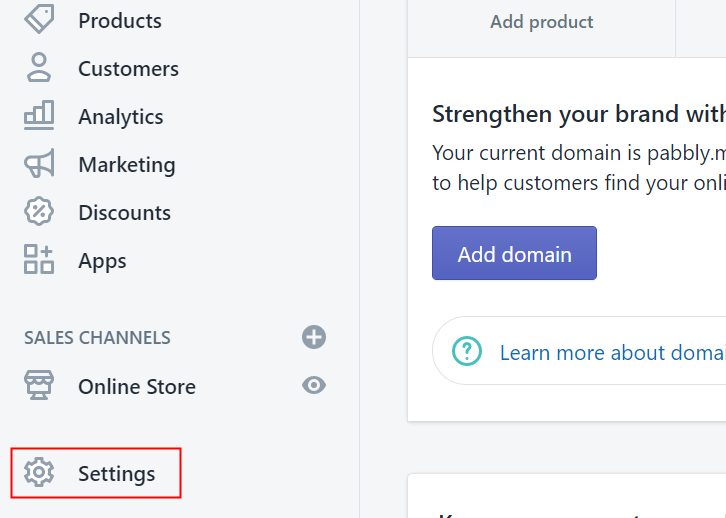
Once you log into your Shopify account, hit the “Settings” option given at the bottom of the screen.

(b) Click on Notifications

How

Now, push the “Notifications” option.

(c) Click on Create Webhook

How

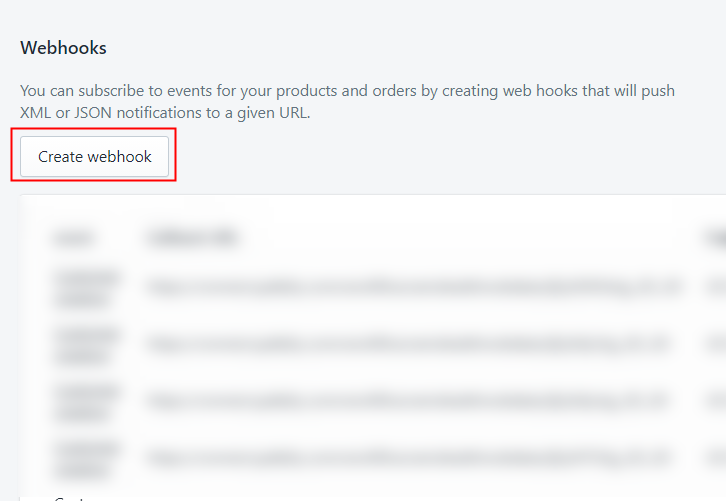
Immediately, scroll down and hit the “Create Webhook” button to paste the copied webhook URL.

(d) Paste the Webhook URL

Paste the Webhook URL

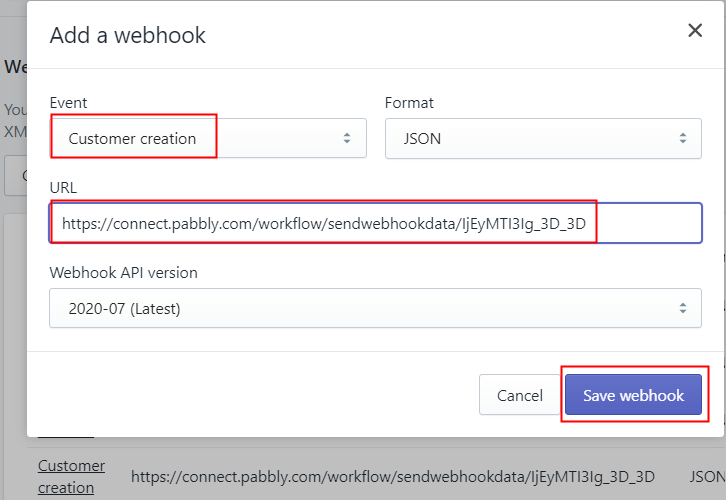
Eventually, a dialogue box will pop-up, here select “Customer Creation” in the event section & then paste the copied webhook URL. After making all the changes hit the “Save Webhook” button.

Step 6: Add a Sample Customer

Now, to check this integration, we will capture the data from Shopify, and for that, we will create a dummy customer on Shopify.

(a) Click on Create Account

Click-on-Create-Account-Shopify-1

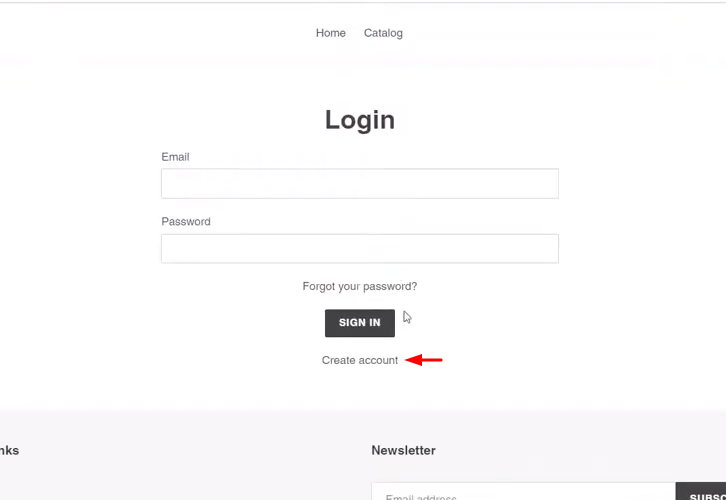
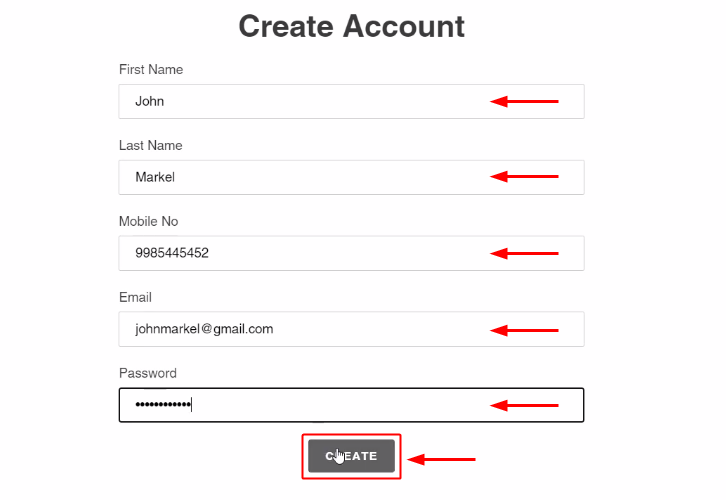
Ultimately, its time to add a customer, first, you have to open the online store page of Shopify in the new tab & then hit the “Create Account” option.

(b) Add Details

create_customer_for_shopify_to_mailjet

Now, add all the required details of the customer like name, email, etc, and hit the “Create” button.

(c) Click Submit Button

Click-Submit-Shopify-1

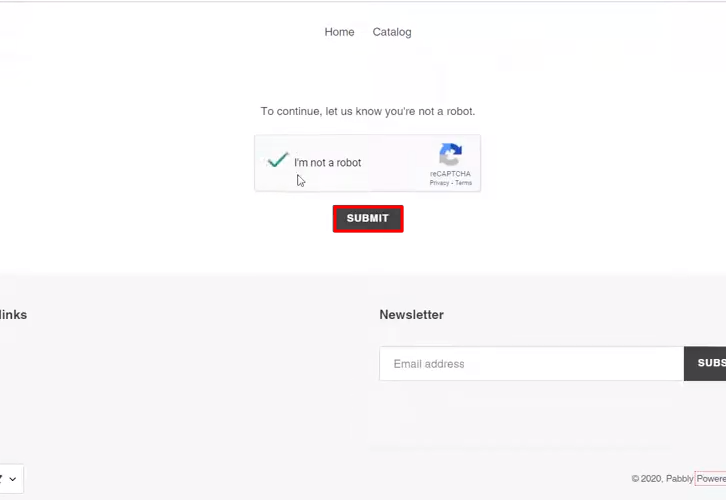
Consequently, tap on the captcha checkbox and then press the “Submit” button. Before that, hit the “Capture Webhook Response” in Pabbly Connect to capture the data.

Step 7: Test the Response in Pabbly Connect Dashboard

check_and_save_trigger_response_for_shopify_to_mailjet

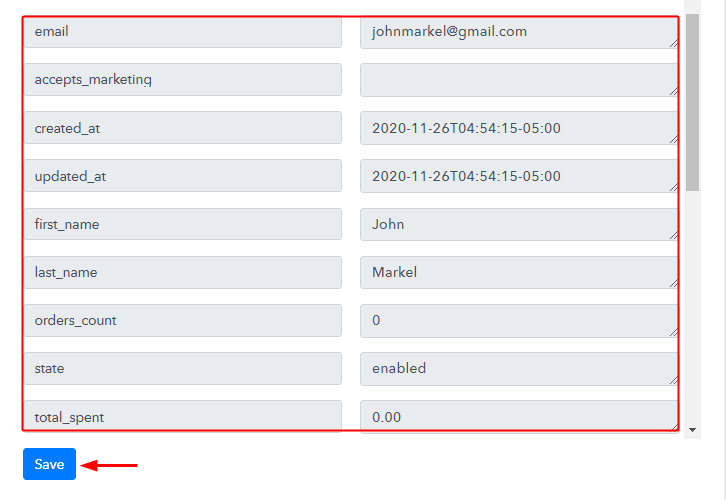
After pressing the “Capture Webhook Response” in Pabbly Connect and “Submit” in Shopify, the customer info will appear on the Pabbly Connect dashboard. Besides, hit the “Save” option.

Step 8: Setting Action for Shopify with EmailOctopus Integration

(a) Select Application you want to Integrate

Select Application you want to Integrate for Shopify with EmailOctopus Integration

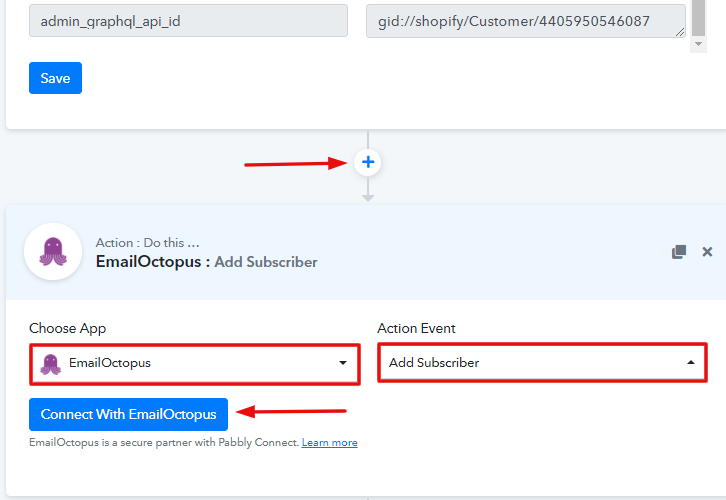
Subsequently, click on the plus button and then, select the app to integrate as ‘EmailOctopus’ & method as ‘Create Subscriber’. Furthermore, press the ‘Connect with EmailOctopus’ button.

Step 9: Connecting EmailOctopus to Pabbly Connect

(a) Go to EmailOctopus Profile Options

Go to EmailOctopus Profile Options

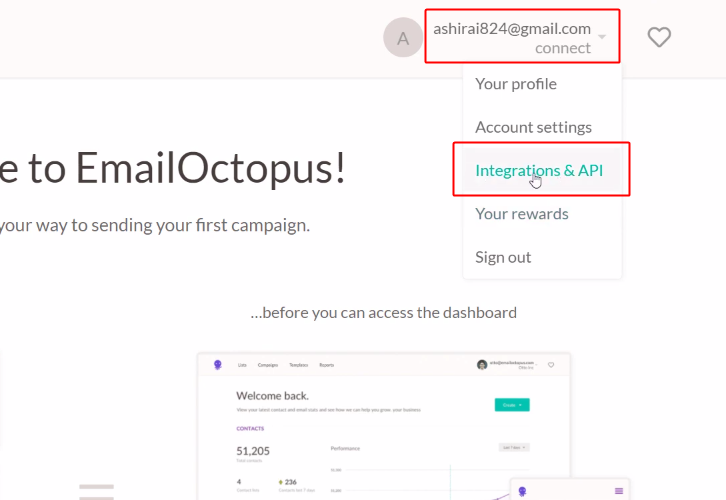
Following that, sign-in and go to your EmailOctopus dashboard. Later, click on the profile caret and select the ‘Integration & API’ option from the menu that opens.

(b) Go to Developer API

Go to Developer API

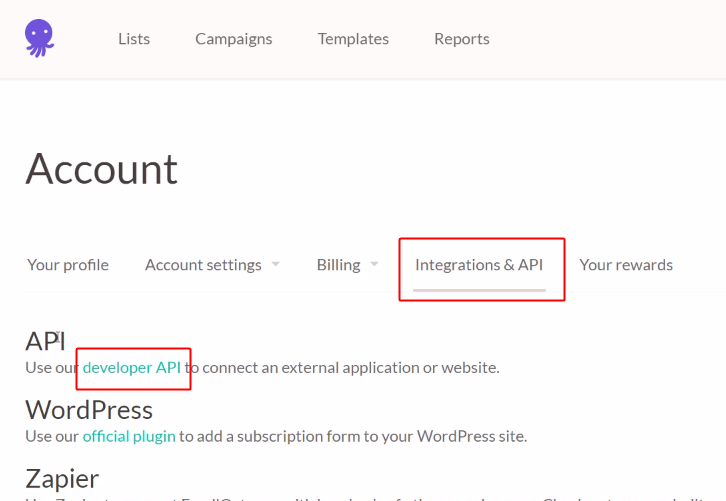
On the ‘Integrations & API’ page hit the ‘Developer API’.

(c) Copy the API Key

Copy the API Key

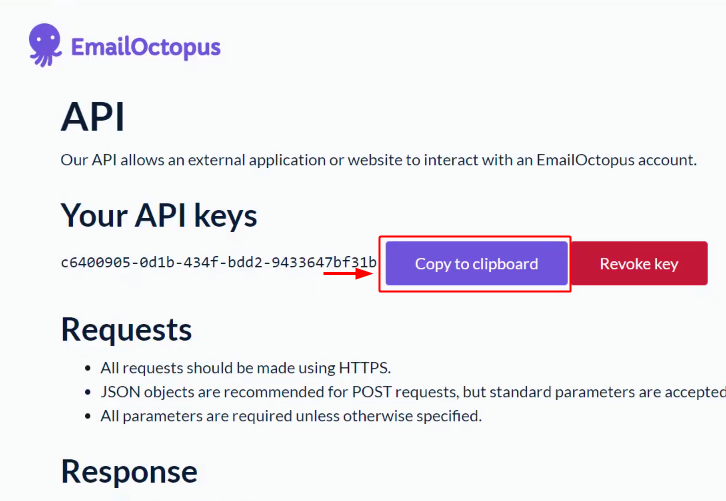
Subsequently, press the ‘Copy to clipboard’ button to copy the API given.

(d) Paste the API Key

Paste the Emailoctopus Api Key

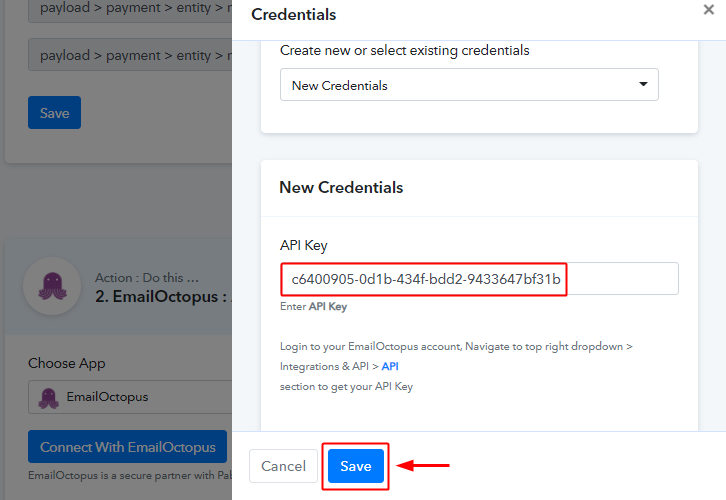
Later on, paste the copied EmailOctopus API key on Pabbly Connect.

(e) Map the Fields

select_list_and_map_fields_for_shopify_to_sendinblue

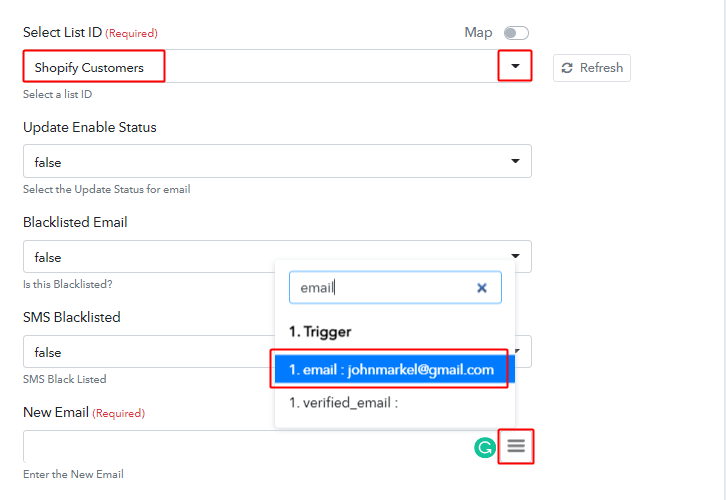
Promptly, map the respective fields to proceed further.

(f) Send Test Request

save_and_send_test_request_for_mailjet_action

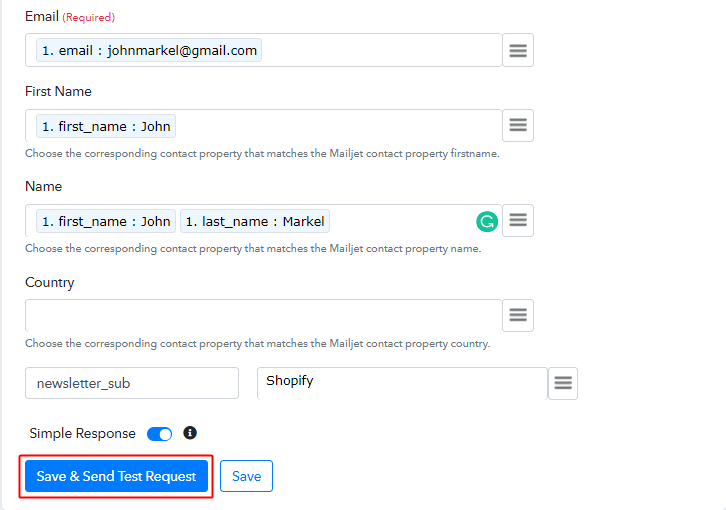
Once you are done mapping the respective fields. Just hit the ‘Save & Send Test Request’ button.

(g) Check & Save Response

check_and_save_mailjet_action_response

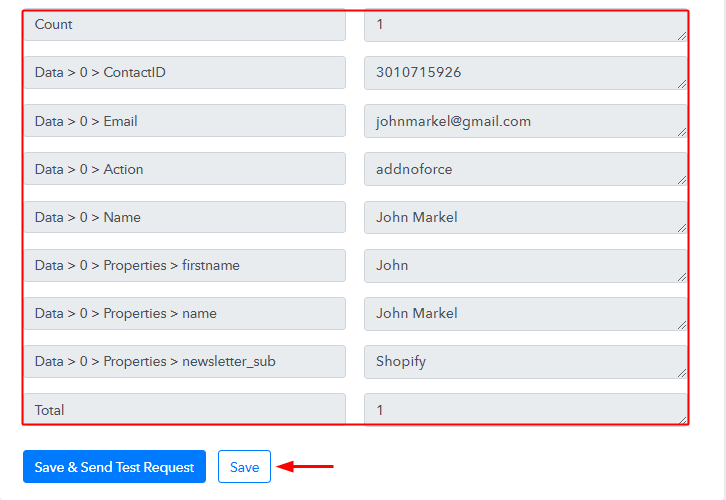
Furthermore, you can check the response of your API in the action window. Lastly, hit the ‘Save’ button to save the action API’s response.

Step 10: Check Response in EmailOctopus Dashboard

Check Response in EmailOctopus Dashboard

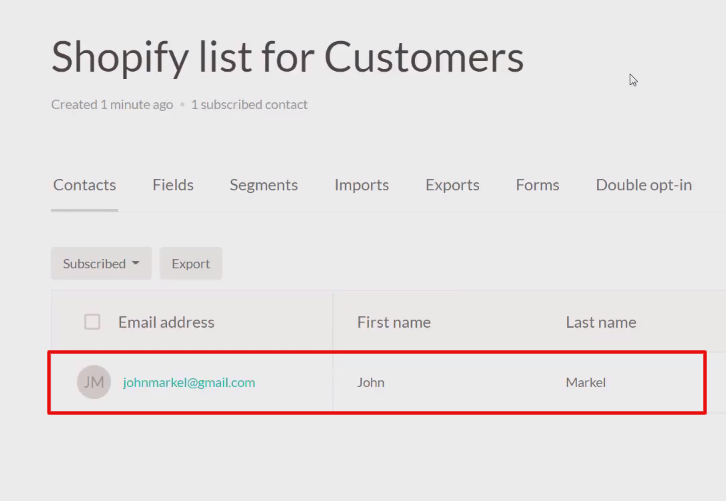
Moreover, you can check the subscriber’s entry on your connected EmailOctopus account.

Conclusion –

That’s it! Now you know the answer to your question “How to Add EmailOctopus Subscriber from New Shopify Customers in real-time?”. Just follow all the step by step procedure mentioned above & your Shopify to EmailOctopus integration is set.

So, what are you waiting for? Go ahead and catch your deal by signing up for a free account.

You May Also Like To Read –

How to Create SurveyMonkey Contact from New PayKickstart Sale

How to Cr

Fed up of manually creating SurveyMonkey contact from new PayKickstart sale? If yes, then we have an incredible tool suggestion for you i.e, Pabbly Connect.

Basically, Pabbly Connect is an integration and automation software that lets you migrate data from one app to another automatically in real-time.

How to Create SurveyMonkey Contact from New PayKickstart Sale

Sometimes, we want the contacts to be added in SurveyMonkey automatically on new sale in PayKickstart. And to do so we have Pabbly Connect to connect both the application for transferring data automatically.

Though, instead of jumping straight into the integration process, let’s discuss a little bit about both the services. So, PayKickstart is an online shopping cart and affiliate management platform with built-in conversion enhancing features. Whereas, SurveyMonkey is an online survey development app which provides surveys, and a suite of paid back-end programs.

Why Choose This Method Of Integration?

In contrast with other integration services-

  • Pabbly Connect does not charge you for its in-built apps like filters, Iterator, Router, Data transformer, and more
  • Create “Unlimited Workflows” and smoothly define multiple tasks for each action
  • As compared to other services which offer 750 tasks at $24.99, Pabbly Connect offers 50000 tasks in the starter plan of $29 itself
  • Unlike Zapier, there’s no restriction on features. Get access to advanced features even in the basic plan
  • Try before you buy! Before spending your money, you can actually signup & try out the working of Pabbly Connect for FREE

Sign Up To Pabbly Connect 

After integrating these applications, you can easily create SurveyMonkey contact from new PayKickstart sale in real-time. Hence, you will be able to know what your buyers like and what they don’t via SurveyMonkey. You can also refer to the below video to easily understand the usage of Pabbly Connect.

However, there is no direct integration possible for these two services yet. Hence, we are going to use Pabbly Connect to make this integration possible.

With the help of this software, you can easily share data within multiple premium services. Further, it won’t need any coding skills to use it. You can set unlimited triggers, actions, formatters, etc for free in Pabbly Connect. Besides, this would be just a one-time setup.

Thus, let’s get started on how to connect PayKickstart and SurveyMonkey in real-time. Moreover, we’ve attached a template for this integration to help you get started more quickly. You can click on the image below to get started. Plus, you can go to the Marketplace & look for more apps/integrations.

Instantly Add EmailOctopus Subscriber from New Shopify Customers - copy

Therefore, without taking any more of your time, let’s move according to plan & follow the step by step procedure to integrate PayKickstart and SurveyMonkey.

Step 1: Sign up to Pabbly Connect

Sign Up

Let’s start the process to create SurveyMonkey contact from new PayKickstart sale by clicking on the ‘Sign Up Free’ button on the Pabbly Connect dashboard. Subsequently, either fill-up all the details manually or sign up using Gmail credentials.

Try Pabbly Connect for FREE

Step 2: Access Pabbly Connect

Select Connect

Next, after logging into the account, click on the ‘Access Now’ button as shown in the above image.

Step 3: Workflow for PayKickstart to SurveyMonkey Integration

(a) Start with a New Workflow

Create New Workflow

Start with creating a workflow for your project by clicking on the ‘Create Workflow’ button.

(b) Name the Workflow

Name the Workflow

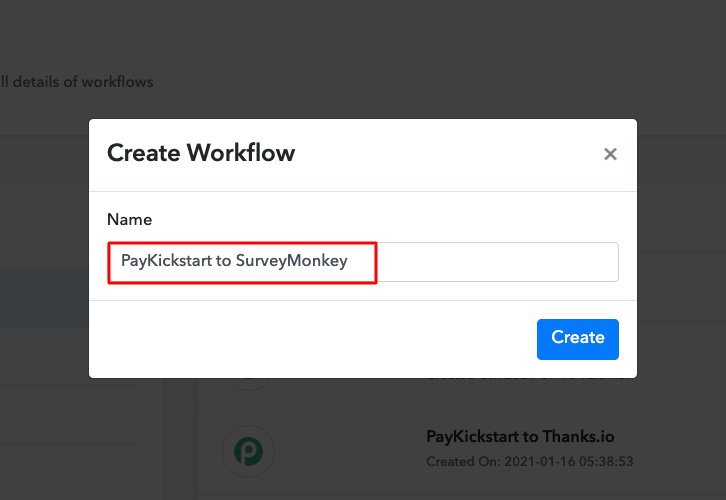
Now, you need to name the workflow just like in the above-shown image. I named the workflow ‘PayKickstart to SurveyMonkey’, you can obviously name the workflow as per your requirements.

Step 4: Setting Trigger for PayKickstart to SurveyMonkey Integration

As soon as you are done with naming your workflow, you will have to select the application you want to integrate. Pabbly Connect allows you to connect unlimited premium apps, create your free account now.

(a) Select Application you Want to Integrate

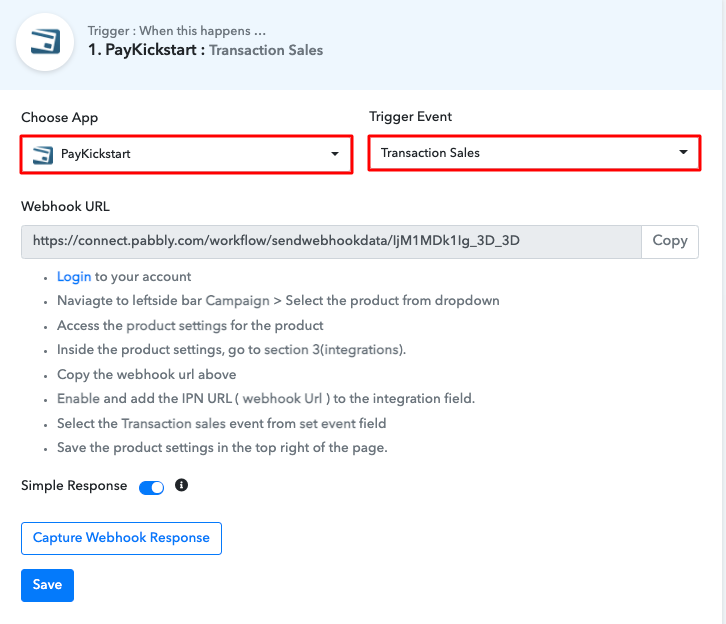
Select PayKickstart

Now, you have to select the application that you want to integrate. In this case, we are choosing ‘PayKickstart’ for integration. In the method section, select ‘Transaction Sales’.

(b) Copy the Webhook URL

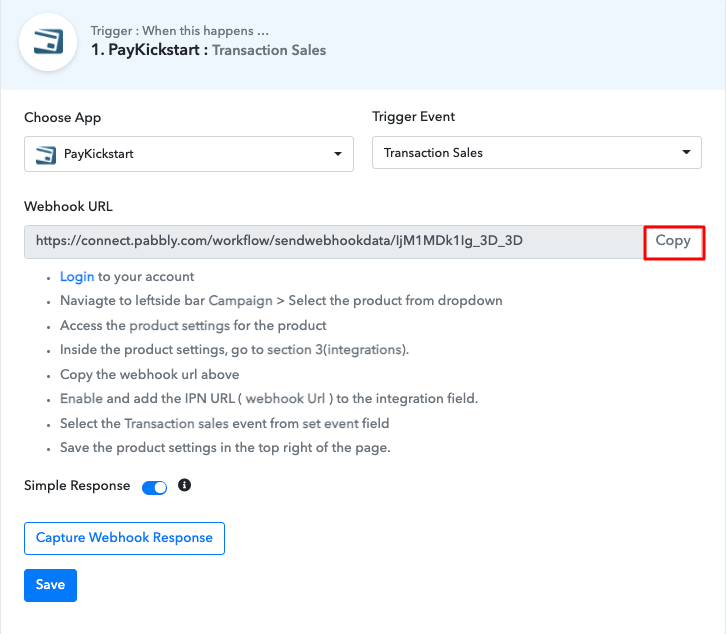
Copy the Webhook URL

The next step is to copy the webhook URL which is appearing on the dashboard just like in the above-shown image.

Step 5: Connecting PayKickstart to Pabbly Connect

To connect PayKickstart with Pabbly Connect, you have to paste the copied webhook URL in the software, for that, you need to log in to your PayKickstart account.

(a) Go to PayKickstart Campaigns

Click Campaigns Paykickstart

To paste the URL, click on the ‘Campaigns’ option in your PayKickstart dashboard.

(b) Select Product

Select Product Paykickstart

After reaching the campaigns page, select any of your listed products then click the edit button.

(c) Paste the Webhook URL

Paste the Webhook URL

Scroll down and click on the ‘Integrations’. In IPN URL section, paste the copied webhook URL and in event section select ‘Transaction Sales’ option.

(d) Save Changes

Save-Changes-Paykickstart-2_censored

After making all the changes hit the ‘Save’ button to save the changes.

Step 6: Make a Test Purchase

To check if the integration is capturing data or not, we will make a dummy purchase in PayKickstart.

(a) Click on Campaigns

Click Campaigns Paykickstart

To make a purchase, again we will go to the ‘Campaigns’ section of your PayKickstart dashboard.

(b) Select Product

Funnel Paykickstart

Here, click on the ‘Funnel’ section of your product and click on the link button.

(c) Copy Funnel URL

Copy Funnel URL Paykickstart

Next, you need to simply copy the given funnel URL and open it in a new tab.

(d) Add Customer Details

Add Customer Info

In this step, add the required customer details like name and email and then hit the ‘Next Step’ button.

(e) Add Billing Information

Add-Billing-Info-2_censored

Now you have to add the billing info like address and contact number and then click on the ‘Next Step’ button.

(f) Complete Purchase

Complete Purchase

After making all the required changes, hit the ‘Complete Purchase’ button. But before that, hit the ‘Capture Webhook Response’ in Pabbly Connect to capture the data.

Step 7: Test the Response in Pabbly Connect Dashboard

Save the Webhook Response

Once you click on the ‘Complete Purchase’ in PayKickstart and on the ‘Capture Webhook Response’ in Pabbly Connect, the contact info will appear on the Pabbly Connect dashboard. Then, click on the ‘Save’ option.

Step 8: Setting Action for PayKickstart to SurveyMonkey Integration

To make this PayKickstart-SurveyMonkey integration work, you have to choose an action for your trigger.

(a) Select Application you Want to Integrate

Select SurveyMonkey

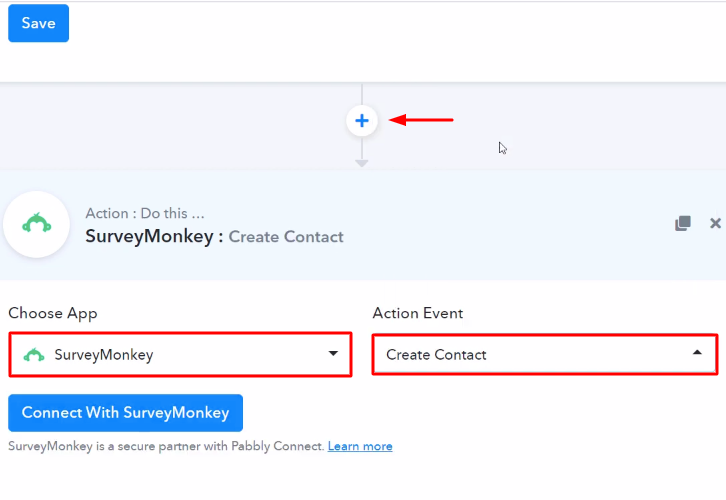
Now in this step, click on the ‘+’ button below and choose the application that you want to integrate. Here we will choose ‘SurveyMonkey’ to integrate and in the method section select ‘Create Contact’.

(b) Click the Connect Button

Connect with SurveyMonkey

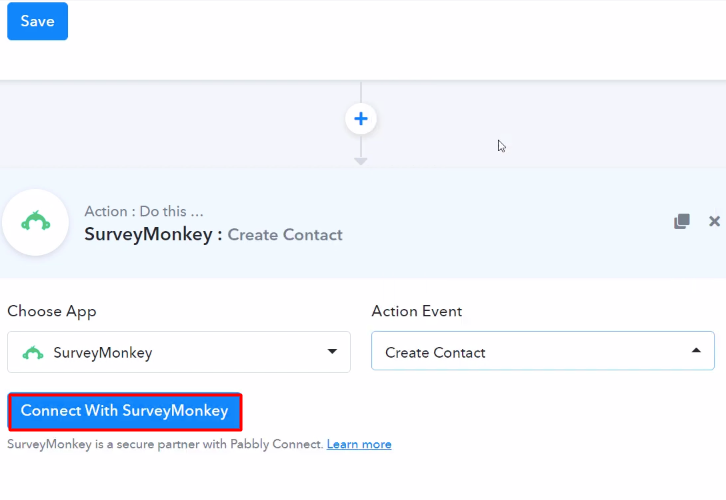
After choosing the application click on the ‘Connect with SurveyMonkey’ button to move forward.

Step 9: Connecting SurveyMonkey to Pabbly Connect

To connect SurveyMonkey to Pabbly Connect, you have to authenticate your SurveyMonkey account. For that, you need to log in to your SurveyMonkey account.

(a) Authorize Application

Authorize Application SurveyMonkey

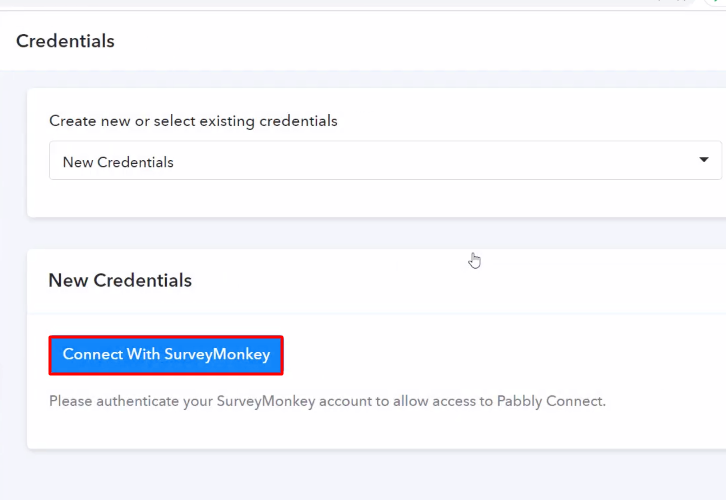
Now, again you have to click on the ‘Connect with SurveyMonkey’ button to authorize your SurveyMonkey account. After clicking the button, grant the permission to connect SurveyMonkey with Pabbly Connect.

(b) Map the Fields

Map the Fields

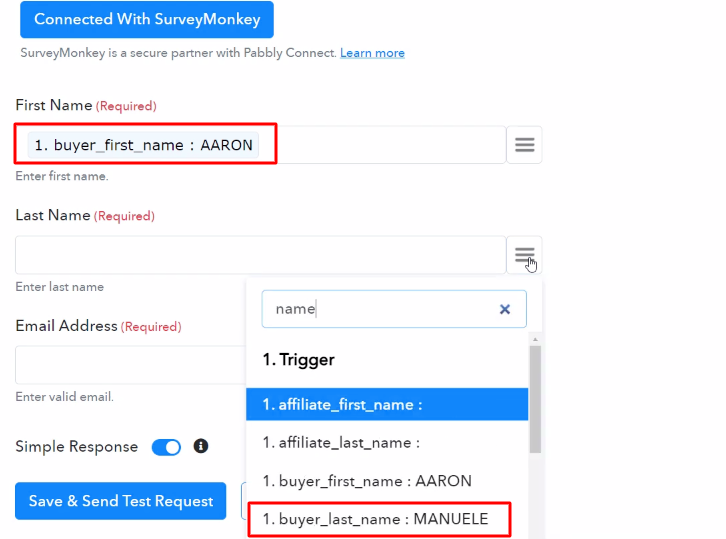
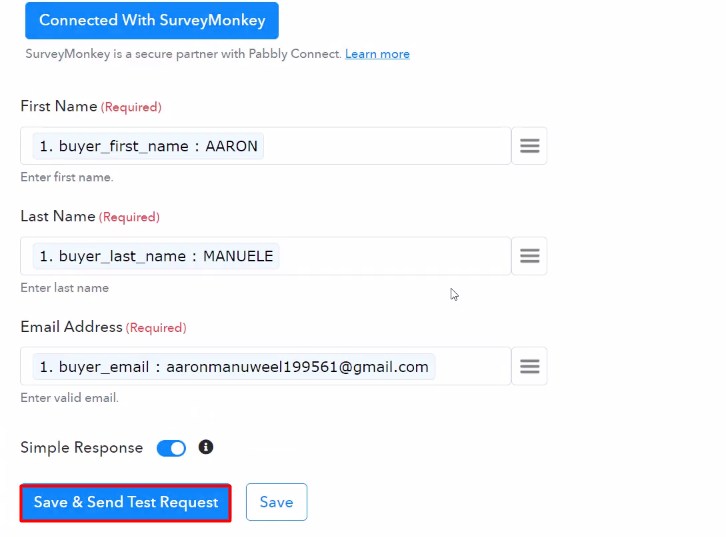
After connecting with your SurveyMonkey account, map all the fields quickly like the name, email, etc.

(c) Save and Send Test Request

Send Test Request

Once you are done adding up all field data click on the ‘Save & Send Test Request’ button.

Step 10: Check Response in SurveyMonkey Dashboard

Check Response

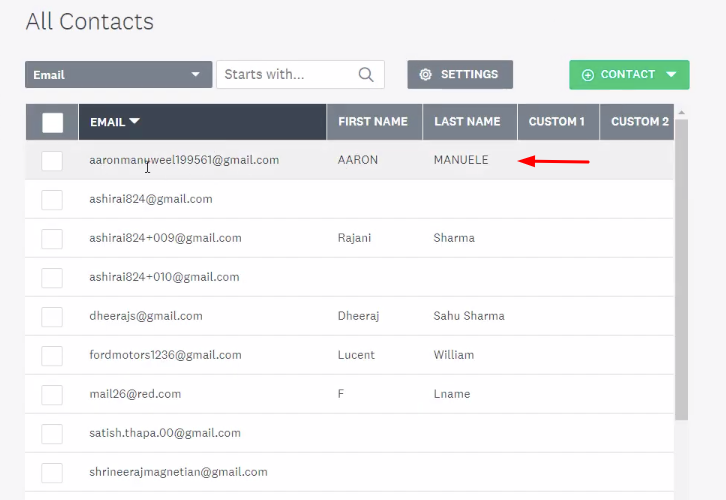
In the end, when you check your SurveyMonkey dashboard, the contact has been added on the new sale in PayKickstart.

Conclusion –

Eventually, this was all about ‘How to Create SurveyMonkey Contact from New PayKickstart Sale’. By following the above-mentioned step by step procedure, your automation will be set in no time. So, what are you waiting for? Go grab, Pabbly Connect for FREE with all its premium features. Besides, don’t forget to comment below for your queries & suggestions.

You May Also Like To Read –

How to Add SendPulse Subscriber from New PayKickstart Subscription

How to Add Sendpulse Subscriber from New PayKickstart Subscription

Fed up with manually adding SendPulse subscribers for every new PayKickstart subscription?

How to Add Sendpulse Subscriber from New PayKickstart Subscription

If yes then don’t you worry as I’m going to tell how to integrate PayKickstart and SendPulse and automate tasks within a few minutes. You must be aware that there is no direct integration between these two services. So, we’ll be using Pabbly Connect to accomplish the automation.

So, basically, Pabbly Connect is an integration & automation service that enables you to transfer information within multiple applications in real-time.

Most importantly, you don’t have to do any coding & even a beginner can use it efficiently. Also, this will be just a one-time set-up & after that, the workflow will take care of the further entries.

Why Choose This Method Of Integration?

In contrast with other integration services-

  • Pabbly Connect does not charge you for its in-built apps like filters, Iterator, Router, Data transformer and more
  • Create “Unlimited Workflows” and smoothly define multiple tasks for each action
  • As compared to other services which offer 750 tasks at $24.99, Pabbly Connect offers 50000 tasks in the starter plan of $29 itself
  • Unlike Zapier, there’s no restriction on features. Get access to advanced features even in the basic plan
  • Try before you buy! Before spending your money, you can actually signup & try out the working of Pabbly Connect for FREE

Sign Up To Pabbly Connect  

But, before jumping directly on the procedure first, let’s learn a wee bit about the services. PayKickstart is a subscription billing tool for different business types. Whereas, SendPulse is a multi-channel marketing automation service that allows combining all delivery channels on a single platform such as email, web push notifications, SMS, Viber etc.

Consequently, once you’re done setting up this workflow your subscribers will get listed onto your automation software i.e, SendPulse whenever there is a successful sale on PayKickstart.

Additionally, we’ve embedded a video tutorial for the same integration. So, have a look at it yourself –

Furthermore, we have attached the template for this integration to help you get started more quickly. You canstrike the ‘Use Workflow’ button given below to get started. Additionally, you can also visit the App Directory & look for more integrations and apps.

How

So, buckle up as we’re going to discover the SendPulse and PayKickstart integration.

How to Add SendPulse Subscriber from New PayKickstart Subscription (step by step)

Step 1: Sign up to Pabbly Connect

Sign Up

Start the procedure of connecting PayKickstart with SendPulse by visiting the Pabbly Connect website. Then, hit the ‘Sign-Up Free‘ button available on the home page. Next, either use your existing Google account or manually fill in the registration form to signup.

Try Pabbly Connect for FREE

Step 2: Access Pabbly Connect

Select Connect

After that, strike the ‘Access Now’ button of the software ‘Connect’ amongst the Pabbly applications.

Step 3: Workflow for PayKickstart with SendPulse Integration

(a) Start with a New Workflow

Create New Workflow

Further, start with creating a workflow to add subscribers on SendPulse for every new PayKickstart sale & to do this push the ‘Create Workflow’ button first.

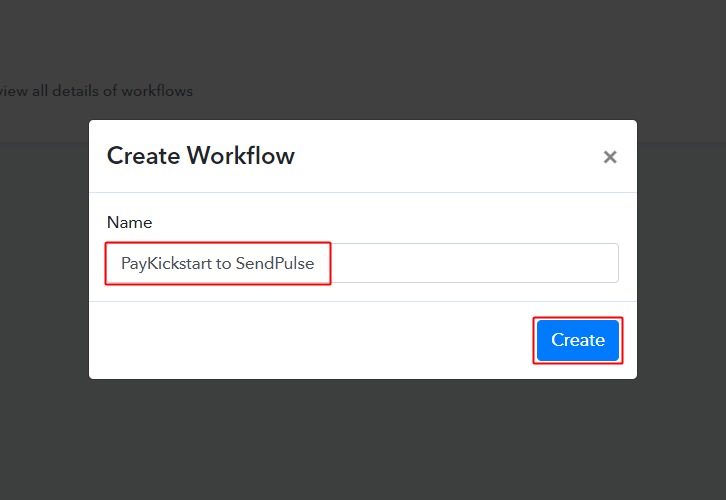
(b) Name the Workflow

workflow_for_paykickstart_to_sendpulse

Now, name the workflow as per the integration or use-case (for instance: PayKickstart to SendPulse etc). Finally, hit the ‘Create’ button available on the window.

Step 4: Setting Trigger for PayKickstart to SendPulse Integration

To automatically add SendPulse subscribers for every PayKickstart sale, you’ll need to set-up a trigger on PayKickstart sales and its respective action to add a subscriber on SendPulse using Pabbly Connect.

(a) Select Application you want to integrate

integrate_paykickstart_for_paykickstart_to_sendpulse

When you click on the ‘Create’ button, a page starts displaying the trigger window will open up.

Select ‘PayKickstart’ service from the ‘Choose App’ field’s drop-down.

(b) Select Method & Connect with PayKickstart

select_method_and_copy_webhook_url_for_paykickstart_to_freshdesk

Also, select the method in here as ‘Transaction Sales’ & after that copy the webhook URL given.

Step 5: Connecting PayKickstart to Pabbly Connect

To connect PayKickstart with Pabbly Connect, sign-in on your PayKickstart account & paste the copied trigger URL.

(a) Go to Your PayKickstart Campaigns

paykickstart_campaigns

After successfully signing in to your PayKickstart account, click on ‘Campaigns’ on the left vertical menu.

(b) Edit Any Product

edit_any_product_from_paykickstart_campaigns

A page will open up carrying all your products on PayKickstart. Then, click on the pencil icon to edit any of the created product.

(c) Click on Integrations

click_on_integrations

Scroll down to the bottom of the page and then click on the third section that is ‘Integrations’.

Later, click on the ‘Enable’ button in the IPN URL section. And after that, click on the ‘Add’ button.

(d) Paste the Webhook URL

paste_webhook_url_for_paykickstart_to_freshdesk

Paste the copied trigger URL in the ‘IPN URL’ field.

Then, select the ‘Transaction Sales’ choice for the ‘SET EVENT’ field’s value.

Finally, hit the ‘Save’ button available at the top-right corner of this page.

Step 6: Test the Response in Pabbly Connect Dashboard

As we can see, we are done setting up the trigger for PayKickstart and SendPulse integration. So, let’s test this trigger by making a test order on PayKickstart.

(a) Capture Webhook Response

capture_webhook_response_for_paykickstart_to_freshdesk

To test the trigger first, hit the ‘Capture Webhook Response’ button on the Pabbly Connect trigger window.

(b) Open Your PayKickstart Campaigns

paykickstart_campaigns

Now, go back to your PayKickstart dashboard & click on ‘Campaigns’ from the verticle menu.

(c) Open Any Product’s Checkout Page

open_checkout_page_for_the_linked_product

Then, open the checkout page link of the product in which you just pasted the trigger URL.

(d) Copy the Checkout Page URL

copy_checkout_page_url_for_paykickstart_to_hubspot

Copy the checkout page URL & then open it in an incognito window.

(e) Make a Test Purchase

enter_contact_information_for_paykickstart_to_sendpulse

Fill all the required purchase details to make a test purchase. First, it’ll ask you to provide the contact details, second the billing details and lastly to finalize the test purchase.

(f) Complete the Test Purchase

complete_test_purchase_for_paykickstart_to_sendpulse

Complete the purchase by following all the steps required.

(g) Check & Save Trigger Response

save_trigger_api_response_for_paykickstart_to_sendpulse

After the successful transaction, the Pabbly Connect trigger response will start illustrating the data for the current PayKickstart purchase.

Don’t forget to save this trigger API response.

Step 7: Setting Action for PayKickstart to SendPulse Integration

Now, as we have gathered all the necessary information to create a subscriber on SendPulse from the PayKickstart response. We can now continue to feed this information to perform some action. After that, a new subscriber will be created automatically for every PayKickstart sale.

(a) Select Application you want to Integrate

integrate_sendpulse_for_paykickstart_to_sendpulse

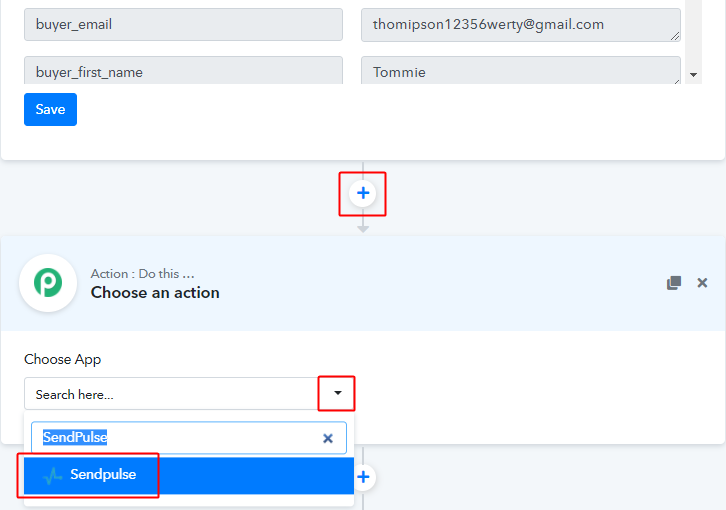
Click on the plus (+) button next to your PayKickstart trigger.

Select the app to integrate as ‘SendPulse ‘.

(b) Select Event & Connect with SendPulse

connect_with_sendpulse_for_paykickstart_to_sendpulse

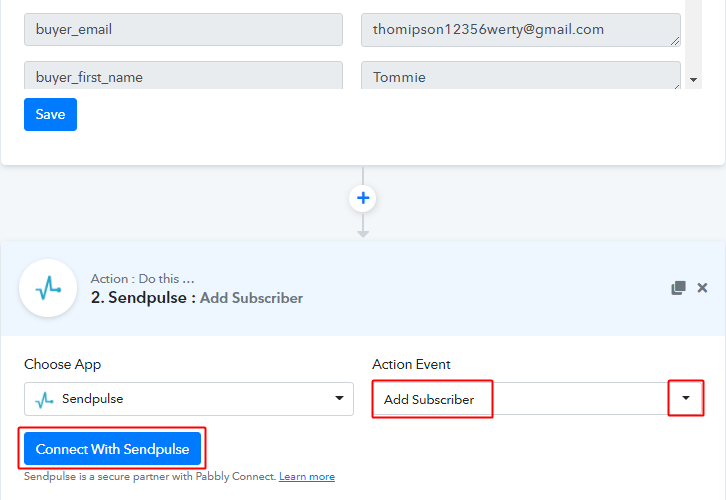
Then, select the action event as ‘Add Subscriber’.

Lastly, push the ‘Connect with SendPulse ‘ button.

A window will slide in from the right asking for an ‘ID’ & ‘Secret Key’.

Step 8: Connecting SendPulse to Pabbly Connect

(a) Go to Your SendPulse Account Settings

Click-on-Account-Settings-Sendpulse

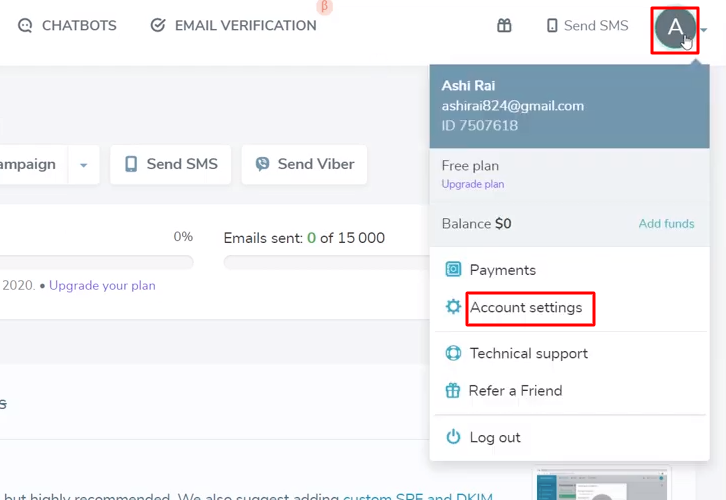
Sign-in your SendPulse account and then click on the ‘Profile’ icon. Then click on the ‘Account Settings’ option from the drop-down menu.

(b) Copy ID & Secret Key

Copy-API-Key-Sendpulse

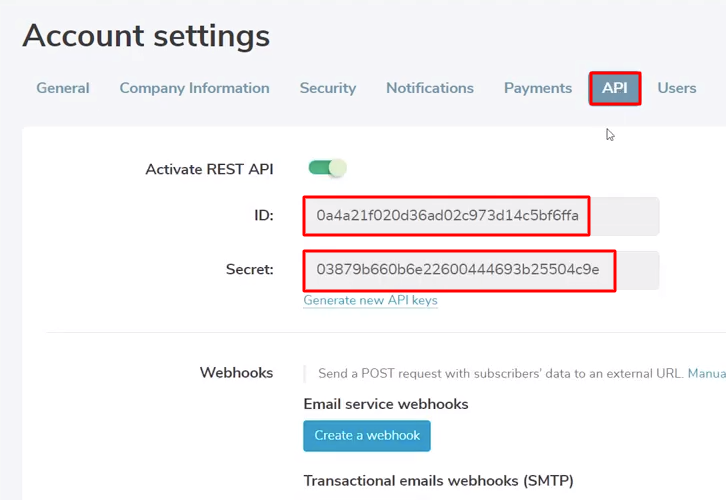
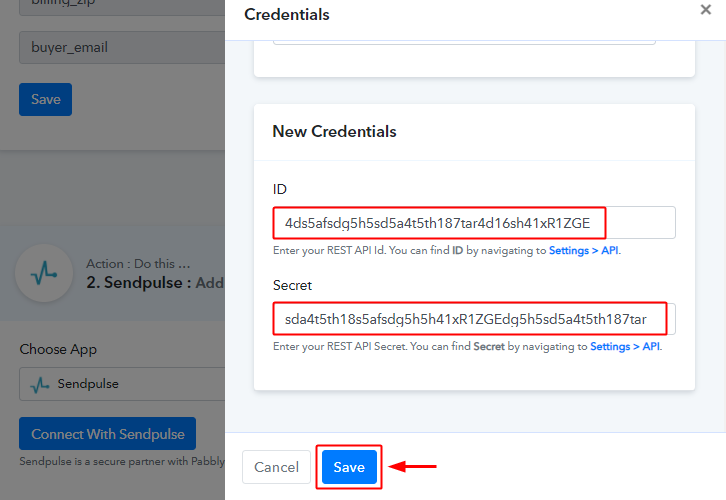
From the account settings page, click on the ‘API’ option with several other options available in the verticle menu, and then copy the ID & secret key.

(c) Paste the ID and Secret Key

paste_api_and_secret_keys_for_paykickstart_to_sendpulse

Now, paste the copied ID and Secret one by one and hit ‘Save’.

(d) Map Fields

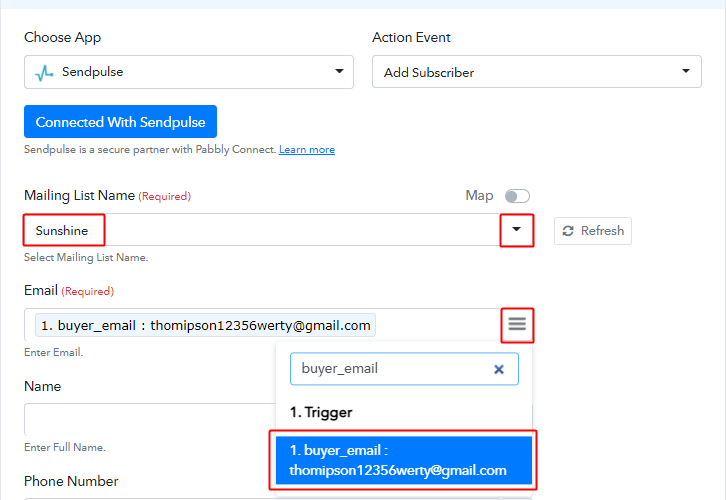
map_valies_for_paykickstart_to_sendpulse

Now, map the email & other required fields.

To map a value, hit the three horizontal lines (menu icon) given next to any particular field.

After that, find and select the response that you want to map with that field.

(e) Send Test Request

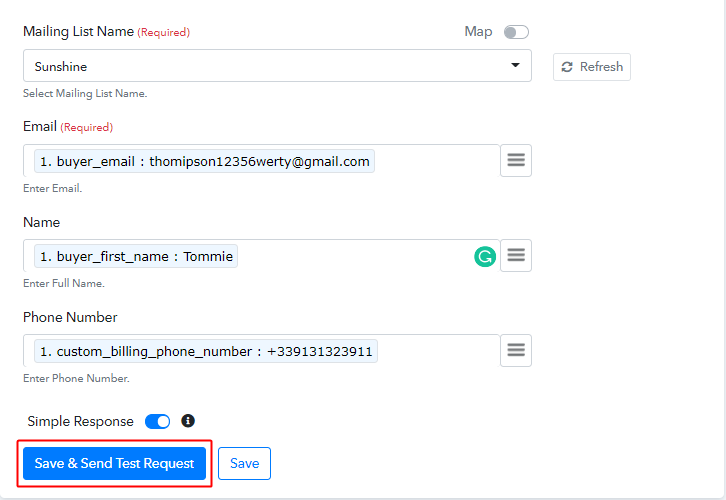
send_test_request_for_sendpulse_action_for_paykickstart_to_sendpulse

Further, click on the ‘Save & Send Test Request’ button to send a test request for creating a subscriber on SendPulse.

(f) Check & Save Response

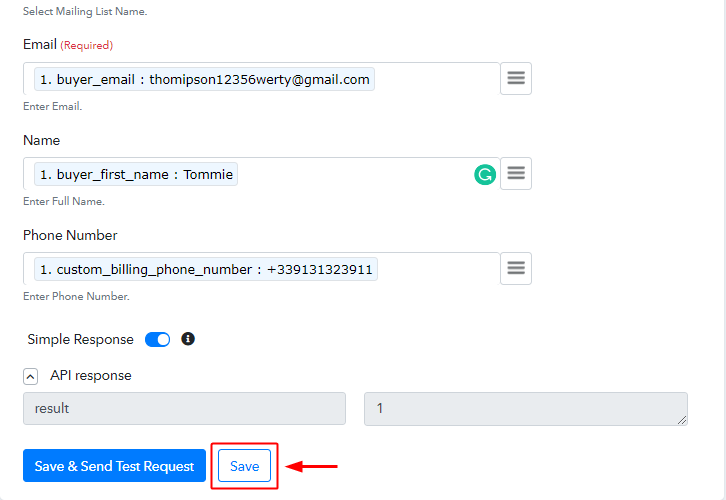
save_action_api_response_for_paykickstart_to_sendpulse

Certainly, you can check the SendPulse action’s response in the API action response window. And, if there is some error while sending the data for creating subscriber then it will start showing you the error.

Finally, click on ‘Save’ to save the action API’s response.

Step 9: Check Response in SendPulse Dashboard

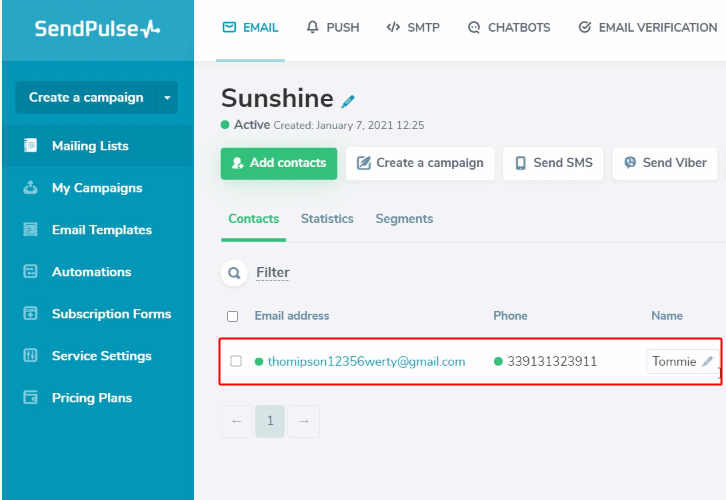
subscriber_entry_on_sendpulse_for_paykickstart_to_sendpulse

Also, you can see the subscriber’s data on your connected SendPulse account.

Conclusion –

To sum up, this was all about ‘How to add SendPulse subscriber from new PayKickstart subscription’. Consequently, after completing the step by step procedure, you will end up auto-creating SendPulse subscriber for every new sale on PayKickstart.

However, now you can grab Pabbly Connect for FREE with all its premium features.

Also, do comment us your queries in the section given below.

You May Also Like to Read:

How to Send Twilio Message from New PayKickstart Sale

Send Twilio Message from New PayKickstart Sale

Have to ever wished to directly send the message from Twilio for every new PayKickstart sale? If yes, then follow the step by step procedure.

Send Twilio Message from New PayKickstart Sale

In this article, we will be going to introduce you to a phenomenal software named Pabbly Connect.

Basically, Pabbly Connect is an integration and automation software that lets you transfer data in real time. It is one of the best software in the market and even a non-programmer can easily design a workflow in a couple of minutes.

Why Choose This Method Of Integration?

In contrast with other integration services-

  • Pabbly Connect does not charge you for its in-built apps like filters, Iterator, Router, Data transformer, and more
  • Create “Unlimited Workflows” and smoothly define multiple tasks for each action
  • As compared to other services which offer 750 tasks at $24.99, Pabbly Connect offers 50000 tasks in the starter plan of $29 itself
  • Unlike Zapier, there’s no restriction on features. Get access to advanced features even in the basic plan
  • Try before you buy! Before spending your money, you can actually signup & try out the working of Pabbly Connect for FREE

Sign Up To Pabbly Connect

Not only that, you can connect many premium apps and share data between them. Additionally, this can help you save plenty of time as it is just a one time set up, and workflow will handle the rest.

But before this, let us ascertain a slight overview of both the software. PayKickstart is a billing and affiliate management platform for subscription-based businesses. Whereas, Twilio is a cloud communication service that allow you to receive and make phone calls and messages globally.

As we all know that there is no integration between PayKickstart and Twilio, that’s why we use Pabbly Connect. Once you set up this workflow, whenever a new sale happens in PayKickstart, a message automatically delivered to the customer via Twilio.

Moreover, we’ve attached the template for the same to help you get started straightaway. You can click on the ‘Use Workflow’ button below to get started. Also, you can visit the Marketplace & look for more integrations/apps.

Send Twilio Message from New PayKickstart Sale Workflow

Now, without taking any more of your time, let’s get directly on track & follow the step by step procedure to integrate PayKickstart and Twilio.

Step 1: Sign up to Pabbly Connect

Sign Up

Begin the process of connecting PayKickstart and Twilio by visiting the Pabbly Connect website. Then, click on the ‘Sign Up Free’ button. Formerly, either fill-up all the details manually or sign up using Gmail credentials.

Try Pabbly Connect for FREE

Step 2: Access Pabbly Connect

Select Connect

After logging into the account, hit the ‘Access Now’ button as shown in the above image.

Step 3: Workflow for PayKickstart to Twilio Integration

(a) Start with a New Workflow

Create New Workflow

Start with creating a workflow of your integration by clicking on the ‘Create Workflow’ button.

(b) Name the Workflow

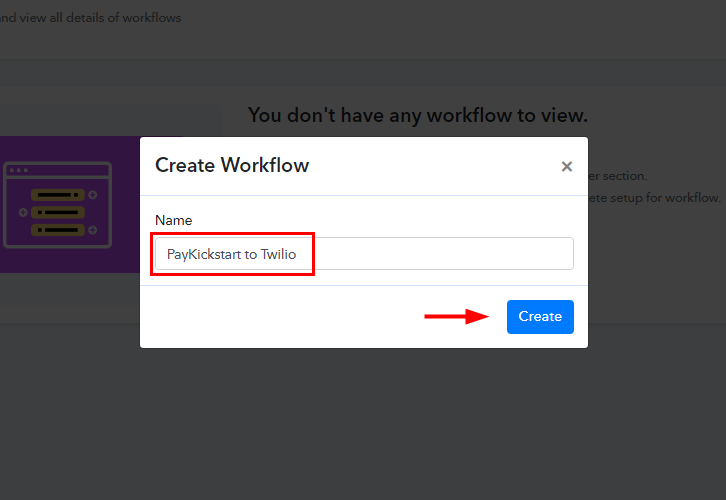
Workflow for PayKickstart to Twilio

Following that, name the workflow according to the integration. Like, we name it as ‘PayKickstart to Twilio’, then click on the ‘Create’ button.

Step 4: Setting Triggers for PayKickstart to Twilio Integration

Promptly, after naming the workflow, now you will have to select the application you want to integrate.

(a) Select Application you want to Integrate

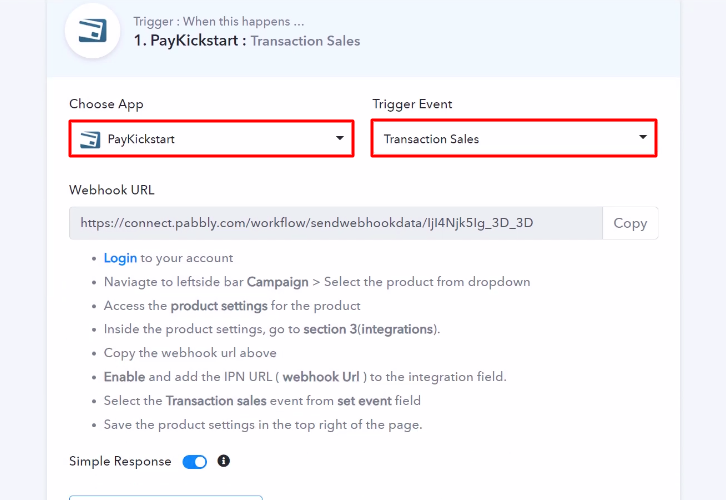
Select Paykickstart

Now, you have to select the application for integration. Here, we are choosing ‘PayKickstart’ for integration and choose method as ‘Transactional Sales’.

(b) Copy the Webhook URL

Copy the Webhook URL

The next step is to copy the Webhook URL which is appearing on the trigger window.

Step 5: Connecting PayKickstart to Pabbly Connect

Promptly, to connect PayKickstart with Pabbly Connect, you have to paste the copied webhook URL in the software, and for that, you need to log in to your PayKickstart account.

(a) Go to PayKickstart Campaigns

PayKickstart Campaigns

Now, click on the ‘Campaigns’ option available on the left vertical menu in your PayKickstart dashboard.

(b) Select Product

edit_any_product_from_paykickstart_campaigns

After that, a page will open up carrying all your products on PayKickstart. Then, click on the pencil icon to edit any of the created product.

(c) Click on Integration

Click on Integration

Scroll the edit page and then click on ‘Integrations’. Now, click on ‘Enable’ in the IPN URL section and then click on the ‘Add’ button.

(d) Paste the Webhook URL

Paste Webhook URL for PayKickstart to Twilio

Thereafter, in the ‘IPN URL’ paste the copied Webhook URL and select the ‘SET EVENT’ as ‘Transactional Sales’. Then, press the ‘Save’ button to save the changes.

Step 6: Test the Response in Pabbly Connect Dashboard

Consequently, we are done setting up the triggers for PayKickstart and Thanks.io integration. So, to check if the integration is capturing data or not, we have to create a sale in PayKickstart and test its response in Pabbly Connect.

(a) Capture Webhook Response

Capture Webhook Response for PayKickstart to Twilio

To test the trigger settings click on the ‘Capture Webhook Response’ button on your Pabbly Connect window.

(b) Open your PayKickstart Campaigns

PayKickstart Campaigns

Now, go to your PayKickstart campaign window to select a product.

(c) Open any Product Checkout Page

Open Checkout Page for the Linked Product

Thereafter, select the same product on which you paste the Webhook URL and then go to the ‘Show 1 Funnel’ section. Here, click on the Checkout link of that product.

(d) Copy the Funnel URL

Copy Checkout Page URL for the PayKickstart to Twilio

Now, a window will pop-up, copy the Funnel URL and open it in a new tab.

(e) Add Customer Details

Add Customer Info

Subsequently, add customer details by adding name, email, billing info, and at last click on the ‘Next Step’ button to move to next step.

(f) Complete the Test Purchase

Complete Transaction for PayKickstart to Twilio

Carry out the test purchase by following all the steps needed to make a successful payment. At last, click on the ‘Complete Purchase’ button.

(g) Check and Save Trigger Response

Save the Webhook Response

After the product has been successfully purchased. Go back to the Pabbly Connect window and you will see that the response is capture. Now, click on the ‘Save’ button to save the test response.

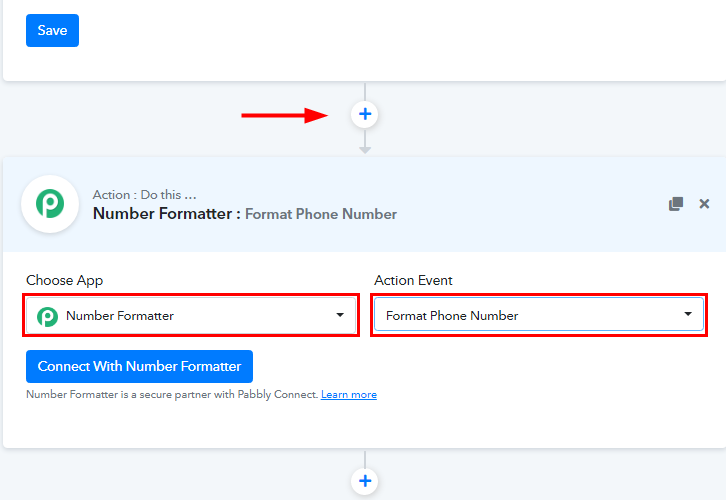
Step 7: Setting Number Formatter to Change Number Format

In the trigger response, the customer’s phone number is having a gap in between which could create a problem in Twilio so we have to remove that gap.

(a) Select Application to Format Number

Select Number Formatter

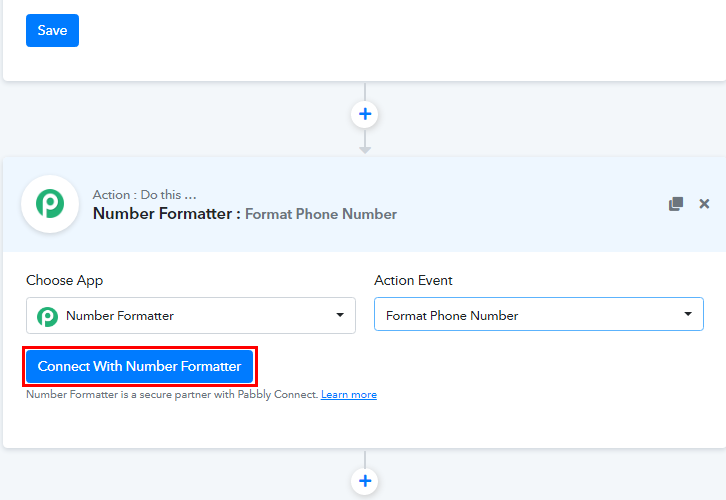
To format the phone number click on the plus (+) button and then, select ‘Number Formatter’ in choose app and in the action event select ‘Format Phone Number’.

(b) Connect with Number Formatter

Connect with Number Formatter

After selecting the application, click on the ‘Connect With Number Formatter’ button.

(c) Map the Fields

Map Fields in Number Formatter

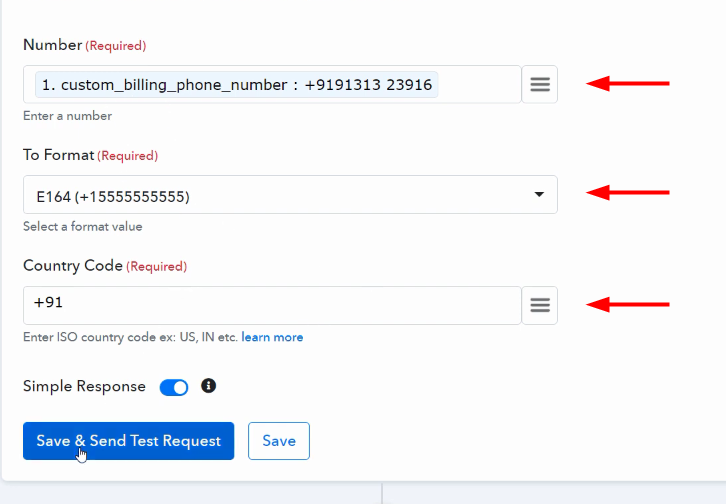
Now, you have to map the field to format the phone number. In the Number field, select phone number, then choose ‘To Format’ and lastly enter Country Code.

(d) Save and Sent Test Request

Save Test Request for Number Formatter

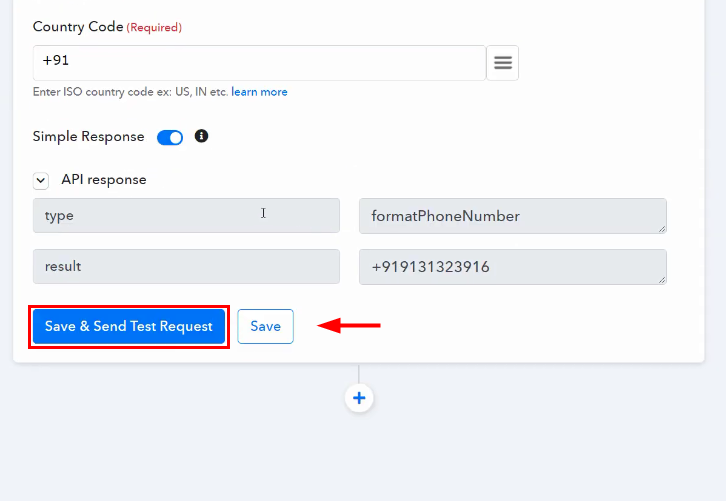
After you map all the details, click on the ‘Save and Sent Request’. Later on, you will see API response and the phone number is formatted in a correct format.

Step 8: Setting Action for PayKickstart to Twilio Integration

Now, as we have gathered all the necessary information to send Twilio message from the PayKickstart response. We can now continue to input this information to perform some action.

(a) Select Application you want to Integrate

Select Twilio for PayKickstart to Twilio

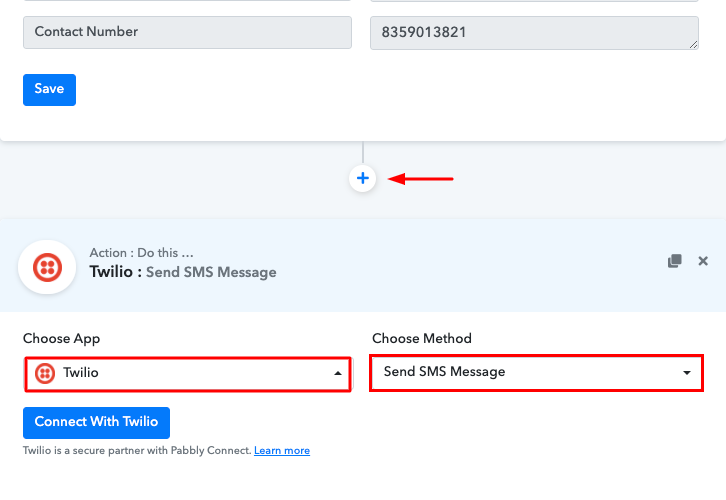
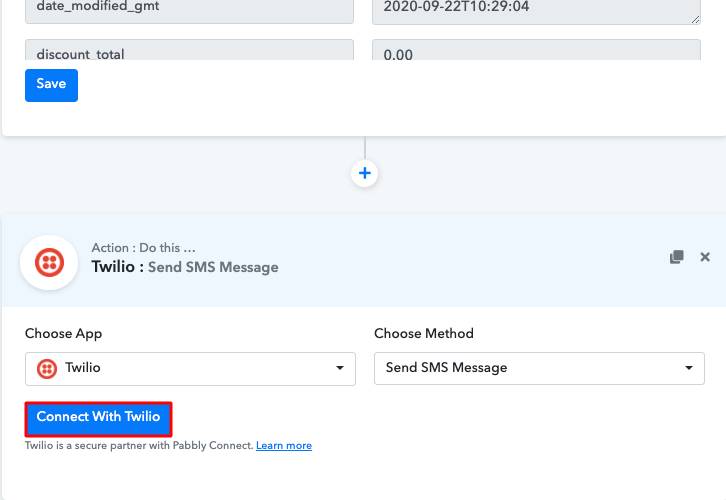
To select the application for action, hit the ‘+’ icon, and in the choose app select ‘Twilio’ and set the method as ‘Send SMS Message’.

(b) Connect with Twilio

Click on Connected with Twilio

After choosing the application click on the ‘Connect With Twilio’ button to move to the next step.

Step 9: Connecting Twilio to Pabbly Connect

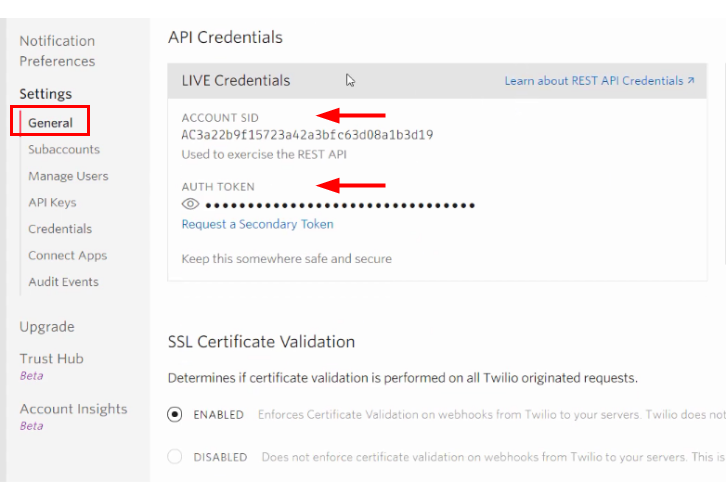
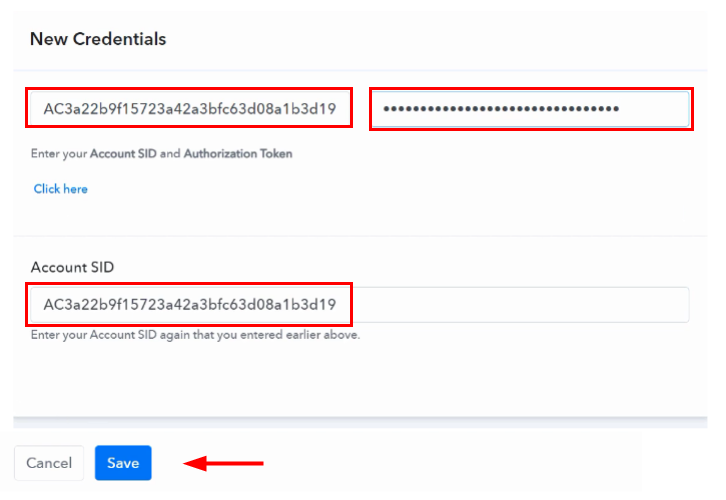
To connect Twilio to Pabbly Connect, you have to enter the account SID and authorization token of your Twilio account in the Pabbly Connect dashboard. For this, you have to log in to your Twilio account.

(a) Copy Authorization Token

Copy Authorization Token

After log in to your Twilio account, go to settings from the Twilio dashboard. There you see, ‘ACCOUNT SID’ and ‘AUTH TOKEN’ simply copy them.

(b) Add Account SID and Authorization Token

Paste API Token

Now, paste the Account SID and Authorization Token in the given fields and then click on the ‘Save’ button.

(c) Map the Fields 

Map Fields for Action

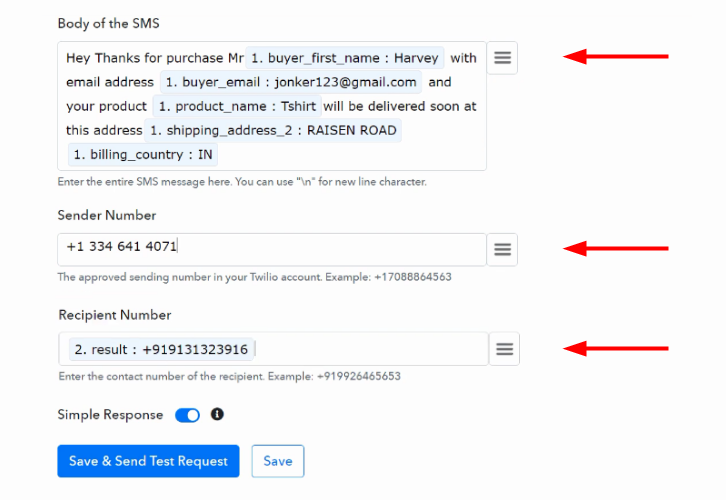
To build an SMS, we have to map the details in respective fields like Message Body, Sender and Recipient Number.

(d) Save and Send a Test Request

Save Test Request for Action

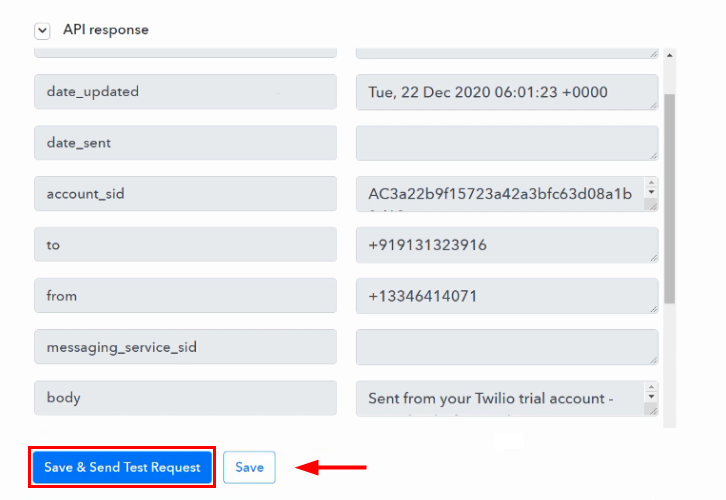
Once, you are done mapping all the fields click on the ‘Save and Sent Test Request’ button. You will see the API response and the SMS has been sent.  If there is an error in workflow, the API response will show an error. In the end, click the ‘Save’ button to save the overall workflow.

Step 10: Check the Response in Twilio dashboard

How

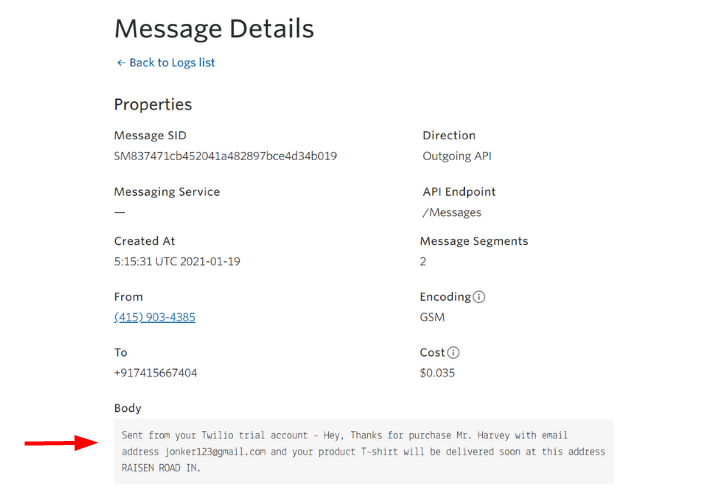
Here, you can see that our integration was successful and the message has been sent from the Twilio account automatically for a new sale in PayKickstart.

Now, whenever there will be any new sale in PayKickstart, a message will be automatically sent from your Twilio account to the recipient.

Conclusion:

Now that you have learned how to send Twilio SMS from the new PayKickstart sale. You can integrate any applications via Pabbly Connect to automate your entire workflow without any coding skills.

Hence, signup for a free account now to experience the best integration. In case of any doubts or suggestions, please leave your comments below.

You May Also Like to Read:

How to Add Sendicate Subscribers from New Shopify Customers

How to Add Sendicate Subscribers from New Shopify Customers

Are you really tired of adding Sendicate subscribers from new Shopify customers manually? If yes then this blog can help you in automating this task. We’ll be using Pabbly Connect to automate the task as there is no direct integration possible for these two services.

How to Add Sendicate Subscribers from New Shopify Customers

Basically, Pabbly Connect is an integration & automation tool that lets you share data from one application to another in real-time.

And the best part is that you don’t have to use any coding skills & even beginners can use it efficiently. Besides, this will be just a one-time set-up and after that, the Pabbly Connect will take care of the rest.

Why Choose This Method Of Integration?

In contrast with other integration services-

  • Pabbly Connect does not charge you for its in-built apps like filters, Iterator, Router, Data transformer, and more
  • Create “Unlimited Workflows” and smoothly define multiple tasks for each action
  • As compared to other services which offer 750 tasks at $24.99, Pabbly Connect offers 50000 tasks in the starter plan of $29 itself
  • Unlike Zapier, there’s no restriction on features. Get access to advanced features even in the basic plan
  • Try before you buy! Before spending your money, you can actually signup & try out the working of Pabbly Connect for FREE

Sign Up To Pabbly Connect

However, before starting the procedure, let’s learn a little about the services. Shopify is an e-commerce platform that offers you to create a website and use their shopping cart solution to sell, ship, and manage your products. On the other hand, Sendicate is an email marketing app that handles content creation, subscriber management, reporting, & email deliverability.

Moreover, once you set-up this workflow all the subscribers will be automatically added in your Sendicate account whenever a customer is enrolled in Shopify.

Yet, we are enclosing a video for the same integration as well. Have a look at it –

Not only that, but we’ve also attached the template for the same to help you get started immediately. You can click on the image below to get started. Plus, you can go to the App Directory & look for more integrations/apps.

HowHow

Instantly Add Sendicate Subscribers from New Shopify Customers

Thus, without taking any more of your time, let’s start the blog about how to create Sendicate subscriber for newly added Shopify customers.

Step 1: Sign up to Pabbly Connect

Sign Up

Start the process to add Sendicate subscribers for newly added Shopify customers by pressing the “Sign Up Free” icon on the Pabbly Connect home page. Next, either manually fill-up all the details or sign up using your Gmail account.

Try Pabbly Connect for FREE

Step 2: Access Pabbly Connect

Select Connect

Later, after logging into the account, hit the “Access Now” button of the Connect section in the dashboard.

Step 3: Workflow for Shopify with Sendicate Integration

(a) Start with a New Workflow

Create New Workflow

Begin with creating a workflow for your project by tapping the ‘Create Workflow’ button.

(b) Name the Workflow

Name the Workflow

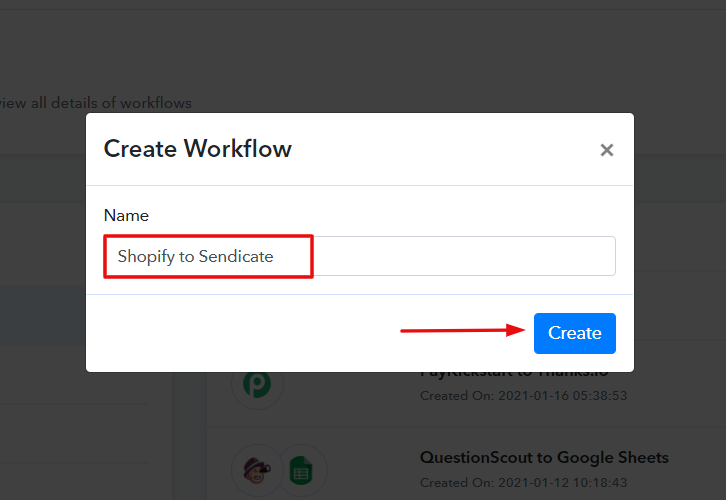
Now, name the workflow just like in the above-shown image. I named the workflow “Shopify to Sendicate”, you can obviously name the workflow as per your requirements.

Step 4: Setting Trigger for Shopify with Sendicate Integration

After naming your workflow, you will have to select the application you want to integrate. Pabbly Connect lets you integrate countless premium applications, click here to create your free account now.

(a) Select Application you Want to Integrate

Select-Shopify-1

Promptly, select the application that you want to integrate. Here, we are choosing “Shopify” for integration. In the method section, select “New Customer”.

(b) Copy the Webhook URL

Copy-the-Webhook-URL-6-1

Once you select the application, copy the webhook URL just like in the above-shown image to take further the integration process.

Step 5: Connecting Shopify to Pabbly Connect

Later, to connect Shopify with Pabbly Connect, you have to paste the copied webhook URL in the software. Accordingly, you have to log in to your Shopify account.

(a) Click on Shopify Settings

Click Settings

Once you log into your Shopify account, hit the “Settings” option given at the bottom of the screen.

(b) Click on Notifications

How

Following that, hit the “Notifications” option.

(c) Click on Create Webhook

How

Promptly, scroll down and hit the “Create Webhook” button to paste the copied webhook URL.

(d) Paste the Webhook URL

Paste the Webhook URL

Afterward, a dialogue box will pop-up, here select “Customer Creation” in the event section & then paste the copied webhook URL. After making all the changes hit the “Save Webhook” button.

Step 6: Add a Sample Customer

Now, to check this integration, we will capture the data from Shopify, and for that, we will create a dummy customer on Shopify.

(a) Click on Create Account

Click-on-Create-Account-Shopify-1

Eventually, its time to add a customer, first, you have to open the online store page of Shopify in the new tab & then hit the “Create Account” option.

(b) Add Details

create_customer_for_shopify_to_mailjet

Certainly, add all the required details of the customer like name, email, etc, and click on the “Create” button.

(c) Click Submit Button

Click-Submit-Shopify-1

Thereafter, hit the captcha checkbox and then tap on the “Submit” button. Before that, hit the “Capture Webhook Response” in Pabbly Connect to capture the data.

Step 7: Test the Response in Pabbly Connect Dashboard

check_and_save_trigger_response_for_shopify_to_mailjet

After pressing the “Capture Webhook Response” in Pabbly Connect and “Submit” in Shopify, the customer info will appear on the Pabbly Connect dashboard. Besides, hit the “Save” option.

Step 8: Setting Action for Shopify with Sendicate Integration

Now, in order to make this Shopify-Sendicate integration work, you have to choose an action for your trigger.

(a) Select Application you Want to Integrate

Select Sendicate

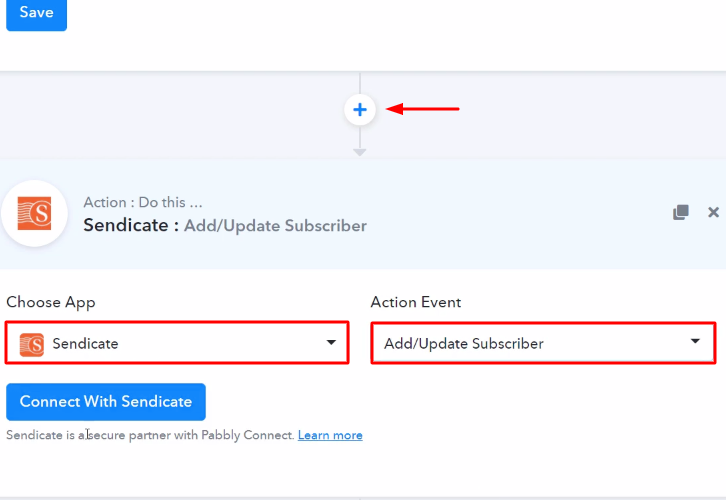
First of all, hit the ‘+’ button below and choose the application that you want to integrate. Here we will choose ‘Sendicate’ to integrate and in the method section select ‘Add/Update Subscriber’.

(b) Click the Connect Button

Connect with Sendicate

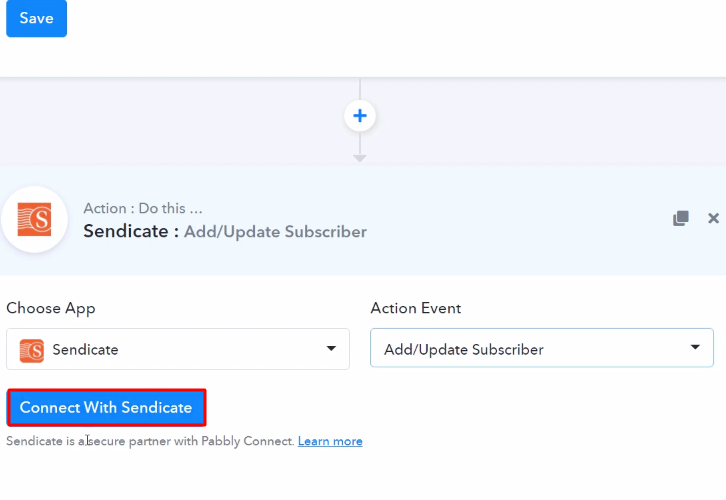
After choosing the application hit the ‘Connect with Sendicate’ button.

Step 9: Connecting Sendicate to Pabbly Connect

Afterward, now it’s time to connect Sendicate to Pabbly Connect. And for that, you have to paste the API token from your Sendicate account to Pabbly Connect. For this, you have to log in to your Sendicate account.

(a) Click on Manage Option

Click Manage Sendicate

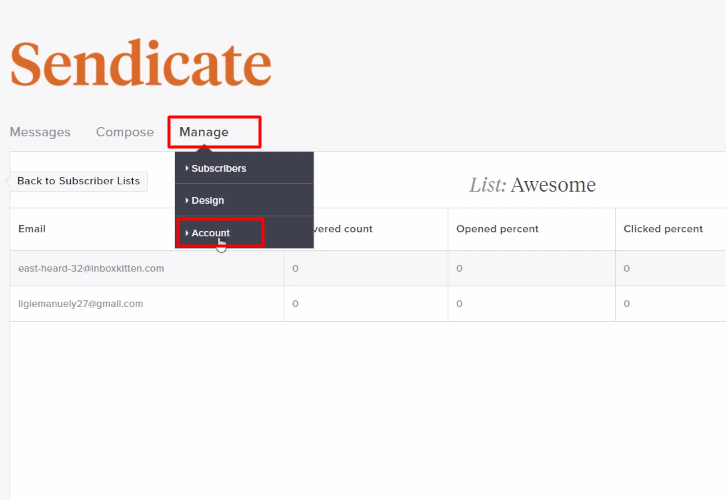
Hereabouts, to get the API token, hit the ‘Manage’ option in your Sendicate dashboard, and then select the ‘Account’ option.

(b) Copy the API Token

Copy the API Token Sendicate

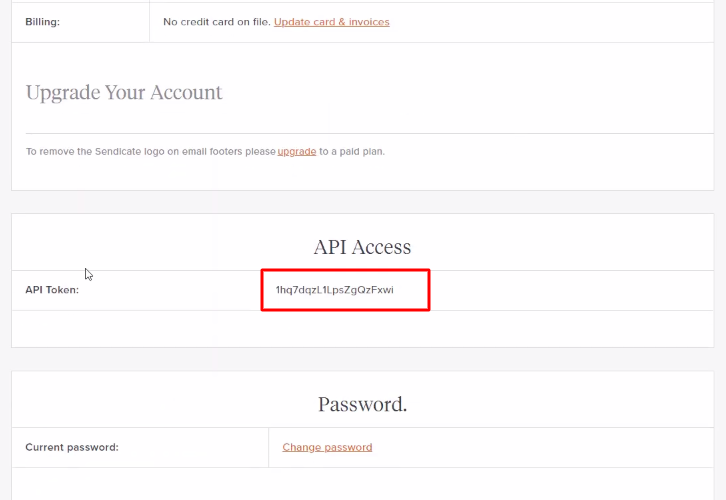
Promptly, scroll down and copy the API token from the ‘API Access’ section.

(c) Paste the API Token

Paste the API Token Sendticate

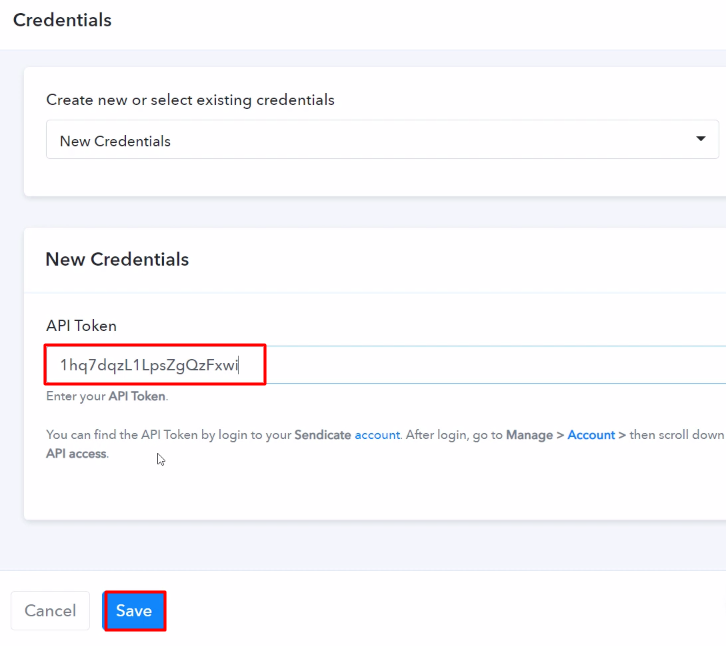
Just, paste the copied API token and then hit the ‘Save’ button.

(d) Map the Fields

Map the Fields

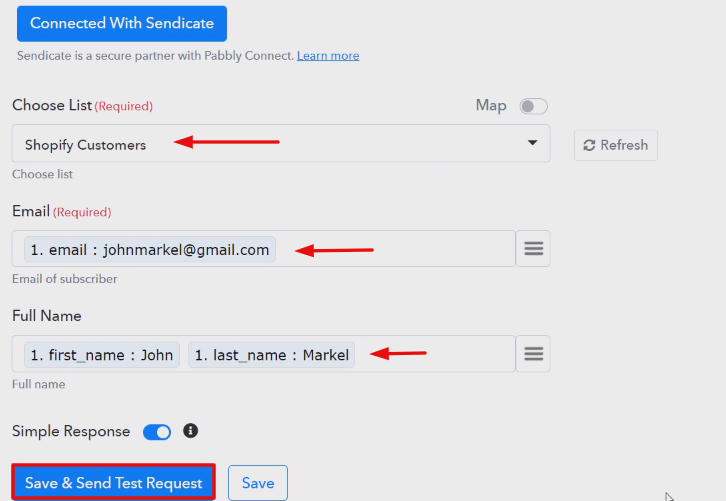
After connecting with your Sendicate account, map all the fields quickly like the list, email, etc. Once you are done adding up all field data click on the ‘Save & Send Test Request’ button.

(e) Check the Action API’s Response

How

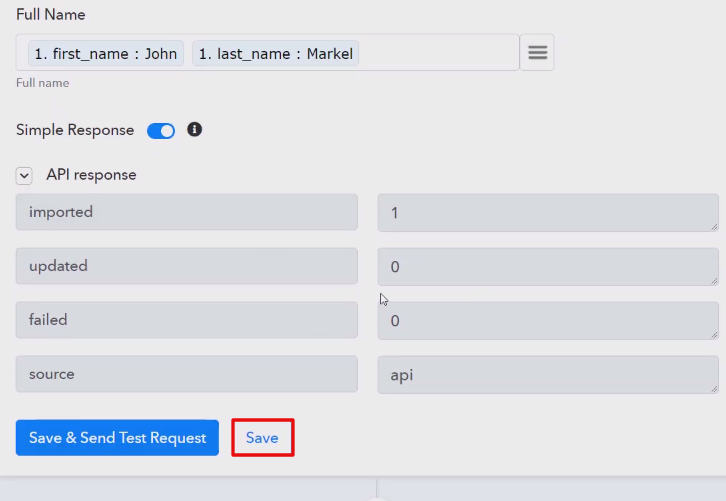
Soon, check the response and hit the “Save” button.

Step 10: Check Response in Sendicate Dashboard

Check Response in Sendicate Dashboard

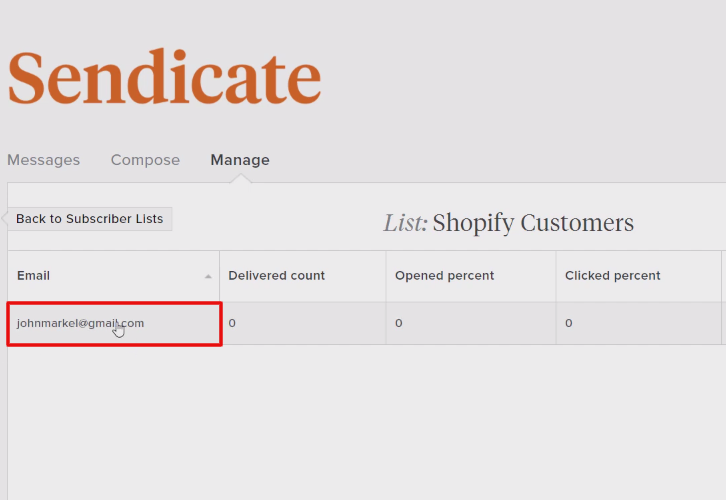
Finally, when you check your Sendicate dashboard, the Shopify customer has been added as a subscriber in Sendicate.

Conclusion –

That’s it! Now you know the answer to your question “How to Add Sendicate Subscribers from New Shopify Customers in real-time?”. Just follow all the step by step procedure mentioned above & your Shopify to Sendicate integration is set.

So, what are you waiting for? Go ahead and catch your deal by signing up for a free account.

You May Also Like To Read –

How to Add Mautic Contact from New PayKickstart Sale

How to Add Mautic Contact from New PayKickstart Sale

Are you still looking for a way to add Mautic contact from new PayKickstart sale? If yes then this blog can help you in automating tasks. Here, we’ll be using Pabbly Connect to automate the task as there is no direct integration possible for these two services.

How to Add Mautic Contact from New PayKickstart Sale

Basically, Pabbly Connect is an integration & automation tool that lets you share data from one application to another in real-time.

The plus point is, you don’t have to use any coding skills & even beginners can use it efficiently. Moreover, this will be just a one-time set-up and after that, the Pabbly Connect will take care of the rest.

Why Choose This Method Of Integration?

In contrast with other integration services-

  • Pabbly Connect does not charge you for its in-built apps like filters, Iterator, Router, Data transformer, and more
  • Create “Unlimited Workflows” and smoothly define multiple tasks for each action
  • As compared to other services which offer 750 tasks at $24.99, Pabbly Connect offers 50000 tasks in the starter plan of $29 itself
  • Unlike Zapier, there’s no restriction on features. Get access to advanced features even in the basic plan
  • Try before you buy! Before spending your money, you can actually signup & try out the working of Pabbly Connect for FREE

Sign Up To Pabbly Connect 

Although, before integration, let’s learn a little about the services. PayKickstart is a subscription billing service for various business types. On the other hand, Mautic is an open marketing software platform that offers you to make personalised emails, create landing pages, create intuitive workflows for customer experiences, etc.

However, once you set-up this workflow all the contacts will be added in your Mautic account automatically, whenever a sale will occur in your PayKiskstart account.

Moreover, we are embedding a video for the same integration as well. Have a look at it –

Moreover, we’ve attached the template for the same to help you get started immediately. All, you have to do is tap the ‘Use Workflow’ button below to get started. Additionally, you can go to the Marketplace & look for more integrations/apps.

HowHow

Add Mautic Contact from New PayKickstart Sale

So, lets start the step by step procedure of integrating PayKickstart with Mautic on real time.

Step 1: Sign up to Pabbly Connect

Sign Up

We will start the process to add Mautic contact from new PayKickstart sale by clicking on the ‘Sign Up Free’ button on the Pabbly Connect dashboard. Subsequently, either fill-up all the details manually or sign up using Gmail credentials.

Try Pabbly Connect for FREE

Step 2: Access Pabbly Connect

Select Connect

Next, after logging into the account, click on the ‘Access Now’ button as shown in the above image.

Step 3: Workflow for PayKickstart to Mautic Integration

(a) Start with a New Workflow

Create New Workflow

Start with creating a workflow for your project by clicking on the ‘Create Workflow’ button.

(b) Name the Workflow

Name the Workflow

Now, you need to name the workflow just like in the above-shown image. I named the workflow ‘PayKickstart to Mautic’, you can obviously name the workflow as per your requirements.

Step 4: Setting Trigger for PayKickstart to Mautic Integration

As soon as you are done with naming your workflow, you will have to select the application you want to integrate. Pabbly Connect allows you to connect unlimited premium apps, create your free account now.

(a) Select Application you Want to Integrate

Select Paykickstart

Now, you have to select the application that you want to integrate. In this case, we are choosing ‘PayKickstart’ for integration. In the method section, select ‘Transaction Sales’.

(b) Copy the Webhook URL

Copy the Webhook URL

The next step is to copy the webhook URL which is appearing on the dashboard just like in the above-shown image.

Step 5: Connecting PayKickstart to Pabbly Connect

To connect PayKickstart with Pabbly Connect, you have to paste the copied webhook URL in the software, for that, you need to log in to your PayKickstart account.

(a) Go to PayKickstart Campaigns

Click Campaigns Paykickstart

To paste the URL, click on the ‘Campaigns’ option in your PayKickstart dashboard.

(b) Select Product

Select Product Paykickstart

After reaching the campaigns page, select any of your listed products then click the edit button.

(c) Paste the Webhook URL

Paste the Webhook URL

Scroll down and click on the ‘Integrations’. In IPN URL section, paste the copied webhook URL and in event section select ‘Transaction Sales’ option.

(d) Save Changes

Save-Changes-Paykickstart-2_censored

After making all the changes hit the ‘Save’ button to save the changes.

Step 6: Make a Test Purchase

To check if the integration is capturing data or not, we will make a dummy purchase in PayKickstart.

(a) Click on Campaigns

Click Campaigns Paykickstart

To make a purchase, again we will go to the ‘Campaigns’ section of your PayKickstart dashboard.

(b) Select Product

Funnel Paykickstart

Here, click on the ‘Funnel’ section of your product and click on the link button.

(c) Copy Funnel URL

Copy Funnel URL Paykickstart

Next, you need to simply copy the given funnel URL and open it in a new tab.

(d) Add Customer Details

Add Customer Info

In this step, add the required customer details like name and email and then hit the ‘Next Step’ button.

(e) Add Billing Information

Add-Billing-Info-1_censored

Now you have to add the billing info like address and contact number and then click on the ‘Next Step’ button.

(f) Complete Purchase

Complete Purchase Paykickstart

After making all the required changes, hit the ‘Complete Purchase’ button. But before that, hit the ‘Capture Webhook Response’ in Pabbly Connect to capture the data.

Step 7: Test the Response in Pabbly Connect Dashboard

Save the Webhook Response

Once you click on the ‘Complete Purchase’ in PayKickstart and on the ‘Capture Webhook Response’ in Pabbly Connect, the subscriber info will appear on the Pabbly Connect dashboard. Then, click on the ‘Save’ option.

Step 8: Setting Action for PayKickstart to Mautic Integration

To make this PayKickstart-Mautic integration work, you have to choose an action for your trigger.

(a) Select Application you Want to Integrate

Select Mautic

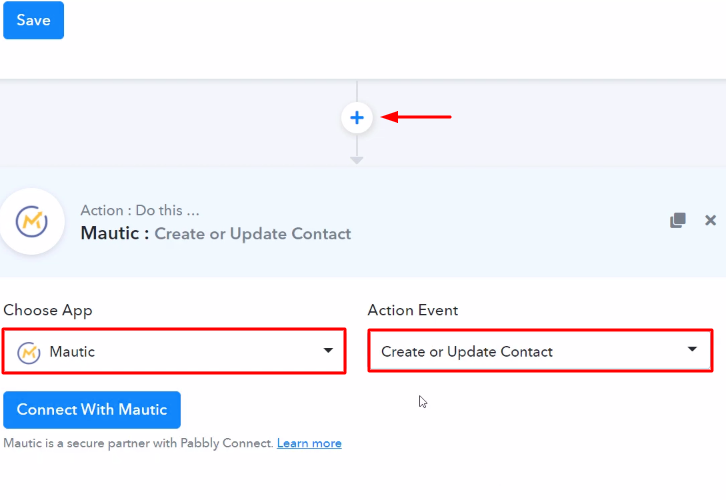
Now in this step, click on the ‘+’ button below and choose the application that you want to integrate. Here we will choose ‘Mautic’ to integrate and in the method section select ‘Create or Update Contact’.

(b) Click the Connect Button

Connect with Mautic

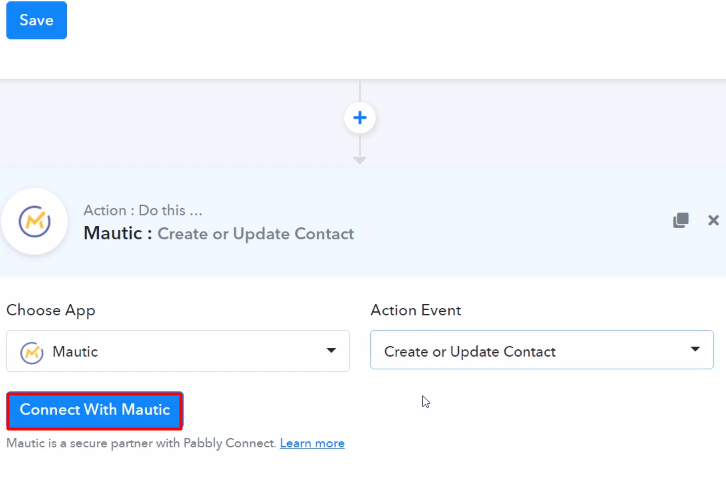
After choosing the application click on the ‘Connect with Mautic’ button to move forward.

Step 9: Connecting Mautic to Pabbly Connect

To connect Mautic to Pabbly Connect, you have to paste the ‘Base URL’ from your Mautic account to Pabbly Connect. For this, you have to log in to your Mautic account.

(a) Click on Mautic Settings

Click on Settings Mautic

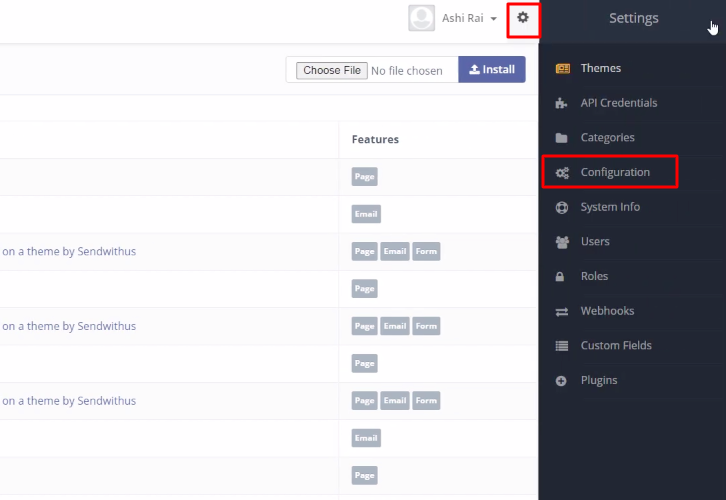
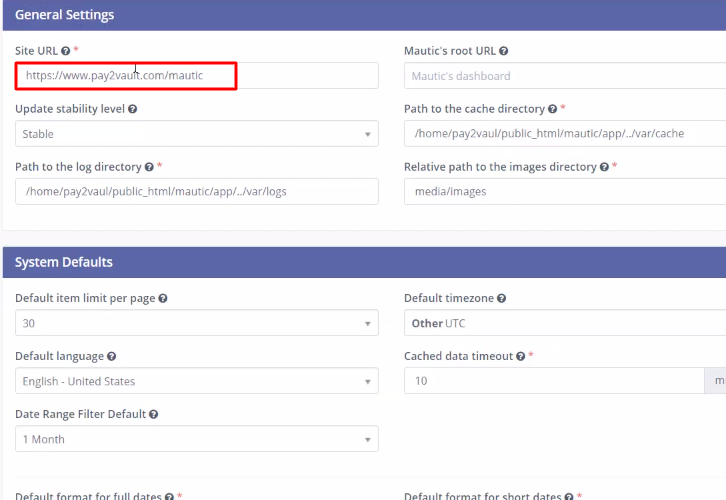
Here, to get the base URL, click on the ‘Settings’ icon in your Mautic dashboard, and then select the ‘Configuration’ option.

(b) Copy the Base URL

Copy the Site URL Mautic

Now, simply copy the base URL to move forward.

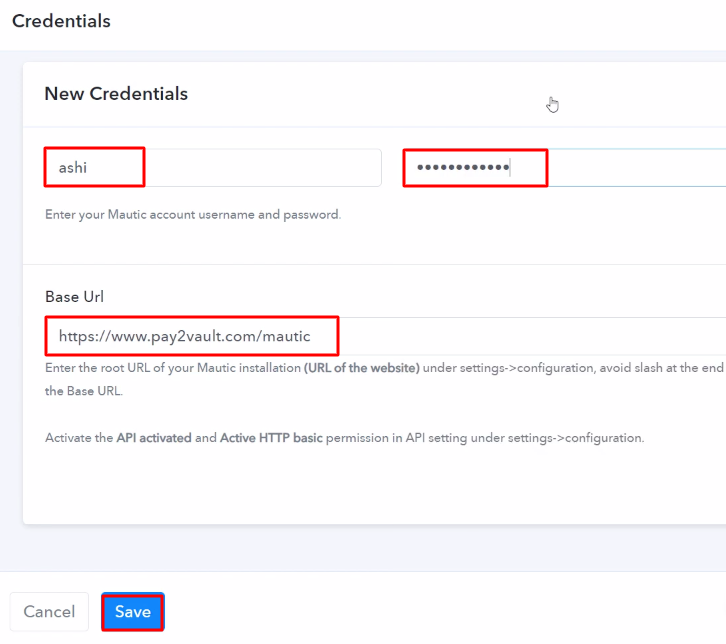
(c) Paste the Credentials

Paste the Credentials Mautic

Here, paste the copied URL and then add your Mautic account’s username and password. After making all the changes hit the ‘Save’ button.

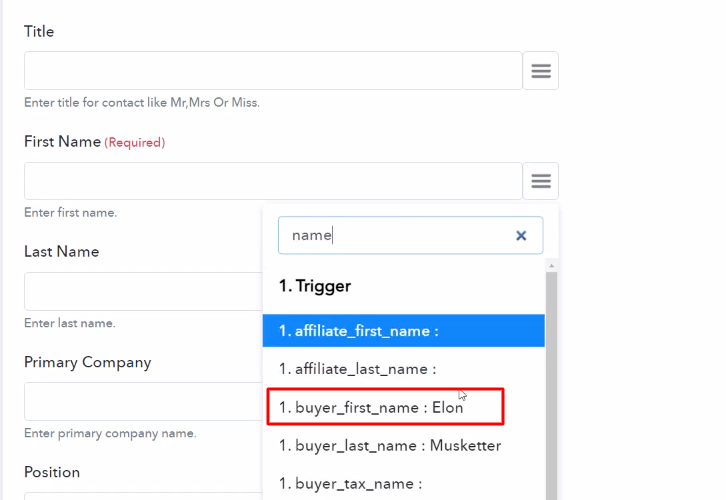
(d) Map the Fields

Map the Fields

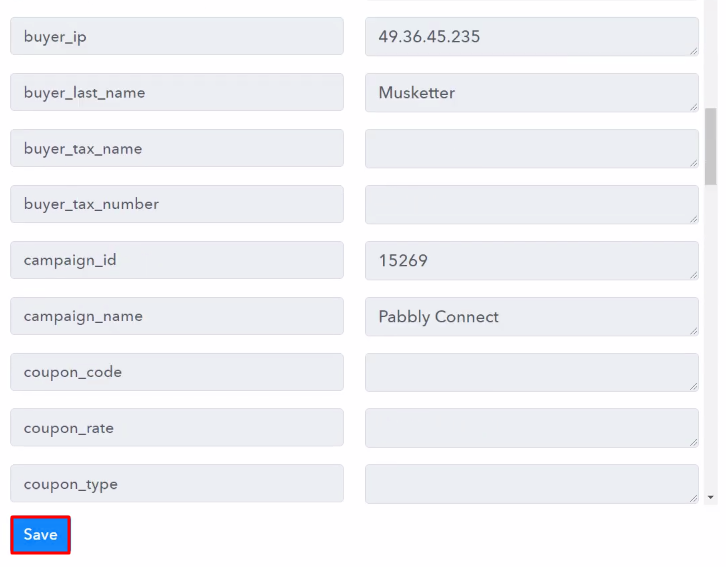
After connecting with your Mautic account, map all the fields quickly like the name, email, etc.

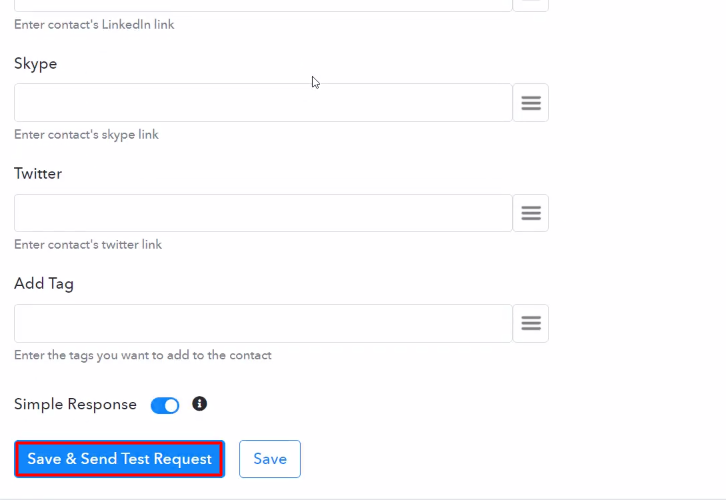
(e) Save and Send Test Request

Send Test Request

Once you are done adding up all field data click on the ‘Save & Send Test Request’ button.

Step 10: Check Response in Mautic Dashboard

Check Response

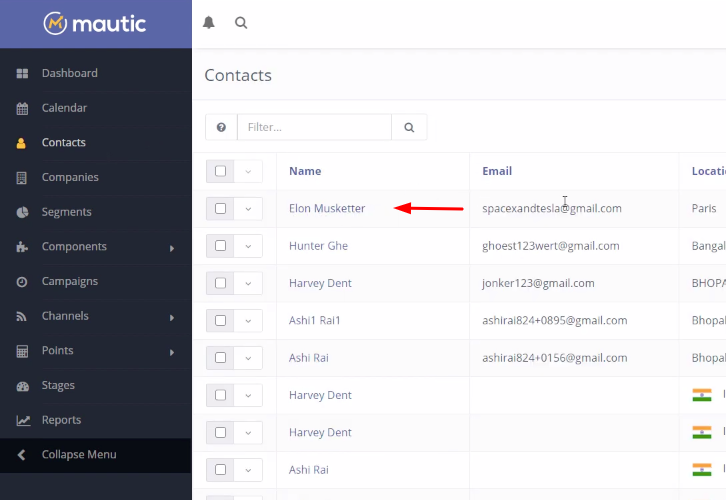
In the end, when you check your Mautic dashboard, the contact has been added on the new sale in PayKickstart.

Conclusion –

Finally, this was all about ‘How to Add Mautic Contact from New PayKickstart Sale’. Just follow the above-mentioned step by step procedure, and you will end up auto-creating Mautic contacts from new sale in PayKickstart. In the meantime, you can grab, Pabbly Connect for FREE with all its premium features. Furthermore, don’t forget to comment below for your queries and suggestions.

You May Also Like To Read –

How to Send Thanks.io Postcard from New PayKickstart Sale

Are you looking for a free and quick way to send Thanks.io postcard from new PayKickstart sale? If yes, then follow the step by step process. As here, we enlighten you with an awesome tool named as Pabbly Connect.

Send Thanks.io Postcard from new PayKickstart Sale

Substantially, Pabbly Connect is an integration and automation tool that let you to transfer data from one app to another automatically in real-time.

Especially, you don’t need to have any coding expertise and even a novice can use it efficiently. Additionally, this will be just a one-time setup and afterwards, the workflow will handle the rest.

Why Choose This Method Of Integration?

In contrast with other integration services-

  • Pabbly Connect does not charge you for its in-built apps like filters, Iterator, Router, Data transformer and more
  • Create “Unlimited Workflows” and smoothly define multiple tasks for each action
  • As compared to other services which offer 750 tasks at $24.99, Pabbly Connect offers 50000 tasks in the starter plan of $29 itself
  • Unlike Zapier, there’s no restriction on features. Get access to advanced features even in the basic plan
  • Try before you buy! Before spending your money, you can actually sign up & try out the working of Pabbly Connect for FREE

Sign Up To Pabbly Connect  

But, before starting the procedure first, let’s know a whit about both the services and the need for the automation. PayKickstart is a billing and affiliate management platform for subscription-based businesses. Whereas, Thanks.io is a cloud-based direct mailing platform that helps you to send automated handwritten postcards and letters.

Since, there is no direct integration between PayKickstart and Thanks.io, that’s why we use Pabbly Connect which allows us to send data from PayKickstart to Thanks.io.

Integration helps you transfer the data between two remote applications automatically with soothing, and you don’t need to enter details manually every time.

After integrating these applications, you can easily send Thanks.io postcard from new PayKickstart sale automatically in real-time. If you want, you can also watch the below video to understand the use of Pabbly Connect.

Moreover, we have attached the template for the same to help you get started easily. You can also click on the ‘Use Workflow’ button below to get started. You can also visit the Marketplace and look for more apps/integrations.

Send Thanks.io Postcard from New PayKickstart Sale

So, fasten your seatbelts as we’re going to disclose how to automatically send Thanks.io postcard from new PayKickstart sale through this step by step integration.

Step 1: Sign up to Pabbly Connect

Sign UpInitiate the process of sending Thanks.io postcard from new PayKickstart sale by pressing the “Sign Up Free” button on the Pabbly Connect dashboard. Later on, either fill-up all the details manually or sign up using Gmail credentials.

Try Pabbly Connect for FREE

Step 2: Access Pabbly Connect

Select Connect

Following this, after logging to your account, click the ’Access Now’ button as shown in the image above.

Step 3: Workflow for PayKickstart to Thanks.io Integration

(a) Start with a new Workflow

Create New Workflow

Launch with creating a workflow for your project by clicking on the ‘Create Workflow’ button.

(b) Name the Workflow

Workflow for PayKickstart to Thanks.io

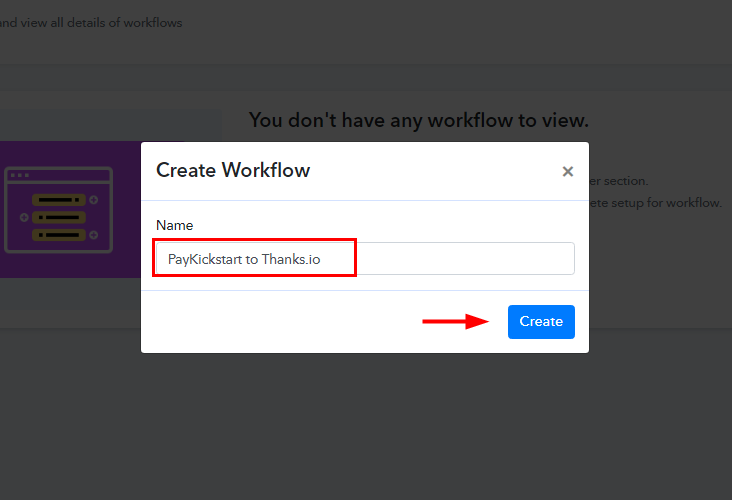
Now, you need to name the workflow according to the use case or integration. As we need to integrate PayKickstart and Thanks.io, so we named the workflow ‘PayKickstart to Thanks.io’. Finally, click on the ‘Create’ button.

Step 4: Setting Trigger for PayKickstart to Thanks.io Integration

As soon as you are done naming the workflow, a trigger window appears where you have to select the application you want to integrate. Pabbly Connect allow you to connect unlimited premium apps, create your free account now.

(a) Select Application you want to integrate

Select Paykickstart

Now, you have to select the application you want to integrate. Here, we are choosing ‘PayKickstart’ in Choose Apps and Trigger Event as ‘Transactional Sales’.

(b) Copy the Webhook URL

Copy the Webhook URL

The next step is to copy the Webhook URL which is appearing on the dashboard.

Step 5: Connecting PayKickstart to Pabbly Connect

Promptly, to connect PayKickstart with Pabbly Connect, you have to paste the copied webhook URL in the software, and for that, you need to log in to your PayKickstart account.

(a) Go to PayKickstart Campaigns

PayKickstart Campaigns

After, login to your PayKickstart account, click on ‘Campaigns’ option in your PayKickstart dashboard.

(b) Select Product

edit_any_product_from_paykickstart_campaigns

After reaching the campaigns page, You will see that your products are listed there, select any one of them and then click on the pencil icon to edit them.

(c) Click on Integration

Click on Integration

Scroll to the bottom of the page and then click on ‘Integrations’. Now, click on ‘Enable’ in the IPN URL section and then click on the “Add” button.

(d) Paste the Webhook URL

Paste Webhook URL for PayKickstart to Thanks.io

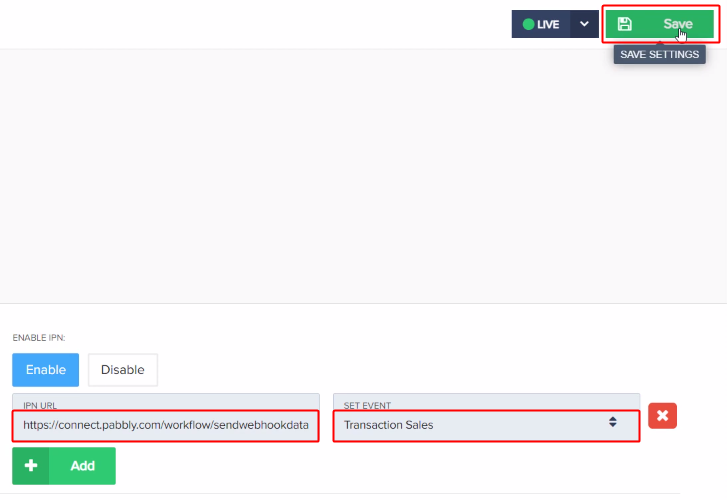
Thereafter, paste the copied Webhook URL in the “IPN URL” field and select the “SET EVENT” as ‘Transactional Sales’. Then, hit the ‘Save’ button which is present at the top right corner of the page.

Step 6: Test the Response in Pabbly Connect Dashboard

Consequently, we are done setting up the triggers for PayKickstart to Thanks.io integration. Now, to test the trigger settings we need to generate a test sale in PayKickstart.

(a) Capture Webhook Response

Capture Webhook Response for PayKickstart to Thanks.io

Click on ‘Capture Webhook Response’ button on your Pabbly Connect window to test the trigger settings.

(b) Open your PayKickstart Campaigns

PayKickstart Campaigns

Now, head back to your PayKickstart window and from the left menu click on ‘Campaigns’.

(c) Open any Product Checkout Page

Open Checkout Page for the Linked Product

After that, select the same product on which you paste the Webhook URL and then click on Checkout link of that product.

(d) Copy the Checkout Page URL

Copy Checkout Page URL for the PayKickstart to Thanks.io

Now, a window will pop-up, copy the Checkout URL and paste it in another tab.

(e) Make a Test Purchase

Add Customer Info

Following this, add all the purchase details to make a test purchase. Begin with adding contact information, after that add billing details and at last wrap up the purchase by clicking on ‘Complete Purchase’.

(f) Complete the Test Purchase

Complete Transaction for PayKickstart to Thanks.io

Complete the test purchase by following all the steps required to make a successful payment.

(g) Check and Save Trigger Response

Save the Webhook Response

Once you successfully complete the registration, go back to Pabbly Connect window and wait for the response to be captured. After that, click on the ‘Save’ button to save the response.

Step 7: Setting Action for PayKickstart to Thanks.io Integration

Now, as we collected all the needed informations to send postcard through Thanks.io from PayKickstart response. We can now proceed to select an application for action process.

(a) Select Application you want to Integrate

Integrate Thanks.io for PayKickstart to Thanks.io

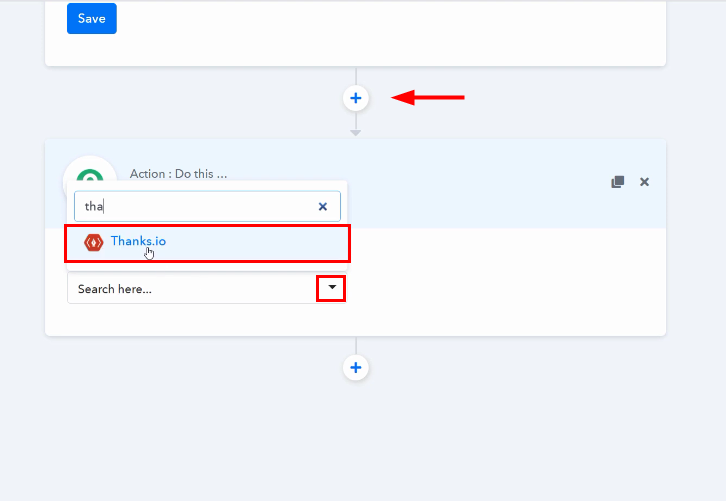
Later on, click on the plus (+) icon and you will see an action window appears. Here, select app to integrate as ‘Thanks.io’.

(b) Select Event and Connect with Thanks.io

Select Action Event

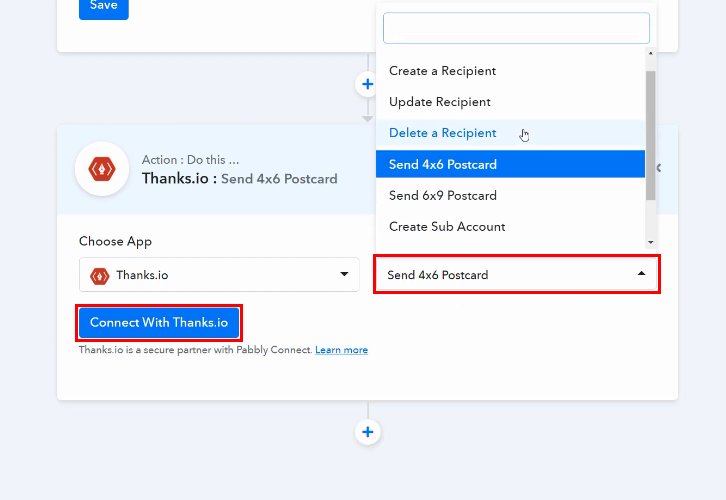
After that, select action event as ‘Send 4×6 Postcard’. And, now click on the Connect with ‘Thanks.io’ button to move further.

Step 8: Connecting Thanks.io to Pabbly Connect

Later on, to connect ‘Thanks.io’ to Pabbly connect you need to paste the ‘Access Token’. For that, you have to log in to your Thanks.io account.

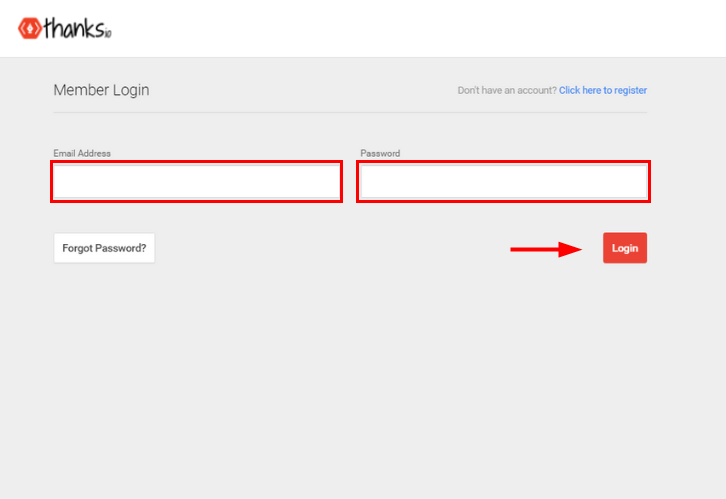
(a) Login to Thanks.io

Login to Thanks.io

To get the ‘Access Token’, first you have to log in to your ‘Thanks.io’ account.

(b) Click on Gear Icon

Click on Gear Icon

Once you log in to your Thanks.io account. In the dashboard, at the topmost section you will see a gear icon click on it and then click on the ‘API Access’ button.

(c) Add Personal Access Token

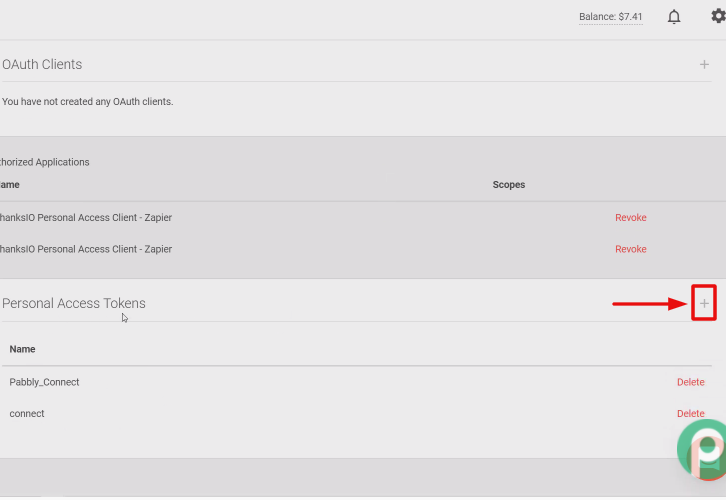
Add Personal Access Token

Afterward, you see API Access page. There, create a ‘Personal Access Tokens’ by scrolling down the page.

(d) Create Token

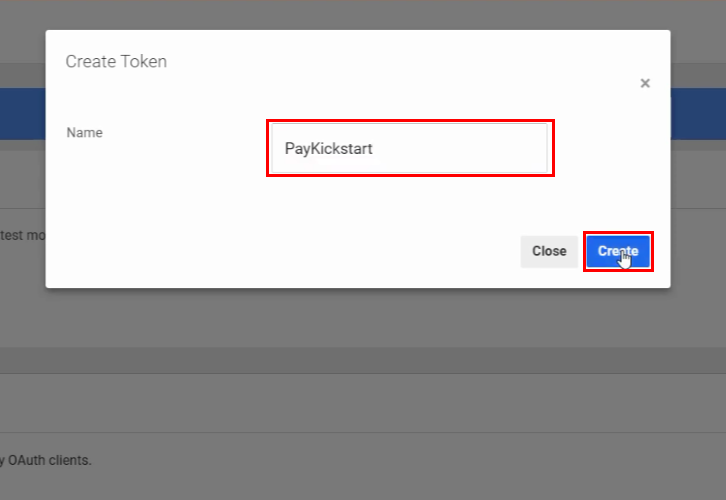
Create Token

When you click on the plus (+) button, a window appear where you have to give a name to the token and then click on the ‘Create’ button.

(e) Copy the API Token

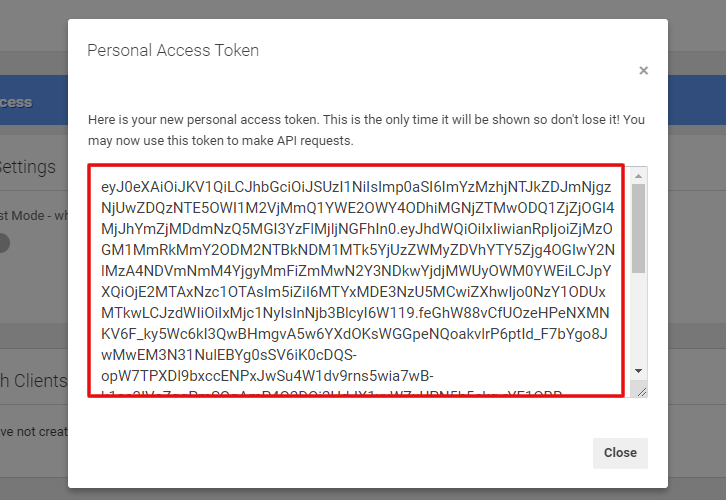
Copy API Token

Straightaway, a token will generate, just copy it to make the API request.

(f) Paste the Token

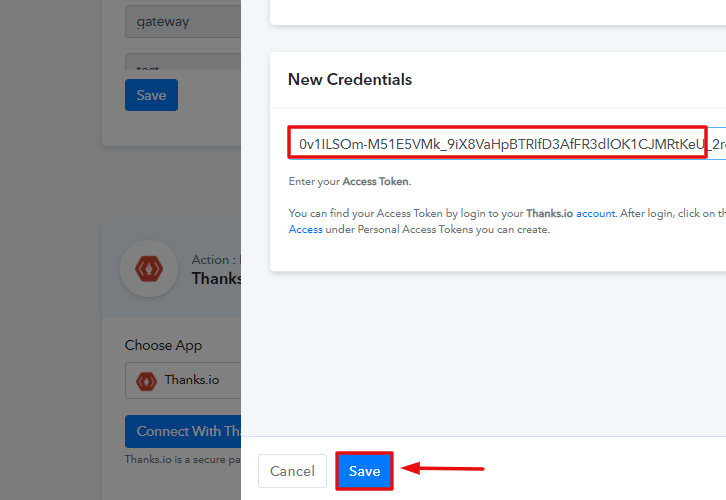
Paste the Token

Promptly, go to the Pabbly Connect Dashboard and paste the Token in the specific column. Next, hit the ‘Save’ button.

(g) Map the Fields

Map the Fields

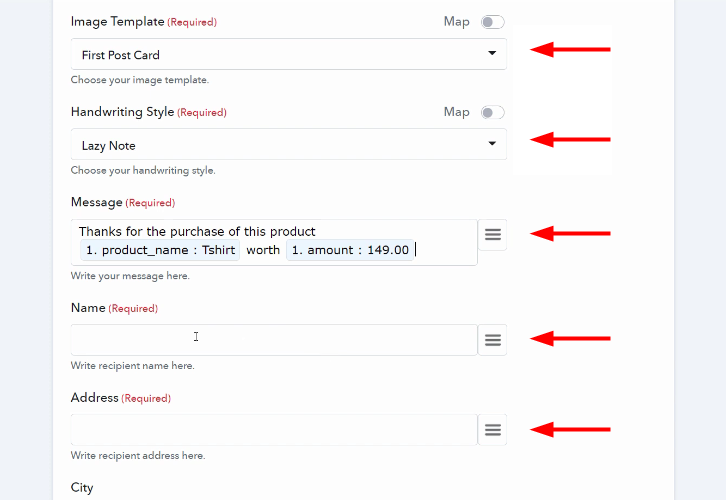
Subsequently, Pabbly Connect will automatically fetch Image Templates from Thanks.io. Now, you have to select the ‘Handwriting Style’, type a suitable message, and then map all details from drop-down like name, address, city, and so on.

(h) Save and Send Test Request

Save and Send Test Request

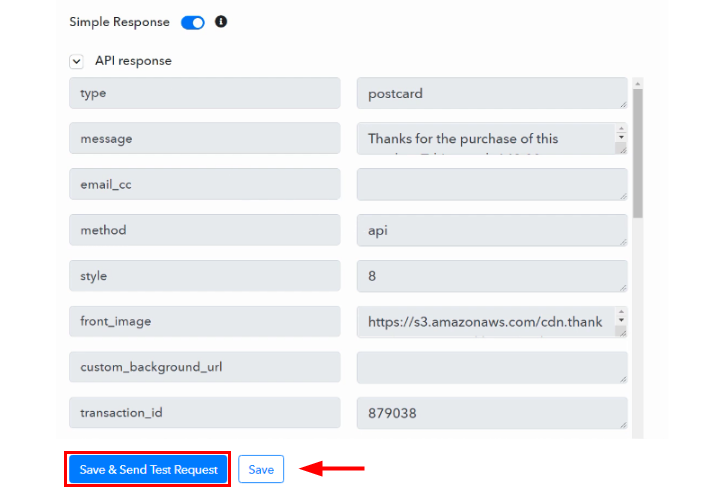
After mapping all the details, click on ‘Save and Send Test Request’ and you will see that the data has been successfully sent to Thanks.io. If there is any error in workflow, the API response will show error.

Now, click on the ‘Save’ button to save overall workflow.

Step 9: Check Response in Thanks.io Dashboard

Check Response

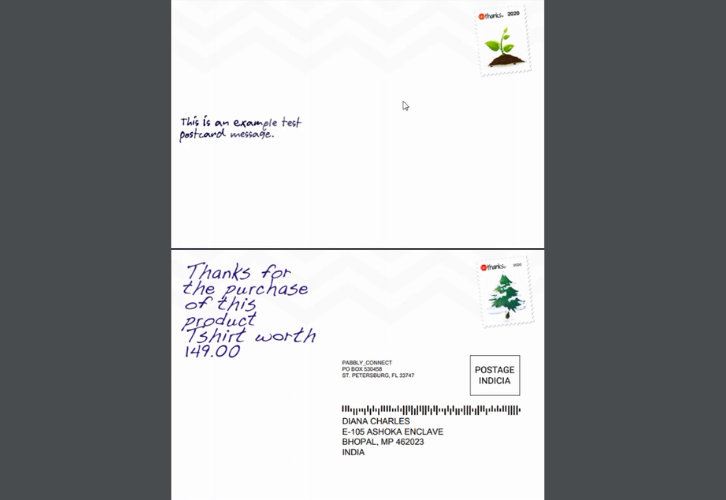
At long last, come to the dashboard of Thanks.io and you will notice that a postcard is updated there. Click on it.

If you want to view it just click on the ‘Preview’ button. It means our automation has successfully accomplished.

Promptly, whenever there is a transaction sales happened in PayKickstart, it will automatically be reflected via postcard through Thanks.io.

Conclusion:

That’s it! Here we completely define “How to Send Thanks.io Postcard from New PayKickstart Sale” using Pabbly Connect. Just follow the step by step procedure and your PayKickstart to Thanks.io integration is all done.

So, what are you waiting for? Go ahead and grab your deal by signing up for a free account.

You May Also Like to Read:

How to Create Zendesk Sell Lead for New PayKickstart Sale

How to Create Zendesk Sell Lead for New PayKickstart Sale

Looking for an easier way to integrate PayKickstart and Zendesk Sell other than coding?

How to Create Zendesk Sell Lead for New PayKickstart Sale

If yes then this article might help you in automating this task within a few minutes. And as there is no direct integration possible in between these two services we’ll be using Pabbly Connect to automate the task.

Basically, Pabbly Connect is an integration & automation tool that allows you to transfer information from one application to another in real-time.

Most importantly, you don’t have to use any coding skills & even beginners can use it efficiently. Besides, this will be just a one-time set-up and after that, the workflow will take care of the rest.

Why Choose This Method Of Integration?

In contrast with other integration services-

  • Pabbly Connect does not charge you for its in-built apps like filters, Iterator, Router, Data transformer and more
  • Create “Unlimited Workflows” and smoothly define multiple tasks for each action
  • As compared to other services which offer 750 tasks at $24.99, Pabbly Connect offers 50000 tasks in the starter plan of $29 itself
  • Unlike Zapier, there’s no restriction on features. Get access to advanced features even in the basic plan
  • Try before you buy! Before spending your money, you can actually signup & try out the working of Pabbly Connect for FREE

Sign Up To Pabbly Connect  

But, before starting the procedure first, let’s learn a little about the services. PayKickstart is a subscription billing software for various business types. Whereas, Zendesk Sell is a sales automation tool that helps you in enhancing productivity, processes, & pipeline visibility for sales teams.

Consequently, once you set-up this workflow all your sell leads will get listed onto your sales automation software i.e, Zendesk Sell whenever there is a successful sale on PayKiskstart.

Additionally, we are embedding a video for the same integration as well. Have a look at it yourself –

Furthermore, we’ve attached a template for the same integration to help you get started instantly. You can click on the ‘Use Workflow’ button below to get started. Additionally, you can visit the App Directory & look for more integrations/apps.

PayKickstart to Zendesk Sell

So, buckle up as we’re going to discover the Zendesk Sell and PayKickstart integration.

How to Create Zendesk Sell Lead for New PayKickstart Sale (step by step)

Step 1: Sign up to Pabbly Connect

Sign Up

Begin the procedure of connecting PayKickstart with Zendesk Sell by visiting the Pabbly Connect website. Then, hit the ‘Sign-Up Free‘ button available. Either use your existing Gmail account or manually fill the registration form to signup.

Try Pabbly Connect for FREE

Step 2: Access Pabbly Connect

Select Connect

After that, strike the ‘Access Now’ button of the software ‘Connect’ within the Pabbly applications.

Step 3: Workflow for PayKickstart with Zendesk Sell Integration

(a) Start with a New Workflow

Create New Workflow

Further, start with creating a workflow to add leads on Zendesk Sell for every new PayKickstart sale & to do this push the ‘Create Workflow’ button first.

(b) Name the Workflow

workflow_for_paykickstart_to_zendesk_sell

Now, name the workflow as per the integration or use-case (for instance: PayKickstart to Zendesk Sell etc). Finally, click on the ‘Create’ button available.

Step 4: Setting Trigger for PayKickstart to Zendesk Sell Integration

To automatically add Zendesk Sell leads for every PayKickstart sale, you’ll need to set-up a trigger on PayKickstart sales and its respective action to add a lead on Zendesk Sell using Pabbly Connect.

(a) Select Application you want to integrate

integrate_paykickstart_for_paykickstart_to_zendesk_sell

When you click on ‘Create’, a page displaying the trigger window will open up.

Select ‘PayKickstart’ from the ‘Choose App’ field’s drop-down.

(b) Select Method & Connect with PayKickstart

select_method_and_copy_webhook_url_for_paykickstart_to_freshdesk

Select the method in here as ‘Transaction Sales’ & then copy the webhook URL given.

Step 5: Connecting PayKickstart to Pabbly Connect

To connect PayKickstart with Pabbly Connect first, log-in your PayKickstart account & paste the copied webhook URL.

(a) Go to Your PayKickstart Campaigns

paykickstart_campaigns

After successfully logging into your PayKickstart account, hit the ‘Campaigns’ option available on the left vertical menu.

(b) Edit Any Product

edit_any_product_from_paykickstart_campaigns

A page will open up carrying all the different products that you’ve created on your PayKickstart account. Then, click on the pencil icon to edit any product.

(c) Click on Integrations

click_on_integrations

Scroll down to the bottom of the page and then click on ‘Integrations’.

Later, click on the ‘Enable’ button in the IPN URL section. After that, click on the ‘Add’ button too.

(d) Paste the Webhook URL

paste_webhook_url_for_paykickstart_to_freshdesk

Paste the Pabbly Connect webhook URL in the ‘IPN URL’ field.

Then, select the ‘Transaction Sales’ option for the ‘SET EVENT’ field.

Finally, click on the ‘Save’ button that is available at the top-right corner of the page.

Step 6: Test the Response in Pabbly Connect Dashboard

As we can see, we are done setting up the trigger for PayKickstart and Zendesk Sell integration. So, let’s test the trigger setup for a test order on PayKickstart.

(a) Capture Webhook Response

capture_webhook_response_for_paykickstart_to_freshdesk

To test the set trigger first, hit the ‘Capture Webhook Response’ button on your Pabbly Connect trigger window.

(b) Open Your PayKickstart Campaigns

paykickstart_campaigns

Now, go back to your PayKickstart dashboard and hit on ‘Campaigns’ from the left verticle menu.

(c) Open Any Product’s Checkout Page

open_checkout_page_for_the_linked_product

Then, open the checkout page of the product in which you just set-up the trigger.

(d) Copy the Checkout Page URL

copy_checkout_page_url_for_paykickstart_to_hubspot

Copy the checkout page URL for any product & then open it in an incognito window.

(e) Make a Test Purchase

feed_contact_information_for_paykickstart_to_zendesk

Fill in all the required purchase details to make the test purchase. First, it’ll ask you to fill in the contact details, second the billing details & lastly to finalize the test purchase.

(f) Complete the Test Purchase

complete_transaction_for_paykickstart_to_zendesk

Make the purchase by completing all the steps required to make a successful payment.

(g) Check & Save Trigger Response

check_and_save_trigger_response_for_paykickstart_to_zendesk

Once you successfully complete the transaction, the Pabbly Connect trigger response will start displaying the data for the current PayKickstart purchase. Also, remember to save this trigger API response.

Step 7: Setting Action for PayKickstart to Zendesk Sell Integration

Now, as we have gathered all the necessary information to create a lead on Zendesk Sell from the PayKickstart response. We can now continue to feed this data to perform the action. After that, a new lead will be created automatically for every PayKickstart sale.

(a) Select Application you want to Integrate

integrate_zendesk_sell_for_paykickstart_to_zendesk

Click on the plus button that is available below your PayKickstart trigger.

Select the app to integrate as ‘Zendesk Sell’.

(b) Select Event & Connect with Zendesk Sell

select_action_event_and_connect_with_zendesk_sell_for_paykickstart_to_zendesk

Then, select the action event as ‘Create Lead’.

Lastly, push the ‘Connect with Zendesk Sell’ button.

(c) Connecting Zendesk Sell to Pabbly Connect

click_on_connect_with_zendesk_sell

Now, click on the ‘Connect with Zendesk Sell’ button that is available in the window that slides in from the right.

(d) Map Fields

map_fields_for_paykickstart_to_zendesk

Now, map the first name & other required fields.

To map a value, hit the three horizontal lines given next to a particular field.

After that, select the response that you want to map with that field.

(e) Send Test Request

send_test_request_for_zendesk_sell_action_for_paykickstart_to_zendesk

Further, click on the ‘Save & Send Test Request’ button to send a test request for creating a lead on Zendesk Sell.

(f) Check & Save Response

check_and_save_action_response_for_paykickstart_to_zendesk

Certainly, you can check the Zendesk Sell action’s response in the API action response window. And, if there is some error while sending the data for creating lead then it will start showing you the error.

Finally, click on the ‘Save’ button to save the action API’s response.

Step 8: Check Response in Zendesk Sell Dashboard

lead_entry_on_zendesk_for_paykickstart_to_zendesk_sell

Also, you can see the lead’s data on your connected Zendesk Sell account.

Conclusion –

To sum up, this was all about ‘How to create Zendesk Sell lead for new PayKickstart sale’. Consequently, after completing the step by step procedure, you will end up auto-creating Zendesk Sell lead for every new sale on PayKickstart.

However, now you can grab Pabbly Connect for FREE with all its premium features.

Also, do comment us your queries in the section given below.
You May Also Like to Read:

How to Create Agile CRM Contact from New PayKickstart Sale

How to Create Agile CRM Contact from New PayKickstart Sale

Are you searching for a free and fastest way to create Agile CRM contact from new PayKickstart sale automatically? If yes, then we have an amazing tool suggestion for you i.e, Pabbly Connect.

Basically, Pabbly Connect is an integration and automation software that lets you migrate data from one app to another automatically in real-time.

How to Create Agile CRM Contact from New PayKickstart Sale

Sometimes, we want the contacts to be added in Agile CRM automatically on new sale in PayKickstart. And to do so we have Pabbly Connect to connect both the application for transferring data automatically.

However, instead of jumping straight into the integration process, let’s discuss a little bit about both the services. So, PayKickstart is an online shopping cart and affiliate management platform with built-in conversion enhancing features. Whereas, Agile CRM is a complete sales and marketing software for small and growing businesses.

Why Choose This Method Of Integration?

In contrast with other integration services-

  • Pabbly Connect does not charge you for its in-built apps like filters, Iterator, Router, Data transformer, and more
  • Create “Unlimited Workflows” and smoothly define multiple tasks for each action
  • As compared to other services which offer 750 tasks at $24.99, Pabbly Connect offers 50000 tasks in the starter plan of $29 itself
  • Unlike Zapier, there’s no restriction on features. Get access to advanced features even in the basic plan
  • Try before you buy! Before spending your money, you can actually signup & try out the working of Pabbly Connect for FREE

Sign Up To Pabbly Connect 

After integrating these applications, you can easily create Agile CRM contact from new PayKickstart sale in real-time. You can also refer to the below video to easily understand the usage of Pabbly Connect.

However, there is no direct integration possible for these two services yet. Hence, we are going to use Pabbly Connect to make this integration possible.

With the help of this software, you can effortlessly share data within multiple premium services easily. Further, it won’t need any coding skills & even a newcomer can use it effectively. Besides, this would be just a one-time setup. Later on, the data will automatically be transferred in real-time.

Thus, let’s get started on how to connect PayKickstart and Agile CRM in real-time. Moreover, we’ve attached a template for this integration to help you get started more quickly. You can click on the image below to get started. Plus, you can go to the Marketplace & look for more apps/integrations.

How

Therefore, without taking any more of your time, let’s move according to plan & follow the step by step procedure to integrate PayKickstart and Agile CRM.

Step 1: Sign up to Pabbly Connect

Sign Up

Let’s start the process to create Agile CRM contact from new PayKickstart sale by clicking on the ‘Sign Up Free’ button on the Pabbly Connect dashboard. Subsequently, either fill-up all the details manually or sign up using Gmail credentials.

Try Pabbly Connect for FREE

Step 2: Access Pabbly Connect

Select Connect

Next, after logging into the account, click on the ‘Access Now’ button as shown in the above image.

Step 3: Workflow for PayKickstart to Agile CRM Integration

(a) Start with a New Workflow

Create New Workflow

Start with creating a workflow for your project by clicking on the ‘Create Workflow’ button.

(b) Name the Workflow

Name the Workflow

Now, you need to name the workflow just like in the above-shown image. I named the workflow ‘PayKickstart to Agile CRM’, you can obviously name the workflow as per your requirements.

Step 4: Setting Trigger for PayKickstart to Agile CRM Integration

As soon as you are done with naming your workflow, you will have to select the application you want to integrate. Pabbly Connect allows you to connect unlimited premium apps, create your free account now.
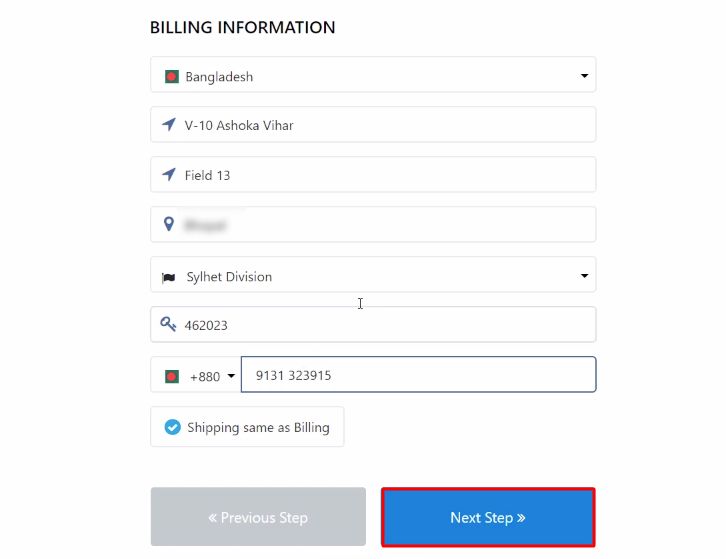
(a) Select Application you Want to Integrate

Select Paykickstart

Now, you have to select the application that you want to integrate. In this case, we are choosing ‘PayKickstart’ for integration. In the method section, select ‘Transaction Sales’.
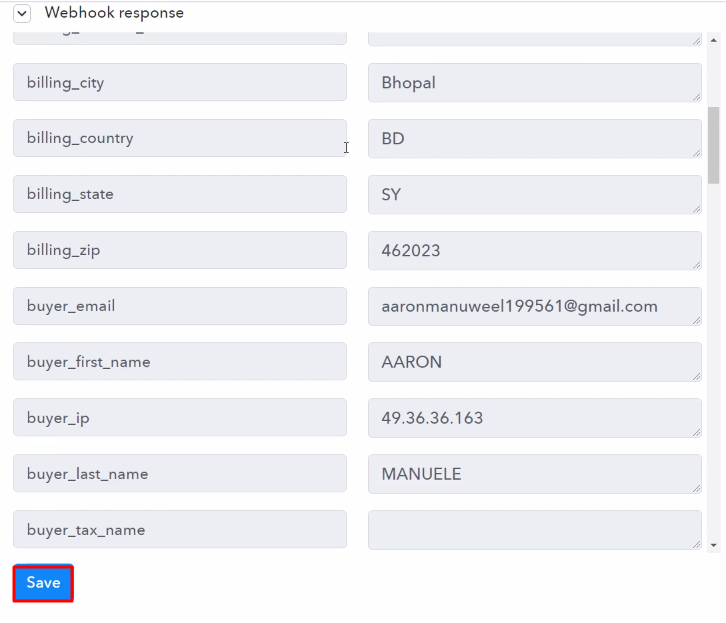
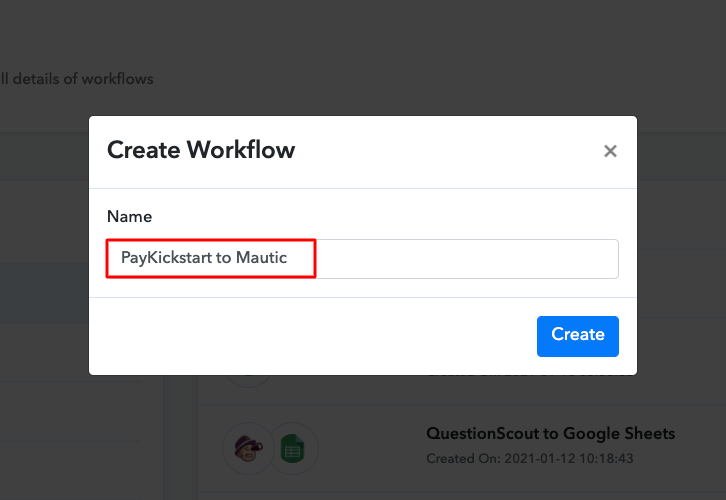
(b) Copy the Webhook URL

Copy the Webhook URL

The next step is to copy the webhook URL which is appearing on the dashboard just like in the above-shown image.

Step 5: Connecting PayKickstart to Pabbly Connect

To connect PayKickstart with Pabbly Connect, you have to paste the copied webhook URL in the software, for that, you need to log in to your PayKickstart account.

(a) Go to PayKickstart Campaigns

Click Campaigns Paykickstart

To paste the URL, click on the ‘Campaigns’ option in your PayKickstart dashboard.

(b) Select Product

Select Product Paykickstart

After reaching the campaigns page, select any of your listed products then click the edit button.

(c) Paste the Webhook URL

Paste the Webhook URL

Scroll down and click on the ‘Integrations’. In IPN URL section, paste the copied webhook URL and in event section select ‘Transaction Sales’ option.

(d) Save Changes

Save-Changes-Paykickstart-2_censored

After making all the changes hit the ‘Save’ button to save the changes.

Step 6: Make a Test Purchase

To check if the integration is capturing data or not, we will make a dummy purchase in PayKickstart.

(a) Click on Campaigns

Click Campaigns Paykickstart

To make a purchase, again we will go to the ‘Campaigns’ section of your PayKickstart dashboard.

(b) Select Product

Funnel Paykickstart

Here, click on the ‘Funnel’ section of your product and click on the link button.

(c) Copy Funnel URL

Copy Funnel URL Paykickstart

Next, you need to simply copy the given funnel URL and open it in a new tab.

(d) Add Customer Details

Add Customer Info

In this step, add the required customer details like name and email and then hit the ‘Next Step’ button.

(e) Add Billing Information

Add Billing Info

Now you have to add the billing info like address and contact number and then click on the ‘Next Step’ button.

(f) Complete Purchase

Complete Purchase

After making all the required changes, hit the ‘Complete Purchase’ button. But before that, hit the ‘Capture Webhook Response’ in Pabbly Connect to capture the data.

Step 7: Test the Response in Pabbly Connect Dashboard

Save the Webhook Response

Once you click on the ‘Complete Purchase’ in PayKickstart and on the ‘Capture Webhook Response’ in Pabbly Connect, the subscriber info will appear on the Pabbly Connect dashboard. Then, click on the ‘Save’ option.

Step 8: Setting Action for PayKickstart to Agile CRM Integration

To make this PayKickstart-Agile CRM integration work, you have to choose an action for your trigger.

(a) Select Application you Want to Integrate

Select Agile CRM

Now in this step, click on the ‘+’ button below and choose the application that you want to integrate. Here we will choose ‘Agile CRM’ to integrate and in the method section select ‘Create Contact’.

(b) Click the Connect Button

Connect with Agile CRM

After choosing the application click on the ‘Connect with Agile CRM’ button to move forward.

Step 9: Connecting Agile CRM to Pabbly Connect

To connect Agile CRM to Pabbly Connect, you have to paste the API token, account email, and domain from your Agile CRM account to Pabbly Connect. For this, you have to log in to your Agile CRM account.

(a) Click on Profile Option

Click on Profile Agile CRM

To get the API token, click on the ‘Profile’ icon in your Agile CRM dashboard.

(b) Click on the Admin Settings

Admin Settings Agile CRM

Next, a box will appear with certain options in it. Click on the ‘Admin Settings’ option to move forward.

(c) Copy the API Token

Copy the API Key

Here, scroll down and click on the ‘Developers & API’ option and then copy the API Key.

(d) Paste the API Token

Paste the Credentials Agile CRM

Paste the copied API key in Pabbly Connect. You can find your domain from your Agile CRM account’s URL and in the email section, you have to enter the email address through which your Agile CRM account was created. After making all the changes, click on the ‘Save’ button.

(e) Map the Fields

Map the Fields

After connecting with your Agile CRM account, map all the fields quickly like the name, email, etc.

(f) Save and Send Test Request

Send Test Request

Once you are done adding up all field data click on the ‘Save & Send Test Request’ button.

Step 10: Check Response in Agile CRM Dashboard

Check Response

In the end, when you check your Agile CRM dashboard, the contact has been added on the new sale in PayKickstart.

Conclusion –

Finally, this was all about ‘How to Create Agile CRM Contact from New PayKickstart Sale’. Just follow the above-mentioned step by step procedure, and your automation is set in no time. So, what are you waiting for? Go grab, Pabbly Connect for FREE with all its premium features. Furthermore, don’t forget to comment below for your queries & suggestions.

You May Also Like To Read –