Are you still adding the Autopilot contact manually for every new order fulfillment on PayKickstart?
Then you must take my advice and try automating this. Automation can help you save a lot of time & utilize it in more productive work. All you need to do is follow the step by step procedure given in this article and you are good to go.
We’ll be using Pabbly Connect to automate the task. This software is best in the market for automating tasks and very easy to use that even a non-programmer can design the workflow in minutes.
Also, using Pabbly Connect software, you can share data within many services in real-time. Moreover, this will be just a one-time set-up and after that, the workflow will take care of the rest.
Why Choose This Method Of Integration?
In contrast with other integration services-
- Pabbly Connect does not charge you for its in-built apps like filters, Iterator, Router, Data transformer and more
- Create “Unlimited Workflows” and smoothly define multiple tasks for each action
- As compared to other services which offer 750 tasks at $24.99, Pabbly Connect offers 50000 tasks in the starter plan of $29 itself
- Unlike Zapier, there’s no restriction on features. Get access to advanced features even in the basic plan
- Try before you buy! Before spending your money, you can actually signup & try out the working of Pabbly Connect for FREE
But, before starting the procedure first, let’s learn a little about the services. PayKickstart is an online shopping cart & affiliate management infrastructure for various business types. Whereas, Autopilot is an email marketing software that assists you in making a stronger customer relationship.
Consequently, once you set-up this workflow all your contact get listed on your email marketing tool i.e, Autopilot whenever you change the order status to ‘Order Received’ on PayKiskstart.
Additionally, we are enclosing a video for the same integration as well. Have a look at it –
Furthermore, we’ve attached the template for the same to help you get started immediately. You can click on the ‘Use Workflow’ button below to get started. Also, you can go to the App Directory & look for more integrations/apps.

So, buckle up as we’re going to discover how to automatically create Autopilot contacts for PayKickstart order fulfillment through this integration.
Step 1: Sign up to Pabbly Connect

Begin the procedure of connecting PayKickstart with Autopilot with visiting the Pabbly Connect website. Then, hit the ‘Sign-Up Free‘ button available. Formerly, use your existing Gmail account or manually fill the registration form to signup.
Step 2: Access Pabbly Connect

After that, strike the ‘Access Now’ button of the software ‘Connect’ within the Pabbly applications.
Step 3: Workflow for PayKickstart with Autopilot Integration
(a) Start with a New Workflow

Further, start with creating a workflow to add contacts on Autopilot for every PayKickstart order fulfillment & to do this push the ‘Create Workflow’ button first.
(b) Name the Workflow
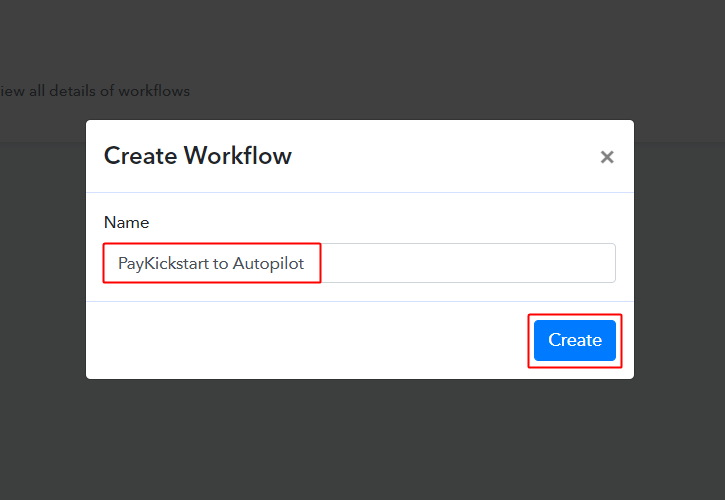
Now, name the workflow as per the integration or use-case (for instance: PayKickstart to Autopilot etc). Finally, click on the ‘Create’ button available.
Step 4: Setting Trigger for PayKickstart to Autopilot Integration
To automatically add Autopilot contact for every PayKickstart order fulfillment, you’ll need to set-up a trigger on PayKickstart order fulfillment and its respective action to add a contact on Autopilot using Pabbly Connect.
(a) Select Application you want to integrate
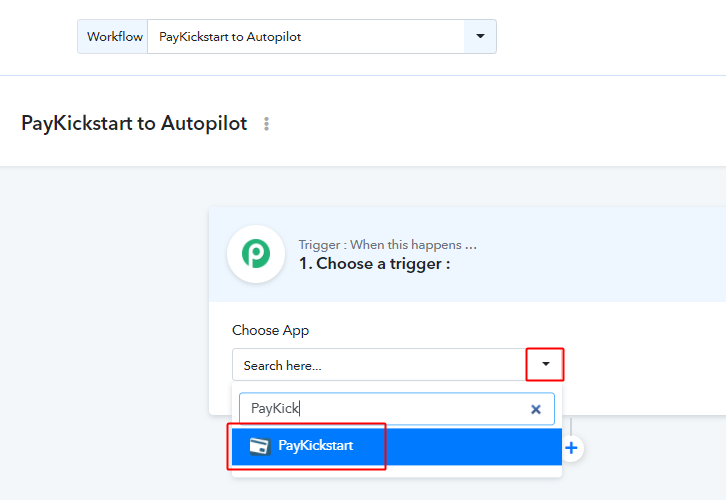
When you click on the create, a page carrying the trigger window will open up.
Select the ‘PayKickstart’ app from the ‘Choose App’ field’s drop-down choices.
(b) Select Method & Connect with PayKickstart

Select the method in here to be ‘Fulfillment Order Received’ & then copy the given webhook URL.
Step 5: Connecting PayKickstart to Pabbly Connect
To connect PayKickstart with Pabbly connect, you’ll need to sign-in your PayKickstart account & paste the copied webhook URL.
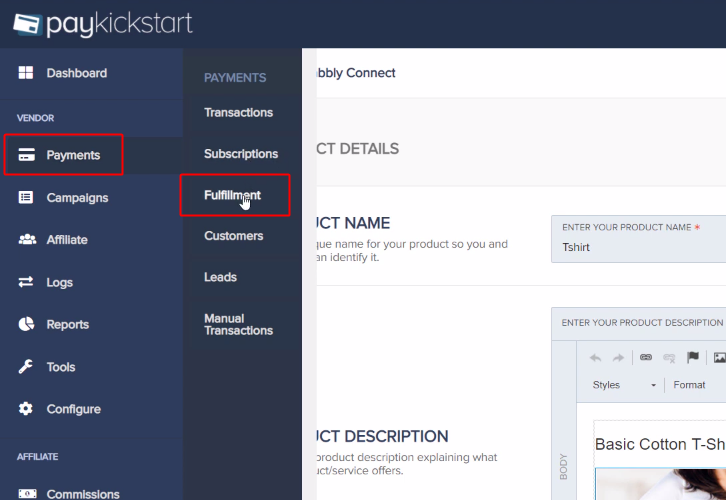
(a) Go to Your PayKickstart Settings
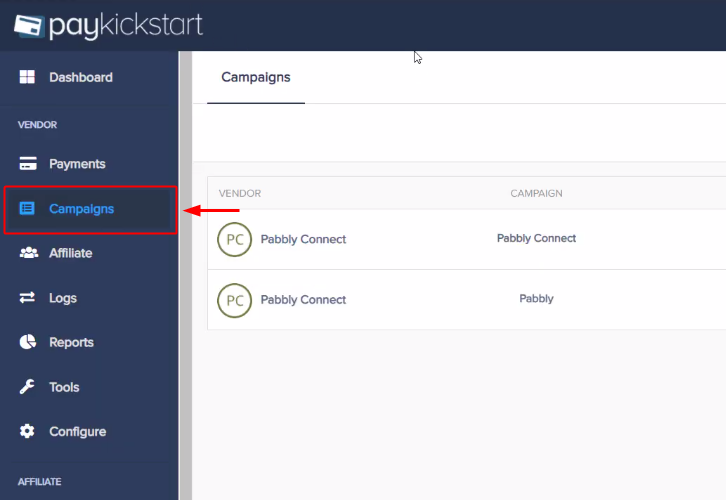
After successfully logging into your PayKickstart account, strike the ‘Campaign’ option available at the bottom of the left vertical menu.
(b) Edit Any Product
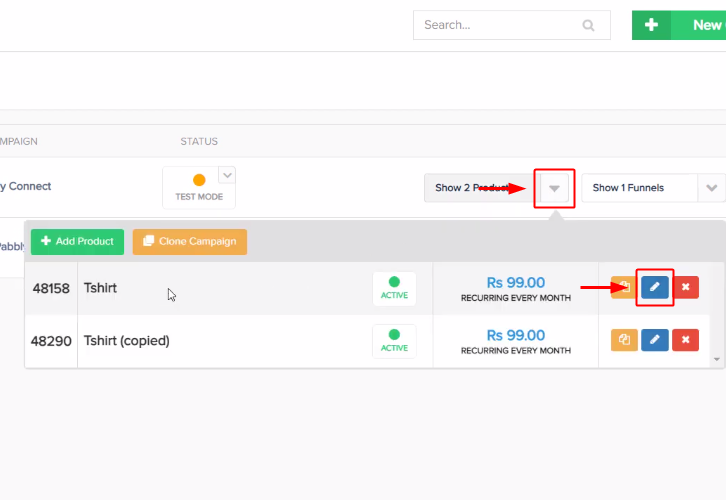
A page will open up carrying all the different products created on PayKickstart. Click on the pencil icon to edit a particular product.
(c) Click on Integrations
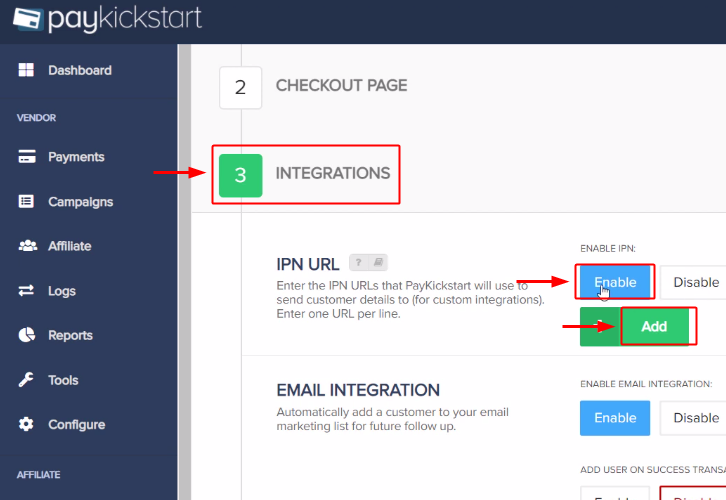
Scroll to the bottom of the page and click on ‘Integrations’.
Then, click on ‘Enable’ in the IPN URL section. After that click on the ‘Add’ button.
(d) Paste the Webhook URL
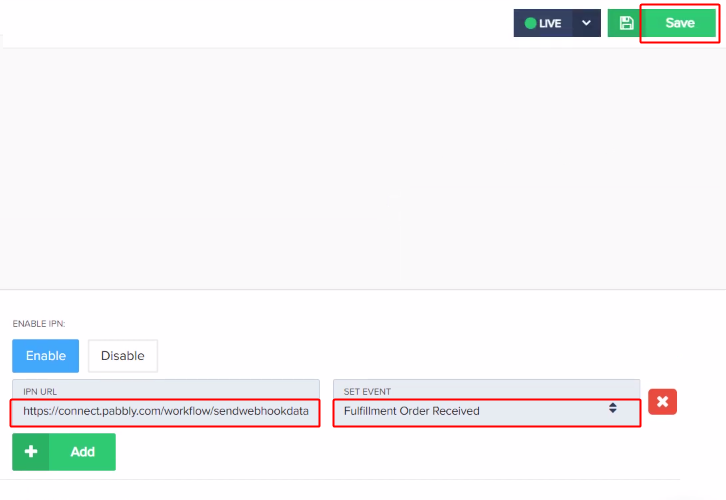
Paste the copied Pabbly Connect trigger URL in the ‘IPN URL’ field.
Then, select the ‘Fulfillement Order Received’ event for the ‘SET EVENT’ field.
Finally, hit the ‘Save’ button available at the top right corner of the page.
Step 6: Test the Response in Pabbly Connect Dashboard
As we can see, we are done setting up the trigger for PayKickstart and Autopilot integration. So, let’s test the trigger setup for a test order fulfillement on PayKickstart.
(a) Capture Webhook Response
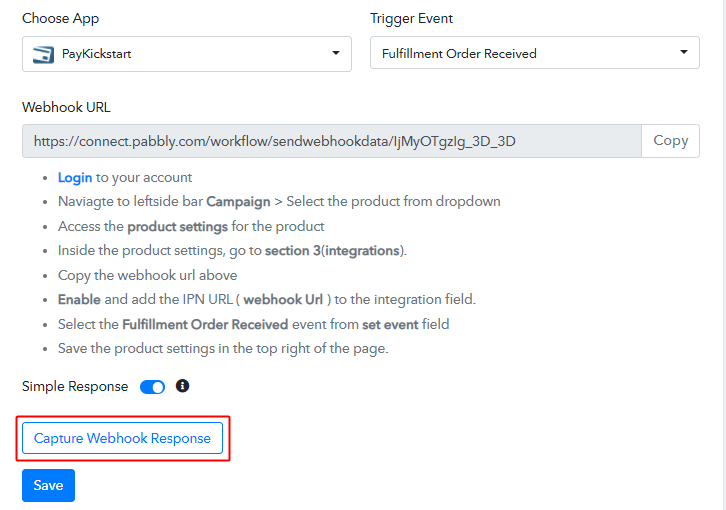
To test the set trigger first, click on the ‘Capture Webhook Response’ button on your Pabbly Connect trigger window.
(b) Open Your PayKickstart Payments
Now, go back to your PayKickstart dashboard and click on the payment option from the left verticle menu. Second, select the ‘Fulfillment’ option from the secondary menu that opens next.
(c) Open Details of Any ‘On Hold’ Order
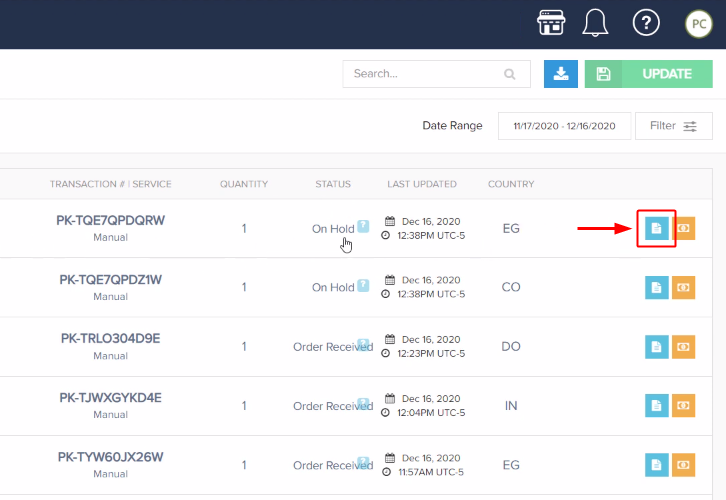
Click on the ‘Details’ button for any whose status is mentioned as ‘On Hold’..
(d) Change Order Status
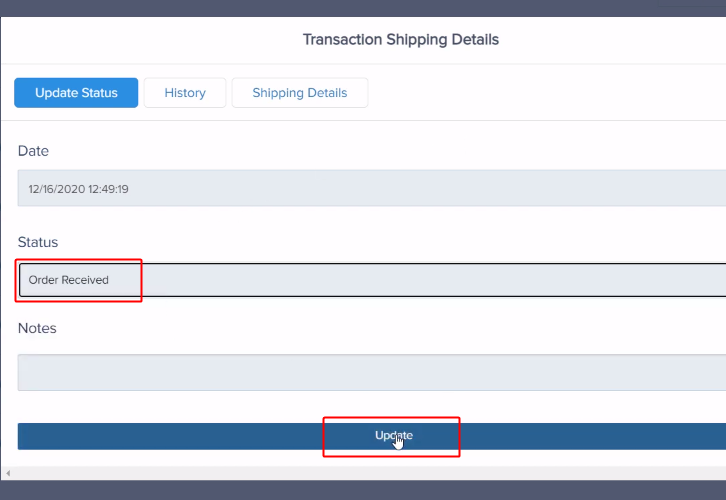
Then, change the order status to ‘Order Received’ and click on the ‘Update’ button.
(e) Check & Save Trigger Response
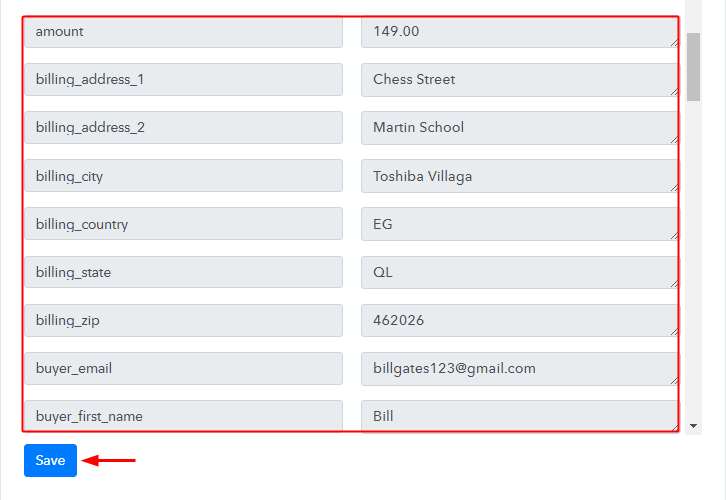
Once you successfully complete the registration, the Pabbly Connect trigger response will start showing the data for the current sign-up. Also, remember to save the trigger response.
Step 7: Setting Action for PayKickstart to Autopilot Integration
Now, as we have gathered all the necessary information to create a contact on Autopilot from the PayKickstart response. We can now proceed to feed this data to perform the action. After that, a new contact will be created automatically for every PayKickstart order fulfillment.
(a) Select Application you want to Integrate
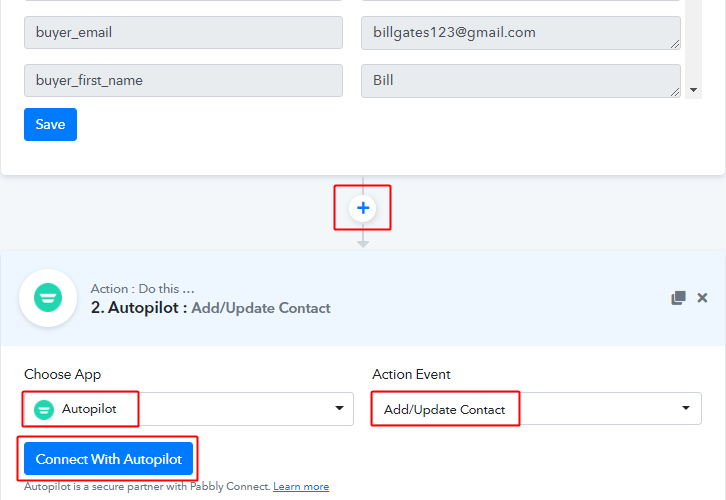
Hit the plus button next to your PayKickstart trigger.
Select the app to integrate here as ‘Autopilot’ & method as ‘Add/Update Contact’.
Lastly, push the ‘Connect with Autopilot’ button.
Then the system will ask you for an API key.
(b) Connecting Autopilot to Pabbly Connect
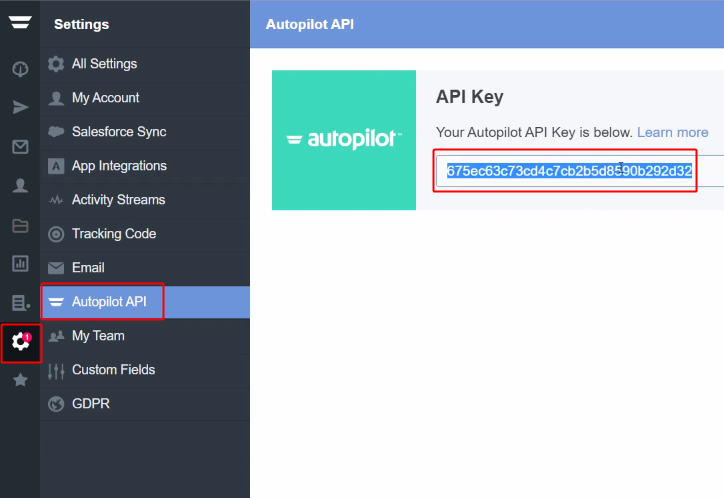
Next, sign-in to your Autopilot account and click on the gear icon (i.e, Settings).
On the secondary menu that opens next, select the Autopilot API option.
Lastly, generate as well as copy the API key.
(c) Paste the API Key on Pabbly Connect
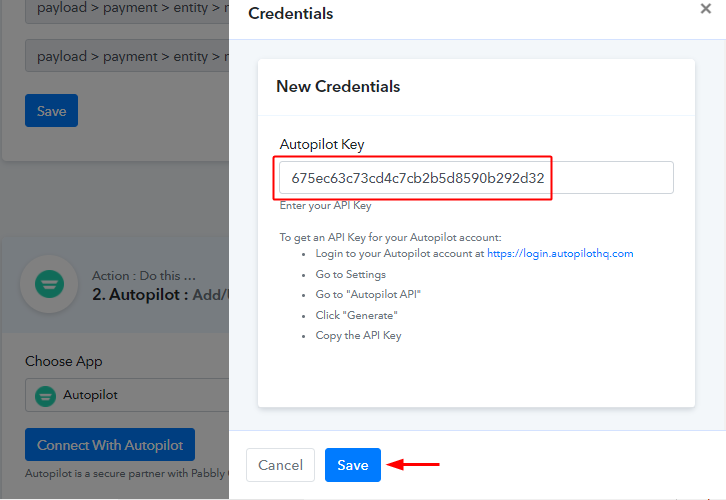
Subsequently, paste the copied Autopilot API key on Pabbly Connect and click on ‘Save’.
(d) Map Fields
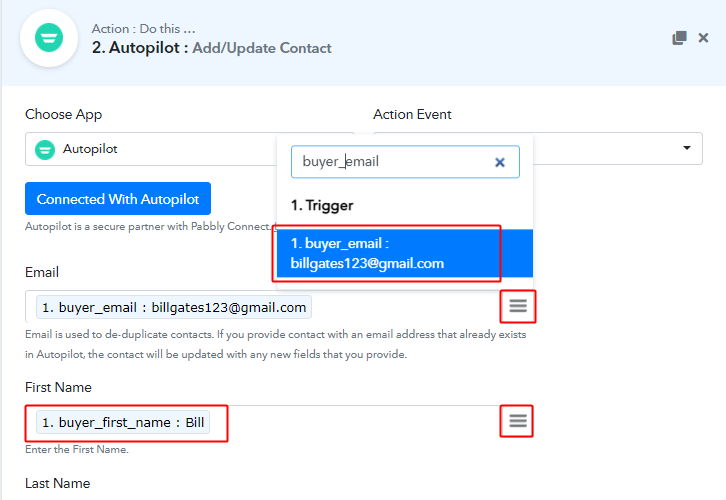
Now, map the email address and other required fields.
To map a value, hit the menu button (three horizontal lines) next to that particular field.
After that, select the value that you want to map with that respective field.
Similarly, map all the other required fields also.
(e) Send Test Request

Further, click on the ‘Save & Send Test Request’ button to send a request for creating a contact on Autopilot.
(f) Check & Save Response
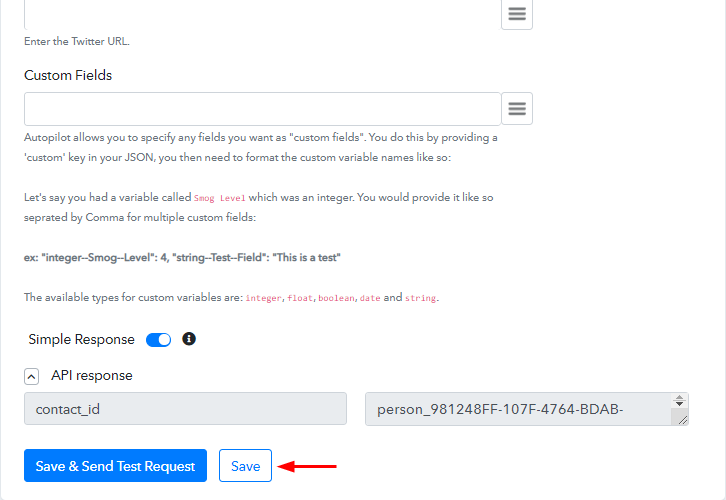
Certainly, you can check the response of your API in the action window. And, if there is some error while sending the data then it will show you the error.
Finally, hit the ‘Save’ button to save the action API’s response.
Step 8: Check Response in Autopilot Dashboard
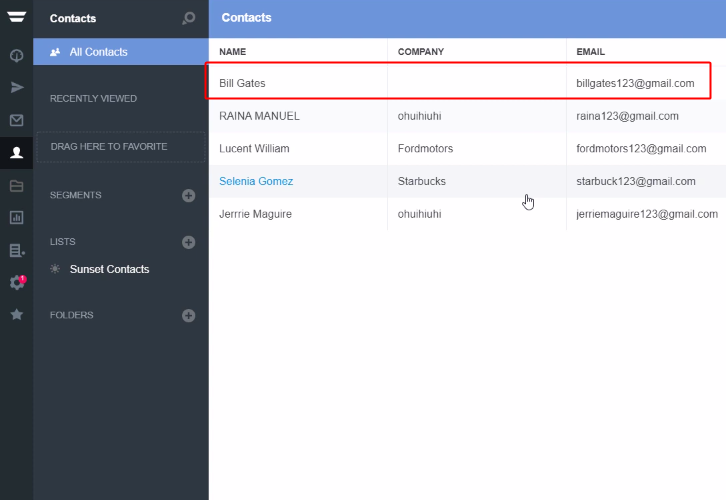
Also, you can check the contact’s entry on your connected Autopilot account.
Conclusion –
To sum up, this was all about ‘How to add Autopilot contact from new PayKickstart order fulfillment’. Consequently, after completing the step by step procedure, you will end up auto-creating Autopilot contact for every order fulfillment on PayKickstart.
Meanwhile, you can opt Pabbly Connect for FREE with all its premium features.
Also, comment below your queries and suggestions.


