Build Your Own AI Sales Assistant in 10 Minutes with Pabbly Chatflow

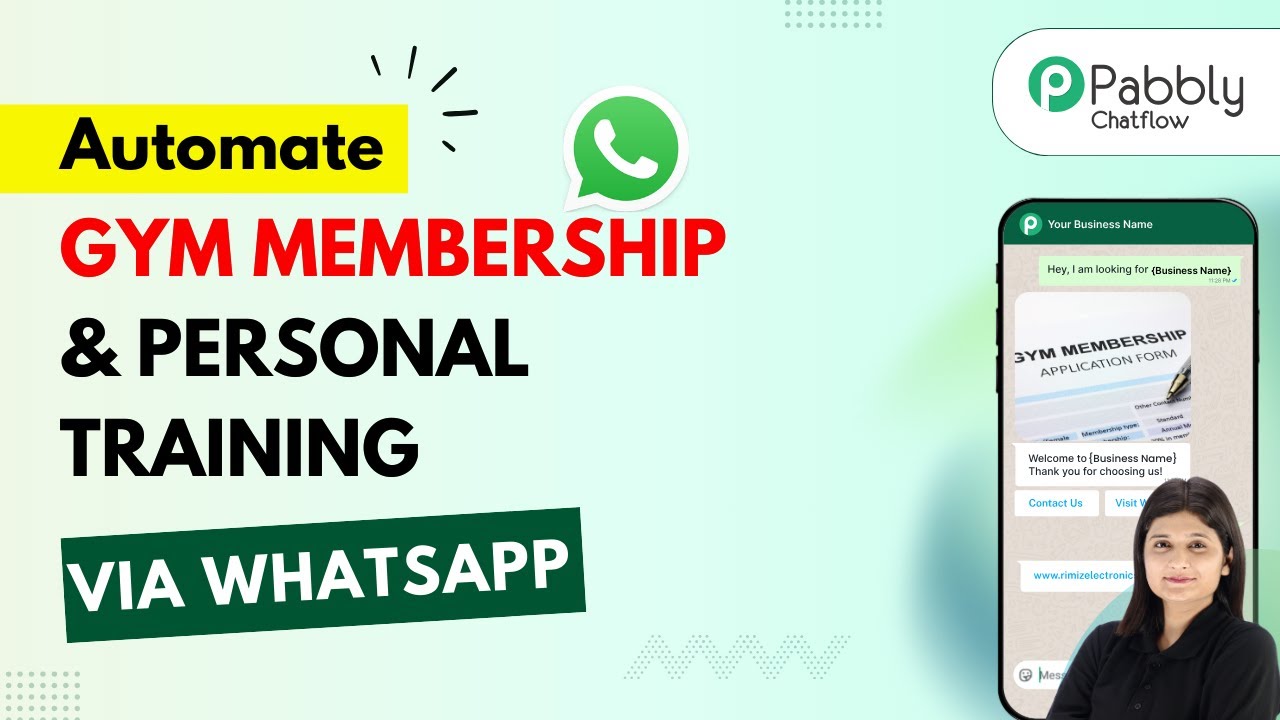
Learn how to create your own AI sales assistant using Pabbly Chatflow in just 10 minutes. No coding required! Discover how to design chat experiences that feel personal and responsive while handling customer inquiries automatically around the clock.

Watch Step By Step Video Tutorial Below


1. Accessing Pabbly Chatflow for Your AI Sales Assistant

To build your AI sales assistant, you need to access Pabbly Chatflow. Start by navigating to the Pabbly website and searching for ‘Pabbly.com/chatflow’ in your browser. This will take you to the Pabbly Chatflow homepage where you can either sign in or sign up.

If you are a new user, click on ‘Sign Up Free’ to create an account and receive 100 free credits to try out Pabbly Chatflow. Existing users can click on ‘Sign In’ to access their dashboard.


2. Setting Up Your AI Sales Assistant in Pabbly Chatflow

Once logged into Pabbly Chatflow, you will see the dashboard with various options. To create your AI sales assistant, select the ‘AI Assistant’ feature from the left sidebar. This is where you can configure your assistant to handle customer inquiries.

  • Choose an instruction type for your AI assistant.
  • Select predefined AI agents like Sales Agent or Customer Support Agent.
  • Set basic instructions for your assistant to follow.

After selecting the instruction type, you can customize the assistant’s responses based on your business needs. This customization is key to making your AI assistant effective in handling sales inquiries.


3. Integrating WhatsApp with Pabbly Chatflow

Next, to enable communication through WhatsApp, you must connect your WhatsApp number in Pabbly Chatflow. This is done by navigating to the settings and selecting the ‘Connect WhatsApp’ option.

Here are the steps to integrate WhatsApp:

  • Click on ‘Connect WhatsApp’ and follow the prompts.
  • Enter your WhatsApp number and verify it.
  • Ensure your account is linked to your Pabbly Chatflow dashboard.

Once your WhatsApp account is connected, your AI sales assistant is ready to send and receive messages through WhatsApp, enhancing customer interaction.


4. Configuring Your AI Assistant’s Responses

In this step, you will set up the responses for your AI sales assistant within Pabbly Chatflow. You can define how the assistant should reply to customer inquiries about products, such as the Samsung Galaxy S24.

To configure responses, you will need to:

Set up initial messages that greet customers when they contact the assistant. Add fallback messages in case the assistant cannot respond. Incorporate a knowledge base to provide accurate information.

By configuring these settings, your AI assistant will be equipped to handle various inquiries effectively, ensuring that customers receive prompt and accurate information.


5. Testing and Launching Your AI Sales Assistant

After configuring your AI assistant, it’s essential to test its functionality before launching it. You can simulate conversations to see how your assistant responds using Pabbly Chatflow.

To test your assistant:

Send test messages to your WhatsApp number. Check the responses from your AI assistant. Make adjustments based on the testing results.

Once you are satisfied with the performance, you can officially launch your AI sales assistant to start engaging with customers on WhatsApp, enhancing your sales process.


Conclusion

Building your own AI sales assistant using Pabbly Chatflow is a straightforward process that requires no coding skills. By following these steps, you can create an efficient assistant that boosts your sales and improves customer interaction.

Ensure you check out Pabbly Connect to create business automation workflows and reduce manual tasks. Pabbly Connect currently offer integration with 2,000+ applications.

Utilize the powerful features of Pabbly Chatflow to streamline your business operations and enhance customer service today!

Automate Gym Membership & Personal Training via WhatsApp with Pabbly Chatflow

Learn how to automate gym memberships and personal training via WhatsApp using Pabbly Chatflow with this detailed tutorial shows you how to build powerful chat automation that engages visitors and converts prospects—without any coding required.

Watch Step By Step Video Tutorial Below


1. Accessing Pabbly Chatflow for Automation

To begin automating gym membership and personal training via WhatsApp, first access Pabbly Chatflow. Simply visit www.Pabbly.com/chatflow in your browser. This platform is crucial for creating an automated WhatsApp chatbot that will handle inquiries efficiently.

Once on the Pabbly Chatflow website, you can log in or sign up for a new account. Existing users should click on ‘Sign In’, while new users can select ‘Sign Up for Free’ to receive 100 credits monthly. After logging in, you will be directed to the Pabbly apps page where you can access Pabbly Chatflow.


2. Creating Your WhatsApp Chatbot in Pabbly Chatflow

After accessing Pabbly Chatflow, it’s time to create your WhatsApp chatbot. Click on the ‘Flows’ option from the left sidebar to enter the flow builder. Here, you can create a new flow by clicking on ‘Add Flow’. Name your flow something relevant, such as ‘Automate Gym Membership and Personal Training via WhatsApp’.

  • Select a trigger event that will initiate the chatbot.
  • Use the ‘Keyword Regex Match’ option to set keywords like ‘gym membership’.
  • Ensure your chatbot can respond to variations of user inquiries.

After setting your trigger, you can start building your response messages. Use the text button to create welcoming messages and options for users to view plans or book training sessions. This is where Pabbly Chatflow truly shines, allowing you to customize user interactions seamlessly.


3. Setting Up Response Options in Pabbly Chatflow

In this section, you will configure how your chatbot responds to inquiries. Using the flow builder in Pabbly Chatflow, add buttons for options like ‘View Plans’ and ‘Book Training’. Each button will trigger specific responses based on user selections.

For example, when a user clicks ‘View Plans’, the chatbot should send a list of membership options. Create a list and fill it with various plans, detailing what each plan offers. Similarly, when the ‘Book Training’ button is clicked, ask the user which training session they would like to book.

  • Include options like ‘Cardio’, ‘Strength’, and ‘Yoga’.
  • Ensure each option leads to a follow-up question for user details.
  • Use contact custom fields to save user responses directly.

This structured approach simplifies the user experience and makes your chatbot more effective. The integration of Pabbly Chatflow allows for dynamic interactions that cater to user needs.


4. Saving User Data to Google Sheets via Pabbly Chatflow

To enhance your gym management, you can save user data directly to Google Sheets using Pabbly Chatflow. This is done by creating an API request within your flow. After collecting user information such as name, email, and membership type, set up an API request to send this data to your Google Sheet.

First, create a new workflow in Pabbly Connect to generate a webhook URL. This URL will be used in your Pabbly Chatflow flow to post data. After setting the request type to ‘POST’, enter the webhook URL and map the user responses to the appropriate fields in Google Sheets.

Map fields like Full Name, Email, and Membership to their respective columns. Test the API connection to ensure data is sent correctly. Save your flow to avoid losing any configurations.

This feature of Pabbly Chatflow not only automates responses but also streamlines data management for your gym, allowing you to focus on customer engagement.


5. Testing Your Chatbot for Effectiveness

Once you have configured your chatbot, it’s essential to test its functionality. Send a message via WhatsApp to your number connected with Pabbly Chatflow and observe how the chatbot responds. Ensure that all buttons and options work as intended and that data is being captured accurately.

For example, if you send a message like ‘I want to book a gym session’, the chatbot should respond with options for training types and follow-up questions. This testing phase is crucial to ensure that your chatbot is fully operational and meets user expectations.

After testing, you can refine your chatbot flows based on user feedback and interactions. With Pabbly Chatflow, you can continuously improve the user experience and automate responses effectively, ensuring that your gym operates smoothly.


Conclusion

By using Pabbly Chatflow, you can automate gym membership and personal training inquiries via WhatsApp efficiently. This tutorial has outlined the essential steps to create a responsive chatbot that enhances user experience and streamlines data management.

Ensure you check out Pabbly Connect to create business automation workflows and reduce manual tasks. Pabbly Connect currently offer integration with 2,000+ applications.

How to Send WooCommerce Order Confirmations via Gmail Automatically with Pabbly Connect

Learn how to automate sending WooCommerce order confirmations via Gmail using Pabbly Connect. Follow our detailed tutorial for step-by-step instructions. Eliminate manual repetitive tasks from your workflow. Discover proven automation methods with intuitive steps designed for efficiency-minded professionals.

Watch Step By Step Video Tutorial Below


1. Introduction to Pabbly Connect for WooCommerce and Gmail Integration

To send WooCommerce order confirmations via Gmail automatically, we will utilize Pabbly Connect. This powerful automation tool allows users to connect different applications seamlessly without any coding knowledge.

First, you need to access your Pabbly Connect account. If you are new, visit the Pabbly Connect website and click on ‘Sign Up for Free’ to create an account. Once logged in, navigate to the workflow builder, where you will set up the integration.


2. Setting Up the Trigger with WooCommerce in Pabbly Connect

In this section, we will set up WooCommerce as the trigger application using Pabbly Connect. Click on ‘Add Trigger’ and search for WooCommerce. Select it and choose the event ‘New Order Created’. This event will trigger the workflow whenever a new order is placed.

  • Click on ‘Connect’ to initiate the connection.
  • Copy the generated webhook URL.
  • Open your WooCommerce account and navigate to the settings.

Once you have copied the webhook URL, go to WooCommerce settings, then to the ‘Advanced’ tab, and find the ‘Webhooks’ option. Click on ‘Add Webhook’, name it (e.g., ‘New Order’), set the status to active, and paste the webhook URL. This connection allows Pabbly Connect to receive data from WooCommerce whenever an order is created.


3. Capturing the Webhook Response in Pabbly Connect

After setting up the webhook in WooCommerce, you need to capture the webhook response in Pabbly Connect. Click on ‘Recapture Webhook Response’ in your Pabbly Connect workflow. This will prepare the system to receive data about the new order.

To test the connection, place a new order in your WooCommerce store. Make sure to fill in all necessary details, including the customer’s email and name. Once the order is placed, Pabbly Connect will capture the response, showing you the order details, including the customer’s information.


4. Sending Confirmation Email via Gmail Using Pabbly Connect

Now that we have captured the order details, the next step is to send a confirmation email via Gmail. In your Pabbly Connect workflow, click on ‘Add Action Step’ and search for Gmail. Select it and choose the event ‘Send Email’. Click on ‘Connect’ to set up the Gmail connection.

  • Select or create a new connection by signing into your Gmail account.
  • Fill in the sender’s name and email address.
  • Map the recipient’s email address using the data captured from WooCommerce.

In the email subject, include the customer’s name and a confirmation message. For the email body, you can use HTML format to create a visually appealing message. Map the customer’s name and order details dynamically so that each email is personalized. Once everything is set up, click on ‘Save and Send Test Request’ to verify the process.


5. Conclusion: Automate Your WooCommerce Order Confirmations with Pabbly Connect

By following these steps, you can automate the process of sending WooCommerce order confirmations via Gmail using Pabbly Connect. This integration not only saves time but also enhances customer experience by providing immediate confirmation emails.

Ensure you check out Pabbly Connect to create business automation workflows and reduce manual tasks. Pabbly Connect currently offer integration with 2,000+ applications.

Now you can implement this automation in your own business to streamline order processing. With Pabbly Connect, you can easily connect various applications and create workflows that fit your needs. Start your free trial today and explore the possibilities!

Automatically Track LinkedIn Lead Ads in Airtable with Pabbly Connect

Learn how to automatically track LinkedIn Lead Ads leads in Airtable using Pabbly Connect. Follow this step-by-step tutorial for seamless integration. Explore systematic approaches to creating efficient automation solutions that convert technical concepts into practical, implementable instructions.

Watch Step By Step Video Tutorial Below


1. Introduction to Pabbly Connect for LinkedIn and Airtable Integration

Pabbly Connect is the ultimate solution for automating the tracking of LinkedIn Lead Ads leads in Airtable. By using Pabbly Connect, you can seamlessly integrate these two powerful applications without any coding knowledge. This integration allows you to automatically create records in Airtable whenever you receive a new lead from LinkedIn. using Pabbly Connect

To get started, you need to log into your Pabbly Connect account. If you are a new user, you can sign up for free and explore the features of Pabbly Connect. Once logged in, you will access the workflow builder, where the integration process begins.


2. Setting Up the Trigger in Pabbly Connect

To track LinkedIn Lead Ads leads automatically, the first step is to configure the trigger in Pabbly Connect. Click on the ‘Add Trigger’ button in your workflow builder. For the trigger application, search for and select Pabbly Connect and choose ‘LinkedIn’ as the application.

  • Select ‘Lead Notifications’ as the event.
  • Click on ‘Connect’ to establish the connection.
  • Choose to add a new connection or select an existing one.

If you are adding a new connection, log in to your LinkedIn account using your email and password. After connecting, select the sponsored account you are using for your ads and click on ‘Save and Send Test Request’. This will prepare Pabbly Connect to capture the lead details from LinkedIn.


3. Capturing Lead Details from LinkedIn

Once the trigger is set, it’s time to capture the lead details. After clicking on ‘Save and Send Test Request’, Pabbly Connect will wait for a webhook response. This is where you will need to test the submission of a lead from LinkedIn. using Pabbly Connect

  • Fill in the lead form on LinkedIn with the required details.
  • Submit the form to send the information to Pabbly Connect.

After submitting, you will see the details captured in Pabbly Connect. This confirms that the integration is working correctly and that the lead information is being sent from LinkedIn to Pabbly Connect.


4. Creating a Record in Airtable via Pabbly Connect

With the lead details successfully captured, the next step is to create a record in Airtable using Pabbly Connect. Click on the ‘Add New Action Step’ and search for Airtable as the action application. Select ‘Create Record’ as the event. using Pabbly Connect

Once again, you will need to connect Airtable with Pabbly Connect. If you have already set up a connection, select it; otherwise, click on ‘Add a New Connection’. Grant the necessary permissions to access your Airtable bases. You can choose to allow access to all records or just specific ones.

Next, you will select the base and table where the lead details will be stored. Instead of entering the details manually, use the mapping feature in Pabbly Connect. This allows you to dynamically insert the lead information from LinkedIn into Airtable, ensuring that each new lead is recorded accurately.


5. Finalizing the Automation Workflow

After mapping the lead details, click on ‘Save and Send Test Request’ to finalize the automation. Pabbly Connect will provide a positive response indicating that the details have been successfully added to Airtable. You should see the first name, last name, email, and phone number of the lead reflected in your Airtable base. using Pabbly Connect

This means that every time a new lead is generated from LinkedIn, the details will be automatically added to Airtable without any manual effort. This automation saves time and ensures that you never miss a lead from your LinkedIn ads.

With Pabbly Connect, you can now efficiently track LinkedIn Lead Ads leads in Airtable and focus more on converting those leads into customers.


Conclusion

In this tutorial, we explored how to use Pabbly Connect to automatically track LinkedIn Lead Ads leads in Airtable. By following these steps, you can streamline your lead management process and enhance your business efficiency.

Ensure you check out Pabbly Connect to create business automation workflows and reduce manual tasks. Pabbly Connect currently offer integration with 2,000+ applications.

Automate LinkedIn Lead Ads Follow-Up: Send Personalized Emails via Gmail Instantly with Pabbly Connect

Learn how to automate follow-up emails from LinkedIn Lead Ads to Gmail instantly using Pabbly Connect. Step-by-step tutorial with detailed instructions. Revolutionize your productivity approach with just a few strategic clicks. Uncover professional methods for connecting applications and creating workflows that reclaim hours of your week.

Watch Step By Step Video Tutorial Below


1. Accessing Pabbly Connect for Automation

To automate follow-up emails via Gmail using Pabbly Connect, start by accessing the platform. Navigate to www.Pabbly.com/connect in your web browser. This will take you to the Pabbly Connect homepage where you can either sign in or sign up for a free account.

If you are a new user, click on the ‘Sign Up Free’ button to create an account and receive 100 free tasks per month. Existing users should simply log in. Once logged in, you will be directed to the Pabbly Connect dashboard, where you can begin setting up your automation.


2. Creating a Workflow in Pabbly Connect

After accessing your Pabbly Connect dashboard, the next step is to create a new workflow. Click on the ‘Create Workflow’ button located at the top right corner of the dashboard. You will be prompted to select a workflow builder option. using Pabbly Connect

  • Choose the Beta version for a modern interface.
  • Name your workflow, for example, ‘Send Personalized Emails via Gmail Instantly’.
  • Select a folder to save your workflow, such as ‘Automations’.

After naming your workflow and selecting a folder, click on the ‘Create’ button. This will open the workflow setup screen where you can define the trigger and action steps for your automation.


3. Setting Up the Trigger for LinkedIn Lead Ads

In this step, you will set the trigger event for your workflow. Click on the ‘Add Trigger’ button and select LinkedIn as your trigger application. Choose the event as ‘Lead Notifications’. This will initiate the workflow whenever a new lead is captured from your LinkedIn Lead Ads.

To connect your LinkedIn account, click on ‘Connect’ and select your existing connection or create a new connection. Ensure you are logged into your LinkedIn account in the same browser for seamless integration with Pabbly Connect. After successful connection, you will need to select the sponsored account to use for this automation.


4. Testing the LinkedIn Trigger

Once you have set up the trigger, it is crucial to test it to ensure it works correctly. Generate a test lead using your LinkedIn Lead Ads form. This can be done by filling out the lead form you have set up previously.

After submitting the test lead, return to your Pabbly Connect dashboard and check for a successful response. The response should include the lead’s details such as email address, name, and company details, confirming that the trigger is functioning as expected.


5. Setting Up the Action to Send Emails via Gmail

Now, you will configure the action step to send a personalized email through Gmail. Click on ‘Add Action’ and select Gmail as your action application. Choose the event as ‘Send Email’. This will allow you to send an email to the lead instantly. using Pabbly Connect

  • Connect your Gmail account by clicking ‘Connect’ and following the prompts.
  • Map the recipient’s email address from the trigger step to ensure the email goes to the right lead.
  • Fill in the email subject and body content, using HTML for formatting if desired.

Finally, click on the ‘Save and Send Test Request’ button to send a test email. Check the recipient’s inbox to confirm that the email has been sent successfully.


Conclusion

By following these steps, you can effectively automate follow-up emails from LinkedIn Lead Ads to Gmail using Pabbly Connect. This integration allows you to send personalized emails instantly, enhancing your lead engagement and improving conversion rates. Start automating your follow-ups today!

Ensure you check out Pabbly Connect to create business automation workflows and reduce manual tasks. Pabbly Connect currently offer integration with 2,000+ applications.

Automatically Send Zoho Form Submissions to Pipedrive CRM with Pabbly Connect

Learn how to automatically send Zoho form submissions to Pipedrive CRM using Pabbly Connect in this step-by-step tutorial. Implement the precise methodologies leading organizations use to automate repetitive tasks, illustrated with practical examples designed for immediate application.

Watch Step By Step Video Tutorial Below


1. Accessing Pabbly Connect for Integration

To start sending Zoho form submissions to Pipedrive CRM automatically, you first need to access Pabbly Connect. Begin by navigating to the Pabbly Connect website at Pabbly.com/connect. Here, you will find options to sign in or sign up for a free account, allowing you to explore the platform.

After signing in, you will be directed to the dashboard where you can access all Pabbly applications. Click on ‘Access Now’ under Pabbly Connect to enter the workflow setup area. This is where you will create the automation that connects Zoho Forms with Pipedrive CRM seamlessly.


2. Creating a Workflow in Pabbly Connect

Within Pabbly Connect, the next step is to create a new workflow. Click on the ‘Create Workflow’ button located at the top right corner of the dashboard. You will be prompted to select between the new beta version or the classic version; choose the beta for a modern experience.

  • Select the beta version by clicking on the ‘Select’ button.
  • Name your workflow something descriptive like ‘Send Zoho Form Submissions to Pipedrive CRM Automatically.’
  • Choose the appropriate folder to save your workflow.

After naming your workflow, click on the ‘Create’ button to proceed. This sets the stage for defining the trigger and action that will automate the process of sending form submissions from Zoho to Pipedrive.


3. Setting Up the Trigger with Zoho Forms

The next step in Pabbly Connect is to set up the trigger. Click on the ‘Add Trigger’ button and select Zoho Forms as your application. Choose the event ‘New Form Submitted’ to initiate the workflow whenever a new submission is received.

Upon selecting this, a webhook URL will be generated. Copy this URL as it will be used to connect Zoho Forms to Pabbly Connect. Now, head over to your Zoho Forms account and locate the form you want to integrate. Edit the form, go to the integrations section, and select webhooks to input the copied URL.


4. Testing the Integration with a Form Submission

Now that you have set up the trigger, it’s time to test the integration. Make a test submission on your Zoho form with dummy data such as first name, last name, email, and phone number. After submitting, you should see a confirmation message indicating that your response was submitted successfully.

Return to Pabbly Connect and check if the webhook response has been received. If successful, you will see the details of the test submission appear, confirming that the connection between Zoho Forms and Pipedrive CRM is working correctly.


5. Adding Action Step to Create a Person in Pipedrive

The final step in this automation process is to define the action that occurs after receiving a new submission. Select Pipedrive as your action application and choose ‘Create Person’ as the event. Click on ‘Connect’ to establish a new connection with your Pipedrive account.

To connect, you will need to enter your Pipedrive API token. You can find this in your Pipedrive account under personal preferences. Copy the token and paste it into Pabbly Connect. Once connected, map the fields from your Zoho form submission to the corresponding fields in Pipedrive, such as name, email, and phone number.

After mapping, click on ‘Save and Send Test Request’ to finalize the action. Upon successful execution, you should see the new person created in your Pipedrive account, confirming that the automation is fully operational.


Conclusion

In this tutorial, we explored how to automatically send Zoho form submissions to Pipedrive CRM using Pabbly Connect. By following the steps outlined, you can streamline your lead management process, ensuring that every new submission is captured in your CRM efficiently. This integration not only saves time but also enhances your workflow, making it easier to manage leads effectively.

Ensure you check out Pabbly Connect to create business automation workflows and reduce manual tasks. Pabbly Connect currently offer integration with 2,000+ applications.

How to Track New Leads from Instagram Lead Ads in Google Sheets Using Pabbly Connect

Learn how to track new leads from Instagram Lead Ads in Google Sheets using Pabbly Connect. Follow our step-by-step tutorial for seamless integration. Build sophisticated automated workflows in less time than you think. This guide translates complex integrations into straightforward steps for immediate implementation.

Watch Step By Step Video Tutorial Below


1. Accessing Pabbly Connect for Instagram Leads

To track new leads from Instagram Lead Ads, the first step is accessing Pabbly Connect. This powerful automation tool allows you to connect various applications seamlessly. Begin by visiting the Pabbly Connect website and signing up or logging in to your account.

Once logged in, navigate to the dashboard. Here, you will find the option to create a new workflow. This is where you will set up the integration between Instagram and Google Sheets using Pabbly Connect.


2. Creating a Workflow in Pabbly Connect

After accessing your dashboard, click on the ‘Create Workflow’ button to initiate the setup process. You will be prompted to choose between the new or classic workflow builder. Select the new workflow builder for a modern interface, then enter a name for your workflow and select a folder for organization.

  • Click on ‘Create’ to open the workflow window.
  • You will see options for setting triggers and actions.
  • Triggers will start the workflow, while actions will execute tasks based on those triggers.

In this workflow, you will set Instagram Lead Ads as the trigger application. This integration is facilitated by Pabbly Connect, ensuring that every new lead from your Instagram ads is captured accurately.


3. Setting Up Instagram Lead Ads as a Trigger

To set up Instagram Lead Ads as your trigger, click on the ‘Add Trigger’ button within your workflow. Search for and select ‘Instagram Lead Ads’ as your application. For the event, choose ‘New Lead Instant’ to ensure you capture leads in real-time.

Next, click on ‘Connect’. If you have previously connected your Instagram account to Pabbly Connect, select the existing connection. Otherwise, create a new connection by logging into your Facebook account, which is necessary since Instagram ads are managed through Facebook.

  • Select the relevant Facebook account linked to your Instagram.
  • Choose the specific Facebook page and lead form you are using for your ads.
  • Click ‘Save and Send Test Request’ to capture the lead data.

With Pabbly Connect, you ensure that every new lead generated on Instagram is automatically tracked and can be processed further.


4. Adding Google Sheets as an Action Step

Once the Instagram trigger is set, it’s time to add Google Sheets as your action application. Click on the ‘Add New Action Step’ button and select ‘Google Sheets’ from the application list. Choose the event as ‘Add New Row’ to insert lead details into your spreadsheet.

Click on ‘Connect’ to establish a connection with Google Sheets. If a connection already exists, select it; otherwise, create a new connection by signing in with your Gmail account. Allow Pabbly Connect the necessary permissions to access your Google Sheets.

Select the specific spreadsheet and worksheet where lead data will be stored. Map the lead data fields from Instagram to the corresponding columns in Google Sheets. Click ‘Save and Send Test Request’ to verify the integration.

This step is crucial as it allows Pabbly Connect to dynamically insert new lead information directly into your Google Sheets, streamlining your lead tracking process.


5. Finalizing the Integration and Testing

Now that you have set up both the trigger and action, it’s essential to finalize the integration. Ensure that all mappings are correctly set, and then click on ‘Save and Send Test Request’ to test the entire workflow.

After submitting a test lead through your Instagram Lead Ads form, check your Google Sheets to confirm that the lead details have been captured accurately. This real-time tracking of leads is made possible by Pabbly Connect, which automates the entire process without manual intervention.

Once everything is confirmed to be working correctly, you can activate the workflow. From now on, every new lead generated from Instagram ads will automatically populate in your Google Sheets, simplifying your lead management process.


Conclusion

In this tutorial, we explored how to track new leads from Instagram Lead Ads in Google Sheets using Pabbly Connect. By following the outlined steps, you can automate the lead tracking process efficiently. This integration not only saves time but also enhances your lead management capabilities, allowing you to focus on growing your business.

Ensure you check out Pabbly Connect to create business automation workflows and reduce manual tasks. Pabbly Connect currently offer integration with 2,000+ applications.

How to Send Product Recommendations After a Purchase Using Stripe with Pabbly Connect

Learn how to automate sending product recommendations after a purchase using Stripe and Pabbly Connect in this step-by-step tutorial. This comprehensive guide reveals exactly how to connect your applications and automate repetitive tasks — accessible for professionals of all technical backgrounds.

Watch Step By Step Video Tutorial Below


1. Accessing Pabbly Connect for Automation

To send product recommendations after a purchase using Stripe, the first step is to access Pabbly Connect. This powerful automation tool allows you to integrate various applications seamlessly. Start by visiting the Pabbly Connect website and signing up for a free account if you are a new user.

Once you are logged in, you will land on the dashboard. Here, you can create and manage your automation workflows. Pabbly Connect enables you to connect Stripe and Gmail to automate sending personalized product recommendations after a purchase.


2. Creating a Workflow in Pabbly Connect

After accessing Pabbly Connect, the next step is to create a new workflow for sending product recommendations. Click on the ‘Create Workflow’ button on the dashboard. You will then need to select the classic workflow builder for this tutorial.

  • Name your workflow meaningfully, such as ‘Product Recommendations After Purchase Using Stripe’.
  • Select the appropriate folder to store your workflow.
  • Click on the ‘Create’ button to finalize your workflow setup.

Now your workflow is ready for configuration. Pabbly Connect allows you to set up triggers and actions that will automate the process of sending product recommendations to customers.


3. Setting Up the Trigger with Stripe

The trigger for this automation will be a new purchase made in Stripe. In your Pabbly Connect workflow, select Stripe as the application and choose the trigger event as ‘New Charge’. This setup will initiate the automation whenever a new payment is processed.

After selecting the trigger event, a webhook URL will be generated. Copy this URL and navigate to your Stripe account. In Stripe, go to the Developers section and select Webhooks. Here, you will add a new webhook by pasting the copied URL and selecting the event ‘Charge Succeeded’ to ensure that your trigger activates correctly.


4. Using OpenAI to Generate Product Recommendations

Once the trigger is set up, the next action is to generate product recommendations using OpenAI. In your Pabbly Connect workflow, add OpenAI as the next application and select the action event as ‘Chat GPT’. This integration will allow you to utilize AI to recommend products based on the customer’s previous purchase.

You will need to connect your OpenAI account by providing your API key. After connecting, specify the model you wish to use, such as ‘GPT-4 Mini’. In the prompt section, instruct OpenAI to recommend products from your catalog, ensuring it does not repeat the purchased product. This setup allows for personalized and relevant recommendations every time a purchase is made.


5. Sending Email Recommendations via Gmail

The final step in your Pabbly Connect workflow is to send the generated product recommendations to the customer’s email via Gmail. Add Gmail as the next application in your workflow and select the action event ‘Send Email’.

Connect your Gmail account and set up the email details, including the sender name and email address. Map the recipient’s email address from the previous steps, ensuring that the email content includes the personalized product recommendations generated by OpenAI. This way, every time a purchase is made, the customer receives tailored product suggestions directly to their inbox.


Conclusion

In this tutorial, we demonstrated how to use Pabbly Connect to automate sending product recommendations after a purchase using Stripe. By integrating Stripe, OpenAI, and Gmail, you can enhance your customer experience and streamline your marketing efforts. Start using Pabbly Connect today to create your own automated workflows!

Ensure you check out Pabbly Connect to create business automation workflows and reduce manual tasks. Pabbly Connect currently offer integration with 2,000+ applications.

Automatically Post Product Reviews to Facebook Using Pabbly Connect

Learn how to automatically post product reviews to Facebook using Pabbly Connect, Google Forms, and Google Sheets. Step-by-step tutorial included. Revolutionize your productivity approach with just a few strategic clicks. Uncover professional methods for connecting applications and creating workflows that reclaim hours of your week.

Watch Step By Step Video Tutorial Below


1. Accessing Pabbly Connect for Integration

To start automatically posting product reviews to Facebook, you need to access Pabbly Connect. First, visit the Pabbly website and navigate to the Pabbly Connect section. If you are a new user, click on ‘Sign Up Free’ to create an account. Existing users can simply log in to their account.

Once logged in, you will be directed to the Pabbly Connect dashboard, where you can create and manage your workflows. Here, you will set up the integration between Google Forms and Facebook. Make sure to familiarize yourself with the dashboard layout for a smoother setup process.


2. Creating a Workflow in Pabbly Connect

In this step, you will create a new workflow in Pabbly Connect. Click on the ‘Create Workflow’ button located at the top right corner of your dashboard. You will be prompted to name your workflow, so enter a descriptive name like ‘Automatically Post Product Reviews to Facebook’.

  • Select the folder to save your workflow.
  • Choose between the Beta and Classic versions of the workflow builder.
  • Click on the ‘Select’ button to proceed.

After naming your workflow, you will see options to select the folder where you want to save it. Choose a suitable folder or create a new one as per your requirement. This organization helps in managing multiple workflows efficiently.


3. Setting Up Trigger for Google Forms

Now, set up the trigger for your workflow using Pabbly Connect. Click on the ‘Add Trigger’ button and select ‘Google Forms’ as the application. Choose ‘New Response Received’ as the event to trigger the workflow whenever a new review is submitted through your Google Form.

After selecting the trigger, you will receive a Webhook URL. Copy this URL, as you will need to paste it into your Google Form to establish the connection. This step is crucial for capturing the responses from your Google Form into Pabbly Connect.


4. Connecting Google Sheets for Data Storage

Next, you need to connect Google Sheets to store the responses received from your Google Forms through Pabbly Connect. In your Google Form, navigate to the ‘Responses’ tab and click on the green Sheets icon to create a new Google Sheet. This sheet will be used to organize and store all the review data.

  • Ensure that the Google Sheet is linked to the correct Google Form.
  • Check that all fields from the form are captured in the sheet.

Once the Google Sheet is created, you will need to set up an add-on for Pabbly Connect within Google Sheets. This allows Pabbly to access the data stored in your Google Sheets, enabling seamless integration between your form submissions and the Facebook posts.


5. Finalizing Automation to Post on Facebook

Finally, you will configure the action step in Pabbly Connect to post the reviews on your Facebook page. Click on ‘Add Action’ and select ‘Facebook Pages’ as the application. Choose ‘Create Page Post’ as the event to create a new post whenever a review is received.

In this step, you will map the fields from your Google Sheets to the Facebook post. This includes the product name, review, customer name, and rating. Once all fields are mapped correctly, save your settings and test the integration to ensure that new reviews are posted automatically to your Facebook page.


Conclusion

By following these steps, you can easily set up an automation using Pabbly Connect to post product reviews automatically on Facebook. This integration not only streamlines your workflow but also enhances your social media presence effectively.

Ensure you check out Pabbly Connect to create business automation workflows and reduce manual tasks. Pabbly Connect currently offer integration with 2,000+ applications.

Automate Follow-Up Tasks in Monday.com with Google Lead Ads Using Pabbly Connect

Learn how to automatically create follow-up tasks in Monday.com for Google Lead Ads leads using Pabbly Connect. Step-by-step integration guide included! Explore systematic approaches to creating efficient automation solutions that convert technical concepts into practical, implementable instructions.

Watch Step By Step Video Tutorial Below


1. Accessing Pabbly Connect for Automation

To start automating follow-up tasks in Monday.com for Google Lead Ads leads, you first need to access Pabbly Connect. Begin by visiting the Pabbly website and signing into your account. If you don’t have an account, you can sign up for free and get 100 tasks monthly.

After signing in, you will see the Pabbly apps page. Click on Pabbly Connect to access the dashboard where you can create and manage your workflows. This platform is crucial as it facilitates the integration between Google Ads and Monday.com, enabling seamless automation of task creation.


2. Creating a Workflow in Pabbly Connect

Once in Pabbly Connect, click on the ‘Create Workflow’ button. Name your workflow, such as ‘Create Follow-Up Task Automatically in Monday.com from Google Ads Leads’. This name helps you identify the workflow easily in the future.

  • Select the new beta workflow builder for a modern experience.
  • Choose a folder to organize your workflow, like ‘All Automations’.

After creating the workflow, you will need to set up a trigger application. For this integration, select Google Ads as the trigger application and choose the trigger event as ‘New Lead Form Entry’. This step is essential as it initiates the automation whenever a new lead is captured.


3. Connecting Google Ads to Pabbly Connect

To connect Google Ads with Pabbly Connect, a webhook URL will be provided. This URL acts as a bridge between the two platforms. Copy the URL and navigate to your Google Ads account to set up the lead form.

  • Create a test lead form with fields for first name, last name, email, phone, and company name.
  • In the lead delivery section, add the webhook URL from Pabbly Connect.

After adding the webhook URL, send a test data request from Google Ads to ensure that the connection is successfully established. Once the test data is sent, you should see the lead details appear in your Pabbly Connect workflow, confirming that the integration is working correctly.


4. Setting Up Monday.com in Pabbly Connect

Now that Google Ads is connected, the next step involves setting up Monday.com as the action application in your workflow. In Pabbly Connect, add a new action step and search for Monday.com. Select the action event as ‘Create Item’.

To connect to Monday.com, you will need an API token. Navigate to your Monday.com account, go to your profile, and find the API token. Copy this token and paste it into Pabbly Connect to establish the connection.

Select the board where you want to create the item, such as ‘Google Ads Leads’. Map the fields from the Google Ads lead data to the corresponding fields in Monday.com.

After mapping the fields, such as the lead’s first name, last name, and email address, click on ‘Save and Send Test Request’. This action will create the item in Monday.com, confirming that the integration is functioning as expected.


5. Conclusion: Automate Your Workflow with Pabbly Connect

In summary, using Pabbly Connect to automate the creation of follow-up tasks in Monday.com for Google Lead Ads leads is a straightforward process. With just a few steps, you can connect these platforms and ensure that every new lead is promptly followed up.

Ensure you check out Pabbly Connect to create business automation workflows and reduce manual tasks. Pabbly Connect currently offer integration with 2,000+ applications.

Check out Pabbly Connect – Automate your business workflows effortlessly! Sign Up Free – Start your journey with ease! 10,000+ Video Tutorials – Learn step by step! Join Pabbly Facebook Group – Connect with 21,000+ like minded people!

This automation not only saves time but also enhances your efficiency in managing leads. By leveraging Pabbly Connect, you can focus more on engaging with your leads rather than on manual data entry. Start automating your workflows today!