Do you send emails to every recipient manually? Have ever wondered if all this can be done automatically and you can save a lot of time and can invest that into some other work?

Well, if the answer to these questions is yes, then we have a solution to your problem called Pabbly Connect. Through this amazing software, you can easily integrate one application to another to transmit data with a few simple steps. You just have to make few clicks in the software and you are ready to roll.
Why Choose This Method Of Integration?
In contrast with other integration services-
- Pabbly Connect does not charge you for its in-built apps like filters, Iterator, Router, Data transformer and more
- Create “Unlimited Workflows” and smoothly define multiple tasks for each action
- As compared to other services which offer 750 tasks at $24.99, Pabbly Connect proffers 50000 tasks in the starter plan of $29 itself
- Unlike Zapier, there’s no restriction on features. Get access to advanced features even in the basic plan
- Try before you buy! Before spending your money, you can actually signup & try out the working of Pabbly Connect for FREE
Pabbly Connect also offers so many great and helping features for your projects like you can create unlimited workflows, integrate thousands of applications, set unlimited triggers, set unlimited actions to those triggers, and you get all these features even with the free plan.
In this blog, we are talking about how you can send bulk emails via Google Sheets and SMTP service. Hence, without taking any more of your time, let’s get started with the blog.
Step 1 : Sign up to Pabbly Connect

Start the process by signing up for Pabbly Connect. Quickly fill in the details manually or sign-up via your Google account.
Try Pabbly Connect for FREE
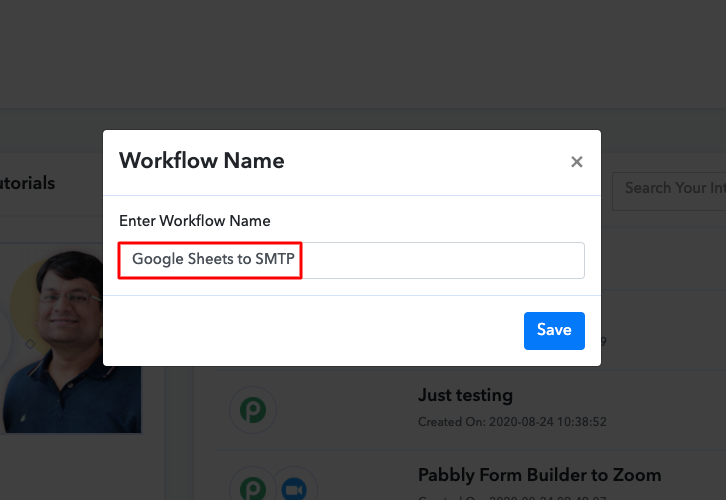
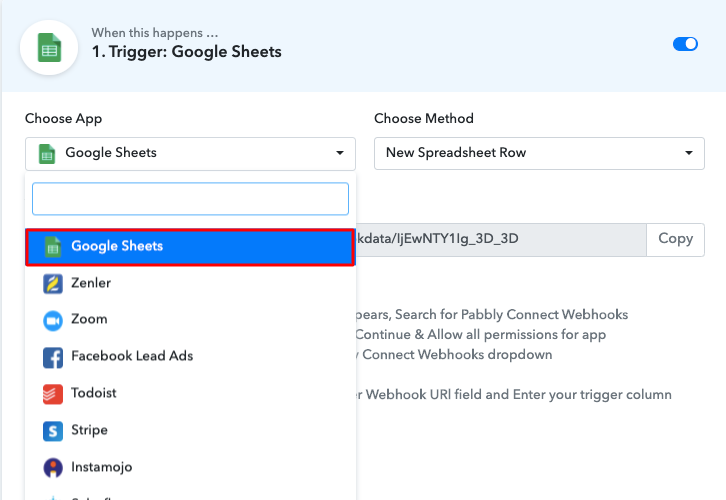
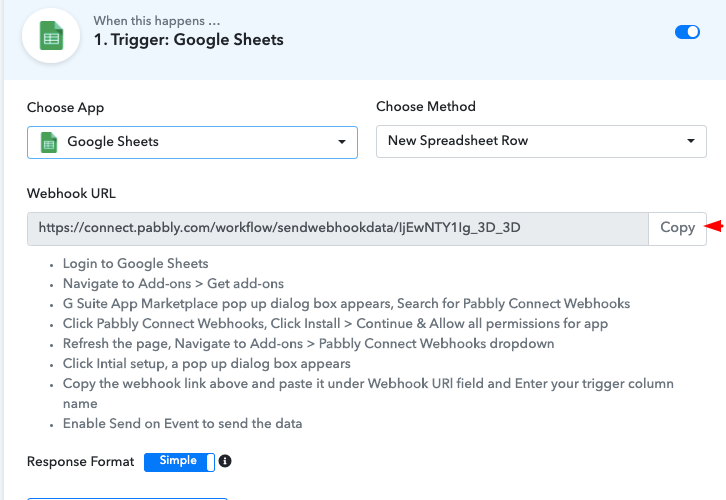
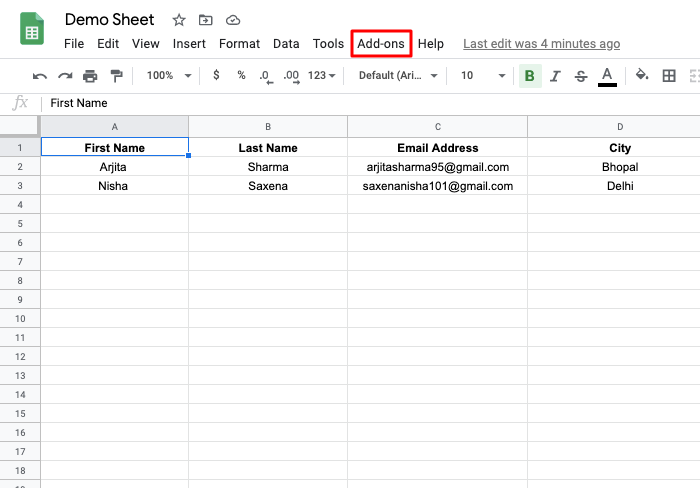
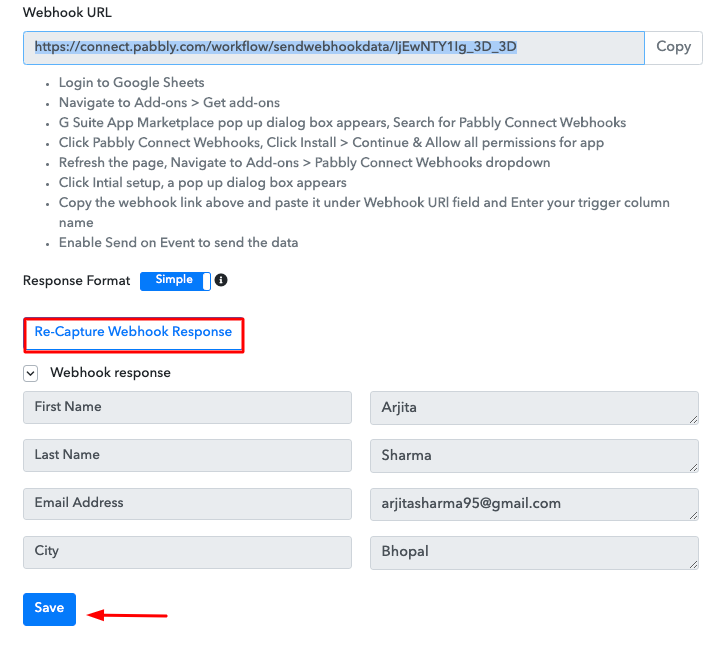
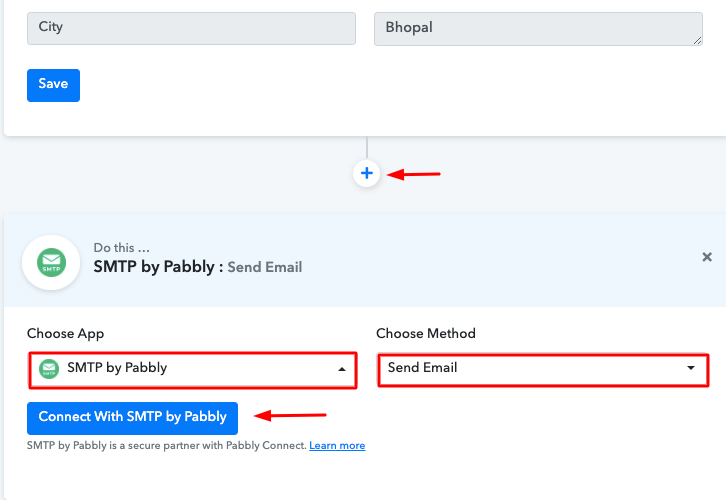
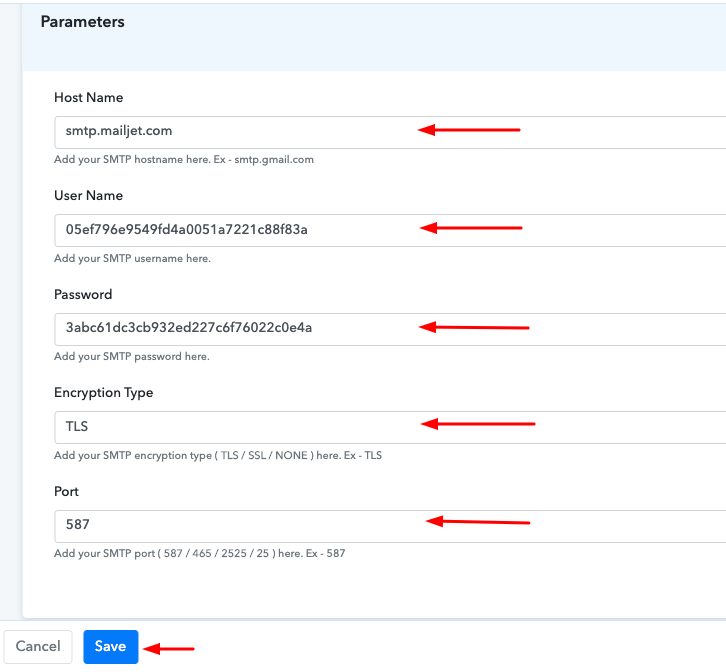
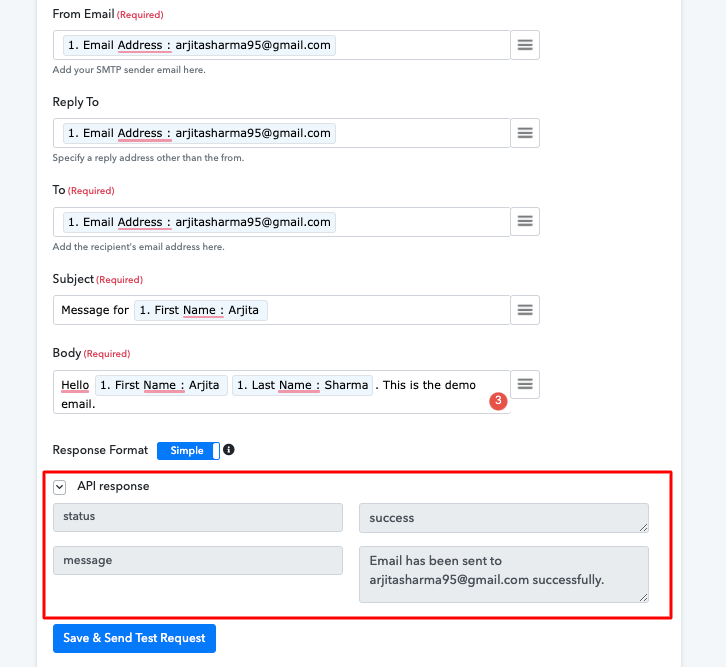
After completing the signup process, click on the Connect section on the dashboard. Start with creating a workflow for your project by clicking on the ‘Create New Workflow’ button. Next, you need to name the workflow just like in the above-shown image. I named the workflow as Google Sheets to SMTP, you can obviously name the workflow as per your requirements. As soon as you are done with creating a workflow, you will have to select the application you want to integrate. Using Pabbly Connect one can bind or connect unlimited apps, click here to create your free account. Now, you have to select the application that you want to integrate. In this case, we are choosing “Google Sheets” for integration. After selecting the application, now you have to copy the webhook URL just like in the above-shown image to take further the integration process. To connect with Google Sheets, you have to paste the copied Webhook URL in your Google Sheet Add-ons section. Go to your Google Sheet that you want to integrate and click on the “Add-ons” option above and then select the add-ons. We have selected “Pabbly Connect Add-on” and if you don’t have them, then you can also install the add-ons. After selecting the add-ons, click on “Initial Set-up” and then paste the copied webhook URL. Once you have pasted the URL, now you have to mention the trigger column and then click on the “Send Test” button. To test the Google Sheet data you have to click on “Capture Webhook Response” in Pabbly Connect. As soon as you click on the “Send Test” in Google Sheet and “Capture Webhook Response” in Pabbly Connect the entry will appear on the Pabbly Connect dashboard. Then, click on the “Save” option. In this step, we will be adding an action for your trigger. Now in this step, click on the + button below and choose SMTP by Pabbly among various other applications. After choosing SMTP by Pabbly, now you have to select “Send Email” and then click on the “Connect with SMTP by Pabbly” button. To connect SMTP by Pabbly to Pabbly Connect, you have to enter parameters provided by your SMTP server in Pabbly Connect dashboard. After clicking on the button, a pop-up window will appear where you have to add the hostname, username, password, encryption type, and port of your SMTP service. You can use any SMTP provider for this. After saving your workflow map up all the required fields and click on the “Send Test Request” button. You can see as you send a test request, the email is delivered to the recipient picked from the Google Sheet. Now, whenever you want to send emails automatically to bulk recipients you can choose in add-ons “Send All Data” while doing the integration. Now, that you know how to send bulk emails via Google Sheets and SMTP service, you can integrate any applications just by following these simple steps. Other than this integration, you can integrate thousands of other applications on Pabbly Connect. All thanks to Pabbly Connect now data transmission is an easy task. Every information you want to transmit from one application to another can now be updated automatically. You don’t have to worry about anything. Therefore, integrate, and relax. For any doubts, please leave your comments below.Step 2 : Access Pabbly Connect

Step 3 : WorkFlow for Google Sheets to SMTP Integration
(a) Create New Workflow

(b) Name the Workflow for Google Sheets to SMTP
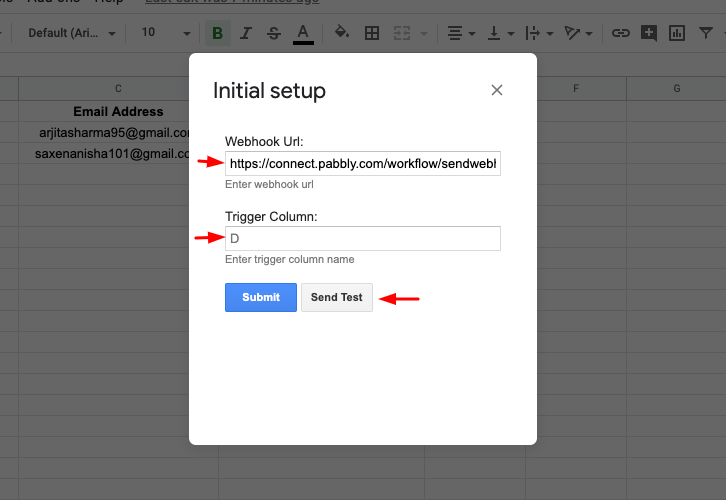
Step 4 : Setting Triggers for Google Sheets to SMTP Integration
(a) Select Application you want to Integrate
(b) Copy the Webhook URL
Step 5 : Paste the Webhook URL in Google Sheets
(a) Click on Add-ons
(b) Paste the Webhook URL
Step 6 : Test the Submission in Pabbly Connect Dashboard
Step 7 : Setting Action for Google Sheets to SMTP Integration
(a) Select SMTP by Pabbly
Step 8 : Connecting ‘SMTP by Pabbly’ to Pabbly Connect
(a) Add Parameters
(b) Send a Test Request

Conclusion –
You May Also Like to Read –


