If you want to split the automation workflow into different paths then you can do it with conditional integration. The conditioning step works according to rules. Subscribers who match the rule or rule set will follow the Yes or Thumb up path. Subscribers who don’t match the rule or rule set will follow the No or Thumb down the path.
In this article, we’re using Pabbly Connect for applying conditional routing between Google Sheets & MailerLite. It allows you to automatically send information between these two apps within a few minutes according to the specified condition.
With Pabbly Connect you can easily set-up a trigger and its respective action. Here, we’ll simply set-up a trigger on Google Sheet that whenever a condition matches, it will automatically take action to send an email instantly inside the MailerLite.
Pabbly Connect allows you to create unlimited workflows with instant triggers and multi-step calls. Also, it allows you to set filters and route data smoothly.
Why Choose This Method Of Integration?
In contrast with other integration services-
- Pabbly Connect does not charge you for its in-built apps like filters, Iterator, Router, Data transformer and more
- Create “Unlimited Workflows” and smoothly define multiple tasks for each action
- As compared to other services which offer 750 tasks at $24.99, Pabbly Connect proffers 50000 tasks in the starter plan of $29 itself
- Unlike Zapier, there’s no restriction on features. Get access to advanced features even in the basic plan
- Try before you buy! Before spending your money, you can actually signup & try out the working of Pabbly Connect for FREE
Let’s get started with the step by step procedure to setup conditional integration between Google Sheets and MailerLite without any technical skills.
Step 1: Open Your Subscribers List to Add Emails to MailerLite
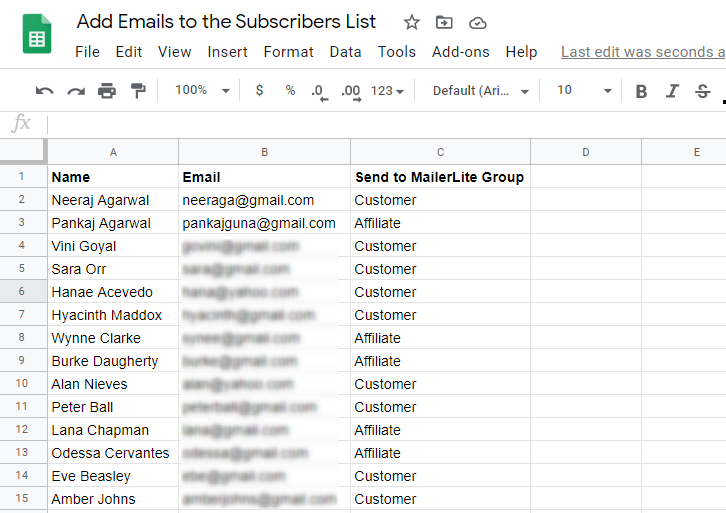
Here, we are applying conditional routing between Google Sheets and MailerLite so that you can send data from Google Sheet to MailerLite according to the specified condition. For conditional integration, we are distributing the emails on the basis of customer and affiliate groups.
For e.g., if you see the customer field you’ll send this email to a different group inside MailerLite and if you see the Affiliate option you’ll send this data to a different group.
(a) Go to the Add-ons Button of Sheet Menu Bar
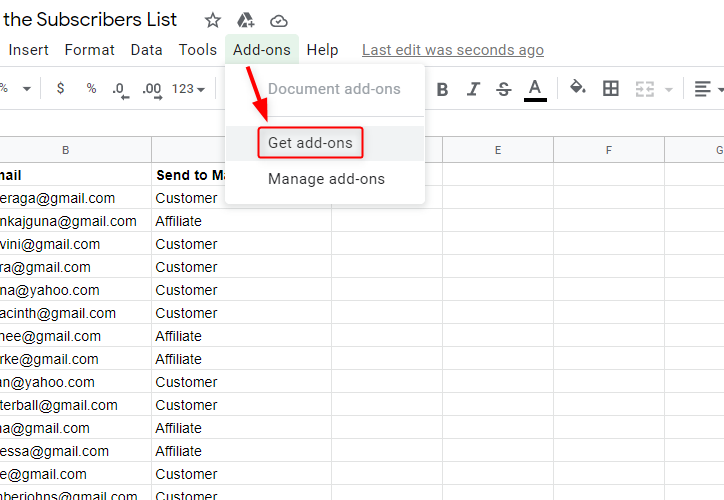
Firstly you need to install the Pabbly Connect Webhook for integrating Google Sheets & MailerLite. Just click on the “Add-ons” button from the sheet menu bar and go to the “Get add-ons” option.
(b) Install Pabbly Connect Webhooks
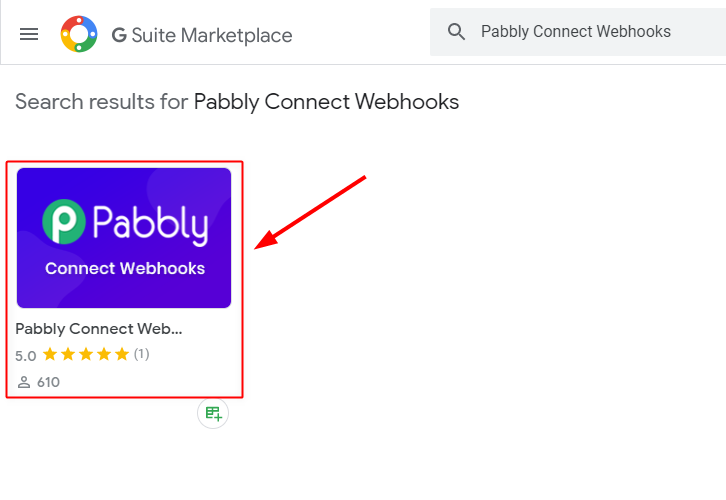
Next, when you click on the “Get add-ons” button, the G Suite Marketplace window will appear on your screen. Momentarily, search for the Pabbly Connect Webhooks and install it for integrating Google Sheets and MailerLite.
(c) Go to Pabbly Connect Webhooks and Click on Initial Setup Option
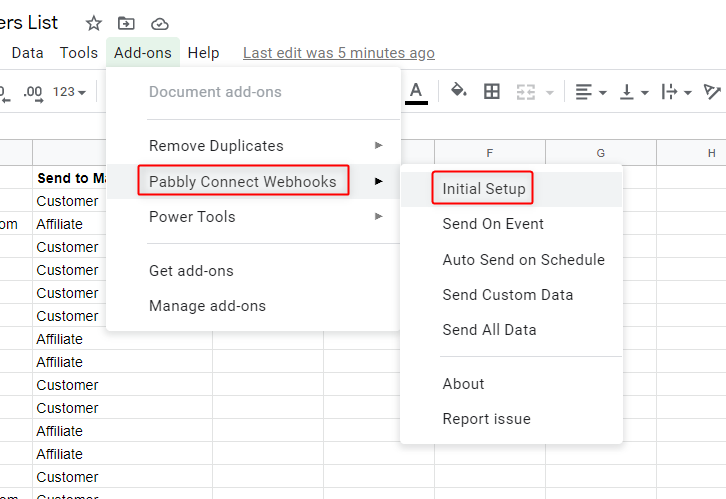
After installing the Pabbly Connect Webhook you will see that it appears on the add-ons section. Now go to the “Initial Setup” option.
Step 2: Sign-up to Pabbly Connect

Now, to create your workflow, visit the Pabbly Connect website and Signup to your account. Either manually fill all the details or sign-up via your Google account.
Step 3: Access Pabbly Connect
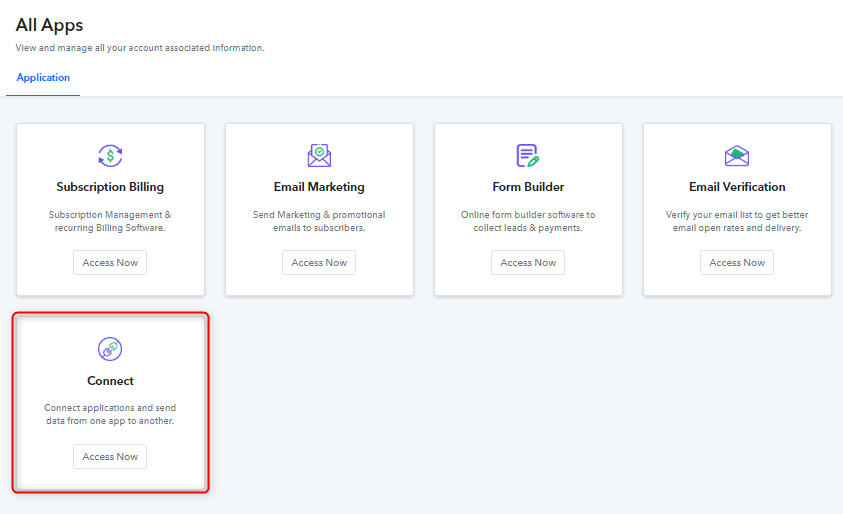
After completing the signup process, go to the “Connect” option and click on the “Access Now” button.
Step 4: Create a WorkFlow to Add Data to Google Sheets
(a) Create New Workflow

Let’s begin the process of creating a conditional workflow between Google Sheets & MailerLite by hitting the ‘Create New Workflow’ button.
(b) Name the Workflow

Following, named your workflow according to your project, which in our case is “Google Sheet Conditional Sending to MailerLite.”
Step 5: Setting Trigger
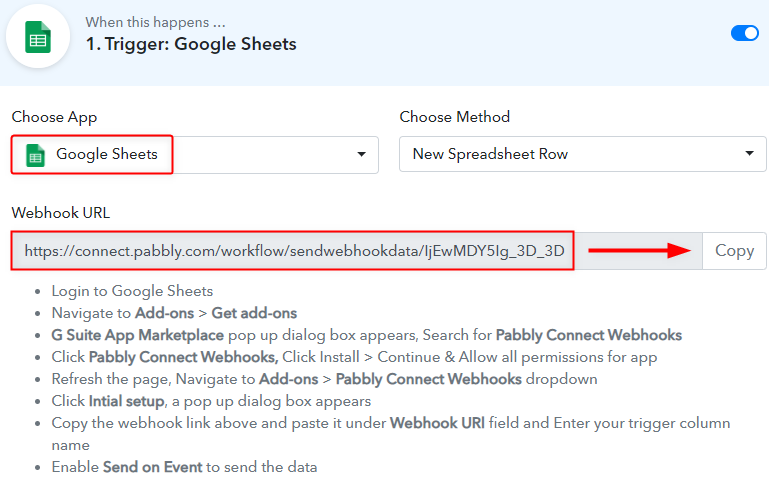
In this step, you need to choose the trigger app, i.e Google Sheets which you want to integrate with MailerLiter. Additionally, copy the webhook URL which appears on the Pabbly Connect dashboard. Basically, a Webhook URL is a way to receive data from the application without any coding requirement.
(a) Go Back to the Google Sheet and Paste the Webhook URL
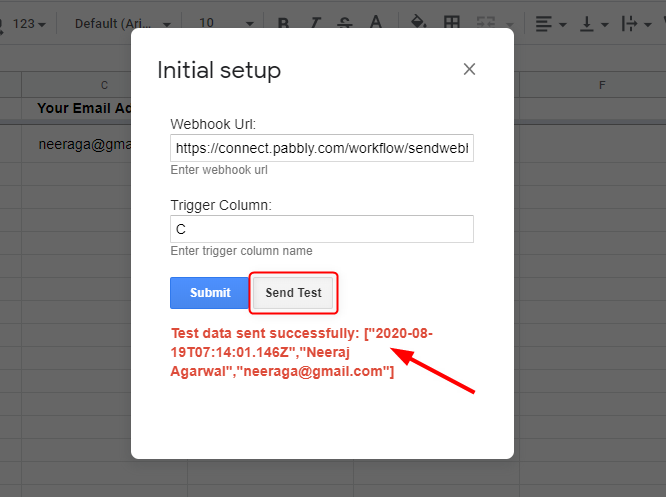
Now go back to the Google spreadsheet, paste the Webhook URL. Also, you have to set the trigger which is the last column of your sheet. Now click on the “Send Test” button and can see the name, date, and email address are posted to the Pabbly Connect
Step 6: Capture Test Data in Pabbly Connect Dashboard
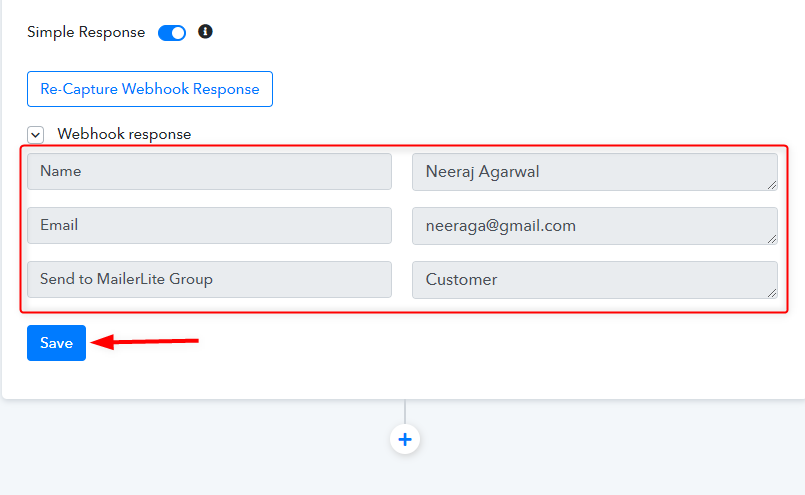
After sending the test data to your workflow, hit the “Capture Webhook Response” button. All details of your sheet like name, email, and group name will come on the Pabbly Connect dashboard. Immediately, save all the responses by clicking on the “Save” button, and your Google spreadsheet is integrated with Pabbly Connect.
Step 7: Add Routes for Conditional Integration
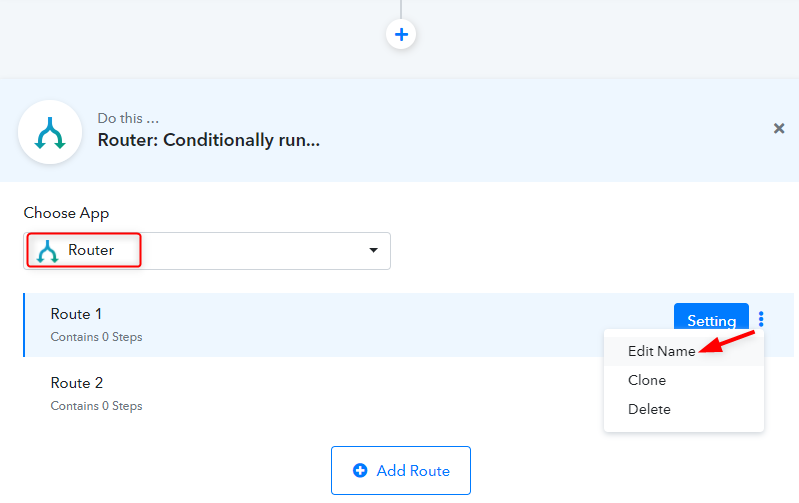
Now, you need to add the conditions using the router. So click on the “+” icon to add a condition for your trigger. Select “Routers” from the drop-down list and edit the route names by clicking on the “three-dots”.
(a) Name the Router’s Condition
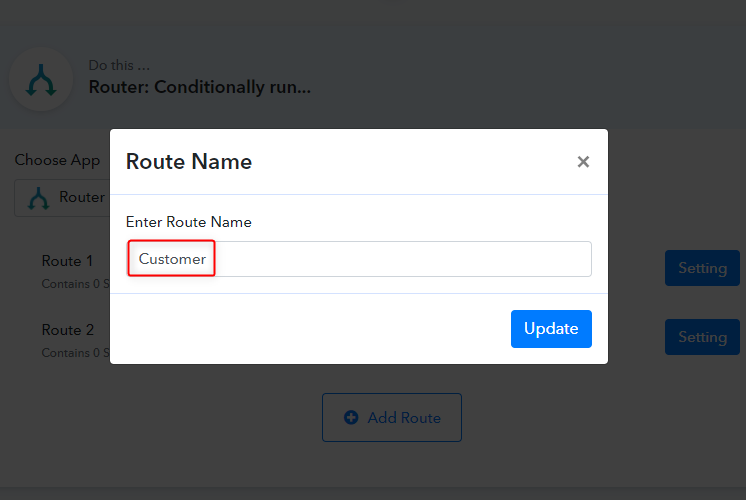
Next, rename your route according to your specified category which in our case is “Customer” & “Affiliate” and hit the update button.
(b) Apply Filter to Router & Save
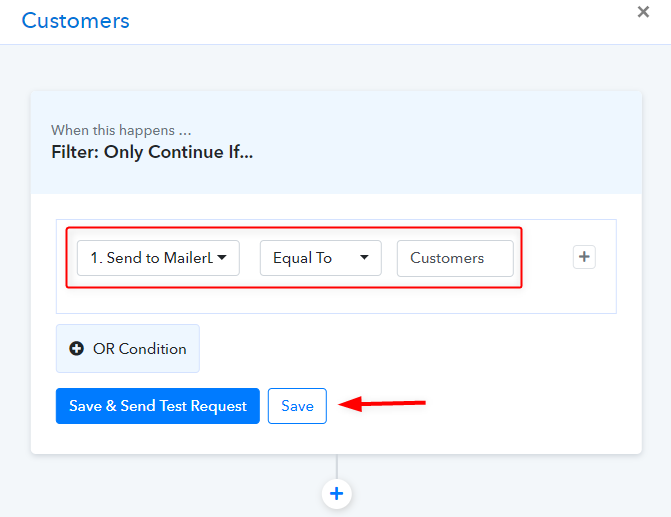
Click on the “Setting” button of your route to set-up the whole customer integration. As soon as, you click on the setting button a new window will pop-up on your screen where you need to apply the filter or condition. Hit the “Save & Send Test Request” button.
(c) Capture API Response
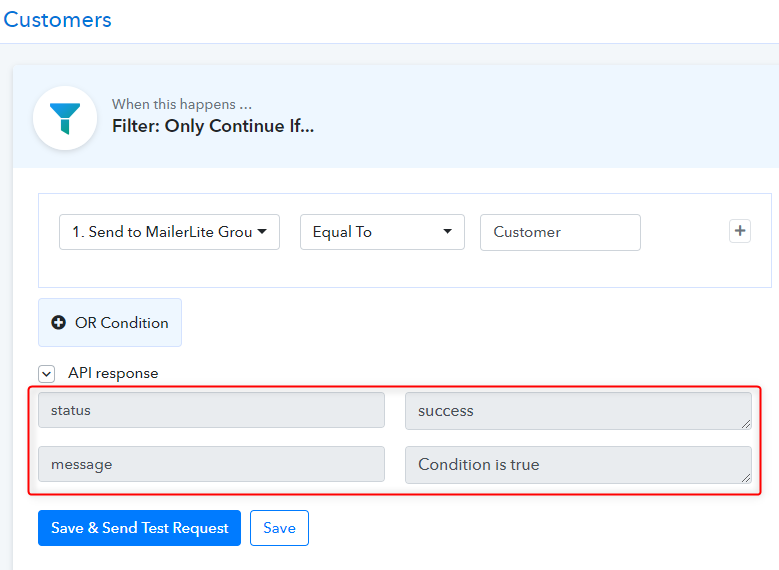
Success message will appear on your screen it means if the data is equals to the Customer this condition will fire up.
Step 8: Setting Action
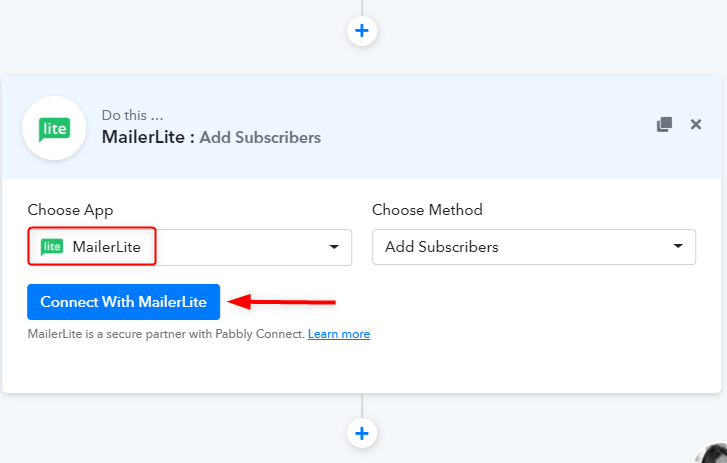
In this step, you have to add subscribers to MailerLite. So click on the “+” icon, choose the MailerLite app, and method as “Add Subscribers”. Hit the “Connect With MailerLiter” button.
(a) Paste the API key inside Pabbly Connect Dashboard & Save
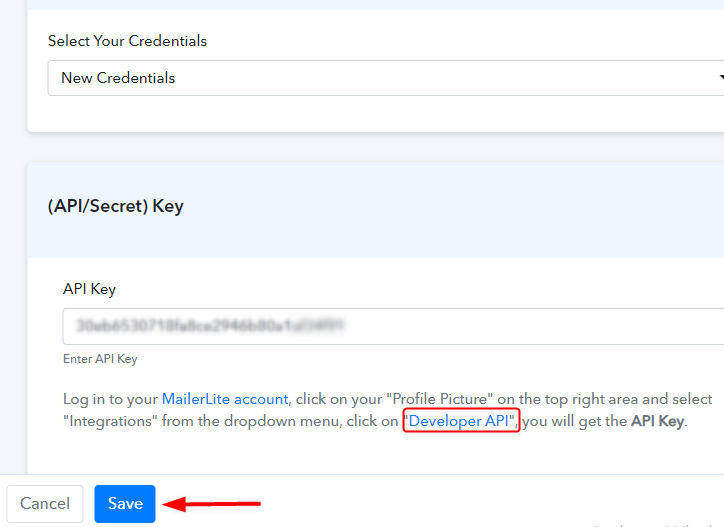
Here, you can see the option to enter the API key which will available inside the MailerLite account. So just click on the “Developer API” and you will get the API key. Paste the API key and click on the Save button.
(b) Map the Data Modules with Google Spreadsheet
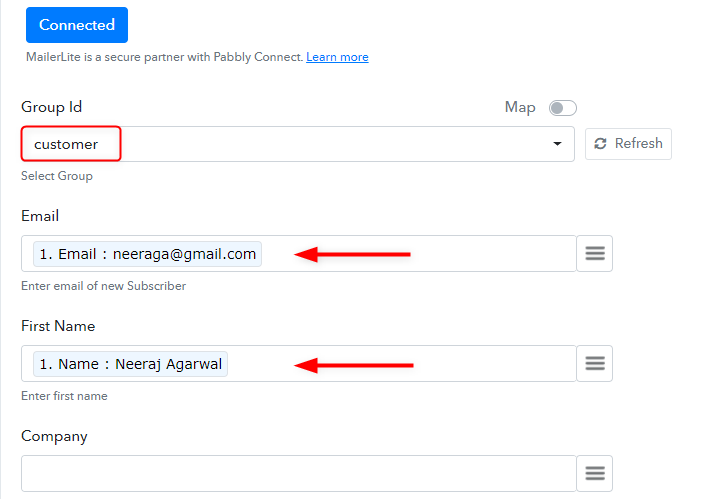
In this step, select the relevant group ID in which you want to add data which in our case is “Customer”. Further, in the next step click on the three-line symbol and map the data that is coming from the Google sheet such as email, name, etc. After, doing all the changes hit the “Save & Send Test Request” button.
Similarly, follow all the steps for the affiliate route like apply condition, connect MailerLite, and map the data.
Step 9: Check Subscribers in Your MailerLite Dashboard
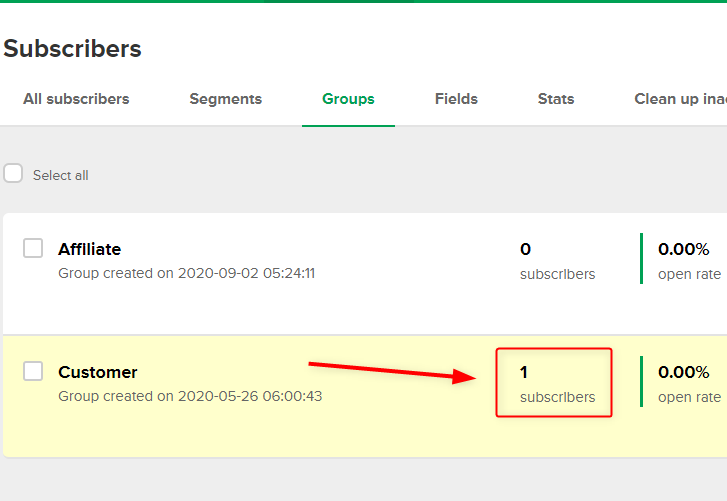
Go to the MailerLite and you’ll see that your subscriber is added to the specific group. So this is the entire process to setup one route. You can set-up the affiliate route as well by following the previous steps.
Step 10: Send All Data
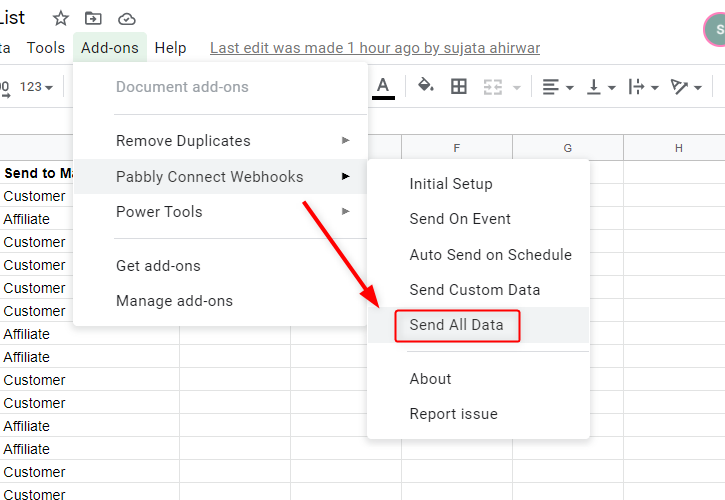
After setting up both the routes, go to the Google Sheets, click on the “Send All Data” option from the Pabbly Connect Webhooks and all your subscribers list added to the MailerLite groups according to the conditional integration.
Step 11: Data is Separated by Groups

That’s it! You can see that your subscriber’s lists are sorted according to your conditional Integration.
Wrapping Up
This was the entire procedure to integrate Google Sheet & MailerLite. Just follow the simple steps as described in this article and you’ll end up receiving an email instantly inside your MailerLite account.
I hope this has helped you! For any further queries comment below.
You May Also Like To Read:


