Are you looking for the simplest way to create Zendesk Sell lead from new Gravity Forms response? If yes, we are presenting a tool named Pabbly Connect to simplify all your repetitive tasks.

Basically, Pabbly Connect is a top-notch integration and automation tool available in the market that puts stops on all kinds of repetitive work.
All you have to do is connect countless premium applications for easy data transmission. And the best part about using the software is, you don’t have to do any kind of hard coding.
Why Choose This Method Of Integration?
In contrast with other integration services-
- Pabbly Connect does not charge you for its in-built apps like filters, Iterator, Router, Data transformer, and more
- Create “Unlimited Workflows” and smoothly define multiple tasks for each action
- As compared to other services which offer 750 tasks at $24.99, Pabbly Connect offers 50000 tasks in the starter plan of $29 itself
- Unlike Zapier, there’s no restriction on features. Get access to advanced features even in the basic plan
- Try before you buy! Before spending your money, you can actually signup & try out the working of Pabbly Connect for FREE
Before jumping straight to the integration process, let’s know more about the services involved and the need for integration. Gravity Forms is a WordPress plugin that enables site owners to generate forms to capture information. It was initially designed for communication forms, but it can be used in a broader context.
Whereas Zendesk Sell is a sales CRM automation platform that helps sales teams improve efficiency, operations, and pipeline visibility.
Many times we want responses received via forms in our sales CRM software which we can do easily with the help of Pabbly Connect. It allows you to integrate Gravity Forms and Zendesk Sell so that whenever a new form is submitted via Gravity Forms, it will get added as a lead in Zendesk Sell.
We have also attached a video to help you out.
Moreover, if you want to try this integration, just click on the image to avail the entire workflow. For more apps and integration, knock yourself out by visiting Marketplace.

Here in this blog, we will connect Gravity Forms and Zendesk Sell.
So, shall we begin the process?
Step 1: Sign up to Pabbly Connect

Begin the process to create a Zendesk Sell lead from the new Gravity Forms response by clicking on the “Sign Up Free” icon on the Pabbly Connect dashboard. Afterward, either fill-up the details manually or sign up using Gmail credentials.
Try Pabbly Connect for FREE
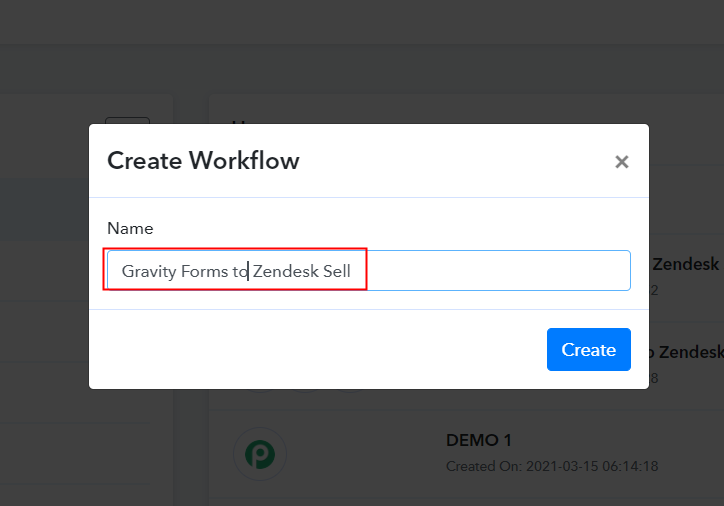
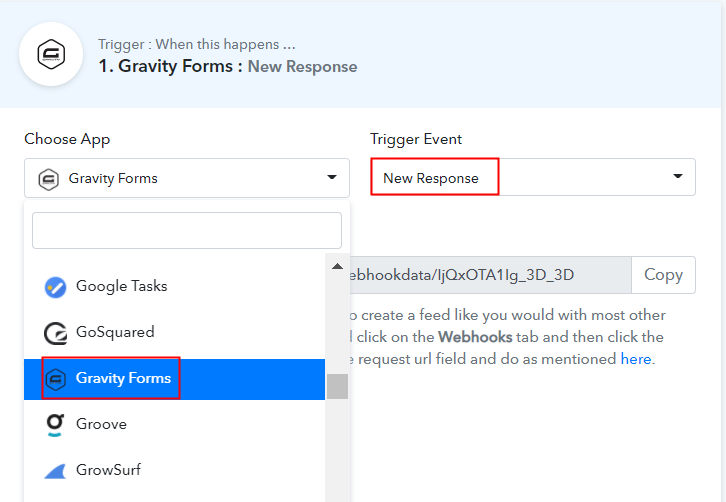
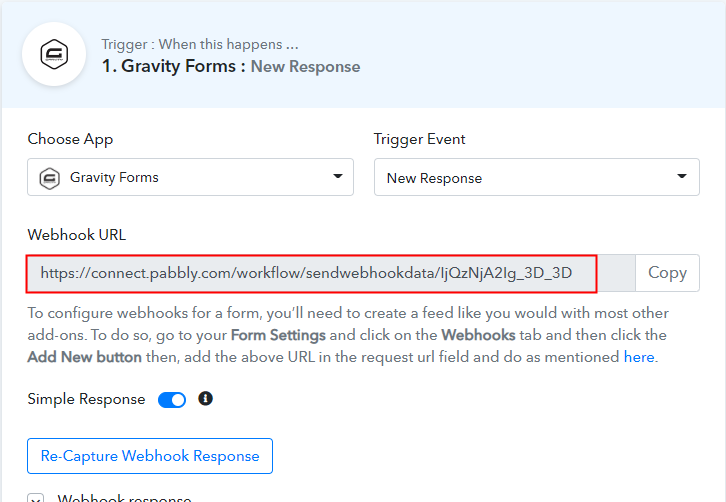
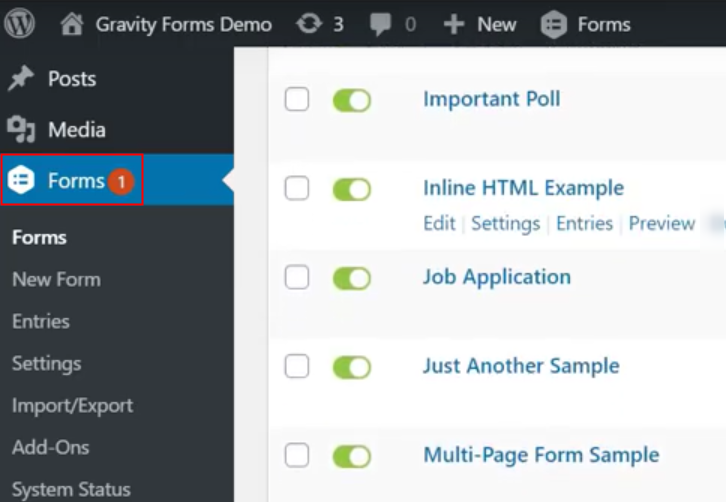
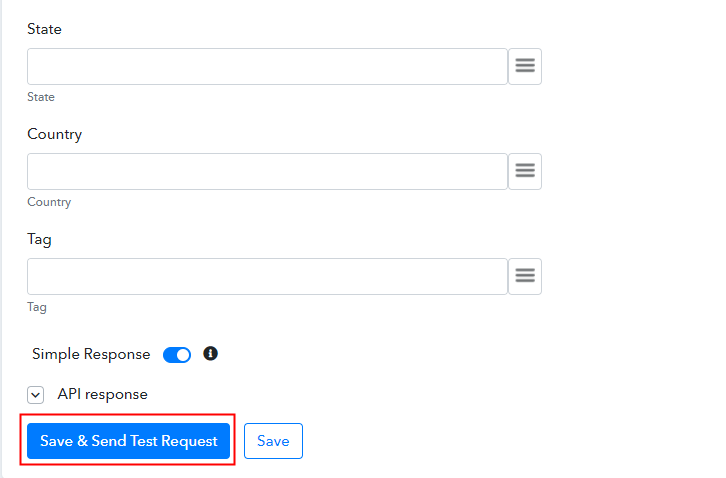
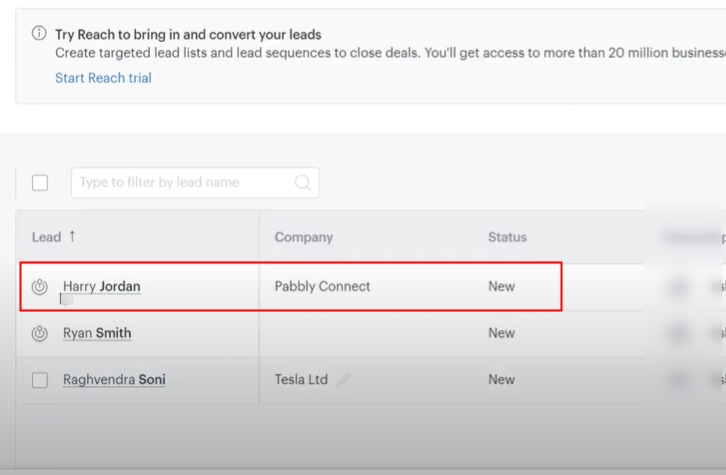
Further, after logging into the account, click on the “Access Now” button as shown in the above image. Begin the process of creating a workflow for integration by clicking on the “Create Workflow” button. Moreover, add the name of workflow which in our case is “Gravity Forms to Zendesk Sell”. Although, you can always name the workflow according to your necessities. Following, after creating a workflow, you have to choose the integration app to create a Zendesk Sell lead from the Gravity Forms response. Pabbly Connect sanctions you to build countless workflows within minutes, click here to sign up for unlimited integrations for free. The following step is to select “Gravity Forms” from the dropdown, then choose the “New Response” option to create a lead in Zendesk Sell from the form response. The next step is to copy the webhook URL which is appearing on the dashboard. Now in order to create a Zendesk Sell lead from the Gravity Forms response, you need to paste the webhook URL in Gravity Forms. Proceed with the integration process by login into your Gravity Forms account. We are accessing Gravity Forms from the WordPress dashboard. Login to your WordPress account and then click on the “Forms” section. Simply select one of the forms, then click on its “Form Settings” as shown in the image. Next, click on the webhook option to paste the copied URL. Further, you have to click on the “Add New” button to paste the copied URL. After you click the button the webhook page will appear on your screen where you have to paste the URL. Just paste the webhook URL copied earlier and click on the “Update Settings” button. Now in order to check the Gravity Forms and Zendesk Sell integration, we are going to make a dummy entry in Gravity Forms. To test a trigger, hit the ‘Capture Webhook Response’ button on the Pabbly Connect trigger window. Simply fill out the form and hit the “Submit” button. Now as you can see the response has been captured in the Pabbly Connect dashboard. To make this Gravity Forms – Zendesk Sell integration work, you have to add an action for your trigger. Now, select the app to integrate here as “Zendesk Sell” & method as “Create Lead”. Conclusively, press the “Connect with Zendesk Sell” button. Next, click on the “Connect with Zendesk Sell” button and authorize your Zendesk Sell account to connect with Pabbly Connect. After connecting with your Zendesk Sell account, map all the fields quickly like the first name, last name, email, etc. Further, hit the “Save & Send Test Request” button to proceed further. Afterwards, you can check the response of your API in the action window. Lastly, hit the “Save” button to save the action API’s response. Ultimately, you can check the lead’s entry in your Zendesk Sell account. So now you know how to add Zendesk Sell lead for new Gravity Forms response using Pabbly Connect. That’s it! Here we mentioned in detail “How to Create Zendesk Sell Lead from New Gravity Forms Response”. Pabbly Connect makes data sending a walk in a park. Other than this integration, you can integrate thousands of other applications on Pabbly Connect. You don’t have to worry about anything. Therefore, signup for free, integrate, and relax. For any doubts, please leave your comments below.Step 2: Access Pabbly Connect

Step 3: Workflow for Gravity Forms to Zendesk Sell Integration
(a) Start with a New Workflow

(b) Name the Workflow
Step 4: Setting Trigger for Gravity Forms to Zendesk Sell Integration
(a) Select Application you Want to Integrate
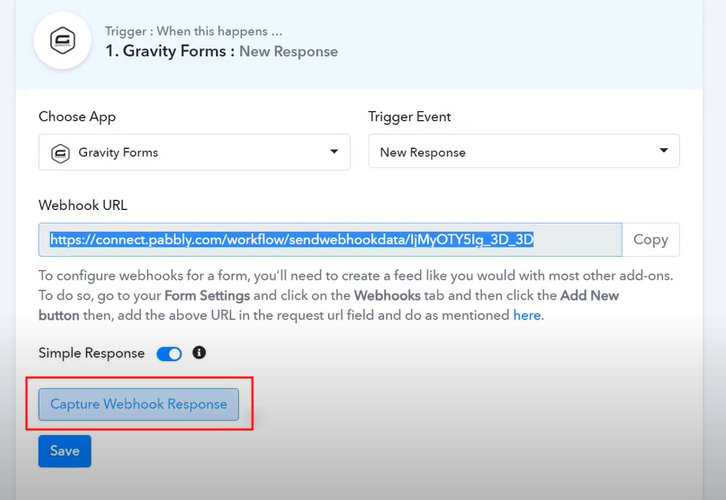
(b) Copy the Webhook URL
Step 5: Connecting Gravity Forms to Pabbly Connect
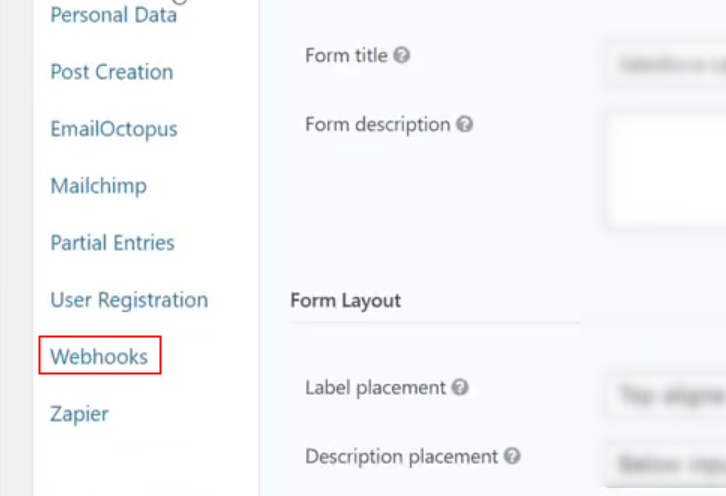
(a) Go to Gravity Forms Settings
(b) Click on Webhooks Option
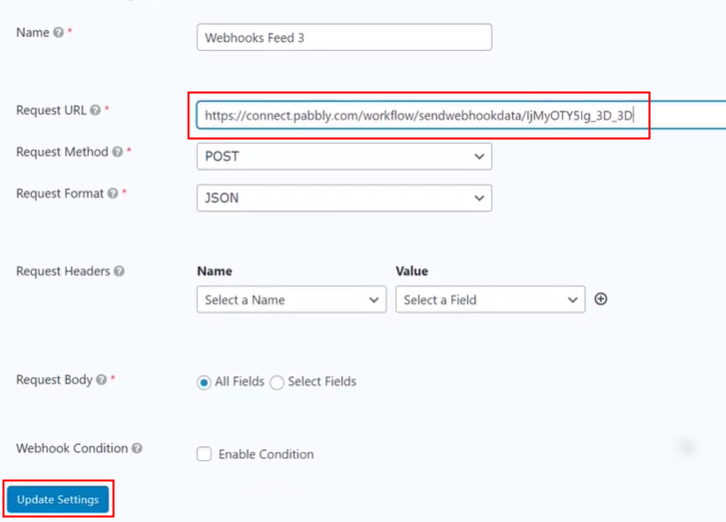
(c) Head to Add New Option

(d) Paste the Webhook URL
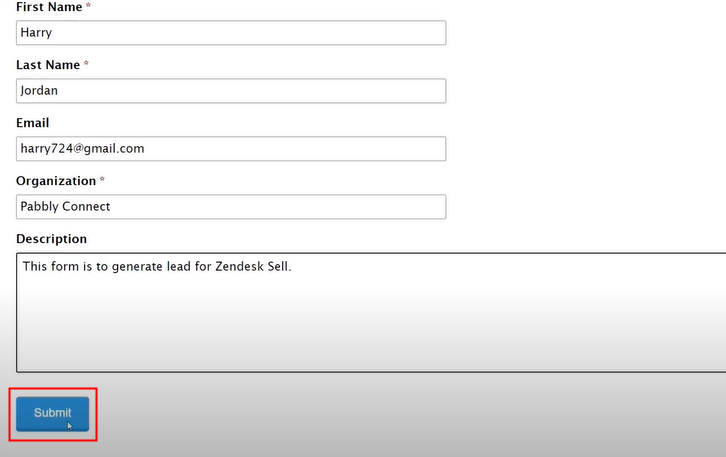
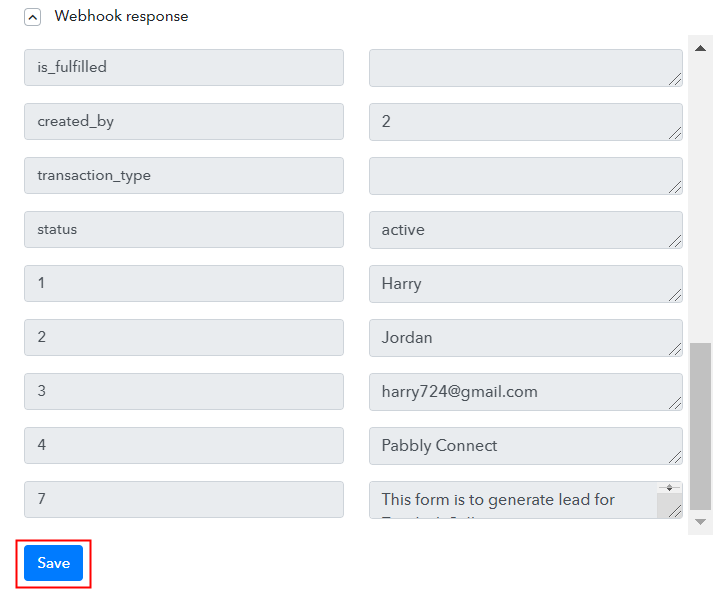
Step 6: Make a Dummy Entry
(a) Capture Webhook Response
(b) Add All the Details
Step 7: Test the Response in Pabbly Connect Dashboard
Step 8: Setting Action for Gravity Forms to Zendesk Sell Integration
(a) Select Application you want to Integrate
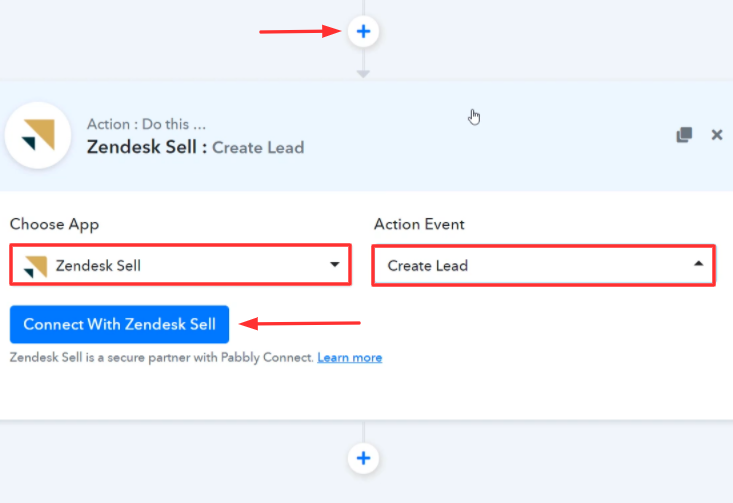
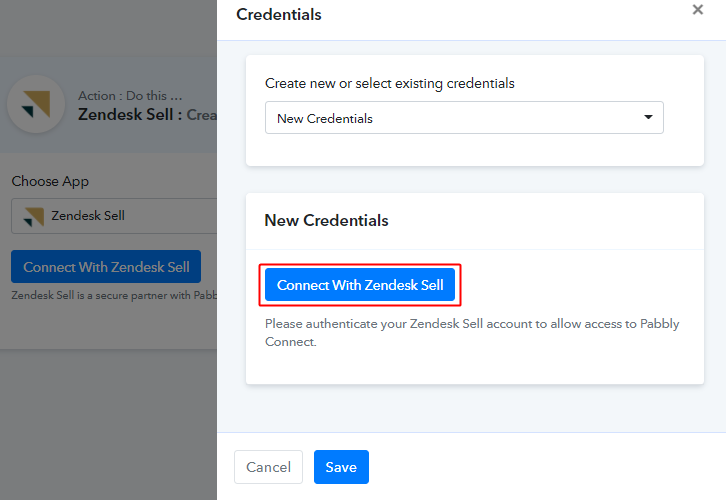
(b) Connecting Zendesk Sell to Pabbly Connect
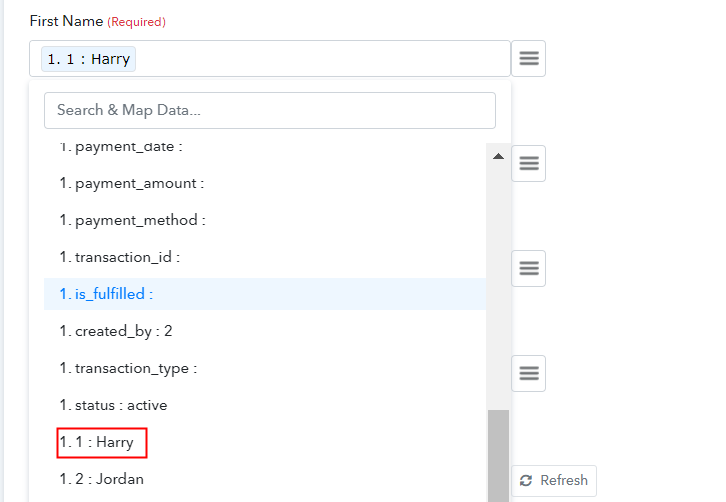
(c) Map the Fields
(d) Save & Send Test Request
Step 9: Check Response in Zendesk Sell Dashboard
Conclusion –
You May Also Like to Read –


