How to Create Xero Invoice from New PayKickstart Sale

How to Create Xero Invoice from New PayKickstart Sale

Are you still looking for a way to create Xero Invoice from new PayKickstart sale? If yes then this blog can help you in automating tasks. Here, we’ll be using Pabbly Connect to automate the task as there is no direct integration possible for these two services.

How to Create Xero Invoice from New PayKickstart Sale

Basically, Pabbly Connect is an integration & automation tool that lets you share data from one application to another in real-time.

The plus point is, you don’t need to have any coding skills & even beginners can use it efficiently. Besides, this will be just a one-time set-up and after that Pabbly Connect will take care of the rest.

Why Choose This Method Of Integration?

In contrast with other integration services-

  • Pabbly Connect does not charge you for its in-built apps like filters, Iterator, Router, Data transformer, and more
  • Create “Unlimited Workflows” and smoothly define multiple tasks for each action
  • As compared to other services which offer 750 tasks at $24.99, Pabbly Connect offers 50000 tasks in the starter plan of $29 itself
  • Unlike Zapier, there’s no restriction on features. Get access to advanced features even in the basic plan
  • Try before you buy! Before spending your money, you can actually signup & try out the working of Pabbly Connect for FREE

Sign Up To Pabbly Connect

Although, before integration, let’s learn a little about the services. PayKickstart is a subscription billing service for various business types. On the other hand, Xero is an easy-to-use cloud-based accounting software service that allows businesses to manage accounts and create invoices.

However, once you set-up this workflow all the subscribers will get their invoices automatically from Xero whenever a sale will occur in your PayKiskstart account.

Moreover, we are embedding a video for the same integration as well. Have a look at it –

Moreover, we’ve attached the template for the same to help you get started immediately. All, you have to do is tap the image below to get started. Additionally, you can go to the App Directory & look for more integrations/apps.

How

So, lets start the step by step procedure of integrating PayKickstart with Xero on real time.

Step 1: Sign up to Pabbly Connect

Sign Up

We will start the procedure to create Xero invoice from new PayKickstart sale by pressing the ‘Sign Up Free’ button on the Pabbly Connect dashboard. Afterward, either fill-up all the details manually or sign up using Gmail credentials.

Try Pabbly Connect for FREE

Step 2: Access Pabbly Connect

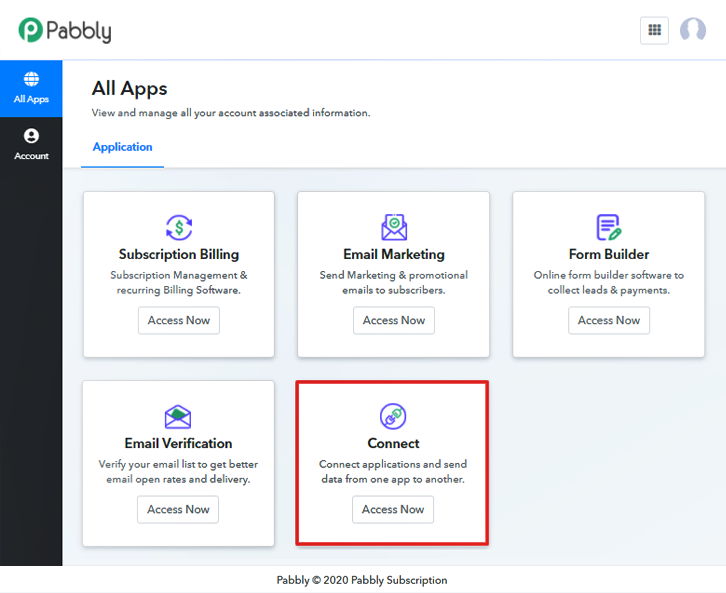
Select Connect

Following that, after logging into the account, hit the ‘Access Now’ button as shown in the above image.

Step 3: Workflow for PayKickstart to Xero Integration

(a) Start with a New Workflow

Create New Workflow

Next, begin with creating a workflow for your project by pressing the ‘Create Workflow’ button.

(b) Name the Workflow

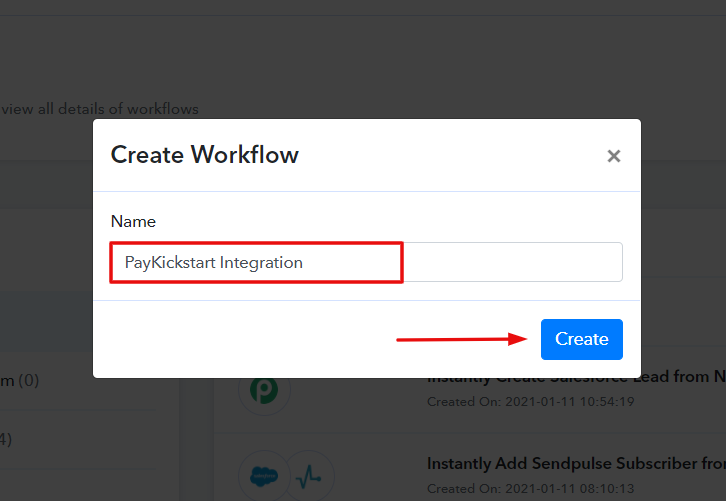
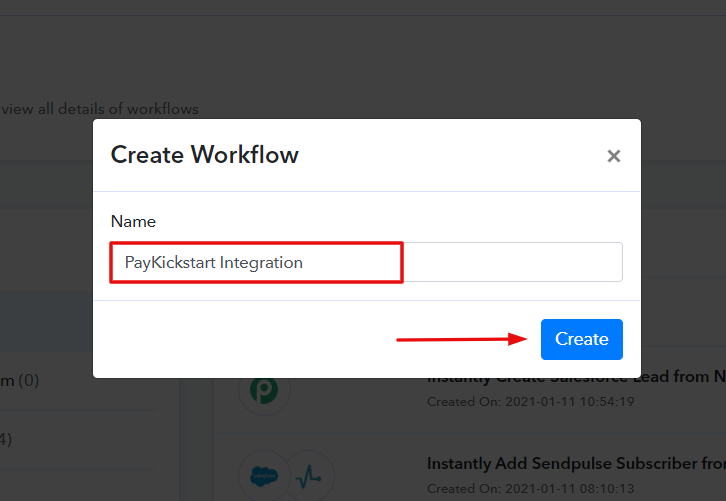
Name the Workflow

Promptly, name the workflow as I named here ‘PayKickstart Integration’, you can obviously name the workflow change it as per your requirements.

Step 4: Setting Trigger for PayKickstart to Xero Integration

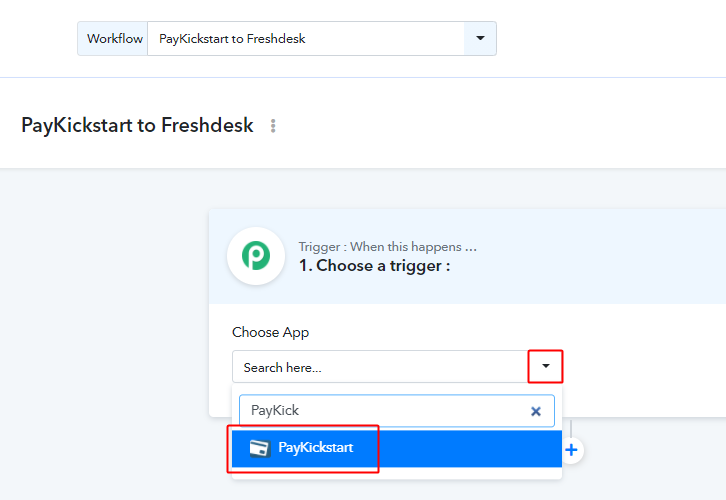
Once you are done with naming your workflow, you will have to select the application you want to integrate. Pabbly Connect allows you to connect unlimited premium apps, create your free account now.

(a) Select Application you Want to Integrate

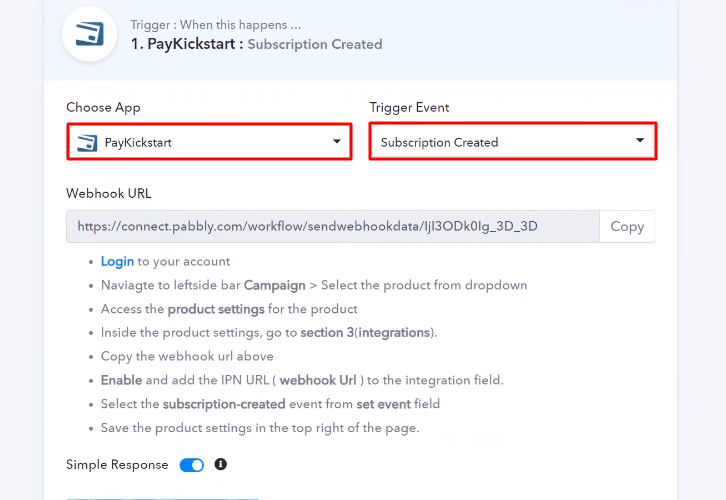
Select Paykickstart

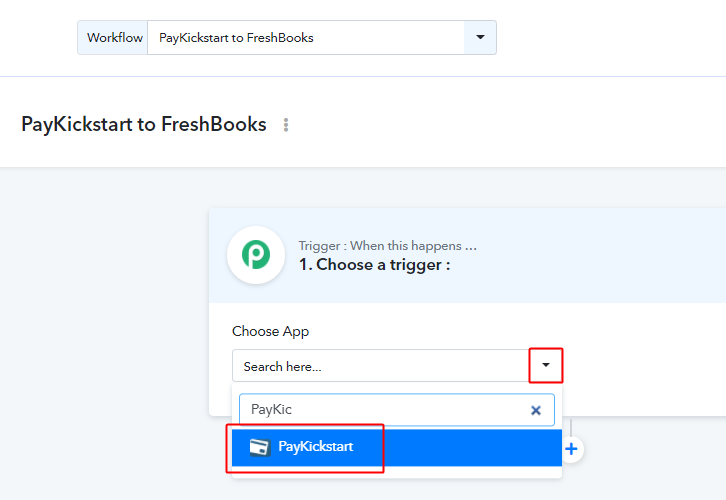
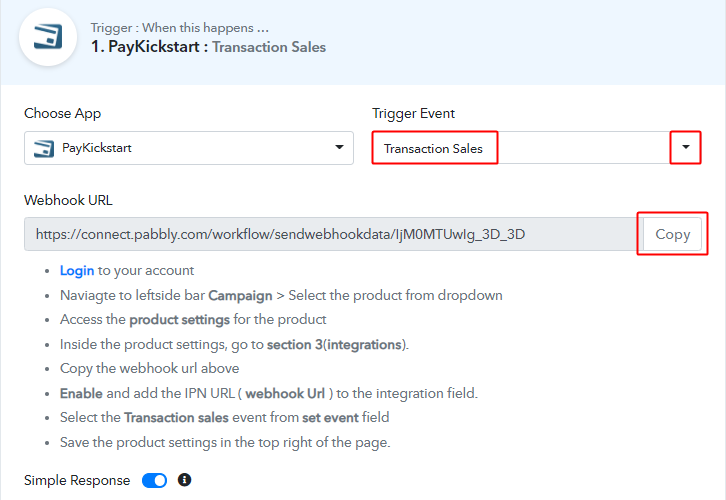
Forthwith, you have to select the application that you want to integrate. Here, we are choosing ‘PayKickstart’ for integration and in the method section, select ‘Transaction Sales’.

(b) Copy the Webhook URL

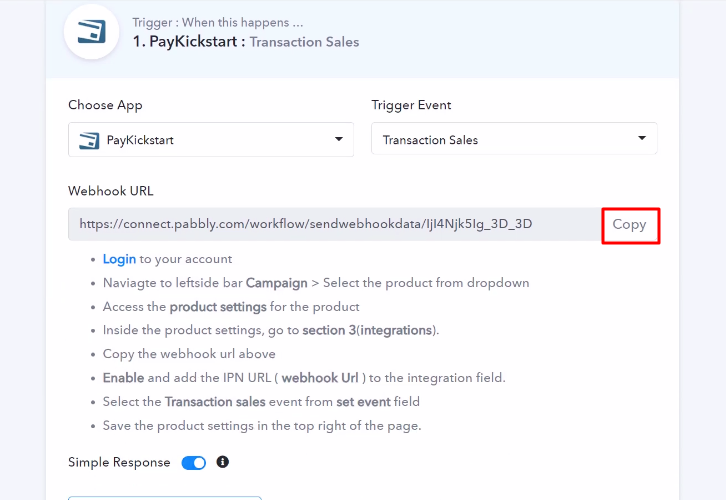
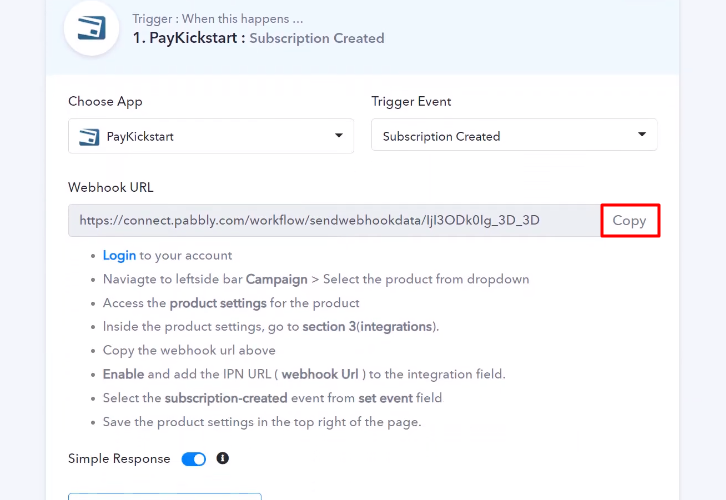
Copy the Webhook URL

The following step is to copy the webhook URL which is appearing on the dashboard.

Step 5: Connecting PayKickstart to Pabbly Connect

Now, in order to connect PayKickstart with Pabbly Connect, you have to paste the copied webhook URL in the software. And to do so, you need to log in to your PayKickstart account.

(a) Go to PayKickstart Campaigns

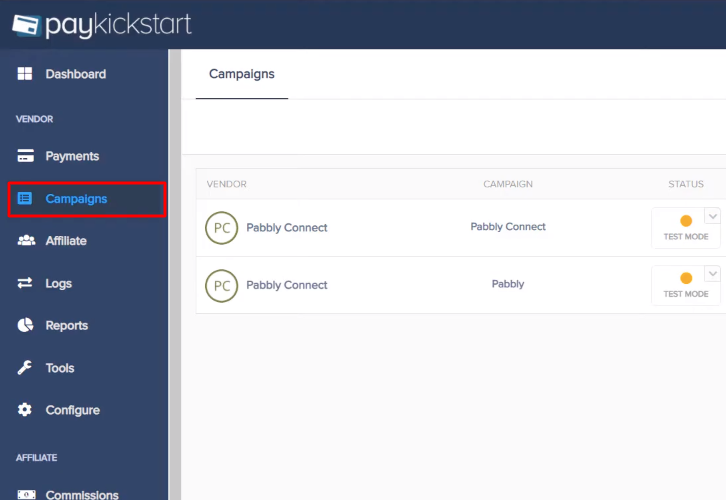
Click Campaigns Paykickstart

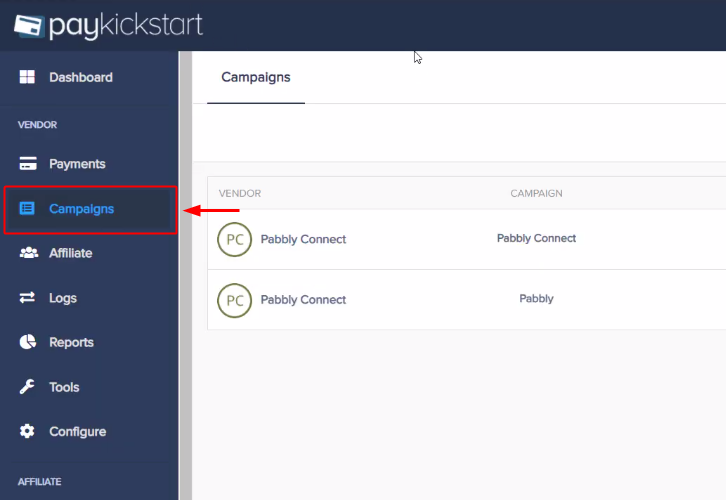
Next, in order to paste the URL, hit the ‘Campaigns’ option in your PayKickstart dashboard.

(b) Select Product

Select Product Paykickstart

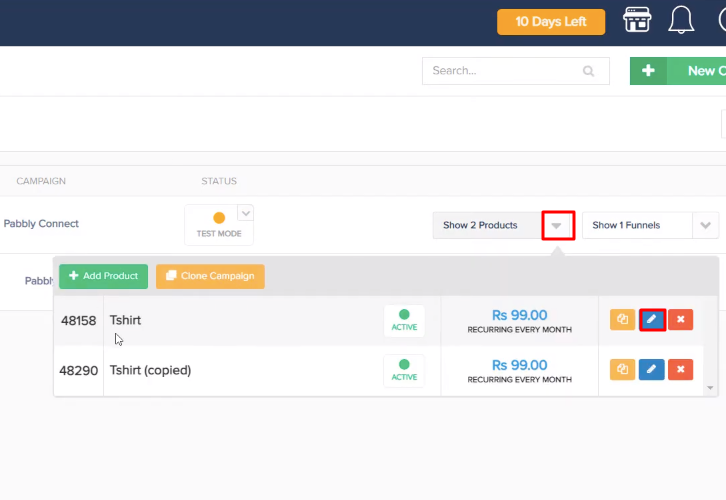
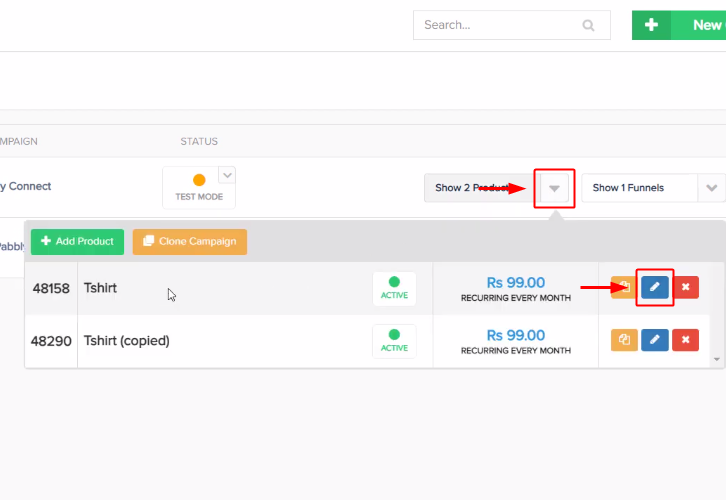
Once you reach the campaigns page, select any of your listed products then click the edit button.

(c) Paste the Webhook URL

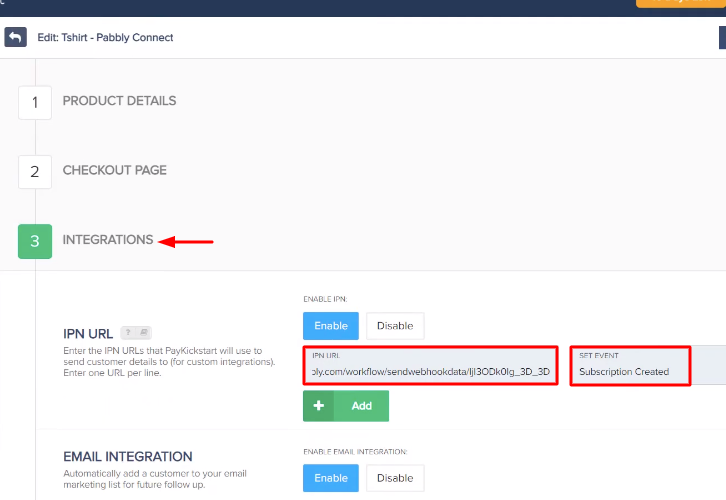
Paste the Webhook URL

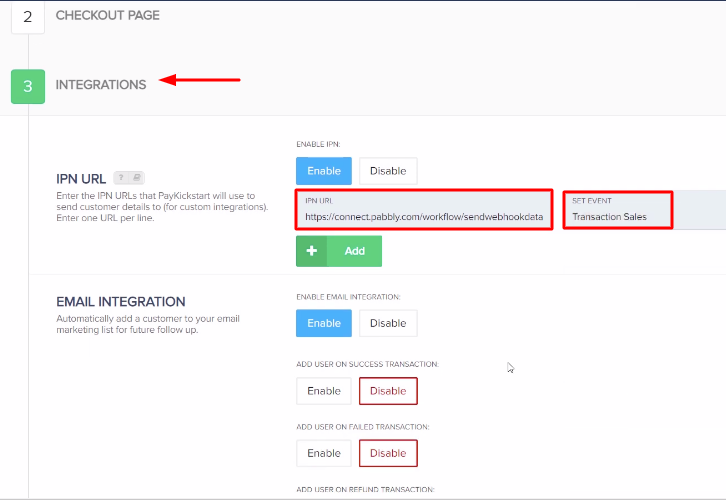
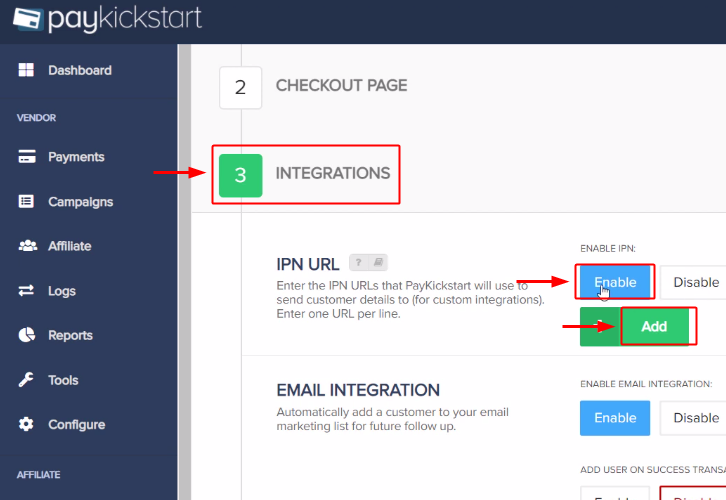
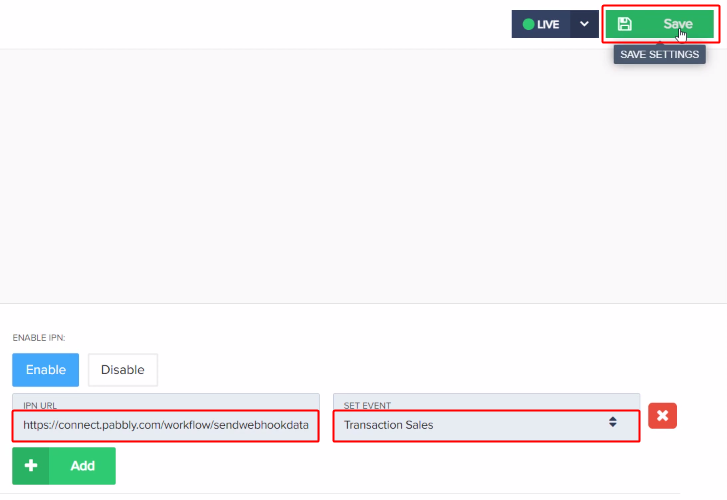
Now, scroll down and hit the ‘Integrations’. In IPN URL section, paste the copied webhook URL and in event section select ‘Transaction Sales’ option.

(d) Save Changes

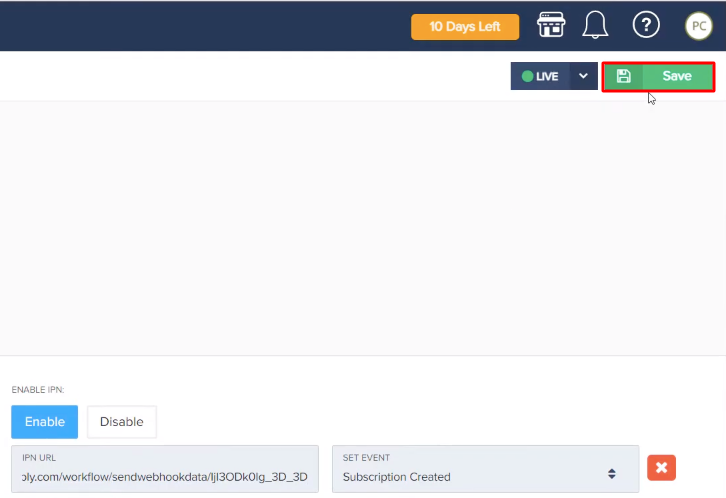
Save-Changes-Paykickstart-2_censored

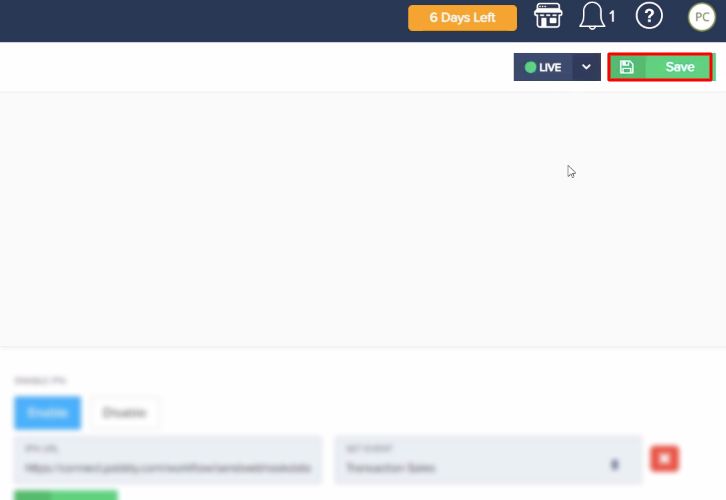
Once you are done making all the changes press the ‘Save’ button to save the changes.

Step 6: Make a Test Purchase

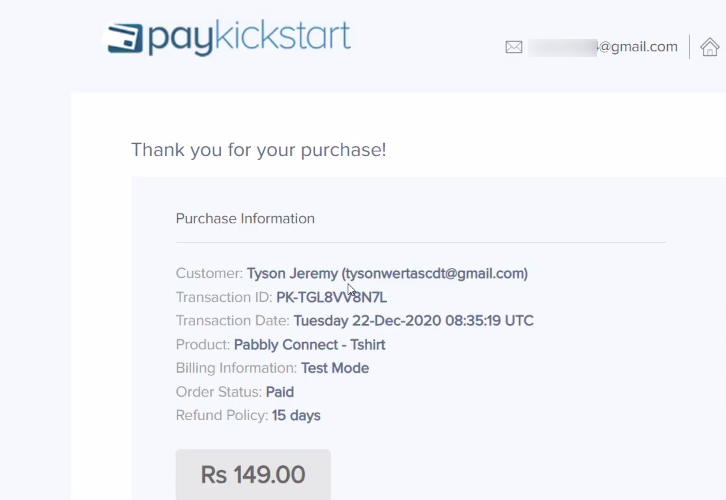
Next, in order to check if the integration is capturing data or not, we will make a dummy purchase in PayKickstart.

(a) Click on Campaigns

Click Campaigns Paykickstart

Subsequently, to make a purchase, again we will go to the ‘Campaigns’ section of your PayKickstart dashboard.

(b) Select Product

Funnel Paykickstart

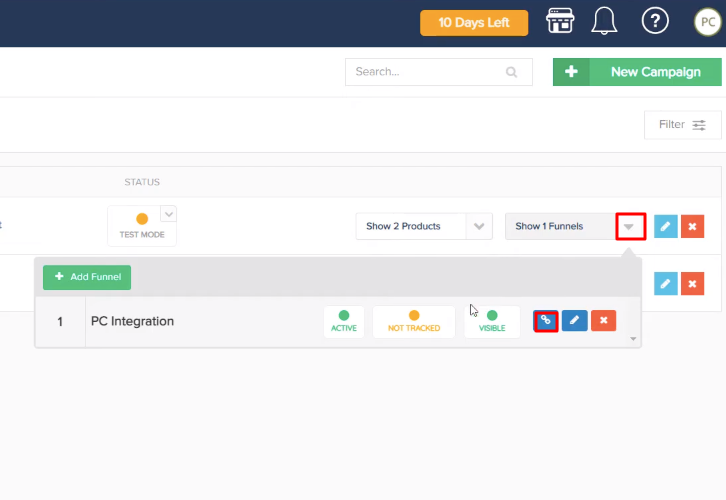
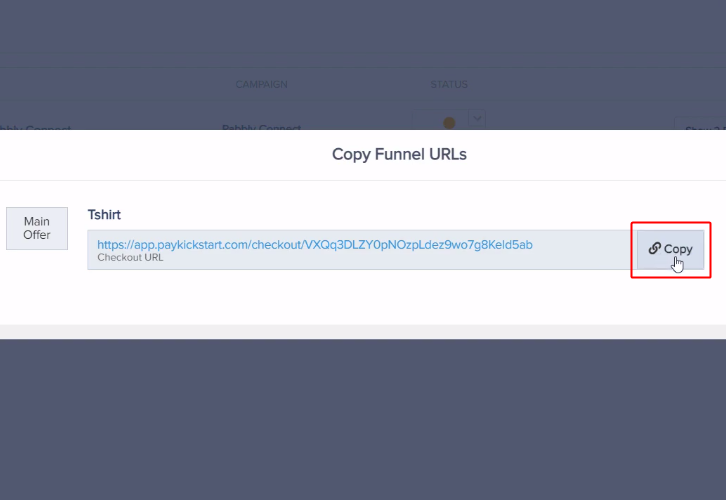
In this step, hit the ‘Funnel’ section of your product and press the link button.

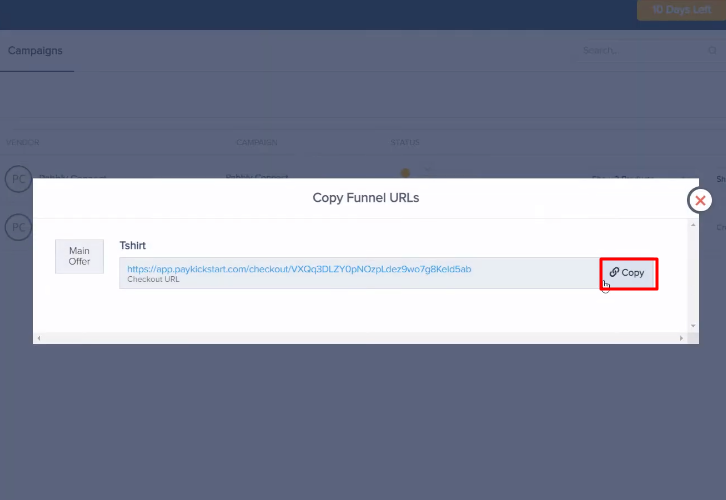
(c) Copy Funnel URL

Copy Funnel URL Paykickstart

Following that, you need to simply copy the given funnel URL & open it in a new tab.

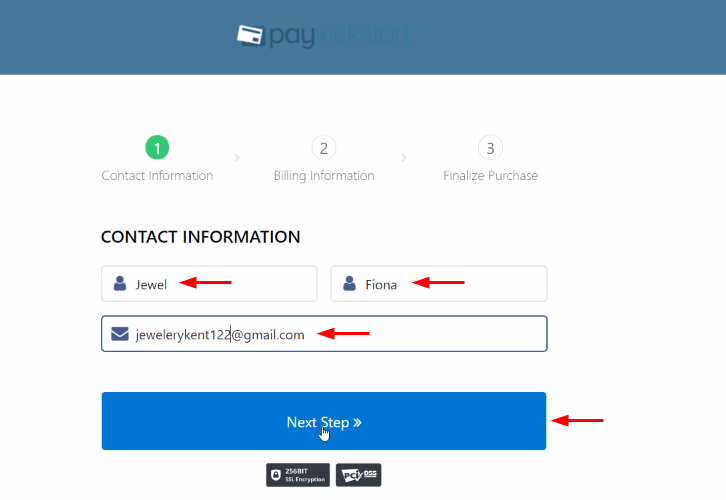
(d) Add Customer Details

Add Customer Details

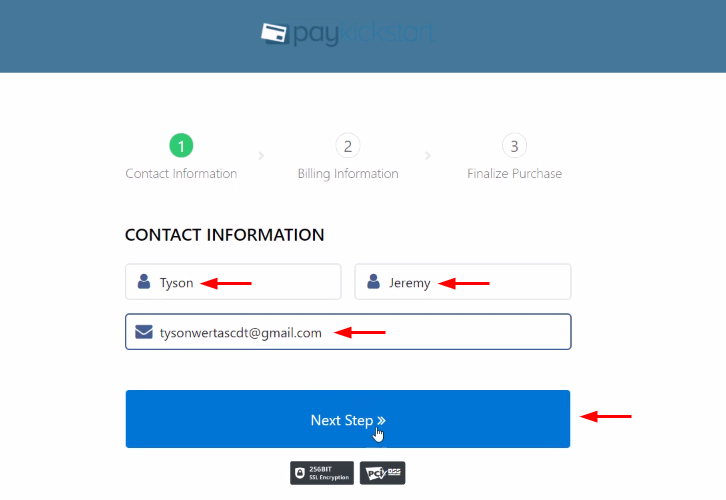
Now, add the required customer details like name and email and then press the ‘Next Step’ button.

(e) Add Billing Information

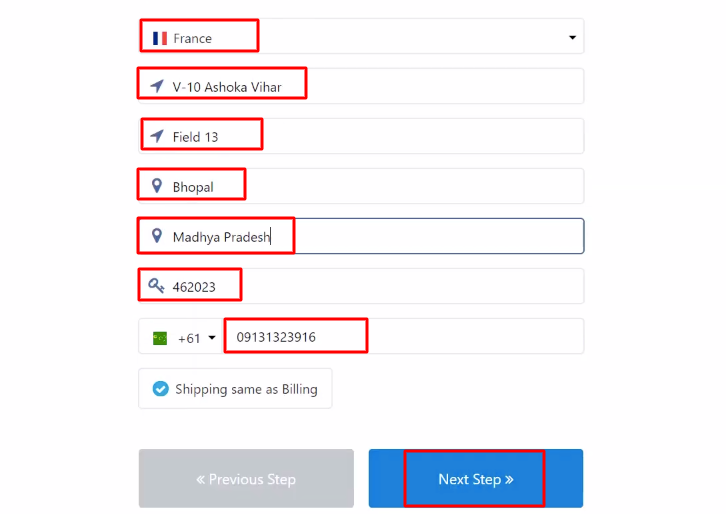
Add Billing Information

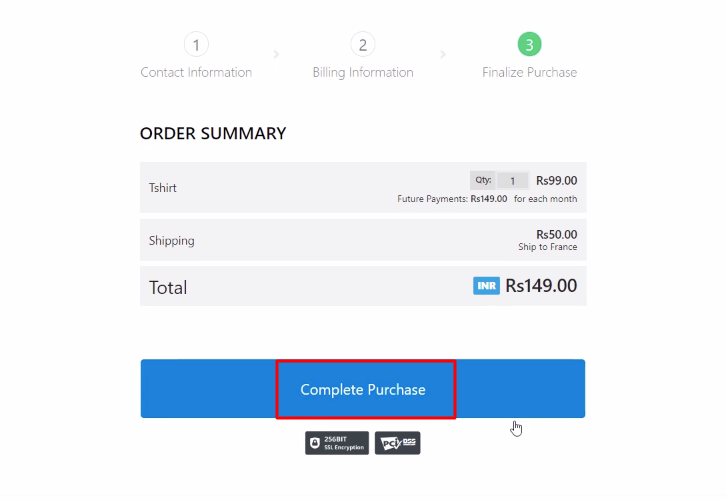
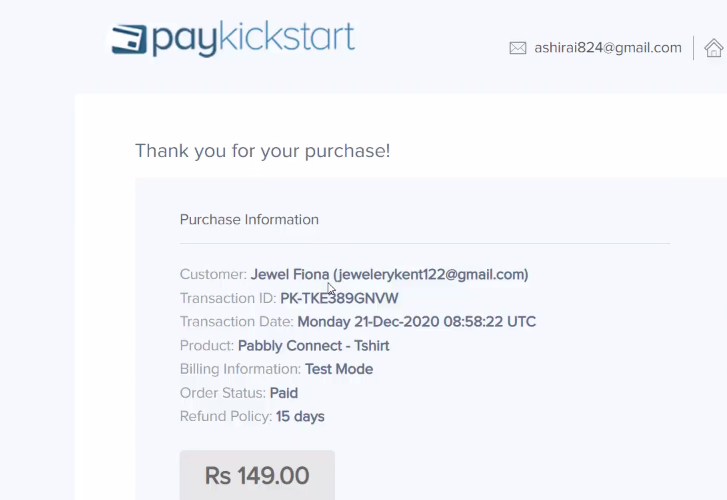
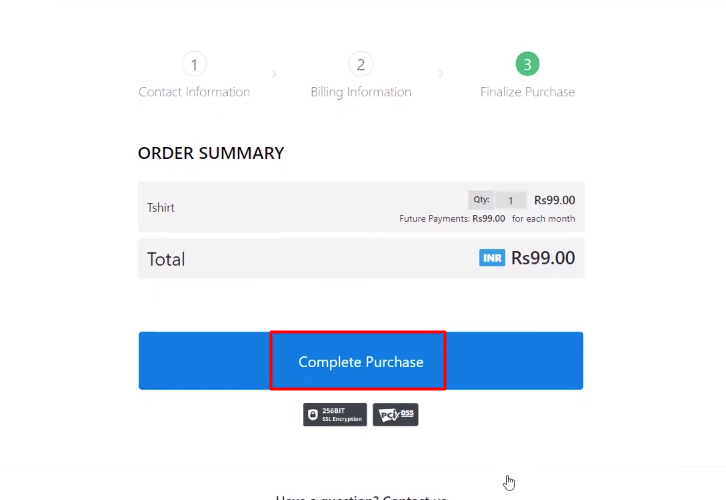
Later, you have to add the billing info like address, contact, etc and then hit the ‘Next Step’ button. Once you are done making all the required changes, hit the ‘Complete Purchase’ button. Before that, press the ‘Capture Webhook Response’ in Pabbly Connect to capture the data.

Step 7: Test the Response in Pabbly Connect Dashboard

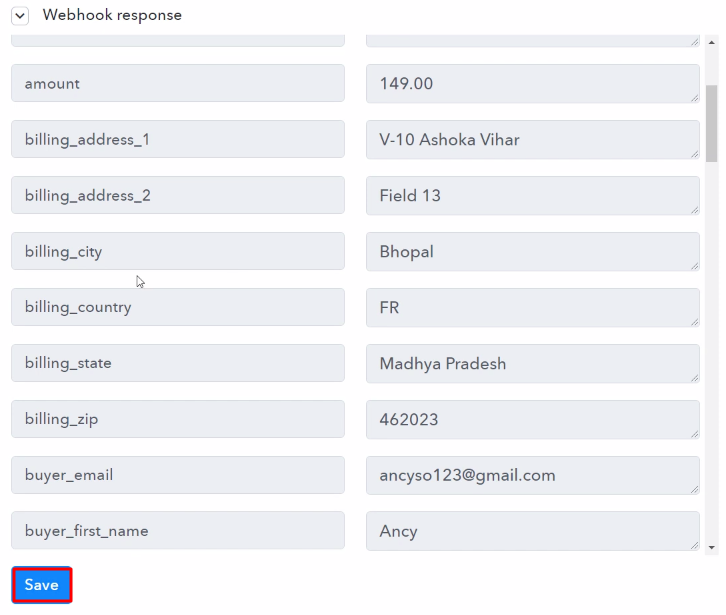
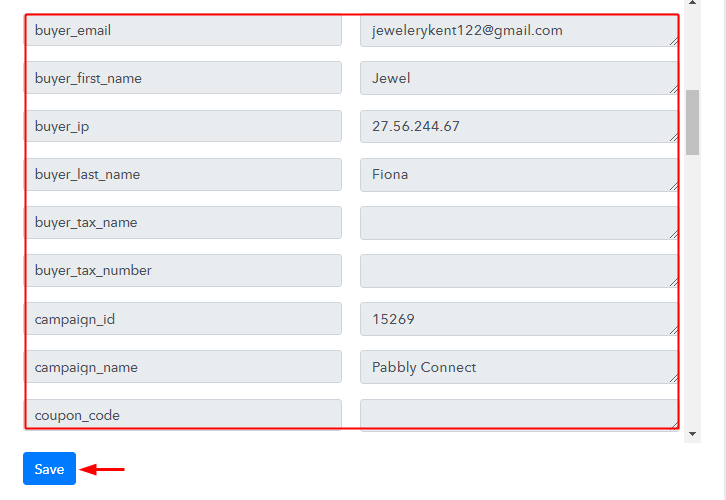
Test the Response in Pabbly Connect Dashboard

After pressing the ‘Complete Purchase’ in PayKickstart and on the ‘Capture Webhook Response’ in Pabbly Connect, the subscriber info will appear on the Pabbly Connect dashboard. Later, hit the ‘Save’ option.

Step 8: Setting Date/Time Formatter to Change Date Format

Now, in this step, we are going to change the date format. Hence for that, we are going to use the action named “Date/Time Formatter”.

(a) Connect With Date/Time Formatter

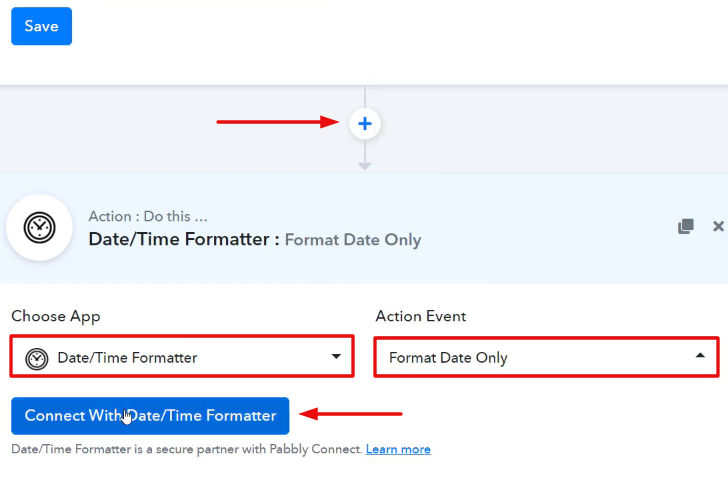
How

Now, choose the application as “Date/Time Formatter” and in the action event choose “Format Date Only”. Then, click on the “Connect With Date/Time Formatter” button.

(b) Map the Field

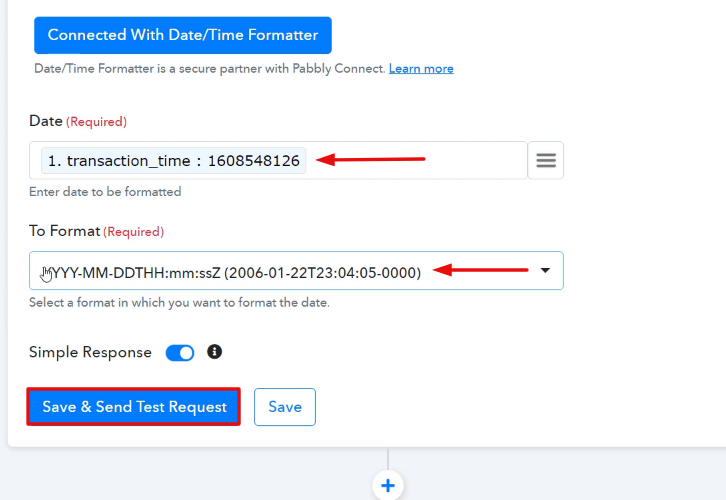
Map the Feilds

Now, map the respective fields and hit the “Save & Sent Test Request” button to proceed further.

(c) Test the Response & Save

Check the Response

Now, as u can see the date has been formatted successfully. Now click on “Save” to proceed further.

Step 9: Setting Action for PayKickstart to Xero Integration

Now, in order to make this PayKickstart and Xero integration work, you have to choose the action for your trigger.

(a) Select Application you Want to Integrate

Select Xero

Now, press the “+” icon to add an action for your trigger. Here we are going to select “Xero” from the dropdown. Then, select the “Create an Invoice” option.

(b) Click the Connect Button

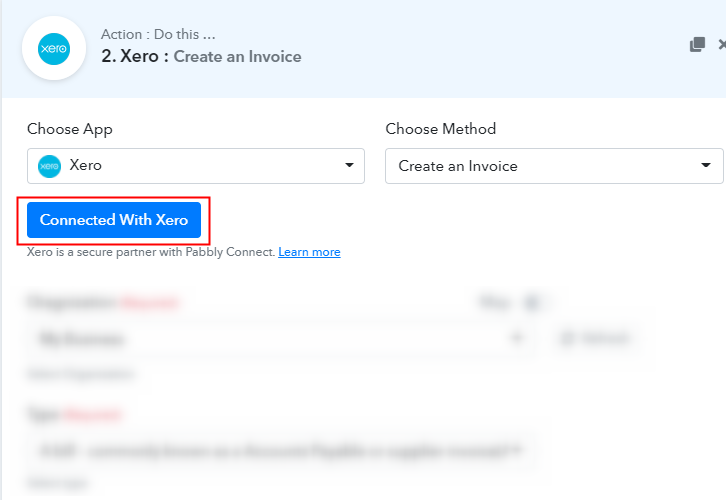
Click the Connect Button

Afterward, click on the “Connect with Xero” button. Besides, it will ask for account authorization for which you have to log in to Xero account.

(c) Add Field Data

Add Field Data

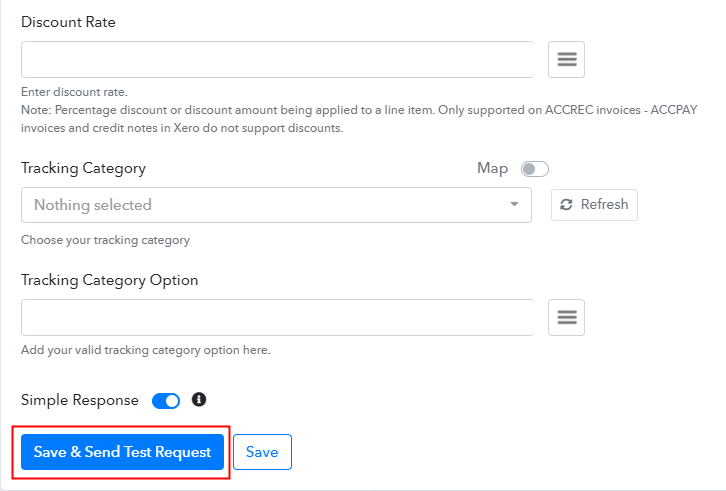
Eventually, it will automatically fetch the data of the organization and type after successful login. Now, all you have to do is add the required field from drop-down such as for the email field, select the email option, and for the name field select the name option.

(d) Save and Send Test Request

Save and Send Test Request

Once you are done making all the changes, save the setting & then “Send Test Request”.

(e) Check the Action API’s Response

Check the Action API’s Response

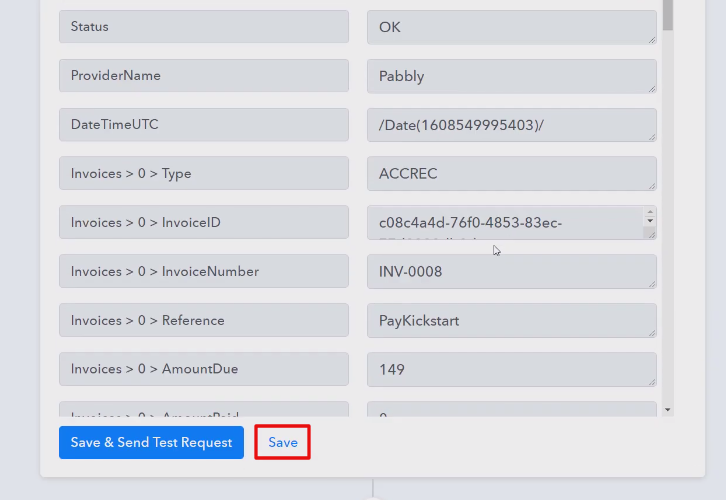
Now, check the response and hit the “Save” button.

Step 10: Check the Response

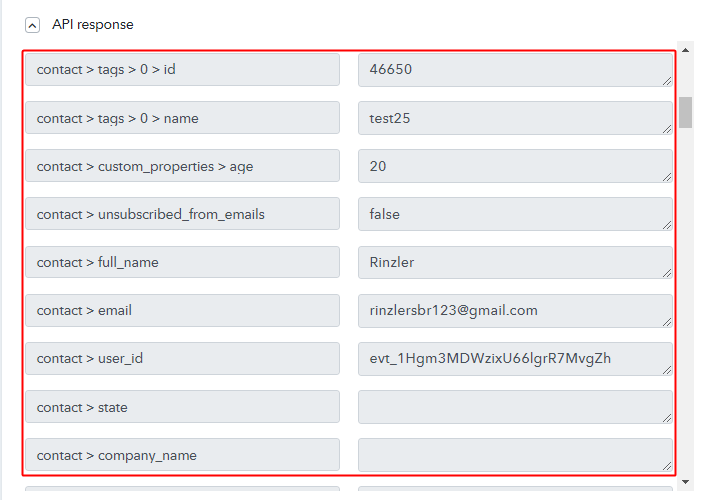
Check the Response

Lastly, when you check the Xero bills, the entered customer’s invoice gets automatically drafted in software.

Now you know how to create Xero invoices from new PayKickstart Sale. This is a one-time process, after this every time when purchase happens, the customer’s invoice will get append in business accounting software.

Conclusion –

Finally, this was all about ‘How to Create Xero Invoice from New PayKickstart Sale’. Just follow the above-mentioned step by step procedure, and you will end up auto-creating Xero invoices from new sale in PayKickstart. In the meantime, you can grab, Pabbly Connect for FREE with all its premium features. Furthermore, don’t forget to comment below for your queries and suggestions.

You May Also Like To Read –

How to Create FreshBooks Client from New PayKickstart Sale

How to Create FreshBooks Client from New PayKickstart Sale

Are you looking for a simpler way to integrate PayKickstart and FreshBooks other than coding?

How to Create FreshBooks Client from New PayKickstart Sale

If yes then this article can help you in automating this task within a few steps. We’ll be using Pabbly Connect to automate the task as there is no direct integration possible in between these two services.

Fundamentally, Pabbly Connect is an integration & automation tool that lets you share data from one application to another in real-time.

Most importantly, you don’t have to use any coding skills & even beginners can use it efficiently. Moreover, this will be just a one-time set-up and after that, the workflow will take care of the rest.

Why Choose This Method Of Integration?

In contrast with other integration services-

  • Pabbly Connect does not charge you for its in-built apps like filters, Iterator, Router, Data transformer and more
  • Create “Unlimited Workflows” and smoothly define multiple tasks for each action
  • As compared to other services which offer 750 tasks at $24.99, Pabbly Connect offers 50000 tasks in the starter plan of $29 itself
  • Unlike Zapier, there’s no restriction on features. Get access to advanced features even in the basic plan
  • Try before you buy! Before spending your money, you can actually signup & try out the working of Pabbly Connect for FREE

Sign Up To Pabbly Connect  

But, before starting the procedure first, let’s learn a little about the services. PayKickstart is a subscription billing software for various business types. Whereas, FreshBooks is an accounting and invoicing software for small as well as large businesses.

Consequently, once you set-up this workflow all your clients get entered into your accounting software i.e, FreshBooks whenever there is a successful sale on PayKiskstart.

Additionally, we are enclosing a video for the same integration as well. Have a look at it –

Furthermore, we’ve attached the template for the same to help you get started immediately. You can click on the ‘Use Workflow’ button below to get started. Also, you can go to the App Directory & look for more integrations/apps.

Use Workflow for paykickstart to freshbooks

So, buckle up as we’re going to discover the FreshBooks and PayKickstart integration.

How to Create FreshBooks Client from New PayKickstart Sale (step by step)

Step 1: Sign up to Pabbly Connect

Sign Up

Begin the procedure of connecting PayKickstart with FreshBooks by visiting the Pabbly Connect website. Then, hit the ‘Sign-Up Free‘ button available. Either use your existing Gmail account or manually fill the registration form to signup.

Try Pabbly Connect for FREE

Step 2: Access Pabbly Connect

Select Connect

After that, strike the ‘Access Now’ button of the software ‘Connect’ within the Pabbly applications.

Step 3: Workflow for PayKickstart with FreshBooks Integration

(a) Start with a New Workflow

Create New Workflow

Further, start with creating a workflow to add clients on FreshBooks for every new PayKickstart sale & to do this push the ‘Create Workflow’ button first.

(b) Name the Workflow

workflow_for_paykickstart_to_freshbooks

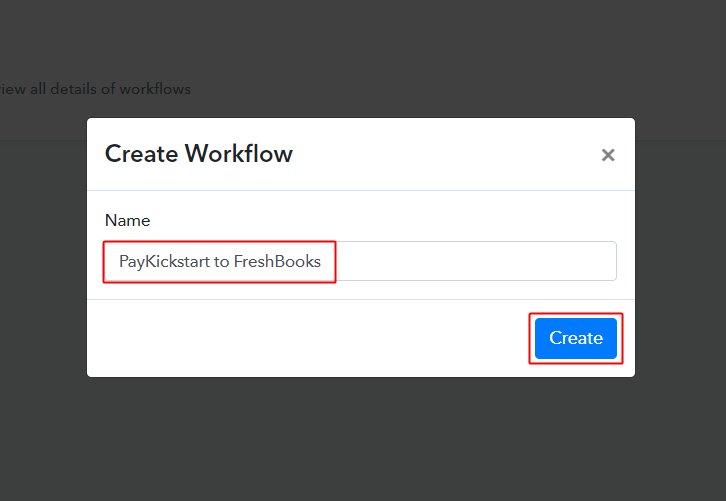
Now, name the workflow as per the integration or use-case (for instance: PayKickstart to FreshBooks etc). Finally, click on the ‘Create’ button available.

Step 4: Setting Trigger for PayKickstart to FreshBooks Integration

To automatically add FreshBooks client for every new PayKickstart sale, you’ll need to set-up a trigger on PayKickstart sales and its respective action to add a client on FreshBooks using Pabbly Connect.

(a) Select Application you want to integrate

integrate_paykickstart_for_paykickstart_to_freshbooks

When you click on the create, a page displaying the trigger window will open up.

Select the ‘PayKickstart’ option from the ‘Choose App’ field’s drop-down.

(b) Select Method & Connect with PayKickstart

select_method_and_copy_webhook_url_for_paykickstart_to_freshdesk

Select the method in here as ‘Transaction Sales’ & then copy the webhook URL.

Step 5: Connecting PayKickstart to Pabbly Connect

To connect PayKickstart with Pabbly connect first, sign-in your PayKickstart account & paste the copied webhook URL.

(a) Go to Your PayKickstart Settings

paykickstart_campaigns

After successfully logging into your PayKickstart account, hit the ‘Campaigns’ option available on the left vertical menu.

(b) Edit Any Product

edit_any_product_from_paykickstart_campaigns

A page will open up carrying all the different products that you’ve created till now on PayKickstart. Click on the pencil icon to edit a product.

(c) Click on Integrations

click_on_integrations

Scroll to the bottom of the page and then click on ‘Integrations’.

Later, click on ‘Enable’ in the IPN URL section. After that click on the ‘Add’ button.

(d) Paste the Webhook URL

paste_webhook_url_for_paykickstart_to_freshdesk

Paste the Pabbly Connect trigger URL in the ‘IPN URL’ field.

Then, select the ‘Transaction Sales’ event option for the ‘SET EVENT’ field.

Finally, click on the ‘Save’ button that is available at the top right corner of the page.

Step 6: Test the Response in Pabbly Connect Dashboard

As we can see, we are done setting up the trigger for PayKickstart and FreshBooks integration. So, let’s test the trigger setup for a test order on PayKickstart.

(a) Capture Webhook Response

capture_webhook_response_for_paykickstart_to_freshdesk

To test the set trigger first, push the ‘Capture Webhook Response’ button on your Pabbly Connect trigger window.

(b) Open Your PayKickstart Campaigns

paykickstart_campaigns

Now, go back to your PayKickstart dashboard & click on ‘Campaigns’ from the left verticle menu.

(c) Open Any Product’s Checkout Page

open_checkout_page_for_the_linked_product

Now, go back to your PayKickstart dashboard & open the checkout page of the product in which you just set-up the trigger condition.

(d) Copy the Checkout Page URL

copy_checkout_page_url_for_paykickstart_to_hubspot

Copy the checkout page URL for the selected product & then open it in an Incognito window.

(e) Make a Test Purchase

enter_paykickstart_test_contact_details_for_paykickstart_to_freshbooks

Fill in all the required purchase details to make a test purchase. First, it’ll ask you to fill in the customer details, second the billing details and lastly to finalize the test purchase.

(f) Complete the Test Purchase

complete_payment_for_paykickstart_to_freshbooks

Complete the purchase by following all the steps required to make a successful payment.

(g) Check & Save Trigger Response

check_and_save_trigger_response_for_paykickstart_to_freshbooks

Once you successfully complete the registration, the Pabbly Connect trigger response will start displaying the data for the current purchase. Also, remember to save this trigger response.

Step 7: Setting Action for PayKickstart to FreshBooks Integration

Now, as we have gathered all the necessary information to create a client on FreshBooks from the PayKickstart response. We can now continue to feed this data to perform the action. After that, a new client will be created automatically for every PayKickstart sale.

(a) Select Application you want to Integrate

integrate_freshbooks_for_paykickstart_to_freshbooks

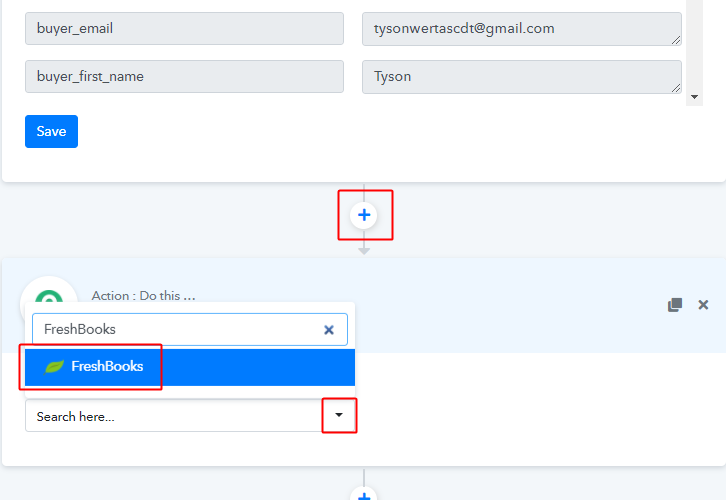
Click on the plus button that is available below your PayKickstart trigger.

Select the app to integrate as ‘FreshBooks’.

(b) Select Event & Connect with FreshBooks

select_event_and_connect_with_freshbooks_for_paykickstart_to_freshbooks

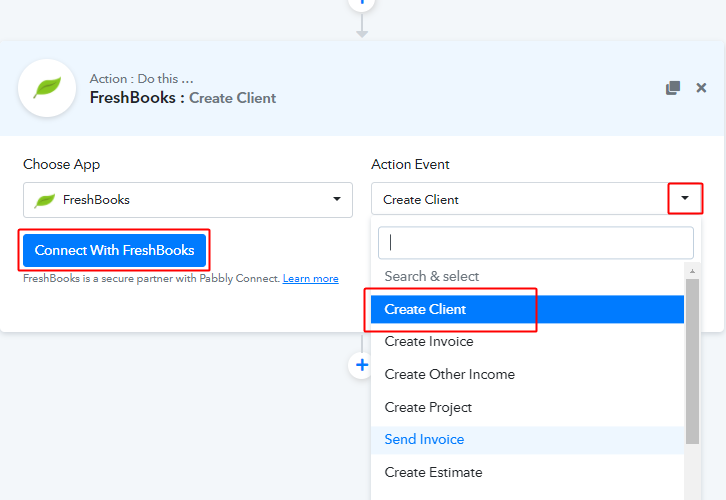
Then, select the action event as ‘Create Client ‘.

Lastly, push the ‘Connect with FreshBooks’ button.

(c) Connecting FreshBooks to Pabbly Connect

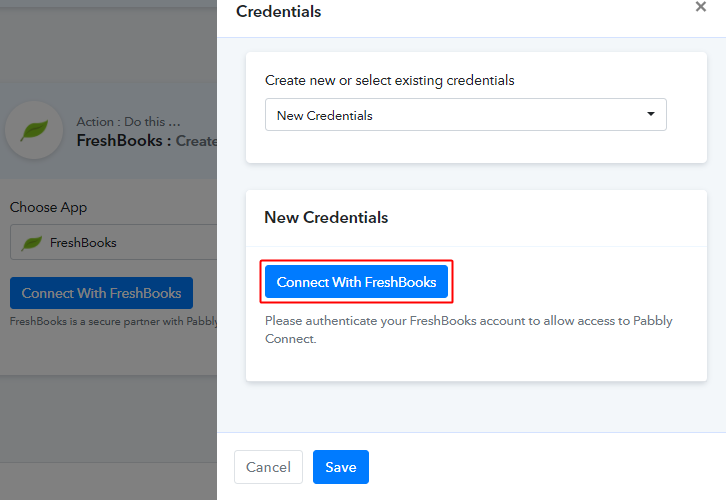
Connect with FreshBooks

In the next window that slides in from the right, hit the on ‘Connect with FreshBooks’ button available & authorize your FreshBooks account to connect with Pabbly Connect.

(d) Choose Account & Map Fields

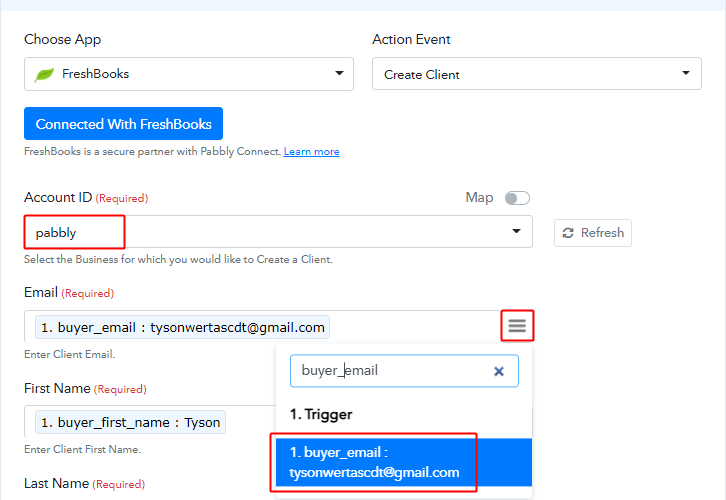
select_account_and_map_values_for_paykickstart_to_freshbooks

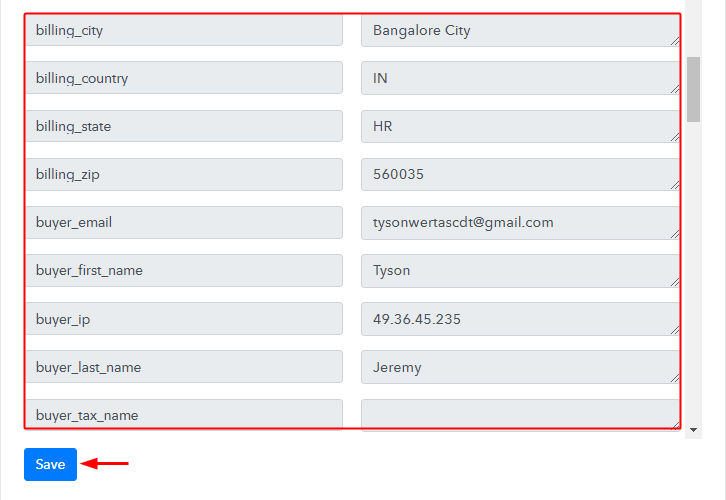
Now, select the account id, map the email & other fields.

To map a value, hit the menu button (i.e, three horizontal lines) next to a particular field.

After that, select the response value that you want to map with that field.

(e) Send Test Request

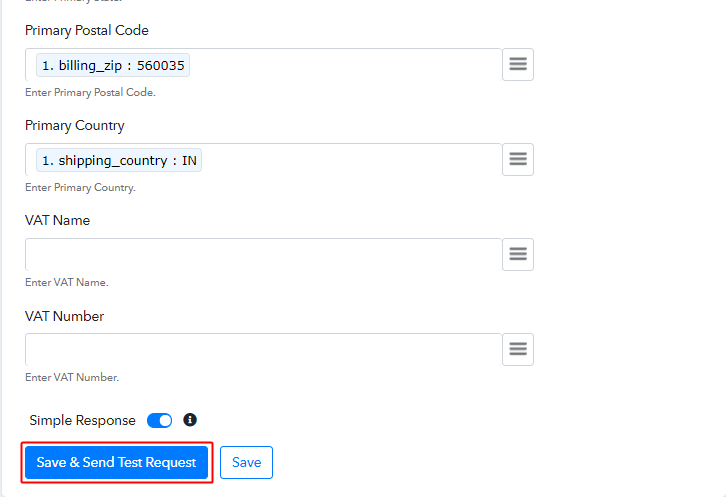
send_test_request_for_freshbooks_action_for_paykickstart_to_freshbooks

Further, click on the ‘Save & Send Test Request’ button to send a request for creating a client on FreshBooks.

(f) Check & Save Response

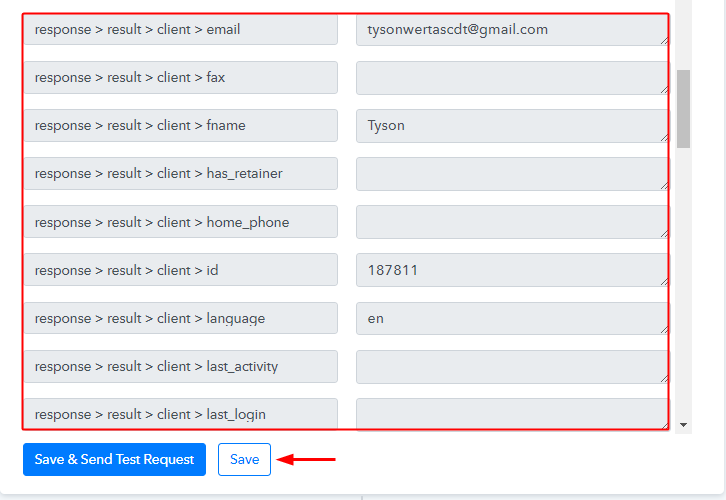
check_and_save_action_response_for_paykickstart_to_freshbooks

Certainly, you can check the response of your API request in the action window. And, if there is some error while sending the data then it will start showing you the error.

Finally, click on the ‘Save’ button to save the action API’s response.

Step 8: Check Response in FreshBooks Dashboard

client_entry_on_freshbooks

Also, you can see the client’s data on your connected FreshBooks account.

Conclusion –

To sum up, this was all about ‘How to create FreshBooks client from new PayKickstart sale’. Consequently, after completing the step by step procedure, you will end up auto-creating FreshBooks clients for every new sale on PayKickstart.

However, you can also grab Pabbly Connect for FREE with all its premium features.

Also, do comment us your queries & suggestions in the section given below.

You May Also Like to Read:


How to Add Sendicate Subscriber from New PayKickstart Sale

How to Add Sendicate Subscriber from New PayKickstart Sale

Do you still add Sendicate subscriber from new PayKickstart sale manually? If yes then this blog can help you in automating this task. We’ll be using Pabbly Connect to automate the task as there is no direct integration possible for these two services.

How to Add Sendicate Subscriber from New PayKickstart Sale

Fundamentally, Pabbly Connect is an integration & automation tool that lets you share data from one application to another in real-time.

The plus point is, you don’t have to use any coding skills & even beginners can use it efficiently. Moreover, this will be just a one-time set-up and after that, the Pabbly Connect will take care of the rest.

Why Choose This Method Of Integration?

In contrast with other integration services-

  • Pabbly Connect does not charge you for its in-built apps like filters, Iterator, Router, Data transformer, and more
  • Create “Unlimited Workflows” and smoothly define multiple tasks for each action
  • As compared to other services which offer 750 tasks at $24.99, Pabbly Connect offers 50000 tasks in the starter plan of $29 itself
  • Unlike Zapier, there’s no restriction on features. Get access to advanced features even in the basic plan
  • Try before you buy! Before spending your money, you can actually signup & try out the working of Pabbly Connect for FREE

Sign Up To Pabbly Connect

But, before starting the procedure first, let’s learn a little about the services. PayKickstart is a subscription billing service for various business types. Whereas, Sendicate is an email marketing app that handles content creation, subscriber management, reporting, & email deliverability.

Consequently, once you set-up this workflow all the subscribers will be automatically added in your Sendicate account whenever there is a successful sale on PayKiskstart.

Additionally, we are enclosing a video for the same integration as well. Have a look at it –

Furthermore, we’ve attached the template for the same to help you get started immediately. You can click on the image below to get started. Also, you can go to the Marketplace & look for more integrations/apps.

Instantly Create Sendicate Subscribers from New PayKickstart Sale

So, get ready as we’re going to discover how to automatically add Sendicate subscriber from new PayKickstart sale through this integration.

Step 1: Sign up to Pabbly Connect

Sign Up

We will begin the process to add Sendicate subscriber from new PayKickstart sale by clicking on the ‘Sign Up Free’ button on the Pabbly Connect dashboard. Subsequently, either fill-up all the details manually or sign up using Gmail credentials.

Try Pabbly Connect for FREE

Step 2: Access Pabbly Connect

Select Connect

Next, after logging into the account, click on the ‘Access Now’ button as shown in the above image.

Step 3: Workflow for PayKickstart to Sendicate Integration

(a) Start with a New Workflow

Create New Workflow

Start with creating a workflow for your project by clicking on the ‘Create Workflow’ button.

(b) Name the Workflow

Name the Workflow

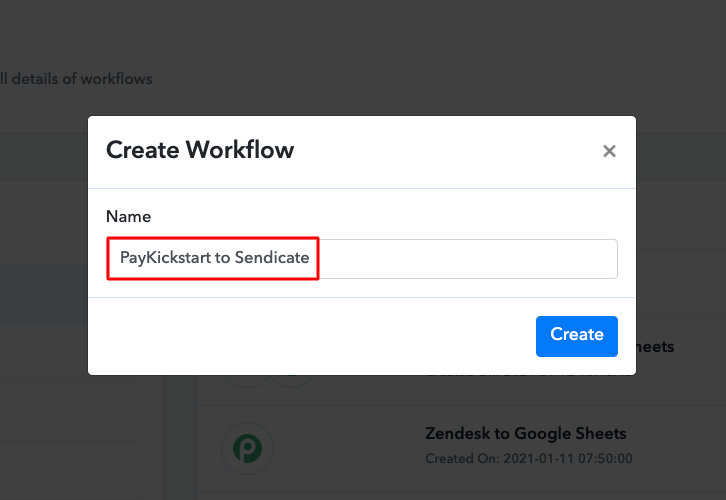
Now, you need to name the workflow just like in the above-shown image. I named the workflow ‘PayKickstart to Sendicate’, you can obviously name the workflow as per your requirements.

Step 4: Setting Trigger for PayKickstart to Sendicate Integration

As soon as you are done with naming your workflow, you will have to select the application you want to integrate. Pabbly Connect allows you to connect unlimited premium apps, create your free account now.

(a) Select Application you Want to Integrate

Select Paykickstart

Now, you have to select the application that you want to integrate. In this case, we are choosing ‘PayKickstart’ for integration. In the method section, select ‘Transaction Sales’.

(b) Copy the Webhook URL

Copy the Webhook URL

The next step is to copy the webhook URL which is appearing on the dashboard just like in the above-shown image.

Step 5: Connecting PayKickstart to Pabbly Connect

To connect PayKickstart with Pabbly Connect, you have to paste the copied webhook URL in the software, for that, you need to log in to your PayKickstart account.

(a) Go to PayKickstart Campaigns

Click Campaigns Paykickstart

To paste the URL, click on the ‘Campaigns’ option in your PayKickstart dashboard.

(b) Select Product

Select Product Paykickstart

After reaching the campaigns page, select any of your listed products then click the edit button.

(c) Paste the Webhook URL

Paste the Webhook URL

Scroll down and click on the ‘Integrations’. In IPN URL section, paste the copied webhook URL and in event section select ‘Transaction Sales’ option.

(d) Save Changes

Save-Changes-Paykickstart-2_censored

After making all the changes hit the ‘Save’ button to save the changes.

Step 6: Make a Test Purchase

To check if the integration is capturing data or not, we will make a dummy purchase in PayKickstart.

(a) Click on Campaigns

Click Campaigns Paykickstart

To make a purchase, again we will go to the ‘Campaigns’ section of your PayKickstart dashboard.

(b) Select Product

Funnel Paykickstart

Here, click on the ‘Funnel’ section of your product and click on the link button.

(c) Copy Funnel URL

Copy Funnel URL Paykickstart

Next, you need to simply copy the given funnel URL and open it in a new tab.

(d) Add Customer Details

Add Customer Info Paykickstart

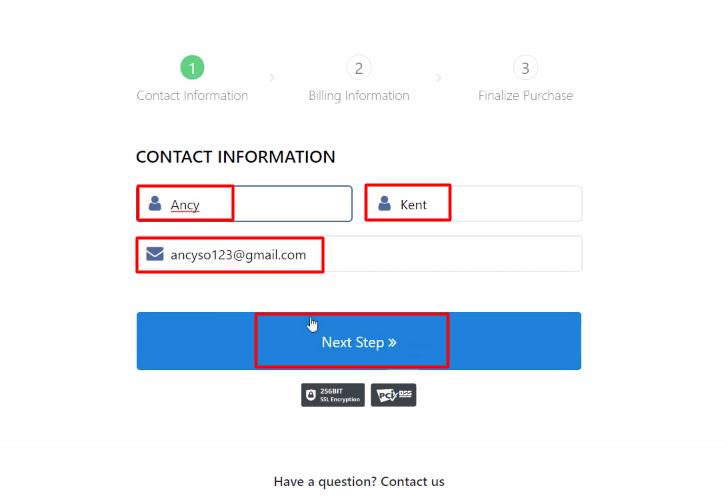
In this step, add the required customer details like name and email and then hit the ‘Next Step’ button.

(e) Add Billing Information

Add Billing Info Paykickstart

Now you have to add the billing info like address and contact number and then click on the ‘Next Step’ button.

(f) Complete Purchase

Complete Purchase Paykickstart

After making all the required changes, hit the ‘Complete Purchase’ button. But before that, hit the ‘Capture Webhook Response’ in Pabbly Connect to capture the data.

Step 7: Test the Response in Pabbly Connect Dashboard

Save the Webhook Response

Once you click on the ‘Complete Purchase’ in PayKickstart and on the ‘Capture Webhook Response’ in Pabbly Connect, the subscriber info will appear on the Pabbly Connect dashboard. Then, click on the ‘Save’ option.

Step 8: Setting Action for PayKickstart to Sendicate Integration

To make this PayKickstart-Sendicate integration work, you have to choose an action for your trigger.

(a) Select Application you Want to Integrate

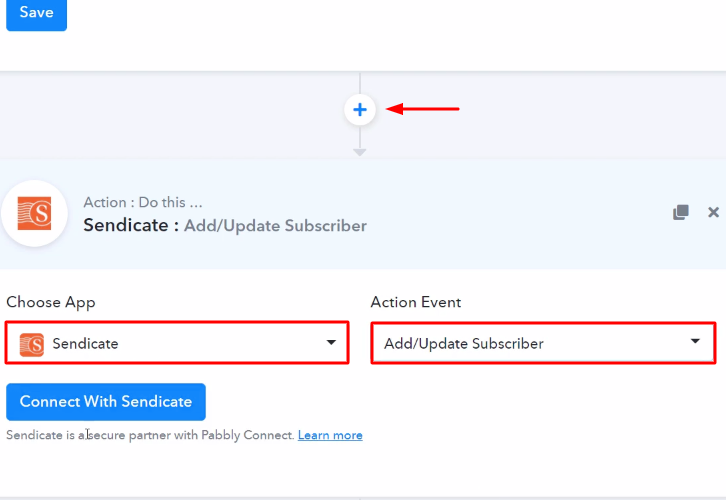
Select Sendicate

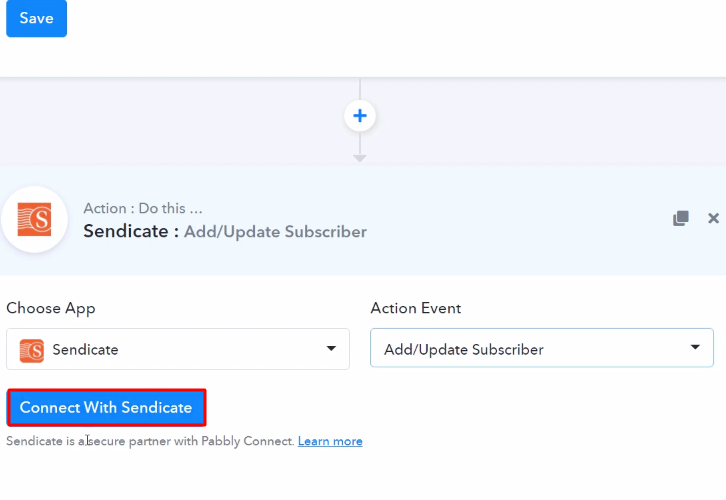
Now in this step, click on the ‘+’ button below and choose the application that you want to integrate. Here we will choose ‘Sendicate’ to integrate and in the method section select ‘Add/Update Subscriber’.

(b) Click the Connect Button

Connect with Sendicate

After choosing the application click on the ‘Connect with Sendicate’ button to move forward.

Step 9: Connecting Sendicate to Pabbly Connect

To connect Sendicate to Pabbly Connect, you have to paste the API token from your Sendicate account to Pabbly Connect. For this, you have to log in to your Sendicate account.

(a) Click on Manage Option

Click Manage Sendicate

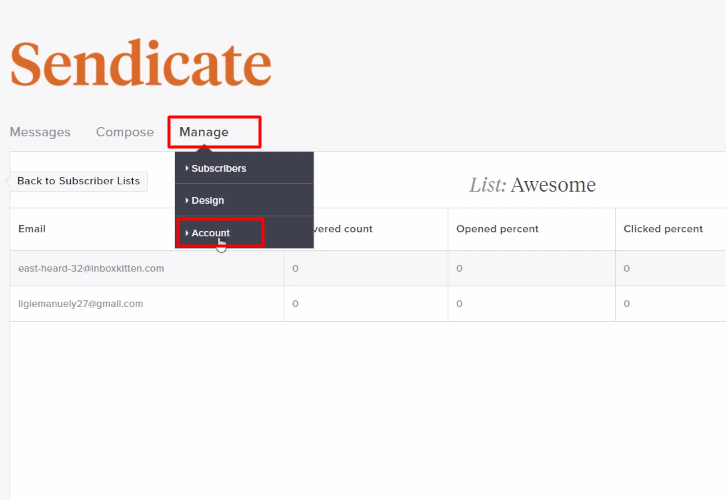
Here, to get the API token, click on the ‘Manage’ option in your Sendicate dashboard, and then select the ‘Account’ option.

(b) Copy the API Token

Copy the API Token Sendicate

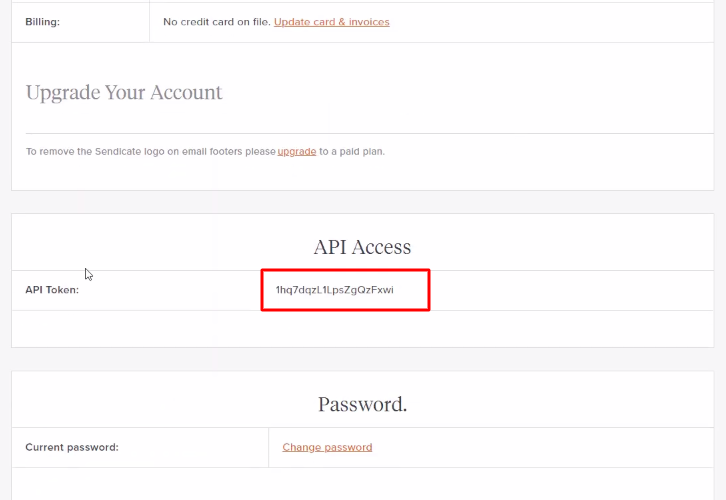
Now, scroll down and copy the API token from the ‘API Access’ section.

(c) Paste the API Token

Paste the API Token Sendticate

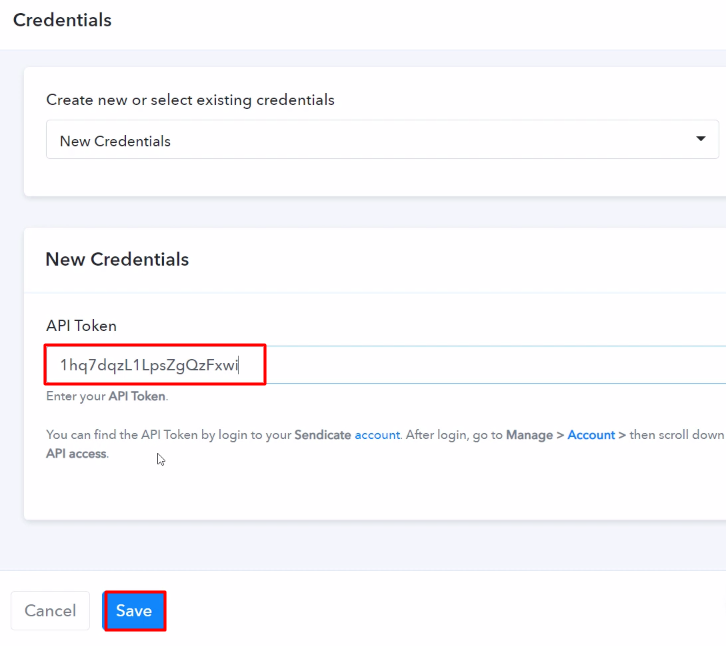
Simply, paste the copied API token and then hit the ‘Save’ button.

(d) Map the Fields

Map the Fields

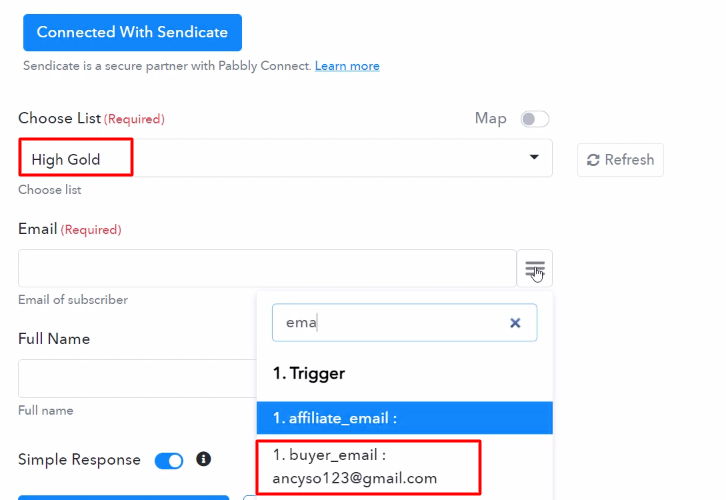
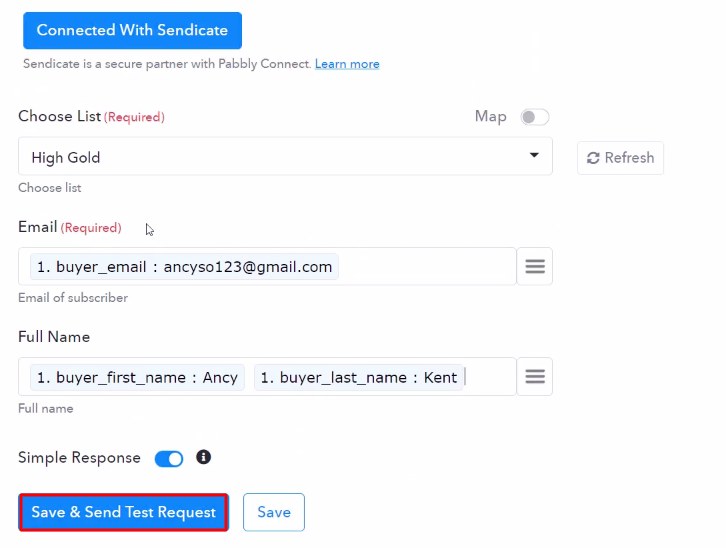
After connecting with your Sendicate account, map all the fields quickly like the list, email, etc.

(e) Save and Send Test Request

Send Test Request

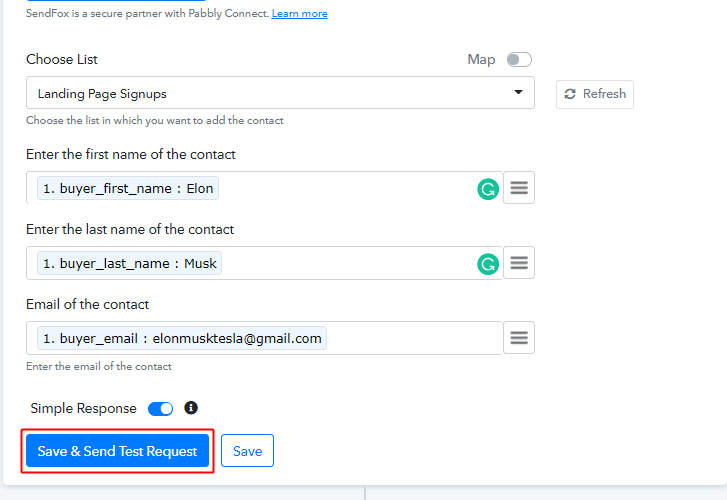
Once you are done adding up all field data click on the ‘Save & Send Test Request’ button.

Step 10: Check Response in Sendicate Dashboard

Check Response

In the end, when you check your Sendicate dashboard, the subscriber has been added on the new sale in PayKickstart.

Conclusion –

Finally, this was all about ‘How to Add Sendicate Subscriber from New PayKickstart Sale’. Just follow the above-mentioned step by step procedure, and you will end up auto-creating Sendicate subscriber from new sale in PayKickstart. In the meantime, you can grab, Pabbly Connect for FREE with all its premium features. Moreover, don’t forget to comment below for your queries and suggestions.

You May Also Like To Read –

How to Send Mailjet SMS from New PayKickstart Order Fulfillment

How to Send Mailjet SMS from New PayKickstart Order Fulfillment

Are you searching for a free and fastest way to send Mailjet SMS from new PayKickstart order fulfillment automatically? If yes, then we have an amazing tool suggestion for you i.e, Pabbly Connect.

Basically, Pabbly Connect is an integration and automation software that lets you migrate data from one app to another automatically in real-time.

How to Send Mailjet SMS from New PayKickstart Order Fulfillment

Sometimes, we want to send SMS to the customer using Mailjet SMS on every new order fulfillment in PayKickstart. And to do so we have Pabbly Connect to connect both the application for transferring data automatically.

However, instead of jumping straight into the integration process, let’s discuss a little bit about both the services. So, PayKickstart is an online shopping cart and affiliate management platform with built-in conversion enhancing features. Whereas, Mailjet SMS is an SMS software designed to help businesses easily create and send personalized SMS messages to their customers.

After integrating these applications, you can easily send Mailjet SMS from new PayKickstart order fulfillment in real-time. You can also refer to the below video to easily understand the usage of Pabbly Connect.

However, there is no direct integration possible for these two services yet. Hence, we are going to use Pabbly Connect to make this integration possible.

With the help of this software, you can effortlessly share data within multiple premium services easily. Further, it won’t need any coding skills & even a newcomer can use it effectively. Besides, this would be just a one-time setup. Later on, the data will automatically be transferred in real-time.

Why Choose This Method Of Integration?

In contrast with other integration services-

  • Pabbly Connect does not charge you for its in-built apps like filters, Iterator, Router, Data transformer, and more
  • Create “Unlimited Workflows” and smoothly define multiple tasks for each action
  • As compared to other services which offer 750 tasks at $24.99, Pabbly Connect offers 50000 tasks in the starter plan of $29 itself
  • Unlike Zapier, there’s no restriction on features. Get access to advanced features even in the basic plan
  • Try before you buy! Before spending your money, you can actually signup & try out the working of Pabbly Connect for FREE

Sign Up To Pabbly Connect 

Thus, let’s get started on how to connect PayKickstart and Mailjet SMS in real-time. Moreover, we’ve attached a template for this integration to help you get started more quickly. You can click on the ‘Use Workflow’ button below to get started. Plus, you can go to the App Directory & look for more apps/integrations.

How

Therefore, without taking any more of your time, let’s move according to plan & follow the step by step procedure to integrate PayKickstart and Mailjet SMS.

Step 1: Sign up to Pabbly Connect

Sign Up

Start the process to send Mailjet SMS from new PayKickstart order fulfillment by pressing the ‘Sign Up Free’ button on the Pabbly Connect dashboard. Then, either fill-up all the details manually or sign up using Gmail credentials.

Try Pabbly Connect for FREE

Step 2: Access Pabbly Connect

Select Connect

Now, after logging into the account, hit the ‘Access Now’ button as shown in the above image.

Step 3: Workflow for PayKickstart to Mailjet SMS Integration

(a) Start with a New Workflow

Create New Workflow

Start by creating a workflow for your project by hitting the ‘Create Workflow’ button.

(b) Name the Workflow

Name the Workflow

Quickly, you need to name the workflow just like in the above-shown image. I named the workflow ‘PayKickstart Integration’, you can obviously name the workflow as per your requirements.

Step 4: Setting Trigger for PayKickstart to Mailjet SMS Integration

After naming your workflow, select the application you want to integrate. Pabbly Connect enables you to connect unlimited premium apps, create your free account now.

(a) Select Application you Want to Integrate

Select Paykickstart

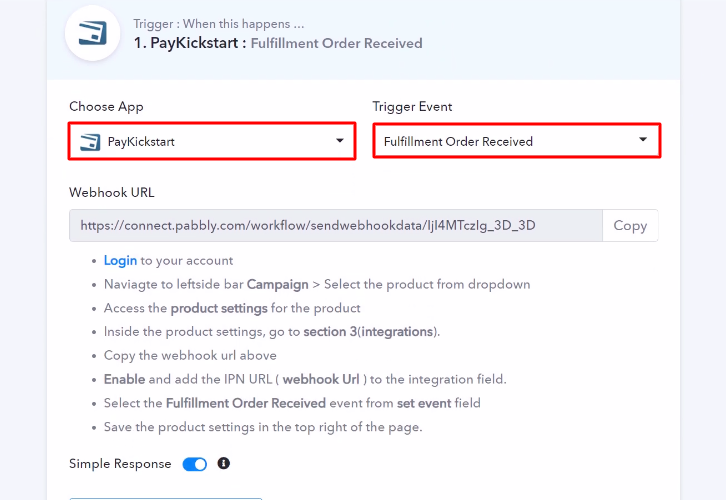
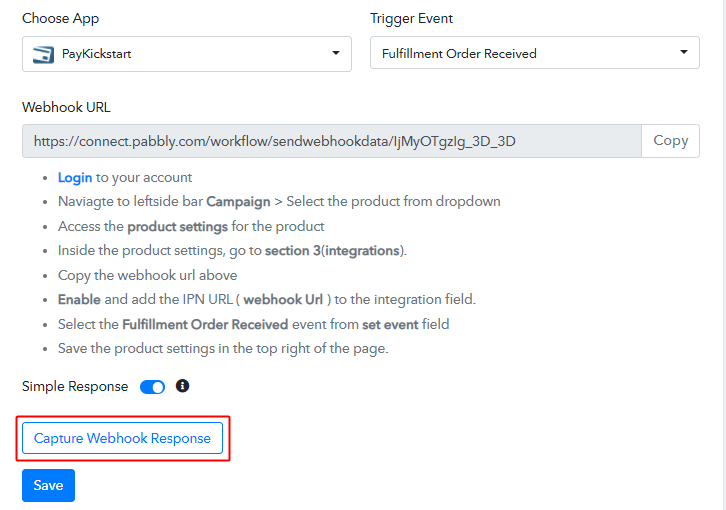
Forthwith, select the application that you want to integrate. Hither, we are choosing ‘PayKickstart’ for integration. Plus, in the method section, select ‘Fulfillment Order Received’.

(b) Copy the Webhook URL

How

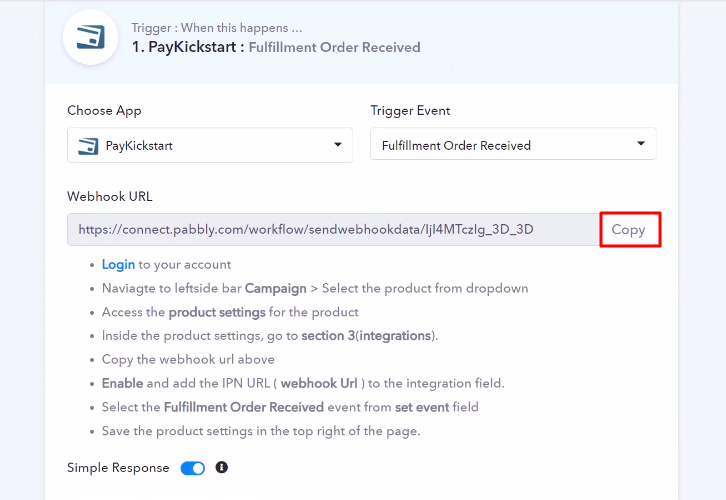
The next step is to copy the webhook URL which is appearing on the dashboard just like in the above-shown image.

Step 5: Connecting PayKickstart to Pabbly Connect

Promptly, to connect PayKickstart with Pabbly Connect, you have to paste the copied webhook URL in the software, and for that, you need to log in to your PayKickstart account.

(a) Go to PayKickstart Campaigns

paykickstart_campaigns

Forthwith, to paste the URL, hit the ‘Campaigns’ option in your PayKickstart dashboard.

(b) Select Product

Select Product Paykickstart

After reaching the campaigns page, select any of your listed products then press the edit button.

(c) Paste the Webhook URL

Paste the Webhook URL

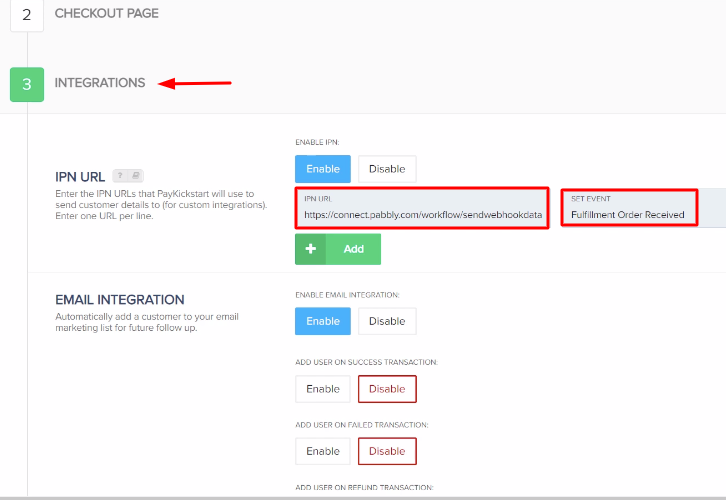
Momentarily, scroll down the page and hit the ‘Integrations’. In the IPN URL section, paste the copied webhook URL, and in the event section select the ‘Fulfillment Order Received’ option.

(d) Save Changes

Save Changes

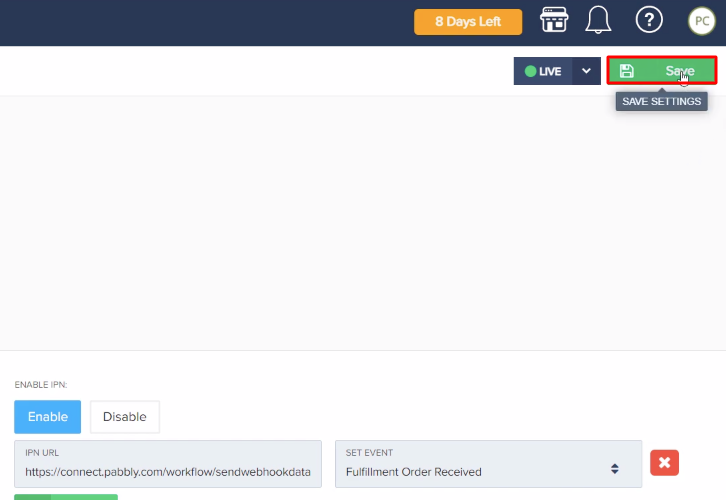
After making all the changes hit the ‘Save’ button to save the changes.

Step 6: Update an Order

Subsequently, to check if the integration is capturing data or not, we will update the status of an order in PayKickstart.

(a) Click on Payments

Select Payments Paykickstart

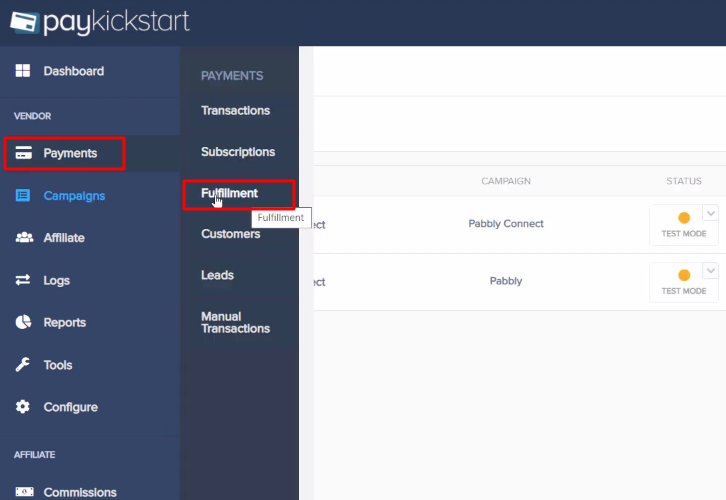
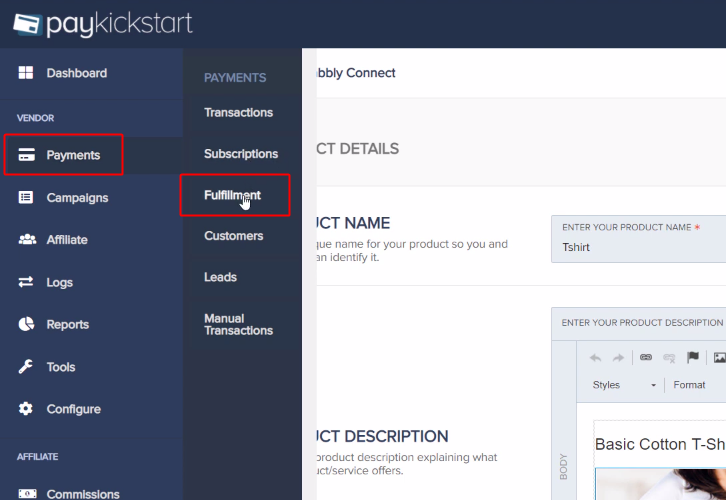
Afterward, to change an order’s status, hit the ‘Payments’ option then select the given ‘Fulfillment’ option.

(b) Select Order

Select Order Paykickstart

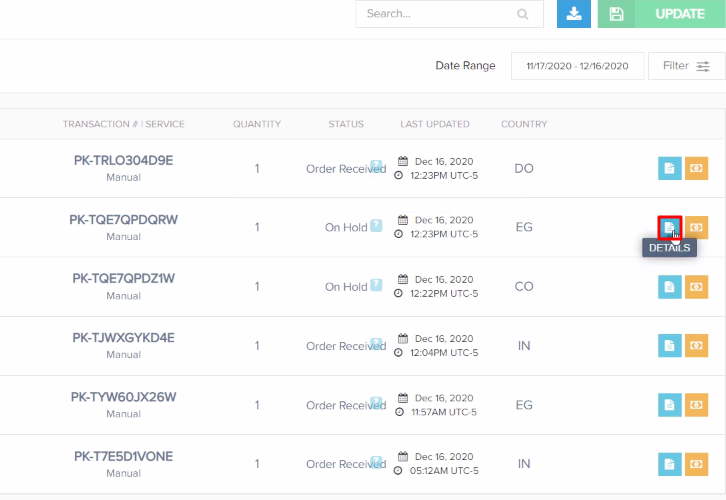
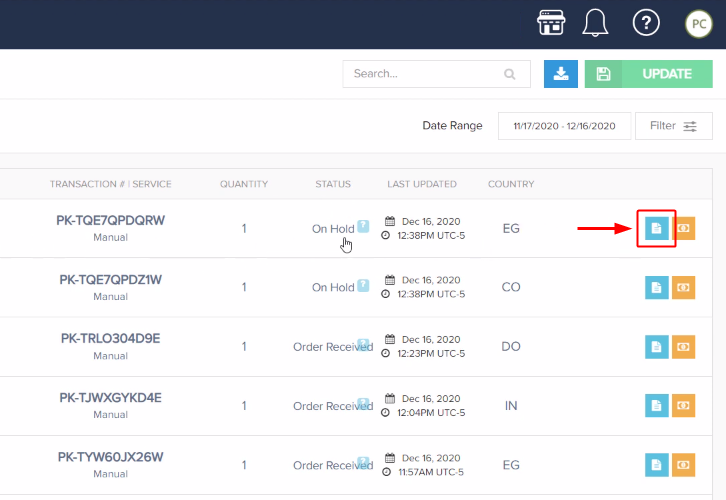
Immediately, select any of the orders those are not fulfilled and hit the ‘Details’ button.

(c) Update Order Status

Update Status Order Paykickstart

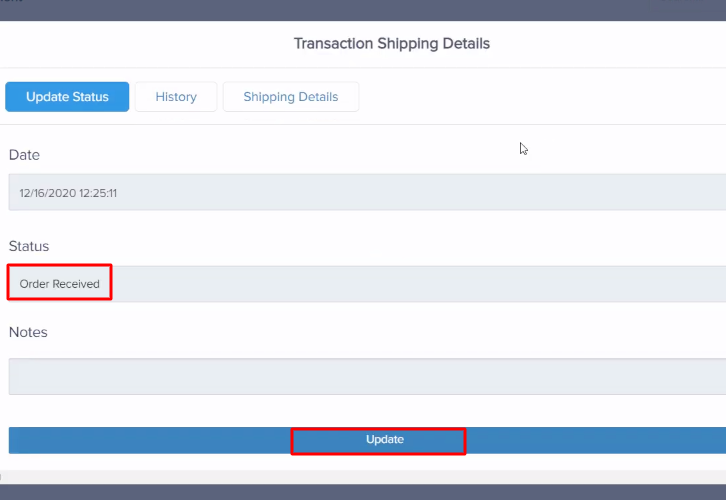
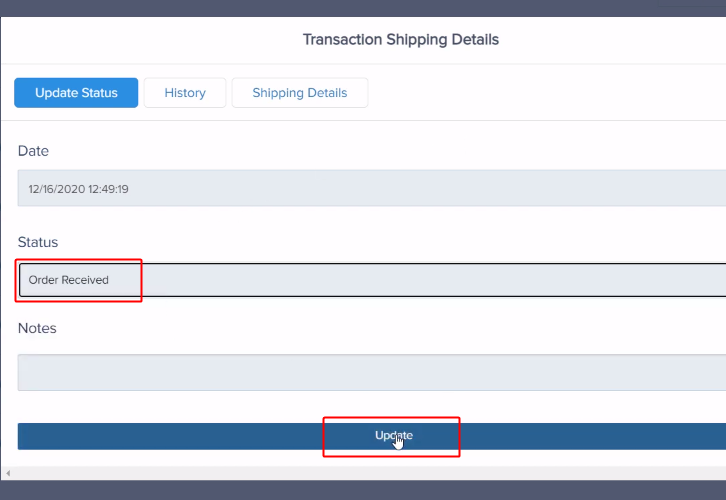
Consequently, now select the ‘Order Received’ in the status section & then hit the ‘Update’ button. Before that, hit the ‘Capture Webhook Response’ button in Pabbly Connect to capture the data.

Step 7: Test the Response in Pabbly Connect Dashboard

Test the Response in Pabbly Connect Dashboard

After pressing the ‘Update’ button in PayKickstart & the ‘Capture Webhook Response’ button in Pabbly Connect, the contact info will appear on the Pabbly Connect dashboard. Subsequently, hit the ‘Save’ option.

Step 8: Setting Action for PayKickstart to Mailjet SMS Integration

Next, to make this PayKickstart-Mailjet SMS integration work, you have to choose an action for your trigger.

(a) Select Application you Want to Integrate

Select Application you Want to Integrate

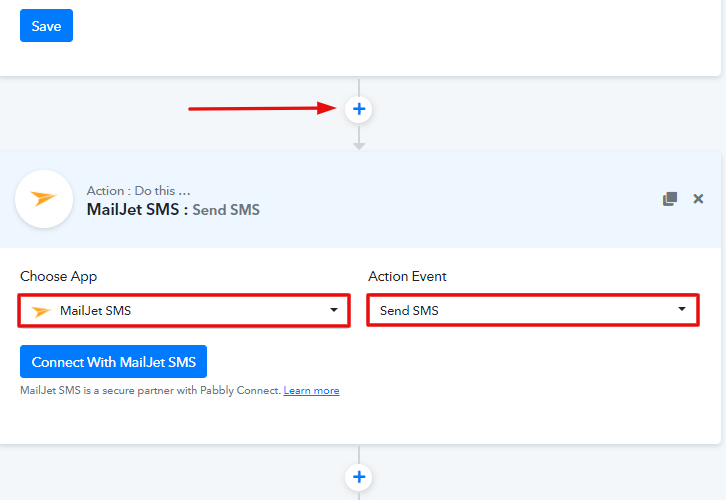
Later on, hit the ‘+’ button below & choose the application that you want to integrate. Here we will choose ‘Mailjet SMS’ to integrate and in the method section select ‘Send SMS’.

(b) Click on Connect Button

Click on Connect Button

After choosing the application press the ‘Connect with Mailjet SMS’ button to move further.

Step 9: Connecting Mailjet SMS to Pabbly Connect

Next, in order to connect Mailjet SMS to Pabbly Connect, you have to authenticate the application. Hence for that, you have to log in to your Mailjet SMS account.

(a) Go to your Mailjet SMS Account & Click on Manage Tokens

How

After logging into your Mailjet SMS account, go to the ‘API credentials’ option. Then, press the ‘Manage Token’ option.

(b) Create a Token

How

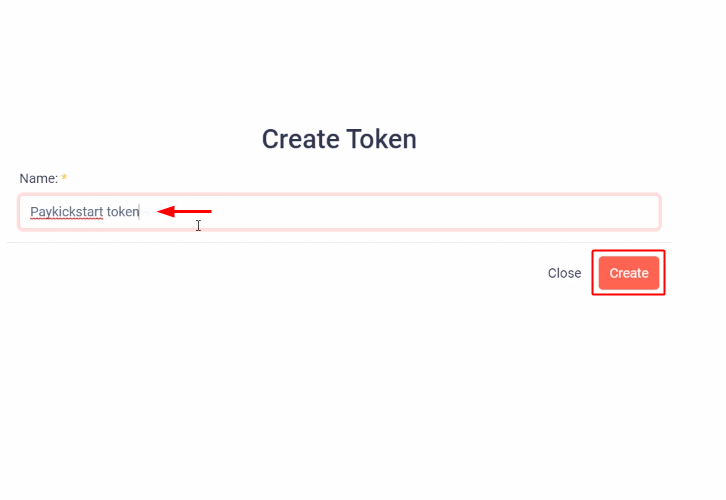
After that, create a Token by pressing the “Create” button.

(c) Name the  Token

How

Next, name the Token as per your requirement, as here we labeled it as “Sunshine”.

(d) Copy the Token

Copy the Bearer Token

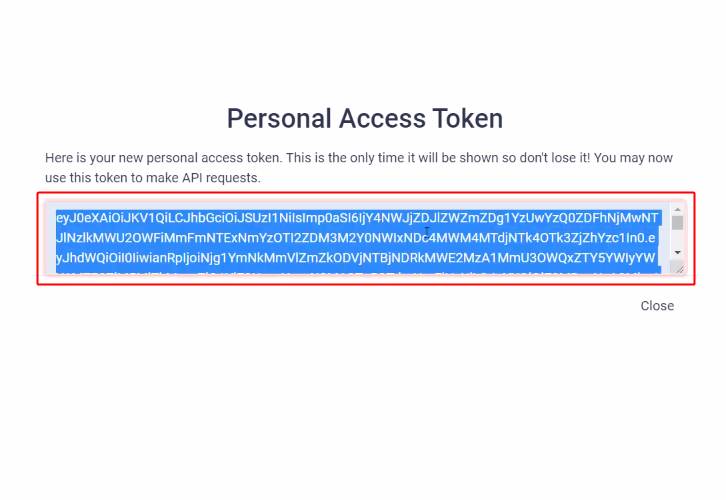
Now, copy the given Token to proceed further.

(e) Paste the Token

Paste the Token

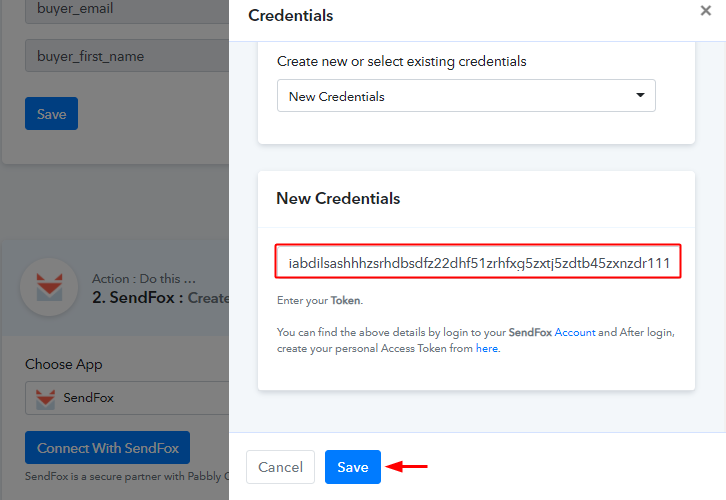
Now, paste the copied token on Pabbly Connect and click on the ‘Save’ button.

(f) Map the Fields

Map the Fields

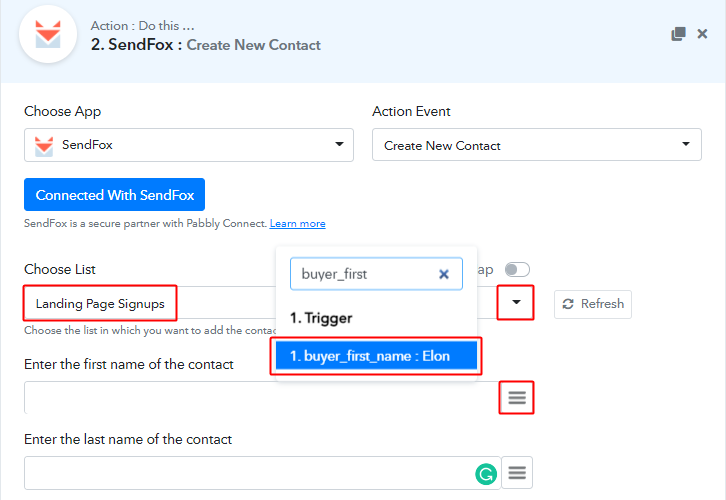
Once you are done connecting with your Mailjet SMS account, map all the fields quickly like the name, Text, Number, etc. After adding up all field data hit the ‘Save & Send Test Request’ button.

(g) Check the Action API’s Response

Check the Action API's Response

Now, as you can check, the response has been successfully captured by Pabbly Connect.

Step 10: Check Response in Mailjet SMS Dashboard

Check Response in Mailjet SMS Dashboard

Eventually, when you check your Mailjet SMS dashboard, the SMS has been sent through the Mailjet SMS account on the new order fulfillment in PayKickstart.

Conclusion –

Finally, this was all about ‘How to Send Mailjet SMS from New PayKickstart Order Fulfillment’. Just follow the above-mentioned step by step procedure, and your automation is set in no time. So, what are you waiting for? Go grab, Pabbly Connect for FREE with all its premium features. Furthermore, don’t forget to comment below for your queries & suggestions.

You May Also Like To Read –

How to Create Freshdesk Contact from New PayKickstart Sale

How to Create Freshdesk Contact from New PayKickstart Sale

Are you still, adding Freshdesk contact manually for every new PayKickstart sale?

How to Create Freshdesk Contact from New PayKickstart Sale

If yes then this blog can help you in automating this task. We’ll be using Pabbly Connect to automate the task as there is no direct integration possible for these two services.
Fundamentally, Pabbly Connect is an integration & automation tool that lets you share data from one application to another in real-time.

Most importantly, you don’t have to use any coding skills & even beginners can use it efficiently. Moreover, this will be just a one-time set-up and after that, the workflow will take care of the rest.

Why Choose This Method Of Integration?

In contrast with other integration services-

  • Pabbly Connect does not charge you for its in-built apps like filters, Iterator, Router, Data transformer and more
  • Create “Unlimited Workflows” and smoothly define multiple tasks for each action
  • As compared to other services which offer 750 tasks at $24.99, Pabbly Connect offers 50000 tasks in the starter plan of $29 itself
  • Unlike Zapier, there’s no restriction on features. Get access to advanced features even in the basic plan
  • Try before you buy! Before spending your money, you can actually signup & try out the working of Pabbly Connect for FREE

Sign Up To Pabbly Connect  

But, before starting the procedure first, let’s learn a little about the services. PayKickstart is a subscription billing service for various business types. Whereas, Freshdesk is an online cloud-based customer service software that provides helpdesk support.

Consequently, once you set-up this workflow all your contact get entered into your customer support software i.e, Freshdesk whenever there is a successful sale on PayKiskstart.

Additionally, we are enclosing a video for the same integration as well. Have a look at it –

Furthermore, we’ve attached the template for the same to help you get started immediately. You can click on the ‘Use Workflow’ button below to get started. Also, you can go to the App Directory & look for more integrations/apps.

HowHow

Create Freshdesk Contact from New PayKickstart Sale

So, buckle up as we’re going to discover how to automatically create Freshdesk contacts for PayKickstart sales through this integration.

Step 1: Sign up to Pabbly Connect

Sign Up

Begin the procedure of connecting PayKickstart with Freshdeskwith visiting the Pabbly Connect website. Then, hit the ‘Sign-Up Free‘ button available. Formerly, use your existing Gmail account or manually fill the registration form to signup.

Try Pabbly Connect for FREE

Step 2: Access Pabbly Connect

Select Connect

After that, strike the ‘Access Now’ button of the software ‘Connect’ within the Pabbly applications.

Step 3: Workflow for PayKickstart with Freshdesk Integration

(a) Start with a New Workflow
Create New Workflow

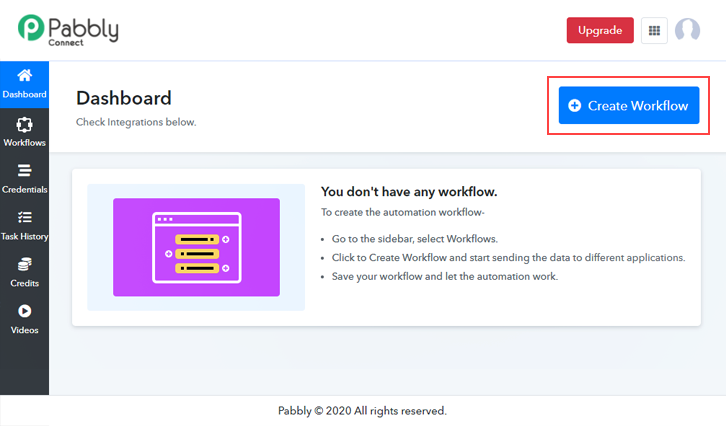
Further, start with creating a workflow to add contacts on Freshdesk for every new PayKickstart sale & to do this push the ‘Create Workflow’ button first.

(b) Name the Workflow

workflow_for_paykickstart_to_freshdesk

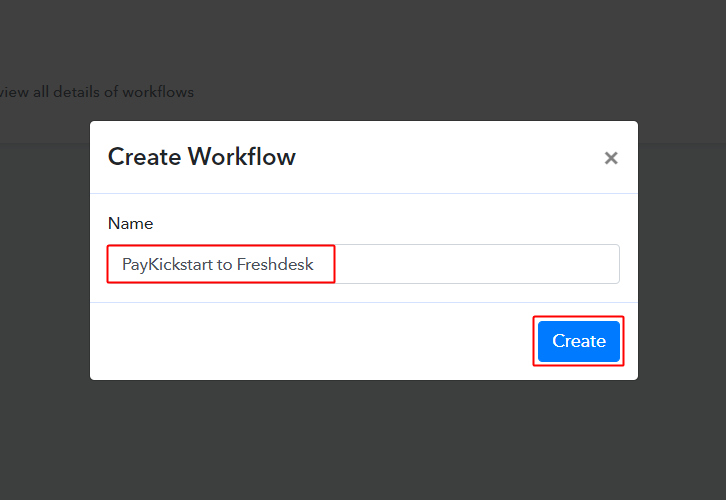
Now, name the workflow as per the integration or use-case (for instance: PayKickstart to Freshdesk etc). Finally, click on the ‘Create’ button available.

Step 4: Setting Trigger for PayKickstart to Freshdesk Integration

To automatically add Freshdesk contact for every PayKickstart sale, you’ll need to set-up a trigger on PayKickstart sales and its respective action to add a contact on Freshdesk using Pabbly Connect.

(a) Select Application you want to integrate

integrate_paykickstart_for_paykickstart_to_freshdesk

When you click on the create, a page carrying the trigger window will open up.

Select the ‘PayKickstart’ app from the ‘Choose App’ field’s drop-down choices.

(b) Select Method & Connect with PayKickstart

select_method_and_copy_webhook_url_for_paykickstart_to_freshdesk

Select the method in here to be ‘Sales’ & then copy the given webhook URL.

Step 5: Connecting PayKickstart to Pabbly Connect

To connect PayKickstart with Pabbly connect, you’ll need to sign-in your PayKickstart account & paste the copied webhook URL.

(a) Go to Your PayKickstart Settings

paykickstart_campaigns

After successfully logging into your PayKickstart account, strike the ‘Campaign’ option available at the bottom of the left vertical menu.

(b) Edit Any Product

edit_any_product_from_paykickstart_campaigns

A page will open up carrying all the different products created on PayKickstart. Click on the pencil icon to edit a particular product.

(c) Click on Integrations

click_on_integrations

Scroll to the bottom of the page and click on ‘Integrations’.

Then, click on ‘Enable’ in the IPN URL section. After that click on the ‘Add’ button.

(d) Paste the Webhook URL

paste_webhook_url_for_paykickstart_to_freshdesk

Paste the copied Pabbly Connect trigger URL in the ‘IPN URL’ field.

Then, select the ‘Transaction Sales’ event for the ‘SET EVENT’ field.

Finally, hit the ‘Save’ button available at the top right corner of the page.

Step 6: Test the Response in Pabbly Connect Dashboard

As we can see, we are done setting up the trigger for PayKickstart and Freshdesk integration. So, let’s test the trigger setup for a test order fulfillement on PayKickstart.

(a) Capture Webhook Response

capture_webhook_response_for_paykickstart_to_freshdesk

To test the set trigger first, click on the ‘Capture Webhook Response’ button on your Pabbly Connect trigger window.

(b) Open Your PayKickstart Campaigns

paykickstart_campaigns

Now, go back to your PayKickstart dashboard and click on ‘Campaigns’ from the left verticle menu.

(c) Open Any Product’s Checkout Page

open_checkout_page_for_the_linked_product

Now, go back to your PayKickstart dashboard and open the checkout page of the product in which you set-up the trigger condition.

(d) Copy the Checkout Page URL

copy_checkout_page_url_for_paykickstart_to_hubspot

Copy the checkout page URL for the selected product.

(e) Make a Test Purchase

fill_the_purchase_details_for_paykickstart_to_freshdesk

Fill in all the required purchase details to make a test subscription. First, it’ll ask for the contact information, second for the billing details and lastly to finalize the test purchase.

(f) Complete the Test Purchase

complete_the_purchase_for_paykickstart_to_freshdesk

Complete the test purchase by following all the steps required to make a successful payment.

(g) Check & Save Trigger Response

check_and_save_trigger_response_for_paykickstart_to_freshdesk

Once you successfully complete the registration, the Pabbly Connect trigger response will start showing the data for the current sign-up. Also, remember to save the trigger response.

Step 7: Setting Action for PayKickstart to Freshdesk Integration

Now, as we have gathered all the necessary information to create contact on Freshdesk from the PayKickstart response. We can now proceed to feed this data to perform the action. After that, a new contact will be created automatically for every PayKickstart sale.

(a) Select Application you want to Integrate

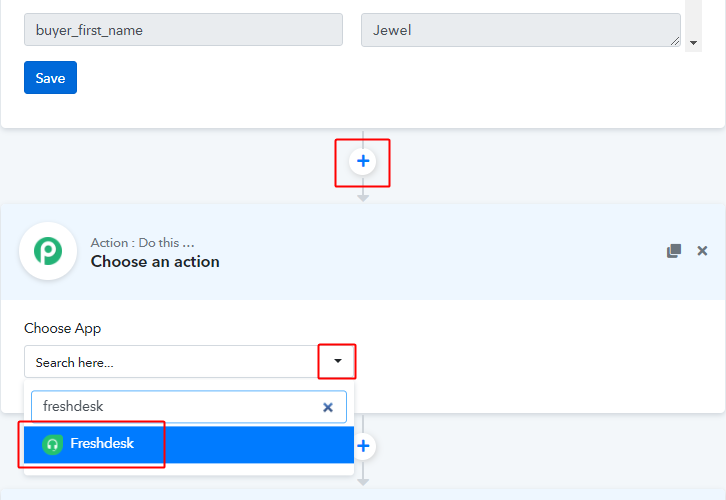
integrate_freshdesk_for_paykickstart_to_freshdesk_workflow

Hit the plus button next to your PayKickstart trigger.

Select the app to integrate here as ‘Freshdesk’.

(b) Select Event & Connect with Freshdesk

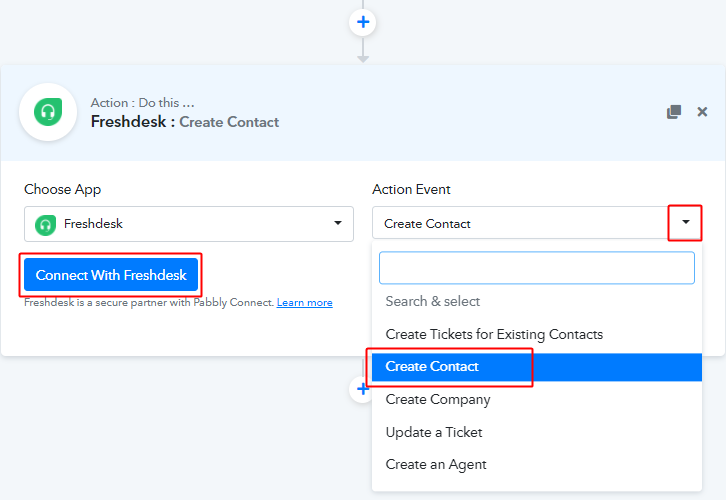
select_action_event_and_connect_with_freshdesk_for_paykickstart_to_freshdesk

Then, select the method as ‘Create Contact’.

Lastly, push the ‘Connect with Freshdesk’ button.

Then the system will ask you for an API key.

Step 8: Connecting Freshdesk to Pabbly Connect

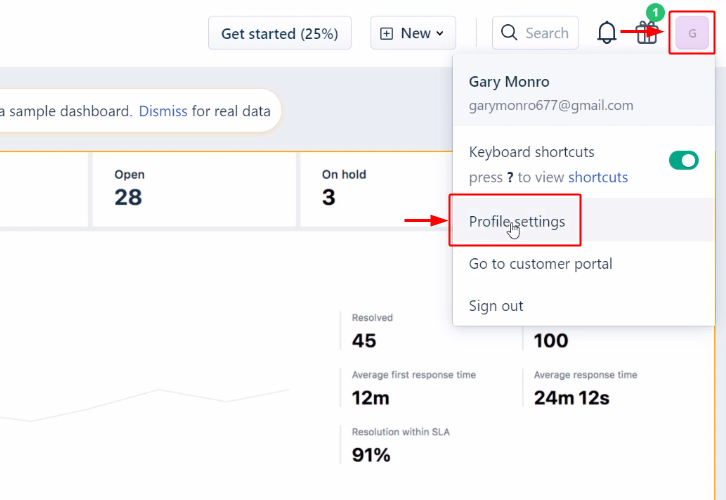
freshdesk_profile_settings

Next, sign-in and go to your Freshdesk dashboard. Click on the profile icon and select the ‘Profile Settings’ option from the menu that opens.

(c) Copy the API Key

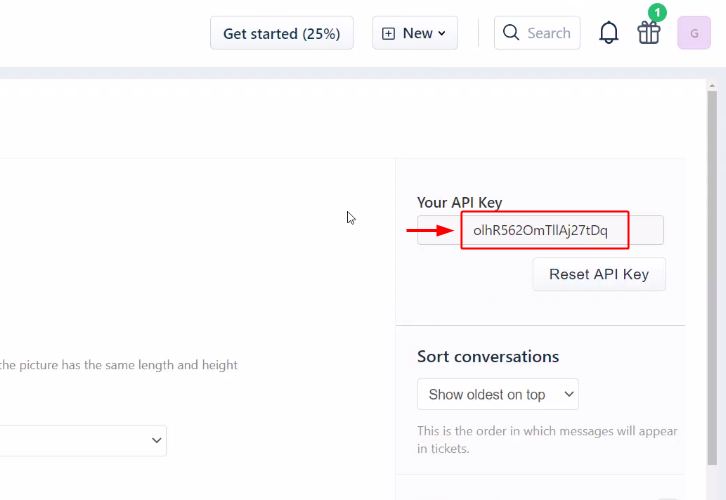
copy_freshdesk_api_key

You’ll see an API key on the profile settings page, select and simply copy it.

(d) Paste the API Key, Password & Subdomain

paste_freshdesk_credentials_and_subdomain_for_paykickstart_to_freshdesk

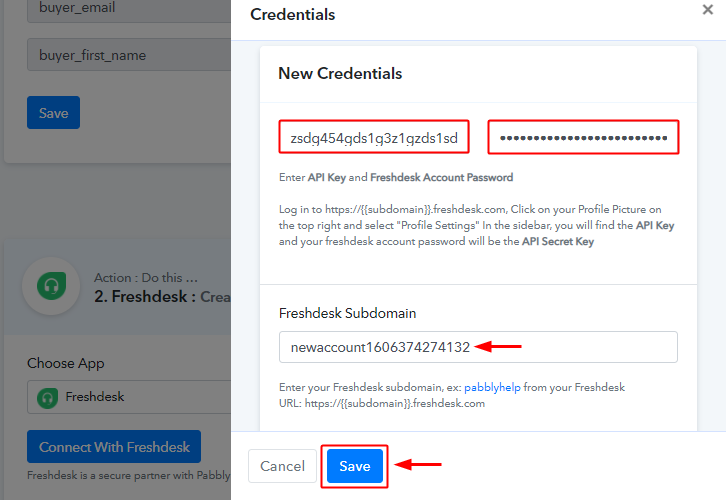
Subsequently, paste the copied Freshdesk API key, password and subdomain (as directed in the help text) on Pabbly Connect and click on ‘Save’.

(d) Choose List & Map Fields

map_fields_for_paykickstart_to_freshdesk

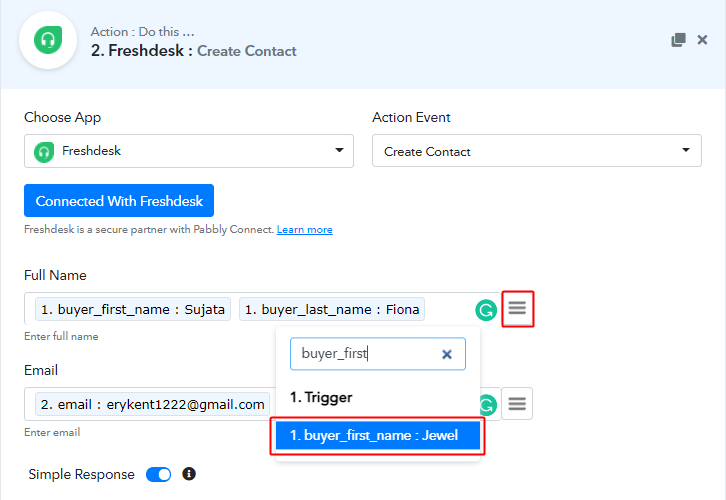
Now, map the full name and email fields.

To map a value, hit the menu button (three horizontal lines) next to that particular field.

After that, select the value that you want to map with that respective field.

Similarly, map all the other required fields also.

(e) Send Test Request

send_test_request_for_freshdesk_action

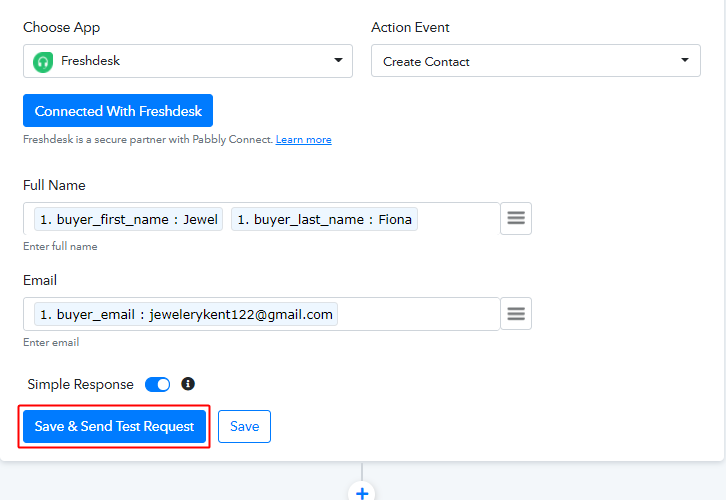
Further, click on the ‘Save & Send Test Request’ button to send a request for creating a contact on Freshdesk.

(f) Check & Save Response

check_and_save_action_response_for_paykickstart_to_freshdesk

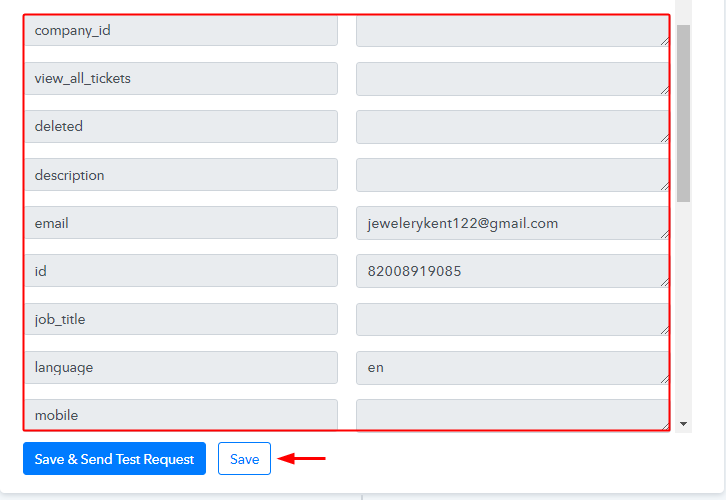
Certainly, you can check the response of your API in the action window. And, if there is some error while sending the data then it will show you the error.

Finally, hit the ‘Save’ button to save the action API’s response.

Step 9: Check Response in Freshdesk Dashboard

contact_entry_on_freshdesk_for_paykickstart_to_freshdesk

Also, you can see the data on your connected Freshdesk account.

Conclusion –

To sum up, this was all about ‘How to create Freshdesk contact from new PayKickstart sale’. Consequently, after completing the step by step procedure, you will end up auto-creating Freshdesk contact for every new sale on PayKickstart.

However, you can also grab Pabbly Connect for FREE with all its premium features.

Also, do comment us your queries & suggestions in the section given below.

You May Also Like to Read:

How to Create Gist Contact from New PayKickstart Order Fulfillment

How to Create Gist Contact from New PayKickstart Order Fulfillment

Searching for the free and fastest way to create Gist contact from new PayKickstart order fulfillment automatically? If yes, then we have an amazing tool suggestion for you i.e, Pabbly Connect.

Basically, Pabbly Connect is an integration and automation software that lets you migrate data from one app to another automatically in real-time.

How to Create Gist Contact from New PayKickstart Order Fulfillment

Sometimes, we want the contacts to be created in Gist on the new order fulfillment in PayKickstart automatically, and to make this wish come true Pabbly Connect is here.

But before we jump straight into the integration process, let’s discuss a little bit about both the services. So, PayKickstart is an online shopping cart and affiliate management platform with built-in conversion enhancing features. Whereas, Gist is a cloud-based solution designed to help businesses automate sales processes by adding live chat windows to websites for increased customer experience.

After integrating these applications, you can easily create Gist contact from new PayKickstart order fulfillment in real-time. You can also refer to the below video to easily understand the usage of Pabbly Connect.

Still, there is no direct integration possible for these two services yet. Therefore, we are going to use Pabbly Connect to make this integration possible.

With the help of this software, you can effortlessly share data within multiple premium services easily. Moreover, it won’t need any coding skills & even a newcomer can use it effectively. Furthermore, this would be just a one-time setup. Later on, the data will automatically be transferred in real-time.

Why Choose This Method Of Integration?

In contrast with other integration services-

  • Pabbly Connect does not charge you for its in-built apps like filters, Iterator, Router, Data transformer, and more
  • Create “Unlimited Workflows” and smoothly define multiple tasks for each action
  • As compared to other services which offer 750 tasks at $24.99, Pabbly Connect offers 50000 tasks in the starter plan of $29 itself
  • Unlike Zapier, there’s no restriction on features. Get access to advanced features even in the basic plan
  • Try before you buy! Before spending your money, you can actually signup & try out the working of Pabbly Connect for FREE

Sign Up To Pabbly Connect 

So, lets get started on how to connect PayKickstart and Gist in real-time. Further, we’ve attached a template for this integration to help you get started more quickly. You can click on the ‘Use Workflow’ button below to get started. And, you can go to the App Directory & look for more apps/integrations.

HowHow

Instantly Create Gist Contact from New PayKickstart Order Fulfillment

So, without taking any more of your time, let’s move according to plan & follow the step by step procedure to integrate PayKickstart and Gist.

Step 1: Sign up to Pabbly Connect

Sign Up

Begin the process to create Gist contact from new PayKickstart order fulfillment by pressing the ‘Sign Up Free’ button on the Pabbly Connect dashboard. Afterward, either fill-up all the details manually or sign up using Gmail credentials.

Try Pabbly Connect for FREE

Step 2: Access Pabbly Connect

Select Connect

Following that, after logging into the account, press the ‘Access Now’ button as shown in the above image.

Step 3: Workflow for PayKickstart to Gist Integration

(a) Start with a New Workflow

Create New Workflow

Begin with creating a workflow for your project by pressing the ‘Create Workflow’ button.

(b) Name the Workflow

Name the Workflow

Promptly, you need to name the workflow just like in the above-shown image. I named the workflow ‘PayKickstart Integration’, you can obviously name the workflow as per your requirements.

Step 4: Setting Trigger for PayKickstart to Gist Integration

After you are done with naming your workflow, you will have to select the application you want to integrate. Pabbly Connect enables you to connect unlimited premium apps, create your free account now.

(a) Select Application you Want to Integrate
Select Paykickstart

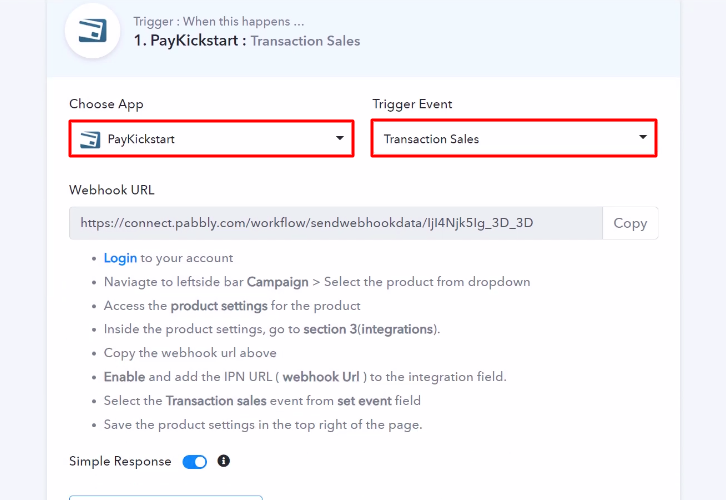
Soon, you have to select the application that you want to integrate. Here, we are choosing ‘PayKickstart’ for integration. And, in the method section, select ‘Fulfillment Order Received’.

(b) Copy the Webhook URL

How

The following step is to copy the webhook URL which is appearing on the dashboard just like in the above-shown image.

Step 5: Connecting PayKickstart to Pabbly Connect

Now, in order to connect PayKickstart with Pabbly Connect, you have to paste the copied webhook URL in the software, and for that, you need to log in to your PayKickstart account.

(a) Go to PayKickstart Campaigns

paykickstart_campaigns

Now, in order to paste the URL, press the ‘Campaigns’ option in your PayKickstart dashboard.

(b) Select Product

Select Product Paykickstart

After reaching the campaigns page, select any of your listed products then press the edit button.

(c) Paste the Webhook URL

Paste the Webhook URL

Now, scroll down the page and press the ‘Integrations’. In the IPN URL section, paste the copied webhook URL, and in the event section select the ‘Fulfillment Order Received’ option.

(d) Save Changes

Save Changes

Once you are done making all the changes press the ‘Save’ button in order to save the changes.

Step 6: Update an Order

Next, in order to check if the integration is capturing data or not, we will update the status of an order in PayKickstart.

(a) Click on Payments

Select Payments Paykickstart

Subsequently, to change an order’s status, press the ‘Payments’ option then select the given ‘Fulfillment’ option.

(b) Select Order

Select Order Paykickstart

Now, select any of the orders those are not fulfilled and press the ‘Details’ button.

(c) Update Order Status

Update Status Order Paykickstart

Subsequently, now select the ‘Order Received’ in the status section & then press the ‘Update’ button. Before that, press the ‘Capture Webhook Response’ button in Pabbly Connect to capture the data.

Step 7: Test the Response in Pabbly Connect Dashboard

Trigger API Response for Stripe to Gist

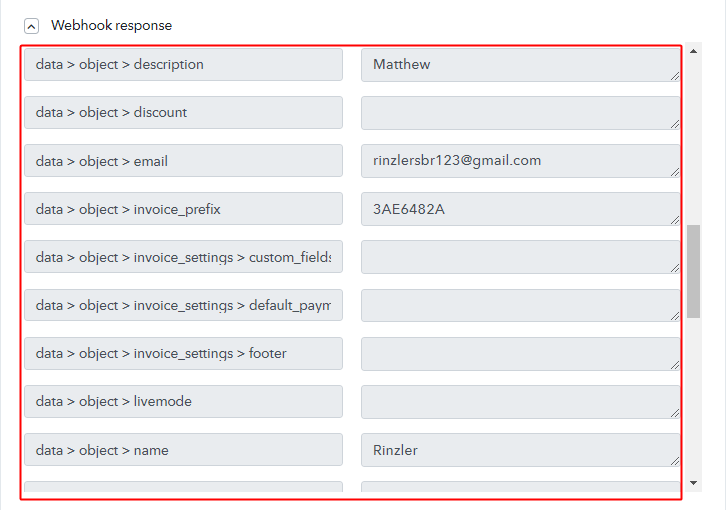
After pressing the ‘Update’ button in PayKickstart & the ‘Capture Webhook Response’ button in Pabbly Connect, the contact info will appear on the Pabbly Connect dashboard. Next, press the ‘Save’ option.

Step 8: Setting Action for PayKickstart to Gist Integration

Consequently, in order to make this PayKickstart-Gist integration work, you have to choose an action for your trigger.

(a) Select Application you Want to Integrate
Integrate Gist for stripe to Gist

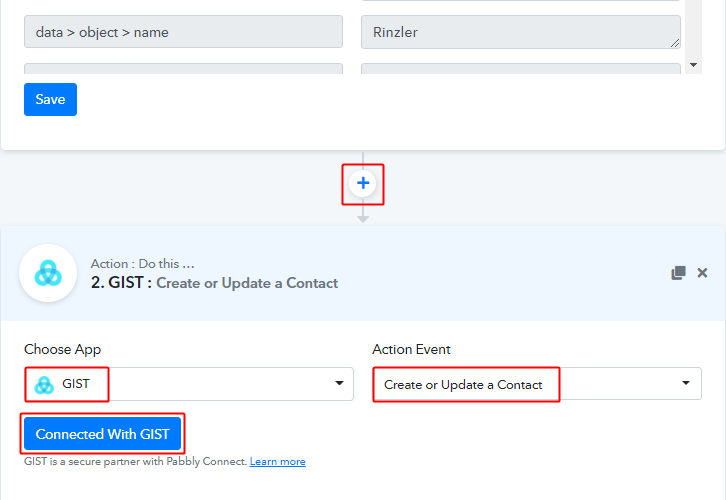
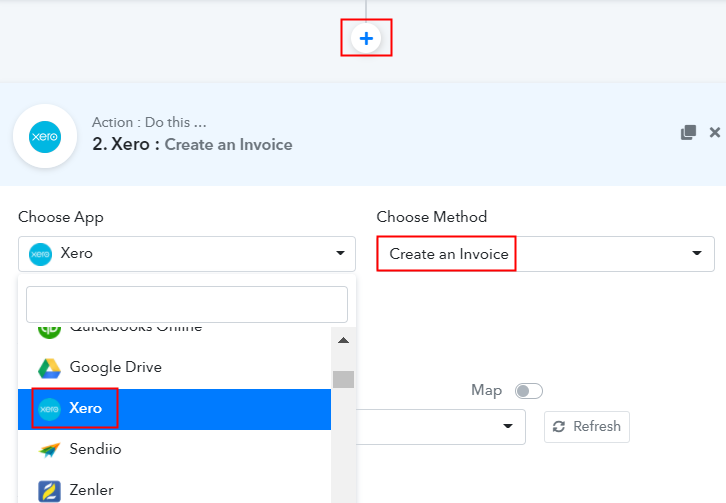
Later on, press the ‘+’ button below & choose the application that you want to integrate. Here we will choose ‘Gist’ to integrate and in the method section select ‘Create or Update a Contact’. After choosing the application press the ‘Connect with Gist’ button to move further.

Step 9: Connecting Gist to Pabbly Connect

Next, in order to connect Gist to Pabbly Connect, you have to authenticate the application. Hence for that, you have to log in to your Gist account.

(a) Go to your Gist Account & Click on Settings

Copy API Key
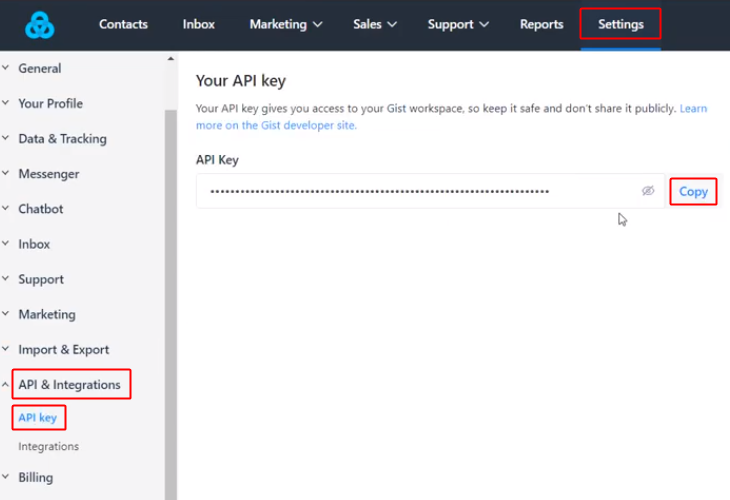
After logging into your Gist account, go to the ‘Settings’ option from the horizontal menu available on the top. Then, press the ‘API & Integration’ option available in the vertical menu that opens. After that, press the ‘API Key’ option & copy the API key by pressing the button next to it.

(b) Paste the API Key

Paste API Key for Stripe to Gist

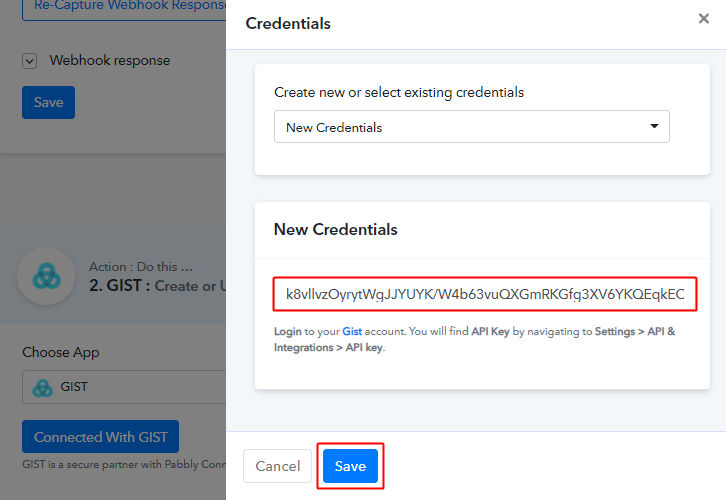
Now, paste the copied API key on Pabbly Connect and click on the ‘Save’ button.

(c) Map the Fields

Map Fields for Stripe to Gist

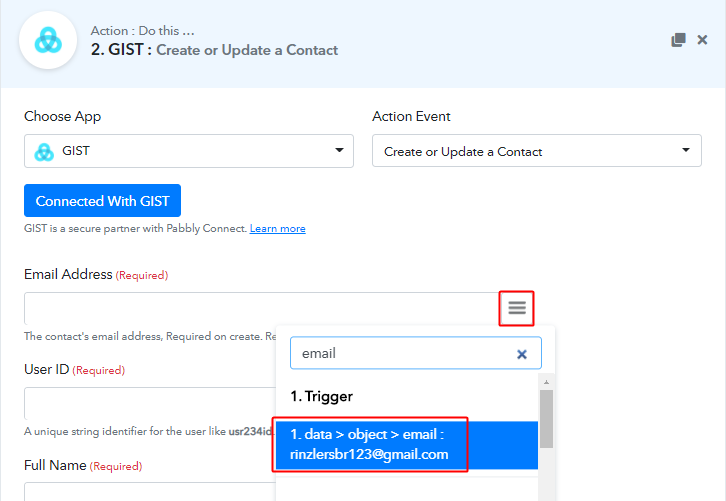
Once you are done connecting with your Gist account, map all the fields quickly like the name, email, etc.

(d) Save and Send Test Request

Send Test Request for Stripe to Gist

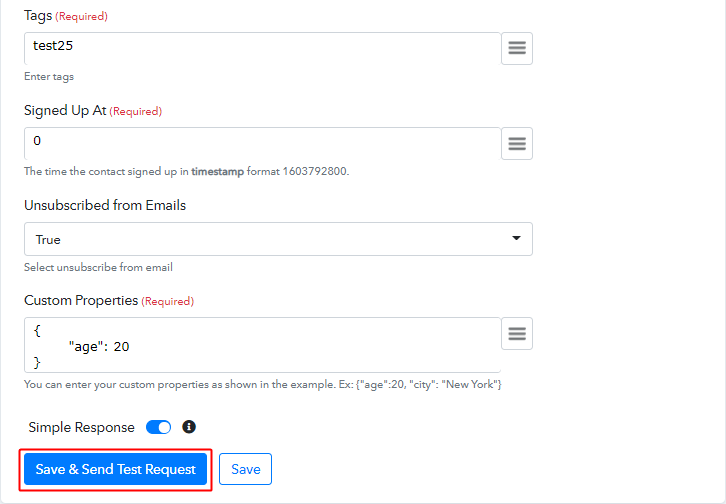
After adding up all field data press the ‘Save & Send Test Request’ button.

(e) Check the Action API’s Response

Action API Response for Stripe to Gist

Now, as you can check, the response has been successfully captured by Pabbly Connect.

Step 10: Check Response in Gist Dashboard

Entry on gist

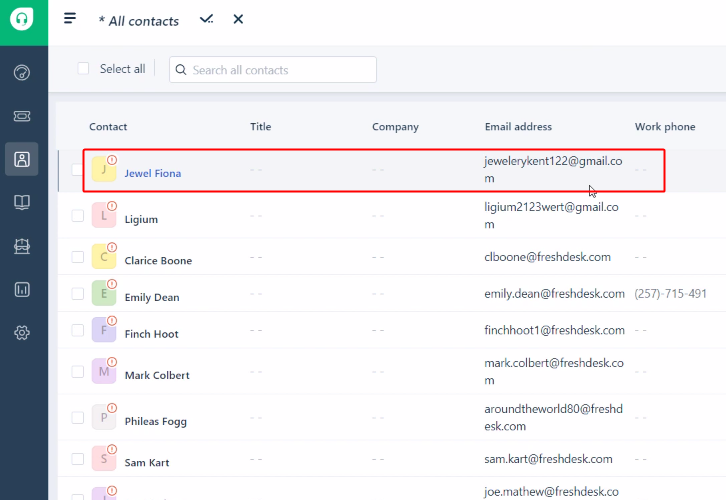
Eventually, when you check your Gist dashboard, the contact has been created in the Gist account on the new order fulfillment in PayKickstart.

Conclusion –

Finally, this was all about ‘How to Create Gist Contact from New PayKickstart Order Fulfillment’. Just follow the above-mentioned step by step procedure, and you will end up auto-creating Gist contact from the newly fulfilled orders in PayKickstart. In the meantime, you can grab, Pabbly Connect for FREE with all its premium features. Moreover, don’t forget to comment below for your queries and suggestions.

You May Also Like To Read –
How to Send Slack Message from Cancelled PayKickstart Subscription

How to Send Slack Message from Cancelled PayKickstart Subscription

Looking for the free and rapid way to send Slack message from cancelled PayKickstart subscription automatically? If yes, then we have the best solution for you named as Pabbly Connect.

Essentially, Pabbly Connect is an integration and automation software that lets you migrate data from one app to another automatically in real-time.

How to Send Slack Message from Cancelled PayKickstart Subscription

Now and then we want to get the Slack channel messages on the cancelled subscriptions in PayKickstart automatically, and to make this wish come true Pabbly Connect is here.

But let’s not jump straight to the integration process, let’s discuss a tiny bit about both the services. So, PayKickstart is an online shopping cart and affiliate management platform with built-in conversion enhancing features. Whereas, Slack is a chatroom application for your whole team to communicate both as a group and in personal one-on-one discussions.

After integrating these applications, whenever there will be any cancelled subscription in your PayKickstart store, the message will be automatically delivered about the cancellation in the Slack channel in real-time. You can also refer to the below video to understand the usage of Pabbly Connect.

However, there is no direct integration possible for these two services yet. So, we are going to use Pabbly Connect to make this integration possible.

Using this software, you can effortlessly share data within multiple premium services easily. More importantly, it won’t need any coding skills & even a novice can use it effectively. Moreover, this would be just a one-time setup. After that, the data will automatically be transferred in real-time.

Why Choose This Method Of Integration?

In contrast with other integration services-

  • Pabbly Connect does not charge you for its in-built apps like filters, Iterator, Router, Data transformer, and more
  • Create “Unlimited Workflows” and smoothly define multiple tasks for each action
  • As compared to other services which offer 750 tasks at $24.99, Pabbly Connect offers 50000 tasks in the starter plan of $29 itself
  • Unlike Zapier, there’s no restriction on features. Get access to advanced features even in the basic plan
  • Try before you buy! Before spending your money, you can actually signup & try out the working of Pabbly Connect for FREE

Sign Up To Pabbly Connect 

So, get ready as we’re going to discover how to connect PayKickstart and Slack in real-time. Furthermore, we’ve attached a template for this integration to help you get started more quickly. You can strike the ‘Use Workflow’ button below to get started. Also, you can go to the Marketplace & look for more apps/integrations.

HowHow

Send Slack Message from Cancelled PayKickstart Subscription

Now, without further ado, let’s move according to plan & follow the step by step procedure to integrate PayKickstart and Slack.

Step 1: Sign up to Pabbly Connect

Sign Up

Kick-off the process to send Slack message from cancelled PayKickstart subscription by clicking on the ‘Sign Up Free’ button on the Pabbly Connect dashboard. Subsequently, either fill-up all the details manually or sign up using Gmail credentials.

Try Pabbly Connect for FREE

Step 2: Access Pabbly Connect

Select Connect

Next, after logging into the account, click on the ‘Access Now’ button as shown in the above image.

Step 3: Workflow for PayKickstart to Slack Integration

(a) Start with a New Workflow

Create New Workflow

Start with creating a workflow for your project by clicking on the ‘Create Workflow’ button.

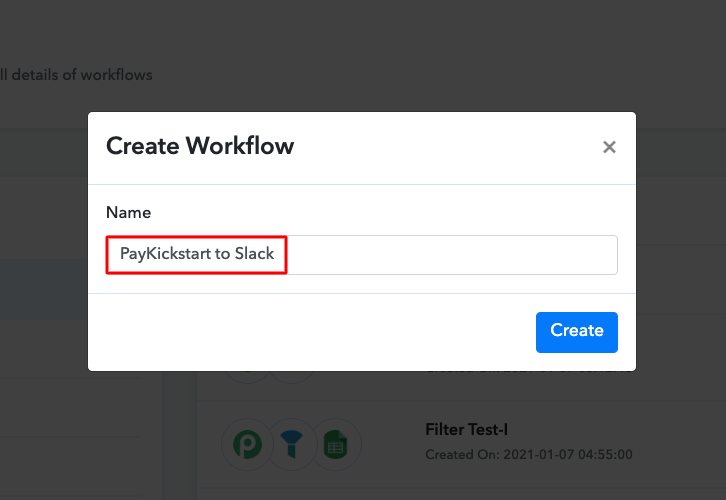
(b) Name the Workflow

Name the Workflow

Now, you need to name the workflow just like in the above-shown image. I named the workflow ‘PayKickstart to Slack’, you can obviously name the workflow as per your requirements.

Step 4: Setting Trigger for PayKickstart to Slack Integration

As soon as you are done with naming your workflow, you will have to select the application you want to integrate. Pabbly Connect allows you to connect unlimited premium apps, create your free account now.

(a) Select Application you Want to Integrate

Select Paykickstart

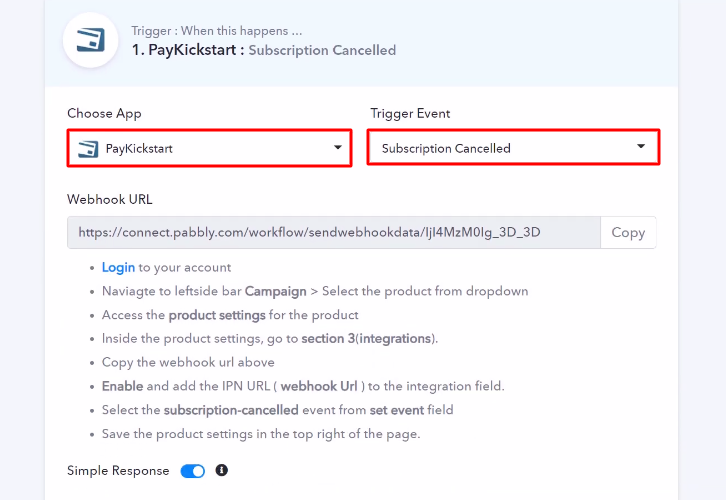
Now, you have to select the application that you want to integrate. In this case, we are choosing ‘PayKickstart’ for integration. In the method section, select ‘Subscription Cancelled’.

(b) Copy the Webhook URL

Copy the Webhook URL

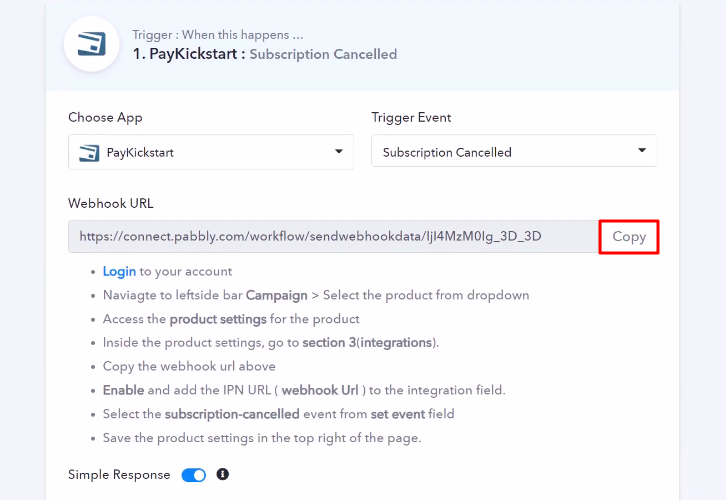
The next step is to copy the webhook URL which is appearing on the dashboard just like in the above-shown image.

Step 5: Connecting PayKickstart to Pabbly Connect

To connect PayKickstart with Pabbly Connect, you have to paste the copied webhook URL in the software, for that, you need to log in to your PayKickstart account.

(a) Go to PayKickstart Campaigns

Click Campaigns Paykickstart

To paste the URL, click on the ‘Campaigns’ option in your PayKickstart dashboard.

(b) Select Product

Select Product Paykickstart

After reaching the campaigns page, select any of your listed products then click the edit button.

(c) Paste the Webhook URL

Paste the Webhook URL Paykickstart

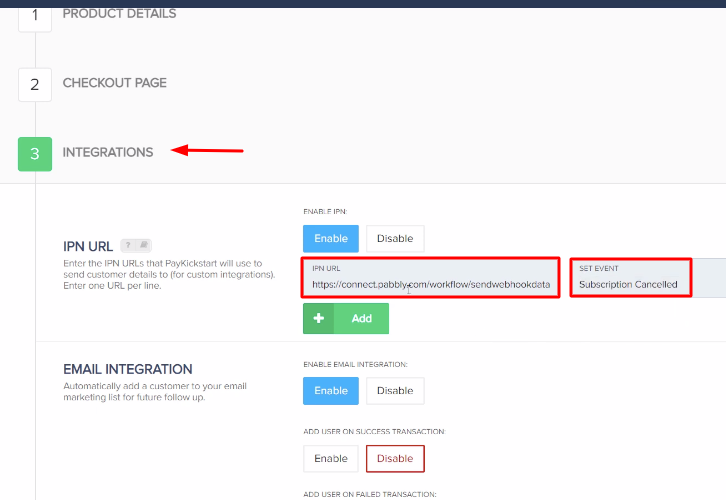
Scroll down and click on the ‘Integrations’. In the IPN URL section, paste the copied webhook URL, and in the event section select the ‘Subscription Cancelled’ option.

(d) Save Changes

Save Changes Paykickstart

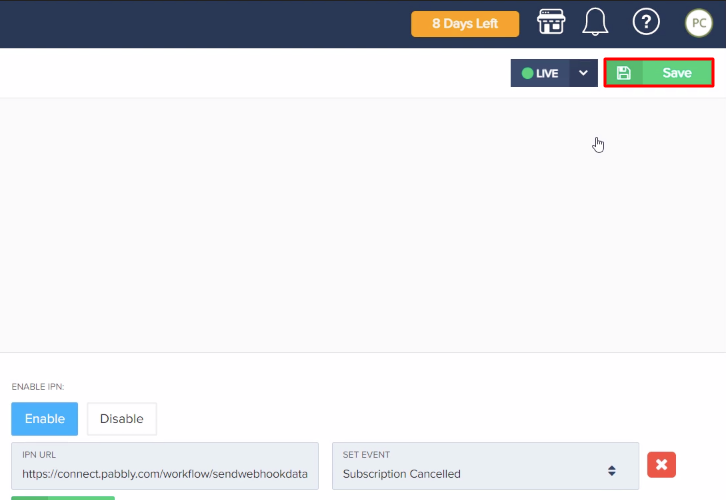
After making all the changes hit the ‘Save’ button to save the changes.

Step 6: Cancel a Subscription

To check if the integration is capturing data or not, we will cancel the subscription of a subscriber in PayKickstart.

(a) Click on Payments

Click on Payments Paykickstart

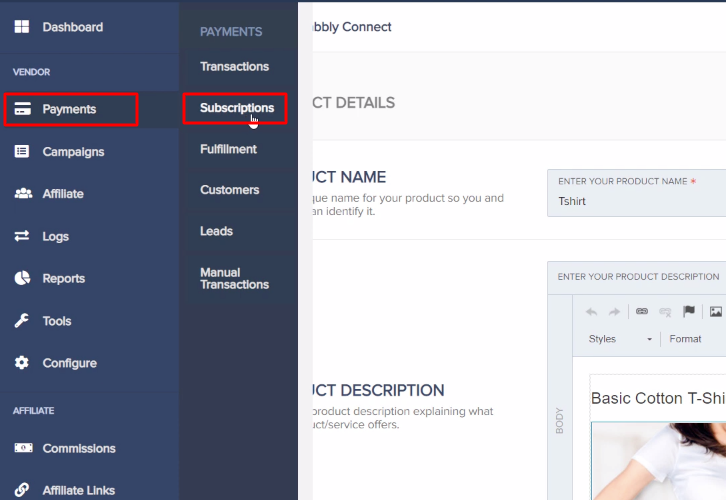
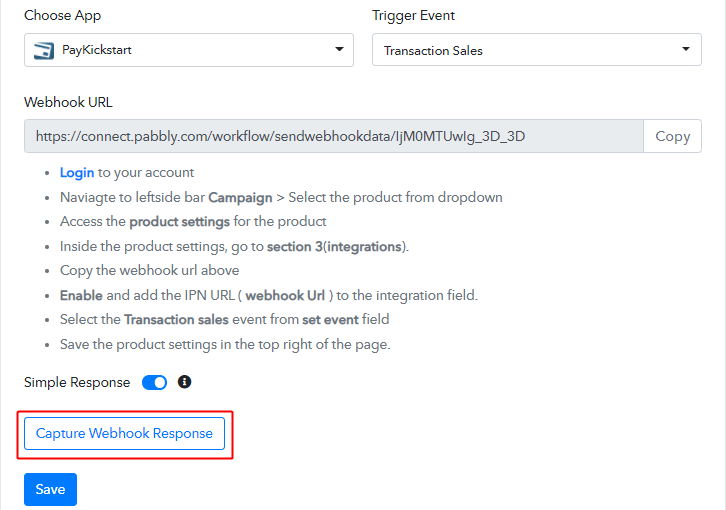
To cancel a subscription, click on the ‘Payments’ in your PayKickstart dashboard and then select the ‘Subscriptions’ option.

(b) Select Subscriber

Select Subscriber Paykickstart

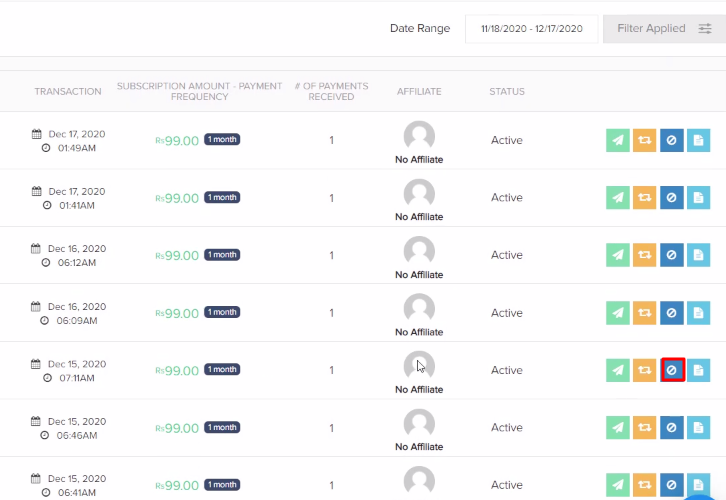
Here, select any of the listed subscribers, whose subscription you want to cancel, and then click on the cancel button.

(c) Cancel Subscription

Cancel Subscription Paykickstart

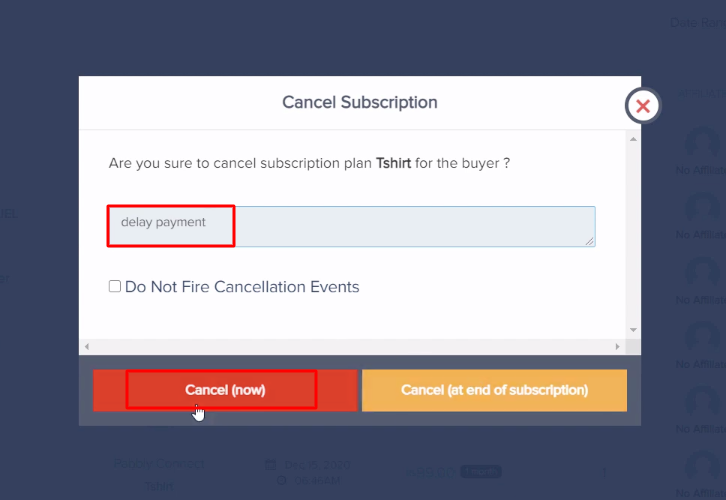
Now, a dialogue box will appear with certain fields and options. Here, you have to mention the reason for the cancellation and then hit the ‘Cancel Now’ button. But before that, click on the ‘Capture Webhook Response’ button in Pabbly Connect to capture the data.

Step 7: Test the Response in Pabbly Connect Dashboard

Save the Webhook Respoonse

Once you click on the ‘Cancel Now’ in PayKickstart and on the ‘Capture Webhook Response’ in Pabbly Connect, the subscriber info will appear on the Pabbly Connect dashboard. Then, click on the ‘Save’ option.

Step 8: Setting Action for PayKickstart to Slack Integration

To make this PayKickstart-Slack integration work, you have to choose an action for your trigger.

(a) Select Application you Want to Integrate

Select Slack

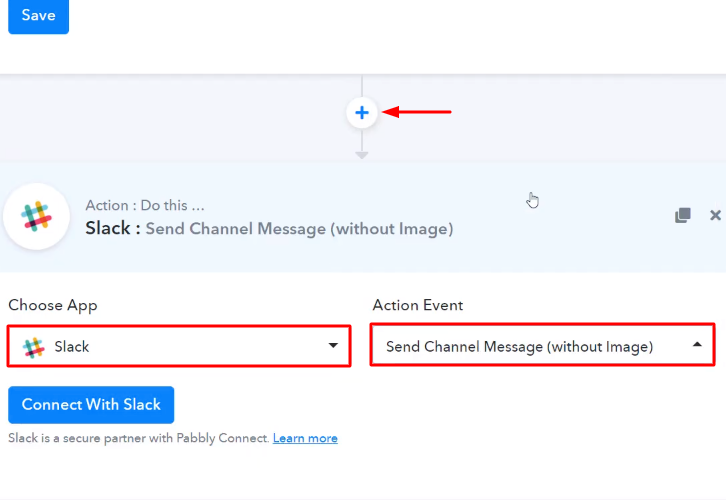
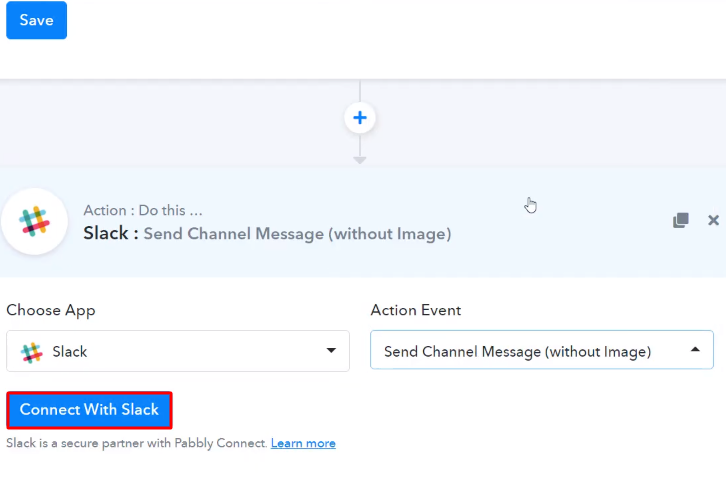
Now in this step, click on the ‘+’ button below and choose the application that you want to integrate. Here we will choose ‘Slack’ to integrate and in the method section select ‘Send Channel Message (Without Image)’.

(b) Click the Connect Button

Connect with Slack

After choosing the application click on the ‘Connect with Slack’ button to move forward.

Step 9: Connecting Slack to Pabbly Connect

To connect Slack to Pabbly Connect, you have to authenticate the application. For this, you have to log in to your Slack account.

(a) Authorize Application

Authorize Application Slack

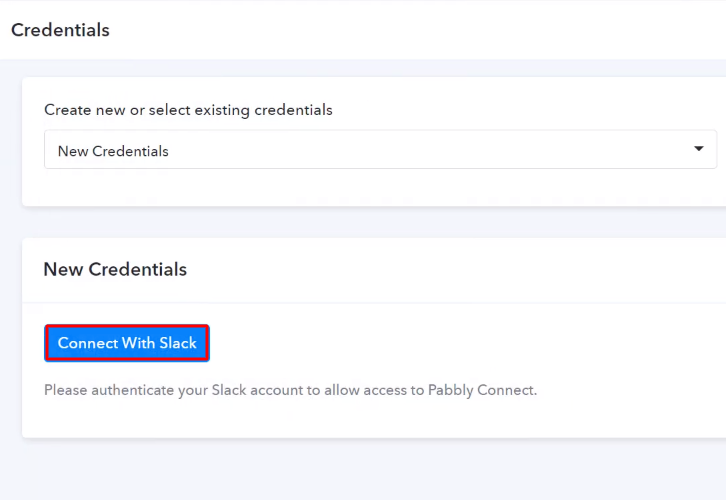
Next, to authenticate your Slack account, you need to again click on the ‘Connect with Slack’ button and then grant the permission to connect Pabbly Connect and Slack.

(b) Map the Fields

Map the Fields

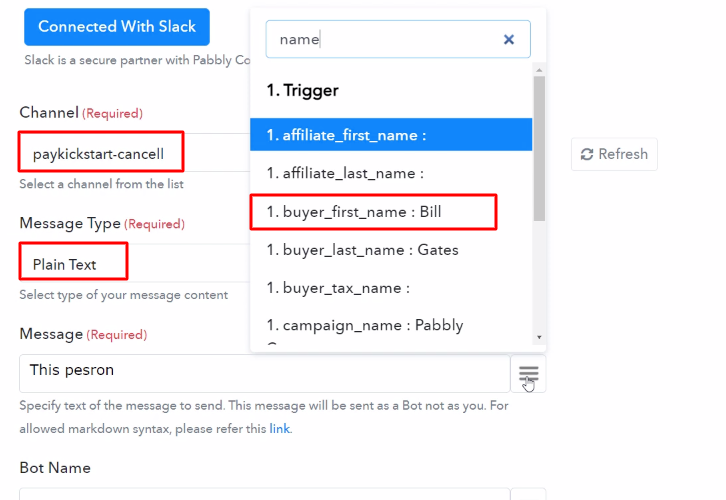
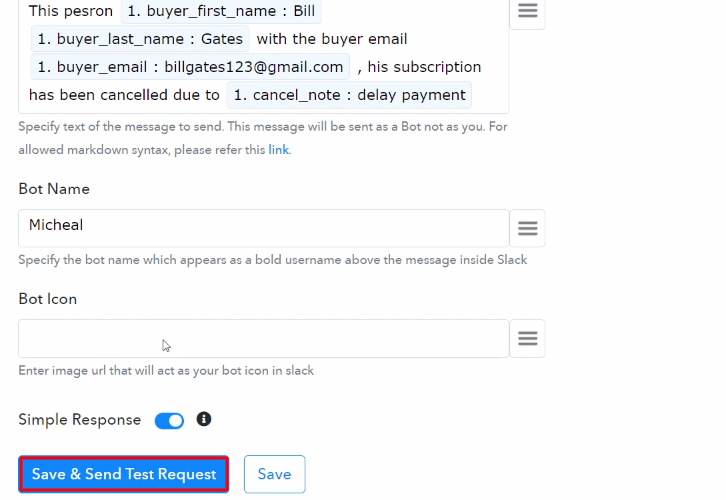
After connecting with your Slack account, map all the fields quickly like the channel, message, etc.

(c) Save and Send Test Request

Send Test Request

Once you are done adding up all field data click on the ‘Save & Send Test Request’ button.

Step 10: Check Response in Slack Dashboard

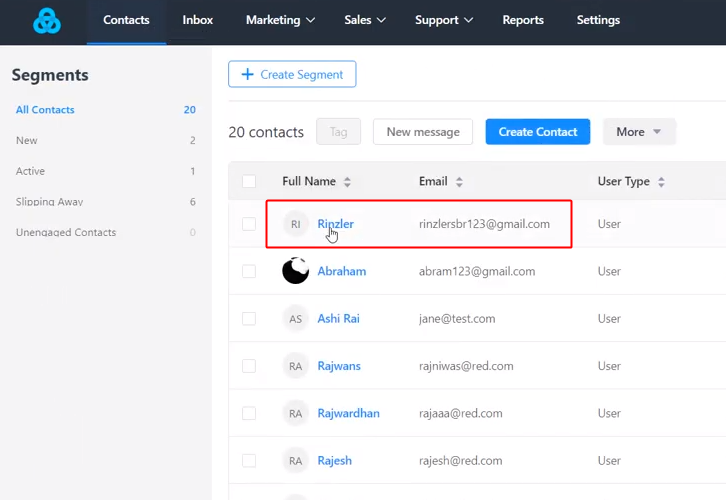
Check Response

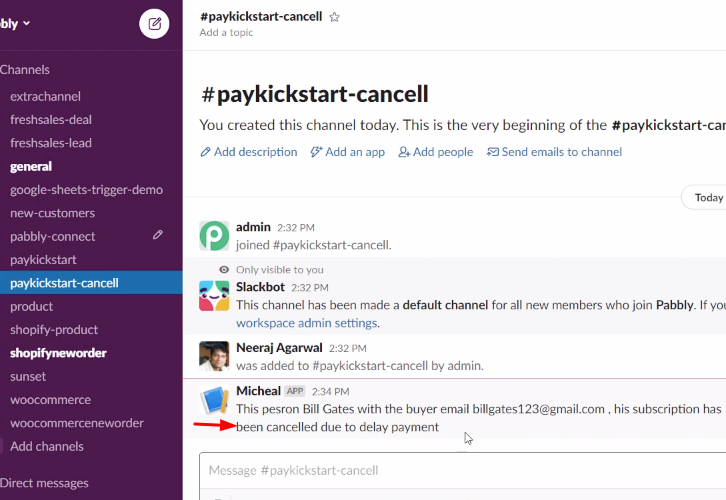
Eventually, when you check your Slack dashboard, the message is delivered in the channel about the cancelled subscription in PayKickstart.

Conclusion –

Winding up, now you know how to send Slack message from cancelled PayKickstart subscription in real-time. This is a one-time process, which will liberate you from the physical work and everything will be managed by the online business automation tool i.e Pabbly Connect. Just follow the step by step procedure mentioned above and your PayKickstart to Slack integration is set. So, what’s stopping you now! Go and catch your deal by signing up for a free account.

You May Also Like To Read –
How to Add QuestionScout Submissions to Google Sheets

Add QuestionScout Submissions to Google Sheets

Are you looking for a way to add QuestionScout submissions to Google Sheets automatically? If yes, then follow the step by step procedure to automate this task.

Significantly, Pabbly Connect is an integration and automation software that grants you to automatically transfer data from one application to another in real-time.

Add QuestionScout Submissions to Google Sheets

Pabbly Connect is the best and affordable tool for automation as it makes every automation task very easy that even a non-programmer can create a workflow in a couple of minutes.

Why Choose This Method Of Integration?

In contrast with other integration services-

  • Pabbly Connect does not charge you for its in-built apps like filters, Iterator, Router, Data transformer and more
  • Create “Unlimited Workflows” and smoothly define multiple tasks for each action
  • As compared to other services which offer 750 tasks at $24.99, Pabbly Connect offers 50000 tasks in the starter plan of $29 itself
  • Unlike Zapier, there’s no restriction on features. Get access to advanced features even in the basic plan
  • Try before you buy! Before spending your money, you can actually signup & try out the working of Pabbly Connect for FREE

Sign Up To Pabbly Connect  

But before we begin the integration process, let us get a bit information about both the software.

QuestionScout is an online form builder tool that enables you to create beautifully designed responsive forms, questionnaires and surveys that are easy to use. Whereas, Google Sheets is a free web-based application for creating spreadsheets.

With Google Sheets and QuestionScout integration, you can automatically add submitted form data as new rows in Google Sheets in real-time. You can watch the video below to understand the use of Pabbly Connect.

Moreover, we’ve connected a template for this integration to assist you. Just simply click on the ‘Use Workflow’ button below to start the workflow. Besides, you can also visit the Marketplace and look for more apps/integrations.

Instantly Add QuestionScout Submissions to Google Sheets
So, without taking any more of your time, let’s get started with the step-by-step process to integrate QuestionScout and Google Sheets.

How to Add QuestionScout Submissions to Google Sheets (step by step)

Step 1: Sign Up to Pabbly Connect

Sign Up

Initiate the process of adding rows in Google Sheets from new QuestionScout submissions by clicking the ‘Sign Up Free’ button on the ‘Pabbly Connect’ dashboard. Afterward, either fill-up all the details manually or sign up using the Google account.

Try Pabbly Connect for FREE

Step 2: Access Pabbly Connect

Select Connect

After logging in to your account, you will be redirected to “All Apps” section. Here, you have to select Connect application and click on ‘Access Now’.

Step 3: Workflow for QuestionScout with Google Sheets Integration

(a) Start with a New Workflow

Create New Workflow

Start with creating a workflow for your integration by clicking on the “Create Workflow” button.

(b) Name the Workflow

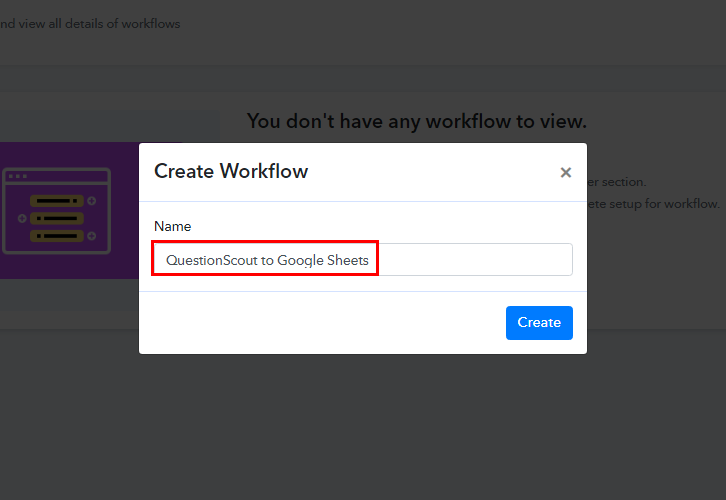
Workflow for QuestionScout to Google Sheets

Now, it’s time to name the workflow as per the integration or use-case. In this case, I have to integrate QuestionScout and Google Sheets. Hence, I name the workflow as ‘QuestionScout to Google Sheets’.

Step 4: Setting Trigger for QuestionScout to Google Sheets Integration

As soon as you finish naming the workflow, now it’s time to select an application you want to integrate. Pabbly Connect allows you to connect unlimited premium apps, so create your free account now.

(a) Select Application you want to Integrate

Integrate QuestionScout for QuestionScout to Google Sheets

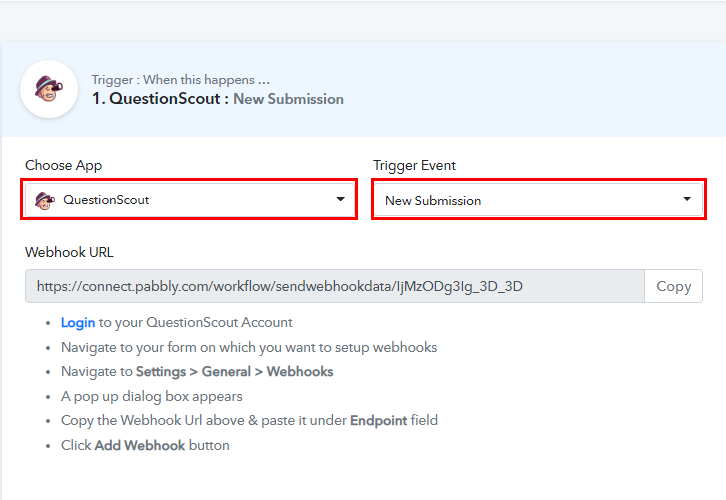
After you click on the create button, a trigger window appears. From the ‘Choose App’ drop down option, select “QuestionScout” and select method as ‘New Submission’.

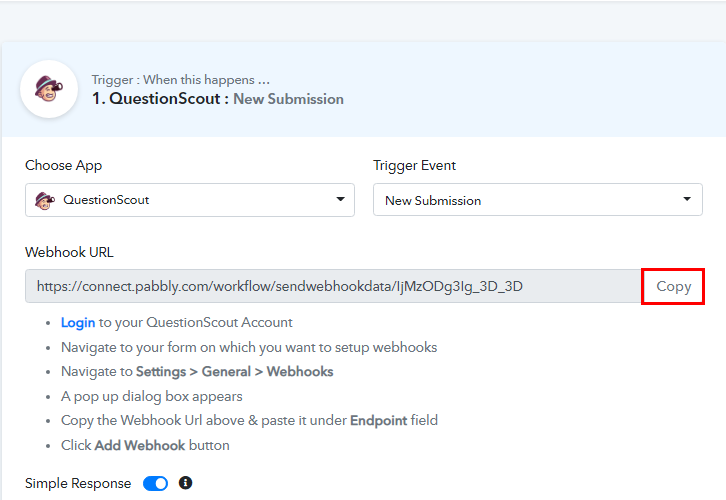
(b) Copy the Webhook URL

Copy Webhook URL

Next step is to copy the ‘Webhook URL’ and after that follow below mention steps to paste it in ‘QuestionScout’.

Step 5: Connecting QuestionScout to Pabbly Connect

To join QuestionScout and Pabbly Connect, you have to paste the copied Webhook URL in QuestionScout. Therefore, you have to log in to your QuestionScout account.

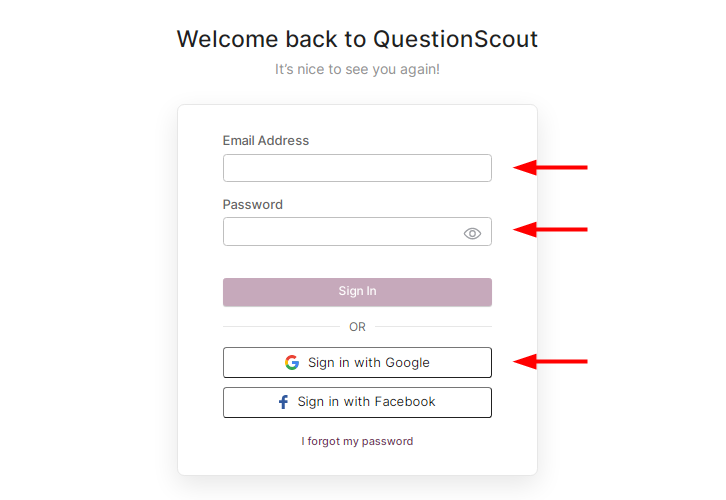
(a) Login to QuestionScout

Login to QuestionScout

Now, log in to your QuestionScout account to create/open the form and paste  Webhook URL.

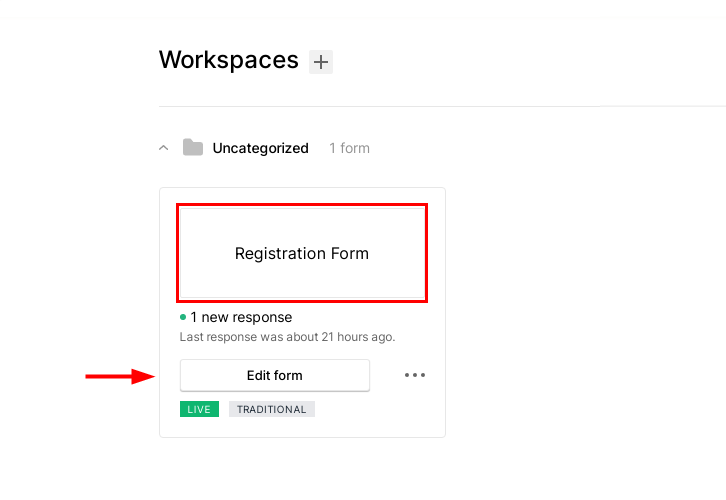
(b) Open the Form

Open the Form

After login into your QuestionScout account, navigate to your form, from which you want submissions, and then click on the ‘Edit Form’ button. For instance, we have created a “Registration Form”.

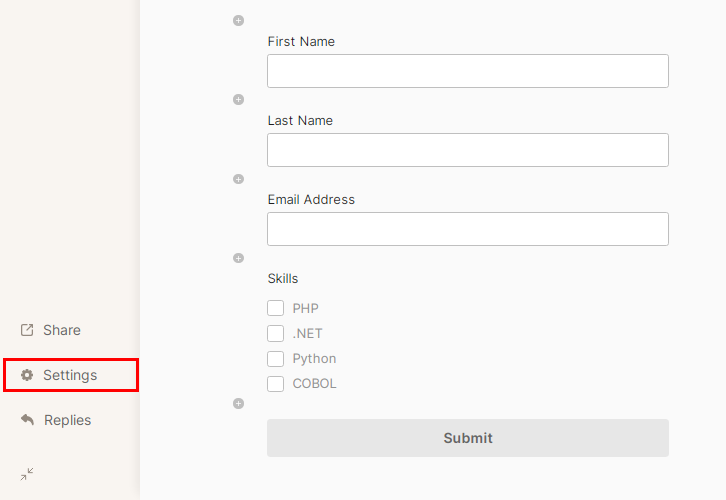
(c) Go to Settings

Go to Settings

When a form is open for editing, you will see the Settings option click on it.

(d) Search for Webhook Option

Search for Webhook Option

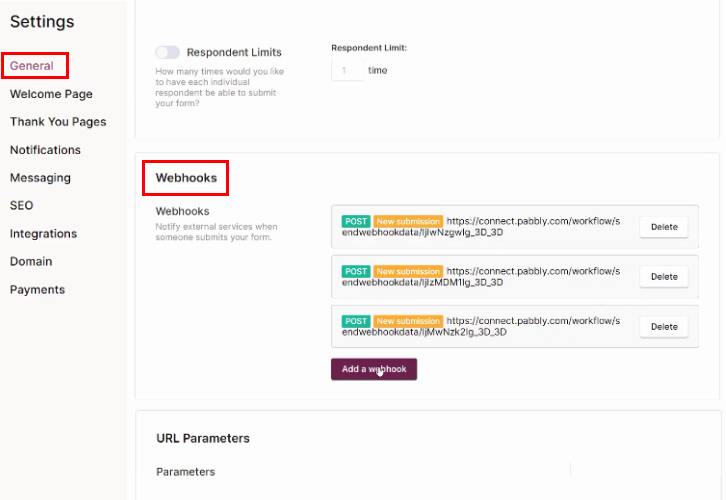
From Settings, select sub-menu as General, and you will see a Webhook option by scrolling down and then click on the ‘Add a Webhook’ button.

(e) Paste the Webhook URL

Paste the Webhook URL

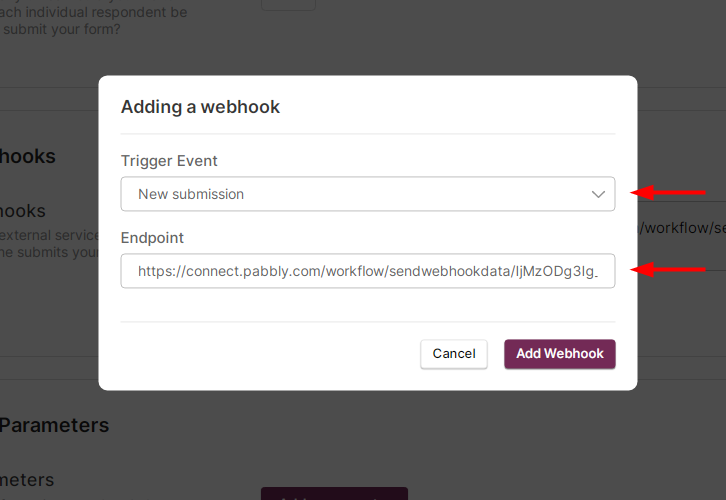
After clicking on the “Add a Webhook” button, a window appears. Subsequently, set Trigger Event as “New Submission” and paste Webhook URL in the ‘Endpoint’ field .

(f) Add Webhook

Click Add Webhook Button

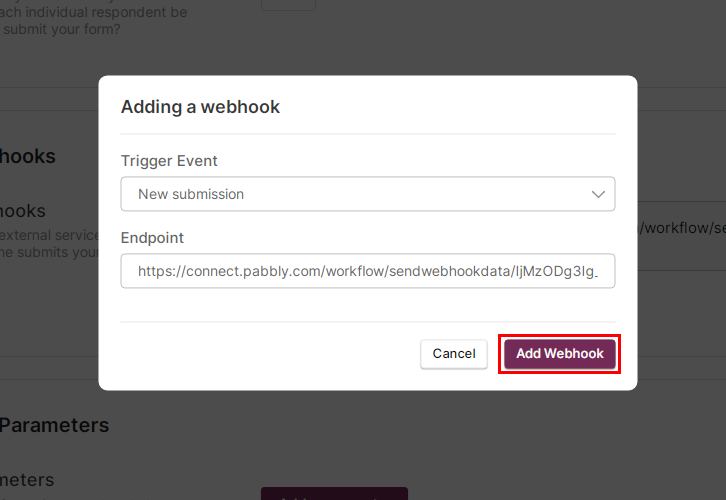
After pasting the Webhook URL, click on the ‘Add Webhook’ button to add it.

Step 6: Test the Response in Pabbly Connect Dashboard

We have finished setting up the trigger for this integration. Now, let’s test the trigger settings by creating a new form submission at QuestionScout.

(a) Capture Webhook Response

Capture Webhook Response

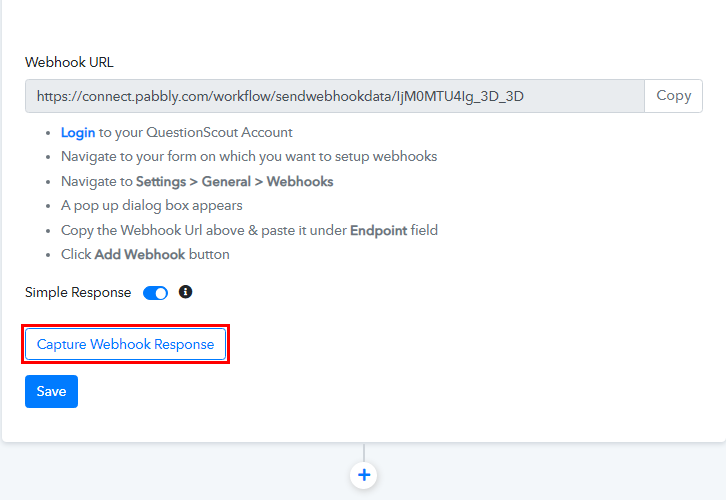
Click on the ‘Capture Webhook Response’ button to test trigger settings in the Pabbly Connect trigger window.

(b) Make a Test Submission

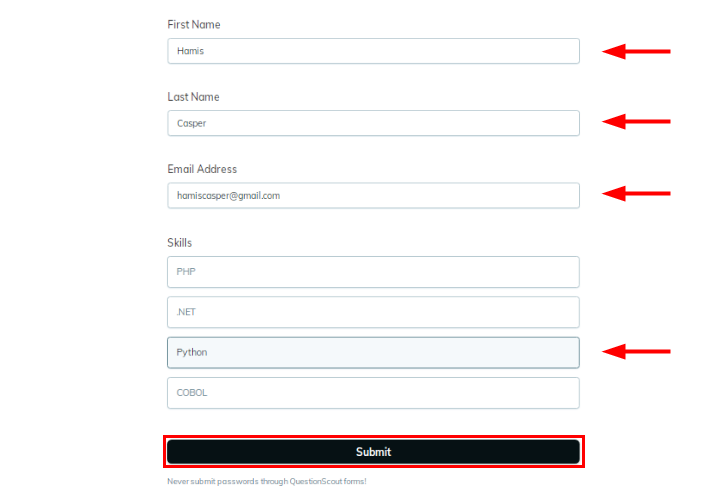
Make Test SubmissionNow, to make a test submission, go back to the ‘QuestionScout Registration Form’ submission window and start entering details. After that, click on the ‘Submit’ button to submit it.

(c) Check & Save the Webhook Response

Check and Save Trigger Response for QuestionScout to Google Sheets

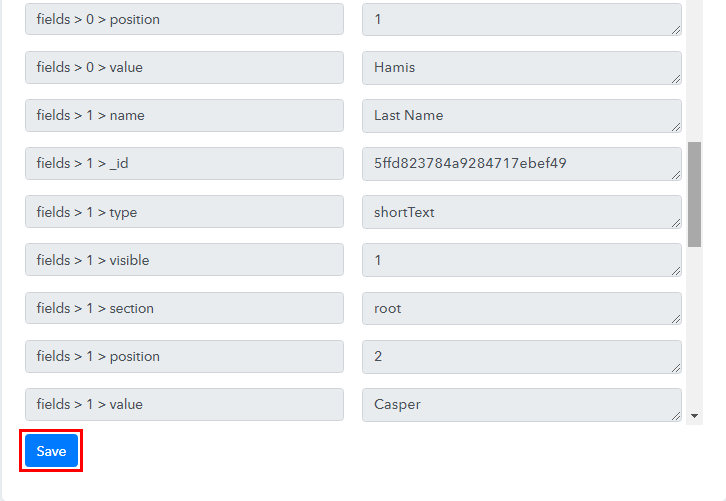
After hitting on the ‘Submit’ button, head back to the Pabbly Connect window, and you will see that response is already being captured. Click on the ‘Save’ button to save the test response.

Step 7: Setting Action for QuestionScout to Google Sheets Integration

Our first step of integration is done. Now it’s time to update this response data as an action so that a new row is automatically created in Google Sheets after every QuestionScout form submission.

(a) Select Application you want to Integrate

Integrate Google Sheets

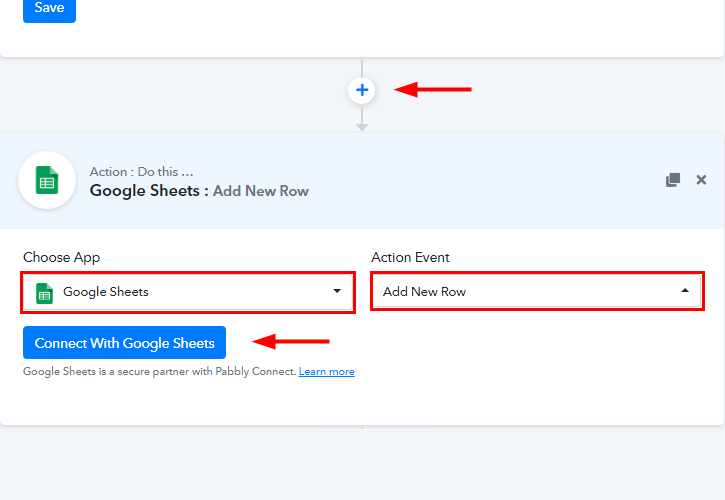
After that, click on the plus (+) icon and you will see an action window appear.

Here, select the “Google Sheets” from Choose App drop down option and “Add New Row” from Action Event. Then, click on the “Connect With Google Sheets” button to connect it to your Google account.

(b) Click the Connect Button

Authorize Google Sheets

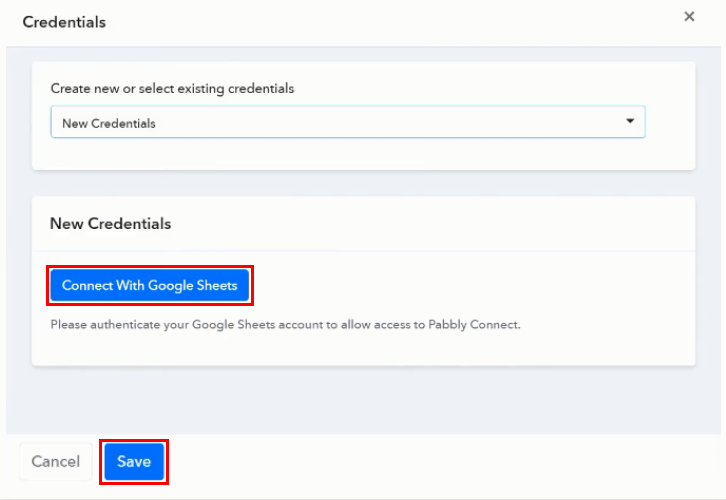
Once you click on the “Connect With Google Sheets” button, a window will pop up, so that you can login and authorize your Google account.

(c) Map the Field

Map the Fields

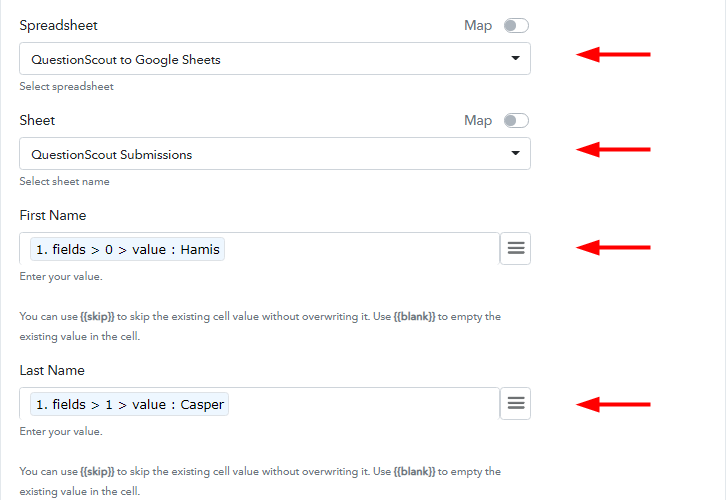
Subsequently, now it is time to map the requisite fields by selecting data like first name, last name, email, and skills in their respective fields.

(d) Test the Submission and Save

Save and Send Test Request

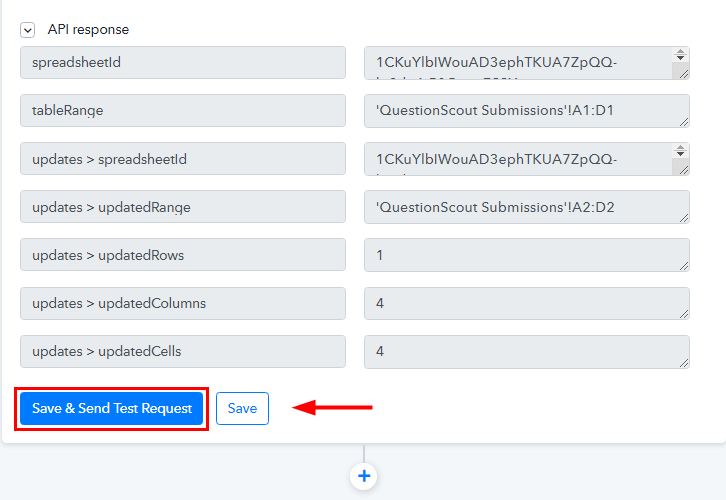
Finally, after mapping all data, click on Save & Send Test Request and you will see that all data is sent to Google Sheets Row. Merely, click on the ‘Save’ button to save the entire workflow.

Step 8: Check Response in Google Sheets

Check Response Google Sheets

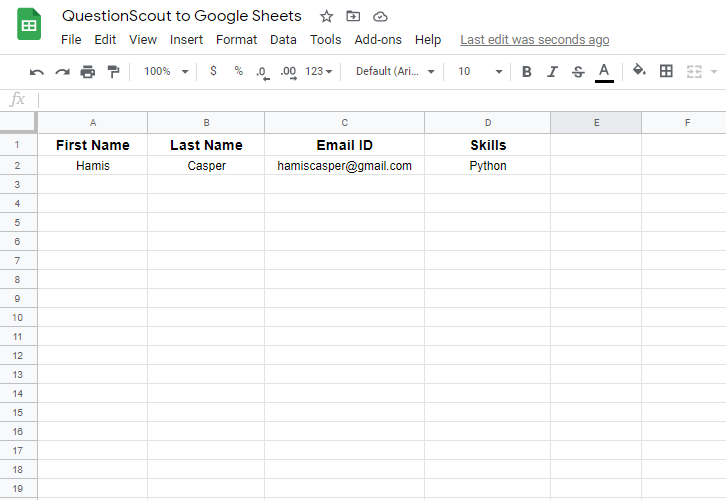
In the end, when you check Google Sheets, registered details get auto-populated in the sheet.

Now, every time whenever there is new form submission in QuestionScout, a row gets automatically created in Google Sheets.

Conclusion-

So this was the simplest and quickest method that you could use to integrate QuestionScout to Google Sheets. As a result, after completing the step by step approach, you will wind up auto-creating Google Sheets Row for every QuestionScout Form Submission.

Grab, Pabbly Connect for FREE with all its premium features.

Also, do comment your feedback below about this integration.

You May Also Like To Read:

How to Create SendFox Contact from New PayKickstart Order Fulfillment

How to Create SendFox Contact from New PayKickstart Order Fulfillment

Have you ever tried adding the SendFox contact for every new order fulfillment on PayKickstart?

How to Create SendFox Contact from New PayKickstart Order Fulfillment

If yes then you must try automating this. Task automation can help you save a lot of time & utilize it in more productive work. All you need to do is follow the step by step procedure given in this blog and you are good to go.

We’ll be using Pabbly Connect to automate the task. This software is best in the market for automating tasks and very easy to use that even a non-programmer can design the workflow in minutes.

Also, using Pabbly Connect software, you can share data within many services in real-time. Moreover, this will be just a one-time set-up and after that, the workflow will take care of the rest.

Why Choose This Method Of Integration?

In contrast with other integration services-

  • Pabbly Connect does not charge you for its in-built apps like filters, Iterator, Router, Data transformer and more
  • Create “Unlimited Workflows” and smoothly define multiple tasks for each action
  • As compared to other services which offer 750 tasks at $24.99, Pabbly Connect offers 50000 tasks in the starter plan of $29 itself
  • Unlike Zapier, there’s no restriction on features. Get access to advanced features even in the basic plan
  • Try before you buy! Before spending your money, you can actually signup & try out the working of Pabbly Connect for FREE

Sign Up To Pabbly Connect  

But, before starting the procedure first, let’s learn a little about the services. PayKickstart is an online shopping cart & affiliate management infrastructure for various business types. Whereas, SendFox is an email marketing software that assists you in making a stronger customer relationship.

Consequently, once you set-up this workflow all your contact get listed on your email marketing tool i.e, SendFox whenever you change the order status to ‘Order Received’ on PayKiskstart.

Additionally, we are enclosing a video for the same integration as well. Have a look at it –
Furthermore, we’ve attached the template for the same to help you get started immediately. You can click on the ‘Use Workflow’ button below to get started. Also, you can go to the App Directory & look for more integrations/apps.

HowHow

Create SendFox Contact from New PayKickstart Order Fulfillment

So, buckle up as we’re going to discover how to automatically create SendFox contacts for PayKickstart order fulfillment through this integration.

How to Create SendFox Contact from New PayKickstart Order Fulfillment (step by step)

Step 1: Sign up to Pabbly Connect

Sign Up

Begin the procedure of connecting PayKickstart with SendFox with visiting the Pabbly Connect website. Then, hit the ‘Sign-Up Free‘ button available. Formerly, use your existing Gmail account or manually fill the registration form to signup.

Try Pabbly Connect for FREE

Step 2: Access Pabbly Connect

Select Connect

After that, strike the ‘Access Now’ button of the software ‘Connect’ within the Pabbly applications.

Step 3: Workflow for PayKickstart with SendFox Integration

(a) Start with a New Workflow

Create New Workflow

Further, start with creating a workflow to add contacts on SendFox for every PayKickstart order fulfillment & to do this push the ‘Create Workflow’ button first.

(b) Name the Workflow

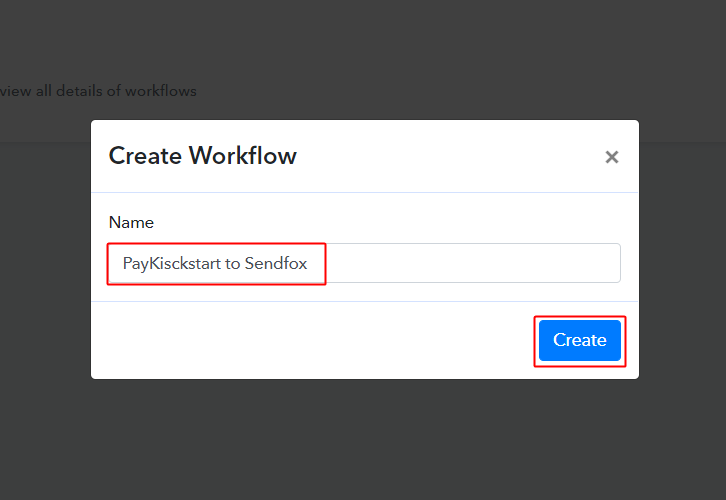
workflow_for_paykickstart_to_sendfox

Now, name the workflow as per the integration or use-case (for instance: PayKickstart to SendFox etc). Finally, click on the ‘Create’ button available.

Step 4: Setting Trigger for PayKickstart to SendFox Integration

To automatically add SendFox contact for every PayKickstart order fulfillment, you’ll need to set-up a trigger on PayKickstart order fulfillment and its respective action to add a contact on SendFox using Pabbly Connect.

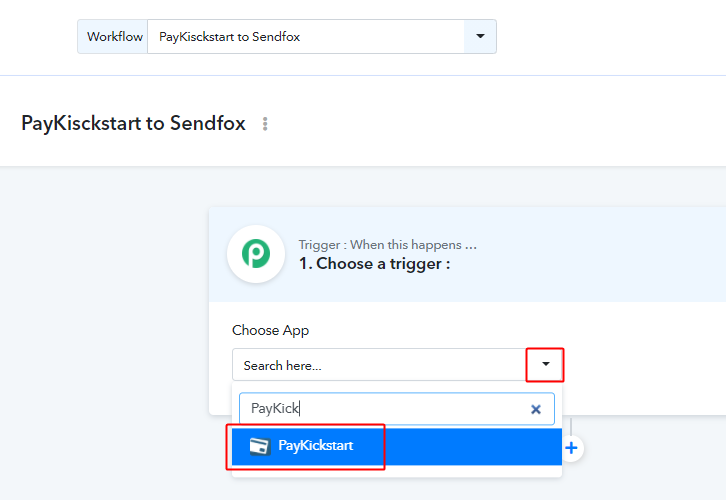
(a) Select Application you want to integrate

integrate_sendfox_for_paykickstart_to_sendfox

When you click on the create, a page carrying the trigger window will open up.

Select the ‘PayKickstart’ app from the ‘Choose App’ field’s drop-down choices.

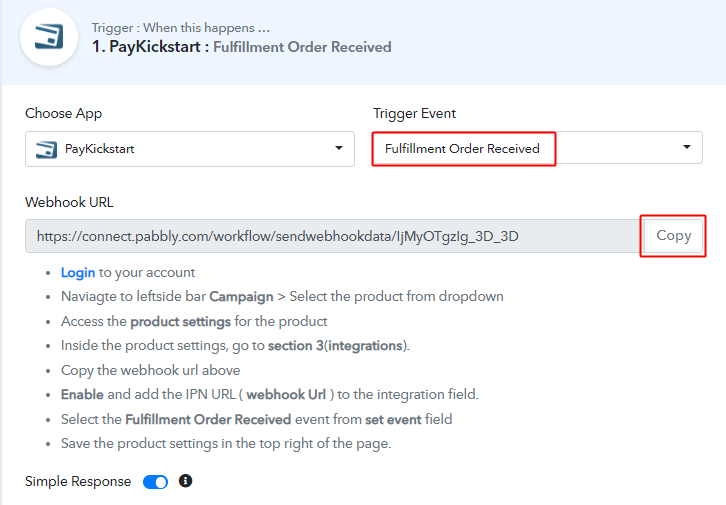
(b) Select Method & Connect with PayKickstart

select_method_and_copy_webhook_url_for_paykickstart_to_autopilot

Select the method in here to be ‘Fulfillment Order Received’ & then copy the given webhook URL.

Step 5: Connecting PayKickstart to Pabbly Connect

To connect PayKickstart with Pabbly connect, you’ll need to sign-in your PayKickstart account & paste the copied webhook URL.

(a) Go to Your PayKickstart Settings

paykickstart_campaigns

After successfully logging into your PayKickstart account, strike the ‘Campaign’ option available at the bottom of the left vertical menu.

(b) Edit Any Product

edit_any_product_from_paykickstart_campaigns

A page will open up carrying all the different products created on PayKickstart. Click on the pencil icon to edit a particular product.

(c) Click on Integrations

click_on_integrations

Scroll to the bottom of the page and click on ‘Integrations’.

Then, click on ‘Enable’ in the IPN URL section. After that click on the ‘Add’ button.

(d) Paste the Webhook URL

paste_webhook_url_for_paykickstart_to_autopilot

Paste the copied Pabbly Connect trigger URL in the ‘IPN URL’ field.

Then, select the ‘Fulfillement Order Received’ event for the ‘SET EVENT’ field.

Finally, hit the ‘Save’ button available at the top right corner of the page.

Step 6: Test the Response in Pabbly Connect Dashboard

As we can see, we are done setting up the trigger for PayKickstart and SendFox integration. So, let’s test the trigger setup for a test order fulfillement on PayKickstart.

(a) Capture Webhook Response

capture_webhook_response_for_paykickstart_to_autopilot

To test the set trigger first, click on the ‘Capture Webhook Response’ button on your Pabbly Connect trigger window.

(b) Open Your PayKickstart Payments

go_to_payment_fulfilment

Now, go back to your PayKickstart dashboard and click on the payment option from the left verticle menu. Second, select the ‘Fulfillment’ option from the secondary menu that opens next.

(c) Open Details of Any ‘On Hold’ Order

click_on_order_details

Click on the ‘Details’ button for any customer whose order status is mentioned as ‘On Hold’.

(d) Change Order Status

change_order_status

Then, change the order status to ‘Order Received’ and click on the ‘Update’ button.

(e) Check & Save Trigger Response

check_and_save_trigger_response_for_paykickstart_to_sendfox

Once you successfully complete the registration, the Pabbly Connect trigger response will start showing the data for the current sign-up. Also, remember to save the trigger response.

Step 7: Setting Action for PayKickstart to SendFox Integration

Now, as we have gathered all the necessary information to create contact on SendFox from the PayKickstart response. We can now proceed to feed this data to perform the action. After that, a new contact will be created automatically for every PayKickstart order fulfillment.

(a) Select Application you want to Integrate

integrate_sendfox_for_paykickstart_to_sendfox_workflow

Hit the plus button next to your PayKickstart trigger.

Select the app to integrate here as ‘SendFox’ & method as ‘Add/Update Contact’.

Lastly, push the ‘Connect with SendFox’ button.

Then the system will ask you for an API key.

(b) Connecting SendFox to Pabbly Connect

go_to_sendfox_settings

Next, sign-in to your SendFox account and click on the profile icon.

On the menu that opens next, select the ‘Settings’ option.

(c) Create SendFox API

sendfox_api_create_new_token

On the settings page, click on the ‘API’ option from the left verticle menu.

Then, click on the ‘Create New Token’ button.

(d) Name the Token & Click on ‘Create’

name_token_and_click_on_create

Name the token and then click on the ‘Create’ button.

(e) Copy the SendFox Token

copy_token

Select and copy the token given.

(f) Paste the API Key on Pabbly Connect

paste_sendfox_token

Subsequently, paste the copied SendFox token on Pabbly Connect and click on ‘Save’.

(d) Choose List & Map Fields

choose_list_and_map_fields

Now, select the list & map the first name and other required fields.

To map a value, hit the menu button (three horizontal lines) next to that particular field.

After that, select the value that you want to map with that respective field.

Similarly, map all the other required fields also.

(e) Send Test Request

send_test_request_for_paykickstart_to_sendfox_action

Further, click on the ‘Save & Send Test Request’ button to send a request for creating a contact on SendFox.

(f) Check & Save Response

save_sendfox_api_response_for_paykickstart_to_sendfox

Certainly, you can check the response of your API in the action window. And, if there is some error while sending the data then it will show you the error.

Finally, hit the ‘Save’ button to save the action API’s response.

Step 8: Check Response in SendFox Dashboard

contact_entry_on_sendfox

Also, you can check the contact’s entry on your connected SendFox account.

Conclusion –
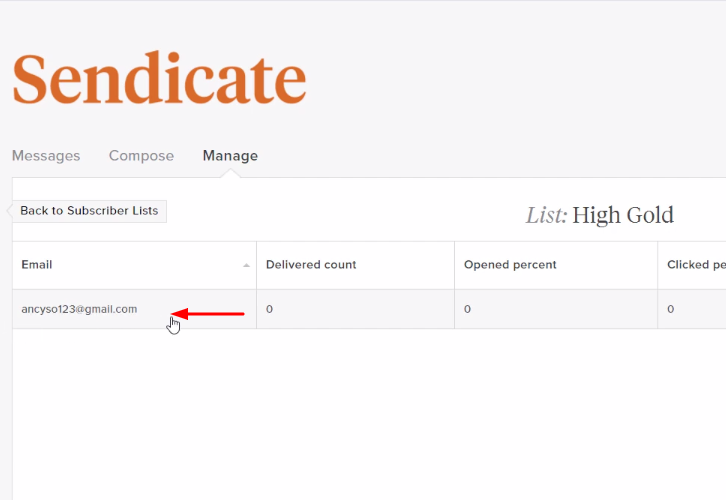
To sum up, this was all about ‘How to create SendFox contact from new PayKickstart order fulfillment’. Consequently, after completing the step by step procedure, you will end up auto-creating SendFox contact for every order fulfillment on PayKickstart.

Meanwhile, you can opt Pabbly Connect for FREE with all its premium features.

Also, comment below your queries and suggestions.

You May Also Like to Read:

How to Add Trello Card from New PayKickstart Subscription

How to Add Trello Card from New PayKickstart Subscription

Looking for a way to add Trello Card from new PayKickstart subscription? If yes, then let us introduce you guys to the amazing tool named Pabbly Connect.

Primarily, Pabbly Connect is an integration & automation software that enables you to connect multiple apps to migrate data from one another automatically in real-time.

How to Add Trello Card from New PayKickstart Subscription

Who doesn’t want to set themselves free from all the repetitive work, and task to be in a single go. Hence to do so, we have the best automation tool for you to make this wish come true i.e, Pabbly Connect.

But before we jump straight into the integration process, let’s know a little bit about both the software. Hence, PayKickstart is an online shopping cart and affiliate management platform with built-in conversion enhancing features. On the other hand, Trello is a collaboration tool that organizes your projects into boards and tells you what’s being worked on, who’s working on what, and where something is in a process, etc.

After integrating these applications, whenever there will be any new subscription in your PayKickstart store, the data will get automatically saved in Trello Card in real-time.

Although, there is no direct integration possible for these two services yet. Hence, we are going to use Pabbly Connect to make this integration possible.

With the help of this software, you can effortlessly share data within multiple premium services easily. Furthermore, you don’t need to have any coding skills & even a beginner can use it efficiently. Furthermore, this would be just a one-time setup. Later on, the data will automatically be transferred in real-time.

Why Choose This Method Of Integration?

In contrast with other integration services-

  • Pabbly Connect does not charge you for its in-built apps like filters, Iterator, Router, Data transformer, and more
  • Create “Unlimited Workflows” and smoothly define multiple tasks for each action
  • As compared to other services which offer 750 tasks at $24.99, Pabbly Connect offers 50000 tasks in the starter plan of $29 itself
  • Unlike Zapier, there’s no restriction on features. Get access to advanced features even in the basic plan
  • Try before you buy! Before spending your money, you can actually signup & try out the working of Pabbly Connect for FREE

Sign Up To Pabbly Connect

So, without wasting any of your time, let’s get started on how to connect PayKickstart and Trello Card in real-time. Additionally, we’ve attached a template for this integration to assist you better and more efficiently. You can just press the ‘Use Workflow’ button below to get started. Also, you can go to the App Directory & look for more apps/integrations.

How How

Instantly Add Trello Card from New PayKickstart Sale

So, let’s get started to plan & follow the step by step process to integrate PayKickstart and Trello Card.

Step 1: Sign up to Pabbly Connect

Sign Up

Begin the process to add Trello Card from new PayKickstart subscription by tapping the ‘Sign Up Free’ button on the Pabbly Connect dashboard. Then, either fill-up all the details manually or sign up using Gmail credentials.

Try Pabbly Connect for FREE

Step 2: Access Pabbly Connect

Select Connect

Then, after logging into the account, push the ‘Access Now’ button as shown in the above image.

Step 3: Workflow for PayKickstart to Trello Card Integration

(a) Start with a New Workflow

Create New Workflow

Start with creating a workflow for your project by pushing the ‘Create Workflow’ button.

(b) Name the Workflow

Name the Workflow

Quickly, name the workflow just like in the above-shown image. I named the workflow ‘PayKickstart Integration’, you can obviously name the workflow as per your necessities.

Step 4: Setting Trigger for PayKickstart to Trello Card Integration

Once you are done with naming your workflow, now select the application you want to integrate. Pabbly Connect enables you to connect unlimited premium apps, create your free account now.

(a) Select Application you Want to Integrate

Select Paykickstart

Promptly, select the application that you want to integrate. Hither, we are choosing ‘PayKickstart’ for integration. In the method section, select ‘Subscription Created’.

(b) Copy the Webhook URL

Copy Webhook URL

The following step is to copy the webhook URL which is appearing on the dashboard just like in the above-shown image.

Step 5: Connecting PayKickstart to Pabbly Connect

Soon, to connect PayKickstart with Pabbly Connect, you have to paste the copied webhook URL in the software. And for that, you need to log in to your PayKickstart account.

(a) Go to PayKickstart Campaigns

Click Campaigns Paykickstart

Subsequently, to paste the URL, hit the ‘Campaigns’ option in your PayKickstart dashboard.

(b) Select Product

Select Product Paykickstart

Once you reach the campaigns page, select any of your listed products then tap on the edit button.

(c) Paste the Webhook URL

Paste the Webhook URL

Afterward, scroll down the page and hit the ‘Integrations’. In IPN URL section, paste the copied webhook URL and in event section select ‘Subscription Created’ option.

(d) Save Changes

Save Changes Paykickstart

Once you are done making all the changes, just push the ‘Save’ button to save the changes.

Step 6: Make a Test Purchase

Subsequently, in order to check if the integration is capturing data or not, we will make a dummy purchase in PayKickstart.

(a) Click on Campaigns

Click Campaigns Paykickstart

Promptly, in order to make a purchase, again we will go to the ‘Campaigns’ section of your PayKickstart dashboard.

(b) Select Product

Funnel Paykickstart

Now, hit the ‘Funnel’ section of your product & press the link button.

(c) Copy Funnel URL

Copy Funnel URL Paykickstart

Then, copy the given funnel URL & open it in a new tab.

(d) Add Customer Details

Test the Response in Pabbly Connect Dashboard

Soon, add the required customer details such as name & email and then hit the ‘Next Step’ button. Quickly, you have to add the billing info such as address, contact number, etc. Then press the ‘Next Step’ button.

(e) Complete Purchase

Complete Purchase Paykickstart

Once you are done making all the required changes, hit the ‘Complete Purchase’ button. Before that, press the ‘Capture Webhook Response’ in Pabbly Connect to capture the data.

Step 7: Test the Response in Pabbly Connect Dashboard

Test the Response in Pabbly Connect Dashboard

After pressing the ‘Complete Purchase’ in PayKickstart and on the ‘Capture Webhook Response’ in Pabbly Connect, the subscriber info will appear on the Pabbly Connect dashboard. Now, hit the ‘Save’ option.

Step 8: Setting Action for PayKickstart to Trello Card Integration

Later, in order to make Trello Cards and PayKickstart integration work, you have to choose the action for your trigger.

(a) Select Application you Want to Integrate

Select Application you Want to Integrate

Now press the (+) icon to select the application you want to Integrate. Then, choose the app as “Trello” from the drop-down. After that, choose the method “Add New Card”. Subsequently, hit the button named “Connect With Trello”.

(b) Click the Given Link

Click the Given Link to Create Trello Cards from new Google Tasks Tasks

Next, hit the “here” button given at the end of the line.

(c) Copy the API Key

Copy the API Key to Create Trello Cards from new Google Tasks Tasks

Now, copy the API key & hit the “Token” to proceed further.

(d) Copy the Username

Copy the Username

After click on the “Token”, now copy the username & then scroll down the page and press the “Allow” button to get the token.

(e) Copy the Token

Copy the Token to integrate Trello with Google Tasks

Now, copy the Token key.

(f) Paste the Respective Keys & Token

Paste the Respective Keys & Token

Moreover, paste the copied username, API Key, Token to integrate Trello with Pabbly Connect. Then, hit the “Save” button.

Step 8: Map Field Data

Map Field Data

Following that, map all the required field data to create Trello Cards for new PayKickstart automatically. And, hit the “Save & Send Test Request” button to send data in Trello Cards.

Step 9: Test the Response & Save

Test the Response & Save

After mapping all the field data, hit the “Save and Send Test Request” button, all the details will be sent to Trello Cards. Then, tap on the “Save” button to save the whole workflow.

Step 10: Check Response in Trello Cards

Check Response in Trello Cards

Ultimately, when you check the Trello Cards, the data of the PayKickstart subscription will get auto-populated in Trello Cards. This is a one-time process after that, all the PayKickstart subscriptions will automatically get updated in Trello Cards.

Conclusion –
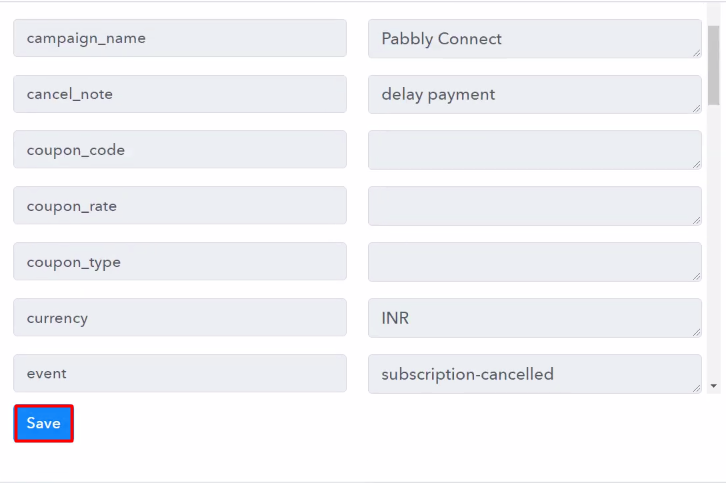
Hopefully, now you know “How to Add Trello Card from New PayKickstart Subscription?”. It’s simple and easy to use and you won’t have to go for any other software after using it. So, what’s stopping you now! Go and catch your deal by signing up for a free account. If you have any suggestions or queries, please drop them down in the comment section, we will get back to you as soon as possible.

You May Also Like To Read –