How to Automatically Create Instagram Posts Every Day Using Pabbly Connect

Learn how to automatically create Instagram posts every day with Pabbly Connect. This step-by-step guide covers the entire integration process. Develop expertise in application integration and learn how to design streamlined automation workflows using proven, simplified approaches.

Watch Step By Step Video Tutorial Below


1. Accessing Pabbly Connect for Instagram Automation

To start automating your Instagram posts, access Pabbly Connect by visiting its official website. Once there, you will find options to either sign in or sign up for a free account.

If you’re a new user, you can sign up for free and receive 100 tasks every month. After signing in, navigate to the Pabbly Connect dashboard to begin creating your automation workflow.


2. Creating a Workflow in Pabbly Connect

To create a new workflow in Pabbly Connect, click on the ‘Create Workflow’ button located at the top right corner of the dashboard. You will be prompted to name your workflow.

For this automation, name your workflow ‘Automatically Create Instagram Post Every Day’ and select the appropriate folder to save it. After naming, click on the ‘Create’ button to proceed.

  • Click on the ‘Create Workflow’ button.
  • Name your workflow.
  • Select the appropriate folder.
  • Click on the ‘Create’ button.

Now, you need to set up the trigger for your workflow. In Pabbly Connect, triggers initiate the workflow, so select ‘Scheduled by Pabbly’ as your trigger application.


3. Setting Up the Trigger for Daily Posts

In this step, you will configure the trigger to run every day at a specific time. Choose the ‘Schedule Workflow’ event and click on the ‘Create’ button. Set the frequency to ‘Every Day’ and select the desired time, such as 12:00 PM.

After setting the time, click on the ‘Save’ button. This configuration ensures your Instagram posts are created daily at the specified time using Pabbly Connect.

  • Choose ‘Scheduled by Pabbly’ as the trigger application.
  • Set the trigger event to ‘Schedule Workflow’.
  • Select ‘Every Day’ and the time for posting.

With the trigger set, your workflow is now scheduled to create Instagram posts daily at 12:00 PM, utilizing the capabilities of Pabbly Connect.


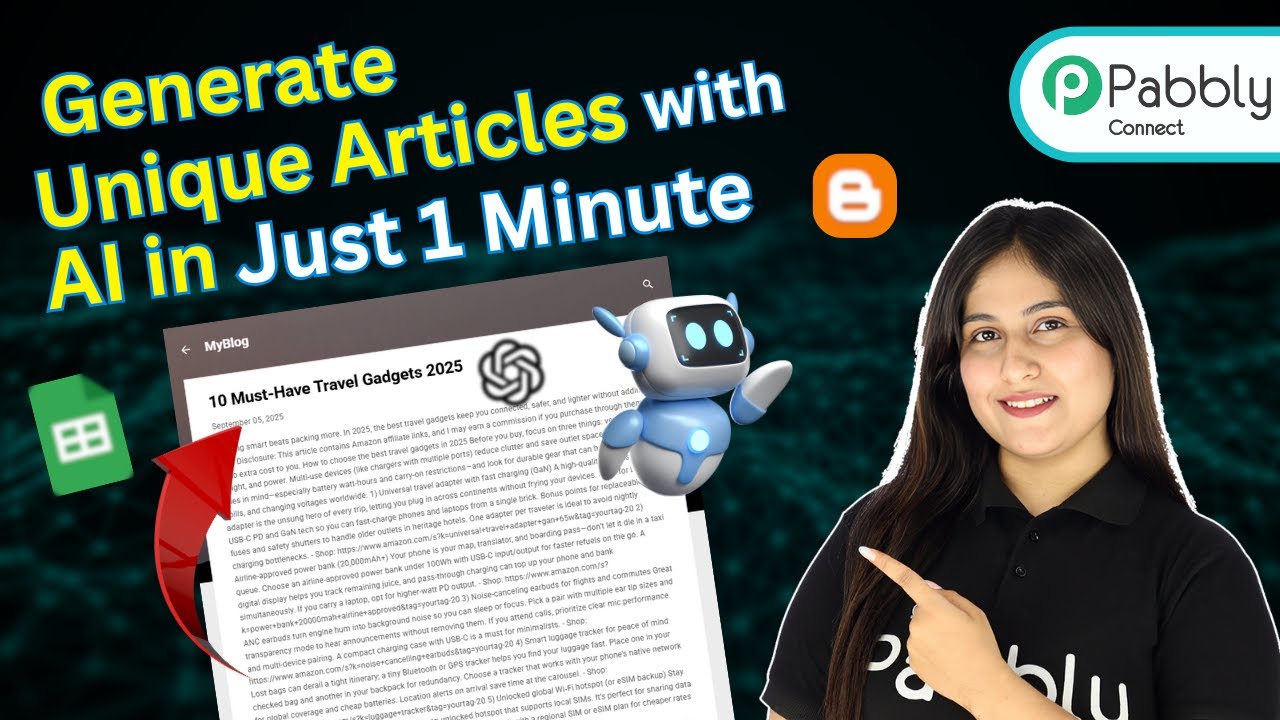
4. Generating Unique Captions and Images

Next, you will generate unique captions for your Instagram posts using OpenAI. Add an action step and select OpenAI as your action application. Choose the ‘Chat GPT’ event and connect it to Pabbly Connect by entering your API token.

For the prompt, write a detailed request like, ‘Generate a 100% unique Instagram caption related to skincare, beauty routine, and product highlights.’ This will guide OpenAI to create engaging captions for your posts.

Select OpenAI and the ‘Chat GPT’ event. Enter your API token to connect. Provide a detailed prompt for caption generation.

Once the caption is generated, you can use it in your Instagram post, ensuring daily fresh content with the help of Pabbly Connect.


5. Publishing the Instagram Posts Automatically

After generating the caption, the next step is to publish the Instagram post. Add another action step, choose Instagram for Business, and set the action event to ‘Publish Post.’ Connect your Instagram account to Pabbly Connect to facilitate this integration.

Map the generated caption and the image URL to the respective fields and click on the ‘Save and Send Test Request’ button. This will create the post on your Instagram profile automatically.

Select Instagram for Business as the action application. Set the action event to ‘Publish Post.’ Map the caption and image URL before saving.

With this setup, every day at the scheduled time, Pabbly Connect will automatically generate and publish a new Instagram post, streamlining your content creation process.


Conclusion

Using Pabbly Connect, you can effortlessly automate the process of creating and posting unique Instagram content daily. This integration not only saves time but also ensures consistent engagement on your profile. Start automating your Instagram posts today!

Ensure you check out Pabbly Connect to create business automation workflows and reduce manual tasks. Pabbly Connect currently offer integration with 2,000+ applications.

Integrate Housing.com Leads Directly to Airtable Using Pabbly Connect

Learn how to automate adding Housing.com leads to Airtable using Pabbly Connect. Follow this step-by-step tutorial for seamless integration. Explore efficient methods for automating routine tasks with clear, concise instructions suited for both newcomers and experienced professionals.

Watch Step By Step Video Tutorial Below


1. Accessing Pabbly Connect for Integration

To begin integrating Housing.com leads into Airtable, you need to access Pabbly Connect. Start by opening your web browser and navigating to the Pabbly Connect landing page by typing ‘Pabbly.com/connect’. This is where you will initiate the automation process.

Once on the landing page, you will see options to either sign in or sign up. If you are a new user, click on the ‘Sign up for free’ button to create an account and receive 100 tasks free each month. Existing users can simply click ‘Sign in’ to access their dashboard. After signing in, select ‘Access Now’ under Pabbly Connect to proceed.


2. Creating a Workflow in Pabbly Connect

After accessing your Pabbly Connect dashboard, the next step is to create a new workflow. Click on the ‘Create Workflow’ button, which will prompt you to choose between the new workflow builder and the classic one. Select the new workflow builder for a modern interface. using Pabbly Connect

  • Enter a name for your workflow.
  • Choose a folder to save your workflow.
  • Click on the ‘Create’ button to open the workflow window.

This workflow window is crucial as it allows you to set up triggers and actions. Click on the ‘Add Trigger’ button to start configuring the integration.


3. Setting Up the Trigger for Housing.com Leads

In the trigger application section, search for and select Housing.com. For the trigger event, choose ‘New Leads’ and click on ‘Connect’. This will generate a webhook URL, which you will need to configure in your Housing.com account. using Pabbly Connect

To implement this webhook URL, reach out to your Housing.com account manager or backend team, as the platform does not provide a user interface option for this. Once the webhook is added, leads will automatically flow into your specified campaign.

After the configuration, return to Pabbly Connect to capture the lead details, which include the requirement, phone number, last name, first name, email address, and area. This data will be used to create records in Airtable.


4. Adding Action Step to Create Records in Airtable

Now that the trigger is set, it’s time to add the action step in Pabbly Connect to create records in Airtable. Search for Airtable in the action application section and select it. For the action event, choose ‘Create Record’ and click on ‘Connect’. using Pabbly Connect

You will have the option to add a new connection or select an existing one. If you’re creating a new connection, click on ‘Connect with Airtable’. You will need to grant permission for Pabbly Connect to access your Airtable bases. Choose the specific base, in this case, ‘New Leads’, and click ‘Grant Access’.

Once the connection is established, you can map the lead details captured from Housing.com to the corresponding fields in Airtable. This mapping ensures that the data is dynamic and updates with each new lead received.


5. Finalizing the Integration and Testing

After mapping all necessary fields, click on ‘Save and Send Test Request’. This action will create a new record in your Airtable base with the lead details. You should see the newly created lead, including their name, email address, phone number, requirement, and area.

  • Ensure all lead details are correctly displayed in Airtable.
  • Confirm that future leads will be automatically added without manual intervention.

Once this setup is complete, you can rest assured that every new lead from Housing.com will be added directly to your Airtable base seamlessly through Pabbly Connect. This automation saves time and enhances your lead management process.


Conclusion

In this tutorial, we explored how to integrate Housing.com leads directly into Airtable using Pabbly Connect. By following the outlined steps, you can automate lead management and enhance efficiency in your business operations. Automate your workflows today with Pabbly Connect for a seamless experience.

Ensure you check out Pabbly Connect to create business automation workflows and reduce manual tasks. Pabbly Connect currently offer integration with 2,000+ applications.

How to Automatically Add Website Leads to Odoo CRM Using Pabbly Connect

Learn how to seamlessly integrate website leads into Odoo CRM automatically using Pabbly Connect with this step-by-step tutorial. Transform complex automation concepts into accessible, actionable steps that eliminate unnecessary manual work while maximizing existing application capabilities.

Watch Step By Step Video Tutorial Below


1. Access Pabbly Connect for Integration

Pabbly Connect is the essential tool for automating the process of adding website leads to Odoo CRM. To start, visit the Pabbly website and sign in to your account. If you are a new user, you can sign up for free and get access to 100 tasks monthly. using Pabbly Connect

Once logged in, navigate to the Pabbly Connect dashboard where you can create new workflows. Click on the ‘Create Workflow’ button to begin setting up the integration between your website lead collection tool and Odoo CRM.


2. Create a Workflow in Pabbly Connect

To create a workflow in Pabbly Connect, select the ‘New Beta’ workflow builder for a modern experience. Name your workflow something like ‘Add Website Leads to Odoo CRM Automatically’ and choose a relevant folder for organization. using Pabbly Connect

After creating the workflow, you will need to set up a trigger application. In this case, select Typeform as the trigger application, since you will be capturing leads from a Typeform submission. Choose ‘New Entry’ as the trigger event and click on connect.

  • Select Typeform as the trigger application.
  • Choose ‘New Entry’ as the trigger event.
  • Connect your Typeform account to Pabbly Connect.

Once connected, you will be prompted to select the specific Typeform that captures your leads. Choose the form you want to use and proceed to save and send a test request to ensure the connection is successful.


3. Submit a Lead through Typeform

Now that your Pabbly Connect workflow is set up with Typeform, it’s time to test it by submitting a lead. Open your Typeform link in a new tab and fill in the required fields with dummy data, such as your name, phone number, and email address. using Pabbly Connect

Submit the form and return to Pabbly Connect to check if the lead details are captured successfully. You should see the response from Typeform reflecting in your Pabbly Connect workflow, confirming that the trigger is working correctly.

  • Enter dummy details in the Typeform fields.
  • Click on the submit button to send the data.
  • Verify that the lead appears in your Pabbly Connect workflow.

This step is crucial as it ensures that the integration is functioning as expected before moving on to the next stage of adding leads to Odoo CRM.


4. Connect Odoo CRM to Pabbly Connect

With your Typeform setup complete, the next step is to connect Odoo CRM to Pabbly Connect. Add a new action step and select Odoo as the action application. Choose ‘Create Lead’ as the action event, then click connect. using Pabbly Connect

To establish this connection, enter your Odoo domain, database name, email address, and API key. You can find your API key in your Odoo account under Preferences and then Account Security. Generate a new API key if needed, and ensure to save the connection.

Input your Odoo domain and database name. Provide your Odoo account email and API key. Save the connection to continue.

After successfully connecting Odoo CRM, you will need to map the fields from the Typeform response to the corresponding fields in Odoo. This ensures that every new lead submitted through Typeform is accurately recorded in your Odoo CRM.


5. Map Fields and Complete the Workflow

In this final step, you will map the fields from the Typeform submission to the Odoo CRM lead fields. This includes entering the first name, last name, phone number, and email address. Utilize the mapping feature to dynamically pull data from the Typeform response. using Pabbly Connect

Once all required fields are mapped, click on ‘Save and Send Test Request’ to finalize the integration. If everything is set up correctly, you should see the new lead appear in your Odoo CRM account, confirming that the automation is complete.

This automation will now run seamlessly, adding every new lead from Typeform directly into your Odoo CRM without any manual effort.


Conclusion

By using Pabbly Connect, you can easily automate the process of adding website leads to Odoo CRM. This tutorial provided a step-by-step guide on how to set up the integration with Typeform, ensuring that every lead is captured efficiently. Enjoy the benefits of automation and streamline your lead management process!

Ensure you check out Pabbly Connect to create business automation workflows and reduce manual tasks. Pabbly Connect currently offer integration with 2,000+ applications.

How to Automatically Add LinkedIn Ads Leads to Zoho CRM Using Pabbly Connect

Learn how to use Pabbly Connect to automatically add LinkedIn Ads leads to Zoho CRM with this step-by-step tutorial. Optimize your lead management process today!

Watch Step By Step Video Tutorial Below


1. Accessing Pabbly Connect to Start Integration

To automatically add LinkedIn Ads leads to Zoho CRM, the first step is accessing Pabbly Connect. Open your browser and navigate to the Pabbly Connect landing page by entering pabby.com/connect.

Once on the landing page, you will see options to either sign in or sign up for free. If you are a new user, click on ‘Sign up for free’ to get started. Existing users should click on ‘Sign In’ to access their accounts. After signing in, select ‘Access Now’ for Pabbly Connect to begin creating your workflow.


2. Creating Your Workflow in Pabbly Connect

Now that you are in Pabbly Connect, click on the ‘Create Workflow’ button. This will prompt you to choose between the new workflow builder and the classic one. For a modern interface, select the new workflow builder.

  • Enter the workflow name: ‘Automatically Add LinkedIn Ads Leads to Zoho CRM’
  • Select your desired folder or create a new one.
  • Click on ‘Create’ to proceed.

After creating the workflow, you will be directed to the workflow window where you can set triggers and actions for your automation process.


3. Setting Up Trigger for LinkedIn Leads

The next step involves setting up the trigger in Pabbly Connect. Click on the ‘Add Trigger’ button and search for ‘LinkedIn’ to select it as your trigger application. For the trigger event, choose ‘Lead Notifications’ and click on ‘Connect’.

You have the option to add a new connection or select an existing one. If you are creating a new connection, click on ‘Add a New Connection’ and then ‘Connect with LinkedIn’. Enter your LinkedIn account credentials and sign in to establish the connection.


4. Performing Test Submission to Capture Response

After successfully connecting LinkedIn to Pabbly Connect, you need to perform a test submission to capture the lead details. Open your LinkedIn account and navigate to the campaign that is running. Click on ‘Apply Now’ to fill in the lead form.

  • Fill in the required fields, such as email address and phone number.
  • Click on ‘Submit’ to send the information to Pabbly Connect.

Once submitted, Pabbly Connect will capture the response, including details like first name, last name, and email. This confirms that the trigger step is functioning correctly.


5. Adding Action to Create Contact in Zoho CRM

Now it’s time to add an action step to create a new contact in Zoho CRM using Pabbly Connect. Click on ‘Add New Action Step’, search for ‘Zoho CRM’, and select it as your action application. For the action event, select ‘Create Contact’ and click on ‘Connect’.

Similar to the trigger setup, you will need to create a new connection for Zoho CRM. Enter your Zoho CRM domain, which can be found in the URL of your Zoho account, and click ‘Save’. Grant the necessary permissions to allow Pabbly Connect to access your Zoho CRM data.

Finally, map the fields from the LinkedIn lead details to the corresponding fields in Zoho CRM. After mapping, click on ‘Save and Send Test Request’ to confirm that the contact is created successfully in Zoho CRM. Refresh your Zoho CRM contacts page to see the new contact with the details you entered during the test submission.


Conclusion

In this tutorial, you learned how to use Pabbly Connect to automatically add LinkedIn Ads leads to Zoho CRM. By following these steps, you can streamline your lead management process and ensure your sales team can follow up efficiently with new leads. Experience the power of automation with Pabbly Connect for your business today!

Ensure you check out Pabbly Connect to create business automation workflows and reduce manual tasks. Pabbly Connect currently offer integration with 2,000+ applications.

Integrate Odoo Leads to Google Sheets Using Pabbly Connect for Easy Reporting

Learn how to integrate Odoo leads to Google Sheets using Pabbly Connect for seamless reporting. Step-by-step tutorial with detailed instructions. Develop expertise in application integration and learn how to design streamlined automation workflows using proven, simplified approaches.

Watch Step By Step Video Tutorial Below


1. Setting Up Pabbly Connect for Odoo and Google Sheets Integration

To begin integrating Odoo leads into Google Sheets, you first need to access Pabbly Connect. This platform allows for seamless automation between applications without any coding skills. Start by navigating to the Pabbly Connect website and signing in to your account.

Once logged in, you can create a new workflow by clicking on the ‘Create Workflow’ button. This is where you will configure the connection between Odoo and Google Sheets. Ensure that you name your workflow appropriately to reflect its purpose, such as ‘Add Leads to Google Sheets for Easy Reporting’.


2. Creating a Webhook Trigger in Pabbly Connect

The next step involves setting up a trigger in Pabbly Connect. Select Odoo as your trigger application and choose the ‘Configure Webhooks’ option. This step is crucial as it allows Pabbly Connect to listen for new leads created in your Odoo account.

  • Select Odoo as the trigger application.
  • Choose ‘Configure Webhooks’ as the trigger event.
  • Copy the generated webhook URL.

After copying the URL, log into your Odoo account, navigate to the CRM section, and create a new automation. This automation will send lead data to the webhook URL whenever a new lead is created.


3. Setting Up Automation in Odoo

In Odoo, access the automation settings to create a new automation that triggers on lead creation. Name this automation as ‘New Lead Created’ and set the trigger to ‘On Create’. This configuration ensures that every time a new lead is added, the data is sent to Pabbly Connect.

Next, add an action to send a webhook notification. Paste the webhook URL you copied earlier from Pabbly Connect. Specify the fields you want to send, such as contact name, email, phone number, and priority.

  • Select ‘Send Webhook Notification’ as the action.
  • Map the fields you want to send to Pabbly Connect.
  • Save the automation in Odoo.

These steps will establish a connection between Odoo and Pabbly Connect, allowing lead data to be captured automatically.


4. Adding Leads to Google Sheets Using Pabbly Connect

Once the Odoo automation is set up, return to Pabbly Connect to add an action step. Select Google Sheets as your action application and choose ‘Add New Row’ as the action event. This step is essential for transferring lead data into your Google Sheets.

Connect your Google Sheets account to Pabbly Connect by clicking on ‘Sign in with Google’. After granting the necessary permissions, choose the spreadsheet and sheet where you want the lead data to be recorded.

Select the spreadsheet titled ‘Leads Details’. Map the lead fields from Odoo to the corresponding columns in Google Sheets. Ensure all required fields are filled before saving.

After mapping the fields, click ‘Save and Send Test Request’. This action will send the lead data to Google Sheets, confirming that the integration between Odoo and Google Sheets via Pabbly Connect is functioning correctly.


5. Conclusion

In this tutorial, we explored how to integrate Odoo leads into Google Sheets using Pabbly Connect. This automation streamlines the reporting process, ensuring that new leads are recorded instantly without manual input. By following these steps, you can enhance your business efficiency and manage leads effectively.

Ensure you check out Pabbly Connect to create business automation workflows and reduce manual tasks. Pabbly Connect currently offer integration with 2,000+ applications.

Check out Pabbly Connect – Automate your business workflows effortlessly! Sign Up Free – Start your journey with ease! 10,000+ Video Tutorials – Learn step by step! Join Pabbly Facebook Group – Connect with 21,000+ like minded people!

With Pabbly Connect, you can automate many other workflows as well, making it a powerful tool for any business looking to optimize operations.

Automate Course Enrollment for E-learning Platforms with Pabbly Chatflow

Learn how to automate course enrollment for e-learning platforms using Pabbly Chatflow. Step-by-step guide for seamless integration with WhatsApp and Learn Smart Academy. Master conversational marketing with practical techniques for creating chatbots that engage visitors at exactly the right moment in their journey.

Watch Step By Step Video Tutorial Below


1. Setting Up Pabbly Chatflow for Course Enrollment

To automate course enrollment for e-learning platforms, the first step is to access Pabbly Chatflow. Start by navigating to the Pabbly Chatflow website and signing up or logging in if you already have an account. This platform provides the necessary tools to create a WhatsApp chatbot that will handle course enrollment seamlessly.

Once logged in, you will be directed to the dashboard. Here, you can begin by adding your WhatsApp number. Click on the button to connect your WhatsApp account via either WhatsApp Connect or manual token connect. This integration is crucial for enabling communication between your users and the chatbot.


2. Creating the WhatsApp Chatbot in Pabbly Chatflow

After setting up your WhatsApp number, the next step is to create a WhatsApp chatbot using Pabbly Chatflow. Click on the ‘Flows’ button in the dashboard to access the flow builder. This is where you will design your chatbot’s interaction process.

  • Click on the ‘Add Flows’ button to create a new flow.
  • Name your flow, e.g., ‘Automate Course Enrollment Chatbot’.
  • Select the trigger event, such as ‘Keyword Match’.

In this step, you’ll specify the keywords that will activate the chatbot. For instance, you can use keywords like ‘hello’ or ‘courses’. This setup ensures that whenever a user sends one of these keywords, the chatbot will respond, making the enrollment process interactive and user-friendly.


3. Designing the Interaction Flow for Course Enrollment

With your chatbot’s trigger set, the next phase involves designing the interaction flow. Using Pabbly Chatflow, you will add various actions that the chatbot will perform when a user engages with it. Start by adding a welcome message that greets users and offers assistance.

  • Add a button labeled ‘View Courses’ that leads users to a list of available courses.
  • Create a list that contains sections for different courses, such as ‘Creativity’, ‘Marketing’, and ‘Language’.
  • Incorporate custom fields to capture user details like name, email, and phone number.

This structured interaction not only enhances user experience but also facilitates the information gathering necessary for course enrollment.


4. Integrating Payment Processing in Pabbly Chatflow

The final step in automating course enrollment involves integrating payment processing within the chatbot using Pabbly Chatflow. After users select a course, the chatbot should prompt them to make a payment.

Include options for ‘Pay Now’ or ‘Pay Later’. For the ‘Pay Now’ option, provide a payment link. After payment, send a confirmation message to the user.

This integration ensures that users can complete their course enrollment seamlessly, enhancing the overall efficiency of the process.


5. Testing and Launching Your Chatbot

Once your chatbot is fully designed, it’s essential to test its functionality. Use Pabbly Chatflow to simulate user interactions and ensure that each step of the enrollment process works as intended. Start by sending the trigger keywords to see how the chatbot responds.

Make any necessary adjustments based on your testing results. Once satisfied with its performance, you can officially launch your WhatsApp chatbot for course enrollment. This will allow users to engage with the chatbot and enroll in courses effectively.


Conclusion

Automating course enrollment for e-learning platforms is made easy with Pabbly Chatflow. By following these steps, you can create an efficient WhatsApp chatbot that enhances user interaction and streamlines the enrollment process. Start using Pabbly Chatflow today to transform your e-learning platform!

Ensure you check out Pabbly Connect to create business automation workflows and reduce manual tasks. Pabbly Connect currently offer integration with 2,000+ applications.

How to Build an AI Assistant for Digital Marketing Agencies Using Pabbly Chatflow

Learn to create an AI assistant for digital marketing agencies using Pabbly Chatflow. Step-by-step integration with YouTube and WhatsApp for automated responses. Discover practical methods for designing chat sequences that capture leads, answer questions, and guide users to the next step in your funnel.

Watch Step By Step Video Tutorial Below


1. Access Pabbly Chatflow for Your AI Assistant

To build an AI assistant for digital marketing agencies, you first need to access Pabbly Chatflow. Start by visiting the landing page of Pabbly Chatflow by typing ‘Pabbly.com/chatflow’ in your browser. This powerful platform allows you to create automated responses for user queries on WhatsApp.

Once on the Pabbly Chatflow landing page, you have two options: sign in or sign up for free. If you are a new user, click on ‘sign up for free’ to receive 100 credits every month. Existing users can click on ‘sign in’ to access their dashboard where all Pabbly applications are displayed.


2. Adding Your WhatsApp Number in Pabbly Chatflow

To create your AI assistant, the next step is to add your WhatsApp number in Pabbly Chatflow. On the dashboard, look for the ‘add WhatsApp number’ button. You will find two methods: WhatsApp connect and manual token connect. Choose one method that suits you best.

  • Click on ‘add WhatsApp number’.
  • Select either WhatsApp connect or manual token connect.
  • Follow the prompts to successfully add your number.

Once your WhatsApp number is added, you can proceed to create your AI assistant. This step is crucial as it connects your automated responses directly to your WhatsApp account, allowing for seamless communication.


3. Creating Your AI Assistant in Pabbly Chatflow

Now that you have added your WhatsApp number, it’s time to create your AI assistant using Pabbly Chatflow. Navigate to the AI assistant feature on the left side of your dashboard. Click on the ‘add assistant’ button to start the setup process. Here, you will be prompted to provide AI instructions.

For this, you can either choose a custom prompt or select from pre-built examples like AI agent or customer support agent. Set the temperature for creativity in responses, with lower values yielding more focused answers. After configuring these settings, select the AI model you wish to use, such as GPT4 mini, and input your OpenAI API key to connect the AI model.


4. Configuring AI Assistant Settings in Pabbly Chatflow

In this section, you will configure various settings for your AI assistant in Pabbly Chatflow. This includes setting header and footer messages, defining stop keywords, and retry attempts. For instance, if you want users to stop the AI assistant, you can set the keyword ‘human’.

  • Add header and footer messages to enhance user interaction.
  • Specify stop keywords for users to halt AI responses.
  • Set a fallback message for when the AI fails to respond.

Once you have configured these settings, your AI assistant will be equipped to handle user queries effectively, ensuring a smooth user experience on WhatsApp.


5. Testing Your AI Assistant with Pabbly Chatflow

After setting up your AI assistant in Pabbly Chatflow, it’s time to test its functionality. Start by sending a message like ‘hey’ on WhatsApp. The AI assistant should respond automatically with a greeting and inquire how it can assist. You can ask specific questions related to your services, such as website redesign.

For example, if you ask, ‘Do you offer website redesign services?’, the AI should reply with accurate information based on the knowledge base you have provided. This step is crucial to ensure that the AI assistant is functioning correctly and providing helpful responses to user queries.


Conclusion

In conclusion, using Pabbly Chatflow to build an AI assistant for digital marketing agencies can significantly enhance customer interaction. By following the steps outlined above, you can automate responses to user queries on WhatsApp, improving efficiency and user satisfaction. Try it out to streamline your digital marketing operations today!

Ensure you check out Pabbly Connect to create business automation workflows and reduce manual tasks. Pabbly Connect currently offer integration with 2,000+ applications.

Automate Sending Custom Fitness Plans with Pabbly Connect, Google Forms, and OpenAI

Learn how to automate sending custom fitness plans using Pabbly Connect, Google Forms, and OpenAI in this detailed tutorial. Step-by-step guide included. Master proven automation processes with practical implementation examples and strategic recommendations you can apply immediately in your workflow.

Watch Step By Step Video Tutorial Below


1. Introduction to Pabbly Connect for Fitness Plans

In this tutorial, we will learn how to automate sending custom fitness plans using Pabbly Connect, Google Forms, and OpenAI. This integration streamlines the process of collecting fitness preferences and sending personalized emails, saving you time and effort.

Pabbly Connect serves as the central platform that facilitates this integration. By connecting Google Forms to OpenAI and Gmail, you can automatically generate and send fitness plans based on user input.


2. Setting Up Google Forms for Data Collection

To begin, we need to create a Google Form that collects essential information from users. This form will include fields such as name, email, age, fitness goals, diet preferences, fitness level, and any medical conditions. Using Pabbly Connect, we will set up a workflow to capture this data.

  • Create a new Google Form named ‘Fitness Wellness Plans’.
  • Add fields for name, email, age, goal, diet preference, fitness level, and medical condition.
  • Ensure the last field is marked as required.

Once your form is set up, you can test it by submitting a sample entry. This will help confirm that your Google Form is ready to send data to Pabbly Connect.


3. Connecting Pabbly Connect to Google Forms

Next, we will connect Pabbly Connect to Google Forms to capture submitted data. Start by signing into your Pabbly Connect account and creating a new workflow.

In your workflow, select Google Forms as the trigger application. Choose the event ‘New Response Received’ and connect your Google account. A webhook URL will be generated, which you will need to copy and paste into your Google Form’s settings.

  • Open your Google Form and navigate to ‘Extensions’ > ‘Add-ons’ > ‘Get Add-ons’.
  • Search for ‘Pabbly Connect Webhooks’ and install it.
  • Go to ‘Pabbly Connect Webhooks’ and select ‘Initial Setup’ to enter the webhook URL.

Setting up this connection ensures that each new response in Google Forms is sent to Pabbly Connect for further processing.


4. Generating Custom Fitness Plans with OpenAI

Once the data is captured by Pabbly Connect, we will use OpenAI to generate personalized fitness plans. Add OpenAI as your action application and select ‘ChatGPT’ as the action event.

To connect OpenAI, you will need to provide an API key. After establishing the connection, set up the prompt for generating the fitness plan. This prompt should include user details collected from Google Forms.

Use the following prompt: ‘You are a certified fitness coach. Create a personalized 7-day workout and diet plan for the following client details…’. Map user data from Google Forms into the prompt for dynamic content generation. Test the OpenAI connection to ensure the fitness plan is generated correctly.

This integration allows you to create tailored fitness plans automatically, leveraging the power of AI through Pabbly Connect.


5. Sending Personalized Emails via Gmail

The final step in our automation workflow is sending the generated fitness plans via email using Gmail. Add Gmail as your action application and select ‘Send Email’ as the action event.

Connect your Gmail account and fill in the required fields, including the recipient’s email address (mapped from Google Forms), subject line, and email body (mapped from the OpenAI response).

Set the sender name as ‘Pabbly’. Use a subject line like ‘Here is your personalized fitness plan’. Choose plain text or HTML format for the email content.

After configuring these settings, test the email action to confirm that the personalized fitness plan is sent successfully. This entire process showcases how Pabbly Connect automates the workflow from form submission to email delivery.


Conclusion

In this tutorial, we demonstrated how to automate sending custom fitness plans using Pabbly Connect, Google Forms, and OpenAI. By following these steps, you can streamline your fitness center’s communication and enhance client engagement efficiently.

Ensure you check out Pabbly Connect to create business automation workflows and reduce manual tasks. Pabbly Connect currently offer integration with 2,000+ applications.

Utilizing Pabbly Connect enables seamless integration and automation, allowing you to focus on providing excellent fitness services while the system handles the rest.

Automate Client Appointment Scheduling for Healthcare via WhatsApp with Pabbly Chatflow

Learn how to automate client appointment scheduling for healthcare using Pabbly Chatflow and WhatsApp. Step-by-step guide to creating your chatbot. Build conversational workflows that guide visitors toward conversion with dynamic, branching dialogs that respond intelligently to user input.

Watch Step By Step Video Tutorial Below


1. Setting Up Pabbly Chatflow for WhatsApp Integration

To automate client appointment scheduling for healthcare via WhatsApp, the first step is to set up Pabbly Chatflow. You can access it by visiting the Pabbly website and signing in or creating a new account. Once logged in, navigate to the dashboard of Pabbly Chatflow, where you can start creating your WhatsApp chatbot.

After accessing Pabbly Chatflow, you will need to connect your WhatsApp number. Click on the ‘Add WhatsApp Number’ button located at the top right corner. Here, you have two options: connect via WhatsApp or use a manual token. The preferred method is to use WhatsApp connect for seamless integration.


2. Creating the Chatbot Flow in Pabbly Chatflow

Next, you will create a flow for your WhatsApp chatbot using Pabbly Chatflow. Click on the ‘Add a Flow’ button to begin. Name your flow, for example, ‘Client Appointment Scheduling for Healthcare’. This will help you identify the flow later.

  • Select a trigger event from the dropdown menu.
  • Choose keywords that will activate the flow, such as ‘Appointment’.
  • Set the response message that the chatbot will send when triggered.

After defining the trigger, you can add various messages and quick reply buttons that will guide users through the appointment scheduling process. Each step should be clear and concise, making it easy for clients to follow.


3. Testing the WhatsApp Chatbot with Pabbly Chatflow

Once you have created your chatbot flow in Pabbly Chatflow, it’s time to test it. Send a message to your connected WhatsApp number using the keyword you set earlier, like ‘Appointment’. The chatbot should respond with a welcome message and options for appointment types.

During testing, ensure that the quick reply buttons work correctly. For example, if a user selects ‘Consultation’, the chatbot should prompt them to choose a preferred time slot. Make sure that the responses are personalized based on the information provided by the user.


4. Finalizing and Saving Your Chatbot Flow

After successfully testing all functionalities, the next step is to finalize your chatbot flow in Pabbly Chatflow. Click on the ‘Save’ button to ensure all your changes are recorded. This step is crucial to make sure your chatbot is ready for real interactions.

Additionally, you can revisit the flow anytime in Pabbly Chatflow to make adjustments or add new features as necessary. This flexibility allows you to continuously improve the client experience based on feedback and usage patterns.


5. Conclusion: Automating Healthcare Appointments via WhatsApp

In conclusion, automating client appointment scheduling for healthcare via WhatsApp using Pabbly Chatflow is a straightforward process. By following the steps outlined, you can create an efficient chatbot that enhances client interaction and streamlines appointment management.

Ensure you check out Pabbly Connect to create business automation workflows and reduce manual tasks. Pabbly Connect currently offer integration with 2,000+ applications.

Utilizing Pabbly Chatflow not only saves time but also improves client satisfaction by providing instant responses and personalized communication. Start implementing your WhatsApp chatbot today to transform your client appointment scheduling process.


How to Generate Unique Articles with AI in Just 1 Minute Using Pabbly Connect

Discover how to generate unique articles quickly using Pabbly Connect to integrate Google Sheets and OpenAI for seamless automation. Navigate the automation landscape confidently with clear, structured guidance suitable for professionals regardless of prior technical experience.

Watch Step By Step Video Tutorial Below


1. Accessing Pabbly Connect for Article Generation

To generate unique articles using Pabbly Connect, start by accessing the platform. Pabbly Connect serves as the central automation tool that connects Google Sheets and OpenAI. You can access Pabbly Connect by visiting Pabbly Connect and signing in or creating a new account.

Once logged in, you will be directed to the dashboard where you can create your first workflow. This workflow will automate the process of generating articles based on data from Google Sheets. Click on the ‘Create Workflow’ button to get started.


2. Setting Up Google Sheets with Pabbly Connect

After accessing Pabbly Connect, the next step is to set up Google Sheets to input your article ideas. This integration will allow you to automatically generate content based on the data you enter in the sheet. Create a new Google Sheet and add columns for your blog ideas, keywords, and any additional notes needed.

  • Create a new Google Sheet named ‘Content Planner’.
  • Add columns for Title, Target Keyword, Audience, and Notes.
  • Enter a new blog idea in the first row to trigger the automation.

With your Google Sheet ready, you can now connect it to Pabbly Connect to automate the workflow. This connection will enable you to send data from Google Sheets to OpenAI for article generation.


3. Creating Your Pabbly Connect Workflow

To create a workflow in Pabbly Connect, click on the ‘Create Workflow’ button and name it something descriptive, like ‘Generate Unique Articles with AI’. Select Google Sheets as your trigger application and choose the event as ‘New or Updated Spreadsheet Row’. This setup will allow Pabbly Connect to monitor your Google Sheet for new entries.

Next, connect your Google account and authorize Pabbly Connect to access your sheets. After successful authentication, select the specific sheet you created earlier. This step is crucial as it sets up the connection that will trigger the article generation whenever a new entry is added.


4. Integrating OpenAI with Pabbly Connect

Once you have set up Google Sheets, the next step is to integrate OpenAI to generate the articles. In your Pabbly Connect workflow, add an action step and select OpenAI as your action application. Choose the event ‘Create Completion’ to generate the article based on the information from your Google Sheet.

You will need to enter your OpenAI API key to connect it with Pabbly Connect. This key allows Pabbly Connect to send requests to OpenAI for generating content. After entering the API key, configure the prompt by mapping the fields from your Google Sheet to the corresponding fields in OpenAI.

  • Map the Title to the prompt field in OpenAI.
  • Include the Target Keyword and Audience for context.
  • Set the tone and any special instructions for the AI.

After configuring the prompt, save the settings in Pabbly Connect. This integration allows OpenAI to generate unique articles based on the data from your Google Sheet.


5. Posting Generated Articles to Google Blogger

The final step in your workflow is to post the generated articles to your Google Blogger account. Add another action step in your Pabbly Connect workflow and select Google Blogger as the application. Choose the event ‘Create a Post’ to publish the article generated by OpenAI.

Connect your Google Blogger account to Pabbly Connect and select the blog where you want to publish the articles. Map the Title and Content fields from the OpenAI response to the appropriate fields in Google Blogger. Set the post status as ‘Live’ to publish it immediately.

Once this is done, save your workflow and test the integration. Each time you add a new entry in your Google Sheet, Pabbly Connect will automatically generate a unique article using OpenAI and post it to your Google Blogger account, streamlining your content creation process.


Conclusion

Using Pabbly Connect, you can effortlessly generate unique articles in just one minute by integrating Google Sheets and OpenAI. This powerful automation saves time and enhances your content creation process, allowing you to focus on other important tasks.

Ensure you check out Pabbly Connect to create business automation workflows and reduce manual tasks. Pabbly Connect currently offer integration with 2,000+ applications.