Automatically Send Customized SMS to Facebook Leads Using OpenAI with Pabbly Connect

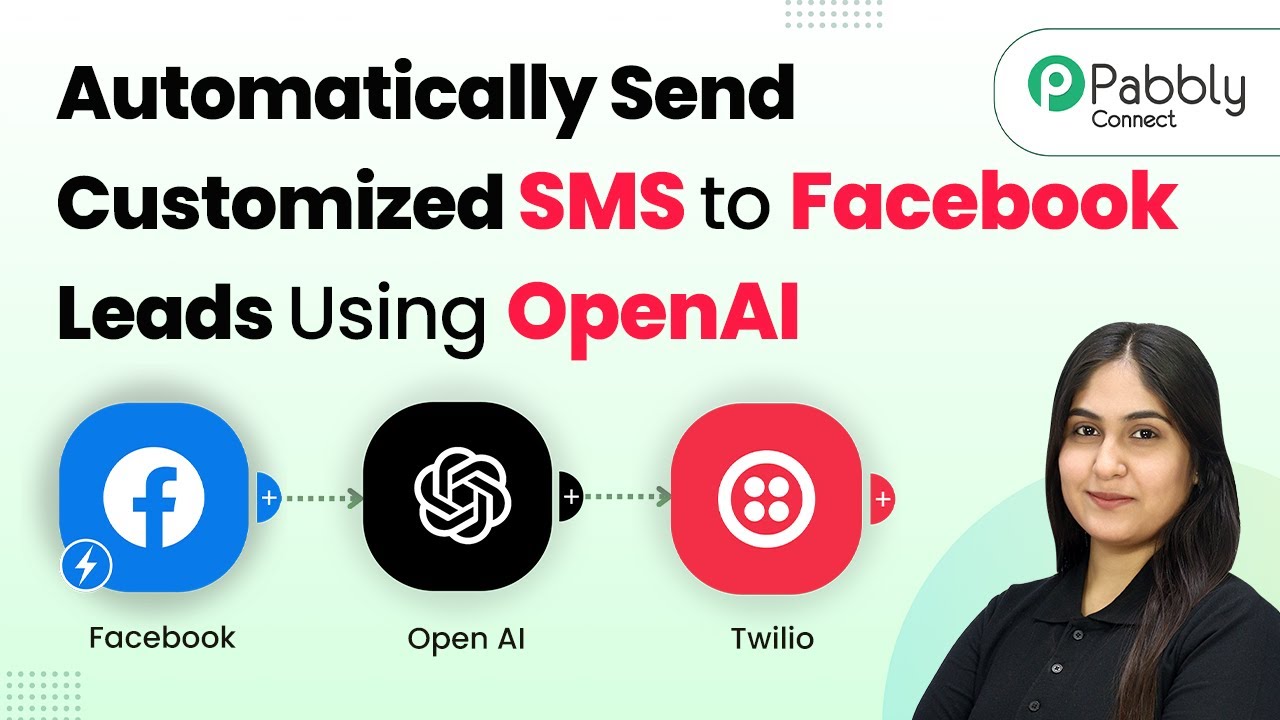
Learn how to automatically send customized SMS to Facebook leads using OpenAI and Pabbly Connect with this detailed tutorial. Eliminate manual repetitive tasks from your workflow. Discover proven automation methods with intuitive steps designed for efficiency-minded professionals.

Watch Step By Step Video Tutorial Below


1. Accessing Pabbly Connect for Integration

To automatically send customized SMS to Facebook leads using OpenAI, you first need to access Pabbly Connect. Start by navigating to the Pabbly Connect homepage by entering the URL in your browser. Once there, you will have the option to sign up for a free account or log in if you are an existing user.

After logging in, you will be taken to the Pabbly Connect dashboard. From here, you can create a new workflow that will facilitate the integration between Facebook leads and OpenAI for SMS sending. This process is crucial as it sets the foundation for your automation.


2. Creating a Workflow in Pabbly Connect

Once you are on the Pabbly Connect dashboard, the next step involves creating a workflow. Click on the ‘Create Workflow’ button located at the top right corner. In the dialog box that appears, you will need to give your workflow a name, such as ‘Automatically Send Customized SMS to Facebook Leads Using OpenAI’. using Pabbly Connect

  • Name your workflow appropriately.
  • Select a folder to save your workflow.
  • Choose the Beta version for a more modern interface.

After naming your workflow, click on the ‘Create’ button. This action will bring you to a screen where you can set up the triggers and actions that will define how your automation operates. Here, you will be guided through the necessary steps to link Facebook leads and OpenAI for SMS generation.


3. Setting Up Facebook Leads as a Trigger

In this section, you will set Facebook leads as the trigger for your automation. Click on the ‘Add Trigger’ button and select ‘Facebook Lead Ads’ as your trigger application. Then, choose the event ‘New Lead’ from the dropdown menu. This selection indicates that the workflow will activate whenever a new lead is generated through your Facebook lead ads. using Pabbly Connect

Next, you will need to connect your Facebook account to Pabbly Connect. This process involves logging into your Facebook account through the Pabbly Connect interface and granting the necessary permissions. Once connected, select the specific Facebook page and lead form you want to use for this automation.


4. Integrating OpenAI for SMS Generation

After successfully setting up Facebook leads as a trigger, the next step involves integrating OpenAI to generate customized SMS. Click on the ‘Add Action’ button and select OpenAI as your action application. Choose the event ‘Generate Text’ to create the SMS content based on the lead information. using Pabbly Connect

  • Input your OpenAI API key to establish the connection.
  • Map the lead details (like first name) to the prompt field for personalized SMS.
  • Select the appropriate model from OpenAI for generating your SMS content.

Once you have configured the settings, click on the ‘Save’ button. This action will ensure that the SMS content is generated automatically whenever a new lead is captured from Facebook.


5. Sending SMS through Twilio

The final step in this automation process is to send the generated SMS to the lead’s phone number using Twilio. Click on the ‘Add Action’ button again and select Twilio as your action application. Choose the event ‘Send SMS’ to initiate the SMS sending process.

In the configuration window, enter your Twilio account SID and authentication token to connect your Twilio account with Pabbly Connect. Next, map the sender’s number (your Twilio number) and the recipient’s number (the lead’s phone number) to ensure the SMS is sent to the right contact.


Conclusion

This tutorial has guided you through the process of automatically sending customized SMS to Facebook leads using OpenAI and Pabbly Connect. By following these steps, you can enhance your lead engagement and streamline communication effortlessly.

Ensure you check out Pabbly Connect to create business automation workflows and reduce manual tasks. Pabbly Connect currently offer integration with 2,000+ applications.

Automate Customer Feedback Collection with Pabbly Chatflow for Gyms

Learn how to automate customer feedback collection for gyms using Pabbly Chatflow. Step-by-step guide to create an AI assistant for effective feedback management. Discover practical methods for designing chat sequences that capture leads, answer questions, and guide users to the next step in your funnel.

Watch Step By Step Video Tutorial Below


1. Accessing Pabbly Chatflow for Feedback Collection

To automate customer feedback collection, start by accessing Pabbly Chatflow. Visit the website at www.Pabbly.com/chatflow and sign in to your account. If you are a new user, you can sign up for free, which provides you with 100 credits monthly.

Once signed in, navigate to the dashboard. Here, you will find options to connect your WhatsApp account, essential for collecting feedback. Click on the ‘Add WhatsApp Number’ button to link your WhatsApp with Pabbly Chatflow for seamless communication.


2. Creating an AI Assistant in Pabbly Chatflow

With Pabbly Chatflow ready, the next step is to create your AI assistant. Click on the ‘AI Assistant’ option from the left sidebar, then select ‘Add AI Assistant’. Give your assistant a name, such as ‘Automate Customer Feedback Collection for Gym’.

  • Provide AI instructions by selecting the instruction type as ‘AI Agent’.
  • Set the creativity level of responses by adjusting the AI configuration slider.
  • Choose the AI model, such as GPT-4 Mini, and enter your OpenAI API key.

After configuring these settings, click on ‘Connect’ to save your AI assistant. This setup is crucial for enabling automated responses based on customer feedback.


3. Configuring the AI Assistant for Feedback Collection

Next, configure your AI assistant for effective feedback collection using Pabbly Chatflow. You can set header and footer messages to guide users during interactions. For instance, include a friendly greeting and instructions on how to provide feedback.

Additionally, upload a knowledge source file that includes common questions and responses related to your gym’s services. This file will help the AI assistant provide accurate answers based on user queries. Ensure to save all changes to maintain the assistant’s functionalities.

  • Set up fallback messages for instances when the AI cannot provide a suitable response.
  • Define keywords that users can type to stop responses from the AI assistant.

By completing these configurations in Pabbly Chatflow, your AI assistant will be well-equipped to handle customer feedback effectively.


4. Testing Your AI Assistant with Pabbly Chatflow

After setting up your AI assistant, it’s time to test its functionality. Send a message through WhatsApp, such as ‘I want to share some feedback’. Wait for the AI to respond and assess its ability to engage in a feedback collection conversation. using Pabbly Connect

Your AI assistant should prompt you to rate your experience and ask follow-up questions based on your responses. This testing phase is crucial to ensure that your assistant is functioning correctly and providing the desired feedback collection experience.


5. Enabling the AI Assistant for Customer Interaction

Once testing is complete, enable your AI assistant for customer interactions. In Pabbly Chatflow, navigate to the inbox settings and select your AI assistant under the AI auto-reply settings. This step allows the assistant to respond to all incoming messages automatically.

You can also assign the AI assistant to specific contact lists or enable it for all contacts. This flexibility is essential for gyms that want to ensure all customer feedback is collected efficiently.

After enabling the AI assistant, conduct another test to confirm that it is operational. Send various feedback messages to see how well the assistant manages responses. This final test will ensure that the setup is complete and functioning as intended.


Conclusion

In conclusion, automating customer feedback collection is seamless with Pabbly Chatflow. By following the steps outlined, you can create an effective AI assistant that enhances customer interaction and feedback management in your gym. This setup not only saves time but also improves customer satisfaction through timely responses.

Ensure you check out Pabbly Connect to create business automation workflows and reduce manual tasks. Pabbly Connect currently offer integration with 2,000+ applications.

Build an AI Assistant for Real-Time Banking Support with Pabbly Chatflow

Learn how to build an AI assistant for banking support using Pabbly Chatflow, integrating WhatsApp, Google, and more for real-time assistance. This detailed guide shows you how to build powerful chat automation that engages visitors and converts prospects—without any coding required.

Watch Step By Step Video Tutorial Below


1. Accessing Pabbly Chatflow for Banking Support

To build an AI assistant for real-time banking support, the first step is to access Pabbly Chatflow. Begin by navigating to the Pabbly website and signing up or logging into your existing account. Once you’re on the dashboard, you’ll see various options to create and manage your assistants.

In Pabbly Chatflow, you can connect your WhatsApp number to facilitate seamless communication with your clients. This integration allows you to automate responses, making it easier to handle banking queries efficiently.


2. Creating Your AI Assistant in Pabbly Chatflow

After accessing Pabbly Chatflow, the next step is to create your AI assistant. Click on the ‘Add Assistant’ button located at the top right corner of the dashboard. You will be prompted to name your assistant; for instance, you can name it ‘Banking Support’.

  • Select the type of AI instructions, such as AI Agent or Customer Support Agent.
  • Set up the assistant configuration, including temperature and AI model selection.
  • Upload a knowledge source file that contains FAQs and banking information.

Once you’ve set these configurations, save your assistant. This setup allows Pabbly Chatflow to provide accurate responses based on the uploaded data.


3. Uploading Knowledge Source for Effective Responses

To enhance the efficiency of your AI assistant, it’s crucial to upload a knowledge source. In Pabbly Chatflow, you can do this by selecting the option to upload a file, ensuring it is in a supported format like PDF or plain text.

Your knowledge source should include common banking queries and their answers. This way, when users reach out via WhatsApp, the AI can pull relevant information from this source to provide accurate responses. For example, you can include details about account statements, withdrawal limits, and more.

  • Ensure the knowledge source is comprehensive and regularly updated.
  • Test the assistant with various queries to ensure it retrieves correct information.

After uploading, verify that Pabbly Chatflow successfully recognizes the file to ensure your assistant is equipped with the necessary information.


4. Testing Your AI Assistant’s Functionality

Once your AI assistant is created and the knowledge source is uploaded, it’s time to test its functionality. Using your WhatsApp account, send a message to the assistant to see how it responds. For example, you can ask, ‘How can I reset my UPI PIN?’

The assistant should provide a detailed response based on the information in your knowledge source, demonstrating its ability to handle real-time banking queries. If the response is satisfactory, you can proceed to finalize your assistant.

Check the response time and accuracy of the assistant. Make adjustments to the knowledge source as needed for improved accuracy.

Utilizing Pabbly Chatflow allows you to refine your assistant’s capabilities continually, ensuring it meets your banking support needs effectively.


5. Assigning Your Assistant to WhatsApp

After testing and finalizing your AI assistant, you need to assign it to your WhatsApp account. In Pabbly Chatflow, navigate to the settings and select the option for AI auto-reply settings. Here, you can enable the assistant to respond to all incoming messages.

To assign your assistant, choose the contact list that corresponds to your WhatsApp account. This ensures that every message received on WhatsApp is handled by your newly created AI assistant, providing immediate support to your customers.

Select the specific assistant you want to assign from your created assistants. Save the settings to ensure the assistant is active for all WhatsApp contacts.

With this setup, Pabbly Chatflow ensures that your assistant is ready to provide real-time banking support efficiently.


Conclusion

In conclusion, building an AI assistant for real-time banking support using Pabbly Chatflow enhances customer interaction through automated responses. Integrating WhatsApp allows for efficient communication, ensuring banking queries are handled promptly and accurately.

Ensure you check out Pabbly Connect to create business automation workflows and reduce manual tasks. Pabbly Connect currently offer integration with 2,000+ applications.

Integrate Leads to Your CRM in Minutes with Pabbly Connect

Learn how to quickly integrate leads from Facebook to your CRM using Pabbly Connect with this step-by-step tutorial. Build sophisticated automated workflows in less time than you think. This guide translates complex integrations into straightforward steps for immediate implementation.

Watch Step By Step Video Tutorial Below


1. Accessing Pabbly Connect for Integration

To begin sending leads to your CRM, you need to access Pabbly Connect. Start by visiting the Pabbly Connect landing page and either sign in or create a new account. Once logged in, you will be directed to the dashboard where you can create your workflow.

After reaching the dashboard, click on the ‘Create Workflow’ button. You will be prompted to select between the new workflow builder and the classic one. Choose the new workflow builder for a modern interface. Enter the workflow name as ‘Send Leads to Your CRM in Minutes’ and select an appropriate folder for your automation.


2. Setting Up the Trigger with Facebook Lead Ads

In this section, you will set up the trigger in Pabbly Connect using Facebook Lead Ads. Click on the ‘Add Trigger’ button and search for ‘Facebook Lead Ads’ in the application list. Select it and choose ‘New Lead Instant’ as the trigger event to capture new leads instantly.

  • Select ‘Facebook Lead Ads’ as the trigger application.
  • Choose ‘New Lead Instant’ as the trigger event.
  • Connect your Facebook account to Pabbly Connect.

After connecting your Facebook account, select the page and lead form you want to use. Make sure to enable the response button and click on ‘Save and Send Test Request’ to capture the lead data. This is crucial for the next steps in your workflow.


3. Creating the Action Step for Your CRM

Next, you will add the action step to send the captured lead data to your CRM using Pabbly Connect. Click on the ‘Add Action Step’ button and search for ‘Salesforce’ (or your preferred CRM). Select ‘Create Contact’ as the action event to add the lead details directly into your CRM.

After selecting Salesforce, you will need to connect your Salesforce account. If you haven’t previously connected it, choose ‘Add a New Connection’. Follow the prompts to grant Pabbly Connect the necessary permissions to access your Salesforce account.

  • Choose ‘Create Contact’ as the action event.
  • Connect to Salesforce by allowing necessary permissions.
  • Map the lead details from Facebook to the appropriate fields in Salesforce.

Once the connection is established, you will map the lead fields such as name, email, and phone number from the Facebook lead to Salesforce. This mapping allows for dynamic data transfer, ensuring that every new lead is accurately recorded in your CRM.


4. Testing the Integration with a Sample Lead

With the workflow set up, it’s time to test the integration using Pabbly Connect. Go back to the Facebook Lead Ads testing tool and create a sample lead by filling in the form. After submitting the test lead, return to your Pabbly Connect workflow and check if the lead data has been captured successfully.

Once the test lead is submitted, Pabbly Connect should show the captured lead data from Facebook. If everything is set up correctly, you should see the lead information populated in the test response. This ensures that your integration is functioning as expected.

Submit a test lead using the Facebook Lead Ads testing tool. Check the response in Pabbly Connect to confirm data capture. Ensure the lead details appear correctly in your CRM.

If the data is captured correctly, proceed to finalize your workflow. This automation will now work seamlessly in the background, sending new leads from Facebook to your CRM without manual intervention.


5. Finalizing the Automation for Continuous Use

Now that you have successfully tested the integration, it’s time to finalize the automation in Pabbly Connect. Ensure that all settings are saved and that your workflow is active. This will allow Pabbly Connect to automatically send new leads from Facebook to your CRM.

By using Pabbly Connect, you can streamline your lead management process, reducing manual entry and ensuring that your CRM is always up to date. This automation not only saves time but also minimizes the risk of errors associated with manual data entry.

With this setup, every time a new lead fills out your Facebook form, their details will be sent to your CRM instantly, allowing you to follow up promptly. Now you can focus on converting leads without worrying about data entry.


Conclusion

In this tutorial, you learned how to integrate Facebook Lead Ads with your CRM using Pabbly Connect. By setting up triggers and actions, you can automate the lead capture process, ensuring that your CRM is always updated with new leads. This seamless integration not only saves time but also enhances your lead management efficiency.

Ensure you check out Pabbly Connect to create business automation workflows and reduce manual tasks. Pabbly Connect currently offer integration with 2,000+ applications.

Create Your First AI Agent in 10 Minutes with Pabbly Chatflow

Learn how to create your first AI agent in just 10 minutes using Pabbly Chatflow. Follow our step-by-step guide to integrate various applications seamlessly. Master conversational marketing with practical techniques for creating chatbots that engage visitors at exactly the right moment in their journey.

Watch Step By Step Video Tutorial Below


1. Accessing Pabbly Chatflow for Your AI Agent

To create your first AI agent, you need to access Pabbly Chatflow. Start by visiting the landing page URL provided in the description. Log in to your Pabbly Chatflow account to reach the dashboard where you can manage your AI agents.

Once logged in, you’ll be greeted by the dashboard. From here, you can navigate to the AI assistant feature, which allows you to set up your agent. Make sure your WhatsApp number is added to Pabbly Chatflow to enable communication through this platform.


2. Creating Your AI Agent in Pabbly Chatflow

After accessing your dashboard, the next step is to create your AI agent. Click on the AI assistant feature, and a setup window will appear. Here, you can select the instruction type for your AI. You can choose a custom prompt or a pre-built example like a customer support agent.

  • Select the instruction type (custom or pre-built).
  • Set the temperature for AI responses (0 for focused, 1 for creative).
  • Choose the AI model to use (OpenAI).

Once you have configured these settings, you can proceed to input your API key from OpenAI. This key is crucial for your AI agent to function properly within Pabbly Chatflow.


3. Setting Up Knowledge Base for Your AI Agent

To enhance your AI agent’s responses, you need to create a knowledge base. Start by compiling unique information about your business in a Google Doc. Once you have your content ready, upload it to Pabbly Chatflow in either .txt or .pdf format.

For optimal performance, using a .txt file is recommended as it has no size limits. After uploading the knowledge base, you can further customize your AI assistant’s interface by adding headings and initial messages that will greet users.


4. Finalizing Your AI Agent in Pabbly Chatflow

Once your knowledge base is uploaded, you can finalize your AI agent. This involves setting up additional features such as fallback messages and keywords that can stop the AI assistant from responding. You can also set retry attempts in case the AI fails to respond.

  • Enter fallback messages for user inquiries.
  • Specify retry attempts (1-10) for the AI responses.
  • Enable or disable the powered by Pabbly label.

After configuring these settings, ensure you save your AI assistant and toggle the activation button. This step is crucial for your AI assistant to start functioning properly within Pabbly Chatflow.


5. Assigning Your AI Agent to Contacts

Now that your AI agent is created and activated, you can assign it to your contacts. Navigate to the inbox section of Pabbly Chatflow to assign your AI assistant to specific contacts. This allows the AI to respond automatically to inquiries from those contacts.

If you want to assign the AI assistant to multiple contacts, you can create a contact list in the settings. This way, whenever someone from this list messages you, the AI assistant will automatically reply based on the knowledge base you provided.


Conclusion

Creating your first AI agent using Pabbly Chatflow is a straightforward process. By following the steps outlined above, you can set up an effective AI assistant for your business that responds to customer inquiries automatically. Start leveraging the power of automation with Pabbly Chatflow today!

Ensure you check out Pabbly Connect to create business automation workflows and reduce manual tasks. Pabbly Connect currently offer integration with 2,000+ applications.

Automate Client Onboarding and Contract Signing for Legal Firms with Pabbly Chatflow

Learn how to automate client onboarding and contract signing for legal firms using Pabbly Chatflow. Step-by-step guide with detailed instructions. This detailed guide shows you how to build powerful chat automation that engages visitors and converts prospects—without any coding required.

Watch Step By Step Video Tutorial Below


1. Accessing Pabbly Chatflow for Client Onboarding

To automate client onboarding and contract signing for legal firms, start by accessing Pabbly Chatflow. Open a new tab and navigate to Pabbly.com/chatflow. This platform serves as your central hub for creating WhatsApp chatbots that streamline communication with clients.

Once on the Pabbly Chatflow homepage, you can sign up for a free account if you are a new user. Existing users can simply log in. After logging in, you will be directed to the dashboard where you can manage your WhatsApp numbers and explore various features.


2. Creating the WhatsApp Chatbot in Pabbly Chatflow

After accessing Pabbly Chatflow, the next step is to create your WhatsApp chatbot designed for client onboarding. Click on the ‘Access Now’ button under the Pabbly Chatflow section. This will lead you to the dashboard where you can manage all your WhatsApp numbers.

  • Click the ‘Add WhatsApp Number’ button to connect your WhatsApp account.
  • Choose between WhatsApp Connect or Manual Token Connect.
  • Select the ‘Flow’ option to create your chatbot.

Once in the flow builder, click on the ‘Add Flow’ button and name your flow as ‘Automate Client Onboarding and Contract Signing for Legal Firms’. This is where you will design your chatbot’s workflow.


3. Designing the Chatbot Flow in Pabbly Chatflow

Now that you have created your flow, it’s time to design how the chatbot will interact with users. Start by selecting a trigger event; for this case, use the ‘Keyword’ option. Enter the keyword ‘start onboarding’ to initiate the onboarding process. using Pabbly Connect

Next, set up the first action by dragging the ‘Ask a Question’ button into the flow. Here, you will ask users for their full name. Use the contact custom field for their name to personalize the interaction. Make sure to save your flow regularly to avoid losing any progress.

  • Drag the ‘List Button’ to offer legal services after capturing the name.
  • Include options like ‘Criminal Defense’, ‘Family Law’, and ‘Property Law’ for users to select.

Once users select a service, your bot will ask for a brief description of their case, further streamlining the onboarding process.


4. Finalizing the Chatbot and Sending Agreements

After gathering all necessary information, the next step in Pabbly Chatflow is to send users a customized agreement based on their selections. Use the ‘Text + Button’ content type to craft your agreement message. This message should include placeholders for the user’s name and selected service type.

Finally, provide two buttons: ‘Proceed’ and ‘Not Now’. Connect these buttons to different responses based on user selection. If they proceed, send a confirmation message; if they choose ‘Not Now’, redirect them back to the service selection.


5. Testing and Launching Your Chatbot with Pabbly Chatflow

Before launching your WhatsApp chatbot, it’s crucial to test its functionality. Interact with the bot by sending the initial trigger keyword and ensure it responds correctly. This testing phase allows you to identify and rectify any issues. using Pabbly Connect

Once satisfied with the chatbot’s performance, save your flow one last time. You can also share your flow layout with others by using the share option in Pabbly Chatflow. Remember that while the layout can be shared, custom fields and templates must be created separately.


Conclusion

By using Pabbly Chatflow, legal firms can efficiently automate client onboarding and contract signing processes. This integration not only saves time but also enhances client interaction through personalized responses. Start your journey with Pabbly Chatflow today to streamline your legal services!

Ensure you check out Pabbly Connect to create business automation workflows and reduce manual tasks. Pabbly Connect currently offer integration with 2,000+ applications.

How to Auto-Send Course Access Emails to New Thinkific Students Using Pabbly Connect

Learn how to use Pabbly Connect to automate sending course access emails to new Thinkific students with this step-by-step tutorial. This comprehensive guide reveals exactly how to connect your applications and automate repetitive tasks — accessible for professionals of all technical backgrounds.

Watch Step By Step Video Tutorial Below


1. Access Pabbly Connect to Set Up Automation

To automate sending course access emails to new Thinkific students, you first need to access Pabbly Connect. Start by visiting the Pabbly website and signing in to your account. If you are a new user, you can sign up for free, giving you access to 100 tasks monthly.

Once signed in, navigate to the Pabbly Connect dashboard. This is where you will create your workflow to connect Thinkific and Gmail. Click on the ‘Create Workflow’ button and choose the new beta workflow builder for a more modern experience.


2. Create a New Workflow in Pabbly Connect

In this step, you will create a workflow specifically for sending course access emails. Name it ‘Auto Send Course Access Emails to New Thinkific Students’ and select a folder for organization.

  • Click on ‘Create’ to finalize the workflow setup.
  • Select ‘Thinkific’ as the trigger application.
  • Choose ‘Enrollment Created’ as the trigger event.

After setting up the trigger, you will see a webhook URL. This URL will be used to connect Thinkific with Pabbly Connect. Copy this URL and proceed to the next step for integration.


3. Integrate Thinkific with Pabbly Connect

To establish the connection between Thinkific and Pabbly Connect, go to your Thinkific account. Navigate to the settings and select ‘Webhooks’ under the ‘Code & Analytics’ section. Here, you will create a new webhook.

  • Paste the copied webhook URL into the target URL field.
  • Select ‘Enrollment’ for the model and ‘Enrollment Created’ for the topic.
  • Save the webhook to finalize the integration.

Once saved, return to Pabbly Connect and wait for a webhook response. To test this, create a new enrollment in Thinkific. This will trigger the webhook and allow you to capture the data in Pabbly Connect.


4. Send Email Using Gmail in Pabbly Connect

After successfully capturing the webhook response, the next step is to set up Gmail to send the course access email. In your Pabbly Connect workflow, add a new action step and select ‘Gmail’ as the action application.

Choose ‘Send Email’ as the action event. Connect your Gmail account to Pabbly Connect. Map the required fields such as sender name, recipient email, subject, and email content.

Make sure to personalize the email content using data from the webhook response. For example, include the student’s name and the course they enrolled in. This will ensure that each email is tailored specifically to the new student.


5. Finalize the Integration and Test

With your Gmail action configured, the final step is to save the workflow and send a test email. Click on ‘Save and Send Test Request’ to check if the email is sent successfully.

After sending the test email, check your Gmail inbox to verify that the email was received. You should see a personalized message welcoming the new student and providing access to their course. This confirms that your integration between Thinkific and Gmail via Pabbly Connect is working flawlessly.


Conclusion

In this tutorial, we demonstrated how to automate sending course access emails to new Thinkific students using Pabbly Connect. By following these steps, you can streamline your enrollment process and enhance student experience.

Ensure you check out Pabbly Connect to create business automation workflows and reduce manual tasks. Pabbly Connect currently offer integration with 2,000+ applications.

Utilizing Pabbly Connect allows you to efficiently manage your course communications without manual effort. Start automating today to save time and improve engagement with your students!

Grow Your Reach Naturally: Share YouTube Videos on Facebook in One Click Using Pabbly Connect

Learn how to use Pabbly Connect to automatically share your YouTube videos on Facebook in one click. Step-by-step tutorial included. Transform complex automation concepts into accessible, actionable steps that eliminate unnecessary manual work while maximizing existing application capabilities.

Watch Step By Step Video Tutorial Below


1. Setting Up Pabbly Connect for YouTube and Facebook Integration

To start sharing YouTube videos on Facebook effortlessly, you need to set up Pabbly Connect. This platform allows you to automate the sharing process, saving you time and effort. Begin by visiting the official Pabbly website, where you can sign in or create a new account.

Once logged in, navigate to the Pabbly Connect dashboard. Here, you can create a new workflow specifically designed for sharing your YouTube videos on Facebook. This integration will ensure that every time you upload a video on YouTube, it will be automatically shared on your Facebook page.


2. Creating a New Workflow in Pabbly Connect

After accessing the dashboard, click on the ‘Create Workflow’ button to initiate the process. In the workflow builder, select the new beta version for a modern experience. Name your workflow something descriptive, like ‘Share YouTube Videos on Facebook in One Click’. This will help you easily identify the purpose of this automation.

  • Select the folder where you want to save your workflow.
  • Choose YouTube as the trigger application.
  • Set the trigger event to ‘New Video in Channel’.

After setting up the trigger, click on ‘Connect’ to establish a connection between Pabbly Connect and your YouTube account. You will need to sign in with your Google account to grant the necessary permissions for accessing your YouTube channel.


3. Testing the Integration with a New Video Upload

To test if your integration is working, upload a new video on your YouTube channel. Make sure to fill in the title and description as you normally would. After publishing the video, return to Pabbly Connect and click on ‘Save and Send Test Request’ to capture the response from YouTube.

Once the test request is successful, you will receive the video URL in the response. This confirms that your Pabbly Connect workflow is correctly capturing the details of the new video upload. You can check the video URL to ensure it leads to the correct video.


4. Sharing the Video on Facebook

Now that you have successfully set up the trigger, it’s time to configure the action step to share the video on Facebook. In the workflow, add a new action step and search for ‘Facebook Pages’ as your action application. Select ‘Create Page Post’ as the action event.

  • Connect your Facebook account to Pabbly Connect.
  • Choose the Facebook page where you want to post the video.
  • Craft a message to accompany your post, such as ‘I have uploaded a new YouTube video. Please check it out!’.

After entering the necessary details, click on ‘Save and Send Test Request’ to finalize the process. If everything is set up correctly, your video will be posted on your Facebook page, allowing your followers to engage with your content.


5. Conclusion: Automate Your Video Sharing with Pabbly Connect

In this tutorial, we explored how to use Pabbly Connect to automate the sharing of YouTube videos on Facebook. By following the steps outlined, you can easily set up a workflow that saves time and enhances your reach. With just one click, every new video you upload on YouTube will be shared automatically on your Facebook page.

Ensure you check out Pabbly Connect to create business automation workflows and reduce manual tasks. Pabbly Connect currently offer integration with 2,000+ applications.

This seamless integration not only simplifies your posting process but also helps you engage with your audience across platforms. Start using Pabbly Connect today to enhance your social media strategy and grow your reach naturally!


Automate WhatsApp Messages to New Odoo Leads in Seconds with Pabbly Connect

Learn how to automate WhatsApp messages to new Odoo leads using Pabbly Connect in this step-by-step guide. Streamline your lead communication today! Follow this definitive guide to creating powerful automated workflows with straightforward, efficiency-focused solutions that save valuable time.

Watch Step By Step Video Tutorial Below


1. Accessing Pabbly Connect for Automation

To begin automating WhatsApp messages to new Odoo leads, you first need to access Pabbly Connect. Navigate to the Pabbly Connect homepage by entering Pabbly.com/connect in your browser. This platform will allow you to seamlessly integrate your Odoo account with WhatsApp Cloud API.

Once on the Pabbly Connect homepage, you will see options to either sign in or sign up. If you are a new user, click on ‘Sign Up Free’ to create an account. Existing users can simply sign in. After logging in, you will be directed to the Pabbly apps window where you can choose Pabbly Connect to start setting up your workflow.


2. Creating Your Workflow in Pabbly Connect

To create an automated workflow, click on the ‘Create Workflow’ button located in the top right corner of the dashboard. This will prompt you to select the workflow builder. Choose the ‘New Beta’ version for a more modern experience.

  • Click on ‘Create’ to proceed.
  • Name your workflow as ‘Automate WhatsApp Messages to New Odoo Leads in Seconds’.
  • Select a folder for saving your workflow, such as ‘Automations’.

By following these steps, you will have successfully set up your workflow in Pabbly Connect. This is where you will define the trigger and action that will automate the process of sending WhatsApp messages to your leads.


3. Setting Up the Trigger for New Odoo Leads

Now that your workflow is created, the next step is to set up the trigger. Click on the ‘Add Trigger’ button and select ‘Odoo’ as your trigger application. For the app event, choose ‘Configure Webhooks’.

Upon clicking ‘Connect’, you will receive a webhook URL. Copy this URL as it will be used to connect your Odoo account to Pabbly Connect. In your Odoo account, navigate to the CRM section and select ‘Automations’. Create a new automation rule named ‘New Lead Generated’ and set the trigger to ‘On Create’.

  • Add an action to ‘Send Webhook Notification’.
  • Paste the copied webhook URL in the URL field.
  • Select the fields such as Name, Phone Number, and Email Address.

With this configuration, your Odoo account is now set to trigger a webhook to Pabbly Connect whenever a new lead is created.


4. Configuring WhatsApp API Action in Pabbly Connect

After successfully setting up the trigger, it’s time to configure the action to send WhatsApp messages. In Pabbly Connect, click on ‘Add Action’ and select ‘WhatsApp Cloud API’ as the action application.

Choose the action event as ‘Send Template Message New’. Click ‘Connect’ to establish a connection. You will need to input your WhatsApp Cloud API credentials including the access token, phone number ID, and WhatsApp business account ID.

Map the phone number from the lead generated in Odoo. Select the template ID for the message you want to send. Ensure to include variables in your template for personalization.

After entering all the necessary details, save your configuration. This will enable Pabbly Connect to send personalized WhatsApp messages to your leads automatically.


5. Testing the Integration of Pabbly Connect

To ensure everything is set up correctly, it’s important to test the integration. Generate a new lead in your Odoo account by clicking on the ‘New’ button and filling in the required details such as name, email, and phone number.

After creating the lead, check your WhatsApp to see if you have received the automated message. The message should be personalized, thanking the lead for their interest. This confirms that your automation is working as intended through Pabbly Connect.

Verify that the message includes the lead’s name correctly. Check the content of the message matches your template.

Once you receive the message, your automation setup is complete, and you can now send WhatsApp messages to new Odoo leads automatically using Pabbly Connect.


Conclusion

In this tutorial, we explored how to automate WhatsApp messages to new Odoo leads using Pabbly Connect. By following these detailed steps, you can streamline your lead communication effectively. Automating this process saves time and ensures that your leads receive timely responses.

Ensure you check out Pabbly Connect to create business automation workflows and reduce manual tasks. Pabbly Connect currently offer integration with 2,000+ applications.

How to Add Typeform Leads to Pipedrive Instantly Using Pabbly Connect

Learn how to integrate Typeform leads with Pipedrive instantly using Pabbly Connect. Follow our detailed tutorial for seamless automation. Navigate the automation landscape confidently with clear, structured guidance suitable for professionals regardless of prior technical experience.

Watch Step By Step Video Tutorial Below


1. Accessing Pabbly Connect for Integration

To begin integrating Typeform leads with Pipedrive, you must first access Pabbly Connect. Open your web browser and navigate to Pabbly.com/connect. This platform will facilitate the automation process between your Typeform and Pipedrive accounts.

Once on the Pabbly Connect homepage, you have two options: sign in if you are an existing user or click on ‘Sign Up Free’ to create a new account. New users can benefit from a free plan that offers 100 tasks per month, allowing you to explore the platform’s features.


2. Creating a Workflow in Pabbly Connect

After signing in to Pabbly Connect, you will see the dashboard. To create a new workflow, click on the ‘Create Workflow’ button located in the top right corner. You will be prompted to select between the new beta and classic workflow builders. For this integration, choose the beta version for its modern features.

  • Click ‘Create Workflow’ and name it ‘Add Typeform Leads to Pipedrive Instantly’.
  • Select the folder where you want to save this workflow.
  • Click ‘Create’ to finalize your workflow setup.

With your workflow created, you can now set up the trigger that will initiate the automation process. This is where Pabbly Connect shines, allowing seamless connections between your applications.


3. Setting Up the Trigger with Typeform

To set up the trigger in Pabbly Connect, click on the ‘Add Trigger’ button. Select Typeform as your trigger application and choose the event ‘New Entry’. This event will activate the workflow whenever a new lead is submitted through your Typeform.

Next, you will need to connect your Typeform account. Click on ‘Connect’, then select ‘Add a Connection’. If you are already logged into Typeform, it will connect automatically. If not, enter your Typeform account details to establish the connection.

  • Choose the form you have created, named ‘Lead Form’.
  • Click ‘Save and Send Test Request’ to proceed.
  • Make a test submission on your Typeform to ensure the trigger is correctly set up.

After the test submission, you should see a response in Pabbly Connect, confirming that the trigger is functioning as intended. This step is crucial for ensuring that your leads are captured accurately.


4. Adding Action Step to Create a Person in Pipedrive

Now that your trigger is set up, it’s time to add an action step in Pabbly Connect. Click on ‘Add Action’ and select Pipedrive as your action application. Choose ‘Create Person’ as the action event. This action will create a new person in your Pipedrive account whenever a new lead is received from Typeform.

To connect your Pipedrive account, click on ‘Connect’ and select ‘Add a New Connection’. You will need to enter your Pipedrive API token, which you can find in your Pipedrive account settings under ‘Personal Preferences’.

Copy your API token from Pipedrive and paste it into the connection field in Pabbly Connect. Map the lead’s details from Typeform to the corresponding fields in Pipedrive. Click ‘Save and Send Request’ to finalize the action setup.

Once you have successfully mapped the details and saved the action, you can check your Pipedrive account to confirm that a new person has been created with the lead’s details. This integration showcases how Pabbly Connect streamlines the process of managing leads.


5. Testing the Complete Automation

To ensure that the entire integration works flawlessly, conduct a final test. Go back to your Typeform and submit another test lead. After submitting, check your Pipedrive account to verify that the new lead appears as expected.

This step is essential to confirm that the automation between Typeform and Pipedrive via Pabbly Connect is functioning correctly. If everything is set up properly, you should see the newly created person with all relevant details displayed in Pipedrive.

Submit a test lead through your Typeform. Refresh your Pipedrive account to see the new entry. Confirm that all details are accurately captured.

With successful testing, you have completed the integration process. Using Pabbly Connect, you can now automatically add Typeform leads to Pipedrive, streamlining your lead management process.


Conclusion

In conclusion, integrating Typeform leads with Pipedrive using Pabbly Connect is a straightforward process. By following the steps outlined in this tutorial, you can automate your lead management, ensuring that no lead goes untracked. This integration not only saves time but also enhances efficiency in your sales process.

Ensure you check out Pabbly Connect to create business automation workflows and reduce manual tasks. Pabbly Connect currently offer integration with 2,000+ applications.