Have you ever tried to send WhatsApp messages to Mailchimp subscribers?
You might have, but was the procedure easy? Well, here in this blog, I’m going to reveal the easiest way to bring automation to this using Pabbly Connect. Also, the process given below won’t require any coding or programming knowledge.
Pabbly Connect is an automation tool that helps you integrate multiple applications and automate manual & repetitive tasks in real-time.
Besides, this will be just a one-time setting and after that, the created workflow will take care of this Mailchimp to WhatsApp message automation.
Why Choose This Method Of Integration?
In contrast with other integration services-
- Pabbly Connect does not charge you for its in-built apps like filters, Iterator, Router, Data transformer and more
- Create “Unlimited Workflows” and smoothly define multiple tasks for each action
- As compared to other services which offer 750 tasks at $24.99, Pabbly Connect offers 50000 tasks in the starter plan of $29 itself
- Unlike Zapier, there’s no restriction on features. Get access to advanced features even in the basic plan
- Try before you buy! Before spending your money, you can actually signup & try out the working of Pabbly Connect for FREE
Before getting started, let’s discuss the services that are involved here. Mailchimp is an email marketing company that can help you to grow your business. Whereas, WhatsApp is a messaging and voice-over-IP service by Facebook.
By integrating Mailchimp with WhatsApp we are going to auto-send WhatsApp messages to Mailchimp subscribers. This way, a message is sent automatically to every new subscriber.
Also, you can watch this video tutorial below to implement this automation.
Additionally, I’ve also added the template for this integration below. To help you get started more quickly. To use this workflow template, you can simply click on the image below. Moreover, you can also go to the Marketplace for more integrations & apps.

Now, buckle up as we’re going to discover the Mailchimp and WhatsApp integration.
Step 1: Sign up to Pabbly Connect

Begin the procedure to auto send WhatsApp messages to Mailchimp subscribers by visiting the Pabbly Connect website. Then, click on the ‘Sign-Up Free‘ button available at the top of the page. Next, either sign in using your existing Gmail account or simply register by filling the form.
Step 2: Access Pabbly Connect

After successfully logging in to the system, click on the ‘Access Now’ button of the service ‘Connect’ amongst all the other Pabbly applications.
Step 3: Workflow for Mailchimp and WhatsApp Integration
(a) Start with a New Workflow

Further, start with creating a workflow for Mailchimp to WhatsApp integration & to do this click the ‘Create Workflow’ button available on the dashboard.
(b) Name the Workflow
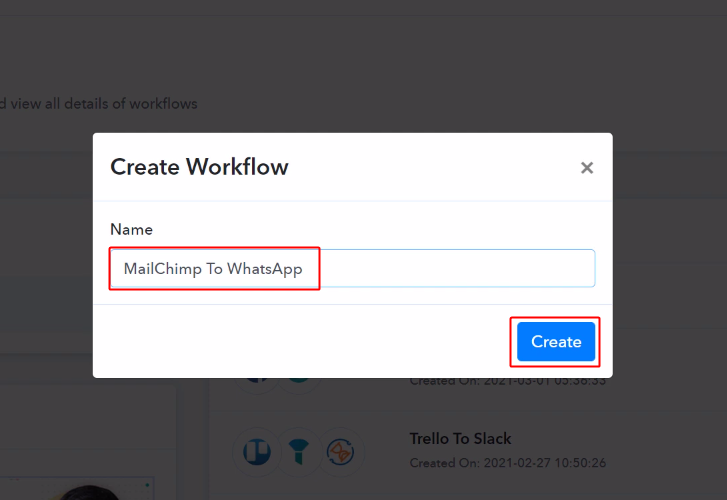
A window will open up requesting the workflow name. Name this workflow as per the integration or use-case (for instance: Mailchimp to WhatsApp etc). Lastly, click on the ‘Create’ button available at the bottom of this window.
Step 4: Setting Trigger for Mailchimp to WhatsApp Integration
First, you’ll need to set up a trigger on the new Mailchimp subscriber and then its respective action using Pabbly Connect.
(a) Select Application you want to integrate
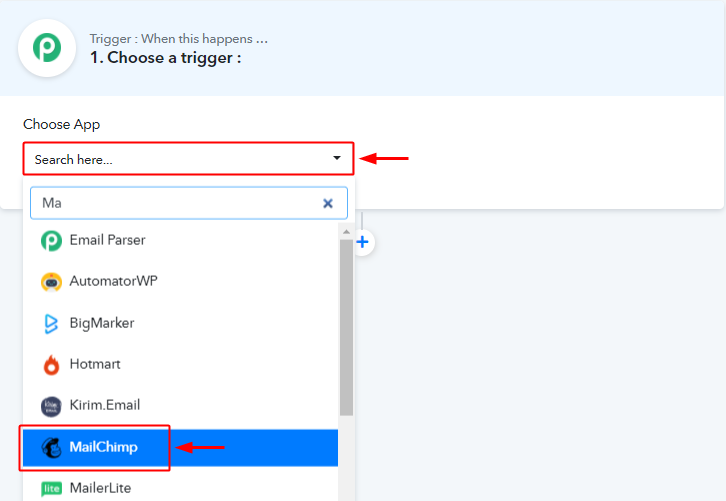
After naming your workflow, you can select a trigger. Choose ‘Mailchimp’ from the drop-down choices.
(b) Select Event & Copy Webhook URL
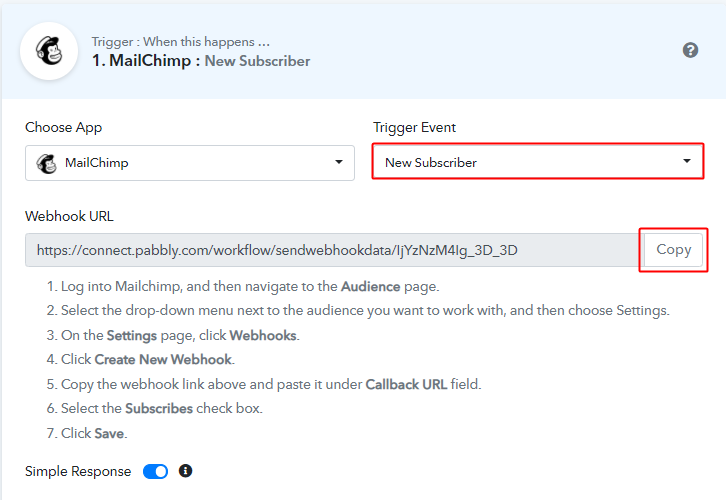
Next, select the trigger event as ‘New Subscriber’ & then click on ‘Copy’ to copy the webhook URL.
Step 5: Connecting Mailchimp to Pabbly Connect
(a) Go to the Audience Dashboard Section
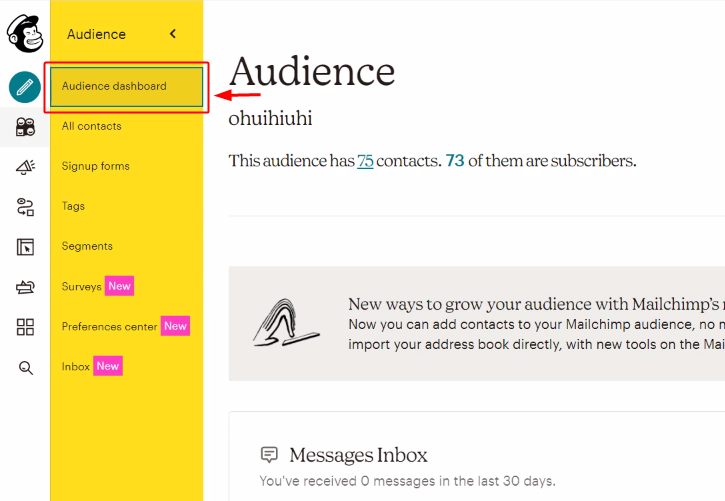
First, log in to your Mailchimp account then click on the ‘Audience dashboard’ option available in the left vertical menu.
(b) Click on ‘Manage Audience’
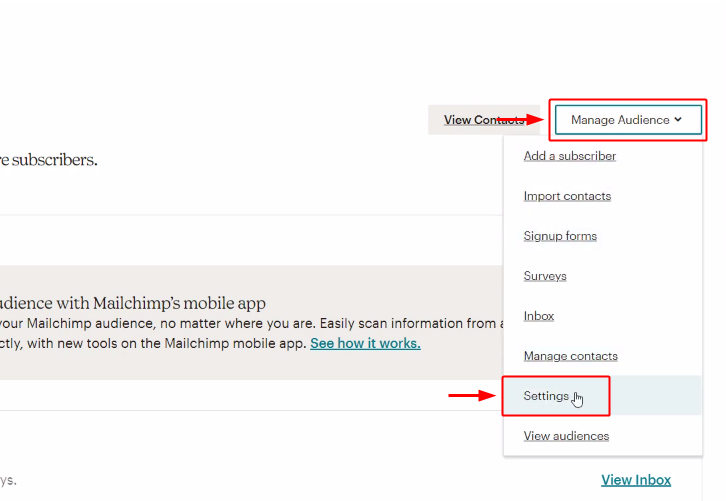
On the Audience page, click on the ‘Manage Audience’ button. Then, select the ‘settings’ option from the drop-down menu that opens up.
(c) Click on Webhooks
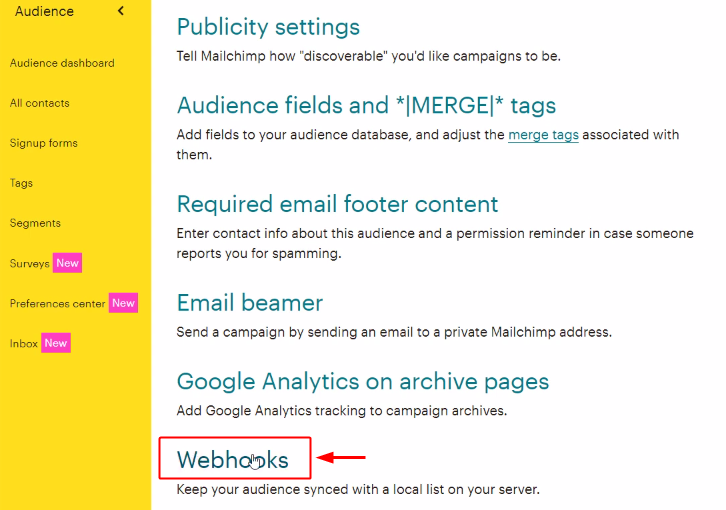
On the settings page, scroll down and click on ‘Webhooks’.
(d) Click on Create New Webhook
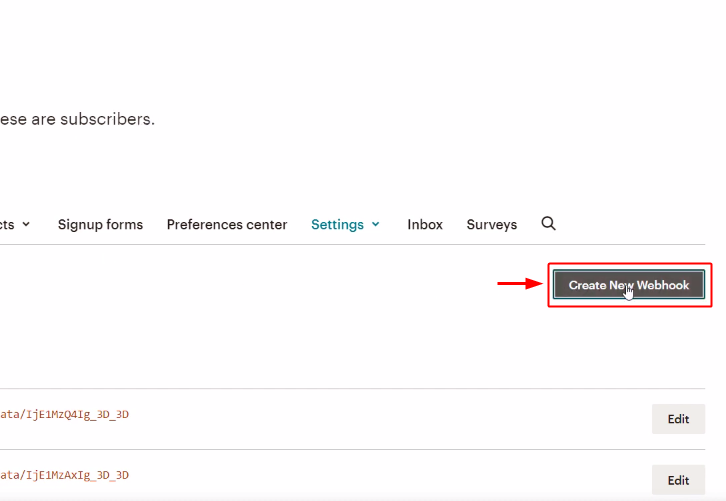
Next, click on the ‘Create New Webhook’ button available on the right side of the page.
(e) Paste Webhook URL
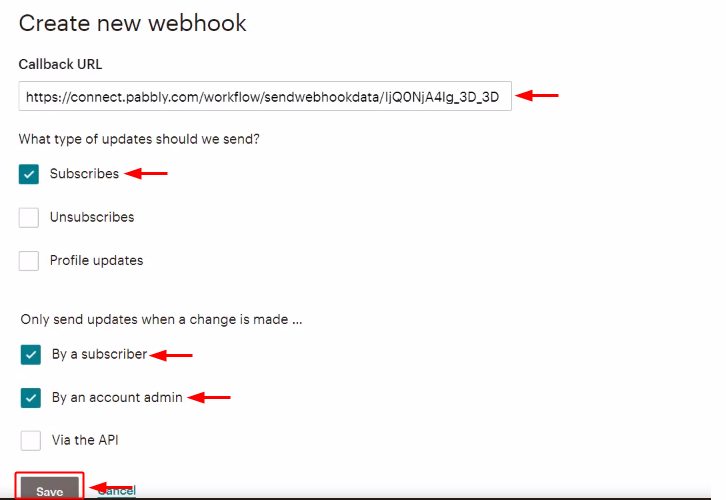
Paste the copied webhook URL in the ‘Callback URL’ field, select the update type and then click on ‘Save’.
Step 6: Test the Response in Pabbly Connect Dashboard
As we can see, we are done setting up the trigger for Mailchimp and WhatsApp integration. So, let’s test the Mailchimp trigger by creating a test subscriber.
(a) Capture Webhook Response

To test the trigger first, click the ‘Capture Webhook Response’ button available in the trigger window.
(b) Go to Add a Subscriber
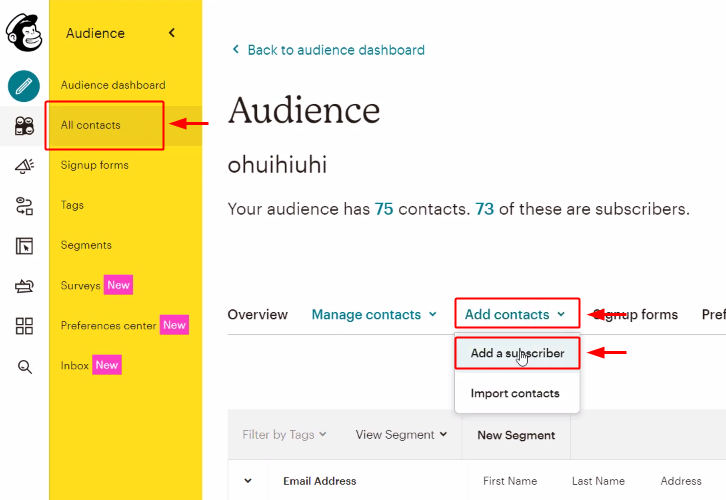
Next, go to the ‘All contacts’ option from the left verticle menu. Then, select the ‘Add contacts’ option from the horizontal menu. Lastly, select the ‘Add a subscriber’ to add a test subscriber on Mailchimp.
(c) Fill in the Subscriber Data & Click on Subscribe Button
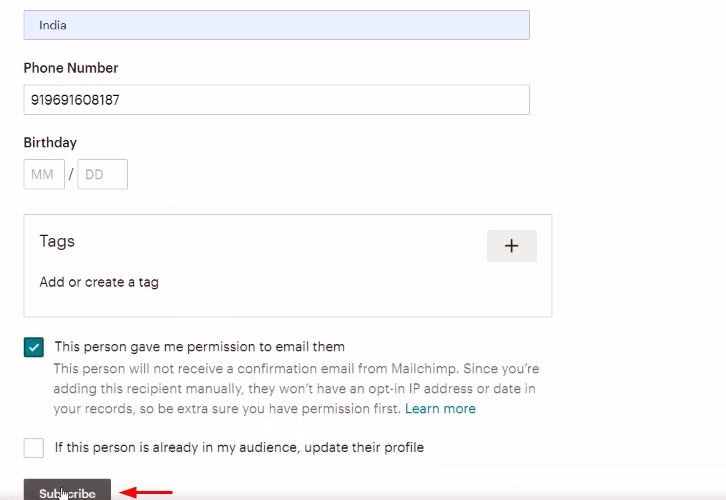
Fill in all the required form information such as first name, last name, address details etc then check the permission box and finally click on ‘Subscribe’.
(d) Check & Save the Trigger API Response
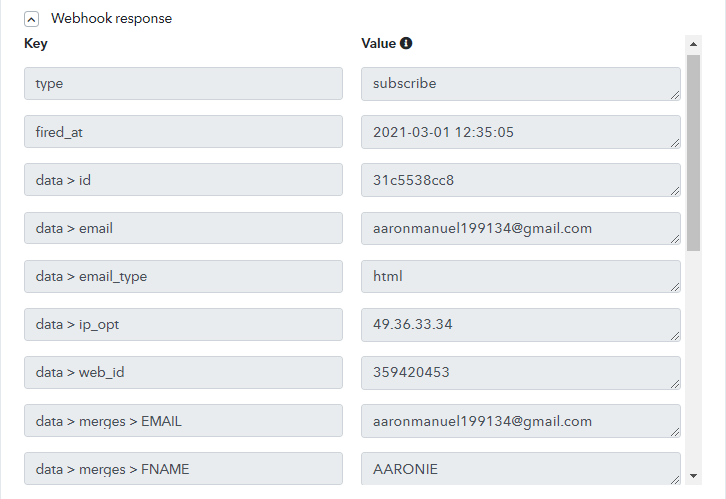
Check your data in the trigger response window & save this data.
Step 7: Setting Action for Mailchimp to WhatsApp Integration
Now, as we have all the data to send a message on WhatsApp from Mailchimp. We can use this data to perform our action. After that, a message will be sent for every subscriber entry automatically. We can not send bulk messages directly from WhatsApp so I’m using Chat API to accomplish this.
(a) Select Application you want to Integrate
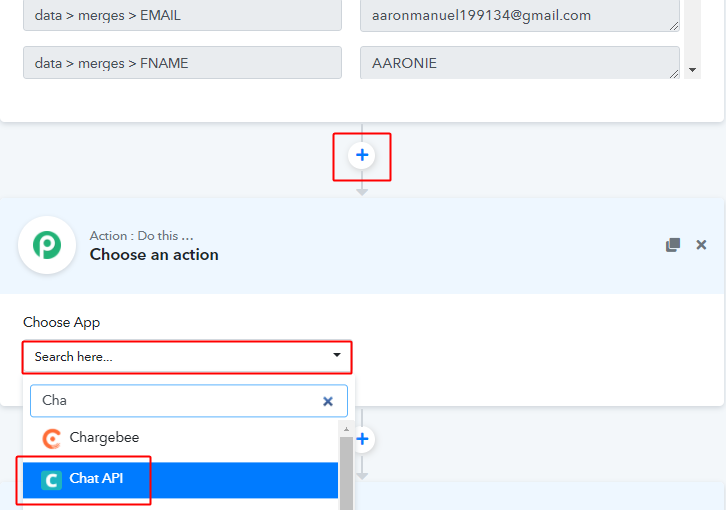
Click on the plus button available next to your Mailchimp trigger window.
Select the app to integrate here as ‘Chat API’.
(b) Select Event & Connect with Mailchimp
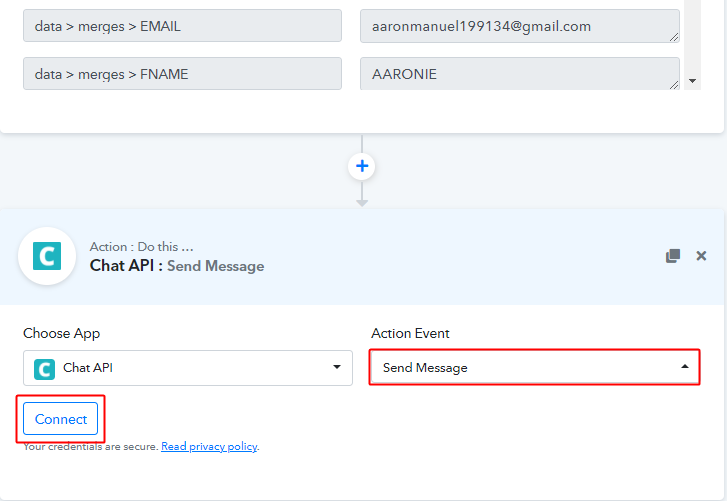
Next, select the event as ‘Send Message’.
Lastly, click the ‘Connect with Chat API’ button.
Step 8: Connecting Chat API to Pabbly Connect
Next, we’ll connect Chat API with Pabbly Connect to complete our action to send WhatsApp messages to Mailchimp subscribers. For this, log in to your Chat API account.
(a) Copy API URL & Token

Copy the Chat API’s API URL & token one by one.
(b) Paste the Copied Chat API URL & Token
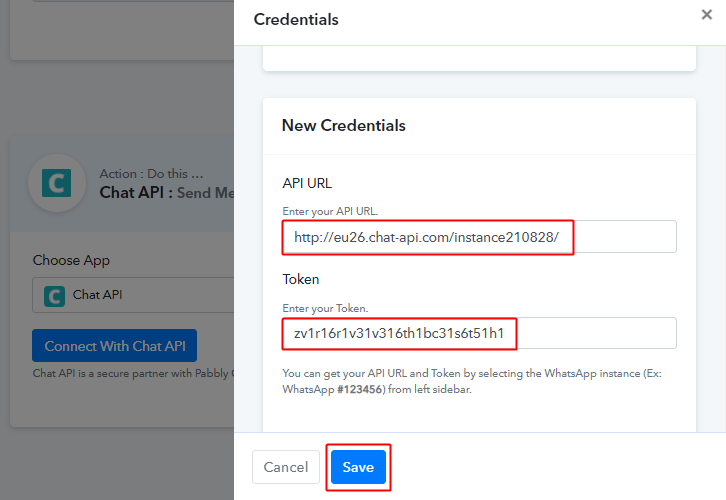
Next, paste the copied API URL & token one by one in the connection window. Finally, click on ‘Save’.
(c) Map Fields & Send Test Request
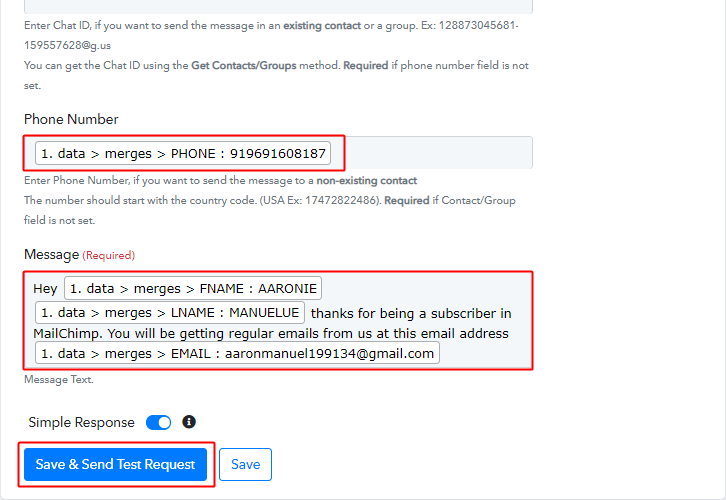
After successfully establishing a connection between Pabbly Connect and Chat API, you’ll see fields like phone number and message. Map the trigger API response within these fields.
To map a value, place your cursor in the field. Then, search for an appropriate response value and select it.
Similarly, you can further map the message field. Also, you can use a combination of the response values as well as plain text to draft your message.
Lastly, click on the ‘Save & Send Test Request’ button to send a message.
(d) Check & Save Response
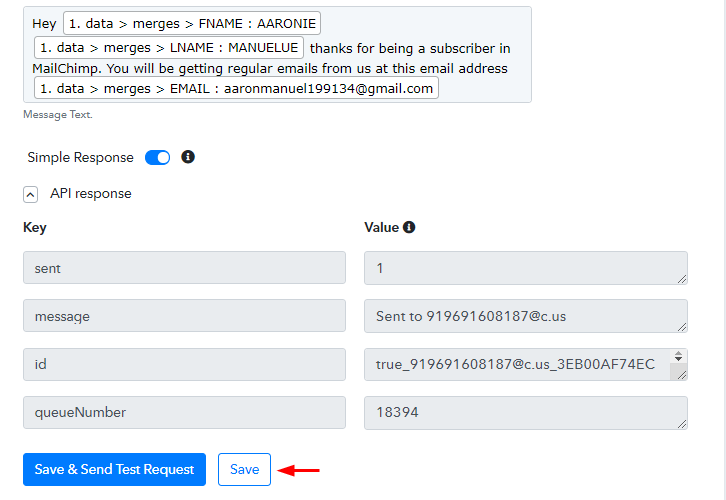
Certainly, you can check the Chat API’s response in the action window. And, if there is some error while sending the data then the window will start showing you an error.
Finally, save the action API’s response.
Step 9: Check Response in WhatsApp
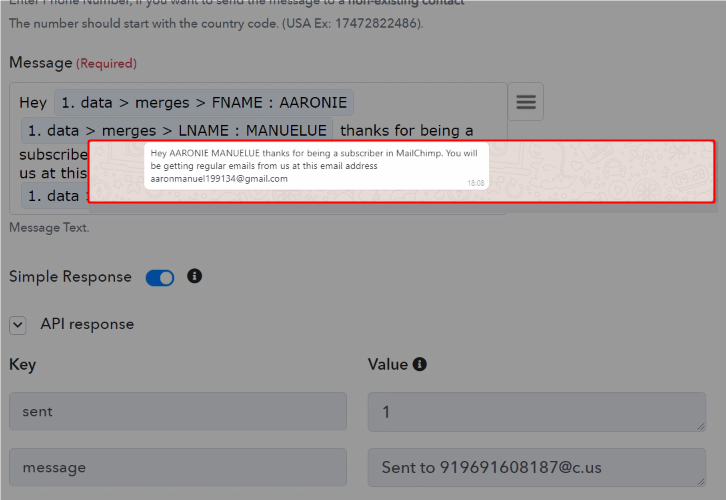
Lastly, check the WhatsApp message on the mentioned phone number.
Conclusion –
To sum up, this was all about ‘How to send WhatsApp messages to Mailchimp subscribers’. Consequently, after completing the step by step procedure, you will end up sending WhatsApp messages automatically from Mailchimp subscribers.
In the meantime, you can grab Pabbly Connect for FREE with all its premium features to automate your routine tasks.
Also, share your feedback on the integration in the comment section below.


