Looking for a way to send Telegram messages from new published WordPress posts automatically? If yes! Then look no further, as here we will tell you the easiest way to integrate WordPress with Telegram using Pabbly Connect.

Before starting the integration process, first, let’s know something about these two services. As we all know WordPress is a web publishing software you can use to create beautiful websites or blogs. It is the easiest and most flexible blogging and website content management system (CMS) for beginners.
Whereas, Telegram is a cross-platform cloud-based instant messaging, video calling, and VoIP service. Therefore, by integrating these two software, Telegram messages can be sent automatically for new published WordPress posts.
In this blog, we are explaining to you how you can integrate WordPress and Telegram via Pabbly Connect. This software is the answer to all your automation-related problems. Through this amazing tool, you can connect any two or more applications and automate your projects and work, and that too without any coding skills.
Why Choose This Method Of Integration?
In contrast with other integration services-
- Pabbly Connect does not charge you for its in-built apps like filters, Iterator, Router, Data transformer, and more
- Create “Unlimited Workflows” and smoothly define multiple tasks for each action
- As compared to other services which offer 750 tasks at $24.99, Pabbly Connect offers 50000 tasks in the starter plan of $29 itself
- Unlike Zapier, there’s no restriction on features. Get access to advanced features even in the basic plan
- Try before you buy! Before spending your money, you can actually signup & try out the working of Pabbly Connect for FREE
But what’s more amazing is that, apart from the integrations, Pabbly Connect also offers many other useful features:
- Create Infinite Workflows
- Universal Premium Apps
- Set Numerous Triggers & Actions
- Path Routers
and the plus point is that you can access all the features even with the free plan.
Hence, let’s not beat around the bushes anymore and get started with the blog about “How to Send Telegram Messages from New Published WordPress Posts”.
Step 1: Sign up to Pabbly Connect
We will begin the procedure to send Telegram messages from new published WordPress posts by visiting the website of Pabbly Connect and then click on the ‘Sign-Up Free‘ button. On the registration page, either signup using an existing Gmail account or manually fill out the form.
Try Pabbly Connect for FREE
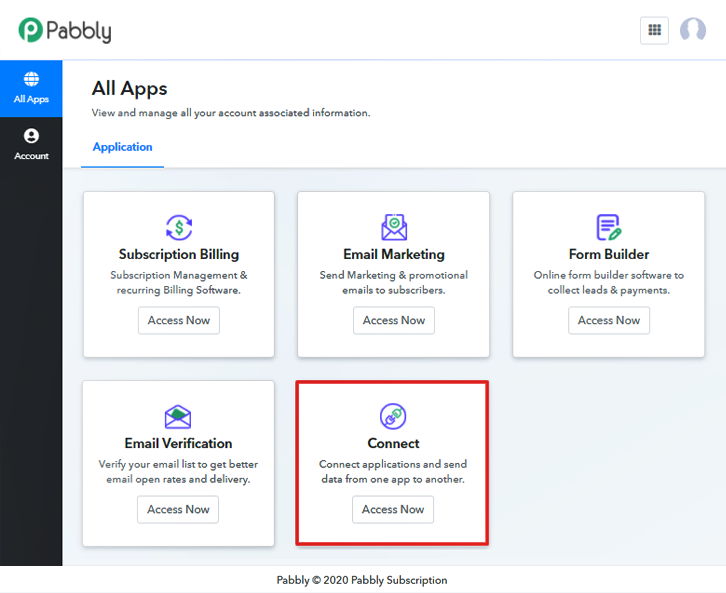
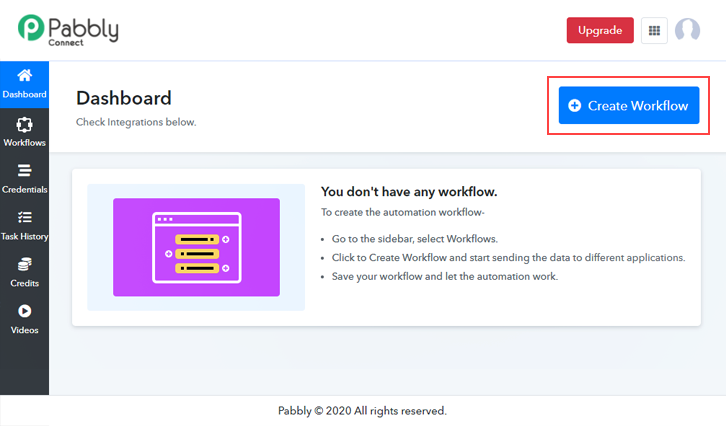
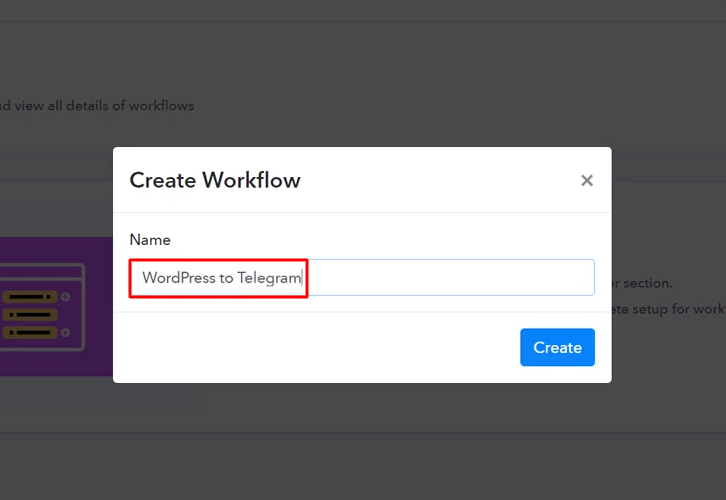
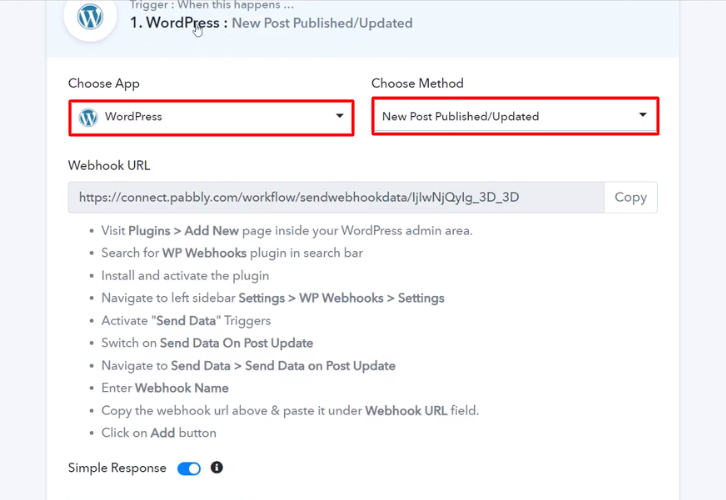
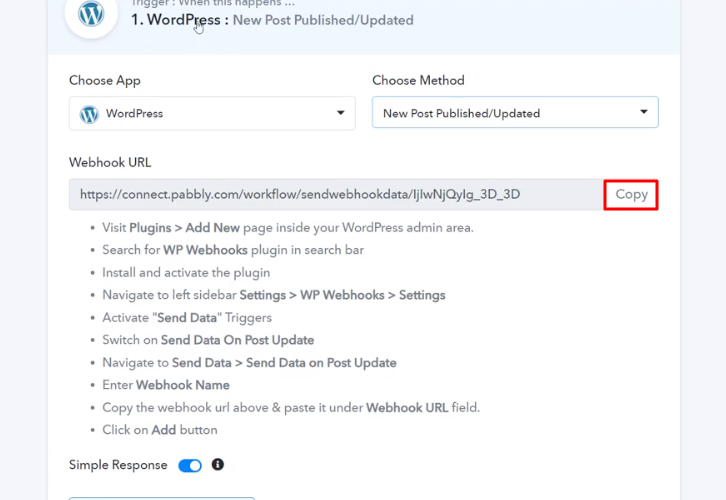
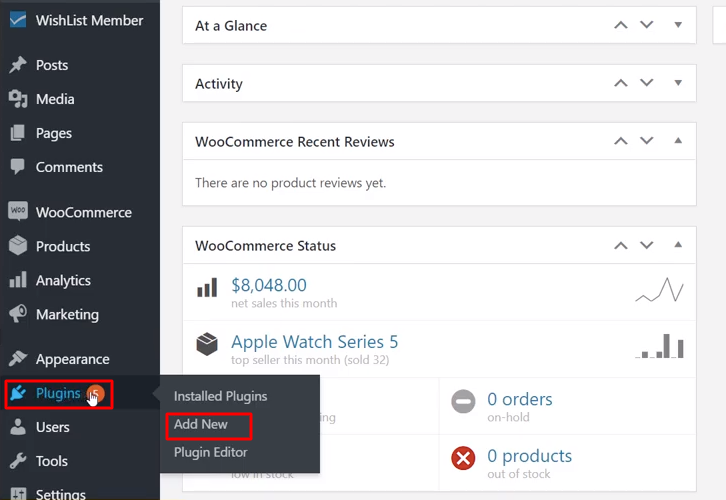
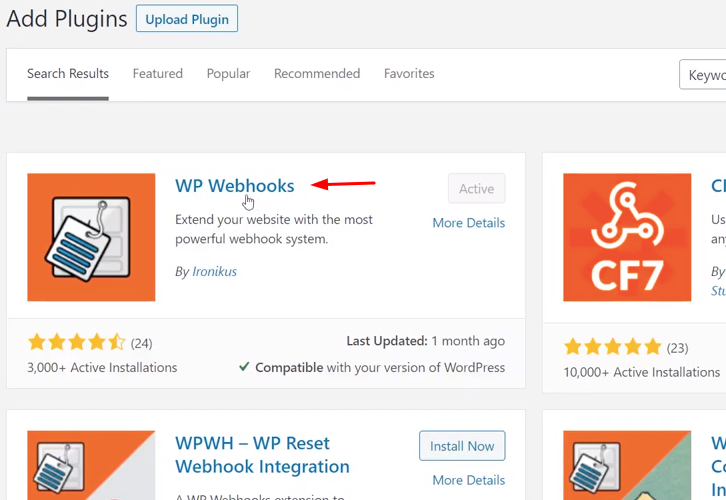
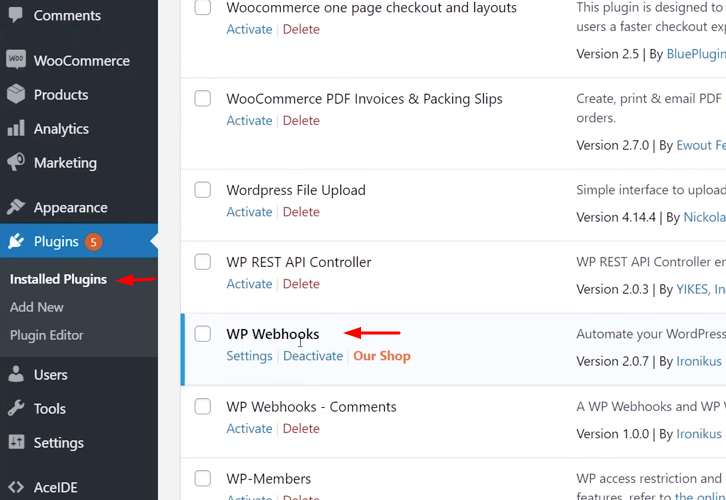
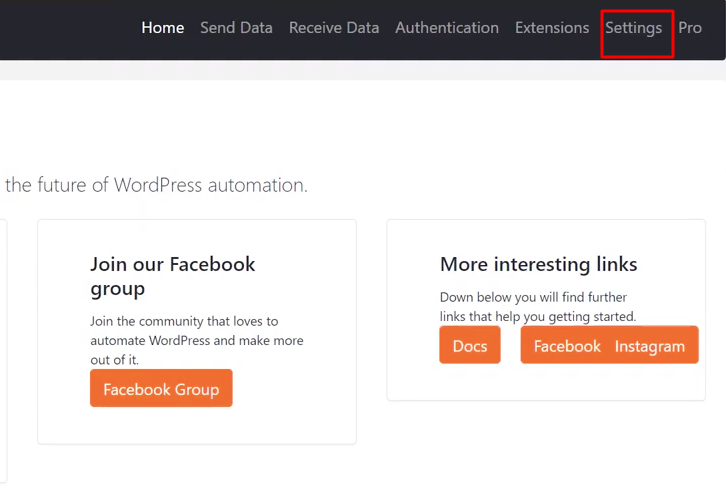
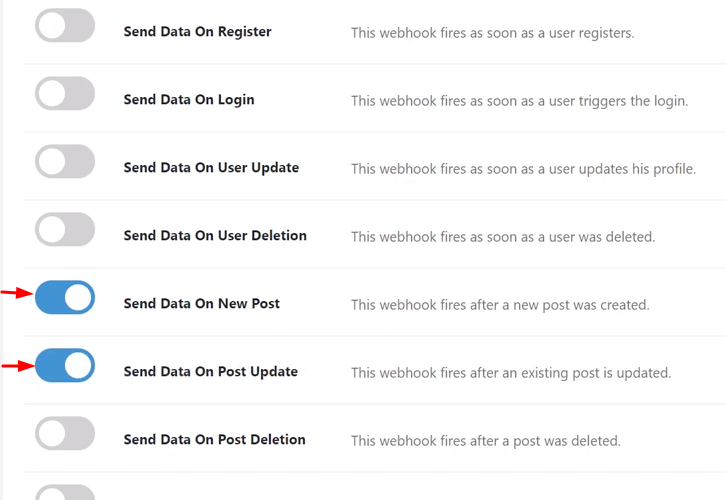
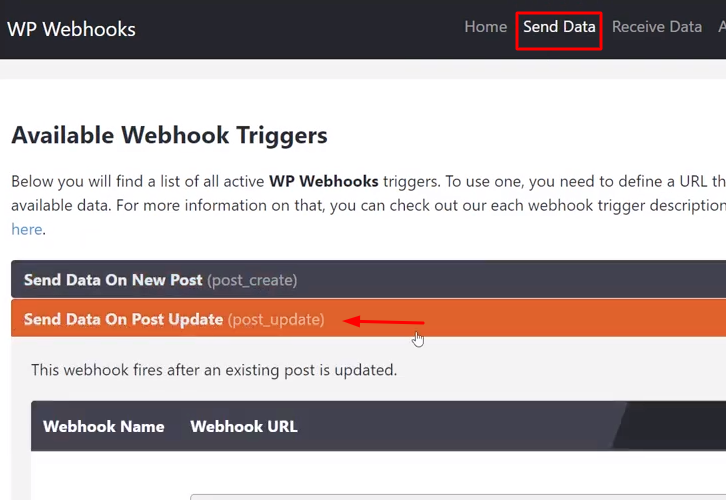
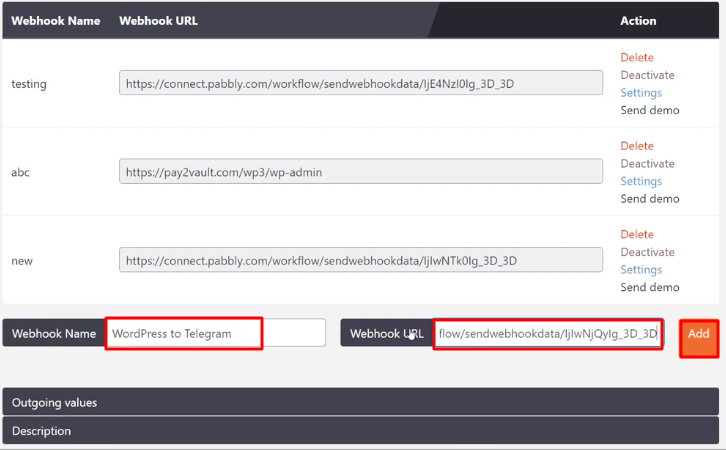
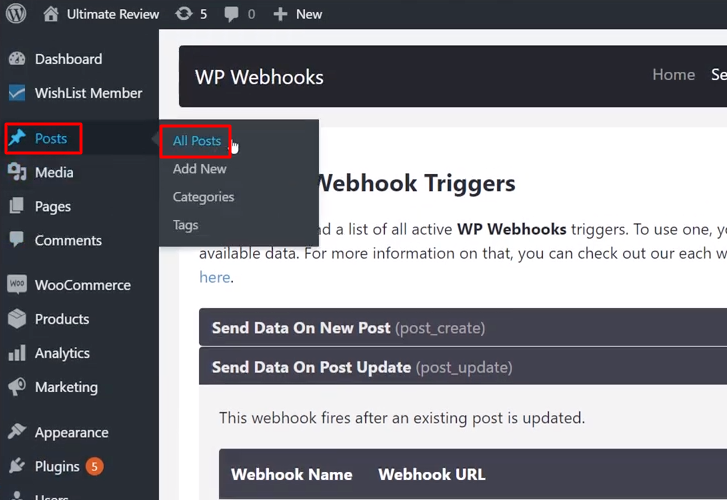
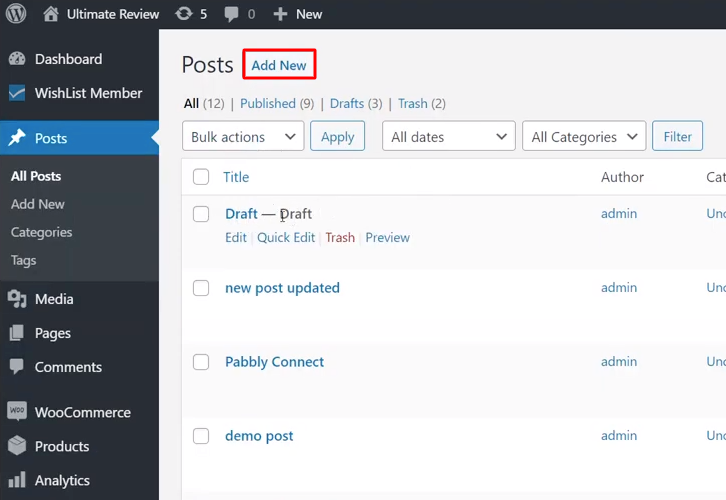
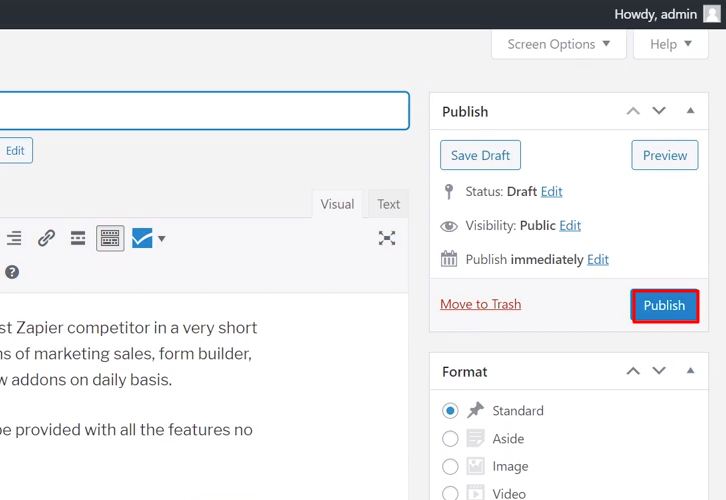
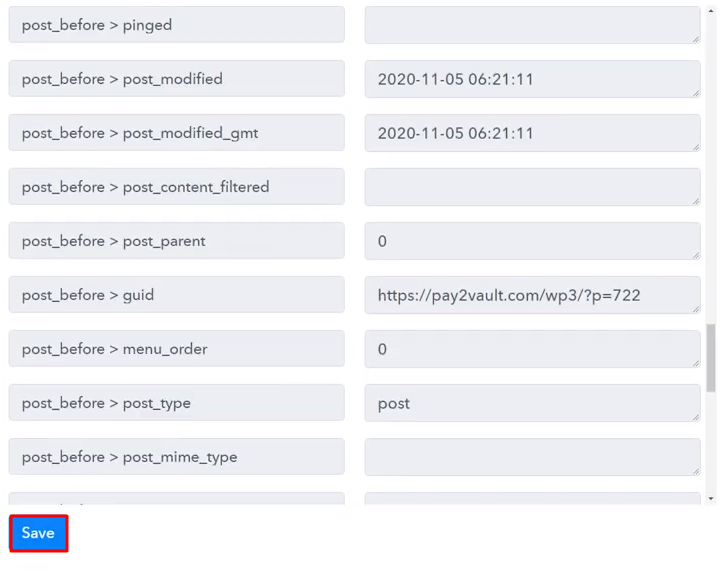
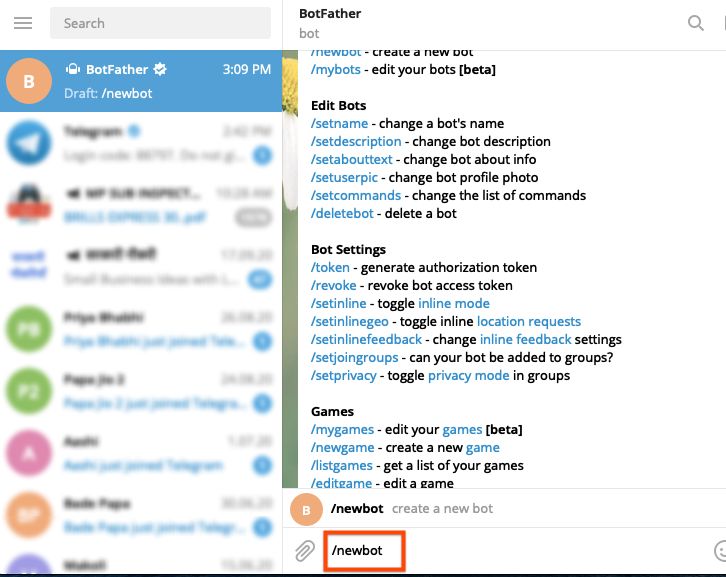
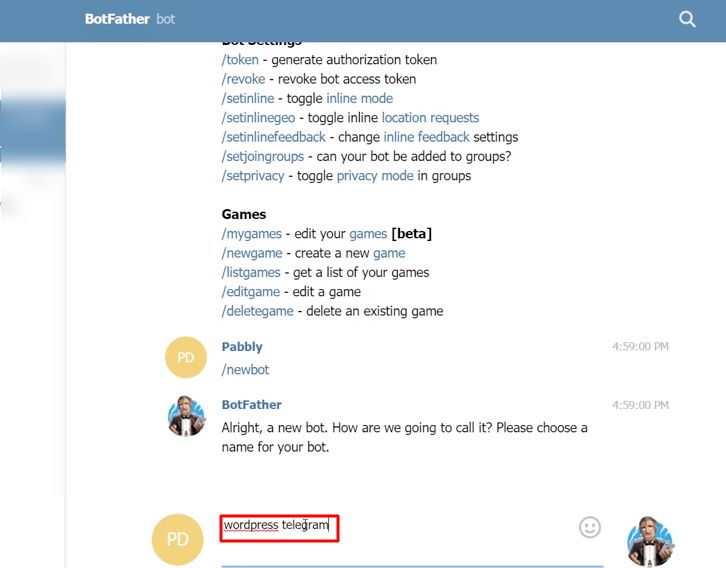
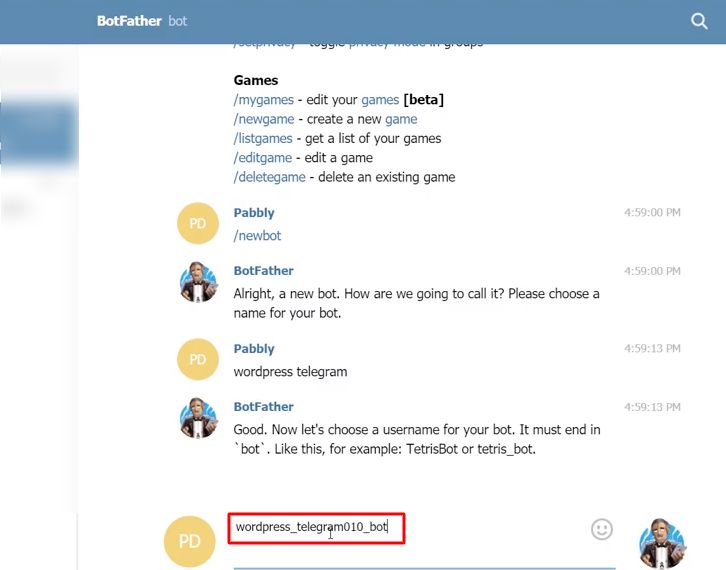
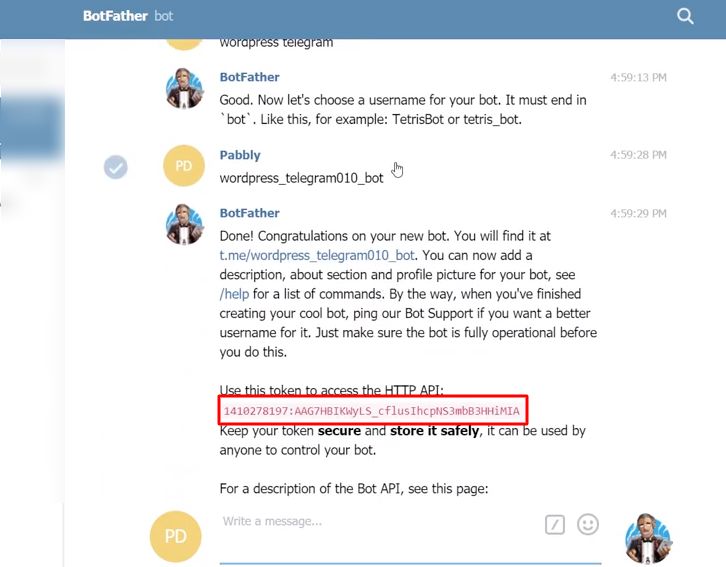
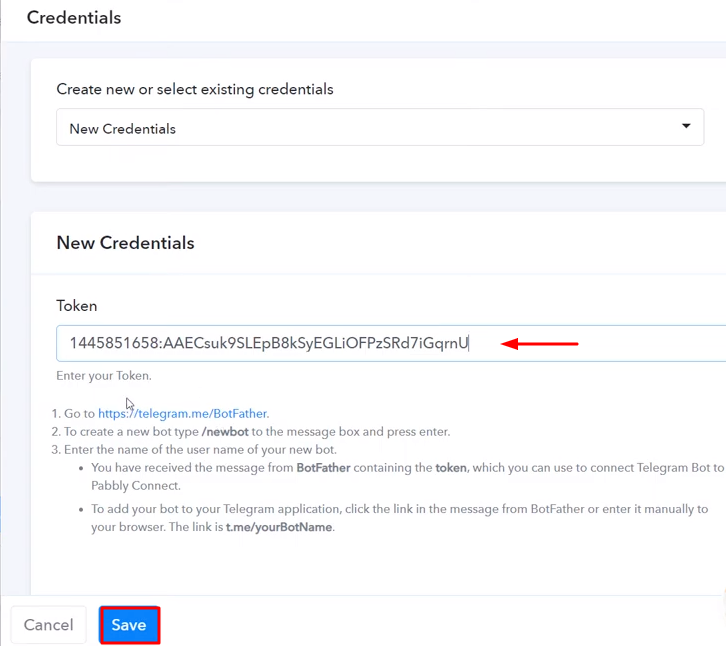
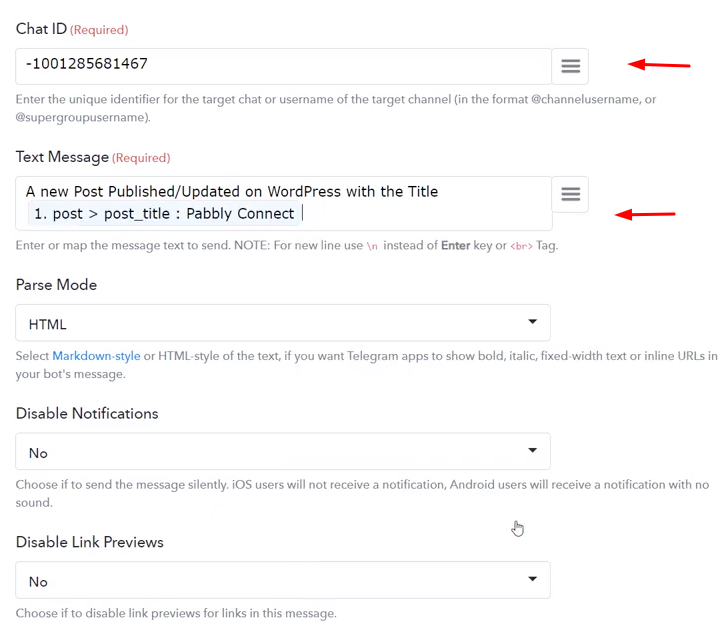
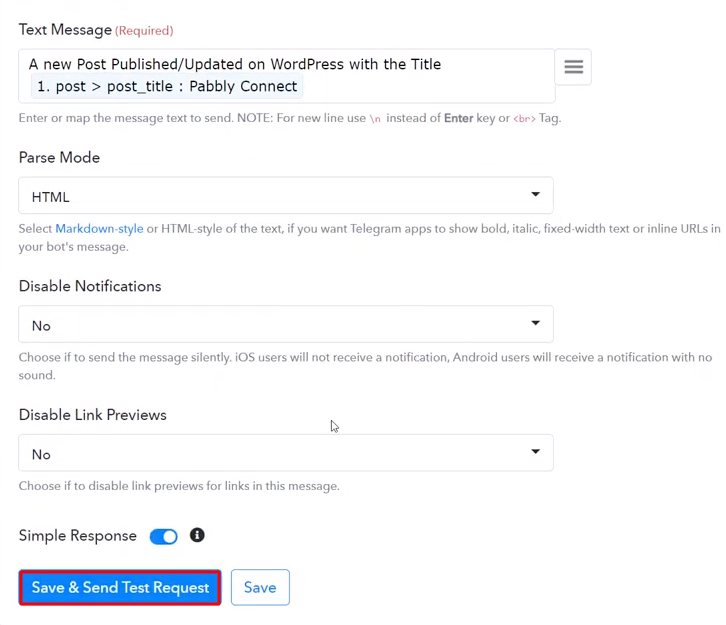
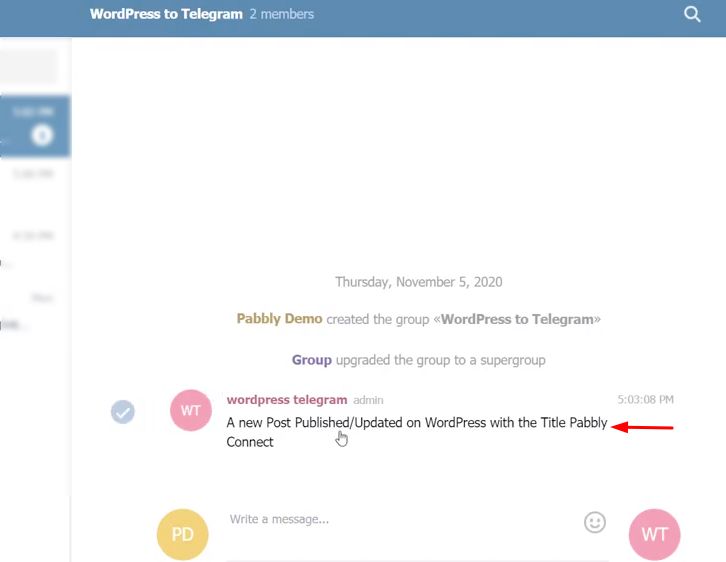
Once you have completed the signup process, click on the Connect section in the dashboard to access Pabbly Connect. Start with creating a workflow for your project by clicking on the ‘Create Workflow’ button. Now, you need to name the workflow just like in the above-shown image. I named the workflow as “WordPress to Telegram”, you can obviously name the workflow as per your requirements and needs. After creating a workflow, you will have to select the application you want to integrate. Using Pabbly Connect, you can integrate any two or more than two applications, create your free account now. Now, you have to select the application that you want to integrate. In this case, we are choosing “WordPress” for integration. After selecting Google Sheets, choose “New Post Published/Updated” in the method section. After selecting the application, now you have to copy the webhook URL just like in the above-shown image to take further the integration process. To connect with WordPress, you have to paste the copied Webhook URL into your WordPress account. For that, you need to login into your WordPress account. To paste the webhook URL, go to the “Plugins” option in your WordPress dashboard and then select the “Add New” option. Next, search “WP Webhooks” in the search bar and then install the plugin and activate it. After installing the webhook plugin, now click on the “Installed Plugins” option and then click on the “Settings” option of WP Webhooks. Once you reach the WP Webhooks’ settings page then again click on the “Settings” option given above. Now after reaching the settings page, scroll down and activate the “Send Data on New Post” and “Send Data on Post Update” triggers. Next, click on the “Send Data” option given on the top of the screen. Now, name your webhook and paste the copied webhook URL in the webhook URL section and click on the “Add” button given below. To check if this integration works or not, we will publish a sample post in WordPress to capture the data. To publish a post, first, we need to click on the “Posts” option and then select the “All Posts” option. Next, click on the “Add New” button to compose a new post. After writing your post, click on the given “Publish” button. Before, clicking the button, click on the “Capture Webhook Response” button in Pabbly Connect to capture the data. As soon as you click on the “Publish” in WordPress and “Capture Webhook Response” in Pabbly Connect the entry will appear on the Pabbly Connect dashboard. Then, click on the “Save” option. In this step, we will be adding an action for your trigger to complete this WordPress-Telegram integration work. Now in this step, click on the + button below and choose “Telegram Bot” and in the method section select “Send a Text Message or a Reply”. After choosing the application click on the “Connect with Telegram Bot” button to move forward. To connect Telegram Bot with Pabbly Connect, you need to sign-in to your Telegram account and go to the backend dashboard. When you click on the “Connect to Telegram Bot” button, a window will slide in from the right, click on the BotFather link or go to your telegram account and search for BotFather. Once you enter into the BotFather chat, you’ll see a “Start” button. So, simply press it to start creating a bot. To create a new bot type “/newbot” and then hit send. Next, it will ask you for a bot name. So, type any bot name that you wanna give to your bot. Lastly, give your bot any username that ends with a suffix “bot”. Just type the username and hit send. Once you successfully assign a username to your bot, a token will show up along with the new bot greetings simply select and copy the token from here. Paste the copied Telegram token in the Pabbly Connect and hit the “Save” button. After connecting with your Telegram account map up all the required fields. But before adding the fields, first, you need to add your created bot in a group as an admin in which you want to receive the messages. You can get your Chat ID from the subdomain part of your Telegram group. Once you are done mapping up all fields click on the “Send Test Request” button. Here, you can see the integration was successful. The message has been delivered to the Telegram group about the new published post in the WordPress account automatically. Now in a similar way, message notifications on Telegram will be sent automatically whenever there will be any new posts published in your WordPress account. Hopefully, now you know “How to Send Telegram Messages from New Published WordPress Posts?”. All you have to do is follow all the above-mentioned steps and you can easily connect WordPress with Telegram in real-time. Using this automation tool, one can easily avoid manual hard work. So, don’t wait anymore. Go and try Pabbly Connect for Free.Step 2: Access Pabbly Connect
Step 3 : WorkFlow for WordPress with Telegram Integrations
(a) Create New Workflow
(b) Name the Workflow
Step 4 : Setting Triggers for WordPress with Telegram Integrations
(a) Select Application you want to Integrate
(b) Copy the Webhook URL
Step 5 : Connecting WordPress to Pabbly Connect
(a) Select Plugins
(b) Install WP Webhooks Plugin
(c) Go to Installed Plugins
(d) Click on Settings
(e) Activate Triggers
(f) Click on Send Data
(g) Paste the Webhook URL
Step 6 : Publish a New Post
(a) Click on Posts
(b) Click the Add New
(c) Publish a Post
Step 7 : Test the Submission in Pabbly Connect Dashboard
Step 8 : Setting Action for WordPress with Telegram Integrations
(a) Select Application you want to Integrate
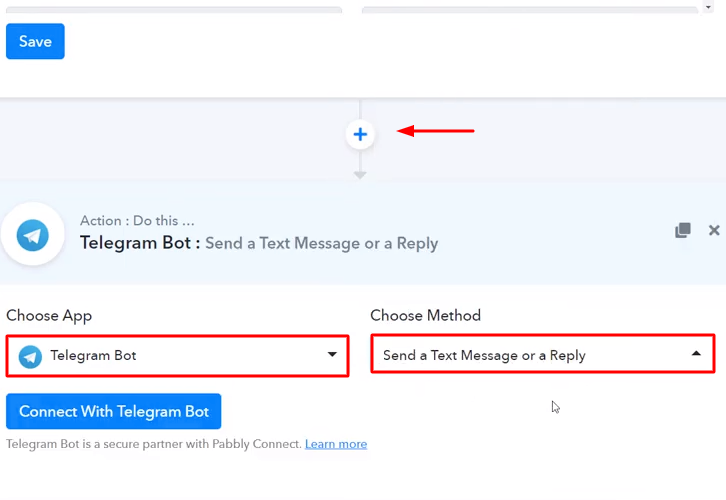
(b) Click on Connect Button
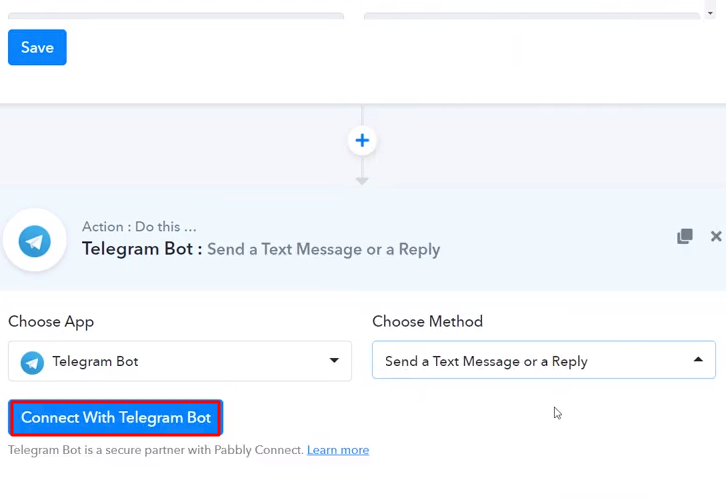
Step 9 : Connecting Telegram to Pabbly Connect
(a) Click the BotFather Link
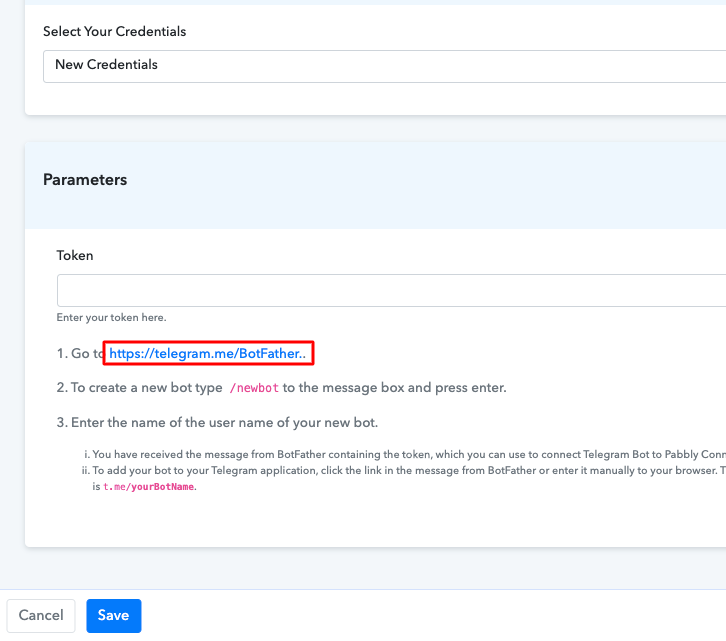
(b) Click Start on BotFather Chat
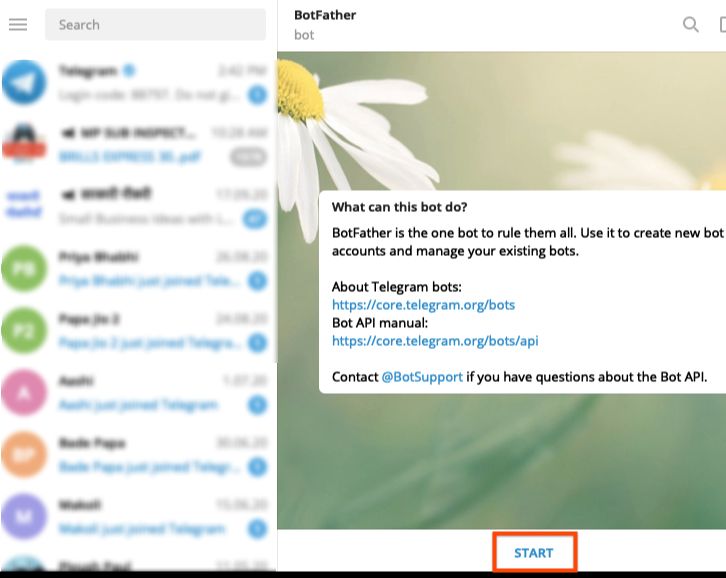
(c) Create a New Bot
(d) Name Your Created Bot
(e) Give Your Bot a Username
(f) Copy the API Token
(g) Paste the API Token
(h) Map the Fields
(i) Send a Test Request
Step 10 : Check Response in Telegram
Conclusion –
You May Also Like to Read –


