Do you want to know how to create GetResponse subscriber from Facebook Lead Ads in real-time? If that’s the case then we are proposing a technique to integrate Facebook and GetResponse using Pabbly Connect.
Basically, Pabbly Connect is an integration and automation software that lets you transfer data automatically between remote applications. Even a non-programmer can use it very efficiently.
Why Choose This Method Of Integration?
In contrast with other integration services-
- Pabbly Connect does not charge you for its in-built apps like filters, Iterator, Router, Data transformer, and more
- Create “Unlimited Workflows” and smoothly define multiple tasks for each action
- As compared to other services which offer 750 tasks at $24.99, Pabbly Connect offers 50000 tasks in the starter plan of $29 itself
- Unlike Zapier, there’s no restriction on features. Get access to advanced features even in the basic plan
- Try before you buy! Before spending your money, you can actually signup & try out the working of Pabbly Connect for FREE
Before we bounce straight into the integration process, let us know a smidgen of information about both services. Facebook is a social media platform or social networking site that allows the user all over the world to connect and interact. However, GetResponse is an email marketing software that helps businesses to create responsive emails and do marketing automation.
Since Facebook and GetResponse don’t have any kind of integration between them, that’s why we use Pabbly Connect.
After integrating this software, you can easily create GetResponse Subscriber from Facebook lead ads automatically. Moreover, we’ve embedded a video below to assist you with this automation process.
Besides, if you want to save a little time in making this automation from scratch, we have attached a template for the same. Just simply click the ‘Use Workflow’ button to get started quickly and in case you are looking for more apps/integrations, simply visit the Marketplace.
Promptly, let’s follow the step by step procedure to integrate Facebook and GetResponse.
Step 1: Sign up to Pabbly Connect
Begin the process to create GetResponse subscriber from Facebook Lead Ads by pressing the ‘Sign Up Free’ button on the Pabbly Connect dashboard. Later, either fill-up all the details manually or sign up using Gmail credentials.
Try Pabbly Connect for FREE
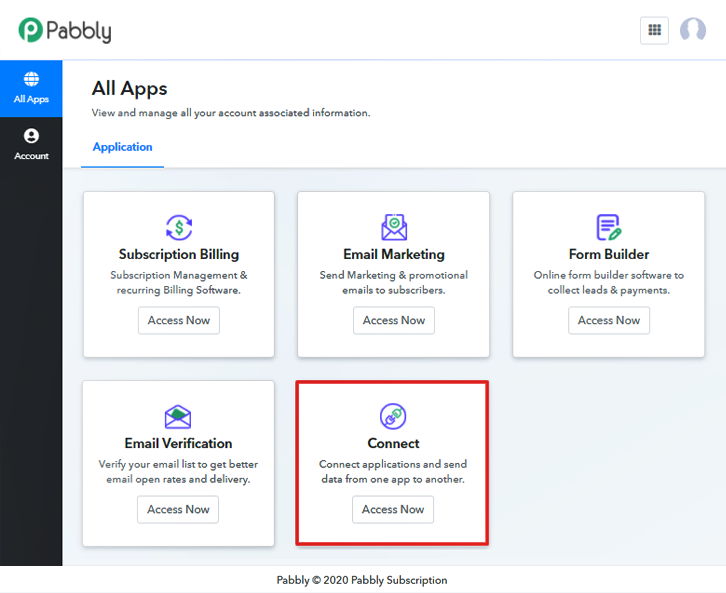
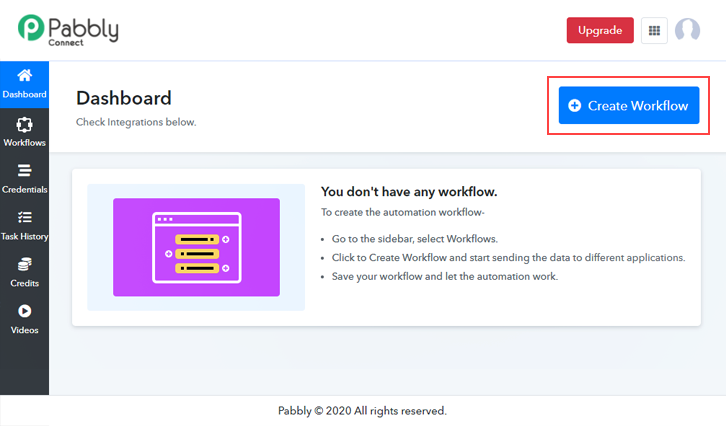
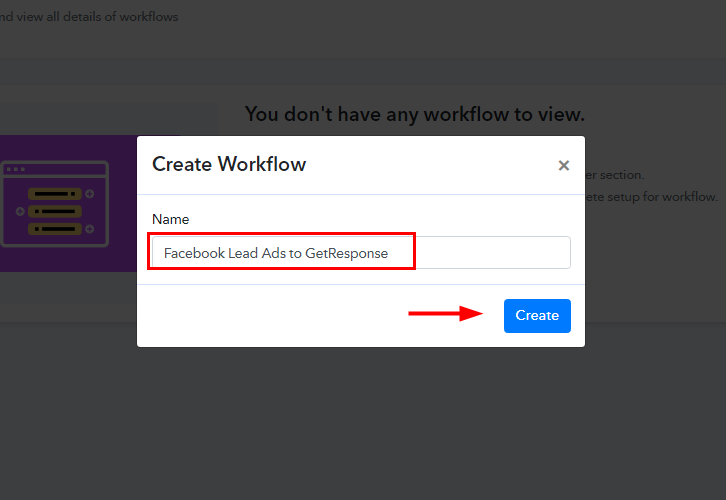
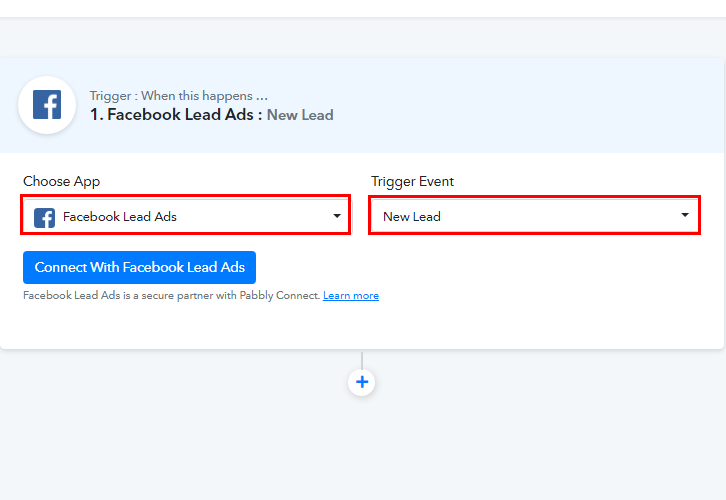
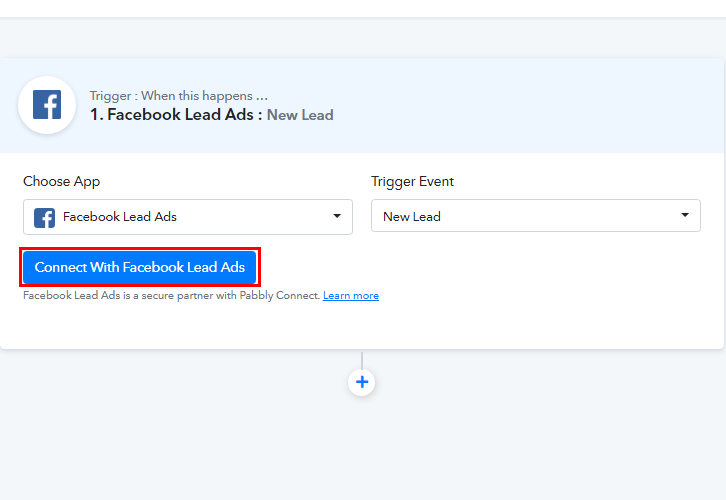
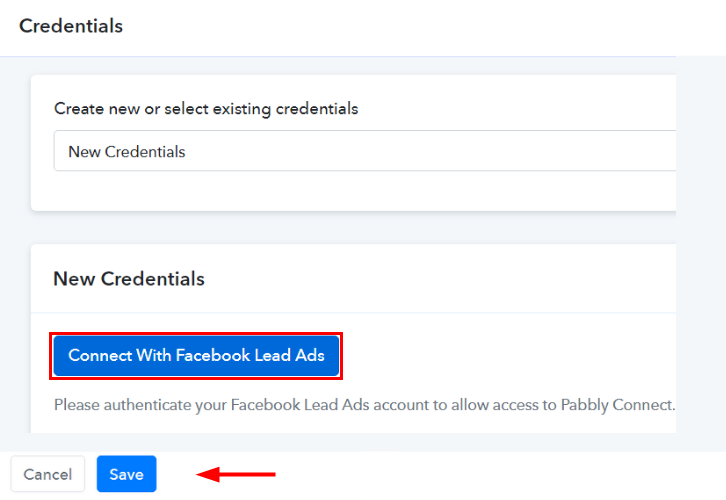
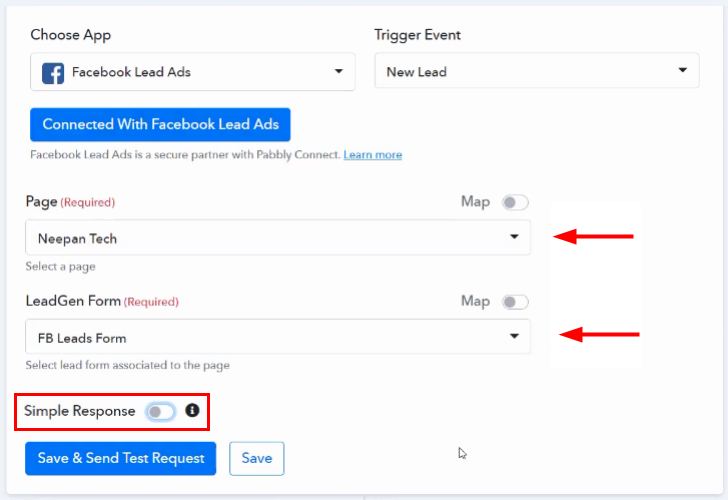
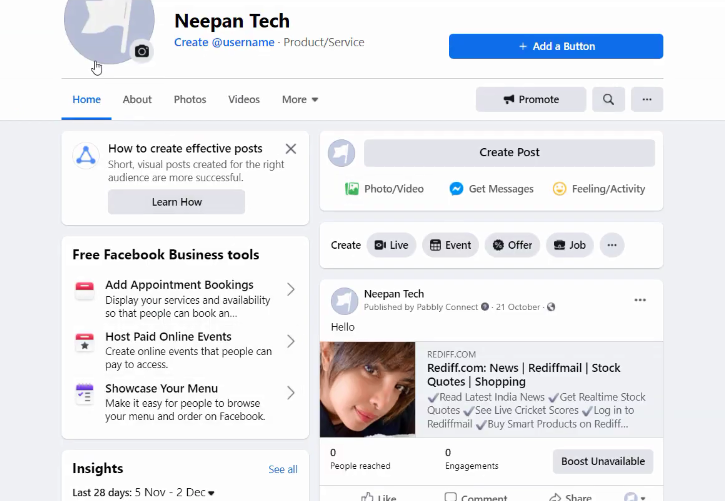
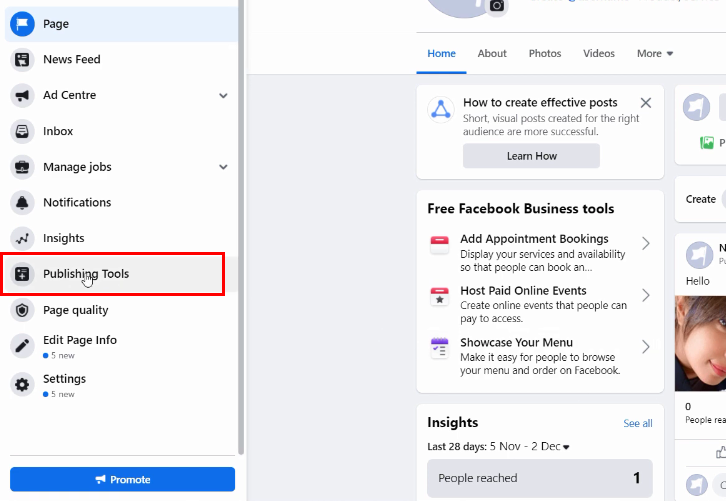
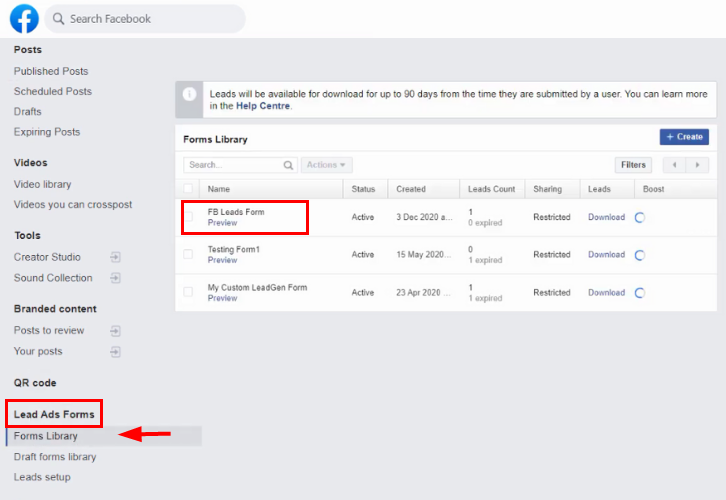
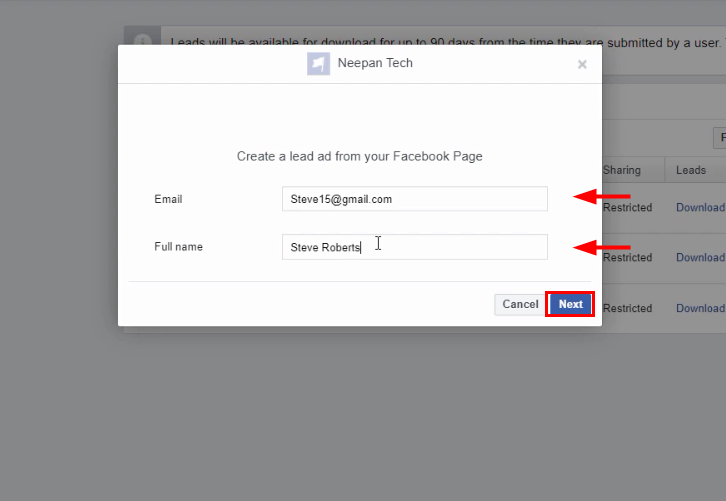
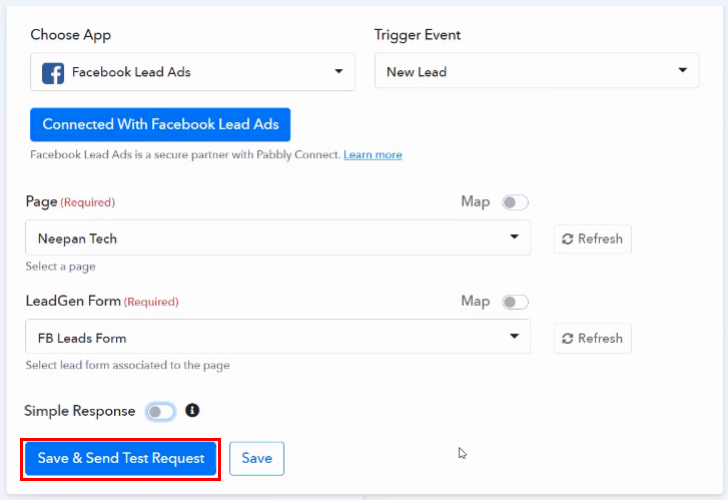
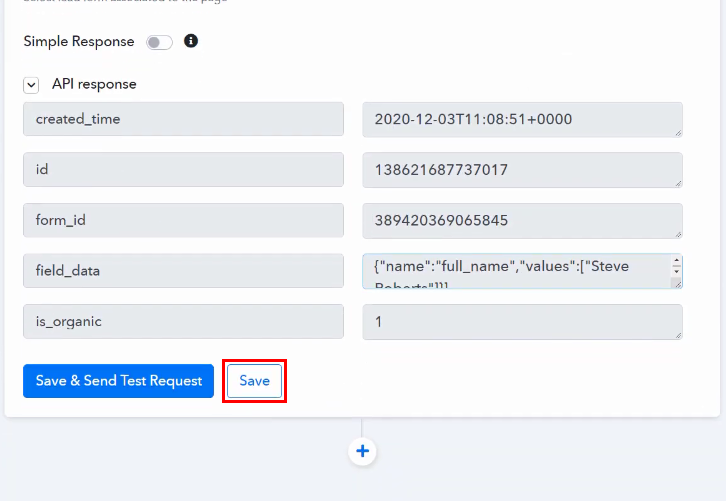
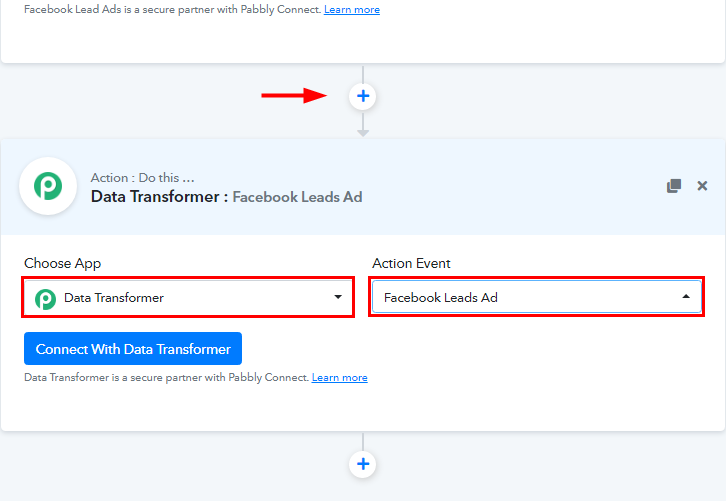
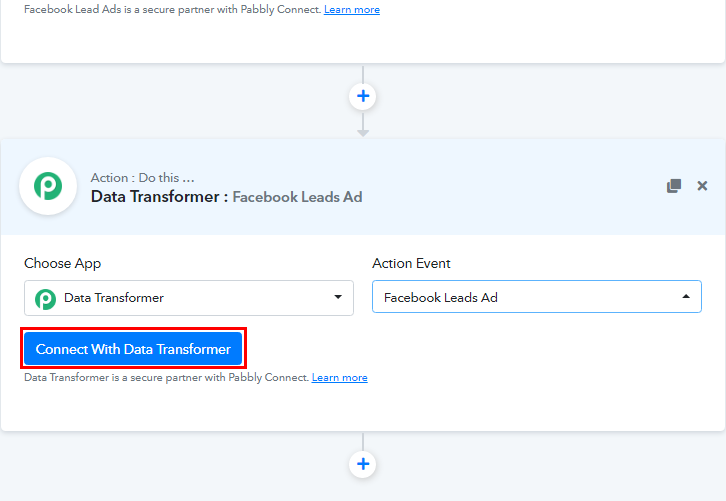
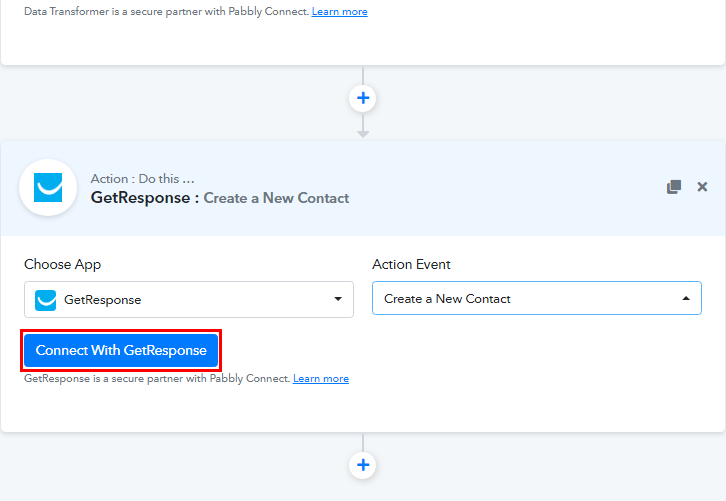
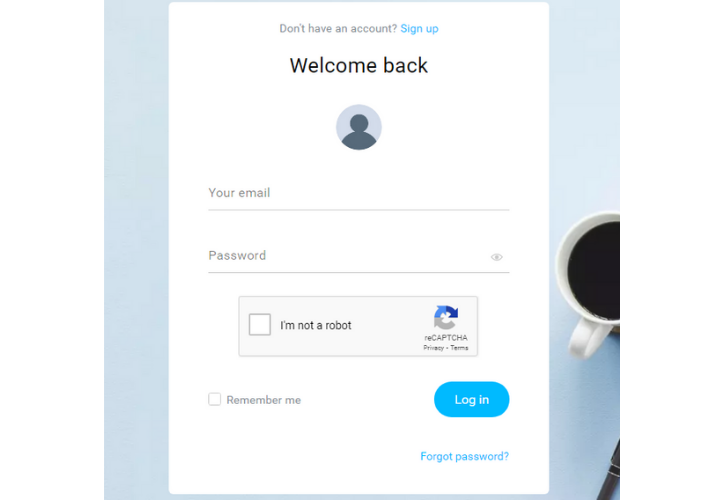
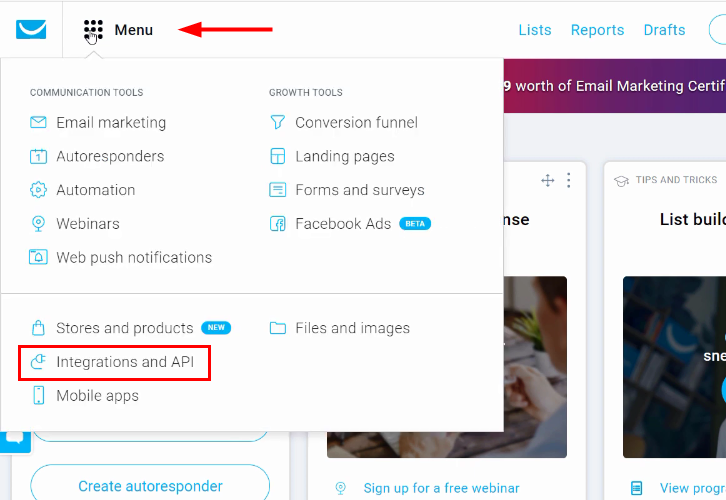
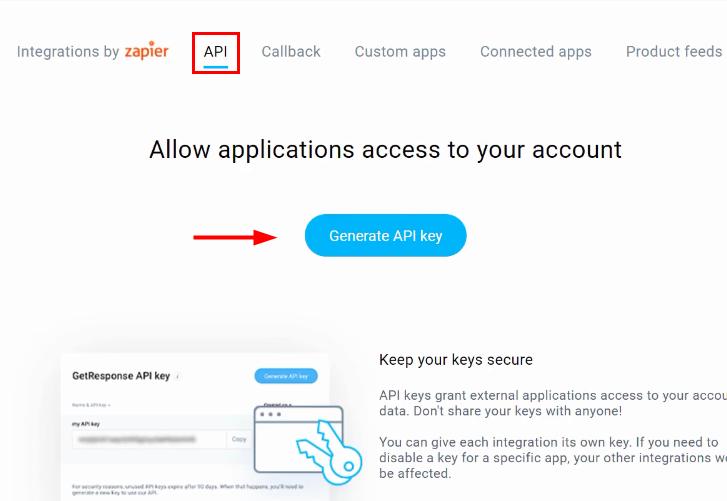
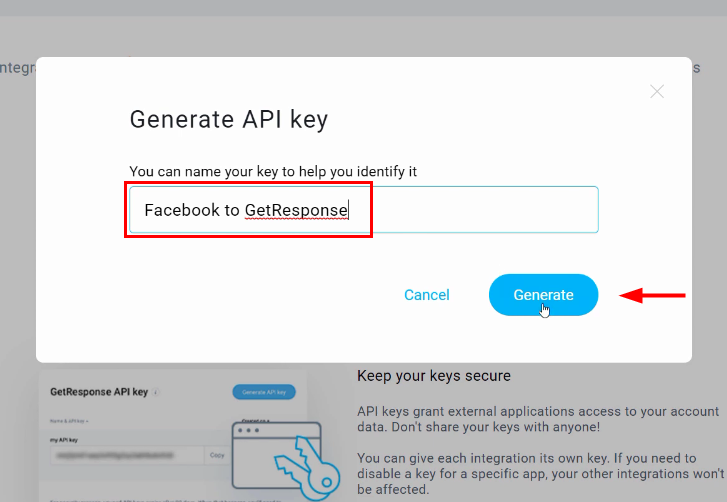
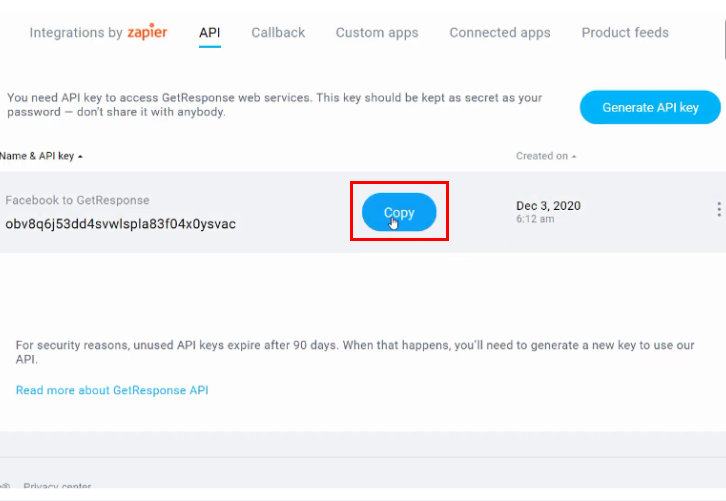
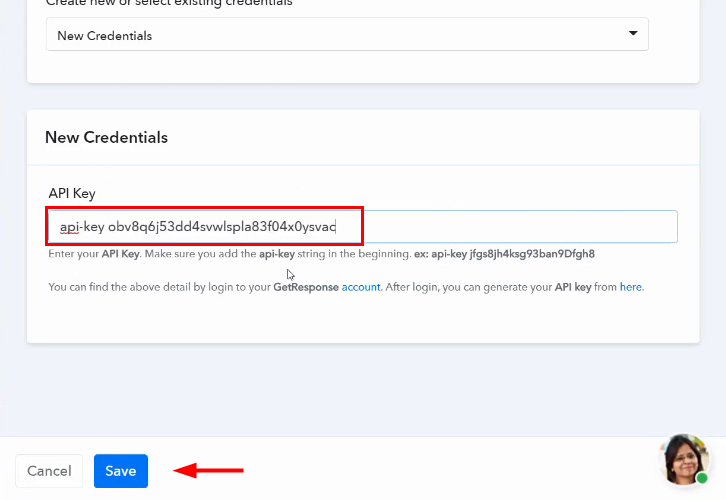
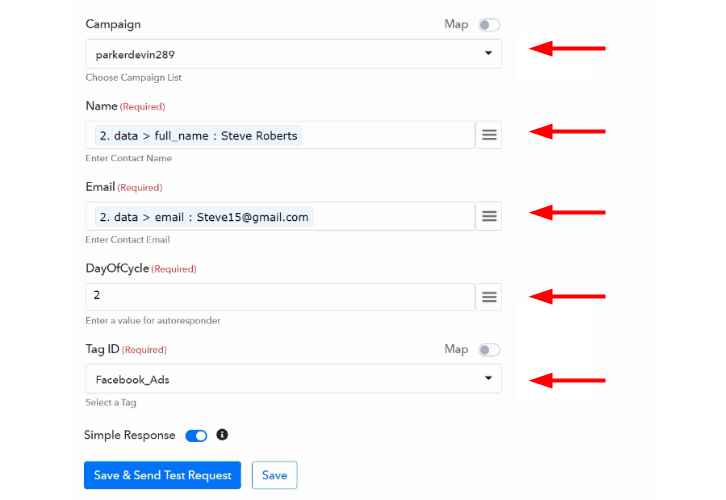
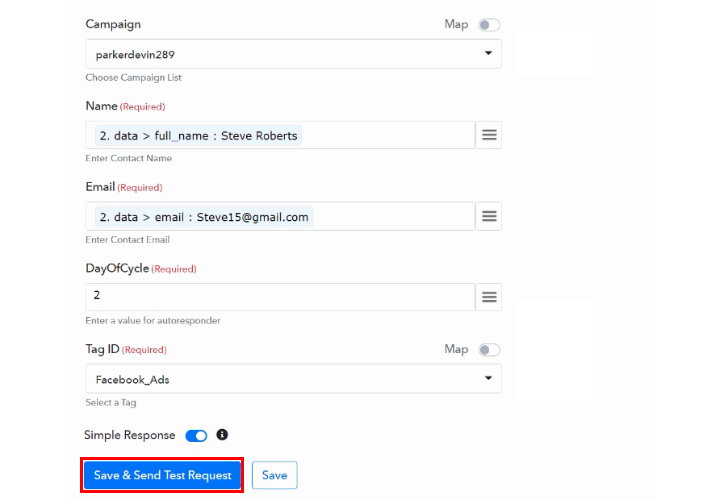
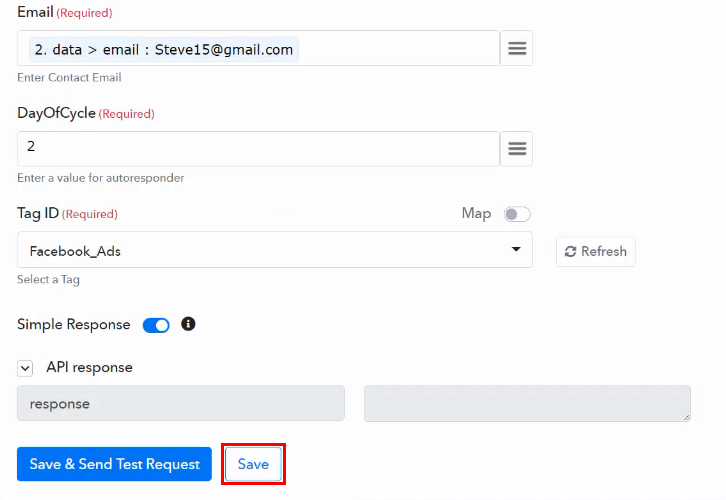
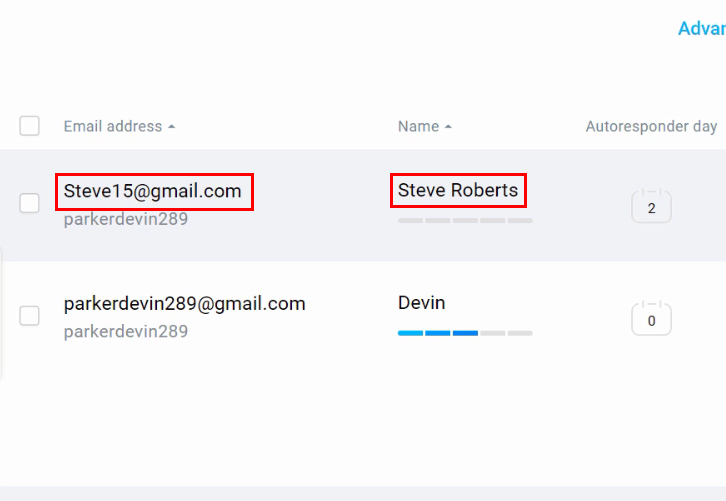
Next, after logging into the account, tap on the ‘Access Now’ button as shown in the above image. Start by creating a workflow for your integration by pressing the ‘Create Workflow’ button. Forthwith, name the workflow according to the integration. I names the workflow ‘Facebook Lead Ads to GetResponse’. To automatically create GetResponse Subscriber from Facebook lead ads, you’ll need to set up a trigger on Facebook new leads and then add its respective action. Now, select the application that you want to integrate. Here, we are choosing ‘Facebook Lead Ads’ for integration & in the method section, select ‘New Lead’. After choosing the application, click on the ‘Connect with Facebook Lead Ads’ button to move forward. Next, a window will pop up, here click on the ‘Connect With Facebook Lead Ads’ button and authorize your Facebook account. At last click on the ‘Save’ button. Subsequently, Pabbly Connect fetches all the pages and forms available on that account. Simply, select the page and forms from which you want to get the leads. And along with this, switch off the ‘Simple Response’ section (to get the data in the correct format). To create a new lead or to check whether the integration process is working or not, go to your Facebook account. Open up the same Facebook page which you have selected above, i.e. ‘Neepan Tech’’. After that, go to the Publishing Tool from the left sidebar and click on it. On the left sidebar, under the ‘Lead Ads Forms’ section, click on the ‘Form Library’ option. And then you see all the lead forms, click on ‘Preview’ of your form, i.e. ‘FB Leads Form’. After clicking on Preview, a window will open up, enter the email ID and full name of the new lead and then click on the ‘Save’ button. And at last click on ‘Submit’. Once you are done with the creation of a new lead, head back to the Pabbly Connect window. And, click on the ‘Save and Sent Request’ button to get the API response. Hence, the API response is showing. Check it and click on the ‘Save’ button to save it. As the fields and values are not showing properly, so we have to add the ‘Data Transformer’ as an action step. To add the Data Transformer, click on the plus (+) button. An action window appears, select ‘Data Transformer’ from the choose app drop-down and select method ‘Facebook Lead Ads’. After selecting the application, click on ‘Connect With Data Transformer’ button. Now, it’s time to map the field data. Simply click on the map button and select the ‘field_data’ which you received through Facebook Lead Ads trigger. Further, click on the ‘Save and Sent Test Request’ button to get the API response. Now we get the response in the correct format, click on the ‘Save’ button. Now that, we have collected all the information in the correct format. It’s time to create a GetResponse subscriber from Facebook response by set up an action. Click on the plus icon and select ‘GetResponse’ from choose app and add action event as ‘Create a New Contact’. Further, click on the ‘Connect With GetResponse’ button. A window will open up. To connect GetResponse to Pabbly Connect, you have to enter the API Key. For which you are required to log in to your GetResponse account. Firstly, log in to your GetResponse account by filling up your credentials. In the GetResponse dashboard, hover the mouse over the Menu section, where you will see the option ‘Integrations and API’, click on it. After that, click on the API from the above menu option and then click on the ‘Generate API Key’ button. Now its time to give a name to the API, we named it ‘Facebook to GetResponse’ and then click on the ‘Generate’ button. Next, copy the generated API Key to paste it in Pabbly Connect. Further, paste the API Key in the Pabbly Connect window and click on ‘Save’ button. Map the fields in the GetResponse action window such as name, email, days of cycle, and tag ID. Now click on the ‘Save and Sent Test Request’ button. Besides, you can check the response of your API in the action window. Ultimately, press the ‘Save’ button to save the action API’s response. Promptly, you have successfully completed the integration process. Go to the GetResponse ‘List’ section and then click on ‘Show all contacts’ button to check for the newly added subscriber. Now, whenever a new lead is created through Facebook Lead Ads, a subscriber will automatically get added to the GetResponse as a new contact. To sum up, this was the whole gist of the process of ‘How to Create GetResponse Subscriber from Facebook Lead Ads’. Consequently, after completing the step by step procedure, you will end up auto-creating GetResponse subscribers for every new lead on Facebook via Pabbly Connect. Although, you can also grab Pabbly Connect for FREE with all its premium features. Also, do comment us your queries & suggestions in the section given below.Step 2: Access Pabbly Connect
Step 3: Workflow for Facebook to GetResponse Integration
(a) Start with a New Workflow
(b) Name the Workflow
Step 4 – Setting Trigger for Facebook Lead Ads to GetResponse Integration
(a) Select Application you want to integrate
(b) Connect with Facebook Lead Ads
(c) Authorize Facebook
(d) Map the fields
Step 5: Create a New Lead
(a) Open Facebook Page
(b) Go to Publishing Tool
(c) Select Form Library
(d) Add Details
(e) Save and Sent Test Request
(f) Check & Save Response
Step 6: Setting Data Transformer
(a) Select Application
(b) Connect with Data Transformer
(c) Map the Field Data
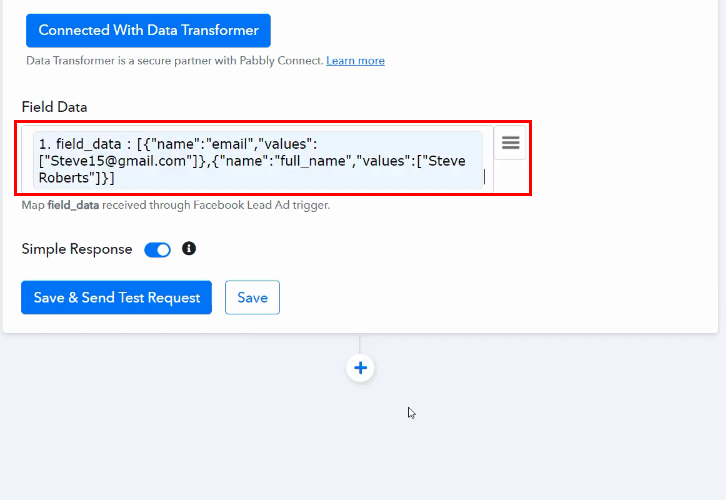
(d) Save and Sent Test Request
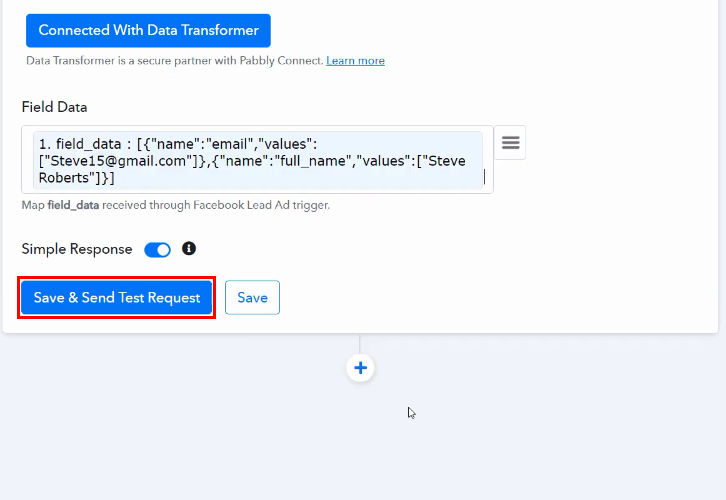
(e) Check & Save Response
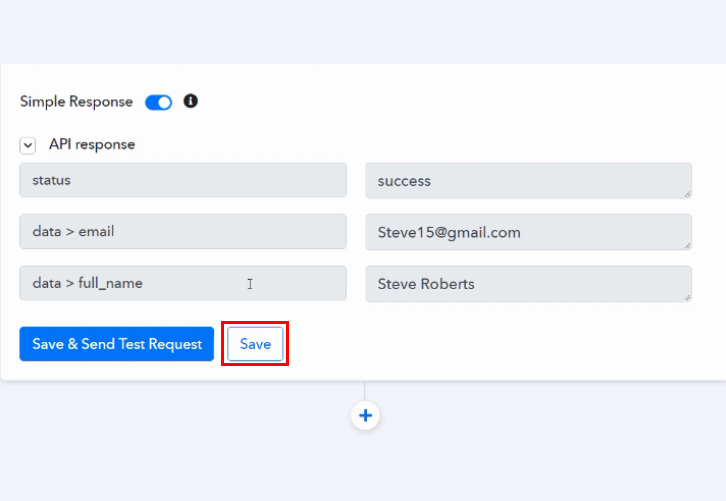
Step 7: Setting Action for Facebook to GetResponse
(a) Select Application you want to Integrate
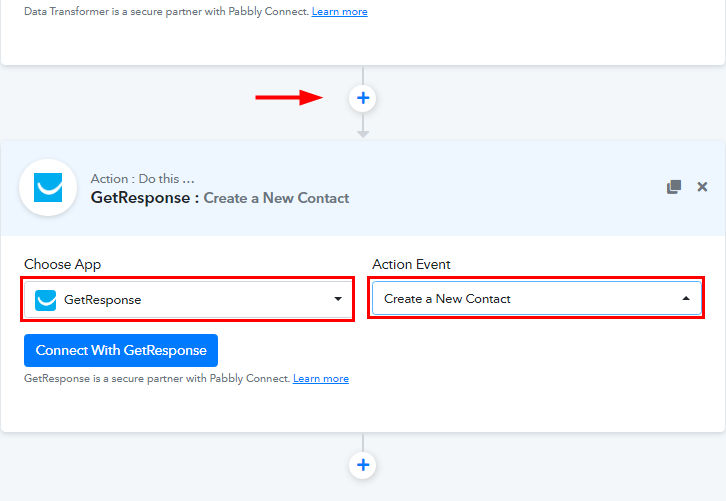
(b) Connect with GetResponse
Step 8: Connect GetResponse with Pabbly Connect
(a) Log in to GetResponse
(b) Go to Integrations and API
(c) Generate New API
(d) Name the API
(e) Copy the API Key
(f) Paste the API Key
(g) Map the Fields
(h) Save and Sent Test Request
(i) Check & Save Response
Step 9: Check Response in GetResponse Dashboard
Conclusion:
You May Also Like To Read –


