In this article, we’re going to connect WP Amelia to Google Calendar and Gmail. WP Amelia is an appointment booking service and once an appointment is booked on WP Amelia, we’ll store its confirmation inside Google Calendar and an automated email will be sent for the same event.
We are going to accomplish this three-step workflow with the help of Pabbly Connect.
Pabbly Connect helps you connect two or more services together. We can create unlimited workflows and set-up instant triggers on service conditions. Furthermore, you can also make use of various formatters, filters, routers etc. Based on the trigger condition we can define an action using multi-steps calls of Pabbly Connect.
Why Choose This Method Of Integration?
In contrast with other integration services-
- Pabbly Connect does not charge you for its in-built apps like filters, Iterator, Router, Data transformer and more
- Create “Unlimited Workflows” and smoothly define multiple tasks for each action
- As compared to other services which offer 750 tasks at $24.99, Pabbly Connect proffers 50000 tasks in the starter plan of $29 itself
- Unlike Zapier, there’s no restriction on features. Get access to advanced features even in the basic plan
- Try before you buy! Before spending your money, you can actually signup & try out the working of Pabbly Connect for FREE
Well, it somehow sounds tough, but I can tell you it would take only a few minutes and you don’t have to use any coding in here.
Now, let’s get started with the step by step procedure to connect WP Amelia to Google Calendar and Gmail.
Step 1: Sign up to Pabbly Connect

Firstly, visit the official website of Pabbly Connect and then click on the ‘Sign-Up Free‘ button. Next, on the signup page, either make use of an existing Google account or manually fill out the registration form details to get in.
Step 2: Access Pabbly Connect

After signing up successfully, click the ‘Access Now’ button that is present in the ‘Connect’ Pabbly application window.
Step 3: Create a WorkFlow to Connect WP Amelia to Google Calendar and Gmail
(a) Click over the Create New Workflow Button

Start with creating a workflow to connect WP Amelia to Google Calendar and Gmail and for this hit the ‘Create New Workflow’ button.
(b) Name the Workflow
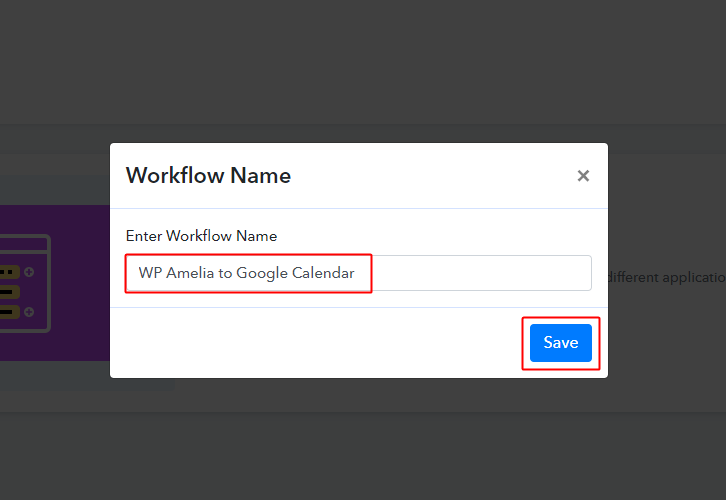
Name the Workflow as per your need (for instance: WP Amelia to Google Calendar’) and hit the ‘Save’ button.
Step 4: Set-up A Trigger to Connect WP Amelia to Google Calendar and Gmail
For WP Amelia to Google Calendar and Gmail integration, you need to set-up a trigger and an action. So, let’s start setting up the trigger first.
(a) Select Application to Integrate as WP Amelia
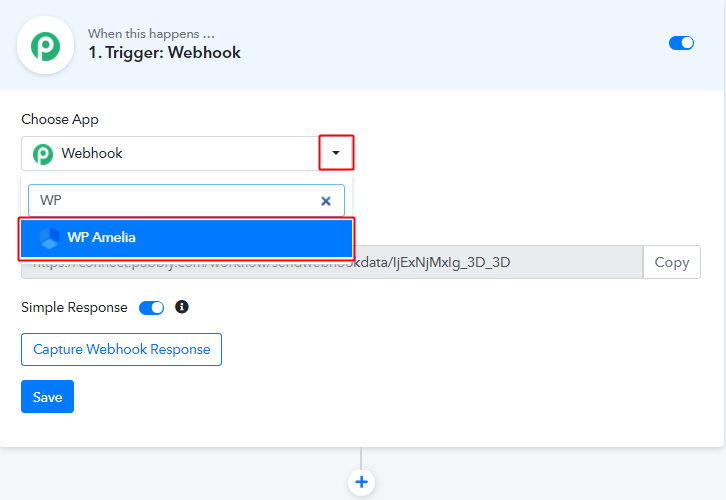
After naming and creating a webhook, you’ll be asked to set-up a trigger condition.
So, select the ‘WP Amelia’ application from the Choose App field drop-down.
(b) Go to your WordPress Site & Embed a Booking Calender
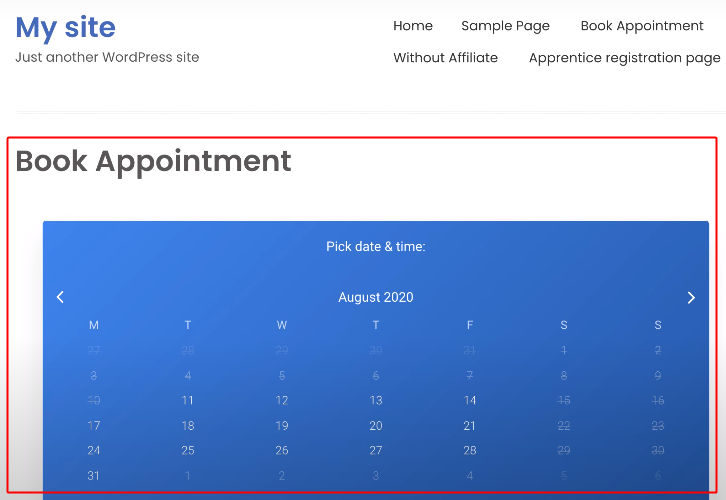
Now, to set-up a trigger on WP Amelia appointment, the triggering calendar should be present on your WordPress site.
So, if you have already created a calendar then you can directly proceed forward towards the next step.
But, if you haven’t created a booking calendar yet then simply embed one on your WordPress site.
(c) Go to WP Amelia Settings
Next, to establish a connection in between your WP Amelia booking calendar and Pabbly Connect, you must do some settings.
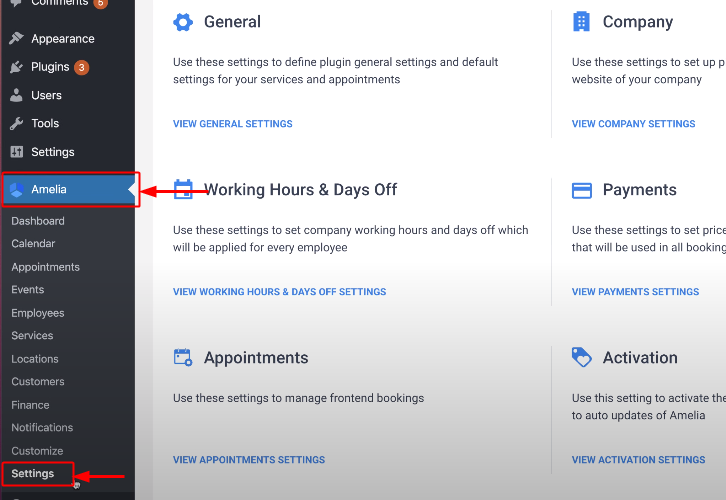
So, go to your WordPress site and click on the ‘Amelia’ present in the verticle menu there.
When you click ‘Amelia’ another menu open up below it. Click on the ‘Settings’ onto this menu.
(d) Click on Integration
Once you click on the Amelia Settings a settings page will open up in the right window.
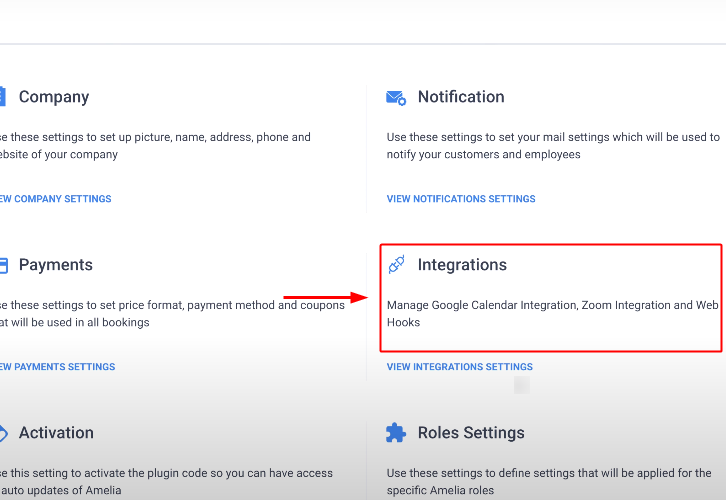
Click over ‘Integrations’ from the multiple setting options available there.
(e) Add a New Webhook on Amelia

Next, a window will slide in from the right side.
Click over ‘Web Hooks’ from the horizontal menu.
And click over the ‘+ Add New Web Hook’ button.
(f) Go to Pabbly Connect and Copy the Webhook URL
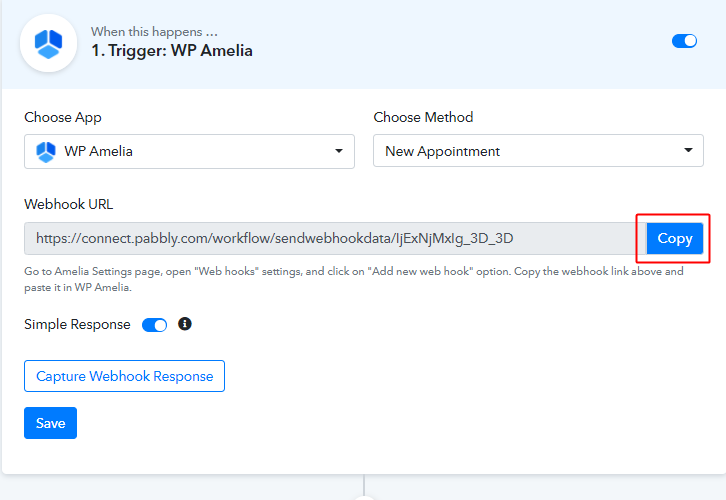
You can see three values to fill-in. So, for the URL field value, held back to Pabbly Connect and copy the Webhook URL.
(g) Paste the Copied Pabbly Connect Webhook URL on Amelia
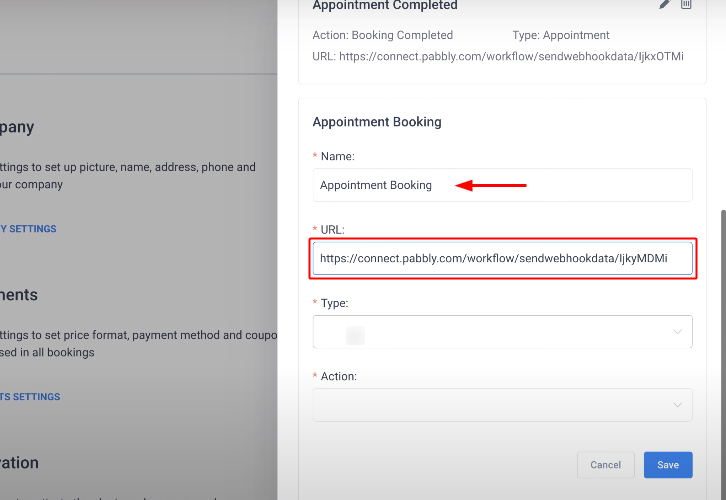
Mention a Webhook name in the ‘Name’ field.
And paste the copied Webhook URL from Pabbly Connect in the ‘URL’ field.
(h) Save the WP Amelia Settings
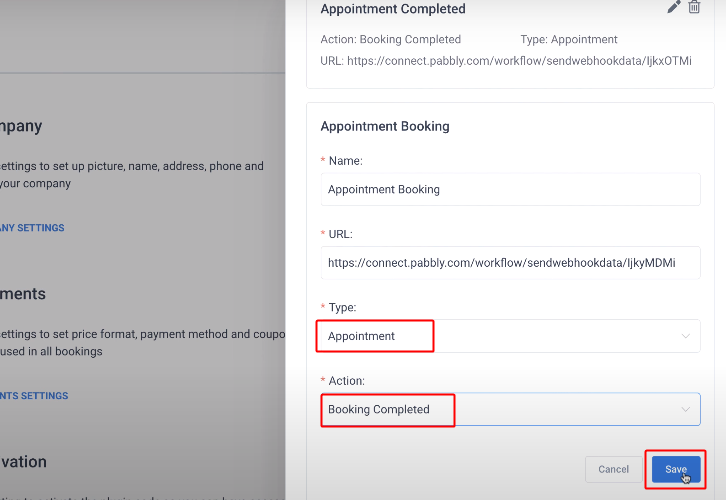
Choose the ‘Appointment’ option from the ‘Type’ field’s drop-down.
And the ‘Booking Completed’ option from the ‘Action’ field’s drop-down.
Lastly, save the Webhook Setting on this page.
(i) Save Amelia Webhook Settings
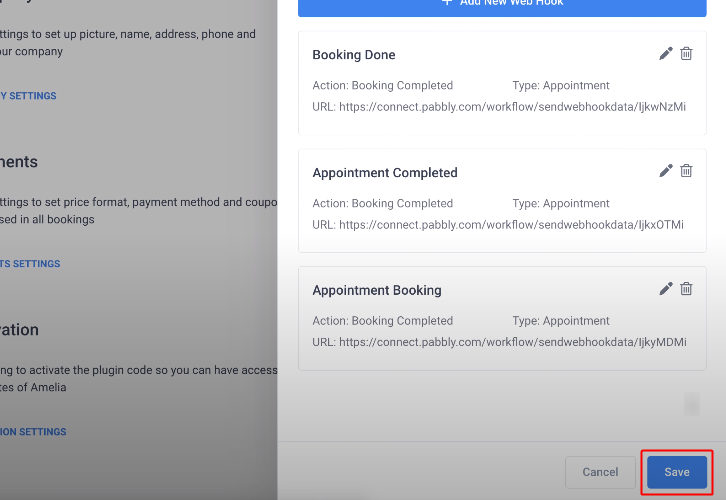
Click the ‘Save’ button on the next window too.
Step 5: Test the Trigger
(a) Click Capture Webhook Response on Pabbly Connect
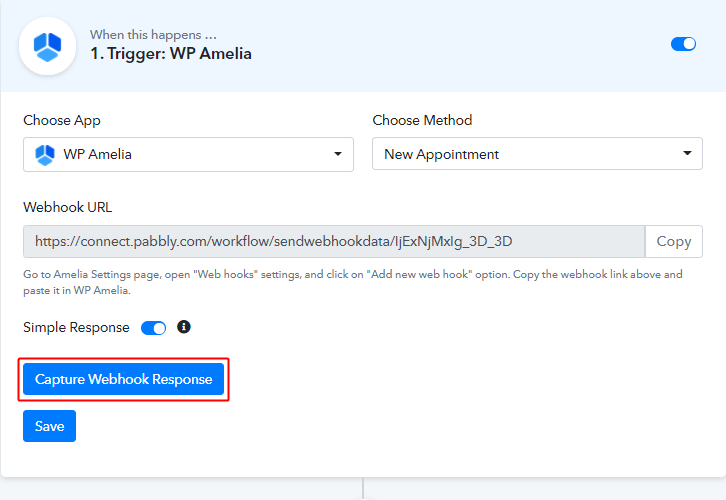
Now, again held back to the Pabbly Connect trigger and click the ‘Capture Webhook Response’ button. The trigger starts capturing the data from the attached Amelia booking calendar.
(b) Make an Appointment
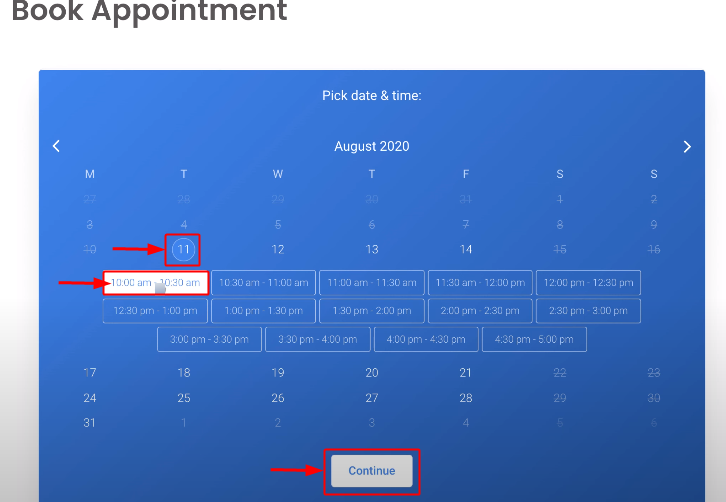
Now, to test whether the integration is successful or not, make an appointment using the attached Amelia booking calendar.
Select a date, time and press the ‘Continue’ button to make an appointment.
(c) Confirm Appointment
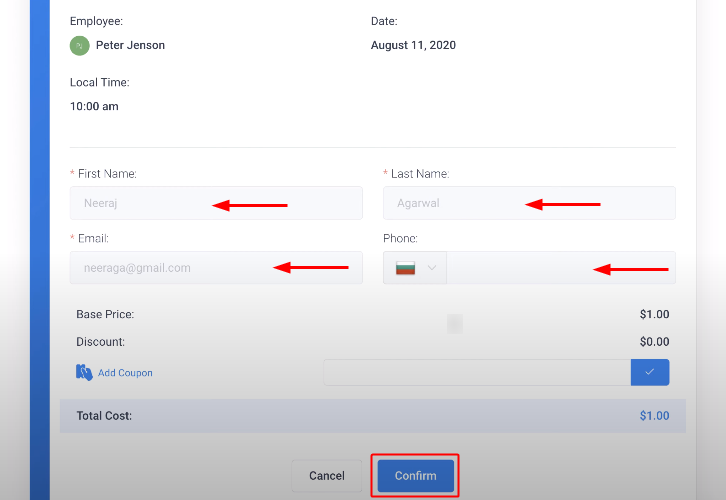
Next, confirm the appointment by filling out the details required & hit the ‘Confirm’ button.
(d) Check Booking Confirmation

If you made a successful booking then the above-shown response will ensure the booking’s success.
(e) Check Webhook Response
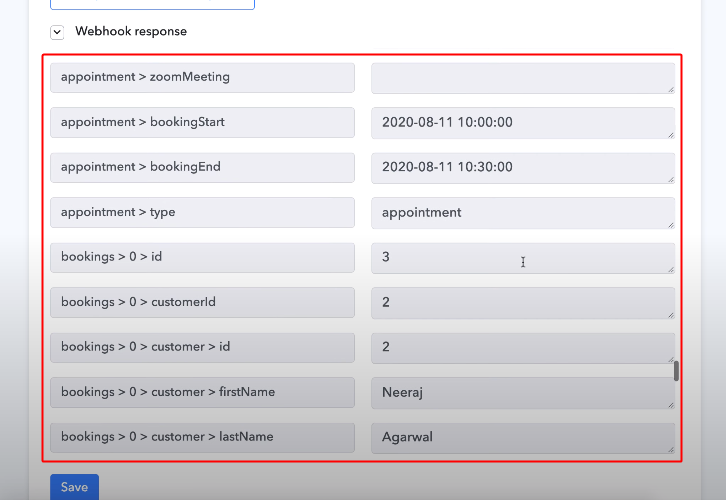
Also, check the Webhook’s response on Pabbly Connect for the successfully booked appointment on Amelia.
Step 6: Set-up an Action to Connect WP Amelia to Google Calendar and Gmail
We’ve gathered the data from WP Amelia in the last step. But the date-time format in WP Amelia is different than the date-time format of Google Calendar. So, our very first action step would be to convert the date-time format for the bookingStart & bookingEnd timings.
(a) Connect Date-Time Formatter
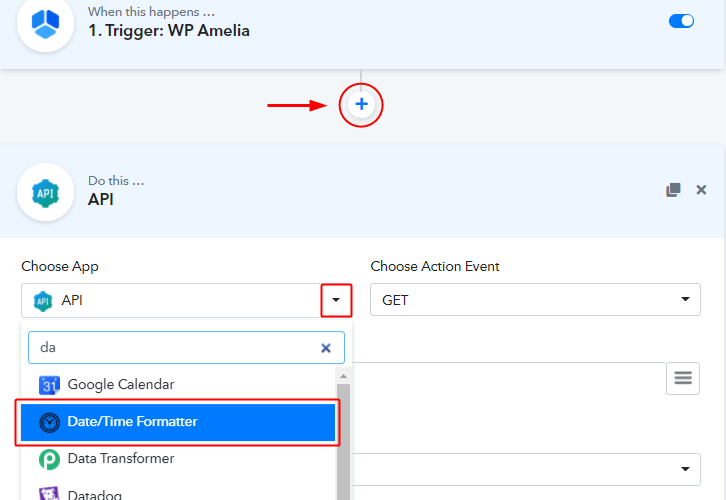
To change the date format integrate the Date/Time Formatter and to do this, select the ‘Date/Time Formatter option from the Choose App field drop-down.
(b) Select Method for Date/Time Formatter

Now, select the method as ‘Format’ and then click the ‘Connect’ button.
(c) Map Date Variables
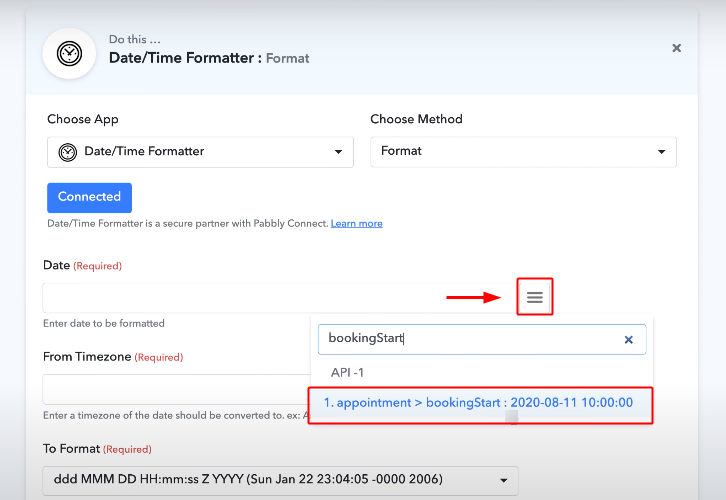
Next map the ‘bookingStart’ date in the date field.
For this, first, click the menu icon (or three verticle lines) next to the ‘Date’ field.
(d) Select the Google Calendar Date Format
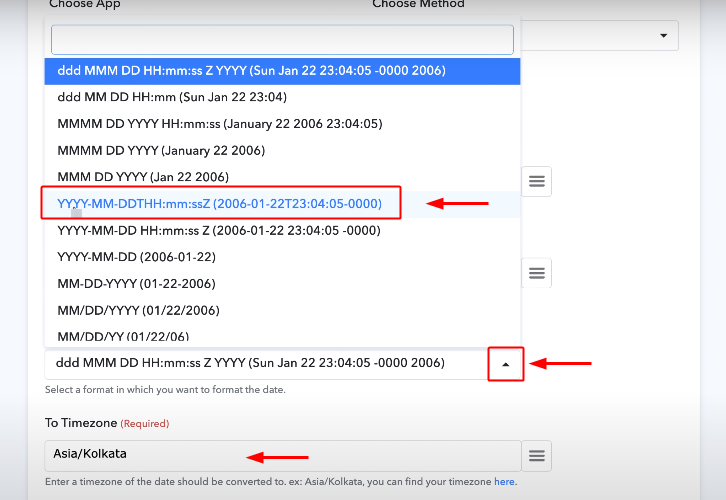
Select the date formate as ‘ YYYY-MM-DDTHH:mm:ssZ’, which is actually the Google Calender date-time format.
(e) Save the Date/Time Formatter Settings
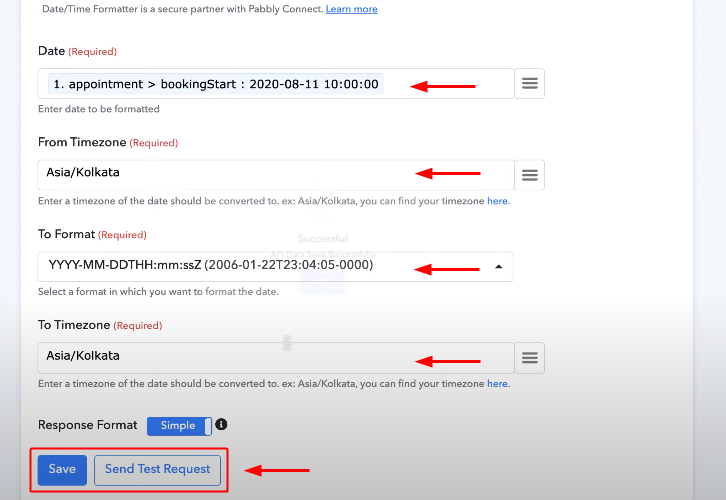
Also, select the timezone, here I’ve selected the timezone as per my country.
Once you are done with all this, hit the ‘Save & Send Test Request’ button.
(f) Check the Date/Time Formatter Response
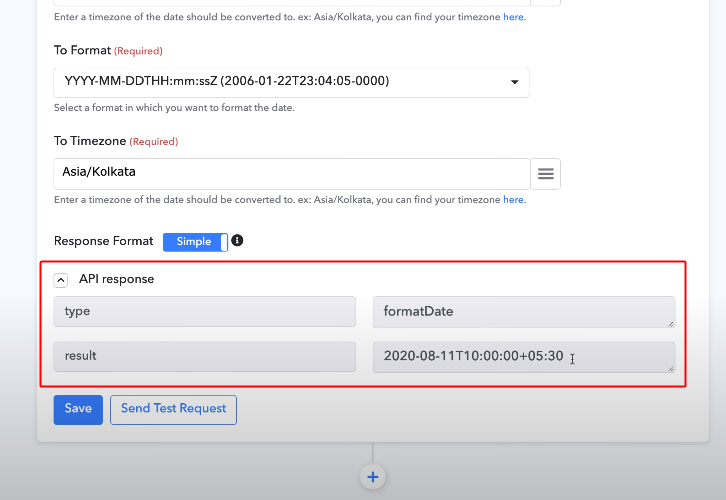
Lastly, check the response of the integration.
Step 7: Format Date/Time for the ‘bookingEnd’ Value
Repeat the last step (Step 5) for ‘bookingEnd’ variable as well with a single change i.e, map the ‘bookingEnd’ variable instead of bookingStart on step 5(b).
Step 8: Integrate Google Calendar
As we have all the values from the trigger response and formatted now. We can start integrating it with Google Calendar. For this, first, you must have an calendar dedicatedly for the purpose. If you haven’t created one then follow the following steps.
(a) Add Calendar
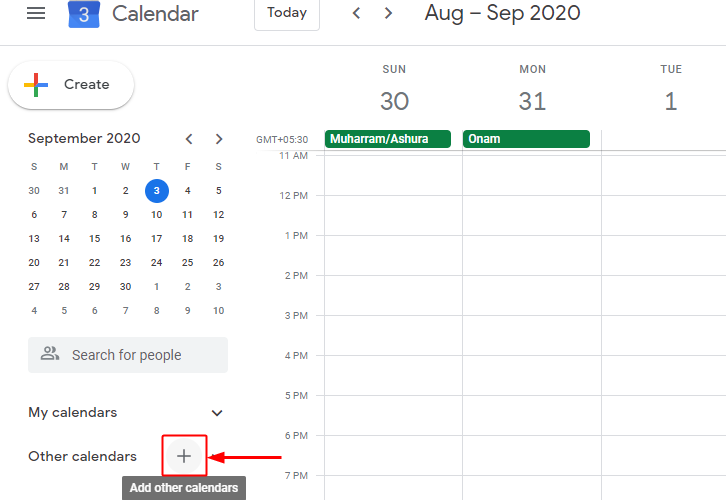
Click the ‘+’ button next to other calendars of your Google Calendar account.
(b) Create a New Calendar
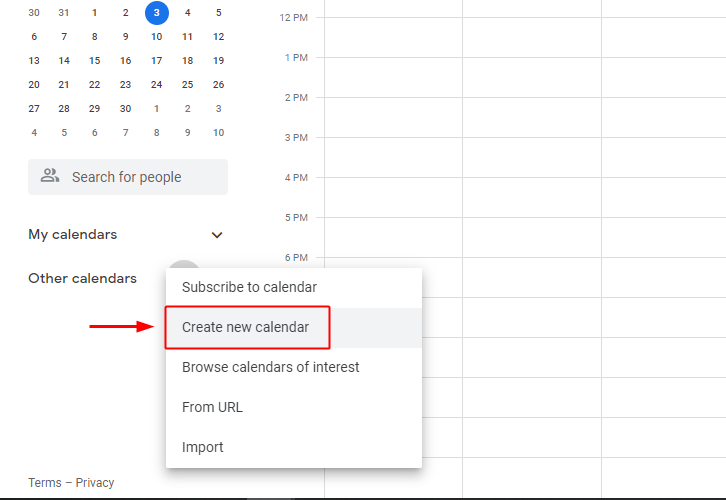
After clicking on the plus button, a drop-down will open up. Select the ‘Create new calendar’ option from the available options here.
(c) Calendar Time Zone Settings

Next, name the newly created calendar, select a time zone as per your location and press the ‘Create Calendar’ button.
(d) Select the Application to Integrate as Google Calendar
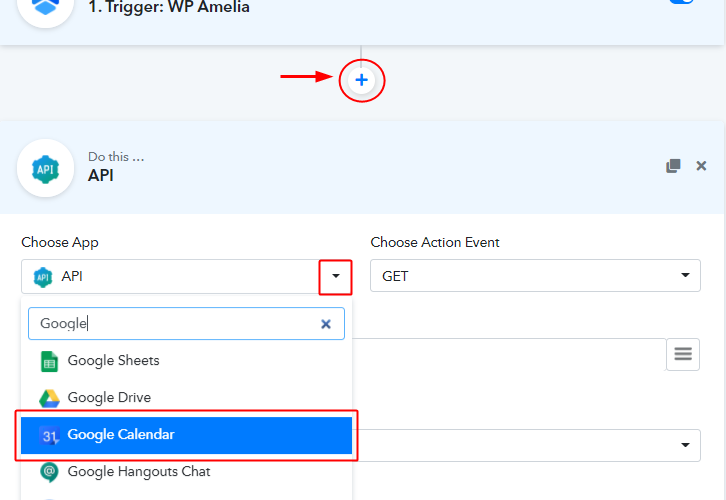
Now, go to Pabbly Connect and click the ‘+’ button next to 2nd Date/Time Formatter that you’ve integrated.
Select the ‘Google Calendar’ application to integrate.
(e) Select Google Calendar Method
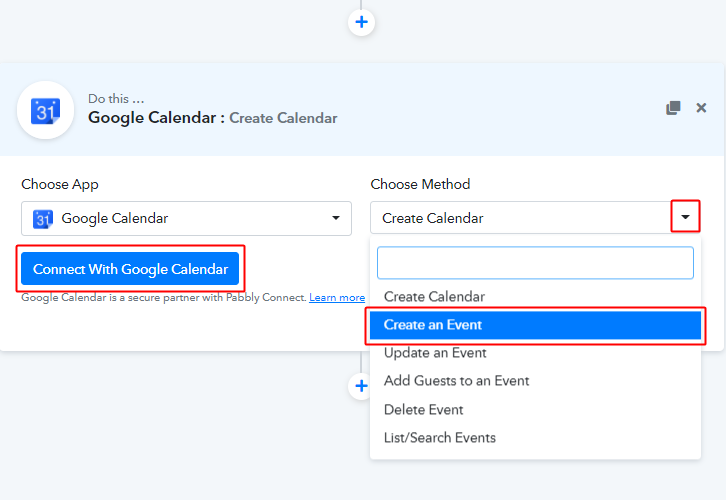
In the choose Method field, select the ‘Create an Event’ option.
Lastly, hit the ‘Connect with Google Calendar’ button.
(f) Authorize your Google Account
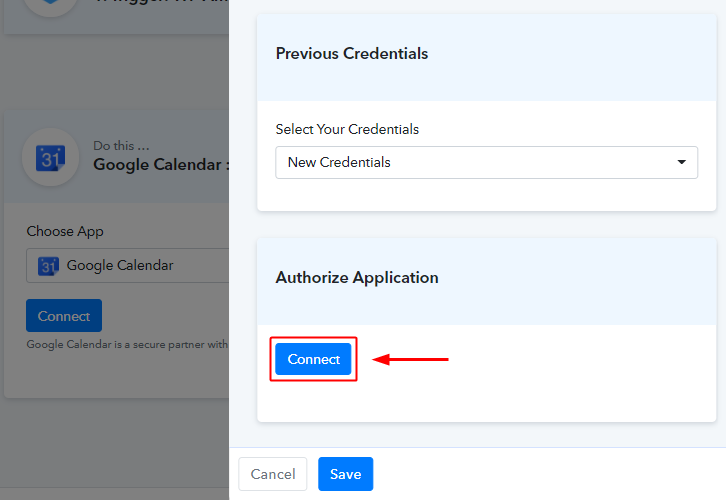
A window will slide in from the right, click on the ‘Connect’ button in it. Authorize the Google account that you want to use for the integration.
(g) Choose Calendar Name
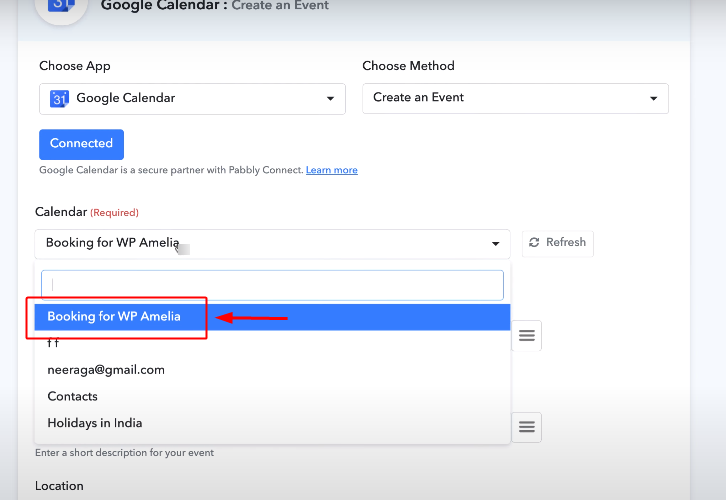
The calendar field starts showing all the created calendars of your connected Google account.
Select the calendar option from the drop-down that you have created for this particular integration.
(h) Map Values
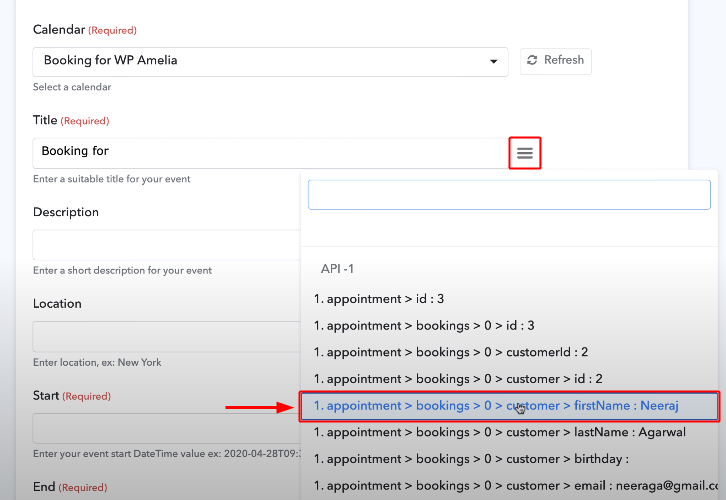
You can use the WP Amelia data to fill-in any field here.
To map a value, place your cursor over the place where you want to map a value then click the three verticle lines next to that field and click over the values that you wanna map from the drop-down.
(i) Map All Values

Similarly, map all the other values too. Remember, to map the ‘bookingStart’ & ‘bookingEnd’ time that we have converted after date-time formatting.
You can find the responses in the end of the drop-down.
(j) Map the Guest Email
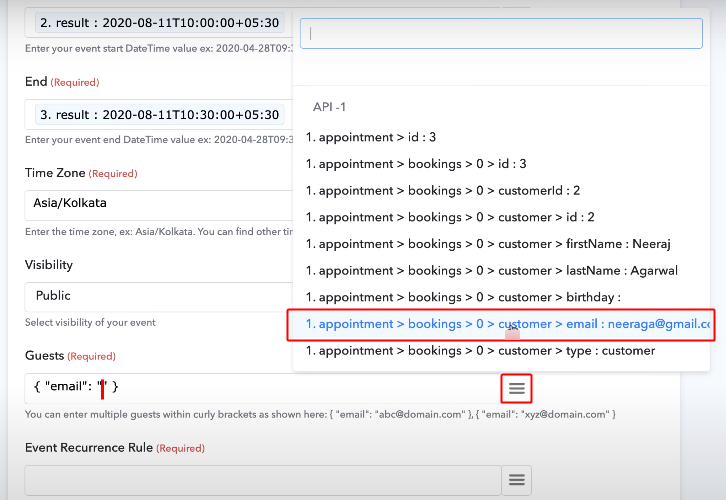
Also, select the ‘Time Zone’ as per your location.
To map the ‘Guests’ field, write {“email”:””} and then place your cursor in between the blank double quotes (as shown) then press the three vericle lines icon next to the Guests field and select the customer’s email.
Moreover, the hints are also present below the field.
(k) Select Event Recurrence & Copy the Rule
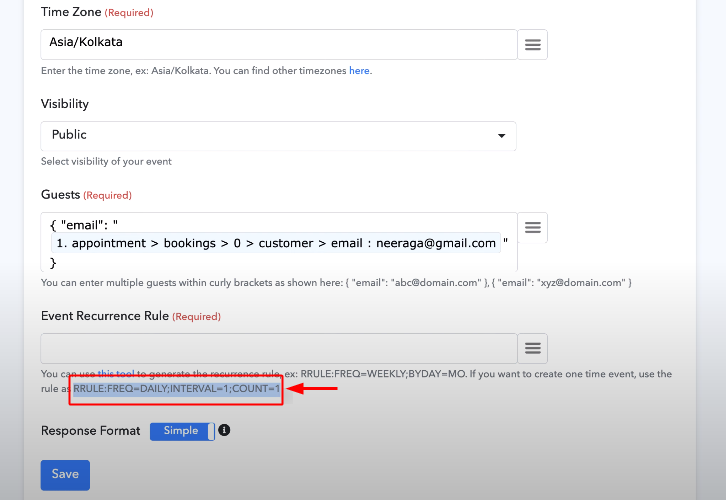
Next, is the Event Recurrenace Rule field, again the field value hints are available at the bottom of the field. There are two choices for selecting the event recurrence. I’ve selected the one time recurrence value. Moreover, you can select the event occurrence other than that as well.
To set the event recurrence to a single time, select and copy the text shown in the above image.
(l) Paste the Chosen Event Recurrence Rule, Save & Send Test Request
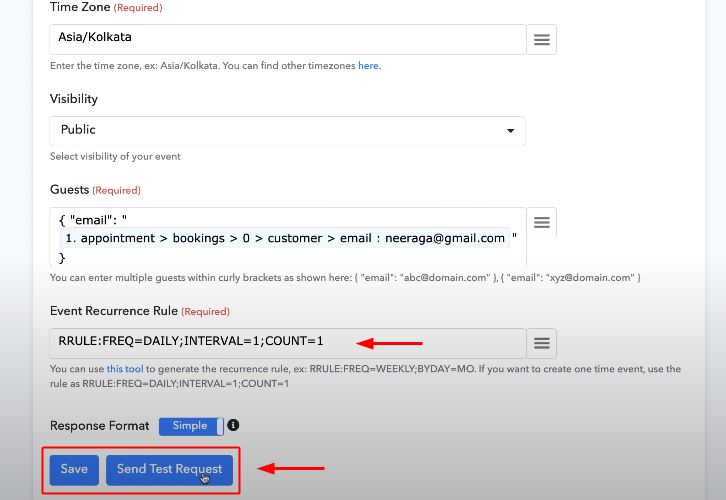
Paste the copied event recurrence values in the field.
Lastly, click save and send a test request.
(m) Check the Response in Google Calendar Account
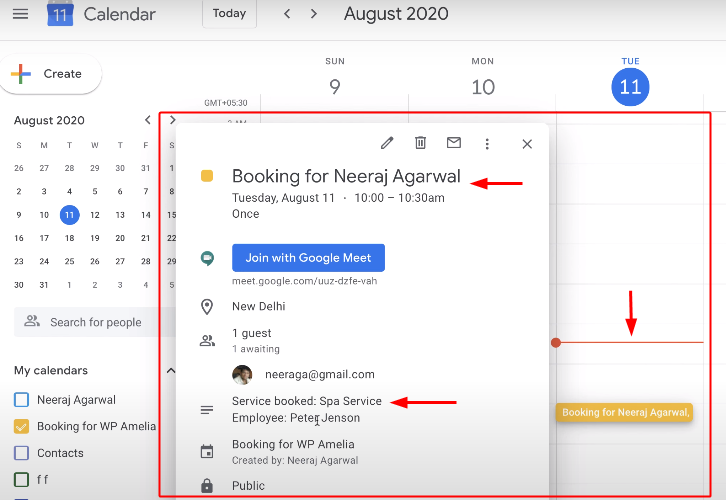
If everything goes fine, you can check the response of the action in your created Google Calendar by a coloured event bar and when you click or hover on it, you can see the booking details that we’ve to send from WP Amelia appointment.
Step 9: Integrate Gmail
As the third step, we’ve to send the appointment information to Gmail as well. So, follow the following steps to do so.
(a) Select the Application to Integrate as Gmail
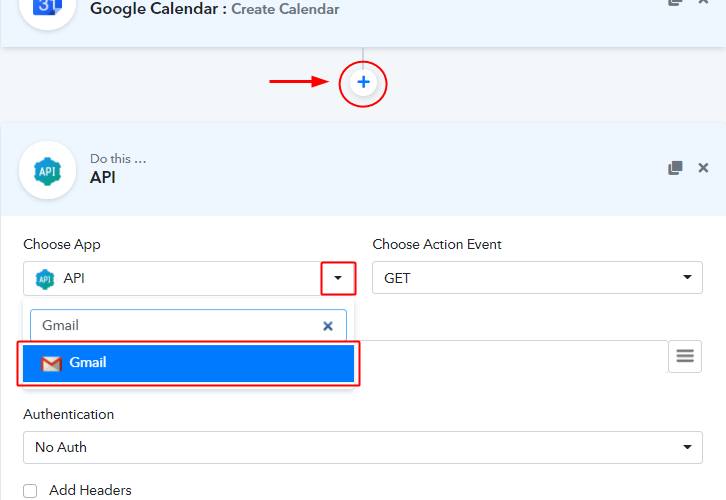
First, click the ‘+’ sign on the bottom and select ‘Gmail’ from the ‘Choose App’ field’s drop-down.
(b) Connect with Gmail Account
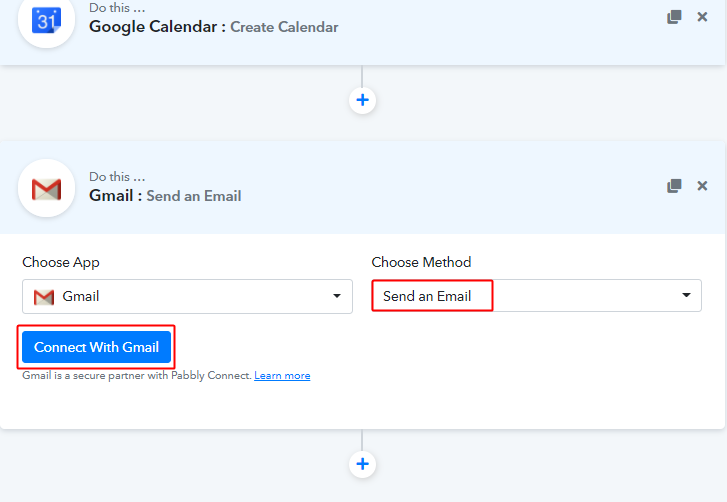
Select the method as ‘Send an Email’ and hit the ‘Connect with Gmail’ button.
(c) Authorize the Gmail Account

In the next, right sliding window, press the ‘Connect’ button and authorize your Gmail account.
(d) Map Gmail Values
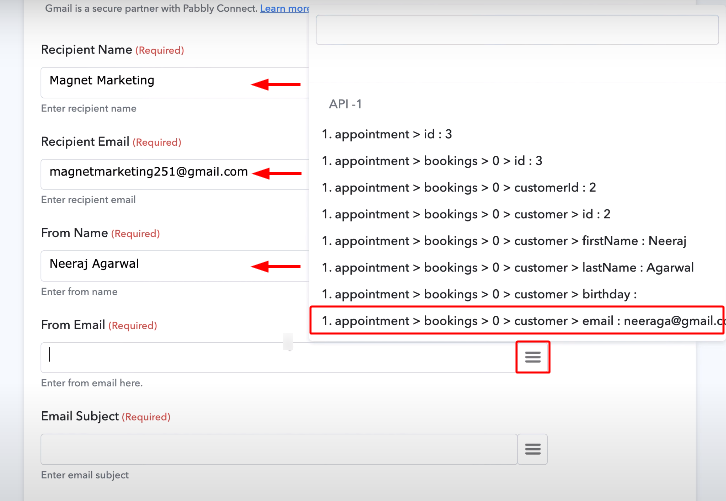
Map the values that you wanna send on Gmail regarding the WP Amelia appointment.
(e) Save Gmail Settings
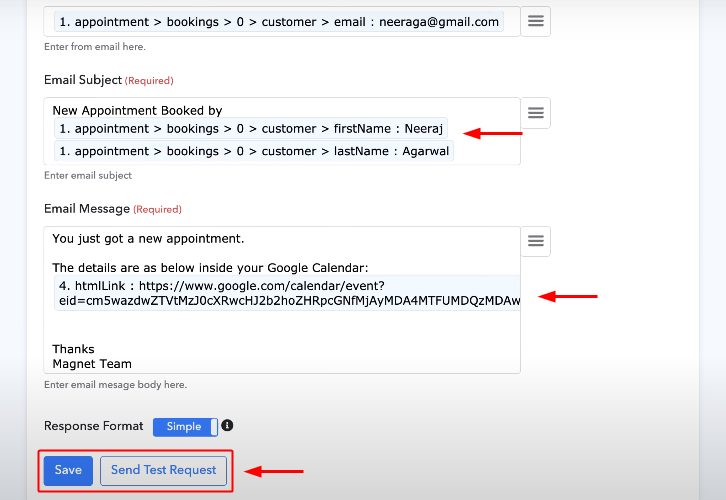
Fill in all the other details and email draft.
Lastly, click ‘Save & Send Test Request’.
(f) Check the Response of the Action over Gmail
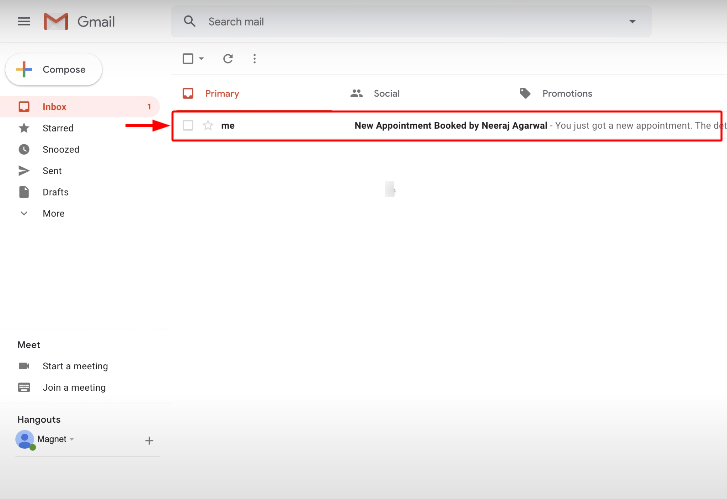
Check the response of the workflow on the Gmail account.
Step 10: Save the Workflow for WP Amelia to Google Calendar and Gmail Integration
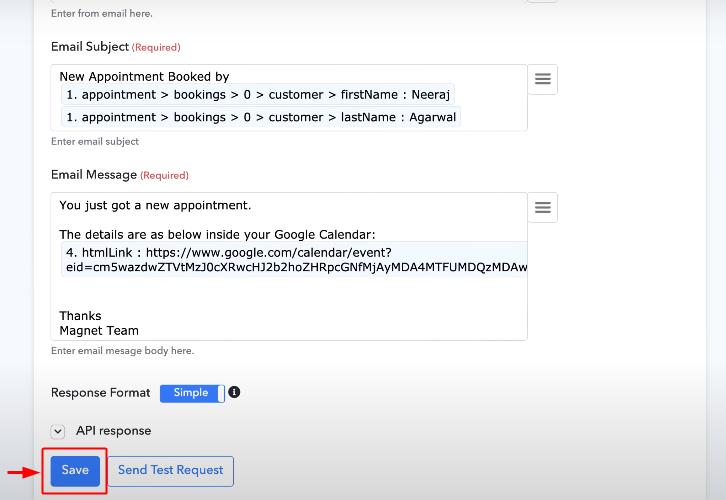
Save the workflow by clicking the ‘Save’ button of the last step of your workflow. In this case, save button of the ‘Gmail’ action.
To test whether your workflow is working as expected or not, make more appointments via WP Amelia and check the response over your Google Calendar and Gmail.
Wind-Up
Well, this is ‘How to connect WP Amelia to Google Calendar and Gmail using Pabbly Connect. Consequently, after completing this procedure, you will end up getting emails of your customer’s bookings from WP Amelia to your Google Calendar and Gmail automatically. Most importantly, the procedure is very easy to implement and you don’t need any coding skills to carry these simple steps.
Are you ready to try Pabbly Connect for FREE?
For any further queries, do comment below.


