How to Display New WooCommerce Products to Facebook Page

How to Display New WooCommerce Products to Facebook Page

Looking for the free and fastest way to display new WooCommerce products to Facebook page? If yes, then allow us to introduce you guys to the wonder tool named Pabbly Connect.

Basically, Pabbly Connect is an integration and automation software that lets you transfer data in real-time.

How to Display New WooCommerce Products to Facebook Page

Sometimes we want our new products from WooCommerce to be posted on Facebook page automatically, and to make this wish come true Pabbly Connect is here.

But let’s not jump straight into the integration process, let’s discuss a little bit about both the services. So, WooCommerce is a WordPress plugin used for selling different types of goods online. You can easily install this plugin in your WordPress account. Whereas, Facebook is a website that allows users, who sign-up for free profiles, to connect with friends, work colleagues, or other people, online.

After integrating these applications, whenever you will add any new product to your WooCommerce store, it will be automatically posted on your Facebook page in real-time.

However, there is no direct integration possible for these two services yet. So, we are going to use Pabbly Connect to make this integration possible.

Using this software, you can effortlessly share data within multiple premium services easily. More importantly, it won’t need any coding skills & even a fresher can use it efficiently. Moreover, this would be just a one-time setup. After that, the data will automatically be transferred in real-time.

Why Choose This Method Of Integration?

In contrast with other integration services-

  • Pabbly Connect does not charge you for its in-built apps like filters, Iterator, Router, Data transformer, and more
  • Create “Unlimited Workflows” and smoothly define multiple tasks for each action
  • As compared to other services which offer 750 tasks at $24.99, Pabbly Connect offers 50000 tasks in the starter plan of $29 itself
  • Unlike Zapier, there’s no restriction on features. Get access to advanced features even in the basic plan
  • Try before you buy! Before spending your money, you can actually signup & try out the working of Pabbly Connect for FREE

Sign Up To Pabbly Connect 

So, get ready as we’re going to discover how to connect WooCommerce and Facebook in real-time. Furthermore, we’ve attached a template for this integration to help you get started more quickly. You can strike the ‘Use Workflow’ button below to get started. Also, you can go to the Marketplace & look for more apps/integrations.

How

Display New WooCommerce Products to Facebook Page

Apart from this integration, Pabbly Connect offers using many remarkable features even in the free plan. Some of these features include using routers, formatters, instant triggers, multi-step calls & support thousands of app integrations.

Now, without taking any more of your time, let’s get directly on track & follow the step by step procedure to integrate WooCommerce and Facebook.

Step 1: Sign up to Pabbly Connect

Sign Up

Begin the process to display new WooCommerce products to Facebook page by clicking on the ‘Sign Up Free’ button on the Pabbly Connect dashboard. Subsequently, either fill-up all the details manually or sign up using Gmail credentials.

Try Pabbly Connect for FREE

Step 2: Access Pabbly Connect

Select Connect

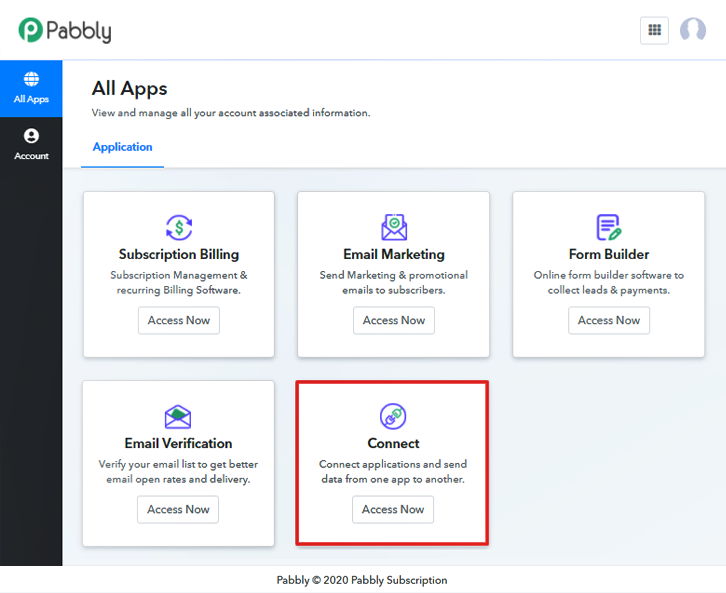
Next, after logging into the account, click on the ‘Access Now’ button as shown in the above image.

Step 3: Workflow for WooCommerce to Facebook Integration

(a) Start with a New Workflow
Create New Workflow

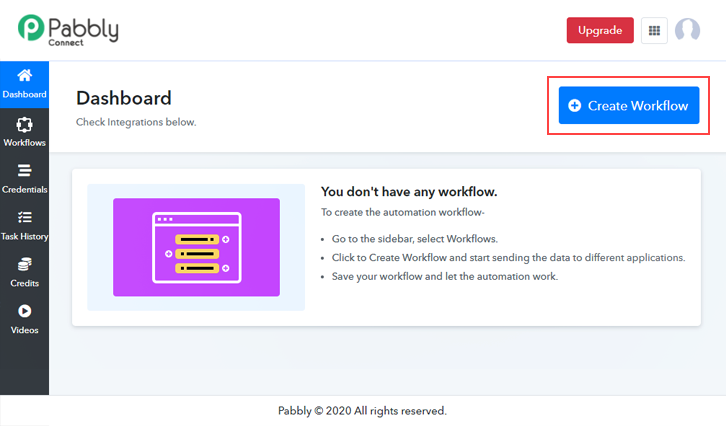
Start with creating a workflow for your project by clicking on the ‘Create Workflow’ button.

(b) Name the Workflow

Name the Workflow

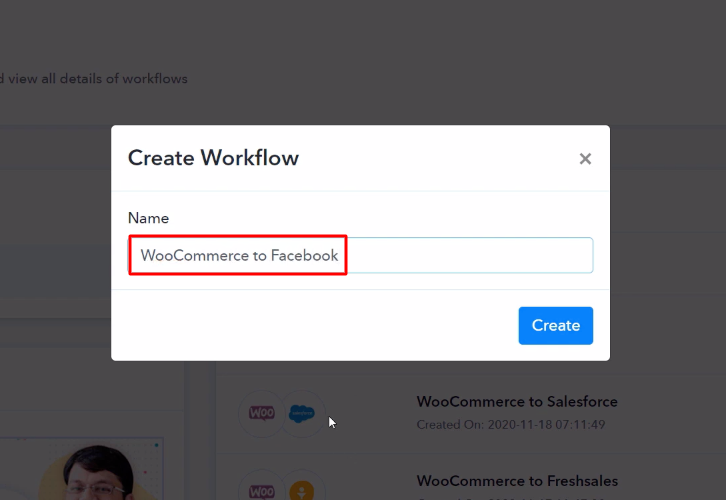
Now, you need to name the workflow just like in the above-shown image. I named the workflow ‘WooCommerce to Facebook’, you can obviously name the workflow as per your requirements.

Step 4: Setting Trigger for WooCommerce to Facebook Integration

As soon as you are done with naming your workflow, you will have to select the application you want to integrate. Pabbly Connect allows you to connect unlimited premium apps, create your free account now.

(a) Select Application you Want to Integrate
Select WooCommerce

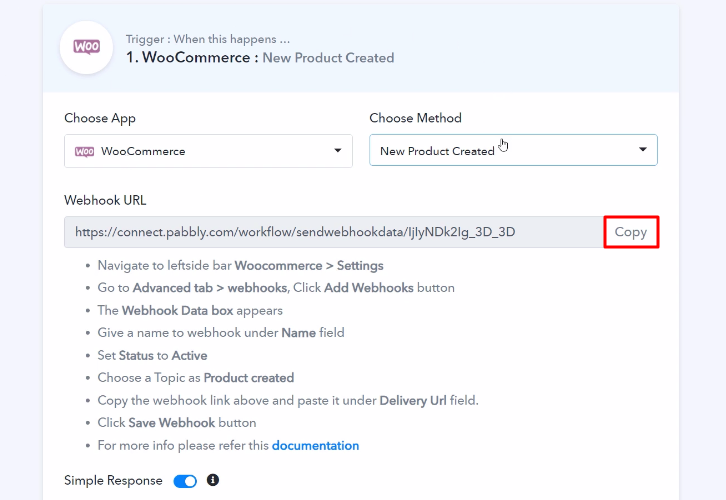
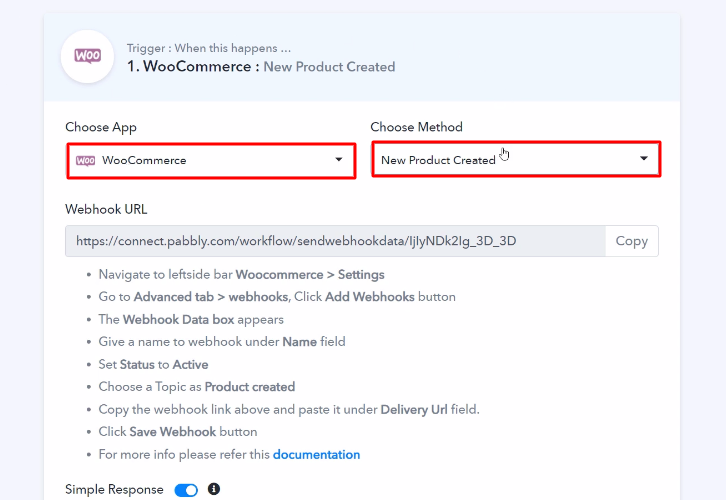
Now, you have to select the application that you want to integrate. In this case, we are choosing ‘WooCommerce’ for integration. In the method section, select ‘New Product Created’.

(b) Copy the Webhook URL

Copy the Webhook URL

The next step is to copy the webhook URL which is appearing on the dashboard just like in the above-shown image.

Step 5: Connecting WooCommerce to Pabbly Connect

To connect WooCommerce with Pabbly Connect, you have to paste the copied webhook URL in the software, for that, you need to log in to your WordPress account.

(a) Go to WooCommerce Settings

Go-to-WooCommerce-Settings

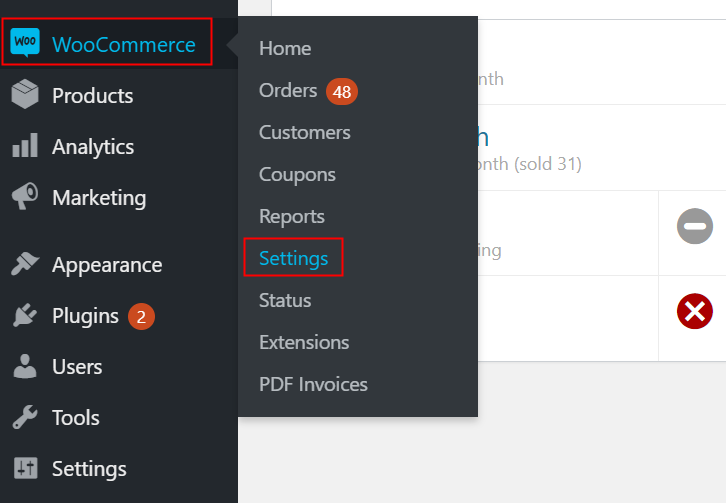
Once you have logged into your WordPress account, now click on WooCommerce then select settings.

(b) Click on Advanced Option

Click-Advanced

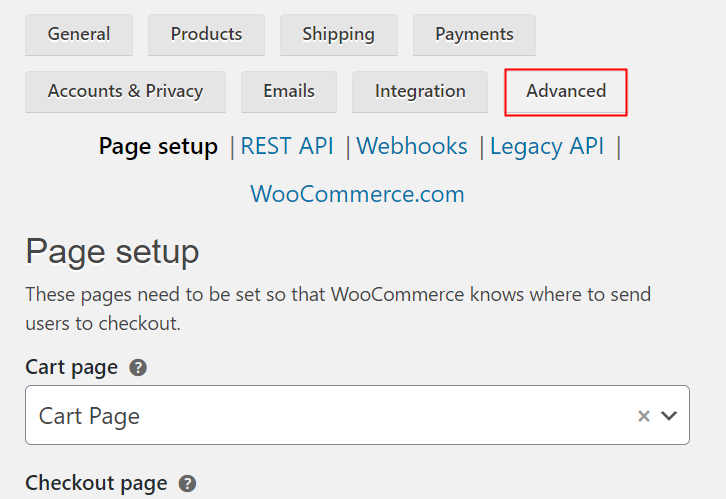
After clicking on ‘Settings’, a tab will open up with different options, here you have to select ‘Advanced’.

(c) Click on Webhooks Option

Click-on-Webhooks-Option

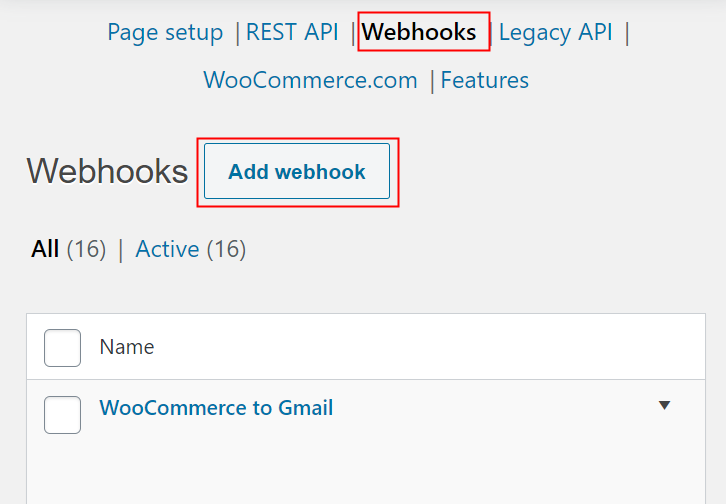
Now, after clicking on ‘Webhooks’, click on the ‘Add Webhook’ option.

(d) Paste the Webhook URL

Paste the Webhook URL

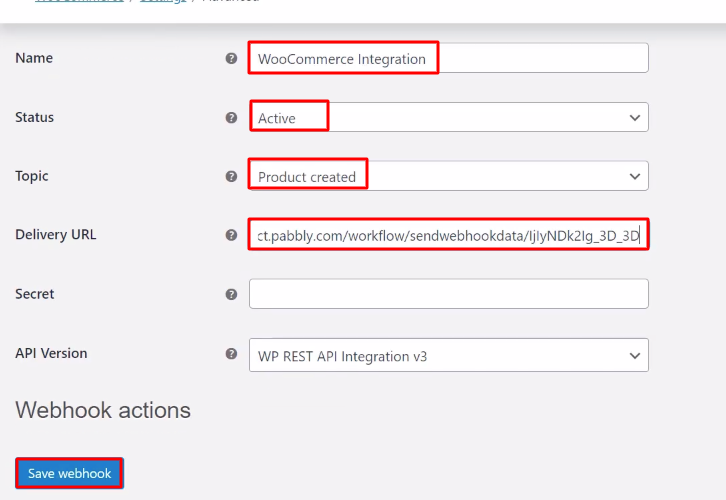
Name the Webhook according to your requirement. Make sure that the status should be ‘Active’ and in the topic section, select ‘Product Created’. Then in the delivery URL, paste your copied URL from Pabbly Connect. After making all changes, click the ‘Save Webhook’ button.

Step 6: Add a Product

To check if the integration is capturing data or not, we will add a new product in WooCommerce.

(a) Click on Products

Click on Products WooCommerce

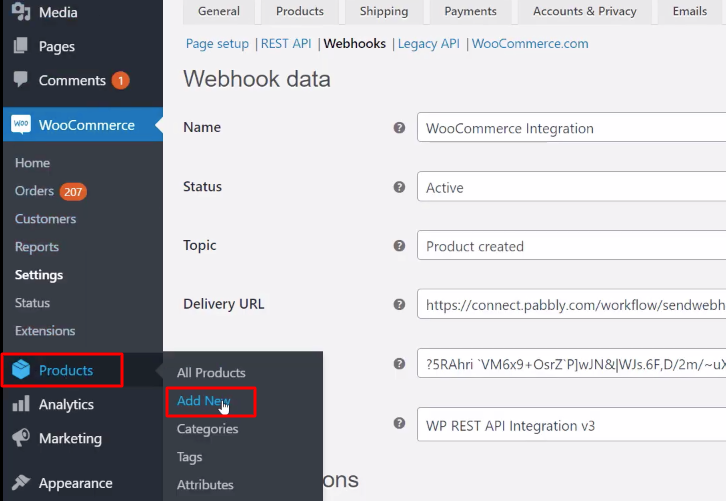
Now, click on the ‘Products’ in your WooCommerce section, then select the ‘Add New’ option.

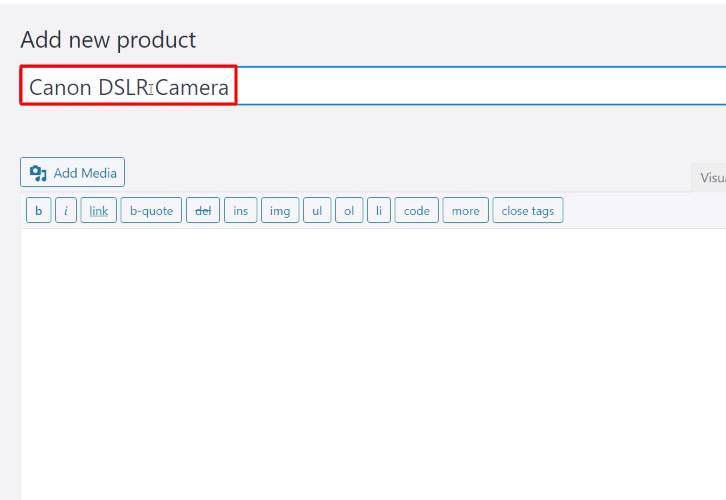
(b) Add Product Title

Add Product Title WooCommerce

Name your product according to your needs and requirements.

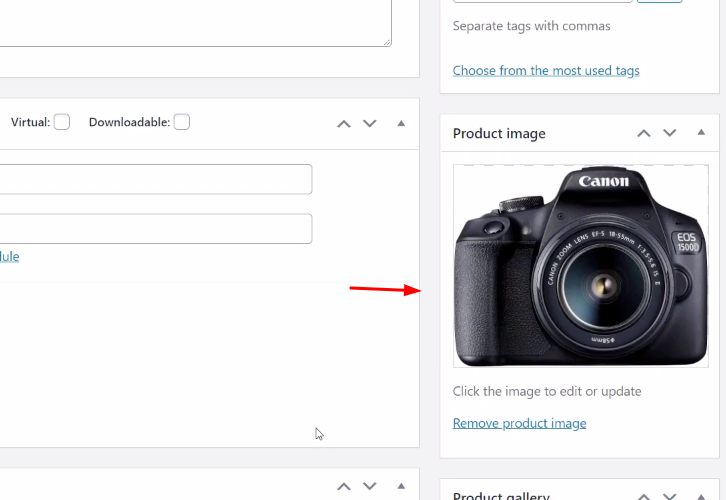
(c) Add Image

Add Product Image WooCommerce

Simply scroll down and add an image of your product.

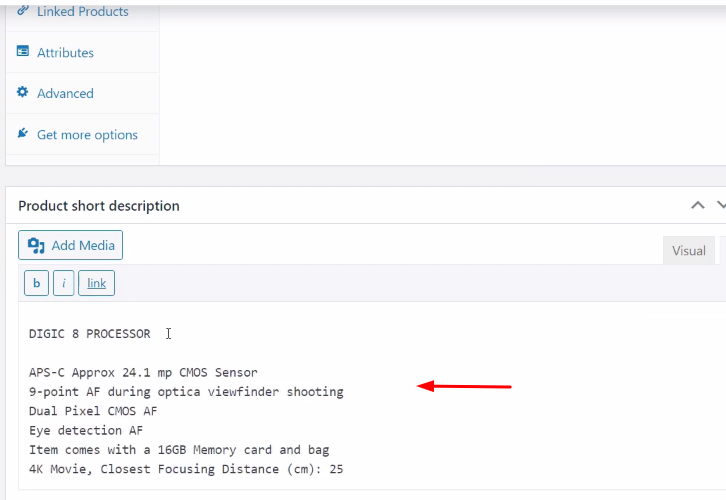
(d) Add Description

Add Product Description WooCommerce

Next, you need to add a description of your product. Add important points about your product in the description box.

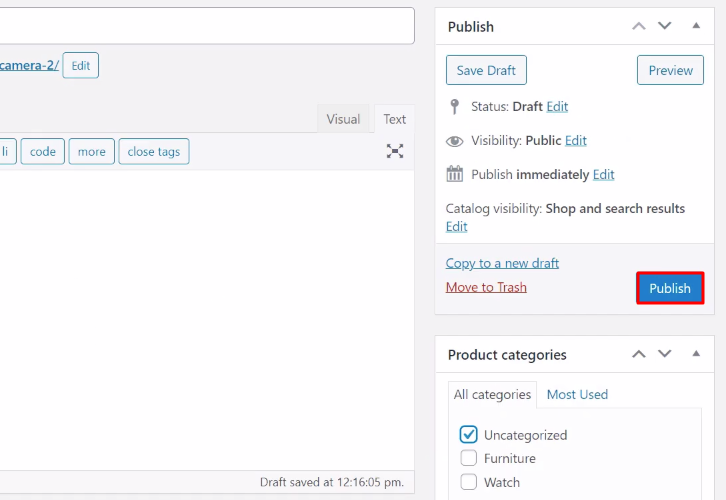
(e) Publish the Product

Click Publish WooCommerce

Now, after making all the required changes, hit the ‘Publish’ button. But before that, hit the ‘Capture Webhook Response’ in Pabbly Connect to capture the data.

Step 7: Test the Response in Pabbly Connect Dashboard
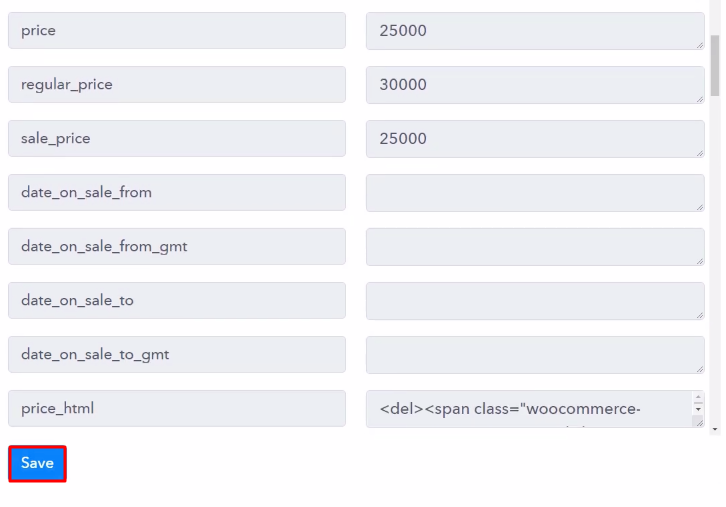
Save the Webhook Response

Once you click on the ‘Publish’ in WooCommerce and on the ‘Capture Webhook Response’ in Pabbly Connect, the product info will appear on the Pabbly Connect dashboard. Then, click on the ‘Save’ option.

Step 8: Setting Action for WooCommerce to Facebook Integration

To make this WooCommerce-Facebook integration work, you have to choose an action for your trigger.

(a) Select Application you Want to Integrate
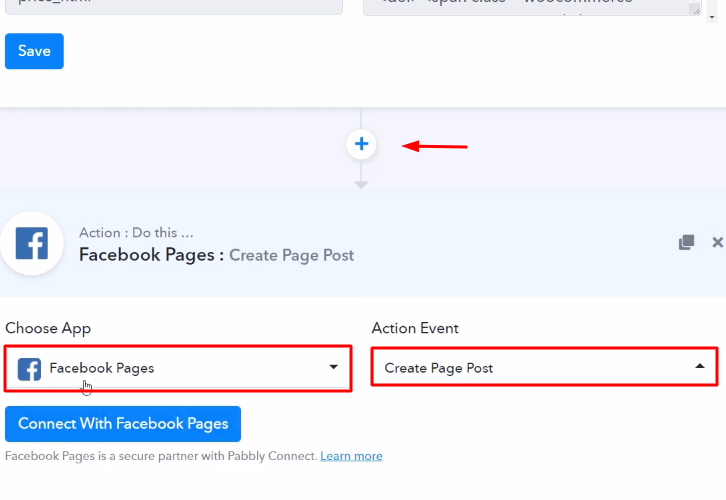
Select Facebook

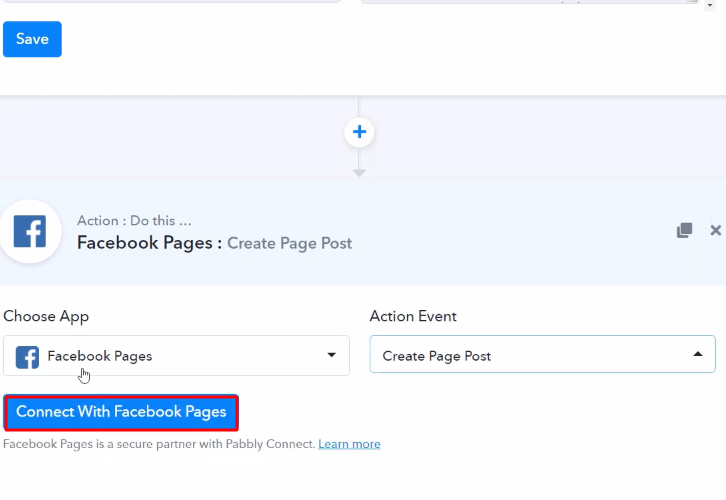
Now in this step, click on the ‘+’ button below and choose the application that you want to integrate. Here we will choose ‘Facebook Pages’ to integrate and in the method section select ‘Create Page Post’.

(b) Click the Connect Button

Click Connect Facebook

After choosing the application click on the ‘Connect with Facebook Pages’ button to move forward.

Step 9: Connecting Facebook to Pabbly Connect

To connect Facebook to Pabbly Connect, you have to authenticate the application. For this, you have to log in to your Facebook account.

(a) Authorize Application

Authorize Application Facebook

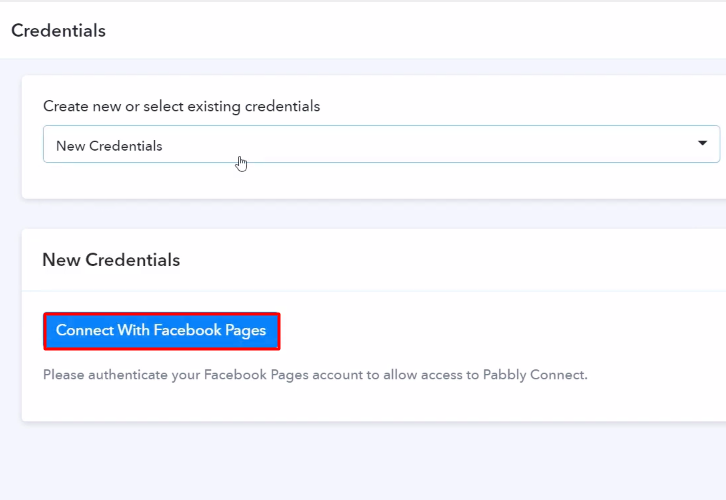
Next, to authenticate your Facebook account, you need to again click on the ‘Connect with Facebook Pages’ button and then select the Facebook account through which you want to login.

(b) Map the Fields

Map the Fields

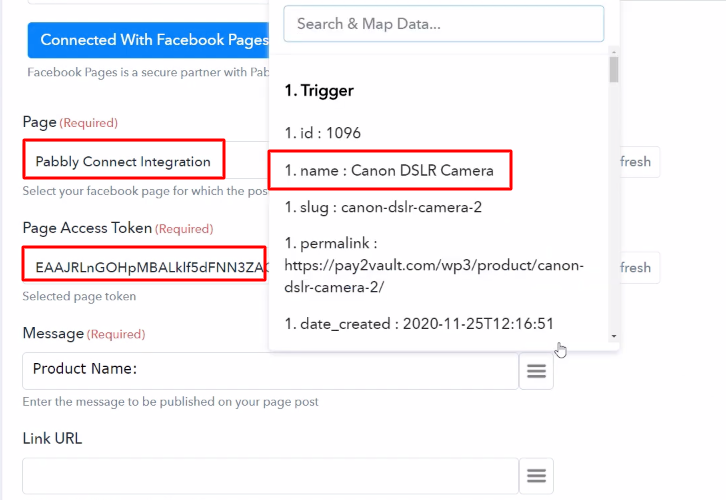
After connecting with your Facebook account, map all the fields quickly like the page, message, etc.

(c) Save and Send Test Request

Send Test Request

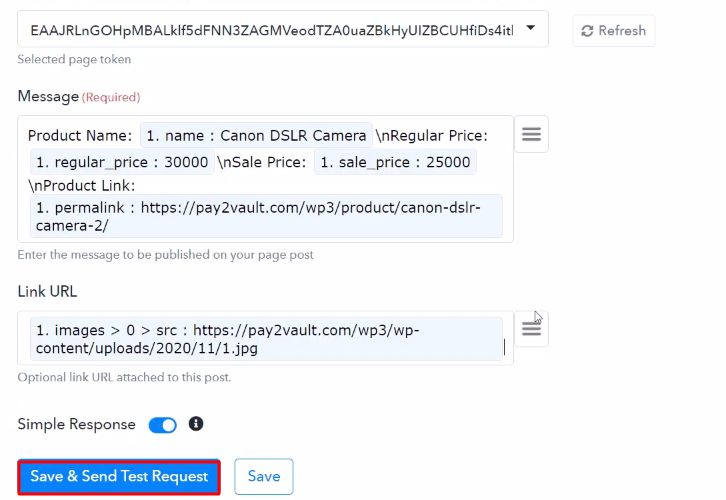
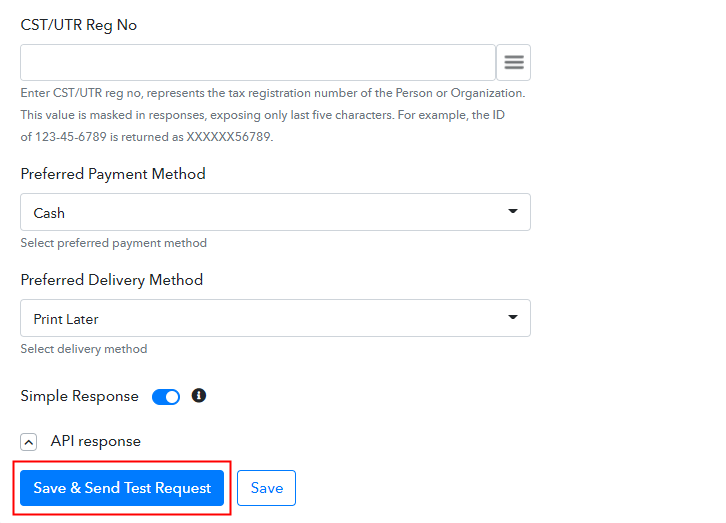
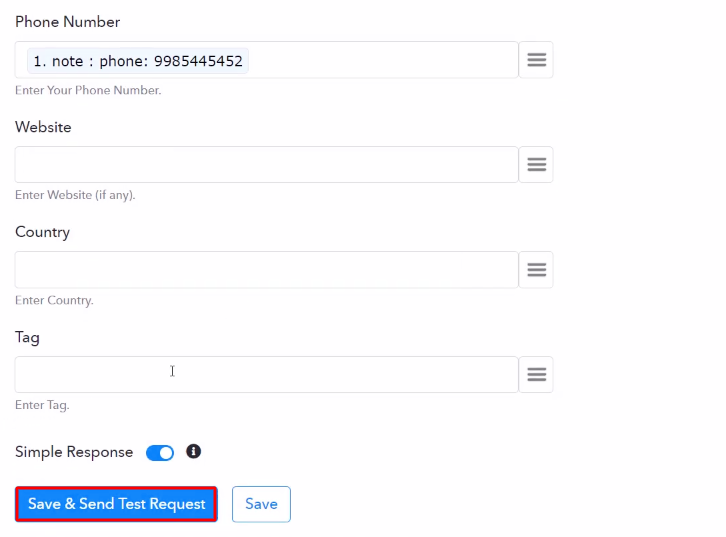
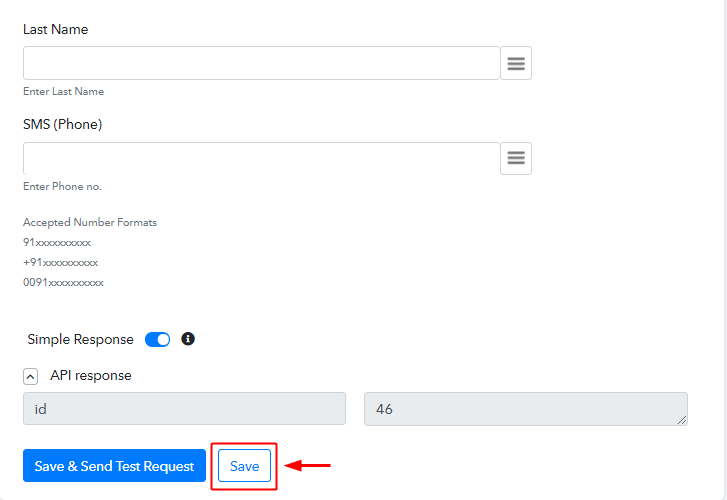
Once you are done adding up all field data click on the ‘Save & Send Test Request’ button.

Step 10: Check Response in Facebook Dashboard
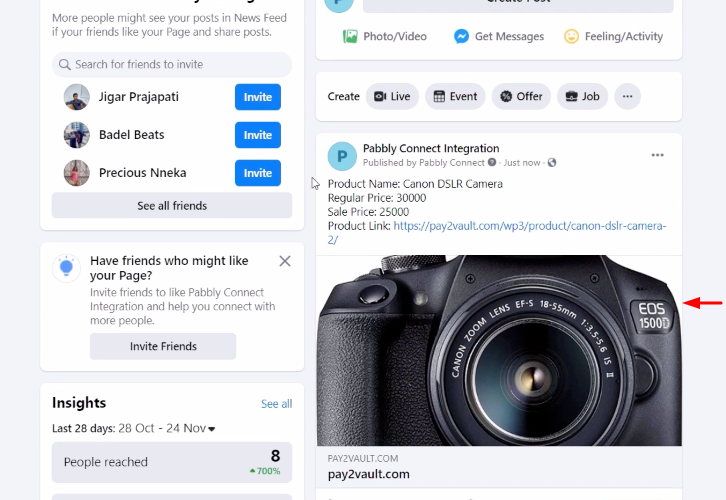
Check Response

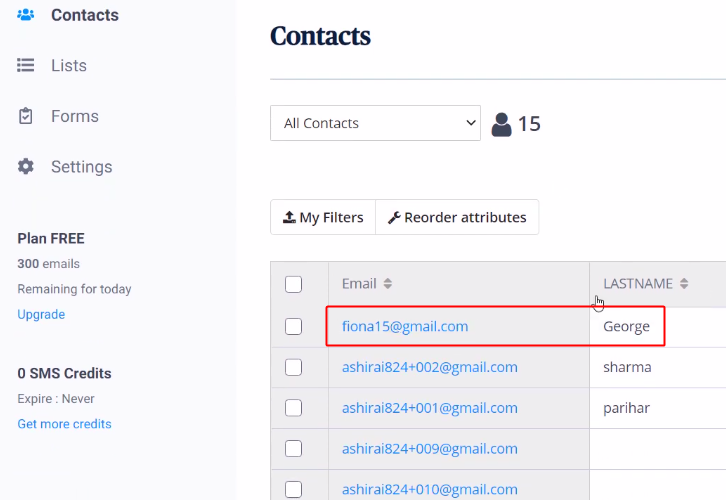
Finally, when you check your Facebook page, the product is automatically posted from WooCommerce.

Conclusion –

Well, this is all about ‘How to Display New WooCommerce Products to Facebook Page’. Consequently, after completing the step by step procedure, you will end up posting the WooCommerce products on Facebook page automatically. Pabbly Connect is the only automation and integration tool that you’ve been waiting for. You won’t have to pay anything to create an account and you can work on it without any coding skills.

Now, try Pabbly Connect for FREE for all its premium features. For any further queries/suggestions, do comment below.

You May Also Like To Read –
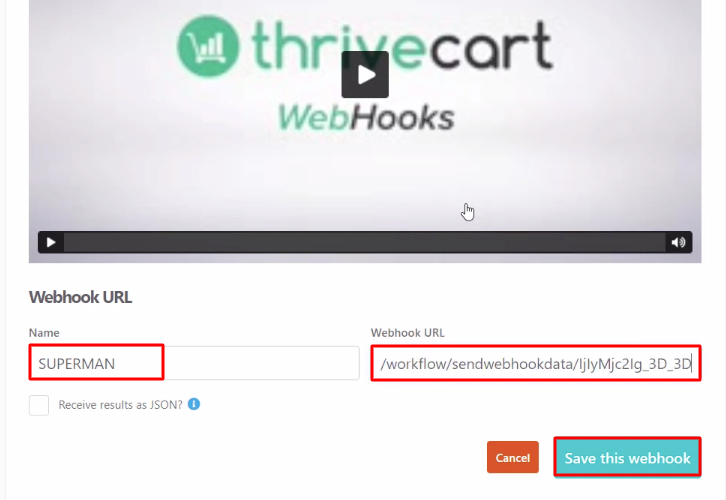
How to Assign Course to Student in Zenler on ThriveCart Sale

How to Assign Course to Student in Zenler on ThriveCart Sale

Want to know the easiest way to integrate ThriveCart with Zenler? If yes then follow this article as we are going to reveal the step-by-step procedure to automatically assign course to student in Zenler on ThriveCart sale using Pabbly Connect.

Basically, Pabbly Connect is an integration and automation software that lets you transfer data in real-time.

How to Assign Course to Student in Zenler on ThriveCart Sale

As we all know, ThriveCart is a software that helps you to promote and take payments for physical products, digital products, subscriptions, and services to your customer. Whereas, Zenler, now known as New Zenler is a learning management system and an online training course builder, that allows users to plan, design, publish, and host their course in a structured manner.

Sometimes we want that students who buy courses in ThriveCart could be automatically assigned to the respective courses in Zenler. To make this wish come true, Pabbly Connect is here.

By implementing this workflow you’ll accomplish the automatic assigning of courses to students in Zenler whenever someone makes a course purchase in ThriveCart. Consequently, you can automatically assign courses to the new students in Zenler from ThriveCart sales.

However, there is no direct integration possible for these two services yet. So, we are going to use Pabbly Connect to make this integration possible.

Using this software, you can effortlessly share data within multiple premium services easily. More importantly, it won’t need any coding skills & even a newbie can use it efficiently. Moreover, this would be just a one-time setup. After that, the data will automatically be transferred in real-time.

Why Choose This Method Of Integration?

In contrast with other integration services-

  • Pabbly Connect does not charge you for its in-built apps like filters, Iterator, Router, Data transformer, and more
  • Create “Unlimited Workflows” and smoothly define multiple tasks for each action
  • As compared to other services which offer 750 tasks at $24.99, Pabbly Connect offers 50000 tasks in the starter plan of $29 itself
  • Unlike Zapier, there’s no restriction on features. Get access to advanced features even in the basic plan
  • Try before you buy! Before spending your money, you can actually signup & try out the working of Pabbly Connect for FREE

Sign Up To Pabbly Connect

So, buckle up as we’re going to discover how to connect ThriveCart and Zenler in real-time. Furthermore, we’ve attached a template for this integration to help you get started more-quickly. You can strike the ‘Use Workflow’ button below to get started. Also, you can go to the Marketplace & look for more apps/integrations.

How

Assign Course to Student in Zenler on ThriveCart Sale

Apart from this integration, Pabbly Connect offers using many remarkable features even in the free plan. Some of these features include using routers, formatters, instant triggers, multi-step calls & support thousands of app integrations.

Now, without taking any more of your time, let’s get directly on track & follow the step by step procedure to integrate ThriveCart and Zenler.

Step 1: Sign up to Pabbly Connect

Sign Up

Begin the process to assign course to student in Zenler on ThriveCart sale by clicking on the ‘Sign Up Free’ button on the Pabbly Connect dashboard. Subsequently, either fill-up all the details manually or sign up using Gmail credentials.

Try Pabbly Connect for FREE

Step 2: Access Pabbly Connect

Select Connect

Next, after logging into the account, click on the ‘Access Now’ button as shown in the above image.

Step 3: Workflow for ThriveCart to Zenler Integration

(a) Start with a New Workflow

Create New Workflow

Start with creating a workflow for your project by clicking on the ‘Create Workflow’ button.

(b) Name the Workflow

Name the Workflow

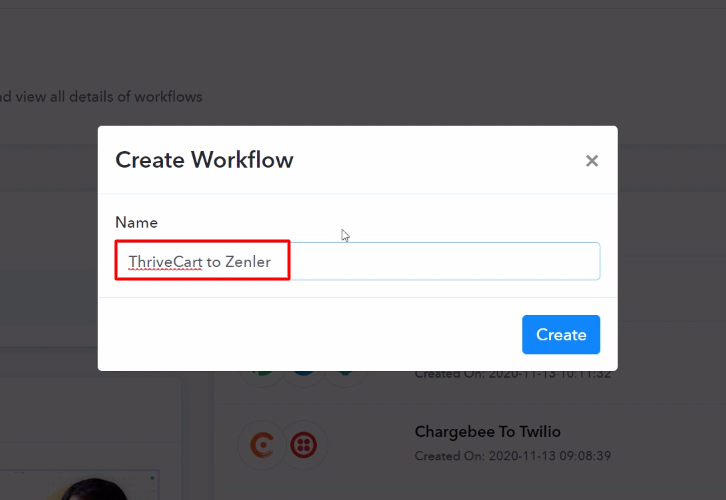
Now, you need to name the workflow just like in the above-shown image. I named the workflow ‘ThriveCart to Zenler’, you can obviously name the workflow as per your requirements.

Step 4: Setting Trigger for ThriveCart to Zenler Integration

As soon as you are done with naming your workflow, you will have to select the application you want to integrate. Pabbly Connect allows you to connect unlimited premium apps, create your free account now.

(a) Select Application you Want to Integrate

Select Thrivecart

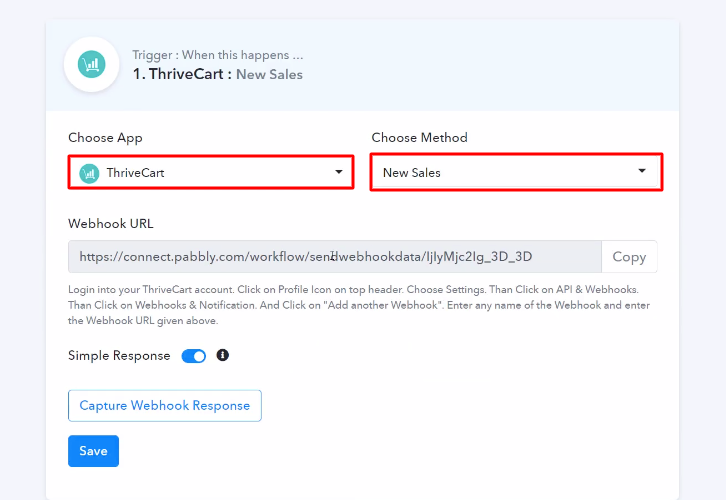
Now, you have to select the application that you want to integrate. In this case, we are choosing ‘ThriveCart’ for integration. In the method section, select ‘New Sales’.

(b) Copy the Webhook URL

Copy the Webhook URL

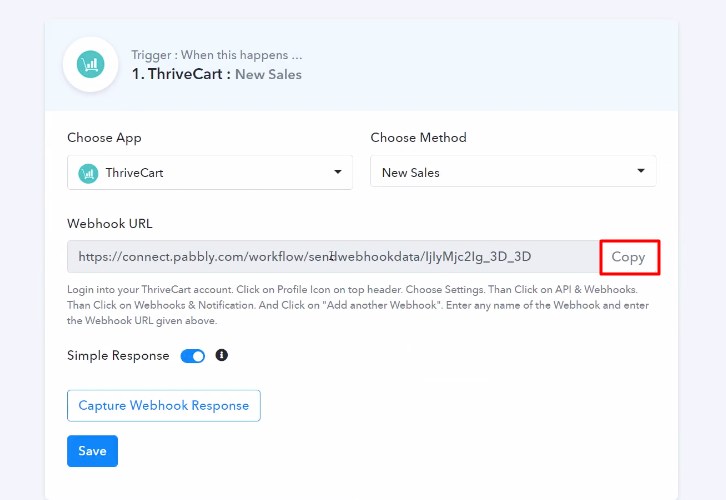
The next step is to copy the webhook URL which is appearing on the dashboard just like in the above-shown image.

Step 5: Connecting ThriveCart to Pabbly Connect

To connect ThriveCart to Pabbly Connect, you have to paste the copied Webhook URL in the software. For that, you have to log in to your ThriveCart account.

(a) Click on ThriveCart Settings

Click Settings Thrivecart

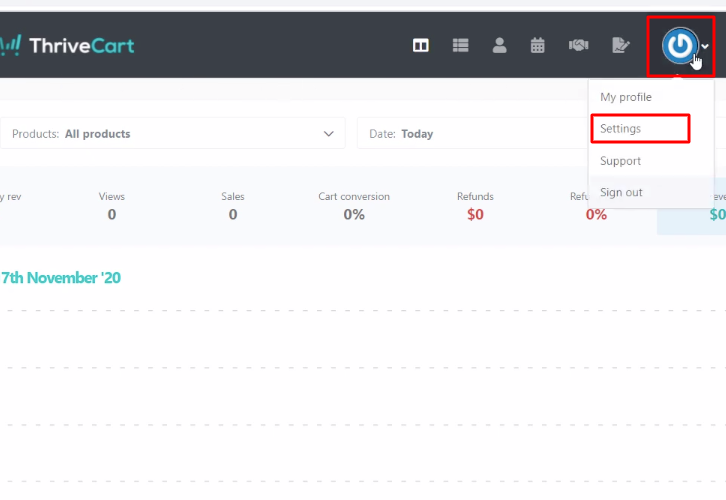
Now, to paste the webhook URL, click the ‘Profile’ icon and then select the ‘Settings’ in your ThriveCart dashboard.

(b) Click on API & Webhooks

API & Webhooks Thrivecart

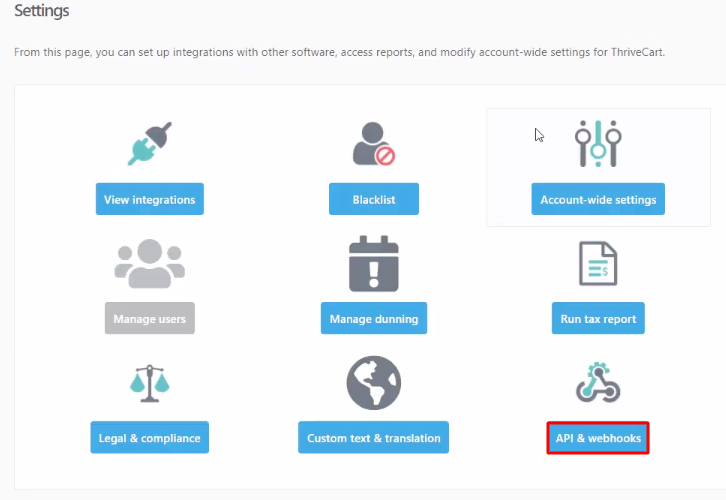
Next, click on the ‘API & Webhooks’ option given on the page.

(c) Select Webhooks & Notifications

Webhooks & Notifications Thrivecart

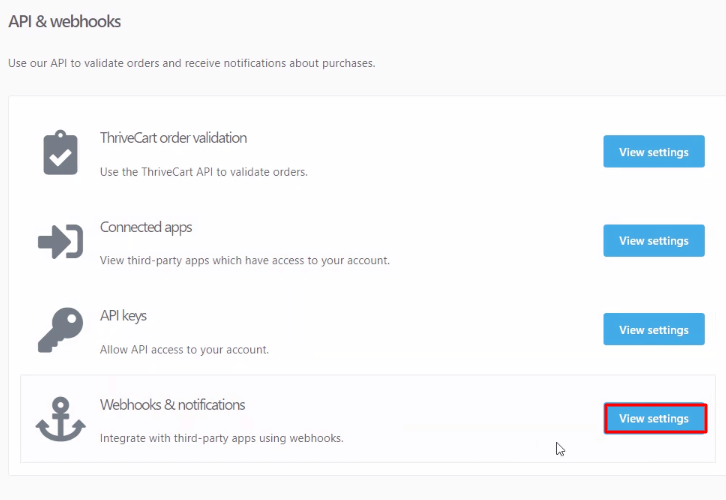
Now, in this step, click on the ‘View Settings’ button of webhooks & notifications.

(d) Add Another Webhook

Add Another Webhook Thrivecart

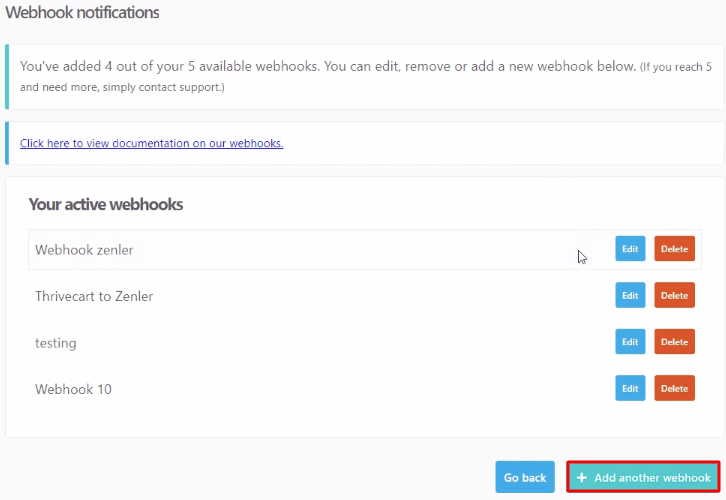
Here, simply click the ‘Add Another Webhook’ button to paste the webhook URL.

(e) Paste the Webhook URL

Paste the Webhook URL Thrivecart

Now, simply name the webhook whatever you like and paste the URL in the ‘Webhook URL’ section. After making the required changes hit the ‘Save the Webhook’ button.

Step 6: Make a Test Purchase

To check this integration, we will make a dummy purchase in ThriveCart to capture the data.

(a) Click on Products

Click on Products Thrivecart

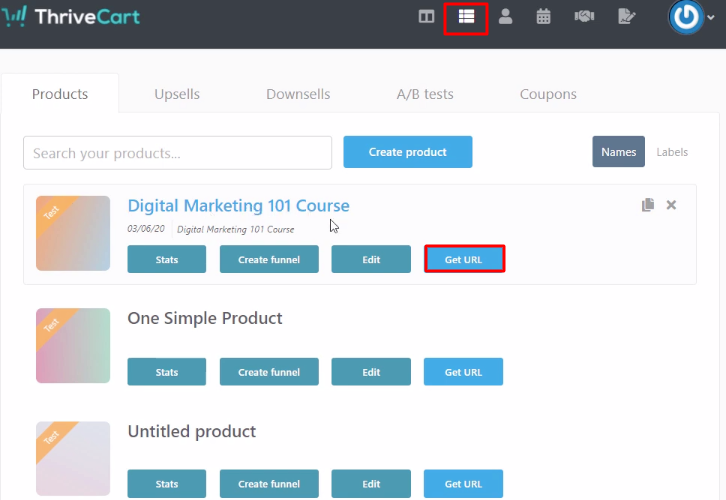
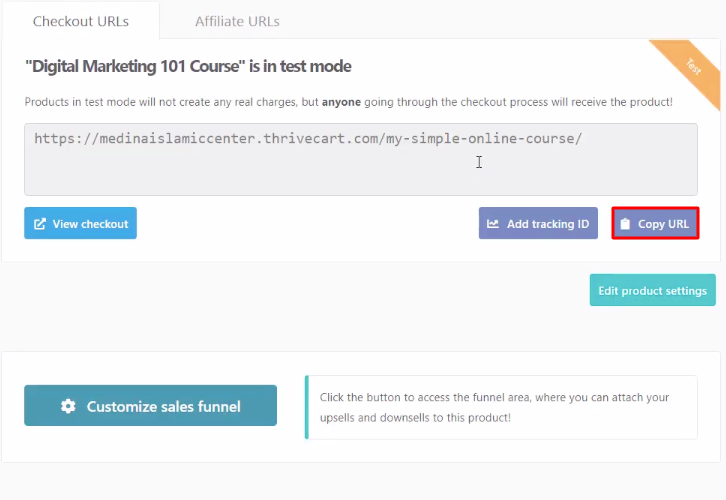
To make a purchase, click on the products icon given at the top of the screen and then select any of the listed products and hit the ‘Get URL’ button.

(b) Copy the Product URL

Copt Product URL Thrivecart

Simply, copy the given product URL and open it in the new tab.

(c) Add Customer Details

Add Customer Details

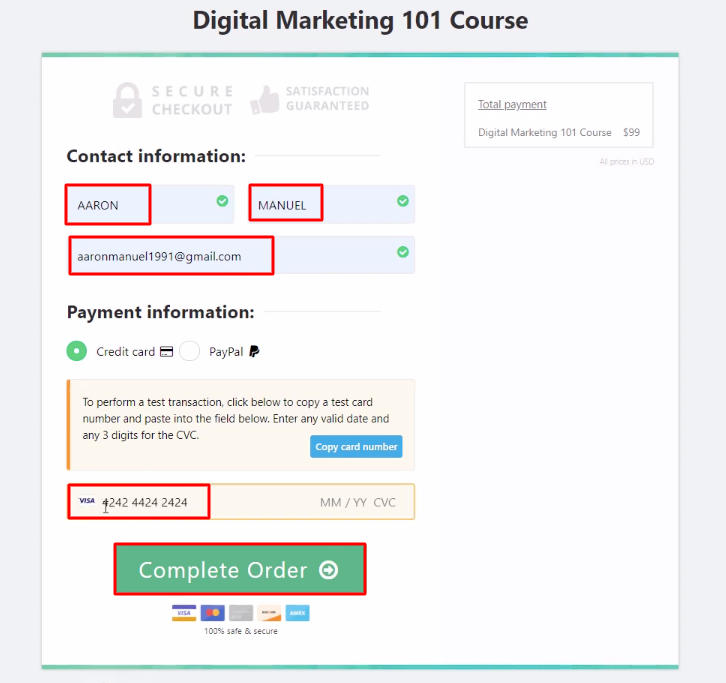
Now, add the customer details like the name and email of the student, etc. Enter your card details and then hit the ‘Complete Order’ button. But before clicking the button, click on the ‘Capture Webhook Response’ in Pabbly Connect.

Step 7: Test the Response in Pabbly Connect Dashboard

Save the Webhook Response

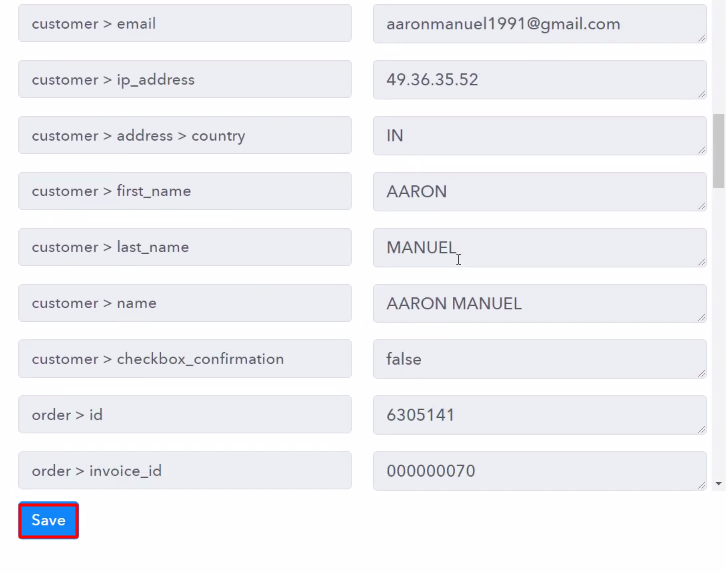
Once you click on the ‘Complete Order’ in ThriveCart and on the ‘Capture Webhook Response’ in Pabbly Connect, the customer info will appear on the Pabbly Connect dashboard. Then, click on the ‘Save’ option.

Step 8: Setting Actions for ThriveCart to Zenler Integration

To make this ThriveCart-Zenler integration work, you have to choose three actions for your trigger. The first is of Zenler to search the student for their student ID, the second is of ‘Router’ to divide the categories of students, and the third is of Zenler to assign the courses to the students.

(a) Select Application you Want to Integrate

Select Zenler

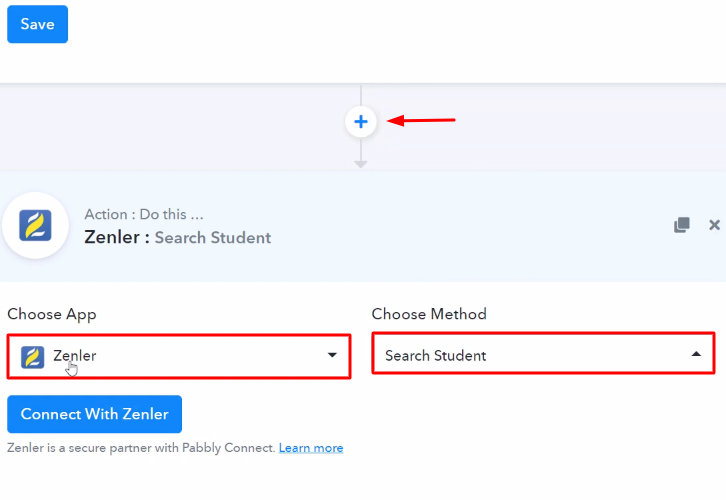
Now in this step, click on the ‘+’ button below and choose the application that you want to integrate. Here we will choose ‘Zenler’ to integrate and in the method section select ‘Search Student’.

(b) Click the Connect Button

Click Connect Zenler

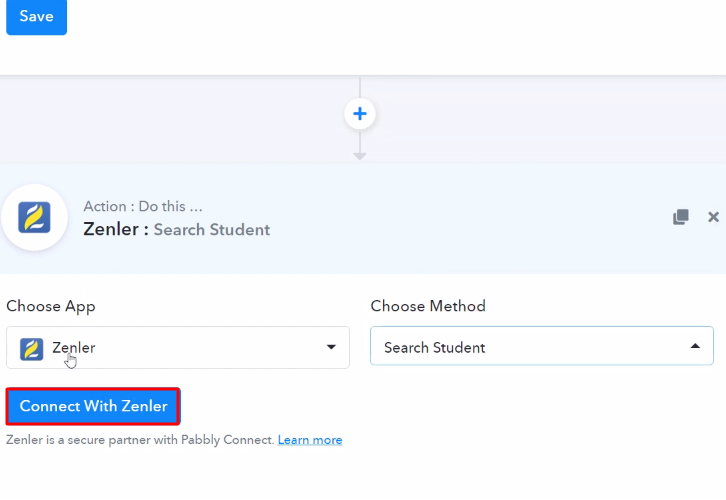
After choosing the application click on the ‘Connect with Zenler’ button to move forward.

(c) Click on Zenler Settings

Settings Zenler

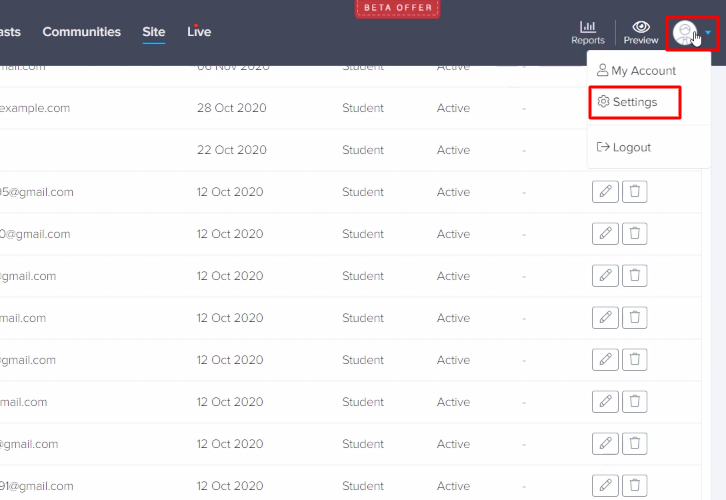
To get the API key, click on the profile icon of your Zenler account, and then select the settings option.

(d) Copy the API Key

Copy the API Key Zenler

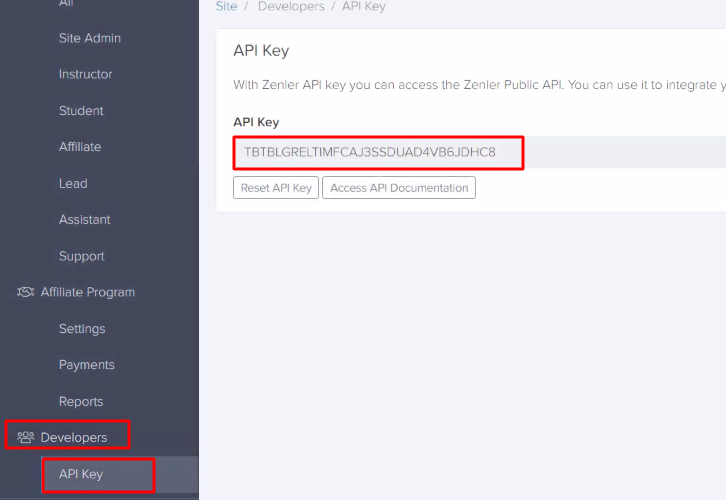
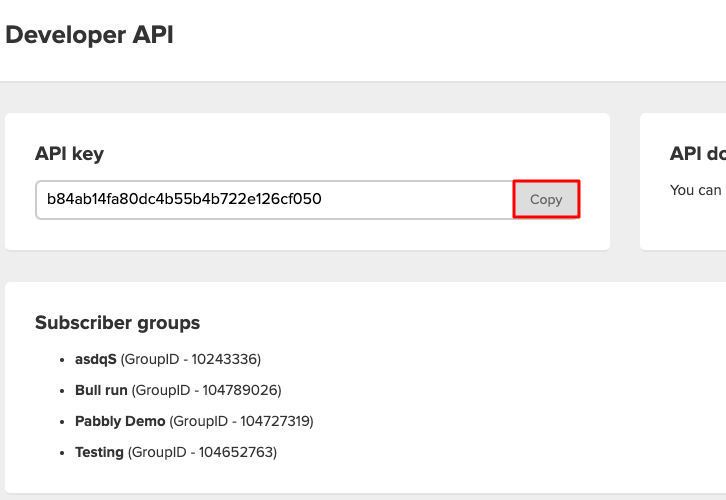
Scroll down, select ‘Developers’, and then select the ‘API Key’ option. Simply copy the given API key.

(e) Paste the API Key

Paste the API Key Zenler

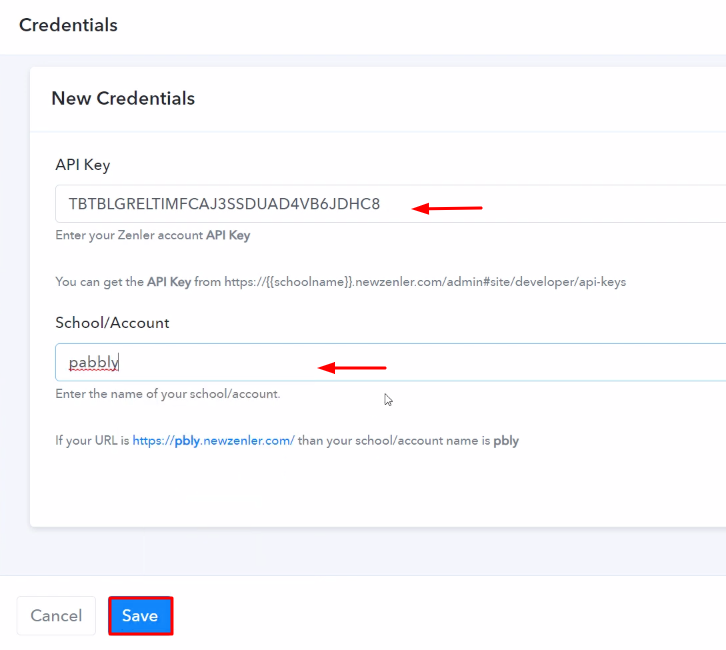
Paste the copied API key and add your school/account from your Zenler account URL. After making these changes, hit the ‘Save’ button.

(f) Send Test Request

Send Test Request Zenler

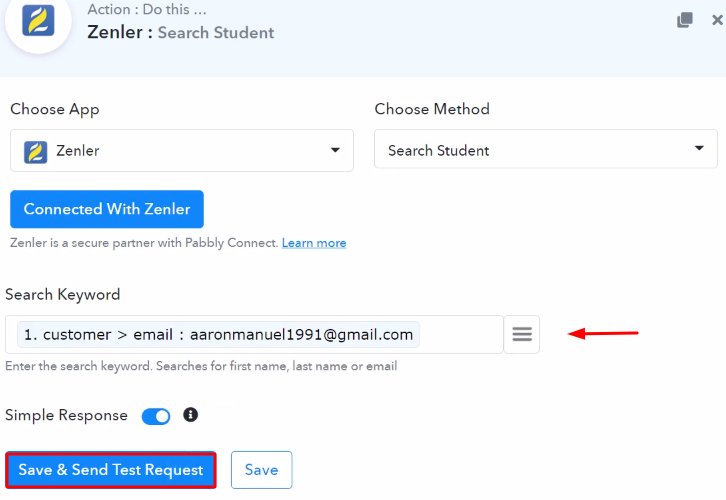
Now, map the student’s email id or name to search the student and then hit the ‘Save & Send Test Request’ button to get the student ID.

(g) Select Router

Select Router

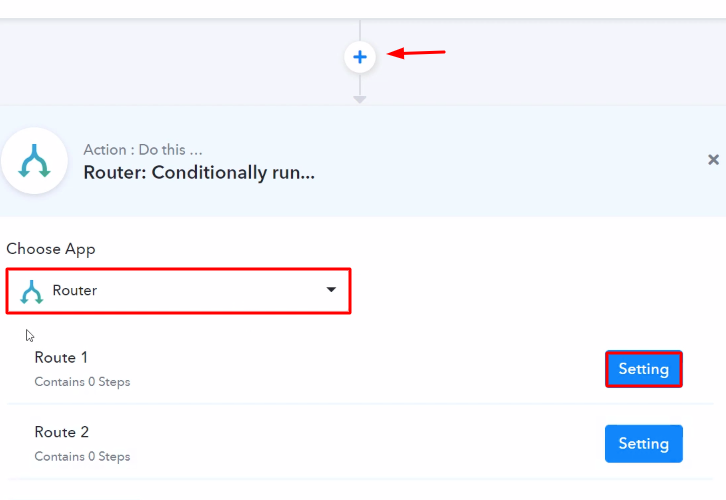
Now in this step, click on the ‘+’ button below and choose the application that you want to integrate. Here we will choose the ‘Router’ to integrate and then hit the ‘Settings’ button of route 1.

(h) Name the Route

Name the Router

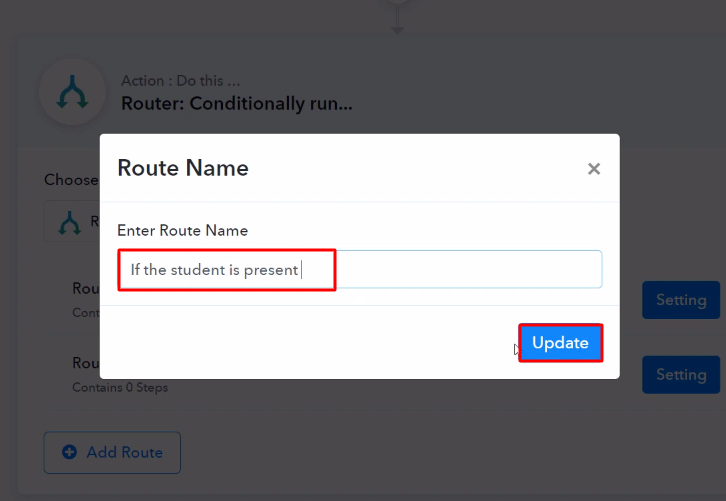
Name route 1 as if the student is present & route as if the student is not present then hit the ‘Update button.

(i) Map the Student ID

Map the Student ID

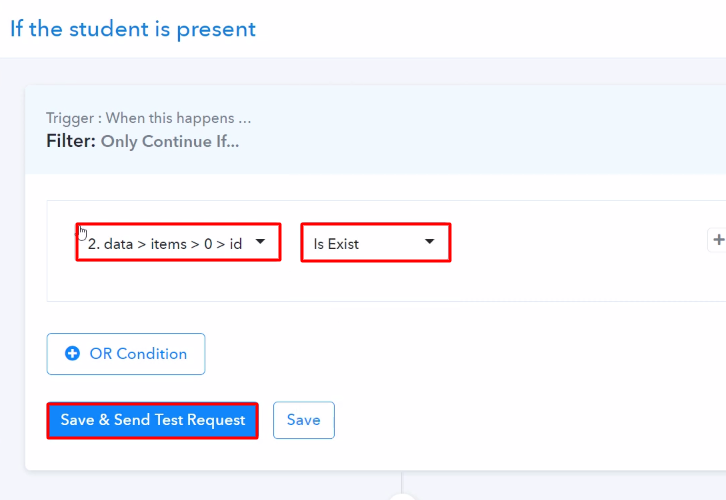
In this step, we are going to find out whether the student exists in the Zenler account or not. Map the student ID we got from previous the action stage and select the ‘Is Exist’ in the second section then hit the ‘Save & Send Test Request’ button.

(j) Save the API Response

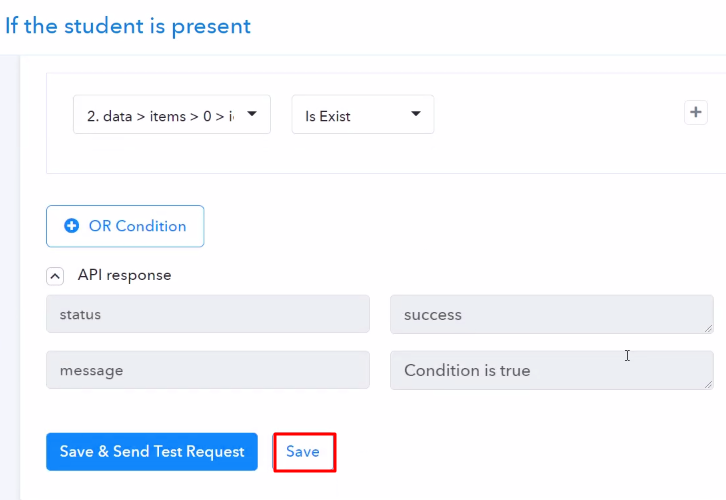
Save the API Response

Here, we can see that the student exists in the Zenler account so hit the ‘Save’ button. Similarly, you can find out about any students by sending test requests on both routes. If any student doesn’t exist, then you can add the student by selecting the Zenler in action and enroll a student in the event section.

(k) Select Application you Want to Integrate

Select Zenler 2

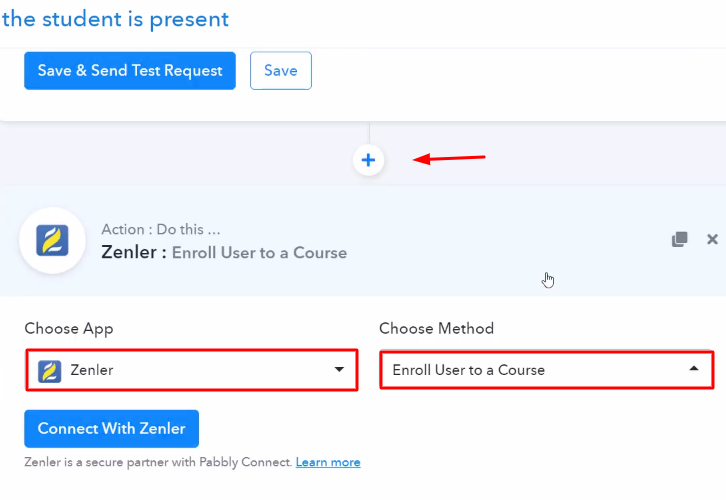
Now in this step, click on the ‘+’ button below and choose the application that you want to integrate. Here we will choose ‘Zenler’ to integrate and in the method section select ‘Enroll User to a Course’.

(l) Click the Connect Button

Click Connect Zenler 2

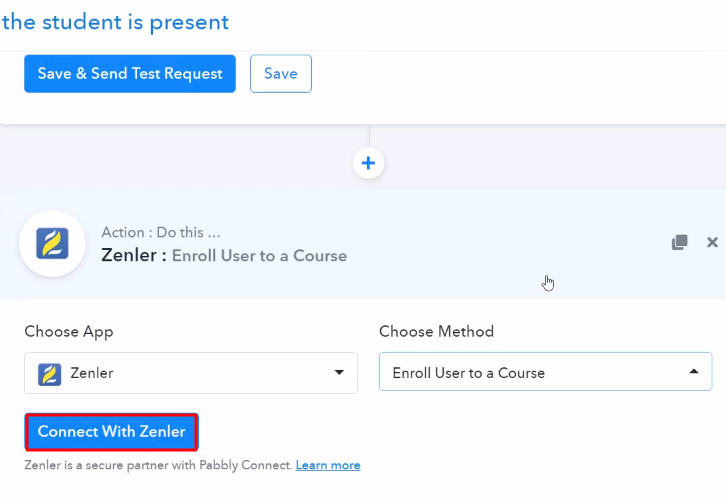
After choosing the application click on the ‘Connect with Zenler’ button to move forward.

Step 9: Connecting Zenler to Pabbly Connect

To connect Zenler to Pabbly Connect, you have to paste the API key from Zenler into Pabbly Connect. For this, you have to log in to your Zenler account.

(a) Click on Zenler Settings

Settings Zenler

To get the API key, click on the profile icon of your Zenler account, and then select the settings option.

(b) Copy the API Key

Copy the API Key Zenler

Scroll down, select ‘Developers’, and then select the ‘API Key’ option. Simply copy the given API key.

(c) Paste the API Key

Paste the API Key Zenler

Paste the copied API key and add your school/account from your Zenler account URL. After making these changes, hit the ‘Save’ button.

(d) Map the Fields

Map the Fields

After connecting with your Zenler account, map all the fields quickly like student ID, course ID, etc.

(e) Save and Send Test Request

Send Test Request Zenler 2

Once you are done adding up all field data click on the ‘Save & Send Test Request’ button.

Step 10: Check Response in Zenler Dashboard

Check Response

Finally, when you check your Zenler dashboard, you can see that the course is assigned to the student in Zenler on ThriveCart sale automatically.

Conclusion –

In a nutshell, this was all about ‘How to Assign Course to Student in Zenler on ThriveCart Sale’. Consequently, after completing this step by step procedure, you will end up auto-assigning course to student in Zenler on ThriveCart sale.

Meanwhile, you can grab, Pabbly Connect for FREE with all its premium features.

Also, comment below your queries and suggestions.

You May Also Like To Read –
How to Create Sendinblue Contact from New Shopify Customers

How to Create Sendinblue Contact from New Shopify Customers

Are you still adding Shopify customers as Sendinblue contacts manually?

If yes then let me introduce you to the automation for the same. We are going to reveal the step by step procedure to automatically add Sendinblue contact from the newly added Shopify customer using Pabbly Connect.

How to Create Sendinblue Contact from New Shopify Customers

But, before getting straight into the procedure, let’s understand the services as well as the need for integration here. Shopify is an eCommerce platform that enables you to build an online shop within minutes. Whereas, Sendinblue is an email marketing software that assists you in making a stronger relationship with your customers.

This workflow will help you accomplish the automatic contact addition on Sendinblue whenever there is a new customer entry on your Shopify store. Consequently, once you set-up this workflow all your new customers automatically get listed on your email marketing tool.

Why Choose This Method Of Integration?

In contrast with other integration services-

  • Pabbly Connect does not charge you for its in-built apps like filters, Iterator, Router, Data transformer and more
  • Create “Unlimited Workflows” and smoothly define multiple tasks for each action
  • As compared to other services which offer 750 tasks at $24.99, Pabbly Connect offers 50000 tasks in the starter plan of $29 itself
  • Unlike Zapier, there’s no restriction on features. Get access to advanced features even in the basic plan
  • Try before you buy! Before spending your money, you can actually signup & try out the working of Pabbly Connect for FREE

Sign Up To Pabbly Connect  

However, there is no direct integration possible for these two services yet. So, we are going to use Pabbly Connect to make this integration possible.

Using this software, you can effortlessly share data within different premium services. More importantly, it won’t need any coding knowledge & even a newbie can use it efficiently. Moreover, the workflow would be just a one-time setup. After that, the data will automatically be transferred in real-time.

So, buckle up as we’re going to discover how to connect Shopify and Sendinblue in real-time. Furthermore, we’ve attached the template for this integration to help you get started at full tilt. You can click on the ‘Use Workflow’ button below to get started. Also, you can go to the App Directory & look for more apps/integrations.

How

Create Sendinblue Contact from New Shopify Customers

Now, without taking any more of your time, let’s get directly on track & follow the step by step procedure to integrate Shopify and Sendinblue.

How to Create Sendinblue Contact from New Shopify Customers (step by step)

Step 1: Sign up to Pabbly Connect

Sign Up

Begin the procedure of connecting Shopify with Sendinblue with visiting the Pabbly Connect website. Then, hit the ‘Sign-Up Free‘ button available on the home page. Then signup using your existing Google account or manually fill the registration form.

Try Pabbly Connect for FREE

Step 2: Access Pabbly Connect

Select Connect

After that, strike the ‘Access Now’ button of the software ‘Connect’ within the Pabbly applications.

Step 3: Workflow for Shopify with Sendinblue Integration

(a) Start with a New Workflow

Create New Workflow

Further, start with creating a workflow to add contacts on Sendinblue for every new Shopify contact & to do this push the ‘Create Workflow’ button first.

(b) Name the Workflow

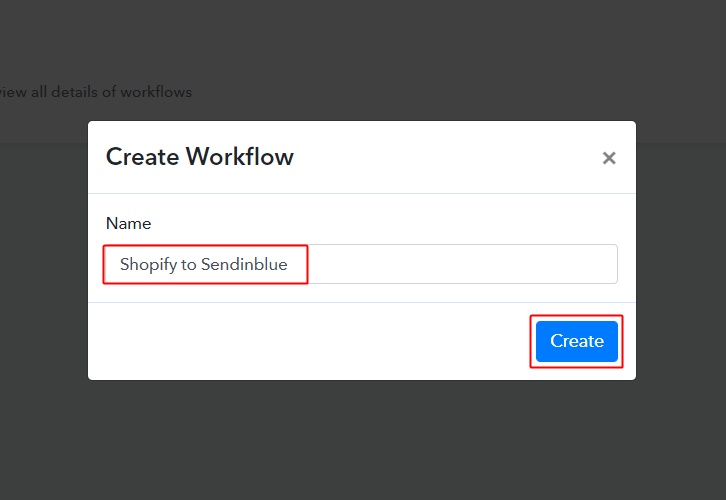
workflow_for_shopify_to_sendinblue

Now, name the workflow as per the integration or use-case (for instance: Shopify to Sendinblue etc). Finally, strike the ‘Create’ button available.

Step 4: Setting Trigger for Shopify to Sendinblue Integration

To automatically add Sendinblue contact for the newly added Shopify customer, you’ll need to set-up a trigger on the new Shopify customer and its respective action to add a contact on Sendinblue using Pabbly Connect.

(a) Select Application you want to integrate

integrate_shopify_for_shopify_to_sendinblue

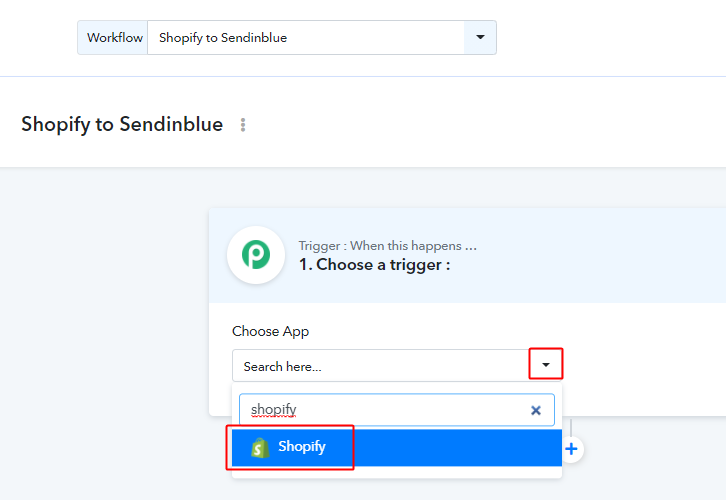
When you click on the create button, a page containing the trigger window will open up next.

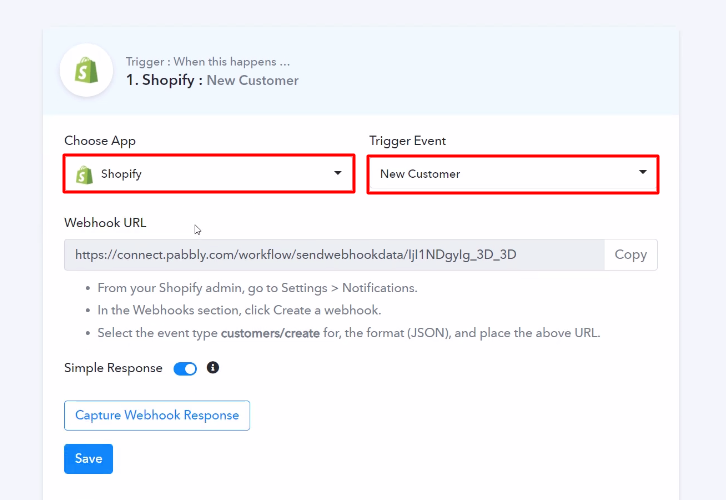
Select the ‘Shopify’ app from the ‘Choose App’ field’s drop-down options.

(b) Select Method & Connect with Shopify

copy_webhook_url_for_shopify_to

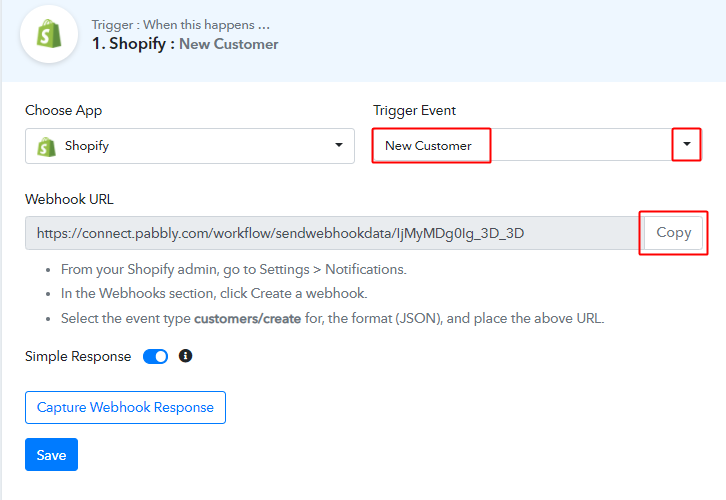
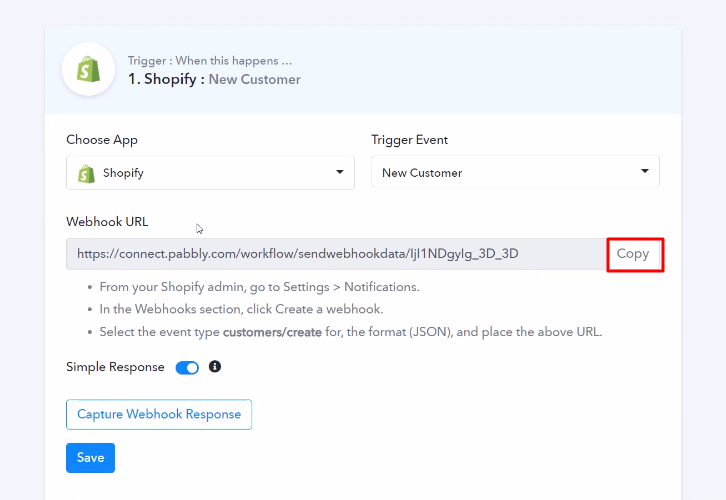
Select the method to be ‘New Customer’ & then copy the webhook URL.

Step 5: Connecting Shopify to Pabbly Connect

To connect Shopify with Pabbly connect, you’ll need to sign-in your Shopify account & create a webhook first.

(a) Go to Your Shopify Settings

click_on_shopify_settings

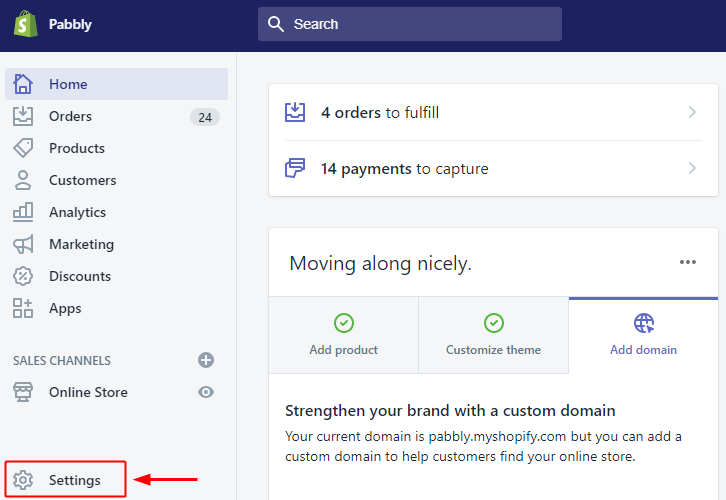
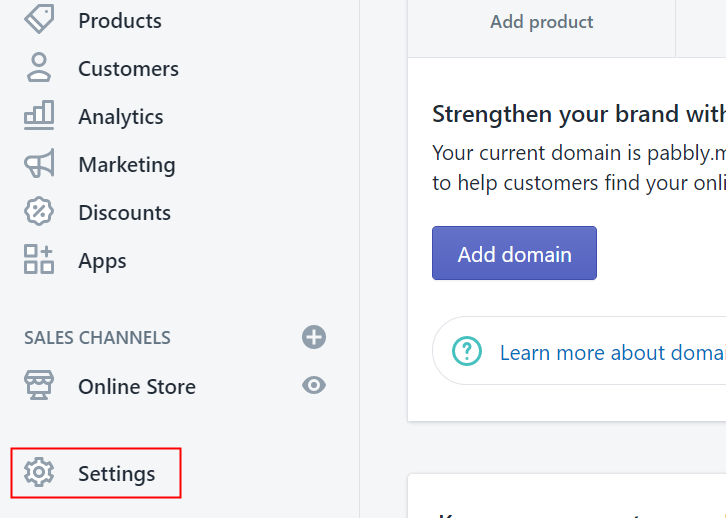
After successfully logging into your Shopify account, click on the ‘Settings’ option available at the bottom of the left vertical menu.

(b) Select Notification Option

Go To Notification

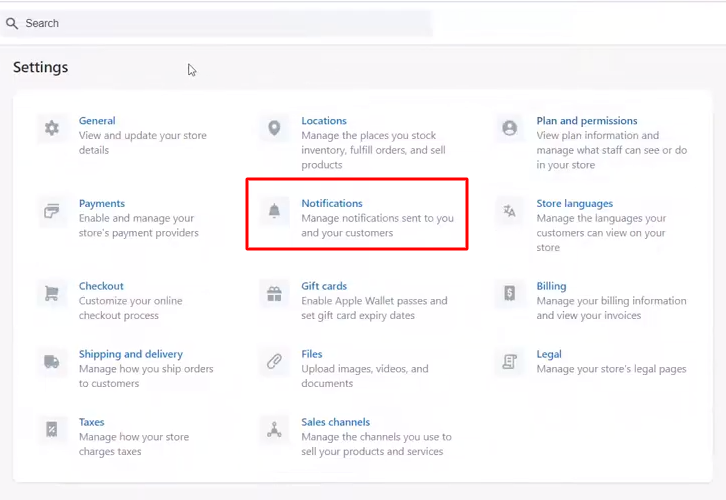
A page will open up carrying all the different setting options of the application. Select the notification option as we need to send automatic emails on user sign up in Shopify store.

(c) Click the Create Webhook Button

Create Webhook Shopify

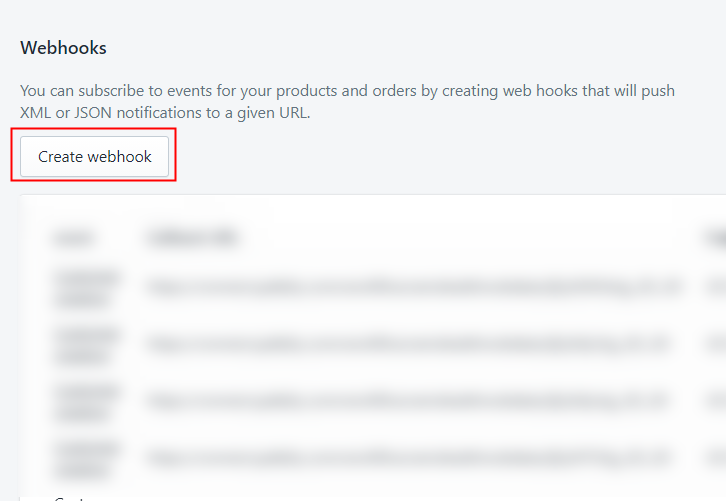
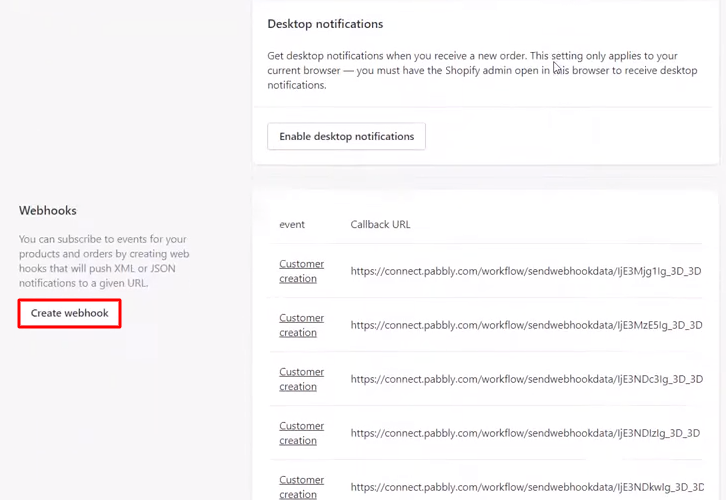
On the next page, there will be many notification options. So, head directly to the bottom of the page on ‘Webhooks’ and click the ‘Create Webhook’ button.

(d) Add Webhook Details

add_webhook_details

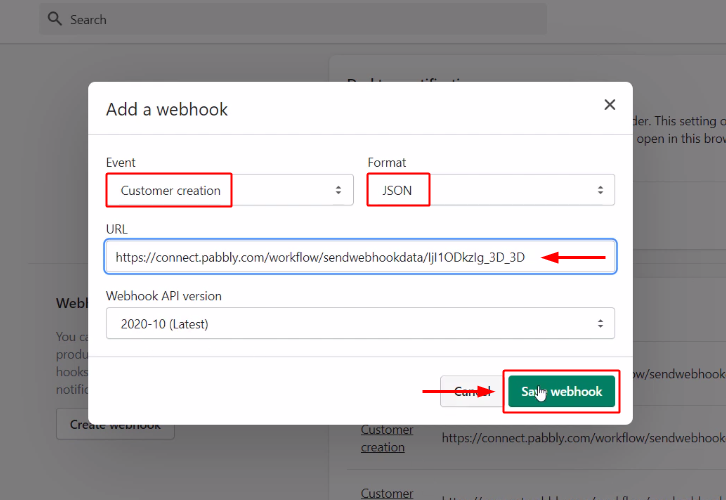
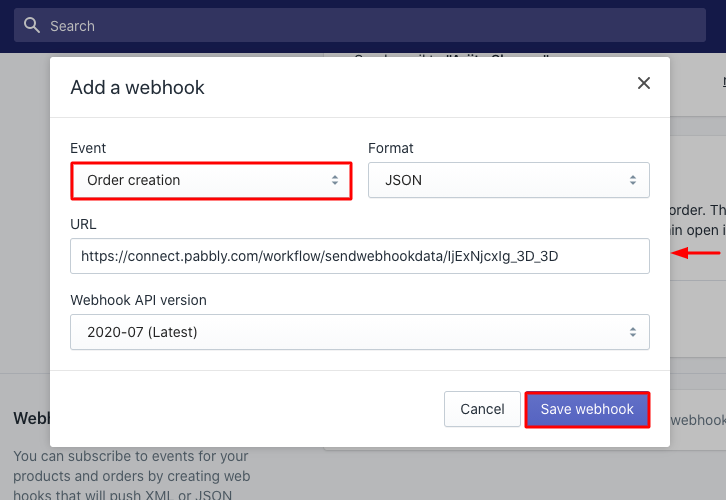
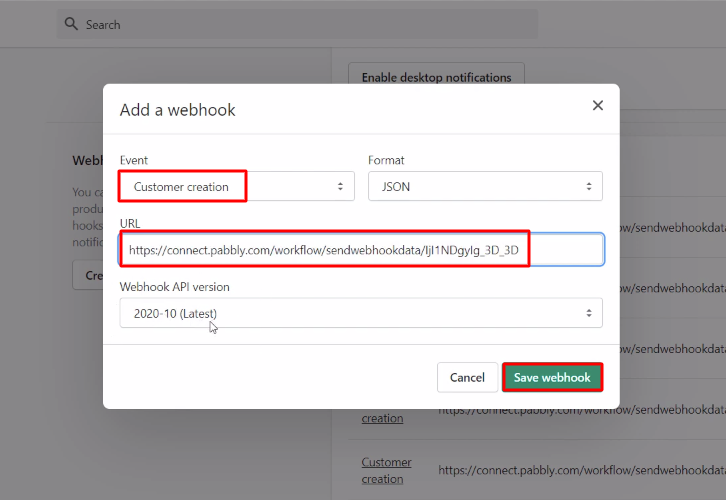
A window asking for webhook information will open up. First, select the event field value as ‘Customer creation’, Then, make sure the format is ‘JSON’. After that paste, the copied webhook URL in the URL field.

Finally, hit the ‘Save webhook’ button present at the bottom right corner of the window.

Step 6: Test the Response in Pabbly Connect Dashboard

As we can see, we are done setting up the trigger for Shopify and Sendinblue integration. So, let’s test the trigger setting by making a test customer on Shopify.

(a) Capture Webhook Response

capture_webhook_response_for_razorpay_to_klaviyo

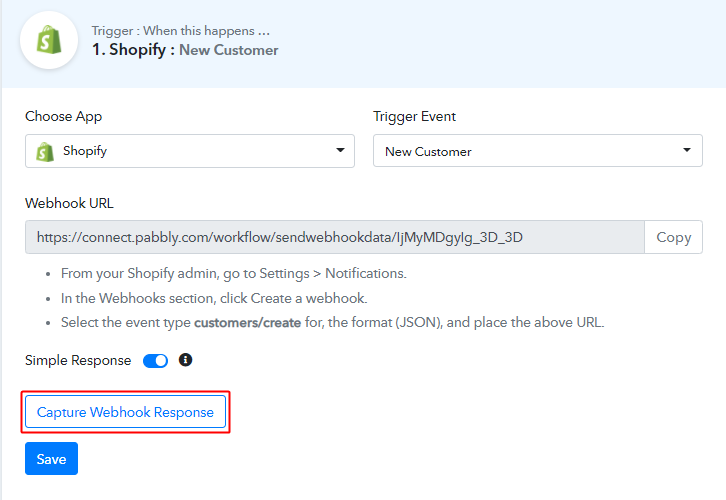
To test the trigger setting, strike the ‘Capture Webhook Response’ button on your Pabbly Connect trigger window.

(b) Open Your Shopify Store

open_online_store

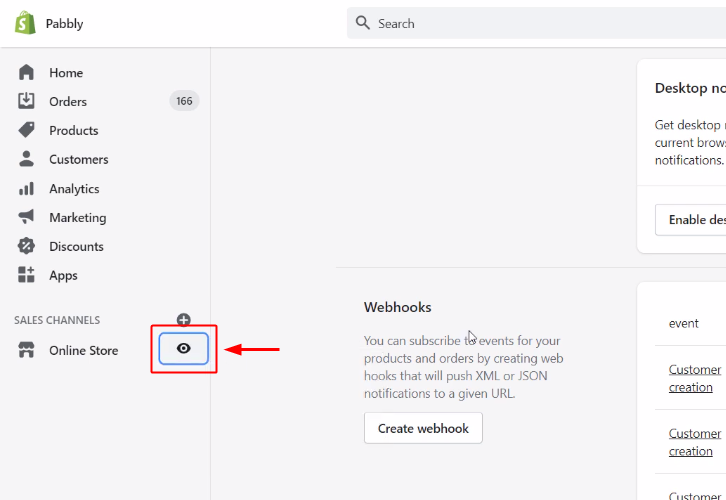
Now, go back to your Shopify dashboard and open the online store.

(c) Create a Test Contact

create_customer_for_shopify_to_mailjet

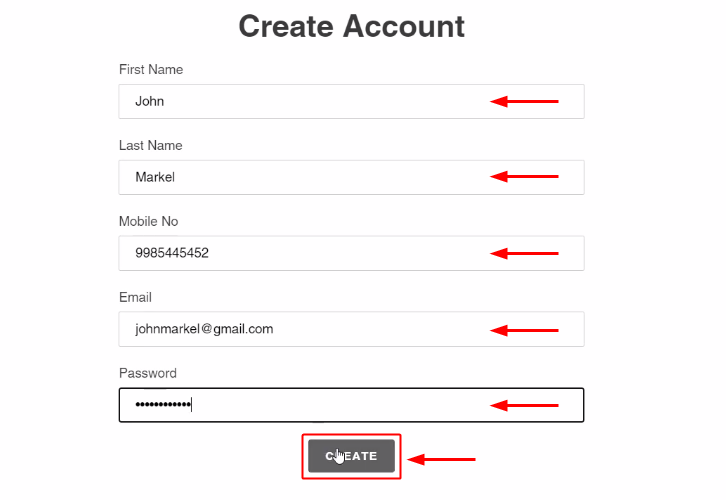
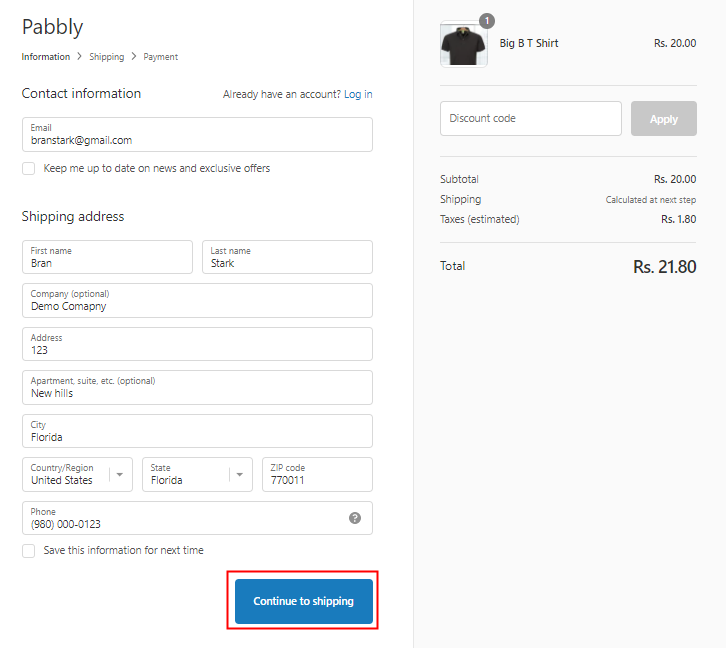
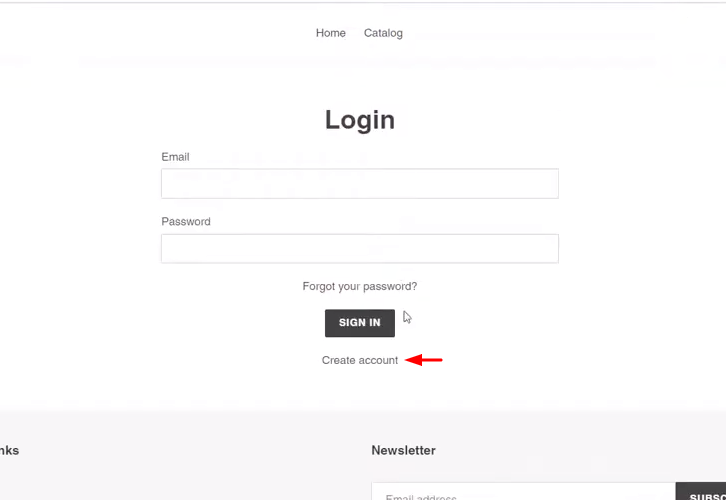
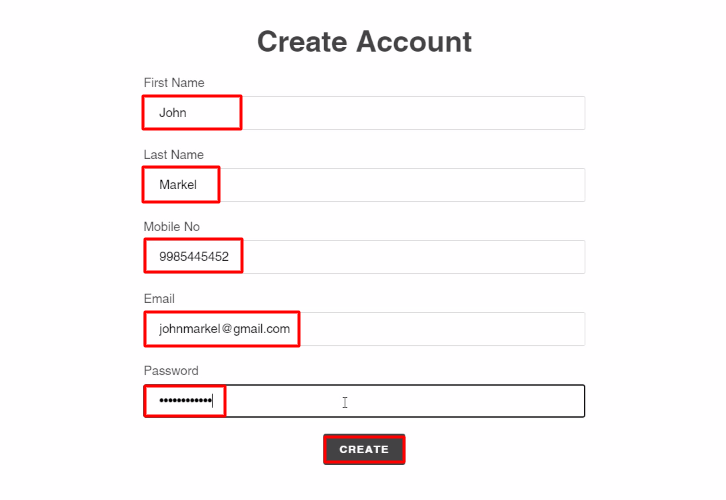
Fill in all the details to make a test contact and complete the registration.

(d) Check & Save Trigger Response

check_and_save_trigger_response_for_shopify_to_mailjet

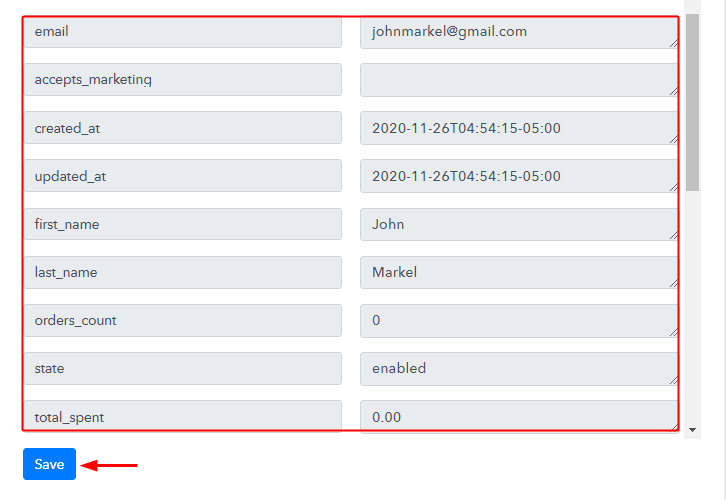
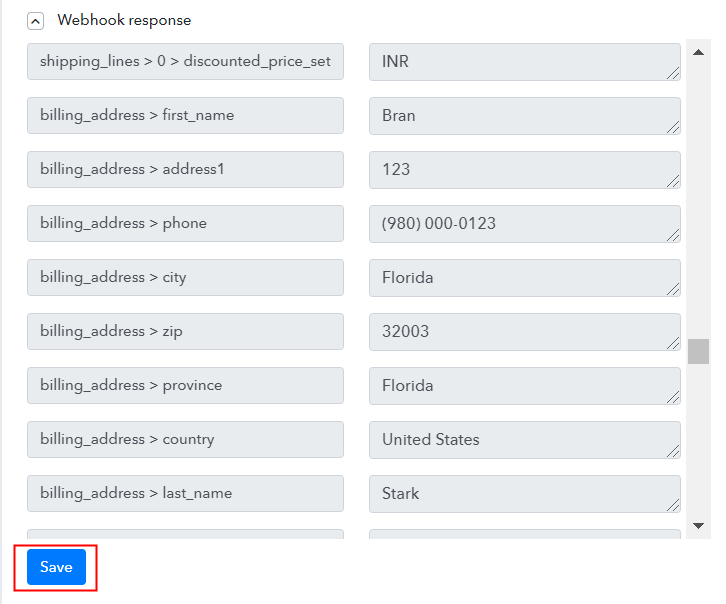
Once you successfully complete a registration, the Pabbly Connect trigger response will start showing the data of the current sign-up. Also, check and Save the trigger response.

Step 7: Setting Action for Shopify to Sendinblue Integration

Now, as we have gathered all the necessary information to create contact on Sendinblue from Shopify response. We can now proceed to feed this data as an action. So that a new subscriber will get created automatically for every new Shopify customer.

(a) Select Application you want to Integrate

integrate_sendinblue_for_shopify_to_sendinblue

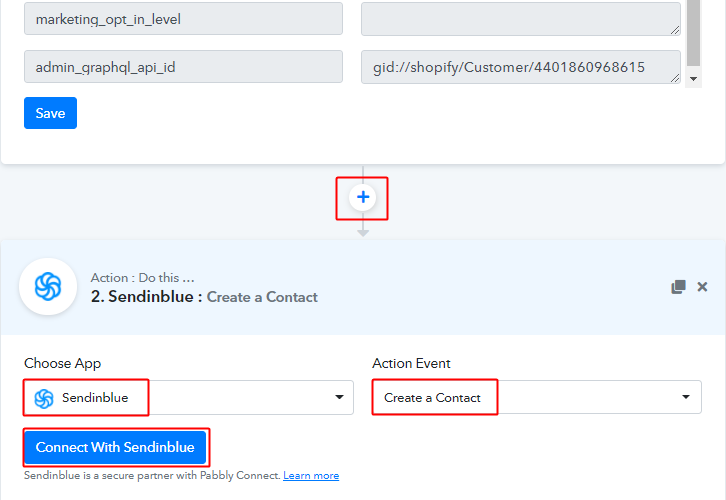
Next, hit the plus button next to the Shopify trigger.

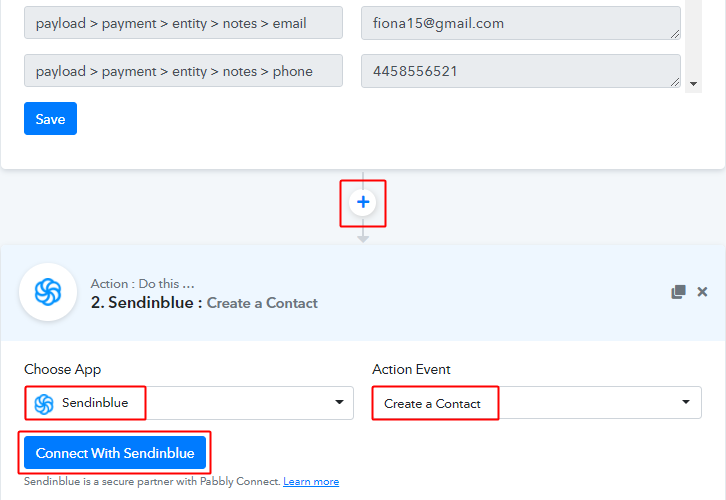
Select the app to integrate as ‘Sendinblue’ & method as ‘Create Contact’.

Lastly, push the ‘Connect with Sendinblue’ button.

Then the system will ask you for an API and API secret key.

(b) Connecting Sendinblue to Pabbly Connect

smtp_and_api

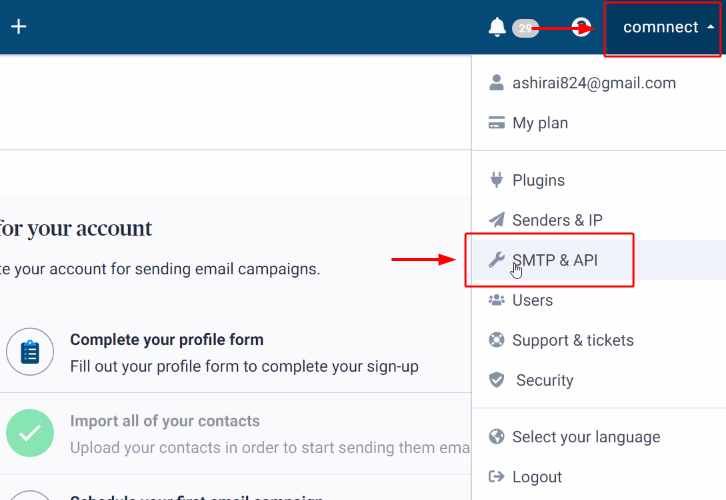
To feed the API key into the system. First, sign-in and go to your Sendinblue dashboard. After that, click on your profile. Then, select the ‘SMTP & API’ option from the menu that opens.

(c) Copy API Key

copy_sendinblue_api

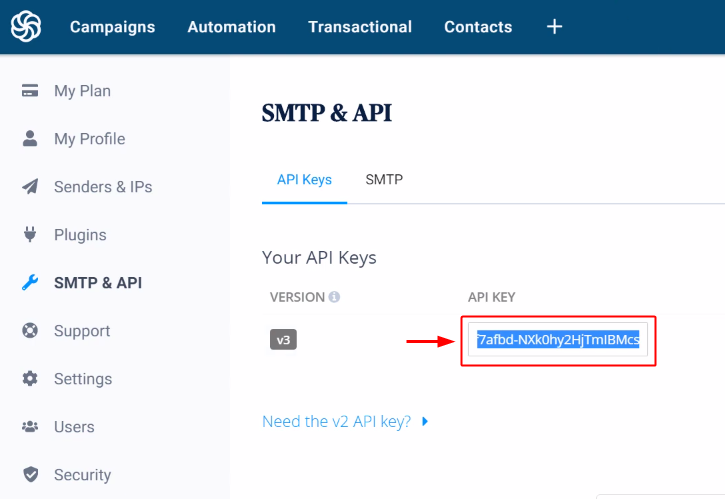
Subsequently, the API key will be available on the SMTP & API page, select & copy the ‘API Key’ available.

(d) Paste the Copied Sendinblue API Key & Save

paste_api_key_and_save_for_razorpay_to_sendinblue_workflow

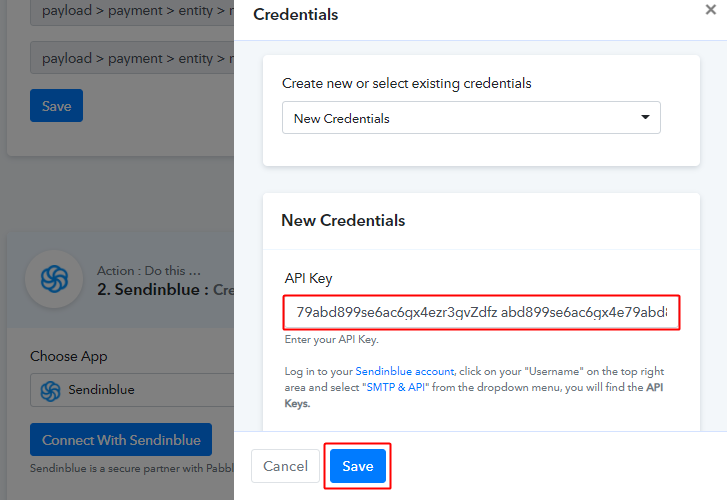
Paste the copied Sendinblue API key in the field provided and after that click on ‘Save’.

(e) Select List & Map Fields

select_list_and_map_fields_for_shopify_to_sendinblue

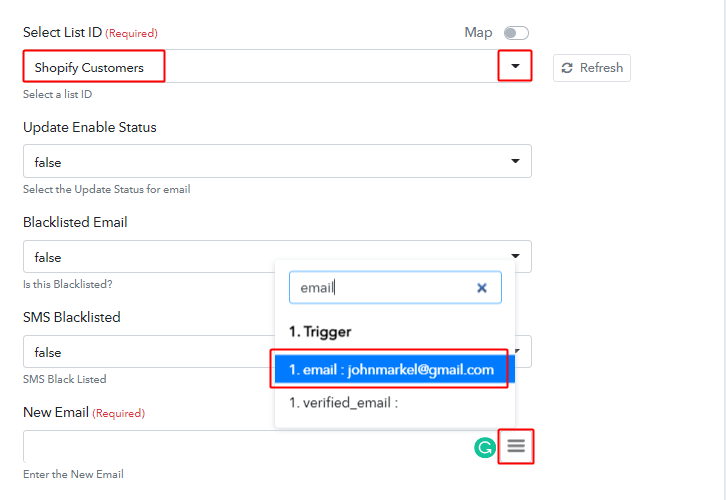
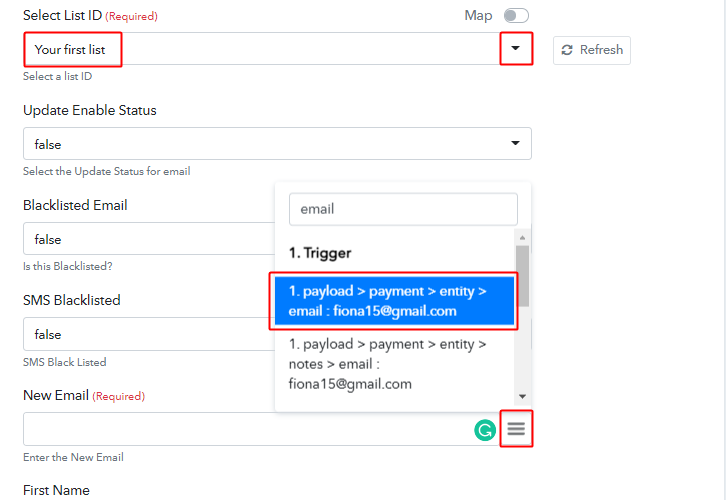
Now first, select the list and then map the email address.

To map a value, hit the menu button (three horizontal lines) next to that particular field.

After that, click-select the value that you want to map with that respective field.

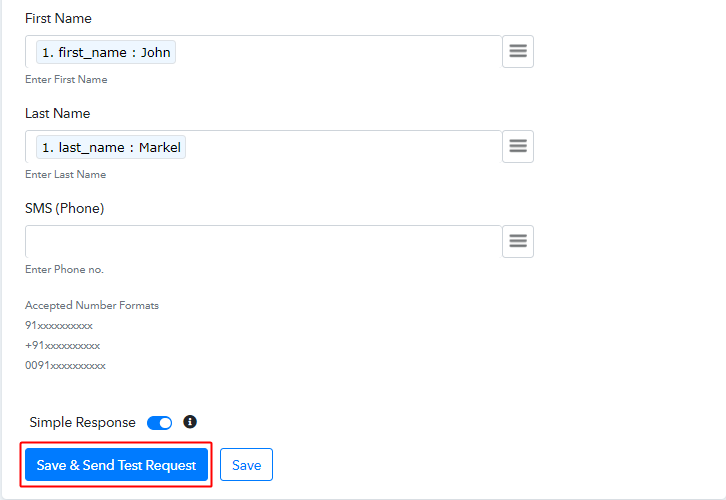
Similarly, map all the other required fields also.

(f) Send Test Request

send_test_request_for_sendinblue_action

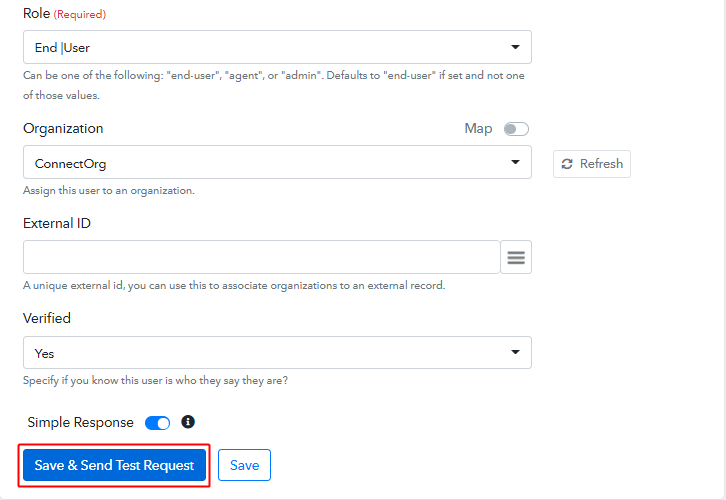
Further, click on the ‘Save & Send Test Request’ button to send a request for creating a contact on Sendinblue.

(g) Check & Save Response

check_and_save_the_sendinblue_api_response

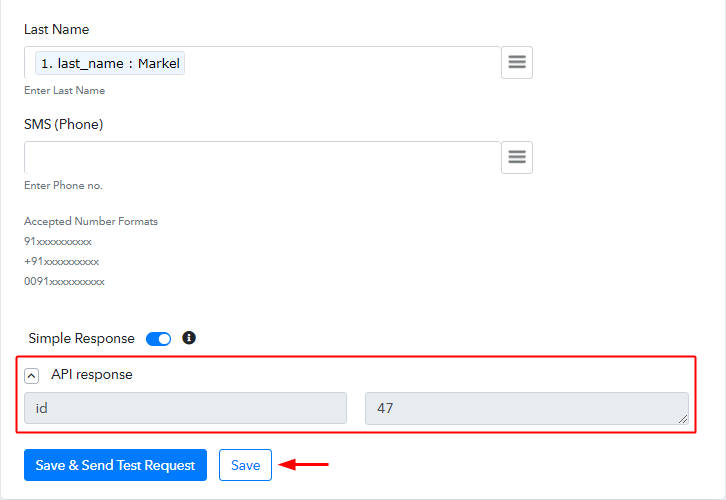
Certainly, you can check the response of your API in the action window. If there is some error while sending the data then it will show you the error. Finally, hit the ‘Save’ button to save the action API’s response.

Step 8: Check Response in Sendinblue Dashboard

contact_entry_on_sendinblue_for_shopify_to_sendinblue

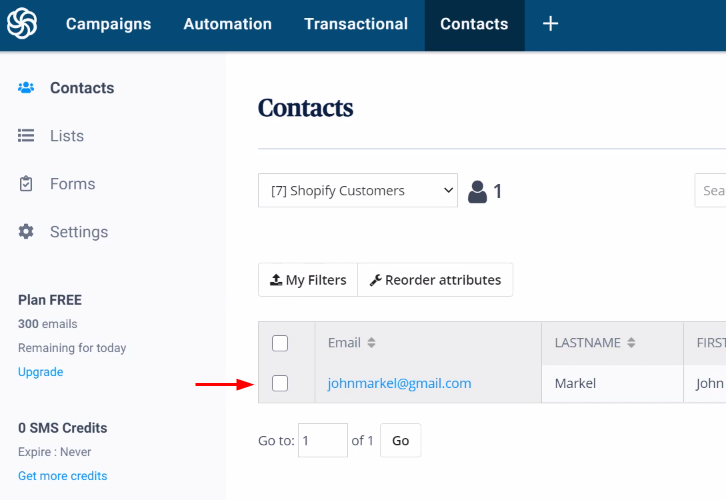
Also, you can check the subscriber’s entry on your connected Sendinblue account.

Conclusion –

To sum up, this was all about ‘How to create Sendinblue contact from new Shopify customers’. Consequently, after completing the step by step procedure, you will end up auto-creating Sendinblue contact from the newly added Shopify customer.

Meanwhile, you can opt Pabbly Connect for FREE with all its premium features.

Also, comment below your queries and suggestions.

You May Also Like to Read:

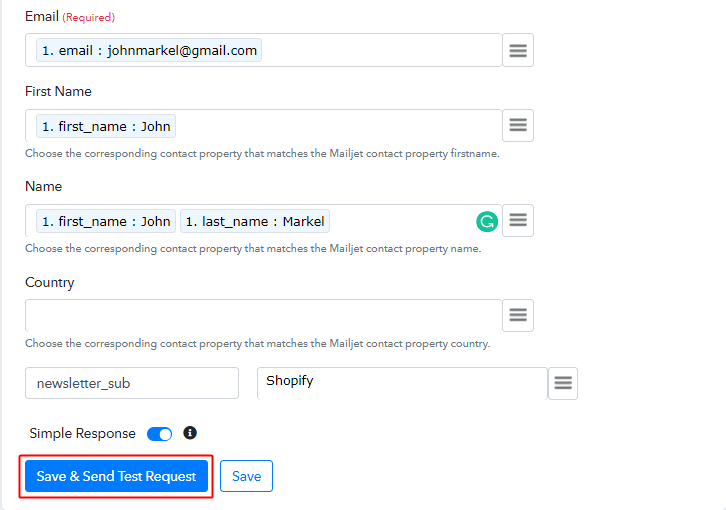
How to Add Contact to Mailjet List from New Shopify Customer

Are you looking for a way to easily integrate Shopify with Mailjet?

If yes then you must follow the procedure given in this blog. As we are going to reveal the step by step procedure to automatically add Mailjet contact. From the newly added Shopify customer using Pabbly Connect.

How to Add Contact to Mailjet List from New Shopify Customer

But, before diving into the procedure, let’s understand the services as well as the need for integrating them. Shopify is an eCommerce platform that allows you to built an online shop within minutes. Whereas, Mailjet is an email marketing service that helps you make a stronger relationship with your customers.

By implementing this workflow you’ll accomplish the automatic contact addition on Mailjet whenever there is a new customer entry on your Shopify store. Consequently, all your new customers automatically get listed on your email marketing software.

Why Choose This Method Of Integration?

In contrast with other integration services-

  • Pabbly Connect does not charge you for its in-built apps like filters, Iterator, Router, Data transformer and more
  • Create “Unlimited Workflows” and smoothly define multiple tasks for each action
  • As compared to other services which offer 750 tasks at $24.99, Pabbly Connect offers 50000 tasks in the starter plan of $29 itself
  • Unlike Zapier, there’s no restriction on features. Get access to advanced features even in the basic plan
  • Try before you buy! Before spending your money, you can actually signup & try out the working of Pabbly Connect for FREE

Sign Up To Pabbly Connect  

However, there is no direct integration possible for these two services yet. So, we are going to use Pabbly Connect to make this integration possible.

Using this software, you can effortlessly share data within different premium services. More importantly, it won’t need any coding knowledge & even a newbie can use it efficiently. Moreover, the workflow would be just a one-time setup. After that, the data will automatically be transferred in real-time.

So, buckle up as we’re going to discover how to connect Shopify and Mailjet in real-time. Furthermore, we’ve attached the template for this integration to help you get started at full tilt. You can click on the ‘Use Workflow’ button below to get started. Also, you can go to the App Directory & look for more apps/integrations.

How

Add Contact to Mailjet List from New Shopify Customer

Apart from this integration, Pabbly Connect offers using many remarkable features even in the free plan. Some of these features include using routers, formatters, instant triggers, multi-step calls & support thousands of app integrations.

Now, without taking any more of your time, let’s get directly on track & follow the step by step procedure to integrate Shopify and Mailjet.

How to Add Contact to Mailjet List from New Shopify Customer (step by step)

Step 1: Sign up to Pabbly Connect

Sign Up

Begin the procedure of connecting Shopify with Mailjet with visiting the Pabbly Connect website. Hit the ‘Sign-Up Free‘ button available on the home page. Then signup using your existing Google account or manually fill the registration form.

Try Pabbly Connect for FREE

Step 2: Access Pabbly Connect

Select Connect

After that, strike the ‘Access Now’ button of the software ‘Connect’ within the Pabbly applications.

Step 3: Workflow for Shopify with Mailjet Integration

(a) Start with a New Workflow

Create New Workflow

Further, start with creating a workflow to add contacts on Mailjet for every new Shopify contact & to do this push the ‘Create Workflow’ button first.

(b) Name the Workflow

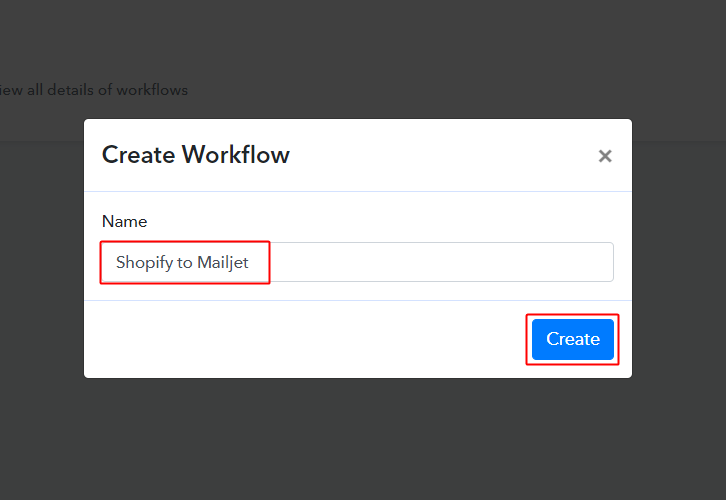
workflow_for_shopify_to_mailjet

Now, name the workflow as per the integration or use-case (for instance: Shopify to Mailjet etc). Finally, strike the ‘Create’ button available.

Step 4: Setting Trigger for Shopify to Mailjet Integration

To automatically add Mailjet contact for the newly added Shopify customer, you’ll need to set-up a trigger on the new Shopify customer and its respective action to add a contact on Mailjet using Pabbly Connect.

(a) Select Application you want to integrate

integrate_shopify_for_shopify_to_mailjet

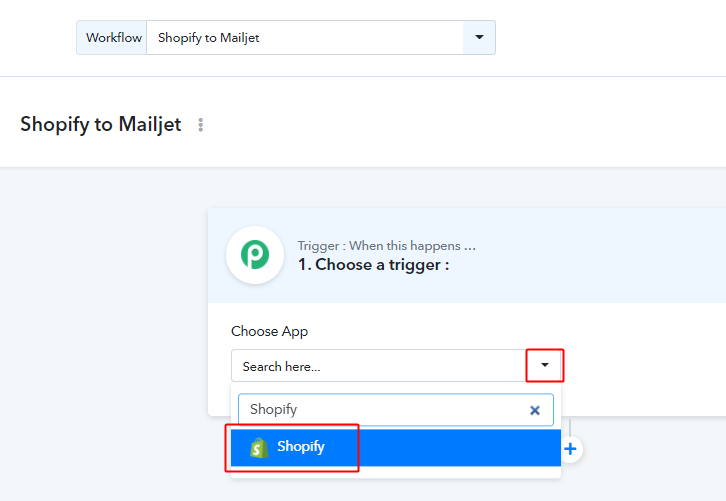
When you click on the create button, a page containing the trigger window will open up next.

Select the ‘Shopify’ app from the ‘Choose App’ field’s drop-down options.

(b) Select Method & Connect with Shopify

copy_webhook_url_for_shopify_to

Select the method to be ‘New Customer’ & then copy the webhook URL.

Step 5: Connecting Shopify to Pabbly Connect

To connect Shopify with Pabbly connect, you’ll need to sign-in your Shopify account & create a webhook first.

(a) Go to Your Shopify Settings

click_on_shopify_settings

After successfully logging into your Shopify account, click on the ‘Settings’ option available at the bottom of the left vertical menu.

(b)Select Notification Option

Go To Notification

A page will open up carrying all the different setting options of the application. Select the notification option as we need to send automatic emails on user sign up in Shopify store.

(c) Click the Create Webhook Button

Create Webhook Shopify

On the next page, there will be many notification options. So, head directly to the bottom of the page on ‘Webhooks’ and click the ‘Create Webhook’ button.

(d) Add Webhook Details

add_webhook_details

A window asking for webhook information will open up. First, select the event field value as ‘Customer creation’, Then, make sure the format is ‘JSON’. After that paste, the copied webhook URL in the URL field.

Finally, hit the ‘Save webhook’ button present at the bottom right corner of the window.

Step 6: Test the Response in Pabbly Connect Dashboard

As we can see we are done setting up the trigger for Shopify and Mailjet integration. So, let’s test the trigger setting by making a test customer on Shopify.

(a) Capture Webhook Response

capture_webhook_response_for_razorpay_to_klaviyo

To test the trigger setting, strike the ‘Capture Webhook Response’ button on your Pabbly Connect trigger window.

(b) Open Your Shopify Store

open_online_store

Now, go back to your Shopify dashboard and open the online store.

(c) Create a Test Contact

create_customer_for_shopify_to_mailjet

Fill in all the details to make a test contact and complete the registration.

(d) Check & Save Trigger Response

check_and_save_trigger_response_for_shopify_to_mailjet

Once you successfully complete a payment, the Pabbly Connect trigger response will start showing the data of the current purchase. Also, check and Save the trigger response.

Step 7: Setting Action for Shopify to Mailjet Integration

Now, as we have gathered all the necessary information to create a contact on Mailjet from Shopify response. We can now proceed to feed this data as an action. So that a new subscriber will get created automatically for every new Shopify customer.

(a) Select Application you want to Integrate

integrate_mailjet_for_shopify_to_mailjet

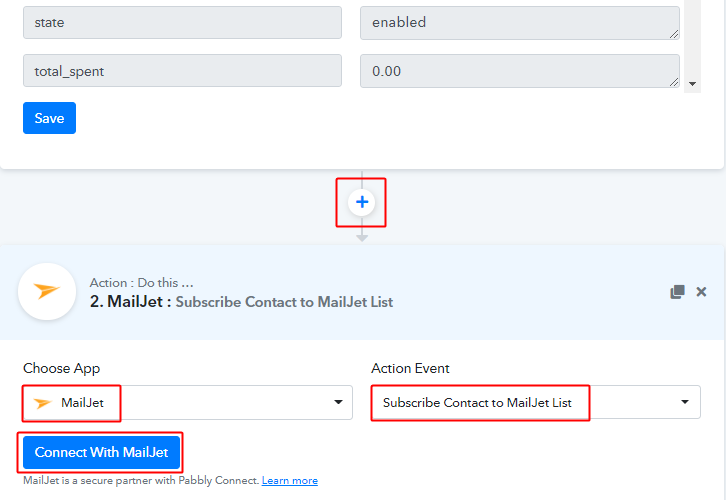
Next, hit the plus button next to the Shopify trigger.

Select the app to integrate as ‘Mailjet’ & method as ‘Create Contact’.

Lastly, push the ‘Connect with Mailjet’ button.

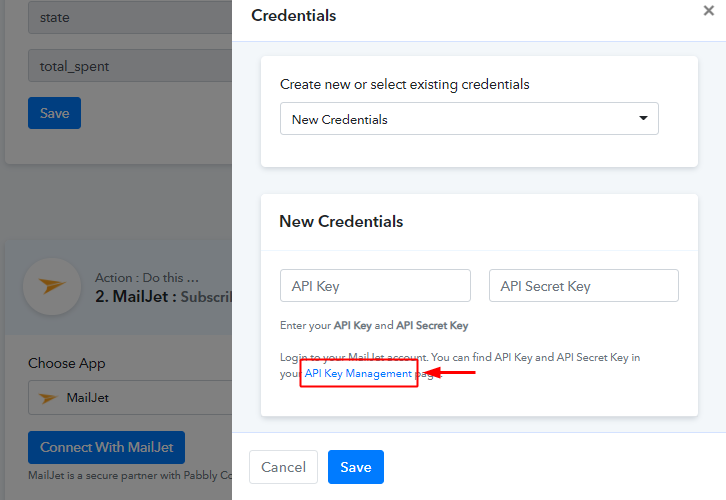
Then the system will ask you for an API and API secret key.

(b) Click on API Key Management

click_on_api_key_management

To feed the API key into the system. First, sign-in and go to your Mailjet dashboard. After that, click on the ‘API Key Management’ text anchor available in the help text.

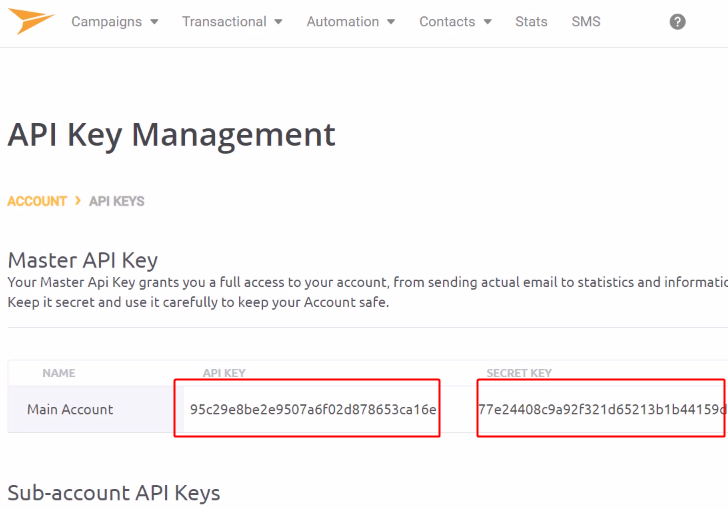
(c) Copy the Mailjet API & API Secret Keys

copy_api_and_api_secret_keys

After you click on the ‘API Key Management’ in the previous window you’ll be directed on the Mailjet API page directly.

Simply, you can copy the API keys given one by one.

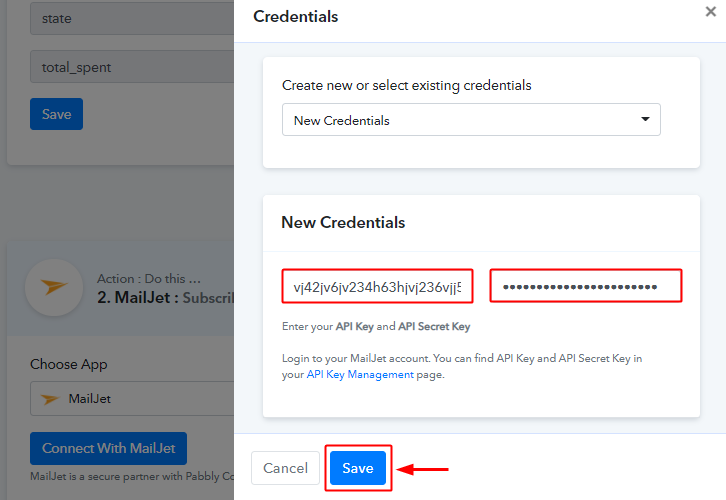
(d) Paste the Copied Mailjet API Keys & Save

paste_the_mailjet_api_keys_and_save

Paste the copied Mailjet API keys in the fields provided and after that click on ‘Save’.

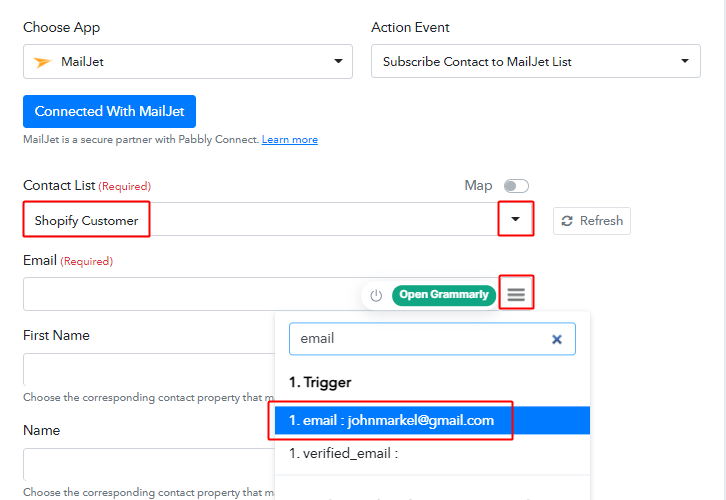
(e) Select List & Map Fields

select_list_and_map_email_id

Now, select the list and map the email address.

To map a value, hit the menu button (three horizontal lines) next to that particular field.

After that, click-select the value that you want to map with that respective field.

Similarly, map all the other required fields also.

(f) Send Test Request

save_and_send_test_request_for_mailjet_action

Further, click on the ‘Save & Send Test Request’ button to send a request for creating a contact on Mailjet.

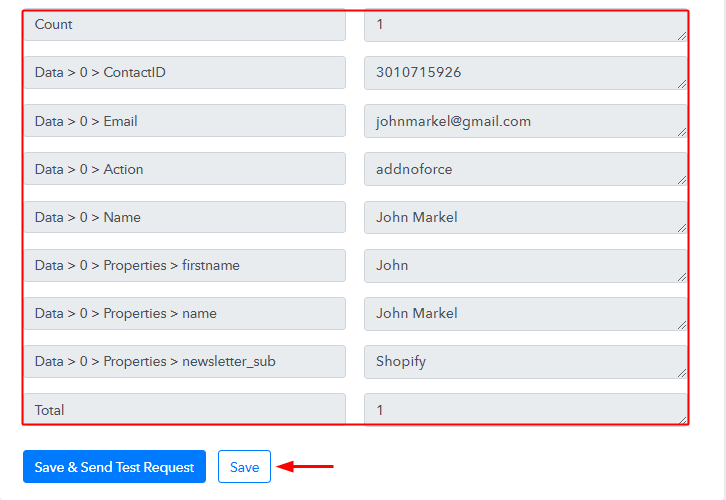
(g) Check & Save Response

check_and_save_mailjet_action_response

Certainly, you can check the response of your API in the action window. If everything is good then the response will show nothing. But, if there is some error while sending the data then it will show you the error. Finally, hit the ‘Save’ button to save the action API’s response.

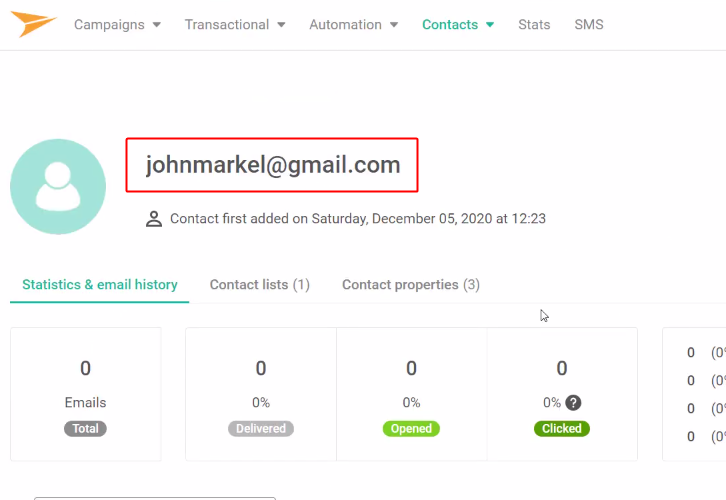
Step 8: Check Response in Mailjet Dashboard

contact's entry_on_mailjet_list

Also, you can check the subscriber’s entry on your connected Mailjet account.

Conclusion –

To sum up, this was all about ‘How to add contact to Mailjet list from new Shopify customer automatically’. Consequently, after completing the step by step procedure, you will end up auto-creating Mailjet contact from the newly added Shopify customer.

Meanwhile, you can grab, Pabbly Connect for FREE with all its premium features.

Also, comment below your queries and suggestions.

You May Also Like to Read:

How to Add MailerLite Subscriber from New Shopify Order

How to Add MailerLite Subscriber from New Shopify Order

Looking for a way to add MailerLite subscriber from new Shopify order? If yes!! Then look no further, as here we are going to integrate Shopify with MailerLite using Pabbly Connect.

How to Add MailerLite Subscriber from New Shopify Order

Wouldn’t that be too helpful and time-saving for you? Well, if only you can use a connecting service that can enable you to transfer data automatically from one app to another. In this blog, I’ll be using Pabbly Connect to do so, as I found it as one of the easiest way to automate my tasks in no time.

But before moving forward, let’s understand both software and why there is a need to integrate Shopify with MailerLite. Shopify is an e-commerce platform that lets you build your own store. And, on the other hand, MailerLite is an email marketing software that comes with features like automation, landing pages and surveys.

Therefore, by connecting Shopify with MailerLite, you can add subscribers in Mailerlite whenever an order is placed in Shopify in real-time. This way you can keep all your customers updated about all the latest updates and news. So, you don’t have to worry about doing repetitive work & can ultimately save a lot of time & effort.

Why Choose This Method Of Integration?

In contrast with other integration services-

  • Pabbly Connect does not charge you for its in-built apps like filters, Iterator, Router, Data transformer, and more
  • Create “Unlimited Workflows” and smoothly define multiple tasks for each action
  • As compared to other services which offer 750 tasks at $24.99, Pabbly Connect offers 50000 tasks in the starter plan of $29 itself
  • Unlike Zapier, there’s no restriction on features. Get access to advanced features even in the basic plan
  • Try before you buy! Before spending your money, you can actually signup & try out the working of Pabbly Connect for FREE

Sign Up To Pabbly Connect 

Pabbly Connect is one of the best integration & automation tools that enables you to integrate unlimited premium applications, set unlimited triggers & actions, create infinite workflows, etc.

Moreover, you don’t even need to have any coding skills. Just integrate it once & relax, it will handle all the workload later. Additionally, you can access all the features even in its free plan. All you need to do is go to the App Directory and look for the apps you use to get started.

Hence, here we will learn how to connect Shopify and MailerLite in real-time. Furthermore, we have a template for this integration that can assist you to get started quickly. Hit the Use Workflow button below to get started.

How

Add MailerLite Subscriber from New Shopify order

So, without any further due, let’s start the blog about how to add MailerLite subscriber whenever a new order is placed in Shopify.

Step 1: Sign up to Pabbly Connect

Sign Up

Start the process to add MailerLite subscriber from new Shopify order by hitting the “Sign Up Free” icon on the Pabbly Connect home page. Next, either manually fill-up all the details or sign up using your Gmail account.

Try Pabbly Connect for FREE

Step 2: Access Pabbly Connect

Select Connect

Following that, after logging into the account, hit the “Access Now” button of the Connect section in the dashboard.

Step 3: Workflow for Shopify with MailerLite Integration

(a) Start with a New Workflow

Create New Workflow

Begin by creating a workflow for your project by pressing the ‘Create Workflow’ button.

(b) Name the Workflow

Name the Workflow

Later, name the workflow just like in the above-shown image. I named the workflow “Shopify to MailerLite”, you can obviously name the workflow as per your requirements.

Step 4: Setting Trigger for Shopify with MailerLite Integration

Once you are done with naming your workflow, now its time to select the application you want to integrate. Pabbly Connect allows you integrate countless premium applications, tap here to create your free account now.

(a) Select Application you Want to Integrate

Select Shopify

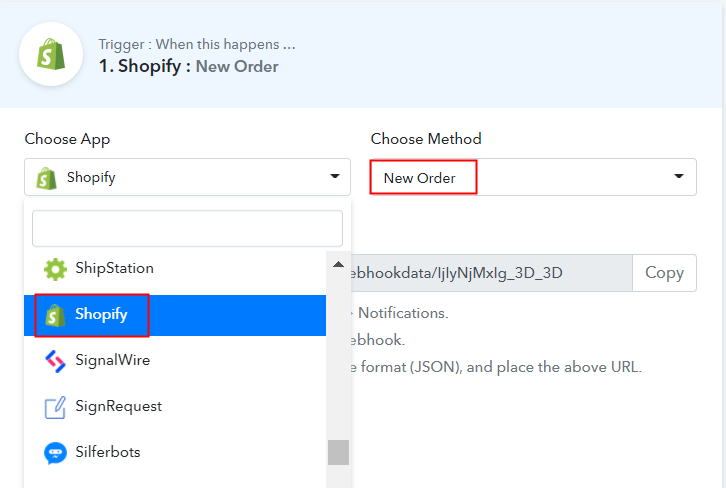
The subsequent step is to select “Shopify” from the dropdown option, then choose the method as “New Order” to add subscribers in MailerLite.

(b) Copy the Webhook URL

Copy the Webhook URL

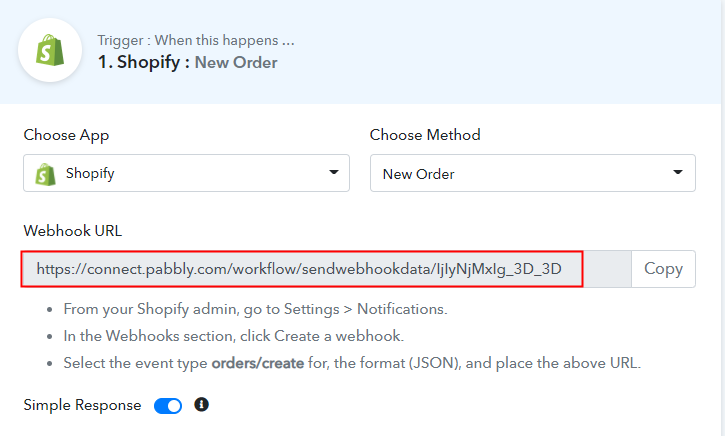
The following step is to copy the webhook URL which is appearing on the dashboard.

Step 5: Connecting Shopify to Pabbly Connect

Next, in order to add MailerLite subscribers from new Shopify orders, you gotta paste the copied Webhook URL in the software. Hence, you have to log in to your Shopify account.

(a) Go to Shopify Settings

Go to Settings

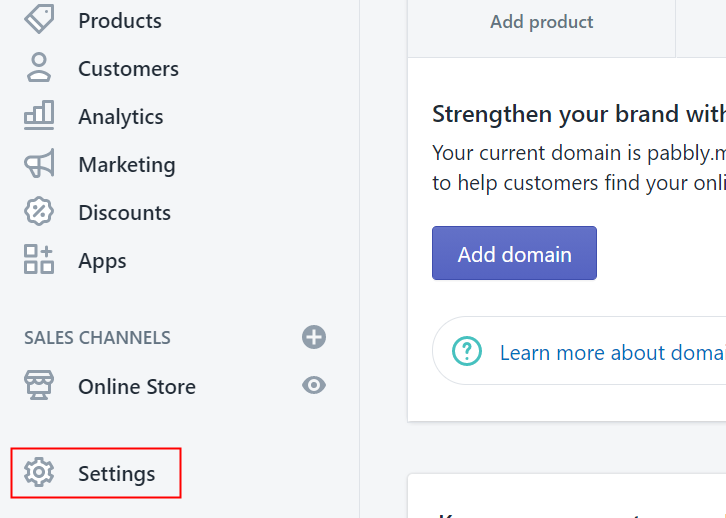
Go to the “Settings” section at the bottom of the dashboard after signing in to your Shopify account.

(b) Click on Notifications

Click on Notifications

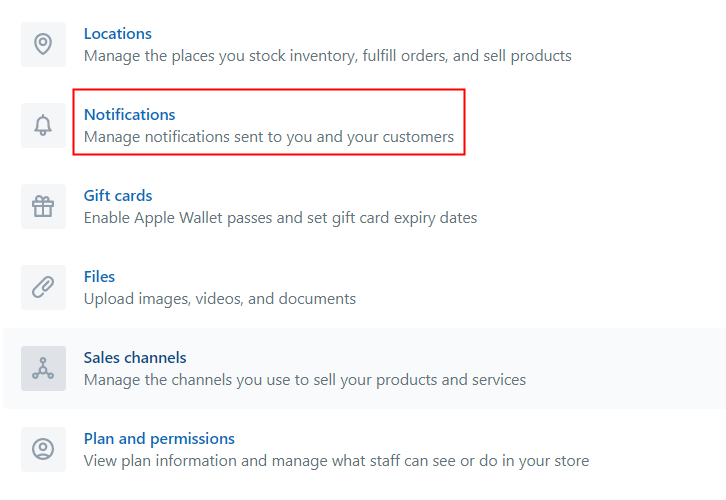
Later, when you tap on Settings, a tab with a different option will open. Now, in order to paste the Webhook URL, simply tap on the “Notifications” option.

(c) Move to Webhook Option

Move to Webhook Option

You will see the Webhook option below in the “Notification” tab, just hit the “Create Webhook” button.

(d) Paste the Webhook URL

Paste the Webhook

Once you hit the “Create Webhook” button, a window will open up with a certain option. In “Event”, choose “Order Creation” from the dropdown, the “Format” would be JSON. Simply paste the copied URL in the “URL” section. Ultimately, hit “Save Webhook” to save the setting.

(e) Make a Purchase to Test Shopify Integration

Make a Test Purchase

Now, to test the integration among Shopify & Pabbly Connect, just make a dummy purchase in your Shopify account of any product. Hence for that, enter all the required details and hit the “Continue Shipping” button. But before making the purchase, you need to go to the Pabbly Connect dashboard and press the button named “Capture Webhook Response”.

Step 6: Test the Response in Pabbly Connect Dashboard

Test the Response

As soon as you click on the “Pay Now” option in the Shopify account, the entry will appear on the “Pabbly Connect” dashboard. Further, click on the “Save” option.

Step 7: Setting Action for Shopify with MailerLite Integration

Moreover, to make this Shopify-MailerLite integration work, you have to choose the action for your trigger.

(a) Select Application you Want to Integrate

Select Mailerlite

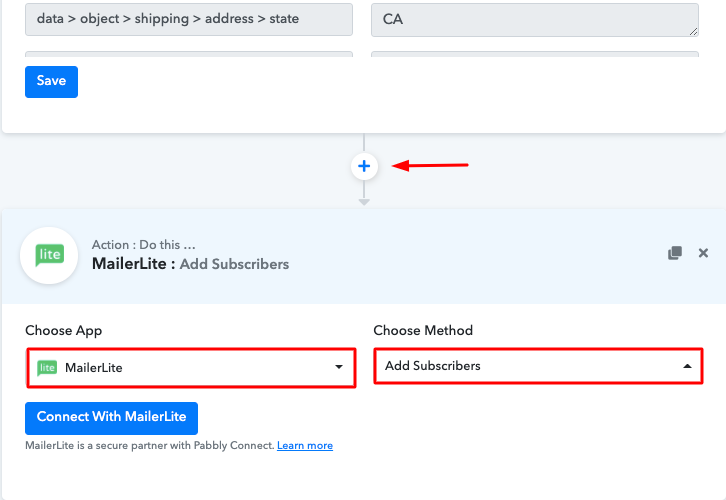
Afterward, press the + button below and choose the application that you want to integrate. Here we will choose “MailerLite” to integrate and in the method section select “Add Subscribers”.

(b) Click the Connect Button

Click Connect Mailerlite

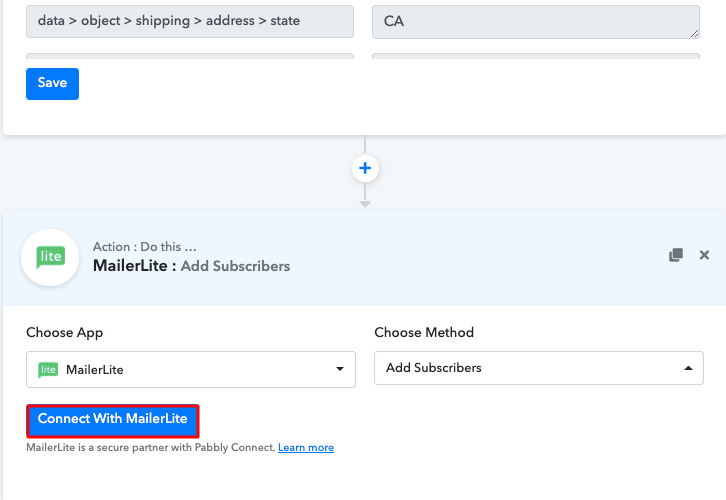
After choosing the application hit the “Connect with MailerLite” button to move forward.

Step 8: Connecting MailerLite to Pabbly Connect

Now, to connect MailerLite to Pabbly Connect, now it’s time to paste the API key into the Pabbly Connect dashboard from your MailerLite account. And to do so, you have to log in to your MailerLite account.

(a) Click on Mailerlite Integrations

Click on Integrations

Once you hit the “Connect” button, a sliding pop-up will open up on the right side asking for the API key of your MailerLite account.

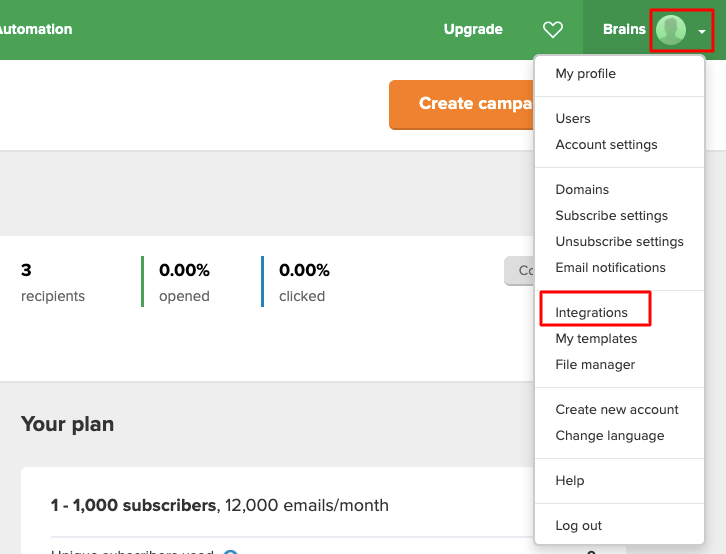
Just press the profile button in your MailerLite dashboard then hit the “Integrations” option.

(b) Click on Developer API

Click on Developers API

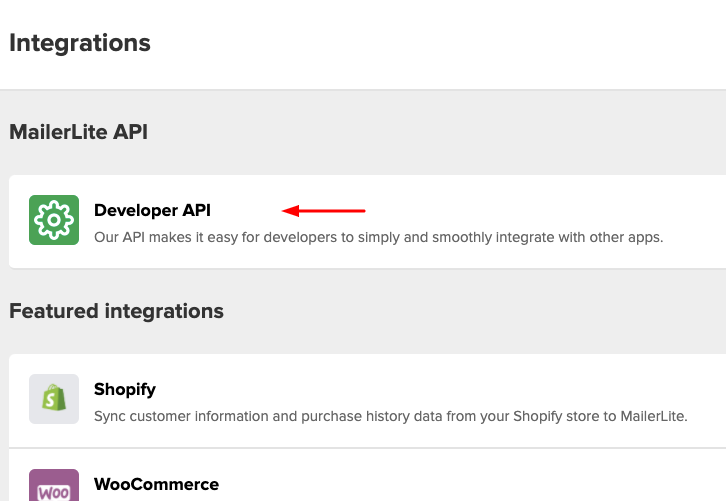
Promptly, you have to press the “Developer API” option to copy the API key.

(c) Copy the API Key

Copy the API Key Add Stripe Customers to a Group of MailerLite Subscribers

Once you reach the developer API page of your MailerLite account. Just copy the given API key to proceed further.

(d) Paste the API Key

Paste the API Key Add Stripe Customers to a Group of MailerLite Subscribers

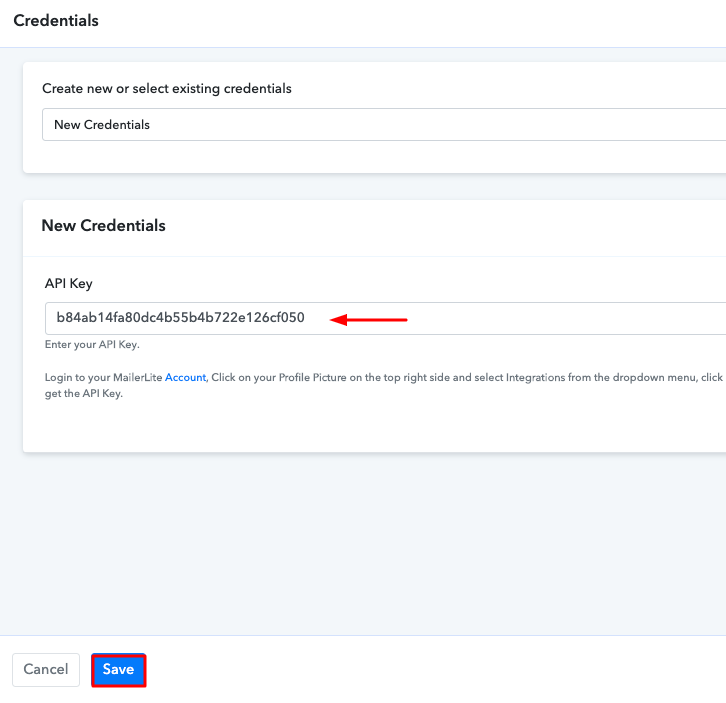
Thereafter, paste the copied API key into the Pabbly Connect dashboard & then hit the “Save” button.

(c) Map Field Details

Map Field Details

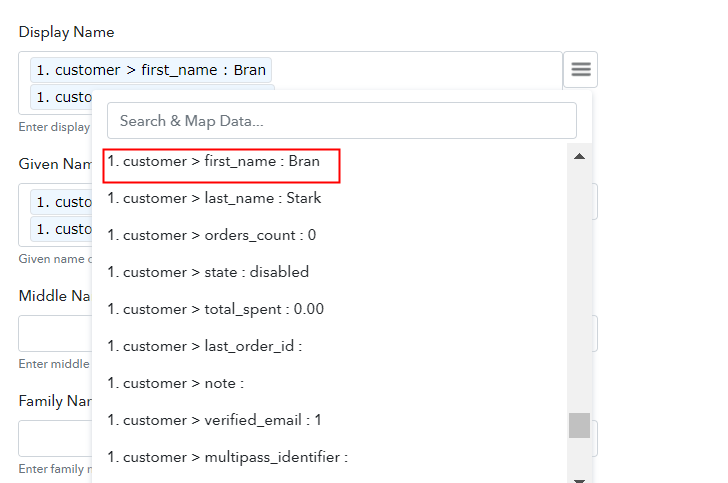
Following that, map the required field from the drop-down such as for the display name, select the name, and for the billing address, map the address.

(d) Save and Send Test Request

Save and Send Test Request

Finally, after filling all the details, save the setting and then “Send Test Request” to test the Shopify-MailerLite integration.

Step 9: Test the Response in Pabbly Connect Dashboard

Test the Response and Save

As you can see, the data has been successfully sent to MailerLite. Forthwith, hit the “Save” button to save the entire workflow.

Step 10: Check Response in MailerLite Dashboard

Check Response in MailerLite Dashboard

Now, as you can see that our integration was successful and the Shopify data has been saved as a subscriber in your MailerLite account automatically. Now, whenever there will be any new order is placed in your Shopify account, they will be automatically saved as subscribers in your MailerLite account.

Conclusion –

That’s it! Now you know the answer to your question “How to add MailerLite subscriber from new Shopify order in real-time?”. Just follow the step by step procedure mentioned above & your Shopify to MailerLite integration will be set.

So, what are you waiting for? Go ahead and catch your deal by signing up for a free account.

You May Also Like To Read –
How to Create Shopify Customers from New Instamojo Sale

How to Create Shopify Customers from New Instamojo Sale

Do you still create Shopify customers from new Instamojo sale manually? If yes, then welcome to the world of automation, here you just have to integrate Instamojo with Shopify and then the data will get transferred automatically.

How to Create Shopify Customers from New Instamojo Sale

But before we get straight into the integration process, let’s know a wee bit about the software that we are about to integrate. Basically, Instamojo is India’s largest on-demand payments and e-commerce platform that empowers over 1,200,000 micro-entrepreneurs, startups, MSMEs, to start, manage, and grow their business online. Whereas, Shopify is a subscription to a software service that offers you to create a website and use their shopping cart solution to sell, ship, and manage your products.

Thus, integrating these two services can help you import all the Instamojo customers to Shopify in real-time. Hence, you don’t have to worry about doing repetitive work & can ultimately save a lot of time & effort.

Now, the question is how you can integrate Instamojo with Shopify? Well, the answer is quite simple and that is known as Pabbly Connect.

Why Choose This Method Of Integration?

In contrast with other integration services-

  • Pabbly Connect does not charge you for its in-built apps like filters, Iterator, Router, Data transformer, and more
  • Create “Unlimited Workflows” and smoothly define multiple tasks for each action
  • As compared to other services which offer 750 tasks at $24.99, Pabbly Connect offers 50000 tasks in the starter plan of $29 itself
  • Unlike Zapier, there’s no restriction on features. Get access to advanced features even in the basic plan
  • Try before you buy! Before spending your money, you can actually signup & try out the working of Pabbly Connect for FREE

Sign Up To Pabbly Connect 

Pabbly Connect is one of the best integration and automation tools that can help you integrate unlimited premium applications, set unlimited triggers & actions, create infinite workflows, and so much more. Besides, to do so, you don’t even need to have any coding skills. Just integrate it once and relax, it will handle all the workload afterward. Moreover, you can access all the features even in its free plan. All you need to do is go to the Marketplace and look for the apps you use to get started.

Here we will learn how to connect Instamojo and Shopify in real-time. Moreover, we have a template for this integration that can assist you to get started quickly. Hit the ‘Use Workflow’ button below to get started.

How

Create Shopify Customers from New Instamojo Sale

Hence, without taking any more of your time, let’s begin to integrate Instamojo to Shopify.

Step 1: Sign up to Pabbly Connect

Sign Up

Begin the process to create Shopify customers from new Instamojo sale by clicking on the ‘Sign Up Free’ button on the Pabbly Connect dashboard. Subsequently, either fill-up all the details manually or sign up using Gmail credentials.

Try Pabbly Connect for FREE

Step 2: Access Pabbly Connect

Select Connect

Next, after logging into the account, click on the ‘Access Now’ button as shown in the above image.

Step 3: Workflow for Instamojo to Shopify Integration

(a) Start with a New Workflow

Create New Workflow

Start with creating a workflow for your project by clicking on the ‘Create Workflow’ button.

(b) Name the Workflow

Name-the-Workflow

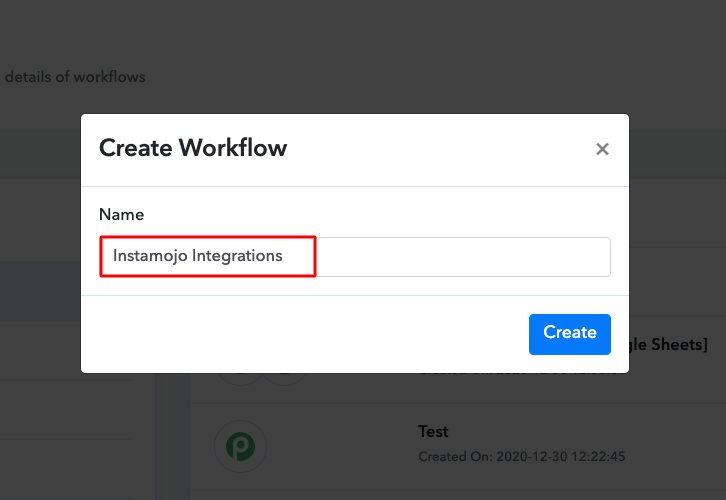
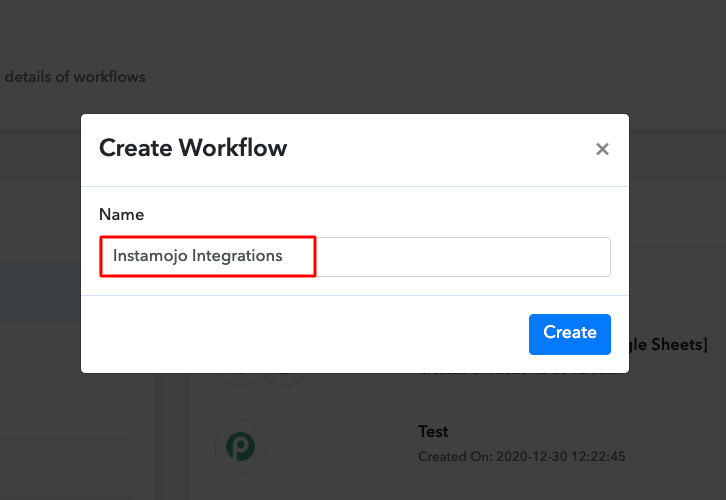
Now, you need to name the workflow just like in the above-shown image. I named the workflow ‘Instamojo Integrations’, you can obviously name the workflow as per your requirements.

Step 4: Setting Trigger for Instamojo to Shopify Integration

As soon as you are done with naming your workflow, you will have to select the application you want to integrate. Pabbly Connect allows you to connect unlimited premium apps, create your free account now.

(a) Select Application you Want to Integrate

Select Instamojo

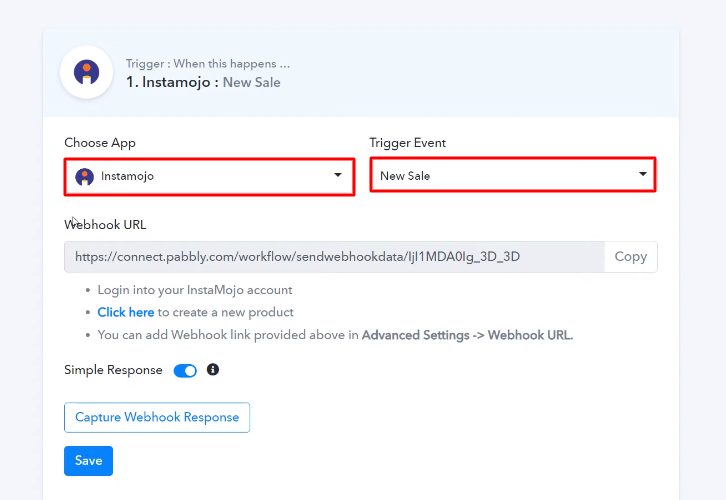
Now, you have to select the application that you want to integrate. In this case, we are choosing ‘Instamojo’ for integration. In the method section, select ‘New Sale’.

(b) Copy the Webhook URL

How

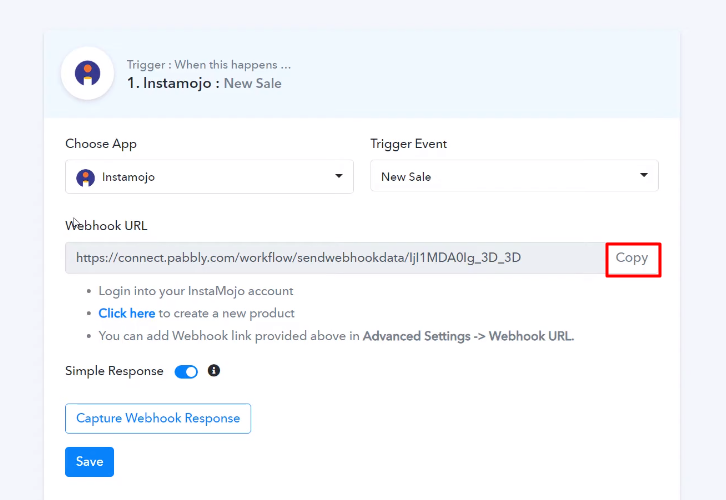
The next step is to copy the webhook URL which is appearing on the dashboard just like in the above-shown image.

Step 5: Connecting Instamojo to Pabbly Connect

To connect Instamojo to Pabbly Connect, you have to paste the copied Webhook URL in the software. For that, you have to log in to your Instamojo account.

(a) Click on Products

Click Products Instamojo

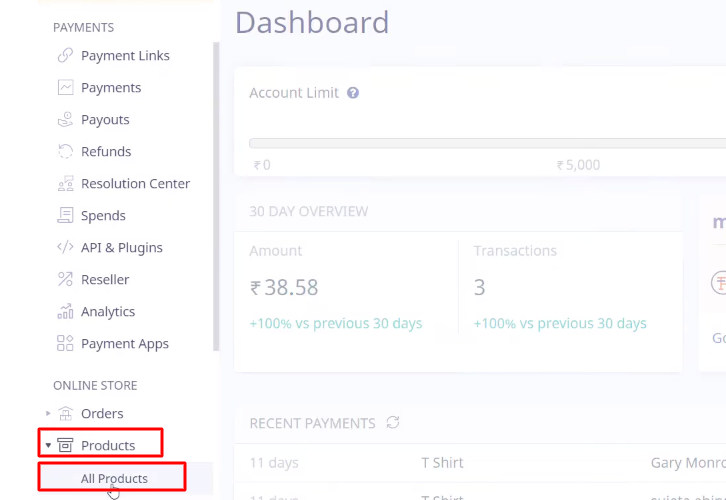
Now, to paste the webhook URL, click the ‘Products’ option and then select the ‘All Products’ in your Instamojo dashboard.

(b) Edit a Product

Edit Product Instamojo

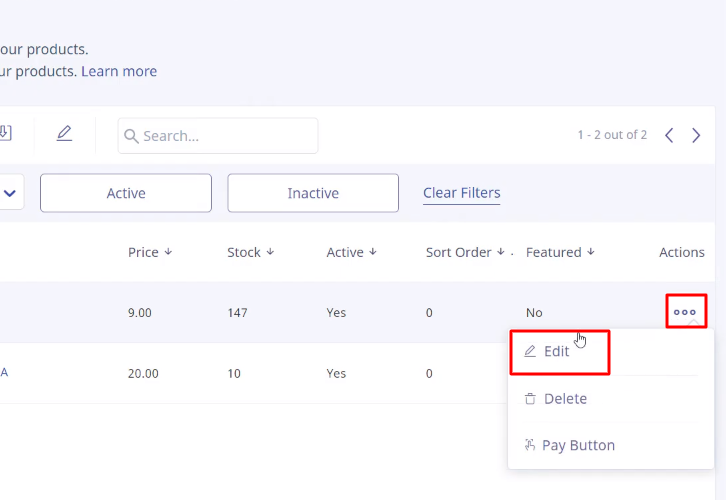
Next, select any of the listed products in your Instamojo account and then click the ‘Edit’ option.

(c) Paste the Webhook URL

Paste the Webhook URL

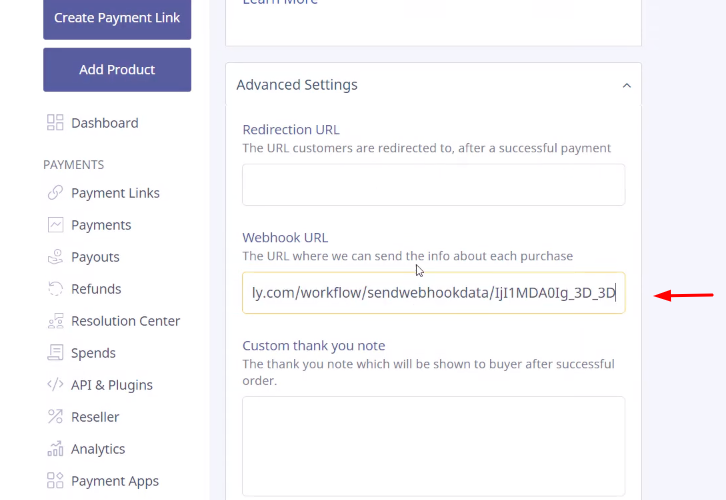
Simply scroll down and paste the copied webhook URL in the ‘Webhook URL’ section.

(d) Save Product

Save Product Instamojo

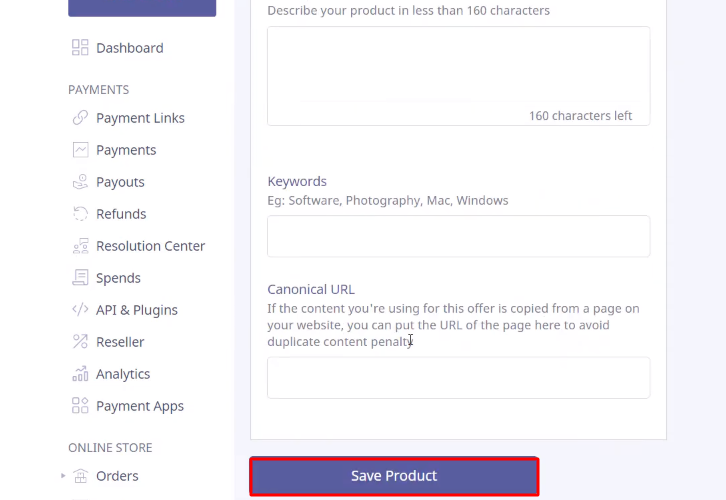
After pasting the URL, scroll down and hit the ‘Save Product’ button to save the changes.

Step 6: Make a Test Purchase

To check this integration, we will make a dummy purchase in Instamojo to capture the data.

(a) Select a Product

Select a Product Instamojo

Now, from the all products section select the product in which you have pasted the webhook URL.

(b) Add to Cart

Add to Cart Instamojo

After selecting the product, hit the ‘Add to Cart’ button.

(c) Click Checkout

Checkout Instamojo

Click on the cart icon at the top section of the screen and then click on the ‘Checkout’ button.

(d) Add Details

Add Details Instamojo

In this step, add the customer details like name, email, etc.

(e) Make Payment

Make Payment Instamojo

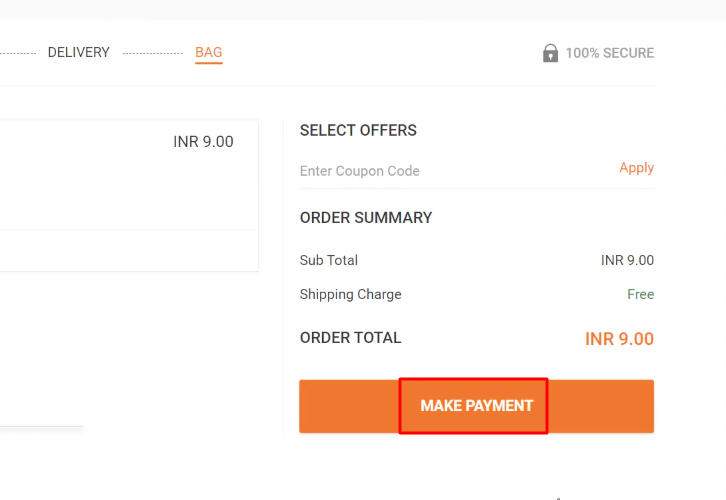
After making all the changes, click the given ‘Make Payment’ button to make the payment. But before that, click the ‘Capture Webhook Response’ button in Pabbly Connect to capture the data.

Step 7: Test the Response in Pabbly Connect Dashboard

Save the Webhook Response

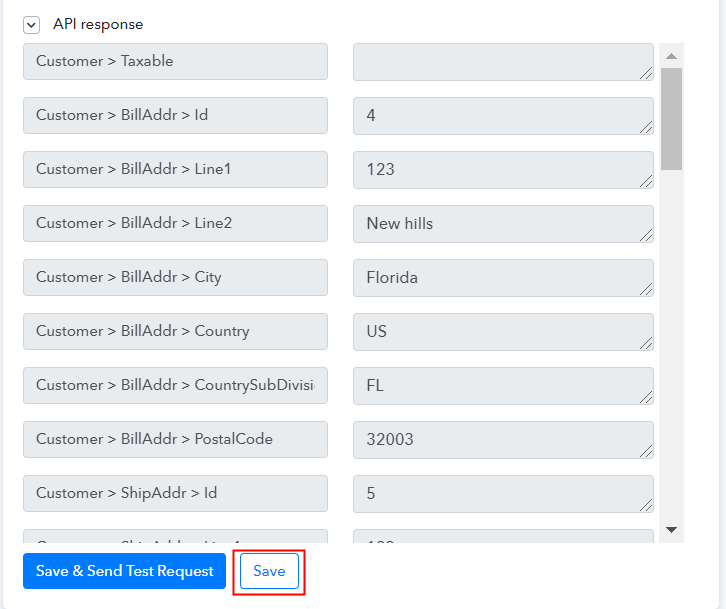
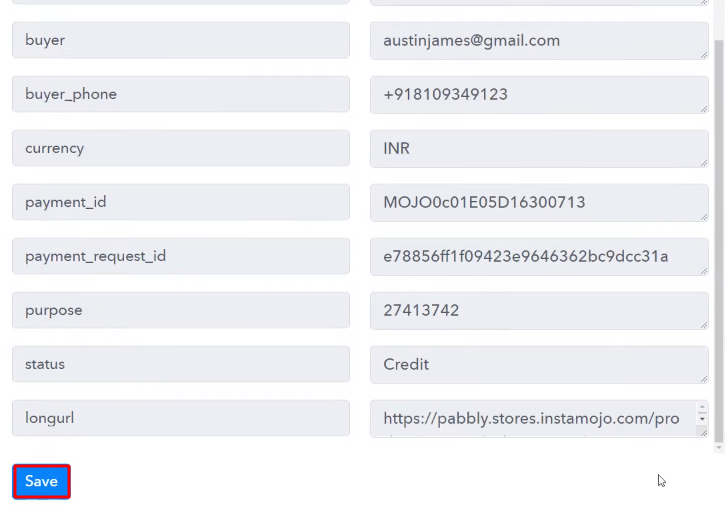
Once you click on the ‘Make Payment’ in Instamojo and on the ‘Capture Webhook Response’ in Pabbly Connect, the customer info will appear on the Pabbly Connect dashboard. Then, click on the ‘Save’ option.

Step 8: Setting Actions for Instamojo to Shopify Integration

To make this Instamojo-Shopify integration work, you have to choose an action for your trigger.

(a) Select Application you Want to Integrate

Select Shopify

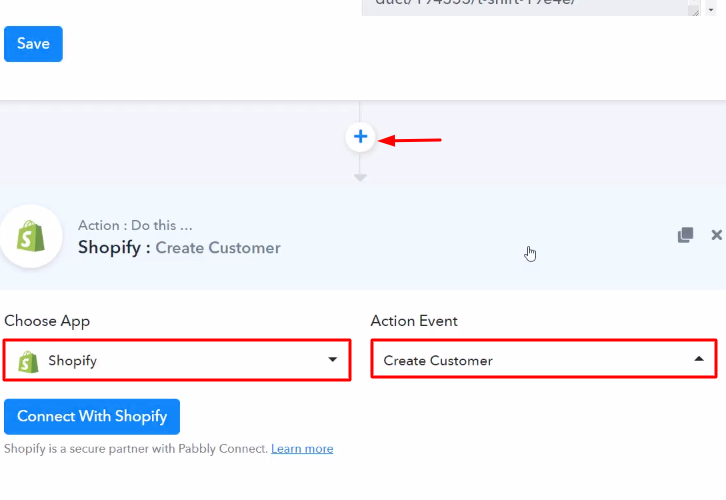
Now in this step, click on the + button below and choose the application that you want to integrate. Here we will choose ‘Shopify’ to integrate and in the method section select ‘Create Customer’.

(b) Click the Connect Button

Click Connect Shopify

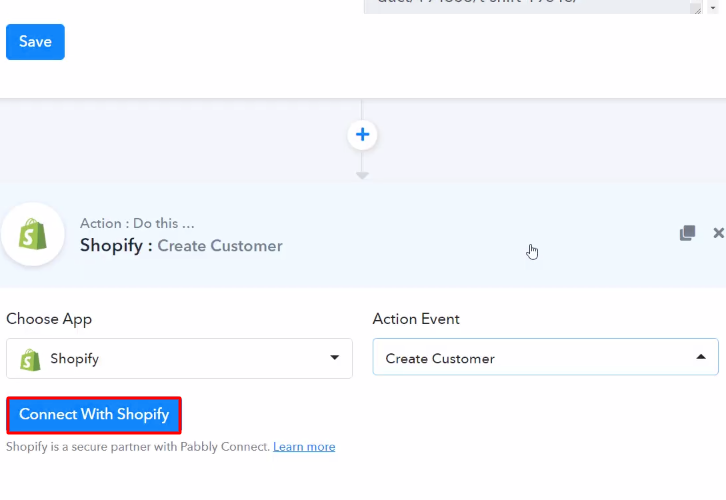
After choosing the application click on the ‘Connect with Shopify’ button to move forward.

Step 9: Connecting Shopify to Pabbly Connect

To connect Shopify to Pabbly Connect, you have to paste the private app password from Shopify into Pabbly Connect. For this, you have to log in to your Shopify account.

(a) Click on Apps

Click on Apps Shopify

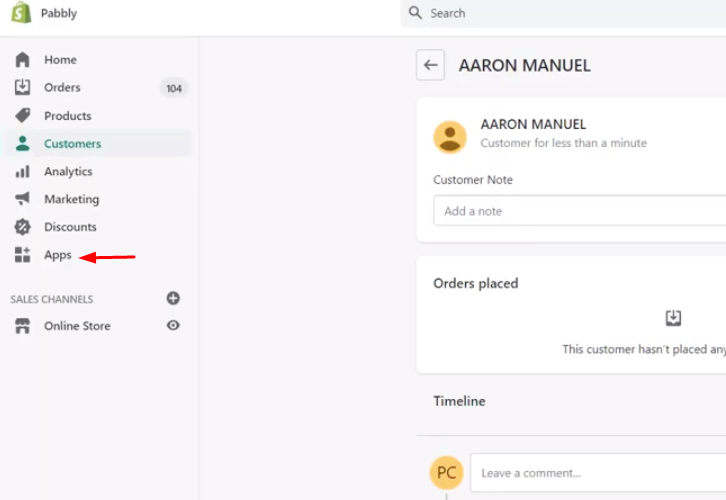
To get the private app password, click on the ‘Apps’ option on your Shopify dashboard.

(b) Click Manage Private Apps

Click on Manage Private Apps

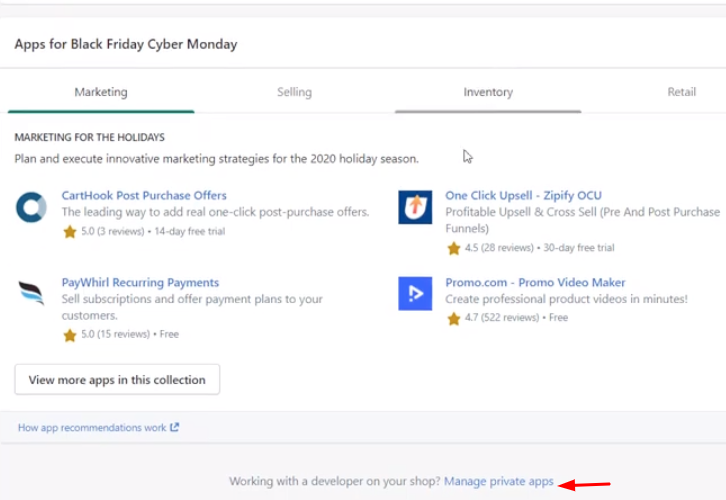
Now, scroll down and click on the ‘Manage Private Apps’ option given below.

(c) Create New Private App

Click on Create New Private App

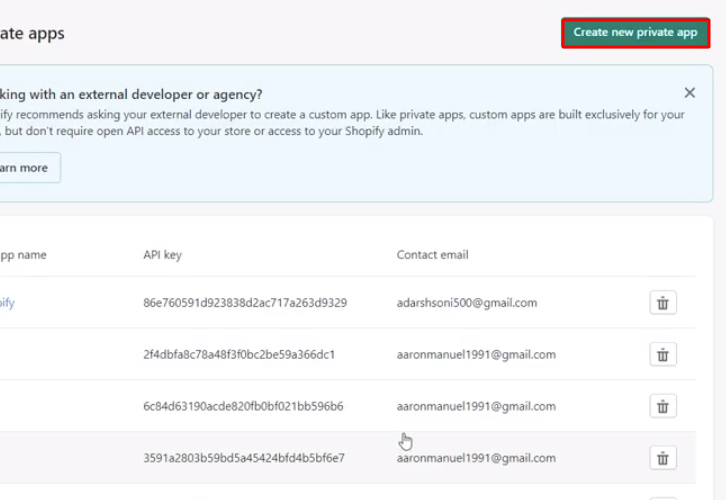
Next, click on the given ‘Create New Private App’ button at the top of the screen.

(d) Name the App

Name the App

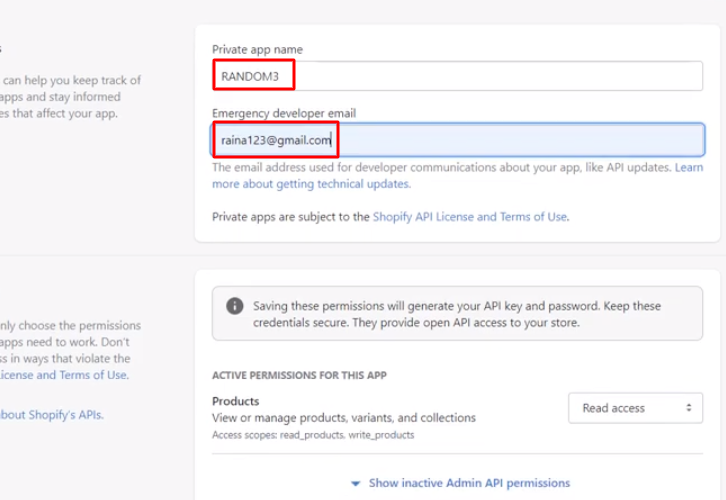
Here, you have to name the app and add the emergency developer email address. You can name the app whatever you like.

(e) Update Access

Update Access

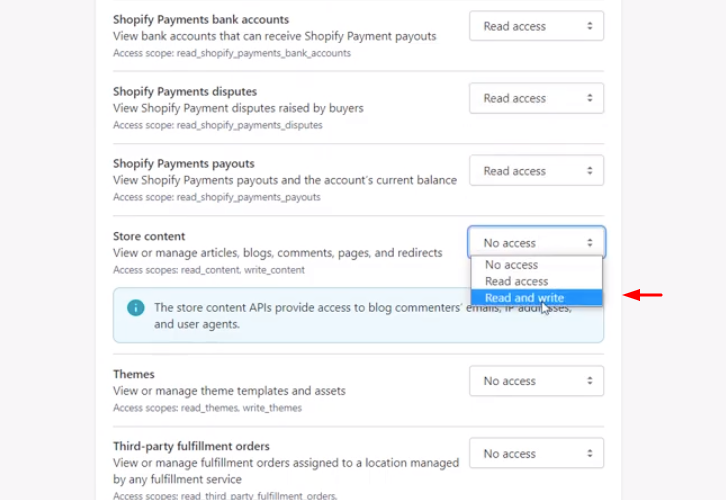
Now after naming the app, scroll down and you will find several options here you have to update the access permission as ‘Read Access’ and ‘Read and Write’ accordingly.

(f) Click on Save Button

Click on Save Button Shopify

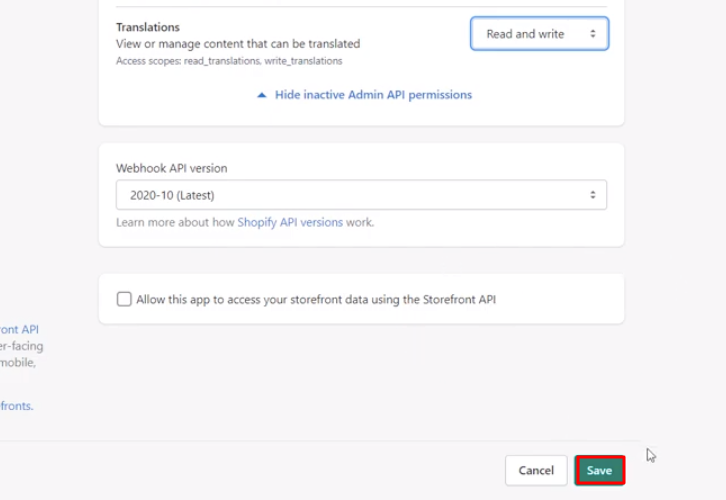
After updating access in all the options, click on the given ‘Save’ button.

(g) Click on Create App

Click on Create App Shopify

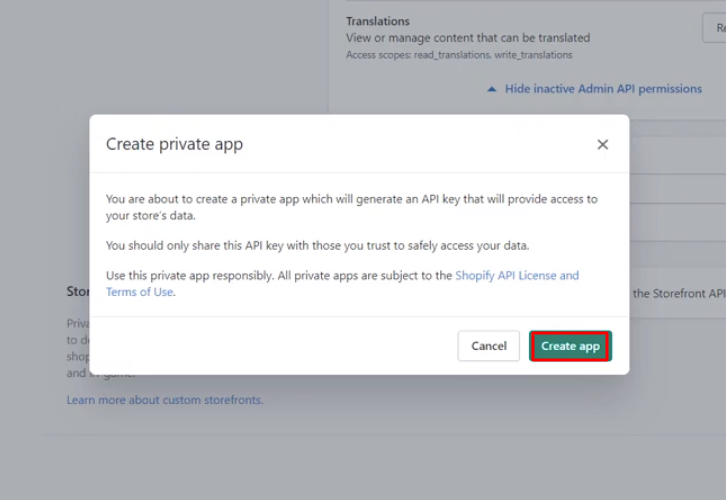
Now, finally, click on the ‘Create App’ button to get the private app password.

(h) Copy Private App Password

Copy Password Shopify

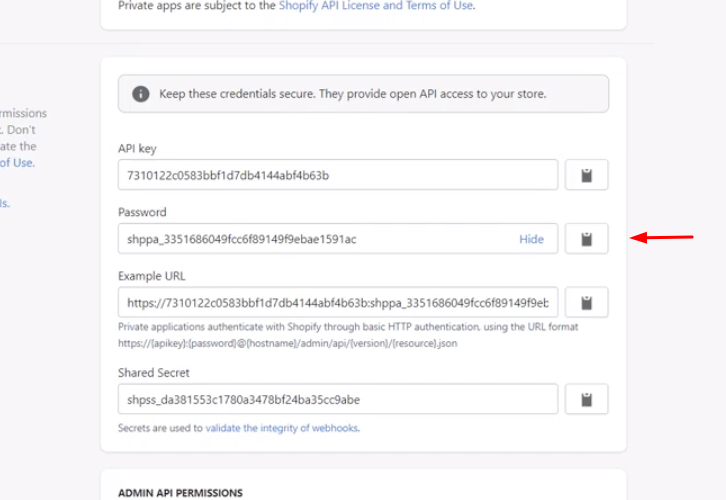
Next, simply copy the given private app password and move further.

(i) Paste the Credentials

Paste the Credentials Shopify

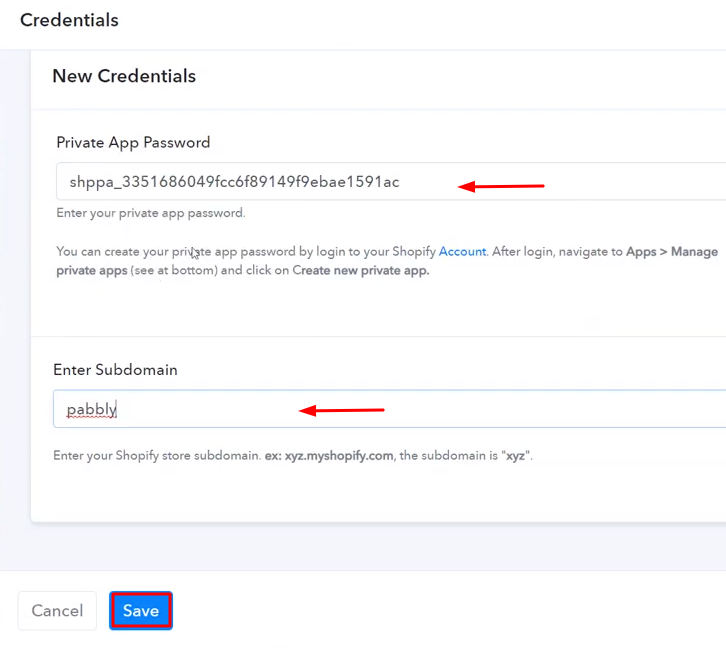
Paste the copied private app password in Pabbly Connect and you can find the subdomain from your Shopify account’s URL. After making all the changes, click on the ‘Save’ button.

(j) Map the Fields

Map the Fields

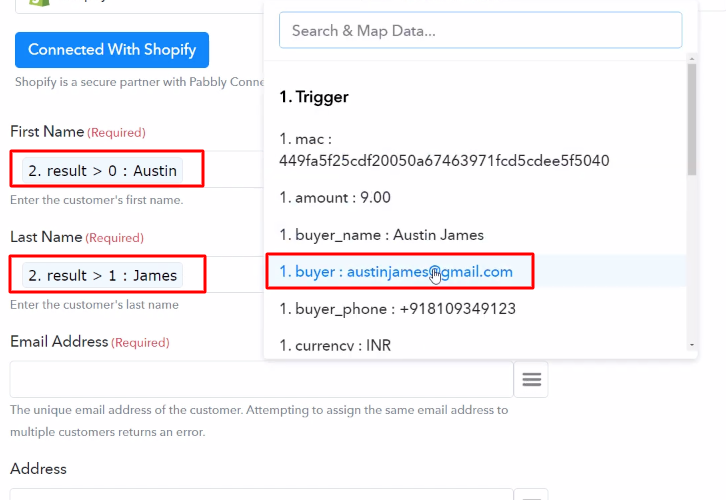
After connecting with your Shopify account, map all the fields quickly like name, email etc.

(k) Save and Send Test Request

Send Test Request

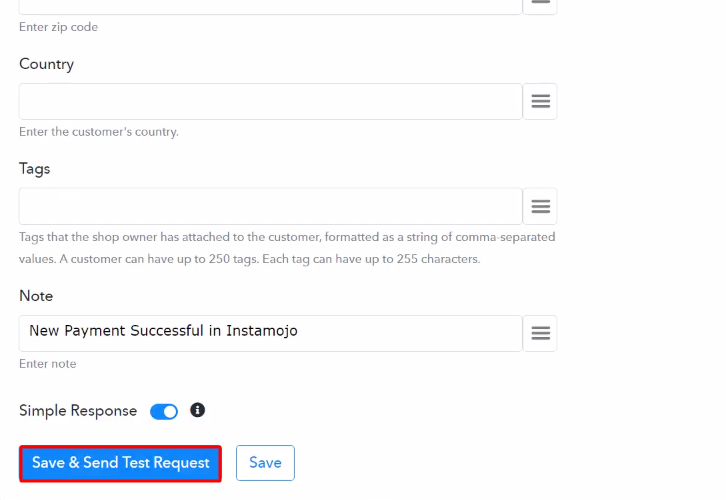
Once you are done adding up all field data click on the ‘Save & Send Test Request’ button.

Step 10: Check Response in Shopify Dashboard

Check Response

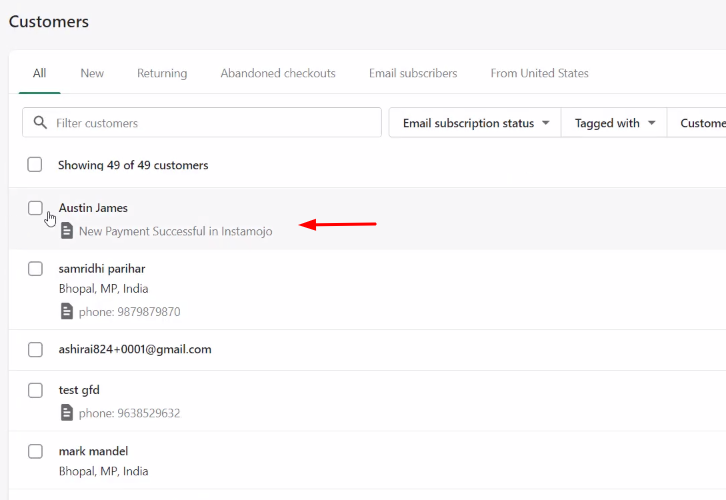
Finally, when you check your Shopify dashboard, your entry from Instamojo will automatically appear there.

Conclusion –

In the end, this was our take on how to create Shopify customers from new Instamojo sale. Now that you have understood how Pabbly Connect works and how it can help you in saving a lot of time and effort, you can integrate any applications easily. You just have to follow these simple steps and once the integration is done, then Pabbly Connect will do the rest for you. Thus, go ahead and signup for free to enjoy this amazing automation and integration service.

For further queries, please drop your comments below. We will get back to you as soon as possible.

You May Also Like To Read –
How to Add Google Sheets Rows from New Instamojo Sale

How to Add Google Sheets Rows from New Instamojo Sale

Are you searching for a way to add Google Sheets rows from new Instamojo sale? If yes!! Then, this could be the end of your search. As here we are going to integrate Instamojo with Google Sheets using Pabbly Connect.

How to Add Google Sheets Rows from New Instamojo Sale

Wouldn’t that be too helpful and time-saving for you? Well, If only you can use a connecting service that can enable you to transfer data automatically from one app to another. So here in this blog, we are going to use Pabbly Connect to automate tasks in real time.

But before getting started, let’s know a bit about the software that we are about to integrate. So basically, Instamojo is India’s largest on-demand payments and e-commerce platform that empowers millions of entrepreneurs, startups, MSMEs, to start, manage, & grow their business online. Whereas, Google Sheets is a spreadsheet that helps you manage your client’s and customer’s data in one place.

Hence, by integrating these two services can help you import all the Instamojo customer’s data to Google Sheets in real-time. Therefore, you don’t have to worry about doing repetitive work & can ultimately save a lot of time & effort.

Pabbly Connect is one of the best integration & automation tools that enable you to integrate unlimited premium applications, set unlimited triggers & actions, create infinite workflows, etc.

Why Choose This Method Of Integration?

In contrast with other integration services-

  • Pabbly Connect does not charge you for its in-built apps like filters, Iterator, Router, Data transformer, and more
  • Create “Unlimited Workflows” and smoothly define multiple tasks for each action
  • As compared to other services which offer 750 tasks at $24.99, Pabbly Connect offers 50000 tasks in the starter plan of $29 itself
  • Unlike Zapier, there’s no restriction on features. Get access to advanced features even in the basic plan
  • Try before you buy! Before spending your money, you can actually signup & try out the working of Pabbly Connect for FREE

Sign Up To Pabbly Connect 

Moreover,  you don’t even need to have any coding skills. Just integrate it once & relax, it will do all the heavy lifting for you. Additionally, you can access all the features even in its free plan. Simply go to the App Directory and look for the apps you use to get started.

Thus, here we will learn how to connect Instamojo and Google Sheets in real-time. Besides, we have a template for this integration that can assist you to get started quickly. Simply press the Use Workflow button below in order to get started.

How

Automatically Add Google Sheets Rows for Instamojo New Sale

Therefore, without taking any more of your time, let’s begin to integrate Instamojo to Google Sheets.

Step 1: Sign up to Pabbly Connect

Sign Up

Start the process to add Google Sheets rows from new Instamojo sale by pressing the ‘Sign Up Free’ button on the Pabbly Connect dashboard. Afterward, either fill-up all the details manually or sign up using Gmail credentials.

Try Pabbly Connect for FREE

Step 2: Access Pabbly Connect

Select Connect

Following that, after logging into the account, hit the ‘Access Now’ button as shown in the above image.

Step 3: Workflow for Instamojo to Google Sheets Integration

(a) Start with a New Workflow

Create New Workflow

Begin with creating a workflow for your project by pressing the ‘Create Workflow’ button.

(b) Name the Workflow

Name the Workflow

Promptly, name the workflow just like in the above-shown image. I named the workflow ‘Instamojo Integrations’, you can obviously name the workflow as per your requirements.

Step 4: Setting Trigger for Instamojo to Google Sheets Integration

After naming your workflow, now it’s time to select the application you want to integrate. Pabbly Connect enables you to connect unlimited premium apps, create your free account now.

(a) Select Application you Want to Integrate

Select Instamojo

Next, select the application that you want to integrate. Here, we are choosing ‘Instamojo’ for integration. In the method section, select ‘New Sale’.

(b) Copy the Webhook URL

How

The following step is to copy the webhook URL which is appearing on the dashboard just like in the above-shown image.

Step 5: Connecting Instamojo to Pabbly Connect

Now, in order to connect Instamojo to Pabbly Connect, you have to paste the copied Webhook URL in the software. Hence for that, you have to log in to your Instamojo account.

(a) Click on Products

Click Products Instamojo

Next, in order to paste the webhook URL, hit the ‘Products’ option and then select the ‘All Products’ in your Instamojo dashboard.

(b) Edit a Product

Edit Product Instamojo

Subsequently, select any of the listed product in your Instamojo account & then hit the ‘Edit’ option.

(c) Paste the Webhook URL

Paste the Webhook URL

Now, scroll down & paste the copied webhook URL in the ‘Webhook URL’ section.

(d) Save Product

Save Product Instamojo

After pasting the URL, scroll down & press the ‘Save Product’ button in order to save the changes.

Step 6: Make a Test Purchase

Furthermore, in order to check this integration, now it’s time to make a dummy purchase in Instamojo to capture the data.

(a) Select a Product

Select a Product Instamojo

Promptly, from the all products section select the product in which you have pasted the webhook URL.

(b) Add to Cart

Add to Cart Instamojo

Once you select the product, just click on the ‘Add to Cart’ button.

(c) Click Checkout

Checkout Instamojo

Press the cart icon at the top section of the screen and then hit the ‘Checkout’ button.

(d) Add Details

Add Details Instamojo

The next step is to add customer details such as name, email, etc.

(e) Make Payment

Make Payment Instamojo

Once you are done making all the changes, hit the given ‘Make Payment’ button to make the payment. Before that, press the ‘Capture Webhook Response’ button in Pabbly Connect to capture the data.

Step 7: Test the Response in Pabbly Connect Dashboard

Save the Webhook Response

Once you hit the ‘Make Payment’ in Instamojo & on the ‘Capture Webhook Response’ in Pabbly Connect, the customer info will appear on the Pabbly Connect dashboard. Later, hit the ‘Save’ option.

Step 8: Setting Actions for Instamojo to Google Sheets Integration

Now, in order to make this Instamojo-Google Sheets integration work, you have to choose an action for your trigger.

(a) Select Application you Want to Integrate

Select Application you Want to Integrate to Add Google Sheets Rows for New Chargebee Subscriptions

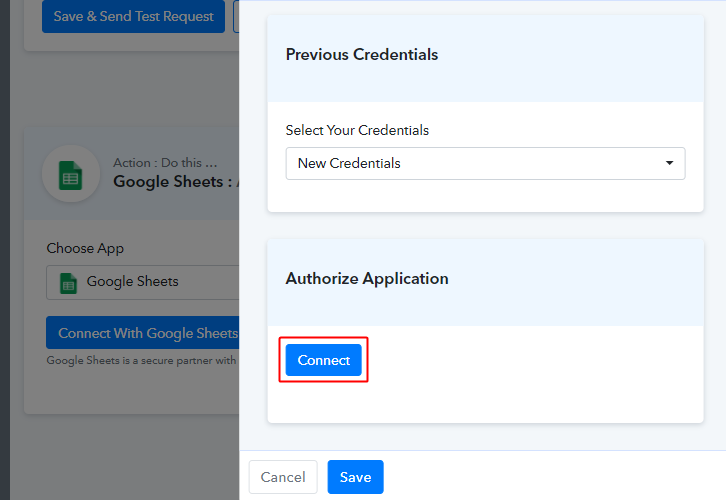
Next, hit the “(+)” icon then select “Google Sheets” and in the choose method option, select ” Add New Row”. Then, press the button named “Connect” to authorize it with Google account.

(b) Click the Connect Button

Click the Connect Button to Add Google Sheets Rows for New Chargebee Subscriptions

After pressing the “Connected with Google Sheets” button, an authorization window will open up, so that you log in to your Google account.

(c) Map Field Data

Send Test Request

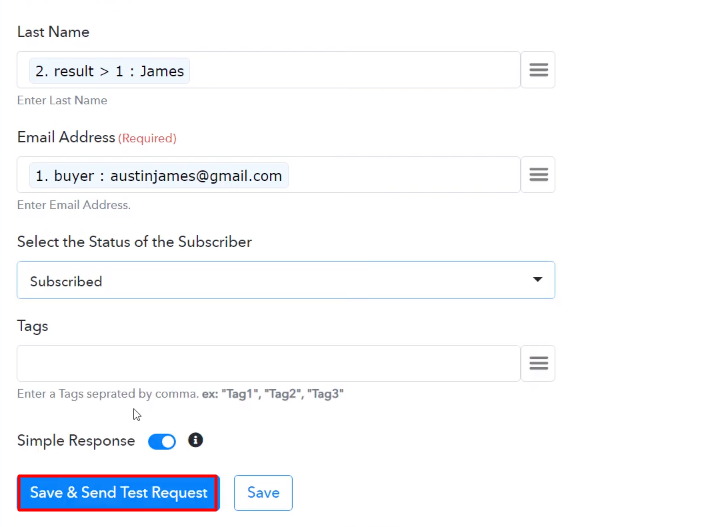
Following that, map the required field from the drop-down such as for the email field, select the email option, and for the name field select the name option. After filling in all the details, press the ‘Send Test Request’ button.

(d) Test the Submission and Save

Test the Submission and Save to Add Google Sheets Rows for New Chargebee Subscriptions

Eventually, once you hit the “Send Test Request”, all the entries will be sent to Google Sheets Rows. Just hit the “Save” button in order to save the whole workflow.

Step 9: Check Response in Google Sheets

Check Response in Google Sheets

Lastly, when you check the Google Sheets, the entered details get auto-populated in a sheet.

Conclusion –

So this was the easiest and fastest method that you could use to integrate Instamojo to Google Sheets. Not only these two applications, but you can connect thousands of applications on Pabbly Connect easily. It’s simple and easy to use and you won’t have to go for any other software after using it. Now that the data transmission is a child’s play, all thanks to Pabbly Connect.

If you have any suggestions or queries, please drop them down in the comment section, we will get back to you as soon as possible.

You May Also Like To Read –
How to Create EngageBay Contact from New Shopify Customer

How to Create EngageBay Contact from New Shopify Customer

Are you in search of a way to create EngageBay contact from new Shopify customer? If yes, then your search ends here, as we have the perfect solution for your problem called Pabbly Connect.

How to Create EngageBay Contact from New Shopify Customer

But before we get into the integration process, let’s discuss a little bit about the software that we are about to integrate. As we all know, Shopify is an e-commerce platform that offers you to create a website and use their shopping cart solution to sell, ship, and manage your products. On the other hand, EngageBay is an all-in-one CRM and marketing automation platform built for small businesses and startups.to acquire, engage, nurture web visitors and convert them to customers.

Therefore, integrating these two services can help you import all the Shopify customers to EngageBay as contacts in real-time. This way you can keep all your customers updated about all the latest updates and news. Hence, you don’t have to worry about doing redundant work & can ultimately save a lot of time and effort.

Why Choose This Method Of Integration?

In contrast with other integration services-

  • Pabbly Connect does not charge you for its in-built apps like filters, Iterator, Router, Data transformer, and more
  • Create “Unlimited Workflows” and smoothly define multiple tasks for each action
  • As compared to other services which offer 750 tasks at $24.99, Pabbly Connect offers 50000 tasks in the starter plan of $29 itself
  • Unlike Zapier, there’s no restriction on features. Get access to advanced features even in the basic plan
  • Try before you buy! Before spending your money, you can actually signup & try out the working of Pabbly Connect for FREE

Sign Up To Pabbly Connect 

Now, to combine these two services, we are using an amazing tool named Pabbly Connect. It is one of the best integration and automation tools that can help you integrate unlimited premium applications, set unlimited triggers & actions, create infinite workflows, and so much more.

Besides, to do so, you don’t even need to have any coding skills. Just integrate it once and relax, it will handle all the workload afterwards. Moreover, you can access all the features even in its free plan. All you need to do is go to the Marketplace and look for the apps you use to get started.

Hence, here we will learn how to connect Shopify and EngageBay in real-time. Moreover, we have a template for this integration that can assist you to get started quickly. Hit the Use Workflow button below to get started.

How

Create EngageBay Contact from New Shopify Customer

Thus, without taking any more of your time, let’s begin to integrate Shopify with EngageBay.

Step 1: Sign up to Pabbly Connect

Sign Up

Initiate the process to create EngageBay contact from new Shopify customer by clicking on the “Sign Up Free” icon on the Pabbly Connect home page. Next, either manually fill-up all the details or sign up using your Gmail account.

Try Pabbly Connect for FREE

Step 2: Access Pabbly Connect

Select Connect

Next, after logging into the account, click on the “Access Now” button of the Connect section in the dashboard.

Step 3: Workflow for Shopify with EngageBay Integration

(a) Start with a New Workflow

Create New Workflow

Start with creating a workflow for your project by clicking on the ‘Create Workflow’ button.

(b) Name the Workflow

Name the Workflow

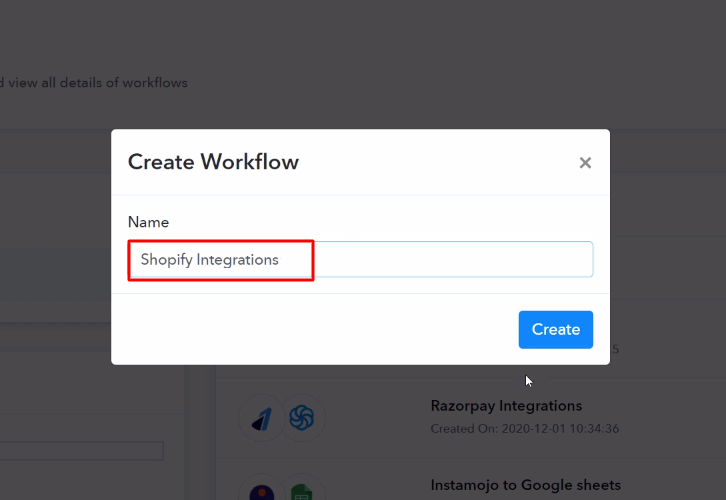
Now, you need to name the workflow just like in the above-shown image. I named the workflow as “Shopify Integrations”, you can obviously name the workflow as per your requirements.

Step 4: Setting Trigger for Shopify with EngageBay Integration

As soon as you are done with naming your workflow, you will have to select the application you want to integrate. Pabbly Connect allows you to integrate unlimited premium applications, create your free account now.

(a) Select Application you Want to Integrate

Select Shopify

Now, you have to select the application that you want to integrate. In this case, we are choosing “Shopify” for integration. In the method section, select “New Customer”.

(b) Copy the Webhook URL

Copy the Webhook URL

After selecting the application, now you have to copy the webhook URL just like in the above-shown image to take further the integration process.

Step 5: Connecting Shopify to Pabbly Connect

To connect Shopify with Pabbly Connect, you have to paste the copied webhook URL in the software. For that, you have to log in to your Shopify account.

(a) Click on Shopify Settings

Shopify Settings

After logging into your Shopify account, click on the “Settings” option given at the bottom of the screen.

(b) Click on Notifications

Click-on-Notifications-Shopify

Next, you need to click on the “Notifications” option given among several other options.

(c) Click on Create Webhook

Click-on-Create-Webhooks-Shopify

Now, just scroll down and then click on the “Create Webhook” button to paste the copied webhook URL.

(d) Paste the Webhook URL

Paste the Webhook URL Shopify

A dialogue box will appear on your screen, here select “Customer Creation” in the event section and then paste the copied webhook URL. After making all the changes click on the “Save Webhook” button.

Step 6: Add a Sample Customer

To check this integration, we will capture the data from Shopify, and for that, we will create a dummy customer on Shopify.

(a) Click on Create Account

Click-on-Create-Account-Shopify

To add a customer, first, you have to open the online store page of Shopify in the new tab and then click on the “Create Account” option.

(b) Add Details

Add Customer Details Shopify

In this step, now you have to add all the required details of the customer like name, email, etc, and hit the “Create” button.

(c) Click Submit Button

Click-Submit-Shopify

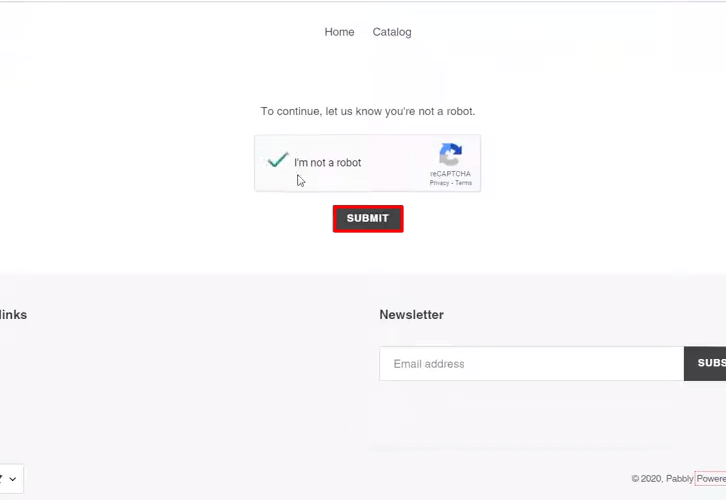
Next, simply click on the captcha checkbox and then click on the “Submit” button. But before clicking on the button, click on the “Capture Webhook Response” in Pabbly Connect to capture the data.

Step 7: Test the Response in Pabbly Connect Dashboard

Save the Webhook Response

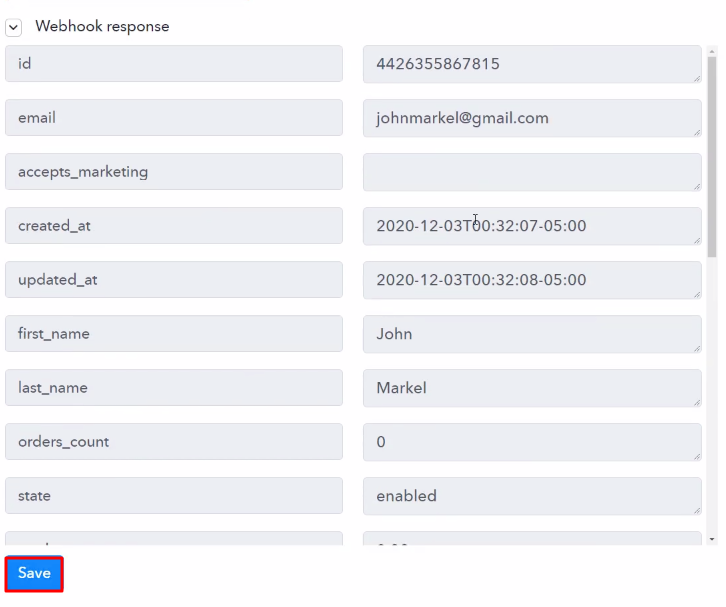
Once you click on the “Capture Webhook Response” in Pabbly Connect and “Submit” in Shopify, the customer info will appear on the Pabbly Connect dashboard. Then, click on the “Save” option.

Step 8: Setting Action for Shopify with EngageBay Integration

To make this Shopify-EngageBay integration work, you have to choose the action for your trigger.

(a) Select Application you Want to Integrate

Select Engagebay

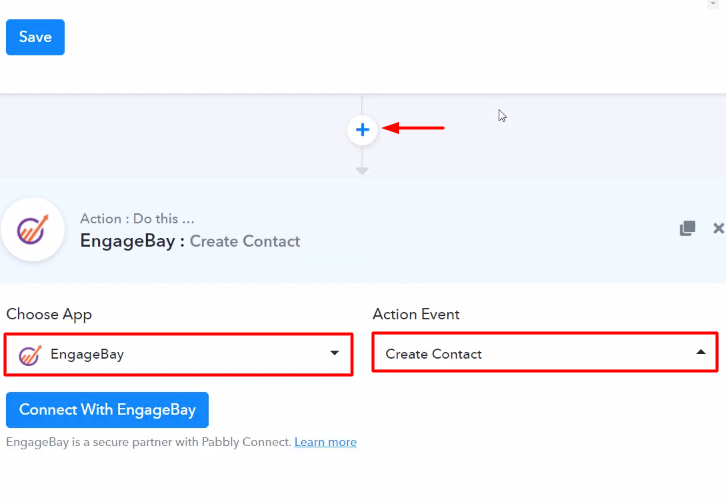
Now in this step, click on the + button below and choose the application that you want to integrate. Here we will choose “EngageBay” to integrate and in the method section select “Create Contact”.

(b) Click the Connect Button

Click Connect Engagebay

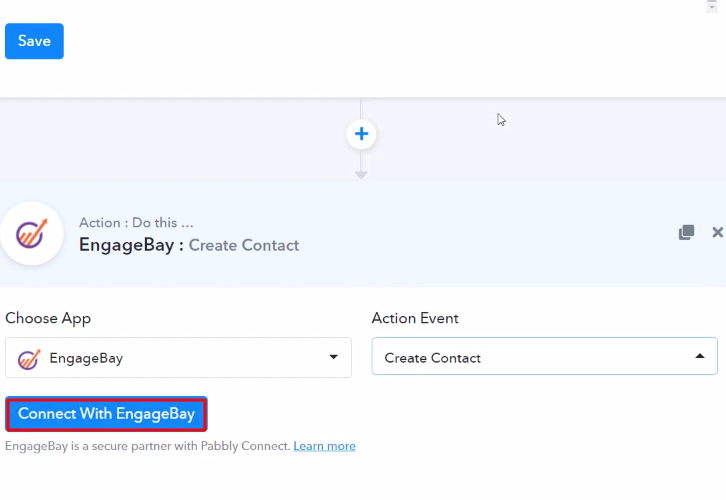
After choosing the application click on the “Connect with EngageBay” button to move forward.

Step 9: Connecting EngageBay to Pabbly Connect

To combine Pabbly Connect and EngageBay, you have to enter the API key of your EngageBay account in the Pabbly Connect dashboard. For this, you have to log in to your EngageBay account.

(a) Click on EngageBay Account Settings

Account Settings Engagebay

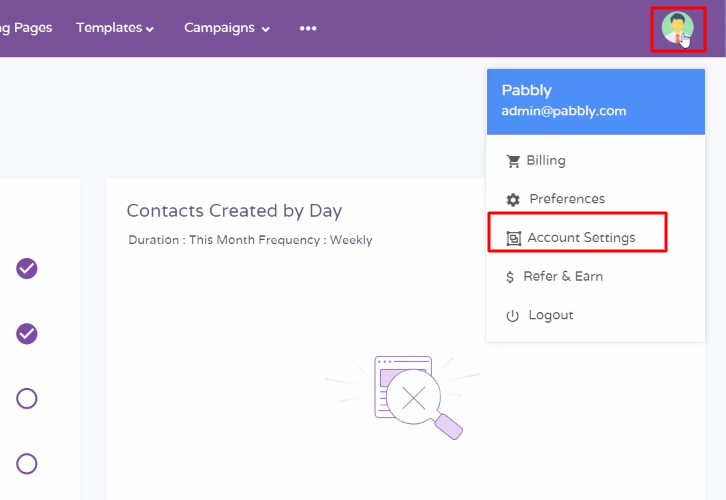
To get the API key click on the profile icon in your EngageBay dashboard and then click on the “Account Settings” option.

(b) Click on API & Tracking Code

API & Tracking Code Engagebay

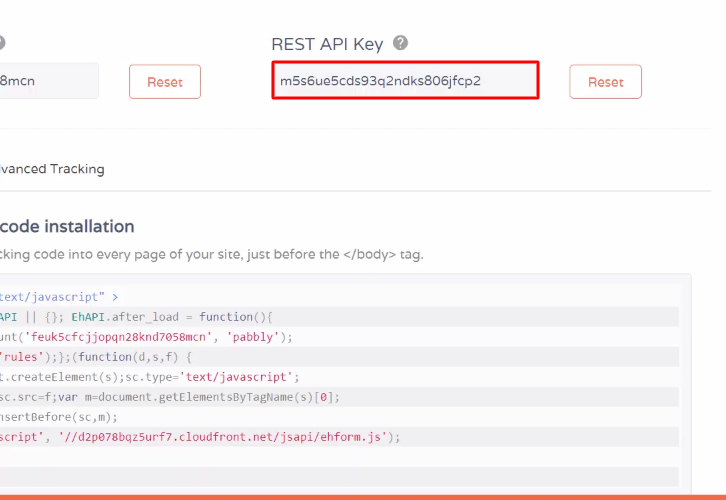
Next, click on the given “API & Tracking Code” option to get the API Key.

(c) Copy the API Key

Copy the API Key Engagebay

Now, simply copy the given API key to move further with the integration process.

(d) Paste the API Key

Paste the API Key Engagebay

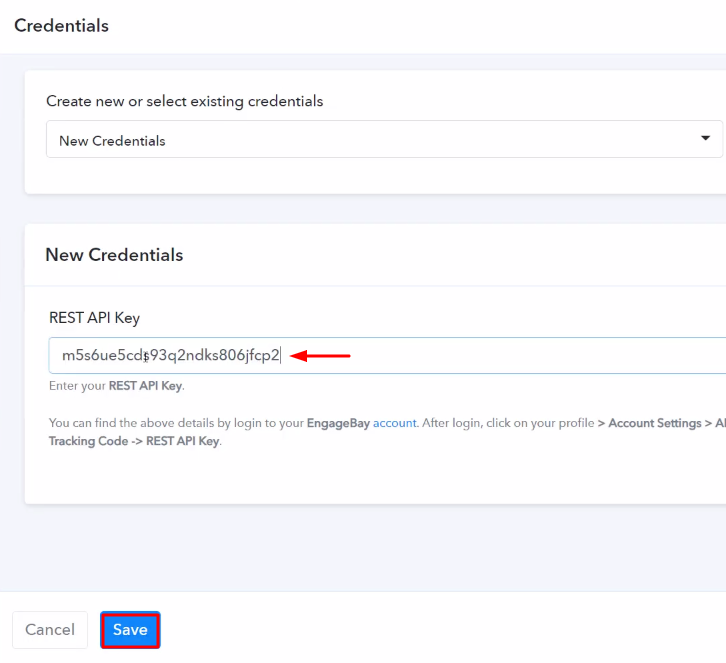
After copying the API key, now paste it into the Pabbly Connect dashboard and then click on the “Save” button.

(e) Map the Fields

Map the Fields

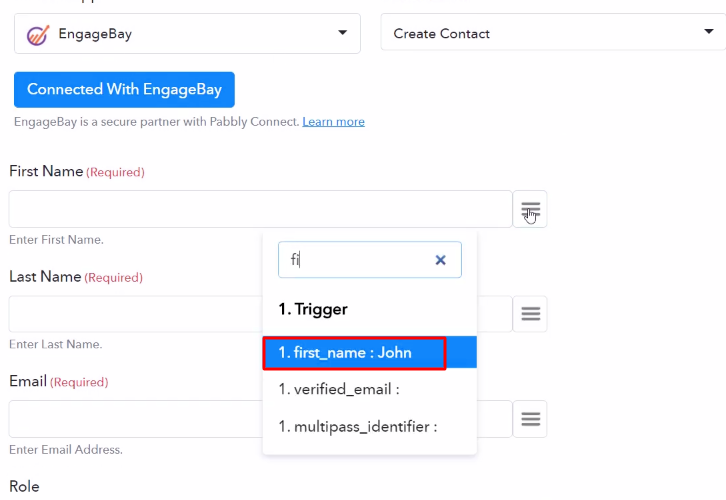
After connecting with your EngageBay account, map all the fields quickly like name, email, etc.

(f) Send Test Request

Send Test Request

Once you are done adding up all field data click on the “Save & Send Test Request” button.

Step 10: Check Response in EngageBay Dashboard

Check Response

Here, you can see that integration was successful and the customer has been added to the EngageBay account as a contact automatically from Shopify.

Conclusion –

Hopefully, here we have mentioned all the important steps to create EngageBay contact from new Shopify customer using the software Pabbly Connect. Now you know how easy it is to integrate Shopify and EngageBay. One can connect unlimited apps within minutes using this software. Not to forget, it doesn’t cost you a dime to create an account and you can work on it without coding skills.

So, it is high time to give Pabbly Connect a try. Get your access by signing up for a free account. For any doubts or suggestions, please drop your comments down below.

You May Also Like to Read –

How to Add Klaviyo Subscriber from New Shopify Customer

How to Add Klaviyo Subscriber from New Shopify Customer

Want to know the easiest way to integrate Shopify with Klaviyo?

If yes then follow this article as we going to reveal the step by step procedure to automatically create Klaviyo subscriber from the newly added Shopify customer using Pabbly Connect.

How to Add Klaviyo Subscriber from New Shopify Customer

Before diving directly onto the workflow, let’s understand the services as well as the need for integrating them. Shopify is an eCommerce platform that allows you to built an online shop within minutes. Whereas, Klaviyo is an email marketing service that helps you make a stronger relationship with your customers.

With implementing this workflow you’ll accomplish the automatic subscriber creation on Klaviyo whenever there is a new customer entry on your Shopify store.  Consequently, all your new customers automatically get listed on your email marketing software.

Why Choose This Method Of Integration?

In contrast with other integration services-

  • Pabbly Connect does not charge you for its in-built apps like filters, Iterator, Router, Data transformer and more
  • Create “Unlimited Workflows” and smoothly define multiple tasks for each action
  • As compared to other services which offer 750 tasks at $24.99, Pabbly Connect offers 50000 tasks in the starter plan of $29 itself
  • Unlike Zapier, there’s no restriction on features. Get access to advanced features even in the basic plan
  • Try before you buy! Before spending your money, you can actually signup & try out the working of Pabbly Connect for FREE

Sign Up To Pabbly Connect  

However, there is no direct integration possible for these two services yet. So, we are going to use Pabbly Connect to make this integration possible.

Using this software, you can effortlessly share data withing multiple premium services easily. More importantly, it won’t need any coding skills & even a beginner can use it efficiently. Moreover, this would be just a one-time setup. After that, the data will automatically be transferred in real-time.

So, buckle up as we’re going to discover how to connect Shopify and Klaviyo in real-time. Furthermore, we’ve attached a template for this integration to help you get started more-quickly. You can strike the ‘Use Workflow’ button below to get started. Also, you can go to the App Directory & look for more apps/integrations.

How

Add Klaviyo Subscriber from New Shopify Customer

Apart from this integration, Pabbly Connect offers using many remarkable features even in the free plan. Some of these features include using routers, formatters, instant triggers, multi-step calls & support thousands of app integrations.

Now, without taking any more of your time, let’s get directly on track & follow the step by step procedure to integrate Shopify and Klaviyo.

How to Add Klaviyo Subscriber from New Shopify Customer (step by step)

Step 1: Sign up to Pabbly Connect

Sign Up

Begin the procedure of connecting Shopify with Klaviyo with visiting the Pabbly Connect website. Hit the ‘Sign-Up Free‘ button available on the home page. Then signup using your existing Google account or manually fill the registration form.

Try Pabbly Connect for FREE

Step 2: Access Pabbly Connect

Select Connect

After that, strike the ‘Access Now’ button of the software ‘Connect’ within the Pabbly applications.

Step 3: Workflow for Shopify with Klaviyo Integration

(a) Start with a New Workflow

Create New Workflow

Further, start with creating a workflow to add a subscriber on Klaviyo for every new Shopify contact & to do this push the ‘Create Workflow’ button first.

(b) Name the Workflow

shopify_to_klaviyo_workflow

Now, name the workflow as per the integration or use-case (for instance: Shopify to Klaviyo etc). Finally, strike the ‘Create’ button available.

Step 4: Setting Trigger for Shopify to Klaviyo Integration

To automatically add Klaviyo subscriber for the newly added Shopify customer, you’ll need to set-up a trigger on the new Shopify customer and its respective action to add a subscriber on Klaviyo using Pabbly Connect.

(a) Select Application you want to integrate

integrate_shopify_for_shopify_to_klaviyo

When you click on the create button, a page containing the trigger window will open up next.

Select the ‘Shopify’ app from the ‘Choose App’ field’s drop-down options.

(b) Select Method & Connect with Shopify

copy_webhook_url_for_shopify_to

Select the method to be ‘New Customer’ & then copy the webhook URL.

Step 5: Connecting Shopify to Pabbly Connect

To connect Shopify with Pabbly connect, you’ll need to sign-in your Shopify account & create a webhook first.

(a) Go to Your Shopify Settings

click_on_shopify_settings

After successfully logging into your Shopify account, click on the ‘Settings’ option available at the bottom of the left vertical menu.

(b)Select Notification Option

Go To Notification

A page will open up carrying all the different setting options of the application. Select the notification option as we need to send automatic emails on user sign up in Shopify store.

(c) Click the Create Webhook Button

Create Webhook Shopify

On the next page, there will be many notification options. So, head directly to the bottom of the page on ‘Webhooks’ and click the ‘Create Webhook’ button.

(d) Add Webhook Details

add_webhook_details

A window asking for webhook information will open up. First, select the event field value as ‘Customer creation’, Then, make sure the format is ‘JSON’. After that paste, the copied webhook URL in the URL field.

Finally, hit the ‘Save webhook’ button present at the bottom right corner of the window.

Step 6: Test the Response in Pabbly Connect Dashboard

As we can see we are done setting up the trigger for Shopify and Klaviyo integration. So, let’s test the trigger setting by making a test customer on Shopify.

(a) Capture Webhook Response

capture_webhook_response_for_razorpay_to_klaviyo

To test the trigger setting, strike the ‘Capture Webhook Response’ button on your Pabbly Connect trigger window.

(b) Open Your Shopify Store

open_online_store

Now, go back to your Shopify dashboard and open the online store.

(c) Create a Test Contact

create_test_account

Fill in all the details to make a test contact and complete the registration.

(d) Check & Save Trigger Response

check_and_save_shopify_trigger_response

Once you successfully complete a payment, the Pabbly Connect trigger response will start showing the data of the current purchase. Also, check and Save the trigger response.

Step 7: Setting Action for Shopify to Klaviyo Integration

Now, as we have gathered all the necessary information to create subscriber on Klaviyo from Shopify response. We can now proceed to feed this data as an action. So that a new subscriber will get created automatically for every new Shopify customer.

(a) Select Application you want to Integrate

integrate_klaviyo_for_razorpay_to_klaviyo

Next, hit the plus button next to the Shopify trigger.

Select the app to integrate as ‘Klaviyo’ & method as ‘Create Contact’.

Lastly, push the ‘Connect with Klaviyo’ button.

Then the system will ask you for a public and private API key.

(b) Access Klaviyo Account Settings

klaviyo_account_settings

To feed the API key into the system. First, sign-in and go to your Klaviyo dashboard. After that, click on your profile. Then, select the ‘Account’ option from the menu that opens.

(c) Access API Key

access_api_key

In the Klaviyo account option, click on ‘Settings’.

Then, click on ‘API Keys’.

(d) Copy the Public & Private API Key

copy_the_public_and_private_api_key

Subsequently, the API key will be available on the SMTP & API page, select & copy the ‘API Key’ available.

(d) Paste the Copied Klaviyo API Key & Save

paste_public_and_private_klaviyo_api_keys

Paste the copied Klaviyo public and private API keys in the fields provided and after that click on ‘Save’.

(e) Select List & Map Fields

map_fields_for_razorpay_to_klaviyo

Now, select the list and map the email address.

To map a value, hit the menu button (three horizontal lines) next to that particular field.

After that, click-select the value that you want to map with that respective field.

Similarly, Map other required fields also.

(f) Send Test Request

save_and_send_test_request_for_klaviyo_action

Further, click on the ‘Save & Send Test Request’ button to send a request for creating a contact on Klaviyo.

(g) Check & Save Response

check_and_save_klaviyo_action_response

Certainly, you can check the response of your API in the action window. If everything is good then the response will show nothing. But, if there is some error while sending the data then it will show you the error. Finally, hit the ‘Save’ button to save the action API’s response.

(h) Confirm to be a Klaviyo Subscriber

confirm_klaviyo_subscription

The test customer will then receive an email to confirm whether he/she wants to be a subscriber on Klaviyo. Click on the confirmation link in your test email account.

Step 8: Check Response in Klaviyo Dashboard

Subscriber_entry_on_klaviyo

Also, you can check the subscriber’s entry on your connected Klaviyo account.

Conclusion –
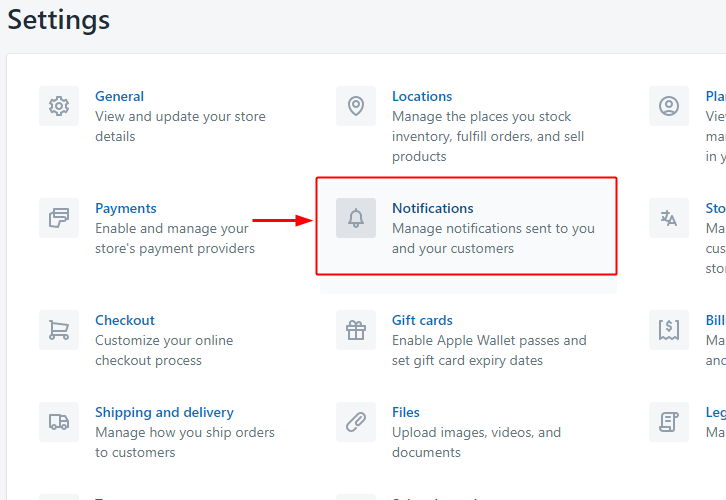
To sum up, this was all about ‘How to add Klaviyo subscriber from new Shopify customer automatically’. Consequently, after completing the step by step procedure, you will end up auto-creating Klaviyo subscriber from the newly added Shopify customer.

Meanwhile, you can grab, Pabbly Connect for FREE with all its premium features.

Also, comment below your queries and suggestions.

You May Also Like to Read:

How to Create Sendinblue Contact from New Razorpay Order

How to Create Sendinblue Contact from New Razorpay Order

Do you wanna know how you can easily integrate Sendinblue with Razorpay and automate the contact creation?

If yes then follow this article as we going to reveal the step by step procedure to automatically create Sendinblue contacts from the newly paid Razorpay orders using Pabbly Connect.

How to Create Sendinblue Contact from New Razorpay Order

Before diving directly onto the method first, let’s understand the services involved here. Razorpay is an online payment gateway for accepting payment using varied payment modes such as cards, net banking, E-wallets etc. Whereas, Sendinblue is a Saas solution for managing email campaigns & sending text messages.

With implementing this workflow you’ll accomplish the automatic contact creation on Sendinblue whenever an order is successfully paid on Razorpay.  Consequently, all your paid customers automatically get listed on your email marketing software.

Why Choose This Method Of Integration?

In contrast with other integration services-

  • Pabbly Connect does not charge you for its in-built apps like filters, Iterator, Router, Data transformer and more
  • Create “Unlimited Workflows” and smoothly define multiple tasks for each action
  • As compared to other services which offer 750 tasks at $24.99, Pabbly Connect offers 50000 tasks in the starter plan of $29 itself
  • Unlike Zapier, there’s no restriction on features. Get access to advanced features even in the basic plan
  • Try before you buy! Before spending your money, you can actually signup & try out the working of Pabbly Connect for FREE

Sign Up To Pabbly Connect  

However, there is no direct integration possible for these two services yet. So, we are going to use Pabbly Connect to make this integration possible.

Pabbly Connect is an affordable automation software available online. It can help you save a lot of time in your manual repetitive tasks. Moreover, the procedure would be just a one-time set-up & the services start sharing data in automatically afterwards.

In this tutorial, we will discover how to connect Sendinblue and Razorpay in real-time. Furthermore, we’ve attached a template for this integration to help you get started more-quickly. You can strike the ‘Use Workflow’ button below to get started. Also, you can go to the App Directory & look for more apps/integrations.

How

Create Sendinblue Contact from New Razorpay Order

Apart from this integration, Pabbly Connect offers using many remarkable features even in the free plan. Some of these features include using routers, formatters, instant triggers, multi-step calls & support thousands of app integrations.

Now, without taking any more of your time, let’s get directly on track & follow the step by step procedure to integrate Razorpay and Sendinblue.

How to Create Sendinblue Contact from New Razorpay Order (step by step)

Step 1: Sign up to Pabbly Connect

Sign Up

Begin the procedure by visiting the Pabbly Connect website. Then hit the ‘Sign-Up Free‘ button available on the home page. Next signup using your existing Google account or manually fill the registration form.

Try Pabbly Connect for FREE

Step 2: Access Pabbly Connect

Select Connect

After successfully logging into Pabbly, strike the ‘Access Now’ button of the software ‘Connect’ in the Pabbly application.

Step 3: Workflow for Razorpay with Sendinblue Integration

(a) Start with a New Workflow

Create New Workflow

Start with creating a workflow to add a contact on Sendinblue for every new Razorpay order & to do this push the ‘Create Workflow’ button first.

(b) Name the Workflow

workflow_for_razorpay_to_sendinblue_workflow

Now, name the workflow as per the integration or use-case (for instance: Razorpay to Sendinblue etc). Finally, strike the ‘Create’ button available.

Step 4: Setting Trigger for Razorpay to Sendinblue Integration

To automatically add Sendinblue contact for the newly added Razorpay orders, you’ll need to set-up a trigger on the new Razorpay orders and its respective action to add a contact on Sendinblue using Pabbly Connect.

(a) Select Application you want to integrate

integrate_razorpay_for_razorpay_to_sendinblue_workflow

When you click on the create button, a page containing the trigger window will open up next.

Select the ‘Razorpay’ app from the ‘Choose App’ field’s drop-down options.

(b) Select Method & Connect with Razorpay

select_method_and_copy_url

Select the method to be ‘Order Paid’ & then click on ‘Connect with Razorpay’ button.

Step 5: Connecting Razorpay to Pabbly Connect

To connect Razorpay with Pabbly connect, you’ll need to sign-in your Razorpay account & create a webhook first.

(a) Go to Your Razorpay Settings

razorpay_webhook_settings

After successfully logging into your Razorpay account, click on the ‘Settings’ option from the left vertical menu.

On the settings page, click on ‘Webhooks’.

Lastly, hit the ‘+ Add New Webhook’ button.

(b) Paste the Webhook URL & Create a Webhook

razorpay_create_webhook

A window asking for webhook information will open up. Paste the copied Pabbly Connect Razorpay trigger webhook URL in the ‘Webhook URL’ field.

Next, select the ‘Action Events’ field’s value as ‘order.paid”

Finally, hit the ‘Create Webhook’ button present at the bottom right corner of the window.

Step 6: Test the Response in Pabbly Connect Dashboard

As we can see we are done setting up the trigger for Razorpay and Sendinblue integration. So, let’s test the trigger setting by making a test order on Razorpay.

(a) Capture Webhook Response

capture_webhook_response

To test the trigger setting, strike the ‘Capture Webhook Response’ button on your Pabbly Connect trigger window.

(b) Access Any Razorpay Payment Page

open_payment_page

Now, go back to your Razorpay payment dashboard and access any payment page.

(c) Make a Payment

How

Fill in all the details to make a payment and complete the payment process.

(d) Check & Save Trigger Response

check_and_save_trigger_api_response

Once you successfully complete a payment, the Pabbly Connect trigger response will start showing the data of the current purchase. Also, check and Save the trigger response.

Step 7: Setting Action for Razorpay to Sendinblue Integration

Now, as we have gathered all the necessary information to create contact on Sendinblue from Razorpay response. We can now proceed to feed this data as an action. So that a new user will get created automatically for every new Razorpay paid order.

(a) Select Application you want to Integrate

integrate_sendinblue_for_razorpay_to_sendinblue_workflow

Next, hit the plus button next to the Razorpay trigger.

Select the app to integrate as ‘Sendinblue’ & method as ‘Create Contact’.

Lastly, push the ‘Connect with Sendinblue’ button.

Then the system will ask you for an API key.

(b) Connecting Sendinblue to Pabbly Connect

smtp_and_api

To feed the API key into the system. First, sign-in and go to your Sendinblue dashboard. After that, click on your profile. Then, select the ‘SMTP & API’ option from the menu that opens.

(c) Copy API Key

copy_sendinblue_api

Subsequently, the API key will be available on the SMTP & API page, select & copy the ‘API Key’ available.

(d) Paste the Copied Sendinblue API Key & Save

paste_api_key_and_save_for_razorpay_to_sendinblue_workflow

Paste the copied Sendinblue API key in the field provided and after that click on ‘Save’.

(e) Select List & Map Fields

select_list_and_map_fields

Now, select the list and map the email address.

To map a value, hit the menu button (three horizontal lines) next to that particular field.

After that, click-select the value that you want to map with that respective field.

Similarly, Map other required fields also.

(f) Send Test Request

send_test_request_for_action

Further, click on the ‘Save & Send Test Request’ button to send a request for creating a contact on Sendinblue.

(g) Check & Save Response

check_and_save_the_sendinblue_api_response

Certainly, you can check the response of your API in the action window. If everything is good then the response will start showing the Id. But, if there is some error while sending the data then it will show you the error. Finally, hit the ‘Save’ button to save the action API’s response.

Step 8: Check Response in Sendinblue Dashboard

contact_entry_on_sendinblue

Also, you can check the contact’s entry on your connected Sendinblue account.

Conclusion –
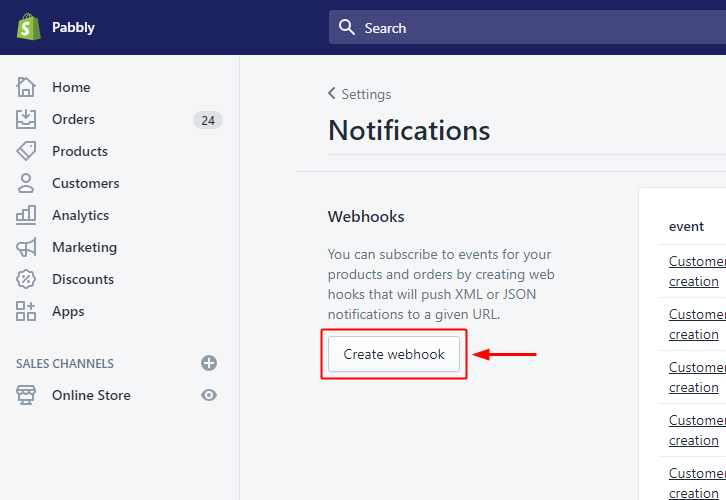
To sum up, this was all about ‘How to create Sendinblue contact from new Razorpay order’. Consequently, after completing the step by step procedure, you will end up creating Sendinblue contacts from the newly paid Razorpay orders automatically.

Meanwhile, you can grab, Pabbly Connect for FREE with all its premium features.

Also, comment below your queries and suggestions.

You May Also Like to Read: