Here we are going to talk about the very robust feature throughout the Pabbly is its “Checkout Page Customizer“.
Although, If you want to create a beautiful layout for your checkout page then this inbuilt customizer will be the best choice. This section allows you to change the layout of your Checkout page as per the business requirement. Here you can set colors, some relevant images, provide responsiveness to your system, handle all billing activities with awesome front-end design.
Gradually, we are going to enhance the functionalities of this customizer, whose information we give to the users by email or any other contact sources. So let’s start by letting you know more about our wonderful feature of Pabbly.
Taking you from the beginning, the first thing comes in the path is a way where you find this customizer in our dashboard.
The Checkout Page Customizer
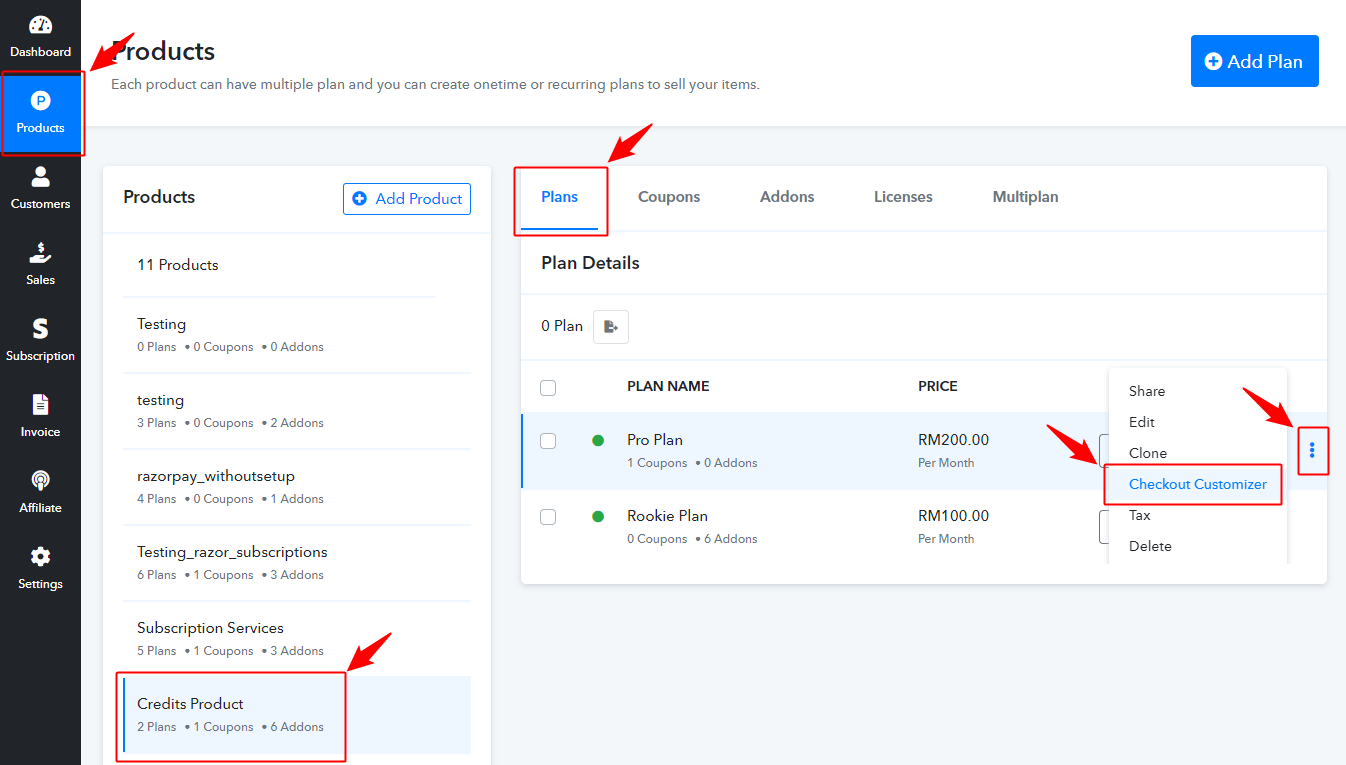
Go to : Home -> Settings -> Products -> Plans -> Checkout Customizer
After this we have to know all the features one by one, they all are listed below –
First of all, select the product and plan for which you want to customize the Checkout Page. In case, you want to apply the same settings for all the available items, then select all products and plans option or keep this as same.
Now, go to the first point :
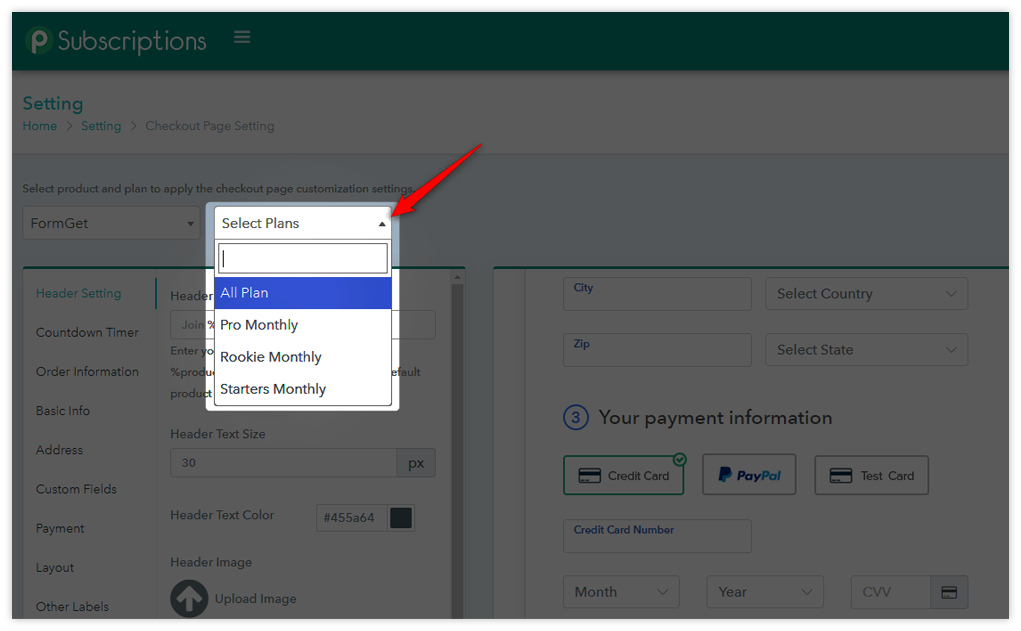
1. Select Product/Plan –
At the first in customizer Setting panel, you will get a filter option for Product/Plans. Where you can set filtration to fetch out the individual product & their individual or all plans.
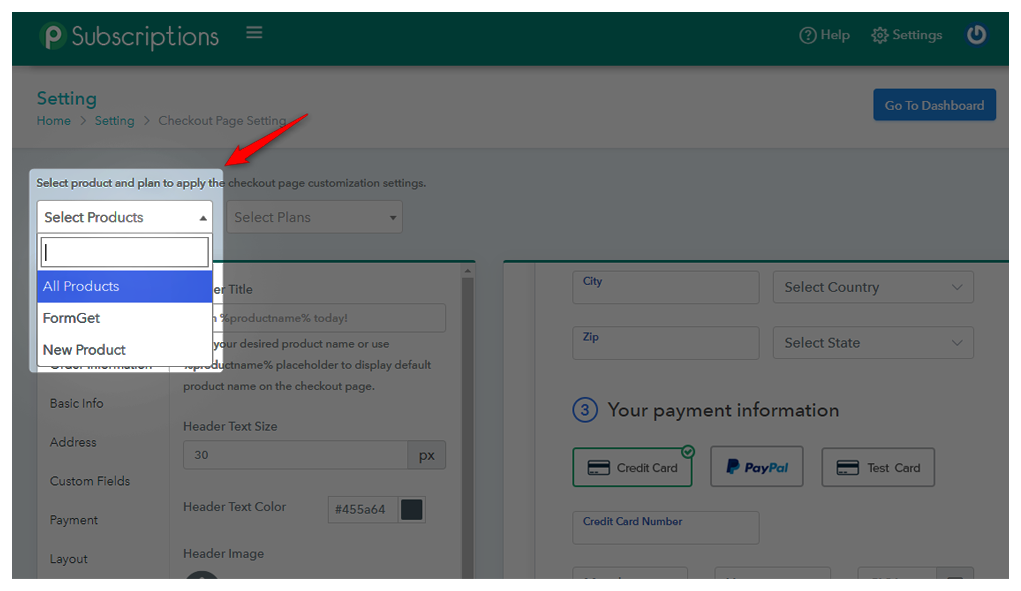
Individual product – Individual plan > Individual product – All plan > All product – All plan.
That means the maximum priority is given to the customization of the checkout page of individual product and individual plan.
There is one more advantage of this setting that you can customize all the checkout pages of different plans in a different manner.
2. Header Settings –
Here you can customize the header section of your checkout page. Inside this setting we have a number of attributes, they are –
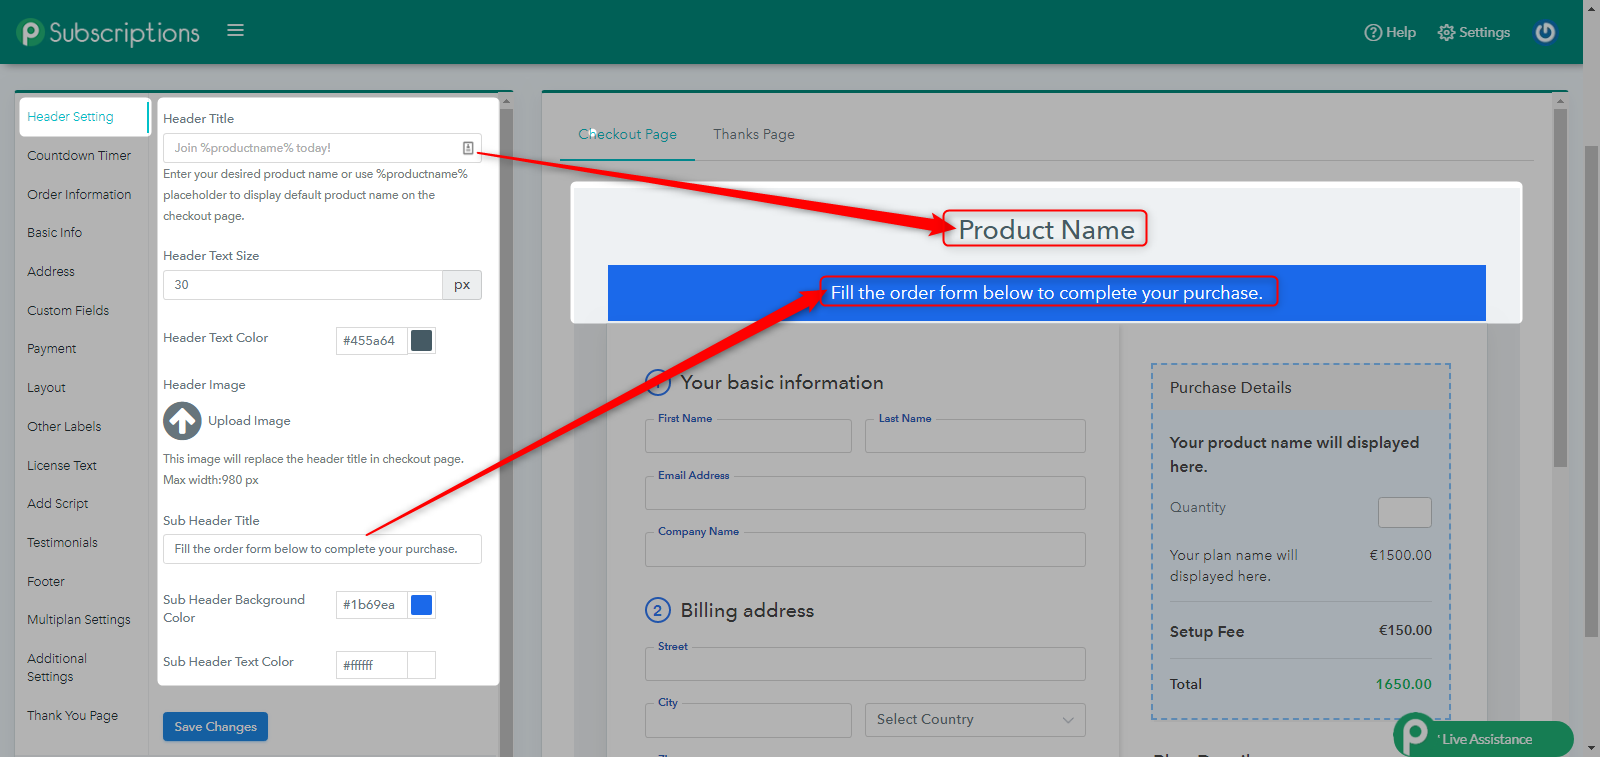
- Header Title – Leave blank to show product name in the header or you can also use %productname% placeholder to customize your header text with the product name
- Header Text Size – Enables you to change the text size of the header section.
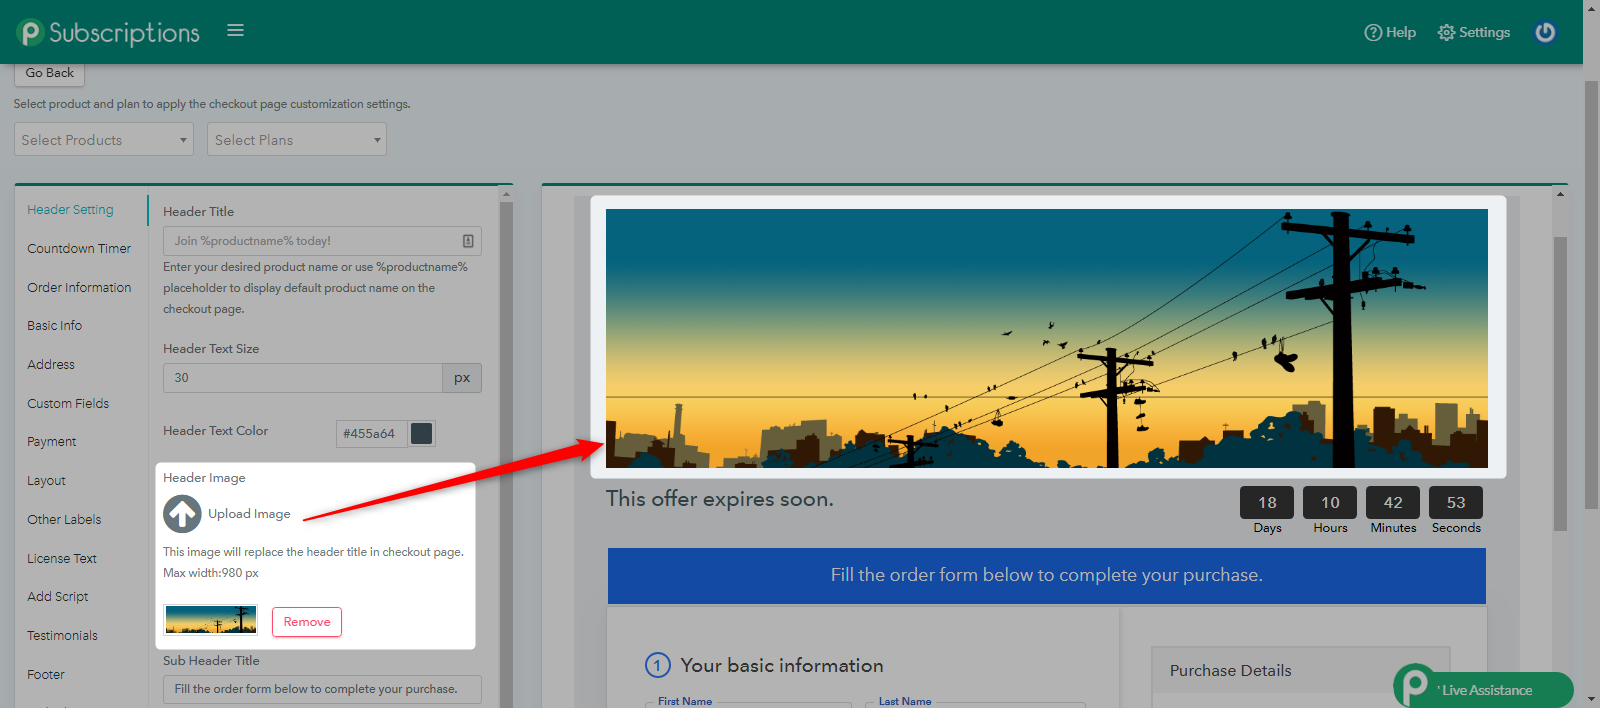
- Text Color – Change the color of the text as per your choice to highlight your title.
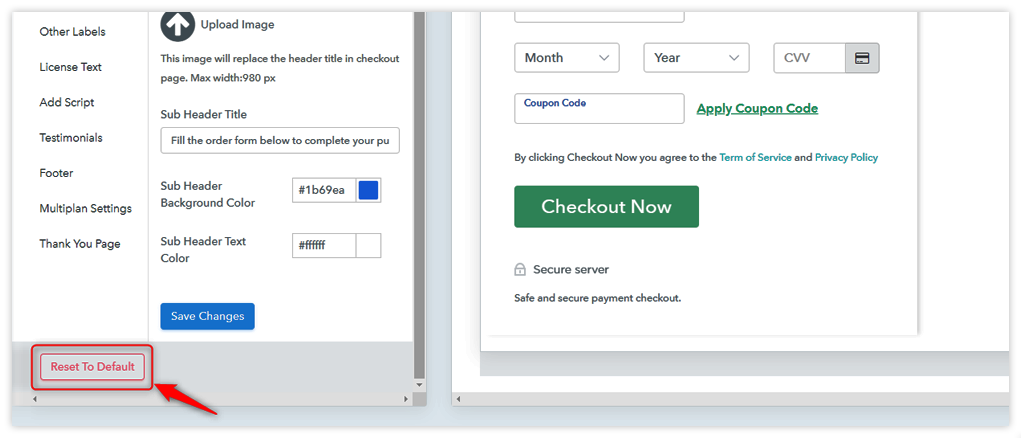
- Header Image – You can use images at the header to make your checkout page even better. But the image will replace the header title on the same checkout page. It means to say that you can either keep the image or the title on your checkout page, it is not possible to keep them together.
- Sub Header Title – Here you can change the header text of your checkout page as per the needs.
- Sub Header Background & Text Color – This option allows you to change the color of Sub Header’s text and background.
This customizer has the option to save in every tab, by which you can save your settings simultaneously.
3. Countdown Timer –
This tab will allow you to manage deals, offers, and discounts through your check out page. You can set the countdown for specific deals that are running and vice versa.
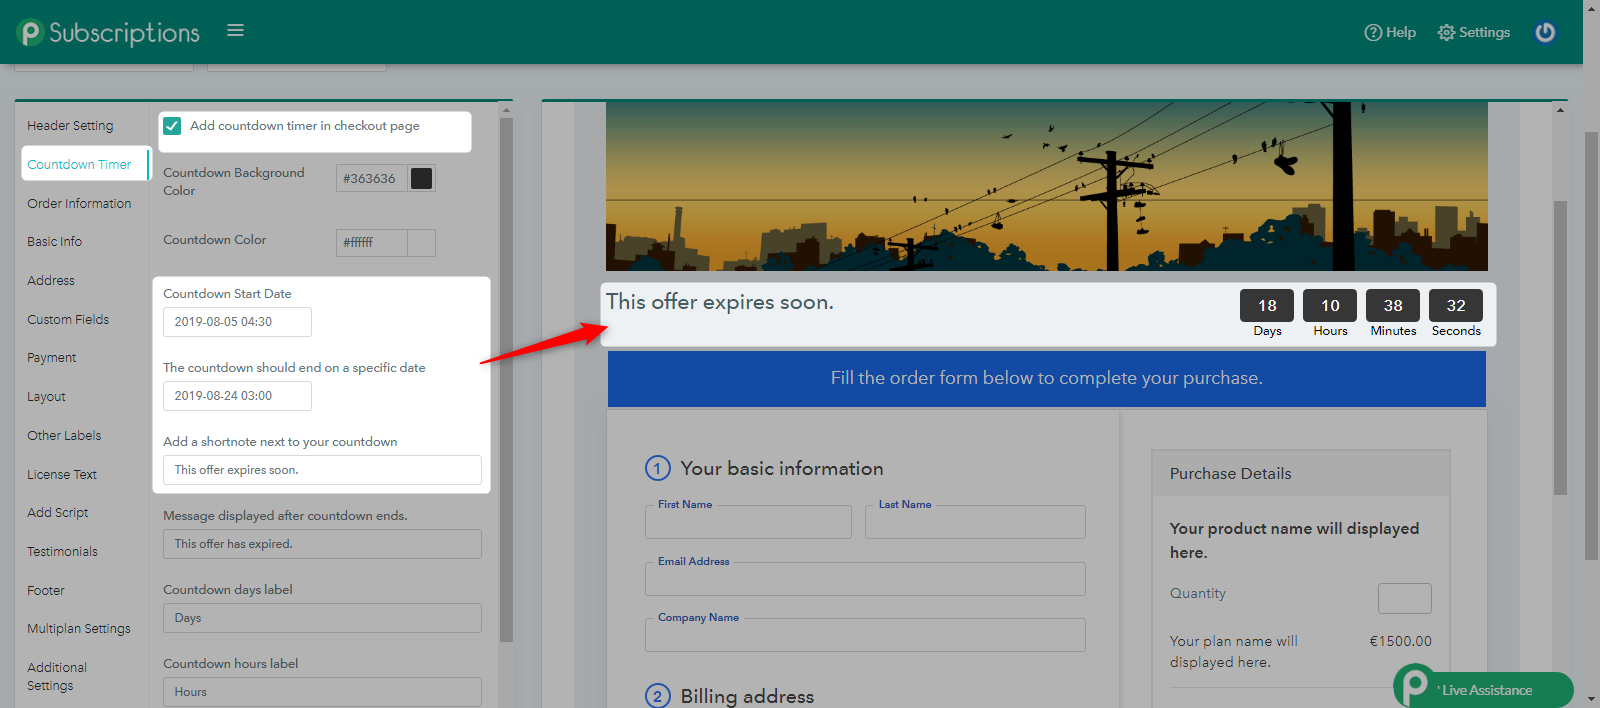
- Check Box – First of all you will find a checkbox as a title ‘Add Countdown Timer in Checkout Page’. If you want to add countdown time in your checkout page for any deals or offers then you need to select this checkbox till right symbol will appear.
- Background Colour – After checking the above checkbox, only you can customize the below options. At the first, we have an option to change the background color of the countdown timer cubes’ color shown in the above picture (set as Black).
- Count Down Start Date – From here you can set the date on which you want to start the specific deal or offers. Default format – YYYY-MM-DD HH:MM:SS.
- Countdown End Date – Here you can set a specific date on which countdown should end.
- Add a short-note next to your countdown – Here you can also give a short note related to your countdown timer. If you want to tell your customers that this deal or offer will end soon or simply want to write a note of “Hurry Up!” then you can do this too.
- Message displayed after countdown ends – Vice versa, here you can replace above short note with some other text which denoted you to end your deals and offers.
Do not forget to save this setting.
4. Order Information –
Now in a list, we have the 3rd option for order information, in which you can apply some front-end setting of order information headings. Let’s know more about this option –
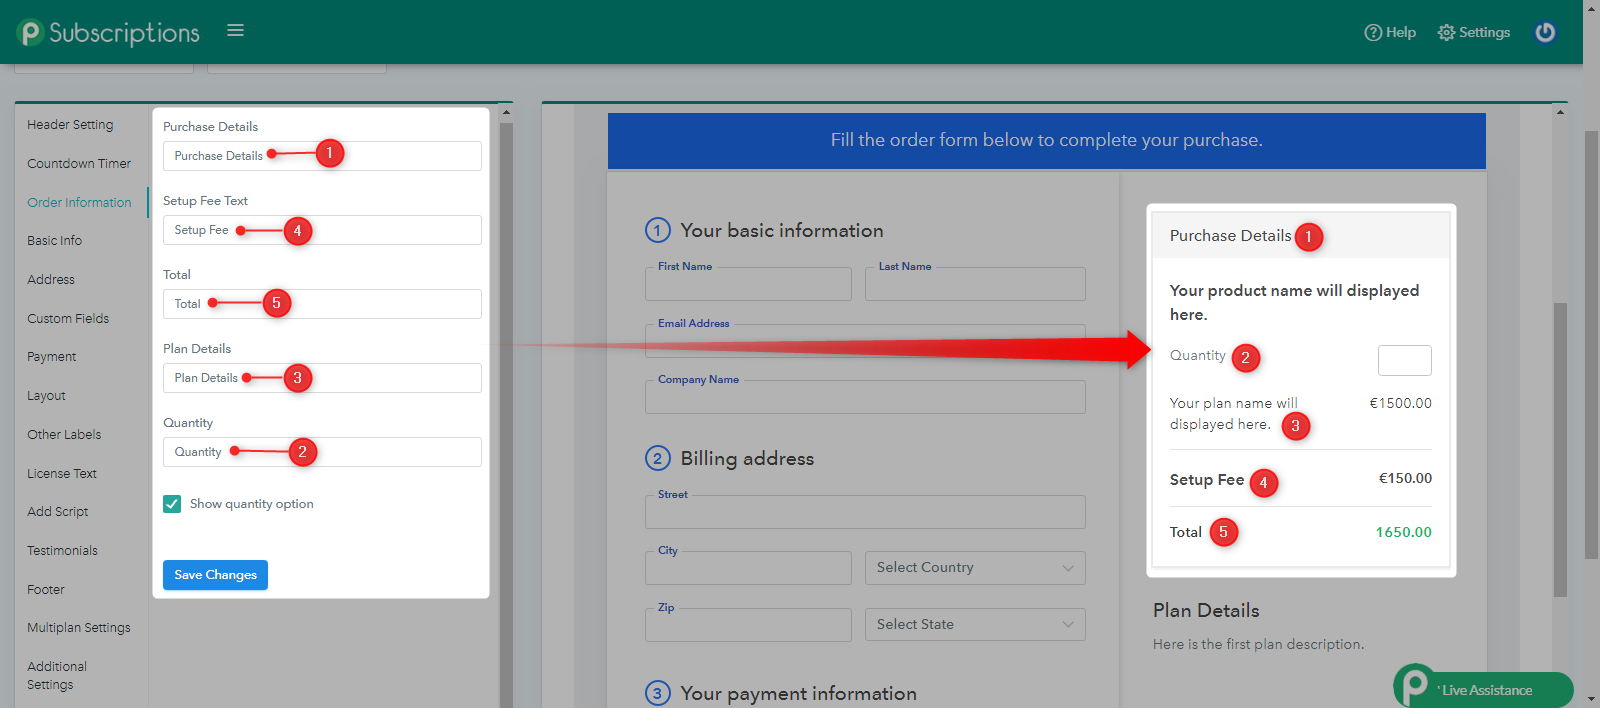
- Purchase Details – With the help of this option, you can modify the heading of Purchase details, Which is given on the right top of the checkout page. Inside this heading, you can show the purchasing amounts as well as the setup fee with the total which can be placed here.
- Quantity – You can provide an option to your customers for making the purchase according to their quantative needs.
- Setup Fee Text – From here you can change the text of the set-up fee and give your heading accordingly. For example, if you want to write that all the tax is included in your setup fee, then here you can write it as well – “Setup Fee Incl. all Taxes”.
- Total – As same as the setup fee you can also change the heading text of Total. It also has the same functionality for e.g. you can put “Sum” or “Grand Total” instead of “Total”.
- Plan Details – This option is located at the right side of check out page by which you can well describe your product or plan which is going to sell out. From here you can change the heading of this Plan details option.
Do not forget to save this settings.
5. Basic Information –
This tab is utilized to manage account information or we can say basic information getting by the customers. There are several fields in itself like – Name, Email Address, Company Name, Phone number, and Website.
So, this customizer allows you to change the heading text of all the fields as per your business needs. We will talk about all of them one by one.
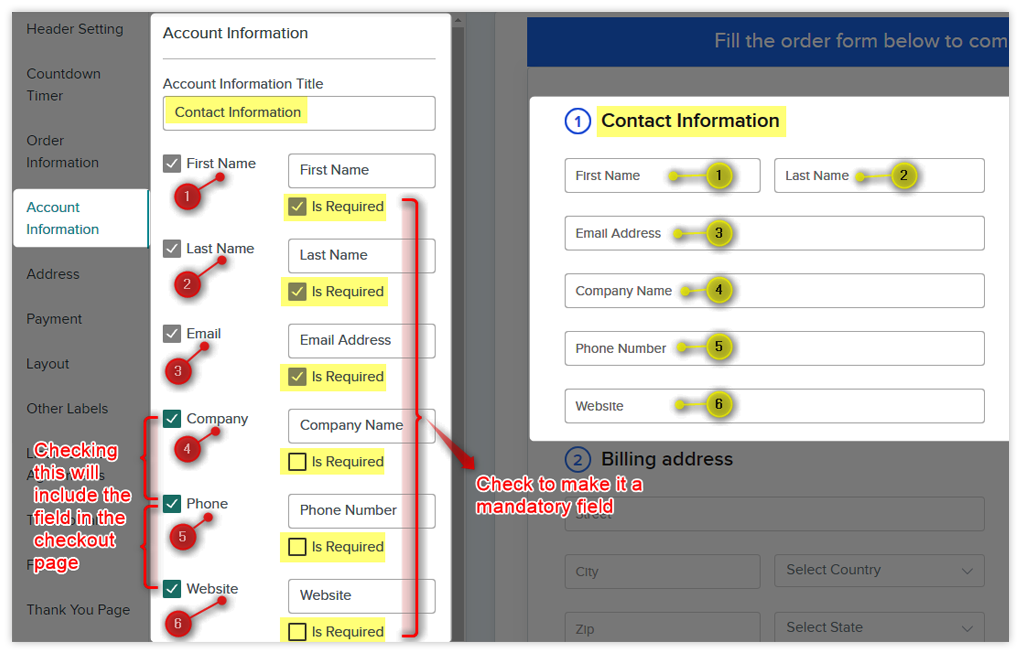
- Account Information Title – This option helps you to add a suitable title for your account information for e.g. “Basic Information” or “Contact Information”.
- First Name, Last Name, Company Name, Phone Number, Website are the fields that you can modify with their titles. They all are shown as a placeholder for their text fields.
- Mandatory Vs Optional Functionality – There is a checkbox associated with each field. So, if you want to put some mandatory columns then you need to tick right on that particular checkbox. All those columns will be treated as mandatory for your checkout page and the rest all are optional.
Do not forget to save this settings.
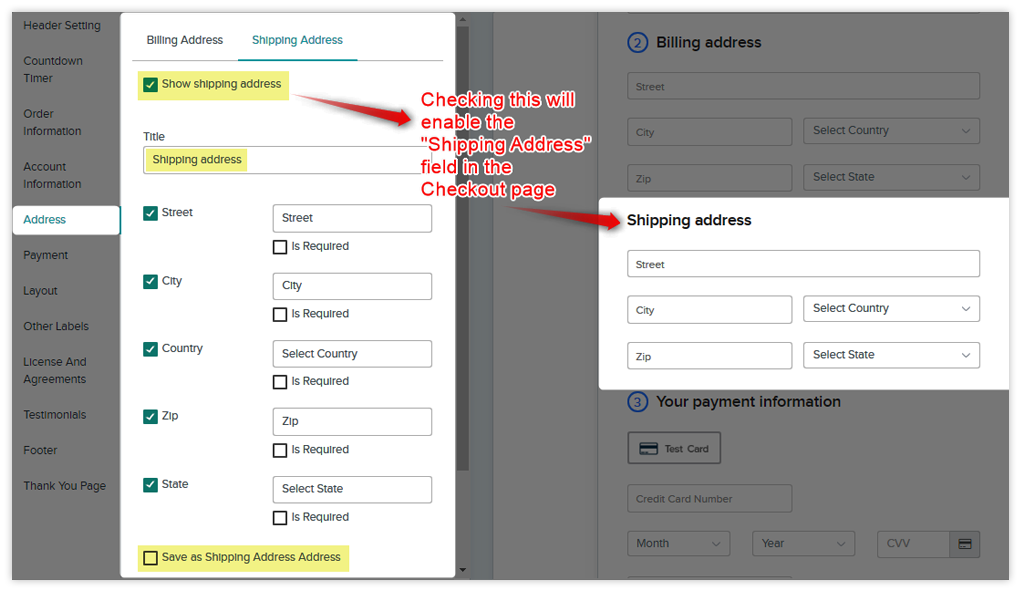
6. Address –
Here the address is categorized into 2 fields, they are –
Billing Address & Shipping Address
You can change their heading titles as well for e.g. – Permanent Address, Present Address etc.
Refer Image –
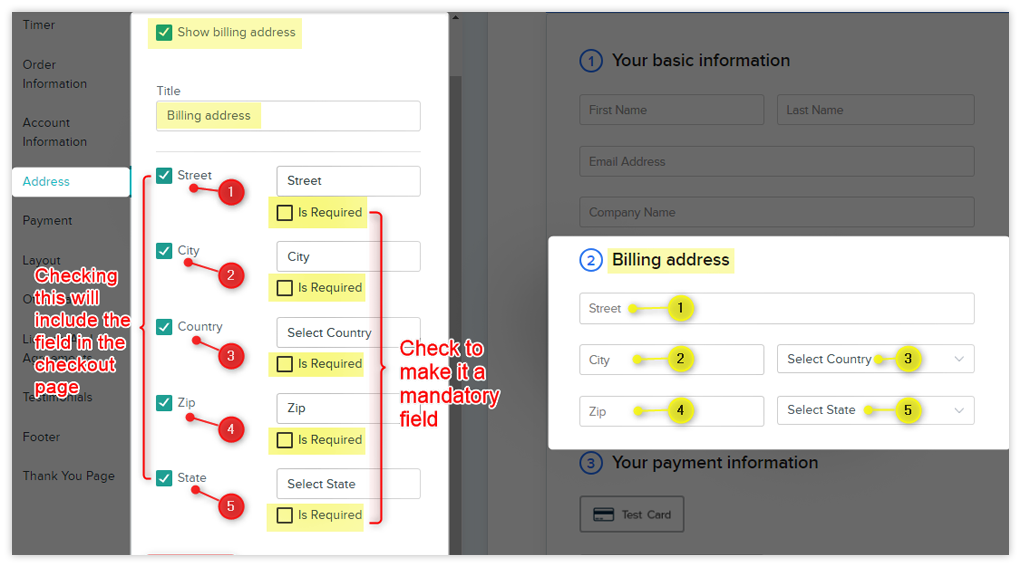
Here you will find the Billing Address column. Now the Shipping Address fields are just the same as the Billing.
7. Custom Fields –
This feature will enable you to add more fields to the checkout pages. You can use this feature if you want to collect more information from your customers.
The feature is located in Settings → Checkout Page Settings → Custom Fields.
Custom Fields Position – Now, you can also choose the position of custom fields to place them below the basic information section or below the address fields.
Refer the image –
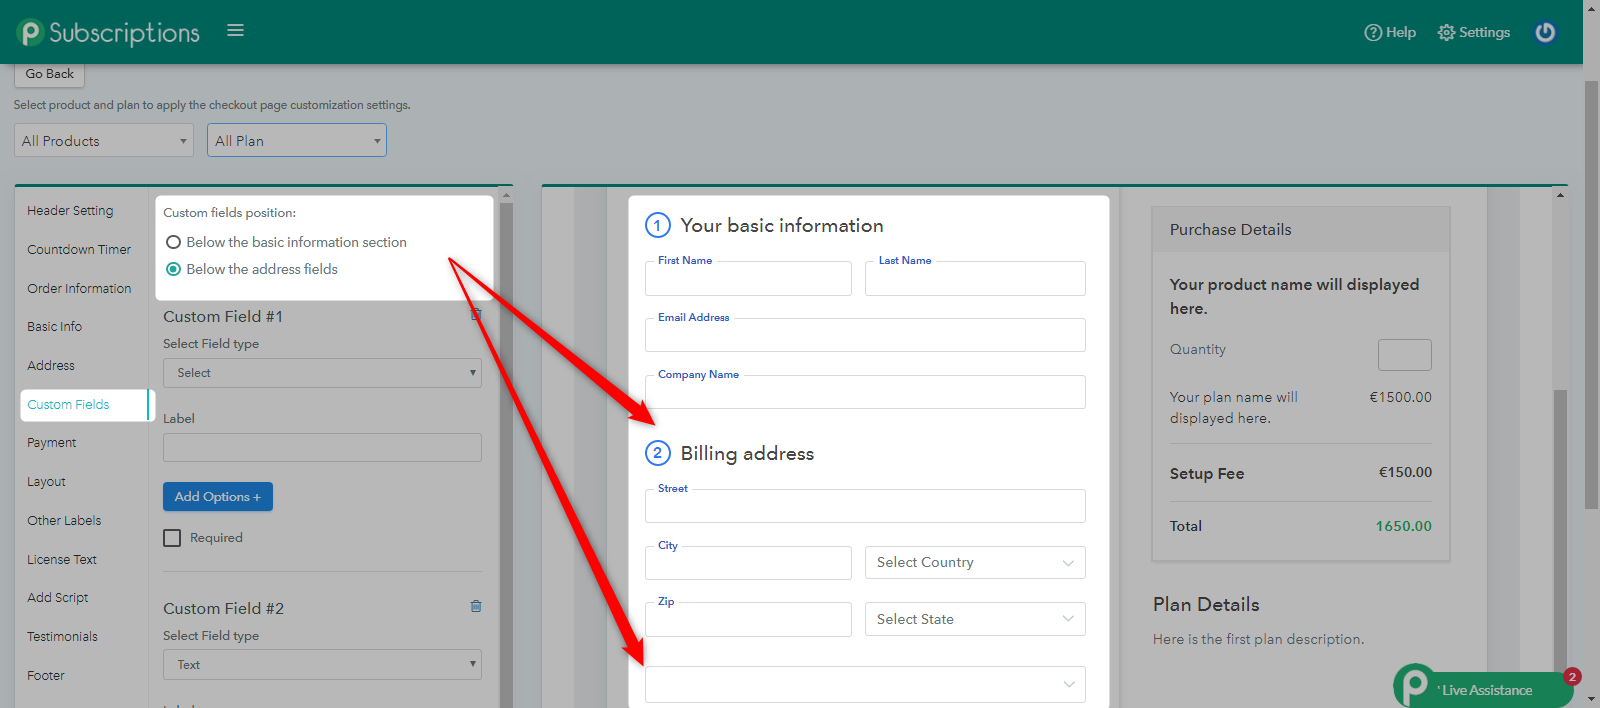
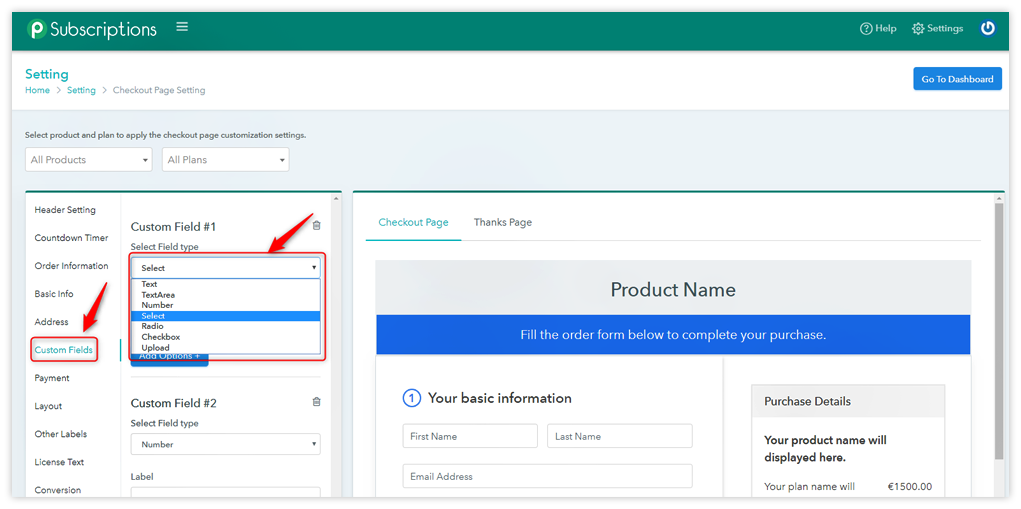
We have 7 different types of fields which can be used for collecting a different kind of information or leads.
- Text Field: A single line field is added in the checkout page where the customer can add one line text.
- Text Area: A multiline field where the customer can type a lengthy text.
- Number Field: Single line field in which only numbers can be filled.
- Select Field: It’s a drop-down field. You can add multiple options in this field.
- Radio: It’s a radio field where only one option can be selected at a time.
- CheckBox: It’s a multiple option field where options are selected by clicking on the checkbox.
- Upload: With this field, your customer can upload any kind of file in the checkout page.
Further, the text field, text area field, number field, and the upload file field can be added by simply assigning the label and saving the changes.
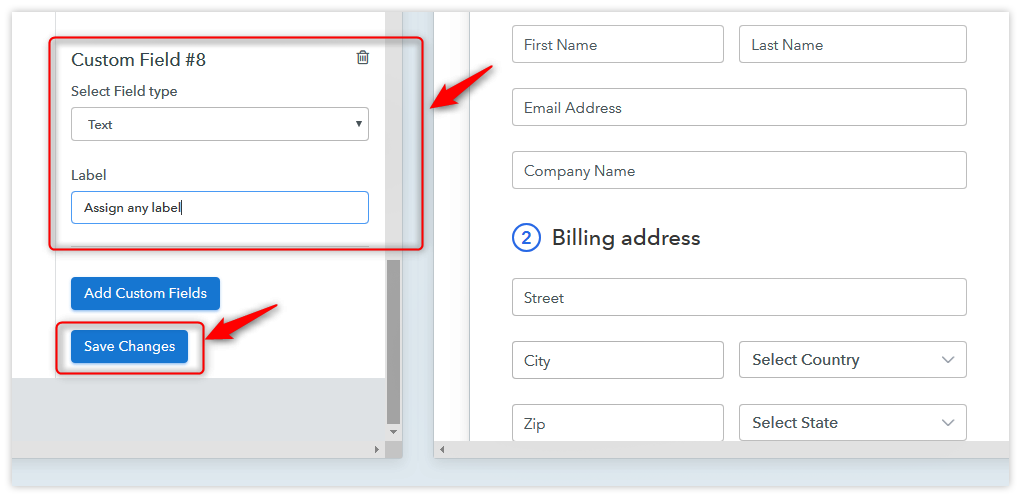
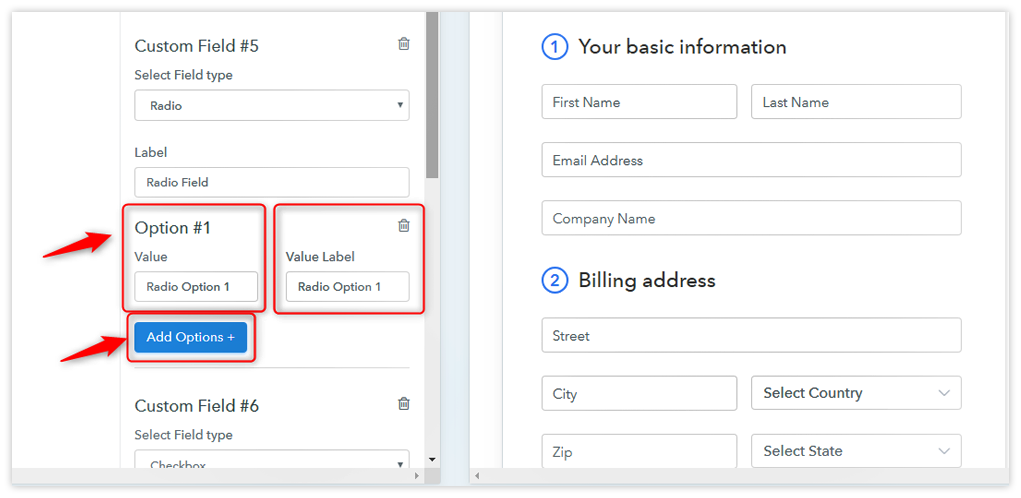
To add the select field, radio field, and checkbox field you have to assign a label first, then click on ‘Add Option’ and assign the values and then save the changes. (If you save these fields without adding any option then the changes will not be shown on the checkout page)
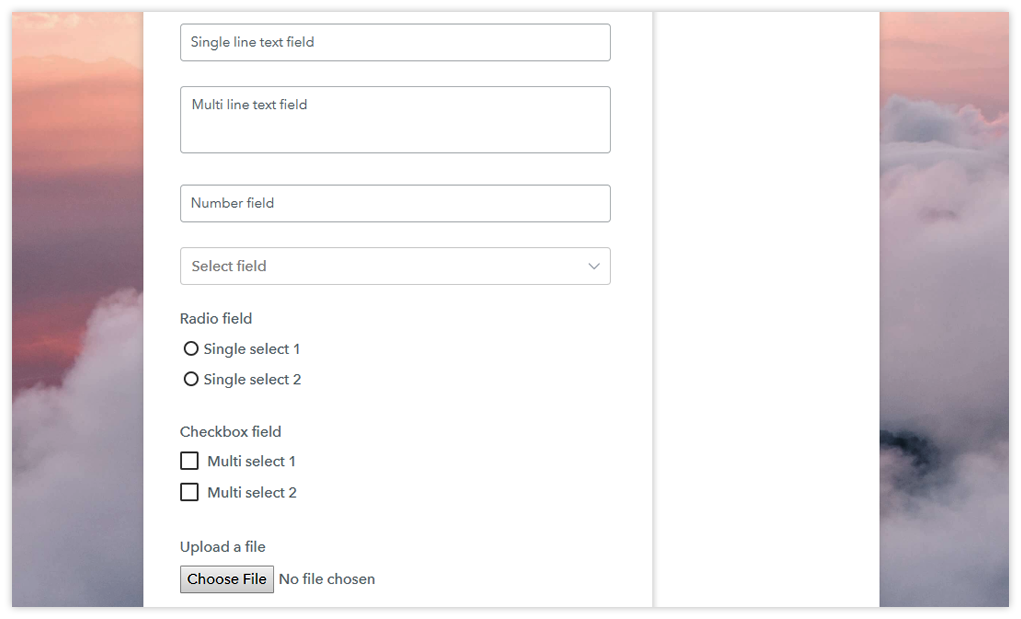
Once you have added all the fields or the required fields then the checkout page will look like this,
When the customers fill the checkout page the data of the default fields can be seen in the customer overview section but for the data of custom fields there will a separate section called as “Custom Data”.
To access the custom data from the Pabbly Subscriptions dashboard, go to Subscription → Click on customer’s email Id → Custom Fields
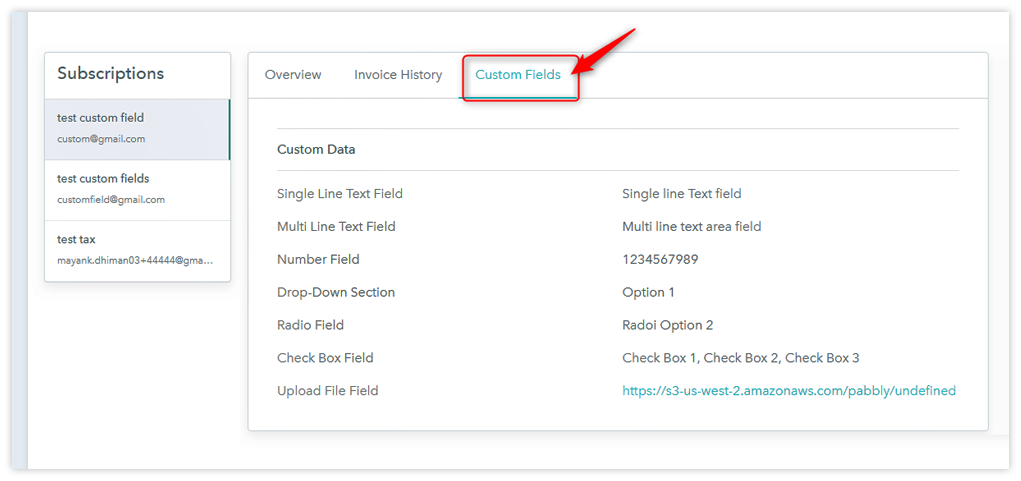
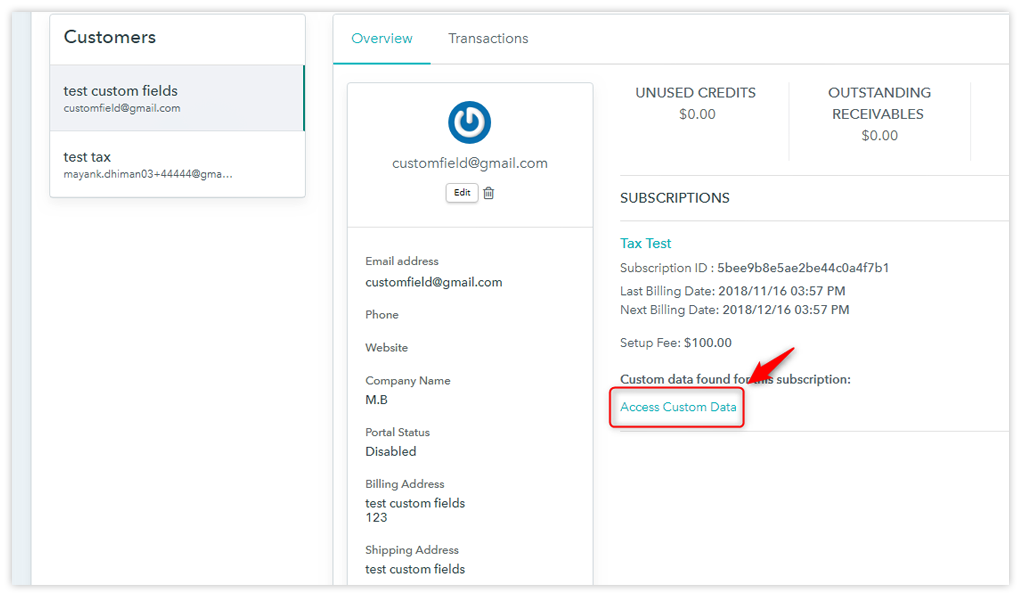
You will also find an “Access Custom Data” button in the customer overview section.
So this is all the information related to custom fields for the checkout page.
Note: Any of the fields does not collect the data in encrypted form. So we request you not to ask for any kind of secured information from your customer like Account Password, Card Details by the custom fields.
If the system detects you using this kind of custom fields then you might face interruption while using the account.
8. Payment –
All the Payment related settings could be done by this feature like – it allows to change the label of card detail fields, expiry month or date, CVV, etc.
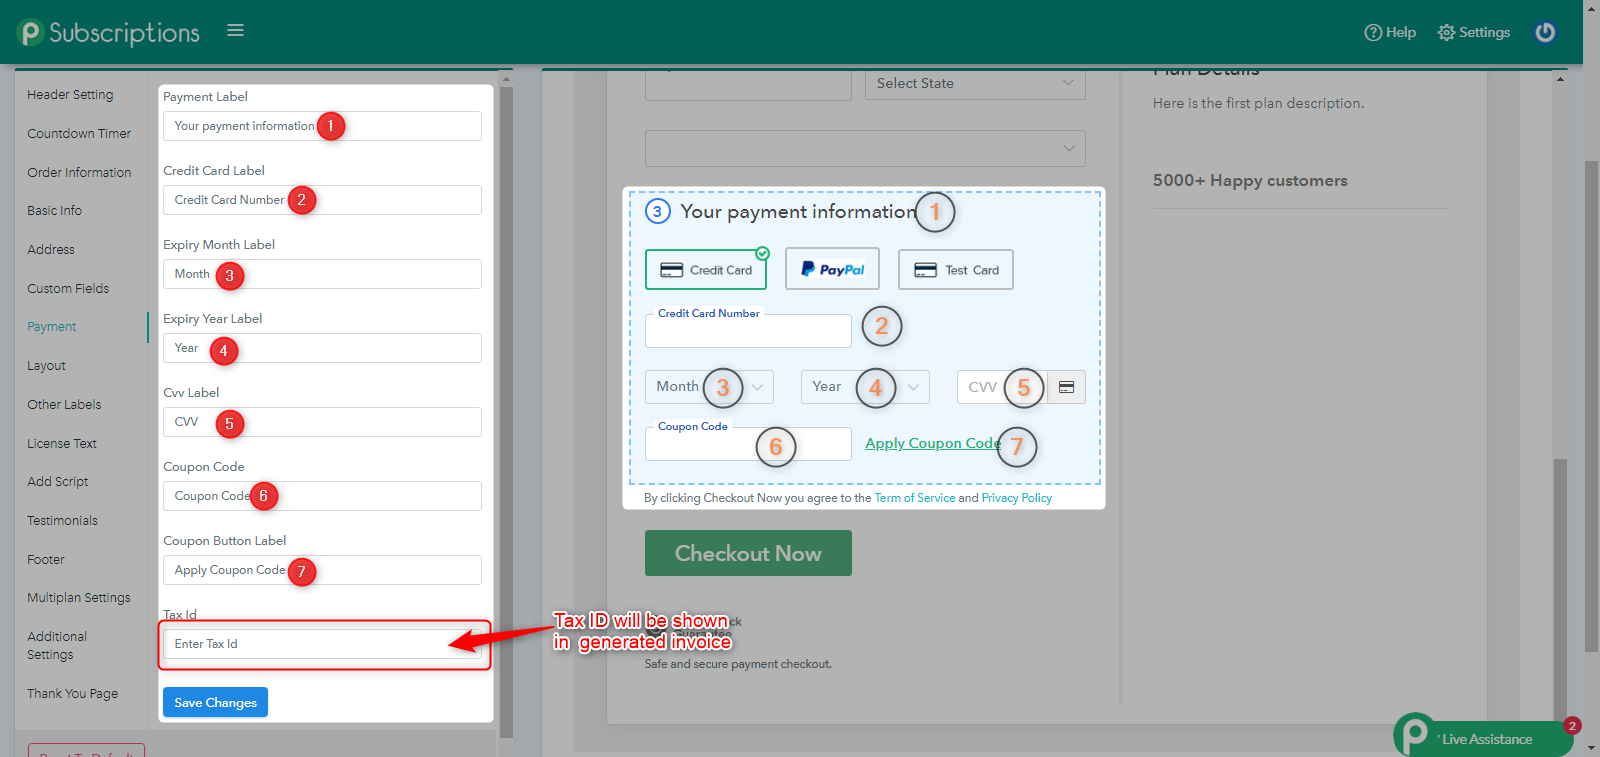
Now in the Payment section, we have a number of fields, they are as follow –
- Payment Label – Through this, you can change the heading of your Payment information.
- Coupon Code Field – You can fill a coupon code from here that will help you to get discounts before every purchase.
- Coupon Code Button – From here, you can change the text of the button and apply coupon code.
- Tax ID – The information filled in this field is shown after purchase in the generated invoice.
9. Layout –
Now come to the setting of Page and Button layout. Here we have the separate setting option to manage all the layout designing through new customizer. Please check out one by one –
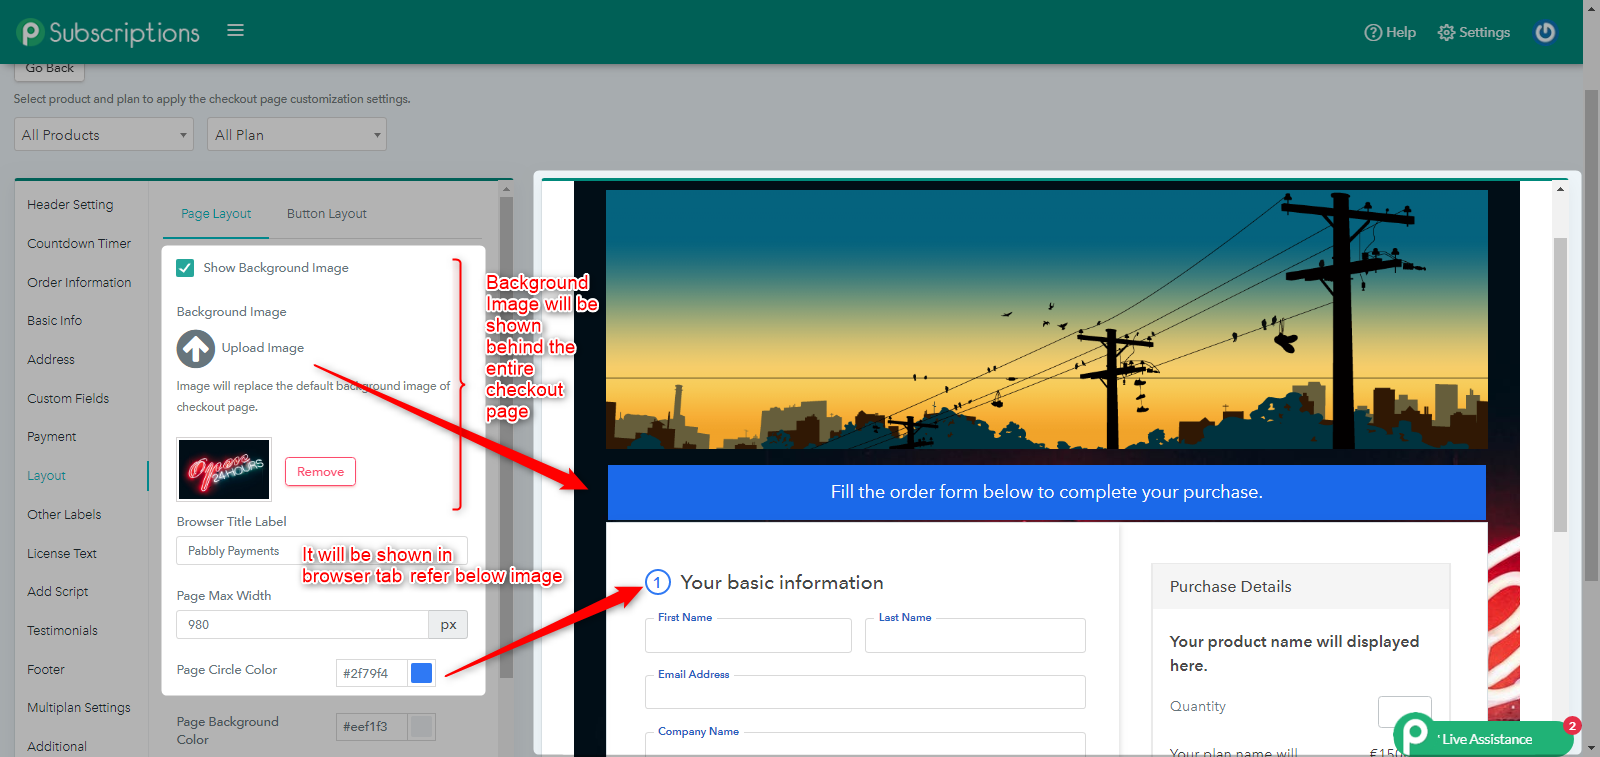
Page Layout –
- Background Image: Through this option, you can change or replace the background image of your checkout page as per the needs.
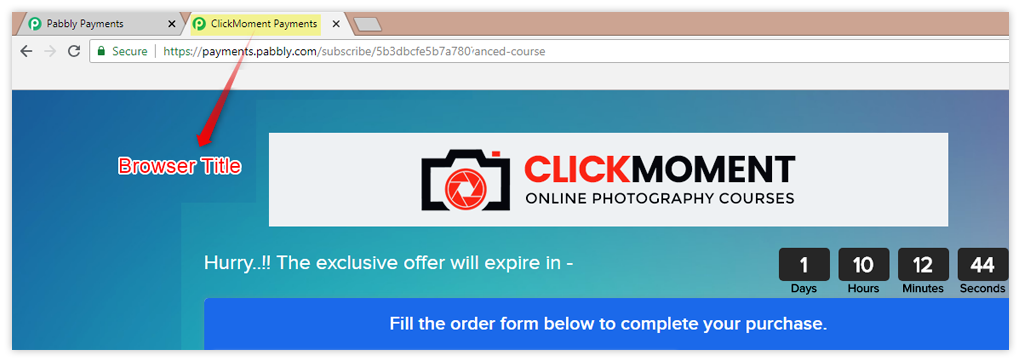
- Browser Title Label: Here you can set a suitable title for your browser window. This title will show at the top of your title bar.
- Page Max. width: You can resize the width of your checkout page.
- Page Background Color: It helps to change the background color of your checkout page.
- Page subtext color: You can change the subtext color through this option. The subtext is nothing but a text written in your terms and conditions also in the footer.
- Label Text Color: From this option, you can change the color of the label in your page e.g. Basic Information, Shipping Address, billing address, etc this all are the labels.
- Page Label Size: As same, you can resize the label text as well.
- Field Text Size: You can resize the text or placeholders whatever you have entered into the text fields.
Do not forget to save these settings at the same moment.
Now we have an option to change the layout for Button as well, let’s take a look on the attributes –
Button Layout-
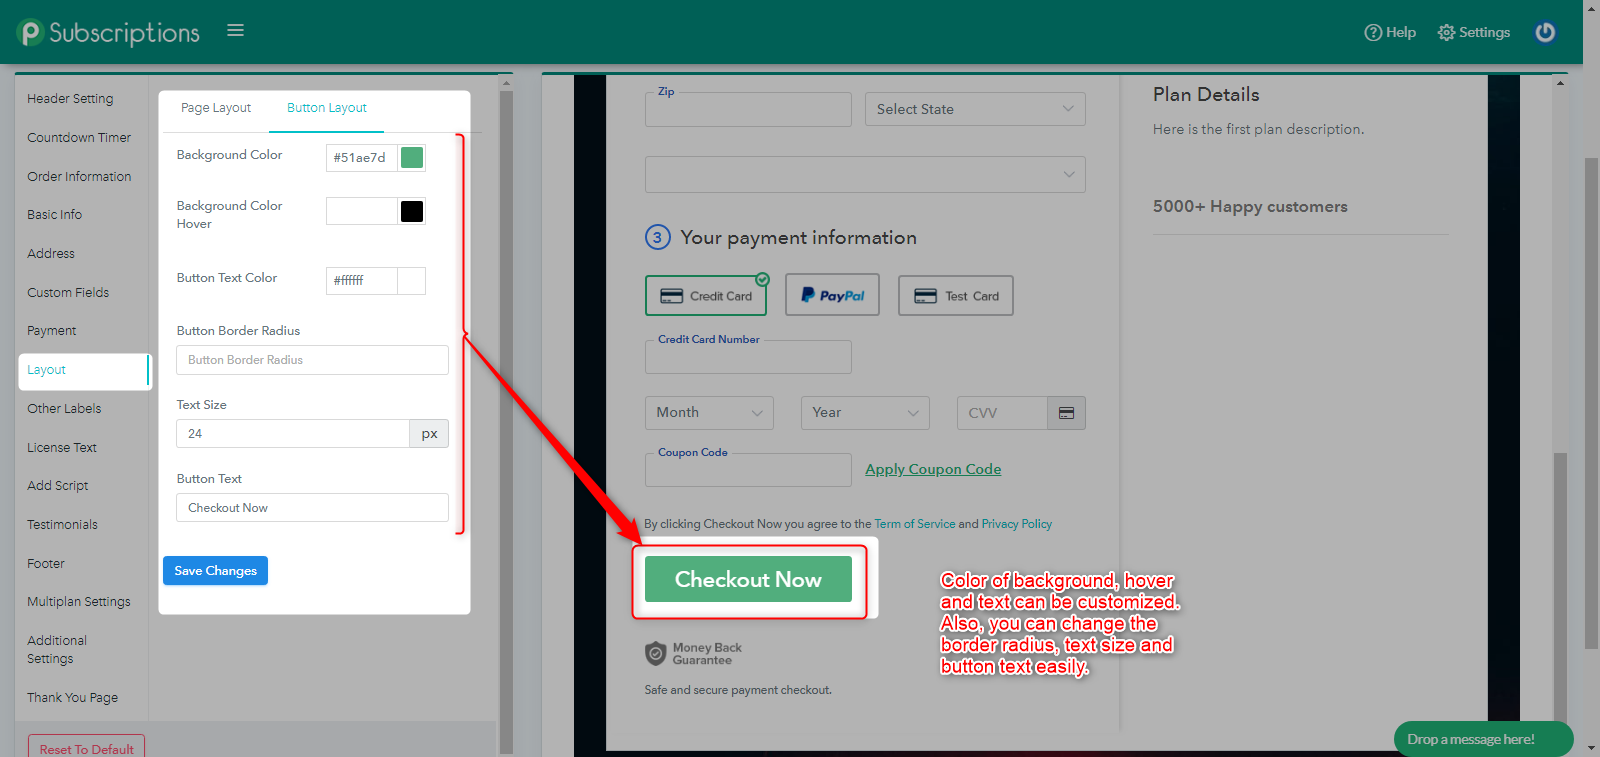
- Background Color: It will change the color of the button’s background. The Submit button is shown in the picture.
- Background Color Hover: This option gives a pretty look to your checkout button, this will help to change the background color of the button when someone is hovering over it.
- Text Color: This option helps to change the color of text inside the button.
- Button Border Radius: you can set the border size of the specific button, and can provide the radiant effect.
- Text Size: If you want to resize the text size of the button, this option provides a facility to do so.
- Button Text: You can change the text as well inside the button, let’s say from “Submit” to “Click Here”.
Full Page Layout –
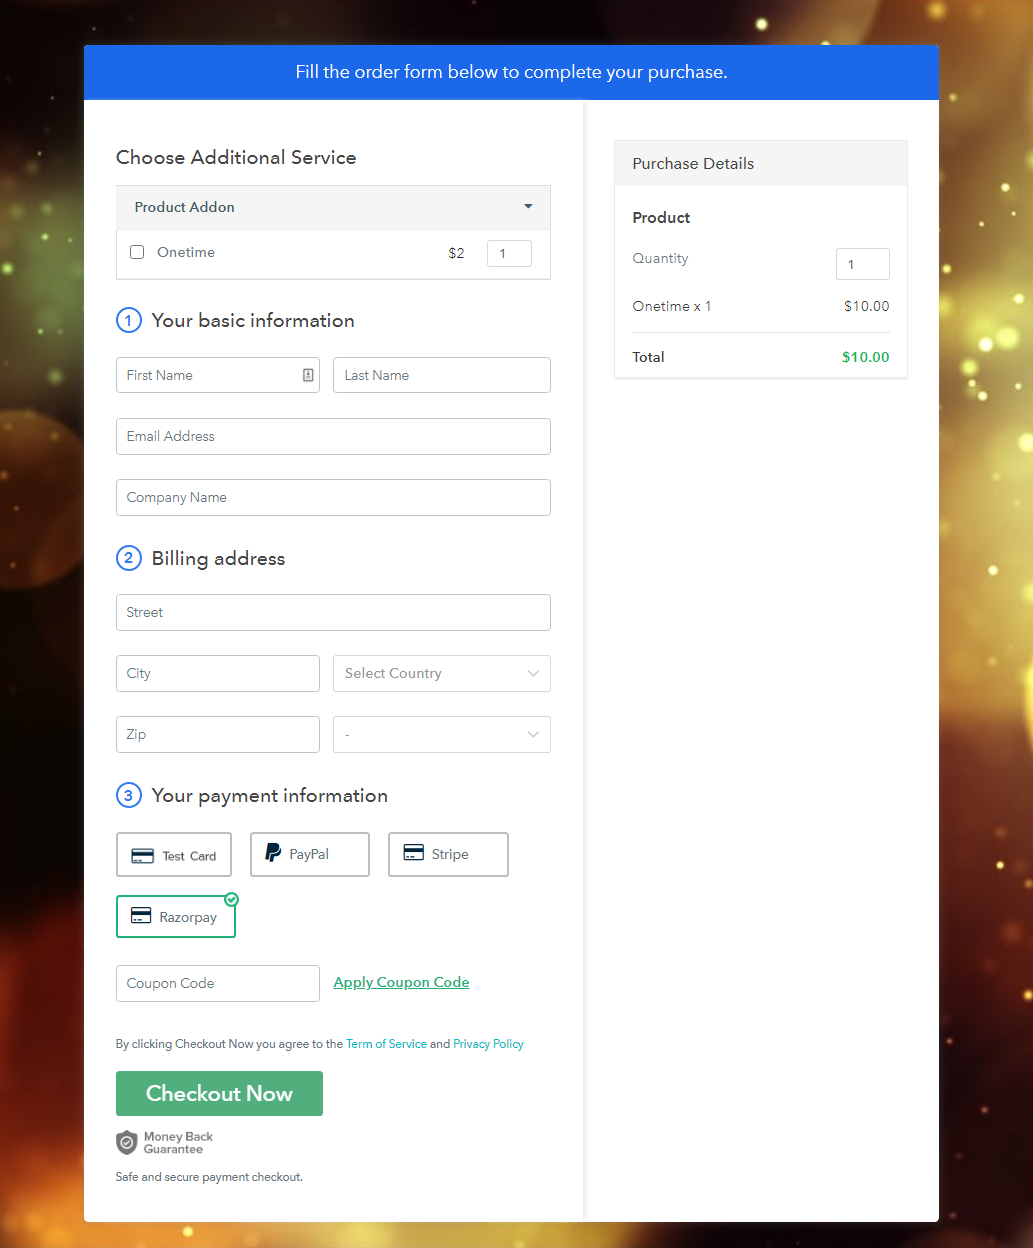
Do not forget to save these settings at the same moment. Now you are done with the layout settings.
10. Other Labels –
As the name suggested here you will find the settings for other labels like – Checkout Page Label, Thank you Page Label, etc.
Please look at the options you will find here-
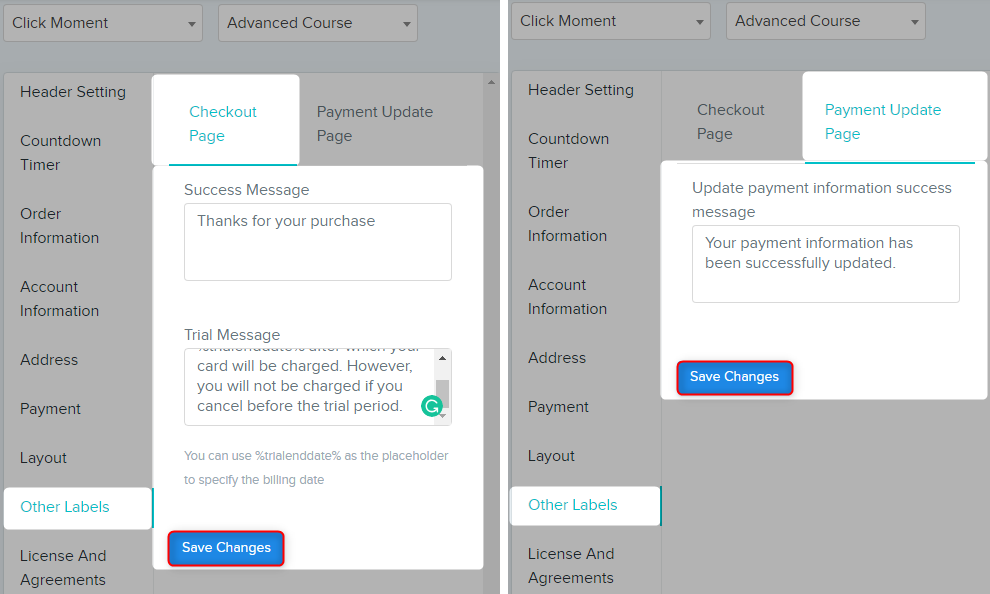
1. Checkout Page
- Success Message: This message will appear at the succession time while the page is running to complete the purchase.
- Trial Message: This is the optional fields that you need to provide at the time when you give a trial version of the same product. This message will appear at the bottom of your checkout page just below the Terms and Conditions section.
2. Payment Update Page
- Update Information Message: This message will appear at the at the time when you send an email to the user for the updation.
11. License And Agreements –
This section includes all the terms and privacy settings. It helps to apply the setting on terms and condition part of your checkout page.
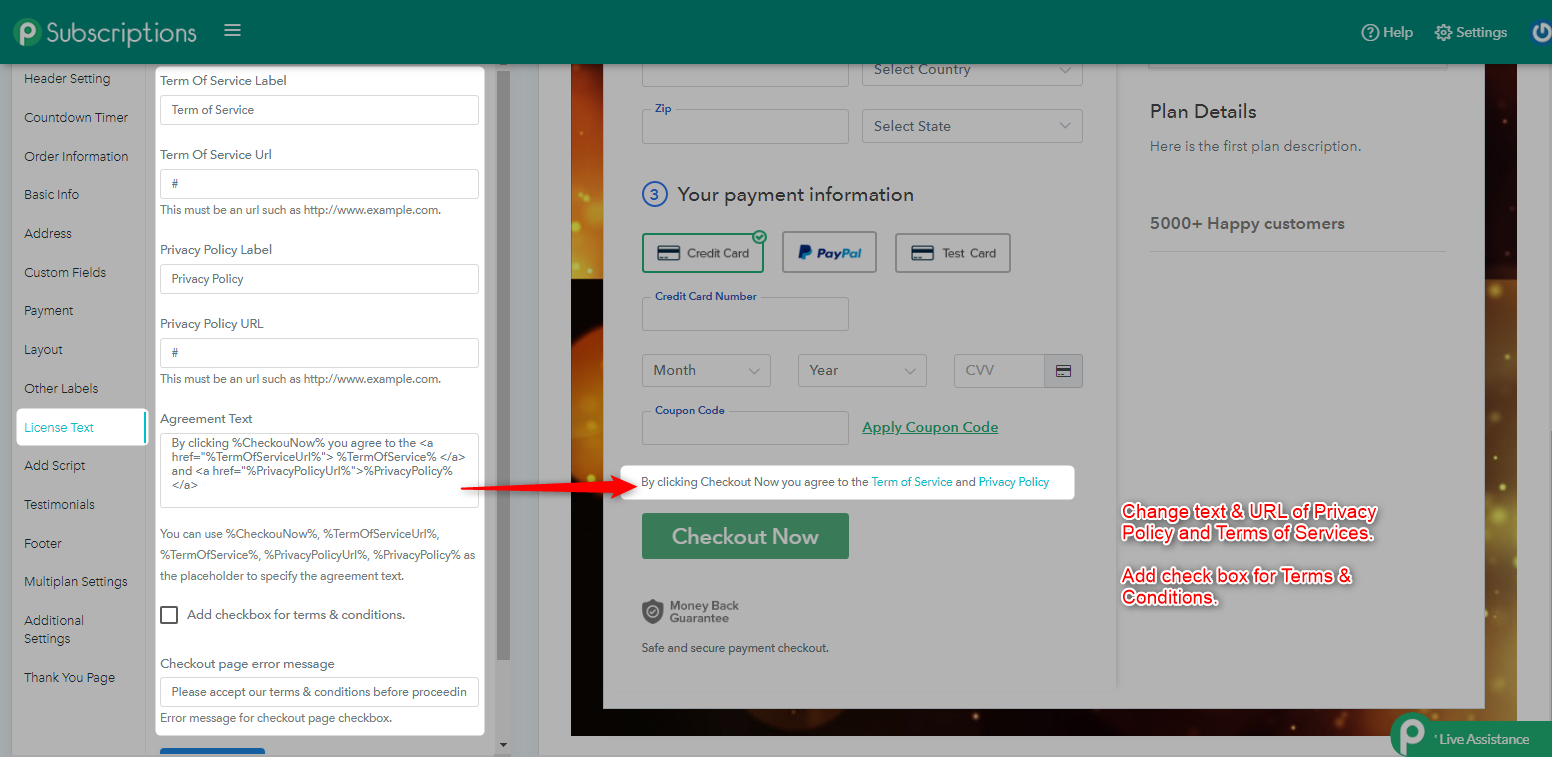
There are a various option inside the section to modify, look at them-
- Term Of Service Label: Here you can change the label of your terms as shown in the picture.
- Term of Service URL: This must be an URL such as http://www.example.com. So that user can redirect their customers there.
- Privacy Policy Label: This is the tab that allows you to change the text of privacy link or label.
- Privacy Policy URL: As same as the term of service URL.
Do not forget to save all the settings till now.
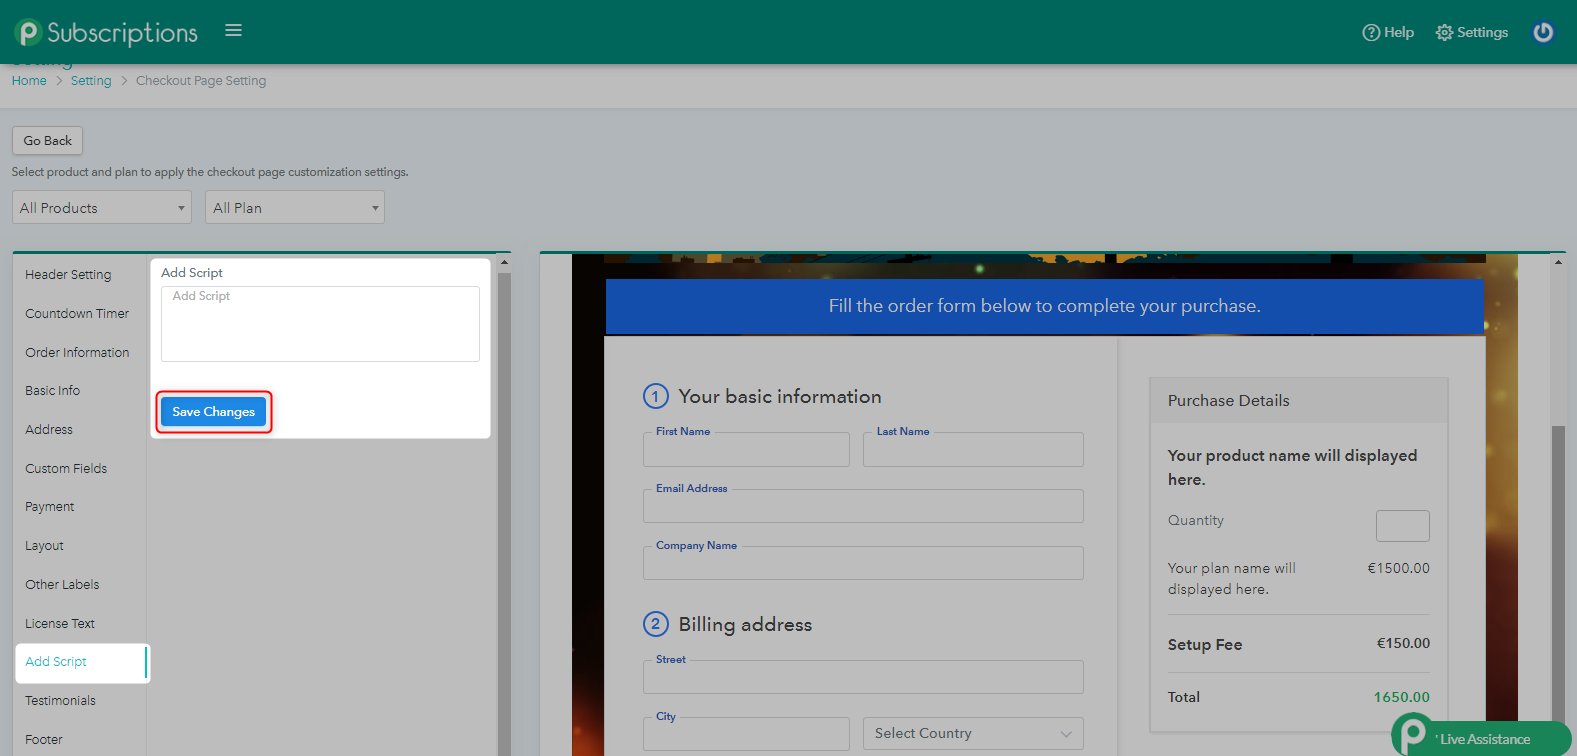
12. Add Script –
In this section, you can add a conversion tracking code (Like Google Analytics or Facebook tracking) for your checkout page and analyze the behavior of your customer whether the customer purchased your product or signed up or left.
13. Testimonials –
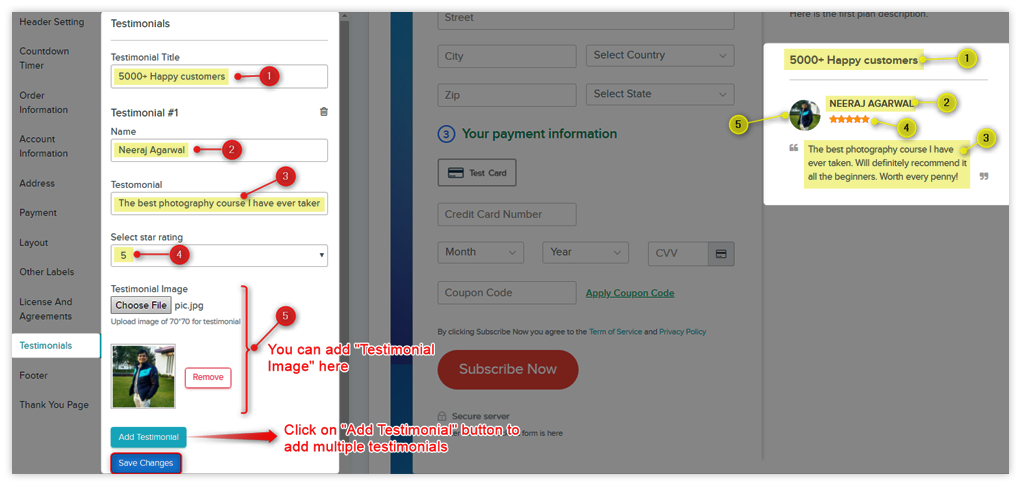
You have to add as much as testimonials you want. Several options are here by which you can apply settings on this testimonial part.
- Testimonial Title: You can set a suitable title for your testimonials.
- Add testimonial(Button): This button allows you to add new testimonials.
- Name: Put the name of your client here.
- Testimonial: What he suppose to praise regarding your product and services.
- Select Star Rating: you can set the ranking as per your clients(In between 1 to 5 star).
- Testimonial Image: You can set a photo of your customer or any of the image whatever he/she likes. You have an option to remove this image as well.
- Delete Testimonial: If you want to delete any of the testimonials from your checkout page, so it could be done by the delete option.
Do not forget to save all the settings till now.
14. Footer –
Here you will be able to apply settings in the footer area. It consists of a footer image and the text.
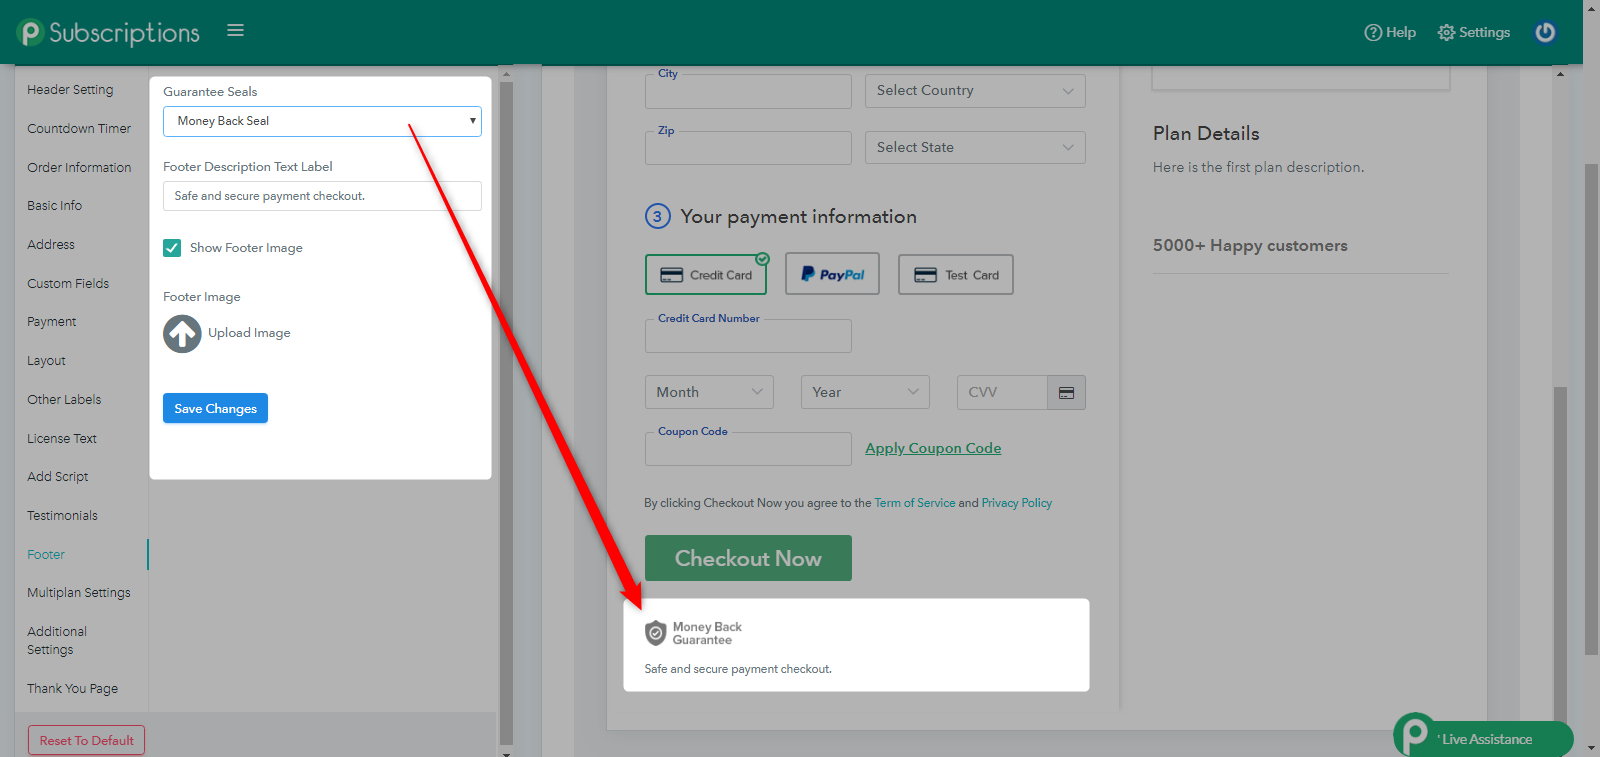
Here, the available options are –
- Guarantee Seals – This Security seals and sealing tape to protect your products from unauthorized access. We have categorized these seals into 4 parts – 100% Satisfaction Seal, Money Back Seal, Encrypted Checkout Seal and Shop with Confidence. You can choose any of them as per your business needs.
- Footer Description Text Label: Here you can provide the description of your product or anything that what you want in the text format.
- Show Footer Image: This is a checkbox, which you need to check if you want to set an image in the footer area and unchecked it for vice versa.
- Footer Image: Once you check the checkbox given above you need to set some relevant image here, which will be displaying in the footer section.
Do not forget to save the settings till now.
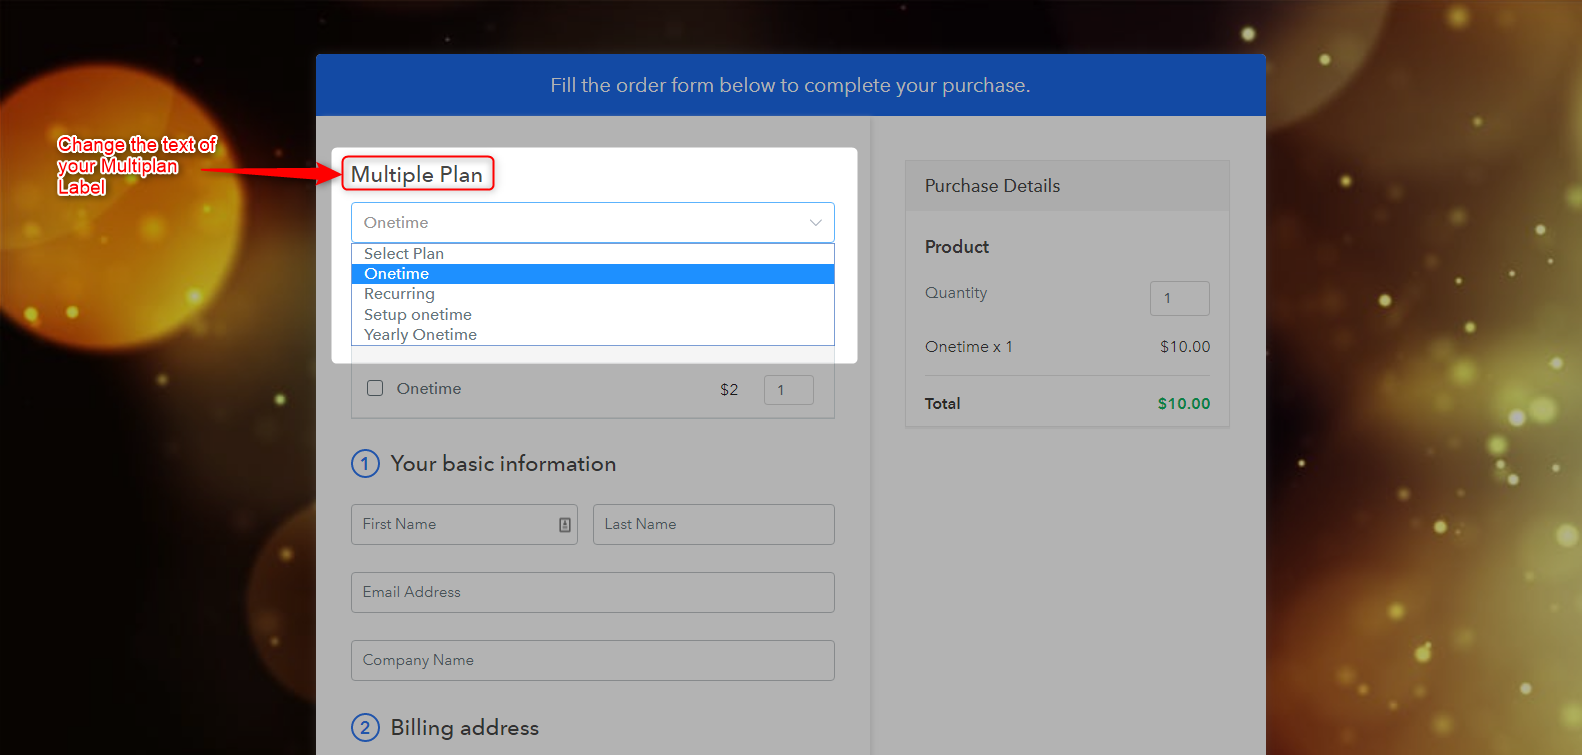
15. Multiplan Settings –
From here, you can change the text of your multiplan label.
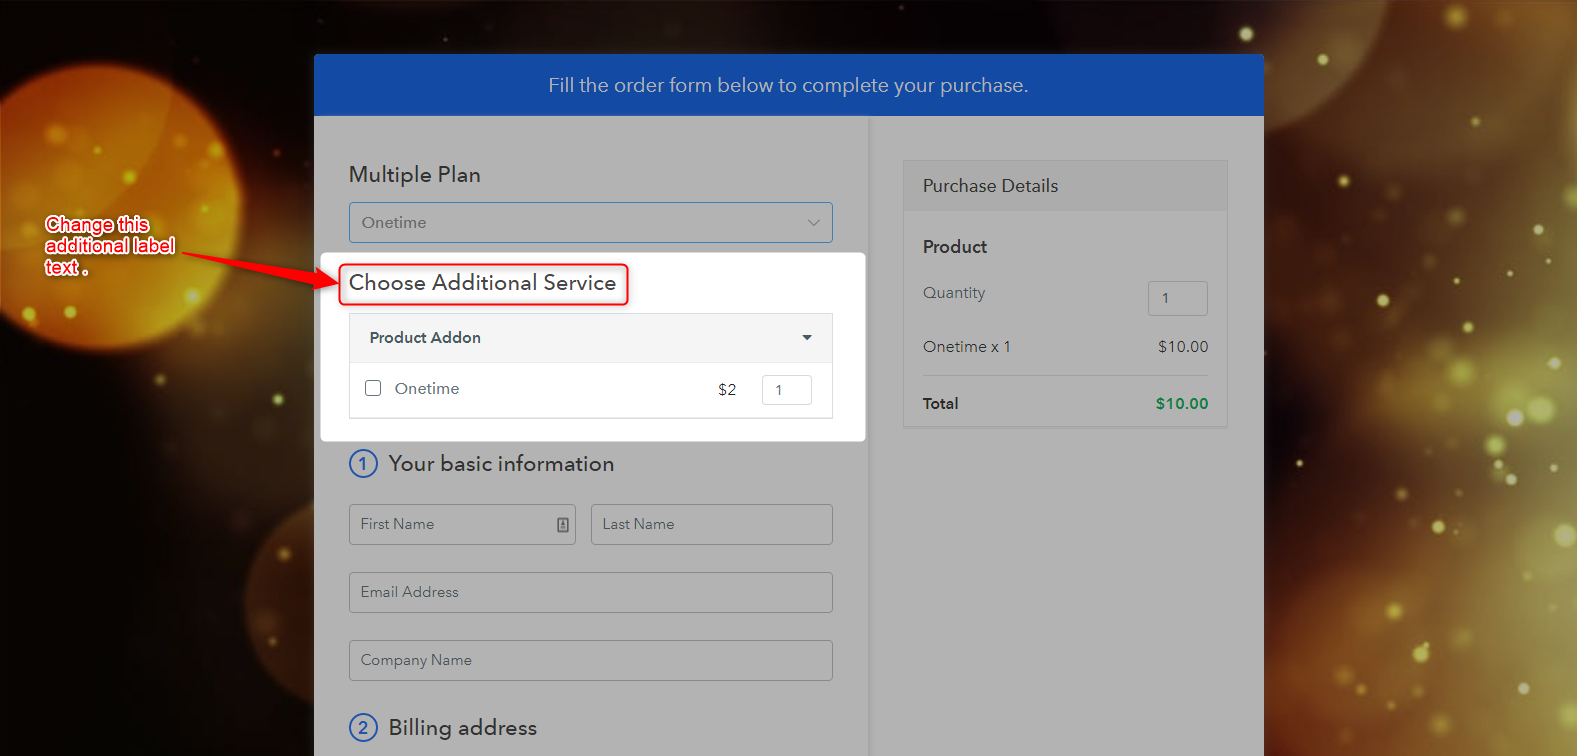
16. Additional Settings –
This feature allows you to change the text of additional services i.e. Addon Heading.
Refer the image –
17. Thank You Page –
Last but not the least, this section will help you to apply the settings on thank you page means the page will come after the payment received of failed. Here you can put the thank you text for your customers. It will give your website a professional look.
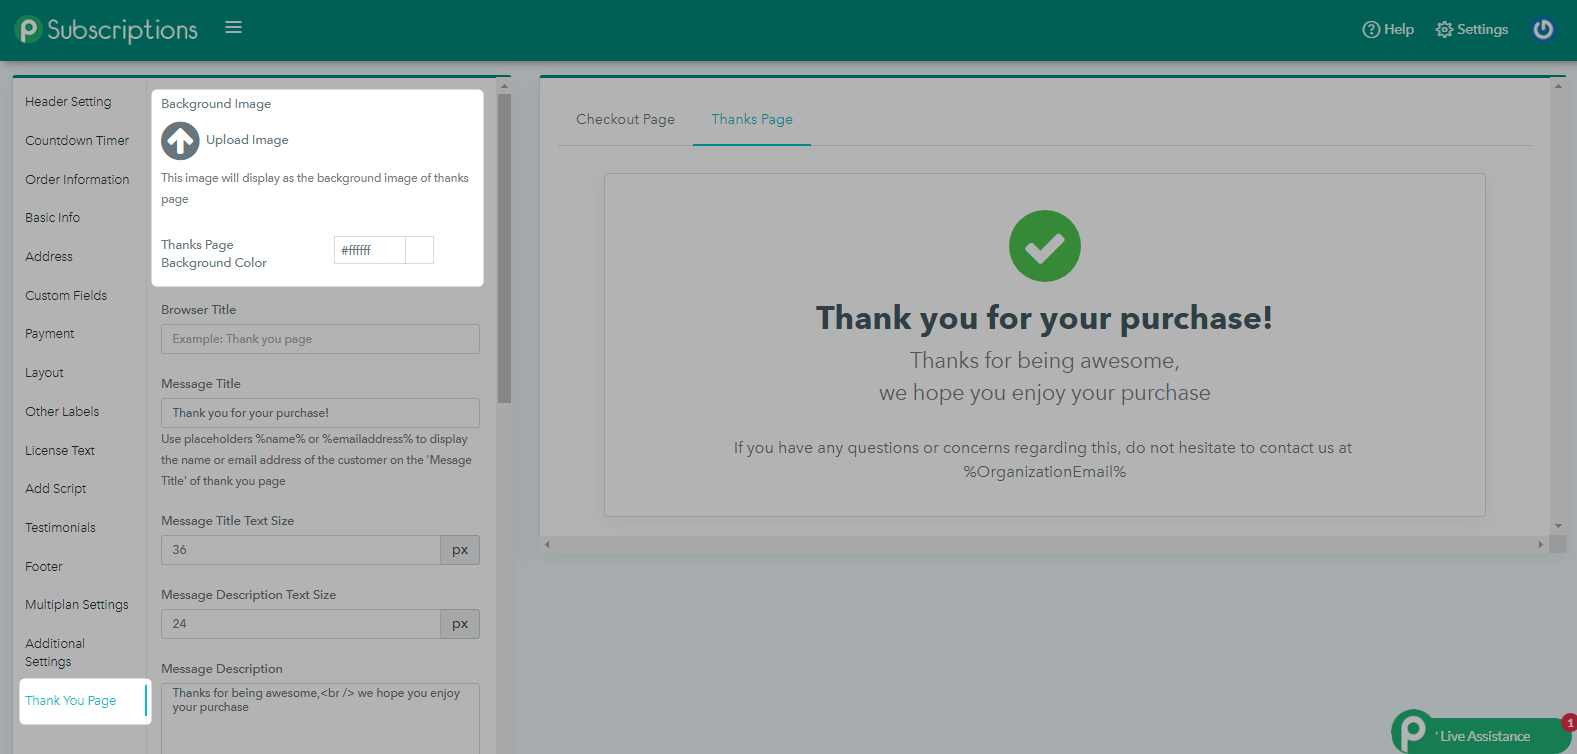
Inside this section, you will find a number of options that can be modified, they are-
- Background Image: Upload background image for your Thank you page from here and make it more attractive.
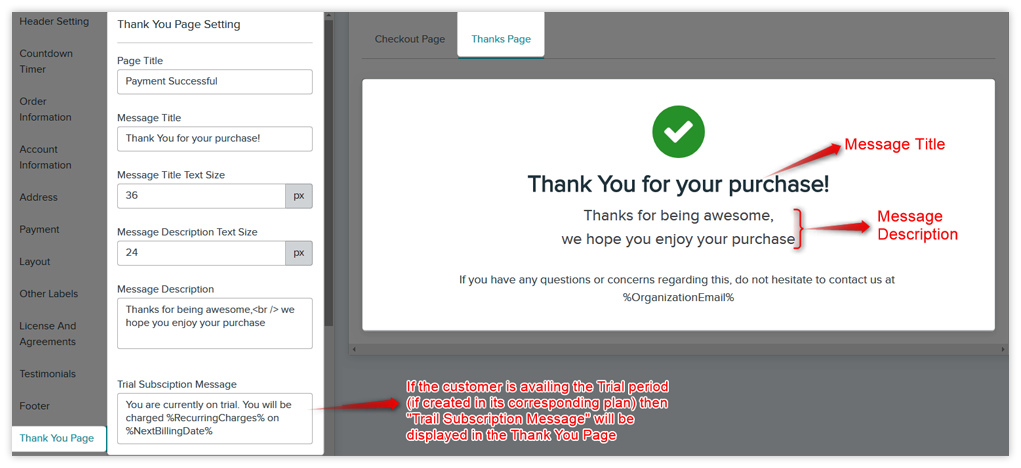
- Page Title: This is the main title of your Thank you page which will be displaying at the top.
- Message Title: This is the message title which you want to give from this page.
- Message Title Text Size: You can resize the message title’s font size.
- Message Description Text Size: Here you can modify the size of message description text.
- Message Description: This is the text box where you can put a suitable message that will be displaying at the thank you page.
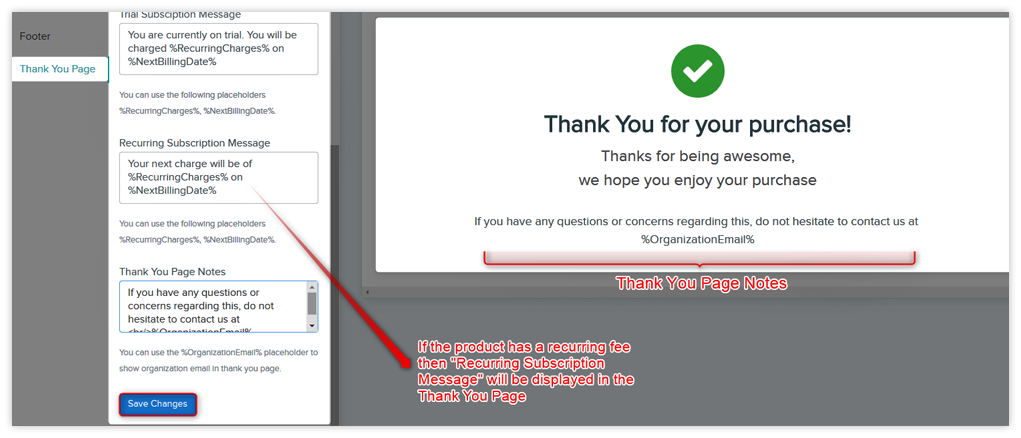
- Trial Subscription Message: If you want to provide any description regarding trail period so you can do so.
- Recurring Subscription Message: If you charge any customer for every week, months or the years, then you can provide a specific message which is going to tell that when your next billing will be and the premium amount. This all will be appearing at the Thank you Page.
- Thank You Page Notes: If you want people to connect with you via Email, comment box etc so here you can provide the details of them.
Do not forget to save the settings till now.
18. Reset To Default –
Sometimes you want to change all the settings through the system, and wish to reset all the settings and changes. Here we have an option to reset all your settings in just one click. Please refer the image below: