We have integrated the PayFast payments gateway with Pabbly by making use of the custom gateway option and building a Python script to manage the redirect.
Here is a quick guide detailing the integration, its requirements and results.
Things which you will require to set up the PayFast payment gateway with Pabbly Subscriptions
- A cloud VPS with full SSH Root access running Ubuntu 18.04 x64
- An SSH Client on your local machine
- Basic Ubuntu Command Line knowledge
- A little bit of networking knowledge
- Basic Python 2.7 knowledge
- A text editor
- A Pabbly Account
Resources
- Digital Ocean Droplets (an easy and affordable VPS to use)
- Python 2.7
- Python PIP (Python Package Manager)
- PayFast Developer Portal
To understand the end to end functionality and integration, the basic flow of a client Pabbly checkout process will be as follows:
- On a specific Pabbly Plan checkout page, a user fills the details and clicks on the integrated payment option. Like PayFast, PayPal, or Stripe
- Once the user clicks ‘Checkout’, Pabbly redirects the payment to an endpoint where we’ve hosted a Python web listener.
- When the Python script receives the request from Pabbly, it fetches the customer’s information from the checkout via a Pabbly API call (‘verifyHosted’)
- Pabbly returns the form data to the Python script in a JSON data format
- The Python script then uses this data to populate the necessary parameters in a PayFast Subscription URL
- Finally, the Python script sends a redirect to the client’s browser, sending them to the PayFast checkout process (via the URL constructed in the script)
This may sound complicated, but we’ve managed to simplify the entire implementation into four simple steps, which should be easy to follow.
- First, download the Python script file at the top of this guide
- Extract the zip file to find the ‘payFast_script.py’
Here are the steps to follow
1 → Install Python 2.7 on your VPS running Ubuntu 18.04
-
- Log in to your VPS via SSH as root (or admin)
- Update your package manager index by running the command
| sudo apt update |
-
- Then, once the above command completes, install the base version of Python 2.7 by running the command.
| sudo apt install python2.7 |
-
- Confirm success after the above command completes by checking the current version of Python running on your VPS, run this command
| python –version |
It should display something like “Python 2.7.15rc1”
-
- Now install the easy Python package manager called ‘pip’ by running this command
| sudo apt install python-pip |
-
- Now that your Python environment is set up, let’s install the Flask package required for the PayFast integration script using the pip installer.
Run the below command
| pip install Flask |
And once that finishes, your Python environment is all set up.
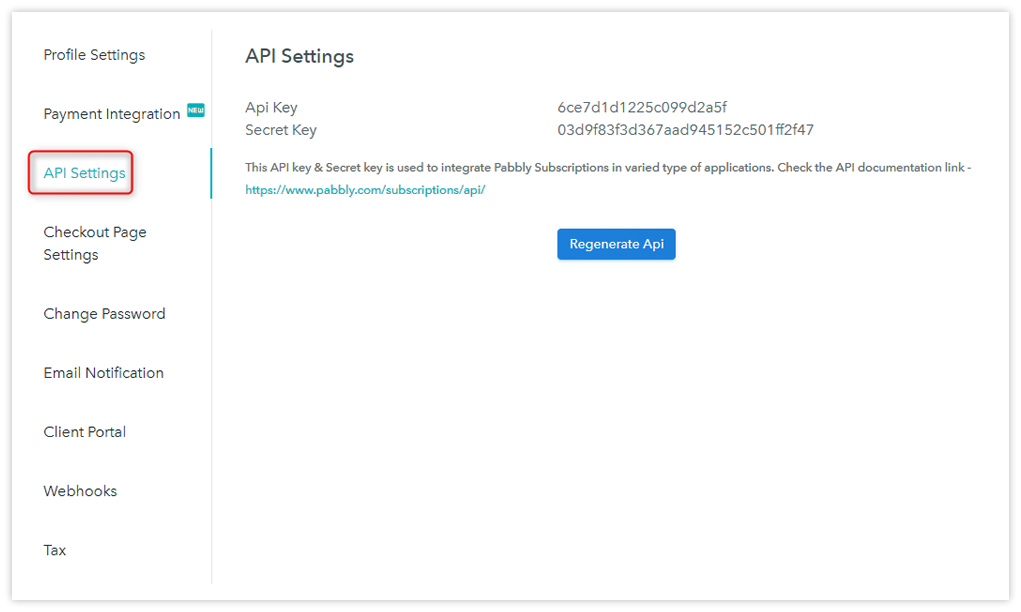
2 → Get your Basic Auth HTTP Header string from Pabbly API details
A crucial part to the success of this integration you’ll need your Pabbly API Key and API Secret which you can find on your Pabbly Subscription Dashboard, under Settings, API Settings
Once you’ve located your Pabbly API Key and API Secret, open a text editor and create a string with them in the following format:
| <APIKey>:<APISecret> |
Example: 6b84a31ed2d11c88a51d:1db932f86aa3d099493212b6c2e4065c
- API Key = 6b84a31ed2d11c88a51d
- API Secret = 6b84a31ed2d11c88a51dcv
This is your Auth string.
Now, navigate to https://www.base64encode.org/ and paste your Auth string in the top text area (labeled ‘Type (or paste) here’ and click the ‘>ENCODE<’ button.
Once the encode completes, the bottom text area will contain a new string which is your HTTP Basic Auth Header string (this is the Auth string you originally provided, now Base64 encoded).
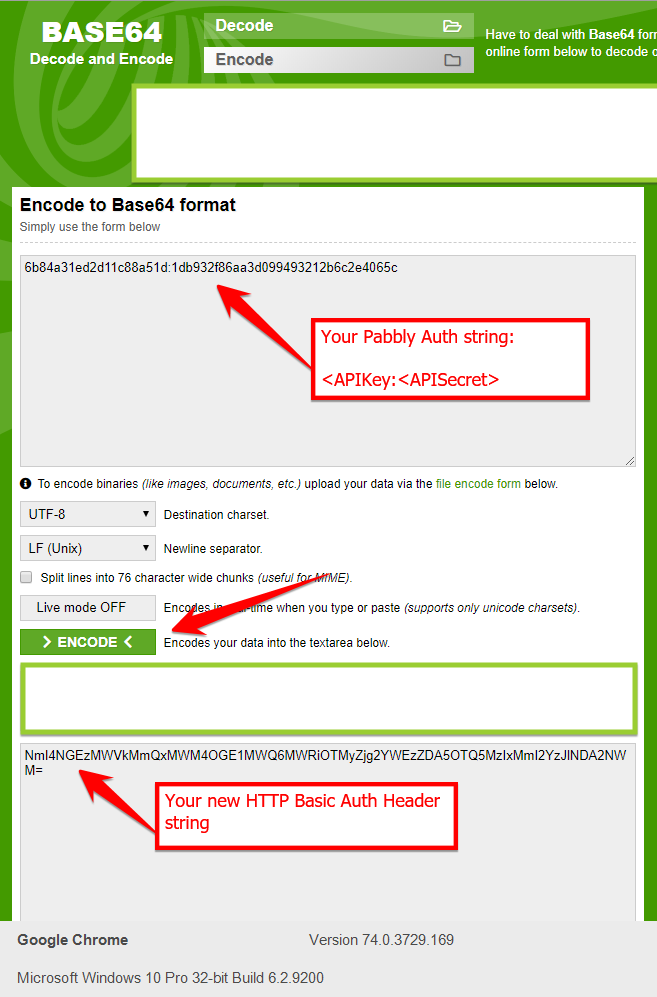
Save this new HTTP Basic Auth Header string – you’ll need this next.
3 → Make adjustments to the Python PayFast integration script
You’ll have to download the Python script.
Save it somewhere on your local machine. Then, open it up in a text editor and follow the below steps
-
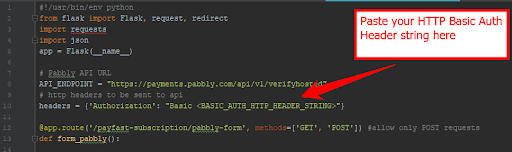
- First, you’ll have to paste your new Basic Auth HTTP Header string into the Python script.
(This is to authenticate against the Pabbly API when we make the required API calls within the Python Script)
To do this, open the Python Script you downloaded at the top of this guide in a text editor.
Then, on line 10, replace the ‘<BASIC_AUTH_HTTP_HEADER_STRING>’ with your HTTP Basic Auth Header string (created in the previous step).
Leave the word ‘Basic’ as is.
So line 10 should like something like:
| “headers = {‘Authorization’: “Basic NmI4NGEzMWVkMmQxMWM4OGE1MWQ6MWRiOTMyZjg2YWEzZDA5OTQ5MzIxMmI2YzJlNDA2NWM=”}” |
-
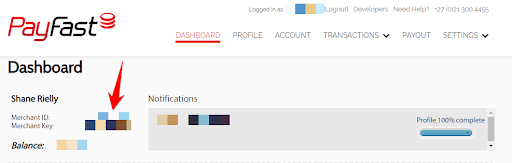
- Then, on line 34, replace the below parameters to build your own ‘PayFast Subscribe’ URL
- <MERCHANT_ID> – your PayFast merchant ID
- Then, on line 34, replace the below parameters to build your own ‘PayFast Subscribe’ URL
(this can be found on your PayFast dashboard when you log in to your account here)
-
-
- <ITEM_NAME> – the name of your payment item within PayFast (this is like a reference on your statement)
-
-
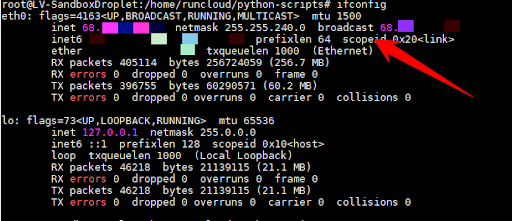
- Lastly, on line 41, replace <VPS_PUBLIC_IP> – with the public IP of your VPS.
- You get this by running the below command in Ubuntu CLI on your SSH session to your VPS (as per step 1 of this guide)
- Lastly, on line 41, replace <VPS_PUBLIC_IP> – with the public IP of your VPS.
| ifconfig |
Locate the ‘broadcast’ attribute on your response, this will be your VPS public IP
(If you’re not able to find your broadcast IP, simply change the <VPS_PUBLIC_IP> placeholder to ‘0.0.0.0’ on the Python script)
-
- Save your update Python script
4 → Upload your Python script to your VPS
Now that you’ve installed Python on your VPS, gotten your Pabbly API details and modified the Python script to suit your details, you’ll need to upload your modified Python script to your VPS in order to run it.
You can achieve this by using the SFTP protocol, and it is the easiest to make use of an SFTP client like FileZilla, WinSCP or CoreFTP
Make sure you upload the Script somewhere easy to find but not obtrusive to normal Linux directories.
(Upload it to something like /home/pythonScripts)
5 → Run your Python Script on your VPS
Once you’ve completed all the above steps, you can run your Python script on your VPS ready to service your Pabbly payment requests.
-
- First, in your VPS SSH session, navigate to the folder where your script is located
| cd /home/pythonScripts |
-
- Then, run your Python script by executing the following command
| nohup payFast_script.py & |
-
-
- The nohub ignores the hangup signal. This means that you can close the terminal without stopping the execution
- The ampersand ‘&’ indicates the script should run in the background
-
Now your Python script should be running and waiting for traffic on http://<VPS_PUBLIC_IP>:5000
(You should test that your server is able to receive network traffic on port 5000 by running a telnet command from your local host and to ensure)
If you run into challenges connecting your Python web listener, investigate the firewall implementation on your VPS (usually with UFW)
6 → Finally, you can configure Pabbly Custom Payment Integration
-
- Log in to the Subscriptions section of your Pabbly Account.
- From your Pabbly Subscriptions Dashboard, navigate to ‘Settings’, ‘Payment Integration’ and then select ‘Custom’ from the ‘Select Payment Gateway’ list and click ‘Add Payment Gateway’
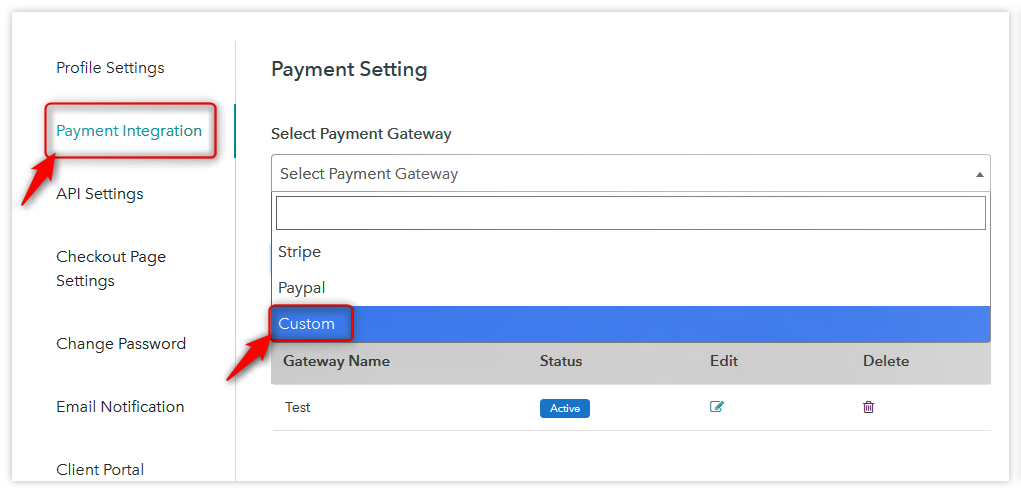
-
- On the corresponding form, give your new Payment gateway a name (ie: ‘PayFast’) and then enter the URL for your VPS hosting you Python script (ie: http://123.456.789.1:5000) and click ‘Submit’
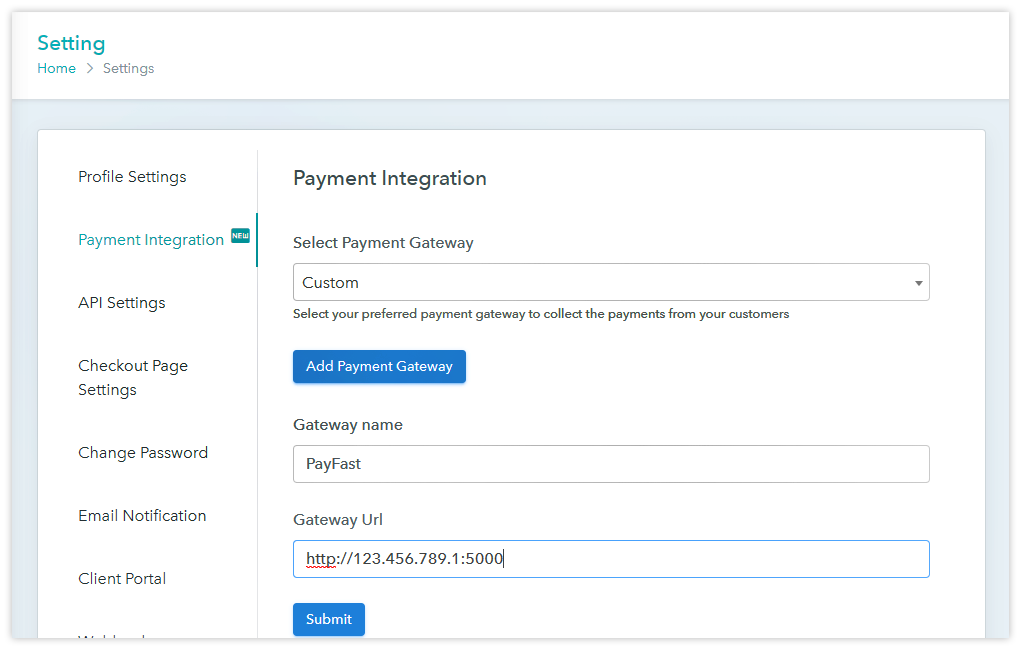
(remember, you’ll need to replace IP above – 123.456.789.1 – with the actual public/broadcast IP of your VPS)
-
- You should now see your new Payment Gateway Integration listed on your ‘Payment Integration’ tab
Now you can associate this new Payment Integration with any of the Plans you have on your Pabbly account by simply selecting it during Plan configuration.
Limitation Of PayFast payment gateway –
- It will work only for ZAR currency and this payment gateway do not have any currency conversion API.


