Pabbly Subscriptions - Get 20% OFF until 1st Jan || Coupon - PSB-SANTA
Days
Hrs
Mins
Secs
Buy Now
Publishing
  • Docs
  • API Docs
  • Pricing
  • Sign-In
Menu
  • Docs
  • API Docs
  • Pricing
  • Sign-In
Publishing
  • Docs
  • API Docs
  • Pricing
  • Sign-In
Menu
  • Docs
  • API Docs
  • Pricing
  • Sign-In
Sign Up Free
Publishing
  • Docs
  • API Docs
  • Pricing
  • Sign-In
Menu
  • Docs
  • API Docs
  • Pricing
  • Sign-In

Publishing Checkout Page on Custom Domain

Pabbly Subscriptions has launched a new “Custom Domain Feature” which allows you to have your own custom domain for the Checkout Page.

Each plan in Pabbly Subscriptions has a unique Checkout page link.

Let’s assume that your website is – “yourcompanydomain.com”

and you want to use a custom domain like – “checkout.yourcompanydomain.com” for your checkout page.

For Example:

https://checkout.yourcompanydomain.com/subscribe/f0fec5f55e:f0fec5f55e/TP

In order to accomplish this, please follow these steps:

Step 1: Set up your custom domain in your Pabbly Subscription Billing account

Once you create a CNAME record on your custom domain with a value of “custom.pabbly.com”, follow the below steps:

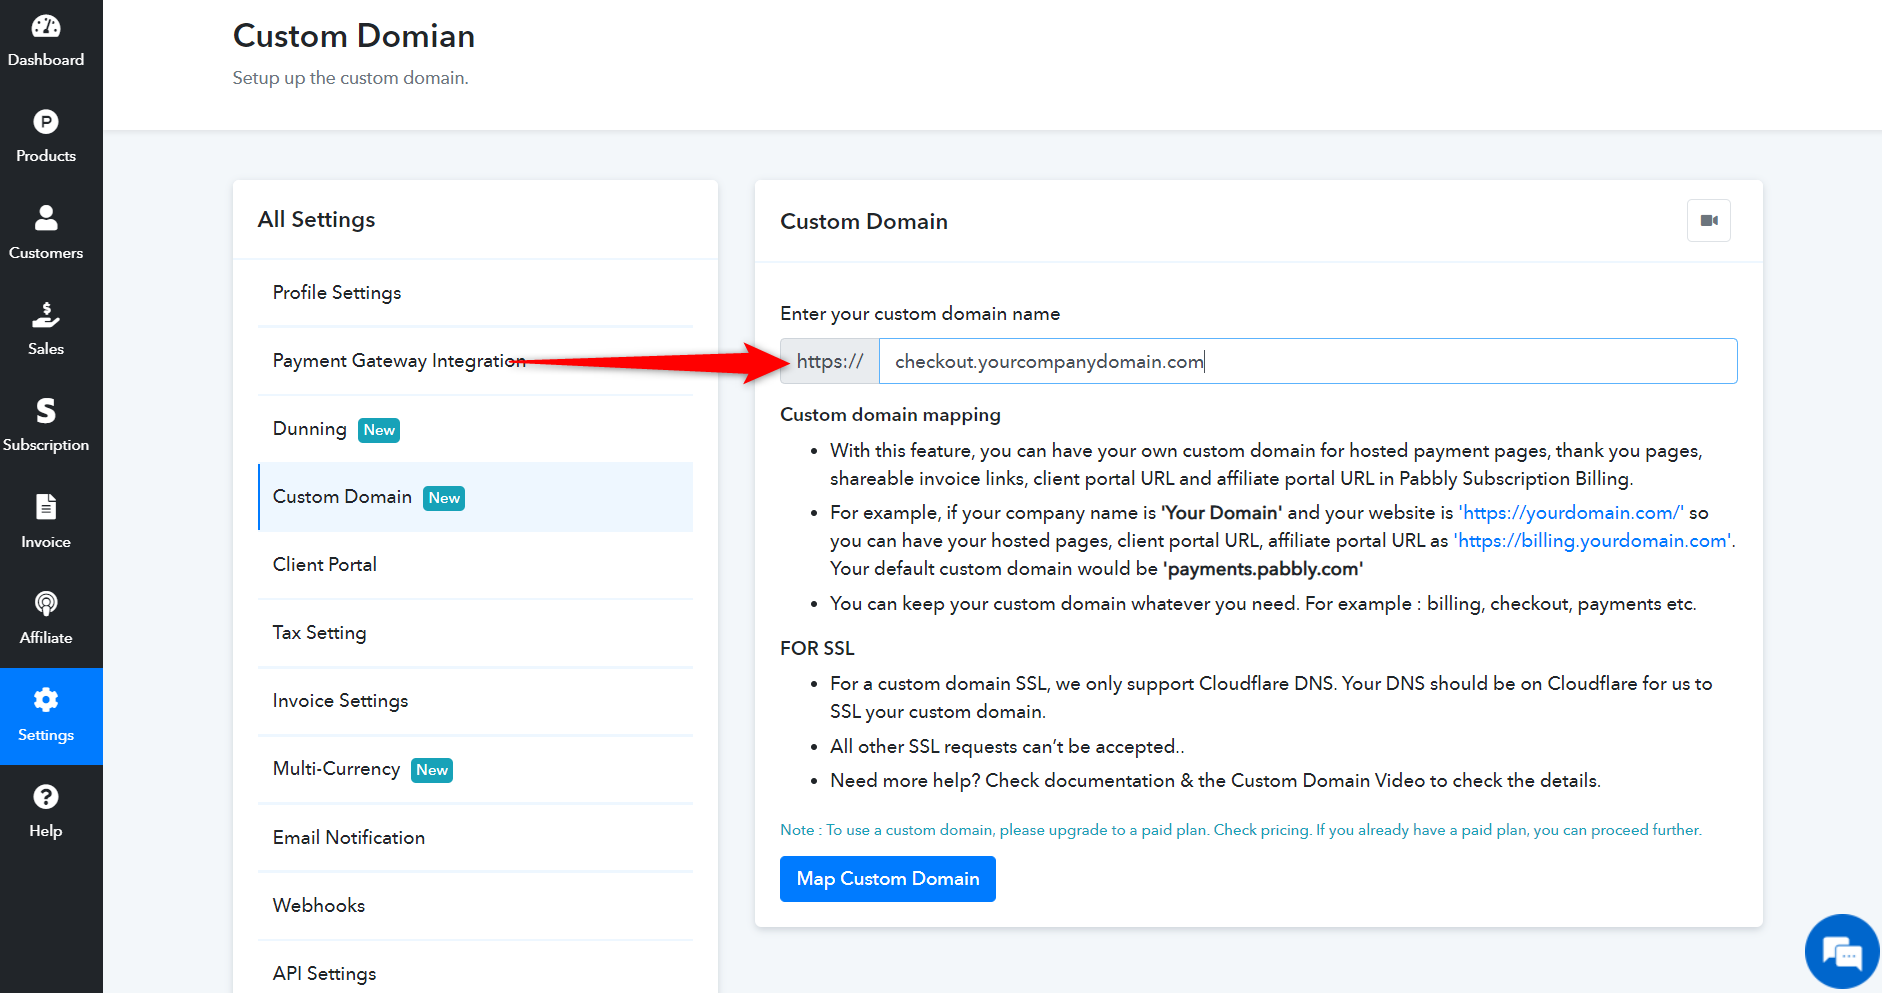
A.  Login into your Pabbly Subscription Billing account.

B. Go to settings ->Custom domain.

C. Enter your custom domain in the field that you see on the screen and click on Map Custom Domain button.

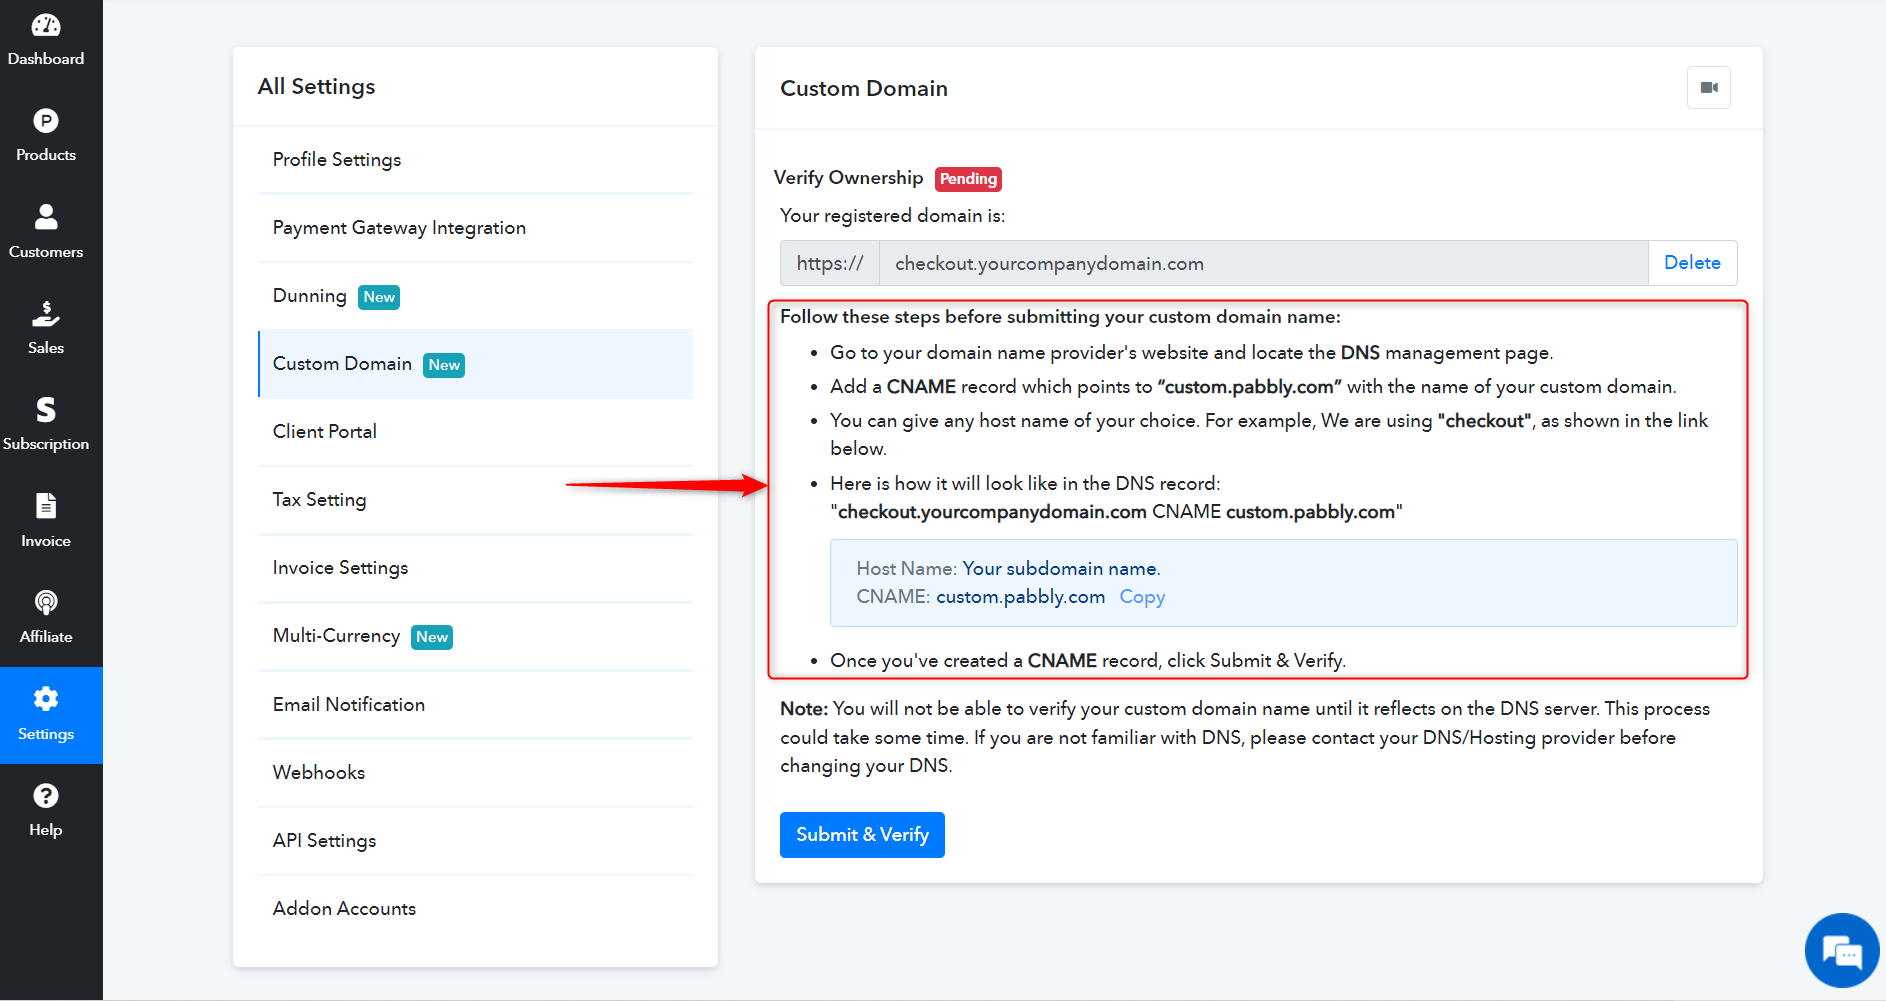
D. Follow the steps displayed on the screen. To add a CNAME:

  • Go to your domain name provider’s website and locate the DNS management page.
  • Add a CNAME record which points to “custom.pabbly.com” with the name of your custom domain.
  • You can give any host name of your choice. For example, We are using “checkout”, as shown in the link below.
  • Here is how it will look like in the DNS record:
    “checkout.yourcompanydomain.com CNAME custom.pabbly.com“

Host name: Your subdomain name

CNAME: custom.pabbly.com

Once, you’re done with the above steps. Hit on submit & verify.

$curr_post_title

E. That’s all! You’re all ready. Your custom domain would be activated and displayed in checkout page URLs, thank you page URLs, shareable invoice URLs, affiliate sign up URL, & Client Portal Sign in URL.

How to add SSL to your Custom Domain –

Note: Every now & then we have been asked: ” Our domain has SSL activated, why I can’t see SSL with Custom Domain?”

Your custom domain is the subdomain of your website (domain). We create a new subdomain for your checkout page. A subdomain is a part of your domain but the changes/features on main domain do not get reflected on your subdomain automatically. All the feature of your domain and subdomain needs to be added one at a time respectively. In the same way, SSL on the main domain will not work for the subdomain. You need to activate SSL for the subdomain, In this case, Custom Domain to make sure your Checkout Page is secure.

See, For example, This is our generic checkout URL: https://payments.pabbly.com/subscribe/f0fec5f55e:f0fec5f55e/TP

You requested a Custom domain as (https://checkout.abc.com). (https://abc.com) is your main domain and you have SSL activated for it.
We created the custom domain as (http://checkout.abc.com). Since this is a subdomain, you need to activate the SSL to ensure your customer checkout data is safe.

Here, the easy way to add the SSL to your sub-domain-

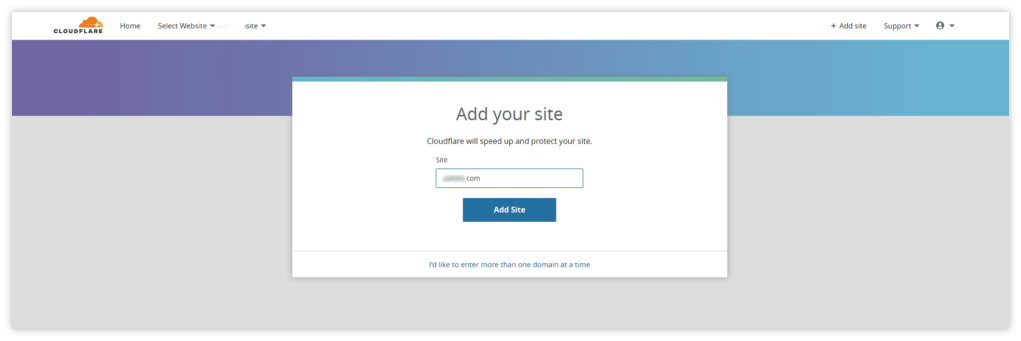
1. Go to CloudFlare (https://www.cloudflare.com/), log in to your dashboard. Now, add your site after clicking on the “Add Site” button in the page.

Add Your Site

2. Once you added your site, the popup window will appear like this-

PopUp Window

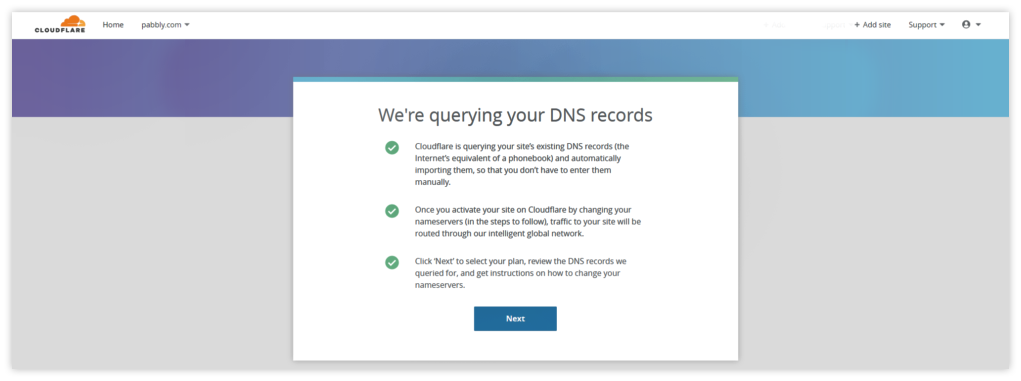
Click on “Next” button to continue the process.

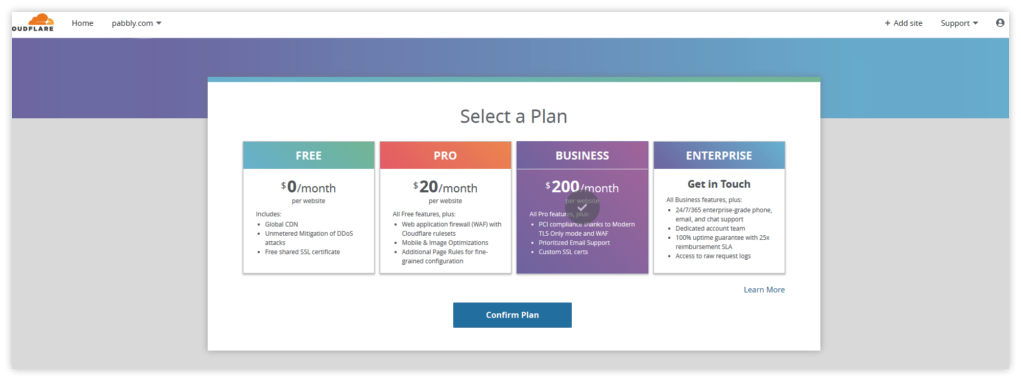
3.  It will redirect you to the plan, select one of the plan to add the SSL in your sub-domain. You can choose the FREE plan without having to pay anything.

Select Plan

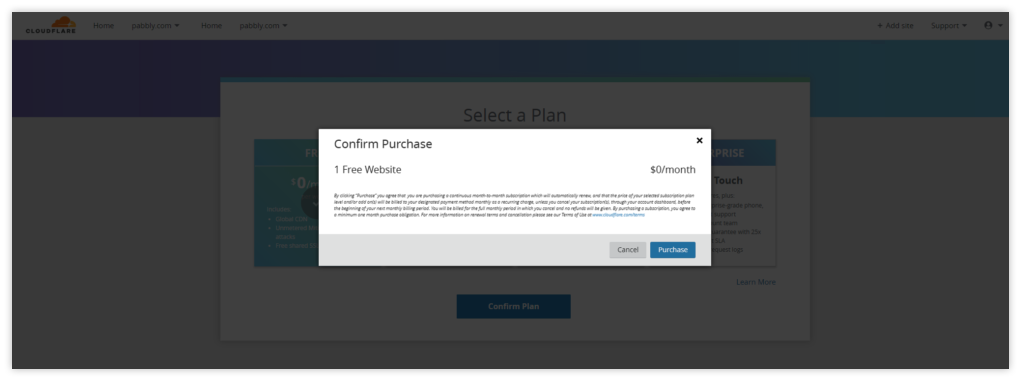
4. Confirm the purchase, after clicking into the “Purchase” button.

Confirm Purchase

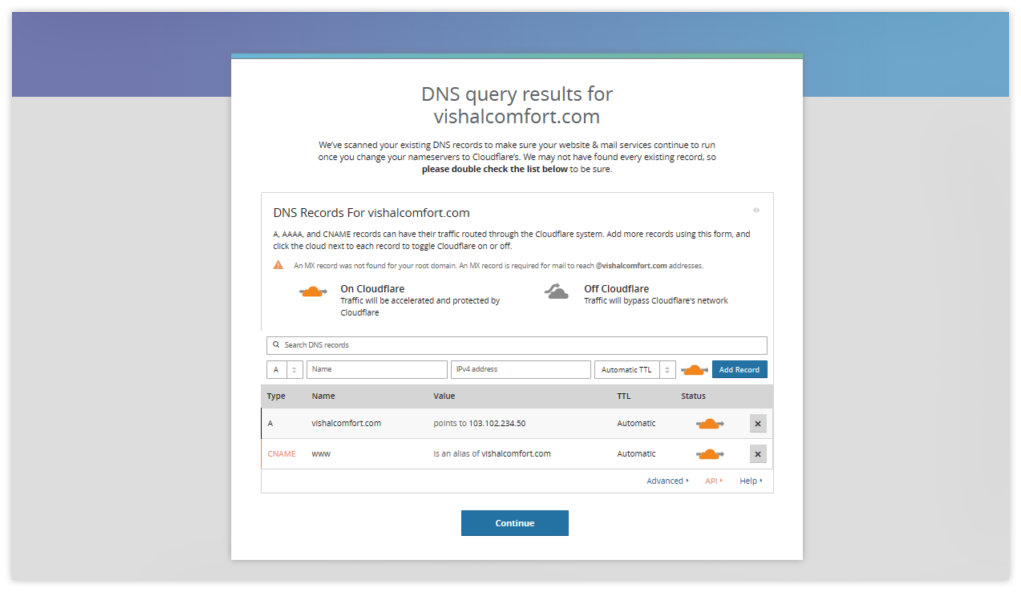
5. DNS Query Result –

CloudFlare will scan your website completely and let you know about the missing records so that you can add them and complete the process to secure your website.

DNS Query Result


6. Change your nameserver from your current DNS provider. Your current DNS provider might be someone from whom you have purchased your domain name. For example Godaddy, NameCheap etc.

Change your nameserver


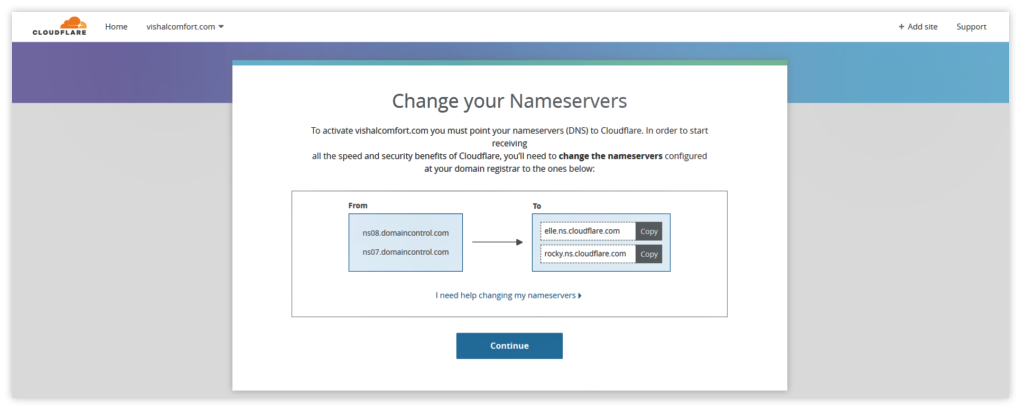
7. Once you have added the Nameserver, you can click on Recheck Nameservers button.

Recheck Nameservers

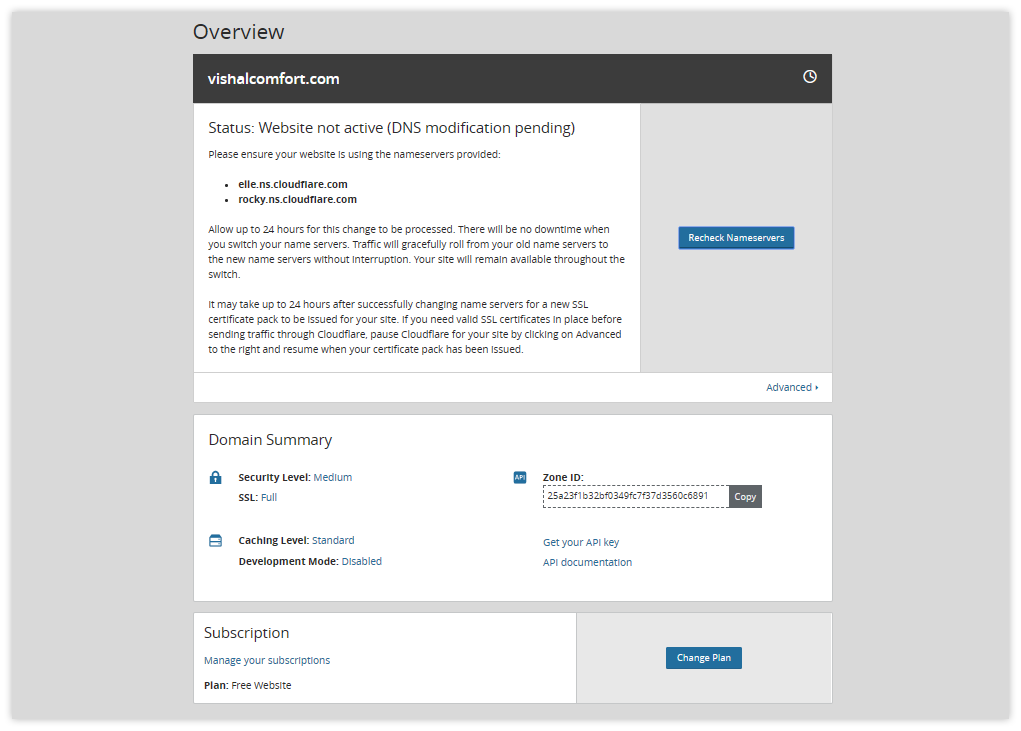
8. Once the Nameservers are added, you will see the Active mention on the CloudFlare Dashboard.

Active Status

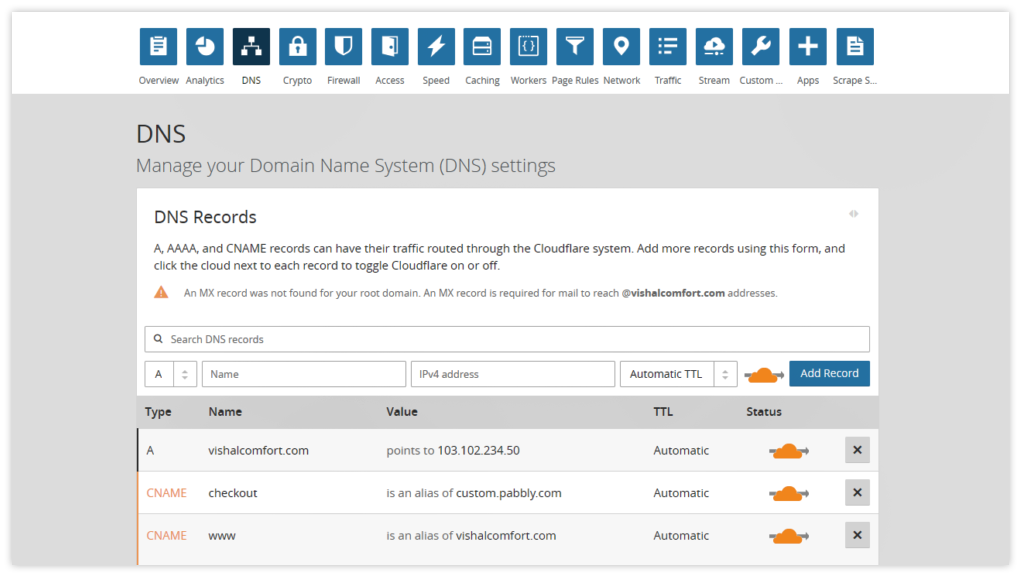
9. You can click on the name of the site and a settings panel will open up. Click on DNS menu on the top to open the DNS window.

DNS menu

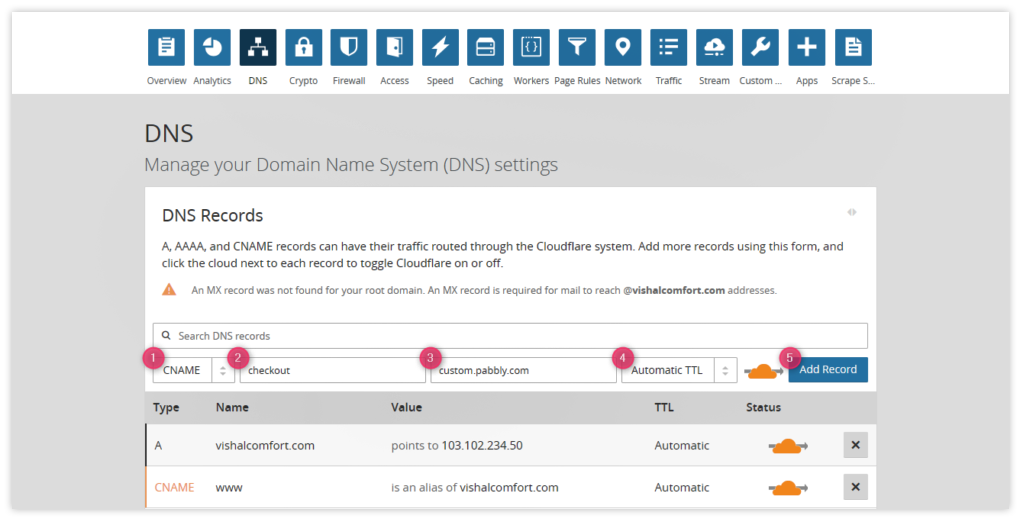
10. Add the CNAME & it’s alias value and clicks on the “Add Record ” button.

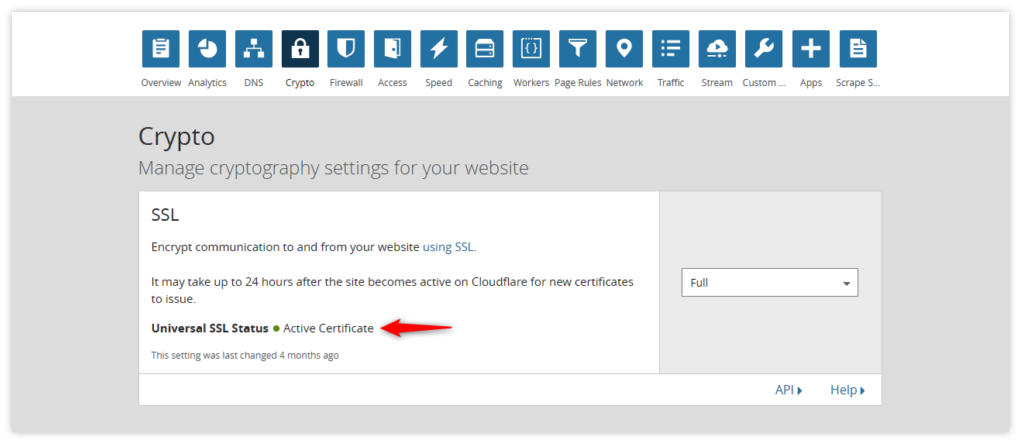
Once you follow the steps, your CNAME will get added like this-

Add Record


11. Now, click on the Crypto option to the submenu and select “Full” in the SSL part. The current status of your “Universal SSL” will be “Initializing Certificate”.

Universal SSL

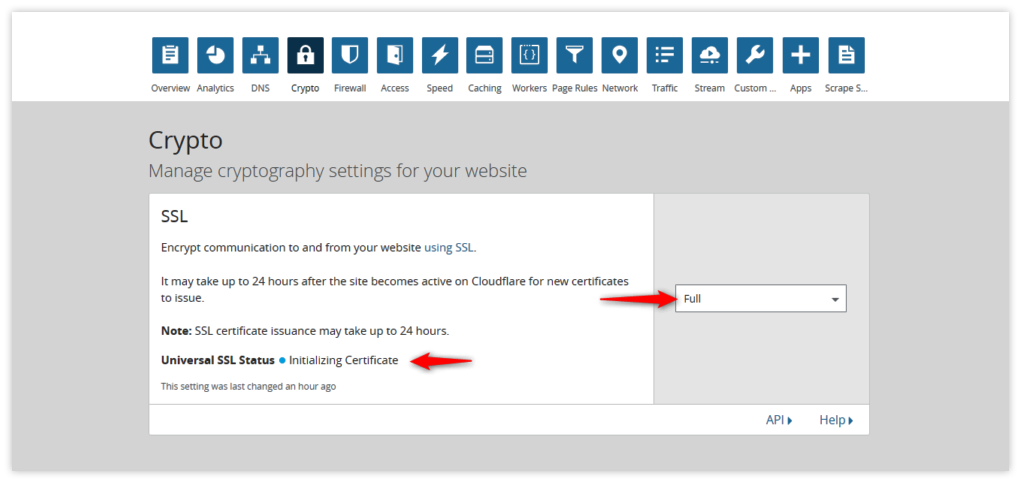
12. And once your DNS record will be added then the status of “Universal SSL” will be changed to “Active Certificate”.

Active Certificate

Products

  • Pabbly Plus
  • Pabbly Connect
  • Pabbly Email Marketing
  • Pabbly Form Builder
  • Pabbly Subscription Billing
  • Pabbly Email Verification

Resources

  • Video Tutorials
  • Blog
  • API
  • Affiliate Program
  • Integrate Your App
  • Pabbly Tuts

Company Details

  • Terms & Conditions
  • Privacy Policy
  • About Us
  • Brand Assets

Get In Touch

  • Sign Up Free
  • Sign In
  • Support
  • Contact Us
  • Vulnerability Disclosure

Follow Us

Experience the full range of business solutions with Pabbly, including form creation, email marketing, billing, automation, and much more!
f  Join FB Group
Publishing
Publishing
Publishing
  • [email protected]​
  • [email protected]​

Products

  • Pabbly Plus
  • Pabbly Connect
  • Pabbly Email Marketing
  • Pabbly Form Builder
  • Pabbly Subscription Billing
  • Pabbly Email Verification

Resources

  • Video Tutorials
  • Blog
  • API
  • Affiliate Program
  • Integrate Your App
  • Pabbly Tuts

Company Details

  • Terms & Conditions
  • Privacy Policy
  • About Us
  • Brand Assets

Get In Touch

  • Sign Up Free
  • Sign In
  • Support
  • Contact Us
  • Vulnerability Disclosure

Follow Us

Experience the full range of business solutions with Pabbly, including form creation, email marketing, billing, automation, and much more!
f  Join FB Group
Publishing
Publishing
Publishing
  • [email protected]​

Company

  • About Us
  • Privacy Policy
  • Terms & Conditions
  • Careers
  • Security
  • Brand Assets

Learn

  • Pabbly Connect Videos
  • Pabbly Connect Community
  • Pabbly Subscription Billing
    Community

Partners

  • Affiliate Program

Products

  • Pabbly Plus
  • Pabbly Connect
  • Pabbly Email Marketing
  • Pabbly Form Builder
  • Pabbly Email Verification
  • Pabbly Subscription Billing

Developer

  • API - Pabbly Subscription Billing
  • API - Pabbly Email Marketing

Contact

  • [email protected]​
  • Contact Us
  • Support
  • Sales: [email protected]​
  • Contact Us
  • Support Forum
  • Enterprise

Follow Us

f  Join FB Group
Publishing
Publishing
Publishing

Developer

  • API - Pabbly Subscription Billing
  • API - Pabbly Email Marketing

Integrations

  • Pabbly Connect Integrations
  • Integrate Your App

Certification

  • SOC2 Type 1
  • ISO 27001:2022

Company

  • About Us
  • Privacy Policy
  • Terms & Conditions
  • Careers
  • Security
  • Brand Assets

Learn

  • Pabbly Connect Videos
  • Pabbly Connect Community
  • Pabbly Subscription Billing Community

Partners

  • Affiliate Program

Products

  • Pabbly Plus
  • Pabbly Connect
  • Pabbly Email Marketing
  • Pabbly Form Builder
  • Pabbly Email Verification
  • Pabbly Subscription Billing
  • Sales: [email protected]​
  • Contact Us
  • Support Forum
  • Enterprise
  • [email protected]​
  • Contact Us
  • Support Forum
  • Enterprise

Follow Us

f  Join FB Group
Publishing
Publishing
Publishing

Developer

  • API - Pabbly Subscription Billing
  • API - Pabbly Email Marketing

Integrations

  • Pabbly Connect Integrations
  • Integrate Your App

Certification

  • SOC2 Type 1
  • ISO 27001:2022
MagnetBrains LLC DBA Pabbly © 2024. All Rights Reserved.
Sitemap
MagnetBrains LLC DBA Pabbly © 2024. All Rights Reserved.
Sitemap

Company

  • About Us
  • Privacy Policy
  • Terms & Conditions
  • Careers
  • Security
  • Brand Assets

Learn

  • Pabbly Connect Videos
  • Pabbly Connect Community
  • Pabbly Subscription Billing Community
  • Blog

Partners

  • Affiliate Program

Products

  • Pabbly Plus
  • Pabbly Connect
  • Pabbly Subscription Billing
  • Pabbly Email Marketing
  • Pabbly Form Builder
  • Pabbly Hook
  • Pabbly Chatflow
  • Sales: [email protected]​
  • Support: [email protected]​
  • Contact Us
  • Support Forum
  • Enterprise
  • [email protected]​
  • [email protected]​
  • Contact Us
  • Support Forum

Follow Us

f  Join Facebook Group
Publishing
Publishing
Publishing

Developer

  • Pabbly API Documentation

Integrations

  • Pabbly Connect Integrations
  • Integrate Your App

Certification

  • SOC2 Type 2
  • ISO 27001:2022
MagnetBrains LLC DBA Pabbly © 2025. All Rights Reserved.
Sitemap