Apart from billing management, Pabbly also provides features like coupons management, payment failure attempts, credit applied and a lot more functionalities which help businesses to manage their entire customer or subscription management cycle.
Let’s have a look at those features one by one –
1. Coupons:
Coupons are used to provide offers and discounts on particular products or services.
To add a coupon. Follow the steps below-
1. Go to the “Products” and click on that product to which you want to add a coupon.
2. Click on “Add Coupon”.
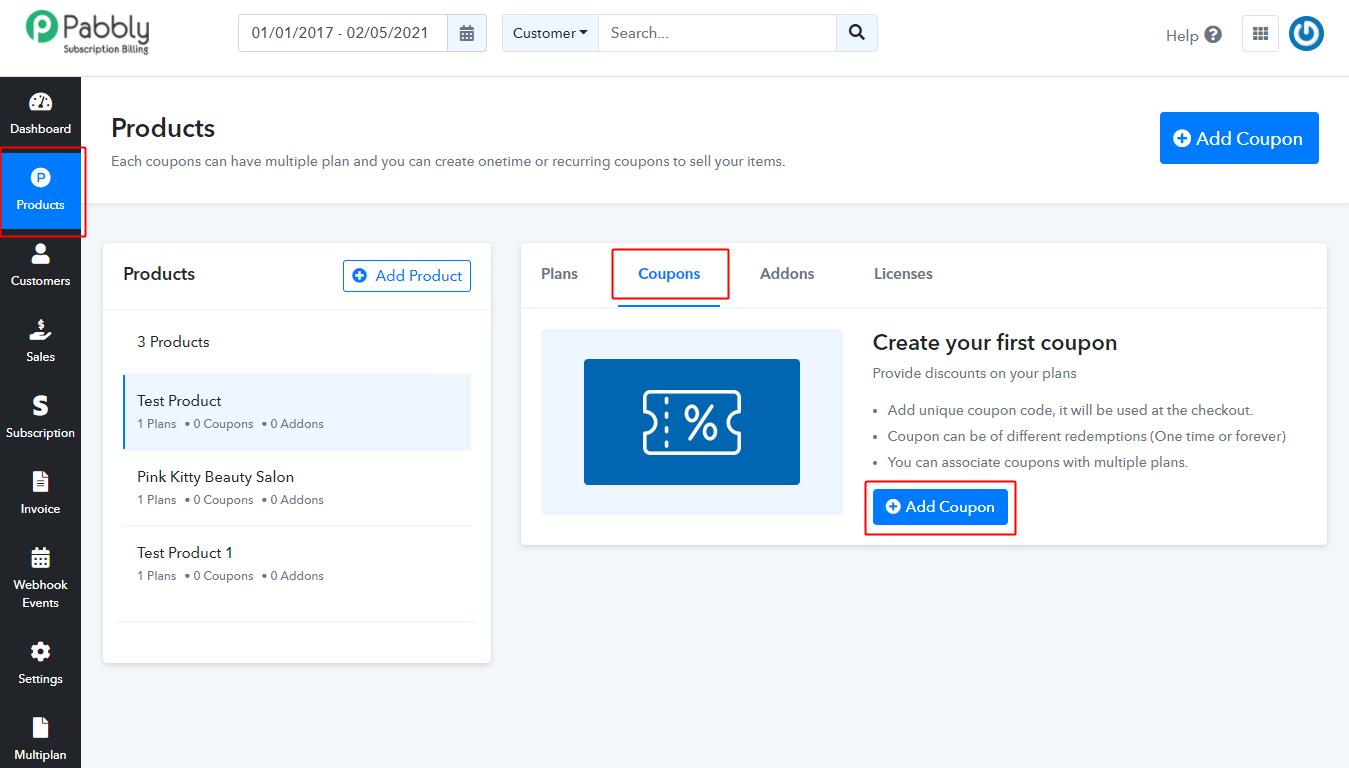
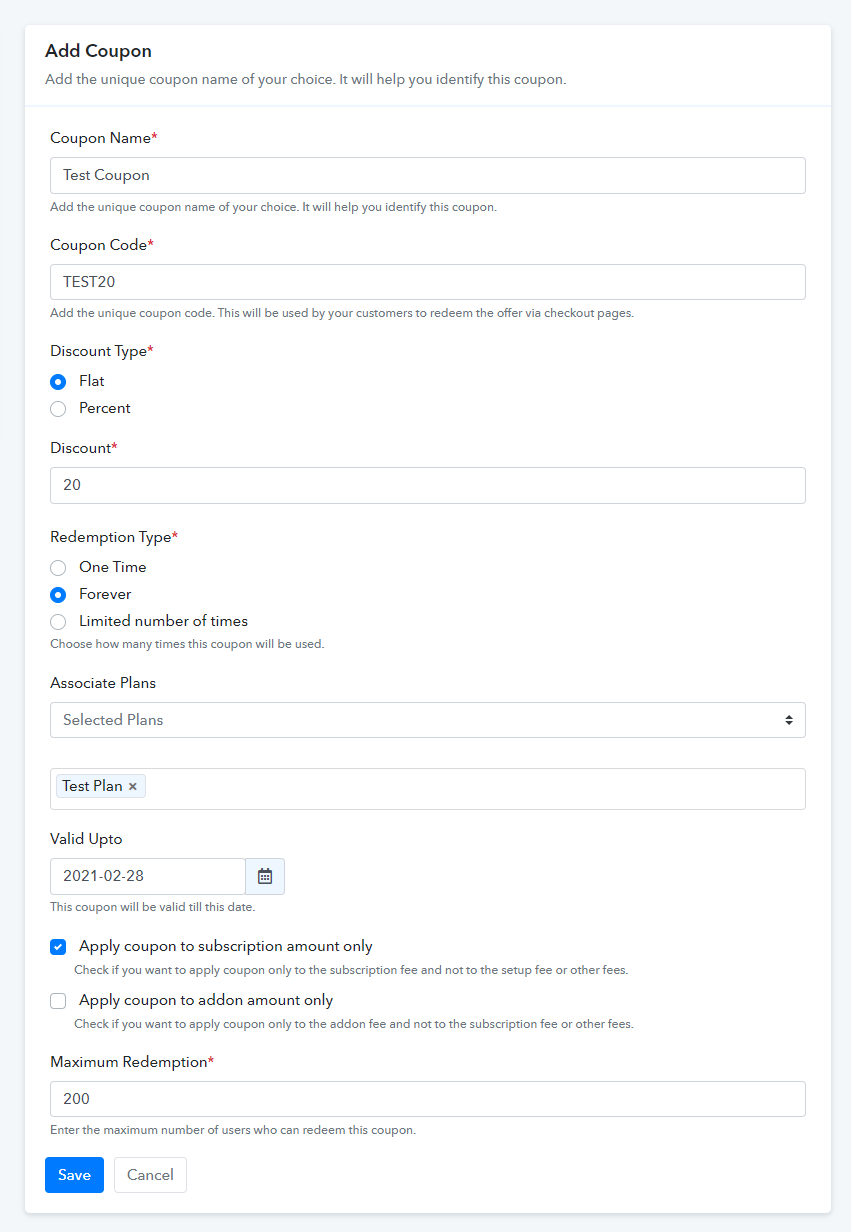
3. Fill up the details of the coupon. You need to fill up all these details shown in the below image in order to create a new coupon –
-
Coupon Name
Here you can input the name of the coupon.
-
Coupon Code
Add a unique coupon code to identify the coupon.
-
Discount
Specify the discount as a flat discount or in % discount which you want to offer your customer.
-
Redemption Type
There are 3 redemption type of coupons
-
- One-time – Select when the coupon is to be redeemed only once for a subscription.
- Forever – Coupon is applied every time when invoice generated.
- Limited number of times – You can specify the no. of times a coupon can be redeemed.
-
Associated Plans
A coupon can be applied to all the plan or to the specific plans.
-
Valid Upto
Here you can set the expiry date of a coupon.
-
Maximum Redemption (Required)
It refers to the maximum number of subscriptions to which this coupon can be used for.
Note: The Redemption cycle works according to the subscriptions not according to the customers.
(A subscription which has a ‘Weekly Billing Cycle’ can use the coupon 4 times in a month and a subscription which has ‘Monthly Billing Cycle’ will use the same coupon only once in a month.)
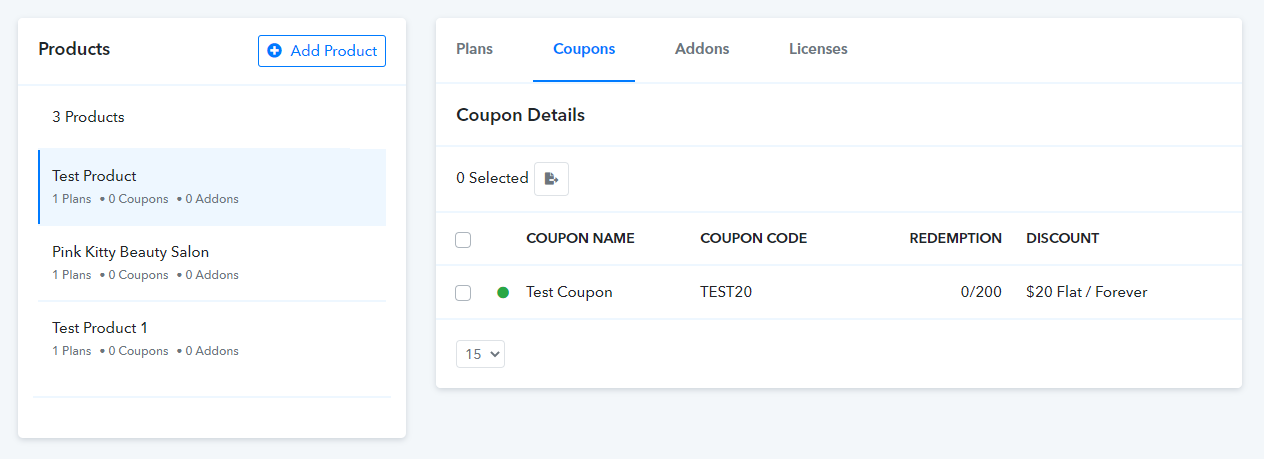
Coupon details are visible below the plans for the product. You can inactive the coupon by clicking on the “Mark As Inactive” button.
P.s: Rules of PayPal with Pabbly Subscriptions:
- PayPal refund feature is applicable for One-Time payment. In case of a recurring payment, PayPal refund is not applicable.
- Coupons will work with “Forever Redemption” type. Coupons will not work with “One Time” & “Limited number of times”.
- Upgrade/downgrade of plans will not work with PayPal.
2. Subscription and Invoice status:
When you explore Pabbly Subscription, you will notice following are the different types of Subscription statuses
- Dunning
- Trial
- Live
- Pending
- Unpaid
- Non Renewing
- Cancelled
- Expired
- Trial Expired
Dunning:- Dunning as a status of subscription is indicated in certain conditions such as when Credit/Debit card is declined, when the system tries to renew the recurring subscription but fails & when the system is sending dunning emails to the customer to update his card details.
Then, the dunning management works as a reminder for both merchant and customers. Here the system will notify the customer about the wrong Credit/Debit card details and the merchant about the payment failure. (via emails 3 times)
P.s: If the payment is made before 3 email reminders then the status is changed from “Dunning” to “Paid”.
If the payment is not made until the 3rd email reminder then the status is changed from “Dunning” to “Failed”.
- Trial:-Trial as a status of a subscription is indicated when a customer has subscribed to a trial plan.
- Live:-Live as a status of a subscription is indicated when a customer is successfully subscribed to an active/live plan.
- Pending:-Pending as a status of a subscription is indicated when a customer is subscribing to an active/live plan and somehow payment process fails to complete.
- Unpaid:- Unpaid as a status of a subscription is indicated when an offline recurring subscription is created but not paid.
- Non-renewing:- Non-renewing as a status of a subscription is indicated when a subscription is scheduled to be cancelled on the next billing date or at the end of the current term. Refer to the screenshot below:
Cancelled:- Cancelled as a status of a subscription is indicated when a subscription is cancelled immediately.
Expired:- Expired as a status of a subscription is indicated when the validity of a certain plan has ended.
Trial Expired:- Trial Expired as a status of a subscription is indicated when the subscribed Trial has ended.
Let’s find out How Invoice statuses behave in respect of the subscription statuses, following are the statuses of Invoice:
- Paid
- Sent
- Overdue
Paid:- Paid is the status of Invoice when the status of subscription is Live.
Sent:- Status as Sent is indicated in two cases and they are mentioned below:
*When you offer Payment term for any subscription, status of Invoice is indicated as “Sent” and the status of Subscription is indicated as “Live”.
*When you create a Manual-recurring subscription in this case status of Invoice is indicated as “Sent” and the status of Subscription is indicated as “Live”.
Overdue:-Overdue is the status of Invoice when the status of subscription is Unpaid.
3. How to delete a product?
Transactions -> Customer’s (Invoices) -> Subscriptions -> Customers -> Coupons -> Plans -> Products. so, to delete a product, follow the steps –
- First, you have to delete the transactions and the corresponding invoice/transaction of that particular product which you want to delete. (Follow the steps shown in the screenshots)
- Then delete all the subscription to that product.
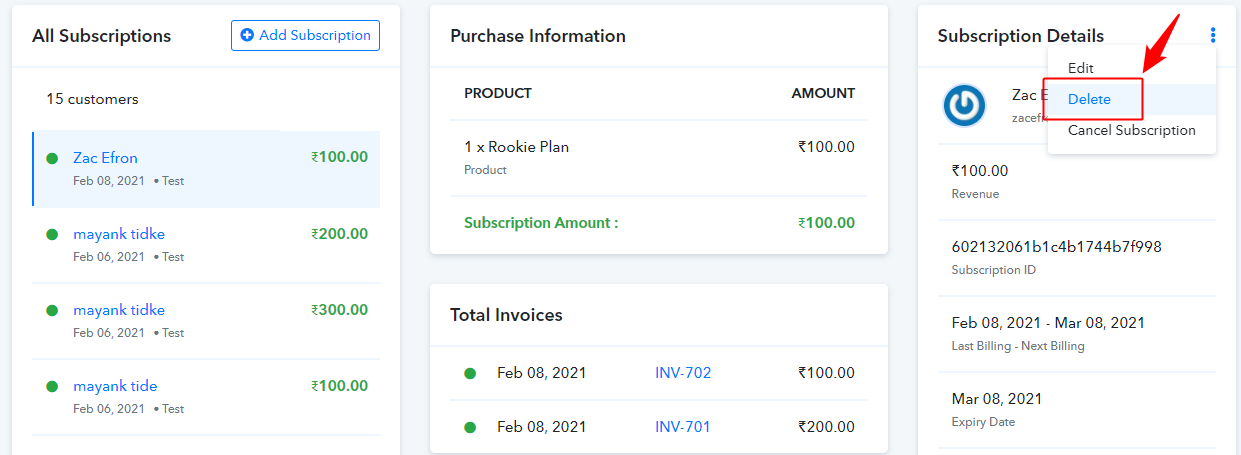
- Then you have to delete the customers who have subscribed to this product.
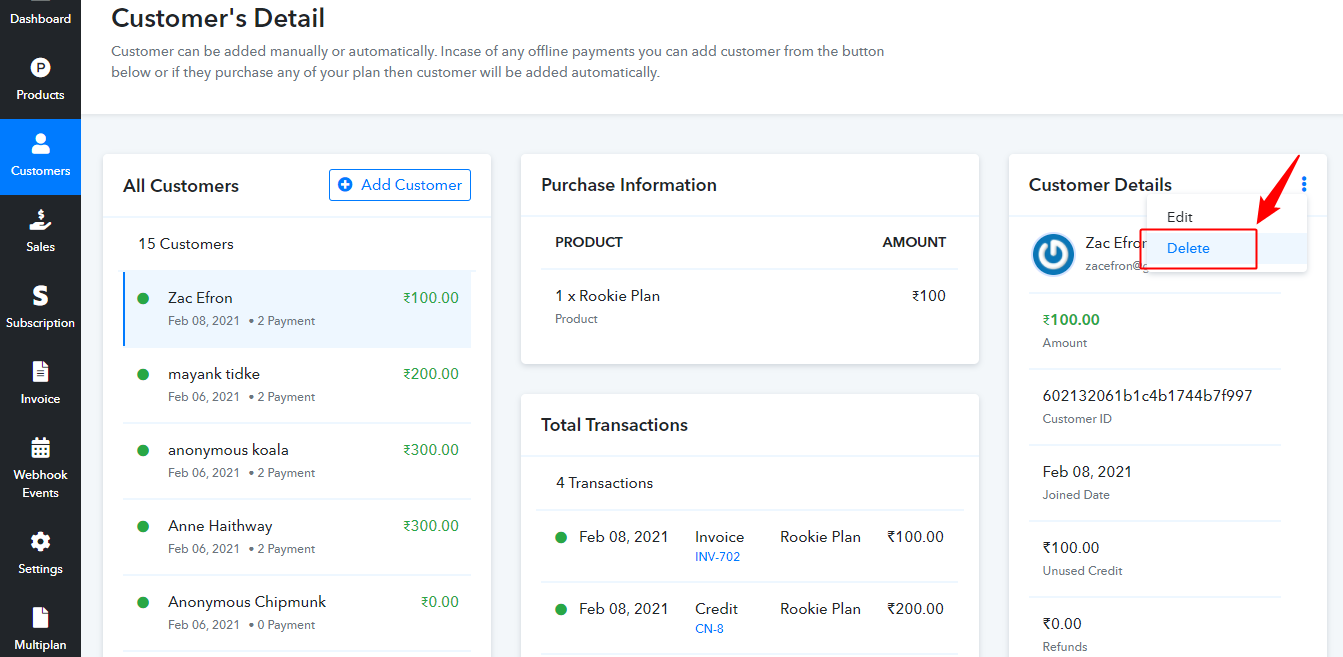
- Now, delete the plans associated with that product.
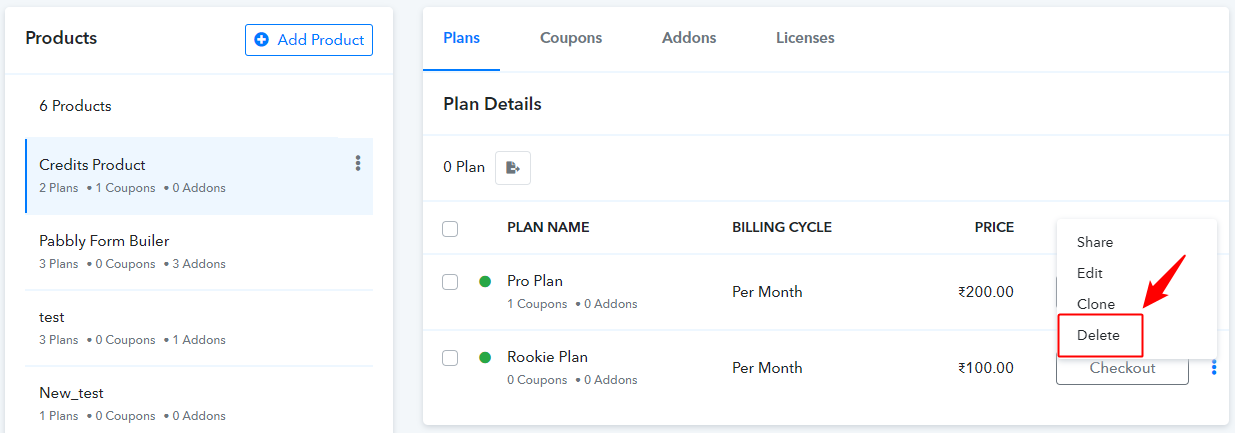
6. Finally, you are able to delete a product.
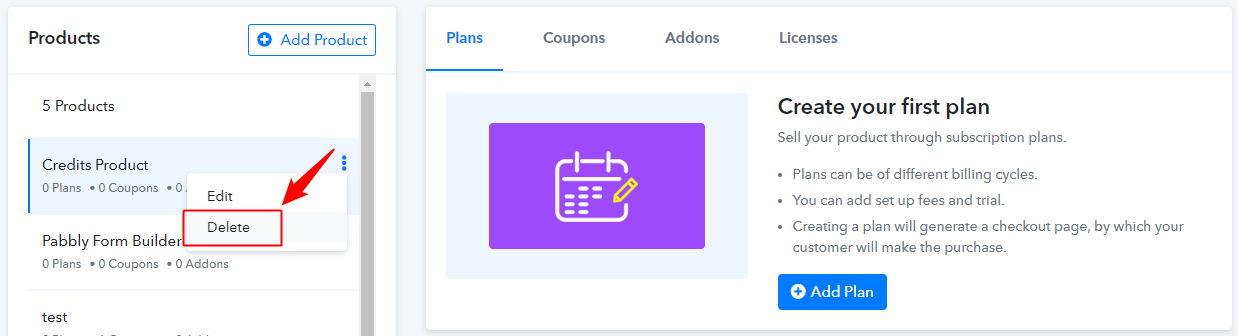
Furthermore, If you have to delete only an invoice, subscription, or a customer, then you can just delete them by following the chain.
4. Auto-fill Checkout Page By Customer Id:
The Pabbly allows it’s users to Auto-fill the customer details into the field of the checkout page. Here, Auto-fill means all the fields given in the checkout page will be filled automatically for any of the specific customers.
Now, how it works?
On firing the API to create a new customer, the system will generate a unique id for each. And, this is what we exactly called a customer_Id. Please refer how the customer_id look like through the list of all customers – https://www.pabbly.com/subscriptions/api/#section-4
Once you get this Customer_id by following the guidelines, you can put that same Id at the end of the checkout link in a specific syntax.
Syntax to add customer id in the checkout link: ?customer_id=
For example: https://payments.pabbly.com/subscribe/5cb963bf0ce68773eec61099/pabbly-hub?customer_id=5b9cc5cc74dcd31e04f1691b
By doing so, it can get all the data automatically from the customer based on the customer_id on the Checkout page. All the details associated with this customer Id is filled automatically in the checkout page.
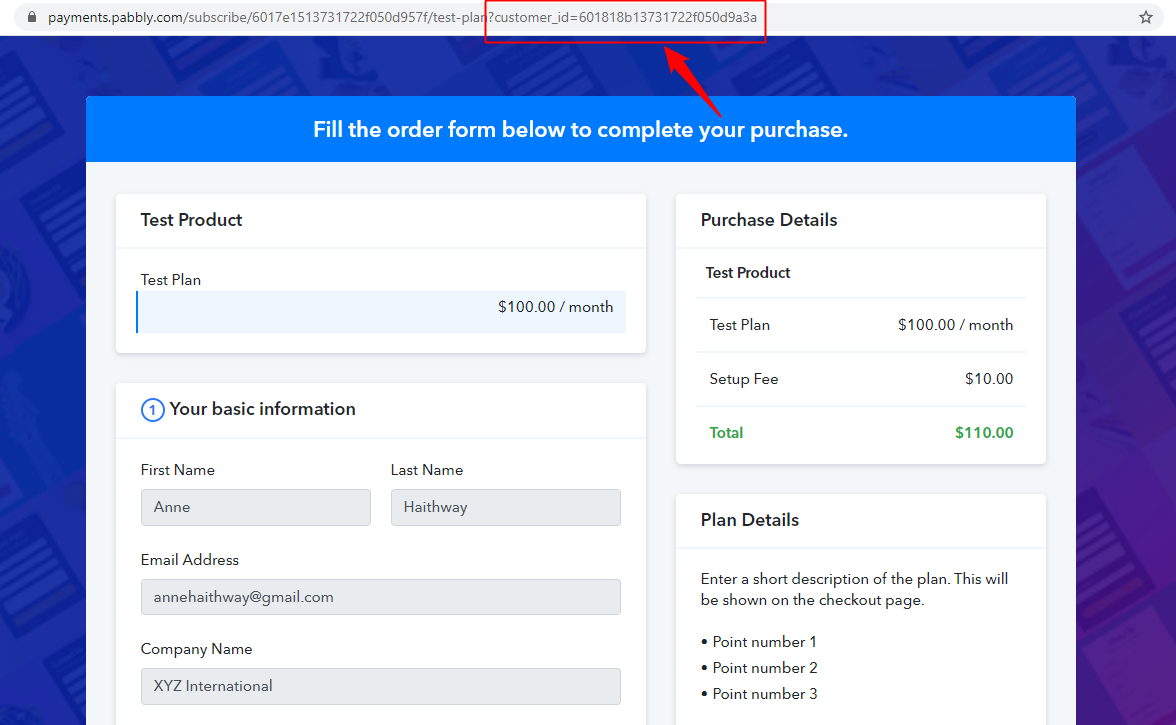
Note: These auto-fill fields or texts are not editable means you can not edit the text for any of the customers manually.
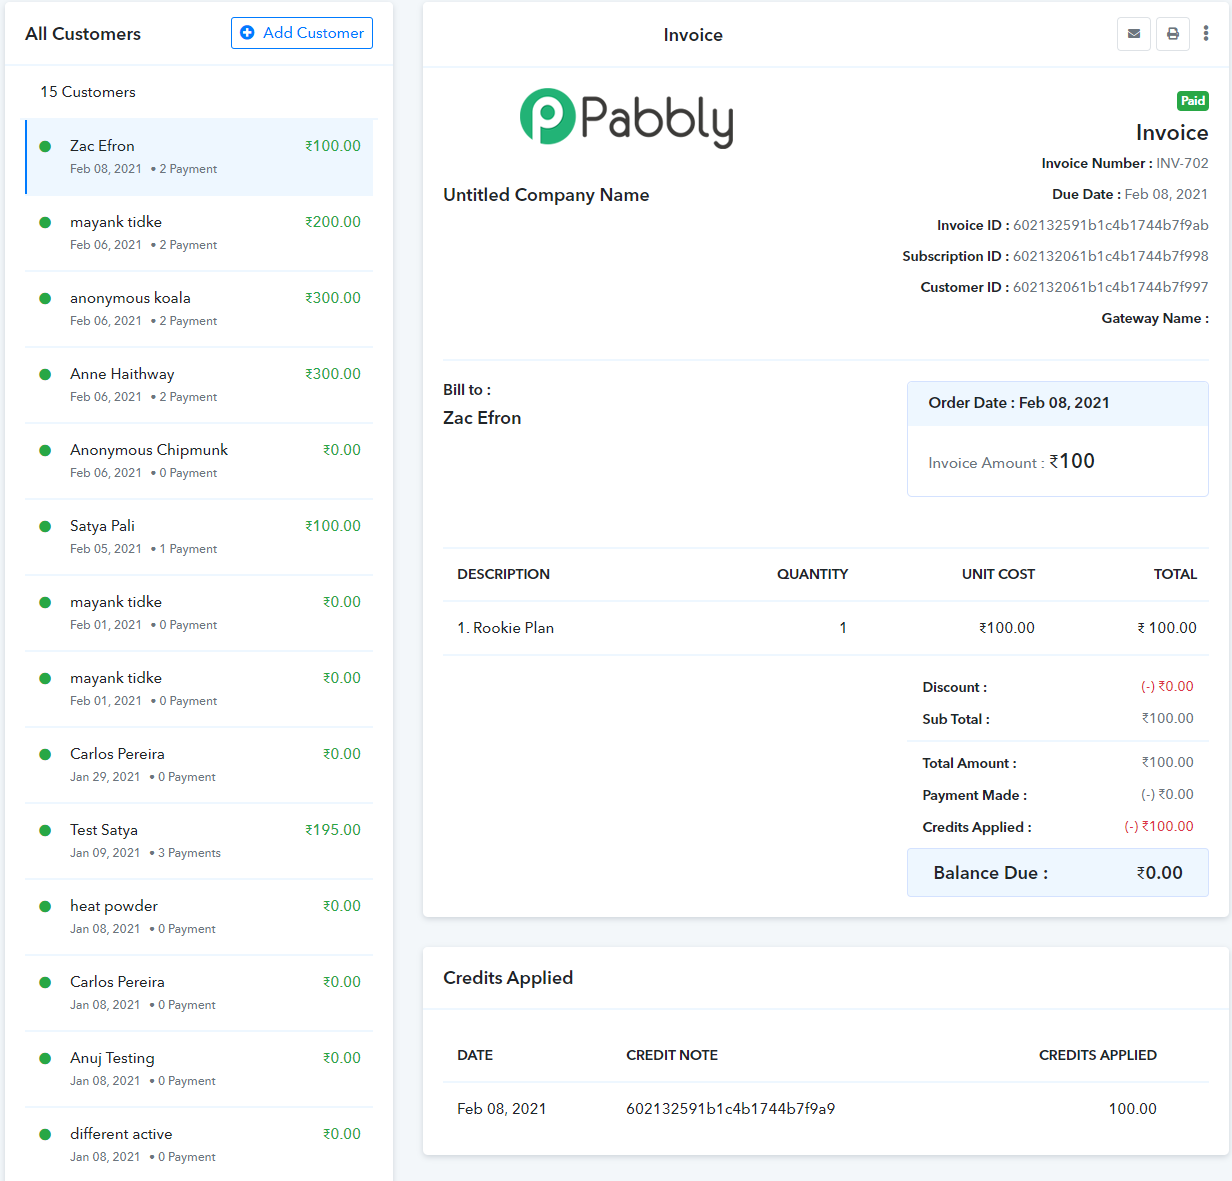
5. What Are Credit Notes?
Suppose you are looking to change your plan from a lower amount to higher ones or vice versa, let’s say :
Right now, you have a subscription of $49 for any plan e.g “Plan1” and you want to change this plan to some other, say “Plan2” whose amount will be, suppose $99.
The credit will be applied to the future transaction as shown below:
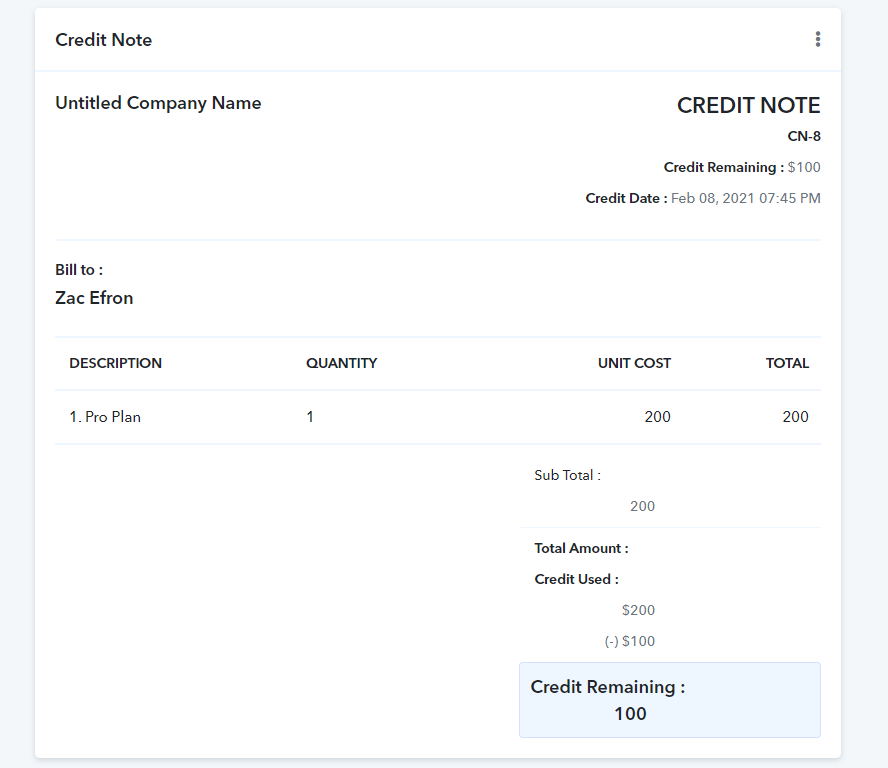
This credit note will be available at: customers -> Transactions -> CN_no.
In case of lower to higher amount – Credit Applied = (A Plan going to update) – (A plan need to be changed).
Or in case of higher to lower one – Credit Applied = (A plan need to be changed) – (A Plan going to update).
So according to the above example –
Credit Applied = $99 – $49 = $50
Now, $50 is your credit amount which you need to pay instead of $99 as shown in the above image.
This is how ‘Credit Applied’ works.
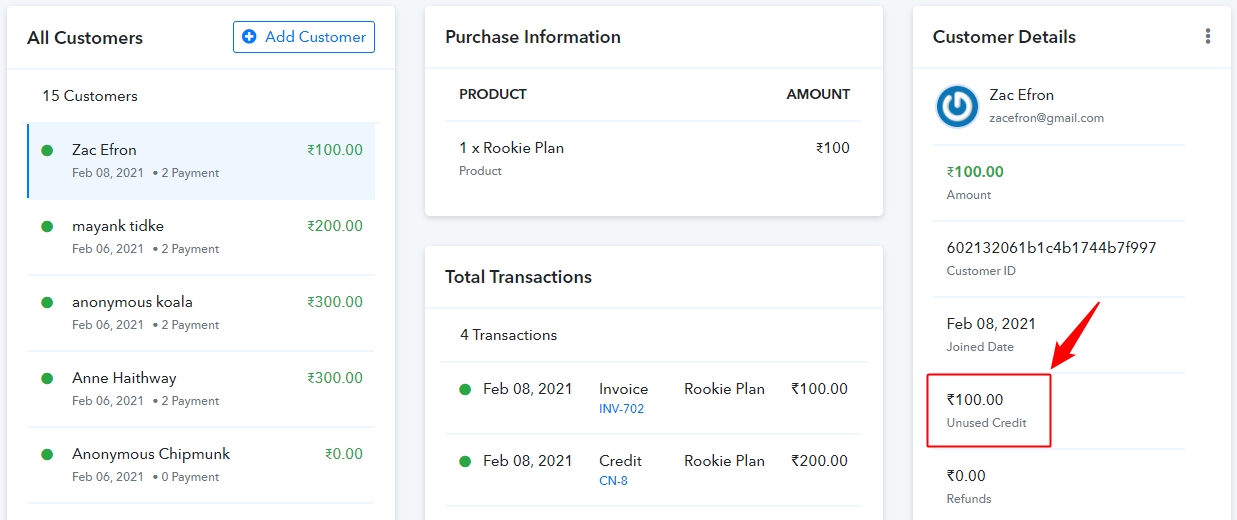
You can also get your total credit amount on the customer section without going to the credit note.
Just go to customers in the Pabbly and you will be able to see the credit amount as like in below picture –
 0
0
Note : This whole process will not be applicable for “One Time Billing Cycle”. You need to set some specified number to generate your billing cycle of any plan for e.g. every week, every year, every month etc.
6. PayPal Standard VS PayPal Payments Pro:
PayPal offers 2 different variants.
PayPal Standard & PayPal Payments Pro
1. PayPal Standard:-
In PayPal standard, the customer will go offsite to PayPal to complete the checkout process.
It does not require reference transactions to be enabled. All the subscriptions are managed at Paypal’s end itself.
Once the payment is successful, Pabbly automatically marks the payment as paid. In the case of failed payment, Pabbly is notified by PayPal and within Pabbly the subscription is marked as unpaid.
Cons of PayPal Standard –
- Customer has to go off-site to PayPal to complete the payment.
Pros of PayPal Standard –
- Available in all countries.
- Customers can pay through credit card, debit card and directly through their PayPal account.
- No Lock-in with the subscription management services (Recurly/Chargebee). All subscriptions are managed at PayPal itself. So, in-case you want to change or close your subscription management services, the billing will still happen directly through PayPal.
2. PayPal Payments Pro – (Reference Transaction):-
The Reference transaction is the feature of PayPal Payments Pro.
It allows you to collect the payment using a credit card on your website itself. However, the customers can’t pay using the PayPal account with PayPal payments pro.
Cons of PayPal Payments Pro (Reference Transaction) –
- Only available in US, Canada and UK to selected customers.
- Only credit and debit card allowed. Customers can’t pay using their PayPal account.
- Lock-in with the subscription management services (Recurly/Chargebee): if you want to change your subscription management service, you will not be able to bill your customers anymore because the subscriptions are not stored at PayPal’s end.
Pros of PayPal Payments Pro (Reference Transaction) –
- You can take payment through your own website. Customers won’t be taken to the PayPal site.
What do we use in Pabbly?
In Pabbly, currently, all the payments happen through PayPal standard offering. You do not need reference transactions for the same. We store all the subscriptions at PayPal itself.
P.s: Rules of PayPal with Pabbly Subscriptions:
- PayPal refund feature is applicable for One-Time payment. In case of recurring payment, PayPal refund is not applicable.
- Coupons will work with “Forever Redemption” type. Coupons will not work with “One Time” & “Limited number of times”.
- Upgrade/downgrade of plans will not work with PayPal.
7. How To Record A Payment?
So far, We have known that ” Pabbly” generates invoices automatically for all the Online Payments, also a user can generate invoice manually. In the scenario of manual invoice or offline transaction (where payment is done via Bank Transfers, Cash, Cheque, others), the status of the invoice will show as “Created” not ” Paid”. To change the status of Invoice from “Created” to “Paid”, Pabbly subscription has added a new feature “Record Payment” where a user can generate invoice manually, add payment details and once the payment detail is added, the status will automatically change to ” Paid”.
Here is how you can use the “Record Payment” feature:
Create an offline subscription of a user. (If you need help creating an offline subscription, follow the URL: (https://www.pabbly.com/subscriptions/docs/features/#section16)
Now, go to the Invoice section, you will see the status of the Invoice is “Created”, Please refer to the screenshot below:
Click on the invoice that you have created manually, You will have few choices on the top left of the Invoice like this:
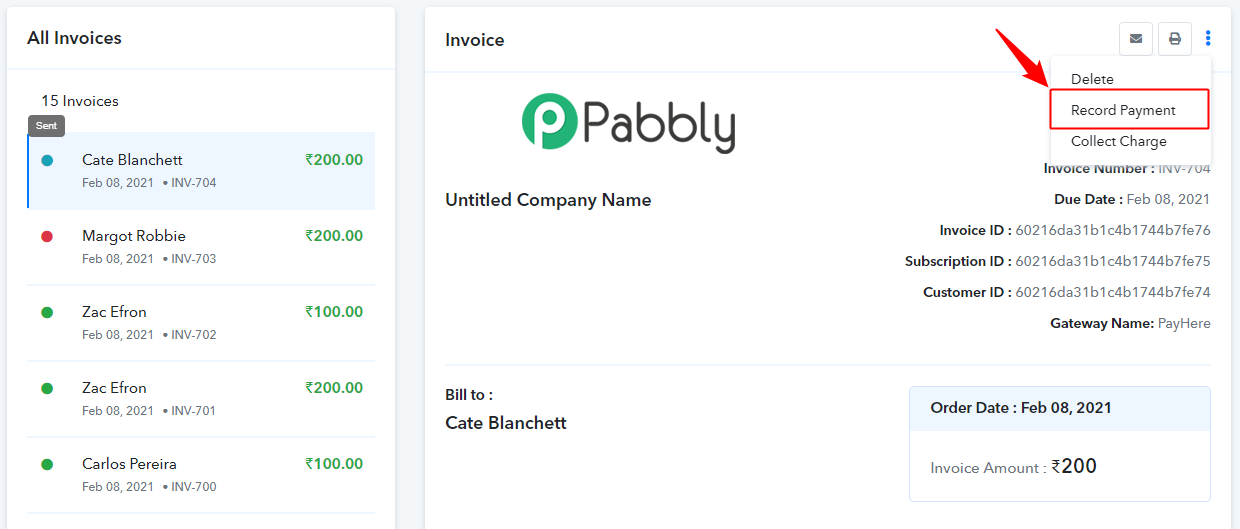
After you choose“Record Payment”, you will be redirected to this page :
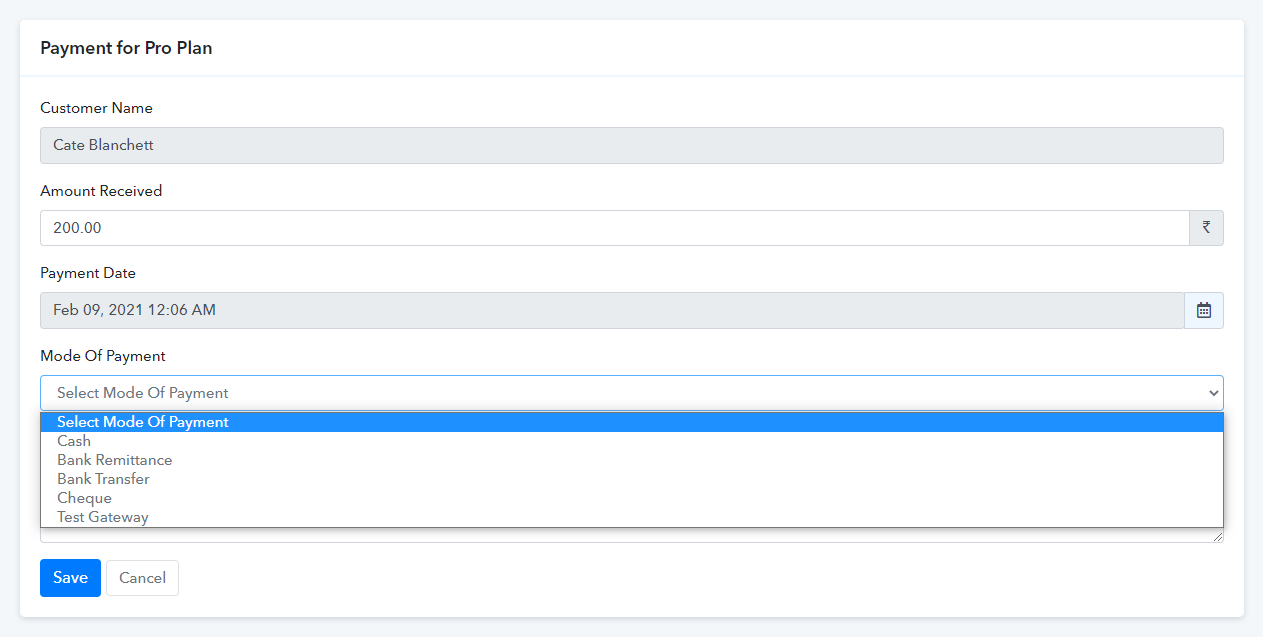
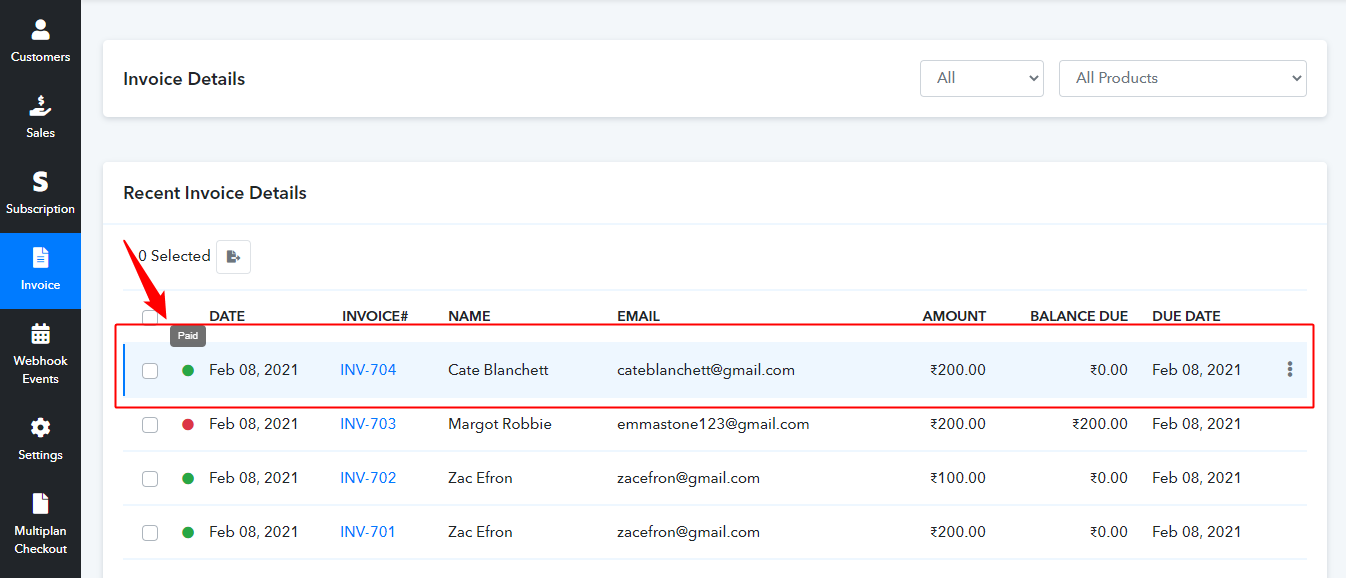
Once the changes have been saved, you can go back to Invoice and you can check the status of the Invoice has been changed to ” Paid”.
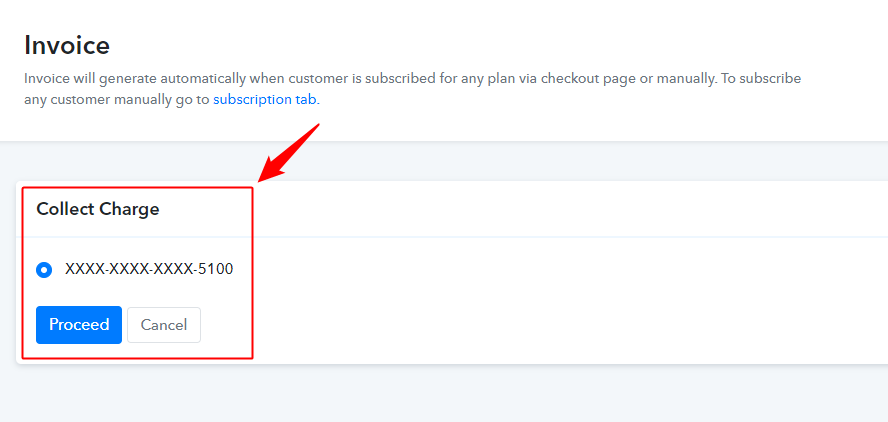
8. How To Collect Charge From Customers?
When you were checking Invoice of offline subscription, you may have noticed one more option by the name “Collect Charge”, refer to screenshot below:
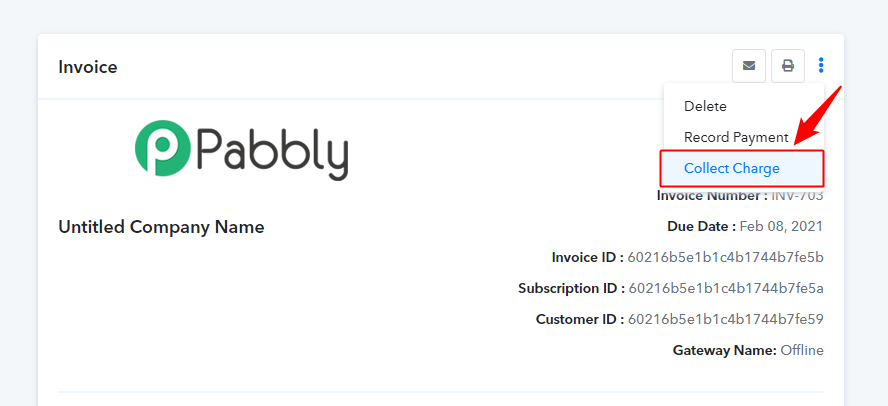
In Collect Charge option, you can do the direct debit from the billing details stored for that customer. It means you will be able to charge the credit card of that customer from within the back-end.
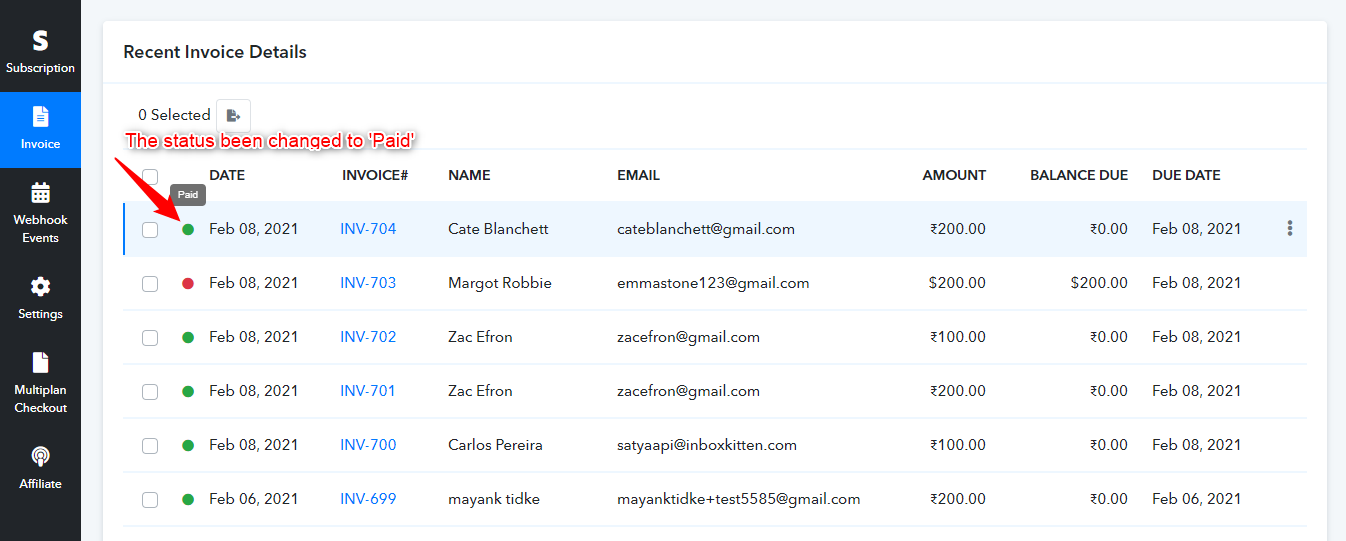
Create an Offline subscription for a customer, fill out the other necessary details and at the end, you have to choose “Payment Method”, you will have two options Offline Payment and card details of the customer. You can directly choose card details and then click on “submit”. Please refer to the screenshot below:
After clicking on submit, an Invoice by the name of the customer will be generated and the status of invoice will be “Paid”. Refer to the screenshot below:
9. How To Process A Refund?
Pabbly Subscriptions have made the Refund process easier for its user, with Pabbly you can refund directly from your account to your customer. You don’t need to go to your Payment Gateway account and then initiate the refund process from there. Follow these simple steps to initiate the refund from your Pabbly subscription’s account.
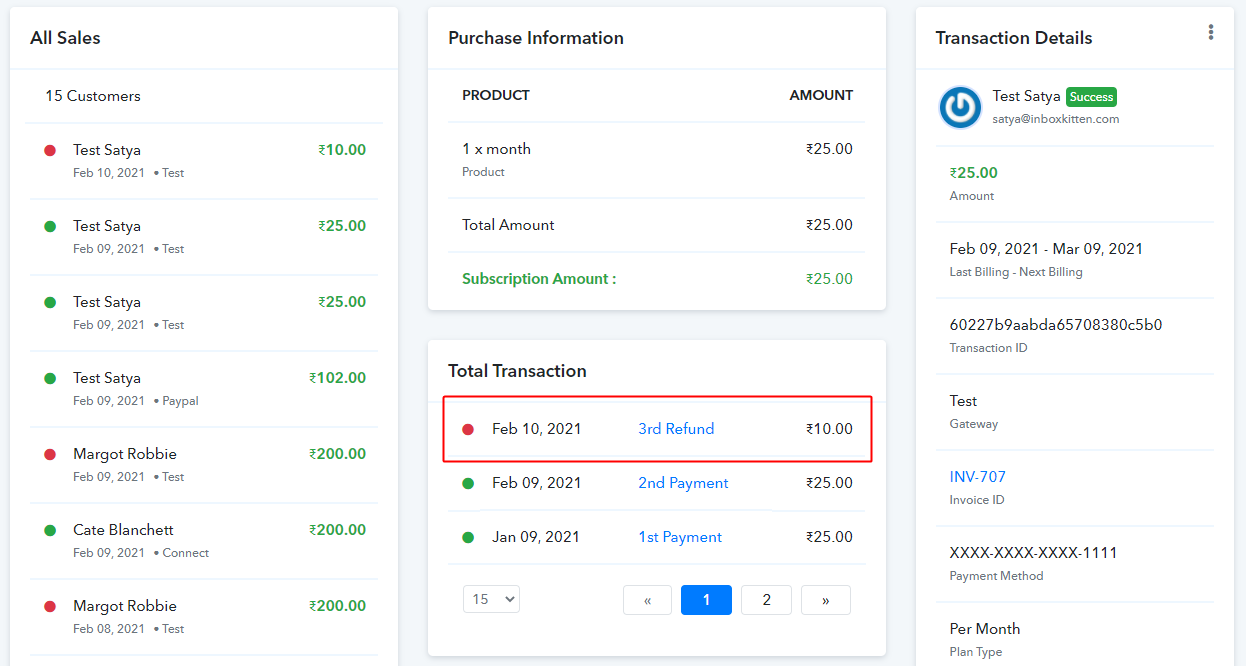
Login to your Pabbly Subscription’s account and choose “Sales” from your Dashboard. Select the Customer you want to initiate the Refund for, follow the screenshot here –
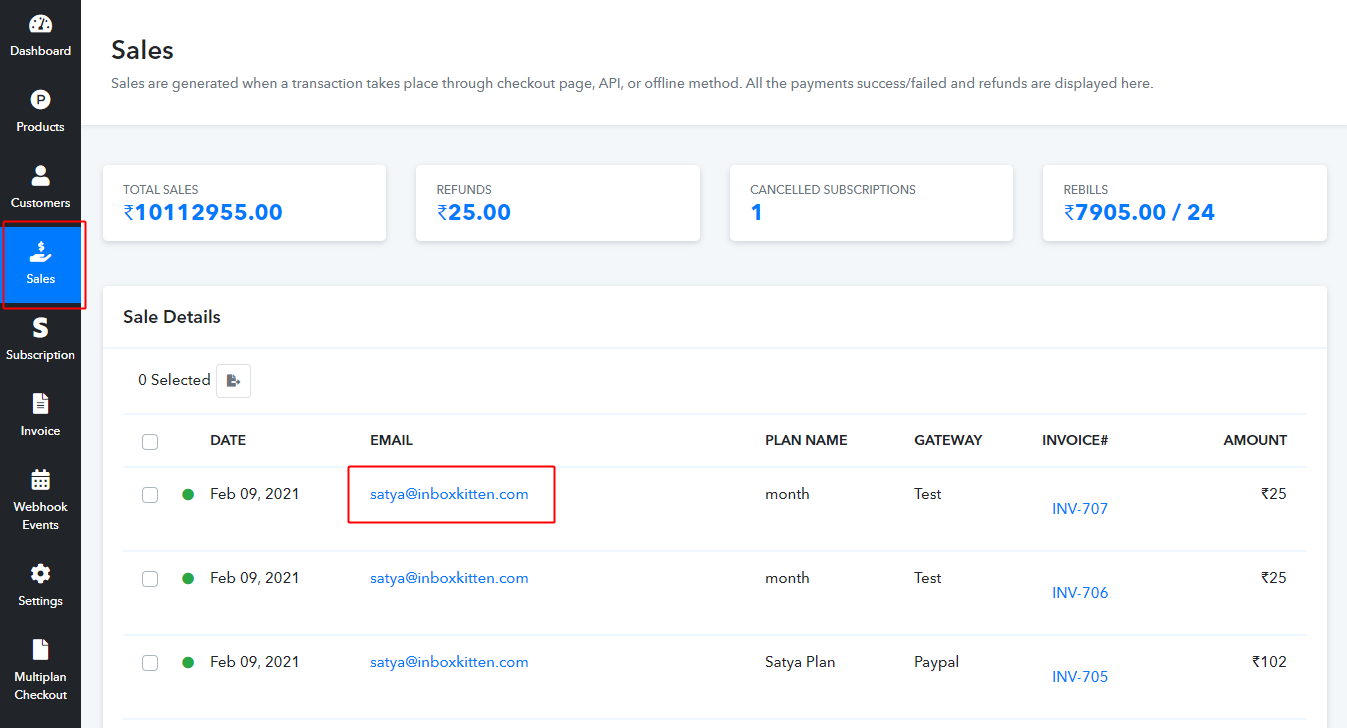
Once you choose the customer having the transaction with “Success” as the status. Click on it and you will be redirected to the “Sales details”. Here, you will find a “Refund/Manage” option. Check the screenshot below –

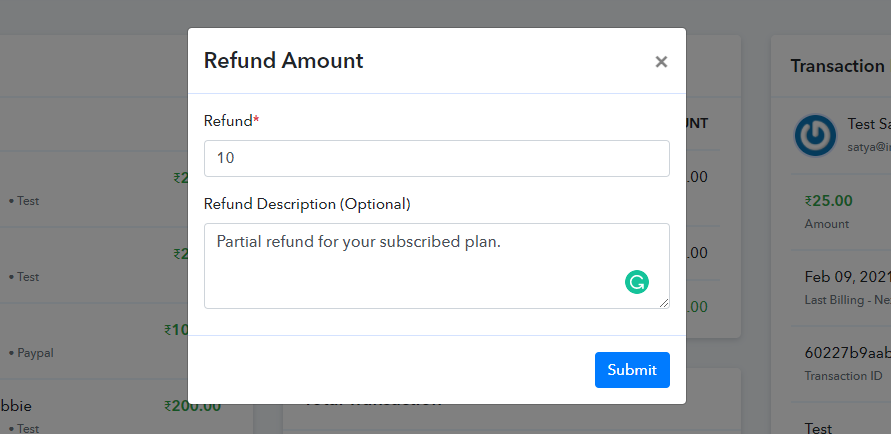
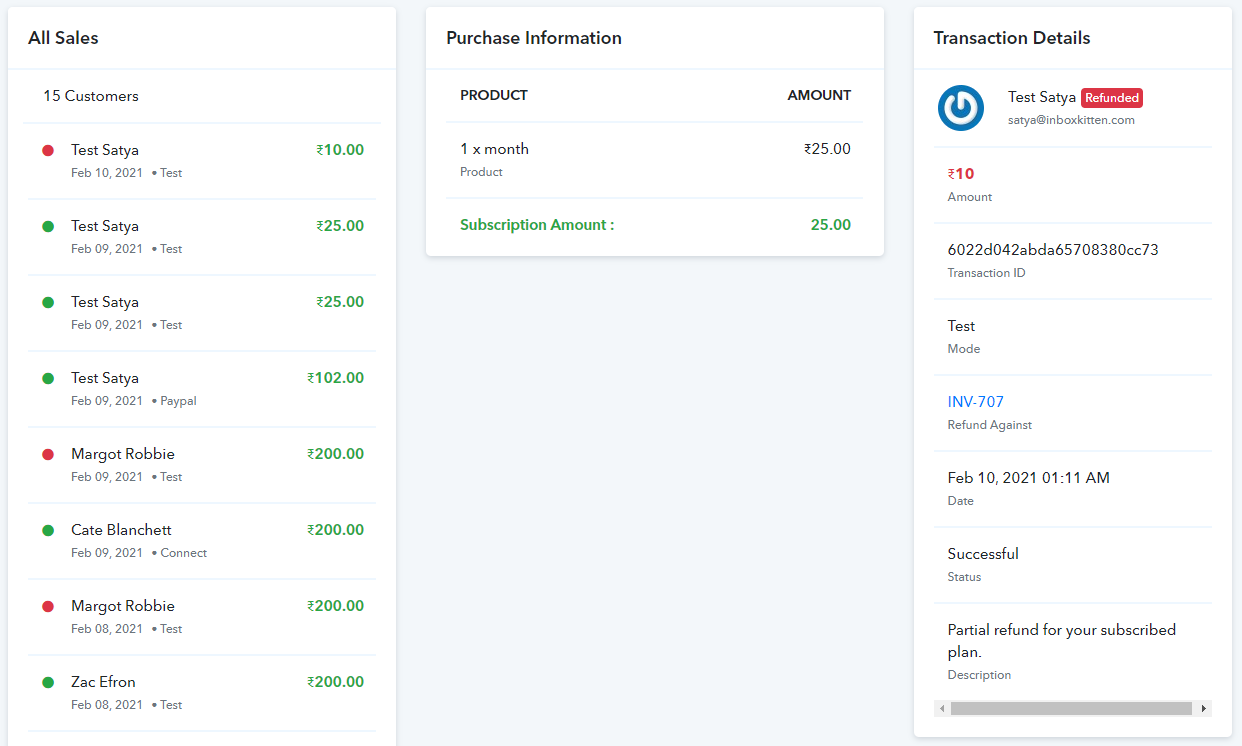
Once you click on “Refund”, a pop-up box will open with two Options, “Refund” and ” Refund Description”. Pabbly subscriptions have the feature of a Partial refund as well, you can add the amount you want to refund. Once you add the amount, added a description(if any) and clicked on “Save”. An automatic Refund receipt is generated against the Invoice.
You can find the receipt under Customer’s Transaction details, please refer to the screenshots below:
If the customer has paid you via Stripe payment gateway then only you can issue a refund by following the above steps.
If the customer used any other payment method like PayPal, Authorize.net or Razorpay then you will need to issue the refund directly from the gateway account.
After issuing the refund you can record it in your Pabbly Subscriptions account.
To record a refund go to
Customers -> Transactions -> Payment -> Record refund
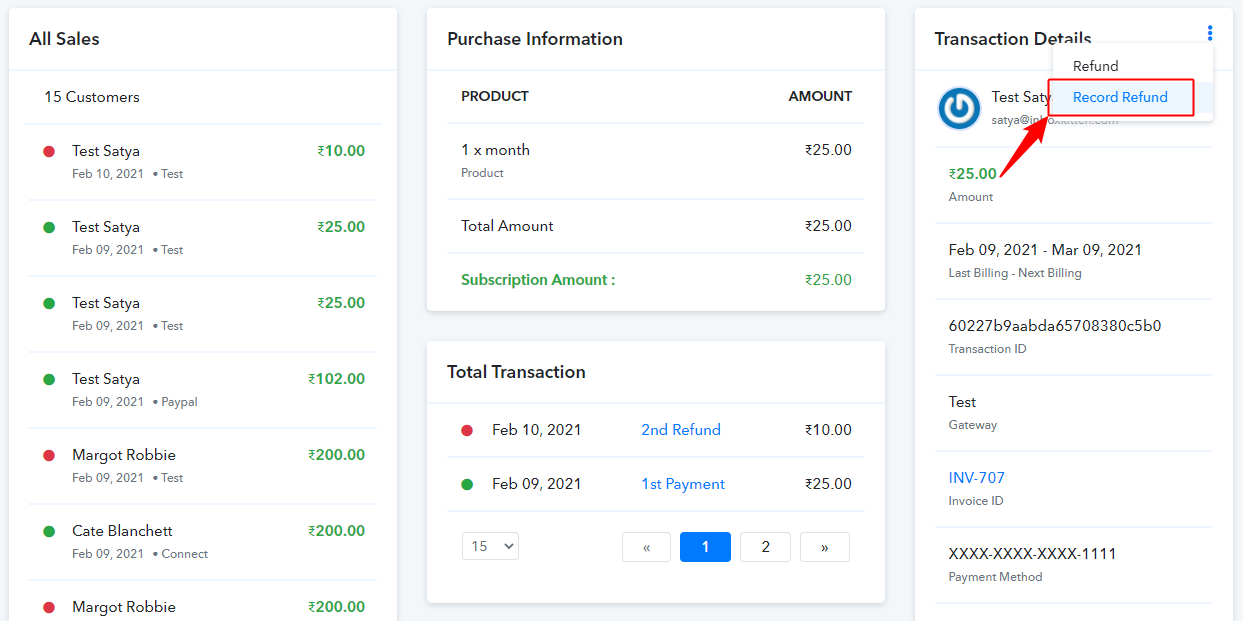
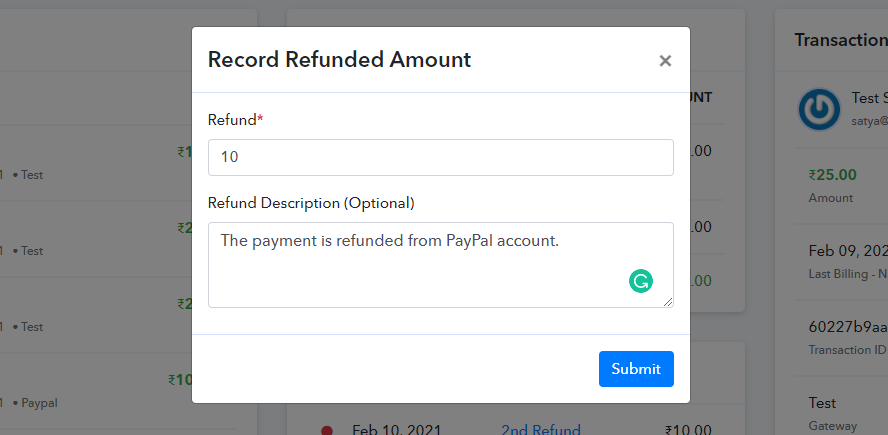
Click on the record refund option and add the amount and description for your reference.
Once you submit the refund Id will be generated from that particular payment.
10. Which Currencies Does Pabbly Support?
Pabbly Subscriptions supports a total of 25+ global currencies. You have to choose a single, preferred currency for your Pabbly Subscriptions account as soon as you sign up.
Please keep in mind that once you select your currency, it can’t be modified/changed later. It will be set as default.
Currency Setting is available under the “Personal Information” tab –
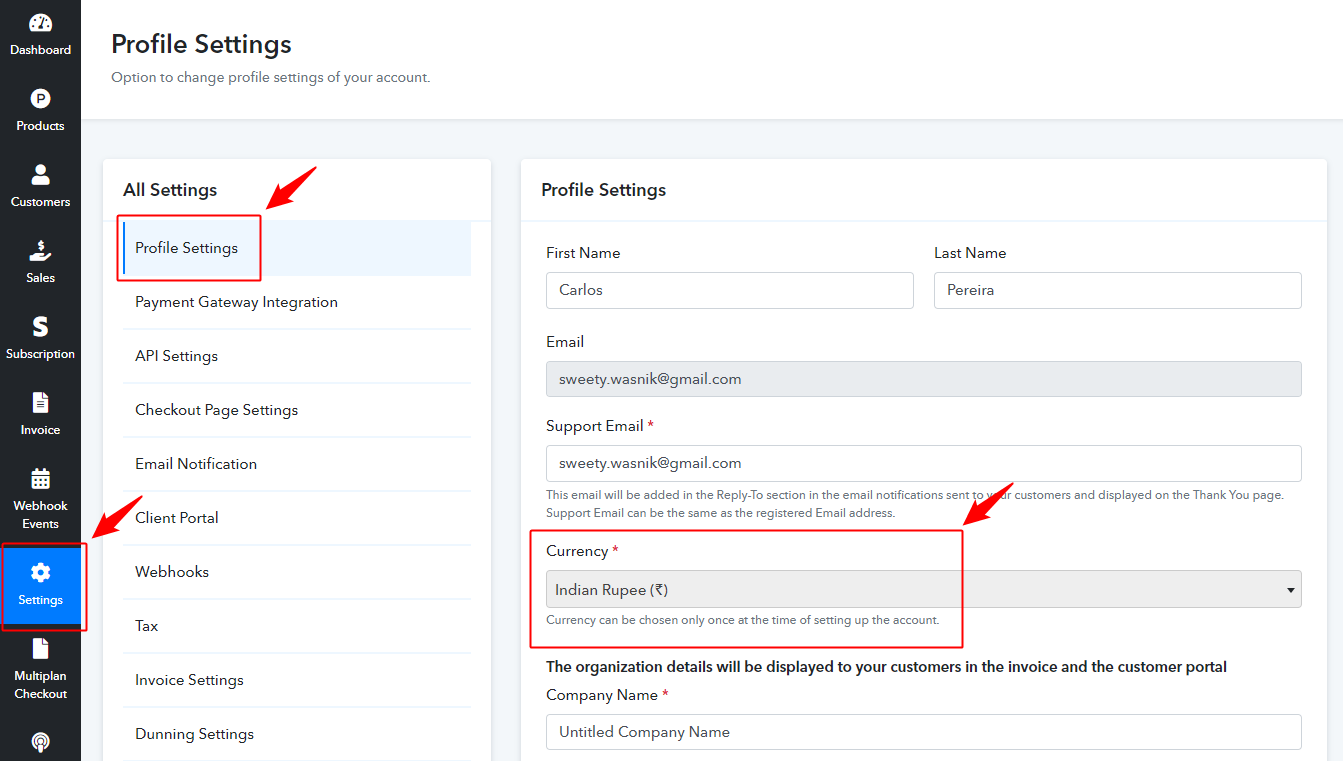
When you click on the “Search Currency”, a drop list will roll down, enabling you to select your preferred currency.
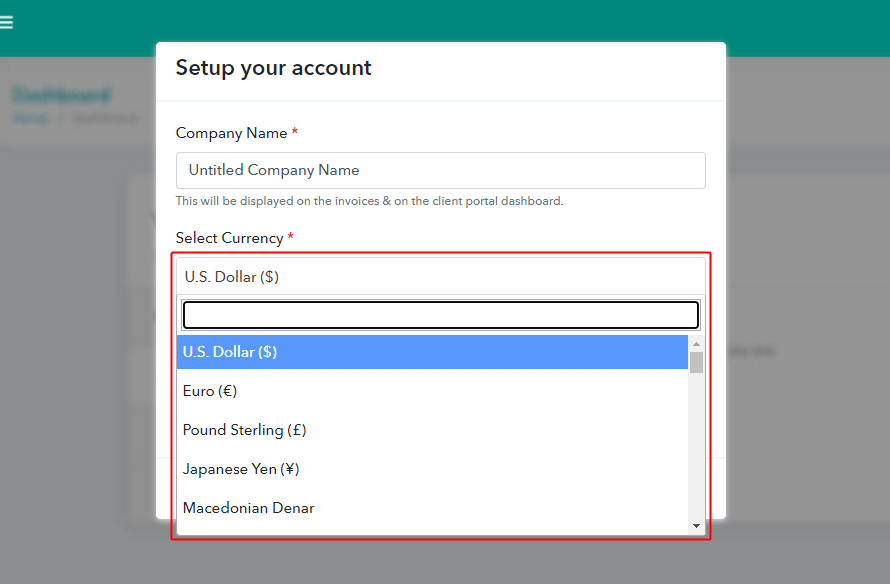
Note: Currencies can be chosen only once while setting up the account. A single currency will run on a single account.
Here is the complete list of all the supported currencies (These currencies are supported by PayPal and Stripe payment gateways)
| Currency Name | Currency Code | Currency Symbol |
|---|---|---|
| U.S. Dollar | USD | $ |
| Euro | EUR | € |
| Pound Sterling | GBP | £ |
| Japanese Yen | JPY | ¥ |
| Canadian Dollar | CAD | C$ |
| Mexican Peso | MXN | Mex$ |
| Hong Kong Dollar | HKD | HK$ |
| Hungarian Forint | HUF | Ft |
| Norwegian Kroner | NOK | kr |
| New Zealand Dollar | NZD | NZ$ |
| Singapore Dollar | SGD | S$ |
| Swedish Kronor | SEK | kr |
| Polish Zloty | PLN | zl |
| Australian Dollar | AUD | A$ |
| Danish Kroner | DKK | kr |
| Swiss Francs | CHF | CHF |
| Czech Koruny | CZK | Kc |
| Israeli Shekel | ILS | ₪ |
| Brazilian Real | BRL | R$ |
| Taiwan New Dollars | TWD | NT$ |
| Malaysian Ringgit | MYR | RM |
| Philippine Peso | PHP | ₱ |
| Thai Baht | THB | ฿ |
| Indian Rupee | INR | ₹ |
| Russian Ruble | RUB | ₽ |
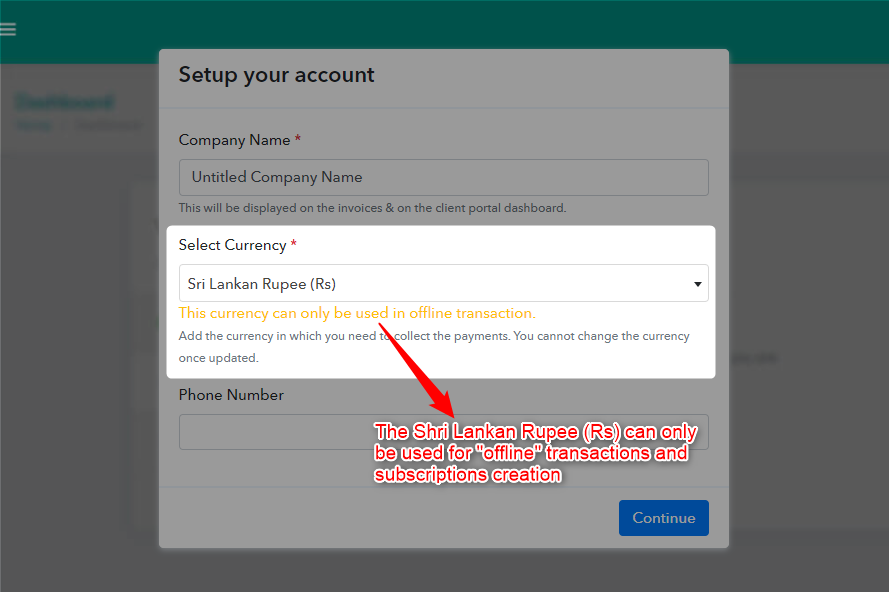
| Sri Lankan Rupee* | LKR | Rs, රු |
| Indonesian Rupiah* | IDR | Rp |
| Moroccan Dirham* | MAD | DH |
| UAE Dirham* | AED | د.إ |
| South Korean Won* | KRW | ₩ |
| Colombian Peso* | COP | $ |
| Macedonian Denar* | MKD | Ден |
Points To Remember –
- Currency names with (*) are only supported with Stripe Payment Gateway.
- The Sri Lankan Rupee can only be used for offline transactions. Meaning, you can manually create subscriptions, invoices & corresponding customers (with Sri Lankan Rupee as the preferred currency) and collect payments via cash or bank transfer.
P.s: Rules of PayPal with Pabbly Subscriptions:
- PayPal refund feature is applicable for One-Time payment. In case of recurring payment, PayPal refund is not applicable.
- Coupons will work with “Forever Redemption” type. Coupons will not work with “One Time” & “Limited number of times”.
- Upgrade/downgrade of plans will not work with PayPal.
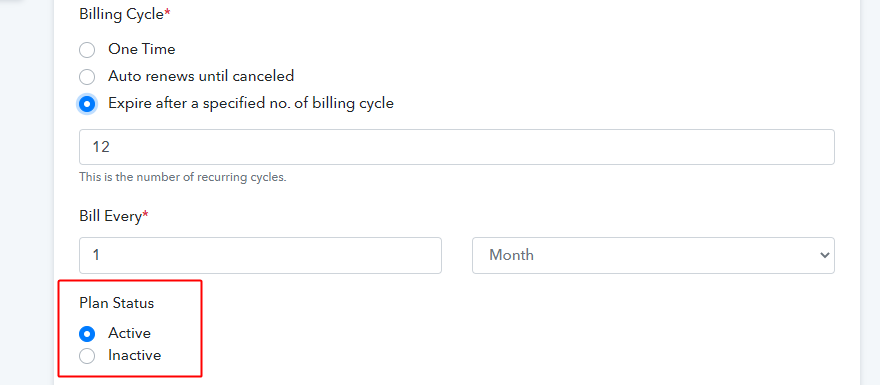
11. How To Activate/Deactivate Plans?
The activation or deactivation of your Product’s plans is a secure way to keep the integrity of your business model.
For instance, suppose you want to expire the lifetime deal of a certain product, you would normally remove the checkout page link from the buy button. But the link isn’t dead yet and a user may still access it if he has that link saved somewhere.
So to completely deactivate a plan, you have to use Deactivation of Plan feature. It is available under the “Edit Plan” setting.
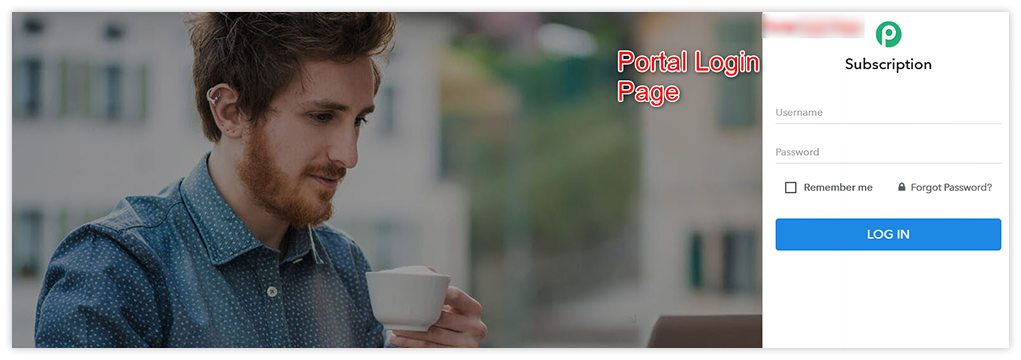
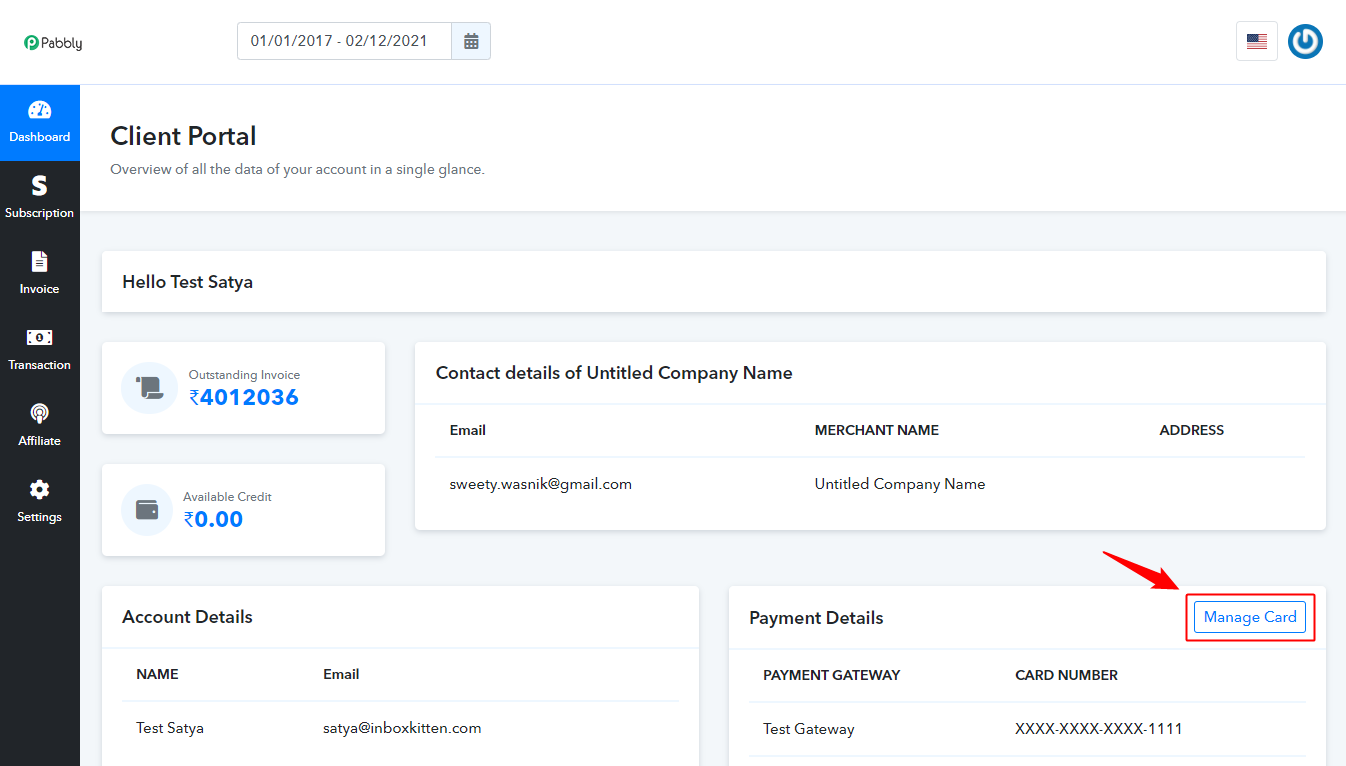
12. Client Portal:
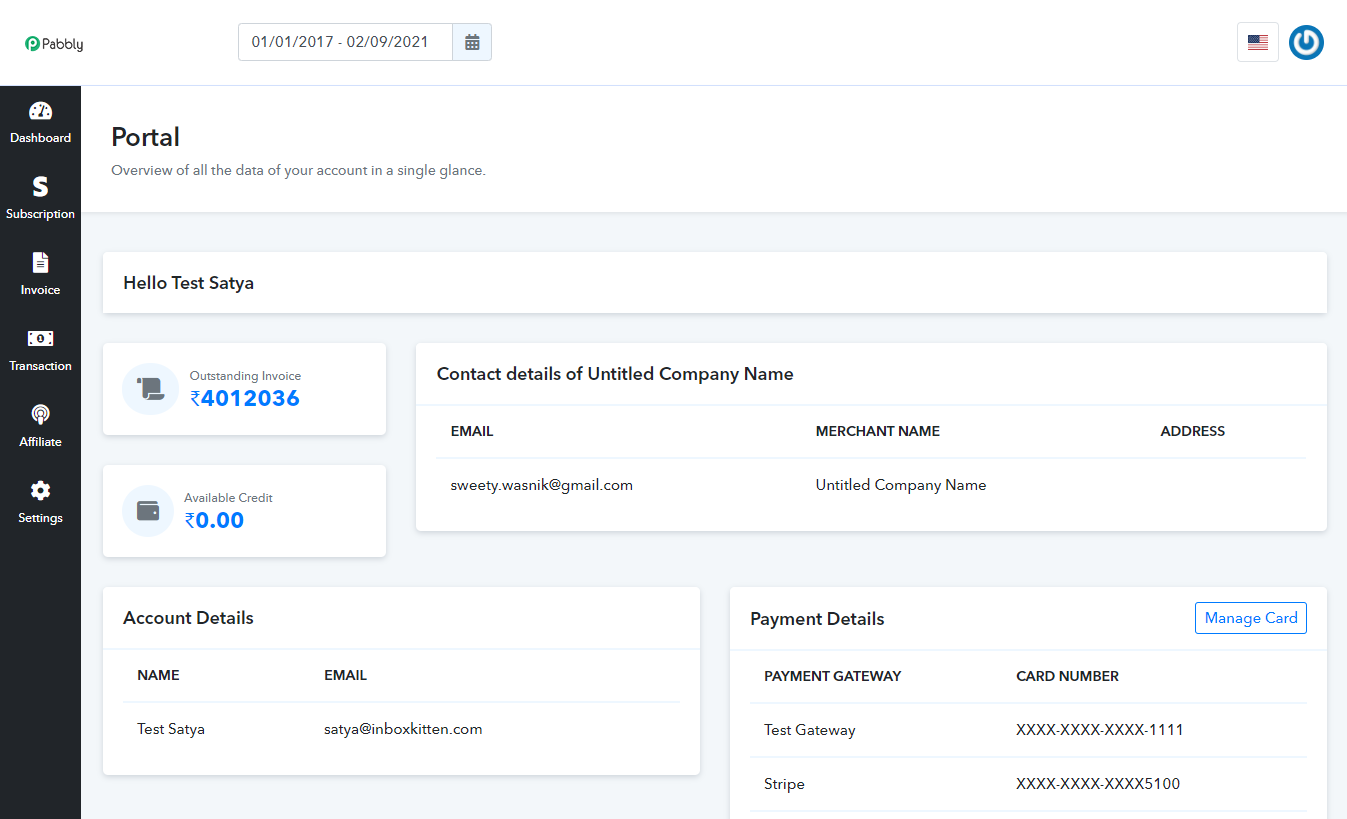
Pabbly Subscriptions offers a dedicated portal to your customers which enables them to –
- Monitor account details, outstanding invoice, available credit
- Upgrade or downgrade subscriptions
- Add alternate card details
- Download invoices
- Track transactions
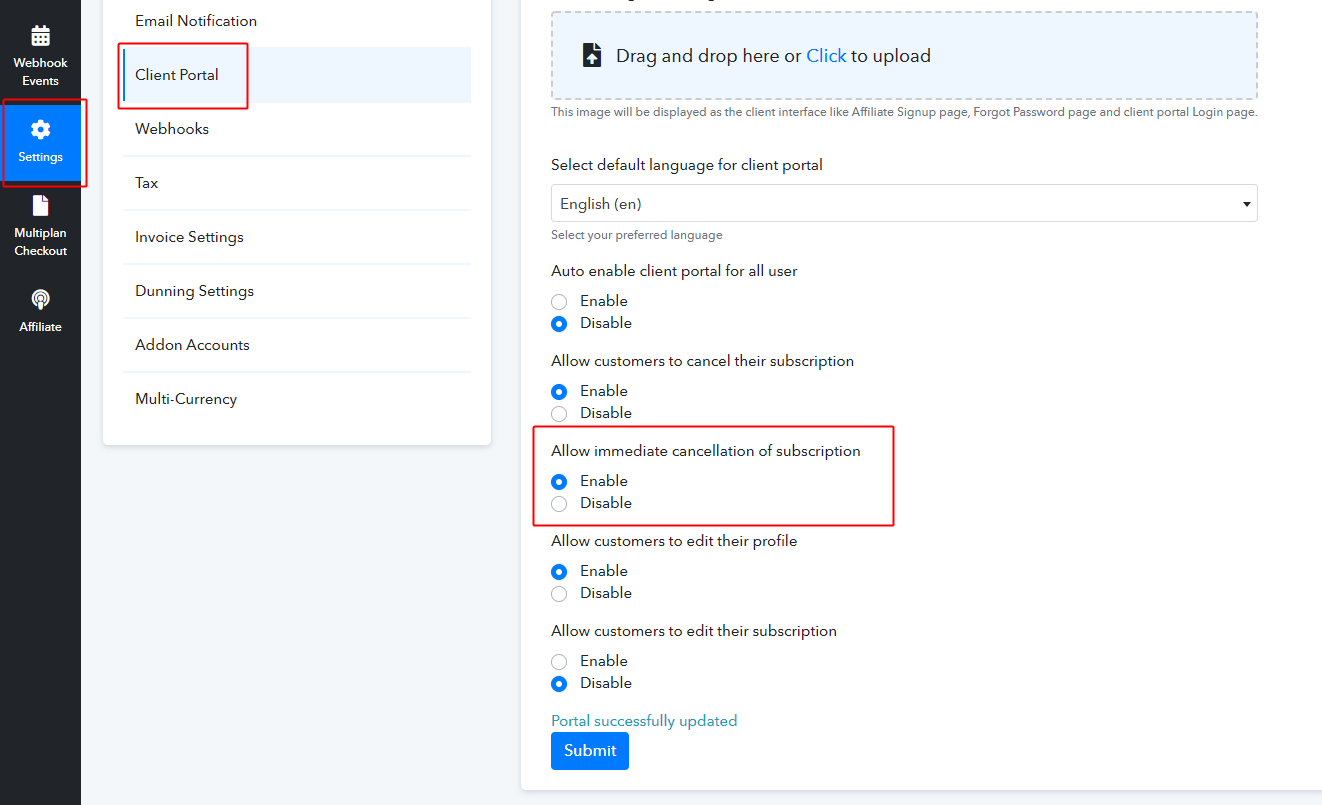
In order to give your customers the access to the client portal, you, as a merchant have to enable it under “Settings → Client Portal”.
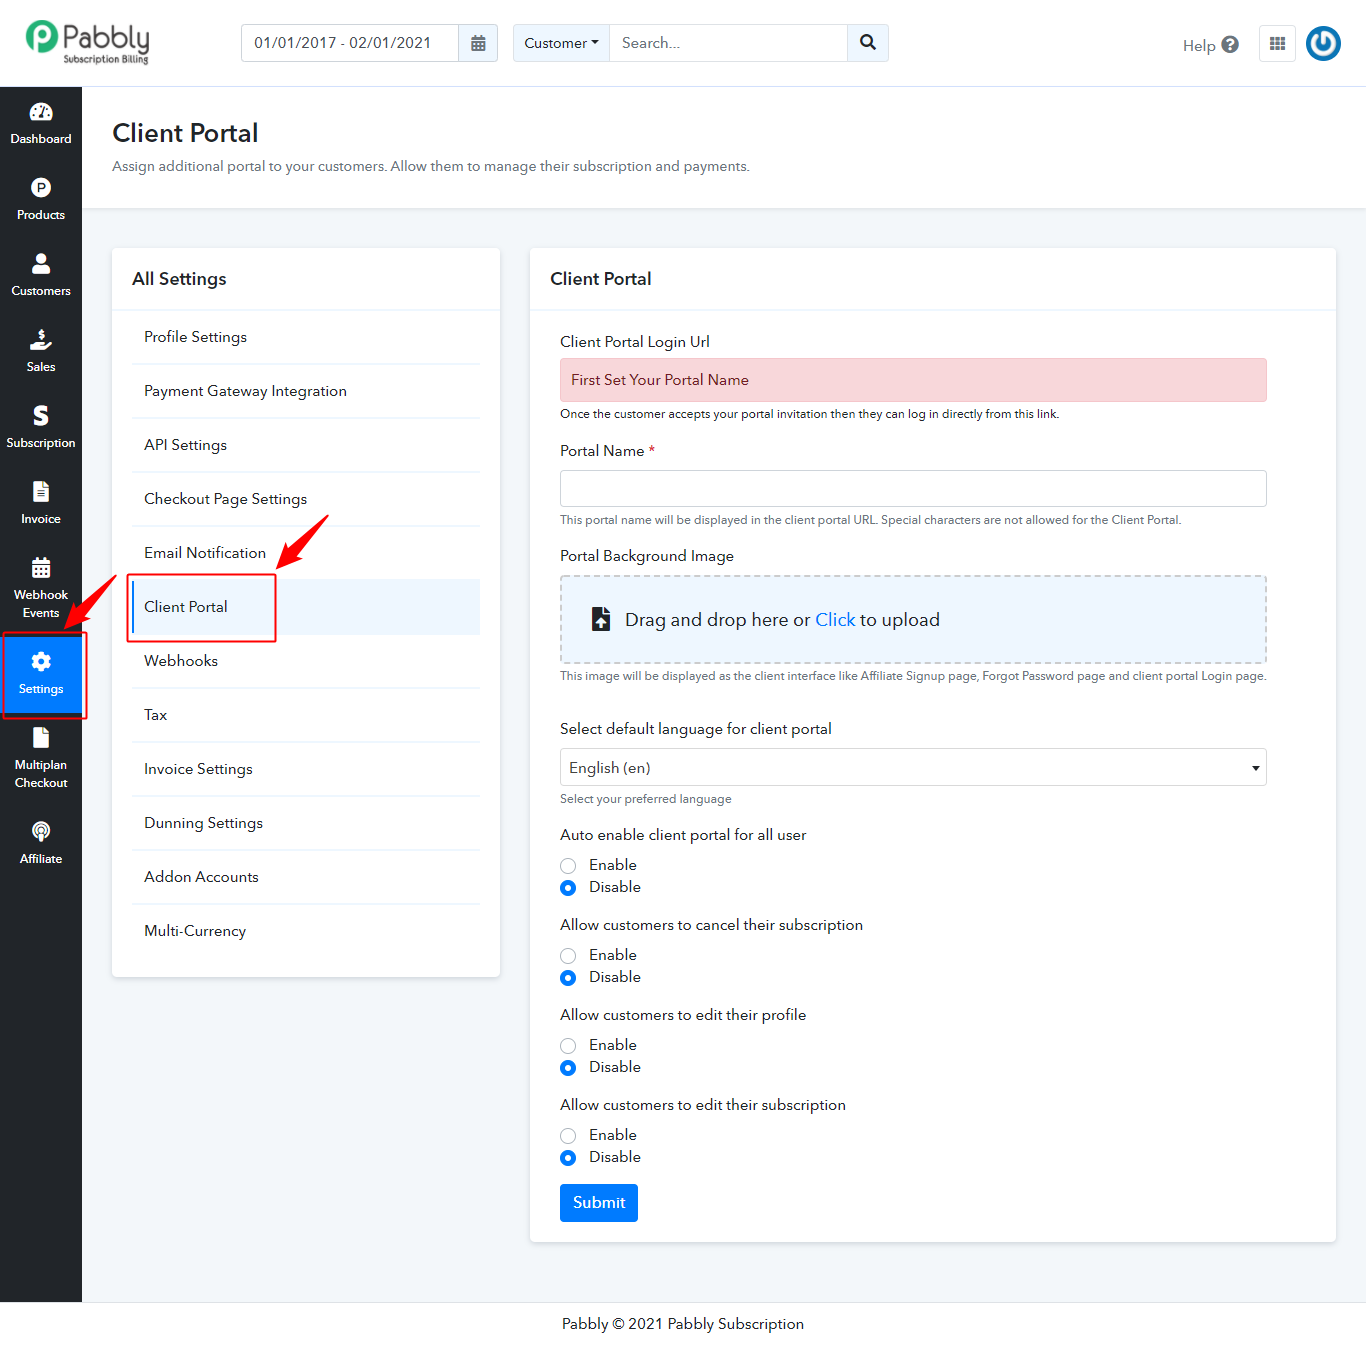
There are several options available in the portal settings through which you can provide permissions to your customers for various actions like –
- Auto-enable client portal for all users.
- Allow customers to cancel their subscription.
- Allow customers to edit their profile.
- Allow customers to edit their subscription.
Now, let’s discuss the working of these options in a detailed manner.
1. Auto-enable client portal for all users – With this option, merchant can decide which customer they want to provide portal access or not.
If the option is disabled, then you have to manually provide portal access to your customers by following the below steps –
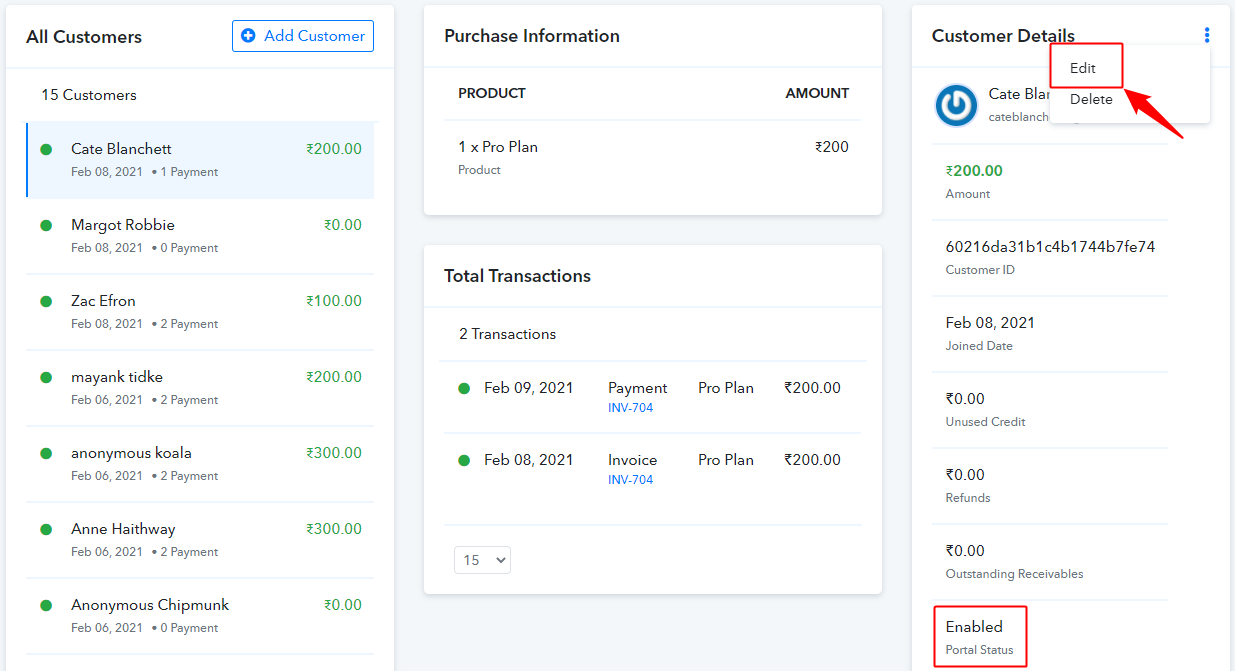
Merchant Dashboard -> Customers -> Individual customers -> Click on three dots options -> Select Edit from the drop down -> Click on “Allow Portal Access” -> Save the changes.
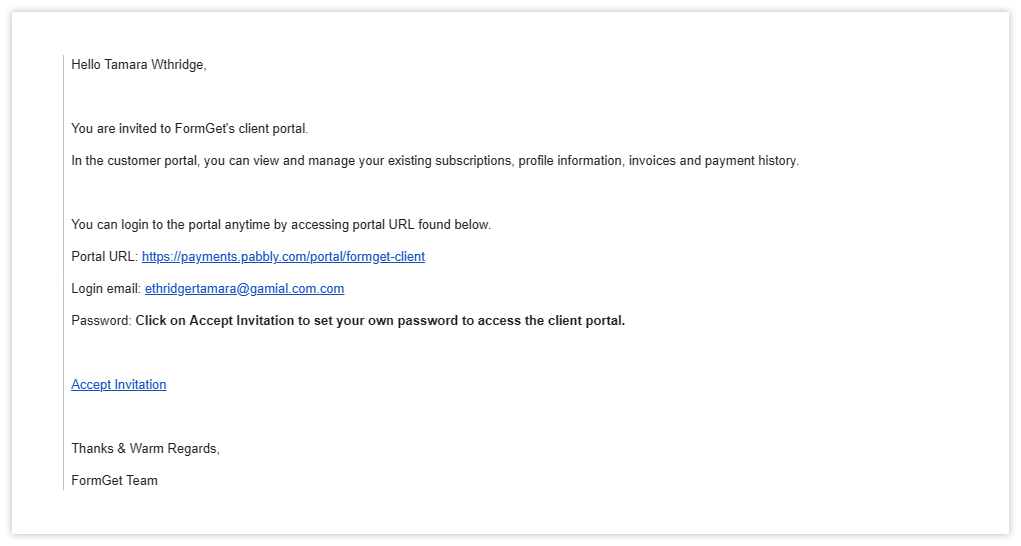
When the option is enabled, all your customers will receive a Client Portal Invitation Email automatically on behalf of your organization when they subscribed to your plan.
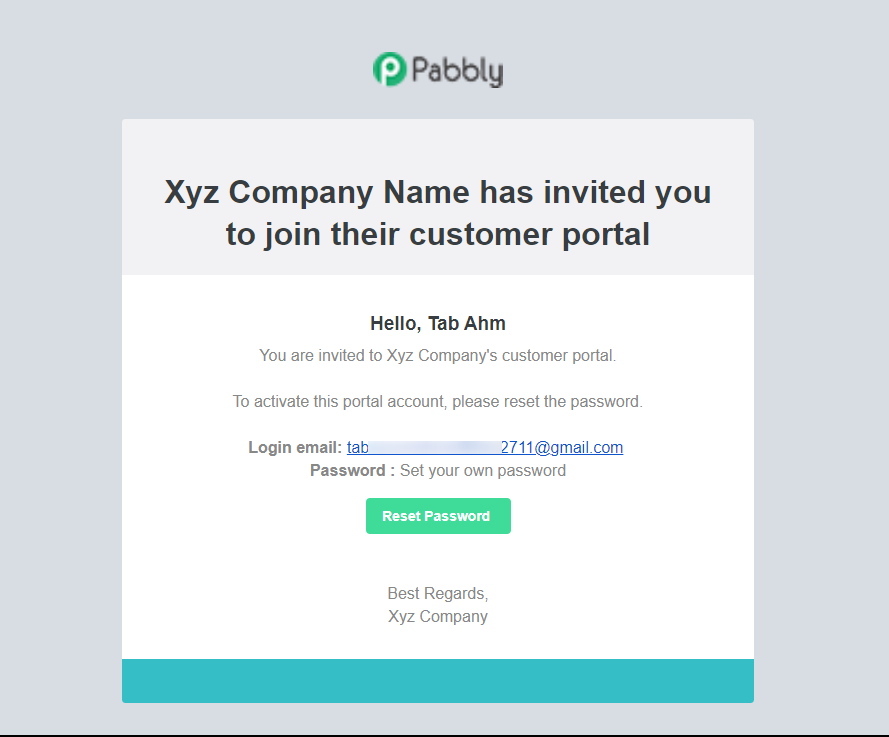
By clicking on Accept Invitation, your customers can set the password to their respective Client Portal. After that, they can access their portal.
As a customer, you can view your Client Portal –
2. Allow customers to cancel their subscription – With this option, customers can cancel their subscriptions from their portal account. And when you enable/disable that option then the cancel subscription button in the Client Portal-> Subscriptions page will also get appear/disappear accordingly.

When merchant enable the “Allow customers to cancel their subscription” option then the new option “Allow immediate cancellation of subscription” will also appear in the Client Portal settings of Merchant account.
This option provide ability to merchants to decide whether they give immediate cancellation options to customers in the portal or not.
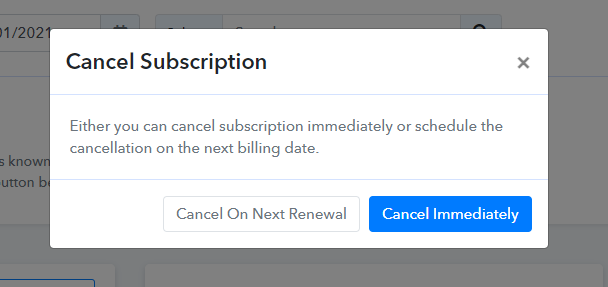
Generally, when a merchant or a customer click on “Cancel Subscription” they see two options –
- Cancel Subscription with Immediate action.
- Cancel Subscription on Next Renewal.
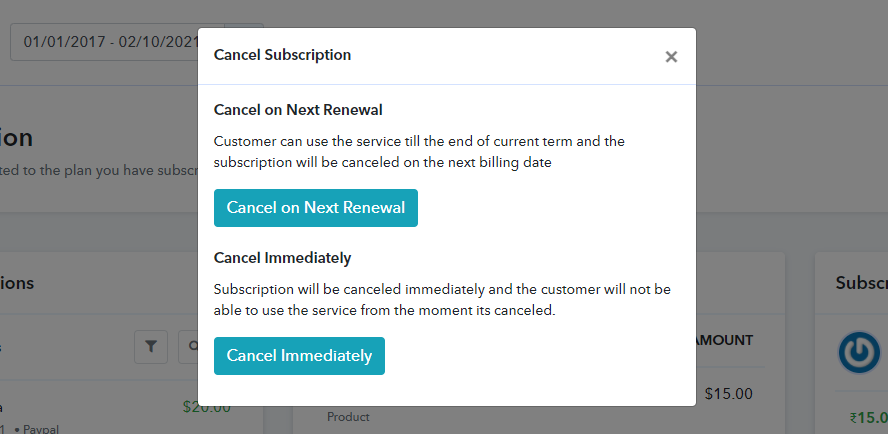
But, when the merchant enable the “Allow immediate cancellation of subscription” option from the portal settings. Then the customers will only see the “Cancel on Next Renewal” option in the portal account like this –
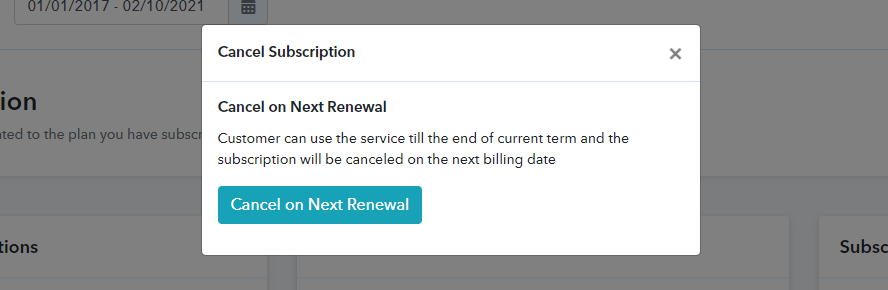
With this new option, your customers can use the service till the end of the current term and the subscription will be cancelled on the next billing date.
3. Allow customers to edit their profile – By enabling/disabling this option, merchant gives permissions to customers for editing their profile.
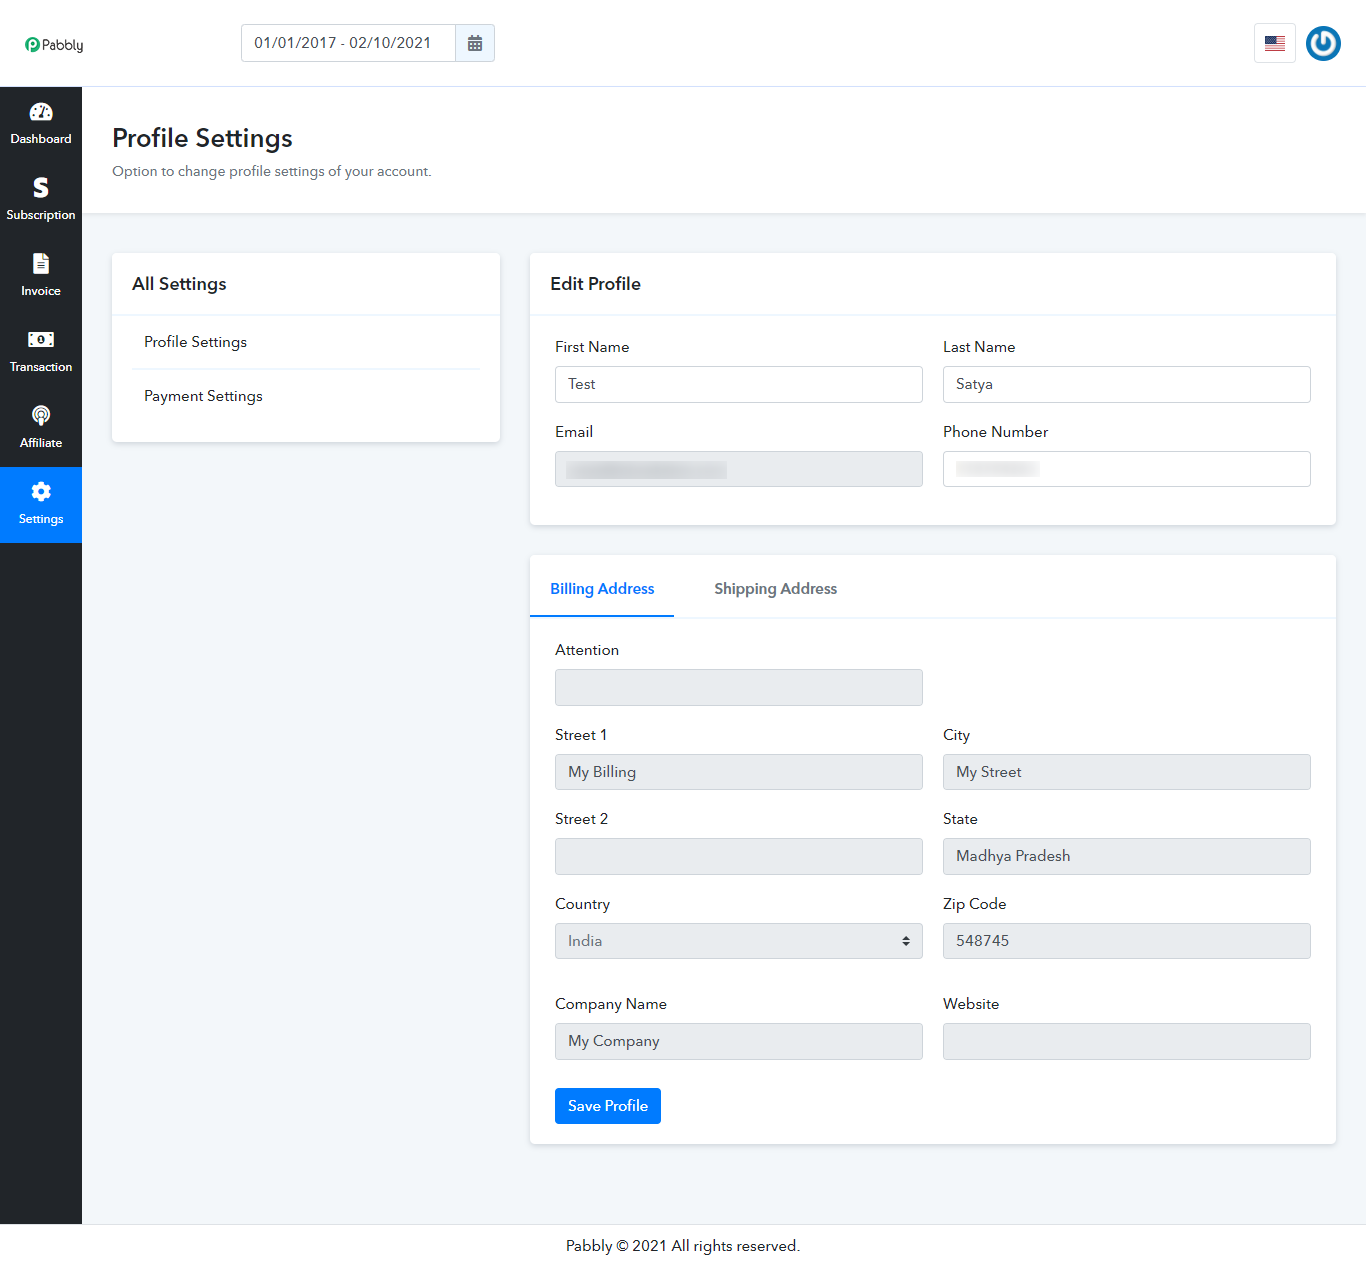
Here, customers can edit their basic details and save the changes.
4. Allow customers to edit their subscription – When you (merchant) enable/disable the edit subscription option you’ll provide your customers the ability to switch to any other plan of a particular product by upgrade/downgrade the subscription from the portal account.
When you click on “Edit” button a subscription page appears like this –
5. Default Language For Client Portal – This option of Pabbly Subscriptions allow merchants to set a default language of the portal as per their choice.
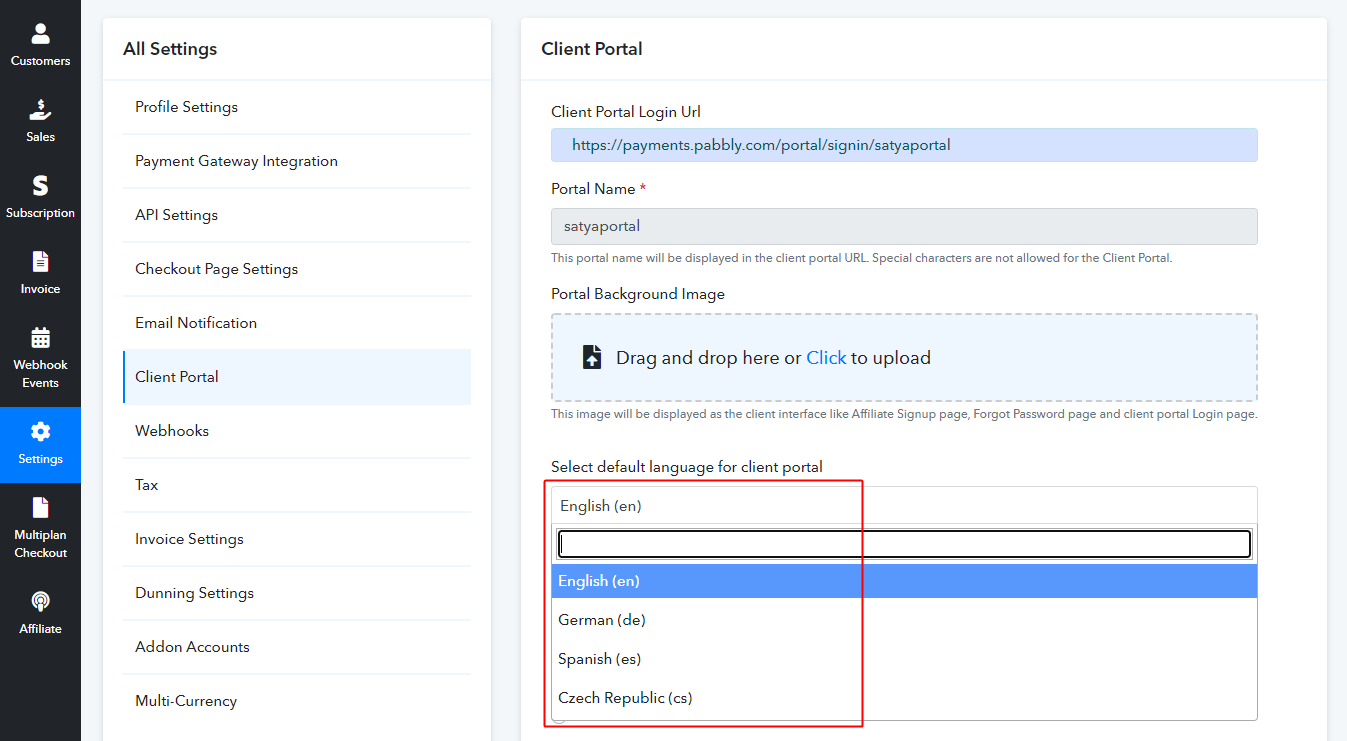
For example – If you (merchant) set Spanish as a Default Language in the client portal settings, then all the data of the customer portal will be displayed in that language only.
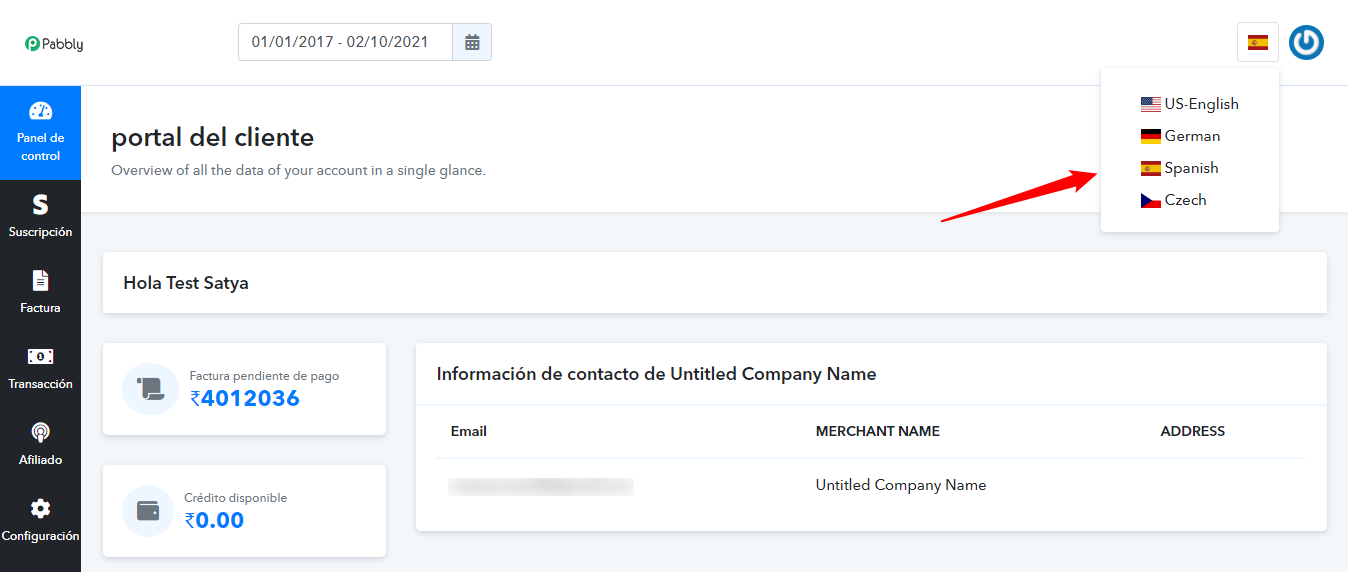
Right now, there are 4 languages available in this option i.e. English, German, Czech & Spanish and the remaining languages will also be implemented soon in the system.
6. Portal Background Image – It’s a last option of the client portal settings through which you can upload a background image.

Client Portal Login –
Affiliate Sign Up –

Forgot Password –

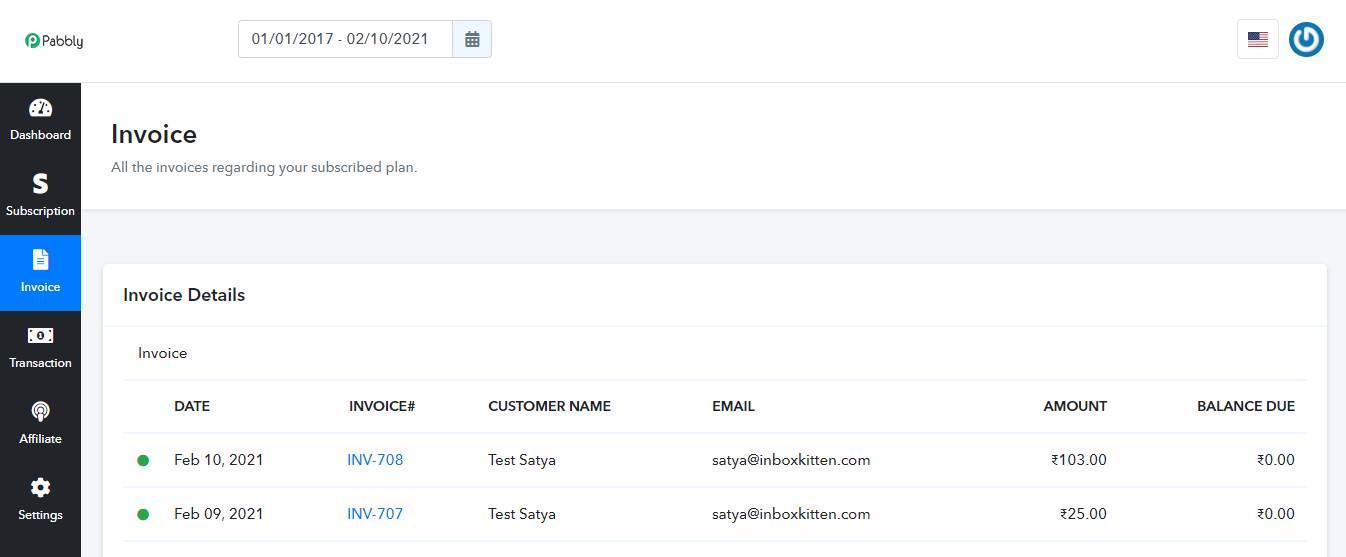
When it comes to invoices, you can view and download it any number of times via “Invoice” tab –
This is how your (customer’s) detailed invoice would look –
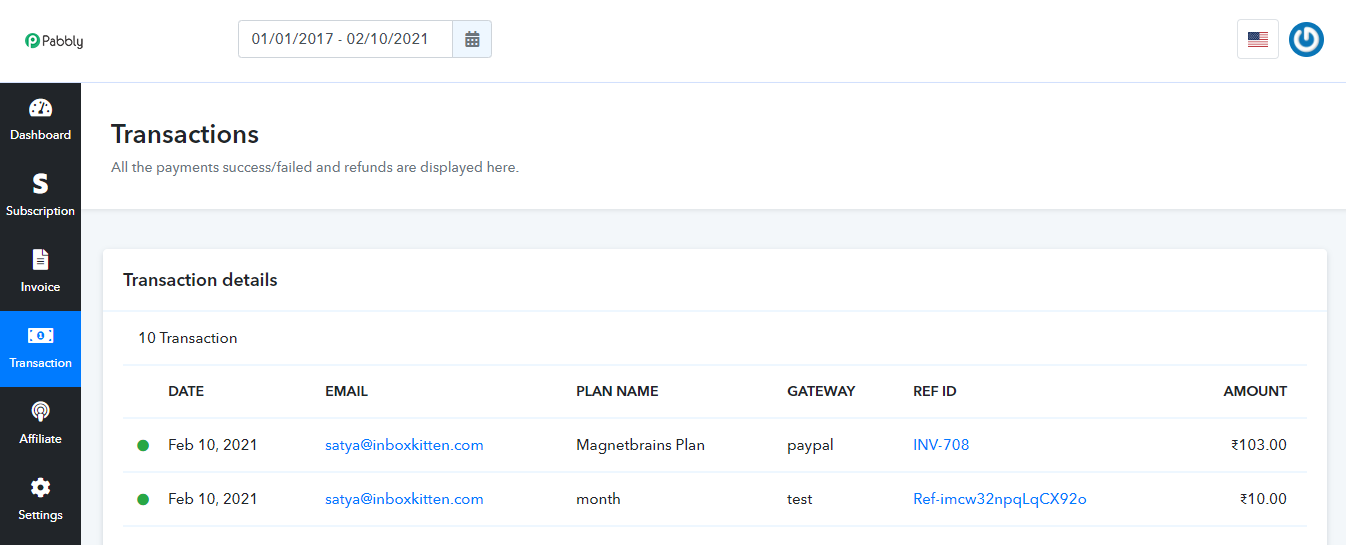
In order to keep a track of your transactions, you can use the “Transaction” tab –
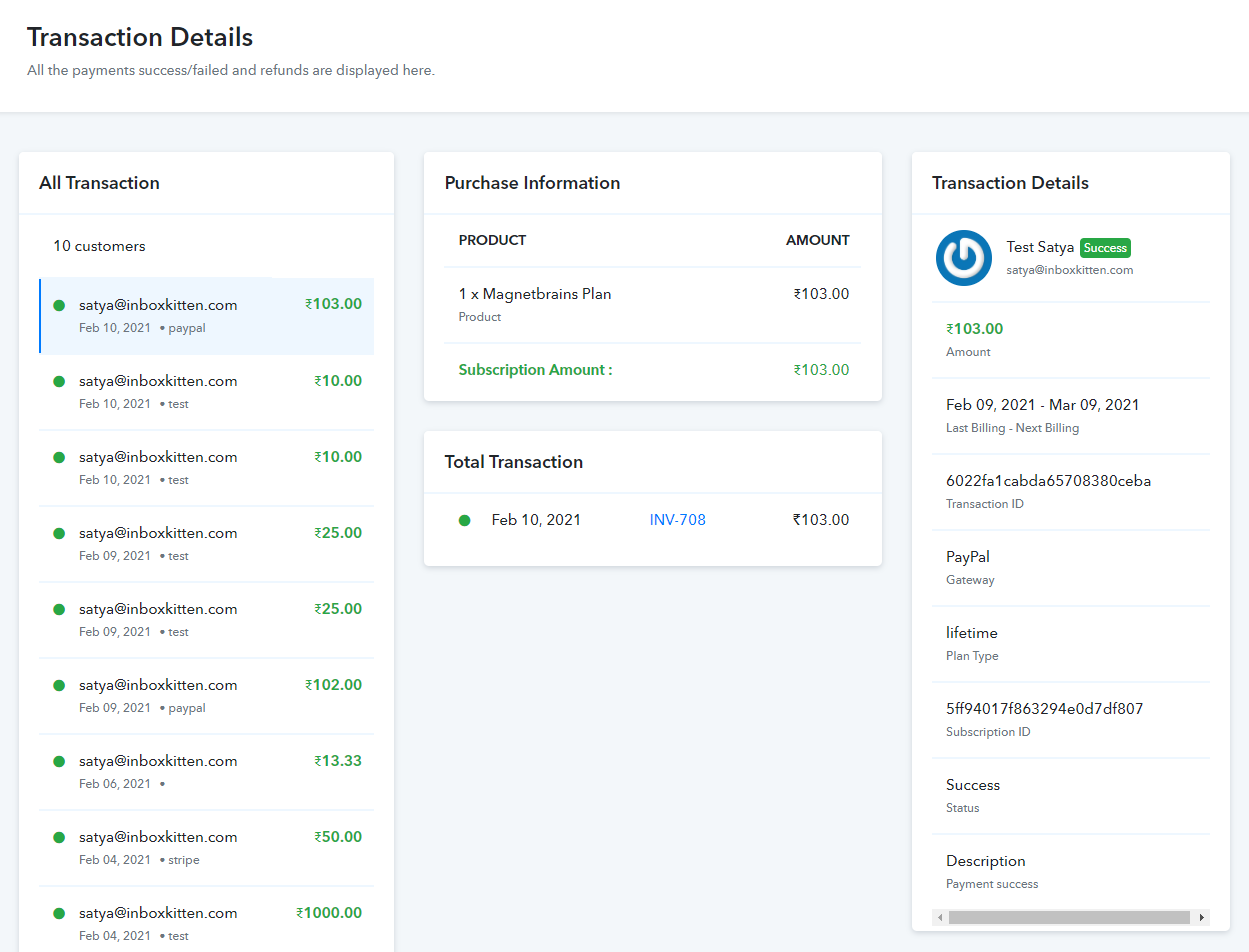
Transaction Details –
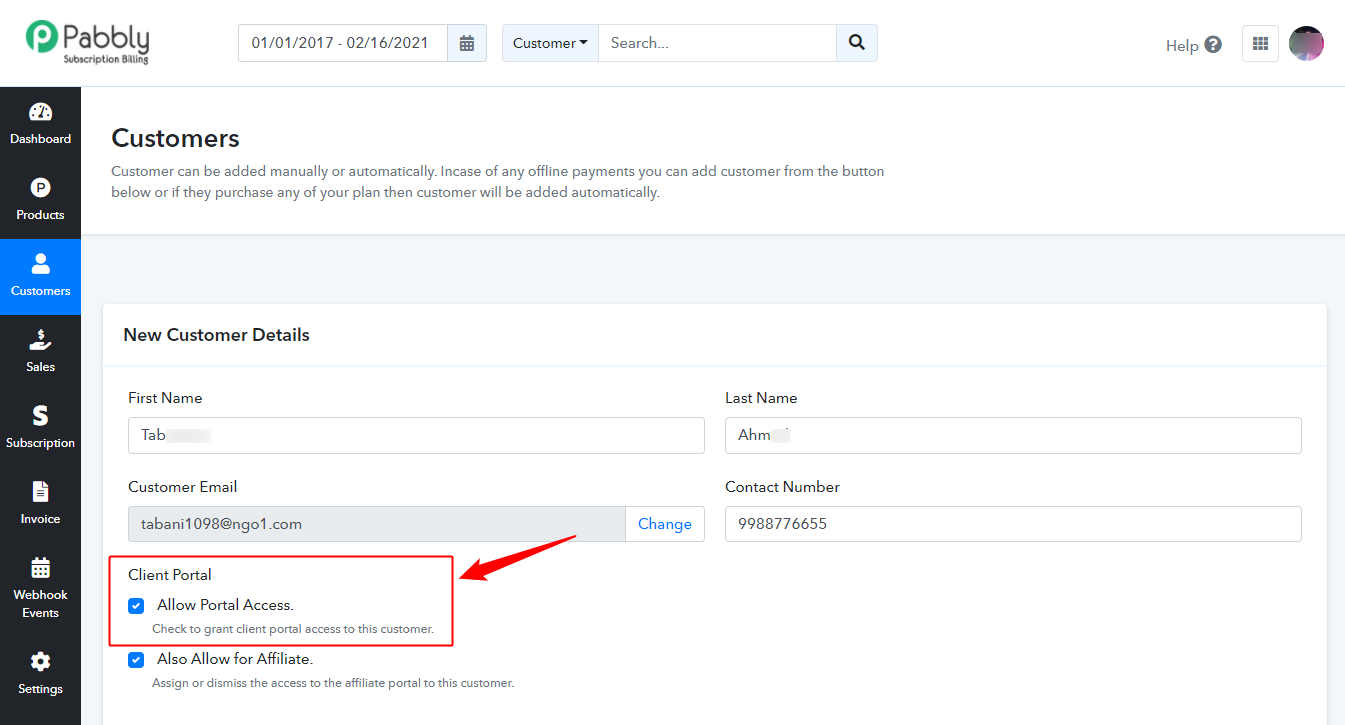
As a merchant, if you want to grant Client Portal access to the selected customers, you can do that by manually adding a customer (via “Customers” tab) and allowing the Client Portal access.
Allow Client Portal Access –
Single Sign-On for Pabbly Subscriptions’ Client Portal
When you have to integrate Pabbly Subscriptions with some other SaaS application, it will be laborious for you (merchant) and your customers to manage client portal login credentials.
Pabbly Subscriptions offers a Single Sign-On feature which enables your customers to seamlessly log in to their respective portals.
As a merchant, you have to do is, pass the customer ID at the time of customer sign up. (check the Pabbly Subscriptions Client Portal session API) This will create a login database in your own application/website and also in Pabbly Subscriptions. Rest will be handled by the backend process.
Your customer will now be able to access the client portal (without having to log in separately) via your own application itself.
Let’s understand this by an example –
Suppose, Joseph is selling a product – FormGet and managing its billing with the help of Pabbly Subscriptions.
Now if a customer wants to purchase Joseph’s product then Joseph faces a problem where he has to provide two separate login credentials to his customer. One for FormGet (which he’s selling) and other for Pabbly Subscriptions Client Portal (via which he’s managing the billings of his products).
But the Single Sign-On feature can solve this problem. Joseph will have to use the Client Portal API in his application (FormGet) at the time of customer sign up process. So, as soon as the customer purchases a FormGet plan and signs up, Client Portal API will come into effect and pass the customer ID to Pabbly Subscriptions.
This will automatically create a Client Portal login credential for the customer as soon as he has signed up for the product, FormGet.Now, once the customer enters into the FormGet application, he can access his Client Portal without having to log in separately. Please note that the client portal button/link will be displayed accordingly by Joseph in the FormGet application.
13. What Is Embed Checkout Page?
Pabbly subscription helps you to give your customers a flawless checkout experience without being redirected to anywhere. Now, embed your Pabbly checkout page in your website without any hassle.
How To Use It In Website?
Just add the code given below in your website and your checkout is embedded.
<iframe width=”100%” height=”1300px” src=”https://payments.pabbly.com/subscribe/5cb963bf0ce68773eec61099/pabbly-suite”></iframe>
Below is a sample checkout page URL, you just have to replace it with your checkout URL “https://payments.pabbly.com/subscribe/5cb963bf0ce68773eec61099/pabbly-hub”
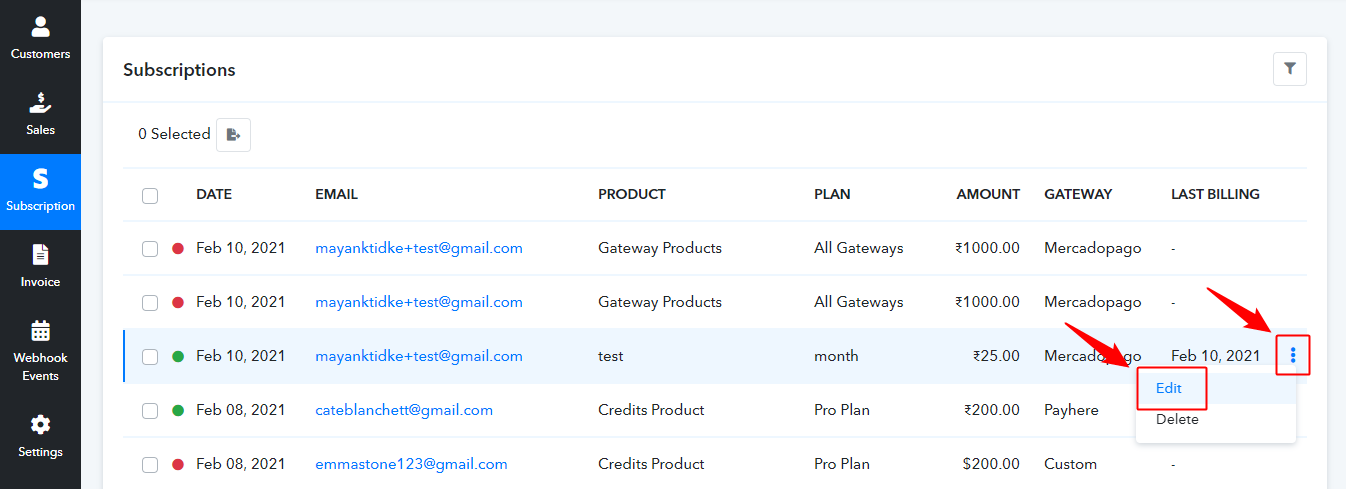
14. What Is The Process Of Plan Upgrade & Downgrade?
Pabbly Subscription enables you to ‘Upgrade’ or ‘Downgrade’ your current recurring subscription. In simple words, you can switch to any of the active- plans of the product that you already purchased.
Suppose you have a purchased a product which has three plans say ‘A, B, C’ for $50, $100 and $150 respectively. You purchased plan ‘B’ for $100 and now you want the services of the plan ‘C’ also. Then you don’t need to wait for the whole month or to end the subscription period of the plan ‘ B’. You can directly ‘Upgrade’ your plan from Pabbly Subscription. Same things go with the ‘Downgrade’ if the features of plan ‘A’ is sufficient for you then you can ‘Downgrade’ the plan from Plan ‘B’ to plan ‘A’ directly.
Plans Can Be Upgrade/Downgrade In Two Ways-
1. The Merchant Will Upgrade Or Downgrade A Plan
If you are the merchant and you want to change the current the plan of your customer. then just follow these steps.
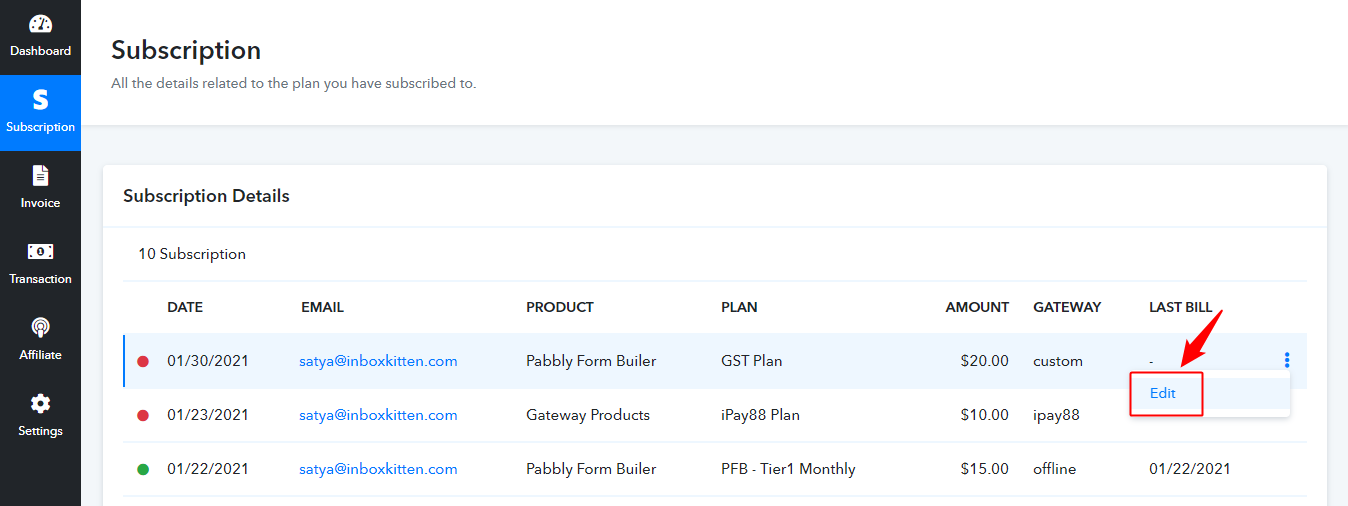
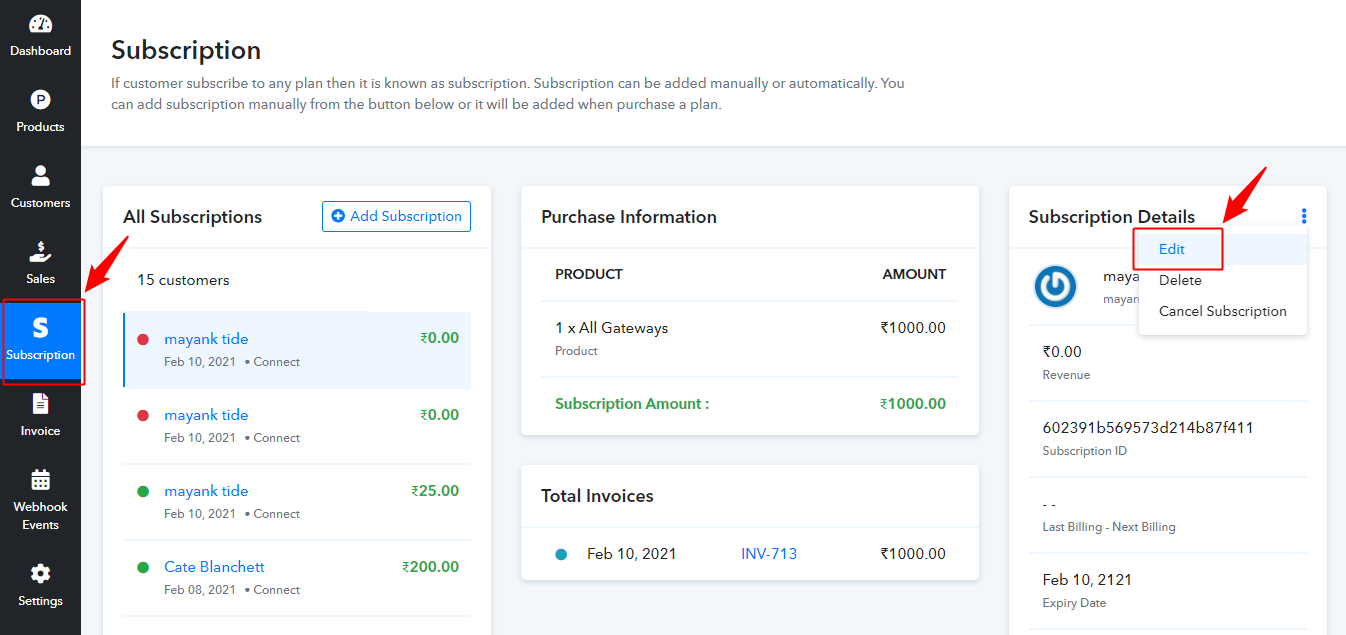
- Click on the ‘Subscription’ on your dashboard and then pick the individual subscription of the customer for which you want to change the plan (Upgrade/Downgrade)
- Click on the ‘Edit’ button.
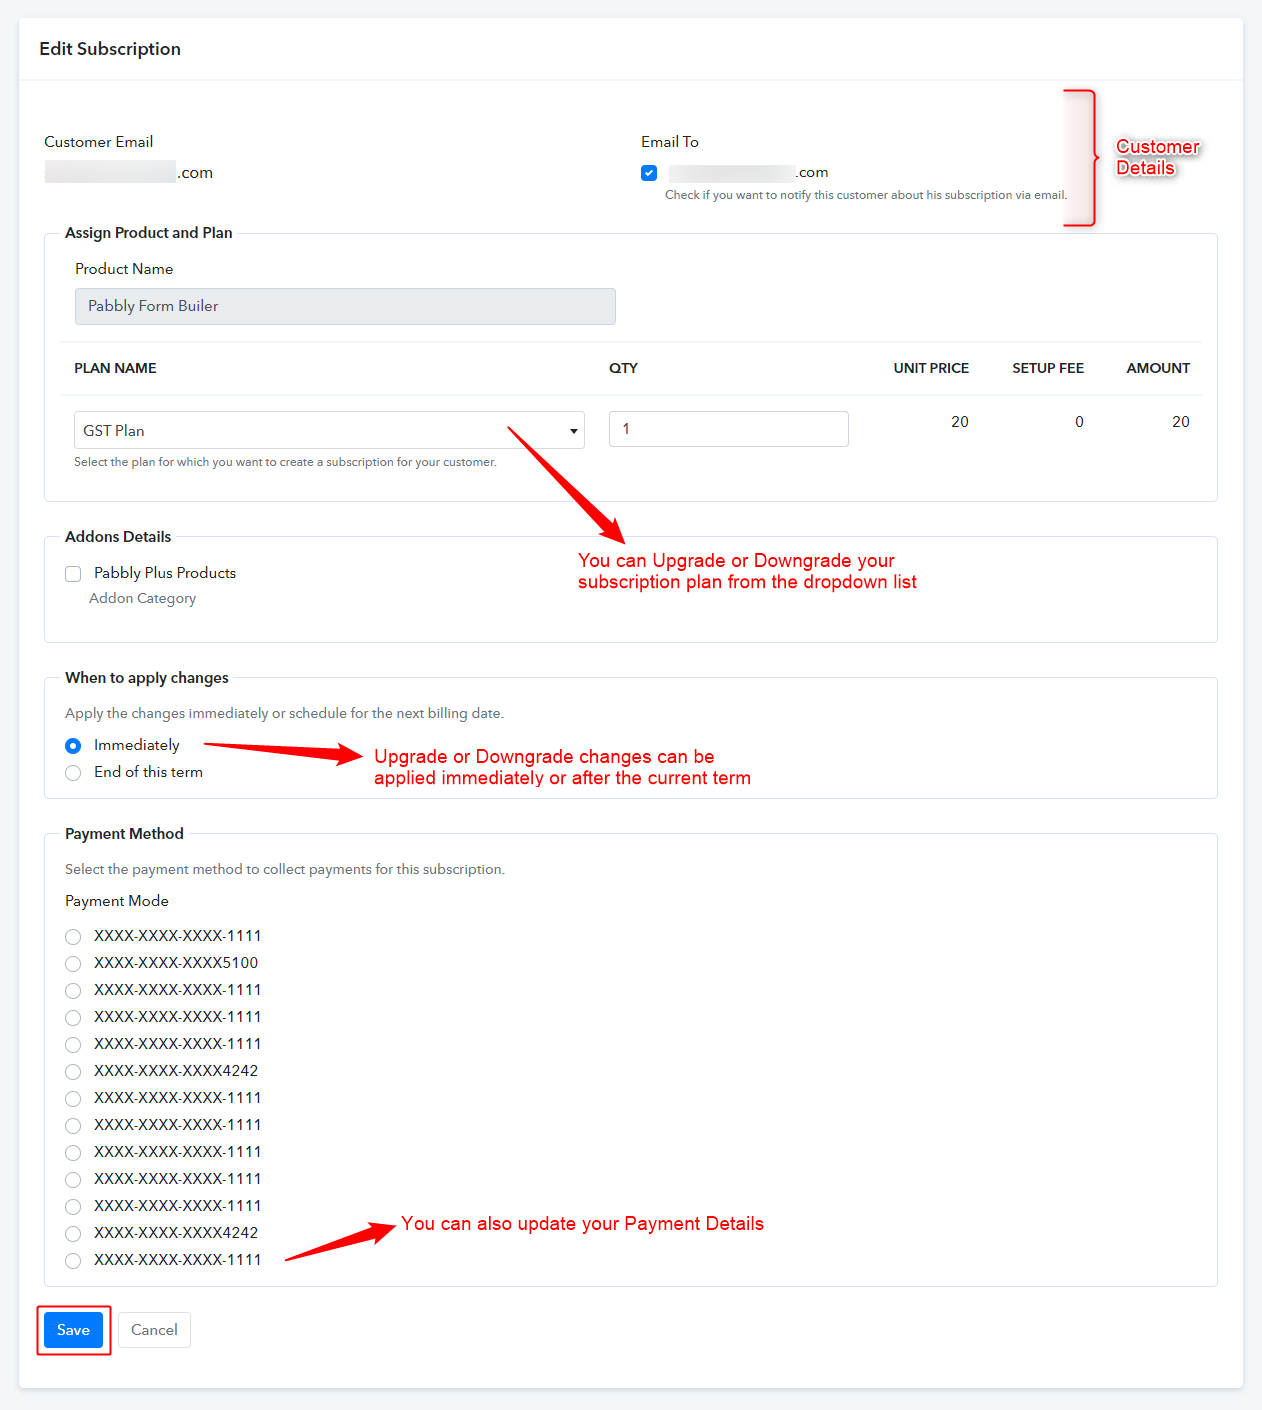
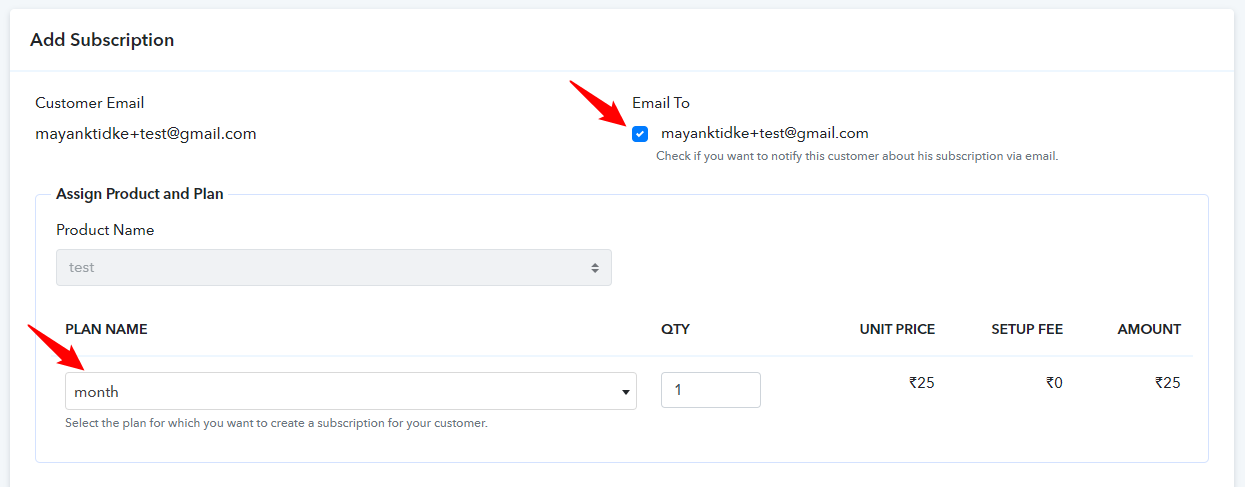
- Check the check box if you want to notify your customer.
- From ‘Plan Name’ select the new plan that you want to assign to your customer.
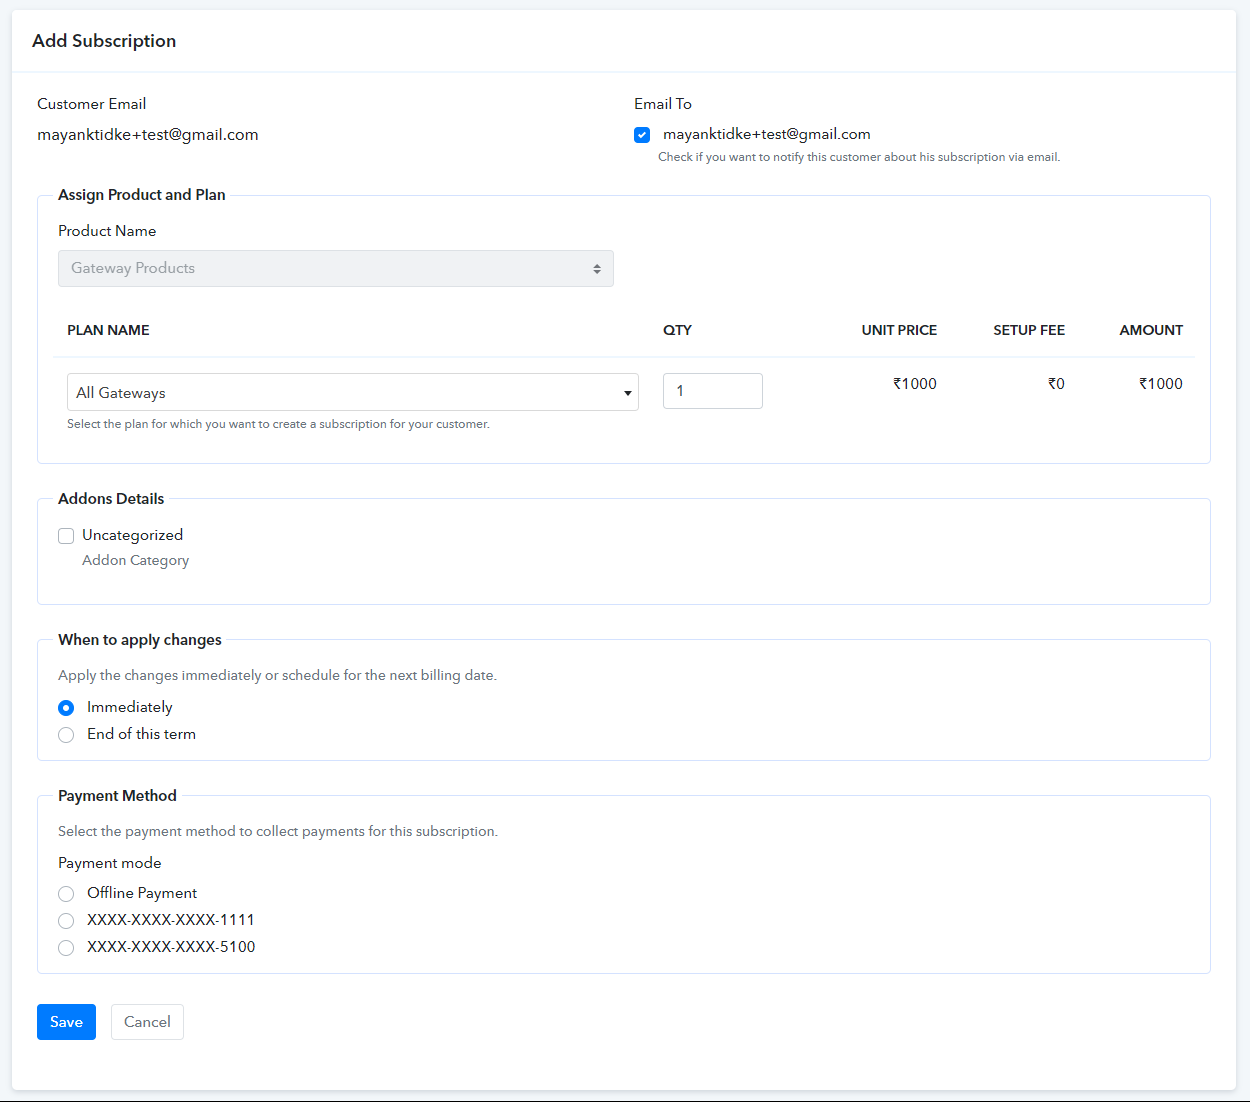
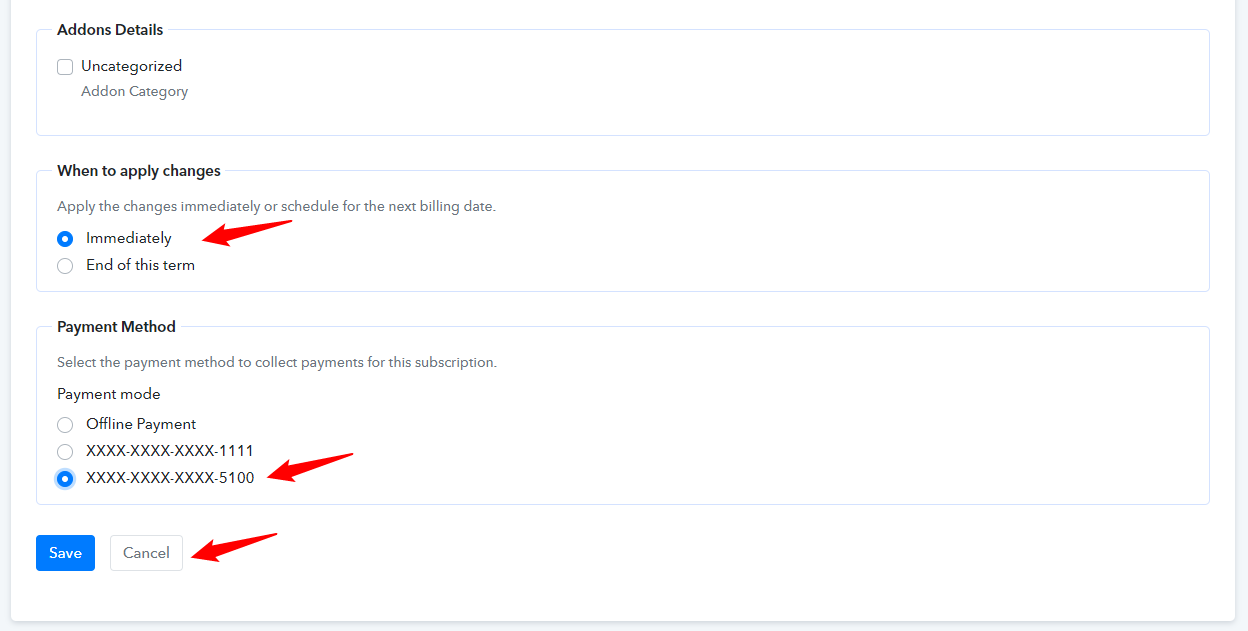
- You can check if you want to apply the changes ‘Immediately’ or at the ‘ End of this term’.
- Select the payment mode.
- Finally, save changes from the ‘Save’ button and the changes will be applied accordingly.
As you change the plan of your customer, you will find several changes,
- In the ‘Reports’ Section the values of ‘Net Revenue’ and ‘Monthly Recurring Revenue’ will be changed.
- The next billing date will be changed as per the plan.
- The customer will have ‘Unused Credits’ if he is applicable for it.
2. Your Customer Can Also Change The Current Plan Via Customer Portal Access.
If your customer has the ‘Customer Portal Access’ then they can change their plan (Upgrade/Downgrade) by following these steps.
- Click to Subscription on the dashboard and select the subscription plan you want to change (Upgrade/Downgrade).
- Click on Edit button.
- Check if you want to notify yourself or not for the changed plan.
- Select the new plan from ‘Plan Name’.
- Select the payment mode and hit the ‘Save’ button.
Finally, your changes will be saved.
15. Email Template V1 V/S V2
Pabbly Subscriptions ‘Email Notification’ feature will notify the merchant and the customer on various actions accordingly via emails. We have updated the email templates in a very impressive way.
Here is the comparison between the old and new versions of email templates.
The old version layout of emails templates looks like this-
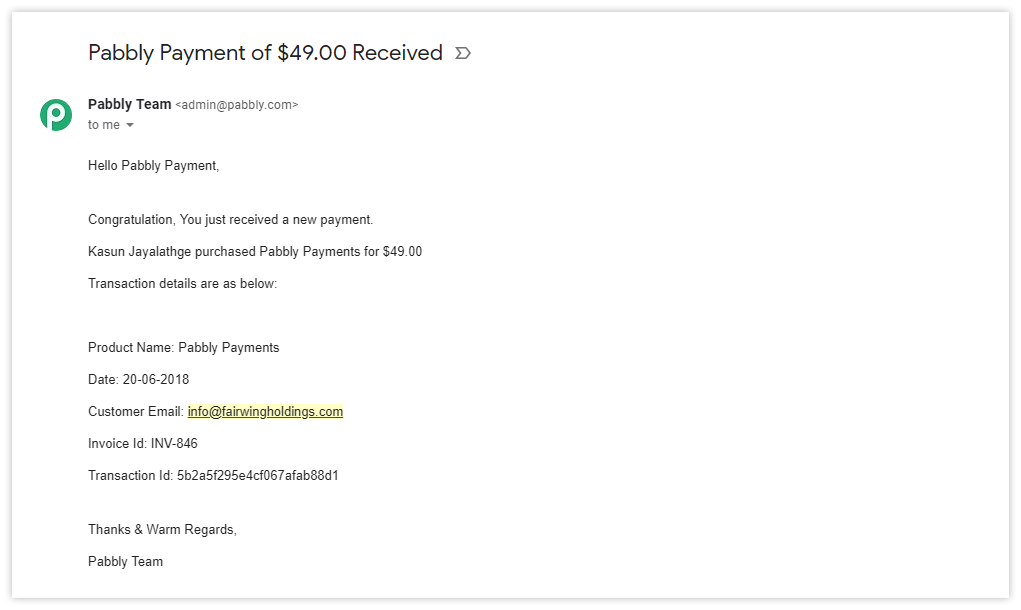
- Successful Payment Notification To Merchant
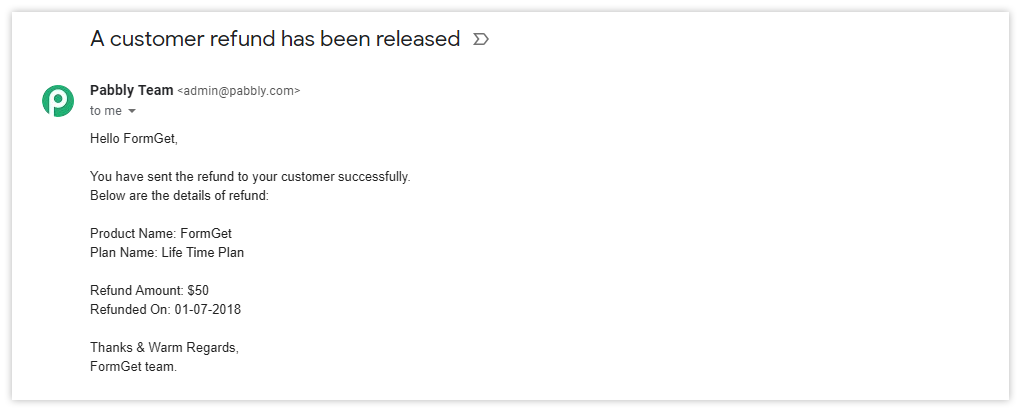
- Refund Notification To Merchant.
- Client Portal invitation to the customer,
We have updated the email templates, which are more impressive and professional than the older version.
Some of the new email templates on different actions are,
- Successful Payment Notification To Merchant,
- Refund Notification to the merchant,
- Client Portal invitation to the customer,
We had presented only a few examples of old and new versions, but we have created 22 emails templated for different events that will be sent to the customer and the merchant on different actions.
16. How To Create An Offline/Manual Subscriptions?
In Pabbly Subscriptions, customers are not only created by a checkout page but also you can add customers offline/manually.
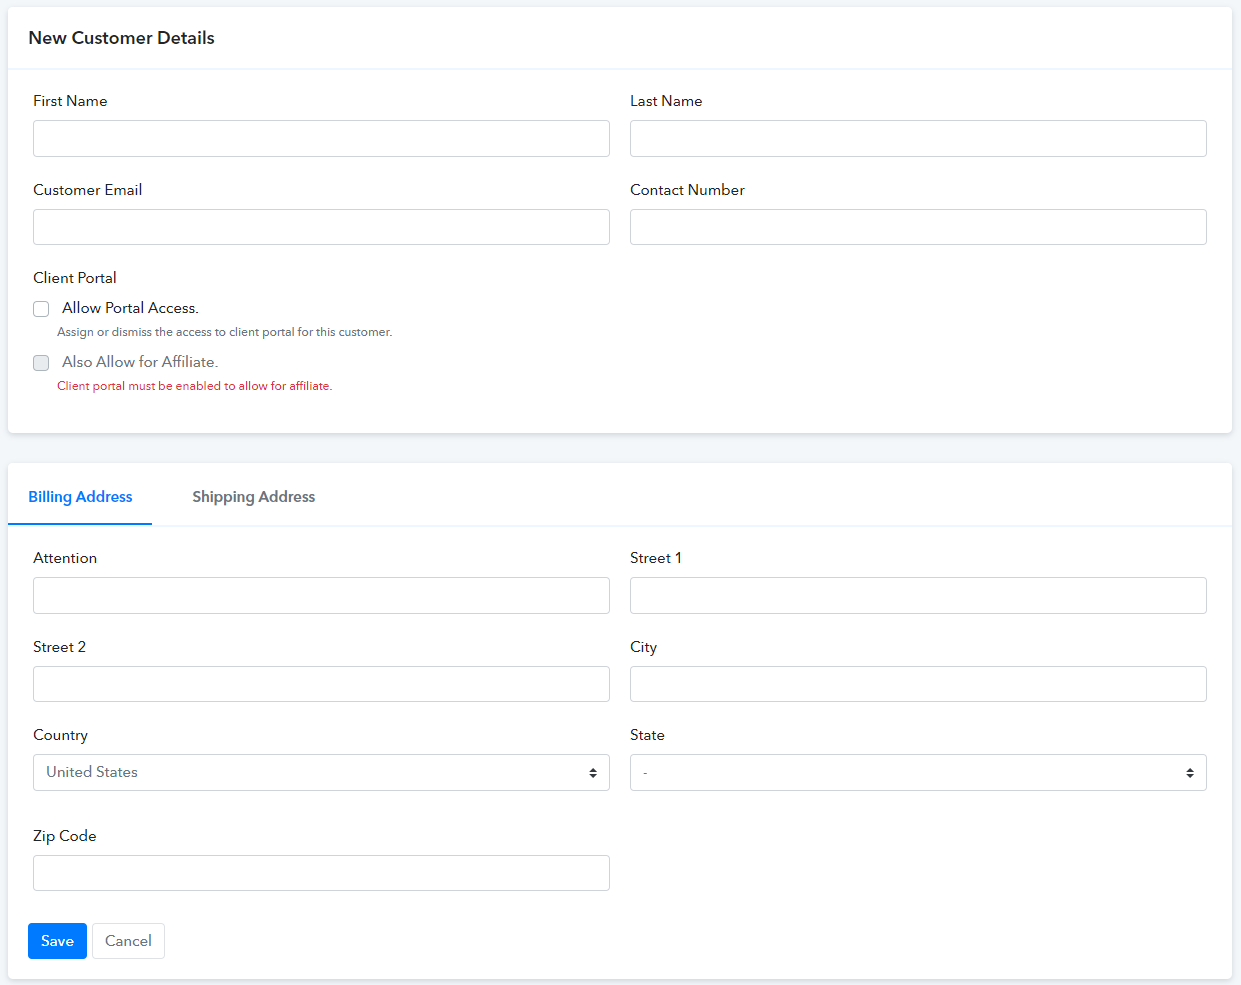
Once you click on the submit button, an offline customer will be created. Then you have to assign a subscription plan to that customer and for doing so follow –
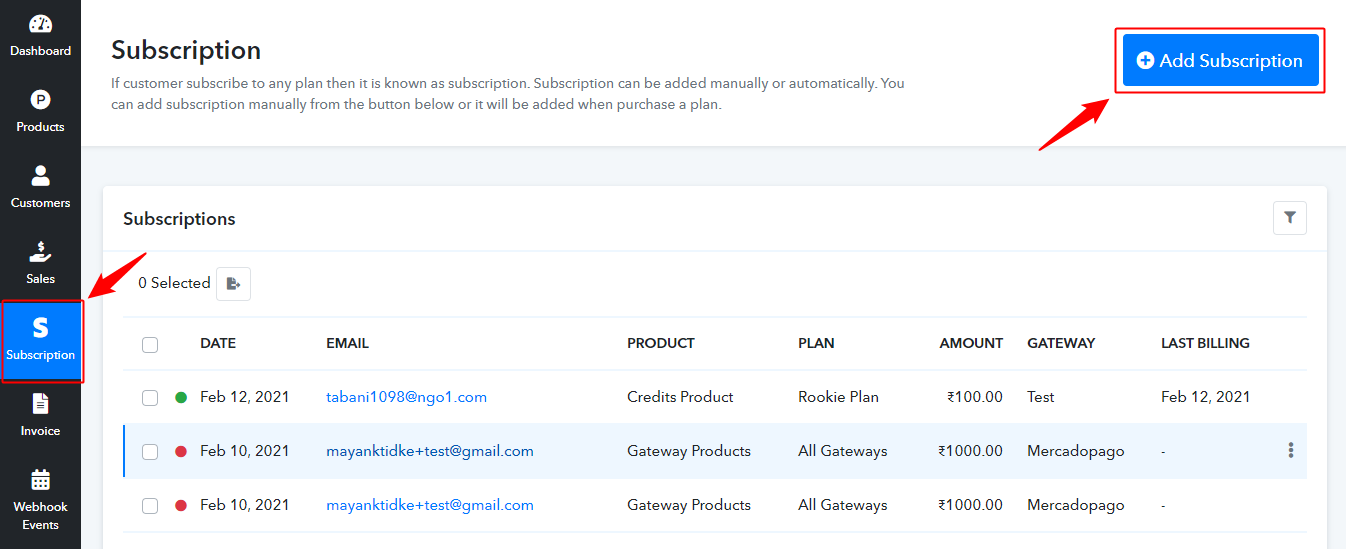
Subscription → Add New Subscription → Select the customer email → Fill all the required details → Click on the Submit button.
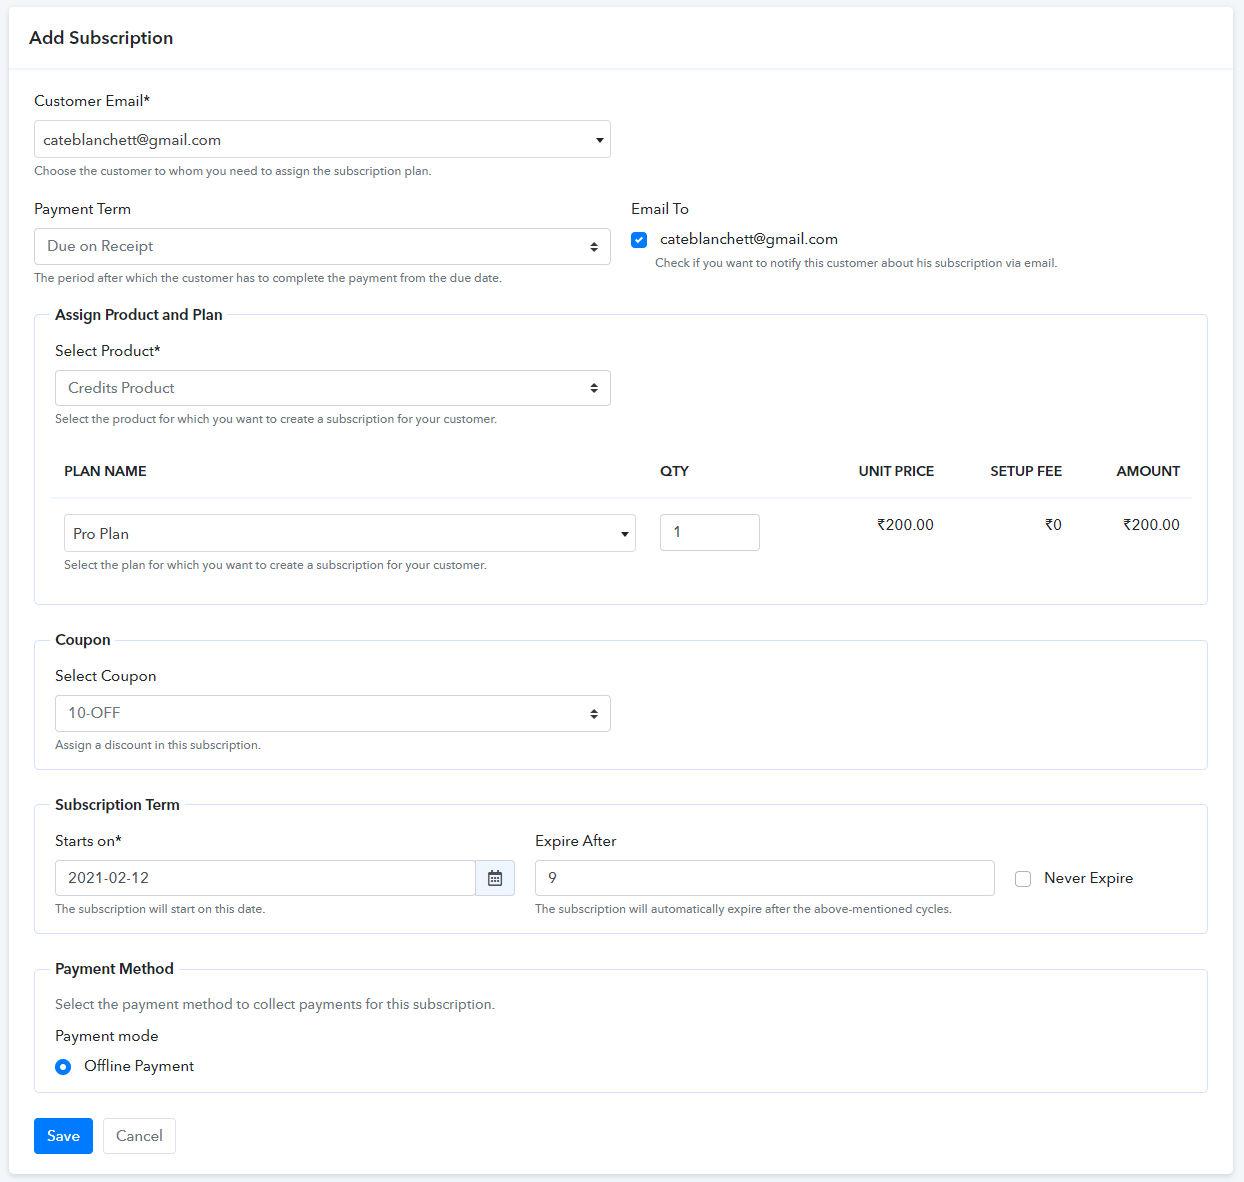
When the offline subscription is created, the status of the subscription is shown as ‘Live’ but the Invoice status is shown as ‘Created’.
Now the subscription is live but the payment is not done yet so if you want to collect payment for an offline subscription then the very first option is Invoice.
In offline subscription, the invoice sent to the customer is a Payable Invoice. The Invoice will be sent automatically to the customer if you have selected the ‘Email To’ option while creating the subscription and if not then you have to send the invoice manually.
To send the invoice to the customer follow,
Invoice → Click on customer’s Invoice Number → Click on the Email Icon → Click on OK and Send the Invoice

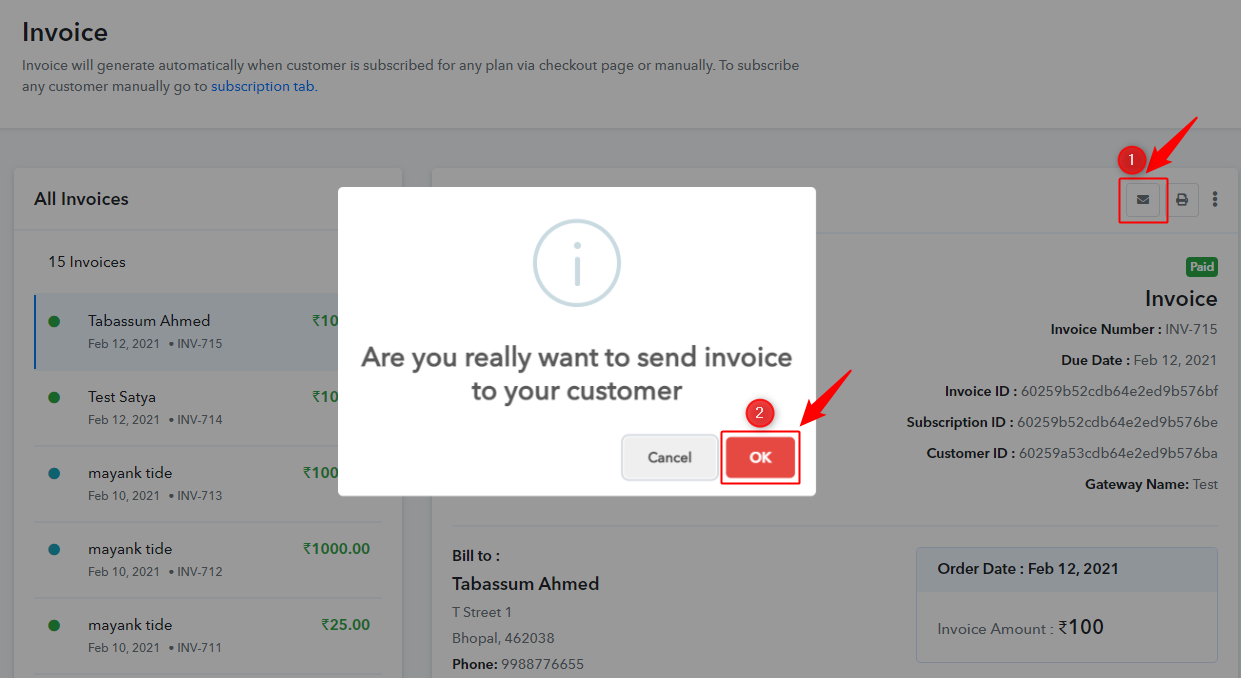
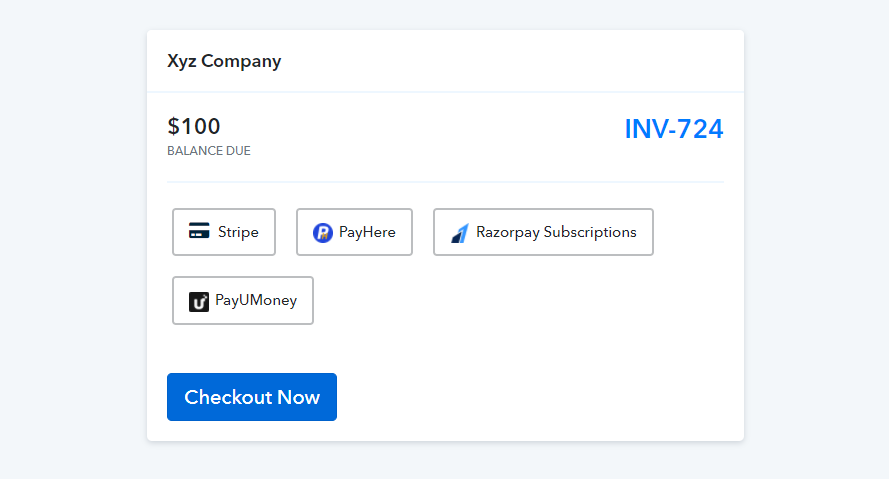
The invoice sent to the customer will consist of a “ViewYour Invoice” button and from there, your customer can pay the amount.
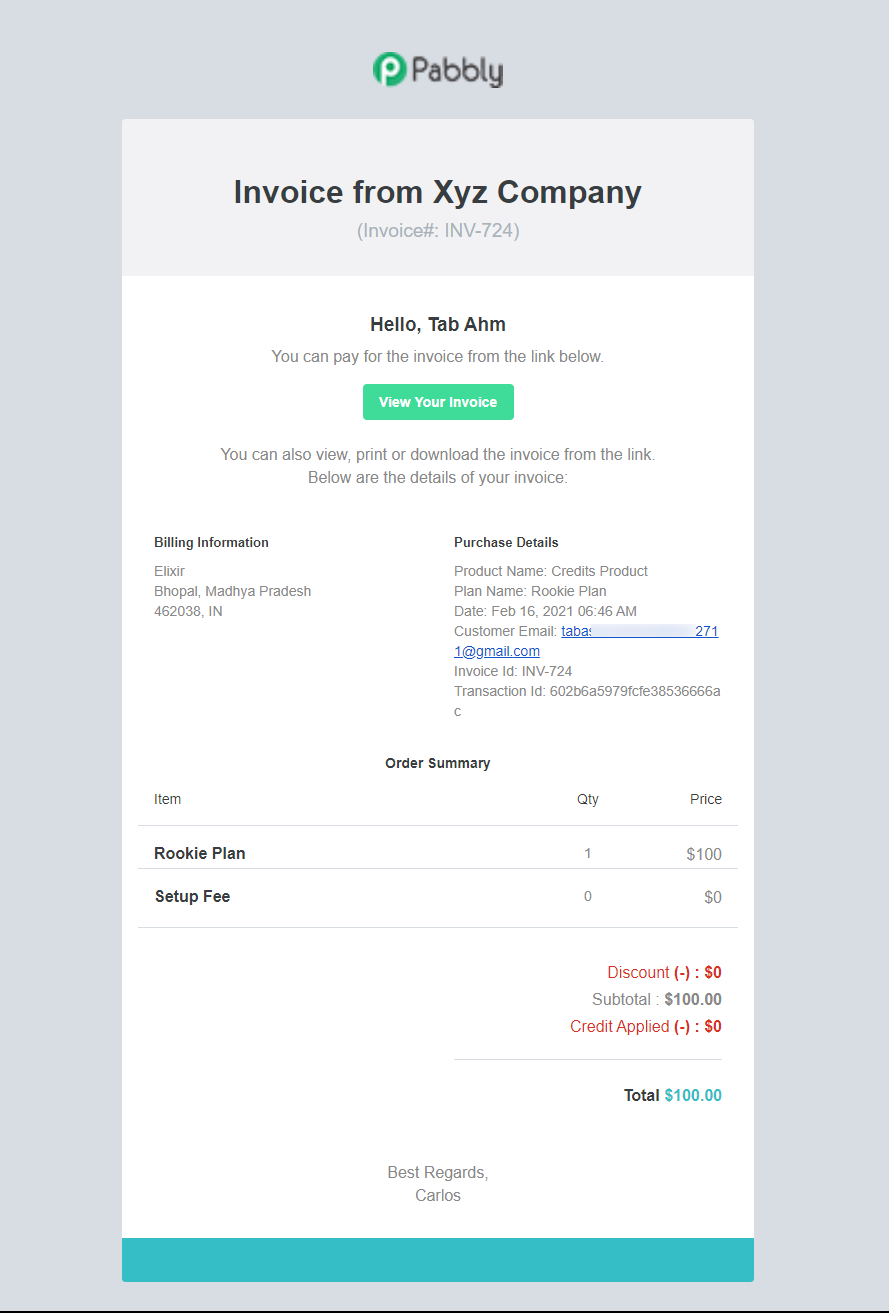
When customers click on the “View Your Invoice” button then they will be redirected to the payments page which has the “Pay Now” button.
Your customer can now fill the details and complete the payment process.
Once the payment process is completed, the status of the Invoice will now be shown as ‘Paid’.
If your plan is of recurring billing cycle then the payable invoice will be sent automatically on every recurring billing to the customer and an email notification of the same action is sent to the merchant.
With this option, Pabbly Subscriptions provides you with two more options to collect payments,
Note: Collect charge will only work if you have the Credit/Debit Card details of the customer.
Note: Record payment will only change the status of Invoice into ‘Paid’ and you have to collect payment manually.
17. How To Add New Card?
With Pabbly Subscriptions, you can Add Card Details of your customer to deduct charges for recurring billing cycles. This is a very flexible feature that the merchant can add card details from the merchant’s dashboard and the customer can also add the card details from the client portal dashboard.
Follow these steps to add the card details from the merchant’s dashboard.
From your Pabbly Subscriptions dashboard go to
Customers → Click on Customer’s email Id → Click on Add New Card → Fill the details and click on Add Card Button.
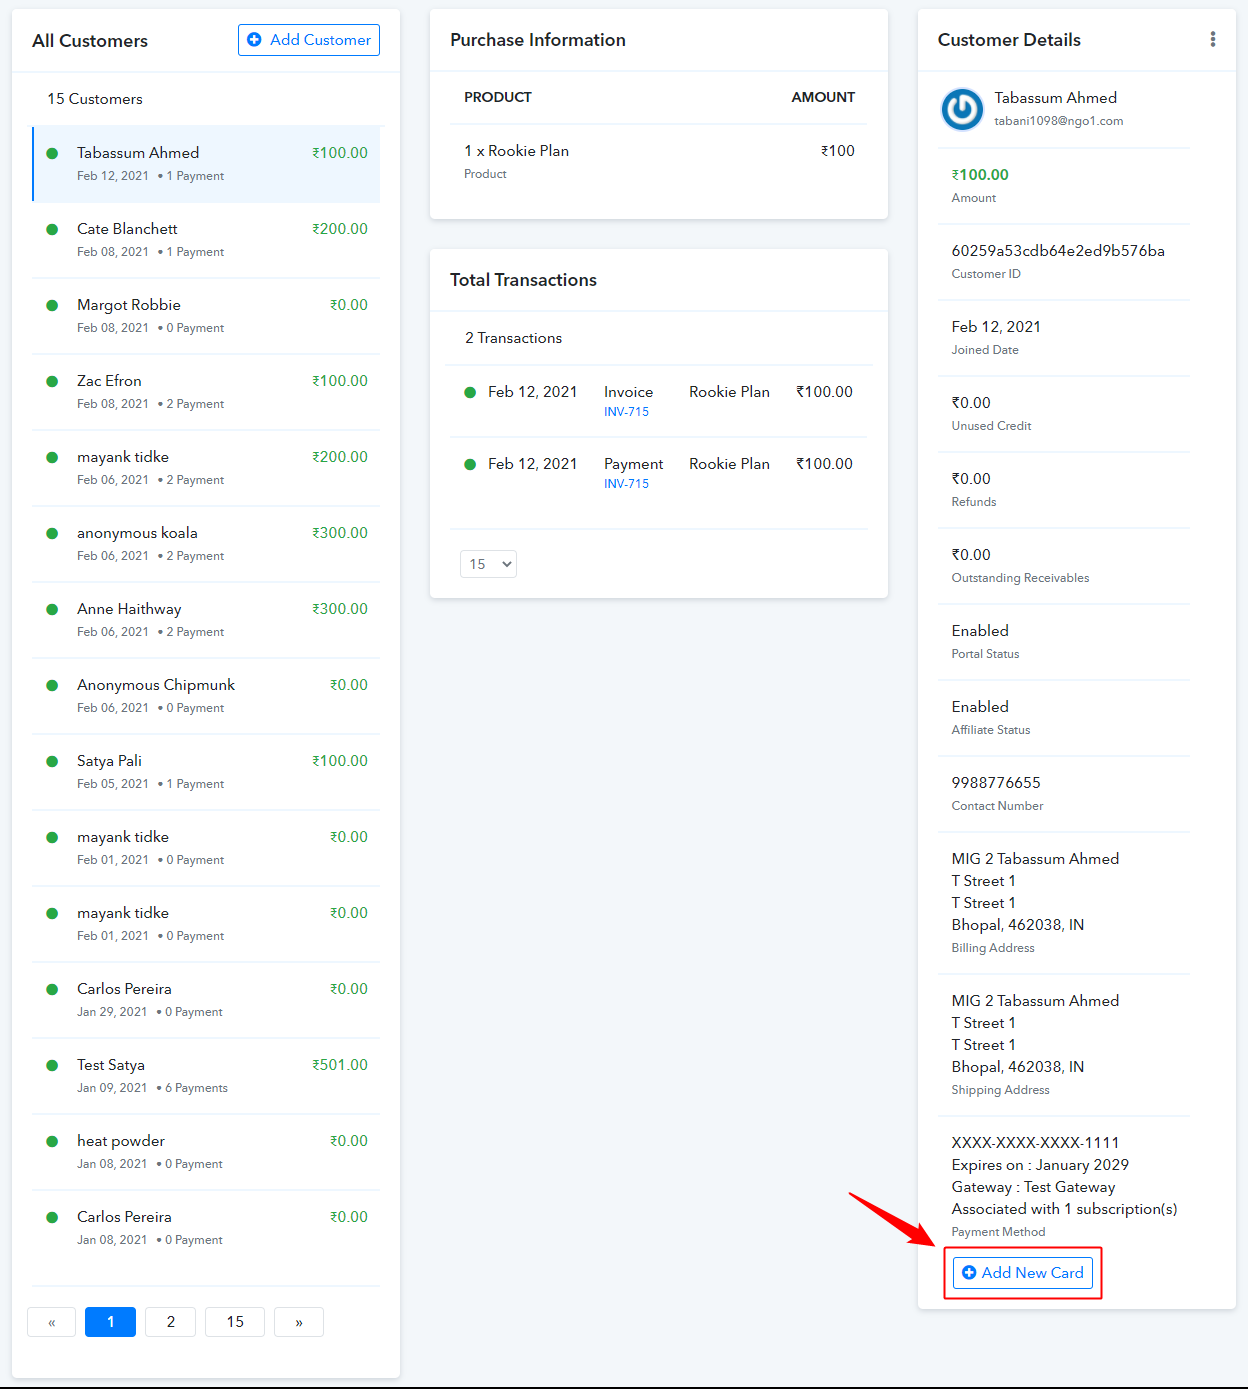
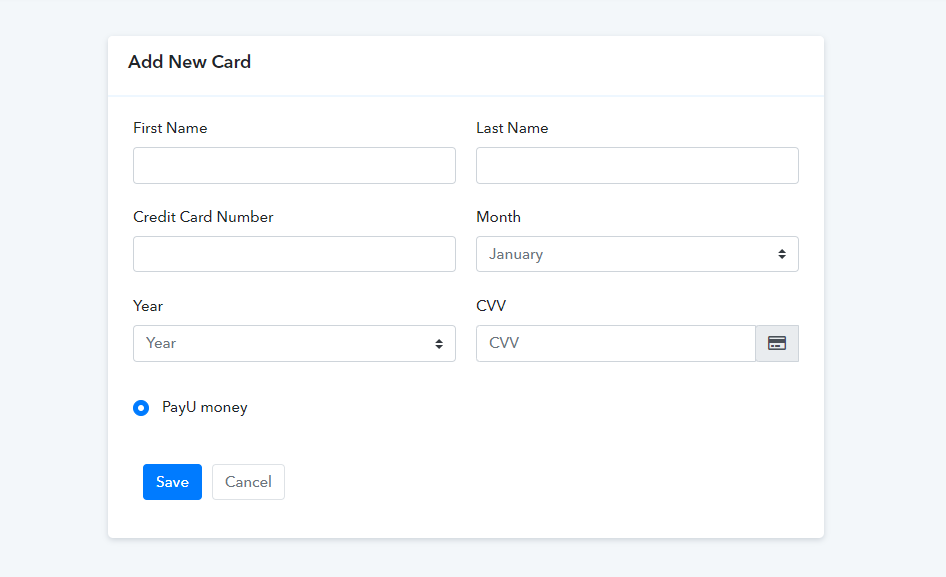
The new card details are shown in the customer’s overview section.
Your customer can also add the card details from the client portal dashboard.
First, you have to give access to the client portal to the customer. Then the customer will log in into the client portal dashboard.
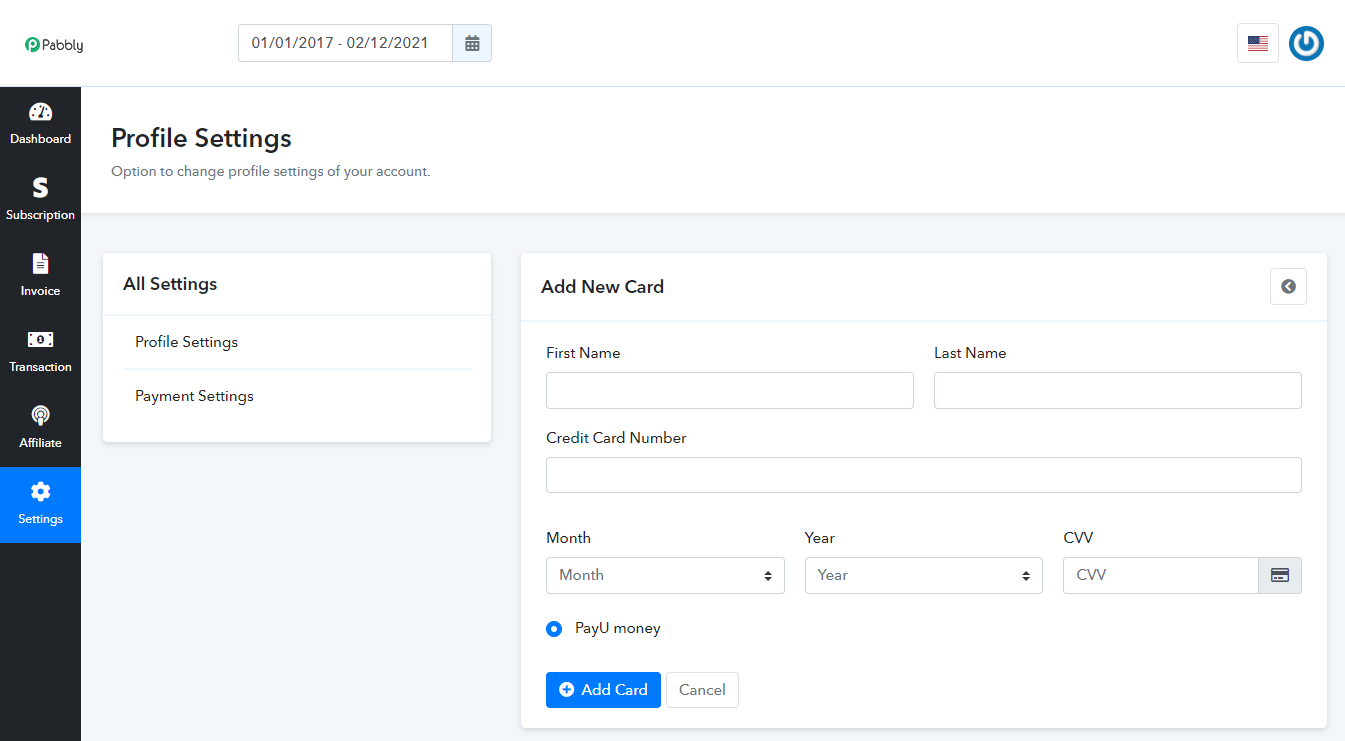
Once the customer is logged in successfully then they will find the option to manage the card details on the dashboard only.
When you click on update card you will be redirected to a new page where your customer will fill the details of the new card.
18. How To Show Multiple Plans In A Checkout Page?
This dynamic feature of Pabbly Subscriptions will enable you to add Multiple plans in a single checkout page.
You can display all the plans of your product on a checkout page and your customer can directly select the suitable plan and purchase it directly.
This feature is located on the dashboard of the Pabbly Subscriptions account.
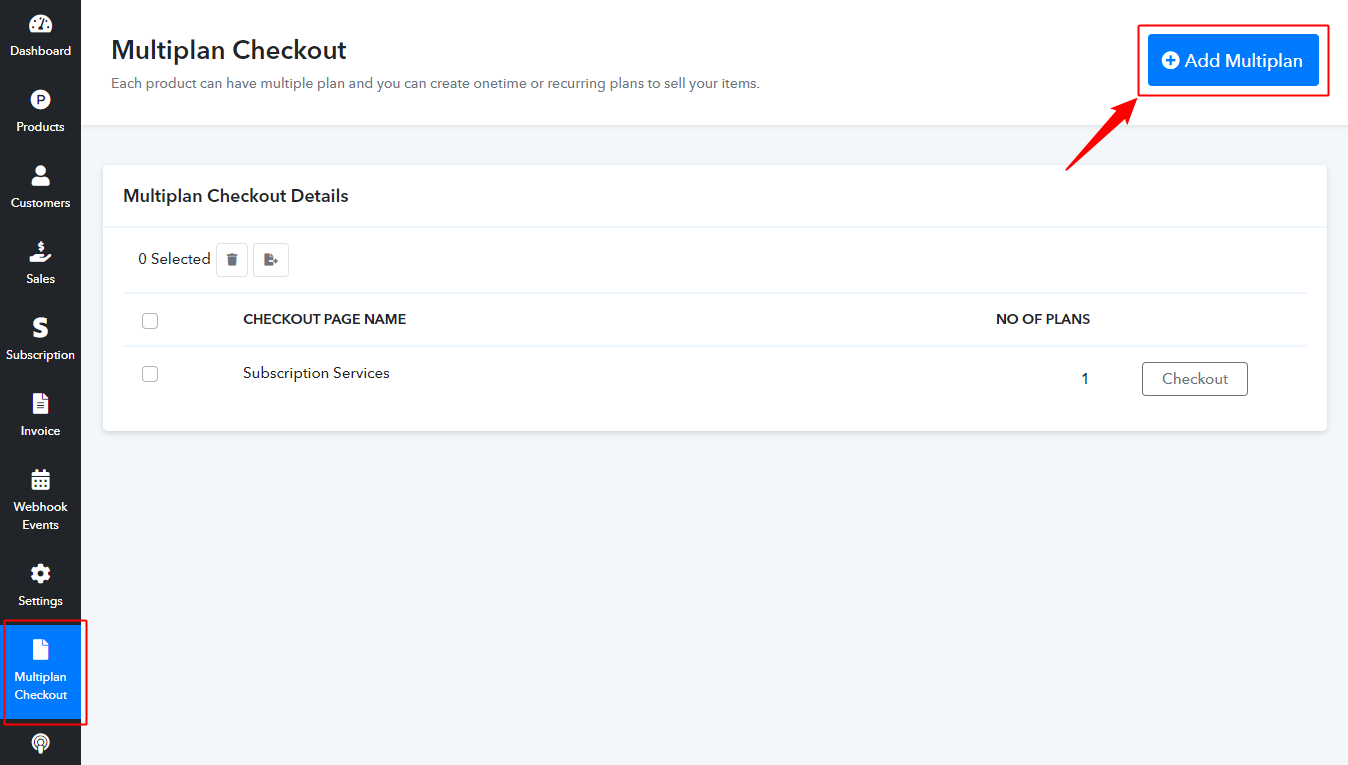
To make a new dynamic checkout page, click on the ‘Create Checkout Page’ button.
Fill all the required labels and hit the save button.
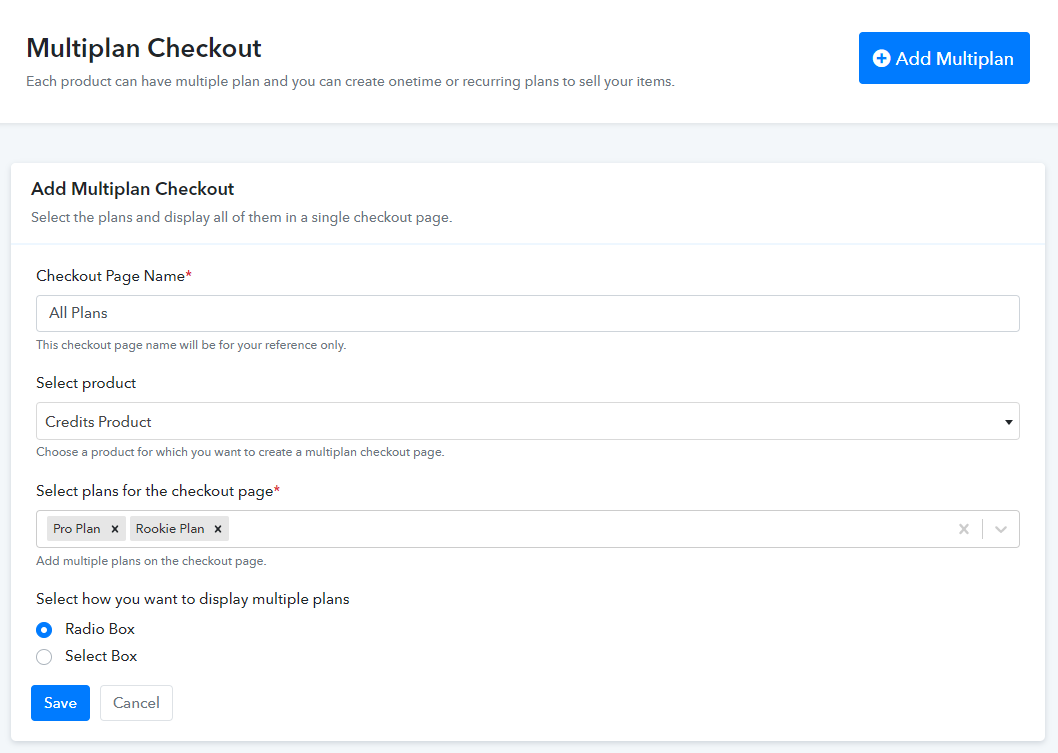
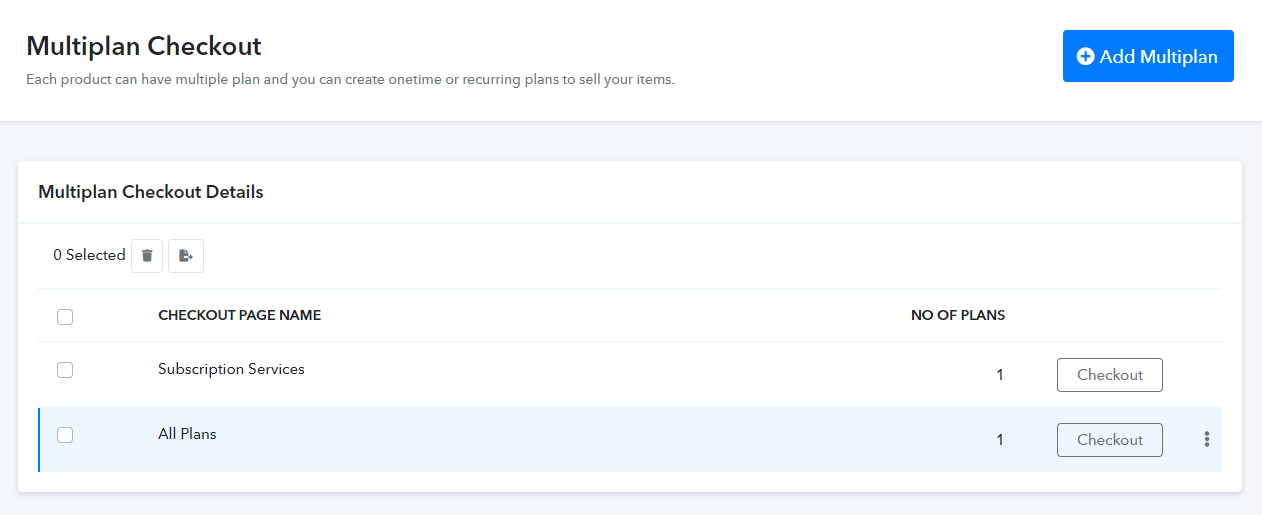
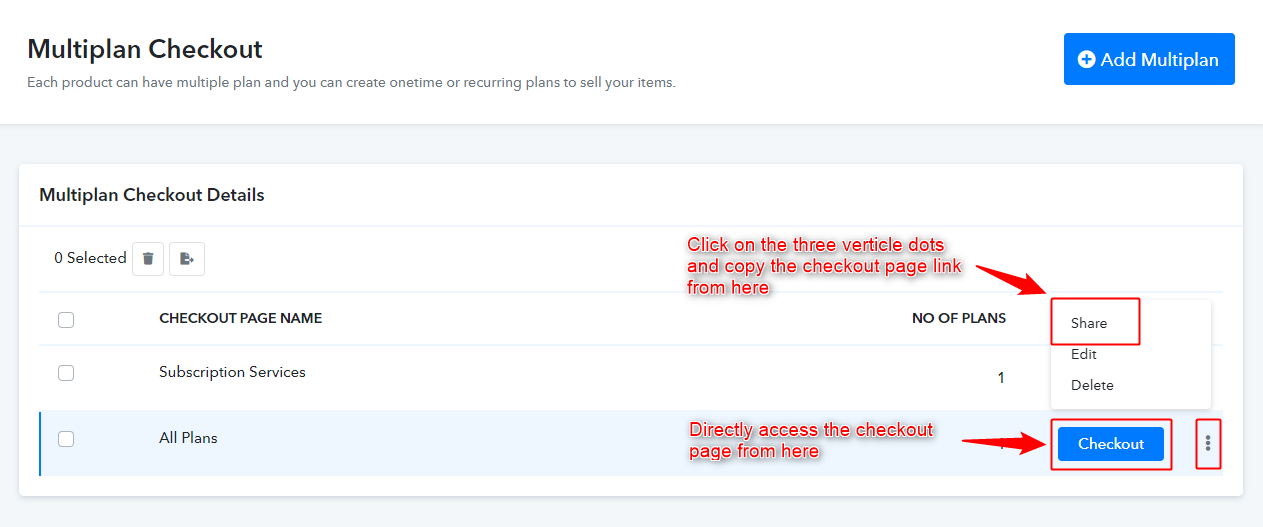
Once the checkout page is created you will get a unique link for the checkout page.
With that, you will also be able to edit and delete the checkout pages as per your requirement.
When all the backend process is done then you can copy the checkout page by the copy icon or you can directly click on the link to check how the page will work.
The front end of the multiple plan checkout page will look like this,
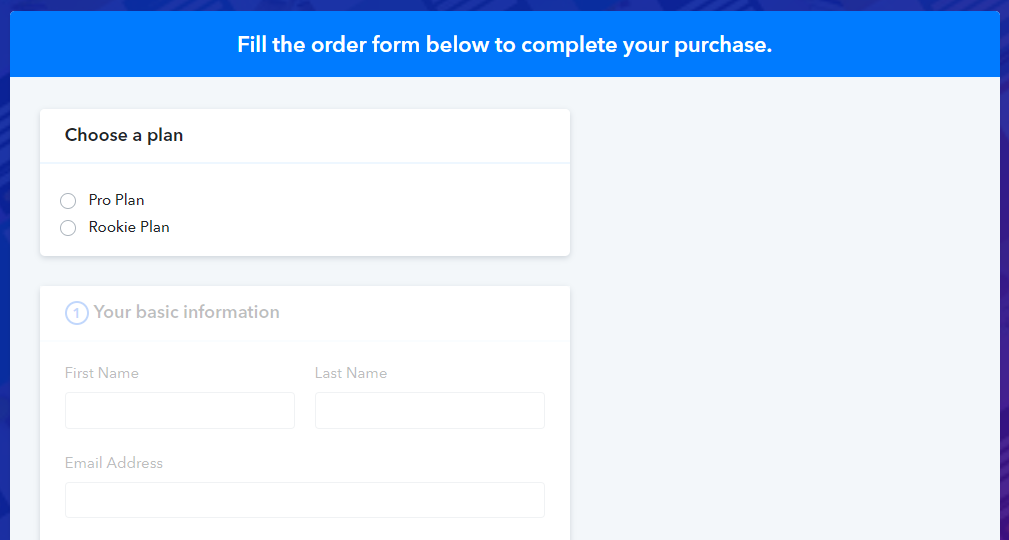
The plans will be automatically seen with radio button and your customer can select any of the plan to process the purchase.
All the fields of checkout page will be active only when your customer will select any of the plans.
P.S
- You can add several plans for a single product but cannot add plans for different products.
- Different checkout page will be displayed while selecting a different plan. (If you have customized the checkout page individually)
19. Invoicing –
Invoices are an official document which is sent by the merchant to his customer on every transaction.
The invoice contains all the important details of product, pricing, and discount.
Since the core working of the software involves a lot of transaction so this is the most basic and important feature.
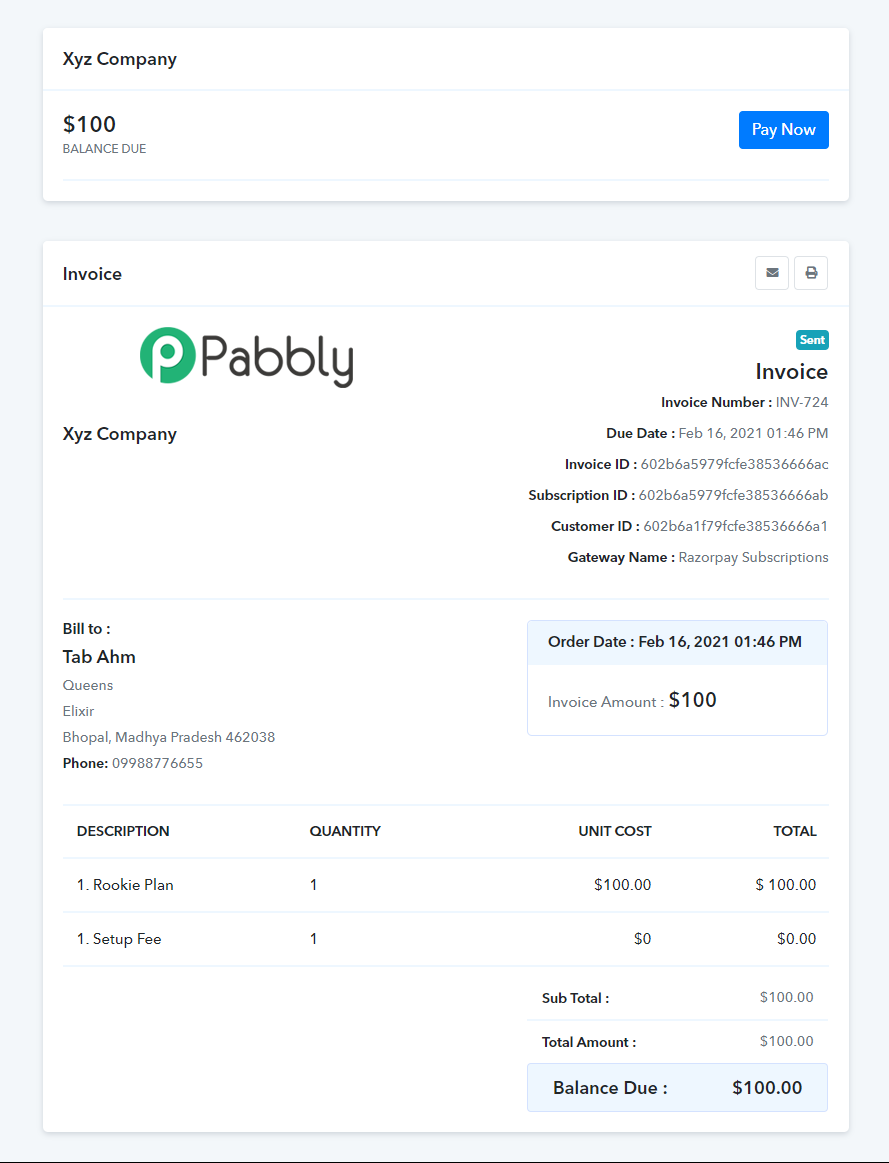
In this system of Pabbly Subscriptions Invoices are sent on every particular transaction. In the invoice, several details are mentioned such as product name, Invoice number, date, quantity, main amount, discount, and total payable amount etc.
There are 2 kinds of invoices in the Pabbly Subscriptions system.
Online Invoice – Invoice which is sent on every online transaction.
- Offline Transaction – Payable invoice is sent to the customer in case of offline transactions.
That simply means when a customer purchases any of your plans via checkout page then an online invoice is automatically sent to the customer on registered email.
And when a customer and a subscription is added by offline or manual method then an offline invoice is sent to the customer. That invoice has a “View Invoice” button when your customer click on that button they will get the details of the pending payable amount and will also find a “Pay Now” button.
Customer will click on that button and complete the payment. Once the payment is completed from customers end the status of invoices will be changed automatically.
Further, there is an Invoice section available in the merchant dashboard by which the merchant can cross check the invoices of all the customers.
With that, there are several options available in the invoice of every customer –
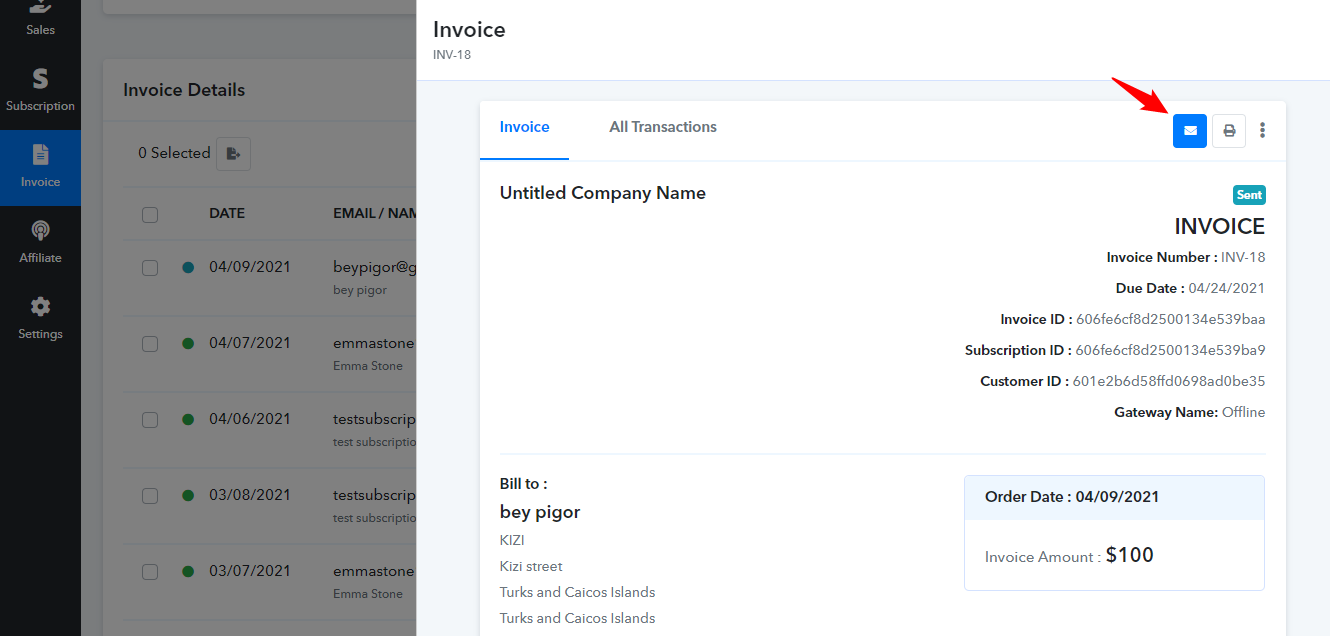
1.> Mail Icon – when you click on the mail icon present in the invoice then the invoice will be re-sent to the customer.
If the invoice status is showing as paid then the normal invoice is sent to the customers.
If there is any other status apart from “live” then the payable invoice is always sent to the customer.
2.> Record payment – If you have taken the amount by any other means, then you can use this option to change the status of the invoice. To know more about this please check the documentation.
3.> Collect Charge – You can directly collect payment from the customer if the card details are saved on the payment gateways. This option will not work in case of the PayPal payment gateway. Check this documentation to know more about this option.
4.> Delete – In case if you want to delete any particular invoice.
![]()
Note – If the status of the invoice is “Paid” then Record payment and collect charge option will not be displayed.
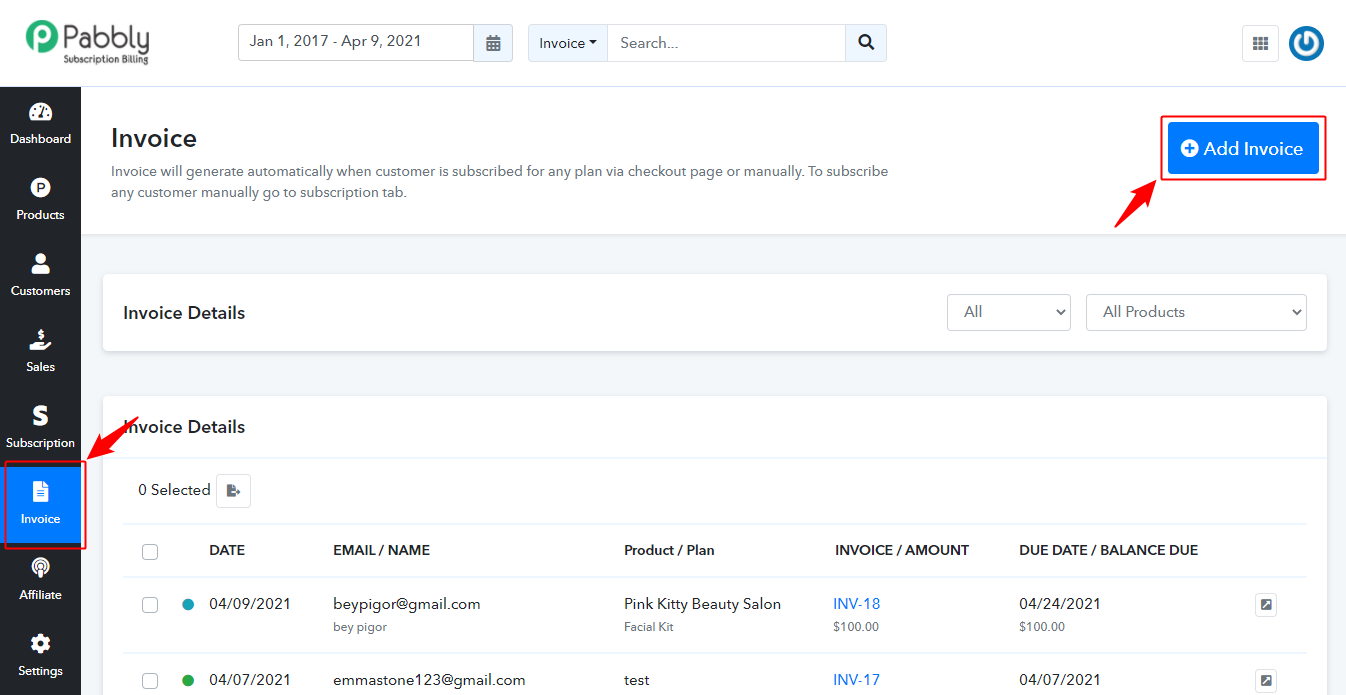
20. Add Invoice –
Usually, invoices are automatically generated whenever a customer is subscribed for any plan via checkout page, API or manually. These invoices are automatically sent to the customers for successful payments. Also, there is a way to send an online invoice for incomplete payments.
But, using this feature, you can add an invoice for any customer from the dashboard itself.
To add an invoice simply go to Pabbly Subscription Dashboard -> Invoice -> Add Invoice
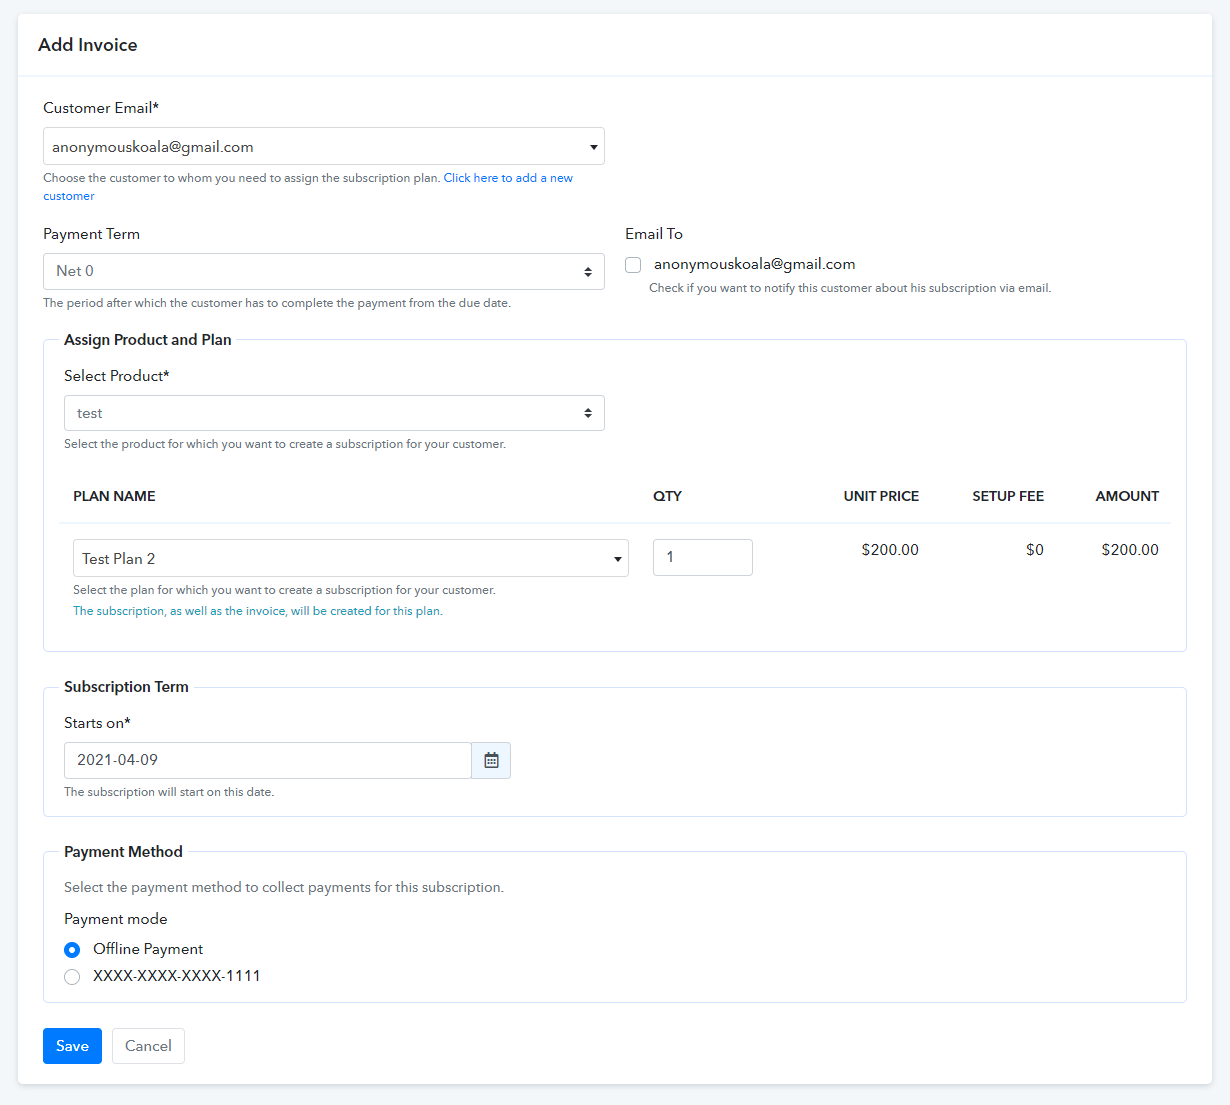
Add Invoice Details: To create an invoice, you’ll need to fill in some details.
1. Customer Email: You can either select an existing customer from the list available or you can create a new customer instantly by clicking on the ‘Click here to add a new customer’ help text available below this field.
2. Payment Term: You can specify the period after which the customer must complete the payment after the due date. For instance: Net 15, 30, 60, end of the month etc.
3. Email To: There is an option available to select if you want to notify the customer about his subscription. When you tick this option an email will be sent automatically when a subscription is created.
4. Select Product: You can select the product for which you want to create a subscription for your customer.
5. Plan Name: Pick the plan of the product for which you want to create a subscription for your customer. Also, you can mention the quantity of the plan purchased.
6. Subscription Term: Specify a start date for the subscription.
7. Payment Method: Select a payment method such as offline, card etc. to collect payments for this subscription.
Lastly, click on ‘Save’ to create an invoice.
A subscription is automatically created for the customer whenever an invoice is created. This subscription will then work on a manual/offline method.
To learn more about Manul/Offline invoice click here.
Moreover, this newly created invoice is sharable & you can share it with your customer using two ways.
1. By sharing the ‘Share Invoice Link’.
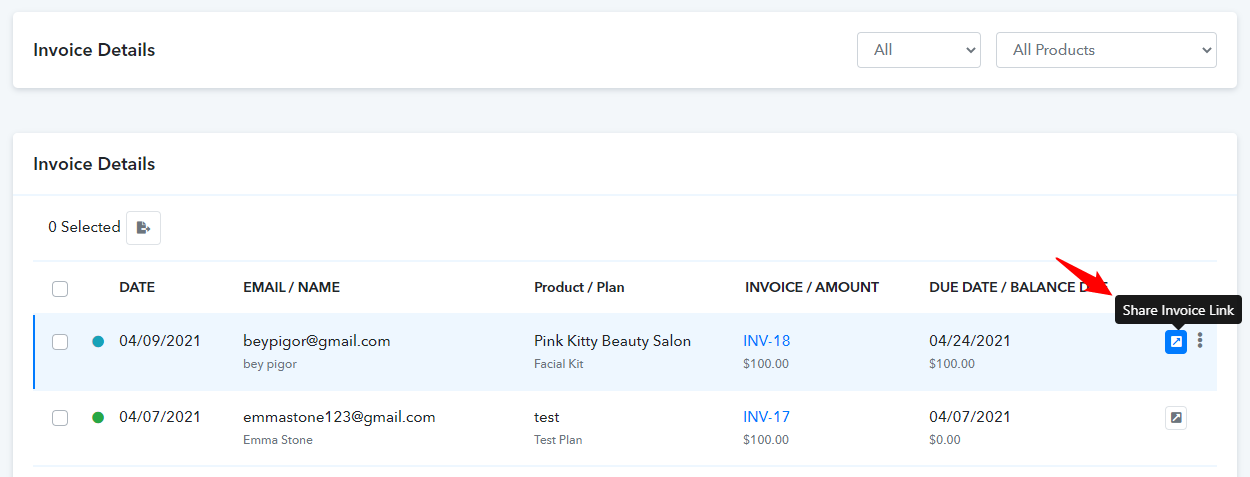
2. By simply clicking on the email icon to send an invoice via email.
21. What Are Custom Invoices?
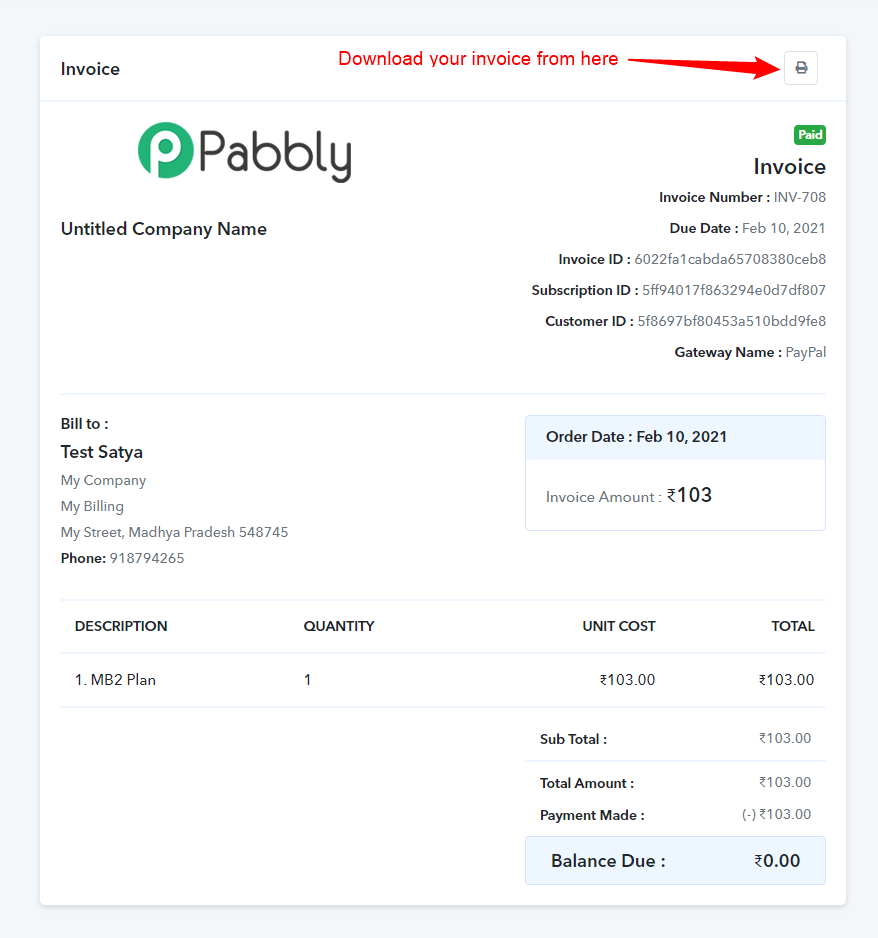
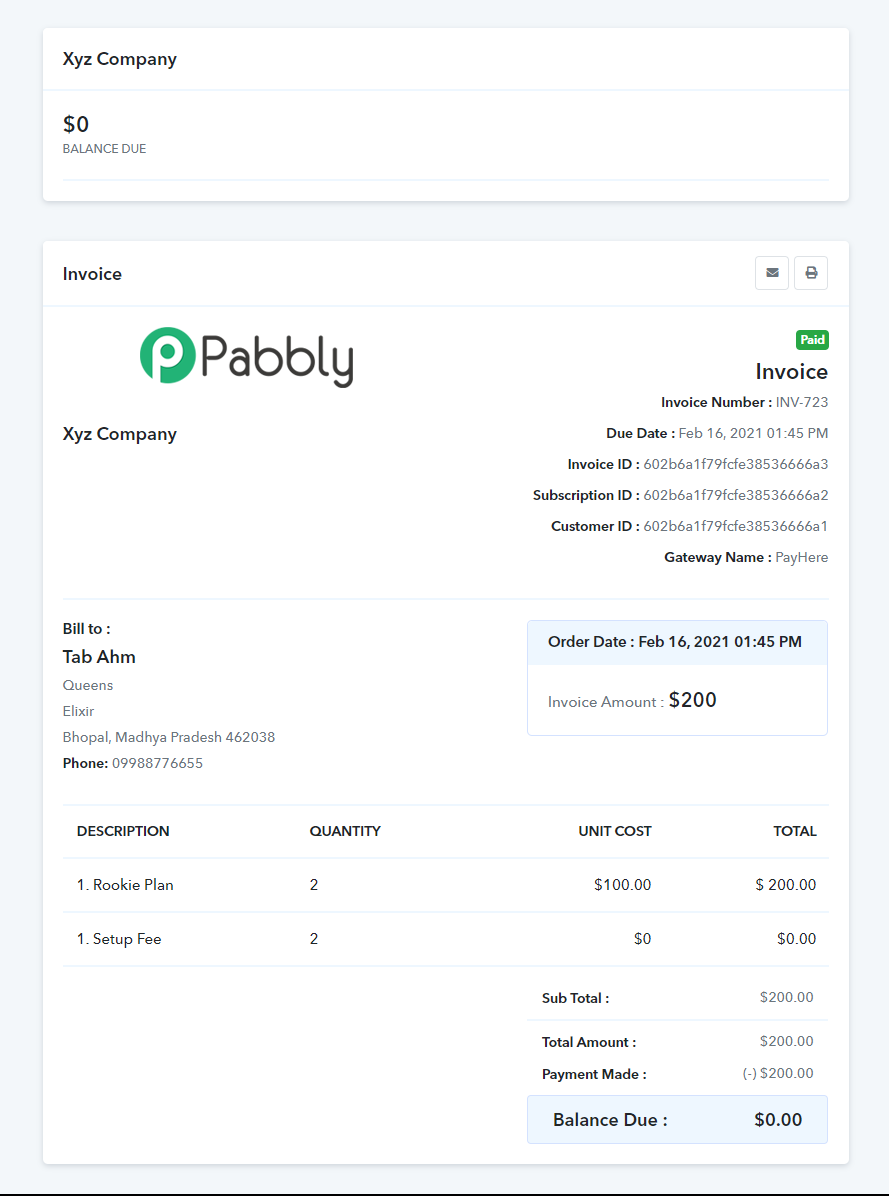
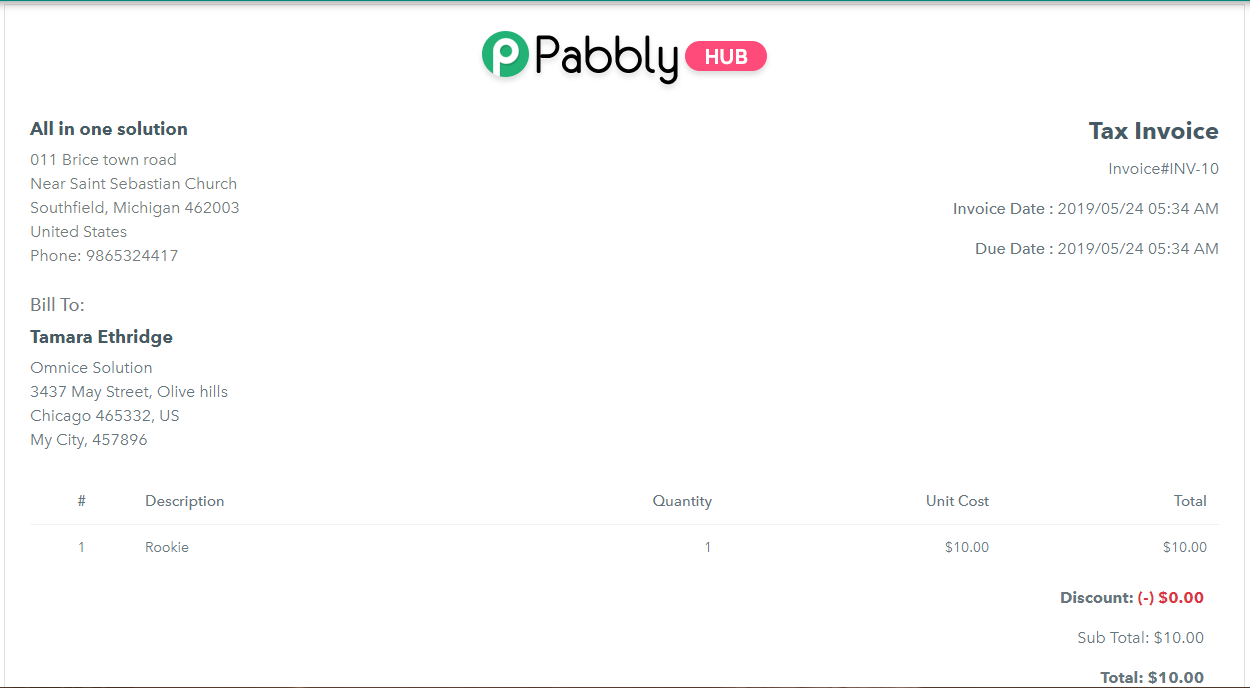
In Pabbly Subscriptions, invoices are generated and sent automatically to the customer whenever a transaction takes place. These invoices fetch data from different fields that a customer fills while purchasing the subscription and also fetches the merchant details from the profile setup. After merging all the data an invoice is generated which looks like this.
Almost all the important data is available in the system generated the invoice, but there is some customization needed in the invoice to make it look more professional.
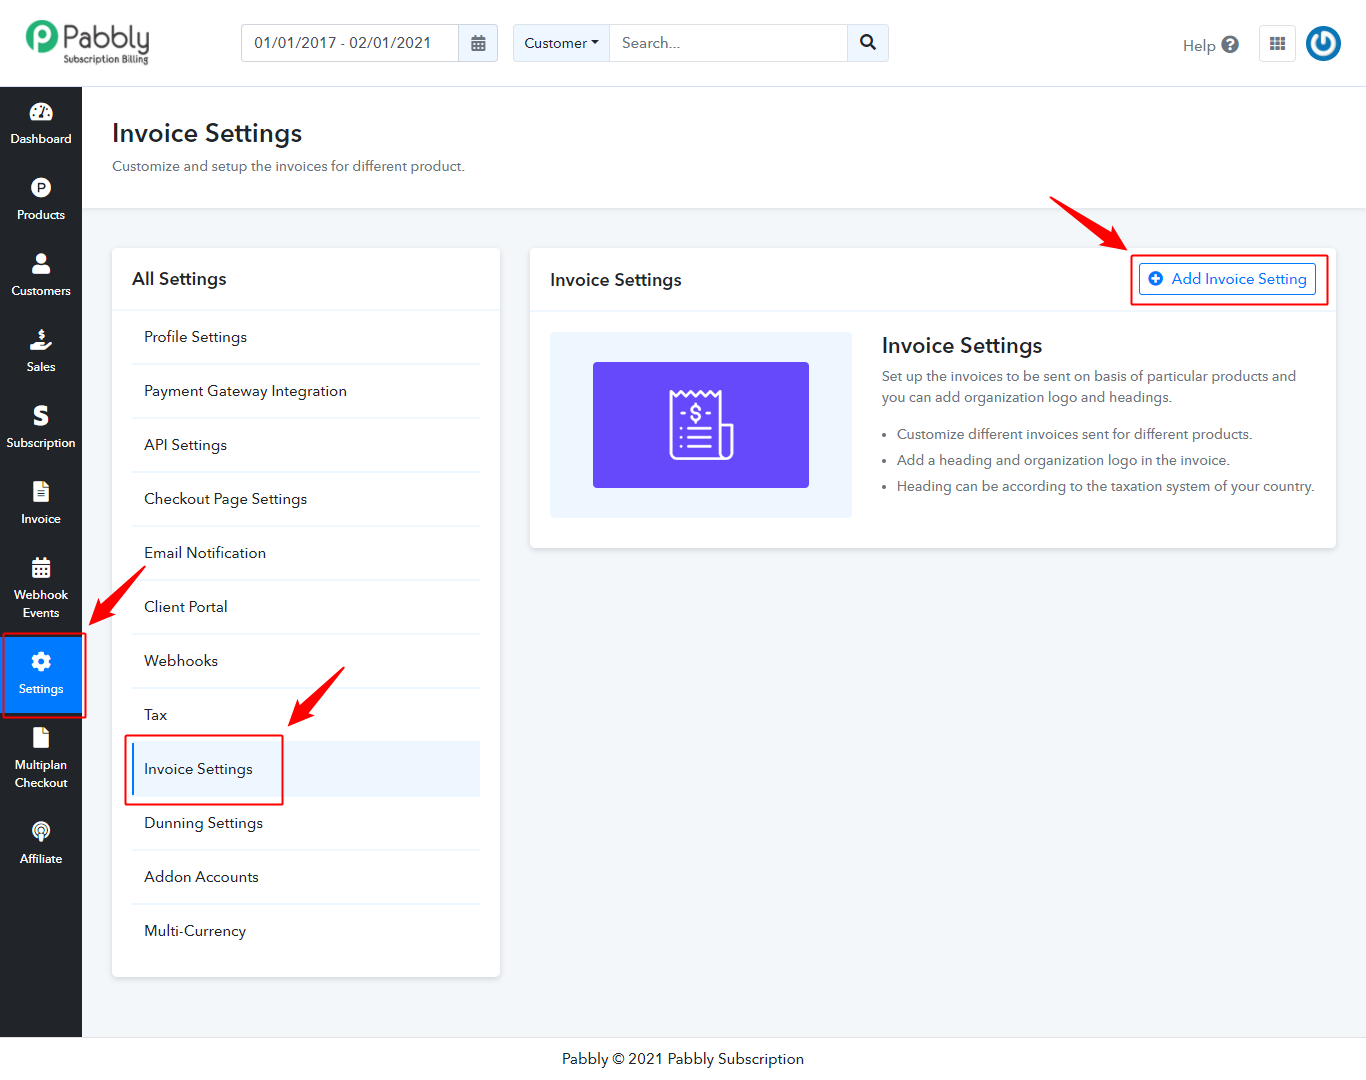
So these invoice customization are located in Settings -> Invoice Settings.
In this settings, you can add a header image and a header text in the invoice, and also set up the invoices to be sent product wise.
That means you can edit different invoices for your different products.
Just click on ‘Add New Invoice Setting Button’.
In the next page, you will need to add a title. Suppose you have different products so invoice title can be the product name so you will not get confused.
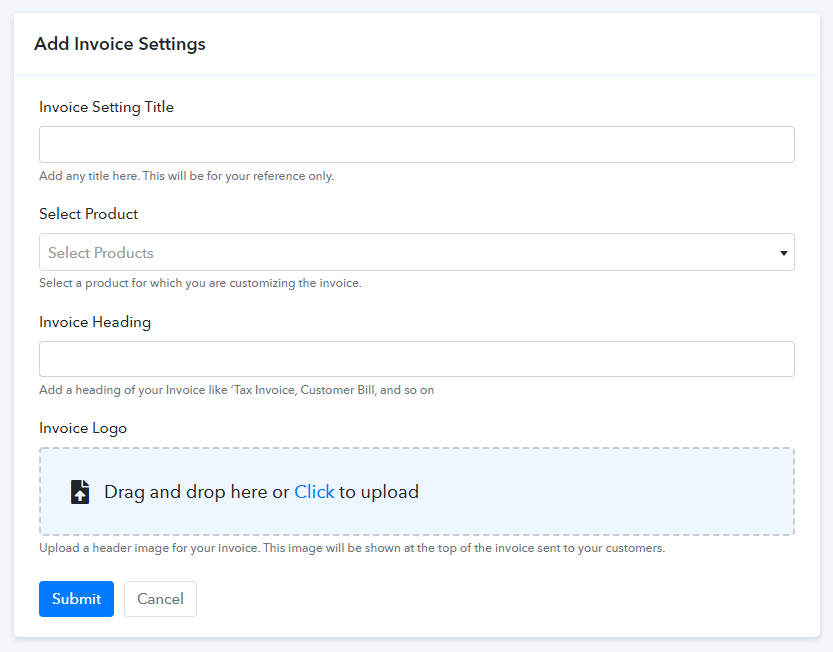
Next, You will select the particular product for which you need to send the invoice.
At last, you can add the Invoice heading like in European countries the invoice is generally called as Tax Invoice or Tax bill. So you can add any invoice heading according to your needs.
You can upload a logo, which will be displayed on the top of the invoice.
Finally, submit the settings.
So when a customer purchases any plan of that particular product which invoices you have customized. Then they will receive a different invoice which has your organization logo a heading. And for your other products, the default invoice will be sent to the customers.
But there are no limitations in it. You can customize the invoices for all the products you have in the same or different manner.
Just log in and check the feature for much better understanding
21. What Is Dunning Management?
Whenever a payment fails either first or recurring, that transaction is captured under our dunning cycle. In this, the system tries to attempt the payment from the customer on 1st, 3rd, 5th, and 7th day from the billing date.
On every attempt, the system automatically sends an email notification to the customer and the merchant.
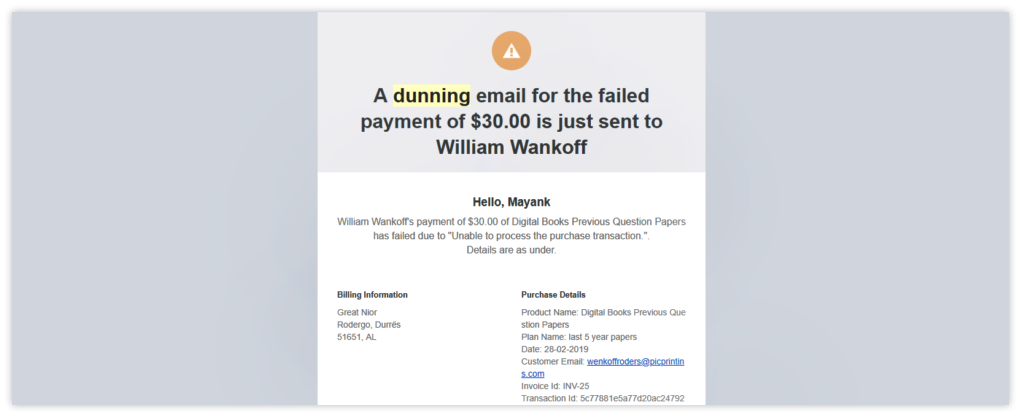
The dunning email notification received by the end customer also has a pay now button. so your customer can directly pay form the email.
You can also stop the dunning cycle for any customer just by deleting the Pending Invoice of that particular transaction.


