Integrating Mojo with So This Using Pabbly Connect: A Step-by-Step Guide

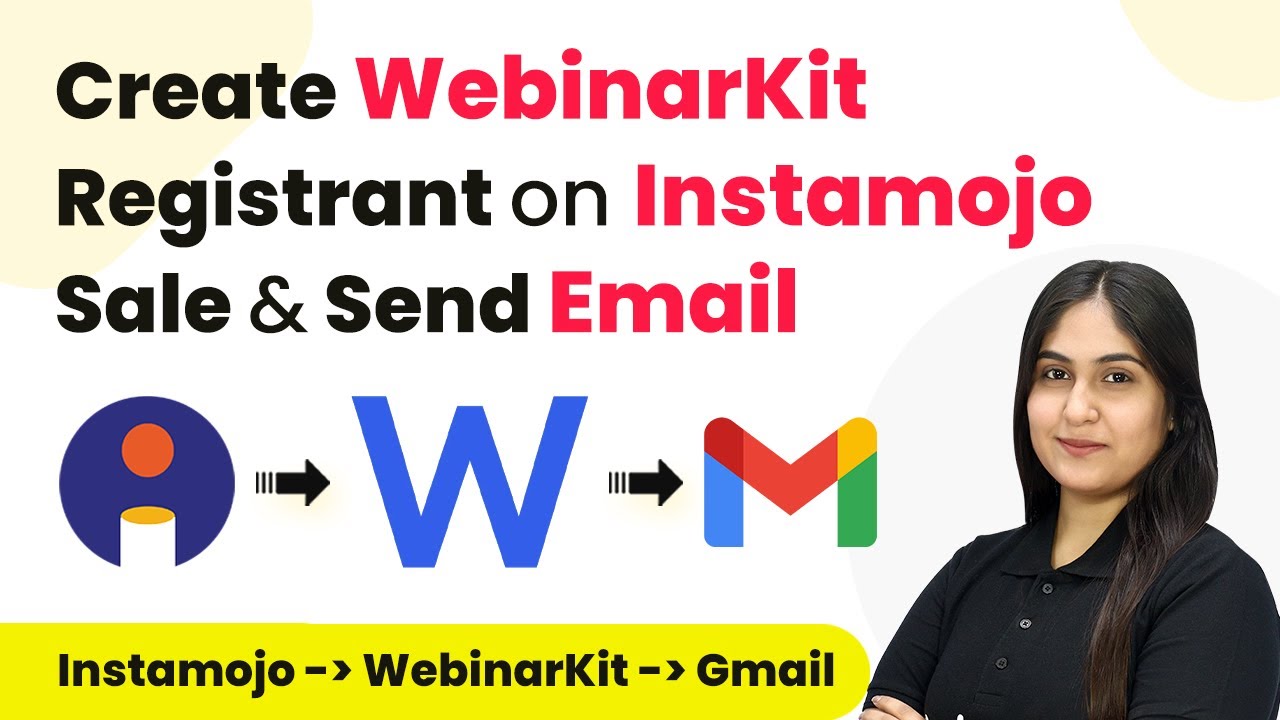
Learn how to integrate Mojo with So This Using Pabbly Connect in this detailed tutorial. Follow each step to automate your webinar registration and email confirmation process. with Pabbly Connect.

Watch Step By Step Video Tutorial Below


1. Setting Up Integration with Mojo and So This

To start integrating Mojo with So This, you first need to access your Pabbly Connect account. This automation will help you register attendees automatically whenever a new sale is made through Mojo.

Begin by logging into your Pabbly Connect account, and navigate to the dashboard. Here are the steps to set up the integration:

  • Click on the ‘Create Workflow’ button in the top right corner.
  • Name your workflow, such as ‘Create Webinar Kit Registrant on Mojo Sale’.
  • Select the folder where you want to save this workflow.

Once you create the workflow, you will set up the trigger. The trigger application will be Mojo, specifically the event for a new sale. This ensures that every time a new sale occurs, the workflow will activate.


2. Configuring the Webhook URL in Mojo

To connect Mojo with Pabbly Connect, you need to configure a webhook URL. This URL allows Pabbly to receive data from Mojo whenever a sale is made.

Follow these steps to set up the webhook in Mojo:

  • Copy the webhook URL provided by Pabbly Connect.
  • Log in to your Mojo account and select the product for which you want to set up the webhook.
  • Paste the webhook URL into the advanced settings of the product and save the changes.

After saving, Mojo will notify Pabbly Connect whenever a new sale occurs, triggering the workflow you created earlier.


3. Creating a Webinar Registrant in So This

Once the webhook is configured, the next step is to create a registrant in So This using the data received from Mojo. This is done by setting an action step in Pabbly Connect.

To create a registrant, follow these steps:

Select So This as the action application. Choose the action event as ‘New Webinar Registration’. Map the necessary fields such as email, first name, and last name from the webhook response.

After mapping the fields, ensure that the data is correctly formatted and then proceed to save the action step. This integration will ensure that every new sale leads to a new registrant in your webinar.


4. Sending Confirmation Email via Gmail

After successfully creating a registrant, the next action is to send a confirmation email using Gmail. This step is crucial for keeping your customers informed.

To set up the email, follow these steps:

Select Gmail as the action application. Choose ‘Send Email’ as the action event. Map the recipient’s email address and customize the email content.

Make sure to include details such as the webinar date and time in the email body. This ensures your customers have all the information they need.


5. Conclusion

In this tutorial, we covered how to integrate Mojo with So This using Pabbly Connect. This integration automates the process of registering webinar attendees and sending confirmation emails via Gmail. By following these steps, you can streamline your webinar registration process and enhance customer communication.

Thanks for following along with this tutorial! Remember to subscribe to the channel for more helpful content like this.

If you found this guide useful, please consider giving it a thumbs up and sharing it with others who might benefit from it.

Utilizing these applications effectively can save you time and ensure that your customers receive timely updates about their registrations. With this integration, you can focus more on delivering valuable content during your webinars.


Automate Your Social Media with Pabbly Connect: Schedule X (Twitter) Posts Automatically

Learn how to use Pabbly Connect to automate your Twitter posts by scheduling them from Google Sheets. Follow this detailed tutorial for seamless integration. Follow this definitive guide to creating powerful automated workflows with straightforward, efficiency-focused solutions that save valuable time.

Watch Step By Step Video Tutorial Below


1. Accessing Pabbly Connect for Automation

To start automating your Twitter posts, you first need to access Pabbly Connect. This platform allows you to integrate various applications seamlessly, including Google Sheets and X (formerly Twitter). Begin by visiting the Pabbly Connect homepage.

Once on the homepage, you can either sign in if you already have an account or sign up for free. New users can benefit from 300 free tasks each month, making it easy to explore the capabilities of Pabbly Connect.


2. Creating a Workflow in Pabbly Connect

After signing in, navigate to the dashboard of Pabbly Connect. Here, you will create a new workflow by clicking on the ‘Create Workflow’ button located at the top right corner. This is where you will define the automation process for posting on X.

  • Click on ‘Create Workflow’.
  • Name your workflow, such as ‘Schedule X Posts’.
  • Select a folder for organization.

Once your workflow is created, you will set a trigger and an action. The trigger will be based on a schedule, allowing your workflow to run at specified intervals, which is essential for automating your Twitter posts.


3. Setting Up the Trigger in Pabbly Connect

In this step, you will configure the trigger for your workflow. Select the ‘Schedule by Pabbly’ trigger option. This feature allows you to run your automation at a specific time each day, ensuring your posts go live as planned. using Pabbly Connect

After selecting the trigger, specify how often you want the workflow to run. For instance, you can choose to run it daily at 12:00 PM. This setup ensures that your Twitter posts are scheduled automatically based on the content in your Google Sheets.


4. Action Steps Using Google Sheets in Pabbly Connect

Next, you will add action steps to your workflow. The first action is to use the ‘DateTime Formatter by Pabbly’ to get the current date. This is crucial as it allows the automation to check what content should be posted each day based on the date. using Pabbly Connect

  • Select ‘DateTime Formatter by Pabbly’.
  • Choose ‘Current Date’ as the action event.
  • Map the date format to match your Google Sheets.

After obtaining the current date, you will add another action step to search for the corresponding row in your Google Sheets. Use the ‘Google Sheets’ application and select the ‘Lookup Spreadsheet Rows’ action event. This step is vital for pulling the correct content to post on X.


5. Posting to Twitter Using Pabbly Connect

Finally, set up the action to post on X (Twitter). In the action step, select X as your application and choose the ‘Create Tweet’ action event. This allows you to take the content retrieved from Google Sheets and post it directly to your Twitter account. using Pabbly Connect

To connect your X account, you will need to authorize it by providing your client ID and client secret from your Twitter developer account. Once connected, map the tweet message using the title and content from your Google Sheets response. After saving the configuration, your automation is complete!


Conclusion

In this tutorial, you learned how to use Pabbly Connect to automate your Twitter posting process by scheduling posts directly from Google Sheets. This integration saves time and ensures consistent engagement on your social media accounts.

Ensure you check out Pabbly Connect to create business automation workflows and reduce manual tasks. Pabbly Connect currently offer integration with 2,000+ applications.

Integrating Instamojo Payments with Google Sheets and WhatsApp Alerts Using Pabbly Connect

Learn how to automate WhatsApp alerts for Instamojo payments and log details in Google Sheets using Pabbly Connect. Step-by-step tutorial included. Learn to create powerful connections between your critical applications without requiring specialized programming knowledge or extensive technical background.

Watch Step By Step Video Tutorial Below


1. Accessing Pabbly Connect for Integration

To begin the integration process, first visit the Pabbly Connect website. Pabbly Connect is the central platform that enables seamless automation between various applications. If you are a new user, you can sign up for free and get started with 100 free tasks each month.

Once signed in, navigate to the dashboard where you will see all available Pabbly applications. Click on Pabbly Connect to access the automation features. Here, you can create a new workflow that will connect Instamojo with Google Sheets and WhatsApp.


2. Creating a Workflow in Pabbly Connect

After accessing Pabbly Connect, you need to create a new workflow. Click on the ‘Create Workflow’ button located at the top right corner of the dashboard. This will prompt a dialog box where you can name your workflow and select a folder to save it.

  • Enter a name for the workflow, such as ‘Send WhatsApp Alerts for Successful and Failed Instamojo Payments’.
  • Select a folder to organize your workflow, for example, ‘Instamojo Automations’.
  • Click the ‘Create’ button to finalize the workflow setup.

This process sets up the foundation for your automation, allowing you to manage payment notifications effectively.


3. Setting Up the Trigger for Instamojo Payments

The next step involves setting up the trigger for your workflow in Pabbly Connect. Select Instamojo as the trigger application and choose the event type as ‘New Sale’. This will allow Pabbly Connect to capture payment details whenever a student makes a purchase using Instamojo.

After selecting the trigger application, Pabbly Connect will generate a unique webhook URL. Copy this URL, as you will need to connect it to your Instamojo account. This connection is crucial for capturing payment data automatically.


4. Connecting Instamojo to Pabbly Connect

Now that you have your webhook URL, log in to your Instamojo account. Navigate to the page where you manage your payment settings. Here, you can add the webhook URL you copied from Pabbly Connect.

In the settings, look for the option to add a webhook. Paste the URL and select the payment statuses you want to track, such as successful and failed payments. Save your changes to ensure that Instamojo can send payment notifications to Pabbly Connect.

Once the webhook is set up, perform a test transaction to verify that Pabbly Connect captures the payment details correctly. This will ensure that your workflow is functioning as intended.


5. Logging Payments in Google Sheets and Sending WhatsApp Alerts

After successfully capturing payment details, the next step is to log these details into Google Sheets. Select Google Sheets as the action application in Pabbly Connect and choose the event type as ‘Add New Row’. This will allow you to create a new entry in your spreadsheet for each payment.

  • Map the fields from the previous step to the corresponding columns in your Google Sheets.
  • Ensure that the payment ID, name, email, phone number, and payment status are included in the row.

Finally, set up WhatsApp alerts using the WhatsApp by AI Sensi application. Select it as the action application and choose the event type as ‘Send Template Message’. Map the necessary fields, such as the recipient’s mobile number and the message template you created for successful or failed payments. This completes the automation process.


Conclusion

This tutorial demonstrated how to integrate Instamojo payments with Google Sheets and WhatsApp alerts using Pabbly Connect. By following these steps, you can automate payment notifications and efficiently manage your educational course enrollments.

Ensure you check out Pabbly Connect to create business automation workflows and reduce manual tasks. Pabbly Connect currently offer integration with 2,000+ applications.

Automate Google Business Profile Replies with Pabbly Connect

Learn how to automate replies to Google Business Profile reviews using Pabbly Connect. Step-by-step guide for integrating Roots and Simply. Discover how to seamlessly connect your essential tools through accessible instructions that make powerful automation available to professionals at every skill level.

Watch Step By Step Video Tutorial Below


1. Accessing Pabbly Connect for Automation

To begin automating replies to Google Business Profile reviews, first access Pabbly Connect by visiting its homepage. You can do this by typing ‘Pabbly.com/connect’ in your browser. Upon reaching the site, you’ll see options to either sign in or sign up for free.

If you’re a new user, click on ‘Sign Up for Free’ to create your account, which takes just a couple of minutes. Existing users can simply click ‘Sign In’ to log into their accounts. With Pabbly Connect, you get 100 free tasks monthly to explore its features and test various automation workflows.


2. Creating a New Workflow in Pabbly Connect

Once logged into Pabbly Connect, navigate to the dashboard where you can view your workflows. To create a new workflow, click on the ‘Create Workflow’ option. You will be prompted to name your workflow; for this task, name it ‘Automatically Reply to Google Business Profile Reviews Based on Ratings.’

  • Select a folder to save your workflow, such as ‘Social Media Automations.’
  • Click on ‘Create’ to finalize the workflow setup.

After creating your workflow, you will see two main sections: Trigger and Action. The Trigger indicates what event will start the workflow, while the Action describes what happens when that event occurs. This is essential for automating responses to reviews on your Google Business Profile.


3. Setting Up the Trigger for Google Business Profile

The next step in Pabbly Connect is to set up the trigger. Click on the trigger application and select ‘Google Business Profile.’ Then, choose the trigger event, which in this case is ‘New Review.’ This means the workflow will initiate whenever a new review is posted.

Next, click on the ‘Connect’ button to establish a connection between Google Business Profile and Pabbly Connect. You can either select an existing connection or create a new one by clicking ‘Add New Connection.’ Sign in with your Google account and grant the necessary permissions for the integration.


4. Defining the Action to Reply to Reviews

After successfully setting up the trigger, it’s time to define the action in Pabbly Connect. You will select ‘Google Business Profile’ again as the action application and choose ‘Create Reply’ as the action event. This action will send a response to the review based on the rating received.

  • Map the Review ID from the trigger step to ensure the correct review is replied to.
  • Enter your custom reply message based on the review rating.

For positive ratings (4 or 5 stars), you might say, ‘Thank you for your positive feedback! We look forward to serving you again.’ For lower ratings (1-3 stars), your reply could be more apologetic, assuring the customer that you will address their concerns.


5. Testing and Activating Your Workflow

Once your trigger and action are set up, it’s time to test the workflow in Pabbly Connect. Click on ‘Save and Send Test Request’ to ensure that everything is working correctly. This will capture the latest review and test the reply functionality.

After confirming that the test works as intended, activate your workflow. Now, whenever a new review is posted on your Google Business Profile, Pabbly Connect will automatically send a reply based on the rating. This automation saves time and ensures timely responses to customer feedback.


Conclusion

By utilizing Pabbly Connect, you can effectively automate responses to Google Business Profile reviews based on customer ratings. This integration not only enhances customer engagement but also streamlines your workflow, allowing you to focus on improving your services.

Ensure you check out Pabbly Connect to create business automation workflows and reduce manual tasks. Pabbly Connect currently offer integration with 2,000+ applications.

Automating WhatsApp Messages with Pabbly Connect and Instamojo Payments

Learn how to automate WhatsApp messages using Pabbly Connect with Instamojo payments, ensuring seamless integration and subscriber creation in ConvertKit. Eliminate manual repetitive tasks from your workflow. Discover proven automation methods with intuitive steps designed for efficiency-minded professionals.

Watch Step By Step Video Tutorial Below


1. Accessing Pabbly Connect for Integration

To begin automating WhatsApp messages, access Pabbly Connect by visiting Pabbly.com/connect in your browser. This platform allows you to integrate various applications seamlessly, including WhatsApp and Instamojo.

After navigating to the site, sign in or create a new account. If you are a new user, you can sign up for free and get 100 tasks monthly. Once logged in, click on Pabbly Connect to enter the dashboard where you can manage your workflows.


2. Creating a New Workflow in Pabbly Connect

In Pabbly Connect, creating a new workflow is essential for setting up your automation. Click on the ‘Create Workflow’ button and name it something descriptive, such as ‘Automated WhatsApp Message for Instamojo Payment’.

  • Select the folder to save your workflow.
  • Define your trigger application as Instamojo V2.
  • Set the trigger event to ‘Successful Payment’.

After setting up your trigger, you will be prompted to connect Instamojo V2 with Pabbly Connect using a webhook URL. This URL will facilitate the data transfer when a payment is made.


3. Connecting Instamojo to Pabbly Connect

To connect Instamojo to Pabbly Connect, navigate to your Instamojo dashboard. Locate the product related to your workflow and click on ‘Advanced’ settings. Here, you will find the option to input the webhook URL.

  • Delete any existing webhook URL.
  • Paste the newly copied webhook URL from Pabbly Connect.
  • Save the changes to update the webhook.

Once the webhook is set, perform a test payment in Instamojo to generate a response. This will confirm that the connection between Instamojo and Pabbly Connect is functioning correctly.


4. Sending WhatsApp Messages via Pabbly Connect

After confirming the webhook response, the next step is to send a WhatsApp message using Pabbly Connect. Select the action application as Wati, and choose the event ‘Send Template Message’.

Connect your Wati account by entering the API endpoint and access token. Map the WhatsApp number from the Instamojo response. Select the template you created for payment confirmations.

Once these details are filled in, click on ‘Save and Send Test Request’ to check if the WhatsApp message is sent successfully. You should receive a confirmation message on your WhatsApp.


5. Creating a Subscriber in ConvertKit

The final step involves creating a subscriber in ConvertKit through Pabbly Connect. Set the action application to ConvertKit and choose the event ‘Add Subscriber to a Sequence’.

Connect your ConvertKit account by entering the API key and secret. Map the email address and names using the data received from Instamojo. Additionally, you can format the names using the text formatter feature in Pabbly Connect.

Once all fields are filled, click ‘Save and Send Test Request’. Verify your ConvertKit dashboard to confirm that the subscriber has been created successfully. This completes the integration process, ensuring that whenever a payment is made, a WhatsApp message is sent and a subscriber is added in ConvertKit.


Conclusion

This tutorial demonstrates how to automate WhatsApp messages and create subscribers in ConvertKit using Pabbly Connect. By following these steps, you can streamline your payment notifications and subscriber management effectively.

Ensure you check out Pabbly Connect to create business automation workflows and reduce manual tasks. Pabbly Connect currently offer integration with 2,000+ applications.

Integrate IndiaMart Leads with Agile CRM Using Pabbly Connect

Learn how to automate the integration of IndiaMart leads into Agile CRM using Pabbly Connect. Follow this step-by-step tutorial for seamless automation. Build sophisticated automated workflows in less time than you think. This guide translates complex integrations into straightforward steps for immediate implementation.

Watch Step By Step Video Tutorial Below


1. Accessing Pabbly Connect for Integration

To begin the integration process, you need to access Pabbly Connect. Start by navigating to the Pabbly Connect website and signing in with your credentials. If you are a new user, you can sign up for free to receive 100 tasks monthly.

Once logged in, you will land on the Pabbly Connect dashboard. Here, you can create a new workflow by clicking on the ‘Create Workflow’ button. You will need to name your workflow and select an appropriate folder to save it. This initial setup is crucial for managing your automation.


2. Setting Up the Trigger with IndiaMart

In this integration, Pabbly Connect will use IndiaMart as the trigger application. Select IndiaMart from the list of available applications and choose ‘New Leads’ as the trigger event. This means that every time a new lead is generated in IndiaMart, the workflow will be activated.

  • Select IndiaMart as the trigger application.
  • Choose ‘New Leads’ as the trigger event.
  • Copy the provided webhook URL for connection.

Next, navigate to your IndiaMart account and access the Lead Manager. Here, you can set up the webhook by pasting the copied URL into the designated field. This step is essential to ensure that Pabbly Connect receives data from IndiaMart.


3. Testing the Connection Between IndiaMart and Pabbly Connect

After setting up the webhook in IndiaMart, it’s time to test the connection. Click on the ‘Test Your Webhook’ option in your IndiaMart account. This will send a test lead to Pabbly Connect, allowing you to verify that the integration is working correctly.

Once you initiate the test, go back to Pabbly Connect. You should see the test lead details appear in your dashboard. Confirm that all necessary information, such as name and contact details, has been received properly.


4. Setting Up the Action with Agile CRM

With the trigger successfully set up, the next step involves configuring the action application, which will be Agile CRM. In Pabbly Connect, select Agile CRM as your action application and choose ‘Create Contact’ as the action event. This means that when a new lead is received from IndiaMart, a new contact will be created in Agile CRM.

To connect Pabbly Connect with Agile CRM, you will need to enter your Agile CRM login email, API key, and domain. Make sure to copy the correct API key from your Agile CRM account settings to ensure a successful connection.

  • Enter your Agile CRM login email.
  • Paste the API key from Agile CRM.
  • Specify the Agile CRM domain without ‘https://’.

After entering these details, click on ‘Save and Send Test Request’ to create the contact in Agile CRM. This action will finalize the integration process.


5. Verifying the Integration in Agile CRM

To confirm that the integration has been successful, navigate to your Agile CRM account and check the contacts section. Refresh the page to see if the new contact created from the IndiaMart lead appears correctly.

In Agile CRM, you should see the contact with the name and details that were mapped from the IndiaMart lead. This verification step is crucial to ensure that the automation is functioning as intended.

In summary, we have successfully integrated IndiaMart leads into Agile CRM using Pabbly Connect. This automation allows for seamless lead management, ensuring that no lead is missed and all information is accurately captured in your CRM.


Conclusion

This tutorial demonstrates how to use Pabbly Connect to automate the integration of IndiaMart leads into Agile CRM. By following these steps, you can streamline your lead management process effectively. Enjoy the benefits of automation and improved efficiency in your business operations.

Ensure you check out Pabbly Connect to create business automation workflows and reduce manual tasks. Pabbly Connect currently offer integration with 2,000+ applications.

How to Autofill Google Docs Template from Microsoft Excel Using Pabbly Connect

Learn how to automate the creation of Google Docs templates from Microsoft Excel using Pabbly Connect. This guide provides detailed steps for seamless integration. Implement the precise methodologies leading organizations use to automate repetitive tasks, illustrated with practical examples designed for immediate application.

Watch Step By Step Video Tutorial Below


Accessing Pabbly Connect for Integration

To start the automation process using Pabbly Connect, first access the platform by visiting the official website. If you are a new user, you can sign up for free and get 100 free tasks every month. Existing users should log in to their accounts to proceed with the setup.

Once logged in, you will see the Pabbly Connect dashboard. From here, you can begin creating your automation workflow. Click on the ‘Create Workflow’ button located in the top right corner. This initiates the process of setting up your integration between Microsoft Excel and Google Docs.


Creating a Workflow in Pabbly Connect

After clicking on ‘Create Workflow’, a dialog box will appear asking for the workflow name and folder selection. Enter a name like ‘Autofill Google Docs Template from Microsoft Excel’ and choose a folder for saving the workflow. This organization helps in managing multiple workflows efficiently within Pabbly Connect.

Next, select the folder where you want to save this workflow. For instance, you can create a folder named ‘Microsoft Excel Automations’. After naming your workflow and selecting the folder, click on the ‘Create’ button to finalize the creation process.

  • Enter a descriptive workflow name.
  • Select the appropriate folder for organization.
  • Click ‘Create’ to establish the workflow.

Now, your workflow is ready, and you will see two sections: Trigger and Action. The next step is to set up the trigger for this automation using Pabbly Connect.


Setting Up Trigger with Microsoft Excel

In this step, we will configure the trigger application as Microsoft Excel. This means whenever a new participant’s data is entered into your Excel sheet, Pabbly Connect will capture that information. Select ‘Microsoft Excel’ as your trigger application and choose the trigger event as ‘New Row in Worksheet’.

After selecting the trigger, click on the ‘Connect’ button to link your Microsoft Excel account with Pabbly Connect. A window will pop up prompting you to add a new connection. Click on ‘Add New Connection’ and follow the authorization steps to connect your Excel account.

  • Select ‘Microsoft Excel’ as the trigger application.
  • Choose ‘New Row in Worksheet’ as the trigger event.
  • Connect your Microsoft Excel account to Pabbly Connect.

Once connected, select the workbook and worksheet containing your participants’ details. For example, choose ‘Participants Details’ as the workbook and ‘Sheet1’ as the worksheet. Click on ‘Save and Send Test Request’ to ensure that the connection is established correctly.


Setting Up Action with Google Docs

Now that the trigger is set up, it’s time to configure the action step using Google Docs. Select ‘Google Docs’ as the action application and choose the action event ‘Create Document from Template’. This action will generate a letter of participation for each participant based on the details captured from Microsoft Excel.

After selecting the action application, click on the ‘Connect’ button to establish a connection with your Google Docs account. You will be prompted to allow access. Click on ‘Allow’ to proceed. Once authorized, you need to select the template document you created for the letters of participation.

Choose ‘Google Docs’ as the action application. Select ‘Create Document from Template’ as the action event. Connect your Google Docs account to Pabbly Connect.

Next, select the template document (e.g., ‘Letter of Participation Template’) and map the required fields such as participant’s name, event date, competition name, and contribution. This mapping allows Pabbly Connect to fill in the details automatically when a new participant is added.


Conclusion

In this tutorial, we demonstrated how to use Pabbly Connect to automate the process of generating Google Docs from Microsoft Excel. This integration not only saves time but also ensures accuracy in creating personalized letters for participants.

Ensure you check out Pabbly Connect to create business automation workflows and reduce manual tasks. Pabbly Connect currently offer integration with 2,000+ applications.

By following these detailed steps, you can efficiently set up your automation to streamline event management tasks. With Pabbly Connect, you can easily integrate various applications and enhance your productivity.

Integrate Instagram Leads with WhatsApp Using Pabbly Connect

Learn how to integrate Instagram leads with WhatsApp using Pabbly Connect for automated responses. Step-by-step tutorial for seamless communication. This comprehensive guide reveals exactly how to connect your applications and automate repetitive tasks — accessible for professionals of all technical backgrounds.

Watch Step By Step Video Tutorial Below


1. Accessing Pabbly Connect for Integration

To begin the integration process, first access Pabbly Connect by visiting the Pabbly website. Here, you will find options to sign in or sign up for free. If you are a new user, you can create an account to get started with 100 free tasks every month.

Once signed in, navigate to the Pabbly Connect dashboard. This dashboard provides access to various automation tools offered by Pabbly. Click on the “Access Now” button under Pabbly Connect to proceed with setting up your workflow for integrating Instagram leads with WhatsApp.


2. Creating a Workflow in Pabbly Connect

After accessing Pabbly Connect, click on the “Create Workflow” button. You will be prompted to name your workflow. For this integration, you can name it “Send and Get WhatsApp Messages for New Instagram Leads via Vati.” Choose a folder to save your workflow, then click “Create.”

  • Name your workflow appropriately.
  • Select the folder for saving your workflow.
  • Click the “Create” button to proceed.

Upon clicking “Create,” you will enter the workflow window. This is where you will set up the trigger and action for your automation. Remember, the trigger indicates what event starts the workflow, and the action is what happens as a result.


3. Setting Up the Trigger with Instagram Lead Ads

The next step is to set up the trigger in Pabbly Connect. Search for “Instagram Lead Ads” and select it as your trigger application. You will then need to choose the trigger event. Select “New Lead Instant” to capture leads as they come in.

After selecting the trigger event, click on “Connect.” If you have previously connected your Instagram account, you can select the existing connection. If not, you will need to add a new connection by clicking “Add a New Connection” and following the prompts to connect your Instagram account.


4. Testing the Integration with Test Leads

Once you have set up the trigger, it’s essential to test the integration. In Pabbly Connect, after saving the trigger, it will prompt you to wait for a webhook response. To test, open a new tab and access the Meta for Developers page to use the Lead Ads Testing Tool.

  • Select your Facebook page and lead form.
  • Fill out the test lead form with dummy data.
  • Submit the form to send test data back to Pabbly Connect.

After submitting the test lead, return to your Pabbly Connect workflow to verify if the response has been captured successfully. You should see the details of the test lead displayed in your workflow.


5. Sending WhatsApp Messages via Vati

With the trigger successfully set up, the next step in Pabbly Connect is to set the action to send WhatsApp messages. Select “Vati” as your action application and choose “Send Template Message” as the action event. Click “Connect” and follow the prompts to link your Vati account.

After connecting, fill in the required details such as the WhatsApp number and message template. Make sure to map the phone number from the lead captured in the previous step to ensure that the message is sent to the correct recipient. You can also customize the message with parameters like the lead’s name.

Finally, after completing all fields, click on “Save and Send Test Request.” This will send a WhatsApp message to the lead using the template you specified. You can check your WhatsApp to confirm that the message has been received successfully.


Conclusion

This tutorial demonstrated how to automate sending WhatsApp messages for new Instagram leads using Pabbly Connect. By following these steps, you can streamline your lead management process and enhance communication with potential clients effectively.

Ensure you check out Pabbly Connect to create business automation workflows and reduce manual tasks. Pabbly Connect currently offer integration with 2,000+ applications.

Integrating Facebook Lead Ads with HubSpot and Slack Using Pabbly Connect

Learn how to automate adding Facebook Lead Ads leads to HubSpot as contacts and notifying your team on Slack using Pabbly Connect. Follow this detailed tutorial for seamless integration.

Watch Step By Step Video Tutorial Below


1. Setting Up Pabbly Connect for Integration

To start integrating Facebook Lead Ads with HubSpot and Slack, you need to access Pabbly Connect. Open your browser and search for Pabbly Connect to reach the landing page.

On the landing page, you have options to sign in or sign up. If you are new, click the ‘Sign Up for Free’ button, which takes only a couple of minutes. This will give you 100 free tasks every month. If you already have an account, simply sign in to access your dashboard.


2. Creating a Workflow in Pabbly Connect

Once signed in, you will land on the Pabbly Connect dashboard. Here, you can create a new workflow. Click on the ‘Create Workflow’ button to begin. using Pabbly Connect

  • Name your workflow, e.g., ‘Add Facebook Lead Ads Leads to HubSpot and Notify Slack.’
  • Select a folder to save your workflow.

After naming and selecting the folder, click on the ‘Create’ button. You will see two sections: Trigger and Action. The Trigger is the event that starts the workflow, while Action is what happens next.


3. Configuring Facebook Lead Ads as Trigger

In this step, you will set Facebook Lead Ads as your trigger application in Pabbly Connect. Search for Facebook Lead Ads and select it as your trigger application.

For the trigger event, select ‘New Lead Instant’. Click on the ‘Connect’ button and then choose ‘Add New Connection’. You will need to authenticate your Facebook account by clicking on ‘Continue’ to allow access.

  • Select the Facebook page you are using for Lead Ads.
  • Choose the lead generation form for capturing leads.

After selecting the page and form, click on ‘Save and Send Test’ to ensure everything is set up correctly. You will need to create a sample submission to test the trigger.


4. Adding HubSpot as Action in Pabbly Connect

Now, it’s time to add HubSpot as the action application in your Pabbly Connect workflow. Search for HubSpot CRM and select it as your action application.

For the action event, choose ‘Create Contact’. Click ‘Connect’ and then select your HubSpot account. After selecting your account, you will need to map the lead details from Facebook Lead Ads to HubSpot.

Map the email address, first name, last name, and phone number fields from the Facebook lead response. Ensure that all mapped data is dynamic to automatically update with new leads.

Once mapped, click on ‘Save and Send Test Request’. You should receive a positive response confirming that a new contact has been created in HubSpot.


5. Notifying on Slack Using Pabbly Connect

The final step is to notify your team on Slack. In your Pabbly Connect workflow, add another action step and choose Slack as the action application.

Select the action event ‘Send Channel Message’. Connect your Slack account by entering the required token type and allowing access. Choose the channel where you want to send the notifications.

Craft your notification message, including lead details like name, email, and phone number. Map the lead details from the Facebook response into the message.

After setting up the message, click on ‘Save and Send Test Request’. A successful response indicates that your notification has been sent to the selected Slack channel.


Conclusion

By following these steps, you can automate the process of adding Facebook Lead Ads leads to HubSpot as contacts and notifying your team on Slack using Pabbly Connect. This integration enhances efficiency and ensures timely follow-ups on leads.

Ensure you check out Pabbly Connect to create business automation workflows and reduce manual tasks. Pabbly Connect currently offer integration with 2,000+ applications.

Integrating Swell with Google Sheets Using Pabbly Connect: A Step-by-Step Guide

Learn how to integrate Swell with Google Sheets using Pabbly Connect. Follow this detailed tutorial for seamless automation of your e-commerce orders. Implement the precise methodologies leading organizations use to automate repetitive tasks, illustrated with practical examples designed for immediate application.

Watch Step By Step Video Tutorial Below


1. Setting Up Pabbly Connect for Swell Integration

To begin the integration process, access Pabbly Connect and create a new workflow. This will serve as the foundation for connecting your Swell account with Google Sheets. Pabbly Connect allows for seamless automation between different applications, and in this case, it will facilitate the transfer of order details from Swell to Google Sheets.

Once you’re in Pabbly Connect, click on ‘Create Workflow’ and name it appropriately. This helps in organizing your integrations. After naming, you will be prompted to select a trigger application. In this case, select Swell as the trigger application.


2. Configuring the Trigger Event in Pabbly Connect

Next, set up the trigger event in Pabbly Connect. For this integration, you will select the event as ‘Order Created’. This means whenever a new order is placed in your Swell account, Pabbly Connect will capture this event and initiate the workflow.

  • Select Swell as the trigger application.
  • Choose ‘Order Created’ as the trigger event.
  • Copy the provided webhook URL for later use.

After selecting the trigger event, Pabbly Connect will generate a webhook URL. This URL is essential for linking your Swell account with Pabbly Connect to receive data whenever a new order is created.


3. Connecting Swell to Pabbly Connect Using Webhooks

To connect your Swell account to Pabbly Connect, log into your Swell account and navigate to the developer settings. Here, you will find the option for webhooks. Click on ‘Add a Webhook’ and paste the webhook URL you copied earlier.

  • Under the webhooks section, click ‘Add a Webhook’.
  • Paste the webhook URL from Pabbly Connect.
  • Select ‘Order Created’ as the event for the webhook.

Once you have configured the webhook, save the changes. This step ensures that every time a new order is created in Swell, the order details will be sent to Pabbly Connect, which will then process the information.


4. Testing the Integration Between Swell and Google Sheets

After successfully setting up the webhook, it’s time to test the integration. Go back to your Swell account and create a test order. This is crucial as it allows Pabbly Connect to receive data and confirm that the integration is working correctly.

Fill out the checkout form with dummy data. Select a shipping method and payment method. Complete the order to trigger the webhook.

Once the order is completed, return to Pabbly Connect to check if the data has been captured. You should see the details of the order, including customer information and order specifics, confirming that the integration is functioning as intended.


5. Transferring Order Data to Google Sheets

The final step involves transferring the captured order data from Pabbly Connect to Google Sheets. For this, you will set up an action step in your workflow.

In Pabbly Connect, select Google Sheets as the action application and choose the action event as ‘Add Row’. This allows you to send the order details directly into a new row in your specified Google Sheet. Map the fields from the Swell order to the corresponding columns in Google Sheets.

After mapping the fields, save your workflow. Now, every time a new order is placed in Swell, Pabbly Connect will automatically add the order details to Google Sheets, streamlining your order management process.


Conclusion

In this tutorial, we demonstrated how to integrate Swell with Google Sheets using Pabbly Connect. By following these steps, you can automate your order management and ensure that every new order is efficiently recorded in your Google Sheets. This integration simplifies your workflow and enhances productivity.

Ensure you check out Pabbly Connect to create business automation workflows and reduce manual tasks. Pabbly Connect currently offer integration with 2,000+ applications.