NFC Magic! Add iPhone Data to Google Sheets Using Pabbly Connect

Learn how to use Pabbly Connect to automatically add iPhone data to Google Sheets with NFC tags. Step-by-step tutorial included! Explore efficient methods for automating routine tasks with clear, concise instructions suited for both newcomers and experienced professionals.

Watch Step By Step Video Tutorial Below


1. Setting Up Pabbly Connect for NFC Automation

To start using Pabbly Connect for integrating your iPhone with Google Sheets, you need to create an account. Visit the Pabbly Connect website and sign up for a free account, which allows you to set up automation workflows.

Once you have logged in, navigate to the dashboard where you can create a new workflow. Click on the ‘Create Workflow’ button, name your workflow (e.g., ‘iPhone to Google Sheets NFC’), and select the folder where you want to save it. This initial setup is crucial for automating data transfer from your iPhone to Google Sheets using NFC tags.


2. Creating a Shortcut on Your iPhone

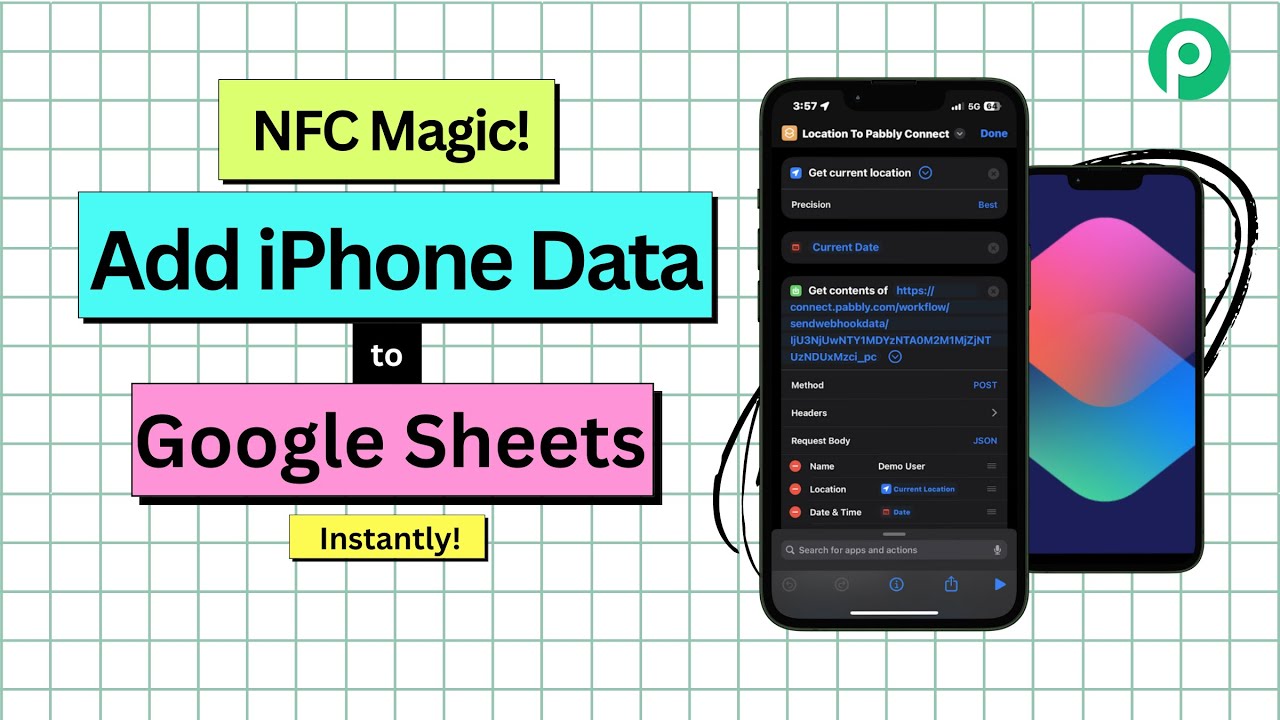
Next, you need to create a shortcut on your iPhone that will collect location data and send it to Pabbly Connect. Open the Shortcuts app and tap the ‘+’ icon to create a new shortcut. Name it appropriately, like ‘Location to Pabbly Connect’.

  • Add action: Get Current Location, set Precision to Best.
  • Add action: Get Current Date and Time.
  • Add action: Get Contents of URL and enter the Webhook URL from Pabbly Connect.

This shortcut will automatically gather the current location and date/time whenever it is triggered. Make sure to copy the Webhook URL generated by Pabbly Connect and paste it into the shortcut.


3. Configuring the Webhook in Pabbly Connect

Now that the shortcut is ready, return to Pabbly Connect to configure the Webhook. In your workflow, select ‘Webhook’ as the trigger app and choose ‘Catch Webhook’ as the trigger event. This will generate a unique Webhook URL.

Copy this URL and paste it into the ‘Get Contents of URL’ action in your iPhone shortcut. Set the method to POST and select JSON for the request format. You will need to map the data fields you want to send, such as name, location, date, latitude, and longitude.


4. Testing the NFC Automation

After setting up your shortcut and configuring the Webhook in Pabbly Connect, it’s time to test the automation. In the Pabbly Connect dashboard, click on ‘Recapture Webhook Response’ to start listening for incoming data.

  • Tap the NFC tag with your iPhone to trigger the shortcut.
  • Allow location permissions when prompted.
  • Check Pabbly Connect for the received data.

This step is critical to ensure that the data from your iPhone is correctly sent to Pabbly Connect and that you can see the response in the workflow.


5. Adding Data to Google Sheets

Finally, you need to set up the action to add the received data to Google Sheets. In Pabbly Connect, select Google Sheets as the action app and choose ‘Add New Row’ as the action event. Connect your Google Sheets account by signing in.

Once connected, select the spreadsheet where you want to store the data. Map the fields from the Webhook response to the corresponding columns in your Google Sheets, such as date, name, location, latitude, and longitude. After completing the mapping, click ‘Save and Send Test Request’ to verify that the data is correctly added to your Google Sheets.


Conclusion

Using Pabbly Connect, you can seamlessly integrate your iPhone with Google Sheets to automate data collection through NFC tags. This tutorial provides a step-by-step guide to setting up the entire process, ensuring instant data transfer.

Ensure you check out Pabbly Connect to create business automation workflows and reduce manual tasks. Pabbly Connect currently offer integration with 2,000+ applications.

How to Send Google Forms Responses to Other Applications Using API by Pabbly Connect

Learn how to send Google Forms responses to other applications using API by Pabbly Connect. Follow this step-by-step tutorial for seamless integration. Develop expertise in application integration and learn how to design streamlined automation workflows using proven, simplified approaches.

Watch Step By Step Video Tutorial Below


1. Accessing Pabbly Connect for Google Forms Integration

To begin sending Google Forms responses to another application using API by Pabbly, you first need to access Pabbly Connect. Navigate to the Pabbly website and sign in or create a free account.

After logging in, click on the Pabbly Connect application. Here, you will be able to create a workflow that connects your Google Forms responses to another application. This process will utilize the API by Pabbly, enabling seamless integration without any programming knowledge.


2. Creating a Workflow in Pabbly Connect

Once you are in Pabbly Connect, click on the ‘Create Workflow’ button. You will be prompted to name your workflow, such as ‘Send Google Form Responses to Another Application Using API by Pabbly’ and choose a folder to save it in.

  • Click on ‘Create’ to set up your workflow.
  • Select Google Forms as the trigger application.
  • Choose ‘New Response Received’ as the trigger event.

After setting the trigger, you will receive a webhook URL. This URL is crucial for connecting your Google Forms to Pabbly Connect, allowing it to capture responses automatically.


3. Linking Google Forms to Pabbly Connect

To link your Google Forms to Pabbly Connect, open your Google Form and navigate to the ‘Responses’ section. Click on ‘View in Sheets’ to create a Google Sheet that will collect your form responses.

  • Go to ‘Extensions’ and select ‘Add-ons’.
  • Search for and install ‘Pabbly Connect Webhooks’.
  • Open the add-on and enter the webhook URL you copied from Pabbly Connect.

Make sure to set the trigger column to the last column with data (usually column E) and click on ‘Submit’ to finalize the setup. This connection allows Pabbly Connect to receive data every time a new response is submitted.


4. Testing the Integration with Google Forms

With your Google Forms and Pabbly Connect linked, it’s time to test the integration. Fill out your Google Form as a test submission to ensure the data is sent to your Google Sheet and captured by Pabbly Connect.

Submit the form with sample data, such as a name, email, and property type. Check your Google Sheet to confirm the response appears correctly. Return to Pabbly Connect to see if the webhook response is received.

If everything is set up correctly, you should see a successful test response in your Pabbly Connect workflow, indicating that the integration is functioning as intended.


5. Executing API Requests in Pabbly Connect

After confirming that your Google Forms responses are captured by Pabbly Connect, the next step is to execute an API request. For this example, we will use MailerLite as the application to send data to.

Select ‘API by Pabbly’ as the action application. Choose ‘Execute API Request’ as the action event. Import the CURL request from MailerLite’s API documentation.

Fill in the necessary details, including your MailerLite API key, and map the data from your Google Forms responses to the corresponding fields in the API request. This ensures that each new form submission creates a subscriber in your MailerLite account.


Conclusion

In this tutorial, we explored how to send Google Forms responses to other applications using API by Pabbly Connect. By following the steps outlined, you can automate your workflows and effectively manage data submissions from Google Forms.

Ensure you check out Pabbly Connect to create business automation workflows and reduce manual tasks. Pabbly Connect currently offer integration with 2,000+ applications.

Utilizing Pabbly Connect not only simplifies the integration process but also enhances your productivity by automating repetitive tasks. Start integrating today for a seamless experience!

How to Create Monday.com Items from Google Sheets Using Pabbly Connect

Learn how to seamlessly create Monday.com items from Google Sheets using Pabbly Connect. Follow this detailed tutorial for step-by-step guidance. Develop expertise in application integration and learn how to design streamlined automation workflows using proven, simplified approaches.

Watch Step By Step Video Tutorial Below


1. Accessing Pabbly Connect for Integration

To create Monday.com items from Google Sheets, you first need to access Pabbly Connect. Simply visit the Pabbly Connect homepage by browsing the URL Pabbly.com/connect. Here, you can sign up for a free account or sign in if you are an existing user.

Once logged in, you will see the Pabbly Connect dashboard. This is where you can create workflows that integrate Google Sheets with Monday.com. To start, click on the ‘Create Workflow’ button located at the top right corner of the dashboard.


2. Creating a Workflow in Pabbly Connect

In the workflow creation dialog, name your workflow ‘Create Monday.com Items from Google Sheets’ and select the folder as Google Sheets. This will help you organize your workflows effectively. using Pabbly Connect

  • Name your workflow clearly for easy identification.
  • Select the appropriate folder to save your workflow.
  • Click on the ‘Create’ button to finalize the workflow setup.

After creating the workflow, you will notice the two main principles of automation: Trigger and Action. The trigger will be Google Sheets, and the action will be Monday.com. You are now ready to set up your trigger.


3. Setting Up Google Sheets as Trigger

For the trigger application, select Google Sheets and set the trigger event to ‘New or Updated Spreadsheet Row’. This means that every time a new row is added, Pabbly Connect will capture this data and send it to Monday.com.

Upon selecting this, Pabbly Connect will generate a webhook URL. You need to copy this URL and set it up in Google Sheets. Go to your Google Sheets and click on ‘Extensions’, then choose ‘Add-ons’ and search for the Pabbly Connect Webhooks add-on to install it.

  • Install the Pabbly Connect Webhooks add-on from the Google Workspace Marketplace.
  • Use the webhook URL from Pabbly Connect in the add-on settings.
  • Set the trigger column to the column where the final data will be entered.

After entering the webhook URL and setting the trigger column, click on ‘Submit’ to configure the setup successfully. This will allow Pabbly Connect to receive data from Google Sheets whenever a new row is added.


4. Connecting Monday.com to Pabbly Connect

Next, you will set up the action application by selecting Monday.com and the action event as ‘Create Item’. This means that every time a new row is added in Google Sheets, a new item will be created in your Monday.com account through Pabbly Connect.

To connect your Monday.com account, click on ‘Connect’ and select ‘Add New Connection’. You will need to enter an API token from your Monday.com account. To retrieve this, go to your Monday.com profile, navigate to ‘Administration’, and regenerate your API token.

Regenerate your API token in Monday.com under Administration settings. Copy the API token and paste it into Pabbly Connect to establish the connection. Select the board and group where the new item will be created.

Once connected, map the fields from Google Sheets to the corresponding fields in Monday.com. This ensures that the data flows correctly between the two applications.


5. Testing the Integration

After setting up the integration, it’s crucial to test it to ensure everything works as expected. Go back to your Google Sheets and add a new row with the task details you want to create in Monday.com.

Once you add the new task, check your Monday.com board to see if the item has been created successfully. If everything is set up correctly, you should see the new item appear with the details you entered in Google Sheets.

Testing your integration is essential to confirm that Pabbly Connect is facilitating the workflow between Google Sheets and Monday.com effectively. If the item appears as expected, your integration is complete and functioning correctly.


Conclusion

In this tutorial, we learned how to create Monday.com items from Google Sheets using Pabbly Connect. By following the steps outlined, you can automate your workflow and enhance productivity by integrating these powerful applications seamlessly.

Ensure you check out Pabbly Connect to create business automation workflows and reduce manual tasks. Pabbly Connect currently offer integration with 2,000+ applications.

Automate LinkedIn with Pabbly Connect: A Step-by-Step Guide

Learn how to automate LinkedIn using Pabbly Connect. This tutorial covers sending WhatsApp messages, posting Instagram content, and managing leads with Google Sheets. This comprehensive guide reveals exactly how to connect your applications and automate repetitive tasks — accessible for professionals of all technical backgrounds.

Watch Step By Step Video Tutorial Below


1. Accessing Pabbly Connect for LinkedIn Automation

To automate LinkedIn with Pabbly Connect, start by accessing the Pabbly Connect website. You can sign in to your existing account or create a new one for free, which provides 100 tasks each month.

Once logged in, you will see the dashboard with various Pabbly applications. Click on ‘Access Now’ for Pabbly Connect to begin creating your automation workflows.


2. Setting Up WhatsApp Messages for LinkedIn Leads

In this section, we will set up an automation to send WhatsApp messages to LinkedIn leads using Pabbly Connect. First, create a new workflow by clicking on the ‘Create Workflow’ button and naming it appropriately.

  • Select ‘LinkedIn Lead Gen Form’ as the trigger application.
  • Choose ‘New Lead Gen Form Response’ as the trigger event.
  • Connect your LinkedIn account to Pabbly Connect.

After setting up the trigger, proceed to configure the action step. Select ‘Interact’ as the action application and ‘Send WhatsApp Template Message’ as the action event. Map the data fields, such as the phone number and message template, to ensure the WhatsApp message is sent correctly to your leads.


3. Automating Instagram Posts to LinkedIn

Next, we will automate posting content from Instagram to LinkedIn using Pabbly Connect. Set up the trigger by selecting ‘Instagram for Business’ and the event ‘New Media Posted’. This captures any new content posted on your Instagram account.

Once the trigger is configured, set the action application to ‘LinkedIn’ and choose the event ‘Share an Article or URL’. Map the necessary fields, such as the content link and visibility settings, to ensure the Instagram post is shared on LinkedIn automatically.


4. Adding LinkedIn Leads to Google Sheets

In this section, we will automate adding LinkedIn leads to Google Sheets using Pabbly Connect. Start by setting the trigger application as ‘LinkedIn Lead Gen Forms’ and the event as ‘New Lead Gen Form Response’. This will capture the details of new leads generated.

  • Select the appropriate LinkedIn account and lead form.
  • Connect Google Sheets as the action application.
  • Choose ‘Add New Row’ as the action event to create a new record.

Map the fields such as first name, last name, email, and phone number from the LinkedIn lead response to your Google Sheets. This ensures that every new lead is recorded automatically in your spreadsheet.


5. Sharing Blogger Posts on LinkedIn Instantly

Finally, we will automate sharing your Blogger posts on LinkedIn using Pabbly Connect. Set the trigger application as ‘Google Blogger’ and the event as ‘New Post Added’ to capture the latest blog posts.

After receiving the blog post details, set up the action application to ‘LinkedIn’ and choose ‘Share an Article or URL’. Map the title and content fields appropriately to share your blog post on LinkedIn without HTML tags.

This process ensures that every new blog post you create on Blogger is automatically shared on your LinkedIn profile, maximizing your content reach.


Conclusion

In this tutorial, we explored how to automate LinkedIn with Pabbly Connect. By integrating various applications like WhatsApp, Instagram, and Google Sheets, you can streamline your LinkedIn activities effectively. Automating these processes saves time and enhances productivity.

Ensure you check out Pabbly Connect to create business automation workflows and reduce manual tasks. Pabbly Connect currently offer integration with 2,000+ applications.

How to Add OptinMonster Lead in MySQL Database Using Pabbly Connect

Learn how to automate the process of adding OptinMonster leads into a MySQL database using Pabbly Connect. Step-by-step guide included. Eliminate manual repetitive tasks from your workflow. Discover proven automation methods with intuitive steps designed for efficiency-minded professionals.

Watch Step By Step Video Tutorial Below


1. Accessing Pabbly Connect for Integration

To begin the integration process, you need to access Pabbly Connect. This platform allows you to automate tasks between different applications without any coding skills. Start by visiting the Pabbly Connect homepage.

Once there, you will see options for signing in or signing up. If you are a new user, click on the ‘Sign up for free’ button to create an account. Existing users can simply click on ‘Sign in’ to access their dashboard. Remember, new users receive 100 free tasks every month to explore the features of Pabbly Connect.


2. Creating a Workflow in Pabbly Connect

After signing into Pabbly Connect, you will be directed to the dashboard. To create a new workflow, click on the ‘Create Workflow’ option. A dialog box will prompt you to name your workflow; for this tutorial, name it ‘Insert OptinMonster Lead in MySQL Database’.

  • Select a folder to save your workflow.
  • Click on ‘Create’ to finalize your workflow setup.

Now, you will see two windows: one for the trigger and another for the action. In this case, OptinMonster will be the trigger application, and MySQL will be the action application. This setup will ensure that whenever a new lead is generated, the details will automatically be recorded in your MySQL database through Pabbly Connect.


3. Setting Up the Trigger with OptinMonster

In the trigger window, select OptinMonster as your trigger application. Next, choose the trigger event as ‘New Lead’. This event signifies that the workflow will initiate when a new lead is generated from OptinMonster.

After selecting the trigger event, Pabbly Connect will generate a webhook URL that acts as a bridge for data transfer from OptinMonster. Copy this URL, as it will be needed to set up the connection in your OptinMonster account.


4. Configuring OptinMonster with Pabbly Connect

Log into your OptinMonster account and navigate to your campaign dashboard. Click on ‘Edit Campaign’ for the form you want to use for lead generation. In the integrations section, look for the option to add a new integration and select ‘Webhooks’ from the list.

  • Click on ‘Add New Webhook’.
  • Paste the webhook URL you copied from Pabbly Connect.
  • Name the webhook, for example, ‘New Leads’.
  • Click on ‘Connect to Webhook’ to finalize.

Once the webhook is set up, return to Pabbly Connect and click on ‘Recapture Webhook Response’. This action will help you capture the response of an actual lead when submitted through your OptinMonster form.


5. Setting Up MySQL Action in Pabbly Connect

Now that the trigger is set, move to the action window in Pabbly Connect. Select MySQL as your action application and choose the action event as ‘Insert Row’. This action will allow you to insert a new row in your MySQL database whenever a lead is generated.

Next, connect to your MySQL database by providing the required details such as database username, password, host name, and port. If you’ve already created a connection, simply select it. After successfully connecting, you will need to map the fields from the previous response to your MySQL table.

Select the table name, for example, ‘OptinMonster Leads’. Map the fields such as first name, last name, email, and phone number using the previous response data.

Once everything is mapped, click on ‘Save and Send Test Request’. If successful, you should see confirmation that the lead details have been added to your MySQL database. This confirms that the integration using Pabbly Connect is working correctly.


Conclusion

In this tutorial, we explored how to automate the process of adding OptinMonster leads into a MySQL database using Pabbly Connect. By following the steps outlined, you can efficiently manage lead data without any coding skills. This integration streamlines your workflow and enhances your lead management capabilities.

Ensure you check out Pabbly Connect to create business automation workflows and reduce manual tasks. Pabbly Connect currently offer integration with 2,000+ applications.

Integrating OptinMonster Leads into MySQL Database Using Pabbly Connect

Learn how to automate the process of adding OptinMonster leads to your MySQL database using Pabbly Connect. Step-by-step tutorial with detailed instructions. Build sophisticated automated workflows in less time than you think. This guide translates complex integrations into straightforward steps for immediate implementation.

Watch Step By Step Video Tutorial Below


1. Accessing Pabbly Connect for Integration

To begin integrating OptinMonster with MySQL, first access Pabbly Connect by visiting its homepage. You can do this by typing the URL Pabbly.com/connect in your browser. Once there, you’ll see options to sign in or sign up for free. If you’re a new user, click on ‘Sign up for free’ to create an account and explore the platform with 100 free tasks per month.

After signing in, you will be directed to the dashboard of Pabbly Connect. Here, you can manage your workflows and create new ones. Click on the ‘Create Workflow’ button to begin setting up your integration. This is where you will define the trigger and action for your automation.


2. Creating the Workflow in Pabbly Connect

In this step, you will create a new workflow to automate the lead generation process. Start by clicking the ‘Create Workflow’ button and providing a name for your workflow, such as ‘Insert OptinMonster Lead in MySQL Database’. Choose a folder to save it, like ‘Automations for Lead Management’.

  • Click on ‘Create’ to initiate the workflow.
  • Select ‘OptinMonster’ as the trigger application.
  • Choose ‘New Lead’ as the trigger event.

By selecting ‘New Lead’, you are instructing Pabbly Connect to start the workflow whenever a new lead is generated in OptinMonster. This sets the foundation for automating the data entry into your MySQL database.


3. Setting Up the Webhook in OptinMonster

After defining the trigger in Pabbly Connect, you need to set up a webhook in OptinMonster. You will receive a webhook URL from Pabbly Connect that acts as a bridge for data transfer. Copy this URL and navigate to your OptinMonster dashboard.

In OptinMonster, edit your campaign and go to the Integrations tab. Here, select ‘Add a New Integration’ and search for webhooks. Paste the copied webhook URL into the designated field and give it a name, such as ‘New Leads’. Click ‘Connect to Webhook’ to finalize the setup. This establishes a connection between OptinMonster and Pabbly Connect.


4. Inserting Data into MySQL Database

With the webhook established, the next step is to insert the lead details into your MySQL database. Return to Pabbly Connect and select ‘MySQL’ as the action application. Choose ‘Insert Row’ as the action event. If you have an existing MySQL connection, select it; otherwise, you’ll need to create a new one by entering your database details.

  • Specify the table name in your MySQL database where the leads will be stored.
  • Map the fields for first name, last name, email, and phone number using the previous response from OptinMonster.
  • Click on ‘Save and Send Test Request’ to verify the integration.

After mapping the fields, you will receive a success response indicating that the lead’s details have been inserted into your MySQL database. This confirms that your integration is functioning correctly through Pabbly Connect.


5. Testing the Integration

To ensure everything is working seamlessly, perform a test by submitting a new lead through your OptinMonster form. After submission, check your MySQL database to see if the new lead’s details are automatically added. This confirms that the integration between OptinMonster and MySQL via Pabbly Connect is successful.

Repeat the test with different lead details to verify that the automation works consistently. Each time a new lead is generated in OptinMonster, Pabbly Connect will automatically update your MySQL database with the latest information, streamlining your lead management process.


Conclusion

In this tutorial, you learned how to integrate OptinMonster leads into your MySQL database using Pabbly Connect. By following the steps outlined, you can automate the process of capturing leads and managing them efficiently. This integration significantly enhances your lead management capabilities.

Ensure you check out Pabbly Connect to create business automation workflows and reduce manual tasks. Pabbly Connect currently offer integration with 2,000+ applications.

How to Create Mailchimp Subscriber from Google Forms Response Using Pabbly Connect

Learn how to create a Mailchimp subscriber from Google Forms responses using Pabbly Connect. This step-by-step tutorial covers the entire integration process. Transform complex automation concepts into accessible, actionable steps that eliminate unnecessary manual work while maximizing existing application capabilities.

Watch Step By Step Video Tutorial Below


1. Accessing Pabbly Connect for Integration

To create a Mailchimp subscriber from Google Forms responses, first, access Pabbly Connect. This platform is essential for automating the integration between Google Forms and Mailchimp.

Visit the Pabbly Connect homepage by browsing to the Pabbly website. Here, you will find options to sign in or sign up for free. If you are a new user, click on ‘Sign Up Free’ to get started. Existing users can simply sign in to access their dashboards.


2. Creating a Workflow in Pabbly Connect

After logging into Pabbly Connect, the next step is to create a new workflow. Click on the ‘Create Workflow’ button located in the top right corner of the dashboard.

  • Name your workflow as ‘Create Mailchimp Subscriber from Google Forms Response’.
  • Select a folder for organization, such as ‘Automations’.
  • Click on the ‘Create’ button to finalize your workflow setup.

With the workflow created, you can now set up the trigger application. Select Google Forms as the trigger application and choose ‘New Response Received’ as the trigger event. This allows Pabbly Connect to capture new responses automatically.


3. Linking Google Forms to Google Sheets

To connect Google Forms with Pabbly Connect, you need to link it to Google Sheets. In your Google Form, navigate to the ‘Responses’ tab and click on ‘Link to Sheets’. This action creates a new spreadsheet to store responses.

Confirm that the new spreadsheet has fields corresponding to the form inputs, such as Timestamp, First Name, Last Name, Email, and Phone Number. Now, you can test the integration by submitting a sample response in the Google Form.

  • Submit a test entry through the Google Form.
  • Check the Google Sheets to ensure the response appears correctly.

Once confirmed, proceed to connect Google Sheets with Pabbly Connect to complete the automation process.


4. Setting Up Webhooks in Google Sheets

To have Google Sheets communicate with Pabbly Connect, install the Pabbly Connect Webhooks add-on. Click on ‘Extensions’ in Google Sheets, then ‘Add-ons’, and select ‘Get Add-ons’. Search for ‘Pabbly Connect Webhooks’ and install it.

After installation, go back to the ‘Extensions’ menu, select ‘Pabbly Connect Webhooks’, and click on ‘Initial Setup’. Here, you’ll enter the webhook URL provided by Pabbly Connect and specify the trigger column, which is typically the last column where data is entered.

Paste the webhook URL from Pabbly Connect. Set the trigger column to the final data column (e.g., Column E).

After configuring, click on ‘Submit’ to finalize the setup. This allows Pabbly Connect to capture data whenever a new response is added to Google Sheets.


5. Adding Mailchimp as the Action Application

The final step in your workflow is to set Mailchimp as the action application in Pabbly Connect. Select Mailchimp and choose ‘Add a New Member with Custom Fields’ as the action event. This will enable you to create a new subscriber based on the Google Forms response.

To connect Mailchimp, click on ‘Connect’ and select ‘Add New Connection’. You will need to enter your Mailchimp API key and Data Center. To find your API key, log into your Mailchimp account, navigate to your profile, and access the API keys section.

Copy the API key and paste it into Pabbly Connect. Enter your Data Center, which can be found in the Mailchimp URL.

Once connected, map the fields from the Google Forms response to the Mailchimp fields, such as email address, first name, and last name. After mapping, click on ‘Save and Send Test Request’ to verify the integration.


Conclusion

In this tutorial, we successfully demonstrated how to create a Mailchimp subscriber from Google Forms responses using Pabbly Connect. By following these steps, you can automate the process of adding subscribers to your Mailchimp account seamlessly.

Ensure you check out Pabbly Connect to create business automation workflows and reduce manual tasks. Pabbly Connect currently offer integration with 2,000+ applications.

How to Create Refrens Invoice on GrooveSell Purchase Using Pabbly Connect

Learn how to create Refrens invoices automatically for GrooveSell purchases using Pabbly Connect. Follow this detailed step-by-step tutorial for seamless integration. Build sophisticated automated workflows in less time than you think. This guide translates complex integrations into straightforward steps for immediate implementation.

Watch Step By Step Video Tutorial Below


1. Accessing Pabbly Connect for Invoice Automation

To create Refrens invoices automatically for GrooveSell purchases, the first step is to access Pabbly Connect. This platform enables seamless integration between GrooveSell and Refrens without coding.

Open your browser and navigate to Pabbly.com/c/connect. You will see options to sign in or sign up. If you are a new user, click on the ‘Sign Up for Free’ button, which takes only a couple of minutes. Once logged in, access the dashboard where you can start creating workflows.


2. Creating a New Workflow in Pabbly Connect

After logging into Pabbly Connect, the next step is to create a new workflow. Click on the ‘Create Workflow’ button to initiate this process. You will be prompted to name your workflow, which should reflect your objective, such as ‘Create Refrens Invoice on GrooveSell Purchase’.

  • Click on the ‘Create’ button to proceed.
  • You will be directed to a window with two main boxes: Trigger and Action.
  • Select GrooveSell as your trigger application.

Here, you will set up the trigger event. Choose ‘Product Purchased’ from the dropdown menu, which will initiate the workflow whenever a purchase occurs in GrooveSell.


3. Connecting GrooveSell to Pabbly Connect

To connect GrooveSell with Pabbly Connect, you will need the VAB URL provided by Pabbly. This URL acts as a bridge between GrooveSell and Pabbly Connect. Copy the VAB URL from your Pabbly Connect dashboard.

Next, log into your GrooveSell account and navigate to the ‘Product Funnels’ section. Here, manage the specific product funnel you want to connect. Click on ‘Manage Product Funnel’ and then on ‘Manage’. In the fulfillment settings, add the VAB URL you copied earlier and save the changes.


4. Testing the Connection with a New Purchase

Once you’ve added the VAB URL, return to Pabbly Connect. The platform will be waiting for a webhook response. To test the connection, you need to make a new purchase from your GrooveSell account for the product linked to the VAB URL.

  • Fill out the checkout form with customer details.
  • Provide a name, email, billing address, and payment information.
  • Click on the ‘Complete Purchase’ button.

After completing the purchase, return to Pabbly Connect, where you should see the response containing all the purchase details, confirming the connection was successful.


5. Creating a Refrens Invoice Using the Received Data

Now that you have received the purchase details in Pabbly Connect, the next step is to set up the action to create a new invoice in Refrens. Select Refrens as your action application and choose ‘Create Invoice’ as the action event.

Connect Refrens with Pabbly Connect by entering the App ID and App Secret provided by the Refrens support team. Fill in the required fields, including the invoice title, currency, and customer details using the mapped data from GrooveSell. This will ensure that every new purchase automatically generates an invoice with the correct information.


Conclusion

In this tutorial, we detailed how to create Refrens invoices automatically for GrooveSell purchases using Pabbly Connect. By following these steps, you can streamline your invoicing process and ensure accurate billing every time.

Ensure you check out Pabbly Connect to create business automation workflows and reduce manual tasks. Pabbly Connect currently offer integration with 2,000+ applications.

How to Create Medium Post from WordPress Using Pabbly Connect

Learn how to automate Medium post creation from WordPress using Pabbly Connect. Follow our detailed tutorial for seamless integration. Discover hidden automation capabilities within your existing tools. This guide shows you how to connect your essential applications and permanently eliminate redundant manual processes.

Watch Step By Step Video Tutorial Below


1. Accessing Pabbly Connect for Integration

To create a Medium post from WordPress, you first need to access Pabbly Connect. This integration platform allows you to automate tasks between different applications seamlessly. Start by visiting the Pabbly Connect website and signing into your account.

If you are a new user, you can sign up for free and enjoy 100 free tasks every month. Once logged in, you will see the dashboard where you can access various applications, including Pabbly, PAB, and others necessary for this integration.


2. Creating a Workflow in Pabbly Connect

Next, you need to create a workflow in Pabbly Connect. Click on the ‘Create Workflow’ button in the top right corner. A dialog box will appear prompting you to name your workflow. Enter a descriptive name such as ‘Create Medium Post from WordPress’.

  • Name your workflow appropriately.
  • Select a folder to save your workflow.
  • Click on ‘Create’ to finalize the workflow setup.

After creating the workflow, you will see two sections labeled ‘Trigger’ and ‘Action’. The trigger is the event that starts the automation, while the action is what happens as a result. You will set up your trigger next.


3. Setting Up the Trigger for WordPress

To set up the trigger, select WordPress as your trigger application in Pabbly Connect. The objective here is to capture new posts published on your WordPress account. Choose the trigger event as ‘New Post Published’.

Pabbly Connect will provide you with a unique webhook URL. Copy this URL as you will need it to connect your WordPress account to Pabbly Connect. Now, navigate to your WordPress account.

  • Go to ‘Plugins’ and click on ‘Add New’.
  • Search for the WP Webhook plugin and install it.
  • After installation, go to the settings of the WP Webhook plugin.

In the settings, create a new webhook for the ‘Post Created’ event, paste the copied webhook URL, and save your settings. This setup ensures that every time a new post is published on WordPress, Pabbly Connect captures the response.


4. Setting Up the Action Step to Create Medium Post

Now that your trigger is set up, it’s time to configure the action step in Pabbly Connect. Select Medium as your action application and choose the action event as ‘Create Post’. This step will allow you to publish the same content from WordPress to Medium.

Click on ‘Connect’ to connect your Medium account to Pabbly Connect. You will need to enter an integration token, which you can generate from your Medium account settings. Once you have the token, paste it into Pabbly Connect and save the connection.

Select the user and author for the Medium post. Map the title and content from the previous WordPress step. Choose the content format as HTML.

After mapping the required fields, click on ‘Save and Send Test Request’. This action will test the integration by attempting to create a post on Medium with the content from your WordPress account.


5. Finalizing the Integration and Testing

After setting up the action step, it’s crucial to finalize the integration. Check your Medium account to see if the post has been published successfully. If everything is set up correctly, you should see the new post reflecting the content you published on WordPress.

To ensure the integration works seamlessly, you can publish a new post on your WordPress account and observe if Pabbly Connect captures the response and creates a corresponding post on Medium automatically.

This automation between WordPress and Medium using Pabbly Connect allows you to streamline your workflow effectively. By following the steps outlined, you can ensure that any content published on WordPress is automatically shared on Medium, enhancing your content reach.


Conclusion

In this tutorial, we learned how to create a Medium post from WordPress using Pabbly Connect. By automating this process, you can effortlessly share your content across platforms, saving time and increasing visibility.

Ensure you check out Pabbly Connect to create business automation workflows and reduce manual tasks. Pabbly Connect currently offer integration with 2,000+ applications.

Creating Jira Issues from Google Forms Responses Using Pabbly Connect

Learn how to automate Jira issue creation from Google Forms responses using Pabbly Connect. Step-by-step guide for seamless integration. Explore efficient methods for automating routine tasks with clear, concise instructions suited for both newcomers and experienced professionals.

Watch Step By Step Video Tutorial Below


1. Accessing Pabbly Connect for Jira Integration

To start creating Jira issues from Google Forms responses, you first need to access Pabbly Connect. Simply search for ‘Pabbly Connect’ in your browser and navigate to the landing page. Here, you will see options to sign in or sign up for free. If you’re a new user, click on ‘Sign up for free’ to get started with 100 free tasks every month.

Once signed in, you will be presented with various Pabbly applications. Click on ‘Access Now’ under Pabbly Connect, where you can create your workflow. This is the crucial step for automating the integration between Google Forms and Jira. Click on the ‘Create Workflow’ button to begin.


2. Creating a Workflow in Pabbly Connect

In this section, you will name your workflow and select the folder for saving it. For instance, you can name your workflow ‘Create Jira Issue from Google Form Responses’ and save it in the ‘Automations’ folder. After naming, click on ‘Create’ to proceed.

  • Select Google Forms as the trigger application.
  • Choose the trigger event as ‘New Response Received’.
  • Copy the provided webhook URL for integration.

After setting up these options, you will need to configure Google Forms to send responses to Pabbly Connect. This webhook URL is essential for connecting your Google Forms account with the Pabbly workflow.


3. Connecting Google Forms to Pabbly Connect

To connect Google Forms with Pabbly Connect, open your Google Forms and navigate to the Responses section. Click on ‘View in Sheets’ to link your form to a Google Sheet. In the Google Sheets interface, go to ‘Extensions’, select ‘Add-ons’, and then click on ‘Get Add-ons’.

  • Search for ‘Pabbly Connect Webhooks’ and install it.
  • After installation, select ‘Pabbly Connect Webhook’ from the Extensions menu.
  • Paste the copied webhook URL and set the trigger column to the last column (e.g., F).

Once configured, click on ‘Submit’ to finalize the setup. Now your Google Forms is successfully connected with Pabbly Connect, and it will wait for a webhook response whenever a new form submission occurs.


4. Testing the Integration with Pabbly Connect

To test the integration, you need to perform a test submission on your Google Form. Open the form in preview mode and fill in the required fields like name, email, summary, and description. Once you’ve filled in the form, click on ‘Submit’.

After submitting, check your Google Sheets to confirm that the details have been recorded. Then, go back to Pabbly Connect and switch on the ‘Send on Events’ button in the Pabbly Connect Webhook settings. This ensures that new details added to Google Sheets are sent to your workflow.

Now, click on ‘Send Test’ in the Pabbly Connect interface to send the captured response to your workflow. If the test is successful, you will see the captured response, including all the details you submitted. This confirms that the integration is working as intended.


5. Creating Jira Issues from Google Forms Responses

Next, you will set up the action to create an issue in Jira. In Pabbly Connect, select Jira as your action application and choose ‘Create Issue’ as the action event. If you haven’t connected your Jira account yet, you will need to create a new connection by clicking on ‘Connect’ and granting the necessary permissions.

Once connected, select the project where you want to create the issue. Map the fields like summary, description, and due date from the Google Forms response to the respective Jira issue fields. For the due date, you may need to format it correctly using Pabbly’s date-time formatter feature to ensure it matches Jira’s required format.

Map the summary to the summary field in Jira. Map the description to the description field in Jira. Ensure the due date is formatted correctly before mapping.

Finally, click on ‘Save and Send Test Request’ to create the issue in Jira. If successful, you will see a confirmation message with the issue ID, and you can verify in your Jira account that the new issue has been created based on the form response.


Conclusion

Using Pabbly Connect, you can seamlessly automate the creation of Jira issues from Google Forms responses. This integration simplifies the process, allowing for efficient task management without manual intervention. By following the steps outlined, you can easily set up this automation and enhance your workflow.

Ensure you check out Pabbly Connect to create business automation workflows and reduce manual tasks. Pabbly Connect currently offer integration with 2,000+ applications.